

Page 1

Page 2

About the User’s Guide
This User’s Guide
instructions for using your printer and information for maintaining and troubleshooting the printer.
The Software User’s Guide
supplied software and using its features.
provides information you need for setting up your printer. It also provides all of the deta iled
,
which is the second section of this guide, provides information you need for installing the
This manual is provided for information purpose s only. All information included herein is subject to change without notice.
Samsung Electronics is not responsible for any changes, direct or indirect, arising from or related to use of this manual.
© 2005 Samsung Electronics Co., Ltd. All rights reserved.
• CLP-600 and CLP-600N are model names of Samsung Electronics Co., Ltd.
• SAMSUNG and Samsung logo are trademarks of Samsung Electronics co., Ltd.
• Apple, TrueType, Laser Writer, and Macintosh are Trademarks of Apple Computer, Inc.
• Microsoft, Windows, Windows 98SE, Windows Me, Windows 2000, Windows 2003, Windows NT 4.0, and Windows
XP are registered trademarks of Microsoft Corporation.
• All other brand or product names are trademarks of their respective companies or organizations.
Page 3

CONTENTS
1. Introduction
Special Features ......................................... ................................................ ........................... 1.1
Printer Components ................................................................................................................ 1.2
Front View ............................................ ................................................ ........................... 1.2
Right Side View ................................................................................................. ............... 1.2
2. Setting Up Your Printer
Unpacking ............................................................................................................................. 2.1
Installing the Toner Cartridges .................................................................. ............................... 2.2
Loading Paper ............................................................................ ........................................ ... 2.4
Changing the Size of the Paper in the Tray ........................................................................... 2.5
Connecting a Printer Cable ....... ................................................ ............................................... 2.6
For Local Printing ............................................... ................................................ ............... 2.6
For Network Printing (CLP-600N only) ................................................................................. 2.7
Turning the Printer On ............................................................................................................ 2.7
Printing a Demo Page .......................................... ................................................ ................... 2.7
Changing the Display Language (CLP-600N Only) ....................................................................... 2.8
Installing the Printer Software .......................................................................................... ....... 2.8
System Requirements ............................................ ................................................ ........... 2.8
Printer Driver Features ................................................................... ................................... 2.9
3. Using the Control Panel
Understanding the Control Panel .............................................................................................. 3.1
Display (CLP-600N Only) ................................................................................................... 3.1
Buttons ........................................................................................................................... 3.2
Using Control Panel Menus
Accessing Control Panel Menus ........................................................................................... 3.2
Overview of Control Panel Menus ......................... ................................................ ............... 3.3
Information Menu .............................................. ................................................ ............... 3.3
Color Menu ................................................................................................................... ... 3.3
Printer Menu ................................................................. ................................................ ... 3.4
Setup Menu .................................................................................................. ................... 3.4
Network Menu ........................................................... ................................................ ....... 3.5
(CLP-600N Only) ........................................................................... ... 3.2
4. Using Print Materials
Choosing Paper and Other Mater i als ......................................................................................... 4.1
Sizes and Capacities .............................................. ................................................ ........... 4.1
Guidelines for Paper and Special Mater ials ........................................................................... 4.1
Loading Paper ............................................................................ ........................................ ... 4.2
Using Tray 1 ......................................................................................... ........................... 4.2
Using the Optional Tray .................................. ................................................ ................... 4.2
Using the Multi-purpose Tray ............................................................................................. 4.2
Using the Manual Feed ............................................... ................................................ ....... 4.3
Printing on Special Print Materials .......... ................................................................................... 4.4
Printing on Envelopes ........................................................................................................ 4.4
Printing on Labels .................................................................................................. ........... 4.5
Printing on Preprinted Paper ............................................................................ ................... 4.5
Printing on Card Stock or Custom-sized Materials .................................................................. 4.6
5. Basic Printing
Printing a Document ............................................................................................................... 5.1
Canceling a Print Job .............................................................................................................. 5.1
ii
Page 4

6. Maintaining Your Printer
Printing a Configuration Page (CLP- 600N Only) .......................................................................... 6.1
Replacing Supplies .............................................................................................. ................... 6.2
Managing Toner Cartridges ................................................... ................................................ ... 6.2
Toner Cartridge Storage .................................................................................................... 6.2
Toner Cartridge Life Expectancy ......................................................................................... 6.2
Redistributing Toner ........................... ................................................ ............................... 6.2
Replacing Toner Cartridges ...................................................................................................... 6.4
Replacing the Paper Transfer Belt ............................................................................................. 6.5
Replacing the Fuser Unit ......................................................................................................... 6.7
Cleaning the Printer ................................. ................................................ ............................... 6.8
Cleaning the Outside of the Printer ...................................................................................... 6.8
Cleaning the Inside of the Printer ........................................................................................ 6.8
Managing the Printer from the Website (CLP- 600N Only) ............................................................. 6.9
Setting Up E-mail Notification .......................................................................................... ... 6.9
Setting the Contact Information Tab ............................................................ ..................... 6.10
7. Solving Problems
Troubleshooting Checklist ..................... ................................................ ................................... 7.1
Solving General Printing Problems ................................................. ........................................... 7.2
Clearing Paper Jams ............................................................................................ ................... 7.4
In the Paper Feed Area ...................................................................................................... 7.4
In the Multi-purpose Tray .................................................................................................. 7.5
Inside the Printer ....................................................................................... ....................... 7.6
In the Paper Exit Area ................................................................ ....................................... 7.7
In the Optional Tray2 ......................................... ................................................ ............... 7.8
Tips for Avoiding Paper Jams ................................................................................... ......... 7.11
Solving Print Quality Problems ............................................................................................... 7.12
Understanding Display Messages ............................................................... ............................. 7.14
Common Windows Problems ......................................................................................... ......... 7.16
Common Macintosh Problems ............................................... ................................................. 7.16
Common Linux Problems ....................................................................................................... 7.16
8. Using Your Printer on a Network (CLP-600N only)
About Sharing the Printer on a Network ......................................................... ........................... 8.1
Setting Up a Network-Connected Printer ................................................................................... 8.1
Configuring Network Parameters on the C ontrol Panel ........................................................... 8.1
9. Installing Printer Options
Precautions When Installing Printer Options ............................................................................... 9.1
Installing an Optional Paper Tray ........... ................................................ ................................... 9.1
Installing a Network Interface Car d (CLP-600N Only) .................................................................. 9.2
10. Specifications
Printer Specifications ............................................................................................................ 10.1
Paper Specifications ............................................................................................ ................. 10.1
Overview ....................................................................................................................... 10.1
Supported Sizes of Paper ................................................................................................. 10.2
Guidelines for Using Paper ............................................................................................... 10.2
Paper Specifications ....................................................................................... ................. 10.3
Paper Output Capacity ....................................................... ............................................. 10.3
Paper Input Capacity .............................................................................. ......................... 10.3
Printer and Paper Storage Environm ent ............................................................................. 10.3
Envelopes ...................................................................................................................... 10.4
Labels ........................................................................................................................... 10.4
iii
Page 5

Important Precautions and Safety
Information
When using this machine, these basic safety precautions
should always be followed to reduce risk of fire, electric
shock, and injury to people:
1
Read and understand all instructions.
2
Use common sense whenever operating electrical
appliances.
3
Follow all warnings and instructions marked on the
machine and in the literature accompanying the
machine.
4
If an operating instruction appears to conflict with
safety information, heed the safety information. You
may have misunderstood the operating instruction.
If you cannot resolve the conflict, contact your sales
or service representative for assistance.
5
Unplug the machine from the AC wall socket before
cleaning. Do not use liquid or aerosol cleaners. Use
only a damp cloth for cleaning.
6
Do not place the machine on an unstable cart, stand
or table. It may fall, causing serious damage.
7
Your machine should never be placed on, near or
over a radiator, heater, air conditioner or ventilation
duct.
8
Do not allow anything to rest on the power cable. Do
not locate your machine where the cords will be
abused by persons walking on them.
9
Do not overload wall outlets and extension cords.
This can diminish performance, and may result in
the risk of fire or electric shock.
shock. Never spill liquid of any kind onto or into the
machine.
12
To reduce the risk of electric shock, do not
disassemble the machine. Take it to a qualified
service technician when repair work is required.
Opening or removing covers may expose you to
dangerous voltages or other risks. Incorrect
reassembly could cause electric shock when the unit
is subsequently used.
13
Unplug the machine from the PC and AC wall outlet,
and refer servicing to qualified service personne l
under the following conditions:
• When any part of the power cord, plug, or
connecting cable is damaged or frayed.
• If liquid has been spilled into the machine .
• If the machine has been exposed to rain or water.
• If the machine does not operate properly after
instructions have been followed.
• If the machine has been dropped, or the cabinet
appears damaged.
• If the machine exhibits a sudden and distinct
change in performance.
14
Adjust only those controls covered by the operating
instructions. Improper adjustment of other controls
may result in damage, and may require extensive
work by a qualified service technician to restore the
machine to normal operation.
15
Avoid using this machine during a lightning storm.
There may be a remote risk of electric shock from
lightning. If possible, unplug the AC power for the
duration of the lightning storm.
16
If you continuously print multiple pages, the surface
of the output tray may become hot. Be careful not to
touch the surface, and keep children away from the
surface.
10
Do not allow pets to chew on the AC power or PC
interface cords.
11
Never push objects of any kind into the machine
through case or cabinet openings. They may touch
dangerous voltage points, creating a risk of fire or
iv
17
SAVE THESE INSTRUCTIONS.
Page 6
Environmental and Safety
Consideration
Laser Safety Statement
The printer is certified in the U.S. to conform to the
requirements of DHHS 21 CFR, chapter 1 Subchapter J for Class
I(1) laser products, and elsewhere, is certified as a Class I laser
product conforming to the requirements of IEC 825.
Class I laser products are not considered to be hazardous. The
laser system and printer are designed so there is never any
human access to laser radiation above a Class I level during
normal operation, user maintenance, or prescribed service
condition.
WARNING
Never operate or service the printer with the protective cover
removed from Laser/Scanner assembly. The reflected beam,
although invisible, can damage your eyes.
When using this product, these basic safety precautions should
always be followed to reduce risk of fire, ele ctric shock, and
injury to persons:
Ozone Safety
During normal operation, this machine
produces ozone. The ozone produced
does not present a hazard to the
operator. However, it is advisable that
the machine be operated in a well
ventilated area.
If you need additional information about
ozone, please contact your nearest
Samsung dealer.
Power Saver
This printer contains advanced energy
conservation technology that reduces
power consumption when it is not in
active use.
When the printer does not receive data
for an extended period of time, power
consumption is automatically lowered.
The energy star emblem does not
represent EPA endorsement of any
product or service.
Recycling
Please recycle or dispose of packaging
materials for this product in an
environmentally responsible manner.
Correct Disposal of This Product
(Waste Electrical & Electronic
Equipment)
(Applicable in the European Union and other
European countries with separate collection
systems)
This marking shown on the product or its
literature, indicates that it should not be
disposed with other household wastes at the
end of its working life. To prevent possible
harm to the environment or human health
from uncontrolled waste disposal, please
separate this from other types of wastes and
recycle it responsibly to promote the
sustainable reuse of material resources.
Household users should contact either the retailer where they
purchased this product, or their local government office, for
details of where and how they can take this item for
environmentally safe recycling.
v
Page 7

Business users should contact their supplier and check the
terms and conditions of the purchase contract. This product
should not be mixed with other commercial wastes for disposal.
Radio Frequency Emissions
FCC Regulations
This device complies with Part 15 of the FCC Rules. Operation
is subject to the following two conditions:
• This device may not cause harmful interference, and
• This device must accept an y interference re ceived, including
interference that may cause undesired operation.
This device has been tested and found to comply with the limits
for a Class B digital device, pursuant to Part 15 of the FCC rules.
These limits are designed to provide reasonable protection
against harmful interference in a residential installation. This
equipment generates, uses and can radiate radio frequency
energy and, if not installed and used in accordance with the
instructions, may cause harmful interference to radio
communications. However, there is no guarantee that
interference will not occur in a particular installation. If this
equipment does cause harmful interference to radio or
television reception, which can be determined by turning the
equipment off and on, the user is encouraged to try to correct
the interference by one or more of the following measures:
1. Reorient or relocate the receiving antenna.
2. Increase the separation between the equipment and
receiver.
3. Connect the equipment into an outlet on a circuit different
from that to which the receiver is connected.
4. Consult the dealer or an experienced radio/TV technician for
help.
CAUTION
by the manufacturer responsible for compliance could void the
user’s authority to operate the equipment.
Canadian Radio Interference Regulations
This digital apparatus does not exceed the Class B limits for
radio noise emissions from digital apparatus as set out in the
interference-causing equipment standard entitled “Digital
Apparatus”, ICES-003 of the Industry and Science Canada.
Cet appareil numérique respecte les limites de bruits
radioélectriques applicables aux appareils numériques de
Classe B prescrites dans la norme sur le matériel brouilleur:
“Appareils Num ériques”, ICES-003 édictée par l’Industrie et
Sciences Canada.
United States of America
: Changes or modifications not expressly approved
Federal Communications Commission (FCC)
Intentional emitter per FCC Part 15
Low power, Radio LAN type devices (radio frequency (RF)
wireless communication devices), operating in the 2.4 GHz
Band, may be present (embedded) in y our printer system. This
section is only applicable if these devices are present. R efer to
the system label to verify the presence of wireless devices.
Wireless devices that may be in your system are only qualified
for use in the United States of America if an FCC ID number is
on the system label.
The FCC has set a general guideline of 20 cm (8 inches)
separation between the device and the body, for use of a
wireless device near the body (this does not include
extremities). This device should be used more than 20 cm (8
inches) from the body when wireless devices are on. The power
output of the wireless device (or devices), which may be
embedded in your printer, is well below the RF exposure lim its
as set by the FCC.
This transmitter must not be collocated or operation in
conjunction with any other antenna or transmitter.
Operation of this device is subject to the following two
conditions:(1) This device may not cause harmful interference,
and(2) this device must accept any interference received,
including interference that may cause undesired operation of
the device.
Wireless devices are not user serviceable. Do not
modify them in any way. Modification to a
wireless device will void the authorization to use
it. Contact manufacturer for service.
FCC Statement for Wireless LAN use:
“While installing and operating this transmitter
and antenna combination the radio frequency
exposure limit of 1mW/cm2 may be exceeded at
distances close to the antenna installed.
Therefore, the user must maintain a minimum
distance of 20cm from the antenna at all times.
This device can not be colocated with another
transmitter and transmitting antenna.”
Declaration of Conformity (European Countries)
Approvals and Certifications
The CE marking applied to this product
symbolises Samsung Electronics Co., Ltd.
Declaration of Conformity with the
following applicable 93/68/EEC Directives
of the European Union as of the dates
indicated:
vi
Page 8

January 1, 1995: Council Directive 73/23/EEC Approximation of
the laws of the member states related to low voltage
equipment.
January 1, 1996: Council Directive 89/336/EEC (92/31/EEC),
approximation of the laws of the Member States related to
electromagnetic compatibility.
March 9, 1999: Council Directive 1999/5/EC on radio
equipment and telecommunications terminal equipment and
the mutual recognition of their conformity.
A full declaration, defining the relevant Directives and
referenced standards can be obtained from your Samsung
Electronics Co., Ltd. representative.
EC Certification
European States qualified under wireless approvals:
EU
Austria, Belgium, Denmark, Finland, France
(with frequency restrictions), Germany,
Greece, Ireland, Italy, Luxembourg, The
Netherlands, Portugal, Spain, Sweden and the
United
Accept EU
European States with restrictions on use:
EU
Iceland, Liechtenstein, Norway and Switzerland
In France, the frequency range is restricted to
2446.5-2483.5 MHz for devices above 10 mW
transmitting power such as wireless
Certification to 1999/5/EC Radio Equipment &
Telecommunications Terminal Equipment Dire ctive
(FAX)
This Samsung product has been self-certified by Samsung for
pan-European single terminal connection to the analogue public
switched telephone network (PSTN) in accordance with
Directive 1999/5/EC. The product has been designed to work
with the national PSTNs and compatible PBXs of the European
countries:
In the event of problems, you should contact the Euro QA Lab
of Samsung Electronics Co., Ltd. in the first instance.
The product has been tested against TBR21 and/or TBR 38. To
assist in the use and application of terminal equipment which
complies with this standard, the European Telecommunication
Standards Institute (ETSI) has issued an advisory document
(EG 201 121) which contains notes and additional requirements
to ensure network compatibility of TBR21 terminals. The
product has been designed against, and is fully compliant with,
all of the relevant advisory notes contained in this document.
European Radio Approval Information (for products
fitted with EU-approved radio devices)
This Product is a printer; low power, Radio LAN type devices
(radio frequency (RF) wireless communication devices),
operating in the 2.4 GHz band, may be present (embedde d) in
your printer system which is intended for home or office use.
This section is only applicable if these devices are present.
Refer to the system label to verify the presen ce of wireless
devices.
Wireless devices that may be in your system are only qualified
for use in the European Union or associated areas if a CE mark
with a Notified Body Registration Number and the Alert
Symbol is on the system label.
The power output of the wireless device or devices that may be
embedded in you printer is well below the RF expo sure limits as
set by the European Commission through the R&TTE directiv e.
Accept EU
No limitations at this time.
Regulatory Compliance Statements
Wireless Guidance
Low power, Radio LAN type devices (radio frequency (RF)
wireless communication devices), operating in the 2.4 GHz
Band, may be present (embedded) in your printer system. The
following section is a general overview of considerations while
operating a wireless device.
Additional limitations, cautions, and concerns for specific
countries are listed in the specific country sections (or country
group sections). The wireless devices in your system are only
qualified for use in the countries identified by the Radio
Approval Marks on the system rating label. If the country you
will be using the wireless device in, is not listed, please contact
your local Radio Approval agency for requirements. Wireless
devices are closely regulated and use may not be allowed .
The power output of the wireless device or devices that may be
embedded in your printer is well below the RF exposure limits
as known at this time. Because the wireless devices (which may
be embedded into your printer) emit less energy than is allowed
in radio frequency safety standards and recommendations,
manufacturer believes these devices are safe for use.
Regardless of the power levels, ca re should be taken to
minimize human contact during normal operation.
As a general guideline, a separation of 20 cm ( 8 inches)
between the wireless device and the body, for use of a wireless
device near the body (this does not include extremities) is
typical. This device should be used more than 20 cm (8 inches)
from the body when wireless devices are on and transmitting.
This transmitter must not be collocated or operation in
conjunction with any other antenna or transmitter.
Some circumstances require restrictions on wireless devices.
Examples of common restrictions are listed below:
vii
Page 9
Radio frequency wireless communication can
interfere with equipment on commercial aircraft.
Current aviation regulations require w ireless
devices to be turned off while traveling in an
airplane. 802.11B (also known as wireless
Ethernet) and Bluetooth communication devices
are examples of devices that provide wireless
communication.
In environments where the risk of interference to
other devices or services is harmful or perceived
as harmful, the option to use a wireless device
may be restricted or eliminated. Airports,
Hospitals, and Oxygen or flammable gas laden
atmospheres are limited examples where use of
wireless devices may be restricted or eliminated.
When in environments where you are uncertain
of the sanction to use wireless devices, ask the
applicable authority for authorization prior to use
or turning on the wireless device.
Every country has different restrictions on the
use of wireless devices. Since your system is
equipped with a wireless device, when traveling
between countries with your system, check with
the local Radio Approval authorities prior to any
move or trip for any restrictions on the use of a
wireless device in the destination country.
If your system came equipped with an internal
embedded wireless device, do not operate the
wireless device unless all covers and shields are
in place and the system is fully assembled.
Wireless devices are not user serviceable. Do not
modify them in any way. Modification to a
wireless device will void the authorization to use
it. Please contact manufacturer for service.
EU Declaration of Conformity (LVD,EMC)
For the follow in g prod uct :
Color Laser Beam Printer
(Product na m e)
CLP-510, CLP-510N
(Model N um b er)
Manufactured at :
Samsung Electronics Co.,Ltd. #259, Gongdan-Dong, Gumi-City, Gyungb uk, KOREA. 730-030
(factory name, address)
W e hereby declare, that all m ajor safety requirem ents, concerning to CE M arking
Directive[93/ 68/ EEC] and Low Voltage Directive [73/ 23/ EEC], ElectroMagnetic
Compatibility [89/ 336/ EEC], amendm ents [92/ 31/ EEC] are fulfilled, as laid out in the
guideline set down by the member states of the EEC Comm ission.
This d ecla ratio n is valid fo r all sam p les tha t are part of thi s decla rat ion , whi ch are
manufactured according to the production charts appendix.
The standards relevant for the evaluation of safety & EMC requirements are as
follow s :
1. Certificate o f con form ity / Tes t repo rt issu ed b y :
2. Tech nical d ocum entation kept at :
w hich w ill be ma de availab le upon req ues t.
LVD : EN 60950:1992+A1+A2+A3+A4+A11, EN 60825-1:1994+A1
EMC : EN55022:1998incA1:2000, EN61000-3-2:2000,EN61000:3-3:1995incA1:2001
EN55024:1998incA1:2001, AS/NZS3548:1995,EN61000:4-2:1995, EN61000:4-1996,
EN61000:4-4:1995, EN61000:4-5:1995 EN61000:4-6:1996, EN61000:4-11:199
LVD : TUV R h e inland
EMC : SAMSUNG Electronics EURO Q.A. Lab. in the U.K
Samsung Electronics Co.,Ltd
(Manufacturer)
Samsung Electronics Co.,Ltd.
#259,Gongdan-Dong,Gum i-City
Gyungbuk, Korea 730-030
2004-9-17
(place and date of issue) (name and signature of authorized person)
(Representative in the EU)
Samsung Electronics Euro QA Lab.
Blackbushe Business Park, Saxony Way
Yateley, Hampshire , GU46 6GG, UK
2004-9-17
(place and date of issue) (name and signature of a uth oriz ed person)
T
e
o
p
m
.
W h an -Soo n Y im / Se nio r Ma na ge r
Yong-Sang Park / Manager
y
r
a
r
.
4
Only use drivers approved for the country in
which the device will be used. See the
manufacturer System Restoration Kit, or contact
manufacturer Technical Support for additional
information.
viii
Page 10
Save time and money
1 Introduction
Congratulations on the purchase of your printer!
This chapter includes:
• Special Features
• Printer Components
Special Features
Your new printer is equipped with sev er al special features that
improve the print quality. You can:
Print in color with excellent quality and speed
• You can print in a full range of colors using cyan, magenta,
yellow, and black.
• You can print up to 2400 x 600 dpi (effective output). For
details, see the
• Your printer prints A4-sized pa per at 20 ppm and letter- sized
paper at 21 ppm (pages per minute).
Use multiple types of media easily
•The
Standard 250-sheet input tray
500-sheet input tray
paper.
Multi-purpose Tray
•The
labels, custom-sized materials, postcards, and heavy paper.
Multi-purpose Tray
The
plain paper.
Software User’s Guide
(Tray 2) supports A4/letter-sized
supports letterhead, envelopes,
also supports up to 100 sheets of
.
(T ray 1) and
optional
1 2
3 4
• You can print on both sides of the paper to save paper
double-sided printing
(
User’s Guide
• You can print multiple page s on a single sheet of paper to
save paper.
• You can use preprinted forms and letterhead. F or details, see
Software User’s Guide
the
• This printer automatically
substantially reducing power consumption when not
printing.
.
). For details, see the
.
conserves electricity
Software
by
Print in various environments
You can print in
. Windows NT 4.0 is only supported on the CLP-600N.
XP
• Your printer is compatibl e with
Linux OS
• Your printer comes with a
• The CLP-600N comes with a built-in
10/100 Base TX. The CLP-600 does not support a network
interface.
To use the CLP-600N in both wired and wireless network
environments, you can install an optional wired/wireless
network interface card. Contact your Samsung dealer or the
retailer where you bought your printer. We strongly
recommend that the card be installed by a trained service
professional.
Windows 98SE/Me/NT 4.0/2000/2003/
Macintosh
.
USB
interface.
and
various
Network interface
,
Create professional documents
•Print
9
8
•Print
•Print
Watermarks
a watermark, such as the word “Confidential.” For details,
see the
document to create a book. Once printed, all you have to do
is fold and staple the pages. For details, see the
User’s Guide
document can be magnified and printed across several
sheets of paper and taped together to form a poster. For
details, see the
Software User’s Guide
Booklets
Posters
. You can custom ize your documents with
.
. This feature enables you to easily print a
Software
.
. The text and pictures of each page of your
Software User’s Guide
.
1.
1
Introduction
Page 11
Printer Components
These are the main components of your printer. Note that all
illustrations on this User’s Guide are from the C L P-600N and
that some parts may be different from your printer.
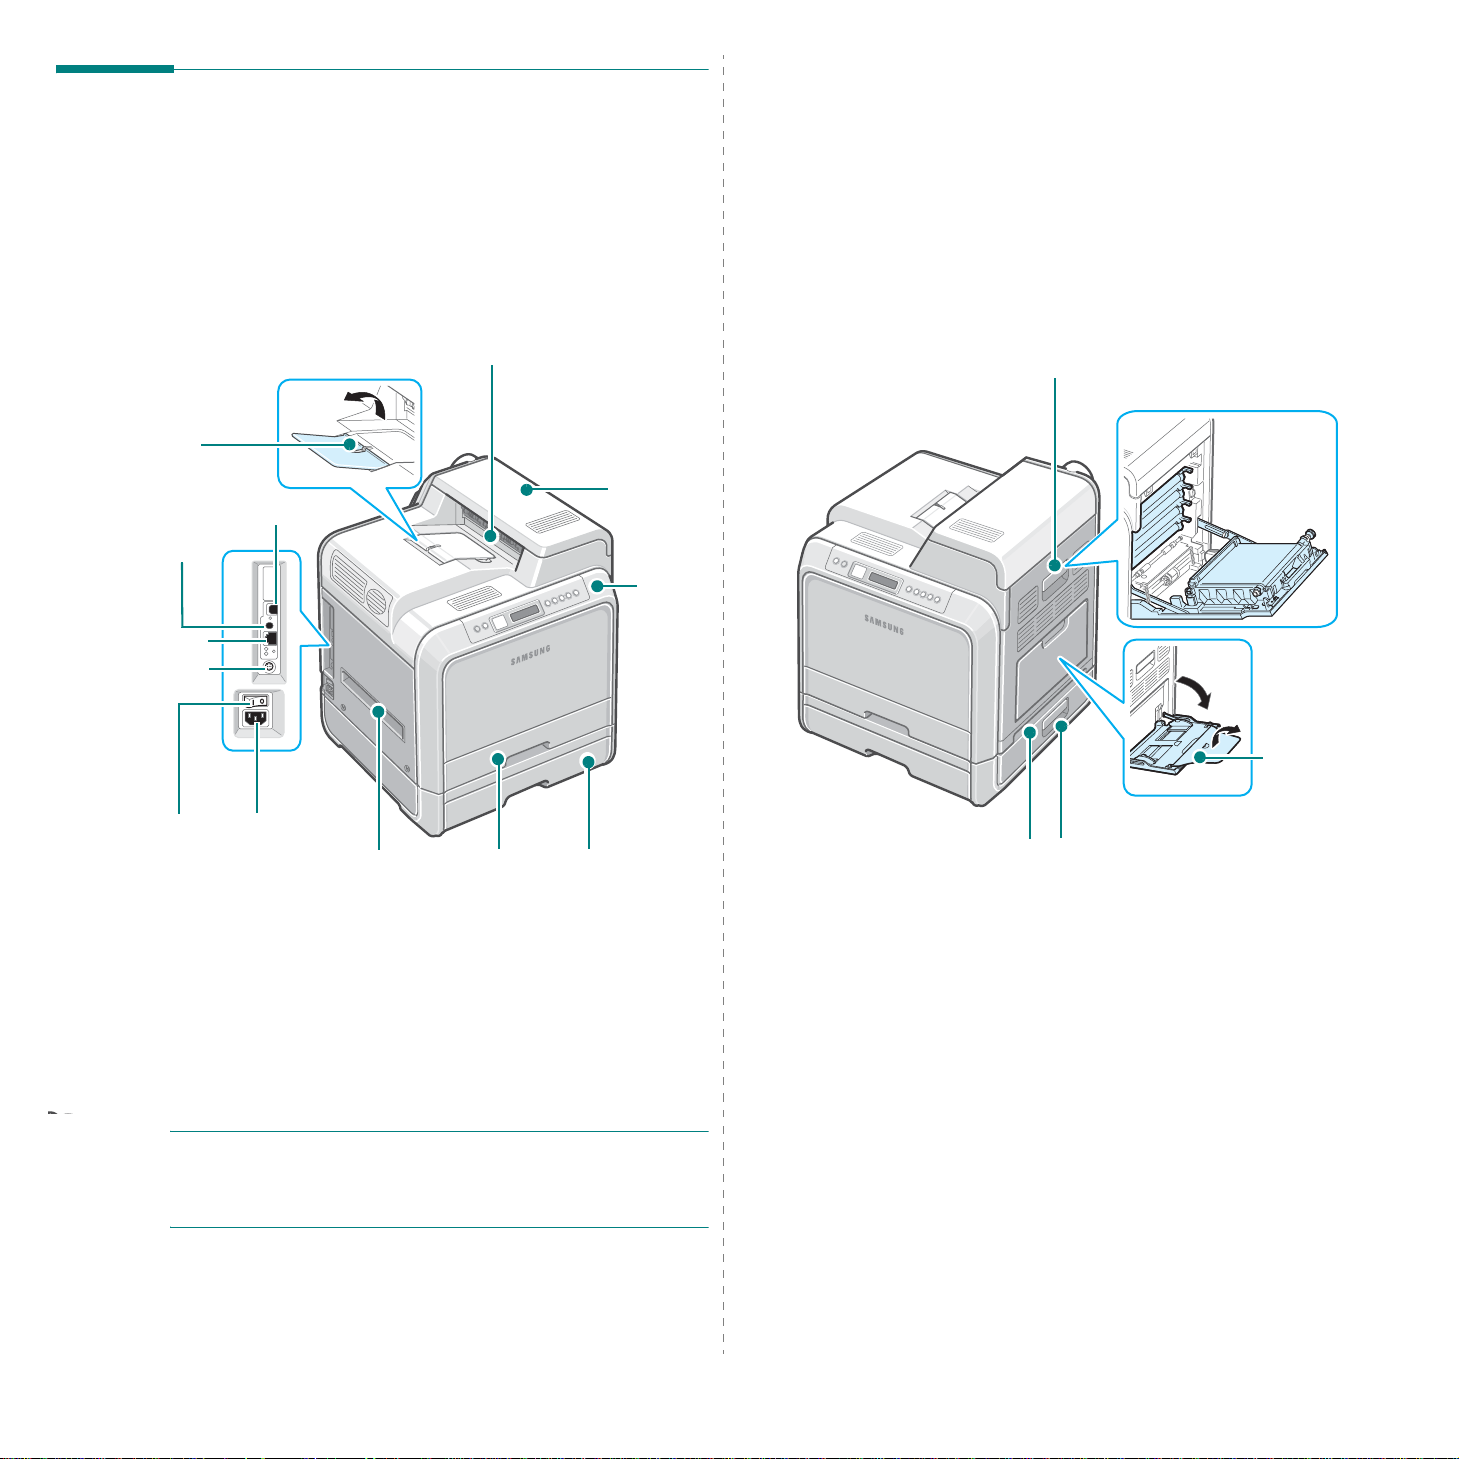
Front View
Output Support
Wireless Network
Antenna
Network Port
Tray 2 Cable
Connector
Power Switch
**
USB Port
*
Power
Receptacle
Handle
(Use to lift
the printer.)
Paper Output
Tray
Tray 1
(250-sheet
paper feeder)
Top Cover
(Open to clear
paper jams.)
Control
Panel
(See 3.1.)
Optional Tray 2
(500-sheet paper
feeder)
Right Side View
Access Door
(Open fully to access the
toner cartridges and paper
transfer belt (PTB).)
(Use to lift the printer.)
Handle
Optional Tray 2 Jam Cover
(Open to clear jams from the
optional Tray 2.)
Multi-purpose
Tray
(Open to load
special print
materials.)
* Only the CLP-600N comes with a network port.
** This wireless network antenna is only available when you have purchased
and installed a wired/wireless network card separately in the CLP-600N.
NOTE:
print a large number of pages at once. Please make sure that
The surface of the output tray may become hot if you
you don’t touch the surface, and prevent children from
approaching it.
Introduction
1.
2
Page 12
2 Setting Up Your Printer
Unpacking
This chapter gives you step-by-step instructions for setting up
your printer .
This chapter includes:
•Unpacking
• Installing the Toner Cartridges
•Loading Paper
• Connecting a Printer Cable
• Turning the Printer On
• Printing a Demo Page
• Changing the Display Language (CLP-600N Only)
• Installing the Printer Software
1
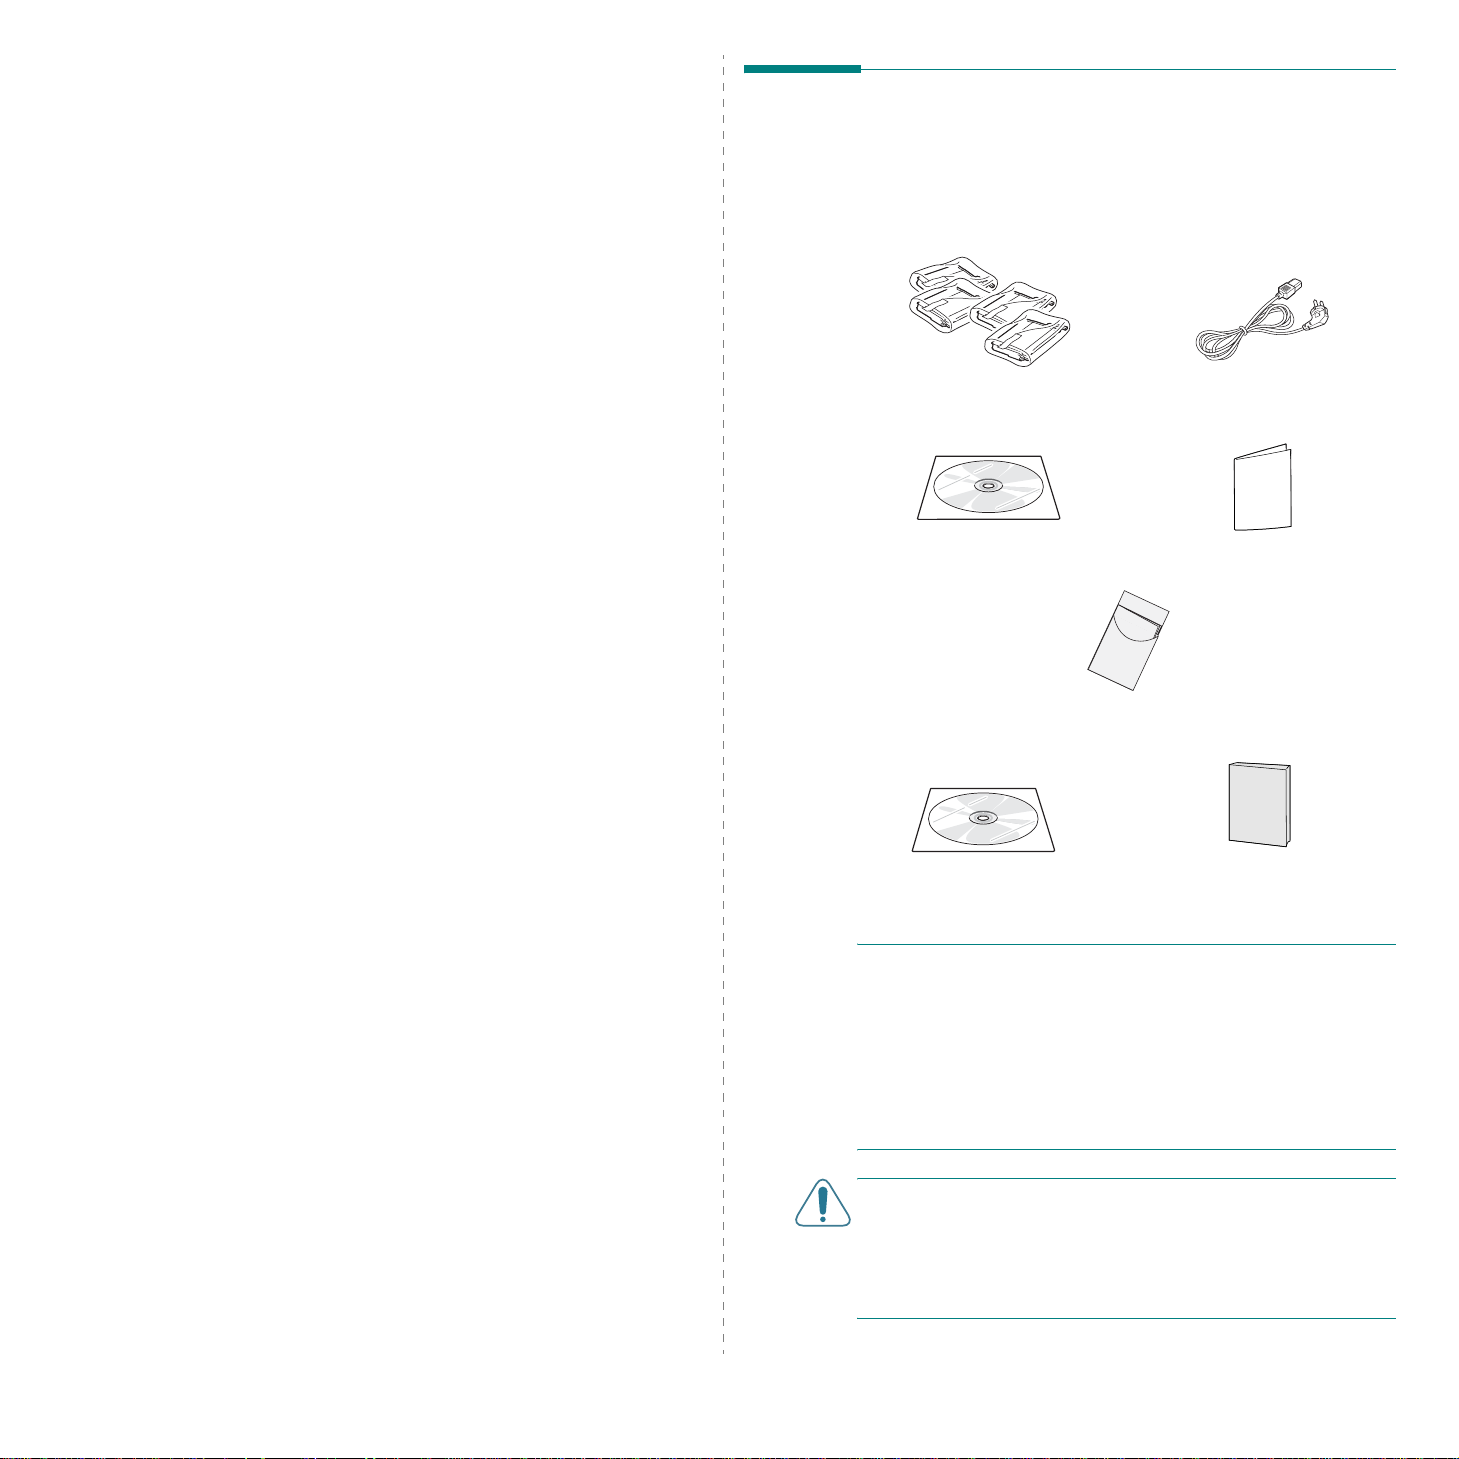
Remove the printer and all of the accessories from the
packing carton. Make sure that the printer has been
packed with the following items:
Toner Cartri dges Power Cord
CD-ROM Quick Install Guide
Optimum Setup Guide
2.
1
Setting Up Your Printer
Network CD (CLP-600N only)
NOTE
S
:
• If any items are missing or damaged, notify your dealer
immediately.
Components may differ from one country to another.
•
• The CD-ROM contains the printer driver, the User’s Guide,
and the Adobe Acrobat Reader program.
• The appearance of the power cord may differ depending on
your country’s specifications. The power cord must be
plugged into a grounded power socket.
CAUTION:
cartridges and the cassette. Use safe lifting and handling
techniques. If you need to move the printer, it should be
moved by two people. Use the lifting handles, as shown in the
diagram (see page 1.2). Back injury could result if a single
person attempts to lift the printer.
This printer weighs 29kg including the toner
Network Quick Guide
(CLP-600N only)
Page 13

2
Carefully remove all of the packing tape from the printer.
Installing the Toner Cartridges
1
Using the handle, completely open the access door.
3
Pull the paper tray out of the printer and remove the
packing tape from the tray.
4
Select a location for the printer:
• Leave enough room to open the printer trays and
covers, and to allow for proper ventilation.
• Provide the proper environment:
- A firm, level surface
- Away from the direct airflow of air conditioners,
heaters, or ventilators
- Free of temperature, sunlight, and humidity extremes
or fluctuations
- Clean, dry, and free of dust
NOTE:
printer.
2
CAUTION
• Do not use sharp objects, such as a knife or scissors, to
• To prevent damage, do not expose the toner cartridges to
• Do not touch the green surface, the OPC drum, on the front
The paper transfer belt is already installed in yo ur
Take the toner cartridges out of their packages.
:
open the toner cartridge packages. You could damage the
surface of the toner cartridges.
light for more than a few minutes. Cover them with paper to
protect them if necessary.
of each toner cartridge with your hands or any other
material. Use the handle on each cartridge in order to avoid
touching this area.
CAUTION:
you do not, print quality problems can occur.
You must place your printer on a level surface. If
2.
2
Setting Up Your Printer
Page 14
3
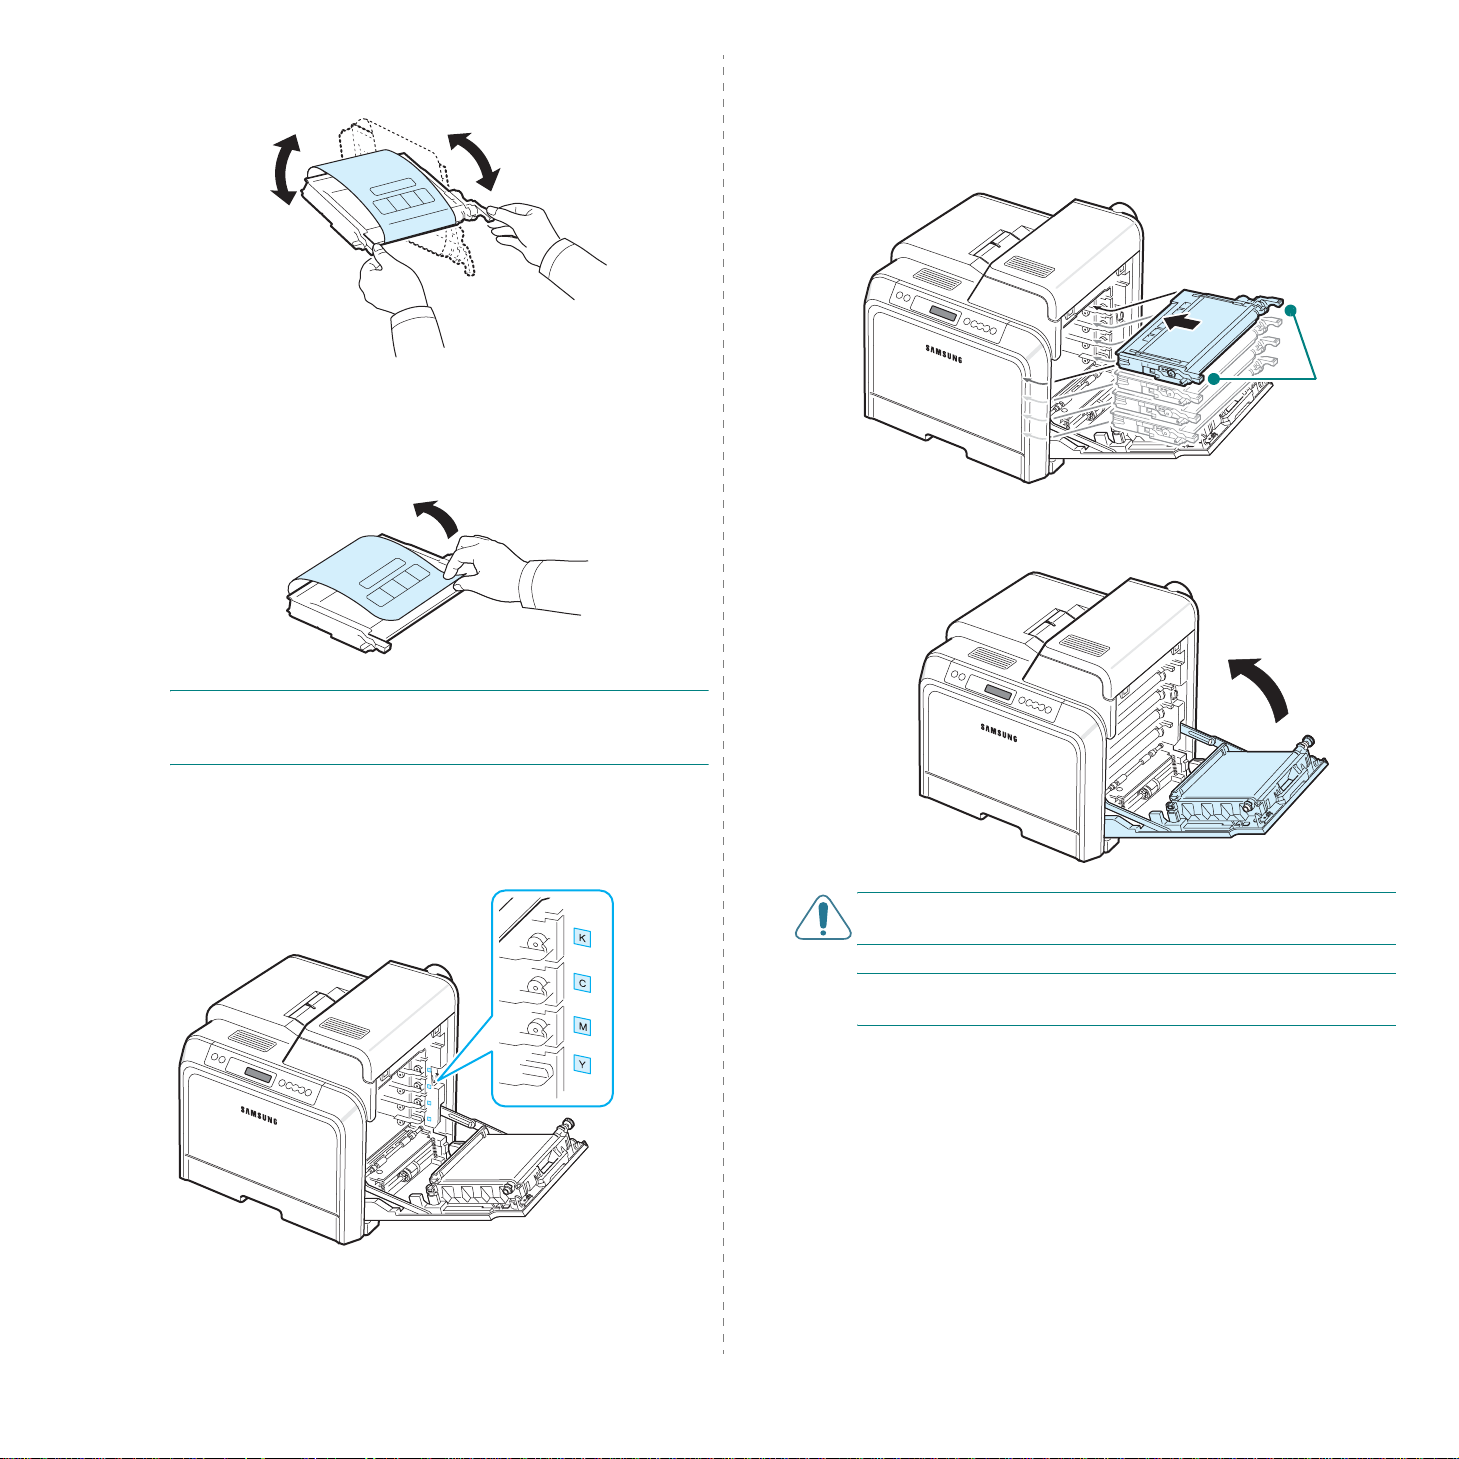
Holding both handles on the toner cartridges, gently rock
them from side to side to evenly distribute the toner.
4
Place the toner cartridges on a flat surface, as shown, and
remove the paper covering the to ner ca rtridges by
removing the tape.
6
Grasp the handles on each toner cartridge. Align the toner
cartridges with the slots inside the printer and insert them
into their corresponding positions in the following order:
Yellow , Magenta, Cyan, and then Black, until they click into
place.
7
Close the access door. Make sure that the door is securely
latched.
Grip
here.
NOTE
: If toner gets on your clothing, wipe it off with a dry
cloth and wash it in cold water. Hot water sets toner into
fabric.
5
On the inside right hand wall of the printer, a label
identifies which color cartridge goes into each cartridge
slot.
Black
Cyan
Magenta
Yellow
CAUTION
printer will not operate.
NOTE
toner cartridge life of about 4,000 pages for blac k and color.
: If the access door is not completely closed, the
: When printing text at 5% coverage, you can expect a
2.
3
Setting Up Your Printer
Page 15
Loading Paper
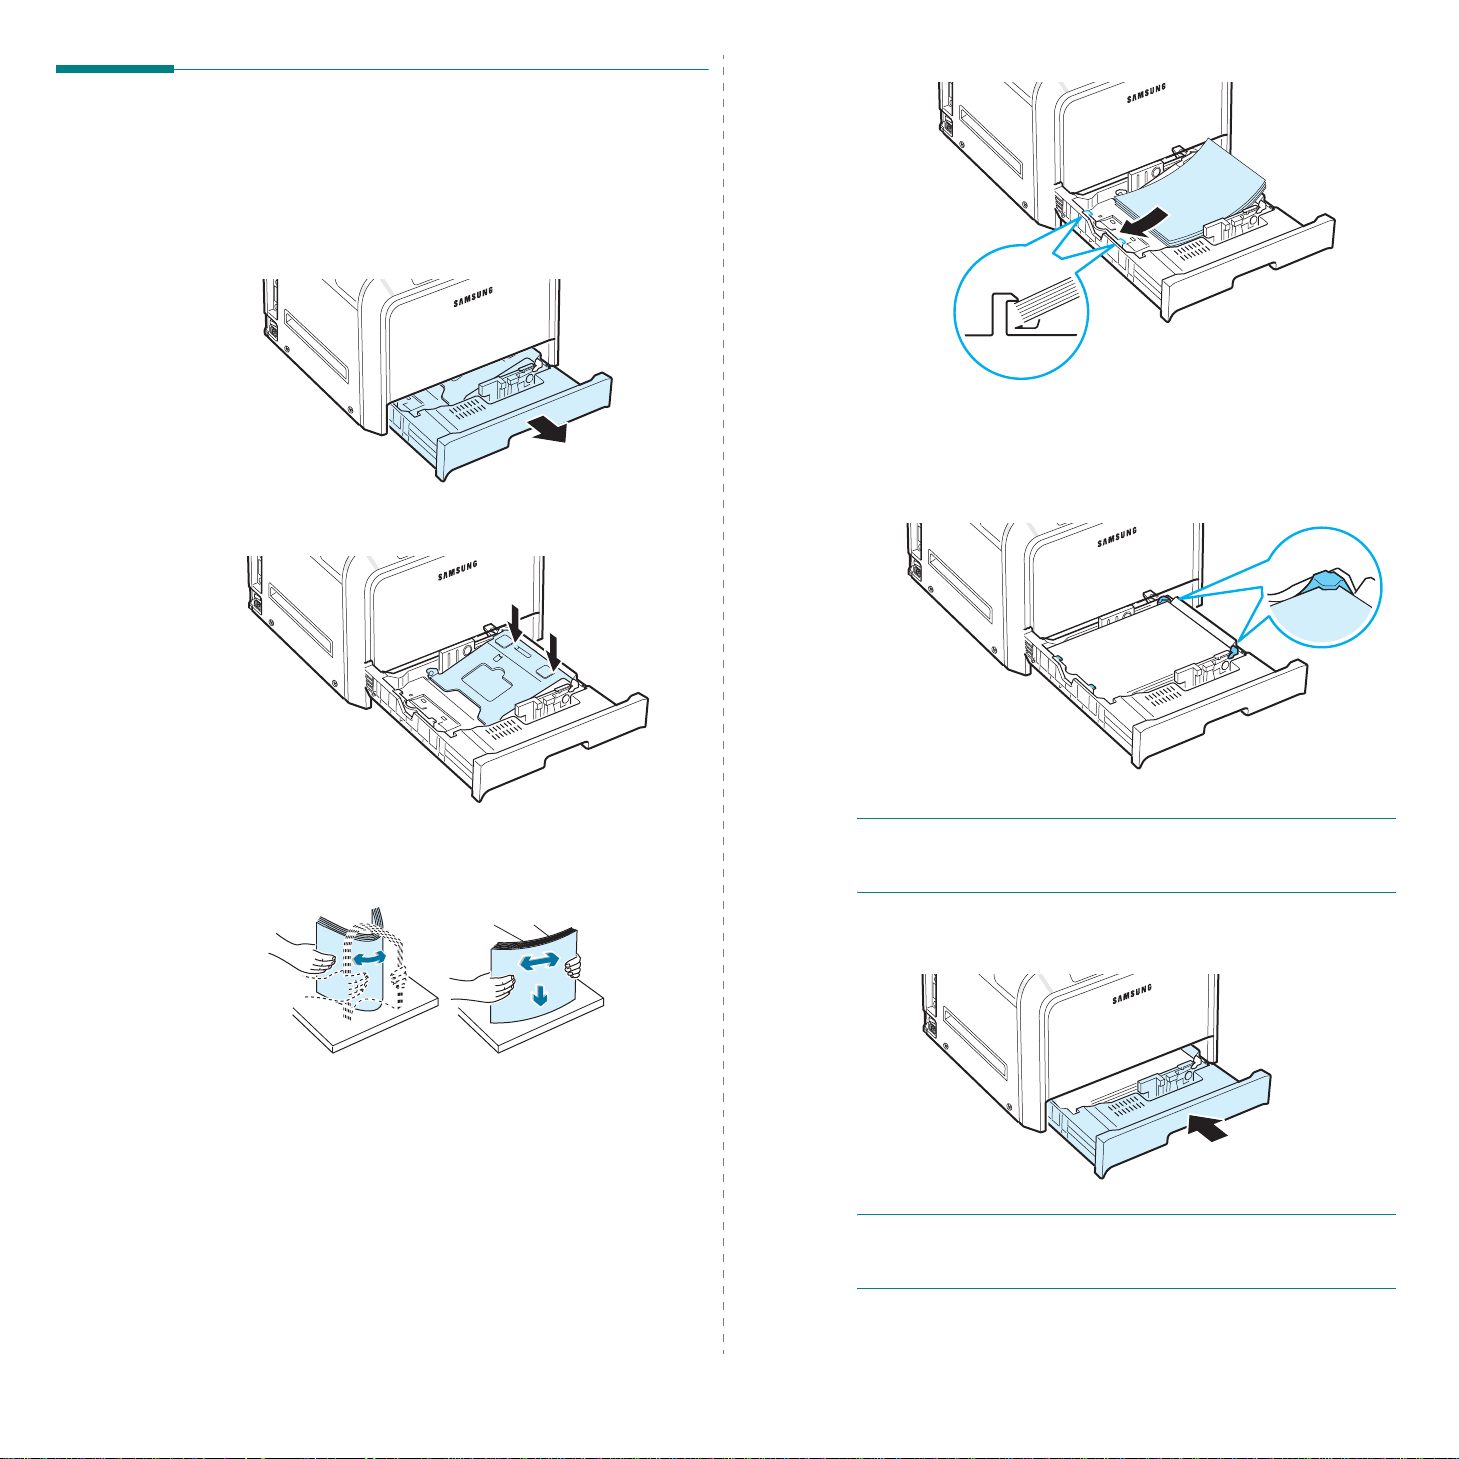
The tray (Tray 1) can hold a maximum of 250 sheets of plain
paper. You can use A4 and letter-sized paper.
To load pape r:
1
Pull the tray out of the printer.
2
Push down on the metal plate until it locks into position.
4
Load paper with the print side facing up.
Make sure not to overfill the tray and that all four corners
are flat in the tray and under the corner brackets, as
shown below. Overfilling the tr ay may cause a paper jam.
3
Flex the paper sheets back and forth to separate the pages
and then fan them while holding one edge. Tap the edges
of the stack on a flat surface to even it up.
2.
4
Setting Up Your Printer
NOTE
: If you want to change the size of the paper in the tra y,
refer to “Changing the Size of the Pape r in the Tray” on
page 2.5.
5
Slide the tray back into the printer.
NOTE
: After you load paper, you need to set up your printer
for the paper type, size, and source you loaded. For details,
see the
Software User’s Guide
.
Page 16
Changing the Size of the Paper in the
Tray
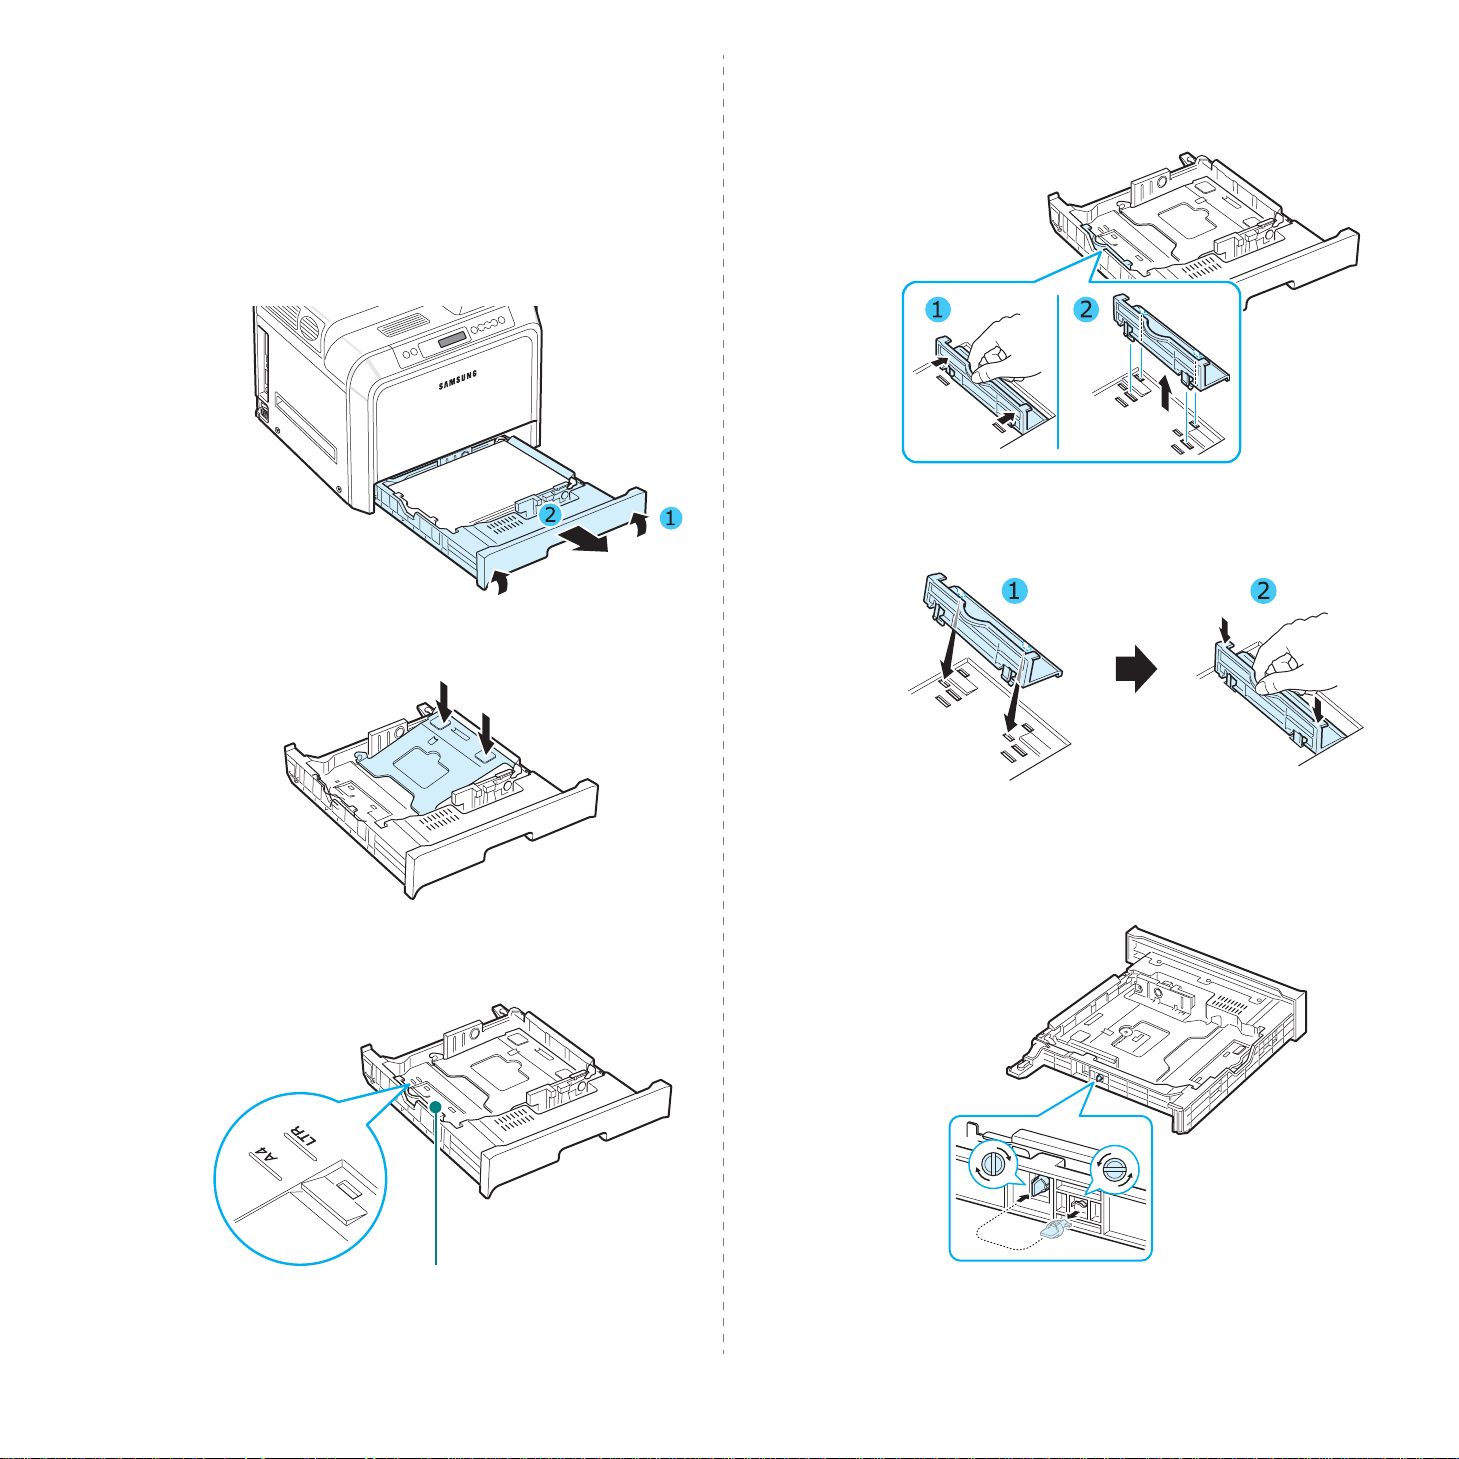
The tray is preset to Letter or A4 size, depending on your
country . T o change the size to A4 or Letter, you must adjust the
paper length guide properly.
1
Pull the tray open. After you pull it all the way out, lift up
the front part of the tray slightly to release the tray from
the printer. Remove paper from the tra y.
2
Push down on the metal plate until it locks into position.
To remove the paper length guide, turn it slightly to your
right to release the locks on the bottom of the guide, then
pull it up.
To place the paper length guide in the paper position you
want, insert the locks on the bottom of the guide into the
desired paper slot and push it all the way in.
3
Lift the paper length guide and place it in the correct
position for the paper size you are loading.
Paper length guide
2.
5
Setting Up Your Printer
4
Holding the handle of the white stopper on the rear part of
the tray , rotate the handle counter clockwise and remove it
from the tray. After removing it, insert the stopper in the
other hole and rotate it clockwise to lock it into position.
Page 17
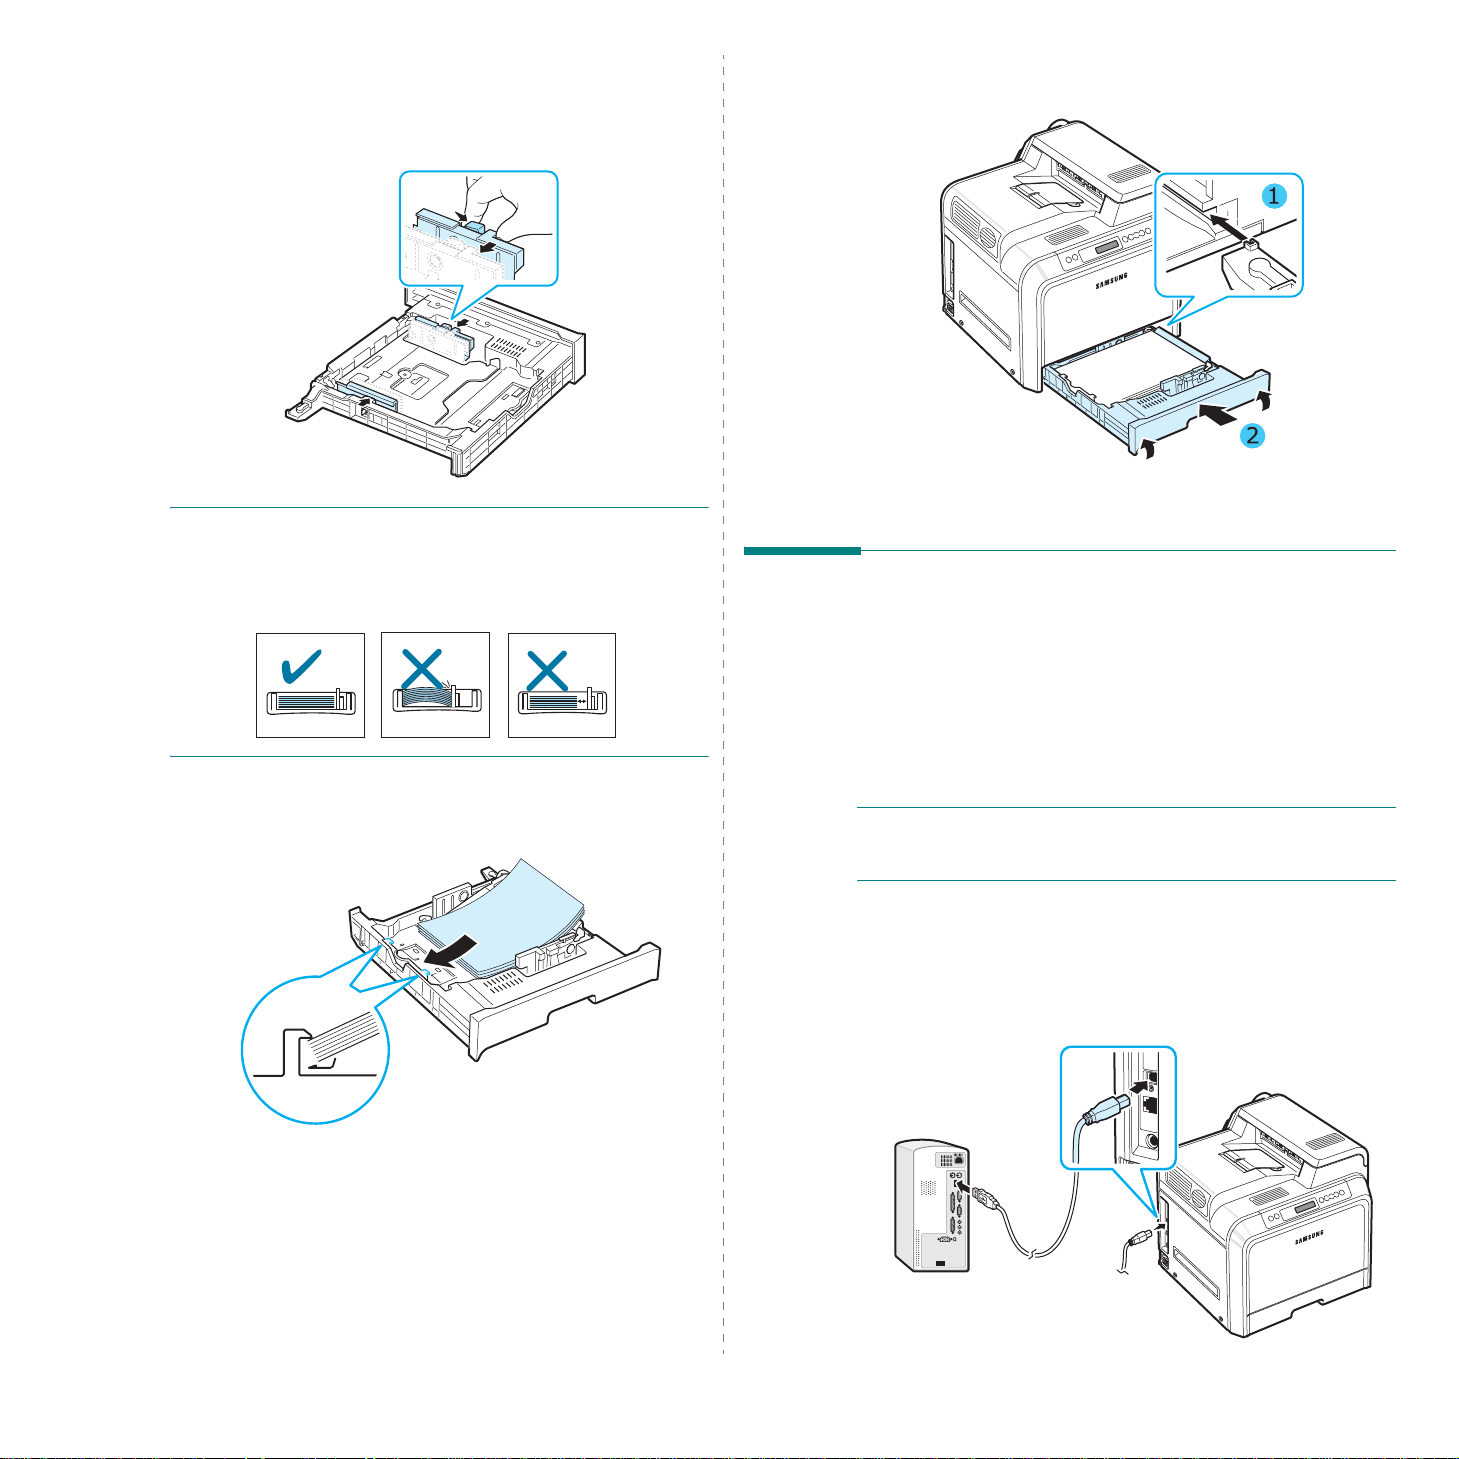
5
Squeeze the paper width guide, as shown and slide it to
the stack of paper until it lightly touches the side of the
stack. Do not push the guide too tightly against the edge
of the paper as it may cause the paper to bend.
N
OTE
S
:
• Do not push the width guide far enough to cause the
material to warp.
• If you do not correctly adjust the width guide, it may cause a
paper jam.
7
To replace the tray, lower the rear edge, align it with the
slot, and slide it into the printer.
Connecting a Printer Cable
6
Load paper with the print side facing up. For more
information, see steps 4 and 5 on page 2.4.
For Local Printing
To print from your computer in a local environment, you need
to connect your printer to the computer with a Universal Serial
Bus (USB) cable.
If you are a Macintosh user, you can use only a USB cable.
NOTE
: Connecting the printer to the USB port of the computer
requires a certified USB cable. You will need to buy a USB 2.0
compliant cable that is 3m or less in length.
1
Make sure that both the printer and the computer are
turned off.
2
Plug the USB cable into the connector on the left rear of
the printer.
2.
6
Setting Up Your Printer
Page 18
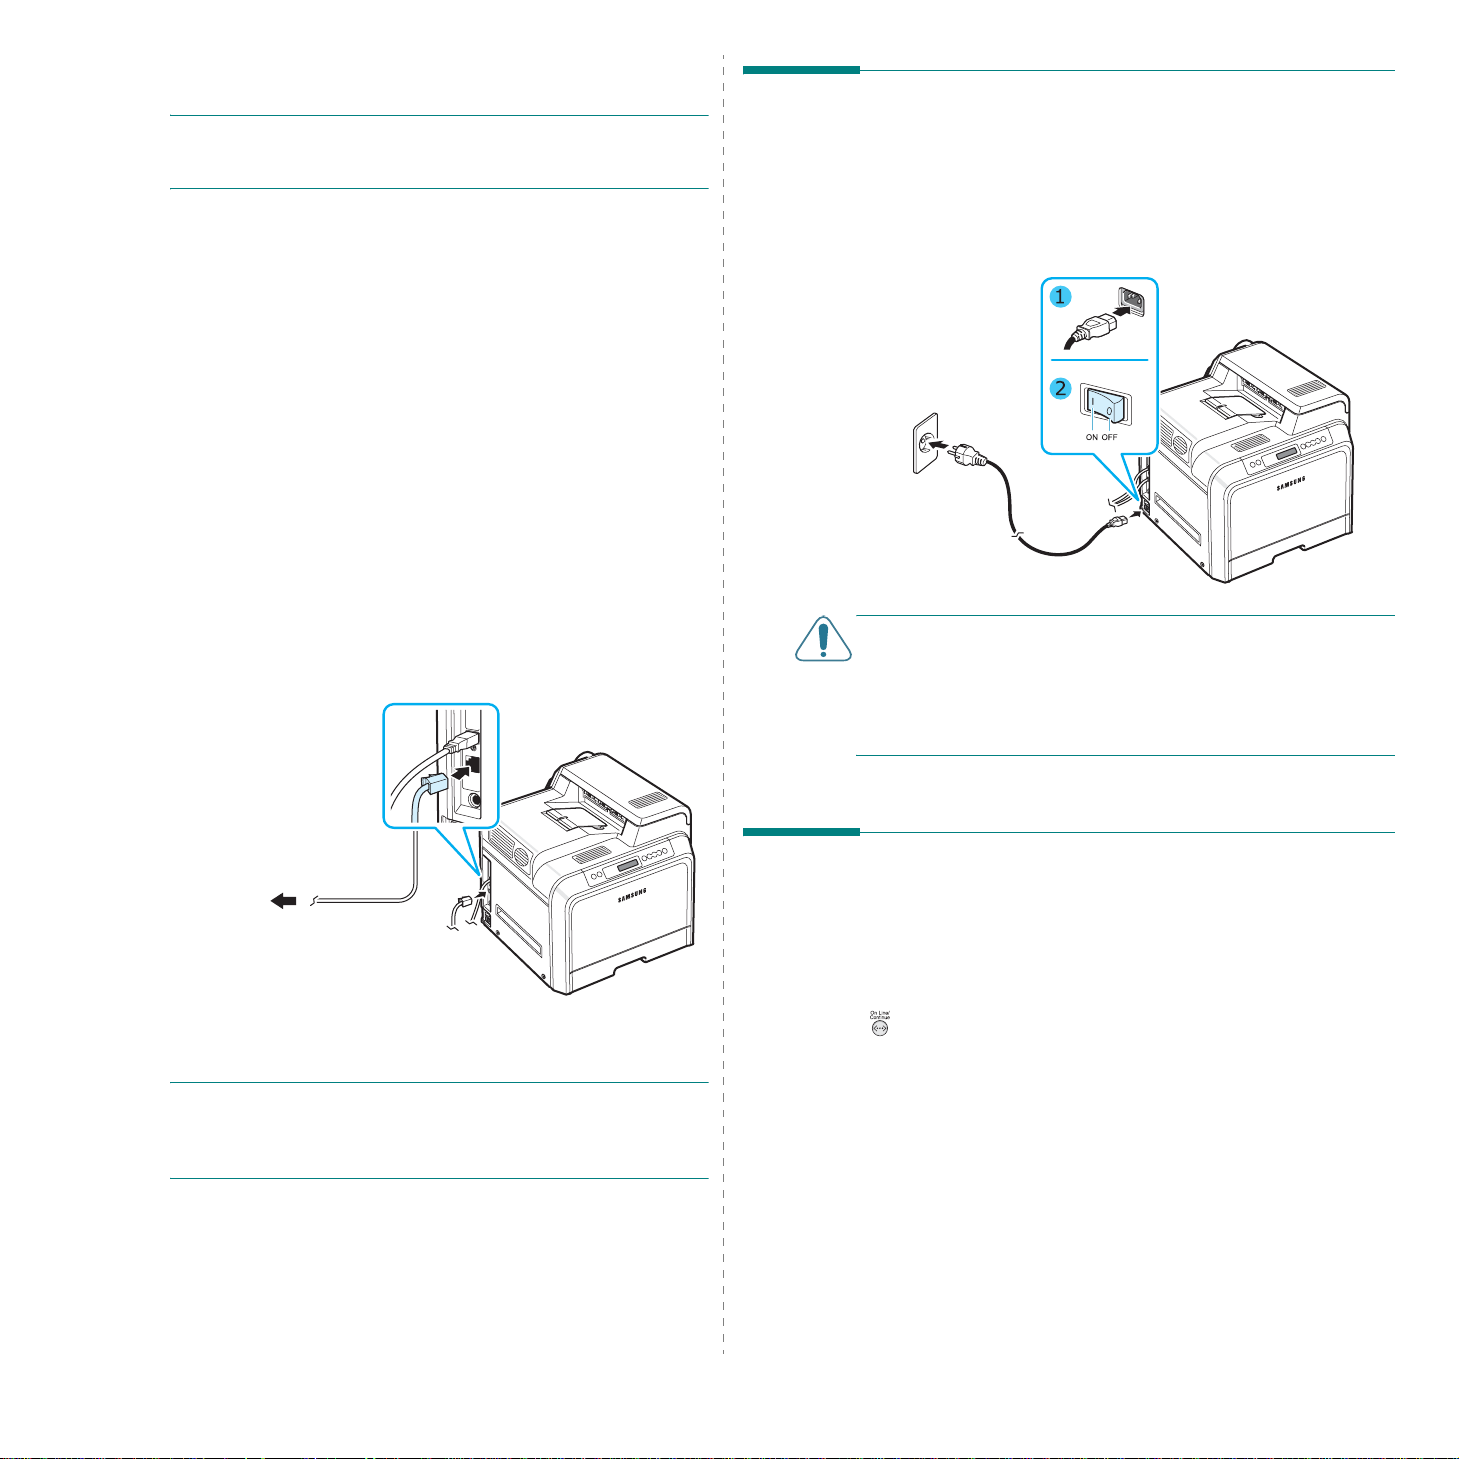
3
Connect the other end of the cable to the USB port on your
computer.
NOTE
: To print using the USB interface, you must run
Windows 98SE/Me/2000/2003/XP or Macintosh with OS
10.3.x.
For Network Printing (CLP-600N only)
You can attach yo ur printer to a network using an Ethernet
cable (UTP cable with RJ.45 connector). The CLP-600N has a
built-in network interface card.
If you want to use the printer in both wired and wireless
network environments, you need to install an optional wired/
wireless network interface card. Contact your Samsung dealer
or the retailer where you bought the printer. We strongly
recommend that the card be installed by a tr ained service
professional.
Using an Ethernet Cable
1
Make sure that both the printer and the computer are
turned off.
2
Plug one end of the Ethernet cable into the Ethernet
network port on the left rear of the printer.
Turning the Printer On
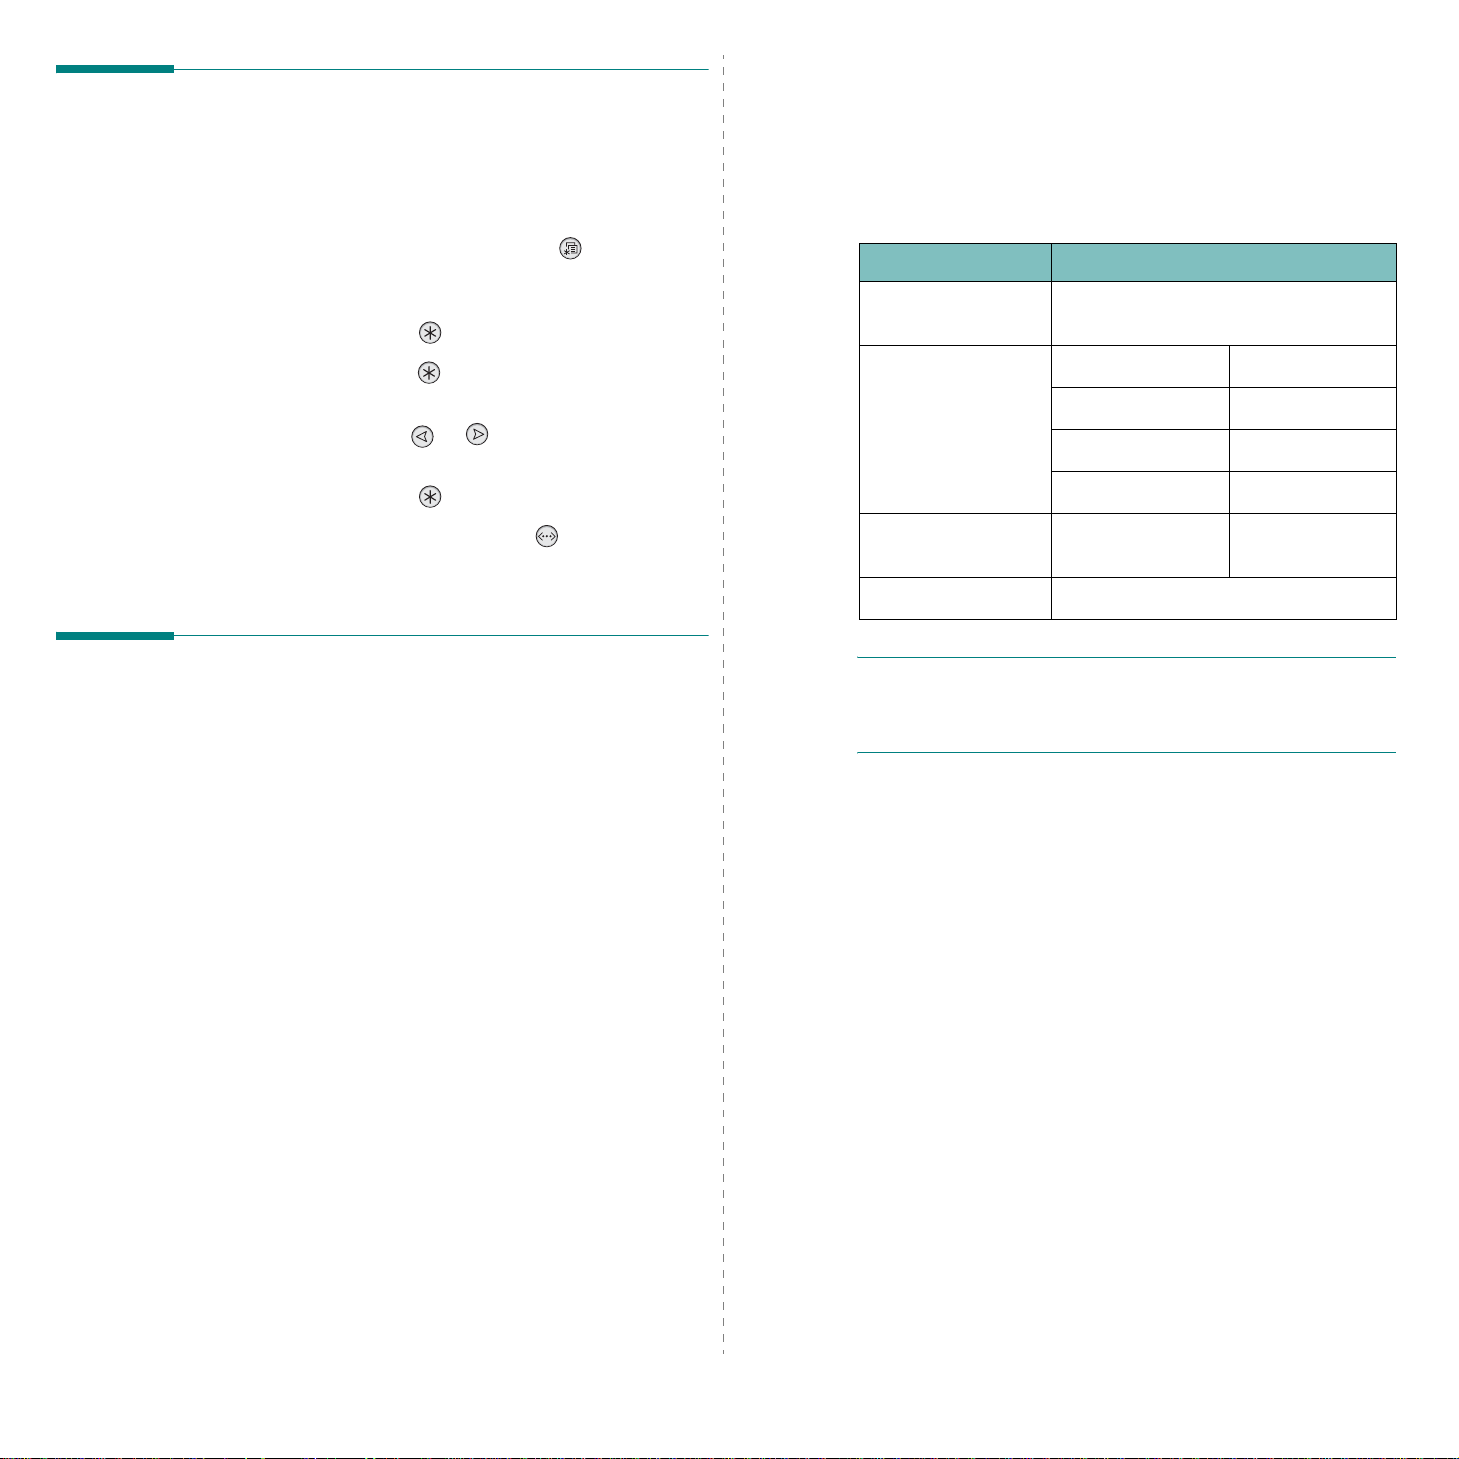
1
Plug the power cord into the power receptacle on the left
rear of the printer.
2
Plug the other end into a properly grounded AC outlet and
turn on the power.
C
AUTION
• Some parts inside of the printer may be hot when power is
on, or after printing. Be careful not to burn yourself when
working inside the printer.
• Do not disassemble the printer when it is turned on or
plugged in. Doing so may give you an electric shock.
:
To the network
LAN connection
3
Plug the other end of the cable into a network LAN
connection.
NOTE
: After connecting the printer, you need to configure the
network parameters on the control panel. See page 8.1 . You
can use the software supplied with the card. Refer to the
Network User’s Guide.
Setting Up Your Printer
2.
Printing a Demo Page
Print a demo page to make sure that the printer is operating
correctly.
To print a demo page:
In ready mode, press and hold the
( ) on the control panel for 2 seconds to print a demo page.
A demo page showing the printer’s features and capa bilities is
printed.
7
On Line/Continue
button
Page 19
Changing the Display Language
(CLP-600N Only)
System Requirements
Before you begin, ensure that your system meets the minimum
requirements. Your printer supports the following operating
system.
To change the language that is displayed on the control panel,
take the following steps:
1
In ready mode, press the
control panel until you see “Setup” on the bottom line of
the display.
2
Press the
3
Press the
displays on the bottom line of the display.
4
Press the scroll button ( or ) until the language you
want to use displays.
5
Press the
6
Press the
ready mode.
Enter
button ( ) to access the menu.
Enter
button ( ) when “LCD Language”
Enter
button ( ) to save the selection.
On Line/Continue
Menu
button ( ) on the
button ( ) to return to
Installing the Printer Software
You must install software using the supplied CDROM after you have set up your printer and
connected it to your computer. For details, see the
Software User’s Guide
The CD-ROM provides you with the following software:
Programs for Windows
.
• Windows 98SE/Me/NT 4.0/2000/XP/2003 - The following
table shows Windows requirements.
Item Requirements
Operating system Windows 98SE/Me/NT 4.0/2000/XP/
2003
RAM 98SE/Me 32 MB
NT 4.0/2000 64 MB
XP 128 MB
2003 256 MB
Free Disk Space 98SE/Me/NT 4.0/
2000/XP/2003
Internet Explorer 5.0 or higher
NOTES
• For Windows NT 4.0/2000/XP/2003, the system
• Windows NT 4.0 is only supported on the CLP-600N.
• Macintosh 10.3.X - For details, see the
• Various Linux OS - For details, see the
:
administrator should install the software.
Guide
.
Guide
.
300 MB
Software User’s
Software User’s
You can install the following printer software using the CDROM.
•
Printer driver
advantage of your printer’s features. Se e the
User’s Guide
printer driver.
SmartPanel
•
Software User’s Guide
SmartPanel program.
for Windows. Use this driver to take full
Software
for details about installing the Samsung
. Appears when printing errors occur. See the
for details about installing the
Macintosh Printer Driver
You can print from a Macintosh with your printer. Go to the
Software User’s Guide
print software and printing from a Macintosh.
for information about installing the
Linux Driver
You can print from a Linux-based computer with your printer.
Go to the Software User’s Guide
installing the Linux driver and printing from a Linux
environment.
for information about
Setting Up Your Printer
2.
8
Page 20

Printer Driver Features
Your printe r drivers will support the following standard
features:
• Paper source selection
• Paper size, orientation, and media type
• number of copies
The table below lists a general overview of features supporte d
by your printer drivers.
Printer driver
Feature
Color Mode Y N Y
Print Quality Option Y Y Y
Poster Printing Y N N
Double-sided
Printing
Multiple Pages Per
Sheet (N-up)
Fit to Page Printing Y N N
Scale Printing Y N Y
Booklet Printing Y N N
Different Source For
First Page
Watermark Y N N
Win98SE/Me/
NT 4.0/2000/
XP/2003
YNN
YYY
YNY
Linux Macintosh
(CPUS)
Overlay Y N N
True type Fonts
Option
NOTE
: For details about installing softw are and using its
features, see the
Software User’s Guide
YNN
.
2.
9
Setting Up Your Printer
Page 21
3 Using the Control Panel
Understanding the Control
This chapter describes how to use the printer’s co ntrol panel.
This chapter includes:
• Understanding the Control Panel
• Using Control Panel Menus (CLP-600N Only)
Panel
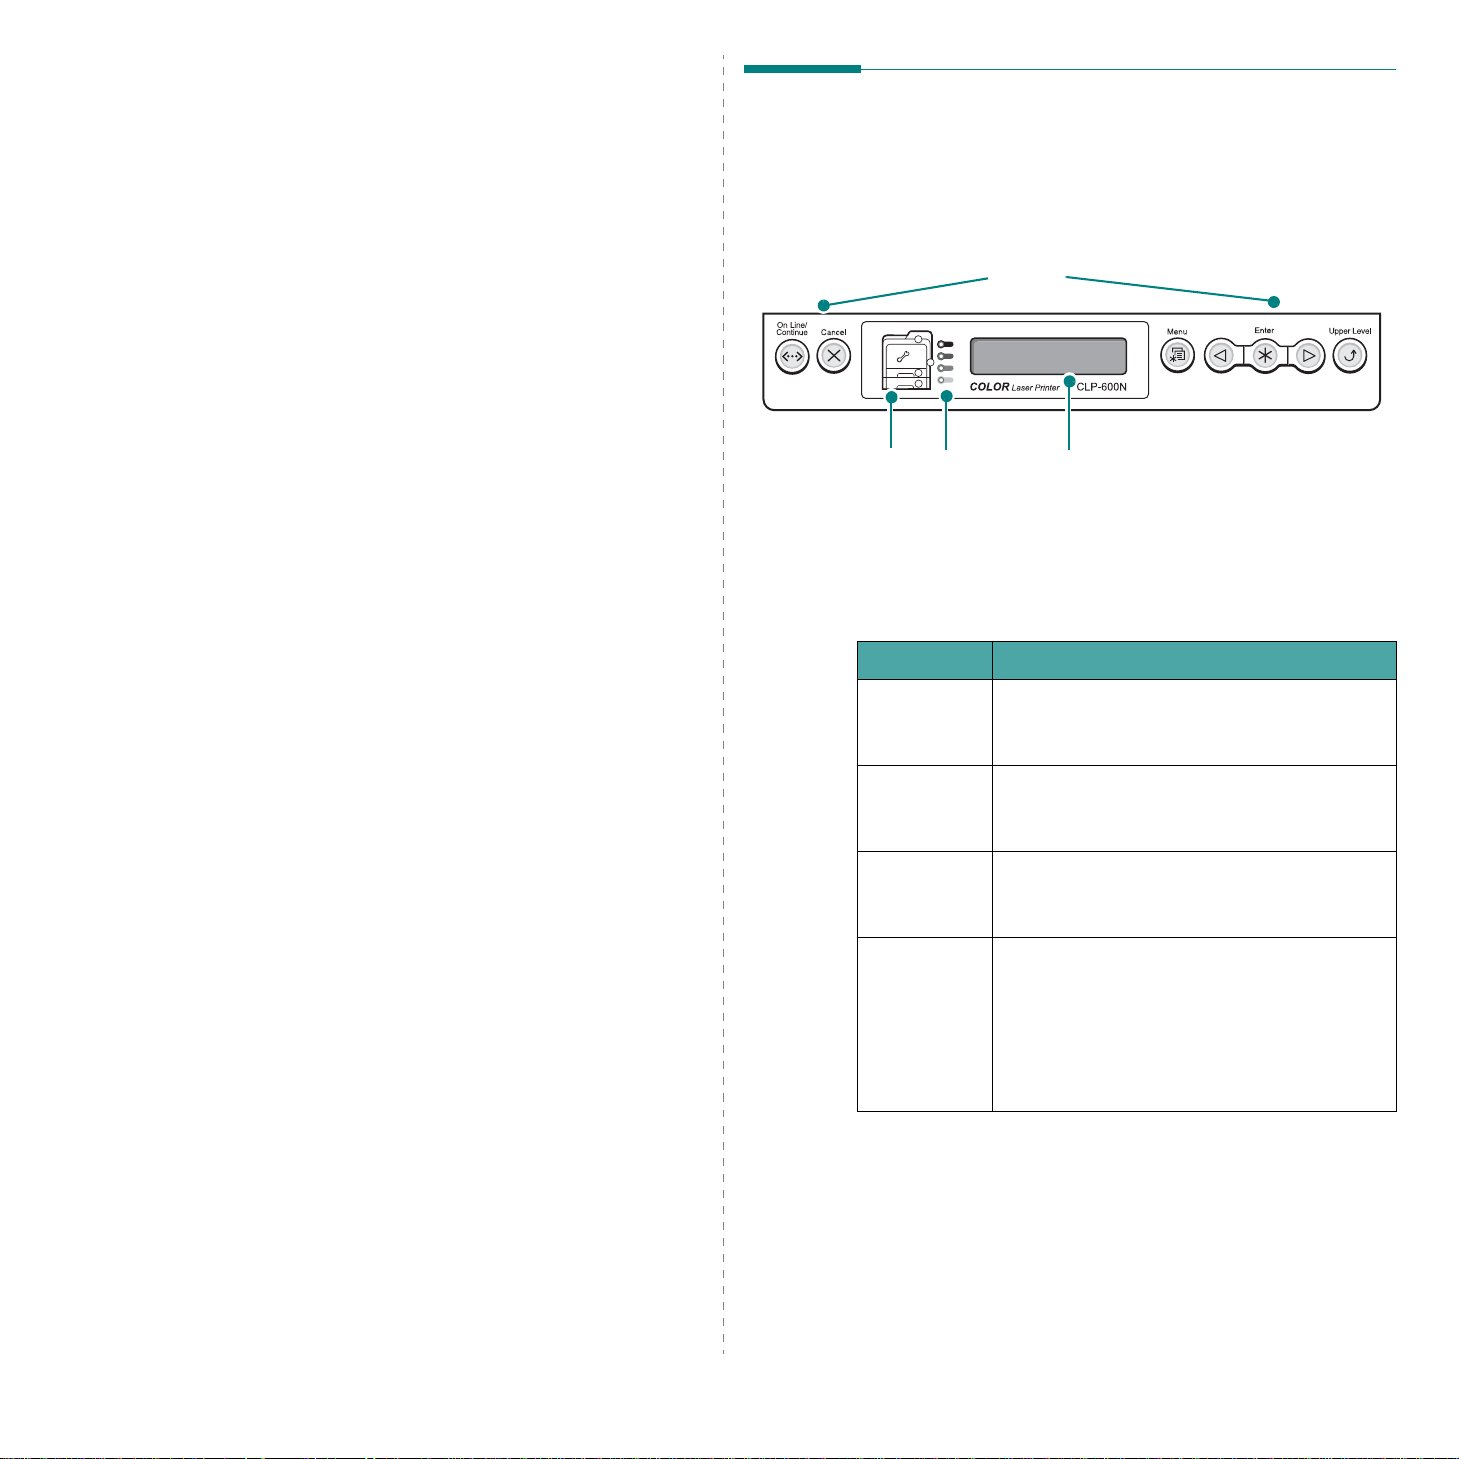
The control panel on the top right side of your CLP-600N printer
has a display and seven buttons. For the CLP-600, the control
panel has no display and two buttons.
Buttons
Status Map
Toner LEDs
Display (CLP-600N Only)
Message Description
Ready • The printer is on-line and ready to print.
Display: display s the printer
status and job in progress.
* The figure shows a CLP-600N’s control panel.
• If you press the
button, the printer goes off-line.
On Line/Continue
Offline • The printer is off-line and cannot print.
• If you press the
button, the printer switches on-line.
Processing... • The printer is printing.
• If you want to stop printing, press the
Cancel
Sleeping... • The printer is in Power Save mode, using
less power. When a print job is received
from the computer, or if any button is
pressed, the printer switches to on-line.
• To deactivate the Power Save mode or
change the power-saving time, see
page 3.4.
See “Understanding Display Messages” on page 7.14 for a
complete listing of all printer messages.
button.
On Line/Continue
3.
1
Using the Control Panel
Page 22
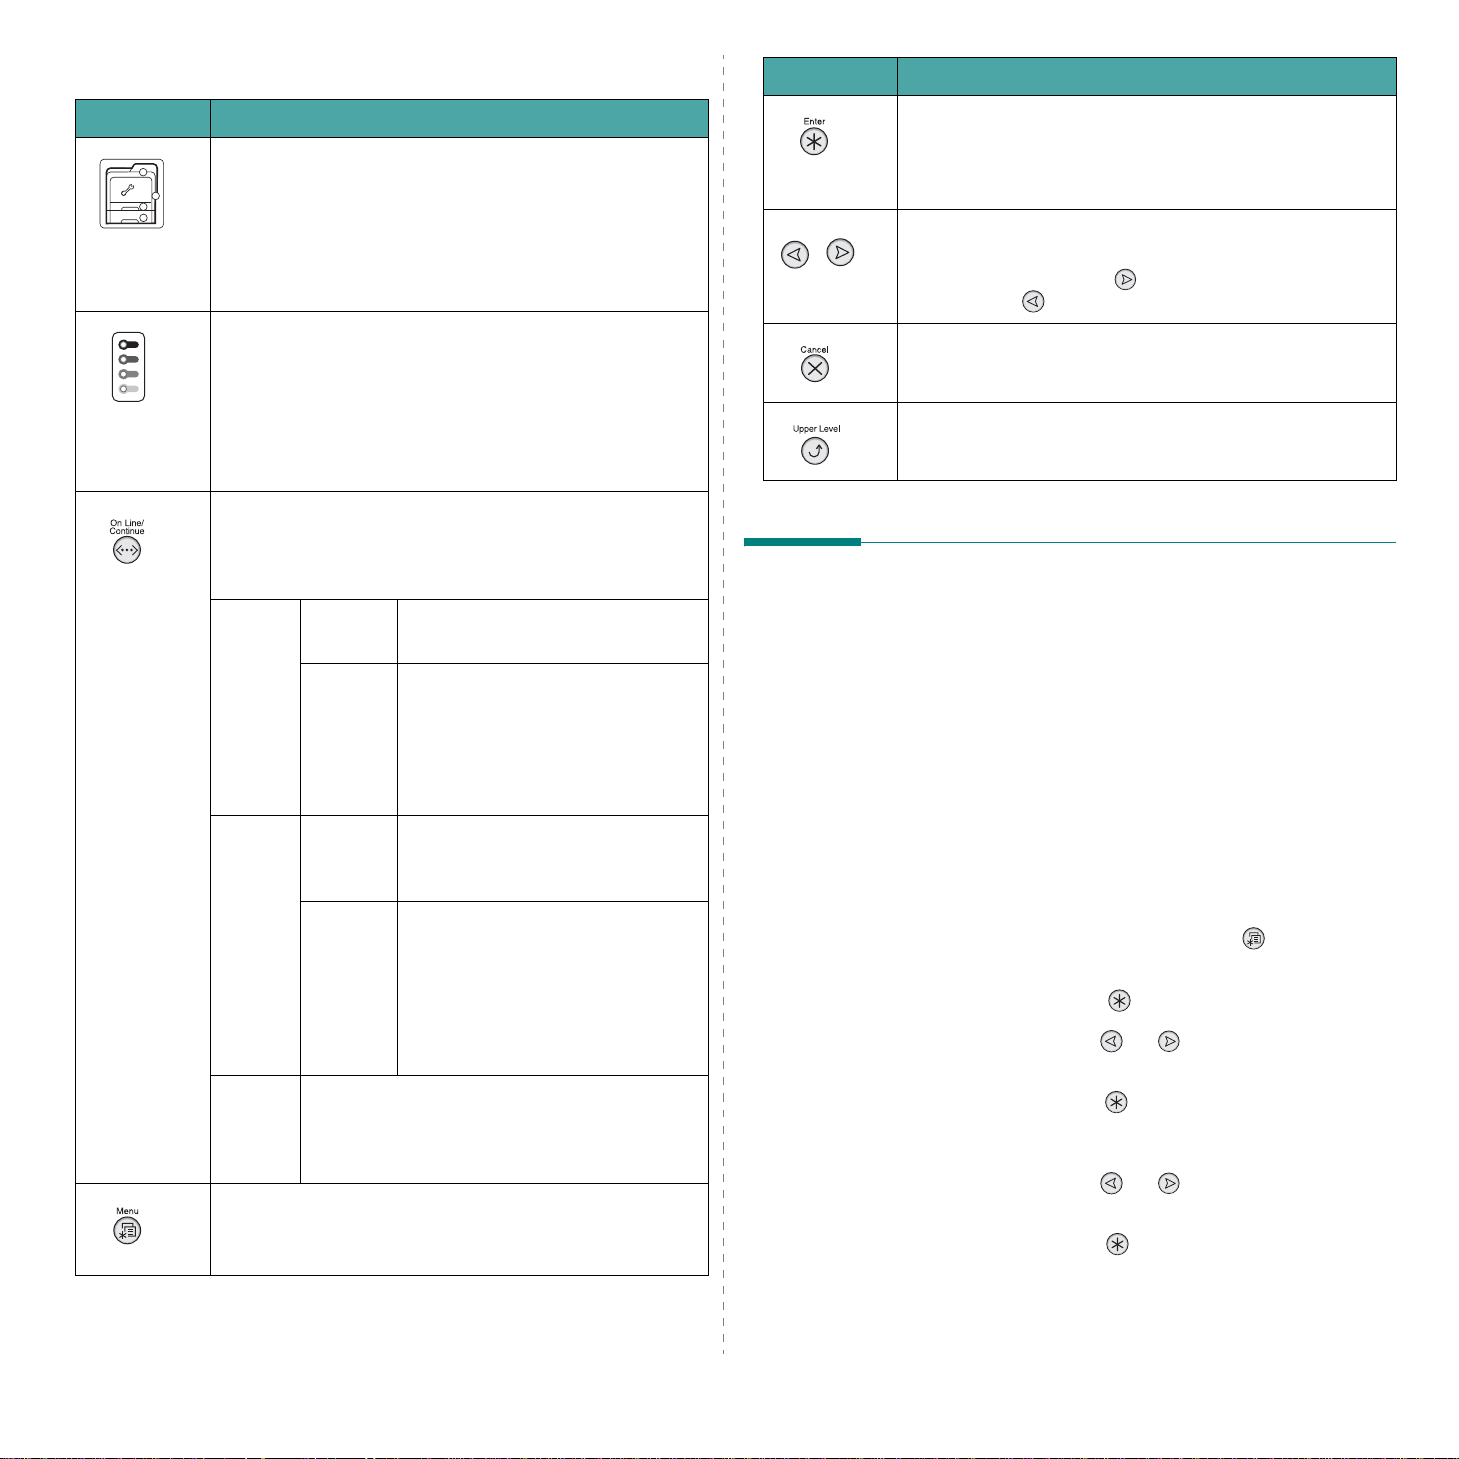
Buttons
Button Description
Button Description
When a paper jam occurs, a lam p tur ns on at the
corresponding location on the Status map so that you can
locate the paper jam. If you use the CLP-600N, the
(status map)
(toner LEDs)
display on the control panel also shows the corresponding
error message, indicating the location of the jam. For
details on the meaning of the LEDs and error messages,
see 7.4.
When a toner cartridge is empty, a corresponding lamp,
indicating the color of the toner cartridge, turns on.
Replace the corresponding toner cartridge with a new one.
See page 6.4.
Or, if you have installed an invalid toner cartridge, a
corresponding lamp turns on. Install only Samsungapproved toner cartridges, designed for your printer.
• Press to switch between on-line and off-line.
• In menu mode, press to return to ready mode.
The color of the
status of the printer.
Green On The printer is on-line and can
Orange On Check the display message. See
Off • The printer is off-line and cannot print.
This button is available only with the CLP-600N.
• Press to enter menu mode.
• In menu mode, press to scroll through the menus.
On Line/Continue
receive data from the co mputer.
Blinking • When the light blinks slowly, the
printer is receiving data from the
computer.
• When the light blinks quickly , the
printer is receiving and printing
data.
page 7.14 for details on the
meaning of the error message.
Blinking A minor error has occurred and the
printer is waiting for the error to be
cleared. Check the display
message. When the problem is
cleared, the printer resumes
printing. If you want to ignore this
warning, press this button.
• The printer is in Power Save mode. When
data is received, it switches to on-line
automatically.
button indicates the
This button is available only with the CLP-600N.
In menu mode, press to select the displayed sub menu
item or to confirm the changed setting. The selected item
is marked with an *.
This button is available only with the CLP-600N.
In menu mode, press to scroll through sub menu items or
setting options. Pressing moves you to the next option
and pressing sends you back to the previous option.
• Press to cancel the current print job.
• In menu mode, press to return to ready mode.
This button is available only with the CLP-600N.
In menu mode, press to go back to the upper menu level.
Using Control Panel Menus (CLP-
600N Only)
A number of menus are available to make it easy for you to
change printer settings. The diagram on page 3.3 shows the
menus and all of the items available in each menu. The items
in each menu and the options you can select are described in
more detail in the tables beginning on page 3.3.
Accessing Control Panel Menus
You can configure yo ur printer from the printer’s control panel.
You can also use the control panel menus while the printer is in
use.
1
In ready mode, press the
the menu you want on the bottom line of the display.
2
Press the
3
Press the scroll button ( or ) until the menu item
you want displays on the bottom line.
4
Press the
5
If the menu item has sub menus, repeat steps 3 and 4.
6
Press the scroll button ( or ) until the menu item
you want displays on the bottom line.
7
Press the
selection.
Enter
button ( ) to access the menu.
Enter
button ( ) to confirm the selected item.
Enter
button ( ) to save your input or
Menu
button ( ) until you see
3.
2
Using the Control Panel
An asterisk (*) appears next to the selection on the
display, indicating that it is now the default.
Page 23
8
To exit the menu, press the
repeatedly, or the
Cancel
Upper Level
button( ).
button ( )
After 60 seconds of inactivity (no key being pressed), the
printer automatically returns to ready mode.
NOTE
: Print settings made from the printer driver on a
connected computer override the settings on the control panel.
Information Menu
This menu contains information pages that you can print to give
details about the printer and its configuration.
Item Explanation
Configuration
The configuration page shows the printer’s
current configuration. See page 6.1.
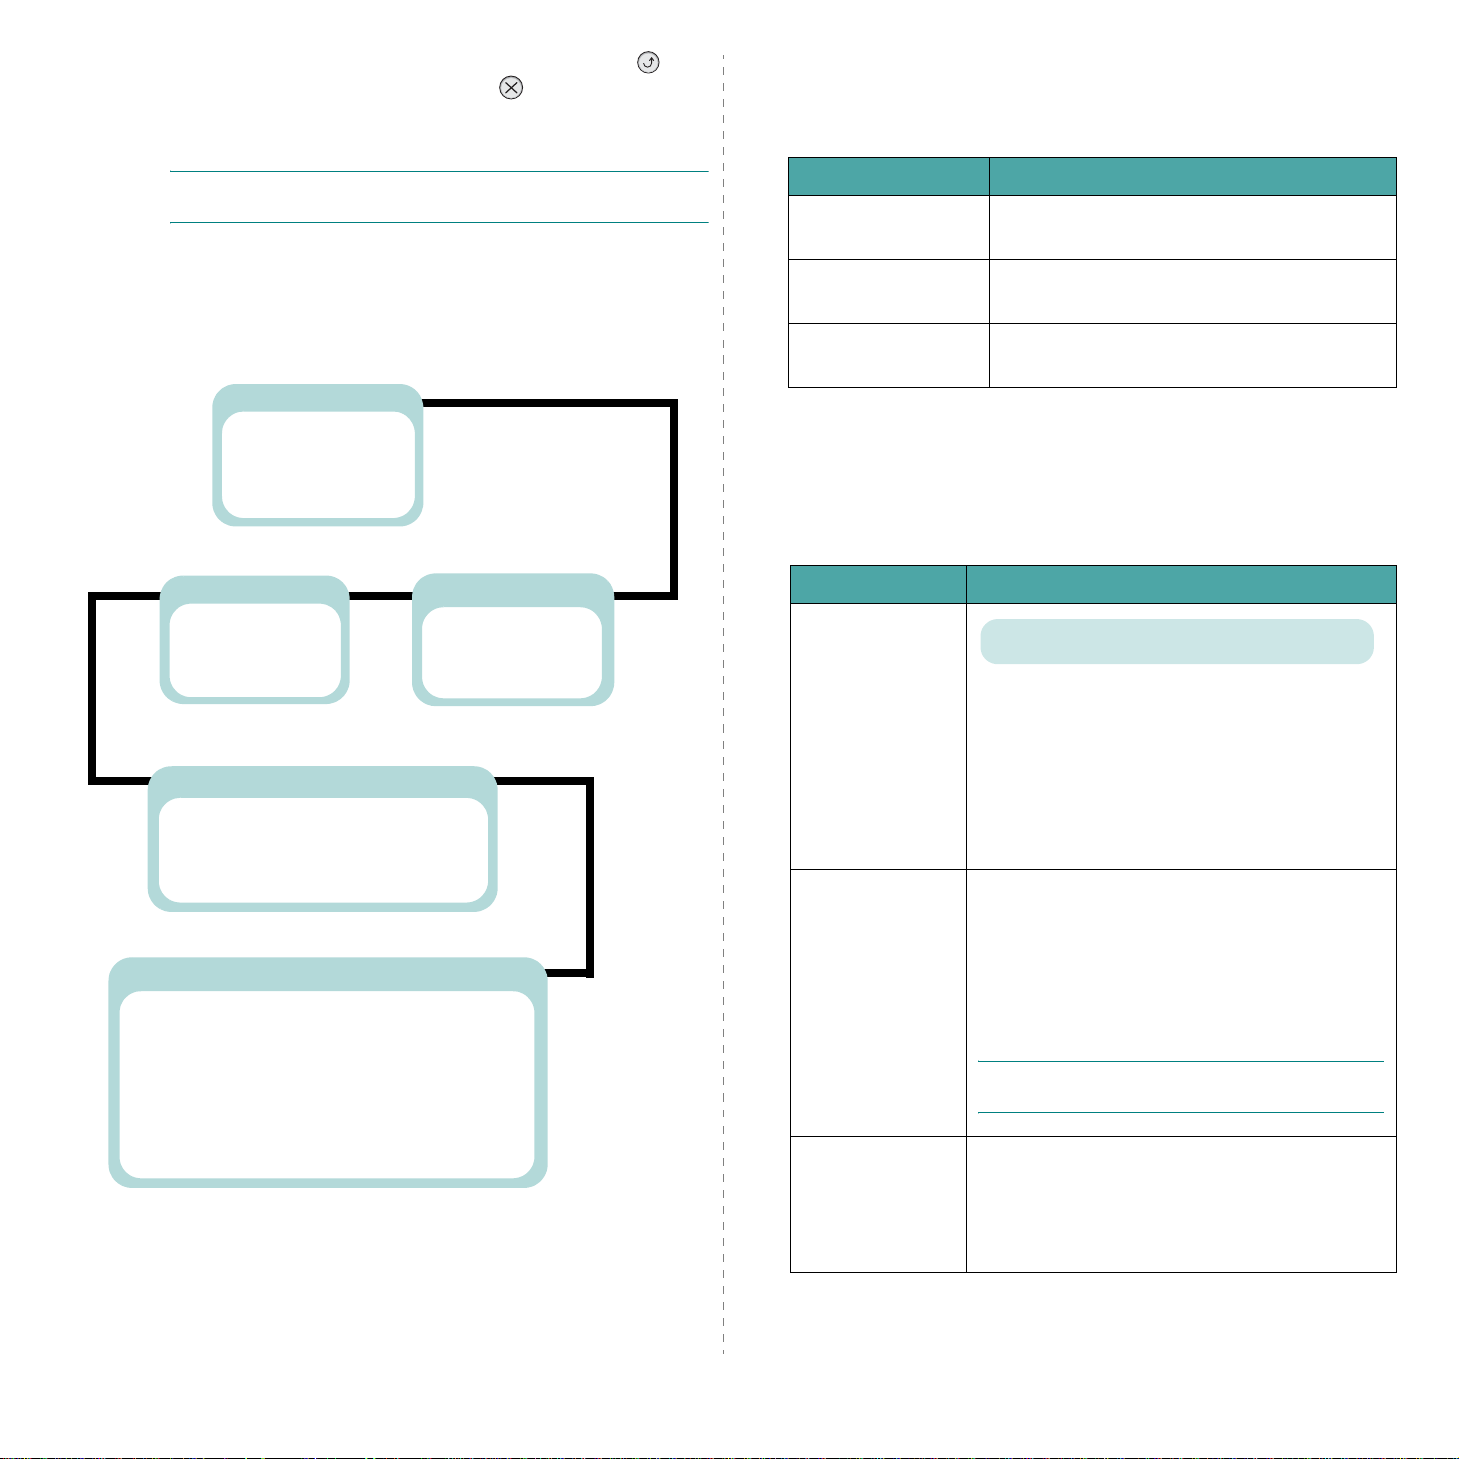
Overview of Control Panel Menus
The control panel menus are used to configure the printer. The
control panel provides access to the following menus:
Information
(See page 3.3.)
Configuration
Menu Map
Demo Page
Printer
(See page 3.4.)
Default Set
Current Job
Setup
(See page 3.4.)
LCD Language
Power Save
Auto Continue
Network
(See page 3.5.)
Config Network
Config TCP
IP Get Method
IP Address
Subnet Mask
Gateway
Config Wireless*
Wireless Default*
* This menu only appears when an optional wired/wireless network interface
card has been installed.
Jam Recovery
Altitude Adj.
Maintenance
Netware
Config Netware
IPX Frame Type
Reset Network
Default Set
Print Net CFG
Color
(See page 3.3.)
Calibration
Custom Color
Auto Color Reg
Menu Map
Demo Page
The menu map shows the layout and current
settings of the control panel menu items.
The demo page allows you to check to see if
your printer is printing properly.
Color Menu
This menu allows you to adjust the color setting.
(*: the default setting)
Item Explanation
Options: Off, Auto*
This menu item allows you to set the printer to
periodically calibrate itself for the best possible
Calibration
Custom Color
Auto Color Reg
color print quality.
•
Off
: The printer is calibrated according to the
default settings.
•
Auto
: Automatically calibrates the printer to
produce the best possible print quality for color
documents.
This item allows you to adjust contrast, color by
color.
CMYK
: Allows you to adjust t he contrast of the
toner in each toner cartridge.
•
Default
Manual Adjust
•
: Optimizes colors automatically.
: Allows you to manually
adjust the color contrast for each cartridge.
N
OTE
: You s hou ld use the
best color quality.
This menu item allows you to adjust the position
of color texts or graphics to match the position of
the printed colors to those on your screen.
Run Now
: The printer executes the auto color
registration now.
Default
setting for
3.
3
Using the Control Panel
Page 24
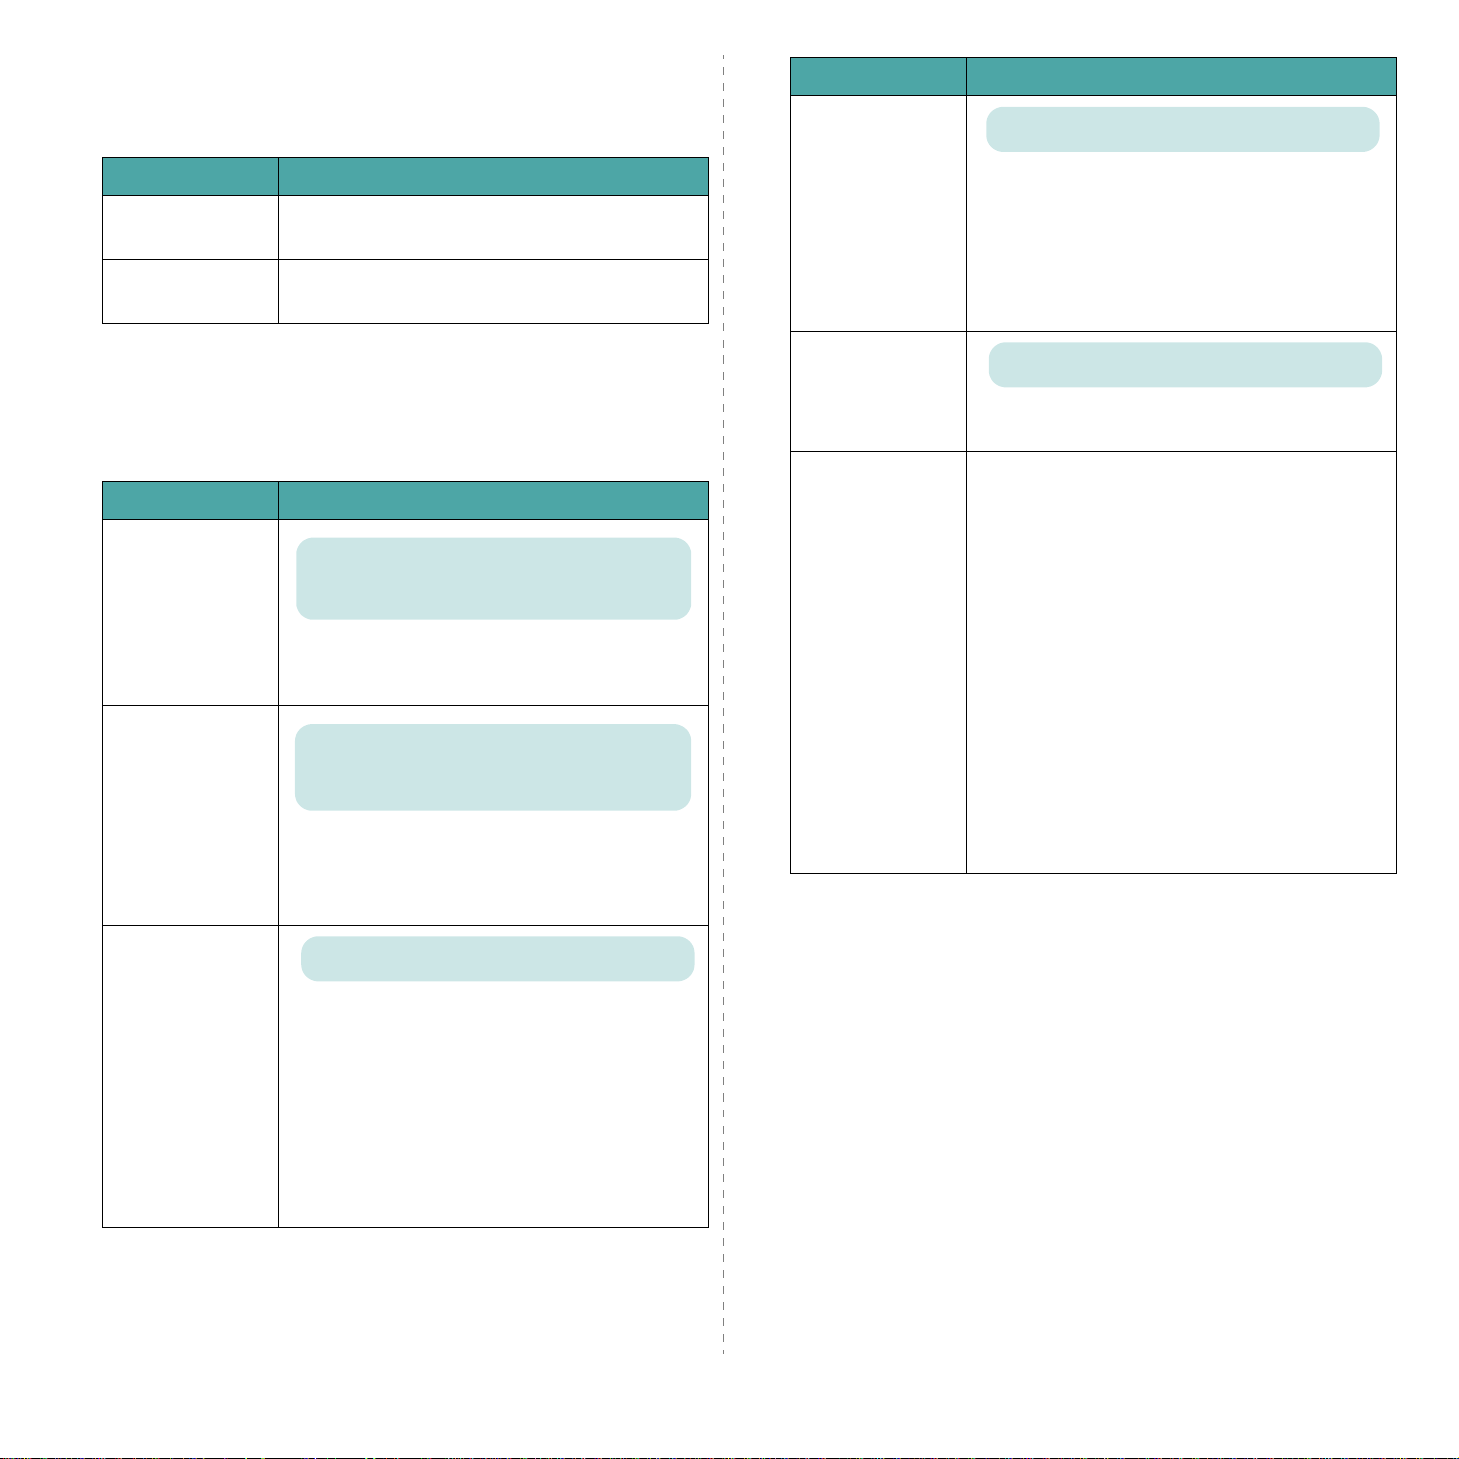
Printer Menu
Item Explanation
This menu allows you to reset the printer settings or cancel the
current job.
Item Explanation
Default Set
Current Job
This menu item allows you to restore the printer’s
factory default settings.
You c an cancel the current print job and remove it
from the printer buffer.
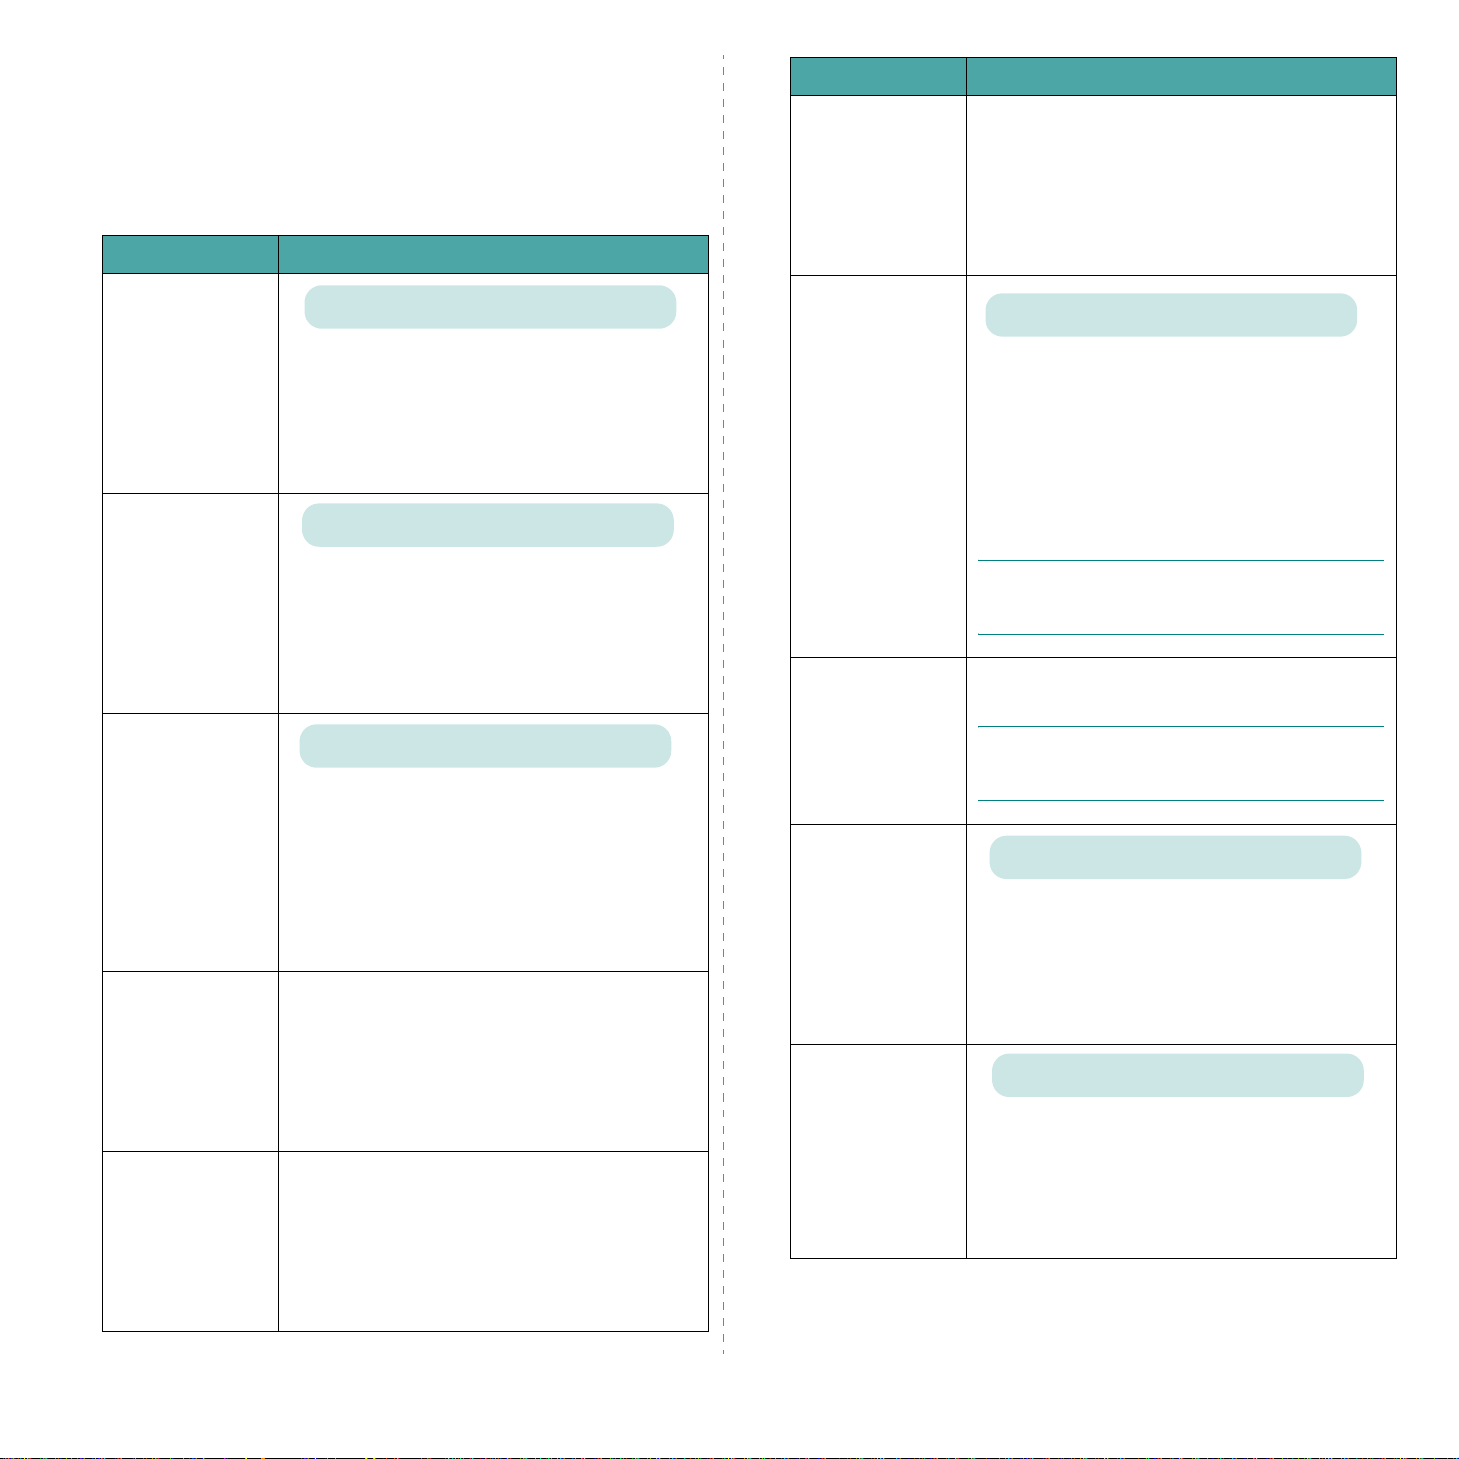
Setup Menu
Use the
(*: the default setting)
Item Explanation
LCD Language
Power Save
Setup
menu to configure a variety of printer features.
Options: English*, Czech, Danish,Dutch, Finnish,
French, German, Hungarian, Italian, No rw egian,
Polish, Po rtu guese, Russian, Spa nish, Swedish,
Turkish, Korean, Chinese
The LCD Language setting determines the
language of the text that appears on the control
panel display and information printing.
Options: 5 Minutes, 10 Minutes, 15 Minutes, 30
Minutes*, 45 Minutes, 60 Minutes, 120 Minutes
* 30 Minutes for USA, 120 Minutes for Europe
When the printer does not receive data for an
extended period of time, power consumption is
automatically lowered. You can set how long the
printer waits before going to power save.
Jam Recovery
Altitude Adj.
Maintenance
Options: Off*, On
This item determines how the printer behaves
when a paper jam occurs.
•
Off
: The printer does not reprint pages.
Printing performance might be increased with
this setting.
On
: The printer automatically reprints pages
•
after you clear the paper jam.
Options: Low*, High
You can optimize the print quality according to
your altitude.
This item allows you to maintain the toner
cartridges and other consumables.
Check Others
•
: This item allows you to view
the total number of images printed with each of
the consumable items, such as the paper
transfer belt or fuser unit.
Transfer Belt, Fuser
: allows you to check
the total number of images printed with the
current paper transfer belt or the fuser unit.
MP Pickroll, Tray1 Pickroll, Tray2 Pick
roll
: These items are only for service
technicians.
Alarm Shortage
•
: This item determines how
the printer behaves when consumable items
run low.
Off
: The printer does not display a warning
message.
On
: The printer displays a warning message.
Auto Continue
Options: Off, On*
This item determines whether o r no t th e p rin te r
continues printing when it detects paper not
matched to your paper setting.
Off
: If a paper mismatch occurs, the message
•
remains on the display and the printer remains
off-line until you insert the correct paper.
On
: If the paper is mismatched, an error
•
message displays. The printer goes off-line for
30 seconds then automatically clears the
message and continues printing.
Using the Control Panel
3.
4
Page 25
Network Menu
Item Explanation
This menu lets you configure the network interface card
installed in your printer according to how the netw ork is set up.
You can upgr ade the network interface card firmware, and print
the configuration.
(*: the default setting)
Item Explanation
Options: Yes, No*
Sets whether or not you configure the network.
Config Network
If you select
Yes
, you can configure the TCP/IP
and Netware menus.
If you select
available:
Netware
Options: Yes, No*
Yes
, the following options are
Config TCP, Config Wireless,
.
Select whether you set the IP address or not.
Yes
Config TCP
If you select
, you can configure the IP
address.
If you select
Yes
, the
IP Get Method
appears on the display . You can select how to get
the IP address.
and
option
You can set this item only when you set
to
Static
Method
. This item lets you enter a
IP Get
gateway manually. Press the scroll button to set
Gateway
the value of the 1st byte between 1 and 255, and
Enter
then press the
button.
Set the value for the 2nd, 3rd, and 4th byte the
same way.
Values: Yes, No*
Configure the wireless network environments.
Config Wireless
If you select
available:
Frequency Mode, Channel, Security Mode
Authentication, WEP Encryption, Using
,
Key Type
Key
Yes
, the following options are
SSID, Operation Mode
, and
Key1~Key4
,
,
.
See “Configuring the Wireless Network” on
page 8.4
N
OTE
: This menu only appears when an optional
wired/wireless network interface card has been
installed.
This item performs a simple reset and restores
the factory default for the wireless configuration.
IP Get Method
IP Address
Subnet Mask
Options: Static*, BOOTP, DHCP
You can set this item only when you set the
Config TCP
•
Static
to
Yes
.
: You can enter an IP address,
subnetmask, and gateway manually.
BOOTP
•
: The BOOTP server allots an IP address
to you automatically.
DHCP
•
: The DHCP server allots an IP address to
you automatically.
You can select this item only when you set
to
Static
Get Method
. This item lets you enter
IP
an IP address manually . Press the scroll button to
set the value of the 1st byte between 1 and 255,
Enter
and then press the
button.
Set the value for the 2nd, 3rd, and 4th byte the
same way.
You can set this item only when you set
to
Static
Method
. This item lets you enter a
IP Get
subnet mask manually. Press the scroll button to
set the value of the 1st byte between 1 and 255,
Enter
and then press the
button.
Set the value for the 2nd, 3rd, and 4th byte the
same way.
Wireless Default
Netware
Config Netware
N
OTE
: This menu only appears when an optional
wired/wireless network interface card has been
installed.
Options: On*, Off
You can select whether or not to use the Netware
protocol.
On
If you select
, you can access the Config
Netware menu item.
In the
Config Netware
menu, you can specify
the frame type parameter used on your network.
Options: Yes, No*
You can set this item only when you set
Netware
to On. This item lets you select
whether or not you set the frame type parameter.
Select
Yes
to select the frame type.
Yes
, the
If you select
IPX Frame Type
option
appears on the display.
3.
5
Using the Control Panel
Page 26

Item Explanation
Values: Auto*, EN_8023, EN_II, EN_8022,
EN_SNAP
You can select this item only when you set
Config Netware
to
Yes
. This item lets you
select the IPX Frame Type.
•
Auto
IPX Frame Type
•
: You can set a frame type automatically.
EN_8022
: Select this value to use the IEEE
802.2 frame type.
EN_8023
•
: Select this value to use the IEEE
802.3 frame type.
EN_II
•
: Select this value to use the ETHERNET
II frame type.
•
EN_SNAP
: Select this value to use the SNAP
frame type.
Reset Network This item reboots the network interface card.
This item performs a simple reset and restores
Default Set
the factory default settings for the network
configuration.
Print Net CFG
This item prints a page showing the network
parameters you have set.
3.
6
Using the Control Panel
Page 27
4 Using Print Materials
This chapter will help you understand the types of p ap er you
can use with your printer and how to properly load paper in the
different paper trays for the best print quality.
This chapter includes:
• Choosing Paper and Other Materials
•Loading Paper
• Printing on Special Print Materials
Sizes and Capacities
Input Source/Capacity
Size
Plain Paper
Envelopes
Labels
Card stock
* Depending on paper thickness, maximum ca pacit y may be reduced.
** If you are experiencing excessive jamming, feed one sheet at a time through
the Multi-purpose Tray .
**
**
**
Tray 1
250 500 100 1
—— 10 1
—— 10 1
—— 10 1
Tray 2
(option)
Multi-purpose Tray
Automatic
Feed
*
Manual
Feed
Choosing Paper and Other
Materials
You can print on a variety of print materials, such as plain
paper, envelopes, labels, card stock, and so on. See “Printing
on Special Print Materials” on page 4.4. To get the best possible
print quality, use only high-quality, copier-grade paper.
When you choose print materials, consider the following:
Desired outcome
•
appropriate for the project.
•
Size
: You can use any size paper that fits easily within the
paper adjusters of the paper tray.
Weight
•
-20~24lbs (75~90g/m
-20~43lbs (75~163g/m2) bond for the
Brightness
•
produce sharper, more vibrant images.
•
Surface smoothness
how crisp the printing looks on the paper.
CAUTION
specifications listed on page 10.3 can cause problems that
may require service. This service will not be cove red by the
warranty or service agreements.
: Your printe r supports paper weights as follows:
optional Tray 2
Multi-purpose Tray
: Using a material that does not conform to the
: The paper you choose should be
2
) bond for Tray 1 or
: Some papers are whiter than others and
: The smoothness of the paper affects
Guidelines for Paper and Special
Materials
When selecting or loading paper, envelopes, or other special
materials, keep these guidelines in mind:
• Attempting to print on damp, curled, wrinkled, or torn pap er
can cause paper jams and poor print quality.
• Use cut-sheet paper only. You cannot use multi-part paper.
• Use only high-quality, copier grade paper for the best print
quality.
• Do not use paper with irregularities, such as tabs or staples.
• Do not attempt to load any tray while printing, and never
overfill the tray. This could cause a paper jam.
• Avoid paper with embossed lettering, perforations, or a
texture that is too smooth or too rough.
• Colored paper should be of the same high quality as white
photocopy paper. The pigments must be able to withstand
the printer’s fusing temperature of 180°C (356 °F) for 0.1
seconds without deteriorating. Do not use paper with a
colored coating that was added after the paper was
produced.
• Preprinted forms must be printed with nonflammable, heatresistant ink that does not melt, vaporize, or release
hazardous emissions when subjected to the printer’s fusing
temperature.
• Store paper in its ream wrapper until you are rea dy to use it.
Place cartons on pallets or shelves, not on the floor.
• Do not place heavy objects on top of the paper , whether it is
packaged or unpackaged.
4.
1
Using Print Materials
• Keep paper away from moisture, direct sunlight, or other
conditions that can cause it to wrinkle or curl.
NOTE:
types of paper are unstable at the fusing temperature and can
give off fumes, or cause damage to the printer.
Do not use carbonless paper or tracing paper. These
Page 28
Loading Paper
Proper paper loading helps prevent paper jams and ensures
trouble-free printing. Do not remove the paper tr ay while a job
is printing. Doing so may cause a paper jam. See “Sizes and
Capacities” on page 4.1 for acceptable paper capacities for
each tray.
Using Tray 1
Load the print material you use for the majority of your print
jobs in Tray 1.
Tray 1 can hold a maximum of 250 sheets of plain A4 or lettersized paper.
You can purchase an optional tray, Tra y 2, and attach it below
Tray 1, to load an additional 500 sheets of paper. See 9.1 for
more information about installing the optional Tray 2.
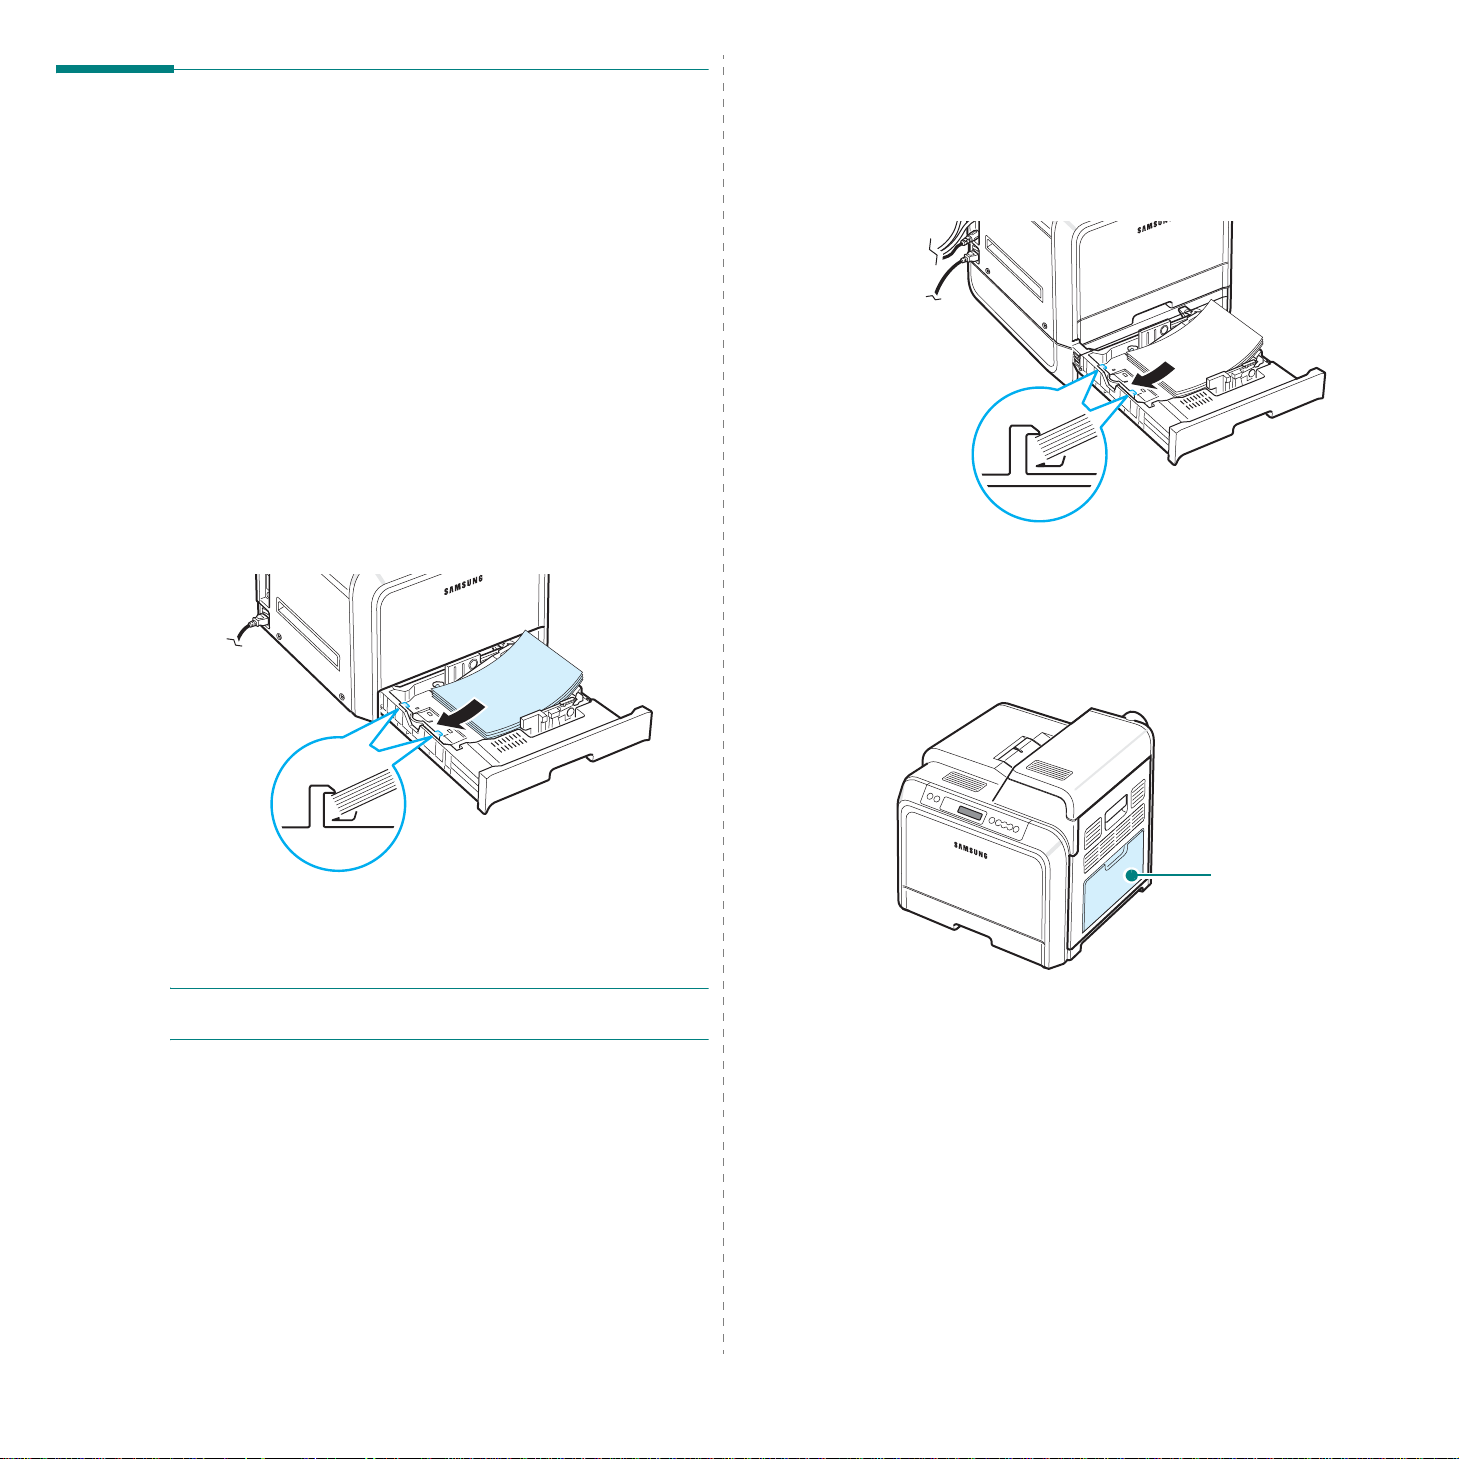
To load paper, pull the tray and the load the paper
print side up
.
with the
Using the Optional Tray
The optional tray, T ray 2, can hold a m aximum of 500 sheets of
plain paper.
T o load paper in T r ay 2, follow the instructions for loading paper
on page 2.4.
Using the Multi-purpose Tray
The Multi-purpose Tray is located on the right side of your
printer. It can be closed when not in use, making the printer
more compact.
For details about loading paper in the paper tray, see “Loading
Paper” on page 2.4.
NOTE:
sheet at a time in the Multi-purpose Tray.
If you experience problems with paper feed, place one
Using Print Materials
4.
Multi-purpose Tray
The Multi-purpose Tray can hold several sizes and types of
material, such as cards and envelopes. You may also want to
use the Multi-purpose Tray for single page print jobs on
letterhead, colored paper for use as separator sheets, or other
special materials that you do not normally keep in the paper
tray. You can load approximately 100 sheets of plain paper, 10
envelopes, 10 sheets of card stock, or 10 labe ls at a time.
• Load only one size of print material at a time in the
Multi-purpose Tray.
• To prevent paper jams, do not add paper when there is still
paper in the Multi-purpose Tray. This also applies to other
types of print materials.
• Print materials should be loaded face down with the top edge
going into the Multi-purpose Tray first, and be placed in the
center of the tray.
2
Page 29
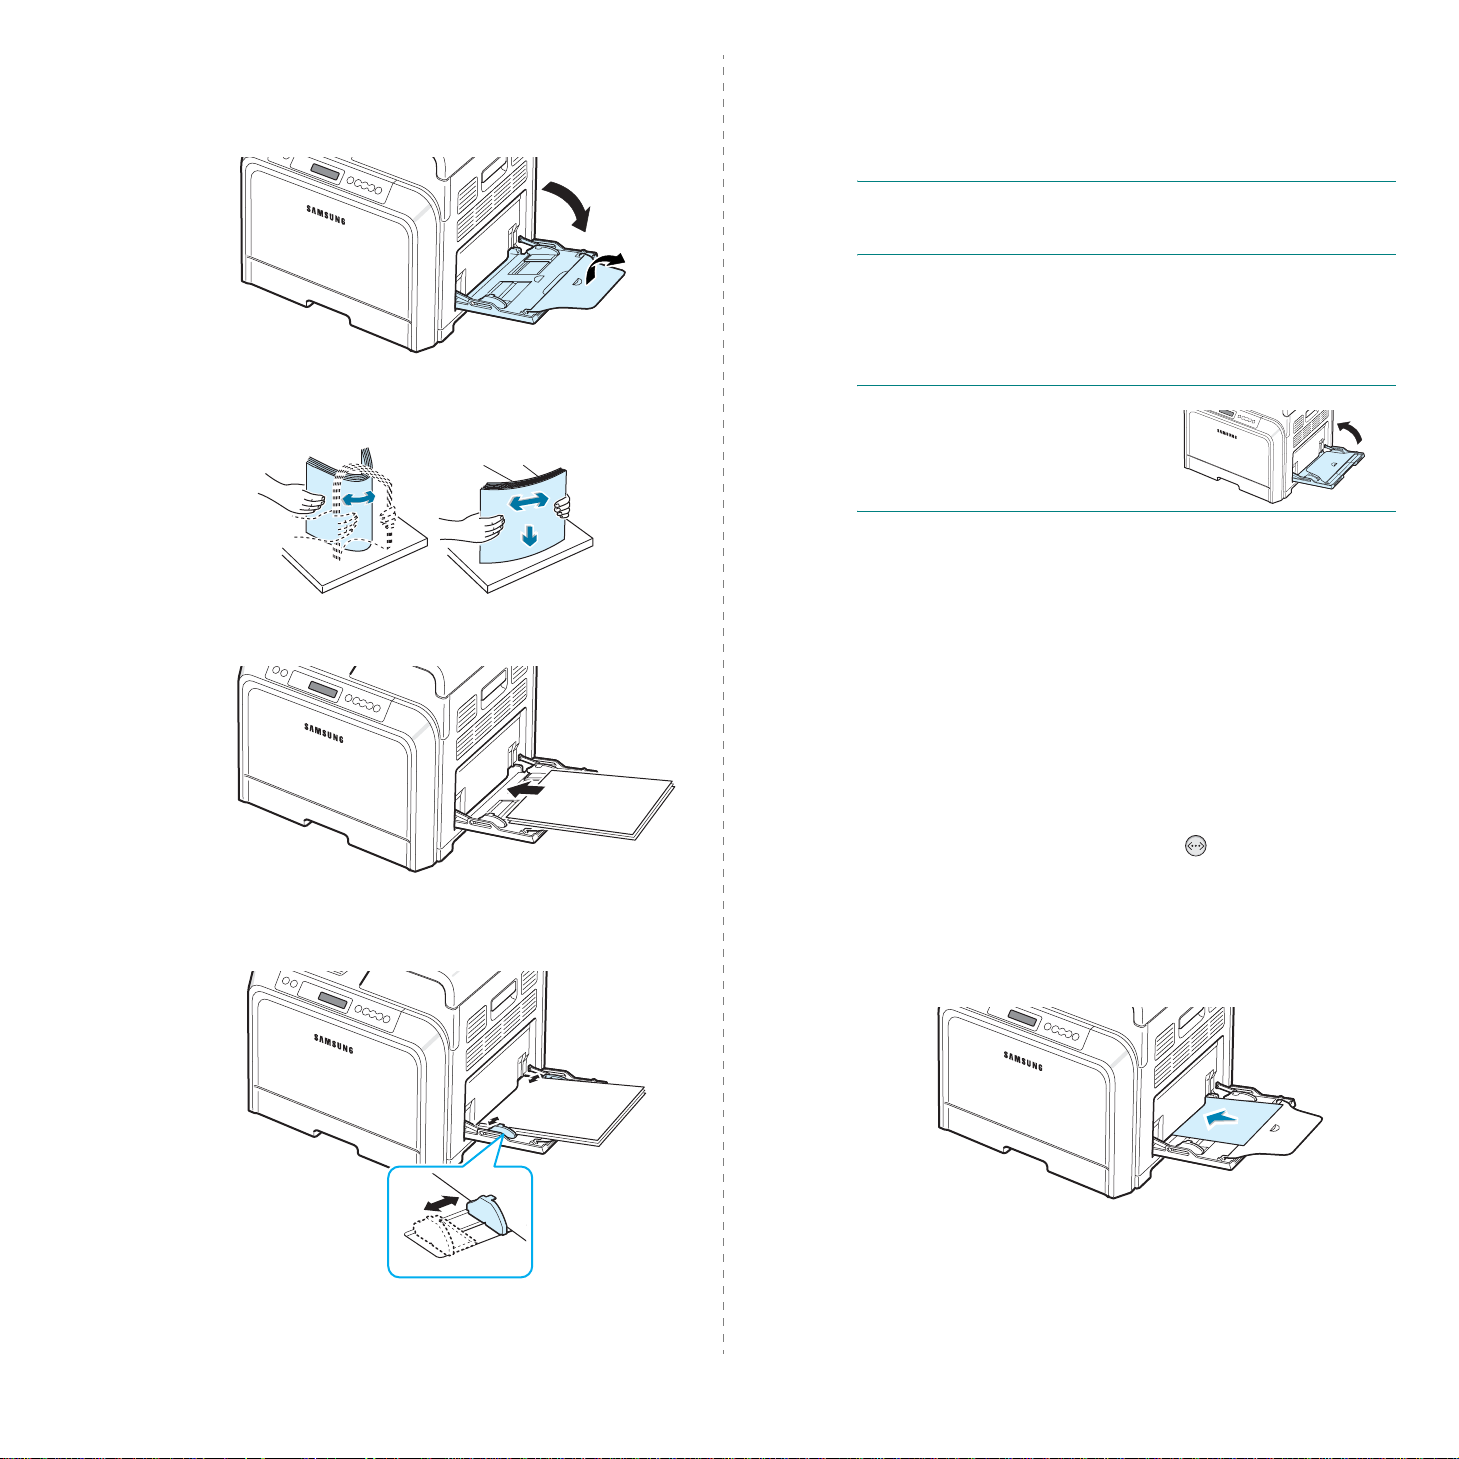
To load print material in the Multi-purpose Tray:
1
Lower the Multi-purpose Tray and unfold the paper support
extension, as shown.
2
If you are using paper, flex or fan the edge of the paper
stack to separate the pages before loading.
If you want to print on previously printed paper from the
Multi-purpose Tray, the p rinted side should be facing up
with the uncurled edge toward the printer. If you
experience problems with the paper feeding, turn the
paper around.
NOTE
: Make sure that you have not loaded too much print
material. The print material buckles if you load a stack that is
too deep or if you push it in too far.
5
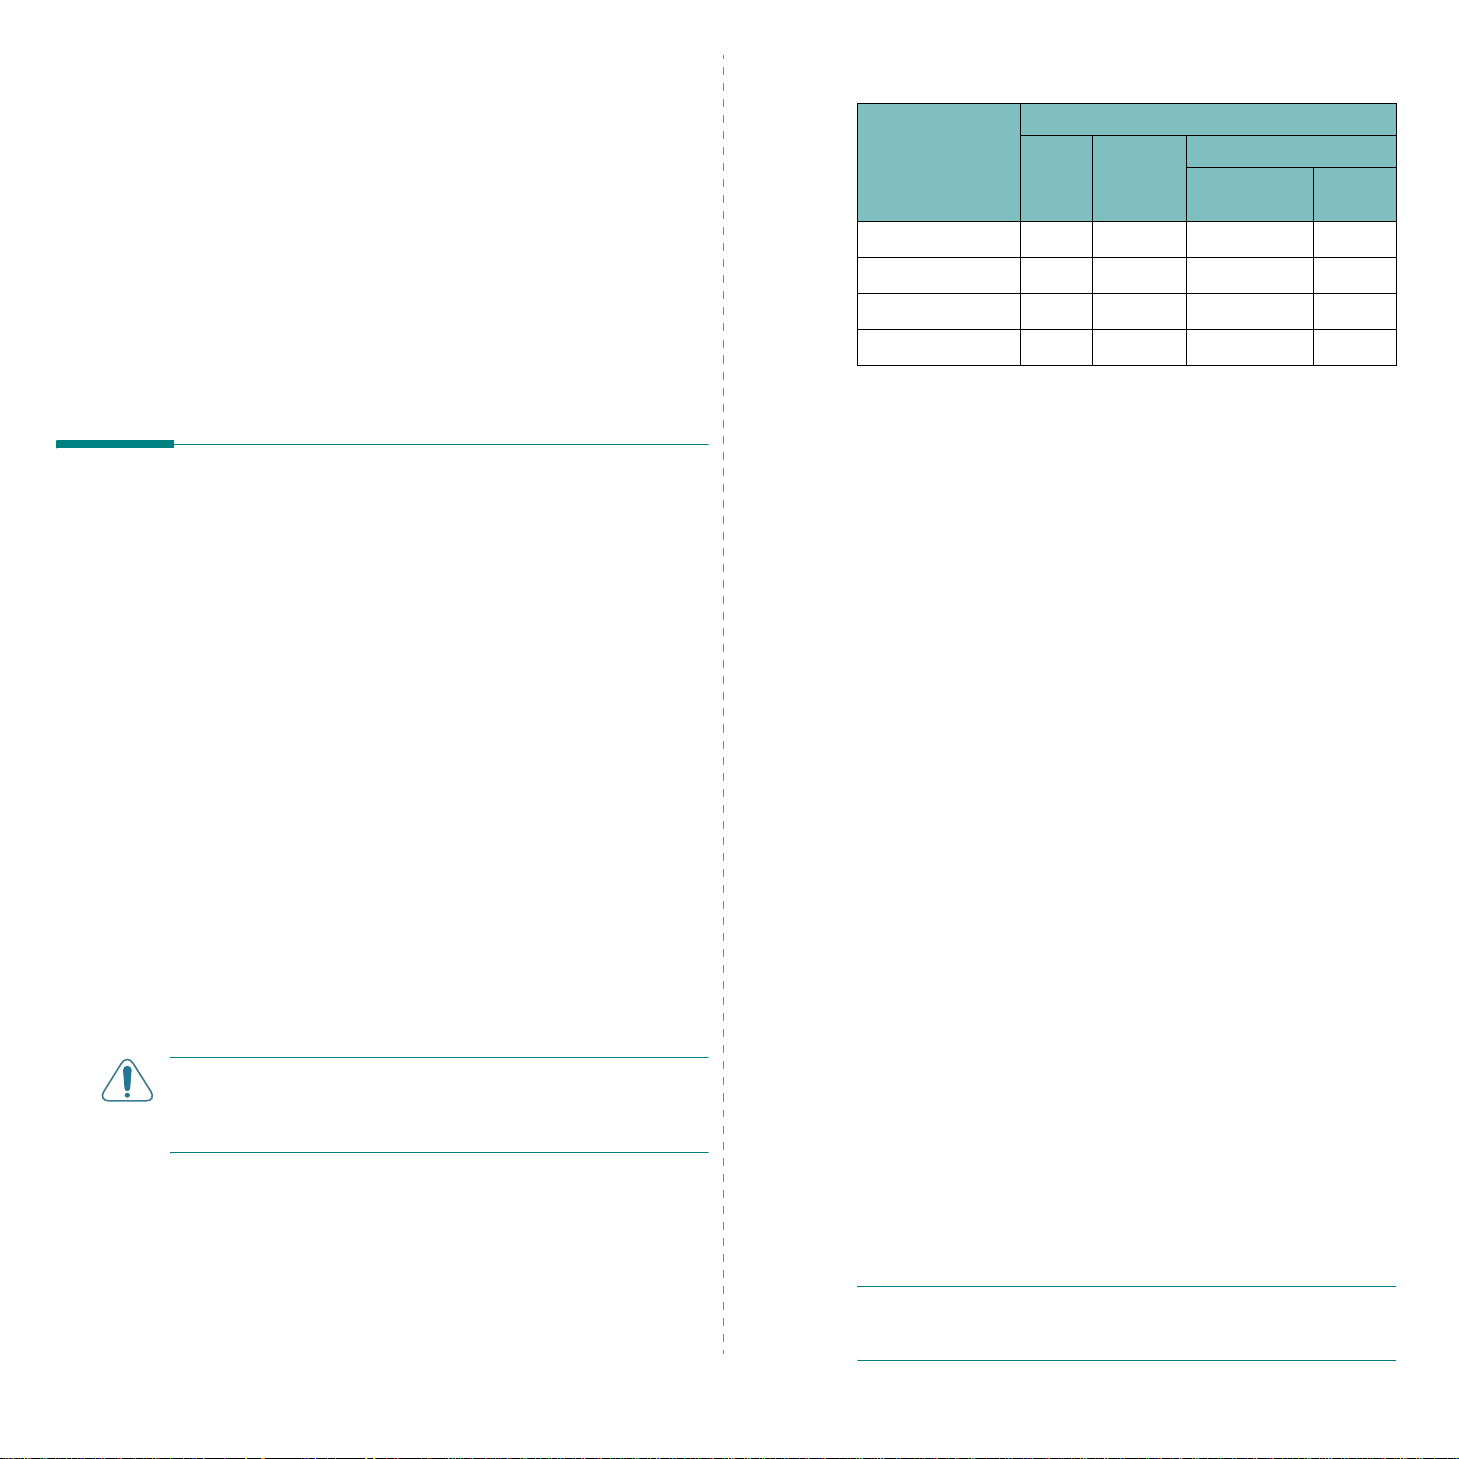
When you print a document, set the paper source to
Multi-Purpose Tray
and type in the software application.
Software User’s Guide
NOTE
: After printing, fold away
the paper support extension and
close the Multi-purpose Tray.
and select the appropriate paper size
For details, see the
.
Using the Manual Feed
3
Load the print material
4
Squeeze the paper width guide and slide it to the edge of
the print material without causing it to bend.
with the print side down
.
You can manually load a sheet of print material in the Multipurpose Tray if you select
Paper
from the
document. For details about changing print settings, see the
Software User’s Guide. Manually loading paper can be
helpful when you want to check the print quality after each
page is printed.
This loading procedure is almost the same as the procedure for
loading in the Multi-purpose Tray , ex cept you load p aper sheetby-sheet in the tray, send print data to print the first page, and
press the
to print each following page.
1
Lower the Multi-purpose T r ay and unfold the paper sup port
extension, as shown.
2
Load a sheet of print material
tab when you change print settings to print a
On Line/Continue
Manual Feed
button ( ) on the control panel
in the
with the print side down
Source
option
.
4.
3
Using Print Materials
Page 30
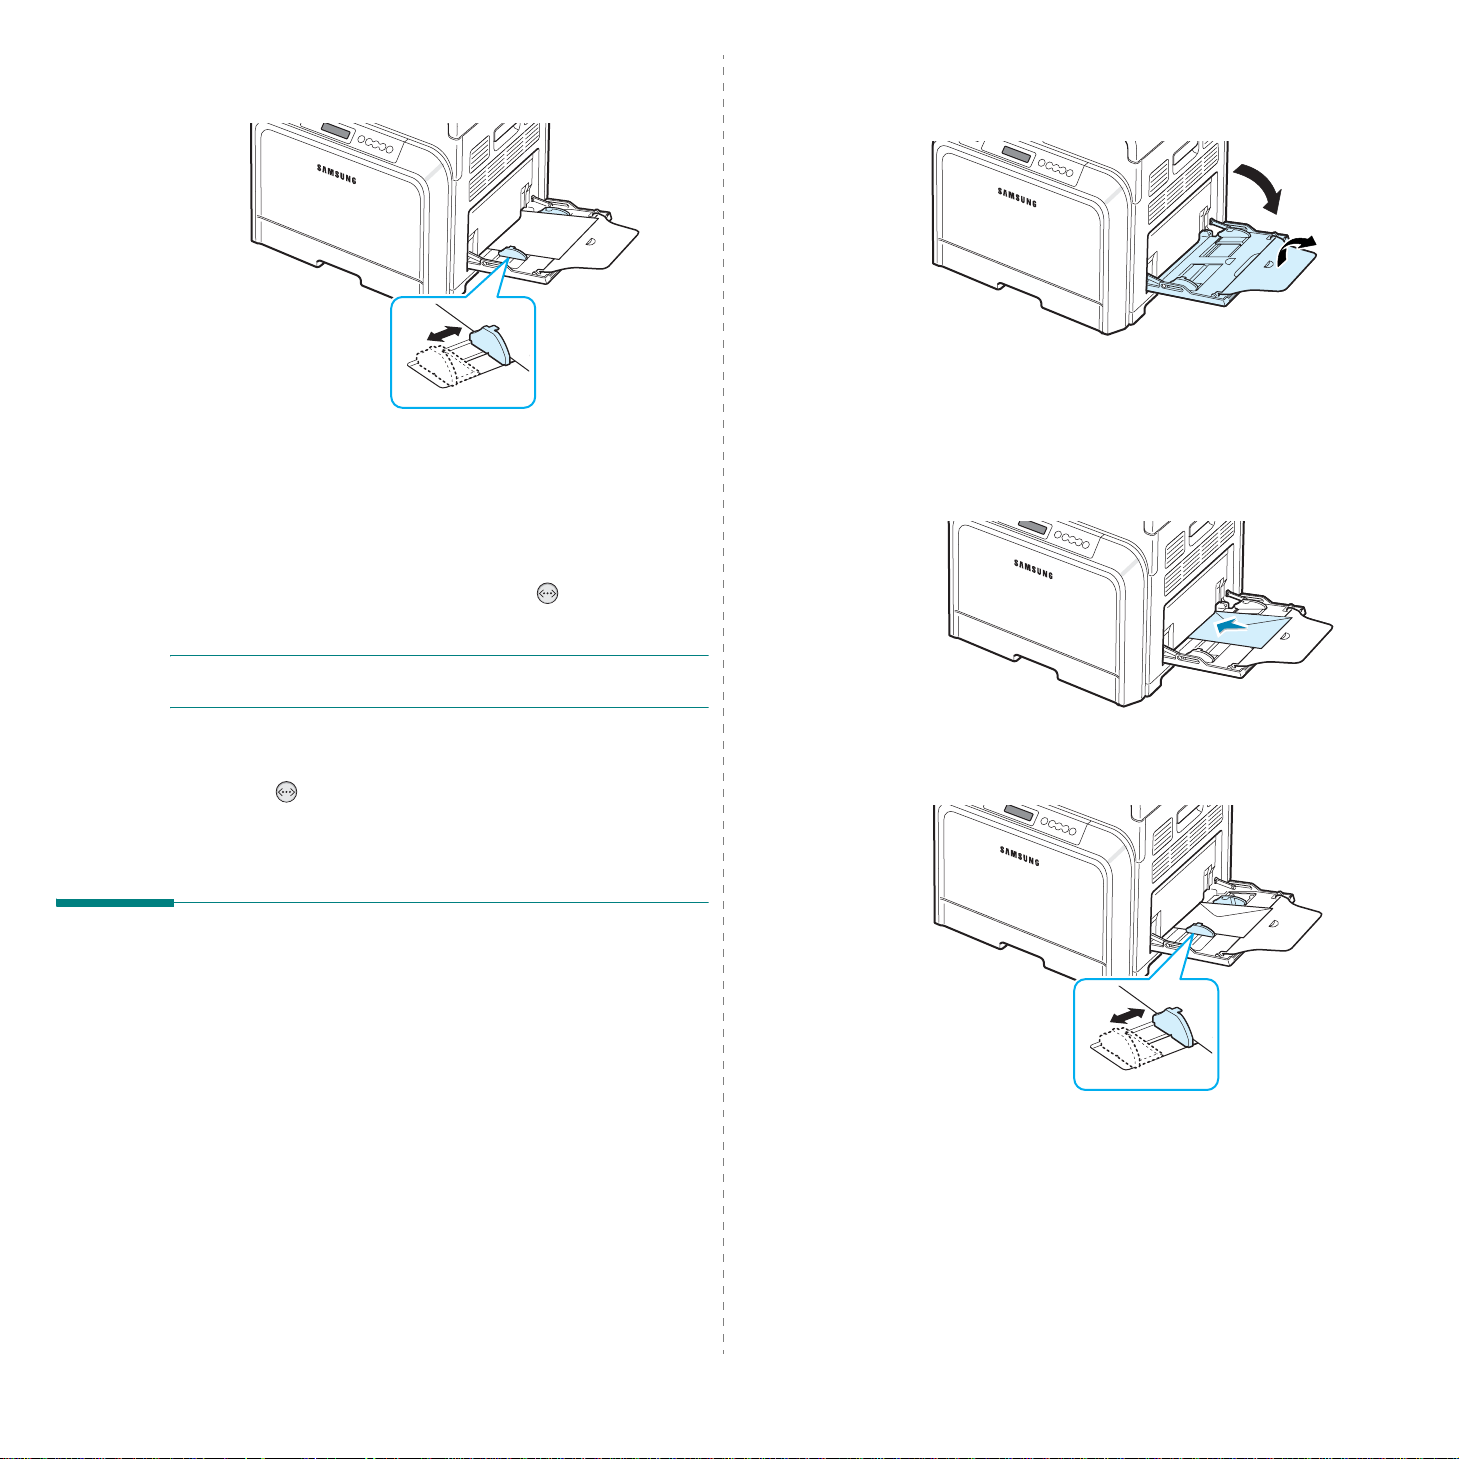
3
Squeeze the paper width guide and slide it to the edge of
the paper without causing it to bend.
4
When you print a document, set the paper source to
Manual Feed
type
in the software application.
Software User’s Guide.
5
Print the document.
6
Press the
The printer picks up the print material and prints.
and select the appropriate paper size and
For details, see the
On Line/Continue
button ( ).
To print on envelopes:
1
Open the Multi-purpose Tray and unfold the paper support.
2
Flex or fan the edge of the envelope stack to separate
them before loading.
3
Load the envelopes into the Multi-purpose Tray
flap side up
enters the printer first.
. The end of the envelope with the stamp area
with the
NOTE:
will automatically fed into the printer.
7
If you don’t press the button after a pause, the paper
After one page is printed, insert the next sheet into the
Multi-purpose Tray and press the
button ( ).
Repeat this step for every page to be pr inted.
On Line/Continue
Printing on Special Print
Materials
Printing on Envelopes
• Load envelopes into the Multi-purpose Tray only.
• Only use envelopes recommended for laser printers. Before
loading envelopes in the Multi-purpose Tray, make sure that
they are undamaged and are not stuck together.
• Do not feed stamped envelopes.
• Never use envelopes with clasps, snaps, windows, coated
linings, or self-stick adhesives.
4
Squeeze the paper width guide and slide it to the edge of
the envelope stack without causing it to bend.
5
When you print, set the paper source to
Tray
and the paper type to
appropriate size in the software application.
see the
Software User’s Guide.
Envelope
Multi-Purpose
, and select the
For details,
4.
4
Using Print Materials
Page 31
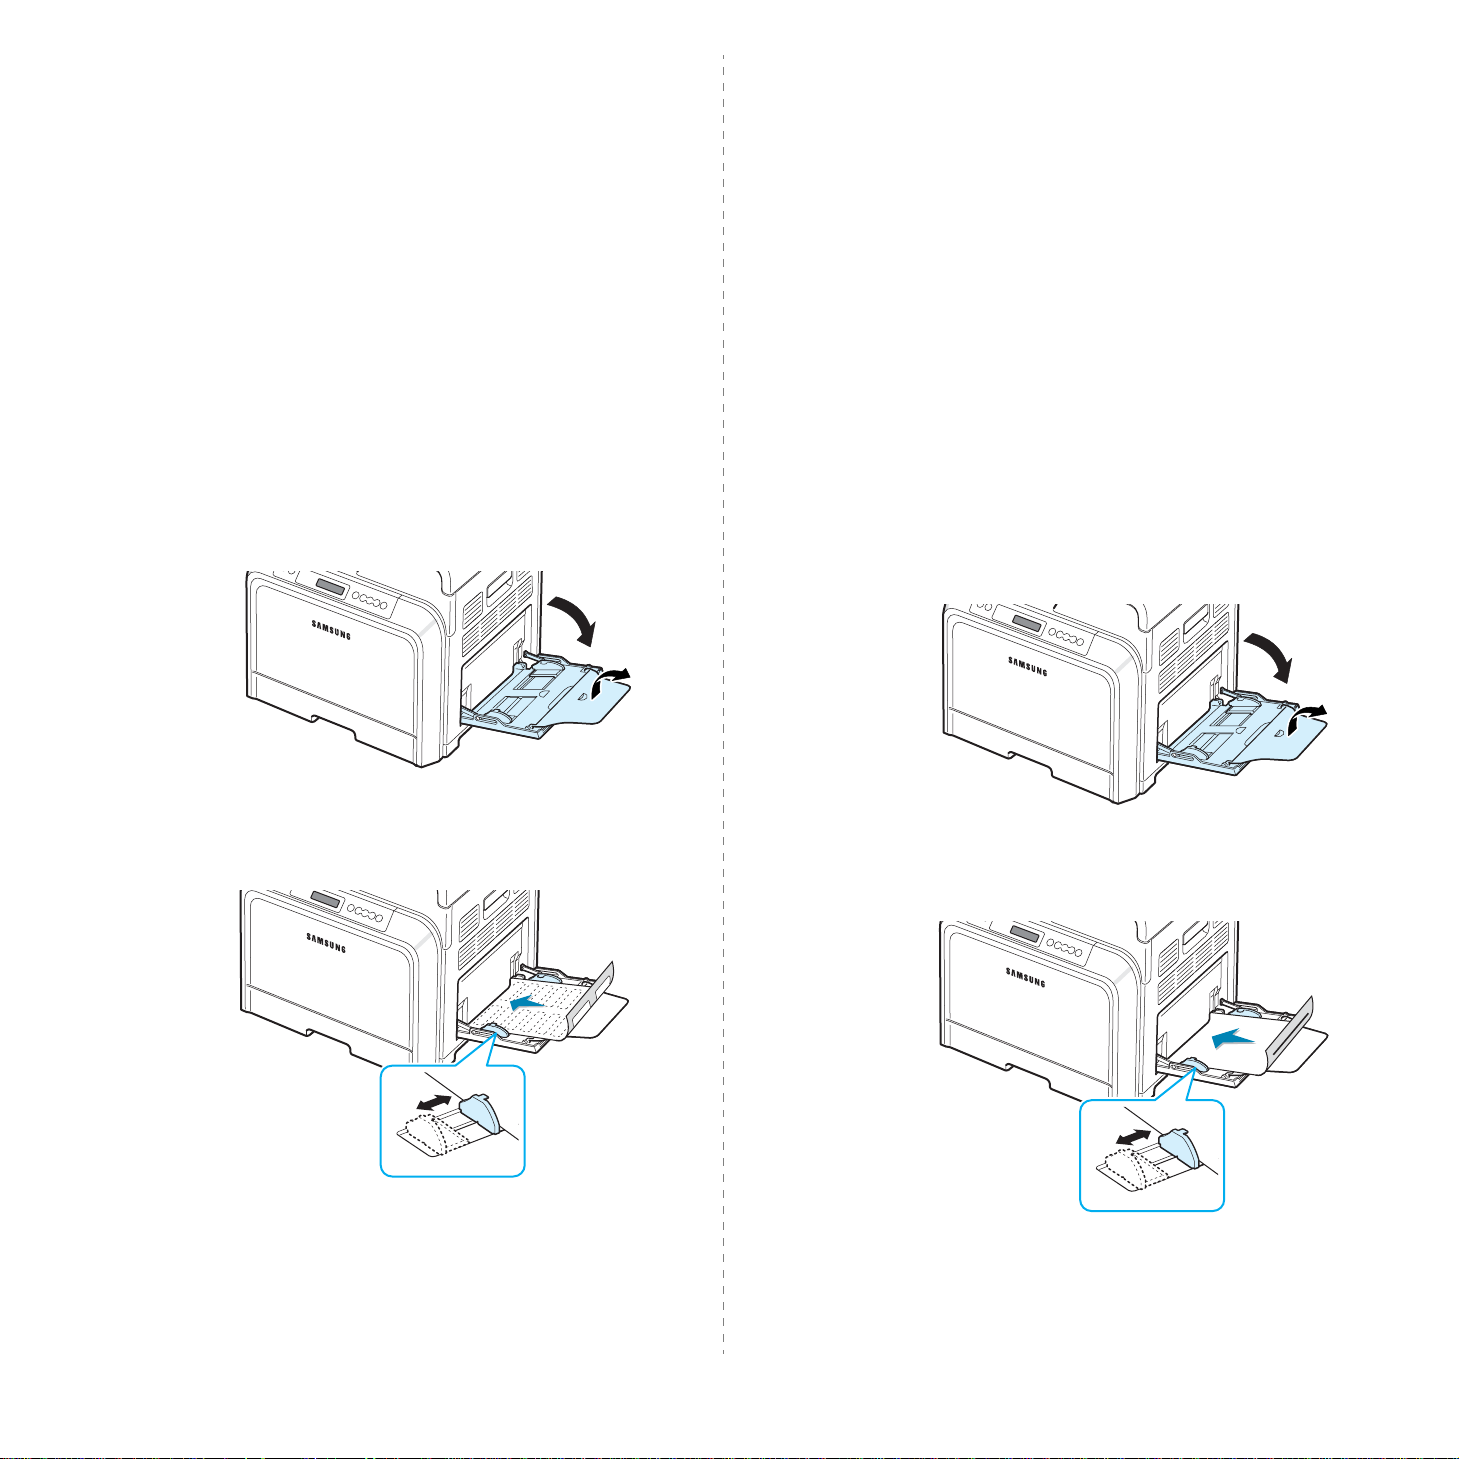
Printing on Labels
Printing on Preprinted Paper
• Only use labels recommended for laser printers.
• Verify that the labels’ adhesive material can tolerate a fusing
temperature of 180°C (356°F) for 0.1 seconds.
• Make sure that there is no exposed adhesive material
between the labels. Exposed areas can cause labels to peel
off during printing, which can cause paper jams. Exposed
adhesive can also cause damage to printer components.
• Never print on the same sheet of labels more than once, or
print on a partial sheet of labels.
• Do not use labels that are separating from the backing sheet
or are wrinkled or damaged in any way.
• To prevent labels from sticking together, do not let the
printed label sheets stack up as they are printed out.
To print on labels:
1
Open the Multi-purpose Tray and unfold the paper support.
• Preprinted paper is paper that has some type of printing on
it before it is sent through the printer (paper that has a
preprinted logo at the top of the page, for example).
• Letterhead must be printed with heat-resistant ink that will
not melt, vaporize, or release hazardous emissions when
subjected to the printer’s fusing temperature of 180°C
(356°F) for 0.1 seconds.
• Ink on letterhead must be non-flammable and should not
adversely affect printer rollers.
• Forms and letterhead should be sealed in moisture-proof
wrapping to prevent changes during storage.
• Before you load preprinted paper, such as forms and
letterhead, verify that the ink on the paper is dry . During the
fusing process, wet ink can come off of preprinted paper,
reducing the print quality.
To print on preprinted paper:
1
Open the Multi-purpose Tray and unfold the paper support.
2
Load labels in the Multi-purpose Tray only,
side down and the top, short edge in first
guide to fit the width of the labels.
3
When you print, set the paper source to
Tray
and the paper type to
appropriate size in the software application. For details,
see the
Software User’s Guide
Labels
.
, and select the
with the print
. Adjust the
Multi-Purpose
2
Load letterhead in the Multi-purpose Tray only,
print side down and the top and short edge
Adjust the guide to fit the edge of the paper stack.
3
When you print, set the paper source to
and the paper type to
Tray
appropriate paper size in the software application.
details, see the
Software User’s Guide.
Preprinted
Multi-Purpose
, and select the
with the
first
.
For
4.
5
Using Print Materials
Page 32
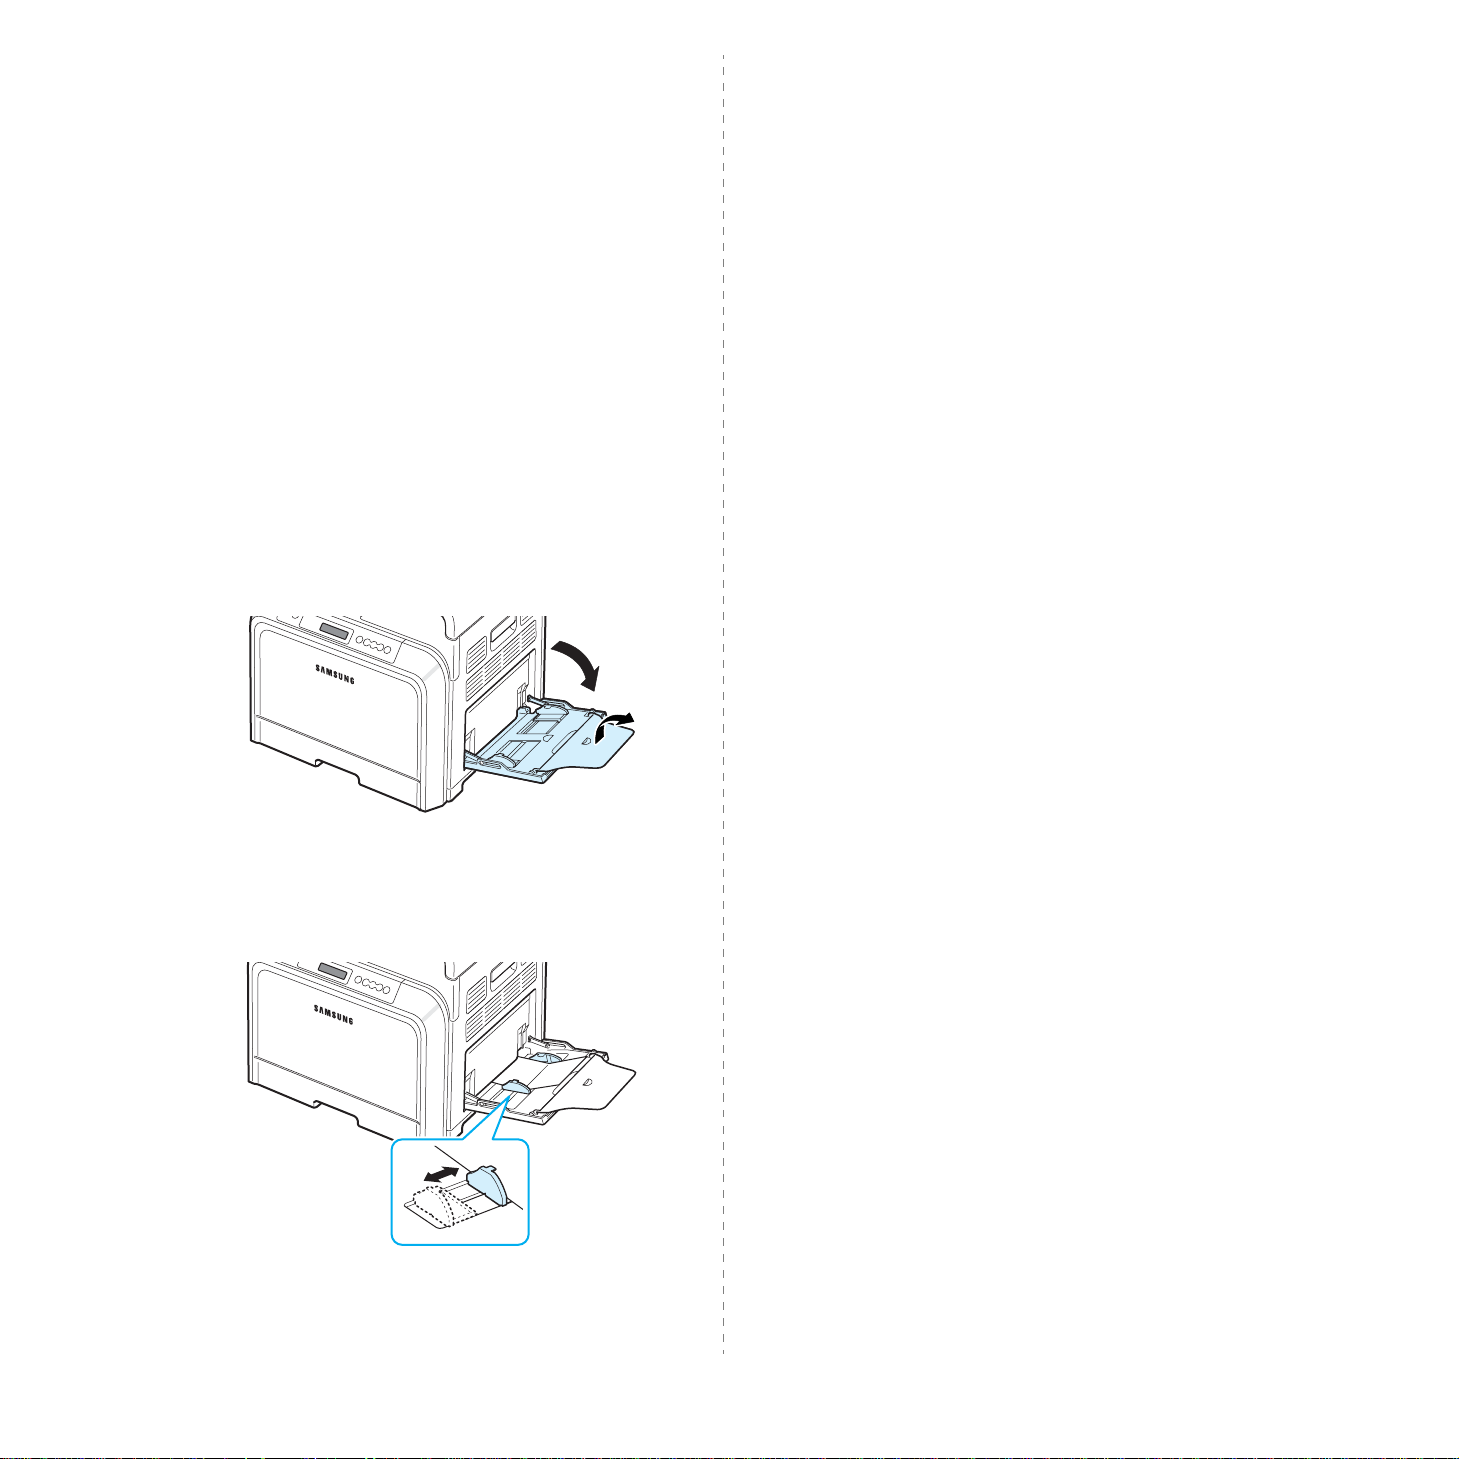
Printing on Card Stock or Customsized Materials
• Postcards, 3.5in. by 5.5in. (index) cards and other customsized materials can be printed with your printer. The
minimum size is 3.5in. by 5.5in. (90mm by 140mm) and the
maximum size is 8.5in. by 14in. (216mm by 356mm).
• Always insert the short edge into the Multi-purpose Tray
first. If you want to print in landscape mode, make this
selection using your software. Inserting the long edge first
may cause a paper jam.
• Do not load more than 10 cards into the Multi-purpose Tray
at a time.
• Do not print on material smaller than 90mm (3.5in.) wide or
140mm (5.5in.) long.
• In the software application, set margins at least 4.3mm
away from the edges of the mate rial.
To print on card stock:
1
Open the Multi-purpose Tray and unfold the paper support.
3
When you print, set the paper source to
and select the appropriate size and type in the
Tray
software application.
User’s Guide
If the size of your print material is not listed in the
box in the
the size manually.
.
Paper
For details, see the
tab, click the
Custom
Multi-Purpose
button and set
Software
Size
2
Load print material in the Multi-purpose Tray only,
the print side down and the short edge first
guide until it lightly touches the stack without causing it to
bend.
. Slide the
with
4.
6
Using Print Materials
Page 33

5 Basic Printing
Printing a Document
This chapter explains common printing tasks.
• Printing a Document
• Canceling a Print Job
This printer allows you to print from various Windows
applications, a Macintosh computer, or a Linux system. The
exact steps for printing a document may vary depending on the
application you use.
For details about printing, see the
Software User’s Guide
.
Canceling a Print Job
If the print job is waiting in a print queue or print spooler , such
as the printer group in Windows, delete the job as follows:
1
Click the Windows
2
For Windows 98SE/NT 4.0 /2000/Me, select
then
Printers
For Windows XP/2003, select
3
Double-click the
4
From the
(Windows 98SE/Me) or
XP/2003).
NOTE
: You can access this window sim ply by double-clicking
the printer icon at the bottom right corner of the Windows
desktop.
Document
Start
button.
.
Printers and Faxes
Samsung CLP-600 Series
menu, select
Cancel
Cancel Printing
(Windows NT 4.0/2000/
Settings
.
icon.
and
5.
1
Basic Printing
You can also cancel the current job by pressing the
button ( ) on the control panel of your printer.
Cancel
Page 34
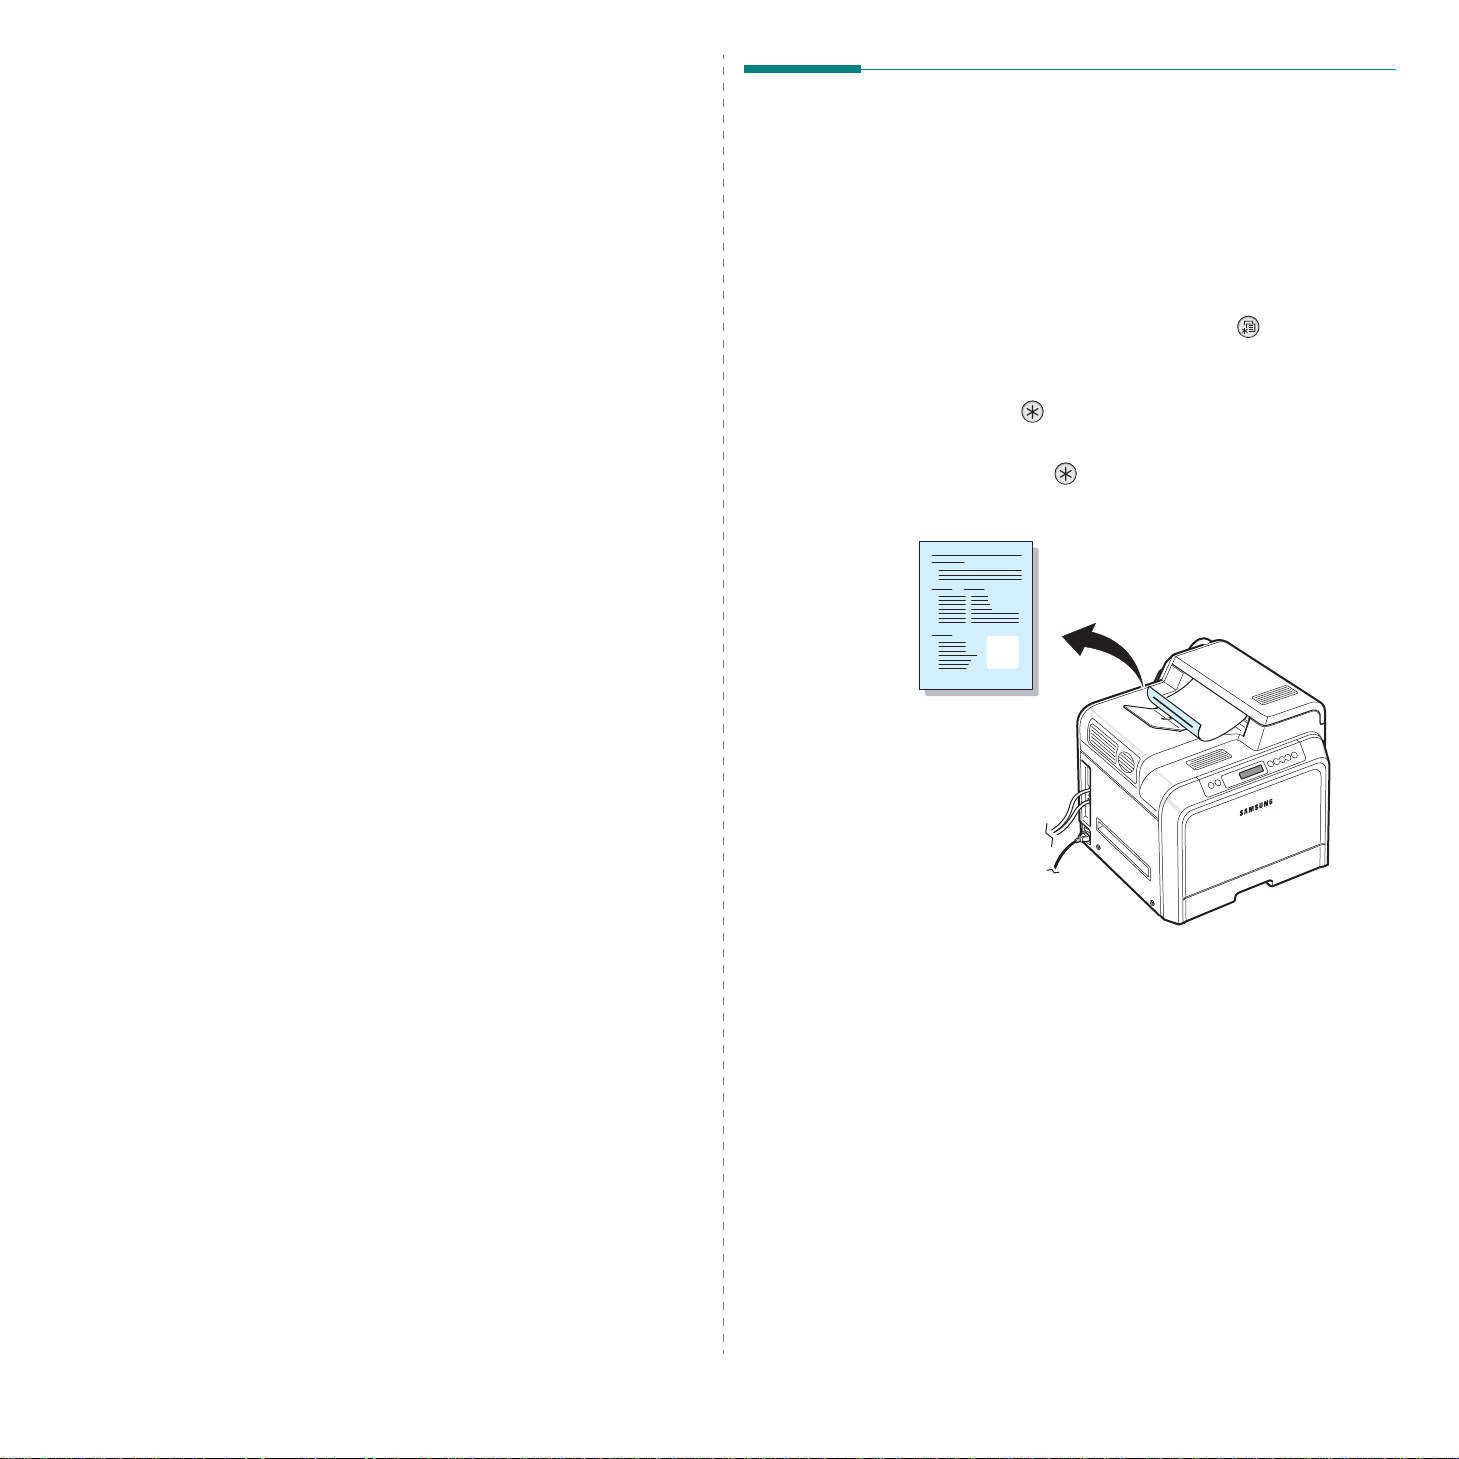
6 Maintaining Your
Printing a Configuration Page
Printer
This chapter provides information for maintaining your printer
and the toner cartridges, as well as suggestions for high-qua lity
and economical printing.
This chapter includes:
• Printing a Configuration Page (CLP-600N Only)
• Replacing Supplies
• Managing Toner Cartridges
• Replacing Toner Cartridges
• Replacing the Paper Transfer Belt
• Replacing the Fuser Unit
• Cleaning the Printer
• Managing the Printer from the Website (CLP-600N
Only)
(CLP-600N Only)
You can print a configuration page from the printer’s control
panel. Use the configuration page to view the current settings,
to help troubleshoot problems, or to verify the installation of
optional accessories, such as an optional tray.
To print a configuration page:
1
In ready mode, press the
panel.
2
When “Information” displays on the bottom line, press the
Enter
button ( ) to access the menu.
3
When “Configuration” displays on the bottom line, press
Enter
the
A configuration page prints out.
button ( ).
Menu
button ( ) on the control
6.
1
Maintaining Your Printer
Page 35

Replacing Supplies
From time to time, you need to replace the following items to
maintain top performance and to avoid print quality problems
and paper feed problems resulting from worn parts.
The following items should be replaced after yo u have printed
the specified number of pages or when the life span of each
item has expired. The SmartPanel progr am window will appear
on the computer, indicating which item needs to be replaced. If
you use the CLP-600N, the display on the control panel will also
show an error message, indicating which item needs to be
replaced. See below.
Item(s)
Black toner
cartridge
Printer Message
(CLP-600N only)
Replace Black
Toner
Pages Printed
Approx. 4,000
*
pages
See
Page
6.4
Managing Toner Cartridges
Toner Cartridge Storage
To get the maximum results from a toner cartridge, keep the
following guidelines in mind:
• Do not remove toner cartridges from their packages until
you are ready to use them.
• Do not refill toner cartridges.
not cover damage caused by using a refilled cartridge.
• Store toner cartridges in the same environment as the
printer.
• To prevent damage to toner cartridges, do not expose them
to light for more than a few minutes.
The printer warranty does
Color toner
cartridges
Paper
transfer belt
Fuser unit Replace Fuser Approx. 50,000
Pick-up
roller
* Average A4-/letter-sized page count based on 5% coverage of ind ividual co l-
ors on each page. Usage conditions and print patterns may cause results to
vary.
** The number of pages may be affected by operating environment, media
type, and media size.
To purchase replacement parts, contact your Samsung dealer
or the retailer where you bought your printer. We strongly
recommend that items be installed by a trained service
professional, except for the toner cartridges (see 6.4), the
paper transfer belt (see 6.5), and the fuser unit (see 6.7).
Replace [Color]
Toner
Replace Transfer
Belt
Replace MP Pickroller
OR
Replace Tray 1
Pick-roller
OR
Replace Tray 2
Pick-roller
Approx. 4,000
pages*
Approx. 35,000
**
pages
pages
Approx. 50,000
pages
6.4
6.5
6.7
Toner Cartridge Life Expectancy
The life of a toner cartridge depends on the amount of toner
that your print jobs require. When printing text at 5%
coverage, the toner cartridges last an average of 4,000 pages
for black and each color. The starter toner cartridge supplied
with the printer lasts an average of 2,000 pages for black and
each color.
Redistributing Toner
When a toner cartridge is low on toner , faded or light areas ma y
appear. It is also possible that colored images may be printed
with incorrect colors due to flawed mixing of toner colors when
one of the colored toner cartridges is low on toner. The
SmartPanel program window appears on the computer telling
you which color cartridge is low on toner. Also, if you use the
CLP-600N, “Ready [Color] Low Toner” may appear on the
display.
The printer is able to continue to print using the current toner
cartridge until the SmartPanel progr am window appears on the
computer telling you to replace the cartridge, or the control
panel displays that message (CLP-600N only).
You may be able to temporarily improve print quality by
redistributing the toner.
6.
2
Maintaining Your Printer
Page 36
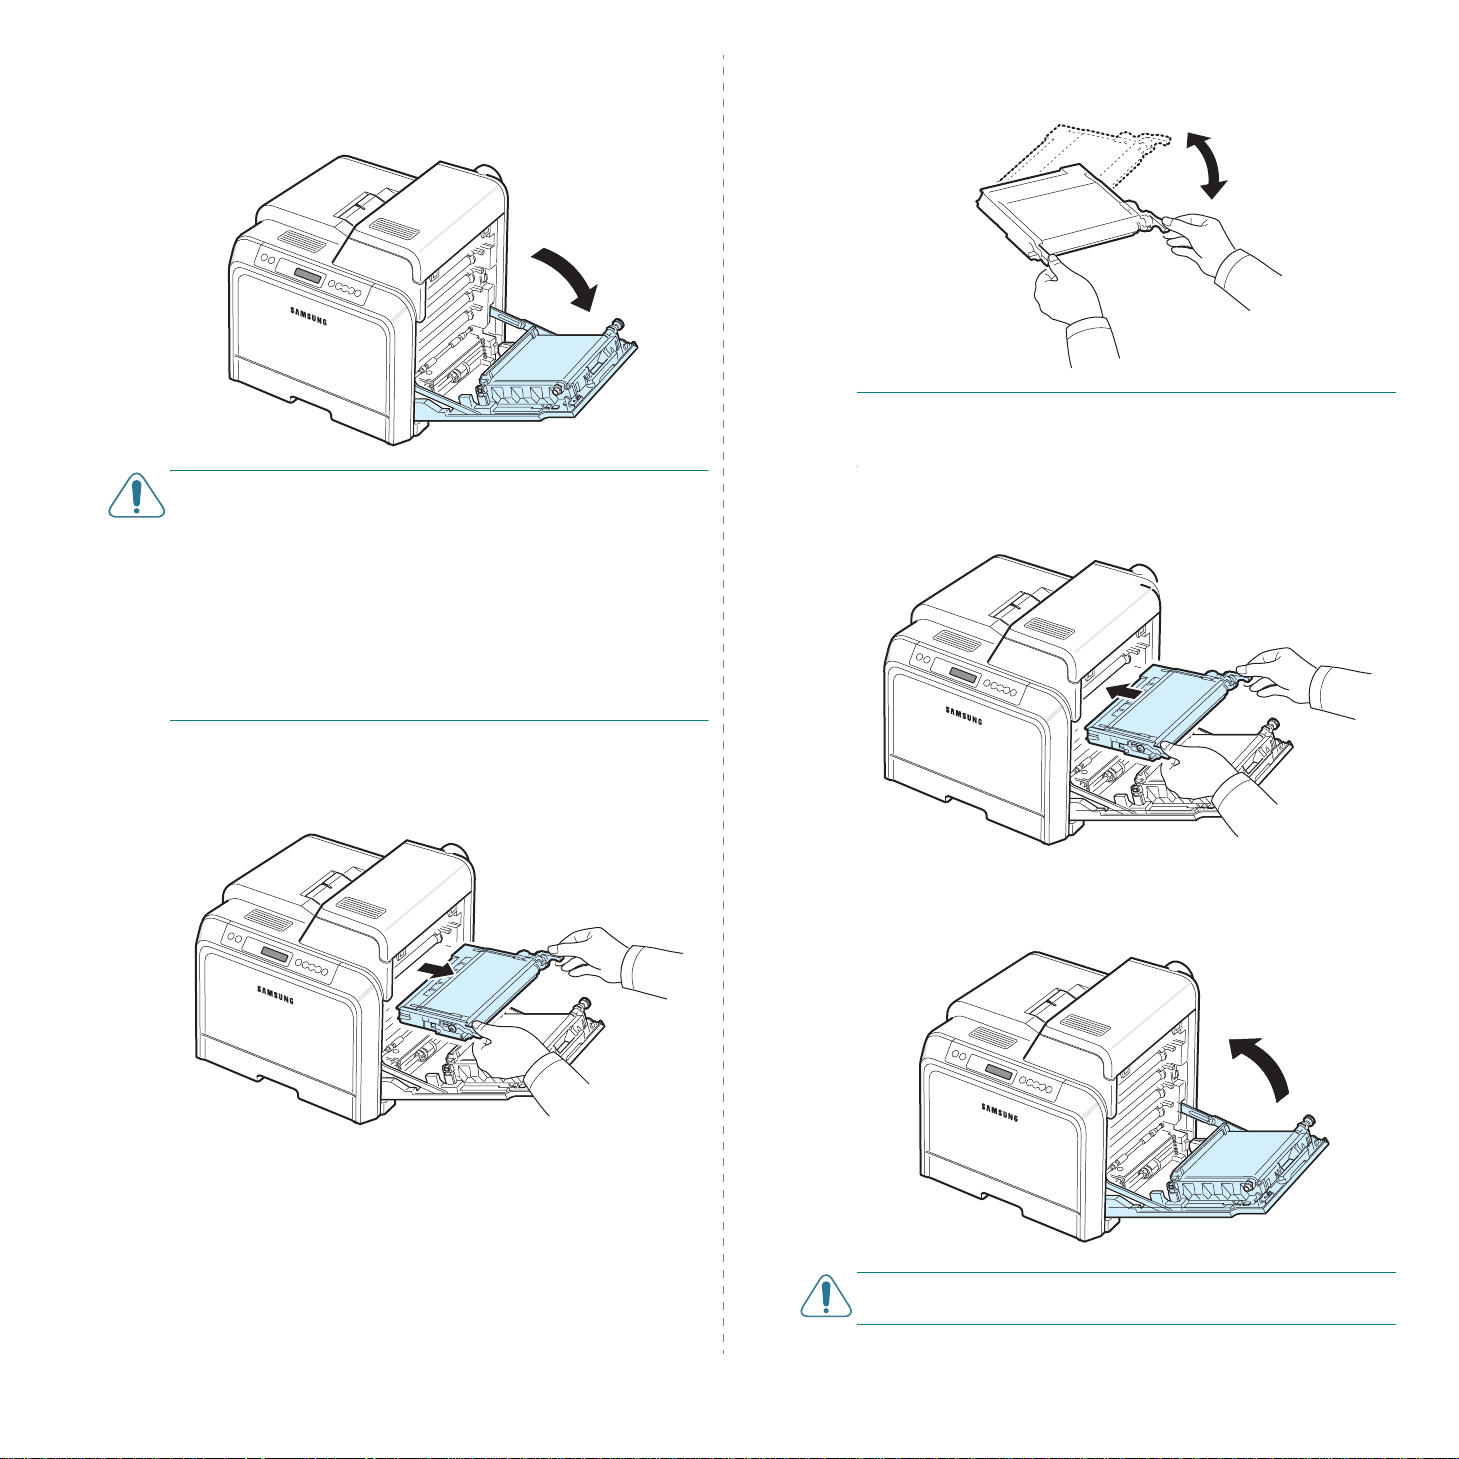
To redistribute the toner:
1
Using the handle, completely open the access door.
3
Holding both handles on the toner cartridge, gently rock it
from side to side to redistribute the toner.
CAUTION
• Do not touch the green surface, the OPC drum, on the front
of the toner cartridge with your hands or any other material.
Use the handle on each cartridge in order to avoid touching
this area.
• Be careful not to scratch the surface of the paper transfer
belt.
• If you leave the access door open for more than a few
minutes, the OPC drum can be exposed to light. This will
cause damage to the OPC drum. Close the access door
should the installation need to be halted for any reason .
2
:
Grasp the handles on the toner cartridge and pull to
remove the cartridge from the printer.
NOTE:
cloth and wash it in cold water. Hot water sets toner into
fabric.
4
5
If toner gets on your clothing, wipe it off with a dry
Slide the toner cartridge back into the printer.
Close the access door. Make sure that the door is securely
latched.
6.
3
Maintaining Your Printer
CAUTION:
printer will not operate.
If the access door is not completely closed, the
Page 37
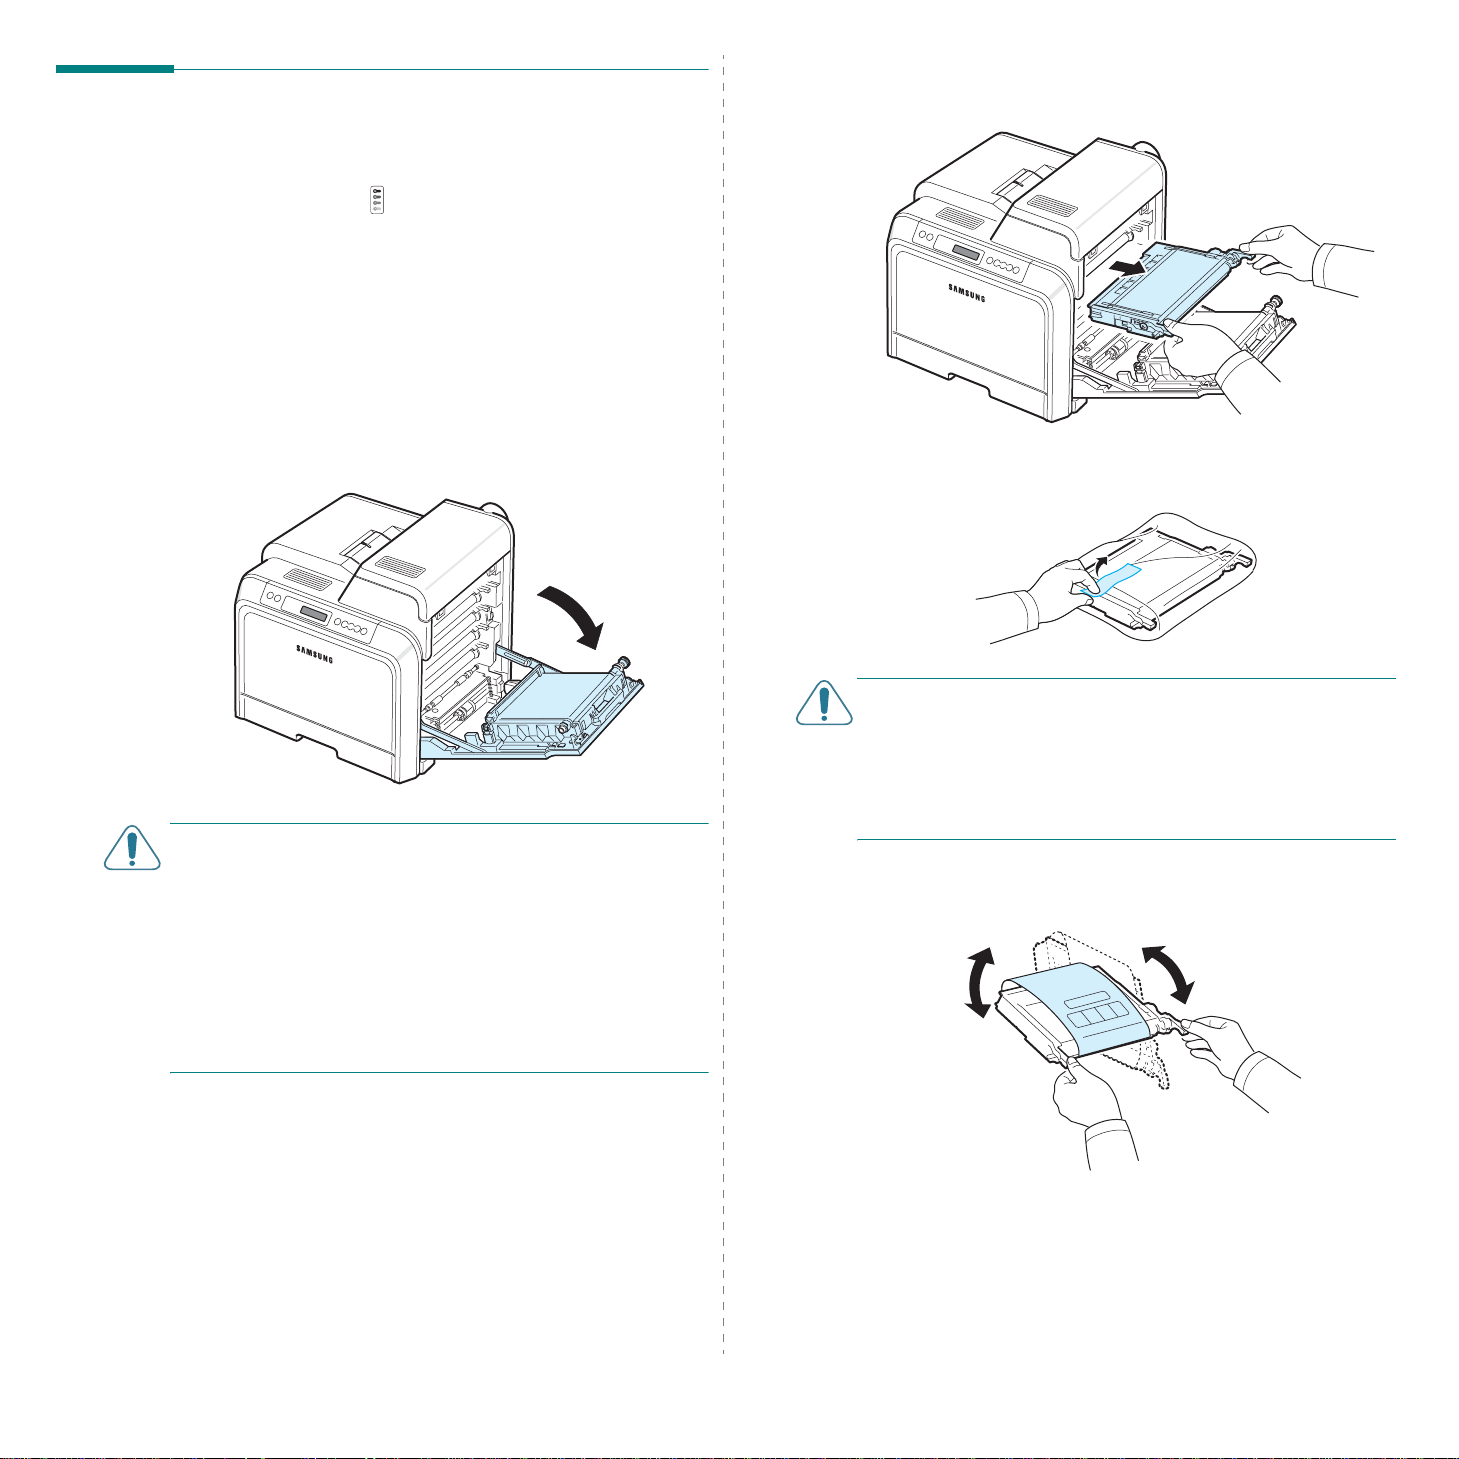
Replacing Toner Cartridges
The printer uses four colors and has a different toner cartridge
for each one: yellow (Y), magenta ( M), cyan (C), an d black (K).
When the T oner LEDs, ( ) on the control panel, indicating each
individual toner cartridge according to its color, turn on, the
printer stops printing. Also, if you use the CLP-600N, the
display on the control panel shows the error message, “[Color]
Toner Empty”. At this stage, replace the toner cartridge in
question.
To replace the toner cartridge:
1
T urn the printer off , then wa it a few minutes for the printer
to cool.
2
Using the handle, completely open the access door.
3
Grasp the handles on the empty toner cartridg e and pull to
remove the cartridge from the printer.
4
Take a new toner cartridge out of its package.
CAUTION
• Do not touch the green surface, the OPC drum, on the front
of each toner cartridge with your hands or any other
material. Use the handle on each cartridge in order to a void
touching this area.
• Be careful not to scratch the surface of the paper transfer
belt.
• If you leave the access door open for more than a few
minutes, the OPC drum can be exposed to light. This will
cause damage to the OPC drum. Close the access door
should the installation need to be halted for any reason .
:
CAUTION
• Don’t use sharp objects, such as a knife or scissors, to open
the toner cartridge package. You could damage the surface
of the toner cartridge.
• To prevent damage, do not expose the toner cartridge to
light for more than a few minutes. Cover it with a piece of
paper to protect it if necessary.
5
:
Holding both handles on the toner cartridge, gently rock it
from side to side to evenly distribute the toner.
6.
4
Maintaining Your Printer
Page 38
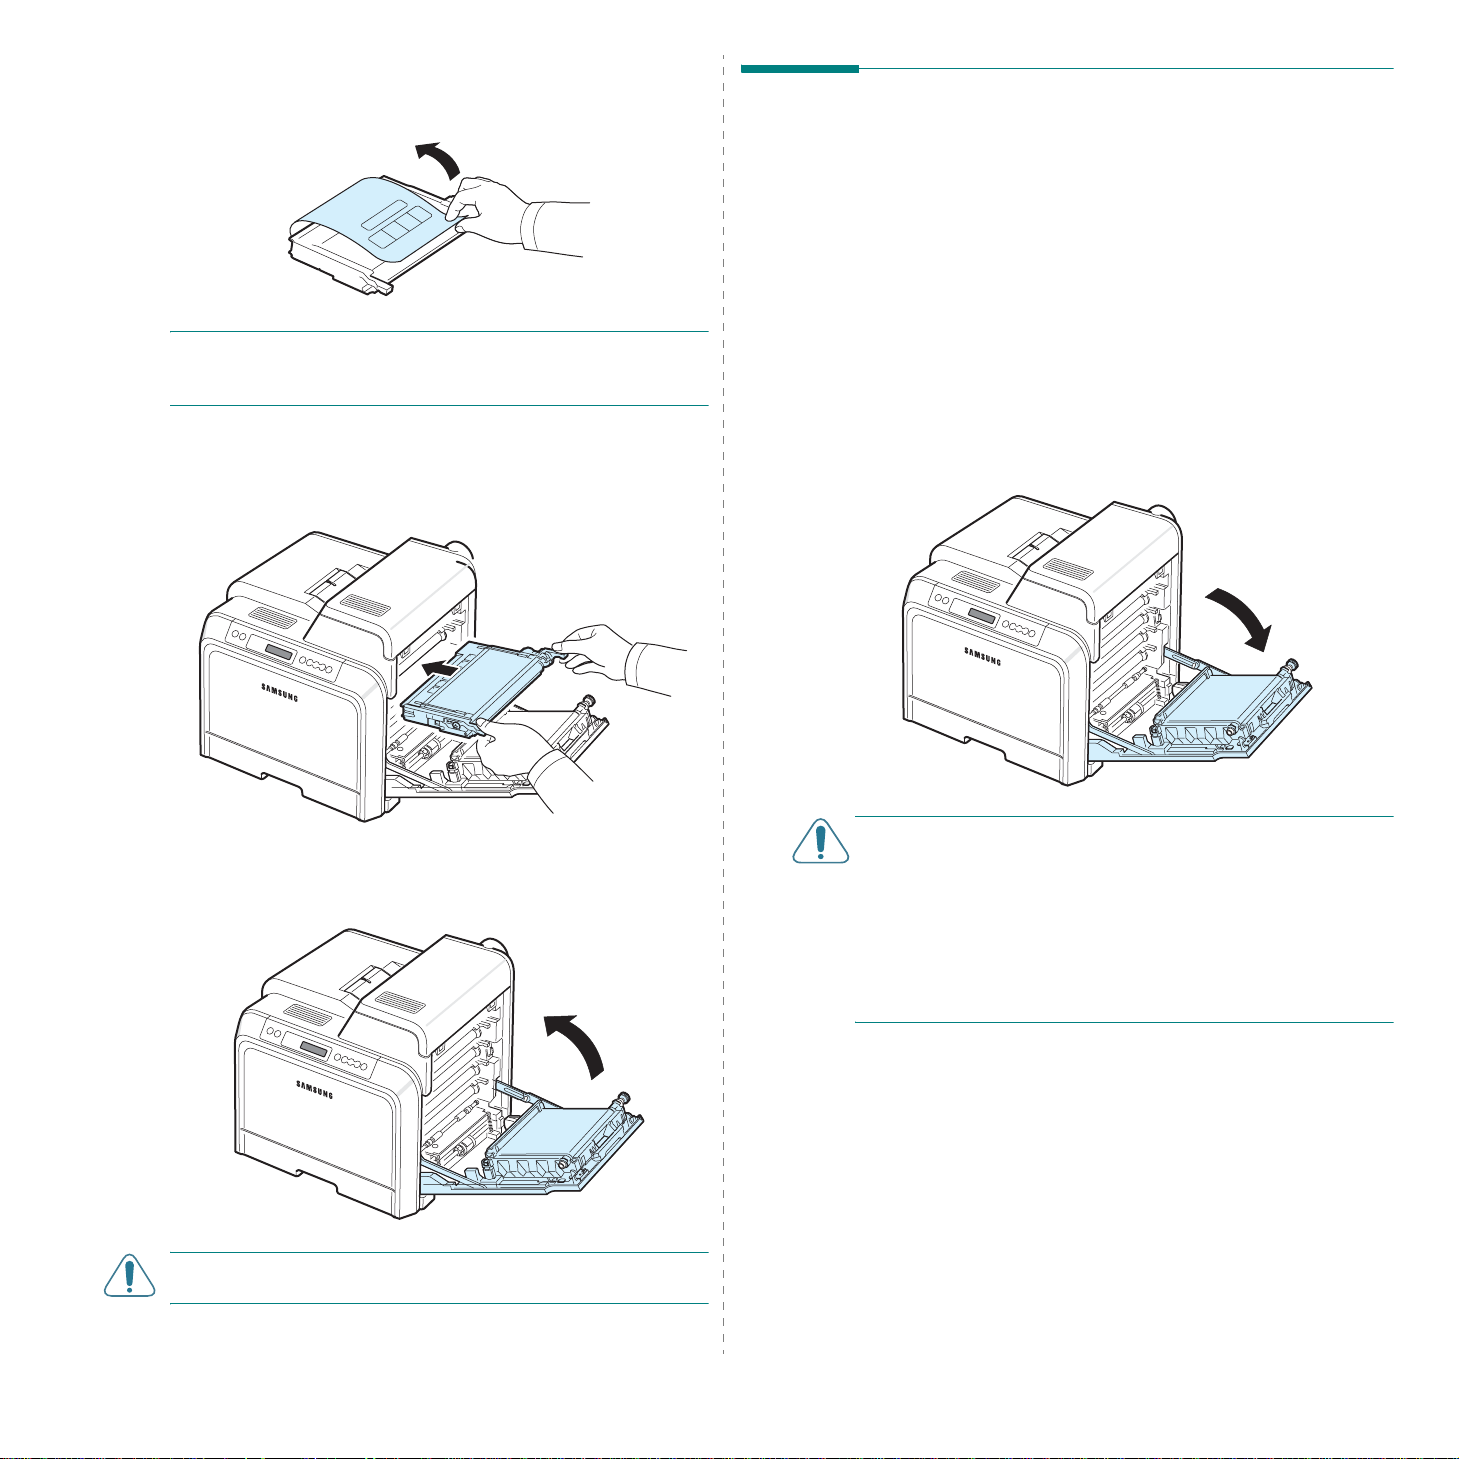
6
Place the toner cartridge on a flat surface, as shown, and
remove the paper covering the to ner ca rtridge by
removing the tape.
NOTE:
cloth and wash it in cold water. Hot water sets toner into
fabric.
7
If toner gets on your clothing, wipe it off with a dry
Make sure that the color of the toner cartridge matches
the color slot and then grasp the handles on the toner
cartridge. Insert the cartridge until it clicks into place.
Replacing the Paper Transfer
Belt
The life of the paper transfer belt is appro ximately 35,000 black
and color pages. When the life span of the paper transfer belt
has expired, the SamrtPanel program window appears on the
computer, indicating the paper transfer belt needs to be
replaced. Also, if you use the CLP-600N, the display on the
control panel shows the error message, “Replace T ransfer Belt” .
At this stage, replace the paper transfer belt.
To replace the paper transfer belt:
1
T urn the printer off , then w ait a few minutes for the printer
to cool.
2
Using the handle, completely open the access door.
8
Close the access door. Make sure that the door is securely
latched, and then turn the printer on.
CAUTION:
printer will not operate.
If the access door is not completely closed, the
Maintaining Your Printer
6.
CAUTION
• Do not touch the green surface, the OPC drum, on the front
of each toner cartridge with your hands or any other
material. Use the handle on each cartridge in order to avoid
touching this area.
• If you leave the access door open for more than a few
minutes, the OPC drum can be exposed to light. This will
cause damage to the OPC drum. Close the access door
should the installation need to be halted for any reason.
5
:
Page 39
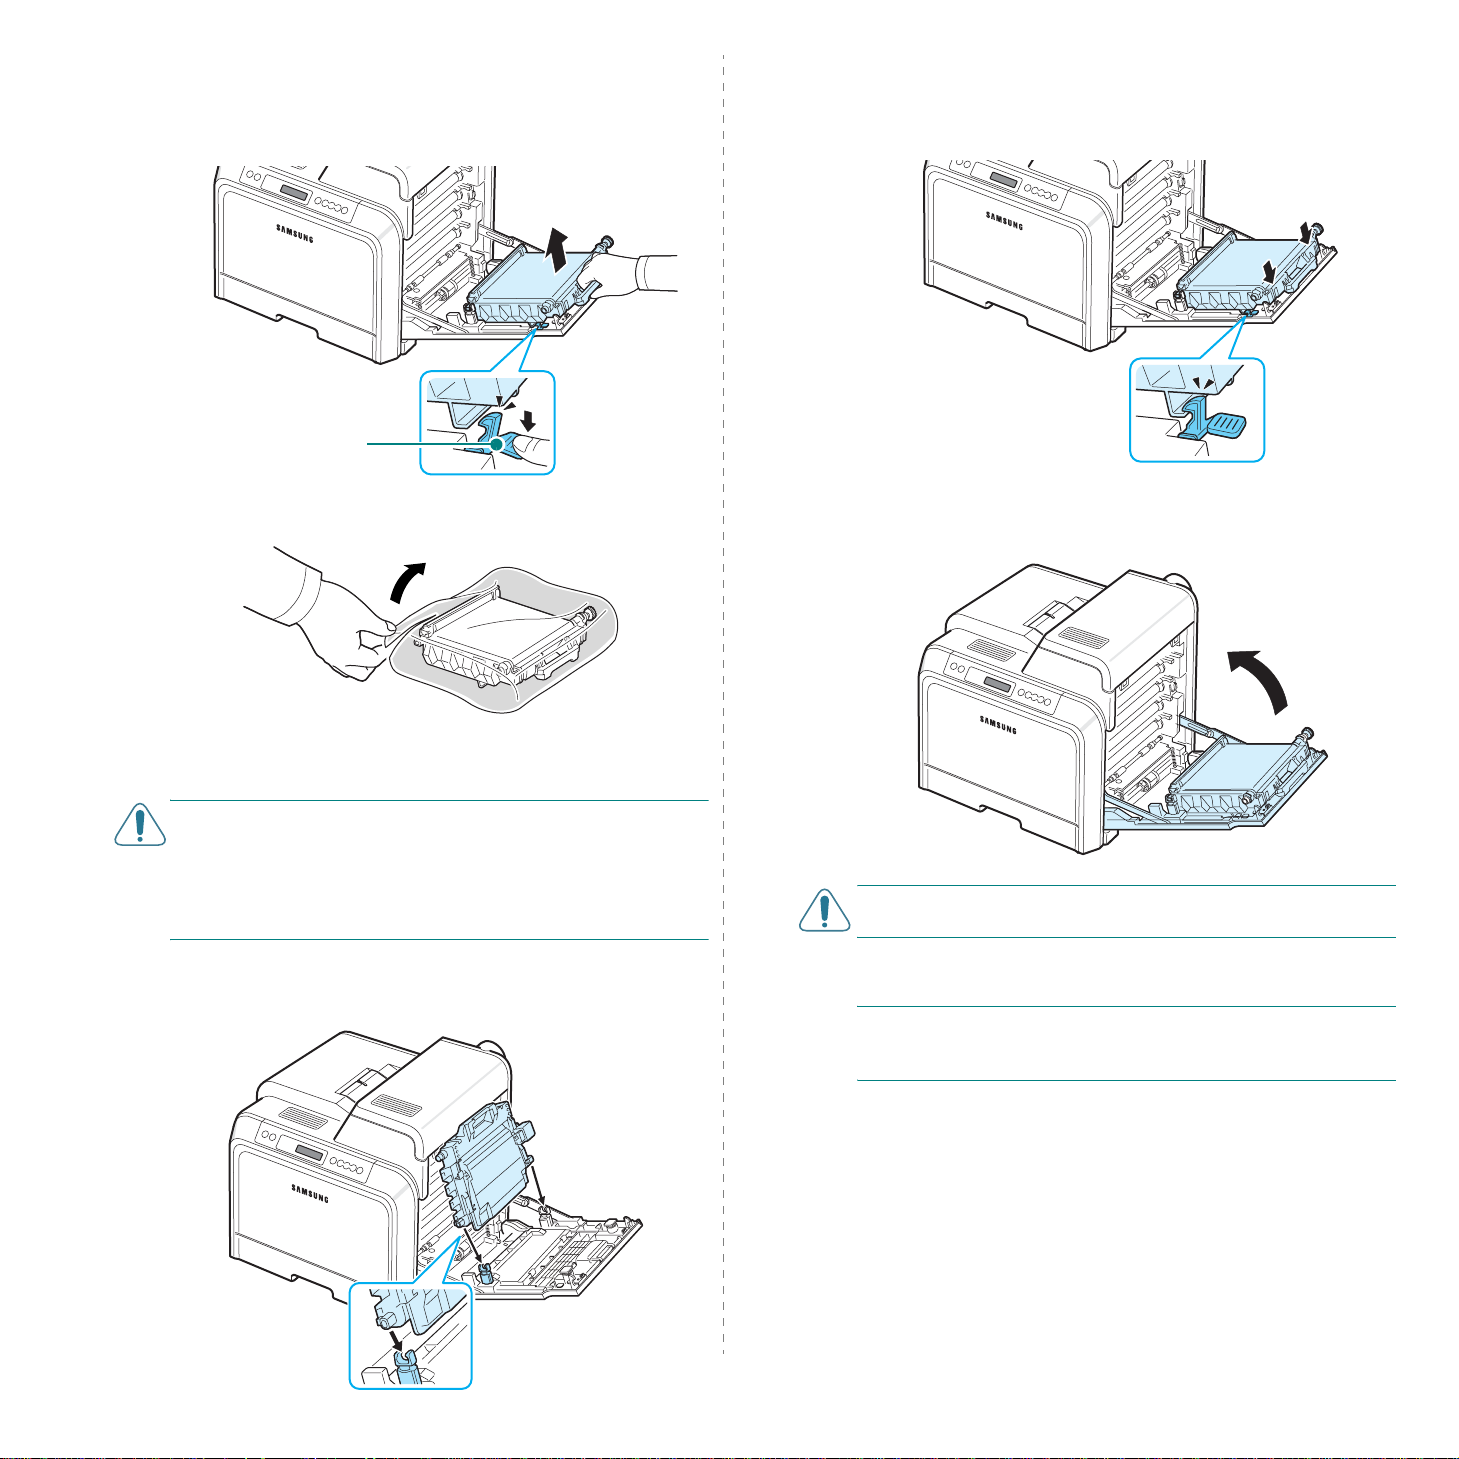
3
Locate the green release button on the inside of the access
door (near the left side of the paper transfer belt). Press
the button to release the paper transfer belt. Holding the
handle on the paper transfer belt, lift it out of the printer.
Green release button
4
Take a new paper transfer belt out of its package.
7
Push down until it clicks into place. Then lower the paper
transfer belt until it is parallel with the access door a n d
firmly seated. The green release button automatically
locks the paper transfer belt.
8
Close the access door firmly.
5
Remove the paper covering the paper transfer belt by
removing the tape.
CAUTION:
• Don’t use sharp objects, such as a knife or scissors, to open
the paper transfer belt package. You could damage the
surface of the paper transfer belt.
• Be careful not to scratch the surface of the paper transfer
belt.
6
Holding the handle on the new paper transfer belt, a lign it
with the slots on the inside of the access door.
CAUTION:
printer will not operate.
9
Turn the printer on.
NOTE
automatically reset the image counter for the paper transfer
belt.
If the access door is not completely closed, the
: After replacing the paper transfer belt, y our printer will
6.
6
Maintaining Your Printer
Page 40
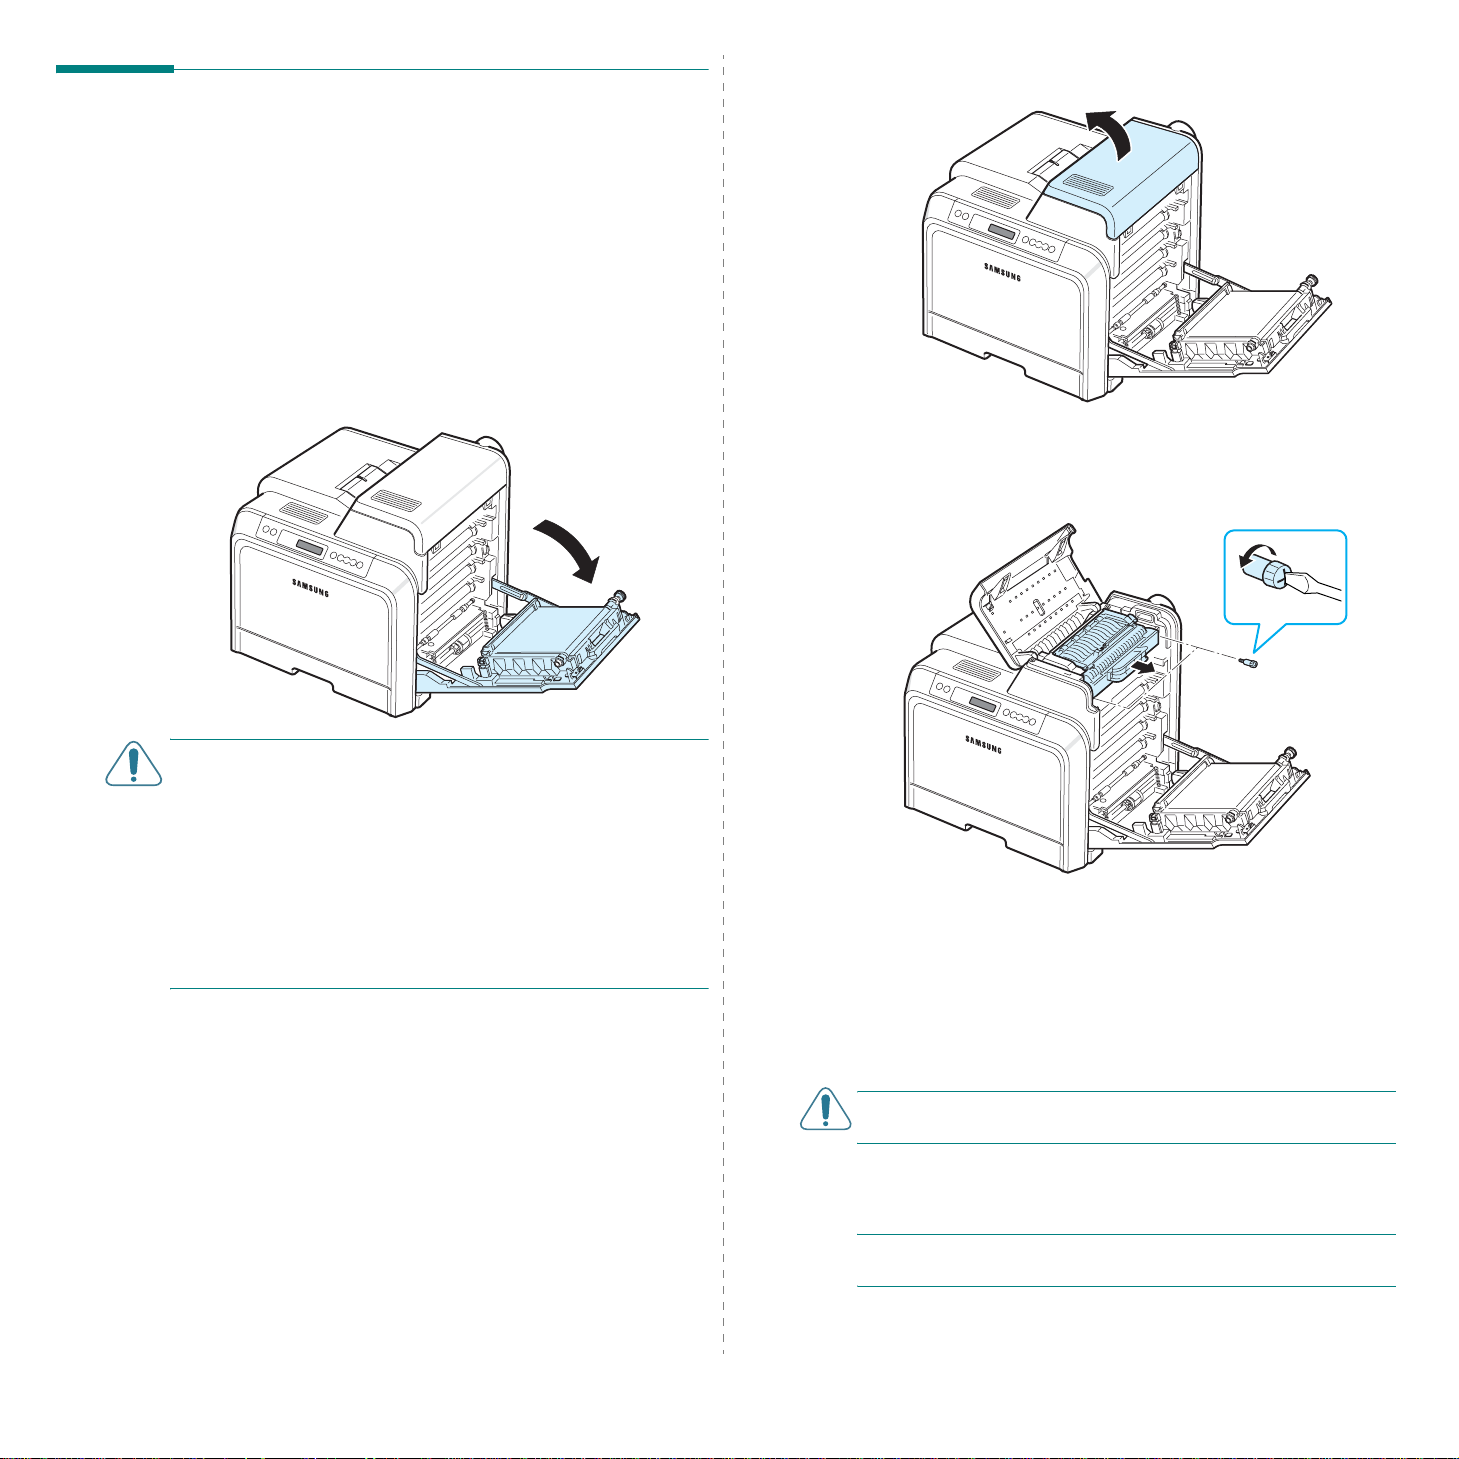
Replacing the Fuser Unit
The life of the fuser unit is approximately 50,000 black and
color pages. When the life span of the fuser unit has expired,
the SmartPanel program window appears on the comp uter,
indicating the fuser unit needs to be replaced. Also, if you use
the CLP-600N, the display on the control panel shows the error
message, “Replace Fuser”. At this stage, replace the fuser unit.
To replace the fuser unit:
1
T urn the printer off , then wa it a few minutes for the printer
to cool.
2
Using the handle, completely open the access door.
3
Open the top cover.
4
Using a copper coin or a screwdriver, remove the two
screws on both sides of the fuser unit. Then using the
handle, pull the fuser unit straight out.
CAUTION
• Do not touch the green surface, the OPC drum, on the front
of each toner cartridge with your hands or any other
material. Use the handle on each cartridge in order to a void
touching this area.
• Be careful not to scratch the surface of the paper transfer
belt.
• If you leave the access door open for more than a few
minutes, the OPC drum can be exposed to light. This will
cause damage to the OPC drum. Close the access door
should the installation need to be halted for any reason .
:
5
Unpack a new fuser unit and insert it into the printer.
6
Tighten the two screws.
7
After making sure that the access door is open, close the
top cover. Make sure that it is securely latched.
8
Close the access door firmly.
CAUTION:
closed, the printer will not operate.
9
Reconnect the power cord and cables and then turn the
printer on.
NOTE
automatically reset the image counter for the fuser unit.
If the top cover and access door are not completely
: After replacing the fuser unit, your printer will
6.
7
Maintaining Your Printer
Page 41
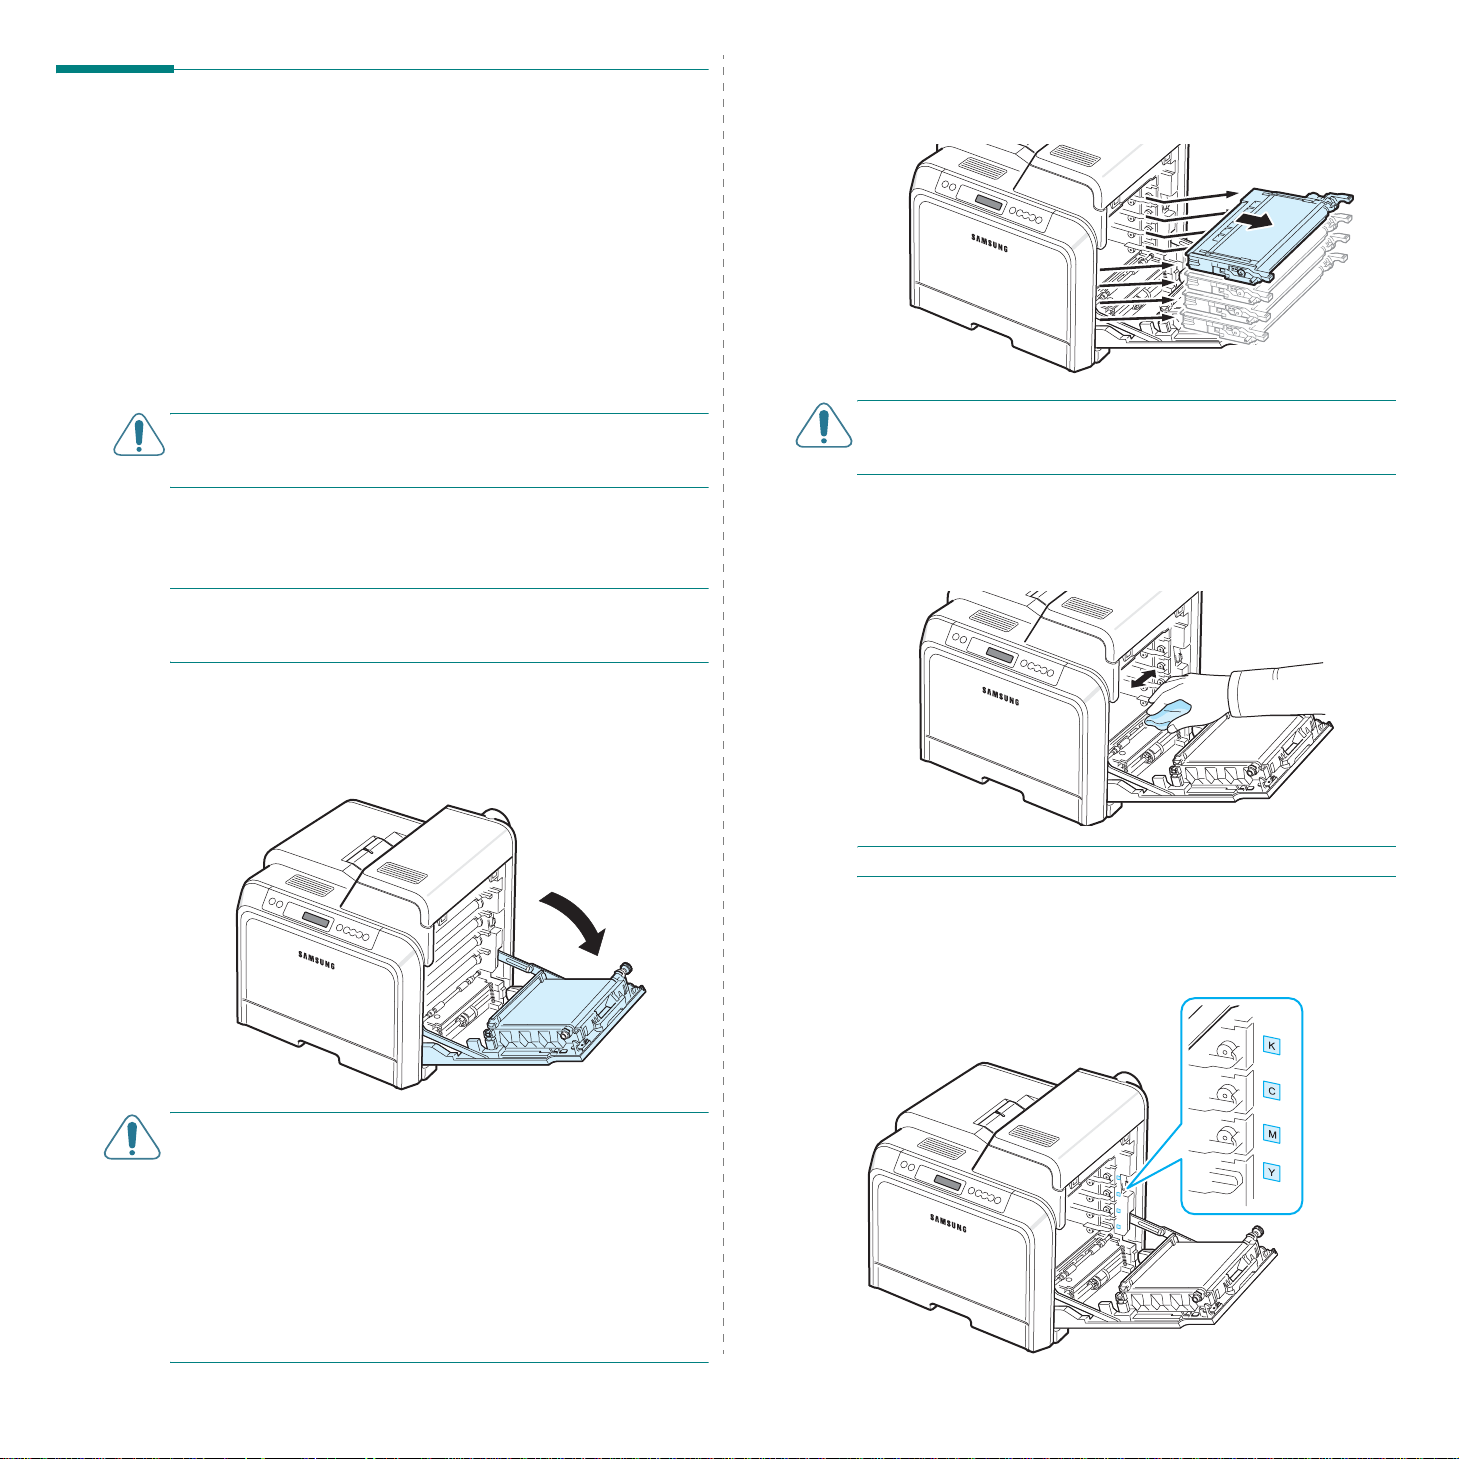
Cleaning the Printer
During the printing process, particles of paper, toner, and dust
can accumulate inside the printer. Over time, this build-up can
cause print quality problems such as toner specks or smearing.
Your printer has a cleaning mode that can corre ct and prevent
these types of problems.
Cleaning the Outside of the Printer
Clean the printer cabinet with a soft lint-free cloth. You can
dampen the cloth slightly with water, but be careful not to let
any water drip onto the printer or inside of it.
CAUTION
containing large amounts of alcohol, solvents, or other strong
substances can discolor or crack the cabinet.
Cleaning the Inside of the Printer
: Cleaning the printer cabinet with cleaners
3
Grasp the handles on each toner cartridge and pull to
remove the cartridges from the printer. Set them on a
clean flat surface.
CAUTION
cartridges to light for more than a few minutes. Cover them
with paper to protect them if necessary.
4
: To prevent damage, do not expose the toner
Look inside the printer. Remove any dust, paper particles,
and spilled toner with a damp, soft lint-free cloth, or small
vacuum cleaner.
NOTE:
to touch the transfer roller. Oil from your fingers can cause
print quality problems.
1
2
CAUTION
• Do not touch the green surface, the OPC drum, on the front
• Be careful not to scratch the surface of the paper transfer
• If you leave the access door open for more than a few
While cleaning the inside of the printer, be careful not
T urn the printer off and unplug the p ower cord, then wait a
few minutes for the printer to cool.
Using the handle, completely open the access door.
:
of each toner cartridge with your hands or any other
material. Use the handle on each cartridge in order to a void
touching this area.
belt.
minutes, the OPC drum can be exposed to light. This will
cause damage to the OPC drum. Close the access door
should the installation need to be halted for any reason .
NOTE
: After cleaning, allow the printer to dry completely.
5
Look inside the printer on the right and then locate the
colors of the toner cartridges that match the colors of the
slots.
Black
Cyan
Magenta
Yellow
6.
8
Maintaining Your Printer
Page 42
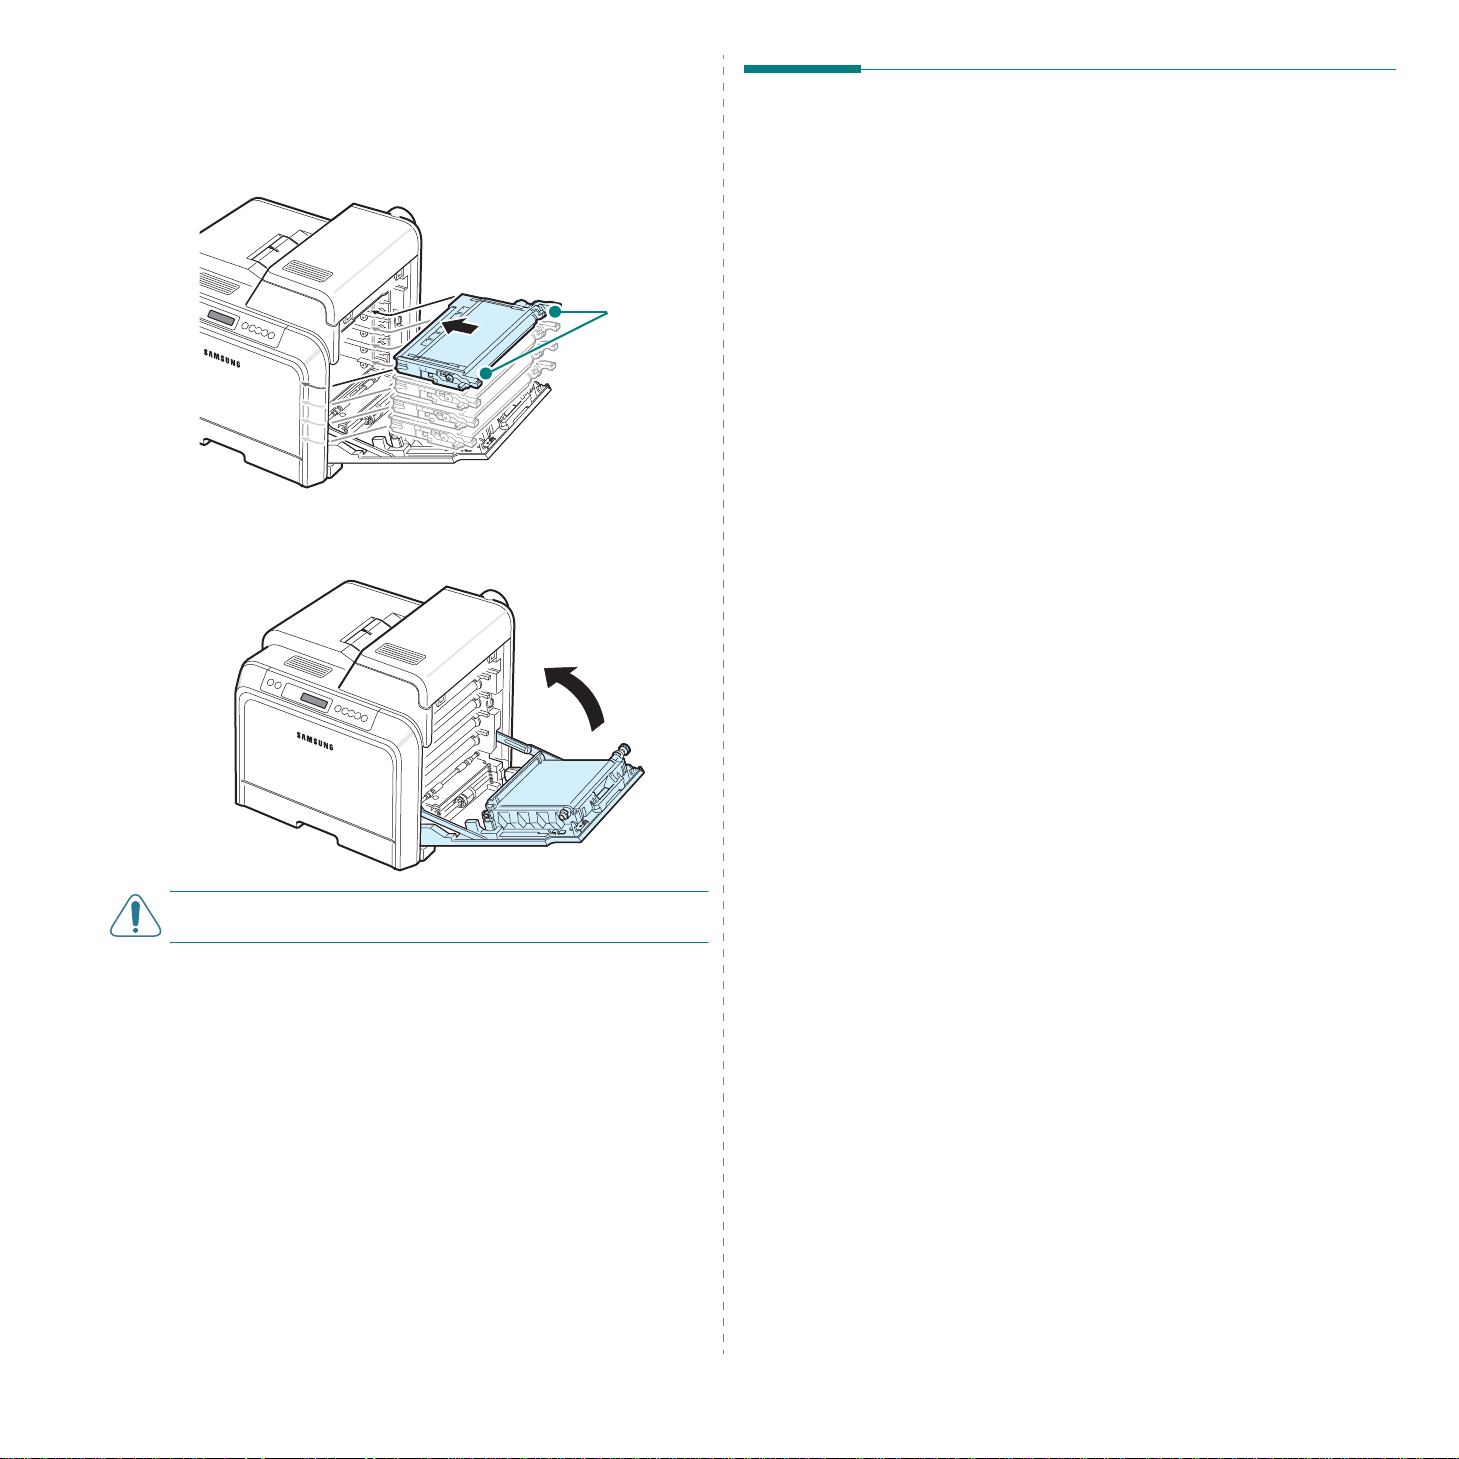
6
Grasp the handles on each toner cartridge. Align the toner
cartridges with the slots inside the printer and insert them
into their corresponding positions in the following order:
Yellow , Magenta, Cyan, and then Black, until they click into
place.
Grip here.
7
Close the access door. Make sure that the door is securely
latched.
Managing the Printer from the
Website
Via your printer’s website, you can set the printer to send email notifications to a specified address.
To access the printer’s website:
1
Start a web browser, such as Internet Explorer from
Windows.
2
Enter the printer’s IP address (http:// xxx.xxx.xxx.xxx) in
the address field and press the
Your printer’s embedded web page opens.
Setting Up E-mail Notification
E-mail notification functionality allows your printer to send
warnings or alerts to a specified address. Y ou can also send an
order for toner to a specified address. An SMTP server should
be used to send these messages.
To set up the E-mail notification feature:
1
On the printer’s web page, click
(CLP-600N Only)
Enter
key or click Go.
Machine Settings
.
CAUTION:
printer will not operate.
8
Plug the power cord in and turn the printer on.
If the access door is not completely closed, the
2
Click
E-mail Notification Setup
3
Fill in the appropriate boxes.
You can set up server infor mation, recipient list &
conditions information, and the toner order system. For
further details about each setting, see the following
sections.
.
Server Information
Configure the settings for your printer to send an e-mail
through the SMTP server.
The following items can be configured:
IP Address or Host Name
•
Name. If you select host name, you need to enter your DNS
setting in TCP/IP on the
SMTP Server and Port
•
port number.
SMTP Requires Authentication
•
need to be authenticated.
•
SMTP Server Login
SMTP Server Password
•
: Enter your login name.
: Select IP Address or Host
Network Settings
: Enter the SMTP server name and
: Check if the SMTP server
: Enter your login password.
tab.
6.
9
Maintaining Your Printer
Page 43

•
SMTP Server Connection Timeout
(30 to 120 seconds) at which the printer attempts to send email from the SMTP server to the specified e-mail address.
Reply Address
•
necessary, you can have the reply message sent to a
particular e-mail address. This is where y ou can enter the email address to which you want replies sent.
: When the printer generates e-mail, if
: Set the time interval
Recipient List & Conditions
Configure the e-mail options for the printer.
The following items can be configured:
SysAdmin E-mail Address
•
the system administrator.
Key User E-mail Address
•
which the printer should send e-mail notifications.
Service E-mail Address
•
service center or service representative.
•
Consumable Shortage Warning
printer will send a warning message when a ppr oximately
10% of a consumable item remains.
•
Consumable & Printer Setup Review
the printer will send the message detailing the status of the
printer and consumables each time the printer prints 1000
pages.
History
•
the replacement time of consumables, and error messages.
: Select to whom the printer will send a history of
: Enter the e-mail address of
: Enter the e-mail address to
: Enter the e-mail address of a
: Select to whom the
: Select to whom
Setting the Contact Information Tab
Select the
the
Name
•
company’s name or office designation.
Phone Number
•
any E-mail Notification mail.
•
Location
E-mail Notification mail.
•
Address
NOTE
may prevent e-mail transmission.
Support
Contact Information
: Enter the e-mail sender’s name, such as your
: Enter position information to be recorded in any
: Enter the sender’s e-mail address.
: It is possible that an installed firewall in the network
tab to view and enter some information in
section.
: Enter a phone number to be recorded in
•
Alert
: Select to whom the printer will send recent error
messages.
Select Notifications
•
receive each notification.
: Set whether or not you want to
Toner Ordering System
The Toner order system allows the printer, when it senses that
a toner cartridge is nearly empty, to send an order for toner to
a specified address.
Configure the settings to enable the toner order system.
The following items can be configured:
Enable
•
when it is low on toner.
•
Phone number
retailer’s phone number.
E-mail
•
address.
URI
•
: Select whether or not the printer sends an e-mail
: Enter the Samsung dealer’s or the
: Enter the Samsung dealer’s or the retailer’s e-mail
: Enter the Samsung dealer’s or the retailer’s URI.
6.
10
Maintaining Your Printer
Page 44

7 Solving Problems
Troubleshooting Checklist
This chapter provides helpful information for what to do if y ou
encounter an error while using your printer.
This chapter includes:
• Troubleshooting Checklist
• Solving General Printing Problems
•Clearing Paper Jams
• Solving Print Quality Problems
• Understanding Display Messages
• Common Windows Problems
• Common Macintosh Problems
• Common Linux Problems
If the printer is not working properly, consult the following
checklist. If the printer does not pass a step, follow the
corresponding troubleshooting suggestions.
Status Response
Make sure that the
Line/Continue
on the control panel is
green and “Ready” is
shown on the
SmartPanel program
window or the control
panel display (CLP-600N
only).
Print a demo page to
verify that the printer is
feeding paper correctly.
See 2.7. (CLP-600N
only)
Check the demo page to
see if it is printed
correctly. (CLP-600N
only)
On
button
• If the button light is off, check the power cord
connection. Check the power switch. Check the
power source by plugging the power cord into
another outlet.
• If the button light is orange, check the display
message and go to “Understanding Display
Messages” on page 7.14.
• If a demo page does not print, check the paper
supply in the paper tray.
• If the paper jams in the printer , go to “Clearing
Paper Jams” on page 7.4.
• If an error message appears on the display, go
to “Understanding Display Messages” on
page 7.14 .
If there is a print quality problem, go to “Solving
Print Quality Problems” on page 7.12.
Print a short document
from a software
application to verify that
the computer and printer
are connected and are
communicating correctly .
If completing the
checklist does not
resolve the printer
problem, check the
following troubleshooting
sections.
• If the page does not print, check the cable
connection between the printer and the
computer.
• Check the print queue or print spooler to see if
the printer has been paused.
• Check the software application to ensure that
you are using the proper printer driver and
communication port. If the page is interrupted
during printing, go to “Solving General Printing
Problems” on page 7.2.
• See “Solving General Printing Problems” on
page 7.2.
• See “Understanding Display Messages” on
page 7.14 .
• See “Common Windows Problems” on
page 7.16 .
•See “Common Macintosh Problems” on
page 7.16 .
• See “Common Linux Problems” on page 7.16.
7.
1
Solving Problems
Page 45
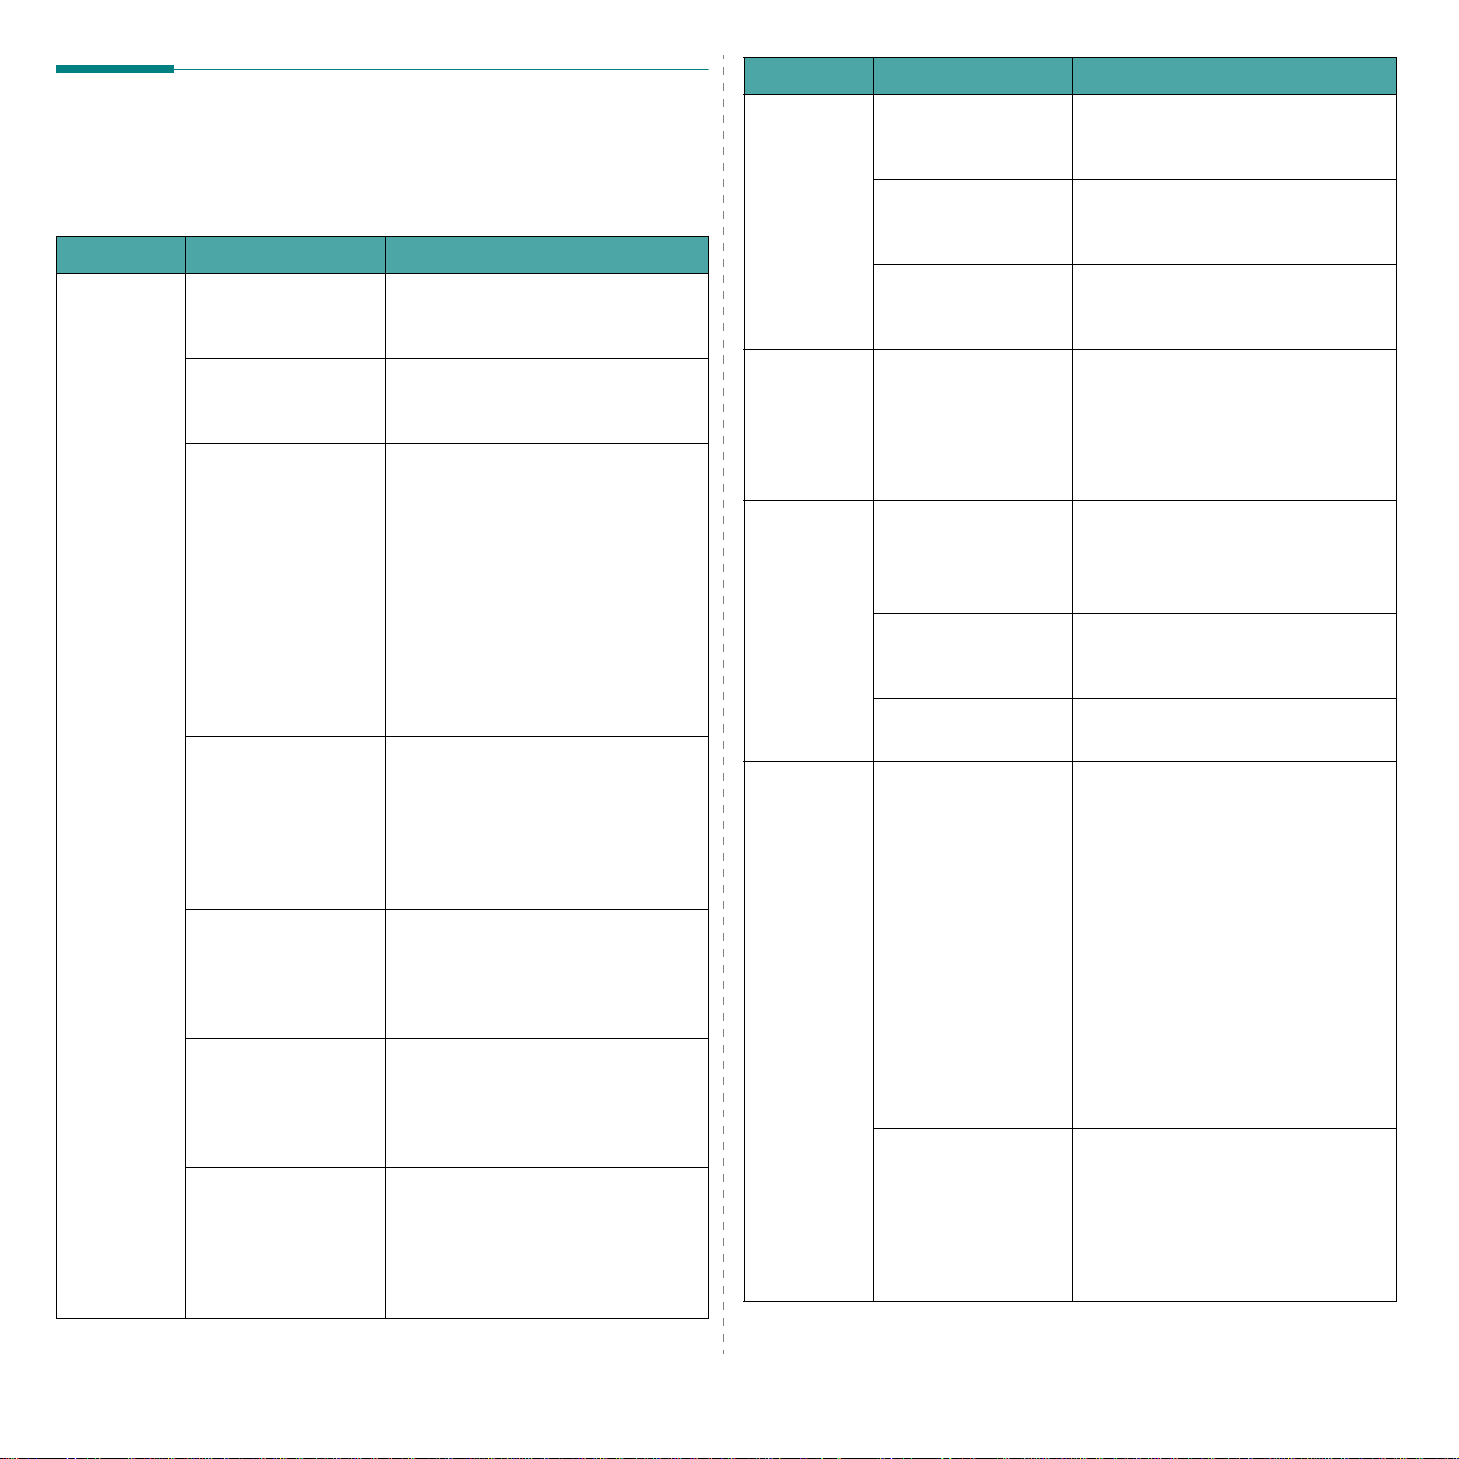
Solving General Printing
Problems
For problems with the operation of your printer, refer to the
table for suggested solutions.
Problem Possible Cause Solution
The printer
does not
print.
The printer is not
receiving power.
The printer is not
selected as the
default printer.
Check the printer for
the following:
• The printer cover is
not closed.
• Paper is jammed. • Clear the paper jam. See 7.4.
• No paper is loaded. • Load paper. See 2.4.
• The toner cartridge
is not installed.
The printer may be in
manual feed mode
and out of paper.
The connection cable
between the
computer and the
printer is not
connected properly.
The connection cable
between the
computer and the
printer is defective.
The port setting is
incorrect.
Check the power cord connections.
Check the power switch and the
power source.
Select
Samsung CLP-600 Series
as your default printer.
After locating the problem, clear it.
If a printer system error occurs,
contact your service representative.
• Close the printer cover.
• Install the toner cartridge. See
2.2.
Check the message on the
SmartPanel program window or the
control panel display (CLP-600N
only), add paper to the Multipurpose Tray, and press the
Line/Continue
printer’s control panel.
Disconnect the printer cable and
reconnect it.
If possible, attach the cable to
another computer that is working
properly and try to print a
document. Yo u c an als o try usin g a
different printer cable.
Check the Windows printer setting
to make sure that the print job is
sent to the correct port. If the
computer has more than one port,
make sure that the printer is
attached to the correct one.
button on the
On
Problem Possible Cause Solution
The printer
does not
print.
(continued)
The printer
selects print
materials
from the
wrong paper
source.
Paper does
not feed into
the printer.
A print job is
extremely
slow.
The printer may be
configured
incorrectly.
The printer driver
may be incorrectly
installed.
The printer is
malfunctioning.
The paper source
selection in the
printer properties
may be incorrect.
Paper has been
loaded incorrectly.
There is too much
paper in the paper
tray.
The paper is too
thick.
The job may be very
complex.
If using Windows
98SE/Me, the
Spooling Setting may
be set incorrectly.
Check the printer properties to
ensure that all of the print settings
are correct.
Reinstall the printer driver; see the
Software User’s Guide
printing a demo page.
Check the display message on the
control panel to determine if the
printer is indicating a system error.
For many software applications, the
paper source selection is found
under the
printer properties window. Select
the correct paper source. For details,
see the
Remove paper from the tray and
reload it correctly.
Check that the paper size adjusters
are set correctly.
Remove excess paper from the tray.
Use only paper that meets printer
specifications.
Reduce the complexity of the
page(s) or try adjusting the print
quality settings.
Adjust the print quality settings,
such as reducing the resolution. If
you have set the resolution to Best,
change it to Normal or
See the
Change the port setting to the USB
or network port to improve print
speed.
Your printer prints A4-sized paper at
20 ppm and letter-sized paper at 21
ppm.
From the
Settings
the
printer icon, choose
click the
choose the
Select the desired spool setting.
Paper tab within the
Software User’s Guide
Software User's Guide.
Start
menu, choose
and
Printers
Samsung CLP-600 Series
Details
tab, and then
Spool Settings
. Try
Draft.
. Right-click
Properties
button.
.
,
7.
2
Solving Problems
Page 46
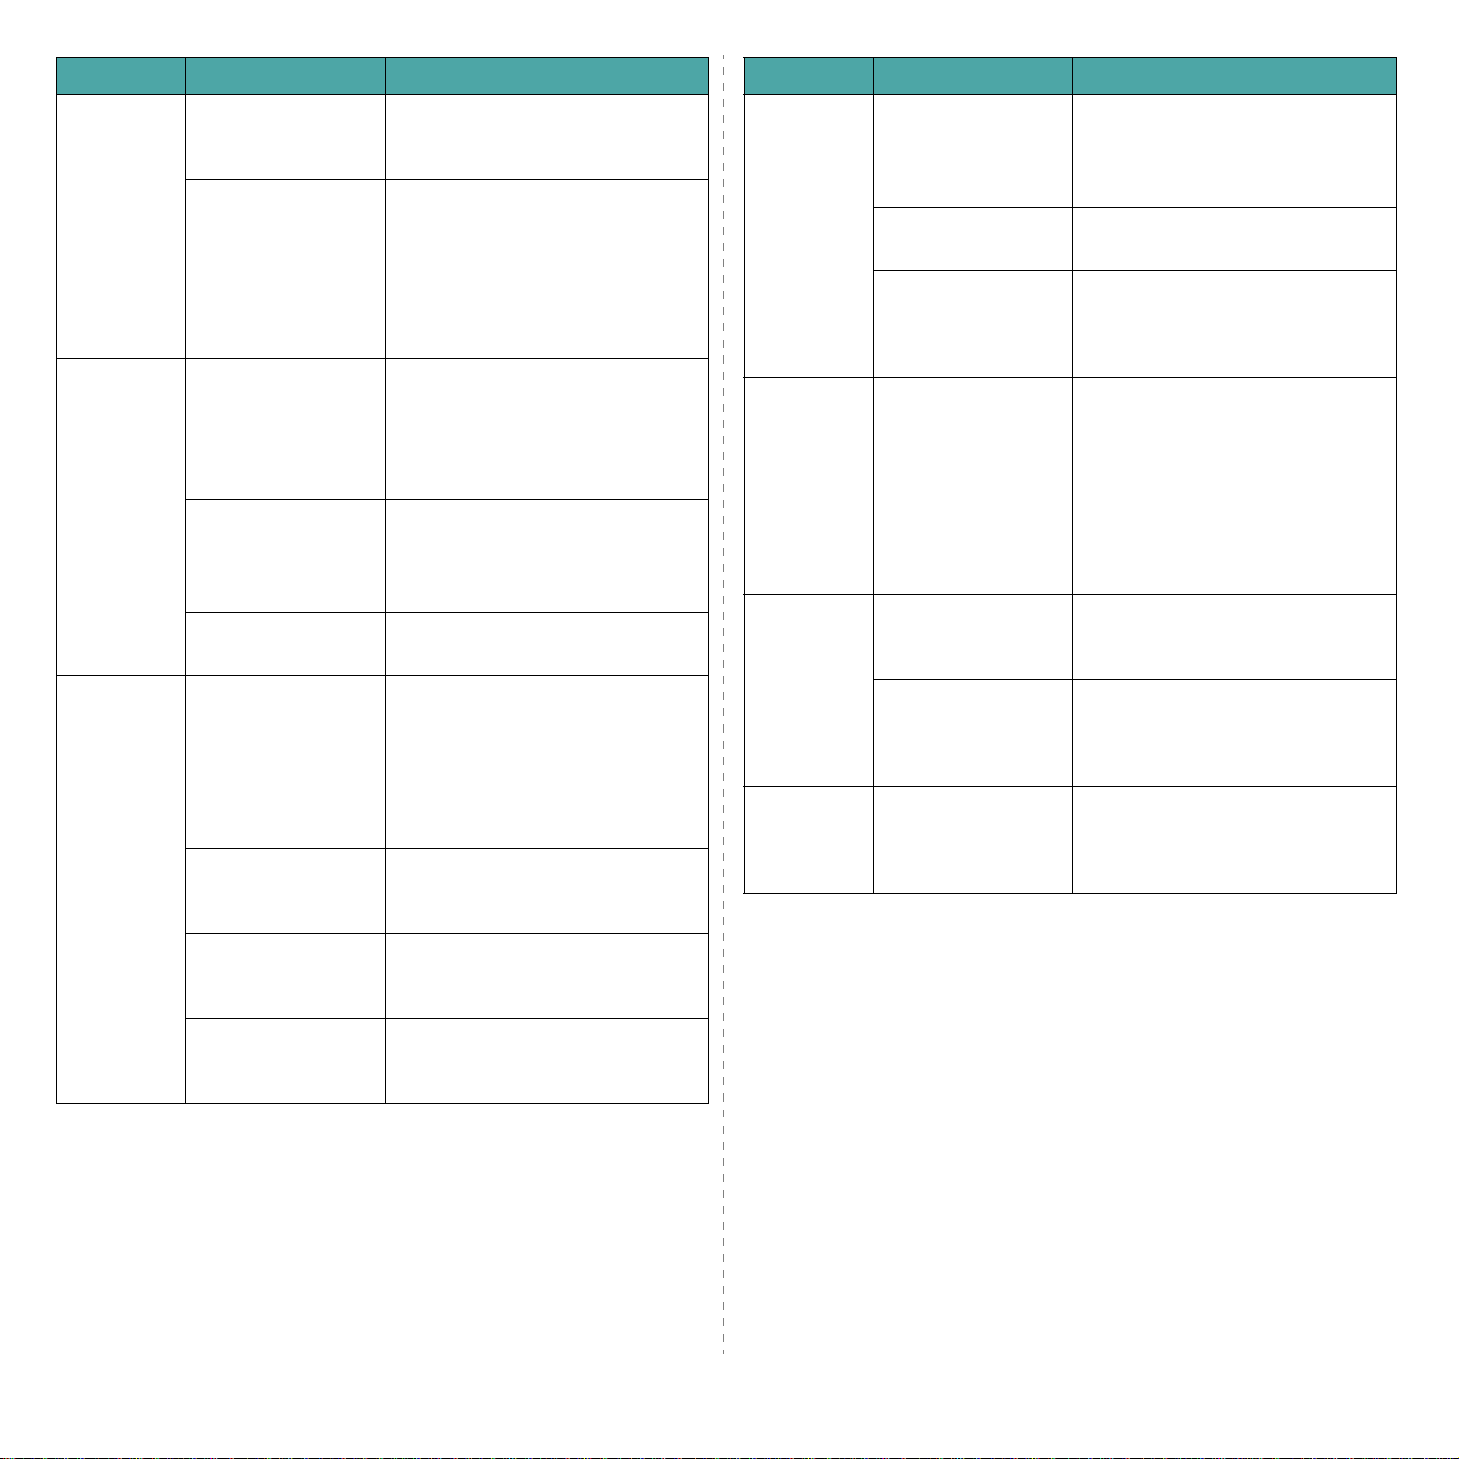
Problem Possible Cause Solution
Problem Possible Cause Solution
Half the
page is
blank.
The paper
keeps
jamming.
The printer
prints, but
the text is
wrong,
garbled, or
incomplete.
The page orientation
setting may be
incorrect.
The paper size and
the paper size
settings do not
match.
There is too much
paper in the paper
tray.
An incorrect type of
paper is being used.
There may be debris
inside the printer.
The printer cable is
loose or defective.
The wrong printer
driver was selected.
Change the page orientation in your
application. For details, see the
Software User’s Guide
Ensure that the paper size in the
printer driver settings matches the
paper in the tray.
Or, ensure that the paper size in the
printer driver settings matches the
paper selection in the software
application settings you use.
Remove excess paper from the tray.
If printing on special materials, use
the Multi-purpose Tray.
Check that the paper size adjusters
are set correctly.
Use only paper that meets printer
specifications.
If printing on special materials, use
the Multi-purpose Tray.
Open the access door and remove
the debris.
Disconnect and reconnect the
printer cable. T ry a print job that you
have already printed successfully. If
possible, attach the cable and
printer to another computer and try
a print job that you know works.
Finally, try a new printer cable.
Check the application's printer
selection menu to ensure that your
printer is selected.
.
Pages print,
but are
blank.
When you
are using
Windows
98SE, the
illustrations
print
incorrectly
from Adobe
Illustrator.
The print
quality of
photos is not
good.
Images are
not clear.
Your printer
has an odd
smell during
initial use.
The toner cartridge is
defective or out of
toner.
The file may have
blank pages.
Some parts, such as
the controller or the
board, may be
defective.
The setting in the
software application
is wrong.
The resolution is set
to Normal or
The resolution of the
photo is very low.
The oil used to
protect the fuser is
evaporating.
Draft.
Redistribute the toner. If necessary,
see page 6.2.
If necessary, replace the toner
cartridge.
Check the file to ensure that it does
not contain blank pages.
Contact a service representative.
Download as Bit Image
Select
Advanced Options
the
the graphic properties window. Print
the document again.
Change the resolution to
then try to print again.
If you increase the photo size in the
software application, the resolution
will be reduced. Reduce the photo
size.
After printing about 100 color pages,
there will be no more smell. It is a
temporary issue.
window of
Best and
in
The software
application is
malfunctioning.
The operating syste m
is malfunctioning.
Try printing a job from another
application.
Exit Windows and reboot the
computer. Turn the printer off and
then back on again.
Solving Problems
7.
3
Page 47
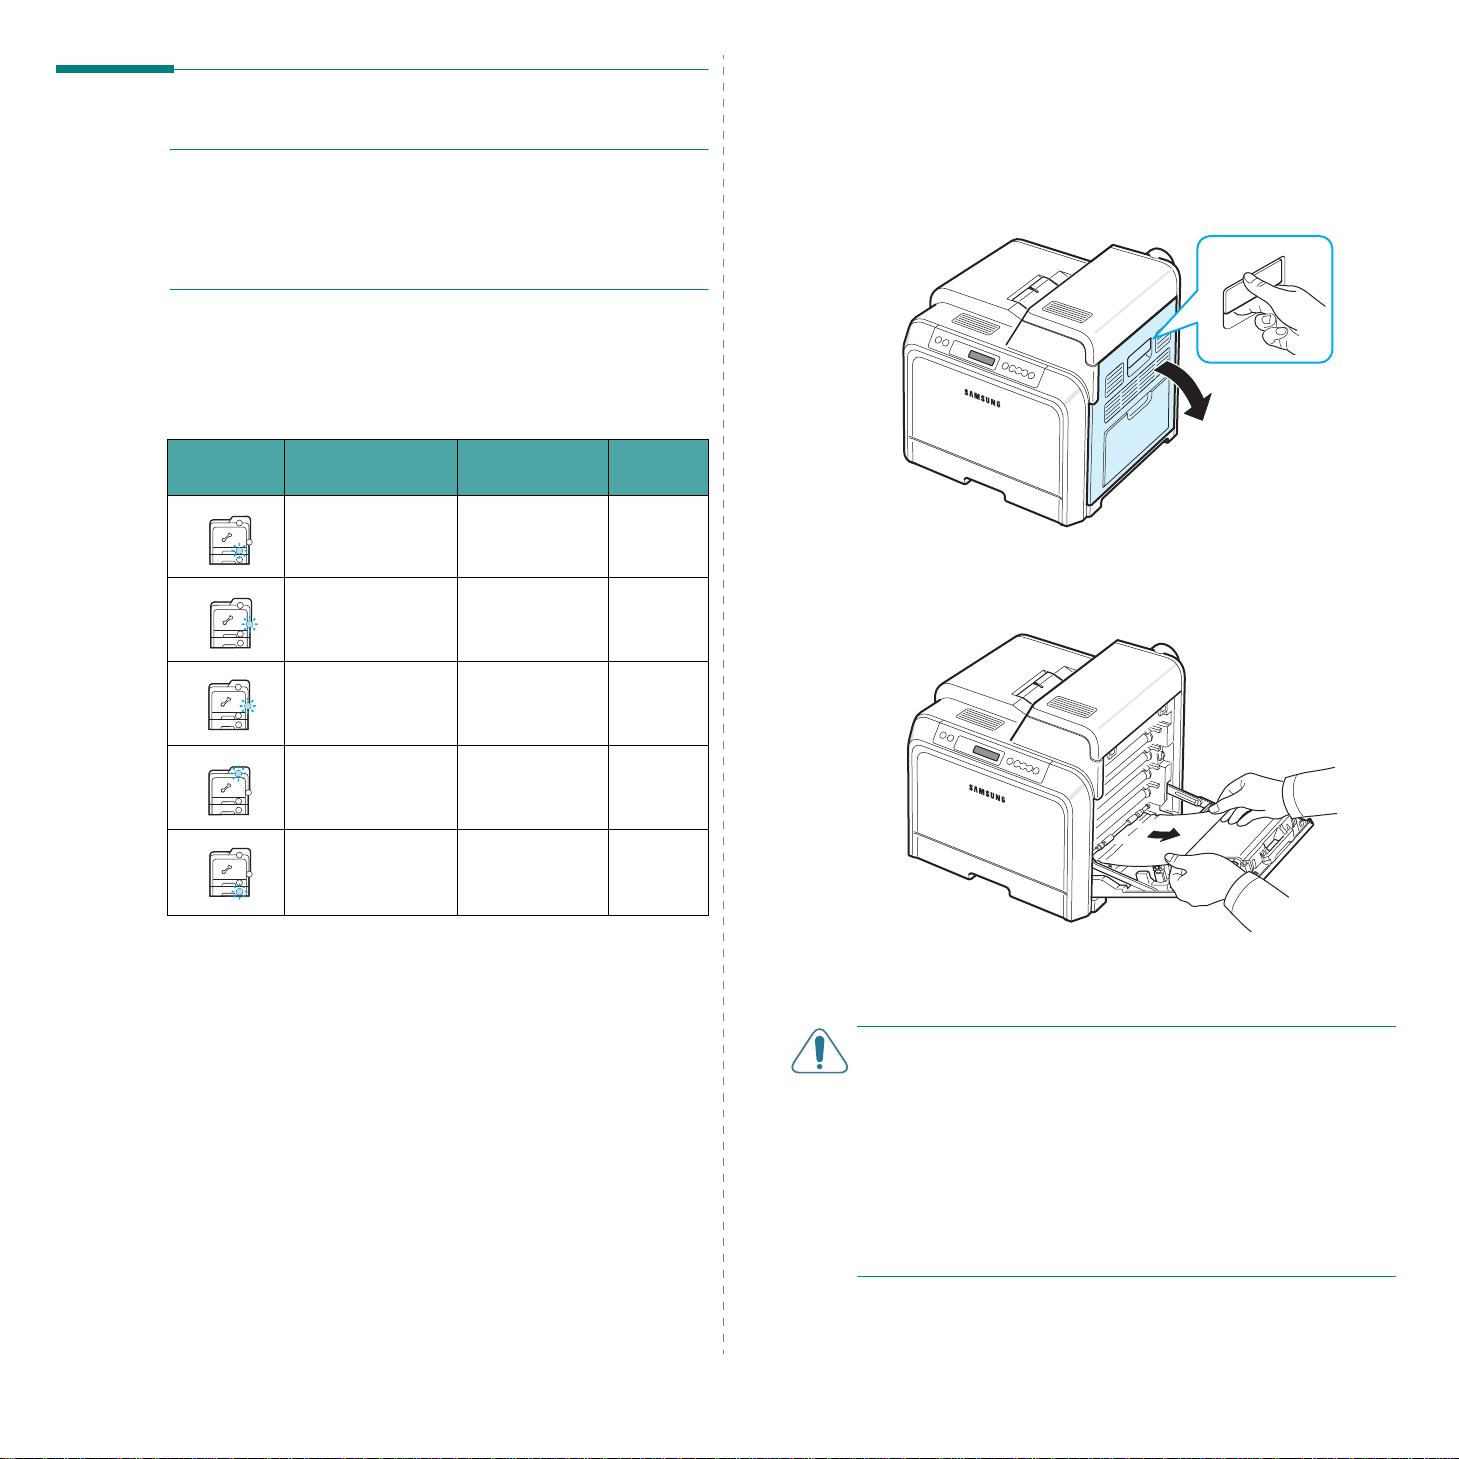
Clearing Paper Jams
NOTE
: When removing paper that is jammed in the printer, if
possible always pull the paper in the direction that it normally
moves so as not to damage internal components. Always pull
firmly and evenly; do not jerk the paper. If the paper tears,
ensure that all fragments of paper are removed; otherwise a
jam will occur again.
When a paper jam occurs, a lamp turns on at the corresponding
location on the Status map of the control panel. If you use the
CLP-600N, the display on the control panel also tells you where
the paper jam has occurred. Refer to the table below to locate
the paper jam and to clear it:
In the Paper Feed Area
If paper is jammed in the paper feed area, a lamp turn s on a t
the corresponding location on the Status map. If you use the
CLP-600N, “Jam0 In Tray1” also appears on the display.
1
Using the handle, completely open the access door.
LED on
Status Map
To resume printing after clearing paper jams, you must open
and close the access door.
Message (CLP-
600N only)
Jam0 In Tray1 In the paper
Jam0 In MP T ray In the multi-
Jam
Inside Printer
Jam
In Exit Area
Jam0 In Tray2 In the optional
Location of
Jam
feed area
purpose tray
Inside printer page 7 .6
In the paper
exit area
tray 2
GoTo
page 7.4
page 7.5
page 7.7
page 7.8
2
Carefully remove the paper by pulling in the d irectio n as
shown below. Go to step 6.
If you cannot find the jammed paper, or if there is any
resistance removing the paper, stop pulling, and go to step
3.
7.
4
Solving Problems
CAUTION
• Do not touch the green surface, the OPC drum, on the front
of each toner cartridge with your hands or any other
material. Use the handle on each cartridge in order to avoid
touching this area.
• Be careful not to scratch the surface of the paper transfer
belt.
• If you leave the access door open for more than a few
minutes, the OPC drum can be exposed to light. This will
cause damage to the OPC drum. Close the access door
should the installation need to be halted for any reason.
:
Page 48
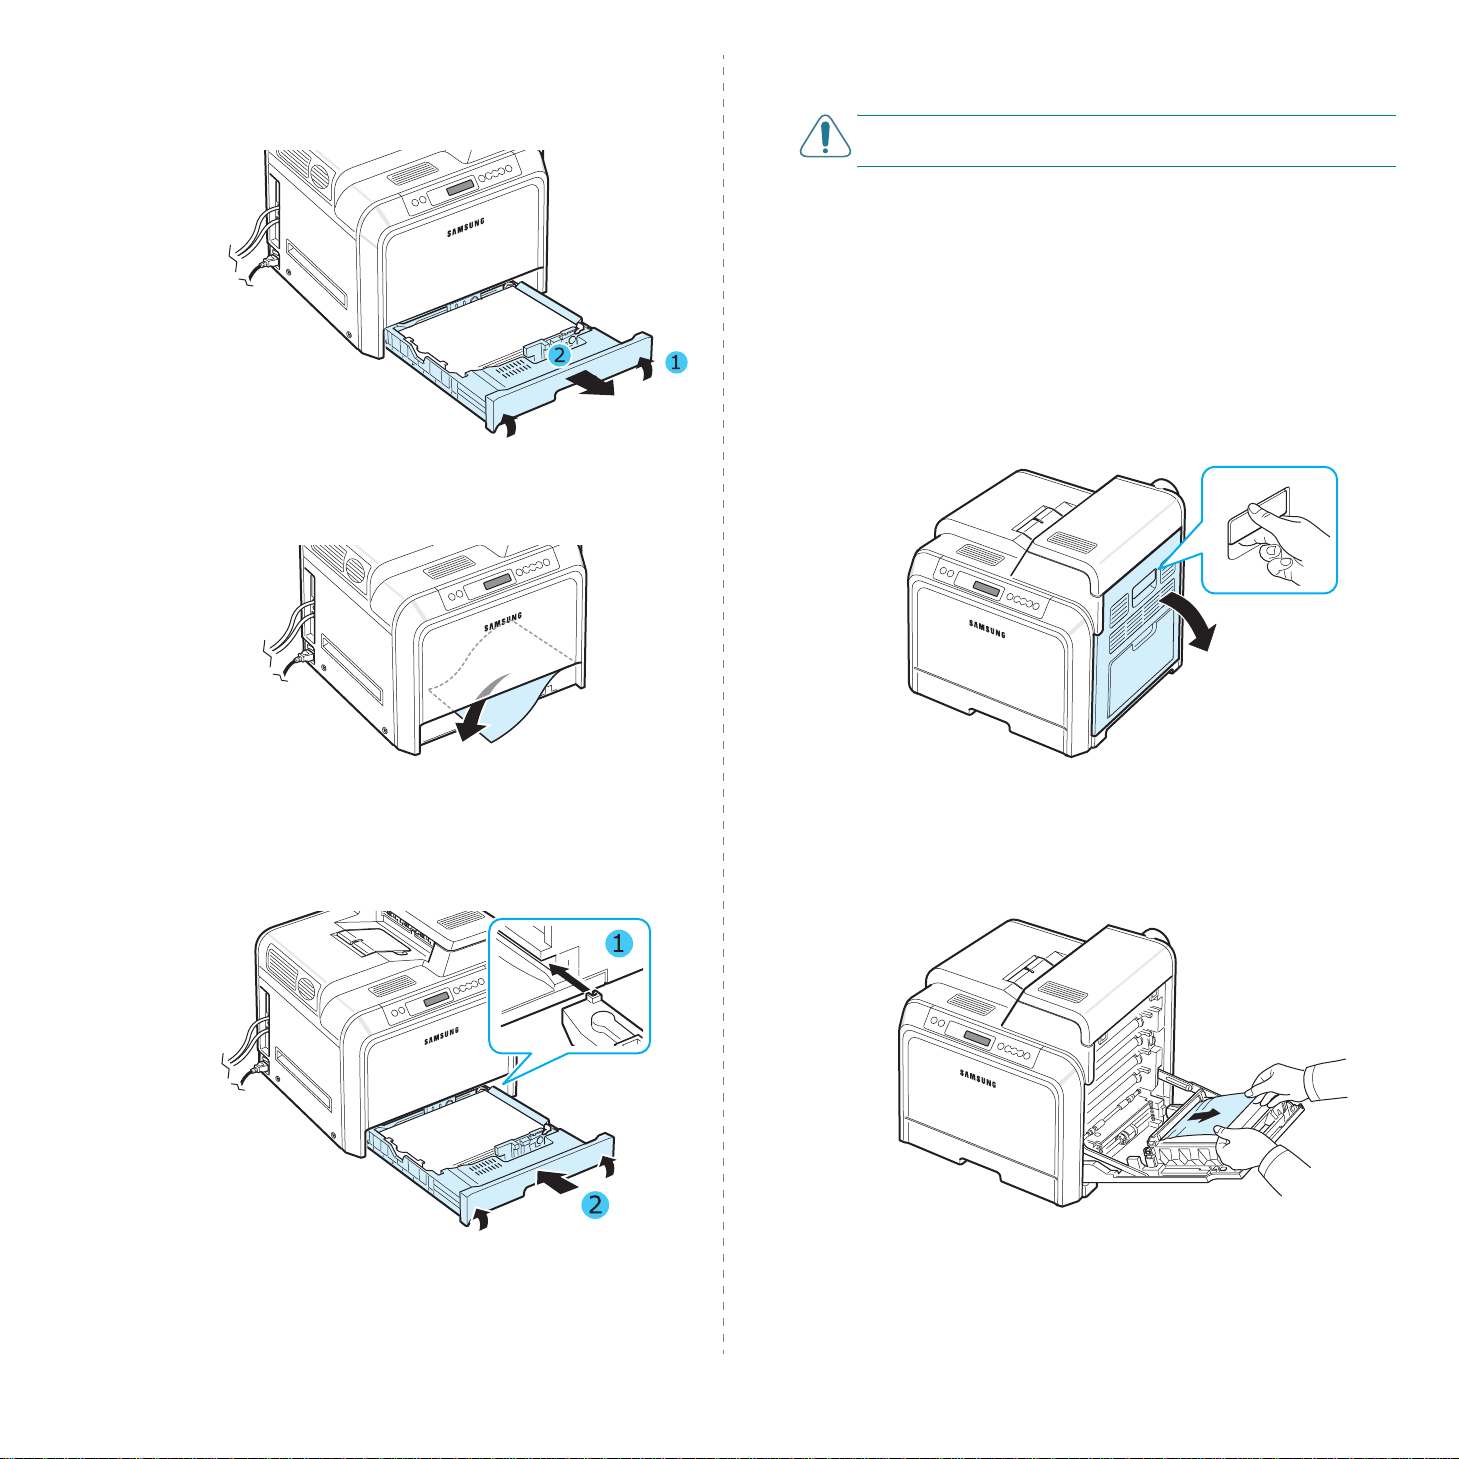
3
Pull the tray open. After you pull it all the way out, lift up
the front part of the tray slightly to release the tray from
the printer.
4
Remove the jammed paper by gently pulling it straight out
as shown below.
7
Close the access door firmly. The printer will resume
printing.
CAUTION:
printer will not operate.
If the access door is not completely closed, the
In the Multi-purpose Tray
When you print using the Multi-purpose Tray and the printer
detects that there is either no paper or the paper has been
improperly loaded, a lamp turns on at the corresponding
location on the Status map. If you use the CLP-600N, “Jam0 In
MP Tray” also appears on the display.
1
If the paper is not feeding properly, using the handle,
completely open the access door.
5
To replace the tray, lower the rear edge, align it with the
slot, and slide it into the printer.
6
After removing the jammed paper, check for paper wh ich
may be jammed in other parts of the printer.
7.
5
Solving Problems
2
Remove the jammed paper by pulling in the direction
shown. To avoid tearing the paper, pull it out gently and
slowly.
 Loading...