

SAMSUNG DCB-H360, DCB-H360RA User Manual

DCB-H360R
Instructions for use
GB
MF68-00397A
DIGITAL CABLE HD RECEIVER
REV. 1.1
DIGITAL CABLE HD RECEIVER
SAFETY INSTRUCTIONS
This STB has been manufactured to satisfy international safety standards.
Please read the following recommended safety precautions carefully.
MAINS SUPPLY: AC 100-240V~, 50/60Hz
OVERLOADING: Do not overload wall outlets, extension cords or adapters as this
can result in fire or electrical shock.
LIQUIDS: Keep liquids away from the STB.
CLEANING: Before cleaning, disconnect the STB from the wall socket.
Use a cloth lightly dampened with water(no solvents) to clean the
exterior.
VENTILATION: Do not block the STB ventilation holes. Ensure that free airflow is
maintained around the STB. Never store the STB where it is exposed
to direct sunlight or near heating equipment e.g. a radiator.
Never stack other electronic equipment on top of the STB.
Place the STB at least 30mm from the wall. Need at least 10mm from
the top and both side of the STB for ventilation.
DCB-H360R
GB
Correct Disposal of This Product
(Waste Electrical & Electronic Equipment)
(Applicable in the European Union and other European
countries with separate collection systems)
This marking shown on the product or its literature,
indicates that it should not be disposed with other
household wastes at the end of its working life. To prevent possible harm
to the environment or human health from uncontrolled waste disposal,
please separate this from other types of wastes and recycle it responsibly
to promote the sustainable reuse of material resources.
Household users should contact either the retailer where they purchased
this product, or their local government office, for details of where and
how they can take this item for environmentally safe recycling.
Business users should contact their supplier and check the terms and
conditions of the purchase contract. This product should not be mixed
with other commercial wastes for disposal.
ATTACHMENTS: Do not use any attachment that is not recommended by the
manufacturer; it may cause a hazard or damage the equipment.
SERVICING: Do not attempt to service this product yourself.
Any attempt to do so will make the warranty invalid.
Refer all servicing to a qualified service agent.
LIGHTNING: If the STB is installed in an area subject to intense lightning activity,
protection devices for the STB mains connector and modem telephone
line are essential. The individual manufacturer’s instruction for
safeguarding other equipment, such as TV set, Hi-Fi, etc., connected
to the STB must also be followed during lightning storms.
GROUNDING: CATV cable MUST BE EARTHED.
The grounding system must comply with local regulations.
NNoottee : Dispose the used batteries at designated place for environment protection.
To disconnect the apparatus from the mains, the plug must be pulled out from the
mains socket, therefore the mains plug shall be readily operable.
GB-1

DCB-H360R
DCB-H360R
TECHNICAL OVERVIEW
TECHNICAL OVERVIEW
What are SDTV and HDTV ?
SDTV
SDTV is a digital TV format that provides a high quality picture at resolutions that can be
displayed on standard TV sets (see more on resolutions later in this chapter).
HDTV
HDTV is a digital TV format that provides the highest quality picture at resolutions that can be
displayed on computer monitors and HDTV-ready TV displays (see more on resolutions later in
this chapter).
Resolution
Resolution refers to the number of pixels on the screen. The higher the resolution, the better
the visual quality.
Digital broadcasts are classified into HD and SD grades according to the visual quality. In
general, HD (High Definition) grade supports resolutions of 1920x1080i and 1280x720p and an
aspect ratio of 16:9 for both ATSC and DVB standards.
SD (Standard Definition) grade supports resolutions of 720x480p and 720x480i for the ATSC
standard, and supports resolutions of 720x576p and 720x576i for the DVB standard.
SD grade usually supports an aspect ratio of 4:3. However, it may differ depending on the
region.
DVB-C ( Cable Digital Video Broadcasting)
Aspect ratio
In addition to resolution, HDTV is also defined by the aspect ratio of its broadcasts.
Aspect ratio means the shape of the screen as defined by the ratio of the screen’s width to its
height. For analog TV and SDTV, the aspect ratio is 4 units wide by 3 units high (usually written
4:3). This is the familiar shape of conventional TVs — slightly wider than they are tall.
For HDTV broadcasts, the aspect ratio is 16:9 (nearly twice as wide as it is tall).
This is, not coincidentally, more like the shape of movies shown in theaters.
This makes HDTV an ideal format for broadcasting and viewing movies on a TV.
But what happens if you are watching a nearly square-shaped 4:3 broadcast on a rectangular
16:9 TV, or vice-versa? The HD Receiver allows you to choose from a variety of screen formats
to help you deal with those scenarios.
GB
Dolby®Digital 5.1
Dolby Digital 5.1 provides 5 discrete channels of digital audio information for use by A/V receivers
capable of decoding the 5.1 channel signal.
The audio signals are broken into left-front, center, right-front, left-rear, right-rear and a
low-frequency effects channel (designed for subwoofers).
The result when connected to a compatible Dolby Digital 5.1 channel A/V receiver and speaker
setup is a home theater experience that provides much of the dynamic range, 360-degree
imaging, and sonic excitement of a real theater.
To take full advantage of the Dolby Digital 5.1 capabilities of the HD Receiver, you will need a
Dolby Digital 5.1 compatible A/V receiver connected to the HD Receiver through the Dolby Digital
Optical jack.
AC-3 is a sound encoding/decoding technology developed in 1987 for movie theatres and means
an AC-3 bit stream. AC-3 is used synonymously with Dolby Digital nowadays.
Digital video broadcasting - cable (DVB-C) is European standard DVB for digital broadcasting
transmission via cable. DVB-C system provide audio/video digital transmission through mpeg-2
format and utilize QAM modulation system.
DVB-C standard has been developed so that a digital broadcasting signal can be sent through
VHF/UHF channels. The advantages of this standard are relatively protected environment with
respect to distortion and signal path attenuation so a higher signal to noise ratio can be
achieved and no negative effect from multipath so higher order modulation schemes can be
implemented.
GB-2
DIGITAL CABLE RECEIVER
HDMI (High Definition Multimedia Interface)
HDMI is an interface to enable the digital transmission of video and audio data with just
a single connector.Using HDMI the receiver transmits a digital video and audio signal
and displays as a vivid picture on a TV having an HDMI input jack.
GB-3

DCB-H360R
DCB-H360R
CONTENT
Safety Instructions . . . . . . . . . . . . . . . . . . . . . . . . . . . . . . . . . . . . . 1
Technical Overview . . . . . . . . . . . . . . . . . . . . . . . . . . . . . . . . . . . . . 2
Content . . . . . . . . . . . . . . . . . . . . . . . . . . . . . . . . . . . . . . . . . . . . . . 4
General Features . . . . . . . . . . . . . . . . . . . . . . . . . . . . . . . . . . . . . . . 5
Connecting Your “STB” . . . . . . . . . . . . . . . . . . . . . . . . . . . . . . . . . 6
Description . . . . . . . . . . . . . . . . . . . . . . . . . . . . . . . . . . . . . . . . . . . 12
Front Panel . . . . . . . . . . . . . . . . . . . . . . . . . . . . . . . . . . . . . . . . . . 12
Rear Panel. . . . . . . . . . . . . . . . . . . . . . . . . . . . . . . . . . . . . . . . . . . 13
Remote Control Unit. . . . . . . . . . . . . . . . . . . . . . . . . . . . . . . . . . . . 14
Basic Functions. . . . . . . . . . . . . . . . . . . . . . . . . . . . . . . . . . . . . . . . 16
Operating The Receiver . . . . . . . . . . . . . . . . . . . . . . . . . . . . . . . . . 22
Main Menu . . . . . . . . . . . . . . . . . . . . . . . . . . . . . . . . . . . . . . . . . . . . 22
1. Installation . . . . . . . . . . . . . . . . . . . . . . . . . . . . . . . . . . . . . . . . 22
1.1 Manual Scanning . . . . . . . . . . . . . . . . . . . . . . . . . . . . . . . 23
1.2 Parental Control . . . . . . . . . . . . . . . . . . . . . . . . . . . . . . . . 23
1.3 Reset to Factory Defaults . . . . . . . . . . . . . . . . . . . . . . . . . 24
1.4 Software Update . . . . . . . . . . . . . . . . . . . . . . . . . . . . . . . . 24
2. Channel . . . . . . . . . . . . . . . . . . . . . . . . . . . . . . . . . . . . . . . . . . 24
2.1 Update List . . . . . . . . . . . . . . . . . . . . . . . . . . . . . . . . . . . . 24
2.2 Favorite Channels . . . . . . . . . . . . . . . . . . . . . . . . . . . . . . . 25
2.3 Set Channel Lock . . . . . . . . . . . . . . . . . . . . . . . . . . . . . . . 25
3. System . . . . . . . . . . . . . . . . . . . . . . . . . . . . . . . . . . . . . . . . . . . 26
3.1 Language Selection. . . . . . . . . . . . . . . . . . . . . . . . . . . . . . 26
3.2 OSD Settings . . . . . . . . . . . . . . . . . . . . . . . . . . . . . . . . . . 27
3.3 Media Settings . . . . . . . . . . . . . . . . . . . . . . . . . . . . . . . . . 28
3.4 Change PIN Code . . . . . . . . . . . . . . . . . . . . . . . . . . . . . . . 29
3.5 Timer Settings. . . . . . . . . . . . . . . . . . . . . . . . . . . . . . . . . . 29
3.6 System Information . . . . . . . . . . . . . . . . . . . . . . . . . . . . . . 30
4. Mail Box . . . . . . . . . . . . . . . . . . . . . . . . . . . . . . . . . . . . . . . . . . 30
5. Irdeto Menu. . . . . . . . . . . . . . . . . . . . . . . . . . . . . . . . . . . . . . . . 31
5.1 CA Status . . . . . . . . . . . . . . . . . . . . . . . . . . . . . . . . . . . . . 31
5.2 IRD Status . . . . . . . . . . . . . . . . . . . . . . . . . . . . . . . . . . . . 31
5.3 Loader Status . . . . . . . . . . . . . . . . . . . . . . . . . . . . . . . . . . 31
Available TV Manufacturer Numbers . . . . . . . . . . . . . . . . . . . . . . . 32
Troubleshooting . . . . . . . . . . . . . . . . . . . . . . . . . . . . . . . . . . . . . . . 38
Disposal . . . . . . . . . . . . . . . . . . . . . . . . . . . . . . . . . . . . . . . . . . . . . . 38
Technical Specifications . . . . . . . . . . . . . . . . . . . . . . . . . . . . . . . . . 39
1. USER SECTION
2. TUNER SECTION
3. VIDEO SECTION
4. AUDIO SECTION
GENERAL FEATURES
DIGITAL HD/SDTV BROADCASTING RECEPTION
SOFTWARE DOWNLOAD VIA NETWORK
ADVANCED ELECTRONIC PROGRAM GUIDE
MULTI LANGUAGE SUPPORTED FOR OSD
SUBTITLE & TELETEXT(OSD ) SUPPORTED
WITH MULTI LANGUAGE
FULL FUNCTION INFRARED REMOTE CONTROL UNIT
SCART OUTPUT
LOW POWER CONSUMPTION
4 FAVORITE LISTS
AUTO UPDATED EPG
PASS LOOP FOR RGB SIGNAL
15 TIMERS TO RESERVE PROGRAMS(EVENTS) FOR TURNING
ON/OFF
VHF, UHF BAND 50.5~858 MHz
MAX 7.252 Msps SYMBOL RATE
16~256 QAM Modulation Format
RF LOOP-THROUGH OUTPUT FOR OTHER RECEIVER OR TV
DVB-C COMPLIANT
MPEG-2: HD(MP@HL), SD(MP@ML)
H.264: MP@L3, MP@L4, HP@L4 up to 30 Mbps
USER SELECTABLE OUTPUT FORMATS 1080i, 720p, 576p, (576i)
1~30 Mbps DATA RATE
SUPPORTS ASPECT RATIO 4:3(NORMAL) AND 16:9(WIDE SCREEN)
HDMI, COMPONENT, COMPOSITE, SCART
DOLBY DECODING
MPEG-1 AUDIO LAYER 1, LAYER 2
MPEG-2 AUDIO
MONO, DUAL, STEREO AND JOINT STEREO AUDIO MODE
32, 44.1 AND 48 kHz SAMPLING FREQUENCIES
VOLUME CONTROL AND MUTE FUNCTION THROUGH
REMOTE CONTROL
SPDIF DIGITAL AUDIO OUTPUT
GB
GB-4
DIGITAL CABLE RECEIVER
GB-5
DCB-H360R
YPbPrL
R
HDMI
ANT.IN
Y
P
B
PR
(OPTICAL)
AUDIO OUT
DIGITAL
HDMI OUT
RF OUT
VIDEO OUT
AUDIO OUT
VIDEO OUT
COMPONENT
AV1
(TV)
AV2
(EXT)
R
L
ANT.IN
Y
P
B
PR
H
RF OUT
VIDEO OUT
AUDIO OUT
VIDEO OUT
COMPONENT
AV1
(TV)
AV2
(EXT)
R
L
YPbPrL
R
HDMI
ANT.IN
Y
P
B
PR
RF OUT
VIDEO OUT
AUDIO OUT
VIDEO OUT
COMPONENT
R
L
ANT.IN
Y
P
B
PR
(OPTICAL)
AUDIO OUT
DIGITAL
HDMI OUT
RF OUT
VIDEO OUT
AUDIO OUT
VIDEO OUT
COMPONENT
AV1
(TV)
AV2
(EXT)
R
L
DCB-H360R
Connecting Your STB
CONNECTING YOUR “STB”
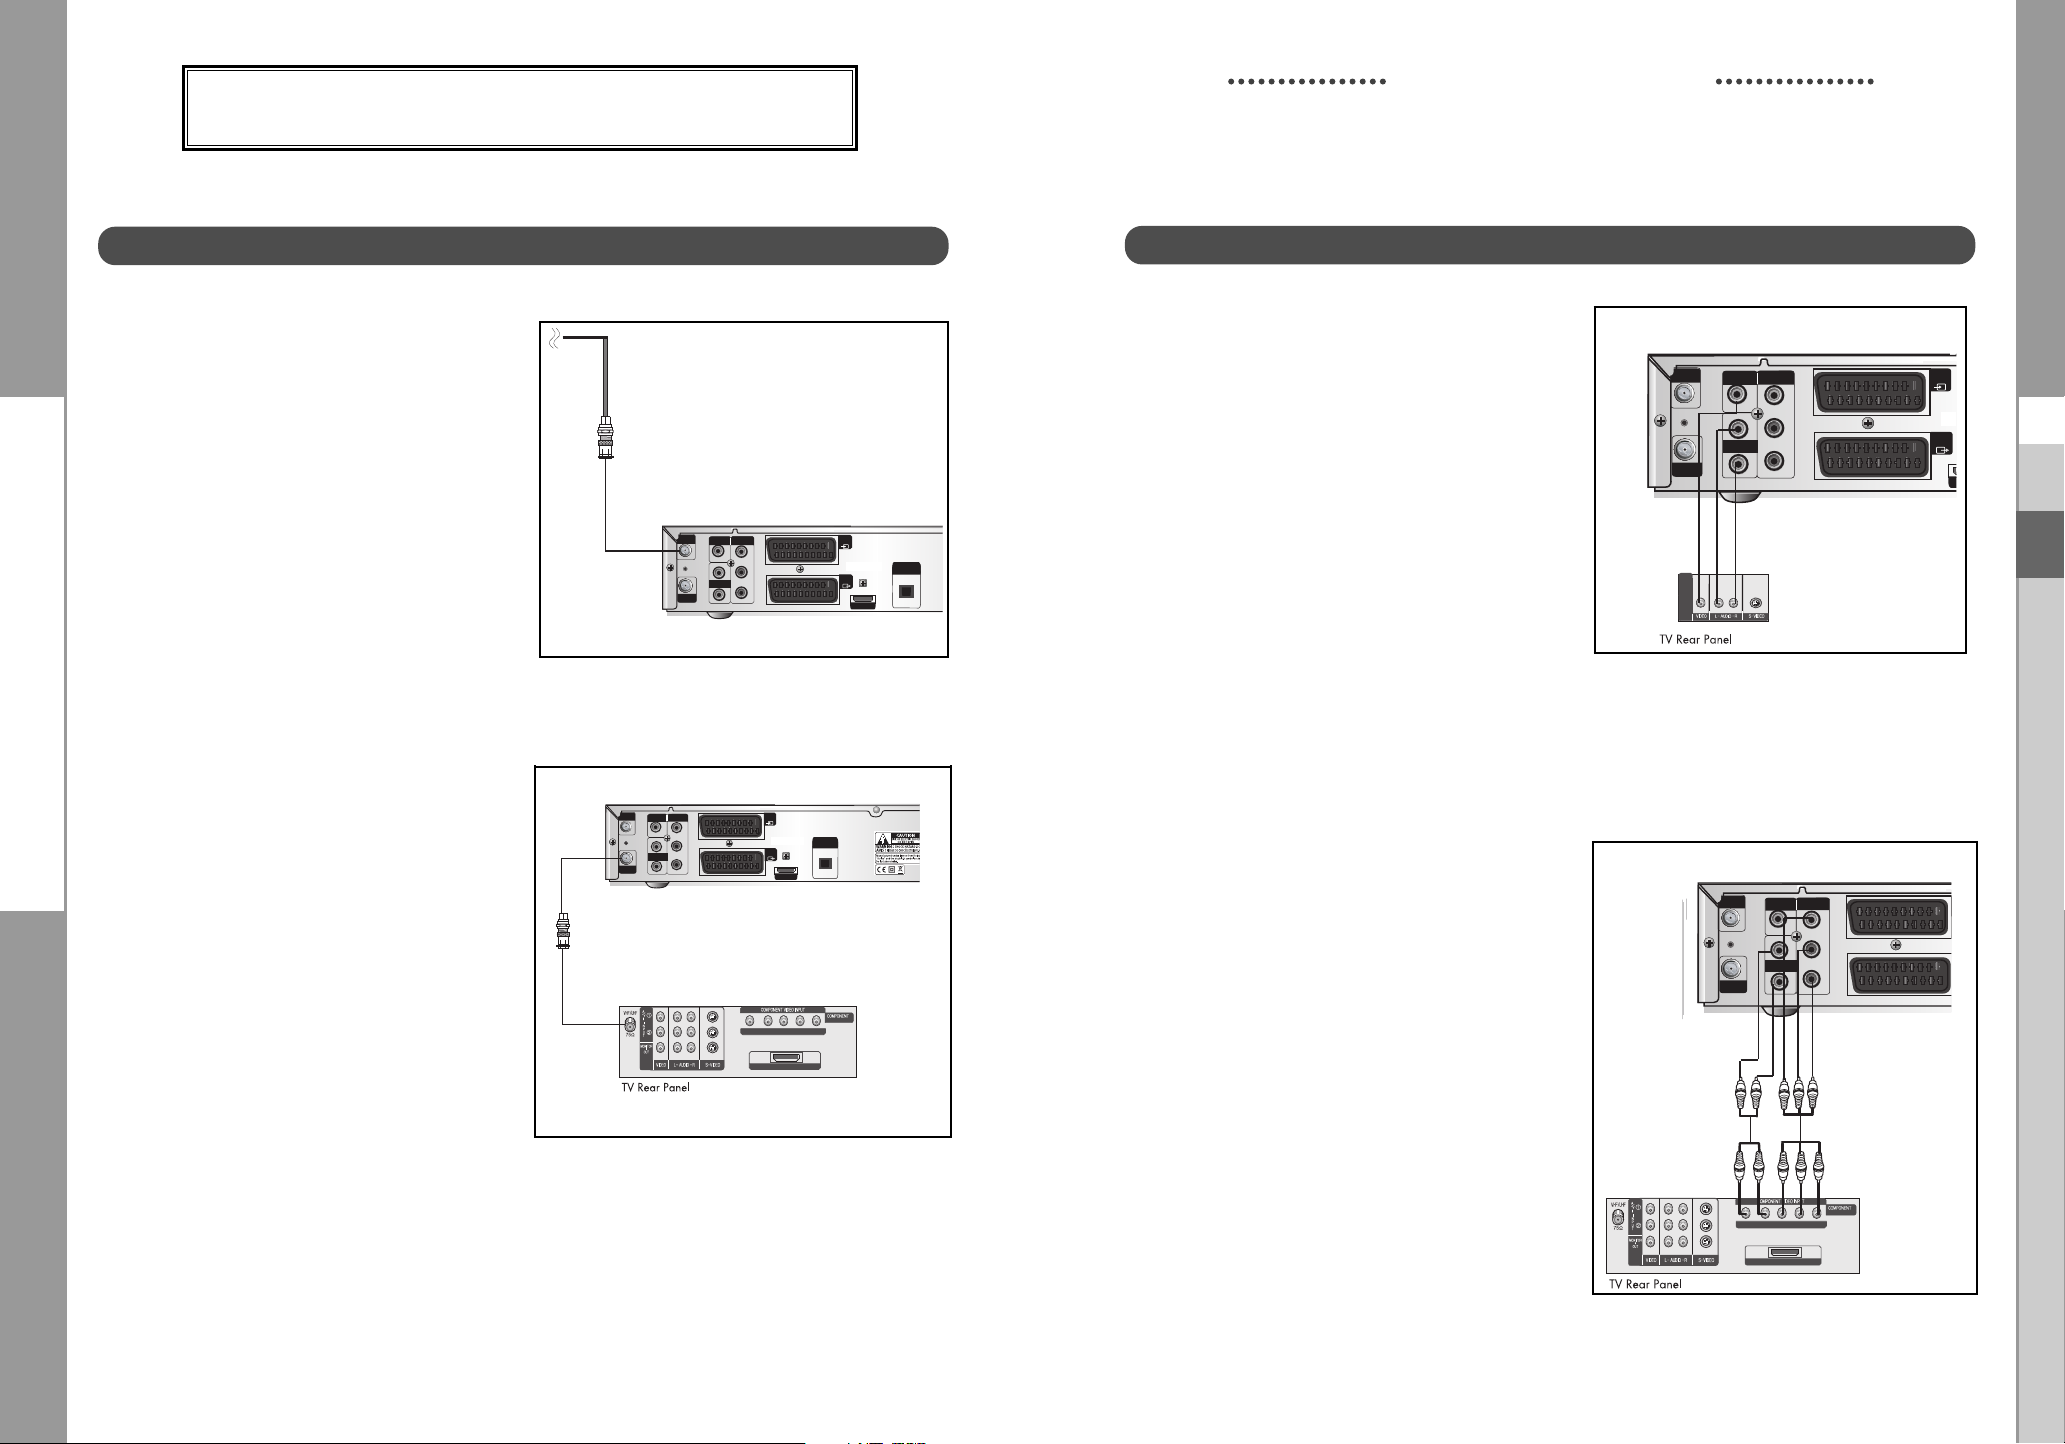
Connecting the receiver cable system
ANT.IN Connection
After installing your cable system, connect the
coaxial cable to “ANT.IN” terminal marked at the
rear of the STB.
All cable connectors should be finger tightened;
do not use any kind of wrench while tightening
connectors. The cable should be 75ohm
impedance coaxial cable.
RF OUT Connection
To facilitate the user using analog receiver
to view analog channels, STB has
been provided with a loop through terminal
marked as “RF OUT”.
Connect the coaxial cable from this terminal
to the IF input terminal of your analog
receiver. Now by keeping the STB in
standby, you will be able to tune and view
analog channels from your analog receiver.
Set-Top Box Rear Panel
Set-Top Box Rear Panel
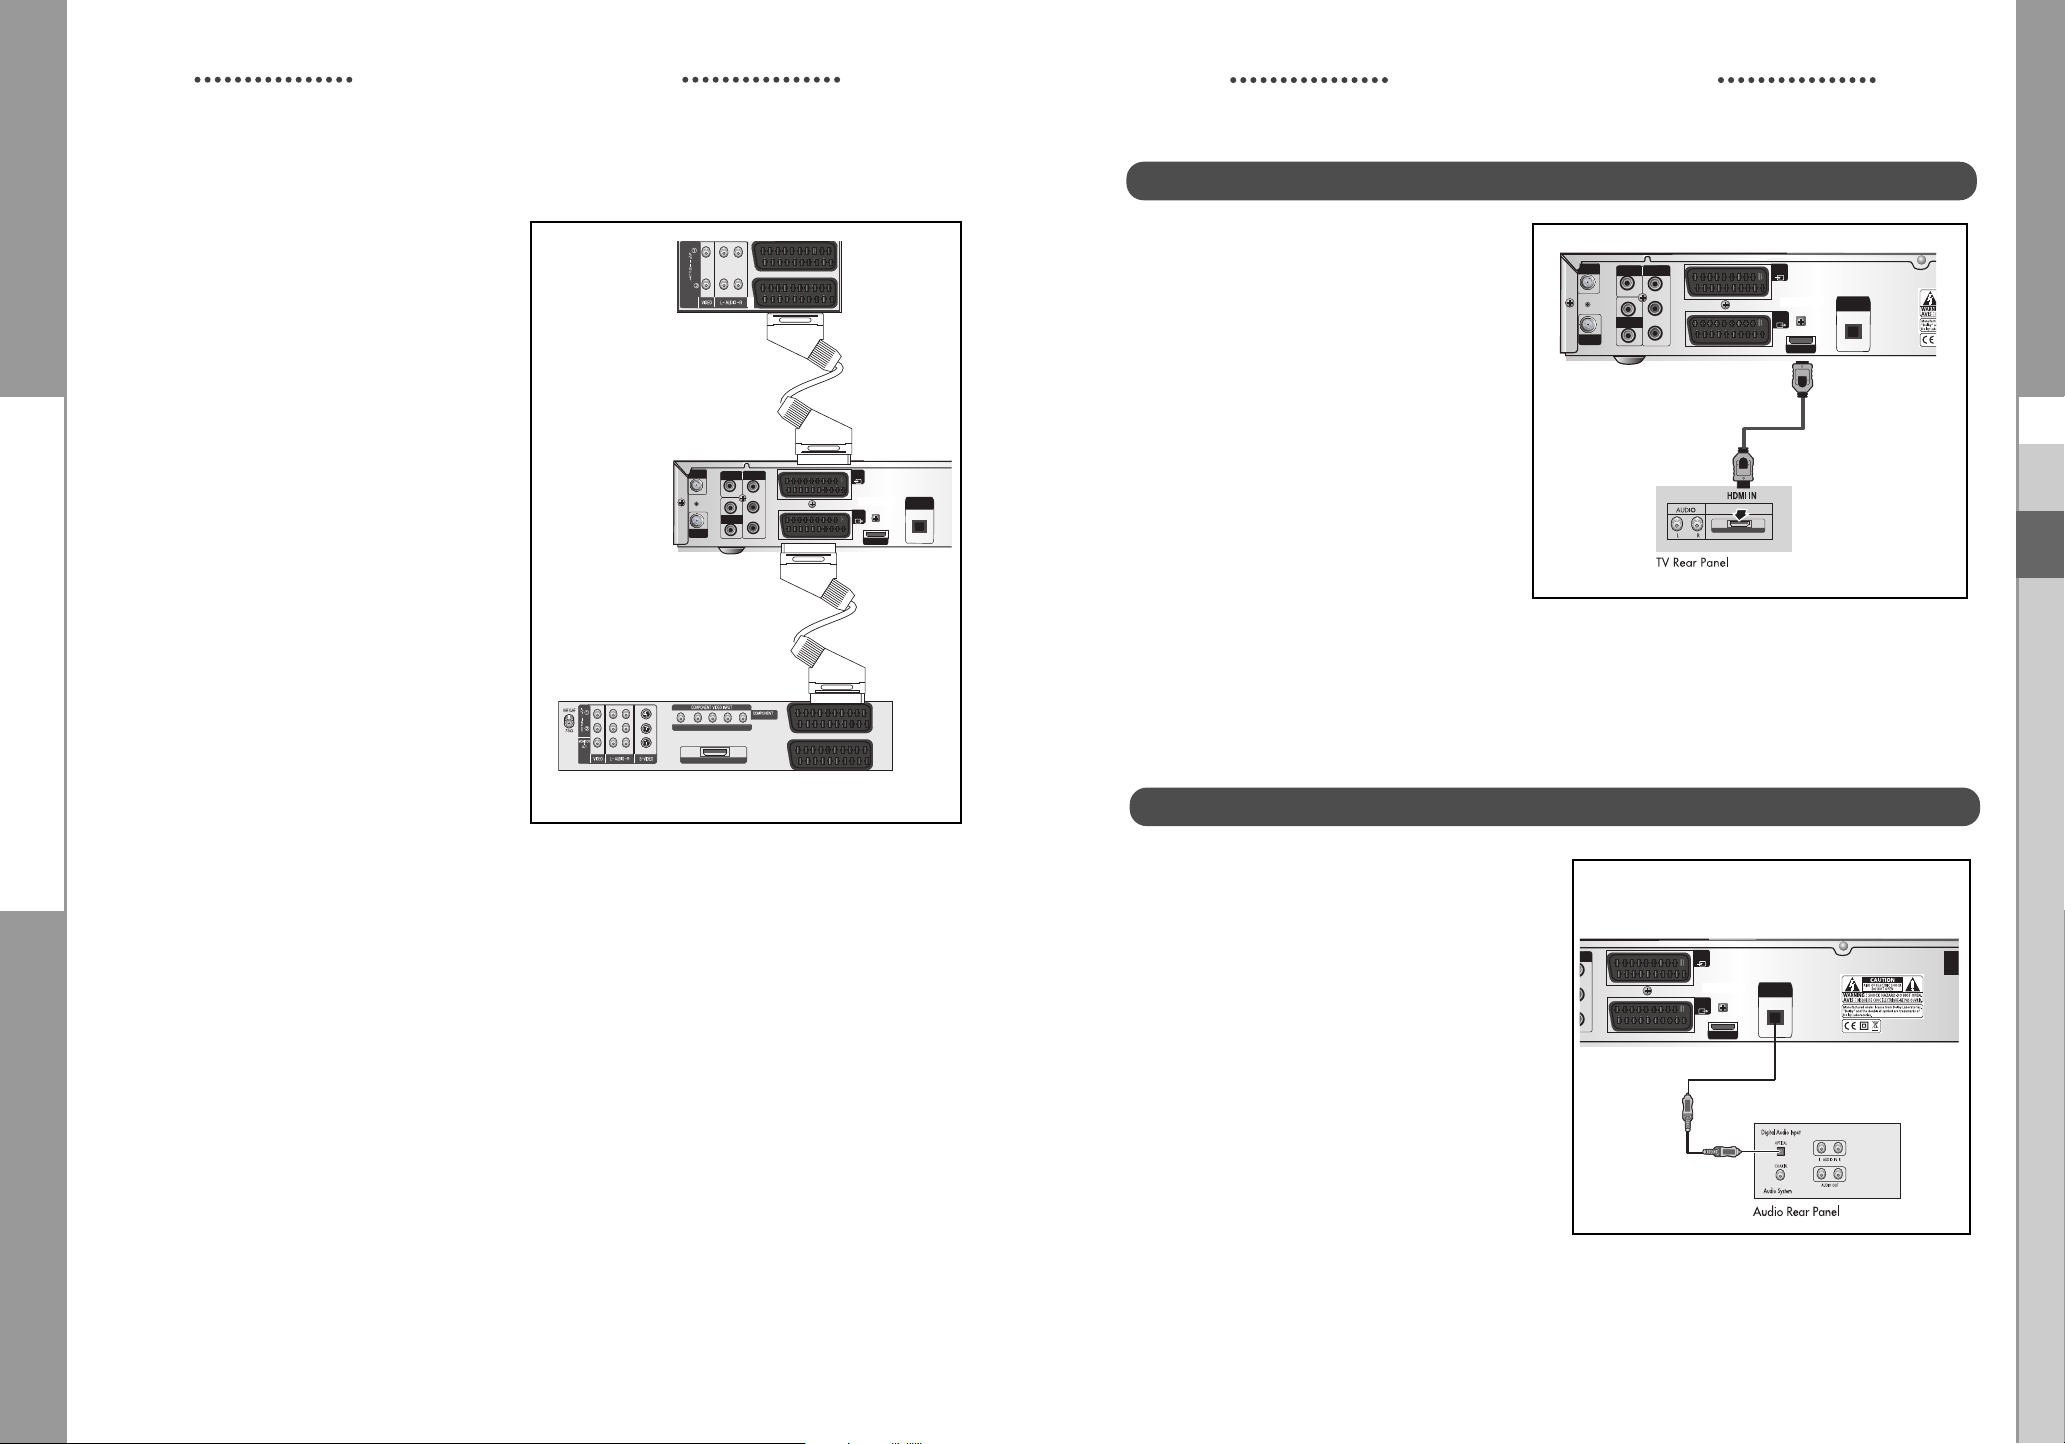
Connecting the Set-Top Box to a TV Set
Composite Connection
1. Connect the cable system to
the ANT.IN jack on the Set-Top
Box.
2. Connect the Video Cables.
Connect a Composite video cable between
the VIDEO OUT jacks on the Set-Top Box and
the TV INPUT jacks on the TV.
3. Connect the Audio Cables.
Connect an audio cable between the L/R
AUDIO OUT jacks on the Set-Top Box and the
L/R AUDIO IN jacks on the TV.
Component Connection
1. Connect the cable system to
the ANT.IN jack on the Set Top Box
2. Connect the Video Cables.
YPBPR format :
Connect a Component video cable
between the VIDEO OUT jacks on the
Set-Top Box and the TV INPUT jacks on
the TV.
3. Connect the Audio Cables.
Connect an audio cable between the
L/R AUDIO OUT jacks on the Set-Top
Box and the L/R AUDIO IN jacks on the
TV.
Set-Top Box Rear Panel
GB
Set-Top Box Rear Panel
GB-6
DIGITAL CABLE RECEIVER
GB-7
DCB-H360R
Y
P
B
PR
(OPTICAL)
AUDIO OUT
DIGITAL
HDMI OUT
AV1
(TV)
AV2
(EXT)
ON
ANT.IN
Y
P
B
PR
(OPTICAL)
AUDIO OUT
DIGITAL
HDMI OUT
RF OUT
VIDEO OUT
AUDIO OUT
VIDEO OUT
COMPONENT
AV1
(TV)
AV2
(EXT)
R
L
YPbPrL
R
HDMI
REAR VCR
TV REAR PANEL
HDMI
ANT.IN
Y
P
B
PR
(OPTICAL)
AUDIO OUT
DIGITAL
HDMI OUT
RF OUT
VIDEO OUT
AUDIO OUT
VIDEO OUT
COMPONENT
AV1
(TV)
AV2
(EXT)
R
L
DCB-H360R
Scart Connection
1. Connect the cable system to
the ANT.IN jack on the Set-Top
Box.
2. Connect a Scart cable between
the VCR OUT jacks on VCR and the
Scart AV2 (EXT) jacks on the STB.
3, Connect Scart cable between AV1
(TV) jack on the STB and jack Scart
Input on the TV
Connecting Your STB
Set-Top Box Rear Panel
Connecting Your STB
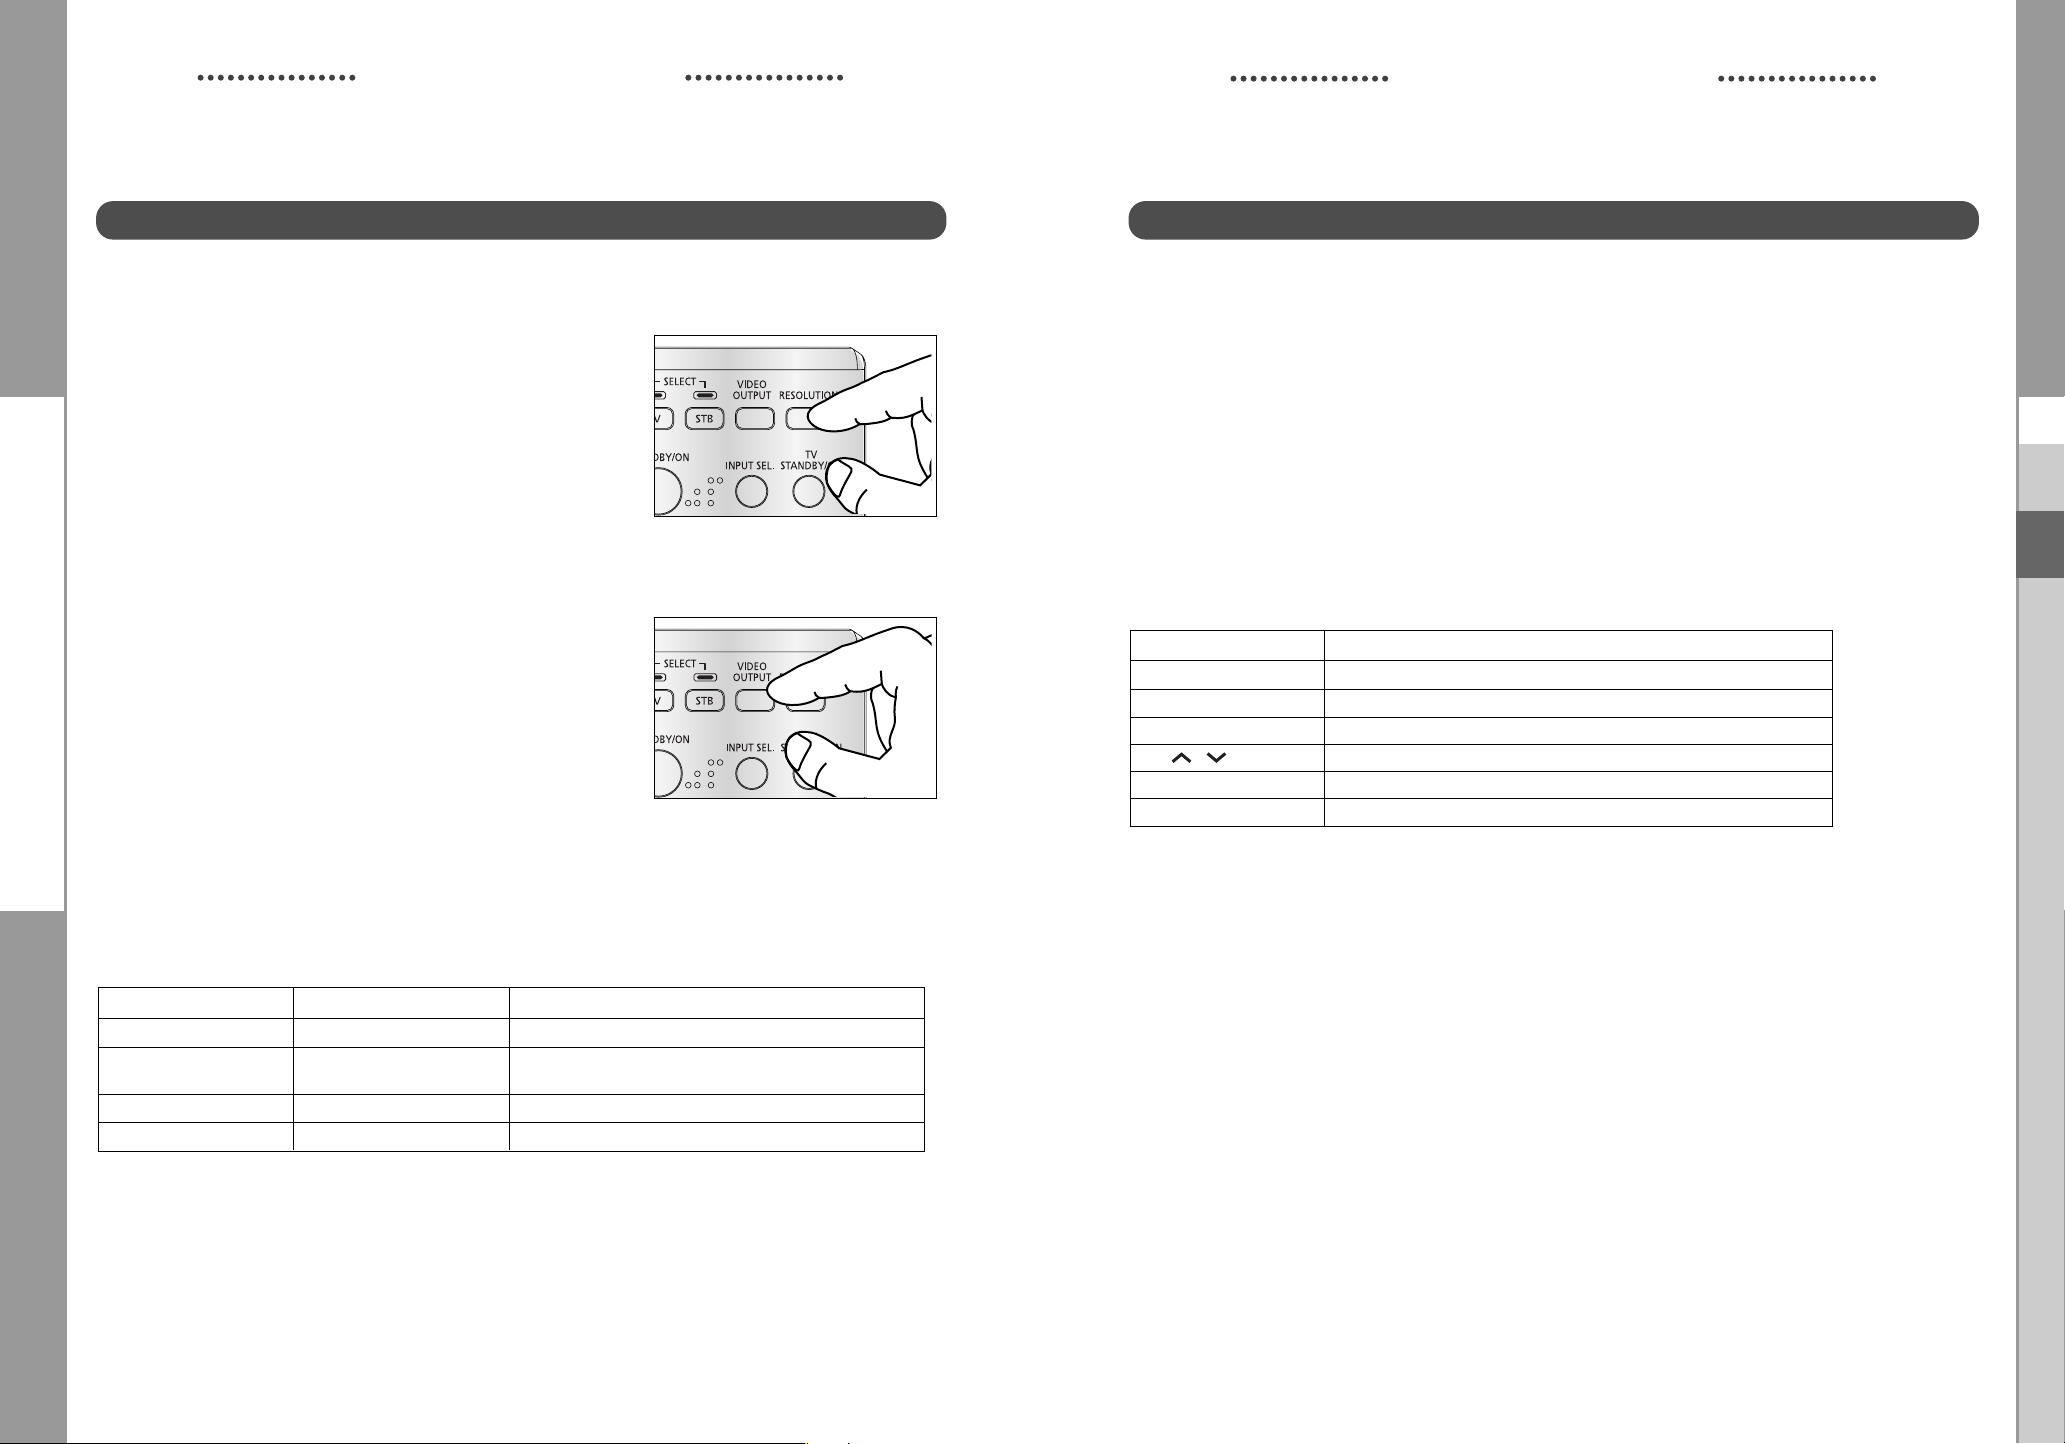
Connecting the Set-Top Box to a TV with a HDMI jack
Set-Top Box Rear Panel
1. Connect the cable system to
the ANT.IN jack on the Set-Top
Box.
2. Connect a HDMI cable
between the HDMI OUT jack
on the Set-Top Box and
the HDMI IN jack on the HDMI
device (TV , Monitor)
NNoottee : Depend on the any receiver, HDMI
out may not operate properly.
GB
Connecting an Audio Component
There are many types of audio systems on the
market today.
A simplified illustration of an audio system is
shown to the right. For more information, see
your audio system owner’s manual.
For An optical digital audio input, connect the
audio system to the DIGITAL AUDIO (OPTICAL)
GB-8
DIGITAL CABLE RECEIVER
jack on the Set-Top Box.
Set-Top Box Rear Panel
GB-9
DCB-H360R
DCB-H360R
Connecting Your STB
Selecting the Resolution and the DTV Output Signal
You can select the appropriate video output for the connected TV or monitor mode.
To select the resolution:
● Select a resolution by using the RESOLUTION key on the
remote control and referring to the following table.
NNoottee : EXIT key at the front of the HD receiver also
operates as RESOLUTION key, when any OSD
is not displayed on the screen.
To select the video output signal:
● Select the output signal by using the VIDEO OUTPUT
key on the remote control and referring to the
following table.
RGB: Select the output signal by using the
VIDEO OUTPUT key on the remote control
referring to the following table.
BPR: Select YPBPR when the TV is connected to the
YP
Component (YP
of the HD receiver.
Resolution and Video Output
Video Out Available Resolution Output Status
Composite 576i Always output.
Scart 576i Scart output can be selected between RGB and
Component (YP
HDMI 1080i/720p/576p The 576i resolution is not supported.
BPR
BPR) and HDMI output port
Composite.
) 1080i/720p/576p The 576i resolution is not supported.
Connecting Your STB
Setting Up TV Operations with the Remote Control
Enter the manufacturer number into the remote control to control the TV with the remote control (see
“Available TV Manufacturer Numbers” on pages 32~37).
1. Turn the TV on.
2. Point the remote control towards the TV.
3. Enter the TV manufacturer number by using the NUMERICAL keys while pressing the TV key.
E.g. For a Samsung TV, press 0, 0 and 1 in this order by using the NUMERICAL keys while
pressing the TV key.
4. When the TV is turned off or on, the configuration is finished.
TV functions that you can control with the remote control
Button key Function
TV STANDBY/ON
INPUT SEL
VOL+/-
CH /
MUTE
0~9
NNoottee : 1.
There is a model that can only be turned on by pressing the numeric key ‘0’ on
the remote control.
2.
TV models of other manufacturer that can be controlled with the remote control
are limited, and some functions may not work.
3.
If you replace the remote control batteries or enter a new manufacturer number,
the previously configured TV manufacturer number is deleted.
4.
When a connected device is an integrated TV model (VCR, DVDP), take care
when using the remote control because it may operate both of them
simultaneously.
5.
If the configuration number does not work, try another number.
Press to turn the TV on or off.
Press to select an external input source for the TV.
Press to adjust the TV volume / Exclusive to the TV
Press to select a TV channel.
Press to mute the TV sound.
Press to select TV channel.
GB
NNoottee : Initial value is YP
BPR (1080i resolution) mode.
GB-10
DIGITAL CABLE RECEIVER
GB-11

DCB-H360R
DCB-H360R
DESCRIPTION
DESCRIPTION
Front Panel
6
7
HIGH DEFINITION CABLE RECEIVER DCB-H360R
MENU
GUIDE
1
2
3
4
5
89
1. / I Turns the receiver operating or standby mode.
2. HDTV Displays the broadcasting status. When the STB detects a
HD Broadcasting signal, the HDTV logo lights.
3. Display Window Displays information about digital HDTV receiver.
4. GUIDE Press to display the on-screen Electronic Program Guide (EPG)
5. MENU Displays the main menu.
6. OK Selects highlighted items on Guide and Menu screens.
>
<
7. These arrow keys navigate in the on screen guide and menu
< >
system.
8. Card Slot Slot for Irdeto Smartcard.
9. EXIT Clears on-screen displays and returns to TV program viewing.
EXIT
Rear Panel
3
1
VIDEO OUT
L
AUDIO OUT
R
COMPONENT
VIDEO OUT
Y
P
B
PR
ANT.IN
RF OUT
245
7
AV2
(EXT)
DIGITAL
AV1
(TV)
HDMI OUT
6
AUDIO OUT
(OPTICAL)
89 11
1. ANT.IN This port is connected to your cable system via a coaxial cable.
2. RF OUT Connects a TV or other receiver via a coaxial cable.
3. VIDEO OUT Connect to a TV, monitor or other external display device through the
Analog Video IN port.
4. AUDIO OUT Connect to a TV, audio receiver or other external device through the
analog Audio IN port.
5. COMP. VIDEO OUT Connect to a TV, monitor or other external display device through the
Component Video IN (YP
BPR). At this time, the VIDEO OUTPUT key
on the remote control has to be YPBPR mode.
6. AV1 (TV) This is used to connect to your TV.
7. AV2 (EXT) This is used to connect to your VCR, DVD or other receiver.
8. HDMI Out Use the HDMI cable to connect this jack on your television for the best
quality picture.
10
ON
POWER
OFF
GB
GB
GB-12
9. DIGITAL AUDIO Output for connection to a digital amplifier.
10. POWER SWITCH This is used to supply(ON) or interupt (OFF) the power.
11. POWER CORD Connect to the wall outlet of AC 100-240V, 50/60Hz.
DIGITAL CABLE RECEIVER
GB-13

DCB-H360R
18
19
20
22
23
29
26
16
17
13
14
15
24
27
10
11
12
21
25
28
30
DCB-H360R
Remote Control Unit
DESCRIPTION
1.
TV (for TV exclusive use)
Switches the remote control mode to TV mode.
2.
STB
Switches the remote control mode to receiver mode.
3. STANDBY/ON
Turns the receiver operating or standby mode.
4. 0 ~ 9 NUMERICAL keys
Press the number keys to tune to a channel or to
enter numbers on menu screens.
5. FAV. CH
Use the key to switch between favorite lists.
6. ALT
Press once to select the soundtrack list and twice
to select video track list.
7. FREEZE
Press once to hold the picture, twice to release.
8. AUDIO
Change the audio to the left, right or both channel.
9. CH. LIST
The scanned channel list appears.
10.Vol+ /Vol-
Adjust the volume level
11. MENU
Press to display the on-screen menus.
12. ¦
These keys are for moving the highlight bar for
selecting options on the menu.
13. GUIDE
Press to display the on-screen Electronic Program
Guide (EPG).
14. P.SIZE
Press to change the screen format according to
the screen aspect ratio and the input signal format.
15. COLOR (RED, GREEN, YELLOW, BLUE)
Use according to the instructions on the screen
when using a menu or guide screen.
DESCRIPTION
16
. RESOLUTION
Selects the output resolution format between 1080i, 720p, and 576p (576i) according to the
video input of the TV or monitor.
17. VIDEO OUPUT
Selects Video Output format between RGB and YP
video input of TV or monitor
18. TV STANDBY/ON
Turns the TV operating or standby mode.(for TV exclusive use)
19. INPUT SEL
Press to select the input source in the TV (for TV exclusive use)
20. PRE. CH
Turn to the previous channel.
21. SUBTITLE
Displays the subtitle on the screen.
22. TEXT
Displays the teletext OSD mode on the screen.
23. TIMER
This is used to reserve a program by EPG.
24. TV/RADIO
Toggles between the TV channel and Radio channel.
<
25. CH /
Press to change the channel
26. RETURN
Press to return to the previous menu.
27. MUTE
Mutes the audio
28. OK
Press to confirm and save any data to the receiver in the menu system
29. INFO
Displays the program information in the screen. Press it once and basic information
appears.Press it twice and detailed information appears in the text box.
30. EXIT
Clears on-screen displays and return to program viewing.
>
BPR according to the
GB
GB
NNoottee : When inserting batteries,
make sure that the polarity(+/-) is correct.
GB-14
DIGITAL CABLE RECEIVER
GB-15
DCB-H360R
DCB-H360R
BASIC FUNCTIONS
BASIC FUNCTIONS
1. Display Screen
Before you can view the television program, you must perform the installation.
Therefore you will see only menu images at first.
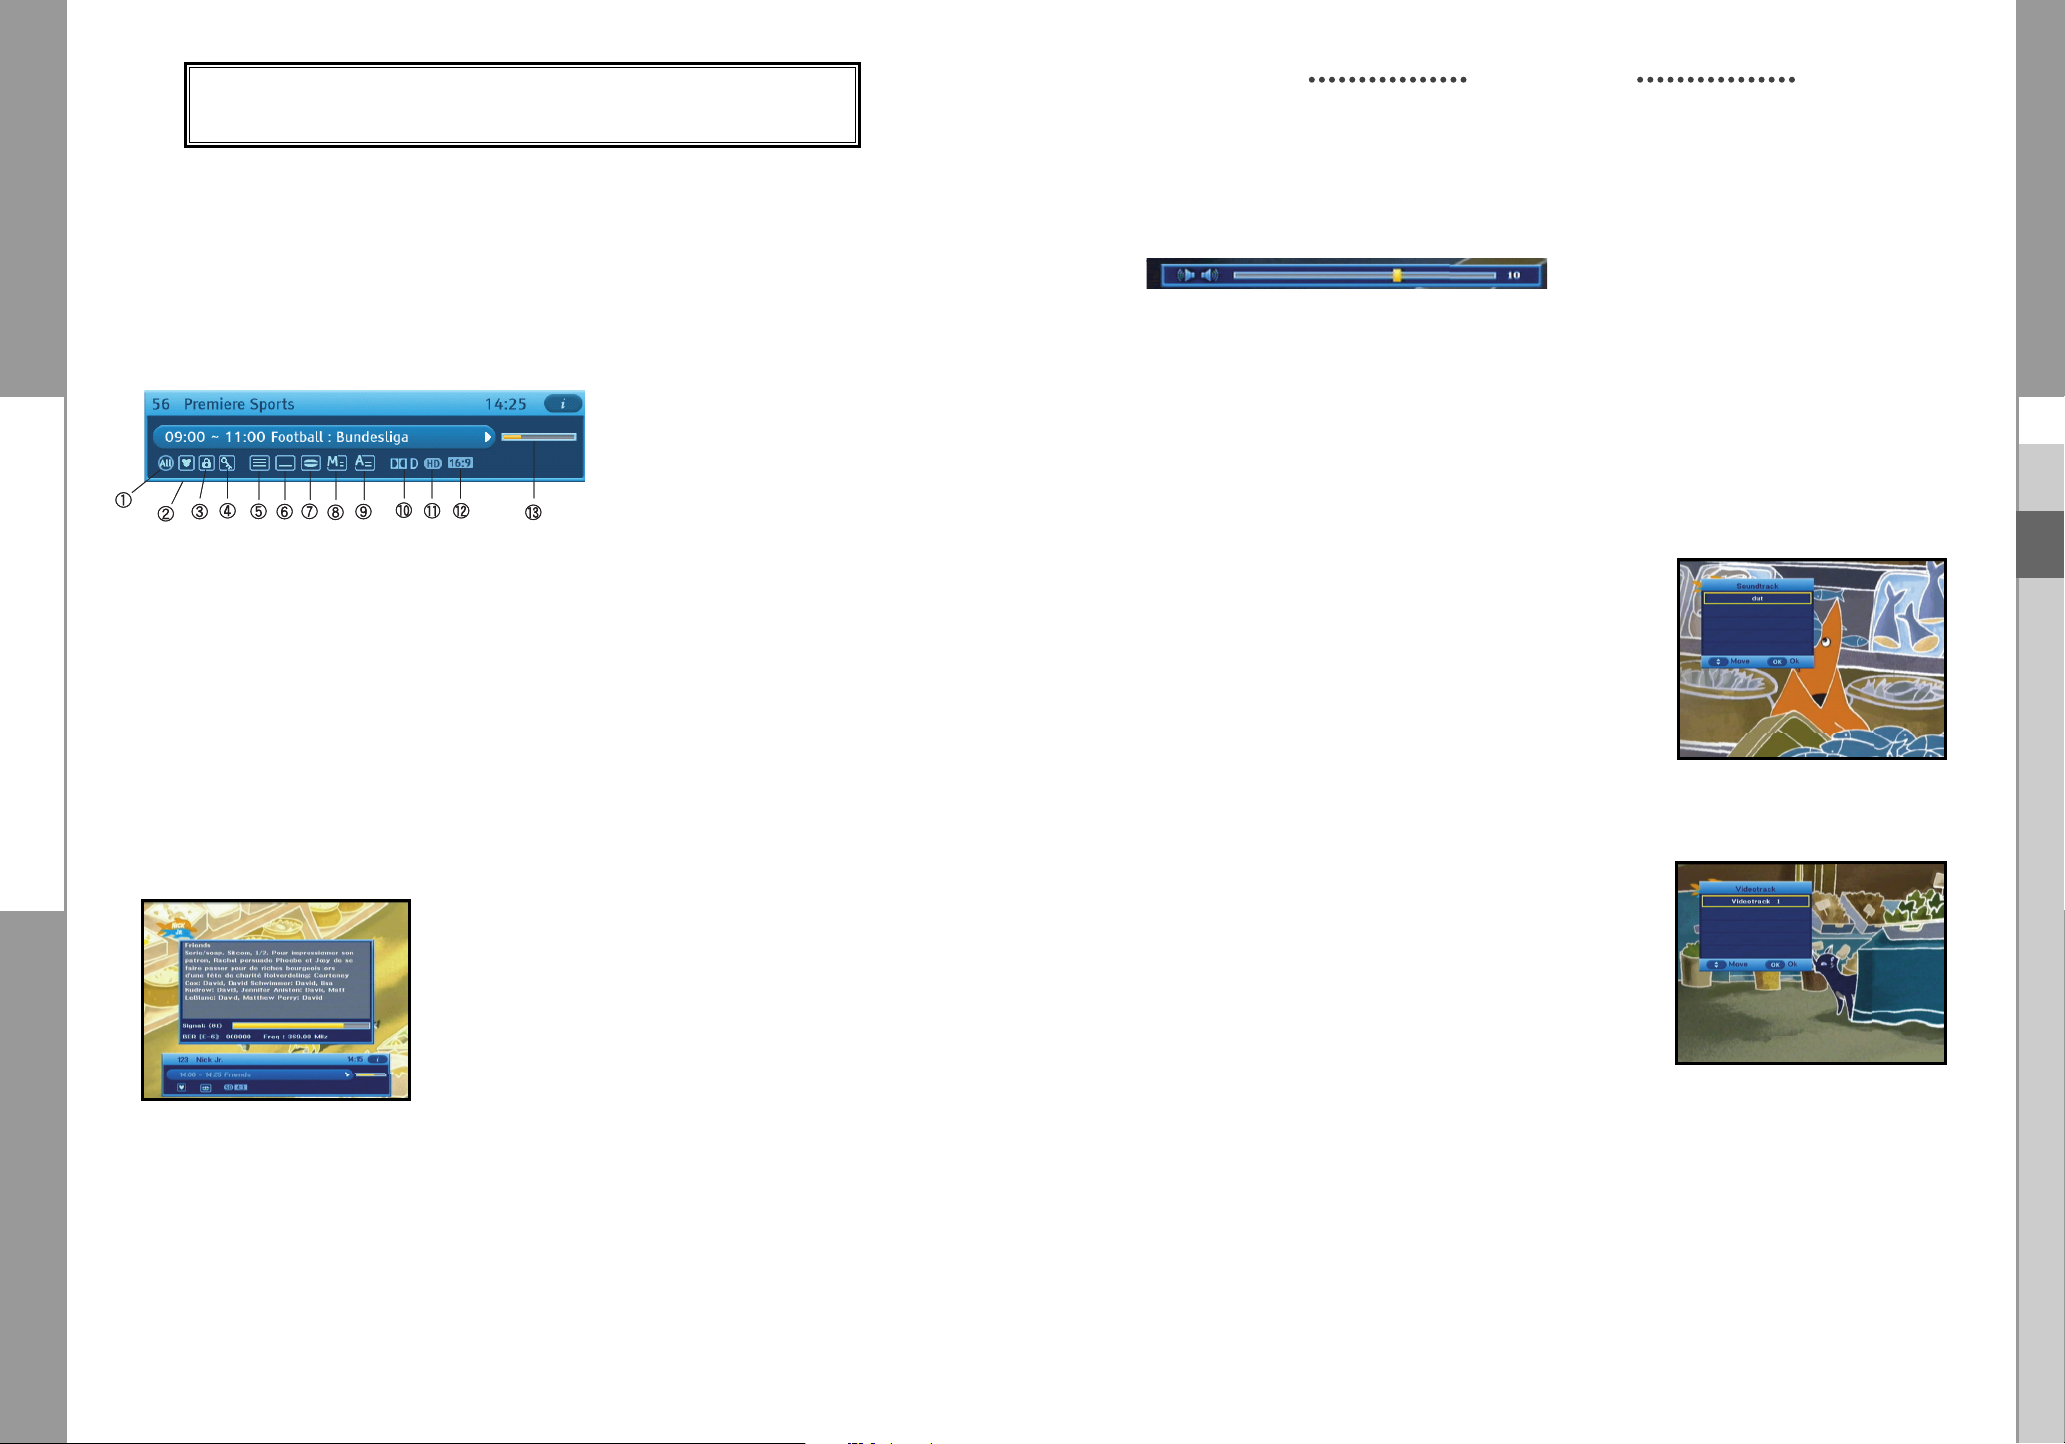
After the television channels have been programmed, you will see the following picture(banner)
each time you switch channels:
! Parental Rating.
@ Favorite Channel.
# Locked Channel.
$ Scramble Channel.
% Teletext
● Press the INFO key in view mode.
● Select the channel by pressing NUMERICAL 0-9 or
^ Subtitle.
& Soundtrack.
* Mail.
( Announcement.
) Dolby Digital.
to move to TV or Radio channel
You will also see this picture each time you change the channels.
When you press the TV/RADIO key on the remote control. TV and Radio program are toggled.
1 HD/SD
2 16:9/4:3
3 Signal Status.
keys and select the TV/RADIO key
2. Volume Control
To control the volume level :
● Press
● Press the MUTE key to turn to silence mode.
● Press the MUTE key again or
NNoottee
the VOL- or VOL+
keys to adjust the volume level.
VOL- / VOL+
keys in order to cancel the mute function.
: HDMI sound is controlled by TV, not HD receiver.
3. Select Soundtrack
● Press the ALT key to see the soundtrack list.
● Press the
● The soundtrack service is not provided for every channel
and depends on the conditions the operator is in.
and OK key to select one.
GB
Detailed program information
● Press the INFO key twice while you are viewing a program
First you will see the banner described above.
After the INFO key is pressed in the second time, detailed information for current program can
be displayed on another banner, if there is more information. When this information is more than
one page, YELLOW and BLUE keys can be used for scroll up and down.
NNoottee
: This service depends on service provider.
GB-16
DIGITAL CABLE RECEIVER
4. Select Videotrack
● Press the ALT key twice to see the videotrack list.
● Press the
● The videotrack service is not provided for every channel
and depends on the conditions the operator is in.
NNoottee : When you select AUTO in the selection window,
and OK key to select one.
operation will follow system setting of main menu.
GB-17
DCB-H360R
DCB-H360R
BASIC FUNCTIONS
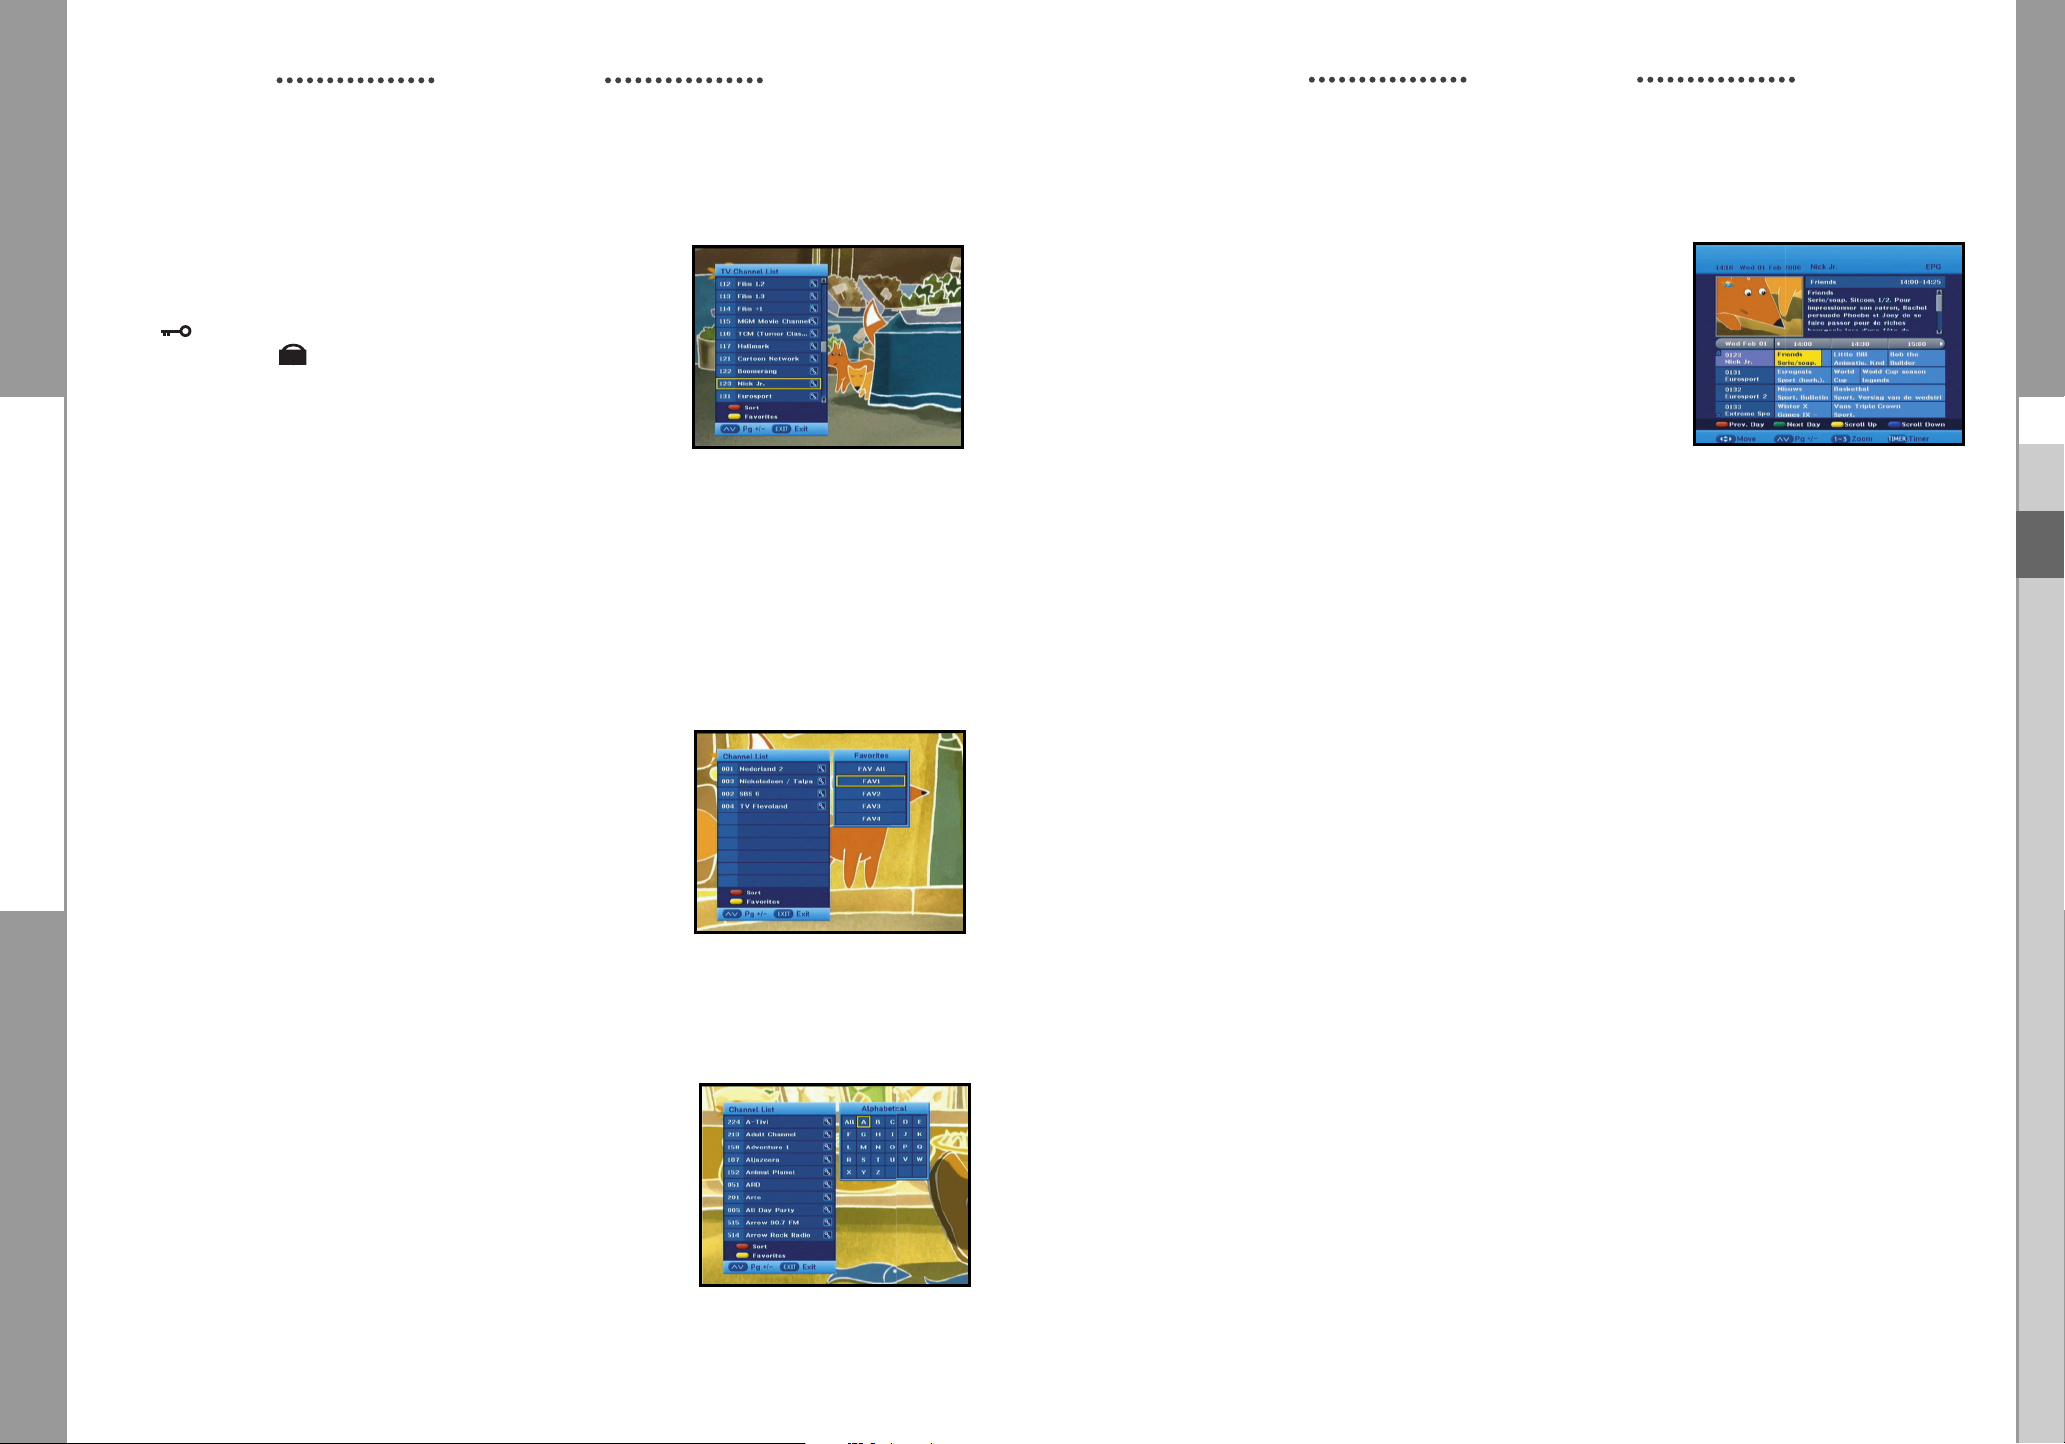
5. Channel List
● Press the CH LIST key while you are viewing a program.
● Select list by pressing the TV/RADIO key.
The icon behind the channel name symbolises scrambled
channel, and the icon behind the channel name shows
locked channel.
● Select the channel by pressing the
control.
● Press the OK key to watch that channel.
The colour key corresponds the following service list.
● YELLOW key : Favorites
● RED key : Alphabetical
<
● Press the (Page Up/Dn) keys to move to next or previous page.
>
keys on the remote
BASIC FUNCTIONS
6. Guide (EPG) Menu
EPG-Electronic Program Guide
The electronic program guide gives you information
for the channels.
NNoottee
: 1. This service depends on service provider.
2. After receiver recognized the GMT-time
from the signal which takes few seconds,
it can display correct EPG information.
● Press the GUIDE key while you are viewing a program.
● RED key is for moving back to the previous date.
● GREEN key is for moving to the next coming date.
● YELLOW key can be used for scroll up, if there is more information than one page.
● BLUE key can be used for scroll down, if there is more information than one page.
GB
● Press the EXIT key to exit.
5.1 Favorite Channel List
● Press the YELLOW key on the remote control to select the
group of favorite channel list.
● Press the YELLOW key to switch between favorite channel list
and channel list.
● Use the
keys to select a favorite group or a channel that
you want.
<
● Press the (Page Up/Dn) keys to move to next or previous page.
● Press the EXIT key to exit
>
5.2 Alphabetical Channel LIst
● Press the RED key on the remote control to select the
Alphabetical channel list.
● Press the RED key to switch between alphabetical channel list
and channel list.
Time interval can be adjusted by press keys as followings on EPG screen:
1 key: 1 hour and 30 minutes 2 key: 30 minutes 3 key: 15 minutes
With the TV/RADIO key you can browse among the various programs lists.
● Select the channel by pressing the
● When the TIMER key on the remote control is pressed in the EPG screen, if the current channel
keys and press the OK key to watch this channel.
involves an event, timer is set immediately and the set timer is indicated on the EPG screen.
A program that has been set in this way is indicated on Timer Setting.
● Use the
keys to select a Alphabetical group or a channel
that you want.
● Press the EXIT key to exit.
GB-18
DIGITAL CABLE RECEIVER
GB-19
DCB-H360R
DCB-H360R
BASIC FUNCTIONS
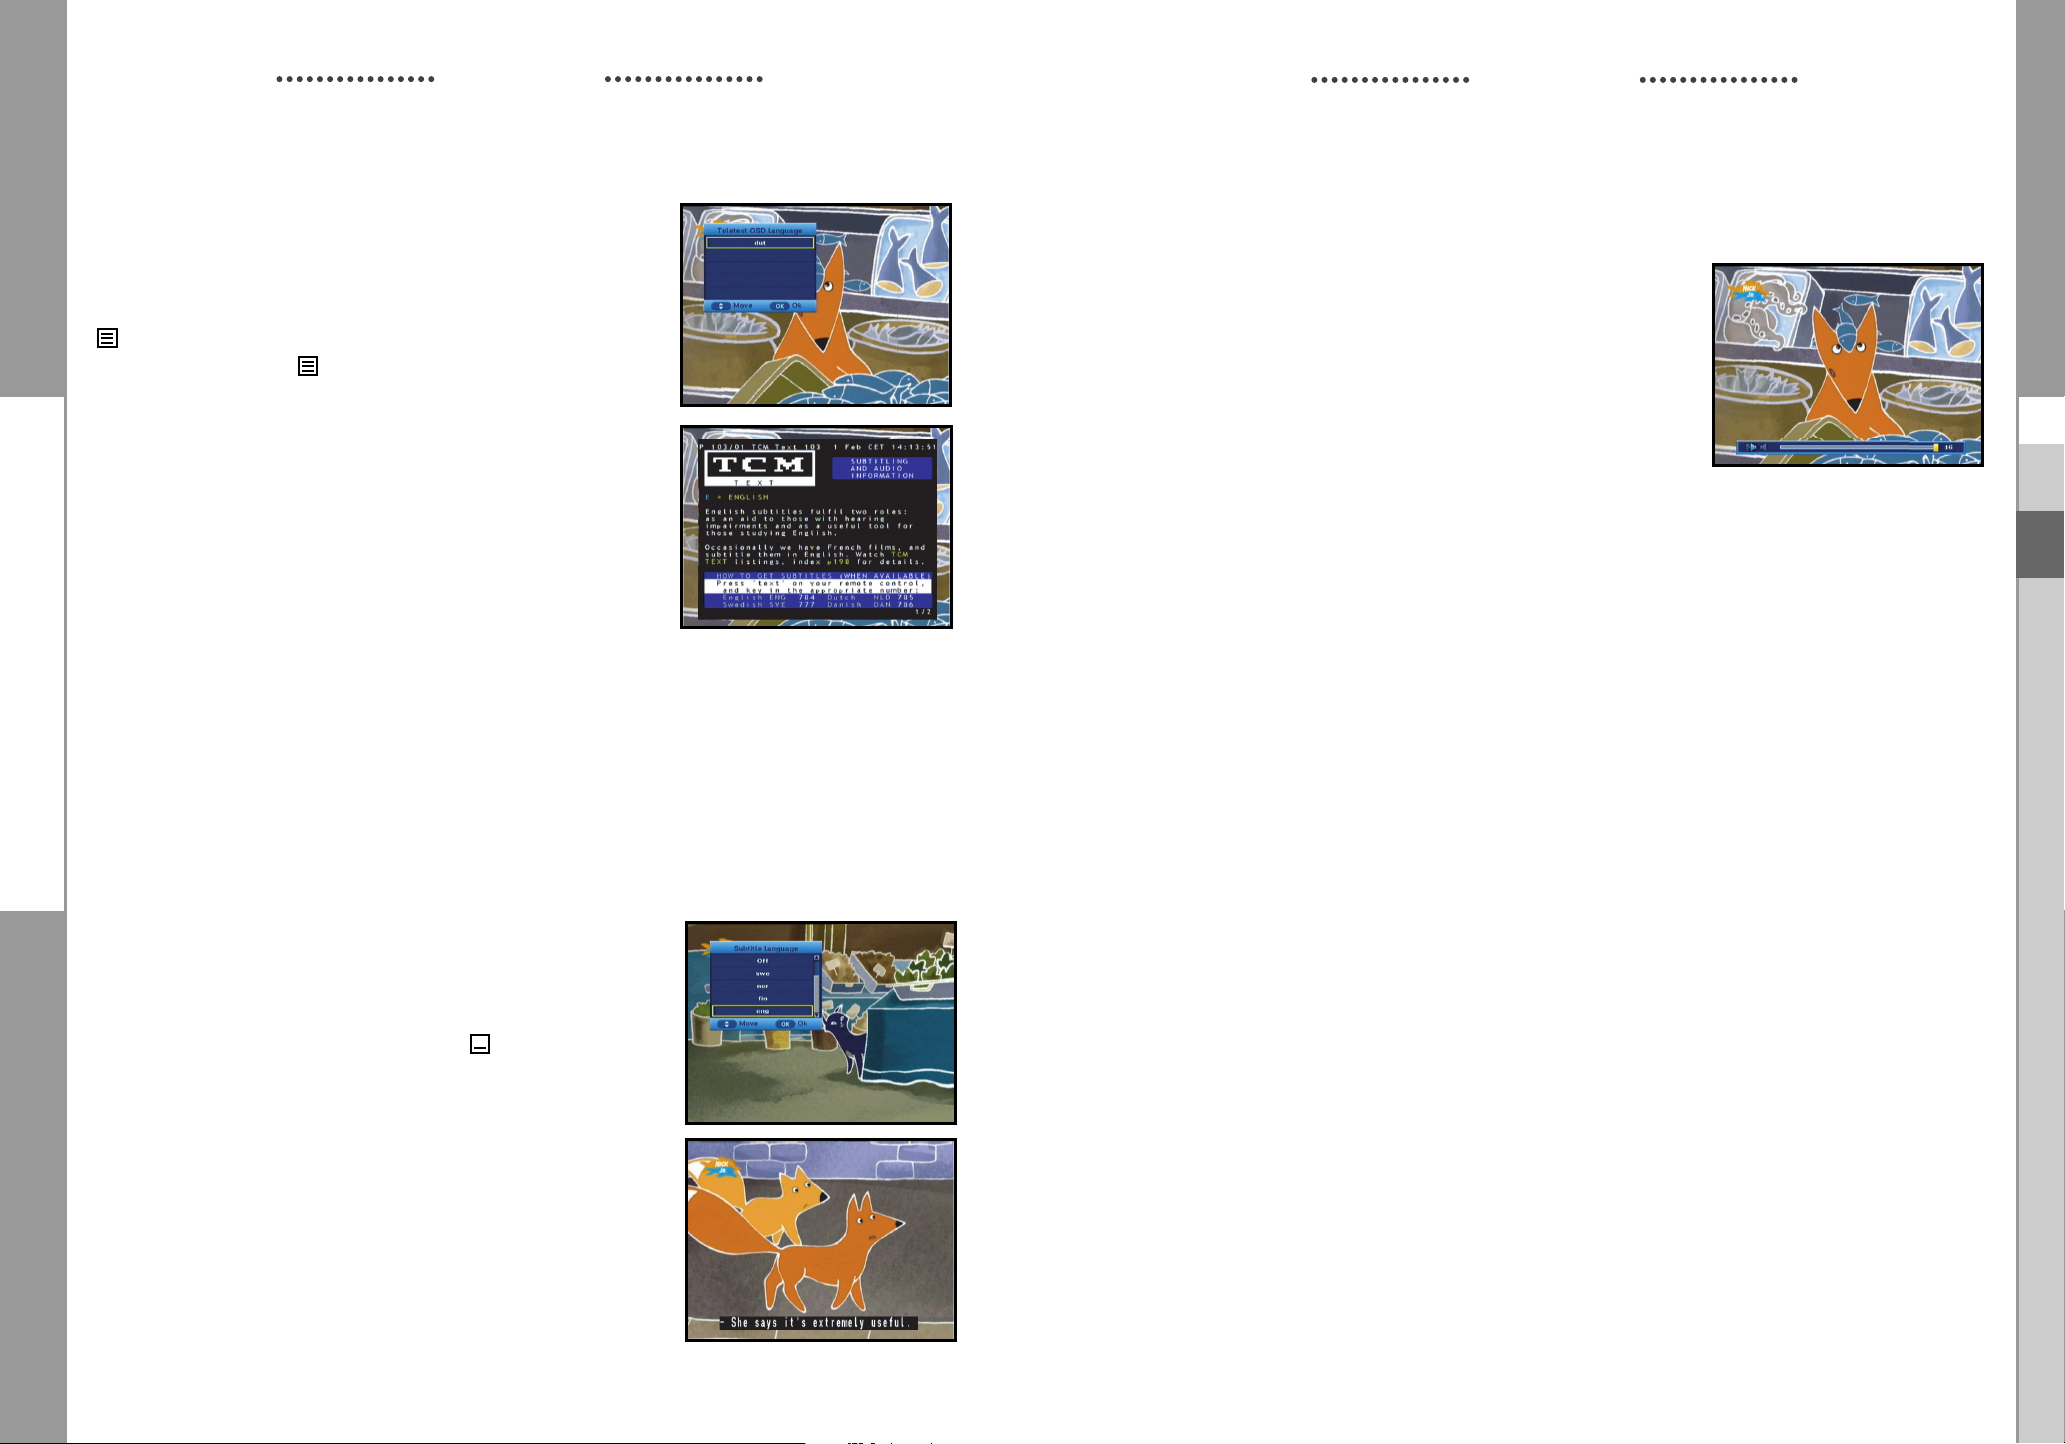
7. Teletext OSD
When the current broadcasting program provides Teletext, press
the TEXT key once to see the current language list for Teletext in
order to get teletext in OSD regardless of TV type.
icon on the banner shows that Teletext is available on this
event(program). Even is displayed on the banner, Teletext
may not be available due to broadcasting.
● Press the EXIT key to exit.
NNoottee :
When the connected TV provides the Teletext
feature, this function is not supported.
The HD receiver does not support the Teletext
VBI function.
BASIC FUNCTIONS
9. Audio Mode
You can choose a mode among left, right or stereo using the AUDIO
key.
To change the audio mode:
● Press the AUDIO key to select the left, right or stereo.
GB
GB
When the teletext application is active following keys can be used:
● NUMERICAL keys: 0.....9 are used to change main page.
Then in the left upper corner will be visible number of the main page. If the broadcasting
program provides this page after the moment (usually about 20s), this page will be visible.
●
keys are used to change main page , just (+1) for key and (-1) for key.
● ¦ keys are used to change Next/Previous subpage number.
Sometimes broadcaster send one or more subpages on one main page. To change sub-page
number just press ¦ or key, if subpages will be exist in STB memory then next/previous
subpage will be displayed.
8. Subtitle
When the current broadcasting program provides subtitle,
press the SUBTITLE key to see the current subtitle language list.
If subtitle is available on current program, is displayed on the
banner .
To change the subtitle language:
● Press the SUBTITLE key once to see the subtitle language
List.
● Use the
● Press the OK key and then the subtitle language you want is
displayed.
keys to select a subtitle language you want.
NNoottee : When you select AUTO in the selection window,
operation will follow system setting of main menu.
GB-20
DIGITAL CABLE RECEIVER
GB-21
DCB-H360R
DCB-H360R
OPERATING THE RECEIVER
OPERATING THE RECEIVER
Main Menu
After installing your cable system and STB with appropriate
connectors.
● Plug in the AC main power and switch on the receiver.
● Press the MENU key to bring up the main menu.
The following on screen display will appear:
The sub menu topics will be displayed.
For the sub-menus Installation, Channel , System, Mailbox and Irdeto
Before you begin with the “Installation” menu, you should check in the 3th menu
“System” whether all the information are applicable for you.
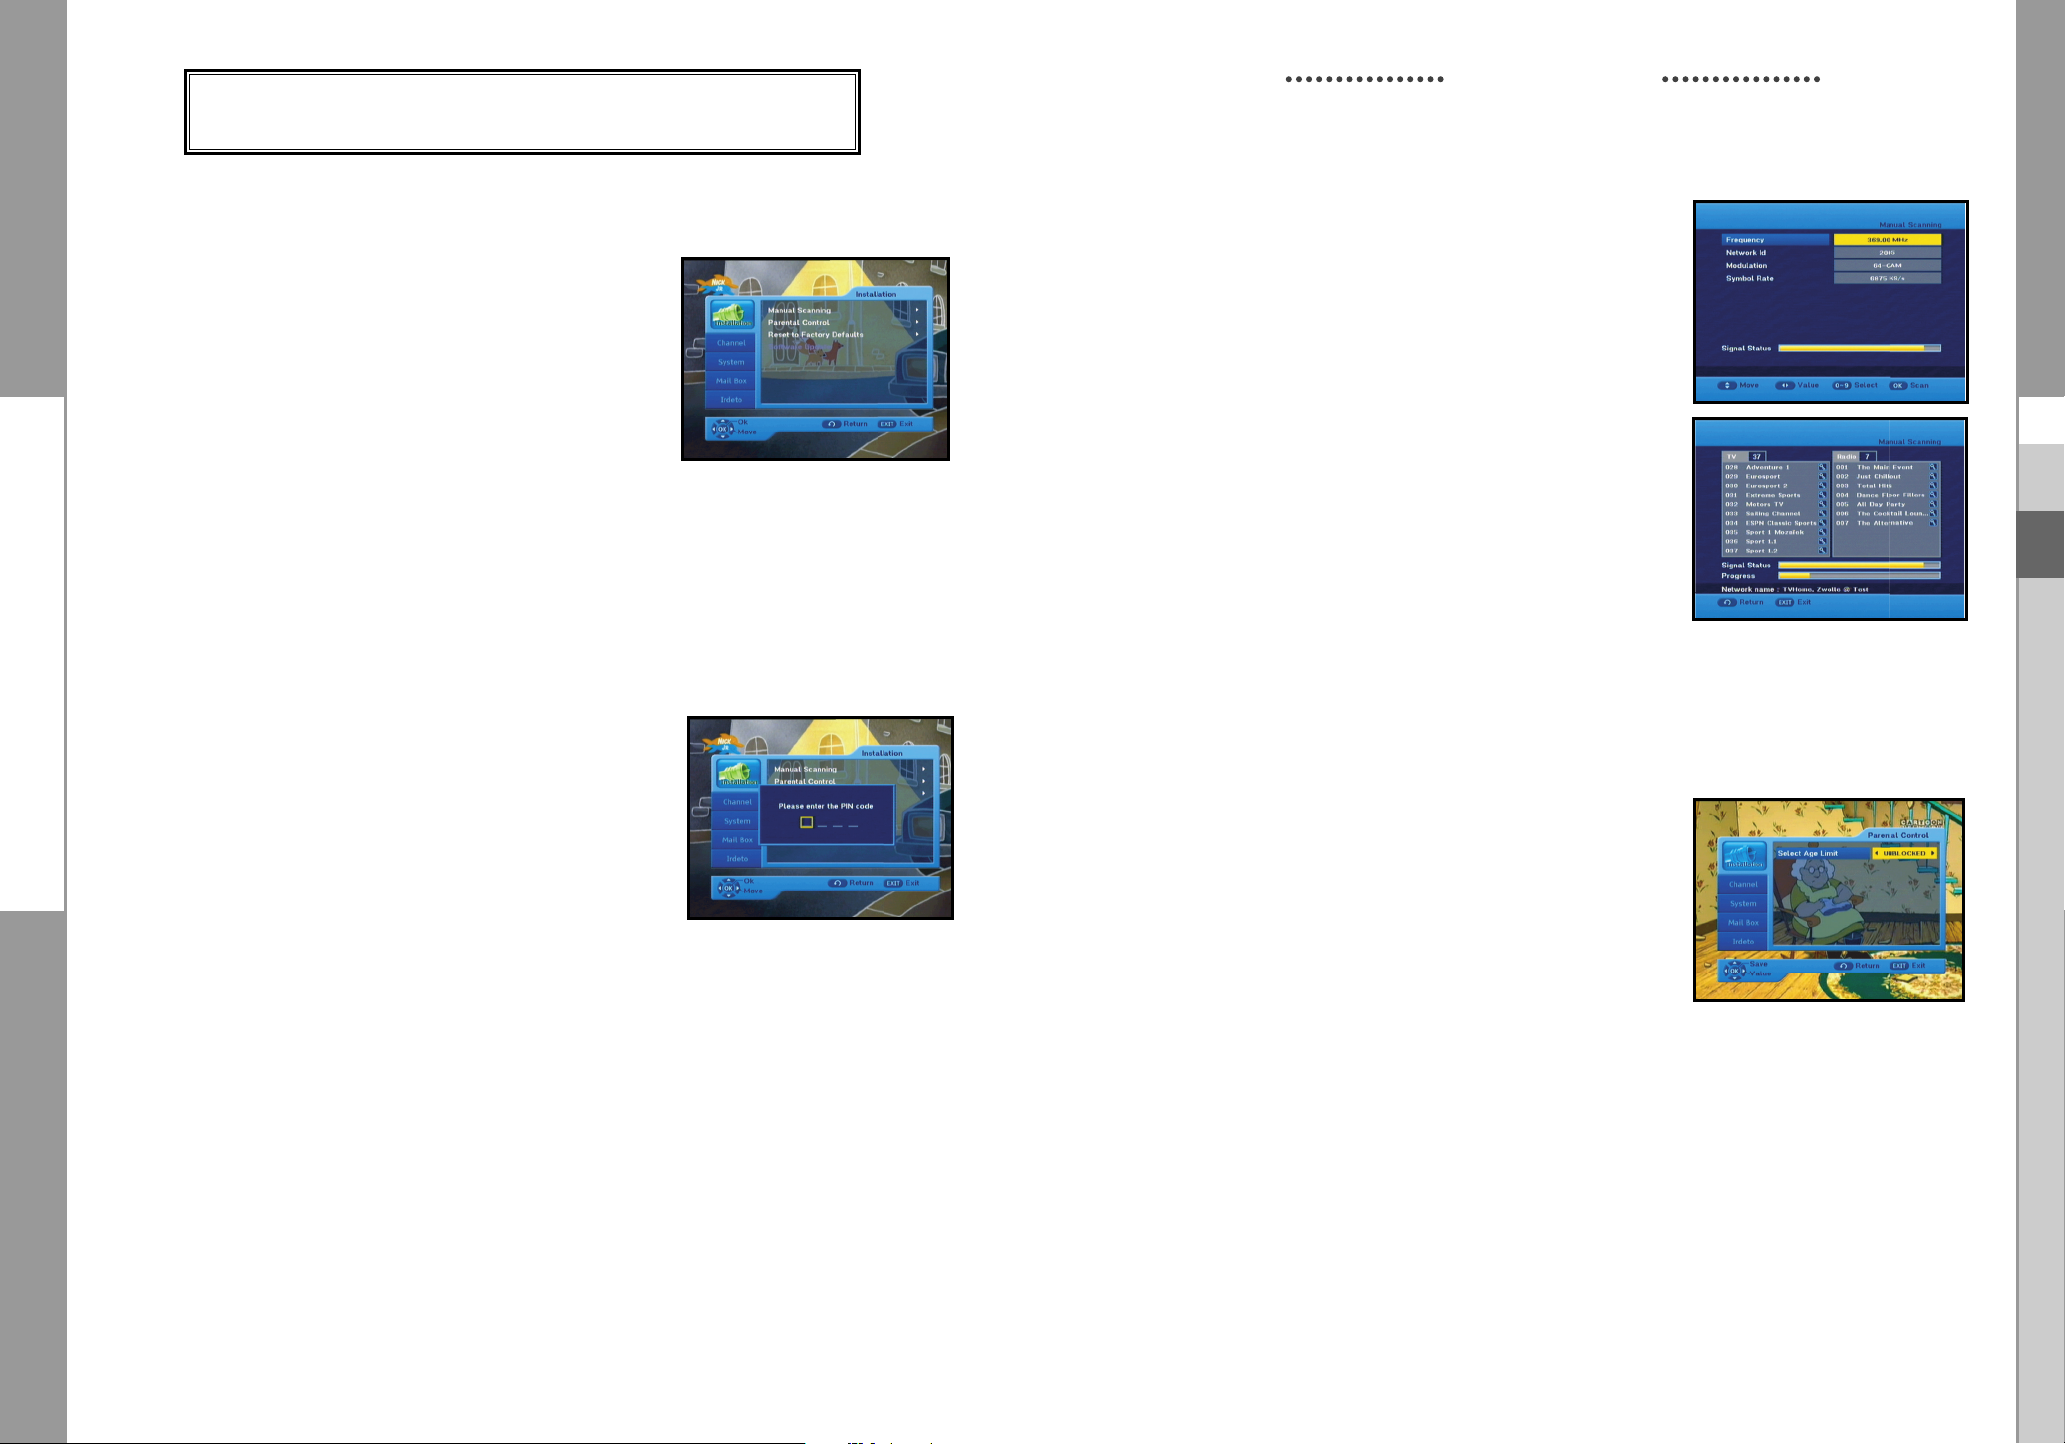
1. Installation
The menu provides settings for customizing, adding new services
and displaying the status of the receiver.
● Select “Installation” in the main menu to select the
sub menu.
● Enter the PIN Code.
If you have not entered your own PIN Code then the
PIN Code 0000 applies, which was set at the factory.
1.1 Manual Scanning
To tune-in new channels, the STB has been provided with
“Manual Scanning” where the channel data can be entered by
the user. After selecting the “Manual Scanning” from the
Installation Menu, the following screen will be displayed:
● Input the frequency of the channel you want to find.
● Input the Network ID of the channel you want to find.
Ask your cable operator.
● Select the Modulation of the channel you want to find.
You can select the value of 16, 32, 64, 128 and 256.
● Input the symbol rate of channel you want to find.
● After select option, press the OK key to start the scan
process.
● Press the EXIT key to exit the menu .
NNoottee
: When you see “NOT COMPLETE CHANNEL”, please scan again with following
instuction of service provider.
1.2 Parental Control
Parental rating protects your children from adult content.
This option is set in Installation Parental Control menu.
● Use the ¦keys to select age for your youngest child
then press the OK key to save this setting.
● All services which age grade is greater than set will be
blocked and request to enter the PIN Code.
GB
GB
GB-22
● If you want blocked all services, select “ALL BLOCKED”.
● By default, all services are “UNBLOCKED”.
Please enter the PIN Code.
● This banner is shown if service which age grade is greater than
set in Parental Control menu. Enter four digits PIN Code to
hide this banner and show service content.
Factory PIN Code is 0000, and you can change it in
Change PIN Code menu.
● Press the EXIT key to exit the menu.
DIGITAL CABLE RECEIVER
GB-23
DCB-H360R
DCB-H360R
OPERATING THE RECEIVER
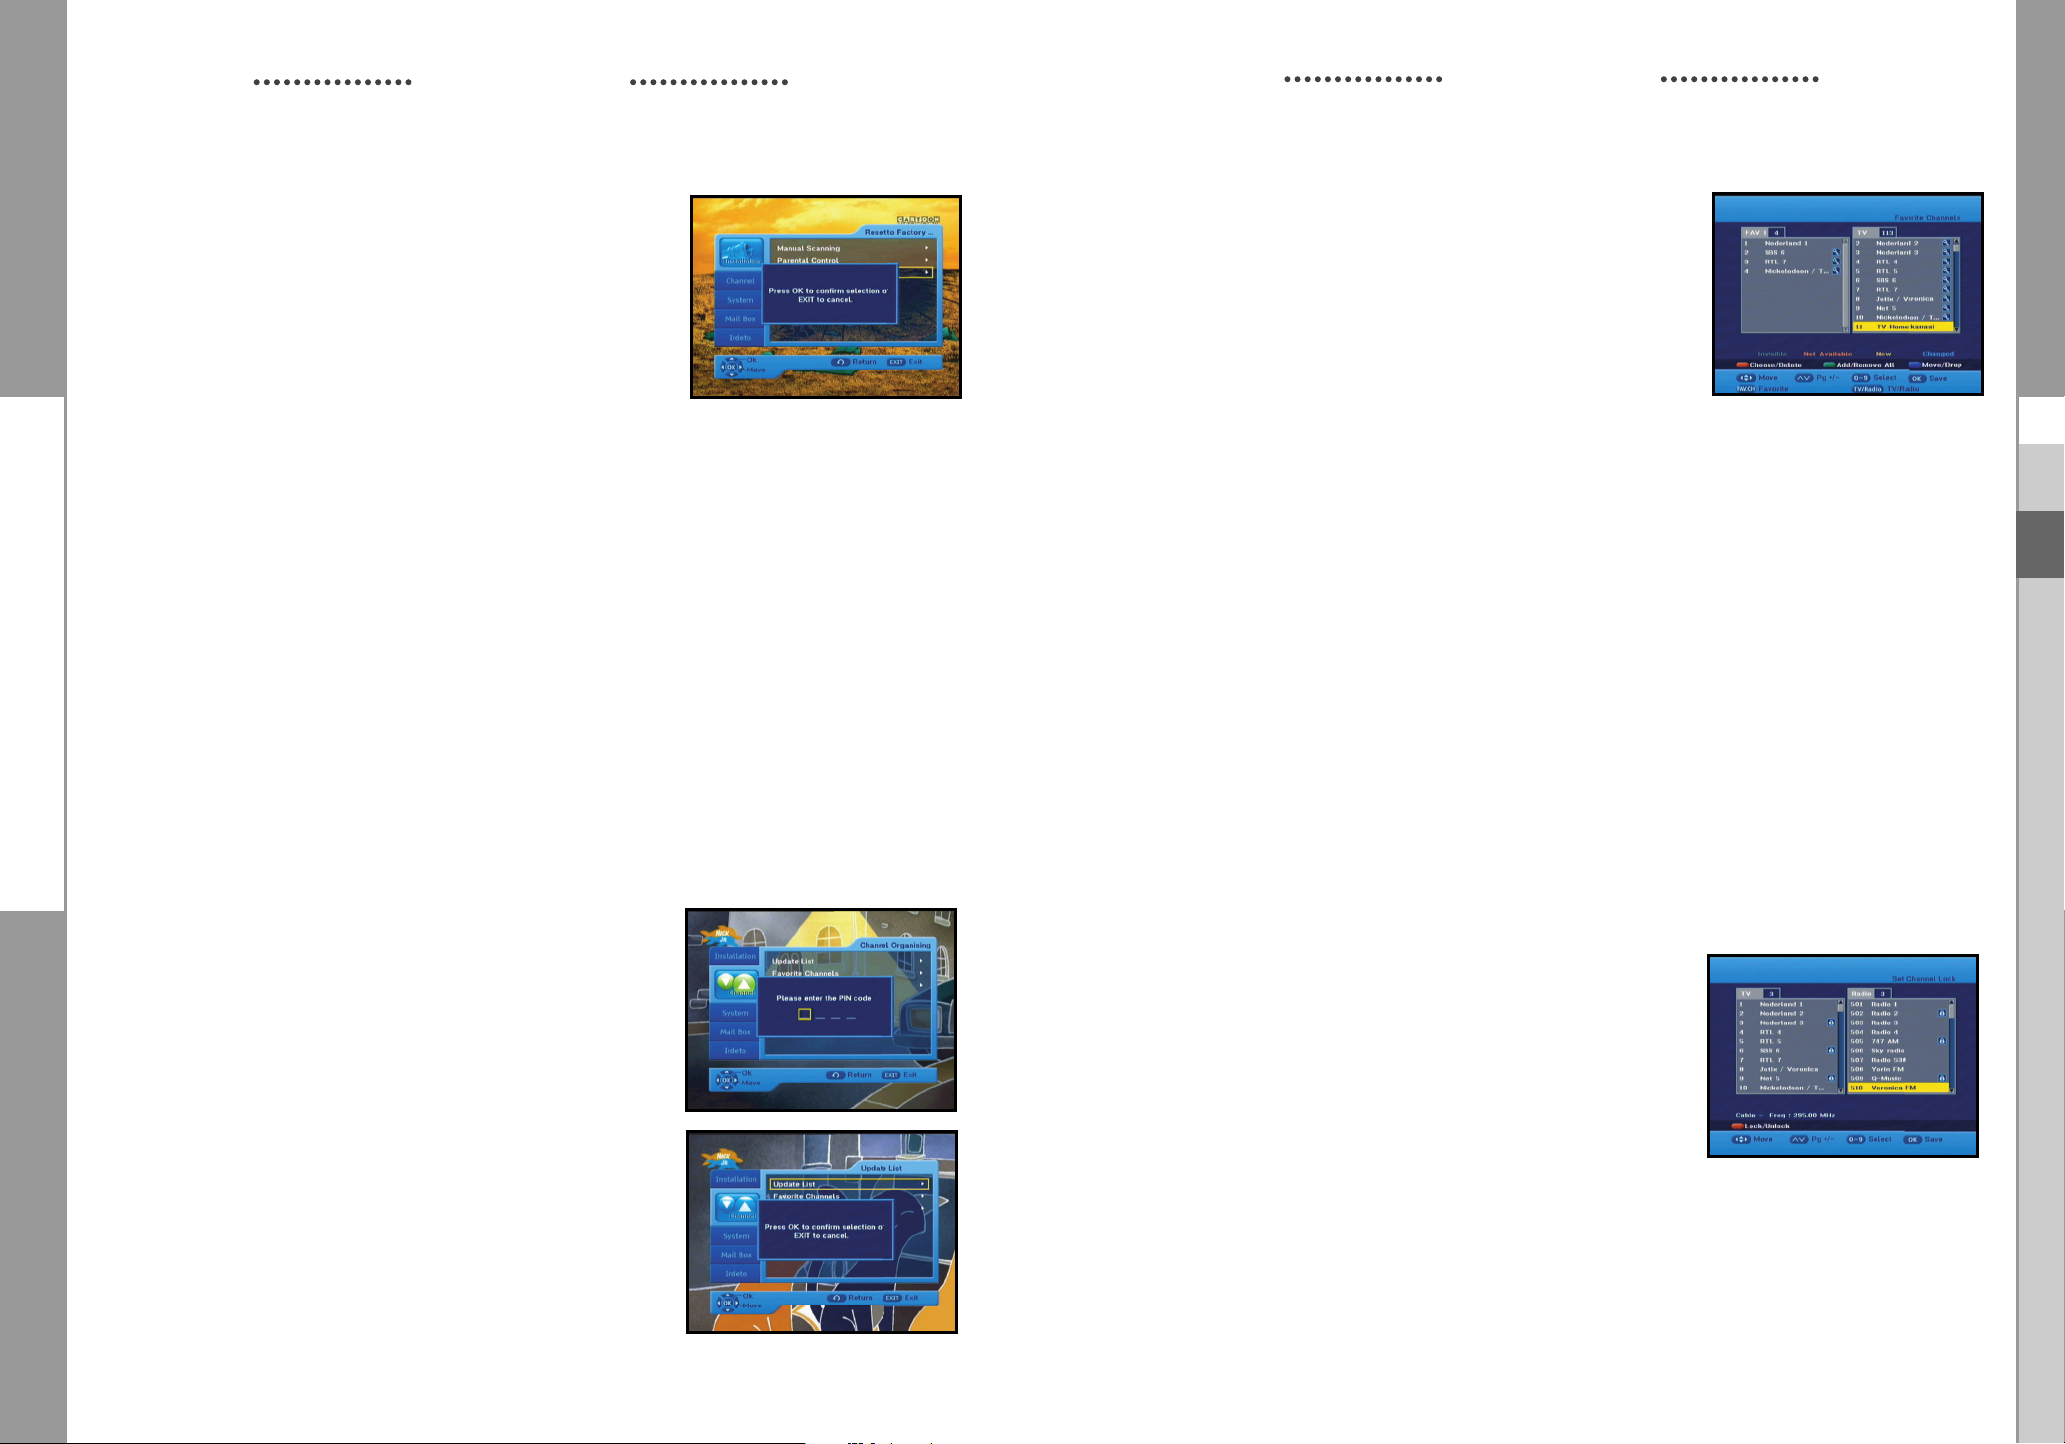
1.3 Reset to Factory Defaults
This is to recover the Factory set values in case the user has
encountered some problems after changing any values of
channel data and others which may be in error.
The screen display will be as follows:
At the request window, if you press the OK key, the receiver
will be reset to factory default settings automatically.
NNoottee
: This causes your previous settings to be deleted!
All settings and information including channel data will
be deleted.
● Press the EXIT key to exit the menu .
1.4 Software Update
This option is enabled only if your cable provider sends software for your STB.
To upgrade the software, place the cursor on Installation Software Update menu and
press the OK key. If new software is available, banner “Start Software Updating Process ?”
will be displayed. There is also information about estimated time of software download.
Press the OK key to confirm and start Software Updating process.
If there is newest software on your STB “You don’t need to update software !” will be displayed.
OPERATING THE RECEIVER
2.2 Favorite Channels
You can immediately register the present channel to the desired
Favorite Group.
In addition, you can register a channel to multiple favorite groups.
● Select the desired Favorite Group(FAV1~FAV4) using the
FAV.CH key.
● Select the desired channel list using the or numeric keys
at the TV or RADIO list window.
● Press the RED key and then register the selected
channel at the Favorite Group.
● Then press the OK key for confirmation.
You can change TV list or Radio list by the TV/RADIO key and change favorite list
by the FAV.CH key.
● When you press the TV/RADIO key, TV list and Radio list are toggled.
● Press the FAV.CH key to select another favorite list.
● Press the EXIT key to exit the menu.
To delete channels from Favorite Group:
● Select a channel list to delete with the keys.
GB
GB
NNoottee
: STB automatically reboots for software upgrading process. During the upgrading
process, TV screen will remain blank for approximately 10 minutes. Window display at
the STB front panel will show the progress. Service will be resumed automatically after
the upgrade is completed.
● Press the EXIT key to exit the menu.
2. Channel
The “Channel” menu has three functions:
Saving changes on channel list by select Update List and it
provides making four favourite lists and set channel lock,
as you want.
● Enter the PIN Code.
If you have not entered your own PIN Code, 0000 applies which
was set at the factory.
2.1 Update List
When some new channels will be transmitted to your cable
network, these channels would be shown on channel list
green colored. To save these channels, use Channel
List.
Update
● Press the RED key to delete the selected channel from the favorite channels.
● Press the EXIT key to exit the menu.
NNoottee
: One favorite list can contain max 200 channels.
2.3 Set Channel Lock
● Select the TV or RADIO channel window by pressing the
¦keys.
● Focus the channel by pressing the keys.
● Select the channel lock by pressing the RED key.
● Press the OK key for confirmation.
This will lock the channel. Whenever you need to view the
channel, you will have to enter the PIN Code at the request
window.
To cancel the lock:
● Press the RED key again in order to cancel the lock.
● Press the EXIT key to exit the menu .
.
GB-24
DIGITAL CABLE RECEIVER
GB-25
DCB-H360R
DCB-H360R
OPERATING THE RECEIVER
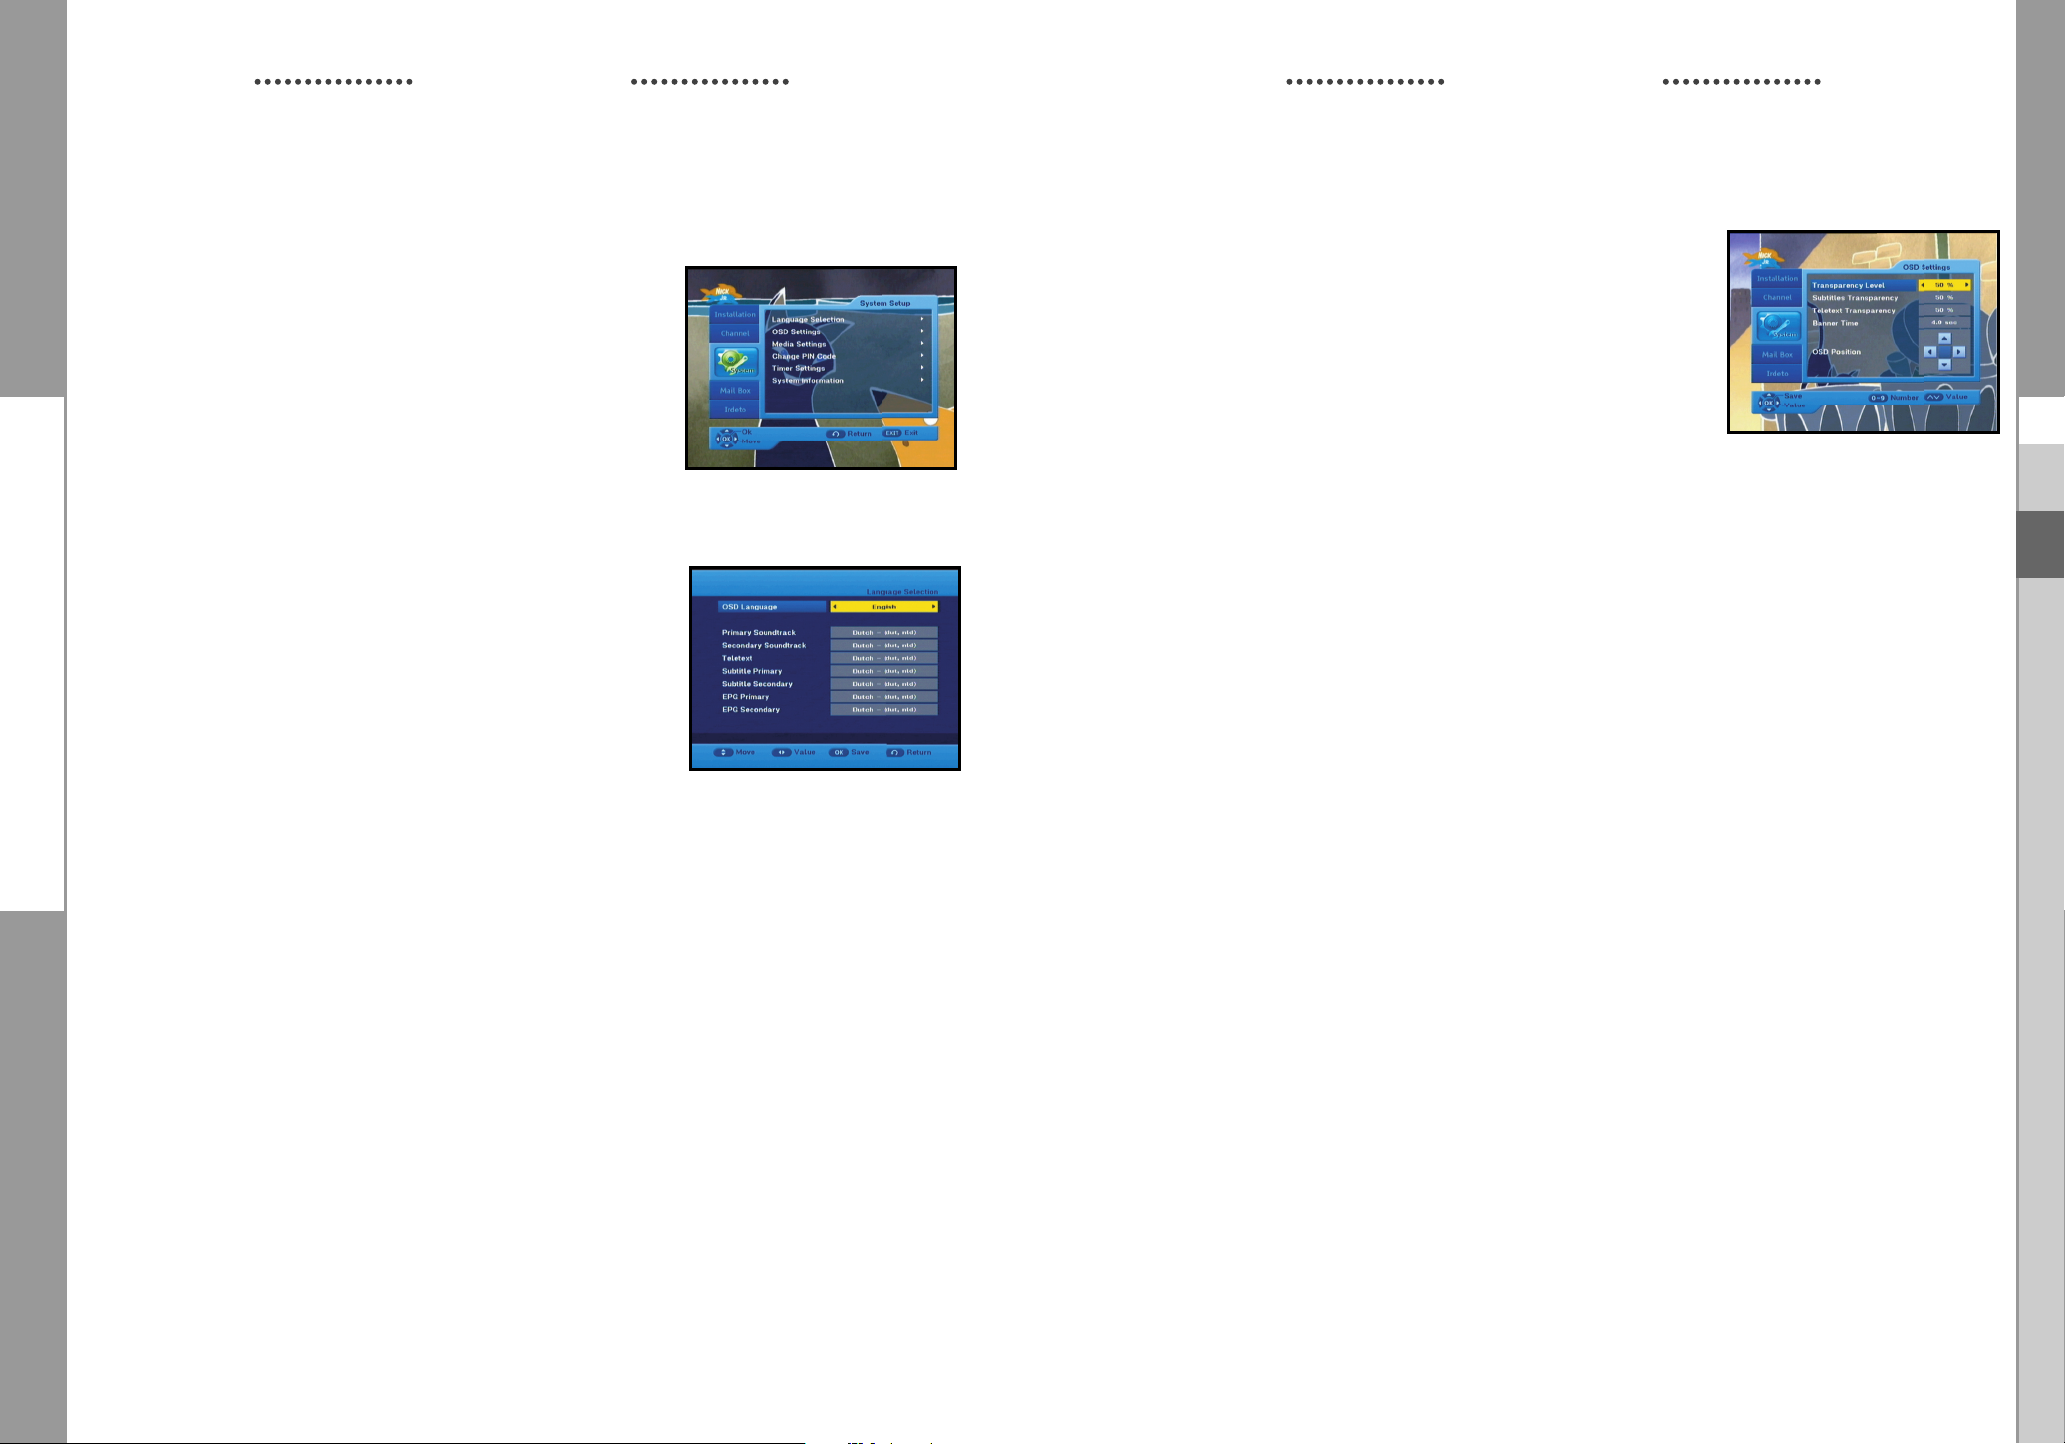
3. System
This option enables you to change the system settings as your
requirements.
3.1 Language Selection
The “Language Selection” option allows the user to select
the desired language of the OSD, Soundtrack, Teletext, Subtitle
or EPG. However, these languages for Soundtrack, Teletext,
Subtitle and EPG depend on broadcasting.
For example, even the language for Subtitle can be selected, it
may not be supported because of no Subtitle on the program.
● There are 3 OSD languages available and 37 languages
supported for soundtracks, subtitles,Teletext, and EPG.
● To select the desired language menu, press the
change language and press the OK key.
¦
keys to
OPERATING THE RECEIVER
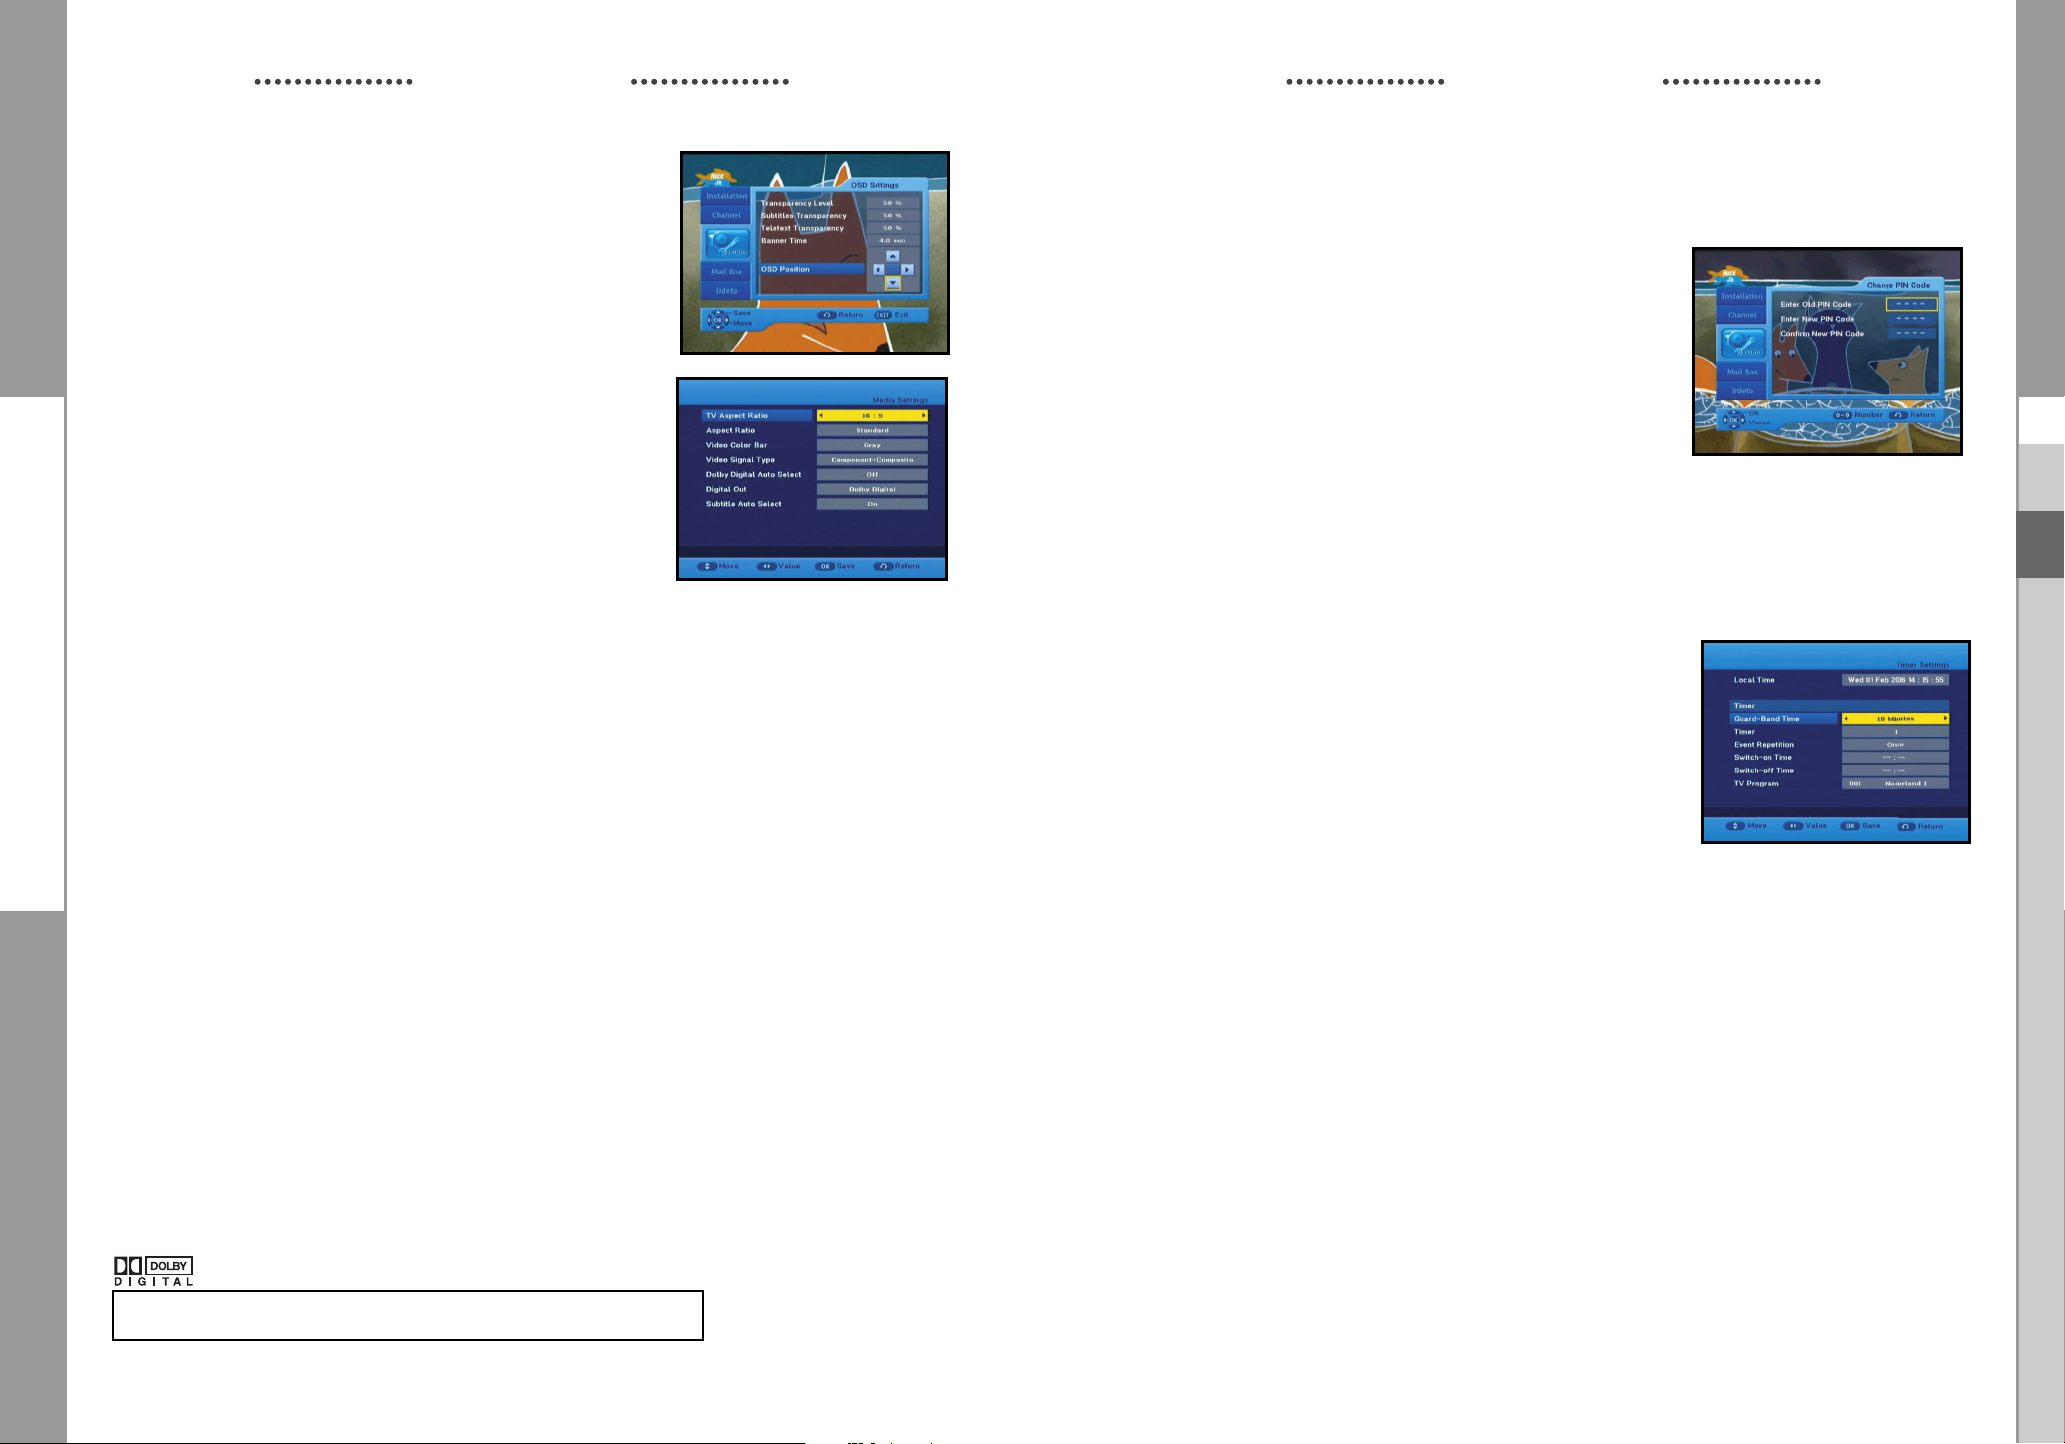
3.2 OSD Settings
You can set the transparency of OSD, subtitle and Teletext,
banner display time and OSD Position.
● Select OSD Transparency level.
The OSD Transparency level from 0 to 100%.
Setting is made with the numeric keys,
¦
keys : Setting in increment of 1%.
CH+/CH- keys : Setting in increment of 10%.
● Select Subtitle Transparency level.
The OSD Transparency level from 0 to 100%.
Setting is made with the numeric keys,
¦
keys : Setting in increment of 1%.
CH+/CH- keys : Setting in increment of 10%.
● Select Teletext Transparency level.
The OSD Transparency level from 0 to 100%.
Setting is made with the numeric keys,
¦
keys : Setting in increment of 1%.
CH+/CH- keys : Setting in increment of 10%.
¦
or CH+/CH- keys .
¦
or CH+/CH- keys .
¦
or CH+/CH- keys .
GB
GB
● The soundtracks, subtitle, Teletext, and EPG will vary according
to the selected language.
● Press the EXIT key to exit the menu .
GB-26
● Set the display duration of the information(banner) box displayed in the screen.
The time ranges from 0.5 to 60.0 seconds.
Setting is made with the numeric keys,
¦
keys : Adjusting in increment of 0.5sec.
CH+/CH- keys : Adjusting in increment of 1 sec.
NNoottee
: This setting does not apply to info banner and info window.
DIGITAL CABLE RECEIVER
¦
keys or CH+/CH- keys.
GB-27
DCB-H360R
DCB-H360R
OPERATING THE RECEIVER
OSD Position
● Place the cursor on the position you want, and press the
¦or
keys until the screen moves to the position
you want.
The screen will move to the position you want.
● Press the EXIT key to exit the menu .
3.3 Media Settings
You can set the various media settings you want.
Place the cursor on this sub menu and press OK.
● Press the
the
● Press the OK key to confirm.
Screen Format
● Select the Screen Format according to your TV : STANDARD 4:3 or WIDE SCREEN 16:9
ratio type.4:3 Video aspect ratio: PAN&SCAN, Full Screen 14:9 LB (Letter Box), 16:9 LB
● When selecting 16:9 for the screen format, you can select an aspect ratio of 4:3 for a movie.
(However, the 16:9 video menu is not available in this aspect ratio).
16:9 Video aspect ratio: Standard, Wide
● When selecting 4:3 for the screen format, you can select an aspect ratio of 16:9 for a movie.
(However, the 4:3 video menu is not available in this aspect ratio).
● Select Video Color Bar: Black or Grey.
- Warning!
Do not display the video color bar in black for extended periods of time as you may
experience temporary or permanent image burn. See also the precaution instructions
regarding your display device.
● Select the Video Signal Type :
Composite + Component, Composite + RGB
● Select the Dolby Digital Auto Select : On or Off.
On : Outputs the Dolby Digital signal first.
Off : Outputs other audio formats first.
● Select the Digital Out : Dolby Digital or PCM.
Dolby Digital : When Dolby Digital Auto Selected is on, outputs the Dolby Digital signal first.
PCM : When Dolby Digital Auto Selected is on, outputs the PCM signal first.
● Select the Subtitle Auto Select : On, Hearing Impaired or off
● Press the EXIT key to exit the menu .
Manufactured under license from Dolby Laboratories.
“Dolby” and the double-D symbol are trademarks of Dolby Laboratories.
keys to move the sub items and press
¦
keys to select the option.
OPERATING THE RECEIVER
3.4 Change PIN Code
To change the PIN Code, select the fourth option “Change PIN
Code”.
This will take you to the following menu:
In this option, you need to enter the current PIN Code at the
first cursor, and at the second cursor enter the desired PIN
Code.
To confirm, you need to enter the new PIN Code again.
Please remember the PIN Code should be a 4 digit numerical
value.
THE FACTORY PRESET PIN Code : 0 0 0 0.
● Press the EXIT key to exit the menu .
3.5 Timer Settings
1) Guard Band Time
Guard-Band time is a function to ensure, that whole event will
fit in set time boundaries.
1 minute of Guard-Band Time means that STB will start this
timer operation 1 minute before set time and end 1 minute
after set time.
2) Timer
15 timers are supported including timer(s) from EPG.
● Select the timer number on ‘Timer’ using the
● Press the
¦
keys to choose event repetition you want to reserve :
Daily, Every Sunday, Every Monday, Every Tuesday, Every Wednesday, Every Thursday,
Every Friday, Every Saturday and Once.
If the timer is set from EPG screen, EPG is displayed on ‘Event Repetition’.
● Press the Numerical (0~9) keys to set the time you want and press the
choose a switch time you want to reserve. If set time on ‘Switch-on Time’ is same as one
on ’Switch-off Time’, this timer works for 24 hours.
● Select TV program to set the event program by pressing the
When you press the TV/RADIO key, TV program and Radio program are toggled.
● Even you can set timers on Daily and Every Monday or Every Sunday, etc.
The priority has the repetition event which is less. For example, when you set timers onOnce
and daily, ‘Once’ will work in stead of ‘Daily’ at that day. If the timer is running, ‘Running’
message with a timer number is displayed on ‘Timer’.
● Press the EXIT key to exit the menu.
¦
keys from 1 to 15.
¦
keys.
keys to
GB
GB
GB-28
DIGITAL CABLE RECEIVER
GB-29
DCB-H360R
DCB-H360R
OPERATING THE RECEIVER
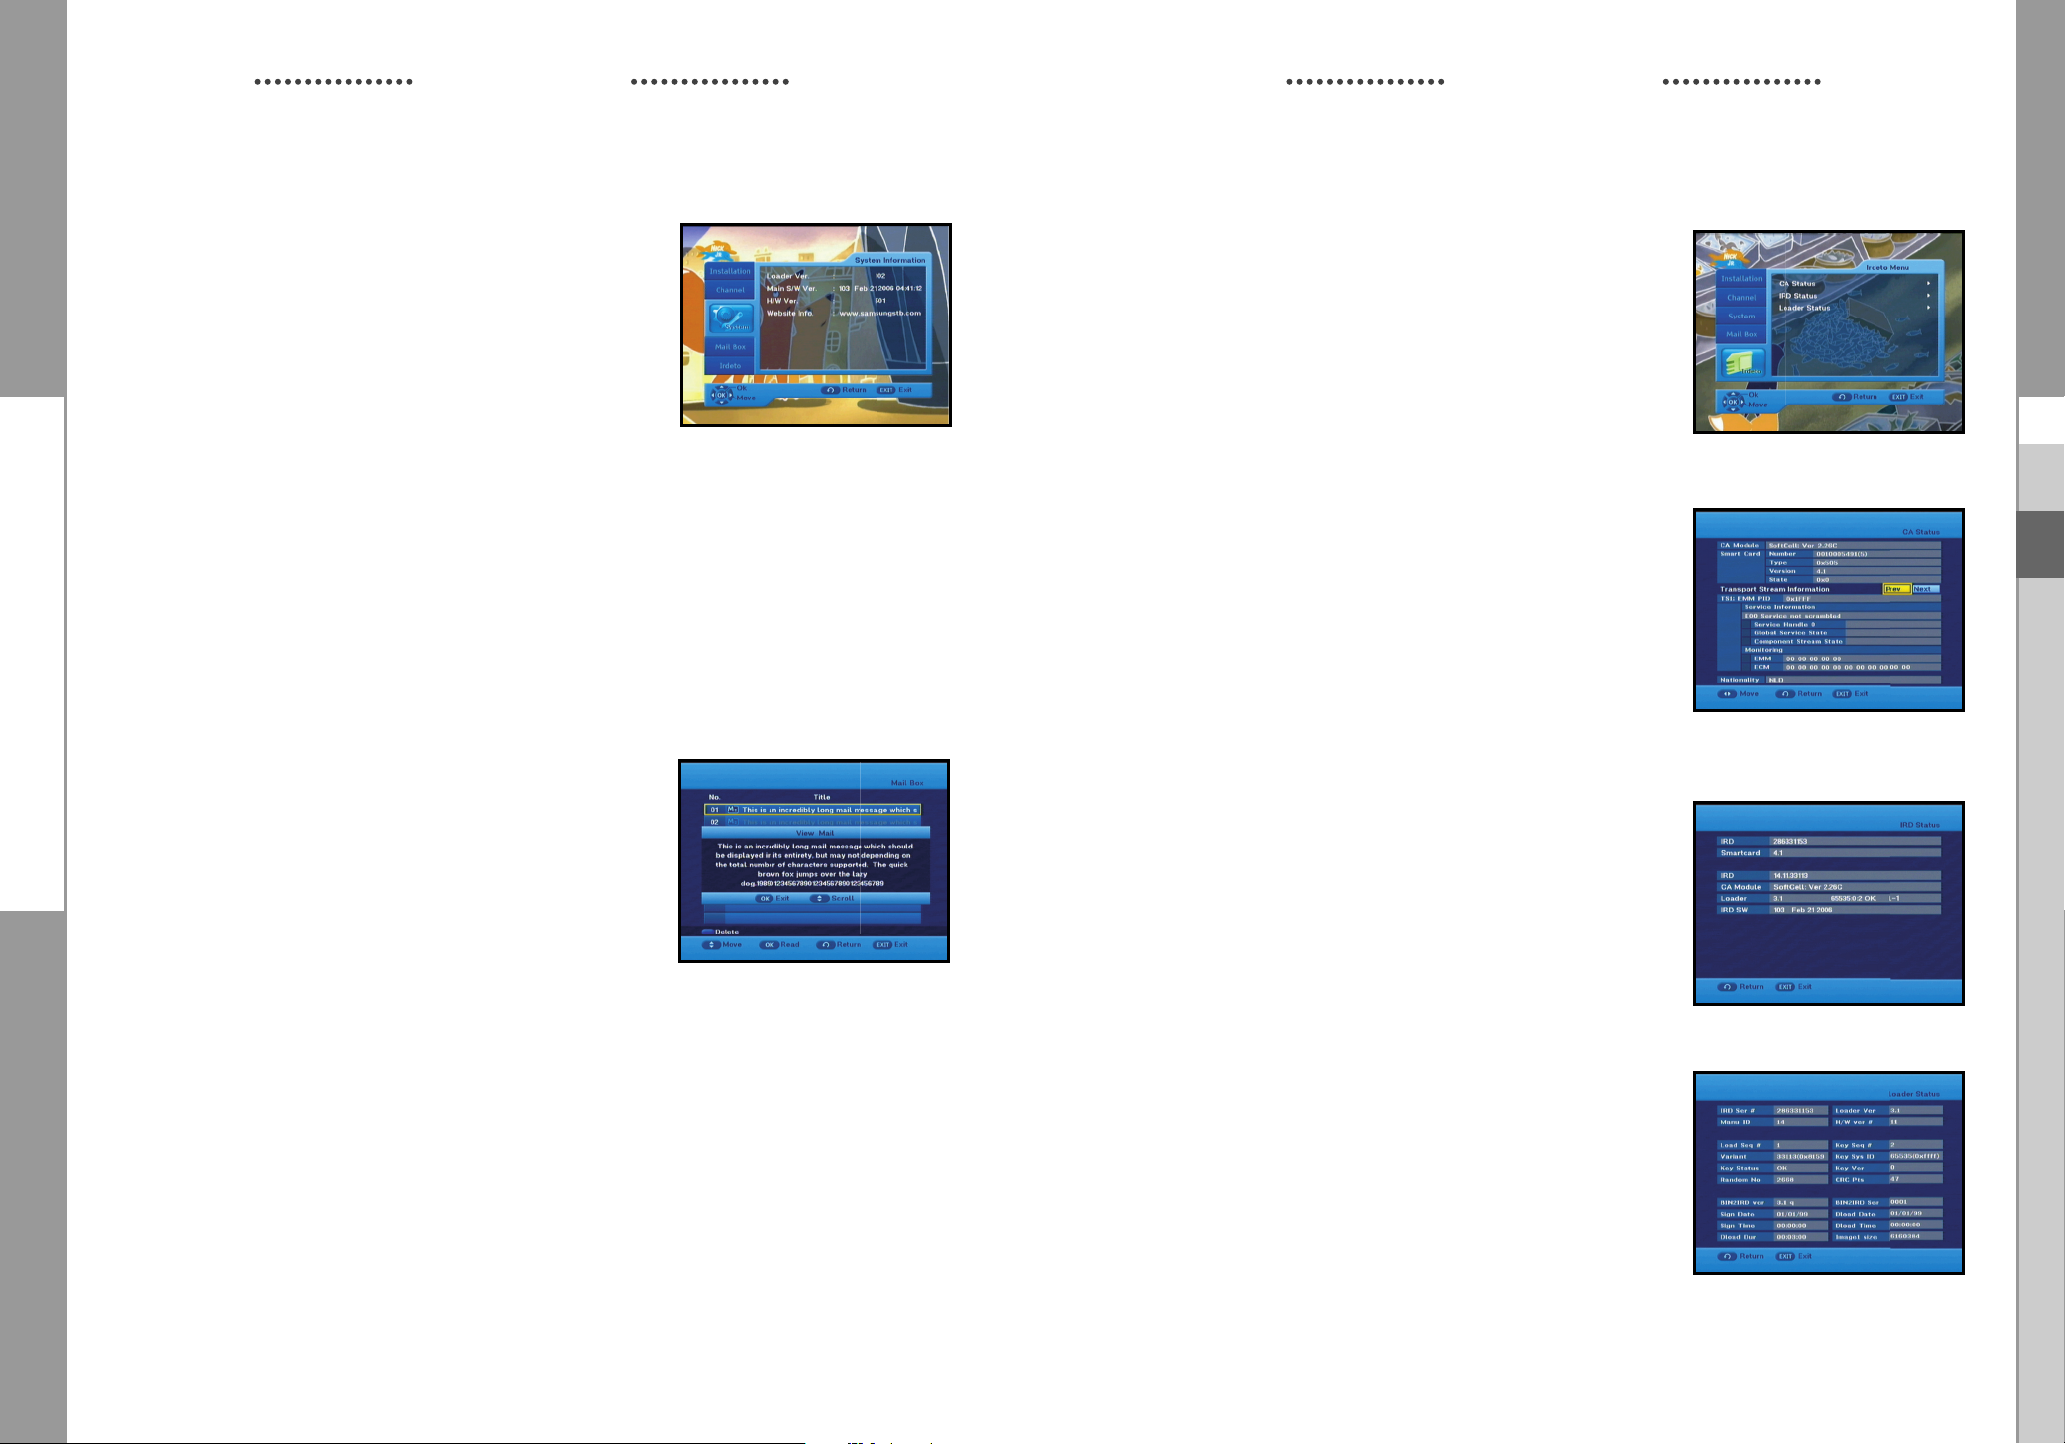
3.6 System Information
If you have to contact your service provider or a service center
they might ask for information available from this menu.
Place the cursor on this sub menu and press the OK key.
The following will be the on-screen display.
● Press the EXIT key to exit the menu.
OPERATING THE RECEIVER
5. Irdeto Menu
The menu provides the information of the smartcard and
the STB. Press the OK key to enter the sub menu.
5.1 CA Status
You can see the CA status (Smart Card EMM/ECM
information).
● Press the EXIT key to exit the menu.
GB
GB
4. Mail Box
You can read the message sent to the individual decoders.
We can save the maximum 10 mail messages.
● Press the EXIT key to exit the menu.
5.2 IRD Status
You can see the IRD status (technical information about
the IRD, CA, Smart Card and software loaded into it).
● Press the EXIT key to exit the menu.
5.3 Loader Status
You can see the information about the IRD, and software
loaded into it.
● Press the EXIT key to exit the menu.
GB-30
DIGITAL CABLE RECEIVER
GB-31

DCB-H360R
1. TV key + 3-Digit User Code
2. TV Operating keys: TV STANDBY/ON, 0~9, CH
TV
Maker (BRAND) NAME CODE NUMBER (3DIGIT) LIST
SAMSUNG 001 002 003 004 005 006 007 008 009
A.R. SYSTEMS 049 152
ACCENT 049 152
ACEC 112
ACURA 195
ADMIRAL 065 076 163 171 190 307 324 369 466
ADYSON 379
AGASHI 076 379
AGEF 324
AIKO 049 076 102 141 152 172 195 225 379
AIWA 377 459
AKAI 049 050 055 066 076 102 107 123 139
AKIBA 049 123 152 380 378
AKITO 049 106 152
AKURA 049 076 123 195 378 426 470
ALARON 042 379
ALBA 018 049 050 107 123 134 163 168 195
ALBIRAL 371
ALCYON 407
ALLORGAN 050 094 236 379
ALLSTAR 049 152
AMPLIVISION 113 379 421 425
AMSTRAD 012 049 076 123 131 152 172 195 225
ANAM 049 152 195
ANAM NATIONAL 049 152
ANGLO 076 195
ANITECH 049 076 152 195 407
ANSONIC 045 049 107 112 152 195 210 226 391
ARC EN CIEL 074 182 186 424 453 463
ARCAM 379 424
ARISTONA 049 050 065 079 112 152 160
ARTHUR MARTIN 107 127 136 139 153 307 425
ASA 020 065 078 080 091 146 171 197 307
ASBERG 049 152 407
ASORA 195
ASTRA 195
ASUKA 050 076 123 378 379
ATLANTIC 049 050 071 113 152 236 379
ATORI 195
AUCHAN 107 425
AUDIOSONIC 049 074 076 152 182 195 213 379 421
AUDIOTON 050 076 379 421
AUSIND 090 407
AUTOVOX 050 071 078 079 080 083 090 156 236
AWA 018 049 131 152 195 226 320 379 426
AYOMI 411
BAIRD 074 102 182 209 218 379 409
BANG & OLUFSEN 324
BARCO 107 371 480
BASIC LINE 049 107 123 195 226 378
BASTIDE 379
Available TV Manufacturer Numbers
/
, VOL+/-, INPUT SEL, MUTE
Maker (BRAND) NAME CODE NUMBER (3DIGIT) LIST
010 050 066 076 102 195 217 365 379
421
481
141 150 152 172 182 195 209 225 379
428 433 437 471 475
225 232 379 413 421 457
426 476
413 421
324 375 408 449
324 379 407 413 449 468 470
433
BAUR 049 107 150 152 172 247 249 357 414
BEKO 152 241 421 433 460
BEON 049 152 163
BEST 213 421
BESTAR 049 152 226 421
BINATONE 379
BLACK STAR 413
BLACKTRON 378
BLACKWAY 378
BLAUPUNKT 057 060 113 247 249 345 451 454 481
BLUE SKY 049 123 152 195 217 232 378 380 457
BLUE STAR 378
BONDSTEC 413
BOOTS 050 106 379
BPL 049 152 378
BRANDT 014 074 182 186 218 424 436 452 462
BRANDT ELECTRONIC 074 453 463
BRANDT ELECTRONIQUE 074 182 186 453
BRINKMANN 049 152 163
BRIONVEGA 049 065 083 152 167 172 324 356 476
BRITANNIA 379
BROTHER 076
BRUNS 065 324
BSR 094 107 110 139 168
BTC 123
BUSH 018 049 076 094 106 107 123 134 139
BUSH(UK) 107 168
CAPSONIC 049 076 152 380
CARREFOUR 018 177
CASCADE 049 064 152 195
CASIO 049 152
CATHAY 049 152
CCE 049 152 379
CENTURION 049 152
CENTURY 065 163 324 411 413 481
CGE 011 090 093 094 107 139 142 163 168
CIHAN 217
CIMLINE 123 134 195
CITY 195
CLARIVOX 049 125 163
CLATRONIC 045 049 076 113 123 152 195 225 379
CMS HIGHTEC 379
COMTEL 125 217
CONCORDE 195
CONDOR 045 049 050 113 152 163 195 210 378
CONTEC 018 131 195 320 379
CONTINENTAL EDISON 014 074 182 186 232 424 453 462 463
COSMEL 195 213
CROSLEY 065 090 093 094 104 107 139 324 346
CROWN 049 152 163 170 195 209 232 407 421
CRYSTAL 477
CS ELECTRONICS 123 379 413
CTC 413
CTC CLATRONIC 045
CURTIS MATHES 126 190
454 470 475
142 172 193 195 209 217 225 226 232
307 378 379 457 458 470 480
346 348 369 407 413 421 480
407 413 421
379 413 421 467
348 407 413 469 481
470
Available TV Manufacturer Numbers
TV
Maker (BRAND) NAME CODE NUMBER (3DIGIT) LIST
CURTIS MATHES 126 190
CYBERTRON 123
DAENYK 042
DAEWOO 049 123 152 193 195 226 379 456 464
DAINICHI 123 379
DANSAI 049 076 141 152 195 379
DANSETTE 426
DANTAX 421
DATSURA 209
DAWA 049 152
DAYTON 049 152 195 226
DE GRAAF 107 139 209 307 479
DECCA 049 102 106 120 217
DECCA(UK) 046 049 050 102 106 131 152 379
DEITRON 049 152
DENKO 076
DENON 126
DERWENT 105
DESMET 049 113 152
DIGATRON 049
DIGILINE 049 152
DIXI 049 152 195 379 413
DORIC 104 105
DREAN 049 152
DTS 195
DUAL 049 050 107 139 152 156 168 182 243
DUAL TEC 040 050 168 195 379
DUMONT 045 065 080 102 139 146 324 375 379
DUMONT-FINLUX 020 045 078 091 104
DUX 049 112 152
DYNATRON 049 152
ELBE 049 107 123 152 172 210 243 369 391
ELBIT 217
ELCIT 045 046 062 065 104 107 150 168 324
ELECTA 076 378
ELECTRO TECH 195
ELEKTA 076 378
ELG 049 152
ELIN 020 049 107 139 152 172 195 379 470
ELITE 049 123 152 467
ELMAN 045 168
ELTA 195 076 379
EMERSON 012 042 049 065 113 152 225 324 378
ERRES 049 112 152
ESC 049 152
ETRON 049 107 139 152 195
EURO-FEEL 076
EUROMAN 049 076 152 379 421
EUROPA 049 152
EUROPHON 045 046 049 050 068 107 120 152 168
EXPERT 071 107 236 425
EXQUISIT 049 152 413
FAMILY LIFE 049 152
FENNER 152 195 226
FERGUSON 049 050 074 076 080 082 102 103 182
FIDELITY 049 050 076 107 152 225 307 379 475
FILSAI 050 379
FINLANDIA 033 139 172 197 209 307 375 470 474
FINLUX 020 042 045 049 078 080 090 091 102
379 414 417 424 468 470
449 469
411 421 435
413
479
413 475 481
379 413
218 247 409 411 436 452 472
104 107 139 146 152 163 197 210 324
375 379 407 408 428 429 437 449 469
Maker (BRAND) NAME CODE NUMBER (3DIGIT) LIST
FIRST LINE 045 049 094 102 107 134 139 152 191
FISHER 018 041 050 065 069 102 104 107 139
FLINT 049 102 123 152 380
FNR 045
FORMENTI 049 090 107 113 139 307 324 379 407
FORMENTI-PHOENIX 050 104 113 307
FORTRESS 190 324
FRABA 049 152 421
FRIAC 045 049 152 195
FRONTECH 066 076 139 195 307 379 413 466 470
FUJITSU 042 045 071 102 107 195 236 379
FUJITSU GENERAL 195 379
FUNAI 042 076 094
GALAXI 045 049 152
GALAXIS 045 049 152 163 421
GBC 104 107 139 168 195 226 480
GE 074 182 218 378
GEANT CASINO 107 425
GEC 049 102 104 107 120 152 171 172 307
GEC(UK) 046 050 102 107 150 162
GELOSO 062 104 107 139 168 171 195 226 307
GENERAL 064 074 182
GENERAL TECHNIC 195
GENEXXA 049 123 152 307 426 466
GOLDHAND 379
GOLDLINE 213
GOLDSTAR(LG) 049 050 055 107 139 152 168 172 182
GOODMANS 018 042 049 076 102 134 139 141 152
GORENJE 421
GPM 123
GRADIENTE 049 152 170 177
GRAETZ 049 090 104 136 139 152 153 162 171
GRANADA 013 018 033 041 049 102 104 105 112
GRANADA(UK) 046 050 090 107 139 162 307
GRANDIN 049 107 113 123 152 195 378 380 425
GRONIC 045 379
GRUNDIG 049 080 090 152 232 247 249 407 454
HALIFAX 076 379
HAMPTON 379
HANIMEX 094
HANSEATIC 018 049 050 094 104 107 113 152 172
HANTAREX 045 046 049 152 195
HANTOR 049 152
HARLEY DAVIDSON 042
HARWOOD 049 152 195 426
HAUPPAUGE 049 152
HAVERMY 190
HCM 049 076 123 152 163 195 378 379 426
HEMA 195 379
HEMMERMANN 150 470
HIFIVOX 074 182 186 424 453 463
195 209 210 226 379 411 413 457 470
156 172 209 320 324 379 408 414 421
470
467 469 480 481
477
379 470
413 469 481
195 219 379 413 414 421 460
182 193 195 218 225 226 232 379 428
450 456 464
172 198 225 307 466 469 475
120 152 171 172 198 209 218 238 241
307 379 407 425 470 471 472 474
435
455
195 241 324 378 379 391 421 455 467
470 475
DCB-H360R
GB
GB-32
DIGITAL CABLE RECEIVER
GB-33

DCB-H360R
DCB-H360R
Available TV Manufacturer Numbers
TV
Maker (BRAND) NAME CODE NUMBER (3DIGIT) LIST
HIGASHI 050
HIGHLINE 049 076 152
HIKONA 123
HINARI 012 018 042 049 066 094 107 123 134
HISAWA 123 378 380 425
HIT 324
HITACHI 018 020 033 049 050 074 086 099 102
HITACHI FUJIAN 013
HITSU 123 195 380
HORNYPHON 049 112 152
HOSHAI 123 380
HUANYU 193 226 379
HYGASHI 379
HYPER 050 168 195 379 413
HYPERSONIC 172
HYPSON 049 076 152 217 378 379 380 425
IBERIA 049 152
ICE 049 076 123 152 195 225 379
ICES 123 379
IMPERIAL 011 049 090 093 094 107 142 152 163
INDIANA 049 152
INGELEN 090 104 136 139 153 162 171 198 232
INGERSOLL 195
INNO HIT 046 049 050 066 102 123 152 195 217
INNOVATION 049 152
INTERACTIVE 210
INTERBUY 076 195 413
INTERFUNK 049 065 067 074 090 104 107 112 139
INTERNAL 049 152
INTERVISION 045 049 055 076 107 123 152 225 232
IR 346
IRRADIO 049 066 090 123 152 195 407 413
ISUKAI 049 123 152 378
ITC 379 480
ITS 049 076 123 152 225 378 379
ITT 042 090 107 134 139 150 162 171 172
ITT-NOKIA 042 090 104 107 134 136 139 150 153
ITV 076 049 152 413
JEAN 018
JEC 141
JET POINT 365
JVC 018 103 123 170 182 225 409 433 439
KAISUI 049 050 123 152 195 378 379 380
KAMOSONIC 050
KAMP 379
KAPSCH 071 107 172 236 466
KARCHER 020 045 049 050 068 076 107 152 195
KATHREIN 455
KAWASHO 379
KB ARISTOCRAT 107
139 195 209 232 307
104 107 110 126 127 139 150 152 162
168 171 182 186 218 238 307 379 466
469 470 472 479
168 307 346 348 369 407 413 421 470
480
435 466
379 407 413
150 152 153 172 182 307 324 413 421
453 463 466 475
378 379 380 413 421
193 197 198 209 307 375 428 466 469
470 471 475 479
162 171 172 193 197 198 209 307 375
470 428 433 435 437
465
217 378 421 435
Maker (BRAND) NAME CODE NUMBER (3DIGIT) LIST
KENDO 045 049 055 134 152 172 210 413 421
KENNEDY 071 079 104 107 139 236 369 480
KINGSLEY 379
KLARMAX 371
KNEISSEL 049 152 210 243 369 391 411 421 435
KOLSTER 045 049 152 470
KONKA 049 123 152 225
KONTAKT 232
KORPEL 049 152
KORTING 065 094 113 324 421
KOSMOS 049 152
KOTRON 076 426
KOYODA 195
KRAKING 411
KRIESLER 050 065 079 112 152 160
KTV 050 379
KURO 445
KYOSHU 076 163 426
KYOTO 107
LECSON 049 152
LEMAIR 210
LENCO 049 107 152 195 226
LENOIR 050 195
LESA 413
LEYCO 049 076 094 102 152
LIESENK & TTER 049 112 152 345
LIFE 440 441 443 444
LIFETEC 049 076 123 152 195 226 440 441 443
LLOYD_S 195
LOEWE 035 049 089 120 152 324 391 421
LOEWE OPTA 035 046 049 065 120 144 152 213 324
LOGIK 131 225
LOGIX 195
LUMA 071 107 110 152 171 172 195 210 226
LUMATRON 049 076 107 152 172 236 379
LUX MAY 049 152 195
LUXOR 042 050 090 107 127 139 150 172 197
LYCO 076
MAAZ 371
MADISON 049 152
MAGNADYNE 045 046 062 065 104 107 120 139 150
MAGNAFON 045 046 050 068 090 120 379 407 481
MAGNAVOX 018 042 049 152
MAGNUM 440 441 443 444
MANDOR 076
MANESTH 076 094 113 134 141 152 379 467
MANHATTAN 049 195
MARANTZ 049 152 455
MARELLI 324
MARK 049 152 195 226 379
MASUDA 123 195 225
MATSUI 012 018 041 049 050 094 100 102 106
MAXIMAL 139
MAXWELL 371
MEDIATOR 049 112 152
MEDION 049 152 195 217 457
MEGAS 435
MEGATRON 126
MELECTRONIC 020 049 074 152 182 193 195 197 210
MELVOX 425
435 476
444
236 307
209 307 375 428 429 470 472 473 475
168 324 413 469
107 131 134 141 150 152 171 195 209
218 225 232 247 307 379 380 470
226 375 379 408 413 428 429 466 470
Available TV Manufacturer Numbers
TV
Maker (BRAND) NAME CODE NUMBER (3DIGIT) LIST Maker (BRAND) NAME CODE NUMBER (3DIGIT) LIST
MELVOX 425
MEMOREX 099 195 217
MEMPHIS 102 125 195 213
MERCURY 049 152 195
METZ 049 065 067 070 092 247 324 412 420
MICROMAXX 049 152 195
MICROSTAR 440 441 443 444
MINERVA 080 090 232 247 249 407 454
MINOKA 049 152 426 470
MITSUBISHI 013 018 049 065 105 131 152 157 190
MIVAR 046 050 058 072 081 090 120 379 391
MONACO 195
MORGAN_S 049 152
MOTION 407
MOTOROLA 190
MTC 152 379 421 470
MTEC 106
MULTISTANDARD 045
MULTITEC 049 152 195
MULTITECH 045 046 049 050 120 152 195 379 407
MURPHY 102 104 105 107 171 307 379
MURPHY(UK) 162
MUSIKLAND 123
MYRYAD 455
NAD 172 209 475
NAIKO 049 152
NAKIMURA 049 152 226
NAONIS 040 071 079 110 171
NAT 085 151
NATIONAL 033 085 104
NEC 018 049 113 131 152 177 195 226 379
NECKERMANN 011 049 050 065 107 139 152 163 210
NEDIATOR 152
NEI 049 125 152 225 477
NESCO 042 413
NETSAT 049 152
NETWORK 213
NEUFUNK 049 152 195 435
NEW TECH 049 050 152 182 195 379
NEW WORLD 123
NICAMAGIC 379
NIKKAI 018 049 076 102 123 125 139 141 152
NOBLEX 049 076 152
NOBLIKO 045 050 080 090 379 407
NOGAMATIC 074 182 186 424 453 463
NOKIA 090 104 107 134 136 139 150 153 157
NORDMENDE 049 074 083 150 152 182 186 218 247
NOVATRONIC 020 049 152 226
OCEANIC 086 094 104 107 108 109 139 172 209
OCEANIC(F) 150
ODEON 076
OKANO 049 076 102 152 421
OMEGA 076
ONCEAS 050
ONWA 123 225
OPERA 049 152
454 481
247 324 454
407 414 421 434
413 421 470
380
247 249 307 324 357 379 413 421 455
470 481
195 213 379 066
162 171 172 193 197 198 209 226 307
375 428 429 433 437 465 470 475 478
479
307 424 453 463 469 481
425 466 469 475
OPTIMUS 099
OPTONICA 190
ORBIT 049 152
ORION 012 042 045 049 076 094 113 131 134
ORLINE 049 123 152
ORMENTI-PHOENIX 104
ORMOND 195
OSAKA 066
OSAKI 049 066 076 102 106 123 152 226 379
OSIO 049 152
OSO 123
OSUME 018 102 123
OTAKE 450
OTTO VERSAND 018 049 050 074 094 104 107 113 134
P.T ACTRON 217
PAEL 050 379
PALLADIUM 049 107 152 163 210 247 324 357 379
PALSONIC 049 055 076 152 379 426
PANAMA 049 076 152 195 379 413
PANASONIC 016 049 099 104 107 139 151 152 172
PANAVISION 049 152 210
PATHE CINEMA 107 113 379 391 411 425 467 470 480
PATHE CINEMA(F) 050 168
PATHE MARCONI 014 074 182 186 424 453 462 463
PAUSA 195
PAUZA 195
PERDIO 049 102 107 113 152 467
PERFEKT 049 152
PERSHIN 425
PHILCO 011 016 049 065 090 093 094 104 107
PHILEX 471
PHILHARMONIC 379
PHILIPS 014 049 050 065 079 089 112 152 160
PHOENIX 049 050 102 104 107 113 152 324 379
PHONOLA 049 050 065 079 112 152 160 324 379
PILOT 049 152
PIONEER 049 074 152 172 182 209 218 307 421
PLANTRON 049 076 152 195
PLAYSONIC 379
POLICOM 074
POPPY 195
PORTLAND 226
POWERPOINT 232
PRANDONI-PRINCE 046 090 120 171 172 307 407 413
PRECISION 379
PREMIER 142
PRIMA 076 195 307
PRINCE 046 171
PRINZ 102 470
PROFEX 107 139 195 407 475
PROFI-TRONIC 045 049 152
PROLINE 049 102 112 191 366 436
PROSONIC 049 085 151 152 195 225 226 379 421
139 150 152 191 195 216 366 367 426
467
426
139 152 172 190 218 247 249 357 362
379 413 414 454 455 467 469 470 480
481
413 421 470
396 420 466 469 481
481
126 142 152 163 168 324 346 348 369
407 413 421 480 481
182 193 216 217 220 226 247 249 324
427 455 482
421
427 466
GB
GB-34
DIGITAL CABLE RECEIVER
GB-35

DCB-H360R
DCB-H360R
Available TV Manufacturer Numbers
TV
Maker (BRAND) NAME CODE NUMBER (3DIGIT) LIST Maker (BRAND) NAME CODE NUMBER (3DIGIT) LIST
PROTECH 045 049 076 125 139 152 163 195 379
PROVISION 049 152
PYE 050 065 079 112 152 160 226 324
PYMI 049 112 152 195 226 324
QUADRA VISION 425
QUASAR 045 046 068 099 413
QUELLE 018 020 049 050 074 076 078 080 090
QUESTA 018
RADIALVA 049 074 107 123 152
RADIOLA 014 049 050 065 079 112 152 160
RADIOMARELLI 045 046 062 065 104 105 150 152 168
RADIONETTE 020 150
RADIOSHACK 049 152
RADIOTONE 049 076 152 163 195 421 426
RANK ARENA 018
RCA 190 218 436
RECOR 049 152
RECTILIGNE 049 152
REDIFFUSION 018 059 104 105 139 171 172 307 471
REDIFFUSION(UK) 150 162
REDSTAR 049 152
REFLEX 049 152
REOC 460
REVOX 049 152 421
REX 040 071 079 107 110 152 171 210 236
RFT 076 102 241 324 391 421
RHAPSODY 379
R-LINE 049 152
ROADSTAR 049 076 123 152 163 195
ROBOTRON 065 324
RODEX 049 152
ROWA 458
ROWSONIC 050
ROYAL LUX 421 426
RTF 065
SABA 046 065 074 077 107 120 139 172 182
SACCS 411
SAGEM 378 380 435
SAISHO 012 050 076 107 131 134 195 307 379
SALORA 033 107 127 136 139 150 153 171 172
SAMBERS 045 046 068 090 120 407 481
SANDRA 379
SANELA 411
SANSUI 049 152 225
SANTON 195
SANYO 018 020 041 049 050 065 102 107 131
SAVE 049 152
SBR 049 112 152
SCHAUB LORENZ 090 104 136 139 153 162 171 198 307
SCHNEIDER 014 040 049 050 065 069 079 104 107
413 457 470 477 480
091 094 113 131 139 146 150 152 153
172 195 247 249 320 345 346 348 357
379 408 413 449 451 454 470 475 480
481
324 413
475
243 307 413 466
186 218 307 324 424 436 452 453 463
466 469 481
477
198 209 307 466 470 472 474 475 479
152 195 198 209 320 379 391 408 421
481
433 469 470 475
112 123 139 152 156 160 168 172 182
195 225 243 307 379 382 413 414 417
457 468 470
SCOTT 042
SEARS 042
SEG 018 045 049 050 076 107 152 172 195
SEI 012 045 049 094 107 139 152 236 324
SEI SINUDYNE 446
SELECO 040 071 079 107 110 152 171 172 210
SENCORA 195
SENTRA 123 139 141 195
SERINO 380 435
SHARP 018 094 170 190 320 362
SHORAI 042 094
SIAM 049 152
SIAREM 045 046 065 104 107 120 139 324 469
SIEMENS 018 049 066 113 152 247 249 307 320
SIERA 050 065 079 112 152 160
SIERRA 049 112 152
SIESTA 421
SILVA 049 152 379
SILVER 018 042 049 076 152 172
SINGER 045 049 065 104 152 195 324 369 413
SINUDYNE 012 045 065 094 104 107 134 139 150
SKANTIC 307 472 473
SKY 049 152
SKYWORTH 448
SOGERA 113
SOLAVOX 066 102 107 139 172 307 466 471
SONAWA 123
SONITRON 209 379 421
SONNECLAIR 049 152
SONOKO 049 050 076 152 195 378 379
SONOLOR 107 139 172 209 357 425 466
SONTEC 049 094 152 421
SONY 018 045 131 211 346 357 358 370
SOUND & VISION 045 123 226
SOUND WAVE 049 113 163
SOUNDESIGN 042
SPECTRA 195
SSANGYONG 195
STANDARD 049 050 113 123 152 195 226 379
STARLIGHT 049 076 107 152 195
STENWAY 123 378
STERN 040 071 079 107 110 152 171 236 243
STRATO 049 076 152 195
SUNKAI 049 094 123 134 152 191 232 367 380
SUNSTAR 049 152 195 225
SUNWOOD 049 152 195
SUPERLA 379
SUPERTECH 049 123 152 195 379
SUPRA 195 226
SUSUMU 123 218
SUTRON 195
SWISSLINE 413
SYDNEY 379
SYSLINE 049
SYTONG 379
TACTUS 106
TANDBERG 065 074 078 172 182 210 213 420 449
TANDY 050 102 123 190 307 379 413 466
TASHIKO 018 050 107 177 379 470 474
232 379 413 407 457 480
357 469 470 481
236 243 307 369 466 476
481
345 451 454 469 481
425
152 172 210 216 236 324 357 366 367
469 470 481
307 466
Available TV Manufacturer Numbers
TV
Maker (BRAND) NAME CODE NUMBER (3DIGIT) LIST Maker (BRAND) NAME CODE NUMBER (3DIGIT) LIST
TATUNG 049 050 102 106 120 131 152 217 379
TCM 440 441 443 444
TEAC 049 076 152 163 195 217 378 380 426
TEC 040 050 064 168 195 213 218 243 379
TECH LINE 049 152 195
TECHICA 123
TECHNEMA 113 467
TECHNICS 099
TECHNOL ACE 042
TEDELEX 379
TEIRON 195
TEKNIKA 042
TELEAVIA 014 074 182 186 218 424 453 462 463
TELECOR 049 107 123 152 379
TELEFUNKEN 049 064 074 082 152 182 186 187 218
TELEFUSION 049 152
TELEGAZI 049 076 107 123 152
TELEMEISTER 049 113 152 467
TELESONIC 049 152
TELESTAR 049 152
TELETECH 049 152 195 213 413
TELETON 018 067 071 107 236 379 470
TELEVIDEON 050 104 107 113 379
TELEVISO 425
TEMCO 094
TEMPEST 049 152 195
TENNESSEE 049 152
TENSAI 020 050 055 094 113 123 152 195 225
TESMET 439
TETUNG 046
TEVION 049 152 195
TEXET 050 123 195 226 379
THOMSON 014 024 049 064 074 134 152 182 186
THORN 049 102 103 106 141 152 218 226 346
THORN-FERGUSON 074 076 080 082 103 218 357 358 375
TOKAI 049 102 107 152 195 213 226 379
TOKYO 141 379
TOMASHI 123 378
TOSHIBA 018 045 128 141 369 379
TOWADA 045 379 470 480
TOYODA 195
TRAKTON 076
TRANS CONTINENS 046 049 152 171 307 379
TRANSONIC 049 152 380 458
TRANSTEC 379
TRIDENT 379
TRISTAR 123
TRIUMPH 012 046 049 128 152 197 375
UHER 049 069 071 080 090 113 152 163 226
ULTRA 409
ULTRAVOX 045 049 050 065 104 107 139 152 226
UNIC LINE 049 152
UNITED 049 152
UNIVERSUM 011 012 018 020 049 074 076 094 107
UNIVOX 049 107 152 213 324 411
UTAX 050
VEGAVOX 163
457 458 470
413 480
230 346 348 424 436 452 453 463
226 379 413 450 467
218 230 424 436 453 462 463 470
348 408 409 411 454 464 470 475
236 307 407 414 421 467
324 379 413 471
131 152 163 172 195 197 210 213 247
320 345 346 357 375 379 407 408 413
421 428 429 437 454 470 480
VESTEL 049 107 125 152 379
VEXA 152 195
VICTOR 170
VIDEO SYSTEM 049 152
VIDEOLOGIQUE 123 379
VIDEOSAT 413 447
VIDEOSYSTEM 049 152
VIDEOTECHNIC 113 226 379
VIDEOTON 107 472
VIDIKRON 045
VIDTECH 018
VIPER 213
VISIOLA 379
VISION 049 113 152 467
VISOREX 442
VISTAR 172 236
VOLTEC 074
VORTEC 152
VOXSON 049 065 090 152 163 171 307 324 407
WALTHAM 049 152 163 182 307 379 472
WATSON 049 107 113 123 152 195 247 467
WATT RADIO 045 050 068 104 107 139 150 379 470
WEGA 018 049 139 152 324
WEGA COLOR 065 088
WEGAVOX 195
WELTBLICK 113 152
WESTINGHOUSE 094 152
WESTON 168
WHARFEDALE 049 152
WHITE 045
WHITE WESTINGHOUSE 049 050 113 152 213 379 467
WINCO 426
WINDSTAR 378
XRYPTON 049 152
YAMISHI 049 123 152 378 379 380
YOKAN 049 152
YOKO 049 050 076 123 152 195 379 413 421
YORX 123
ZANUSSI 040 071 079 110 152 171 236 307 379
ZOPPAS 040 071 079 110 171 307
466
480
477
GB
GB-36
DIGITAL CABLE RECEIVER
GB-37

DCB-H360R
DCB-H360R
TROUBLESHOOTING
Problem Possible cause Solution of the problem
No display LED on Power cord not plugged in correctly Power cord plug in correctly
the front panel;
No power supply
No pictures on the screen Receiver in Standby mode; Set receiver to “On”;
SCART,RCA or HDMI not connected Check connection;
tightly to video input of television;
Incorrect channel or video output Check channel and video input of TV
selected on television: (TV instruction manual);
Incorrect video output selection on HD Check video output on HD receiver
Receiver (Refer to page 10)
No sound SCART or Audio connected incorrectly; Check connection;
Loudness level = 0; Increase loudness on television set
or HD receiver;
Muting active Press the MUTE key
Remote Control does not Incorrect Operation; Point remote control towards the
operate directly receiver;
Batteries dead or inserted incorrectly Replace batteries or insert correctly
Poor picture quality Signal strength too low Check all wire connections
Menu screen does not Channel lists not installed; Scan channels. Please go to
disappear Installation menu;
On-Screen Error Messages; Signal cable not connected or not tight Check connection
“Searching for signal”;
“No signal”
On-Screen Error Messages; Smartcard (Depend on model)
“Smartcard Failure” - not plugged in correctly; Check the smartcard;
“Unknown smartcard”
“Please insert Smartcard” - not plugged in Insert the smartcard
DISPOSAL
The device, packaging material (e.g. Styrofoam) and the batteries must never be disposed of
with household refuse. Please obtain appropriate information about the regulations in your
community, and dispose of all refuse in accordance with regulations at the separate locations
provided.
TECHNICAL SPECIFICATIONS
Power supply
Type : SMPS
Input voltage : AC 100-240V~, 50/60 Hz
Fuse rating : 250 V/T1.6AH
Tuner & Demodulator
Input Frequency : 50.5~858 MHz
Channel Bandwith 8 MHz
DEMODULATION : QAM DVB-C
SYMBOL RATE : MAX 7.252 Msps
Constellation : 16, 32, 64, 128, 256 QAM
CABLE OUT : RF LOOP-THROUGH OUTPUT for other
receiver or TV
Video decoder
System decoding : MPEG-2 ISO/IEC 13818-2
Profile@Level (MP@HL(HD), MP@ML(SD))
H.264 ISO/IEC 14496-10
(MP@L3, MP@L4, HP@L4 up to 30 Mbps)
Resolution : 1080i, 720p, 576p, (576i)
Video Output: SD output (2 SCART (AV1,AV2), Composite RCA)
HD output (Component (YPBPR), HDMI)
Video Format 4:3(Normal) & 16:9 (Widescreen)
Audio Decoder
System decoding : MPEG Audio-1 ISO/IEC 11172-3
(Layer1, Layer2)
MPEG Audio-2 ISO/IEC 13818-3
Dolby Digital (AC-3)
Audio mode : Mono, Dual stereo, Joint stereo
Sampling Rate: 32kHz, 44.1kHz, 48kHz, 96kHz
Audio output : Analog output (L/R (RCA) 1 CH)
Digital output (S/PDIF(Optical))
GB
GB-38
PHISICAL SPECIFICATION
Size (W x D x H) 351 x 227 x 60 mm
Weight (Net) 2.47Kg
DIGITAL CABLE RECEIVER
GB-39
 Loading...