

Page 1

E-MANUAL
Contact SAMSUNG WORLDWIDE
If you have any questions or comments relating to Samsung products, please contact the SAMSUNG customer care centre.
Country
EIRE 0818 717 100 www.samsung.com/ie
U.K 0330 SAMSUNG (7267864) www.samsung.com/uk
Customer Care Centre
Web Site
Plasma TV
user manual
© 2011 Samsung Electronics Co., Ltd. All rights reserved.
imagine the possibilities
Thank you for purchasing this Samsung product.
To receive more complete service, please register
your product at
www.samsung.com/register
Model _____________ Serial No. _____________
BN68-03421K-01
Page 2
For more information on how to use e-Manual (p. 14)
Figures and illustrations in this User Manual are provided for reference only and may differ from actual product
appearance. Product design and specifications may be changed without notice.
Digital TV notice
1. Functionalities related to Digital TV (DVB) are only available in countries/areas where DVB-T (MPEG2 and MPEG4 AVC) digital terrestrial signals are
broadcasted or where you are able to access to a compatible DVB-C (MPEG2 and MPEG4 AAC) cable-TV service. Please check with your local
dealer the possibility to receive DVB-T or DVB-C signal.
2. DVB-T is the DVB European consortium standard for the broadcast transmission of digital terrestrial television and DVB-C is that for the broadcast
transmission of digital TV over cable. However, some differentiated features like EPG (Electric Programme Guide), VOD (Video On Demand) and so
on, are not included in this specification. So, they cannot be workable at this moment.
3. Although this TV set meets the latest DVB-T and DVB-C standards, as of [August, 2008], the compatibility with future DVB-T digital terrestrial and
DVB-C digital cable broadcasts cannot be guaranteed.
4. Depending on the countries/areas where this TV set is used some cable-TV providers may charge an additional fee for such a service and you may
be required to agree to terms and conditions of their business.
5. Some Digital TV functions might be unavailable in some countries or regions and DVB-C might not work correctly with some cable service providers.
6. For more information, please contact your local Samsung customer care centre.
The reception quality of TV may be affected due to differences in broadcasting method between the countries. Please check the TV
✎
performance in the local SAMSUNG Authorized Dealer, or the Samsung Call Centre whether it can be improved by reconfiguring TV setting or
not.
User Instructions
• Screen Image retention
Do not display a still image (such as on a video game) on the plasma display panel for more than several minutes as it can cause screen image
retention. This image retention is also known as “screen burn”. To avoid such image retention, reduce the degree of brightness and contrast of the
screen when displaying a still image.
• Heat on the top of the Plasma TV
The top side of the product may be hot after long periods of use as heat dissipates from the panel through the vent hole in the upper part of the
product.
This is normal and does not indicate any defect or operation failure of the product.
However, children should be prevented from touching the upper part of the product.
• The product is making a “cracking” noise.
A “cracking” noise may occur when the product contracts or expands due to a change in the surrounding environment such as temperature or
humidity. This is normal and not a defect of the unit.
• Cell Defects
The PDP uses a panel consisting of 2,360,000(HD-level) to 6,221,000(FHD-level) pixels which require sophisticated technology to produce. However,
there may be a few bright or dark pixels on the screen. These pixels will have no impact on the performance of the product.
• Avoid operating the TV at temperatures below 41°F (5°C)
• A still image displayed too long may cause permanent damage to the PDP Panel.
Watching the Plasma TV in 4:3 format for a long period of time may leave traces of borders displayed on the left, right and centre of
the screen caused by the difference of light emission on the screen. Playing a DVD or a game console may cause similar effects to the
screen.
Damages caused by the above effect are not covered by the Warranty.
• After-images on the Screen.
Displaying still images from Video games and PC for longer than a certain period of time may produce partial after-images.
To prevent this effect, reduce the “brightness” and “contrast” when displaying still images for a long time.
• Warranty
Warranty does not cover any damage caused by image retention.
Burn-in is not covered by the warranty.
WARNINGS: Image retention, commonly known as screen burn-in, can occur on most types of television if the same image is displayed
✎
continuously. The most common causes of image retention are logos that remain stationary on the TV screen. These logos are common on many
programmes received via a Set-top Box. To reduce this risk, avoid displaying still images for long durations and lower the brightness or contrast
settings to decrease the intensity of the picture. Extended viewing of movies and Programmes in aspect ratios that are different from the aspect ratio
of the TV may cause image retention. Always endeavour to avoid black borders top or bottom by using the zoom function. This will help eliminate the
black borders and fit the picture to the entire area of the screen. Using a video game console may cause image retention and is not recommended.
When using a PC input, avoid displaying still images for long durations and reduce the brightness or contrast settings to decrease the intensity of the
picture.
IMPORTANT: Image retention issues are not covered by your Samsung® warranty.
✎
English - 2
Page 3
Accessories
✎
Please make sure the following items are included with your TV. If any items are missing, contact your
dealer.
✎
The items’ colours and shapes may vary depending on the models.
✎
Cables not included in the package contents can be purchased separately.
✎
Check that there is no accessory hidden behind packing materials when you open the box.
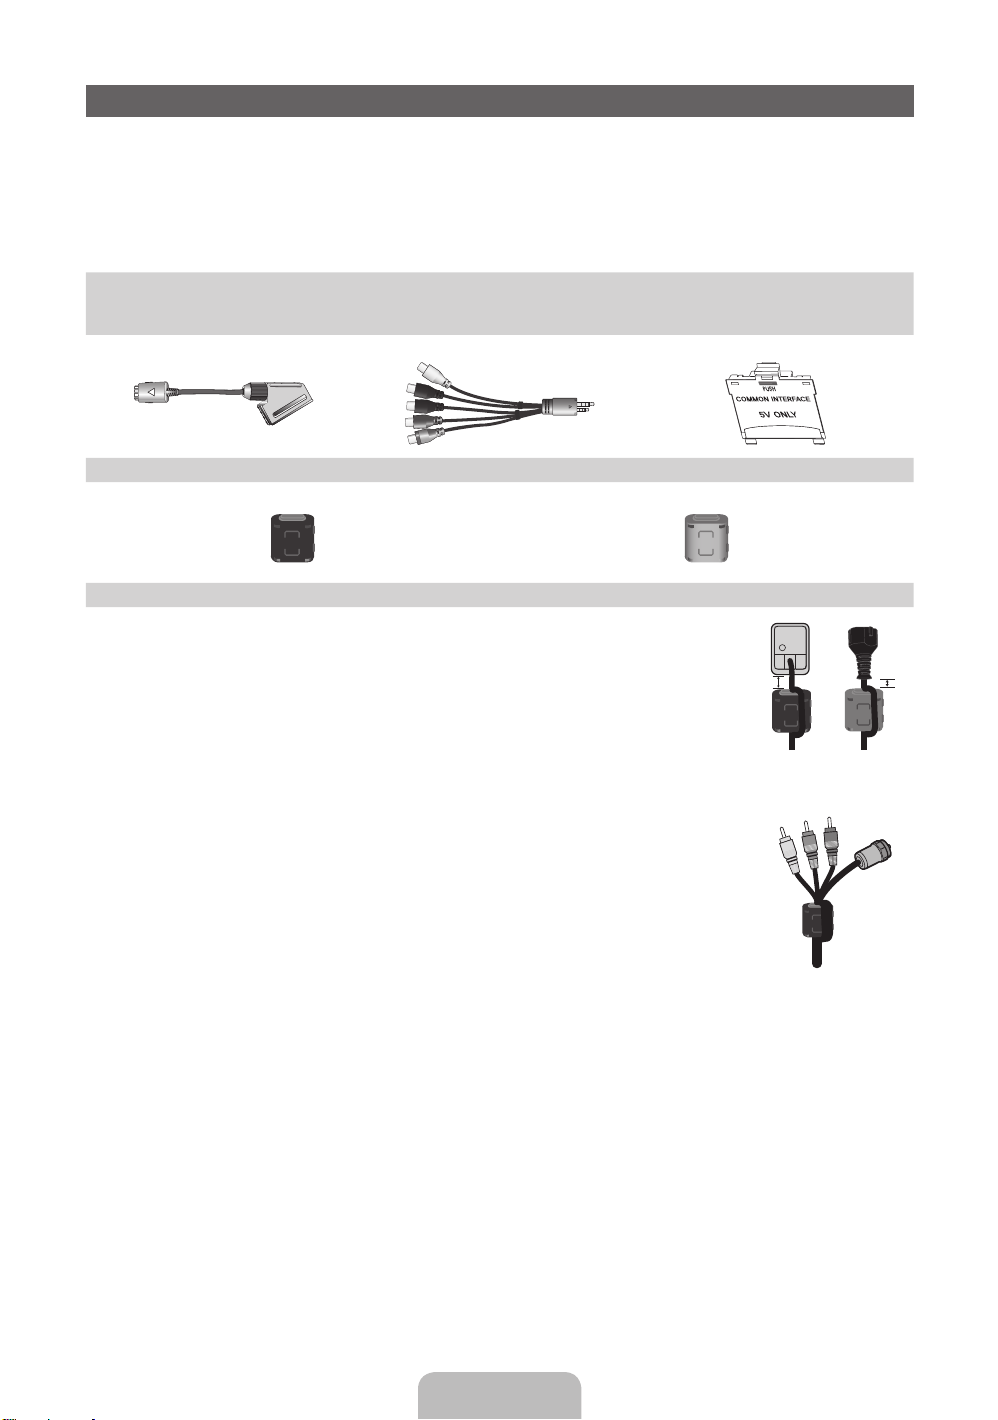
• Remote Control & Batteries (AAA x 2) • Cleaning-Cloth
• Owner’s Instructions
Scart Adapter AV / Component Adapter CI Card Adapter
Ferrite Core (2EA) Ferrite Core (1EA)
✎
Ferrite Core for Power Cord: The ferrite cores are used to shield the cables from
interference. When connecting a cable, open the ferrite core and clip it around the
cable near the plug as shown in the figure.
A Maximum distance between the ferrite core and the end of the cord inserted in
x
the TV: 6~8 inches
B Maximum distance between the ferrite core and the other end of the cord
x
inserted in the AC outlet: 3/4 inch
A
Power Cord
B
✎
Ferrite Core : The ferrite cores are used to shield the cables from interference. When
connecting a cable, open the ferrite core and clip it around the cable near the plug as
shown in the figure.
Antenna Cable/
Component Cable
(sold separately)
• An administration fee may be charged if either
– (a) an engineer is called out at your request and there is no defect in the product
(i.e. where you have failed to read this user manual)
– (b) you bring the unit to a repair centre and there is no defect in the product
(i.e. where you have failed to read this user manual).
• The amount of such administration charge will be advised to you before any work or home visit is carried out.
English - 3
Page 4
Viewing the Control Panel
✎
The product colour and shape may vary depending on the model.
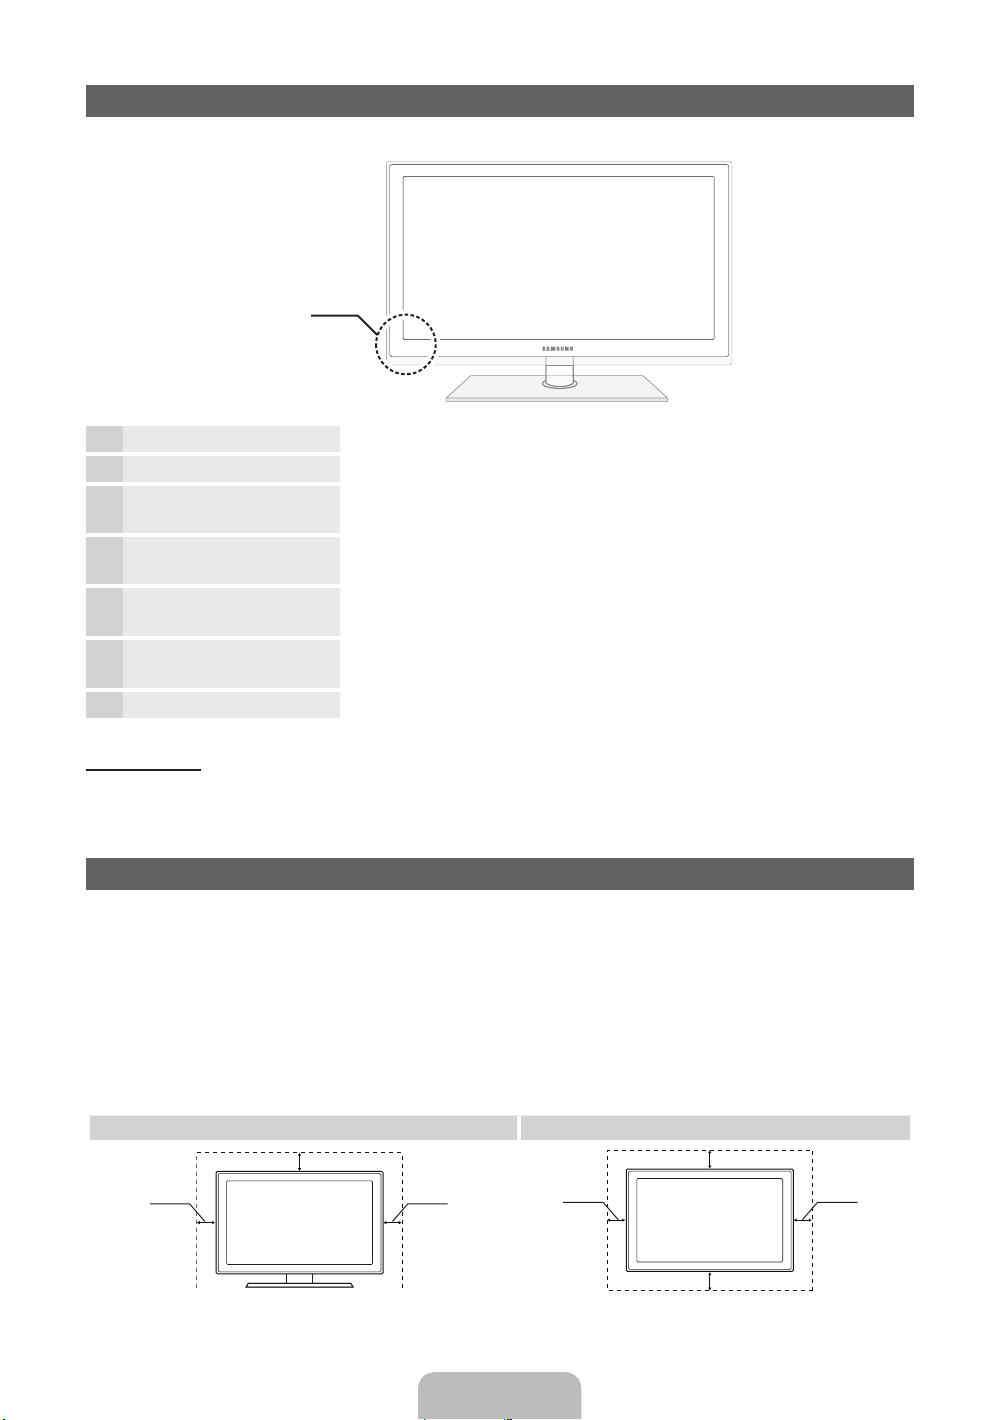
Control Panel
Remote control sensor Aim the remote control towards this spot on the TV.
Power Indicator Blinks and turns off when the power is on and lights up in standby mode.
SOURCE
MENU Displays an on-screen menu, the OSD (on screen display) of your TV’s
Y
z
P
E
(Power)
Toggles between all the available input sources. In the on-screen menu, use
this button as you would use the ENTERE button on the remote control.
features.
Adjusts the volume. In the OSD, use the
the ◄ and ► buttons on the remote control.
Changes the channels. In the OSD, use the
would use the ▼ and ▲ buttons on the remote control.
Turns the TV on or off.
Y
z
buttons as you would use
buttons as you
Standby mode
Do not leave your TV in standby mode for long periods of time (when you are away on a holiday, for example).
A small amount of electric power is still consumed even when the power button is turned off. It is best to unplug
the power cord.
Securing the Installation Space
Keep the required distances between the product and other objects (e.g. walls) to ensure proper ventilation.
Failing to do so may result in fire or a problem with the product due to an increase in the internal temperature of
the product.
✎
When using a stand or wall-mount, use parts provided by Samsung Electronics only.
If you use parts provided by another manufacturer, it may result in a problem with the product or an injury
x
due to the product falling.
✎
The appearance may differ depending on the product.
✎
Be careful when you contact the TV because some parts can be somewhat hot.
Installation with a stand. Installation with a wall-mount.
10 cm
10 cm10 cm
10 cm
10 cm
10 cm
10 cm
English - 4
Page 5

Viewing the Remote Control
✎
This is a special remote control for the visually impaired persons and has Braille points on the Power,
Channel and Volume buttons.
ON/OFF
Turns the remote control light on or off.
When on, the buttons become illuminated
for a moment when pressed. (Using the
remote control with this button set to On
will reduce the battery usage time.)
Turns the TV on and off.
Displays and selects the available video
sources.
Have direct access to channels.
POWER
SOURCE
Alternately select Teletext ON, Double,
Mix or OFF.
Adjusts the volume.
Opens the OSD.
Link to various application services.
Quickly select frequently used functions.
Returns to the previous menu.
These buttons are for the Channel and
SMART HUB menu and interactive
TV(MHEG) (UK only) features, etc.
Use these buttons in media contents and
Anynet+ modes.
TTX/MIX
MUTE
CH LIST
HUB
SMART
TOOLS
RETURN
A B C D
MENU
TV
SOCIAL
E-MANUAL
SEARCH
P.SIZE
AD/SUBT.
PRE-CH
GUIDE
INFO
EXIT
Returns to the previous channel.
Cuts off the sound temporarily.
Changes channels.
Displays channel lists on the screen.
Displays the EPG (Electronic Programme
Guide).
Displays information on the TV screen.
u/d/l/r
: Move the cursor on-screen
menu item.
ENTERE: Selects the menu and
changes the corresponding item value.
Exits the menu.
SOCIAL TV: Displays the Social TV
screen.
SEARCH: Support to recommendation
search word and search function.
W
: Sets the video, which provided with
3D signal.
E-MANUAL: Displays the e-Manual.
P.SIZE: Selects the Picture Size.
AD/SUBT.: Turns the audio description on
and off (not available in some locations). /
Displays digital subtitles.
✎
Press the TOOLS button to use the DUAL I-II (sound effect selection).
Installing batteries (Battery size: AAA)
• Insert two AAA or equivalent type
batteries inside. Place the batteries
in the right directions.
• Replace the battery cover.
English - 5
• Replace the battery cover.
Page 6

Changing the Input Source
SOURCE
Source
Use to select TV or an external input
sources such as a DVD / Blu-ray player /
cable box / STB satellite receiver.
■ TV / Ext. / PC / HDMI1/DVI / HDMI2
/ HDMI3 / HDMI4 / AV / Component
/ USB / AllShare
✎
In the Source, connected inputs will
be highlighted.
✎
Ext. and PC always stay activated.
Edit Name
In the Source, press the TOOLS button, and then you
can set an external input sources name you want.
■ VCR / DVD / Cable STB / Satellite STB / PVR
STB / AV Receiver / Game / Camcorder / PC /
DVI PC / DVI Devices / TV / IPTV / Blu-ray / HD
DVD / DMA: Name the device connected to the
input jacks to make your input source selection
easier.
✎
When connecting a PC to the HDMI IN 1(DVI)
port with HDMI cable, you should set the TV to
PC mode under Edit Name.
✎
When connecting a PC to the HDMI IN 1(DVI)
port with HDMI to DVI cable, you should set the
TV to DVI PC mode under Edit Name.
✎
When connecting an AV devices to the HDMI IN
1(DVI) port with HDMI to DVI cable, you should
set the TV to DVI Devices mode under Edit
Name.
Edit Favourites
In the Source, press the TOOLS button to select Edit
Favourites. You can set an external input source to
Favourites.
Information
You can see detailed information about the selected
external device.
Refresh
In the Source, If the external devices is not displayed,
press the TOOLS button to select Refresh. Searching
for connected devices.
✎
For best cable connection to this product, be sure to use cables with a maximum thickness as below:
• Maximum thickness - 0.55 inches (14mm)
Connecting to an Antenna
When the TV is initially powered on, basic settings proceed automatically.
✎
Preset: Connecting the mains and antenna.
✎
The PDP device may interfere with an amateur radio or AM radio.
✎
When using two-way radio mobile and portable units or amateur radio or AM radio near by your TV, this
may cause the TV to malfunction.
VHF/UHF AntennaCable
PR
ANT IN
or
English - 6
Page 7

POWER
Plug & Play (Initial Setup)
When the TV is initially powered on, a sequence of on-screen prompts will assist in configuring basic settings.
Press the POWERP button. Plug & Play is available only when the Source is set to TV.
✎
Before turning on the TV, make sure the antenna cable is connected (p. 6).
Selecting a language
1
Setting the Network
2
Software upgrade When network connection settings are complete, Software Upgrade is available.
3
Selecting Store
4
Demo or Home Use
Selecting a country
5
Setting the Clock
6
Mode
Selecting an antenna
7
Selecting a channel
8
Enjoy your TV.
9
Press the ▲ or ▼ button, then press the ENTER
Select the desired OSD (On Screen Display) language.
Set up your network connection. Press the ENTER
to start. If you want to setting to it later, select Skip. For more
information, refer to “Wired / Wireless Network Connection” in the
e-Manual.
Select Next to upgrade TV software. Your TV will automatically upgrade, if your
TV need a software upgrade. If you want to upgrade later, select the Skip. For
more information, refer to “Software Upgrade” (Preference Features → Support
Menu) in the e-Manual.
✎
This may take some time, depending on network status.
Press the ◄ or ► button, then press the ENTER
Select the Home Use mode. Store Demo mode is for retail environments.
To return the unit’s settings from Store Demo to Home Use (standard): Press the
volume button on the TV. When you see the volume OSD, press and hold MENU
for 5 sec.
Store Demo is only for shop display. If you select it, several functions are not able
to use. Please select Home Use when you watch at home.
Press the ▲ or ▼ button, then press the ENTER
appropriate country.
✎
After selecting the country in the Country menu, some models may proceed
with an additional option to setup the pin number.
✎
When you input the PIN number, “0-0-0-0” is not available.
Set the Clock Mode automatically or manually.
Press the ▲ or ▼ button, then press the ENTER
Satellite. The option may differ depending on country.
Press the ▲ or ▼ button, then press the ENTER
source to memorise. When setting the antenna source to Cable, a step appears
allowing you to assign numerical values (channel frequencies) to the channels.
For more information, refer to Channel → Memorising Channels in the e-Manual.
✎
When Air or Cable is selected first: After all Air or Cable channels are
stored, the step for storing Satellite channels is displayed.
✎
When Satellite is selected first: After all Satellite channels are stored, the
step for storing Air or Cable channels is displayed.
✎
Press the ENTERE button at any time to interrupt the memorisation
process.
Press the ENTER
E
button.
E
button.
E
button
E
button.
E
button. Select the
E
button. Select Air, Cable or
E
button. Select the channel
P
If You Want to Reset This Feature...
Select System - Plug & Play (Initial Setup). Enter your 4 digit PIN number. The default PIN number is “0-0-0-0”.
If you want to change the PIN number, use the Change PIN function.
You should do Plug & Play (MENU → System) again at home although you did in shop.
✎
If you forget the PIN code, press the remote control buttons in the following sequence in Standby mode,
which resets the PIN to “0-0-0-0”: MUTE → 8 → 2 → 4 → POWER (on).
English - 7
Page 8
Connecting to an AV devices
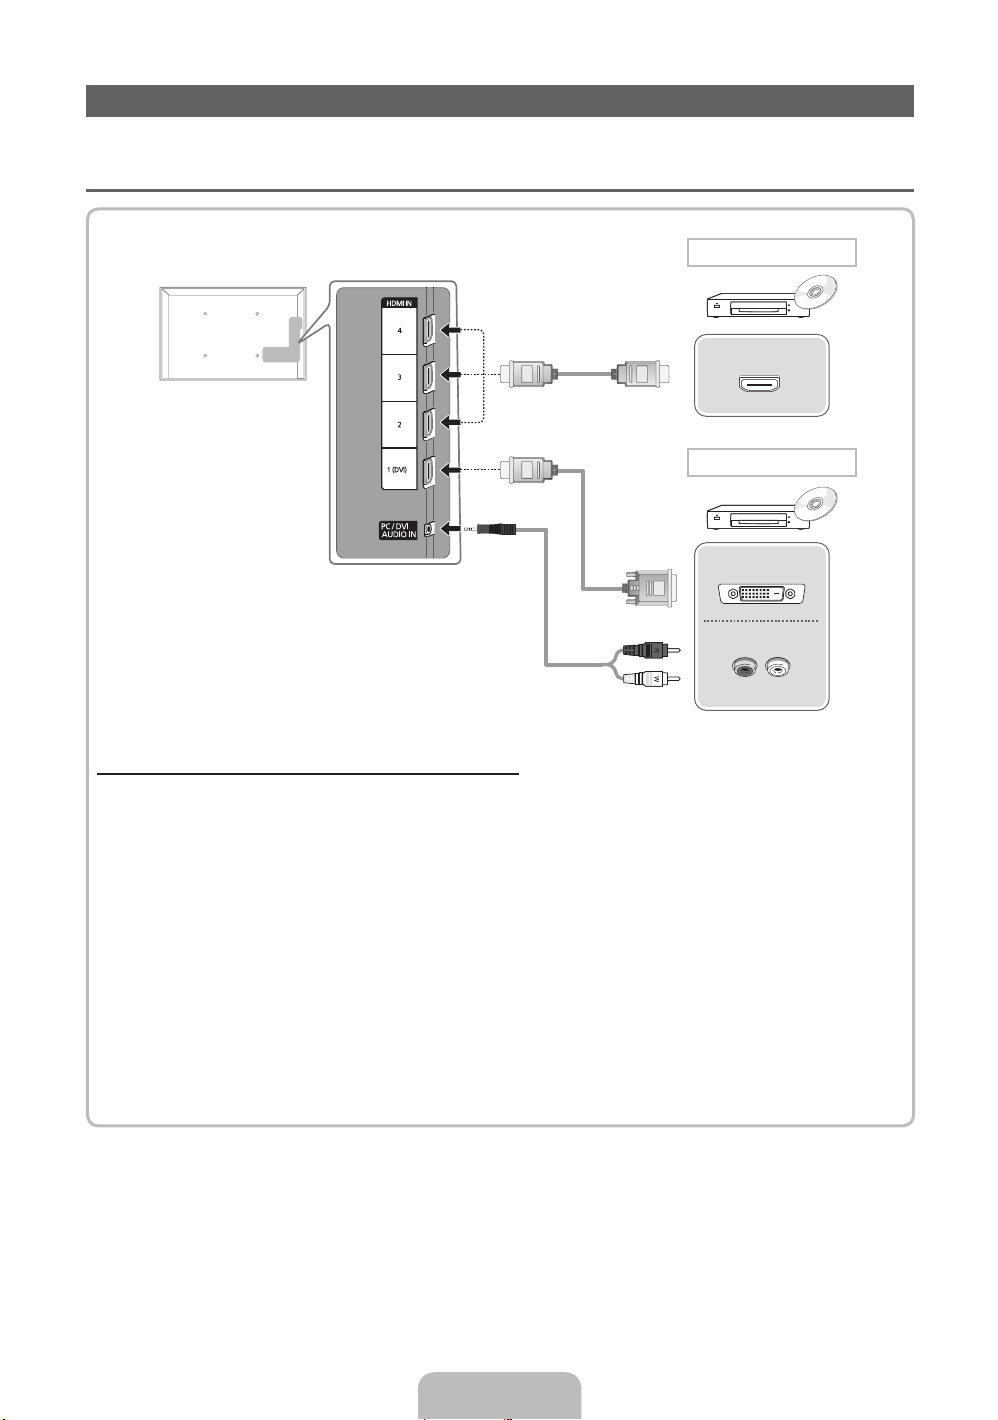
Available devices: DVD, Blu-ray player, HD cable box, HD STB (Set-Top-Box) satellite
¦
receiver, VCR
HDMI connection
HDMI OUT
HDMI to DVI connection
DVI OUT
AUDIO OUT
R-AUDIO-L
Using an HDMI or an HDMI to DVI cable (up to 1080p)
✎
HDMI IN 1(DVI), 2, 3, 4 / PC/DVI AUDIO IN
For better picture and audio quality, connect to a digital device using an HDMI cable.
x
An HDMI cable supports digital video and audio signals, and does not require an audio cable.
x
– To connect the TV to a digital device that does not support HDMI output, use an HDMI/DVI and
audio cables.
The picture may not display normally (if at all) or the audio may not work if an external device that
x
uses an older version of HDMI mode is connected to the TV. If such a problem occurs, ask the
manufacturer of the external device about the HDMI version and, if out of date, request an upgrade.
Be sure to purchase a certified HDMI cable. Otherwise, the picture may not display or a connection
x
error may occur.
A basic high-speed HDMI cable or one with ethernet is recommended. This product does not support
x
the ethernet function via HDMI.
English - 8
Page 9
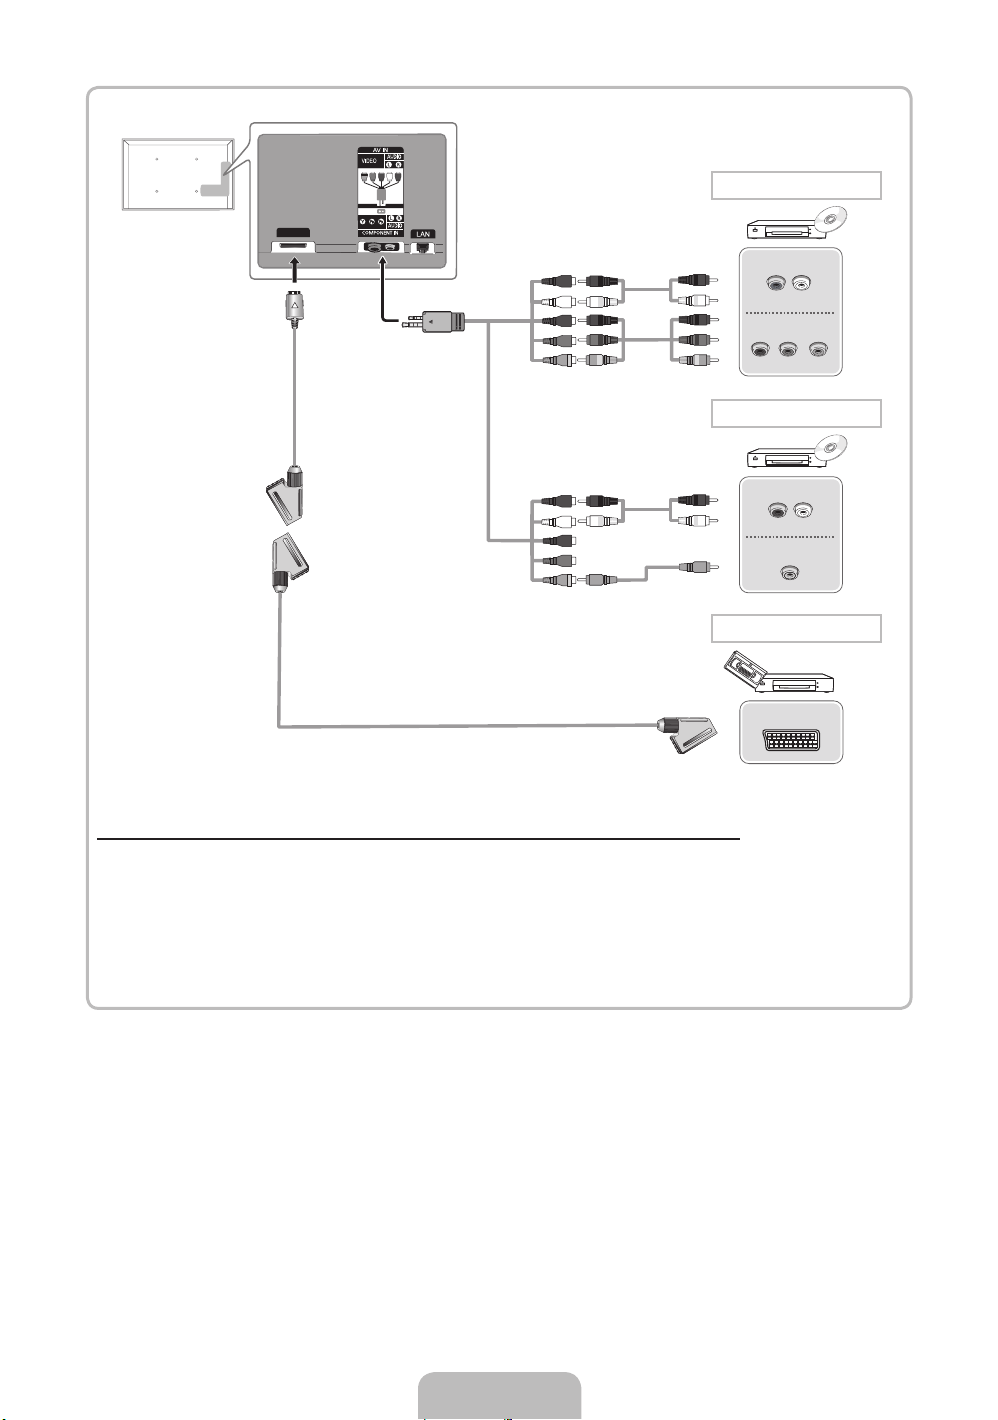
EXT (RGB)
Component connection
RW
RB
G
R
W
R
B G
AUDIO OUT
R-AUDIO-L
COMPONENT OUT
PRPBG
AV connection
R
W
Y
R W
Y
AUDIO OUT
R-AUDIO-L
VIDEO OUT
SCART connection
EXT
Using a Component (up to 1080p) or an Audio/Video (480i only) and a Scart Cable
✎
In Ext. mode, DTV Out supports MPEG SD Video and Audio only.
✎
When connecting to AV IN, the colour of the AV IN [VIDEO] jack (green) will not match the video cable
(yellow).
✎
To obtain the best picture quality, the Component connection is recommended over the A/V
connection.
English - 9
Page 10
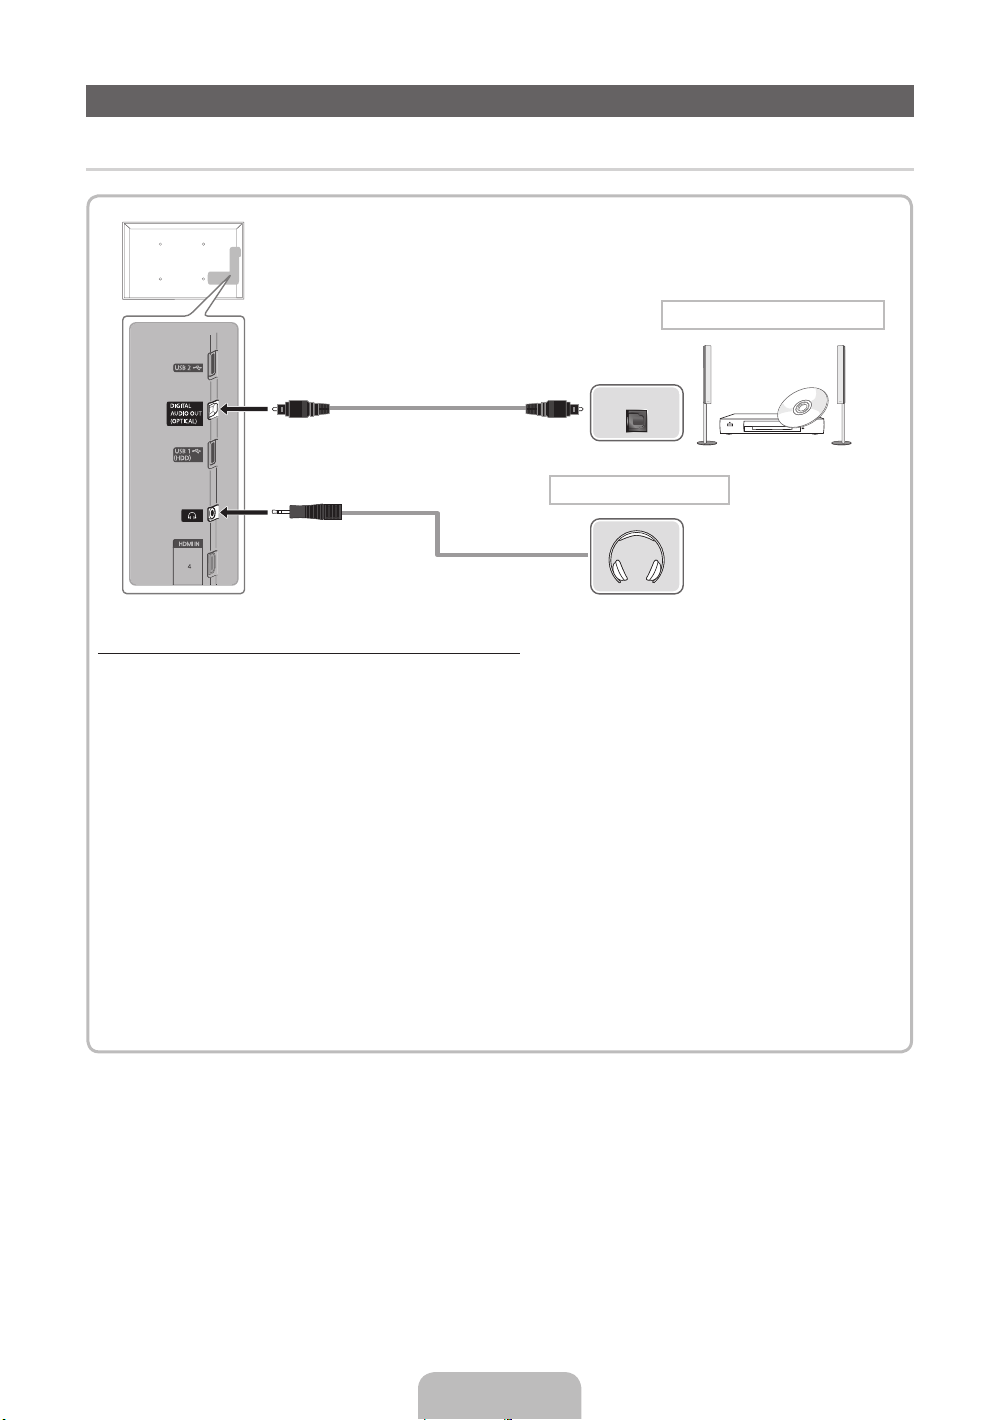
Connecting to a PC and Audio device
¦ Available devices: digital audio system, amplifier, DVD home theatre
DVD home theatre connection
OPTICAL
Headphones connection
Using an Optical (Digital) or a Headphone Connection
✎
DIGITAL AUDIO OUT (OPTICAL)
When a digital audio system is connected to the DIGITAL AUDIO OUT (OPTICAL) jack, decrease the
x
volume of both the TV and the system.
5.1 CH (chnnel) audio is available when the TV is connected to an external device supporting 5.1 CH.
x
When the receiver (home theatre) is set to on, you can hear sound output from the TV’s optical jack.
x
When the TV is receiving a DTV signal, the TV will send 5.1 CH sound to the home theatre receiver.
When the source is a digital component such as a DVD / Blu-ray player / cable box / STB (Set-TopBox) satellite receiver and is connected to the TV via HDMI, only 2 CH audio will be heard from the
home theatre receiver. If you want to hear 5.1 CH audio, connect the digital audio out jack from your
DVD / Blu-ray player / cable box / STB satellite receiver directly to an amplifier or home theatre.
✎
Headphones H: You can connect your headphones to the headphones output on your set. While the
headphones are connected, the sound from the built-in speakers will be disabled.
Sound function may be restricted when connecting headphones to the TV.
x
Headphone volume and TV volume are adjusted separately.
x
English - 10
Page 11
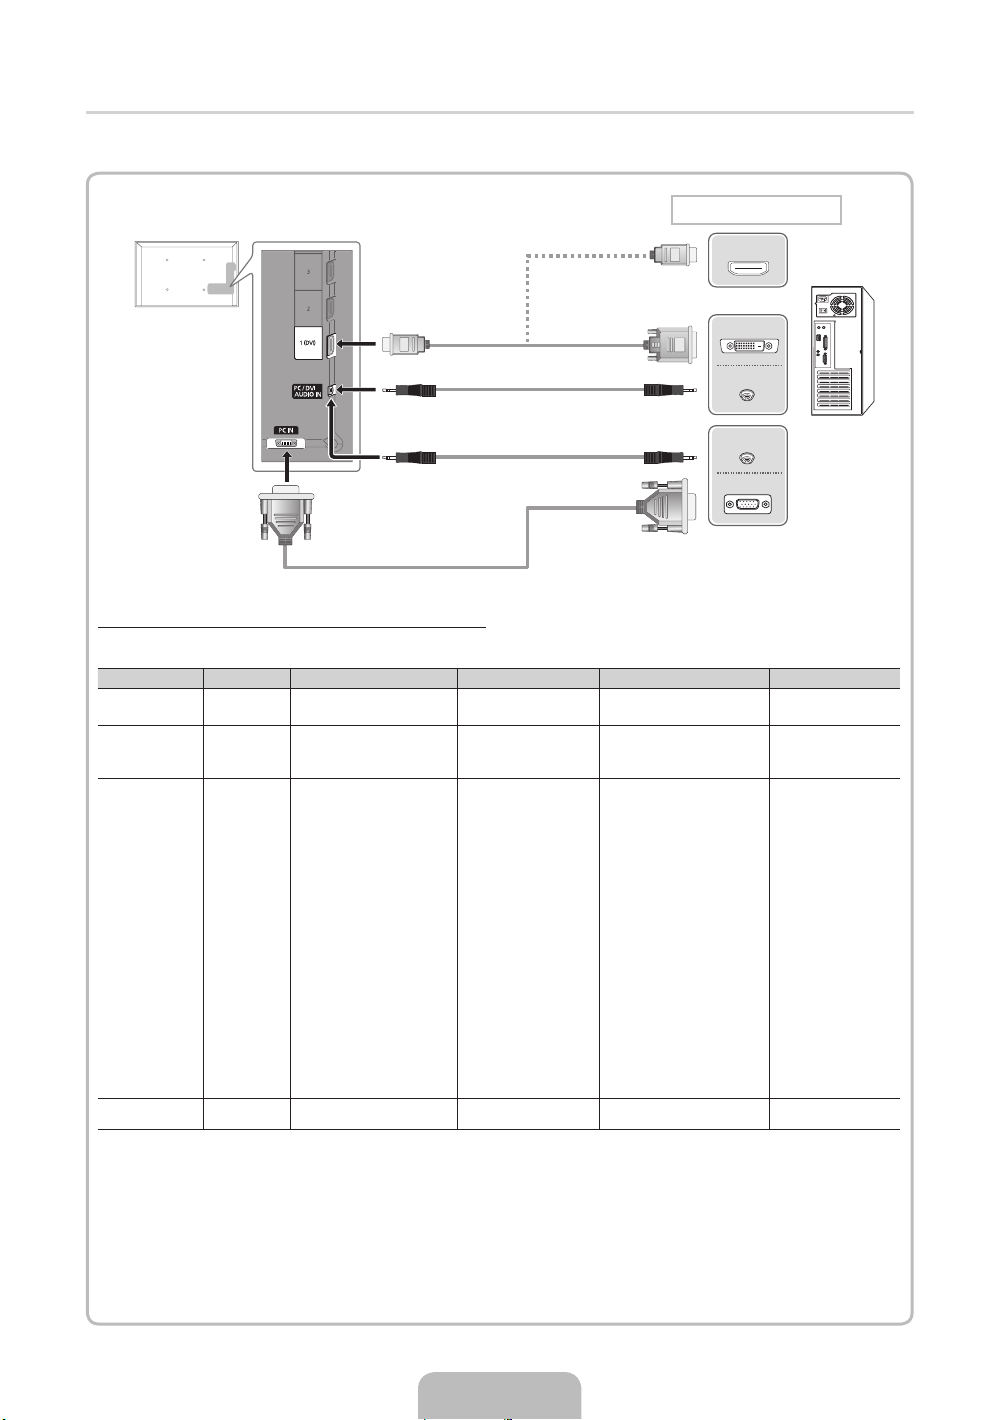
¦ Using an HDMI cable or an HDMI to DVI cable or a D-sub cable
✎
Connecting through the HDMI cable may not be supported depending on the PC.
PC connection
HDMI OUT
DVI OUT
AUDIO OUT
AUDIO OUT
PC OUT
Display Modes (D-Sub and an HDMI to DVI Input)
Optimal resolution is 1920 X 1080 @ 60 Hz.
Mode Resolution Horizontal Frequency (KHz) Vertical Frequency (Hz) Pixel Clock Frequency (MHz) Sync Polarity (H / V)
IBM
MAC
VESA DMT
VESA DMT /
DTV CEA
640 x 350
720 x 400
640 x 480
832 x 624
1152 x 870
640 x 480
640 x 480
640 x 480
800 x 600
800 x 600
800 x 600
1024 x 768
1024 x 768
1024 x 768
1152 x 864
1280 x 1024
1280 x 1024
1280 x 800
1280 x 800
1280 x 960
1360 x 768
1440 x 900
1440 x 900
1680 x 1050
1920 x 1080p 67.500 60.000 148.500 +/+
31.469
31.469
35.000
49.726
68.681
31.469
37.861
37.500
37.879
48.077
46.875
48.363
56.476
60.023
67.500
63.981
79.976
49.702
62.795
60.000
47.712
55.935
70.635
65.290
70.086
70.087
66.667
74.551
75.062
59.940
72.809
75.000
60.317
72.188
75.000
60.004
70.069
75.029
75.000
60.020
75.025
59.810
74.934
60.000
60.015
59.887
74.984
59.954
25.175
28.322
30.240
57.284
100.000
25.175
31.500
31.500
40.000
50.000
49.500
65.000
75.000
78.750
108.000
108.000
135.000
83.500
106.500
108.000
85.500
106.500
136.750
146.250
+/-
-/+
-/-
-/-
-/-
-/-
-/-
-/+/+
+/+
+/+
-/-
-/+/+
+/+
+/+
+/+
-/+
-/+
+/+
+/+
-/+
-/+
-/+
✎
NOTE
For HDMI/DVI cable connection, you must use the HDMI IN 1(DVI) jack.
x
The interlace mode is not supported.
x
The set might operate abnormally if a non-standard video format is selected.
x
Separate and Composite modes are supported. SOG(Sync On Green) is not supported.
x
English - 11
Page 12
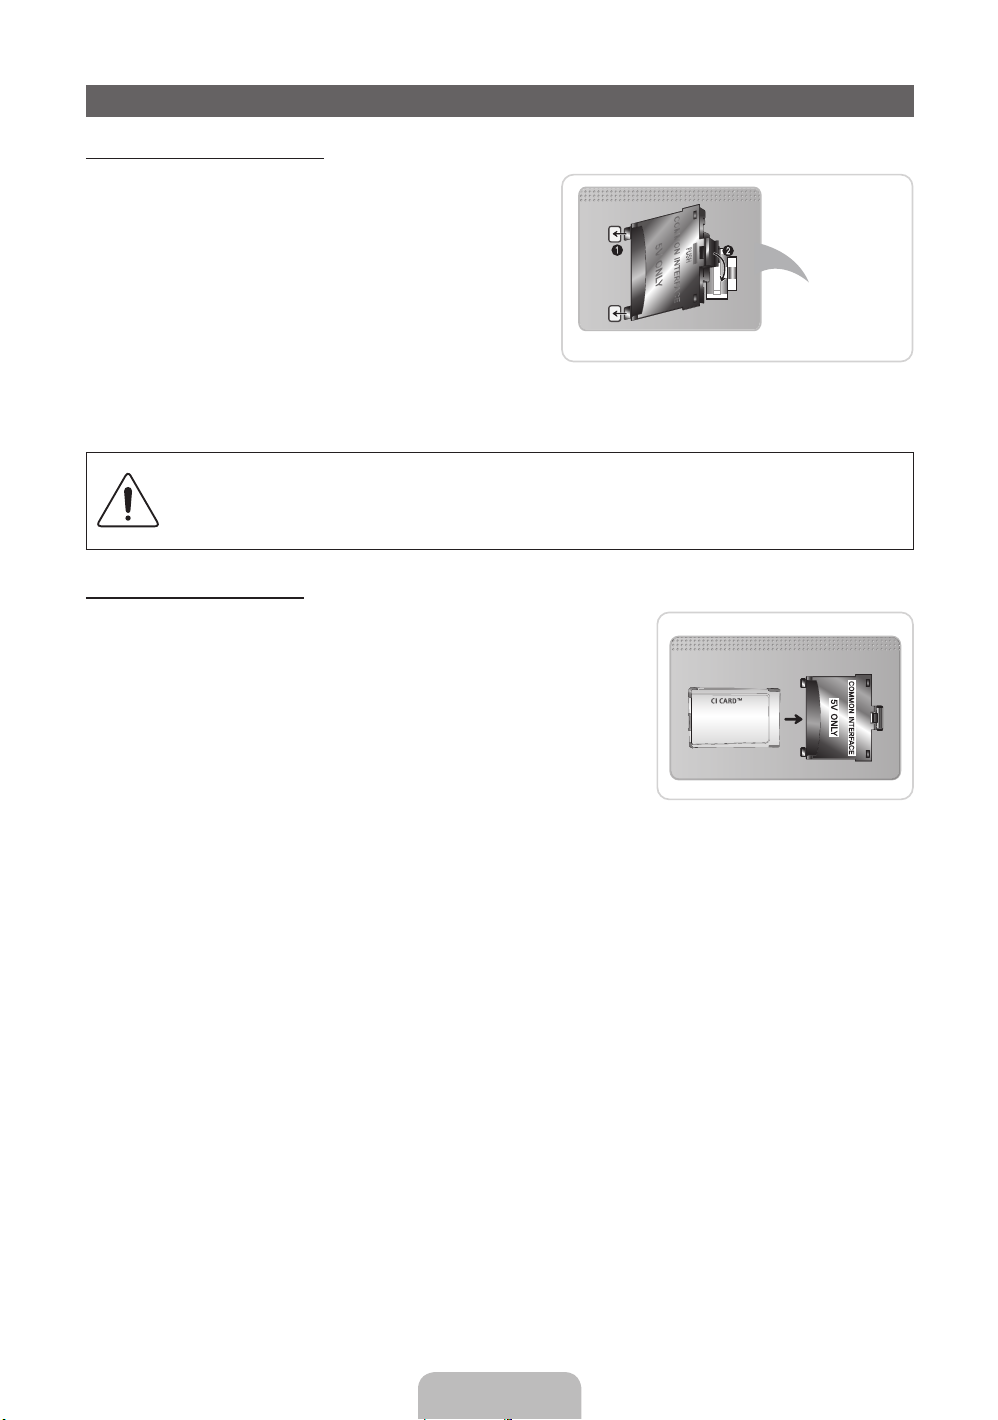
Connecting to a COMMON INTERFACE slot
Attaching the CI Card Adapter
Attach the adapter as shown below.
To connect the CI CARD Adapter, follow these steps.
✎
We recommend attaching the adapter before installing
the wall mount, or inserting the “CI or CI+ CARD”.
1. Insert the CI CARD Adapter into the two holes on the
product 1.
✎
Please find a two holes on the rear of the TV. A two
holes is beside the COMMON INTERFACE port.
2. Connect the CI CARD Adapter into the COMMON
INTERFACE port on the product 2.
3. Insert the “CI or CI+ CARD”.
We recommand that you insert the CI card before you mount the TV on a wall. It may be difficult to
insert after the mounting.
Insert the card after attaching the CI-Module on TV. It is difficult to attach the module if you insert
the card before attaching.
Using the “CI or CI+ CARD”
To watch paid channels, the “CI or CI+ CARD” must be inserted.
• If you don’t insert the “CI or CI+ CARD”, some channels will display
the message “Scrambled Signal”.
• The pairing information containing a telephone number, the “CI or CI+
CARD” ID the Host ID and other information will be displayed in about
2~3 minutes. If an error message is displayed, please contact your
service provider.
• When the configuration of channel information has finished, the
message “Updating Completed” is displayed, indicating the channel
list is updated.
✎
NOTE
You must obtain a “CI or CI+ CARD” from a local cable service provider.
x
When removing the “CI or CI+ CARD”, carefully pull it out with your hands since dropping the “CI or CI+
x
CARD” may cause damage to it.
Insert the “CI or CI+ CARD” in the direction marked on the card.
x
The location of the COMMON INTERFACE slot may be different depending on the model.
x
“CI or CI+ CARD” is not supported in some countries and regions; check with your authorized dealer.
x
If you have any problems, please contact a service provider.
x
Insert the “CI or CI+ CARD” that supports the current antenna settings. The screen will be distorted or
x
will not be seen.
TV Rear
English - 12
Page 13
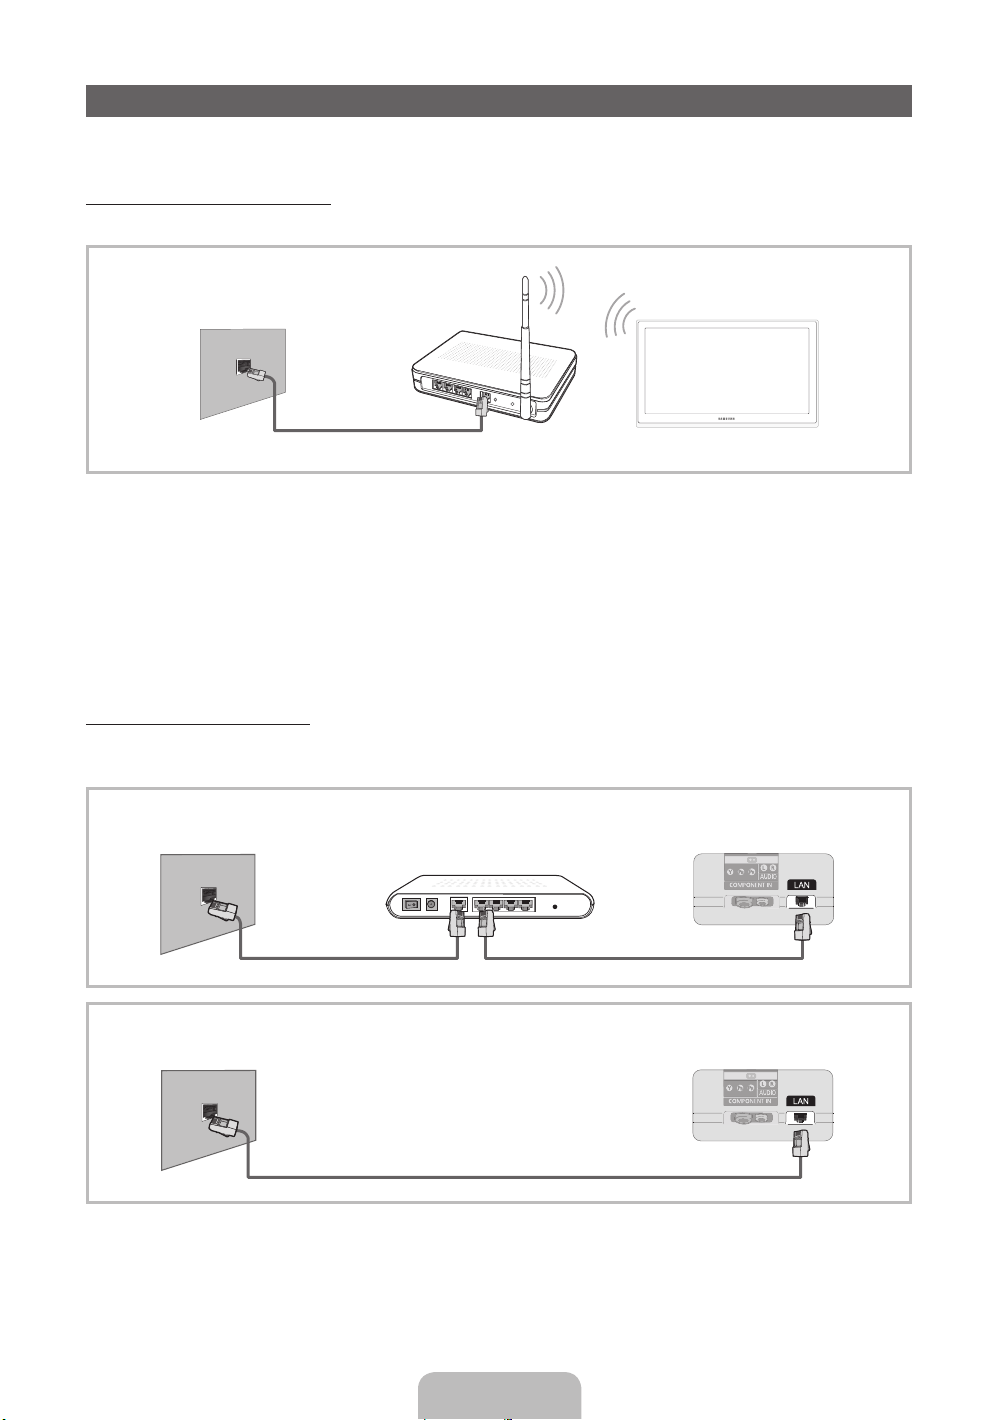
Network Connection
You can set up your TV so that it can access the Internet through your local area network (LAN) using a wired or
wireless connection.
Network Connection - Wireless
You can connect your TV to your LAN through a standard wireless router or modem.
Wireless IP sharer
The LAN Port on
the Wall
Samsung’s Wireless LAN adapter supports the IEEE 802.11a/b/g and n communication protocols. Samsung
recommends using IEEE 802.11n. When you play the video over a IEEE 802.11b/g connection, the video may
not play smoothly.
Most wireless network systems incorporate a security system that requires devices that access the network
through an access point or wireless router (typically a wireless IP Sharer) to transmit an encrypted security code
called an access key.
If Pure High-throughput (Greenfield) 802.11n mode is selected and the Encryption type is set to WEP, TKIP or
TKIP AES (WPS2Mixed) for your wireless router, Samsung TVs will not support a connection in compliance with
new Wi-Fi certification specifications.
(Wireless route having
DHCP server)
LAN Cable
TV
Network Connection - Wired
There are two main ways to connect your TV to your network using cable, depending on your network setup.
They are illustrated below:
The Modem Port on the Wall
The LAN Port on the Wall
✎
It is not supported when the network speed is under 10 Mbps.
External Modem
(ADSL / VDSL / Cable TV)
LAN Cable
LAN CableModem Cable
TV Rear Panel
TV Rear Panel
English - 13
Page 14
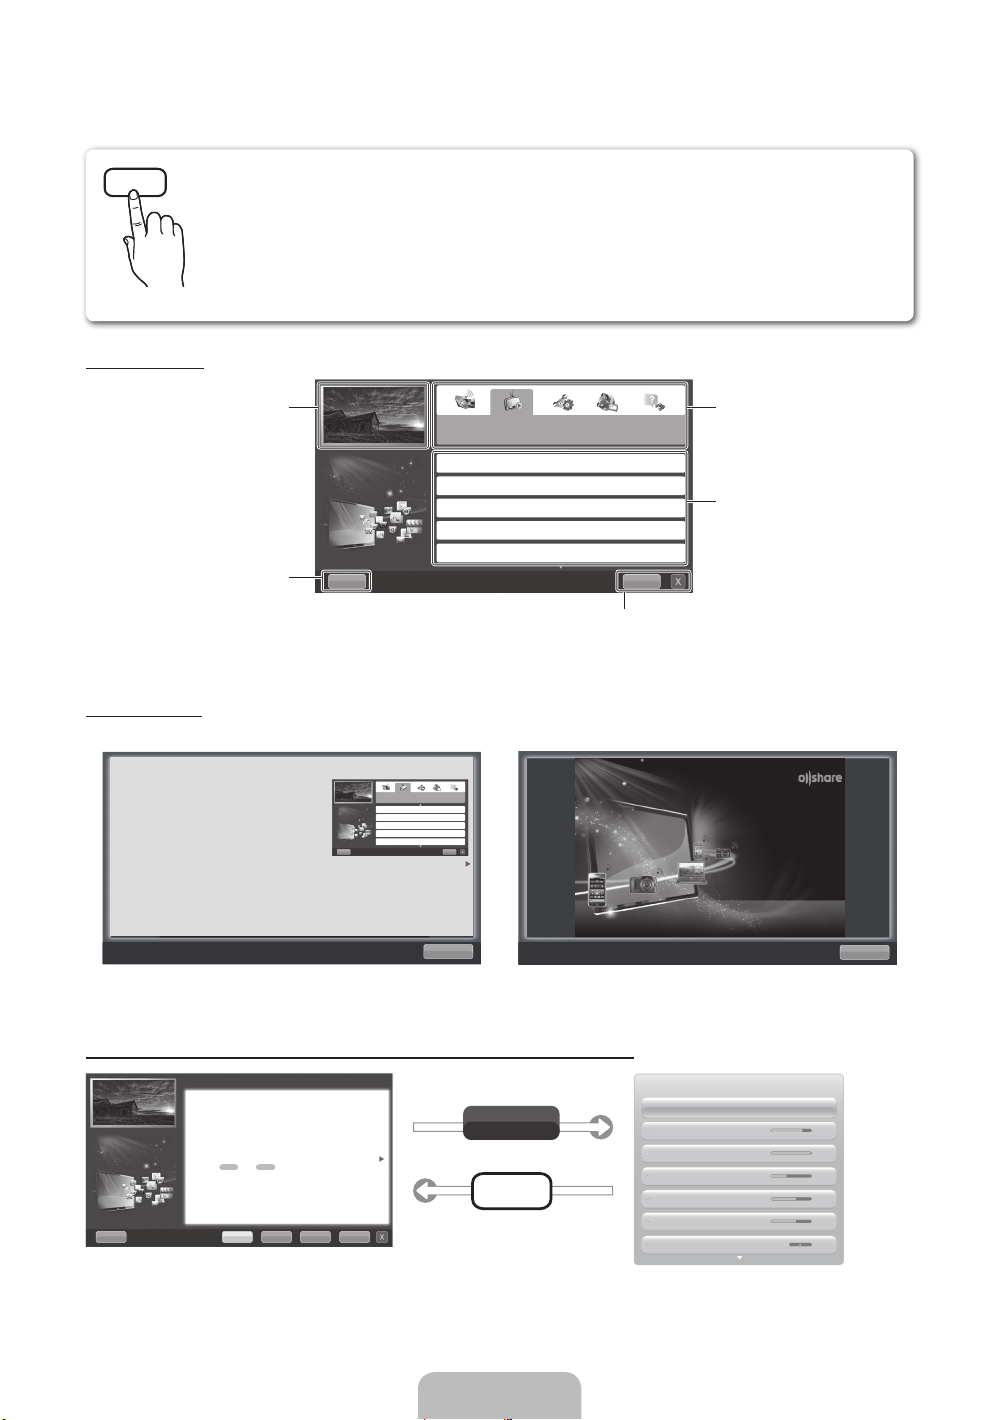
How to view the e-Manual
E-MANUAL
You can read the introduction and instructions about the TV features stored
in your TV.
O
MENUm → Support → e-Manual → ENTER
✎
If you want to return to e-Manual, press E-MANUAL button on remote.
✎
You can’t use the Try Now function, if the menu is not activated.
Screen Display
TV Screen: Displays the current input
Help: Displays the e-Manual Guide
or Product guide. Press ENTER
Using the Help
Display the e-Manual Guide & the Product Guide by pressing Help.
How to view the e-Manual
You can read the introduction and instructions about
the TV features stored in your TV.
O MENU
source screen.
E
button.
m
→ Support → e-Manual → ENTER
Basic Features
Changing the Preset Picture Mode
Adjusting Picture Settings
Changing the Picture Size
Changing the Picture Options
Setting up the TV with Your PC
Basic Features
E
Changing the Preset Picture Mode
Adjusting Picture Settings
Changing the Picture Size
Changing the Picture Options
Setting up the TV with Your PC
IndexHelp
E
Change the category. Press
button to select category you want.
Displays the sub-menu list. Press
ENTER
menu you want.
IndexHelp
Index: Displays index screen.
X: Exit the e-Manual.
Sync media from multiple devices with AllShare
E
button to select sub-
AllShare™ syncs your digital devices so you can
enjoy music, movies and photos from your PC,
camera and mobile devices, on your larger TV
screen. Connects you to multiple PCs, as well.
l
or r
Return
<E-manual Guide>
The e-Manual guide appears as above.
The product guide appears as above.
How to toggle between the e-Manual and the corresponding menu(s).
Basic Features > Changing the Preset Picture Mode (5/10)
Changing the Preset Picture Mode
■
Picture Mode t
Select your preferred picture type.
N When an input source is set to PC, the Picture Mode is only available the
Standard and Entertain.
• Dynamic: Suitable for a bright room.
• Standard: Suitable for a normal environment.
for LED TV
for PDP TV
/ Relax
• Natural
• Movie: Suitable for watching movies in a dark room.
• Entertain: Suitable for watching movies and games.
Help Try Now Home Zoom Index
✎
This function is not enabled in some menus.
: Suitable for reducing eye strain.
Try Now
E-MANUAL
English - 14
Return
<Product Guide>
Picture
Picture Mode Standard
Cell light 14
Contrast 100
Brightness 45
Sharpness 50
Colour 50
Tint (G/R) G 50 R 50
Page 15
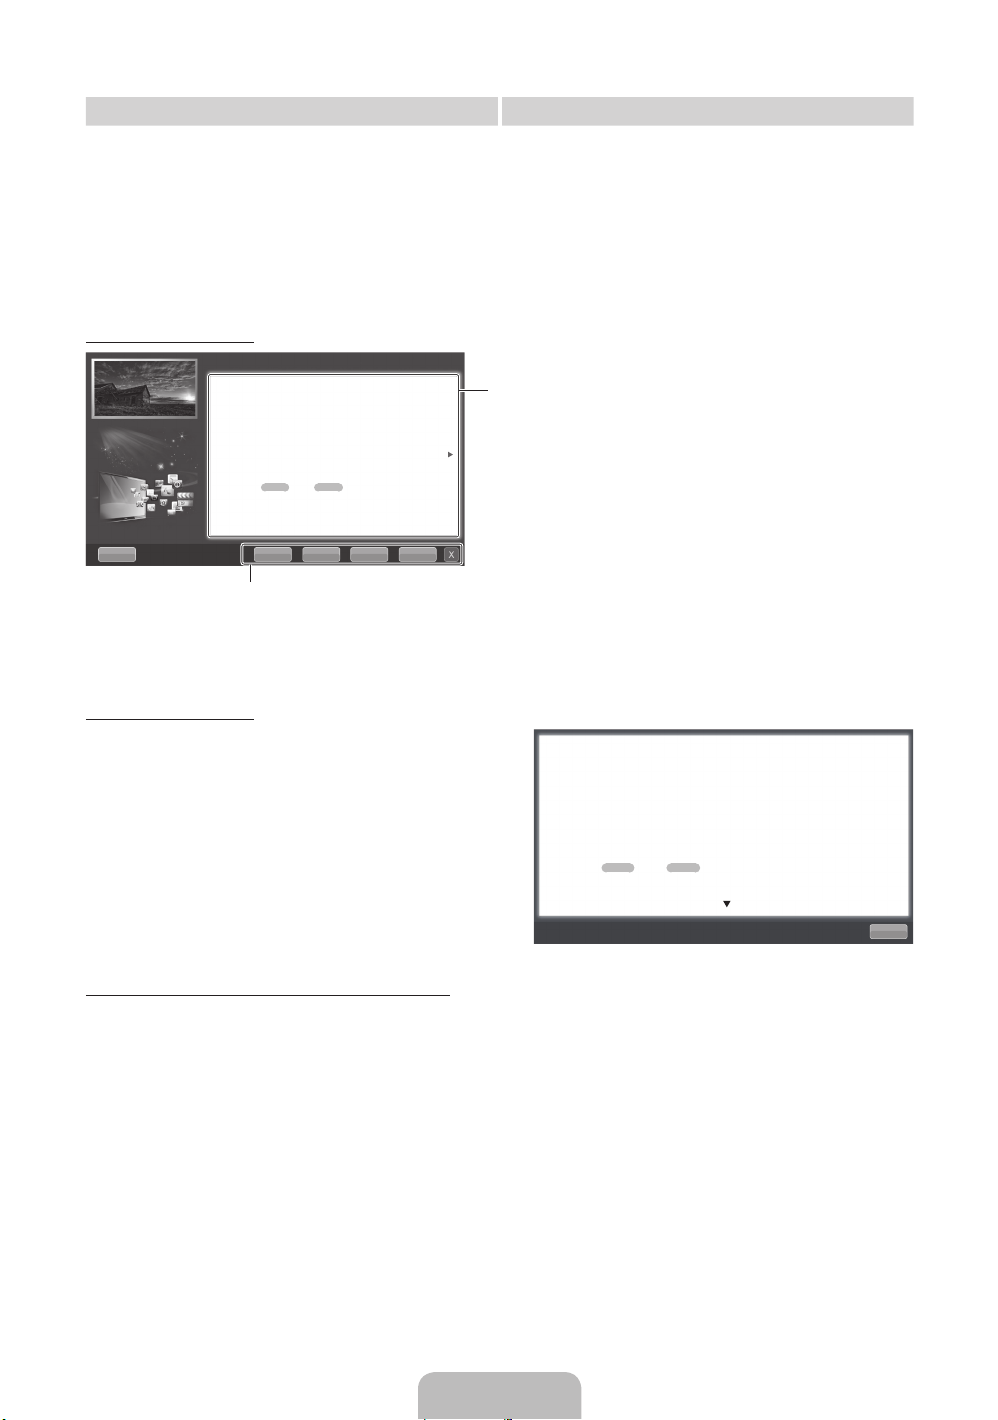
Method 1 Method 2
1. Select Try Now, if you want to execute the
corresponding menu(s).
2. To return to the e-Manual screen, press the
E-MANUAL button.
Viewing the Contents
Basic Features > Changing the Preset Picture Mode (5/10)
Changing the Preset Picture Mode
O MENUm → Picture → Picture Mode → ENTER
■
Picture Mode t
Select your preferred picture type.
N When an input source is set to PC, the Picture Mode is only available
the Standard and Entertain.
• Dynamic: Suitable for a bright room.
• Standard: Suitable for a normal environment.
for LED TV
for PDP TV
• Natural
• Movie: Suitable for watching movies in a dark room.
• Entertain: Suitable for watching movies and games.
Help Try Now Home Zoom Index
/ Relax
Try Now: Displays the corresponding menu(s).
Home: Moves to the e-Manual home screen.
Zoom: Magnifies a screen.
Index: Displays index screen.
E
: Suitable for reducing eye strain.
1. Press the ENTER
E
button when selecting
Contents Area. The “Are you sure?” is displayed.
Select Yes and then press the ENTERE button.
The OSD window will be displayed.
2. To return to the e-Manual screen, press the
E-MANUAL button.
Contents Area: You can view the corresponding
contents, if you selected a sub-menu. To move
previous or next page, press the l or r button.
Viewing the Contents
When you view the e-Manual instruction, select the
Zoom to magnify the screen. You can scroll through
u
the magnified screen by using the
✎
To return to the previous screen, press the RETURN
or d buttons.
button.
How to search a keyword by using index page
✎
This function may not supported depending on the language.
u
1. If you want to search a keyword, press the
l
2. Press the
3. Press the
or r button to select a character order you want, and then press the ENTERE button.
u
or d button to select a keyword you want to see, and then press the ENTERE button.
/ d / l / r button to select Index.
4. You can view the corresponding e-Manual instruction screen.
✎
To close the Index screen, press the RETURN button.
Changing the Preset Picture Mode
O MENUm → Picture → Picture Mode → ENTER
■
Picture Mode t
Select your preferred picture type.
N When an input source is set to PC, the Picture Mode is only available the Standard
and Entertain.
• Dynamic: Suitable for a bright room.
• Standard: Suitable for a normal environment.
for LED TV
• Natural
• Movie: Suitable for watching movies in a dark room.
• Entertain: Suitable for watching movies and games.
/ Relax
for PDP TV
E
: Suitable for reducing eye strain.
Return
English - 15
Page 16
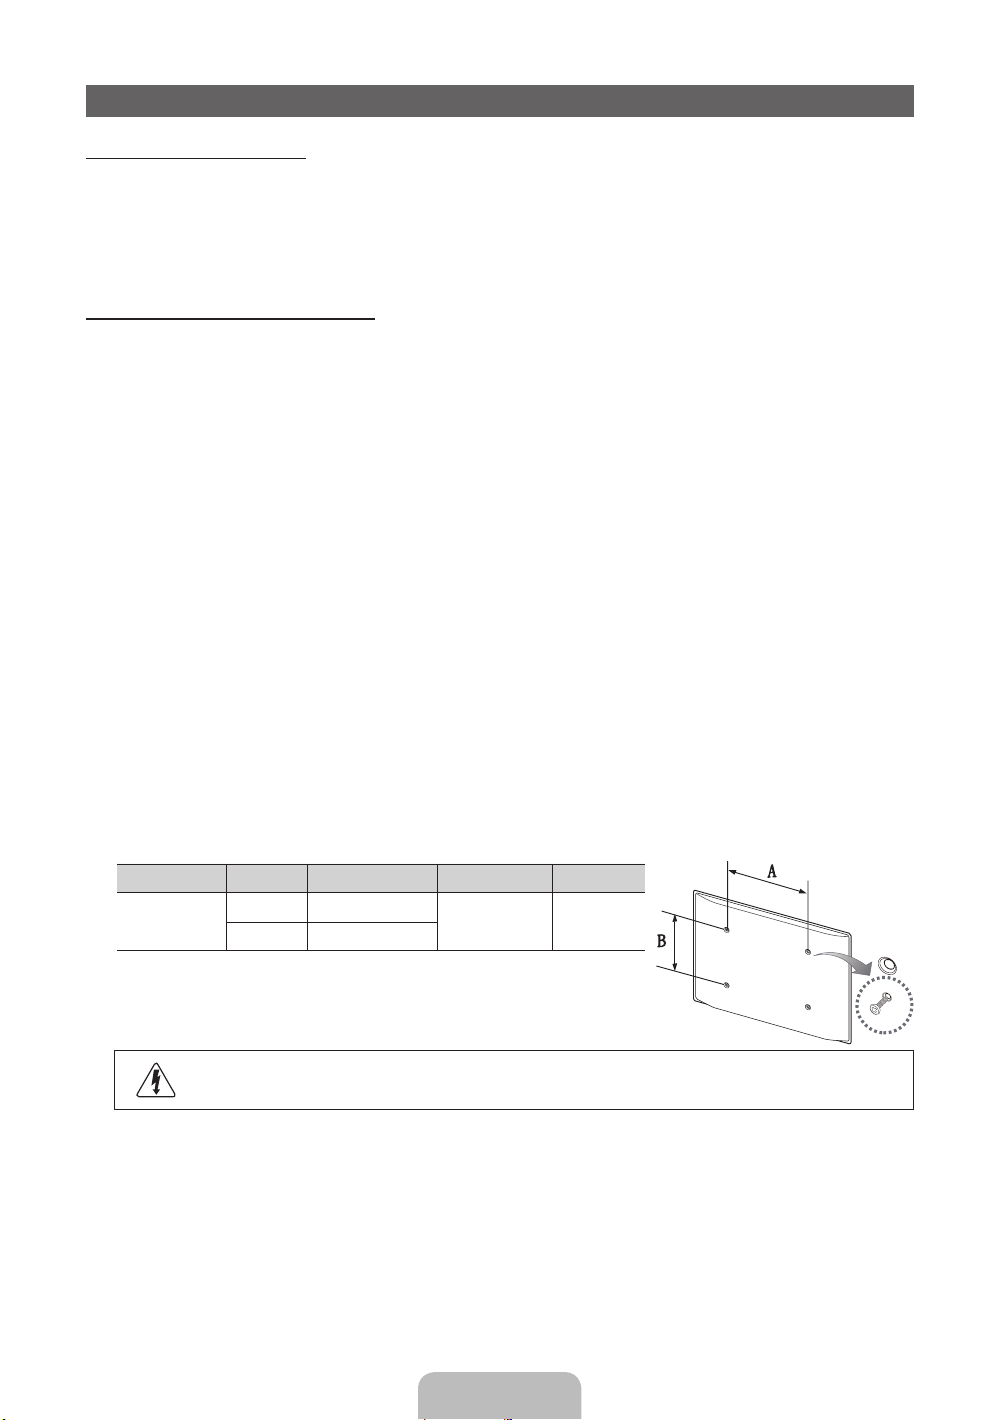
Installing the Wall Mount
Installing the Wall Mount Kit
The wall mount kit (sold separately) allows you to mount the TV on the wall.
For detailed information on installing the wall mount, see the instructions provided with the wall mount. Contact a
technician for assistance when installing the wall mount bracket.
Samsung Electronics is not responsible for any damage to the product or injury to yourself or others if you elect
to install the TV on your own.
Wall Mount Kit Specifications (VESA)
✎
The wall mount kit is not supplied, but sold separately.
Install your wall mount on a solid wall perpendicular to the floor. When attaching to other building materials,
please contact your nearest dealer. If installed on a ceiling or slanted wall, it may fall and result in severe personal
injury.
✎
NOTE
Standard dimensions for wall mount kits are shown in the table below.
x
When purchasing our wall mount kit, a detailed installation manual and all parts necessary for assembly
x
are provided.
Do not use screws that do not comply with the VESA standard screw specifications.
x
Do not use screws that are longer than the standard dimension or do not comply with the VESA standard
x
screw specifications. Screws that are too long may cause damage to the inside of the TV set.
For wall mounts that do not comply with the VESA standard screw specifications, the length of the
x
screws may differ depending on the wall mount specifications.
Do not fasten the screws that are too strongly; this may damage the product or cause the product to fall,
x
leading to personal injury. Samsung is not liable for these kinds of accidents.
Samsung is not liable for product damage or personal injury when a non-VESA or non-specified wall
x
mount is used or the consumer fails to follow the product installation instructions.
Our 55” model do not comply with VESA Specifications. Therefore, you should use our dedicated wall
x
mount kit for this model.
Do not mount the TV at more than a 15 degree tilt.
x
Product Family inches VESA Spec. (A * B) Standard Screw Quantity
PDP-TV
[Ultra-Slim]
✎
Unscrew the hole around before installing Wall-Mount on the wall.
51 400 X 400
59 ~ 64 600 X 400
Do not install your Wall Mount Kit while your TV is turned on. It may result in personal injury
due to electric shock.
M8 4
English - 16
Page 17
Troubleshooting
If you have any questions about the TV, first refer to this list. If none of these troubleshooting tips apply, please
visit “www.samsung.com,” then click on Support, or contact the call centre listed on the back-cover of this
manual.
Issues Solutions and Explanations
The TV won’t turn on. • Make sure the AC power cord is securely plugged in to the wall outlet and the TV.
There is no picture/video. • Check cable connections (remove and reconnect all cables connected to the TV and external
The remote control does not work. • Replace the remote control batteries with the poles (+/–) in the right direction.
The cable/set top box remote control
doesn’t turn the TV on or off, or adjust the
volume.
✎
Some of above pictures and functions are available at specific models only.
✎
You can keep your TV as optimum condition to upgrade the latest firmware on web site (samsung.com →
• Make sure the wall outlet is working.
• Try pressing the POWER button on the TV to make sure the problem is not the remote. If the TV turns
on, refer to “Remote control does not work” below.
devices).
• Set your external device’s (Cable/Sat Box, DVD, Blu-ray etc) video outputs to match the connections
to the TV input. For example, if an external device’s output is HDMI, it should be connected to an
HDMI input on the TV.
• Make sure your connected devices are powered on.
• Be sure to select the TV’s correct source by pressing the SOURCE button on the remote control.
• Clean the sensor’s transmission window on the remote.
• Try pointing the remote directly at the TV from 5~6 feet away.
• Programme the Cable/Set remote control to operate the TV. Refer to the Cable/Set user manual for
the SAMSUNG TV code.
Support → Downloads) by USB.
Licence
List of Features
Excellent Digital Interface & Networking: With a built-in HD digital tuner, nonsubscription HD broadcasts can be
viewed without a cable box / STB (Set-Top-Box) satellite receiver.
3D
This exciting new feature enables you to view 3D content.
SMART HUB
The Gateway to all content integrated in one place
• It’s all integrated to guide you to easier and diverse entertainment choices.
• Control your entertainment life with easy and simple user friendly UI.
• Access to diverse Apps that are adding up every day.
• Customize your TV, by App grouping & sorting to your taste.
AllShare™
AllShare™ connects your TV and compatible Samsung mobile phones/devices through a network.
Anynet+(HDMI-CEC)
Allows you to control all connected Samsung devices that support anynet+ with your Samsung TV’s remote.
English - 17
Page 18
Securing the TV to the wall
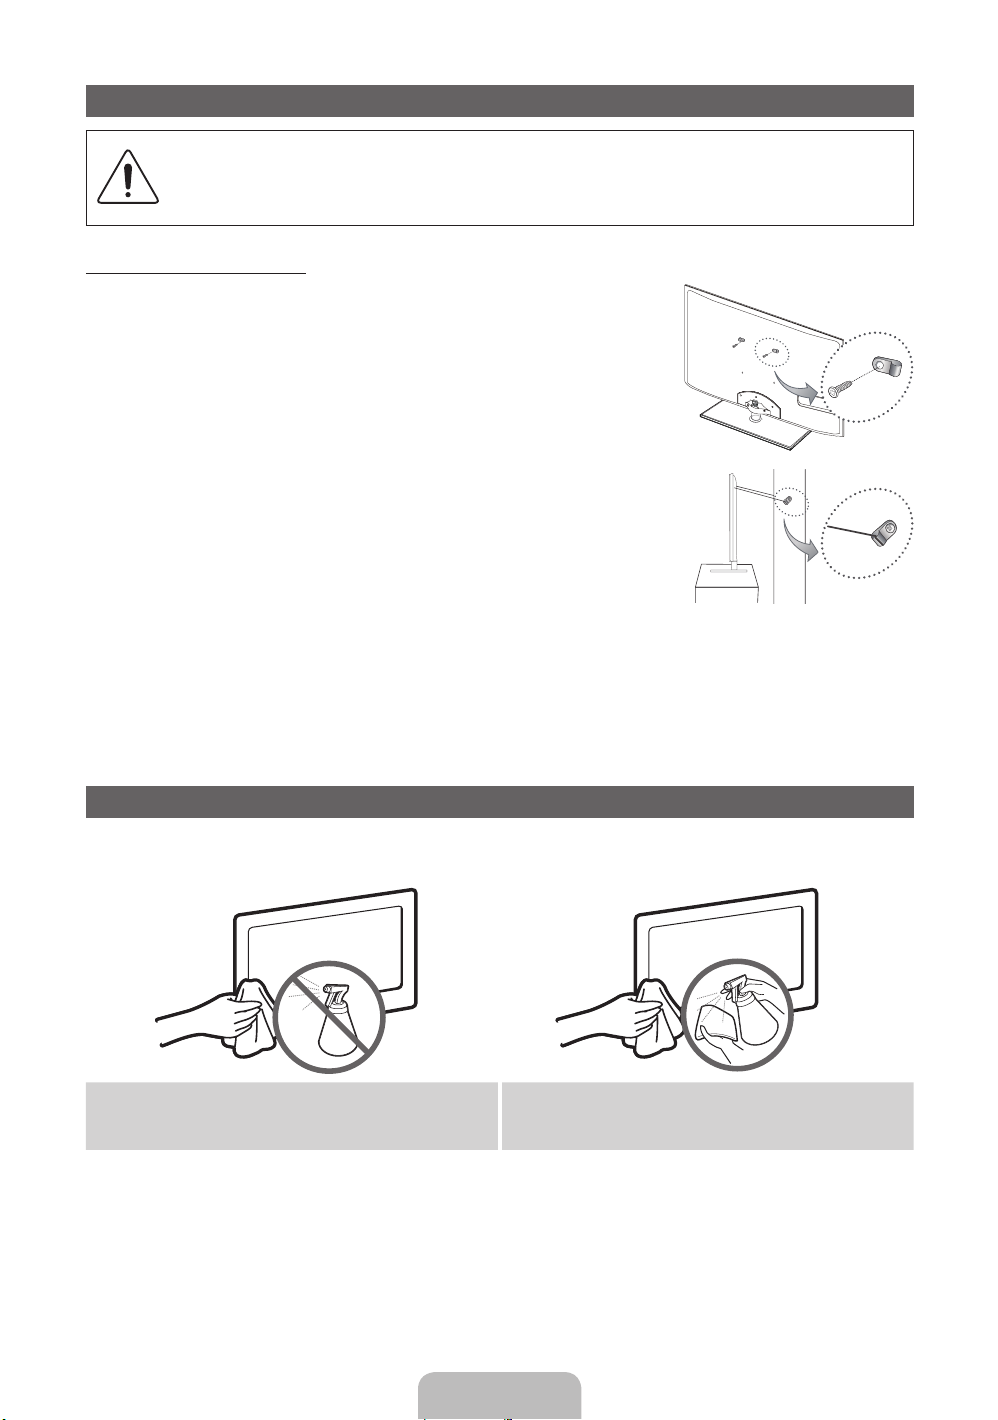
Caution: Pulling, pushing, or climbing onto the TV may cause the TV to fall. In particular, ensure
that your children do not hang over or destabilize the TV; doing so may cause the TV to tip over,
resulting in serious injuries or death. Follow all safety precautions provided in the included Safety
Flyer. For added stability and safety, install the anti-fall device as follows.
To Avoid the TV from Falling
1. Put the screws into the clamps and firmly fasten them onto the wall.
Confirm that the screws have been firmly installed onto the wall.
✎
You may need additional material such as an anchor depending on the
type of wall.
✎
Since the necessary clamps, screws, and string are not supplied,
please purchase these additionally.
2. Remove the screws from the back centre of the TV, put the screws into the
clamps, and then fasten the screws onto the TV again.
✎
Screws may not be supplied with the product. In this case, please
purchase the screws of the following specifications.
3. Connect the clamps fixed onto the TV and the clamps fixed onto the wall
with a strong cable and then tie the string tightly.
✎
NOTE
Install the TV near to the wall so that it does not fall backwards.
x
It is safe to connect the string so that the clamps fixed on the wall are equal to or lower than the
x
clamps fixed on the TV.
Untie the string before moving the TV.
x
4. Verify all connections are properly secured. Periodically check connections for any sign of fatigue for failure. If
you have any doubt about the security of your connections, contact a professional installer.
Wall
Storage and Maintenance
✎
If you attached some stickers on the TV screen, it remains some debris after removing the sticker. Please
clean it to watch TV.
Do not spray water or a cleaning agent directly onto
the product. Any liquid that goes into the product may
cause a failure, fire, or electric shock.
Clean the product with a soft cloth dapped in a small
amount of water.
English - 18
Page 19
Specifications
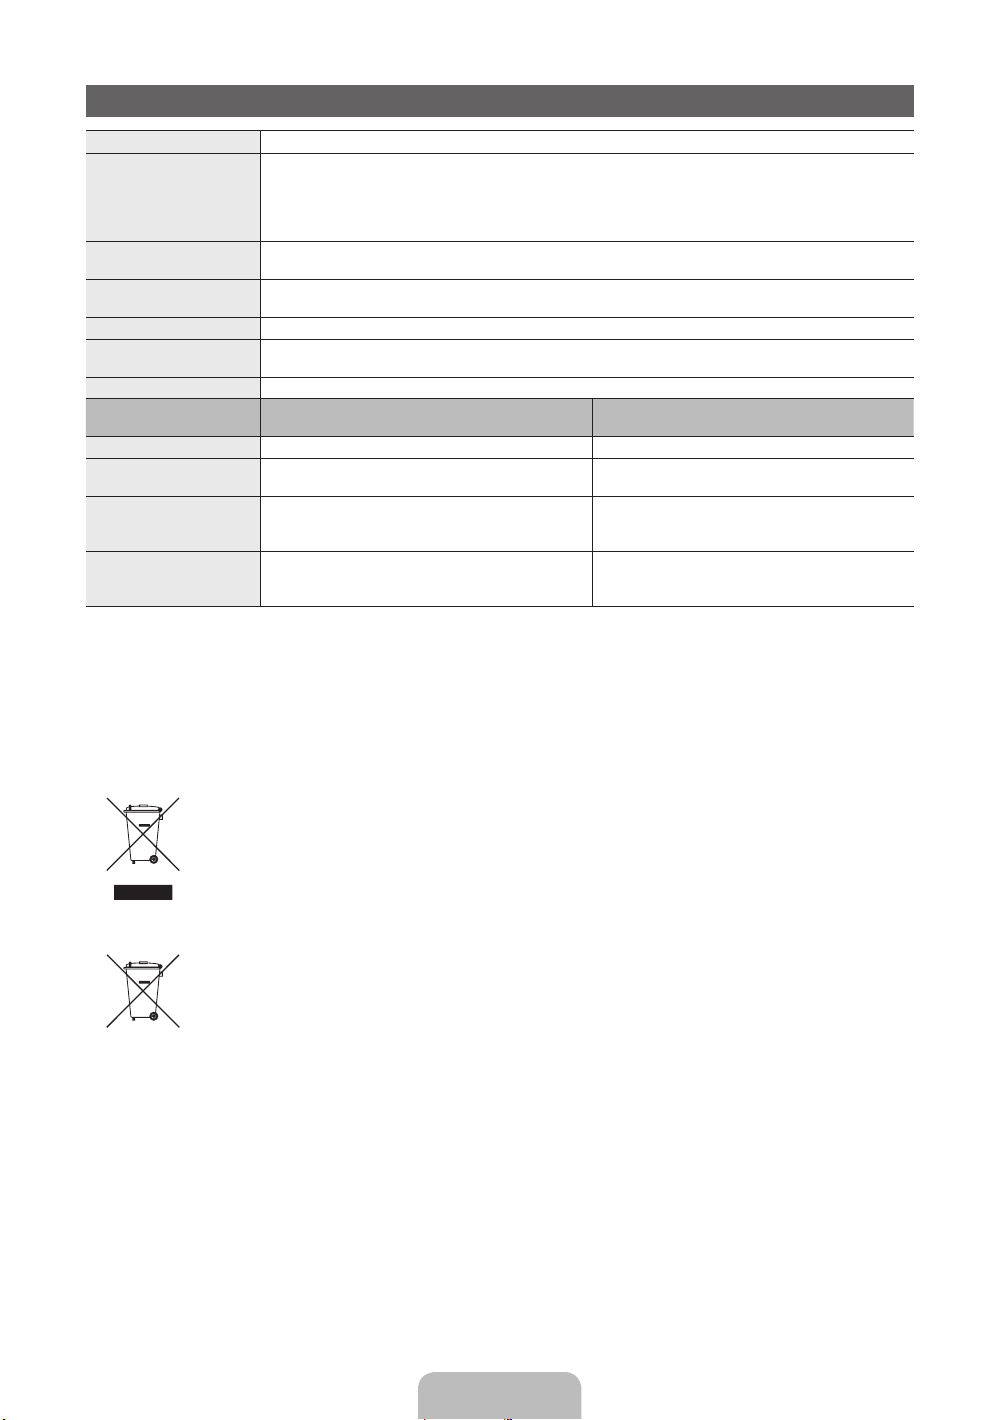
Display Resolution 1920 x 1080
Environmental Considerations
Operating Temperature
Operating Humidity
Storage Temperature
Storage Humidity
TV System Analogue: B/G, D/K, L, I (Depending on your country selection)
Colour/Video System Analogue: PAL, SECAM, NTSC-4.43, NTSC-3.58, PAL60
Sound System BG, DK, L, NICAM, MPEG1, DD, DD+, HEAAC.
HDMI IN Video: 1080 24p, 1080p, 1080i, 720p, 576p, 576i, 480p, 480i
Stand Swivel (Left / Right) -20˚ ~ 20˚
Model Name PS51D6900
Screen Size 51 inches 59 inches
Sound
(Output) 10 W X 2 15 W X 2
Dimensions (WxDxH)
Body
With stand
Weight
Without Stand
With Stand
✎
Design and specifications are subject to change without prior notice.
✎
For information about power supply, and more about power consumption, refer to the label attached to the
Digital: MPEG-2 MP@ML, MPEG-4, H.264/AVC MP@L3, [email protected], [email protected]
Audio: 2Ch Linear PCM 32/44.1/48kHz, 16/20/24bits.
PS51D6910
1195.9 X 38.0 X 719.4 mm
1195.9 X 305.0 X 783.1 mm
22.4 kg
27.1 kg
product.
✎
Hereby, Samsung, declares that this PDP TV is in compliance with the essential requirements and other
relevant provisions of Directive 1999/5/EC.
10°C to 40°C (50°F to 104°F)
10% to 80%, non-condensing
-20°C to 45°C (-4°F to 113°F)
5% to 95%, non-condensing
Digital: DVB-T2/DVB-C
PS59D6900
PS59D6910
1378.4 X 38.0 X 827.3 mm
1378.4 X 335.0 X 886.3 mm
30.6 kg
36.3 kg
Correct Disposal of This Product (Waste Electrical & Electronic Equipment)
(Applicable in the European Union and other European countries with separate collection systems)
This marking on the product, accessories or literature indicates that the product and its electronic accessories (e.g. charger,
headset, USB cable) should not be disposed of with other household waste at the end of their working life. To prevent possible
harm to the environment or human health from uncontrolled waste disposal, please separate these items from other types of waste
and recycle them responsibly to promote the sustainable reuse of material resources. Household users should contact either the
retailer where they purchased this product, or their local government office, for details of where and how they can take these items
for environmentally safe recycling. Business users should contact their supplier and check the terms and conditions of the purchase
contract. This product and its electronic accessories should not be mixed with other commercial wastes for disposal.
Correct disposal of batteries in this product
(Applicable in the European Union and other European countries with separate battery return systems)
This marking on the battery, manual or packaging indicates that the batteries in this product should not be disposed of with other
household waste at the end of their working life. Where marked, the chemical symbols Hg, Cd or Pb indicate that the battery
contains mercury, cadmium or lead above the reference levels in EC Directive 2006/66. If batteries are not properly disposed of,
these substances can cause harm to human health or the environment. To protect natural resources and to promote material
reuse, please separate batteries from other types of waste and recycle them through your local, free battery return system.
English - 19
Page 20
ELECTRONICS
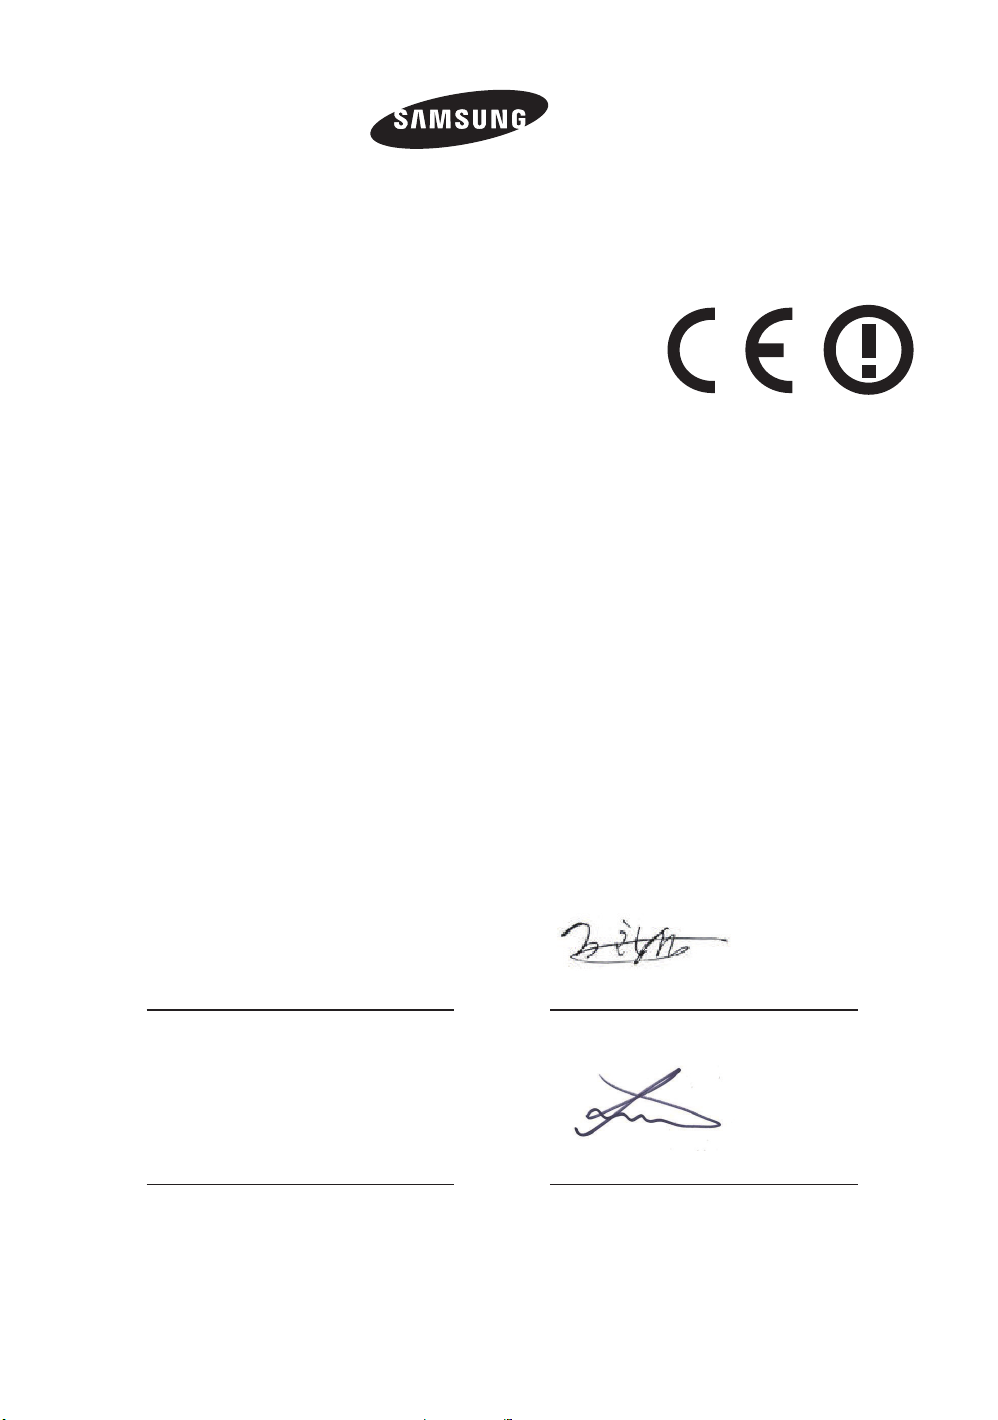
Declaration of Conformity
For the following
Product : PDP TV
Model(s) : PS51D6900 PS59D6900 PS51D6910 PS59D6910
Year of Affixing CE Marking : 2011
Manufactured at:
F1: Samsung Electronics Co., Ltd.
416, Maetan 3-Dong, Yeongtong-Gu, Suwon-Si, Gyeonggi-Do, 443-742 Korea
F2: Samsung Electronics Slovakia s.r.o
Hviezdoslavova 807 924 27 Galanta, Slovak Republic
F3: Samsung Electronics Hungarian Co., Ltd.
H-5126 Jaszfenyszaru, Samsung ter 1
(Factories name and address)
We hereby declare under our sole responsibility that the electrical product above is in compliance with
the essential requirements of R&TTE Directive (1995/5/EC), the Low Voltage Directive (2006/95/EC) and
Electromagnetic Compatibility Directive (2004/108/EC) by application of
EN 60065: 2002+A1:2006+A11:2008
EN55022: 2006+A1:2007
EN61000-3-2:2006
EN 300 328-1 v1.7.1
EN 301 489-17 v1.3.2 :2008
EN 300 440-1 v 1.5.1
EN61000-3-3:1995+A1:2001+A2:2005
EN55024:1998+A1:2001+A2:2003
EN55013:2001+A1:2003+A2 :2006
EN55020:2007
EN 301 489-1 v1.8.1 :2008
EN 300 440-2 v.1.3.1
and the Eco-Design Directive (2009/125/EC) implemented by Regulation (EC) No 642/2009 for televisions.
The Technical documentation is kept at the below Manufacturer’s address.
Manufacturer
Samsung Electronics Co., Ltd.
416 Maetan-dong, Young-Tong gu,
Suwon, Korea 442-742
05 Jan 2011
(Place and date of issue)
Chang Seub Eum / Manager
(Name and signature of authorized person)
Representative in the EU :
Samsung Electronics Euro QA Lab.
Blackbushe Business Park
Saxony Way, Yateley, Hampshire
GU46 6GG, UK
06 Jan 2011
(Place and date of issue)
Joong Hoon Choi / Lab. Manager
(Name and signature of authorized person)
Note : It is not the address of Samsung Service Centre. For the address or the phone number of
Samsung Service Centre, see the warranty card or contact the retailer where you purchased your
product.
Page 21

This page is intentionally
left blank.
Page 22
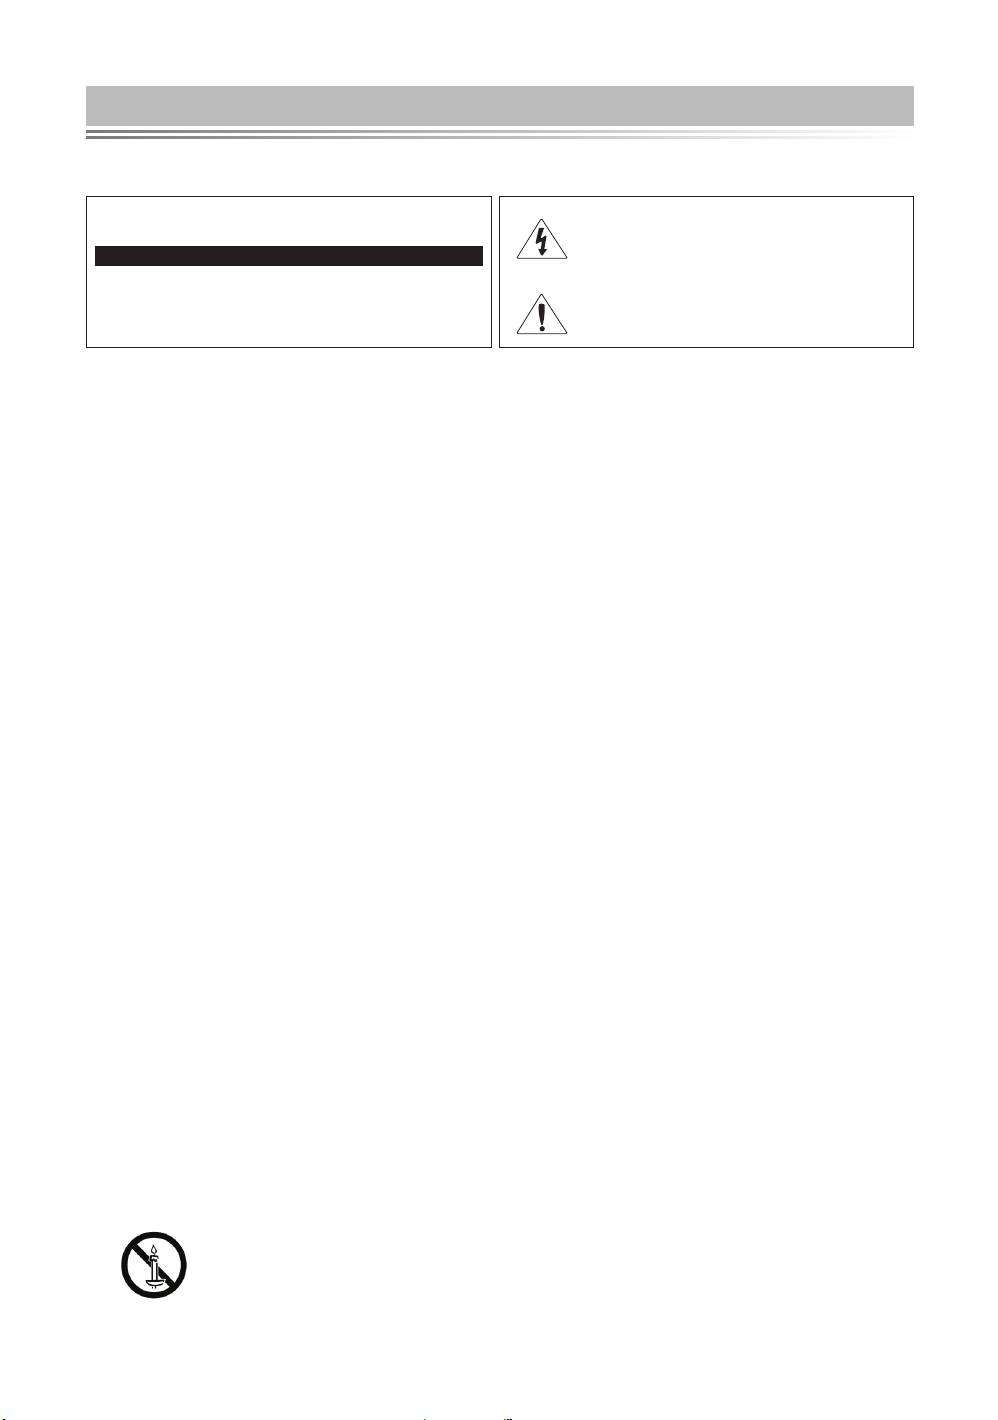
Warning! Important Safety Instructions
Please read the appropriate section that corresponds to the marking on your Samsung product before attempting to
install the product.
CAUTION
RISK OF ELECTRIC SHOCK DO NOT OPEN
CAUTION: TO REDUCE THE RISK OF ELECTRIC SHOCK,
DO NOT REMOVE COVER (OR BACK). THERE ARE
NO USER SERVICEABLE PARTS INSIDE. REFER ALL
SERVICING TO QUALIFIED PERSONNEL.
y The slots and openings in the cabinet and in the back or bottom are provided for necessary ventilation.To ensure reliable
operation of this apparatus, and to protect it from overheating, these slots and openings must never be blocked or covered.
– Do not cover the slots and openings with a cloth or other materials.
– Do not block the slots and openings by placing this apparatus on a bed, sofa, rug or other similar surface.
– Do not place this apparatus in a confined space, such as a bookcase, or built-in cabinet, unless proper ventilation is provided.
– Give your product 10 cm (4 inch) clearance from the wall.
y Do not place this apparatus near or over a radiator or heat resistor, or where it is exposed to direct sunlight.
y Do not place heat generating items such as candles, ashtrays, incense, flammable gas or explosive materials near the product.
y Do not place a water containing vessel on this apparatus, as this can result in a risk of fire or electric shock.
y Do not expose this apparatus to rain or place it near water(near a bathtub, washbowl, kitchen sink, or laundry tub, in a wet
basement, or near a swimming pool etc.). If this apparatus accidentally gets wet, unplug it and contact an authorized dealer
immediately. Make sure to pull out the power cord from the outlet before cleaning.
y This apparatus use batteries. In your community there might be regulations that require you to dispose of these batteries properly
under environmental considerations. Please contact your local authorities for disposal or recycling information.
y Do not overload wall outlets, extension cords or adaptors beyond their capacity, since this can result in fire or electric shock.
y Power-supply cords should be routed so that they are not likely to be walked on or pinched by items placed upon or against
them, paying particular attention to cords at plug end, adaptors and the point where they exit from the appliance.
y To protect this apparatus from a lightning storm, or when it is left unattended and unused for long periods of time, unplug it from
the wall outlet and disconnect the antenna or cable system.
This will prevent damage to the set due to lightning and power line surges.
y Before connecting the AC power cord to the DC adaptor outlet, make sure the voltage designation of the DC adaptor
corresponds to the local electrical supply.
y Never insert anything metallic into the open parts of this apparatus. Doing so many create a danger of electric shock.
y To avoid electric shock, never touch the inside of this apparatus. Only a qualified technician should open this apparatus.
y Make sure to plug the power cord in until it is firmly inserted. When removing the power cord, make sure to hold the power plug
when pulling the plug from the outlet. Do not touch the power cord with wet hands.
y If this apparatus does not operate normally - in particular, if there are any unusual sounds or smells coming from it - unplug it
immediately and contact an authorized dealer or service centre.
y Be sure to pull the power plug out of the outlet if the TV is to remain unused or if you are to leave the house for an extended
period of time (especially when children, elderly or disabled people will be left alone in the house).
– Accumulated dust can cause an electric shock, an electric leakage or a fire by causing the power cord to generate sparks and
heat or the insulation to deteriorate.
y Be sure to contact an authorized service centre, when installing your set in a location with heavy dust, high or low
temperatures,high humidity, chemical substances and where it operates for 24 hours such as the airport, the train station etc.
Failure to do so may cause serious damage to your set.
y Use only a properly grounded plug and receptacle.
– An improper ground may cause electric shock or equipment damage. (Class l Equipment only.)
y To disconnect the apparatus from the mains, the plug must be pulled out from the mains socket, therefore the mains plug shall
be readily operable.
y Do not allow children to hang onto the product.
y Store the accessories (battery, etc.) in a location safely out of the reach of children.
y Do not install the product in an unstable location such as a shaky self, a slanted floor or a location exposed to vibration.
y Do not drop or impart any shock to the product. If the product is damaged, disconnect the power cord and contact a service centre.
This symbol indicates that high voltage is
present inside. It is dangerous to make any kind
of contact with any internal part of this product.
This symbol alerts you that important literature
concerning operation and maintenance has
been included with this product.
WARNING - TO PREVENT THE SPREAD OF FIRE,
KEEP CANDLES OR OTHER OPEN FLAMES
AWAY FROM THIS PRODUCT AT ALL TIMES.
Page 23

Wiring the Mains Power Supply Plug (UK Only)
IMPORTANT NOTICE
The mains lead on this equipment is supplied with a moulded plug incorporating a fuse. The value of the fuse is indicated on
the pin face of the plug and, if it requires replacing, a fuse approved to BSI1362 of the same rating must be used.
Never use the plug with the fuse cover omitted if the cover is detachable. If a replacement fuse cover is required, it must be of
the same colour as the pin face of the plug. Replacement covers are available from your dealer.
If the fitted plug is not suitable for the power points in your house or the cable is not long enough to reach a power point, you
should obtain a suitably approved extension lead or consult your dealer for assistance. However, if there is no alternative but to
cut off the plug, remove the fuse and then safely dispose of the plug.
Do NOT connect the plug to a mains socket as there is a risk of shock hazard from the bared flexible cord.
IMPORTANT
The wires in the mains lead are coloured in accordance with the following code:
BLUE - NEUTRAL BROWN - LIVE
As these colours may not correspond to the coloured markings identifying the terminals in your plug, proceed as follows :
The wire coloured BLUE must be connected to the terminal marked with the letter N or coloured BLUE or BLACK. The wire
coloured BROWN must be connected to the terminal marked with the letter L or coloured BROWN or RED.
WARNING:
DO NOT CONNECT EITHER WIRE TO THE EARTH TERMINAL, WHICH IS MARKED WITH THE
LETTER E OR BY THE EARTH SYMBOL , OR COLOURED GREEN OR GREEN AND YELLOW.
Warranty Card
UNITED KINGDOM REPUBLIC OF IRELAND
(EIRE)
This Samsung product is warranted for a period of twelve (12) months from the original date of purchase, against defective
materials and workmanship. In the event that warranty service is required, you should return the product to the retailer from
whom it was purchased. However, Samsung Authorised Dealers and Authorised Service Centres in other EC Countries will
comply with the warranty on the terms issued to purchasers in the country concerned. In case of difficulty, details of our
Authorised Service Centres are available from:
Samsung Customer Support Centre, PO Box 479, Gateshead, NE9 9BJ United Kingdom
Telephone: 0330 SAMSUNG (7267864) Fax: 0330 7260001 (UK & Northern Ireland)
WARRANTY CONDITIONS
1. The warranty is only valid if, when warranty service is required, the warranty card is fully and properly completed and
is presented with the original invoice or sales slip or confirmation, and the serial number on the product has not been
defaced.
2. Samsung’s obligations are limited to the repair or, at its discretion, replacement of the product or the defective part.
3. Warranty repairs must be carried out by Authorised Samsung Dealers or Authorised Service Centres. No re-imbursement
will be made for repairs carried out by non Samsung Dealers and, any such repair work and damage to the products
caused by such repair work will not be covered by this warranty.
4. This product is not considered to be defective in materials nor workmanship by reason that it requires adaptation in
order to conform to national or local technical or safety standards in force in any country other than the one for which the
product was originally designed and manufactured.
Tel: 0818 717 100 Fax: +44 (0)117 915 6736 (EIRE Only)
Web : www.samsung.com
 Loading...