

Page 1

Quick Start GUIDE
COLDSTORE | CSTORE15-3U
Version 3.0.3
Page 2

Contents
A) Quick S
tart Guide Legends
B) Safety Instructions
C) Product Package Contents
D) Basic Requirements
E) System Overview
F) Chassis Mounting
G) System Connections
H) Disk Loading
I) Power Up Sequence
J) Front Panel Menu
K) COLDSTORE Set up and Maintenance Software - SITESCAPE
Installing SITESCAPE
Getting Connected
3
3
4
4
4
4
5
5
6
6
7
7
8
L) System Configuration
M) Disk Management – Adding & Removing Disks
N) Troubleshooting
No power
No disk
Disk fail
O) System Transportation
P) Further Information & Resources
11
13
13
13
14
14
14
14
Page 3

A) Quick Start Guide Legends
The Information icon highlights particularly useful information or items which are very important to note
when using or configuring the product.
The Caution icon indicates possible actions or procedures which could prevent proper operation or
cause a system malfunction and the associated text will explain how to avoid this.
The Warning icon highlights important basic safety issues which if ignored may have a potential for
damage to the hardware, property damage, personal injury or even death.
Users are urged to read the safety information before
connecting and using the product.
References to further product information are listed at the end of this guide or may be downloaded from
the Veracity website www.veracityglobal.com. Refer to these resources for full product information,
information about terms and conditions of use, limited warranties, returns, software licence agreements,
environmental and recycling procedures and any other regulatory notices.
COLDSTORE
or Registered Trademarks of Veracity UK Ltd. Other trademarks referred to in this guide belong to their
respective owners.
®
, LAID™, SFS™, DISKPLAY™, TRINITY® and the Veracity company logo are Trademarks
COLDSTORE is covered by the following patents:
US Patent No. 8190837; European Patent No. 1999554B; Australian Patent No. 2007231179; Japanese Patent
No. 2009-502184.
The storage array should NOT be moved once powered
up as this is very likely to cause disk damage – this
applies to all types of disk storage arrays.
nformation in this guide is subject to change without notice.
I
This document is copyright © 2011-2018 Veracity UK Ltd, all rights reserved.
B) Safety Instructions
These safety instructions are important and are provided to help prevent equipment damage and injury to
the installers and operators of the system. Please read and understand all of these instructions before
connecting and switching on the product.
Do not use a damaged power cable with the product. If the cable is cut, damaged, severely twisted, or if
the plug is loose, replace the power cable with a new one.
Do not place liquids (e.g. tea, coffee etc.) on top of the product. Specifically, do not spill any liquids onto
or into the product. If this happens, immediately switch off the power at the wall outlet and disconnect all
cables from the unit.
Do not handle the product or the power cable with wet hands. This could result in electric shock and
even death.
Do not insert any items into the air vents or openings anywhere on the unit, especially the power supply
unit. To do so may cause damage to fans and other components, may cause the system to malfunction and
may result in electric shock and even death.
The product is heavy. Ensure that proper lifting techniques are used when moving the unit to avoid
personal injury. It is highly recommended that the unit is installed in a proper 19” equipment rack before disks
are inserted. The unit is extremely heavy when fully populated with disks.
VERACITY COLDSTORE | CSTORE15-3U QUICK START GUIDE | REV 3.0.3 | October 2018 | 3
Page 4

Ensure that the product is securely held at all times as dropping the product will almost certainly damage
it (possibly beyond repair) and more importantly, may cause severe personal injury, especially to hands and
feet. Extreme caution is essential.
Do not move the system once powered up. To do so may result in damage to the disks and potential
loss of data.
C) Product Package Contents
Carefully unpack the package contents. This will consist of the main unit wrapped in a protective
polythene bag and mounted in foam blocks, an accessories box and a copy of this Quick Start Guide.
| The COLDSTORE unit will contain 15 x empty 3.5” hard disk trays.
| The COLDSTORE unit will incorporate a dual, hot-swappable power supply unit.
The accessories box will contain:
| Rack mount lugs and mounting screws (note these are left- and right-handed)
| 60 x Hard disk tray mounting screws
| 2 x screw-terminal connectors for digital I/O (green plugs)
| Power cable (UK, EU or US).
| Standard warranty statement
| 4 x base feet and screws (for free-standing use)
D) Basic Requirements
For correct setup and operation of the system, the following items will be required:
| SATA Hard disks (minimum three units – any capacity).
| A computer such as a PC or laptop (running Windows 7 (or later Windows operating system)
| Ethernet Network (including network cables and a switch)
| Preferred Video Management System (see website for list of supported systems)
E) System Overview
COLDSTORE is a hard disk array system specifically designed for video surveillance storage. It uses our
LAID sequential writing system, our SFS sequential disk filing system and custom-designed hardware and
firmware to achieve a high-capacity, high-reliability, very low power system ideally suited to surveillance
storage.
COLDSTORE itself is a 3U, 19” rack unit with 15 x 3.5” disk
bays. The disk cage is accessible by releasing the catches on
the left and right of the unit front panel.
The front LCD panel provides basic information and control of
basic system operation. However, all information may be
viewed-, configuration carried out- and control executed- over
a network connection using the SITESCAPE application
program.
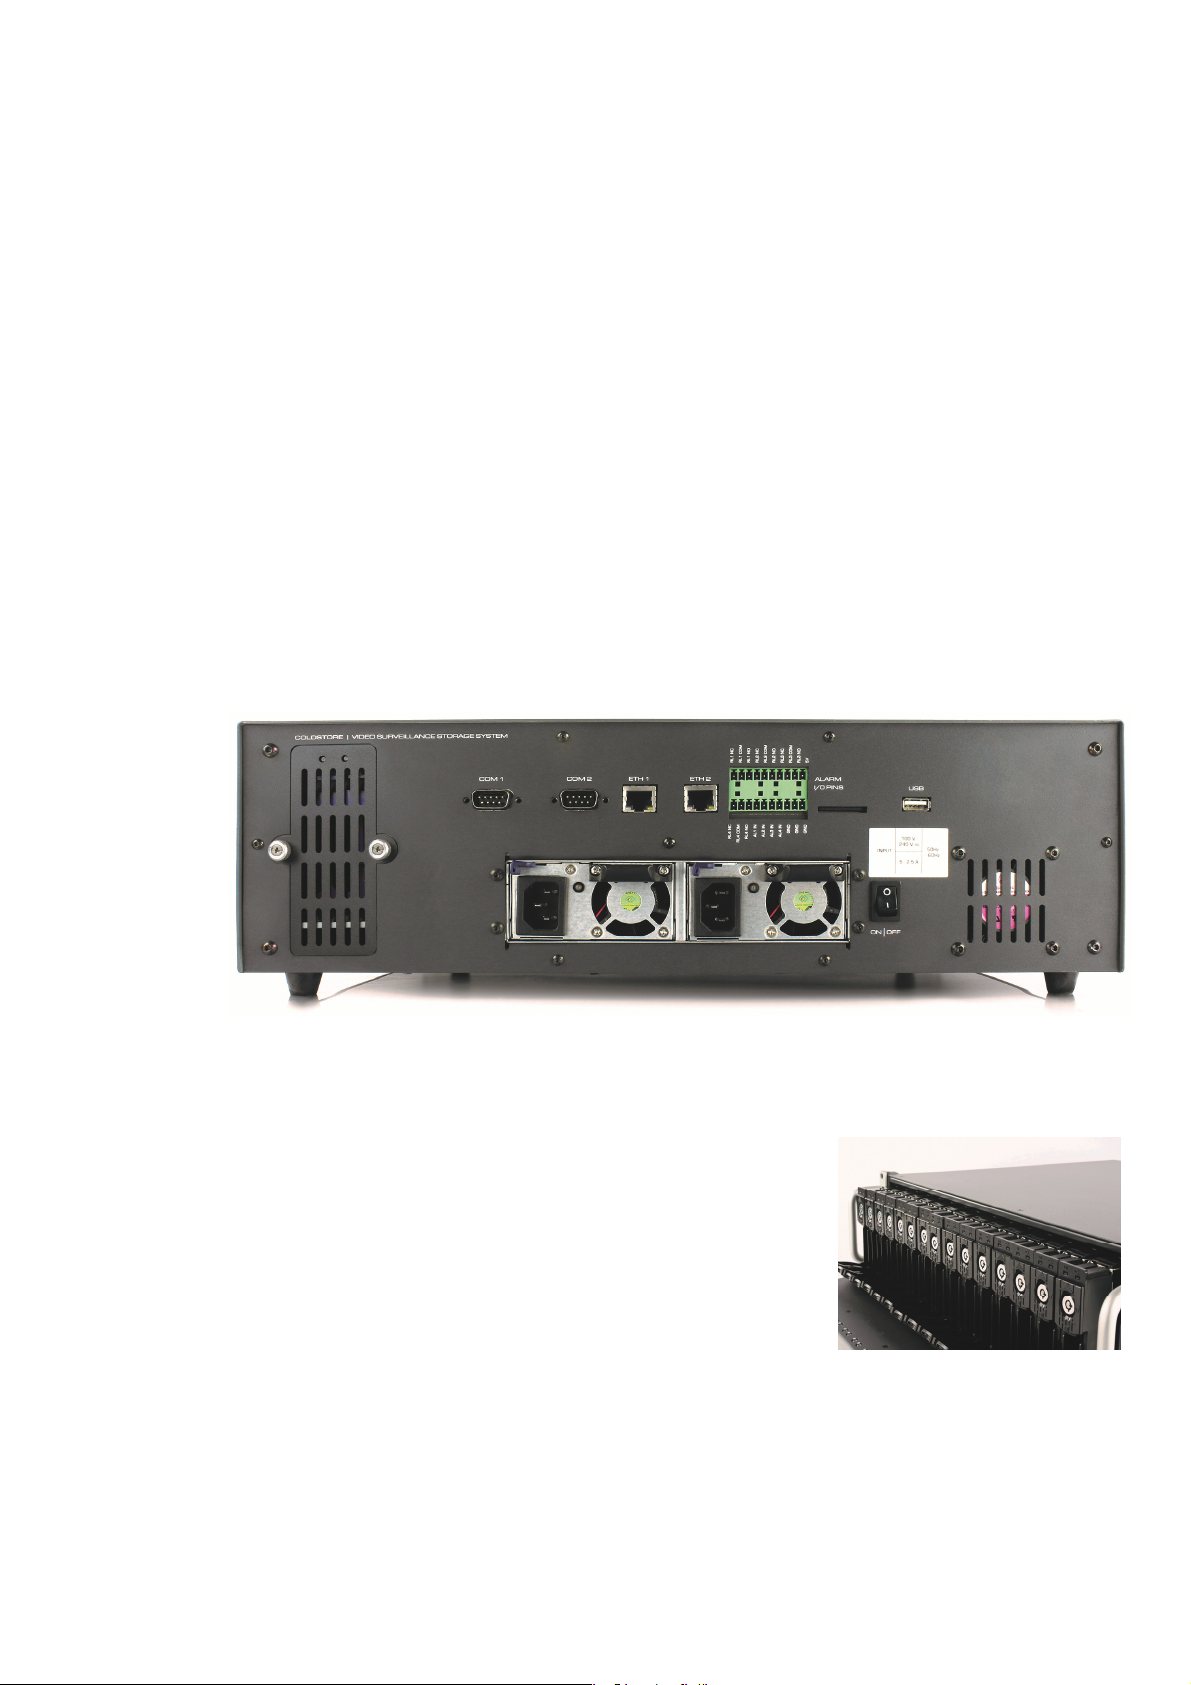
The rear panel provides dual power, digital I/O and dual network connections as shown in G) below. The
dual serial ports are for engineering purposes only and are not required for normal configuration and
operation.
F) Chassis Mounting
The rack mount lugs should be fitted to the unit as a first step. This is recommended whether or not the
unit will be mounted in an equipment rack. This makes the unit easier and safer to handle.
If the unit is to be used free-standing, we recommend fitting the base feet to avoid damaging supporting
surfaces with the metal case.
VERACITY COLDSTORE | CSTORE15-3U QUICK START GUIDE | REV 3.0.3 | October 2018 | 4
Page 5
We highly recommend that the unit is mounted into a rack for normal operation.
If rack-mounted, it is essential that the unit is mounted on a rack tray or shelf for support – it should not
be mounted on the rack-mount lugs alone.
We highly recommend that the unit is mounted in the rack (or if not to be rack mounted, placed in the
desired location) before any disks are inserted. The unit is quite heavy when empty, but very heavy when fully
populated with hard disks. Therefore, care should be taken when lifting the unit, and this is best done before
the disks are fitted. This also removes the risk of physical shock damage to hard disks when moving the unit
into place. (See section M), Disk Management – Adding & Removing Disks, below).
G) System Connections
Once properly located, the power and network cables can be prepared ready for connection. However,
at this stage, do not switch on the power. See rear panel photo below for location of connectors.
Steps:
1 Connect a network cable from your network switch to the network port labelled ETH1.
2 Connect two power cables to the unit, but do not switch the unit on.
If network connection redundancy is required, a second network cable can be connected between your
network switch and the network port labelled ETH2 but before connecting ensure that the COLDSTORE has
been configured to support redundancy.
The digital I/O c
onnections are not covered in this Quick Start Guide – see COLDSTORE User’s Guide.
H) Disk Loading
COLDSTORE is delivered with 15 lockable disk trays. To remove
a tray, slide the top section of the tray upwards, releasing the
lower section. Pull the lower section down and outwards (as
illustrated) and gently slide the tray out.
Any make, model or size of SATA hard disk may be used in
COLDSTORE. For optimum use of disk space, we recommend
that all disks be of identical capacity. Load the disks into the
trays using the mounting screws provided. Use four screws per
disk for secure mounting.
COLDSTORE requires at least two disks for set up and configuration. A minimum of three disks are
required for typical operation (normal COLDSTORE mirrored overlapping-pair mode).
Ensure the system has not yet been switched on before mounting the first disks – the COLDSTORE start
procedure requires disks to be present for full boot-up and normal operation. If the system has been
up
switched on in error, simply switch the unit off before proceeding. Note that further disks can be added late
whi
le the system is running.
r
VERACITY COLDSTORE | CSTORE15-3U QUICK START GUIDE | REV 3.0.3 | October 2018 | 5
Page 6

Carefully insert the loaded trays into the COLDSTORE unit, starting from the left (Disk Slot 1) and filling
each slot in sequence with as many disks as required. The trays should be inserted as follows:
With the tray level wide open, insert the tray into the slot taking care that the tray guide lines up with the
disk cage runners. Slide the tray in fully and then close the lever, engaging the teeth of the lever at the
bottom with the lip of the disk cage, thus firmly pushing the disk into the slot and into the SATA
connectors on the backplane.
Disk insertion should not be forced and should take a medium pressure only. If the disk will not engage,
check that the tray is correctly aligned – pull the tray out and re-insert. The tray should run smoothly into the
slot.
A cover on the rear of the unit permits access to two, 2.5” solid state disk (SSD) drives. These drives are
fitted as an option for certain COLDSTORE configurations. When SSD drives are fitted, yellow status LEDs
show constant ON to indicate drive presence and flash when there is a disk fault. A flashing LED also indicates
it is safe to remove the drive. Seek technical help from your supplier or from Veracity’s technical support team.
Fitting 2.5” disk drives to the rear drive bays will not provide performance benefits and could the correct
operation of the COLDSTORE.
I) Power Up Sequence
Once the disks are properly loaded, switch on the unit using the power switch on the rear panel.
COLDSTORE will boot up and information will be displayed on the front panel LCD.
Once switched on, the unit must NOT be moved, as in common with any disk array type, this may risk
damage to disks in operation.
If setting up more than one COLDSTORE, power on one unit and configure it fully before powering on the
next. Continue this procedure until all COLDSTORES are fully configured.
J) Front Panel Menu
On boot, the front panel LCD will display the following sequence:
Starting up . . . .
Please wait
Analysing Disk 1 . . . .
Analysing Disk 2 . . . .
15:54:49 26OCT15
UTC+0 Idle
COLDSTORE will power up each disk present
in turn, log the details and capacity, and move
onto the next disk. Once all disk checks are
complete, COLDSTORE will switch to idle
mode, with time and date display ready for
input.
There are four buttons to control the system from the front panel. These are Up, Down, Select and
Cancel.
The default IP address of COLDSTORE is 10.0.0.140 – to check the current IP address setting, carry out
the following:
Button Action LCD Display Result
(default display – shows unit date, time and status) 15:45:54 26OCT15
Select SYSTEM STATUS
Down \/ SETTINGS INFO
VERACITY COLDSTORE | CSTORE15-3U QUICK START GUIDE | REV 3.0.3 | October 2018 | 6
IDLE
1-1 Disks
2-1 IP Addresses
Page 7

Select IP Address 1
IP Address 1 corresponds to the ETH1 connection. Press Cancel at any time to move back up the menu
hierarchy. Pressing Cancel three times will return to the default (general status) display.
See the COLDSTORE User’s Guide for full details of the front panel menu system and control.
010.000.000.140
K) COLDSTORE Set up and Maintenance Software - SITESCAPE
SITESCAPE is a software application which works with all configurable Veracity network devices.
For COLDSTORE, SITESCAPE can be used to set up, apply firmware upgrades, obtain status and view
diagnostics. The latest version of SITESCAPE and COLDSTORE system firmware can be obtained from
Veracity’s download site veracitydownloads.com.
Please note that SITESCAPE requires Microsoft .NET Framework. The latest versions of Windows
desktop operating systems include the Framework. If the Framework is not present, then it will
downloaded from Microsoft over the internet during the installation.
be
During the installation or operation of SITESCAPE a network protection application such as a firewall
may notif
allow the SITESCAPE full access to the network. Note also that some network protection applications may not
notify you that access has been blocked. If you repeatedly fail to access the COLDSTORE using SITESCAPE
consider checking the configuration of your firewall and ensure that the SITESCAPE has full, unblocked
network access.
For more information about installing and using SITESCAPE, see COLDSTORE User’s Guide.
y you that network access is blocked for SITESCAPE. If prompted or otherwise, please choose
Installing SITESCAPE
To install SITESCAPE on your computer:
1 Download the latest SITESCAPE installer compressed archive from
http://veracitydownloads.com/Home/Perma?code=SITESCAPE_LATEST.
2 Extract the contents of the archive to a temporary folder.
3 Right-click the executable application file and choose Run as Administrator to begin the
installation.
For Windows 8.1 or Window 10, if Windows SmartScreen is enabled, click the More info link then
click Run Anyway.
to
If Window User Account Control is enabled, click Yes when prompted.
The Licence Terms and Conditions dialog window is shown.
4 Scroll through the licence terms and conditions and, if you agree with them, check the box against
I agree to the license terms and conditions. If you do not agree, click Close to abandon
installation of SITESCAPE.
To change the default installation location for SITESCAPE on your computer, click Options. In the
Setup Options dialog, either type the full folder path to your preferred installation location into the
Install location box, or click Browse to use the Folder Browser dialog to help specify the
location. In either case, click OK on the Setup Options dialog to use the chosen installation
location, or click Cancel to use the default installation location.
Click Install to begin SITESCAPE installation.
The Setup Progress window is shown. You may be presented with other windows or dialogs not
controlled by SITESCAPE if your computer has specialist protection software installed. Follow the
VERACITY COLDSTORE | CSTORE15-3U QUICK START GUIDE | REV 3.0.3 | October 2018 | 7
Page 8

instructions from that software to allow installation of SITESCAPE.
If successful, the Installation Setup Completed dialog is shown.
Getting Connected
i) Network with DHCP server
By default, COLDSTORE has DHCP server support disabled.
If DHCP server support on the COLDSTORE is enabled then, after powering up your COLDSTORE, the
COLDSTORE will use the network settings assigned by the DHCP server on your network. Use the front
panel to find out the COLDSTOREs current network settings, as described in section J). Skip step 5 in
part ii) of this section to complete COLDSTORE set-up.
If DHCP on the COLDSTORE has been enabled but no DHCP server is available, use the front panel to
show the COLDSTOREs current network settings, as described in section J), then continue to the next part of
this section.
ii) Network without DHCP server
On networks without a DHCP server, or when DHCP server support is disabled, assigning network
settings suitable for your installation to a COLDSTORE typically requires you to temporarily change your
computer’s network settings. This change ensures that your computer is on the same logical network as
your new COLDSTORE.
Before proceeding, check that the current IP address and other network settings of the COLDSTORE
using the front panel menu, as described in section J).
COLDSTORE 3U devices have two Ethernet connections - labelled ETH1 and ETH2. By default,
connection ETH1 has IP address 10.0.0.140, subnet mask 255.255.255.0 and gateway 10.0.0.1.
This section assumes that the network settings of the COLDSTORE are set to their defaults. If the
network settings differ from the default, you will need to adapt the instructions in this section to suit the
current network settings of the COLDSTORE read from the LCD display.
Steps:
1 Ensure that the Status LED on the front panel of the COLDSTORE is flashing before continuing.
If the Status LED is not flashing, the COLDSTORE is still in the boot-up phase. Please wait until
the Status LED is flashing before proceeding.
2 Disconnect any network lead currently attached to connection ETH1 on the rear panel of the
COLDSTORE.
3 Either attach a standard, CAT5E network cable directly from your computer to the ETH1
connection on the COLDSTORE, or temporarily connect your computer and the ETH1 connection
on the COLDSTORE to a simple, unmanaged network switch.
4 Change your computer’s network settings to IP address 10.0.0.139 and the same subnet mask
and gateway as the COLDSTORE.
If the COLDSTORE is not using the default network settings, then choose an IP address for the
computer that does not clash with the IP address of the COLDSTORE but matches the subnet
and gateway addresses.
5 Using the Windows Start Menu, navigate to All Apps>Veracity. Click SITESCAPE.
If Window User Account Control is enabled, click Yes when prompted.
The SITESCAPE splash screen is shown momentarily. The software’s version number is shown on
the splash screen.
VERACITY COLDSTORE | CSTORE15-3U QUICK START GUIDE | REV 3.0.3 | October 2018 | 8
Page 9

The first time you run SITESCAPE, the Authentication and server selector SITESCAPE dialog is
shown. Click Yes if you want a user name and password to secure access to SITESCAPE in
future, otherwise click No. Click Save.
The SITESCAPE application main window is shown.
6 To fin
d your COLDSTORE device on the network, click the Discovery link in the left-hand panel.
The Discovery window is displayed in the right-hand panel.
7 Click Search.
After a short while, the Discovery Window will update to show a COLDSTORE tab.
If a warning dialog or other notification is shown by a network firewall protection application,
choose to allow the SITESCAPE application full access to the network.
8 Click the COLDSTORES tab.
Your COLDSTORE should listed with the default IP address, or the IP address read from the LCD
display of the COLDSTORE.
If the COLDSTORE is not listed try repeat step 7.
If after several search attempts the COLDSTORE is still not listed, try to add the COLDSTORE
manually:
a Click Add Manually.
The Add device manually dialog is shown.
b Enter the IP address for the COLDSTORE.
This is either the default IP address, or the IP address read from the LCD display of the
COLDSTORE.
c Click Add.
The Add device manually dialog closes and the Discovery window updates to show a
Manual tab.
VERACITY COLDSTORE | CSTORE15-3U QUICK START GUIDE | REV 3.0.3 | October 2018 | 9
Page 10

d Click the Manual tab.
The Discovery window shows an entry for the COLDSTORE.
9 Put a check in the checkbox next to the COLDSTORE entry.
10 Click Next.
The Selected Devices window is shown.
If the COLDSTORE entry shows a Credentials Required link, then proceed as follows:
a Click Credentials Required.
The Credentials dialog is shown.
b Enter the username and password for the COLDSTORE.
By default, the device username is admin and device password is admin.
c Click Save.
The Credentials dialog closes and the Select Devices window is shown.
If you have entered the correct credentials the Credentials Required link will not be
shown. Skip to step 11.
If the Invalid Credentials link is still shown, the credentials entered do not match those on
the COLDSTORE. Try re-entering the credentials by clicking Invalid Credentials.
If the COLDSTORE is eventually listed but with status offline and with error Device not found and
a manually entered IP address for the COLDSTORE was used, then it is possible that SITESCAPE
is being prevented from accessing the network by, for example, a firewall, or the COLDSTORE is
not connected to the network, it is not powered up, the COLDSTORE is still booting up or the IP
address used was not incorrect. To retry:
a Select the COLDSTORE entry.
b Click Remove selected items.
The Discovery window is shown.
If the Discovery window is not shown, click Previous to return to the Discovery window.
c Click the Manual tab.
The manually entered COLDSTORE is shown.
d Click the trash can icon beside the COLDSTORE entry.
The manually entered COLDSTORE entry is removed.
e Repeat step 8
11 Click Add to site.
The Complete! confirmation window is shown.
If there was an issue with the COLDSTORE being added, a message box will be shown. Click OK
and then check for errors shown against the COLDSTORE entry. Typical issues are that the
device has not been found or the credentials are invalid. Retrace previous steps to correct the
issue.
VERACITY COLDSTORE | CSTORE15-3U QUICK START GUIDE | REV 3.0.3 | October 2018 | 10
Page 11

12 Click Done.
The My Site window is shown.
If a COLDSTORE entry is shown, you have successfully added the COLDSTORE and it is ready for
configuration. Skip to section L).
If no COLDSTORE entry is shown, ensure that you selected the COLDSTORE in the Discovery
window, specified correct credentials for the COLDSTORE in the Selected Devices window, that
you clicked Add to site and were shown the Complete! confirmation window before you clicked
Done.
L) System Configuration
This section assumes you have installed SITESCAPE and have added your COLDSTORE to My Site. If
you have not done this, please complete section K) before continuing.
Aside for using SITESCAPE to make changes to the COLDSTORE network settings required for your
installation, some other changes that should be considered are: enter the address of the primary NTP
server on the network, and set the correct time zone for the geographical location of the COLDSTORE.
Also, SITESCAPE can be used to query the COLDSTORE’s array and disk status e.g. checking the
loaded disks are visible, correct and are writable.
See COLDSTORE User’s Guide gives full details of all operations possible with SITESCAPE.
Correct time-sync may be essential for correct operation, depending upon application. It is strongly
recommended that a master NTP time server system be added to the network. Veracity’s TIMENET PRO is a
suitable hardware device – see www.veracityglobal.com for full details.
If the network settings of the COLDSTORE are to be changed, this should be the last operation done
using SITESCAPE. After changing the network settings, it will be necessary to re-add the COLDSTORE to My
Site to interact with the COLDSTORE. Also, depending on the network settings changes made, it may be
necessary to change the computer’s network settings in order to communicate fully with the COLDSTORE.
To configure the network address of your COLDSTORE proceed as follows:
1 Using the Windows Start Menu, navigate to All Apps>Veracity. Click SITESCAPE.
If Window User Account Control is enabled, click Yes when prompted.
The SITESCAPE splash screen is shown momentarily then, later, the SITESCAPE application main
window is displayed.
2 Click the Site tools link in the left-hand panel.
Site tools expands to show a number of tools.
3 Click COLDSTORE configuration.
The COLDSTORE Configuration window is displayed in the right-hand panel.
VERACITY COLDSTORE | CSTORE15-3U QUICK START GUIDE | REV 3.0.3 | October 2018 | 11
Page 12

4 Click Configure network settings.
To show labels for the COLDSTORE configuration windows including Configure network
settings click the … button.
5 Put a check in the checkbox next to the COLDSTORE entry.
The Interface 1 IPV4 protocol and IPV6 protocol and Interface 2 IPV4 protocol and IPV6 protocol
tabs will update with the current network settings for the selected COLDSTORE.
The Interface 1 tab shows the network settings for ETH1 network connection. Interface 2 tab the
ETH2 network connection.
6 Click the Interface 1 tab.
The IPV4 and IPV6 protocol tabs will be updated with the network settings for ETH1 network
connection. One of the protocol tabs will show the current values of that protocol.
7 Click the IPV4 protocol tab.
The IPV4 Protocol tab for ETH1 connection of the selected COLDSTORE is shown.
8 Enter the network settings in IPV4 format as required for your installation.
Update the COLDSTORE IP address, set the netmask and the default gateway using the
dotted addressing form typical of IPV4.
Optionally, set the DNS server address entries if fully qualified domain names might be used
elsewhere, for example when entering the NTP server details. The NTP servers are set-up in a
different COLDSTORE configuration window and can be done later.
After following the remaining steps, your COLDSTORE will switch to the network settings requested. You
may nee
9 Click Save.
10 Click OK to confirm the changes made, or Cancel to abandon the changes made.
VERACITY COLDSTORE | CSTORE15-3U QUICK START GUIDE | REV 3.0.3 | October 2018 | 12
d to alter your computers settings to re-establish a connection.
A confirmation message box is shown.
If OK was clicked, a confirmation banner will be displayed indicating that the changes have been
Page 13

sent to the COLDSTORE. The COLDSTORE will now automatically reboot and will have the
network settings you specified. Continue as follows:
a Wait until the Status LED of the COLDSTORE is flashing again.
b On the COLDSTORE front panel menu, initiate a shutdown of the COLDSTORE.
The LCD display will update to show the shutdown process.
Wait until the LCD display shows the Power Off message.
c Power off the COLDSTORE.
d Disconnect the network cable from the computer to the COLDSTORE or private network
switch. Reconnect the network cable from the installation’s network switch.
e Power on the COLDSTORE.
11 Click the Site link in the left-hand panel.
The My Site window is displayed in the right-hand panel.
12 Select the COLDSTORE entry added previously.
13 Click Remove selected items.
The COLDSTORE entry is removed from My Site.
14 Close the SITESCAPE application.
If other COLDSTORE devices require initial network settings configuration, repeat the Getting Connected
part of section K) until all COLDSTOREs have been given network settings suitable for the installation.
Once all the COLDSTORE devices have been configured, if necessary, change the network settings of
the computer to the values suited for the installation and re-attach the computer to the installation’s
network switch.
The SITESCAPE application can then be used to search for and add all the COLDSTORE devices on the
installation’s network to My Site. SITESCAPE can then be used to fully manage all aspects of
COLDSTORE configuration, operation and retrieve diagnostic information.
For full details on how to use SITESCAPE with COLDSTORE, refer to the COLDSTORE User’s Guide.
M) Disk Management – Adding & Removing Disks
Further disks may be added to the array at any time, and these may be added with the system either on
or off. The new disks will be incorporated into the array automatically. No disk configuration is required.
Simply slide the disk & tray in the first empty drive slot and close the disk tray lever, ensuring the tray is
fully inserted and that the disk is engaged with the backplane connector.
Removal of disks requires a simple, yet specific, procedure. Please refer to the COLDSTORE User’s
Guide.
To remove a disk from the array, follow the proper procedure as described in the COLDSTORE User’s
Guide. Specifically, do not remove disks when COLDSTORE is switched off. Failure to follow proper
procedure will not result in data loss, but disks removed in this way will require some manual intervention
before they will be readable in DISKPLAY or other USB docking station.
N) Troubleshooting
No power
The green LEDs on the front panel and the LCD backlight will illuminate when power is present. If these
are not on, check the unit power switch is on. Check the power cable is fully inserted into the PSU.
VERACITY COLDSTORE | CSTORE15-3U QUICK START GUIDE | REV 3.0.3 | October 2018 | 13
Page 14

Check the power cable fuse and if necessary replace the fuse or try a different power cable. Check that
the wall socket is live by plugging another device into it.
No disk
If there are no disks present, COLDSTORE will not be able to operate. Please switch off the unit and add
at least two, preferably three disks to the array as described above.
A COLDSTORE in this state will not appear in SITESCAPE search results.
Check the IP address of the unit as described in section J) above. Open a Command Prompt window on
the computer and use the ping command to send an ICMP ping to the COLDSTORE IP address. If there
is no response, check the network, the network connections and the computer’s network settings.
If the ICMP ping is successfully received, try searching for the IP address by entering the address
manually in SITESCAPE as described in Section K) above.
If this still fails to connect to COLDSTORE, check your firewall settings and the network switch
configuration or contact your IT Network Administrator.
Disk fail
Any disk drive failure will result in a red LED highlighting the failed drive. Extract the disk tray from the
array (no special procedure required for a failed disk, and no need to switch off the system). Remove the
failed disk from the tray, clearly label it and set it aside. Fit a spare disk to the tray and re-insert into the
empty disk slot. The new disk will be automatically incorporated into the array.
If a disk has failed on first use within the array, it may already have been faulty or may have been handled
incorrectly during assembly. It is essential that all disks are handled carefully, are not dropped or even
knocked against hard objects, including table surfaces.
If a disk has been dropped it should NOT be used to store critical data. The most common cause of early
disk failure is rough handling of the disk prior to installation in a disk array. All disk manufacturers provide free
test programs which may be downloaded from their websites to check disk health.
If you are unsure of the status of a disk, it is strongly recommended that it be tested first before use.
For recommendations on processing failed disks, see the COLDSTORE User’s Guide.
O) System Transportation
If the unit is to be transported for any reason, it is recommended that the original packaging be retained
for this purpose. All warranties will be void if the product is transported in sub-standard packaging.
It is strongly recommended that all hard disks are removed before transporting the unit and that any hard
disks are transported in a suitably secure separate package. The hard disks add considerably to the weight of
the unit and they are also the most sensitive to rough handling in shipment. They will not be properly
protected from shock and damage if shipped inside the COLDSTORE unit itself. Please refer to the disk drive
manufacturer’s recommendations regarding disk drive transportation.
P) Further Information & Resources
Further information on COLDSTORE may be found in the COLDSTORE User’s Guide and on the Veracity
website. For further information on specific VMS integrations, please refer to the relevant manufacturer or
your system supplier.
Veracity Website - www.veracityglobal.com
VERACITY COLDSTORE | CSTORE15-3U QUICK START GUIDE | REV 3.0.3 | October 2018 | 14
 Loading...