

Page 1
4
Samsung Electronics
3. Operating Instructions
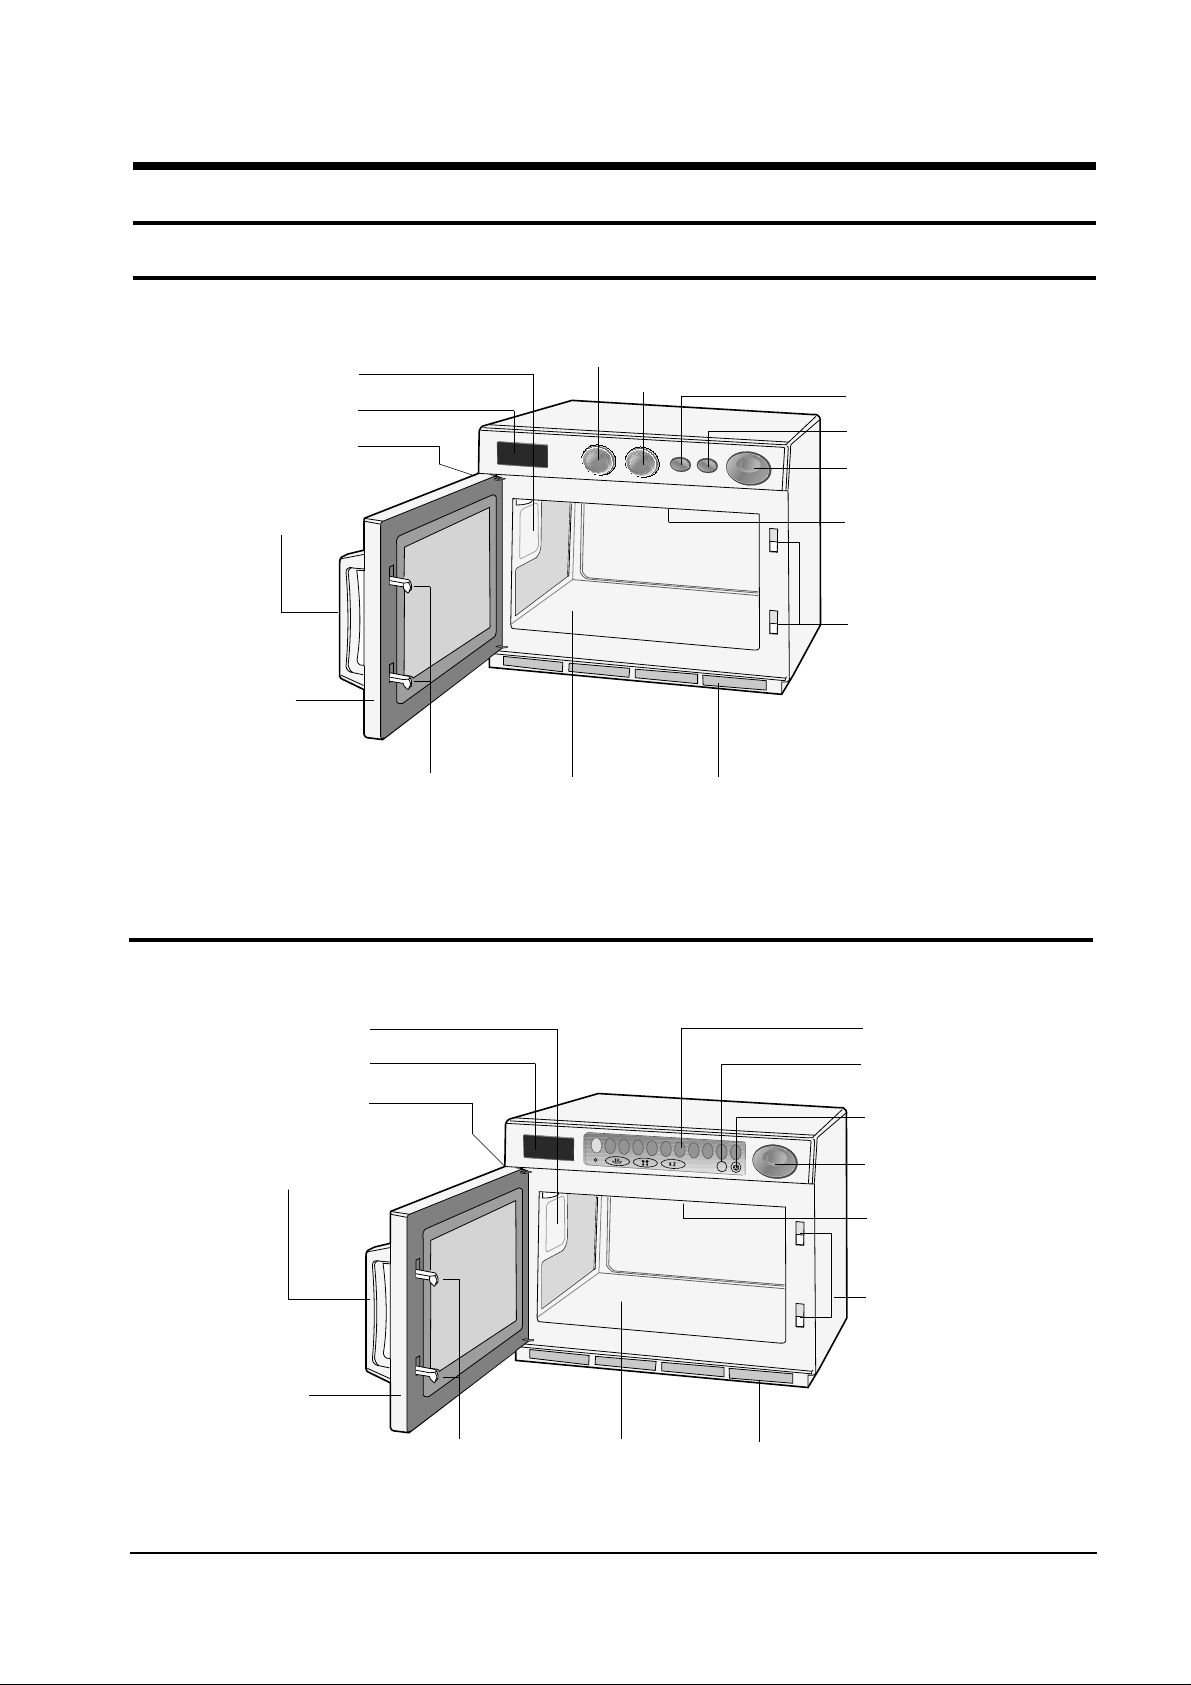
3-1 Features (CM-1819 / CM-1419)
OVEN LAMP
DISPLAY
OVEN LAMP COVER
DOOR HANDLE
DOOR
+20sec PAD
STOP/CANCEL PAD
START BUTTON
CEILING COVER
SAFETY INTERLOCK
HOLES
VARIABLE COOKING POWER CONTROL DIAL
TIMER DIAL
DOOR LATCHES PLATE TRAY AIR FILTER
P
1 2 3 4 5 6 7 8 9 0
+ 20sec
OVEN LAMP
DISPLAY
OVEN LAMP COVER
DOOR HANDLE
DOOR
CONTROL PANEL
+20sec PAD
STOP/CANCEL PAD
START BUTTON
CEILING COVER
SAFETY INTERLOCK
HOLES
3-2 Features (CM-1829 / CM-1429)
DOOR LATCHES PLATE TRAY AIR FILTER
Page 2
5
Samsung Electronics
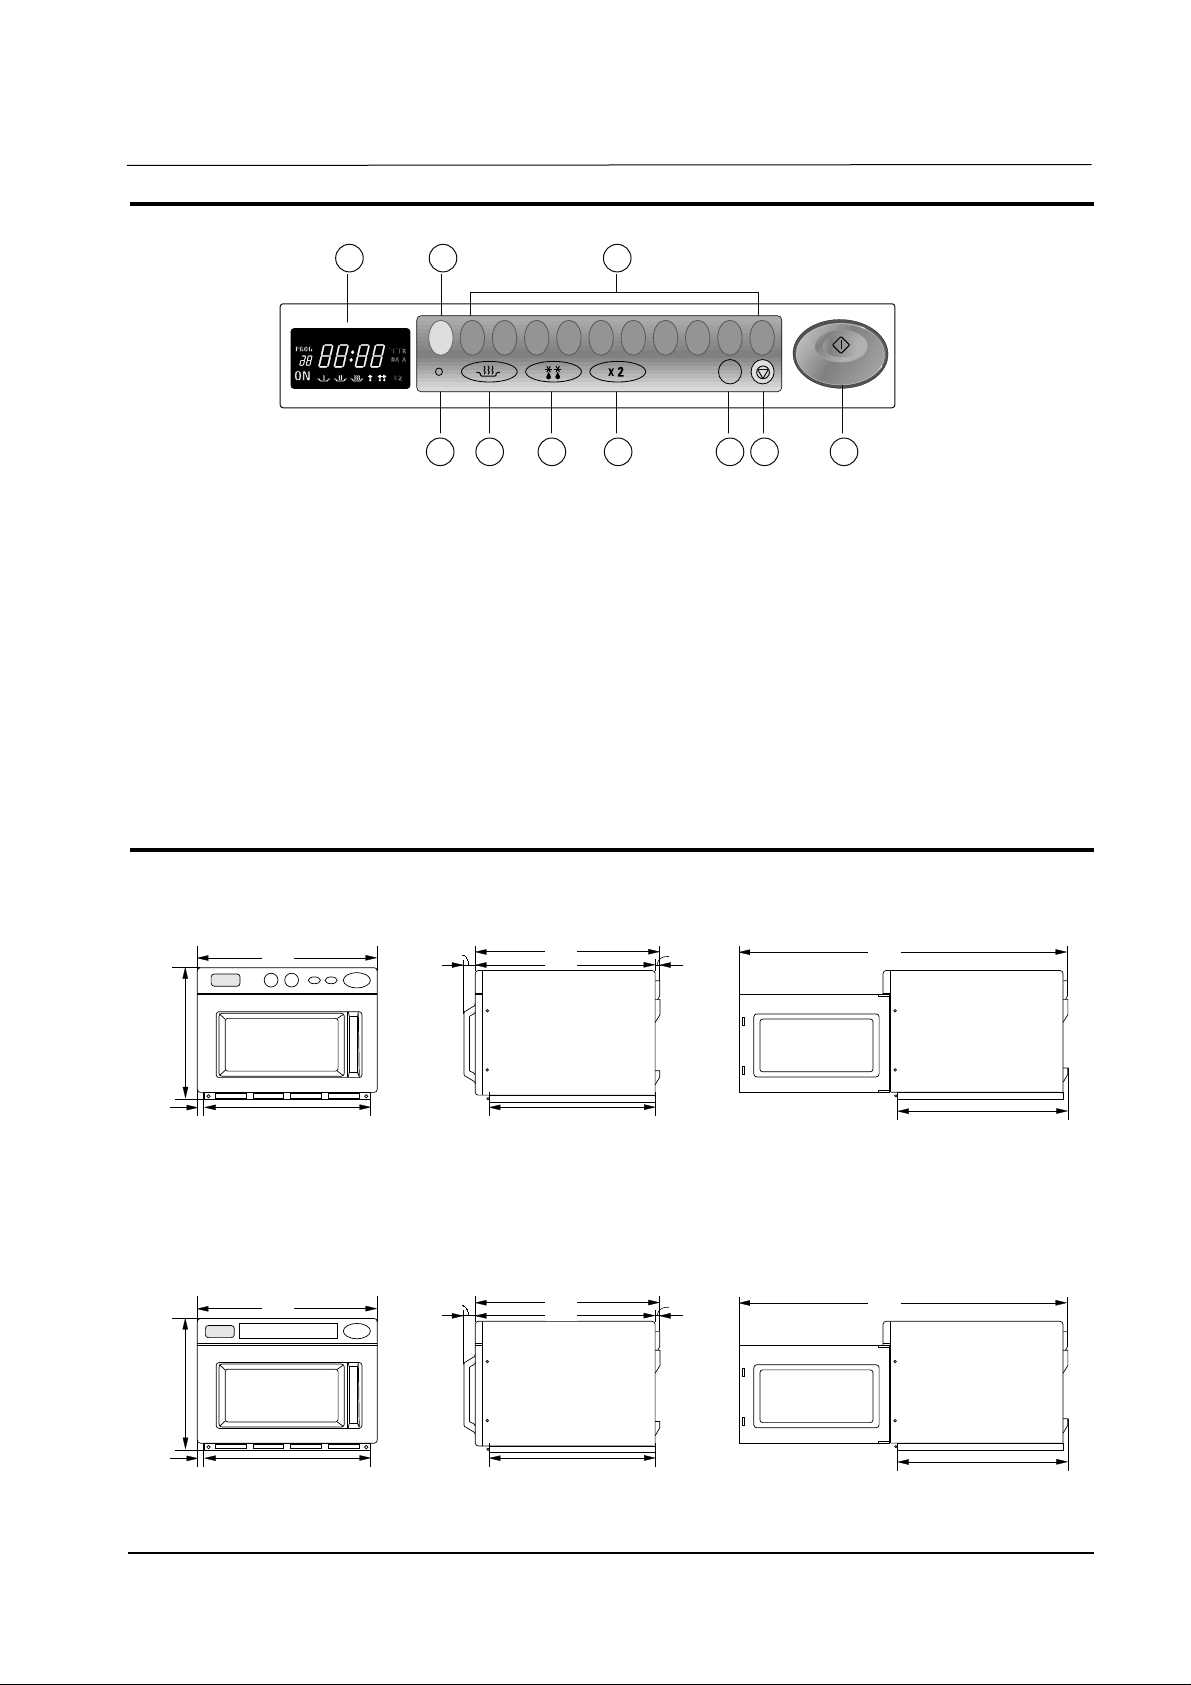
3-4 External Views (CM-1819 / CM-1419)
514
1000
368
444
10
464
486
530
43
26
557
514
1000
368
444
10
464
486
530
43
26
557
3-3 Control Panel (CM-1829 / CM-1429)
1. DISPLAY
2. PROGRAM PAD
3. PROGRAM LOCK PAD
4. NUMBER PADS(TIME, MEMORY PROGRAMMING)
5. POWER LEVEL SELECTOR PAD
6. DEFROST SELECTOR PAD
7. DOUBLE QUANTITY PAD
8. +20sec PAD (ONE TOUCH COOK PAD)
9. STOP/CANCEL PAD
10. START BUTTON
1 2 4
3 5 6 7 8 9 10
P
1 2 3 4 5 6 7 8 9 0
+ 20sec
Operating Instructions
3-4-1 External Views (CM-1819 / CM-1419)
3-4-2 External Views (CM-1829 / CM-1429)
Page 3
6
Samsung Electronics
3-5 Operation Guide (CM-1819 / CM-1419)
Cooking/Reheating
1. Make sure the oven is plugged into a properly earthed electrical outlet and ‘ON’ appears in the display
window.
2. Open the door.
The oven lamp will be turned on.
3. Put the food into a suitable container, place it in the center of the oven and then close the door securely.
Result: The oven lamp will go off.
4. Select the desired power level by rotating the COOKING POWER CONTROL DIAL.
Result: The selected power level will be displayed in the display window.
5. Set the desired heating time by rotating the TIMER DIAL.
Result: “ON” blinks and the selected time is displayed in the display window.
6. Press pad:
Result:The oven lamp and cooling fan will be turned on.
Heating will start.
The time on digital display will count down.
7. When all time is elapsed, the end of cycle Beep Tone will sound 4 times and all heating will stop. The
oven lamp will go off. For 1 min, the display shows and the cooling fan will keep working in order to cool
down the interior parts. During the time, the fan will not stop even when you open the door. 1 min later it
will stop and ON appears again. Food may be removed from oven whilst the fan is still running.
8. Open the door and take the food out.
9. Close the door. The oven lamp will go off.
NOTE: Whilst heating, one press on pad stops the oven. You can restart it by pressing the pad or a
second press on pad will cancel the selected program. When it is NOT in a heating cycle, one tap
on pad cancels the selected program. You can set the power level first and then the cooking time
next, or vice versa. You can press +20sec button one or more times in order to add the cooking
time by 20 seconds.
Operating Instructions
Page 4

7
Samsung Electronics
3-5 Operation Guide (CM-1819 / CM-1419 continued)
To stop the cooking
You can stop cooking at any time so that you can:
• Check the food
• Turn the food over or stir it
• Leave it to stand
* Temporarily ; Open the door or press button once.
Result: Cooking stops. To resume cooking, close the door and press again.
* Completely ; Press the button twice.
Result: The cooking settings are cancelled.
If you want to cancel any cooking settings before starting cooking, simply press once.
Using the Defrost Feature
The Defrost feature enables you to defrost meat, poultry, fish.
NOTE: Only use containers that are microwave-safe.
1. Open the door.
2. Place the frozen food in the centre of the plate tray.
3. Close the door.
4. Rotate the Variable Cooking Power Control dial to the DEFROST HIGH( ) or DEFROST LOW( ) as
you wish.
Result: The DEFROST indicator appears on the digital display.
5. Rotate the TIMER dial to set the defrosting time.
The Maximum time that can be set under defrosting mode is 50min.
6. Press button.
Result: Defrosting begins.
Operating Instructions
Page 5

8
Samsung Electronics
3-5 Operation Guide (CM-1829 / CM-1429)
Cooking/Reheating
NOTE: When you first plug in the power cord, the oven beeps once and all the indicators show for 5 sec in
the display window.
NOTE: When heating cycle is completed and you open the door, the oven lamp automatically turns on and
goes off 1 min later.
NOTE: When you open the door whilst in a heating cycle, the oven stops operating and the oven lamp
automatically turns on for 1 min and goes off 1 min later. If you leave the oven door open for more
than 1 min, the oven beeps once every minute and after 5 min the power source check indicator
‘ON’ appears in the display window.
This oven is preset at the factory for automatic operation.
1. Make sure the oven is plugged into a properly earthed electrical outlet and ‘ON’ appears in the display
window.
2. Open the door.
The oven lamp will be turned on.
3. Put the food into a suitable container, place it in the centre of the oven and then close the door securely.
Result: The oven lamp will go off.
4. Select the desired power level by pressing the Power Level Selector pad.
Result: The selected power level will be displayed in the display window.
5. Set the desired heating time by pressing the Number pads.
Result: The selected time is displayed in the display window.
6. Press START button:
Result: The oven lamp and cooling fan will be turned on. Heating will start. The time on digital display
will count down.
7. When all time is elapsed, the end of cycle Beep Tone will sound 4 times and all heating will stop. The
oven lamp will go off. For 1 min, the display shows and the cooling fan will keep working in order to
cool down the interior parts. During the time, the fan will not stop even when you open the door. 1 min
later it will stop and ‘ON’ appears again. Food may be removed from oven whilst the fan is still running.
8. Open the door and take the food out.
9. Close the door. The oven lamp will go off.
Operating Instructions
Page 6

9
Samsung Electronics
3-5 Operation Guide (CM-1829 / CM-1429 continued)
Using the Defrost Feature
NOTE: When the oven was operating for longer than 25 min under Defrosting cycle, you can NOT change
the power level from Defrosting to Heating(Cooking/Reheating) mode.
NOTE: The oven is designed not to work when power level is set to ‘0’ mode between the heating mode
and the defrosting mode.
* Use only containers that are microwave-safe.
1. Open the door.
2. Place the frozen food in the centre of the plate tray.
3. Close the door.
4. Press the Defrost selector pad to set DEFROST HIGH ( ) or DEFROST LOW ( ) as you wish.
Result: The selected DEFROST indicator appears in the display.
5. Press the Number pads to set the defrosting time. (Max. 50 min)
6. Press button.
Result: Defrosting begins.
NOTE: It is not possible to set a defrosting time for longer than 50min. The defrost indicator will flash and it
is advisable to press CANCEL and enter a new defrost level and time.
Repeat Feature
You can repeat the previous cooking setting (regardless of manual or automatic memory heating) by
pressing the START button. The oven starts with exactly the same heating time and power level that were
used in the last operation.
NOTE: Repeat feature does not support for +20sec pad. The repeat feature will be cancelled once the
power source is cut off.
Using +20sec Pad
This is a ONE TOUCH COOK pad.
By touching the +20sec pad once, you can start heating instantly.
You can increase the cooking time by pressing the +20sec pad while heating is being done.
A cooking time increases by 20 seconds at each press on +20sec pad. But it can not exceed the maximum
time. Like traditional cooking, you may find that, depending on the food’s characteristics or your tastes, you
have to adjust the cooking times slightly.
Before operating the oven, times can be increased/decreased using either the time pads or +20sec button.
During the operating, time may only be added by using the +20sec button.
Operating Instructions
Page 7

10
Samsung Electronics
3-5 Operation Guide (CM-1829 / CM-1429 continued)
Memory Pads Programming
1. Hold down PROGRAM LOCK pad and then press PROGRAM pad. Hold together for 2 sec.
Be sure to press the pads firmly.
Result: PROG indicator appears in the digital display.
2. Press appropriate NUMBER pad for the desired memory number.
Result: Selected memory program code appears below the PROGRAM indicator.
3. Select power level by pressing the POWER LEVEL pad.
Result:Default power level HIGH appears in the display at first press of the POWER LEVEL pad.
Press the POWER LEVEL pad one or more times until you get the desired power level.
4. Press NUMBER pads to set the cooking time.
Result: The maximum time according to each cooking power level can be referred to in the title “Power
Levels and Time Variations” on page 12~13. The NUMBER pads will not operate or respond when you
press a cooking time exceeding the maximum value.
NOTE: It is not possible to set a cooking time for longer than the maximum time allowed on the chosen
program. The power level indicator will flash and it is advisable to press CANCEL and to enter a new
power level and cooking time.
5. Hold down PROGRAM LOCK pad and then press PROGRAM pad. Hold together for 2 sec once again.
Result: PROG indicator and memory number indicator blink 3 times in the digital display with a beep
sound. And then the display goes blank.
Caution: Be sure to press the pads firmly in the right position.
6. When you want to program more, repeat the procedures above again.
Memory programs are available up to 30 items. Make sure the unit is properly programmed.
After programming is finished, all you have to do for memory cooking is to press the NUMBER pad. Then
the selected memory program automatically starts cooking.
Operating Instructions
Page 8

11
Samsung Electronics
3-5 Operation Guide (CM-1829 / CM-1429 continued)
How to Operate Memory Cooking
After having finished memory programming, just press the NUMBER pad of the memory number you want to
select. The oven will automatically start heating according to the pre-programmed cooking time and power
level after a short delay (5 sec).
1. Make sure the oven is plugged into a properly earthed electrical outlet and ‘ON’ appears in the display
window.
2. Open the door.
The oven lamp will be turned on.
3. Put the food into a suitable container, place it in the centre of the oven and then close the door securely.
Result: The oven lamp will go off.
4. Press NUMBER pad.
Result: After 2 seconds, the selected memory program automatically starts heating.
Stopping the Cooking
You can stop cooking at any time so that you can:
• Check the food
• Turn the food over or stir it
• Leave it to stand
To stop the cooking;
* Temporarily: Open the door or press pad once.
Result: Cooking stops. To resume cooking, close the door and press again.
* Completely: Press the pad twice.
Result: The cooking settings are cancelled.
If you want to cancel any cooking settings before starting cooking, simply press CANCEL pad once.
Operating Instructions
Page 9

12
Samsung Electronics
3-5 Operation Guide (CM-1829 / CM-1429 / CM-1819 / CM-1419)
Power Levels and Time Variations
The power level function enables you to adapt the amount of energy dissipated and thus the time required to
cook or reheat your food, according to its type and quantity. You can choose between the power levels
below.
.....................................................................................................................................................
Power Level Percentage CM-1819/1829 Percentage CM-1419/1429
.....................................................................................................................................................
HIGH( ) 100% 1800 W 100% 1400W
MEDIUM( ) 70% 1260 W 70% 980W
LOW( ) 50% 900 W 50% 700W
HIGH DEFROST( ) 20% 360 W 25% 360W
LOW DEFROST( ) 10% 180 W 13% 180W
.....................................................................................................................................................
You cannot set the cooking time longer than maximum value allowed to each specific power level. (see
below.)
..................................................................
Power Level Max. Time
..................................................................
HIGH 25 min.
MEDIUM 40 min.
LOW 40 min.
HIGH DEFROST 50 min.
LOW DEFROST 50 min.
..................................................................
Operating Instructions
 Loading...