

Page 1

BD-D6700
Blu-ray
user manual
imagine the possibilities
Thank you for purchasing this Samsung product.
To receive more complete service,
please register your product at
www.samsung.com/register
™
Disc Player
Page 2

Key features
Blu-ray Disc Features
Blu-ray Discs support the highest quality HD video
available in the industry - Large capacity means
no compromise on video quality.
The following Blu-ray Disc features are disc
dependant and will vary.
Appearance and navigation of features will also
vary from disc to disc.
Not all discs will have the features described
below.
Video highlights
The BD-ROM format supports three highly advanced
video codecs, including AVC, VC-1 and MPEG-2.
HD video resolutions are also supported:
• 1920 x 1080 High Definition
• 1280 x 720 High Definition
For High-Definition Playback
To view high-definition contents on a Blu-ray Disc,
you need an HDTV (High Definition Television).
Some Blu-ray Discs may require you to use the
player’s HDMI OUT to view high-definition content.
The ability to view high-definition content on
Blu-ray Discs may be limited depending on the
resolution of your TV.
BD-LIVE
You can use a Blu-ray Disc that supports BDLIVE to download content provided by the disc
manufacturer through a network connection.
Blu-ray Disc Player Features
3D
This player can play 3D contents through an HDMI
cable.
To implement the 3D effect, connect a 3D device
(3D-compliant AV receiver, 3D-compliant TV) to
the player using an HDMI cable, and play the 3D
content while wearing 3D vision glasses.
3D Conversion
When you play 2D contents, you can convert 2D
into 3D contents by pressing the 2D3D button
on the remote control.
Smart Hub
You can download various for pay or freeof-charge applications through a network
connection. These applications provide a range
of Internet services and content including news,
weather forecasts, stock market quotes, games,
movies, and music.
AllShare
You can play videos, music, and photos saved on
your devices (such as your PC, mobile phones, or
NAS) through a network connection.
Playing multimedia files
You can use the USB connection to play various
kinds of multimedia files (MP3, JPEG, DivX, etc.)
located from a USB storage device.
2 English
Page 3
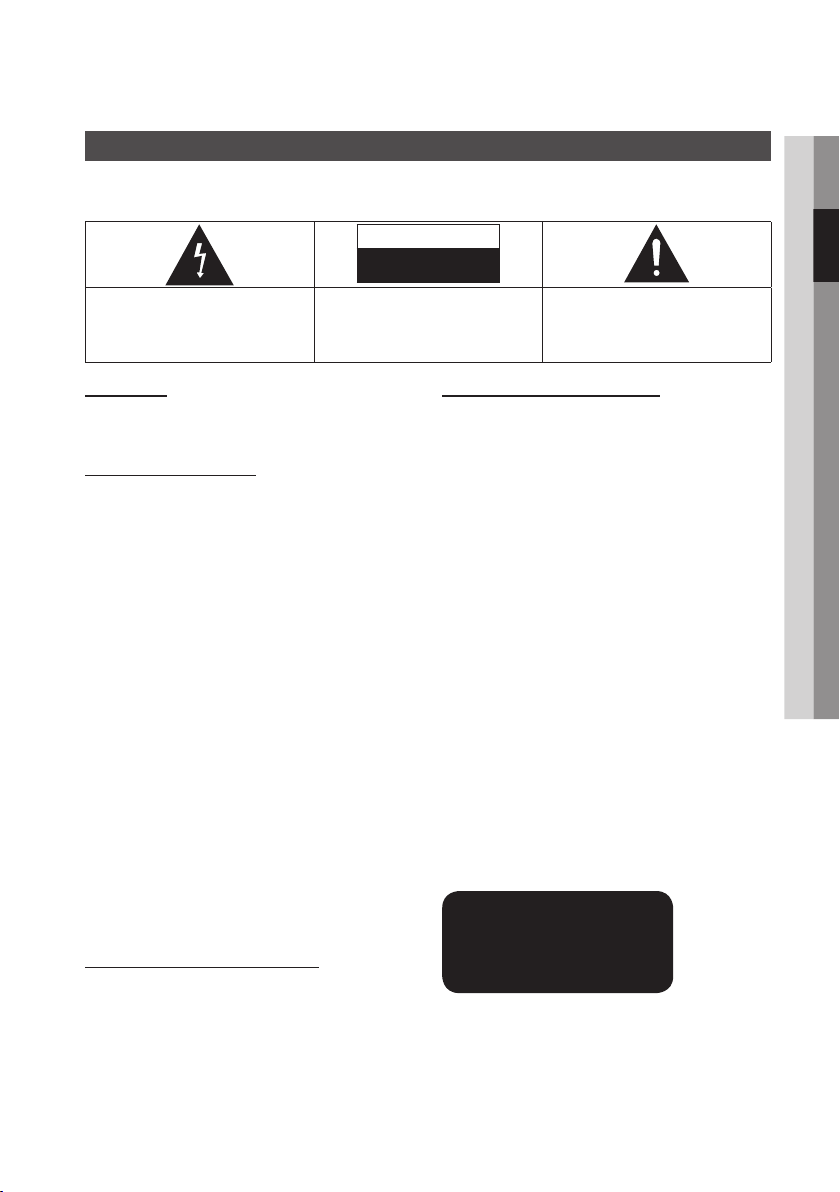
Safety Information
Warning
TO REDUCE THE RISK OF ELECTRIC SHOCK, DO NOT REMOVE THE COVER (OR BACK).
NO USER-SERVICEABLE PARTS ARE INSIDE. REFER SERVICING TO QUALIFIED SERVICE PERSONNEL.
CAUTION
RISK OF ELECTRIC SHOCK
DO NOT OPEN
The lighting flash and Arrowhead within the
triangle is a warning sign alerting you of
dangerous voltage inside the product.
WARNING
• To reduce the risk of fire or electric shock, do
not expose this appliance to rain or moisture.
FCC NOTE (for U.S.A)
This equipment has been tested and found to
comply with the limits for a Class B digital device,
pursuant to Part 15 of the FCC rules. These limits
are designed to provide reasonable protection
against harmful interference in a residential
installation. This equipment generates, uses
and can radiate radio frequency energy and, if
not installed and used in accordance with the
instructions, may cause harmful interference
to radio or television reception, which can be
determined by turning the equipment off and on.
The user is encouraged to try to correct the
interference by one or more of the following measures.
• Reorient or relocate the receiving antenna.
• Increase the separation between the equipment
and receiver.
• Connect this equipment into an outlet on a
circuit different from that to which the receiver is
connected.
• Consult the dealer or an experienced radio/TV
technician for help.
• This class B digital product meets all
requirements of the Canadian Interference Causing Equipment Regulations.
Note to CATV system installer
This reminder is provided to call CATV system
installer’s attention to Article 820-40 of the
National Electrical Code (Section 54 of Canadian
Electrical Code, Part I) that provides guidelines
for proper grounding and, in particular, specifies
that the cable ground shall be connected to the
grounding system of the building as close to the
point of cable entry as practical.
CAUTION:
TO REDUCE THE RISK OF ELECTRIC
SHOCK, DO NOT REMOVE COVER (OR BACK)
NO USER SERVICEABLE PARTS INSIDE. REFER
SERVICING TO QUALIFIED SERVICE PERSONNEL.
The explanation point within the triangle
is a warning sign alerting you of important
instructions accompanying the product.
CLASS 1 LASER PRODUCT
This Compact Disc player is classified as a CLASS
1 LASER product. Use of controls, adjustments
or performance of procedures other than those
specified herein may result in hazardous radiation
exposure.
Complies with 21CFR 1040.10 except for
deviations pursuant to Laser Notice No. 50, dated
June 24, 2007.
DANGER :
• VISIBLE AND INVISIBLE LASER RADIATION
WHEN OPEN. AVOID DIRECT EXPOSURE TO
BEAM. (FDA 21 CFR)
CAUTION :
• CLASS 3B VISIBLE AND INVISIBLE LASER
RADIATION WHEN OPEN. AVOID EXPOSURE
TO THE BEAM (IEC 60825-1)
• THIS PRODUCT UTILIZES A LASER.
USE OF CONTROLS OR ADJUSTMENTS
OR PERFORMANCE OF PROCEDURES
OTHER THAN THOSE SPECIFIED HEREIN
MAY RESULT IN HAZARDOUS RADIATION
EXPOSURE. DO NOT OPEN COVER AND DO
NOT REPAIR YOURSELF. REFER SERVICING
TO QUALIFIED PERSONNEL.
CLASS 1 LASER PRODUCT
KLASSE 1 LASER PRODUKT
LUOKAN 1 LASER LAITE
KLASS 1 LASER APPARAT
PRODUCTO LÁSER CLASE 1
NOTE
✎
`If the Region number of a Blu-ray Disc/DVDs does
not correspond to the Region number of this player,
the player cannot play the disc.
02 Safety Information
English 3
Page 4

Safety Information
Precautions
Important Safety Instructions
Read these operating instructions carefully before
using the unit. Follow all the safety instructions
listed below.
Keep these operating instructions handy for future
reference.
1. Read these instructions.
2. Keep these instructions.
3. Heed all warnings.
4. Follow all instructions.
5. Do not use this apparatus near water.
6. Clean only with a dry cloth.
7. Do not block any ventilation openings.
Install in accordance with the manufacturer’s
instructions.
8. Do not install near any heat sources such
as radiators, heat registers, stoves, or other
apparatus (including AV receivers) that
produce heat.
9. Do not defeat the safety purpose of the
polarized or grounding-type plug. A polarized
plug has two blades with one wider than the
other. A grounding type plug has two blades
and a third grounding prong. The wide blade
or the third prong are provided for your safety.
If the provided plug does not fit into your
outlet, consult an electrician for replacement
of the obsolete outlet.
10. Protect the power cord from being walked on
or pinched particularly at plugs, convenience
receptacles, and the point where they exit
from the apparatus.
11. Only use attachments/accessories specified
by the manufacturer.
12. Use only with the cart,
stand, tripod, bracket,
or table specified by the
manufacturer, or sold with
the apparatus. When a cart
is used, use caution when
moving the cart/apparatus combination to
avoid injury from tip-over.
13. Unplug this apparatus during lightning storms
or when unused for long periods of time.
14. Refer all servicing to qualified service
personnel. Servicing is required when
the apparatus has been damaged in any
way, such as power-supply cord or plug is
damaged, liquid has been spilled or objects
have fallen into the apparatus, the apparatus
has been exposed to rain or moisture, does
not operate normally, or has been dropped.
Viewing using 3D function
IMPORTANT HEALTH AND SAFETY
INFORMATION FOR 3D PICTURES.
Read and understand the following safety
information before using the 3D function.
• Some viewers may experience discomfort while
viewing 3D TV such as dizziness, nausea, and
headaches.
If you experience any such symptom, stop
viewing 3D TV, remove the 3D Active Glasses,
and rest.
• Watching 3D images for an extended period of
time may cause eye strain. If you feel eye strain,
stop viewing 3D TV, remove your 3D Active
Glasses, and rest.
• A responsible adult should frequently check on
children who are using the 3D function.
If there are any reports of tired eyes, headaches,
dizziness, or nausea, have the child stop viewing
3D TV and rest.
• Do not use the 3D Active Glasses for other
purposes (such as general eyeglasses,
sunglasses, protective goggles, etc.)
• Do not use the 3D function or 3D Active Glasses
while walking or moving around. Using the 3D
function or 3D Active Glasses while moving
around may cause you to bump into objects,
trip, and/or fall, and cause serious injury.
4 English
Page 5
Disc Storage & Management
Disc Handling
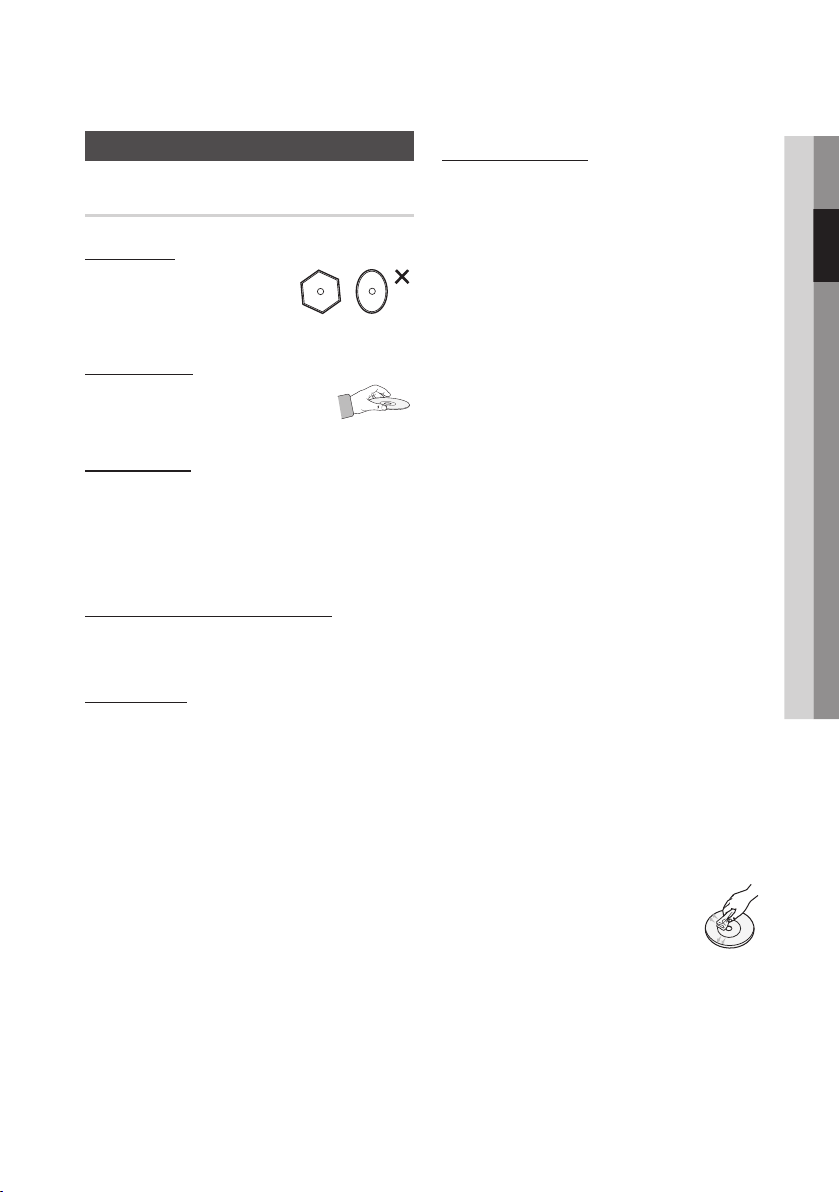
Disc Shape
• Use discs with regular
shapes. If you use an irregular
disc (a disc with a special
shape), you can damage the player.
Holding discs
• Avoid touching the surface of
a disc where data has been
recorded.
Blu-ray Discs
• Do not leave a Blu-ray Disc in the player for long
periods of time. Remove the Blu-ray Disc from
the player and store it in its case.
• Be careful not to scratch or leave fingerprints on
the surface of the Blu-ray Disc.
DVD-VIDEO, Audio CD (CD-DA)
• Wipe off dirt or contamination on the disc with a
soft cloth.
Disc Storage
Be careful not to damage the disc because the
data on these discs is highly vulnerable to the
environment.
• Do not keep under direct sunlight.
• Keep in a cool ventilated area.
• Store vertically.
• Keep in a clean protection jacket.
• If you move your player suddenly from a cold
place to a warm place, condensation may occur
on the operating parts and lens and cause
abnormal disc playback. If this occurs, unplug
the player, wait for two hours, and then connect
the plug to the power outlet. Then, insert the
disc, and try to play back again.
Handling Cautions
• Do not write on the printed side with a ball-point
pen or pencil.
• Do not use record cleaning sprays or antistatic
sprays to clean discs. Also, do not use volatile
chemicals, such as benzene or thinner.
• Do not apply labels or stickers to discs. (Do not
use discs fixed with exposed tape adhesive or
leftover peeled-off stickers.)
• Do not use scratch-proof protectors or covers.
• Do not use discs printed with label printers
available on the market.
• Do not load warped or cracked discs.
• Before connecting other components to this
player, be sure to turn them off.
• Do not move the player while it is playing a disc.
The disc can be scratched or damaged and the
player’s internal parts can be damaged.
• Do not put a flower vase filled with water or any
small metal objects on the player.
• Be careful not to put your hand into the disc
slot.
• Do not place anything other than the disc in the
disc slot.
• Interference from exterior sources such as
lightening and static electricity can affect
the normal operation of this player. If this
occurs, turn the player off and on again with
the POWER button, or disconnect and then
reconnect the AC power cord to the AC power
outlet. The player will operate normally.
• Be sure to remove the disc and turn off the
player after use.
• Disconnect the AC power cord from the AC
outlet when you don’t intend to use the player
for long periods of time.
• To clean a disc, wipe it in a straight
line from the inside to the outside of
the disc.
• Do not expose the player to any
liquid.
• When the AC plug is connected to a wall outlet,
the player will still draw power (standby mode)
when it is turned off.
02 Safety Information
English 5
Page 6

Safety Information
• Apparatus shall not be exposed to dripping or
splashing and no objects filled with liquids, such
as vases, shall be placed on the apparatus.
• The main plug is used as a disconnect device
and shall stay readily operable at any time.
• Do not touch the power plug with a wet hand.
Otherwise, it can cause an electric shock.
• Do not share one power socket with multiple
electric devices. Otherwise, it may cause an
overheat, resulting in a fire.
• If you encounter an abnormal noise, burning
smell or smoke, turn off the power switch
immediately and disconnect the power plug
from the wall outlet. Then, contact the nearest
customer center for technical assistance. If you
still use the product as it is, this may cause an
electric shock or fire.
Maintenance of Cabinet
Before you clean the Blu-ray Disc’s cabinet, be
sure to disconnect the AC power cord from the
AC outlet.
• Do not use benzene, thinner, or other solvents
for cleaning.
• Wipe the cabinet with a soft cloth.
Restrictions on Playback
• This player may not respond to all operating
commands because some Blu-ray Disc, DVD,
and CD discs allow specific or limited operation
and provide only certain features during
playback.
Please note that this is not a defect in the player.
• Samsung cannot guarantee that this player
will play every disc bearing the Blu-ray Disc,
DVD or CD logo because disc formats evolve,
and problems and errors may occur during the
creation of Blu-ray Disc, DVD, and CD software
and/or the manufacture of discs.
Please contact the SAMSUNG customer care
center if you have questions or encounter
difficulty in playing Blu-ray Disc, DVD, or CD
discs in this player. Also, refer to rest of this user
manual for additional information on playback
restrictions.
6 English
Page 7

Contents
KEY FEATURES
SAFETY INFORMATION
GETTING STARTED
2 Blu-ray Disc Features
2 Blu-ray Disc Player Features
3 Warning
4 Precautions
4 Important Safety Instructions
4 Viewing using 3D function
5 Disc Storage & Management
5 Disc Handling
11 Before using the User Manual
11 Disc Types and Contents your player can play
11 Disc types your player cannot play
12 Blu-ray Disc Compatibility
12 Disc Types
13 Region Code
13 Copyright
14 Supported File Formats
16 Logos of Discs the player can play
16 Accessories
17 Front Panel
18 Rear Panel
19 Remote Control
19 Tour of the Remote Control
20 Setting the Remote Control to Operate Your TV
ENGLISH
CONNECTIONS
21 Connecting to a TV
21 Case 1 : Connecting to a TV with an HDMI Cable
- Best Quality (Recommended)
22 Case 2 : Connecting to a TV with a Component
Cable - Better Quality
23 Case 3 : Connecting to a TV with an Audio/Video
cable - Good Quality
English 7
Page 8

Contents
CONNECTIONS
SETUP
24 Connecting to an Audio System
24 Case 1 : Connecting to an Audio System
25 Case 2 : Connecting to an Audio System
26 Case 3 : Connecting to an Audio System
26 Case 4 : Connecting to an Audio System
27 Connecting to the Network
27 Cable Network
28 Wireless Network
29 Initial Settings
30 Accessing the Settings Menu
31 Display
31 3D Settings
32 TV Aspect
32 Smart Hub Screen Size
32 BD Wise (Samsung Players only)
32 Resolution
34 HDMI Color Format
34 Movie Frame (24Fs)
35 HDMI Deep Color
35 Still Mode
35 Progressive Mode
35 HDMI Video Output
35 Audio
35 Digital Output
37 PCM Downsampling
37 Dynamic Range Control
37 Downmixing Mode
37 DTS Neo:6 Mode
38 Audio Sync
38 HDMI Audio Output
38 Network
38 Network Settings
42 Network Status
42 BD-LIVE Internet Connection
(HDMI supported AV receiver)
(Recommended)
(HDMI supported AV receiver)
(Recommended)
(AV receiver with Dolby Digital or DTS decoder)
- Better Quality
(Stereo Amplifier) - Good Quality
- Best Quality
- Best Quality
8 English
Page 9

SETUP
42 System
42 Initial Settings
42 Anynet+(HDMI-CEC)
43 BD Data Management
43 Time Zone
43 DivX® Video On Demand
43 Reset
43 Language
44 Security
44 BD Parental Rating
44 DVD Parental Rating
44 Change Password
44 General
44 Front Display
44 Light Effect
44 Network Remote Control
45 Support
45 Software Upgrade
46 Contact Samsung
ENGLISH
BASIC FUNCTIONS
47 Playing a Video
47 Playback
47 3D Converter
48 Disc Structure
48 Using the Disc Menu/Title Menu/Popup Menu
48 Using the Disc Menu
48 Using the Title Menu
48 Playing the Title List
48 Using the Popup Menu
49 Using the Search and Skip Functions
49 Searching for a Desired Scene
49 Skipping Chapters
49 Slow Motion Play/Step Motion Play
49 Slow Motion Play
49 Step Motion Play
English 9
Page 10

Contents
BASIC FUNCTIONS
NETWORK SERVICES
49 Using the TOOLS button
50 Moving to a Desired Scene Directly
50 Repeating the Title or Chapter
50 Repeating a Section
50 Changing to Full Screen
51 Selecting the Picture Settings
51 Selecting the Audio Language
51 Selecting the Subtitle Language
52 Changing the Camera Angle
52 Setting BONUSVIEW
52 Listening to Music
52 Playing an Audio CD (CD-DA)/MP3
53 Repeat an Audio CD (CD-DA)/MP3
53 Playlist
54 Playing back Pictures
54 Playing a JPEG files
54 Using the TOOLS button
55 Playing back a USB Storage Device
56 Using Smart Hub
56 Starting Smart Hub for the First Time
59 The Settings Menu - BLUE (D)
61 The Edit Mode Menu - YELLOW (C)
63 The Sort Menu - GREEN (B)
63 Samsung Apps
63 For Pay Apps
65 BD-LIVE™
65 Using the AllShare Function
10 English
APPENDIX
66 Troubleshooting
68 Repairs
69 Index
70 Specifications
Page 11
Getting Started
Before using the User Manual
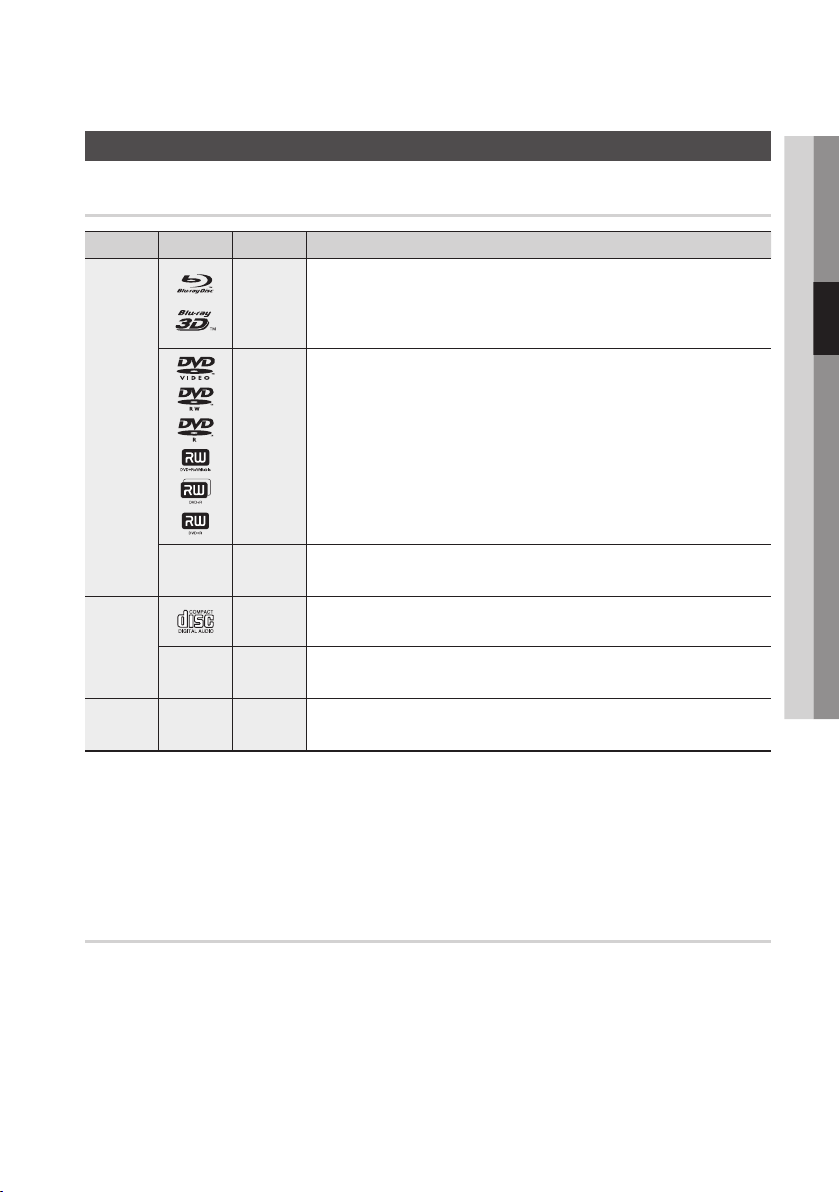
Disc Types and Contents your player can play
Ter m Logo Icon Definition
h
Indicates a function available on a BD-ROM or BD-RE/-R disc recorded in the BD-RE
format.
z
VIDEO
Z
Indicates a function available on a DVD-VIDEO or recorded DVD+RW/DVD-RW(V)/
DVD-R/+R discs that have been recorded and finalized.
y
Indicates a function available in a CD-RW/-R, DVD-RW/-R, BD-RE/-R disc or a USB
storage media containing DivX, MKV, MP4 contents.
Indicates a function available on an audio CD-RW/-R (CD-DA format).
Indicates a function available in a CD-RW/-R, DVD-RW/-R, BD-RE/-R disc or a USB
storage media containing MP3 or WMA contents.
Indicates a function available in a CD-RW/-R, DVD-RW/-R, BD-RE/-R disc or a USB
storage media containing JPEG contents.
MUSIC
PHOTO
-
x
o
-
w
-
G
03 Getting Started
NOTE
✎
`The player may not play certain CD-RW/-R and DVD-R because of the disc type or recording conditions.
`If a DVD-RW/-R disc has not been recorded properly in DVD video format, it will not be playable.
`Your player will not play content that has been recorded on a DVD-R at a bit-rate that exceeds 10 Mbps.
`Your player will not play content that has been recorded on a BD-R or USB device at a bit rate that exceeds 30 Mbps.
Disc types your player cannot play
• HD DVD
• DVD-ROM/PD/MV-
Disc, etc
• DVD-RAM
• Super Audio CD
(except CD layer)
• DVD-RW(VR mode)
• CVD/CD-ROM/CDV/
CD-G/CD-I/LD
(CD-Gs play audio only,
not graphics.)
• 3.9 GB DVD-R Disc for
Authoring.
English 11
Page 12

Getting Started
NOTE
✎
`Some commercial discs and DVDs purchased
outside your region may not play on this player.
`Playback may not work for some types of discs, or
when you use specific operations, such as angle
change and aspect ratio adjustment. Information
about the discs is written in detail on the disc box.
Please refer to this if necessary.
`Do not allow the disc to become dirty or scratched.
Fingerprints, dirt, dust, scratches or deposits of
cigarette smoke on the recording surface may make
it impossible to use the disc for playback.
`Discs with PAL programs recorded on them cannot
be played using this player.
`This player is compatible with the NTSC color system
only.
`When you play a BD-J title, loading may take longer
than a normal title or some functions may perform
slowly.
`This player may not respond to all operating
commands because some Blu-ray Disc, DVD, and
CD discs allow specific or limited operation and
provide only certain features during playback.
Please note that this is not a defect in the player.
`Samsung cannot guarantee that this player will play
every disc bearing the Blu-ray Disc, DVD or CD logo
because disc formats evolve, and problems and
errors may occur during the creation of Blu-ray Disc,
DVD, and CD software and/or the manufacture of
discs.
Please contact the SAMSUNG customer care center
if you have questions or encounter difficulty when
playing Blu-ray Disc, DVD, or CD discs in this player.
Also, refer to rest of this user manual for additional
information on playback restrictions.
Blu-ray Disc Compatibility
Blu-ray Disc is a new and evolving format.
Accordingly, disc compatibility issues are possible.
Not all discs are compatible and not every disc will
play back. For additional information, refer to the
Compliance and Compatibility Notice section of
this user manual.
Disc Types
BD-ROM
Blu-ray ROM discs can only be played back.
This player can play back pre-recorded
commercial BD-ROM discs.
BD-RE/-R
Blu-ray RE/-R discs can be recorded on and
played back.
This player can play back a BD-RE/-R disc
recorded by other compatible Blu-ray Disc
recorders.
DVD-VIDEO
• This player can play back pre-recorded
commercial DVDs (DVD-VIDEO discs) with
movies.
• When switching from the first layer to the
second layer of a dual-layered DVD-VIDEO disc,
there may be momentary distortion in the image
and sound. This is not a malfunction of the
player.
DVD-RW/-R/+R
This player can play back a DVD-RW/-R/+R disc
recorded and finalized with a DVD video recorder.
The ability to play back may depend on recording
conditions.
DVD+RW
• This player can play back a DVD+RW disc
recorded with a DVD Video recorder. The
ability to play back may depend on recording
conditions.
Audio CD (CD-DA)
• This player can play back CD-DA format audio
CD-RW/-R discs.
• The player may not be able to play some
CD-RW/-R discs due to the condition of the
recording.
12 English
Page 13
CD-RW/-R
• Use a 700MB (80 minute) CD-RW/-R disc.
If possible, do not use an 800MB (90 minute) or
larger disc, as the disc may not play back.
• If the CD-RW/-R disc was not recorded as a
closed session, you may experience delays
when playing back the beginning of the disc or
all recorded files may not play.
• Some CD-RW/-R discs may not play on this
player, depending on the device which was
used to burn them. For contents recorded on
CD-RW/-R media from CDs for your personal
use, playability may vary depending on the
contents and discs.
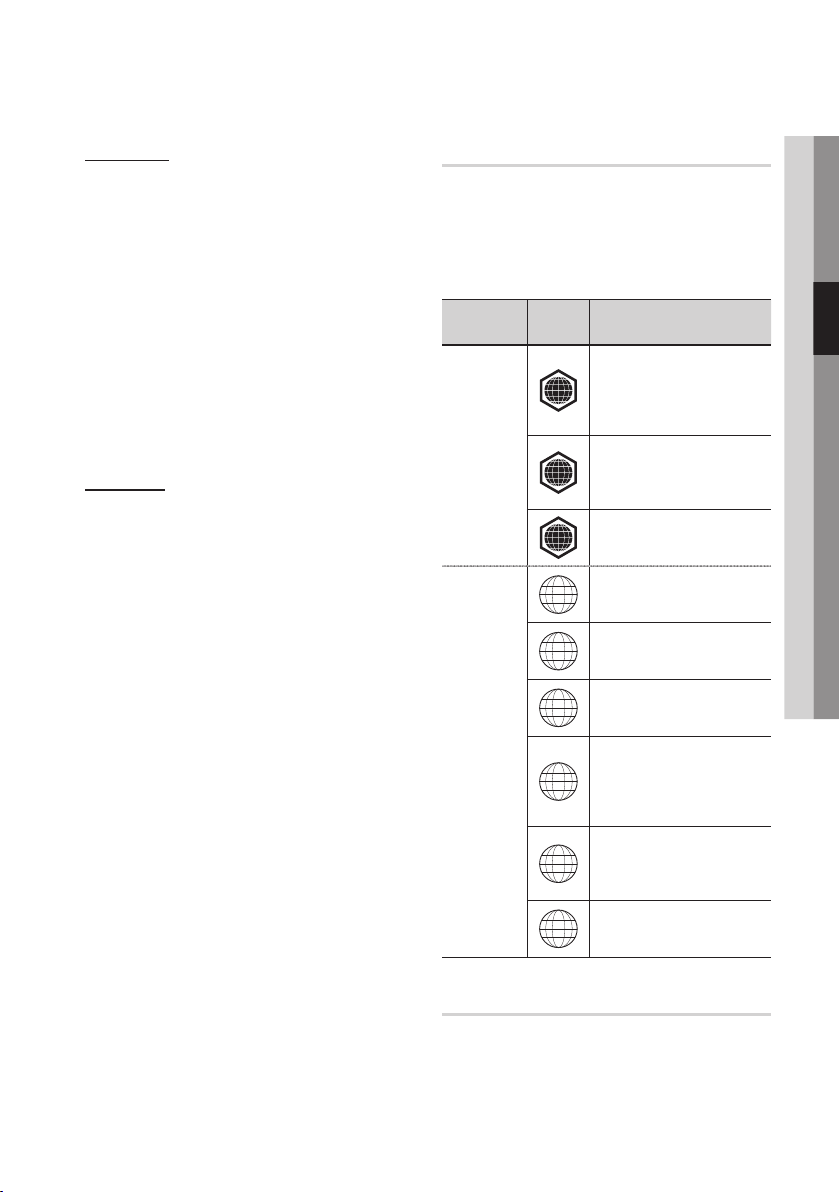
Region Code
Both players and discs are coded by region.
These regional codes must match for a disc to
play. If the codes do not match, the disc will not
play.
The Region Number for this player is displayed on
the rear panel of the player.
Disc Type
Region
Code
North America, Central America,
South America, Korea, Japan,
A
Taiwan, Hong Kong and South
East Asia.
Area
03 Getting Started
AVCHD (Advanced Video Codec High
Definition)
• This player can play back AVCHD format discs.
These discs are normally recorded and used in
camcorders.
• The AVCHD format is a high definition digital
video camera format.
• The MPEG-4 AVC/H.264 format compresses
images with greater efficiency than the
conventional image compressing format.
• Some AVCHD discs use the “x.v.Color” format.
This player can play back AVCHD discs that use
“x.v.Color” format.
• “x.v.Color” is a trademark of Sony Corporation.
• “AVCHD” and the AVCHD logo are trademarks
of Matsushita Electronic Industrial Co., Ltd. and
Sony Corporation.
NOTE
✎
`Some AVCHD format discs may not play, depending
on the recording condition.
AVCHD format discs need to be finalized.
`“x.v.Color” offers a wider color range than normal
DVD camcorder discs.
`Some DivX, MKV and MP4 format discs may not
play, depending on the video resolution and frame
rate condition.
Blu-ray Disc
DVD-VIDEO
Europe, Greenland, French
territories, Middle East, Africa,
B
Australia and New Zealand.
India, China, Russia, Central
C
and South Asia.
The U.S., U.S. territories and
1
Canada
Europe, Japan, the Middle East,
2
Egypt, South Africa, Greenland
Taiwan, Korea, the Philippines,
3
Indonesia, Hong Kong
Mexico, South America,
Central America, Australia,
4
New Zealand, Pacific Islands,
Caribbean
Russia, Eastern Europe, India,
most of Africa, North Korea,
5
Mongolia
China
6
Copyright
© 2011 Samsung Electronics Co.,Ltd.
All rights reserved; No part or whole of this user’s
manual may be reproduced or copied without the
prior written permission of Samsung Electronics
Co.,Ltd.
English 13
Page 14

Getting Started
Supported File Formats
Notes on the USB connection
• Your player supports USB storage media, MP3 players, digital cameras, and USB card readers.
• The player does not support folder or file names longer than 128 characters.
• Some USB/digital camera devices may not be compatible with the player.
• Your player supports the FAT16, FAT32, and NTFS files systems.
• Connect USB devices directly to the player’s USB port. Connecting through a USB cable may cause
compatibility problems.
• Inserting more than one memory device into a multi-card reader may cause the reader to operate
improperly.
• Supports the PTP protocol.
• Do not disconnect a USB device during a “loading” process.
• The bigger the image resolution, the longer the image takes to display.
• This player cannot play MP3 files with DRM (Digital Rights Management) downloaded from commercial
sites.
• Your player only supports the video that is under 30fps (frame rate).
• Your player only supports USB Mass Storage Class (MSC) devices. Examples of MSC are Thumb
drives and USB HDD. (HUB is not supported.)
• A Certain USB HDD Device, multi-card reader and Thumb drives may not be compatible with this
product.
• If some devices require excessive power, USB device may be limited by the circuit safety device.
• If the device is disconnected or playback is unstable during contents playback from USB HDD, please
supply the power.
If the problem still occurs, contact the USB HDD manufacturer.
• You must remove the USB storage device safely (by performing the “Safely Remove USB” function) in
order to prevent a possible damage to the USB memory.
Press the MENU button to move to the home menu, and select the YELLOW (C) button and press the
ENTER button.
• SAMSUNG is not responsible for any data file damage or data loss.
Video File Support
File Extension Container Video Codec Resolution
*.avi
*.mkv
AVI
MKV
Divx 3.11/4.x/
5.1/6.0
H.264 BP/MP/HP 1920x1080 6 ~ 30 25
MPEG4 SP/ASP 1920x1080
Motion JPEG 1920x1080
DivX 3.11/4.x/
5.1/6.0
H.264 BP/MP/HP 1920x1080
MPEG4 SP/ASP 1920x1080
Motion JPEG 1920x1080
1920x1080 6 ~ 30 8
1920x1080
Frame rate
(fps)
6 ~ 30 8
6 ~ 30 8
6 ~ 30 8
6 ~ 30 25
6 ~ 30 8
6 ~ 30 8
Bit rate (Mbps) Audio Codec
MP3
AC3
LPCM
ADPCM
DTS Core
MP3
AC3
LPCM
ADPCM
DTS Core
14 English
Page 15

*.asf
*.wmv
*.mp4
*.3gp
*.vro
*.mpg
*.mpeg
*.ts
*.tp
*.trp
ASF
ASF
MP4
3GPP
VRO
VOB
PS
TS
DivX 3.11/4.x
/5.1/6.0
1920x1080
H.264 BP/MP/HP 1920x1080
MPEG4 SP/ASP 1920x1080
Motion JPEG 1920x1080
Window Media
Video v9
1920x1080
H.264 BP/MP/HP 1920x1080
MPEG4 SP/ASP 1920x1080
H.264 BP/MP/HP 1920x1080
MPEG4 SP/ASP 1920x1080
MPEG2 1920x1080
MPEG1 352 X 288
MPEG2 1920x1080
H.264 1920x1080
MPEG2 1920x1080
H.264 1920x1080
VC1 1920x1080
6 ~ 30 8
6 ~ 30 25
6 ~ 30 8
6 ~ 30 8
6 ~ 30 25 WMA
6 ~ 30 25
6 ~ 30 8
6 ~ 30 25
6 ~ 30 8
24/25/30 30
24/25/30 30
24/25/30 30
24/25/30 30
6 ~ 30 25
24/25/30 30
6 ~ 30 25
6 ~ 30 25
MP3
AC3
LPCM
ADPCM
WMA
MP3
ADPCM
AAC
ADPCM
AAC
HE-AAC
AC3
MPEG
LPCMMPEG1 352 X 288
AC3
MPEG
LPCM
AAC
AC3
AAC
MP3
DD+
HE-AAC
Limitations
- Even when the file is encoded by a supported codec mentioned above, a file might not be played if its
content has a problem.
- Normal playback is not guaranteed if the file's container information is wrong or the file itself is corrupted.
- Files having higher Bit rate/frame rate than standard may stutter with sound/video playback.
- Seek (skip) function is not available if the file's index table is damaged.
- When you playback a file remotely through network connection, video playback may stutter depending
on established network speed.
Video decoder
- Supports up to H.264 Level 4.1
- Does not support H.264 FMO/ASO/RS, VC1 SP/MP/AP L4 and AVCHD
- MPEG4 SP, ASP :
Below 1280 x 720 : 60 frames max
Above 1280 x 720 : 30 frames max
- Does not support GMC 2 or higher
Audio decoder
- Supports WMA 7, 8, 9 and STD
- Does not support WMA 9 PRO multi-channel if number of channels is more than 2.
- Does not support WMA 9 Lossless, voice.
- Does not support WMA sampling rate of 22050Hz mono
- Does not support APDCM MULAW, ALAW
03 Getting Started
English 15
Page 16
Getting Started
Supported DivX subtitle file formats
*.ttxt, *.smi, *.srt, *.sub, *.txt
Music File Support
File Extension Container Audio Codec Support Range
*.mp3
*.wma
MP3
WMA
Logos of Discs the player can play
Blu-ray Disc 3D Blu-ray Disc DTS-HD Master Audio DivX
MP3 -
Compliant with WMA version 10
WMA
* Sampling rates (in kHz) - 8, 11, 16, 22, 32, 44.1, 48
* Bit rates - All bit-rates in the range 5kbps to 384kbps
BD-LIVE Dolby TrueHD
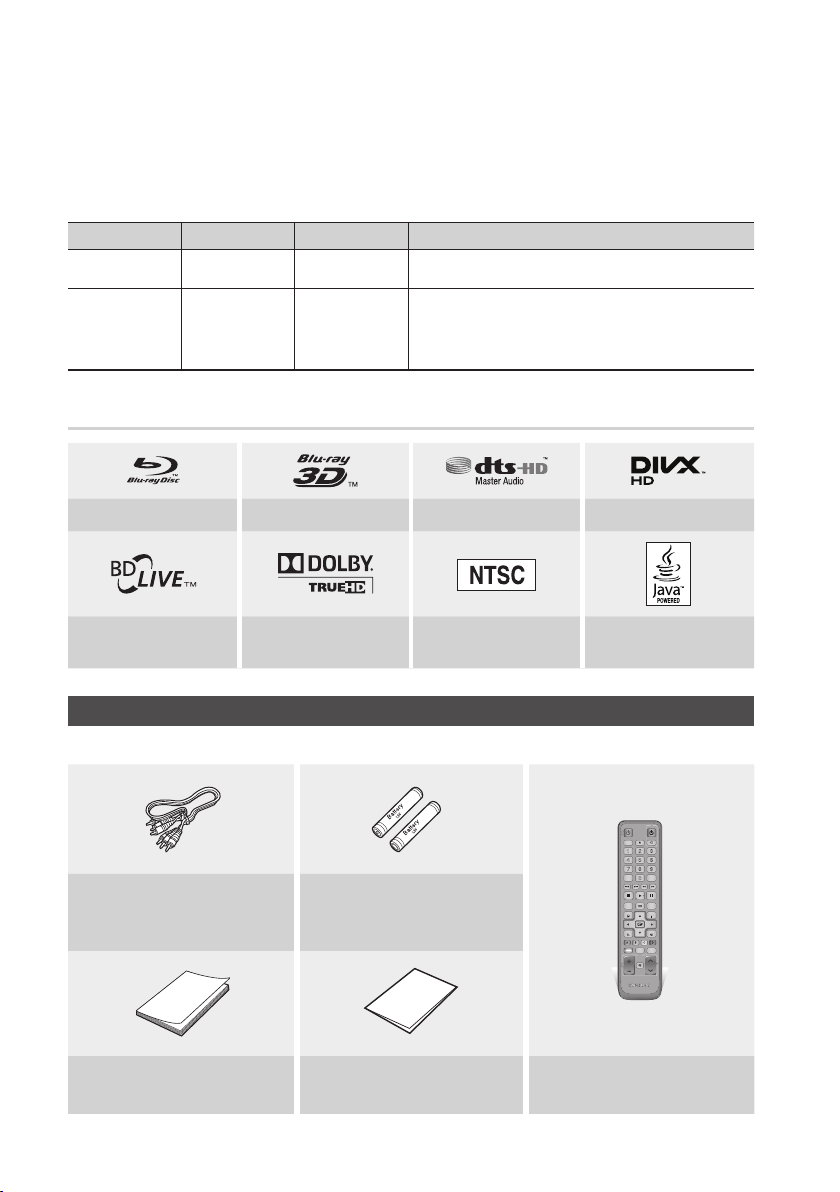
Check for the supplied accessories below.
Audio/Video cable
(AC39-00073A)
User Manual
(AK68-02026A)
16 English
NTSC broadcast system in
U.S.A, Canada, Korea, Japan
Accessories
Batteries for Remote Control
(AAA Size)
(AC43-12002H)
Quick Guide
(AK68-01996D)
Java
TV
POWER
POWER
2D3D
SOURCE
1 2 3
4 5 6
7 8 9
SUBTITLE
AUDIO
0
DISC MENU TITLE MENUMENU
POPUP
TOOLS
INFO
EXITRETURN
INTERNET@
SEARCHSMART
ALL
HUB
79
MUTE
VOL CH
Remote Control
(AK59-00122A)
Page 17
Front Panel
db c e f g ha
REMOTE CONTROL SENSOR Detects signals from the remote control.
1
POWER BUTTON Turns the player on and off.
2
DISPLAY Displays the playing status, time, etc.
3
5V
500mA
03 Getting Started
i
DISC SLOT Inserts a disc.
4
STOP BUTTON Stops disc playback.
5
PLAY/PAUSE BUTTON Plays a disc or pauses playback.
6
ENTER BUTTON Selects menu items or starts a disc.
7
EJECT BUTTON Ejects a disc.
8
USB HOST
9
NOTE
✎
`You can perform software upgrades using the USB Host jack with a USB memory flash stick only.
`When the player displays the Blu-ray Disc menu, you may not start the movie by pressing the Play button on the player
or the remote. To play the movie, you must select Play Movie or Start in the disc menu, and then press the ENTER
button.
You can connect a USB memory flash stick here and use it as storage when
the player is connected to BD-LIVE. You can also use the USB Host for software
upgrades and MP3/JPEG/DivX/MKV/MP4 playback.
English 17
Page 18
Getting Started
c da b
Rear Panel
e
AUDIO VIDEO
AUDIO VIDEO
g
DIGITAL AUDIO OUT Connects to an AV receiver.
1
LAN
2
HDMI OUT 1
3
HDMI OUT 2
4
COMPONENT OUT Connects to external devices that have Component video input.
5
VIDEO OUT Connects to the video input of external devices using a video cable.
6
AUDIO OUT Connects to the audio input of external devices using audio cables.
7
NOTE
✎
`To use Anynet+ (HDMI-CEC) function, connect the HDMI cable to HDMI 1 terminal.
When you connect the HDMI 2 terminal, Anynet+ (HDMI-CEC) function is not available.
`When you connect the HDMI 2 terminal with HDMI cable and set HDMI Video Output to Auto, video signal may not be
output. To output both video and audio signal, please set HDMI Video Output to Dual Output. (See page 35)
Use for network based services (See pages 56~65), BD-LIVE, and software
upgrades using a network connection.
Using an HDMI cable, connect this HDMI output terminal to the HDMI input terminal on
your TV for the best quality picture or to your AV receiver for the best quality sound.
Using an HDMI cable, connect this HDMI output terminal to the HDMI input terminal on
your TV for the best quality picture or to your AV receiver for the best quality sound.
f
18 English
Page 19
Tour of the Remote Control
Remote Control
03 Getting Started
Turn the player on and off.
Press to eject a disc.
Press this when you want to use 3D
Press numeric buttons to operate options.
Press to switch the Blu-ray Disc/DVD’s
Press to skip backwards or forwards.
Press to stop a disc.
Use to enter the disc menu.
Press to move to the home menu.
Press to use Tools menu.
Return to the previous menu.
Press to use Netflix.
Press to use Smart Hub.
TV volume adjustment.
Mutes the speakers of your TV.
function.
subtitle language.
POWER
2D3D
1 2
4 5 6
7 8 9
SUBTITLE
0
DISC MENU TITLE MENUMENU
TOOLS
INTERNET@
HUB
79
MUTE
VOL CH
TV
POWER
SOURCE
3
AUDIO
POPUP
INFO
EXITRETURN
SEARCHSMART
ALL
Turn the TV on and off.
(To operate your TV, please refer to page
20)
After setup, allows you to set the input
source on your TV.
Use to access various audio functions on a
disc (Blu-ray Disc/DVD).
Press to search a disc backwards or
forwards.
Press to pause a disc.
Press to play a disc.
Use to enter the popup menu/title menu.
Use to display the playback information
during playing a Blu-ray Disc/DVDs.
Use to select menu items and change
menu value.
Press to exit the menu.
These buttons are used both for menus
on the player and also several Blu-ray Disc
functions.
Press to search contents.
Use to select a TV channel.
Installing batteries
NOTE
✎
`If the remote does not operate properly:
• Check the polarity +/– of the batteries.
• Check if the batteries are drained.
• Check if the remote sensor is blocked by
obstacles.
• Check if there is any fluorescent lighting nearby.
CAUTION
!
`Dispose of batteries according to local environmental
regulations. Do not put them in the household trash.
English 19
Page 20

Getting Started
Setting the Remote Control to Operate Your TV
You can control certain functions of your TV with
this remote control.
Button Function
TV POWER Used to switch the television on and off.
TV SOURCE
TV VOL (+/–) Used to adjust the volume of the television.
TV CH (,/.) Used to select the desired channel.
TV MUTE Used to toggle the sound on and off.
NOTE
✎
`The functions listed above will not necessarily work
To determine whether your television is
compatible, follow the instructions below.
1. Switch your television on.
2. Point the remote control towards the
television.
3. Press and hold the TV POWER button, and
then enter the two-figure code in the table
to the right that corresponds to the brand of
your television by pressing the appropriate
number buttons.
If your television is compatible with the remote
control, it will switch off.
The remote is now programmed to operate
the TV.
NOTE
✎
`If several codes are listed for your television brand,
`If you replace the remote control’s batteries, you
Used to select an external source
connected to the TV.
on all televisions. If you encounter problems, use the
TV remote control.
try each one in turn until you find one that works.
must set the brand code again.
TV Control Codes
Brand Code
SAMSUNG
BANG & OLUFSEN
BLAUPUNKT TV POWER+71
BRIONVEGA TV POWER+57
CONTINENTAL
EMERSON TV POWER+64
FERGUSON TV POWER+73
FORMENTI TV POWER+57
GRADIENTE TV POWER+70
IMPERIAL TV POWER+52
LOEWE OPTA TV POWER+06, +57
MAGNAVOX TV POWER+40
MITSUBISHI
TV POWER+01, +02,
+03, +04, +05,
+06, +07, +08, +09
AIWA TV POWER+82
TV POWER+10, +11,
ANAM
+12, +13, +14,
+15, +16, +17, +18
TV POWER+57
BRANDT TV POWER+73
CGE TV POWER+52
TV POWER+75
EDISON
TV POWER+19, +20,
+23, +24, +25,
+26, +27, +28,
DAEWOO
+29, +30, +31,
+32, +33, +34
TV POWER+06, +49,
FINLUX
+57
FUJITSU TV POWER+84
TV POWER+49, +52,
GRUNDIG
+71
TV POWER+60, +72,
HITACHI
+73, +75
JVC TV POWER+61, +79
TV POWER+06, +19,
LG
+20, +21, +22, +78
LOEWE TV POWER+06, +69
METZ TV POWER+57
TV POWER+06, +48,
+62, +65
MIVAR TV POWER+52, +77
NEC TV POWER+83
NEWSAN TV POWER+68
Brand Code
NOBLEX TV POWER+66
NOKIA TV POWER+74
NORDMENDE
PANASONIC
PHONOLA
RADIOMARELLI TV POWER+57
SCHNEIDER TV POWER+06
SINUDYNE TV POWER+57
TELEFUNKEN
THOMSON
THOMSON ASIA TV POWER+80, +81
TV POWER+72, +73,
+75
TV POWER+53, +54,
+74, +75
TV POWER+06, +55,
PHILIPS
+56, +57
TV POWER+06, +56,
+57
TV POWER+58, +59,
PIONEER
+73, +74
RADIOLA TV POWER+06, +56
RCA TV POWER+45, +46
REX TV POWER+74
TV POWER+57, +72,
SABA
+73, +74, +75
SALORA TV POWER+74
TV POWER+41, +42,
SANYO
+43, +44, +48
SELECO TV POWER+74
TV POWER+36, +37,
SHARP
+38, +39, +48
SIEMENS TV POWER+71
SINGER TV POWER+57
SONY TV POWER+35, +48
TELEAVA TV POWER+73
TV POWER+67, +73,
+75, +76
TV POWER+72, +73,
+75
TV POWER+47, +48,
TOSHIBA
+49, +50, +51, +52
WEGA TV POWER+57
YOKO TV POWER+06
ZENITH TV POWER+63
20 English
Page 21
Connections
Connecting to a TV
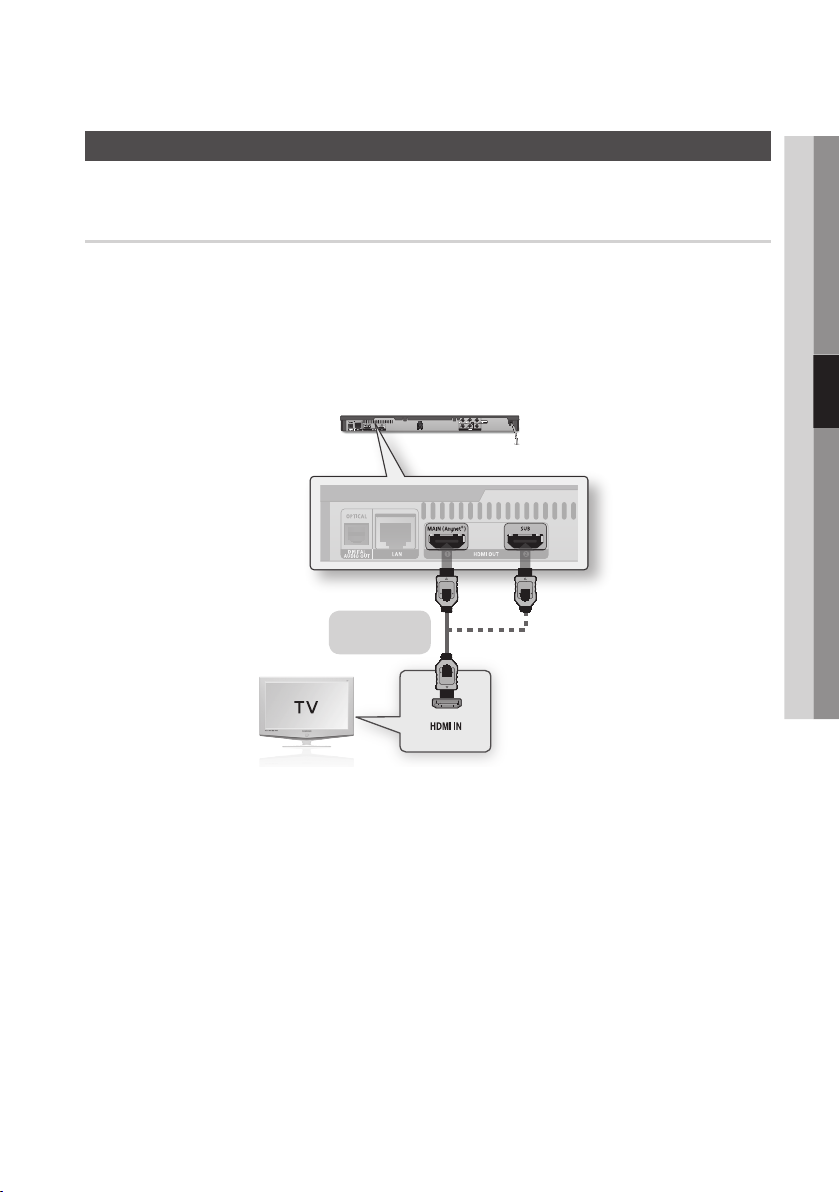
Case 1 : Connecting to a TV with an HDMI Cable - Best Quality (Recommended)
1. Using an HDMI cable, connect the HDMI OUT 1 terminal on the rear of the player to the HDMI IN
terminal of your TV.
2. Turn on the player and TV.
3. Press the input selector on your TV remote control until the HDMI signal from the player appears on
your TV screen.
• If you have set the remote control to operate your TV (See page 20), press the TV SOURCE button
on the remote control and select HDMI as the external source of the TV.
AUDIO VIDEO
Or
HDMI cable
(not included)
04 Connections
NOTE
✎
`An HDMI cable outputs digital video/audio, so you don’t need to connect an audio cable.
`To use Anynet+ (HDMI-CEC) function, connect the HDMI cable to HDMI 1 terminal.
When you connect the HDMI 2 terminal, Anynet+ (HDMI-CEC) function is not available.
`When you connect the HDMI 2 terminal with HDMI cable and set HDMI Video Output to Auto, video signal may not be
output. To output both video and audio signal, please set HDMI Video Output to Dual Output. (See page 35)
`If the player is connected to your TV in the HDMI 720p, 1080i, or 1080p output mode, you must use a High speed
(category 2) HDMI cable.
`HDMI outputs only a pure digital signal to the TV.
If your TV does not support HDCP (High-bandwidth Digital Content Protection), random noise appears on the screen.
`Depending on your TV, certain HDMI output resolutions may not work. Please refer to the user manual of your TV.
`When you connect the player to the TV using the HDMI cable for the first time or to a new TV, the HDMI output
resolution will be automatically set to the highest supported by the TV.
`You must have an HDMI connection to enjoy videos with 3D technology.
`A long HDMI cable may cause a screen noise. If this occurs, set Deep Color to Off in the menu.
`
If you use HDMI-to-DVI cable to connect to your display device, you must also connect the AV Out or Digital Audio Out to
your display device or an audio sytem to hear audio.
English 21
Page 22
Connections
Case 2 : Connecting to a TV with a Component Cable - Better Quality
- You can connect the player to your TV using Component video cables.
- You will enjoy high quality images with accurate color reproduction. Component video separates
the picture element into black and white (Y), blue (P
images. (Audio signals are delivered through the audio output.)
1. Using a Component video cable, connect the COMPONENT OUT terminals on the rear of the player
to the COMPONENT IN terminals of your TV.
2. Using audio cables, connect the AUDIO OUT (red and white) terminals on the rear of the player to
the AUDIO IN (red and white) terminals of your TV.
3. Turn on the player and TV.
4. Press the input selector on your TV remote control until the “COMPONENT” signal from the player
appears on the TV screen.
• If you have set the remote control to operate your TV (See page 20), press the TV SOURCE button
on the remote control and select COMPONENT as the external source of the TV.
B
) and red (PR) signals to present clear and clean
AUDIO VIDEO
AUDIO VIDEO
Component cable
Audio cable
Red
White Red Blue Green
NOTE
✎
`Depending on the manufacturer, the component terminals on your TV may be marked “R-Y, B-Y, Y ” or “Cr, Cb, Y”
instead of “P
Please refer to the user manual of your TV.
`You can select from a variety of resolution settings as 1080i, 720p, 480p, or 480i, depending on the contents type.
(See pages 32~34)
`The actual resolution may differ from the setting in the setup menu if you have connected both Component and HDMI
cables. The resolution may also be different depending on the contents type. (See pages 32~34)
B
, PR, Y”. The number and position of terminals may vary depending on the TV set.
(not included)
22 English
Page 23
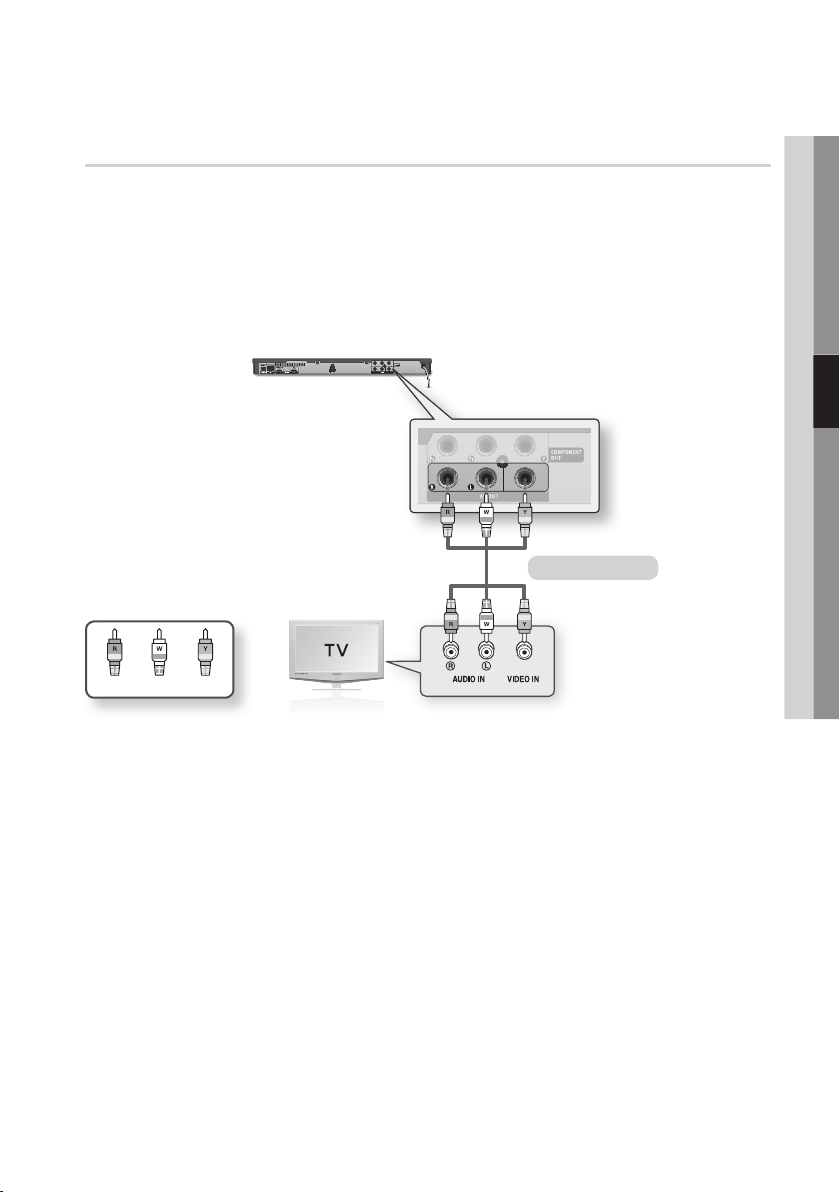
Case 3 : Connecting to a TV with an Audio/Video cable - Good Quality
1. Using an Audio/Video cable, connect the VIDEO OUT (yellow) / AUDIO OUT (red and white)
terminals on the rear of the player to the VIDEO IN (yellow) / AUDIO IN (red and white) terminals of
your TV.
2. Turn on the player and TV.
3. Press the input selector on your TV remote control until the “VIDEO” signal from the player appears
on the TV screen.
• If you have set the remote control to operate your TV (See page 20), press the TV SOURCE button
on the remote control and select VIDEO as the external source of the TV.
AUDIO VIDEO
AUDIO VIDEO
Audio/Video cable
WhiteRed Yellow
04 Connections
NOTE
✎
`Noise may be generated if the audio cable is placed too close to the power cable.
`If you want to connect to an AV receiver, please refer to the AV receiver connection pages. (See pages 24~26)
`The number and position of input terminals may vary depending on your TV set. Please refer to the user manual of your
TV.
CAUTION
!
`Do not connect the player to your TV through a VCR. Video signals fed through VCRs may be affected by copyright
protection systems and the picture will be distorted on the television.
English 23
Page 24
Connections
Connecting to an Audio System
• Please turn the volume down when you turn on the AV receiver. A sudden loud sound may cause
damage to the speakers and your ears.
• Set the audio output format according to the capabilities of your AV receiver. (See pages 35~38)
• The position of HDMI input terminals may vary depending on your AV receiver. Please refer to the
user manual of your AV receiver.
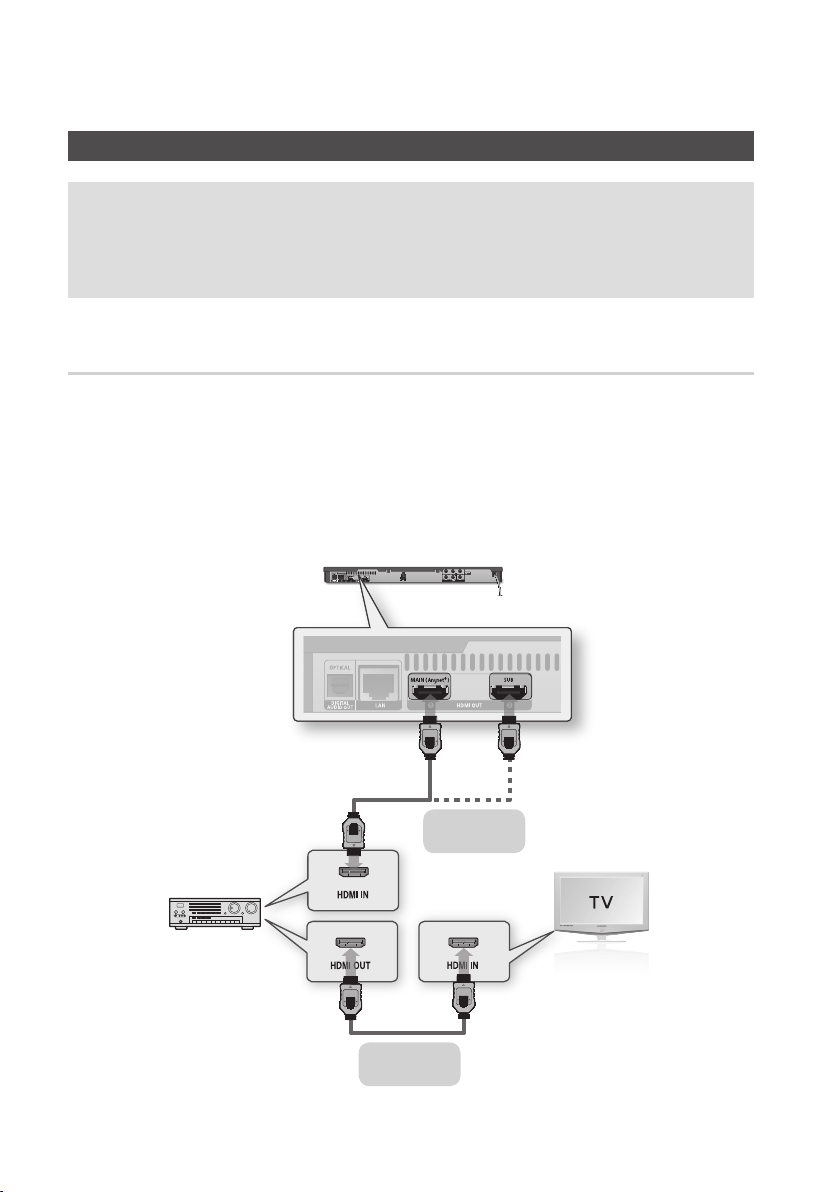
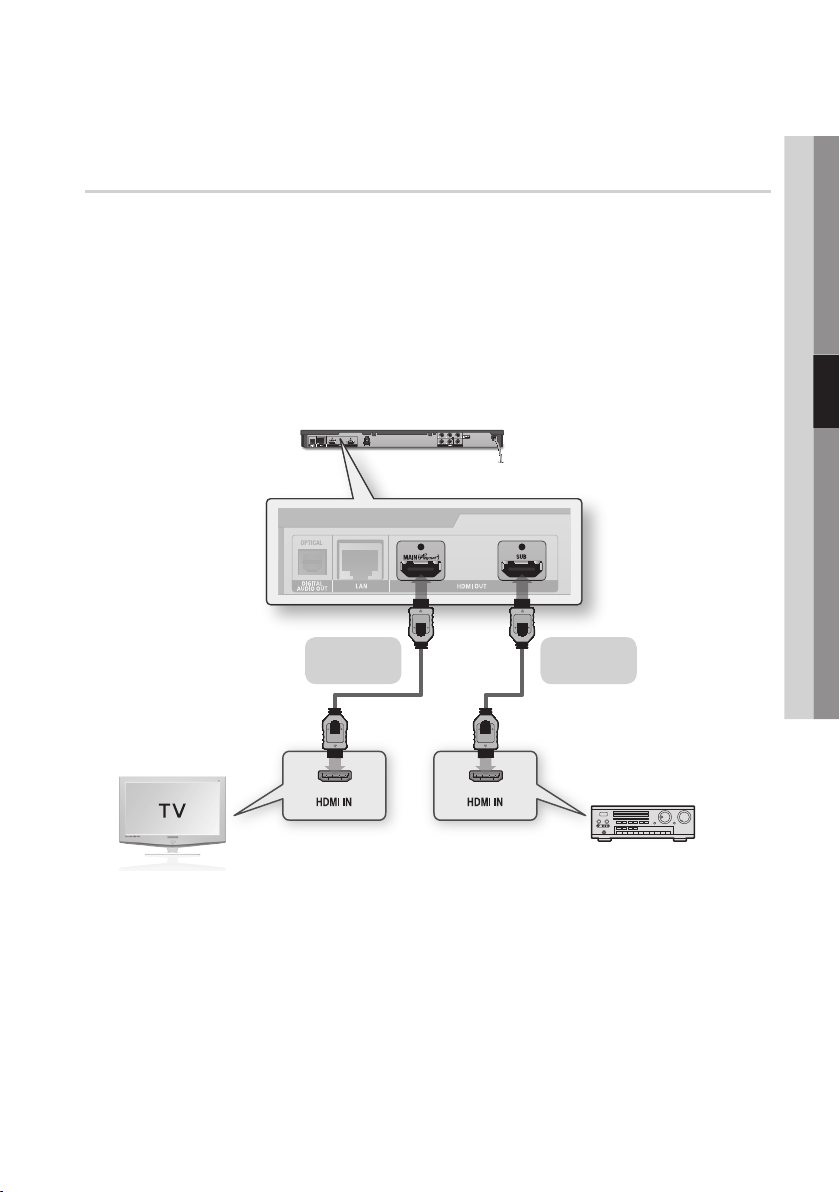
Case 1 : Connecting to an Audio System (HDMI supported AV receiver)
- Best Quality (Recommended)
1. Using an HDMI cable, connect the HDMI OUT 1 terminal on the rear of the player to the HDMI IN
terminal of your AV receiver.
2. Using an HDMI cable, connect the HDMI OUT terminal of the AV receiver to the HDMI IN terminal of
your TV.
3. Turn on the player, TV, and AV receiver.
4. Press the input select button of the AV receiver and TV to select the external input to hear sound
from the player. Refer to your AV receiver’s user manual to set the AV receiver’s audio input.
AUDIO VIDEO
Or
HDMI cable
(not included)
24 English
3D supported
AV receiver
HDMI cable
(not included)
Page 25
Case 2 : Connecting to an Audio System (HDMI supported AV receiver)
AUDIO
- Best Quality (Recommended)
1. Using an HDMI cable, connect the HDMI OUT 1 terminal on the rear of the player to the HDMI IN
terminal of your AV receiver.
2. Using an HDMI cable, connect the HDMI OUT 2 terminal on the rear of the player to the HDMI IN
terminal of your AV receiver.
3. Turn on the player, TV, and AV receiver.
4. Press the input select button of the AV receiver and TV to select the external input to hear sound
from the player. Refer to your AV receiver’s user manual to set the AV receiver’s audio input.
5. Press the input selector on your TV remote control until the HDMI signal from the player appears on
your TV screen.
OPTICAL
1 2
AUDIO VIDEO
04 Connections
OPTICAL
HDMI cable
(not included)
1 2
HDMI cable
(not included)
2D supported AV receiver
CAUTION
!
`Do not connect the HDMI OUT 1 and HDMI OUT 2 terminals of the product with an HDMI cable.
NOTE
✎
`If you connect 2 AV receivers on both HDMI OUT 1 and HDMI OUT 2 terminals, you will have more desired audio
output with HDMI OUT 2 terminals.
`If HDMI OUT 2 terminal is connected to a TV or an AV receiver which is turned on and HDMI Audio Output set to Auto,
then HDMI OUT 1 terminal does not output Audio.
If you want to hear from both HDMI OUT 1 and HDMI OUT 2 terminal, please set the HDMI Audio Output set to Dual.
(See page 38)
English 25
Page 26

Connections
Case 3 : Connecting to an Audio System (AV receiver with Dolby Digital or DTS decoder) - Better Quality
1. Using an optical cable, connect the DIGITAL
AUDIO OUT (OPTICAL) terminal on the
rear of the player to the DIGITAL AUDIO IN
(OPTICAL) terminal of your AV receiver.
2. Using the video signal cable(s), connect
the HDMI, COMPONENT, or VIDEO OUT
terminals on the rear of the player to the
HDMI, COMPONENT, or VIDEO IN terminal
of your TV. (See pages 21~23)
3. Turn on the player, TV, and AV receiver.
4.
Press the input select button of the
to select the external input and hear sound
from the player. Refer to your
manual to set the
5. Press the input selector on your TV remote
control to select the video source (HDMI,
Component, or Video.)
AV receiver’s
AV
receiver
AV receiver’s
audio input.
AUDIO VIDEO
user
Case 4 : Connecting to an Audio
System (Stereo Amplifier)
- Good Quality
1. Using the audio cables, connect the AUDIO
OUT (red and white) terminals on the rear of
the player to the AUDIO IN (red and white)
terminals of your Stereo Amplifier.
2. Using the video signal cable(s), connect
the HDMI, COMPONENT, or VIDEO OUT
terminals on the rear of the player to the
HDMI, COMPONENT, or VIDEO IN terminal
of your TV. (See pages 21~23)
3.
Turn on the player, TV and Stereo Amplifier.
4.
Press the input select button of the
Amplifier
5. Press the input selector on your TV remote
to select the external input in order
to hear sound from the player. Refer to your
Stereo Amplifier’s
Amplifier’s
control to select the video source (HDMI,
Component, or Video.)
user manual to set the
audio input.
Stereo
Stereo
AUDIO VIDEO
Case 2 : Optical cable
(not included)
White Red
NOTE
✎
`If you use the Digital Audio connection described in Case 3, you will hear only front two speakers with Digital Output
setting as PCM.
Case 3 : Audio cable
26 English
Page 27

Connecting to the Network
This player lets you use network based services (See pages 56~65) such as Smart Hub and BD-LIVE,
and software upgrades when it is connected to a network. We recommend using an AP (Access Point)
or IP router for the connection. For more information on router connections, refer to the user manual of
the router or contact the router manufacturer for technical assistance.
Cable Network
1. Using the Direct LAN Cable (UTP cable), connect the LAN terminal of the player to the LAN terminal
of your modem or router.
2. To set the network options, see pages 38~42.
AUDIO VIDEO
Router
04 Connections
Broadband modem
(with integrated router)
Broadband
service
NOTE
✎
`
Internet access to Samsung’s software update server may not be allowed, depending on the router you use or your ISP’s
policy. For more information, contact your ISP (Internet Service Provider).
`For DSL users, please use a router to make a network connection.
`To use the AllShare function, you must connect your PC to your network as shown in the figure.
The connection can be wired or wireless.
Or
Networking with PC for
AllShare function
Broadband modem
Broadband
service
English 27
Page 28

Connections
Wireless Network
Your player has built in Wi-Fi capability. You can connect to a network through a Wireless IP sharer
(a router or modem).
To set the network options, see pages 38~42.
Broadband
service
Networking with PC for
AllShare function
NOTE
✎
`To use a wireless network, your player must be connected to a wireless IP sharer (router). If the wireless IP sharer
supports DHCP, your player can use a DHCP or static IP address to connect to the wireless network.
`Select a channel for the wireless IP sharer that is not currently being used. If the channel set for the wireless IP sharer
is currently being used by another device nearby, this will result in interference and communication failure.
`If Pure High-throughput (Greenfield) 802.11n mode is selected and the Encryption type is set to WEP, TKIP or TKIP-
AES (WPS2Mixed) for your AP, this player will not support a connection in compliance with new Wi-Fi certification
specifications.
`If your AP supports WPS (Wi-Fi Protected Setup), you can connect to the network via PBC (Push Button Configuration)
or PIN (Personal Identification Number). WPS will automatically configure the SSID and WPA key in either mode.
`You can setup a wireless network three ways:
- Wireless (General)
- Using WPS(PBC)
- One Foot Connection
Wireless (General) includes both Automatic and Manual setup procedures.
`Wireless LAN, by its nature, may cause interference, depending on the operating conditions (AP performance, distance,
obstacles, interference by other radio devices, etc).
`Set the wireless IP sharer to Infrastructure mode. Ad-hoc mode is not supported.
`The player supports only the following wireless security key protocols :
- WEP (OPEN/SHARED), WPA-PSK (TKIP/AES), WPA2-PSK (TKIP/AES)
`To use the AllShare function, you must connect your PC to your network as shown in the figure.
The connection can be wired or wireless.
Wireless IP sharer
28 English
Page 29

Setup
Initial Settings
1. Turn on your TV after connecting the player.
When you connect the player to a TV for the
first time, player turns on automatically and
the Initial Settings screen appears.
Initial Settings | On-Screen Language
Select a language for the on-screen displays.
Български Hrvatski Čeština
Dansk Nederlands English
Eesti keel Suomi Français
Deutsch Ελληνικά Magyar
Indonesia Italiano
2. Press the ▲▼◄► buttons to select the
desired language, and then press the ENTER
button.
3. Press the ENTER button to select Start.
4. Press the ▲▼ buttons to select the desired
TV Aspect Ratio, and then press the ENTER
button. (See page 32)
5. Press the ▲▼ buttons to select the desired
Network Settings : Wired, Wireless (General),
WPS(PBC) or One Foot Connection, and
then press the ENTER button. If you do not
know the details of your Network Settings,
press the BLUE (D) button on your remote
instead to skip Network Settings here, finish
the Initial Settings, and go to the Home menu.
If you selected a Network Setting, go to
pages 38~42 for more information about the
Network settings. When done, go to Step 6.
6. The Home menu appears. (For more
information about the Home menu, please
see page 30.)
m
Move " Enter
한국어
• Home Menu
My Contents
Videos
Photos
Music
My Devices Internet Settings
d WPS(PBC)
NOTE
✎
`When the player is connected to the TV for the first
time, the player turns on automatically. This is not a
malfunction.
`The Home menu will not appear if you do not
configure the initial settings except as noted below.
`If you press the BLUE (D) button during the network
setup, you can access the Home menu even if the
network setup is not completed yet.
`If you want to display the Initial Setting screen again
to make changes, select the Reset option. (See page
43)
`If you use an HDMI cable to connect the player to an
Anynet+(HDMI-CEC)-compliant Samsung TV and
1.) You have set the Anynet+(HDMI-CEC) feature
to On in both the TV and the player and 2.) You have
set the TV to a language supported by the player,
the player will select that language as the preferred
language automatically.
`If you leave the player in the stop mode for more
than 5 minutes without using it, a screen saver will
appear on your TV. If the player is left in the screen
saver mode for more than 20 minutes, the power
will automatically turn off.
05 Setup
English 29
Page 30

Setup
POWER
POWER
TV
SOURCE
DISC MENU TITLE MENUMENU
SUBTITLE
AUDIO
INFO
POPUP
TOOLS
EXITRETURN
1 2 3
4 5 6
7 8 9
0
2D3D
Accessing the Settings Menu
1
2 4
MENU Button : Press to move to the Home menu.
1
RETURN Button : Return to the previous menu.
2
ENTER / DIRECTION Button :
Move the cursor or select an item.
3
Activate the currently selected item.
Confirm a setting.
EXIT Button : Press to exit the current menu.
4
To access the Settings menu and sub-menus,
follow these steps:
1. Press the POWER button.
The Home Menu appears.
• Home Menu
My Contents
Videos
Photos
Music
My Devices Internet Settings
1
Selects My Devices.
1
Selects My Contents.
2
Selects Internet.
3
Selects Settings.
4
Displays the buttons available.
5
d WPS(PBC)
3
2. Press the ◄► buttons to select Settings,
and then press the ENTER button.
3. Press the ▲▼ buttons to select the desired
submenu, and then press the ENTER button.
4. Press the ▲▼ buttons to select the desired
item, and then press the ENTER button.
5. Press the EXIT button to exit the menu.
NOTE
✎
`When the player is connected to a network, select
Smart Hub from the Home menu.
Download the desired content from Samsung Apps.
(See pages 63~65)
`The access steps may differ depending on the menu
you selected.
`The OSD (On Screen Display) may change in this
player after you upgrade the software version.
• Settings menu
Settings
Display
Audio
Network
System
Language
Security
General
Support
Above : The Settings menu showing the 3D
2
Settings sub-menu.
3
The following menu items are on the Settings
3D Settings
3D Settings
3D Blu-ray Playback Mode : Auto
Screen Size :
>
Move " Enter ' Return
HDMI Deep Color : Auto
55
inch
Menu :
4
• Display
• Audio
5
• Network
• System
• Language
• Security
• General
• Support
The menu items are addressed in the order
listed above on the following pages, starting with
Display.
30 English
Page 31

Display
You can configure various display options such as
the TV Aspect Ratio, Resolution, etc.
3D Settings
Select whether to play a Blu-ray Disc with 3D
contents in 3D Mode.
Settings
Display
Audio
Network
System
Language
Security
General
Support
3D Blu-ray Playback Mode
3D Blu-ray Discs are available in two formats: Bluray 3D and 3D only. You can choose to watch a
Blu-ray 3D disc in 3D or 2D mode before playing
the disc.
• Auto : Automatically detect if a connected TV
has 3D capability and play a Blu-ray 3D disc in
3D or 2D accordingly or a 3D only disc in 3D if
the TV supports 3D.
3D only discs will not be played if your TV does
not support 3D.
• 3D 3D : Play 3D only and Blu-ray 3D discs in
3D mode at all times.
• 3D 2D : Play Blu-ray 3D discs in 2D mode at
all times. 3D only discs will not be played.
NOTE
✎
`For some 3D discs, to stop a movie during 3D
playback, press the STOP (
movie stops and the 3D mode option is de-activated.
To change a 3D option selection when you are
playing a 3D movie, press the STOP (
once. The Blu-ray menu appears. Press the STOP
(
Blu-ray menu.
`Depending on the content and the position of the
picture on your TV screen, you may see vertical
black bars on the left side, right side, or both sides.
3D Settings
3D Settings
3D Blu-ray Playback Mode : Auto
Screen Size :
HDMI Deep Color : Auto
55
inch
>
Move " Enter ' Return
) button once. The
) button
) button again, then select 3D Settings in the
Screen Size
Lets you enter the actual screen size of your TV so
that the player can adjust the image according to
the screen size and display an optimal 3D image.
(For 3D displays bigger than 116 inches, simply
setting it as 116 is also a safe choice.)
CAUTION
!
`If you want to enjoy 3D content, connect a 3D device
(3D compliant AV receiver or TV) to the player’s
HDMI OUT port using a high-speed HDMI cable. Put
on 3D glasses before playing the 3D content.
`The player outputs 3D signals only through HDMI
cable connected to the HDMI OUT port.
`As the video resolution in 3D play mode is fixed
according to the resolution of the original 3D
video, you can not change the resolution to your
preference.
`Some functions such as BD Wise, screen size
adjustment, and resolution adjustment may not
operate properly in 3D play mode.
`You must use a high-speed HDMI cable for proper
output of the 3D signal.
`Stay at least three times the width of the screen
from the TV when watching 3D images. For example,
if you have a 46 inch screen, stay 138 inches (11.5
feet) from the screen.
- Place the 3D video screen at eye level for the
best 3D picture.
`When the player is connected to some 3D devices,
the 3D effect may not function properly.
`“Blu-ray 3D” and “Blu-ray 3D” logo are trademarks
of the Blu-ray Disc Association.
05 Setup
English 29
Page 32

Setup
TV Aspect
Depending on the type of television you have, you
may want to adjust the screen size setting.
• 16:9 Original : Select when you connect the
player to a 16:9 TV screen. The player will
display all content in its original aspect ratio.
Content formatted in 4:3 will be displayed with
black bars on the left and right.
• 16:9 Full : Select when you connect the player
to a 16:9 TV screen. All content will fill the
full screen. Content formatted in 4:3 will be
stretched.
• 4:3 Letter Box : Select when you connect the
player to a 4:3 TV screen. The player will display
all content in its original aspect ratio. Content
formatted in 16:9 will be displayed with black
bars on the top and bottom.
• 4:3 Pan-Scan : Select when you connect the
player to a 4:3 TV screen. 16:9 content will have
the extreme left and right portions cut off.
NOTE
✎
`Depending on the disc type, some aspect ratios may
not be available.
`If you select an aspect ratio and option which is
different than the aspect ratio of your TV screen,
then the picture might appear to be distorted.
`If you select the 16:9 Original, your TV may display
4:3 Pillarbox (black bars on sides of picture).
Smart Hub Screen Size
Set the Smart Hub Screen to the optimal size.
• Size 1 : Smart Hub screen size will be smaller
than default. You may see some black on sides
of screen.
• Size 2 : This is the default setting for Smart
Hub. The player displays the normal Smart Hub
screen size.
• Size 3 : This will display a larger Smart Hub
screen size. The image may be too large for
your TV screen.
BD Wise (Samsung Players only)
BD Wise is Samsung’s latest inter-connectivity
feature.
When you connect a Samsung player and a
Samsung TV with BD Wise to each other via
HDMI, and BD Wise is on in both the player and
TV, the player outputs video at the video resolution
and frame rate of the Blu-ray Disc/DVDs.
• Off : The output resolution stays fixed at the
resolution you set previously in the Resolution
menu, regardless of the resolution of the disc.
See Resolution below.
• On :
The player outputs video at the original
resolution and frame rate of the Blu-ray Disc/DVDs.
NOTE
✎
`When BD Wise is on, the Resolution setting
automatically defaults to BD Wise and BD Wise
appears in the Resolution menu.
`If the player is connected to a device that does not
support BD Wise, you can not use the BD Wise
function.
`For proper operation of BD Wise, set the BD Wise
menu of both the player and the TV to On.
Resolution
Lets you set the output resolution of the
Component and HDMI video signal to Auto,
1080p, 1080i, 720p, 480p, or 480i. The number
indicates the number of lines of video per frame.
The i and p indicate interlaced and progressive
scan, respectively. The more lines, the higher the
quality.
• Auto : Automatically sets the output resolution
to the connected TV’s maximum resolution.
• BD Wise : Automatically sets the resolution to
the resolution of the Blu-ray Disc/DVDs if you
have connected the player via HDMI to a TV
with the BD Wise feature. (The BD Wise menu
item appears only if BD Wise is set to On. See
BD Wise above.)
• 1080p : Outputs 1080 lines of progressive
video.
• 1080i : Outputs 1080 lines of interlaced video.
• 720p : Outputs 720 lines of progressive video.
• 480p : Outputs 480 lines of progressive video.
• 480i : Outputs 480 lines of interlaced video.
32 English
Page 33

Resolution according to the output mode
• Blu-ray Disc/E-contents/Digital Contents playback
HDMI / connected HDMI / not connected
Setup
BD Wise
1080p@60F 1080p@60F 1080p@60F 480i - - -
Movie Frame : Auto (24Fs) 1080p@24F 1080p@24F 480i - - -
1080i 1080i 1080i 480i 480i 1080i 480i
• DVD playback
Setup
BD Wise 480i 480i - -
1080p@60F 1080p@60F 480i - -
1080i 1080i 480i 480p 480i
Output
Auto
720p 720p 720p 480i 480i 720p 480i
480p 480p 480p 480i 480i 480p 480i
480i - - - 480i 480i 480i
Output
Auto
720p 720p 480i 480p 480i
480p 480p 480i 480p 480i
480i - - 480i 480i
HDMI Mode
Blu-ray Disc
Resolution of
Blu-ray Disc
Max.
Resolution of
TV input
Max. Resolution of TV
E-contents/
Digital
contents
1080p@60F 480i - - -
Max.
Resolution of
TV input
HDMI / connected HDMI / not connected
HDMI Mode
input
Component/
VIDEO Mode
480i - - -
Component/VIDEO Mode
480i - -
Component Mode
Blu-ray Disc
Component Mode VIDEO Mode
E-contents/
Digital
contents
05 Setup
VIDEO Mode
English 29
Page 34

Setup
NOTE
✎
`If the TV you connected to the player does not
support Movie Frame or the resolution you selected,
the message “If no pictures are shown after
selecting ‘Yes’, please wait for 15 seconds to return
to the previous resolution. Do you want to change
the resolution?” appears.
If you select Yes, the TV’s screen will go blank for
15 seconds, and then the resolution will revert to the
previous resolution automatically.
`If the screen stays blank after you have changed the
resolution, remove all discs, and then press and hold
the STOP (
more than 5 seconds. All settings are restored to
the factory default. Follow the steps on the previous
page to access each mode and select the Display
Setup that your TV will support.
`When the factory default settings are restored, all
stored user BD data is deleted.
`The Blu-ray Disc must have the 24 frame feature for
the player to use the Movie Frame (24Fs) mode.
`If both HDMI and Component jacks are connected
and you are currently viewing Component output,
the resolution is fixed to 480i.
`When the HDMI cable is not connected and video
output is component mode, DivX contents with copy
protection can only be output 480i.
) button on the front of the player for
HDMI Color Format
Lets you set the color space format for HDMI
output to match the capabilities of the connected
device (TV, monitor, etc).
• Auto : Automatically sets the player to the
optimum format supported by your device.
• YCbCr (4:4:4) : If your TV supports the YCbCr
color space via HDMI, select this to output the
normal YCbCr color gamut.
• RGB (Standard) : Select this to output the
normal RGB color gamut.
• RGB (Enhanced) : If you have connected the
player to a DVI display device such as a monitor,
select this to output the enhanced RGB color
gamut.
Movie Frame (24Fs)
Setting the Movie Frame (24Fs) feature to Auto
allows you to adjust the player’s HDMI output to
24 frames per second for improved picture quality.
You can enjoy the Movie Frame (24Fs) feature only
on a TV supporting this frame rate. You can select
Movie Frame only when the player is in the HDMI
1080i or 1080p output resolution modes.
• Auto : Movie Frame (24Fs) functions work.
• Off : Movie Frame (24Fs) functions are off.
34 English
Page 35

HDMI Deep Color
Lets you output video from the HDMI OUT jack
with Deep Color. Deep Color provides more
accurate color reproduction with greater color
depth.
• Auto : The player outputs video with Deep Color
to a connected TV which supports HDMI Deep
Color.
• Off : The picture is output without Deep Color.
Still Mode
Lets you set the type of picture the player displays
when you pause DVD playback.
• Auto : Automatically shows the best still picture
depending on the content.
• Frame : Select when pausing a scene with a
little action.
• Field : Select when pausing a scene with a lot
of action.
Progressive Mode
Lets you improve picture quality when viewing
DVDs.
• Auto :
Select to have the player automatically
select the best picture quality for the DVD you’re
watching.
• Video : Select for the best picture quality from
concert or TV show DVDs.
HDMI Video Output
Lets you output HDMI video signals to one or two
displays.
• Auto : Recommended when using one display
device or an HDMI supported AV receiver which
cannot support 3D.
• Dual Output : Recommended when using two
display devices.
NOTE
✎
`When you connect a device to the HDMI 2 terminal
with an HDMI cable and set HDMI Video Output to
Auto, the player may not output the video signal. To
output both the video and audio signal, please set
HDMI Video Output to Dual Output.
Audio
Digital Output
You set the Digital Output to match the capabilities
of the AV receiver you’ve connected to the player :
• PCM : Choose if you have connected an HDMI
supported AV receiver.
• Bitstream (Unprocessed) : Select if you have
connected an HDMI supported AV receiver
with Dolby TrueHD and DTS-HD Master Audio
decoding capabilities.
• Bitstream (Re-encoded DTS) : Choose if you
have connected an AV receiver using a Digital
Optical input that can decode DTS.
• Bitstream (Re-encoded Dolby D) : Select if
you don’t have an HDMI supported AV receiver,
but have an AV receiver with Dolby Digital
decoding capabilities.
For more details, please refer to the digital output
selection table. (See page 36)
05 Setup
English 29
Page 36

Setup
Digital Output Selection
Setup PCM
Connection
PCM
Dolby Digital
Dolby Digital
Plus
Audio Stream
on Blu-ray
Audio Stream
on DVD
Definition for
Blu-ray Disc
* If the Source Stream is 2ch or mono, “Re-encoded Dolby D” Setting are not applied. Output will be
PCM 2ch.
Disc
Dolby TrueHD
DTS
DTS-HD High
Resolution
Audio
DTS-HD
Master Audio
PCM PCM 2ch PCM 2ch PCM 2ch PCM 2ch PCM 2ch PCM 2ch
Dolby Digital
DTS
Any
HDMI
supported
AV receiver
Up to PCM
7.1ch
Up to PCM
7.1ch
Up to PCM
7.1ch
Up to PCM
7.1ch
Up to PCM
6.1ch
Up to PCM
7.1ch
Up to PCM
7.1ch
Up to PCM
5.1ch
Up to PCM
5.1ch
Decodes the main feature
audio and BONUSVIEW
audio stream together
into PCM audio and adds
Navigation Sound Effects.
Optical
PCM 2ch PCM PCM 2ch DTS re-encoded
PCM 2ch Dolby Digital Dolby Digital DTS re-encoded
PCM 2ch
PCM 2ch Dolby TrueHD Dolby Digital DTS re-encoded
PCM 2ch DTS DTS DTS re-encoded
PCM 2ch
PCM 2ch
PCM 2ch Dolby Digital Dolby Digital Dolby Digital Dolby Digital
PCM 2ch DTS DTS DTS DTS
Bitstream
(Unprocessed)
HDMI
supported
AV receiver
Dolby Digital
Plus
DTS-HD High
Resolution
Audio
DTS-HD
Master Audio
Outputs only the main
feature audio stream so that
your AV receiver can decode
the audio bitstream.
You will not hear
BONUSVIEW audio or
Navigation Sound Effects.
Optical
Dolby Digital DTS re-encoded
DTS DTS re-encoded
DTS DTS re-encoded
Bitstream
(Re-encoded
DTS)
HDMI supported
AV receiver or
Optical
Decodes the main
feature audio and
BONUSVIEW audio
stream together
into PCM audio and
adds Navigation
Sound Effects, then
re-encodes the
PCM audio into DTS
bitstream.
Bitstream
(Re-encoded
Dolby D)
HDMI supported
AV receiver or
Optical
Re-encoded
Dolby Digital *
Re-encoded
Dolby Digital *
Re-encoded
Dolby Digital *
Re-encoded
Dolby Digital *
Re-encoded
Dolby Digital *
Re-encoded
Dolby Digital *
Re-encoded
Dolby Digital *
Decodes main
feature audio and
BONUSVIEW audio
stream together
into PCM audio
and add Navigation
Sound Effects, then
reencodes the PCM
audio into Dolby
digital bitstream.
Blu-ray Discs may include three audio streams :
- Main Feature Audio : The audio soundtrack of the main feature.
- BONUSVIEW audio : An additional soundtrack such as the director or actor’s commentary.
- Navigation Sound Effects : When you choose some menu navigation, Navigation Sound Effects may
sound. Navigation Sound Effects are different on each Blu-ray Disc.
36 English
Page 37

NOTE
✎
`Be sure to select the correct Digital Output or you
will hear no sound or just loud noise.
`If the HDMI device (AV receiver, TV) is not compatible
with compressed formats (Dolby digital, DTS), the
audio signal outputs as PCM.
`Regular DVDs do not have BONUSVIEW audio and
Navigation Sound Effects.
`Some Blu-ray Discs do not have BONUSVIEW audio
and Navigation Sound Effects.
`This Digital Output setup does not effect the analog
(L/R) audio or HDMI audio output to your TV.
It effects the optical and HDMI audio output when
your player is connected to an AV receiver.
`If you play MPEG audio soundtracks, the audio signal
outputs as PCM regardless of your Digital Output
selections (PCM or Bitstream).
PCM Downsampling
Lets you set 48kHz and 96kHz PCM downsampling on or off.
• Off : Select when the AV receiver connected to
the player is 96kHz compatible.
• On : Select when the AV receiver connected
to the player is not 96kHz compatible. 96kHz
signals will be down converted to 48kHz.
NOTE
✎
`Even when PCM Downsampling is set to Off, some
discs will only output downsampled audio through
the optical digital outputs.
HDMI
• If your TV is not compatible with compressed
multi-channel formats (Dolby Digital, DTS), the
player may output PCM 2ch downmixed audio
even though you selected Bitstream (either Reencoded or Unprocessed) in the setup menu.
• If your TV is not compatible with PCM sampling
rates over 48kHz, the player may output 48kHz
downsampled PCM audio even though you set
PCM Downsampling to Off.
Dynamic Range Control
You can listen at low volumes, but still hear dialog
clearly.
This is only active if your player detects a Dolby
Digital signal.
• Auto : The Dynamic Range Control will be set
automatically based on the information provided
by the Dolby TrueHD Soundtrack.
• Off : You can enjoy the movie with the standard
Dynamic Range.
• On : When Movie soundtracks are played at low
volume or through smaller speakers, the system
can apply appropriate compression to make
low-level content more intelligible and prevent
dramatic passages from getting too loud.
Downmixing Mode
Lets you select how the player will downmix multichannel audio into fewer channels.
• Normal Stereo : Downmixes the multi-channel
audio into two channel stereo. Choose when
connected to equipment that does not support
virtual surround functions such as Dolby Pro
Logic.
• Surround Compatible : Downmixes multi-
channel audio into surround compatible stereo.
Choose when connected to equipment that
supports virtual surround functions such as
Dolby Pro Logic.
DTS Neo:6 Mode
You can enjoy multi-channel sound from an Audio
CD (CD-DA).
• Off : Outputs a 2-channel audio signal through
the front speakers only.
• Cinema : Select to play 2-channel movie sound
over multi-channels.
• Music : Select to play 2-channel music over
multi-channels.
NOTE
✎
`If you are using an HDMI supported AV receiver, this
option is available when you set Digital Output setup
as PCM.
05 Setup
English 29
Page 38

Setup
Audio Sync
In some cases when the player is connected to a
digital TV, the audio signal may not synchronize
with the video signal. If this occurs, adjust the
audio delay time to match the video signal.
• You can set the audio delay time between 0
msec and 200 msec.
Adjust it to the optimal setting.
NOTE
✎
`The audio delay time you specify may not be exact
depending on the played content.
HDMI Audio Output
Lets you select HDMI audio signals from one or
two audio devices (AV receiver or TV etc.).
• Auto : Recommended when you want to listen
the audio from one audio device when you have
two audio devices connected on HDMI OUT 1
and 2. In this case, you may not hear the audio
from device connected HDMI OUT 1.
• Dual Output : Recommended when you want
to listen the audio from two audio devices when
you have two audio devices connected on HDMI
OUT 1 and 2. If you connect 2 AV receivers on
both HDMI OUT 1 and 2, you will have more
desired audio output from HDMI OUT 2.
Network
Before you begin, contact your ISP to find out
if your IP address is static or dynamic. If it is
dynamic, and you are using a wired or wireless
connection, we recommend using the Auto
procedures. If you are using a wireless connection
and your router has the capability, you can use
WPS(PBC) or One Foot Connection.
If your IP address is static, you must use the
manual set up procedure for both wired and
wireless connections.
Network Settings
To begin setting up the network connection for
your player, follow these steps:
1. In the Home menu, press the ◄► buttons to
select Settings, and then press the ENTER
button.
2. Press the ▲▼ buttons to select Network, and
then press the ENTER button.
3. Press the ▲▼ buttons to select Network
Settings, and then press the ENTER button.
4. Press the ▲▼ buttons to select Wired,
Wireless (General), WPS(PBC) or One Foot
Connection, and then press the ENTER
button.
5. If you have a wired network, go to Wired
Network below. If you have a wireless
network, go to Wireless Network on pages
39~42.
Wired Network
Setting Up a Wired Connection - Auto
1. Press the ▲▼ buttons to select Wired.
Settings
Display
Audio
Network
System
Language
Security
General
Support
2. Press the ENTER button.
The Network Status screen appears. The
player connects to the network after the
network connection is verified.
Network Settings
Select a network connection type.
Wired
Wireless
(General)
Connect to the network using LAN cable. Please make
WPS(PBC)
sure that the LAN cable is connected.
One Foot
Connection
Move " Enter ' Return
>
38 English
Setting Up a Wired Connection - Manual
If you have a static IP address or the Auto Setting
does not work, you’ll need to set the Network
Settings values manually.
To view your Network Settings values on most
Windows computers, follow these steps:
Page 39

Windows XP
1. Right click the Network icon on the bottom
right of the Windows desktop.
2. In the pop-up menu, click Status.
3. On the dialog that appears, click the Support
tab.
4. On the Support tab, click the Details button.
The Network settings are displayed.
Windows 7
1. Click the Network icon on the bottom right of
the Windows desktop.
2. In the pop-up menu, click Network and
Sharing Center.
3. On the dialog that appears, click the Local
Area Connection or Wireless Network
Connection depending on your network
connection.
4. On the Support tab, click the Details button.
The Network settings are displayed.
NOTE
✎
`Depending on your Windows version, the information
may differ.
To enter the Network settings into your player,
follow these steps:
1. Press the ▲▼ buttons to select Wired, and
then press the ENTER button.
2. Press the ◄► buttons to select IP Settings,
and then press the ENTER button.
3. On the Network Status screen, select Cancel,
and then press Enter.
Settings
Display
Audio
IP Mode Manual
Network
System
Language
DNS Mode Manual
Security
General
Support
IP Address
Subnet Mask
Gateway
DNS Server
IP Settings
0.0.0.0
0.0.0.0
0.0.0.0
0.0.0.0
OK
Move " Enter ' Return
>
4. Press the ENTER button to select IP Mode.
5. Press the ▲▼ buttons to select Manual, and
then press the ENTER button.
6. Press the ▼ button to go to the first entry field
(IP Address).
7. Use the number buttons on your remote to
enter numbers.
8. When done with each field, press the ►
button to move successively to the next field.
You can also use the other arrow buttons to
move up, down, and back.
9. Enter the IP Address, Subnet Mask, and
Gateway values.
10. Press the ▼ button to go to DNS Mode.
11. Press the ▼ button to go to the first DNS
entry field. Enter the numbers as above.
12. Press the ENTER button to select OK.
The Network Status screen appears. The
player connects to the network after the
network connection is verified.
Wireless Network
You can setup a wireless network three ways:
• Wireless (General)
• Using WPS(PBC)
• One Foot Connection
Wireless (General) includes both Automatic and
Manual setup procedures.
Setting Up the Wireless Network Connection
- Auto
Most wireless networks have an optional security
system that requires devices that access the
network to transmit an encrypted security code
called an Access or Security Key. The Security
Key is based on a Pass Phrase, typically a word
or a series of letters and numbers of a specified
length you were asked to enter when you set up
security for your wireless network. If you use this
method of setting up the network connection, and
have a Security Key for your wireless network, you
will have to enter the Pass Phrase during the Auto
setup process.
05 Setup
English 29
Page 40

Setup
1. Press the ▲▼ buttons to select Wireless
(General).
Settings
Display
Select a network connection type.
Audio
Network
Wired
System
Wireless
Language
(General)
Security
WPS(PBC)
General
One Foot
Connection
Support
Network Settings
Set up wireless network by selecting your Wireless
Router. You may need to enter security key depending
on the setting of the Wireless Router.
>
Move " Enter ' Return
2. Press the ENTER button.
When done, it displays a list of the available
networks.
3. Press the ▲▼ buttons to select the desired
network, and then press the ENTER button.
The Security screen appears.
4.
On the Security screen, enter your network’s
Pass Phrase. Enter numbers directly using your
remote control.
To select a letter, press the ▲▼◄► buttons to
move the cursor, then press the ENTER button.
Settings
✎
Display
Audio
Network
System
Language
Security
General
Support
NOTE
Network Settings
Enter security key. 0 entered
a b c d e f 1 2 3
g h i j k l 4 5 6
m n o p q r 7 8 9
s t u v w x y z 0
a/A
Delete Space Done
*
a
Previous m Move " Enter ' Return
`You should be able to find the Pass Phrase on one of
the set up screens you used to set up your router or
modem.
5. When done, press the GREEN (B) button on
your remote, or press the ▲▼◄► buttons to
move the cursor to Done, and then press the
ENTER button.
The Network Status screen appears. The
player connects to the network after the
network connection is verified.
Setting Up the Wireless Network Connection
- Manual
If the Auto Setting does not work, you need to
enter the Network setting values manually.
To view the Network Settings values on most
Windows computers, follow these steps:
Windows XP
1. Right click the Network icon on the bottom
right of the Windows desktop.
2. In the pop-up menu, click Status.
3. On the dialog that appears, click the Support
tab.
4. On the Support tab, click the Details button.
The Network settings are displayed.
Windows 7
1. Click the Network icon on the bottom right of
the Windows desktop.
2. In the pop-up menu, click Network and
Sharing Center.
3. On the dialog that appears, click the Local
Area Connection or Wireless Network
Connection depending on your network
connection.
4. On the Support tab, click the Details button.
The Network settings are displayed.
NOTE
✎
`Depending on your Windows version, the information
may differ.
40 English
Page 41

To enter the Network settings into your player,
follow these steps:
1. Follow Steps 1 through 4 in the ‘Setting Up
the Wireless Network Connection - Auto’
procedure.
2. When done, press the GREEN (B) button on
your remote, or press the ▲▼◄► buttons to
move the cursor to Done, and then press the
ENTER button. The Network Status screen
appears.
Settings
Display
Audio
IP Mode Manual
Network
System
Language
DNS Mode Manual
Security
General
Support
IP Address
Subnet Mask
Gateway
DNS Server
IP Settings
0.0.0.0
0.0.0.0
0.0.0.0
0.0.0.0
OK
Move " Enter ' Return
>
3. On the Network Status screen, select Cancel,
and then press Enter.
4. Press the ◄► buttons to select IP Settings,
and then press the ENTER button.
5. Press the ENTER button to select IP Mode.
6. Press the ▲▼ buttons to select Manual, and
then press the ENTER button.
7. Press the ▼ button to go to the first entry field
(IP Address).
8. Use the number buttons to enter numbers.
9. When done with each field, press the ►
button to move successively to the next field.
You can also use the other arrow buttons to
move up, down, and back.
10. Enter the IP Address, Subnet Mask, and
Gateway values.
11. Press the ▼ to go to DNS Mode.
12. Press the ▼ button to go to the first DNS
entry field. Enter the numbers as above.
13. Press the OK button.
14. The Network Status screen appears. The
player connects to the network after the
network connection is verified.
WPS(PBC)
The easiest way to set up the wireless network
connection is using the WPS(PBC) function or the
One Foot Connection function.
If your wireless router has a WPS(PBC) button,
follow these steps:
1. Press the ▲▼ buttons to select WPS(PBC).
Settings
Display
Select a network connection type.
Audio
Network
Wired
System
Wireless
Language
(General)
Security
WPS(PBC)
General
One Foot
Connection
Support
Network Settings
Connect to the Wireless Router easily by pressing the
WPS(PBC) button. Choose this if your Wireless Router
supports Push Button Configuration(PBC).
>
Move " Enter ' Return
2. Press the ENTER button.
3. Press the WPS(PBC) button on your router
within two minutes. Your player automatically
acquires all the network settings values it
needs and connects to your network.
4. The Network Status screen appears. The
player connects to the network after the
network connection is verified.
One Foot Connection
You can set up the wireless connection
automatically if you have a Samsung Wireless
Router which supports One Foot Connection. To
connect using the One Foot Connection function,
follow these steps:
1. Press the ▲▼ buttons to select One Foot
Connection.
Settings
Display
Select a network connection type.
Audio
Network
Wired
System
Wireless
Language
(General)
Security
WPS(PBC)
General
One Foot
Connection
Support
Network Settings
Connect to wireless network automatically if your
Wireless Router supports One Foot Connection. Select
this connection type after placing the Wireless Router
within 10 inches(25cm) of product.
>
Move " Enter ' Return
05 Setup
English 29
Page 42

Setup
2. Press the ENTER button.
3. Place the Samsung Wireless Router within 25
cm (10 inches) of your player to connect.
4. Wait until the connection is automatically
established.
Network Status
Check whether a connection to the network and
the Internet have been established.
Settings
Display
Audio
Network
System
Internet is connected successfully.
Language
If you have a problem using any Internet services, contact your Internet service
Security
provider.
General
Support
KT_WLAN
Network Status
MAC Address XX:XX:XX:XX:XX:XX
IP Address 0.0.0.0
Subnet Mask 0.0.0.0
Gateway 0.0.0.0
DNS Server 0.0.0.0
IP Settings Retry OKNetwork Settings
< Move " Enter ' Return
BD-LIVE Internet Connection
Set to allow or prohibit an Internet connection
when you use the BD-LIVE service.
• Allow (All) : The Internet connection is allowed
for all BD-LIVE contents.
• Allow (Valid Only) : The Internet connection is
allowed only for BD-LIVE contents containing a
valid certificate.
• Prohibit : No Internet connection is allowed for
any BD-LIVE content.
NOTE
✎
`What is a valid certificate?
When the player uses BD-LIVE to send the disc data
and a request to the server to certify the disc, the
server uses the transmitted data to check if the disc
is valid and sends the certificate back to the player.
`The Internet connection may be restricted while you
are using BD-LIVE contents.
System
Initial Settings
By using the Initial Settings function, you can set
the language, Network Settings, etc.
For more information about the Initial Settings
function, refer to the Initial Settings section of this
user manual. (See pages 29~46)
Anynet+(HDMI-CEC)
Anynet+ is a convenient function that offers linked
operations with other Samsung players that have
the Anynet+ feature.
To operate this function, connect this player to a
Samsung TV with an HDMI cable.
With Anynet+ on, you can operate this player
using a Samsung TV remote control and start
disc playback simply by pressing the PLAY ( )
button on the TV’s remote control.
For more information, please see the TV user
manual.
• Off : Anynet+ functions will not work.
• On : Anynet+ functions will work.
NOTE
✎
`This function is not available if the HDMI cable does
not support CEC.
`If your Samsung TV has an Anynet+ logo, then it
supports the Anynet+ function.
`Depending on your TV, certain HDMI output
resolutions may not work.
Please refer to the user manual of your TV.
42 English
Page 43

BD Data Management
Lets you manage the downloaded contents you
accessed through a Blu-ray Disc that supports the
BD-LIVE service and stored on an attached Flash
memory device.
You can check the device’s information including
the storage size, delete the BD data, or change
the Flash memory device.
Change Device allows you to select either the
player’s Internal Memory or External Memory
(connected USB Device).
If the data to be stored from BD-LIVE is greater
than the size of the remaining memory or the
Internal Memory is full, connect an External USB
device, then select External Device in the menu.
BD Data Management Screen Information :
• Total Size : Total memory size of the device.
• Available Size : Available memory in the device.
NOTE
✎
`In the external memory mode, disc playback may
be stopped if you disconnect the USB device in the
middle of playback.
`Only those USB devices formatted in FAT file
system (DOS 8.3 volume label) are supported. We
recommend you use USB devices that support USB
2.0 protocol with 4 MB/sec or faster read/write
speed.
`The Resume Play function may not work after you
format the storage device.
`The total memory available to BD Data Management
may differ, depending on the conditions.
Time Zone
You can specify the time zone that is applicable to
your area.
Settings
Display
Audio
Network
System
Language
Security
General
Support
Time Zone
GMT + 00:00
London, Lisbon, Casablanca
<
Change " Save ' Return
DivX® Video On Demand
View DivX® VOD Registration Codes to purchase
and play DivX® VOD contents.
Reset
All settings will revert to the default except for the
network and Smart Hub settings.
NOTE
✎
`The default password is 0000.
Language
You can select the language you prefer for the
Home menu, disc menu, etc.
• On-Screen Menu : Select the language for the
on-screen displays.
• Disc Menu : Select the language for the disc
menu displays.
• Audio : Select the language for disc audio.
• Subtitle : Select the language for disc subtitles.
NOTE
✎
`The selected language will only appear if it is
supported on the disc.
05 Setup
English 29
Page 44

Setup
Security
This function works in conjunction with Blu-ray
Disc/DVDs that have been assigned an age rating
or numeric rating that indicates the maturity level
of the content. These numbers help you control
the types of Blu-ray Disc/DVDs that your family
can watch.
Select an age rating you want to set for the BD
Parental Rating and a rating level you want to set
for the DVD Parental Rating. The player will only
play Blu-ray Discs rated at or below the age rating
and DVDs rated below the numeric rating unless
the password is entered.
Larger numbers indicate more mature content.
BD Parental Rating
Prevent playback of Blu-ray Discs with specific
age ratings unless a password is entered.
DVD Parental Rating
Prevent playback of DVDs with specific numerical
ratings unless a password is entered.
Change Password
Change the 4-digit password used to access
security functions.
If you forgot your password
1. Remove the disc.
2. Press and hold the STOP (
front panel for 5 seconds or more.
All settings will revert to the factory settings.
NOTE
✎
`When the factory default settings are restored, all
the user stored BD data will be deleted.
) button on the
General
Front Display
Change the brightness of the front panel.
• Auto : Dim during playback.
• Dim : Dim the display window.
• Bright : Brighten the display window.
Light Effect
You can adjust the light effect on the player.
• Always On : Activate Light Effect at all times.
It is recommended for continuous display for
commercial or demonstration use.
• Auto : Activate Light Effect when you turn the
player on or off and when you insert or eject a
disc. This is recommended for home use.
• Off : Turn Light off.
Network Remote Control
The Network Remote Control function lets you
control your Blu-ray Disc player from a remote
device such as a smart phone through a wireless
connection to your local area network.
To use the Network Remote Control function,
follow these steps:
1. Select On in the Network Remote Control
menu.
2. Install the Samsung network remote control
application to control your player on your
compatible portable device.
3. Make sure your portable device and your
player are connected to the same wireless
router.
4. Start the application on your portable device.
The application should find your player and
display it on a list.
5. Select the player.
6. If this is the first time you are using the
function, it will ask you to allow or deny
remote control of the player. Select Allow.
7. Follow the instructions that came with the
application to control the player.
44 English
Page 45

Support
Software Upgrade
The Software Upgrade menu allows you to
upgrade the player’s software for performance
improvements or additional services.
By Internet
To upgrade by Internet, follow these steps:
1. Select By Internet, and then press the
ENTER button. The Connecting to Server
message appears.
2. If there is a download available, the Download
pop-up appears with a progress bar and the
download starts.
3. When the download is complete, the Upgrade
Query window appears with three choices:
Upgrade Now, Upgrade Later, or Don’t
Upgrade.
4. If you select Upgrade Now, the player
upgrades the software, turns off, and then
turns on automatically.
5. If you do not make a selection in one minute
or select Upgrade Later, the player stores
the new upgrade software. You can upgrade
the software later using the By Downloaded
function.
6. If you select Don’t Upgrade, the player
cancels the upgrade.
NOTE
✎
`Your player must be connected to the Internet to use
the By Internet function.
`The upgrade is complete when the player turns off,
and then turns on again by itself.
`Never turn the player off or back on manually during
the update process.
`Samsung Electronics shall take no legal responsibility
for player malfunction caused by an unstable
Internet connection or consumer negligence during
a software upgrade.
`If you want to cancel the upgrade while the upgrade
software is downloading, press the ENTER button.
By USB
To upgrade by USB, follow these steps:
1. Visit www.samsung.com/bluraysupport.
2. Download the latest USB software upgrade
zip archive to your computer.
3. Unzip the zip archive to your computer. You
should have a single folder with the same
name as the zip file.
4. Copy the folder to a USB flash drive.
5. No disc should be inserted in the product,
and then insert the USB flash drive into the
USB port of the player.
6. In the player’s menu, go to Settings > Support
> Software Upgrade.
7. Select By USB.
NOTE
✎
`No disc should be inserted in the product when you
upgrade the software using the USB Host jack.
`When the software upgrade is done, check the
software details in the software Upgrade menu.
`Do not turn off the player during the software
upgrade. It may cause the player to malfunction.
`Software upgrades using the USB Host jack must be
performed with a USB memory flash stick only.
By Disc
To upgrade by Disc, follow these steps:
1. Visit www.samsung.com/bluraysupport.
2. Download the latest disc software upgrade
zip archive to your computer.
3. Unzip the zip archive to your computer. You
should have a single folder with the same
name as the zip file.
4. Write the folder onto a disc. We recommend a
CD-R or DVD-R.
05 Setup
English 29
Page 46

Setup
5. Finalize the disc before you remove it from
your computer.
6. Insert the disc into player.
7. In the player’s menu, go to Settings > Support
> Software upgrade.
8. Select By Disc.
NOTE
✎
`When the system upgrade is done, check the
software details in the software Upgrade menu.
`Do not turn off the player during the Software
Upgrade. It may cause the player malfunction.
By Downloaded
The By Downloaded option lets you upgrade
using a file the player downloaded earlier but
you decided not to install immediately or a file
downloaded by the player in Standby Mode (See
Download in Standby Mode below).
To upgrade By Downloaded, follow these steps:
1. If upgrade software has been downloaded,
you will see the software version number to
the right of By Downloaded.
2. Select By Downloaded, and then press the
ENTER button.
3. The player displays a message asking if you
want to upgrade. Select Yes. The player
begins the upgrade.
4. When the update is complete, the player turns
off automatically, and then turns on.
NOTE
✎
`When the system upgrade is done, check the
software details in the software Upgrade menu.
`Do not turn off the player during the software
Upgrade. It may cause the player to malfunction.
To set Download in Standby Mode, follow these
steps:
1. Press the ▲▼ buttons to select Download in
Standby Mode, and then press the ENTER
button.
2. Select On or Off.
• Off : If you select Off, the player will notify
you with a pop up message when new
upgrade software is available.
• On : If you select On, the player will
automatically download new upgrade
software when it is in Standby mode with
the power off. If it downloads new upgrade
software, the player will ask you if you want
to install it when you turn the player on.
NOTE
✎
`To use the Download in Standby Mode function, your
player must be connected to the Internet.
Contact Samsung
Provides contact information for assistance with
your player.
Download in Standby Mode
You can set the Download in Standby Mode
function so that the player downloads new
upgrade software when it is in Standby mode. In
Standby mode, the player is off, but its Internet
connection is active. This allows the player to
download upgrade software automatically, when
you are not using it.
46 English
Page 47

Basic Functions
Playing a Video
Playback
1.
Push a disc into the Blu-ray Disc player with
the disc’s label facing up.
2. Press the PLAY ( ) button.
Playback related buttons
PLAY ( ) Starts playback.
Stops playback.
• If you press the button once : The
)
STOP (
PAUSE (
NOTE
✎
`For some discs, pressing the STOP (
once may not memorize the stop position.
`Video files with high bit rates of 20Mbps or more
strain the player’s capabilities and may stop playing
during playback.
stop position is memorized.
• If you press the button twice : The
stop position is not memorized.
) Pauses playback.
) button
3D Converter
This function can convert the 2D output of 2D
contents into 3D.
1. Connect this player to a TV that supports 3D
using an HDMI cable.
2. When you play 2D contents, press the
2D3D button on the remote control to
convert 2D into 3D contents.
3. You can toggle between 2D and 3D by
pressing the 2D3D button repeatedly.
If you are playing 3D contents in the 3D
mode, you cannot use this function.
NOTE
✎
`You can’t convert 2D contents into 3D or use the
2D3D button In the following cases:
- When the player is not connected with an HDMI
cable
- When the connected TV does not support 3D.
- When you are playing 3D contents (disc, file).
`2D content is converted into the following 3D
formats:
- 1080p 24fps : Output to 1080p 24 fps 3D.
- Others : Output to 720p 3D.
- Photo files : Output to 720p 3D.
`2D content that the player can convert to 3D:
- 2D content that supports 3D conversion
- Smart Hub content, DVD Video, BD-ROM, VCD,
Video files, and photo files.
`When you use the 3D converter, the Bonusview
function is not available.
(Depending on the disc, a black outline appears.)
`Some viewers may experience discomfort while
viewing 3D contents such as dizziness, nausea, and
headaches.
Adjusting the 3D Depth
The 3D Depth function lets you adjust the 3D
depth of 2D to 3D conversions. Values range from
1 to 10. The higher the number, the deeper the
3D depth.
1. When you are viewing converted 3D contents,
press the TOOLS button.
2. Press the ▲▼ buttons to select 3D Depth,
and then press the ENTER button.
3. Adjust the 3D Depth using the ◄► buttons.
06 Basic Functions
English 47
Page 48

Basic Functions
Disc Structure
The content of discs are usually divided as shown
below.
• Blu-ray Disc, DVD-VIDEO
title 1 title 2
chapter 1 chapter 2 chapter 1 chapter 2 chapter 3
• Audio CD (CD-DA)
track 1 track 2 track 3 track 4 track 5
• MP3, WMA, DivX, MKV and MP4
folder (group) 1 folder (group) 2
file 1 file 2 file 1 file 2 file 3
Using the Disc Menu/Title Menu/
Popup Menu
Using the Title Menu
1. During playback, press the TITLE
MENU button on the remote control.
2. Press the ▲▼◄► buttons to make
the desired selection, then press the
ENTER button.
NOTE
✎
`Depending on the disc, the menu items may differ
and this menu may not be available.
Playing the Title List
1. During playback, press the DISC
MENU or TITLE MENU button.
2. Press the ▲▼ buttons to select an
entry you want to play from the Title
List, and then press the ENTER
button.
NOTE
✎
`If your disc has a playlist, press the GREEN (B)
button to go to the playlist.
Using the Popup Menu
Z
z
Using the Disc Menu
1. During playback, press the DISC
MENU button on the remote control.
2. Press the ▲▼◄►
selection, and then press the ENTER
button.
NOTE
✎
`Depending on the disc, the menu items may differ
and this menu may not be available.
buttons to make a
48 English
hZ
1. During playback, press the POPUP
MENU button on the remote control.
2. Press the ▲▼◄► buttons or ENTER
button to select the desired menu.
NOTE
✎
`Depending on the disc, the menu items may differ
and this menu may not be available.
h
Page 49

Using the Search and Skip Functions
Slow Motion Play/Step Motion Play
06 Basic Functions
During play, you can search quickly through a
chapter or track, and use the skip function to
jump to the next selection.
Searching for a Desired Scene
hzZyx
• During playback, press the SEARCH ( )
button.
Each time you press the SEARCH (
button, the playback speed will change as follows
BD-ROM,
BD-RE/-R,
DVD-RW/-R,
DVD+RW/+R,
DVD-VIDEO
DivX, MKV, MP4
• To return to normal speed playback, press the
PLAY (
NOTE
✎
`The player does not play sound in search mode.
) button.
)
)
(
(
)
(
1
4
1
4
1
1
)
2 ) 3
)
5 ) 6 ) 7
(
2 ( 3
(
5 ( 6 ( 7
)
2 ) 3
(
2 ( 3
)
Skipping Chapters
hzZyx
• During playback, press the SKIP ( )
button.
If you press the SKIP (
moves to the next chapter.
If you press the SKIP (
moves to the beginning of the chapter. One
more press makes the disc move to the
beginning of the previous chapter.
) button, the disc
) button, the disc
Slow Motion Play
hzZyx
• In pause mode, press the SEARCH ( )
button.
Each time you press the SEARCH (
the playback speed will change as follows:
*
1/8 * 1/4 * 1/2
• To return to normal speed playback, press the
PLAY (
:
✎
) button.
NOTE
`The player does not play sound in Slow mode.
Step Motion Play
hzZyx
• In pause mode, press the PAUSE ( ) button.
Each time you press the PAUSE (
new frame appears.
• To return to normal speed playback, press the
PLAY (
✎
During playback, you can operate the disc
menu by pressing the TOOLS button.
• Tools Menu Screen
) button.
NOTE
`The player does not play sound in Step mode.
Using the TOOLS button
Tools
Title Search 1/2
Chapter Search : 1/20
Time Search : 00:00:13/01:34:37
Repeat Mode : 0ff
Full Screen : Original
Picture Settings : Normal
Audio : 1/1 JPN 2CH
Subtitle : 0/2 Off
Angle : 1/1
BONUSVIEW Video : Off
BONUSVIEW Audio : 0/1 Off
<
Change
"
Enter ' Return
) button,
) button, a
English 47
Page 50

Basic Functions
NOTE
✎
`Depending on the disc, the Tools menu may differ.
Moving to a Desired Scene Directly
hzZy
1. During playback, press the TOOLS button.
2. Press the ▲▼ buttons to select Title Search,
Chapter Search, or Time Search.
3. Press the ◄► or number button to select
desired Title, Chapter or Time, then press the
ENTER button.
Repeating the Title or Chapter
hzZy
To repeat the disc title or chapter.
Depending on the disc, the Repeat function may
not be available.
1. During playback, press the TOOLS
button.
Press the ▲▼ buttons to select Repeat Mode.
2.
3. Press the ◄► buttons to select Chapter or
Title, then press the ENTER button.
4. To return to normal play, press the TOOLS
button again.
5.
Press the ▲▼ buttons to select Repeat Mode.
6. Press the ◄► buttons to select Off, then
press the ENTER button.
Repeating a Section
hzZy
1. During playback, press the TOOLS
button.
Press the ▲▼ buttons to select Repeat Mode.
2.
3. Press the ◄► buttons to select Repeat A-B,
then press the ENTER button.
4. Press the ENTER button at the point where
you want repeat play to start (A).
5. Press the ENTER button at the point where
you want repeat play to stop (B).
6. To return to normal play, press the TOOLS
button again.
7.
Press the ▲▼ buttons to select Repeat Mode.
8. Press the ◄► buttons to select Off, and then
press the ENTER button.
NOTE
✎
`If you set point (B) before 5 seconds has lapsed, a
prohibition message appears.
`Depending on the disc, the menu items may differ
and this menu may not be available.
Changing to Full Screen
1. During playback, press the TOOLS button.
2. Press the ▲▼ buttons to select Full Screen.
3. Press the ◄► buttons to select the desired
mode.
NOTE
✎
`This function is available when the TV aspect ratio is
16:9 full. (See page 32)
50 English
Page 51

Selecting the Picture Settings
hzZy
This function enables you to adjust video quality
when the player is connected to a TV.
1. During playback, press the TOOLS button.
2. Press the ▲▼ buttons to select Picture
Settings, and then press the ENTER button.
3. Press the ◄► buttons to select the desired
Picture Settings, and then press the ENTER
button.
• Dynamic : Choose this setting to increase
Sharpness.
• Normal : Choose this setting for most
viewing applications.
• Movie : This is the best setting for watching
movies.
• User : Lets you adjust the sharpness and
noise reduction function respectively.
NOTE
✎
`When you use BD wise function, this menu will not
appear.
Selecting the Audio Language
hzZx
You can also operate this function by
pressing the AUDIO button on the
remote control.
1.
During playback, press the TOOLS button.
2.
Press the ▲▼ buttons to select Audio.
3.
Press the ◄► buttons to select the desired
audio language.
NOTE
✎
`The ◄► indicator will not appear on the screen
if the BONUSVIEW section does not contain any
BONUSVIEW audio settings.
`Information about the main feature/BONUSVIEW
mode will also appear if the Blu-ray Disc has a
BONUSVIEW section.
Press the ◄► button to switch between main
feature and BONUSVIEW audio modes.
`The languages available through the Audio Language
function depend on the languages that are encoded
on the disc. This function or certain languages may
not be available.
`A Blu-ray Disc can contain up to 32 audio languages
and a DVD up to 8.
`Some Blu-ray Discs may allow you to select either
the PCM or Dolby digital audio soundtrack in English.
`If you press the AUDIO button on the remote control,
Audio bar appears.
Press the RETURN button to remove the Audio bar.
Selecting the Subtitle Language
hZx
You can also operate this function by
pressing the SUBTITLE button on the
remote control.
1. During playback, press the TOOLS button.
2. Press the ▲▼ buttons to select Subtitle.
3. Press the ◄► buttons to select the desired
subtitle language.
NOTE
✎
`Depending on the Blu-ray Disc / DVD, you may be
able to change the desired subtitle in the Disc Menu.
Press the DISC MENU button.
`This function depends on the selection of subtitles
that are encoded on the disc and may not be
available on all Blu-ray Discs/DVDs.
`A Blu-ray Disc can contain up to 255 subtitle
languages and a DVD up to 32.
`Information about the main feature/BONUSVIEW
mode will also appear if the Blu-ray Disc has a
BONUSVIEW section.
`This function changes both the primary and
secondary subtitles at the same time.
`The total numbers of primary and secondary
subtitles are displayed respectively.
`If you press the SUBTITLE button on the remote
control, the subtitle bar appears.
Press the RETURN button to remove the subtitle bar.
06 Basic Functions
English 47
Page 52

Basic Functions
Changing the Camera Angle
hZ
When a Blu-ray Disc/DVD contains multiple angles
of a particular scene, you can use the ANGLE
function.
1. During playback, press the TOOLS button.
2. Press the ▲▼ buttons to select Angle.
3. Press the ◄► buttons to select the desired
Angle.
Setting BONUSVIEW
h
The BONUSVIEW feature allows you to view
additional content (such as commentaries) in a
small screen window while the movie is playing.
This function is only available if the disc has the
Bonusview feature.
1. During playback, press the TOOLS button.
2. Press the ▲▼ buttons to select BONUSVIEW
Video or BONUSVIEW Audio.
3. Press the ◄► buttons to select the desired
Bonusview.
NOTE
✎
`If you switch from BONUSVIEW Video, BONUSVIEW
Audio will change automatically in accordance with
BONUSVIEW Video.
`2D contents are playing convert into 3D, bonusview
function is not available.
(Depending on discs, black outline may be shown)
Listening to Music
ow
Playing an Audio CD (CD-DA)/MP3
1. Insert an Audio CD (CD-DA) or an MP3 Disc.
• For an Audio CD (CD-DA), the first track
plays automatically.
• For an MP3 disc, press the ▲▼ buttons to
select Music, then press the ENTER button
on the connected device popup.
Press the ENTER button.
Audio CD (CD-DA)/MP3 Screen Elements
31
1/13
Music
TRACK 001
7
+
6
00:13 / 00:43
Audio CD
"
5
Displays the music information.
1
Displays the playlist.
2
Display the current track/total tracks.
3
Displays buttons available.
4
Shows the current play time/total play time.
5
Displays the current playback status.
6
Displays the repeated playback status.
7
2
TRACK 001
00:43
TRACK 002
03:56
TRACK 003
04:41
TRACK 004
04:02
Enter < Page / Tools ' Return
4
52 English
2. Press the ▲▼ buttons to select the track
you want to play, and then press the ENTER
button.
Page 53

Repeat an Audio CD (CD-DA)/MP3
1. During the Playlist playback, press the
TOOLS button.
2. Press the ▲▼ buttons to select
Repeat Mode, and then press the ◄►
buttons to select the desired repeat mode.
3. Press the ▲▼ buttons to select Shuffle
Mode, and then press the ◄► buttons to
select On or Off.
4. Press the ENTER button.
Off
) One Song The current song is repeated.
(
) All All songs are repeated.
(
Songs are played in the order in which
they were recorded.
The random option plays songs in
)
(
Shuffle Mode
random order. To operate this function,
please set the shuffle mode to On.
Playlist
1. Insert an Audio CD (CD-DA) or an MP3 Disc.
• For an Audio CD (CD-DA), the first track
plays automatically.
• For an MP3 disc, press the ▲▼ buttons
to select Music, then press the ENTER
button.
2. To move to the Music List, press the STOP
) or RETURN button.
(
The Music List screen appears.
3. Press the YELLOW (C) button.
4. Press the ▲▼◄► buttons to move to a
desired track, and then press the ENTER
button. A check appears on the track.
Repeat this procedure to select additional
tracks.
TRACK 002
03:56
TRACK 004
04:02
TRACK 006
03:40
TRACK 008
03:52
1/2 Page
Audio CD | Music
TRACK 001
00:43
TRACK 003
04:41
TRACK 005
03:43
TRACK 007
04:06
Close Edit Mode
Selected Items : 3
( )
Page / Tools " Select ' Return
5. To remove a track from the list, move to the
track, and then press the ENTER button
again.
The check on the track is cancelled.
6. When done, press the TOOLS button.
7. Press the ▲▼ buttons to select Play
Selected, and then press the ENTER button.
The tracks you selected play automatically.
Music
TRACK 001
+
00:13 / 00:43
Audio CD
TRACK 001
00:43
TRACK 002
03:56
TRACK 003
04:41
"
Enter / Tools ' Return
1/3
06 Basic Functions
8. To go to the Music List, press the RETURN
button.
NOTE
✎
`You can create a playlist with up to 99 tracks on
Audio CDs (CD-DA).
English 47
Page 54

Basic Functions
Playing back Pictures
G
Playing a JPEG files
1. Insert a JPEG disc.
2. Press the ▲▼ buttons to select Photos, and
then press the ENTER button.
3. Press the ▲▼◄► buttons to select the folder
you want to play, and then press the ENTER
button.
4. Press the ▲▼◄► buttons to select the photo
you want to play, and then press the ENTER
button.
NOTE
✎
`You can’t enlarge the subtitle and PG graphic in the
full screen mode.
Using the TOOLS button
You can use various function by pressing
the TOOLS button.
Tools
Start Slide Show
Background Music : Off
Background Music Setting
Zoom
Rotate
Picture Settings
Information
"
Enter ' Return
• Zoom : Select to enlarge the current picture.
(Enlarged up to 4 times)
• Rotate : Select to rotate the picture. (This will
rotate the picture either clockwise or counter
clockwise.)
• Picture Settings : Select this if you want to
adjust the picture quality.
• Information : Shows the picture information
including the name and size, etc.
NOTE
✎
`To enable the background music function, the photo
file must be in the same storage media as the music
file. However, the sound quality can be affected by
the bit rate of the MP3 file, the size of the photo, and
the encoding method.
Using the Slide Show function
1. Press the TOOLS button.
2. Press the ▲▼ buttons to select Start Slide
Show, and then press the ENTER button.
The Slide Show starts.
3. To pause the slide show, press the TOOLS
button again.
Tools
Pause Slide Show
Slide Show Speed : Normal
Slide Show Effect : Blind
Background Music : Off
Background Music Setting
Zoom
Rotate
Picture Settings
Information
"
Enter ' Return
• Start Slide Show : Select to start the slide
show.
• Background Music : Select to listen to music
while viewing a picture.
• Background Music Setting : Select to set the
background music setting.
54 English
4. Press the ▲▼ buttons to select Pause Slide
Show, and then press the ENTER button.
5. You can also set the slide show speed and
effect using the same method.
Page 55

Playing back a USB Storage Device
You can use the USB connection to play
multimedia files (MP3, JPEG, DivX, etc) located
from a USB storage device.
1. Move to the Home menu.
My Contents
Videos
Photos
Music
My Devices Internet Settings
d WPS(PBC)
2. In Stop mode, connect the USB storage
device to the USB port on the front panel of
the player.
My Contents
Videos
Connected Device
Photos
Music
123
NOTE
✎
`You must remove the USB storage device safely
(by performing the “Safely Remove USB” function)
in order to prevent a possible damage to the USB
memory. Press the MENU button to move to the
Home menu, select the YELLOW (C) button, and
then press the ENTER button.
`If you insert a disc when playing a USB storage
device, the device mode changes to “DVD or CD”
automatically.
06 Basic Functions
My Devices Internet Settings
"
Enter ' Return
Safely Remove USB d WPS(PBC)
3. Press the ENTER button.
4. Press the ▲▼◄► buttons to select the
desired Videos, Music, or Photos, and then
press the ENTER button.
5. For playing back Video, Music or Photo files,
see pages 47~54.
English 47
Page 56

Network Services
You can enjoy various network services such as
Smart Hub or BD-LIVE by connecting the player
to your network.
Read the following instructions before using any
network service.
1. Connect the player to the network.
(See pages 27~28)
2. Configure the network settings.
(See pages 38~42)
Using Smart Hub
Using Smart Hub, you can stream movies, videos,
and music from the Internet, access various for
pay or free-of-charge applications and view them
on your TV. Application content includes news,
sports, weather forecasts, stock market quotes,
maps, photos, and games.
You can also start this function by
pressing the SMART HUB button on
the remote control.
Starting Smart Hub for the First Time
To start Smart Hub for the first time, follow these
steps :
1. Go to the Home menu.
3. The Smart Hub screen appears.
In a few cases, the Country screen appears
immediately after.
4. If the Country screen has appeared, press the
▲▼ buttons to select your country, then press
the ENTER button.
NOTE
✎
`Certain applications are available only in certain
countries.
5. The Terms of Service Agreement screen
appears.
If you want to agree, press the ◄► buttons
to select Agree, then press the ENTER
button.
NOTE
✎
`Screens can take a few seconds to appear.
6. The Service Update screen appears and
installs a number of services and applications.
When done, it closes. The applications and
services downloaded are displayed on the
Smart Hub screen. This may take some time.
NOTE
✎
`Smart Hub may close momentarily during the
installation process.
`A number of screens may appear after installation.
You can press the ENTER button to close them or let
them close on their own.
7. To start an application, press the ▲▼◄►
buttons to highlight a widget, then press the
ENTER button.
My Contents
Videos
Photos
Music
My Devices Internet Settings
d WPS(PBC)
2. Press the ◄► buttons to select Internet, and
then press the ENTER button.
56 English
Page 57

Smart Hub at a Glance
1 2 3 5
Search
Your Video
Recommended
Contents 1
Contents 2
Contents 3
xxxxxxxx
xxxxxxxx
Contents 7
xxxxxxxx
Contents 1
xxxxxxxx
Contents 2
Contents 8
xxxxxxxx
xxxxxxxx
Contents 4
Contents 3
xxxxxxxx
xxxxxxxx
Contents 9
Contents 10
xxxxxxxx
xxxxxxxx
a
Login b Sort by Edit Mode d Settings
Samsung Apps
Contents 1 Contents 2 Contents 3 Contents 4
Contents 4
xxxxxxxx
xxxxxxxx
Contents 5
xxxxxxxx
Contents 11
xxxxxxxx
4
Contents 5
xxxxxxxx
Contents 6
xxxxxxxx
Contents 12
xxxxxxxx
7 6
Commercial : Displays the Smart Hub Guide, an
introduction to the player, and new application
1
introductions.
Your Video : Provides recommendations for videos
based on your tastes.
• Lets you see movie recommendations based on
your previous preferences.
• Lets you select a movie, displays a list of VOD
2
(Video on Demand) providers that have the movie,
and then lets you choose a provider for streaming.
(Streaming is unavailable in some areas.)
• For instructions to use Your Video, please visit
www.samsung.com.
Search : Provides an integrated search of your video
providers and connected AllShare devices.
• Usable while using Smart Hub (except when you
are watching a Blu-ray Disc).
3
• For easy access, use the SEARCH button on the
remote control.
• For instructions to use search function, please
visit www.samsung.com.
Samsung Apps : You can download various for pay
4
or free-of-charge application services.
Recommended : Displays recommended contents
5
managed by Samsung.
Navigation Help : Displays the remote control
buttons you can use to navigate in Smart Hub.
• RED (A) : To log in to Smart Hub.
6
• GREEN (B) : To sort the applications.
• YELLOW (C) : To edit the applications.
• BLUE (D) : To change the settings of Smart Hub.
My Applications : Displays your personal gallery
of applications which you can add to, modify, and
7
delete.
NOTE
✎
`Samsung Electronics takes no legal responsibility for
any interruption of the Smart Hub service caused by
the service provider for any reason.
`The Smart Hub service downloads and processes
data via the Internet so that you can enjoy the
Internet contents on your TV screen.
If the Internet connection is unstable, the service
may be delayed or interrupted.
Furthermore, the player may turn off automatically in
response to conditions on the Internet.
If this occurs, check the Internet connection and try
again.
`Application services may be provided in English only
and the contents available may vary, depending on
your area.
`For more information about a Smart Hub service,
visit the web site of the applicable service provider.
`The services provided are subject to change by the
Smart Hub service provider without notice.
`The Smart Hub service contents may differ
depending on the player’s firmware version.
07 Network Services
English 57
Page 58

Network Services
Using the Keypad
Through your remote, you can use the On-Screen
Keypad to enter letters, numbers, and symbols.
1 2 3
. , –
abc def
1
2 6
3
4 5 6
ghi jkl mno
7 8 9
pqrs tuv wxyz
0
Shift Delete
T9
ab Ab AB 1
b
Input Method / Language: English
4 5
The current keypad.
1
Use to enter letters, numbers, and symbols.
Press the SUBTITLE button on the remote control to
shift the input mode.
2
: ab, Ab, AB, numbers or icons.
Displays the current input mode.
3
Press the GREEN (B) button on the remote control
4
to change the input method. (T9 or ABC)
Press the TOOLS button on the remote control to
5
change the language.
Press the AUDIO button on the remote control to
6
delete a character.
Entering Text, Numbers and Symbols
To enter text, press the number button on the
remote that corresponds to the letter you want
to enter. Press the button rapidly to enter a letter
that is not the first letter listed on the On-Screen
keypad button. For example, if you want to enter
the letter b, press the 2 button on your remote
rapidly twice. To enter the first letter listed on a
button, press, release, and then wait.
To move within the text, use the Arrow buttons.
To delete text, move the cursor to the right of the
character you want to delete, and then press the
AUDIO button. To change case or enter numbers
or punctuation, press the SUBTITLE button.
Creating an Account
To establish your own, exclusive, configuration of
Smart Hub, create your own Smart TV Account.
To create an account, follow these steps:
1. Press the RED (A) button on your remote
control. The Create Account screen appears.
Search
Your Video
Login
Recommended
Contents 7
xxxxxxxx
Contents 1
xxxxxxxx
Smart TV ID
Password
Contents 8
xxxxxxxx
Press [Enter]
Contents 1
Contents 2
Press [Enter]
xxxxxxxx
Remember my Smart TV ID and password
Contents 3
Contents 2
Login Cancel
xxxxxxxx
xxxxxxxx
Create Account Forgot Password
Contents 9
xxxxxxxx
a
Login b Sort by Edit Mode d Settings
2. Press the ▲▼◄► buttons to select Create
Account, and then press the ENTER button.
3. On the next screen, select Smart TV ID, and
then press the ENTER button.
An entry screen and keypad appear.
4. Use the keypad to enter your e-mail address.
This will serve as your ID.
NOTE
✎
`The keypad works like the keypad on a cell phone.
5. When done, press the ENTER button to
select OK, and then press the ENTER button
again. The Create Account screen re-appears.
6. Select Password, and then press the ENTER
button. An entry screen and a keypad appear.
7. Use the keypad to enter a password.
The password can be any combination of
letters, numbers, and symbols.
NOTE
✎
`Press the RED (A) button on your remote to show or
hide the password as you enter it.
xxxxxxxx
Contents 3
xxxxxxxx
Contents 4
xxxxxxxx
Contents 10
xxxxxxxx
Samsung Apps
Contents 1 Contents 2 Contents 3 Contents 4
Contents 4
Contents 5
xxxxxxxx
xxxxxxxx
Contents 6
Contents 5
xxxxxxxx
xxxxxxxx
Contents 11
Contents 12
xxxxxxxx
xxxxxxxx
58 English
Page 59

8. When done, press the ENTER button to
select OK, and then press the ENTER button
again. The Create Account screen re-appears.
9. Select Confirm password, and then press
the ENTER button.
10. Repeat Steps 7 and 8.
11. When the Create Account screen re-appears,
select Create Account, and then press the
ENTER button. The Confirmation window
appears.
12. Select OK, and then press the ENTER button.
The Continue to Register Service window
appears.
13. Select Go Register, and then press the
ENTER button.
14. The Register Service Account Window
appears.
• If you have existing accounts with any of
the listed providers, you can associate the
provider account and the provider account
password with your Smart TV Account.
Registration makes it easier to access
the providers web site. For registration
instructions, go to Step 2 in Account
Management under the Settings Menu.
• If you don’t have existing provider accounts
or do not want to register existing accounts
at this time, select OK, and then press the
ENTER button. You can also let the window
close on its own in about a minute.
NOTE
✎
`You must use an e-mail address as an ID.
`You can register up to 10 User Accounts.
`You do not need an account to use Smart Hub.
Account Log In
To log in to your Smart TV Account, follow these
steps:
1. With the Smart Hub main screen displayed
on your TV, press the RED (A) button on your
remote. The Create Account screen appears.
2. Select the Down Arrow next to the Smart TV
ID field, and then press the ENTER button.
3. Select your ID from the list that appears, and
then press the ENTER button. The Create
Account screen re-appears.
4. Select Password, and then press the ENTER
button. An entry screen and a keypad
appears.
5. Using the keypad and your remote, enter your
password. When done, press the ENTER
button, select OK, and then press the ENTER
button again.
NOTE
✎
`If you want Smart Hub to enter your password
automatically, select Remember my Smart TV ID and
password after you have entered your password,
and then press the ENTER button. A check
appears. Smart Hub will now enter your password
automatically when you select or enter your ID.
The Settings Menu - BLUE (D)
The Settings Menu Screen gives you access
to account management, reset, and properties
functions.
To access the Settings Menu, and then select a
menu item, follow these steps:
1. Press the BLUE (D) button on your remote.
2. Press the ▲▼ to select a menu item, and
then press the ENTER button.
The functions on the Settings Menu screen are
described below.
NOTE
✎
`The Service Manager item listed in the Settings
Menu is not available for Blu-ray Disc players.
Account Management
The Account Management Menu contains
functions that let you register your service provider
accounts, change your Smart Hub password, and
delete or deactivate your Smart TV Account.
07 Network Services
English 59
Page 60

Network Services
Register Service Account
If you have existing accounts with any of the
providers listed by the Register Service Account
function, you can associate the provider account
and the provider account password with your
Smart TV Account. If you associate the account,
you will be able to log onto the account through
Smart Hub easily, without entering your account
name or password.
To use the Register Service Account function,
follow these steps:
1. In the Account Management menu, select
Register Service Account, and then press the
ENTER button. The Register Service Account
Window appears.
2. Press the ▲▼ buttons to select a Service
Provider you want to associate with your
Smart TV Account, and then press the
ENTER button.
NOTE
✎
`If you have a Samsung apps account and you want
to use the Samsung Apps function in Smart Hub, you
must register your Samsung Apps account here. See
pages 63~65 for more information.
3. Press the ▲▼ buttons to select Register, and
then using your remote and the on-screen
Keypad, enter your site ID and password.
When done, press the ENTER button.
NOTE
✎
`This is the ID and password you normally use to
access your account on this site.
4. If you have entered the ID and password
correctly, the Registered Successfully
message appears.
5. If you pressed OK, repeat Steps 2 through 4
to associate another Service Provider.
6. When you are done, press the RETURN
button.
Change Password
The Change Password function lets you change
your Smart Hub password. To change the
password, follow these steps:
1. Select Change Password, and then press
the ENTER button.
2. Enter your current password. The next screen
appears.
3. On the next screen, enter a new password on
the first line. Enter it again on the second line
to confirm.
4. The Changing Password Complete message
screen appears. Press the ENTER button
or wait for the screen to close - about 5
seconds.
Remove from TV Account list
The Remove Service Accounts function cancels
all your current registered Service Accounts that
you registered on the Register Service Account
screen.
Deactivate Account
The Deactivate Account function deactivates
your Smart TV Account and deletes it and all your
account settings entirely from Smart Hub.
Reset
The Reset function initializes all downloaded
widgets, erases all user accounts and settings
from the player, and resets all Smart Hub settings
to the factory default settings. It then restarts
Smart Hub as if it were starting for the first time.
Your account, however, remains on the Smart
Hub server. To log into your account, enter your
ID and password on the Create Account screen.
To use the Reset function, follow these steps:
1. In the Settings menu, select Reset, and then
press the ENTER button.
The Reset screen appears.
2. Enter the your Security password. This is the
password you entered if you set up a BD or
DVD Parental rating (See page 44). If you did
not, enter 0000.
60 English
Page 61

3. After a few moments, Smart Hub automatically
resets. The screen may go black, then Smart
Hub re-appears. In a few moments, it starts
the re-initialization procedure.
4. To complete the re-initialization, go to Step 4
in Starting Smart Hub for the First Time. (See
page 56)
NOTE
✎
`If you forgot your password, press the STOP (
button on the front panel of the player for more than
5 seconds with no disc inserted.
)
Properties
The Properties menu item lists three functions that
display information about Smart Hub :
Detail
Lists information about Smart Hub including
version number, the number of services installed,
memory usage, and the unique product ID.
Terms of Service Agreement
Displays the Terms of Service Agreement.
The Edit Mode Menu - YELLOW (C)
The functions in the Edit Mode menu let you
manipulate the widgets in the My Applications
section of the Smart Hub screen. Using these
functions, you can lock and unlock access to
some widgets, New Folder and move widgets to
them, rename folders, delete widgets, and change
the position of widgets on the screen.
To access the Edit Mode Menu, and then select a
menu item, follow these steps:
1. Press the YELLOW (C) button on your
remote. The Edit Mode menu bar appears on
the bottom of the screen.
2. Press the ▲▼◄► to select a menu item, and
then press the ENTER button.
The functions in the Edit Mode Menu bar are
described below.
NOTE
✎
`Some menu items may not appear on the screen.
To see these items, press the ◄► to move to the
screen edge, and then press one more time to reveal
the items.
`You can close the bar by highlighting the X on the
bottom right side, and then pressing the ENTER
button.
Move
The Move function lets you change the screen
position of a widget. To use the Move function,
follow these steps:
1. Press the YELLOW (C) button on your
remote.
2. Select a widget, and then press the ENTER
button. A check appears above the widget.
3. Press the ▲▼◄► to select Move, and then
press the ENTER button. A position change
icon appears above the widget.
4. Press the ▲▼◄► to move the icon. Press
the ENTER button when the icon is in the
position of your choice. The widget moves to
its new location.
Move to Folder
The Move to Folder function lets you move a
widget to a folder. To use the Move to Folder
function, follow these steps:
1. Press the YELLOW (C) button on your
remote.
2. Select a widget, and then press the ENTER
button. If you already create a folder, the
widget can be moved.
3. Press the ▲▼◄► to select Move to Folder,
and then press the ENTER button. The Move
to Folder window opens.
4. Press the ▲▼◄► to select a folder, and
then press the ENTER button. The Moved to
Folder message appears, and then closes.
The widget has been moved to the folder.
07 Network Services
English 61
Page 62

Network Services
To Access Widgets in a Folder
1. Close the Edit Mode menu.
2. In My Applications, press the ▲▼◄► to
select a folder, and then press the ENTER
button. The folder opens.
3. Select a widget, and then press the ENTER
button. The widget’s application or service
starts.
To Edit Items in a Folder
Select a folder, and then press the ENTER button.
The folder opens.
Press the YELLOW (C) button on your remote.
The Edit buttons appear at the bottom of the
screen.
These buttons work the same as the Edit Mode
menu buttons on the main screen. For example,
to move a widget back to the My Applications
main screen:
1. Select the widget.
2. Select Move to Folder, and then press the
ENTER button. The Move to Folder window
appears.
3. Select My Applications, and then press the
ENTER button. The Move to Folder window
closes and the widget returns to the main My
Applications screen.
New Folder
The New Folder function lets you create and name
new folders. Once you have created a folder, you
can move widgets into it. To use the New Folder
function, follow these steps:
1. Press the YELLOW (C) button on your
remote.
2. Press the ▲▼◄► to move the cursor to New
Folder, and then press the ENTER button.
The New Folder window and a keypad
appear.
3. Use the keypad to enter the name of the
folder, and then press the ENTER button.
The New Folder screen closes and the New
Folder appears on the Smart Hub screen.
Rename Folder
The Rename Folder function lets you rename
folders. To use the Rename Folder function, follow
these steps:
1. Press the YELLOW (C) button on your
remote.
2. Press the ▲▼◄► to select a folder, and then
press the ENTER button.
3. Press the ▲▼◄► to select Rename a Folder,
and then press the ENTER button. The Folder
Rename window and a keypad appears.
4. Use the keypad to enter a new name, and
then press the ENTER button. The Rename
window closes and the new name appears
below the folder.
Lock
The Lock function lets you lock some widgets
in My Applications so they can not be opened
without entering the Parental Security Code.
To use the Lock function, follow these steps:
1. Press the YELLOW (C) button on your
remote.
2. Press the ▲▼◄► to select a widget, and
then press the ENTER button. If the widget
can be locked, the Lock menu item is
enabled.
3. Press the ▲▼◄► to select Lock, and then
press the ENTER button. The Lock Service
window appears.
4. Enter your Parental Security Code (See
page 44). If you have not created a Parental
Security Code, enter 0000.
5. Press the ENTER button. The Lock Service
window appears confirming the lock, and
then closes. A lock symbol appears next to
the widget.
62 English
Page 63

Unlock
Samsung Apps
07 Network Services
1. Press the YELLOW (C) button on your
remote.
2. Press the ▲▼◄► to select a locked widget,
and then press the ENTER button.
3. Press the ▲▼◄► to select Unlock, and then
press the ENTER button. The Lock Service
window appears.
4. Enter the Parental Security Code (See page
44). If you have not created a Parental
Security Code, enter 0000.
5. Press the ENTER button. The Lock Service
Released window appears confirming the lock
has been release, and then closes.
Delete
The Delete function lets you delete widgets from
My Applications. To use the Delete function, follow
these steps:
1. Press the YELLOW (C) button on your
remote.
2. Press the ▲▼◄► to select a widget, and
then press the ENTER button.
3. Press the ▲▼◄► to select Delete, and then
press the ENTER button. The message, “Do
you want to delete selected item(s)?” appears.
4. Select Ye s, and then press the ENTER
button. The widget is deleted.
The Sort Menu - GREEN (B)
The functions in the Sort Menu let you sort the
widgets in My Applications by Name, Date,
Frequency (of use), and Category. If you manually
change the position of a widget, the Sort Menu
automatically highlights User Defined when you
start it.
To sort the widgets in My Applications, follow
these steps:
1. Press the GREEN (B) button on your remote.
2. Press the ◄► to select a sorting method,
and then press the ENTER button. Smart
Hub sorts the widgets by the method you
have chosen.
Samsung Apps lets you download for pay or freeof-charge applications and services to your Bluray Disc player and view or use them on your TV.
These applications and services include videos,
music, photos, games, news, sports, etc. Widgets
for the new apps appear in My Applications.
Additional applications and services are added
regularly.
For Pay Apps
To download for pay apps, you need to create a
Samsung Apps account and add a credit card to
the account.
To create a Samsung Apps account, please visit
www.samsung.com
NOTE
✎
`This service may not provided in some countries.
Accessing the Samsung Apps Screen
To access Samsung Apps, press the ▲▼◄►
buttons to navigate to the Samsung Apps area
on the Smart Hub main screen, and then press
the ENTER button. The Samsung Apps screen
appears.
NOTE
✎
`If this is the first time you are accessing this screen,
the terms of service window appears. If you want
to agree, select Agree, and then press the ENTER
button.
English 63
Page 64

Network Services
Using the Samsung Apps Screen
To use the Samsung Apps screen, follow these
steps:
1. Press the ◄► buttons to move to the
category list on the left.
2. Press the ▲▼ to highlight a category. In a few
seconds, the Samsung Apps screen displays
the applications in that category. The Sort
tabs appear across the top.
3. Press the ► button to move to the displayed
applications or services.
4. Press the ▲▼◄► buttons to select an
application or service, and then press the
ENTER button. The Application Details screen
appears describing the service or application.
5. Select Download Now, and then press the
ENTER button. If the application or service is
free, it downloads and runs. If not, and there
is a fee, follow the directions on the screen to
complete the download.
NOTE
✎
`Some apps are free to download, but require
registration with the provider or a paid account with
the provider to use.
`Widgets for applications and services you have
downloaded from Samsung Apps appear in My
Applications.
Sort By Tabs
You can access the Sort By tabs on the top of
the screen using the ▲▼◄► buttons. Each
tab displays the services or applications in the
category you chose, sorted by the criteria on the
tab (Recommended, Most Downloaded, Most
Recent, Name).
You can also use the BLUE (D) button on your
remote to access the Sort By tabs. Each time
you press the BLUE (D) button, you change the
display from one sort tab to the next.
Samsung Apps by category
The following categories are available:
• What’s New? : Displays newly registered
applications.
• Video : Displays various video media such as
movies, TV shows, and short length videos.
• Game : Displays various games such as sudoku
and chess.
• Sports : Displays various sports media services
such as match information, images, and short
length videos.
• Lifestyle : Includes various lifestyle media
services such as music, personal photo
management tools, and social networking such
as Facebook and Twitter.
• Information : Includes various information
services such as news, stocks, and weather.
• Other : Includes other miscellaneous services.
My Account
My Account gives you access to your Samsung
Apps order and download history, and to the My
Apps Cash screen. You must have a Samsung
Apps account to access this information.
Help
If you have questions about Samsung Apps,
check Help first. If none of the tips apply, please
visit www.samsung.com.
To use the Help function, follow these steps:
1. Press the ▲▼◄► buttons to select Help,
and then press the ENTER button.
2. Press the ▲▼ to scroll the Help text.
3. Press the ◄ to exit Help.
64 English
Page 65

Using the colored buttons on your remote
with Samsung Apps
• RED (A) (Login) : To log into your Smart TV
Account.
• GREEN (B) (Thumbnail View/List View) : To
toggle applications between Thumbnail and List
view.
• BLUE (D) (Sort By) : To sort the applications
in a category by Recommended, Most
Downloaded, Most Recent, or Name.
• Return : To return to the previous menu.
NOTE
✎
`The Internet contents services may be added or
deleted by providers without notice.
For instructions to use Your Video or Search
Function, please visit www.samsung.com
BD-LIVE™
Once the player is connected to the network, you
can enjoy various movie-related service contents
using a BD-LIVE compliant disc.
1. Attach a USB memory stick to the USB jack
on the side of the player, and then check
its remaining memory. The memory device
must have at least 1GB of free space to
accommodate the BD-LIVE services.
2. Insert a Blu-ray Disc that supports BD-LIVE.
3. Select an item from various BD-LIVE service
contents provided by the disc manufacturer.
NOTE
✎
`The way you use BD-LIVE and the provided contents
may differ, depending on the disc manufacturer.
Using the AllShare Function
AllShare lets you play music, video, and photo
files located in your PC or your DLNA compatible
mobile phone or NAS on the player.
To use AllShare with your player, you must
connect the player to your network (See pages
27~28).
To use AllShare with your PC, you must install
AllShare software on your PC.
If you have a DLNA compatible mobile phone or
NAS, you can use AllShare without any additional
software.
You can download the PC software and get
detailed instructions for using AllShare from the
Samsung.com web site.
07 Network Services
English 65
Page 66

Appendix
Troubleshooting
Before requesting service, please check the following.
PROBLEM SOLUTION
No operation can be performed with the
remote control.
Disc does not play. • Ensure that the disc is installed with the label side facing up.
Disc Menu does not appear. • Ensure that the disc has disc menus.
• Check the batteries in the remote control. They may need replacing.
• Operate the remote control at a distance of no more than 20 feet.
• Remove batteries and hold down one or more buttons for several minutes
to drain the microprocessor inside the remote control to reset it. Reinstall
batteries and try to operate the remote control again.
• Check the region number of the Blu-ray Disc/DVD.
The prohibition message appears on the
screen.
Play mode differs from the Setup Menu
selection.
The screen ratio cannot be changed. • The Screen Ratio is fixed on your Blu-ray Disc/DVD.
No audio. • Make sure you have selected the correct Digital Output in the Audio Options
The screen is blocked • If the HDMI output is set to a resolution your TV cannot support (for
• This message appears when an invalid button is pressed.
• The Blu-ray Disc/DVD’s software doesn’t support the feature (e.g., angles).
• You’ve requested a title or chapter number or search time that is out of
range.
• Some of the functions selected in the Setup Menu may not work properly if
the disc is not encoded with the corresponding function.
• This is not a problem with the player.
Menu.
example, 1080p), you may not see a picture on your TV.
• Press the STOP (
no disc inside. All settings will revert to the factory settings.
• When the factory default settings are restored, all stored user BD data is
deleted.
) button (on front panel) for more than 5 seconds with
66 English
Page 67

PROBLEM SOLUTION
Forgot password • Press the STOP (
no disc inside. All settings including the password will revert to the factory
settings.
Don’t use this unless absolutely necessary.
• When the factory default settings are restored, all stored user BD data is
deleted.
08 Appendix
) button (on front panel) for more than 5 seconds with
If you experience other problems. • Go to the contents and find the section of the user manual that contains the
explanations regarding the current problem, and follow the procedure once
again.
• If the problem still cannot be solved, please contact your nearest Samsung
authorized service center.
The picture is noisy or distorted • Make sure that the disc is not dirty or scratched.
• Clean the disc.
No HDMI output. • Check the connection between the TV and the HDMI jack of the player.
• Check if your TV supports 480p, 720p, 1080i, 1080p HDMI input
resolution.
Abnormal HDMI output screen. • If random noise appears on the screen, it means that TV does not support
HDCP (High-bandwidth Digital Content Protection).
AllShare function
I can see folders shared through AllShare,
but I cannot see the files.
• AllShare shows only files corresponding to the Image, Music, and Movie
categories. Files that do not correspond to these categories may not be
displayed.
Video is played intermittently. • Check if the network is stable.
• Check if the network cable is properly connected and if the network is not
overloaded.
• The wireless connection between the DLNA compatible device and the
player is unstable.
Check the connection.
AllShare connection between player and PC
is unstable.
• The IP address under the same subnetwork should be unique. If they are
not, IP interference can cause this phenomenon.
• Check if you have a firewall enabled.
If so, disable the firewall function.
English 67
Page 68

Appendix
PROBLEM SOLUTION
BD-LIVE
I cannot connect to the BD-LIVE server. • Check whether the network connection is successful or not by using the
Network Status menu. (See page 42)
• Check whether the USB memory device is connected to the player.
• The memory device must have at least 1GB of free space to accommodate
the BD-LIVE service.
You can check the available size in BD Data Management. (See page 43)
• Check whether the BD-LIVE Internet Connection menu is set to Allow(All).
• If all above fails, contact the contents provider or update the player to the
latest firmware.
When using the BD-LIVE service, an error
occurs.
NOTE
✎
`When the factory default settings are restored, all stored user BD data is deleted.
• The memory device must have at least 1GB of free space to accommodate
the BD-LIVE service.
You can check the available size in BD Data Management. (See page 43)
Repairs
If you contact us to repair your player, an administration fee may be charged if either:
1. An engineer is called out to your home at your request and there is no defect in the product.
2. You bring the unit to a repair center and there is no defect in the product.
We will provide you with the amount of the administration fee before we make a home visit or begin any
work on your player.
We recommend you read this manually thoroughly, search for a solution on line at www.samsung.com,
or contact Samsung Customer Care at 1-800-SAMSUNG (726-7864) before seeking to repair your
player.
68 English
Page 69

Index
08 Appendix
A
Accessories 16
AllShare 65
Anynet+ (HDMI-CEC) 42
Audio Language 51
B
Background Music 54
BD Data Management 43
BD-LIVE 42, 65
BD Wise 32
BONUSVIEW 52
C
Camera Angle 52
Contact Samsung 46
D
Digital Output 35~37
Disc Menu 48
Disc Structure 48
Disc Types 11~13
Downmixing Mode 37
Dynamic Range Control 37
H
HDMI Deep Color 35
K
Keypad 58
M
Movie Frame (24Fs) 34
MP3 52~53
N
Network Settings 38~42
P
PCM Downsampling 37
Popup Menu 48
Progressive Mode 35
R
Region Code 13
Remote Control 19
Remote Control Sensor 17
Resolution 32~34
S
Samsung Apps 63~65
Slide Show 54
Smart Hub 56~63
Software Upgrade 45~46
Subtitle Language 51
U
USB Storage Device 55
W
Wired Network 38~39
Wireless Network 39~42
Z
Zoom 54
I
Initial Settings 42
J
JPEG 54
T
3D Settings 31
Title Menu 48
TV Aspect 32
English 69
Page 70

Appendix
Power Requirements AC 120V, 60Hz
Power Consumption 19W
General
Disc
Video Output
Video/Audio HDMI
Audio Output
Network
Weight 3.8 Ibs
Dimensions 17.0 (W) X 8.3 (D) X 1.7 (H) inches
Operating Temperature Range +41°F to +95°F
Operating Humidity Range 10 % to 75 %
BD (Blu-ray Disc) Reading Speed : 9.834 m/sec.
DVD (Digital Versatile Disc)
CD : 5 inches (COMPACT DISC)
CD : 3 1/2 inches (COMPACT DISC)
Composite Video
Component Video
2 Channel L(1/L), R(2/R)
Digital Audio Output Optical
Ethernet 10/100BASE-TX Terminal
Wireless LAN Built-in
Security
WPS(PBC) Supported
Specifications
Reading Speed : 6.98 ~ 7.68 m/sec.
Approx. Play Time (Single Sided, Single Layer Disc) : 135 min.
Reading Speed : 4.8 ~ 5.6 m/sec.
Maximum Play Time : 74 min.
Reading Speed : 4.8 ~ 5.6 m/sec.
Maximum Play Time : 20 min.
1 Channel : 1.0 Vp-p (75Ω load)
Blu-ray/DVDs : 480i
Y : 1.0 Vp-p (75Ω load)
: 0.70 Vp-p (75Ω load)
P
R
P
: 0.70 Vp-p (75Ω load)
B
Blu-ray Disc : 480i
DVD : 480p, 480i
2D : 1080p, 1080i, 720p, 480p
3D : 1080p, 720p
PCM audio, Bitstream audio
WEP (OPEN/SHARED)
WPA-PSK (TKIP/AES)
WPA2-PSK (TKIP/AES)
- Design and specifications are subject to change without prior notice.
- Weight and dimensions are approximate.
- Dispose unwanted electronics through an approved recycler.
To find the nearest recycling location, go to our website: www.samsung.com/recyclingdirect or call,
(877) 278 - 0799
70 English
Page 71

Compliance and Compatibility Notice
NOT ALL discs are compatible
• Subject to the restrictions described below and those noted throughout this Manual, including the Disc
Type and Characteristics section of this user manual, disc types that can be played are: pre-recorded
commercial BD-ROM, DVD-VIDEO, and Audio CD (CD-DA) discs; BD-RE/-R, DVD-RW/-R discs; and
CD-RW/-R discs.
• Discs other than the above cannot and/or is not intended to be played by this player. And some of the
above discs may not play due to one or more reasons provided below.
• Samsung cannot assure that this player will play every disc bearing the BD-ROM, BD-RE/-R,
DVD-VIDEO, DVD-RW/-R, DVD+RW/+R and CD-RW/-R logos, and this player may not respond to
all operating commands or operate all features of every disc. These and other disc compatibility and
player operation issues with new and existing format discs are possible because:
- Blu-ray is a new and evolving format and this player may not operate all features of Blu-ray Discs
because some features may be optional, additional features may have been added to the Blu-ray
Disc format after the production of this player, and certain available features may be subject to
delayed availability;
- not all new and existing disc format versions are supported by this player;
- new and existing disc formats may be revised, changed, updated, improved and/or supplemented;
- some discs are produced in a manner that allows specific or limited operation and feature during
playback;
- some features may be optional, additional features may have been added after the production of this
player or certain available features may be subject to delayed availability;
- some discs bearing the BD-ROM, BD-RE/-R, DVD-VIDEO, DVD-RW/-R, DVD+RW/+R and
CD-RW/-R logos may still be non-standardized discs;
- some discs may not be played depending on their physical state or recording conditions;
- problems and errors can occur during the creation of Blu-ray Disc, DVD software and/or the
manufacture of discs;
- this player operates differently than a standard DVD player or other AV equipment; and/or
- for reasons noted throughout this user manual and for other reason(s) discovered and posted by
SAMSUNG customer care center.
• If you encounter disc compatibility or player operation problems, please contact SAMSUNG customer
care center.
You may also contact SAMSUNG customer care center for possible updates on this player.
• For additional information on playback restrictions and disc compatibility, refer to the Precautions,
Before Reading the user manual, Disc Types and Characteristics, and Before Playing sections of this
user manual.
08 Appendix
Copy Protection
• Because AACS (Advanced Access Content System) is approved as content protection system for
Blu-ray Disc format, similar to use of CSS (Content Scramble System) for DVD format, certain
restrictions are imposed on playback, analog signal output, etc., of AACS protected contents.
The operation of this product and restrictions on this product may vary depending on your time of
purchase as those restrictions may be adopted and/or changed by AACS after the production of this
product. Furthermore, BD-ROM Mark and BD+ are additionally used as content protection system for
Blu-ray Disc format, which imposes certain restrictions including playback restrictions for BD-ROM
Mark and/or BD+ protected contents. To obtain additional information on AACS, BD-ROM Mark, BD+,
or this product, please contact SAMSUNG customer care center.
English 71
Page 72

Appendix
• Many Blu-ray Disc/DVDs are encoded with copy protection. Because of this, you should only connect
your Player directly to your TV, not to a VCR. Connecting to a VCR results in a distorted picture from
copy-protected Blu-ray Disc/DVDs.
• This item incorporates copy protection technology that is protected by U.S. patents and other
intellectual property rights of Rovi Corporation. Reverse engineering and disassembly are prohibited.
• Under the U.S. Copyright laws and Copyright laws of other countries, unauthorized recording, use,
display, distribution, or revision of television programs, videotapes, Blu-ray Discs, DVDs, and other
materials may subject you to civil and/or criminal liability.
• For Blu-ray Disc Player progressive scan output : CONSUMERS SHOULD NOTE THAT NOT
ALL HIGH DEFINITION TELEVISION SETS ARE FULLY COMPATIBLE WITH THIS product AND
MAY CAUSE ARTIFACTS TO BE DISPLAYED IN THE PICTURE. IN CASE OF PROGRESSIVE SCAN
PICTURE PROBLEMS, IT IS RECOMMENDED THAT THE USER SWITCH THE CONNECTION TO
THE ‘STANDARD DEFINITION’ OUTPUT. IF THERE ARE QUESTIONS REGARDING OUR TV SET
COMPATIBILITY WITH THIS product, PLEASE CONTACT OUR CUSTOMER SERVICE CENTER.
Network Service Disclaimer
All content and services accessible through this device belong to third parties and are protected by
copyright, patent, trademark and/or other intellectual property laws. Such content and services are
provided solely for your personal noncommercial use. You may not use any content or services in a
manner that has not been authorized by the content owner or service provider. Without limiting the
foregoing, unless expressly authorized by the applicable content owner or service provider, you may
not modify, copy, republish, upload, post, transmit, translate, sell, create derivative works, exploit, or
distribute in any manner or medium any content or services displayed through this device.
THIRD PARTY CONTENT AND SERVICES ARE PROVIDED “AS IS.” SAMSUNG DOES NOT WARRANT
CONTENT OR SERVICES SO PROVIDED, EITHER EXPRESSLY OR IMPLIEDLY, FOR ANY PURPOSE.
SAMSUNG EXPRESSLY DISCLAIMS ANY IMPLIED WARRANTIES, INCLUDING BUT NOT LIMITED
TO, WARRANTIES OF MERCHANTABILITY OR FITNESS FOR A PARTICULAR PURPOSE. SAMSUNG
DOES NOT GUARANTEE THE ACCURACY, VALIDITY, TIMELINESS, LEGALITY, OR COMPLETENESS
OF ANY CONTENT OR SERVICE MADE AVAILABLE THROUGH THIS DEVICE AND UNDER NO
CIRCUMSTANCES, INCLUDING NEGLIGENCE, SHALL SAMSUNG BE LIABLE, WHETHER IN
CONTRACT OR TORT, FOR ANY DIRECT, INDIRECT, INCIDENTAL, SPECIAL OR CONSEQUENTIAL
DAMAGES, ATTORNEY FEES, EXPENSES, OR ANY OTHER DAMAGES ARISING OUT OF, OR IN
CONNECTION WITH, ANY INFORMATION CONTAINED IN, OR AS A RESULT OF THE USE OF ANY
CONTENT OR SERVICE BY YOU OR ANY THIRD PARTY, EVEN IF ADVISED OF THE POSSIBILITY OF
SUCH DAMAGES.
Third party services may be terminated or interrupted at any time, and Samsung makes no representation
or warranty that any content or service will remain available for any period of time. Content and services
are transmitted by third parties by means of networks and transmission facilities over which Samsung
has no control. Without limiting the generality of this disclaimer, Samsung expressly disclaims any
responsibility or liability for any interruption or suspension of any content or service made available
through this device.
Samsung is neither responsible nor liable for customer service related to the content and services.
Any question or request for service relating to the content or services should be made directly to the
respective content and service providers.
72 English
Page 73

License
•
Manufactured under license from Dolby Laboratories. Dolby and the double-D symbol
are trademarks of Dolby Laboratories.
• Manufactured under license under U.S. Patent #’s : 5,451,942; 5,956,674; 5,974,380;
5,978,762; 6,226,616; 6,487,535; 7,212,872; 7,333,929; 7,392,195; 7,272,567
& other U.S. and worldwide patents issued & pending. DTS and the Symbol are
registered trademarks, & DTS-HD, DTS-HD Master Audio, and the DTS logos are
trademarks of DTS, Inc. Product includes software. © DTS, Inc. All Rights Reserved.
• DivX
- ABOUT DIVX VIDEO : DivX
This is an official DivX Certified® device that plays DivX video.
Visit www.divx.com for more information and software tools to convert your files into DivX video.
- ABOUT DIVX VIDEO-ON-DEMAND : This DivX Certified
play purchased DivX Video-on-Demand (VOD) movies. To obtain your registration code, locate the
DivX VOD section in your device setup menu. Go to vod.divx.com for more information on how to
complete your registration.
- DivX Certified
- DivX
®
®
to play DivX® video up to HD 1080p, including premium content.
, DivX Certified® and associated logos are trademarks of DivX, Inc. and are used under license.
- Covered by one or more of the following U.S. patents : 7,295,673; 7,460,668; 7,515,710; 7,519,274.
•
The terms HDMI and HDMI High-Denition Multimedia Interface, and the HDMI Logo are trademarks
or registered trademarks of HDMI Licensing LLC in the United States and other countries.
• Oracle and Java are registered trademarks of Oracle and/or its affiliates. Other names
may be trademarks of their respective owners
®
is a digital video format created by DivX, Inc.
®
device must be registered in order to
08 Appendix
• Open Source License Notice
- In the case of using open source software, Open Source Licenses are available on the product
menu.
• Blu-ray Disc™, Blu-ray™ and the logos are trademarks of the Blu-ray Disc Association.
• This item incorporates copy protection technology that is protected by U.S. patents and other
intellectual property rights of Rovi Corporation. Reverse engineering and disassembly are prohibited.
English 73
Page 74

LIMITED WARRANTY TO ORIGINAL PURCHASER
This SAMSUNG brand product, as supplied and distributed by SAMSUNG and delivered new, in the original carton to the original
consumer purchaser, is warranted by SAMSUNG against manufacturing defects in materials and workmanship for a limited
warranty period of:
One (1) Year Parts and Labor*
(*90 Days Parts and Labor for Commercial Use)
This limited warranty begins on the original date of purchase, and is valid only on products purchased and used in the United
States. To receive warranty service, the purchaser must contact SAMSUNG for problem determination and service procedures.
Warranty service can only be performed by a SAMSUNG authorized service center. The original dated bill of sale must be
presented upon request as proof of purchase to SAMSUNG or SAMSUNG's authorized service center. Transportation of the
product to and from the service center is the responsibility of the purchaser.
SAMSUNG will repair or replace this product, at our option and at no charge as stipulated herein, with new or reconditioned parts
or products if found to be defective during the limited warranty period specified above. All replaced parts and products become
the property of SAMSUNG and must be returned to SAMSUNG. Replacement parts and products assume the remaining original
warranty, or ninety (90) days, whichever is longer.
SAMSUNG’s obligations with respect to software products distributed by SAMSUNG under the SAMSUNG brand name are set
forth in the applicable end user license agreement. Non-SAMSUNG hardware and software products, if provided, are on an “AS
IS” basis.
Non-SAMSUNG manufacturers, suppliers, publishers, and service providers may provide their own warranties.
This limited warranty covers manufacturing defects in materials and workmanship encountered in normal, and except to the
extent otherwise expressly provided for in this statement, noncommercial use of this product, and shall not apply to the following,
including, but not limited to: damage which occurs in shipment; delivery and installation; applications and uses for which this
product was not intended; altered product or serial numbers; cosmetic damage or exterior finish; accidents, abuse, neglect, fire,
water, lightning or other acts of nature; use of products, equipment, systems, utilities, services, parts, supplies, accessories,
applications, installations, repairs, external wiring or connectors not supplied and authorized by SAMSUNG, or which damage this
product or result in service problems; incorrect electrical line voltage, fluctuations and surges; customer adjustments and failure
to follow operating instructions, cleaning, maintenance and environmental instructions that are covered and prescribed in the
instruction book; product removal or reinstallation; reception problems and distortion related to noise, echo, interference or other
signal transmission and delivery problems. SAMSUNG does not warrant uninterrupted or error-free operation of the product.
THERE ARE NO EXPRESS WARRANTIES OTHER THAN THOSE LISTED AND DESCRIBED ABOVE, AND NO WARRANTIES
WHETHER EXPRESS OR IMPLIED, INCLUDING, BUT NOT LIMITED TO, ANY IMPLIED WARRANTIES OF MERCHANTABILITY
OR FITNESS FOR A PARTICULAR PURPOSE, SHALL APPLY AFTER THE EXPRESS WARRANTY PERIODS STATED
ABOVE, AND NO OTHER EXPRESS WARRANTY OR GUARANTY GIVEN BY ANY PERSON, FIRM OR CORPORATION WITH
RESPECT TO THIS PRODUCT SHALL BE BINDING ON SAMSUNG. SAMSUNG SHALL NOT BE LIABLE FOR LOSS OF
REVENUE OR PROFITS, FAILURE TO REALIZE SAVINGS OR OTHER BENEFITS, OR ANY OTHER SPECIAL, INCIDENTAL OR
CONSEQUENTIAL DAMAGES CAUSED BY THE USE, MISUSE OR INABILITY TO USE THIS PRODUCT, REGARDLESS OF
THE LEGAL THEORY ON WHICH THE CLAIM IS BASED, AND EVEN IF SAMSUNG HAS BEEN ADVISED OF THE POSSIBILITY
OF SUCH DAMAGES. NOR SHALL RECOVERY OF ANY KIND AGAINST SAMSUNG BE GREATER IN AMOUNT THAN THE
PURCHASE PRICE OF THE PRODUCT SOLD BY SAMSUNG AND CAUSING THE ALLEGED DAMAGE. WITHOUT LIMITING
THE FOREGOING, PURCHASER ASSUMES ALL RISK AND LIABILITY FOR LOSS, DAMAGE OR INJURY TO PURCHASER AND
PURCHASER’S PROPERTY AND TO OTHERS AND THEIR PROPERTY ARISING OUT OF THE USE, MISUSE OR INABILITY
TO USE THIS PRODUCT SOLD BY SAMSUNG NOT CAUSED DIRECTLY BY THE NEGLIGENCE OF SAMSUNG. THIS
LIMITED WARRANTY SHALL NOT EXTEND TO ANYONE OTHER THAN THE ORIGINAL PURCHASER OF THIS PRODUCT, IS
NONTRANSFERABLE AND STATES YOUR EXCLUSIVE REMEDY.
Some states do not allow limitations on how long an implied warranty lasts, or the exclusion or limitation of incidental or
consequential damages, so the above limitations or exclusions may not apply to you. This warranty gives you specific legal rights,
and you may also have other rights which vary from state to state.
To obtain warranty service, please contact SAMSUNG customer care center.
Page 75

Contact SAMSUNG WORLD WIDE
If you have any questions or comments relating to Samsung products, please contact the SAMSUNG
customer care center.
Area Contact Center
`
North America
Canada 1-800-SAMSUNG (726-7864) www.samsung.com
Mexico 01-800-SAMSUNG (726-7864) www.samsung.com
U.S.A 1-800-SAMSUNG (726-7864) www.samsung.com
`
Latin America
Argentine 0800-333-3733 www.samsung.com
Brazil 0800-124-421 / 4004-0000 www.samsung.com
Chile 800-SAMSUNG (726-7864) www.samsung.com
Colombia 01-8000112112 www.samsung.com
Costa Rica 0-800-507-7267 www.samsung.com
Dominica 1-800-751-2676 www.samsung.com
Ecuador 1-800-10-7267 www.samsung.com
El Salvador 800-6225 www.samsung.com
Guatemala 1-800-299-0013 www.samsung.com
Honduras 800-7919267 www.samsung.com
Jamaica 1-800-234-7267 www.samsung.com
Nicaragua 00-1800-5077267 www.samsung.com
Panama 800-7267 www.samsung.com
Peru 0-800-777-08 www.samsung.com
Puerto Rico 1-800-682-3180 www.samsung.com
Trinidad &
Tobago
Venezuela 0-800-100-5303 www.samsung.com
`
Europe
Albania 42 27 5755 -
Austria
Belgium 02-201-24-18
Bosnia 05 133 1999 Bulgaria 07001 33 11 www.samsung.com
Croatia 062 SAMSUNG (062 726 7864) www.samsung.com
Czech
Denmark 70 70 19 70 www.samsung.com
Finland 030 - 6227 515 www.samsung.com
France 01 48 63 00 00 www.samsung.com
Germany
Hungary 06-80-SAMSUNG (726-7864) www.samsung.com
Italia 800-SAMSUNG (726-7864) www.samsung.com
Kosovo +381 0113216899 Luxemburg 261 03 710 www.samsung.com
Macedonia 023 207 777 Montenegro 020 405 888 -
Netherlands
Norway 815-56 480 www.samsung.com
Poland
Portugal 80820-SAMSUNG (726-7864) www.samsung.com
Rumania
1-800-SAMSUNG (726-7864) www.samsung.com
0810 - SAMSUNG (7267864,
€ 0.07/min)
800-SAMSUNG (800-726786)
Samsung Zrt., česká organizační
složka, Oasis Florenc, Sokolovská394/17, 180 00, Praha 8
01805 - SAMSUNG (726-7864
€ 0,14/Min)
0900-SAMSUNG
(0900-7267864) (€ 0,10/Min)
0 801 1SAMSUNG (172678)
/ 022-607-93-33
1. 08010 SAMSUNG (72678) doar din reţeaua Romtelecom,
tarif local
2. 021.206.01.10 - din orice
reţea, tarif normal
Web Site
www.samsung.com
www.samsung.com/
be (Dutch)
www.samsung.com/
be_fr (French)
www.samsung.com
www.samsung.com
www.samsung.com
www.samsung.com
www.samsung.com
Area Contact Center
Serbia
Slovakia 0800-SAMSUNG (726-7864) www.samsung.com
Spain 902-1-SAMSUNG (902 172 678) www.samsung.com
Sweden 0771 726 7864 (SAMSUNG) www.samsung.com
Switzerland
U.K 0330 SAMSUNG (7267864) www.samsung.com
Eire 0818 717100 www.samsung.com
Lithuania 8-800-77777 www.samsung.com
Latvia 8000-7267 www.samsung.com
Estonia 800-7267 www.samsung.com
`
CIS
Russia 8-800-555-55-55 www.samsung.com
Georgia 8-800-555-555 Armenia 0-800-05-555 Azerbaijan 088-55-55-555 -
Kazakhstan
Uzbekistan 8-10-800-500-55-500 www.samsung.com
Kyrgyzstan 00-800-500-55-500 www.samsung.com
Tadjikistan 8-10-800-500-55-500 www.samsung.com
Ukraine 0-800-502-000
Belarus 810-800-500-55-500 Moldova 00-800-500-55-500 -
`
Asia Pacific
Australia 1300 362 603 www.samsung.com
New Zealand
China
Hong Kong (852) 3698 4698
India
Indonesia
Japan 0120-327-527 www.samsung.com
Malaysia 1800-88-9999 www.samsung.com
Philippines
Singapore 1800-SAMSUNG (726-7864) www.samsung.com
Thailand 1800-29-3232 / 02-689-3232 www.samsung.com
Taiwan 0800-329-999 www.samsung.com
Vietnam 1 800 588 889 www.samsung.com
`
Middle East
Bahrain 8000-4726 www.samsung.com
Egypt 08000-726786 www.samsung.com
Jordan 800-22273 www.samsung.com
Morocco 080 100 2255 www.samsung.com
Oman 800-SAMSUNG (726-7864) www.samsung.com
Saudi Arabia 9200-21230 www.samsung.com
Turkey 444 77 11 www.samsung.com
U.A.E 800-SAMSUNG (726-7864) www.samsung.com
`
Africa
Nigeria 0800-SAMSUNG (726-7864) www.samsung.com
South Africa 0860-SAMSUNG (726-7864 ) www.samsung.com
0700 Samsung (0700 726
7864)
0848-SAMSUNG (7267864,
CHF 0.08/min)
8-10-800-500-55-500
(GSM: 7799)
0800 SAMSUNG (0800 726 786)
400-810-5858 / 010-6475 1880
3030 8282 / 1800 110011 /
1800 3000 8282 / 1800 266 8282
0800-112-8888 /
021-5699-7777
1-800-10-SAMSUNG(726-7864) /
1-800-3-SAMSUNG(726-7864) /
1-800-8-SAMSUNG(726-7864) /
02-5805777
Web Site
www.samsung.com
www.samsung.com/ch
www.samsung.com/
ch_fr/(French)
www.samsung.com
www.samsung.ua
www.samsung.com/
ua_ru
www.samsung.com
www.samsung.com
www.samsung.com/hk
www.samsung.com/
hk_en/
www.samsung.com
www.samsung.com
www.samsung.com
Page 76

Español
Aviso de Cinavia: Este producto utiliza tecnología
Cinavia para limitar el uso de copias no autorizadas de algunas películas
de producción comercial, videos y sus bandas sonoras. Cuando se
detecta el uso de una copia no autorizada, aparecerá un mensaje y se
interrumpirá la reproducción o la copia.
Información adicional sobre la tecnología Cinavia se facilita en el Centro
de información al cliente en línea de Cinavia en http://www.cinavia.com.
Para solicitar información adicional sobre Cinavia por correo, envíe una
tarjeta con su dirección postal a: Cinavia Consumer Information Center,
P.O. Box 86851, San Diego, CA, 92138, EE.UU.
Este producto incorpora tecnología de propietario bajo licencia de
Verance Corporation y está protegido mediante la patente en EE.UU.
7.369.677 y otras patentes en EE.UU. y en otros países pendientes,
así como por copyright y la protección de secreto comercial de
ciertos aspectos tecnológicos. Cinavia es una marca comercial de
Verance Corporation. Copyright 2004-2010 Verance Corporation.
Todos los derechos reservados por Verance. La ingeniería inversa o
desensamblaje están prohibidos.
Français
Avis Cinavia : Ce produit utilise la technologie Cinavia
pour limiter l’utilisation de copies illégales de certains lms et vidéos
disponibles dans le commerce et de leur bande sonore. Lorsqu’une
utilisation illégale ou une reproduction interdite est détectée, un
message s’afche et la lecture ou la reproduction s’interrompt.
De plus amples renseignements sur la technologie Cinavia sont
disponibles auprès du Centre d’information des consommateurs en
ligne de Cinavia sur http://www.cinavia.com. Pour obtenir des
renseignements supplémentaires par la poste sur Cinavia, envoyez votre
demande avec votre adresse au : Cinavia Consumer Information Center,
P.O. Box 86851, San Diego, CA, 92138, USA.
Ce produit intègre une technologie sous licence de Verance Corporation
protégée par le brevet américain 7,369,677 et d'autres brevets
américains et internationaux déposés ou en attente, de même que
par des droits d'auteur et le secret industriel pour certains aspects de
cette technologie. Cinavia est une marque de commerce de Verance
Corporation. Copyright 2004-2010 Verance Corporation.
Tous droits réservés par Verance. Il est interdit de tenter de démonter
l’appareil et d’en étudier le fonctionnement en vue de le reproduire.
Português
Nota da Cinavia: Esse produto usa tecnologia
Cinavia para limitar o uso de cópias não autorizadas de lmes e vídeos
produzidos comercialmente e sua trilha sonora. Quando se detecta o
uso proibido de uma cópia não autorizada, aparece uma mensagem e a
reprodução ou cópia é interrompida.
Há mais informações sobre a tecnologia Cinavia na Central Cinavia
on-line de informações ao cliente, em http://www.cinavia.com. Para
solicitar mais informações sobre a Cinavia pelo correio, envie um
cartão postal com seu endereço para: Cinavia Consumer Information
Centre, P.O. Box 86851, San Diego, CA, 92138, USA.
Esse produto incorpora tecnologia proprietária sob licença da Verance
Corporation e protegida pela Patente 7.369.677 dos EUA e outras
patentes nos EUA e no mundo todo, emitidas e pendentes, além
de direitos autorais e proteção ao segredo comercial de certos
aspectos dessa tecnologia. Cinavia é uma marca registrada da Verance
Corporation. Copyright 2004-2010 Verance Corporation. Todos os
direitos reservados à Verance. É proibido realizar engenharia reversa
ou desmontagem.
English
limit the use of unauthorized copies of some commercially-produced
film and videos and their soundtracks. When a prohibited use of an
unauthorized copy is detected, a message will be displayed and playback
or copying will be in interrupted.
More information about Cinavia technology is provided at the Cinavia
Online Consumer Information Center at http://www.cinavia.com.
To request additional information about Cinavia by mail, send a postcard
with your mailing address to: Cinavia Consumer Information Center,
P.O. Box 86851, San Diego, CA, 92138, USA.
This product incorporates proprietary technology under license from
Verance Corporation and is protected by U.S. Patent 7,369,677 and
other U.S. and worldwide patents issued and pending as well as
copyright and trade secret protection for certain aspects of such
technology. Cinavia is a trademark of Verance Corporation.
Copyright 2004 - 2010 Verance Corporation. All rights reserved by
Verance. Reverse engineering or disassembly is prohibited.
Cinavia Notice : This product uses Cinavia technology to
Page 77

Français
Cinavia pour limiter l'utilisation de copies non autorisées de certains
lms et vidéos commerciaux ainsi que leurs bandes son. Lorsqu'une
copie non autorisée est détectée, un message est afché et la lecture
ou la copie est interrompue. Des informations complémentaires
concernant la technologie Cinavia sont disponibles sur le site http://
www.cinavia.com du Centre d'information consommateur Cinavia. Pour
toute demande d'informations complémentaires concernant Cinavia
par courrier, veuillez écrire à l'adresse suivante : Cinavia Consumer
Information Centre, P.O. Box 86851, San Diego, CA, 92138, USA.
Ce produit intègre la technologie de protection de la propriété sous
licence Verance Corporation protégée par les brevets américains
7,369,677 et d’autres brevets américains et internationaux accordés et
en attente ainsi que la protection des droits d'auteur et de l'information
commerciale condentielle pour certains aspects de cette technologie.
Cinavia est une marque commerciale de Verance Corporation. Copyright
2004-2010 Verance Corporation. Tous droits réservés par Verance.
Il est interdit de tenter de démonter l’appareil et d’en étudier le
fonctionnement en vue de le reproduire.
tecnologia Cinavia per limitare l'uso di copie non autorizzate di lm
e video commerciali e relative tracce audio. Se viene rilevato l'uso
proibito di una copia non autorizzata, viene visualizzato un messaggio
che interrompe la riproduzione o la copia. Per maggiori informazioni
sulla tecnologia Cinavia consultare il centro online di informazioni
ai consumatori di Cinavia all'indirizzo http://www.cinavia.com. Per
richiedere maggiori informazioni su Cinavia per e-mail, inviare un
messaggio con il proprio indirizzo a: Cinavia Consumer Information
Centre, P.O. Box 86851, San Diego, CA, 92138, USA.
Questo prodotto è dotato di tecnologia proprietaria di Verance
Corporation ed è protetto dal brevetto U.S.A. 7.369.677 e da altri
brevetti U.S.A. e di altri Paesi registrati e in attesa di registrazione, di
una protezione del copyright e del segreto aziendale per alcuni aspetti di
tale tecnologia. Cinavia è un marchio di Verance Corporation. Copyright
2004-2010 Verance Corporation. Verance. Tutti i diritti riservati. Sono
vietati il reverse engineering o lo smontaggio.
para limitar a utilização não autorizada de cópias de alguns lmes
e vídeos produzidos comercialmente e respectivas bandas sonoras.
Quando a utilização proibida de uma cópia não autorizada é detectada,
é apresentada uma mensagem e a reprodução ou cópia é interrompida.
Poderá obter mais informações sobre a tecnologia Cinavia no Centro de
Informação ao Consumidor Online da Cinavia em http://www.cinavia.
com. Para solicitar informações adicionais sobre a Cinavia por correio,
envie um bilhete postal com a sua morada para: Cinavia Consumer
Information Centre, P.O. Box 86851, San Diego, CA, 92138, USA.
Este produto incorpora tecnologia proprietária ao abrigo da licença da
Verance Corporation e protegida pela patente americana, 7,369,677 e
outras patentes dos EUA e de outros países, emitidas ou cuja aprovação
esteja pendente, bem com direitos de autor e protecção de segredo
comercial para determinados aspectos da tecnologia mencionada. A
Cinavia é uma marca comercial da Verance Corporation. Direitos de
autor 2004-2010 Verance Corporation. Todos os direitos reservados
pela Verance. É proibido qualquer procedimento de desmontagem ou
montagem.
Avis de Cinavia : Ce produit utilise la technologie
Italiano
Avvertenza Cinavia : Questo prodotto utilizza
Português
Aviso Cinavia : Este produto utiliza tecnologia Cinavia
Español
Cinavia para limitar el uso de copias no autorizadas de algunas películas
de producción comercial, vídeos y sus bandas sonoras. Cuando se
detecta el uso de una copia no autorizada, aparecerá un mensaje y se
interrumpirá la reproducción o la copia. Información adicional sobre la
tecnología Cinavia se facilita en el Centro de información al cliente en
línea de Cinavia en http://www.cinavia.com. Para solicitar información
adicional sobre Cinavia por correo, envíe una tarjeta con su dirección
postal a: Cinavia Consumer Information Center, P.O. Box 86851, San
Diego, CA, 92138, EE.UU.
Este producto incorpora tecnología de propietario bajo licencia de
Verance Corporation y está protegido mediante la patente en EE.UU.
7.369.677 y otras patentes en EE.UU. y en otros países pendientes,
así como por copyright y la protección de secreto comercial de
ciertos aspectos tecnológicos. Cinavia es una marca comercial de
Verance Corporation. Copyright 2004-2010 Verance Corporation.
Todos los derechos reservados por Verance. La ingeniería inversa o
desensamblaje están prohibidos.
maakt gebruik van Cinavia-technologie om het gebruik van illegale
exemplaren van sommige commercieel geproduceerde lms en video's
en de soundtracks ervan te beperken. Wanneer wordt gedetecteerd dat
een illegale kopie wordt gebruikt, wordt een bericht weergegeven en zal
het afspelen of kopiëren worden onderbroken. U vindt meer informatie
over Cinavia-technologie bij het Cinavia Online Consumer Information
Centre op http://www.cinavia.com. Als u aanvullende informatie over
Cinavia via de post wenst te ontvangen, stuurt u een postkaart met uw
postadres naar: Cinavia Consumer Information Centre, P.O. Box 86851,
San Diego, CA, 92138, USA.
Dit product omvat bedrijfseigen technologie onder licentie van de
Verance Corporation en wordt beschermd door U.S. Patent 7.369.677
en andere Amerikaanse en internationale patenten die zijn verstrekt
of nog in behandeling zijn, naast de bescherming van copyrights en
bedrijfsgeheimen voor bepaalde aspecten van dergelijke technologie.
Cinavia is een handelsmerk van Verance Corporation.
Copyright 2004-2010 Verance Corporation. Alle rechten voorbehouden
door Verance. Reverseengineering of demontage is verboden.
Cinavia-teknologi til begrænsning af ikkeautoriseret kopiering af visse
kommercielt producerede lm og videoer samt deres lydspor. Når
forbudt anvendelse af en ikke-autoriseret kopi detekteres, vises en
meddelelse, og afspilning eller kopiering bliver afbrudt.
Flere informationer om Cinavia-teknologi fås hos Cinavias
onlineforbrugerinformationscenter på http:// www.cinavia.com. For at
få ere informationer om Cinavia pr. post kan du sende et postkort med
din postadresse til: Cinavia Consumer Information Centre, P.O. Box
86851, San Diego, CA, 92138, USA.
Dette produkt anvender producentspecik teknologi under licens fra
Verance Corporation og er beskyttet af USA-patent 7.369.677 og andre
USA- og vendensomfattende patenter, både allerede udstedte og under
ansøgning, samt copyright og beskyttelse af handelshemmeligheder
for visse dele af sådan teknologi. Cinavia er et varemærke tilhørende
Verance Corporation. Copyright 2004-2010 Verance Corporation. Alle
rettigheder forbeholdes Verance. Reverse engineering eller adskillelse
er forbudt.
Aviso de Cinavia : Este producto utiliza tecnología
Nederlands
Dansk
Opmerking betreffende Cinavia : Dit product
Bemærkning vedr. Cinavia : Dette produkt anvender
Page 78

Suomi
tekniikkaa rajoittaakseen joidenkin kaupallisesti tuotettujen elokuvien ja
videoiden sekä niiden ääniraitojen luvattomien kopioiden käyttöä. Kun
luvattoman kopion kielletty käyttö tunnistetaan, viesti tulee näkyviin
ja toisto tai kopiointi keskeytetään. Saat lisätietoja Cinavia-tekniikasta
Cinavia Online Consumer Information Centre -kuluttajakeskuksesta
osoitteessa http://www.cinavia.com. Voit pyytää lisätietoja Cinaviasta
postitse lähettämällä postikortin, joka sisältää postiosoitteesi,
osoitteeseen: Cinavia Consumer Information Centre, P.O. Box 86851,
San Diego, CA, 92138, USA.
Tässä tuotteessa käytetään valmistajien tekniikkaa Verance
Corporationin lisenssillä. Käyttöä suojaavat USA:n patentin 7,369,677 ja
muut USA:n sekä maailmanlaajuiset myönnetyt ja vireillä olevat patentit
sekä tiettyjen tekniikan osien tekijänoikeus- ja kauppasalaisuussuojat.
Cinavia on Verance Corporationin tavaramerkki. Copyright 2004-2010
Verance Corporation. Verance pidättää kaikki oikeudet. Käytetyn
salaustekniikan purkaminen on kielletty.
Norsk
teknologi for å begrense bruken av uautoriserte kopier av enkelte
kommersielt produserte lmer, videoer og deres lydspor. Når det
detekteres forbudt bruk av en uautorisert kopi, vises en melding og
avspillingen eller kopieringen vil bli avbrutt. Mer informasjon om Cinaviateknologien nner du hos Cinavias forbrukersenter på http://www.
cinavia. com. For mer informasjon om Cinavia via regulær post, send et
postkort med din postadresse til: Cinavia Consumer Information Centre,
P.O. Box 86851, San Diego, CA, 92138, USA.
Dette produktet innbefatter proprietær teknologi på lisens fra Verance
Corporation og er beskyttet av amerikansk patent 7,369,677 og andre
amerikanske og verdensomfattende patenter og patentsøknader, samt
beskyttelse av copyright og forretningshemmeligheter for visse aspekter
av slik teknologi. Cinavia er et varemerke som tilhører Sony Corporation.
Copyright 2004-2010 Verance Corporation. Alle rettigheter forbeholdt
for Verance. Omvendt utvikling eller demontering er forbudt.
Svenska
Cinavia-teknik för att begränsa antalet obehöriga kopior på vissa
kommersiellt producerade lmer och videor och deras ljudspår.
Om en förbjuden användning av en obehörig kopia upptäcks visas
ett meddelande och uppspelningen eller kopieringen avbryts. Mer
information om Cinavia-tekniken erbjuds av Cinavia Online Consumer
Information Centre på adressen http://www.cinavia.com. För att begära
ytterligare information om Cinavia via post, skicka ett vykort med din
adress till: Cinavia Consumer Information Centre, P.O. Box 86851, San
Diego, CA, 92138, USA.
Den här produkten införlivar egendomsteknik på licens från Verance
Corporation och skyddas av det amerikanska patentet 7,369,677
och andra patent i USA och internationellt och väntande patent, samt
upphovsrätt och varumärkesskydd för vissa delar av sådan teknik.
Cinavia är ett varumärke som tillhör Verance Corporation. Upphovsrätt
2004-2010 Verance Corporation. Med ensamrätt för Verance.
Reverse engineering och nedmontering är förbjudet.
Cinavia-ilmoitus: Tämä tuote käyttää Cinavia-
Cinavia-merknad : Dette produktet bruker Cinavia-
Cinavia-meddelande : Den här produkten använder
Česky
přístroj využívá technologii Cinavia k omezení použití neoprávněných
kopií některých komerčních lmů a videí a jejich zvukových stop. Při
zjištění zakázaného použití neautorizované kopie se zobrazí hlášení a
přehrávání nebo kopírování je přerušeno. Další informace o technologii
Cinavia naleznete v Online středisku informací pro spotřebitele na webu
http://www.cinavia.com. Další informace o technologii Cinavia si můžete
vyžádat také poštou. Pošlete svou korespondenční adresu na adresu:
Cinavia Consumer Information Centre, P.O. Box 86851, San Diego, CA,
92138, USA.
Tento přístroj využívá proprietární technologii licencovanou společností
Verance Corporation a je chráněn patentem USA č. 7 369 677 a dalšími
vydanými a přihlášenými patenty ve Spojených státech amerických a
dalších zemích. Na některé aspekty této technologie se také vztahuje
ochrana autorských práv a obchodního tajemství. Cinavia je ochranná
známka společnosti Verance Corporation. Copyright 2004-2010
Verance Corporation. Všechna práva vyhrazena společností Verance.
Zpětná analýza a převod do strojového kódu jsou zakázány.
Deutsch
Technologie um die Erstellung illegaler Kopien kommerziell produzierter
Filme und Videos sowie deren Soundtracks zu verhindern. Wenn die
verbotene Nutzung einer illegalen Kopie festgestellt wird, erscheint
eine Meldung und die Wiedergabe bzw. der Kopiervorgang werden
abgebrochen. Mehr Informationen über die Cinavia Technologie nden
Sie im Online Kundeninformationszentrum unter http://www.cinavia.
com. Wenn Sie zusätzliche Informationen über Cinavia über E-Mail
erhalten möchten, senden Sie bitte eine Postkarte mit Ihrer E-Mail
Adresse an: Cinavia Consumer Information Centre, P.O. Box 86851,
San Diego, CA, 92138, USA.
Dieses Gerät nutzt geschützte Technologie unter der Lizenz von Verance
Corporation und ist durch das U.S. Patent 7.369.677 und andere in
der USA und weltweit ausgestellten & angemeldeten Patenten sowie
durch die Urheberrechte und die Sicherung von Betriebsgeheimnissen
bestimmter Aspekte dieser Technologie geschützt. Cinavia ist eine
Handelsmarke von Verance Corporation. Copyright 2004-2010 Verance
Corporation. Alle Rechte vorbehalten für Verance Reverse Engineering
oder Demontage sind verboten.
Magyar
Cinavia technológiáját használja a kereskedelmi forgalomban lévő
lmek és videók, valamint hangsávjaik illetéktelen másolásának
megakadályozására. Ha illetéktelen másolat tiltott használatát érzékeli,
a készülék megjelenít egy üzenetet, és a lejátszás vagy másolás
félbeszakad.
A Cinavia technológiáról további információkat a Cinavia Online
ügyfélszolgálaton kaphat a http:// www.cinavia.com címen. További
információk a Cinaviáról postai úton küldjön egy levelezőlapot a
postacímével a következő címre: Cinavia Consumer Information Centre,
P.O. Box 86851, San Diego, CA, 92138, USA.
A termék egy szerzõi jogvédelmi technológiát alkalmaz, mely eljárást
a Verance Corporation birtokol, és az USA-ban bejegyzett 7,369,677
számú szabadalom, illetve más, az USÁban és máshol bejegyzett
szabadalmak és szerzõi jogok védenek, és az ilyen technológiákra
vonatkozó kereskedelmi titkok. A Cinavia a Verance Corporation
védjegye. Copyright 2004-2010 Verance Corporation. A Verance
minden jogot fenntart. A rendszer visszafejtése vagy visszafordítása
tilos.
Upozornění k technologii Cinavia : Tento
Cinavia Hinweise : Dieses Gerät nutzt die Cinavia
Cinavia gyelmeztetés : A készülék a
Page 79

Polski
technologii Cinavia w celu ograniczenia wykorzystania nieupoważnionych
kopii pewnych lmów i obrazów wideo wyprodukowanych w celach
komercyjnych, oraz ich ścieżek dźwiękowych. W przypadku wykrycia
zakazanego użycia nieautoryzowanej kopii, zostanie wyświetlony
komunikat i proces odtwarzania i kopiowania zostanie zatrzymany.
Więcej informacji o technologii Cinavia można uzyskać w Centrum
obsługi klienta Cinavia online: http:// www.cinavia.com. Aby poprosić
o przesłanie dodatkowych informacji o Cinavia pocztą, wyślij kartkę ze
swoim adresem pocztowym na adres: Centrum informacji konsumenta
Cinavia, P.O. Box 86851, San Diego, CA, 92138, USA.
Urządzenie to zostało wyprodukowane z zastosowaniem technologii
własnościowej na licencji rmy Verance Corporation, i jest chronione
amerykańskim patentem 7,369,677 oraz innymi patentami Stanów
Zjednoczonych i innych krajów, wydanymi i wydawanymi, oraz prawami
autorskimi, a także chroniony tajemnicą handlową obejmującą określone
aspekty takiej technologii. Cinavia jest znakiem towarowym rmy Verance
Corporation. Copyright 2004–2010 Verance Corporation. Wszystkie
prawa zastrzeżone przez rmę Verance. Niedozwolone jest odtwarzanie
wsteczne (ang. reverse engineering) i rozmontowywanie urządzenia.
výrobok využíva technológiu Cinavia na obmedzenie používania
neoprávnených kópií niektorých komerčne vyrábaných lmov a videí a
ich zvukových záznamov. Keď sa zistí, že došlo k zakázanému použitiu
neoprávnenej kópie, zobrazí sa správa a prehrávanie alebo kopírovanie
sa preruší.
Viac informácií o technológií Cinavia nájdete na on-line informačnom
centre pre spotrebiteľov Cinavia na lokalite http://www.cinavia.com.
Ak chcete požiadať o zaslanie ďalších informácií o technológii Cinavia
poštou, zašlite list s vašou poštovou adresou na adresu: Cinavia
Consumer Information Centre, P.O. Box 86851, San Diego, CA, 92138,
USA.
Tento výrobok obsahuje súkromnú technológiu na základe licencie
od spoločnosti Verance Corporation, ktorá je chránená americkým
patentom č. 7 369 677 a ďalšími patentmi a patentovými prihláškami
v USA a na celom svete, pričom niektoré aspekty tejto technológie
podliehajú aj ochrane autorským právom a ochrane obchodného
tajomstva. Cinavia je obchodná značka spoločnosti Verance Corporation.
Autorské práva 2004 - 2010 Verance Corporation. Spoločnosť Verance
si vyhradzuje všetky práva. Spätná analýza alebo prevod do strojového
kódu sú zakázané.
uporablja tehnologijo Cinavia za omejitev uporabe nepooblaščenih kopij
nekaterih komercialno posnetih lmov in videoposnetkov ter njihovih
zvočnih posnetkov. Kadar naprava zazna uporaba nepooblaščene kopije,
se bo prikazalo sporočilo in predvajanje ali kopiranje se bo prekinilo.
Več informacij o tehnologiji Cinavia najdete v spletnem informacijskem
središču za stranke Cinavia na http://www.cinavia.com. Če želite prejeti
dodatne informacije o tehnologiji Cinavia po pošti, nam pošljite
svoj domači naslov na: Cinavia Consumer Information Centre, P.O. Box
86851, San Diego, CA, 92138, USA.
Ta izdelek vsebuje lastniško tehnologijo z licenco družbe Verance
Corporation in je zaščiten z ameriškim patentom 7,369,677 ter drugimi
izdanimi ali vloženimi ameriškimi in svetovnimi patenti, kot tudi z zakoni
o varstvu pravic in nerazkrivanju poslovnih skrivnosti za določene
vidike takšne tehnologije. Cinavia je blagovna znamka družbe Verance
Corporation. Avtorske pravice 2004-2010 Verance Corporation. Vse
pravice si pridržuje družba Verance. Obratno inženirstvo in razstavljanje
sta prepovedana.
Komentarz Cinavia : Urządzenie to korzysta z
Slovensky
Slovenščina
Upozornenie na technológiu Cinavia : Tento
Obvestilo o tehnologiji Cinavia: Ta izdelek
Български
технологията Cinavia, за да ограничи използването на неоторизирани
копия на някои филми, видеоклипове и саундтраци. Когато се засече
забранено ползване на неоторизирано копие, ще се покаже съобщение и
възпроизвеждането или копирането ще се прекъсне. Повече информация за
технологията Cinavia се предоставя от онлайн центъра за информация за
клиенти на Cinavia на http://www.cinavia.com. За да поискате
допълнителна информация от Cinavia по пощата, изпратете запитванията с
вашия пощенски адрес на: Cinavia Consumer Information Centre, P.O. Box
86851, San Diego, CA, 92138, USA.
Този продукт използва фирмена технология под лиценз от Verance
Corporation и е защитен с патент на САЩ 7,369,677 и други издадени и
заявени патенти в САЩ и по целия свят, както и от защита на авторското
право и търговските тайни за определени аспекти от такава технология.
Cinavia е търговска марка на Verance Corporation. Copyright 2004-2010
Verance Corporation. Всички права запазени от Verance. Забранен е
инженеринг или демонтиране в обратен ред.
Română
tehnologie Cinavia pentru a limita utilizarea unor copii neautorizate ale
unor lme sau materiale video produse spre comercializare, precum şi
a coloanelor sonore asociate acestora. Dacă este detectată utilizarea
ilegală sa unei copii neautorizate, va aşat un mesaj şi redarea
sau copierea este întreruptă. Pentru informaţii suplimentare despre
tehnologia Cinavia, consultaţi Centrul online de informaţii
pentru consumatori Cinavia, la adresa http://www.cinavia.com. Pentru
a solicita prin poştă informaţii suplimentare despre Cinavia, trimiteţi un
plic timbrat cu adresa dvs. la: Cinavia Consumer Information Centre, P.O.
Box 86851, San Diego, CA, 92138, USA.
Acest aparat încorporează tehnologie de proprietate sub licenţă de la
Verance Corporation şi este protejat de către brevetul SUA 7.369.677
şi de către alte brevete din SUA şi din întreaga lume emise şi în curs
de emitere, precum şi de către legea drepturilor de autor şi a secretului
comercial privind anumite aspecte ale acestei tehnologii. Cinavia este o
marcă comercială a Verance Corporation. Copyright 2004-2010 Verance
Corporation. Toate drepturile sunt rezervate de Verance. Este interzisă
demontarea sau dezasamblarea produsului.
Ελληνικά
προϊόν χρησιμοποιεί τεχνολογία Cinavia για τον περιορισμό της χρήσης μη
εξουσιοδοτημένων αντιγράφων ορισμένων ταινιών και βίντεο που διατίθενται
στο εμπόριο, καθώς και της ηχητικής επένδυσής τους. Αν ανιχνευτεί απαγορευμένη
χρήση ενός μη εξουσιοδοτημένου αντιγράφου, εμφανίζεται ένα μήνυμα και
διακόπτεται η αναπαραγωγή ή αντιγραφή. Περισσότερες πληροφορίες για την
τεχνολογία Cinavia παρέχονται στο Διαδικτυακό κέντρο πληροφόρησης
πελατών της Cinavia, στη διεύθυνση http://www.cinavia.com. Για να ζητήσετε
πρόσθετες πληροφορίες σχετικά με την τεχνολογία Cinavia μέσω ταχυδρομείου,
στείλτε μια κάρτα με την ταχυδρομική διεύθυνσή σας στο: Cinavia Consumer
Information Centre, P.O. Box 86851, San Diego, CA, 92138, USA.
Το προϊόν αυτό ενσωματώνει αποκλειστική τεχνολογία που χρησιμοποιείται κατόπιν
αδείας από τη Verance Corporation, η οποία προστατεύεται από το δίπλωμα
ευρεσιτεχνίας Η.Π.Α. με αριθμό 7.369.677 και άλλα διπλώματα ευρεσιτεχνίας που
έχουν εκδοθεί και εκκρεμούν στις Η.Π.Α. και διεθνώς, καθώς και από προστασία
πνευματικών δικαιωμάτων και εμπορικών μυστικών για ορισμένα στοιχεία της
συγκεκριμένης τεχνολογίας. Η επωνυμία Cinavia είναι εμπορικό σήμα της Verance
Corporation. Πνευματικά δικαιώματα 2004-2010 Verance Corporation. Με
την επιφύλαξη παντός δικαιώματος από τη Verance. Απαγορεύεται η αποσυμπίληση
ή ανακατασκευή κώδικα.
Бележка за Cinavia : Този продукт използва
Notă din partea Cinavia : Acest aparat utilizează
Ειδοποίηση τεχνολογίας Cinavia : Αυτό το
Page 80

Hrvatski
tehnologiju Cinavia kako bi se ograničila uporaba neovlaštenih kopija
nekih komercijalno proizvedenih lmova i videozapisa i njihovih zvučnih
zapisa. Kada se otkrije zabranjena uporaba neovlaštene kopije, prikazat
će se poruka i prekinut će se reproduciranje i kopiranje.
Ostale informacije o tehnologiji Cinavia dostupne su u mrežnom
informacijskom centru za korisnike tvrtke Cinavia na http://www.cinavia.
com. Kako biste zatražili dodatne informacije o tehnologiji Cinavia
putem pošte, pošaljite nam dopis na poštansku adresu: Cinavia
Consumer Information Centre, P.O. Box 86851, San Diego, CA, 92138,
SAD.
Ovaj proizvod sadržava zakonom zaštićenu tehnologiju pod licencom
korporacije Verance i zaštićen je američkim patentom 7,369,677 i
ostalim američkim i svjetskim patentima koji su izdanje i čije je izdanje
u tijeku, kao i zaštitama autorskih prava i poslovnih tajni za određene
aspekte te tehnologije. Cinavia je zaštitni znak korporacije Verance.
Autorsko pravo 2004-2010 Verance Corporation. Sva prava pridržava
Verance. Zabranjeni su obrnuti inženjering i rastavljanje.
Cinavia tehnologiju za ograničenje upotrebe neovlašćenih kopija nekih
komercijalno proizvedenih lmova i video zapisa i zvučnih zapisa.
Kada se otkrije upotreba neovlašćene kopije, prikazaće se poruka i
reprodukcija ili kopiranje će biti prekinuto.
Više informacija o Cinavia tehnologija dostupne su na internet
informacionom centru za potrošače Cinavia na adresi http://www.cinavia.
com. Da biste zatražili dodatne informacije o Cinavia-i putem pošte,
pošaljite razglednicu sa vaše e-adrese: Cinavia Consumer Information
Centre, P.O. Box 86851, San Diego, CA, 92138, SAD.
Ovaj proizvod sadrži tehnologiju u vlasništvu pod licencom kompanije
Verance Corporation i zaštićen je američkim patentom 7,369,677 i
drugim američkim i svetskim patentima koji su potvrđeni ili su na
čekanju, kao i zaštitom autorskih prava i poslovne tajne za određene
aspekte takve tehnologije. Cinavia je zaštitni znak kompanije Verance
Corporation. Copyright 2004-2010 Verance Corporation. Sva prava
zadržana od strane kompanije Verance. Reinženjering ili demontaža su
zabranjeni.
Қазақша
фильм мен бейнелердің және олардың саунд-тректерінің
рұқсатсыз көшірмелерін шектеу үшін Cinavia технологиясы
пайдаланылады. Пайдалануға тыйым салынған рұқсатсыз
көшірмені пайдалану анықталса, хабар көрсетіледі және
ойнату немесе көшіру үзіледі. Cinavia технологиясы туралы
қосымша ақпарат http : //www.cinavia.com торабындағы
Cinavia желілік тұтынушылар туралы ақпарат орталығында
берілген. Cinavia туралы қосымша ақпаратты пошта арқылы
сұрау үшін пошта мекенжайыңыз бар ашықхатты мына
мекенжайға жіберіңіз : Cinavia Consumer Information Centre,
P.O. Box 86851, San Diego, CA, 92138, USA.
Бұл Verance корпорациясының лицензиясы бар жекеменшік
технологияны қамтиды және АҚШ-тың 7,369,677 патентімен,
әрі шығарылған және күтудегі басқа АҚШ және дүниежүзілік
патенттермен, сондай-ақ, авторлық құқықтармен және
осындай технологияның белгілі бір жақтарын құпия
қорғаныспен қорғалған. Cinavia – Verance корпорациясының
сауда белгісі. Авторлық құқықтар, 2004-2010 Verance
корпорациясы. Барлық құқықтар Verance корпорациясымен
қорғалған. Кері жобалауға және бөлшектеуге тыйым
салынады.
Obavijest o tehnologiji Cinavia : ovaj proizvod rabi
Srpski
Cinavia obaveštenje : Ovaj proizvod koristi
Cinavia ескертуі : Бұл өнімде коммерциялық
Русский
технологией Cinavia, которая не позволяет использовать незаконно сделанные
копии серийно изготавливаемых записей фильмов и видео, а также музыку
из этих фильмов и видео. В случае обнаружения использования незаконно
сделанной копии на экране появится соответствующее сообщение, и процесс
воспроизведения или копирования будет прерван.
Дополнительные сведения о технологии Cinavia представлены на сайте Центра
информации для потребителей Cinavia по адресу: http://www.cinavia.com.
Чтобы запросить дополнительные сведения о технологии Cinavia по почте,
отправьте нам открытку с вашим почтовым адресом: Cinavia Consumer
Information Centre, P.O. Box 86851, San Diego, CA, 92138, USA.
Данный продукт оснащен запатентованной технологией с лицензией
от Verance Corporation и защищенной патентом США 7,369,677 и
другими патентами США и международными патентами, изданными и
рассматриваемыми, а определенные аспекты этой технологии – авторскими
правами и охраной секретов производствам. Cinavia является товарным
знаком корпорации Verance Corporation. Verance Corporation, 20042010 гг. Все права защищены корпорацией Verance. Инженерный анализ и
разборка запрещены.
Українська
використовується технологія Cinavia, що обмежує використання
несанкціонованих копій деяких комерційних кінофільмів і відеозаписів, а
також використаних у них звукових доріжок. У разі виявлення забороненого
використання несанкціонованої копії, відобразиться відповідне повідомлення,
а відтворення або копіювання буде призупинено.
Додаткові відомості про технологію Cinavia можна знайти в Інформаційному
онлайн-центрі Cinavia за веб-адресою http://www.cinavia.com. Щоб
надіслати запит на отримання додаткової інформації про Cinavia поштою,
надішліть поштову листівку зі своєю поштовою адресою на таку адресу:
Cinavia Consumer Information Centre, P.O. Box 86851, San Diego,
CA, 92138, USA. У цьому продукті використано запатентовану технологію,
ліцензовану компанії Verance Corporation і захищену патентом США 7 369
677 та іншими всесвітніми патентами, виданими та такими, що очікують
затвердження, а також авторським правом і принципами охорони таємниць
виробництва певних аспектів цієї технології. Cinavia є торговельною маркою
Verance Corporation. Авторське право належить корпорації Verance
Corporation, 2004-2010 рр. Усі права належать корпорації Verance.
Забороняється вносити зміни до конструкції продукту або розбирати його.
Уведомление о Cinavia: Данный продукт оснащен
Зауваження щодо Cinavia: у цьому продукті
Page 81

繁體中文
使用某些商業製造的電影和視訊及其聲道的未經授權副本。當偵測
到禁止使用的未經授權副本時,將會顯示一則訊息,並且播放或複
製動作將會中斷。
Cinavia 技術的詳細資訊在 Cinavia
線上消費者資訊中心中提供,網址為:http://www.
cinavia.com。若要透過郵件請求關於 Cinavia
的其他資訊,請將含有您的郵寄地址的明信片寄往:Cinavia
Consumer Information Centre, P.O. Box 86851, San Diego, CA,
92138, USA.
本产品融合了在获得 Verance Corporation 许可并且受美国专利
7,369,677 以及其他在盖和世界各地已公布和正在申请的专利保护
,并且受此类技术特定方面的版权和商业秘密保护。
Cinavia 是 Verance Corporation 的商标。20042010 Verance Corporation 版权所有。Verance
保留一切权利。严禁进行逆向工程和反汇编。
一些商业制造的电影和视频及其声道的未获得授权的副本。检测到
禁止使用未获得授权的副本的情况时,将会显示消息,并且播放或
复制将会中断。
有关 Cinavia 技术的更多信息,在 Cinavia
在线消费者信息中心提供,网址如下:http://www.
cinavia.com。要通过邮件请求关于 Cinavia
的更多信息,请将含有您的邮寄地址的明信片寄往:Cinavia
Consumer Information Centre, P.O. Box 86851, San Diego, CA,
92138, USA.
本产品融合了在获得 Verance Corporation 许可并且受美国专利
7,369,677 以及其他在盖和世界各地已公布和正在申请的专利保护
,并且受此类技术特定方面的版权和商业秘密保护。
Cinavia 是 Verance Corporation 的商标。20042010 Verance Corporation 版权所有。Verance
保留一切权利。严禁进行逆向工程和反汇编。
Cinavia 聲明:本產品使用 Cinavia 技術來限制
中国语
Cinavia 声明:本产品使用 Cinavia 技术来限制使用
תירבע
הודעה בנוגע ל-Cinavia : מוצר זה משתמש
בטכנולוגית Cinavia כדי להגביל את השימוש בהעתקים בלתי
חוקיים של סרטים בהפקה מסחרית ופסי הקול שלהם. כאשר יזוהה
שימוש אסור בעותק בלתי חוקי, תוצג על כך הודעה וכל הפעלה או
העתקה יופסקו.
מידע נוסף אודות טכנולוגית Cinavia ניתן למצוא במרכז המידע
המקוון לצרכן של Cinavia בכתובת http://www.cinavia.com.
לקבלת מידע נוסף אודות Cinavia בדואר, שלח גלויה עם כתובתך
אל: Cinavia Consumer Information Centre, P.O. Box
86851, San Diego, CA, 92138, USA.
מוצר זה משלב טכנולוגיה קניינית תחת רישיון מטעם תאגיד
Verance והוא מוגן על ידי פטנט אמריקאי 7,369,677 ופטנטים
אמריקאים ועולמיים אחרים שהתקבלו או שהם עומדים ותלויים,
כמו גם על ידי הגנה על זכויות יוצרים וסודות מסחריים עבור הבטים
מסוימים של טכנולוגיה כזו. Cinavia הוא סמל מסחרי של תאגיד
Verance. זכויות יוצרים 2004 - 2010 תאגיד Verance. כל
הזכויות שמורות ל-Verance. חל איסור לבצע הנדסה לאחור או
פירוק המוצר.
Thai
ประกาศเกี่ยวกับ Cinavia :
ผลิตภัณฑ์นี้ใช้เทคโนโลยี Cinavia เพื่อจำกัดการใช้งานแผ่น
ที่ไม่ได้รับอนุญาตของฟิล์มและวิดีโอและแทร็กเสียงที่ผลิตม
าเพื่อการค้าบางแผ่น เมื่อพบการใช้งานต้องห้ามของแผ่นที่ไ
ม่ได้รับอนุญาต ข้อความจะปรากฏขึ้นและการเล่นหรือการคัด
ลอกจะหยุดทำงาน
ข้อมูลเพิ่มเติมเกี่ยวกับเทคโนโลยี Cinavia มีให้ที่ศูนย์
ข้อมูลลูกค้าทางออนไลน์ของ Cinavia ที่ http://www.
cinavia.com หากต้องการขอรับข้อมูลเพิ่มเติมเกี่ยวกับ
Cinavia ทางไปรษณีย์ ส่งโปสการ์ดที่มีที่อยู่ของคุณไป
ที่: Cinavia Consumer Information Centre, P.O. Box
86851, San Diego, CA, 92138, USA
ผลิตภัณฑ์นี้รวมเอาเทคโนโลยีเอกสิทธิ์เฉพาะภายใต้การอ
นุญาตจาก Verance Corporation และได้รับความคุ้มครอง
โดยสิทธิบัตรสหรัฐฯ เลขที่ 7,369,677 และสิทธิบัตรสหรัฐ
ฯ อื่นๆ และทั่วโลกที่ประกาศแล้วและรอการพิจารณา รวม
ทั้งลิขสิทธิ์และการป้องกันความลับทางการค้าในบางด้าน
ของเทคโนโลยีดังกล่าว Cinavia เป็นเครื่องหมายการค้าข
อง Verance Corporation ลิขสิทธิ์ 2004-2010 Verance
Corporation สงวนสิทธิ์ทั้งหมดโดย Verance ห้ามดำเนิน
การทางวิศวกรรมย้อนกลับหรือถอดชิ้นส่วนผลิตภัณฑ์
Türkçe
Cinavia Notice : This product uses Cinavia technology
to limit the use of unauthorized copies of some commercially-produced
lm and videos and their soundtracks. When a prohibited use of an
unauthorized copy is detected, a message will be displayed and playback
or copying will be interrupted.
More information about Cinavia technology is provided at the Cinavia
Online Consumer Information Centre at http://www.cinavia.com. To
request additional information about Cinavia by mail, send a postcard
with your mailing address to: Cinavia Consumer Information Centre, P.O.
Box 86851, San Diego, CA, 92138, USA.
This product incorporates proprietary technology under licence from
Verance Corporation and is protected by U.S. Patent 7,369,677
and other U.S. and worldwide patents issued and pending as well
as copyright and trade secret protection for certain aspects of such
technology. Cinavia is a trademark of Verance Corporation. Copyright
2004-2010 Verance Corporation. All rights reserved by Verance. Reverse
engineering or disassembly is prohibited.
Indonesia
Pemberitahuan Cinavia : Produk ini menggunakan
teknologi Cinavia untuk membatasi penggunaan tanpa izin salinan
lm dan video tertentu yang diproduksi secara komersial serta
soundtracknya. Apabila penggunaan salinan tanpa izin yang dilarang
terdeteksi, pesan akan ditampilkan dan pemutaran atau penyalinan akan
dihentikan.
Informasi selengkapnya tentang teknologi Cinavia tersedia di Pusat
Informasi Pelanggan Online Cinavia di http://www.cinavia.com. Untuk
meminta informasi tambahan mengenai Conavia melaui pos, kirimkan
kartu pos dengan alamat surat Anda ke: Cinavia Consumer Information
Centre,P.O.Box 86851, San Diego, CA, 92138, USA.
Produk ini menerapkan teknologi milik sendiri berdasarkan lisensi dari
Verance Corporation dan dilindungi oleh Paten AS 7,369,677 dan paten
AS dan di seluruh dunia lainnya yang terdaftar dan dalam pendaftaran,
serta perlindungan hak cipta dan rahasia dagang atas aspek tertentu
dari teknologi tersebut. Cinavia adalah merek dagang dari Verance
Corporation. Hak Cipta 2004-2010 Verance Corporation. Semua hak
dimiliki oleh Verance. Rekayasa balik atau pembongkaran dilarang.
Page 82

Tiếng Việt
ΔϴΑήόϟΔϐϠϟ
sư dung công nghê Cinavia đê han chê viêc sư dung cac
ban sao trai phep môt sô bô phim va video đươc san xuât
thương mai va cac đoan âm thanh cua chung. Khi bi phat
hiên sư dung ban sao trai phep, môt thông bao se đươc
hiên thi va viêc phat lai hoăc sao chep se bi gian đoan.
Thông tin khac vê công nghê Cinavia đươc cung câp
tai Trung tâm thông tin danh cho ngươi tiêu dung trưc
tuyên Cinavia ơ đia chi http://www.cinavia.com. Đê yêu
câu thông tin khac vê Cinavia qua thư, hay gưi môt danh
thiêp kem theo đia chi nhân thư cua ban đên: Cinavia
Consumer Information Centre, P.O. Box 86851, San
Diego, CA, 92138, USA.
San phâm nay tich hơp công nghê đôc quyên theo giây
phep cua Verance Corporation va đươc bao hô bơi Băng
sang chê Hoa Ky 7,369,677 va cac băng sang chê cua
Hoa Ky va trên toan thê giơi khac đa đươc câp va đang
chơ câp cung như sư bao vê bi mât thương mai va ban
quyên đôi vơi cac khia canh cu thê cua công nghê đo.
Cinavia la nhan hiêu cua Verance Corporation. Ban quyên
2004-2010 Verance Corporation. Moi quyên đươc bao lưu
bơi Verance. Nghiêm câm thiêt kê đôi chiêu va thao rơi
san phâm.
Thông bao cua Cinavia:
San phâm nay
Page 83

QUESTIONS OR COMMENTS?
COUNTRY CALL OR VISIT US ONLINE AT WRITE
IN THE US
1-800-SAMSUNG
(726-7864)
www.samsung.com
Samsung Electronics America, Inc.
85 Challenger Road Ridgefield Park,
NJ 07660-2112
AK68-02026A-00
 Loading...