

Page 1

Cat. No. 15-1981
OWNER’S MANUAL
Please read before using this equipment.
181-CHANNEL REMO TE CONTROL
CABLE CONVERTER
with Volume Control
Page 2
INTRODUCTION
Your RadioShack 181-Channel Remote Control Cable Converter lets you
connect a non-cable-ready video
product to cable. It is compatible with
all cable systems and gives you complete remote control selection of all
cable channels (VHF, Mid-Band, Super-Band, and Hyper-Band) . The converter’s volum e control let s you adju st
a connected TV’s sound. You can also
use the converter’s remote control to
turn on or off and fine tune most TVs.
Important Note:
This cable conver ter
does not decode “scrambled” premium channels. You can, however , use
it with the cable box provided by the
cable company so you can receive
premium channels and still have remote control of all other channels.
Note to Cable TV System Installer:
This reminder is provided to call the
CATV system installer’s attention to
Article 820-40 of the NEC that provides guidelines for prope r grounding
and, in particular, specifies that the
cable ground be connected to the
grounding system of the building as
close to cable entry as practical.
Note:
You need two AAA batteries
and a 75-ohm coaxial cable to operate
your converter. You might also need
extra coaxial cable, an A/B switch, a
two-way splitter, and (if your TV has
only 300-ohm terminals) a 75-to-300
ohm transformer. Read the entire
“Connecting the Conver ter” section of
this Owner’s Manua l before you be gin
to install your converter.
WARNING
shock hazard, do not expose this product to
rain or moisture.
CAUTION
ELECTRIC SHOCK, DO NOT REMOVE
COVER OR BACK. NO USER-SERVICEABLE PARTS INSIDE. REFER SERVICING TO QUALIFIED PERSONNEL.
!
The graphical symbols with supplemental
markings are located on the back of the product.
:
To reduce the risk of fire or
CAUTION
RISK OF ELECTRIC
SHOCK. DO NOT OPEN.
: TO REDUCE THE RISK OF
This symbol is intended to alert
you to the presence of uninsulated dangerous voltage within
the product’s enclosure that
might be of sufficient magnitude
to constitute a risk of electric
shock. Do not open the product’s case.
This symbol is intended to
inform you that important operating and maintenance instructions are included in the
literature accompanying this
product.
!
We recommend you reco rd your converter’s serial numbe r here. The number is on the bottom of the converter.
Serial Number __________________
© 1999 Tandy Corporation.
RadioShack is a registered trademark used by Tandy Corporation.
All Rights Reserved.
2
Page 3

CONTENTS
Preparation ....................... ...... ....... ...... ....... ...... ....... ...... ....... ...... ....... ................... 4
Setting CH4/CH3 ............................................................................................ 4
Choosing the Cable System Type ................................................................... 4
Connecting the Converter to AC Power .......................................................... 5
Turning the Converter On/Off .......................................................................... 5
Using the Switched AC Outlet ......................................................................... 6
Connecting the Converter .................................................................................. 7
Connecting to a TV ......................................................................................... 7
Connecting to Cable ........................................................................................ 7
Single-Wire Cable System ........................................................................ 8
Two-Wire Cable System ........................................................................... 9
Connecting to a VCR .................................................................................... 10
Recording and Viewing a Non-Premium Cable Channel ........................ 10
Recording and Viewing a Premium Cable Channel ................................ 11
Operation ................................ ............. ............. ............. ............. ............. ........... 12
Operating the Converter’s Receiver ................... ...... ....... ...... ....... ...... ...... ..... 12
Using the Remote Control ............................................................................. 13
Remote Control TVs ............................................................................... 14
Adjusting the Volume .................................................................................... 14
Muting the Sound .......................................................................................... 14
Storing a Channel in Memory ....................................................................... 14
Setting the Sleep Timer ................................................................................ 15
Using Parental Lock (PL) .............................................................................. 15
Locking a Channel .................................................................................. 15
Watching a Locked Channel ................................................................... 15
Unlocking a Channel .............................................................................. 16
Changing the Security Code ......................................................................... 16
Resetting the Security Code ......................................................................... 16
Variations in Channel Numbering ................................................................. 17
Care and Maintenance ...................................................................................... 19
The FCC Wants You to Know ........................................................................ 20
Specifications .................................................................................................... 21
3
Page 4
PREPARATION
Your converter’s remote control requires two AAA batteries (not supplied) for power. For the best
performance and l ongest life, we recommend RadioShack alkaline batteries.
Cautions:
• Use only fresh batteries of the
required size and recommended
type.
• Do not mix old and new batteri es,
different types of batteries (standard, alkaline, or rechargeable), or
rechargeable batteries of different
capacities.
Follow these steps to install batteries.
Warning:
promptly and properly . Do not burn or
bury them.
Caution:
remote control for a month or more,
remove the batteries. Batteries can
leak chemicals that can destroy electronic parts.
Dispose of old batteries
If you do not plan to use th e
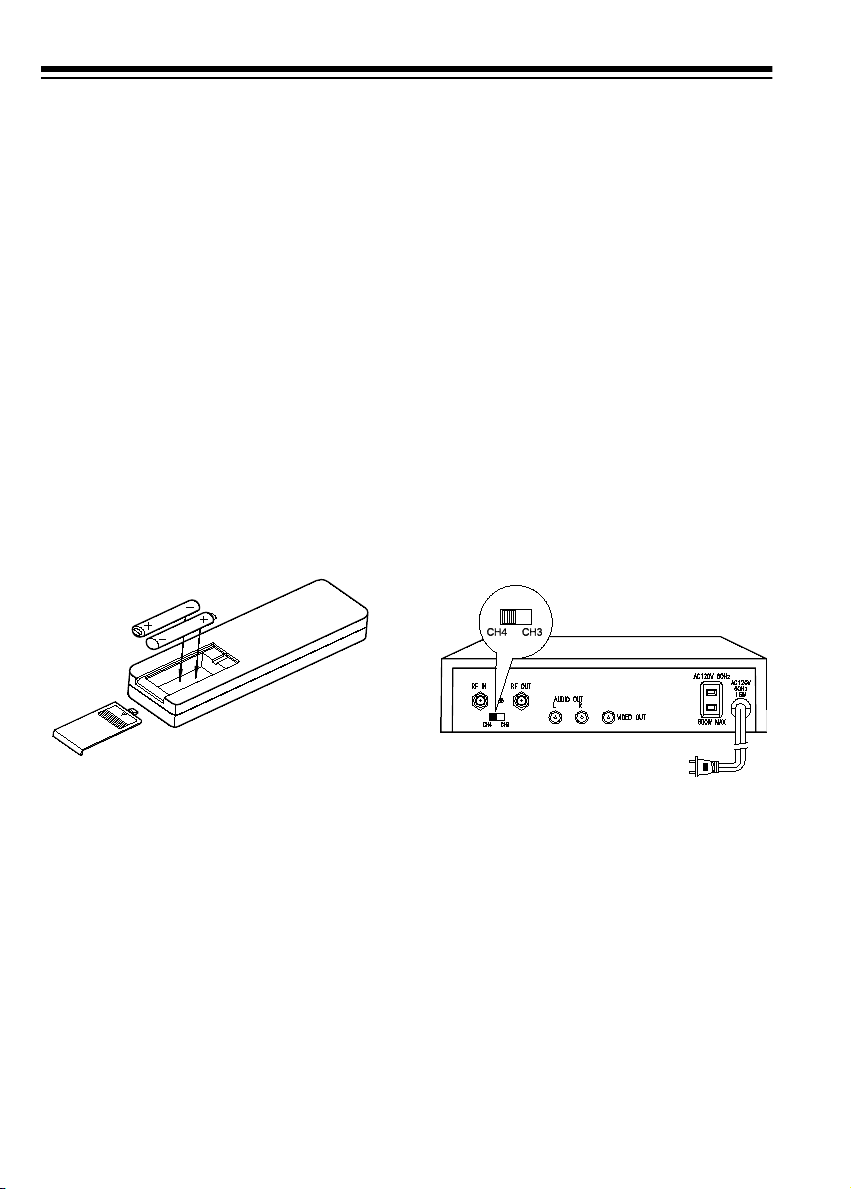
SETTING CH4/CH3
Set your TV’s tuner to Channe l 3 or 4
(whichever is not used for br oadcasts
in your area). Then set
the back of the conve rter to m atch th e
channel you selected on your TV’s
tuner.
CH4/CH3
on
1. Slide the battery compartment
cover in the direction of the ar row
to remove it.
2. Place the batteries in the compartment as indicated by the
polarity symb ols ( + a nd –) m ar ked
inside.
3. Replace the cover.
When the remote control stops operating properly, replace the batteries.
4
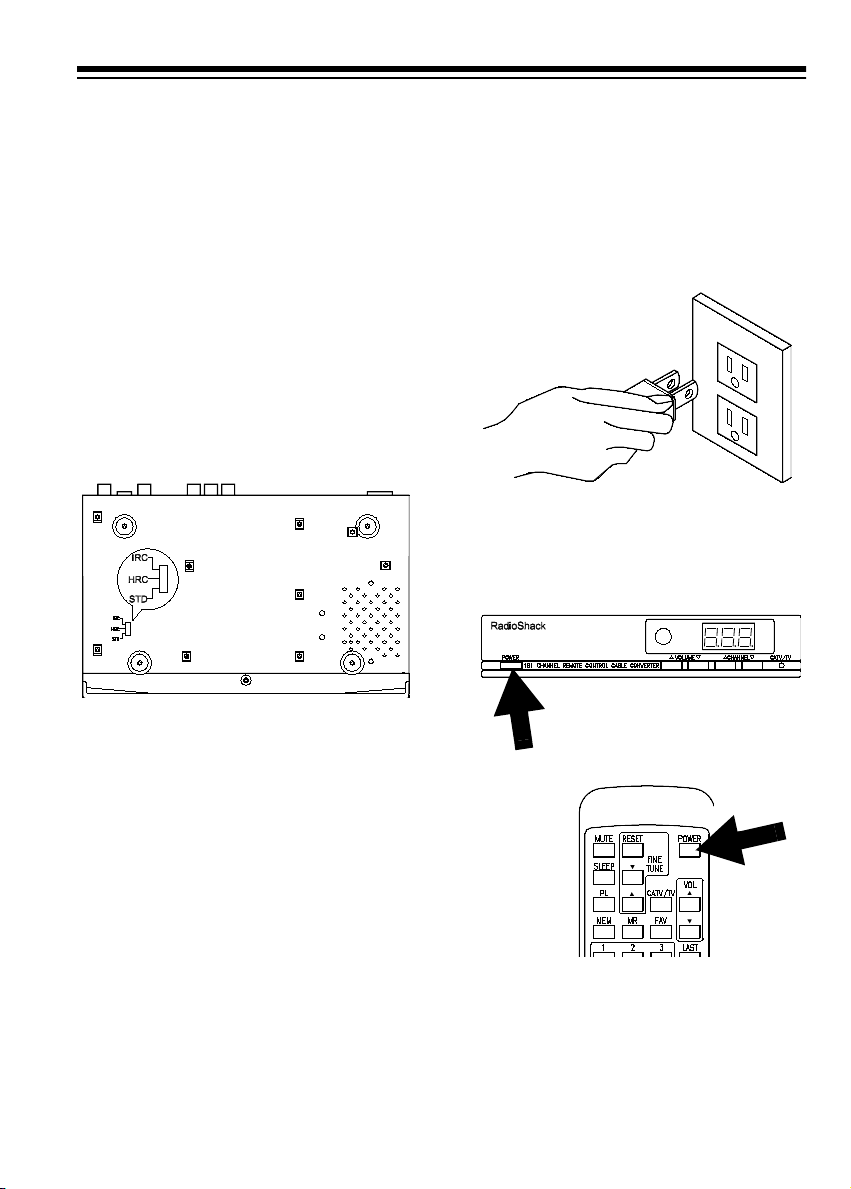
CHOOSING THE CABLE
SYSTEM TYPE
There are three types of cable TV
channel frequency systems: standard, IRC, and HRC. Most cabl e systems use a standard system. Your
converter is pres et to use a standard
channel frequency system.
Page 5
Caution:
converter, make sure your converter is
not connected t o an AC outlet before
setting
To avoid damaging your
IRC/HRC/STD
.
CONNECTING THE
CONVERTER TO AC
POWER
Note:
If you are not sure what ty pe of
channel frequency system your cable
system uses, co ntact your local c able
company.
If the cable system in you r area is not
standard, use a paper clip or other
pointed object to se t
the bottom of the converter for the
type of cable system you have.
Note:
HRC and IRC are methods
used by some cable companies for
converting satellite and local broadcast channels to cable channels.
Channels 5 and 6 on IRC systems and
all channels on HRC systems are
slightly different frequencies from
those used on standard systems.
IRC/HRC/STD
on
Plug the converter’s power cord into a
standard AC outlet.
TURNING THE
CONVERTER ON/OFF
To turn the conv erter on or off, press
POWER
on the remote control.
on the front of the converter or
5
Page 6

USING THE SWITCHED
AC OUTLET
The converter’s built-in switched AC
outlet lets you connec t a TV or another electronic device that uses 120V,
60Hz power (up to 60 0 watts) directly
to the converter.
Press
POWER
mote control to tu rn on the converter
and the outlet. Pre ss
turn them off.
Notes:
• If a TV you plugged into the
switched AC outlet has an instanton feature, it might go into a
standby mode when you turn on
the converter. If this happens, you
might have to turn on your TV
using its power switch or remote
control.
• If you plugged a digital TV into the
switched AC outlet, it might automatically reset to a channel other
than 3 or 4 when you turn off the
converter. If this happens, you
might want to plug it into a standard AC outlet and tur n it on and
off manually.
on the converter or re-
POWER
again to
6
Page 7
CONNECTING THE CONVERTER
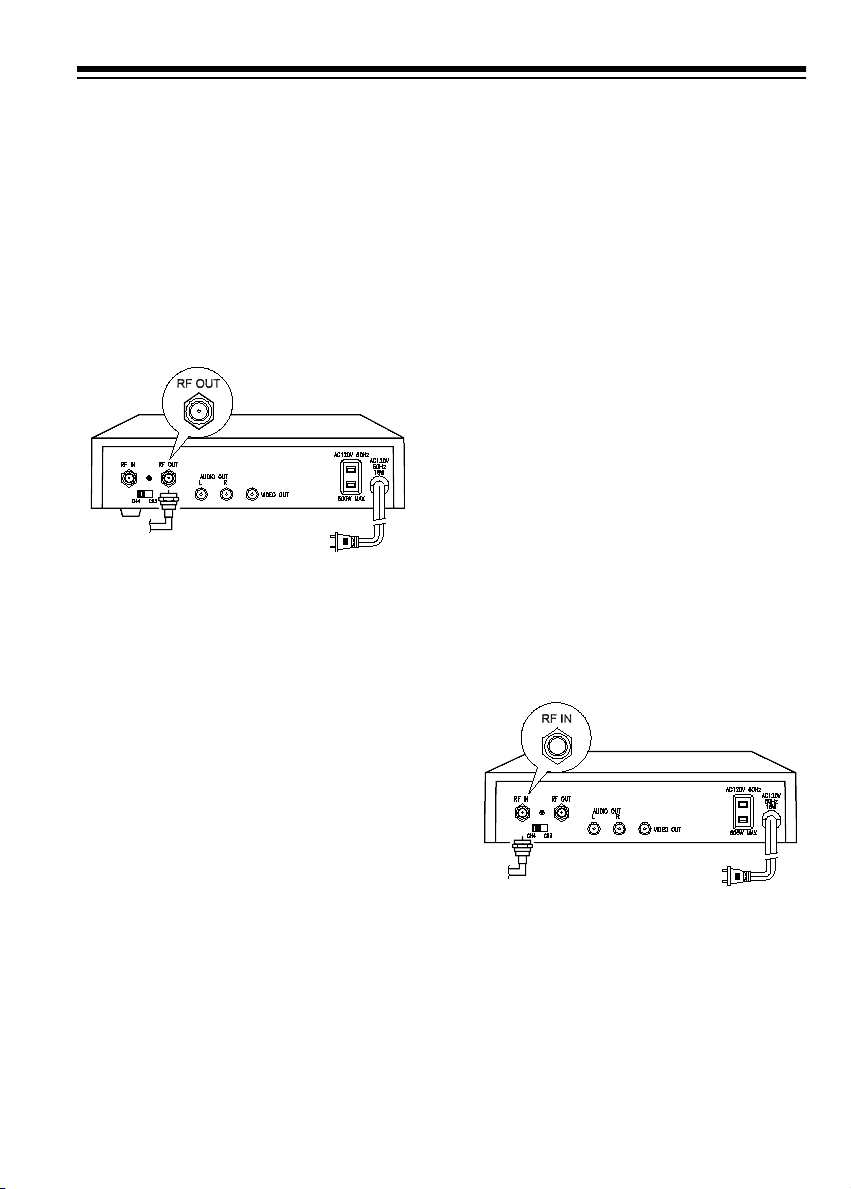
CONNECTING TO A TV
Use the supplied 75-ohm coaxial cable with F-type connecto rs to connect
the 75-ohm terminal on your TV to the
RF OUT
converter. If your TV has only 300ohm terminals, use a 75-to-300 ohm
transformer (not supplied), available
from your local RadioShack store.
terminal on the back of the
CONNECTING TO CABLE
How you connect your converter depends on the complexit y of your video
system. Refer to the connection examples on the next few p ages to find
the one that is most similar to your
system.
Notes:
Connect the cabl e company’s coaxial
cable to the
of the converter.
• Your system might use a combination of two or more of the following
examples. If you have questions,
take a diagram of your system to
your local RadioShack store for
assistance.
• Check local regulations before
connecting any device to your
cable system.
terminal on the back
RF IN
7
Page 8
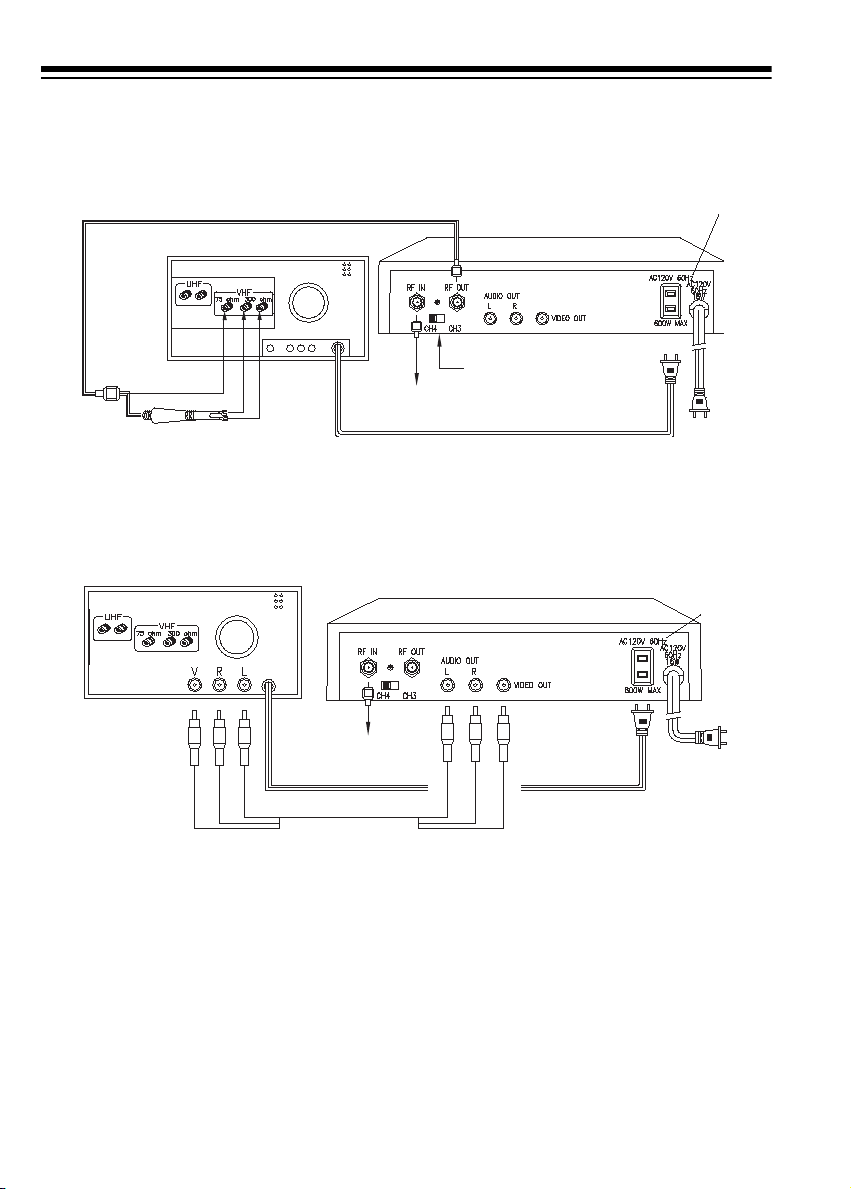
Single-Wire Cable Syst em
Connect to TV R/F Inputs
TV Set
Matching Transformer
(75-300 Ohm)
Connect to TV Audio/Video Inputs
TV Set
Cable Converter
CH4/CH3
From Cable Company
AC Plug from TV Set
Cable Converter
Switched
AC Outlet
To Standard
AC Outlet
Switched
AC Outlet
TV Set
From Cable
Company
To Standard
AC Outlet
8
Page 9

Two-Wire Cable System
Some cable systems offer more than 181 channels and include two incoming wires.
To use your converter with such a system, install an A/B switch (not supplied),
available from your local Ra dioShack stor e, to connect the cabl e company’s wires
to the converter.
A/B Switch
Two Wires From
Cable Company
Switched
AC Outlet
From
Cable
Company
Matching Transformer
(75-300 Ohm)
Cable Converter
CH4/CH3
TV Set
AC Plug From TV Set
Use the A/B switch to select the group of channels you want to watch.
To Standard
AC Outlet
9
Page 10

CONNECTING TO A VCR
Recording and Viewing a Non-Premium Cable Channel
This connection lets you record a non-premium cable channel while you view it.
VCR
From Cable Company
To Standard
AC Outlet
Cable Converter
CH4/CH3
TV Set
Matching Transformer
(75-300 Ohm)
Switched
AC Outlet
To Standard
AC Outlet (both)
10
Page 11

Recording and Viewing a Premium Cable Channel
This connection lets you:
• record a premium or non-premium cable channel while you view it
• record a premium cable channel while you view a non-premium cable channel
• record a non-premium cable channel while you view another non-premium
cable channel
Use an A/B switch (no t supp lied) to conn ect y our TV s et to th e VCR and the cabl e
converter. Use a t wo-way splitter (not supplied) to connec t the cable company’s
wire to the conver ter and the cable com pany’s CATV box . Your local RadioS hack
store has the accessories you need to make this connection.
Two-Way Splitter
From Cable
Company
Cable Converter
Switched
AC Outlet
CATV Box
To Switched
AC Out let
VCR
To Standard
AC Outlet
TV Set
To Standard
AC Out let
Matching Transformer
(75-300 Ohm)
With the A/B switch set to the converter position, you have remote control of all cable channels, except premium cable channels.
When you want to view premium c hannels, set the A/B switch to the position for
CATV. Then follow the instructions in the VCR’s owner’s manual to set the channel
switches on the VCR and CATV box.
11
Page 12

OPERATION
OPERATING THE
CONVERTER’S
RECEIVER
Press
POWER
mote control to turn the conve rter and
the switched AC outlet on and off.
When you turn off the co nver ter, a dot
appears on the lower right corner of
the display to indicate that the converter is in standby mode.
Press
CHANNEL
verter to select i ndividual chan nels, or
hold down
channels in th e direction of the arrow.
The selected channel appea rs on the
display.
Press
VOL U M E
VOL
crease the vo lume, or press
remote control to decrease it.
Press
CATV or TV mode. In TV mode,
(TV) appears before the channel number on the display.
on the remote control to in-
on the converter or
CATV/TV
on the converter or re-
or on the con-
CHANNEL
to select either the
or to scan
on the converter or
VOL
VOL U M E
on the
Sample Display Indications
Standby/Favorite Channel
Sleep Timer
Parental Lock
125
— CATV Channel 125.
•
U16
•
— TV Channel 16.
U52.
•
•
•
•
•
U
•
•
— TV Channel 52 is a
favorite channel.
11.5
— CATV Channel 115 is
receiving a program and the sl ee p
timer has been set up.
1.2.5.
locked and it is also a favorite
channel. The sleep timer has
been set up.
⊆⊆
memory operation.
∪•∪
parental lock.
∪
.
control code.
∪
.
control code.
— CATV Channe l 125 is
— Press
— Press
1
— the 1st digit of a parental
2
— the 2nd digit of a parental
MEM
or
to start a
FAV
to activate
PL
12
∪
.
3
•
— the 3rd digit of a parental
control code.
•⊂⊂ — Press
firm your entry, or store a programmed function in memory.
⊃⊃
•
— Press
firm your entry, or erase a programmed function from memory.
FINE TUNE
FINE TUNE
to con-
to con-
Page 13

USING THE REMOTE
CONTROL
RESET
(Fine Tuning Center ) — press
to return to the default setting.
The remote control lets you operate
your converter fr om across the room.
For the most dependable operation,
point the remote control toward the
converter’s display.
Here is a description of each of the remote control’s keys:
— press to temporarily turn off
MUTE
sound. To restore so und, press
MUTE
again.
— lets you set y our converter
SLEEP
to automatically t urn off after the preset time.
FINE TUNE
/ — press to rec eive
the best possible reception or confirm
the entry of
Parental Lock
(
PL
TUNE
to lock channels.
MEM, FAV
, and PL.
) — use with
FINE
POWER
— press to turn the converter
and the switched AC outlet on and off.
CATV/TV
— press to select CATV or
TV mode.
VOL
ume or
FAV
a favorite channel or with
/ — press to increase vol-
to decrease it.
— use with
FINE TUNE
FINE TUNE
to store
to delete it.
(Last Channel Recall)
LAST
— press
to recall the chan nel you sele cted before the current channel.
/ — press to sele ct individual
CH
channels or scan channels in the direction of the arrow. The converter’s
display shows the channel number.
— use with
MEM
FINE TUNE
to
store a channel you previously finetuned.
MR (Memory Recall
) — press to tune
to your favorite channel stored in
memory.
Number Buttons (0–9)
— press to directly select channels. Precede single-digit channels with a
(02, 03, 04,
0
and so on).
13
Page 14

Remote Control TVs
If your TV has a remote control and
your converter’s remote control interferes with the TV’s operation, either
turn off the TV’s remote control feature (if the TV has a remote control on/
off switch) or cover the TV’s remote
control receiver window (with a piece
of black tape, for example).
ADJUSTING THE
VOLUME
Repeatedly press
on the converter or
the remote control to adjust the volume.
VOL UM E
VO L
or
or on
store the sound, press
repeatedly press
the converter or
remote control.
MUTE
VOLUME
VOL
again or
MUTE
or on
or on the
STORING A CHANNEL
IN MEMORY
Follow these step s to store a favorite
channel in memory.
1. Repeatedly press
on the converter or
on the remote contro l to select
the channel.
CHANNEL
CH
or
or
MUTING THE SOUND
Press
temporarily turn off th e sound. To re-
14
on the remote control to
MUTE
2. Press
3. Press
appears on the lower righ t corner
of the display.
To select the channel cur rently sto red
in memory, press
To remove a stored channel from
memory, repeatedly press
or on the converter or
on the remote control to select it,
press
FAV
The channel is deleted from memory
and the dot disappears from the display.
.
FAV
FINE TUNE
.
MR
, then press
. A dot
CHANNEL
CH
FINE TUNE
or
.
Page 15

SETTING THE SLEEP
TIMER
Follow these steps to set the convert er to automatically turn of f after a certain length of time (90, 60, or 30
minutes).
1. Press
the sleep timer indicator lights.
2. Repeatedly press
desired length of time appears.
When the preset ti me is reached,
appears and the converter automatically turns off.
SLEEP
9.0
.
appears and
SLEEP
until the
00
Locking a Channel
1. Repeatedly press
the remote control to select the
channel you want to lock.
2. Press
3. Hold down
the selected channel.
appears to confirm the entry.
4. Release
appears to indicate the channel is
locked.
. ∪∪ appears.
PL
FINE TUNE
FINE TUNE
CH
or on
to lock
∪
.
Watching a Locked Channel
⊂.⊂
.∪
Notes:
• To see the re maining time on the
timer, press
• To turn off the timer, repeatedly
press
The sleep timer indicator disappears and the converter stays on
until you turn it off.
SLEEP
once.
SLEEP
until 00 appears.
USING PARENTAL LOC K
(PL)
To prevent children from viewing adult
programs (for exa mple), you can loc k
channels you se lect then set the c onverter so it does not tune them.
Note:
Your converter’s security code
is preset to 2999, but you c an chan ge
it (see “Changing the Security Code”
on Page 16).
1. Repeatedly press
the remote control to select the
locked channel you want to watch.
2. Press
keys on the remote control to
enter the secur ity code (preset to
2999).
appear for about two seconds,
then the converter unlocks all
channels.
To re-lock all channe ls, turn the converter off then turn it back on again.
then use the number
PL
∪
∪
.
.2
1
,
CH
, and
or on
.3
∪
15
Page 16

Unlocking a Channel
1. Repeatedly press
the remote control to select the
desired locked channel.
CH
or on
CHANGING THE
SECURITY CODE
1. Repeatedly press
the remote control to select a
locked channel.
CH
or on
2. Press
keys on the remote control to
enter the security code. The converter unlocks the channel.
3. Press
down
selected channel. ⊃⊃ appears to
confirm the entry. The converter
deletes the lock.
, then use the number
PL
. ∪∪ appears. Then hold
PL
FINE TUNE
to unlock the
2. Press
keys on the remote control to
enter the current 4-digit security
code (preset to 2999).
3. Press
keys on the remote control to
enter a new 4-digit security code.
4. Press
then use the number
PL
then use the number
PL
FINE TUNE
.
RESETTING THE
SECURITY CODE
1. Follow Steps 1 and 2 under
“Unlocking a Channel.”
2. Press
keys on the remote control to
enter
default master code) within 3 seconds. The converter resets the
security code to 2999.
, then use the number
PL
(your converter’s
71269
16
Page 17

VARIATIONS IN
CHANNEL NUMBERING
Some cable compan ies us e a ch annel
numbering system that is different
from the one used by your converter .
For example, the channel your cable
company calls 21 might ap pear as
on the converter’s display.
Use the supplied cha nnel number labels to mark the cable company’s
channel numbers that differ from the
channels on the converter’s display.
Then peel off the bac king on each label and paste the large label on the
converter and the smal l label on your
remote control.
This table compares channels that
your converter shows to channel numbers that might be assigned by your
local cable company.
Indicator Cable Channel
1 1
22
33
44
55
66
77
88
99
10 10
11 11
18
Indicator Cable Channel
12 12
13 13
14 A
15 B
16 C
17 D
18 E
19 F
20 G
21 H
22 I
23 J
24 K
25 L
26 M
27 N
28 O
29 P
30 Q
31 R
32 S
33 T
34 U
35 V
36 W
37 AA or W+1
38 BB or W+2
39 CC or W+3
40 DD or W+4
17
Page 18

Indicator Cable Channel
41 EE or W+5
42 FF or W+6
43 GG or W+7
44 HH or W+ 8
45 II or W+9
46 JJ or W+10
47 KK or W+11
48 LL or W+12
49 MM or W+13
50 NN or W+14
51 OO or W+15
52 PP or W+16
53 QQ or W+17
54 A6 or W+18
55 A7 or W+19
56 A8 or W+20
57 A5 or W+21
58 A4 or W+22
59 A3 or W+23
60 A2 or W+24
61 A1 or W+25
62 RR or W+26
63 SS or W+27
64 TT or W+28
65 UU or W+29
66 VV or W+30
67 WW or W+31
68 XX or W+32
69 YY or W+33
Indicator Cable Channel
70 ZZ or W+34
71 AAA or W+35
72 BBB or W+36
73 CCC or W+37
74 DDD or W+38
75 EEE or W+39
76 FFF or W+40
77 GGG or W +41
78 HHH or W+42
79 III or W+43
80 JJJ or W+44
81 KKK or W+45
82 LLL or W+46
83 MMM or W+47
84 NNN or W+48
85 OOO or W +49
86 PPP or W+50
87 QQQ or W +51
88 RRR or W+52
89 SSS or W+53
90 TTT or W+54
91 UUU or W+55
92 VVV or W+56
93 WWW or W+57
94 XXX or W+58
95 A-5
96 A-4
97 A-3
98 A-2
Indicator Cable Channel
99 A-1
100 YYY or W+59
101 ZZZ or W+60
102 W+61
103 W+62
104 W+63
105 W+64
106 W+65
107 W+66
108 W+67
109 W+68
110 W+69
111 W+70
112 W+71
113 W+72
114 W+73
115 w+74
116 w+75
117 w+76
118 w+77
119 w+78
120 w+79
121 w+80
122 w+81
123 w+82
124 w+83
125 w+84
18
Page 19

CARE AND MAINTENANCE
Your RadioShack 181-Cha nnel Remote Control Cable Converter is an example
of superior design and craftsmanship. The following suggestions will help you
care for your converter so you can enjoy it for years.
Keep the converter dr y. If it gets wet, wipe i t dry i mmedia tely. Liqui ds
might contain minerals that can corrode the electronic circuits.
Use and store the converter only in normal temperature environments. Temperature extremes can shorten the life of electronic devices, damage batteries, and distort or melt plastic parts.
Keep the converter away from dust and dirt, which can caus e premature wear of parts.
Handle the converter gently and carefully. Dropping it can damage
circuit boards and cases and can cause the converter to work improperly.
Use only fresh bat teries of the required s ize and recomme nded type .
Batteries can leak chemical s that damage you r converter’ s electron ic
parts.
Wipe the converter with a damp cloth occasional ly to keep it looking
new. Do not use har sh chemic als, cle aning so lvents, or strong de tergents to clean the converter.
Modifying or tampering with the converter’s internal components can cause a
malfunction and mi ght invalida te its war ranty and vo id your FCC a uthorizati on to
operate it. If your converter is not performing as it should, take it to your local RadioShack store for assistance.
19
Page 20

THE FCC WANTS YOU TO KNOW
Your converter might cause TV or radio interference even when it is operating
properly. To determin e whether your conv erter is c ausing th e interfere nce, turn o ff
your converter. If the interference goes aw ay, your converter is caus ing it. Try to
eliminate the interference by:
• moving your converter away from the receiver
• connecting your converter to an outlet that is on a different electrical circuit from
the receiver
• contacting your local RadioShack store for help
If you cannot eliminat e the in terferen ce, the FCC requ ires that y ou stop us ing y our
converter.
20
Page 21

SPECIFICATIONS
REMOTE CONTROL
Range .................................................................................. 8m (26 feet)/30
°
Angle
Power Source ....... ....... ...... ...... ....... ...... ...................... Two 1.5 Volt (AAA) Batteri es
Dimensions (HWD) .....................................................................
5
/
(16
8
× 2 × 6
7
8
/
Inches
×
50 × 175 mm)
Weight (with Batteries) ..................................................................................... 3 oz
(81 grams)
CONVERTER
RF
Input Bandwidth ................................................................................... 54–806 MHz
Output Channel .............................................................................................. 3 or 4
Input/Output Impedance ............................................................................ 75 ohms
Noise Figure .......................................................................................... 15 dB Max.
Max. Cross Modulation ............................... –57 dB (70 Ch. In, each at +12 dB µV)
Fine-Tuning Range ........................................................ ±4 MHz in 62.5 kHz Steps
Frequency Stability ................................................................................... ±250 kHz
Output Level ................................................................................ 66 dB µV (typical)
66 dB µV±3 (range)
Video Carrier Center Frequency Accuracy ...................................... ±100 kHz Max.
Sound Carrier Center Frequency Accuracy ........................... 4.5 MHz ±0.007 MHz
P/S Ratio .................................................................................................. 16 ± 3 dB
Local Oscillator Leakage ................................................... –10 dBmV Max. at input
Video and Audio
Video Output .................................................................................................. 1 Vp-p
Video Output Impedance ........................................................................... 75 ohms
Audio Output .................................................................................................. 1 Vp-p
Audio Output Impedance .......................................................................... 600 ohms
Power Consumption .............................................. 16 Watts at 120 Volts AC 60 Hz
Dimensions (HWD) ...................................................................... 2
×
95/8 × 6 Inches
×
(50
246 × 152 mm)
Weight ............................................................................................................ 2.8 lb
(1.27 kg)
Specifications ar e typical; indivi dual units m ight vary. Speci fications are su bject to
change and improvement without notice.
21
Page 22

NOTES
22
Page 23

23
Page 24

Limited Ninety-Day Warranty
This product is warran ted by RadioSh ack against manufactur ing defects in mater ial and wor kmanship under norma l use for ninety (90) days from the date of purchase fr om RadioShack companyowned stores and authorized RadioShack franchisees and dealers. EXCEPT AS PROVIDED
HEREIN, RadioShack MAKES NO EXPRESS WARRANTIES AND ANY IMPLIED WARRANTIES,
INCLUDING THOSE OF MERCHANTABILITY AND FITNESS FOR A PARTICULAR PURPOSE,
ARE LIMITED IN DURATION TO THE DURATION OF THE WRITTEN LIMITED WARRANTIES
CONTAINED HEREIN. EXCEPT AS PROVIDED HEREIN, RadioShack SHALL HAVE NO LIABILITY OR RESPONSIBILITY TO CUSTOMER OR ANY OTHER PERSON OR ENTITY WITH RESPECT TO ANY LIABILITY, LOSS OR DAMAGE CAUSED DIRECTLY OR INDIRECTLY BY USE
OR PERFORMANCE OF THE PRODUCT OR ARISING OUT OF ANY BREACH OF THIS WARRANTY, INCLUDING, BUT NOT LIMITED TO, ANY DAMAGES RESULTING FROM INCONVENIENCE, LOSS OF TIME, DATA, PROPERTY, REVENUE, OR PROFIT OR ANY INDIRECT,
SPECIAL, INCIDENTAL, OR CONSEQUENTIAL DAMAGES, EVEN IF RadioShack HAS BEEN ADVISED OF THE POSSIBILITY OF SUCH DAMAGES.
Some states do not allow the limitations on how long an implied warranty lasts or the exclusion of incidental or consequential damages, so the above limitations or exclusions may not apply to you.
In the event of a product defect during the warranty per iod, take the product and the Ra dioShack
sales receipt as proof of pu rchase date to a ny RadioSha ck store. RadioSha ck will, at its op tion, un less otherwise provided by law: (a) correct the de fect by product repair wit hout char ge for par ts an d
labor; (b) replace the product wi th one of the same or similar design; or (c) refund the purchase
price. All replac ed par ts a nd produ cts, and p roducts on which a refund is made, b ecome the property of Ra dioShack. New or recondi tioned par ts and produ cts may be used in the p erformance of
warranty service. Re paired or repl aced par ts and produ cts are warranted for the r emainder of th e
original warranty period. You will be charged for repair or replacement of the product made afte r th e
expiration of the warranty period.
This warranty does not cover: (a) da ma ge o r failure ca used by or attributable to acts of God, a buse,
accident, misuse, improper or abn or mal usa ge, failure to follow instructio ns, imprope r instal lation o r
maintenance, alteration, l ightning or other incidence of excess voltage or cur rent; (b) any repairs
other than those provided by a RadioShack Authorized Service Facility; (c) consumables such as
fuses or batteries; (d) cosmetic da mage; (e) transportation, shipping or insu rance costs; or (f) co sts
of product removal, installation, set-up service adjustment or reinstallation.
This warranty gives you specific legal r ights, and you may also have other rights wh ich vary from
state to state.
RadioShack Customer Relations, Dept. W, 100 Throckmorton St., Suite 600, Fort Worth, TX 76102
We Service What We Sell
3/97
RadioShack
A Division of Tandy Corporation
Fort Worth, Texas 76102
03A99 Printed in China
 Loading...