

Page 1

Page 2

7!2.).'
4/02%6%.4&)2%/23(/#+(!:!2$$/./453%4()30,5'7)4(!.%84%./.#/2$2%#%04!#,%
/2/4(%2/54,%45.,%334(%",!$%3#!."%&5,,9).3%24%$4/02%3%.4",!$%%80/352%
4/02%6%.4&)2%/23(/#+(!:!2$$/./4%80/3%4()3!00,)!.#%4/2!)./2-/)3452%
4/026%.4%,%#42)#!,3(/#+-!4#(7)$%",!$%0,5'4/7)$%3,/4&5,,9).3%24
2)3+/&%,%#42)#3(/#+
$/./4/0%.
#!54)/.
4HISLIGHTNIGFLASHWITHARROW
HEADSYMBOLWITHINANEQUI
LATERALTRIANGLEISINTENDEDTO
ALERTTHEUSERTOTHEPRESENCE
OF UNINSULATED hDANGEROUS
VOLTAGEv WITHIN THE PRODUCTS
ENCLOSURE THAT MAY BE OF
SUFFICIENT MAGNITUDE TO
CONSTITUTE A RISK OF ELECTRIC
SHOCKTOPERSONS
7ARNING4OREDUCETHERISKOF
ELECTRIC SHOCK DO NOT REMOVE
COVER OR BACK NO USER
SERVICEABLEPARTSINSIDE2EFER
SERVING TO QUALIFIED SERVICE
PERSONNEL
4HEEXCLAMATIONPOINTWITHIN
AN EQUILATERAL TRIANGLE IS
INTENDEDTOALERTTHEUSERTO
THE PRESENCE OF IMPORTANT
OPERATING AND MAINTENANCE
SERVICING INSTRUCTIONS IN
THE LITERATURE ACCOMPANYING
THEAPPLIANCE
2EADTHESEINSTRUCTIONS
+EEPTHESEINSTRUCTIONS
(EEDALLWARNINGS
&OLLOWALLINSTRUCTIONS
$ONOTUSETHISAPPARATUSNEARWATER
#LEANONLYWITHDRYCLOTH
$ONOTBLOCKANYVENTIATIONOPENINGS)NSTALLINACCORDANCEWITHTHEMANUFACTURESINSTRUCTIONS
$O NOT INSTALL NEAR ANY HEAT SOURCES SUCH AS RADIATORS HEAT REGISTERS STOVES OR OTHER APPARTUS
INCLUDINGAMPLIFIERSTHARPRODUCEHEAT
$ONOT DEFEATTHE SAFETYPURPOSE OF THE POLARIZED OR GROUNDING TYPE PLUG!POLARIZEDPLUGHAS TWO
BLADESWITHONEWIDERTHANTHEOTHER!GROUNDINGTYPEPLUGHASTWOBLADESANDATHIRDGROUNDINGPRONG
4HEWIDEBLADEORTHETHIRDPRONGAREPROVIDEDFORYOURSAFETY)FTHEPROVIDEDPLUGDOESNOTFITINTOYOUR
OUTLETCONSULTANELECTRICIANFORREPLACEMENTOFTHEOBSOLETEOUTLET
0ROTESTTHEPOWERCORDFROMBEINGWALKEDONORPINCHEDPARTICULARYATTHEPLUGSCONVENIENCERECEP
TACLESANDATTHEPOINTWHERETHEYEXITFROMTHEAPPARATUS
/NLYUSEATTACHMENTSACCESSORIESSPECIFIEDBYTHEMANUFACTURER
5SEONLYWITHTHECARTSTANDTRIPODBRACKETORTABLESPECIFIEDBYTHEMANUFAC
TURER OR SOLD WITH THE APPARATUS 7HEN A CART IS USED USE CAUTION WHEN
MOVINGTHECARTAPPARATUSCOMBINATIONTOAVOIDINJURYFROMTIPOVER
5NPLUGTHEAPPARATUSDURINGLIGHTENINGSORTORWHENUNUSEDFORLONGPERIODSOFTIME
2EFERALLSERVICINGTOQUALIFIEDPERSONNEL3ERVINGISREQUIREDWHENTHEAPPARATUSHASBEENDAMAGEDIN
ANYWAYSUCHASPOWERSUPPLYCORDORPLUGISDAMAGEDLIQUIDHASBEENSPILLEDOROBJECTSHAVEFALLEN
INTO THE APPARATUS HAS BEEN EXPOSED TO RAIN OR MOISTURE DOES NOT OPERATE NORMALLY OR HAS BEEN
DROPPED
4HISAPPLIANCESHALLNOTBEEXPOSEDTODRIPPINGORSPLASHINGWATERANDTHATNOOBJECTFILLEDWITHLIQUID
SUCHASVASESSHALLBEPLACEDONTHEAPPARATUS
#AUTIONTOPREVENTELECRICALSHOCKMATCHWIDEBLADEPLUGWIDESLOTFULLYINSERT
0LEASEKEEPAGOODVENTILATIONENVIRONMENTAROUNDTHEENTIREUNIT
)-0/24!.43!&%49).3425#4)/.3
Page 3

Safety Instructions/Consignes de sécurité/Sicherheitsvorkehrungen/Instrucciones de seguridad
WARNING: To reduce the risk of fire or electric shock, do not expose this unit to rain
or moisture. To reduce the hazard of electrical shock, do not remove cover or back.
No user serviceable parts inside. Please refer all servicing to qualified personnel.The
lightning flash with an arrowhead symbol within an equilateral triangle, is intended to
alert the user to the presence of uninsulated "dangerous voltage" within the products
enclosure that may be of sufficient magnitude to constitute a risk of electric shock to
persons. The exclamation point within an equilateral triangle is intended to alert the
user to the presence of important operating and maintenance (servicing) instructions
in the literature accompanying the product.
Important Safety Instructions
1. Please read all instructions before operating the unit.
2. Keep these instructions for future reference.
3. Please heed all safety warnings.
4. Follow manufacturers instructions.
5. Do not use this unit near water or moisture.
6. Clean only with a damp cloth.
7. Do not block any of the ventilation openings. Install in accordance with the manufacturers instructions.
8. Do not install near any heat sources such as radiators, heat registers, stoves, or
other apparatus (including amplifiers) that produce heat.
9. Do not defeat the safety purpose of the polarized or grounding-type plug. A polarized plug has two blades with one wider than the other. A grounding type plug has
two blades and a third grounding prong. The wide blade or third prong is provided
for your safety. When the provided plug does not fit your outlet, consult an electrician for replacement of the obsolete outlet.
10. Protect the power cord from being walked on and pinched particularly at plugs,
convenience receptacles and at the point at which they exit from the unit.
11. Unplug this unit during lightning storms or when unused for long periods of time.
12. Refer all servicing to qualified personnel. Servicing is required when the unit has
been damaged in any way, such as power supply cord or plug damage, or if liquid
has been spilled or objects have fallen into the unit, the unit has been exposed to
rain or moisture, does not operate normally, or has been dropped.
ATTENTION: Pour éviter tout risque d’électrocution ou d’incendie, ne pas exposer cet
appareil à la pluie ou à l’humidité. Pour éviter tout risque d’électrocution, ne pas ôter le
couvercle ou le dos du boîtier. Cet appareil ne contient aucune pièce remplaçable par
l'utilisateur. Confiez toutes les réparations à un personnel qualifié. Le signe avec un éclair
dans un triangle prévient l’utilisateur de la présence d’une tension dangereuse et non
isolée dans l’appareil. Cette tension constitue un risque d’électrocution. Le signe avec un
point d’exclamation dans un triangle prévient l’utilisateur d’instructions importantes relatives à l’utilisation et à la maintenance du produit.
Consignes de sécurité importantes
1. Veuillez lire toutes les instructions avant d’utiliser l’appareil.
2. Conserver ces instructions pour toute lecture ultérieure.
3. Lisez avec attention toutes les consignes de sécurité.
4. Suivez les instructions du fabricant.
5. Ne pas utiliser cet appareil près d’une source liquide ou dans un lieu humide.
6. Nettoyez l’appareil uniquement avec un tissu humide.
7. Veillez à ne pas obstruer les fentes prévues pour la ventilation de l’appareil. Installez
l’appareil selon les instructions du fabricant.
8. Ne pas installer près d’une source de chaleur (radiateurs, etc.) ou de tout équipement
susceptible de générer de la chaleur (amplificateurs de puissance par exemple).
9. Ne pas retirer la terre du cordon secteur ou de la prise murale. Les fiches canadiennes
avec polarisation (avec une lame plus large) ne doivent pas être modifiées. Si votre
prise murale ne correspond pas au modèle fourni, consultez votre électricien.
10. Protégez le cordon secteur contre tous les dommages possibles (pincement, tension,
torsion,, etc.). Veillez à ce que le cordon secteur soit libre, en particulier à sa sortie du
boîtier.
11. Déconnectez l’appareil du secteur en présence d’orage ou lors de périodes
d’inutilisation prolongées.
12. Consultez un service de réparation qualifié pour tout dysfonctionnement (dommage
sur le cordon secteur, baisse de performances, exposition à la pluie, projection liquide dans l’appareil, introduction d’un objet dans le boîtier, etc.).
ACHTUNG: Um die Gefahr eines Brandes oder Stromschlags zu verringern, sollten
Sie dieses Gerät weder Regen noch Feuchtigkeit aussetzen.Um die Gefahr eines
Stromschlags zu verringern, sollten Sie weder Deckel noch Rückwand des Geräts entfernen. Im Innern befinden sich keine Teile, die vom Anwender gewartet werden können. Überlassen Sie die Wartung qualifiziertem Fachpersonal.Der Blitz mit Pfeilspitze im
gleichseitigen Dreieck soll den Anwender vor nichtisolierter “gefährlicher Spannung”
im Geräteinnern warnen. Diese Spannung kann so hoch sein, dass die Gefahr eines
Stromschlags besteht. Das Ausrufezeichen im gleichseitigen Dreieck soll den Anwender
auf wichtige Bedienungs- und Wartungsanleitungen aufmerksam machen, die im mitgelieferten Informationsmaterial näher beschrieben werden.
Wichtige Sicherheitsvorkehrungen
1. Lesen Sie alle Anleitungen, bevor Sie das Gerät in Betrieb nehmen.
2. Bewahren Sie diese Anleitungen für den späteren Gebrauch gut auf.
3. Bitte treffen Sie alle beschriebenen Sicherheitsvorkehrungen.
4. Befolgen Sie die Anleitungen des Herstellers.
5. Benutzen Sie das Gerät nicht in der Nähe von Wasser oder Feuchtigkeit.
6. Verwenden Sie zur Reinigung des Geräts nur ein feuchtes Tuch.
7. Blockieren Sie keine Belüftungsöffnungen. Nehmen Sie den Einbau des Geräts nur
entsprechend den Anweisungen des Herstellers vor.
8. Bauen Sie das Gerät nicht in der Nähe von Wärmequellen wie Heizkörpern,
Wärmeklappen, Öfen oder anderen Geräten (inklusive Verstärkern) ein, die Hitze
erzeugen.
9. Setzen Sie die Sicherheitsfunktion des polarisierten oder geerdeten Steckers nicht
außer Kraft. Ein polarisierter Stecker hat zwei flache, unterschiedlich breite Pole. Ein
geerdeter Stecker hat zwei flache Pole und einen dritten Erdungsstift. Der breitere
Pol oder der dritte Stift dient Ihrer Sicherheit. Wenn der vorhandene Stecker nicht in
Ihre Steckdose passt, lassen Sie die veraltete Steckdose von einem Elektriker ersetzen.
10. Schützen Sie das Netzkabel dahingehend, dass niemand darüber laufen und
es nicht geknickt werden kann. Achten Sie hierbei besonders auf Netzstecker,
Mehrfachsteckdosen und den Kabelanschluss am Gerät.
11. Ziehen Sie den Netzstecker des Geräts bei Gewittern oder längeren Betriebspausen
aus der Steckdose.
12. Überlassen Sie die Wartung qualifiziertem Fachpersonal. Eine Wartung ist notwendig, wenn das Gerät auf irgendeine Weise, beispielsweise am Kabel oder
Netzstecker beschädigt wurde, oder wenn Flüssigkeiten oder Objekte in das Gerät
gelangt sind, es Regen oder Feuchtigkeit ausgesetzt war, nicht mehr wie gewohnt
betrieben werden kann oder fallen gelassen wurde.
PRECAUCION: Para reducir el riesgo de incendios o descargas, no permita que este
aparato quede expuesto a la lluvia o la humedad. Para reducir el riesgo de descarga
eléctrica, nunca quite la tapa ni el chasis. Dentro del aparato no hay piezas susceptibles
de ser reparadas por el usuario. Dirija cualquier reparación al servicio técnico oficial. El
símbolo del relámpago dentro del triángulo equilátero pretende advertir al usuario de
la presencia de “voltajes peligrosos” no aislados dentro de la carcasa del producto, que
pueden ser de la magnitud suficiente como para constituir un riesgo de descarga eléctrica a las personas. El símbolo de exclamación dentro del triángulo equilátero quiere
advertirle de la existencia de importantes instrucciones de manejo y mantenimiento
(reparaciones) en los documentos que se adjuntan con este aparato.
Instrucciones importantes de seguridad
1. Lea todo este manual de instrucciones antes de comenzar a usar la unidad.
2. Conserve estas instrucciones para cualquier consulta en el futuro.
3. Cumpla con todo lo indicado en las precauciones de seguridad.
4. Observe y siga todas las instrucciones del fabricante.
5. Nunca utilice este aparato cerca del agua o en lugares húmedos.
6. Limpie este aparato solo con un trapo suave y ligeramente humedecido.
7. No bloquee ninguna de las aberturas de ventilación. Instale este aparato de acu
erdo a las instrucciones del fabricante.
8. No instale este aparato cerca de fuentes de calor como radiadores, calentadores,
hornos u otros aparatos (incluyendo amplificadores) que produzcan calor.
9. No anule el sistema de seguridad del enchufe de tipo polarizado o con toma de
tierra. Un enchufe polarizado tiene dos bornes, uno más ancho que el otro. Uno
con toma de tierra tiene dos bornes normales y un tercero para la conexión a
tierra. El borne ancho o el tercero se incluyen como medida de seguridad. Cuando
el enchufe no encaje en su salida de corriente, llame a un electricista para que le
cambie su salida anticuada.
10. Evite que el cable de corriente quede en una posición en la que pueda ser pisado
o aplastado, especialmente en los enchufes, receptáculos y en el punto en el que
salen de la unidad.
11. Desconecte de la corriente este aparato durante las tormentas eléctricas o cuando
no lo vaya a usar durante un periodo de tiempo largo.
12. Dirija cualquier posible reparación solo al servicio técnico oficial. Deberá hacer que
su aparato sea reparado cuando esté dañado de alguna forma, como si el cable de
corriente o el enchufe están dañados, o si se han derramado líquidos o se ha introducido algún objeto dentro de la unidad, si esta ha quedado expuesta a la lluvia o
la humedad, si no funciona normalmente o si ha caído al suelo.
-
Page 4

Table of Contents
ENGLISH
Introduction ..................................................................................................................................1
System Features ...........................................................................................................................2
Expedition Pro XPL100 ..............................................................................................................4
Expedition Pro XPL200 ..............................................................................................................6
Expedition Pro XPL300 ..............................................................................................................8
Positioning and Mounting Instructions ........................................................................... 12
Expedition Pro Accessories ................................................................................................... 14
Specifications/Caractéristiques techniques ...................................................................57
FRANÇAIS
Introduction ............................................................................................................................... 15
Caractéristiques techniques ................................................................................................. 16
Expedition Pro XPL100 ........................................................................................................... 18
Expedition Pro XPL200 ........................................................................................................... 20
Expedition Pro XPL300 ........................................................................................................... 22
Consignes de positionnement et de montage ..............................................................26
Caractéristiques techniques ................................................................................................. 57
DEUTSCHE
Einleitung .................................................................................................................................... 29
Produktmerkmale des Expedition Pro-Systems ............................................................ 30
Expedition Pro XPL100 ........................................................................................................... 32
Expedition Pro XPL200 ........................................................................................................... 34
Expedition pro XPL300 ........................................................................................................... 36
Anweisungen zur Positionierung und Montage ...........................................................40
Zubehör für die Expedition Pro-Lautsprechersysteme .............................................. 42
Technische Daten ..................................................................................................................... 58
ESPAÑOL
Introducción ............................................................................................................................... 43
Características del sistema .................................................................................................... 44
Expedition Pro XPL100 ........................................................................................................... 46
Expedition Pro XPL200 ........................................................................................................... 48
Expedition XPL300 ................................................................................................................... 50
Colocación e instrucciones de montaje ........................................................................... 54
Colocación e instrucciones de montaje ........................................................................... 55
Accesorios Expedition ............................................................................................................ 56
Especificaciones técnicas ......................................................................................................58
Copyright 2001-2007, Samson Technologies Corp.
Printed September, 2007 v1
Samson Technologies Corp.
45 Gilpin Avenue
Hauppauge, New York 11788-8816
Phone: 1-800-3-SAMSON (1-800-372-6766)
Fax: 631-784-2201
www.samsontech.com
Page 5

Introduction
Welcome to Samson Expedition XPL series—the portable audio system for the new century! This exceptionally versatile system offers the perfect solution wherever you need portable, high-quality audio: as a main PA system or as onstage monitors
in clubs and performance halls; in houses of worship; as a sound system for business presentations, mobile DJs at parties,
or aerobics instruction; and for use in outdoor environments such as parks, beaches and flea markets. What’s more, every
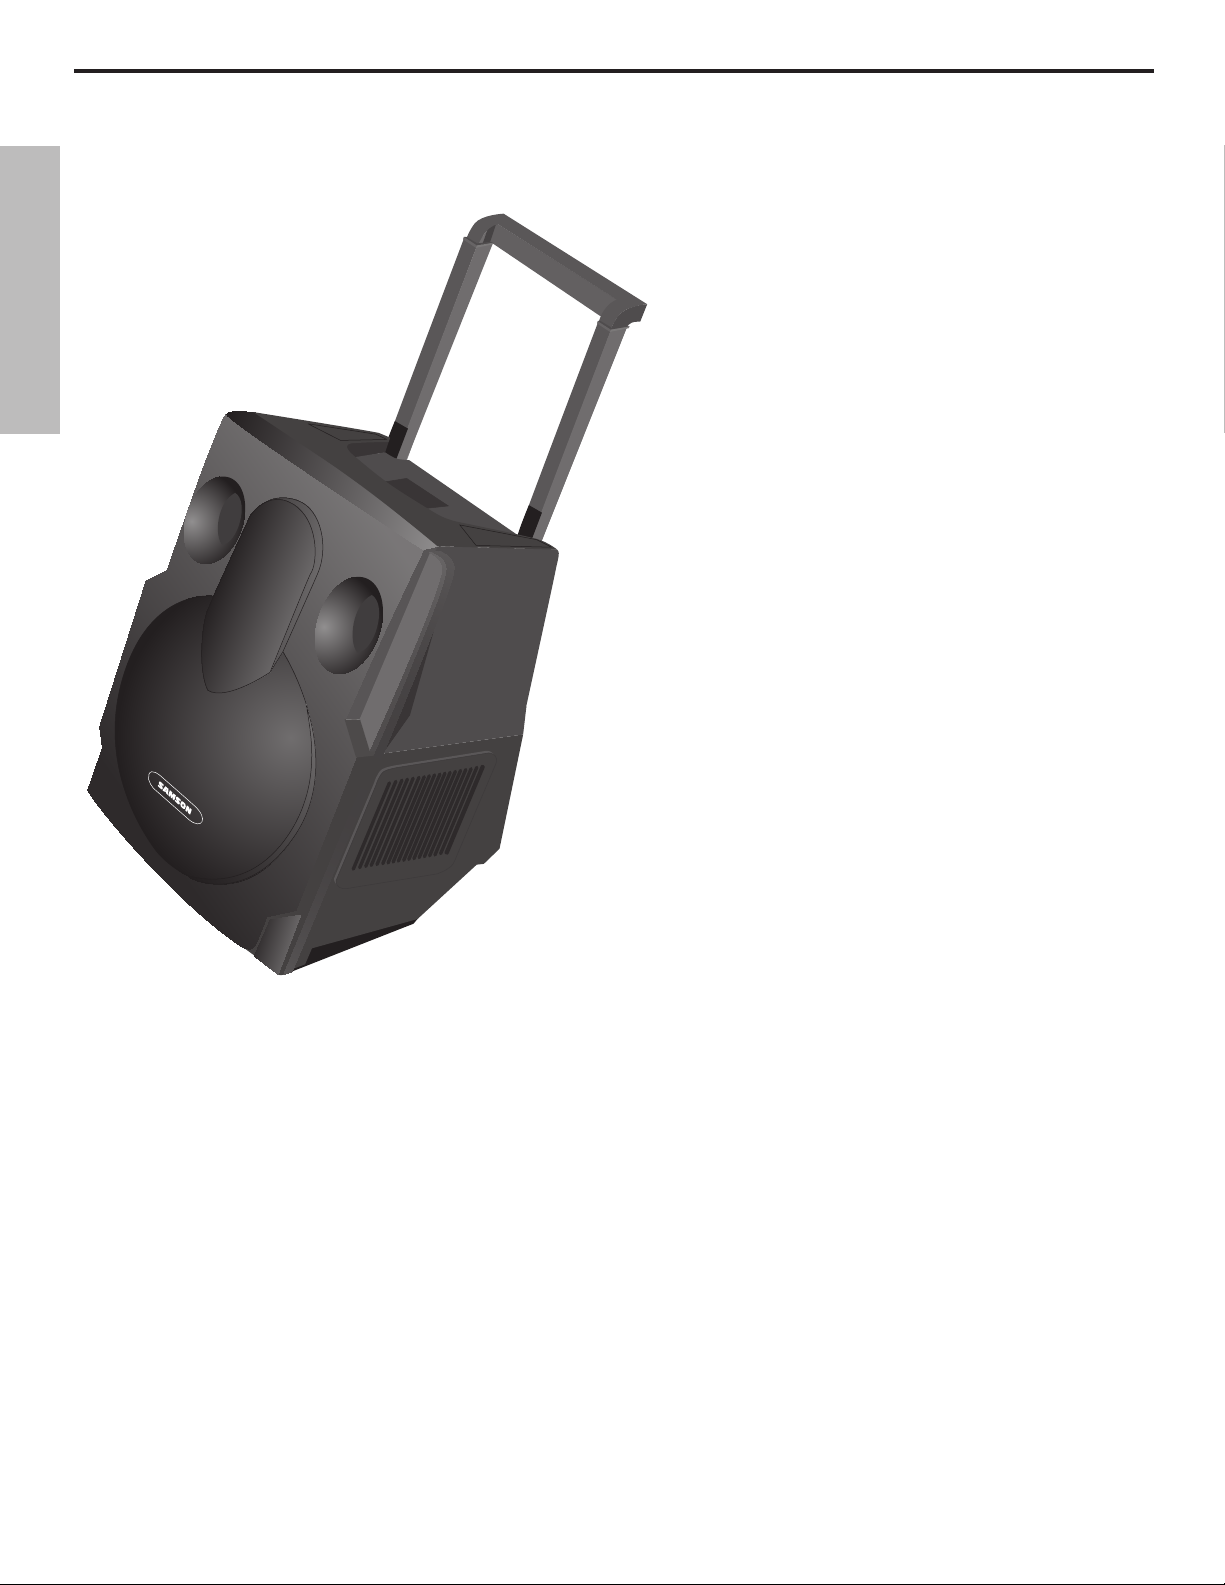
Expedition XPL series system comes with a built-in telescoping handle and locking wheels, making it easy to take professional audio with you wherever you go!
There are three different Samson Expedition XPL series systems detailed in this manual. All utilize the same lightweight yet
rugged two-way speaker enclosure that pairs a custom designed 12" woofer with a matched 1" compression driver. The
Expedition XPL100 is a passive 8-ohm enclosure that can be used with any external power amplifier rated at up to 250 watts.
The Expedition XPL200 is a powered version that includes a lightweight, "class D" power cell along with a precision designed
crossover, speaker protection circuitry and built-in limiting. And the Expedition XPL300 is designed as a total all-in-one portable PA system, adding a four-channel stereo mixer—complete with digital effects—to the equation. In addition, a number
of expansion options are available, including a 500-watt active subwoofer (our dB1500a or dB1800a); a rechargeable LeadAcid GelCel battery pack; and a rear-panel MP3 docking station. There's even a pre-wired custom compartment that accommodates one of two different Samson wireless receivers!
In this manual, you’ll find a detailed description of the features of all three Expedition Pro systems, as well as a guided tour
through all components, step-by-step instructions for setting up your system and full specifications. If your Expedition Pro
was purchased in the United States, you’ll also find a warranty card enclosed—don’t forget to fill it out and mail it! This
will enable you to receive online technical support and will allow us to send you updated information about this and other
Samson products in the future. If your Expedition Pro system was purchased outside of the U. S., contact your local distributor for warranty details. Also, be sure to check out our website www.samsontech.com for complete information about our
full product line.
ENGLISH
SPECIAL NOTE for U.S. purchasers: Should your Expedition Pro system ever require servicing, a Return Authorization number
(RA) is necessary. Without this number, the unit will not be accepted. If your Expedition Pro system was purchased in the
United States, please call Samson at 1-800-372-6766 for a Return Authorization number prior to shipping your system. If possible, return the unit in its original carton and packing materials. If your Expedition Pro system was purchased outside of the
U. S., contact your local distributor for information.
1
Page 6
System Features
SAMSON
ENGLISH
The Samson Expedition Pro system uses state-of-the art
technology to bring a revolutionary new degree of flexibility and portability to professional audio. Its main features include:
• A built-in telescoping handle and locking wheels that
make it easier than ever before to transport your audio
system.
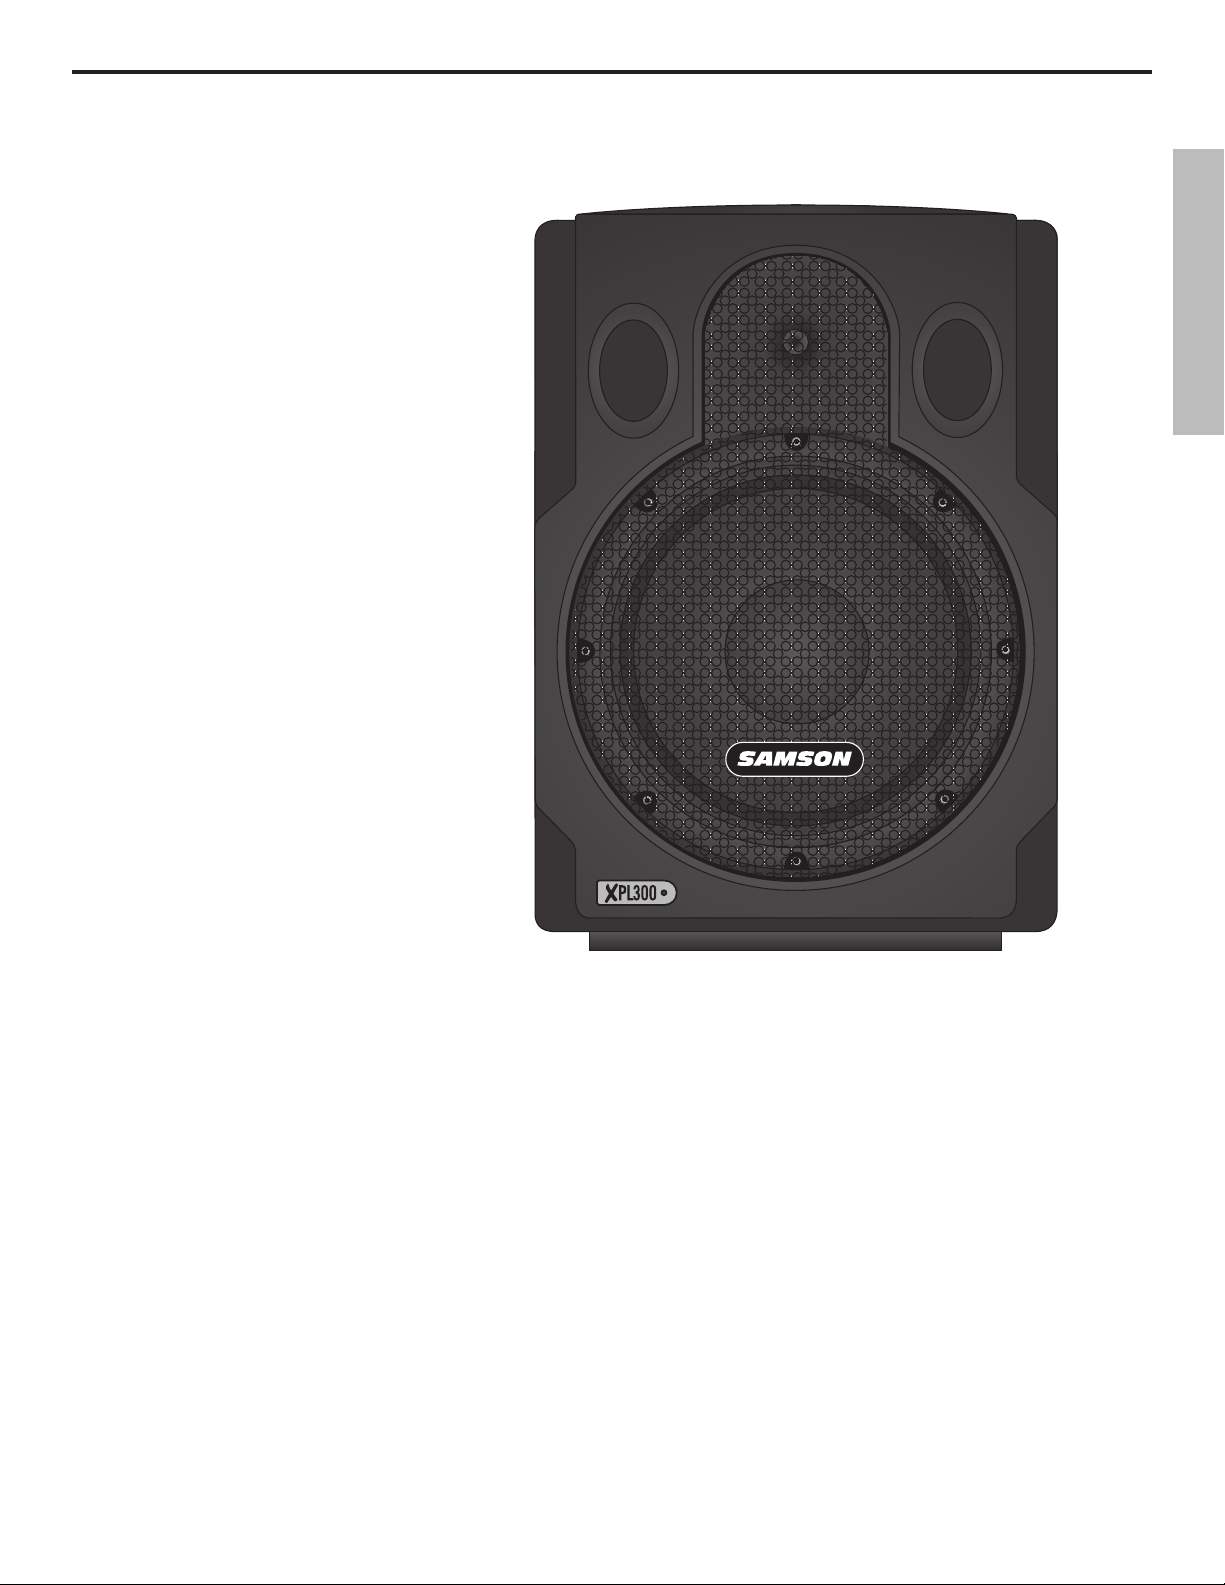
• All Expedition Pro enclosures are lightweight and compact yet exceptionally durable and roadworthy. Injectionmolded with Polypropylene, they feature substantial internal bracing to support a nearly 1/2" thick side wall construction, making them strong and rigid enough to allow
maximum energy to be delivered to the sound output. In
addition, a steel grill and scuff-resistant textured finish
makes for a rugged speaker enclosure that will deliver
dependable performance in even the most demanding
environments.
• The low frequency section includes a custom designed
12-inch low frequency driver with a 2.5-inch Kapton
Former voice coil and 50 ounce barium ferrite magnet for
accurate and super-tight bass response.
• A high frequency section that delivers clear, sweet top
end thanks to its 1-inch compression driver with a specially designed 34mm titanium diaphragm for linear response
and an elliptical wave guide horn design that reduces
nearly all sonic diffraction.
• A tilt position that allows the Expedition Pro to be used
as an onstage wedge monitor.
• Integral 1 3/8" pole-mount receptacle and convenient
fly points allow the Expedition Pro to be pole-mounted or
“flown” using standard PA hardware.
• The XPL100 is a passive cabinet that can be used with
any power amplifier rated at up to 250 watts into 8 ohms.
It requires no power and provides dual Speakon™ and 1/4" connectors that allow
multiple XPL100s to be daisy-chained where extended coverage is required.
• The XPL200 contains a 250 watt, light-weight, “class D” power amplifier and
advanced crossover. Dual balanced XLR connectors allow daisy-chaining of multiple Expedition Pro enclosures, and a limiter circuit assures a clean output even
when you’re pushing the XPL200 to maximum levels. In addition, there are three
stages of speaker protection, including relay switching for power on and off.
• The XPL300 includes all the features of the XPL200, and adds a flexible four-channel stereo mixer that provides two monophonic and one stereo mic/line channels
with dual XLR and 1/4" connectors. In addition, separate dual phono connectors allow you to hook up an external cassette, MP3 or CD player. Each mixer
channel includes two-band equalization and independent volume control, and
there’s even built-in digital multi-effects processor for the addition of ten different reverb, delay and chorus presets. Balanced left and right XLR outputs allow
daisy-chaining of multiple Expedition speakers (with a mono/stereo switch that
allows operation in either mode), and a VU meter enables you to continuously
monitor output levels. The XPL200 and XPL300 also include a meter that shows
battery level when used with the optional RB 2030 rechargable battery cartridge
(see below).
2
Page 7
System Features
• The top panel of both the XPL200 and
XPL300 provides a prewired compartment
that accommodates a variety of Samson
wireless systems that offer superior RF and
audio performance already proven on stages around the world. Receivers supported
include the UM1 or AM1 models.
• A wide range of optional accessories, including: the MP1020 mounting bracket, which
allows any Expedition Pro enclosure to
be “flown” from the ceiling; the RB 2030
rechargeable battery cartridge, which provides up to two hours of power to either the
XPL200 or XPL300 from its dual Lead-Acid
GelCel batteries and TS50 and TS100 tripod
speaker stands for portable set-ups.
• The db1500a and dB1800a are active
subwoofers that pair a massive 500-watt
amplifier with heavy-duty 15-inch and 18inch low frequency drivers. They’re ideal
complements to any Expedition XPL series
enclosure or any loudspeaker system, when
the application requires deep, powerful lowend response. The built-in stereo electronic
crossover allows the dB1500a and dB1800a
to operate either in mono or as a common
subwoofer in a stereo system. They feature
all-steel grills and rigid corners, as well as an
integral pole mount.
ENGLISH
3
Page 8
Expedition Pro XPL100
AMPLIFIER INPUTS AND EXTENSIONS
INPUT EXTENSION
MAXIMUM POWER
250 WATTS RMS
2 WAY 8 OHM
CAUTION
RISK OF ELECTRIC SHOCK
DO NOT OPEN
INPUT EXTENSION
RISQUE DE CHOC ELECTRIQUE
NE PAS OUVRIR
DO NOT EXPOSE THIS EQUIPMENT
TO RAIN OR MOISTURE.
AVIS;
MADE IN CHINA
SPEAKON™
SPEAKON™
+
-
AMPLIFIER INPUTS AND EXTENSIONS
INPUT EXTENSION
MAXIMUM POWER
250 WATTS RMS
2 WAY 8 OHM
CAUTION
RISK OF ELECTRIC SHOCK
DO NOT OPEN
INPUT EXTENSION
RISQUE DE CHOC ELECTRIQUE
NE PAS OUVRIR
DO NOT EXPOSE THIS EQUIPMENT
TO RAIN OR MOISTURE.
AVIS;
MADE IN CHINA
Guided Tour
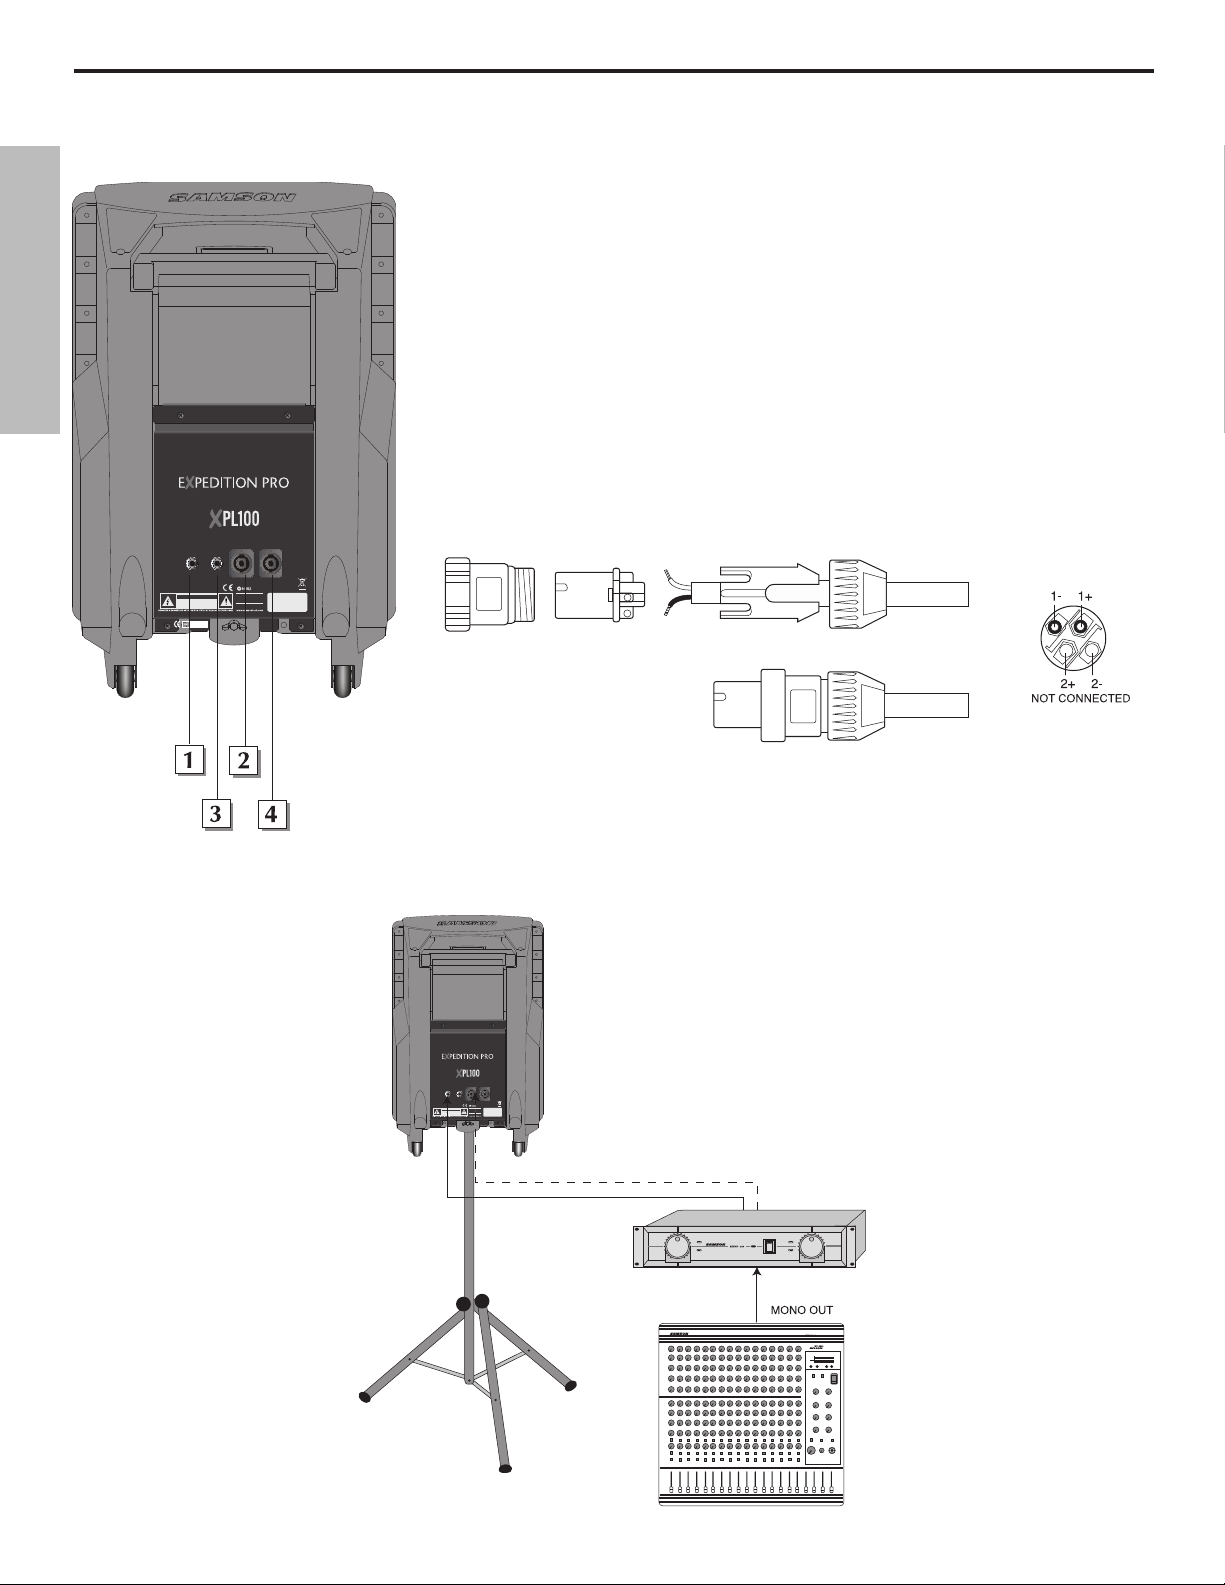
1: 1/4" input - Use this standard 1/4" connector to connect signal from a power
amplifier (rated at up to 250 watts into 8 ohms) to the XPL100.
2: Speakon™ input - Alternatively, you can use this Speakon™ connector to connect
signal from a power amplifier (rated at up to 250 watts into 8 ohms) to the XPL100.
ENGLISH
3: 1/4" extension - Use this standard 1/4" connector to daisy-chain one XPL100 to
another. See below for interconnection diagrams.
4: Speakon™ extension - Alternatively, you can use this Speakon™ connector to
daisy-chain one XPL100 to another. See below for interconnection diagrams.
Speakon™ Wiring
Interconnecting the XPL100
Using one XPL100: A single mono signal (bus or aux
send) is routed from a mixer to a power amplifier. One
speaker output of the power amplifier is connected to either
the XPL100 1/4" input connector (solid line) or Speakon™
input connector (dotted line).
4
Page 9
Expedition Pro XPL100
AMPLIFIER INPUTS AND EXTENSIONS
INPUT EXTENSION
MAXIMUM POWER
250 WATTS RMS
2 WAY 8 OHM
CAUTION
RISK OF ELECTRIC SHOCK
DO NOT OPEN
INPUT EXTENSION
RISQUE DE CHOC ELECTRIQUE
NE PAS OUVRIR
DO NOT EXPOSE THIS EQUIPMENT
TO RAIN OR MOISTURE.
AVIS;
MADE IN CHINA
AMPLIFIER INPUTS AND EXTENSIONS
INPUT EXTENSION
MAXIMUM POWER
250 WATTS RMS
2 WAY 8 OHM
CAUTION
RISK OF ELECTRIC SHOCK
DO NOT OPEN
INPUT EXTENSION
RISQUE DE CHOC ELECTRIQUE
NE PAS OUVRIR
DO NOT EXPOSE THIS EQUIPMENT
TO RAIN OR MOISTURE.
AVIS;
MADE IN CHINA
SAMSON
MPL2242
MMPL2242
MPL2242
SERVO - 240
SAMSON
AMPLIFIER INPUTS AND EXTENSIONS
INPUT EXTENSION
MAXIMUM POWER
250 WATTS RMS
2 WAY 8 OHM
CAUTION
RISK OF ELECTRIC SHOCK
DO NOT OPEN
INPUT EXTENSION
RISQUE DE CHOC ELECTRIQUE
NE PAS OUVRIR
DO NOT EXPOSE THIS EQUIPMENT
TO RAIN OR MOISTURE.
AVIS;
MADE IN CHINA
AMPLIFIER INPUTS AND EXTENSIONS
INPUT EXTENSION
MAXIMUM POWER
250 WATTS RMS
2 WAY 8 OHM
CAUTION
RISK OF ELECTRIC SHOCK
DO NOT OPEN
INPUT EXTENSION
RISQUE DE CHOC ELECTRIQUE
NE PAS OUVRIR
DO NOT EXPOSE THIS EQUIPMENT
TO RAIN OR MOISTURE.
AVIS;
MADE IN CHINA
SAMSON
MPL2242
MMPL2242
MPL2242
SERVO - 240
SAMSON
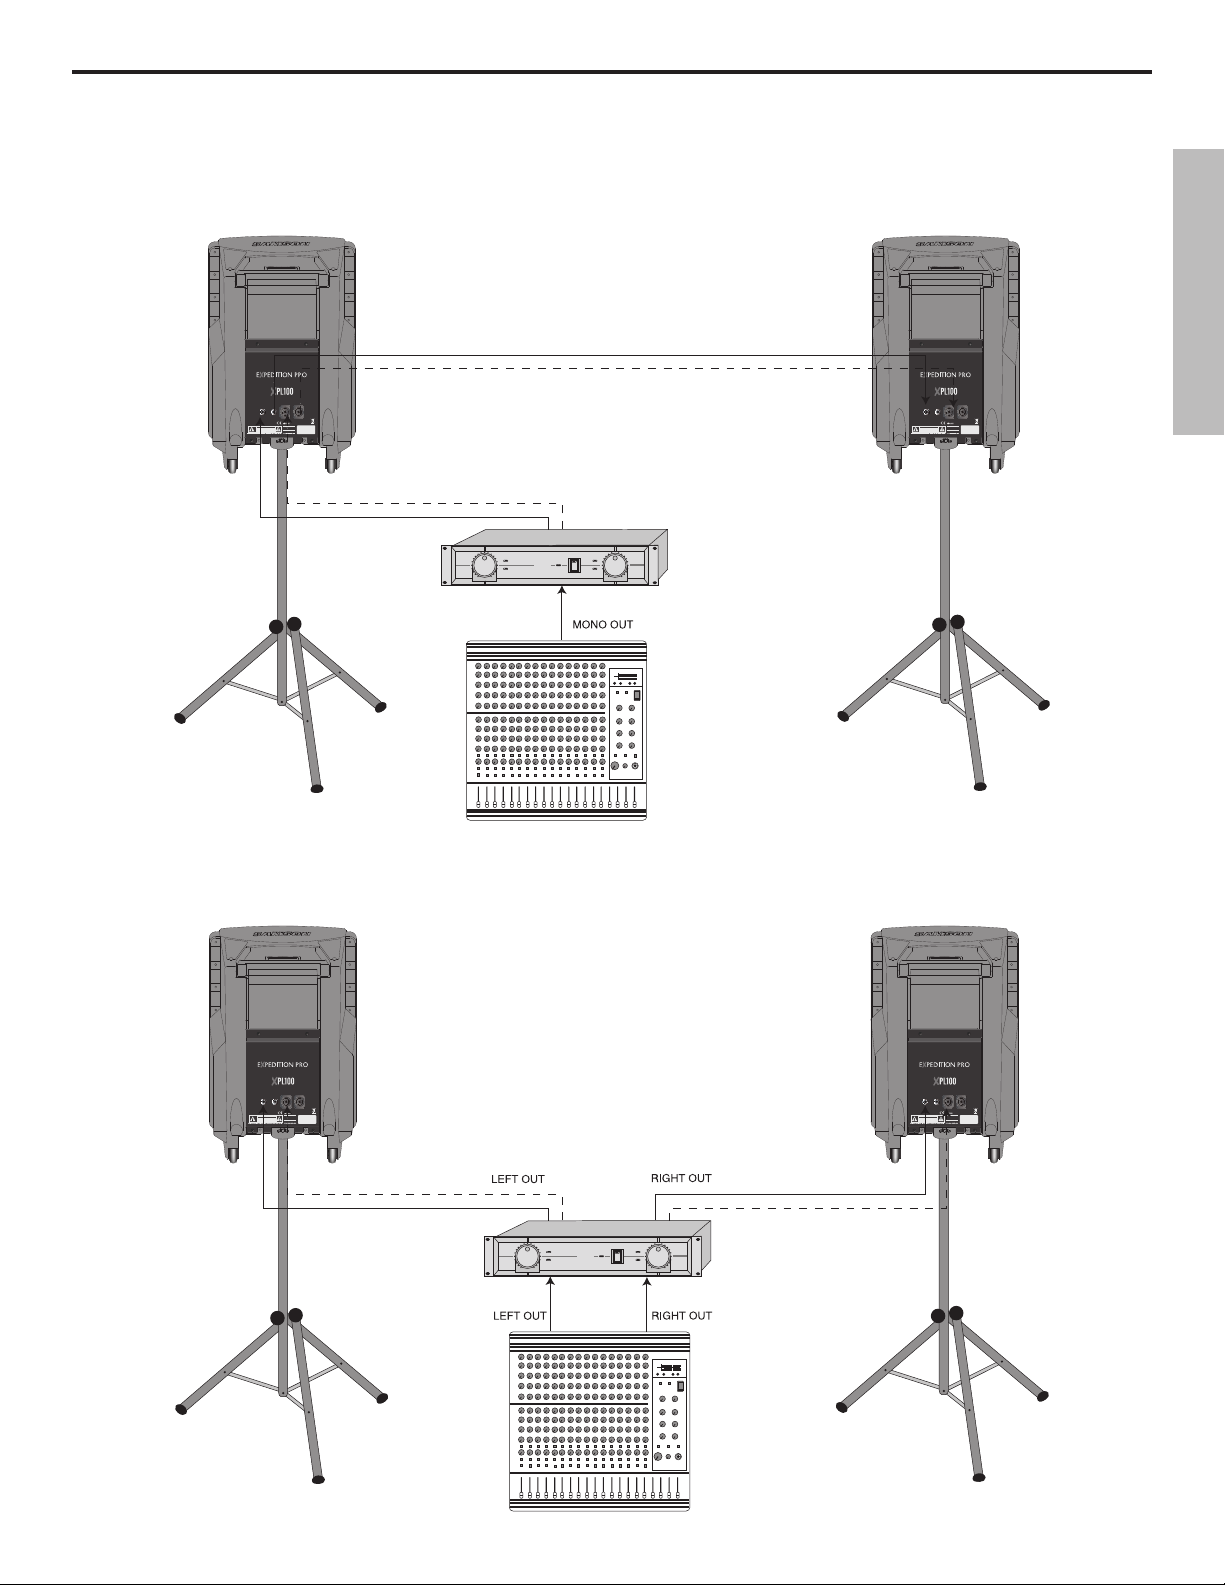
Using two XPL100s in mono: A single mono signal (bus or aux send) is routed from a mixer to a power amplifier. One speaker
output of the power amplifier is connected to either the XPL100 1/4" input (solid line) or Speakon™ input (dotted line), and a connection is made between either the 1/4" extension to a second XPL100’s input (solid line) or between the Speakon™ extension to a
second XPL100’s Speakon™ input (dotted line).
ENGLISH
Using two XPL100s in stereo: A stereo signal (bus or aux send) is routed from a mixer to a power amplifier. The left speaker output of the power amplifier is connected to one XPL100 (using either the 1/4" input [solid line] or Speakon™ input [dotted line]),
and the right speaker output of the power amplifier is connected to the other XPL100 (again using either the 1/4" input [solid line]
or Speakon™ input [dotted line]).
5
Page 10
Expedition Pro XPL200
UTILISER UN FUSIBLE
DE RECHANGE DE
MEME TYPE.
AMPLIFIED SPEAKER CABINET
BI-AMPED 150 WATTS LOW
50 WATTS HIGH FREQUENCY
SIGNAL OUTPUT
SIGNAL INPUT
AC OUT
350VA MAX
POWER
AC
CAUTION:
ATTENTION:
FOR CONTINUED
PROTECTION
AGAINST RISK
OF FIRE,
REPLACE ONLY
WITH SAME
TYPE OF FUSE.
FUSE: T5AL 250V
CAUTION
RISK OF ELECTRIC SHOCK
DO NOT OPEN
VOLUME
RATING
POWER
100-240 V ~ 50Hz/60Hz 360W
100
5
LIMITER
AC IN
ON
CHARGE
BATTERY OPERATION
OFF
+3dB
0dB
-10dB
75%
50%
25%
BATTERYMAIN
RISQUE DE CHOC ELECTRIQUE
NE PAS OUVRIR
DO NOT EXPOSE THIS EQUIPMENT
TO RAIN OR MOISTURE.
AVIS;
MADE IN CHINA
SAMSON
MPL2242
MMPL2242
MPL2242
ENGLISH
Guided Tour
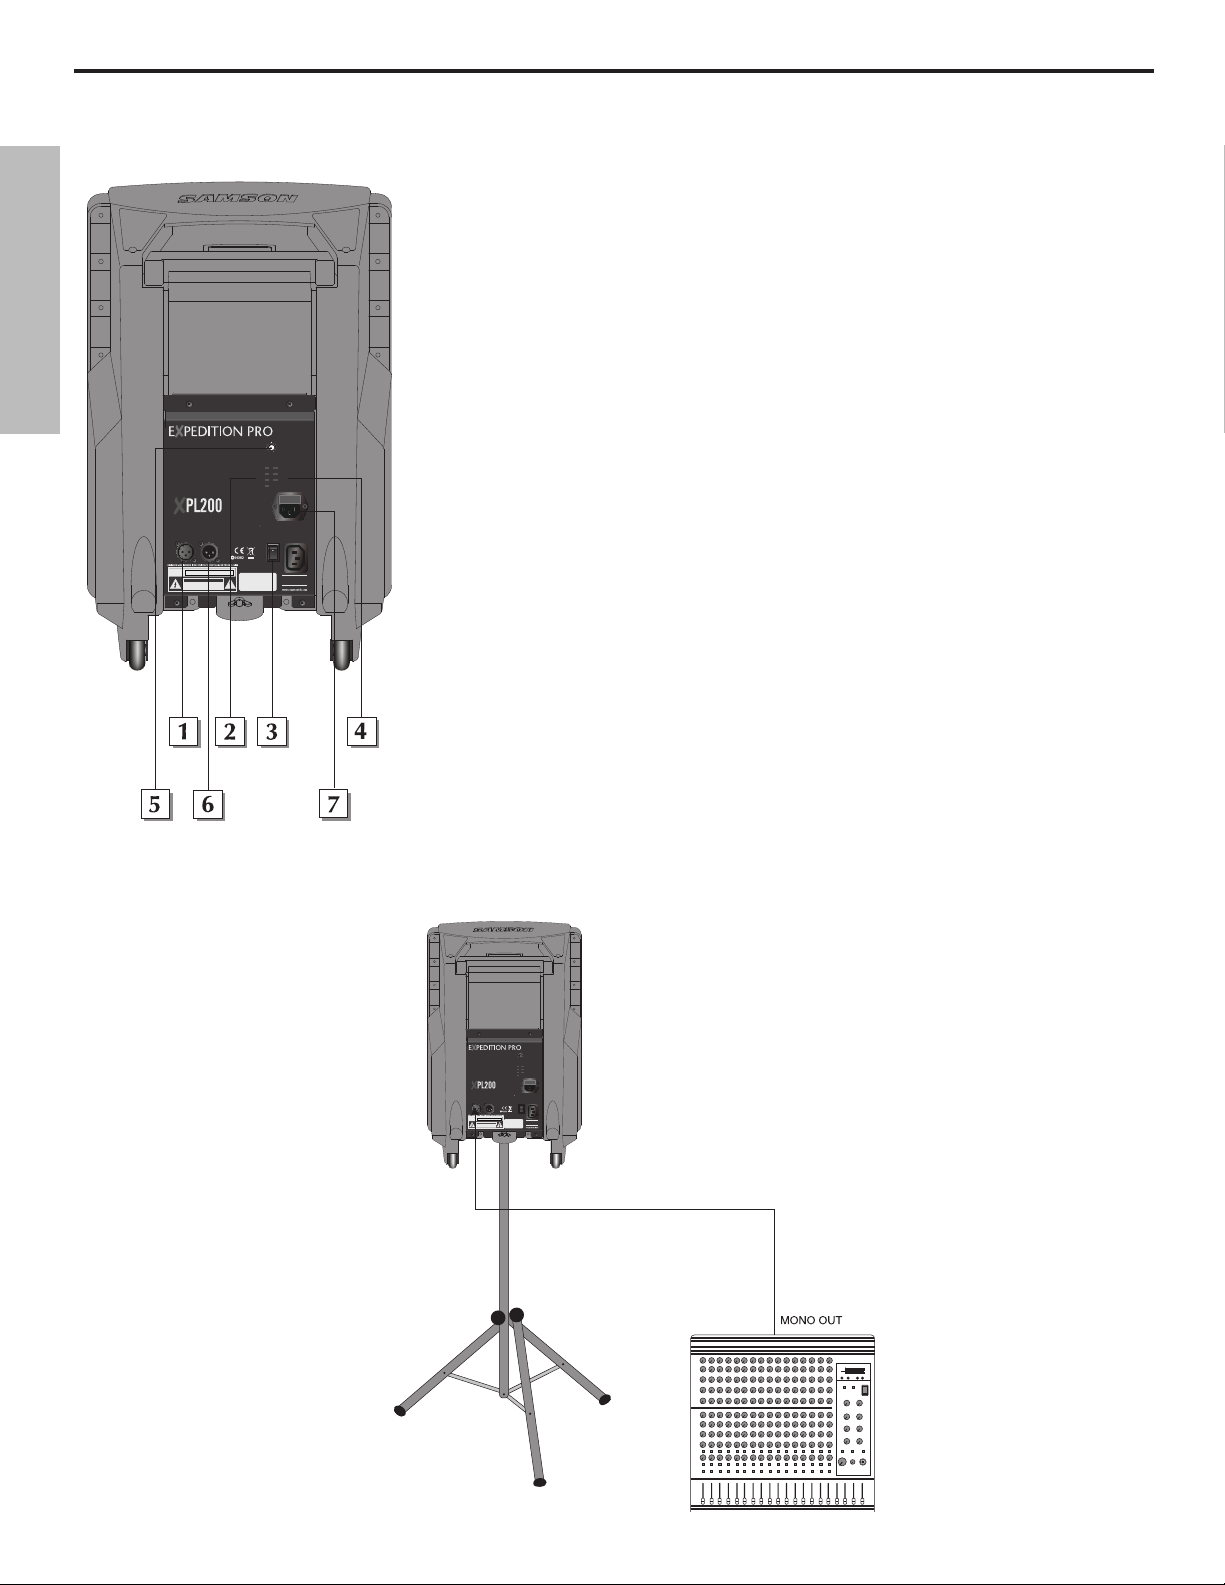
1: Input connector - Use this balanced female XLR connector to route line-level
signal into the XPL200.
2: Output VU meter - This three-segment bar meter shows the XPL200 output
level. For optimum signal-to-noise ratio, set the Volume control (see #6 below)
so that program material is usually at or around 0 VU, with occasional but not
steady excursions to the red “+3 dB” segment.
3: Power switch - Use this to turn power to the XPL200 on or off.
4: Battery VU meter - If an optional RB 2030 rechargable battery pack is
installed, this meter shows how much battery power remains as it is being
charged (Power switch off) or depleted (Power switch on).
5: Volume control - This knob sets the level of the XPL200’s built-in power
amplifier.
6: Output connector- This balanced male XLR connector carries line-level output signal from the XPL200. It is used to send signal to a second XPL200 being
daisy-chained (see interconnection diagram on the following page) or to an
optional DB1500 subwoofer.
7: AC input - Connect the supplied heavy-gauge 3-pin “IEC” power cable here.
Interconnecting the XPL200
Using one XPL200: A single mono signal (bus or aux send) is
routed from a mixer to the XPL200 XLR input.
6
Page 11
Expedition Pro XPL200
UTILISER UN FUSIBLE
DE RECHANGE DE
MEME TYPE.
AMPLIFIED SPEAKER CABINET
BI-AMPED 150 WATTS LOW
50 WATTS HIGH FREQUENCY
SIGNAL OUTPUT
SIGNAL INPUT
AC OUT
350VA MAX
POWER
AC
CAUTION:
ATTENTION:
FOR CONTINUED
PROTECTION
AGAINST RISK
OF FIRE,
REPLACE ONLY
WITH SAME
TYPE OF FUSE.
FUSE: T5AL 250V
CAUTION
RISK OF ELECTRIC SHOCK
DO NOT OPEN
VOLUME
RATING
POWER
100-240 V ~ 50Hz/60Hz 360W
100
5
LIMITER
AC IN
ON
CHARGE
BATTERY OPERATION
OFF
+3dB
0dB
-10dB
75%
50%
25%
BATTERYMAIN
RISQUE DE CHOC ELECTRIQUE
NE PAS OUVRIR
DO NOT EXPOSE THIS EQUIPMENT
TO RAIN OR MOISTURE.
AVIS;
MADE IN CHINA
UTILISER UN FUSIBLE
DE RECHANGE DE
MEME TYPE.
AMPLIFIED SPEAKER CABINET
BI-AMPED 150 WATTS LOW
50 WATTS HIGH FREQUENCY
SIGNAL OUTPUT
SIGNAL INPUT
AC OUT
350VA MAX
POWER
AC
CAUTION:
ATTENTION:
FOR CONTINUED
PROTECTION
AGAINST RISK
OF FIRE,
REPLACE ONLY
WITH SAME
TYPE OF FUSE.
FUSE: T5AL 250V
CAUTION
RISK OF ELECTRIC SHOCK
DO NOT OPEN
VOLUME
RATING
POWER
100-240 V ~ 50Hz/60Hz 360W
100
5
LIMITER
AC IN
ON
CHARGE
BATTERY OPERATION
OFF
+3dB
0dB
-10dB
75%
50%
25%
BATTERYMAIN
RISQUE DE CHOC ELECTRIQUE
NE PAS OUVRIR
DO NOT EXPOSE THIS EQUIPMENT
TO RAIN OR MOISTURE.
AVIS;
MADE IN CHINA
SAMSON
MPL2242
MMPL2242
MPL2242
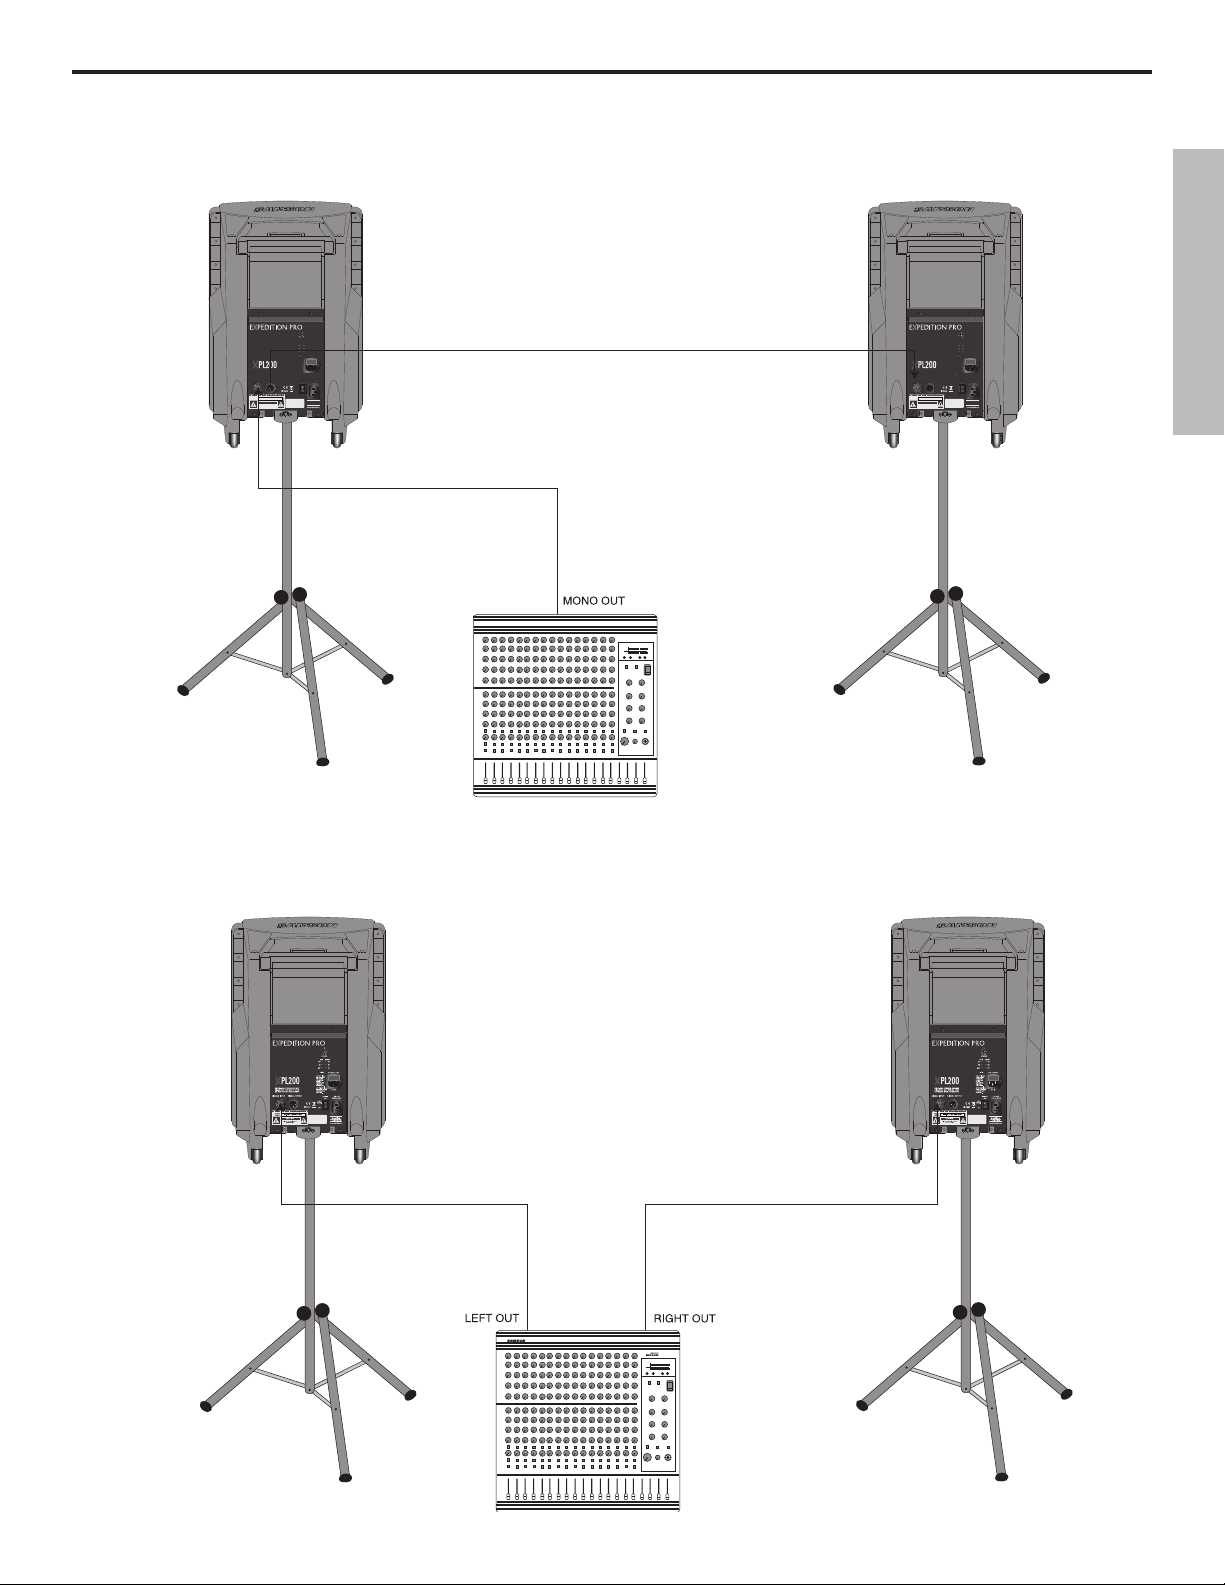
Using two XPL200s in mono: A single mono signal (bus or aux send) is routed from a mixer to one XPL200’s XLR input, and a
connection is made between that XPL200’s XLR output to a second XPL100’s XLR input.
ENGLISH
Using two XPL200s in stereo: A stereo signal (bus or aux send) is routed from a mixer, with the left side connected to one
XPL200’s XLR input, and the right side connected to the other XPL200’s XLR input.
7
Page 12
Expedition Pro XPL300
ENGLISH
Guided Tour
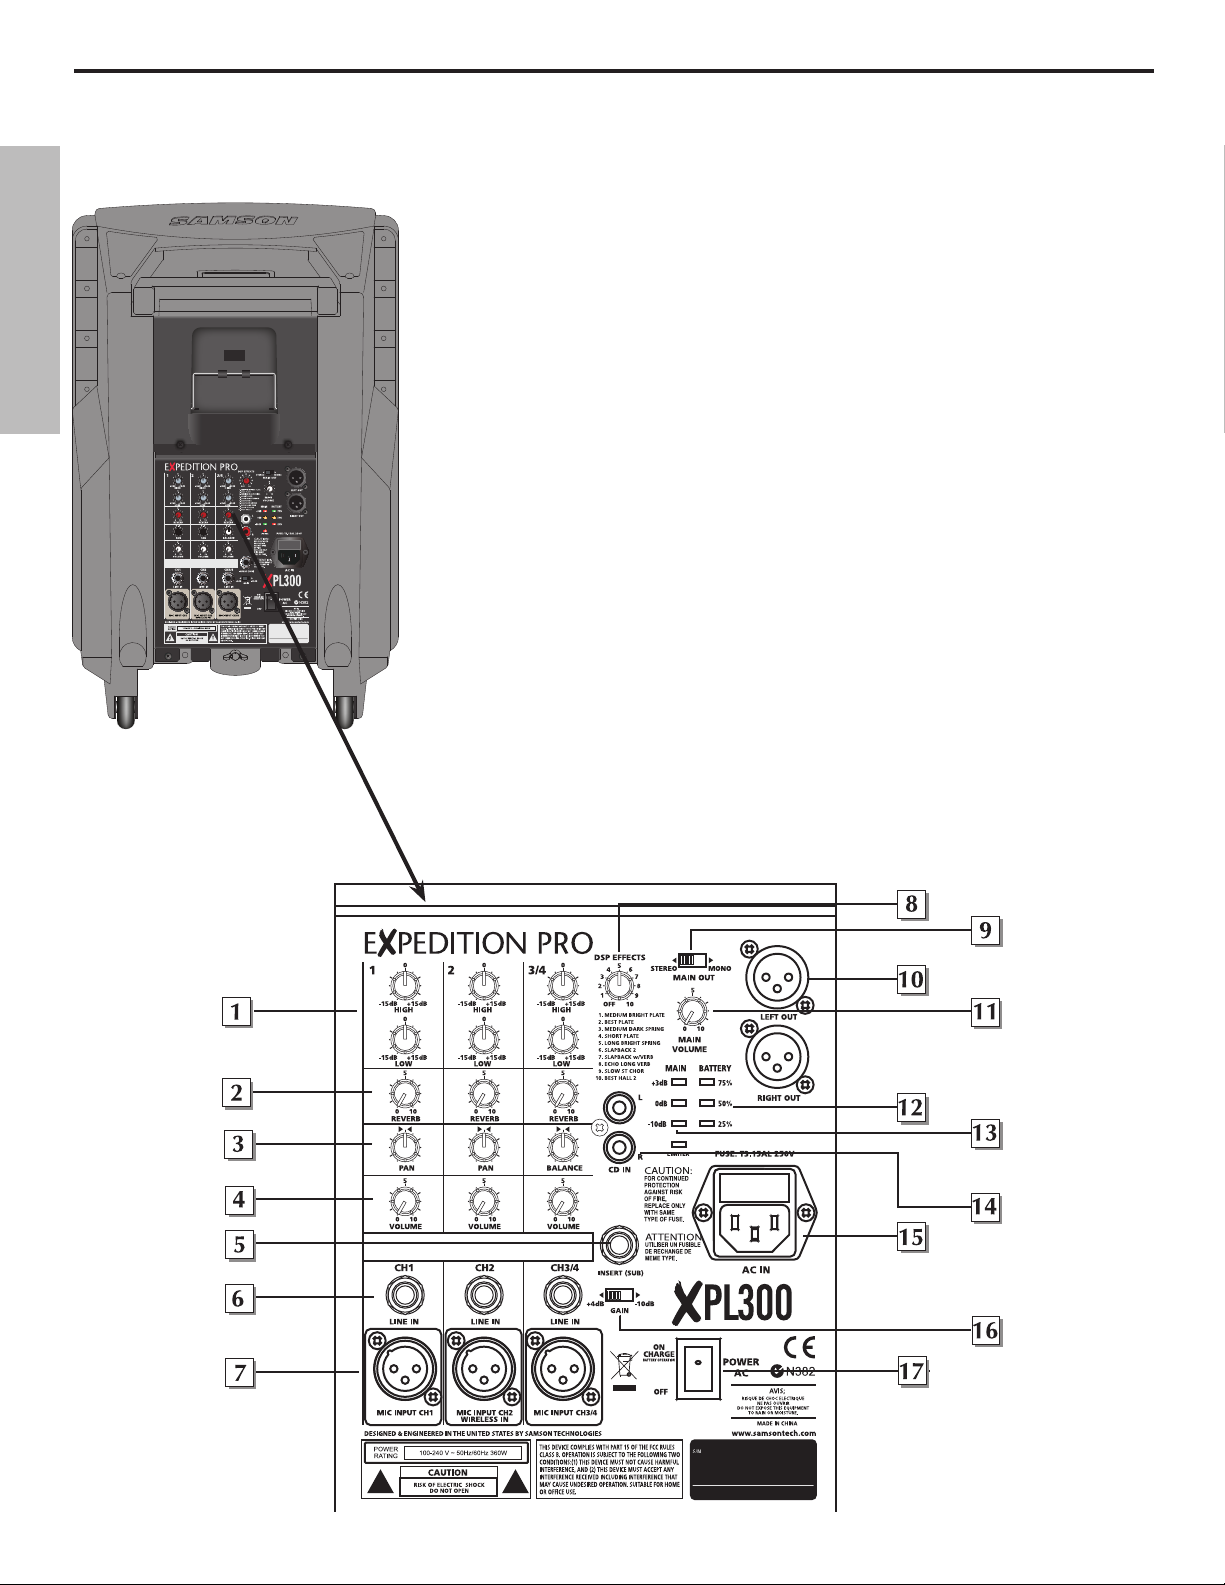
1: Equalizer - These controls allow you to shape your sound by boosting or cutting
the amount of bass (at 100 Hz) or treble (at 10 kHz) by up to 15 dB. A center detent
in each knob indicates no boost or cut (that is, flat response). As each knob is turned
clockwise from the 12 o’clock position, the bass or treble is boosted; as it is turned
counterclockwise from the 12 o’clock position, the bass or treble is reduced.
2: Reverb send
channel to the onboard DSP effects processor. As you move the knob clockwise from
0 to 10, more signal is sent. To hear the effect, one of the ten presets must be selected
using the DSP Effects control (see #10 on the next page). Be careful not to send too
much signal to the DSP, or a distorted sound will result.
3: Pan/Balance control
ing you to place the signal anywhere in the left-right stereo spectrum, while keeping
the overall signal level constant. When the knob is placed at its center (detented)
position, the signal is sent equally to both the left and right outputs. To route a signal
hard left or right, place the pan knob either fully counterclockwise or fully clockwise.
In channel 3/4 (the stereo channel), this knob acts as a Balance control, allowing you
to alter the relative levels of the two input signals. When the knob is placed at its center detented position, both signals are at equal strength. When moved left of center,
you’ll hear more of the left input signal; when moved right of center, you’ll hear more
right input signal.
4: Channel volume control - This knob determines the level of the channel In
stereo channel 3/4, this knob simultaneously controls the level of both inputs (the
relative levels of the two can be adjusted with the Balance knob, as described in #3
above). In practice, you’ll use the channel volume controls to continuously adjust the
levels of the various signals being blended together by the XPL300 mixer.
- These knobs determine how much signal is being sent from the
- In channels 1 and 2, this knob acts as a Pan control, allow-
8
Page 13

Expedition Pro XPL300
5: Insert (sub) connector - This 1/4" connector brings line-level signal in directly before the XPL300 power amplifiers. It is nor-
mally used to return signal from an optional dB1500a or dB1800 subwoofer.
6: Line inputs - Use these 1/4" jacks to connect line-level sources to the XPL300. Channels 1 and 2 are mono 1/4" connectors;
channel 3/4 uses a stereo (TRS) 1/4" connector, with tip carrying left signal and ring carrying right signal. Stereo devices should
always be connected to the stereo channel (channels 3/4). If a wireless receiver is connected to the XPL300 via its internal connectors (see page 14 in this manual), its output arrives at channel 2, which can also carry another line-level source connected
to its line input, as well as signal from a microphone connected to its mic input. If an optional MP3 player is installed, its output
arrives at channels 3/4, which can also carry another two line-level sources (one connected to its line input and a second connected to the CD inputs [see #15 on the following page]), as well as signal from a microphone connected to its mic input.
7: Mic inputs - Use these XLR jacks to connect microphones to the XPL300’s built-in mic preamps. Each channel can carry both
one or more line level sources (see #6 above) as well as a mic source.
8: DSP Effects control - Use this to select one of ten reverb presets (Medium Bright Plate, Best Plate, Medium Dark Plate, Short
Plate, Long Bright Spring, Slapback 2, Slapback w/Verb, Slow St Chor or Best Hall). If you don’t want to hear any reverb, set this
switch to the “Off” position.
9: Mono/Stereo switch - When using one XPL300, set this switch to “Mono” so that the XPL300 power amp receives signal from
both the left and right output sections. When using multiple Expedition Pro speaker enclosures, set this switch to “Stereo”; the
XPL300 will then reproduce only signal from the left output section only (that is, signals panned left at the mixer); the Right output can then be used to send signal from the right output section (that is, signal panned right at the mixer) to a second enclosure.
See the interconnection diagrams on pages 10 - 11 for more information.
10: Outputs - The dual XLR connectors carry line-level output signal from the XPL300. They are used to send signal to a second
XPL300 (or XPL200) being daisy-chained (see the interconnection diagram on the following page) or to an optional DB1500
subwoofer. Note that the signal being output from these connectors is dependent upon the setting of the Mono/Stereo switch
(see #9 above). When set to “Stereo,” the Left XLR connector carries left signal only and the Right XLR connector carries right sig
nal only; when set to “Mono,” both the Left and Right connectors carry the same monophonic signal, summed from both the left
and right output sections. See the interconnection diagrams on pages 10 - 11 for more information.
-
ENGLISH
11: Main Volume control - This knob determines the final output signal level—you can think of this as being the “master fader.”
Signals from all four channels are routed here just before being routed to the XPL300’s built-in power amplifiers and Left and
Right output jacks (see #10 above).
12: Battery VU meter - If an optional RB 2030 rechargable battery pack is installed, this meter shows how much battery power
remains as it is being charged (Power switch off) or depleted (Power switch on). See #20 on the following page.
13: Output VU meter
noise ratio, try to adjust all channel and main Volume controls so that program material is usually at or around 0 VU, with occasional but not steady excursions to the red “+3 dB” segment.
14: CD inputs
channel 3/4. If an optional MP3 player is installed, note that its output also arrives at channels 3/4, in addition to line-level signal
arriving at its 1/4" TRS line input (see #6 on the preceding page) and signal from a microphone connected to its mic input (see #7
on the preceding page).
15: AC input - Connect the supplied heavy-gauge 3-pin “IEC” power cable here.
16: Voltage selector - Make sure this is set correctly for the country you are in before turning on the power to the XPL300.
17: Gain switch - Sets the line-level TRS input of channel 3/4 (see #6 on the preceding page) to either +4 (professional) or -10
(consumer) level.
18: Power switch - Use this to turn power to the XPL300 on or off. If an optional RB 2030 rechargable battery pack is installed, it
will charge when this switch is in the “Off” position.
- Connect the outputs of a CD or tape player to this set of dual phono jacks. Signal arriving here returns to stereo
- This three-segment bar meter shows the continuous output level of the XPL300. For optimum signal-to-
9
Page 14
Expedition Pro XPL300
MP3
Using The Docking Station
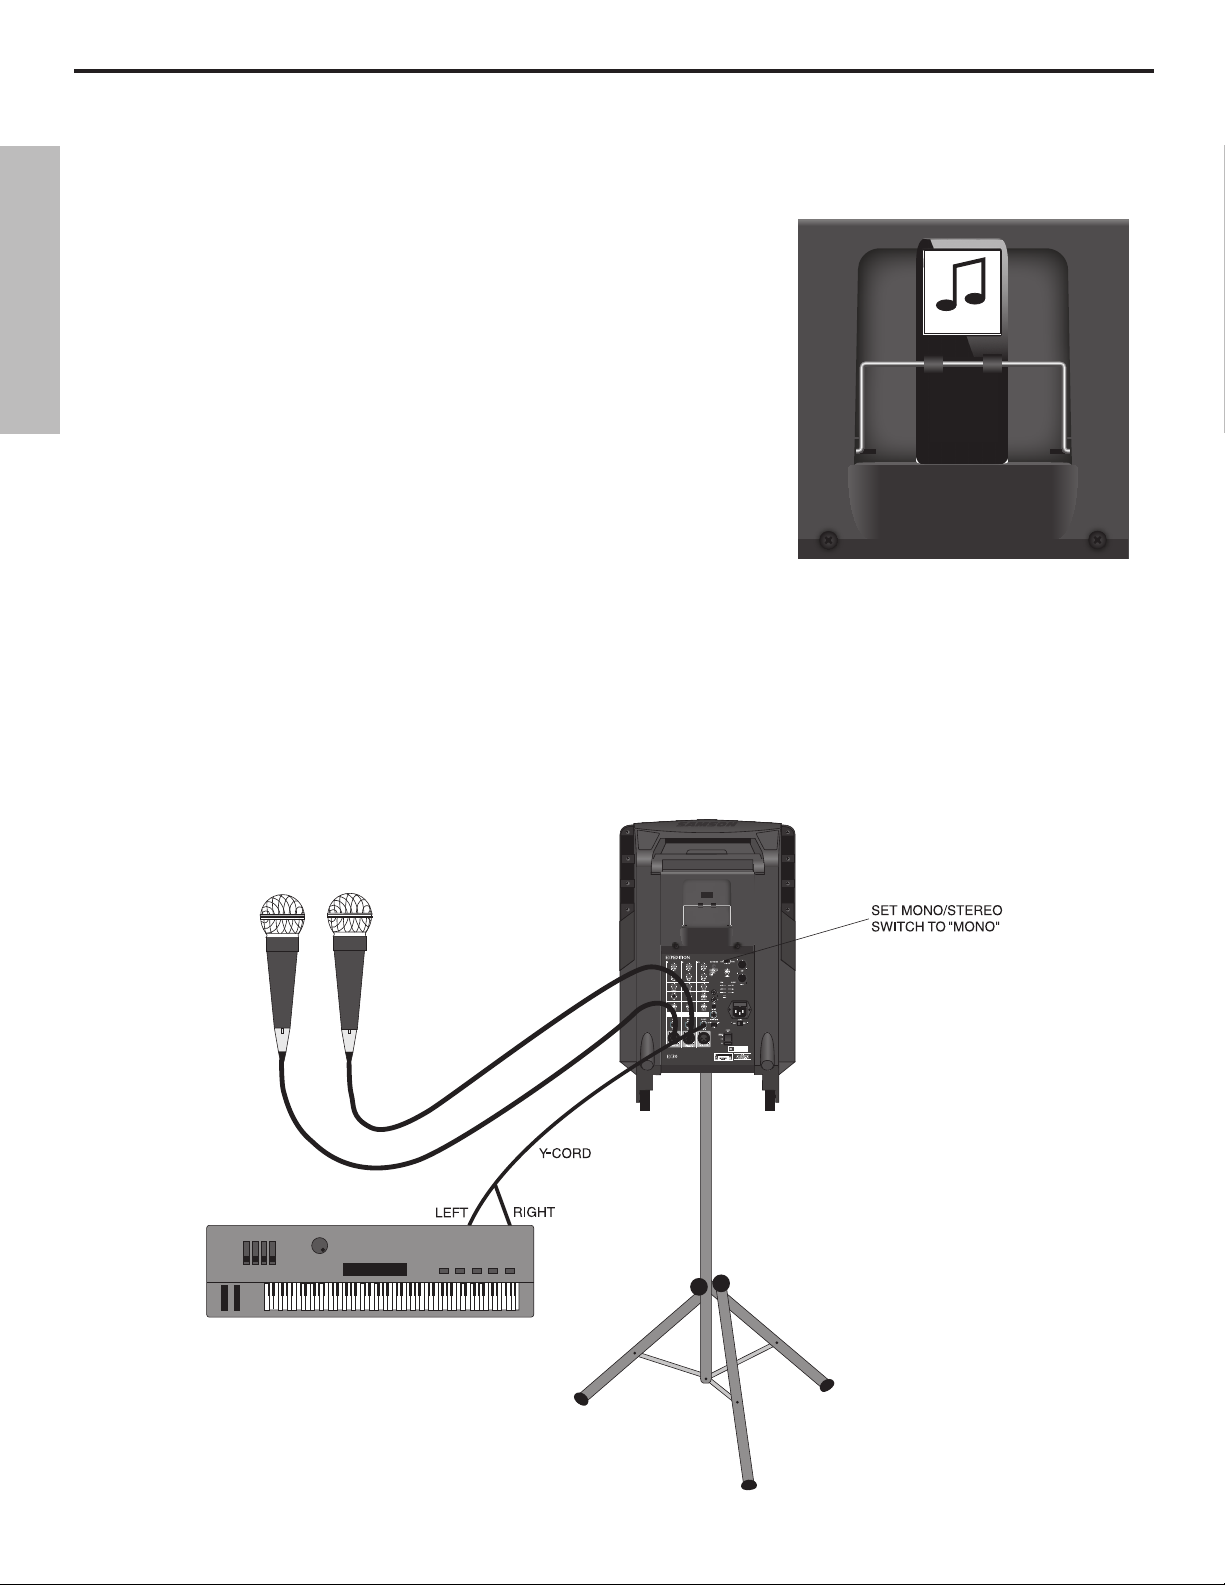
The XPL300 has a built-in MP3 docking station, which fits neatly into a special compartment above the XPL300’s mixer allowing you to install an MP3 player to provide
background music for meetings or performances. The XPL300’s docking station is compatible with most popular MP3 players that have a 30-pin connector on the bottom.
Follow the steps below to install your MP3 player.
ENGLISH
• If your MP3 player came with a dock adapter, fit it in the XPL300’s docking station.
• Pull the spring loaded retaining bracket forward and slide your MP3 player into
place making sure it mates properly with the 30 pin connector.
• If you have a thin style MP3 player, remove your MP3 player and install the included
thick EVA foam.
• Then, pull the spring loaded retaining bracket forward to re-install the MP3 player.
• Slowly lower the spring loaded retaining bracket to hold the MP3 player in place.
Interconnecting the XPL300
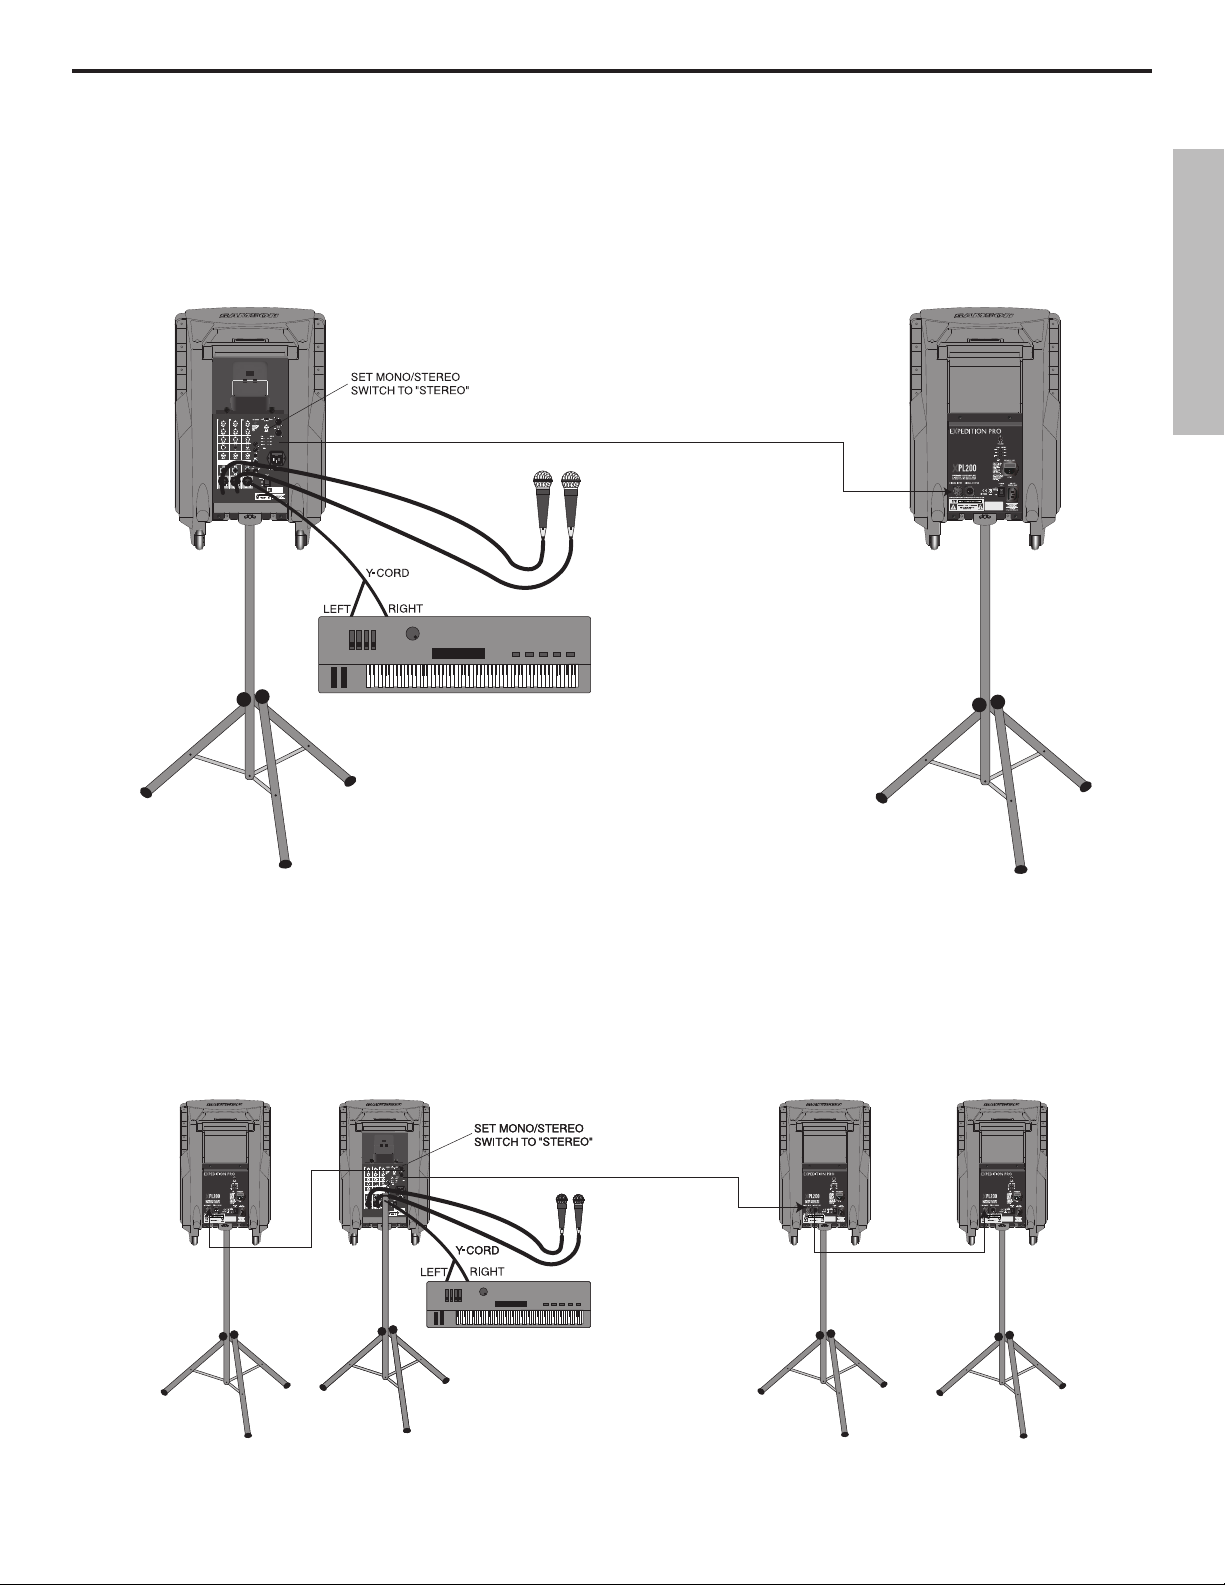
Using one XPL300: In this example, microphones are connected to the XLR mic inputs of channels 1 and 2, and a stereo key-
board is connected to the stereo 1/4" TRS connector of channel 3/4 (using a Y-cord, with the tip carrying the left signal and the
ring carrying the right signal). IMPORTANT NOTE: When using just one XPL300, always be sure to set its Mono/Stereo
switch to “Mono.”
10
Page 15
Expedition Pro XPL300
Using one XPL300 and an XPL200 (stereo operation): In this example, microphones are connected to the XLR mic inputs of
channels 1 and 2 of an XPL300, and a stereo keyboard is connected to the stereo 1/4" TRS connector of channel 3/4 of the XPL300
(using a Y-cord, with the tip carrying the left signal and the ring carrying the right signal). A connection is then made between
the Right output of the XPL300 to the XLR input of an XPL200. IMPORTANT NOTE: When using the XPL300 with additional
Expedition Pro enclosures, always be sure to set the XPL300 Mono/Stereo switch to “Stereo.”
ENGLISH
Using one XPL300 and three XPL200s (extended range stereo operation): In this example, microphones are connected to the
XLR mic inputs of channels 1 and 2 of an XPL300, and a stereo keyboard is connected to the stereo 1/4" TRS connector of channel
3/4 of the XPL300 (using a Y-cord, with the tip carrying the left signal and the ring carrying the right signal). A connection is then
made between the Left output of the XPL300 to the XLR input of an XPL200 (both will then carry the same left channel signal).
Finally, a connection is made between the Right output of the XPL300 and an XPL200, and between that XPL200’s XLR output
and the XLR input of a third XPL200 (both will then carry the same right channel signal). IMPORTANT NOTE: When using the
XPL300 with additional Expedition Pro enclosures, always be sure to set the XPL300 Mono/Stereo switch to “Stereo.”
11
Page 16
Positioning and Mounting Instructions
General Positioning Tips
• Operating a microphone or turntable in front of a speaker is a sure formula for
feedback and/or rumble problems, so always place the Expedition Pro in front
of any mics or turntables that are being used.
ENGLISH
• Use the Expedition Pro upright for all “front-of-house” PA applications; use it in
its tilt-back position only for onstage monitoring.
• Always raise the speakers as high above the audience as is practicable for maximum coverage.
• Use sufficient enclosures for the space you’re in. The larger the space, the more
speakers will be required.
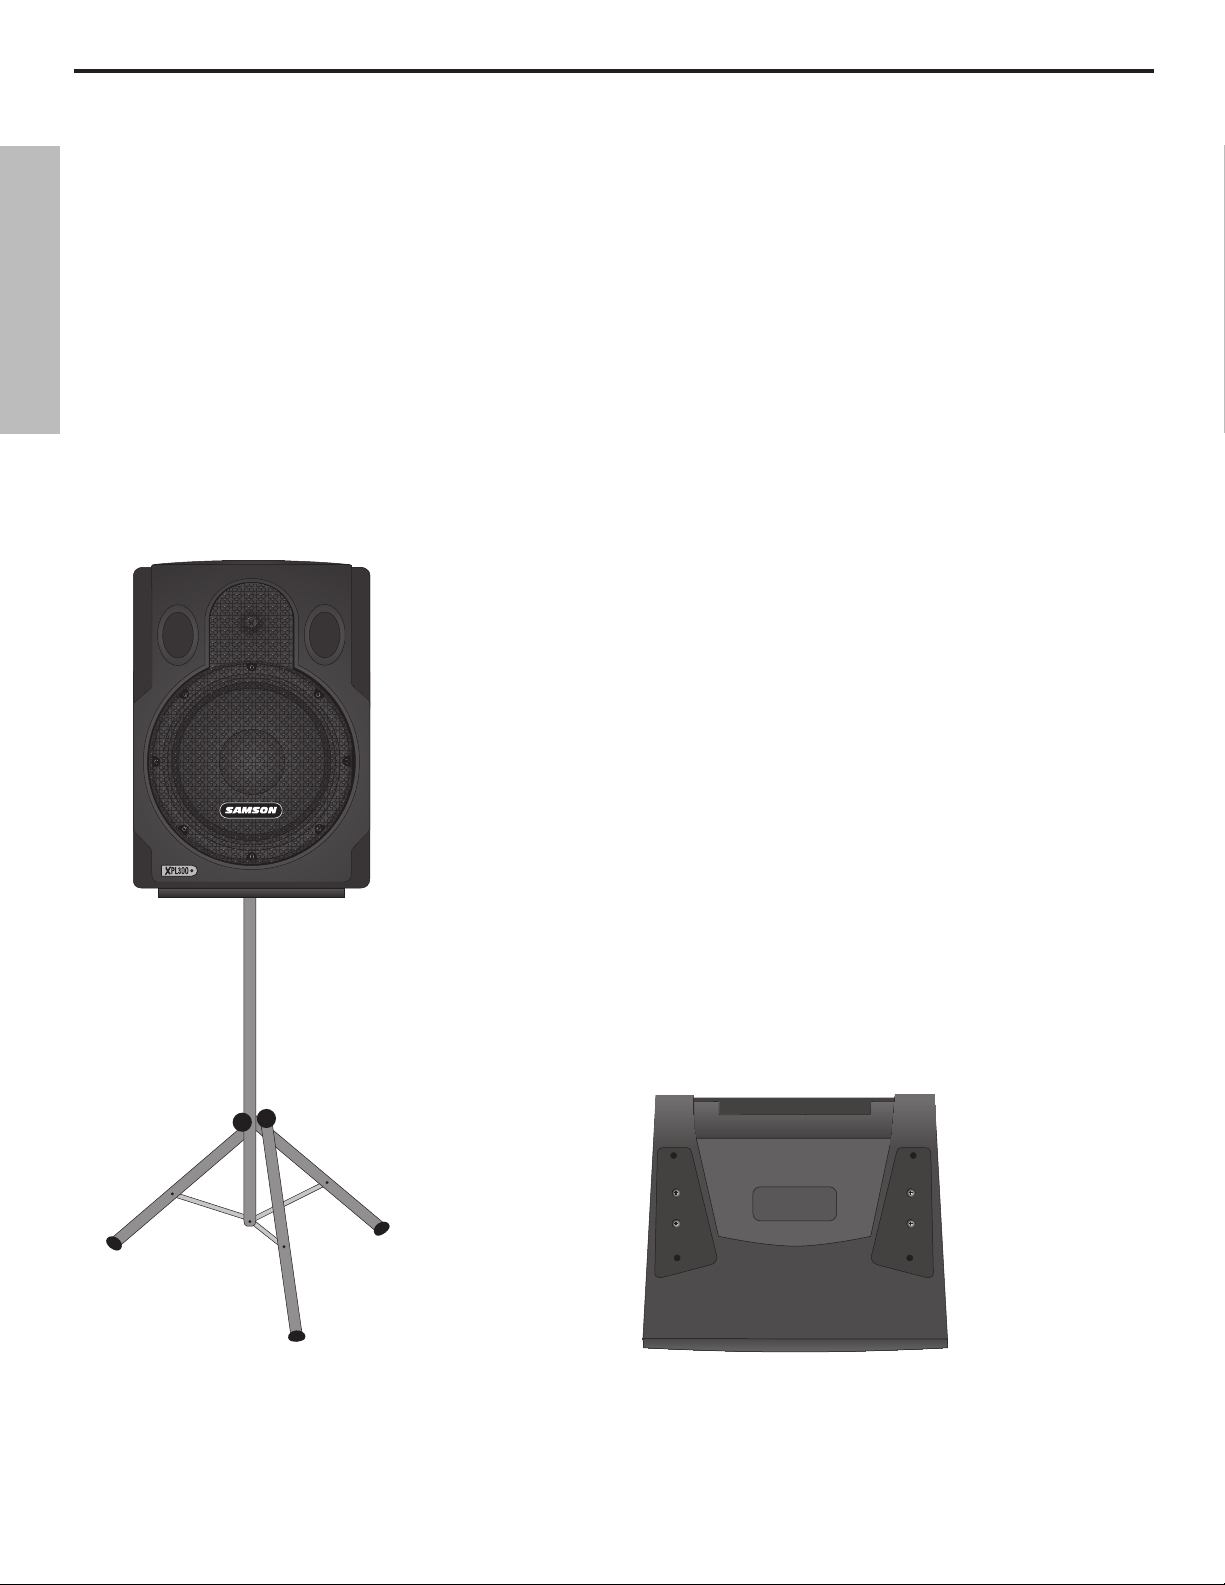
Pole-Mounting
The underside of the Expedition Pro contains a 1-3/8" stand mount socket that
allows it to be raised up on any standard speaker pole mounting (such as the
Samson TS50 or TS100 speakers stands). Pole-mounting is generally advisable
when you want to maximize the distance that the Expedition Pro covers (sometimes called speaker “throw”).
If you are using an DB1500 subwoofer, you can use its integral pole mount to place
an XPL100, XPL200 or XPL300 immediately above it, creating a complete column
of sound.
Fly Mounting, Wall Mounting, and Ceiling Mounting
As shown in the illustration below, the top panel of the Expedition Pro contains a
number of fly points, located in compartments to the left and right of the wireless
receiver compartment. The covers placed over these compartments are simply
attached with double-sided sticky tape, so just pull up to remove.
Expedition Pro fly-mount points
12
Page 17
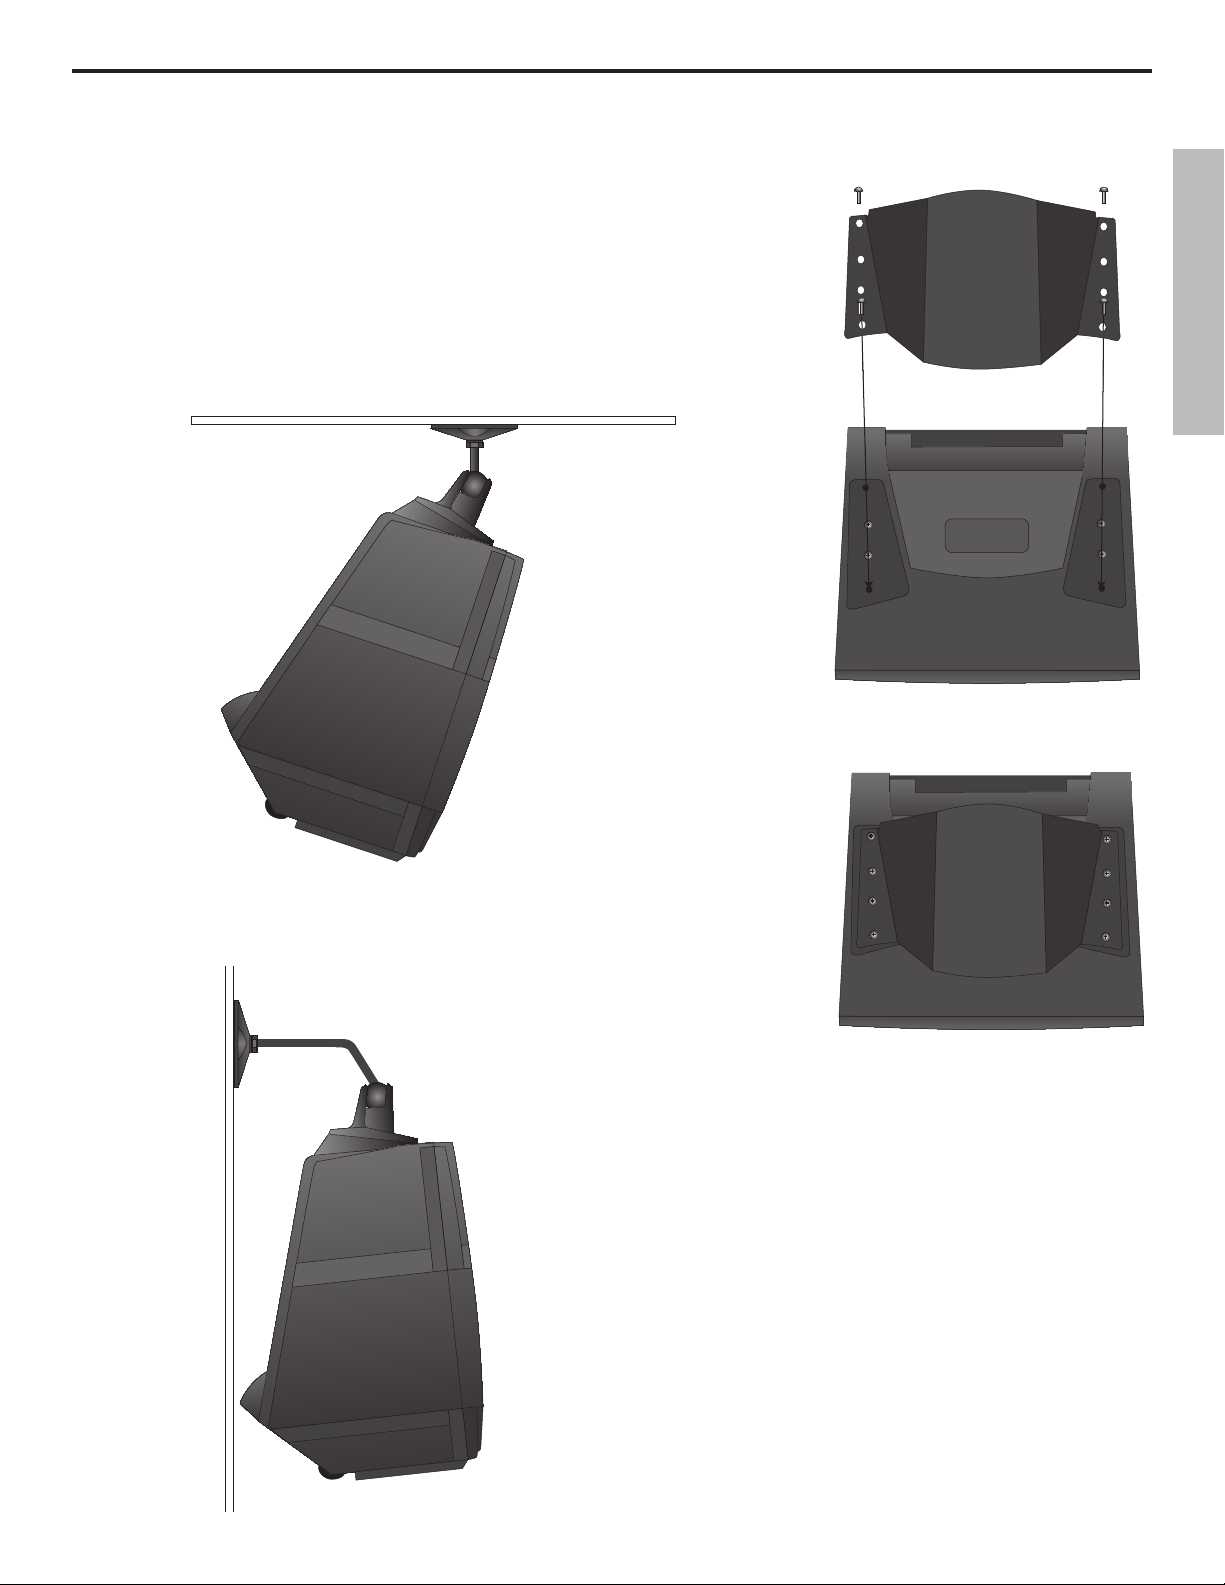
Positioning and Mounting Instructions
Before fly-mounting, wall-mounting or ceiling-mounting the Expedition Pro, you must
first install a Samson MP1020 mounting bracket to the fly points, as shown in the illustrations on the right
Standard cabling and hardware can then be attached to the MP1020 mounting bracket in
environments where the Expedition Pro needs to be “flown.”
In fixed installations where you wish to mount the Expedition Pro to a ceiling, use the
OmniMount model 100-STMP mount, as shown in the illustration below:
ENGLISH
In fixed installations where you wish to mount the Expedition Pro from a wall, use the
OmniMount model 100-WB mount, as shown in the illustration below:
Installing the MP1020 mounting
bracket (top view)
Top of Expedition Pro with MP1020 mount-
ing bracket installed.
13
Page 18

Expedition Pro Accessories
As shown in the illustration on the left, the top panel of the Expedition Pro XPL200
and XPL300 provides a prewired compartment that accommodates Samson wireless receivers: AM1 or UMl. Output signal from a wireless receiver mounted in an
XPL300 arrives at channel 2 of the onboard mixer.
In addition, a number of accessories are available from your local Samson dealer
that allow you to expand the capabilities of your Expedition Pro system. These
ENGLISH
XPL200/XPL300 wireless compartment
(top view)
include:
• The DB1500 active subwoofer—the ideal complement to any Expedition Pro
enclosure (or to any loudspeaker system, for that matter)—pairs a powerful 500-watt amplifier with a heavy-duty 15" low frequency driver in order to
provide deep low end response. A built-in stereo electronic crossover allows
the DB1500 to operate either in mono or as a common subwoofer in a stereo
system. It features an all-steel grill and rigid corners, as well as an integral 1
3/8" pole-mount receptacle
• The RB 2030 rechargable battery cartridge, which provides up to two hours of
power to either the XPL200 or XPL300 from its dual Lead-Acid GelCel batteries.
• The MP1020 mounting bracket, which allows any Expedition Pro enclosure
to be “flown” or mounted on the wall or ceiling using standard OmniMount
hardware. For more information, see the “Positioning and Mounting the
Expedition Pro” section on page 12.
14
Page 19

Introduction
Bienvenue dans l’univers des Samson Expedition XPL — les enceintes audio portables du nouveau millénaire ! Offrant une polyvalence, une portabilité et une qualité sonore exceptionnelles, ces enceintes représentent la solution par excellence pour les
applications de sonorisation ou de retour de scène dans les clubs, salles de concert et lieux de culte. Elles peuvent également
servir de systèmes de sonorisation portables pour les présentations commerciales, les performances de DJ, les cours de sport ou
les utilisations en extérieur (parcs, plages, marchés). De plus, les enceintes Expedition XPL sont toutes équipées d'une poignée
télescopique et de roulettes avec frein qui leur permettent de vous suivre partout !
Ce manuel porte sur trois enceintes Samson Expedition XPL différentes. Ces enceintes 2 voies légères mais très robustes sont
toutes munies d’un Woofer de 30 cm (12 pouces) spécialement conçu et d’un Tweeter à compression adapté de 2,5 cm (1 pouce).
L'Expedition XPL100 est une enceinte 8 Ohms passive pouvant être reliée à n'importe quel amplificateur externe délivrant une
puissance maximum de 250 Watts. L'Expedition XPL200 est une version active équipée d’une section d’amplification légère
(travaillant en Classe D), d'un filtre de haute précision, de circuits de protection pour les haut-parleurs et d’un limiteur intégré.
L'Expedition XPL300 est un système de sonorisation portable complet offrant un mélangeur stéréo 4 voies et des effets numériques. Par ailleurs, différents produits d’expansion sont disponibles, comme nos Subwoofers actifs de 500 Watts (dB1500a ou
dB1800a), l’accumulateur Lead-Acid GelCel rechargeable et la station d’accueil pour lecteur de MP3 à loger en face arrière. Vous
disposez même d’un compartiment pré-câblé pouvant accueillir l’un des deux systèmes sans fil de Samson !
Ce manuel vous donne une description détaillée des caractéristiques des trois enceintes de la gamme Expedition Pro, ainsi qu'un
tour d'horizon de leurs éléments et leurs procédures de réglage et d'utilisation détaillées. Si vous avez acquis votre Expedition Pro
aux Etats-Unis, n'oubliez pas de remplir la carte de garantie fournie et de nous la renvoyer. Vous pourrez ainsi bénéficier de notre
service d'assistance technique en ligne et recevoir des renseignements sur les toutes dernières nouveautés Samson. Si vous avez
acquis votre Expedition Pro hors des Etats-Unis, vous pouvez prendre connaissance des détails de la garantie auprès de votre distributeur. N'oubliez pas de non plus de visiter notre site Internet (http://www.samsontech.com) qui regroupe toutes les informations sur toute notre gamme de produits.
FRANÇAIS
NOTE SPÉCIALE : S’il arrive que votre Expedition Pro ait besoin de maintenance, vous devez disposer d’un numéro d’autorisation
(Return Authorization) pour nous le renvoyer. Sans ce numéro, l’appareil ne sera pas accepté. S’il a été acheté au Etats-Unis,
veuillez appeler le numéro suivant 1-800-372-6766 pour obtenir un numéro d’autorisation avant de renvoyer votre appareil. Si
l’appareil n’a pas été acheté aux Etats-Unis, veuillez contacter votre revendeur Samson pour obtenir de plus amples informations.
Veuillez également conserver le matériel d’emballage original, afin d’y placer l’appareil pour tout transport.
15
Page 20

Caractéristiques techniques
SAMSON
FRANÇAIS
Les enceintes Samson Expedition Pro bénéficient des
dernières avancées technologiques, ce qui leur permet
d'offrir des performances exceptionnelles en matière de
modularité et de mobilité. Voici quelques-unes de leurs
caractéristiques :
• La poignée télescopique et les roulettes intégrées facilitent grandement le transport et le déplacement de
l'enceinte.
• D'une grande légèreté et compacité, les enceintes
Expedition Pro n'en sont pas moins robustes et parées
pour la route. En polypropylène injecté, elles bénéficient
d'un très grand support interne avec des parois d'environ
1,25cm d'épaisseur, ce qui leur confère une solidité et une
rigidité suffisante pour mener le maximum d'énergie à la
sortie audio. Grâce à la grille métallique et au revêtement
anti-éraflures, les enceintes sont encore plus résistantes
et performantes, même dans les environnements les plus
exigeants.
• Les basses fréquences sont restituées par un Woofer de
30 cm (12 pouces) de conception spéciale équipé d'une
bobine de 6,3 cm (2,5 pouces) avec support en Kapton et
d'un aimant en ferrite de baryum de 1,4 kg garantissant
une réponse très précise et prononcée.
• Les hautes fréquences sont cristallines et très douces
grâce au Tweeter à compression de 2,5 cm (1 pouce) avec
dôme en titane de conception spéciale, à l’élément de
mise en phase assurant une réponse linéaire et au pavillon
à guide d’ondes elliptique permettant d'éliminer toute diffraction sonore.
• Possibilité d'utiliser les Expedition Pro comme bains de
pied de scène grâce au pivot intégré.
• Le réceptacle pour pied 1 3/8" et les points d'ancrage permettent de monter les
Expedition Pros sur un pied ou une perche et de les fixer/suspendre au moyen
d'accessoires standard.
• L'XPL100 est une enceinte passive pouvant être reliée à n'importe quel amplifica
teur d'au plus 250 Watts dans 8 Ohms. Ne nécessitant aucune alimentation, elle
est équipée de connecteurs Speakon et de Jacks 6,35mm permettant de relier, si
besoin est, plusieurs XPL100 en cascade.
• La XPL200 est équipée d’un amplificateur de puissance léger de 250 Watts (travaillant en Classe D) et d’un filtre de coupure perfectionné. Les deux connecteurs XLR
symétriques permettent de relier plusieurs enceintes Expedition Pro en cascade,
et un limiteur garantit l'absence de distorsion en sortie même lorsque l'XPL200 est
poussée dans ses retranchements. Enfin, l'XPL200 bénéficie de trois étages de protection des haut-parleurs avec commutations de relais lors des mises sous et hors
tension.
-
• L'XPL300 reprend toutes les caractéristiques de l'XPL200 en lui ajoutant un mélan
geur stéréo 4 voies très souple d'emploi proposant deux voies micro/ligne mono
et une voie micro/ligne stéréo sur connecteurs XLR et Jacks 6,35mm. En outre,
deux connecteurs RCA séparés permettant la connexion d'une platine cassette
16
-
Page 21

ou CD externe. Les voies du mélangeur sont
munies d’un égaliseur 2 bandes et d’un
réglage de volume indépendant, et vous
disposez même d’un processeur d’effets
numérique intégré proposant 10 Presets de
réverbération, délai et Chorus. Les sorties
XLR symétriques gauche et droite offrent
la possibilité de relier plusieurs enceintes
Expedition en cascade (le sélecteur mono/
stéréo détermine le mode d’utilisation) et le
VU-mètre permet de contrôler les niveaux de
sortie en continu. Les sorties XLR gauche et
droite symétriques permettent de relier plusieurs enceintes Expedition Pro en cascade
(avec sélecteur mono/stéréo) alors qu'un VUmètre permet de connaître en permanence
les niveaux de sortie. Les XPL200 et XPL300
intègrent par ailleurs d'un témoin d'usure
de l'accumulateur (en cas de présence de
l'accumulateur rechargeable RB 2030 disponible en option – voir ci-dessous).
Caractéristiques techniques
FRANÇAIS
• Les XPL200 et XPL300 disposent sur leur des
sus d'un compartiment précâblé pouvant
recevoir divers systèmes sans fil Samson dont
les performances audio ont maintes fois été
prouvés sur les scènes du monde entier. Vous
avez le choix entre les récepteurs UHF AM1
ou UM1.
De très nombreux accessoires sont dis-
•
ponibles en option, comme le support
MP1020, qui permet de suspendre l'enceinte
Expedition XPL au plafond, l’accumulateur
rechargeable RB 2030, qui offre jusqu’à deux
heures d'autonomie aux XPL200 et XPL300
grâce à sa double-pile Lead-Acid GelCel, ainsi
que les trépieds TS50 et TS100 pour les systèmes portables.
• Les db1500a et dB1800a sont des Subwoofers actifs équipés d'un amplificateur de 500
Watts et de Woofers renforcés de 38,1 cm (15 pouces) et 45,7 cm (18 pouces). Ce sont les
compagnons idéaux des Expedition XPL (ou toute autre enceinte) pour les applications
nécessitant des basses fréquences riches et puissantes. Grâce à leur filtre électronique stéréo, les dB1500a et dB1800a peuvent être configurés en mono ou en Subwoofer standard
pour les systèmes stéréo. Ils sont pourvus de coins ultra résistants, d'une grille tout acier et
d’une embase pour pied intégrée.
-
17
Page 22

Expedition Pro XPL100
AMPLIFIER INPUTS AND EXTENSIONS
INPUT EXTENSION
MAXIMUM POWER
250 WATTS RMS
2 WAY 8 OHM
CAUTION
RISK OF ELECTRIC SHOCK
DO NOT OPEN
INPUT EXTENSION
RISQUE DE CHOC ELECTRIQUE
NE PAS OUVRIR
DO NOT EXPOSE THIS EQUIPMENT
TO RAIN OR MOISTURE.
AVIS;
MADE IN CHINA
SPEAKON™
SPEAKON™
+
-
1- 1+
2+ 2-
NOT CONNECTED
AMPLIFIER INPUTS AND EXTENSIONS
INPUT EXTENSION
MAXIMUM POWER
250 WATTS RMS
2 WAY 8 OHM
CAUTION
RISK OF ELECTRIC SHOCK
DO NOT OPEN
INPUT EXTENSION
RISQUE DE CHOC ELECTRIQUE
NE PAS OUVRIR
DO NOT EXPOSE THIS EQUIPMENT
TO RAIN OR MOISTURE.
AVIS;
MADE IN CHINA
FRANÇAIS
Visite guidée
1 : Entrée Jack 6,35mm – Reliez à ce Jack 6,35mm standard la sortie d'un amplifica-
teur de puissance (d'au plus 250 Watts dans 8 Ohms).
2 : Entrée Speakon™ - Vous pouvez également relier à cette embase Speakon® la sortie d'un amplificateur de puissance (d'au plus 250 Watts dans 8 Ohms).
3 : Jack 6,35 d'extension – Ce connecteur Jack 6.35mm permet de relier une XPL100
à une autre en cascade. Vous pouvez trouver ci-dessous les schémas de connexion.
4 : Embase Speakon™ d'extension – Cette embase Speakon® permet de relier une
XPL100 à une autre en cascade. Vous pouvez trouver ci-dessous les schémas de connexion.
Câblage des embases Speakon™
Connexions à l'XPL100
Emploi d'une seule XPL100 : Reliez un signal mono (bus
ou départ auxiliaire) du mélangeur à l'amplificateur de puissance. Reliez ensuite l'une des sorties HP de l'amplificateur
de puissance à l'entrée Jack 6.35mm (ligne pleine) ou à
l'entrée Speakon™ (ligne pointillée) de l'XPL100.
18
Page 23

Expedition Pro XPL100
AMPLIFIER INPUTS AND EXTENSIONS
INPUT EXTENSION
MAXIMUM POWER
250 WATTS RMS
2 WAY 8 OHM
CAUTION
RISK OF ELECTRIC SHOCK
DO NOT OPEN
INPUT EXTENSION
RISQUE DE CHOC ELECTRIQUE
NE PAS OUVRIR
DO NOT EXPOSE THIS EQUIPMENT
TO RAIN OR MOISTURE.
AVIS;
MADE IN CHINA
AMPLIFIER INPUTS AND EXTENSIONS
INPUT EXTENSION
MAXIMUM POWER
250 WATTS RMS
2 WAY 8 OHM
CAUTION
RISK OF ELECTRIC SHOCK
DO NOT OPEN
INPUT EXTENSION
RISQUE DE CHOC ELECTRIQUE
NE PAS OUVRIR
DO NOT EXPOSE THIS EQUIPMENT
TO RAIN OR MOISTURE.
AVIS;
MADE IN CHINA
SAMSON
MPL2242
MMPL2242
MPL2242
SERVO - 240
SAMSON
AMPLIFIER INPUTS AND EXTENSIONS
INPUT EXTENSION
MAXIMUM POWER
250 WATTS RMS
2 WAY 8 OHM
CAUTION
RISK OF ELECTRIC SHOCK
DO NOT OPEN
INPUT EXTENSION
RISQUE DE CHOC ELECTRIQUE
NE PAS OUVRIR
DO NOT EXPOSE THIS EQUIPMENT
TO RAIN OR MOISTURE.
AVIS;
MADE IN CHINA
AMPLIFIER INPUTS AND EXTENSIONS
INPUT EXTENSION
MAXIMUM POWER
250 WATTS RMS
2 WAY 8 OHM
CAUTION
RISK OF ELECTRIC SHOCK
DO NOT OPEN
INPUT EXTENSION
RISQUE DE CHOC ELECTRIQUE
NE PAS OUVRIR
DO NOT EXPOSE THIS EQUIPMENT
TO RAIN OR MOISTURE.
AVIS;
MADE IN CHINA
SAMSON
MPL2242
MMPL2242
MPL2242
SERVO - 240
SAMSON
Emploi de deux XPL100 en mono : Reliez un signal mono (bus ou départ auxiliaire) du mélangeur à l'amplificateur de puissance.
Reliez ensuite l'une des sorties HP de l'amplificateur de puissance à l'entrée Jack 6.35mm (ligne pleine) ou à l'entrée Speakon™
(ligne pointillée) de l'XPL100. Reliez ensuite le Jack 6,35mm d'extension à l'entrée Jack (ligne pleine) de la seconde XPL100 ou
l'embase Speakon™ d'extension à l'entrée Speakon™ de la seconde XPL100 (ligne pointillée).
FRANÇAIS
Emploi de deux XPL100 en stéréo : Reliez un signal stéréo (bus ou départ auxiliaire) du mélangeur à l'amplificateur de puissance. Reliez ensuite la sortie HP gauche de l'amplificateur de puissance à la première XPL100 (sur l'entrée Jack [ligne pleine] ou
sur l'entrée Speakon™ [ligne pointillée]), puis la sortie HP droite de l'amplificateur de puissance à la seconde XPL100 (de nouveau
sur l'entrée Jack [ligne pleine] ou sur l'entrée Speakon™ [ligne pointillée]).
19
Page 24

Expedition Pro XPL200
UTILISER UN FUSIBLE
DE RECHANGE DE
MEME TYPE.
AMPLIFIED SPEAKER CABINET
BI-AMPED 150 WATTS LOW
50 WATTS HIGH FREQUENCY
SIGNAL OUTPUT
SIGNAL INPUT
AC OUT
350VA MAX
POWER
AC
CAUTION:
ATTENTION:
FOR CONTINUED
PROTECTION
AGAINST RISK
OF FIRE,
REPLACE ONLY
WITH SAME
TYPE OF FUSE.
FUSE: T5AL 250V
CAUTION
RISK OF ELECTRIC SHOCK
DO NOT OPEN
VOLUME
RATING
POWER
100-240 V ~ 50Hz/60Hz 360W
100
5
LIMITER
AC IN
ON
CHARGE
BATTERY OPERATION
OFF
+3dB
0dB
-10dB
75%
50%
25%
BATTERYMAIN
RISQUE DE CHOC ELECTRIQUE
NE PAS OUVRIR
DO NOT EXPOSE THIS EQUIPMENT
TO RAIN OR MOISTURE.
AVIS;
MADE IN CHINA
UTILISER UN FUSIBLE
DE RECHANGE DE
MEME TYPE.
AMPLIFIED SPEAKER CABINET
BI-AMPED 150 WATTS LOW
50 WATTS HIGH FREQUENCY
SIGNAL OUTPUT
SIGNAL INPUT
AC OUT
350VA MAX
POWER
AC
CAUTION:
ATTENTION:
FOR CONTINUED
PROTECTION
AGAINST RISK
OF FIRE,
REPLACE ONLY
WITH SAME
TYPE OF FUSE.
FUSE: T5AL 250V
CAUTION
RISK OF ELECTRIC SHOCK
DO NOT OPEN
VOLUME
RATING
POWER
100-240 V ~ 50Hz/60Hz 360W
100
5
LIMITER
AC IN
ON
CHARGE
BATTERY OPERATION
OFF
+3dB
0dB
-10dB
75%
50%
25%
BATTERYMAIN
RISQUE DE CHOC ELECTRIQUE
NE PAS OUVRIR
DO NOT EXPOSE THIS EQUIPMENT
TO RAIN OR MOISTURE.
AVIS;
MADE IN CHINA
SAMSON
MPL2242
MMPL2242
MPL2242
FRANÇAIS
Visite guidée
1 : Connecteur d'entrée – Connecteur XLR femelle symétrique chargé d'accueillir
recevoir les signaux niveau ligne sur l'XPL200.
2 : VU-mètre de sortie – Cet afficheur de niveau à trois segments indique le niveau
de sortie de l'XPL200. Pour obtenir un rapport signal/bruit optimal, réglez le potentiomètre de volume (voir n°6 ci-dessous) de sorte que le signal audio fluctue aux
environs de 0 VU sans jamais atteindre ou presque le segment rouge "+3 dB".
3 : Interrupteur d'alimentation – Permet de mettre l'XPL200 sous et hors tension.
4 : Témoin d'usure de l'accumulateur – Si l'XPL200 est équipée de l'accumulateur
RB2030 en option, ce témoin vous indique l'autonomie restante de l'accumulateur
lorsque l'XPL200 est en cours d'utilisation (batteries en cours de consommation) ou
lorsqu'elle est éteinte (batteries en cours de chargement).
5 : Potentiomètre de volume – Ce potentiomètre permet de fixer le volume des
amplificateurs de puissance de l'XPL200.
6 : Connecteur de sortie – Connecteur XLR mâle symétrique auquel est dirigé
le signal de sortie niveau ligne de l'XPL200. Ce connecteur permet également de
transmettre un signal à une deuxième XPL200 reliée en cascade (voir schémas
d'interconnexion en page suivante) ou à un Subwoofer DB1500 disponible en
option.
7 : Connecteur d'alimentation – Reliez à ce connecteur le cordon d'alimentation 3
plots IEC fourni.
Connexion de l'XPL200
Emploi d'une seule XPL200 : Reliez un signal mono (bus ou
départ auxiliaire) du mélangeur à l'entrée XLR de l'XPL200.
20
Page 25

Expedition Pro XPL200
UTILISER UN FUSIBLE
DE RECHANGE DE
MEME TYPE.
AMPLIFIED SPEAKER CABINET
BI-AMPED 150 WATTS LOW
50 WATTS HIGH FREQUENCY
SIGNAL OUTPUT
SIGNAL INPUT
AC OUT
350VA MAX
POWER
AC
CAUTION:
ATTENTION:
FOR CONTINUED
PROTECTION
AGAINST RISK
OF FIRE,
REPLACE ONLY
WITH SAME
TYPE OF FUSE.
FUSE: T5AL 250V
CAUTION
RISK OF ELECTRIC SHOCK
DO NOT OPEN
VOLUME
RATING
POWER
100-240 V ~ 50Hz/60Hz 360W
100
5
LIMITER
AC IN
ON
CHARGE
BATTERY OPERATION
OFF
+3dB
0dB
-10dB
75%
50%
25%
BATTERYMAIN
RISQUE DE CHOC ELECTRIQUE
NE PAS OUVRIR
DO NOT EXPOSE THIS EQUIPMENT
TO RAIN OR MOISTURE.
AVIS;
MADE IN CHINA
UTILISER UN FUSIBLE
DE RECHANGE DE
MEME TYPE.
AMPLIFIED SPEAKER CABINET
BI-AMPED 150 WATTS LOW
50 WATTS HIGH FREQUENCY
SIGNAL OUTPUT
SIGNAL INPUT
AC OUT
350VA MAX
POWER
AC
CAUTION:
ATTENTION:
FOR CONTINUED
PROTECTION
AGAINST RISK
OF FIRE,
REPLACE ONLY
WITH SAME
TYPE OF FUSE.
FUSE: T5AL 250V
CAUTION
RISK OF ELECTRIC SHOCK
DO NOT OPEN
VOLUME
RATING
POWER
100-240 V ~ 50Hz/60Hz 360W
100
5
LIMITER
AC IN
ON
CHARGE
BATTERY OPERATION
OFF
+3dB
0dB
-10dB
75%
50%
25%
BATTERYMAIN
RISQUE DE CHOC ELECTRIQUE
NE PAS OUVRIR
DO NOT EXPOSE THIS EQUIPMENT
TO RAIN OR MOISTURE.
AVIS;
MADE IN CHINA
SAMSON
MPL2242
MMPL2242
MPL2242
Emploi de deux XPL200 en mono : Reliez un signal mono (bus ou départ auxiliaire) du mélangeur à l'entrée XLR de l'XPL200,
puis reliez la sortie XLR de la première XPL200 à l'entrée XLR de la seconde XPL200.
FRANÇAIS
Emploi de deux XPL200 en stéréo : Reliez le canal gauche d'un signal stéréo (bus ou départ auxiliaire) provenant du mélangeur
à l'entrée XLR de la première XPL200, puis le signal droit à l'entrée XLR de la seconde XPL200.
21
Page 26

Expedition Pro XPL300
FRANÇAIS
Visite guidée
1 : Egaliseur – L'égaliseur deux bandes vous permet d'obtenir précisément le son
désiré grâce aux 15 dB d'amplification/atténuation proposés sur les fréquences graves
(à 100 Hz) et aiguës (à 10 kHz). Lorsque les potentiomètres d'égalisation sont en position centrale crantée, aucune égalisation n'est appliquée (réponse plate). Plus vous les
tournez vers la droite, plus vous amplifiez les graves et les aigus. Plus vous les tournez
vers la gauche, plus vous atténuez les graves et les aigus.
2 : Potentiomètres de départ réverbération – Ces potentiomètres permettent de
fixer la quantité de signal de la voie à diriger dans le processeur d'effets numérique
interne. Plus vous déplacez les potentiomètres vers la position 10, plus la quantité de
signal dirigée dans le processeur d'effet augmente. Pour qu’un effet soit audible, l’un
des 10 Presets doit être sélectionné à l’aide du réglage DSP Effects (voir n° 10 à la page
suivante). Veillez à ne pas envoyer trop de signal dans le processeur DSP sous peine de
provoquer de la distorsion.
3 : Réglage de panoramique/balance – Sur les voies 1 et 2, ce potentiomètre sert de
réglage de panoramique et permet de placer le signal dans le champ stéréo gauchedroit, tout en conservant un niveau de signal constant. En position centrale crantée,
le signal est transmis de manière égale aux sorties gauche et droite. Pour envoyer un
signal exclusivement à la sortie gauche ou droite, il suffit de tourner le potentiomètre,
respectivement, à fond à gauche ou à fond à droite.
Sur la voie 3/4 (voie stéréo), ce potentiomètre sert de réglage de balance et permet
de régler le dosage entre les deux signaux d'entrée. Lorsque le potentiomètre est
placé en position centrale crantée, les deux signaux sont de niveau égal. Le fait de
le déplacer vers la gauche relève le niveau du signal d'entrée gauche par rapport au
signal droit. Inversement, le fait de le déplacer vers la droite relève le niveau du signal
d'entrée droit par rapport au signal gauche.
4 : Potentiomètres de volume des voies – Ces potentiomètres permettent de fixer le
niveau de chaque voie. Sur la voie stéréo 3/4, ce potentiomètre gère simultanément
le niveau des deux entrées (vous pouvez régler le niveau relatif entre ces deux entrées
22
Page 27

Expedition Pro XPL300
par le biais du potentiomètre de balance – voir n°3 ci-avant). En pratique, ces potentiomètres de volume permettent de réaliser le
mixage des signaux reçus sur les différentes entrées du mélangeur de l'XPL300.
5 : Connecteur d'insertion (sub) – Ce Jack 6,35 mm permet d'insérer un signal à niveau ligne directement avant les amplificateurs de puissance de la XPL300. Ce connecteur sert normalement de retour pour le signal d’un Subwoofer dB1500a ou dB18000
optionnel
6 : Entrées ligne – Jacks 6,35mm permettant de relier des sources niveau ligne à l'XPL300. Les voies 1 et 2 disposent de connecteurs Jacks 6,35mm mono alors que la voie 3/4 dispose d'un connecteur Jack 6,35 stéréo (canal gauche sur pointe et canal
droit sur bague). Reliez toujours les sources stéréo à la voie stéréo (voie 3/4). Si un récepteur sans fil est relié à l'XPL300 par le
biais des ports internes (voir page 28 du présent manuel), sa sortie est dirigée vers la voie 2, sur laquelle est également dirigée
une autre source niveau ligne reliée à l'entrée ligne correspondante ainsi qu'un signal micro relié à l'entrée microphone correspondante. Lorsqu’un lecteur de MP3 optionnel est installé, sa sortie est connectée à la voie 3/4, qui permet également d’utiliser
deux autres sources à niveau ligne (l'une reliée à l’entrée ligne, et l’autre aux entrées CD [voir n° 15 à la page suivante]), ainsi que
le signal d'un micro relié à l’entrée micro.
7 : Entrées microphone – Entrées XLR permettant de relier des microphones aux préamplificateurs micro internes de l'XPL300.
Chaque voie peut véhiculer une ou plusieurs sources niveau ligne (voir n°6 ci-dessus) ainsi qu'une source microphone.
8 : Potentiomètre DSP Effects –Permet de sélectionner l’un des 10 Presets de réverbération (Medium Bright Plate, Best Plate,
Medium Dark Plate, Short Plate, Long Bright Spring, Slapback 2, Slapback w/Verb, Slow St Chor ou Best Hall). Pour couper l'effet
de réverbération, placez le potentiomètre en position "Off".
9 : Sélecteur mono/stéréo – Si vous n'utilisez qu'une seule XPL300, placez ce sélecteur en position "Mono" afin que
l'amplificateur de puissance de l'XPL300 puisse recevoir les signaux de sections de sortie gauche et droite. Si vous utilisez plusieurs enceintes Expedition Pro, placez-le en position "Stereo". L'XPL300 se chargera de reproduire alors uniquement le signal du
canal gauche (c'est à dire, la somme des signaux placés sur la gauche de l'espace sonore au niveau du mélangeur). La sortie droite
se charge alors de transmettre le signal du canal droit (somme des signaux placés sur la droite de l'espace sonore au niveau du
mélangeur) à une seconde enceinte. Veuillez vous reporter aux schémas d'interconnexion en page 24 - 25 pour de plus amples
détails.
10 : Sorties – L'XPL300 est équipée de deux sorties XLR niveau ligne. Ces sorties permettent d'alimenter une seconde XPL300
(ou XPL200) reliée en cascade (voir schéma d'interconnexion en page suivante) ou un Subwoofer DB1500 disponible en option.
Sachez que la nature du signal émis à ces sorties dépend du réglage du sélecteur Mono/Stéréo (voir n°9 ci-dessus). Lorsqu'il est
placé en position "Stéréo", la sortie XLR gauche émet uniquement le canal gauche tandis que la sortie XLR droite se charge du
canal droit. Lorsqu'il est placé en position "Mono", les deux sorties XLR reprennent le même signal monophonique correspondant
à la somme des canaux de sortie gauche et droit. Reportez-vous aux schémas d'interconnexion en pages 24 - 25 pour de plus
amples détails.
11 : Potentiomètre de volume général – Ce potentiomètre permet de régler le niveau de sortie final – on peut le comparer à un
"Fader Master". Les signaux des quatre voies sont dirigés vers ce potentiomètre juste avant d'être affectés aux amplificateurs de
puissance de l'XPL300 et aux sorties gauche et droite (voir n°10 ci-dessus).
FRANÇAIS
12 : Témoin d'usure de l'accumulateur – Si l'XPL200 est équipée de l'accumulateur rechargeable RB2030 en option (voir page x),
ce témoin vous indique l'autonomie restante de l'accumulateur lorsque l'XPL300 est en cours d'utilisation (batteries en cours de
consommation) ou lorsqu'elle est éteinte (batteries en cours de chargement). Voir n°20 page suivante.
13 : VU-mètre de sortie - Cet afficheur de niveau à trois segments indique le niveau de sortie de l'XPL200. Pour obtenir un rapport signal/bruit optimal, réglez le potentiomètre de volume (voir n°6 ci-dessous) de sorte que le signal audio fluctue aux environs de 0 VU sans jamais atteindre ou presque le segment rouge "+3 dB".
14 : Entrées CD – Ces entrées au format RCA permettent la connexion des sorties d'une platine CD ou cassette. Les signaux reçus
à ces entrées sont affectés à la voie stéréo 3/4.Lorsqu’un lecteur de MP3 optionnel est installé, sa sortie est aussi routée à la voie
3/4, en plus des signaux connectés à l’entrée ligne en Jack 6,35 mm (voir n° 6 à la page précédente) et à l’entrée micro (voir n° 7 à
la page précédente).
15 : Connecteur d'alimentation - Reliez à ce connecteur le cordon d'alimentation 3 plots IEC fourni.
16 : Sélecteur de niveau nominal – Ce sélecteur permet de fixer le niveau nominal de l'entrée Jack stéréo de la voie 3/4 (voir n°6
en page précédente) sur +4 (niveau professionnel) ou -10 (niveau grand public).
17 : Interrupteur d'alimentation – Permet de mettre l'XPL300 sous et hors tension. Si l'XPL300 est équipée de l'accumulateur RB
2030, celui-ci se chargent lorsque l'XPL300 est éteinte (interrupteur en position "Off").“Off” position.
23
Page 28

Expedition Pro XPL300
MP3
Utilisation de la station d’accueil
Les XPL300 disposent d’une station d’accueil MP3 intégrée, qui peut être logée dans
un compartiment spécial au-dessus du mélangeur de l’enceinte. Elle vous permet
d’installer un lecteur de MP3 pour diffuser de la musique pendant les présentations
ou les spectacles. Cette station d’accueil est compatible avec la plupart des lecteurs de
MP3 munis d’un connecteur 30 broches (sous le lecteur). Suivez la procédure ci-dessous pour installer votre lecteur de MP3.
• Si votre lecteur de MP3 était fourni avec un adaptateur pour station d’accueil,
placez-le dans la station de l’enceinte XPL300.
• Tirez sur la pince de fixation à ressort pour l’ouvrir, puis glissez votre lecteur de MP3
en place en vous assurant que le connecteur 30 broches soit correctement aligné.
• Si votre lecteur de MP3 est très mince, retirez-le puis insérez la mousse EVA fournie.
• Tirez ensuite sur la pince de fixation à ressort pour l’ouvrir, puis réinstallez votre
lecteur de MP3.
• Relâchez doucement la pince de fixation à ressort pour qu’elle maintienne votre lecteur de MP3 en place.
FRANÇAIS
Interconnexion de l'XPL300
Emploi d'une seule XPL300 : Dans cet exemple, des microphones sont reliés aux entrées microphone XLR des voies 1 et 2 alors
qu'une clavier stéréo est reliée au connecteur Jack 6,35mm stéréo de la voie 3/4 (par le biais d'une câble en Y avec signal gauche
sur pointe et signal droit sur bague). IMPORTANT : Si vous ne vous servez que d'une XPL300, n'oubliez pas de placer son
sélecteur Mono/Stereo en position "Mono".
24
Page 29

Expedition Pro XPL300
Emploi d'une XPL300 et d'une XPL200 (configuration stéréo) : Dans cet exemple, reliez les microphones aux entrées micro
XLR des voies 1 et 2 de l'XPL300 ainsi qu'un clavier stéréo au connecteur Jack 6,35mm stéréo de la voie 3/4 de l'XPL300 (par le
biais d'un câble en Y avec signal gauche sur pointe et signal droit sur bague). Reliez ensuite la sortie droite de l'XPL300 à l'entrée
XLR de l'XPL200. IMPORTANT: Si vous utilisez une XPL300 avec d'autres enceintes Expedition Pro, n'oubliez pas de toujours
placer le sélecteur "Mono/Stereo" de l'XPL300 en position "Stereo".
FRANÇAIS
Emploi d'une XPL300 et de trois XPL200 (configuration stéréo étendue) : Dans cet exemples, reliez les microphones aux
entrées micro XLR des voies 1 et 2 de l'XPL300 ainsi qu'un clavier stéréo au connecteur Jack 6,35mm stéréo de la voie 3/4 de
l'XPL300 (par le biais d'un câble en Y avec signal gauche sur pointe et signal droit sur bague). Reliez ensuite la sortie gauche de
l'XPL300 à l'entrée XLR d'une XPL200 (les deux diffusent alors le même signal gauche), puis reliez la sortie droite de l'XPL300 à une
autre XPL200, puis reliez la sortie XLR de cette XPL200 à l'entrée XLR de la troisième XPL200 (les deux XPL200 diffusent alors le
même signal droit). IMPORTANT: Si vous utilisez une XPL300 avec d'autres enceintes Expedition Pro, n'oubliez pas de tou-
jours placer le sélecteur "Mono/Stereo" de l'XPL300 en position "Stereo".
25
Page 30

Consignes de positionnement et de montage
Conseils de positionnement d'ordre général
• L'utilisation d'un microphone ou d'une platine disque devant une enceinte est
la meilleure manière de provoquer du Larsen et/ou du ronflement. Evitez donc
toujours de placer les enceintes Expedition Pro à proximité des micros et des
platines disques en cours d'utilisation.
• Pour la sonorisation de façade, placez les enceintes Expedition Pro à la verticale. Pour les retours de scène, placez-les en position inclinée.
• Relevez toujours les enceintes au maximum au dessus du public avant
d'obtenir une couverture maximale.
• Adaptez le nombre d'enceintes à la taille de la salle. Plus la salle est grande,
plus il vous faut d'enceintes.
Montage sur pied
FRANÇAIS
Les enceintes Expedition Pro disposent, sous leur dessous, d'une renfoncement
pour pied 1-3/8" permettant de les fixer sur n'importe quel pied d'enceinte standard (comme les pieds d’enceinte Samson TS50 ou TS100). En général, il est
recommandé de monter les enceintes sur pied pour optimiser leur couverture (ou
"portée").
Le Subwoofer DB1500 est équipé d'un fixation intégrée permettant de venir placer
une XPL100, XPL200 ou XPL300 au-dessus de lui afin de créer une véritable colonne de son.
Suspension, montage mural et montage au plafond
Comme vous pouvez le voir sur l'illustration ci-dessous, les enceintes Expedition
Pro propose de nombreux points d'ancrage situés dans des renfoncements à
gauche et à droit du compartiment pour le récepteur d'un système sans fil. Les
caches placés au-dessus de ces renfoncements ne sont fixés que par adhésif double face. Il suffit de tirer dessus pour les retirer.
Points d'ancrage des enceintes Expedition Pro
26
Page 31

Consignes de positionnement et de montage
Avant de pouvoir suspendre les enceintes Expedition Pro ou de les fixer au mur ou au
plafond, vous devez au préalable installer le support de fixation Samson MP1020 sur les
points d'ancrage (voir illustrations de droite).
Le support de fixation MP1020 accepte les câbles et accessoires de suspension standards.
Pour les installations fixes nécessitant le montage au plafond de l'enceinte Expedition Pro,
servez-vous d'une fixation OmniMount modèle 100-STMP (voir illustration ci-dessous) :
FRANÇAIS
Pour les installation fixes nécessitant le montage mural de l'enceinte Expedition Pro,
servez-vous d'une fixation OmniMount modèle 100-WB (voir illustration ci-dessous) :
Installation du support de fixation
MP1020 (vue supérieure)
Vue de dessus d'une Expedition Pro équipée
du support de fixation MP1020.
27
Page 32

Accessoires pour enceintes Expedition Pro
Comme le montre l'illustration de gauche, les Expedition Pro XP200 et XP300 disposent, sur leur dessus, d'un compartiment précâblé pouvant accueillir le récepteur d'un
système sans fil UM1 ou AM1. Le signal transmis par le récepteur du système sans fil
monté sur l'XP300 est affecté à la voie 2 du mélangeur interne.
Par ailleurs, de nombreux accessoires disponibles auprès de votre revendeur Samson
permettent d'étendre les possibilités des enceintes Expedition Pro. Voici quelques-uns
de ces accessoires :
• Subwoofer actif dB1500a — complément idéal de toutes les enceintes Expedition
Pro (ou de tout autre enceinte). Ce Subwoofer associe une puissante bi-amplification de 500 Watts à un robuste haut-parleur grave de 38 cm permettant de délivrer un registre infra-grave d'une très grande profondeur. Le filtre électronique stéréo
Compartiment des XP200/XP300 pour
récepteur d'un système sans fil
(vue supérieure)
FRANÇAIS
interne permet d'utiliser l'dB1500a en mono ou comme Subwoofer général d'un
système stéréo. Ce Subwoofer est en outre pourvu de coins rigide et d'une grille
entièrement en métal ainsi que d'un réceptacle pour perche de fixation 1 3/8".
• Accumulateur rechargeable Lead-Acid Gelcel RB 2030 offrant deux heures
d'autonomie à l'XPL200 ou à l'XPL300.
• Support de fixation MP1020 permettant de suspendre ou de monter au plafond
ou au mur n'importe quelle enceinte Expedition Pro par le biais de fixations
OmniMount standard. Veuillez vous reporter à la section "Positionnement et montage des Expedition Pro" en page 26 pour de plus amples renseignements.
28
Page 33

Einleitung
Willkommen bei der Samson Expedition XPL Serie — das tragbare Audiosystem für das neue Jahrhundert! Dieses außergewöhnlich vielseitige System ist die perfekte Lösung für alle Situationen, in denen tragbares, hochwertiges Audio benötigt wird: Als PAHauptsystem oder als Bühnenmonitore in Clubs und Festhallen; in Gotteshäusern; als Soundsystem für Geschäftspräsentationen,
mobile DJs auf Parties oder Aerobic-Training; und für Freilufteinsätze in Parks, an Stränden und auf Flohmärkten. Außerdem verfügt jedes System der Expedition XPL Serie über einen integrierten Teleskopgriff und arretierbare Rollen, damit Sie professionelles
Audio problemlos überall hin mitnehmen können!
In diesem Handbuch werden drei verschiedene Systeme der Samson Expedition XPL Serie detailliert beschrieben. Alle verwenden
das gleiche leichte, aber stabile 2-Weg Boxengehäuse, das einen 12" Spezialwoofer mit einem passenden 1" Kompressionstreiber
kombiniert. Die Expedition XPL100 ist eine passive 8-Ohm Box, die mit jeder externen Endstufe mit einer maximalen
Nennleistung von 250 Watt eingesetzt werden kann. Die Expedition XPL200 ist eine aktive Version mit einer leichten “Class D”
Powerzelle plus präzisem Crossover, Lautsprecherschutzschaltung und integriertem Limiting. Die Expedition XPL300 ist als völlig
eigenständiges, tragbares PA-System konzipiert und bietet zusätzlich einen 4-Kanal Stereomischer mit Digitaleffekten. Zudem
sind mehrere optionale Erweiterungen erhältlich, inklusive einem 500-Watt Aktivsubwoofer (unser dB1500a oder dB1800a),
einem GelCel Bleiakku und einer rückseitigen MP3 Dockingstation. Es gibt sogar ein vorverdrahtetes, spezielles Fach, in dem sich
einer unserer beiden Samson Drahtlosempfänger unterbringen lässt!
Dieses Handbuch gibt Ihnen eine detaillierte Beschreibung der Merkmale der drei Lautsprechersysteme der Expedition ProReihe, sowie einen Überblick über alle Komponenten, Schritt-für-Schritt-Anleitungen zur Konfiguration und die genauen technischen Daten. Für den Fall, dass Sie Ihr Expedition Pro-System in den USA erworben haben, vergessen Sie nicht, die beigefügte
Garantiekarte auszufüllen und abzuschicken. Damit haben Sie die Möglichkeit auf unseren technischen Online-Support und auf
Zusendung aktueller Informationen über diese und andere Samson-Produkte . Falls Sie Ihr System außerhalb der USA gekauft
haben, erkundigen Sie sich bei Ihrem Händler nach den Garantiebedingungen. Und vergessen Sie nicht, unsere Web-Seite (http://
www.samsontech.com) zu besuchen – dort werden Sie umfassende Informationen über alle unsere Produkte finden.
BEMERKUNG: Sollte Ihr Expedition Pro eine Wartung brauchen, ist eine Rücksendungsnummer (Return Autorization) zum
Rücktransport an uns notwendig. Ohne diese Nummer, wird das Gerät nicht angenommen. Wenn es in den USA erworben wurde,
rufen Sie unter die Nummer 1-800-372-6766 an, um eine Rücksendungsnummer zu erhalten. Wenn das Gerät nicht in den USA
erworben wurde, wenden Sie sich an Ihren Samson-Fachhandel, um weitere Informationen zu erhalten. Verwahren Sie bitte die
ursprünglichen Verpackungsmaterialien.
DEUTSCHE
29
Page 34

Produktmerkmale des Expedition Pro-Systems
SAMSON
Die Samson-Expedition Pro-Lautsprechersysteme sind
auf dem neuesten Stand der Technik. So verleihen sie
professionellen Audio-Produkten eine noch nicht dagewesene Modularität und Mobilität. Hier die wesentlichen
Merkmale:
• Ein eingebauter Teleskopgriff und Laufrollen erleichtern
enorm den Transport.
• Alle Expedition Pro-Lautsprecher sind kompakt und
in Leichtbauweise, gleichzeitig aber extrem haltbar und
“straßentauglich”. Gefertigt aus Polypropylen-Spritzguss
besitzen sie eine solide Innenkonstruktion zur zusätzlichen Stabilisierung der ca. 1,25cm dicken Seitenwände,
was ihnen die nötige Solidität und Steifigkeit verleiht, um
an den Ausgängen geringsten Verlust zu gewährleisten.
• Die Bass-Sektion umfasst einen 12” Spezialbasstreiber
mit einer 2.5” Kapton Former Schwingspule und einem 50
Unzen Bariumferrit-Magneten für eine präzise und superkompakte Bassansprache.
DEUTSCHE
• Der XPL100 ist ein passiver Lautsprecher, der an beliebigen Verstärkern bis zu
• Das XPL200 enthält eine leichte 250 Watt “Class D” Endstufe und ein komplexes
• Eine Höhensektion, die ein klares, weiches Top End
liefert – dank einem 1” Kompressionstreiber mit TitanSpezialmembran und einem Phasing Plug für linearen
Frequenzgang und einem elliptischen Wave Guide-Horn,
das nahezu alle Schalldiffraktionen verringert
• Eine Kippstellung, die die Nutzung der Expedition Pro
als Fußmonitore auf der Bühne erlaubt.
• Das für 1-3/8“-Stative geeignete Gehäuse sowie passende Verankerungspunkte erlauben die Installation
der Expedition Pro auf Stativ bzw. ”hängend” mittels
Standard-PA-Zubehör.
250 Watt an 8 Ohm betrieben werden kann. Er braucht keinen Netzanschluss
und stellt je zwei Speakon- und Klinken-Buchsen zu Verfügung, womit bei Bedarf
mehrere XPL100 kaskadiert werden können.
Crossover. Duale symmetrisierte XLR-Verbinder ermöglichen die Kaskadierung
mehrerer Expedition Pro-Systeme, und ein Limiter sichert auch dann einen klaren
Ton, wenn Sie den XPL200 an seinen Leistungsgrenzen betreiben. Außerdem gibt
es noch eine dreistufige Lautsprecher-Schutzschaltung, die Relais-gesteuertes
Ein- und Ausschalten einschließt.
• Der XPL300 beinhaltet alle Produktmerkmale des XPL200 und dazu einen
einfach zu bedienenden 4- Kanal-Stereo-Mischer, der zwei Mono- und einen
Stereo-Mik/Line-Kanal mit dualen XLR- und Klinken-Buchsen zu Verfügung
stellt. Ferner gibt es noch getrennte duale Cinch-Ausgänge zum Anschluss
eines externen Kassettenrekorders oder CD-Players. Jeder Mischerkanal ist ausgestattet mit einem 2-Band-EQ und unabhängigem Pegelregler sowie einem
integrierten digitalen Multieffektprozessor mit zehn verschiedenen Reverb-,
Delay- und Chorus-Presets. Über die symmetrischen linken und rechten XLRAusgänge lassen sich mehrere Expedition-Boxen (mit einem Mono/StereoSchalter zur Wahl der Betriebsart) miteinander verketten. Über die VU-Anzeige
30
Page 35

Produktmerkmale des Expedition Pro-Systems
können Sie die Ausgangspegel ständig überwachen. Die symmetrischen XLR-Linksund - Rechts-Ausgänge ermöglichen
die Kaskadierung mehrerer Expedition
Pro-Lautsprechersysteme (mit Mono/
Stereo-Schalter), und eine VU-Anzeige
versetzt Sie in die Lage, den momentanen
Ausgangspegel zu kontrollieren. Der XPL200
und der XPL300 beinhalten auch eine
Ladeanzeige, die beim Betrieb mit dem
optionalen Akku-Set RB2030 zum Einsatz
kommt (siehe unten).
• Der XPL200 und der XPL300 stellen auf ihrer
Oberseite ein anschlussbereites Fach bereit,
in dem die diversen kabellosen Systeme
von Samson – durch ihre hervorragende
Leistung schon auf Bühnen überall auf
der Welt bewährt – untergebracht werden.
Unter den unterstützten Empfängern haben
Sie die Wahl zwischen den UM1- oder M32UHF-Modellen oder dem VHF-Modell VM1.
• Ein breites Spektrum an Sonderzubehör: die
MP1020 Montagehalterung, mit der sich alle
Expedition Pro-Gehäuse an der Decke befestigen lassen; die RB 2030 Akku-Cartridge, die
das XPL200 oder XPL300 über ihre beiden
GelCel Bleisäurebatterien mit maximal
zwei Stunden Energie versorgt, sowie die
TS50 und TS100 Boxenständer für tragbare
Setups.
DEUTSCHE
• Die db1500a und dB1800a sind
Aktivsubwoofer, die eine massive 500-Watt
Endstufe mit hoch belastbaren 15” und
18“ Basstreibern kombinieren. Die ideale
Ergänzung für alle Boxen der Expedition
XPL Serie oder andere Boxensysteme, wenn
ein tiefes und mächtiges Low End benötigt
wird. Über das integrierte elektronische
Stereo-Crossover können die dB1500a und
dB1800a entweder in Mono oder als gemeinsamer Subwoofer in einem Stereosystem
betrieben werden. Die Boxen sind mit Vollstahl-Schutzgittern und versteiften Ecken sowie
einer integrierten Ständerhalterung ausgestattet.
31
Page 36

Expedition Pro XPL100
AMPLIFIER INPUTS AND EXTENSIONS
INPUT EXTENSION
MAXIMUM POWER
250 WATTS RMS
2 WAY 8 OHM
CAUTION
RISK OF ELECTRIC SHOCK
DO NOT OPEN
INPUT EXTENSION
RISQUE DE CHOC ELECTRIQUE
NE PAS OUVRIR
DO NOT EXPOSE THIS EQUIPMENT
TO RAIN OR MOISTURE.
AVIS;
MADE IN CHINA
SPEAKON™
SPEAKON™
+
-
1- 1+
2+ 2-
NOT CONNECTED
AMPLIFIER INPUTS AND EXTENSIONS
INPUT EXTENSION
MAXIMUM POWER
250 WATTS RMS
2 WAY 8 OHM
CAUTION
RISK OF ELECTRIC SHOCK
DO NOT OPEN
INPUT EXTENSION
RISQUE DE CHOC ELECTRIQUE
NE PAS OUVRIR
DO NOT EXPOSE THIS EQUIPMENT
TO RAIN OR MOISTURE.
AVIS;
MADE IN CHINA
Überblick
1: Klinken-Eingang – Benutzen Sie diese Standard-Klinken-Buchse zum Anschluss
eines Signals von einem Verstärker (bis 250 Watt an 8 Ohm).
2: Speakon™-Eingang – Sie können alternativ diesen Speakon"-Anschluss zur
Verbindung des XPL100 mit einem Verstärker verwenden (bis 250 Watt an 8 Ohm)
3: Zusatz-Klinken-Buchse – Einen Standard-Klinken-Verbinder benutzen, um einen
XPL100 mit einem anderen zu verketten. Siehe Anschluss-Schemata unten.
4: Zusatz-Speakon™-Buchse – Alternativ kann man diesen Speakon"-Anschluss zur
Verkettung zweier XPL100 verwenden. Siehe Anschluss-Schemata unten.
Verkabelung per Speakon™-Buchsen
DEUTSCHE
Verbindung der XPL100
Betrieb eines einzigen XPL100: Ein einzelnes Mono-Signal (Bus
oder Aux-Send) geht vom Mischer zum Verstärker. Dann einen der
Lautsprecherausgänge des Verstärkers mit dem Klinken-Eingang
(durchgezogene Linie) oder mit dem Speakon™-Eingang (punktierte Linie) des XPL100 verbinden.
32
Page 37

Expedition Pro XPL100
AMPLIFIER INPUTS AND EXTENSIONS
INPUT EXTENSION
MAXIMUM POWER
250 WATTS RMS
2 WAY 8 OHM
CAUTION
RISK OF ELECTRIC SHOCK
DO NOT OPEN
INPUT EXTENSION
RISQUE DE CHOC ELECTRIQUE
NE PAS OUVRIR
DO NOT EXPOSE THIS EQUIPMENT
TO RAIN OR MOISTURE.
AVIS;
MADE IN CHINA
AMPLIFIER INPUTS AND EXTENSIONS
INPUT EXTENSION
MAXIMUM POWER
250 WATTS RMS
2 WAY 8 OHM
CAUTION
RISK OF ELECTRIC SHOCK
DO NOT OPEN
INPUT EXTENSION
RISQUE DE CHOC ELECTRIQUE
NE PAS OUVRIR
DO NOT EXPOSE THIS EQUIPMENT
TO RAIN OR MOISTURE.
AVIS;
MADE IN CHINA
SAMSON
MPL2242
MMPL2242
MPL2242
SERVO - 240
SAMSON
AMPLIFIER INPUTS AND EXTENSIONS
INPUT EXTENSION
MAXIMUM POWER
250 WATTS RMS
2 WAY 8 OHM
CAUTION
RISK OF ELECTRIC SHOCK
DO NOT OPEN
INPUT EXTENSION
RISQUE DE CHOC ELECTRIQUE
NE PAS OUVRIR
DO NOT EXPOSE THIS EQUIPMENT
TO RAIN OR MOISTURE.
AVIS;
MADE IN CHINA
AMPLIFIER INPUTS AND EXTENSIONS
INPUT EXTENSION
MAXIMUM POWER
250 WATTS RMS
2 WAY 8 OHM
CAUTION
RISK OF ELECTRIC SHOCK
DO NOT OPEN
INPUT EXTENSION
RISQUE DE CHOC ELECTRIQUE
NE PAS OUVRIR
DO NOT EXPOSE THIS EQUIPMENT
TO RAIN OR MOISTURE.
AVIS;
MADE IN CHINA
SAMSON
MPL2242
MMPL2242
MPL2242
SERVO - 240
SAMSON
Mono-Betrieb zweier XPL100: Ein einzelnes Mono-Signal (Bus oder Aux-Send) geht vom Mischer zum Verstärker. Dann einen der
Lautsprecherausgänge des Verstärkers mit dem Klinken-Eingang (durchgezogene Linie) oder mit dem Speakon™-Eingang (punktierte Linie)
des XPL100 verbinden. Sodann die Zusatz-Klinken-Buchse an den Klinken-Eingang (durchgezogene Linie) des zweiten XPL100 oder die ZusatzSpeakon™-Buchse an den Speakon™-Eingang des zweiten XPL100 (punktierte Linie) anschließen.
Stereo-Betrieb zweier XPL100: Ein Stereo-Signal (Bus oder Aux-Send) geht vom Mischer zum Verstärker. Der linke Lautsprecherausgang des
Verstärkers wird an einen XPL100 (an den Klinken-Eingang [durchgezogene Linie] oder an den Speakon™-Eingang [punktierte Linie]) angeschlossen, der rechte an den anderen XPL100 (von Neuem entweder an den Klinken-Eingang Eingang [durchgezogene Linie] oder an den
Speakon™-Eingang [punktierte Linie]).
DEUTSCHE
33
Page 38

Expedition Pro XPL200
UTILISER UN FUSIBLE
DE RECHANGE DE
MEME TYPE.
AMPLIFIED SPEAKER CABINET
BI-AMPED 150 WATTS LOW
50 WATTS HIGH FREQUENCY
SIGNAL OUTPUT
SIGNAL INPUT
AC OUT
350VA MAX
POWER
AC
CAUTION:
ATTENTION:
FOR CONTINUED
PROTECTION
AGAINST RISK
OF FIRE,
REPLACE ONLY
WITH SAME
TYPE OF FUSE.
FUSE: T5AL 250V
CAUTION
RISK OF ELECTRIC SHOCK
DO NOT OPEN
VOLUME
RATING
POWER
100-240 V ~ 50Hz/60Hz 360W
100
5
LIMITER
AC IN
ON
CHARGE
BATTERY OPERATION
OFF
+3dB
0dB
-10dB
75%
50%
25%
BATTERYMAIN
RISQUE DE CHOC ELECTRIQUE
NE PAS OUVRIR
DO NOT EXPOSE THIS EQUIPMENT
TO RAIN OR MOISTURE.
AVIS;
MADE IN CHINA
UTILISER UN FUSIBLE
DE RECHANGE DE
MEME TYPE.
AMPLIFIED SPEAKER CABINET
BI-AMPED 150 WATTS LOW
50 WATTS HIGH FREQUENCY
SIGNAL OUTPUT
SIGNAL INPUT
AC OUT
350VA MAX
POWER
AC
CAUTION:
ATTENTION:
FOR CONTINUED
PROTECTION
AGAINST RISK
OF FIRE,
REPLACE ONLY
WITH SAME
TYPE OF FUSE.
FUSE: T5AL 250V
CAUTION
RISK OF ELECTRIC SHOCK
DO NOT OPEN
VOLUME
RATING
POWER
100-240 V ~ 50Hz/60Hz 360W
100
5
LIMITER
AC IN
ON
CHARGE
BATTERY OPERATION
OFF
+3dB
0dB
-10dB
75%
50%
25%
BATTERYMAIN
RISQUE DE CHOC ELECTRIQUE
NE PAS OUVRIR
DO NOT EXPOSE THIS EQUIPMENT
TO RAIN OR MOISTURE.
AVIS;
MADE IN CHINA
SAMSON
MPL2242
MMPL2242
MPL2242
Überblick
1: Eingang – Diesen symmetrisierten XLR-Anschluss für die Einspeisung von
Line-Pegel-Signalen in den XPL200 benutzen.
2: VU-Anzeige: Dies ist die dreistufige Ausgangspegel-Anzeige des XPL200.
Für optimalen Rauschabstand den Volume-Regler (6) so einstellen, dass das
Audiosignal um 0 VU bleibt und das rote -3-dB-Segment nur gelegentlich aufflackert.
3: Netzschalter – Erlaubt das Ein- oder Ausschalten des XPL200.
4: Ladeanzeige – Bei Verwendung des optionalen RB2030-Akku-Sets kann
man dessen Restkapazität hier ablesen, sowohl bei Benutzung des XPL200
(Verbrauch) oder wenn er ausgeschaltet ist (Laden).
5: Volume-Regler – Bestimmt die Lautstärke der eingebauten Verstärker des
XPL200.
6: Ausgang – Dieser symmetrische XLR-Anschluss trägt das Line-PegelAusgangssignal des XPL200. Wird verwendet, um ein Signal an einen zweiten,
kaskadierten XPL200 anzuschließen (siehe Anschluss-Schemata auf der folgenden Seite), oder einen optionalen DB1500-Subwoofer.
7: Netzanschluss – Hier das mitgelieferte 3-Pin-IEC-Netzkabel anschließen.
DEUTSCHE
Anschluss des XPL200
Betrieb eines XPL200: Ein einzelnes Mono-Signal (Bus oder Aux-Send) geht
vom Mischer zum XLR-Eingang des XPL200.
34
Page 39

Expedition Pro XPL200
UTILISER UN FUSIBLE
DE RECHANGE DE
MEME TYPE.
AMPLIFIED SPEAKER CABINET
BI-AMPED 150 WATTS LOW
50 WATTS HIGH FREQUENCY
SIGNAL OUTPUT
SIGNAL INPUT
AC OUT
350VA MAX
POWER
AC
CAUTION:
ATTENTION:
FOR CONTINUED
PROTECTION
AGAINST RISK
OF FIRE,
REPLACE ONLY
WITH SAME
TYPE OF FUSE.
FUSE: T5AL 250V
CAUTION
RISK OF ELECTRIC SHOCK
DO NOT OPEN
VOLUME
RATING
POWER
100-240 V ~ 50Hz/60Hz 360W
100
5
LIMITER
AC IN
ON
CHARGE
BATTERY OPERATION
OFF
+3dB
0dB
-10dB
75%
50%
25%
BATTERYMAIN
RISQUE DE CHOC ELECTRIQUE
NE PAS OUVRIR
DO NOT EXPOSE THIS EQUIPMENT
TO RAIN OR MOISTURE.
AVIS;
MADE IN CHINA
UTILISER UN FUSIBLE
DE RECHANGE DE
MEME TYPE.
AMPLIFIED SPEAKER CABINET
BI-AMPED 150 WATTS LOW
50 WATTS HIGH FREQUENCY
SIGNAL OUTPUT
SIGNAL INPUT
AC OUT
350VA MAX
POWER
AC
CAUTION:
ATTENTION:
FOR CONTINUED
PROTECTION
AGAINST RISK
OF FIRE,
REPLACE ONLY
WITH SAME
TYPE OF FUSE.
FUSE: T5AL 250V
CAUTION
RISK OF ELECTRIC SHOCK
DO NOT OPEN
VOLUME
RATING
POWER
100-240 V ~ 50Hz/60Hz 360W
100
5
LIMITER
AC IN
ON
CHARGE
BATTERY OPERATION
OFF
+3dB
0dB
-10dB
75%
50%
25%
BATTERYMAIN
RISQUE DE CHOC ELECTRIQUE
NE PAS OUVRIR
DO NOT EXPOSE THIS EQUIPMENT
TO RAIN OR MOISTURE.
AVIS;
MADE IN CHINA
SAMSON
MPL2242
MMPL2242
MPL2242
Mono-Betrieb zweier XPL200: Ein einzelnes Mono-Signal (Bus oder Aux-Send) geht vom Mischer zum XLR-Eingang des XPL200.
Dann den XLR-Ausgang des ersten XPL200 an den XLR-Eingang des zweiten XPL200 anschließen.
Stereo-Betrieb zweier XPL200: Den linken Kanal eines Stereo-Signals (Bus oder Aux-Send), das vom Mischer kommt, mit dem
XLR-Eingang des einen XPL200, dann das Signal des rechten Kanals mit dem XLR-Eingang des anderen XPL200 verbinden.
DEUTSCHE
35
Page 40

Expedition pro XPL300
Überblick
1: Equalizer – Diese beiden Regler erlauben Ihnen Klangbeeinflussung durch
Anhebung oder Absenkung der Bässe (bei 100 Hz) beziehungsweise der Höhen
(bei 10 kHz) um bis zu 15 dB. In der Mittelstellung der Regler findet keine
Klangveränderung statt (d. h. neutrale Tonwiedergabe). Im Uhrzeigersinn gedreht, verstärkt der entsprechende Regler die Bässe bzw. Höhen, entgegen dem Uhrzeigersinn
werden diese jeweils abgesenkt.
2: Reverb-Send – Diese Regler bestimmen die Anteil des Signals, das zum internen DSP-Effekt-Prozessor abgeht. Nach rechts drehen (von 0 zu 10) erhöht den
Signalanteil. Um den Effekt zu hören, muss eines der zehn Presets mit dem DSP
Effects-Regler gewählt sein (siehe 10 auf der nächsten Seite). Nicht zu hoch einstellen,
sonst erhält man Verzerrungen.
3: Panorama/Balance-Regler – In den Kanälen 1 und 2 dient dieser Regler der
Panorama-Steuerung und erlaubt die Plazierung des Signals im Links-Rechts-StereoFeld unter Beibehaltung des Gesamt-Signalpegels. In Mittelstellung geht das Signal zu
gleichen Teilen zum linken und rechten Ausgang. Um das Signal ausschließlich nach
links oder nach rechts zu senden, stellen Sie den Regler entsprechend ganz nach links
oder rechts.
Im Kanal 3/4 (Stereo-Kanal) fungiert dieser Regler als Balance-Steuerung und
erlaubt die Einstellung des Pegelverhältnisses zwischen beiden Eingangssignalen. In
Mittelstellung haben beide Signale die gleiche Stärke. Nach links gedreht hören Sie
mehr vom linken Eingangssignal, nach rechts gedreht hören sie dementsprechend
mehr vom rechten Eingangssignal.
DEUTSCHE
4: Kanal-Volume – Diese Regler bestimmen den jeweiligen Kanalpegel. Im StereoKanal (3/4) steuern sie gleichzeitig die Pegel beider Eingänge (das Verhältnis beider
Pegel kann mit dem Balance-Regler eingestellt werden, wie unter 3. oben bes-
36
Page 41

Expedition Pro XPL300
chrieben). In der Praxis erlauben diese Kanal-Volume-Regler, die Abmischung der Signale vorzunehmen, die von den verschiedenen Mischer-Eingängen des XPL300 kommen.
5: Insert (sub) – Über diese 1/4" Buchse lassen sich Line-Pegel-Signale direkt vor den XPL300 Endstufen einspeisen. Die Signale
werden normalerweise von einem optionalen dB1500a oder dB1800 Subwoofer zurückgeführt.
6: Line-Eingänge – Diese Klinken-Buchsen dienen der Verbindung von Line-Pegel-Quellen mit dem XPL300. Kanäle 1 und 2 sind
Mono-Klinken-Anschlüsse; Kanal 3/4 benutzt eine Stereo-Klinken-Buchse (TRS) (Spitze: linker Kanal, Ring: rechter Kanal). StereoQuellen sollten immer mit dem Stereo-Kanal (3/4) verbunden werden. Im Falle des Anschlusses eines Funkempfängers an den
XPL300 via dessen interner Anschlüsse (siehe Seite 42 in diesem Handbuch) liegt dessen Output an Kanal 2 an, der auch noch ein
zweites Line-Singal trägt, das von Line-Quellen über den entsprechenden Line-Eingang kommt, genauso wie ein Mikro-Signal,
das über den entsprechenden Mikrofon-Eingang kommt. Wenn ein optionaler MP3 Player installiert ist, wird sein Ausgangssignal
über die Kanäle 3/4 geleitet, die zusätzlich noch zwei weitere Line-Pegel-Quellen (eine Quelle am Line-Eingang und eine zweite
an den CD-Eingängen [siehe 15 auf der folgenden Seite]) sowie das Signal eines an den Mic-Eingang angeschlossenen Mikrofons
verarbeiten können.
7: Mikrofon-Eingänge – Diese XLR-Buchsen dienen dem Anschlus von Mikrofonen an die internen Mikrofonvorverstärker des
XPL300. Jeder Kanal kann sowohl eine als auch mehrere Line-Pegel-Quellen (siehe 6. oben) darstellen wie auch eine Mik-Quelle.
8: DSP-Effekt-Regler – Damit wählen Sie eines von zehn Reverb Presets (Medium Bright Plate, Best Plate, Medium Dark Plate,
Short Plate, Long Bright Spring, Slapback 2, Slapback w/Verb, Slow St Chor oder Best Hall). Um überhaupt keinen Reverb zu
bekommen, stellen Sie den Schalter in die Stellung ”Off”.
9; Mono/Stereo – Beim Betrieb nur eines XPL300 stellen Sie diesen Schalter auf ”Mono”, damit der Verstärker des XPL300
die Signale der Sektionen für den linken als auch für den rechten Ausgang erhält. Bei Verwendung mehrerer Expedition ProLautsprecher den Schalter auf ”Stereo” stellen; der XPL300 gibt dann nur das Signal des linken Kanals wieder (d. h. die auf der
linken Seite des Mischers abgenommenen Signale), und der rechte Ausgang kann dazu genutzt werden, ein Signal vom rechten Kanal (d. h. das auf der rechten Seite des Mischers abgenommene Signal) an einen zweiten Lautsprecher zu senden. Siehe
Anschluss-Schemata auf den Seiten 38 - 39 für mehr Details.
10: Ausgänge – Die zwei XLR-Buchsen tragen das Line-Pegel-Ausgangssignal vom XPL300. Sie dienen zur Weiterleitung
des Signals an einen zweiten XPL300 (oder XPL200) zur Verkettung (siehe Anschluss-Schemata auf der folgenden Seite) oder
an den optionalen DB1500-Subwoofer. Das Output-Signal an diesen Ausgängen ist abhängig von der Stellung des Stereo/
Mono-Schalters (9. oben) . Im Stereo-Modus, liefert die linke XLR-Verbindung nur das linke Signal, genauso wie die rechte XLRVerbindung nur das rechte; im Mono-Modus liegt sowohl am linken als auch am rechten Anschluss das gleiche Mono-Signal an,
das der Summe beider Ausgänge entspricht. Siehe Anschluss-Schemata auf den Seiten 38 - 39 für mehr Information.
11: Main-Volume-Regler – Dieser bestimmt den endgültigen Ausgangs-Signalpegel – vergleichbar einem ”Master Fader”. Hier
gehen die Signale aller vier Kanäle durch, bevor sie direkt danach zu den internen Verstärkern sowie zu den linken und rechten
Ausgängen gesendet werden (siehe 10. oben).
12: Ladestatus – Bei Verwendung des optionalen RB2040-Akku-Sets (siehe Seite x für weitere Informationen) kann man hier die
Restkapazität des Akkus ablesen, sowohl wenn der Verstärker aus ist (Aufladen) oder an (Verbrauch). Siehe 20 auf der folgenden
Seite.
13: Ausgangspegel-Anzeige – Dies ist die dreistufige Ausgangspegelanzeige des XPL300. Für optimalen Rauschabstand Kanalund Main-Volume-Regler so einstellen, dass das Ausgangssignal um 0 VU herum liegt und das rote +3-dB-Segment nur gelegentlich aufleuchtet.
14: CD-Eingänge – Verbinden sie die Ausgänge eines CD- oder Kassettenrekorders mit diesen beiden Cinch-Buchsen. Die hier
empfangenen Signale werden in den Stereo-Kanal (3/4) eingespeist. Wenn ein optionaler MP3 Player installiert ist, wird dessen
Ausgabe auch in die Kanäle 3/4 eingespeist – zusätzlich zu dem über den 1/4” TRS Line-Eingang eingehenden Line-Pegel-Signal
(siehe 6 auf der vorherigen Seite) und dem über den Mic-Eingang eingehenden Mikrofonsignal (siehe 7 auf der vorherigen Seite).
15: Netzanschluss – Hier das mitgelieferte 3-Pin-IEC-Netzkabel anschließen.
16: Nominalpegel – Dieser Wahlschalter erlaubt die Festsetzung des Nominalpegels des Stereo-Line-Eingangs von Kanal 3/4
(siehe 6. auf der vorhergehenden Seite) auf +4 (professionell) oder –10 (Amateurbereich).
DEUTSCHE
17: Netzschalter – Dies ist der Ein/Aus-Schalter des XPL300. Wenn das optionale RB2030-Akku-Set installiert ist, lädt sich der
Akku auf, sobald der XPL300 ausgeschaltet wird.
37
Page 42

Expedition Pro XPL300
MP3
Dockingstation einsetzen
Das XPL300 verfügt über eine integrierte MP3 Dockingstation, die exakt in ein spezielles Fach über dem XPL300 Mischer passt, damit Sie einen MP3 Player installieren
und Background-Musik für Versammlungen oder Darbietungen abspielen können. Die
Dockingstation des XPL300 ist mit den meisten populären MP3 Playern mit unterseitigem 30-Pol Anschluss kompatibel. Gehen Sie beim Installieren des MP3 Players wie
folgt vor:
• Wenn Ihr MP3 Player mit einem Dock-Adapter ausgerüstet ist, fügen Sie ihn in die
XPL300 Dockingstation ein.
• Ziehen Sie die federbestückte Halteklammer nach vorne und schieben Sie Ihren
MP3 Player an seinen Platz. Achten Sie auf die korrekte Verbindung des 30-Pol
Anschlusses.
• Besonders flache MP3 Player sollten Sie wieder herausnehmen und zuvor den mitgelieferten dicken EVA-Schaumstoff installieren.
• Ziehen Sie dann die federbestückte Halteklammer nach vorne, um den MP3 Player wieder zu installieren.
• Senken Sie die federbestückte Halteklammer langsam ab, damit der MP3 Player fest sitzt.
Anschluss des XPL300
Betrieb eines einzigen XPL300: Bei diesem Beispiel werden die Mikrofone an die XLR-Mik-Eingänge von Kanal 1 und 2 ang-
eschlossen, ebenso wie ein Stereo-Keyboard an die Stereo-Klinken-Buchse von Kanal 3/4 (mittels Y-Kabel, Spitze trägt das linke,
Ring das rechte Signal). WICHTIGER HINWEIS: Beim Betrieb nur eines XPL300 dessen Mono/Stereo-Schalter immer auf
”Mono” stellen.
DEUTSCHE
38
Page 43

Expedition Pro XPL300
Stereo-Betrieb eines XPL300 und XPL200: Bei diesem Anschlussbeispiel die Mikrofone an die XLR-Mikro-Eingänge von Kanal 1
und 2 des XPL300 anschließen, sowie ein Stereo-Keyboard an die Stereo-Klinken-Buchsen von Kanal 3/4 des XPL300 (per Y-Kabel,
Spitze trägt das linke, Ring das rechte Signal). Weiter wird der rechte Ausgang des XPL300 mit dem XLR-Eingang des XPL200 verbunden. WICHTIGER HINWEIS: Beim Betrieb des XPL300 mit zusätzlichen Expedition Pro-Lautsprechern stellen Sie sicher,
dass der Mono/Stereo-Schalter des XPL300 auf ”Stereo” geschaltet ist.
Betrieb eines XPL300 zusammen mit drei XPL200 (Breitband-Stereo): Bei diesem Anschlussbeispiel werden die Mikrofone mit
den XLR-Mik-Eingängen der Kanäle 1 und 2 des XPL300 verbunden, genauso wie ein Stereo-Keyboard mit den Stereo-KlinkenBuchsen von Kanal 3/4 des XPL300 (mit Hilfe eines Y-Kabels, Spitze trägt das linke, der Ring das rechte Signal). Dann wird der linke
Ausgang des XPL300 an den XLR-Eingang eines XPL200 angeschlossen (beide tragen dann das gleiche Signal des linken Kanals).
Schließlich verbindet man noch den rechten Ausgang des XPL300 mit einem anderen XPL200 und den dessen XLR-Ausgang mit
dem XLR-Eingang des dritten (die beiden XPL200 tragen demnach das selbe Signal des rechten Kanals). WICHTIGER HINWEIS:
Beim Betrieb eines XPL300 zusammen mit weiteren Expedition Pro-Lautsprechersystemen muss der Mono/StereoSchalter des XPL300 immer auf ”Stereo” stehen.
DEUTSCHE
39
Page 44

Anweisungen zur Positionierung und Montage
Allgemeine Hinweise zur Positionierung
• Das Betreiben eines Mikrofons oder Plattenspielers direkt vor einem
Lautsprecher ist eine recht sichere Methode, um Rückkopplung und/oder
Brummen zu provozieren. Plazieren Sie deshalb den Expedition Pro vor den
Mikrofonen oder Plattenspielern.
• Verwenden Sie den Expedition Pro für die ”front-of-house”-PA in aufrechter
Position, zum Bühnen-Monitoring dagegen in Kipp-Stellung.
• Bringen Sie die Lautsprechers immer so hoch über dem Publikum an, wie es für
einen maximalen beschallten Bereich sinnvoll ist.
• Richten Sie die Anzahl der Lautsprechersysteme nach der Größe des
Konzertbereichs. Je größer, desto mehr Lautsprecher sind notwendig.
Stativ-Montage
Die Unterseite der Expedition Pro hat eine Vertiefung für ein 1-3/8“-Stativ, die
Anbringung auf jedem beliebigen Standard-Lautsprecherstativ gestattet (zum
Beispiel die Samson TS50 oder TS100 Boxenständer). Stativmontage ist im
Allgemeinen dann angezeigt, wenn der größtmögliche beschallte Bereich erzielt
werden soll.
DEUTSCHE
Eine integrierte Befestigungsvorrichtung des DB1500-Subwoofer erlaubt die
Montage eines XPL100, XPL200 oder XPL300 unmittelbar auf den Subwoofer,
wodurch man eine komplette Klangsäule erhält.
Aufhängen der Lautsprecher, sowie Wand- und DeckenMontage
Wie auf der Abbildung unten gezeigt, bietet die Oberseite der Expedition ProSysteme eine Reihe von Verankerungspunkten, die in Vertiefungen links und rechts
des Fachs für den Funkempfänger sitzen. Die Abdeckungen der Vertiefungen sind
lediglich mit doppelseitigem Klebeband befestigt. Um sie zu entfernen, einfach
daran ziehen.
40
Verankerungspunkte der
Expedition Pro-Lautsprecher
Page 45

Anweisungen zur Positionierung und Montage
Vor dem Aufhängen, Wand- oder Decken-Montage der Expedition Pro muss eine SamsonMP1020-Halterung an den Verankerungspunkten angebracht werden (siehe Illustration
rechts).
Der MP1020 ist kompatibel zu Standard-Kabeln und –Zubehör, die der hängenden
Installation dienen.
Für Festinstallationen in Form von Deckenmontage verwenden Sie eine OmniMountBefestigung Modell 100-STMP (siehe Abbildung unten):
In Festinstallationen in Form von Wandmontage verwenden Sie eine OmniMountBefestigung Modell 100-WB (siehe Abbildung unten):
Montage der MP1020-Haltevorrichtung (von
oben gesehen)
DEUTSCHE
Oberseite des Expedition Pro mit
installierter MP1020-Haltevorrichtung
41
Page 46

Zubehör für die Expedition Pro-Lautsprechersysteme
Wie auf der linken Illustration zu sehen, besitzt die Oberseite der Expedition Pro
XPL200- und XPL300-Lautsprecher ein anschlussbereites Fach zur Aufnahme einer der
2 verschiedenen Samson-Funkempfänger UM1 oder AM1. Das Ausgangssignal eines
im XPL300 installierten Funkempfängers liegt an Kanal 2 des internen Mischers an.
Weiterhin ist bei Ihrem Samson-Händler noch eine Reihe von Zubehör erhältlich, das
die Fähigkeiten der Expedition Pro-Systeme erweitert – darunter folgende:
• Der DB1500-Aktiv-Subwoofer – die ideale Ergänzung zu jedem Expedition
Pro-System (oder zu jedem Lautsprecher generell) – vereinigt in sich
einen leistungsstarken 500-Watt-Verstärker mit einem 15“-HochleistungsBassfrequentreiber. Die interne elektronische Stereo-Frequenzweiche erlaubt den
Betrieb des DB1500 entweder in Mono allein oder als gemeinsamen Subwoofer in
Fach im XPL200/XPL300 für die Aufnahme
eines Funkempfängers
(von oben gesehen)
einem Stereo-System. Er ist mit einem Stahlgitter und verstärkten Ecken ausgestattet, wie mit einer integrierten 1-3/8“-Stativ-Aufnahmevorrichtung.
• Das RB2030-Akku-Set, der dem XPL200 oder XPL300 dank seiner zwei Lead-AcidGelCell-Speicher für zwei Stunden netzunabhängigen Betrieb gestattet.
• Die MP1020-Haltevorrichtung, die den Expedition Pro hängende Installation bzw.
Decken- oder Wandmontage mit Hilfe von OmniMount-Standardzubehör ermöglicht. Für weitere Informationen siehe Abschnitt ”Anweisungen zur Positionierung
und Montage” auf Seite 40.
º
DEUTSCHE
42
Page 47

Introducción
Bienvenido al Samson Expedition XPL series—¡el sistema portátil de audio del próximo siglo! Este sistema excepcionalmente versátil supone la solución perfecta para cualquier situación en la que necesite audio portátil y de alta calidad:
como sistema PA principal o como monitores de escenario en pequeños recintos; en factorías y centros de trabajo; como
sistema de sonido para presentaciones, equipos móviles de DJs y fiestas, o para su uso por profesores de aerobic; también puede ser usado en aplicaciones en exteriores como parques, playas o mercadillos. ¡Y además, cada uno de estos
sistemas Expedition XPL series viene equipado con un asa telescópica y ruedas, lo que hace más fácil transportarlo a
cualquier sitio!
En este manual se describen tres sistemas Samson Expedition XPL series distintos. Todos ellos utilizan el mismo recinto
acústico de dos vías ligero pero robusto, formado por un woofer de 12" de diseño exclusivo unido a un cabezal de compresión de 1". El Expedition XPL100 es un recinto pasivo de 8 ohmios que puede ser usado con cualquier etapa de potencia exterior con una capacidad de hasta 250 watios. El Expedition XPL200 es una versión autoamplificada que incluye
una ligera etapa de potencia de clase "D" junto con un crossover de gran precisión, circuitería de protección de altavoces
y limitador interno. Y el Expedition XPL300 ha sido diseñado para ser un sistema PA portátil todo en uno, sumando a la
ecuación una mesa de mezclas stereo de cuatro canales—que incluye efectos digitales. Además, dispone de una amplia
gama de opciones, entre las que están un subwoofer activo de 500 watios (nuestro dB1500a o dB1800a); una batería
GelCel recargable y un sistema de conexión MP3 para el panel trasero. Incluso la unidad dispone de un compartimiento
exclusivo precableado que le permite instalar uno o dos sistemas inalámbricos Samson!
En este manual, encontrará una descripción más detalladas de las características de los tres sistemas Expedition pro, así
como un recorrido guiado por todos los componentes, instrucciones paso-a-paso para el ajuste de su sistema y especificaciones completas. Si adquirió su Expedition pro en los Estados Unidos, encontrará también una tarjeta de garantía
dentro del embalaje—¡no olvide rellenarla y devolvérnosla por correo!. Esto le permitirá recibir soporte técnico online y
hará que le podamos enviar información actualizada de este y de otros productos Samson futuros. Si compró su sistema
Expedition pro en un país diferente a los Estados Unidos, contacte con su distribuidor local para que le informe de los
detalles de la garantía. Además, no deje de acceder a nuestra página web (http://www.samsontech.com) para ver información completa de toda nuestra línea de productos.
NOTA ESPECIAL para los usuarios de los EE.UU.: En caso de que su sistema Expedition pro tenga que ser reparado en
algún momento, le será necesario un número de autorización de devolución (RA). Sin este número, la unidad no será
aceptada en fábrica. Si adquirió su sistema en los Estados Unidos, llame al número de teléfono 1-800-372-6766 para
solicitar su número de autorización antes de devolvérnosla. Si la ha adquirido en otro país, póngase en contacto con su
distribuidor Samson para que le informe de los detalles de lo que debe hacer. Conserve el embalaje original y los materiales de protección que viene dentro de él, y si es posible, envíe la unidad empaquetada con ellos.
ESPAÑOL
43
Page 48

Características del sistema
SAMSON
El sistema Samson Expedition Pro usa tecnología de última
generación para hacer que el audio profesional llegue a un revolucionario nuevo grado de flexibilidad y portatibilidad. Entre sus
características principales se incluye:
• Anclaje telescópico y ruedas que hacen que su sistema audio
sea aun más fácil de transportar de lo que nunca pudo pensar.
• Todos los recintos Expedition pro son ligeros y compactos
a la vez que duraderos y firmes. Moldeados por inyección de
Polipropileno, su estructura interna es capaz de soportar una
pared de media pulgada de espesor, lo que hace que sean lo
suficientemente fuertes y rígidos para permitir el desarrollo de
la máxima energía a la salida de sonido. Además, una parrilla
metálica y un acabado a prueba de todo tipo de desgaste lo
convierten en un recinto de altavoz resistente que producirá un
rendimiento que dependerá siempre de la ejecución incluso en
las situaciones más duras.
• La sección de bajas frecuencias incluye un cabezal de baja
frecuencia y 12 pulgadas de diseño exclusivo con una bobina de
voz Kapton Former de 2.5 pulgadas y un imán de ferrita de bario
con un peso de 50 onzas para una respuesta en graves súper
precisa.
ESPAÑOL
• El XPL100 es un recinto pasivo que puede ser usado con cualquier etapa de potencia que
• El XPL200 dispone de una etapa de potencia de clase "D" de 250 watios y muy ligera, junto
• Una sección de altas frecuencias que produce unos agudos
limpios y dulces gracias a su cabezal de compresión de 1 pulgada con un diafragma de titanio de diseño exclusivo junto con
un conector de fase para una respuesta lineal y un diseño elíptico de trompeta de guía de ondas que reduce prácticamente
cualquier difracción sónica.
• Puede colocar cualquiera de los sistemas en una posición inclinada que le permite usar el Expedition pro como un monitor de
escenario increíble.
• Un receptáculo de montaje integral de barra de 1 3/8" y puntos
de anclaje adecuados permite montar el Expedition pro sobre
una barra o “colgarlo” usando piezas standard de sistemas PA.
desarrolle hasta 250 vatios a 8 ohmnios. No necesita corriente y dispone de conectores
doble Speakon" y de 6.3 mm que permiten la conexión en cadena de varios XPL100s para
configuraciones en las que se necesite una cobertura más amplia.
con un avanzado crossover. Conectores XLR balanceados dobles permiten la conexión en
cadena de varios recintos Expedition pro, y un circuito de limitador le asegura una salida
limpia incluso cuando esté llevando el XPL200 hasta sus niveles máximos. Además, hay
tres fases de protección del altavoz, incluyendo un disparo por relé durante el encendido y
apagado de la unidad.
• El XPL300 incluye todas las características del XPL200, y añade un flexible mezclador stereo
de cuatro canales que le ofrece dos canales monofónicos y un canal micro/línea stereo con
conectores XLR y de 6.3 mm dobles. Además, unos conectores de tipo auriculares le permiten la conexión de un cassette o reproductor de CD exterior.Cada canal del mezclador
incluye ecualización de dos bandas y control de volumen independiente, e incluso dispone
de un procesador multiefectos interno con el que dispone de diez presets de reverb, retardo y chorus diferentes. Dispone también de salidas XLR izquierda y derecha balanceadas le
permiten conectar en cadena varios recintos Expedition (con un interruptor mono/stereo
que le permite usar los recintos en cualquiera de esos modos), y un medidor VU para que
44
Page 49

pueda monitorizar continuamente los niveles
de salida. Las salidas XLR balanceado izquierda y
derecha permiten la conexión en serie de varios
altavoces Expedition pro (con un interruptor
mono/stereo que permite el funcionamiento en
cualquiera de los dos modos), y un medidor VU
le permite monitorizar de forma continua los
niveles de salida. El XPL200 y XPL300 también
incluyen un medidor que le muestra el nivel de la
pila cuando se usan con el cartucho de pila recargable opcional RB 2030 (vea luego).
• El panel superior de tanto el XPL200 como el
XPL300 dispone de un compartimento precableado para poder albergar una gran variedad
de sistemas inalámbricos de Samson que le
ofrecen un rendimiento audio y RF superior ya
demostrado en escenarios a todo lo ancho del
mundo. Los receptores aceptados incluyen los
modelos UHF UM1 o M32 o el modelo de VHF
VM1.
• Disponible una amplia gama de accesorios opcionales, incluyendo: la abrazadera de montaje
MP1020 que permite la instalación "aérea" de
los recintos Expedition Pro en techos; la batería
recargable RB 2030, que ofrece hasta dos horas
de funcionamiento continuado al XPL200 o
XPL300 por medio de su doble pila GelCel y los
trípodes TS50 y TS100 para la instalación en escenarios y montajes portátiles.
Características del sistema
• El db1500a y dB1800a son subwoofers activos que
engloban una increíble etapa de potencia de 500
watios y unos cabezales de bajas frecuencias de
15 y 18 pulgadas de alto rendimiento. Estos subwoofers son el complemento ideal para cualquier
recinto Expedition XPL series o cualquier otro
sistema de altavoces, cuando la aplicación
requiera una respuesta en graves potente y profunda. El crossover electrónico stereo interno le
permite usar el dB1500a y dB1800a en mono o
como un subwoofer común en un sistema stereo.
Disponen de parrillas de protección en acero y
cantoneras rígidas, así como de un casquillo integral para montaje en barra.
ESPAÑOL
45
Page 50

Expedition Pro XPL100
AMPLIFIER INPUTS AND EXTENSIONS
INPUT EXTENSION
MAXIMUM POWER
250 WATTS RMS
2 WAY 8 OHM
CAUTION
RISK OF ELECTRIC SHOCK
DO NOT OPEN
INPUT EXTENSION
RISQUE DE CHOC ELECTRIQUE
NE PAS OUVRIR
DO NOT EXPOSE THIS EQUIPMENT
TO RAIN OR MOISTURE.
AVIS;
MADE IN CHINA
SPEAKON™
SPEAKON™
+
-
1- 1+
2+ 2-
NOT CONNECTED
AMPLIFIER INPUTS AND EXTENSIONS
INPUT EXTENSION
MAXIMUM POWER
250 WATTS RMS
2 WAY 8 OHM
CAUTION
RISK OF ELECTRIC SHOCK
DO NOT OPEN
INPUT EXTENSION
RISQUE DE CHOC ELECTRIQUE
NE PAS OUVRIR
DO NOT EXPOSE THIS EQUIPMENT
TO RAIN OR MOISTURE.
AVIS;
MADE IN CHINA
Recorrido guiado
1: Entrada de 6.3 mm – Utilice este conector standard de 6.3 mm para hacer pasar la señal
desde una etapa de potencia (con una potencia de hasta 250 vatios a 8 ohmnios) al XPL100.
2: Entrada Speakon™ – De forma alternativa, puede usar este conector Speakon" para dar
entrada a la señal de su etapa de potencia (con una potencia de hasta 250 vatios a 8 ohmnios)
al XPL100.
3: Extensión de 6.3 mm – Utilice este conector standard de 6.3 mm para conectar en serie un
XPL100 con otro. Vea más abajo los diagramas de interconexión.
4: Extensión Speakon™ - Utilice este conector Speakon™ para conectar en serie un XPL100
con otro. Vea más abajo los diagramas de interconexión.
Cableado Speakon™
ESPAÑOL
Uso de un único XPL100: Una señal mono única (bus o envío
auxiliar) es dirigida desde una mesa de mezclas a una etapa de
potencia. Una salida de altavoz de su etapa de potencia se conecta
bien al conector de entrada de 6.3 mm del XPL100 (línea continua)
o al conector de entrada Speakon" (línea de puntos).
46
Page 51

Expedition Pro XPL100
AMPLIFIER INPUTS AND EXTENSIONS
INPUT EXTENSION
MAXIMUM POWER
250 WATTS RMS
2 WAY 8 OHM
CAUTION
RISK OF ELECTRIC SHOCK
DO NOT OPEN
INPUT EXTENSION
RISQUE DE CHOC ELECTRIQUE
NE PAS OUVRIR
DO NOT EXPOSE THIS EQUIPMENT
TO RAIN OR MOISTURE.
AVIS;
MADE IN CHINA
AMPLIFIER INPUTS AND EXTENSIONS
INPUT EXTENSION
MAXIMUM POWER
250 WATTS RMS
2 WAY 8 OHM
CAUTION
RISK OF ELECTRIC SHOCK
DO NOT OPEN
INPUT EXTENSION
RISQUE DE CHOC ELECTRIQUE
NE PAS OUVRIR
DO NOT EXPOSE THIS EQUIPMENT
TO RAIN OR MOISTURE.
AVIS;
MADE IN CHINA
SAMSON
MPL2242
MMPL2242
MPL2242
SERVO - 240
SAMSON
AMPLIFIER INPUTS AND EXTENSIONS
INPUT EXTENSION
MAXIMUM POWER
250 WATTS RMS
2 WAY 8 OHM
CAUTION
RISK OF ELECTRIC SHOCK
DO NOT OPEN
INPUT EXTENSION
RISQUE DE CHOC ELECTRIQUE
NE PAS OUVRIR
DO NOT EXPOSE THIS EQUIPMENT
TO RAIN OR MOISTURE.
AVIS;
MADE IN CHINA
AMPLIFIER INPUTS AND EXTENSIONS
INPUT EXTENSION
MAXIMUM POWER
250 WATTS RMS
2 WAY 8 OHM
CAUTION
RISK OF ELECTRIC SHOCK
DO NOT OPEN
INPUT EXTENSION
RISQUE DE CHOC ELECTRIQUE
NE PAS OUVRIR
DO NOT EXPOSE THIS EQUIPMENT
TO RAIN OR MOISTURE.
AVIS;
MADE IN CHINA
SAMSON
MPL2242
MMPL2242
MPL2242
SERVO - 240
SAMSON
Uso de dos XPL100s en mono: Una única señal mono (bus o envío auxiliar) es enviada desde una mesa de mezclas a una etapa de potencia.
Una salida de altavoz de la etapa de potencia es bien al conector de entrada de 6.3 mm del XPL100 (línea continua) o al conector de entrada
Speakon™(línea de puntos), y después se realiza una conexión entre bien la extensión de 6.3 mm y la entrada del segundo XPL100 (línea continua) o entre la extensión Speakon™ y la entrada Speakon™ de un segundo XPL100 (línea de puntos).
Uso de dos XPL100s en stereo: Una señal stereo (bus o envío auxiliar) es enviada desde una mesa de mezclas a una etapa de potencia. La
salida de altavoz izquierda de la etapa de potencia es conectada a un XPL100 (usando bien la entrada de 6.3 mm [línea continua] o la entrada
Speakon™ [línea de puntos]), y después la salida derecha de altavoz de la etapa de potencia es conectada al otro XPL100 (nuevamente usando
bien la entrada de 6.3 mm [línea continua] o la entrada Speakon™ [línea de puntos]).
ESPAÑOL
47
Page 52

Expedition Pro XPL200
UTILISER UN FUSIBLE
DE RECHANGE DE
MEME TYPE.
AMPLIFIED SPEAKER CABINET
BI-AMPED 150 WATTS LOW
50 WATTS HIGH FREQUENCY
SIGNAL OUTPUT
SIGNAL INPUT
AC OUT
350VA MAX
POWER
AC
CAUTION:
ATTENTION:
FOR CONTINUED
PROTECTION
AGAINST RISK
OF FIRE,
REPLACE ONLY
WITH SAME
TYPE OF FUSE.
FUSE: T5AL 250V
CAUTION
RISK OF ELECTRIC SHOCK
DO NOT OPEN
VOLUME
RATING
POWER
100-240 V ~ 50Hz/60Hz 360W
100
5
LIMITER
AC IN
ON
CHARGE
BATTERY OPERATION
OFF
+3dB
0dB
-10dB
75%
50%
25%
BATTERYMAIN
RISQUE DE CHOC ELECTRIQUE
NE PAS OUVRIR
DO NOT EXPOSE THIS EQUIPMENT
TO RAIN OR MOISTURE.
AVIS;
MADE IN CHINA
UTILISER UN FUSIBLE
DE RECHANGE DE
MEME TYPE.
AMPLIFIED SPEAKER CABINET
BI-AMPED 150 WATTS LOW
50 WATTS HIGH FREQUENCY
SIGNAL OUTPUT
SIGNAL INPUT
AC OUT
350VA MAX
POWER
AC
CAUTION:
ATTENTION:
FOR CONTINUED
PROTECTION
AGAINST RISK
OF FIRE,
REPLACE ONLY
WITH SAME
TYPE OF FUSE.
FUSE: T5AL 250V
CAUTION
RISK OF ELECTRIC SHOCK
DO NOT OPEN
VOLUME
RATING
POWER
100-240 V ~ 50Hz/60Hz 360W
100
5
LIMITER
AC IN
ON
CHARGE
BATTERY OPERATION
OFF
+3dB
0dB
-10dB
75%
50%
25%
BATTERYMAIN
RISQUE DE CHOC ELECTRIQUE
NE PAS OUVRIR
DO NOT EXPOSE THIS EQUIPMENT
TO RAIN OR MOISTURE.
AVIS;
MADE IN CHINA
SAMSON
MPL2242
MMPL2242
MPL2242
Recorrido guiado
1: Conector de entrada – Utilice este conector hembra XLR balanceado para hacer pasar
una señal con nivel de línea al XPL200.
2: Medidor VU de salida – Este medidor de barra de tres segmentos muestra el nivel
de salida del XPL200. Para conseguir la mejor relación señal-ruido, ajuste el control de
volumen (vea el punto 6 de abajo) de tal forma que el material de programa esté habitualmente sobre los 0 VU, con excursiones ocasionales (no constantes) al segmento rojo "+3
dB".
3: Interruptor de encendido – Utilice este interruptor para encender o apagar el
XPL200.
4: Medidor VU de pila – Si tiene instalado un paquete de pila recargable opcional
RB2030, este medidor le mostrará la carga de la pila cuando esté cargándola (interruptor
Power apagado) o cuando se esté usando (interruptor Power encendido).
5: Control de volumen – este mando giratorio ajusta el nivel de las etapas de potencia
internas del XPL200.
6: Conector de salida – Este conector XLR balanceado macho da salida a la señal de
salida con nivel de línea del XPL200. Se utiliza para pasar señal a un segundo XPL200 que
tenga conectado en cadena (vea el diagrama de interconexión en la página siguiente) o a
un subwoofer opcional DB1500.
7: Entrada AC – Conecte aquí el cable de alimentación “IEC” de tres puntas y gran calibre.
ESPAÑOL
Interconexión del XPL200
Uso de un único XPL200: Una única señal mono (bus o envío auxiliar) es enviada desde
un mezclador a la entrada XLR del XPL200.
48
Page 53

Expedition Pro XPL200
UTILISER UN FUSIBLE
DE RECHANGE DE
MEME TYPE.
AMPLIFIED SPEAKER CABINET
BI-AMPED 150 WATTS LOW
50 WATTS HIGH FREQUENCY
SIGNAL OUTPUT
SIGNAL INPUT
AC OUT
350VA MAX
POWER
AC
CAUTION:
ATTENTION:
FOR CONTINUED
PROTECTION
AGAINST RISK
OF FIRE,
REPLACE ONLY
WITH SAME
TYPE OF FUSE.
FUSE: T5AL 250V
CAUTION
RISK OF ELECTRIC SHOCK
DO NOT OPEN
VOLUME
RATING
POWER
100-240 V ~ 50Hz/60Hz 360W
100
5
LIMITER
AC IN
ON
CHARGE
BATTERY OPERATION
OFF
+3dB
0dB
-10dB
75%
50%
25%
BATTERYMAIN
RISQUE DE CHOC ELECTRIQUE
NE PAS OUVRIR
DO NOT EXPOSE THIS EQUIPMENT
TO RAIN OR MOISTURE.
AVIS;
MADE IN CHINA
UTILISER UN FUSIBLE
DE RECHANGE DE
MEME TYPE.
AMPLIFIED SPEAKER CABINET
BI-AMPED 150 WATTS LOW
50 WATTS HIGH FREQUENCY
SIGNAL OUTPUT
SIGNAL INPUT
AC OUT
350VA MAX
POWER
AC
CAUTION:
ATTENTION:
FOR CONTINUED
PROTECTION
AGAINST RISK
OF FIRE,
REPLACE ONLY
WITH SAME
TYPE OF FUSE.
FUSE: T5AL 250V
CAUTION
RISK OF ELECTRIC SHOCK
DO NOT OPEN
VOLUME
RATING
POWER
100-240 V ~ 50Hz/60Hz 360W
100
5
LIMITER
AC IN
ON
CHARGE
BATTERY OPERATION
OFF
+3dB
0dB
-10dB
75%
50%
25%
BATTERYMAIN
RISQUE DE CHOC ELECTRIQUE
NE PAS OUVRIR
DO NOT EXPOSE THIS EQUIPMENT
TO RAIN OR MOISTURE.
AVIS;
MADE IN CHINA
SAMSON
MPL2242
MMPL2242
MPL2242
Uso de dos XPL200 en mono: Una única señal mono (bus o envío auxiliar) es enviada desde un mezclador a la entrada XLR de uno de los
XPL200, y después se realiza una conexión entre la salida XLR de este XPL200 y la entrada XLR de un segundo XPL200.
Uso de dos XPL200s en stereo: Una señal stereo (bus o envío auxiliar) es enviada desde un mezclador, con el lado izquierdo conectado a la
entrada XLR de un XPL200 y el lado derecho conectado a la entrada XLR del otro XPL200.
ESPAÑOL
49
Page 54

Expedition XPL300
Recorrido guiado
1: Ecualizador – Estos controles le permiten dar forma a su sonido realzando o cortando la
cantidad de graves (a 100 Hz) o agudos (a 10 kHz) en hasta 15 dB. Una muesca central en cada
mando le indica la posición de sin realce ni corte (es decir, respuesta plana). Cuando gire uno de
los mandos hacia la derecha partiendo de la posición de las 12 en punto, los graves o los agudos serán realzados; cuando los gire a la izquierda desde esa posición de las 12 en punto, dichas
frecuencias serán reducidas.
2: Envío de reverberación – Estos mandos determinan la cantidad de señal que es enviada
desde el canal al procesador de efectos DSP interno. Cuanto más gire hacia la derecha el mando
desde el 0 hacia el 10, más cantidad de señal será enviada. Para escuchar los efectos, debe elegir
uno de los diez presets disponibles por medio del control DSP Effects (vea el punto #10 en la
página siguiente). Tenga cuidado de no enviar demasiada señal al DSP, ya que podría producirse
un sonido distorsionado.
3: Control Pan/Balance – En los canales 1 y 2, este mando actúa como un control de panorama
stereo, permitiéndole colocar la señal en cualquier punto del espectro stereo izquierda-derecha, manteniendo el nivel global de la señal constante. Cuando el mando está colocado en su
posición central (muesca), la señal es enviada por igual a ambas salidas izquierda y derecha.
Para dirigir una señal completamente a la izquierda o la derecha, coloque el mando de panorama completamente a la izquierda o la derecha.
En el canal 3/4 (el canal stereo), este mando actúa como un control de balance que le permite
modificar los niveles relativos de las dos señales de entrada. Cuando este mando esté colocado
en su posición de muesca central, ambas señales tendrán igual fuerza. Cuando lo mueva hacia
la izquierda desde el centro, escuchará más la señal de entrada izquierda; cuando lo mueva a la
derecha desde el centro, escuchará más la señal de entrada derecha.
4: Control de volumen de canal – Este mando giratorio determina el nivel del canal. En el
canal stereo 3/4, este mando controla simultáneamente el nivel de ambas entradas (los niveles
relativos de las dos pueden ser ajustados con el control de balance, como hemos descrito en el
punto 3 anterior). En la práctica, usará los controles de volumen de canal para ajustar de forma
continua los niveles de las diversas señales que estén siendo mezcladas con el mezclador del
XPL300.
ESPAÑOL
50
Page 55

Expedition XPL300
5: Conector de inserción (sub) –Esta toma de 6.3 mm coloca la señal de nivel de línea justo antes de las etapas de potencia del XPL300.
Normalmente se usa para el retorno de la señal de un subwoofer opcional dB1500a o dB1800a.
6: Entradas de línea – Utilice estas clavijas de 6.3 mm para conectar fuentes con nivel de línea al XPL300. Los canales 1 y 2 tienen conectores
mono de 6.3 mm; el canal 3/4 usa un conectores stereo de 6.3 mm (TRS), en el que la punta lleva la señal izquierda y el anillo la derecha. Las
unidades stereo siempre deberían ser conectadas al canal stereo (canales 3/4). Si conecta un receptor inalámbrico al XPL300 por medio de sus
conectores internos (vea la página 56 de este manual), su salida entrará por el canal 2, el cual también puede aceptar otra fuente con nivel de
línea que esté conectada a su entrada de línea, así como la señal de un micrófono conectada a su entrada de micro. Si ha instalado un reproductor MP3 opcional, su salida llegará a los canales 3/4, que pueden recibir también otra fuente de nivel de línea opcional (una estará conectada a
la entrada de línea y la segunda a las entradas CD [vea el punto #15 de la página siguiente]); igualmente, también puede conectar la señal de un
micrófono en la entrada de micro.
7: Entradas de micro – Utilice estas tomas XLR para conectar micrófonos a los preamplificadores de micro internos del XPL300. Cada canal
puede aceptar una o más fuentes de nivel de línea (vea el punto 6 anterior) así como una fuente de micro.
8: Control de efectos DSP – Use este mando para elegir uno de los diez presets de reverb (Medium Bright Plate, Best Plate, Medium Dark Plate,
Short Plate, Long Bright Spring, Slapback 2, Slapback w/Verb, Slow St Chor o Best Hall). Si no quiere escuchar nada de reverb, coloque este interruptor en la posición “Off”.
9: Interruptor Mono/Stereo – Cuando esté usando un único XPL300, coloque este interruptor en "Mono" para que la etapa de potencia del
XPL300 reciba la señal de tanto las secciones de salida izquierda y derecha. Cuando esté usando varios recintos de altavoces Expedition, ajuste
este interruptor a "Stereo"; el XPL300 reproducirá entonces solo señal de la sección de salida izquierda (es decir, las señales que estén colocadas
completamente a la izquierda en el mezclador); puede usar entonces la salida derecha para enviar señal desde la sección de salida derecha (es
decir, las señales que estén colocadas completamente a la derecha en el mezclador) a un segundo recinto. Vea los diagramas de interconexión
de las páginas 52 - 53 para más información.
10: Salidas – Los dos conectores XLR llevan la señal de salida con nivel de línea del XPL300. Se utilizan para enviar señal a un segundo XPL300
(o XPL200) que esté conectado en cadena (vea el diagrama de interconexión en la página siguiente) o a un subwoofer opcional DB1500. Tenga
en cuenta que la señal de salida que está siendo enviada desde estos conectores depende del ajuste del interruptor Mono/Stereo (vea el punto
9 anterior). Cuando lo ajuste a "Stereo", el conector XLR izquierdo transportará solo la señal izquierda y el conector XLR derecho transportará
solo la señal derecha; cuando lo ajuste a "Mono", ambos conectores llevarán la misma señal monofónica, sumadas a partir de las secciones de
salida izquierda y derecha. Vea los diagramas de interconexión de las páginas 52 - 53 para más información.
11: Control de volumen principal – Este mando giratorio determina el nivel final de señal de salida—puede pensar en él como si fuese el
"fader master". Las señales de los cuatro canales son enviadas aquí justo antes de ser enviadas a las etapas de potencia internas del XPL300 y a
los conectores de salida izquierdo y derecho (vea el punto 10 anterior).
12: Medidor de pila VU – Si ha instalado una pila recargable opcional RB 2030 (vea la página x para más información), este medidor le mostrará
la cantidad de carga de la pila cuando se esté recargando (interruptor Power apagado) o cuando esté en funcionamiento (interruptor Power
encendido). Vea le punto 20 de la página siguiente.
13: Medidor VU de salida – Este medidor de tres segmentos muestra el nivel de salida continua del XPL300. Para conseguir la mejor relación
señal-ruido, pruebe a ajustar todos los canales y controles de volumen de tal forma que el material de programa esté habitualmente sobre los 0
VU, con alguna excursión ocasional (nunca constante) en el segmento rojo "+3 dB".
14: Entradas de CD – Conecte las salidas de un reproductor de CD o de cinta a este grupo de clavijas de auriculares. La señal que llega aquí
es enviada al canal 3/4. Si ha instalado un reproductor MP3 opcional, tenga en cuenta que su salida llegará a los canales 3/4, junto con la señal
de nivel de línea que llegue a la entrada de línea TRS de 6.3 mm (vea el punto #6 de la página anterior) pudiendo recibir también la señal de un
micrófono conectado a la entrada de micro (vea el punto #7 de la página anterior).
15: Entrada AC - Conecte aquí el cable de alimentación “IEC” de tres puntas y gran calibre.
16: Interruptor de ganancia – Ajusta la entrada TRS de nivel de línea del canal 3/4 (vea el punto 6 de la página anterior) a nivel profesional (+4)
o no profesional (-10).
ESPAÑOL
17: Interruptor Power – Utilice este interruptor para encender o apagar el XPL300. Si ha instalado una pila recargable opcional RB2030, esta
pila se cargará cuando coloque este interruptor en la posición “Off”.
51
Page 56

Expedition XPL300
MP3
Uso del panel de conexión
El XPL300 dispone de un panel de conexión MP3, que se adapta perfectamente en un
compartimiento especial que hay encima del mezclador del XPL300 y que le permite
instalar un reproductor de MP3 para disponer de música de fondo o acompañamiento
para todo tipo de usos. El panel de conexión del XPL300 es compatible con la mayoría
de los reproductores de MP3 que tengan un conector de 30 puntas en la parte inferior.
Siga estos pasos para instalar su reproductor.
• Si su reproductor de MP3 viene con un adaptador de puerto, colóquelo en el panel
de conexión del XPL300.
• Empuje la abrazadera de sujeción hacia arriba y deslice su reproductor MP3 en el
hueco para que quede firmemente sujeto, asegurándose también de que se encaje
correctamente con el conector de 30 puntas.
• Si tiene un reproductor MP3 muy fino, extraiga el reproductor e instale la placa EVA
de relleno que se incluye con su Expedition.
• Después, vuelva a usar la abrazadera de sujeción para reinstalar el reproductor de
MP3.
• Baje suavemente la abrazadera hasta que el reproductor quede firme en su sitio.
Interconexión del XPL300
Uso de un único XPL300: En este ejemplo, hemos conectado micrófonos a las entradas XLR de micro de los canales 1 y 2, y un teclado stereo
ha sido conectado a la toma TRS stereo de 6.3 mm del canal 3/4 (usando un cable en Y, con la señal izquierda en la punta y la derecha en el
anillo). NOTA IMPORTANTE: Cuando esté usando un único XPL300, asegúrese siempre de colocar su interruptor Mono/Stereo a "Mono."
ESPAÑOL
52
Page 57

Expedition XPL300
Uso de un XPL300 y un XPL200 (funcionamiento stereo): En este ejemplo, hemos conectado micrófonos a las entradas de micro XLR de
los canales 1 y 2, y un teclado stereo a la clavija TRS stereo del canal 3/4 del XPL300 (usando un cable en Y, con la señal izquierda en la punta
y la derecha en el anillo). Después hemos hecho una conexión entre la salida derecha del XPL300 y la entrada XLR de un XPL200. NOTA
IMPORTANTE: Cuando esté usando el XPL300 con otros recintos Expedition adicionales, asegúrese de ajustar el interruptor Mono/
Stereo a "Stereo".
Uso de un XPL300 y tres XPL200 (funcionamiento stereo con rango ampliado): En este ejemplo, hemos conectado micrófonos a las entra-
das XLR de los canales 1 y 2 de un XPL300, y hemos conectado un teclado stereo a la clavija TRS stereo de 6.3 mm del canal 3/4 del XPL300
(usando un cable en Y, con la señal izquierda en la punta y la derecha en el anillo). Después hemos hecho una conexión entre la salida izquierda
del XPL300 y la entrada de un XPL200 (ambos llevará la misma señal del canal izquierdo). Finalmente, hemos hecho una conexión entre la salida
derecha del XPL300 y un XPL200, y entre la salida XLR de ese XPL200 y la entrada XLR de un tercer XPL200 (ambos llevarán la misma señal del
canal derecho). NOTA IMPORTANTE: Cuando esté usando el XPL300 con otros recintos Expedition adicionales, asegúrese de ajustar el
interruptor Mono/Stereo a "Stereo".
ESPAÑOL
53
Page 58

Colocación e instrucciones de montaje
Consejos generales de colocación
• El uso de un micrófono o tocadiscos delante de un altavoz es una fórmula segura de
conseguir problemas de realimentaciones y/o zumbidos, por lo que evite siempre colocar el Expedition delante de cualquier micro o giradiscos que esté usando.
• Utilice el Expedition de pie para todas las aplicaciones PA "cara al público”; colóquelos
en la posición inclinada solo para usarlos como monitores de escenario.
• Coloque siempre los altavoces lo más por encima del público que le sea posible para
conseguir la máxima cobertura.
• Utilice un número de recintos suficiente para el espacio en el que esté. Cuanto mayor
sea el espacio, más altavoces necesitará.
Montaje sobre barra
En la parte inferior del Expedition encontrará un receptáculo para montaje en soporte de
1-3/8" que le permitirá colocar la unidad encima de cualquier soporte de altavoces standard
(como los soportes de altavoces Samson TS50 o TS100). El montaje sobre soporte de barra
es en general recomendable cuando quiera conseguir maximizar la distancia de cobertura
del Expedition (llamada a veces en los altavoces “alcance”).
Si está usando un subwoofer DB1500, puede usar su receptáculo interno para soporte de
barra para colocar un XPL100, XPL200 o XPL300 justo encima de él, creando una columna
de sonido completa.
ESPAÑOL
Montaje colgado, montaje en pared y montaje en techo
Tal como puede ver en la ilustración de abajo, el panel superior del Expedition dispone de
una serie de puntos de anclaje, situados en compartimentos a la izquierda y la derecha del
compartimento del receptor inalámbrico. Las tapas que están situadas sobre estos receptáculos simplemente están pegadas con doble cinta adhesiva, por lo que solo tiene que
tirar de ellas para quitarlas.
54
Puntos de montaje volado del Expedition
Page 59

Colocación e instrucciones de montaje
Antes de realizar un montaje colgado, montaje en pared o en techo del Expedition, primero debe
colocar una abrazadera de montaje Samson MP1020 en los puntos de anclaje, tal como se muestra
en la ilustración de la derecha
Puede unir cableado y piezas standard a la abrazadera de montaje MP1020 en aquellas configuraciones en las que el Expedition deba quedar “flotando”.
En instalaciones fijas en las que quiera montar el Expedition colgado de un techo, use el montaje
OmniMount modelo 100-STMP, tal como puede ver en la ilustración de abajo:
En instalaciones fijas en la que quiera montar el Expedition colgado de una pared, utilice el
OmniMount modelo 100-WB, tal como puede ver en la siguiente ilustración:
Instalación de la abrazadera de montaje
MP1020 (vista superior)
Parte superior del Expedition con la abraza-
dera de montaje
MP1020 instalada.
ESPAÑOL
55
Page 60

Accesorios Expedition
Tal como puede ver en la ilustración de la izquierda, el panel superior del Expedition XPL200
y XPL300 dispone de un compartimento precableado que puede albergar cualquiera de los
siguientes dos receptores inalámbricos de Samson: los modelos UM1 o AM1. La señal de salida
de un receptor inalámbrico colocado en un XPL300 llega a la unidad a través del canal 2 del
mezclador interno.
Además, en su distribuidor Samson local dispone de una serie de accesorios que le permiten
ampliar las posibilidades de su sistema Expedition. Entre estos accesorios se incluye:
* El subwoofer activo DB1500—es el compañero ideal para cualquier recinto Expedition (o
Compartimento de receptor inalámbrico del
XPL200/XPL300 (vista superior)
* la pila recargable RB 2030, que le ofrece hasta dos horas de alimentación para el XPL200 o
para cualquier otro sistema de altavoces, para el caso)—en el que se une un potente amplificador de 500 vatios con un cabezal de frecuencias graves de 15” y alto rendimiento para
ofrecerle una respuesta profunda y potente en los super graves. Un crossover o separador
de frecuencias stereo electrónico interno permite al DB1500 funcionar tanto en mono o
como un subwoofer normal de un sistema stereo. Dispone de una parrilla metálica y esquinas rígidas, así como un receptáculo para montaje sobre soporte de barra de 1 3/8" integrado
XPL300, gracias a sus dos pilas de ácido GelCel.
* La abrazadera de montaje MP1020, que permite que cualquier recinto Expedition sea “col
gado” o montado en pared o techo usando piezas OmniMount standard. Para más información, vea la sección de “Colocación y montaje del Expedition” en la página 54.
-
ESPAÑOL
56
Page 61

Specifications/Caractéristiques techniques
Specifications
Power Rating: (@ 8Ω): ............................................................................... XPL100 250 Watts Program; 400 Watts Max. Peak
XPL200, XPL300 ..................................................................................... 250 Watts
Frequency Response: (all models) ....................................................... 60 Hz – 15 kHz ± 3 dB
Sensitivity:
XPL100 ...................................................................................................... 97 dB SPL @ 1W/1m
Crossover Frequency:...............................................................................
XPL100 ...................................................................................................... 2.3 kHz (12 dB Per Octave)
XPL200, XPL300 ..................................................................................... 2.3 kHz (24 dB Per Octave Linkwitz-Riley Constant Phase)
LF Driver: (all models) .............................................................................. 12-inch heavy-duty driver ,2.5-inch voice coil (Kapton Former),50
oz. barium ferrite magnet
HF Driver: (all models) .............................................................................1-inch compression driver - 34mm diaphragm
Stereo Mixer Section: (XPL300 only)...................................................
Inputs ........................................................................................................ 2 Mic/Line XLR/TRS,
1 Stereo Line w/Mic TRS/RCA/XLR
Outputs .................................................................................................... +4 Balanced XLR
Frequency Response ........................................................................... 10 Hz - 50 kHz
Crosstalk ................................................................................................... 70 dB @ 1 kHz
Equalization Frequencies ...................................................................
Effects .......................................................................................................DSP Reverb with 10 Presets
Mounting: (all models) ............................................................................Integral 1 3/8" Pole Mount Receptacle,
Fly Points
Dimensions: (all models) ........................................................................ 4 5/8 in. (w) x 17 3/8 (d) x 21 1/4 (h) 371 mm (w) x 441 (d) x 539 (h)
Weight: ..........................................................................................................
XPL100 ...................................................................................................... 28.5 lbs • 12.9 kg
XPL200 ......................................................................................................
XPL300 ...................................................................................................... 45.0 lbs • 20.4 kg
100 Hz (Low), 10 kHz (High)
42.0 lbs • 19.0 kg
Specifications are subject to change without notice.
Caractéristiques techniques
Puissance nominale : (dans 8 Ω) :
XPL100 ...................................................................................................... 250 Watts programme ; 400 Watts crête max.
XPL200, XPL300 .....................................................................................
Réponse en fréquence : (tous les modèles) ..................................... 60 Hz – 15 kHz ± 3 dB
Sensibilité :
XPL100 ...................................................................................................... 97 dB SPL à 1 W/1 m
Fréquence de coupure : (tous les modèles) ..................................... 2,4 kHz (12 dB/octave)
Woofer : (tous les modèles) .................................................................... Woofer renforcé de 30,5 cm, bobine de 6,4 cm (support en Kapton),
aimant en ferrite de baryum de 1,4 kg
Tweeter : (tous les modèles) .................................................................. Tweeter à compression de 2,5 cm - 34mm diaphragm
Mélangeur stéréo : (seulement pour les XPL300)
Entrées ...................................................................................................... 2 entrées micro/ligne XLR/Jack 6,35 mm, 1 entrée ligne stéréo avec
Sorties ....................................................................................................... XLR symétrique +4
Réponse en fréquence ........................................................................ 10 Hz - 50 kHz
Diaphonie ................................................................................................
Fréquences de l'égaliseur .................................................................. 100 Hz (graves), 10 kHz (aigus)
Effets .......................................................................................................... Réverbération DSP avec 10 Presets
Installation : (tous les modèles) ............................................................ Embase pour pied intégrée de 3,5 cm, points d'ancrage
Dimensions : (tous les modèles) ..........................................................371 mm (l) x 441 mm (p) x 539 mm (h)
Poids :
XPL100 ...................................................................................................... 12,9 kg
XPL200 ......................................................................................................
XPL300 ...................................................................................................... 20,4 kg
250 Watts
entrée micro Jack 6,35 mm//RCA/XLR
70 dB à 1 kHz
19 kg
Les caractéristiques peuvent être modifiées à tout moment sans préavis.
57
Page 62

Technische Daten/Especificaciones técnicas
Technische Daten
Nennleistung: (@ 8Ω): ..............................................................................
XPL100 ......................................................................................................
XPL200, XPL300 ..................................................................................... 250 Watt
Frequenzgang: (alle Modelle) ............................................................... 60 Hz – 15 kHz ± 3 dB
Empfindlichkeit: .........................................................................................
XPL100 ......................................................................................................
Crossover-Frequenz: (alle Modelle) .................................................... 2.4 kHz (12 dB pro Oktave)
LF-Treiber: (alle Modelle) ........................................................................ 12" Hochleistungstreiber, 2.5" Schwingspule (Kapton Former),
50 Unzen Bariumferrit-Magnet
HF-Treiber: (alle Modelle)........................................................................ 1" Kompressionstreiber - 34mm diaphragm
Stereomischersektion: (nur XPL300)
Eingänge .................................................................................................. 2 Mic/Line XLR/TRS, 1 Stereo Line mit Mic TRS/CINCH/XLR
Ausgänge ................................................................................................. +4 symmetrische XLR
Frequenzgang ........................................................................................ 10 Hz - 50 kHz
Übersprechen .........................................................................................
EQ-Frequenzen ...................................................................................... 100 Hz (Bässe), 10 kHz (Höhen)
Effekte .......................................................................................................DSP Reverb mit 10 Presets
Montage: (alle Modelle) .......................................................................... Integrierte 1 3/8" Ständerhalterung, Aufhängepunkte
Abmessungen: (alle Modelle) ............................................................... 371 (B) x 441 (T) x 539 (H) mm 14 5/8" (B) x 17 3/8 (T) x 21 1/4 (H)
Gewicht:
XPL100 ...................................................................................................... 12.9 kg • 28.5 lbs.
XPL200 ......................................................................................................
XPL300 ...................................................................................................... 20.4 kg • 45.0 lbs.
250 Watt Programm; 400 Watt Spitze
97 dB Schalldruck @ 1W/1m
70 dB @ 1 kHz
19.0 kg • 42.0 lbs.
Technische Daten können unangekündigt geändert werden.
Especificaciones técnicas
Potencia media: (@_8Ω): .........................................................................
XPL100 ...................................................................................................... 250 watios de programa; 400 watios máximo en picos
XPL200, XPL300 ..................................................................................... 250 watios
Respuesta de frecuencia: (todos los modelos) ............................... 60 Hz – 15 kHz ± 3 dB
Sensibilidad: ................................................................................................
XPL100 ...................................................................................................... 97 dB SPL_@ 1W/1m
Frecuencia de crossover:( todos los modelos) ................................ 2.4 kHz (12 dB por octava)
Cabezal graves: (todos los modelos) .................................................. cabezal de 12 pulgadas de alto rendimiento, bobina de voz de 2.5
pulgadas (Kapton Former), imán de ferrita de bario de 50 onzas de
peso
Cabezal de agudos: (todos los modelos) .......................................... Cabezal de compresión de 1 pulgada - 34mm diaphragm
Sección de mezclador stereo: (solo XPL300)
Entradas ........................................................................................................ 2 XLR/TRS para micro/línea,1 de línea stereo con micro en TRS/RCA/
XLR
Salidas .......................................................................................................+4 XLR balanceadas
Respuesta de frecuencia ....................................................................10 Hz - 50 kHz
Crosstalk o cruce de señal ..................................................................
Frecuencias de ecualización .............................................................100 Hz (graves), 10 kHz (agudos)
Efectos ....................................................................................................... DSP reverb con 10 presets
Montaje: (todos los modelos) ............................................................... Casquillo integral para montaje en barra de 1 3/8", puntos para
Dimensiones: (todos los modelos) ...................................................... 14 5/8 in. (l)_x 17 3/8 (p) x 21 1/4 (a) 371 mm (l) x 441 (p) x 539 (a)
Peso: ...............................................................................................................
XPL100 ...................................................................................................... 28.5 lbs • 12.9 kg
XPL200 ...................................................................................................... 42.0 lbs • 19.0 kg
XPL300 ...................................................................................................... 45.0 lbs • 20.4 kg
70 dB @ 1 kHz
montaje aéreo
Estas especificaciones están sujetas a cambios sin previo aviso.
58
Page 63

Page 64

Samson Technologies Corp.
45 Gilpin Avenue
Hauppauge, New York 11788-8816
Phone: 1-800-3-SAMSON (1-800-372-6766)
Fax: 631-784-2201
www.samsontech.com
 Loading...