

Page 1
800-WATT PORTABLE PA SYSTEM
800
E PEDITION
X P
with Blu etooth
®
Owner's Manual
Page 2

Copyright 2015
v2.2
Samson Technologies Corp.
45 Gilpin Avenue
Hauppauge, New York 11788-8816
Phone: 1-800-3-SAMSON (1-800-372-6766)
Fax: 631-784-2201
www.samsontech.com
The Bluetooth® word mark and logos are registered trademarks owned by Bluetooth
SIG, Inc. and any use of such marks by Samson Technologies is under license. Other
trademarks and trade names are those of their respective owners.”
Page 3
Important Safety Information
ATTENTION
RISQUE DE CHOC ÉLECTRONIQUE -
NE PAS OUVRIR
This lightning flash with arrowhead symbol within an equilateral
triangle is intended to alert the user to the presence of non-insulated
“dangerous voltage” within the product’s enclosure that may be of
sufficient magnitude to constitute a risk of electric shock.
The exclamation point within an equilateral triangle is intended to
alert the user to the presence of important operating and maintenance
instructions in the literature accompanying the appliance.
ENGLISH
To prevent electric shock hazard, do not connect to mains power supply
CAUTION
while grille is removed.
WARNING: TO REDUCE THE RISK OF ELECTRIC SHOCK, DO NOT REMOVE COVER
(OR BACK) AS THERE ARE NO USER-SERVICEABLE PARTS INSIDE. REFER
SERVICING TO QUALIFIED SERVICE PERSONNEL.
If you want to dispose this product, do not mix it with general household waste. There is a
separate collection system for used electronic products in accordance with legislation that
requires proper treatment, recovery and recycling.
Private household in the 28 member states of the EU, in Switzerland and Norway may
a retailer (if you purchase a similar new one).
For Countries not mentioned above, please contact your local authorities for a correct method of
disposal.
By doing so you will ensure that your disposed product undergoes the necessary treatment, recovery
and recycling and thus prevent potential negative effects on the environment and human health.
XP800 • Portable PA System
return their used electronic products free of charge to designated collection facilities or to
3
FRANÇAISDEUTSCHEESPAÑOLITALIANO
Page 4

Important Safety Information
1. Read these instructions.
2. Keep these instructions.
3. Heed all warnings.
4. Follow all instructions.
5. Do not use this apparatus near water.
6. Clean only with dry cloth.
7. Do not block any ventilation openings. Install in accordance with the manufacturer’s
instructions.
8. Do not install near any heat sources such as radiators, heat registers, stoves, or other
apparatus (including amplifiers) that produce heat.
9. Do not defeat the safety purpose of the polarized or grounding type plug. A polarized
plug has two blades with one wider than the other. A grounding type plug has two
blades and a third grounding prong. The wide blade or the third prong are provided
for your safety. If the provided plug does not fit into your outlet, consult an electrician
for replacement of the obsolete outlet.
10. Protect the power cord from being walked on or pinched particularly at the plugs,
convenience receptacles, and at the point where they exit from the apparatus.
11. Only use attachments/accessories specified by the manufacturer.
12. Use only with the cart, stand, tripod, bracket, or table specified by the
manufacturer, or sold with the apparatus. When a cart is used, use
caution when moving the cart/apparatus combination to avoid injury
from tip-over.
13. Unplug the apparatus during lightening, sort or when unused for long periods of time.
14. Refer all servicing to qualified personnel. Service is required when the apparatus has
been damaged in any way, such as power supply cord or plug is damaged, liquid has
been spilled or objects have fallen into the apparatus has been exposed to rain or
moisture, does not operate normally, or has been dropped.
15. This appliance shall not be exposed to dripping or splashing water and that no object
filled with liquid such as vases shall be placed on the apparatus.
16. Caution-to prevent electrical shock, match wide blade plug wide slot fully insert.
17. Please keep a good ventilation environment around the entire unit.
18. POWER ON/OFF SWITCH: For products with a power switch, the power switch DOES
NOT break the connection from the mains.
19. MAINS DISCONNECT: The plug should remain readily operable. For rack-mount or
installation where plug is not accessible, an all-pole mains switch with a contact
separation of at least 3mm in each pole shall be incorporated into the electrical
installation of the rack or building.
4
Page 5

Important Safety Information
FCC Notice
1. This device complies with Part 15 of the FCC Rules. Operation is subject to the follow-
ing two conditions:
(1) This device may not cause harmful interference.
(2) This device must accept any interference received, including interference that may
cause undesired operation.
2. Changes or modifications not expressly approved by the party responsible for compli-
ance could void the user’s authority to operate the equipment.
FCC Statement
This equipment has been tested and found to comply with the limits for a Class B digital device, pursuant to Part 15 of the FCC Rules. These limits are designed to provide
reasonable protection against harmful interference in a residential installation.
This equipment generates uses and can radiate radio frequency energy and, if not
installed and used in accordance with the instructions, may cause harmful interference
to radio communications. However, there is no guarantee that interference will not occur
in a particular installation. If this equipment does cause harmful interference to radio
or television reception, which can be determined by turning the equipment off and on,
the user is encouraged to try to correct the interference by one or more of the following
measures:
• Reorient or relocate the receiving antenna.
• Increase the separation between the equipment and receiver.
• Connect the equipment into an outlet on a circuit different from that to which the
receiver is connected.
• Consult the dealer or an experienced radio/TV technician for help.
ENGLISH
FRANÇAISDEUTSCHEESPAÑOLITALIANO
FCC Radiation Exposure Statement
This equipment complies with FCC RF radiation exposure limits set forth for an uncontrolled environment. This equipment should be installed and operated with a minimum
distance of 20 centimeters between the radiator and your body.
RF Warning Statement
The device has been evaluated to meet general RF exposure requirement. The device
can be used in portable exposure condition without restriction.
This device complies with RSS-310 of Industry Canada. Operation is subject to the
condition that this device does not cause harmful interference.
Hereby, Samson Technologies Corp., declares that this XP800 is in compliance with the
essential requirements and other relevant provisions of Directive 1999/5/EC. The declaration of conformity may be consulted at:
http://www.samsontech.com/samson/products/portable-pa/expedition/xp800/#downloads-and-manuals-tab
XP800 • Portable PA System
5
Page 6

Introduction
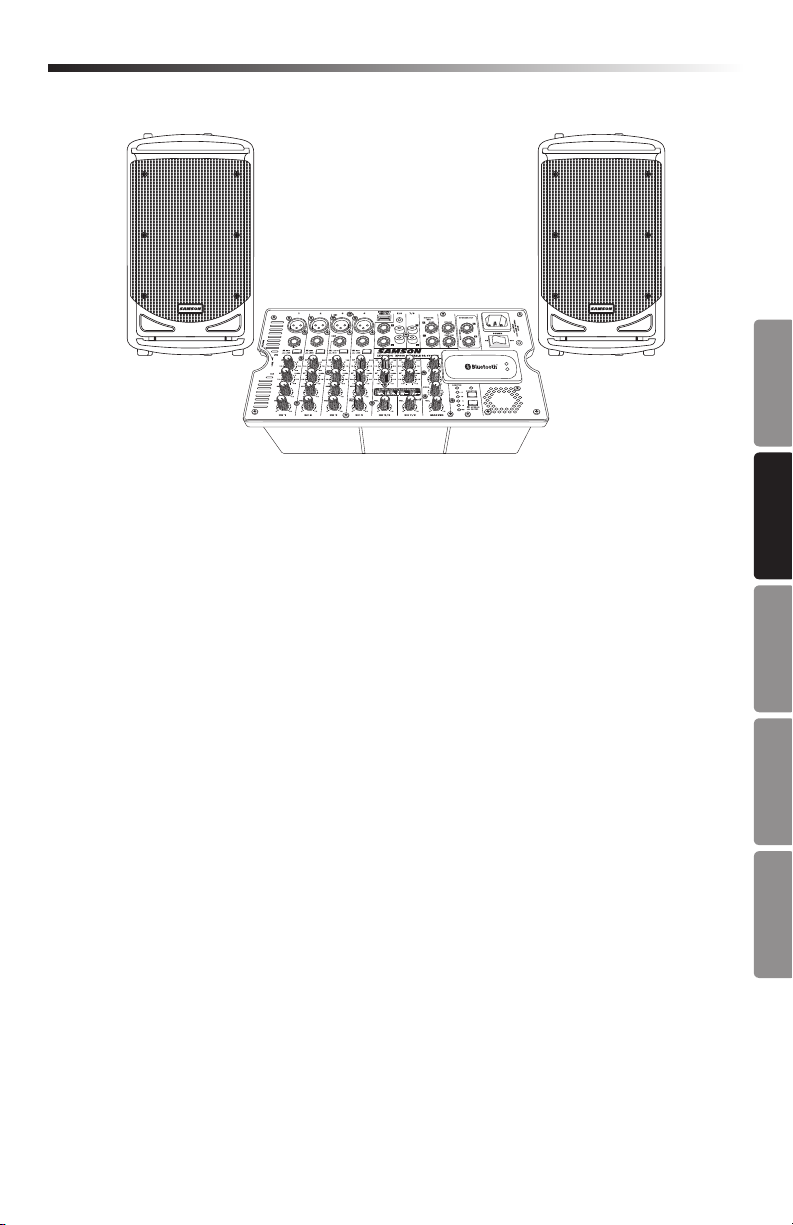
Thank you for purchasing the Expedition XP800 PORTABLE PA SYSTEM from Samson!
The XP800 delivers the optimum balance between huge, awesome sound and portability. The system is light enough for one person to carry, and packs together into a single
unit, making it amazingly easy to transport even in the trunk of a compact car.
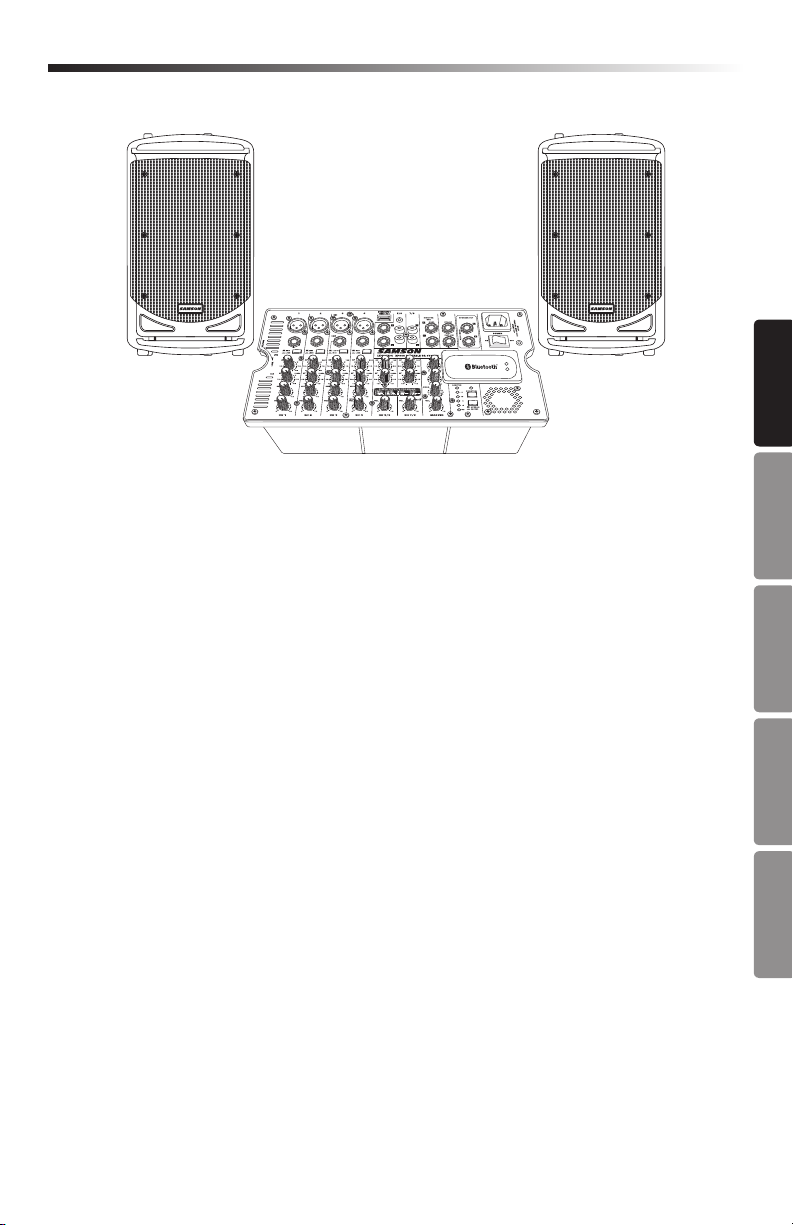
The XP800 system is comprised of two 8” 2-way speaker cabinets, an 8-channel, 800
watt powered mixer, and two speakers cables. The powered mixer packs neatly into the
back of one of the speaker cabinets and there is an accessory compartment behind the
second cabinet to hold the speaker and power cables. The two speakers feature our
unique slide and lock design to join together, allowing the entire system to pack up into
a single unit about the size of a carry-on piece of luggage.
The 8-channel mixer can be used while it is stored in the back of the speaker or
removed from the speaker for desktop use. It features 4 inputs for connecting microphones, plus two inputs for connecting stereo signals, like those from a keyboard or
MP3 player. There’s also a built-in, 24-bit digital effects processor to add studio quality
effects to your voice or instruments. For music playback, the XP800 features wireless
Bluetooth
The mixer also provides a robust output, with 800 watts of total power from the highly-efficient, lightweight, Class D amplifier section.
The XP800 employs a matched speaker system with dual 2-way enclosures that have
proprietary 8” woofers and 1” high frequency drivers loaded in a 90° x 60° horn for
wide vertical coverage. To project the sound to a larger audience, the XP800 speakers
can be mounted on standard speaker stands, thanks to the integral pole mount receptacles. The XP800 is constructed using durable ABS, high impact plastic, making it super
road tough, and at the same time, lightweight.
The XP800 is the perfect solution for your solo performance, garage band rehearsal,
cocktail hour act, boardroom presentation, or classroom lecture. In this manual, you’ll
find a detailed description of the features of the XP800 PA system, as well as step-bystep instructions for its setup and use, and full specifications.
We recommend you keep the following records for reference, as well as a copy of your
sales receipt.
Serial number: ____________________________________________
Date of purchase: __________________________________________
Dealer name: _____________________________________________
With proper care and maintenance, your XP800 will operate trouble-free for many years.
Should your XP800 ever require servicing, a Return Authorization (RA) number must be
obtained before shipping your unit to Samson. Without this number, the unit will not be
accepted. Please call Samson at 1-800-3SAMSON (1-800-372-6766) for an RA number prior to shipping your unit. Please retain the original packing materials and, if possible, return the unit in its original carton. If your XP800 was purchased outside of the
United States, contact your local distributor for warranty details and service information.
®
connectivity, to stream audio from your smart phone, tablet, or computer.
6
Page 7
Features
The Samson Expedition XP800 is a compact portable PA system with dual 2-way speakers, onboard mixer and 800 watt power amplifier. Here are some of the main features:
• Lightweight and designed to allow you to connect all the pieces together into a sin-
gle, easy to move case.
• The mixer is stored in one of the speaker cabinets; the other cabinet has an acces-
sory compartment for storing the speaker cables, microphones, etc.
• The speakers are tuned, 2-way vented enclosures with 8” woofers for deep bass,
complimented by a 1-inch high frequency driver, set in a custom horn with a 60 x
90 degree coverage pattern producing a clean, clear sound.
• Internal 2 x 400 watt lightweight power amplifier produces a powerful stereo sound.
• The XP800’s mixer can be removed from the speaker for tabletop placement and
you can use the kick stand to set the mixer at an ergonomically correct angle. You
can also use the optional SMS308 adapter to mount the mixer to a microphone
stand.
• The 8-channel mixer features four Mic/Line inputs allowing you to connect micro-
phones or line level signals, plus three stereo inputs for connecting line signals
from keyboards, drum machines and MP3 players.
• Each channel features bass and treble controls allowing you to tailor the sound of
each input.
• To create a lush sound on the first four channels, you can select from the sixteen
on-board, 24-bit digital effects.
• Bluetooth® connectivity allows you to stream wireless audio from your smartphone,
tablet, or computer.
• For added flexibility, the XP800’s mixer has Subwoofer and Monitor ouptus, allow-
ing you to connect external powered speakers or active subwoofer to expand the
system.
ENGLISH
FRANÇAISDEUTSCHEESPAÑOLITALIANO
XP800 • Portable PA System
7
Page 8

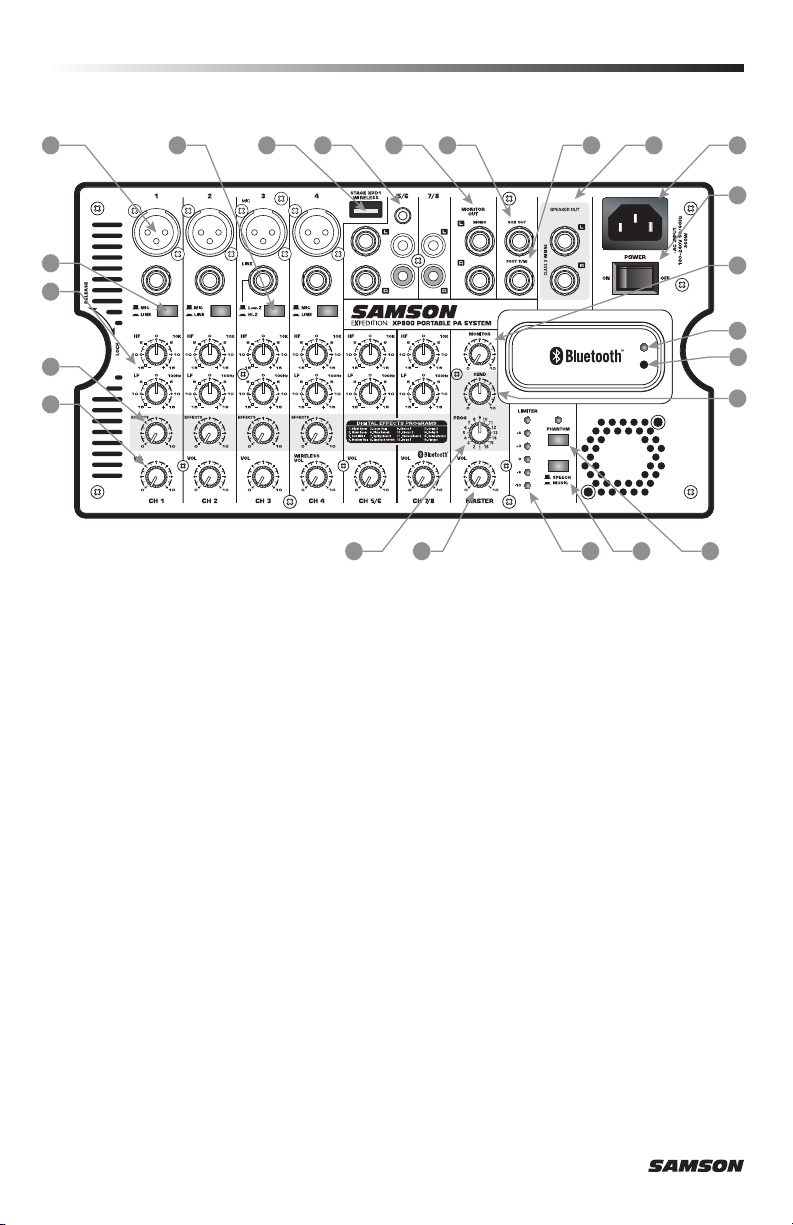
Mixer Layout
1
3
5
6
7
42 8 1211 13
19
9 10
20 21
22
23
14
15
16
17
18
1. Channel Input Jacks (channels 1 – 4)
MIC XLR Connector – Use these XLR jacks to connect low impedance microphones to
the XP800’s built-in mic preamps.
LINE ¼” Phone Connector – Use these ¼” jacks to connect instrument or audio
sources with line–level signals to the XP800. You can connect the outputs from
acoustic guitar with active pickups, keyboards, drum machines, CD/MP3/TAPE players and other units with line level outputs here.
2. Low-Z/Hi-Z Switch – This switches changes the input impedance of the channel 3
¼” jack from low impedance (Low-Z), for line level devices, to high impedance (HiZ) for electric instruments with pickups.
3. MIC/LINE Switch (channels 1, 2, & 4) – The MIC position changes the gain of both
input jacks to MIC level. The LINE position reduces the gain of both jacks by 26dB
to line level.
4. STAGE XPD1 WIRELESS Input – Connect the optional Samson Stage XPD1 digital
wireless USB receiver to this input. The wireless receiver gets its power from the
XP800, so no additional power supply is needed. The WIRELESS input is routed
to the channel 4 LEVEL control. Note: The USB connector is for the Stage XPD1
receiver only. The connector is not designed to charge smartphones, tablets, or similar devices.
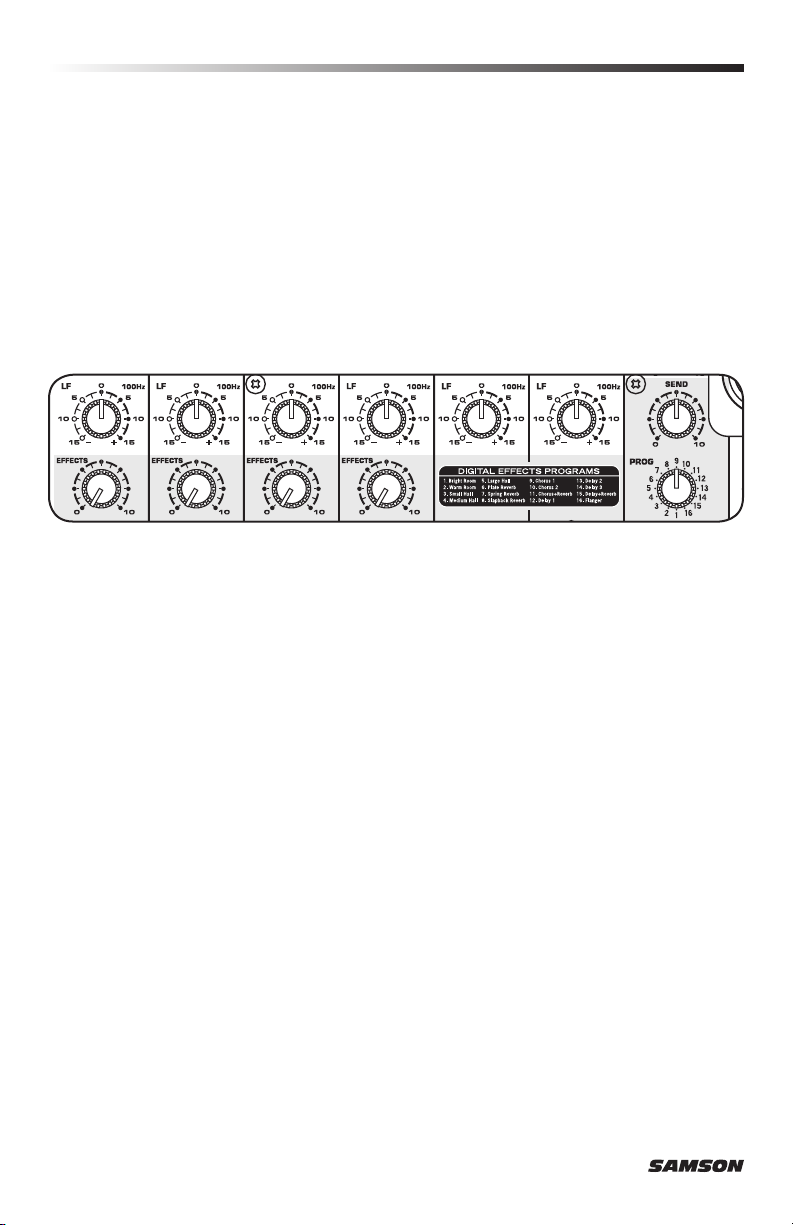
5. Equalizer Knobs
HIGH Frequency – The HIGH knob controls the amount of treble applied to each
channel. The channel’s high frequency response is flat when the knob is in the center detent (12:00) position. Rotating the knob to the right will boost the channel’s
high frequency response above 10 kHz by 15 dB, and rotating it towards the left
8
Page 9

Mixer Layout
will cut the high frequency response by 15 dB.
LOW Frequency – The LOW knob controls the amount of bass applied to each channel. The channel’s low frequency response is flat when the knob is in the center
detent (12:00) position. Rotating the knob to the right will boost the channel’s low
frequency response below 100 Hz by 15 dB, and rotating it towards the left will cut
the low frequency response by 15 dB.
6. EFFECTS Knobs – Use the EFFECTS control knows to add an effect to a Mic or Line
input on any of the first four input channels. As the knob is rotated clockwise, the
level of signal sent to the effects bus is increased.
7. LEVEL Knobs – This knob sets the overall level for the input channel.
NOTE: To reduce noise, set the LEVEL controls on any unused channels to the mini-
mum setting.
8. Stereo Channel Input Jacks (channels 5/6, 7/8) – For stereo inputs, use the L input to
connect the left channel and the R input to connect the right channel. Use these
inputs to connect high impedance microphones, synthesizers, drum machines,
MP3, CD, tape players or any other line level device. The XP800 features ¼”
phone,
¹
/
8
” phone, and RCA connectors.
9. MONITOR OUT Jacks – The signal present at the MONITOR OUT jacks is sent from
the MONITOR level control knob, which is fed from the input channels. The
MASTER control does not affect the MONITOR OUT signal. This output can be
used to send the mix to powered speaker cabinets to use a stage monitors, or as
additional front of house speakers to expand the coverage of the system.
10. SUB OUT Connector – This full-range output is used to send the main mix to an
external active subwoofer. The signal present at this connector is the after the
MASTER level control.
11. FOOT SW Jack – Connect a footswitch to this jack to turn on and off the on–board
digital effects.
12. SPEAKER OUT Jacks – Two ¼” phone powered output jacks used to connect the left
and right speakers. Use the included speaker cables to connect the speakers.
CAUTION: The total impedance load for each side of the amplifier must not be less
than 8 Ohms. Do not connect additional speakers to the XP800 mixer/amplifier.
13. AC Input – Connect the supplied heavy gauge 3-pin “IEC” power cable here.
14. POWER Switch – Use the POWER switch to turn power to the XP800 on or off. The
switch illuminates red when the unit is in the ON position and receiving power.
15. MONITOR Level Knob – The MONITOR level control is used to control the overall level
sent to the MONITOR OUT.
16. Pairing Indicator – Displays the Bluetooth status of the XP800 system.
17. Pairing Button – Press this button to enable discoverable mode in order to pair with
a Bluetooth audio device.
ENGLISH
FRANÇAISDEUTSCHEESPAÑOLITALIANO
XP800 • Portable PA System
9
Page 10

Mixer Layout
18. Effects SEND Knob – The SEND knob is used to adjust the total amount of effects
added to the master bus.
19. Effects Program (PROG) Selector – This control knob is used to select one of 16, 24–
bit DSP effects programs.
20. MASTER Knob – The MASTER volume knob controls the overall output level. This
knob determines the final output signal level. Signals from all channels are routed
here just before being routed to the built–in power amplifiers and Left and Right
speaker output jacks.
21. Metering LED Indicators – This six–segment bar meter shows the XP800’s output
level. For optimum signal–to–noise ratio, set the VOLUME control so that program
material is usually at or around +3 to +6 VU, with occasional, but not steady lighting of the red “LIMITER” segment.
22. SPEECH/MUSIC Switch – The SPEECH/MUSIC switch is used to change the overall
frequency response, or tone contour, for the XP800 sound system. If your application is mainly for music, press the switch down to select the MUSIC response
curve. If your application is mainly for spoken word, leave the switch up to select
the SPEECH response curve.
23. PHANTOM Switch – The XP800 features an onboard phantom power supply to oper-
ate condenser microphones. When the switch is engaged, the LED will illuminate
indicating that phantom power is now available on the microphone pre–amps.
IMPORTANT NOTE: To avoid a loud pop, be sure to turn down the MASTER level
control before plugging and unplugging the mic cables when the phantom power is
active.
10
Page 11
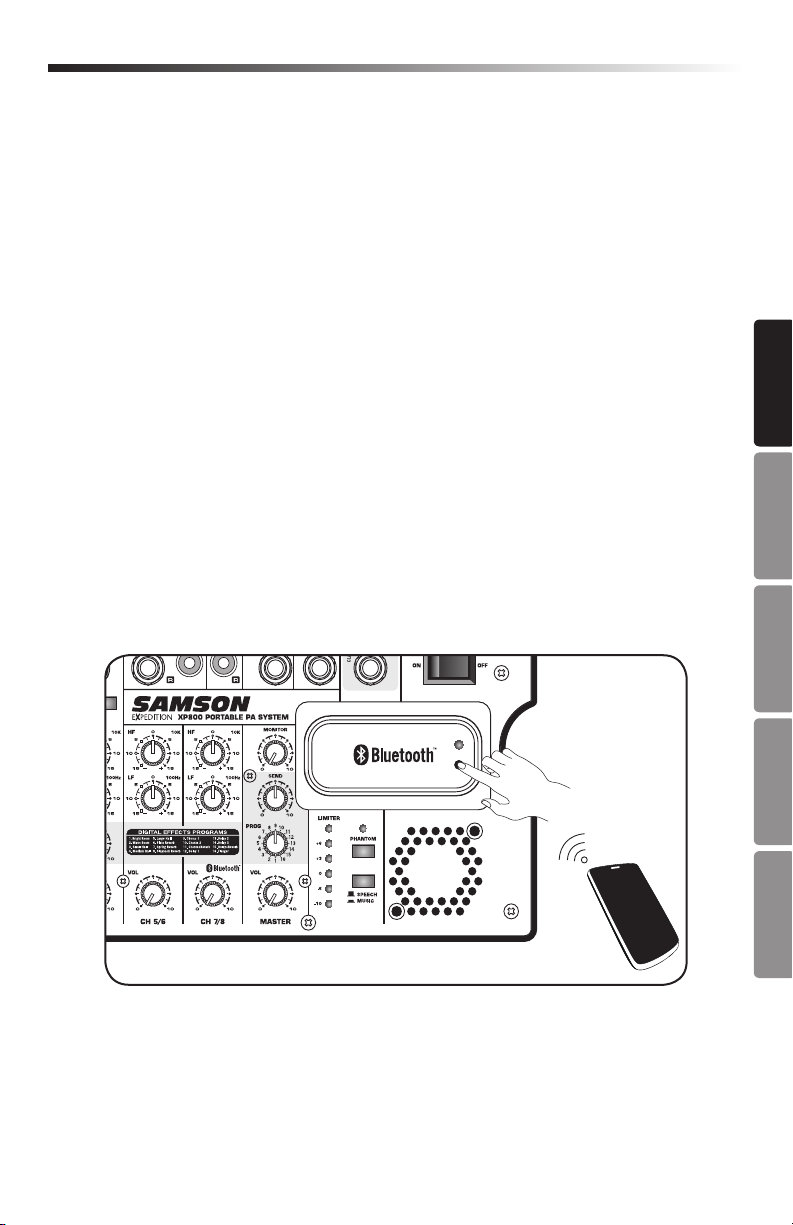
Pairing with a Bluetooth® device
Bluetooth® is a wireless communication technology that allows for connectivity between a
wide range of devices. The XP800 uses Bluetooth to stream high quality audio from your
Bluetooth enabled device without the need for connecting any cables. In order for your device
to work with the XP800 it must first be paired.
1. Turn all channel LEVEL controls down counterclockwise to 0.
2. With the XP800 and your Bluetooth device powered on; press the PAIR button on
the top panel of the XP800 mixer to make the speaker discoverable. The Bluetooth
indicator will slowly flash blue.
3. In the settings of your Bluetooth device, set it to “discover” available devices.
4. From the Bluetooth device list, select the "Samson XP800" device.
5. If your device asks for a passkey, enter digits 0000 (four zeros) and press OK. Some
devices may also ask you to accept the connection.
6. As the XP800 is connecting to your device, the Bluetooth indicator will quickly flash
blue.
7. The XP800 speaker indicates that pairing is complete when the indicator turns
steady blue. You can now stream audio from your device to the XP800 speakers.
8. With the volume control on your Bluetooth device turned up, play some music,
and slowly raise the XP800 BLUETOOTH channel 7/8 LEVEL control until you have
reached the desired level.
ENGLISH
FRANÇAISDEUTSCHEESPAÑOLITALIANO
XP800 • Portable PA System
11
Page 12
Setting Up the XP800
Unpack all the system components from the shipping carton and save all packing materials in the event your unit ever needs to be returned for service.
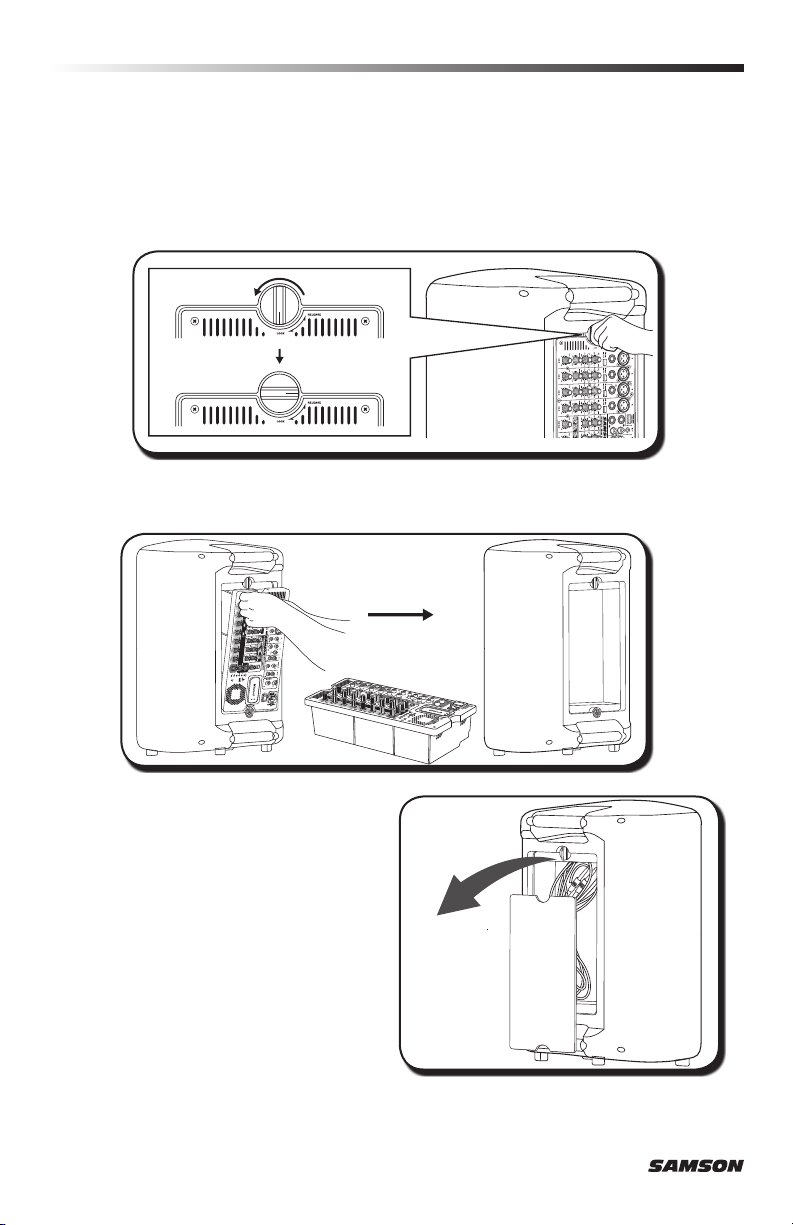
Remove the mixer by turning the quarter turn screw counterclockwise towards the
RELEASE position.
LOCK
RELEASE
Carefully hold the mixer to remove it from the speaker.
Remove the accessory compartment cover
by turning the quarter turn screw counterclockwise towards the RELEASE position,
and remove the included speaker cables.
Replace the accessory panel by aligning
the bottom of the panel with the slots.
Make sure the quarter turn screw is in the
RELEASE position; then close the panel
and turn the quarter turn screw clockwise
to LOCK.
12
Page 13
Setting Up the XP800
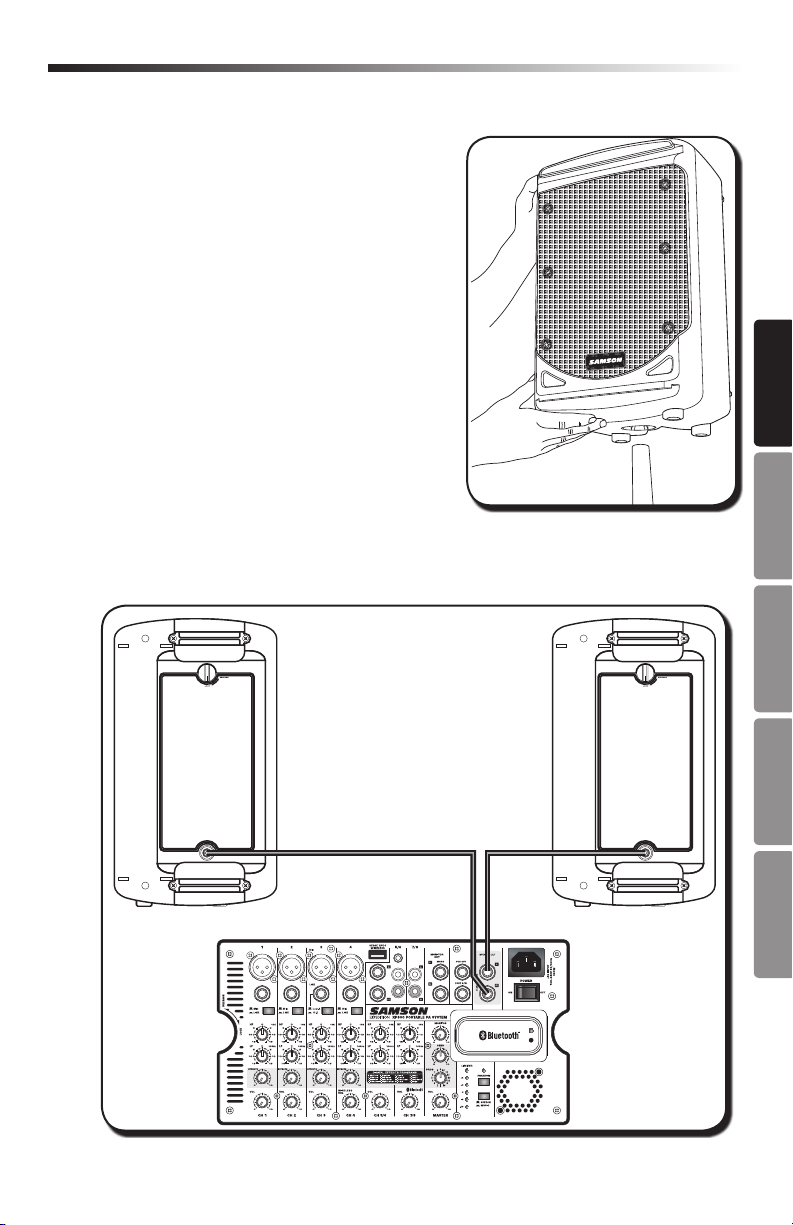
Position the speakers on the floor or on stands.
For maximum sound coverage the XP800 can
be used with a standard 13⁄8” speaker stand.
The speaker should be raised above the heads
of the listening audience. Take care when
placing the speaker on a stand, to ensure that
it is on a level, steady surface and will not tip
over. When using the speaker on the floor, or
when the speaker is below the listener, the
XP800 features a monitor angle position to
project the sound up, towards the audience.
ENGLISH
Using one of the included speaker cables, connect the mixer’s LEFT SPEAKER OUT to
the left speaker’s input connector. Next, use the second included speaker cable to connect the RIGHT SPEAKER OUT to the right speaker’s input connector.
FRANÇAISDEUTSCHEESPAÑOLITALIANO
XP800 • Portable PA System
13
Page 14
Quick Start
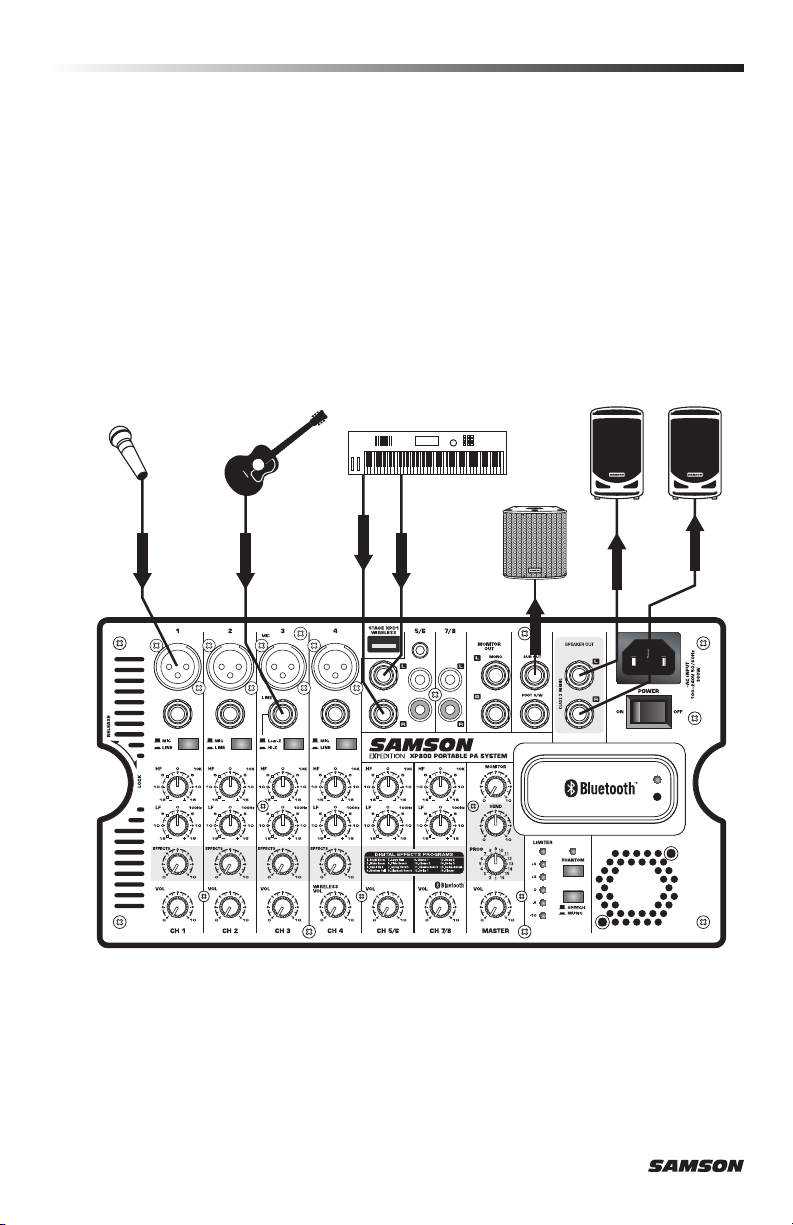
1. Be sure that the XP800’s POWER switch is set to the OFF position.
2. If the speakers are not connected, connect the speaker wires as described in the
previous section.
3. Turn each of the channel LEVEL and MASTER volume controls fully counterclockwise, to the “0” position.
4. Next, connect one side of the included power cable to the XP800 mixer’s power
inlet and the other to a grounded AC power outlet.
5. Connect your microphones using standard XLR cables, instruments using ¼” phone
cables, and MP3 player using
Dynamic Microphone
SIGNAL
Electric Acoustic
Guitar
SIGNAL
¹
/
8
” cable, into the appropriate jacks on the mixer.
XP800 Speaker Cabinets
Keyboard
Active
Subwoofer
SIGNAL
SIGNAL
SIGNAL
SIGNAL
SIGNAL
6. Switch on all equipment connected to the XP800, then switch the XP800’s POWER
switch to the ON position.
7. Turn the MASTER level control about 3/4 of the way up.
8. Start talking or playing into channel 1 while slowly adjusting the LEVEL control
until you have reached the desired level. Do the same for each channel you are
using.
14
Page 15

XP800 Quick Start
9. If you notice that the LIMITER indicator is lighting constantly, turn the MASTER
volume down so that the indicator only lights occasionally during loud hits.
10. To add depth to the mix or smooth out the vocals, you can apply effects such as
reverb to channels 1–4. To do this, raise the EFFECTS level controls on the channel(s) to which you would like to add the effect.
11. Slowly turn up the effects SEND knob until the desired sound is reached.
12. To alter the tonal characteristic of the signal, you can adjust the LOW (bass) and
HIGH (treble) controls. If you find the audio too muddy, you may want to reduce the
LOW control. If you find that the audio sounds dull, you can increase the HIGH control. There is no right or wrong way to EQ a sound. You should listen to how the mix
sounds in the room and fine-tune to your liking.
ENGLISH
FRANÇAISDEUTSCHEESPAÑOLITALIANO
XP800 • Portable PA System
15
Page 16
Applying Effects
The XP800 features built-in, high quality, 24-bit digital effects that you can add to channels 1 through 4. You can use effects like delay or reverb to enhance vocals or ambiance
to the mix by following the steps below:
1. Connect a mic or instrument to the desired channel, and adjust the volume and
equalizer to your liking.
2. Use the PROG selector to choose one of the ten built-in digital effects.
3. Raise the EFFECTS level on the channel to which you want to add the digital effect.
4. Raise the effects SEND main level control to apply the amount of effect desired.
Avoiding Feedback
Feedback is the annoying howling and squealing that can heard when the microphone
picks up sound from the speaker. The sound is then re-amplified back through the
speaker again, creating a feedback loop. Follow these steps to minimize the likelihood
of feedback:
• Avoid pointing the microphone directly at the speakers. In general it is
recommended that the microphone be positioned behind the speaker enclosure.
This uses the directional characteristics of the speaker and microphone to your
advantage.
• Keep the microphone as far from the speakers as possible. This will help achieve
isolation between the speaker and the microphone, and allow you to increase the
output of the XP800.
• Position the microphone as close to the sound source as possible. This will
enable the microphone to pick up more direct sound, and allow you to reduce the
microphone input gain control.
• Reduce the MASTER LEVEL of the XP800 system.
16
Page 17
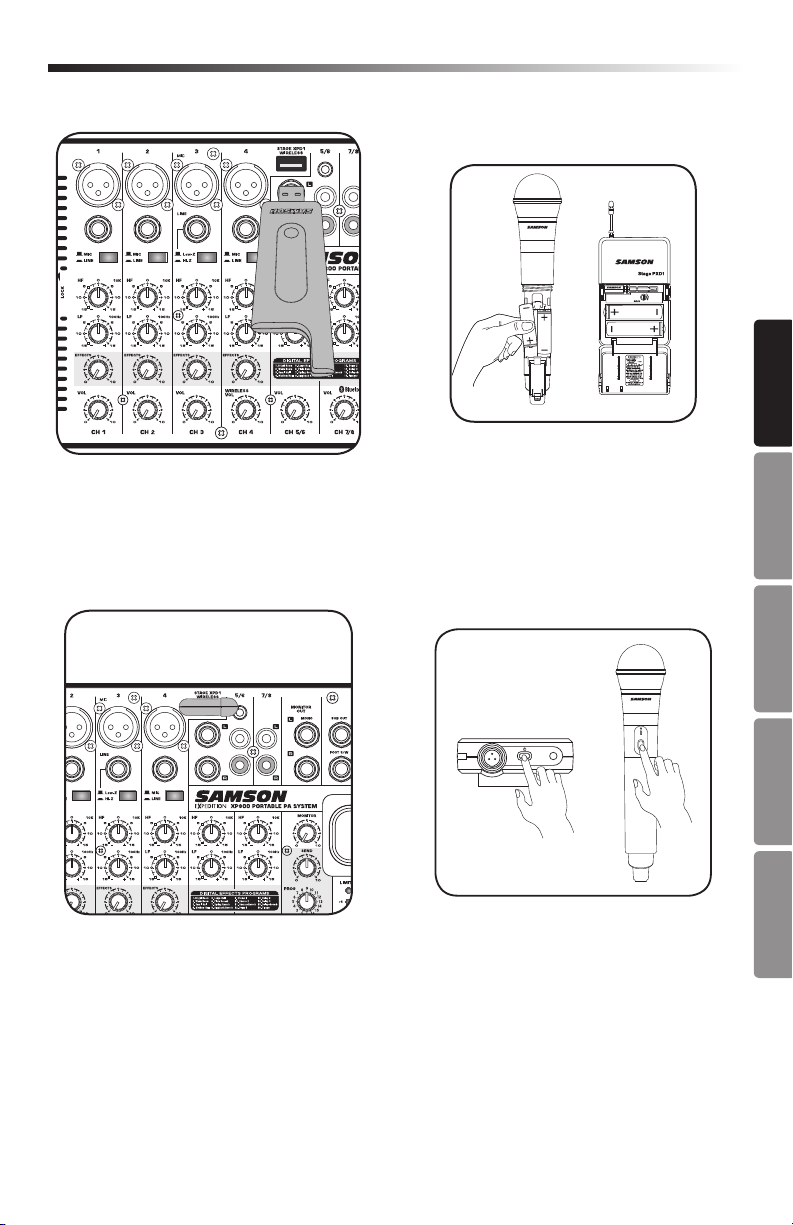
Stage XPD1 Wireless System (Optional)
ENGLISH
Plug the RXD1 USB receiver into
the Channel 4 USB jack labeled
WIRELESS.
Turn the channel 4 LEVEL
knob on the XP800 completely
counterclockwise to 0, then
turn the POWER siwtch on the
XP800 to the ON position.
On the wireless transmitter, place a
fresh set of AA (LR6) batteries in the
transmitter battery holder, taking care
to observe the polarity markings.
Turn on the power to the transmitter by
pressing and holding Power switch; the
indicator LED will light amber.
FRANÇAISDEUTSCHEESPAÑOLITALIANO
XP800 • Portable PA System
17
Page 18
Stage XPD1 Wireless System (Optional)
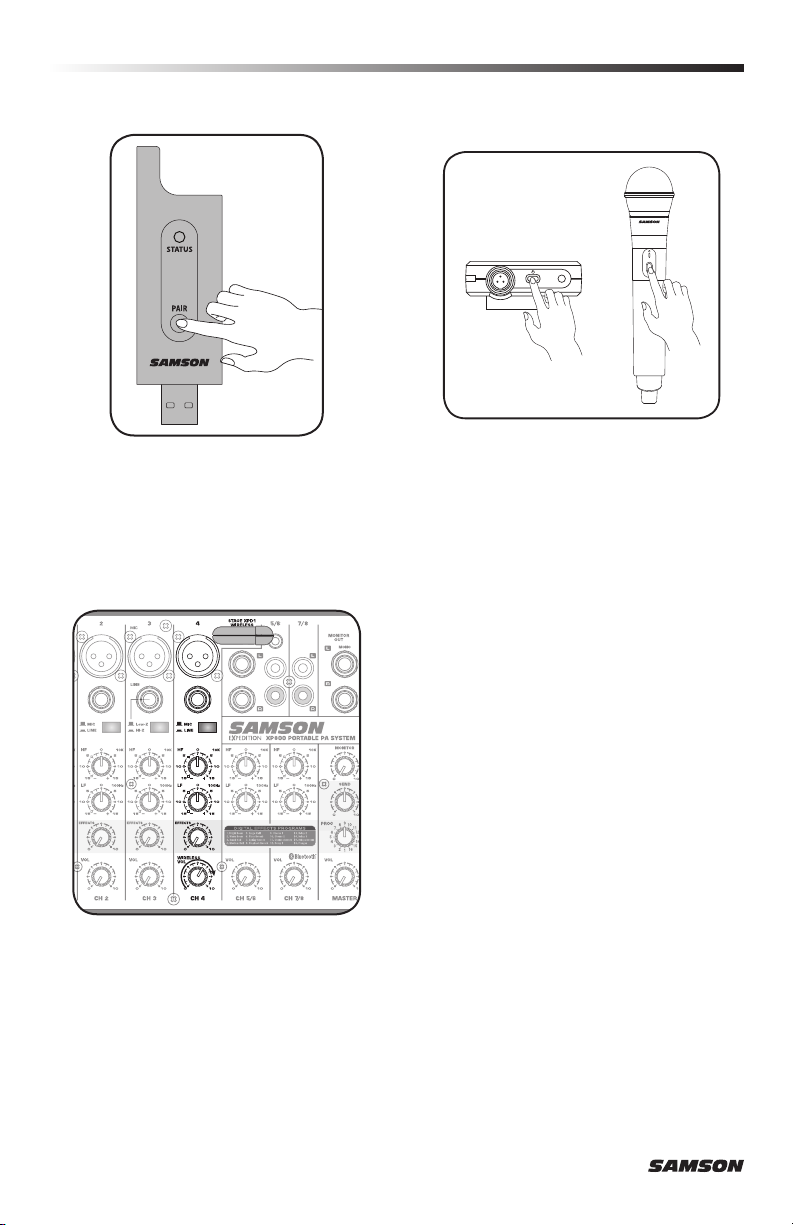
If the handheld transmitter and
receiver have not been previously
paired, press and hold the button on
the RXD1 receiver for >5 seconds,
until it begins to flash.
Raise the MASTER LEVEL control
and speak or sing into the mic at
a normal performance level while
raising the Channel 4 LEVEL
control until the desired level is
reached.
Press and hold the Power button
on the transmitter >5 seconds.
This will put both components into
pairing modes. Once the receiver
and transmitter communicate and
sync, the LEDs on both units will
light steady and will be ready for
operation.
If you hear distortion check the
LIMITER LED. If it is lit red, turn
down the channel 4 LEVEL on the
XP800 until it lights only occasionally
during loud sounds. If you still hear
distortion, unscrew the microphone
body and use the supplied plastic
screwdriver to turn the Gain control
in the HXD1 transmitter slowly
counterclockwise until the distortion
disappears.
Conversely, if you hear a weak, noisy
signal at the desired volume level
(and with the WIRELESS control of
the XP800 turned fully clockwise),
use the supplied plastic screwdriver
to turn the Gain control in the
transmitter slowly clockwise until the
signal reaches an acceptable level.
18
Page 19
Specications
Amplifier
Power (0.5% THD at 1KHz)
Frequency Response 20 Hz - 20 kHz
Power Consumption 100-240Vac, 50/60Hz, 450W
Operating Temperature 14° F (-10° C) to 104° F (40° C)
Low Frequency 8” bass transducer
High Frequency 1” tweeter
Inputs XLR, ¼” balanced, RCA, 3.5 mm stereo, USB Wireless
Outputs ¼” MONITOR, ¼” SUB OUT , ¼” Speaker output
Maximum Output Level
(0.5% T.H.D at 1KHz)
Phantom Power +15V DC, Fixed Phantom Voltage
Input Channel
EQ
Speech/Music Switch
Effects
Indicators
Bluetooth® Bluetooth 3.0, A2DP
Modulation Technique FHSS (GFSK, π/4-DQPSK, 8-DPSK)
Dimensions 20.1’’(L) x 10.6’’(W) x 19’’(H)
Weight 41.5Ib / 18.8kg
High 10kHz Shelving ±15 dB
Low 100Hz Shelving ±15 dB
800 W @ 8Ω (400 W per channel) Peak
400 W @ 8Ω (200 W per channel) Average
Speakers
Mixer
+22dBu(MONITOR L/R & SUB OUT) @10KΩ
167Hz, 3dB/Octave
16 Preset, 24-bit DSP
5-point Level, LIMITER, PHANTOM
Dimensions and Weight
510mm(L) x 270mm(W) x 485mm(H)
ENGLISH
FRANÇAISDEUTSCHEESPAÑOLITALIANO
At Samson, we are continually improving our products, therefore specifications and
images are subject to change without notice.
XP800 • Portable PA System
19
Page 20

Le mot Bluetooth®, sa marque et ses logos sont des marques déposées qui appartiennent à Bluetooth SIG, Inc. et toute utilisation de ces marques par Samson Technologies doit se faire dans le cadre d'une licence. Les autres noms et marques appartiennent
à leurs propriétaires respectifs."
20
Page 21
Informations de sécurité importantes
ATTENTION
RISQUE DE CHOC ÉLECTRONIQUE -
NE PAS OUVRIR
Cet éclair avec le symbole de flèche dans un triangle équilatéral est
destiné à alerter l'utilisateur de la présence de «tension dangereuse»
non isolée à l'intérieur du produit qui peut être d'une importance
suffisante pour constituer un risque de choc électrique .
Le point d'exclamation dans un triangle équilatéral est destiné à alerter
l'utilisateur de la présence d' importantes instructions de fonctionnement
et d'entretien dans la documentation accompagnant l'appareil.
ENGLISH
Pour éviter tout risque de choc électrique, ne pas brancher au secteur
AVERTISSEMENT
quand la grille est enlevée.
AVERTISSEMENT: POUR RÉDUIRE LE RISQUE D'ÉLECTROCUTION,
NE PAS ÔTER LE COUVERCLE NI LE DOS DU BOITIER. CET APPAREIL
NE CONTIENT AUCUNE PIÈCE REMPLAÇABLE PAR L'UTILISATEUR. CONFIER
L'ENTRETIEN A DU PERSONNEL D'ENTRETIEN QUALIFIE.
Pour mettre ce produit au rebut, ne le mélangez pas aux ordures ménagères. Il existe un
système de collecte séparée pour les produits électroniques usagés, conformément à la
législation qui prévoit le traitement, la récupération et le recyclage corrects.
Les ménages dans les 28 états membres de l'UE, en Suisse et en Norvège peuvent mettre
lecte agréées ou auprès d'un détaillant (si vous achetez un produit neuf similaire).
Pour les pays non mentionnés ci-dessus, veuillez contacter les autorités locales pour connaitre la
méthode de traitement appropriée.
Ce faisant, vous vous assurerez que votre produit subit le traitement, la récupération et le recyclage
nécessaires et prévenez ainsi les effets négatifs potentiels sur l'environnement et la santé humaine.
XP800 • Système de sonorisation portable
au rebut leurs produits électroniques usagés gratuitement auprès d'installations de col-
21
FRANÇAISDEUTSCHEESPAÑOLITALIANO
Page 22

Informations de sécurité importantes
1. Lisez ces instructions.
2. Conservez ces instructions.
3. Respectez tous les avertissements.
4. Suivez toutes les instructions.
5. N'utilisez pas cet appareil à proximité d'un point d'eau.
6. Nettoyez-le avec un chiffon sec.
7. N'obstruez en aucun cas les orifices d'aération. Installez en respectant la notice du
fabricant.
8. Ne l'installez pas à proximité d'une source de chaleur telle qu'un radiateur, une bouche
de chaleur, un poêle ou d'autres appareils (dont les amplificateurs) produisant de la
chaleur.
9. Ne détériorez pas la sécurité de la fiche polarisée ou de la fiche de terre. Une prise
polarisée est composée de deux fiches dont l'une est plus large que l'autre. Une fiche de
terre comporte deux lames et une troisième broche de mise à la terre. La lame la plus
large ou la troisième broche assure la sécurité de l'utilisateur. Si la prise de l'appareil ne
rentre pas dans la prise d'alimentation secteur de votre installation, veuillez consulter un
électricien agréé pour le remplacement de la prise secteur.
10. Placez le cordon d'alimentation de sorte qu'il ne soit ni piétiné ni comprimé, en
particulier au niveau de la fiche de connexion, de la prise de courant et du point de
sortie de l'appareil.
11. Utiliser uniquement des fixations/accessoires spécifiés par le fabricant.
12. Utilisez uniquement le chariot, le pied, le trépied, le support ou la table
recommandé par le fabricant ou fourni avec l'appareil. Lors de l'utilisation
d'un chariot, veuillez faire attention en déplaçant l'ensemble chariot/
appareil afin d'éviter tout accident corporel en cas de renversement.
13. Débranchez cet appareil pendant les orages ou en cas de non-utilisation prolongée.
14. Faites effectuer toutes les réparations nécessaires par du personnel qualifié. Des
réparations sont nécessaires si l'appareil est endommagé d'une façon quelconque, par
exemple: cordon ou prise d'alimentation endommagé, liquide renversé ou objet tombé
à l'intérieur de l'appareil, exposition de l'appareil à la pluie ou à l'humidité, appareil qui
ne marche pas normalement ou que l'on a fait tomber.
15. Cet appareil ne doit pas être exposé à des éclaboussures ou des gouttes d'eau et aucun
objet rempli de liquide, comme un vase, ne doit se trouver à proximité.
16. Attention - Pour prévenir les chocs électriques, n'insérez la lame large de la fiche que
dans la fente large de la prise.
17. Veillez à ce que la zone autour de l'unité soit bien aérée.
18. COMMUTATEUR MARCHE/ARRET: Pour les produits munis d'un interrupteur
d'alimentation, celui-ci ne rompt pas la connexion au circuit électrique.
19. DECONNEXION DU SECTEUR: La fiche doit rester facilement accessible. Pour
le montage en rack ou lors d'une installation où la fiche n'est pas accessible, un
commutateur omnipolaire dont les contacts sont séparés d'au moins 3mm sur chaque
pôle doit être incorporé dans l'installation électrique du rack ou du bâtiment.
22
Page 23

Informations de sécurité importantes
Avis de la FCC
1. Ce dispositif est conforme à la section 15 des réglementations de la FCC.
Le fonctionnement du dispositif est assujetti aux deux conditions suivantes:
(1) Cet appareil ne doit pas causer d'interférences nuisibles.
(2) Il doit accepter toute interférence reçue, notamment celles pouvant entraîner un
dysfonctionnement.
2. Les changements ou les modifications non expressément approuvés par le fabricant peuvent
annuler l'autorisation accordée à l'utilisateur pour faire fonctionner l'équipement.
Déclaration de la FCC
Cet équipement a été testé et déclaré conforme aux limites pour appareils numériques de
classe B, selon la section 15 des règlements de la FCC. Ces restrictions visent à garantir une
protection suffisante contre les interférences nuisibles dans une installation à domicile.
Cet appareil génère et utilise un rayonnement de fréquence radio et peut causer des interférences nuisibles aux communications radio s'il n'est pas installé ou utilisé conformément
aux instructions. Cependant, il n'existe aucune garantie contre ces interférences dans le cas
où l'installation n'est pas conforme. Si cet appareil cause des interférences nuisibles à la
réception des signaux de radio ou de télévision, ce qui peut être déterminé en allumant et
en éteignant l'appareil, l'utilisateur peut tenter de résoudre le problème de l'une des façons
suivantes:
• Réorientez ou repositionnez l'antenne de réception.
• Augmentez la distance séparant l'équipement du récepteur.
• Branchez l'appareil sur un circuit différent de celui du récepteur.
• Demandez conseil au revendeur ou à un technicien radio/TV expérimenté.
ENGLISH
FRANÇAISDEUTSCHEESPAÑOLITALIANO
Déclaration de la FCC concernant l'exposition aux radiations
Cet équipement respecte les limites FCC d'exposition aux ondes radio définies pour un environnement non contrôlé. Cet équipement doit être installé et utilisé à une distance minimum
de 20cm par rapport au radiateur et vous-même.
Avertissement concernant les fréquences radio
Le dispositif est conforme aux exigences en matière d'exposition aux fréquences radio. Le
dispositif peut être transporté sans aucune restriction.
Cet appareil est conforme à la norme RSS-310 de l'industrie canadienne. Son utilisation est
sujette aux conditions voulant que cet appareil ne cause aucune interférence nuisible.
Par la présente, Samson Technologies Corp. , déclare que ce XP800 est conforme aux
exigences essentielles et autres dispositions pertinentes de la directive 1999/5 / CE . La
déclaration de conformité peut être consultée à l’adresse:
http://www.samsontech.com/samson/products/portable-pa/expedition/xp800/#downloads-and-manuals-tab
XP800 • Système de sonorisation portable
23
Page 24

Introduction
Merci d'avoir acquis le SYSTÈME D'ENCEINTES AMPLIFIÉES PORTATIVES Expedition
XP800 de Samson! Le XP800 offre le meilleur compromis entre son époustouflant et portabilité. Suffisamment léger pour permettre à une seule personne de le transporter, ce système
est formé d'un seul appareil, ce qui en simplifie énormément le transport, même dans le
coffre d'une voiture compacte.
Le système XP800 se compose de deux enceintes 2 voies de 8" (20,32cm), d'une console
de mixage active 8 voies de 800W et de deux câbles d'enceintes. La console de mixage se
range bien au dos de l'une des enceintes, la deuxième d'entre elles étant dotée d'un logement à accessoires situé à l'arrière, qui renfermera les câbles d'enceintes et d'alimentation.
Les deux enceintes sont équipées de notre modèle exclusif de glissière à cran pour les
regrouper, ce qui permet à l'ensemble du système d'être réuni en un seul ensemble ayant à
peu près les dimensions d'un bagage de cabine.
La console de mixage 8 voies peut s'utiliser encastrée derrière l'enceinte ou détachée de
l'enceinte pour être posée sur une table. Elle présente 4 entrées permettant de brancher des
micros, auxquelles s'ajoutent deux entrées pour des signaux stéréo, comme ceux provenant
d'un clavier ou d'un lecteur MP3. Il y a également un processeur 24 bits à effets numériques
intégrés pour ajouter des effets de qualité studio à votre voix ou à vos instruments. Pour
écouter de la musique, le XP800 est doté de la connectivité sans fil Bluetooth® pour passer
des fichiers audio stockés sur votre smartphone, votre tablette ou votre ordinateur. La console
de mixage est également équipée d'une sortie robuste d'une puissance totale de 800W provenant de la partie amplificateur léger à haut rendement de Classe D.
Le XP800 fait appel à un système d'enceintes appariées à double caisson 2 voies présentant
des haut-parleurs de graves brevetés de 8” (20,32cm) et des tweeters hautes fréquences de
1” (2,5cm) encastrés dans un pavillon de 90° x 60° pour une couverture verticale étendue.
Pour étendre la diffusion du son à un public plus large, les enceintes XP800 peuvent être
installées sur des pieds standard grâce aux logements intégrés. Le XP800 est fabriqué en
plastique robuste à haute résistance aux chocs ABS tout en étant léger.
Le XP800 est l'idéal pour votre spectacle en solo, la répétition de votre groupe amateur, votre
morceau de début de soirée, votre exposé en salle de conférence. Dans ce manuel, vous trouverez une description détaillée des fonctions du système de sonorisation XP800, les instructions pour sa configuration, son utilisation, ainsi que les caractéristiques techniques.
Nous vous conseillons de conserver les renseignements suivants pour consultation ultérieure,
ainsi qu'une copie de votre preuve d'achat.
Numéro de série: ____________________________________________
Date d'achat: __________________________________________
Nom du revendeur: _____________________________________________
Avec un entretien adapté et une bonne maintenance, votre XP800 vous donnera satisfaction pendant de très nombreuses années. Pour faire réparer votre enceinte, vous devez tout
d’abord obtenir un numéro de retour (RA) avant de la renvoyer à Samson. Sans ce numéro,
l'unité ne sera pas acceptée. Veuillez appeler Samson au numéro 1-800-3SAMSON (1-800372-6766) pour obtenir un numéro RA avant d'expédier votre appareil. Veuillez conserver les
éléments d'emballage d'origine et, si possible, retourner l'appareil dans son carton d'origine.
Si vous avez acheté votre XP800 ailleurs qu'aux États-Unis, contactez votre distributeur pour
obtenir tous les renseignements sur la garantie et le service après-vente.
24
Page 25
Caractéristiques
Le Samson Expedition XP800 est un système d'enceintes amplifiées portatives compactes
constitué de deux enceintes 2 voies, d'une console de mixage intégrée et d'un amplificateur
d'une puissance de 800W. Voici ses principales caractéristiques:
• Léger, il est conçu pour vous permettre de regrouper tous les éléments en un seul coffret
facile à déplacer.
• La console de mixage se range dans l'une des enceintes, l'autre étant munie d'un range-
ment à accessoires où vous pourrez mettre les câbles d'enceintes, les micros, etc.
• Les enceintes sont des baffles 2 voies configurés à caissons de graves de 25 cm pour
des graves profonds, complétés par un tweeter hautes fréquences de 2,5cm à zone de
couverture de 60 x 90 degrés restituant un son limpide et fidèle.
• L'amplificateur interne léger de 2 x 500W donne un son stéréo puissant.
• On peut détacher de l'enceinte la console de mixage du système XP800 pour la poser
sur une table; on peut en outre utiliser le support inclinable pour positionner la console
de mixage selon un angle ergonomique. Vous pouvez également vous servir de l'adaptateur SMS308 en option pour installer la console de mixage sur un pied de micro.
• La console de mixage 10 voies présente quatre entrées Mic/Line qui vous permettent
de brancher des micros ou des sources de niveau de ligne, auxquelles s'ajoutent trois
entrées stéréo permettant de brancher des câbles provenant de claviers, de boîtes à
rythmes et de lecteurs MP3.
• Chaque voie présente des réglages de graves et d'aigus qui vous permettent d'ajuster le
son de chaque entrée.
• Pour obtenir un son somptueux sur les quatre premières voies, vous pouvez choisir par
les seize effets numériques 24 bits intégrés.
• La connectivité Bluetooth® vous permet d'écouter sans fil un fichier audio présent sur
votre smartphone, votre tablette ou votre ordinateur.
• Pour une flexibilité accrue, la console de mixage du XP800 présente une Sortie Monitor
et Subwoofer (caisson de basses) qui vous permet de brancher des enceintes amplifiées
externes ou un caisson actif d'extrêmes graves pour élargir le système.
ENGLISH
FRANÇAISDEUTSCHEESPAÑOLITALIANO
XP800 • Système de sonorisation portable
25
Page 26
Disposition de la console de mixage
1
3
5
6
7
42 8 1211 13
19
9 10
20 21
22
23
14
15
16
17
18
1. Jacks d'entrée de voie (voies 1 à 4)
Connecteur MIC – XLR – Servez-vous de ces prises XLR pour relier des micros à faible
impédance aux préamplis à prise mic intégrés du XP800.
Connecteur jack LINE - ¼” – Servez-vous de ces jacks de ¼” pour corriger les sources
d'instruments ou audio avec les signaux de niveau ligne allant vers le XP800. Vous pouvez relier les sorties entre les capteurs actifs d'une guitare acoustique, les claviers, les
boîtes à rythmes, les lecteurs de CD/MP3/CASSETTE et autres appareils ayant ici des
sorties ligne.
2. Sélecteur Low-Z/Hi-Z – Ce commutateur modifie l'impédance d'entrée du jack ¼” de la
voie 3 d'impédance faible (Low-Z), pour les équipements à niveau de ligne, à l'impédance élevée (Hi-Z) pour les instruments électriques munis de capteurs.
3. Commutateur MIC/LINE (voies 1,2 et 4) - La MIC fait passer le gain des deux jacks d'entrée
au niveau de MIC. La position LINE réduit le gain des deux prises jack à partir de 26dB
jusqu'au niveau ligne.
4. Entrée Stage XPD1 SANS FIL*– Relie le récepteur USB numérique sans fil Samson Stage
XPD1 disponible en option à cette entrée. Le récepteur sans fil tire son alimentation
du XP800, et donc, l'alimentation électrique supplémentaire est inutile. L'entrée
WIRELESS (sans fil) est acheminée vers le réglage de LEVEL (niveau) de la voie 4.
Remarque:
Le connecteur USB n’est destiné qu’au récepteur Stage XPD1. Le
connecteur n’est pas conçu pour recharger les smartphones, tablettes ni autres appareils similaires.
5. Boutons de réglage de l'égaliseur
HAUTE Fréquence – Le bouton HIGH règle la valeur des aigus appliquée à chaque voie.
La réponse de la voie dans les hautes fréquences est plate lorsque ce bouton est au
centre (à midi). Tournez-le vers la droite ou la gauche pour accentuer ou atténuer de +/15 dB les fréquences supérieures à 10 kHz.
26
Page 27

Disposition de la console de mixage
BASSE Fréquence – Le bouton LOW règle la valeur des graves appliquée à chaque voie.
La réponse dans les basses fréquences de la voie est plate lorsque ce bouton est au
centre (à midi). Tourner le bouton vers la droite accentuera la réponse basses fréquences
de la voie, au-dessous de 100Hz, de 15dB; à l'inverse, le tourner vers la gauche atténuera la réponse basses fréquences de 15dB.
6. Sélecteur EFFECTS - Servez-vous du sélecteur EFFECTS pour ajouter un effet à une entrée
Mic ou Ligne sur l'une des quatre premières voies d'entrée, quelle qu'elle soit. Tourner le
bouton vers la droite augmente le niveau du signal envoyé au bus d'effets.
7. Boutons LEVEL - Ce bouton règle le niveau d'ensemble de la voie d'entrée.
REMARQUE: Pour atténuer le bruit, positionnez au minimum les réglages de LEVEL
(Niveau) sur l'une des voies inutilisées.
8. Jacks d'entrée de voies stéréo (voies 5/6, 7/8) - Pour les entrées stéréo, utilisez l'entrée
L pour relier la voie de gauche et l'entrée R pour relier la voie de droite. Servez-vous de
ces entrées pour brancher des micros à haute impédance, des synthétiseurs, des boîtes
à rythmes, des lecteurs MP3, platines CD, magnétophones ou tout autre dispositif à
entrée de ligne. Le XP800 présente des connecteurs de casque ¼”, de casque
des connecteurs RCA.
9. Jacks MONITOR OUT (Sortie Monitor) - Le signal présent sur les jacks SORTIE MONITOR
est envoyé depuis le bouton de réglage de niveau MONITOR, alimenté par les voies
d'entrée. Le réglage MASTER n'a aucun effet sur le signal de SORTIE MONITOR. Cette
sortie peut être utilisée pour envoyer le mix vers les enceintes amplifiées pour les utiliser
comme enceintes de monitoring de scène ou comme enceintes de sonorisation supplémentaires pour étendre la couverture du système.
10. Connecteur SUB OUT – Cette sortie toute plage sert à envoyer le mix principal vers un
caisson de basses. Le signal présent au niveau de ce connecteur est celui qui suit le
régulateur de niveau de MASTER.
11. Jack FOOT SW – Connectez une pédale à ce jack pour allumer ou couper les effets numériques intégrés.
12. Jacks SPEAKER OUT (Sortie Enceintes) – Deux jacks de sortie alimentés en ¼” utilisés
pour brancher les enceintes de gauche et de droite. Branchez les enceintes à l'aide des
câbles d'enceintes joints à la livraison.
ATTENTION: La charge d'impédance totale de chaque côté de l'amplificateur ne doit
pas être inférieure à 8Ohms. Ne pas relier d'enceintes supplémentaires à la console de
mixage/l'amplificateur du XP800.
13. Entrée AC (secteur) – Branchez ici le gros câble de secteur CEI à trois broches joint à la
livraison.
14. Interrupteur POWER (Marche/Arrêt) - À l'aide de l'interrupteur Marche/Arrêt, mettre le
XP800 en marche ou à l'arrêt. Il s'allume en rouge lorsque l'appareil est sur MARCHE et
qu'il est alimenté en courant.
15. Bouton de réglage MONITOR - Le réglage de niveau MONITOR (Monitoring) sert à régler le
niveau global envoyé à la SORTIE MONITOR.
16. Témoin d'appariement – Affiche le statut Bluetooth du système XP800.
17. Bouton d'appariement – Appuyez sur ce bouton afin d'apparier un dispositif audio
Bluetooth en mode Découverte.
¹
/
8
”, et
ENGLISH
FRANÇAISDEUTSCHEESPAÑOLITALIANO
XP800 • Système de sonorisation portable
27
Page 28

Disposition de la console de mixage
18. Bouton d'envoi d'effets SEND - Le bouton SEND sert à régler la quantité totale d'effets
ajoutés au bus master.
19. Sélecteur du Programme d'effets (PROG) - Ce bouton sert à sélectionner l'un des 16 programmes d'effets bits du DSP.
20. Bouton MASTER - Le bouton de volume MASTER (volume principal) règle le niveau de
sortie global. Ce bouton détermine le niveau final du signal de sortie. Les signaux partant de l'ensemble des voies sont acheminés ici immédiatement avant d'être réacheminés vers les amplificateurs de puissance intégrés et les jacks de sortie de haut-parleurs
de gauche et de droite.
21. Indicateurs de mesure LED - Cet indicateur à barres à six segments donne le niveau
de sortie du XP800. Pour un rapport signal/bruit optimum, positionnez le réglage de
VOLUME de telle sorte que le matériau du programme soit habituellement situé entre +3
et +6VU, avec des excursions occasionnelles, mais non permanentes, vers le segment
“LIMITER” (Limiteur) rouge.
22. Sélecteur SPEECH/MUSIC - Le sélecteur SPEECH/MUSIC sert à modifier la réponse en fréquence globale, ou contour sonore, de la sono XP800. Si vous vous en servez principalement pour la musique, enfoncez le sélecteur pour choisir la courbe de réponse MUSIC.
Si vous vous en servez principalement pour le discours parlé, laissez le sélecteur en
position haute pour choisir la courbe de réponse SPEECH (Parole).
23. Interrupteur PHANTOM - Le XP800 est équipé d'une alimentation fantôme intégrée pour
faire fonctionner les micros à condensateur. Lorsque cet interrupteur est enclenché,
le témoin LED s'allume pour signaler que l'alimentation fantôme est présente sur les
préamplis des micros.
REMARQUE IMPORTANTE: Pour éviter un fort claquement, bien réduire le réglage de
niveau MASTER (principal) avant de brancher ou de débrancher les câbles mic lorsque
l'alimentation fantôme est activée.
28
Page 29

Appariement avec un dispositif Bluetooth
Bluetooth® est une technologie de communication sans fil permettant de connecter toute une série
de dispositifs. Le XP800 utilise Bluetooth pour lire des morceaux de grande qualité acoustique
depuis un dispositif Bluetooth, et ce sans utiliser de câbles. Si vous souhaitez utiliser votre
dispositif avec le XP800, vous devez préalablement l'apparier.
1. Réduisez tous les réglages de NIVEAU (LEVEL) à fond en les mettant à 0.
2. Lorsque le XP800 et votre dispositif Bluetooth sont en marche ; appuyez sur la
touche d'appariement (PAIR) sur le panneau supérieur de la console de mixage du
XP800 pour que votre enceinte soit détectée. Le témoin Bluetooth bleu clignotera
lentement.
3. Dans les paramètres de votre dispositif Bluetooth, activez l'option "détecter les dispositifs
disponibles".
4. Choisissez le dispositif "Samson XP800" dans la liste des dispositifs Bluetooth.
5. Si votre appareil demande d'entrer une clé d'accès, entrez 0000 (quatre zéros) et appuyez
sur OK. Certains dispositifs peuvent vous demander d'accepter la connexion.
6. Une fois la connexion établie entre le XP800 et votre appareil, l'indicateur Bluetooth se
met à clignoter rapidement en bleu.
7. L'enceinte du XP800 indique que l'appariement a été effectué lorsque le témoin bleu
cesse de clignoter pour s'allumer en continu. Vous pouvez à présent passer un signal
audio de votre dispositif sur les enceintes du XP800.
8. Augmentez le volume de votre dispositif Bluetooth, jouez un morceau, puis augmentez
doucement le NIVEAU du canal 7/8 BLUETOOTH du XP800 jusqu'à ce que vous ayez
atteint le niveau recherché.
®
ENGLISH
FRANÇAISDEUTSCHEESPAÑOLITALIANO
XP800 • Système de sonorisation portable
29
Page 30

Installation du XP800
Sortez tous les composants du système du carton de livraison et conservez tous les emballages pour le cas où vous auriez à renvoyer votre appareil au S.A.V.
Retirez la console de mixage en faisant tourner la vis quart-de-tour en sens horaire vers la
position RELEASE (LIBÉRATION).
LOCK
RELEASE
Tenez bien la console de mixage avec soin pour la retirer de l'enceinte.
Retirez le cache du compartiment à accessoires en tournant la vis quart-de-tour en
sens antihoraire vers la position RELEASE
(LIBÉRATION), puis retirez les câbles d'enceintes joints.
Remettez en place le panneau des accessoires en alignant le bas du panneau sur
les fentes. Vérifiez que la vis quart-de-tour
est bien sur RELEASE (LIBÉRATION) ;
ensuite, fermez le panneau et tournez la
vis quart-de-tour en sens horaire sur LOCK
(VERROUILLAGE).
30
Page 31

Installation du XP800
Posez les enceintes par terre ou sur des pieds.
Pour une couverture sonore maximale, le XP800
peut être utilisé avec une embase standard
d'enceinte de 13⁄8”. Essayez autant que possible
d’installer l'enceinte pour qu’elle soit au-dessus
de la tête des auditeurs. Faites attention à ce que
l'enceinte soit placée sur une surface stable pour
éviter les chutes. Lorsque vous posez l'enceinte
à même le sol ou lorsque l'enceinte se trouve
plus bas que les auditeurs, recourez à la position
d'angle de monitoring du XP800 qui permet de
projeter le son vers le haut, vers les auditeurs.
En vous servant d'un des câbles d'enceinte joints à la livraison, reliez la SORTIE D'ENCEINTE
GAUCHE (SPEAKER OUT) de la console de mixage au connecteur d'entrée de l'enceinte
gauche. Ensuite, servez-vous du deuxième câble d'enceinte joint à la livraison pour relier la
SORTIE D'ENCEINTE DROITE au connecteur d'entrée de l'enceinte droite.
ENGLISH
FRANÇAISDEUTSCHEESPAÑOLITALIANO
XP800 • Système de sonorisation portable
31
Page 32

Démarrage rapide
1. Vérifiez que l'interrupteur Marche/Arrêt du XP800 est bien sur ARRÊT.
2. Si les enceintes ne sont pas connectées, raccordez les fils des enceintes comme indiqué
au paragraphe précédent.
3. Tournez chacun des réglages de NIVEAU de voie et de volume PRINCIPAL (LEVEL et
MASTER) à fond sur “0”.
4. Ensuite, branchez une extrémité du câble d'alimentation joint à l'entrée de courant de la
table de mixage du XP800 et l'autre sur une prise de secteur à prise de terre.
5. Branchez vos micros au moyen de câbles XLR standard, vos instruments au moyen de
câbles Jack ¼” (6,35mm), et le lecteur MP3 par un câble de
jacks correspondants de la table de mixage.
¹
/
8
” (3,175mm) dans les
Microphone dynamique
SIGNAL
Guitare électrique
acoustique
SIGNAL
Clavier
SIGNAL
SIGNAL
Armoires haut-parleurs XP800
Subwoofer
actif
SIGNAL
SIGNAL
SIGNAL
6. Mettez en marche tous les équipements raccordés au XP800, puis mettez sur MARCHE
l'interrupteur Marche/Arrêt du XP800.
7. Augmentez le réglage de niveau de volume PRINCIPAL (MASTER) jusqu'aux trois quarts.
8. Commencez à parler ou à jouer d'un instrument sur la voie 1 tout en faisant varier lente-
ment le réglage de NIVEAU (LEVEL) jusqu'à ce que le niveau désiré soit atteint. Faites
de même pour chaque voie que vous utilisez.
32
Page 33

Conguration rapide du XP800
9. Si vous remarquez que le témoin LIMITEUR (LIMITER) s'allume en continu, réduire le
volume PRINCIPAL (MASTER) pour que le témoin ne s'allume qu'occasionnellement
lorsque les morceaux sont forts.
10. Pour donner de la profondeur au mélange ou lisser les voix, vous pouvez appliquer des
effets comme la réverbération sur les voies 1 à 4. Pour ce faire, appuyez sur le bouton
EFFECTS de la (des) voie(s) à laquelle (auxquelles) vous voudriez ajouter l'effet.
11. Montez lentement le bouton d'ENVOI des effets (SEND) jusqu'à obtenir le son recherché.
12. Pour modifier la caractéristique tonale du signal, vous pouvez ajuster les réglages de
LOW (graves) et HIGH (aigus). Si vous trouvez le signal audio trop lourd, vous voudrez
peut-être réduire le réglage de LOW (graves). Si vous estimez que le signal audio est
terne, vous pouvez augmenter le réglage de HIGH (aigus). Il n'y a pas de bonne ni de
mauvaise méthode pour égaliser un son. Vous devrez écouter pour savoir quel est l'effet
acoustique du mélange dans la salle et affiner le réglage à votre convenance.
ENGLISH
FRANÇAISDEUTSCHEESPAÑOLITALIANO
XP800 • Système de sonorisation portable
33
Page 34

Pour appliquer des effets
Le XP800 présente des effets numériques 24 bits intégrés de qualité supérieure que vous
pouvez ajouter aux voies 1 à 4. Vous pouvez utiliser des effets comme la temporisation ou la réverbération pour améliorer les voix ou l'ambiance au mixage en suivant les phases ci-dessous:
1. Branchez un micro ou un instrument sur la voie désirée, puis réglez le volume et l'égaliseur à votre convenance.
2. Utilisez le sélecteur de Programme de Réverbération pour choisir l'un des dix effets numériques intégrés.
3. Augmentez le niveau des EFFECTS de la voie à laquelle vous voulez ajouter l'effet numérique.
4. Augmentez le réglage du niveau principal d'ENVOI des effets (SEND) pour appliquer la
valeur de l'effet désiré.
Éviter l'effet Larsen
Le Larsen est ce bruit strident et désagréable qui se produit lorsque le son de l'enceinte est
capté par le micro. Le son est alors réamplifié dans l'enceinte, et ainsi de suite. Suivez ces
étapes pour minimiser le risque d'effet Larsen:
• Évitez d'orienter le micro en direction des enceintes. En général, il est recommandé
de placer le micro derrière l'enceinte. Ceci permet de profiter des caractéristiques
directionnelles de l'enceinte et du micro.
• Éloignez le micro le plus possible des enceintes. Ceci assure une isolation entre
l'enceinte et le micro, ce qui vous permettra d'augmenter la sortie du XP800.
• Placez le micro le plus près possible de la source sonore. Le micro capte ainsi plus de
sons directs, ce qui vous permettra de réduire le contrôle du gain d'entrée du micro.
• Réduisez le NIVEAU PRINCIPAL (MASTER LEVEL) du système XP800.
34
Page 35

Système sans l de scène XPD1 (en option)
ENGLISH
Branchez le récepteur à port USB
RXD1 dans le jack USB de Voie 4
marqué WIRELESS (SANS FIL).
Tournez à fond en sens inverse
horaire le bouton de NIVEAU de
voie 4 situé sur le XP800 jusqu'à 0,
puis mettez l'interrupteur MARCHE/
ARRÊT (POWER) du XP800 sur
MARCHE.
Sur l'émetteur portable sans fil,
introduisez un jeu de piles AA (LR6)
neuves dans le logement à piles de
l'émetteur, en veillant à bien respecter les
repères de polarité.
Mettez l'émetteur en Marche en appuyant
sur l'interrupteur Marche/Arrêt et en le
maintenant enfoncé; le témoin LED s'allu-
mera en orange.
FRANÇAISDEUTSCHEESPAÑOLITALIANO
XP800 • Système de sonorisation portable
35
Page 36

Système sans l de scène XPD1 (en option)
Si l'émetteur et le récepteur portatifs n'ont
pas été auparavant appariés, appuyez sur le
bouton du récepteur RXD1 et maintenez-le
enfoncé sur plus de 5 secondes jusqu'à ce
qu'il se mette à clignoter.
Augmentez le réglage du NIVEAU
PRINCIPAL (MASTER LEVEL), puis
parlez ou chantez dans le micro à un
niveau normal sur scène en augmentant
le réglage de NIVEAU de la Voie 4 jusqu'à
ce que vous parveniez au niveau désiré.
Appuyez sur le bouton Marche/Arrêt de
l'émetteur portatif et maintenez-le enfoncé
plus de 5 secondes. Ceci fera passer les
deux éléments en mode Appariement.
Une fois que l'émetteur et le récepteur
communiquent et se synchronisent,
les témoins LED des deux appareils
s'allumeront en continu et seront prêts à
fonctionner.
Si vous entendez une distorsion, contrôlez
le témoin LED du LIMITEUR. S'il est allumé
en rouge, réduisez le NIVEAU (LEVEL) de
la voie 4 sur le XP800 jusqu'à ce qu'il ne
s'allume plus que par moments pendant les
sons puissants. Si vous entendez toujours
une distorsion, dévissez le corps du micro
et servez-vous du tournevis en plastique
joint à la livraison pour tourner lentement le
réglage du Gain de l'émetteur HXD1 en sens
inverse horaire jusqu'à ce que la distorsion
disparaisse.
À l'inverse, si vous entendez un faible
signal plein de bruit au volume désiré (le
réglage SANS FIL du XP800 étant à fond
en sens horaire), servez-vous du tournevis
en plastique joint à la livraison pour tourner
lentement le réglage du Gain de l'émetteur
HXD1 en sens horaire en attendant que le
signal atteigne un niveau acceptable.
36
Page 37

Spécications
Amplificateur
Puissance (0,5% THD à
1KHz)
Réponse en fréquence 20 Hz - 20 kHz
Consommation d'énergie 100-240Vac, 50/60Hz, 450W
Température de fonctionnement 14° F (-10° C) to 104° F (40° C)
Basse fréquence Capteur de graves de 8" (20,32cm)
Haute fréquence Cône d'aigus de 1"
Entrées XLR, ¼” symétrique, RCA, stéréo de 3,5 mm, USB
Sorties
Niveau de sortie maximum
(0,5% T.H.D à 1KHz)
Alimentation fantôme +15Vcc, tension fantôme fixe
Égaliseur des
voies d'entrée
Sélecteur Speech/Music
Effets
Témoins
Bluetooth
Technique de modulation FHSS (GFSK, π/4-DQPSK, 8-DPSK)
Dimensions 20.1’’ x 10.6’’ x 19’’ (l x p x h)
Poids 41.5Ib / 18,8kg
®
Haut par paliers de 10kHz ±15dB
Bas par paliers de 100Hz ±15dB
800W à 8 Ω (400W par voie) en pointe
400 W à 8 Ω (200W par voie) en moyenne
Enceintes
Mélangeur
sans fil
MONITOR ¼”, SUB OUT ¼”, sortie enceinte ¼”
+22dBu (MONITORING gauche/droite & SUB OUT) à
10KΩ
167Hz, 3dB/octave
16 préenregistrés, 24-bit DSP
Niveau à 5 points, LIMITER, PHANTOM
Bluetooth 3.0, A2DP
Dimensions et poids
510mm x 270mm x 485mm (l x p x h)
ENGLISH
FRANÇAISDEUTSCHEESPAÑOLITALIANO
Chez Samson, nous améliorons nos produits en permanence, certaines images et
spécifications sont donc susceptibles de changer sans notification préalable.
XP800 • Système de sonorisation portable
37
Page 38

Die Wortmarke Bluetooth® und ihre Logos sind eingetragene Markenzeichen der
Bluetooth SIG, Inc.; jede Verwendung solcher Marken durch Samson Technologies ist
lizenziert. Andere Marken und Handelsnamen sind Eigentum ihrer jeweiligen Inhaber."
38
Page 39

Wichtige Sicherheitshinweise
ATTENTION
RISQUE DE CHOC ÉLECTRIQUE –
NE PAS OUVRIR
Das von einem gleichseitigen Dreieck umschlossene Blitz-Pfeil-Symbol
soll den Anwender darauf hinweisen, dass nicht isolierte „gefährliche
Spannung“ im Gerätegehäuse vorhanden und u.U. ausreichend hoch
ist, um ein Stromschlagrisiko zu bergen.
Das von einem gleichseitigen Dreieck umschlossene Ausrufezeichen soll
für den Nutzer wichtige Hinweise zu Betrieb und Wartung des Geräts
hervorheben.
ENGLISH
Um einem Stromschlag vorzubeugen, schließen Sie das Gerät nicht an
VORSICHT
das Stromnetz an, wenn das Gitter entfernt ist.
WARNUNG: UM STROMSCHLAG ZU VERMEIDEN, NEHMEN SIE DIE FRONTBLENDE
UND RÜCKWAND NICHT AB – IM INNEREN BEFINDEN SICH KEINE TEILE, DIE
VON BENUTZERN GEWARTET ODER REPARIERT WERDEN KÖNNEN. ÜBERLASSEN
SIE WARTUNGS- UND REPARATURARBEITEN ENTSPRECHEND QUALIFIZIERTEN
FACHKRÄFTEN.
Entsorgen Sie dieses Gerät nach Ende seiner Nutzungsdauer bitte nicht als Restmüll. Nutzen
Sie bitte die in Ihrer Region bestehenden Entsorgungsmöglichkeiten (Sammelsystem) für
Elektronikprodukte. Mit einer fachgerechten Entsorgung ermöglichen Sie ordnungsgemäße
Handhabung, Aufbereitung und Wiederverwendung gemäß den gesetzlichen Bestimmungen.
Privathaushalte in den 28 Mitgliedsstaaten der EU, in der Schweiz und in Norwegen können
gebrauchte elektronische Geräte kostenlos in den dafür vorgesehenen Sammelstellen oder beim
Einzelhändler (bei Kauf eines ähnlichen Neugeräts) abgeben.
In allen anderen als den genannten Ländern wenden Sie sich zwecks ordnungsgemäßer Entsorgung bitte
an die für Ihren Ort zuständige Behörde.
So gehen Sie sicher, dass das von Ihnen entsorgte Produkt ordnungsgemäß gehandhabt, aufgearbeitet
oder recycelt wird, und leisten einen wichtigen Beitrag zum Schutz von Umwelt und Gesundheit.
FRANÇAISDEUTSCHEESPAÑOLITALIANO
XP800 • Mobiles PA-System
39
Page 40

Wichtige Sicherheitshinweise
1. Lesen Sie die vorliegende Anleitung.
2. Bewahren Sie diese Anleitung auf.
3. Beachten Sie sämtliche Warnhinweise.
4. Befolgen Sie sämtliche Anweisungen.
5. Verwenden Sie dieses Gerät nicht in Wassernähe.
6. Reinigen Sie ausschließlich mit einem trockenen Tuch.
7. Blockieren Sie keine Entlüftungsöffnungen. Stellen Sie das Gerät den Anweisungen des Her-
stellers entsprechend auf.
8. Stellen Sie das Gerät nicht in der Nähe von Wärmequellen wie Heizstrahlern, Wärmespeichern,
Öfen oder anderen Wärme erzeugenden Geräten (auch keine Verstärker) auf.
9. Beeinträchtigen Sie auf keinen Fall die Schutzfunktion des Schutzkontaktsteckers oder ge-
polten Steckers. Ein polarisierter Stecker besitzt zwei Blätter, von denen eines breiter als das
andere ist. Ein Schutzkontaktstecker besitzt zwei Kontakte sowie eine Erdungszinke. Der breitere Kontakt bzw. die Erdungszinke dienen der Sicherheit des Benutzers. Falls der mitgelieferte
Stecker nicht in die Steckdose an Ihrem Standort passt, wenden Sie sich an einen qualifizierten
Elektriker, damit dieser die Steckdose durch eine neue ersetzen kann.
10. Verhindern Sie, dass auf das Netzkabel getreten oder dieses eingeklemmt werden kann. Das gilt
insbesondere für den Bereich von Stecker, Steckdose sowie für die Stelle, an dem das Kabel
aus dem Gerät heraustritt.
11. Verwenden Sie Aufbaugeräte und Zubehörprodukte nur dann, wenn der Hersteller diese spezi-
fiziert hat.
12. Verwenden Sie es nur mit dem Wagen, Stativ, Ständer oder Tisch, der vom Her-
steller freigegeben wurde oder zum Lieferumfang des Geräts gehört. Benutzen
Sie den Wagen besonders vorsichtig, wenn Sie ihn samt Gerät verschieben,
um Verletzungen durch ein Umstürzen oder Kippen des Wagens zu vermeiden.
13. Ziehen Sie bei einem Gewitter den Netzstecker des Geräts oder wenn das Gerät
für längere Zeit nicht genutzt wird.
14. Überlassen Sie Wartung und Reparaturen ausschließlich entsprechend qualifizierten Fachkräf-
ten. Bei Schäden am Gerät ist eine Wartung und ggf. Reparatur erforderlich, z.B. bei Beschädigung des Stromkabels oder Steckers, verschütteter Flüssigkeit oder in das Gerät gefallenen
Gegenständen; außerdem auch dann, wenn das Gerät Regen oder Feuchtigkeit ausgesetzt war,
nicht ordnungsgemäß funktioniert oder fallengelassen wurde.
15. Auf das im Folgenden beschriebene Gerät darf Flüssigkeit weder tropfen noch spritzen. Daher
dürfen keine mit Flüssigkeit gefüllten Gefäße (z.B. eine Vase) auf das Gerät gestellt werden.
16. Vorsicht: Um einen Stromschlag zu verhindern, führen Sie den breiten Kontakt des Steckers
vollständig in die breite Öffnung ein.
17. Bitte achten Sie darauf, dass die Umgebung der gesamten Einheit stets gut belüftet ist.
18. EIN/AUS-SCHALTER: Wenn ein Gerät einen Ein/Aus-Schalter besitzt, unterbricht dieser NICHT
den Kontakt zur Stromversorgung.
19. HAUPTTRENNSCHALTER: Der Stecker muss jederzeit verwendbar sein. Bei Befestigung im
Rack oder Einbau an Orten, an denen kein Steckdosenzugang möglich ist, muss der Schalter
für die Hauptstromversorgung mit allen Kontakten mit einer Kontakttrennung von mindestens
3mm pro Pol in die Elektrik des Racks oder Gebäudes integriert werden.
40
Page 41

Wichtige Sicherheitshinweise
Hinweis der FCC (Federal Communications Commission, USA)
1. Dieses Gerät erfüllt Teil 15 der FCC-Vorschriften. Der Betrieb unterliegt den folgenden beiden
Bedingungen:
(1) Dieses Gerät darf keine schädlichen Interferenzen verursachen.
(2) Dieses Gerät muss alle empfangenen Interferenzen aufnehmen, einschließlich Interferenzen,
die unerwünschten Betrieb verursachen können.
2. Veränderungen oder Modifikationen, die von der für Compliance zuständigen Stelle nicht aus-
drücklich genehmigt sind, können die Berechtigung des Benutzers zum Betrieb der Ausrüstung
unwirksam werden lassen.
FCC-Erklärung
Dieses Gerät wurde getestet und hält die Grenzwerte für digitale Geräte der Klasse B gemäß
FCC-Richtlinien Abschnitt 15 ein. Diese Grenzen gewährleisten bei der Installation in Wohngebieten einen ausreichenden Schutz vor Störungen.
Dieses Gerät erzeugt, gebraucht und kann Radiofrequenzen ausstrahlen. Wird das Gerät abweichend von den Anweisungen dieses Handbuchs installiert bzw. verwendet, ist beim Betrieb von
Radio- und Fernsehgeräten mit Störungen zu rechnen. Der Hersteller übernimmt jedoch keine
Garantie für eine absolute Störungsfreiheit bei jeder Installation, da diese je nach Standort beeinträchtigt werden kann. Falls dieses Gerät Funkstörungen im Radio- oder Fersehempfang verursacht
(überprüfen Sie dies durch Ein- und Ausschalten des Geräts), können Sie diese Funkstörungen
möglicherweise wie folgt beheben:
• richten Sie das funkgestörte Gerät neu aus oder platzieren Sie es in einem anderen Bereich;
• vergrößern Sie die Entfernung zwischen diesem Gerät und dem funkgestörten Gerät;
• verbinden Sie dieses Gerät mit einem Stromkreis, der unabhängig vom Stromkreis des funkge-
störten Geräts ist;
• wenden Sie sich an Ihre Vertriebsstelle oder an einen erfahrenen Radio-/Fernsehtechniker.
ENGLISH
FRANÇAISDEUTSCHEESPAÑOLITALIANO
FCC Radiation Exposure Statement
Dieses Gerät erfüllt die Bedingungen der FCC RF Radiation Exposure Limits auch unter unkontrollierbaren Umweltbedingungen. Dieses Gerät sollte so installiert und in Betrieb gesetzt werden, dass
ein Mindestabstand von 20cm zwischen dem Gerät und Ihrem Körper gewährleistet ist.
RF Warning Statement
Dieses Gerät erfüllt die allgemeinen Richtlinien hinsichtlich der RF Funkfrequenzbelastung. Das
Gerät kann ohne Beschränkung tragbar eingesetzt werden.
Das Gerät entspricht den Richtlinien RSS-310 der Industry Canada. Die Inbetriebnahme unterliegt
der Bedingung, dass das Gerät keine schädlichen Interferenzen verursacht.
Hiermit Samson Technologies Corp., erklärt, dass dieses XP800 in Übereinstimmung
mit den grundlegenden Anforderungen und den anderen relevanten Vorschriften der
Richtlinie 1999/5 / EG . Die Konformitätserklärung kann abgerufen werden unter :
http://www.samsontech.com/samson/products/portable-pa/expedition/xp800/#downloads-and-manuals-tab
XP800 • Mobiles PA-System
41
Page 42

Einführung
Vielen Dank, dass Sie die Expedition XP800 gekauft haben, das PORTABLE PA-SYSTEM von
Samson! Das XP800 bietet die optimale Balance zwischen mächtigem, faszinierendem Klang und
Mobilität. Das System ist so leicht, dass es von einer Person getragen werden kann, und lässt sich
als einzelne Einheit verpacken, die verblüffend einfach zu transportieren ist: sogar im Kofferraum
eines Kompaktwagens.
Das XP800 besteht aus zwei 8-Zoll-Zweiwege-Lautsprechergehäusen, einem mit 800W betriebenen Acht-Kanal-Mixer und zwei Lautsprecherkabeln. Der mit einem Netzanschluss versehene Mixer
lässt sich leicht in einem der Lautsprechergehäuse verstauen. Zudem gibt es für Lautsprecher und
Stromkabel ein Zubehörfach hinter dem zweiten Gehäuse. Die beiden Lautsprecher verfügen über
unser einzigartiges Slide-and-Lock-Design für den Zusammenbau. Damit kann das gesamte System
zu einer Einheit von der Größe eines Handgepäckstücks zusammengepackt werden.
Der Acht-Kanal-Mixer kann auch eingesetzt werden, wenn er in der Rückseite des Lautsprechers
verstaut oder zur Nutzung am Desktop vom Lautsprecher abgenommen wurde. Er bietet
vierEingänge für Mikrofone sowie zwei Eingänge für die Übertragung von Stereosignalen wie denen
eines Keyboards oder eines MP3-Players. Ferner gibt es einen integrierten 24-Bit-Prozessor für
digitale Effekte. Damit können Sie Ihre Stimme oder Instrumente in Studioqualität bearbeiten. Für
das Abspielen von Musik bietet das XP800 kabellose Bluetooth®-Konnektivität, um Inhalte von
Ihrem Smartphone, Tablet oder Computer zu streamen. Darüber hinaus bietet der Mixer dank des
hocheffizienten, leichten Klasse-D-Verstärkers ein robustes Output, mit insgesamt 800W.
Das XP800 verwendet ein abgestimmtes Lautsprechersystem mit Zweiwege-Gehäusen. Darin sitzen proprietäre 8-Zoll-Woofer und 1-Zoll-Hochfrequenztreiber in einem Horn mit einem vertikalen
Abstrahlwinkel von 90 x 60 . Um ein größeres Publikum zu beschallen, können die XP800Lautsprecher mithilfe der integrierten Befestigungsstangen durch Stecksockel auf herkömmliche
Lautsprecherständer montiert werden. Für die Konstruktion des XP800 wurde robuster ABS (stoßfester Kunststoff) verwendet, der für geringes Gewicht sorgt und für hohe Widerstandsfähigkeit
sorgt.
Das XP800 ist die perfekte Lösung für Ihre Soloperformance, für Garagenband-Proben, kleine
Auftritte auf Cocktailpartys, Präsentationen in Konferenzräumen oder während des Unterrichts im
Klassenzimmer. In dieser Anleitung wird der Funktionsumfang des PA-Systems XP800 detailliert
beschrieben, Einrichtung und Bedienung werden Schritt für Schritt erklärt. Ebenfalls enthalten
sind die ausführlichen Spezifikationen.
Bewahren Sie die nachstehende Anleitung bitte sorgfältig auf, am Besten zusammen mit Ihrem
Kaufbeleg.
Seriennummer: ____________________________________________
Kaufdatum: __________________________________________
Händler: _____________________________________________
Wenn Sie Ihr XP800 mit angemessener Sorgfalt behandeln, funktioniert sie jahrelang problemlos. Sollte Ihr XP800 gewartet werden müssen, besorgen Sie sich vor Senden des Geräts an
Samson bitte eine Return Authorization (RA) Number (Rücksendeberechtigungsnummer). Ohne
eine solche Nummer müssen wir das eingeschickte Gerät leider zurückweisen. Sie können sich
telefonisch unter +1-800-3SAMSON (+1-800-372-6766) an Samson wenden. Erfragen Sie eine
Umtauschberechtigungsnummer und schicken Sie anschließend Ihr Gerät ein. Bitte verwenden Sie
zum Einschicken möglichst Originalkarton und -verpackungsmaterial. Wenn Sie Ihr XP800 außerhalb der USA erworben haben, wenden Sie sich bitte an einen Händler in Ihrer Umgebung. Dort
erhalten Sie alle für Garantie, Wartung und Reparaturen erforderlichen Informationen.
42
Page 43

Leistungsmerkmale
Das Samson Expedition XP800 ist ein kompaktes mobiles PA-System mit dualen ZweiwegeLautsprechern, zugehörigem Mixer und 800-Watt-Verstärker. Hier einige der wichtigsten
Eigenschaften:
• Leicht und so konzipiert, dass sich sämtliche Teile in einem, gut zu transportierenden
Gehäuse miteinander verbinden lassen.
• Der Mixer wird in einem der Lautsprechergehäuse untergebracht; das zweite Gehäuse verfügt
über ein Zubehörfach für die Aufbewahrung der Lautsprecherkabel, Mikrofone usw.
• Bei den Lautsprechern handelt es sich um abgestimmte, belüftete Zweiwege-Gehäuse mit
8-Zoll-Woofern für einen satten Bass, ergänzt durch einen 1-Zoll-Hochfrequenztreiber im
passend konstruierten Horn mit 60 ×90-Abstrahlwinkel. Das Ergebnis ist ein reiner, klarer
Klang.
• Der leichte interne 2x400-Watt-Leistungsverstärker produziert einen kraftvollen Stereosound.
• Der Mixer des XP800 kann vom Lautsprecher abgenommen und auf einen Tisch gestellt wer-
den. Dank des Kickständers kann der Mixer in einem ergonomisch korrekten Winkel positioniert werden. Eine weitere Befestigungsmöglichkeit am Mikrofonständer bietet der optionale
SMS308-Adapter.
• Der Achtkanal-Mixer bietet vier Mic/Line-Eingänge, an die Mikrofone oder Line-Pegel-Signale
angeschlossen werden können, außerdem bieten drei Stereoeingänge Anschlussmöglichkeiten
für Keyboards, Drum Machines und MP3-Playern.
• Jeder Kanal verfügt über Steuerelemente zur Bass- und Höhensteuerung, mit denen der Klang
jedes Eingangs passend abgestimmt werden kann.
• Für einen vollen Sound auf den ersten vier Kanälen können Sie aus 16 integrierten 24-Bit-
Digitaleffekten wählen.
• Dank Bluetooth®- Konnektivität kann Audio kabellos von Smartphones, Tablets oder
Computern gestreamt werden.
• Darüber hinaus erhöhen Subwoofer- und Monitorausgänge die Flexibilität des XP800-Mixers.
So können Sie Lautsprecher oder aktive Subwoofer mit externer Stromversorgung anschließen
und so das System zu erweitern.
ENGLISH
FRANÇAISDEUTSCHEESPAÑOLITALIANO
XP800 • Mobiles PA-System
43
Page 44

Mixer-Aufbau
1
3
5
6
7
42 8 1211 13
19
9 10
20 21
22
23
14
15
16
17
18
1. Kanaleingangsbuchsen (Kanäle 1 – 4)
MIC XLR-Verbindung – Verwenden Sie diese XLR(Cannon)-Buchsen, um Mikrofone mit geringer
Impedanz an die Mikrofon-Vorverstärker anzuschließen, die in das XP800 integriert sind.
LINE ¼-Zoll-Klinkenstecker: Mit diesen ¼-Zoll-Buchsen lassen sich Instrumente oder
Audioquellen mit Line-Pegel-Signalen an das XP800 anschließen. Auch die Outputs von
akustischen Gitarren mit aktiven Abnehmern sowie von Keyboards, Drum Machines, CD-/MP3Playern, Tonband-/Kassettenabspielern und weiteren Geräten mit Line-Pegel-Outputs können
Sie hier anschließen
2. Schalter Low-Z/Hi-Z: Dieser Schalter ändert die Eingangsimpedanz der 3 ¼-Zoll-Buchse von
niedriger Impedanz (Low-Z), für Line-Pegel-Geräte, auf hohe Impedanz (Hi-Z) für elektrische
Geräte mit Abnehmern.
3. Schalter MIC/LINE (Kanäle 1, 2 und 4): Die MIC-Position verändert die Verstärkerleistung (Gain)
beider Eingangsbuchsen auf MIC-Pegel. Die LINE-Position reduziert die Verstärkerleistung
(Gain) beider Eingangsbuchsen um 26dB auf Line-Pegel.
4. Eingang STAGE XPD1 WIRELESS: Verbindet den optionalen digitalen, kabellosen USB-Receiver
Samson Stage XPD1 mit diesem Eingang. Der kabellose Receiver bezieht seinen Strom aus
dem XP800, daher ist keine zusätzliche Stromversorgung nötig. Der Eingang WIRELESS wird
auf die LEVEL-Steuerung von Kanal4 geleitet. Hinweis:
Der USB Anschluss ist nur für den
Stage XPD1 Receiver vorgesehen. Der Anschluss ist nicht dafür ausgelegt, Smartphones,
Tablets oder ähnliche Geräte zu laden.
5. Equalizer-Drehregler
HIGH Frequency: Die Drehregler HIGH (Hochfrequenz) steuern das Ausmaß der Höhe, die auf
den jeweiligen Kanal angewendet wird. Der Hochfrequenzgang des Kanals ist flach, wenn der
Regler in der Mittelstellung (12:00 Uhr) eingerastet ist. Mit einer Rechtsdrehung des Reglers
steigt der Hochfrequenzgang des Kanals oberhalb von 10 kHz um 15 dB – eine Drehung nach
44
Page 45

Anordnung des Mixers
links reduziert den Hochfrequenzgang um 15 dB.
LOW Frequency: Der Drehregler LOW (Niedrigfrequenz) steuert den Bass, der auf den jeweiligen Kanal angewendet wird. Der Niedrigfrequenzgang des Kanals ist flach, wenn der Regler in
der Mittelstellung (12:00 Uhr) eingerastet ist. Mit einer Rechtsdrehung des Reglers steigt der
Niedrigfrequenzgang des Kanals unterhalb von 100 Hz um 15 dB – eine Drehung nach links
reduziert den Niedrigfrequenzgang um 15 dB.
6. Drehregler EFFECTS: Mit dem Drehregler EFFECTS kann ein Effekt auf ein Mikrofon oder einen
Line-Eingang auf jedem der ersten vier Eingangskanäle gelegt werden. Durch Drehen des
Reglers im Uhrzeigersinn wird der an den Effektebus gesandte Pegel erhöht.
7. Drehregler LEVEL: Dieser Drehregler bestimmt den Gesamtpegel des Eingangskanals.
HINWEIS: Zur Geräuschreduktion können LEVEL-Drehregler auf einen beliebigen ungenutzten
Kanal gestellt und auf die Mindeststufe gesetzt werden.
8. Stereokanal-Eingangsbuchsen (Kanäle 5/6, 7/8): Verwenden Sie für Stereoeingänge den Eingang
„L“, um den linken Kanal zu verbinden und den Eingang „R“, um den rechten Kanal zu verbinden. Verwenden Sie diese Eingänge, um Mikrofone mit hoher Impedanz, Synthesizer, Drum
Machines, MP3-, CD-, Tonband-/Kassettenabspielgeräte und alle sonstigen Line-Pegel-Geräte
anzuschließen. Das XP800 ist mit ¼-Zoll-Klinken-,
gestattet.
9. Buchsen MONITOR OUT: Das an den MONITOR OUT-Boxen anliegende Signal wird vom
Drehregler für die MONITOR-Pegelsteuerung ausgesandt. Dieser wiederum wird aus den
Eingangskanälen gespeist. Die Steuerung MASTER wirkt sich nicht auf das MONITOR OUTSignal aus. Dieses Output kann verwendet werden, um die Mischung an Lautsprecher mit
Stromversorgung zu senden, um Bühnenmonitore zu verwenden, oder als zusätzliche Front-ofHouse-Lautsprecher, um die Reichweite des Systems zu erhöhen.
10. Connector SUB OUT – Dieser Ausgang für das gesamte Spektrum wird dazu verwendet, den
Haupt-Mix an einen externen aktiven Subwoofer zu senden. Das an diesem Stecker anliegende
Signal ist das nach dem Regler für den MASTER-Pegel.
11. Buchse FOOT SW – Schließen Sie diese Buchse an einen Fußschalter an, um die integrierten
Digitaleffekte an- und auszuschalten.
12. Buchsen SPEAKER OUT – Zwei ¼-Zoll-Klinkenbuchsen mit Stromversorgung für den Anschluss
der linken und rechten Lautsprecher. Verwenden Sie die im Lieferumfang enthaltenen
Lautsprecherkabel, um die Lautsprecher zu verbinden.
ACHTUNG! Die Gesamtlast der Impedanz darf pro Verstärkerseite nicht unter 8 Ohm liegen.
Schließen Sie keine zusätzlichen Lautsprecher an den Mixer/Verstärker der XP800 an.
13. AC Input (Netzsteckereingang): Stecken Sie den Stecker des mitgelieferten dreiphasigen
Gerätekabels hier ein.
14. Schalter POWER: Verwenden Sie den POWER-Schalter, um die Stromversorgung der XP800 anoder auszuschalten. Der Schalter leuchtet rot, wenn die Einheit in der Stellung AN ist und mit
Strom versorgt wird.
15. Pegel-Drehregler MONITOR: Die MONITOR-Pegelsteuerung wird dazu verwendet, den
Gesamtpegel zu steuern, der auf MONITOR OUT geschickt wird.
16. Pairing Indicator (Anzeige der Gerätekopplung): Zeigt den Bluetooth-Status der XP800-Anlage.
¹
/
8
-Zoll-Klinken- und Cinch-Steckern aus-
ENGLISH
FRANÇAISDEUTSCHEESPAÑOLITALIANO
XP800 • Mobiles PA-System
45
Page 46

Anordnung des Mixers
17. Taste Pairing: Wenn Sie diese Taste drücken, wird der Modus „sichtbar“ aktiviert, um eine
Kopplung mit einem Bluetooth-Audiogerät zu ermöglichen.
18. Effekte – Drehregler SEND: Der Drehregler SEND wird dazu verwendet, die Gesamtzahl der
Effekte anzupassen, die dem Masterbus hinzugefügt werden.
19. Effekte – Programmwähler (PROG): Mit diesem Drehregler können Sie eines der 16 Programme
mit 24-Bit-DSP-Effekten wählen.
20. Drehregler MASTER: Der Lautstärke-Drehregler MASTER steuert den Gesamt-Ausgangspegel.
Dieser Drehregler bestimmt den Signalpegel der endgültigen Ausgabe. Signale aus allen
Kanälen werden hierhin geroutet, direkt bevor sie an die integrierten Leistungsverstärker und
die Ausgangsboxen für die linken und rechten Lautsprecher geleitet werden.
21. LED-Anzeigen des Aussteuerungsmessers: Dieser aus sechs Segmenten bestehende Riegel des
Aussteuerungsmessers zeigt den Ausgabepegel der XP800. Für ein optimales Signal-RauschVerhältnis stellen Sie VOLUME (den Lautstärkeregler) so ein, dass Programmmaterial normalerweise bei etwa +3 bis +6 vu liegt, mit gelegentlichem, aber nicht ständigem Aufleuchten
des roten LIMITER(Begrenzer)-Segments.
22. Schalter SPEECH/MUSIC: Mit dem Schalter SPEECH/MUSIC (Sprache/Musik) wird beim
XP800-Soundsystem der Gesamtfrequenzgang verändert oder die Kontur gestärkt. Falls Ihre
Anwendung vorrangig auf Musik ausgerichtet ist, drücken Sie den Schalter hinunter, um die
Frequenzgangkurve MUSIC auszuwählen. Falls Ihre Anwendung vorrangig auf gesprochene
Sprache ausgerichtet ist, lassen Sie den Schalter oben, um die Frequenzgangkurve SPEECH
auszuwählen.
23. Schalter PHANTOM: Das XP800 liefert auch Strom über eine integrierte Phantomspeisung, um
Kondensatormikrofone zu betreiben. Wenn der Schalter an ist, leuchtet die LED auf und zeigt,
dass auf den Mikrofon-Vorverstärkern nun Phantomstrom verfügbar ist.
WICHTIGER HINWEIS: Um ein Knallgeräusch zu vermeiden, regeln Sie unbedingt die MASTERPegelsteuerung herunter, bevor Sie die Mikrofonkabel ein- bzw. ausstöpseln, während die
Phantomspeisung noch aktiviert ist.
46
Page 47

Pairing (Kopplung) mit einem Bluetooth®-Gerät
Bluetooth® ist eine kabellose Kommunikationstechnik, mit der sich viele unterschiedliche Geräte
miteinander verbinden lassen. Die XP800 nutzt Bluetooth, um Audio in hoher Qualität von einem
Bluetooth-fähigen Gerät zu streamen; dafür sind keine Kabelverbindungen nötig. Bevor ein Gerät
zusammen mit dem XP800 funktioniert, muss es gekoppelt (paired) werden.
1. Drehen Sie alle Regler für Kanalpegel (LEVEL) gegen den Uhrzeigersinn herunter auf 0.
2. Das XP800 und das Bluetooth-Gerät müssen eingeschaltet sein; drücken Sie anschlie-
ßend auf die Taste PAIR auf dem oberen Panel des XP800-Mixers, um den Lautsprecher
sichtbar zu machen. Die Bluetooth-Anzeige blinkt langsam blau.
3. Setzen Sie das Bluetooth-Gerät im Einstellungsmenü auf „verfügbare Geräte finden“.
4. Wählen Sie aus der Bluetooth-Geräteliste das Gerät „Samson XP800“.
5. Falls Ihr Gerät ein Passwort anfordert, geben Sie die Ziffern 0000 (vier Nullen) ein und
drücken Sie auf OK). Manche Geräte fragen außerdem, ob Sie die Verbindung annehmen
möchten.
6. Während das XP800 sich mit Ihrem Gerät verbindet, blinkt die Bluetooth-Anzeige schnell
blau.
7. Die dauerhaft blaue Anzeige des XP800-Lautsprechers zeigt, dass das Pairing abgeschlossen ist. Jetzt können Sie Audio von Ihrem Gerät auf die XP800-Lautsprecher streamen.
8. Stellen Sie die Lautstärke Ihres Bluetooth-Gerätes an, spielen Sie Musik ab und erhöhen
Sie LEVEL (die Pegelkontrolle) von XP800-BLUETOOTH-Kanal 7/8 langsam , bis Sie den
gewünschten Pegel erreicht haben.
ENGLISH
FRANÇAISDEUTSCHEESPAÑOLITALIANO
XP800 • Mobiles PA-System
47
Page 48

Das XP800 einrichten
Packen Sie alle Systemkomponenten aus dem Versandkarton aus und heben Sie sämtliche
Verpackungsmaterialien auf, falls Ihre Gerät später für Wartungs- oder Reparaturarbeiten zurückgesandt werden muss.
Um den Mixer herauszunehmen, drehen Sie die große Schraube eine Vierteldrehung gegen den
Uhrzeigersinn in Richtung der Position RELEASE (freigeben).
LOCK
RELEASE
Entfernen Sie den Mixer vorsichtig vom Lautsprecher.
Entfernen Sie die Abdeckung des
Zubehörfaches, indem Sie die große Schraube
eine Vierteldrehung gegen den Uhrzeigersinn
drehen, in Richtung der Position RELEASE,
und entnehmen Sie die mitgelieferten
Lautsprecherkabel.
Bringen Sie das Zubehör-Element wieder an,
indem Sie die Unterseite der Platte an den
Schlitzen ausrichten. Achten Sie darauf, dass
die Vierteldrehschraube sich in der Position
RELEASE befindet; schließen Sie dann die
Platte und drehen Sie die Vierteldrehschraube
im Uhrzeigersinn auf LOCK (verschließen).
48
Page 49

Das XP800 einrichten
Positionieren Sie die Lautsprecher auf dem Boden
oder an Ständern.
Für maximale Schallabstrahlung kann das XP800
mit einem Standard-13⁄8-Zoll-Lautsprecherständer
verwendet werden. Der Lautsprecher sollte oberhalb
der Köpfe des Publikums positioniert sein. Seien
Sie vorsichtig, wenn Sie den Lautsprecher auf
einem Ständer platzieren: Dieser sollte sicher auf
einer ebenen und stabilen Fläche stehen, auf der
nicht umkippen kann. Wenn die Lautsprecher auf
dem Boden oder auf einer niedrigeren Höhe als
die Zuhörer eingesetzt werden, kann das XP800
in einem Monitorwinkel positioniert werden, um
den Sound nach oben, in Richtung der Zuhörer,
abzustrahlen.
Verwenden Sie die mitgelieferten Lautsprecherkabel, um die den Ausgang LEFT SPEAKER OUT
des Mixers mit dem Eingang des linken Lautsprechers. Nun verbinden Sie die Buchse RIGHT
SPEAKER OUT über das zweite mitgelieferte Lautsprecherkabel mit dem Eingang des rechten
Lautsprechers.
ENGLISH
FRANÇAISDEUTSCHEESPAÑOLITALIANO
XP800 • Mobiles PA-System
49
Page 50

Kurzanleitung
1. Achten Sie darauf, dass der Schalter POWER des XP800 auf OFF steht.
2. Falls die Lautsprecher nicht angeschlossen sind, verbinden Sie die Lautsprecherkabel wie im
vorigen Abschnitt beschrieben.
3. Drehen Sie alle Kanal-Lautstärkeregler für LEVEL und MASTER bis zum Anschlag gegen den
Uhrzeigersinn, auf die Position „0“.
4. Schließen Sie anschließend ein Ende des mitgelieferten Netzkabels an den Stromeingang des
XP800-Mixers an und das andere Ende an eine geerdete Wechselstrom-Steckdose.
5. Schließen Sie Ihre Mikrofone mit Standard-XLR-Kabeln, Instrumente mit ¼-2-Klinkensteckern
und MP3-Player mit
¹
/
8
-Zoll-Kabeln an die passenden Mixerbuchsen an.
Dynamisches Mikrofon
Elektro-
Akustikgitarre
Keyboard
XP800 Lautsprechergehäuse
Aktiver
Subwoofer
SIGNAL
SIGNAL
SIGNAL
SIGNAL
SIGNAL
SIGNAL
SIGNAL
6. Schalten Sie das gesamte an das XP800 angeschlossene Equipment an, und stellen Sie dann
den POWER-Schalter des XP800 auf die Position ON.
7. Drehen Sie die MASTER-Pegelsteuerung zu ungefähr 3/4 auf.
8. Sprechen oder singen Sie in Kanal1 und drehen Sie dabei den LEVEL-Regler langsam auf,
bis der gewünschte Pegel erreicht ist. Wiederholen Sie dies für jeden Kanal, den Sie nutzen.
50
Page 51

XP800 Kurzanleitung
9. Wenn Sie sehen, dass die LIMITER-Anzeige durchgehend leuchtet, drehen Sie die MASTER-
Lautstärke herunter, so dass die Anzeige nur noch gelegentlich, an lauten Stellen, aufleuchtet.
10. Um dem Mix mehrere Tiefe zu verleihen oder die Stimmen zu „glätten“, können Sie den
Kanälen 1-4 Effekte wie Reverb (Nachhall) hinzufügen. Erhöhen Sie dazu die EFFECTSPegelsteuerungen auf dem Kanal/den Kanälen, dem/denen Sie den Effekt hinzufügen möchten.
11. Drehen Sie den Effekte-Regler SEND langsam, bis der gewünschte Sound erreicht ist.
12. Um die Klangcharakteristik des Signals verändern, können Sie die Regler LOW (Tiefen) und
HIGH (Höhen) anpassen. Falls Sie das Audio zu dumpf/verwaschen finden, können Sie den
Regler LOW reduzieren. Falls Sie den Audioklang flach finden, können Sie den Regler HIGH
hochregeln. Es gibt keinen richtigen oder falschen Weg, einen Sound auszugleichen. Sie sollten sich anhören, wie der Mix im Raum klingt und ihn nach Ihren Wünschen abstimmen.
ENGLISH
FRANÇAISDEUTSCHEESPAÑOLITALIANO
XP800 • Mobiles PA-System
51
Page 52

Effekte anwenden
Das XP800 hat integrierte digitale 24-Bit-Effekte hoher Qualität, die Sie den Kanälen 1bis4 hinzufügen können. Sie können Effekte wie Verzögerung oder Hall nutzen, um den Mix mit Vokalstimmen
oder Ambiente anzureichern. Nutzen Sie dazu die folgenden Schritte:
1. Verbinden Sie Mikrofon oder Instrument mit dem gewünschten Kanal und passen Sie Lautstärke und Equalizer ganz nach Ihren Wünschen an.
2. Verwenden Sie den Selektor PROG, um einen von zehn digitalen Effekten auszuwählen.
3. Heben Sie den EFFECTS-Pegel auf dem Kanal, auf den Sie den digitalen Effekt anwenden
möchten.
4. Ziehen Sie die Haupt-Pegelsteuerung SEND nach oben, um das Ausmaß des gewünschten
Effekts anzuwenden.
Feedback verhindern
„Feedback“ ist das ärgerliche Heulen und Quietschen, das zu hören ist, wenn das Mikrofon Ton
aus dem Lautsprecher auffängt. Der Ton wird durch den Lautsprecher erneut verstärkt und erzeugt
so eine Feedback-Schleife. Mit folgenden Schritten können Sie das Auftreten von Feedback
minimieren:
• Vermeiden Sie, das Mikrofon direkt auf die Lautsprecher zu richten. Im Allgemeinen wird
empfohlen, das Mikrofon hinter dem Lautsprechergehäuse zu positionieren. Dies nutzt die
direktionalen Eigenschaften von Lautsprecher und Mikrofon zu Ihrem Vorteil aus.
• Das Mikrofon sollte immer so weit wie möglich von den Lautsprechern entfernt sein. Das hilft,
Lautsprecher und Mikrofon voneinander zu isolieren und ermöglicht Ihnen, das Output des
XP800 zu steigern.
• Positionieren Sie das Mikrofon möglichst nah an der Klangquelle. Dadurch kann es mehr
direkten Sound auffangen, und Sie können den Regler für die Mikrofon-Eingangsverstärkung
reduzieren.
• Reduzieren Sie das MASTER LEVEL der XP800-Anlage.
52
Page 53

Kabellose XPD1-Anlage für die Bühne (optional)
ENGLISH
Stecken Sie den RXD1-USB-Receiver
in die USB-Buchse von Kanal4mit der
Beschriftung WIRELESS.
Drehen Sie den LEVEL-Drehregler
von Kanal4des XP800 gegen den
Uhrzeigersinn bis zur Ziffer 0, und
bringen Sie anschließend den POWER-
Schalter an dem XP800 auf die Position
ON.
Platzieren Sie für den kabellosen Transmitter
einen neuen Satz AA(LR6)-Batterien in
die Batteriehalterung des Transmitters und
beachten Sie die Markierungen für die Pole.
Schalten Sie den Transmitter ein, indem Sie
den Power-Schalter drücken und halten; darauf-
hin leuchtet die LED-Anzeige bernsteinfarben
auf.
FRANÇAISDEUTSCHEESPAÑOLITALIANO
XP800 • Mobiles PA-System
53
Page 54

Kabellose XPD1-Anlage für die Bühne (optional)
Falls die Handgeräte Transmitter und Receiver
zuvor noch nicht gekoppelt wurden, drücken
und halten Sie die Taste am RXD1-Receiver
länger als 5 Sekunden, bis sie zu blinken
beginnt.
Ziehen Sie den MASTER LEVEL-Regler hoch
und sprechen oder singen Sie mit normalem
Performance-Pegel ins Mikrofon, während
Sie den LEVEL-Regler von Kanal4 bis zum
gewünschten Niveau hochdrehen.
Drücken und halten Sie die Power-Taste am
Transmitter länger als 5 Sekunden. Dies
bringt beide Komponenten in den PairingModus. Sobald Receiver und Transmitter
miteinander kommunizieren und sich
synchronisieren, leuchten die LEDs beider
Einheiten stetig und sind betriebsbereit.
Falls Sie eine Verzerrung hören, überprüfen Sie
die LIMITER LED. Falls die LED immer noch rot
leuchtet, drehen Sie LEVEL, die Pegelsteuerung
von Kanal 4, an der XP800-Einheit, bis sie
nur noch gelegentlich bei lauten Geräuschen
aufleuchtet. Falls Sie Geräusche verzerrt hören,
schrauben Sie das Mikrofon auf und verwenden
den bereitgestellten Kunststoff-Schraubendreher,
um den Verstärkungsregler im HXD1-Transmitter
langsam gegen den Uhrzeigersinn zu drehen, bis
die Verzerrung verschwindet.
Wenn Sie jedoch im Gegensatz dazu beim
gewünschten Lautstärkepegel ein schwaches,
verrauschtes Signal hören (wobei der
WIRELESS-Regler des XP800 vollständig im
Uhrzeigersinn gedreht ist), verwenden Sie den
beigefügten Kunststoff-Schraubendreher, um
den Verstärkungsregler im Transmitter langsam
im Uhrzeigersinn zu drehen, bis das Signal ein
akzeptables Niveau erreicht.
54
Page 55

Technische Daten
Verstärker
Stromaufnahme (0,5% THD
bei 1KHz)
Frequenzbereich 20 Hz - 20 kHz
Stromverbrauch 100-240Vac, 50/60Hz, 450W
Betriebstemperatur 14° F (-10° C) to 104° F (40° C)
Niedrigfrequenz (Low Frequency, LF)
Hochfrequenz (High Frequency, HF)
Eingänge XLR, ¼Zoll ausgewogen, RCA, 3,5 mm Stereo, USB
Ausgänge ¼-Zoll-MONITOR, ¼-Zoll-SUB OUT , ¼-Zoll-Lautspre-
Maximaler Ausgabepegel
(0,5% T.H.D bei 1KHz)
Phantomstrom +15V DC, Gleichbleibender Phantomstrom
Eingangskanal
EQ
Schalter Sprache/Musik
Effekte
Anzeigen
Bluetooth
Modulationstechnik FHSS (GFSK, π/4-DQPSK, 8-DPSK)
Abmessungen 20,1Zoll (L) x 10,6Zoll (W) x 19Zoll (H)
Gewicht 41,5Ib / 18,8kg
®
Hoch 10kHz Shelving ±15 dB
Tief 100Hz Shelving ±15 dB
Abmessungen und Gewicht
800W @ 8 Ω (400W pro Kanal) Spitze
400W @ 8Ω (200W pro Kanal) Durchschnitt
Lautsprecher
8-Zoll-Bass-Wandler
1-Zoll-Kalottenlautsprecher
Mixer
kabellos
cher-Output
+22dBu (MONITOR L/R & SUB OUT) @10KΩ
167Hz, 3dB/Oktave
16 Voreinstellungen, 24-bit DSP
5-Punkt-Pegel, LIMITER, PHANTOM
Bluetooth 3.0, A2DP
510mm(L) x 270mm(W) x 485mm(H)
ENGLISH
FRANÇAISDEUTSCHEESPAÑOLITALIANO
Wir bei Samson verbessern unsere Produkte ständig, daher unterliegen Spezifikationen
und Bilder dem Vorbehalt der unangekündigten Änderung.
XP800 • Mobiles PA-System
55
Page 56

La marca Bluetooth® y logotipos son marcas comerciales registradas de Bluetooth SIG,
Inc. y todo uso de dichas marcas por parte de Samson Technologies es bajo licencia.
Otras marcas comerciales y nombres comerciales son de sus respectivos propietarios.”
56
Page 57

Información de seguridad importante
ATENCIÓN
RISQUE DE CHOC ÉLECTRONIQUE -
NE PAS OUVRIR
Este símbolo del rayo con punta de flecha dentro de un triángulo equilátero
pretende alertar al usuario de la presencia de "voltaje peligroso" no aislado
dentro de la carcasa del producto que puede ser de magnitud suficiente
para constituir un riesgo de descarga eléctrica.
El signo de exclamación dentro de un triángulo equilátero pretende alertar
al usuario de la presencia de instrucciones de operación y mantenimiento
importantes en los materiales que acompañan al aparato.
ENGLISH
Para evitar el riesgo de descarga eléctrica, no conecte a la red eléctrica de
PRECAUCIÓN
alimentación mientras se retira la rejilla.
ADVERTENCIA: PARA REDUCIR EL RIESGO DE DESCARGA ELÉCTRICA, NO QUITE LA
CUBIERTA (O LA PARTE TRASERA) YA QUE NO CONTIENE PIEZAS QUE PUEDAN SER
REPARADAS POR EL USUARIO. LAS REPARACIONES DEBEN SER REALIZADAS POR
PERSONAL DE SERVICIO CUALIFICADO.
Si desea deshacerse de este producto, no lo mezcle con los residuos generales de su hogar.
Existe un sistema especial de recolección de aparatos electrónicos usados, de acuerdo con la
legislación que exige un procedimiento adecuado de tratamiento, recuperación y reciclaje.
Los usuarios domésticos de los 28 estados miembros de la UE, de Suiza y de Noruega, pueden
devolver sus aparatos electrónicos usados, sin coste alguno, a los centros de recolección designados o a un comercio minorista (si adquieren un producto nuevo similar).
Si se encuentra en un país no mencionado anteriormente, póngase en contacto con las autoridades locales para que le indiquen cuál es el método correcto para deshacerse del aparato.
De esta manera, se asegurará de que el producto desechado se someta a los tratamientos necesarios de
recuperación y reciclaje y se eviten así los posibles efectos negativos para el medio ambiente y la salud
humana.
FRANÇAISDEUTSCHEESPAÑOLITALIANO
XP800 • Sistema PA portátil
57
Page 58

Información de seguridad importante
1. Lea estas instrucciones.
2. Conserve estas instrucciones.
3. Preste atención a todas las advertencias.
4. Siga todas las instrucciones.
5. No utilice este aparato cerca de agua.
6. Limpie únicamente con un paño seco.
7. No bloquee ninguna de las aberturas de ventilación. Instale el equipo de acuerdo con las
instrucciones del fabricante.
8. No instale el equipo cerca de fuentes de calor, como radiadores, calefactores, hornos u otros
aparatos (incluidos otros amplificadores) que produzcan calor.
9. No anule el sistema de seguridad que supone un enchufe polarizado o con toma de tierra. Un
enchufe polarizado tiene dos clavijas, una más ancha que la otra. Un enchufe con toma de
tierra tiene dos clavijas iguales y una tercera de puesta a tierra. La tercera clavija, más ancha,
se proporciona para su seguridad. Si el enchufe suministrado no coincide con su tomacorriente, consulte a un electricista para reemplazar la toma obsoleta.
10. Coloque el cable de alimentación en una posición en la que no pueda ser pisado o pellizcado,
especialmente cerca de los enchufes, los tomacorrientes y el punto en que salen del aparato.
11. Use solamente los conectores/accesorios especificados por el fabricante.
12. Utilice solo con el carro, pedestal, trípode, soporte o mesa especificado por
el fabricante o que se venda con el aparato. Cuando utilice un carro, tenga
cuidado al mover la combinación de carro/aparato para evitar lesiones en caso
de vuelcos.
13. Desenchufe el aparato durante las tormentas eléctricas o cuando no lo utilice
durante períodos prolongados.
14. Todas las reparaciones deben ser realizadas por personal cualificado. Se debe reparar el
aparato cuando haya sufrido cualquier tipo de daño; por ejemplo, si se ha dañado el cable
de alimentación o el enchufe, si se ha derramado líquido o se ha caído algún objeto sobre el
aparato, si ha quedado expuesto a la lluvia o la humedad, si no funciona normalmente o si
se ha dejado caer.
15. Este dispositivo no debe exponerse a goteos o salpicaduras de agua, y no debe colocarse
sobre el aparato ningún objeto lleno de líquido, como un jarrón.
16. Precaución - para evitar descargas eléctricas, haga coincidir la clavija ancha con la ranura
ancha e inserte totalmente.
17. Mantenga el ambiente bien ventilado alrededor de toda la unidad.
18. INTERRUPTOR DE ENCENDIDO/APAGADO: En los productos con interruptor de encendido/
apagado, el interruptor NO CORTA la conexión a la red eléctrica.
19. DESCONEXIÓN: El enchufe debe estar en una posición de fácil acceso. Para el montaje en
rack o la instalación en espacios donde no haya fácil acceso al enchufe, se deberá incorporar
a la instalación eléctrica del rack o del edificio un interruptor de corriente omnipolar con una
separación entre contactos de al menos 3mm en cada polo.
58
Page 59

Información de seguridad importante
Aviso de la FCC
1. Este dispositivo cumple con el apartado 15 de las normas de la FCC. El funcionamiento está
sujeto a las dos siguientes condiciones:
(1) Este dispositivo no debe ocasionar interferencia perjudicial.
(2) Este dispositivo debe aceptar cualquier interferencia recibida, incluso la interferencia
que pueda ocasionar funcionamiento no deseado.
2. Cualquier cambio o modificación no aprobado expresamente por la parte responsable del
cumplimiento podría anular la autoridad del usuario para utilizar este equipo.
Declaración de FCC.
Este equipo ha sido probado y cumple con los límites para un dispositivo digital Clase B,
conforme a la Parte 15 de las Normas de FCC. Estos límites están diseñados para proporcionar protección razonable contra interferencia dañina en una instalación residencial.
Este equipo genera, utiliza y puede irradiar energía de radiofrecuencia y si no se instala
y utiliza de acuerdo con las instrucciones puede causar interferencia perjudicial para las
radiocomunicaciones. No obstante, no se puede garantizar que no haya interferencia en una
instalación particular. Si este equipo causa interferencia perjudicial para la recepción de
radio o televisión, lo que se puede establecer apagando o encendiendo el equipo, el usuario
tendrá que corregir la interferencia mediante una o más de las siguientes medidas:
• Reoriente o reubique la antena receptora.
• Aumente la separación entre el equipo y el receptor.
• Conecte el equipo a un tomacorriente en un circuito diferente al que está conectado el
receptor.
• Consulte al distribuidor o a un técnico de radio/TV experimentado.
ENGLISH
FRANÇAISDEUTSCHEESPAÑOLITALIANO
Declaración de Exposición a la Radiación de FFC.
Este dispositivo cumple con los límites de exposición a la radiación de radiofrecuencia establecidos por FCC para un entorno no controlado. Este equipo debe ser instalado y operado a
una distancia mínima de 20 cm entre el radiador y su cuerpo.
Declaración de advertencia de RF
El equipo ha sido evaluado para cumplir con el requisito general de exposición de RF El
dispositivo se puede utilizar en condición de exposición portátil sin restricción.
Este dispositivo cumple con la RSS-210 de la Industria de Canadá. El funcionamiento está
sujeto a la condición de que no cause interferencia perjudicial.
Por la presente, Samson Technologies Corp. , declara que este XP800 está en conformidad con los requisitos esenciales y otras disposiciones relevantes de la Directiva 1999/5
/ CE . La declaración de conformidad se puede consultar en:
http://www.samsontech.com/samson/products/portable-pa/expedition/xp800/#downloads-and-manuals-tab
XP800 • Sistema PA portátil
59
Page 60

Introducción
¡Muchas gracias por comprar el SISTEMA PA PORTÁTIL XP800 de Samson! El XP800
ofrece el equilibrio óptimo entre un sonido impresionante y portabilidad. El sistema es lo
suficientemente ligero como para ser transportado por una persona y se embala en una
sola unidad, por lo que es increíblemente fácil de transportar, incluso en el maletero de un
automóvil compacto.
El sistema XP800 se compone de dos recintos de altavoces de 8” de 2 vías, un mezclador
amplificado de 8 canales, de 800 vatios y dos cables de altavoces. El mezclador amplificado
se embala perfectamente en la parte posterior de uno de los recintos de altavoces y hay
un compartimento para accesorios detrás del segundo recinto para sostener los cables de
los altavoces y de alimentación. Los dos altavoces cuentan con nuestro diseño único de
deslizamiento y de bloqueo para unirse, permitiendo que todo el sistema se empaque en una
sola unidad del tamaño de un equipaje de mano.
El mezclador de 8 canales se puede utilizar mientras está almacenado en la parte posterior del
altavoz o retirado del altavoz para uso de escritorio. Cuenta con 4 entradas para conexión de
micrófonos, además de dos entradas para conexión de señales estéreo, como las de un teclado
o reproductor de MP3. Además hay un procesador de efectos digitales de 24 bits incorporado
para añadir efectos con calidad de estudio a su voz o instrumentos. Para reproducción de
música, el XP800 incluye conectividad inalámbrica Bluetooth®para transmitir audio desde su
smartphone, tablet u ordenador. El mezclador también proporciona una salida sólida, con 800
vatios de potencia total de la sección del amplificador de Clase D ligero de alta eficiencia.
El XP800 emplea un sistema de altavoces emparejado con recintos de 2 vías duales que tienen
woofers de 8” propios y conductores de alta frecuencia de 1” cargados en un difusor de 90 °
x 60 ° para amplia cobertura vertical. Para proyectar el sonido a una audiencia más amplia,
los altavoces del XP800 se pueden montar en soportes de altavoces estándar, gracias a los
receptáculos integrales de montaje en poste. El XP800 está construido utilizando duradero
plástico ABS de alto impacto, por lo que es muy resistente, y al mismo tiempo ligero.
El XP800 es la solución perfecta para su actuación como solista, ensayo de banda de garaje,
actuación de hora del cóctel, presentación en sala de juntas o una conferencia en el aula. En
este manual, encontrará una descripción detallada de las características del sistema PA XP800,
así como también instrucciones paso a paso para su instalación y uso, y especificaciones
completas.
Le recomendamos guardar los siguientes registros como referencia, así como una copia de su
recibo de compra.
Número de serie: ____________________________________________
Fecha de compra: __________________________________________
Nombre del distribuidor: _____________________________________________
Con el cuidado y mantenimiento adecuado, su XP800 funcionará sin problemas durante
muchos años. Si su XP800 necesitara reparación, deberá solicitar un número de Autorización
de Retorno (RA) antes de enviarlo a Samson. Sin ese número, no se aceptará la unidad. Llame
a Samson al 1-800-3SAMSON (1-800-372-6766) para obtener un número de autorización de
retorno antes de enviar su unidad. Por favor, guarde el embalaje original y, de ser posible, envíe
la unidad en su caja original. Si su XP800 fue comprada fuera de los Estados Unidos, póngase
en contacto con su distribuidor local para obtener los detalles de la garantía y la información de
servicio.
60
Page 61

Características
El Samson Expedition XP80 es un sistema PA portátil compacto con altavoces de 2 vías duales,
mezclador integrado y amplificador de potencia de 800 vatios. Estas son algunas de las características principales:
• Ligero y diseñado para permitirle conectar todas las piezas juntas en una única caja fácil
para trasladar.
• El mezclador se almacena en uno de los recintos de altavoces; el otro recinto tiene un
compartimento para accesorios para almacenar los cables de los altavoces, micrófonos,
etc.
• Los altavoces son recintos sintonizados, de 2 vías ventilados con woofers de 8” para graves
profundos, complementados por un conductor de alta frecuencia de 1 pulgada, situado en
un difusor a medida con un patrón de cobertura de 60 x 90 grados que produce un sonido limpio y claro.
• El amplificador de potencia ligero interno de 2 x 400 vatios produce un potente sonido
estéreo.
• El mezclador del XP800 se puede extraer desde el altavoz para instalar sobre una mesa y
puede utilizar el soporte para colocar el mezclador en un ángulo ergonómicamente correcto. También puede utilizar el adaptador SMS308 opcional para montar el mezclador a un
pie de micrófono.
• El mezclador de 8 canales cuenta con cuatro entradas de micrófono/línea que le permite
conectar micrófonos o señales de nivel de línea, además de tres entradas estéreo para
conectar señales de línea de teclados, cajas de ritmos y reproductores de MP3.
• Cada canal cuenta con controles de graves y agudos lo que le permite adaptar el sonido de
cada entrada.
• Para crear un sonido exuberante en los primeros cuatro canales, puede seleccionar entre
los dieciséis efectos digitales de 24 bits incorporados.
• La conectividad Bluetooth® le permite transmitir audio inalámbrico desde su smartphone,
tablet u ordenador.
• Para mayor flexibilidad, el mezclador del XP800 tiene subwoofer y salida de monitor, lo
que permite conectar altavoces amplificados externos o un subwoofer activo para expandir
el sistema.
ENGLISH
FRANÇAISDEUTSCHEESPAÑOLITALIANO
XP800 • Sistema PA portátil
61
Page 62

Disposición del mezclador
1
3
5
6
7
42 8 1211 13
19
9 10
20 21
22
23
14
15
16
17
18
1. Toma para entrada de canales (canales 1 - 4)
Conector de micrófono XLR - Utilice estas entradas XLR para conectar micrófonos de baja
impedancia a los preamplificadores de micrófono incorporados del XP800.
Conector fono de ¼ ” DE LÍNEA- Utilice estas tomas de ¼” para conectar fuentes de instru-
mentos o de audio con señales de nivel de línea al XP800. Aquí puede conectar las salidas
de guitarra acústica con pastillas activas, teclados, cajas de ritmos, reproductores de CD/
MP3/cinta de audio y otras unidades con salidas de nivel de línea.
2. Interruptor Low-Z/Hi-Z - Este interruptor cambia la impedancia de entrada de la toma del
canal 3 de ¼” de baja impedancia (Low-Z), para dispositivos de nivel de línea a alta impedancia (Hi-Z) para instrumentos eléctricos con micrófonos.
3. Interruptor de Micrófono/Línea (canales 1, 2 y 4) - La posición MIC cambia la ganancia de
ambas tomas de entrada a MIC. La posición LINE (línea) reduce la ganancia de ambas
entradas de 26dB al nivel de línea.
4. Entrada INALÁMBRICA STAGE XPD1 – Conecte el receptor USB inalámbrico digital Samson
Stage XPD1 opcional a esta entrada El receptor inalámbrico obtiene su energía del
XP800, por lo tanto, no se necesita ninguna fuente de alimentación adicional. La entrada
WIRELESS (Inalámbrica) se dirige al control de LEVEL (nivel) del canal 4 Nota:
El conector USB solo es para el receptor Stage XPD1. El conector no está diseñado para la carga
de teléfonos inteligentes, tabletas u otros dispositivos similares.
5. Perillas del ecualizador
HIGH Frequency (alta frecuencia) – La perilla HIGH controla la cantidad de agudos aplicada
a cada canal. La respuesta de alta frecuencia del canal es plana cuando la perilla está en la
posición central (12:00). Girando la perilla hacia la derecha incrementará la respuesta de
alta frecuencia del canal sobre 10 kHz en 15dB, y girándola hacia la izquierda se reduce la
alta frecuencia en 15dB.
62
Page 63

Disposición del mezclador
LOW Frequency (baja frecuencia) – La perilla LOW controla la cantidad de bajos aplicada a
cada canal. La respuesta de baja frecuencia del canal es plana cuando la perilla está en la
posición central (12:00). Girando la perilla hacia la derecha incrementará la respuesta de
baja frecuencia del canal por debajo de 100 Hz en 15dB, y girándola hacia la izquierda se
reduce la baja frecuencia en 15dB.
6. Perillas EFFECTS (efectos) - Utilice las perillas de control de EFECTOS para añadir un efecto
a una entrada de Micrófono o Línea en cualquiera de los primeros cuatro canales de entrada. A medida que la perilla se gira en sentido horario, se aumenta el nivel de la señal enviada al bus de efectos.
7. Perillas LEVEL (nivel) - Esta perilla establece el nivel general para el canal de entrada.
NOTA: Para reducir el ruido, ajuste los controles del NIVEL en los canales no utilizados al
ajuste mínimo
8. Tomas de entrada de canales estéreo (canales 5/6, 7/8) – Para entradas estéreo, utilice la
entrada L para conectar el canal izquierdo y la entrada R para conectar el canal derecho.
Utilice estas entradas para conectar micrófonos de alta impedancia, sintetizadores, cajas de
ritmos, reproductores de MP3, CD, de cinta de audio o cualquier otro dispositivo de nivel de
línea El XP800 incluye clavija tipo jack de ¼” , clavija tipo jack de
9. Tomas MONITOR OUT – La señal presente en las tomas MONITOR OUT se envía desde la
perilla de control de nivel MONITOR, que se alimenta de los canales de entrada. El control
MASTER (maestro) no afecta a la señal MONITOR OUT. Esta salida se puede usar para
enviar la mezcla a los recintos de altavoces amplificados para utilizar monitores de escenario o como altavoces adicionales delanteros para ampliar la cobertura del sistema.
10. Conector SUB OUT - Esta salida de rango completo se utiliza para enviar la mezcla principal
a un subwoofer activo externo. La señal presente en este conector es el después al control
de nivel MASTER.
11. Toma FOOT SW – Conecte un pedal a esta toma para activar y desactivar los efectos digitales
incorporados.
12. Tomas SPEAKER OUT – Dos jacks de salida de ¼” amplificados utilizados para conectar
los altavoces izquierdo y derecho Utilice los cables de altavoces incluidos para conectar
los altavoces.
PRECAUCIÓN: La carga de impedancia total para cada lado del amplificador no debe ser
inferior a 8 ohmios. No conecte altavoces adicionales al mezclador/amplificador del
XP800.
13. Entrada de CA - Conecte el cable de alimentación reforzado «IEC» de 3 pines aquí
14. Interruptor POWER (encendido) - Utilice el interruptor POWER para encender o apagar
el XP800. El interruptor se ilumina en rojo cuando la unidad está en la posición ON
(encendido) y recibiendo energía.
15. Perilla MONITOR Level (nivel del MONITOR) - El control de nivel del MONITOR se utiliza
para controlar el nivel general enviado a MONITOR OUT.
16. Indicador de emparejamiento – Muestra el estado de Bluetooth del sistema XP800.
17. Botón de emparejamiento – Oprima este botón para activar el modo de detección para
emparejar con un dispositivo de audio con Bluetooth.
¹
/
8
” y conectores RCA.
ENGLISH
FRANÇAISDEUTSCHEESPAÑOLITALIANO
XP800 • Sistema PA portátil
63
Page 64

Disposición del mezclador
18. Perilla Effects SEND (Envío de efectos) – La perilla SEND se utiliza para ajustar la cantidad
total de efectos añadidos al bus maestro.
19. Selector del programa de efectos (PROG) – Esta perilla de control se utiliza para seleccionar
uno de los 16 programas de efectos DSP de 24 bits.
20. Perilla MASTER (Maestro) – La perilla de volumen MASTER controla el nivel de salida general. La perilla determina el nivel de señal de salida final. Las señales de todos los canales
se dirigen hacia aquí justo antes de ser dirigidas a los amplificadores de potencia integrados y tomas de salida de los altavoces Izquierdo y Derecho.
21. Indicadores de medición LED – Este medidor de seis segmentos muestra el nivel de salida del
XP800. Para una relación señal-ruido óptima, configure el control del VOLUMEN para que
el material del programa sea en general o alrededor de +3 a +6 VU, con iluminación ocasional, pero no constante del segmento rojo "LIMITER".
22. Interruptor SPEECH/MUSIC (Vocalización/música) – El interruptor SPEECH/MUSIC se utiliza
para cambiar la respuesta de frecuencia general, o contorno de tono, para el sistema de
sonido XP800. Si su aplicación es principalmente para música, oprima el interruptor para
seleccionar la curva de respuesta MUSIC. Si su aplicación es principalmente para palabra
hablada, oprima el interruptor para seleccionar la curva de respuesta SPEECH.
23. Interruptor PHANTOM (Fantasma) - El XP800 incorpora una fuente de alimentación fantasma
para operar micrófonos de condensado. Cuando el interruptor está activado, el LED se iluminará indicando que hay alimentación fantasma disponible en los preamplificadores de los
micrófonos.
NOTA IMPORTANTE: Para evitar un fuerte estallido, asegúrese de bajar el control de nivel
MAESTRO antes de enchufar y desenchufar los cables del micrófono cuando se activa la
alimentación fantasma.
64
Page 65

Emparejar con un dispositivo Bluetooth®
Bluetooth®es una tecnología de comunicación inalámbrica que permite conectividad entre una
amplia gama de dispositivos. El XP800 utiliza Bluetoothpara reproducir audio de alta calidad desde
su dispositivo habilitado para Bluetoothsin la necesidad de conectar cables. Para que su dispositivo
funcione con el XP800 primero debe estar emparejado.
1. Baje todos los controles de NIVEL del canal hacia la izquierda hasta llegar a 0.
2. Con el XP800 y su dispositivo Bluetooth encendido, oprima el botón EMPAREJAR en el
panel superior del mezclador del XP800 para que se pueda detectar el altavoz. El indicador
de Bluetooth lentamente destellará en azul.
3. En las configuraciones de su dispositivo Bluetoothconfigure para “descubrir” dispositivos
disponibles.
4. De la lista de dispositivos Bluetooth seleccione el dispositivo "Samson XP800"
5. Si su dispositivo solicita una clave de paso, introduzca 0000 (cuatro ceros) y oprima OK.
Algunos dispositivos pueden pedirle que acepte la conexión.
6. Como el XP800 se está conectando a su dispositivo, el indicador de Bluetooth rápidamente
destellará en azul.
7. El altavoz del XP800 indica que el emparejamiento se completó cuando el indicador se
ilumina en azul constante. Ahora puede transmitir audio desde su dispositivo a los altavoces
del XP800
8. Con el control de volumen en su dispositivo Bluetooth alto, reproduzca música y lentamente
eleve el control del NIVEL del canal 7/8 de BLUETOOTH del XP800 hasta que haya alcanzado el nivel deseado.
ENGLISH
FRANÇAISDEUTSCHEESPAÑOLITALIANO
XP800 • Sistema PA portátil
65
Page 66

Congurar el XP800
Desembale todos los componentes del sistema de la caja de envío y guarde todos los materiales
de embalaje en caso de que su unidad tenga que devolverse para reparación.
Retire el mezclador girando el tornillo un cuarto de vuelta en sentido antihorario hacia la posición RELEASE.
LOCK
RELEASE
Con cuidado sostenga el mezclador para retirarlo del altavoz.
Retire la tapa del compartimento para accesorios girando el tornillo un cuarto de vuelta en
sentido antihorario hacia la posición RELEASE
(liberar) y retire los cables de los altavoces
incluidos.
Reemplace el panel de accesorios alineando la parte inferior del panel con las ranuras. Asegúrese de que el tornillo de cuarto de
vuelta está en la posición RELEASE (liberar);
luego cierre el panel y gire el tornillo un cuarto
de vuelta hacia la derecha a la posición LOCK.
66
Page 67

Congurar el XP800
Coloque los altavoces en el piso o en soportes.
Para una cobertura de sonido máxima, el XP800
se puede utilizar con un soporte de altavoz de
13⁄8” estándar. El altavoz se debe elevar sobre
las cabezas del público que está escuchando.
Tenga cuidado al colocar el altavoz en un soporte,
para asegurarse de que esté en una superficie
nivelada y estable y no se caerá. Al utilizar el
altavoz en el suelo, o cuando el altavoz esté por
debajo del oyente, el XP800 cuenta con una
posición de ángulo del monitor para proyectar el
sonido hacia arriba, hacia el público.
Utilizando uno de los cables de los altavoces incluidos, conecte el LEFT SPEAKER OUT del
mezclador al conector de entrada del altavoz izquierdo. Luego utilice el segundo cable de
altavoz incluido para conectar el RIGHT SPEAKER OUT al conector de entrada del altavoz
derecho.
ENGLISH
FRANÇAISDEUTSCHEESPAÑOLITALIANO
XP800 • Sistema PA portátil
67
Page 68

Inicio Rápido
1. Asegúrese de que el interruptor POWER (encendido) del XP800 esté ajustado a la posición
OFF.
2. Si los altavoces no están conectados, conecte los cables de los altavoces como se describe
en la sección anterior.
3. Gire cada uno de los controles de NIVEL del canal y volumen MAESTRO completamente a
la izquierda, a la posición "0".
4. Luego conecte un extremo del cable de alimentación incluido a la entrada de alimentación
del mezclador del XP800 y el otro a una toma de alimentación de CA con conexión a tierra.
5. Conecte micrófonos utilizando cables XLR estándar, instrumentos utilizando cables con
conector tipo jack de ¼”, y reproductor de MP3 utilizando un cable de
apropiadas del mezclador.
Micrófono dinámico
Guitarra acústica
eléctrica
Teclado
Gabinetes de altavoces XP800
Subwoofer
activo
SEÑAL
SEÑAL
SEÑAL
SEÑAL
SEÑAL
¹
/
8
” en las tomas
SEÑAL
SEÑAL
6. Encienda todo el equipo conectado al XP800, luego coloque el interruptor POWER (encen-
dido) del XP800 en la posición ON.
7. Gire el control de volumen MAESTRO alrededor de 3/4 hacia arriba.
8. Empiece a hablar o reproducir en el canal 1 mientras ajusta el control de NIVEL lentamente
hasta alcanzar el nivel deseado Haga lo mismo para cada canal que esté utilizando.
68
Page 69

XP800 Inicio Rápido
9. Si advierte que el indicador LIMITER (limitador) se ilumina en forma constante, baje el
volumen MAESTRO de modo que el indicador se ilumine de forma ocasional durante impactos de alto volumen.
10. Para agregar profundidad a la mezcla o suavidad a las voces, puede aplicar efectos, como
reverbación, a los canales 1–4. Para hacerlo, eleve los controles de nivel EFFECTS en el/los
canal(es) para el/los que quisiera agregar el efecto.
11. Lentamente suba la perilla de envío de efectos SEND hasta que se llegue al sonido deseado.
12. Para modificar la característica tonal de la señal, puede agregar los controles LOW (bajos)
y HIGH (agudos). Si encuentra que el audio es demasiado turbio, puede necesitar reducir
el control LOW. Si encuentra que es un sonido sordo, puede aumentar el control HIGH. No
existe una forma correcta o errónea para ecualizar un sonido. Debe escuchar cómo suena la
mezcla en la sala y ajustarla a su gusto.
ENGLISH
FRANÇAISDEUTSCHEESPAÑOLITALIANO
XP800 • Sistema PA portátil
69
Page 70

Aplicar efectos
El XP800 incluye efectos digitales de 24 bits de alta calidad que puede añadir desde el canal 1
hasta el 4. Puede utilizar efectos como retardo o reverbación para mejorar voces o dotar de ambiente a la mezcla siguiendo estos pasos:
1. Conecte un micrófono o instrumento al canal deseado y ajuste el volumen y el ecualizador a
su gusto.
2. Utilice el selector PROG para elegir uno de los diez efectos digitales incorporados.
3. Eleve el nivel EFFECTS del canal para el que quiere añadir el efecto digital.
4. Eleve el control de nivel principal de envío de efectos SEND para aplicar la cantidad de efecto
deseado.
Evitar acoples
El acople es el molesto aullido y chillido que se escucha cuando el micrófono capta el sonido
desde el altavoz. Luego el sonido se vuelve a amplificar a través del altavoz, creándose un
circuito de acople. Siga estos pasos para minimizar la probabilidad de acople:
• Evite apuntar el micrófono directamente a los altavoces En general se recomienda que el
micrófono se coloque detrás del recinto del altavoz. Esto hace uso de las características
direccionales del altavoz y el micrófono en beneficio suyo.
• Mantenga el micrófono lo más lejos posible de los altavoces. Ayudará a alcanzar aislamiento
entre el altavoz y el micrófono y le permitirá incrementar la salida del XP800.
• Coloque el micrófono lo más cerca posible de la fuente de sonido. Esto permitirá que el
micrófono capte el sonido más directo y le permite reducir el control de la entrada del
micrófono.
• Disminuya el MASTER LEVEL del sistema XP800
70
Page 71

Sistema inalámbrico Stage XPD1 (Opcional)
ENGLISH
Conecte el receptor RXD1 USB a la
toma USB del Canal 4 etiquetada como
WIRELESS (Inalámbrica).
Gire la perilla LEVEL (nivel) del canal
4 del XP800 por completo hacia
la izquierda hasta llegar a 0, luego
coloque el interruptor POWER en el
XP800 a la posición ON.
En el transmisor inalámbrico, coloque
un juego nuevo de pilas AA (LR6) en el
compartimento de pilas del transmisor,
teniendo cuidado de observar las marcas de
polaridad.
Encienda la alimentación para el transmi-
sor manteniendo pulsado el interruptor de
alimentación; el indicador LED se iluminará
de color ámbar.
FRANÇAISDEUTSCHEESPAÑOLITALIANO
XP800 • Sistema PA portátil
71
Page 72

Sistema inalámbrico Stage XPD1 (Opcional)
Si el transmisor y el receptor portátil no se
han emparejado previamente, mantenga
pulsado el botón del receptor RXD1 durante
>5 segundos, hasta que comience a
parpadear.
Suba el control MASTER LEVEL (nivel
maestro) y hable o cante en el micrófono
a un nivel de ejecución normal mientras
sube el control LEVEL (nivel) del Canal 4
hasta que se alcance el nivel deseado.
Mantenga pulsado el botón Power
(Encendido) en el transmisor durante
>5 segundos. Esto colocará a
ambos componentes en modos de
emparejamiento. Una vez que el receptor y
el transmisor se comuniquen y sincronicen,
las LEDs de ambas unidades se
encenderán en forma constante y estarán
listas para funcionar.
Si oye distorsión, verifique el LIMITER
LED. Si está encendida en rojo, baje el
LEVEL (nivel) del canal 4 en el XP800
hasta que se encienda solo ocasionalmente
durante sonidos fuertes. Si todavía oye
distorsión, desenrosque el cuerpo del
micrófono y utilice el destornillador de
plástico suministrado para girar el Control de
ganancia en el transmisor HXD1 lentamente
hacia la izquierda hasta que desaparezca la
distorsión.
Por el contrario, si oye una señal débil y
ruidosa en el nivel de volumen deseado (y
con el control WIRELESS (inalámbrico) del
XP800 completamente a la derecha), utilice
el destornillador de plástico suministrado
para girar el Control de ganancia en el
transmisor HXD1 lentamente hacia la
derecha hasta que la señal llegue a un
aceptable nivel.
72
Page 73

Especicaciones
Amplificador
Encendido (0,5% THD a
1KHz)
Respuesta de frecuencia 20 Hz - 20 kHz
Consumo de energía 100-240Vac, 50/60Hz, 450W
Temperatura de Funcionamiento 14° F (-10° C) to 104° F (40° C)
Baja frecuencia Transductor de graves de 8”
Alta frecuencia Tweeter de 1”
Entradas XLR, ¼”equilibrado, RCA, 3,5 mm estéreo, USB
Salidas MONITOR de ¼” SUB OUT de ¼” , Salida de altavo-
Nivel de salida máximo
(0,5% T.H.D a 1KHz)
Alimentación fantasma +15V DC, Tensión fantasma fija
Ecualizador del
canal de entrada
Interruptor de vocalización/
música
Efectos
Indicadores
Bluetooth
Técnica de modulación FHSS (GFSK, π/4-DQPSK, 8-DPSK)
Dimensiones 20,1’’(Longitud) x 10,6’’(Anchura) x 19’’(Altura)
Peso 41,5 libras / 18,8kg
®
Alto 10kHz Shelving ±15 dB
Bajo 100Hz Shelving ±15 dB
800 W @ 8Ω (400 W por canal ) Máximo
400 W @ 8Ω (200 W por canal ) Promedio
Altavoces
Mezclador
Inalámbrico
ces de ¼”
+22dBu(MONITOR L/R & SUB OUT) @10KΩ
167Hz, 3dB/Octava
16 Preestablecidos, DSP de 24 bits
Nivel de 5 puntos, LIMITADOR, FANTASMA
Bluetooth 3.0, A2DP
Dimensiones y peso
510mm(Longitud) x 270mm(Anchura) x
485mm(Altura)</530>
ENGLISH
FRANÇAISDEUTSCHEESPAÑOLITALIANO
En Samson estamos continuamente mejorando nuestros productos, por lo tanto las
imágenes y las especificaciones están sujetas a cambios sin previo aviso.
XP800 • Sistema PA portátil
73
Page 74

Il marchio di denominazione Bluetooth® e i relativi loghi sono marchi registrati di
proprietà di Bluetooth SIG, Inc. e l'uso di tali marchi da parte di Samson Technologies
viene concesso su licenza.. Altri marchi registrati e nomi commerciali rimangono di
proprietà dei rispettivi titolari."
74
Page 75

Informazioni importanti sulla sicurezza
ATTENZIONE
RISCHIO DI SCOSSA ELETTRICA
NON APRIRE
Il simbolo del fulmine con la punta a freccia in un triangolo equilatero
avverte l'utente sulla presenza di "voltaggio pericoloso" non isolato
all'interno del prodotto, che può avere magnitudo sufficiente per
costituire rischio di scossa elettrica.
Il punto esclamativo in un triangolo equilatero avverte l'utente sulla
presenza di importanti istruzioni relative all'uso e la manutenzione nei
documenti allegati al prodotto.
ENGLISH
Per prevenire il rischio di scossa elettrica, non collegare l'apparecchio a
ATTENZIONE
una presa di corrente in assenza della griglia.
AVVERTENZA! PER RIDURRE IL RISCHIO DI SCOSSA ELETTRICA, NON RIMUOVERE
IL COPERCHIO (O IL PANNELLO POSTERIORE) POICHÉ L'APPARECCHIO NON
CONTIENE PARTI RIPARABILI DALL'UTENTE. PER EVENTUALI RIPARAZIONI,
CONSULTARE UN TECNICO QUALIFICATO.
Se si desidera smaltire il prodotto, non smaltirlo con i rifiuti domestici generici. È disponibile
un sistema di raccolta separata per gli apparecchi elettronici in conformità con le normative che
stabiliscono precisi requisiti per il trattamento, il recupero e il riciclaggio di tali rifiuti.
I cittadini residenti nei 28 Paesi dell'Unione europea, in Svizzera e in Norvegia, possono con-
segnare gratuitamente gli apparecchi elettronici dismessi presso strutture di raccolta apposite o
presso un rivenditore (nel caso di acquisto contestuale di un nuovo apparecchio).
Per i Paesi non summenzionati, contattare le autorità locali per conoscere le modalità di smaltimento
previste.
In tal modo sarà garantito un corretto processo di trattamento, recupero e riciclaggio del prodotto evitando
potenziali danni all'ambiente e alla salute umana.
FRANÇAISDEUTSCHEESPAÑOLITALIANO
XP800 • Sistema PA portatile
75
Page 76

Informazioni importanti sulla sicurezza
1. Leggere queste istruzioni.
2. Conservare queste istruzioni.
3. Prestare attenzione a tutte le avvertenze.
4. Seguire tutte le istruzioni.
5. Non usare l'apparecchio vicino all'acqua.
6. Pulire esclusivamente con un panno asciutto.
7. Non ostruire le aperture di ventilazione. Installare in conformità alle istruzioni del pro-
duttore.
8. Non installare in prossimità di fonti di calore come radiatori, condotti dell'aria, piani cu-
cina o altri apparecchi (inclusi amplificatori) che producono calore
9. Non manomettere la funzione di sicurezza della spina polarizzata o di messa a terra. Una
spina polarizzata è dotata di due lamelle, una più larga dell'altra. Una spina con messa a
terra ha due lamelle e un terzo perno di messa a terra. La lamella più larga o il terzo perno
hanno lo scopo di garantire la sicurezza dell'utente. Se la spina fornita non è compatibile
con la presa di corrente in uso, consultare un elettricista per la sostituzione della presa
obsoleta.
10. Proteggere il cavo per evitare che venga inavvertitamente calpestato o schiacciato, in par-
ticolare all'altezza di spine, adattatori e punti di collegamento all'apparecchio.
11. Usare esclusivamente accessori specificati dal produttore.
12. Usare esclusivamente con il carrello, stand, treppiede, braccio o tavolo
specificati dal produttore o venduti con l'apparecchio. Se si usa un carrello,
prestare attenzione durante lo spostamento del carrello/dell'apparecchio
per evitare cadute.
13. Scollegare l'apparecchio durante i temporali e in previsione di lunghi pe-
riodi di inutilizzo.
14. Contattare un tecnico qualificato per qualsiasi operazione di manutenzione. La riparazione
è necessaria se l'apparecchio, il cavo di alimentazione o la spina sono stati danneggiati,
se sono penetrati liquidi od oggetti all'interno dell'apparecchio o se l'apparecchio è stato
esposto a pioggia o umidità, non funziona correttamente o è caduto.
15. Non esporre l'apparecchio a schizzi o gocce d'acqua e non collocare sull'apparecchio
oggetti contenenti acqua, ad esempio vasi.
16. Attenzione! Per evitare il rischio di scossa elettrica, prestare attenzione al corretto inseri-
mento delle lamelle della spina.
17. Garantire sufficiente ventilazione intorno all'intero apparecchio.
18. INTERRUTTORE DI ACCENSIONE/SPEGNIMENTO – per gli apparecchi dotati di interrut-
tore di accensione/spegnimento, l'interruttore NON interrompe il collegamento elettrico.
19. DISCONNESSIONE DALLA RETE ELETTRICA – la presa di corrente deve rimanere facil-
mente accessibile. Per installazioni incassate o nel caso in cui la presa non sia accessibile, deve essere incorporato nell'installazione un interruttore multipolare elettrico con
separazione di contatto di almeno 3 mm per ogni polo.
76
Page 77

Informazioni importanti sulla sicurezza
Notifica FCC
1. Questo apparecchio è conforme alla parte 15 delle norme FCC. L'uso è soggetto alle seguenti
condizioni:
(1) Questo dispositivo non deve causare interferenze nocive.
(2) Questo dispositivo deve accettare qualsiasi interferenza ricevuta, incluse interferenze
che possono causarne il funzionamento indesiderato.
2. Modifiche o cambiamenti non espressamente approvati dalla parte responsabile per la con-
formità possono annullare la facoltà dell'utente di utilizzare l'apparecchio.
Certificazione FCC
Questo apparecchio è stato testato ed è stato trovato conforme ai limiti applicati a dispositivi
digitali di classe B, ai sensi della parte 15 delle norme FCC. Questi limiti sono stati pensati
per fornire una protezione accettabile dalle interferenze dannose in installazioni residenziali.
Il presente apparecchio genera, utilizza e può irradiare energia a radiofrequenza e, in caso di
installazione e uso non conforme alle istruzioni, può provocare interferenze dannose per le
comunicazioni radio. Tuttavia, non esiste alcuna garanzia che non si verifichino interferenze
in un’installazione particolare. Nel caso in cui il presente apparecchio causi interferenze alla
ricezione radio o televisiva, che si possono determinare spegnendo e accendendo l’apparecchio, l’utente è invitato a tentare di correggere l’interferenza applicando uno o più dei
seguenti provvedimenti:
• Riorientamento o riposizionamento dell’antenna ricevente.
• Aumento della distanza che separa l’apparecchio dal ricevitore.
• Collegamento dell’apparecchio a una presa o un circuito diversi da quelli a cui è collega-
to il ricevitore.
• Per assistenza, consultare il rivenditore o un tecnico radio/TV esperto.
ENGLISH
FRANÇAISDEUTSCHEESPAÑOLITALIANO
Certificazione sull'esposizione alle radiazioni FCC
Questo apparecchio è conforme ai limiti di esposizione alle radiazioni FCC definiti per un
ambiente non controllato. Questo apparecchio deve essere installato e utilizzato con una
distanza minima di 20 cm tra l'elemento radiatore e il corpo dell'utente.
Avvertenza RF
L'apparecchio è stato ritenuto conforme ai requisiti generali di esposizione alle frequenze
radio. L'apparecchio può essere usato in condizioni di esposizione portatile senza restrizioni.
L'apparecchio è conforme alla normativa industriale RSS-310 per il Canada. L'uso dell'apparecchio è concesso a condizione che esso non causi interferenze nocive.
Con la presente , Samson Technologies Corp. , dichiara che questo XP800 è conforme ai
requisiti essenziali ed alle altre disposizioni pertinenti della Direttiva 1999 / 5 / CE . La
dichiarazione di conformità può essere consultata al seguente indirizzo:
http://www.samsontech.com/samson/products/portable-pa/expedition/xp800/#downloads-and-manuals-tab
XP800 • Sistema PA portatile
77
Page 78

Introduzione
Grazie per l'acquisto di questo SISTEMA PA PORTATILE Expedition XP800 di Samson!
XP800 garantisce un ottimo equilibrio fra portabilità e qualità audio nitida e potente. Il sistema è abbastanza leggero per essere trasportato da una persona, e racchiude tutte le funzioni
in una singola unità compatta: perfetto per essere riposto persino nel bagagliaio di una piccola utilitaria.
Il sistema XP800 è composto da 2 altoparlanti a 2 vie da 8", un mixer a 8 canali da 800
watt e due cavi audio per altoparlanti. Il mixer può essere collocato sul retro di uno dei due
vani per altoparlanti, ed è inoltre presente uno scomparto accessori dietro il secondo vano per
riporre l'altoparlante e i cavi di alimentazione. I due altoparlanti possono essere uniti grazie al
nostro esclusivo sistema di blocco scorrevole, consentendo di compattare l'intero sistema in
una singola unità delle dimensioni di una valigia.
Il mixer a 8 canali può essere usato sia riposto sul retro dell'altoparlante, o in modo indipendente su un piano. Il dispositivo è dotato di 4 ingressi per il collegamento di microfoni,
più due ingressi per segnali stereo, ad esempio tastiere o lettori Mp3. Inoltre, l'apparecchio
è dotato di un processore di effetti digitali a 24 bit per aggiungere effetti in qualità audio
da studio a voce o strumenti. Per la riproduzione musicale, XP800 è dotato di connettività
Bluetooth® per trasmettere contenuti audio direttamente da smartphone, tablet o compu-
ter. Il mixer offre inoltre una robusta uscita audio con 800 watt di potenza totale grazie alla
potente e leggera sezione amplificatore di Classe D.
XP800 è dotato di un sistema ad altoparlanti abbinati con doppi quadri a 2 vie che includono
woofer proprietari da 8" e driver ad alta frequenza da 1" montati in una tromba 90° x 60° per
la massima copertura verticale. Per riprodurre il suono in ambienti particolarmente ampi, gli
altoparlanti XP800 possono essere montati su supporti standard grazie ai connettori predisposti per il montaggio. XP800 è costruito in solido ABS resistente agli impatti, per garantire
leggerezza e robustezza.
Il sistema XP800 è la soluzione perfetta per concerti e prove musicali, spettacoli, presentazioni aziendali o lezioni scolastiche. Questo manuale contiene una descrizione dettagliata
delle funzioni del sistema PA XP800, insieme a istruzioni passo-passo per l'installazione e
l'uso, con una panoramica finale sulle specifiche tecniche.
Si raccomanda di conservare le presenti istruzioni insieme a una copia della ricevuta d'acquisto.
Numero di serie: ____________________________________________
Data di acquisto: __________________________________________
Nome del rivenditore: _____________________________________________
In condizioni corrette d'uso e di manutenzione, il XP800 è progettato per garantire diversi
anni di funzionamento. In caso sia necessaria la riparazione, si prega di richiedere un numero
di autorizzazione al reso (Return Authorization, RA) prima di inviare l'apparecchio a Samson.
In assenza di tale numero, l'apparecchio non verrà accettato. Si prega di contattare Samson
al numero 1-800-3SAMSON (1-800-372-6766) per ottenere il numero RA necessario all'invio dell'apparecchio. Si raccomanda di conservare l'imballo originale e, se possibile, inviare
l'apparecchio nella sua confezione originale. Se il XP800 è stato acquistato al di fuori degli
Stati Uniti, si prega di contattare il distributore locale per dettagli sulla garanzia e informazioni sulla riparazione.
78
Page 79

Funzioni
Samson Expedition XP800 è un sistema PA portatile compatto con doppio altoparlante a 2
vie, mixer integrato e amplificatore da 800 watt. Tra le caratteristiche principali:
• Leggero e progettato per consentire di montare tutte le parti insieme in un sistema com-
patto e facile da spostare.
• Il mixer può essere riposto sul retro di uno dei due altoparlanti; l'altro altoparlante è
dotato di vano accessori per riporre cavi, microfoni ecc.
• Altoparlanti sintonizzati e ventilati a 2 vie con woofer da 8" per bassi potenti e driver alta
frequenza da 1", integrati in una tromba con copertura 60 x 90 gradi per garantire un
suono nitido e pulito.
• Il potente amplificatore interno compatto da 2 x 400 watt produce un suono stereo
potente e profondo.
• Il mixer del XP800 può essere rimosso dall'altoparlante per essere usato su un piano, ed
è possibile usare il supporto integrato per mantenere il mixer all'angolazione più ergonomica. Inoltre, è possibile usare l'adattatore opzionale SMS038 per montare il mixer su
un supporto da microfono.
• Il mixer a 8 canale è dotato di quattro ingressi mic/linea per collegare microfoni o segna-
li di linea, più tre ingressi stereo per collegare segnali di linea da tastiere, drum machine
e lettori Mp3.
• Ogni canale è dotato di controlli bass e treble per regolare con precisione il suono di
ciascun ingresso.
• Per la massima ricchezza audio sui primi quattro canali, è possibile scegliere fra i sedici
effetti digitali a 24 bit integrati.
• La connettività Bluetooth® consente di trasmettere contenuti audio wireless da smar-
tphone, tablet o computer.
• Infine, per offrire ulteriore flessibilità, il mixer del XP800 è dotato di uscite Subwoofer
e Monitor, che consentono di collegare altoparlanti esterni o subwoofer indipendenti per
espandere la potenza del sistema.
ENGLISH
FRANÇAISDEUTSCHEESPAÑOLITALIANO
XP800 • Sistema PA portatile
79
Page 80

Layout del mixer
1
3
5
6
7
42 8 1211 13
19
9 10
20 21
22
23
14
15
16
17
18
1. Jack di ingresso canali (canali 1 – 4)
Connettore MIC XLR – Utilizzare questi jack XLR per collegare microfoni a bassa impeden-
za ai preamplificatori per microfoni integrati nel XP800..
Connettore jack LINEA ¼” – Utilizzare questi jack ¼” per collegare strumenti o sorgenti
audio con segnali line-level al XP800. Da qui è possibile collegare le uscite da chitarre
acustiche con pickup attivi, tastiere, drum machine, lettori CD/MP3/CASSETTE e altre
unità con uscite line-level.
2. Interruttore Low-Z/Hi-Z – Questo interruttore modifica l'impedenza in entrata del jack 3
¼” del canale da bassa (Low-Z) per i dispositivi line-level, ad alta (Hi-Z) impedenza per
gli strumenti elettrici con pickup.
3. Interruttore MIC/LINE (canali 1, 2 e 4) – La posizione MIC modifica il gain su entrambi
i jack di ingresso a livello MIC. La posizione LINE riduce il gain su entrambi i jack di
26dB al livello del segnale di linea in ingresso.
4. Ingresso STAGE XPD1 WIRELESS – Collegare il ricevitore digitale wireless Samson Stage
XPD1 (opzionale) a questo ingresso. Il ricevitore wireless viene alimentato dal XP800,
pertanto non sono necessarie sorgenti di alimentazione aggiuntive. L'ingresso WIRELESS
è instradato sul controllo di livello del CANALE 4. Nota: Il connettore USB è utilizza-
bile unicamente con il ricevitore Stage XPD1. Il connettore non ha la funzione di
caricare smartphone, tablet o dispositivi analoghi.
5. Equalizzatori
HIGH – L'equalizzatore HIGH controlla il volume di treble applicato su ogni canale. La
risposta in frequenza alta del canale è piatta quando l'equalizzatore è impostato sulla
posizione centrale (12:00). Ruotando l'equalizzatore verso destra si aumenterà la risposta in frequenza alta del canale sopra a 10 kHz di 15 dB, ruotandolo verso sinistra si
abbasserà la risposta in frequenza alta di 15 dB.
80
Page 81

Layout del mixer
LOW – L'equalizzatore LOW controlla il volume di bassi applicato su ogni canale. La
risposta in frequenza bassa del canale è piatta quando l'equalizzatore è impostato sulla
posizione centrale (12:00). Ruotando l'equalizzatore verso destra si aumenterà la risposta in frequenza bassa del canale sotto a 100 Hz di 15 dB, ruotandolo verso sinistra si
abbasserà la risposta in frequenza bassa di 15 dB.
6. Manopola EFFECTS - Utilizzare la manopola EFFECTS (EFFETTI) per aggiungere un effet-
to a un ingresso Mic/Line o a uno qualsiasi dei quattro canali in ingresso. Ruotando la
manopola verso destra, il livello di segnale inviato al bus effetti aumenta.
7. Manopola LEVEL - Questa manopola imposta il livello complessivo per il canale in ingres-
so.
NOTA: per ridurre il rumore, impostare i controlli LEVEL su un qualsiasi canale inutilizzato al valore minimo.
8. Jack di ingresso canali stereo (canali 5/6, 7/8) – Per gli ingressi stereo, usare l'ingresso L
per collegare il canale sinistro e l'ingresso R per il canale destro. Utilizzare questi ingressi per collegare microfoni ad alta impedenza, sintetizzatori, drum machine, lettori Mp3/
CD/cassette o qualsiasi altro dispositivo line-level. XP800 è dotato di connettori jack
¼”,
¹
/
8
” , e RCA.
9. Jack MONITOR OUT – Il segnale presente nei jack MONITOR OUT è inviato dal controllo di
livello MONITOR alimentato dai canali in ingresso. Il controllo MASTER non agisce sul
segnale MONITOR OUT. Questa uscita può essere usata per inviare il mix ad altoparlanti
con funzione spia (monitor), oppure come altoparlanti extra per espandere la portata
audio del sistema.
10. Connettore SUB OUT – Questa uscita full-range è usata per inviare il mix principale a un
subwoofer esterno attivo. Il segnale presente su questo connettore è quello dopo del controllo del volume MASTER.
11. Jack FOOT SW – Questo jack si collega a un interruttore a pedale per attivare/disattivare
gli effetti digitali integrati.
12. Jack SPEAKER OUT – Due jack in uscita da ¼” per collegare gli altoparlanti destro e sini-
stro. Usare i cavi inclusi per collegare gli altoparlanti.
ATTENZIONE! Il carico di impedenza totale per ogni lato dell'amplificatore non deve essere inferiore a 8 Ohm. Non collegare altoparlanti aggiuntivi al mixer/amplificatore del
XP800.
13. Ingresso CA – Collegare il cavo di alimentazione a sezione elevata e 3 pin IEC.
14. Interruttore POWER – Usare l'interruttore di accensione (POWER) per accendere/spegnere
il XP800. L'interruttore si illumina di rosso quando l'unità è in posizione ON e riceve
alimentazione.
15. Manopola di controllo MONITOR – La manopola di controllo MONITOR è usata per control-
lare il livello complessivo inviato a MONITOR OUT.
16. Spia abbinamento – Visualizza lo stato Bluetooth del sistema XP800.
17. Pulsante abbinamento – Premere questo pulsante per abilitare la modalità rilevamento di
altri dispositivi e consentire l'abbinamento a un dispositivo audio Bluetooth.
ENGLISH
FRANÇAISDEUTSCHEESPAÑOLITALIANO
XP800 • Sistema PA portatile
81
Page 82

Layout del mixer
18. Manopola effetti SEND – La manopola SEND è usata per regolare il volume totale di effetti
aggiunti al bus master.
19. Selettore programma effetti (PROG) – Questa manopola di controllo è usata per selezionare
uno dei programmi effetti 16/24-bit DSP.
20. Manopola MASTER – La manopola volume MASTER controlla il livello in uscita generale.
La manopola determina il livello finale di uscita del segnale. I segnali da tutti i canali
sono inviati qui prima di essere inviati agli amplificatori integrati e ai jack delle uscite
degli altoparlanti destro e sinistro.
21. Indicatore LED – Questo indicatore a sei barre mostra il livello in uscita del XP800. Per
un rapporto ottimale segnale-rumore, impostare il VOLUME in modo che il materiale in
riproduzione sia attestato intorno a +3 o +6 VU con illuminazione occasionale, non fissa,
del segmento rosso "LIMITER".
22. Interruttore SPEECH/MUSIC – L'interruttore SPEECH/MUSIC è utilizzato per modificare la
frequenza in risposta complessiva o la tonalità della voce riprodotte dal sistema audio
XP800. Se l'uso principale del sistema è con materiale musicale, premere l'interruttore
per selezionare la curva di risposta MUSIC. Se l'uso principale del sistema è con materiale vocale, premere l'interruttore per selezionare la curva di risposta SPEECH.
23. Interruttore PHANTOM – Il XP800 è dotato di un sistema di alimentazione fantasma
(phantom) integrato per l'uso con microfoni condensatori. Quando l'interruttore è attivato, la spia LED si illuminerà per indicare che l'alimentazione fantasma è disponibile sui
pre-amp del microfono.
NOTA IMPORTANTE – per evitare suoni bruschi e violenti, assicurarsi che il controllo del
volume MASTER sia abbassato prima di collegare e scollegare i cavi del microfono mentre l'alimentazione fantasma è attiva.
82
Page 83

Abbinamento a un dispositivo Bluetooth
Bluetooth® è una tecnologia di comunicazione wireless che consente la connettività tra un'ampia
gamma di dispositivi. XP800 utilizza la tecnologia Bluetooth per trasmettere audio ad alta qualità
da qualsiasi dispositivo abilitato Bluetooth senza necessità di collegare alcun cavo. Prima di
utilizzare un dispositivo con il XP800 via Bluetooth, è necessario abbinarlo.
1. Ruotare tutti i controlli LEVEL del canale in senso antiorario su 0.
2. Con il XP800 e il dispositivo Bluetooth accesi, premere il pulsante PAIR sul pannello
superiore del mixer del XP800 per rendere l'altoparlante rilevabile via Bluetooth. La spia
Bluetooth lampeggerà lentamente in blu.
3. Dalle impostazioni del dispositivo Bluetooth abilitare il "riconoscimento" di altri disposi-
tivi.
4. Dall'elenco di dispositivi Bluetooth selezionare "Samson XP800".
5. Se il dispositivo richiede una password, inserire 0000 (quattro zeri) e premere OK. Alcuni
dispositivi potrebbero chiedere di accettare il collegamento.
6. Durante il collegamento al dispositivo, la spia Bluetooth del XP800 lampeggerà rapida-
mente in blu.
7. L'abbinamento è completo quando la spia sul XP800 diventa blu fisso. È ora possibile
riprodurre contenuti audio dal proprio dispositivo tramite gli altoparlanti del XP800.
8. Con il controllo volume del dispositivo Bluetooth attivato, avviare la riproduzione musicale
e alzare lentamente il volume dei canali 7/8 BLUETOOTH del XP800 fino a raggiungere
il volume desiderato.
®
ENGLISH
FRANÇAISDEUTSCHEESPAÑOLITALIANO
XP800 • Sistema PA portatile
83
Page 84

Installazione del XP800
Estrarre tutti i componenti del sistema dalla confezione e conservare i materiali di imballaggio in caso di restituzione del prodotto.
Rimuovere il mixer ruotando la vite a farfalla in senso antiorario verso la posizione RELEASE.
LOCK
RELEASE
Tenere saldamente il mixer per rimuoverlo dall'altoparlante.
Rimuovere il coperchio del vano accessori
ruotando la vite a farfalla in senso antiorario
verso la posizione RELEASE, quindi estrarre
i cavi audio inclusi.
Reinserire il pannello accessori allineando il fondo del pannello con le fessure.
Assicurarsi che la vite a farfalla sia in posizione RELEASE; quindi chiudere il pannello
e ruotare la vite a farfalla in senso orario
verso la posizione LOCK.
84
Page 85

Installazione del XP800
Posizionare gli altoparlanti sul pavimento o su un
supporto.
Per la massima copertura sonora, il XP800
può essere usato con uno stand per
altoparlanti standard da 13⁄8”. L'altezza ideale
dell'altoparlante è al di sopra delle teste
degli ascoltatori. Prestare attenzione durante
il montaggio dell'altoparlante su uno stand:
assicurarsi che sia posizionato su una superficie
piana e stabile per evitare il rischio di caduta. Se
si desidera usare l'altoparlante su un pavimento o
più in basso rispetto all'ascoltatore, il XP800 può
essere posizionato in modo inclinato per dirigere
l'audio verso l'alto.
Usando uno dei cavi inclusi, collegare l'USCITA SINISTRA DELL'ALTOPARLANTE al connettore di ingresso dell'altoparlante sinistro. Quindi usare il secondo cavo incluso per collegare
l'USCITA DESTRA DELL'ALTOPARLANTE al connettore di ingresso dell'altoparlante destro.
ENGLISH
FRANÇAISDEUTSCHEESPAÑOLITALIANO
XP800 • Sistema PA portatile
85
Page 86

Avvio rapido
1. Assicurarsi che l'interruttore di ACCENSIONE del XP800 sia in posizione OFF.
2. Se gli altoparlanti non sono collegati, collegare i cavi degli altoparlanti come descritto
alla sezione precedente.
3. Ruotare completamente ciascuno dei controlli volume LEVEL e MASTER in senso antio-
rario in posizione "0".
4. Quindi collegare un'estremità del cavo di alimentazione incluso all'ingresso di alimenta-
zione del mixer del XP800 e l'altra a una presa di corrente CA con messa a terra.
5. Collegare i microfoni tramite cavi XLR standard, gli strumenti tramite cavi con jack da
¼” e i lettori MP3 tramite cavi da
¹
/
8
” nei rispettivi jack sul mixer.
Microfono dinamico
SEGNALE
Chitarra acustica
elettrica
SEGNALE
Tastiera
Subwoofer
SEGNALE
SEGNALE
Vani altoparlanti XP800
attivo
SEGNALE
SEGNALE
SEGNALE
6. Accendere tutti i dispositivi collegati al XP800, quindi accendere l'interruttore del
XP800 in posizione ON.
7. Ruotare il controllo del volume MASTER di circa 3/4 in senso orario.
8. Iniziare a parlare o a riprodurre musica attraverso il canale 1 regolando lentamente il
controllo LEVEL fino a raggiungere il livello desiderato. Eseguire la stessa operazione per
tutti i canali utilizzati.
86
Page 87

Avvio rapido XP800
9. Se l'indicatore LIMITER è costantemente acceso, abbassare il volume MASTER affinché
la spia si accenda solo occasionalmente in corrispondenza dei picchi più alti.
10. Per aggiungere profondità al mix o appianare le parti vocali, è possibile applicare effetti
audio, ad esempio riverberi, sui canali 1-4 A tal fine, alzare i controlli di livello EFFECTS
sui canali a cui si desidera aggiungere gli effetti.
11. Alzare lentamente la manopola SEND degli effetti fino a ottenere il volume desiderato.
12. Per alterare la tonalità del segnale, è possibile regolare i controlli LOW (bassi) e HIGH
(alti). Se l'audio risulta troppo torbido o confuso, abbassare il controllo LOW. Se l'audio
risulta troppo debole, aumentare il controllo HIGH. Non esiste un modo giusto o un
modo sbagliato per equalizzare i suoni; è sufficiente ascoltare la resa sonora nel contesto, e regolare i valori di conseguenza.
ENGLISH
FRANÇAISDEUTSCHEESPAÑOLITALIANO
XP800 • Sistema PA portatile
87
Page 88

Applicare effetti
Il XP800 è dotato di effetti digitali integrati a 24-bit che possono essere aggiunti ai canali da 1
a 4. È possibile usare effetti come delay o riverbero per ottimizzare la resa vocale o l'atmosfera
di un brano seguendo queste istruzioni:
1. Collegare un microfono o uno strumento al canale desiderato, quindi regolare il volume e
l'equalizzatore secondo le proprie preferenze.
2. Usare il selettore PROG per scegliere uno dei dieci effetti digitali integrati.
3. Alzare il controllo EFFECTS sul canale a cui si desidera aggiungere l'effetto digitale.
4. Alzare il controllo principale SEND degli effetti per portare gli effetti al volume desiderato.
Evitare feedback
Il feedback è un fastidioso effetto di ritorno che può essere spesso udito quando il
microfono riceve il suono dall'altoparlante. Il suono viene amplificato nuovamente
tramite lo stesso altoparlante, generando un loop di ritorno. Seguire queste istruzioni per
ridurre al minimo la presenza di feedback:
• Evitare di dirigere il microfono direttamente verso gli altoparlanti. In generale,
si raccomanda di posizionare il microfono dietro il gruppo altoparlanti, al fine di
sfruttare a proprio vantaggio le proprietà direzionali di altoparlanti e microfono.
• Tenere il microfono il più possibile distante dagli altoparlanti. Ciò supporterà
l'isolamento tra l'altoparlante e il microfono, e consentirà di aumentare la potenza
in uscita del XP800.
• Posizionare il microfono il più vicino possibile alla sorgente audio. Ciò consentirà al
microfono di recepire più suono diretto, permettendo quindi di ridurre il controllo
gain sull'entrata del microfono.
• Abbassare il VOLUME MASTER del sistema XP800.
88
Page 89

Sistema Stage XPD1 Wireless (Opzionale)
ENGLISH
Collegare il ricevitore RXD1 USB al
jack USB del canale 4 indicato come
WIRELESS.
Ruotare la manopola LEVEL del
canale 4 sul XP800 in senso
antiorario portandola a 0, quindi
spostare l'interruttore di accensione
(POWER) del XP800 in posizione
ON.
Inserire un set di batterie nuove tipo
AA (LR6) nel trasmettitore wireless,
rispettando la polarità indicata.
FRANÇAISDEUTSCHEESPAÑOLITALIANO
Accendere il trasmettitore tenendo
premuto l'interruttore Power; la spia LED
si accenderà in color ambra.
XP800 • Sistema PA portatile
89
Page 90

Sistema Stage XPD1 Wireless (Opzionale)
Se il trasmettitore e il ricevitore non sono
stati ancora abbinati, tenere premuto il
tasto sul ricevitore RXD1 per almeno 5
secondi finché non lampeggia.
Alzare il controllo del volume MASTER
e parlare o cantare nel microfono ad
un volume di voce normale, alzando
contemporaneamente il controllo
LEVEL sul canale 4 fino a raggiungere
il volume desiderato.
Tenere premuto il pulsante Power sul
trasmettitore per almeno 5 secondi. Ciò
porterà entrambi i dispositivi in modalità
abbinamento. Una volta che il ricevitore
e il trasmettitore sono sincronizzati e
comunicanti, le spie LED su entrambe le
unità rimarranno accese, a indicare che i
dispositivi sono pronti all'uso.
In caso di distorsioni, controllare la spia
LED del LIMITER. Se la spia è illuminata
in rosso, abbassare il LIVELLO del canale
4 sul XP800 finché la spia non si accende
solo in occasione di suoni particolarmente
alti. Se si avvertono ancora distorsioni,
svitare il corpo del microfono e usare
il cacciavite in plastica fornito per
girare lentamente il controllo Gain sul
trasmettitore HXD1 in senso antiorario fino
a eliminare la distorsione.
Viceversa, se si avverte un segnale
rumoroso debole al livello di volume
impostato (e con il controllo WIRELESS
del XP800 ruotato completamente in
senso orario), usare il cacciavite in
plastica fornito per girare lentamente il
controllo Gain sul trasmettitore in senso
orario finché il segnale non raggiunge un
livello accettabile.
90
Page 91

Speciche tecniche
Amplificatore
Potenza (0,5% THD a 1KHz)
Risposta in frequenza 20 Hz - 20 kHz
Consumo energetico 100-240Vac, 50/60Hz, 450W
Temperatura di esercizio 14° F (-10° C) to 104° F (40° C)
Bassa frequenza Trasduttore bassi da 8"
Alta frequenza Tweeter da 1"
Entrate XLR, ¼” bilanciato, RCA, 3,5 mm stereo, USB Wire-
Uscite ¼” MONITOR, ¼” SUB OUT , Uscita altoparlante ¼”
Livello massimo in uscita
(0,5% T.H.D a 1KHz)
Potenza fantasma +15 V CC, Voltaggio fantasma fisso
EQ canale in
entrata
Interruttore voce/musica
Effetti
Indicatori
Bluetooth
Tecnica di Modulazione FHSS (GFSK, π/4-DQPSK, 8-DPSK)
Dimensioni 20,1’’(L) x 10,6’’(l) x 19’’(A)
Peso 41,5 Ib / 18,8 kg
®
Alto 10 kHz Shelving ±15 dB
Basso 100 Hz Shelving ±15 dB
800 W @ 8Ω (400 W per canale) Picco
400 W @ 8Ω (200 W per canale) Media
Altoparlanti
Mixer
less
+22 dBu (MONITOR L/R & SUB OUT) @10KΩ
167 Hz, 3 dB/Octave
16 Preset, 24-bit DSP
Livello 5-point, LIMITER, FANTASMA
Bluetooth 3.0, A2DP
Peso e dimensioni
510 mm(L) x 270 mm(l) x 485 mm(A)
ENGLISH
FRANÇAISDEUTSCHEESPAÑOLITALIANO
Samson è continuamente al lavoro per migliorare la propria gamma di prodotti, pertanto
specifiche tecniche e illustrazioni possono variare senza preavviso.
XP800 • Sistema PA portatile
91
Page 92

Samson Technologies Corp.
45 Gilpin Avenue
Hauppauge, New York 11788-8816
Phone: 1-800-3-SAMSON (1-800-372-6766)
Fax: 631-784-2201
www.samsontech.com
 Loading...