

Page 1

®
STUDIO REFERENCE MONITORS
80 WATT ACTIVE SUBWOOFER
Page 2
Safety Instructions/Consignes de sécurité/Sicherheitsvorkehrungen
WARNING: To reduce the risk of fire or electric shock, do not expose this unit to rain or moisture. To reduce the hazard of electrical shock, do not remove cover or back. No
user serviceable parts inside. Please refer all servicing to qualified personnel.The lightning flash with an arrowhead symbol within an equilateral triangle, is intended to alert
the user to the presence of uninsulated "dangerous voltage" within the products enclosure that may be of sufficient magnitude to constitute a risk of electric shock to persons. The exclamation point within an equilateral triangle is intended to alert the user to the presence of important operating and maintenance (servicing) instructions in the
literature accompanying the product.
Important Safety Instructions
1. Please read all instructions before operating the unit.
2. Keep these instructions for future reference.
3. Please heed all safety warnings.
4. Follow manufacturers instructions.
5. Do not use this unit near water or moisture.
6. Clean only with a damp cloth.
7. Do not block any of the ventilation openings. Install in accordance with the manufacturers instructions.
8. Do not install near any heat sources such as radiators, heat registers, stoves, or other apparatus (including amplifiers) that produce heat.
9. Do not defeat the safety purpose of the polarized or grounding-type plug. A polarized plug has two blades with one wider than the other. A grounding type plug has
two blades and a third grounding prong. The wide blade or third prong is provided for your safety. When the provided plug does not fit your outlet, consult an electrician
for replacement of the obsolete outlet.
10. Protect the power cord from being walked on and pinched particularly at plugs, convenience receptacles and at the point at which they exit from the unit.
11. Unplug this unit during lightning storms or when unused for long periods of time.
12. Refer all servicing to qualified personnel. Servicing is required when the unit has been damaged in any way, such as power supply cord or plug damage, or if liquid has
been spilled or objects have fallen into the unit, the unit has been exposed to rain or moisture, does not operate normally, or has been dropped.
ATTENTION: Pour éviter tout risque d’électrocution ou d’incendie, ne pas exposer cet appareil à la pluie ou à l’humidité. Pour éviter tout risque d’électrocution, ne pas ôter le
couvercle ou le dos du boîtier. Cet appareil ne contient aucune pièce remplaçable par l'utilisateur. Confiez toutes les réparations à un personnel qualifié. Le signe avec un éclair
dans un triangle prévient l’utilisateur de la présence d’une tension dangereuse et non isolée dans l’appareil. Cette tension constitue un risque d’électrocution. Le signe avec
un point d’exclamation dans un triangle prévient l’utilisateur d’instructions importantes relatives à l’utilisation et à la maintenance du produit.
Consignes de sécurité importantes
1. Veuillez lire toutes les instructions avant d’utiliser l’appareil.
2. Conserver ces instructions pour toute lecture ultérieure.
3. Lisez avec attention toutes les consignes de sécurité.
4. Suivez les instructions du fabricant.
5. Ne pas utiliser cet appareil près d’une source liquide ou dans un lieu humide.
6. Nettoyez l’appareil uniquement avec un tissu humide.
7. Veillez à ne pas obstruer les fentes prévues pour la ventilation de l’appareil. Installez l’appareil selon les instructions du fabricant.
8. Ne pas installer près d’une source de chaleur (radiateurs, etc.) ou de tout équipement susceptible de générer de la chaleur (amplificateurs de puissance par exemple).
9. Ne pas retirer la terre du cordon secteur ou de la prise murale. Les fiches canadiennes avec polarisation (avec une lame plus large) ne doivent pas être modifiées. Si votre
prise murale ne correspond pas au modèle fourni, consultez votre électricien.
10. Protégez le cordon secteur contre tous les dommages possibles (pincement, tension, torsion,, etc.). Veillez à ce que le cordon secteur soit libre, en particulier à sa sortie
du boîtier.
11. Déconnectez l’appareil du secteur en présence d’orage ou lors de périodes d’inutilisation prolongées.
12. Consultez un service de réparation qualifié pour tout dysfonctionnement (dommage sur le cordon secteur, baisse de performances, exposition à la pluie, projection liquide dans l’appareil, introduction d’un objet dans le boîtier, etc.).
ACHTUNG: Um die Gefahr eines Brandes oder Stromschlags zu verringern, sollten Sie dieses Gerät weder Regen noch Feuchtigkeit aussetzen.Um die Gefahr eines
Stromschlags zu verringern, sollten Sie weder Deckel noch Rückwand des Geräts entfernen. Im Innern befinden sich keine Teile, die vom Anwender gewartet werden können. Überlassen Sie die Wartung qualifiziertem Fachpersonal.Der Blitz mit Pfeilspitze im gleichseitigen Dreieck soll den Anwender vor nichtisolierter “gefährlicher Spannung”
im Geräteinnern warnen. Diese Spannung kann so hoch sein, dass die Gefahr eines Stromschlags besteht. Das Ausrufezeichen im gleichseitigen Dreieck soll den Anwender
auf wichtige Bedienungs- und Wartungsanleitungen aufmerksam machen, die im mitgelieferten Informationsmaterial näher beschrieben werden.
Wichtige Sicherheitsvorkehrungen
1. Lesen Sie alle Anleitungen, bevor Sie das Gerät in Betrieb nehmen.
2. Bewahren Sie diese Anleitungen für den späteren Gebrauch gut auf.
3. Bitte treffen Sie alle beschriebenen Sicherheitsvorkehrungen.
4. Befolgen Sie die Anleitungen des Herstellers.
5. Benutzen Sie das Gerät nicht in der Nähe von Wasser oder Feuchtigkeit.
6. Verwenden Sie zur Reinigung des Geräts nur ein feuchtes Tuch.
7. Blockieren Sie keine Belüftungsöffnungen. Nehmen Sie den Einbau des Geräts nur entsprechend den Anweisungen des Herstellers vor.
8. Bauen Sie das Gerät nicht in der Nähe von Wärmequellen wie Heizkörpern, Wärmeklappen, Öfen oder anderen Geräten (inklusive Verstärkern) ein, die Hitze erzeugen.
9. Setzen Sie die Sicherheitsfunktion des polarisierten oder geerdeten Steckers nicht außer Kraft. Ein polarisierter Stecker hat zwei flache, unterschiedlich breite Pole. Ein
geerdeter Stecker hat zwei flache Pole und einen dritten Erdungsstift. Der breitere Pol oder der dritte Stift dient Ihrer Sicherheit. Wenn der vorhandene Stecker nicht in
Ihre Steckdose passt, lassen Sie die veraltete Steckdose von einem Elektriker ersetzen.
10. Schützen Sie das Netzkabel dahingehend, dass niemand darüber laufen und es nicht geknickt werden kann. Achten Sie hierbei besonders auf Netzstecker,
Mehrfachsteckdosen und den Kabelanschluss am Gerät.
11. Ziehen Sie den Netzstecker des Geräts bei Gewittern oder längeren Betriebspausen aus der Steckdose.
12. Überlassen Sie die Wartung qualifiziertem Fachpersonal. Eine Wartung ist notwendig, wenn das Gerät auf irgendeine Weise, beispielsweise am Kabel oder Netzstecker
beschädigt wurde, oder wenn Flüssigkeiten oder Objekte in das Gerät gelangt sind, es Regen oder Feuchtigkeit ausgesetzt war, nicht mehr wie gewohnt betrieben
werden kann oder fallen gelassen wurde.
Page 3

Instrucciones de seguridad / Istruzioni di Sicurezza
PRECAUCION: Para reducir el riesgo de incendios o descargas, no permita que este aparato quede expuesto a la lluvia o la humedad. Para reducir el riesgo de descarga eléc-
trica, nunca quite la tapa ni el chasis. Dentro del aparato no hay piezas susceptibles de ser reparadas por el usuario. Dirija cualquier reparación al servicio técnico oficial. El
símbolo del relámpago dentro del triángulo equilátero pretende advertir al usuario de la presencia de “voltajes peligrosos” no aislados dentro de la carcasa del producto, que
pueden ser de la magnitud suficiente como para constituir un riesgo de descarga eléctrica a las personas. El símbolo de exclamación dentro del triángulo equilátero quiere
advertirle de la existencia de importantes instrucciones de manejo y mantenimiento (reparaciones) en los documentos que se adjuntan con este aparato.
Instrucciones importantes de seguridad
1. Lea todo este manual de instrucciones antes de comenzar a usar la unidad.
2. Conserve estas instrucciones para cualquier consulta en el futuro.
3. Cumpla con todo lo indicado en las precauciones de seguridad.
4. Observe y siga todas las instrucciones del fabricante.
5. Nunca utilice este aparato cerca del agua o en lugares húmedos.
6. Limpie este aparato solo con un trapo suave y ligeramente humedecido.
7. No bloquee ninguna de las aberturas de ventilación. Instale este aparato de acuerdo a las instrucciones del fabricante.
8. No instale este aparato cerca de fuentes de calor como radiadores, calentadores, hornos u otros aparatos (incluyendo amplificadores) que produzcan calor.
9. No anule el sistema de seguridad del enchufe de tipo polarizado o con toma de tierra. Un enchufe polarizado tiene dos bornes, uno más ancho que el otro. Uno con
toma de tierra tiene dos bornes normales y un tercero para la conexión a tierra. El borne ancho o el tercero se incluyen como medida de seguridad. Cuando el enchufe
no encaje en su salida de corriente, llame a un electricista para que le cambie su salida anticuada.
10. Evite que el cable de corriente quede en una posición en la que pueda ser pisado o aplastado, especialmente en los enchufes, receptáculos y en el punto en el que
salen de la unidad.
11. Desconecte de la corriente este aparato durante las tormentas eléctricas o cuando no lo vaya a usar durante un periodo de tiempo largo.
12. Dirija cualquier posible reparación solo al servicio técnico oficial. Deberá hacer que su aparato sea reparado cuando esté dañado de alguna forma, como si el cable de
corriente o el enchufe están dañados, o si se han derramado líquidos o se ha introducido algún objeto dentro de la unidad, si esta ha quedado expuesta a la lluvia o la
humedad, si no funciona normalmente o si ha caído al suelo.
ATTENZIONE: per ridurre il rischio di incendio o di scariche elettriche, non esponete questo apparecchio a pioggia o umidità. Per ridurre il pericolo di scariche elettriche evitate
di rimuoverne il coperchio o il pannello posteriore. Non esistono all'interno dell'apparecchio parti la cui regolazione è a cura dell'utente. Per eventuale assistenza, fate riferimento
esclusivamente a personale qualificato. Il fulmine con la punta a freccia all'interno di un triangolo equilatero avvisa l'utente della presenza di "tensioni pericolose" non isolate
all'interno dell'apparecchio, tali da costituire un possibile rischio di scariche elettriche dannose per le persone. Il punto esclamativo all'interno di un triangolo equilatero avvisa
l'utente della presenza di importanti istruzioni di manutenzione (assistenza) nella documentazione che accompagna il prodotto.
Importanti Istruzioni di Sicurezza
1. Prima di usare l'apparecchio, vi preghiamo di leggerne per intero le istruzioni.
2. Conservate tali istruzioni per una eventuale consultazione futura.
3. Vi preghiamo di rispettare tutte le istruzioni di sicurezza.
4. Seguite tutte le istruzioni del costruttore.
5. Non usate questo apparecchio vicino ad acqua o umidità.
6. Pulite l'apparecchio esclusivamente con un panno asciutto.
7. Evitate di ostruire una qualsiasi delle aperture di ventilazione. Posizionatelo seguendo le istruzioni del costruttore.
Non posizionatelo vicino a sorgenti di calore come radiatori, scambiatori di calore, forni o altri apparecchi (amplificatori compresi) in grado di generare calore.
8.
9. Non disattivate la protezione di sicurezza costituita dalla spina polarizzata o dotata di collegamento a terra. Una spina polarizzata è dotata di due spinotti, uno più
piccolo ed uno più grande. Una spina dotata di collegamento a terra è dotata di due spinotti più un terzo spinotto di collegamento a terra. Questo terzo spinotto, eventualmente anche più grande, viene fornito per la vostra sicurezza. Se la spina fornita in dotazione non si adatta alla vostra presa, consultate un elettricista per la sostituzione
della presa obsoleta.
10. Proteggete il cavo di alimentazione in modo che non sia possibile camminarci sopra né piegarlo, con particolare attenzione alle prese, ai punti di collegamento e al punto
in cui esce dall'apparecchio.
11. Staccate l'apparecchio dalla alimentazione in caso di temporali o tempeste o se non lo usate per un lungo periodo.
12. Per l'assistenza, fate riferimento esclusivamente a personale qualificato. È necessaria l'assistenza se l'apparecchio ha subito un qualsiasi tipo di danno, come danni al cavo
o alla spina di alimentazione, nel caso in cui sia stato versato del liquido o siano caduti oggetti al suo interno, sia stato esposto a pioggia o umidità, non funzioni corret-
tamente o sia stato fatto cadere.
Copyright 2005, Samson Technologies Corp.
Printed November, 2005 v5.4
Samson Technologies Corp.
Phone: 1-800-3-SAMSON (1-800-372-6766)
Fax: 516-364-3888
www.samsontech.com
Page 4

Contents
Introduction. . . . . . . . . . . . . . . . . . . . . . . . . . . . . . . . . . . . . . . . . . . . . . . . . . . . . 5
Resolv sub88 Features . . . . . . . . . . . . . . . . . . . . . . . . . . . . . . . . . . . . . . . . . . .6
Resolv sub88 Layout. . . . . . . . . . . . . . . . . . . . . . . . . . . . . . . . . . . . . . . . . . . . . 7
Front View Layout . . . . . . . . . . . . . . . . . . . . . . . . . . . . . . . . . . . . . . . . . . . . . . . 7
Remote Control Layout . . . . . . . . . . . . . . . . . . . . . . . . . . . . . . . . . . . . . . . . . .7
Rear Panel Layout . . . . . . . . . . . . . . . . . . . . . . . . . . . . . . . . . . . . . . . . . . . . . . . 8
Setting up the sub88 - Quick Start. . . . . . . . . . . . . . . . . . . . . . . . . . . . . . . . 9
Operating the Resolv sub88 . . . . . . . . . . . . . . . . . . . . . . . . . . . . . . . . . . . .10
Resolv sub88 Control Panel . . . . . . . . . . . . . . . . . . . . . . . . . . . . . . . . . . . . .10
The Ins and The Outs . . . . . . . . . . . . . . . . . . . . . . . . . . . . . . . . . . . . . . . . . . .11
Control Functions and Indicators. . . . . . . . . . . . . . . . . . . . . . . . . . . . . . . .12
Using the Remote Control . . . . . . . . . . . . . . . . . . . . . . . . . . . . . . . . . . . . . .13
Connecting the Resolv sub88
Mono Sub With Active Satellites. . . . . . . . . . . . . . . . . . . . . . . . . . . . . . . . .14
Mono Sub With Passive Satellites Using Line Inputs . . . . . . . . . . . . . .15
Resolv sub88 Wiring Guide. . . . . . . . . . . . . . . . . . . . . . . . . . . . . . . . . . . . . .16
Specifications . . . . . . . . . . . . . . . . . . . . . . . . . . . . . . . . . . . . . . . . . . . . . . 65 -67
. . . . . . . . . . . . . . . . . . . . . . . . . . . . . . . . . . .14
Table des m a tièr e s
Introduction. . . . . . . . . . . . . . . . . . . . . . . . . . . . . . . . . . . . . . . . . . . . . . . . . . . .17
Caractéristiques des Resolv sub88. . . . . . . . . . . . . . . . . . . . . . . . . . . . . . .18
Présentation des Resolv sub88 . . . . . . . . . . . . . . . . . . . . . . . . . . . . . . . . . .19
Face avant. . . . . . . . . . . . . . . . . . . . . . . . . . . . . . . . . . . . . . . . . . . . . . . . . . . . . .19
Télécommande . . . . . . . . . . . . . . . . . . . . . . . . . . . . . . . . . . . . . . . . . . . . . . . . .19
Face arrière. . . . . . . . . . . . . . . . . . . . . . . . . . . . . . . . . . . . . . . . . . . . . . . . . . . . .20
Configuration des REsolv sub88 - Connexion rapide . . . . . . . . . . . . .21
Utilisation des Resolv sub88 . . . . . . . . . . . . . . . . . . . . . . . . . . . . . . . . . . . .22
Réglages des Resolv sub88 . . . . . . . . . . . . . . . . . . . . . . . . . . . . . . . . . . . . .22
Réglages et voyants LED . . . . . . . . . . . . . . . . . . . . . . . . . . . . . . . . . . . . . . . .24
Touches SYSTEM LEVEL UP et SYSTEM LEVEL Down . . . . . . . . . . . . . .24
Utilisation de la télécommande . . . . . . . . . . . . . . . . . . . . . . . . . . . . . . . . .25
Connexion des Resolv sub88. . . . . . . . . . . . . . . . . . . . . . . . . . . . . . . . . . . .26
Subwoofer avec satellites actifs . . . . . . . . . . . . . . . . . . . . . . . . . . . . . . . . .26
Subwoofer mono avec satellites passifs utilisant les entrées ligne. . 27
Plan de câblage des Resolv sub88. . . . . . . . . . . . . . . . . . . . . . . . . . . . . . .28
Caractéristiques techniques. . . . . . . . . . . . . . . . . . . . . . . . . . . . . . . . . 65 -67
In halt
Einleitung . . . . . . . . . . . . . . . . . . . . . . . . . . . . . . . . . . . . . . . . . . . . . . . . . . . . . .29
Resolv sub88 Features . . . . . . . . . . . . . . . . . . . . . . . . . . . . . . . . . . . . . . . . . .30
Resolv sub88 Layout. . . . . . . . . . . . . . . . . . . . . . . . . . . . . . . . . . . . . . . . . . . .31
Layout der Vorderseite. . . . . . . . . . . . . . . . . . . . . . . . . . . . . . . . . . . . . . . . . .31
Layout der Fernbedienung. . . . . . . . . . . . . . . . . . . . . . . . . . . . . . . . . . . . . .31
Layout der Rückseite . . . . . . . . . . . . . . . . . . . . . . . . . . . . . . . . . . . . . . . . . . .32
sub88 einrichten - Schnellstart . . . . . . . . . . . . . . . . . . . . . . . . . . . . . . . . . .33
Resolv sub88 bedienen . . . . . . . . . . . . . . . . . . . . . . . . . . . . . . . . . . . . . . . .34
Resolv sub88 Bedienfeld. . . . . . . . . . . . . . . . . . . . . . . . . . . . . . . . . . . . . . . .34
Eingänge und Ausgänge. . . . . . . . . . . . . . . . . . . . . . . . . . . . . . . . . . . . . . . .35
Steuerungsfunktionen und Anzeigen . . . . . . . . . . . . . . . . . . . . . . . . . . .36
Fernbedienung verwenden . . . . . . . . . . . . . . . . . . . . . . . . . . . . . . . . . . . . .37
Resolv sub88 anschließen. . . . . . . . . . . . . . . . . . . . . . . . . . . . . . . . . . . . . . .38
Mono Sub mit aktiven Satelliten . . . . . . . . . . . . . . . . . . . . . . . . . . . . . . . .38
Mono Sub mit passiven Satelliten an den Line-Eingängen . . . . . . .39
Resolv sub88 Verdrahtung . . . . . . . . . . . . . . . . . . . . . . . . . . . . . . . . . . . . . .40
Technische Daten . . . . . . . . . . . . . . . . . . . . . . . . . . . . . . . . . . . . . . . . . . 65 -67
Co nten i do
Introducción . . . . . . . . . . . . . . . . . . . . . . . . . . . . . . . . . . . . . . . . . . . . . . . . . . .41
Características del Resolv sub88 . . . . . . . . . . . . . . . . . . . . . . . . . . . . . . . .42
Distribución del Resolv sub88. . . . . . . . . . . . . . . . . . . . . . . . . . . . . . . . . . .43
Vista frontal . . . . . . . . . . . . . . . . . . . . . . . . . . . . . . . . . . . . . . . . . . . . . . . . . . . .43
Mando a distancia . . . . . . . . . . . . . . . . . . . . . . . . . . . . . . . . . . . . . . . . . . . . . .43
Panel trasero . . . . . . . . . . . . . . . . . . . . . . . . . . . . . . . . . . . . . . . . . . . . . . . . . . .44
Configuración del sub88 - Arranque rápido. . . . . . . . . . . . . . . . . . . . . .45
Manejo del Resolv sub88 . . . . . . . . . . . . . . . . . . . . . . . . . . . . . . . . . . . . . . .46
Panel de control del Resolv sub88. . . . . . . . . . . . . . . . . . . . . . . . . . . . . . .46
Entradas y salidas. . . . . . . . . . . . . . . . . . . . . . . . . . . . . . . . . . . . . . . . . . . . . . .47
Funciones de control y pilotos . . . . . . . . . . . . . . . . . . . . . . . . . . . . . . . . . .48
Uso del mando a distancia . . . . . . . . . . . . . . . . . . . . . . . . . . . . . . . . . . . . . .49
Conexión del Resolv sub88 . . . . . . . . . . . . . . . . . . . . . . . . . . . . . . . . . . . . .50
Sub mono con satélites activos . . . . . . . . . . . . . . . . . . . . . . . . . . . . . . . . .50
Sub mono con satélites pasivos usando las entradas de línea . . . .51
Guía de cableado del Resolv sub88. . . . . . . . . . . . . . . . . . . . . . . . . . . . . .52
Especificaciones técnicas . . . . . . . . . . . . . . . . . . . . . . . . . . . . . . . . . . . 65 -67
Contenuti
Introduzione . . . . . . . . . . . . . . . . . . . . . . . . . . . . . . . . . . . . . . . . . . . . . . . . . . .53
Resolv sub88 - Le Caratteristiche . . . . . . . . . . . . . . . . . . . . . . . . . . . . . . . .54
Resolv sub88 - I Componenti. . . . . . . . . . . . . . . . . . . . . . . . . . . . . . . . . . . .55
Il Pannello Frontale . . . . . . . . . . . . . . . . . . . . . . . . . . . . . . . . . . . . . . . . . . . . .55
Il Telecomando . . . . . . . . . . . . . . . . . . . . . . . . . . . . . . . . . . . . . . . . . . . . . . . . .55
Il Pannello Posteriore . . . . . . . . . . . . . . . . . . . . . . . . . . . . . . . . . . . . . . . . . . .56
Come Configurare il sub88 - Uso Immediato. . . . . . . . . . . . . . . . . . . . .57
L'Uso del Resolv sub88 . . . . . . . . . . . . . . . . . . . . . . . . . . . . . . . . . . . . . . . . .58
Il Pannello di Controllo del Resolv sub88 . . . . . . . . . . . . . . . . . . . . . . . .58
L'Uso del Resolv sub88 . . . . . . . . . . . . . . . . . . . . . . . . . . . . . . . . . . . . . . . . .59
Gli Ingressi e le Uscite. . . . . . . . . . . . . . . . . . . . . . . . . . . . . . . . . . . . . . . . . . .59
L'Uso del Resolv sub88 . . . . . . . . . . . . . . . . . . . . . . . . . . . . . . . . . . . . . . . . .60
Funzioni di Controllo e Indicatori. . . . . . . . . . . . . . . . . . . . . . . . . . . . . . . .60
L'Uso del Telecomando . . . . . . . . . . . . . . . . . . . . . . . . . . . . . . . . . . . . . . . . .61
Sub in Mono con Satelliti Attivi. . . . . . . . . . . . . . . . . . . . . . . . . . . . . . . . . .62
Sub in Mono con Satelliti Passivi Tramite l'Uso degli Ingressi di Linea 63
Resolv sub88 - Guida al Cablaggio. . . . . . . . . . . . . . . . . . . . . . . . . . . . . . .64
Specifiche. . . . . . . . . . . . . . . . . . . . . . . . . . . . . . . . . . . . . . . . . . . . . . . . . . 65 -67
Page 5

Introduction
Thank you for purchasing the Samson Resolv sub88 Active Subwoofer. Taking care of the low
end in any near-field monitor or multi-media system, a powerful 80-watt low frequency amplifier drives a heavy-duty 8-inch transducer, reproducing tones between 40 –180 Hz. The sub88’s
low frequency driver is an 8-inch, 25mm excursion transducer with a Butyl surround, providing
extended range and tight low frequency response. The sub88 comes with an infrared remote
control, allowing you to easily control your monitor system from anywhere in the control room.
The remote control instantly gives you additional control room monitoring features by providing
Sub Level, System Level, Dim, Sub Mute and System Mute. In order to maximize the sound of your
monitor system, the sub88 has a built-in active crossover, with variable crossover frequency, for
connecting to your satellite speakers. The sub88 provides intelligent sub-satellite control thanks
to the clever switching that automatically returns the satellites to full-range operation whenever
the sub88 is muted. The rear panel features a footswitch jack allowing you to easily switch on and
off the subwoofer on the fly. With a phase switch to time align your monitors, the sub88 provides
expanded control. Balanced inputs and outputs on standard XLR and 1/4-inch connectors make
interfacing to other active monitors or power amplifier simple. The sub88’s enclosure is constructed of rigid MDF (Medium Density Fiberboard) to insure maximum sound pressure level and
is finished in durable black satin textured paint. If you are using the sub88 together with a pair of
Resolv 50a's, you have the Resolv 2.1 montor system. The sub88 is also a perfect add-on to your
Resolv 65, Resolv 65a, for your Resolv 80a monitor system, or for any near field monitor system
where extended low end is desired.
ENGLISH
In these pages, you’ll find a detailed description of the features of the sub88 subwoofer, as well
as a guided tour through its control panel, step-by-step instructions for its setup and use, and
full specifications. If you have a Resolv 2.1 system, check the Resolv 50a's owner manual for more
information on your full range monitor. You’ll also find a warranty card enclosed—please don’t forget to fill it out and mail it in so that you can receive online technical support and so we can send
you updated information about these and other Samson products in the future.
With proper care and adequate air circulation, your sub88 will operate trouble free for many years.
We recommend you record your serial number in the space provided below for future reference.
Serial number:__________________________________________
Date of purchase: _______________________________________
Should your unit ever require servicing, a Return Authorization number (RA) must be obtained
before shipping your unit to Samson. Without this number, the unit will not be accepted. Please
call Samson at 1-800-3SAMSON (1-800-372-6766) for a Return Authorization number prior to shipping your unit. Please retain the original packing materials and if possible, return the unit in the
original carton and packing materials.
5
5
Page 6
Resolv sub88 Features
®
ENGLISH
The Samson Resolv sub88 reference subwoofer is a perfect compliment to the Resolv 50a’s or any near-field or multi-media monitor system. Here are some of its main features:
• Heavy-duty, 8” long excursion (25mm) transducer with Butyl surround
• 80 Watt Power Amplifier
• Infrared Remote control for System level, Sub Level, Dim, Mute and Sub Mute
• Eight-segment LED Input VU Meter
• Tuned Port Enclosure
• High Pass Outputs for satellite speakers, which return to full range operation when the sub is muted
• Variable Crossover 40 - 180 Hz
• Mute Switch Footswitch Jack
• Phase Switch
• Balanced Line Inputs and Outputs on XLR connectors plus Unbalanced Line Inputs on RCA connectors.
• Volume Control
• Black Satin Finish
• Three-year extended warranty
6
6
Page 7

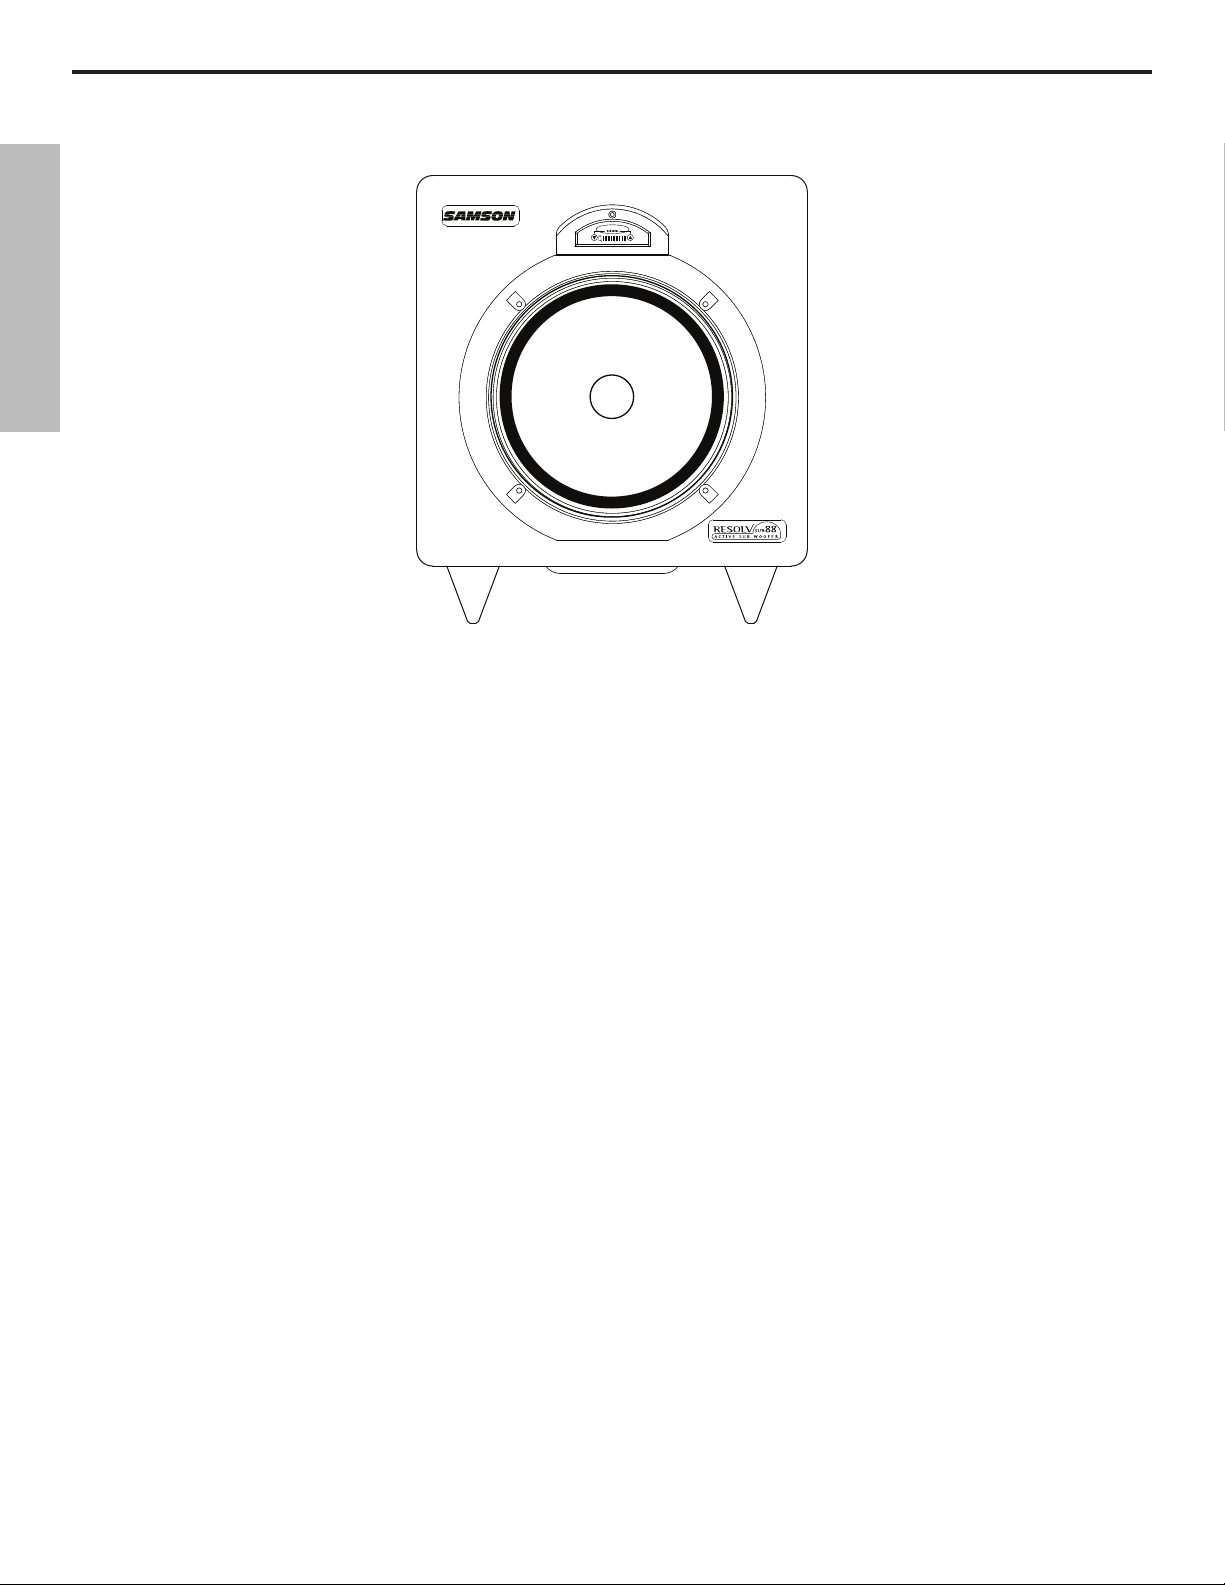
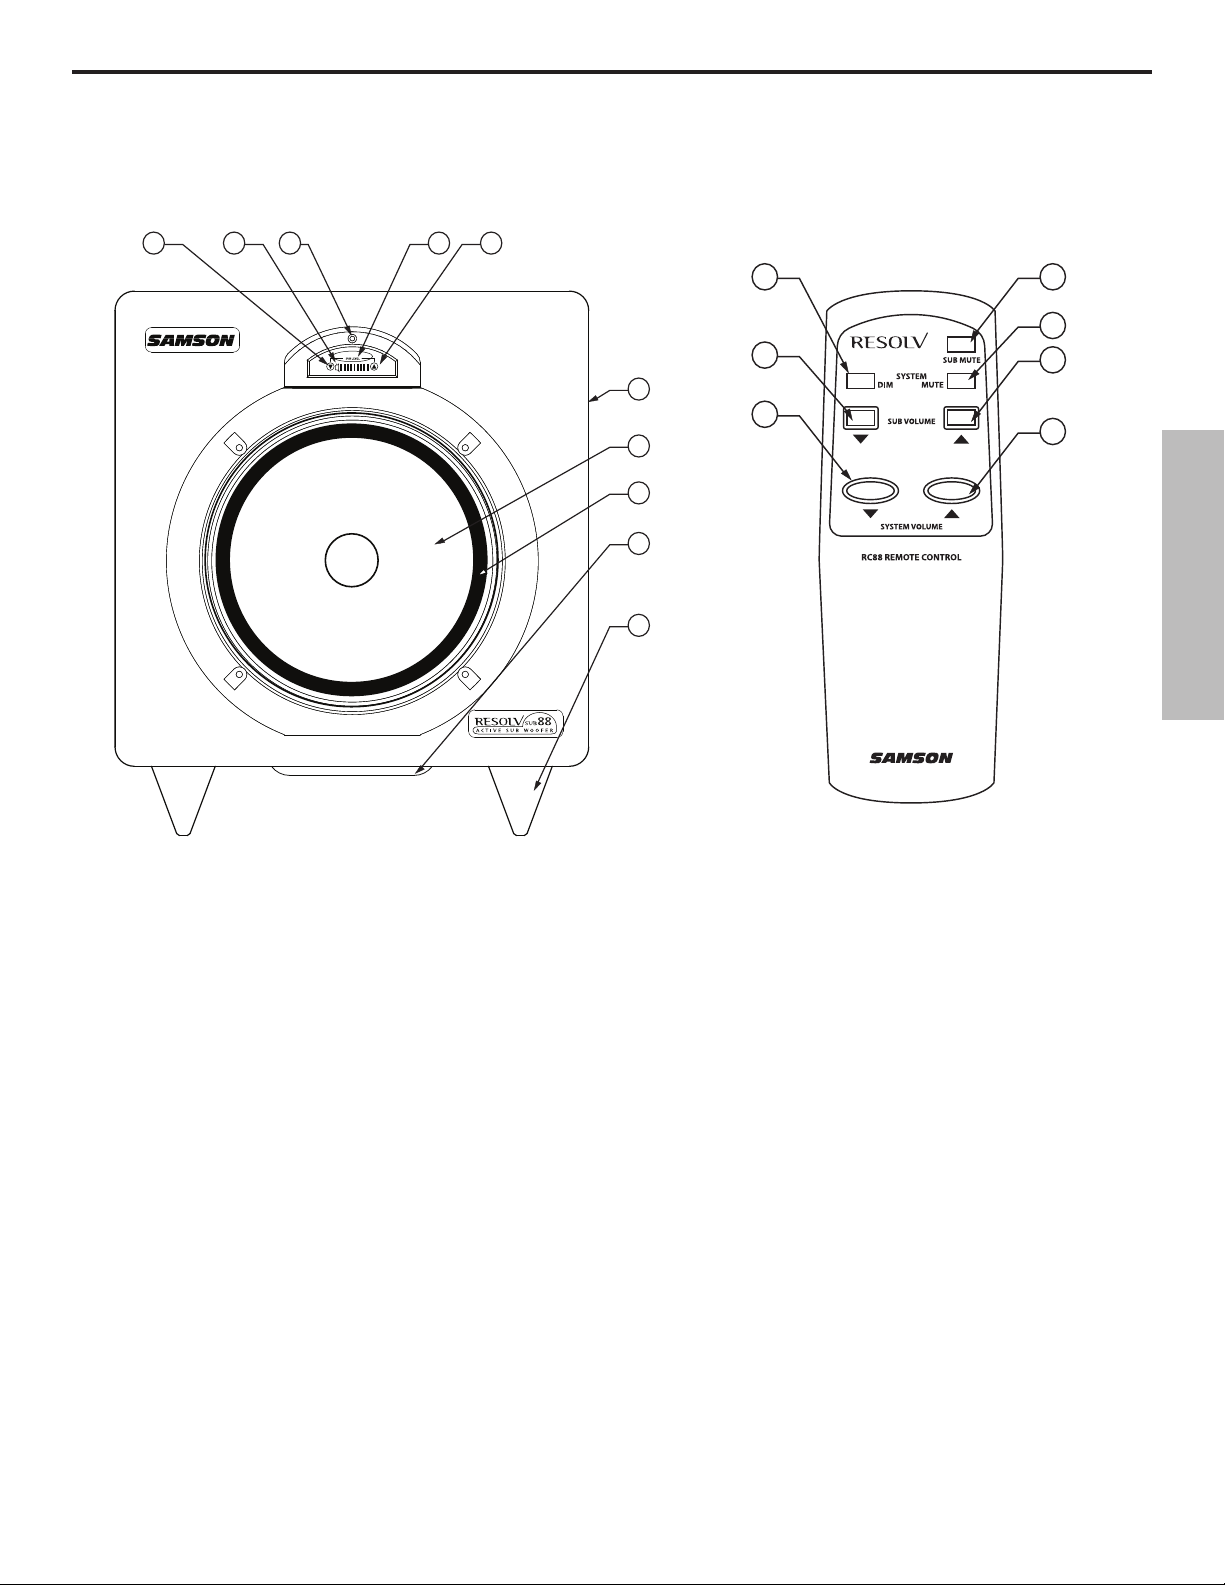
Resolv sub88 Layout
®
$
%
&
'
!
"
#
Front View Layout
Remote Control Layout
ENGLISH
1 SUB DOWN - Push switch used to lower the Sub volume.
2 MUTE – LED lights indicating that the sub is off.
3 POWER LED – Blue LED lights indicating that the sub88 is
powered up and ready for operation. The Power LED will also
flash while receiving information from the IR remote control.
4 VU METER – Eight segment LED VU meter showing input
level.
5 SUB UP – Push switch used to raise the Sub volume.
6 ENCLOSURE - Rigid MDF (Medium Density Fiberboard) con-
struction finished in a sleek black textured paint.
7 TRANSDUCER - Heavy Duty 8,” long excursion (25mm)
extended range low frequency transducer.
8 BUTYL SURROUND - Provides maximum excursion while
maintaining tight bass response.
9 TUNED PORT - Quiet port design offering linear extended low
frequency response. (Bottom of unit.)
A SYSTEM DIM switch – When pressed
the system level is lowered by 20dB.
B SUB VOLUME DOWN switch
– Push
switch used to lower the level of the
sub-woofer.
C SYSTEM VOLUME DOWN switch
– Push switch used to lower the overall
system level.
D SUB MUTE switch – When pressed the
sub-woofer is turned off.
E SYSTEM MUTE switch – When pressed
the system is turned off.
F SUB VOLUME UP switch – Push switch
used to raise the level of the sub-woofer.
G SYSTEM VOLUME UP switch
– Push
switch used to raise the overall system
level.
10 NON-SKID FEET - Large, hard, plastic feet keep enclosure in
place even at high sound pressure levels.
7
7
Page 8

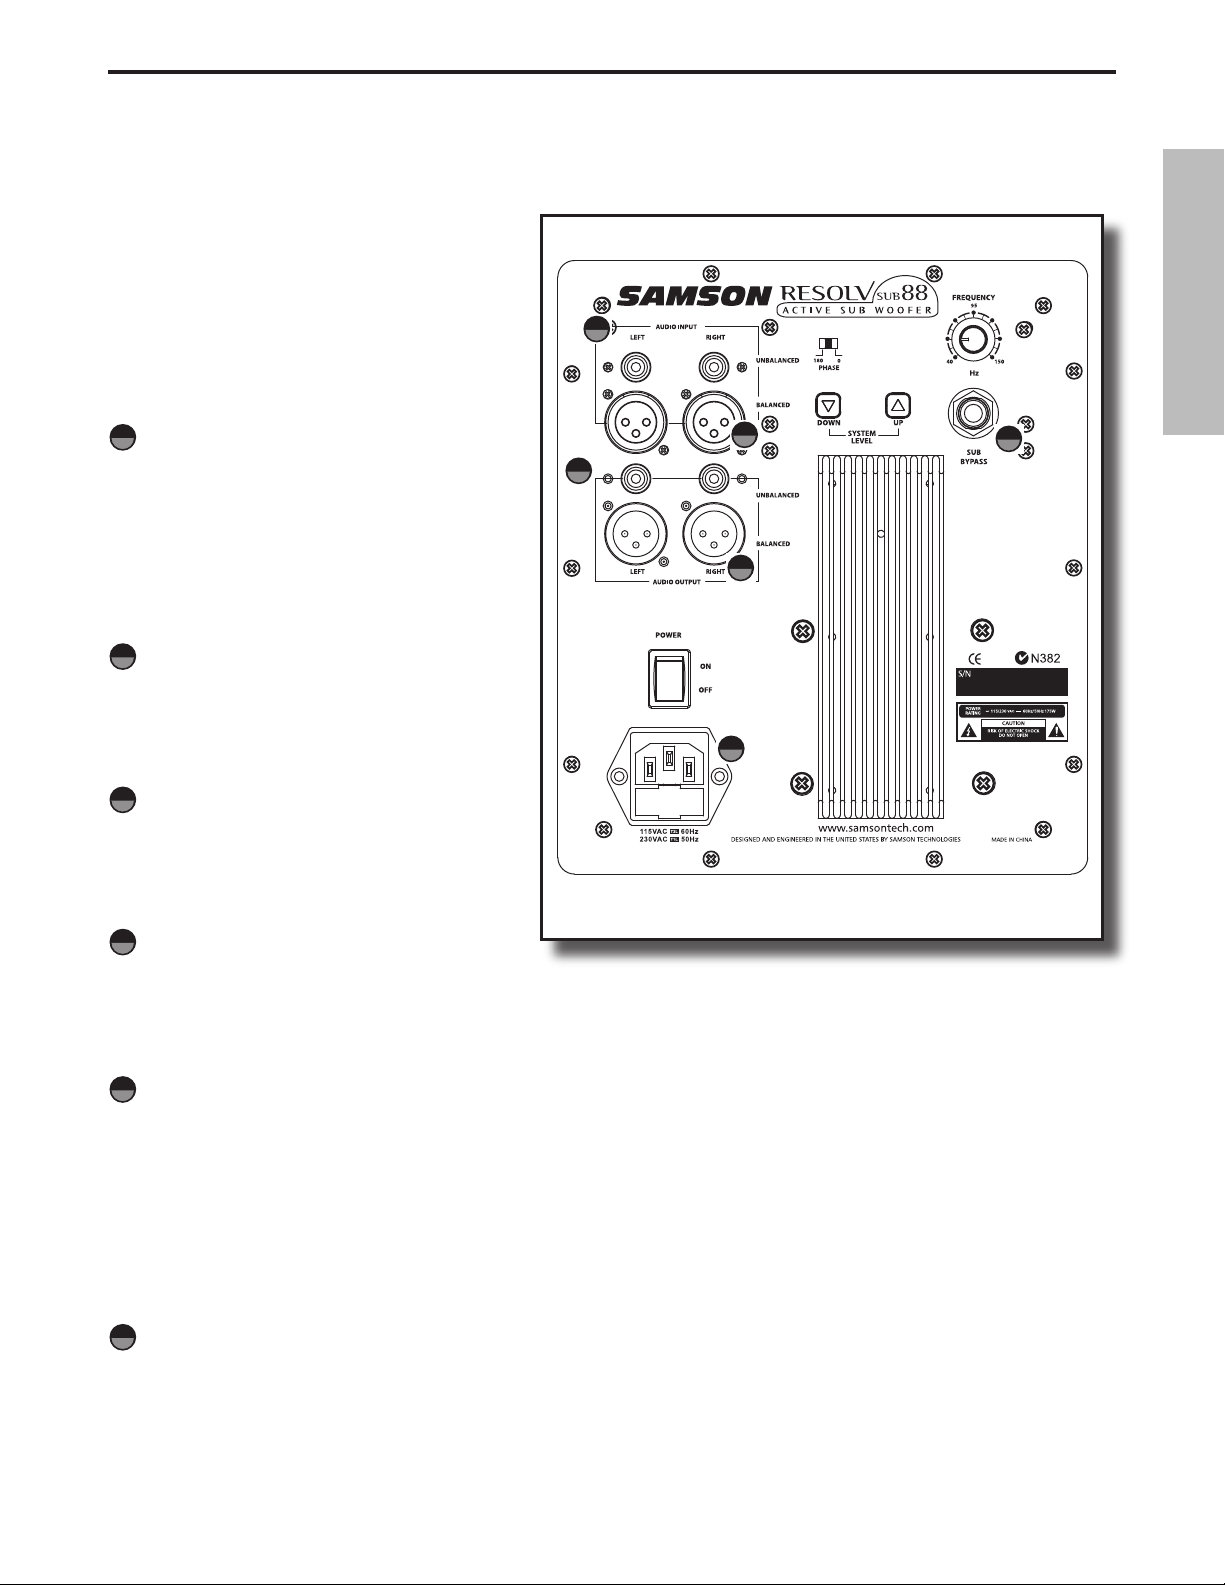
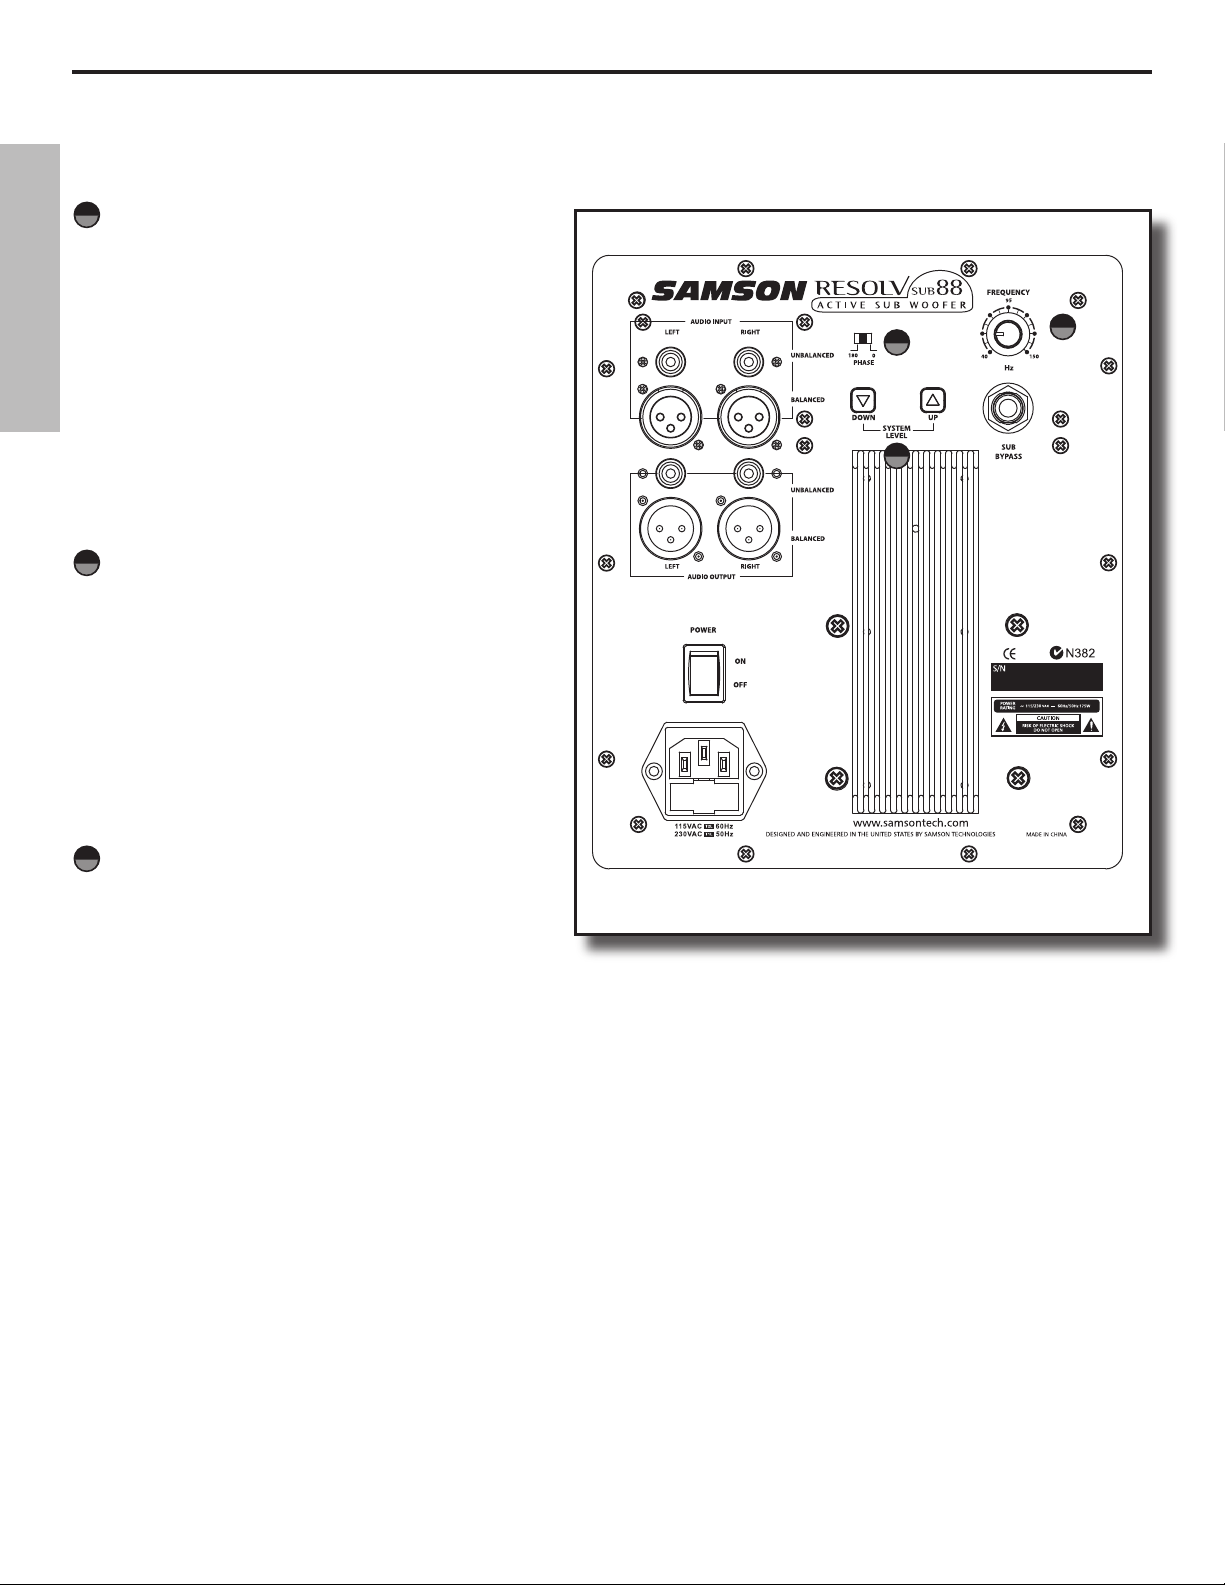
Resolv sub88 Layout
Rear Panel Layout
ENGLISH
1 LEFT UNBALANCED INPUT - Female RCA connector that accepts
unbalanced line level signals.
2 LEFT BALANCED INPUT
balanced line level signals.
3 LEFT UNBALANCED OUTPUT
sends unbalanced line level signals to powered satellite speakers
or an amplifier connected to passive satellites.
4 LEFT BALANCED OUTPUT
balanced line level signals to powered satellite speakers or an
amplifier connected to passive satellites.
5 POWER SWITCH
6 AC INLET - Connect the supplied standard IEC power cable here.
7 RIGHT UNBALANCED INPUT
accepts unbalanced line level signals.
8 RIGHT BALANCED INPUT
balanced line level signals.
9 RIGHT UNBALANCED OUTPUT
sends unbalanced line level signals to powered satellite speakers
or an amplifier connected to passive satellites.
– Used to switch on the sub88.
- Female XLR connector that accepts
- Female RCA connector that
- Male XLR connector that sends the
- Female RCA connector that
- Female XLR connector that accepts
- Female RCA connector that
10 RIGHT BALANCED OUTPUT - Male XLR connector that
sends the balanced line level signals to powered satellite
speakers or an amplifier connected to passive satellites.
11 PHASE SWITCH - Allows for 180 degrees out-of-phase
operation.
12 SYSTEM LEVEL DOWN - Used to lower the overall output
level.
13 SYSTEM LEVEL UP
level for the sub88 and connected satellites.
14 FREQUENCY
High-Pass outputs.
15 SUB BYPASS JACK- Used to connect an external switch to
activate the internal mute function.
16 HEAT SINK
– Used to raise the overall output
- Adjusts the low frequency end range of the
- Provides cooling of internal power amplifier.
8
8
Page 9
Setting up the sub88 - Quick Start
CONFIGURING YOUR MONITOR SYSTEM
Before you start plugging in cables, you should take a minute
and decide how you want to interface your new subwoofer.
Common Sub Operation
In most cases, a common sub ( mono) bass operation is desired.
This is true for several reasons, but mostly because low frequencies produced by a subwoofer tend to be non-directional. Since
low frequency sound waves take so much space to develop,
you can’t tell if the sub-bass is coming from the left or right
side,unless of course you’re in a very large room. Because of
this phenomenon, just about all sub-bass material is mixed in
mono.
Placing the sub88
Because the low frequencies reproduced by the sub88 are
non-directional, you can position the unit almost anywhere. It
is however, a good idea to keep the sub88 away from corners.
Ideally the sub88 should be positioned in the middle, and up
close to the wall you are facing in the mixing position.
Quick Start
ENGLISH
Setting up your sub88 Active Subwoofer is a simple procedure,
which takes only a few minutes: The following section is an
explanation to get your Resolv 2.1, sub-satellite monitor system
running. The example assumes that you are using an active satellite speaker like a Resolv 50a.
• Remove all packing materials (save them in case of need for
future service) and decide where the unit is to be physically
placed.
• Make sure the power to your mixers powered satellite moni
tors and other equipment in your audio system is off. Locate
the sub88’s Power switch on the rear panel and place the to
its off position.
• Connect your mixer’s left and right output to the left and
right AUDIO INPUTS on the sub88 rear panel.
Note: It is always recommended to use balanced cables when ever
possible. For a detailed wiring diagram see page 16 in this manual.
• Now, connect the sub88’s left Audio Output to the input of
the left side satellite speaker and the connect the sub88’s
right AUDIO OUTPUT to the right side satellite speaker.
-
• Locate the FREQUENCY control on the sub88’s rear panel
and set the knob to 70Hz (10 o’clock position).
• Before you power up your gear make sure that your mixer’s
output level is turned all the way down so you can fade up
your new monitor system.
9
9
Page 10

Operating the Resolv sub88
Quick Start - Continued
• Now, power up the sub88.
• Press and hold the rear panel SYETEM LEVEL DOWN
control for 5 seconds. This will let you start with the
monitor system turned all the way off.
ENGLISH
Now, power up your active satellite speakers at set
the volume for the normal operating level.
• Apply a signal (like music from a CD or MP3 player)
and check the mixer master level meter to see that
you have a good signal.
Once you confirm a good signal is being sent from the
mixer, use the sub88's rear panel SYSTEM LEVEL UP and
DOWN controls to set the monitor system to the desired
operating volume. Bure sure to check the front panel VU
meter to avoid cliping the sub88's input.
Operating the Resolv sub88
Note: You can fine tune your system response to your particular liking by adjusting the crossover FREQUENCY control,
as well as, the balance between the sub and satellite levels. If
you do not have a digital real time analyzer, you’ll have to use
your ears by checking the sound of various recordings that are
familiar to you. You can also use a digital RTA like the Samson
D1500 to flatten the system perfectly.
Resolv sub88 Control Panel
The sub88’s control panel provides the connections and
user interface to the sub88’s internal electronic crossover and power amplifier section. The internal amplifier is a 80 Watt power amplifier capable of producing
incredible bass output. The sub88 employs an electronic crossover that adjusts the high frequency cutoff
point for the subwoofer, and also a high-pass output
for your satellite speakers. You will achieve a tremendous benefit in sound quality by running your satellites
speakers from the sub88’s High-Pass outputs. The reason for this is that when your satellite speaker receives
the filtered output from the sub88, it will no longer be
looking at the frequencies below the crossover point.
Let’s say your satellite speaker has a natural frequency
roll-off at 70 Hz, and you are sending full range signal
(as low as 20Hz) to the satellite amplifier and speaker.
Even though the speaker can only reproduce 70Hz and
up, the amplifier is still outputting 20-70Hz, which is
wasted power and ultimately turns into heat. By using
the sub88’s High-Pass output, the satellite amplifier and
speaker never see the frequencies lower than what’s set
by the Sweep frequency. This means you’ll have more
power dedicated to the frequencies you want the satellites to reproduce, resulting in a much cleaner sound
with more headroom.
10
10
Page 11
The Ins and The Outs
The sub88 features both balanced and unbalanced line level inputs and outputs so that connection with passive or active satellites is easy.
It is recommended that you use the balanced
line inputs and outputs to interface the sub88
with active monitors like the Resolve 50a’s. See
page 16 for a detailed cable wiring diagram.
Operating the Resolv sub88
ENGLISH
1
UNBALANCED INPUTS
1
Unbalanced connections can be made using
the female RCA connectors.
Note: In order to get the lowest amount of
induced noise and hum, use the Balanced connectors whenever possible.
BALANCED INPUTS
2
If you want to connect your mixer using balanced line level signals, use the female XLR
connectors.
UNBALANCED OUTPUTS
3
These female RCA connectors send unbalanced
line level signals to powered satellite speakers
or an amplifier connected to passive satellites.
BALANCED OUTPUTS
4
Male XLR connectors that send the balanced line
level signals to powered satellite speakers or an
amplifier connected to passive satellites.
2
5
3
4
6
SUB BYPASS JACK
5
The Sub Bypass jack provides a switch closure to
activate sub88’s internal mute circuit. By using
a standard footswitch that you can buy at your
local music store or by making a cable with a
switch, or even by wiring a switch permanently
in the mix area, the sub88 can be easily turned
on and off.
AC INLET
6
Connect the supplied IEC power cable here. Be
sure that the power switch is in the off position
when connecting the AC cord.
11
11
Page 12
Operating the Resolv sub88
Control Functions and Indicators
SYSTEM LEVEL Up and Down
7
Controls
The volume control is used to adjust the amount
of level to the sub88 subwoofer. In addition,
ENGLISH
the volume control will also control the output
level of the high-pass outputs. Therefore, if you
are using the sub88 without using the high-pass
outputs, the volume control adjusts the low frequency output of the sub88. If you are using the
sub88’s internal electronic crossover to run satellite speakers, then the volume control will adjust
the overall system level.
FREQUENCY
8
The FREQUENCY control selects the upper range
cutoff frequency of the sub88’s internal electronic
crossover with a range of 30 Hz to 200 Hz. The
sub88’s crossover provides a 12dB per octave,
Linkwitz Riley filter curve. The Sweep adjusts the
highest frequency that the sub88 will reproduce,
and at the same time, the high-pass outputs track
the selected crossover frequency as the lower
limit frequency to the satellite speakers.
9
8
7
PHASE Switch
9
The sub88 can be switched for inverted phase
operation by setting the PHASE SWITCH to the
180° (degree) position. Experiment with this
switch to provide the best blend between the
subwoofer and satellite speakers.
12
12
Page 13

Using the Remote Control
You can take advantage of many of the sub88’s powerful
features of the using the infrared remote. You can mute and
control the level of the sub, and mute or control the over-all
system level using the sub88’s remote control. You can even
lower the volume of the over-all system using the DIM function for those times when you need to talk to someone in the
control room without disturbing the groove. Make sure that
the two AAA batteries are installed and then follow the sections below that detail the operation of the remote control.
10
Using the SYSTEM VOLUME controls
The UP and DOWN SYSTEM VOLUME controls are used
to adjust the overall level of the monitor system, which
includes the sub88 and the connected satellite speakers.
If you want to make the monitor system louder, aim the
remote control at the sub88’s IR window and press the
SYSTEM VOLUME UP control. To lower the over-all SYSTEM
VOLUME, point the remote control at the sub88’s IR window and press the SYSTEM VOLUME DOWN control.
Using the Remote Control
ENGLISH
11
1314
12
10
Using the SUB MUTE button
11
Once you have a good listening level set for the monitor
system you can audition your mix with and without the
subwoofer by using the SUB MUTE button located in the
upper right hand corner of the remote control. If you
want to mute the subwoofer, point the remote control at
the sub88’s IR window and press SUB MUTE. At this point,
take notice to the lighted, red MUTE LED located in the IR
window indicating that the sub is off. Now, press the SUB
MUTE button again to un-mute the subwoofer and notice
that the red MUTE LED is now off.
Thanks to the sub88’s intelligent crossover design, the
outputs to the satellite speakers are retuned to full range
when the subwoofer is muted using the SUB MUTE button. When you un-mute the subwoofer by pressing the
SUB MUTE button again, the outputs to the satellite
speakers are once again passed at the crossover point set
by the rear panel FREQUENCY control knob.
Using the SUB VOLUME controls
12
The UP and DOWN SUB VOLUME controls are used to
adjust the level of the subwoofer. If you want to make
the subwoofer louder, aim the remote control at the
sub88’s IR window and press the SUB VOLUME UP control.
To lower the VOLUME, point the remote control at the
sub88’s IR window and press the SUB VOLUME DOWN
control.
Using the SYSTEM MUTE button.
13
The SYSTEM MUTE button is used to turn off the entire
monitor system including the sub woofer and satellite
speakers. Aim the remote control at the sub88’s IR window and press SYSTEM MUTE to defeat the mix. When
you want to get back to listening, press the SYSTEM MUTE
button again to un-mute the system.
14
Using the DIM control
The sub88 incorporates a very useful feature; “DIM” which
let’s you instantaneously lower your mix by 20dB. This
convenient facility lets you pick up a phone or carry on
an argument…ah, conversation with your mates without having to (necessarily) yell over or mute the mix.
Using the DIM helps keep the creative juices going even
through the normal distractions, so you don’t disturb the
groove. It is also extremely useful for checking your mix
and low levels, a practice which many good engineers use
as a technique to hear where things are sitting in the mix.
To use the DIM control, aim the remote control at the
sub88’s IR window and press SYSTEM DIM and the level
will be lowered by 20dB. When you want to get back to
the normal listening level, press the SYSTEM DIM button
again.
13
Page 14
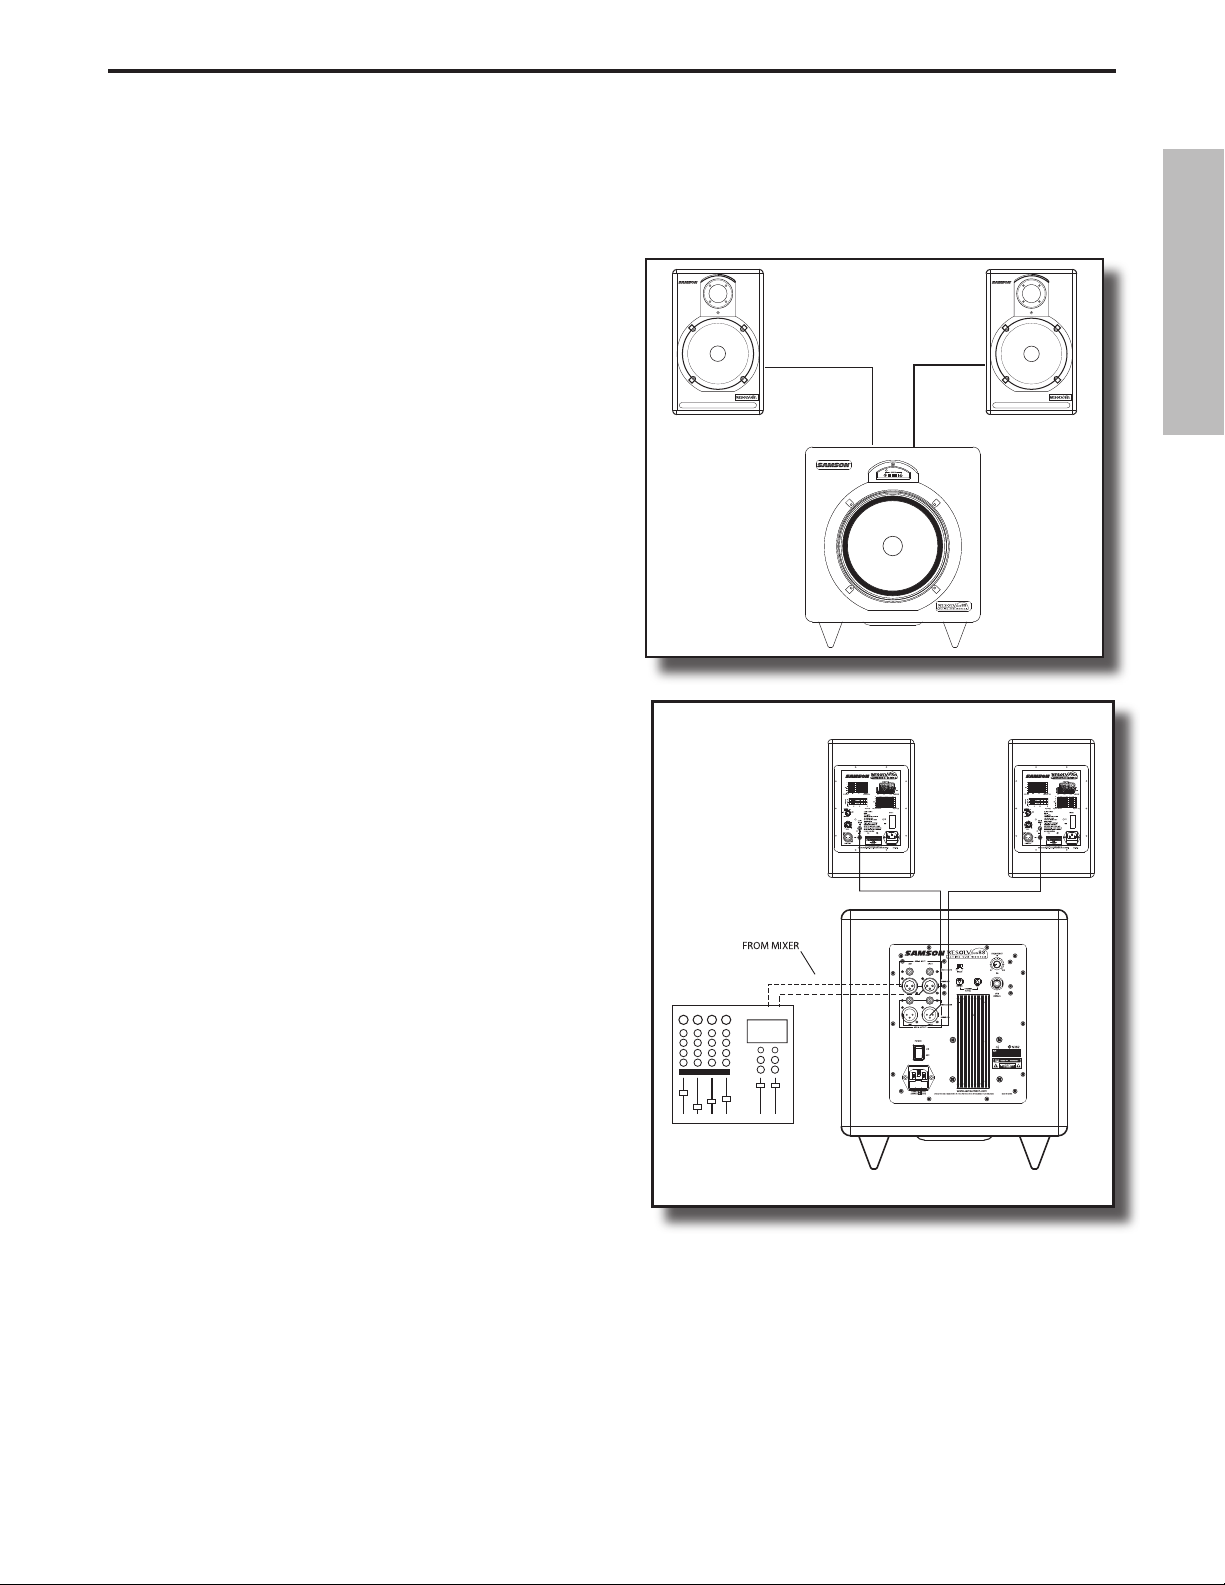
Connecting the Resolv sub88
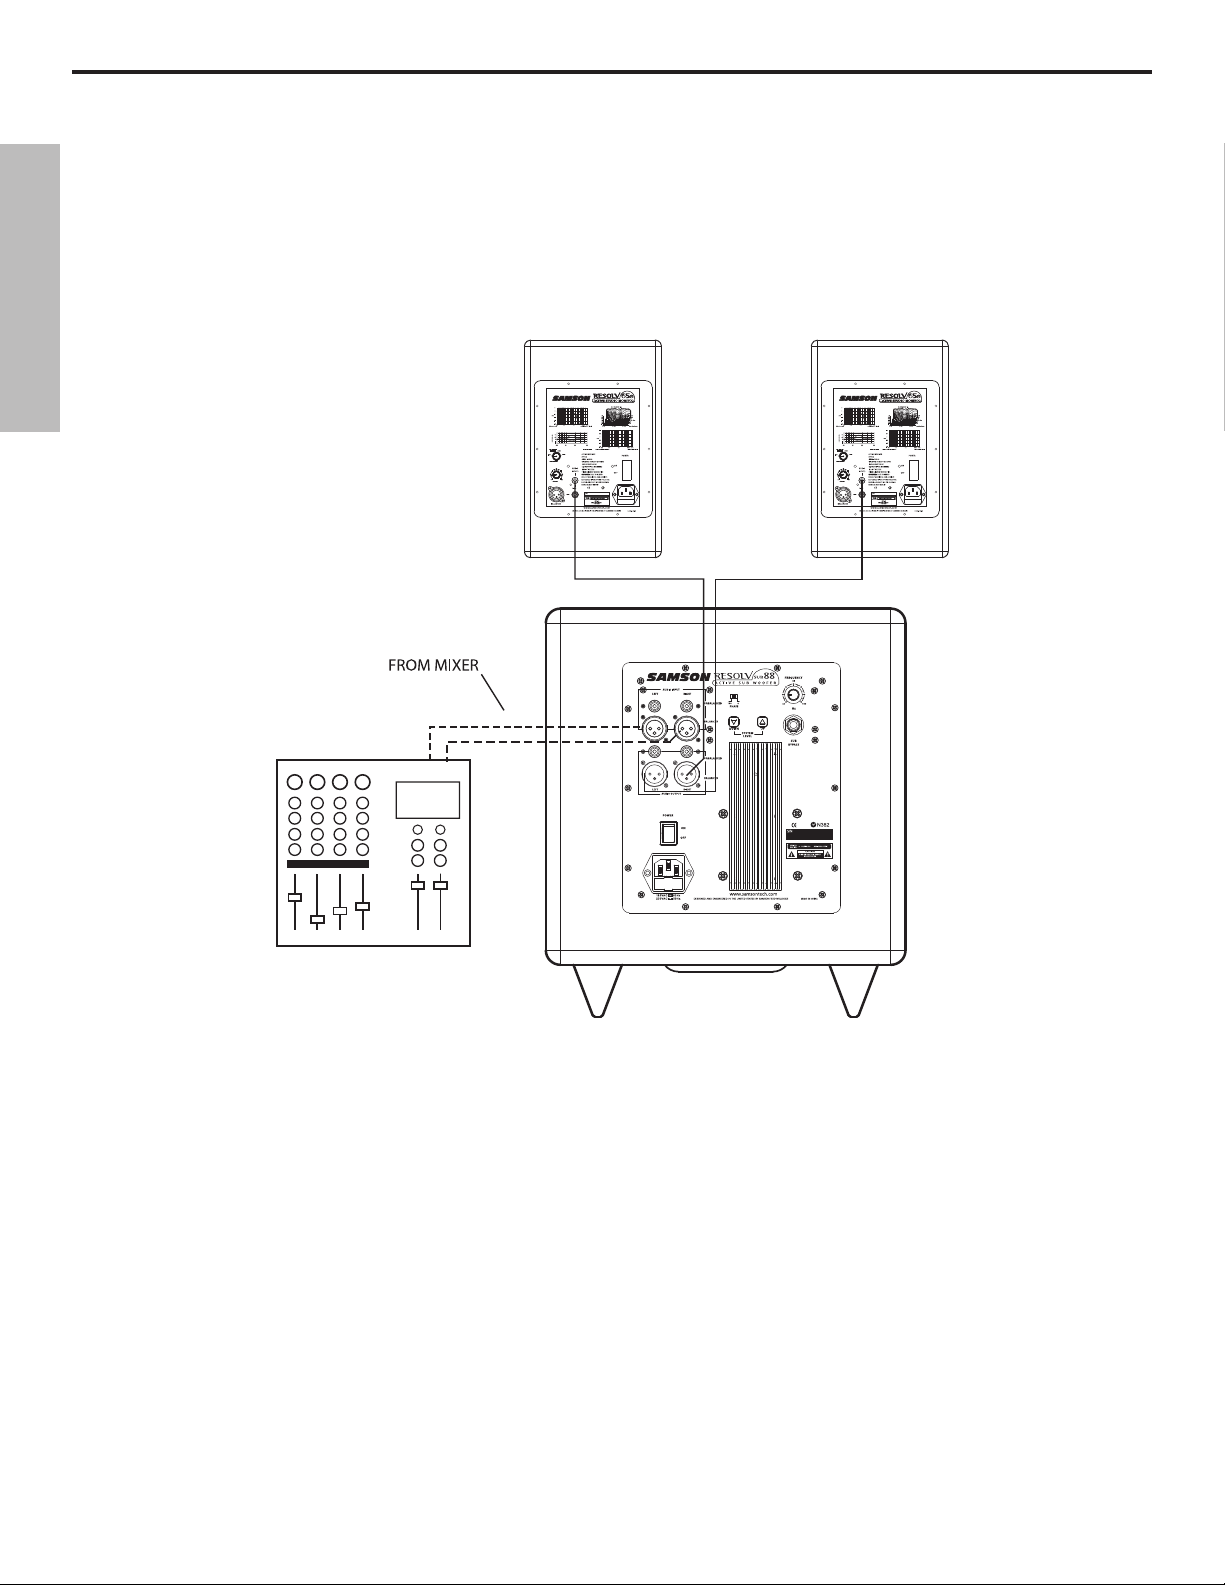
Mono Sub With Active Satellites
If you have active monitors, installation is easy using the Sub88's LINE LEVEL inputs. Below is a typical system set-up using the
sub88 with a mixer and a pair of active satellite loudspeakers. The sub88’s inputs and outputs utilize industry standard RCA connectors. For a detailed wiring diagram, see the section “sub88 Connections” on page 16. Follow the steps in the diagram below to
set up your system.
ENGLISH
• Lower your mixer’s master outputs to all the way off.
• Connect the mixer’s left output to the sub88’s LEFT LINE INPUT and the mixer’s right output to the sub88’s RIGHT LINE
INPUT. Now connect the sub88’s LEFT LINE OUTPUT to the input of the left powered satellite, and the sub88’s RIGHT LINE
OUTPUT to the input of the right powered satellite.
• Now adjust the SWEEP control to the desired frequency. Consult your studio monitors owner’s manual for a recommended crossover point. You can also use your ears by adjusting the SWEEP control to the frequency that sounds good to you.
A good place to start is about 70 Hz. (10 O'clock)
• Run an audio signal (like some music from a CD) through your mixer and raise the level to a comfortable listening level.
Now slowly raise the sub88 SUB VOLUME control and listen to the low frequency output. Adjust the sub88 to the level
of low frequency output that you like. Now, when you raise and lower your mixer’s output, the sub88 and satellites will
track at the same relative volume.
14
Page 15
Connecting the Resolv sub88
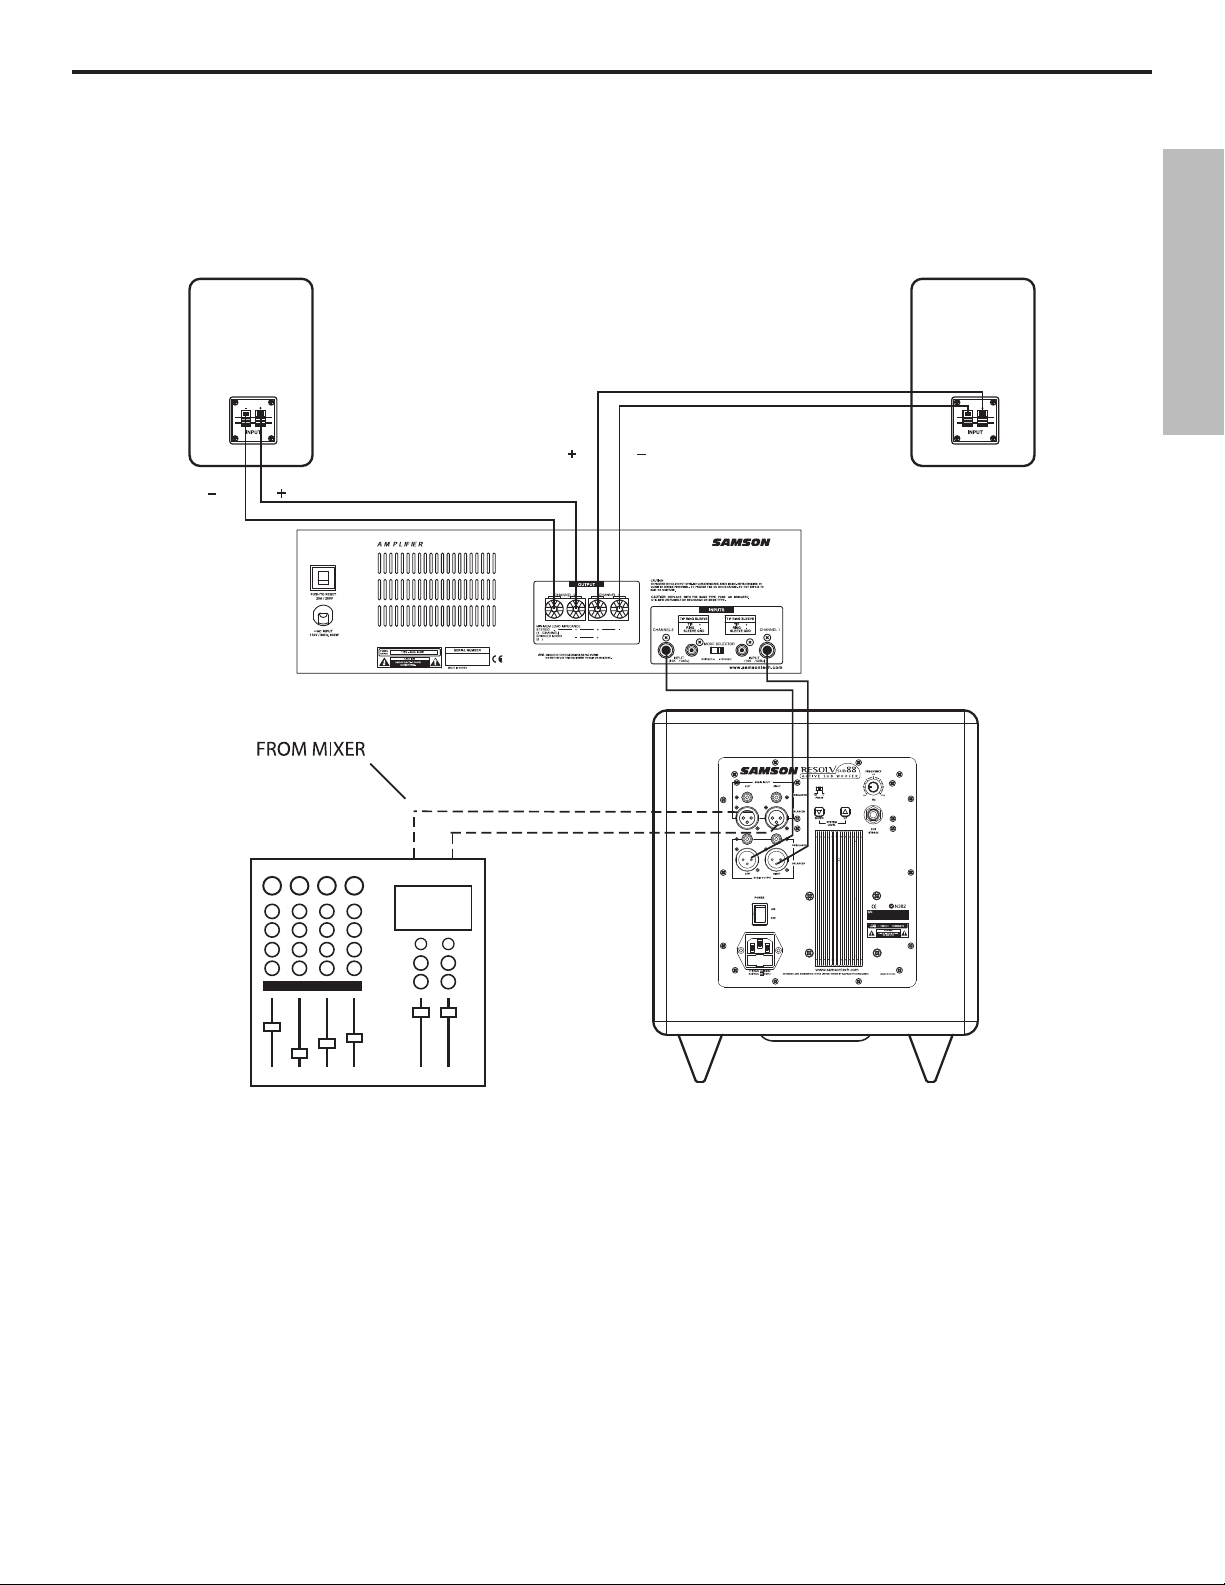
Mono Sub With Passive Satellites Using Line Inputs
Below is a typical system set-up using the sub88 with a mixer, stereo power amp and a pair of passive satellite loudspeakers.
The sub88’s inputs and outputs utilize industry standard RCA connectors. For a detailed wiring diagram, see the section “sub88
Connections” on page 16. Follow the steps in the diagram below to set up your system.
ENGLISH
• Lower your mixer’s master outputs to all the way off.
• Connect the mixer’s left output to the sub88’s LEFT AUDIO INPUT and the mixer’s right output to the sub88’s RIGHT
AUDIO INPUT. Now connect the sub88’s LEFT AUDIO OUTPUT to the left side input of the power amp, and the sub88’s
RIGHT AUDIO OUTPUT to the right side input of the power amp. Connect a speaker wire from the left output of your
power amp to your left satellite, and then, connect a speaker wire from the right output of your power amp to your right
satellite.
• Now adjust the SWEEP control to the desired frequency. Consult your studio monitors owner’s manual for a recommended crossover point. You can also use your ears by adjusting the SWEEP control to the frequency that sounds good to you.
A good place to start is about 70 Hz. (10 O'clock)
• Now set the level of your power amp up to the normal operating volume. Run an audio signal (like some music from
a CD) through your mixer and raise the level to a comfortable listening level. Now slowly raise the sub88 SUB volume
control and listen to the low frequency output. Adjust the sub88 to the level of low frequency output that you like. Now,
when you raise and lower your mixer’s output, the sub88 and satellites will track at the same relative volume.
15
15
Page 16
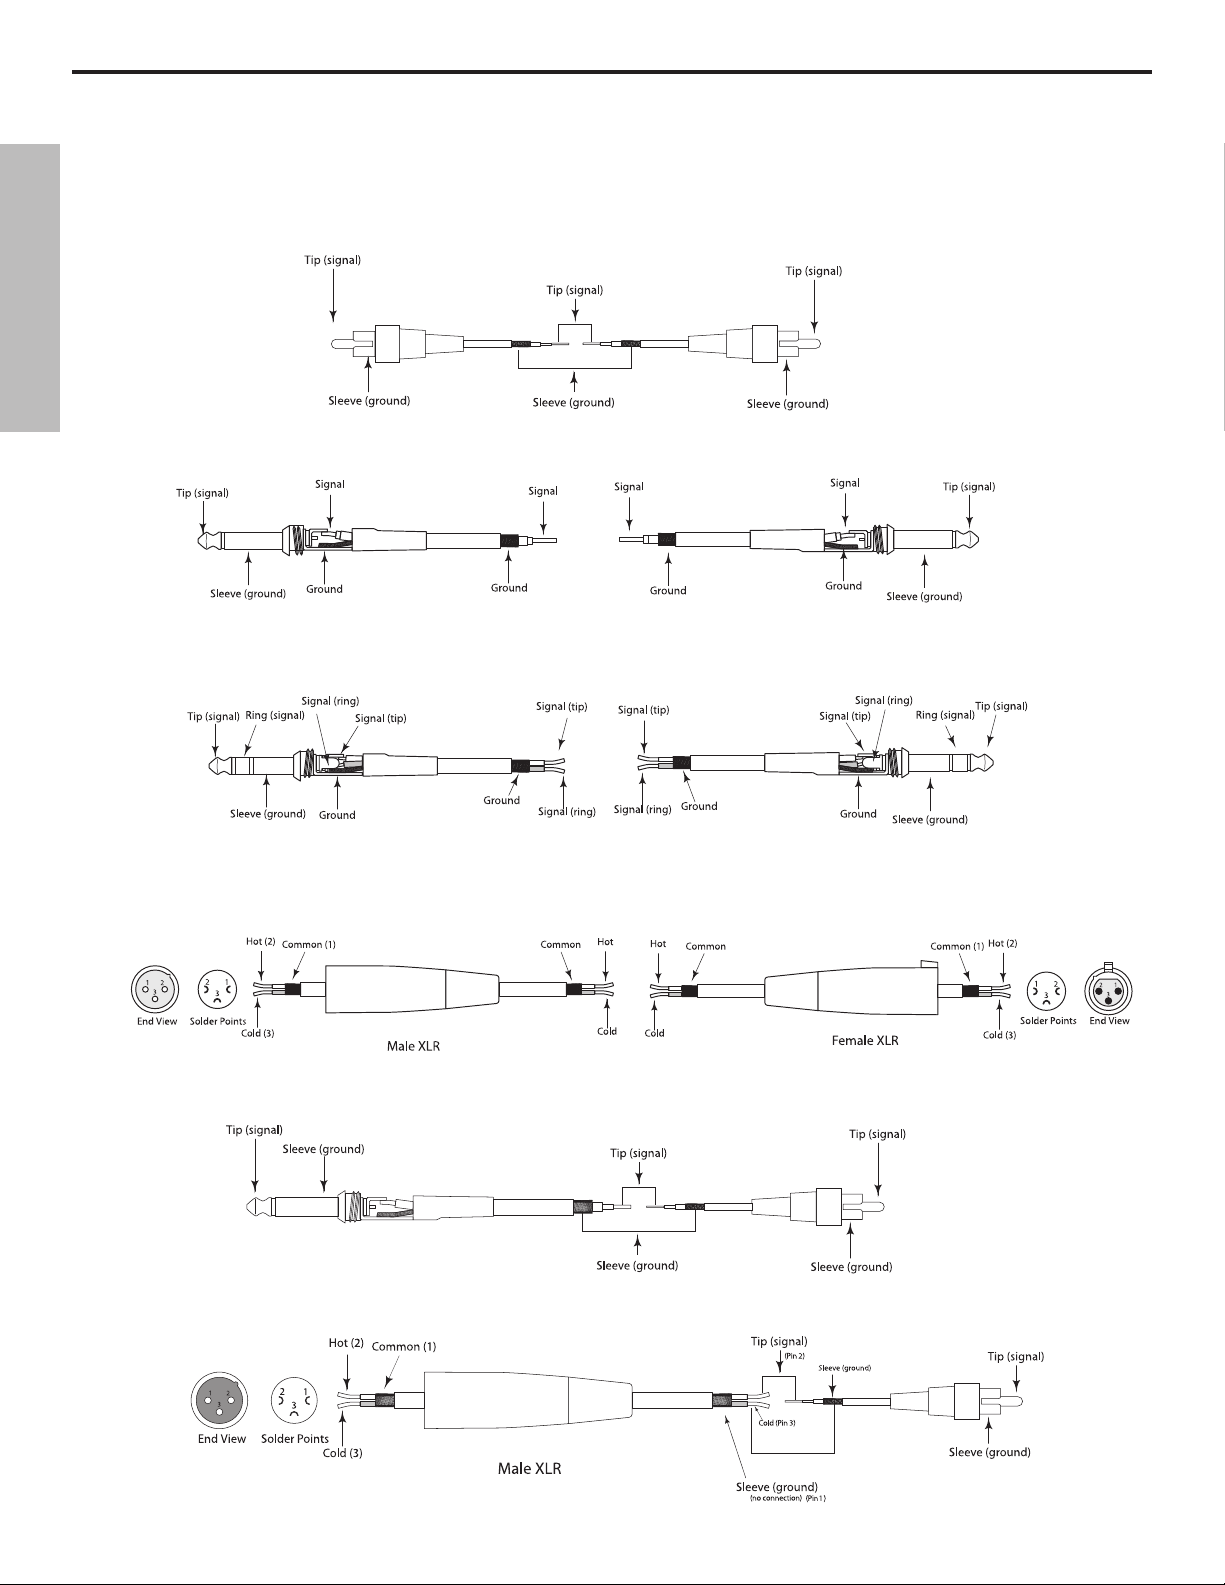
Resolv sub88 Connections
Resolv sub88 Wiring Guide
There are several ways to interface the Resolv sub88, depending on your exact monitoring set-up. Follow the cable
diagrams below for connecting your monitor system.
RCA to RCA Cable
ENGLISH
Un-Balanced 1/4” to 1/4” Cable
Balanced 1/4” to 1/4” Cable
Balanced XLR to XLR Cable
Unbalanced 1/4” to RCA Cable
Un-Balanced XLR to RCA Cable
16
16
Page 17

Introduction
Merci d'avoir porté votre choix sur les Subwoofers actifs Samson Resolv sub88. Assurant la restitution des graves dans n'importe quel système de moniteurs de proximité ou système multimédia,
leur puissant amplificateur de 80 Watts dédié aux basses fréquences alimente un Woofer haute
puissance de 203 mm (8 pouces), ce qui permet de reproduire des fréquences de 40 Hz à 180 Hz.
Les sub88 sont équipés d'un Woofer de 203 mm (8 pouces) à longue excursion (25 mm) et suspension en Copolymère Butyle, offrant ainsi une réponse précise et étendue dans les basses fréquences. Ils sont offerts avec une télécommande à infrarouge vous permettant d'effectuer les réglages
de votre système de moniteurs à distance. Elle met aussi à votre disposition d'autres réglages et
d'autres fonctions, soit Sub Level, System Level, Dim, Sub Mute et System Mute. Afin d'optimiser le
son de votre système de moniteurs, les sub88 sont dotés d'un filtre actif à fréquence de coupure
variable intégré pour la connexion de vos enceintes satellites. Les sub88 offrent également une
fonction Mute permettant d'obtenir, d'une simple pression sur un sélecteur au pied, une écoute
comparative avec ou sans Subwoofer. Lorsque la fonction Mute est activée, les satellites peuvent
à nouveau recevoir des signaux large bande. Le réglage de temporisation des moniteurs peut être
effectué avec l'inverseur de phase des sub88, permettant ainsi plus de possibilités. Afin de faciliter
la connexion à d'autres moniteurs actifs ou à un amplificateur de puissance, les entrées et les sorties symétriques du sub88 sont pourvues de connecteurs 6,35 mm et XLR standard. Le baffle des
sub88 est en panneaux de particules MDF, pour une puissance maximale exempte de vibrations,
et leur finition noire satinée est très résistante. Utilisez le sub88 avec une paire de Resolv 50a pour
obtenir un système de moniteurs Resolv 2.1. Les sub88 sont aussi d'excellents moniteurs d'appoint
pour les Resolv 65, les Resolv 65a, les systèmes de moniteurs Resolv 80a ou pour tout système de
moniteurs de proximité nécessitant une réponse étendue dans les basses fréquences.
Dans ces pages, vous trouverez une description détaillée de toutes les fonctions des sub88, ainsi
qu'une description des réglages, des connexions, de son utilisation et de ses caractéristiques techniques. Si vous possédez le système Resolv 2.1, veuillez consulter le mode d'emploi des Resolv 50a
pour plus d'informations sur les moniteurs large bande. Vous trouverez également une carte de
garantie : n'oubliez pas de la compléter et de nous l'envoyer afin que vous puissiez bénéficier de
l'assistance technique en ligne et recevoir les informations les plus récentes concernant les produits Samson.
FRANÇAIS
Installez et utilisez votre RESOLV 120a avec soin et veillez à assurer une ventilation suffisante. Nous
vous recommandons de noter le numéro de série du produit ci-dessous pour toute référence ultérieure.
Numéro de série :
Date d'achat :
Si vous devez faire réparer l'appareil, vous devez tout d'abord obtenir un numéro de retour
auprès de Samson. Sans ce numéro, l'appareil sera refusé. Contactez Samson aux USA au : 1-8003SAMSON (1-800-372-6766) ou contactez votre revendeur. Les conditions de garantie et de retour
varient selon le pays de distribution. Conservez l'emballage d'origine et utilisez-le pour tout retour
en atelier.
17
17
Page 18

Caractéristiques des Resolv sub88
®
FRANÇAIS
Les Subwoofers Samson Resolv sub88 sont d'excellents moniteurs d'appoint pour les Resolv 50a et tous les systèmes multimédia
et les systèmes de moniteurs de proximité. Voici les caractéristiques générales :
• Woofer renforcé de 203 mm (8 pouces) à longue excursion (25mm) et suspension en Copolymère Butyle
• Amplificateur de puissance de 80 Watts
• Télécommande à infrarouge permettant d'utiliser les fonctions System level, Sub Level, Dim, Mute et Sub Mute
• VU-mètre d'entrée à huit segments à diodes
• Évent accordé
• Sorties passe-haut pour satellites, pouvant envoyer des signaux large bande lorsque le Mute est activé
• Filtre variable de 40 Hz à 180 Hz
• Fonction Mute
• Inverseur de phase
• Entrées et sorties ligne symétriques sur connecteurs XLR, et entrées ligne asymétriques sur connecteurs RCA
• Bouton de réglage du volume
• Finition noire satinée
• Garantie étendue de trois ans
18
18
Page 19
Présentation des Resolv sub88
®
$
%
&
'
!
"
#
Face avant
Télécommande
FRANÇAIS
1 SUB DOWN - Cette touche sert à réduire le niveau du sub88.
2 MUTE – Voyant LED indiquant que le Mute est activé.
3 LED POWER – La LED bleu indique que le sub88 est opéra-
tionnel. Elle clignote lorsque la télécommande est utilisée.
4 VU-MÈTRE – VU-mètre d'entrée à huit segments à diodes.
5 SUB UP – Cette touche sert à augmenter le niveau du sub88.
6 ÉBÉNISTERIE - Baffle à panneaux de particules MDF et super-
be finition noire.
7 WOOFER - Woofer haute puissance de 203 mm (8 pouces) à
longue excursion (25mm), pour une réponse étendue dans les
basses fréquences.
8 SUSPENSION EN COPOLYMÈRE BUTYLE - Permet une excur-
sion maximale tout en maintenant une réponse précise dans
les basses fréquences.
9 ÉVENT ACCORDÉ - Évent accordé (en dessous) offrant une
réponse linéaire étendue dans les basses fréquences.
A TOUCHE SYSTEM DIM – Permet de
réduire le niveau du système de 20 dB.
TOUCHE SUB VOLUME DOWN
B
– Permet de réduire le niveau du
Subwoofer.
C TOUCHE SYSTEM VOLUME DOWN
– Permet de réduire le niveau général
du système.
D TOUCHE SUB MUTE – Permet d'activer
le Mute du Subwoofer.
E TOUCHE SYSTEM MUTE – Permet d'ac-
tiver le Mute du système.
F TOUCHE SUB VOLUME UP – Permet
d'augmenter le niveau du Subwoofer.
G TOUCHE SYSTEM VOLUME UP
– Permet d'augmenter le niveau général
du système.
10 PIEDS ANTIDÉRAPANTS - Pieds en plastique assurant l'an-
crage parfait en présence de fortes pressions sonores.
19
19
Page 20

Présentation des Resolv sub88
Face arrière
FRANÇAIS
1 ENTRÉE ASYMÉTRIQUE GAUCHE - Connecteur RCA femelle
pour la connexion de signaux asymétriques à niveau ligne.
2 ENTRÉE SYMÉTRIQUE GAUCHE
la connexion de signaux symétriques à niveau ligne.
3 SORTIE ASYMÉTRIQUE GAUCHE
pour l'envoi de signaux asymétriques à niveau ligne aux satellites
actifs ou à l'amplificateur relié aux satellites passifs.
4 SORTIE SYMÉTRIQUE GAUCHE
l'envoi de signaux symétriques à niveau ligne aux satellites actifs
ou à l'amplificateur relié aux satellites passifs.
5 INTERRUPTEUR SECTEUR
6 EMBASE SECTEUR - Utilisez cette embase pour connecter le cor-
don secteur fourni.
7 ENTRÉE ASYMÉTRIQUE DROITE
la connexion de signaux asymétriques à niveau ligne.
8 ENTRÉE SYMÉTRIQUE DROITE - Connecteur XLR femelle pour la
connexion de signaux symétriques à niveau ligne.
9 SORTIE ASYMÉTRIQUE DROITE - Connecteur RCA femelle pour
l'envoi de signaux asymétriques à niveau ligne aux satellites
actifs ou à l'amplificateur relié aux satellites passifs.
– Permet la mise sous tension.
- Connecteur XLR femelle pour
- Connecteur RCA femelle
- Connecteur XLR mâle pour
- Connecteur RCA femelle pour
10 SORTIE SYMÉTRIQUE DROITE - Connecteur XLR mâle
pour l'envoi de signaux symétriques à niveau ligne aux
satellites actifs ou à l'amplificateur relié aux satellites passifs.
11 INVERSEUR DE PHASE - Permet d'inverser la phase de
180 degrés.
12 TOUCHE SYSTEM LEVEL DOWN - Permet de réduire le
niveau général.
13 TOUCHE SYSTEM LEVEL UP
niveau général de l'ensemble du système.
14 FREQUENCY
fréquences des sorties passe-haut.
15 JACK SUB BYPASS - Permet de connecter un sélecteur
externe pour activer la fonction Mute.
16 PLAQUE DE REFROIDISSEMENT - Sert à dissiper la cha-
leur générée par l'amplificateur de puissance intégré.
- Réglage déterminant la bande des basses
– Permet d'augmenter le
20
20
Page 21

Conguration des REsolv sub88 - Connexion rapide
$%05)3,!#/.3/,%
CONFIGURATION DU SYSTÈME DE MONITEURS
Avant d'effectuer les connexions, prenez le temps de déterminer comment sera connecté votre nouveau Subwoofer.
Configuration mono
Dans la plupart des cas, un seul Subwoofer commun configuré
en mono est souhaité pour plusieurs raisons, la principale
étant que les basses fréquences produites sont omnidirectionnelles. Comme les basses fréquences prennent énormément
d'espace pour se développer, il est impossible de dire si elles
proviennent de la droite ou de la gauche, sauf si bien sûr vous
vous trouvez dans une très grande salle. En raison de ce phénomène, pratiquement tous les signaux d'extrêmes graves sont
mélangés en mono.
Positionnement des Resolv sub88
Comme les basses fréquences reproduites par les sub88 sont
omnidirectionnelles, vous pouvez placer ces derniers pratiquement n'importe où. Toutefois, il est recommandé de ne pas les
installer près des coins. Idéalement, les sub88 devraient être
positionnés dans le milieu et près du mur auquel vous faites
face dans la position de mixage.
Connexion rapide
FRANÇAIS
L'installation du Subwoofer actif sub88 se fait facilement et en
seulement quelques minutes. La section qui suit explique comment procéder pour obtenir un système de moniteurs Sub et
satellites Resolv 2.1 fonctionnel. Pour cet exemple, nous présumons que vous utilisez des satellites actifs, tels les Resolv 50a.
• Sortez l'appareil de son emballage (conservez-le pour tout
retour en atelier) et choisissez son emplacement.
• Assurez-vous que vos satellites ou tout autre équipement du
système sont hors tension. Placez l'interrupteur secteur du
sub88 (situé sur la face arrière) sur la position OFF.
• Connectez les sorties gauche et droite de la console de
mixage aux entrées AUDIO INPUT gauche et droite sur la face
arrière du sub88.
Remarque : Autant que possible, utilisez des câbles symétriques.
Pour un schéma de câblage détaillé, consultez la page 28.
• Connectez ensuite la sortie AUDIO OUTPUT gauche du
sub88 à l'entrée du satellite de gauche, et la sortie AUDIO
OUTPUT droite du sub88 au satellite de droite.
• Réglez le bouton de réglage FREQUENCY du sub88 (situé sur
la face arrière) sur 70 Hz (position 10 heures).
• Avant de mettre les appareils sous tension, assurez-vous que
le niveau de sortie de la console de mixage est diminué au
minimum afin que vous puissiez augmenter graduellement
le niveau de votre nouveau système de moniteurs.
21
21
Page 22

FRANÇAIS
Utilisation des Resolv sub88
Connexion rapide - Suite
• Mettez le sub88 sous tension.
• Appuyez sur la touche SYETEM LEVEL DOWN située
sur la face arrière et maintenez-la enfoncée pendant
5 secondes afin de diminuer le niveau du système de
moniteurs au minimum.
• Mettez les satellites actifs sous tension et réglez leur
niveau de sortie au niveau souhaité.
• Utilisez le signal d'un CD afin de vérifier, à l'aide du
VU-mètre du signal principal de votre console de
mixage, que vous avez un niveau convenable.
Lorsque vous êtes certain que le niveau de la console de
mixage est convenable, réglez le niveau général du système de moniteurs à l'aide des touches SYSTEM LEVEL
UP et SYSTEM LEVEL DOWN situées sur la face arrière du
sub88. Surveillez le VU-mètre sur la face avant afin d'éviter tout écrêtage du signal du sub88.
Remarque : Vous pouvez personnaliser la réponse de votre
système en définissant la fréquence de coupure à l'aide du
réglage FREQUENCY, de même que le dosage entre le niveau
du sub88 et celui des satellites. Si vous ne possédez pas d'analyseur en temps réel numérique, vous devez effectuer les réglages à l'oreille avec plusieurs enregistrements avec lesquels
vous êtes familier. Vous pouvez également utiliser un analyseur en temps réel numérique comme le Samson D1500 pour
obtenir un rendement optimal.
Utilisation des Resolv sub88
Réglages des Resolv sub88
La face arrière des sub88 regroupe les connexions et les
interfaces utilisateurs du filtre électronique intégré et
de l'amplificateur de puissance. D'une puissance de 80
Watts, l'amplificateur interne est en mesure de générer une très puissante sortie de graves. Les sub88 sont
équipés d'un filtre électronique permettant de régler la
fréquence de coupure du Subwoofer, ainsi que d'une
sortie passe-haut pour vos satellites. Vous pouvez améliorer grandement la qualité sonore en connectant vos
satellites aux sorties passe-haut des sub88 car comme
ils reçoivent le signal de sortie filtré de ce dernier, ils
ne reproduisent plus les fréquences en deçà du point
de coupure. Par exemple, supposons que la fréquence
de coupure de votre satellite est de 70 Hz et que vous
envoyez un signal large bande (aussi bas que 20 Hz) à
son amplificateur et son haut-parleur. Même si le hautparleur ne peut pas reproduire les fréquences de moins
de 70 Hz, l'amplificateur génère tout de même les fréquences de 20 Hz à 70 Hz, ce qui entraîne une dépense
inutile de puissance et, par conséquent, de la chaleur.
En utilisant la sortie passe-haut d'un sub88, les fréquences envoyées à l'amplificateur et au haut-parleur du satellite ne sont jamais en deçà de celle sélectionnée avec
le réglage SWEEP. Vous obtenez ainsi plus de puissance
pour la restitution des fréquences que vous désirez que
les satellites reproduisent et, par conséquent, un son
bien plus clair et une plus grande réserve de puissance.
22
22
Page 23

Entrées et sorties
Les sub88 disposent d'entrées et de sorties à
niveau ligne symétriques et asymétriques afin
de faciliter la connexion des satellites actifs et
passifs. Il est recommandé d'utiliser les entrées
symétriques à niveau ligne pour relier le sub88
aux moniteurs actifs comme les Resolv 50a.
Voir page 28 pour schéma de câblage détaillé.
ENTRÉES ASYMÉTRIQUES
1
Ces connecteurs RCA femelles permettent la
connexion de signaux asymétriques.
Remarque : Autant que possible, utilisez les
connecteurs symétriques afin d'éviter les bruits
induits et les ronflements.
ENTRÉES SYMÉTRIQUES
2
Si vous désirez connecter votre console de
mixage à l'aide de signaux à niveau ligne symétriques, utilisez ces connecteurs XLR femelles.
SORTIES ASYMÉTRIQUES
3
Utilisation des Resolv sub88
1
2
3
4
6
5
FRANÇAIS
Ces connecteurs RCA femelles permettent
d'envoyer des signaux à niveau ligne asymétriques aux satellites actifs ou à l'amplificateur
auquel sont connectés les satellites passifs.
SORTIES SYMÉTRIQUES
4
Ces connecteurs XLR mâles permettent d'envoyer des signaux à niveau ligne symétriques
aux satellites actifs ou à l'amplificateur auquel
sont connectés les satellites.
JACK SUB BYPASS
5
Le Jack Sub Bypass permet de connecter un
sélecteur servant à activer le circuit de mise en
sourdine des sub88. Il peut être activé et désactivé à l'aide d'un sélecteur au pied standard, d'un
câble muni d'un commutateur ou même avec un
commutateur installé de façon permanente dans
la zone de mixage.
EMBASE SECTEUR
6
Utilisez cette embase pour connecter le cordon
secteur fourni. Assurez-vous que l'interrupteur
secteur est bien à la position OFF lorsque vous
connecter le cordon secteur.
23
23
Page 24

Utilisation des Resolv sub88
Réglages et voyants LED
Touches SYSTEM LEVEL UP et SYS-
7
TEM LEVEL DOWN
Ce réglage détermine le niveau sonore du
Subwoofer sub88, de même que celui des sorties
passe-haut. Ainsi, si vous utilisez le sub88 sans
les sorties passe-haut, ces touches permettent de
régler le niveau de basses fréquences du sub88.
Si vous utilisez le filtre électronique interne du
sub88 pour vos satellites, ce réglage détermine
alors le niveau sonore de l'ensemble du système.
FREQUENCY
8
Le réglage FREQUENCY permet de sélectionner
la fréquence de coupure du filtre électronique
interne du sub88 avec une bande de 30 Hz à 200
FRANÇAIS
Hz. Il s'agit d'un filtre de type Linkwitz-Riley à 12
dB/octave. Ce réglage détermine la fréquence
maximale que peut reproduire le sub88 et, du
fait même, la fréquence minimale que peuvent
reproduire les satellites.
9
8
7
Inverseur de phase
9
La phase du sub88 peut être inversée en réglant
le commutateur PHASE à la position 180 degrés.
Expérimentez avec ce commutateur afin de trouver le dosage souhaité entre le Subwoofer et les
satellites.
24
24
Page 25

Utilisation de la télécommande
Utilisation de la télécommande
Vous pouvez tirer avantage de la plupart des fonctions du
sub88 en utilisant la télécommande infrarouge. Elle permet
d'activer la fonction Mute du sub88 et de l'ensemble du système, ainsi que de régler leur niveau sonore. La fonction DIM
vous permet même de réduire le niveau sonore de l'ensemble
du système, ce qui vous permet d'échanger des commentaires sans perdre le fil de la session de mixage. Assurez-vous
que les piles AAA sont correctement installées et suivez les
instructions qui suivent pour vous familiariser avec le fonctionnement de la télécommande.
10
Utilisation du réglage SYSTEM VOLUME
Les touches d'augmentation et de diminution du réglage
SYSTEM VOLUME servent à déterminer le niveau général
du système de moniteurs, qui comprend le sub88 et les
satellites connectés. Pour augmenter le niveau sonore du
système, pointez la télécommande vers le capteur infrarouge du sub88 puis appuyez sur la touche d'augmentation. Pour réduire le niveau sonore du système, appuyez
plutôt sur la touche de diminution.
Utilisation de la touche SUB MUTE
11
Lorsque vous êtes satisfait du niveau d'écoute, faites une
écoute comparative avec et sans Subwoofer à l'aide de la
touche SUB MUTE, dans le coin supérieur droit de la télécommande. Pour ce faire, pointez la télécommande vers
le capteur infrarouge du sub88 puis appuyez sur la touche SUB MUTE. La LED MUTE rouge s'allume alors dans le
capteur infrarouge, indiquant que le sub88 est désactivé.
Pressez à nouveau sur la touche SUB MUTE pour réactiver
le Subwoofer. La LED MUTE s'éteint alors.
Lorsque la fonction Mute est activée, en appuyant sur
la touche SUB MUTE, le filtre permet à nouveau aux
satellites de recevoir des signaux large bande. Lorsque
la fonction Mute est désactivée, en appuyant à nouveau
sur la touche SUB MUTE, les satellites ne reçoivent que
les fréquences supérieures à celle sélectionnée à l'aide du
réglage FREQUENCY sur la face arrière.
Utilisation du réglage SUB VOLUME
12
Les touches d'augmentation et de diminution du réglage
SUB VOLUME servent à déterminer le niveau de sortie du
Subwoofer. Pour l'augmenter, pointez la télécommande
vers le capteur infrarouge du sub88 puis appuyez sur la
touche d'augmentation. Pour le réduire, appuyez plutôt
sur la touche de diminution.
11
1314
12
10
13
Utilisation de la touche SYSTEM MUTE.
La touche SYSTEM MUTE sert à mettre en sourdine le
système de moniteurs, soit le Subwoofer et les satellites.
Pointez la télécommande vers le capteur infrarouge du
sub88 puis appuyez sur la touche SYSTEM MUTE pour
activer la fonction Mute du système. Appuyez à nouveau
sur la touche SYSTEM MUTE pour désactiver le Mute.
Utilisation de la touche DIM
14
Les sub88 mettent à votre disposition une fonction très
pratique : la fonction DIM. Elle permet de réduire instantanément le niveau général de 20 dB. Cette fonction
permet ainsi de répondre au téléphone ou d'échanger
des commentaires sans toutefois vous faire perdre le fil
de la session de mixage et, du même coup, votre inspiration. De plus, elle est extrêmement utile pour l'écoute du
mélange à niveaux peu élevés, une technique que plusieurs ingénieurs du son emploient pour situer les pistes
dans le mélange.
Pour utiliser le réglage DIM, pointez la télécommande
vers le capteur infrarouge du sub88 puis appuyez sur la
touche SYSTEM DIM. Le niveau général est alors réduit
de 20 dB. Pour le ramener au niveau d'écoute habituel,
appuyez à nouveau sur la touche SYSTEM DIM.
FRANÇAIS
25
Page 26

$%05)3,!#/.3/,%
Connexion des Resolv sub88
Subwoofer avec satellites actifs
FRANÇAIS
• Diminuez le niveau de sortie de votre console de mixage au minimum.
• Connectez la sortie gauche de la console de mixage à l'entrée LEFT LINE INPUT du sub88, et la sortie droite de la console
de mixage è l'entrée RIGHT LINE INPUT du sub88. Reliez ensuite la sortie LEFT LINE OUTPUT du sub88 à l'entrée du satellite actif de gauche, et la sortie RIGHT LINE OUTPUT du sub88 à l'entrée du satellite actif de droite.
• Déterminez la fréquence de coupure à l'aide du réglage SWEEP. Consultez le mode d'emploi de vos moniteurs de studio
pour le point de coupure recommandé. Vous pouvez également sélectionner la fréquence qui vous convient le mieux à
l'oreille. La fréquence de coupure recommandée est de 70 Hz (position 10 heures).
• Utilisez le signal d'un CD pour réaliser les essais et augmentez le niveau de sortie de la console de mixage jusqu'à ce que
vous obteniez un niveau d'écoute confortable. Ensuite, augmentez graduellement le niveau de sortie du sub88 à l'aide
du réglage SUB VOLUME jusqu'à ce que vous obteniez le niveau de basses fréquences souhaité. Le niveau de sortie du
sub88 et des satellites demeure proportionnel à celui de la console de mixage.
26
Page 27

Connexion des Resolv sub88
$%05)3,!#/.3/,%
Subwoofer mono avec satellites passifs utilisant les entrées ligne
Voici une configuration type composée d'un sub88, d'une console de mixage, d'un amplificateur stéréo et d'une paire de satellites
passifs. La connexion aux entrées et aux sorties du sub88 s'effectue à l'aide de connecteurs RCA standard. Pour un schéma de
câblage détaillé, consultez la section “Connexion des entrées des RESOLV sub88” à la page 28. Suivez les étapes ci-dessous pour
configurer votre système.
FRANÇAIS
• Diminuez le niveau de sortie de votre console de mixage au minimum.
• Connectez la sortie gauche de la console de mixage à l'entrée LEFT AUDIO INPUT du sub88, et la sortie droite de la con
sole de mixage à l'entrée RIGHT AUDIO INPUT du sub88. Connectez ensuite la sortie LEFT AUDIO OUTPUT du sub88 à
l'entrée gauche de l'amplificateur de puissance, et la sortie RIGHT AUDIO OUTPUT du sub88 à l'entrée droite de l'amplificateur de puissance. À l'aide de câbles de haut-parleur standard, reliez la sortie gauche de l'amplificateur de puissance au
satellite de gauche, et la sortie droite de votre amplificateur de puissance au satellite de droite.
• Déterminez la fréquence de coupure à l'aide du réglage SWEEP. Consultez le mode d'emploi de vos moniteurs de studio
pour le point de coupure recommandé. Vous pouvez également sélectionner la fréquence qui vous convient le mieux à
l'oreille. La fréquence de coupure recommandée est de 70 Hz (position 10 heures).
• Réglez maintenant le niveau de sortie de l'amplificateur de puissance au niveau d'utilisation. Utilisez le signal d'un CD
pour réaliser les essais et augmentez le niveau de sortie de la console de mixage jusqu'à ce que vous obteniez un niveau
d'écoute confortable. Ensuite, augmentez graduellement le niveau de sortie du sub88 à l'aide du réglage SUB VOLUME
jusqu'à ce que vous obteniez le niveau de basses fréquences souhaité. Le niveau de sortie du sub88 et des satellites
demeure proportionnel à celui de la console de mixage.
27
27
-
Page 28

Connexion des entrées des Resolv sub88
Plan de câblage des Resolv sub88
Il y a différentes façons d'utiliser les Resolv sub88 selon votre configuration matérielle. Suivez les plans de câblage suivants correspondant à vos besoins.
Câble RCA/RCA
Jack 6,35 mm/Jack 6,35 mm asymétrique
FRANÇAIS
Jack 6,35 mm/Jack 6,35 mm symétrique
Câble XLR/XLR symétrique
Câble asymétrique Jack 6,35 mm à RCA
Câble asymétrique XLR à RCA
28
28
Page 29

Einleitung
Herzlichen Dank für den Kauf des Samson Resolv sub88 Active Subwoofers. Sein leistungsstarker
80 Watt Bassverstärker betreibt einen hochbelastbaren 8" Wandler, der Klänge im Bereich von 40
–180 Hz reproduziert und alle tiefen Frequenzen eines Nahfeldmonitor- oder Multimediasystems
optimal zur Geltung bringt. Der Tieffrequenz-Treiber des sub88 besteht aus einem 8” Wandler mit
25 mm Auslenkung und einem Butylen-Rahmen, der einen erweiterten Frequenzbereich und
kompakten Bass-Frequenzgang ermöglicht. Der sub88 wird mit einer Infrarot-Fernbedienung
geliefert, mit der Sie Ihr Monitorsystem von jeder Stelle des Kontrollraums aus steuern können. Die
Fernbedienung bietet mit Sub Level, System Level, Dim, Sub Mute und System Mute noch zusätzliche Kontrollraum-Abhörfunktionen. Zur Maximierung des Sounds Ihres Monitorsystems verfügt
der sub88 über ein integriertes aktives Crossover mit variabler Crossover-Frequenz zum Anschluss
an Satellitenboxen. Der sub88 ermöglicht dank einer intelligenten Umschaltung, die die Satelliten
beim Stummschalten des sub88 automatisch in den Breitband-Betrieb zurücksetzt, zudem eine
intelligente Sub-Satelliten-Steuerung. Auf der Rückseite befindet sich eine Fußschalter-Buchse,
mit der Sie den Subwoofer jederzeit ein- und ausschalten können. Ein Phasenschalter zur Laufzeitanpassung der Monitore erweitert die Steuerungsmöglichkeiten des sub88. Symmetrische Einund Ausgänge via standard XLR- und 1/4" Buchsen erlauben die einfache Integration in andere
Aktivmonitor- oder Endstufensysteme. Das Gehäuse des sub88 besteht aus stabilen Faserplatten
(MDF), um den maximalen Schalldruckpegel sicherzustellen, und besitzt eine schwarze Lackierung
mit "Schwarzer Satin" Textur. Wenn Sie den sub88 zusammen mit einem Paar Resolv 50a betreiben, erhalten Sie das Resolv 2.1 Monitorsystem. Der sub88 ist zudem die perfekte Ergänzung für
ein Resolv 65, Resolv 65a, Resolv 80a oder jedes andere Nahfeldmonitorsystem, dessen Tiefbassbereich erweitert werden soll
.
DEUTSCHE
Auf diesen Seiten finden Sie eine detaillierte Erläuterung der Funktionen des sub88 Subwoofers
sowie eine Führung durch das Bedienfeld, schrittweise Anleitungen für die Einrichtung und
Anwendung plus umfassende Spezifikationen. Wenn Sie ein Resolv 2.1 System besitzen, finden Sie
im Resolv 50a Bedienungshandbuch weitere Informationen über Ihren Breitband-Monitor. Bitte
vergessen Sie nicht, die beiliegende Garantiekarte ausgefüllt an uns zurückzusenden, damit Sie
online technischen Support erhalten und wir Ihnen zukünftig aktuelle Informationen über dieses
und andere Samson-Produkte zukommen lassen können.
Bei sorgsamer Behandlung und angemessener Belüftung wird Ihr sub88 viele Jahre störungsfrei
arbeiten. Die Seriennummer Ihres Geräts sollten Sie sicherheitshalber in der Zeile unten eintragen.
Seriennummer:__________________________________________
Kaufdatum: _______________________________________
Sollte Ihr Gerät einmal gewartet werden müssen, besorgen Sie sich vor der Rücksendung an
Samson bitte eine Return Authorization Number (RA) (Rückgabeberechtigungsnummer). Ohne
diese Nummer wird das Gerät nicht angenommen. Bitte rufen Sie Samson unter der Nummer
1-800-3SAMSON (1-800-372-6766) an, um eine RA-Nummer vor der Rücksendung zu erhalten.
Heben Sie bitte das Original-Verpackungsmaterial auf und schicken Sie das Gerät, falls möglich, im
Originalkarton und mit dem Originalverpackungsmaterial zurück.
29
29
Page 30

Resolv sub88 Features
®
Der Samson Resolv sub88 Referenz-Subwoofer ist die perfekte Ergänzung für das Resolv 50a sowie jedes andere Nahfeld- oder
Multimedia-Monitorsystem. Seine wichtigsten Features sind:
•
• 80 Watt Endstufe
• Infrarot-Fernbedienung für System Level, Sub Level, Dim, Mute und Sub Mute
DEUTSCHE
• 8-segmentige LED Input VU-Anzeige
• abgestimmtes Port-Gehäuse
•
• variables Crossover 40 - 180 Hz
• Fußschalter-Buchse für Mute-Schaltung
• Phasen-Schalter
• symmetrische XLR Line-Eingänge und Ausgänge plus asymmetrische Cinch Line-Eingänge
• Volume-Regler
• "Schwarze Satin" Oberfläche
hoch belastbarer 8” Wandler mit langer Auslenkung (25 mm) und Butylen-Rahmen
High-Pass-Ausgänge für Satellitenboxen. Kehren
bei Stummschaltung von Sub in den Breitband-Betrieb zurück.
• 3-jährige, erweiterte Garantie
30
30
Page 31

Resolv sub88 Layout
®
$
%
&
'
!
"
#
Layout der Vorderseite
Layout der Fernbedienung
1 SUB DOWN - Drucktaste zum Absenken des Sub-Pegels.
2 MUTE – LED zeigt die Deaktivierung des Sub an.
3 POWER LED – Bei leuchtender blauer LED ist der sub88 einge-
schaltet und betriebsbereit. Die Power LED blinkt, während sie
Informationen von der IR-Fernbedienung empfängt.
4 VU-ANZEIGE – 8-segmentige LED VU-Anzeige für den
Eingangspegel.
5 SUB UP – Drucktaste zum Anheben des Sub-Pegels.
6 ENCLOSURE - Stabile Faserplatten-Konstruktion (MDF) mit
Oberfläche aus elegantem, schwarzem, texturiertem Lack.
7 WANDLER - Hoch belastbarer 8” Bass-Wandler mit langer
Auslenkung (25 mm) und erweitertem Frequenzbereich.
8 BUTYLEN-RAHMEN - Ermöglicht eine maximale Auslenkung
bei kompakter Bass-Ansprache.
9 ABGESTIMMTER PORT - Rauscharme Port-Konstruktion
bietet eine linear erweiterte Bass-Ansprache (Geräte-Unterseite)
DEUTSCHE
A SYSTEM DIM-Taste – Bei gedrückter
Taste wird der Systempegel um 20 dB
abgesenkt.
B SUB VOLUME DOWN-Taste – Druck-
taste zum Absenken des SubwooferPegels.
C SYSTEM VOLUME DOWN-Taste –
Drucktaste zum Absenken des SystemGesamtpegels.
ist der Subwoofer deaktiviert.
E SYSTEM MUTE-Taste
Taste ist das System ausgeschaltet.
D SUB MUTE-Taste
F SUB VOLUME UP-Taste – Drucktaste
zum Anheben des Subwoofer-Pegels.
G SYSTEM VOLUME UP-Taste – Druck-
taste zum Anheben des System-Gesamtpegels.
– Bei gedrückter Taste
– Bei gedrückter
10 RUTSCHFESTE FÜSSE
- Große Hartplastik-Füße halten das
Gehäuse auch bei hohen Schalldruckpegeln auf seinem Platz.
31
31
Page 32

Resolv sub88 Layout
Layout der Rückseite
DEUTSCHE
1 LEFT UNBALANCED INPUT - Cinch-Buchse für asymmetrische
Line-Pegel-Signale.
2 LEFT BALANCED INPUT
- XLR-Buchse für symmetrische Line-
Pegel-Signale.
3 LEFT UNBALANCED OUTPUT
- Cinch-Buchse, die asymmetrische Line-Pegel-Signale zu aktiven Satellitenboxen oder zu
einem Amp plus passiven Satelliten überträgt.
4 LEFT BALANCED OUTPUT
- XLR-Stecker, der symmetrische LinePegel-Signale zu aktiven Satellitenboxen oder zu einem Amp
plus passiven Satelliten überträgt.
5 POWER-SCHALTER – Zum Ein-/Ausschalten des sub88.
6 AC INLET - Zum Anschluss des mitgelieferten standard IEC-
Netzkabels.
7 RIGHT UNBALANCED INPUT
- Cinch-Buchse für asymmetrische
Line-Pegel-Signale.
8 RIGHT BALANCED INPUT
- XLR-Buchse für symmetrische Line-
Pegel-Signale.
9 RIGHT UNBALANCED OUTPUT
- Cinch-Buchse, die asymmetrische Line-Pegel-Signale zu aktiven Satellitenboxen oder zu
einem Amp plus passiven Satelliten überträgt.
10 RIGHT BALANCED OUTPUT - XLR-Stecker, der symme-
trische Line-Pegel-Signale zu aktiven Satellitenboxen oder
zu einem Amp plus passiven Satelliten überträgt.
11 PHASE-SCHALTER - Ermöglicht den Betrieb mit umge-
kehrter Phase (180 Grad)
.
12 SYSTEM LEVEL DOWN - Zum Absenken des Gesamt-
Ausgangspegels.
13 SYSTEM LEVEL UP – Zum Anheben des Gesamt-Aus-
gangspegels des sub88 und angeschlossener Satelliten.
14 FREQUENCY
- Regelt den tieffrequenten Endbereich der
High-Pass-Ausgänge.
15 SUB BYPASS-BUCHSE - Zum Anschließen eines externen
Schalters, der die interne Mute-Funktion aktiviert.
16 KÜHLKÖRPER
- Kühlt die interne Endstufe.
32
32
Page 33

sub88 einrichten - Schnellstart
6/--)3#(%2
MONITORSYSTEM KONFIGURIEREN
Bevor Sie Kabel anschließen, sollten Sie entscheiden, wie Sie
Ihren neuen Subwoofer integrieren möchten.
Common Sub-Betrieb
In den meisten Fällen ist ein common Sub-Bass-Betrieb (Mono)
wünschenswert. Hierfür gibt es mehrere Gründe, am wichtigsten ist jedoch, dass die von einem Subwoofer erzeugten tiefen
Frequenzen unidirektional sind. Da tiefe Frequenzwellen so viel
Raum benötigen, um sich zu entwickeln, lässt sich nicht mehr
feststellen, ob der Subbass von links oder rechts kommt, falls
Sie sich nicht gerade in einem sehr großen Raum befinden.
Aufgrund dieses Phänomens ist fast das gesamte SubbassMaterial in Mono gemischt.
sub88 platzieren
Da die vom sub88 erzeugten Bässe ungerichtet sind, können
Sie die Box fast überall aufstellen, außer in Ecken. Idealerweise
sollten Sie den sub88 in der Mitte und in der Nähe der Wand
aufstellen, die Ihnen beim Mischen gegenüberliegt.
Schnellstart
Das Einrichten Ihres sub88 Active Subwoofers ist einfach und
dauert nur wenige Minuten: Der folgende Abschnitt beschreibt,
wie Sie Ihr Resolv 2.1, Subsatelliten-Monitorsystem in Betrieb
nehmen. Das Beispiel geht davon aus, dass Sie eine aktive
Satellitenbox, z. B. Resolv 50a, verwenden.
• Entfernen Sie das gesamte Verpackungsmaterial (heben Sie
es für die spätere Verwendung auf) und entscheiden Sie, wo
das Gerät physisch platziert werden soll.
DEUTSCHE
• Die aktiven Satellitenmonitore Ihres Mischers und alle
anderen Geräte Ihres Audiosystems müssen ausgeschaltet
sein. Stellen Sie den rückseitigen Power-Schalter des sub88
auf Aus (Off) ein.
• Verbinden Sie den linken und rechten Ausgang des Mischers
mit den linken und rechten AUDIO INPUTS auf der Rückseite
des sub88.
Hinweis: Benutzen Sie möglichst immer symmetrische Kabel. Ein
detailliertes Verdrahtungsdiagramm finden Sie auf Seite 40 dieses
Handbuchs.
• Verbinden Sie dann den linken AUDIO OUTPUT des sub88
mit dem Eingang der linken Satellitenbox und den rechten
AUDIO OUTPUT des sub88 mit dem Eingang der rechten
Satellitenbox.
• Stellen Sie den FREQUENCY-Regler auf der Rückseite des
sub88 auf 70 Hz (10 Uhr) ein.
• Achten Sie vor dem Einschalten der Geräte darauf, dass der
Ausgangspegel des Mischers ganz zurückgedreht ist, damit
Sie Ihr neues Monitorsystem hochfahren können.
33
33
Page 34

Resolv sub88 bedienen
Schnellstart - Fortsetzung
• Schalten Sie den sub88 jetzt ein.
• Halten Sie den rückseitigen SYSTEM LEVEL DOWN-
Regler 5 Sekunden lang gedrückt. Dadurch wird das
Monitorsystem anfänglich ganz zurückgedreht.
Schalten Sie dann Ihre aktiven Satellitenboxen ein
und stellen Sie die Lautstärke auf den normalen
Betriebspegel ein.
• Speisen Sie ein Signal ein (z. B. Musik von CD/MP3
Player) und prüfen Sie auf der Master-Pegelanzeige
des Mischers, ob das Signal stark genug ist.
Wenn der Mischer ein optimales Signal ausgibt, stellen
Sie mit den rückseitigen SYSTEM LEVEL UP- und DOWNReglern des sub88 das Monitorsystem auf den gewünschten Betriebspegel ein. Stellen Sie über die vorderseitige VU-Anzeige sicher, dass der Eingang des sub88
nicht übersteuert wird (Clipping).
Resolv sub88 bedienen
Hinweis: Sie können den Frequenzgang Ihres Systems auf
Ihren persönlichen Geschmack abstimmen, indem Sie den
FREQUENCY-Regler des Crossovers sowie die Balance der
Sub- und Satellitenpegel einstellen. Falls Sie keinen digitalen
Echtzeit-Analyzer besitzen, müssen Sie die Einstellungen nach
Gehör vornehmen und den Klang anhand verschiedener
Aufnahmen, die Sie gut kennen, überprüfen. Sie können das
System natürlich auch mit einem digitalen RTA, z. B. Samson
D1500, perfekt linear einstellen.
DEUTSCHE
Resolv sub88 Bedienfeld
Das Bedienfeld des sub88 enthält die Anschlüsse und
Anwenderschnittstelle zum internen elektronischen
Crossover und der Endstufensektion. Die interne 80
Watt Endstufe kann unglaubliche Bass-Ausgangspegel
erzeugen. Das elektronische Crossover des sub88
regelt den Höhen-Cutoff-Punkt für den Subwoofer und
verfügt über einen Hochpass-Ausgang für SatellitenLautsprecher. Wenn Sie Ihre Satelliten-Lautsprecher
über die Hochpass-Ausgänge betreiben, können Sie
die Klangqualität drastisch verbessern. Grund: Wenn
der Satelliten-Lautsprecher das vom sub88 gefilterte Ausgangssignal empfängt, muss er sich nicht
mehr um die Frequenzen unterhalb des CrossoverPunkts kümmern. Angenommen, die natürliche
Frequenzabsenkung der Satellitenbox liegt bei 70 Hz
und Sie senden ein breitbandiges Signal (bis hinunter
auf 20 Hz) zum Satellitenverstärker und -lautsprecher.
Obwohl der Lautsprecher nur 70 Hz und darüber reproduzieren kann, gibt der Verstärker weiterhin 20 - 70
Hz aus. Dies ist verschwendete Leistung, die in Hitze
umgewandelt wird. Bei Verwendung des HochpassAusgangs werden Satellitenverstärker und -box nie
mit Frequenzen konfrontiert, die unterhalb des mit
der Sweep-Frequenz eingestellten Werts liegen. Es
kann also mehr Leistung auf die Frequenzen verwandt
werden, die die Satelliten reproduzieren sollen. Das
Resultat ist ein klarerer Klang mit mehr Headroom.
34
34
Page 35

Eingänge und Ausgänge
Der sub88 verfügt über symmetrische und
asymmetrische Line-Pegel-Eingänge und Ausgänge, wodurch der Anschluss an passive
oder aktive Satelliten problemlos möglich
ist. Um den sub88 mit aktiven Monitoren,
z. B. Resolve 50a, zu kombinieren, sollten
Sie die symmetrischen Line-Eingänge und
-Ausgänge verwenden. Ein detailliertes KabelVerdrahtungsdiagramm finden Sie auf Seite 40.
UNBALANCED INPUTS
1
Asymmetrische Verbindungen werden über die
Cinch-Buchsen hergestellt.
Hinweis: Das geringste induzierte Rauschen und
Brummen erhalten Sie allerdings mit den symmetrischen Anschlüssen.
BALANCED INPUTS
2
Resolv sub88 bedienen
1
2
3
4
5
Die symmetrischen Line-Pegel-Signale des
Mischers werden über die XLR-Buchsen
angeschlossen.
UNBALANCED OUTPUTS
3
Diese Cinch-Buchsen leiten asymmetrische
Line-Pegel-Signale zu aktiven Satellitenboxen
oder einer Endstufe plus passive Satelliten
weiter.
BALANCED OUTPUTS
4
Diese XLR-Stecker leiten symmetrische LinePegel-Signale zu aktiven Satellitenboxen oder zu
einer Endstufe plus passive Satelliten weiter.
SUB BYPASS-BUCHSE
5
Über die Sub Bypass-Buchse lässt sich ein Schalter schließen, der die interne Mute-Schaltung
des sub88 aktiviert. Indem Sie einen in jedem
Musikgeschäft erhältlichen Fußschalter verwenden oder ein Kabel mit Schalter bauen oder
einen Schalter fest im Mix-Bereich installieren,
können Sie den sub88 einfach ein-/ausschalten.
6
DEUTSCHE
AC INLET
6
Hier schließen Sie das mitgelieferte IECNetzkabel an. Beim Anschließen des Netzkabels
sollte der Netzschalter auf OFF/AUS stehen.
35
35
Page 36

Resolv sub88 bedienen
Steuerungsfunktionen und Anzeigen
SYSTEM LEVEL Up und Down-
7
Regler
Mit dem Volume-Regler steuern Sie die Höhe des
zum sub88 Subwoofer geleiteten Signalpegels
sowie den Ausgangspegel der HochpassAusgänge. Wenn Sie also den sub88 ohne
Hochpass-Ausgänge verwenden, steuert der
Volume-Regler den Bass-Ausgang des sub88.
Wenn Sie mit dem internen elektronischen
Crossover Satellitenboxen betreiben, steuert der
Volume-Regler den Gesamtpegel des Systems.
FREQUENCY
8
Mit dem FREQUENCY-Regler wählen Sie die
Cutoff-Frequenz der Höhen im Bereich von
30 Hz bis 200 Hz für das interne elektronische
Crossover des sub88. Dieses bietet eine Linkwitz
Riley-Filterkurve mit 12 dB/Oktave. Sweep
bestimmt die höchste Frequenz, die der sub88
erzeugt, wobei diese gleichzeitig die untere
Grenzfrequenz der Signale ist, die über die
Hochpass-Ausgänge zu den Satellitenboxen ausgegeben werden.
9
8
7
PHASE-Schalter
9
DEUTSCHE
Sie können den sub88 mit umgekehrter Phasenlage betreiben, indem Sie den
PHASE-SCHALTER auf 180° (Grad) einstellen.
Experimentieren Sie mit diesem Schalter, um
die beste Mischung zwischen Subwoofer und
Satellitenboxen zu finden.
36
36
Page 37

Fernbedienung verwenden
Mit der Infrarot-Fernbedienung können Sie viele leistungsstarke Funktionen des sub88 nutzen und beispielsweise
den Pegel des Sub sowie den Gesamtpegel des Systems
stummschalten und steuern. Sie können mit der DIMFunktion sogar den Pegel des Gesamtsystems verringern,
wenn Sie mit jemandem im Kontrollraum reden möchten,
ohne den Groove zu stören. Prüfen Sie, ob die beiden
AAA-Batterien (Mikrozellen) installiert sind und gehen Sie
dann nach den folgenden Abschnitten vor, in denen die
Handhabung der Fernbedienung beschrieben wird.
10
SYSTEM VOLUME-Regler verwenden
Mit den UP und DOWN SYSTEM VOLUME-Reglern regeln
Sie den Gesamtpegel des Monitorsystems, zu dem
der sub88 und die angeschlossenen Satellitenboxen
gehören. Wenn Sie das Monitorsystem lauter einstellen
möchten, zeigen Sie mit der Fernbedienung auf das IRFenster des sub88 und drücken den SYSTEM VOLUME UPRegler. Um SYSTEM VOLUME leiser einzustellen, zeigen
Sie mit der Fernbedienung auf das IR-Fenster des sub88
und drücken den SYSTEM VOLUME DOWN-Regler.
Fernbedienung verwenden
11
1314
12
10
11
SUB MUTE-Taste einsetzen
Nachdem Sie einen guten Abhörpegel für das Monitor-
system eingestellt haben, können Sie Ihre Mischung
mit und ohne Subwoofer abhören, indem Sie die SUB
MUTE-Taste auf der Fernbedienung oben rechts drücken.
Zum Stummschalten des Subwoofers zeigen Sie mit der
Fernbedienung auf das IR-Fenster des sub88 und drücken SUB MUTE. Beachten Sie die leuchtende rote MUTE
LED im IR-Fenster, die die Deaktivierung des Sub anzeigt.
Drücken Sie jetzt nochmals die SUB MUTE-Taste, um die
Stummschaltung des Subwoofers aufzuheben und die
rote MUTE LED auszuschalten.
Dank dem intelligenten Crossover des sub88 werden die
Ausgänge zu den Satellitenboxen wieder breitbandig
geschaltet, wenn der Subwoofer mit der SUB MUTE-Taste
stummgeschaltet wird. Wenn Sie die Stummschaltung
des Subwoofers durch nochmaliges Drücken der SUB
MUTE-Taste wieder aufheben, werden die Ausgänge zu
den Satellitenboxen erneut durch das Hochpass-Filter
mit der Eckfrequenz geleitet, die mit dem rückseitigen
FREQUENCY-Regler eingestellt ist.
12
SUB VOLUME-Regler einsetzen
Mit den UP und DOWN SUB VOLUME-Reglern steuern
Sie den Pegel des Subwoofers. Um den Subwoofer lauter
einzustellen, zeigen Sie mit der Fernbedienung auf das
IR-Fenster des sub88 und drücken den SUB VOLUME UPRegler. Um VOLUME leiser einzustellen, zeigen Sie mit der
Fernbedienung auf das IR-Fenster des sub88 und drücken
den SUB VOLUME DOWN-Regler.
13
SYSTEM MUTE-Taste verwenden
Mit der SYSTEM MUTE-Taste schalten Sie das gesamte
Monitorsystem, inklusive Subwoofer und Satellitenboxen,
aus. Zeigen Sie mit der Fernbedienung auf das IR-Fenster
des sub88 und drücken Sie SYSTEM MUTE, um die
Mischung stummzuschalten. Um die Mischung erneut
abzuhören, drücken Sie nochmals die SYSTEM MUTETaste, um die Stummschaltung aufzuheben.
14
DIM-Regler verwenden
Mit der praktischen "DIM"-Funktion des sub88 können
Sie den Pegel Ihrer Mischung sofort um 20dB absenken,
um einen Telefonanruf zu beantworten oder mit Kollegen
zu diskutieren, ohne gegen die Mischung anschreien
oder diese ganz stummschalten zu müssen. Mit Hilfe
der DIM-Funktion fließen die "kreativen Ströme" auch
bei den normalen Ablenkungen weiter und der Groove
bleibt erhalten. Die Funktion ist auch zum Abhören
der Mischung bei niedrigen Pegeln sehr praktisch, eine
Technik, mit der viele gute Toningenieure prüfen, ob die
Dinge in der Mischung richtig platziert sind.
Um die DIM-Funktion zu nutzen, zeigen Sie mit der Fernbedienung auf das IR-Fenster des sub88 und drücken
SYSTEM DIM. Der Pegel wird um 20dB abgesenkt. Um
zum normalen Abhörpegel zurückzukehren, drücken Sie
nochmals die SYSTEM DIM-Taste.
DEUTSCHE
37
Page 38

6/--)3#(%2
Resolv sub88 anschließen
Mono Sub mit aktiven Satelliten
DEUTSCHE
• Drehen Sie die Master-Ausgänge Ihres Mischers ganz zurück.
• Verbinden Sie den linken Mischerausgang mit dem LEFT LINE INPUT des sub88 und den rechten Mischerausgang mit
dem RIGHT LINE INPUT. Verbinden Sie dann den LEFT LINE OUTPUT des sub88 mit dem Eingang der linken, aktiven
Satellitenbox und den RIGHT LINE OUTPUT mit dem Eingang der rechten, aktiven Satellitenbox.
• Stellen Sie dann den SWEEP-Regler auf die gewünschte Frequenz ein. Schlagen Sie den empfohlenen Crossover-Punkt im
Handbuch Ihrer Studiomonitore nach. Sie können den SWEEP-Regler auch nach Gehör auf die Frequenz einstellen, die
am besten klingt. Ein guter Anfangswert ist etwa 70 Hz (10 Uhr).
• Schicken Sie ein Audiosignal (z. B. eine Musik-CD) durch Ihren Mischer und stellen Sie den Pegel auf eine angenehme
Abhörlautstärke ein. Drehen Sie dann den SUB VOLUME-Regler des sub88 langsam auf und achten Sie auf die BassAusgabe. Stellen Sie den sub88 auf den gewünschten Tiefbass-Pegel ein. Wenn Sie nun den Ausgangspegel Ihres Mischer
erhöhen oder verringern, folgen sub88 und die Satelliten der Änderung mit der gleichen relativen Lautstärke.
38
Page 39

Resolv sub88 anschließen
6/--)3#(%2
Mono Sub mit passiven Satelliten an den Line-Eingängen
Es folgt ein typisches System-Setup, bei dem der sub88 mit einem Mischer, einer Stereo-Endstufe und einem Paar passiver
Satellitenboxen kombiniert ist. Die Ein- und Ausgänge des sub88 sind mit Cinch-Anschlüssen gemäß Industriestandard bestückt.
Ein detailliertes Verdrahtungsdiagramm finden Sie im Abschnitt “sub88 Anschlüsse” auf Seite 40. Gehen Sie zum Einrichten des
Systems wie folgt vor.
• Drehen Sie die Master-Ausgänge Ihres Mischers ganz zurück.
• Verbinden Sie den linken Mischerausgang mit dem LEFT AUDIO INPUT des sub88 und den rechten Mischerausgang mit
dem RIGHT AUDIO INPUT. Verbinden Sie dann den LEFT AUDIO OUTPUT des sub88 mit dem linken Eingang der Endstufe
und den RIGHT AUDIO OUTPUT mit dem rechten Eingang. Führen Sie ein Boxenkabel vom linken Ausgang Ihrer Endstufe
zum linken Satelliten und ein weiteres Kabel vom rechten Ausgang der Endstufe zum rechten Satelliten.
• Stellen Sie dann den SWEEP-Regler auf die gewünschte Frequenz ein. Schlagen Sie den empfohlenen Crossover-Punkt im
Handbuch Ihrer Studiomonitore nach. Sie können den SWEEP-Regler auch nach Gehör auf die Frequenz einstellen, die
am besten klingt. Ein guter Anfangswert ist etwa 70 Hz (10 Uhr).
• Stellen Sie jetzt Ihre Endstufe auf den normalen Betriebspegel ein. Schicken Sie ein Audiosignal (z. B. eine Musik-CD)
durch Ihren Mischer und stellen Sie den Pegel auf eine angenehme Abhörlautstärke ein. Drehen Sie dann den SUB
Volume-Regler des sub88 langsam auf und achten Sie auf die Bass-Ausgabe. Stellen Sie den sub88 auf den gewünschten
Tiefbass-Pegel ein. Wenn Sie nun den Ausgangspegel Ihres Mischer erhöhen oder verringern, folgen sub88 und die
Satelliten der Änderung mit der gleichen relativen Lautstärke.
DEUTSCHE
39
39
Page 40

Resolv sub88 Anschlüsse
3PITZE3IGNAL
3PITZE3IGNAL
2àCKANSICHT
2àCKANSICHT
,ÚTPUNKTE
(EI
(EI
0OL
KEINE6ERBINDUNG0OL
+ALT
+ALT
+ALT
8,23TECKER
8,23TECKER
8,2"UCHSE
+ALT
+ALT
(EI
(EI
(EI
-ASSE
-ASSE
-ASSE
-ASSE -ASSE
,ÚTPUNKTE
,ÚTPUNKTE
2àCKANSICHT
3PITZE3IGNAL
3PITZE3IGNAL
3CHIRM%RDE
3CHIRM%RDE
3CHIRM%RDE
3CHIRM%RDE
3CHIRM%RDE
3CHIRM%RDE
+ALT0OL
2ING3IGNAL
2ING3IGNAL
3IGNAL2ING
3IGNAL2ING 3IGNAL2ING
3IGNAL2ING
3IGNAL3PITZE
3IGNAL3PITZE 3IGNAL3PITZE
3IGNAL3PITZE
3PITZE3IGNAL
3PITZE3IGNAL
3PITZE3IGNAL
3PITZE3IGNAL
3PITZE3IGNAL
3PITZE3IGNAL
3CHIRM%RDE
3CHIRM%RDE
3CHIRM%RDE
3PITZE3IGNAL
3PITZE3IGNAL
3CHIRM%RDE
%RDE %RDE %RDE
%RDE
%RDE
%RDE
%RDE
%RDE
3CHIRM%RDE
3CHIRM%RDE
3CHIRM%RDE
Resolv sub88 Verdrahtung
Abhängig von Ihrem genauen Monitoring-Setup können Sie den sub88 auf mehrere Arten ins System integrieren. Gehen Sie nach
den folgenden Verkabelungsdiagrammen vor, um Ihr Monitorsystem anzuschließen.
Kabel: Cinch auf Cinch
Kabel: asymmetrisch 1/4” auf 1/4”
Kabel: symmetrisch 1/4” auf 1/4”
Kabel: symmetrisch XLR auf XLR
DEUTSCHE
Kabel: asymmetrisch 1/4” auf Cinch
Kabel: asymmetrisch XLR auf Cinch
40
40
Page 41

Introducción
Felicidades y gracias por su compra del subwoofer activo Samson Resolv sub88. Esta unidad se ocupa
de los super graves en cualquier sistema de monitorización de campo cercano o sistema multimedia,
con su potente amplificador de graves de 80 watios que da señal a un impresionante transductor de
8" de alto rendimiento, que reproduce sonidos entre los 40 –180 Hz. El cabezal de graves del sub88
es un transductor de 8”, de 25 mm de recorrido de excursión con un recubrimiento butílico que le
ofrece un rango ampliado y una respuesta en graves compacta. El sub88 viene con un control remoto
por infrarrojos, que le permite controlar fácilmente su sistema de monitores desde cualquier punto
de la sala de control. Este mando a distancia le ofrece de forma instantánea funciones adicionales de
monitorización de sala de control por medio del Sub Level, System Level, Dim, Sub Mute y System Mute.
De cara a maximizar el sonido de su sistema de monitores, el sub88 tiene un crossover activo interno,
con frecuencia de separación variable, para que lo conecte a altavoces satélites. El sub88 le ofrece
un control inteligente sub-satélite gracias a un útil conmutador que devuelve automáticamente los
satélites al funcionamiento de rango completo cuando anula el sub88. El panel trasero dispone de un
conector para pedal de disparo que le permite conectar o desconectar el subwoofer fácilmente y sobre
la marcha. Con un interruptor de fase para alinear en el tiempo sus monitores, el sub88 le ofrece un
control aún mayor. Entradas y salidas balanceadas en conectores XLR y de 6,3 mm standard hacen que
la interconexión a otros monitores activos o etapas de potencia sea muy sencilla. El recinto acústico del
sub88 ha sido fabricado en un robusto MDF (fibra de densidad media) para asegurarle el máximo nivel
de presión sonora y su acabado es en una resistente capa de pintura negra satinada. Si utiliza el sub88
junto con un par de Resolv 50a, tendrá el sistema de monitorización Resolv 2.1. El sub88 es también
el compañero perfecto para su sistema de monitorización Resolv 65, Resolv 65a, Resolv 80a o para
cualquier sistema de monitores de campo cercano en el que se necesite una ampliación de los graves.
En estas páginas encontrará una descripción detallada de todas las características del subwoofer sub88,
así como un recorrido guiado por su panel de control, instrucciones paso-a-paso para su montaje y uso
y una completa tabla con las especificaciones. También encontrará una tarjeta de garantía—no se olvide
de rellenarla y enviárnosla por correo para que pueda recibir soporte técnico online y para que podamos
enviarle información actualizada sobre este y otros productos Samson en el futuro.
Con unos cuidados mínimos y una correcta circulación de aire, su sub88 funcionará sin problemas
durante muchos años. Le recomendamos que apunte aquí abajo el número de serie de este aparato para
cualquier consulta en el futuro.
Número de serie:__________________________________________
Fecha de compra: _______________________________________
En el improbable caso de que su unidad tenga que ser reparada en algún momento, necesitará
conseguir un número de Autorización de devolución (RA) para poder enviar su unidad a Samson. Sin
este número, ninguna unidad es aceptada en fábrica. Póngase en contacto con Samson en el teléfono
1-800-3SAMSON (1-800-372-6766) para que le facilitemos este número de autorización de devolución
antes de enviarnos la unidad. Le recomendamos que guarde el embalaje original de este aparato y, si es
posible, utilice este embalaje para devolvernos la unidad en caso de reparación.
ESPAÑOL
41
41
Page 42

Características del Resolv sub88
®
El subwoofer de referencia Samson Resolv sub88 es el complemento perfecto al Resolv 50a o a cualquier otro sistema de
monitorización de campo cercano. Estas son algunas de sus características principales:
• T
• Etapa de potencia de 80 watios
• Control remoto por infrarrojos que gestiona el nivel de sistema, nivel sub, dim, mute y mute sub
• Medidor de entrada VU de ocho segmentos LED
• Recinto acústico con tobera afinada
• Salidas pasa-altos para altavoces satélites, que vuelven a funcionamiento de rango completo al anular el sub
• Crossover variable de 40 - 180 Hz
• Conector de pedal de conmutación de anulación (mute)
• Interruptor de fase
ESPAÑOL
• Entradas y salidas balanceadas de línea en conectores XLR y entradas de línea no balanceadas en RCA.
• Control de volumen
• Acabado en negro satinado
ransductor de 8” de alto rendimiento y largo recorrido de excursión (25 mm) con recubrimiento butílico
• Garantía ampliada de tres años
42
42
Page 43

Distribución del Resolv sub88
®
$
%
&
'
!
"
#
Vista frontal
Mando a distancia
1 SUB DOWN - Pulsador que reduce el volumen del sub.
2 MUTE – Piloto que se ilumina cuando el sub está en off.
3 Piloto POWER – Piloto que se ilumina en azul para indicarle
que el sub88 está encendido y listo para funcionar. Este piloto
también parpadeará cuando esté recibiendo información
desde el mando a distancia IR.
4 MEDIDOR VU – Medidor VU de ocho segmentos LED que le
muestra el nivel de entrada.
5 SUB UP – Pulsador que aumentar el volumen del sub
6 RECINTO ACUSTIVO - Fabricado en robusto MDF (fibra de
densidad media) y con una resistente capa de pintura negra.
7 TRANSDUCTOR - Transductor de graves de rango ampliado,
alto rendimiento y largo recorrido de excursión (25 mm) en 8".
8 RECUBRIMIENTO BUTILICO - Permite la máxima excursión
con una respuesta en graves compacta.
9 TOBERA AFINADA - Diseño de tobera silenciosa que le ofrece
una respuesta en graves ampliada y lineal (parte inferior).
10 PATAS ANTIDESLIZANTES - Grandes patas de plástico que
evitan que el recinto se mueva incluso al máximo volumen.
A Interruptor SYSTEM DIM – Cuando
lo pulse el nivel del sistema será
amortiguado o reducido en 20dB.
B Interruptor SUB VOLUME DOWN –
Pulsador que sirve para reducir el nivel
del subwoofer.
C Interruptor SYSTEM VOLUME DOWN
– Pulsador que se usa para amortiguar
ESPAÑOL
el nivel global del sistema.
D Interruptor SUB MUTE – Cuando lo
pulse, el subwoofer se descativará.
E Interruptor SYSTEM MUTE – Cuando
lo pulse, el sistema entero se
desactivará.
F Interruptor SUB VOLUME UP
– Pulsador que le permite aumentar el
nivel del subwoofer.
G Interruptor SYSTEM VOLUME UP
– Pulsador que se usa para aumentar el
nivel global de todo el sistema.
43
43
Page 44

Distribución del Resolv sub88
Panel trasero
1 ENTRADA NO BALANCEADA IZQUIERDA - Conector
RCA hembra que acepta señales de nivel de línea no
balanceadas.
2 ENTRADA BALANCEADA IZQUIERDA
hembra que acepta señales de nivel de línea balanceadas.
3 SALIDA NO BALANCEADA IZQUIERDA
hembra que da salida a señales de nivel de línea no
balanceadas a altavoces satélites autoamplificados o a una
etapa de potencia y satélites pasivos.
4 SALIDA BALANCEADA IZQUIERDA
que da salida a señales de nivel de línea balanceadas a
satélites autoamplificados o etapas y altavoces pasivos.
ESPAÑOL
5 INTERRUPTOR POWER
6 ENTRADA DE CA
– Uselo para encender el sub88.
- Conecte aquí el cable de alimentación
IEC incluido.
7 ENTRADA NO BALANCEADA DERECHA
hembra como en el caso del punto 1 anterior.
8 ENTRADA BALANCEADA DERECHA
como en el caso del punto 2 de arriba.
9 SALIDA NO BALANCEADA DERECHA
hembra con las mismas funciones que en el caso de la salida
comentada en el punto 3 anterior.
- Conector XLR
- Conector RCA
- Conector XLR macho
- Conector RCA
- Conector XLR hembra
- Conector RCA
10 SALIDA BALANCEADA DERECHA - Conector XLR macho
que, al igual que en el caso de la salida indicada en el punto
4 anterior, da salida a señales de nivel de línea balanceadas
a satélites autoamplificados o amplificadores y altavoces
pasivos.
11 INTERRUPTOR PHASE
- Le permite usar la unidad con un
desfase de 180 grados.
12 SYSTEM LEVEL DOWN - Se usa para reducir el nivel de
salida global.
13 SYSTEM LEVEL UP
– Se usa para aumentar el nivel de
salida global de tanto el sub88 como de los altavoces
satélites conectados.
14 FREQUENCY
- Esto le permite ajustar el rango de graves
para las salidas pasa-altos.
15 CONEXION SUB BYPASS
- Se usa para la conexión de un
conmutador exterior para activar la función de anulación
(mute) interna.
16 CISIPADOR DE CALOR
- Permite la refrigeración de la
etapa de potencia interna.
44
44
Page 45

Conguración del sub88 - Arranque rápido
CONFIGURACION DE SU SISTEMA DE MONITORES
Antes de conectar ningún cable, dedique unos minutos a
decidir cómo quiere interconectar su nuevo subwoofer.
Funcionamiento con sub común
En la mayoría de los casos, suele ser preferible el uso de un
sub común (mono). Esto se debe a varios motivos, pero
principalmente a que las frecuencias graves producidas por un
subwoofer tienden a ser no-direccionales. Dado que las ondas
sonoras de baja frecuencia necesitan mucho espacio para
desarrollarse, no podrá discernir si los sub-graves vienen del lado
derecho o izquierdo, salvo que esté en una sala enorme. Por ello,
prácticamente todo el material de sub-graves se mezcla en mono.
Colocación del sub88
Dado que las bajas frecuencias reproducidas por el sub88 son
no-direccionales, puede colocar esta unidad prácticamente
en cualquier lugar. No obstante, es una buena idea colocar el
sub88 lejos de las esquinas. Le recomendamos que coloque
este subwoofer en un punto central y cerca de la pared de la
pared que esté en frente de la posición de mezcla.
Arranque rápido
La configuración de su subwoofer activo sub88 es un proceso
muy sencillo que solo le llevará unos minutos: A continuación
le explicamos cómo poner en marcha su sistema de
monitorización Resolv 2.1 de sub y satélites. Para este ejemplo
vamos a asumir que utiliza un altavoz satélite activo como el
Resolv 50a.
• Quite todo el embalaje (pero consérvelo por si es necesario
para cualquier reparación en el futuro) y determine donde va
a ubicar físicamente las unidades.
• Asegúrese que tanto sus monitores satélites activos como
el resto del equipo de su sistema audio esté apagado.
Compruebe también que el interruptor de encendido del
panel trasero del sub88 esté en la posición off.
• Conecte la salida izquierda y derecha de la mesa de mezclas
a las entradas AUDIO INPUTS izquierda y derecha del panel
trasero del sub88.
Nota: Le recomendamos que use cables balanceados siempre que
sea posible. Vea en la página 52 de este manual un diagrama de
cableado en detalle.
• Después, conecte las salidas audio izquierda y derecha
del sub88 a las entradas de los altavoces satélites del lado
izquierdo y derecho, respectivamente.
ESPAÑOL
• Localice el control FREQUENCY del panel trasero del sub88 y
colóquelo sobre los 70Hz (posición de "las 10 en punto").
• Antes de encender su equipo, asegúrese de que el nivel de
salida de la mesa de mezclas esté al mínimo para que pueda
ir subiendo poco a poco el volumen de sus monitores.
45
45
Page 46

Manejo del Resolv sub88
Arranque rápido - Continuación
• Encienda ahora el sub88.
• Mantenga pulsado el control SYSTEM LEVEL DOWN
del panel trasero durante 5 segundos. Esto hará que
el sistema de monitorización empiece al mínimo.
Después, encienda sus altavoces satélites activos y
ajuste el volumen al nivel operativo normal.
• Haga pasar una señal (música de un CD o MP3) y
compruebe el medidor del nivel master de la mesa
para ver si tiene una buena señal.
Una vez que confirme que esté siendo enviada una
buena señal desde la mesa, use los controles SYSTEM
LEVEL UP y DOWN del sub88 para ajustar el sistema
de monitorización al volumen que quiera. Asegúrese
de comprobar el medidor VU frontal para evitar
saturaciones en la entrada del sub88.
Manejo del Resolv sub88
Nota: Ajustando el control FREQUENCY del crossover puede
aafinar la respuesta del sistema a sus gustos particulares,
al igual que puede ajustar también el balance entre el nivel
del sub y de los satélites. Si no tiene un analizador digital en
tiempo real, tendrá que usar sus oídos para comprobar el
sonido de diversas grabaciones que conozca bien. También
puede usar un RTA digital como el Samson D1500 para ajustar
el sistema a la perfección.
Panel de control del Resolv sub88
El panel de control del sub88 dispone de las conexiones
y del interface de usuario para las secciones de etapa
de potencia y crossover electrónicos internos del
sub88. El amplificador interno es una etapa de potencia
de 80 watios capaz de producir una increíble salida
de graves. El sub88 emplea un crossover electrónico
que ajustar el punto de corte de los agudos para el
subwoofer, y también de una salida pasa-altos para sus
altavoces satélites. Si conecta sus satélites a las salidas
pasa-altos del sub88 conseguirá una gran mejora en
la calidad final. La razón de esto es que cuando sus
altavoces satélites reciban la salida filtrada procedente
del sub88, ya no tratarán de recibir ninguna frecuencia
por debajo del punto de crossover. Supongamos que
su altavoz satélite tiene la supresión de frecuencias
natural ajustada a 70 Hz, y que envía una señal de
rango completo (hasta los 20 Hz) al amplificador y
altavoz satélite. Pues bien, incluso aunque el altavoz
ESPAÑOL
solo puede reproducir frecuencias superiores a los
70Hz, el amplificador seguirán dando salida a señales
a 20-70Hz, lo que supone un malgasto de potencia
y una pérdida en forma de calor. Al usar las salidas
pasa-altos del sub88, al amplificador y altavoz satélites
nunca les llegarán frecuencias que estén por debajo de
la ajustada con el mando Sweep. Esto quiere decir que
tendrá más potencia para las frecuencias que quiere
que reproduzcan sus satélites, lo que al final redunda
en un sonido más limpio y con más margen.
46
46
Page 47

Entradas y salidas
El sub88 dispone de entradas y salidas de
nivel de línea tanto balanceadas como no
balanceadas, por lo que puede conectarlo
fácilmente con satélites activos y pasivos. Le
recomendamos que use las entradas y salidas de
línea balanceadas para interconectar el sub88
con monitores activos como los Resolv 50a. En la
página 52 encontrará un completo diagrama de
cableado.
ENTRADAS NO BALANCEADAS
1
Puede hacer conexiones no balanceadas usando
estos conectores RCA hembra.
Manejo del Resolv sub88
1
2
3
5
Nota: De cara a conseguir la menos cantidad
de ruido y zumbido inducido, use los conectores
balanceados siempre que pueda.
ENTRADAS BALANCEADAS
2
Si quiere conectar su mesa usando señales de
nivel de línea balanceadas, use los conectores
XLR hembra.
SALIDAS NO BALANCEADAS
3
Estos conectores RCA hembra emiten señales de
nivel de línea no balanceada a altavoces satélites
autoamplificados o a una etapa conectada a
altavoces pasivos.
SALIDAS BALANCEADAS
4
Conectores XLR macho que dan salida a señales
de nivel de línea balanceada a altavoces satélites
autoamplificados o a una etapa conectada a
altavoces pasivos.
5
CONECTOR SUB BYPASS
Este conector le permite disponer de un
conmutador para activar el circuito de anulación
(mute) interno del sub88. Por medio de un pedal
de disparo standard de los que puede adquirir
en los comercios habituales, o con un cable y un
interruptor o con un cableado fijo en la zona de
mezclas, podrá activar y desactivar fácilmente el
sub88.
4
6
ESPAÑOL
ENTRADA CA
6
Conecte aquí el cable de alimentación IEC
incluido. Asegúrese que el interruptor de
encendido esté en la posición off antes de
conectar este cable a la corriente.
47
47
Page 48

Manejo del Resolv sub88
Funciones de control y pilotos
Controles SYSTEM LEVEL arriba y
7
abajo
Este control se usa para ajustar la cantidad
de nivel que va al subwoofer sub88. Además,
este control devolumen se encargará también
del nivel de salida enviado a las tomas pasaaltos. Por tanto, si usa el sub88 sin usar esas
salidas, este control ajustará la salida de bajas
frecuencias del sub88. Si usa el crossover
interno del sub88 para dar señal a unos
altavoces satélites, entonces este control
ajustará el nivel global del sistema.
FREQUENCY
8
Este control le permite elegir la frecuencia
de corte de rango superior del crossover
electrónico interno del sub88, con un rango de
30 Hz a 200 Hz. El crossover del sub88 le ofrece
una curva de filtro Linkwitz Riley de 12dB por
octava. Esto ajustará la frecuencia más alta
que será reproducida por el sub88 y a la vez,
las salidas pasa-altos usarán la frecuencia
elegida de crossover como el límite inferior de
frecuencia para los altavoces satélites.
9
8
7
Interruptor PHASE
9
Puede conmutar el sub88 para que invierta
su fase ajustando el interruptor PHASE a la
posición de 180° (grados). Haga pruebas con
este interruptor hasta conseguir la mejor
mezcla entre el subwoofer y sus altavoces
satélites.
ESPAÑOL
48
48
Page 49

Uso del mando a distancia
Uso del mando a distancia
El uso del mando a distancia por infrarrojos del sub88 le
permite sacar partido de funciones de gran utilidad. Puede
anular y controlar el nivel del sub, y anular o controlar el nivel
global del sistema a través de este mando. Incluso puede
reducir el volumen de todo el sistema usando la función DIM,
muy útil para esas ocasiones en las que necesita hablar con
alguien en la sala de control sin cortar la música. Asegúrese
de que estén instaladas en el mando las dos pilas de tipo AAA
y lea lo siguiente para saber cómo usar el mando.
Uso de los controles SYSTEM VOLUME
10
Los controles SYSTEM VOLUME arriba y abajo se usan
para ajustar el nivel global del sistema de monitorización,
que incluye el sub88 y los altavoces satélites conectados.
Si quiere hacer que el sistema suene más fuerte, apunte
el mando a distancia hacia el receptor de IR del sub88 y
pulse el control SYSTEM VOLUME arriba. Para disminuir
el volumen global del sistema, pulse el control SYSTEM
VOLUME abajo.
11
Uso del botón SUB MUTE
Una vez que haya ajustado un buen nivel de escucha para
el sistema de monitorización, puede escuchar su mezcla
con y sin el subwoofer usando el botón SUB MUTE de la
esquina superior derecha del mando a distancia. Si quiere
anular el subwoofer, apunte el mando a distancia hacia
el receptor de IR del sub88 y pulse el botón SUB MUTE.
En ese punto, observe que se ilumina el piloto rojo MUTE
que está en el receptor IR para indicarle que el sub está
desactivado. Después, pulse de nuevo SUB MUTE para
reactivar (des-anular) el subwoofer y el piloto se apagará.
11
1314
12
10
13
Uso del botón SYSTEM MUTE.
Este botón se usa para desactivar todo el sistema de
monitorización, incluyendo el subwoofer y los altavoces
satélites conectados. Apunte el mando hacia el receptor
de IR del sub88 y pulse SYSTEM MUTE para anular la
mezcla. Cuando quiera recuperar el sonido, vuelva a
pulsar de nuevo el botón SYSTEM MUTE.
Uso del control DIM
14
Gracias al inteligente diseño del crossover del sub88, las
salidas a los altavoces satélites vuelven a quedar como
salidas de rango completo cuando anula el subwoofer al
usar este botón SUB MUTE. Cuando lo vuelva a activar, las
salidas a los satélites volverán a quedar como pasa-altos
con el punto de crossover ajustado de acuerdo al valor de
mando de control FREQUENCY del panel trasero.
12
Uso de los controles SUB VOLUME
Los controles SUB VOLUME arriba y abajo se usan para
ajustar el nivel del subwoofer. Si quiere que el subwoofer
suene más fuerte, apunte el mando a distancia hacia el
receptor de IR del sub88 y pulse el control SUB VOLUME
arriba. Para disminuir el volumen del sub88, use el control
SUB VOLUME abajo.
El sub88 incorpora una función muy útil; este “DIM” le
permite disminuir o amortiguar inmediatamente el nivel
de su mezcla 20dB. Esta función le permite por ejemplo
atender a un teléfono o comentar algo sin que tenga que
gritar (necesariamente) por encima del sonido o anular
completamente su mezcla. Esto le ayuda a seguir el
proceso creativo incluso con las distracciones habituales,
para que no pare el ritmo. Esto resulta muy útil para
comprobar su mezcla a bajo nivel, algo que usan muchos
buenos técnicos para escuchar cómo queda realmente
todo al final.
Para usar este control DIM, apunte el mando hacia el
receptor de IR del sub88 y pulse SYSTEM DIM, tras lo que
el nivel será reducido en 20dB. Cuando quiera recuperar
de nuevo el nivel de escucha normal, vuelva a plsar el
botón SYSTEM DIM de nuevo.
49
ESPAÑOL
Page 50

Conexión del Resolv sub88
Sub mono con satélites activos
• Reduzca al mínimo las salidas master de la mesa de mezclas.
• Conecte las salidas izquierda y derecha de la mesa de mezclas a las tomas LEFT y RIGHT LINE INPUT del sub88. Conecte
después las salidas LEFT y RIGHT LINE OUTPUT del sub88 a la entrada de los altavoces satélites autoamplificados
izquierdo y derecho, respectivamente.
ESPAÑOL
• Ajuste ahora el control SWEEP a la frecuencia que quiera. Consulte el manual de instrucciones de sus monitores de
estudio para saber cúal es el punto de crossover recomendado. Puede usar también sus oídos para ajustar el control
SWEEP a la frecuencia que mejor le suene. Un buen punto de partida pueden ser los 70 Hz (Posición de "las 10 en
punto").
• Ajuste ahora el nivel de su etapa de potencia a un nivel operativo normal. Haga pasar una señal audio (una canción de
un CD, por ejemplo) por su mesa de mezclas y aumente el nivel hasta un volumen de escucha medio. Después, vaya
subiendo lentamente el control SUB VOLUME del sub88 y controle la salida de baja frecuencia. Ajuste el sub88 al nivel de
graves que quiera. Después, conforme suba o baje la salida de su mezclador, el sub88 y los altavoces satélites seguirán a
la vez el mismo volumen relativo.
50
Page 51

Conexión del Resolv sub88
Sub mono con satélites pasivos usando las entradas de línea
Aquí abajo puede ver una configuración típica en la que se usa el sub88 con una mesa de mezclas, una etapa de potencia
stereo y un par de satélites pasivos. Las entradas y salidas del sub88 usan conectores RCA standard. Para más detalles
sobre el cableado, vea en la página 52 la sección “Conexiones del sub88”. Siga estos pasos para configurar su sistema.
• Reduzca al mínimo las salidas master de la mesa de mezclas.
• Conecte la salida izquierda de la mesa a la entrada LEFT AUDIO INPUT del sub88 y la salida derecha de la mesa a
la entrada RIGHT AUDIO INPUT. Conecte luego las salidas LEFT y RIGHT AUDIO OUTPUT del sub88 a las entradas
del lado izquierdo y derecho de la etapa de potencia. Conecte después un cable de altavoz desde la salida
izquierda de su etapa al altavoz satélite izquierdo y después otro cable de altavoz desde la salida derecha de la
etapa al satélite derecho.
• Ajuste ahora el control SWEEP a la frecuencia que quiera. Consulte el manual de instrucciones de sus monitores
de estudio para saber cúal es el punto de crossover recomendado. Puede usar también sus oídos para ajustar el
control SWEEP a la frecuencia que mejor le suene. Un buen punto de partida pueden ser los 70 Hz (Posición de
"las 10 en punto").
• Ajuste ahora el nivel de su etapa de potencia a un nivel operativo normal. Haga pasar una señal audio (una
canción de un CD, por ejemplo) por su mesa de mezclas y aumente el nivel hasta un volumen de escucha medio.
Después, vaya subiendo lentamente el control SUB VOLUME del sub88 y controle la salida de baja frecuencia.
Ajuste el sub88 al nivel de graves que quiera. Después, conforme suba o baje la salida de su mezclador, el sub88
y los altavoces satélites seguirán a la vez el mismo volumen relativo.
51
51
ESPAÑOL
Page 52

Conexiones del Resolv sub88
Guía de cableado del Resolv sub88
Existen varias formas de interconectar el sub88 dependiendo de su configuración de montaje concreta. Siga
estos diagramas para la conexión de su sistema de monitorización.
Cable RCA a RCA
Cable 6,3 mm a 6,3 mm no balanceado
Cable 6,3 mm a 6,3 mm balanceado
Cable XLR a XLR balanceado
Cable de 6,3 mm a RCA no balanceado
ESPAÑOL
Cable XLR a RCA no balanceado
52
52
Page 53

Introduzione
Vi ringraziamo di aver acquistato il Subwoofer Attivo Resolv sub88 Samson. Il suo compito è di occuparsi
dell'estremo inferiore di qualsiasi sistema di monitor in campo ravvicinato o multimediale ed è dotato di
un potente amplificatore per le basse frequenze da 80-watt che alimenta un trasduttore da 8 pollici “heavy
duty”, da 25mm di escursione con contorno in Butile, che permette un intervallo esteso ed una precisa
risposta alle basse frequenze. Il sub88 ha in dotazione un telecomando a infrarossi che ne permette facilmente il controllo da qualsiasi punto della cabina di regìa. Il telecomando permette l'accesso istantaneo a
funzioni aggiuntive di monitorizzazione in cabina di regìa e dispone di Livello del Sub, Livello del Sistema,
Attenuazione (“Dim”), Esclusione (in “Mute”) del Sub ed Esclusione (in “Mute”) del Sistema. Per migliorare al
massimo il suono del sistema di monitor, il sub88 dispone di un crossover attivo interno dotato di frequenza
di incrocio variabile, per il collegamento di casse acustiche satelliti. Il sub88 permette il controllo intelligente del sistema sub-satelliti grazie ad un interruttore che riporta automaticamente i satelliti alla risposta
sull'intero intervallo di frequenze ogni qual volta il sub88 viene escluso. Il pannello posteriore dispone di
una presa per interruttore a pedale che permette facilmente di accendere e spegnere il subwoofer “al volo.”
Dotato com'è di un commutatore di fase che permette l'allineamento temporale dei monitor, il sub88 fornisce ampie capacità di controllo. Ingressi ed uscite bilanciati su connettori standard XLR e da 1/4” semplificano l'interfacciamento con altri monitor attivi o finali di potenza. Per assicurare il massimo livello di pressione
sonora, il mobile del sub88 è costruito in rigida MDF (Medium Density Fiberboard - Tavola di Fibra di Media
Densità) ed è rifinito in duratuta vernice granulare nera satinata. Se usate il sub88 insieme ad una coppia
di Resolv 50, disponete di un sistema di monitor Resolv 2.1. Il sub88 è anche il complemento perfetto per i
sistemi di monitor Resolv 65, Resolv 65a, Resolv 80a e per qualsiasi sistema di monitor in campo ravvicinato
al quale si voglia estendere la risposta in bassa frequenza.
In queste pagine troverete una descrizione dettagliata delle caratteristiche del subwoofer sub88, la descrizione del suo pannello di controllo, istruzioni passo a passo per le sue configurazioni di collegamento e
d'uso e le specifiche complete. Se disponete di un sistema Resolv 2.1, controllate il manuale d'uso dei
Resolv 50a per ulteriori informazioni sui vostri monitor a spettro completo. Troverete anche inclusa la garanzia che vi preghiamo di compilare e inviare per posta, per permettervi di ricevere supporto tecnico in linea e
informazioni aggiornate su questo e su altri futuri prodotti Samson.
Se lo trattate con cura permettendo una corretta circolazione dell'aria, il vostro sub88 sarà in grado di funzionare senza problemi per molti anni. Vi raccomandiamo di registrarne il numero di serie nell'apposito spazio che segue, a memoria futura.
Numero di serie: _____________________________________________________________
Data d'acquisto: _____________________________________________________________
Dovesse mai accadere che il vostro apparecchio necessiti di un intervento in assistenza, contattate il distributore Samson Italiano m. casale bauer via mail all'indirizzo info@casalebauer.com oppure telefonicamente
allo 051 - 766.648. Vi preghiamo di conservare i materiali di imballo originali e di usarli in caso di spedizione.
ITALIANO
53
53
Page 54

Resolv sub88 - Le Caratteristiche
®
Il subwoofer di riferimento Resolv su88 Samson è il complemento perfetto per i Resolv 50a e per qualsiasi sistema di monitor a
campo ravvicinato o multimediale. Ecco alcune delle sue caratteristiche principali.
•
•
• Telecomando a Infrarossi per il controllo di Livello di Sistema, Livello del Sub, Attenuazione (“Dim”), Esclusione (in “Mute”)
• Misura VU dell'Ingresso a otto segmenti LED
•
•
•
•
•
• Ingressi ed Uscite a livello di Linea Bilanciati su connettori XLR e Ingressi di Linea Sbilanciati su connettori RCA
Trasduttore da 8“ “Heavy-duty”, a Escursione Ampia (25mm) con Contorno in Butile
Amplificatore di Potenza da 80 Watt
ed Esclusione del Sub (in “Mute)
Cassa Acustica Aperta Accordata
Uscite su Passa-alto per Casse Acustiche Satelliti
(in “Mute”)
Crossover Variabile da 40 a 180 Hz
Presa per Interruttore di Esclusione (“Mute”) a pedale
Commutatore di Fase
, che ritornano all'intero spettro di frequenza quando il sub viene escluso
•
•
•
ITALIANO
Controllo di Volume
Finitura in Nero Satinato
Garanzia estesa a tre anni (valida per il mercato Statunitense).
54
54
Page 55

Resolv sub88 - I Componenti
®
$
%
&
'
!
"
#
Il Pannello Frontale
Il Telecomando
1 SUB GIÙ - permette di abbassare il volume del Sub.
2 ESCLUSIONE (in “MUTE”) – LED che si accende ad indicare che
il sub è spento.
3 LED DI ALIMENTAZIONE – LED blu che si accende ad indica-
re che il sub88 è alimentato e attivo. Il LED di Alimentazione
si accende anche quando vengono ricevute informazioni dal
telecomando a IR.
4 MISURA VU – misura VU a otto segmenti LED che mostra il
livello in ingresso.
5 SUB SU – permette di alzare il volume del Sub.
6 CASSA ACUSTICA - costruita in rigida MDF (Medium Density
Fiberboard - Tavola di Fibra di Media Densità) e rifinita in elegante vernice granulare nera.
7 TRASDUTTORE - trasduttore per le basse frequenze da 8“,
“Heavy Duty”, ad ampia escursione (25mm) ed intervallo esteso.
8 CONTORNO IN BUTILE - permette la massima escursione man-
tenendo precisa la risposta alle basse frequenze.
9 APERTURA ACCORDATA - design ad apertura silenziosa che
offre una risposta estesa e lineare alle basse frequenze (nel
fondo dell'unità).
10 PIEDINI ANTI-SCIVOLO - ampi piedini in plastica rigida che
mantengono in posizione la cassa acustica anche ad elevati
livelli di pressione sonora.
A Interruttore di Attenuazione del Siste–
ma (SYSTEM DIM) – premendolo, si atte-
nua il livello del sistema di 20dB.
B Interruttore di VOLUME GIÙ del SUB
– permette di abbassare il livello del subwoofer.
C Interruttore di VOLUME GIÙ del SISTE–
MA – permette di abbassare il livello glo-
bale del sistema.
D Interruttore di ESCLUSIONE (in “MUTE”)
del SUB
woofer.
E Interruttore di ESCLUSIONE (in “MUTE”)
del SISTEMA
l'intero sistema.
F Interruttore di VOLUME SU del SUB
– permette di alzare il livello del sub-woofer.
– premendolo, si spegne il sub-
– premendolo, si spegne
ITALIANO
G Interruttore di VOLUME SU del SISTE–
– permette di alzare il livello globale
MA
del sistema.
55
55
Page 56

Resolv sub88 - I Componenti
Il Pannello Posteriore
ITALIANO
1 INGRESSO SBILANCIATO DI SINISTRA - connettore RCA femmi-
na che accetta segnali sbilanciati a livello di linea.
2 INGRESSO BILANCIATO DI SINISTRA
- connettore XLR femmina
che accetta segnali bilanciati a livello di linea.
3 USCITA SBILANCIATA DI SINISTRA - connettore RCA femmina
che invia segnali sbilanciati a livello di linea alle casse acustiche
satelliti amplificate o a un amplificatore collegato a satelliti passivi.
4 USCITA BILANCIATA DI SINISTRA - connettore XLR ma–schio
che invia segnali bilanciati a livello di linea alle casse acustiche
satelliti amplificate o a un amplificatore collegato a satelliti passivi.
5 INTERRUTTORE DI ACCENSIONE – per accendere il sub88.
6 PRESA IN CA - è qui che va collegato il cavo di alimentazione IEC
standard in dotazione.
7 INGRESSO SBILANCIATO DI DESTRA - connettore RCA femmina
che accetta segnali sbilanciati a livello di linea.
8 INGRESSO BILANCIATO DI DESTRA - connettore XLR femmina
che accetta segnali bilanciati a livello di linea.
9 USCITA SBILANCIATA DI DESTRA - connettore RCA femmina
che invia segnali sbilanciati a livello di linea alle casse acustiche
satelliti amplificate o a un amplificatore collegato a satelliti passivi.
10 USCITA BILANCIATA DI DESTRA - connettore XLR ma–
schio che invia segnali bilanciati a livello di linea alle casse
acustiche satelliti amplificate o a un amplificatore collegato a satelliti passivi.
11 COMMUTATORE DI FASE - consente il funzionamento
fuori-fase di 180 gradi.
12 LIVELLO DI SISTEMA GIÙ - permette di abbassare il livello
globale in uscita del sub88 e dei satelliti collegati.
13 LIVELLO DI SISTEMA SU
- permette di alzare il livello glo-
bale in uscita del sub88 e dei satelliti collegati.
14 FREQUENZA - regola il limite dell'intervallo delle basse
frequenze delle uscite in Passa-alto.
15 PRESA DI ESCLUSIONE (IN “BYPASS”) DEL SUB - per-
mette di collegare un interruttore esterno per attivare la
funzione interna di esclusione in “mute”.
16 ALETTE DI RAFFREDDAMENTO - si occupano del raffred-
damento dell'amplificatore interno.
56
56
Page 57

Come Congurare il sub88 - Uso Immediato
%"-.*9&3
COME CONFIGURARE IL SISTEMA DI MONITOR
Prima di cominciare ad effettuare i collegamenti, prendetevi
un minuto per decidere come interfacciare il vostro nuovo
subwoofer.
Il Sub in Comune
Nella maggior parte dei casi, è preferibile usare il sub in
comune (in mono). Questo per molte ragioni, ma la più
importante è che le basse frequenze prodotte da un subwoofer tendono ad essere “non-direzionali.” Dato che, per
svilupparsi, le onde sonore a bassa frequenza hanno davvero bisogno di tanto spazio, non si riesce a capire se i bassi
dal sub provengono da sinistra o da destra, naturalmente a
meno che non ci si trovi in un ambiente davvero ampio. Per
questo fenomeno, praticamente tutto il materiale sonoro per
i sub viene missato in mono.
Il Posizionamento del sub88
Dato che le basse frequenze riprodotte dal sub88 non sono
direzionali, potete posizionarlo praticamente ovunque. È
comunque buona idea allontanare il sub88 dagli angoli. La
posizione ideale del sub88 è in mezzo, il più vicino possibile
al muro che vi sta di fronte quando siete in posizione di missaggio.
Uso Immediato
La messa a punto del Subwoofer Attivo sub88 è una procedura semplice che richiede sono pochi minuti. I paragrafi che
seguono spiegano come configurare per l'uso il sistema subsatelliti Resolv 2.1. Nell'esempio si assume che stiate usando
casse acustiche satelliti attive come le Resolv 50a.
• Eliminate tutti i materiali di imballo (conservateli in caso
fosse in futuro necessario un intervento di assistenza) e
decidete dove volete posizionare fisicamente l'unità.
• Accertatevi che il mixer, i monitor amplificati satelliti e
gli altri apparecchi del vostro sistema audio siano spenti.
Trovate l'interruttore di accensione nel pannello posteriore
del sub88 e spegnetelo.
• Collegate le uscite sinistra e destra del mixer agli INGRESSI
AUDIO sinistro e destro del pannello posteriore del sub88.
Nota: è sempre raccomandabile l'uso di cavi bilanciati, ogni volta che è possibile. Per i diagrammi dettagliati di cablaggio, fate
riferimento a pagina 64 di questo manuale.
• A questo punto, collegate l'USCITA AUDIO di sinistra del sub88 all'ingresso della cassa acustica satellite di sinistra e la
sua USCITA AUDIO di destra all'ingresso della cassa acustica satellite di destra.
• Trovate il controllo di FREQUENZA nel pannello posteriore del sub88 e regolatelo a 70Hz (in posizione a “ore 10”).
ITALIANO
• Prima di accendere le apparecchiature accertatevi che il livello generale del mixer sia completamente chiuso, per per
mettervi di alzare gradualmente il volume del sistema di monitor.
57
57
-
Page 58

L'Uso del Resolv sub88
Uso Immediato - continua
• A questo punto, accendete il sub88.
• Premete e tenete premuto per 5 secondi il controllo
LIVELLO DI SISTEMA GIÙ del pannello posteriore.
Così potrete partire col livello del sistema completamente chiuso.
• È il momento di accendere le casse satelliti amplificate e regolarne il volume al normale livello operativo.
• Inviate un segnale (per esempio, musica da un lettore
CD o MP3) e controllate la misura di livello generale
del mixer per assicurarvi di avere un buon segnale.
Quando avete la conferma che il segnale inviato dal
mixer è di buon livello, usate i controlli di LIVELLO DI
SISTEMA SU e GIÙ per regolare il sistema di monitor al
volume voluto. Controllate la misura VU del pannello
L'Uso del Resolv sub88
Il Pannello di Controllo del Resolv sub88
frontale del sub88 per evitare di mandarne in distorsione l'ingresso.
Nota: potete effettuare a piacere la regolazione fine del
vostro sistema intervenendo sul controllo di FREQUENZA
del crossover e sul bilanciamento tra i livelli del sub e dei
satelliti. Se non disponete di un analizzatore digitale in
tempo reale, dovrete effettuare le regolazioni ad orecchio
sfruttando il suono di registrazioni che conoscete bene.
Per rendere perfettamente piatta la risposta del sistema,
potete anche usare un RTA digitale come il D1500 Samson.
Il pannello di controllo del sub88 fornisce i collegamenti
e l'interfaccia utente al crossover interno ed alla sezione
di amplificazione del sub88. L'amplificatore interno è
un finale di potenza da 80 Watt capace di produrre in
uscita bassi incredibili. Il sub88 sfrutta un crossover
elettronico che regola sia la frequenza del punto di
taglio del subwwofer che le uscite in Passa-alto per le
casse acustiche satelliti. Alimentando le casse acustiche
satelliti dalle uscite in Passa-alto del sub88 otterrete
grandi benefici nella qualità sonora del sistema. Questo
perché quando le casse acustiche satelliti ricevono
l'uscita filtrata dal sub88, non si occupano più delle
frequenze al di sotto del punto di incrocio (crossover).
Per esempio, immaginiamo che i vostri satelliti abbiano
una estensione di frequenza naturale fino ai 70 Hz e che
li alimentiate con segnali sull'intero spettro audio (che
scende fino a 20 Hz). Anche se si tratta di casse che
possono riprodurre solo dai 70 Hz in su, dall'amplificatore viene comunque presentato in uscita l'intervallo
dai 20 ai 70 Hz e si tratta di potenza sprecata che in ultima analisi si trasforma in calore. Quando si usa l'uscita
in Passa-alto del sub88, la cassa e l'amplificatore satelliti
non ricevono mai frequenze al di sotto della regolazione della frequenza di “Incrocio.” Questo significa che c'è
maggiore potenza dedicata alle frequenze che volete
che i satelliti riproducano ed il risultato è un suono
molto più pulito con un maggiore intervallo dinamico.
ITALIANO
58
58
Page 59

Gli Ingressi e le Uscite
Il sub88 dispone di ingressi e di uscite a livello di
linea sia bilanciati che sbilanciati per cui il collegamento con satelliti attivi o passivi è immediato.
Per interfacciare il sub88 con monitor amplificati
come i Resolv 50a, vi raccomandiamo di usare gli
ingressi e le uscite a livello di linea bilanciati. Per
il diagramma di cablaggio dettagliato, fate riferimento a pagina 64.
INGRESSI SBILANCIATI
1
I collegamenti sbilanciati vanno effettuati tramite
i connettori RCA femmina.
L'Uso del Resolv sub88
1
2
3
5
Nota: per ottenere il minimo rumore e ronzìo
indotto, ogni volta che è possibile usate i connettori
Bilanciati.
INGRESSI BILANCIATI
2
Se volete collegare il mixer sfruttando segnali a
livello di linea bilanciati, usate i connettori XLR
femmina.
USCITE SBILANCIATE
3
Sono connettori RCA femmina che inviano segnali a livello di linea sbilanciati alle casse acustiche
satelliti amplificate o a un finale di potenza collegato a satelliti passivi.
USCITE BILANCIATE
4
Connettori XLR maschi che inviano segnali a livello di linea bilanciati alle casse acustiche satelliti amplificate o a un finale di potenza collegato a satelliti passivi.
PRESA PER L'ESCLUSIONE (IN “BYPASS”) DEL SUB
5
4
6
La presa di Bypass del Sub permette il collegamento di un interruttore di chiusura per attivare il circuito interno di esclusione (in
“MUTE”) del sub88. Tramite un comune interruttore a pedale reperibile presso qualsiasi negozio di strumenti musicali, un cavo
che termina con un interruttore o addirittura tramite il collegamento di un interruttore posizionato permanentemente nell'area di
missaggio, è facilmente possibile accendere e spegnere il sub88.
PRESA PER CA
È qui che va collegato il cavo di alimentazione IEC in dotazione. Quando lo collegate, assicuratevi che l'interruttore di alimen-
6
tazione sia spento (in posizione “off”).
59
59
ITALIANO
Page 60

L'Uso del Resolv sub88
Funzioni di Controllo e Indicatori
Controllo di LIVELLO DI SISTEMA Su
7
e Giù
Si tratta dei controlli di volume che permettono d i
regolare il livello del subwoofer sub88. Inoltre, i
controlli di volume regolano il livello delle uscite i n
Passa-alto. Per cui, se usate il sub88 senza usare l e
uscite in Passa-alto, i controlli di volume regolano
l'uscita in bassa frequenza del sub88. Se usate i l
crossover elettronico interno del sub88 per alimen- tare
le casse acustiche satelliti, allora i controlli di volume regolano il livello generale dell'intero sistema.
9
7
8
FREQUENZA
8
Il controllo di FREQUENZA sceglie l'interval- l o
superiore della frequenza di taglio del crossover elettronico interno del sub88 in un intervallo c he
varia da 30 a 200Hz. Il crossover del sub88 fornisce una
curva di filtro di tipo Linkwitz Riley a 12dB per otta- v a .
Il suo inviluppo regola la frequenza più acuta che i l
sub88 riproduce e, contemporaneamente, le uscite
del passa-alto tracciano la frequenza di crossover
selezionata come limite inferiore di frequenza per le
casse acustiche satelliti.
Commutatore di FASE
9
È possibile commutare il sub88 in modo che funzio- ni
in inversione di fase, e lo si fa regolandone l'INTERRUTTORE “PHASE” in posizione “180°” (centottanta gradi). Sperimentate la regolazione di questo interruttore in modo da ottenere il risultato di miscelazione migliore tra il subwoofer e le casse satelliti.
ITALIANO
60
60
Page 61

L'Uso del Telecomando
L'Uso del Telecomando
Potete sfruttare molte delle potenti funzioni del sub88 tramite
l'uso del telecomando a infrarossi. Potete controllare il livello
del sub ed escluderlo, oppure controllare il livello dell'intero
sistema ed escluderlo agendo sul telecomando IR del sub88.
Potete addirittura abbassare il volume dell'intero sistema tramite la funzione DIM, nel caso in cui dovete parlare con qualcuno
in cabina di regìa senza spegnere del tutto le casse. Controllate
che nel telecomando siano installate due batterie AAA, poi
seguite i paragrafi sotto che dettagliano il funzionamento del
telecomando.
L'Uso dei Controlli di VOLUME DEL SISTEMA
10
I controlli di VOLUME DEL SISTEMA SU e GIÙ permettono
di regolare il volume globale del sistema di monitor, che
comprende il sub88 e le casse acustiche satelliti collegate.
Se volete alzare il volume del sistema di monitor, puntate il
telecomando verso la finestra IR del sub88 e premete il controllo di VOLUME DEL SISTEMA SU; per abbassare il volume
dell'intero sistema, allo stesso modo usate il controllo di
VOLUME DEL SISTEMA GIÙ.
11
L'Uso del tasto di ESCLUSIONE (“MUTE”) DEL SUB
Una volta ottenuto un buon livello d'ascolto per il sistema
di monitor, usando il tasto SUB MUTE che si trova nell'angolo in alto a destra del telecomando, potete ascoltare il
missaggio con e senza il subwoofer. Se volete escludere
il subwoofer, putate il telecomando verso la finestra IR del
sub88 e premete il tasto SUB MUTE. Vedrete accendersi
il LED rosso di MUTE, ad indicare che il sub è disattivato.
Quando premerete nuovamente il tasto di ESCLUSIONE
DEL SUB, il subwoofer ritornerà attivo e vedrete spegnersi il
LED di MUTE.
11
1314
12
10
L'Uso del tasto di ESCLUSIONE (“MUTE”) DEL SISTEMA.
13
Il tasto SYSTEM MUTE permette di spegnere l'intero sistema di monitor che comprende il subwoofer e le casse
acustiche satelliti. Per escludere l'intero mix, puntate il
telecomando verso la finestra IR del sub88 e premete
il tasto SYSTEM MUTE. Quando volete riavere l'ascolto,
ripremete nuovamente il tasto SYSTEM MUTE ed il sistema ritornerà attivo.
L'Uso del Controllo di ATTENUAZIONE (“DIM”)
14
Grazie al design intelligente del crossover del sub88, quan
do il sub viene escluso tramite l'uso del tasto SUB MUTE,
alle uscite per le casse acustiche satelliti viene restituito l'intero intervallo di frequenze in uscita. Quando il subwoofer
viene riattivato, premendo nuovamente il tasto SUB MUTE,
alle uscite per le casse acustiche satelliti viene nuovamente
applicato il filtro Passa-alto con il punto di crossover regolato dal controllo di FREQUENZA del pannello posteriore.
L'Uso dei Controlli di VOLUME DEL SUB
12
I controlli di VOLUME DEL SUB SU e GI
regolare il livello del subwoofer. Se volete alzare il volume
del subwoofer, puntate il telecomando verso la finestra IR
del sub88 e premete il controllo di VOLUME DEL SUB SU;
per abbassare il volume del subwoofer, allo stesso modo
usate il controllo di VOLUME DEL SUB GIÙ.
Ù permettono di
-
Il sub88 dispone di una funzione davvero utile, la funzione di ATTENUAZIONE, che permette di abbassare istantaneamente il livello del mix di 20dB. È una caratteristica
preziosa che vi permette di rispondere al telefono o di
affrontare una lite... pardon, una conversazione con i
colleghi senza dover (per forza) urlare più forte del mix e
senza doverlo spegnere. L'uso del DIM permette di non
disperdere l'energia creativa, pur rispondendo alle normali distrazioni, senza disturbare il bilanciamento del mix. È
anche molto utile per controllare il mix a livelli di ascolto
contenuti, una buona abitudine che molti ottimi ingegneri usano come tecnica per sentire i punti deboli del mix.
Per usare il controllo DIM, puntate il telecomando verso
la finestra IR del sub88, premete SYSTEM DIM ed il livello
dell'intero sistema verrà attenuato di 20dB. Quando volete tornare al normale livello d'ascolto, ripremete il tasto
SYSTEM DIM.
61
ITALIANO
Page 62

%"-.*9&3
Il Collegamento del Resolv sub88
Sub in Mono con Satelliti Attivi
Se disponete di monitor da studio attivi, l'installazione è semplice tramite gli ingressi e le uscite a livello di linea del sub88. Di
seguito trovate descritta una tipica configurazione che sfrutta il sub88 con un mixer ed una coppia di casse acustiche satelliti attive. Gli ingressi e le uscite a livello di linea del sub88 sono su connettori RCA standard. Per il diagramma dettagliato di cablaggio,
fate riferimento alle apposite istruzioni a pagina 64. Per configurare il vostro sistema, fate riferimento alle istruzioni qui di seguito.
• Chiudete completamente le uscite generali del mixer.
• Collegate l'uscita di sinistra del mixer all'INGRESSO DI LINEA DI SINISTRA e l'uscita di destra del mixer all'INGRESSO DI
LINEA DI DESTRA del sub88. Collegate poi l'USCITA DI LINEA DI SINISTRA del sub88 all'ingresso del satellite amplificato di
sinistra e l'USCITA DI LINEA DI DESTRA al satellite amplificato di destra.
• A questo punto regolate il controllo FREQUENCY alla frequenza voluta. Consultate il manuale d'uso dei vostri monitor da
studio per scoprire il punto di crossover raccomandato. Potete anche effettuare la regolazione ad orecchio, scegliendo
per il controllo FREQUENCY la frequenza che vi suona meglio. Un buon punto di partenza è intorno ai 70 Hz.
• Inviate un segnale audio (ad esempio, musica da CD) dal mixer ed aumentate il volume fino ad un livello di ascolto con
fortevole. A questo punto alzate lentamente il controllo di VOLUME del sub88 ed ascoltate l'uscita in bassa frequenza.
Regolate il sub88 in modo che il livello di uscita delle basse frequenze sia quello che desiderate. Da qui in poi, quando
alzate o abbassate il livello di uscita dal mixer, il sub88 ed i satelliti manterranno tra loro lo stesso volume relativo.
ITALIANO
62
-
Page 63

Il Collegamento del Resolv sub88
%"-.*9&3
Sub in Mono con Satelliti Passivi Tramite l'Uso degli Ingressi di Linea
Quella di seguito è una configurazione tipica con l'uso di un sub88 con un mixer, un finale di potenza stereo ed una coppia di
casse acustiche satelliti passive. Gli ingressi e le uscite di linea del sub88 sono su connettori RCA standard. Per il diagramma dettagliato di cablaggio, fate riferimento alle apposite istruzioni a pagina 64. Per configurare il vostro sistema, fate riferimento alle
istruzioni qui di seguito.
• Chiudete completamente le uscite generali del mixer.
• Collegate l'uscita di sinistra del mixer all'INGRESSO AUDIO DI SINSITRA del sub88 e l'uscita di destra del mixer al suo
INGRESSO AUDIO DI DESTRA. Collegate poi l'USCITA AUDIO DI SINISTRA del sub88 all'ingresso di sinistra del finale di
potenza e la sua USCITA AUDIO DI DESTRA all'ingresso di destra del finale di potenza. Collegate un cavo per cassa acustica dall'uscita di sinistra del finale di potenza al satellite di sinistra, poi collegatene un altro dall'uscita di destra del finale di
potenza al satellite di destra.
• A questo punto regolate il controllo FREQUENCY alla frequenza voluta. Consultate il manuale d'uso dei vostri monitor da
studio per scoprire il punto di crossover raccomandato. Potete anche effettuare la regolazione ad orecchio, scegliendo
per il controllo FREQUENCY la frequenza che vi suona meglio. Un buon punto di partenza è intorno ai 70 Hz.
• Regolate ora il finale di potenza al normale livello operativo. Inviate un segnale audio (ad esempio, musica da CD) dal
mixer ed aumentate il volume fino ad un livello di ascolto confortevole. A questo punto alzate lentamente il controllo di
VOLUME del sub88 ed ascoltate l'uscita in bassa frequenza. Regolate il sub88 in modo che il livello di uscita delle basse
frequenze sia quello che desiderate. Da qui in poi, quando alzate o abbassate il livello di uscita dal mixer, il sub88 ed i
satelliti manterranno tra loro lo stesso volume relativo.
63
63
ITALIANO
Page 64

Resolv sub88 - Le Connessioni
0UNTIDI
SALDATURA
6ISTADI
FRONTE
8,2-ASCHIO
#ALDO
-ASSA
&REDDO
#ORPOMASSA
#ORPOMASSA
0UNTASEGNALE
0UNTASEGNALE
#ORPOMASSA
NESSUNCOLLEGAMENTO0IN
-ASSA
0IN
0IN
0UNTASEGNALE
0UNTASEGNALE
0UNTASEGNALE
#ORPOMASSA
#ORPOMASSA
#ORPOMASSA
0UNTASEGNALE
0UNTASEGNALE
0UNTASEGNALE
#ORPOMASSA
#ORPOMASSA
#ORPOMASSA
0UNTIDI
SALDATURA
0UNTIDI
SALDATURA
6ISTADI
FRONTE
6ISTADI
FRONTE
8,2-ASCHIO
8,2&EMMINA
#ALDO
-ASSA
&REDDO
#ALDO
-ASSA
&REDDO
#ALDO
-ASSA
&REDDO
&REDDO
#ALDO
-ASSA
-ASSA
-ASSA
-ASSA
#ORPOMASSA
#ORPOMASSA
-ASSA
0UNTA
SEGNALE
!NELLO
SEGNALE
0UNTA
SEGNALE
!NELLO
SEGNALE
3EGNALE
ANELLO
3EGNALE
ANELLO
3EGNALE
ANELLO
3EGNALE
ANELLO
3EGNALE
PUNTA
3EGNALE
PUNTA
3EGNALE
PUNTA
3EGNALE
PUNTA
0UNTASEGNALE
#ORPOMASSA
0UNTASEGNALE
#ORPOMASSA
3EGNALE
3EGNALE
3EGNALE
3EGNALE
-ASSA
-ASSA
-ASSA
-ASSA
Resolv sub88 - Guida al Cablaggio
A seconda della configurazione dei vostri monitor, è possibile interfacciare il Resolv sub88 in molti modi diversi. Per il collegamento del vostro sistema di monitor, seguite i diagrammi di cablaggio riportati qui di seguito.
Cavo RCA - RCA
Cavo Sbilanciato 1/4” - 1/4”
Cavo Bilanciato 1/4” - 1/4”
Cavo Bilanciato XLR - XLR
ITALIANO
Cavo Sbilanciato 1/4” - RCA
Cavo Sbilanciato XLR - RCA
64
64
Page 65

Specifications/Caractéristiques techniques/Technische Daten/Especificaciones técnicas/Specifiche
Specifications
Transducer: 8", Long Excursion ( 25mm ) Transducer
Amplifier:
Power Rating: 80 Watts RMS
Frequency response: 20Hz-150Hz+/-3 dB
Sensitivity: 94dB SPL @ 1 W/1m
Line Input
Connector: Balanced XLR FEMALE
Un-balanced RCA FEMALE
Line Output
Connector: Balanced XLR MALE
Un-balanced RCA FEMALE
Crossover Frequency: Variable 30Hz – 150Hz
Enclosure:
Construction: MDF (Medium Density Fiberboard)
Finish: Black Vinyl
Feet: Large Hard Plastic
Dimensions: 13.75″ (h) x 12.25" (w) x 12.25" (d)
347 mm (h) x 312 (w) x 312 (d)
Weight: 22 lbs., 10 kg.
Caractéristiques techniques
Haut-parleur : Woofer de 203 mm (8 pouces) à longue excursion (25mm)
Amplificateur
Puissance : 80 Watts efficace
Bande passante : 20 Hz - 150 Hz +/- 3 dB
Rendement : 94 dB SPL à 1 W/1 m
Entrée ligne
Connecteurs : XLR symétrique femelle
RCA asymétrique femelle
Sortie ligne
Connecteurs : XLR symétrique mâle
RCA asymétrique femelle
Bande passante : 30 Hz – 150 Hz variable
Baffle
Construction : Panneaux de particules de fibres de moyenne densité MDF
Finition : Vinyle noir
Pieds : Plastique de grande dimension
Dimensions: 347 mm (h) x 312 mm (l) x 312 mm (p)
Poids : 10 kg
Technische Daten
Wandler: 8" Wandler mit langer Auslenkung (25 mm)
Verstärker:
Ausgangsleistung: 80 Watt RMS
Frequenzgang: 20 Hz - 150 Hz+/-3 dB
Empfindlichkeit: 94 dB SPL @ 1 W/1m
Line-Eingang
Anschluss:
asymmetrische Cinch-Buchse
Line-Ausgang
Anschluss: symmetrischer XLR-Stecker vva
asymmetrische Cinch-Buchse
Crossover-Frequenz: variabel 30 Hz – 150 Hz
Gehäuse:
symmetrische XLR-Buchse
65
65
Page 66

Specifications/Caractéristiques techniques/Technische Daten/Especificaciones técnicas/Specifiche
Konstruktion: Faserplatte (MDF)
Oberfläche: Schwarzes Vinyl
Füße: Große Hartplastik-Füße
Abmessungen: 347 mm (H) x 312 (B) x 312 (T)
13.75″ (H) x 12.25" (B) x 12.25" (T )
Gewicht: 10 kg, 22 lbs.
specificaciones
Transductor: Transductor de 8" de largo recorrido de excursión (25 mm)
Amplificador:
Potencia: 80 watios RMS
Respuesta de frecuencia: 20Hz-150Hz+/-3 dB
Sensibilidad: 94dB SPL @ 1 W/1m
Entrada de línea
Conector: XLR balanceado HEMBRA
RCA no balanceado HEMBRA
Salida de línea
Conector: XLR balanceado MACHO
RCA no balanceado HEMBRA
Frecuencia de separación (crossover): Variable 30Hz – 150Hz
Recinto acústico:
Construcción: MDF (fibra de densidad media)
Acabado: Vinilo de color negro
Patas: Grandes patas en plástico de gran rigidez
Dimensiones: 13.75″ (h) x 12.25" (w) x 12.25" (d)
347 mm (h) x 312 (w) x 312 (d)
Peso: 22 lbs., 10 kg.
Specifiche
Trasduttore: Trasduttore da 8", ad Escursione Ampia ( 25mm )
Amplificatore:
Valore di Potenza: 80 Watt RMS
Risposta in Frequenza: da 20Hz a 150Hz, +/-3 dB
Sensitività: 94dB SPL @ 1 W/1m
Ingresso di Linea
Connettore:
RCA FEMMINA Sbilanciato
Uscita di Linea
Connettore: XLR MASCHIO Bilanciato
RCA FEMMINA Sbilanciato
Frequenza di Incrocio (Crossover): Variable tra 30Hz e 150Hz
Cassa Acustica:
Costruzione: in MDF (Medium Density Fiberboard Tavola di Fibra di Media Densità)
Finitura: in Vinile Nero
Piedini: Ampi Piedini in Gomma
Dimensioni: 347 mm (a) x 312 (l) x 312 (p)
13,75
Peso: 22 lbs., 10 kg.
XLR FEMMINA Bilanciato
″ (a) x 12,25" (l) x 12,25" (p)
66
66
Page 67

Specifications/Caractéristiques techniques/Technische Daten/Especificaciones técnicas/Specifiche
Signed on behalf of the manufacturer:
Name:
Title:
Signed on behalf of the representative:
Name:
Title:
Address:
Address:
Date of issue: 05/03/2005
Equipment: Powered Subwoofer
Model #: Samson Resolv Sub88
Class:
Manufacturer:
Address:
This is to certify that the aforementioned equipment fully conforms to the protection requirements
of the following EC Council Directives:
Directives Applicable Standards Title
73/23/EEC
EN 60065:2002 Audio, video and similar electronic apparatus - Safety requirements
EN 50081-1:1992
EN 50082-1:1997
89/336/EEC
Electromagnetic compatibility - Generic emission standard -- Part 1:
Residential, commercial and light industry
Electromagnetic compatibility - Generic imm unity standard -- Part 1:
Residential, commercial and light industry
SAMSON TECHNOLOGIES CORPORATION
575 Underhill Boulevard, Syosset, New York 11791 USA
Douglas Bryant
President
Resolv sub88 Frequency Response / Bande passante des Resolv sub88 / Resolv sub88 Frequenzgang
Respuesta de frecuencia del Resolv sub88 / Risposta in Frequenza del Resolv sub88
67
Page 68

Samson Technologies Corp.
Phone: 1-800-3-SAMSON (1-800-372-6766)
Fax: 516-364-3888
www.samsontech.com
 Loading...