

Page 1
200 Watt 2-Way Powered Loudspeakers
Page 2
Safety Instructions/Consignes de sécurité/Sicherheitsvorkehrungen
WARNING: To reduce the risk of fire or electric shock, do not expose this unit to rain or moisture. To reduce the hazard of electrical shock, do not remove cover or back. No
user serviceable parts inside. Please refer all servicing to qualified personnel.The lightning flash with an arrowhead symbol within an equilateral triangle, is intended to alert
the user to the presence of uninsulated "dangerous voltage" within the products enclosure that may be of sufficient magnitude to constitute a risk of electric shock to persons. The exclamation point within an equilateral triangle is intended to alert the user to the presence of important operating and maintenance (servicing) instructions in the
literature accompanying the product.
Important Safety Instructions
1. Please read all instructions before operating the unit.
2. Keep these instructions for future reference.
3. Please heed all safety warnings.
4. Follow manufacturers instructions.
5. Do not use this unit near water or moisture.
6. Clean only with a damp cloth.
7. Do not block any of the ventilation openings. Install in accordance with the manufacturers instructions.
8. Do not install near any heat sources such as radiators, heat registers, stoves, or other apparatus (including amplifiers) that produce heat.
9. Do not defeat the safety purpose of the polarized or grounding-type plug. A polarized plug has two blades with one wider than the other. A grounding type plug has two
blades and a third grounding prong. The wide blade or third prong is provided for your safety. When the provided plug does not fit your outlet, consult an electrician for
replacement of the obsolete outlet.
10. Protect the power cord from being walked on and pinched particularly at plugs, convenience receptacles and at the point at which they exit from the unit.
11. Unplug this unit during lightning storms or when unused for long periods of time.
12. Refer all servicing to qualified personnel. Servicing is required when the unit has been damaged in any way, such as power supply cord or plug damage, or if liquid has
been spilled or objects have fallen into the unit, the unit has been exposed to rain or moisture, does not operate normally, or has been dropped.
ATTENTION: Pour éviter tout risque d’électrocution ou d’incendie, ne pas exposer cet appareil à la pluie ou à l’humidité. Pour éviter tout risque d’électrocution, ne pas ôter
le couvercle ou le dos du boîtier. Cet appareil ne contient aucune pièce remplaçable par l'utilisateur. Confiez toutes les réparations à un personnel qualifié. Le signe avec un
éclair dans un triangle prévient l’utilisateur de la présence d’une tension dangereuse et non isolée dans l’appareil. Cette tension constitue un risque d’électrocution. Le signe
avec un point d’exclamation dans un triangle prévient l’utilisateur d’instructions importantes relatives à l’utilisation et à la maintenance du produit.
Consignes de sécurité importantes
1. Veuillez lire toutes les instructions avant d’utiliser l’appareil.
2. Conserver ces instructions pour toute lecture ultérieure.
3. Lisez avec attention toutes les consignes de sécurité.
4. Suivez les instructions du fabricant.
5. Ne pas utiliser cet appareil près d’une source liquide ou dans un lieu humide.
6. Nettoyez l’appareil uniquement avec un tissu humide.
7. Veillez à ne pas obstruer les fentes prévues pour la ventilation de l’appareil. Installez l’appareil selon les instructions du fabricant.
8. Ne pas installer près d’une source de chaleur (radiateurs, etc.) ou de tout équipement susceptible de générer de la chaleur (amplificateurs de puissance par exemple).
9. Ne pas retirer la terre du cordon secteur ou de la prise murale. Les fiches canadiennes avec polarisation (avec une lame plus large) ne doivent pas être modifiées. Si votre
prise murale ne correspond pas au modèle fourni, consultez votre électricien.
10. Protégez le cordon secteur contre tous les dommages possibles (pincement, tension, torsion,, etc.). Veillez à ce que le cordon secteur soit libre, en particulier à sa sortie
du boîtier.
11. Déconnectez l’appareil du secteur en présence d’orage ou lors de périodes d’inutilisation prolongées.
12. Consultez un service de réparation qualifié pour tout dysfonctionnement (dommage sur le cordon secteur, baisse de performances, exposition à la pluie, projection liquide dans l’appareil, introduction d’un objet dans le boîtier, etc.).
ACHTUNG: Um die Gefahr eines Brandes oder Stromschlags zu verringern, sollten Sie dieses Gerät weder Regen noch Feuchtigkeit aussetzen.Um die Gefahr eines
Stromschlags zu verringern, sollten Sie weder Deckel noch Rückwand des Geräts entfernen. Im Innern befinden sich keine Teile, die vom Anwender gewartet werden können.
Überlassen Sie die Wartung qualifiziertem Fachpersonal.Der Blitz mit Pfeilspitze im gleichseitigen Dreieck soll den Anwender vor nichtisolierter “gefährlicher Spannung” im
Geräteinnern warnen. Diese Spannung kann so hoch sein, dass die Gefahr eines Stromschlags besteht. Das Ausrufezeichen im gleichseitigen Dreieck soll den Anwender auf
wichtige Bedienungs- und Wartungsan leitungen aufmerksam machen, die im mitgelieferten Informationsmaterial näher beschrieben werden.
Wichtige Sicherheitsvorkehrungen
1. Lesen Sie alle Anleitungen, bevor Sie das Gerät in Betrieb nehmen.
2. Bewahren Sie diese Anleitungen für den späteren Gebrauch gut auf.
3. Bitte treffen Sie alle beschriebenen Sicherheitsvorkehrungen.
4. Befolgen Sie die Anleitungen des Herstellers.
5. Benutzen Sie das Gerät nicht in der Nähe von Wasser oder Feuchtigkeit.
6. Verwenden Sie zur Reinigung des Geräts nur ein feuchtes Tuch.
7. Blockieren Sie keine Belüftungsöffnungen. Nehmen Sie den Einbau des Geräts nur entsprechend den Anweisungen des Herstellers vor.
8. Bauen Sie das Gerät nicht in der Nähe von Wärmequellen wie Heizkörpern, Wärmeklappen, Öfen oder anderen Geräten (inklusive Verstärkern) ein, die Hitze erzeugen.
9. Setzen Sie die Sicherheitsfunktion des polarisierten oder geerdeten Steckers nicht außer Kraft. Ein polarisierter Stecker hat zwei flache, unterschiedlich breite Pole. Ein
geerdeter Stecker hat zwei flache Pole und einen dritten Erdungsstift. Der breitere Pol oder der dritte Stift dient Ihrer Sicherheit. Wenn der vorhandene Stecker nicht in
Ihre Steckdose passt, lassen Sie die veraltete Steckdose von einem Elektriker ersetzen.
10. Schützen Sie das Netzkabel dahingehend, dass niemand darüber laufen und es nicht geknickt werden kann. Achten Sie hierbei besonders auf Netzstecker,
Mehrfachsteckdosen und den Kabelanschluss am Gerät.
11. Ziehen Sie den Netzstecker des Geräts bei Gewittern oder längeren Betriebspausen aus der Steckdose.
12. Überlassen Sie die Wartung qualifiziertem Fachpersonal. Eine Wartung ist notwendig, wenn das Gerät auf irgendeine Weise, beispielsweise am Kabel oder Netzstecker
beschädigt wurde, oder wenn Flüssigkeiten oder Objekte in das Gerät gelangt sind, es Regen oder Feuchtigkeit ausgesetzt war, nicht mehr wie gewohnt betrieben
werden kann oder fallen gelassen wurde.
Page 3
Instrucciones de seguridad / Istruzioni di Sicurezza
PRECAUCION: Para reducir el riesgo de incendios o descargas, no permita que este aparato quede expuesto a la lluvia o la humedad. Para reducir el riesgo de descarga eléc-
trica, nunca quite la tapa ni el chasis. Dentro del aparato no hay piezas susceptibles de ser reparadas por el usuario. Dirija cualquier reparación al servicio técnico oficial. El
símbolo del relámpago dentro del triángulo equilátero pretende advertir al usuario de la presencia de “voltajes peligrosos” no aislados dentro de la carcasa del producto, que
pueden ser de la magnitud suficiente como para constituir un riesgo de descarga eléctrica a las personas. El símbolo de exclamación dentro del triángulo equilátero quiere
advertirle de la existencia de importantes instrucciones de manejo y mantenimiento (reparaciones) en los documentos que se adjuntan con este aparato.
Instrucciones importantes de seguridad
1. Lea todo este manual de instrucciones antes de comenzar a usar la unidad.
2. Conserve estas instrucciones para cualquier consulta en el futuro.
3. Cumpla con todo lo indicado en las precauciones de seguridad.
4. Observe y siga todas las instrucciones del fabricante.
5. Nunca utilice este aparato cerca del agua o en lugares húmedos.
6. Limpie este aparato solo con un trapo suave y ligeramente humedecido.
7. No bloquee ninguna de las aberturas de ventilación. Instale este aparato de acuerdo a las instrucciones del fabricante.
8. No instale este aparato cerca de fuentes de calor como radiadores, calentadores, hornos u otros aparatos (incluyendo amplificadores) que produzcan calor.
9. No anule el sistema de seguridad del enchufe de tipo polarizado o con toma de tierra. Un enchufe polarizado tiene dos bornes, uno más ancho que el otro. Uno con
toma de tierra tiene dos bornes normales y un tercero para la conexión a tierra. El borne ancho o el tercero se incluyen como medida de seguridad. Cuando el enchufe
no encaje en su salida de corriente, llame a un electricista para que le cambie su salida anticuada.
10. Evite que el cable de corriente quede en una posición en la que pueda ser pisado o aplastado, especialmente en los enchufes, receptáculos y en el punto en el que
salen de la unidad.
11. Desconecte de la corriente este aparato durante las tormentas eléctricas o cuando no lo vaya a usar durante un periodo de tiempo largo.
12. Dirija cualquier posible reparación solo al servicio técnico oficial. Deberá hacer que su aparato sea reparado cuando esté dañado de alguna forma, como si el cable de
corriente o el enchufe están dañados, o si se han derramado líquidos o se ha introducido algún objeto dentro de la unidad, si esta ha quedado expuesta a la lluvia o la
humedad, si no funciona normalmente o si ha caído al suelo.
ATTENZIONE: per ridurre il rischio di incendio o di scariche elettriche, non esponete questo apparecchio a pioggia o umidità. Per ridurre il pericolo di scariche elettriche evitate
di rimuoverne il coperchio o il pannello posteriore. Non esistono all'interno dell'apparecchio parti la cui regolazione è a cura dell'utente. Per eventuale assistenza, fate riferimento
esclusivamente a personale qualificato. Il fulmine con la punta a freccia all'interno di un triangolo equilatero avvisa l'utente della presenza di "tensioni pericolose" non isolate
all'interno dell'apparecchio, tali da costituire un possibile rischio di scariche elettriche dannose per le persone. Il punto esclamativo all'interno di un triangolo equilatero avvisa
l'utente della presenza di importanti istruzioni di manutenzione (assistenza) nella documentazione che accompagna il prodotto.
Importanti Istruzioni di Sicurezza
1. Prima di usare l'apparecchio, vi preghiamo di leggerne per intero le istruzioni.
2. Conservate tali istruzioni per una eventuale consultazione futura.
3. Vi preghiamo di rispettare tutte le istruzioni di sicurezza.
4. Seguite tutte le istruzioni del costruttore.
5. Non usate questo apparecchio vicino ad acqua o umidità.
6. Pulite l'apparecchio esclusivamente con un panno asciutto.
7. Evitate di ostruire una qualsiasi delle aperture di ventilazione. Posizionatelo seguendo le istruzioni del costruttore.
8. Non posizionatelo vicino a sorgenti di calore come radiatori, scambiatori di calore, forni o altri apparecchi (amplificatori compresi) in grado di generare calore.
9. Non disattivate la protezione di sicurezza costituita dalla spina polarizzata o dotata di collegamento a terra. Una spina polarizzata è dotata di due spinotti, uno più piccolo
ed uno più grande. Una spina dotata di collegamento a terra è dotata di due spinotti più un terzo spinotto di collegamento a terra. Questo terzo spinotto, eventualmente
anche più grande, viene fornito per la vostra sicurezza. Se la spina fornita in dotazione non si adatta alla vostra presa, consultate un elettricista per la sostituzione della
presa obsoleta.
10. Proteggete il cavo di alimentazione in modo che non sia possibile camminarci sopra né piegarlo, con particolare attenzione alle prese, ai punti di collegamento e al punto
in cui esce dall'apparecchio.
11. Staccate l'apparecchio dalla alimentazione in caso di temporali o tempeste o se non lo usate per un lungo periodo.
12. Per l'assistenza, fate riferimento esclusivamente a personale qualificato. È necessaria l'assistenza se l'apparecchio ha subito un qualsiasi tipo di danno, come danni al cavo
o alla spina di alimentazione, nel caso in cui sia stato versato del liquido o siano caduti oggetti al suo interno, sia stato esposto a pioggia o umidità, non funzioni correttamente o sia stato fatto cadere.
If you want to dispose this product, do not mix it with general household waste. There is a
separate collection system for used electronic products in accordance with legislation that
requires proper treatment, recovery and recycling.
Private household in the 25 member states of the EU, in Switzerland and Norway may return their used
electronic products free of charge to designated collection facilities or to a retailer (if you purchase a similar
new one).
For Countries not mentioned above, please contact your local authorities for a correct method of disposal.
By doing so you will ensure that your disposed product undergoes the necessary treatment, recovery and
recycling and thus prevent potential negative effects on the environment and human health.
Copyright 2011 - Samson Technologies Corp.
Samson Technologies Corp.
45 Gilpin Avenue
Hauppauge, New York 11788-8816
Phone: 1-800-3-SAMSON (1-800-372-6766)
Fax: 631-784-2201
www.samsontech.com
V1.2
Page 4

Table of Contents
Introduction. . . . . . . . . . . . . . . . . . . . . . . . . . . . . . . . . . . . . . . . . . . . . . . . 5
Auro D208/D210 Features . . . . . . . . . . . . . . . . . . . . . . . . . . . . . . . . . . . . . . . 6
Quick Start. . . . . . . . . . . . . . . . . . . . . . . . . . . . . . . . . . . . . . . . . . . . . . . . . 7
Rear Panel Layout . . . . . . . . . . . . . . . . . . . . . . . . . . . . . . . . . . . . . . . . . . . . 8
Connecting a Microphone. . . . . . . . . . . . . . . . . . . . . . . . . . . . . . . . . . . . . . . 9
Connecting a Stereo Signal Source . . . . . . . . . . . . . . . . . . . . . . . . . . . . . . . . .10
Linking Two Speakers Per Side . . . . . . . . . . . . . . . . . . . . . . . . . . . . . . . . . . . .11
Positioning the Auro D208/D210 . . . . . . . . . . . . . . . . . . . . . . . . . . . . . . . . . .12
Connections. . . . . . . . . . . . . . . . . . . . . . . . . . . . . . . . . . . . . . . . . . . . . . . .13
Specications. . . . . . . . . . . . . . . . . . . . . . . . . . . . . . . . . . . . . . . . . . . . . . .14
Dimensions . . . . . . . . . . . . . . . . . . . . . . . . . . . . . . . . . . . . . . . . . . . . . . . .15
4
Auro D208/D210
Page 5

Introduction
Thank you for purchasing the Samson Auro professional, powered loudspeaker. The Auro D208 and
D210 are compact and powerful speaker cabinets featuring 200 watts of bi-amped onboard power.
The Auro D208 and D210, respectively, feature 8” and 10” heavy-duty, long-excursion woofers, as well
as 1” high frequency drivers on 1” throat wide dispersion horns. The speaker cabinets provide both
XLR and ¼” phone jacks that handle microphone or line level inputs. The XLR Line Output allows you
to “daisy-chain” multiple Auro cabinets together to create larger sound reinforcement systems.
For added speaker protection, the Auro D208 and D210 feature dual optical limiters that keep your
speaker sounding perfect at any level, and the integrated two-band equalizer allows you to sculpt
the mix to your desired sound. The cabinet’s shape has been designed to be congured for either
front-of-house use, or for operation as a wedge-style monitor. In addition, the Auro D208 and D210
can be easily stand mounted using the integral 1 3/8” pole mount receptacle.
Each Auro PA system’s durable enclosure is made of high-impact polypropylene with a scu-resistant
textured nish, and include a heavy-grade steel grill, oering excellent protection against wear and
tear for truly portable audio. The Auro active monitors are ideal for live music, DJ, lecture, and installed sound applications, or anywhere serious power and superior sound quality are desired.
ENGLISH
In these pages, you’ll nd a detailed itemization of the features of the Auro PA stracystem, as well
as a description of its front and rear panels, step-by-step instructions for its setup and use, and full
specications. You’ll also nd a warranty card enclosed—please don’t forget to ll it out and mail it in
so that you can receive online technical support, and so that we can send you updated information
about this and other Samson products in the future. Also, be sure to check out our website (www.
samsontech.com) for complete information about our full product line.
With proper care and adequate air circulation, your Auro cabinet will operate trouble free for many
years. We recommend you record your serial number in the space provided below for future reference.
Serial number: _______________________________
Date of purchase: ____________________________
Should your unit ever require servicing, a Return Authorization (RA) number must be obtained before
shipping your unit to Samson. Without this number, the unit will not be accepted. Please call Samson
at 1-800-3SAMSON (1-800-372-6766) for an RA number prior to shipping your unit. Please retain the
original packing materials and, if possible, return the unit in the original carton and packing materials. If you purchased your Samson product outside the United States, please contact your local
distributor for warranty and service information.
FRANÇAISDEUTSCHEESPAÑOLITALIANO
Owner's Manual
Auro D208/D210
5
Page 6

Auro D208/D210 Features
Here is a look at some the features of the Auro powered loudspeakers:
• 200 watt, two-way active loudspeakers for live sound applications
• 150W LF + 50W HF power ampliers (peak)
• Ultra-wide, at frequency response
• Custom-designed, heavy-duty, 8”/10” long throw low frequency drivers provide enhanced bass
response
• 1” high frequency driver with 1” throat for smooth high-end reproduction
• Balanced Mic/Line input with Volume control and Peak LED
• Two-band LF and HF shelving equalizer
• XLR Line Output connectors to “daisy-chain” multiple Auro cabinets
• Multi-band dynamics processing with audibly transparent limiting
• Internal 24 dB/octave time aligned electronic crossover
• 35° monitor angle for the D208 and 45° degree monitor angle for the D210
• Standard 1 3/8-inch (35mm) speaker stand receptacle
• Versatile, portable design with integrated side handles
• Tuned, ported bass reex design for extended low end
• Rugged, lightweight polypropylene cabinet construction
6
Auro D208/D210
Page 7

Quick Start
The following steps will help you set up your Auro D208/D210 loudspeakers.
Setup
1. Turn the Level control on the rear panel fully counterclockwise.
2. Set the Bass and Treble EQ controls to the 12 o’clock position.
3. Turn the Power switch OFF.
Connections
1. Connect either a line-level signal from your mixer (or other source) or a microphone to the Input
jack on the Auro D208/D210 rear panel.
2. Connect the supplied power cable to the IEC socket on the back of the loudspeaker. Plug the
power cable into an AC outlet.
3. Note: Always make sure that the AC outlet is congured with the correct voltage as indicated on
the rear panel of the Auro loudspeaker.
ENGLISH
Operation
1. Switch the Auro’s Power switch to the ON position.
2. Run an audio signal from your mixer, or talk into the microphone.
3. Slowly raise the Auro’s Level control until you have reached the desired level.
4. If the volume from the speakers gets really loud, or you see the Peak indicator blinking frequently,
turn down the Level control on the Auro D208/D210 a little until the Peak indicator does not light,
or only lights occasionally with signal peaks.
FRANÇAISDEUTSCHEESPAÑOLITALIANO
Owner's Manual
Auro D208/D210
7
Page 8
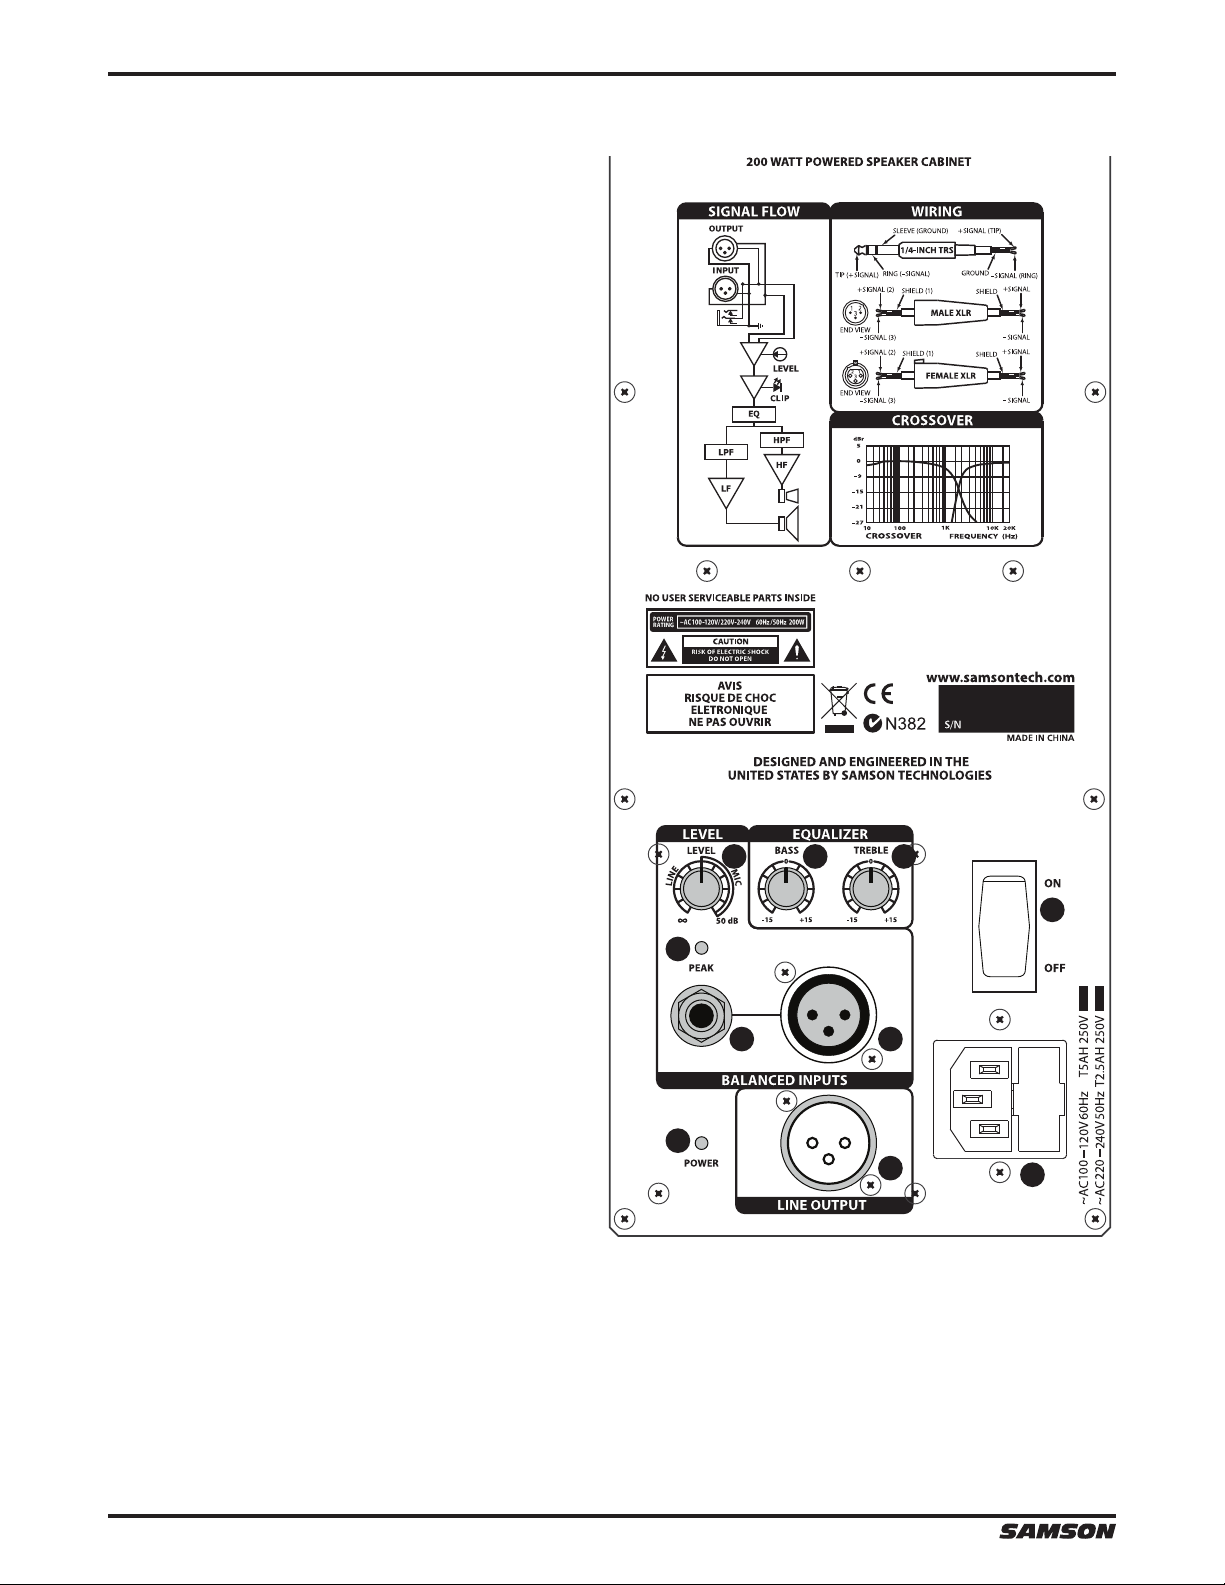
Rear Panel Layout
1. XLR Input Connector
This female XLR connector accepts either a
balanced microphone or line level signal.
2. 1/4” Input Connector
Use this 1/4” input for connecting balanced
microphone or balanced and unbalanced
line level inputs.
3. Line Output
Male XLR connector used to link multiple
Auro cabinets.
4. Level Control
This control adjusts the overall signal level at
the input of the power ampliers. For attenuating a line level signal, turn the control from
fully counter-clockwise until 12 o’clock. For a
mic level signal turn the Level control past 12
o’clock.
5. Bass EQ Control
This controls the low band of the loudspeaker equalizer, +/- 15 dB at 80 Hz.
6. Treble EQ Control
This controls the high band of the loudspeaker equalizer, +/- 15 dB at 12 kHz.
7. Peak Indicator
This RED LED lights when the amp is near the
clipping point. If the Peak indicator lights
frequently, turn down the Level control on
the Auro loudspeaker or turn down the
signal at the source, until the indicator does
not light anymore, or lights occasionally with
signal peaks.
8. Power Indicator
This LED lights GREEN when amp is active.
9. Power Switch
Switches on the Auro’s main power.
4
7
2 1
8
5
6
9
3
10
10. AC Power Inlet
Connect the supplied standard IEC AC power cable here.
8
Auro D208/D210
Page 9
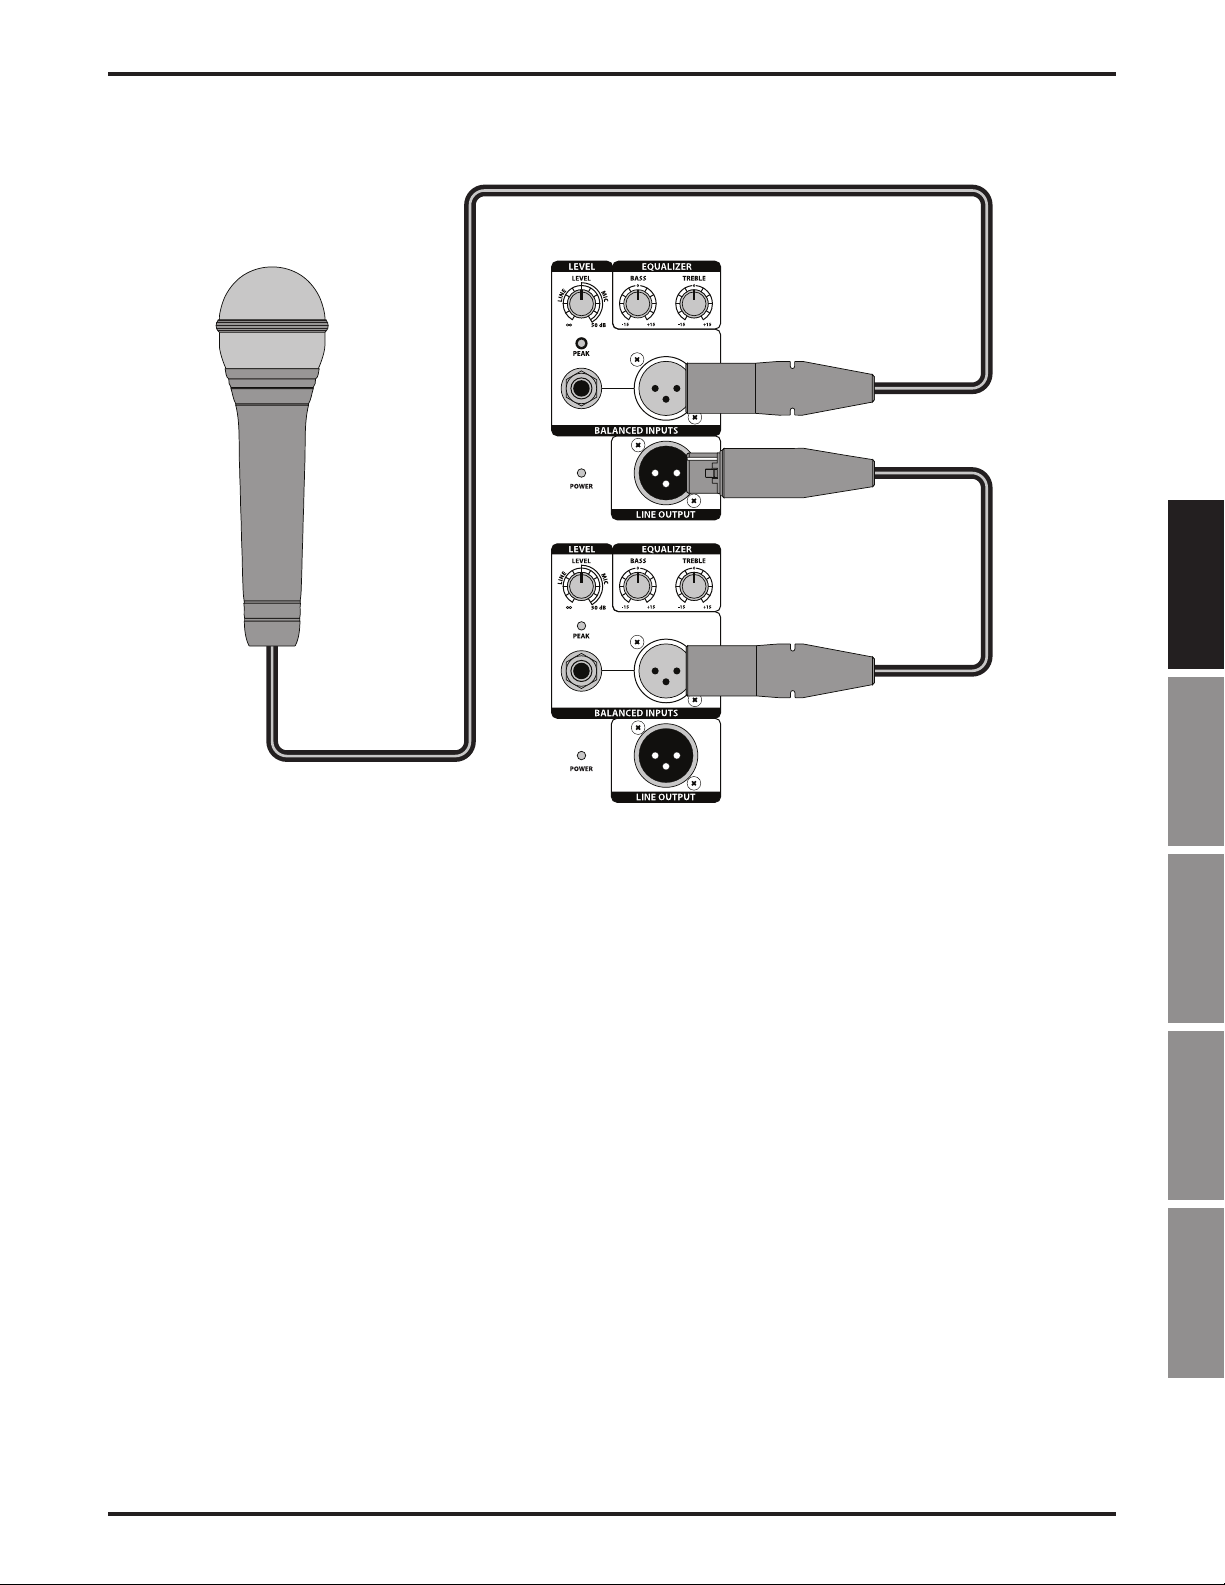
Connecting a Microphone
ENGLISH
Using a Microphone
• Be sure that the Auro D208/D210 Power switch is set to the o position.
• Turn the LEVEL control fully counterclockwise to the o position.
• Connect the power cable to an AC socket.
• Using a standard XLR cable, plug a microphone into the Auro’s XLR INPUT.
• Switch the Power switch to the ON position.
• While speaking or singing into the microphone, slowly raise the LEVEL control until you have
reached the desired level.
• For larger sound reinforcement you can run several monitors using the Line Output to daisy-chain
one Auro to another.
FRANÇAISDEUTSCHEESPAÑOLITALIANO
Owner's Manual
Auro D208/D210
9
Page 10
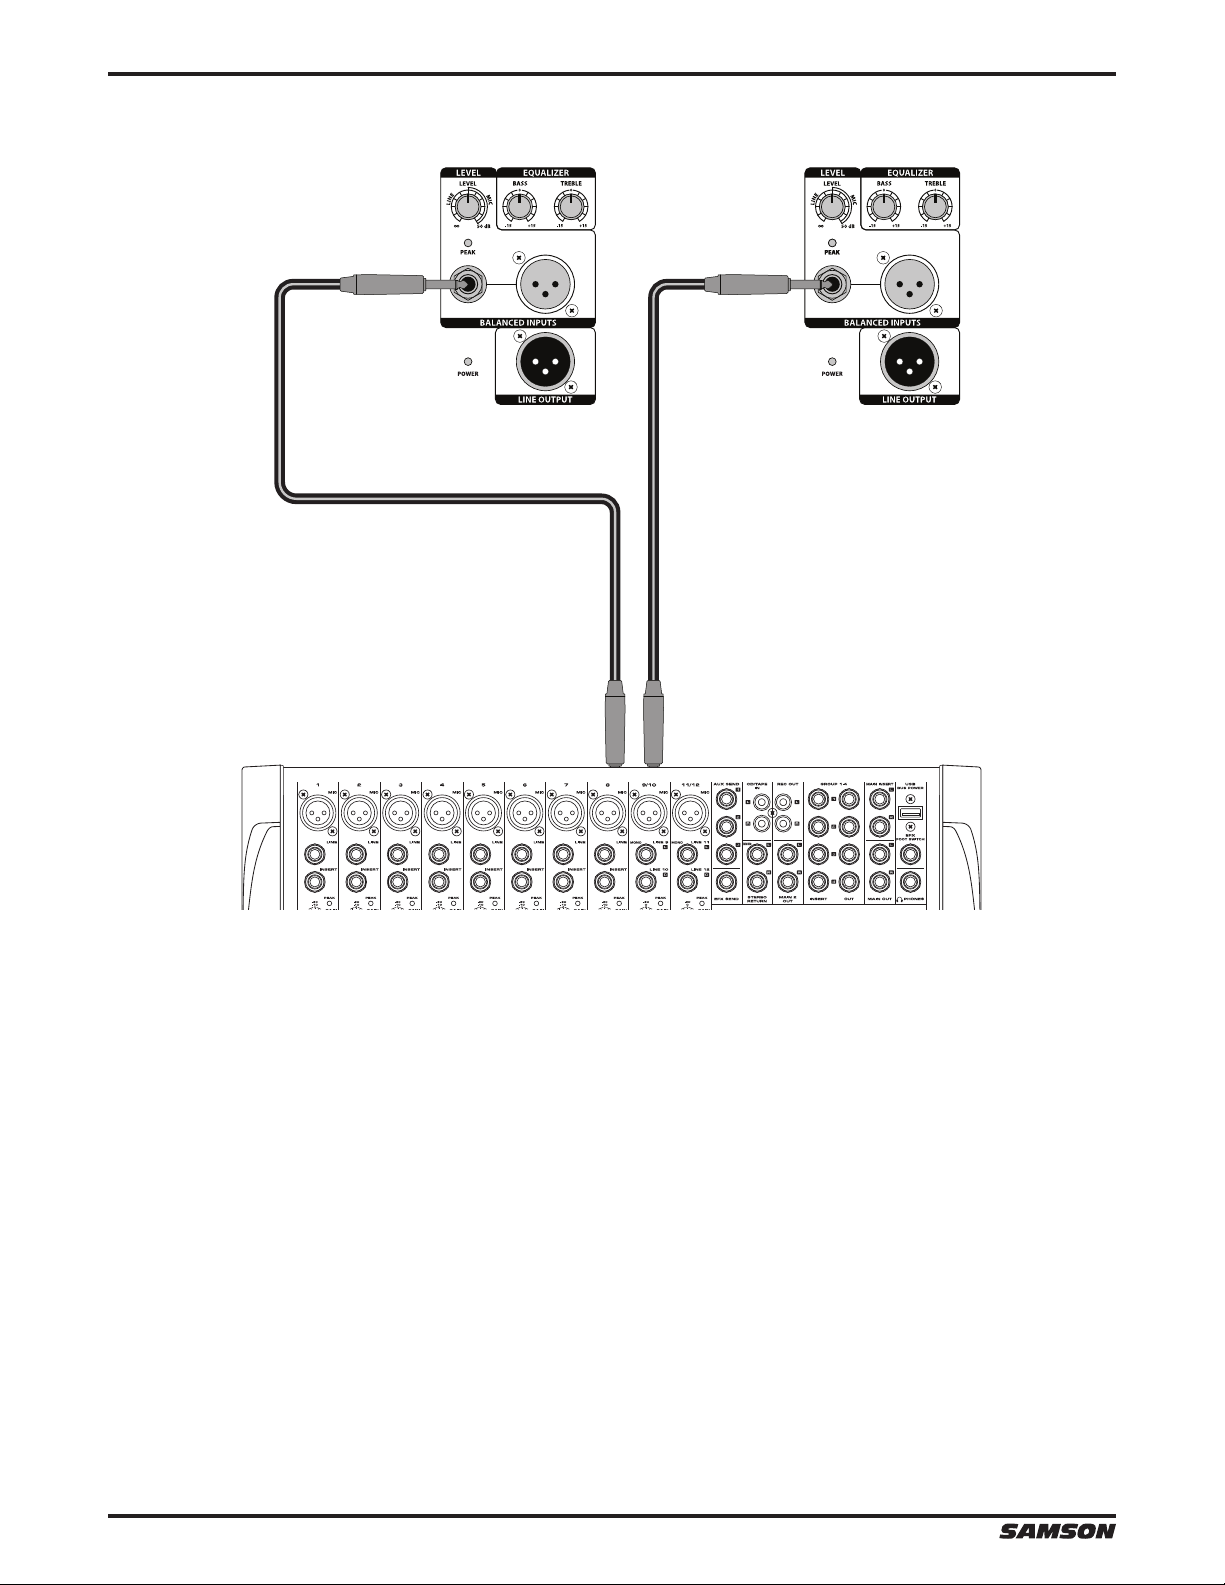
Connecting a Stereo Signal Source
Using a Stereo Line Level Signal
• Be sure that the Auro D208/D210 Power switch is set to the o position.
• Turn the LEVEL control fully counterclockwise to the o position.
• Connect the power cable to an AC socket.
• Using standard XLR or 1/4” cables, connect the line level signals from a mixer or keyboard into the
Auro Inputs.
• Switch the Power switch to the ON position.
• Now, run an audio signal from your mixer (like music from a CD) while slowly raising the Auro’s
Level control until you have reached the desired level.
10
Auro D208/D210
Page 11
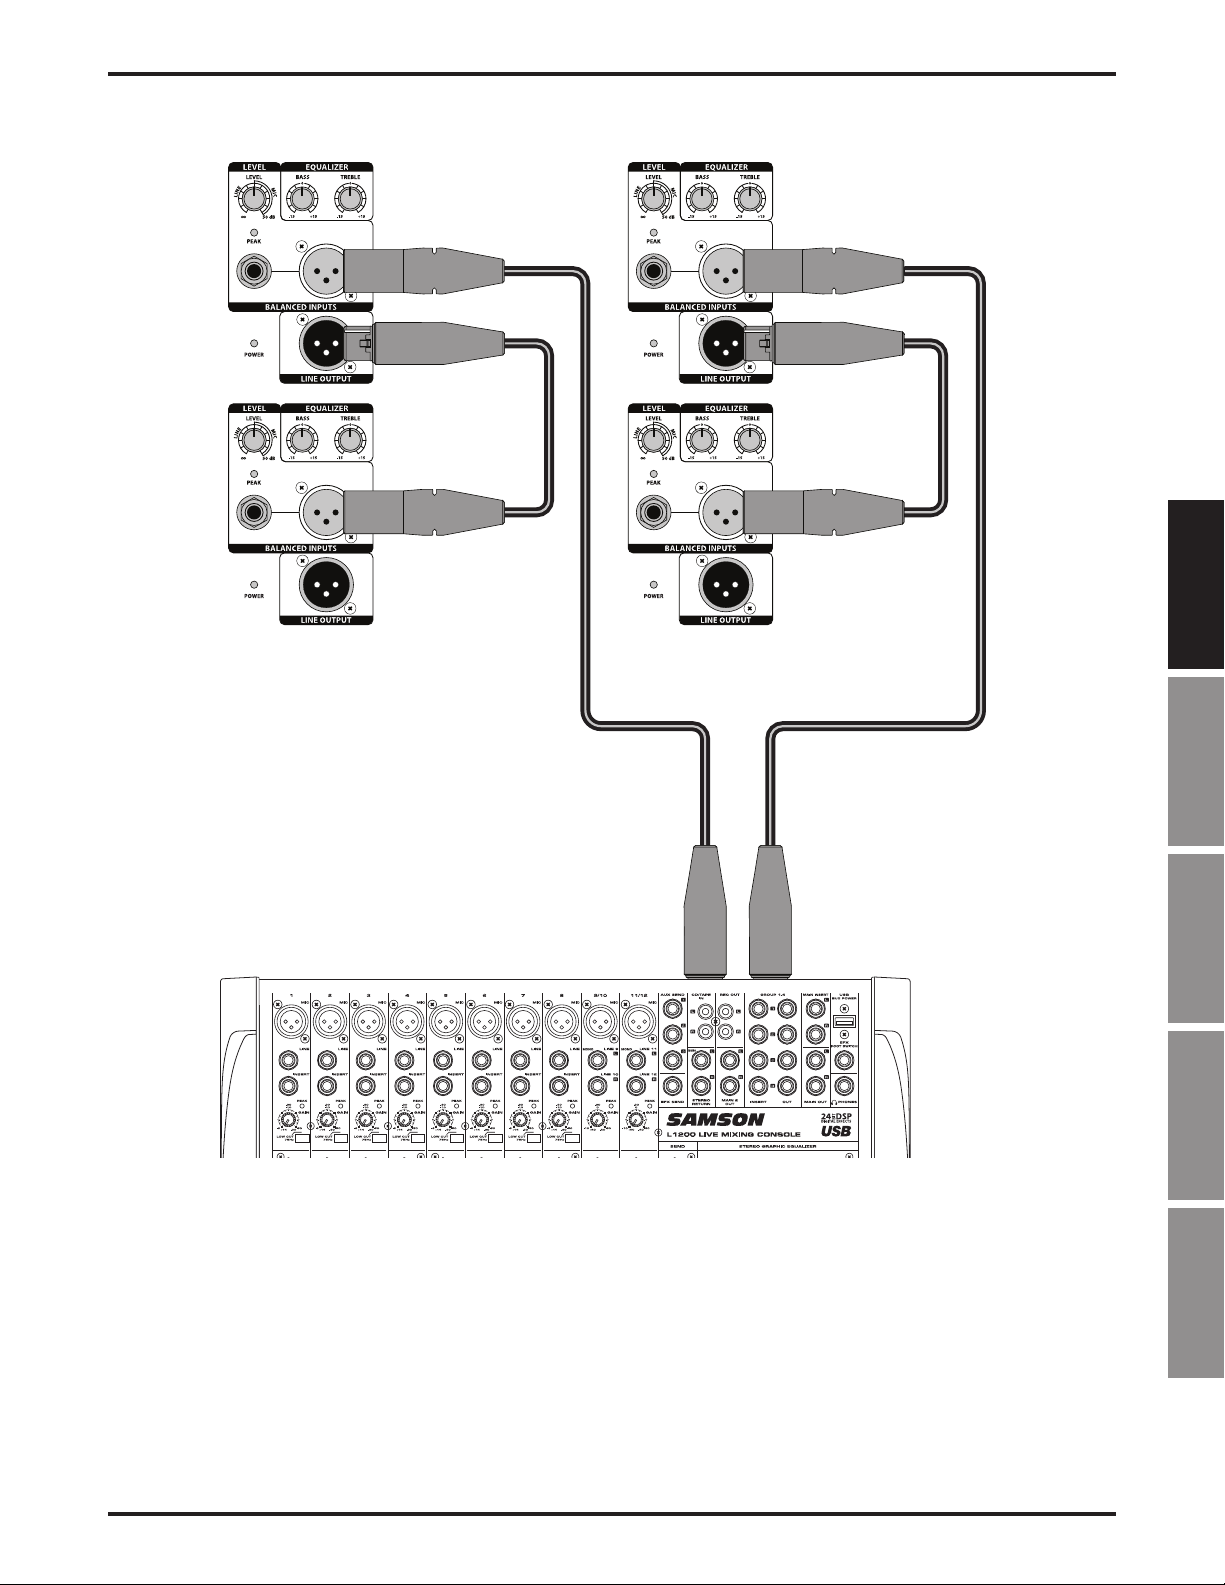
Linking Two Speakers Per Side
ENGLISH
Linking two Auro cabinets per side:
• Turn the LEVEL control fully counterclockwise to the o position.
• Connect the left and right line-level outputs from a mixer to the inputs of two Auro loudspeakers.
• Feed the Line Outputs to another pair of Auro loudspeaker inputs.
• Now, run an audio signal from your mixer (like music from a CD) while slowly raising the Auro’s
Level control until you have reached the desired level.
FRANÇAISDEUTSCHEESPAÑOLITALIANO
Owner's Manual
Auro D208/D210
11
Page 12

Positioning the Auro D208/D210
Speaker Placement
Whenever possible, it is a good idea to raise the speakers
above the heads of the listening audience. The Auro enclosures feature standard 1 3/8” pole mount receptacles, which
are compatible with speaker stands from a variety of manufacturers. In a smaller setting like a school cafeteria, library,
or a mall kiosk, you can also use the Auro loudspeaker in one
of the tilt back monitor positions, which will improve the
projection of the speakers and may eliminate the need for
speaker stands.
Note: When using a speaker pole mount, be sure the pole is
capable of supporting the weight of the Auro loudspeaker.
Note: Always have another person to assist when mounting
the Auro speaker onto a speaker stand, or when adjusting
the stand while the speaker is mounted on the stand.
Using the Auro D208/D210 as a Floor Monitor
The Auro D208/D210 is an ideal solution for stage monitoring and thanks to its unique design, can be placed on its side
to be used as a wedge monitor. The Auro D208 features a 35°
monitor position, and the Auro D210 features a 45° monitor
position.
12
Auro D208/D210
Page 13
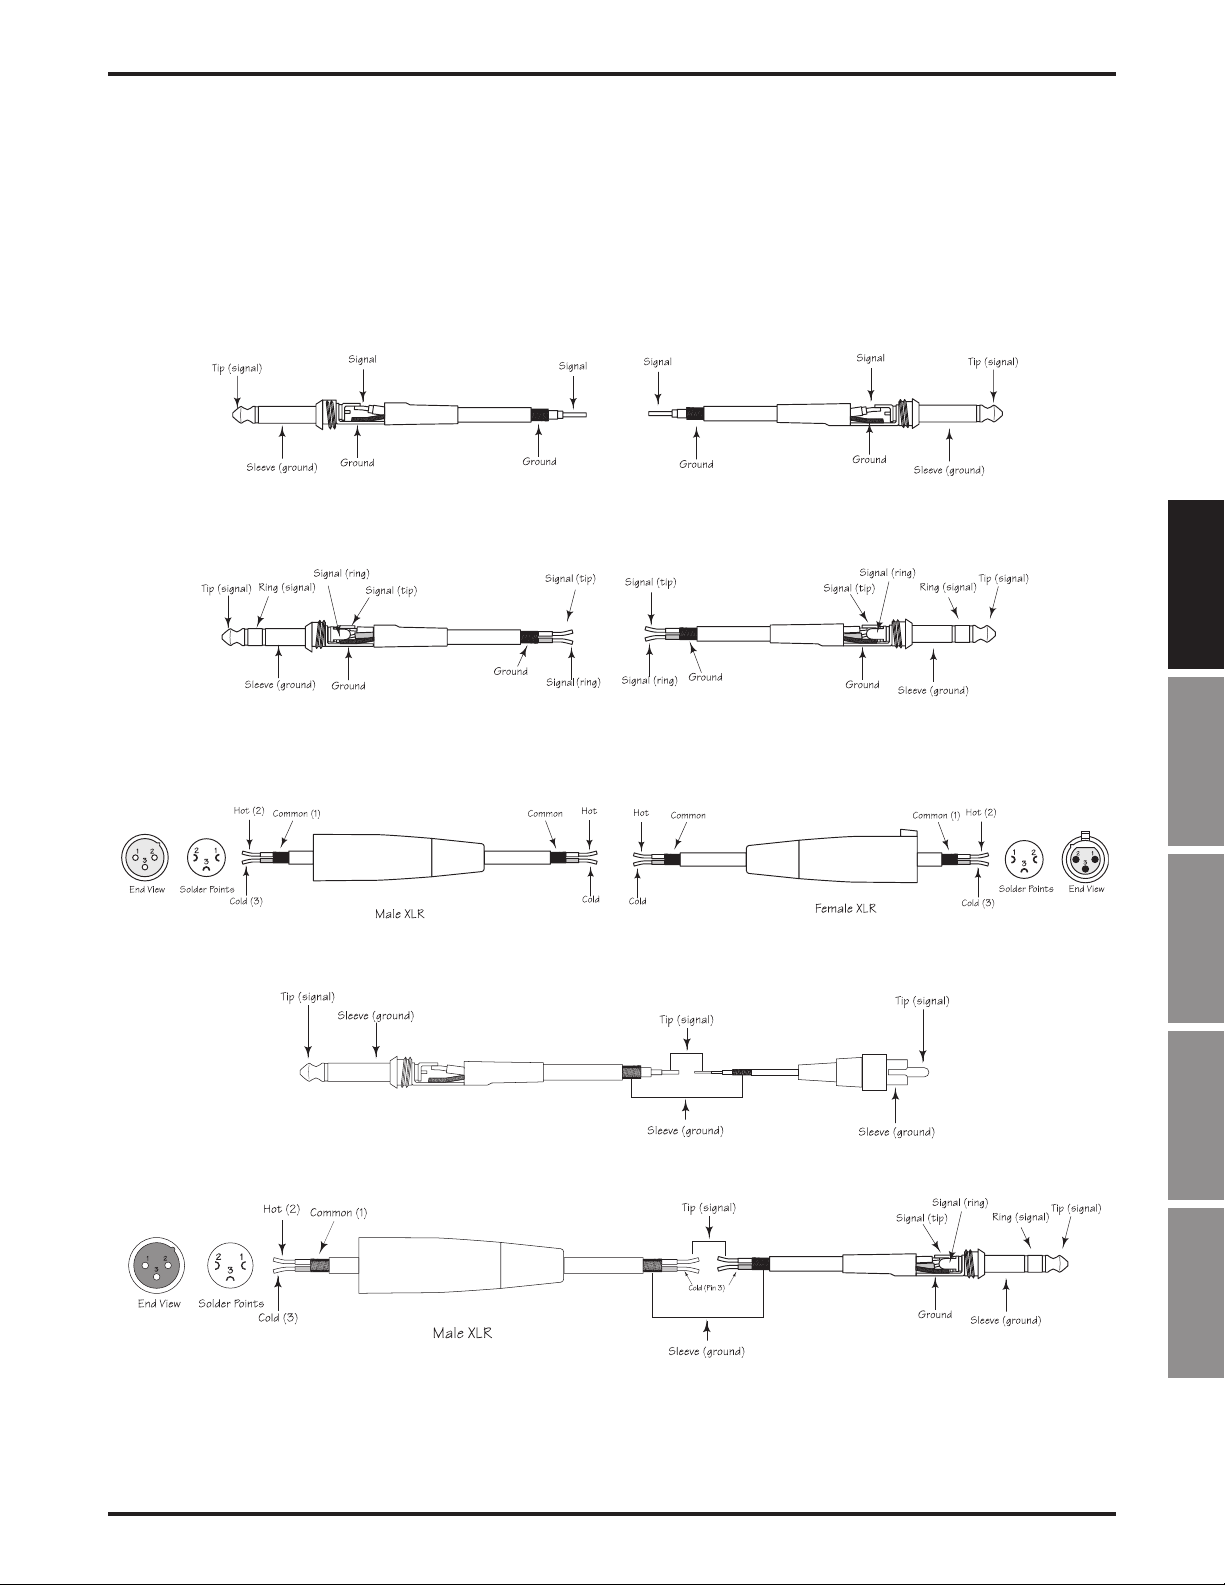
Connections
The Auro D208/D210 features balanced inputs and outputs, so connecting balanced and unbalanced
signals is acceptable. Whenever possible, use balanced connections to other equipment to suppress
interference.
Unbalanced 1/4” Connector
Balanced TRS 1/4” Connector
ENGLISH
XLR to XLR Balanced
Unbalanced 1/4” Connector to RCA
XLR to Balanced 1/4-Inch
FRANÇAISDEUTSCHEESPAÑOLITALIANO
Owner's Manual
Auro D208/D210
13
Page 14
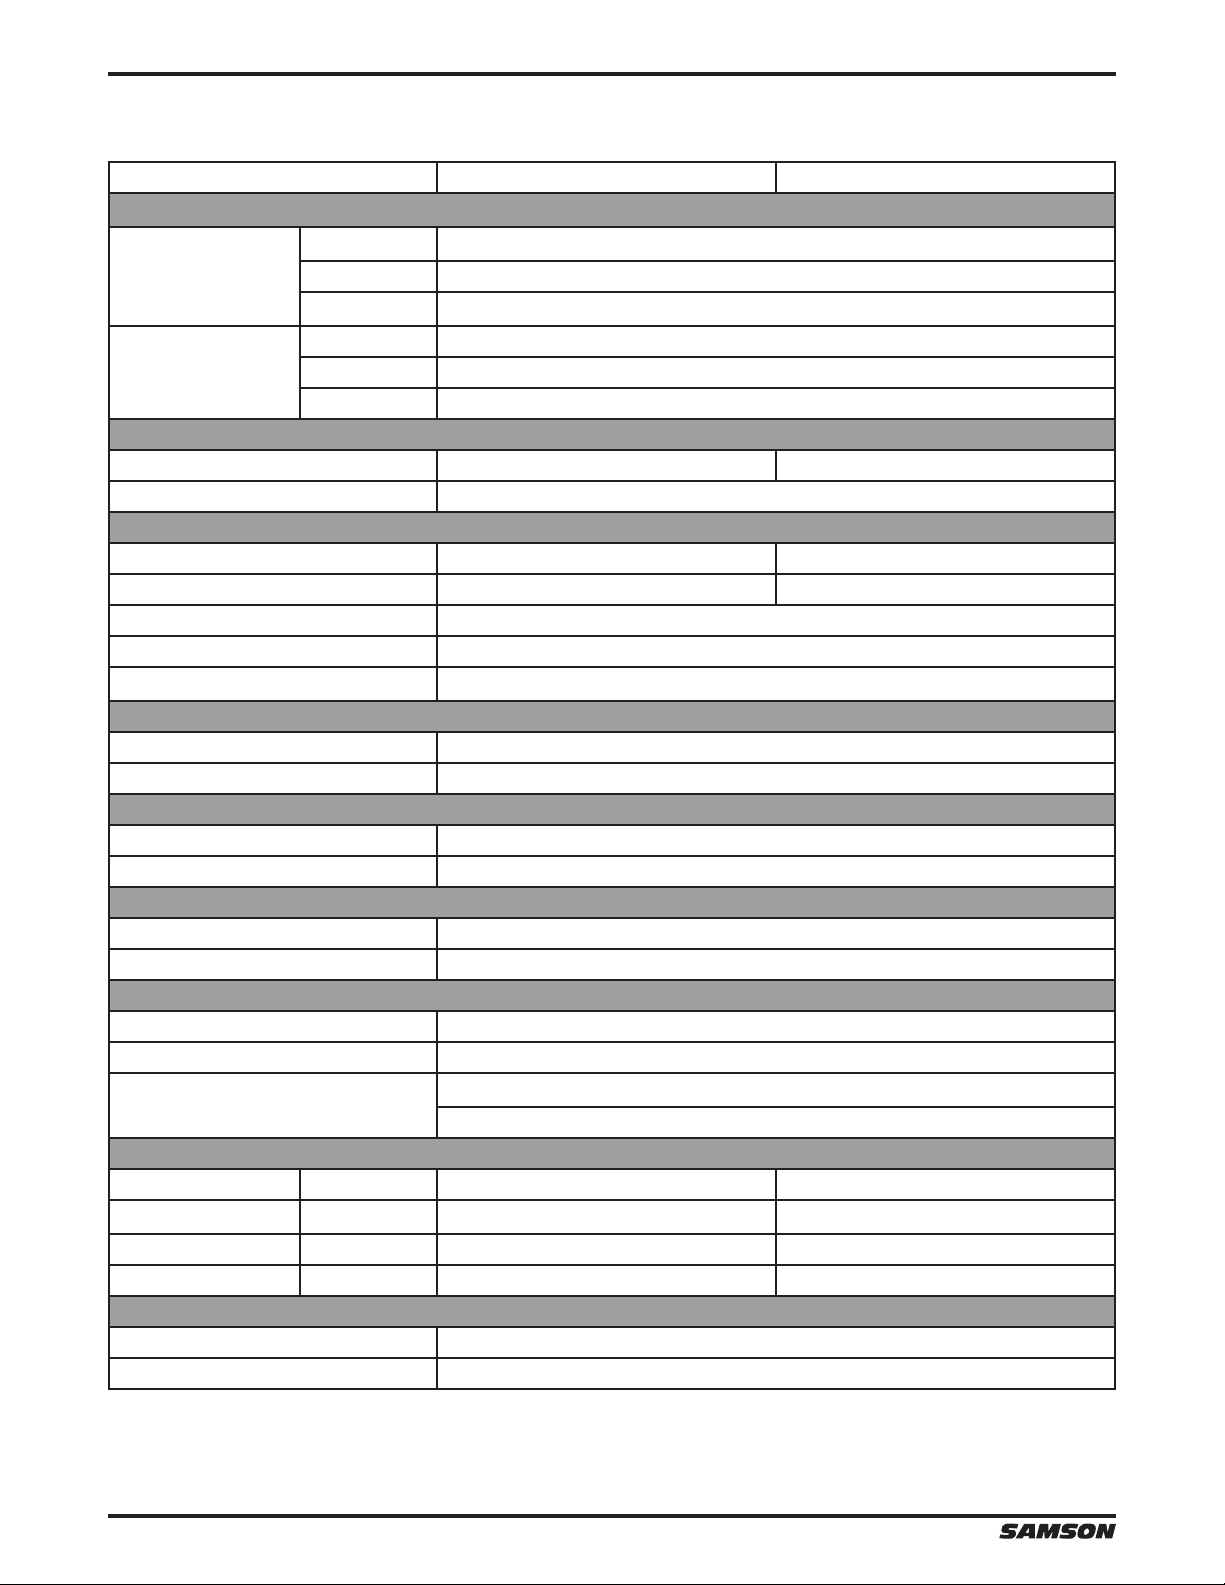
Specications
D208 D210
Output Power
RMS Power 135 W @ 8 ohms
Low Frequency
High Frequency
Low Frequency 8” bass transducer 10” bass transducer
High Frequency 1” (25 mm) high frequency driver
Frequency Response (-3 dB) 64 Hz to 20 kHz 60 Hz to 20 kHz
Maximum Sound Pressure Level 113 dB SPL @ 1 m 113 dB SPL @ 1 m
Limiter Optical
Horizontal Coverage Angle 90°
Vertical Coverage Angle 60°
Crossover Type 24 dB/oct Linkwitz-Riley
Crossover Frequency 2.1 kHz
Inputs Balanced XLR & 1/4” Mic/Line Connectors
Output Balanced XLR Line Output
High ±15 dB @ 12 kHz, shelving
Low ±15 dB @ 80 Hz, shelving
Power Consumption 300 W max.
AC Connector 3-pin IEC 250 VAC, 20 A male
Fuse 100 - 115 VAC T5AL / 250 V
Dimensions in 9.8” L x 8.0” W x 14.7” H 11.5” L x 9.6” W x 18.3” H
Weight lbs 14.7 18.8
Mounting Method Integral 1 3/8” Pole Mount Receptacle
Fly Point 1
Peak Power 160 W @ 8 ohms
THD < 1 %
RMS Power 20 W @ 8 ohms
Peak Power 40 W @ 8 ohms
THD < 1 %
Transducers
Acoustic Performance
Electronic Crossover
Input/Output
Equalization
Power Supply
220 - 240 VAC T2.5AL / 250 V
Dimensions and Weight
mm 249 mm L x 205 mm W x 372 mm H 292 mm L x 244 mm W x 464 mm H
kg 6.66 8.52
Mounting
14
Specications are subject to change without notice.
Auro D208/D210
Page 15
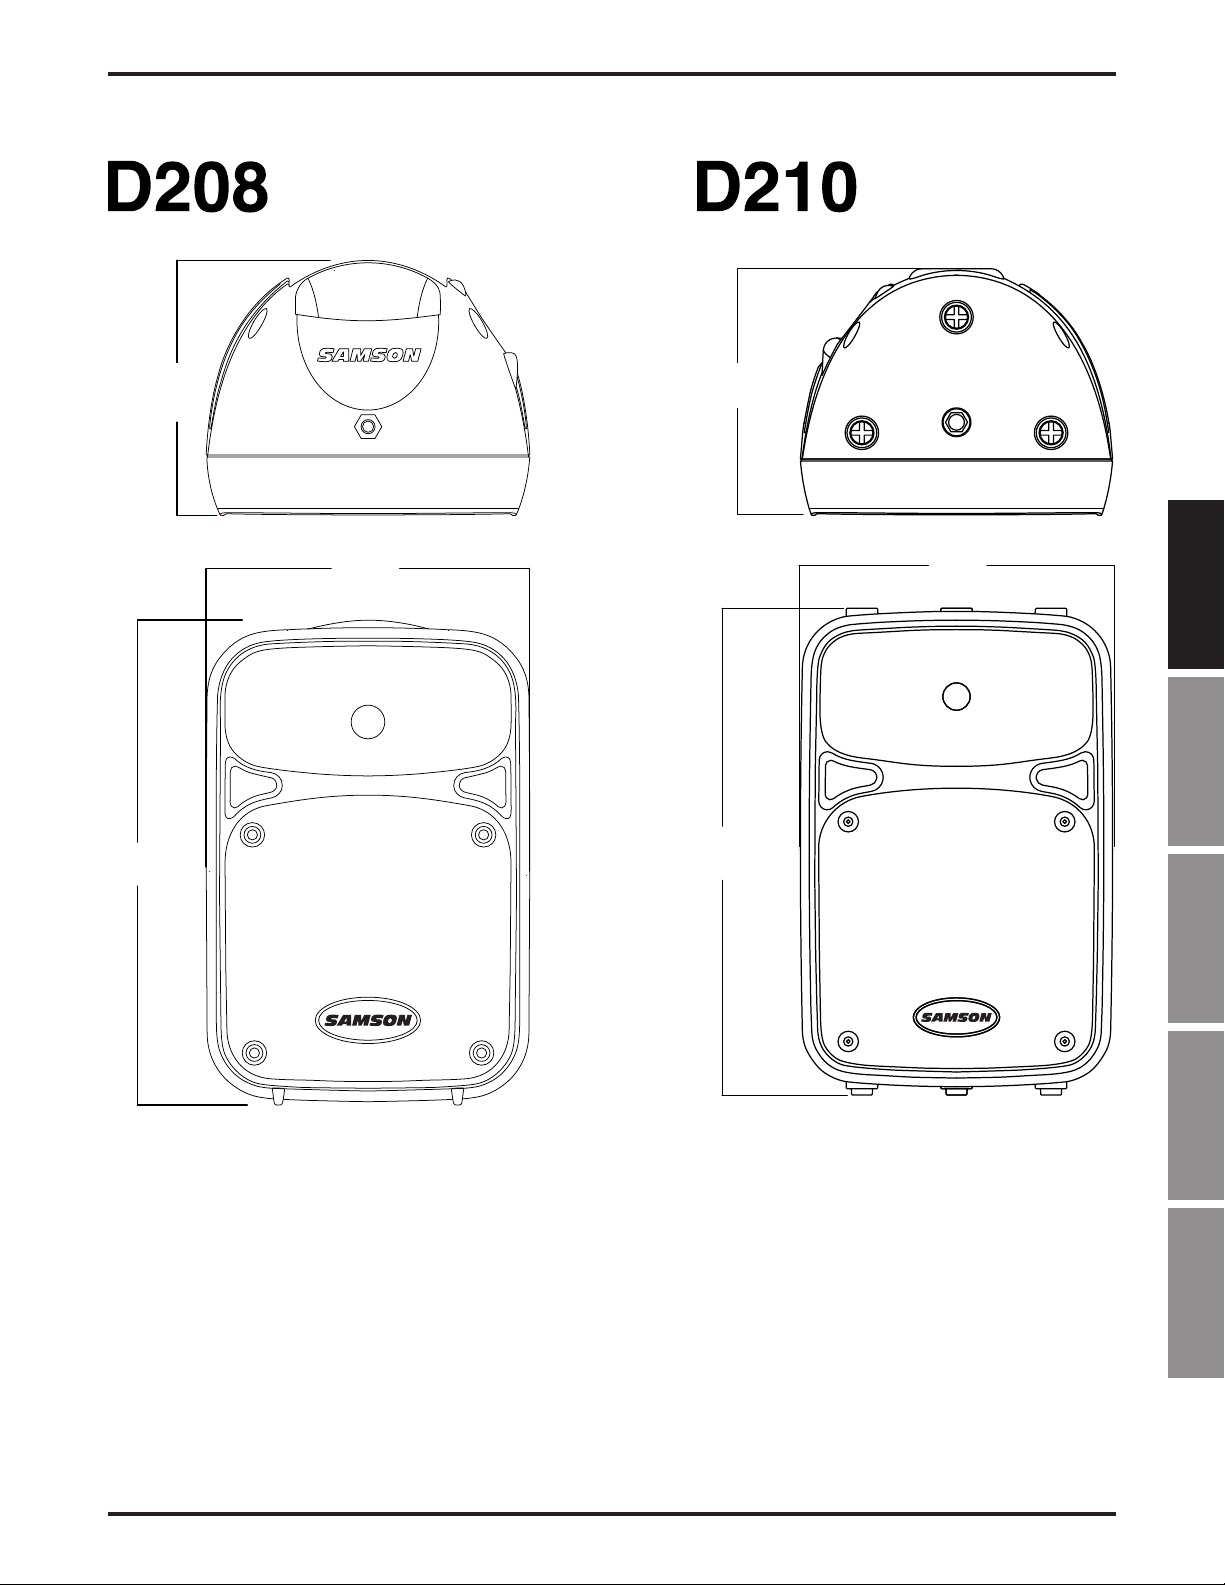
Dimensions
8.0 in/
205 mm
14.7 in/
372 mm
9.8 in/
249 mm
9.6 in/
244 mm
11.5 in/
292 mm
ENGLISH
FRANÇAISDEUTSCHEESPAÑOLITALIANO
18.3 in/
464 mm
Owner's Manual
Auro D208/D210
15
Page 16

Table des matières
Introduction. . . . . . . . . . . . . . . . . . . . . . . . . . . . . . . . . . . . . . . . . . . . . . . .17
Auro D208/D210 — Généralités . . . . . . . . . . . . . . . . . . . . . . . . . . . . . . . . . . .18
Mise en oeuvre . . . . . . . . . . . . . . . . . . . . . . . . . . . . . . . . . . . . . . . . . . . . . .19
Face arrière . . . . . . . . . . . . . . . . . . . . . . . . . . . . . . . . . . . . . . . . . . . . . . . .20
Connexion d’un micro . . . . . . . . . . . . . . . . . . . . . . . . . . . . . . . . . . . . . . . . .21
Connexion d’un signal stéréo. . . . . . . . . . . . . . . . . . . . . . . . . . . . . . . . . . . . .22
Connexion de 2 enceintes par côté . . . . . . . . . . . . . . . . . . . . . . . . . . . . . . . . .23
Positionnement des enceintes Auro D208/D210. . . . . . . . . . . . . . . . . . . . . . . . .24
Connexions . . . . . . . . . . . . . . . . . . . . . . . . . . . . . . . . . . . . . . . . . . . . . . . .25
Caractéristiques techniques. . . . . . . . . . . . . . . . . . . . . . . . . . . . . . . . . . . . . .26
Dimensions . . . . . . . . . . . . . . . . . . . . . . . . . . . . . . . . . . . . . . . . . . . . . . . .27
16
Auro D208/D210
Page 17

Introduction
Merci d’avoir choisi les enceintes actives Samson Auro professional. Les enceintes Auro D208 et D210
sont compactes et puissantes. Elles délivrent 200 Watts par bi-amplication interne. Les enceintes
Auro D208 et D210, sont équipées respectivement de Woofers de 8 pouces (20 cm) et de 10 pouces
(25 cm) haute abilité et à longue élongation, et de Tweeters à compression de 25 mm montés sur
des trompes à dispersion large et couplés par guide d’onde de 25 mm. Ces enceintes sont équipées
de connecteurs XLR et 6,35 mm qui peuvent accepter des signaux à niveau micro ou ligne. La sortie
ligne en XLR vous permet de connecter plusieurs enceintes Auro en série et obtenir ainsi un système
de sonorisation évolutif en fonction de vos besoins.
Pour une protection supérieure, les enceintes Auro D208 et D210 sont équipées de doubles limiteurs
optiques qui vous garantissent le meilleur son, quel que soit le niveau. L’égaliseur 2 bandes intégré
vous permet de modier la réponse en fonction du résultat sonore souhaité. La forme trapézoïdale
des baes vous permet d’utiliser les enceintes en sonorisation de façade ou en retour de scène «bain
de pied». De plus, le format compact des enceintes vous permet de les empiler à l’aide des supports
intégrés. Vous pouvez également monter les enceintes sur pied grâce à leur embase pour pied intégrée.
ENGLISH
Le bae des Auro est en polypropylène ultra résistant, anti-rayures et anti-choc. Les Woofers sont
parfaitement protégés par une grille en acier haute résistance — les enceintes sont parfaitement
protégées contre l’usure et les abus des concerts. Les Auro sont parfaites en sonorisation de concerts,
pour les DJ, les conférences, les installations xes, ou toute autre application nécessitant une puissance élevée et une très bonne qualité sonore.
Dans ces pages, vous trouverez tout ce dont vous avez besoin sur les Auro PA, avec une description
des faces avant et arrière, des instructions pas-à-pas de mise en œuvre et d’utilisation, et les caractéristiques techniques. Vous trouverez également la carte de garantie — pensez à nous la renvoyer
pour bénécier de l’assistance technique, et pour recevoir toutes les mises à jour sur les produits
Samson à l’avenir. Également, consultez notre site Internet (www.samsontech.com) pour de plus
amples renseignements sur tous nos produits.
Avec un entretien adapté, les enceintes Auro vous donneront satisfaction pendant de très nombreuses années. Prenez le temps de noter le numéro de série et la date d’achat ci-dessous pour toute
référence ultérieure.
Numéro de série : _______________________________
FRANÇAISDEUTSCHEESPAÑOLITALIANO
Date d’achat : ____________________________
Si vous devez faire réparer cet appareil, vous devez tout d’abord obtenir un numéro d’autorisation de
retour auprès de nos services. Sans ce numéro d’autorisation, l’appareil ne sera pas accepté lors de sa
réception. Appelez Samson au : 1-800-3SAMSON (1-800-372-6766) pour obtenir ce numéro d’autorisation. Utilisez les emballages d’origine pour le retour.
Owner's Manual
Auro D208/D210
17
Page 18
Auro D208/D210 — Généralités
Voici quelques unes des fonctions des enceintes actives Auro :
• Enceintes de sonorisation actives 2 voies de 200 Watts
• 150 Watts pour le Woofer + 50 Watts pour le Tweeter (en crête)
• Réponse en fréquence ultra-large et plate
• Woofer de 8/10 pouces (20/25 cm) de construction spéciale, haute résistance, à longue élonga-
tion orant une réponse étendue dans le bas du spectre
• Tweeter de 25 mm avec couple acoustique de 25 mm orant une restitution douce et musicale
des hautes fréquences
• Entrée Micro/ligne symétrique avec réglage de volume et Led d’écrêtage
• Égaliseur Baxendall deux bandes (basses et hautes fréquences)
• Sortie ligne en XLR pour connecter plusieurs Auro en série
• Traitement multi-bande de la dynamique avec limitation indécelable
• Filtre actif interne à 24 dB/octave avec alignement temporel
• Angles de retour de 30 degrés par la D208 et de 45 degrés pour la D210 en retours de scène
• Embase pour pied standard de 35 mm
• Enceinte polyvalente et aisément transportable avec poignées latérales intégrées
• Bae Bass Reex accordé pour une réponse étendue dans le bas du spectre
• Bae ultra résistant et léger en polypropylène
18
Auro D208/D210
Page 19

Mise en oeuvre
Les étapes suivantes vous aident à utiliser rapidement vos enceintes Auro D208/D210.
Mise en œuvre
1. Baissez le niveau Level de face arrière au minimum.
2. Réglez les boutons Bass et Treble en position centrale.
3. Placez l’interrupteur en position OFF.
Connexions
1. Reliez un signal à niveau ligne en provenance de votre console de mixage (ou toute autre source),
ou un micro à l’entrée Input de l’Auro D208/D210 (en face arrière).
2. Connectez le cordon d’alimentation fourni à l’embase IEC, à l’arrière de l’enceinte. Reliez la che
secteur à une prise secteur murale.
3. Remarque : Vériez toujours que la tension d’utilisation de l’enceinte (indiquée en face arrière)
soit identique à la tension secteur de votre zone géographique.
ENGLISH
Utilisation
1. Placez l’interrupteur en position ON.
2. Alimentez le signal en provenance de la console de mixage ou parlez dans le micro.
3. Montez lentement le niveau Level de l’ Auro jusqu’à obtenir le niveau souhaité. .
4. Si le volume des enceintes est trop élevé, ou si le témoin Peak s’allume souvent, baissez un peu le
bouton Level de l’Auro D208/D210 jusqu’à ce que le témoin Peak ne s’allume que rarement, sur
les pointes de signal.
FRANÇAISDEUTSCHEESPAÑOLITALIANO
Owner's Manual
Auro D208/D210
19
Page 20

Face arrière
1. Entrée XLR
Cette embase XLR femelle accepte les signaux symétriques à niveau micro ou ligne.
2. Entrée Jack 6,35 mm
Utilisez cette entrée en Jack 6,35 mm avec un
micro symétrique ou des signaux à niveau
ligne symétriques ou asymétriques.
3. Sortie Ligne
Cette embase XLR mâle vous permet de
relier plusieurs enceintes Auro en série.
4. Bouton Level
Ce bouton règle le niveau général en entrée
des étages de puissance. Lorsque vous travaillez avec un signal à niveau ligne, utilisez
la moitié inférieure de la plage du potentiomètre. Lorsque vous travaillez avec un signal
à niveau micro, utilisez la moitié supérieure.
5. Bouton Bass
Règle l’égaliseur basse fréquence sur une
plage de
+/- 15 dB à 80 Hz.
6. Bouton Treble
Règle l’égaliseur haute fréquence sur une
plage de
+/- 15 dB à 12 kHz.
7. Témoin Peak
Ce témoin ROUGE s’allume lorsque l’amplicateur de sortie atteint l’écrêtage. Si le témoin Peak s’allume souvent, baissez le bouton Level sur l’Auro ou réduisez le niveau à la
source, jusqu’à ce que le témoin ne s’allume
que rarement, sur les pointes de signal.
8. Témoin Power
Cette Led s’allume en vert lorsque l’enceinte
est sous tension.
4
7
2 1
8
5
6
9
3
10
9. Interrupteur secteur Power
Place l’Auro sous/hors tension.
10. Embase secteur
Connectez le cordon secteur fourni à cette embase.
20
Auro D208/D210
Page 21

Connexion d’un micro
ENGLISH
Utilisation d’un micro
• Placez l’interrupteur de l’Auro D208/D210 sur O.
• Baissez le niveau LEVEL de face arrière au minimum sur O.
• Connectez le cordon d’alimentation fourni à l’embase IEC, à l’arrière de l’enceinte. Reliez la che
secteur à une prise secteur murale.
• Utilisez un câble XLR standard pour relier un micro à l’entrée XLR de l’Auro.
• Placez l’interrupteur de l’Auro D208/D210 sur ON.
• Parlez ou chantez dans le micro et montez progressivement le bouton LEVEL jusqu’à obtenir le
niveau souhaité.
• Pour une puissance de sonorisation plus importante, reliez plusieurs enceintes Auro en série avec
la sortie Line Output.
FRANÇAISDEUTSCHEESPAÑOLITALIANO
Owner's Manual
Auro D208/D210
21
Page 22

Connexion d’un signal stéréo
Utilisation d’un signal stéréo à niveau ligne
• Placez l’interrupteur de l’Auro D208/D210 sur O.
• Baissez le niveau LEVEL de face arrière au minimum.
• Connectez le cordon d’alimentation fourni à l’embase IEC, à l’arrière de l’enceinte. Reliez la che
secteur à une prise secteur murale.
• À l’aide d’un câble XLR ou Jack 6,35 mm standard, connectez les signaux à niveau ligne d’une
console de mixage ou d’un clavier aux entrées des enceintes Auro.
• Placez l’interrupteur de l’Auro D208/D210 sur ON.
• Lancez la lecture du signal à niveau ligne en provenance de la console de mixage (musique en
provenance d’un lecteur de CD, par exemple), et montez progressivement le réglage Level des
enceintes, jusqu’à obtenir le niveau souhaité.
22
Auro D208/D210
Page 23

Connexion de 2 enceintes par côté
ENGLISH
Pour connecter deux enceintes Auro par côté :
• Baissez le niveau Level de face arrière au minimum.
• Reliez les sorties ligne gauche et droite de la console aux entrées des deux enceintes Auro.
• Reliez les sorties Line Outputs à deux autres enceintes Auro comme indiqué sur l’illustration.
• Lancez la lecture du signal à niveau ligne en provenance de la console de mixage (musique en
provenance d’un lecteur de CD, par exemple), et montez progressivement le réglage Level des
enceintes, jusqu’à obtenir le niveau souhaité.
FRANÇAISDEUTSCHEESPAÑOLITALIANO
Owner's Manual
Auro D208/D210
23
Page 24

Positionnement des enceintes Auro D208/D210
Positionnement des enceintes
Lorsque cela est possible, placez les enceintes au-dessus
de la tête du public. Les enceintes Auro sont équipées de
supports de pied d’enceintes à verrouillage, compatibles
avec les pieds d’enceintes de nombreux fabricants. Pour les
applications de plus faible puissance comme dans une cantine d’école, une bibliothèque, un petit kiosque à musique,
vous pouvez placer l’enceinte en position latérale inclinée, ce
qui améliore la projection des enceintes et élimine le besoin
d’utiliser des pieds.
Remarque : Si vous utilisez des pieds d’enceintes, veillez à
utiliser des modèles pouvant supporter la charge des Auro.
Remarque : Aidez-vous d ‘une autre personne lorsque vous
installez les Auro sur des pieds, ou lorsque vous réglez les
pieds avec les enceintes dessus.
Utilisation des Auro
D208/D210
en retour de
scène
Les Auro D208/D210 sont parfaites en retour de scène bain
de pied en position inclinée, grâce à leur forme unique. L’Auro D208 ore une dispersion de 35° en position de retour, et
l’Auro D210 ore une dispersion de 45°.
24
Auro D208/D210
Page 25

Connexions
Les enceintes Auro D208/D210 sont équipées d’entrées et de sorties symétriques, acceptant également des signaux symétriques. Lorsque cela est possible, utilisez des liaisons symétriques pour éviter
toute interférence.
Jack 6,35 mm asymétrique
Jack 6,35 mm stéréo symétrique
ENGLISH
XLR vers XLR (symétrique)
Jack 6,35 mm asymétrique vers RCA
XLR vers Jack 6,35 mm stéréo symétrique
FRANÇAISDEUTSCHEESPAÑOLITALIANO
Owner's Manual
Auro D208/D210
25
Page 26

Caractéristiques techniques
D208 D210
Puissance de sortie
Ecace 135 W dans 8 ohms
Basse fréquence
Haute fréquence
Basse fréquence Woofer de 20 cm Woofer de 25 cm
Haute fréquence Tweeter de 25 mm, bobine à l cuivre
Réponse en fréquence (-3 dB) 64 Hz à 20 kHz 60 Hz à 20 kHz
Pression sonore maximum 113 dB SPL à 1 m 113 dB SPL à 1 m
Limiteur Optique
Couverture horizontale 90°
Couverture verticale 60°
Type de ltre Linkwitz-Riley à 24 dB/oct
Fréquence de coupure 2,1 kHz
Entrées Connecteurs Mic/Line symétriques XLR et Jack 6,35 mm
Sorties Sortie ligne symétrique en XLR
High ±15 dB à 12 kHz, Baxendall
Low ±15 dB à 80 Hz, Baxendall
Consommation électrique 300 W max.
Embase secteur IEC 3 broches, 250 Vca, 20 A mâle
Fusible 100 - 115 Vca T5 AL / 250 V
Dimensions Pouces 9.8” L x 8.0” W x 14.7” H 11.5” L x 9.6” W x 18.3” H
Poids Livres US 14,7 18,8
Méthode d’installation Embase pour pied d’enceinte standard de 35 mm
Points de suspension 1
Crête 160 W dans 8 ohms
DHT < 1 %
Ecace 20 W dans 8 ohms
Crête 40 W dans 8 ohms
DHT < 1 %
Haut-parleurs
Mesures acoustiques
Filtre actif
Entrées/sorties
Égalisation
Alimentation
220 - 240 Vca T2,5 AL / 250 V
Dimensions et poids
mm 249 mm (L) x 205 mm (l) x 372 mm (H) 292 mm (L) x 244 mm (l) x 464 mm (H)
kg 6,7 8,5
Installation
26
Caractéristiques sujettes à modications sans préavis
Auro D208/D210
Page 27

Dimensions
8,0 in/
205 mm
14,7 in/
372 mm
9.8 in/
249 mm
9,6 in/
244 mm
11,5 in/
292 mm
ENGLISH
FRANÇAISDEUTSCHEESPAÑOLITALIANO
18,3 in/
464 mm
Owner's Manual
Auro D208/D210
27
Page 28

Inhalt
Einleitung . . . . . . . . . . . . . . . . . . . . . . . . . . . . . . . . . . . . . . . . . . . . . . . . .29
Auro D208/D210 Features . . . . . . . . . . . . . . . . . . . . . . . . . . . . . . . . . . . . . . .30
Schnellstart . . . . . . . . . . . . . . . . . . . . . . . . . . . . . . . . . . . . . . . . . . . . . . . .31
Rückseite. . . . . . . . . . . . . . . . . . . . . . . . . . . . . . . . . . . . . . . . . . . . . . . . . .32
Mikrofon anschließen. . . . . . . . . . . . . . . . . . . . . . . . . . . . . . . . . . . . . . . . . .33
Stereo-Signalquelle anschließen. . . . . . . . . . . . . . . . . . . . . . . . . . . . . . . . . . .34
Zwei Boxen pro Seite koppeln . . . . . . . . . . . . . . . . . . . . . . . . . . . . . . . . . . . .35
Auro D208/D210 positionieren. . . . . . . . . . . . . . . . . . . . . . . . . . . . . . . . . . . .36
Anschlüsse . . . . . . . . . . . . . . . . . . . . . . . . . . . . . . . . . . . . . . . . . . . . . . . .37
Technische Daten . . . . . . . . . . . . . . . . . . . . . . . . . . . . . . . . . . . . . . . . . . . .38
Abmessungen . . . . . . . . . . . . . . . . . . . . . . . . . . . . . . . . . . . . . . . . . . . . . .39
28
Auro D208/D210
Page 29

Einleitung
Herzlichen Dank für den Kauf einer professionellen Samson Auro-Aktivbox. Die Auro D208 und D210
sind kompakte, kraftvolle Boxen und erzeugen intern 200 Watt an Bi-Amp-Leistung. Die Auro D208
und D210 verfügen jeweils über hochbelastbare, weit auslenkende 8” und 10” Woofer sowie über
1” Höhentreiber auf breit streuenden Hörnern mit 1” Trichterönungen. Die Lautsprechergehäuse
bieten XLR- und 6,35 mm Klinkenbuchsen für Eingangssignale mit Mikrofon- und Line-Pegel. Über
den XLR Line-Ausgang lassen sich mehrere Auro-Boxen verketten, um größere Beschallungssysteme
aufzubauen.
Zum zusätzlichen Schutz der Lautsprecher sind die Auro D208 und D210 mit doppelten optischen
Limitern ausgerüstet, die Ihren Boxen bei allen Pegeln einen perfekten Klang verleihen. Mit dem integrierten 2-Band-EQ können Sie die Mischung nach Ihren Klangvorstellungen formen. Die trapezförmigen Gehäuse lassen sich als PA-Hauptboxen und als Bodenmonitore kongurieren. Zudem kann
man die Auro D208 und D210 lassen sich mit der integrierten 1 3/8” Ständerhalterung problemlos auf
Ständern montieren.
Das robuste Gehäuse des mühelos transportierbaren Auro PA-Systems besteht aus hochschlagfestem Polypropylen mit kratzfester texturierter Oberäche und einem massiven Stahlschutzgitter, was
einen hervorragenden Schutz gegen Verschleiß bietet. Die Auro-Aktivmonitore sind ideal geeignet
für Live-Musik, DJing, Vorträge und Festinstallationen sowie für alle Gelegenheiten, bei denen Leistungsstärke und exzellente Klangqualität unverzichtbar sind.
Auf diesen Seiten nden Sie eine detaillierte Aufstellung der Funktionen des Auro PA-Systems sowie
eine Be schreibung der Vorder- und Rückseite, schrittweise Anleitungen für die Einrichtung und
Anwendung plus umfassende technische Daten. Bitte vergessen Sie nicht, die beiliegende Garantiekarte ausgefüllt an uns zurückzusenden, damit Sie online technischen Support erhalten und wir
Ihnen zukünftig aktuelle Informationen über dieses und andere Samson-Produkte zukommen lassen
können. Besuchen Sie auch unsere Website (www.samsontech.com), um Informationen über unsere
komplette Produktpalette zu erhalten.
Bei sorgsamer Behandlung und angemessener Belüftung wird Ihre Auro-Aktivbox viele Jahre
störungsfrei funktionieren. Die Seriennummer Ihres Geräts sollten Sie vorsorglich in der Zeile unten
eintragen.
Seriennummer: _______________________________
Kaufdatum: __________________________________
ENGLISH
FRANÇAISDEUTSCHEESPAÑOLITALIANO
Falls Ihr Gerät einmal gewartet werden muss, benötigen Sie vor der Rücksendung an Samson eine
Return Authorization-Nummer (RA/Rücksendeberechtigungsnummer). Ohne diese Nummer wird das
Gerät nicht angenommen. Rufen Sie bitte Samson unter 1-800-3SAMSON (1-800-372-6766) an, um
vor der Rücksendung eine RA-Nummer zu erhalten. Bewahren Sie das Verpackungsmaterial auf und
schicken Sie das Gerät möglichst im Originalkarton und der Originalverpackung zurück. Wenn Sie Ihr
Samson-Produkt nicht in den USA gekauft haben, setzen Sie sich bei Fragen zu Garantie und Wartung
bitte mit Ihrem lokalen Vertrieb in Verbindung.
Owner's Manual
Auro D208/D210
29
Page 30

Auro D208/D210 Features
Die wichtigsten Features der Auro-Aktivboxen:
• 2-Weg, 200-Watt Aktivboxen für die Live-Beschallung
• 150 W LF + 50 W HF Endstufen (Spitzenleistung)
• Ultrabreiter linearer Frequenzgang
• Speziell entwickelte, hochbelastbare 8”/10” Basstreiber mit weiter Auslenkung und optimiertem
Bassfrequenz gang
• 1” Höhentreiber mit 1” Trichterönung für ausgewogene Höhenwiedergabe
• Symmetrischer Mic/Line-Eingang mit Pegelregler und Peak LED
• 2-Band LF und HF Shelving EQ
• XLR Line-Ausgänge zum Verketten mehrerer Auro-Boxen
• Mehrbandige Dynamikbearbeitung mit hörbar transparentem Limiting
• Internes laufzeitangepasstes elektronisches Crossover mit 24 dB/Oktave
• 35° Monitorwinkel bei der D208 und 45° Monitorwinkel bei der D210Standard 1 3/8” (35 mm)
Boxenständerhalterung
• Vielseitige tragbare Konstruktion mit integrierten Seitengrien
• Abgestimmtes Bassreexsystem mit Luftkanal für erweiterte Tiefbässe
• Robustes, leichtes Polypropylen-Gehäuse
30
Auro D208/D210
Page 31

Schnellstart
Die folgenden Schritte werden Ihnen bei der Inbetriebnahme Ihrer Auro D208/D210 Aktivboxen
helfen.
Einrichtung
1. Drehen Sie den rückseitigen Pegelregler ganz nach links.
2. Stellen Sie die Bass- und Treble EQ-Regler auf 12 Uhr ein.
3. Stellen Sie den Power-Schalter auf OFF ein.
Anschlüsse
1. Schließen Sie entweder das Line-Pegel-Signal Ihres Mischers (oder andere Quelle) oder ein Mikrofon an die Input-Buchse auf dem rückseitigen Bedienfeld der Auro D208/D210 an.
2. Schließen Sie das mitgelieferte Netzkabel an den rückseitigen IEC-Eingang der Box an. Verbinden
Sie das Netzkabel mit einer Netzsteckdose.
3. Hinweis: Achten Sie immer darauf, dass die Netzsteckdose die Spannung liefert, die auf dem rückseitigen Bedienfeld der Auro angegeben ist.
Betrieb
1. Stellen Sie den Netzschalter auf ON ein.
2. Speisen Sie ein Audiosignal über Ihren Mischer ein oder sprechen Sie ins Mikrofon.
3. Drehen Sie den Pegelregler der Auro langsam auf, bis die gewünschte Lautstärke erreicht ist.
4. Wenn die Boxen sehr laut sind oder deren Peak-Anzeige häug blinkt, drehen Sie den Pegelregler
der Auro D208/D210 etwas zurück, bis die Peak-Anzeige nicht mehr oder nur noch bei Signalspitzen aueuchtet.
ENGLISH
FRANÇAISDEUTSCHEESPAÑOLITALIANO
Owner's Manual
Auro D208/D210
31
Page 32

Rückseite
1. XLR-Eingang
Diese XLR-Buchse akzeptiert ein symmetrisches Signal mit Mikrofon- oder LinePegel.
2. 6,35 mm Eingang
Diese 6,35 mm-Buchse akzeptiert symmetrische Mikrofonsignale oder symmetrische
und unsymmetrische Line-Pegel-Signale.
3. Line-Ausgang
Über diesen XLR-Stecker lassen sich mehrere
Auro-Boxen koppeln.
4. Pegelregler
Damit stellen Sie den Gesamtsignalpegel am
Eingang der Endstufen ein. Um ein LinePegel-Signal zu verstärken, drehen Sie den
Regler von ganz links in Richtung 12 Uhr. Bei
einem Signal mit Mikrofonpegel drehen Sie
den Regler über 12 Uhr hinaus.
5. Bass EQ-Regler
Steuert das tiefe Band des EQ, +/-15 dB bei
80 Hz.
6. Treble EQ-Regler
Steuert das hohe Band des EQ, +/-15 dB bei
12 kHz.
7. Peak-Anzeige
Diese ROTE LED leuchtet, wenn sich der
Verstärker der Clipping-Grenze nähert. Wenn
die Peak-Anzeige häug leuchtet, drehen Sie
den Pegelregler an der Auro-Box oder das
Signal an der Quelle so weit zurück, bis die
Anzeige nicht mehr oder nur gelegentlich
bei Signalspitzen leuchtet.
8. Netzanzeige
Diese LED leuchtet GRÜN bei aktiviertem
Verstärker.
9. Netzschalter
Schaltet die Auro ein.
4
7
2 1
8
5
6
9
3
10
10. Netzeingang
Schließen Sie hier das mitgelieferte standard IEC-Netzkabel an.
32
Auro D208/D210
Page 33

Mikrofon anschließen
ENGLISH
Mikrofon verwenden
• Achten Sie darauf, dass der Auro D208/D210 Netzschalter auf O steht.
• Drehen Sie den Pegelregler (LEVEL) ganz nach links auf O.
• Verbinden Sie das Netzkabel mit einer Netzsteckdose.
• Schließen Sie ein Mikrofon über ein standard XLR-Kabel an den XLR-Eingang der Auro an.
• Stellen Sie den Netzschalter auf ON.
• Sprechen oder singen Sie ins Mikrofon und drehen Sie den Pegelregler langsam auf, bis die
gewünschte Lautstärke erreicht ist.
• Für größere Beschallungsaufgaben können Sie mehrere Boxen betreiben, indem Sie mehrere
Auros über die Line-Ausgänge miteinander verketten.
FRANÇAISDEUTSCHEESPAÑOLITALIANO
Owner's Manual
Auro D208/D210
33
Page 34

Stereo-Signalquelle anschließen
Stereosignal mit Line-Pegel verwenden
• Achten Sie darauf, dass der Auro D208/D210 Netzschalter auf O steht.
• Drehen Sie den Pegelregler (LEVEL) ganz nach links auf O.
• Verbinden Sie das Netzkabel mit einer Netzsteckdose.
• Schließen Sie die Line-Pegel-Signale eines Mischers oder Keyboards über standard XLR- oder 6,35
mm-Kabel an die Auro-Eingänge an.
• Stellen Sie den Netzschalter auf ON.
• Speisen Sie jetzt ein Audiosignal vom Mischer ein (z. B. Musik von CD) und drehen Sie den Auro-
Pegelregler langsam auf, bis die gewünschte Lautstärke erreicht ist.
34
Auro D208/D210
Page 35

Zwei Boxen pro Seite koppeln
ENGLISH
Zwei Auro-Boxen pro Seite koppeln:
• Drehen Sie den Pegelregler (LEVEL) ganz nach links auf O.
• Verbinden Sie den linken und rechten Line-Pegel-Ausgang eines Mischers mit den Eingängen von
zwei Auro-Boxen.
• Speisen Sie die Line-Ausgänge der D208/D210 in ein weiteres Paar von Auro-Boxeneingängen
ein.
FRANÇAISDEUTSCHEESPAÑOLITALIANO
• Speisen Sie jetzt ein Audiosignal vom Mischer ein (z. B. Musik von CD) und drehen Sie den AuroPegelregler langsam auf, bis die gewünschte Lautstärke erreicht ist.
Owner's Manual
Auro D208/D210
35
Page 36

Auro D208/D210 positionieren
Boxenplatzierung
Man sollte die Boxen möglichst immer über den Köpfen
der Zuhörer platzieren. Die Auro-Gehäuse verfügen über
standard 1 3/8” Ständerhalterungen, die zu Boxenständern
verschiedenster Hersteller kompatibel sind. In einem kleineren Setup, z. B. Schulcafeteria, Bibliothek oder Kiosk, kann
man die Auro-Boxen auch in einer der zurückgekippten
Monitorpositionen betreiben, die die Abstrahlung der Boxen
verbessern und Ständer eventuell überüssig machen.
Hinweis: Die verwendeten Ständer müssen das Gewicht der
Auro-Boxen sicher tragen können.
Hinweis: Bitten Sie immer jemanden um Hilfe, wenn Sie die
Auro-Box auf einen Ständer montieren oder den Ständer bei
montierter Box neu einstellen.
Auro D208/D210 als Bodenmonitor betreiben
Die Auro D208/D210 ist die ideale Lösung für das Bühnenmonitoring, da sie dank ihrer neuartigen Konstruktion auf
die Seite gelegt und als Bodenmonitor benutzt werden
kann. Der Monitorwinkel der Auro D208 beträgt 35° und der
Monitorwinkel der Auro D210 beträgt 45°.
36
Auro D208/D210
Page 37

Anschlüsse
Da die Auro D208/D210 über symmetrische Ein- und Ausgänge verfügt, kann man symmetrische und
unsymmetrische Signale anschließen. Verwenden Sie möglichst immer symmetrische Verbindungen
zu anderen Geräten, um Störungen zu unterdrücken.
unsymmetrischer 6,35 mm Anschluss
Spitze (Signal) Spitze (Signal)
Schirm (Masse) Schirm (Masse)Masse Masse Masse Masse
Signal Signal Signal Signal
symmetrischer 6,35 mm TRS-Anschluss
Spitze (Signal)
Ring (Signal)
Schirm (Masse)
Signal (Ring)
Signal (Spitze)
Masse
Signal (Spitze)
Masse
Signal (Ring)
XLR auf XLR symmetrisch
Heiß (2)
Masse (1) Masse
2
1 2
3
Rückansicht Lötpunkte
1
3
Kalt (3)
XLR-Stecker
unsymmetrischer 6,35 mm Anschluss auf Cinch
Spitze (Signal)
Schirm (Masse)
Signal (Spitze)
Masse
XLR-Buchse
Spitze (Signal) Spitze (Signal)
Heiß
Kalt
Signal (Ring)
Heiß
Kalt
Signal (Ring)
Signal (Spitze)
Masse
Ring (Signal)
Schirm (Masse)
Heiß (2)
Masse (1)Masse
Kalt (3)
Spitze (Signal)
1
2
2 1
3
3
Lötpunkte Rückansicht
ENGLISH
FRANÇAISDEUTSCHEESPAÑOLITALIANO
XLR auf 6,35 mm symmetrisch
Heiß (2)
Masse (1)
2
1 2
3
Rückansicht Lötpunkte
Owner's Manual
1
3
Kalt (3)
XLR-Stecker
Schirm (Masse)
Spitze (Signal)
Kalt (Pol 3)
Schirm (Masse)
Auro D208/D210
Schirm (Masse)
Signal (Ring)
Signal (Spitze)
Masse
Ring (Signal)
Schirm (Masse)
Spitze (Signal)
37
Page 38

Technische Daten
D208 D210
Ausgangsleistung
Dauer 135 W @ 8 Ohm
Bässe
Höhen
Bässe 8” Basswandler 10” Basswandler
Höhen 1” (25 mm) Höhentreiber
Frequenzgang (-3 dB) 64 Hz bis 20 kHz 60 Hz bis 20 kHz
Max. Schalldruck 113 dB SPL @ 1 113 dB SPL @ 1 m
Limiter optisch
Horizontaler Abstrahlwinkel 90°
Vertikaler Abstrahlwinkel 60°
Crossover-Typ 24 dB/Okt. Linkwitz-Riley
Crossover-Frequenz 2,1 kHz
Eingänge symmetrische XLR & 6,35 mm Mic/Line-Anschlüsse
Ausgänge symmetrischer XLR Line-Ausgang
Höhen ±15 dB @ 12 kHz, Shelving
Bässe ±15 dB @ 80 Hz, Shelving
Leistungsaufnahme 300 W max.
Netzanschluss 3-Pol IEC 250 VAC, 20 A Stecker
Sicherung 100 - 115 VAC T5AL / 250 V
Abmessungen Zoll 9,8” L x 8,0” B x 14,7” H 11,5” L x 9,6” B x 18,3” H
Gewicht lbs 14,7 18,8
Montageverfahren Integrierte 1 3/8” Ständerhalterung
Aufhängepunkte 1
Spitze 160 W @ 8 Ohm
Klirrfaktor < 1 %
Dauer 20 W @ 8 Ohm
Spitze 40 W @ 8 Ohm
Klirrfaktor < 1 %
Wandler
Akustische Leistung
Elektronisches Crossover
Eingang/Ausgang
Equalizer
Spannungsversorgung
220 - 240 VAC T2,5AL / 250 V
Abmessungen und Gewicht
mm 249 mm L x 205 mm B x 372 mm H 292 mm L x 244 mm B x 464 mm H
kg 6,66 8,52
Montage
38
Technische Daten können unangekündigt geändert werden.
Auro D208/D210
Page 39

Abmessungen
8,0 in/
205 mm
14,7 in/
372 mm
9.8 in/
249 mm
9,6 in/
244 mm
11,5 in/
292 mm
ENGLISH
FRANÇAISDEUTSCHEESPAÑOLITALIANO
18,3 in/
464 mm
Owner's Manual
Auro D208/D210
39
Page 40

Indice
Introducción . . . . . . . . . . . . . . . . . . . . . . . . . . . . . . . . . . . . . . . . . . . . . . .41
Características del Auro D208/D210. . . . . . . . . . . . . . . . . . . . . . . . . . . . . . . . .42
Puesta en marcha . . . . . . . . . . . . . . . . . . . . . . . . . . . . . . . . . . . . . . . . . . . .43
Panel trasero . . . . . . . . . . . . . . . . . . . . . . . . . . . . . . . . . . . . . . . . . . . . . . .44
Conexión de un micrófono . . . . . . . . . . . . . . . . . . . . . . . . . . . . . . . . . . . . . .45
Conexión de una fuente de señal stereo . . . . . . . . . . . . . . . . . . . . . . . . . . . . . .46
Enlace de dos recintos por lado . . . . . . . . . . . . . . . . . . . . . . . . . . . . . . . . . . .47
Colocación del Auro D208/D210. . . . . . . . . . . . . . . . . . . . . . . . . . . . . . . . . . .48
Conexiones . . . . . . . . . . . . . . . . . . . . . . . . . . . . . . . . . . . . . . . . . . . . . . . .49
Especicaciones técnicas . . . . . . . . . . . . . . . . . . . . . . . . . . . . . . . . . . . . . . .50
Dimensiones . . . . . . . . . . . . . . . . . . . . . . . . . . . . . . . . . . . . . . . . . . . . . . .51
40
Auro D208/D210
Page 41

Introducción
Felicidades y gracias por la compra de estos recintos acústicos profesionales autoamplicados
Samson Auro. Los Auro D208 y D210 son recintos acústicos compactos y potentes que le ofrecen
200 watios de potencia biamplicada interna. El Auro D208 y D210, respectivamente, dispone de un
woofer de alto rendimiento y largo recorrido de excursión de 8” y 10”, así como cabezales de agudos
de 1” con trompetas de gran dispersión con un cuello de 1”. Estos recintos le ofrecen conectores XLR y
de 6,3 mm capaces de admitir tanto entradas de nivel de micro como de línea. La salida de línea XLR
le permite conectar en cadena varios recintos Auro juntos para crear sistemas de refuerzo de sonido
aun más potentes.
Para una mayor protección de los altavoces, los Auro D208 y D210 disponen de un doble limitador
óptico que hacen que sus altavoces suenen a la perfección en cualquier momento, y el ecualizador
integrado de dos bandas le permite modelar la mezcla hasta conseguir el sonido deseado. Este
recinto ha sido diseñado con un formato que le permite usarlo tanto como caja para usos FOH
o como monitor de escenario tipo cuña. Además, el Auro D208 y D210 pueden ser fácilmente
montados sobre un soporte de barra gracias al casquillo integrado de 1 3/8”.
La robusta carcasa de cada uno de estos recintos Auro está fabricada en polipropileno de gran
resistencia a los golpes y con un acabado exterior realmente duro, e incluyen una parrilla de acero de
gran robustez, lo que le ofrece una protección total contra el desgaste y el uso, para convertirlos en
unidades audio totalmente portátiles y listas para las giras. Los monitores activos Auro son perfectos
para música en directo, DJ, conferencias y aplicaciones de sonido jas, o en cualquier otro lugar en la
que necesite verdadera potencia y calidad de sonido.
En estas páginas encontrará una descripción detallada de las características del sistema PA Auro,
así como una descripción de su panel frontal y posterior, instrucciones paso-a-paso para su
conguración y manejo y una completa tabla de especicaciones técnicas. También encontrará una
tarjeta de garantía—no se olvide de cumplimentarla y devolvérnosla por correo para que pueda
recibir soporte técnico online y para que podamos enviarle información actualizada acerca de este y
otros productos Samson en el futuro. Además, consulte nuestra página web (www.samsontech.com)
para ver la información de toda nuestra gama de productos.
Con unos cuidados mínimos y una correcta refrigeración, su recinto Auro funcionará sin darle ningún
problema durante años. Para cualquier referencia futura, le recomendamos que apunte aquí abajo el
número de serie.
Número de serie: _______________________________
ENGLISH
FRANÇAISDEUTSCHEESPAÑOLITALIANO
Fecha de compra: ____________________________
En el improbable caso de que este aparato deba ser reparado en algún momento, deberá
conseguir un número de Autorización de devolución (RA) antes de enviar este aparato a Samson.
Sin este número, ninguna unidad será aceptada. Póngase en contacto con Samson en el teléfono
1-800-3SAMSON (1-800-372-6766) para solicitar su número de Autorización de devolución antes de
devolvernos su unidad. Conserve el embalaje original y las protecciones y, si es posible, devuélvanos
la unidad en ellos. Si adquirió este producto Samson fuera de los Estados Unidos, póngase en
contacto con su distribuidor local para que le facilite los detalles acerca de la garantía y reparaciones.
Owner's Manual
Auro D208/D210
41
Page 42

Características del Auro D208/D210
Estas son algunas de las características principales de los recintos acústicos autoamplicados Auro:
• Recintos acústicos activos de 2 vías y 200 watios para aplicaciones de sonido directo
• Etapas de potencia de 150 W en graves + 50 W agudos (picos)
• Respuesta de frecuencia plana y súper ancha
• Cabezales de graves de gran proyección y alto rendimiento de 8”/10” de diseño exclusivo para
ofrecerle una respuesta mejorada en las bajas frecuencias
• Cabezal de agudos de 1” con garganta de 1” para una reproducción totalmente suave de los súper
agudos
• Entrada balanceada de micro/línea con control de volumen y piloto de picos
• Ecualizador de dos bandas con estantería de graves y agudos
• Conectores de salida de línea XLR que le permiten conectar en cadena varios recintos Auro
• Procesado dinámico multibandas con limitación totalmente transparente
• Crossover interno electrónico de 24 dB/octava con alineación de tiempo
• Posibilidad de colocación como monitor en cuña con un ángulo de 35° para el D208 y de 45° para
el D210
• Casquillo para barras de soporte de altavoz standard de 1 3/8” (35 mm)
• Diseño versátil y manejable con asas laterales integradas
• Diseño de tobera reex de graves, anada para unos súper graves mejorados
• Recinto fabricado en polipropileno, de gran resistencia y ligereza
42
Auro D208/D210
Page 43

Puesta en marcha
Los pasos siguientes le ayudarán a la hora de congurar y poner en marcha sus recintos Auro D208/
D210.
Conguración
1. Gire el control de nivel (Level) del panel trasero a su tope izquierdo (mínimo).
2. Ajuste los controles de EQ Bass y Treble a la posición de las “12 en punto”.
3. Apague la unidad (asegúrese de que el interruptor de encendido esté en la posición OFF).
Conexiones
1. Conecte una señal de nivel de línea procedente de su mezclador (u otra fuente) o un micrófono a
la toma Input del panel trasero del Auro D208/D210.
2. Conecte el cable de alimentación incluido a la toma IEC de la parte trasera del recinto. Conecte el
otro extremo a una salida de corriente alterna.
ENGLISH
3. Nota: Asegúrese siempre de que la salida de corriente alterna sea del voltaje y amperaje que
aparecen indicados en el panel trasero de su recinto Auro.
Funcionamiento
1. Coloque el interruptor de encendido (Power) de su recinto Auro en la posición ON.
2. Haga pasar una señal audio desde su mesa de mezclas, o hable o cante en el micrófono.
3. Suba lentamente la posición del control Level del Auro hasta que consiga el nivel de escucha que
quiera.
4. Si el volumen emitido por sus altavoces es demasiado potente, o si observa que el indicador
Peak parpadea con demasiada frecuencia, reduzca un poco la posición del control Level del Auro
D208/D210 hasta que el piloto deje de iluminarse o hasta que solo lo haga de forma puntual en
los picos de señal.
FRANÇAISDEUTSCHEESPAÑOLITALIANO
Owner's Manual
Auro D208/D210
43
Page 44

Panel trasero
1. Conector de entrada XLR
Esta toma XLR hembra acepta una señal de
nivel de línea o de micro balanceada.
2. Conector de entrada de 6,3 mm
Use esta entrada de 6,3 mm para la conexión
de entrada de nivel de micro balanceadas o
de nivel de línea tanto balanceadas como no
balanceadas.
3. Salida de línea
Conector XLR macho que le permite enlazar
varios recintos acústicos Auro.
4. Control Level
Este control le permite ajustar el nivel de
señal global en la entrada de las etapas de
potencia. Si quiere atenuar una señal de
nivel de línea, gire el control desde su tope
izquierdo hasta la posición de las “12 en
punto”. Para una señal de nivel de micro,
llévelo más allá de la posición de las “12 en
punto”.
5. Control EQ Bass
Esto controla la banda de graves del recinto
acústico en un rango de +/- 15 dB a 80 Hz.
6. Control EQ Treble
Esto controla la banda de agudos del recinto
7
acústico en un rango de +/- 15 dB a 12 kHz.
7. Indicador Peak
Este piloto ROJO se ilumina cuando el
amplicador está cerca del punto de
saturación. Si este piloto se ilumina con
frecuencia, baje el control Level de su recinto
8
Auro o baje el nivel de la señal en la fuente
hasta que el piloto ya no se encienda o lo
haga solamente de forma puntual en los
picos de señal.
8. Indicador de encendido
Este piloto se ilumina en VERDE cuando la unidad esté encendida.
9. Interruptor Power
Le permite encender o apagar el Auro.
4
2 1
5
6
9
3
10
10. Entrada de corriente
Conecte aquí el cable de alimentación IEC standard incluido.
44
Auro D208/D210
Page 45

Conexión de un micrófono
ENGLISH
Uso de un micrófono
• Asegúrese de que el interruptor de encendido del Auro D208/D210 esté en la posición OFF.
• Coloque el control LEVEL al mínimo (tope izquierdo).
• Conecte el cable de alimentación en la entrada de corriente del recinto y en una salida de
corriente alterna.
• Usando un cable XLR standard, conecte un micrófono en la toma INPUT XLR del Auro.
• Coloque el interruptor de encendido en la posición ON.
• Mientras habla o canta en el micrófono, suba lentamente la posición del mando LEVEL hasta que
consiga el nivel deseado.
• Para sistemas de refuerzo de sonido mayores, puede conectar juntos varios monitores usando la
salida de línea para conectar en cadena un recinto Auro con otro.
FRANÇAISDEUTSCHEESPAÑOLITALIANO
Owner's Manual
Auro D208/D210
45
Page 46

Conexión de una fuente de señal stereo
Uso de una señal de nivel de línea stereo
• Asegúrese de que el interruptor de encendido del Auro D208/D210 esté en la posición OFF.
• Coloque el control LEVEL al mínimo (tope izquierdo).
• Conecte el cable de alimentación en la entrada de corriente del recinto y en una salida de
corriente alterna.
• Usando cables con conectores standard XLR o de 6,3 mm, conecte las señales de nivel de línea
procedentes de su mezclador o teclado a las entradas del Auro.
• Coloque el interruptor de encendido en la posición ON.
• Ahora, haga pasar una señal audio desde su mezclador (como la de un CD de música, por
ejemplo) mientras gira lentamente hacia la derecha el control Level del Auro hasta que consiga el
nivel de escucha que quiera.
46
Auro D208/D210
Page 47

Enlace de dos recintos por lado
ENGLISH
Enlace de dos recintos Auro por lado:
• Coloque el control LEVEL en su posición mínima (tope izquierdo).
• Conecte las salidas de nivel de línea izquierda y derecha de su mezclador en las entradas de dos
recintos Auro.
• Conecte las salidas de línea de estos recintos a las entradas de otro par de recintos Auro.
• Ahora, haga pasar una señal audio desde su mezclador (como la de un CD de música, por
ejemplo) mientras gira lentamente hacia la derecha el control Level del Auro hasta que consiga el
nivel de escucha que quiera.
FRANÇAISDEUTSCHEESPAÑOLITALIANO
Owner's Manual
Auro D208/D210
47
Page 48

Colocación del Auro D208/D210
Colocación del recinto acústico
Siempre que sea posible, resulta una buena idea colocar
los altavoces a una altura superior a la de las cabezas del
público. Los recintos acústicos Auro disponen de casquillos
standard de 1 3/8” para colocación en barra con tuercas
de jación, compatibles con gran cantidad de soportes de
altavoz del mercado. En entornos más reducidos (bares,
bibliotecas, kioskos) puede colocar también los Auro en el
suelo, inclinados en cuña, lo que mejorará la proyección de
los altavoces y eliminará la necesidad de soportes.
Nota: Cuando instale los altavoces en barra, asegúrese que
sea capaz de soportar el peso de los recintos Auro.
Nota: Haga siempre que otra persona le ayude cuando
coloque los recintos Auro sobre un soporte de altavoces o
cuando ajuste el soporte con el altavoz ya instalado en él.
Uso del Auro D208/D210 como un monitor de
suelo
El Auro D208/D210 es la solución perfecta para
monitorización de escenario y, gracias a su exclusivo diseño,
puede colocarlo de lado para usarlo como monitor de cuña.
El Auro D208 le permite colocarlo como un monitor con un
ángulo de 35° y el Auro D210 con un ángulo de 45°.
48
Auro D208/D210
Page 49

Conexiones
Los recintos acústicos Auro D208/D210 disponen de entradas y salidas balanceadas, por lo que
puede usarlos con señales tanto balanceadas como no balanceadas. Siempre que sea posible, use
conexiones balanceadas para evitar posibles interferencias con el resto de equipos.
Conector 6,3 mm no balanceado
Punta (señal)
Lateral (masa) Lateral (masa)
Señal
Masa
Conector TRS 6,3 mm balanceado
Punta (señal)
Lateral (masa)
Señal (anillo)
Masa
Señal (punta)
XLR a XLR balanceado
Común (1)
Activo (2)
Puntos de
Vista
frontal
soldadura
XLR macho
Masa
Masa
Común
Señal
Señal (punta)
Señal (anillo)
Activo Activo
Pasivo Pasivo
Señal
Señal (punta)
Señal (anillo)
Masa
Común
Masa
Señal
Masa
Señal (punta)
Masa
XLR hembra
Señal (anillo)
Anillo (señal)Anillo (señal)
Lateral (masa)
Común (1)
Pasivo (3)Pasivo (3)
Punta (señal)
Punta (señal)
Activo (2)
Puntos de
soldadura
Vista
frontal
ENGLISH
FRANÇAISDEUTSCHEESPAÑOLITALIANO
Conector de 6,3 mm no balanceado a RCA
Punta (señal)
Lateral (masa)
XLR a 6,3 mm balanceado
Activo (2)
Común (1)
Vista
frontal
Puntos de
soldadura
Pasivo (3)
XLR macho
Owner's Manual
Punta (señal)
Lateral (masa)
Pasivo (punta 3)
Lateral (masa)
Auro D208/D210
Punta (señal)
Lateral (masa)
Punta (señal) Punta (señal)
Señal (punta)
Masa
Anillo (señal)
Anillo (señal)
Lateral (masa)
49
Page 50

Especicaciones técnicas
Potencia de salida
D208 D210
Potencia RMS
Bajas frecuencias
Altas frecuencias
Bajas frecuencias Transductor de graves de 8” Transductor de graves de 10”
Altas frecuencias Cabezal de agudos de 1” (25 mm)
Respuesta de frecuencia (-3 dB) 64 Hz a 20 kHz 60 Hz a 20 kHz
Nivel máximo presión sonora 113 dB SPL @ 1 m 113 dB SPL @ 1 m
Limitador Óptico
Ángulo cobertura horizontal 90°
Ángulo cobertura vertical 60°
Tipo de crossover 24 dB/octava Linkwitz-Riley
Frecuencia de crossover 2.1 kHz
Entradas Conectores micro/línea XLR y 6,3 mm balanceados
Salida Salida de línea XLR balanceada
Agudos ±15 dB @ 12 kHz, estantería
Graves ±15 dB @ 80 Hz, estantería
Consumo 300 W máximo
Conector de corriente IEC de 3 puntas 250 V CA, 20 A, macho
Fusible 100 - 115 V CA T5AL / 250 V
Dimensiones in 9.8” L x 8.0” P x 14.7” A 11.5” L x 9.6” P x 18.3” A
Peso lbs 14.7 18.8
Método de montaje Casquillo para montaje en barra de 1 3/8”
Puntos de anclaje suspendido 1
Potencia picos
THD < 1 %
Potencia RMS
Potencia picos
THD < 1 %
Transductores
Rendimiento acústico
Crossover electrónico
Entrada/salida
Ecualización
Alimentación
Dimensiones y peso
mm 249 mm L x 205 mm P x 372 mm A 292 mm L x 244 mm P x 464 mm A
kg 6.66 8.52
Sistema de montaje
135 W @ 8 ohmios
160 W @ 8 ohmios
20 W @ 8 ohmios
40 W @ 8 ohmios
220 - 240 V CA T2.5AL / 250 V
50
Estas especicaciones están sujetas a cambios sin previo aviso.
Auro D208/D210
Page 51

Dimensiones
8,0 in/
205 mm
14,7 in/
372 mm
9.8 in/
249 mm
9,6 in/
244 mm
11,5 in/
292 mm
ENGLISH
FRANÇAISDEUTSCHEESPAÑOLITALIANO
18,3 in/
464 mm
Owner's Manual
Auro D208/D210
51
Page 52

Indice
Introduzione . . . . . . . . . . . . . . . . . . . . . . . . . . . . . . . . . . . . . . . . . . . . . . .53
Auro D208/D210 – Caratteristiche. . . . . . . . . . . . . . . . . . . . . . . . . . . . . . . . . .54
Guida rapida . . . . . . . . . . . . . . . . . . . . . . . . . . . . . . . . . . . . . . . . . . . . . . .55
Pannello posteriore . . . . . . . . . . . . . . . . . . . . . . . . . . . . . . . . . . . . . . . . . . .56
Collegare un microfono . . . . . . . . . . . . . . . . . . . . . . . . . . . . . . . . . . . . . . . .57
Collegare una sorgente in stereo. . . . . . . . . . . . . . . . . . . . . . . . . . . . . . . . . . .58
Collegare due casse per canale. . . . . . . . . . . . . . . . . . . . . . . . . . . . . . . . . . . .59
Posizionamento delle Auro D208/D210 . . . . . . . . . . . . . . . . . . . . . . . . . . . . . .60
Collegamenti . . . . . . . . . . . . . . . . . . . . . . . . . . . . . . . . . . . . . . . . . . . . . . .61
Speciche . . . . . . . . . . . . . . . . . . . . . . . . . . . . . . . . . . . . . . . . . . . . . . . . .62
Dimensioni . . . . . . . . . . . . . . . . . . . . . . . . . . . . . . . . . . . . . . . . . . . . . . . .63
52
Auro D208/D210
Page 53

Introduzione
Grazie per aver acquistato le casse acustiche professionali attive Auro Samson. Le Auro D208 e D210
sono casse acustiche compatte e potenti che orono 200 watt in biamplicazione e, rispettivamente,
di woofer “heavy duty” a escursione ampia da 8” (20 cm) e 10” (25 cm), oltre a un altoparlante ad alta
frequenza da 1” (25 mm) con tromba a dispersione ampia da 1” (25 mm). Il pannello dispone sia di
prese sia XLR sia di jack da 6,25 mm, in grado di gestire ingressi di livello microfonico o di linea. L’uscita XLR permette di collegare in cascata più casse Auro per creare sistemi di amplica-zione sonora di
dimensioni maggiori.
A ulteriore protezione degli altoparlanti, le Auro D208 e D210 dispongono di doppi limitatori ottici
che ne mantengono perfetto il suono a qualsiasi livello, e di un equalizzatore interno a due bande
che permette di scolpirne il suono a piacere. La loro forma trapezioidale ne permette l’uso sia come
casse frontali che come monitor da palco. Inoltre, sono le Auro D208 e le D210 possono facilmente
essere installate su asta, grazie al ricettacolo interno per il montaggio su aste da 1 e 3/8”.
Il cabinet esterno di ognuno dei sistemi PA Auro è realizzato in polipropilene resistente agli urti, con
nitura lavorata antigrao, ed è dotato di una robusta griglia in acciaio che ore una protezione
eccellente contro l’usura alla quale vanno inevitabilmente incontro i sistemi audio portatili. I monitor
attivi Auro sono ideali per la musica dal vivo, per i DJ, nell’ambito di conferenze e installazioni sonore, oppure per qualsiasi situazione in cui si vuole disporre di un livello superiore di potenza e qualità
sonora.
ENGLISH
Queste pagine forniscono una panoramica dettagliata sulle caratteristiche dei sistemi PA Auro, la descrizione dei pannelli frontali e posteriori, istruzioni passo a passo per il collegamento e l’uso, nonché
le speciche complete. Troverete anche la garanzia, da compilare e inviare per posta per poter ricevere supporto tecnico online e informazioni aggiornate su questo e altri prodotti Samson. Vi invitiamo
anche a visitare anche il nostro sito web (www.samsontech.com) per informazioni complete sulla
nostra intera linea di prodotti.
Se trattate con cura e adeguatamente ventilate, le vostre casse Auro funzioneranno senza problemi
per molti anni. Vi raccomandiamo di annotare qui sotto il numero di serie come futuro riferimento.
Numero di serie: _______________________________
Data d’acquisto: ____________________________
Se l’unità necessitasse di riparazione, prima di spedirla a Samson dovrete ottenere un numero di
Autorizzazione Reso. In sua assenza, l’unità non verrà accettata. Vi preghiamo di contattare Samson al
numero 1-800-3SAMSON (1-800-372-6766) per richiedere il numero di autorizzazione prima di procedere alla spedizione. Conservate l’imballaggio originale e, se possibile, utilizzatelo per spedire l’unità.
Se il prodotto Samson è stato acquistato al di fuori degli Stati Uniti, contattate il vostro distributore di
zona per tutti i dettagli sulla garanzia e l’assistenza.
FRANÇAISDEUTSCHEESPAÑOLITALIANO
Owner's Manual
Auro D208/D210
53
Page 54

Auro D208/D210 – Caratteristiche
Ecco una panoramica su alcune delle caratteristiche delle casse acustiche attive Auro.
• Casse acustiche attive a due vie da 200 watt per applicazioni di amplicazione dal vivo.
• Amplicatori di potenza da 150 W per le frequenze basse e 50 W per le frequenze alte (valori di
picco).
• Risposta in frequenza neutra e particolarmente estesa.
• Altoparlanti per le basse frequenze da 8“/10” (20/25 cm) con progettazione specica, ad ampia
escursione e di tipo “heavy duty”, forniscono una risposta estesa dei bassi.
• Driver da 1” (25 mm) con bocca di emissione da 1” (25 mm), per una riproduzione morbida degli
acuti.
• Ingresso Mic/Line bilanciato con controllo volume e LED Peak.
• Equalizzatore a due bande (shelving) per le frequenze basse e acute.
• Uscita XLR line per il collegamento in cascata di più casse Auro.
• Elaborazione dinamica multibanda con limitatore trasparente sul segnale audio.
• Crossover elettronico interno da 24 dB/ottava ad allineamento temporale.
• Angolatura da monitor a 35 gradi per la D208 e a 45 gradi per la D210.
• Alloggiamento per l’installazione su asta standard da 3,5 cm.
• Design versatile e facilmente trasportabile, con maniglie laterali integrate.
• Design “bass reex” accordato, per una risposta estesa alle basse frequenze.
• Cabinet esterno in polipropilene, robusto e leggero.
54
Auro D208/D210
Page 55

Guida rapida
Le istruzioni qui di seguito vi aiuteranno a congurare le vostre casse acustiche Auro D208/D210.
Congurazione
1. Ruotate completamente in senso orario il controllo Level sul panello posteriore.
2. Regolate i controlli di EQ su Bass e Treble in posizione “a ore 12”.
3. Spostate l’interruttore Power su OFF.
Collegamenti
1. Collegate o un segnale a livello di linea da un mixer (o da un’altra sorgente) o un microfono al jack
di ingresso sul pannello posteriore della Auro D208/D210.
2. Collegate il cavo di alimentazione in dotazione alla presa IEC sul retro della cassa acustica, poi
collegate l’altro capo a una presa di alimentazione CA.
3. Nota: accertatevi sempre che la tensione della presa CA corrisponda a quanto indicato sul pannello posteriore della cassa acustica Auro.
ENGLISH
Uso
1. Spostate l’interruttore Power della Auro su ON.
2. Inviate un segnale audio dal mixer, oppure parlate nel microfono.
3. Alzate lentamente il controllo Level della Auro no a raggiungere il livello desiderato.
4. Se il volume dalla cassa acustica diventa davvero elevato, oppure se l’indicatore LED lampeggia
di frequente, abbassate leggermente il controllo Level dell’Auro D208/D210 no a far spegnere
l’indicatore, o no a farlo accendere solo di tanto in tanto con segnali di picco.
FRANÇAISDEUTSCHEESPAÑOLITALIANO
Owner's Manual
Auro D208/D210
55
Page 56

Pannello posteriore
1. Connettore di ingresso XLR
È un connettore XLR femmina bilanciato che
accetta segnale da un microfono o a livello di
linea.
2. Connettore di ingresso da 6,35 mm
Usate questo ingresso da 6,35 mm per il
collegamento di un microfono bilanciato o di
un segnale bilanciato o sbilanciato a livello di
linea.
3. Uscita Line
Connettore XLR maschio che permette di
collegare più casse Auro in cascata.
4. Controllo Level
Regola il livello globale del segnale all’ingresso dei nali di potenza. Per attenuare
un segnale a livello di linea, ruotatelo dalla
posizione completamente in senso antiorario
no a “ore 12”. Per un segnale microfonico,
ruotatelo oltre la posizione a “ore 12”.
5. Controllo equalizzatore Bass
Controlla le frequenze basse dell’equalizzatore della cassa acustica, +/- 15 dB a 80 Hz.
6. Controllo equalizzatore Treble
Controlla le frequenze acute dell’equalizzatore della cassa acustica, +/- 15 dB a 12 kHz.
7. Indicatore Peak
È un LED ROSSO che si accende quando l’ampli è vicino al punto di clipping. Se l’indicatore Peak si accende di frequente, abbassate
il controllo Level della cassa Auro oppure
abbassate il segnale dalla sorgente nché
l’indicatore non si accende più, o si accende
occasionalmente sui picchi del segnale.
8. Indicatore Power
Il LED diventa VERDE quando l’ampli è acceso.
9. Interruttore Power
È l’interruttore che controlla l’accensione della cassa Auro.
4
7
2 1
8
5
6
9
3
10
10. Presa di alimentazione CA
Collegate qui il cavo di alimentazione IEC standard in dotazione.
56
Auro D208/D210
Page 57

Collegare un microfono
ENGLISH
Usare un microfono
• Accertatevi che l’interruttore Power della Auro D208/D210 sia in posizione OFF.
• Ruotate completamente il controllo LEVEL in senso antiorario, no a disattivarlo.
• Collegate il cavo di alimentazione a una presa CA.
• Usando un cavo XLR standard, collegate un microfono all’ingresso XLR della Auro.
• Spostate l’interruttore Power in posizione ON.
• Parlando o cantando nel microfono, alzate lentamente il controllo LEVEL no a raggiungere il
livello desiderato.
• Se volete creare sistemi di amplicazione di dimensioni più ampie, potete connettere più monitor
sfruttando l’uscita Line delle Auro per eettuare un collegamento in cascata.
FRANÇAISDEUTSCHEESPAÑOLITALIANO
Owner's Manual
Auro D208/D210
57
Page 58

Collegare una sorgente in stereo
Usare un segnale stereo a livello di linea
• Accertatevi che l’interruttore Power della Auro D208/D210 sia in posizione OFF.
• Ruotate completamente il controllo LEVEL in senso antiorario, no a disattivarlo.
• Collegate il cavo di alimentazione a una presa CA.
• Usando cavi XLR o da 6,35 mm standard, collegate i segnali a livello di linea da un mixer o una
tastiera agli ingressi della Auro.
• Spostate l’interruttore Power in posizione ON.
• A questo punto mandate un segnale audio dal mixer (ad esempio musica da un CD) e alzate len-
tamente il controllo LEVEL delle Auro no a raggiungere il livello desiderato.
58
Auro D208/D210
Page 59

Collegare due casse per canale
ENGLISH
Collegare due casse Auro per canale
• Ruotate completamente il controllo LEVEL in senso antiorario, no a disattivarlo.
• Collegate le uscite destra e sinistra a livello di linea di un mixer agli ingressi di due casse Auro.
• Collegate le uscite LINE agli ingressi di un’altra coppia di casse Auro.
• A questo punto mandate un segnale audio dal mixer (ad esempio musica da un CD) e alzate len-
tamente il controllo LEVEL delle Auro no a raggiungere il livello desiderato.
FRANÇAISDEUTSCHEESPAÑOLITALIANO
Owner's Manual
Auro D208/D210
59
Page 60

Posizionamento delle Auro D208/D210
Posizionare le casse
Quando possibile, è sempre una buona idea sollevare le casse al di sopra della testa degli ascoltatori. Le casse acustiche
Auro hanno alloggiamenti standard per il montaggio su aste
da 3,5 cm, compatibili con aste per casse di vari costruttori.
In contesti di dimensioni più contenute, per esempio nella
mensa di una scuola, in una libreria o in uno stand, potete
anche usare le casse Auro in una delle posizioni inclinate da
monitor, cosa che migliora la proiezione delle casse e può
eliminare la necessità di montarle su aste.
Nota: quando installate una cassa Auro su un’asta, assicuratevi che l’asta possa sopportarne il peso.
Nota: fatevi sempre aiutare da un’altra persona quando
montate le casse Auro sulle apposite aste, o quando regolate
le aste con le casse già installate.
Usare le Auro D208/D210 come monitor da palco
Le Auro D208/D210 sono ideali come monitor da palco, grazie all’esclusivo design che permette di sistemarle sul anco.
Le Auro D208 supportano una posizione a 35 gradi, mentre
le Auro D210 sono regolabili con un’angolazione a 45 gradi.
60
Auro D208/D210
Page 61

Collegamenti
Le Auro D208/D210 dispongono di ingressi e uscite bilanciati per cui è possibile collegare segnali sia
bilanciati sia sbilanciati. Quando possibile, usate collegamenti bilanciati verso gli altri apparecchi,
per eliminare potenziali interferenze.
Connettore Sbilanciato da 1/4”
Punta (segnale)
Corpo (massa)
Segnale
Massa
Connettore TRS Bilanciato da 1/4”
Punta (segnale)
Anello (segnale)
Corpo (massa) Massa
Segnale (anello)
Segnale (punta)
XLR - XLR Bilanciato
Vista di fronte
Punti di
saldatura
Caldo (2)
Freddo (3)
Calza (1)
XLR Maschio
Connettore Sbilanciato da1/4” a RCA
Segnale
Massa
Segnale (anello)
Massa
Segnale (punta)
Calza
Caldo
Freddo
Segnale
Segnale (punta)
Segnale (anello)
Caldo
Freddo
Massa
Calza
Massa
Segnale
Massa
Segnale (punta)
XLR Femmina
Corpo (massa)
Segnale (anello)
Anello (segnale)
Massa
Calza (1)
Punta (segnale)
Corpo (massa)
Caldo (2)
Freddo (3)
Punta (segnale)
Vista di fronte
Punti di
saldatura
ENGLISH
FRANÇAISDEUTSCHEESPAÑOLITALIANO
Punta (segnale)
Corpo (massa)
Connettore Bilanciato da XLR a 1/4”
Caldo (2)
Vista di fronte
Punti di
saldatura
Calza (1)
Freddo (3)
Owner's Manual
XLR Maschio
Punta (segnale)
Corpo (massa)
Punta (segnale)
Freddo (Pin 3)
Corpo (massa)
Auro D208/D210
Punta (segnale)
Corpo (massa)
Segnale (punta)
Massa
Segnale (anello)
Anello (segnale)
Corpo (massa)
Punta (segnale)
61
Page 62

Speciche
D208 D210
Potenza in uscita
Potenza RMS 135 W @ 8 ohm
Basse frequenze
Alte frequenze
Basse frequenze Trasduttore da 8” (20 cm) Trasduttore da 10” (25 cm)
Alte frequenze Altoparlante da 1” (25 mm) per alte frequenze
Risposta in frequenza (-3 dB) Da 64 Hz a 20 kHz Da 60 Hz a 20 kHz
Livello max di pressione sonora 113 dB SPL @ 1 m 113 dB SPL @ 1 m
Limitatore Ottico
Angolo di copertura orizzontale 90°
Angolo di copertura verticale 60°
Tipo di crossover Linkwitz-Riley 24 dB/ott
Frequenza crossover 2,1 kHz
Ingressi XLR bilanciati e connettori Mic/Line da 6,35 mm
Uscite Uscita Line XLR bilanciata
Acuti ±15 dB @ 12 kHz, shelving
Bassi ±15 dB @ 80 Hz, shelving
Potenza assorbita 300 W max.
Connettore CA IEC a 3 pin maschio 250 VCA, 20 A
Fusibile 100 - 115 VCA T5AL / 250 V
Dimensioni mm 249 mm L x 205 mm P x 372 mm A 292 mm L x 244 mm P x 464 mm A
Peso kg 6,66 8,52
Metodo di installazione Alloggiamento integrato per il montaggio su asta da 3,5 cm
Punti di sospensione 1
Pot. di picco 160 W @ 8 ohm
THD < 1 %
Potenza RMS 20 W @ 8 ohm
Pot. di picco 40 W @ 8 ohm
THD < 1 %
Trasduttori
Prestazioni acustiche
Crossover elettronico
Ingressi/Uscite
Equalizzazione
Alimentazione
220 - 240 VCA T2,5AL / 250 V
Dimensioni e peso
Installazione
62
Le speciche possono variare senza preavviso.
Auro D208/D210
Page 63

Dimensioni
8,0 in/
205 mm
14,7 in/
372 mm
9.8 in/
249 mm
9,6 in/
244 mm
11,5 in/
292 mm
ENGLISH
FRANÇAISDEUTSCHEESPAÑOLITALIANO
18,3 in/
464 mm
Owner's Manual
Auro D208/D210
63
Page 64

Samson Technologies Corp.
45 Gilpin Avenue
Hauppauge, New York 11788-8816
Phone: 1-800-3-SAMSON (1-800-372-6766)
Fax: 631-784-2201
www.samsontech.com
 Loading...