

Page 1
RFX Keypad
n
/
n
n
/
i
n
Samson Corporation-Swannanoa, NC 28778 800.311.1047 www.samsoncorporation.com
Parts and Technical Service guide
Guía de servicio técnico y recambio
Guide d’instructions et pièces de rechange
Ref.:
Model 2190
Descriptio
Descripción/ Descriptio
E
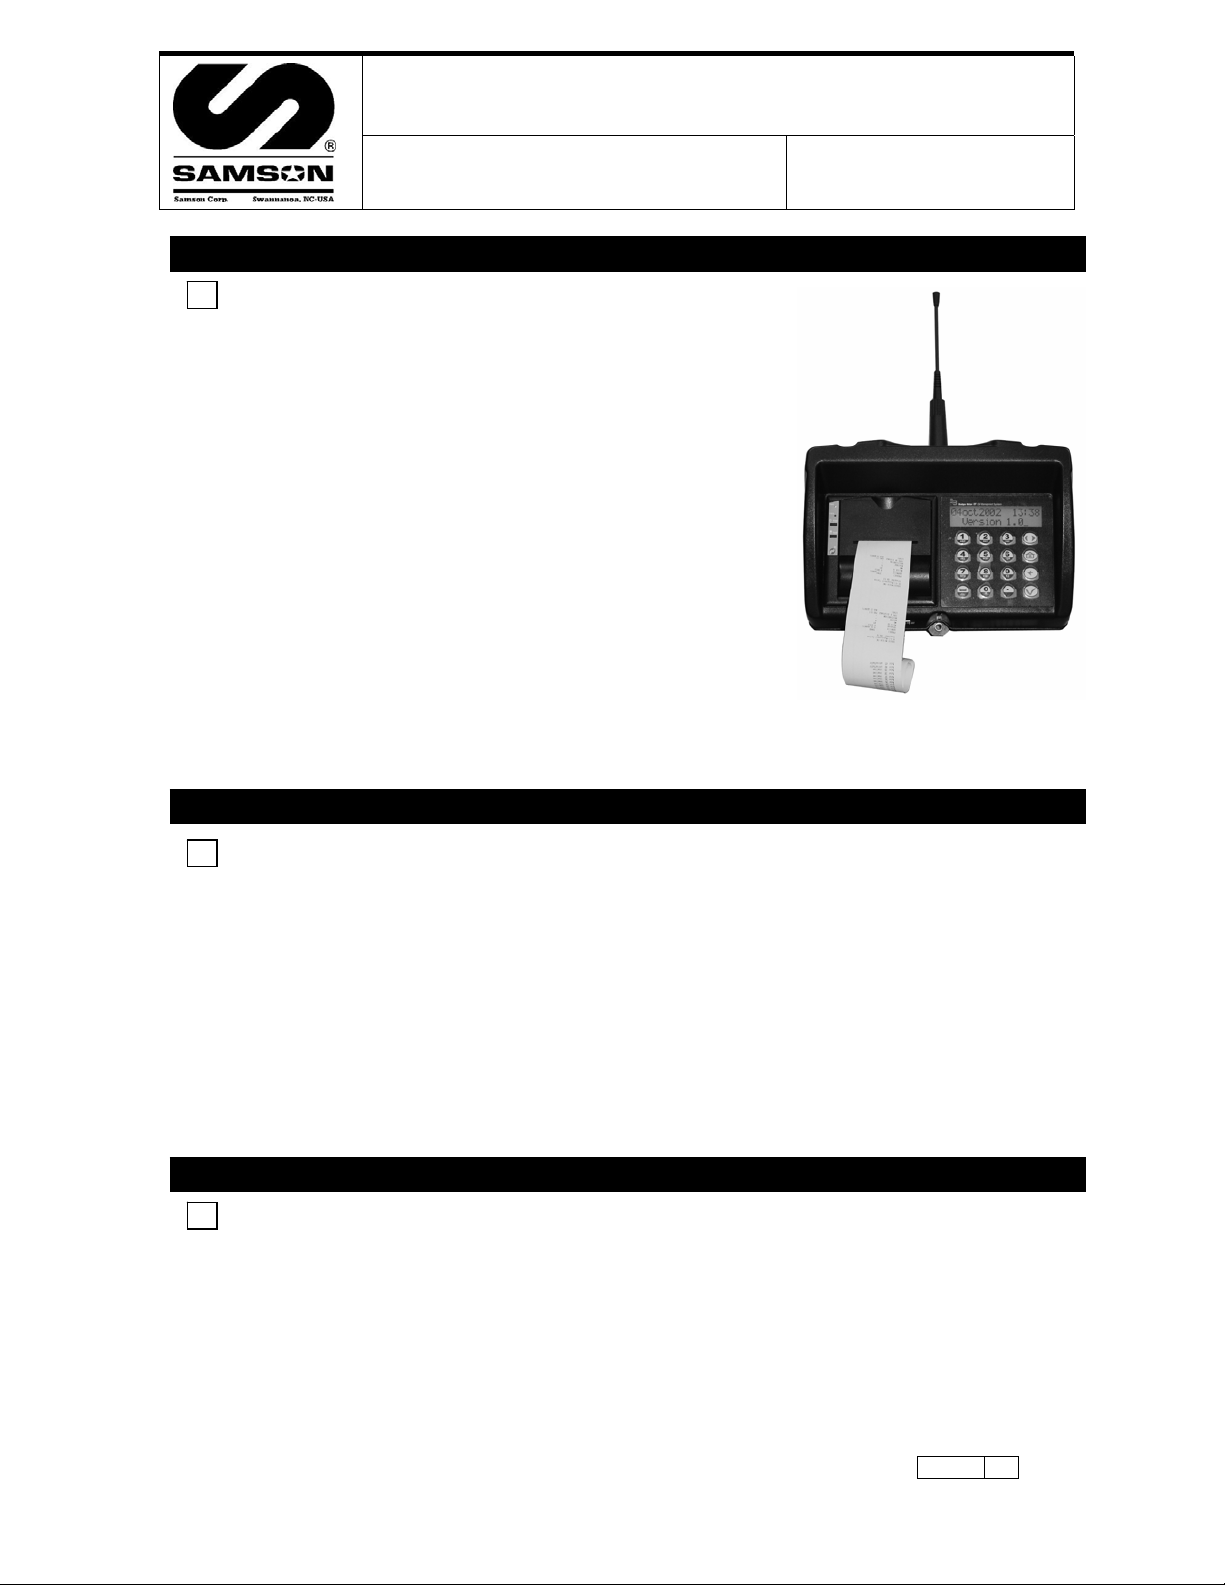
The Samson RFX is designed to control and monitor the consumption
and inventory balances of automotive fluid products with minimal
installation and programming costs. The wall mounted keypad module
consists of a 12-button keypad, LCD display and integral ticket printer.
The RFX keypad can control up to 48 meters and track 8 different
fluids and tanks. It is capable of send ing and receiving data typically
up to 300 feet in a service facility installation. A unique, patented
feature of the control system is that the dispense trigger of the RFX
Meter is locked until authorization from the keypad is received. After
the dispense is completed, the user can top off the dispense and the
actual amount used is sent back to the keypad and this meter returns
to the locked status. Additionally, the meter can be installed on
portable dolly systems offering control and monitoring of often highcost lubrication products. Up to 50 operators can be defined with their
own unique PIN number for accessing the system. The system
provides dispense reports by operator, fluid type, meter or tank. This
allows for flexibility in reviewing system activity.
E
The operator enters his PIN number and selects the hose that the fluid is to be dispensed fro m.
The operator then enters the required quantity and presses ENTER to confirm. The meter is then
authorized to automatically dispense and shut off when the authorized amount of fluid is
dispensed. The operator may then top off the vehicle for the proper fill, if necessary. The operator
may allow the meter to “time out” or may depress “Reset” which sends all actua l dispense data
back to the keypad and puts the meter into a secure “Locked” status until the next authorized
dispense work order is received from the keypad. After each dispense, a transaction ticket is
printed showing the fluid and quantity dispensed along with the operator's name.
E
Mount the keypad to the wall either inside the shop on a wall facing the shop. In either case
mount the included remote antenna INSIDE the shop up high on the wall with line of sight to all
the meters.
Range is 300 feet unobstructed, be sure to test the keypad/antenna mounting position with a 2188
meter at all positions in the shop, and try to simulate a ‘worst case scenario’ with vehicle
obstructions during testing. Performing this important step will ensure trouble-free service for the
End User and no callbacks for the Installer.
Operatio
Modo de empleo/ Moded’emplo
Installation and Configuratio
2190
1
Page 2

Samson Corporation-Swannanoa, NC 28778 800.311.1047 www.samsoncorporation.com
Table of Contents
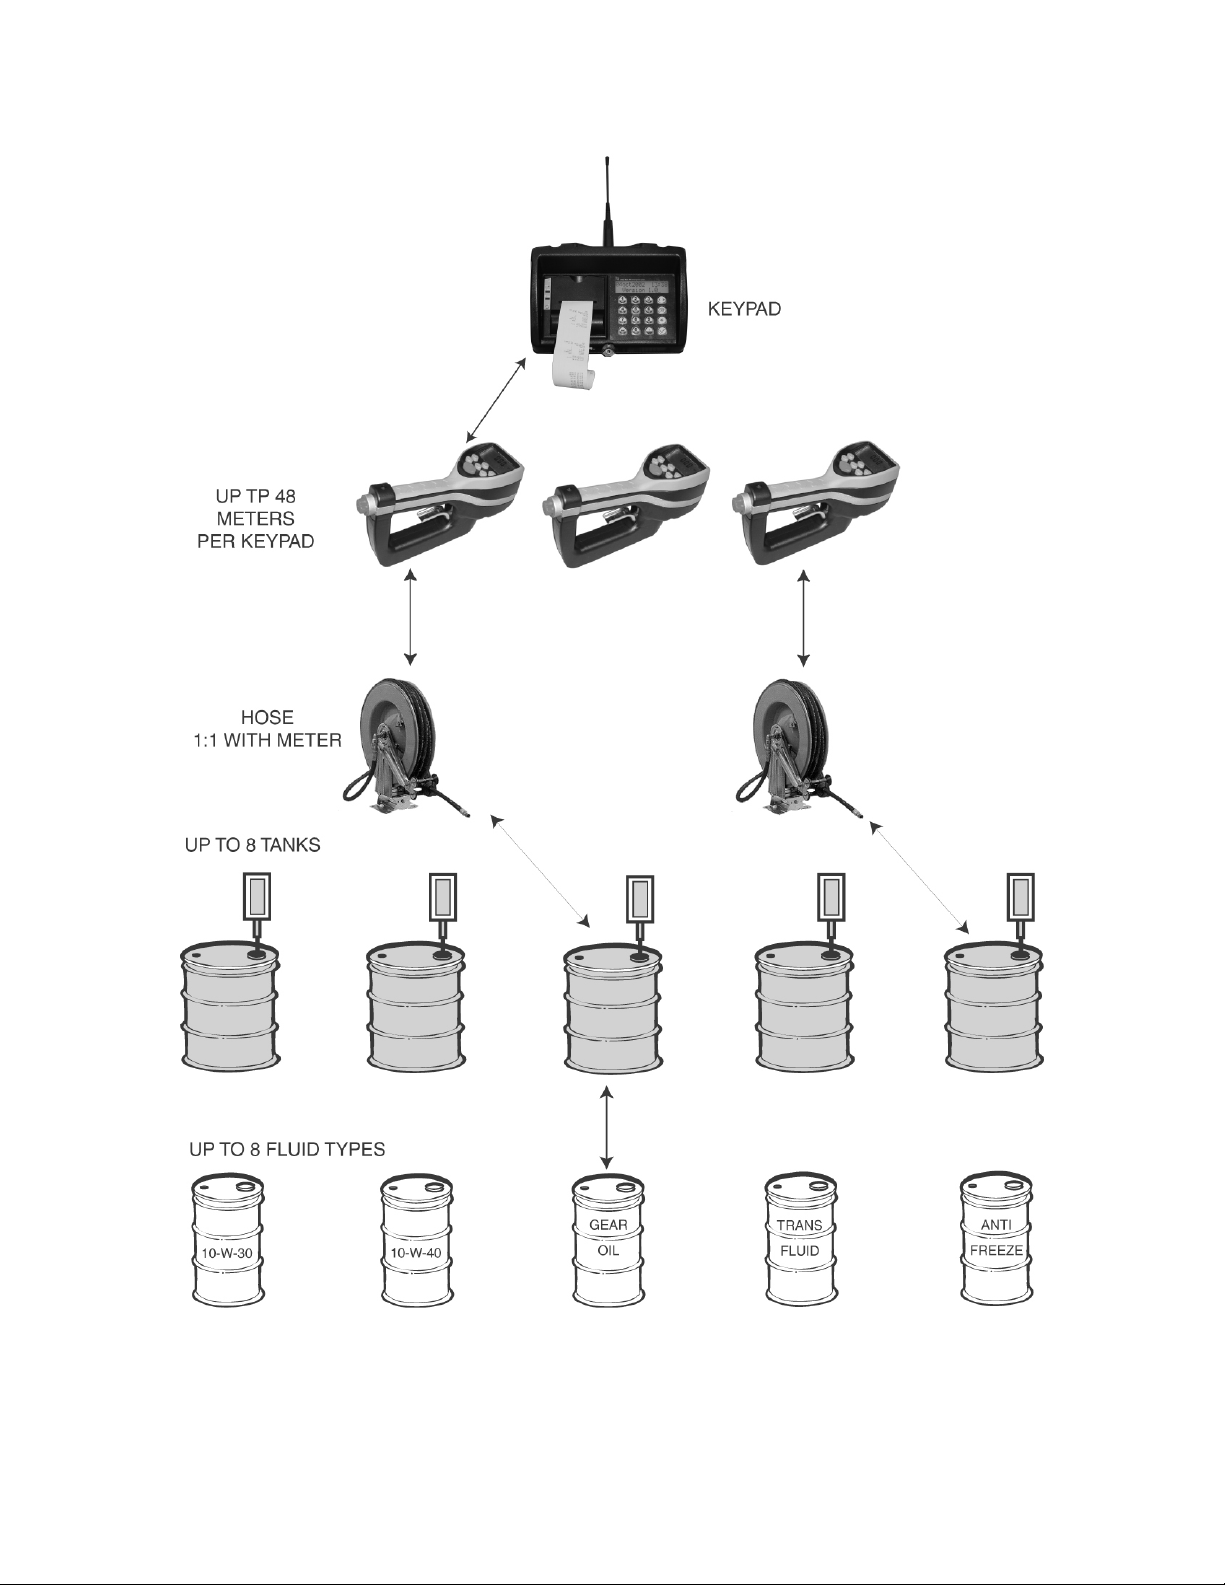
Diagram of RFX Logical Set-up..........................................................................................3
Keyboard Description..........................................................................................................4
Default Screens....................................................................................................................5
Supervisor Menu..................................................................................................................5
Initialization Menu Screens (INI)........................................................................................8
Configuration Menu (CNF) ...............................................................................................16
Meter Reset Menu (MET)..................................................................................................22
Report Menu Screens (REP)..............................................................................................23
Internal Printer Reports......................................................................................................30
Fluid Type Definitions.......................................................................................................31
Tank Definitions ................................................................................................................32
Hose/Meter Definitions......................................................................................................33
User Definitions.................................................................................................................35
Page 3
Samson Corporation-Swannanoa, NC 28778 800.311.1047 www.samsoncorporation.com
PICTORAL DIAGRAM OF RFX LOGICAL SET-UP
Page 4
Samson Corporation-Swannanoa, NC 28778 800.311.1047 www.samsoncorporation.com
This device complies with Part 15 of the FCC Rules. Operation is
subject to the following two conditions: (1) this device may not
cause harmful interference, and (2) this device must accept any
interference received, including interference that may cause
undesired operation.
FCC ID: GIF-RFKEYPAD
FCC CERTIFIED, PART 15, SUBPART C
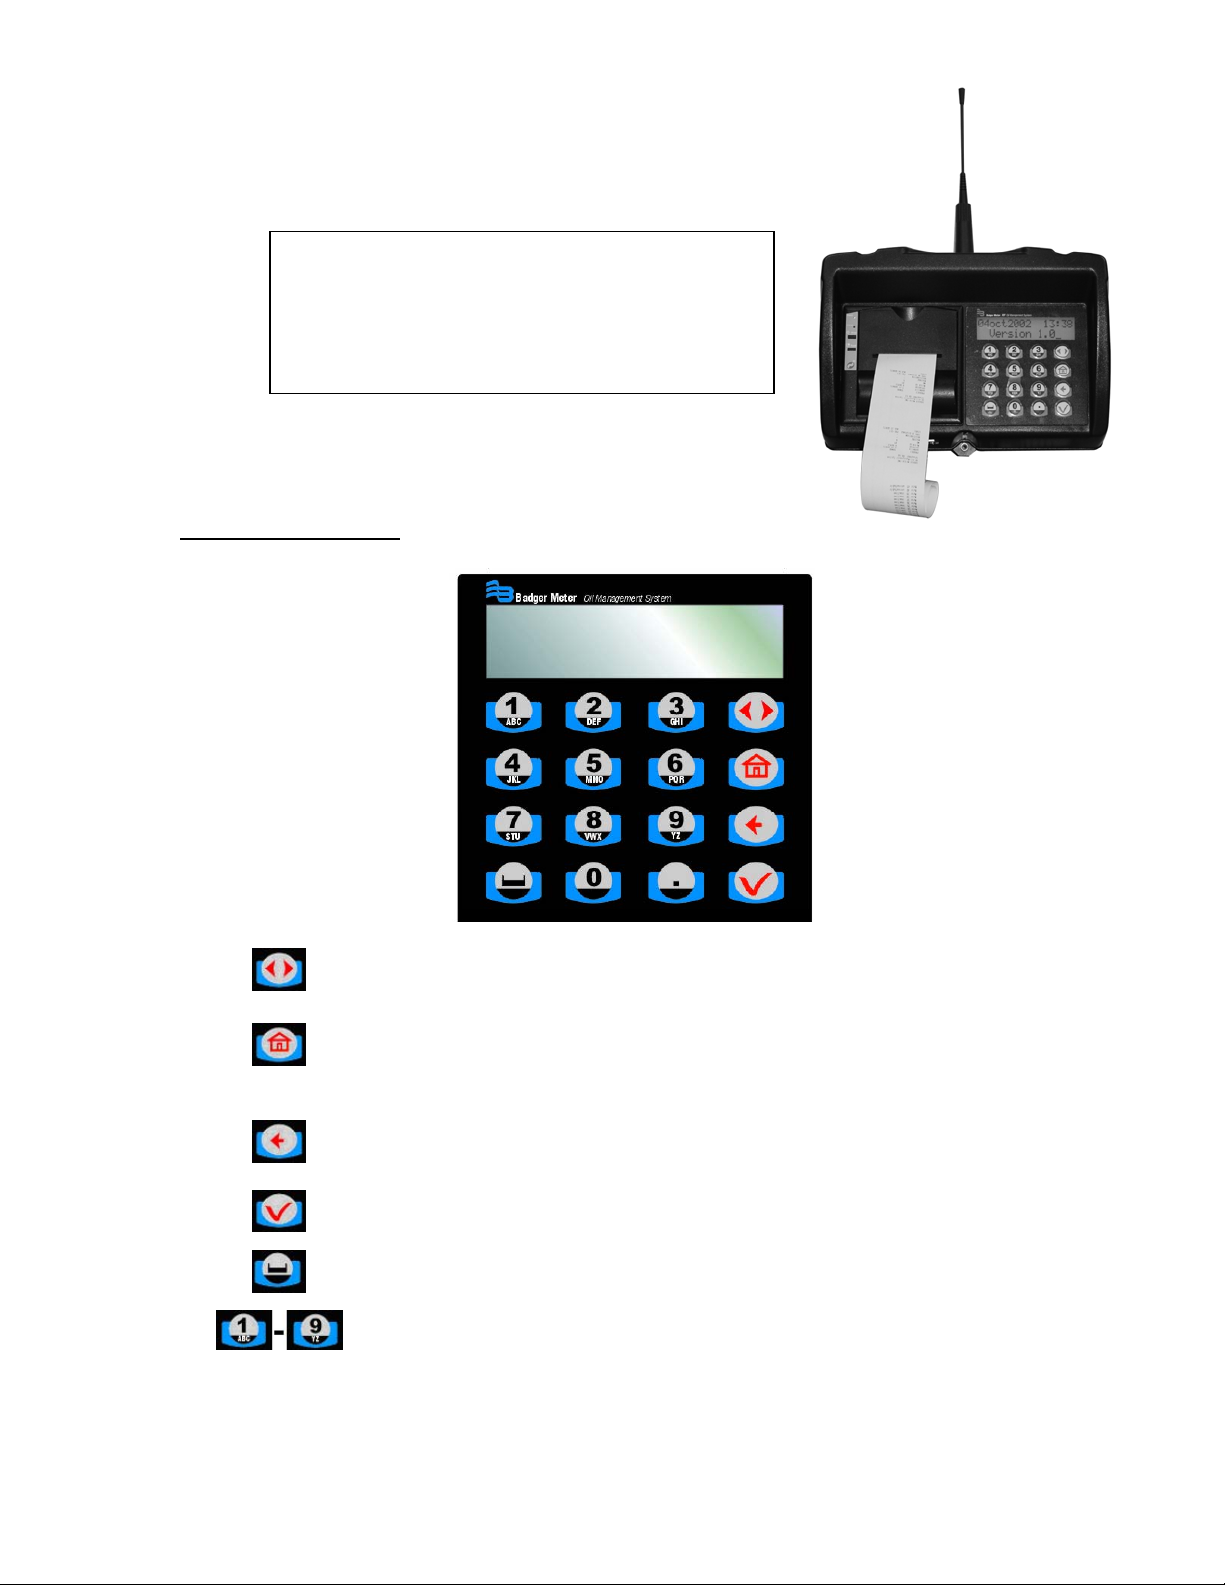
Keyboard Description:
Scroll Key: Used to select options on active display
Home Key: Pressing this key will return display to the PIN Number
and Time/Date screens
Backspace Key: Used to backspace when entering data
Enter Key: Used to enter data and move to the next screen
Space Key: Used to enter a space character when entering data
Alphanumeric Keys: Used to enter data on display. Hold down key
until the desired character is on display. Then release the key.
Page 5
Samson Corporation-Swannanoa, NC 28778 800.311.1047 www.samsoncorporation.com
Default Screens:
• The Personal Identification Number (PIN) number is 4 numeric digits
• 1 supervisor account
• Maximum of 50 operators
• The supervisor account has access to the management screens
(initialization, configuration, communication, report, external printer and
internal printer reports)
• The operator account only has access to the dispense order screens
At power up, the following screens will be displayed:
01Jan2002 01:05
Version 1.0 US
This screen is displayed for system information only.
It is displayed during 1 seconds every 5 seconds. The 4 other seconds the
Enter Pin No. Screen will be displayed.
Enter Pin No.
****
Active keys:
Numeric keys,
,
Supervisor Menu:
To access the management menu, enter the Supervisor PIN Number.
The Supervisor PIN is 4 numeric digits; default is 0000 at initial power-up.
Page 6
Samson Corporation-Swannanoa, NC 28778 800.311.1047 www.samsoncorporation.com
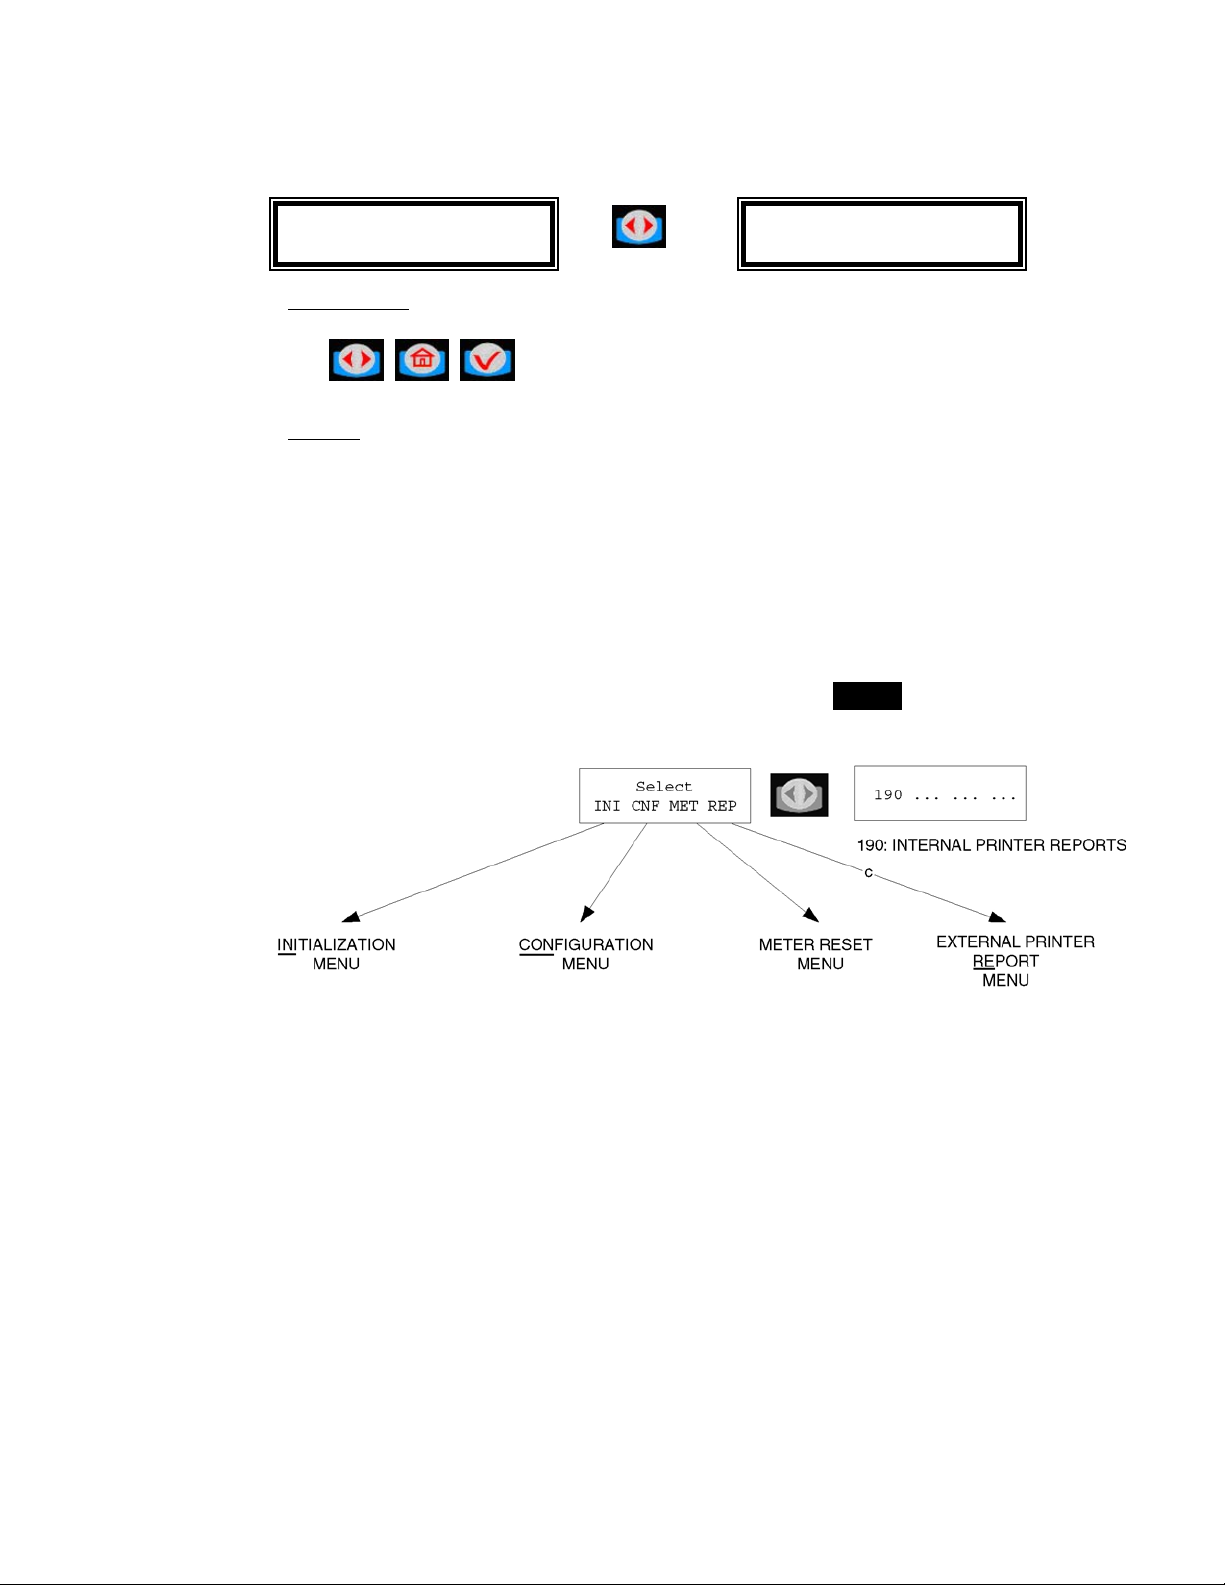
Management Menu: The management menu displays after entering the
supervisor PIN Number
Select
INI CNF MET REP
190 - - - - - - - - -
Active keys:
, ,
Action:
• Choose which menu option is desired
Screens in INI can be accessed only when the Dispense Order list is
empty. If the supervisor wants to change one of these parameters whereas
the list is not empty, a screen message will be displayed. The supervisor
must clear all transaction records through the CNF menu prior to entering
the INI (initialization) menu.
For screens with multiple choices, the selection is in inverse video. (i.e.
The selection is green on black.)
The scroll key is used to select an answer (Example Yes – No). The
selection is in inverse video, it is validated with the ENTER key.
To go to the desired menu, move the scroll key to your choice and press
the ENTER key
Page 7

Samson Corporation-Swannanoa, NC 28778 800.311.1047 www.samsoncorporation.com
Initialization Menu: Flow Chart
aThe parameter changes will affect all data in memory (example: if we
change the quantity unit from liters to gallons, the general quantity will be
simply switched from liters to gallons (no conversion from the previous
quantity unit to the new quantity unit)
aNo pending dispense order
Page 8
Samson Corporation-Swannanoa, NC 28778 800.311.1047 www.samsoncorporation.com
Initialization Menu Screens (INI):
• System date and time are initially blank
• System time is in military standard
• System date is in format DD/MMM/YYYY (in English)
• To change month, press to increment month
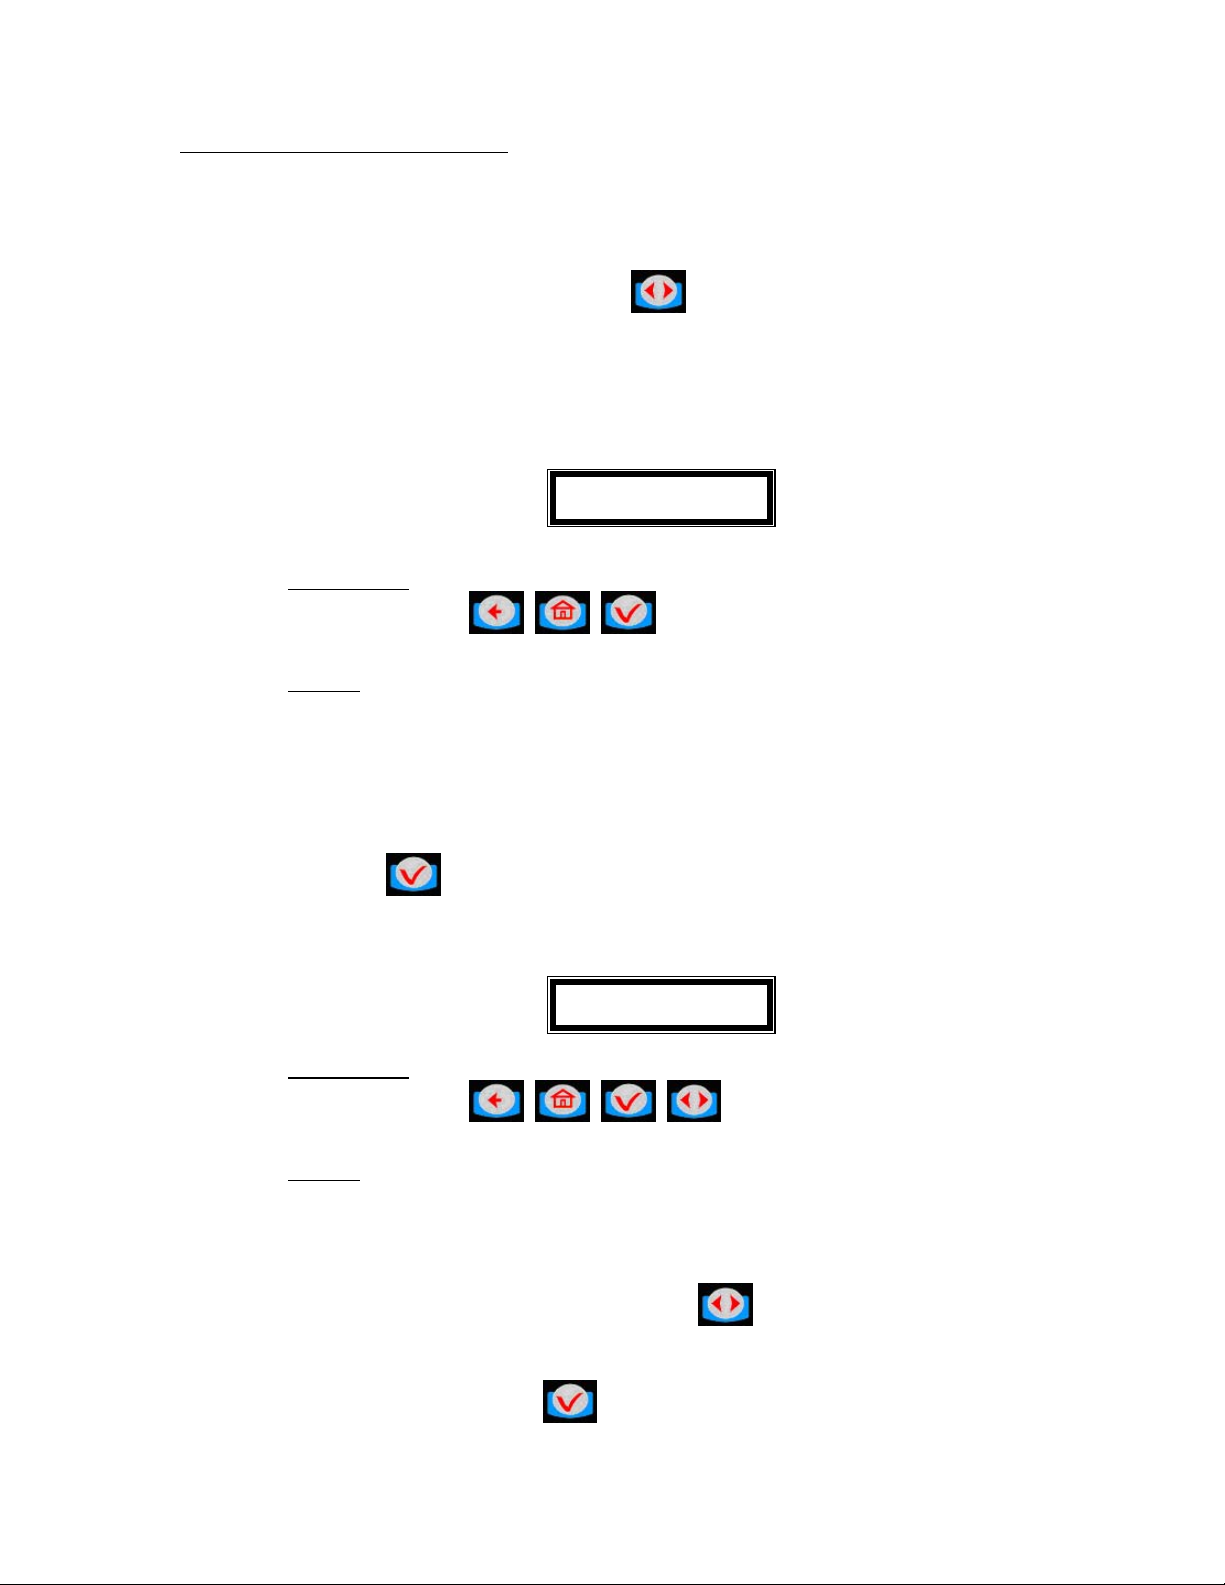
Enter Time:
Enter Time
--:--
Active keys:
Numeric keys,
, ,
Action:
• Enter key with no entry Æ Jumps to TANK UNIT screen
• If the time/date are already entered into the system, press enter
with no date to move to the next screens.
Enter time by using the numeric keys to set a 24-hour military time of day.
Press
when finished to move to the next initialization screen.
• Enter Date:
Enter Date
--/jan/----
Active keys:
Numeric keys,
, , ,
Action: Date is changed and tank unit screen is displayed.
Enter date by first entering the two digit day of the month. The cursor will
automatically jump to the month. Use
to select month, then enter a
four-digit year.
After date is set, press
to move to the next initialization screen.
Page 9
Samson Corporation-Swannanoa, NC 28778 800.311.1047 www.samsoncorporation.com
Tank Initialization:
The tank screens are used to set up the tanks in the system. Each tank is
assigned a number and a starting quantity level in the desired unit of
measure. The following is the process for installing a tank:
• Maximum of 8 Tanks
• Tank ID’s are numbered 1 thru 8
• Tank unit of measure can be quarts, liters, pints or gallons
• By default, the unit of measure is liters
• Set the dispensing unit of measure to the proper value
• The tank stock level setting is updated after each dispense from the
associated tank.
• The tank stock level quantity setting Format is 5.3 digits
(99999.999)
• The remaining tank stock level quantity will be printed out to the
nearest whole number after each dispense on the ticket.
• The Supervisor may update the tank stock level quantity setting at
any time by entering these screens to change stock levels
Tank Unit
Tank No -
Active keys:
Numeric keys,
, ,
Action:
• Enter key with no entry jumps to Fluids Screens
Enter a numeric value from 1 to 8 and press
Tank Unit
LITERS
Active keys:
Numeric keys,
, , ,
Use to select between LITERS, GALLONS, PINTS, QUARTS and
REMOVE (REMOVE option will delete the tank from the system.)
Press
to move to the next screen.
Page 10
Samson Corporation-Swannanoa, NC 28778 800.311.1047 www.samsoncorporation.com
Tank Stock Level
No X: ---------
Active keys:
Numeric keys,
, ,
Use the numeric keys to enter a stock level from 00000.000 to 99999.999.
Press
to move to next screen.
Alphanumeric keys are validated only for some of the display menus. In
these menus to enter a letter just hold the related key and the letters scroll.
Then release the key when the letter you want is displayed.
Fluid Initialization:
This screen is used to set initial tank stock level or when ever supplier
delivers fluid. The fluid screens allow the supervisor to set the fluid
names used in the system. The parameters are:
• Maximum of 8 Fluid types
• The fluid type ID number ranges from 1 to 8
• The fluid type name is a 16 alphanumeric string
• Initially, the fluid type name is blank
Select Fluid
No -
Active keys:
Numeric keys, , ,
Action:
• Enter key with no entry Æ moves to Tank/Fluid relationship
screen
Fluid No. 1
----------------
Active keys:
Alphanumeric keys,
, ,
Page 11
Samson Corporation-Swannanoa, NC 28778 800.311.1047 www.samsoncorporation.com
Tank-Fluid Relationship Screens:
The relationship between tank id and fluid type id will be 1:1 (one tank
assigned to one fluid type id). For example, the supervisor may associate
tank #1 with fluid #1 or tank #1 with fluid #2. Each tank must be
associated with one and only one fluid type.
Tank-Fluid
Tank No -
Active keys:
Numeric keys,
Action:
• Enter key with no entry Æ moves to Create Hose screens
Active keys:
Numeric keys,
The user must enter a valid number for a fluid in the system. Pressing enter
after a valid fluid number will bring the Tank-Fluid Tank No-, screen.
, ,
Tank-Fluid
Fluid No -
, ,
Page 12
Samson Corporation-Swannanoa, NC 28778 800.311.1047 www.samsoncorporation.com
Adding and Deleting RF Meters: (Meter and Hose are synonymous)
This set of screens allows the Supervisor to add or delete RF Meters from
the keypad system.
• The RF Meter identification number can be found on the RF Meter
under the battery pack
• The RF Meter identification number format is 10 decimal digits
(-.---.---.---)
• Leading zeros must be entered
X.XXX.XXX.XXX
• RF Meters can be added and deleted
• Maximum of 48 RF Meters
• A given keypad can exchange data only with RF Meters whose
identification number is in this list.
• All RF Meters addresses and ids are unique
• The relationship between tank and RF Meter will be 1:n (one tank
assigned to n RF Meters). Since there will be a relationship
between tank and fluid type, the RF Meter will be assigned to one
fluid type.
• Initially the RF Meter address list is empty
Create Hose
-.---.---.---
Active keys:
Numeric keys,
, ,
Action:
• After validated RF Meter address is entered the tank-hose screen is
displayed
• Enter key with no entry Æ moves to Delete Hose screen
• If RF Meter address already used Hose Address Already Used Screen is
displayed
Hose Address
Already Used
Active keys:
There is no active key.
This screen is displayed if another RF Meter already uses the last three
number of the RF Meter.
If this screen displays check RF Meters in system to make some duplicate
RF Meters do not exist, then check to see if this RF Meter has already been
created in the system.
It is displayed for 3 seconds and it comes back to create hose screen.
Page 13

Samson Corporation-Swannanoa, NC 28778 800.311.1047 www.samsoncorporation.com
No Action
The relationship between tank and RF Meter will be 1:n (one tank
assigned to n meters). Since there will be a relationship between tank and
fluid type, the RF Meter will be assigned to one fluid type. Assign the RF
Meter to the tank in which it is connected.
Tank-Hose
Tank No -
Active keys:
Numeric keys,
, ,
Action:
Create hose screen is displayed
Hose ID
_ _
The system will automatically insert the created hose into the next
available slot (1-48) in the system. The user has the option to
change this hose number to any number (1-48) not currently in use.
Note: The Hose ID is the number used to create dispense orders
for the meter by the operator.
The supervisor has the option to delete a hose/RF Meter through
this screen. This is necessary when there is a change to the
system; whereby, a RF Meter needs replacement for any reason.
The supervisor should delete from the keypad the removed RF
Meter prior to creating the new RF Meter. This will put the new
RF Meter in the same logical position with the keypad and the
dispense order process will remain the same.
Delete Hose
-.---.---.---
Active keys:
Numeric keys, , ,
Action:
• If a RF Meter is deleted, the Delete Hose screen is displayed
• Enter key with no entry Æ Create Operator screen is displayed
Page 14

Samson Corporation-Swannanoa, NC 28778 800.311.1047 www.samsoncorporation.com
Adding and Deleting Operators:
• Only an operator with valid PIN can dispense fluid
• A Maximum of 50 operators may be active in the system at a time
• The operator id (PIN number) format is 4 numeric digits
• The operator name format is 16 alphanumeric digits
• Initially, the operator list is empty
New operator
----
Active keys:
Numeric keys,
, ,
Action:
• If a new operator has been added, the Operator name screen is
displayed
• Enter key with no entry Æ Delete Operator screen is displayed
Operator XXXX
----------------
Active keys:
Alphanumeric keys,
, ,
Action:
• The New operator screen is displayed
• Enter the operator’s name using the keypad and then press enter to add.
To delete an operator, enter the four-digit id number for the operator to be
deleted and press enter.
Delete operator
----
Active keys:
Numeric keys, , ,
Page 15

Samson Corporation-Swannanoa, NC 28778 800.311.1047 www.samsoncorporation.com
Page 16

Samson Corporation-Swannanoa, NC 28778 800.311.1047 www.samsoncorporation.com
Configuration Menu: (CNF)
The Configuration Menu allows the supervisor to set-up all parameters for
the Keypad Operation. The Supervisor is the only user with access to
these screens.
Clearing Transactions from Keypad Memory:
• Removes all transactions (Dispense Orders) previously recorded in
memory
• Clear transactions will erase WO results data, Data will be cleared
confirmation.
Clear Transacts
YES / NO
Active keys:
The selection is in reverse video
, ,
Use the scroll key to select between YES/NO.
Confirm Clear
YES / NO
Active keys:
The selection is in reverse video
, ,
Action: The keypad will automatically return to the Clear Transacts screen on
YES or NO confirmation
Page 17

Samson Corporation-Swannanoa, NC 28778 800.311.1047 www.samsoncorporation.com
System Reset:
Allows the user to reset all the configuration parameters to default values:
System Reset
YES / NO
Active keys:
, ,
Action:
• If yes, the keypad asks the user to confirm
• If no, the keypad displays the mileage type screen
Confirm Reset
YES / NO
Active keys:
, ,
Action: The keypad returns to the System Reset screen
Mileage Type:
Allows the user to select how mileage is stored in the keypad
• KM/MILES
• The mileage type by default is KM.
Mileage Type
KM / MILES
Active keys:
, ,
Action:
• Press enter key to move to Mileage Info screen
Page 18

Samson Corporation-Swannanoa, NC 28778 800.311.1047 www.samsoncorporation.com
Mileage and Registration Information Option:
Allows the supervisor to select the storage of vehicle mileage and
registration information for each dispense order.
• 16 numeric digit field
• YES/NO to the option of entering the vehicle mileage information for
each dispense order
• Mileage information by default is NO
Mileage Info
YES / NO
Active keys:
, ,
Action: Use the scroll key to select YES/NO, press enter key to move to the
Registration option screen
• 16 numeric digit field
• YES/NO to the option of entering the vehicle registration information
for each dispense order
• Registration information by default is NO
Regist. Info
YES / NO
Active keys:
, ,
Action:
Use the scroll key to select YES/NO, press enter key to move to the
keypad timeout screen
Page 19

Samson Corporation-Swannanoa, NC 28778 800.311.1047 www.samsoncorporation.com
Keypad Timeout Option:
• Timeout parameter corresponding to the time it takes to validate after
all dispense order data has been entered. If the enter button is not
pressed within the time allocated, the keypad display goes back to the
initial menu, and the input data is erased.
• The keypad timeout is between 0 to 255 seconds (0 no timeout) and
the default for this feature is 10 seconds
Keypad Timeout
10-
Active keys:
Numeric keys,
, ,
Action:
• Press Enter key to move to Hose Inactive Timeout Option
Hose Inactive Timeout Option:
• Essentially, this is the time the user has to top-off the dispense and
completing the automatic batch.
• Timeout parameter corresponding to the time that a RF Meter could
stay inactive after the reset key has been pressed on the meter.
• If the user has not pressed reset on the RF Meter within the timeout
period, the RF Meter will transmit the dispense order quantity to the
keypad and lockout the RF Meter.
• Meter inactive timeout is sent to the RF meter. It’s the meter (ER) that
is responsible of tracking this timer.
• The meter inactive timeout is set for all RF Meters.
• The meter inactive timeout is between 0 to 65534 seconds (0 = no
timeout) and the default value is 10 minutes.
Hose Inactive
600
Active keys:
Numeric keys,
, ,
Action:
• Press Enter key to move to Display Timeout Option
Page 20

Samson Corporation-Swannanoa, NC 28778 800.311.1047 www.samsoncorporation.com
Display Timeout Option: (Do Not Change)
• Timeout parameter corresponding to the time for displaying
information on the keypad LCD before it is refreshed with new
information
• The display timeout is set at 2 seconds
Display Timeout
2--
Active keys:
Numeric keys,
, ,
Action:
• Press Enter key to move to Internal Printer Option
Internal Printer Option:
• YES / NO. Parameter indicating the existence of an internal printer
(CUSTOM FT190).
• The internal printer value is set by default NO (a The keypad will not
detect the existence of a printer)
Internal printer
YES / NO
Active keys:
, ,
Action:
• Use scroll key to select the internal printer setting
• Press Enter key to select the internal printer setting and move to
External Printer Option
External Printer Option:
• YES / NO. Parameter indicating the existence of an external printer
(EPSON LX300).
• The external printer value is set by default NO
External Printer
YES / NO
Active keys:
, ,
Page 21

Samson Corporation-Swannanoa, NC 28778 800.311.1047 www.samsoncorporation.com
Action:
• Use scroll key to select the external printer setting
• Press Enter key to move to select the external printer setting and
Supervisor Password Option
Supervisor Password Option:
The default supervisor password for protecting the modification of the
supervisor id is 0000.
The Supervisor can change this password during the initial set-up of the
system.
Maximum of 1 Supervisor login password
Super new pass
****
Active keys:
Numeric keys,
, ,
Action:
• Use numeric keys to enter the new password then press enter.
• Enter key with no entry Æ No change to password and displays
buzzer option.
Super Confirm
----
Active keys:
Numeric keys,
, ,
Action: reenter new password to confirm.
Buzzer Option:
This screen provides the user with the option to have a beep on
every key entry. The default is YES.
Buzzer
YES / NO
Active keys:
, ,
Page 22

Samson Corporation-Swannanoa, NC 28778 800.311.1047 www.samsoncorporation.com
Action:
keypad will display the Supervisor Menu
Select YES or NO by using the scroll key, then press Enter. The
.
Meter Reset Menu (MET):
• Only the supervisor has access to this process.
• The supervisor may delete a dispense order in the keypad que for a
single hose or all hoses in the system.
• If the supervisor selects all RF Meters, all dispense orders in the que
will be deleted and all meters may be programmed for a dispense
order.
Init all Hose
YES / NO
Active keys:
, ,
Action:
• If YES Æ Start (Hoses Init) is displayed
• If NO Æ User is prompted for a hose number to reset
Start Hoses Init
Press enter
• Press ENTER to reset the hose
Meter Reset Menu Flowchart:
Page 23

Samson Corporation-Swannanoa, NC 28778 800.311.1047 www.samsoncorporation.com
Report Menu Screens: (REP)
The supervisor has the opportunity to print out a variety of reports, if there
is an external printer
connected to the keypad.
INI: Prints all parameters associated with the system initialization
CNF: Prints all parameters selected for the configuration of the keypad
MET: Prints the status of all hoses/meters
REP: Prints the dispense order history
The external printer has to be activated and connected.
aWhen the keypad is printing out a report or a receipt, the keypad
keyboard will be locked for all new data entry (i.e. the operator will not be
able to enter a new Dispense Order List while the keypad is printing).
aIf the keypad detects an error on the internal printer or the external
printer (not connected, out of paper or off line), the keypad keyboard will
be locked for all new data entry and an error will displayed on the keypad
LCD. The user should check the printers for off-line or out of paper
conditions.
aIf an error is detected while printing, the keypad will not purge the
memory (especially in the case of the Dispense Order List report)
aAfter printing out the Dispense Order List report, the Dispense Order
list memory is erased automatically
The dispense order receipt is automatically (after a user prompt message)
printed out after the RF reception of the dispense order result
Select Report
INI CNF MET WO
Active keys:
, ,
Action:
• Use the scroll key to select report option
• Enter key with no entry Æ keypad returns to Supervisor Menu screen
Page 24

Samson Corporation-Swannanoa, NC 28778 800.311.1047 www.samsoncorporation.com
Initialization Report:
DD/MMM/YYYY INITIALIZATION REPORT HH:MI
TNK PRODUCT LEVEL UNT
=== ================ ===== ======
1 Fluid 1 name 99999 LITERS
2 Fluid 2 name 99999 LITERS
(…) (…) (…) (…)
7 Fluid 7 name 99999 LITERS
8 Fluid 8 name 99999 LITERS
ID ADDR TNK
=== ================ ===
123 124456 1
234 561444 2
(…) (…) (…)
ID PIN NAME
=== ==== ================
1 1234 John SMITH
2 1235 Paul GREEN
3 1236 Mike BROWN
(…) (…) (…)
ID PRODUCT
=== ================
1 Fluid 1 name
2 Fluid 2 name
(…) (…)
7 Fluid 7 name
8 Fluid 8 name
DD/MMM/YYYY
Date of the printout
HH:MI Time of the printout
TNK Tank No
PRODUCT Fluid type name
QTY Quantity dispensed
UNT Unit
ADDR Meter RF address
ID RF Meter Id (Last 3 address characters)
TNK Tank No
PIN User pin number
NAME User name
Page 25

Samson Corporation-Swannanoa, NC 28778 800.311.1047 www.samsoncorporation.com
Configuration Report:
DD/MMM/YYYY CONFIGURATION REPORT HH:MI
Mileage Type KM
Registration Info NO
Mileage Info NO
Internal printer Yes
External printer Yes
Address printer
Buzzer Yes
Approved PTB NO
Supervisor pass 1234
Hose Inactive 600
Keypad Timeout 10
Display Timeout 2
On-Off sequence 999999
Select Report
INI CNF COM WO
Active keys:
, ,
Action:
• Use scroll key to move to CNF and press Enter key
• Enter key with no entry Æ Supervisor Menu screen is displayed
Start
CNF Report
Active keys:
,
Action:
After Report is completed the Select Report screen is displayed
Page 26

Samson Corporation-Swannanoa, NC 28778 800.311.1047 www.samsoncorporation.com
Communications Report:
DD/MMM/YYYY COMMUNICATION REPORT HH:MI
ADDR ID STA
====== ==== ===
0.000.000.101 1 inactive
0.000.000.137 2 inactive
0.000.000.111 3 inactive
0.000.000.126 4 inactive
0.000.000.127 5 inactive
0.000.000.109 6 inactive
0.000.000.100 7 inactive
0.000.000.135 8 inactive
DD/MMM/YYYY
Date of the printout
HH:MI Time of the printout
ADDR Meter RF address
ID RF Meter Id (Last 3 address characters)
STA Status of the RF link:
• OK Î RF link is established
• KO Î RF link not established
• ? Î RF link doubtful
Select Report
INI CNF COM WO
Active keys:
, ,
Action:
• Use scroll to move to COM and press Enter
• Enter key with no entry Æ Supervisor Menu screen is displayed
Active keys:
,
Action: After printing Select Report Menu is displayed
Start
COM report
Page 27

Samson Corporation-Swannanoa, NC 28778 800.311.1047 www.samsoncorporation.com
Dispense Order Reports:
Select Report
INI CNF COM WO
Active keys:
, ,
Action:
• Scroll to WO and press Enter key
• Enter key with no entry Æ Supervisor Menu screen is displayed
Select REP
USR PRO HOS TNK
Active keys:
, ,
Action: Scroll to report to print and press the Enter key
There are four reports that may be printed associated with Dispense Orders:
• USR: Print dispense orders by Operator
• PRO: Print dispense orders by Fluid Type
• HOS: Print dispense orders by Hose/Meter
• TNK: Print dispense orders by Tank
User Report (USR):
DD /MMM/YYYY STATISTICAL REPORT BY USER HH:MI
USER PRODUCT QTY
================ ================ =====
JOHN SMITH FLUID TYPE 1 99999
FLUID TYPE 2 99999
FLUID TYPE 3 99999
FLUID TYPE 4 99999
PAUL GREEN FLUID TYPE 5 99999
FLUID TYPE 6 99999
FLUID TYPE 7 99999
FLUID TYPE 8 99999
(…)
Start
Report
Active keys:
,
Action: After printing the Select Report Screen is displayed
Page 28

Samson Corporation-Swannanoa, NC 28778 800.311.1047 www.samsoncorporation.com
Product Report (PRO):
DD/MMM/YYYY STATISTICAL REPORT BY PRODUCT HH:MI
PRODUCT USER QTY
================ ================ =====
FLUID TYPE 1 JOHN SMITH 99999
PAUL GREEN 99999
FLUID TYPE 2 JOHN SMITH 99999
PAUL GREEN 99999
FLUID TYPE 3 JOHN SMITH 99999
PAUL GREEN 99999
(…)
Start
Report
Active keys:
,
Action: After printing the Select Report Screen is displayed
Hose/Meter Report (HOS):
DD/MMM/YYYY STATISTICAL REPORT BY RF METER HH:MI
ADDR ID USER QTY
====== === ================ =====
123456 456 JOHN SMITH 99999
PAUL GREEN 99999
234561 561 JOHN SMITH 99999
PAUL GREEN 99999
(…)
Start
Report
Active keys:
,
Action:
After printing the Select Report Screen is displayed
Page 29

Samson Corporation-Swannanoa, NC 28778 800.311.1047 www.samsoncorporation.com
Tank Report (TNK):
DD/MMM/YYYY STATISTICAL REPORT TANK LEVEL HH:MI
TNK PRODUCT LEVEL UNT
=== ================ ===== =======
1 5W30 OIL 123 LITERS
2 GEAR OIL 1111 LITERS
3 ATF 111 11111 GALLONS
4 HYDRAULIC FLUID 232 QUARTS
5 10W40 OIL 3466 PINTS
6 WASHER FLUID 1 LITERS
7 5W40 OIL 2344 LITERS
8 BEER 43234 PINTS
Start
Report
Active keys:
,
Action: After printing the Select Report Screen is displayed
Report Menu Flowchart
REPORT
MENU
Select Report
INI CNF COM WO
Start
INI Report
Start
CNF Report
Start
COM Report
Select REP
USR PRO HOS TNK
Start
Report
Page 30

Samson Corporation-Swannanoa, NC 28778 800.311.1047 www.samsoncorporation.com
Internal Printer Reports:
FLU: Prints all fluids created in the system
HDS: Prints all hose numbers with meter serial numbers
TNK: Prints all tanks created in the system
USE: Prints all operators created in the system
WO: Prints all work orders pending
PEN: Prints the current meter status
“INACTIVE”: Hose is ready
“ACTIVE”: A dispense order is pending
“UNREACHABLE”: Hose is not ready
- Hit reset button on meter to begin communications test
and reset meter.
PAR: Prints the current setting in configuration menu
MEM: Prints the memory configuration for system
NOTE: It is recommended that the supervisor print all internal reports and store hard
copies after setting up the system.
Page 31

Samson Corporation-Swannanoa, NC 28778 800.311.1047 www.samsoncorporation.com
Fluid Type Definitions
Fluid id Name
1
2
3
4
5
6
7
8
Maximum Fluid types is 8
The Fluid name can be 16 characters in length
Page 32

Samson Corporation-Swannanoa, NC 28778 800.311.1047 www.samsoncorporation.com
Tank Definitions
Tank id Tank Level
1
2
3
4
5
6
7
8
Maximum of 8 Tanks
Tank Capacity
The Tank Capacity value is formatted 00000.000
Page 33

Samson Corporation-Swannanoa, NC 28778 800.311.1047 www.samsoncorporation.com
Hose/Meter Definitions
Hose/Meter id Address Number x.xxx.xxx.xxx
1
2
3
4
5
6
7
8
9
10
11
12
13
14
15
16
17
18
19
20
21
22
23
24
Maximum of 48 Hose/Meters
Hose/Meters address is a 10 digit number
Address Data Format is x.xxx.xxx.xxx
Page 34

Samson Corporation-Swannanoa, NC 28778 800.311.1047 www.samsoncorporation.com
Hose/Meter Definitions
Hose/Meter id Address Number x.xxx.xxx.xxx
25
26
27
28
29
30
31
32
33
34
35
36
37
38
39
40
41
42
43
44
45
46
47
48
Maximum of 48 Hose/Meters
Hose/Meters address is a 10 digit number
Address Data Format is x.xxx.xxx.xxx
Page 35

Samson Corporation-Swannanoa, NC 28778 800.311.1047 www.samsoncorporation.com
User Definitions
User id User Name
1 Reserved Supervisor
2
3
4
5
6
7
8
9
10
11
Pin id
0000
12
13
14
15
16
17
18
19
20
21
22
23
24
25
The User Name is up to 16 characters
The User Pin id is a 4 digit number with leading 0’s required
Page 36

Samson Corporation-Swannanoa, NC 28778 800.311.1047 www.samsoncorporation.com
User Definitions
User id User Name
26
27
28
29
30
31
32
33
34
35
36
Pin id
37
38
39
40
41
42
43
44
45
46
47
48
49
50
The User Name is up to 16 characters
The User Pin id is a 4 digit number with leading 0’s required
Maximum of 50 users
Page 37

Samson Corporation-Swannanoa, NC 28778 800.311.1047 www.samsoncorporation.com
 Loading...