

Page 1
PORTABLE COLUMN ARRAY SYSTEM
Owner's Manual
Page 2

Page 3
Important Safety Information
RISQUE DE CHOC ÉLECTRONIQUE -
ATTENTION
NE PAS OUVRIR
This lightning flash with arrowhead symbol within an equilateral triangle is
intended to alert the user to the presence of non-insulated “dangerous voltage”
within the product’s enclosure that may be of sufficient magnitude to constitute
a risk of electric shock.
The exclamation point within an equilateral triangle is intended to alert the user
to the presence of important operating and maintenance instructions in the
literature accompanying the appliance.
CAUTION
To prevent electric shock hazard, do not connect to mains power supply while
grille is removed.
WARNING: TO REDUCE THE RISK OF ELECTRIC SHOCK, DO NOT REMOVE COVER (OR
BACK) AS THERE ARE NO USER-SERVICEABLE PARTS INSIDE. REFER SERVICING TO
QUALIFIED SERVICE PERSONNEL.
If you want to dispose this product, do not mix it with general household waste.
There is a separate collection system for used electronic products in accordance
with legislation that requires proper treatment, recovery and recycling.
Private household in the 28 member states of the EU, in Switzerland and Norway
may return their used electronic products free of charge to designated collection
facilities or to a retailer (if you purchase a similar new one).
For Countries not mentioned above, please contact your local authorities for a correct
method of disposal.
By doing so you will ensure that your disposed product undergoes the necessary treatment,
recovery and recycling and thus prevent potential negative effects on the environment and
human health.
ENGLISHFRANÇAISDEUTSCHEESPAÑOLITALIANO
Copyright 2019, v4.1
Samson Technologies Corp.
278-B Duffy Ave
Hicksville, New York 11801
Phone: 1-800-3-SAMSON (1-800-372-6766)
Fax: 631-784-2201
www.samsontech.com
®
The Blueto oth
and any use of such marks by Samson Technologies is under license. Other trademarks and
trade names are those of their respective owners.”
Resound VX8.1 • Portable Column Array System 3
word mark and logos are registered trademarks owned by Bluetooth SIG, Inc.
Page 4

Important Safety Information
1. Read these instructions.
2. Keep these instructions.
3. Heed all warnings.
4. Follow all instructions.
5. Do not use this apparatus near water.
6. Clean only with dry cloth.
7. Do not block any ventilation openings. Install in accordance with the manufacturer’s
instructions.
8. Do not install near any heat sources such as radiators, heat registers, stoves, or other
apparatus (including amplifiers) that produce heat.
9. Do not defeat the safety purpose of the polarized or grounding type plug. A polarized plug
has two blades with one wider than the other. A grounding type plug has two blades and
a third grounding prong. The wide blade or the third prong are provided for your safety.
If the provided plug does not fit into your outlet, consult an electrician for replacement
of the obsolete outlet.
10. Protect the power cord from being walked on or pinched particularly at the plugs,
convenience receptacles, and at the point where they exit from the apparatus.
11. Only use attachments/accessories specified by the manufacturer.
12. Use only with the cart, stand, tripod, bracket, or table specified by the
manufacturer, or sold with the apparatus. When a cart is used, use caution
when moving the cart/apparatus combination to avoid injury from tip-over.
13. Unplug the apparatus during lightening, sort or when unused for long periods of time.
14. Refer all servicing to qualified personnel. Service is required when the apparatus has
been damaged in any way, such as power supply cord or plug is damaged, liquid has been
spilled or objects have fallen into the apparatus has been exposed to rain or moisture,
does not operate normally, or has been dropped.
15. This appliance shall not be exposed to dripping or splashing water and that no object
filled with liquid such as vases shall be placed on the apparatus.
16. Caution-to prevent electrical shock, match wide blade plug wide slot fully insert.
17. Please keep a good ventilation environment around the entire unit.
18. POWER ON/OFF SWITCH: For products with a power switch, the power switch DOES
NOT break the connection from the mains.
19. MAINS DISCONNECT: The plug should remain readily operable. For rack-mount
or installation where plug is not accessible, an all-pole mains switch with a contact
separation of at least 3mm in each pole shall be incorporated into the electrical
installation of the rack or building.
20. Warning: The apparatus shall be connected to a MAINS socket outlet with a protective
earthing connection.
4
Page 5

Important Safety Information
FCC Notice
1. This device complies with Part 15 of the FCC Rules. Operation is subject to the following
two conditions:
(1) This device may not cause harmful interference.
(2) This device must accept any interference received, including interference that may
cause undesired operation.
2. Changes or modifications not expressly approved by the party responsible for compliance
could void the user’s authority to operate the equipment.
FCC Statement
This equipment has been tested and found to comply with the limits for a Class B digital
device, pursuant to Part 15 of the FCC Rules. These limits are designed to provide
reasonable protection against harmful interference in a residential installation.
This equipment generates uses and can radiate radio frequency energy and, if not
installed and used in accordance with the instructions, may cause harmful interference
to radio communications. However, there is no guarantee that interference will not occur
in a particular installation. If this equipment does cause harmful interference to radio or
television reception, which can be determined by turning the equipment off and on, the user
is encouraged to try to correct the interference by one or more of the following measures:
• Reorient or relocate the receiving antenna.
• Increase the separation between the equipment and receiver.
• Connect the equipment into an outlet on a circuit different from that to which the
receiver is connected.
• Consult the dealer or an experienced radio/TV technician for help.
FCC Radiation Exposure Statement
This equipment complies with FCC RF radiation exposure limits set forth for an uncontrolled
environment.
RF Warning Statement
This equipment complies with FCC‘s RF radiation exposure limits set forth for an
uncontrolled environment. End user must follow the specific operating instructions for
satisfying RF exposure compliance. This transmitter must not be co-located or operating in
conjunction with any other antenna or transmitter.
ENGLISHFRANÇAISDEUTSCHEESPAÑOLITALIANO
Hereby, Samson Technologies Corp., declares that this Resound VX8.1 is in compliance
with the essential requirements and other relevant provisions of Directive 2014/53/EU. The
declaration of conformity may be consulted at:
http://www.samsontech.com/site_media/support/manuals/VX8.1_DOC.pdf
Resound VX8.1 • Portable Column Array System 5
Page 6

Introduction
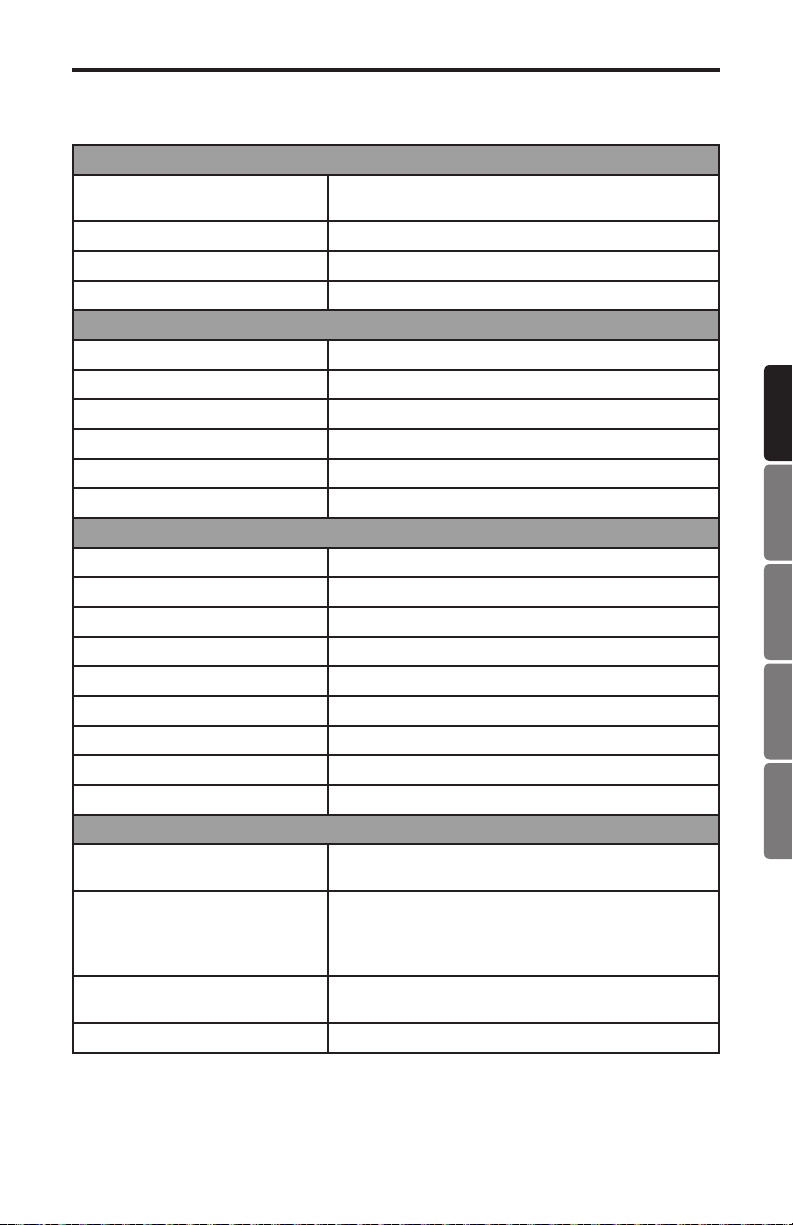
Congratulations on purchasing the Resound VX8.1 Portable Column Array System from
Samson! The Resound VX8.1 is an all-in-one system featuring a12” subwoofer and eight
3.5” drivers arranged in a vertical speaker array. Installation and setup are extremely easy
with the three column array pieces locking together and fitting into the subwoofer. The
onboard 3-channel mixer allows the Resound VX8.1 to be used a stand alone PA, or it can
be connected to a mixer an used as part of a sound reinforcement system.
The vertical array can be arranged in-line for 120° of horizontal coverage, or rotated 45°
left and right for an ultra-wide 200° of coverage. The mixer has inputs for microphones,
instruments and line level devices. The Resound VX8.1 also includes wireless Bluetooth
connectivity, to stream audio from your smart phone, tablet, or computer. With 700 watts
of continuous power (350 watts for the subwoofer and 350 watts for the vertical array)
and four DSP settings for different sound applications, the Resound VX8.1 is a the perfect
solution where high-quality sound reinforcement is needed.
In these pages, you’ll find a detailed description of the features of the Resound VX8.1, stepby-step instructions for its setup and use, and full specifications. If your Resound VX8.1
was purchased in the United States, you’ll also find a warranty card enclosed—don’t forget
to follow the instructions so that you can receive technical support and so that we can send
you updated information about this and other Samson products in the future. Also, be sure
to check out our website (www.samsontech.com) for complete information about our full
product line.
We recommend you keep the following records for reference, as well as a copy of your sales
receipt.
Serial number: _____________________________________________________
Date of purchase: ___________________________________________________
If you have any questions or comments regarding the Resound VX8.1 Portable Column
Array System or any other products from Samson, do not hesitate to contact us at
support@samsontech.com.
With proper care and maintenance, your Resound VX8.1 Portable Column Array System will
operate trouble-free for many years. Should your Resound VX8.1 Portable Column Array
System ever require servicing, a Return Authorization (RA) number must be obtained before
shipping your unit to Samson. Without this number, the unit will not be accepted. Please
visit www.samsontech.com/ra for an RA number prior to shipping your unit. Please retain
the original packing materials and, if possible, return the unit in its original carton. If your
Resound VX8.1 Portable Column Array System was purchased outside of the United States,
contact your local distributor.
®
6
Page 7
Getting Started
Subwoofer Spacer Center
4
Speaker
Array
ENGLISHFRANÇAISDEUTSCHEESPAÑOLITALIANO
Top
Speaker
Array
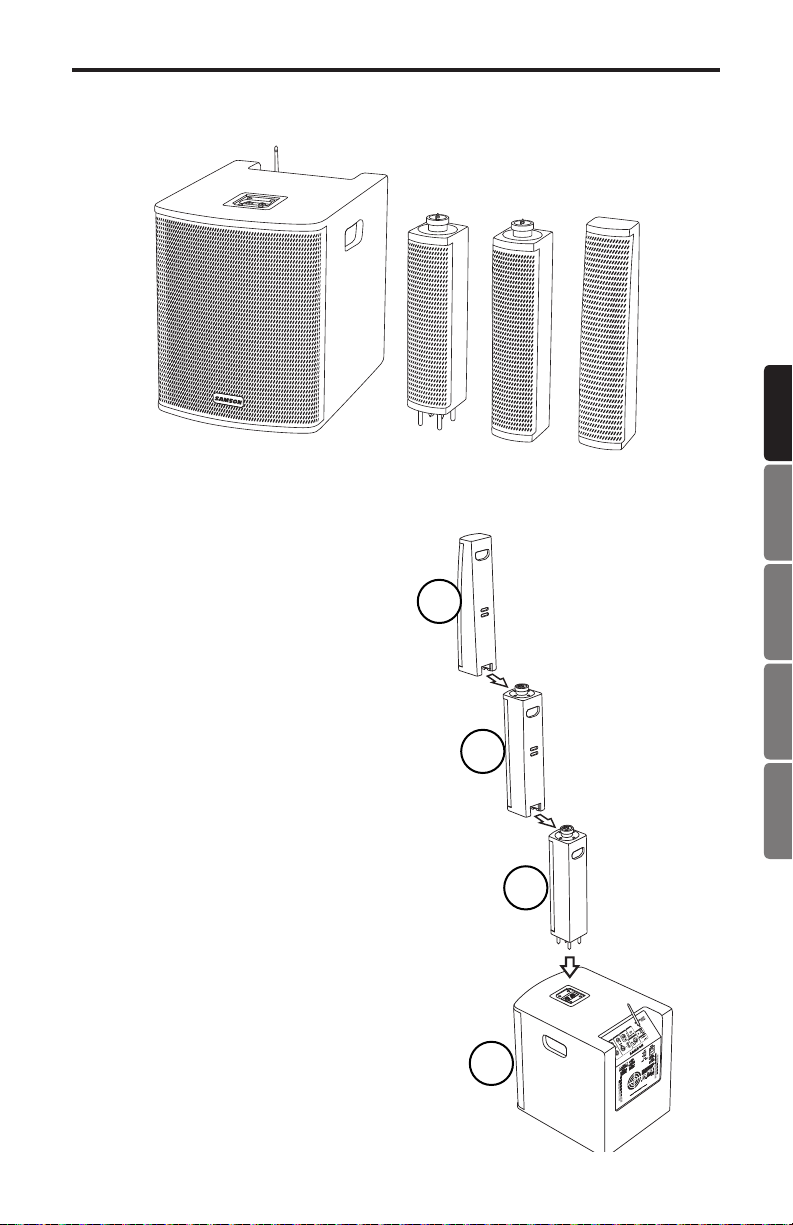
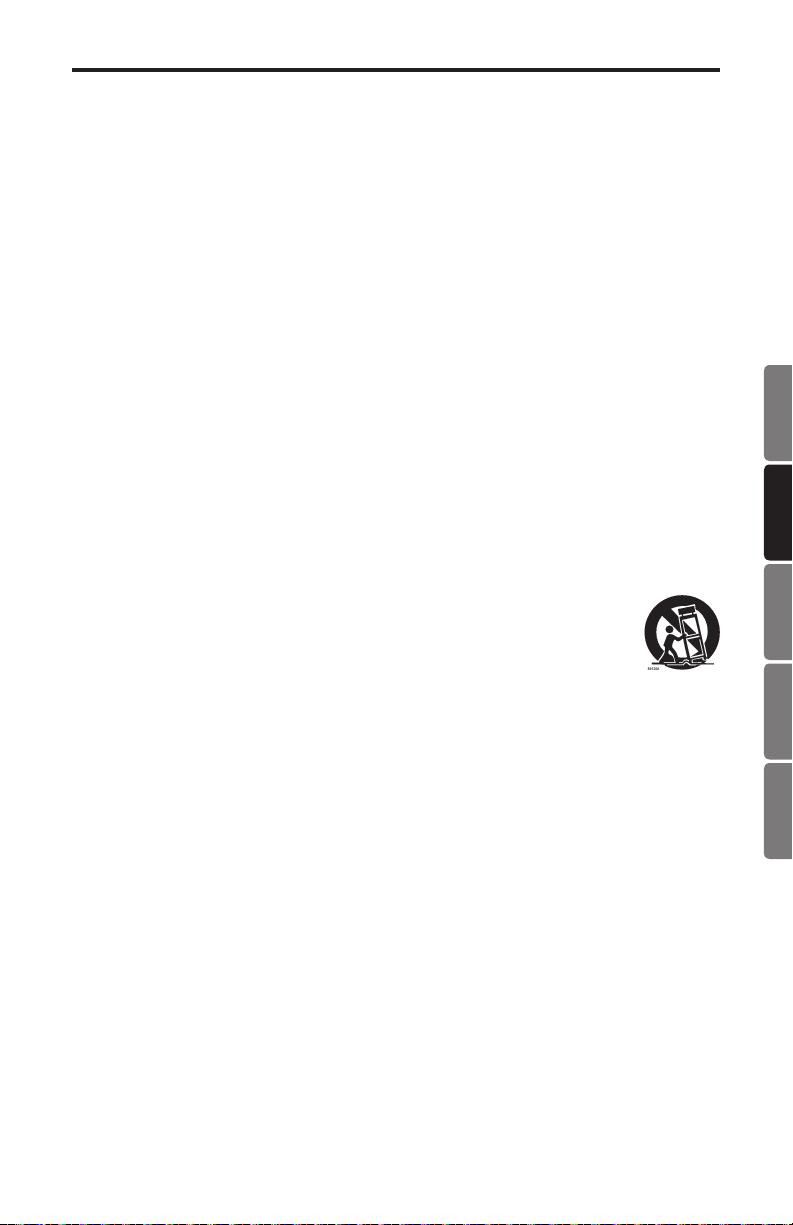
The Resound VX8.1 is made up of four sections:
12” subwoofer with built-in amplifier, spacer,
center speaker array with four 3.5” drivers and the
top speaker array with four 3.5” drivers. Follow the
steps below to put the system together.
1. Place the Resound VX8.1 subwoofer on a flat,
steady surface.
2. Insert the spacer section into the subwoofer,
by aligning the four pins on the spacer with
the four holes on the subwoofer.
3. Slide the center speaker array into the top of
the space until it snaps in place.
4. Slide the top speaker array into the top of the
center speaker array until it snaps in place.
3
2
1
Resound VX8.1 • Portable Column Array System 7
Page 8
Getting Started
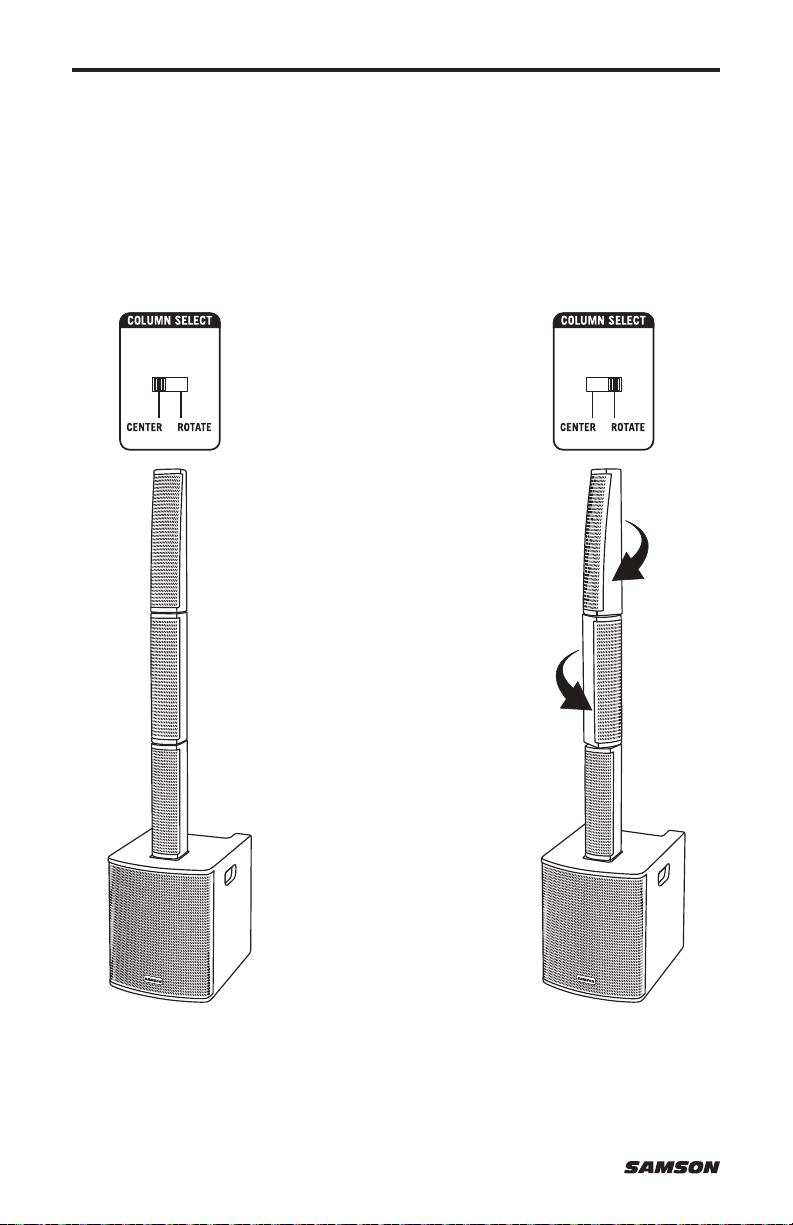
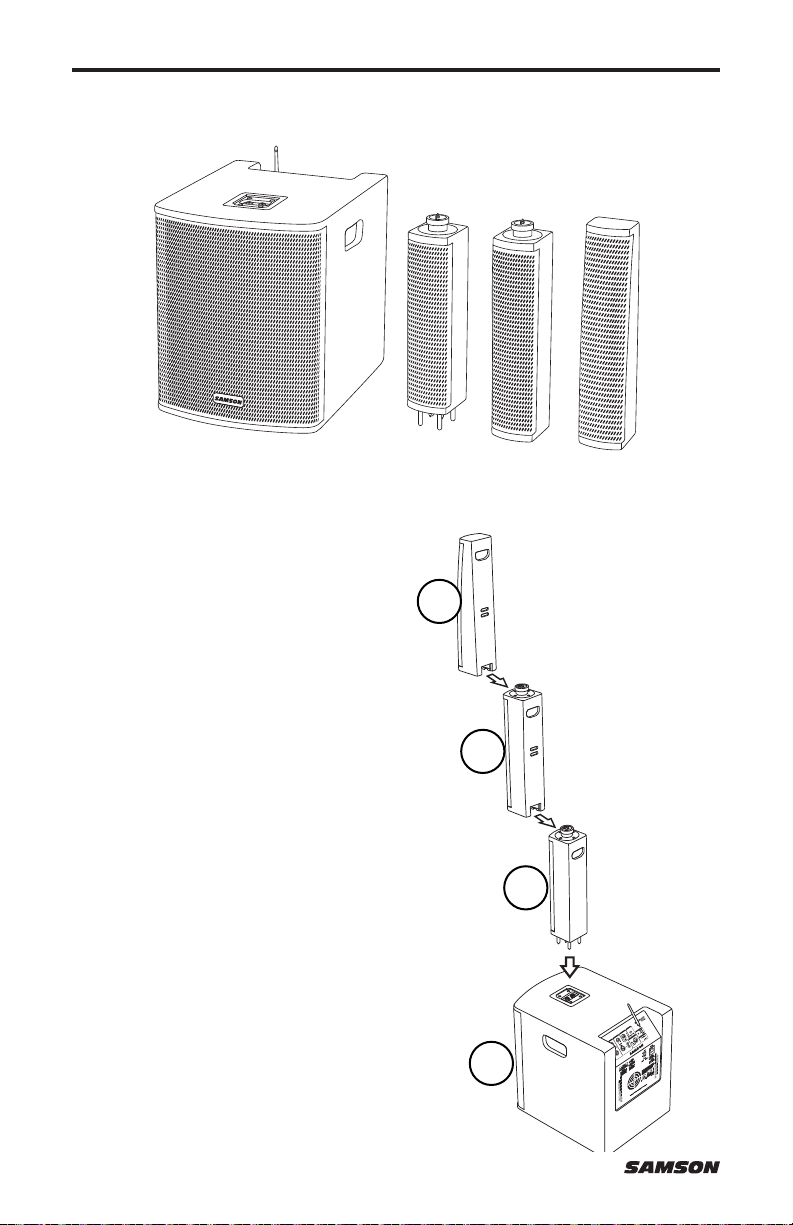
The Resound VX8.1 provides a horizontal coverage of 120°. The unique array design allows
the two speaker arrays to be rotated 45° in opposite directions providing an exceptionally
wide coverage area of 200°.
The onboard DSP has two Column Select settings. When the speaker arrays are centered,
set the COLUMN SELECT switch to the Center position. When the two arrays are rotated 45°
, set the switch to the Rotate position. This will ensure the tonal response of the speaker
array remains consistent in either position.
8
Page 9
Quick Start
1. Set the Resound VX8.1 power switch to the
OFF position, and fully turn all of the LEVEL
controls counterclockwise to 0.
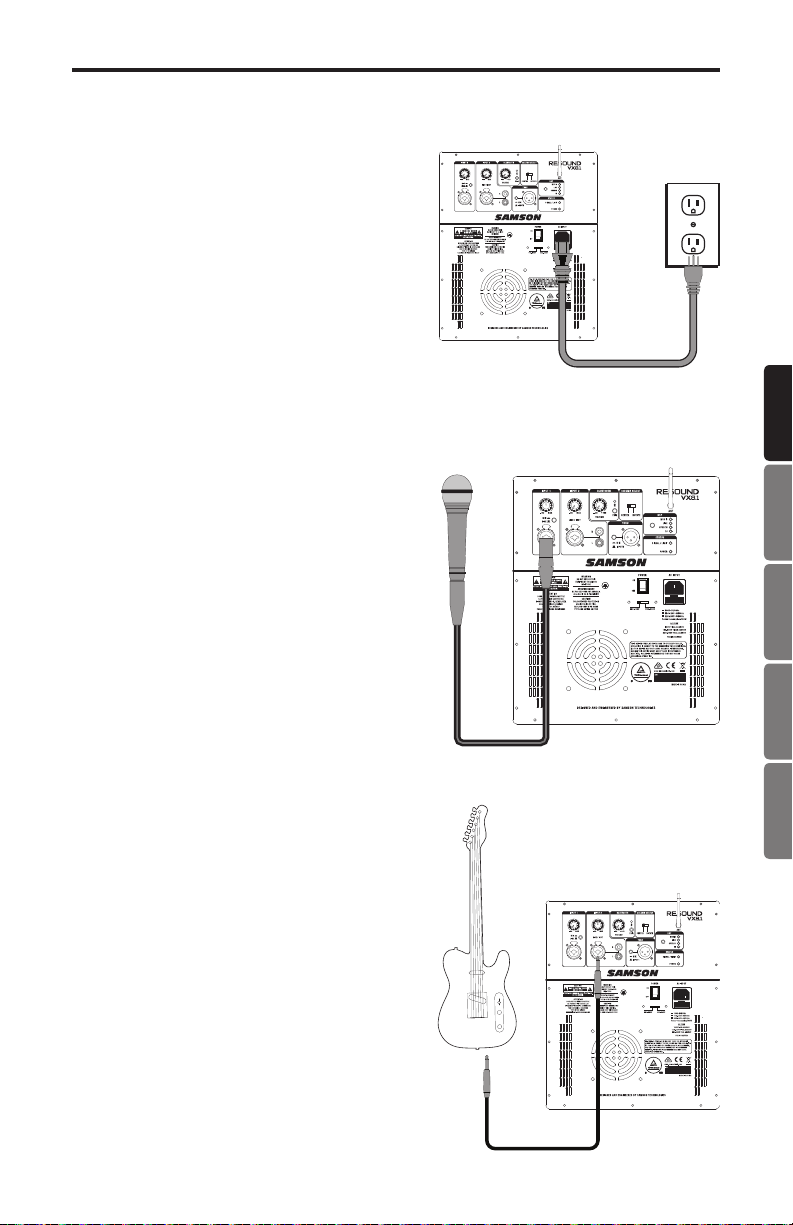
2. If an outlet is available, connect the included
power cord to the AC input of the speaker,
and plug it into an electrical outlet.
3. Set the Resound VX8.1 power switch to the
ON position.
4. Connect your audio sources.
5. Turn the MASTER VOLUME control up and
set the input levels, following the steps
below.
Making Connections
INPUT 1 (Microphone / Line Input)
1. Connect a microphone using a standard XLR
cable or line level equipment using a 1⁄4”
instrument cable.
2. If connecting a microphone, set the MIC /
LINE switch to the down (MIC) position. If
connecting a line level device, set the LINE /
MIC switch to the up (LINE) position.
3. While speaking into the microphone or
playing music from a line level audio source,
slowly raise the channel INPUT 1 Volume
control until you have reached the desired
level.
NOTE: If not using the Channel 1 input, turn the
VOLUME control all the way down to keep out
any unwanted noise.
INPUT 2
Connecting an electric guitar
1. Connect an electric guitar using a standard
1/4” instrument cable.
2. Push the LINE/INST switch to the INST
(down) position.
3. While playing the guitar, slowly raise the
channel INPUT 2 Volume control until you
have reached the desired level.
Note: If connecting an electric guitar it is
recommended to use a preamp between the
instrument and Resound VX8.1 to replicate
the sound of a guitar amplifier.
ENGLISHFRANÇAISDEUTSCHEESPAÑOLITALIANO
Resound VX8.1 • Portable Column Array System 9
Page 10

Quick Start
Bluetooth®
1. Turn the BLUETOOTH Volume control down
counterclockwise to 0.
2. Rotate the Bluetooth antenna so that it is in
the vertical position.
3. With the Resound VX8.1 and your Bluetooth
device powered on; press the PAIR button on
the rear panel of the Resound VX8.1 to make
the speaker discoverable. The Bluetooth
indicator will slowly flash blue.
4. In the settings of your Bluetooth device, set it
to “discover” available devices.
5. From the Bluetooth device list, select the
“SAMSON BLUETOOTH” device.
6. If your device asks for a passkey, enter digits
0000 (four zeros) and press OK. Some
devices may also ask you to accept the
connection.
7. The Resound VX8.1 speaker indicates that pairing is complete when the indicator
turns steady blue. You can now stream audio from your device to the Resound VX8.1
speakers.
8. With the volume control on your Bluetooth device turned up, play some music, and
slowly raise the Resound VX8.1 BLUETOOTH VOLUME control until you have reached
the desired level.
10
Page 11
Resound VX8.1 Controls and Connections
3
6 7
8
13
10
9
2
1 4
12
11
14
5
15
16
18
17
19
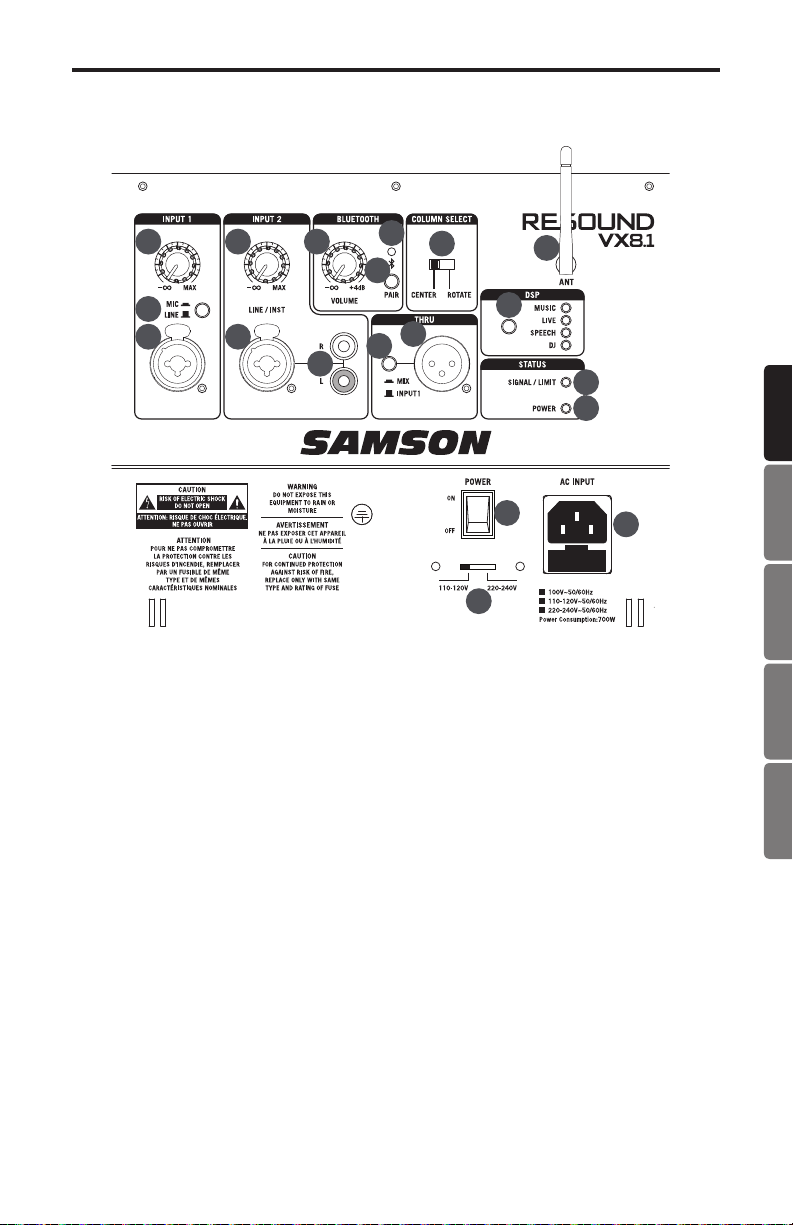
1. INPUT 1 - XLR - 1 ⁄4” combo input for connecting a microphone or a device with a line
level signal.
2. LINE / MIC Switch - Adjusts the gain of the CH1 input for a microphone or line level
device.
3. INPUT 1 Volume - Controls the level of the INPUT 1 Mic/Line input.
4. INPUT 2 - XLR - 1 ⁄4” combo input for connecting a instrument or device with a line
level signal.
5. INPUT 2 Stereo Input - Stereo RCA input connectors for connecting the output of
devices such as MP3, mobile device, or any other line level device.
6. INPUT 2 Volume - Controls the level of the INPUT 2 inputs.
®
7. BLUETOOTH
8. Pairing Indicator - Displays the Bluetooth status of the XP208w system.
9. PAIR Button - Press this button to enable pairing mode in order to connect to a
Bluetooth audio device.
10. Bluetooth Antenna - This antenna receives signal from a paired device and should be
placed in a vertical position when using the Bluetooth. The Bluetooth receiver has a
range of approximately 100’ (30m).
VOLUME - Controls the level of the Bluetooth input.
ENGLISHFRANÇAISDEUTSCHEESPAÑOLITALIANO
Resound VX8.1 • Portable Column Array System 11
Page 12

Resound VX8.1 Controls and Connections
11. LINE OUT - Line level XLR output jack to connect to the input of a another Resound
VX8.1 to expand your sound system.
NOTE: When connecting another powered speaker system to the THRU Output of the
Resound VX8.1, it is important to power on the main Resound VX8.1 system first, then
power on the linked speaker. When powering down the system, it is recommended to
turn off all linked speakers, then power off the main Resound VX8.1 system.
12. MIX / INPUT 1 Switch - This switch is used to select the signal that is sent to the THRU
Output. When the switch is in the MIX position, the signal at the THRU Output is a mix
of both the Input 1 and Input 2 signals. When the switch is in the INPUT 1 position the
THRU Output carries only the Input 1 signal.
13. COLUMN SELECT Switch - This switch selects the frequency response that is appropriate
for the speaker array based on the position of the speakers. When the speakers are all
in-line, use the CENTER setting. When the speaker arrays are rotated 45° in opposite
directions, use the ROTATE setting.
14. DSP - The Resound VX8.1 has four preset EQ contour curves: MUSIC, LIVE, SPEECH
and DJ.
15. SIGNAL / LIMIT Indicator - This two color indicator lights green when signal is present at
the inputs and red when the internal amplifier is near the clipping point and the limiter
is engaged. If the indicator lights red frequently, turn down the Input Volume controls
on the Resound VX8.1 or turn down the signal at the source, until the indicator does
not light anymore, or lights only occasionally with high signal peaks.
16. POWER Indicator - This indicator lights green indicating the Resound VX8.1 is On and
receiving power.
17. AC Inlet – Connect the supplied 3-pin IEC power cable here.
18. POWER Switch – Use the POWER switch to turn power to the Resound VX8.1 on or off.
19. AC Voltage selection switch - This switch is used to set the operation voltage. Be sure to
check that the switch is set correctly for your country.
12
Page 13
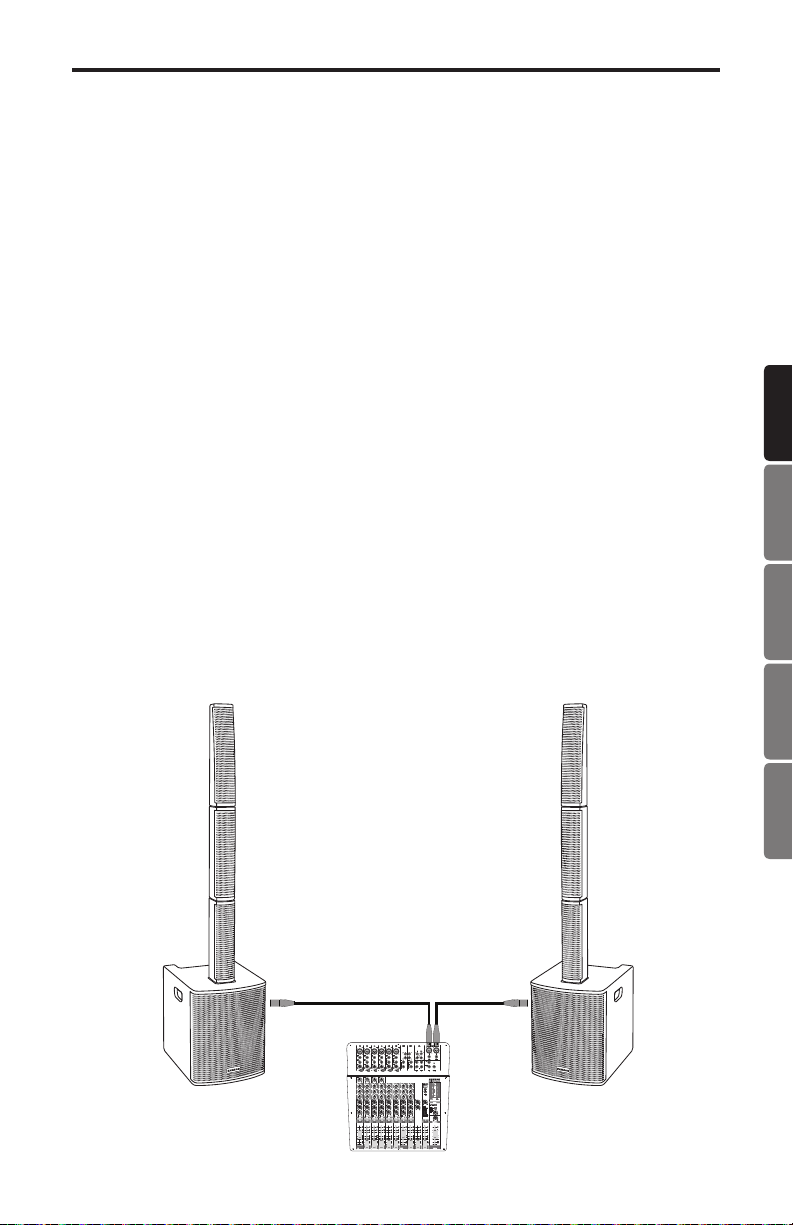
Using Two Resound VX8.1 Systems
For larger sound reinforcement applications using a pair of Resound VX8.1 systems, there
are two methods of connecting the systems.
Connect two Resound VX8.1 systems to a mixer
1. Turn the Resound VX8.1 system’s and mixer Power switch to the OFF positions.
2. Turn the VOLUME controls on the rear panel of the Resound VX8.1 down, fully
counterclockwise.
3. Following the manufacturer’s instruction, connect the audio sources to your mixer.
4. Connect either a XLR or 1/4” cable from the output of your mixer to the INPUT 1 jack
on the Resound VX8.1 rear panel. Set the MIC / LINE switch to the LINE position.
5. Connect the supplied power cables to the IEC sockets on the back of the Resound
VX8.1 systems. Plug the power cables into an AC outlet.
Note: Always make sure that the AC outlet is configured with the correct voltage as
indicated on the rear panel of the Resound VX8.1.
6. Switch the Resound VX8.1 POWER switches to the ON position.
7. Run an audio signal from your mixer and check that you are getting a good level using
the mixers output meter.
8. Slowly raise the Resound VX8.1 INPUT 1 Volume controls until you have reached the
desired level.
9. If the volume from the speakers gets really loud, or you see the LIMIT indicator blinking
frequently, turn down the Volume control on the Resound VX8.1 a little until the Peak
indicator does not light, or only lights occasionally with signal peaks.
Note: Before plugging in and turning on, remember the “last on, first off” rule of
powered audio gear - When powering up your system, be sure that all the wires are
connected, first turn on your mixer and any other outboard gear, then turn on your
Resound VX8.1. When powering down, turn off your Resound VX8.1 off first and then
your mixer and outboard gear.
ENGLISHFRANÇAISDEUTSCHEESPAÑOLITALIANO
Resound VX8.1 • Portable Column Array System 13
Page 14
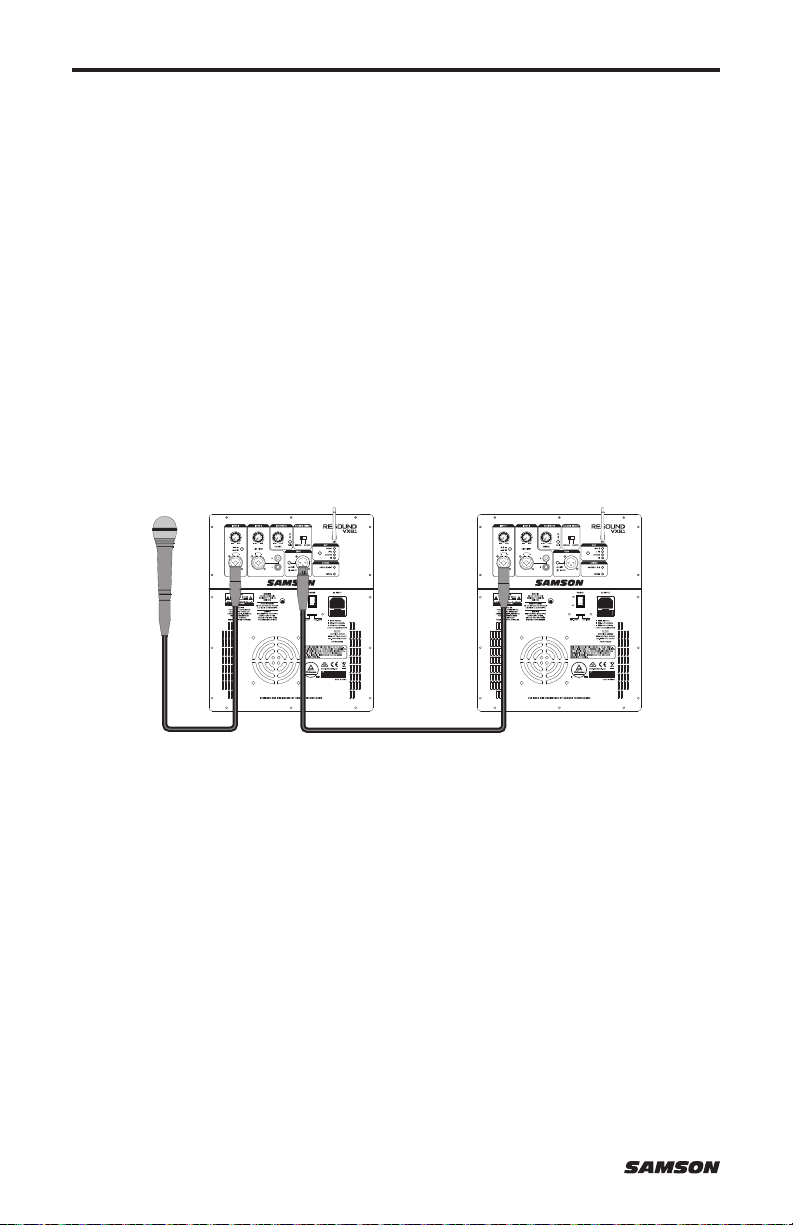
Using Two Resound VX8.1 Systems
Daisy-chaining two Resound VX8.1 systems
This method is convenient when you don’t have a mixer or have minimal input sources.
1. Connect the all of the input sources to the main Resound VX8.1 system.
2. Set the MIX / INPUT 1 switch to the down MIX position.
3. Connect an XLR cable from the THRU output on the main Resound VX8.1 to the INPUT
1 of the second Resound VX8.1 system.
4. On the second Resound VX8.1, set the INPUT 1 MIC / LINE switch to the LINE
position.
5. Set the level of the audio of the main Resound VX8.1 system.
6. Raise the INPUT 1 Volume control of the second Resound VX8.1 until the desired
output level is reached.
NOTE: When connecting another powered speaker system to the THRU Output of the
Resound VX8.1, it is important to power on the main Resound VX8.1 system first, then
power on the linked speaker. When powering down the system, it is recommended to
turn off all linked speakers, then power off the main Resound VX8.1 system.
14
Page 15
Specifications
Amplifier
System Power
Frequency Response 60Hz – 20kHz (-3dB)
Max SPL 125 dB @ 1W/1m
Power Consumption AC Input 100V/110-120V/220-240V 50/60Hz 700W
High Frequency Drivers 8 x 3.5” drivers w/ 1” voice coil
Array Left/Right Rotation 90°
Horizontal Dispersion 120°–200°
Low Frequency Driver 12” woofer
Construction Plywood cabinet with textured black paint
Grille Perforated steel grille with foam backing
Input 1 XLR - 1/4” combo (Mic/Line)
Input 2 XLR - 1/4” combo (Line/Instrument), RCA
Outputs XLR Thru
EQ DSP
Column Array DSP
Bluetooth
Bluetooth Frequency
RF Power
Status Indicators
®
Dimensions and Weight
Subwoofer Dimensions (LxWxH)
Speaker Array Dimensions
(LxWxH)
Spacer Dimensions (LxWxH) 3.86” x 17.72” x 4.37
System Weight 67 lb / 30.4 kg
700 W (2 x 350 W) continuous
1400 W (2 x 700 W) program
Speakers
Mixer
Music, Live, Speech, DJ
Center, Rotate
Bluetooth 4.0 A2DP
2.402GHz ~ 2.480GHz
<10mW
Signal/Limit (2-color), Power, Bluetooth status
15.16” x 18.62” x 19.69”
385 mm x 473 mm x 500 mm
3.86” x 19.04” x 4.37”
(Top array tapers to 2.5”)
98 mm x 484 mm x 111 mm
(Top array tapers to 63.5 mm)
98 mm x 450 mm x 111 mm
ENGLISHFRANÇAISDEUTSCHEESPAÑOLITALIANO
At Samson, we are continually improving our products, therefore specifications and images
Resound VX8.1 • Portable Column Array System 15
are subject to change without notice.
Page 16

Renseignements importants sur l'innocuité
RISQUE DE CHOC ÉLECTRONIQUE -
Le symbole en forme d’éclair dans un triangle équilatéral a pour but d’alerter de
la présence d’une «tension dangereuse» à l’intérieur du boîtier, de parties non
isolées sous tensions suffisamment élevées pour représenter un risque de choc
électrique.
Le point d’exclamation dans un triangle équilatéral a pour but d’alerter
l’utilisateur de la présence d’instructions de maintenance ou d’opérations
essentielles dans la documentation de l’appareil.
Pour éviter tout risque de choc électrique, ne pas brancher l'appareil sur le
AVERTISSEMENT : AFIN DE RÉDUIRE LES RISQUES DE CHOCS ÉLECTRIQUES,
NE RETIREZ JAMAIS LES CAPOTS. IL N'Y A AUCUNE PIÈCE RÉPARABLE PAR
L'UTILISATEUR À L'INTÉRIEUR. CONTACTEZ UN SERVICE TECHNIQUE COMPÉTENT
POUR LA MAINTENANCE DE CET APPAREIL.
Si vous voulez vous débarrasser de ce produit, ne le mélangez pas avec les ordures
ménagères. Il existe un système de collecte séparée pour les produits électroniques
usagés, conformément à la législation qui exige un traitement, une récupération et
un recyclage appropriés.
Les ménages privés dans les 28 États membres de l'UE, en Suisse et en Norvège
peuvent renvoyer gratuitement leurs produits électroniques usagés à des centres de collecte
agréées ou à un revendeur (si vous en achetez un neuf similaire).
Pour les pays non mentionnés ci-dessus, veuillez contacter les autorités locales pour
connaître la méthode d'élimination correcte.
De fait, vous vous assurez que votre produit mis au rebut subit le traitement, la récupération
et le recyclage nécessaires et vous évitez tout impact néfaste sur l'environnement et la santé
humaine.
ATTENTION
NE PAS OUVRIRIR
ATTENTION
secteur lorsque la grille est retirée.
La marque et les logos Bluetooth
SIG, Inc. et toute utilisation de ces marques par Samson Technologies est sous licence. Les
autres marques et noms commerciaux sont ceux de leurs propriétaires respectifs."
16
®
sont des marques déposées appartenant à Bluetooth
Page 17
Renseignements importants sur l'innocuité
1. Lisez ces instructions.
2. Conservez ces instructions.
3. Tenez compte de tous les avertissements.
4. Suivez toutes les instructions.
5. N'utilisez pas cet appareil près de l'eau.
6. Nettoyer uniquement avec un chiffon sec.
7. N'obstruez pas les ouvertures de ventilation. Installez l'appareil conformément aux
instructions du fabricant.
8. N'installez pas l'appareil à proximité de sources de chaleur telles que radiateurs, registres
de chaleur, poêles ou autres appareils (y compris les amplificateurs) qui produisent de
la chaleur.
9. Ne pas défaire la fonction de sécurité de la fiche polarisée ou de mise à la terre. Une
fiche polarisée possède deux lames dont l'une est plus large que l'autre. Une fiche de
type mise à la terre a deux lames et une troisième broche de mise à la terre. La lame
large ou la troisième broche sont prévues pour votre sécurité. Si la fiche fournie ne rentre
pas dans votre prise, consultez un électricien pour le remplacement de la prise obsolète.
10. Protégez le cordon d'alimentation pour éviter qu'il ne soit piétiné ou pincé, en particulier
au niveau des prises, des prises de courant et à l'endroit où il sort de l'appareil.
11. N'utiliser que les accessoires/accessoires spécifiés par le fabricant.
12. N'utiliser qu'avec le chariot, le support, le trépied, le support ou la table
spécifiés par le fabricant, ou vendus avec l'appareil. Lorsqu'un chariot est
utilisé, soyez prudent lorsque vous déplacez la combinaison chariot/appareil
afin d'éviter les blessures causées par le basculement du chariot.
13. Débrancher l'appareil en cas de foudre, de tri ou longues périodes d'inutilisation.
14. Confiez toute réparation à un membre de personnel qualifié. L'entretien est nécessaire
lorsque l'appareil a été endommagé de quelque manière que ce soit, par exemple si
le cordon d'alimentation ou la fiche est endommagé, si du liquide a été renversé ou si
des objets sont tombés dans l'appareil, ont été exposés à la pluie ou à l'humidité, ne
fonctionnent pas normalement ou ont été échappés.
15. Cet appareil ne doit pas être exposé à des gouttes ou des éclaboussures d'eau et aucun
objet rempli de liquide tel qu'un vase ne doit être placé sur l'appareil.
16. Attention - pour éviter tout risque d'électrocution, faites correspondre la fiche large de la
lame avec la fente large de la fente complètement insérée.
17. Veillez à maintenir un bon environnement de ventilation autour de l'ensemble de l'appareil.
18. INTERRUPTEUR MARCHE/ARRÊT : Pour les produits équipés d'un interrupteur
d'alimentation, l'interrupteur d'alimentation NE COUPLE PAS la connexion au secteur.
19. DÉBRANCHER LE CORDON D'ALIMENTATION : La fiche doit rester facilement
utilisable. Pour un montage en rack ou une installation où la fiche n'est pas accessible,
un interrupteur secteur omnipolaire avec une séparation des contacts d'au moins 3 mm
dans chaque pôle doit être intégré dans l'installation électrique du rack ou du bâtiment.
20. Avertissement : L'appareil doit être raccordé à une prise de courant secteur avec prise
de terre de protection.
ENGLISHFRANÇAISDEUTSCHEESPAÑOLITALIANO
Resound VX8.1 - Système de réseau de colonnes portables 17
Page 18

Renseignements importants sur l'innocuité
Avis de la FCC
1. Cet appareil est conforme à l'article 15 du règlement de la FCC. L'utilisation est soumise
aux deux conditions suivantes :
(1) Cet appareil ne doit pas causer d'interférences nuisibles.
(2) Cet appareil doit accepter toute interférence reçue, y compris les interférences
susceptibles de provoquer un fonctionnement non désiré.
2. Tout changement ou modification non expressément approuvé par la partie responsable
de la conformité pourrait annuler le droit de l'utilisateur d'utiliser l'équipement.
Déclaration de la FCC
Cet équipement a été testé et déclaré conforme aux limites d'un appareil numérique
de classe B, conformément à la partie 15 des règlements de la FCC. Ces limites sont
conçues pour fournir une protection raisonnable contre les interférences nuisibles dans une
installation résidentielle.
Cet équipement génère des utilisations et peut émettre de l'énergie radiofréquence et, s'il
n'est pas installé et utilisé conformément aux instructions, peut causer des interférences
nuisibles aux communications radio. Cependant, il n'y a aucune garantie que des
interférences ne se produiront pas dans une installation particulière. Si cet équipement
cause des interférences nuisibles à la réception de la radio ou de la télévision, ce qui peut
être déterminé en éteignant et en rallumant l'équipement, l'utilisateur est encouragé à
essayer de corriger ces interférences par une ou plusieurs des mesures suivantes :
• Réorienter ou déplacer l'antenne de réception.
• Augmenter la distance entre l'équipement et le récepteur.
• Brancher l'équipement dans une prise de courant sur un circuit différent de celui
auquel le récepteur est branché.
• Consulter le revendeur ou un technicien radio/TV expérimenté pour obtenir de l'aide.
Énoncé de la FCC sur l'exposition aux rayonnements
Cet équipement est conforme aux limites d'exposition aux rayonnements RF de la FCC
établies pour un environnement non contrôlé.
Déclaration d'avertissement RF
Cet équipement est conforme aux limites d'exposition aux rayonnements RF de la FCC
établies pour un environnement non contrôlé. L'utilisateur final doit suivre les instructions
d'utilisation spécifiques pour satisfaire à la conformité de l'exposition aux RF. Cet émetteur
ne doit pas être installé ou fonctionner conjointement avec une autre antenne ou un autre
émetteur.
Par la présente, Samson Technologies Corp. déclare que ce Resound VX8.1 est conforme
aux exigences essentielles et autres dispositions pertinentes de la Directive 2014/53/EU. La
déclaration de conformité peut être consultée sur le site :
http://www.samsontech.com/site_media/support/manuals/VX8.1_DOC.pdf
18
Page 19

Introduction
Félicitations pour l'achat du système Resound VX8.1 Portable Column Array de Samson !
Le Resound VX8.1 est un système tout-en-un doté d'un subwoofer de 12" et de huit hautparleurs de 3,5" disposés dans une enceinte verticale. L'installation et l'installation sont
extrêmement faciles grâce aux trois éléments du tableau de colonnes qui s'emboîtent les
uns dans les autres et s'emboîtent dans le subwoofer. Le mélangeur 3 canaux intégré permet
d'utiliser le Resound VX8.1 en tant que sonorisation autonome, ou il peut être connecté à
un mélangeur et utilisé dans le cadre d'un système de renforcement sonore.
Le réseau vertical peut être disposé en ligne pour une couverture horizontale de 120°, ou
pivoté de 45° à gauche et à droite pour une couverture ultra large de 200°. Le mélangeur
dispose d'entrées pour microphones, instruments et appareils de niveau ligne. Le Resound
VX8.1 inclut également la connectivité Bluetooth® sans fil, pour diffuser l'audio depuis votre
téléphone intelligent, tablette ou ordinateur. Avec une puissance continue de 700 watts
(350 watts pour le subwoofer et 350 watts pour le réseau vertical) et quatre réglages DSP
pour différentes applications sonores, le Resound VX8.1 est la solution parfaite là où une
amplification sonore de haute qualité est nécessaire.
Dans ces pages, vous trouverez une description détaillée des caractéristiques du Resound
VX8.1, des instructions étape par étape pour son installation et son utilisation, et des
spécifications complètes. Si votre Resound VX8.1 a été acheté aux États-Unis, vous
trouverez également une carte de garantie ci-jointe - n'oubliez pas de suivre les instructions
afin que vous puissiez recevoir un soutien technique et que nous puissions vous envoyer des
informations à jour sur ce produit et d'autres produits Samson dans le futur. Aussi, n'oubliez
pas de consulter notre site Web (www.samsontech.com) pour de plus amples renseignements
sur notre gamme complète de produits.
Nous vous recommandons de conserver les documents suivants à titre de référence, ainsi
qu'une copie de votre reçu de caisse.
Numéro de série : _____________________________________________________
ENGLISHFRANÇAISDEUTSCHEESPAÑOLITALIANO
Date d'achat : ________________________________________________________
Si vous avez des questions ou des commentaires concernant le Resound VX8.1 Portable
Column Array System ou tout autre produit de Samson, n'hésitez pas à nous contacter à
support@samsontech.com.
Avec un entretien et une maintenance appropriés, votre système Resound VX8.1 fonctionne
sans problème pendant de nombreuses années. Si votre système Resound VX8.1 Portable
Column Array System nécessite un entretien, un numéro d'autorisation de retour (RA) doit
être obtenu avant d'envoyer votre appareil à Samson. Sans ce numéro, l'appareil ne sera
pas accepté. Veuillez consulter le site www.samsontech.com/ra pour obtenir un numéro RA
avant d'expédier votre appareil. Veuillez conserver les matériaux d'emballage d'origine et, si
possible, retourner l'appareil dans son emballage d'origine. Si votre système Resound VX8.1
Portable Column Array a été acheté en dehors des États-Unis, contactez votre distributeur
local.
Resound VX8.1 - Système de réseau de colonnes portables 19
Page 20
Prise en main
Subwoofer Entretoise Réseau
Le Resound VX8.1 se compose de quatre sections
: Subwoofer 12" avec amplificateur intégré,
entretoise, enceinte centrale avec quatre hautparleurs de 3,5" et l'enceinte supérieure avec
quatre haut-parleurs de 3,5". Suivez les étapes
ci-dessous pour assembler le système.
1. Placez le caisson de basse Resound VX8.1 sur
une surface plane et stable.
2. Insérez la section de l'entretoise dans le
subwoofer, en alignant les quatre broches
de l'entretoise avec les quatre trous du
subwoofer.
3. Faites glisser l'enceinte centrale dans le haut
de l'espace jusqu'à ce qu'elle s'enclenche en
place.
4. Faites glisser l'enceinte supérieure dans
la partie supérieure de l'enceinte centrale
jusqu'à ce qu'elle s'enclenche en place.
4
d'enceintes
centrales
3
2
1
Haut-parleur
haut-parleur
Array
20
Page 21
Prise en main
Le Resound VX8.1 offre une couverture horizontale de 120°. La conception unique de
l'enceinte permet de faire pivoter les deux enceintes de 45° dans des directions opposées,
ce qui donne une zone de couverture exceptionnellement large de 200°.
Le DSP embarqué dispose de deux réglages de sélection de colonne. Lorsque les enceintes
sont centrées, placez le commutateur COLUMN SELECT en position centrale. Lorsque les
deux matrices sont tournées de 45°, placez l'interrupteur en position Rotation. Cela garantira
que la réponse tonale de l'enceinte reste constante dans l'une ou l'autre position.
ENGLISHFRANÇAISDEUTSCHEESPAÑOLITALIANO
Resound VX8.1 - Système de réseau de colonnes portables 21
Page 22

Démarrage rapide
1. Mettez l'interrupteur d'alimentation
Resound VX8.1 en position OFF et tournez
complètement toutes les commandes LEVEL
dans le sens antihoraire à 0.
2. Si une prise est disponible, branchez le
cordon d'alimentation fourni sur l'entrée CA
de l'enceinte et branchez-le sur une prise
électrique.
3. Mettez l'interrupteur d'alimentation Resound
VX8.1 en position ON.
4. Connectez vos sources audio.
5. Tournez la commande MASTER VOLUME
vers le haut et réglez les niveaux d'entrée, en
suivant les étapes ci-dessous.
Établir des liens
INPUT 1 (Entrée microphone / ligne)
1. Connectez un microphone à l'aide d'un câble
XLR standard ou d'un équipement de niveau
de ligne à l'aide d'un câble instrument 1⁄ 4".
2. Si vous connectez un microphone, placez le
commutateur MIC / LINE en position basse
(MIC). Si vous connectez un appareil de
niveau ligne, placez le commutateur LINE /
MIC en position haute (LINE).
3. Tout en parlant dans le microphone ou en
jouant de la musique à partir d'une source
audio de niveau ligne, augmentez lentement
la commande de volume du canal INPUT 1
jusqu'à ce que vous ayez atteint le niveau
souhaité.
REMARQUE : Si vous n'utilisez pas l'entrée du
canal 1, tournez la commande VOLUME à fond
pour éviter tout bruit indésirable.
INPUT 2
Connexion d'une guitare électrique
1. Connectez une guitare électrique à l'aide d'un
câble d'instrument 1/4" standard.
2. Poussez le commutateur LINE/INST en
position INST (bas).
3. Tout en jouant de la guitare, augmentez
lentement le volume du canal INPUT 2 jusqu'à
ce que vous ayez atteint le niveau désiré.
Note : Si vous connectez une guitare
électrique, il est recommandé d'utiliser un
préampli entre l'instrument et Resound VX8.1
pour reproduire le son d'un amplificateur de
guitare.
22
Page 23

Démarrage rapide
Bluetooth®
1. Tournez le bouton BLUETOOTH Volume vers
le bas dans le sens antihoraire jusqu'à 0.
2. Tournez l'antenne Bluetooth pour qu'elle soit
en position verticale.
3. Avec le Resound VX8.1 et votre appareil
Bluetooth sous tension, appuyez sur le bouton
PAIR sur le panneau arrière du Resound
VX8.1 pour rendre l'enceinte détectable. Le
voyant Bluetooth clignote lentement en bleu.
4. Dans les paramètres de votre appareil
Bluetooth, réglez-le sur "découvrir" les
appareils disponibles.
5. Dans la liste des appareils Bluetooth,
sélectionnez l'appareil "SAMSON
BLUETOOTH".
6. Si votre appareil vous demande un mot de
passe, entrez les chiffres 0000 (quatre zéros) et appuyez sur OK. Certains appareils
peuvent également vous demander d'accepter la connexion.
7. L'enceinte Resound VX8.1 indique que le couplage est terminé lorsque l'indicateur
devient bleu fixe. Vous pouvez maintenant diffuser de l'audio de votre appareil vers les
haut-parleurs Resound VX8.1.
8. Lorsque la commande de volume de votre appareil Bluetooth est activée, écoutez de la
musique et augmentez lentement la commande Resound VX8.1 BLUETOOTH VOLUME
jusqu'à ce que vous ayez atteint le niveau souhaité.
ENGLISHFRANÇAISDEUTSCHEESPAÑOLITALIANO
Resound VX8.1 - Système de réseau de colonnes portables 23
Page 24

Commandes et connexions Resound VX8.1
3
6 7
8
13
10
9
2
1 4
12
11
14
5
15
16
18
17
19
1. INPUT 1 - XLR - Entrée combo 1⁄ 4" pour connecter un microphone ou un appareil avec
un signal de niveau ligne.
2. Commutateur LINE / MIC - Règle le gain de l'entrée CH1 pour un microphone ou un
appareil de niveau ligne.
3. INPUT 1 Volume - Contrôle le niveau de l'entrée micro/ligne INPUT 1.
4. INPUT 2 - XLR - Entrée combo 1⁄ 4" pour connecter un instrument ou un appareil avec
un signal de niveau ligne.
5. INPUT 2 Stereo Input - Connecteurs d'entrée stéréo RCA pour connecter la sortie
d'appareils tels que MP3, appareil mobile ou tout autre appareil de niveau ligne.
6. INPUT 2 Volume - Contrôle le niveau des entrées INPUT 2.
7. BLUETOOTH® VOLUME - Contrôle le niveau de l'entrée Bluetooth.
8. Indicateur d'appairage - Affiche l'état Bluetooth du système XP208w.
9. Bouton PAIR - Appuyez sur ce bouton pour activer le mode de couplage afin de vous
connecter à un appareil audio Bluetooth.
10. Antenne Bluetooth - Cette antenne reçoit le signal d'un appareil jumelé et doit être
placée en position verticale lorsque vous utilisez le Bluetooth. Le récepteur Bluetooth a
une portée d'environ 100' (30m).
24
Page 25

Commandes et connexions Resound VX8.1
11. LINE OUT - Prise de sortie XLR de niveau ligne à connecter à l'entrée d'un autre
Resound VX8.1 pour étendre votre système audio.
REMARQUE : Lorsque vous connectez un autre système d'enceintes amplifiées à
la sortie THRU de la Resound VX8.1, il est important d'allumer d'abord le système
principal Resound VX8.1, puis l'enceinte reliée. Lors de la mise hors tension du
système, il est recommandé d'éteindre tous les haut-parleurs connectés, puis d'éteindre
le système principal Resound VX8.1.
12. Commutateur MIX / INPUT 1 - Ce commutateur est utilisé pour sélectionner le signal qui
est envoyé à la sortie THRU. Lorsque le commutateur est en position MIX, le signal à la
sortie THRU est un mélange des signaux d'entrée 1 et 2. Lorsque le commutateur est
en position INPUT 1, la sortie THRU ne transmet que le signal d'entrée 1.
13. Commutateur COLUMN SELECT - Ce commutateur sélectionne la réponse en fréquence
appropriée pour le réseau d'enceintes en fonction de la position des enceintes. Lorsque
les enceintes sont toutes en ligne, utilisez le réglage CENTRE. Lorsque les enceintes
sont tournées de 45° dans des directions opposées, utilisez le réglage ROTATE.
14. DSP - Le Resound VX8.1 possède quatre courbes de contour d'égalisation préréglées :
MUSIQUE, LIVE, SPEECH et DJ.
15. Indicateur SIGNAL / LIMITATION - Cet indicateur bicolore s'allume en vert lorsque le signal
est présent aux entrées et en rouge lorsque l'amplificateur interne est proche du point
d'écrêtage et que le limiteur est engagé. Si l'indicateur s'allume fréquemment en rouge,
baissez le volume d'entrée du Resound VX8.1 ou baissez le signal à la source, jusqu'à
ce que l'indicateur ne s'allume plus, ou ne s'allume qu'occasionnellement avec de fortes
pics de signal.
16. Voyant POWER - Ce voyant s'allume en vert indiquant que le Resound VX8.1 est sous
tension et qu'il est sous tension.
17. Entrée CA - Connectez ici le câble d'alimentation IEC à 3 broches fourni.
18. Interrupteur POWER - Utilisez l'interrupteur POWER pour mettre le Resound VX8.1 sous
tension ou hors tension.
19. Commutateur de sélection de tension alternative - Ce commutateur est utilisé pour régler
la tension de fonctionnement. Assurez-vous que l'interrupteur est correctement réglé
pour votre pays.
ENGLISHFRANÇAISDEUTSCHEESPAÑOLITALIANO
Resound VX8.1 - Système de réseau de colonnes portables 25
Page 26

Utilisation de deux systèmes Resound VX8.1
Pour les applications de sonorisation de plus grande envergure utilisant une paire de
systèmes Resound VX8.1, il existe deux méthodes pour connecter les systèmes.
Connecter deux systèmes Resound VX8.1 à un mélangeur.
1. Mettez le système Resound VX8.1 et l'interrupteur d'alimentation du mélangeur en
position OFF.
2. Tournez les commandes VOLUME du panneau arrière du Resound VX8.1 vers le bas, à
fond dans le sens antihoraire.
3. En suivant les instructions du fabricant, connectez les sources audio à votre mélangeur.
4. Connectez un câble XLR ou 1/4" de la sortie de votre mélangeur à la prise INPUT 1 du
panneau arrière du Resound VX8.1. Mettez le commutateur MIC / LINE en position LINE.
5. Connectez les câbles d'alimentation fournis aux prises IEC à l'arrière des systèmes
Resound VX8.1. Branchez les câbles d'alimentation dans une prise secteur.
Note : Assurez-vous toujours que la prise secteur est configurée avec la tension
correcte comme indiqué sur le panneau arrière du Resound VX8.1.
6. Mettre les commutateurs Resound VX8.1 POWER en position ON.
7. Lancez un signal audio à partir de votre table de mixage et vérifiez que vous obtenez un
bon niveau à l'aide de l'indicateur de sortie de la table de mixage.
8. Augmentez lentement les commandes de volume du Resound VX8.1 INPUT 1 jusqu'à
ce que vous ayez atteint le niveau désiré.
9. Si le volume des haut-parleurs devient vraiment fort, ou si le voyant LIMIT clignote
fréquemment, baissez un peu le contrôle de volume du Resound VX8.1 jusqu'à ce que le
voyant Peak ne s'allume plus, ou ne s'allume qu'occasionnellement avec des pics de signal.
Note : Avant de brancher et d'allumer l'appareil, rappelez-vous la règle "last on, first
off" de l'équipement audio alimenté - Lorsque vous allumez votre système, assurezvous que tous les fils sont connectés, allumez d'abord votre mélangeur et tout autre
équipement externe, puis allumez votre Resound VX8.1. Lors de la mise hors tension,
éteignez d'abord votre Resound VX8.1, puis votre mélangeur et votre moteur hors-bord.
26
Page 27

Utilisation de deux systèmes Resound VX8.1
Enchaînement en guirlande de deux systèmes Resound VX8.1
Cette méthode est pratique lorsque vous n'avez pas de mélangeur ou que vous avez des
sources d'entrée minimales.
1. Connectez toutes les sources d'entrée au système principal Resound VX8.1.
2. Mettez l'interrupteur MIX / INPUT 1 en position basse MIX.
3. Connectez un câble XLR de la sortie THRU de la sortie principale Resound VX8.1 à
l'entrée 1 du deuxième système Resound VX8.1.
4. Sur le second Resound VX8.1, placez le commutateur INPUT 1 MIC / LINE en position
LINE.
5. Réglez le niveau audio du système principal Resound VX8.1.
6. Soulevez la commande de volume INPUT 1 du second Resound VX8.1 jusqu'à ce que
le niveau de sortie désiré soit atteint.
REMARQUE : Lorsque vous connectez un autre système d'enceintes amplifiées à
la sortie THRU de la Resound VX8.1, il est important d'allumer d'abord le système
principal Resound VX8.1, puis l'enceinte reliée. Lors de la mise hors tension du
système, il est recommandé d'éteindre tous les haut-parleurs connectés, puis d'éteindre
le système principal Resound VX8.1.
ENGLISHFRANÇAISDEUTSCHEESPAÑOLITALIANO
Resound VX8.1 - Système de réseau de colonnes portables 27
Page 28

Caractéristiques techniques
Amplificateur
Puissance du système
Réponse en fréquence 60Hz - 20kHz (-3dB)
Max SPL 125 dB @ 1W/1m
Consommation d'énergie Entrée AC 100V/110-110-120V/220-240V 50/60Hz 700W
Haut-parleurs haute fréquence 8 haut-parleurs de 3,5 po avec bobine acoustique de 1 po
Rotation gauche/droite du
panneau solaire
Dispersion horizontale 120°–200°
Driver basse fréquence Haut-parleur de grave de 12 po
Construction Armoire en contreplaqué avec peinture noire texturée
Grille Grille perforée en acier avec support en mousse
Entrée 1 XLR - combo 1/4" (micro/ligne)
Entrée 2 XLR - combo 1/4" (ligne/instrument), RCA
Sorties XLR Thru
EQ DSP
Réseau de colonnes DSP
Bluetooth
Fréquence Bluetooth
Puissance RF
Indicateurs d'état
®
Signal/Limite (bicolore), Alimentation, état Bluetooth
Dimensions et poids
Dimensions du subwoofer
(LxLxHxH)
Dimensions du panneau de
haut-parleurs (LxLxHxH)
Dimensions de l'entretoise
(LxlxH)
Poids du système 67 lb / 30,4 kg
(les cônes de la rangée supérieure vont jusqu'à 63,5 mm)
700 W (2 x 350 W) en continu
Programme 1400 W (2 x 700 W) en continu
Haut-parleurs
90°
Mélangeur
Musique, En direct, Discours, DJ
Centre, Rotation
Bluetooth 4.0 A2DP
2.402GHz ~ 2.480GHz ~ 2.480GHz
<10mW
15,16 po x 18,62 po x 19,69 po
385 mm x 473 mm x 500 mm
3.86" x 19.04" x 4.37"
(la rangée supérieure s'effile jusqu'à 2.5")
98 mm x 484 mm x 111 mm
3.86" x 17.72" x 4.37
98 mm x 450 mm x 111 mm
Chez Samson, nous améliorons continuellement nos produits, donc les spécifications et les
28
images sont sujettes à changement sans préavis.
Page 29

Wichtige Sicherheitsinformationen
GEFAHR EINES ELEKTRONISCHEN SCHOCKS -
ACHTUNG
NICHT ÖFFNEN
Dieses Blitzsymbol mit Pfeilspitze in einem gleichseitigen Dreieck soll den
Benutzer auf das Vorhandensein einer nicht isolierten "gefährlichen Spannung"
im Gehäuse des Produkts aufmerksam machen, die von ausreichender Höhe
sein kann, um eine Gefahr eines Stromschlags darzustellen.
Das Ausrufezeichen innerhalb eines gleichseitigen Dreiecks soll den Benutzer
auf das Vorhandensein wichtiger Betriebs- und Wartungsanweisungen in der
dem Gerät beiliegenden Anleitung hinweisen.
VORSICHT
Um die Gefahr eines Stromschlags zu vermeiden, schließen Sie das Gerät nicht
an das Stromnetz an, während das Gitter entfernt ist.
WARNUNG: UM DAS RISIKO EINES STROMSCHLAGS ZU VERRINGERN, ENTFERNEN SIE
NICHT DIE ABDECKUNG (ODER DIE RÜCKSEITE), DA SICH KEINE VOM BENUTZER ZU
WARTENDEN TEILE IM INNEREN BEFINDEN. WENDEN SIE SICH BZGL. DER WARTUNG
AN QUALIFIZIERTES SERVICEPERSONAL.
Wenn Sie dieses Produkt entsorgen möchten, entsorgen Sie es nicht in dem
allgemeinen Hausmüll. Es gibt ein separates Sammelsystem für gebrauchte
Elektronikprodukte in Übereinstimmung mit den gesetzlichen Bestimmungen,
die eine ordnungsgemäße Entsorgung, Verwertung und Wiederverwendung
sicherstellen.
Privathaushalte in den 28 Mitgliedsstaaten der EU, in der Schweiz und in Norwegen können
ihre gebrauchten elektronischen Produkte kostenlos an benannte Sammelstellen oder an einen
Einzelhändler zurückgeben (wenn Sie eine ähnliche neue kaufen).
Für Länder, die nicht oben erwähnt werden, wenden Sie sich bitte an Ihre örtlichen
Behörden, um eine korrekte Entsorgungsmethode zu erfahren.
Auf diese Weise stellen Sie sicher, dass Ihr entsorgtes Produkt der notwendigen
Behandlung, Verwertung und Wiederverwertung unterzogen wird und verhindern so mögliche
negative Auswirkungen auf die Umwelt und die menschliche Gesundheit.
ENGLISHFRANÇAISDEUTSCHEESPAÑOLITALIANO
Die Bluetooth®-Wortmarke und -Logos sind eingetragene Marken im Besitz von Bluetooth
SIG, Inc. und jede Verwendung dieser Marken durch Samson Technologies erfolgt durch
Lizenz. Andere Marken und Handelsnamen sind die ihrer jeweiligen Eigentümer."
Hall VX8.1 - Tragbares Säulen-Array-System 29
Page 30

Wichtige Sicherheitsinformationen
1. Lesen Sie diese Anleitung.
2. Bewahren Sie diese Anleitung gut auf.
3. Beachten Sie alle Warnungen.
4. Befolgen Sie alle Anweisungen.
5. Verwenden Sie dieses Gerät nicht in der Nähe von Wasser.
6. Nur mit einem trockenen Tuch reinigen.
7. Blockieren Sie keine Lüftungsöffnungen. Installieren Sie das Gerät gemäß den
Anweisungen des Herstellers.
8. Installieren Sie es nicht in der Nähe von Wärmequellen wie Heizkörpern, Heizregistern,
Öfen oder anderen Geräten (einschließlich Verstärkern), die Wärme erzeugen.
9. Unterbrechen Sie nicht den Sicherheitszweck des polarisierten oder geerdeten Steckers.
Ein polarisierter Stecker hat zwei Flügel, von denen einer breiter als der andere ist. Ein
geerdeter Stecker hat zwei Stifte und einen dritten Erdungsstift. Der breite oder der
dritte Stift sind zu Ihrer Sicherheit vorgesehen. Wenn der mitgelieferte Stecker nicht in
Ihre Steckdose passt, wenden Sie sich an einen Elektriker, um die veraltete Steckdose
auszutauschen.
10. Treten Sie nicht auf das Netzkabel und klemmen Sie es nicht ein, insbesondere an den
Steckern, Steckdosen und an den Stellen, an denen sie aus dem Gerät austreten.
11. Verwenden Sie nur vom Hersteller spezifizierte Aufsätze/Zubehörteile.
12. Nur mit dem vom Hersteller angegebenen oder mit dem Gerät verkauften
Wagen, Ständer, Stativ, Halter oder Tisch verwenden. Wenn ein Wagen
verwendet wird, ist beim Bewegen der Wagen/Gerätekombination Vorsicht
geboten, um Verletzungen durch Umkippen zu vermeiden.
13. Ziehen Sie den Stecker des Geräts während des Aufhellens, beim Sortieren oder bei
längerer Nichtbenutzung.
14. Überlassen Sie alle Wartungsarbeiten qualifiziertem Personal. Eine Wartung ist
erforderlich, wenn das Gerät in irgendeiner Weise beschädigt wurde, z.B. wenn das
Netzkabel oder der Stecker beschädigt ist, Flüssigkeit darüber verschüttet wurde oder
Gegenstände in das Gerät gefallen sind, es Regen oder Feuchtigkeit ausgesetzt war, nicht
normal funktioniert oder fallen gelassen wurde.
15. Dieses Gerät darf keinem Tropf- oder Spritzwasser ausgesetzt sein und es dürfen keine
mit Flüssigkeit gefüllten Gegenstände, wie z.B. Vasen, auf das Gerät gestellt werden.
16. Vorsicht, um einen Stromschlag zu vermeiden, stecken Sie den breiten Schlitz des
Klingensteckers vollständig ein.
17. Bitte sorgen Sie für eine gute Lüftungsumgebung rund um das gesamte Gerät.
18. EIN/AUS-SCHALTER: Bei Produkten mit Netzschalter trennt der Netzschalter die
Verbindung NICHT vom Netz.
19. NETZFREISCHALTUNG: Der Stecker sollte leicht bedienbar bleiben. Bei der
Gestellmontage oder bei Installationen, bei denen der Stecker nicht zugänglich ist, muss
ein allpoliger Netzschalter mit einem Kontaktabstand von mindestens 3 mm in jedem Pol
in die elektrische Installation des Gestells oder des Gebäudes integriert werden.
20. Warnung: Das Gerät ist an eine Netzsteckdose mit Schutzerdungsanschluss
anzuschließen.
30
Page 31

Wichtige Sicherheitsinformationen
FCC-Mitteilung
1. Dieses Gerät entspricht Teil 15 der FCC-Vorschriften. Der Betrieb unterliegt den
folgenden beiden Bedingungen:
(1) Dieses Gerät darf keine schädlichen Störungen verursachen.
(2) Dieses Gerät muss alle empfangenen Störungen verarbeiten können, einschließlich
Störungen, die einen unerwünschten Betrieb verursachen können.
2. Änderungen oder Modifikationen, die nicht ausdrücklich von der für die Einhaltung
der Vorschriften verantwortlichen Stelle genehmigt wurden, könnten die Befugnis des
Benutzers zum Betrieb des Geräts aufheben.
FCC-Erklärung
Dieses Gerät wurde getestet und entspricht den Grenzwerten für ein digitales Gerät der
Klasse B gemäß Teil 15 der FCC-Vorschriften. Diese Grenzwerte sollen einen angemessenen
Schutz vor schädlichen Störungen in einer Wohnanlage bieten.
Dieses Gerät erzeugt Wellen und kann Hochfrequenzenergie abstrahlen und kann, wenn es
nicht in Übereinstimmung mit den Anweisungen installiert und verwendet wird, schädliche
Störungen der Funkkommunikation verursachen. Es gibt jedoch keine Garantie dafür, dass
bei einer richtigen Installation keine Störungen auftreten. Wenn dieses Gerät schädliche
Störungen des Radio- oder Fernsehempfangs verursacht, was durch Aus- und Einschalten
des Geräts festgestellt werden kann, wird dem Benutzer empfohlen, zu versuchen, die
Störungen durch eine oder mehrere der folgenden Maßnahmen zu beheben:
• Richten Sie die Empfangsantenne neu aus oder verlegen Sie sie.
• Vergrößern Sie den Abstand zwischen Gerät und Empfänger.
• Schließen Sie das Gerät an eine Steckdose in einem anderen Stromkreis als dem, an
den der Empfänger angeschlossen ist.
• Wenden Sie sich an den Händler oder einen erfahrenen Radio-/Fernsehtechniker.
FCC Strahlungsexpositionserklärung
Dieses Gerät entspricht den FCC-Grenzwerten für die HF-Strahlung, die für eine
unkontrollierte Umgebung festgelegt sind.
RF-Warnhinweis
Dieses Gerät entspricht den von der FCC festgelegten Grenzwerten für die HF-Strahlung
in einer unkontrollierten Umgebung. Der Endverbraucher muss die spezifischen
Betriebsanleitungen befolgen, um die Einhaltung der RF-Belastung zu gewährleisten. Dieser
Sender darf nicht zusammen mit anderen Antennen oder Sendern aufgestellt oder betrieben
werden.
ENGLISHFRANÇAISDEUTSCHEESPAÑOLITALIANO
Hiermit erklärt Samson Technologies Corp., dass dieses Hall VX8.1 den grundlegenden
Anforderungen und anderen relevanten Bestimmungen der Richtlinie 2014/53/EU
entspricht. Die Konformitätserklärung kann eingesehen werden unter:
http://www.samsontech.com/site_media/support/manuals/VX8.1_DOC.pdf
Hall VX8.1 - Tragbares Säulen-Array-System 31
Page 32

Einführung
Herzlichen Glückwunsch zum Kauf des tragbaren Säulenarraysystems Resound VX8.1 von
Samson! Das Resound VX8.1 ist ein All-in-One-System mit einem 12" Subwoofer und acht
3,5" Treibern, die in einem vertikalen Lautsprecher-Array angeordnet sind. Die Installation
und Einrichtung ist denkbar einfach, da die drei Säulen-Array-Stücke miteinander
verbunden sind und in den Subwoofer passen. Der integrierte 3-Kanal-Mixer ermöglicht
es, das Resound VX8.1 als eigenständige PA zu verwenden, oder es kann an ein Mischpult
angeschlossen und als Teil eines Beschallungssystems verwendet werden.
Das vertikale Array kann in Reihe für 120° der horizontalen Abdeckung angeordnet werden,
oder 45° nach links und rechts gedreht werden, um eine ultrabreite Abdeckung von 200°
zu erreichen. Der Mixer verfügt über Eingänge für Mikrofone, Instrumente und Line-PegelGeräte. Das Resound VX8.1 verfügt auch über eine drahtlose Bluetooth®-Verbindung,
um Audio von Ihrem Smartphone, Tablet oder Computer zu übertragen. Mit 700 Watt
Dauerleistung (350 Watt für den Subwoofer und 350 Watt für das vertikale Array) und vier
DSP-Einstellungen für verschiedene Soundanwendungen ist die Hall VX8.1 die perfekte
Lösung, wenn es um hochwertige Beschallung geht.
Auf diesen Seiten finden Sie eine detaillierte Beschreibung der Funktionen des Resound
VX8.1, eine Schritt-für-Schritt-Anleitung für ihre Einrichtung und Verwendung sowie
vollständige Spezifikationen. Wenn Ihr Resound VX8.1 in den Vereinigten Staaten
gekauft wurde, finden Sie auch eine Garantiekarte im Anhang - vergessen Sie nicht, den
Anweisungen zu folgen, damit Sie technischen Support erhalten und wir Ihnen in Zukunft
aktuelle Informationen über dieses und andere Samson-Produkte zusenden können.
Besuchen Sie auch unsere Website (www.samsontech.com), um vollständige Informationen
über unsere gesamte Produktpalette zu erhalten.
Wir empfehlen Ihnen, die folgenden Unterlagen sowie eine Kopie Ihres Kaufbelegs
aufzubewahren.
Seriennummer: _____________________________________________________
Kaufdatum: ________________________________________________________
Wenn Sie Fragen oder Anmerkungen zum Hall VX8.1 Tragbaren Säulen-Array-System oder
anderen Produkten von Samson haben, zögern Sie nicht, uns unter support@samsontech.
com zu kontaktieren.
Bei sachgemäßer Pflege und Wartung funktioniert Ihr Hall VX8.1 Tragbares Säulen-ArraySystem über viele Jahre störungsfrei. Sollte Ihr Hall VX8.1 Tragbares Säulen-Array-System
jemals gewartet werden müssen, muss vor dem Versand Ihres Gerätes an Samson eine
Rücksendenummer (RA-Nummer) eingeholt werden. Ohne diese Nummer wird das Gerät
nicht akzeptiert. Bitte besuchen Sie www.samsontech.com/ra für eine RA-Nummer vor dem
Versand Ihres Gerätes. Bitte bewahren Sie die Originalverpackung auf und senden Sie das
Gerät nach Möglichkeit im Originalkarton zurück. Wenn Ihr Hall VX8.1 Tragbares SäulenArray-System außerhalb der Vereinigten Staaten gekauft wurde, wenden Sie sich bitte an
Ihren lokalen Händler.
32
Page 33

Erste Schritte
Subwoofer Abstandhalter Center-
4
LautsprecherArray
ENGLISHFRANÇAISDEUTSCHEESPAÑOLITALIANO
TopLautsprecherArray
Das Hall VX8.1 besteht aus vier Teilen: 12"
Subwoofer mit eingebautem Verstärker,
Abstandhalter, Center-Lautsprecher-Array mit vier
3,5" Treibern und Top-Lautsprecher-Array mit vier
3,5" Treibern. Führen Sie die folgenden Schritte
aus, um das System aufzubauen.
1. Stellen Sie den Subwoofer Resound VX8.1 auf
eine ebene, stabile Fläche.
2. Stecken Sie den Abstandshalter in den
Subwoofer, indem Sie die vier Stifte am
Abstandshalter mit den vier Löchern am
Subwoofer ausrichten.
3. Schieben Sie das Center-Lautsprecher-Array
in die Oberseite, bis es einrastet.
4. Schieben Sie das obere Lautsprecher-Array
in die Oberseite des mittleren LautsprecherArrays, bis sie einrastet.
3
2
1
Hall VX8.1 - Tragbares Säulen-Array-System 33
Page 34

Erste Schritte
Das Hall VX8.1 bietet eine horizontale Abstrahlung von 120°. Das einzigartige Array-Design
ermöglicht es, die beiden Lautsprecher-Arrays um 45° in entgegengesetzte Richtungen zu
drehen und bietet einen außergewöhnlich großen Erfassungsbereich von 200°.
Der Onboard-DSP verfügt über zwei Einstellungen für die Spaltenauswahl. Wenn die
Lautsprecher-Arrays zentriert sind, stellen Sie den Schalter COLUMN SELECT auf die
Position Center. Wenn die beiden Arrays um 45° gedreht werden, stellen Sie den Schalter
auf die Position Turn. Dadurch wird sichergestellt, dass das Klangbild des LautsprecherArrays in beiden Positionen konstant bleibt.
34
Page 35

Schnellstart
1. Stellen Sie den Netzschalter von Resound
VX8.1 auf AUS und drehen Sie alle LEVELRegler gegen den Uhrzeigersinn auf 0.
2. Wenn eine Steckdose vorhanden ist,
schließen Sie das mitgelieferte Netzkabel an
den AC-Eingang des Lautsprechers an und
stecken Sie es in eine Steckdose.
3. Stellen Sie den Netzschalter von Resound
VX8.1 in die Position ON.
4. Schließen Sie Ihre Audioquellen an.
5. Drehen Sie den MASTER VOLUME-Regler
und stellen Sie die Eingangspegel ein, indem
Sie die folgenden Schritte ausführen.
Aufbau von Verbindungen
EINGANG 1 (Mikrofon-/Line-Eingang)
1. Schließen Sie ein Mikrofon mit einem
handelsüblichen XLR-Kabel oder
einem Line-Pegel-Gerät mit einem
1⁄4"-Instrumentenkabel an.
2. Wenn Sie ein Mikrofon anschließen, stellen
Sie den Schalter MIC / LINE auf die Position
Down (MIC). Wenn Sie ein Line-Pegel-Gerät
anschließen, stellen Sie den LINE / MICSchalter auf die obere Position (LINE).
3. Während Sie in das Mikrofon sprechen oder
Musik von einer Line-Pegel-Audioquelle
wiedergeben, drehen Sie langsam den Kanal
INPUT 1 Lautstärkeregler, bis Sie den
gewünschten Pegel erreicht haben.
HINWEIS: Wenn Sie den Eingang Kanal 1 nicht
verwenden, drehen Sie den Lautstärkeregler
ganz nach unten, um unerwünschte Geräusche
zu vermeiden.
ENGLISHFRANÇAISDEUTSCHEESPAÑOLITALIANO
EINGANG 2
Anschluss einer E-Gitarre
1. Schließen Sie eine E-Gitarre mit einem
handelsüblichen 1/4" Instrumentenkabel an.
2. Drehen Sie den Schalter LINE/INST in die
Position INST (nach unten).
3. Drehen Sie während des Gitarrenspielens
langsam den Kanal INPUT 2 Volume Regler,
bis Sie den gewünschten Pegel erreicht haben.
Hinweis: Beim Anschluss einer E-Gitarre
wird empfohlen, einen Vorverstärker
zwischen dem Instrument und dem Hall
VX8.1 zu verwenden, um den Klang eines
Gitarrenverstärkers zu reproduzieren.
Hall VX8.1 - Tragbares Säulen-Array-System 35
Page 36

Schnellstart
Bluetooth®
1. Drehen Sie den BLUETOOTH Volume Regler
gegen den Uhrzeigersinn auf 0.
2. Richten Sie die Bluetooth-Antenne so aus,
dass sie sich in der vertikalen Position
befindet.
3. Drücken Sie bei eingeschaltetem VX8.1
und eingeschaltetem Bluetooth-Gerät die
PAIR-Taste auf der Rückseite des VX8.1, um
den Lautsprecher sichtbar zu machen. Die
Bluetooth -Anzeige blinkt langsam blau.
4. Stellen Sie in den Einstellungen Ihres
Bluetooth-Geräts ein, dass verfügbare Geräte
"erkannt" werden.
5. Wählen Sie in der Liste der Bluetooth-Geräte
das Gerät "SAMSON BLUETOOTH" aus.
6. Wenn Ihr Gerät nach einem Code fragt,
geben Sie die Ziffern 0000 (vier Nullen) ein und drücken Sie OK. Einige Geräte können
Sie auch auffordern, die Verbindung zuerst zu akzeptieren.
7. Der Lautsprecher Resound VX8.1 zeigt an, dass die Kopplung abgeschlossen ist, wenn
die Anzeige konstant blau leuchtet. Sie können nun Audio von Ihrem Gerät auf die Hall
VX8.1 Lautsprecher streamen.
8. Wenn der Lautstärkeregler Ihres Bluetooth-Geräts aufgedreht ist, spielen Sie Musik ab
und drehen Sie langsam den Lautstärkeregler des Hall VX8.1 BLUETOOTH VOLUME,
bis Sie den gewünschten Pegel erreicht haben.
36
Page 37

Hall VX8.1 Steuerung und Verbindungen
3
6 7
8
13
10
9
2
1 4
12
11
14
5
15
16
18
17
19
1. EINGANG 1 - XLR - 1⁄ 4" Kombieingang zum Anschluss eines Mikrofons oder eines
Geräts mit einem Line Level Signal.
2. LINE / MIC-Schalter - Stellt die Verstärkung des CH1-Eingangs für ein Mikrofon oder ein
Line Level Gerät ein.
3. EINGANG 1 Lautstärke - Regelt den Pegel des Mic/Line-Eingangs.
4. EINGANG 2 - XLR - 1⁄ 4" Kombieingang zum Anschluss eines Instruments oder Geräts
mit einem Line Level Signal.
5. EINGANG 2 Stereoeingang - Stereo-Cinch-Eingangsanschlüsse zum Anschluss des
Abspielens von Geräten wie MP3, mobilem Gerät oder jedem anderen Line-Level-Gerät.
6. EINGANG 2 Lautstärke - Regelt den Pegel des EINGANG 2.
®
7. BLUETOOTH
8. Kopplungsanzeige - Zeigt den Bluetooth -Status des XP208w-Systems an.
9. PAIR-Taste - Drücken Sie diese Taste, um den Kopplungsmodus zu aktivieren, um eine
Verbindung zu einem Bluetooth-Audiogerät herzustellen.
10. Bluetooth-Antenne - Diese Antenne empfängt das Signal von einem gekoppelten Gerät
und sollte bei Verwendung von Bluetooth in einer vertikalen Position ausgerichtet
werden. Der Bluetooth -Empfänger hat eine Reichweite von ca. 30 m (100').
VOLUME - Regelt den Pegel des Bluetooth -Eingangs.
ENGLISHFRANÇAISDEUTSCHEESPAÑOLITALIANO
Hall VX8.1 - Tragbares Säulen-Array-System 37
Page 38

Hall VX8.1 Steuerung und Verbindungen
11. LINE OUT - Line-Pegel XLR-Ausgangsbuchse zum Anschluss an den Eingang eines
anderen Hall VX8.1 zur Erweiterung Ihres Soundsystems.
HINWEIS: Wenn Sie ein anderes Aktivlautsprechersystem an den THRU-Ausgang des
Hall VX8.1 anschließen, ist es wichtig, zuerst das Hauptsystem VX8.1 einzuschalten
und danach den angeschlossenen Lautsprecher. Wenn Sie das System ausschalten,
wird empfohlen, alle angeschlossenen Lautsprecher auszuschalten und dann das
Hauptsystem VX8.1 auszuschalten.
12. MIX / INPUT 1 Schalter - Dieser Schalter wird verwendet, um das Signal auszuwählen,
das an den THRU Ausgang gesendet wird. Wenn sich der Schalter in der Position
MIX befindet, ist das Signal am THRU-Ausgang eine Mischung aus den Signalen von
Eingang 1 und Eingang 2. Wenn sich der Schalter in der Position INPUT 1 befindet,
gibt der THRU-Ausgang nur das Signal von Eingang 1 aus.
13. COLUMN SELECT-Schalter - Dieser Schalter wählt den Frequenzgang, der für das
Lautsprecher-Array geeignet ist, basierend auf der Position der Lautsprecher. Wenn
die Lautsprecher alle in Reihe geschaltet sind, verwenden Sie die Einstellung CENTER.
Wenn die Lautsprecher-Arrays um 45° in entgegengesetzte Richtungen gedreht werden,
verwenden Sie die Einstellung ROTATE.
14. DSP - Das Hall VX8.1 verfügt über vier voreingestellte EQ-Konturkurven: MUSIK, LIVE,
SPRACHE und DJ.
15. SIGNAL / LIMIT-Anzeige - Diese zweifarbige Anzeige leuchtet grün, wenn ein Signal an
den Eingängen angeschlossen ist und rot, wenn sich der interne Verstärker in der Nähe
des Clipping-Punktes befindet und der Limiter aktiviert ist. Wenn die Anzeige häufig
rot leuchtet, drehen Sie die Eingangslautstärkeregler an dem Hall VX8.1 herunter oder
schalten Sie das Signal an der Quelle ab, bis die Anzeige nicht mehr leuchtet oder nur
noch gelegentlich bei hohen Signalspitzen leuchtet.
16. POWER-Anzeige - Diese Anzeige leuchtet grün und zeigt an, dass das Hall VX8.1
eingeschaltet ist und Strom erhält.
17. AC-Eingang - Schließen Sie hier das mitgelieferte 3-polige IEC-Netzkabel an.
18. Netzschalter - Verwenden Sie den Netzschalter, um das Hall VX8.1 ein- oder
auszuschalten.
19. Wechselspannungswahlschalter - Mit diesem Schalter wird die Betriebsspannung
eingestellt. Vergewissern Sie sich, dass der Schalter für Ihr Land richtig eingestellt ist.
38
Page 39

Verwendung von zwei Hall VX8.1 Systemen
Für größere Beschallungsanwendungen mit einem Paar Hall VX8.1-Systemen gibt es zwei
Möglichkeiten, die Systeme miteinander zu verbinden.
Verbinden Sie zwei Hall VX8.1 Systeme mit einem Mischpult.
1. Schalten Sie den Netzschalter des VX8.1-Systems und des Mischpults auf die
Positionen OFF.
2. Drehen Sie die VOLUME-Regler auf der Rückseite des Hall VX8.1 ganz nach unten,
gegen den Uhrzeigersinn.
3. Schließen Sie die Audioquellen gemäß den Anweisungen des Herstellers an Ihr
Mischpult an.
4. Schließen Sie entweder ein XLR- oder ein 1/4"-Kabel vom Ausgang Ihres Mischpults an
die Buchse INPUT 1 auf der Rückseite des Hall VX8.1 an. Stellen Sie den Schalter MIC
/ LINE auf die Position LINE.
5. Schließen Sie die mitgelieferten Netzkabel an die IEC-Buchsen auf der Rückseite der
Hall VX8.1-Systeme an. Stecken Sie die Netzkabel in eine Steckdose.
Hinweis: Vergewissern Sie sich immer, dass die Steckdose mit der richtigen Spannung
konfiguriert ist, wie auf der Rückseite des Hall VX8.1 angegeben.
6. Schalten Sie die POWER-Schalter des Hall VX8.1 in die Position ON.
7. Führen Sie ein Audiosignal von Ihrem Mischpult aus und überprüfen Sie, ob Sie mit
Hilfe des Ausgangsmeters einen guten Pegel erhalten.
8. Erhöhen Sie langsam die Lautstärkeregler des Hall VX8.1 INPUT 1, bis Sie den
gewünschten Pegel erreicht haben.
9. Wenn die Lautstärke aus den Lautsprechern wirklich laut wird oder die LIMIT-Anzeige häu-
fig blinkt, drehen Sie den Lautstärkeregler an dem Hall VX8.1 etwas leiser, bis die PeakAnzeige nicht mehr leuchtet oder nur gelegentlich Signalspitzen anzeigt.
Hinweis: Bevor Sie das Gerät anschließen und einschalten, denken Sie an die "Last On,
First Off"-Regel der aktiven Audiogeräte - Achten Sie beim Einschalten Ihres Systems darauf, dass alle Kabel angeschlossen sind, schalten Sie zuerst Ihr Mischpult und alle anderen
Außenborder ein und schalten Sie dann erst Ihr Hall VX8.1 ein. Wenn Sie das Gerät ausschalten, schalten Sie zuerst Ihr Hall VX8.1 aus und dann Ihr Mischpult und Ihre Außenborder.
ENGLISHFRANÇAISDEUTSCHEESPAÑOLITALIANO
Hall VX8.1 - Tragbares Säulen-Array-System 39
Page 40

Verwendung von zwei Hall VX8.1 Systemen
Daisy-Chaining von zwei Hall VX8.1-Systemen
Diese Methode ist praktisch, wenn Sie kein Mischpult oder nur wenige Eingangsquellen haben.
1. Schließen Sie alle Eingangsquellen an das Hauptsystem VX8.1 an.
2. Stellen Sie den Schalter MIX / INPUT 1 auf die untere MIX-Position.
3. Schließen Sie ein XLR-Kabel vom THRU-Ausgang des Hauptsystems VX8.1 an den
INPUT 1 des zweiten Hall VX8.1-Systems an.
4. Stellen Sie bei dem zweiten Hall VX8.1 den Schalter INPUT 1 MIC / LINE auf die
Position LINE.
5. Stellen Sie den Pegel des Audiosignals des Hauptsystems VX8.1 ein.
6. Drehen Sie den INPUT 1 Volume Regler des zweiten Hall VX8.1, bis der gewünschte
Ausgangspegel erreicht ist.
HINWEIS: Wenn Sie ein anderes Aktivlautsprechersystem an den THRU-Ausgang des
Hall VX8.1 anschließen, ist es wichtig, zuerst das Hauptsystem VX8.1 einzuschalten
und danach den angeschlossenen Lautsprecher. Wenn Sie das System ausschalten,
wird empfohlen, alle angeschlossenen Lautsprecher auszuschalten und dann das
Hauptsystem VX8.1 auszuschalten.
40
Page 41

Technische Daten
Verstärker
Systemleistung
Frequenzgang 60Hz - 20kHz (-3dB)
Max SPL 125 dB bei 1W/1m/1m
Leistungsaufnahme AC-Eingang 100V/110-120V/220-240V 50/60Hz 700W
Hochfrequenztreiber 8 x 3,5" Treiber mit 1" Schwingspule
Array Links/Rechts Rotation 90°
Horizontale Verteilung 120°–200°
Niederfrequenztreiber 12" Tieftöner
Konstruktion Holzschrank mit Struktur in schwarzer Farbe
Gitter Perforiertes Stahlgitter mit Schaumstoffrücken
Eingang 1 XLR - 1/4" Kombination (Mic/Line)
Eingang 2 XLR - 1/4" Combo (Leitung / Gerät), RCA
Ausgänge XLR Thru
EQ DSP
Säulen-Array DSP
Bluetooth
Bluetooth-Frequenz
HF-Leistung
Statusanzeigen
®
Signal/Limit (2-farbig), Stromversorgung, Bluetooth-
Abmessungen und Gewicht
Abmessungen des Subwoofers
(LxBxH)
Abmessungen des LautsprecherArrays (LxBxH)
Abmessungen des
Abstandhalters (LxBxH)
Systemgewicht 67 lb / 30.4 kg
700 W (2 x 350 W) Dauerbetrieb
1400 W (2 x 700 W) Programm
Lautsprecher
Mischpult
Musik, Live, Sprache, DJ
Zentrieren, Drehen
Bluetooth 4.0 A2DP
2.402GHz ~ 2.480GHz
<10mW
Status
15.16" x 18.62" x 19.69".
385 mm x 473 mm x 500 mm
3,86" x 19,04" x 4,37"
(Oberes Array verjüngt sich auf 2,5")
98 mm x 484 mm x 111 mm
(Oberes Array verjüngt sich auf 63,5 mm)
3.86" x 17.72" x 4.37
98 mm x 450 mm x 111 mm
ENGLISHFRANÇAISDEUTSCHEESPAÑOLITALIANO
Die Produkte von Samson unterliegen einer ständigen Verbesserung, daher können sich
Hall VX8.1 - Tragbares Säulen-Array-System 41
Spezifikationen und Bilder ohne Vorankündigung ändern.
Page 42

Información importante de seguridad
RIESGO DE DESCARGA ELÉCTRICA -
Este símbolo de relámpago con punta de flecha dentro de un triángulo
equilátero tiene por objeto alertar al usuario de la presencia de "tensión
peligrosa" no aislada dentro de la carcasa del producto que puede ser de
magnitud suficiente como para constituir un riesgo de descarga eléctrica.
El signo de exclamación dentro de un triángulo equilátero tiene por objeto alertar
al usuario de la presencia de importantes instrucciones de funcionamiento y
mantenimiento en la documentación que acompaña al aparato.
Para evitar el riesgo de descarga eléctrica, no conecte la unidad a la red eléctrica
ADVERTENCIA: PARA REDUCIR EL RIESGO DE DESCARGA ELÉCTRICA, NO RETIRE
LA CUBIERTA (O LA PARTE POSTERIOR) YA QUE NO HAY PIEZAS QUE PUEDAN SER
REPARADAS POR EL USUARIO EN SU INTERIOR. REFIERA LAS REPARACIONES A
PERSONAL DE SERVICIO CALIFICADO.
Si desea desechar este producto, no lo mezcle con la basura doméstica general.
Existe un sistema de recogida diferente de los productos electrónicos usados de
acuerdo con la legislación que exige un procedimiento adecuado de tratamiento,
recuperación y reciclaje.
Los hogares de los 28 Estados miembros de la UE, en Suiza y Noruega pueden
devolver gratuitamente sus productos electrónicos usados a centros de recogida designados
o a un minorista (si compra uno nuevo similar).
Para los países no mencionados anteriormente, póngase en contacto con las autoridades
locales para obtener un método correcto de eliminación.
De este modo, se asegurará de que su producto desechado se somete al procedimiento
requerido de tratamiento, recuperación y reciclaje y de este modo, evitará posibles efectos
negativos sobre el medio ambiente y la salud humana.
ATENCIÓN
NO ABRIR
PRECAUCIÓN
mientras la rejilla esté desmontada.
La marca y los logotipos Bluetooth
Inc. y cualquier uso de dichas marcas por parte de Samson Technologies es bajo licencia.
Otras marcas y nombres comerciales son de sus respectivos propietarios".
42
®
son marcas registradas propiedad de Bluetooth SIG,
Page 43

Información importante de seguridad
1. Lea estas instrucciones.
2. Conserve estas instrucciones..
3. Preste atención a todas las advertencias.
4. Siga todas las instrucciones.
5. No utilice este aparato cerca del agua.
6. Limpie sólo con un paño seco.
7. No bloquee ninguna de las aberturas de ventilación. Instale de acuerdo con las
instrucciones del fabricante.
8. No lo instale cerca de fuentes de calor como radiadores, registros de calor, estufas u
otros aparatos (incluyendo amplificadores) que produzcan calor.
9. No anule el propósito de seguridad del enchufe polarizado o con conexión a tierra.
Un enchufe polarizado tiene dos clavijas, una más ancha que la otra. Un enchufe con
conexión a tierra tiene dos clavijas y una tercera clavija de conexión a tierra. La clavija
ancha o la tercera clavija se proporcionan para su seguridad. Si el enchufe suministrado
no encaja en su toma de corriente, consulte a un electricista para reemplazar la toma de
corriente obsoleta.
10. Proteja el cable de alimentación de ser pisado o pellizcado, particularmente en los
enchufes, receptáculos de conveniencia y en el punto donde salen del aparato.
11. Utilice únicamente los aditamentos o accesorios especificados por el fabricante.
12. Utilice únicamente con el carro, soporte, trípode, soporte o mesa
especificados por el fabricante o vendidos con el aparato. Cuando utilice un
carro, tenga cuidado al mover la combinación de carro/aparato para evitar
lesiones por vuelco.
13. Desenchufe el aparato cuando haya tormentas eléctricas o cuando no lo utilice durante
largos períodos de tiempo.
14. Todas las reparaciones deben ser realizadas por personal cualificado. El servicio es
necesario cuando el aparato ha sido dañado de alguna manera, como por ejemplo si el
cable de alimentación o el enchufe están dañados, si se ha derramado líquido o si han
caído objetos dentro del aparato, si ha estado expuesto a la lluvia o la humedad, si no
funciona normalmente o si se ha caído.
15. Este aparato no debe estar expuesto a goteos o salpicaduras de agua y no debe colocarse
ningún objeto lleno de líquido, como jarrones, sobre el aparato.
16. Precaución: para evitar descargas eléctricas, haga coincidir la clavija ancha y la ranura
ancha hasta que el enchufe esté insertado por completo.
17. Por favor, mantenga un buen ambiente de ventilación alrededor de toda la unidad.
18. INTERRUPTOR DE ENCENDIDO/APAGADO: Para los productos con interruptor de
alimentación, el interruptor de alimentación NO interrumpe la conexión de la red eléctrica.
19. DESCONEXIÓN DE LA RED ELÉCTRICA: El enchufe debe permanecer en buen estado
de funcionamiento. Para el montaje en bastidor o en una instalación en la que no se
pueda acceder al enchufe, debe incorporarse a la instalación eléctrica del bastidor o del
edificio un interruptor de red para todos los polos con una separación de los contactos
de al menos 3mm en cada polo.
20. Advertencia: El aparato debe conectarse a una toma de corriente con conexión protectora
a tierra.
ENGLISHFRANÇAISDEUTSCHEESPAÑOLITALIANO
Resound VX8.1 • Sistema de columna portátil 43
Page 44

Información importante de seguridad
Aviso de la FCC
1. Este dispositivo cumple con la Parte 15 de las normas de la FCC. El funcionamiento está
sujeto a las siguientes condiciones:
(1) Este dispositivo no puede causar interferencias perjudiciales.
(2) Este dispositivo debe aceptar cualquier interferencia recibida, lo que incluye
interferencias que puedan causar un funcionamiento no deseado.
2. Los cambios o modificaciones no aprobados expresamente por la parte responsable del
cumplimiento podrían anular la autoridad del usuario para operar el equipo.
Declaración de la FCC
Este equipo ha sido probado y se ha determinado que cumple con los límites para un
dispositivo digital de Clase B, de acuerdo con la Parte 15 de las normas de la FCC. Estos
límites están diseñados para proporcionar una protección razonable contra interferencias
perjudiciales en una instalación residencial.
Este equipo genera usos y puede irradiar energía de radiofrecuencia y, si no se instala
y utiliza de acuerdo con las instrucciones, puede causar interferencias perjudiciales
en las comunicaciones de radio. Sin embargo, no hay garantía de que no se produzcan
interferencias en una instalación en particular. Si este equipo causa interferencias
perjudiciales en la recepción de radio o televisión, lo cual puede determinarse apagando
y encendiendo el equipo, se recomienda al usuario que intente corregir la interferencia
mediante alguna o más de las siguientes medidas:
• Volver a orientar o ubicar la antena receptora.
• Aumente la separación entre el equipo y el receptor.
• Conecte el equipo a una toma de corriente de un circuito diferente al que está
conectado el receptor.
• Consulte al distribuidor o a un técnico de radio o TV experimentado para obtener ayuda.
Declaración de exposición a la radiación de la FCC
Este equipo cumple con los límites de exposición a la radiación RF de la FCC establecidos
para un entorno no controlado.
Declaración de advertencia de RF
Este equipo cumple con los límites de exposición a la radiación RF de la FCC establecidos
para un entorno no controlado. El usuario final debe seguir las instrucciones de operación
específicas para satisfacer el cumplimiento de la exposición a RF. Este transmisor no debe
estar ubicado en el mismo lugar ni operar en conjunto con ninguna otra antena o transmisor.
Por la presente, Samson Technologies Corp. declara que Resound VX8.1 cumple con los
requisitos esenciales y otras disposiciones relevantes de la Directiva 2014/53/EU. La
declaración de conformidad puede consultarse en el sitio web:
http://www.samsontech.com/site_media/support/manuals/VX8.1_DOC.pdf
44
Page 45

Introducción
¡Felicitaciones por la compra del sistema de columna portátil Resound VX8.1 de Samson!
Resound VX8.1 es un sistema todo en uno que incluye un subwoofer de 12" y ocho
transductores de 3,5" dispuestos en un conjunto de altavoces verticales. La instalación y
la configuración son extremadamente fáciles con las tres piezas del conjunto de columnas
unidas y encajadas en el subwoofer. El mezclador integrado de 3 canales permite que
Resound VX8.1 sea usado como un PA independiente, o puede ser conectado a un
mezclador o usado como parte de un sistema de refuerzo de sonido.
El conjunto vertical puede ser acomodado en línea para 120° de cobertura horizontal, o
girado 45° a izquierda y derecha para una cobertura ultra ancha de 200°. El mezclador
tiene entradas para micrófonos, instrumentos y dispositivos de nivel de línea. Resound
VX8.1 también incluye conectividad inalámbrica Bluetooth
teléfono inteligente, tableta u ordenador. Con 700 vatios de potencia continua (350 vatios
para el subwoofer y 350 vatios para el conjunto vertical) y cuatro configuraciones DSP para
diferentes aplicaciones de sonido, Resound VX8.1 es la solución perfecta donde se necesita
un refuerzo de sonido de alta calidad.
En estas páginas, encontrará una descripción detallada de las características de Resound
VX8.1, instrucciones paso a paso para su configuración y uso, y especificaciones completas.
Si su Resound VX8.1 fue comprado en los Estados Unidos, también encontrará una tarjeta
de garantía incluida, no olvide seguir las instrucciones para que pueda recibir soporte
técnico y para que podamos enviarle información actualizada sobre este y otros productos
Samson en el futuro. También, asegúrese de visitar nuestro sitio web (www.samsontech.com)
para obtener información completa sobre nuestra línea completa de productos.
Le recomendamos que guarde los siguientes registros como referencia, así como una copia
de su recibo de venta.
Número de serie: _____________________________________________________
®
para transmitir audio desde su
ENGLISHFRANÇAISDEUTSCHEESPAÑOLITALIANO
Fecha de compra: ____________________________________________________
Si tiene alguna pregunta o comentario sobre el sistema de columna portátil Resound VX8.1
o cualquier otro producto de Samson, no dude en ponerse en contacto con
support@samsontech.com.
Con el cuidado y mantenimiento adecuados, su sistema de columna portátil Resound VX8.1
funcionará sin problemas durante muchos años. Si su Sistema de columna portátil Resound
VX8.1 requiere servicio, un número de Autorización de Devolución (RA) debe ser obtenido
antes de enviar su unidad a Samson. Sin este número, la unidad no será aceptada. Por favor
visite www.samsontech.com/ra para obtener un número RA antes de enviar su unidad. Por
favor, conserve los materiales de embalaje originales y, si es posible, devuelva la unidad en
su caja original. Si su Sistema de Columna Portátil Resound VX8.1 fue comprado afuera de
los Estados Unidos, contacte a su distribuidor local.
Resound VX8.1 • Sistema de columna portátil 45
Page 46

Cómo empezar
Subwoofer Espaciador Conjunto de
Resound VX8.1 se compone de cuatro secciones:
Subwoofer de 12" con amplificador incorporado,
espaciador, matriz de altavoces central con cuatro
transductores de 3,5" y una matriz de altavoces
superior con cuatro transductores de 3,5". Siga los
pasos que se indican a continuación para armar el
sistema.
1. Coloque el subwoofer Resound VX8.1 sobre
una superficie plana y estable.
2. Inserte la sección de espaciador en el
subwoofer, alineando las cuatro clavijas
del espaciador con los cuatro orificios del
subwoofer.
3. Deslice el conjunto de altavoces centrales en
la parte superior del espacio hasta que encaje
en su sitio.
4. Deslice la matriz de altavoces superior en
la parte superior de la matriz de altavoces
central hasta que encaje en su sitio.
4
altavoces
centrales
3
2
1
Conjunto de
altavoces
superiores
46
Page 47

Cómo empezar
Resound VX8.1 proporciona una cobertura horizontal de 120°. El diseño único del
conjunto permite que los dos conjunto de altavoces giren 45° en direcciones opuestas,
proporcionando un área de cobertura excepcionalmente amplia de 200°.
El DSP integrado tiene dos configuraciones de Selección de Columna. Cuando los conjunto
de altavoces estén centrados, coloque el interruptor COLUMN SELECT en la posición
central. Cuando los dos arreglos se giren 45°, coloque el interruptor en la posición de
rotación. Esto asegurará que la respuesta tonal de la matriz de altavoces se mantenga
consistente en cualquiera de las dos posiciones.
ENGLISHFRANÇAISDEUTSCHEESPAÑOLITALIANO
Resound VX8.1 • Sistema de columna portátil 47
Page 48

Inicio rápido
1. Coloque el interruptor de encendido de
Resound VX8.1 en la posición OFF, y gire
completamente todos los controles LEVEL en
sentido contrario a las agujas del reloj en 0.
2. Si hay una toma de corriente disponible,
conecte el cable de alimentación incluido a la
entrada de CA del altavoz y enchúfelo a una
toma de corriente.
3. Ponga el interruptor de alimentación de
Resound VX8.1 en la posición ON.
4. Conecte sus fuentes de audio.
5. Gire el control MASTER VOLUME hacia arriba
y ajuste los niveles de entrada, siguiendo los
pasos que se indican a continuación.
Conexiones
INPUT 1 (Entrada de micrófono/entrada de línea)
1. Conecte un micrófono con n cable XLR
estándar o un equipo de nivel de línea con un
cable de instrumento de 1/4".
2. Si conecta un micrófono, ponga el interruptor
MIC/LINE en la posición hacia abajo (MIC).
Si conecta un dispositivo de nivel de línea,
coloque el interruptor LINE/MIC en la
posición (LINE) hacia arriba.
3. Mientras habla en el micrófono o reproduce
música de una fuente de audio de nivel
de línea, levante lentamente el control de
volumen del canal INPUT 1 hasta que haya
alcanzado el nivel deseado.
NOTA: Si no utiliza la entrada de canal 1, gire
el control VOLUME completamente hacia abajo
para evitar cualquier ruido no deseado.
INPUT 2
Conexión de una guitarra eléctrica
1. Conecte una guitarra eléctrica con un cable
de instrumento estándar de 1/4".
2. Pulse el interruptor LINE/INST hasta la
posición INST (abajo).
3. Mientras toca la guitarra, suba lentamente el
control de volumen del canal INPUT 2 hasta
que haya alcanzado el nivel deseado.
Nota: Si se conecta una guitarra eléctrica,
se recomienda utilizar un preamplificador
entre el instrumento y Resound VX8.1 para
reproducir el sonido de un amplificador de
guitarra.
48
Page 49

Inicio rápido
Bluetooth®
1. Gire el control de volumen BLUETOOTH
hacia abajo en sentido contrario a las agujas
del reloj a 0.
2. Gire la antena Bluetooth de modo que quede
en posición vertical.
3. Con Resound VX8.1 y su dispositivo
Bluetooth encendido, presione el botón PAIR
en el panel trasero del Resound VX8.1 para
que se descubra el altavoz. El indicador
Bluetooth parpadeará lentamente en azul.
4. En la configuración de su dispositivo
Bluetooth, póngalo en "descubrir" los
dispositivos disponibles.
5. En la lista de dispositivos Bluetooth,
seleccione el dispositivo "SAMSON
BLUETOOTH".
6. Si el dispositivo solicita una clave de acceso, ingrese los dígitos 0000 (cuatro ceros) y
pulse Aceptar. Es posible que algunos dispositivos pidan que se acepte la conexión.
7. El altavoz Resound VX8.1 indica que se ha completado el emparejamiento cuando el
indicador se vuelve azul fijo. Ahora puede transmitir audio desde su dispositivo a los
altavoces Resound VX8.1.
8. Con el control de volumen del dispositivo Bluetooth activado, reproduzca algo de
música y levante lentamente el control de volumen BLUETOOTH VOLUME de Resound
VX8.1 hasta que haya alcanzado el nivel deseado.
ENGLISHFRANÇAISDEUTSCHEESPAÑOLITALIANO
Resound VX8.1 • Sistema de columna portátil 49
Page 50

Controles y conexiones de Resound VX8.1
3
6 7
8
13
10
9
2
1 4
12
11
14
5
15
16
18
17
19
1. ENTRADA 1 - XLR: entrada combinada de 1/4" para conectar un micrófono o un
dispositivo con una señal de nivel de línea.
2. Interruptor LINE/MIC: ajusta la ganancia de la entrada CH1 para un micrófono o
dispositivo de nivel de línea.
3. ENTRADA 1 Volumen: controla el nivel de la entrada de INPUT 1 Mic/Line.
4. ENTRADA 2 - XLR: entrada combinada de 1/4" para conectar un instrumento o un
dispositivo con una señal de nivel de línea.
5. INPUT 2 Stereo Input: conectores de entrada RCA estéreo para conectar la salida de
dispositivos como MP3, dispositivos móviles o cualquier otro dispositivo de nivel de
línea.
6. Volumen de ENTRADA 2: controla el nivel de las entradas de ENTRADA 2.
®
7. BLUETOOTH
8. Indicador de emparejamiento: muestra el estado de Bluetooth del sistema XP208w.
9. Botón PAIR: pulse este botón para activar el modo de emparejamiento con el fin de
conectarse a un dispositivo de audio Bluetooth.
10. Antena Bluetooth: esta antena recibe la señal de un dispositivo emparejado y debe
colocarse en posición vertical cuando se utiliza Bluetooth. El receptor Bluetooth tiene
un alcance de aproximadamente 100' (30m).
VOLUME: controla el nivel de entrada de Bluetooth.
50
Page 51

Controles y conexiones de Resound VX8.1
11. LINE OUT: conector de salida XLR de nivel de línea para conectar a la entrada de otro
Resound VX8.1 para expandir su sistema de sonido.
NOTA: Cuando conecte otro sistema de altavoces con alimentación a la salida THRU de
Resound VX8.1, es importante encender primero el sistema principal Resound VX8.1
y, a continuación, encender el altavoz conectado. Al apagar el sistema, se recomienda
apagar todos los altavoces conectados y, a continuación, apagar el sistema Resound
VX8.1 principal.
12. Interruptor MIX/INPUT 1: este interruptor se utiliza para seleccionar la señal que se
envía a la salida THRU. Cuando el interruptor está en la posición MIX, la señal en la
salida THRU es una mezcla de las señales de la entrada 1 y la entrada 2. Cuando el
interruptor está en la posición INPUT 1, la salida THRU sólo transmite la señal de la
entrada 1.
13. Conmutador COLUMN SELECT: este conmutador selecciona la respuesta de frecuencia que
es apropiada para el arreglo de altavoces basándose en la posición de los altavoces.
Cuando todos los altavoces estén en línea, utilice el ajuste CENTER. Cuando al
conjunto de altavoces se lo gira 45° en direcciones opuestas, utilice el ajuste ROTATE.
14. DSP: Resound VX8.1 tiene cuatro curvas de contorno del ecualizador preestablecidas:
MUSIC, LIVE, SPEECH y DJ.
15. Indicador de SEÑAL/LÍMITE: este indicador de dos colores se ilumina de color verde
cuando la señal está presente en las entradas y de rojo cuando el amplificador interno
está cerca del punto de recorte y el limitador está activado. Si se ilumina el indicador
de color rojo con frecuencia, baje los controles de volumen de entrada en el Resound
VX8.1 o baje la señal en la fuente, hasta que el indicador no se ilumine más, o se
ilumine sólo ocasionalmente con picos de señal altos.
16. Indicador POWER: este indicador se ilumina de color verde indicando que el Resound
VX8.1 está encendido y recibiendo alimentación.
17. Entrada de CA: conecte aquí el cable de alimentación IEC de 3 clavijas suministrado.
18. Interruptor POWER: utilice el interruptor POWER para encender o apagar Resound VX8.1.
19. Interruptor de selección de voltaje de CA: este interruptor se utiliza para ajustar el voltaje
de operación. Asegúrese de comprobar que el interruptor está en la posición correcta
para su país.
ENGLISHFRANÇAISDEUTSCHEESPAÑOLITALIANO
Resound VX8.1 • Sistema de columna portátil 51
Page 52

Uso de dos sistemas Resound VX8.1
Para aplicaciones de refuerzo de sonido más grandes que utilizan un par de sistemas
Resound VX8.1, existen dos métodos para conectar los sistemas.
Conecte dos sistemas Resound VX8.1 a un mezclador
1. Ponga el sistema Resound VX8.1 y el interruptor de alimentación en la posición OFF.
2. Gire hacia abajo los controles VOLUME del panel trasero de Resound VX8.1, en el
sentido contrario a las agujas del reloj.
3. Siguiendo las instrucciones del fabricante, conecte las fuentes de audio a su mezclador.
4. Conecte un cable XLR o de 1/4" desde la salida de su mezclador a la toma INPUT 1 en
el panel trasero de Resound VX8.1. Ponga el interruptor MIC/LINE en la posición LINE.
5. Conecte los cables de alimentación suministrados a las tomas IEC en la parte posterior
de los sistemas Resound VX8.1. Enchufe los cables de alimentación a un tomacorriente
de CA.
Nota: Asegúrese siempre de que el tomacorriente de CA tenga el voltaje correcto, tal
como se indica en el panel trasero de Resound VX8.1.
6. Ponga los interruptores POWER de Resound VX8.1 en la posición ON.
7. Pase una señal de audio de su mezcladora y compruebe que obtiene un buen nivel
utilizando el medidor de salida de la mezcladora.
8. Suba lentamente los controles de volumen INPUT 1 de Resound VX8.1 hasta que haya
alcanzado el nivel deseado.
9. Si el volumen de los altavoces es muy alto, o si ve que el indicador LIMIT parpadea
con frecuencia, baje un poco el control de volumen en Resound VX8.1 hasta que no se
ilumine el indicador Peak, o sólo se ilumine ocasionalmente con picos de señal.
Nota: Antes de conectar y encender, recuerde la regla "último en colocar, primero en
desconectar" del equipo de audio encendido: Al encender su sistema, asegúrese de que
todos los cables estén conectados, primero encienda su mezcladora y cualquier otro
equipo externo, luego encienda su Resound VX8.1. Cuando lo apague, apague primero
su Resound VX8.1 y luego su mezcladora y su equipo externo.
52
Page 53

Uso de dos sistemas Resound VX8.1
Conexión en cadena de dos sistemas Resound VX8.1
Este método es conveniente cuando usted no tiene un mezclador o tiene fuentes de entrada
mínimas.
1. Conecte todas las fuentes de entrada al sistema principal Resound VX8.1.
2. Ponga el interruptor MIX/INPUT 1 en la posición MIX hacia abajo.
3. Conecte un cable XLR de la salida THRU del Resound VX8.1 principal a la entrada 1
del segundo sistema Resound VX8.1.
4. En el segundo Resound VX8.1, ponga el interruptor INPUT 1 MIC/LINE en la posición
LINE.
5. Ajuste el nivel de audio del sistema principal Resound VX8.1.
6. Suba el control de volumen INPUT 1 del segundo Resound VX8.1 hasta que se alcance
el nivel de salida deseado.
NOTA: Cuando conecte otro sistema de altavoces con alimentación a la salida THRU de
Resound VX8.1, es importante encender primero el sistema principal Resound VX8.1
y, a continuación, encender el altavoz conectado. Al apagar el sistema, se recomienda
apagar todos los altavoces conectados y, a continuación, apagar el sistema Resound
VX8.1 principal.
ENGLISHFRANÇAISDEUTSCHEESPAÑOLITALIANO
Resound VX8.1 • Sistema de columna portátil 53
Page 54

Especificaciones
Amplificador
Potencia del sistema
Respuesta de frecuencia 60Hz – 20kHz (-3dB)
Máx SPL 125 dB a 1W/1m
Consumo de energía Entrada de CA 100V/110-120V/220-240V 50/60Hz 700W
Transductores de alta
frecuencia
Conjunto de rotación
izquierda/derecha
Dispersión horizontal 120°–200°
Transductores de baja
frecuencia
Construcción Gabinete de contrachapado con pintura negra texturizada
Rejilla Rejilla de acero perforado con soporte de espuma
Entrada 1 XLR - 1/4" combo (Mic/Line)
Entrada 2 XLR - 1/4" combo (Línea/Instrumento), RCA
Salidas XLR Thru
EQ DSP
Conjunto de columnas DSP
Bluetooth
Frecuencia Bluetooth
Potencia de RF
Indicadores de estado
Dimensiones del subwoofer
(LxAnxAl)
Dimensiones de la matriz de
altavoces (LxAnxAl)
Dimensiones del espaciador
(LxWxH)
Peso del sistema 30,4kg / 67lb
54
®
En Samson estamos continuamente mejorando nuestros productos, por lo tanto las
especificaciones y las imágenes están sujetas a cambios sin previo aviso.
Programa de 700W (2 x 350W) continuo
de 1400W (2 x 700W)
Altavoces
8 transductores de 3.5" con bobina de voz de 1»
90°
Woofer de 12"
Mezclador
Music, Live, Speech, DJ
Centrar, girar
Bluetooth 4.0 A2DP
2.402GHz ~ 2.480GHz
<10mW
Señal/Límite (2 colores), alimentación, estado de Bluetooth
Dimensiones y peso
15,16" x 18,62" x 19,69".
385 mm x 473 mm x 500 mm
3.86" x 19.04" x 4.37"
(El conjunto superior se estrecha a 2.5")
98 mm x 484 mm x 111 mm
(conos del conjunto superior hasta 63,5mm)
3,86" x 17,72" x 4,37
98 mm x 450 mm x 111 mm
Page 55

Importanti informazioni di sicurezza
RISCHIO DI SCOSSA ELETTRICA -
ATTENZIONE
NON APRIRE
Questo simbolo del lampo con la punta a freccia all'interno di un triangolo
equilatero avverte l'utente della presenza di una "tensione pericolosa" non
isolata all'interno del prodotto che può essere di entità sufficiente a costituire
un rischio di scossa elettrica.
Il punto esclamativo all'interno di un triangolo equilatero avverte l'utente
della presenza di importanti istruzioni operative e di manutenzione nella
documentazione che accompagna l'apparecchio.
ATTENZIONE
Per evitare il rischio di scosse elettriche, non collegare l'alimentazione di rete
quando la griglia è stata rimossa.
ATTENZIONE: PER RIDURRE IL RISCHIO DI SCOSSE ELETTRICHE, NON RIMUOVERE IL
COPERCHIO (O IL RETRO) IN QUANTO ALL'INTERNO NON VI SONO PARTI RIPARABILI
DALL'UTENTE. RIVOLGERSI A PERSONALE DI ASSISTENZA QUALIFICATO.
Se si desidera smaltire questo prodotto, non mischiarlo con i rifiuti domestici
generici. Esiste un sistema di raccolta differenziata per i prodotti elettronici usati
in conformità alla legislazione che richiede un trattamento, un recupero e un
riciclaggio adeguati.
I nuclei familiari dei 28 Stati membri dell'UE, della Svizzera e della Norvegia
possono restituire gratuitamente i loro prodotti elettronici usati a centri di raccolta designati
o a un rivenditore (acquistandone uno nuovo simile).
Per i Paesi non menzionati sopra, contattare le autorità locali per conoscere il corretto
metodo di smaltimento.
In questo modo si garantisce che il prodotto smaltito venga sottoposto al necessario
trattamento, recupero e riciclaggio, evitando così potenziali effetti negativi sull'ambiente e
sulla salute umana.
ENGLISHFRANÇAISDEUTSCHEESPAÑOLITALIANO
Il marchio denominativo e i loghi Bluetooth® sono marchi registrati di proprietà di Bluetooth
SIG, Inc. e qualsiasi uso di tali marchi da parte di Samson Technologies è concesso in
licenza. Altri marchi e nomi commerciali sono quelli dei rispettivi proprietari".
Resound VX8.1 - Sistema a colonna portatile 55
Page 56

Importanti informazioni di sicurezza
1. Leggere queste istruzioni.
2. Conservare queste istruzioni.
3. Rispettare tutti gli avvertimenti.
4. Seguire tutte le istruzioni.
5. Non utilizzare l'apparecchio vicino all'acqua.
6. Pulire solo con un panno asciutto.
7. Non bloccare le aperture di ventilazione. Installare secondo le istruzioni del produttore.
8. Non installare vicino a fonti di calore come radiatori, diffusori di aria calda, stufe o altri
apparecchi (compresi gli amplificatori) che producono calore.
9. Non annullare lo scopo di sicurezza della spina polarizzata o con messa a terra. Una
spina polarizzata ha due lame, una delle quali è più larga dell'altra. Una spina con messa
a terra ha due lame e un terzo polo di messa a terra. La lama larga o il terzo polo sono
forniti per la sicurezza dell'utente. Se la spina in dotazione non si adatta alla presa,
consultare un elettricista per la sostituzione della presa obsoleta.
10. Proteggere il cavo di alimentazione in modo che non venga calpestato o schiacciato, in
particolare in corrispondenza delle spine, delle prese e nel punto di uscita dall'apparecchio.
11. Utilizzare solo accessori specificati dal produttore.
12. Utilizzare solo con il carrello, il supporto, il treppiede, la staffa o il tavolo specificati
dal produttore, o venduti con l'apparecchio. Quando si utilizza un carrello,
prestare attenzione quando si sposta la combinazione carrello/apparecchio
per evitare lesioni da ribaltamento.
13. Scollegare l'apparecchio durante l'illuminazione, la selezione o quando non
viene utilizzato per lunghi periodi di tempo.
14. Per tutti gli interventi di manutenzione rivolgersi a personale qualificato. L'assistenza
si rende necessaria quando l'apparecchio è stato danneggiato in qualsiasi modo, ad
esempio se il cavo di alimentazione o la spina sono stati danneggiati, se è stato versato
del liquido o sono caduti oggetti all'interno dell'apparecchio, se questo è stato esposto a
pioggia o umidità, se non funziona normalmente o se è caduto.
15. L'apparecchio non deve essere esposto a gocce o schizzi d'acqua né bisogna appoggiarvi
sopra alcun oggetto pieno di liquido, ad esempio, vasi.
16. Prestare attenzione onde prevenire scosse elettriche, abbinare la spina a lama larga con
lo slot largo completamente inserito.
17. Mantenere una buona ventilazione intorno all'intera unità.
18. INTERRUTTORE DI ACCENSIONE/SPEGNIMENTO: Per i prodotti con interruttore di
alimentazione, l'interruttore di alimentazione NON interrompe il collegamento dalla rete
elettrica.
19. SCOLLEGAMENTO DELLA RETE ELETTRICA: La spina deve rimanere facilmente
azionabile. Per il montaggio su rack o per installazioni in cui la spina non è accessibile,
nell'impianto elettrico del rack o dell'edificio deve essere incorporato un interruttore di
rete multipolare con una separazione dei contatti di almeno 3 mm per polo.
20. Attenzione: L'apparecchio è collegato a una presa di corrente con un collegamento di
protezione di messa a terra.
56
Page 57

Importanti informazioni di sicurezza
Avviso FCC
1. Questo dispositivo è conforme alla Parte 15 delle norme FCC. Il funzionamento è soggetto
alle due condizioni seguenti:
(1) Questo dispositivo non deve causare interferenze dannose.
(2) Questo dispositivo deve accettare qualsiasi interferenza ricevuta, comprese le
interferenze che possono causare un funzionamento indesiderato.
2. Cambiamenti o modifiche non esplicitamente approvati dalla parte responsabile della
conformità possono invalidare il diritto dell'utente ad utilizzare l'apparecchiatura.
Dichiarazione FCC
Questa apparecchiatura è stata testata e trovata conforme ai limiti per un dispositivo digitale
di Classe B, in conformità alla Parte 15 delle norme FCC. Questi limiti sono progettati
per fornire una ragionevole protezione contro le interferenze dannose in un'installazione
residenziale.
Questa apparecchiatura genera utilizza e può irradiare energia a radiofrequenza e, se
non è installata e utilizzata secondo le istruzioni, può causare interferenze dannose alle
comunicazioni radio. Tuttavia, non vi è alcuna garanzia che non si verifichino interferenze
in una particolare installazione. Se questa apparecchiatura causa interferenze dannose alla
ricezione radio o televisiva, che possono essere determinate spegnendo e riaccendendo
l'apparecchio, l'utente è incoraggiato a tentare di correggere l'interferenza con una o più
delle seguenti misure:
• Riorientare o riposizionare l'antenna ricevente.
• Aumentare la distanza tra l'apparecchiatura e il ricevitore.
• Collegare l'apparecchio a una presa su un circuito diverso da quello a cui è collegato il
ricevitore.
• Consultare il rivenditore o un tecnico radio/TV esperto per assistenza.
Dichiarazione di esposizione alle radiazioni FCC
Questa apparecchiatura è conforme ai limiti di esposizione alle radiazioni RF FCC stabiliti
per un ambiente non controllato.
Dichiarazione di avvertimento RF
Questa apparecchiatura è conforme ai limiti di esposizione alle radiazioni RF della
FCC stabiliti per un ambiente non controllato. L'utente finale deve seguire le istruzioni
operative specifiche per soddisfare la conformità all'esposizione alle radiofrequenze.
Questo trasmettitore non deve essere posizionato o funzionare insieme ad altre antenne o
trasmettitori.
ENGLISHFRANÇAISDEUTSCHEESPAÑOLITALIANO
Con la presente, Samson Technologies Corp. dichiara che il presente Resound VX8.1 è
conforme ai requisiti essenziali e alle altre disposizioni pertinenti della Direttiva 2014/53/
UE. La dichiarazione di conformità può essere consultata al seguente indirizzo:
http://www.samsontech.com/site_media/support/manuals/VX8.1_DOC.pdf
Resound VX8.1 - Sistema a colonna portatile 57
Page 58

Introduzione
Congratulazioni per aver acquistato il sistema a colonna portatile Resound VX8.1 di
Samson! Il Resound VX8.1 è un sistema all-in-one con un subwoofer da 12" e otto driver
da 3,5" disposti in un array di diffusori verticali. L'installazione e la configurazione sono
estremamente semplici: i tre elementi della serie di colonne si fissano insieme e si
inseriscono nel subwoofer. Il mixer a 3 canali integrato consente di utilizzare Resound VX8.1
come sistema PA autonomo, oppure di collegarlo a un mixer e utilizzarlo nell'ambito di un
sistema di rinforzo sonoro.
La matrice verticale può essere disposta in linea per 120° di copertura orizzontale, oppure
ruotata di 45° a sinistra e a destra per una copertura ultra larga 200°. Il mixer dispone
di ingressi per microfoni, strumenti e dispositivi di linea. Resound VX8.1 include anche
la connettività wireless Bluetooth® per lo streaming audio dallo smartphone, dal tablet o
dal computer. Con 700 watt di potenza continua (350 watt per il subwoofer e 350 watt
per l'array verticale) e quattro impostazioni DSP per diverse applicazioni audio, il Resound
VX8.1 è la soluzione perfetta per le applicazioni che richiedono un rinforzo sonoro di alta
qualità.
Queste pagine descrivono dettagliatamente le caratteristiche di Resound VX8.1, contengono
istruzioni passo - passo per la sua configurazione e il suo utilizzo, nonché le specifiche
complete. Se il Resound VX8.1 è stato acquistato negli Stati Uniti, sarà corredato anche
da una scheda di garanzia - non dimenticare di seguire le istruzioni per ricevere assistenza
tecnica e informazioni aggiornate su questo e altri prodotti Samson in futuro. Inoltre,
assicurarsi di visitare il nostro sito web (www.samsontech.com) per informazioni complete
sulla nostra linea completa di prodotti.
Si consiglia di conservare le seguenti registrazioni di riferimento, nonché una copia della
ricevuta di vendita.
Numero di serie: _____________________________________________________
Data di acquisto: _____________________________________________________
In caso di domande o commenti sul sistema Resound VX8.1 Portable Column Array System
o su qualsiasi altro prodotto Samson, contattarci all'indirizzo support@samsontech.com.
Con la cura e la manutenzione adeguate, il sistema a colonna portatile Resound VX8.1
funzionerà senza problemi per molti anni. Se il sistema Resound VX8.1 Portable Column
Array System necessita di manutenzione, è necessario ottenere un numero di autorizzazione
alla restituzione (RA) prima di spedire l'unità a Samson. Senza questo numero, l'unità
non sarà accettata. Visitare il sito www.samsontech.com/ra per un numero RA prima della
spedizione dell'unità. Conservare i materiali di imballaggio originali e, se possibile, restituire
l'unità nella confezione originale. Se il sistema a colonna portatile Resound VX8.1 è stato
acquistato al di fuori degli Stati Uniti, contattare il distributore locale.
58
Page 59

Come iniziare
Subwoofer Distanziatore Sistema di
Il Resound VX8.1 è composto da quattro sezioni:
Subwoofer da 12" con amplificatore integrato,
distanziatore, diffusore centrale con quattro driver
da 3,5" e l'array superiore diffusori con quattro
driver da 3,5". Seguire la procedura seguente per
mettere insieme il sistema.
1. Posizionare il subwoofer Resound VX8.1 su
una superficie piana e stabile.
2. Inserire la sezione distanziatore nel subwoofer,
allineando i quattro perni del distanziatore con
i quattro fori del subwoofer.
3. Far scorrere il diffusore centrale nella parte
superiore dello spazio finché non scatta in
posizione.
4. Far scorrere il gruppo diffusori superiore nella
parte superiore del gruppo diffusori centrale
finché non scatta in posizione.
4
diffusori al
centro del
diffusore
3
2
1
Array
ENGLISHFRANÇAISDEUTSCHEESPAÑOLITALIANO
superiore
diffusori
Resound VX8.1 - Sistema a colonna portatile 59
Page 60

Come iniziare
Il Resound VX8.1 fornisce una copertura orizzontale di 120°. L'esclusivo design dell'array
consente di ruotare i due array di diffusori di 45° in direzioni opposte, offrendo un'area di
copertura eccezionalmente ampia di 200°.
Il DSP integrato ha due impostazioni Column Select. Quando i diffusori sono centrati,
impostare il selettore COLUMN SELECT sulla posizione centrale. Quando le due matrici
sono ruotate di 45°, impostare l'interruttore sulla posizione di rotazione. In questo modo la
risposta tonale del gruppo diffusori rimane costante in entrambe le posizioni.
60
Page 61

Avvio rapido
1. Portare l'interruttore di alimentazione
Resound VX8.1 in posizione OFF e ruotare
completamente tutti i comandi LEVEL in
senso antiorario su 0.
2. Se è disponibile una presa di corrente,
collegare il cavo di alimentazione incluso
all'ingresso CA del diffusore e inserirlo in una
presa elettrica.
3. Impostare l'interruttore di alimentazione
Resound VX8.1 sulla posizione ON.
4. Collegare le sorgenti audio.
5. Ruotare il comando MASTER VOLUME
verso l'alto e impostare i livelli di ingresso,
seguendo la procedura seguente.
Effettuare i collegamenti
INPUT 1 (Microfono/Ingresso di linea)
1. Collegare un microfono usando un cavo XLR
standard o un'apparecchiatura di livello di
linea usando un cavo per strumenti da 1⁄ 4".
2. Se si collega un microfono, impostare
l'interruttore MIC/LINE sulla posizione bassa
(MIC). Se si collega un dispositivo a livello di
linea, impostare l'interruttore LINE/MIC sulla
posizione su (LINE).
3. Mentre si parla nel microfono o si riproduce
musica da una sorgente audio a livello
di linea, alzare lentamente il controllo
del volume del canale INPUT 1 fino a
raggiungere il livello desiderato.
NOTA Se non si utilizza l'ingresso del canale
1, abbassare completamente il comando
VOLUME per evitare qualsiasi rumore
indesiderato.
INPUT 2
Collegamento di una chitarra elettrica
1. Collegare una chitarra elettrica utilizzando un
cavo standard per strumenti da 1/4".
2. Spingere l'interruttore LINE/INST in posizione
INST (giù).
3. Mentre si suona la chitarra, aumentare
lentamente il controllo del volume del
canale INPUT 2 fino a raggiungere il livello
desiderato.
Nota: Se si collega una chitarra elettrica si
consiglia di utilizzare un preamplificatore tra
lo strumento e Resound VX8.1 per replicare il
suono di un amplificatore per chitarra.
ENGLISHFRANÇAISDEUTSCHEESPAÑOLITALIANO
Resound VX8.1 - Sistema a colonna portatile 61
Page 62

Avvio rapido
Bluetooth®
1. Ruotare il controllo del volume BLUETOOTH
verso il basso in senso antiorario fino a 0.
2. Ruotare l'antenna Blueto oth in modo che sia
in posizione verticale.
3. Con Resound VX8.1 e il dispositivo Bluetooth
acceso; premere il pulsante PAIR sul
pannello posteriore di Resound VX8.1 per
rendere l'altoparlante rilevabile. L'indicatore
Bluetooth lampeggia lentamente in blu.
4. Nelle impostazioni del dispositivo Bluetooth,
impostarlo per "scoprire" i dispositivi
disponibili.
5. Dall'elenco dei dispositivi Bluetooth,
selezionare il dispositivo "SAMSON
BLUETOOTH".
6. Se il dispositivo richiede una chiave di
accesso, immettere le cifre 0000 (quattro zeri) e premere OK. Alcuni dispositivi
possono anche chiedere di accettare la connessione.
7. L'altoparlante Resound VX8.1 indica che l'accoppiamento è completo quando
l'indicatore diventa blu fisso. Ora è possibile trasmettere in streaming l'audio dal
dispositivo agli altoparlanti Resound VX8.1.
8. Con il controllo del volume del dispositivo Bluetooth alzato, riprodurre un po' di
musica e alzare lentamente il controllo Resound VX8.1 BLUETOOTH VOLUME fino a
raggiungere il livello desiderato.
62
Page 63

Resound VX8.1 Controlli e connessioni
3
6 7
8
13
10
9
2
1 4
12
11
14
5
15
16
18
17
19
1. INPUT 1 - XLR - Ingresso combo da 1⁄ 4" per il collegamento di un microfono o di un
dispositivo con segnale di livello di linea.
2. Interruttore LINE/MIC - Regola il guadagno dell'ingresso CH1 per un microfono o un
dispositivo a livello di linea.
3. Volume INPUT 1 - Regola il livello dell'ingresso INPUT 1 Mic/Line.
4. INPUT 2 - XLR - Ingresso combo da 1⁄ 4" per il collegamento di uno strumento o
dispositivo con un segnale di livello di linea.
5. Ingresso stereo INPUT 2 - Connettori di ingresso RCA stereo per il collegamento
dell'uscita di dispositivi quali MP3, dispositivi mobili o qualsiasi altro dispositivo a
livello di linea.
6. Volume INPUT 2 - Controlla il livello degli ingressi INPUT 2.
®
7. BLUETOOTH
8. Indicatore di accoppiamento - Visualizza lo stato Bluetooth del sistema XP208w.
9. Pulsante PAIR - Premere questo pulsante per attivare la modalità di accoppiamento per
connettersi a un dispositivo audio Bluetooth.
10. Antenna Bluetooth - Questa antenna riceve il segnale da un dispositivo accoppiato e
deve essere collocata in posizione verticale quando si utilizza il Bluetooth. Il ricevitore
Bluetooth ha una portata di circa 100' (30m).
VOLUME - Controlla il livello dell'ingresso Bluetooth.
ENGLISHFRANÇAISDEUTSCHEESPAÑOLITALIANO
Resound VX8.1 - Sistema a colonna portatile 63
Page 64

Resound VX8.1 Controlli e connessioni
11. LINE OUT - Uscita XLR a livello di linea da collegare all'ingresso di un altro Resound
VX8.1 per espandere il sistema audio.
NOTA Quando si collega un altro sistema di diffusori amplificati all'uscita THRU del
Resound VX8.1, è importante accendere prima il sistema principale Resound VX8.1,
quindi accendere il diffusore collegato. Quando si spegne il sistema, si raccomanda di
spegnere tutti gli altoparlanti collegati, quindi spegnere il sistema principale Resound
VX8 .1.
12. Interruttore MIX/INPUT 1 - Questo interruttore è utile per selezionare il segnale inviato
all'uscita THRU. Quando l'interruttore è in posizione MIX, il segnale all'uscita THRU
è un mix di entrambi i segnali Input 1 e Input 2. Quando l'interruttore è in posizione
INPUT 1, l'uscita THRU trasporta solo il segnale di ingresso 1.
13. Interruttore COLUMN SELECT - Questo interruttore seleziona la risposta in frequenza
appropriata per il gruppo diffusori in base alla posizione dei diffusori. Quando gli
altoparlanti sono tutti in linea, utilizzare l'impostazione CENTER. Quando i diffusori
vengono ruotati di 45° in direzioni opposte, utilizzare l'impostazione ROTATE.
14. DSP - Il Resound VX8.1 ha quattro curve di contorno EQ preimpostate: MUSICA, LIVE,
SPEECH e DJ.
15. Spia SIGNAL / LIMIT - Questa spia a due colori si illumina in verde quando il segnale
è presente agli ingressi e in rosso quando l'amplificatore interno è vicino al punto
di clipping e il limitatore è inserito. Se la spia si illumina di rosso frequentemente,
abbassare i controlli del volume d'ingresso del Resound VX8.1 o abbassare il
segnale alla sorgente, fino a quando la spia non si illumina più, o si illumina solo
occasionalmente con picchi di segnale elevati.
16. Spia di alimentazione - Questa spia si illumina in verde per indicare che Resound VX8.1
è acceso e sta ricevendo alimentazione.
17. Ingresso CA - Collegare qui il cavo di alimentazione IEC a 3 pin in dotazione.
18. Interruttore di alimentazione - Usare l'interruttore di alimentazione per accendere o
spegnere il Resound VX8.1.
19. Interruttore di selezione della tensione CA - Questo interruttore viene utilizzato per
impostare la tensione di funzionamento. Accertarsi che l'interruttore sia impostato
correttamente per il proprio Paese.
64
Page 65

Utilizzo di due sistemi VX8.1 Resound VX8.1
Per applicazioni di rinforzo sonoro più grandi che utilizzano una coppia di sistemi Resound
VX8.1, sono previsti due metodi per collegare i sistemi.
Collegare due sistemi Resound VX8.1 a un mixer
1. Portare l'interruttore di alimentazione del sistema Resound VX8.1 e del mixer sulle
po s izi o ni OF F.
2. Ruotare i comandi VOLUME sul pannello posteriore di Resound VX8.1 verso il basso,
completamente in senso antiorario.
3. Seguendo le istruzioni del produttore, collegare le sorgenti audio al mixer.
4. Collegare un cavo XLR o 1/4" dall'uscita del mixer al connettore INPUT 1 del pannello
posteriore di Resound VX8.1. Impostare l'interruttore MIC / LINE sulla posizione LINE.
5. Collegare i cavi di alimentazione in dotazione alle prese IEC sul retro dei sistemi
Resound VX8.1. Inserire i cavi di alimentazione in una presa di corrente alternata.
Nota: Assicurarsi sempre che la presa di corrente alternata sia configurata con la
tensione corretta, come indicato sul pannello posteriore di Resound VX8.1.
6. Portare gli interruttori Resound VX8.1 POWER in posizione ON.
7. Eseguire un segnale audio dal mixer e verificare che si stia ottenendo un buon livello
utilizzando il misuratore di uscita del mixer.
8. Aumentare lentamente i controlli del volume di Resound VX8.1 INPUT 1 fino a
raggiungere il livello desiderato.
9. Se il volume dei diffusori diventa molto alto, o se l'indicatore LIMIT lampeggia
frequentemente, abbassare un po' il controllo del volume di Resound VX8.1 fino a
quando l'indicatore di picco non si accende, o si accende solo occasionalmente con
picchi di segnale.
Nota: Prima di collegare e accendere il sistema, ricordare la regola "last on, first off"
dell'apparecchiatura audio alimentata - All'accensione del sistema, assicurarsi che
tutti i cavi siano collegati, accendere prima il mixer e qualsiasi altra apparecchiatura
esterna, quindi accendere il Resound VX8.1. Quando si spegne, spegnere prima il
Resound VX8.1 e poi il mixer e l'apparecchiatura esterna.
ENGLISHFRANÇAISDEUTSCHEESPAÑOLITALIANO
Resound VX8.1 - Sistema a colonna portatile 65
Page 66

Utilizzo di due sistemi VX8.1 Resound VX8.1
Collegamento a catena di due sistemi VX8.1 Resound VX8.1
Questo metodo è comodo quando non si dispone di un mixer o di sorgenti di ingresso minime.
1. Collegare tutte le sorgenti di ingresso al sistema principale Resound VX8.1.
2. Impostare l'interruttore MIX / INPUT 1 sulla posizione MIX in basso.
3. Collegare un cavo XLR dall'uscita THRU dell'uscita principale Resound VX8.1 all'INPUT
1 del secondo sistema Resound VX8.1.
4. Sul secondo Resound VX8.1, impostare l'interruttore INPUT 1 MIC/LINE sulla posizione
LINE.
5. Impostare il livello dell'audio del sistema principale Resound VX8.1.
6. Aumentare il controllo del volume INPUT 1 del secondo Resound VX8.1 fino a
raggiungere il livello di uscita desiderato.
NOTA Quando si collega un altro sistema di diffusori amplificati all'uscita THRU del
Resound VX8.1, è importante accendere prima il sistema principale Resound VX8.1,
quindi accendere il diffusore collegato. Quando si spegne il sistema, si raccomanda di
spegnere tutti gli altoparlanti collegati, quindi spegnere il sistema principale Resound
VX8 .1.
66
Page 67

Specifiche
Amplificatore
Potenza del sistema
Risposta in frequenza 60Hz - 20kHz (-3dB)
SPL massimo 125 dB a 1W/1m
Consumo energetico Ingresso AC 100V/110-120V/220-240V 50/60Hz
Driver ad alta frequenza 8 driver da 3,5" con bobina mobile da 1".
Rotazione sinistra/destra dell'array 90°
Dispersione orizzontale 120°–200°
Driver a bassa frequenza Woofer da 12
Costruzione Armadio in compensato con vernice nera testurizzata
Griglia Griglia in acciaio forato con supporto in schiuma
Ingresso 1 XLR - 1/4" combo (Mic/Line)
Ingresso 2 XLR - 1/4" combo (linea/strumento), RCA
Uscite XLR Thru
EQ DSP
Array di colonne DSP
Bluetooth
Frequenza Bluetooth
Potenza RF
Indicatori di stato
Dimensioni Subwoofer (LxLxPxA)
Dimensioni dell'array di diffusori
(LxLxPxA)
Dimensioni del distanziatore
(LxLxPxA)
Peso del sistema 67 libbre/30,4 kg
®
700 W (2 x 350 W) programma continuo
1400 W (2 x 700 W) programma
700W
Diffusori
Miscelatore
Musica, Live, Discorso, DJ
Centro, ruotare
Bluetooth 4.0 A2DP
2.402GHz ~ 2.480GHz
<10mW
Segnale/Limite (2 colori), alimentazione, stato
Bluetooth
Dimensioni e peso
15,16" x 18,62" x 19,69" x 19,69"
385 mm x 473 mm x 500 mm
3,86" x 19,04" x 4,37"
(l'array superiore si assottiglia fino a 2,5")
98 mm x 484 mm x 111 mm
(l'array superiore si assottiglia fino a 63,5 mm)
3,86" x 17,72" x 4,37
98 mm x 450 mm x 111 mm
ENGLISHFRANÇAISDEUTSCHEESPAÑOLITALIANO
Samson migliora continuamente i propri prodotti, pertanto le specifiche e le immagini sono
Resound VX8.1 - Sistema a colonna portatile 67
soggette a modifiche senza preavviso.
Page 68

Having Trouble with your Resound VX8.1?
We can help!
CONTACT OUR SUPPORT TEAM: support@samsontech.com
Our experts can help you resolve any issues.
Follow us:
@samson @samsontech @samson_technologies
Samson Technologies Corp.
278-B Duffy Ave
Hicksville, New York 11801
Phone: 1-800-3-SAMSON (1-800-372-6766)
Fax: 631-784-2201
www.samsontech.com
 Loading...