

Page 1
Owner's Manual
Page 2

Introduction
Congratulations on your purchase of the Samson G-Track Pro USB Microphone
with Audio Interface. The G-Track Pro features dual 1” ultra thin capsules with
selectable polar patterns, onboard 24-bit 96kHz Analog-to-Digital converter
and USB output. Plus, the G-Track Pro features a built-in audio interface with
headphone output allowing you to connect your electric guitar or bass, keyboards,
drum machines and just about any other signal source. The onboard mixer
allows you set clean signals for recording by providing Instrument and Mic input
level controls. In addition, the G-Track Pro employs a clever monitoring system
allowing you to choose a variety of playback options for headphones or monitors
with zero latency monitoring of the input signals. Whether you’re recording your
latest song idea, podcast, or streaming on your gaming channel, the G-Track Pro
is the simplest and most comprehensive solution for high-quality recording on a
Mac or PC. Just plug it in and start creating!
In these pages, you’ll find a detailed description of the features of the G-Track
Pro, as well as step-by-step instructions for its setup and use. If your microphone
was purchased in the United States, you’ll also find a registration card enclosed—
don’t forget to follow the instructions so that you can receive online technical
support and so that we can send you updated information about this and other
Samson products in the future. Also, be sure to check out our website www.
samsontech.com for complete information about our full product line.
We recommend you keep the following records for reference, as well as a copy of
your sales receipt:
Serial number: _________________________________________
Date of purchase: ______________________________________________
If you have any questions or comments regarding the G-Track Pro or any other
products from Samson, do no hesitate to contact us at
support@samsontech.com.
With proper care and maintenance, your G-Track Pro will operate trouble-free for many
years. Should your G-Track Pro ever require servicing, a Return Authorization (RA)
number must be obtained before shipping your unit to Samson. Without this number,
the unit will not be accepted. Please visit www.samsontech.com/ra for an RA number
prior to shipping your unit. Please retain the original packing materials and, if possible,
return the unit in its original carton. If your G-Track Pro was purchased outside of
the United States, contact your local distributor for warranty details and service
information.
G-Track Pro • Professional USB Microphone with Audio Interface2
Page 3
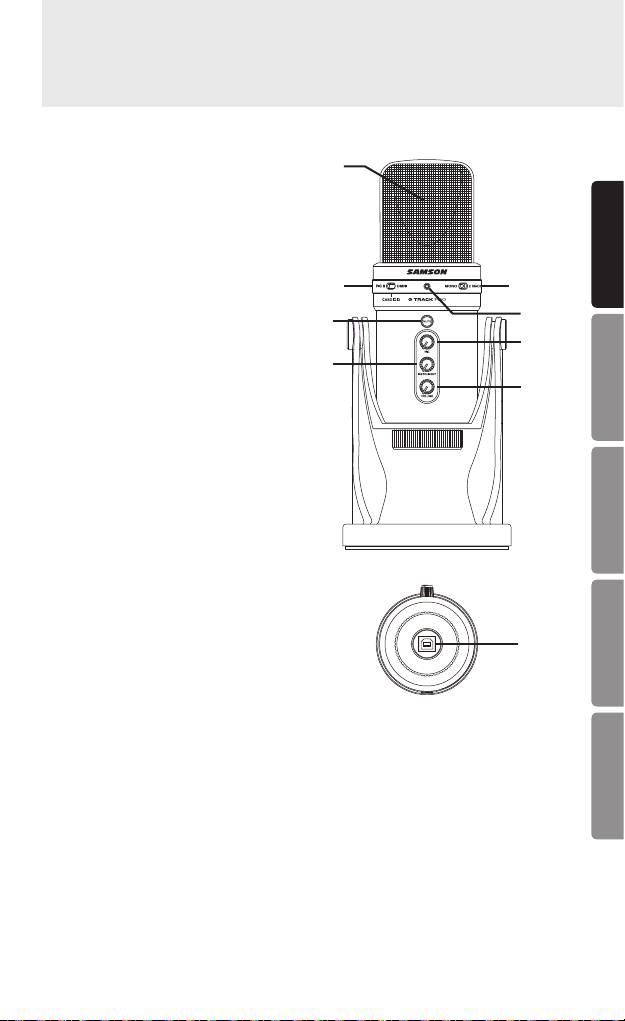
G-Track Pro Callouts
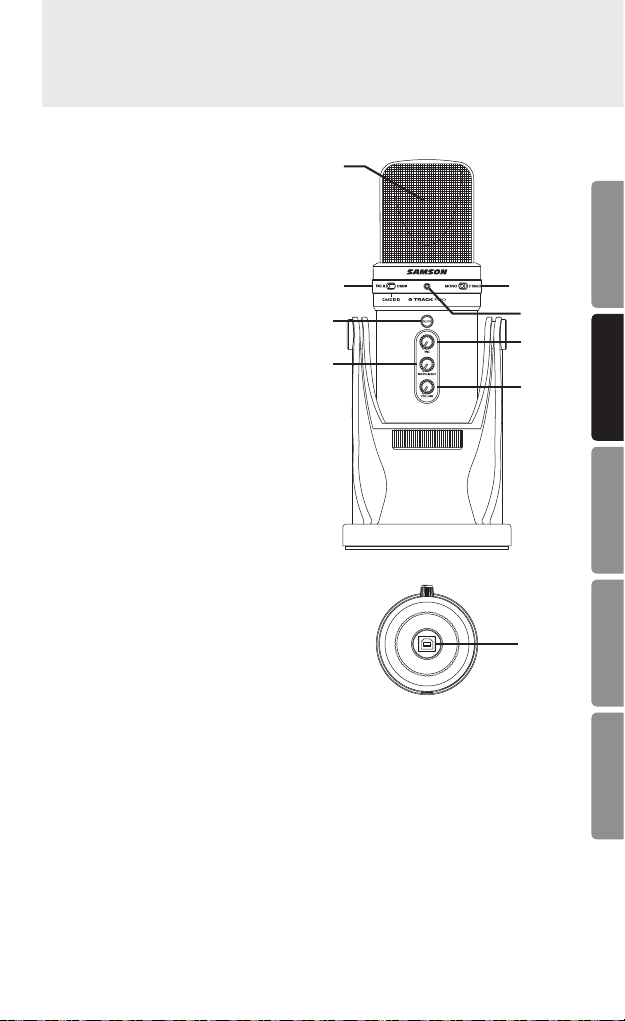
1. Capsule – Dual, 1-inch (25mm)
diaphragms
2. Pattern Switch – Select from one
of the three pick-up patterns:
Omnidirectional, Cardioid, Figure-8
3. Recording Select Switch – The slide
switch allows you to select the
different recording modes:
Mono: Microphone input and
instrument input are mixed
together and sent to the computer
as a mono signal.
2-Track: Microphone input and
intsrument input are sent to the
computer on separate tracks.
4. Status Indicator – The three color
Power/Clip/Mute LED lights green
to indicate power, flashes red when
the input signal is clipping, and
lights amber when the microphone
is muted.
5. Mute Button – Mutes the output of
the microphone to the computer
and headphone output. The Status
Indicator will illuminate amber
when the microphone is muted.
6. MIC – Control to adjust the
sensitivity of the internal
microphone.
7. INSTRUMENT – Control to adjust
the input level of the instrument
input.
8. VOLUME – Control to adjust
the overall volume of the 1/8”
Headphone output.
9. USB Jack – B size USB connector
for interfacing with your PC or Mac
computer.
1
2
5
3
4
ENGLISH
6
7
8
FRANÇAISDEUTSCHEESPAÑOLITALIANO
9
Owner’s Manual 3
Page 4
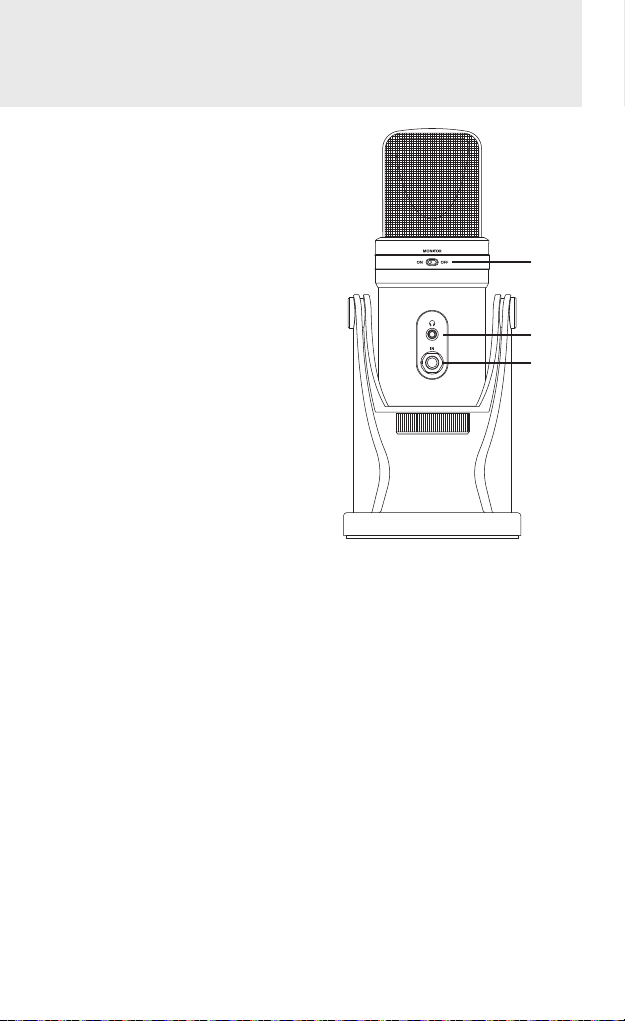
G-Track Pro Callouts
10. DIRECT MONITOR On/Off Switch
– This switch turns the direct
monitor on and off. This switch
does not affect the audio from
the computer.
11. Headphone Output – 3.5mm
stereo jack for connecting
headphones or studio monitors.
The headphone output provides
a mix of the direct signal (if
enabled) from the microphone
and the audio playback from the
computer.
12. IN Jack – 1/4” mono instrument
input for connecting instruments
in like electric guitar and bass
guitar, or line level signal like
those from keyboards, drum
machines and mixers.
10
11
12
G-Track Pro • Professional USB Microphone with Audio Interface4
Page 5

Quick Start
Follow this simple quick start for a typical set-up to start recording.
Using the G-Track Pro with a computer
1. Position the G-Track Pro on your desktop by using the included microphone
base.
2. Set the G-Track Pro’s pattern switch. If you are recording a single person,
set the switch to the Cardioid position and be sure to face the front side,
with the Samson logo. If recording two people, set the microphone to the
Figure-8 position and if recording multiple subjects, set the switch to the
Omni position.
3. Connect headphones to the Headphone output located on the rear of the
microphone.
4. Plug the USB cable into the G-Track Pro and plug the other end of the cable into an
available USB port on your computer.
5. Set the G-Track Pro as the input and output audio device by following the steps in
the section “Connecting to a Computer”.
6. Launch your recording software.
7. Turn down the output VOLUME control on the G-Track Pro and if not already set,
select the G-Track Pro as the input and outputs in the software.
8. Create two mono audio tracks. Set one track to G-Track Pro Left Input for the
microphone input and the other track to G-Track Pro Right Input for the instrument
input. Note: Input names may vary depending on software.
9. Arm the tracks for recording.
10. Set the input levels of the microphone by following the steps in the section “Setting
Levels”.
11. Set the direct monitor setting by following the steps in the section “Direct Monitor”.
12. While singing/speaking or playing your instrument into the G-Track Pro, raise the
VOLUME control until the audio output is at a comfortable listening level.
13. Press the record button and start creating.
ENGLISH
FRANÇAISDEUTSCHEESPAÑOLITALIANO
Owner’s Manual 5
Page 6

Connecting to a Computer
Using the G-Track Pro with Windows Computers
1. Connect the G-Track Pro to the computer using the included USB cable.
2. From the Start Menu, open the Control Panel and select Sound.
3. Click the Recording tab and select the Samson G-Track Pro as the audio
input device.
4. Set the Output sample rate by clicking the Properties button and selecting
the Advanced tab.
5. Set the G-Track Pro as the output device by clicking the Playback tab and
selecting the Samson G-Track Pro.
6. Set the Input sample rate by clicking the Properties button and selecting the
Advanced tab. Note: The Input and Output sample rates must be set to the
same setting. To avoid any sample rate conversion issues, make sure that
the sample rate in your software is set to the same settings.
Using the G-Track Pro with Apple OSX
1. Connect the G-Track Pro to the computer using the included USB cable.
2. Open System Preferences from the dock or the main Apple Menu.
3. Select the Sound preference icon, choose the Input tab and select Samson
G-Track Pro.
4. Set the G-Track Pro as the output device by clicking the Output tab and
selecting Samson G-Track Pro.
5. To set the sample rate, from the Applications folder, open the Utilities folder
and open Audio MIDI Setup.
6. From the Window menu, select Show Audio Window.
7. Select the Samson G-Track Pro
8. From the Format dropdown menu, select the desired sample rate and bit
depth.
G-Track Pro • Professional USB Microphone with Audio Interface6
Page 7

Setting Levels
You can adjust the G-Track Pro’s internal analog input gain stage by using the
G-Track Pro’s INSTRUMENT and MIC level control knobs. The purpose of the
level, (or gain) controls are to optimize the amount of good signal relative to any
associated noise. The G-Track Pro preamp includes a clip indicator to show when
the input signal is overdriving or clipping the input.
To set a good level on the mic:
1. Set the G-Track Pro up in front of the desired sound source and slowly raise
the MIC volume control until you see the CLIP indicator light red.
2. Then, turn the MIC volume control down until the indicator no longer lights
red.
3. Repeat the same process for the instrument. Play your instrument or line
level device at a performance level, and slowly turn up the INSTRUMENT
volume control until the CLIP indicator lights red.
4. Then, turn the INSTRUMENT volume control down until the CLIP indicator
no longer lights red.
5. Once you set the INSTRUMENT and MIC input level control you shouldn’t
need to change them during recording.
6. Use the level controls in the computer software to set the balance between
the instrument mic and stereo mix from the software.
ENGLISH
FRANÇAISDEUTSCHEESPAÑOLITALIANO
Owner’s Manual 7
Page 8
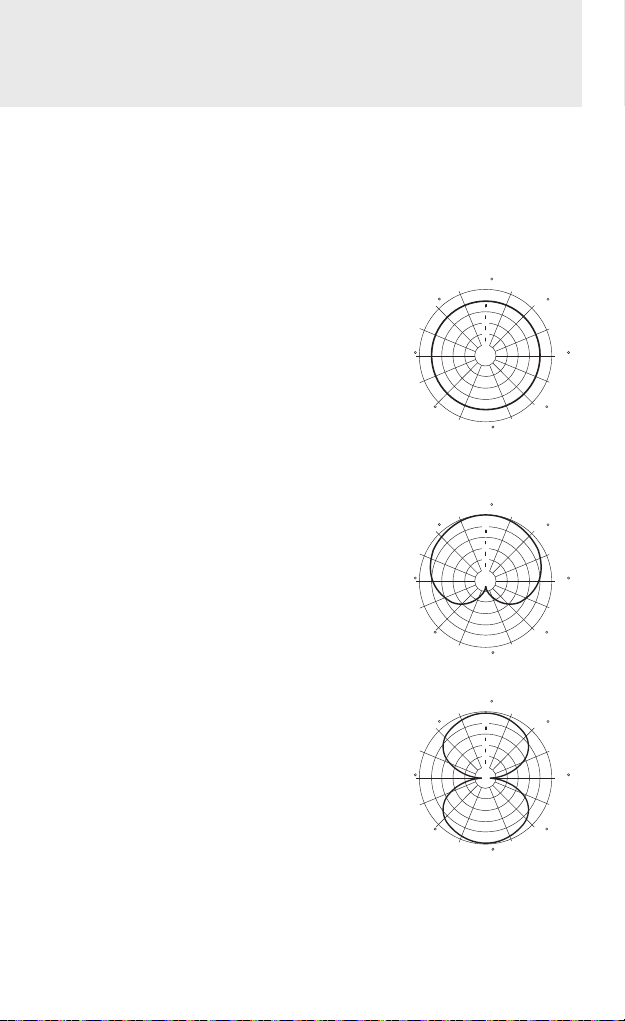
About Polar Patterns
180
180
180
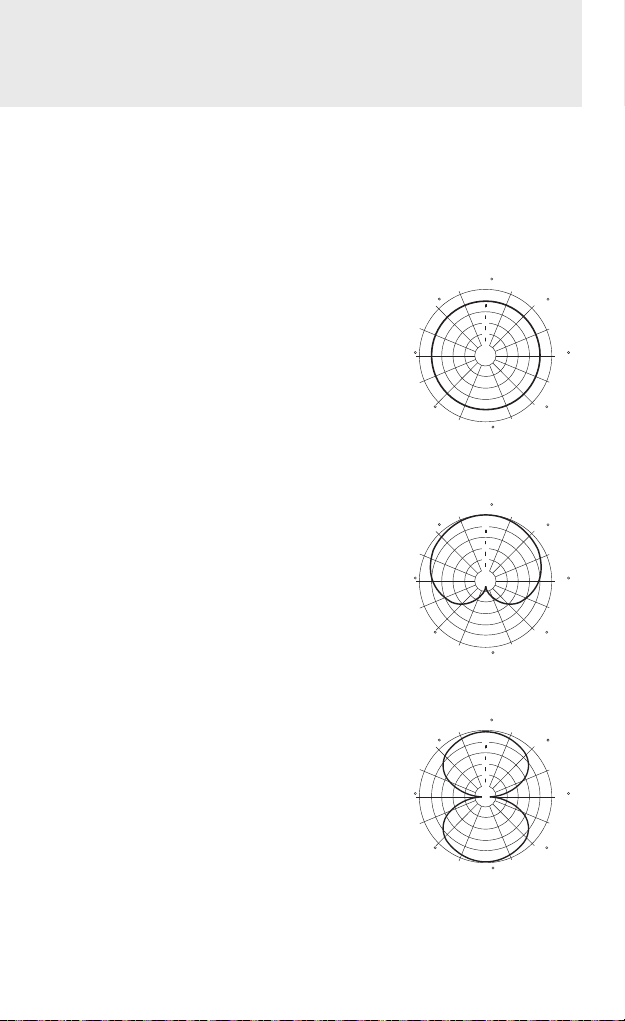
An important characteristic of any microphone is its directionality or polar pattern.
The G-Track Pro feature dual 1” capsules, allowing for a choice of three individual
polar patterns: omnidirectional, unidirectional (cardioid), and bidirectional
(figure-8). The microphone pattern can be selected using the three-position
slide switch below the left side of the grill. Each pattern has distinct pick-up
characteristics with respect to the sensitivity and frequency response to sounds
arriving from different directions. The following section discusses some of the
features of each pattern, to help you choose the best setting for your application.
Omnidirectional - The omnidirectional setting
reproduces sound from all directions, (including offaxis), with an even frequency response, which makes
it resistant to the phenomenon known as proximity
effect. It captures a greater amount of ambient sound
than the other settings, and thus will include more of
the room sound than when using a directional setting.
The omnidirectional setting is great for recording
ensemble performances including group vocals, brass,
woodwind, and other instruments with the artists
facing each other in a circle around the microphone.
To select the omnidirectional pickup pattern, set the
pattern selection switch to the right position.
Unidirectional (Cardioid) - The cardioid pickup
pattern is the most widely used for studio and live
miking applications. It captures sound in front of
the microphone and rejects sound from the sides
and back, which allows for better separation of
instruments in the studio, and picks up more of the
instrument sound in relation to the sound of the room.
The separation also allows for more control and more
gain before feedback in live sound reinforcement
situations. To select the cardioid pickup pattern, set
the pattern selection switch to the center position.
Bidirectional (Figure-8) - This setting captures sound
directly in front and back of the microphone while
rejecting sound on the left and right sides, and has
minimal off-axis frequency response deterioration.
It is very useful in a variety of stereo microphone
techniques. The figure-8 pattern can be used to
simultaneously capture two instruments or vocalists
by positioning the microphone directly between them,
so one is addressing the front of the microphone
and the other the rear. To select the figure-8 pickup
pattern, set the pattern selection switch to the left
position.
135 135
135 135
135 135
0
5
45
10
15
20
25
dB
Omnidirectional
0
5
45
10
15
20
25
dB
Cardioid
0
5
45
10
15
20
25
dB
Figure-8
45
90 90
45
90 90
45
90 90
G-Track Pro • Professional USB Microphone with Audio Interface8
Page 9

Direct Monitor
The G-Track Pro has a simple, yet sophisticated direct monitor system, which
provides zero latency monitoring.
What’s Latency, and what’s Zero Latency, and why do I need it?
Latency is the delay time between record and playback that all computer
software has when recording and monitoring simultaneously. Simply stated,
when recording, the computer software needs to recognize the input signal,
then crunch a bunch of numbers and then send the signal through to the
output. Depending on several factors like the speed of your computer, the
amount of tracks you’ve recorded, and whether or not you’re using the effects
in the software, this can take a few to several milliseconds. A delay of several
milliseconds can sometimes make it hard for a musician to play on time. To solve
this problem, the G-Track Pro lets you monitor the internal microphone and line
inputs directly on the headphones without making the round-trip in and out of
the computer. As a result you hear the inputs with no latency.
MONITOR ON/OFF Switch
When listening back to your recording during a mixing session, or if you want
to only hear the G-Track Pro’s inputs after it has gone through your computer
software effects, you may want to turn the Direct Monitor off. To turn the Direct
Monitor off, move the DIRECT MONITOR switch on the rear of the G-Track Pro
to the OFF position, you hear only the playback from your computer software,
in stereo, with no input signal. To enable the Direct Monitor, set the DIRECT
MONITOR switch to the ON position. If you plan to use direct monitoring on the
G-Track Pro, disable software monitoring for the armed (input) tracks.
ENGLISH
FRANÇAISDEUTSCHEESPAÑOLITALIANO
Owner’s Manual 9
Page 10

Specifications
Element Type Dual back electret condenser
Diaphragm Width/Thickness 25mm/3 microns
Polar Pattern Cardioid (unidirectional), bidirectional
Frequency Response 50Hz–20kHz
Max Sensitivity +6dB FS/PA (all polar patterns)
Max. SPL 120dB SPL
Bit Depth/Sample Rate 16 or 24-bit/ Up to 96kHz
Digital Output USB
Headphone Output/Impedance 1/8” (3.5mm)/ 16Ω
Headphone Power Output 85mW @ 32Ω
Instrument Input/Impedance 1/4”/ 1MΩ
Controls Mute, Mic/Instrument/Headphone Volumes,
LED 3-color Power/Clip/Mute
Body Construction/Grille Die-cast zinc/heavy gauge mesh
Accessories Integrated desktop base, USB cable
Product Dimensions 4.5” x 10.5” diameter
Product Weight 3.52lb (1.6kg)
(figure-8), omnidirectional
Monitor On/Off, Mono/2 Track Recording
Modes
(116mm x 268.5mm diameter)
G-Track Pro • Professional USB Microphone with Audio Interface10
Page 11
Important Safety Information
Note: This equipment has been tested and found to comply with the limits for
a Class B digital device, pursuant to Part 15 of the FCC rules. These limits are
designed to provide reasonable protection against harmful interference in a
residential installation. This equipment generates, uses and can radiate radio
frequency energy and, if not installed and used in accordance with the instructions, may cause harmful interference to radio communications. However, there is
no guarantee that the interference will not occur in a particular installation. If this
equipment does cause harmful interference to radio or television reception, which
can be determined by turning the equipment off and on, the user is encouraged to
try to correct the interference by one or more of the following measures:
Reorient or relocate the receiving antenna.
Increase the separation between the equipment and receiver.
Connect the equipment into an outlet on a circuit different from that of the
receiver.
Consult the dealer or an experienced radio/TV technician for help
WARNING: Listening to music at high volume levels and for extended durations
can damage one’s hearing. In order to reduce the risk of damage to hearing, one
should lower the volume to a safe, comfortable level, and reduce the amount of
time listening at high levels.
Please use the following guidelines established by the Occupational Safety Health
Administration (OSHA) on maximum time exposure to sound pressure levels
before hearing damage occurs.
• 90 dB SPL at 8 hours
• 95 dB SPL at 4 hours
• 100 dB SPL at 2 hours
• 105 dB SPL at 1 hour
• 110 dB SPL at 1/2 hour
• 115 dB SPL at 15 minutes
• 120 dB SPL - avoid or damage may occur
ENGLISH
FRANÇAISDEUTSCHEESPAÑOLITALIANO
If you want to dispose this product, do not mix it with general household
waste. There is a separate collection system for used electronic products
in accordance with legislation that requires proper treatment, recovery
and recycling.
Private household in the 28 member states of the EU, in Switzerland
and Norway may return their used electronic products free of charge to designated
collection facilities or to a retailer (if you purchase a similar new one).
For Countries not mentioned above, please contact your local authorities for a
correct method of disposal.
By doing so you will ensure that your disposed product undergoes the necessary
treatment, recovery and recycling and thus prevent potential negative effects on
the environment and human health.
Owner’s Manual 11
Page 12

Introduction
Merci d'avoir acheté le microphone USB avec interface audio Samson G-Track
Pro. Le G-Track Pro est doté d'une double capsule ultra fine de 1” (2,5 cm) avec
des courbes de directivité sélectionnables, intègre un convertisseur analogiquenumérique de 24 bits cadencé à 96kHz et une sortie USB. En outre, le
G-Track Pro est équipé d'une interface audio intégrée avec une sortie casque,
qui vous permet de relier votre guitare électrique ou votre basse, des claviers,
des batteries ou toute autre source sonore. Le mixeur embarqué vous permet
de définir des signaux clairs pour l'enregistrement, grâce à ses commandes
de niveau d'entrée Mic et Instrument. De plus, le G-Track Pro s'appuie sur un
système de surveillance intelligent, qui vous permet de choisir parmi diverses
options de lecture, pour les casques ou les moniteurs, avec une surveillance
sans latence des signaux d'entrée. Que vous enregistriez votre dernière idée de
chanson, un podcast ou que vous diffusiez des signaux en continu sur votre
chaîne de jeux, le G-Track Pro constitue la solution la plus simple et la plus
complète pour obtenir un enregistrement de haute qualité, sur Mac ou sur PC.
Branchez-le et créez!
Ces pages vous présentent une description détaillée des caractéristiques du
G-Track Pro ainsi que des instructions détaillées d’installation et d’utilisation.
Si vous avez acheté votre microphone en dehors des États-Unis, une carte
d’inscription vous est fournie. Vous trouverez également des informations sur la
façon d’enregistrer votre produit en ligne afin de bénéficier du support technique
en ligne, et pour que nous puissions vous envoyer des informations à jour à ce
sujet et d’autres produits Samson à l’avenir. De même, assurez-vous de consulter
notre site Web www.samsontech.com pour en savoir plus sur notre gamme
complète de produits.
Nous vous recommandons de conserver les informations suivantes pour référence,
ainsi que la copie de votre facture.
Numéro de série: _________________________________________
Date d'achat: ______________________________________________
Pour toute question ou commentaire sur le G-Track Pro ou sur tout autre produit
Samson, n'hésitez pas à nous contacter par email à support@samsontech.com.
En l'entretenant et en l'utilisant correctement, vous bénéficierez de votre G-Track Pro
pendant de nombreuses années. Si votre système G-Track Pro doit être réparé, vous
devez demander un numéro RA (Autorisation de retour, Return Authorization) avant
d’expédier votre appareil à Samson. Sans ce numéro, l'unité ne sera pas acceptée.
Veuillez visiter le site Web www.samsontech.com/ra afin d'obtenir un numéro RA avant
d'expédier votre appareil. Veuillez conserver les matériaux d'emballage d'origine et,
si possible, retourner l'appareil dans son carton d'origine. Si vous avez acheté votre
G-Track Pro en dehors des États-Unis, contactez votre distributeur local pour en savoir
plus sur la garantie et les services d'entretien.
G-Track Pro • Microphone USB professionnel avec interface audio12
Page 13
Légendes G-Track Pro
1. Capsule – Double, diaphragmes de 1
pouce (25mm)
2. Commutateur de courbe – Sélectionnez
l'une des trois courbes de directivité:
Omnidirectionnelle, cardioïde,
Figure-8
3. Commutateur de sélection
d'enregistrement – Le commutateur
coulissant vous permet de
sélectionner les différents modes
d'enregistrement:
Mono: L'entrée microphone et
instrument sont mélangées et
envoyées à l'ordinateur sous la forme
d'un signal unique.
2-pistes: L'entrée microphone et
l'entrée instrument sont envoyées
à l'ordinateur sur deux pistes
différentes.
4. Indicateur d'état – La LED tricolore
Power/Clip/Mute s'allume en vert
pour indiquer que l'appareil est sous
tension, clignote en rouge lorsque
le signal d'entrée est écrêté et
s'allume en orange lorsque le son du
microphone est coupé.
5. Bouton Mute (coupure du son) – Coupe
la sortie du microphone vers la
sortie de l'ordinateur ou du casque.
L'indicateur d'état s'allume en orange
lorsque le son du microphone est
coupé.
6. MIC – Commande permettant
d'ajuster la sensibilité du microphone
interne.
7. INSTRUMENT – Commande permettant
d'ajuster le niveau d'entrée de
l'entrée de l'instrument.
8. VOLUME – Commande permettant
d'ajuster le volume global de la sortie
de prise casque de 1/8” (0,31 cm).
9. Prise USB – Connecteur USB de type
B pour communiquer avec votre PC ou
votre Mac.
1
2
5
3
4
ENGLISH
6
7
8
FRANÇAISDEUTSCHEESPAÑOLITALIANO
9
Mode d’emploi 13
Page 14

Légendes G-Track Pro
10. Commutateur DIRECT MONITOR
On/Off (marche/arrêt MONITEUR
DIRECT)– Ce commutateur met en
marche et arrête le moniteur direct.
Ce commutateur n'affecte pas le
signal audio en provenance de
l'ordinateur.
11. Sortie casque – Prise stéréo de
3,5mm pour connecter un casque
ou des moniteurs de studio. La
sortie casque offre un mélange
du signal direct (s'il est activé) du
microphone et de la lecture audio
de l'ordinateur.
12. Prise IN – Entrée d'instrument
mono de 1/4” (0,63 cm) pour
relier les instruments, tels que des
guitares électriques ou basses, ou
un signal de niveau de ligne tel que
ceux des claviers, des batteries et
des mixeurs.
10
11
12
G-Track Pro • Microphone USB professionnel avec interface audio14
Page 15

Démarrage rapide
Suivez les instructions suivantes très simples pour une configuration rapide afin
de commencer un enregistrement.
Utilisation du G-Track Pro avec un ordinateur
1. Positionnez le G-Track Pro sur votre bureau en utilisant le socle pour
microphone fourni.
2. Réglez le commutateur de courbe du G-Track Pro. Si vous enregistrez
une seule personne, réglez le commutateur sur la position cardioïde et
assurez-vous de vous placer face à l'avant du micro, devant la face portant
le logo Samson. Si vous enregistrez deux personnes, réglez le microphone
sur la position Figure-8 et si vous enregistrez plusieurs personnes, réglez le
commutateur sur la position Omni.
3. Branchez les casques sur la sortie Casque, située à l'arrière du microphone.
4. Branchez le câble USB sur le G-Track Pro et l'autre extrémité dans le port USB libre
de votre ordinateur.
5. Réglez le G-Track Pro en tant que périphérique audio d'entrée et de sortie en suivant
les étapes décrites à la section «Connexion à un ordinateur».
6. Lancez votre logiciel d'enregistrement.
7. Baissez la commande de VOLUME sur le G-Track Pro et si ce n'est pas déjà fait,
sélectionnez le G-Track Pro comme entrée et sortie dans votre logiciel.
8. Créez deux pistes audio mono. Réglez une piste sur l'entrée gauche du G-Track Pro
pour le microphone et l'autre piste sur l'entrée droite du G-Track Pro pour l'entrée
de l'instrument. Remarque: les noms des entrées peuvent varier en fonction du
logiciel.
9. Activez les pistes pour l'enregistrement.
10. Réglez les niveaux d'entrée du microphone en suivant les étapes décrites à la
section «Réglage des niveaux».
11. Définissez les réglages du moniteur direct en suivant les étapes décrites à la section
«Moniteur direct».
12. Pendant que vous parlez, chantez ou jouez d'un instrument de musique devant le
G-Track Pro, augmentez la commande de VOLUME jusqu'à ce que l'entrée audio
atteigne un niveau d'écoute confortable.
13. Appuyez sur le bouton d'enregistrement et à vous de jouer.
ENGLISH
FRANÇAISDEUTSCHEESPAÑOLITALIANO
Mode d’emploi 15
Page 16

Connexion à un ordinateur
Utilisation du G-Track Pro avec les ordinateurs sous Windows
1. Branchez le G-Track Pro sur votre ordinateur à l'aide du câble USB fourni.
2. Dans le menu Démarrer, ouvrez le Panneau de configuration et sélectionnez
Son.
3. Cliquez sur l'onglet Enregistrement et sélectionnez le Samson G-Track Pro
comme périphérique d'entrée audio.
4. Réglez le taux d'échantillonnage de sortie en cliquant sur le bouton
Propriétés et en sélectionnant l'onglet Avancé.
5. Réglez le G-Track Pro en tant que périphérique de sortie en cliquant sur
l'onglet Lecture et en sélectionnant Samson G-Track Pro.
6. Réglez le taux d'échantillonnage d'entrée en cliquant sur le bouton
Propriétés et en sélectionnant l'onglet Avancé. Remarque: les taux
d'échantillonnage d'entrée et de sortie doivent être réglés sur le
même paramètre. Pour éviter les problèmes de conversion de taux
d'échantillonnage, assurez-vous que le taux d'échantillonnage de votre
logiciel est réglé sur les mêmes paramètres.
Utilisation du G-Track Pro avec un ordinateur Apple sous OSX
1. Branchez le G-Track Pro sur votre ordinateur à l'aide du câble USB fourni.
2. Ouvrez Préférences système de la station d'accueil ou du menu Pomme
principal.
3. Sélectionnez l'icône de préférence Son, choisissez l'onglet Entrée et
sélectionnez Samson G-Track Pro.
4. Réglez le G-Track Pro en tant que périphérique de sortie en cliquant sur
l'onglet Sortie et en sélectionnant Samson G-Track Pro.
5. Pour régler le taux d'échantillonnage, depuis le dossier Applications, ouvrez le
dossier Utilitaires et ouvrez Configuration audio MIDI.
6. Dans le menu Fenêtre, sélectionnez Afficher la fenêtre Audio.
7. Sélectionnez Samson G-Track Pro
8. Dans le menu déroulant Format, sélectionnez le taux d'échantillonnage
souhaité et la profondeur de bits.
G-Track Pro • Microphone USB professionnel avec interface audio16
Page 17

Réglage des niveaux
Vous pouvez ajuster l'étape de gain d'entrée interne du G-Track Pro en utilisant les
boutons de commande de niveau INSTRUMENT et MIC du G-Track Pro. L'objectif
des commandes de niveau (ou de gain) est d'optimiser la quantité de signaux
corrects par rapport à tout autre bruit associé. Le préamplificateur du G-Track Pro
est doté d'un indicateur de crête pour indiquer quand le signal sature ou écrête
l'entrée.
Pour régler un niveau correct sur le microphone:
1. Placez le G-Track Pro juste devant la source sonore souhaitée et augmentez
lentement la commande de volume du microphone jusqu'à ce que la LED de
l'indicateur d'écrêtage s'allume en rouge.
2. Ensuite, baissez la commande de volume du microphone, jusqu'à ce que
l'indicateur ne soit plus rouge.
3. Répétez la même procédure pour l'instrument. Jouez de votre instrument
ou de votre appareil de niveau de ligne à un niveau de performance, puis
tournez lentement la commande de volume de l'INSTRUMENT, jusqu'à ce
que l'indicateur d'écrêtage soit allumé en rouge.
4. Ensuite, baissez la commande de volume de l'INSTRUMENT, jusqu'à ce que
l'indicateur ne soit plus rouge.
5. Une fois les niveaux d'entrée du MICROPHONE et de l'INSTRUMENT
réglés, vous ne devriez plus avoir besoin de les modifier pendant
l'enregistrement.
6. Utilisez les commandes de niveau du logiciel pour établir la balance entre le
micro de l'instrument et le mélange stéréo à partir du logiciel.
ENGLISH
FRANÇAISDEUTSCHEESPAÑOLITALIANO
Mode d’emploi 17
Page 18
À propos des courbes de directivité
180
180
180
0
Une caractéristique importante de tout microphone est sa direction ou sa courbe de
directivité. Le G-Track Pro est doté de capsules doubles de 1” (2,5cm), qui permet
de choisir parmi trois courbes de directivité individuelles: omnidirectionnelle,
unidirectionnelle (cardioïde), et bidirectionnelle (figure-8). Il est possible de
sélectionner la courbe d'un microphone à l'aide du commutateur coulissant à trois
positions situé en dessous du côté gauche de la grille. Chaque courbe présente des
caractéristiques de captation distinctes en ce qui concerne la sensibilité et la réponse
en fréquence aux sons provenant de différentes directions. La section suivante traite
de certaines particularités de chaque courbe, pour vous aider à choisir le meilleur
paramétrage pour votre application.
Omnidirectionnelle - Le paramètre omnidirectionnel
reproduit le son provenant de toutes les directions
(y compris désaxés), avec une réponse en fréquence
homogène, ce qui lui confère une certaine résistance
au phénomène nommé effet de proximité. Il capture
une plus grande quantité de bruits de fond que les
autres paramètres, et inclut par conséquent plus de
bruits ambiants que lors de l'utilisation du paramètre
directionnel. Le paramètre omnidirectionnel est idéal
pour enregistrer des ensembles, comme des groupes
vocaux, des cuivres, des instruments à vent et d'autres
instruments associés à des artistes se faisant face pour
former un cercle autour du microphone. Pour sélectionner
la courbe de captation omnidirectionnelle, placez le
commutateur de sélection de courbe sur la position
correspondante.
Unidirectionnel (cardioïde) - La courbe de captation
cardioïde est la plus utilisée pour les applications en prise
de son en studio ou en direct. Il capture le son devant le
microphone et rejette le son de l'arrière et des côtés, ce
qui permet une meilleure séparation des instruments en
studio, et capte plus de sons de l'instrument par rapport
au son de la pièce. La séparation permet également un
meilleur contrôle et un meilleur gain avant le retour,
dans les cas de renforcement du son en direct. Pour
sélectionner la courbe de captation cardioïde, réglez
le commutateur de sélection de courbe sur la position
centrale.
Bidirectionnel (Figure-8) - Ce réglage capture le son
directement devant et derrière le microphone en
rejetant les sons provenant des côtés gauche et droit,
et présente une détérioration de réponse en fréquence
désaxée minimale. Ce réglage est très utile pour diverses
techniques de microphone stéréo. La courbe figure-8
peut être utilisée pour capturer simultanément deux
instruments ou chanteurs en positionnant le microphone
directement entre eux. Ainsi, l'un projette le son vers
l'avant du microphone, tandis que l'autre le projette
vers l'arrière. Pour sélectionner la courbe de captation
figure-8, réglez le commutateur de sélection de courbe
sur la position gauche.
135 135
135 135
135 135
0
5
45
10
15
20
25
dB
Omnidirectionnel
0
5
45
10
15
20
25
dB
Cardioïde
5
45
10
15
20
25
dB
Figure-8
45
45
45
90 90
90 90
90 90
G-Track Pro • Microphone USB professionnel avec interface audio18
Page 19

Moniteur direct
Le G-Track Pro est doté d'un système de moniteur direct simple, mais sophistiqué, qui
assure une surveillance sans latence.
Qu'est-ce que la latence ? Qu'est-ce que la latence nulle ? et pourquoi en ai-je besoin?
La latence est le temps qui s'écoule entre l'enregistrement et la lecture effectués par
le logiciel lors de l'enregistrement et la surveillance simultanés. En termes simples,
lors de l'enregistrement, le logiciel doit reconnaître le signal d'entrée, puis le diviser en
groupes de chiffres, et enfin envoyer le signal vers la sortie. En fonction de différents
facteurs tels que la vitesse de votre ordinateur, la quantité de pistes enregistrées ou
l'utilisation ou non des effets dans le logiciel, cela peut demander jusqu'à quelques
millisecondes. Un délai de plusieurs millisecondes peut empêcher un musicien de
jouer de manière synchronisée. Pour résoudre ce problème, le G-Track Pro vous permet
de surveiller les entrées du microphone interne et de ligne directement sur les casques,
sans avoir à faire le trajet aller-retour depuis et vers l'ordinateur. Par conséquent, vous
entendez les entrées, sans latence.
Commutateur MONITOR ON/OFF (MONITEUR MARCHE/ARRÊT)
Lorsque vous écoutez votre enregistrement au cours d'une session de mixage, ou si
vous souhaitez n'entendre que les entrées du G-Track Pro après l'application des effets
logiciels, vous souhaiterez peut-être désactiver le moniteur direct. Pour désactiver le
moniteur direct, déplacez le commutateur DIRECT MONITOR vers l'arrière du G-Track
Pro sur la position OFF, vous entendez uniquement la lecture de votre logiciel, en
stéréo, sans signal d'entrée. Pour activer le moniteur direct, réglez le commutateur
DIRECT MONITOR en position ON. Si vous envisagez d'utiliser la surveillance directe
sur le G-Track Pro, désactivez la surveillance logicielle pour les pistes concernées
(entrée).
ENGLISH
FRANÇAISDEUTSCHEESPAÑOLITALIANO
Mode d’emploi 19
Page 20

Spécifications
Type d'élément Double condensateur back électret
Largeur/épaisseur du diaphragme 25mm/3microns
Courbe de directivité Cardioïde (unidirectionnel), bidirectionnel
Réponse en fréquence 50Hz - 20kHz
Sensibilité maximum +6dB FS/PA (toutes les courbes de directivité)
Niveau de pression sonore max. 120dB
Profondeur de bit/Taux
d'échantillonnage 16 ou 24-bits / jusqu'à 96kHz
Sortie numérique USB
Sortie/impédance casque 1/8” (3,5mm)/ 16Ω
Sortie d'alimentation casque 85mW @ 32Ω
Entrée/impédance de l'instrument 1/4” (0,63 cm)/ 1MΩ
Commandes Silence, Volumes Mic/Instrument/Casque,
LED Tricolore Alimentation/Ecrêtage/Silence
Construction du corps/Grille Zinc en fonte moulée/Maillage renforcé
Accessoires Socle de bureau intégré, câble USB
Dimensions du produit Diamètre 4,5” x 10,5”
Poids du produit 3,52lb (1,6kg)
(figure-8), omnidirectionnel
Moniteur On/Off, Modes d'enregistrement
Mono/2 pistes
(116mm x 268,5mm)
G-Track Pro • Microphone USB professionnel avec interface audio20
Page 21

Informations de sécurité importantes
Remarque: cet équipement a été testé et jugé conforme aux limites d’un appareil
numérique de classe B, conformément à la partie15 des règles de la FCC. Ces limites
sont conçues pour fournir une protection raisonnable contre les interférences nuisibles
dans une installation résidentielle. Cet équipement génère, utilise et peut émettre de
l’énergie à radiofréquences et, s’il n’est pas installé et utilisé conformément aux instructions, peut causer des interférences nuisibles aux communications radio. Cependant, il
n’y a aucune garantie que des interférences ne se produiront pas dans une installation
particulière. Si cet équipement provoque des interférences nuisibles à la réception de
la radio ou de la télévision, ce qui peut être déterminé en éteignant, puis en rallumant
l’appareil, l’utilisateur est invité à essayer de corriger les interférences en prenant une
ou plusieurs des mesures suivantes:
Réorienter ou déplacer l’antenne de réception.
Augmenter la distance entre l’équipement et le récepteur.
Brancher l’équipement dans une prise sur un circuit différent de celui auquel le récepteur est connecté.
Demander de l’aide au revendeur ou à un technicien radio/TV expérimenté.
AVERTISSEMENT: l'écoute de musique à des niveaux de volume élevés pendant une
période prolongée peut endommager l'audition. Afin de réduire le risque de troubles
auditifs, il convient de diminuer le volume à un niveau confortable et sûr et de réduire la
durée d'écoute à des niveaux élevés.
Veuillez suivre les directives suivantes établies par l'Occupational Safety Health Administration (OSHA) sur la durée maximale d'exposition aux niveaux de pression sonore
avant qu'un dommage auditif ne survienne.
Pour mettre ce produit au rebut, ne le mélangez pas aux ordures ménagères. Il
existe un système de collecte séparée pour les produits électroniques usagés,
conformément à la législation qui prévoit le traitement, la récupération et le
recyclage corrects.
Les ménages dans les 28 états membres de l'UE, en Suisse et en Norvège
peuvent mettre au rebut leurs produits électroniques usagés gratuitement auprès
d'installations de collecte agréées ou auprès d'un détaillant (si vous achetez un produit
neuf similaire).
Pour les pays non mentionnés ci-dessus, veuillez contacter les autorités locales pour
connaitre la méthode de traitement appropriée.
Ce faisant, vous vous assurerez que votre produit subit le traitement, la récupération et
le recyclage nécessaires et prévenez ainsi les effets négatifs potentiels sur l'environnement et la santé humaine.
• Niveau de pression sonore de 90 dB pendant 8heures
• Niveau de pression sonore de 95 dB pendant 4heures
• Niveau de pression sonore de 100 dB pendant 2heures
• Niveau de pression sonore de 105 dB pendant 1heure
• Niveau de pression sonore de 110 dB pendant 1/2heure
• Niveau de pression sonore de 115 dB pendant 15minutes
• Niveau de pression sonore 120 dB - à éviter pour ne pas
endommager votre audition.
ENGLISH
FRANÇAISDEUTSCHEESPAÑOLITALIANO
Mode d’emploi 21
Page 22

Einführung
Herzlichen Glückwunsch zum Kauf des Samson G-Track Pro USB-Mikrofons mit
Audioschnittstelle. Das G-Track Pro verfügt über extrem dünne 1“-Dualkapseln mit
wählbaren Richtcharakteristika, integriertem Analog-Digital-Wandler mit 24Bit und
96kHz sowie einen USB-Ausgang. Zusätzlich verfügt das G-Track Pro über eine
integrierte Audioschnittstelle mit Kopfhörerausgang, die Ihnen den Anschluss von
E-Gitarren, E-Bässen, Keyboards, Drumcomputern und fast allen anderen Signalquellen
ermöglicht. Mit den Reglern für Instrumenten- und Mikrofonpegel des integrierten
Mixers können Sie Signale zur Aufnahme sauber einpegeln. Weiterhin verfügt das
G-Track Pro über eine intelligente Monitoring-Funktion, mit der Ihnen eine Vielzahl
von Playback-Optionen der Eingangssignale für Kopfhörer oder Monitore latenzfrei zur
Verfügung steht. Ob Sie Ihre Ideen für neue Songs, Podcasts oder Streaming-Inhalte für
Ihren Gaming-Channel aufnehmen: Das G-Track Pro ist die einfachste und gleichzeitig
umfassendste Lösung für hochwertige Aufnahmen mit einem Mac oder PC. Einfach
anschließen und direkt kreativ werden!
In diesem Handbuch wird der gesamte Funktionsumfang des G-Track Pro im Detail
beschrieben. Schritt für Schritt werden Einrichtung und Bedienung erklärt. Wenn Sie
Ihr Mikrofon in den USA gekauft haben, liegt ihm eine Garantiekarte bei. Bitte befolgen
Sie die Anweisungen, damit Sie unseren technischen Kundendienst online nutzen und
wir Ihnen für dieses und andere Samson-Produkte zukünftig aktualisierte Informationen
zukommen lassen können. Alle Informationen zu unserer gesamten Produktpalette
finden Sie auch auf unserer Website www.samsontech.com.
Wir empfehlen, die folgenden Informationen und Ihren Kaufbeleg aufzubewahren:
Seriennummer: ___________________________________________
Kaufdatum: ______________________________________________
Wenn Sie Fragen oder Anmerkungen zum G-Track Pro oder anderen Produkten von
Samson haben, erreichen Sie uns unter support@samsontech.com.
Wenn Sie Ihr G-Track Pro mit angemessener Sorgfalt behandeln und korrekt warten,
funktioniert es jahrelang problemlos. Falls Ihr G-Track Pro einmal gewartet werden muss,
benötigen Sie eine „Return Authorization Number“ (RA/Rücksendeberechtigungsnummer).
Erst nach Erhalt dieser Nummer können Sie Ihr Gerät bei Samson einschicken. Ohne eine
solche Nummer müssen wir das eingeschickte Gerät leider zurückweisen. Bitte besuchen Sie
www.samsontech.com/ra, um eine Rücksendeberechtigungsnummer zu erhalten und schicken
Sie anschließend Ihr Gerät ein. Verwenden Sie zum Einschicken möglichst Originalkarton und
-verpackungsmaterial. Wenn Sie Ihr G-Track Pro außerhalb der USA erworben haben, wenden
Sie sich bitte an einen Händler in Ihrer Umgebung. Dort erhalten Sie alle für Garantie,
Wartung und Reparaturen wichtigen Informationen.
G-Track Pro • Professionelles USB-Mikrofon mit Audioschnittstelle22
Page 23

G-Track Pro Aufbau
1. Kapsel – dual, 1-Zoll-Membran
(25mm)
2. Schalter Richtcharakteristik – Wählen
Sie eine der drei Richtcharakteristika
aus: Kugel (Omni), Niere (Cardioid),
Acht (Fig 8)
3. Aufnahme-Auswahlschalter – mit
diesem Schiebeschalter können Sie
die verschiedenen Aufnahmemodi
auswählen:
Mono: Mikrofon- und
Instrumenteneingang werden
zusammengeführt und als MonoSignal an den Computer gesendet.
2-Spur (2-Track): Mikrofon- und
Instrumenteneingang werden als
getrennte Spuren an den Computer
gesendet.
4. Statusanzeige – die dreifarbige
LED leuchtet grün, wenn die
Stromversorgung aktiv ist, blinkt rot,
wenn das Eingangssignal übersteuert
ist, und leuchtet gelb, wenn das
Mikrofon stummgeschaltet ist.
5. Mute-Taster – Schaltet den Ausgang
des Mikrofons zum Computer und
den Kopfhörerausgang stumm. Die
Statusanzeige leuchtet gelb, wenn
das Mikrofon stummgeschaltet ist.
6. MIC – Regler zur Anpassung der
Empfindlichkeit des internen
Mikrofons.
7. INSTRUMENT – Regler zur
Anpassung des Eingangspegels am
Instrumenteneingang.
8. VOLUME – Regler zur Anpassung
der Gesamtlaustärke am 3,5-mmKopfhörerausgang.
9. USB-Buchse – USB-Anschluss der
Größe B zum Anschluss an einen
Computer (Mac oder PC).
1
2
5
3
4
ENGLISH
6
7
8
FRANÇAISDEUTSCHEESPAÑOLITALIANO
9
Bedienungshandbuch 23
Page 24

G-Track Pro Aufbau
10. MONITOR Ein/Aus-Schalter – Dieser
Schalter aktiviert/deaktiviert das
direkte Monitoring. Er hat keinen
Einfluss auf das Audiosignal vom
Computer.
11. Kopfhörerausgang – 3,5-mm-
Stereoklinkenbuchse zum
Anschluss von Kopfhörern
oder Studiomonitoren. Am
Kopfhörerausgang liegt eine
Mischung des direkten Signals
(sofern aktiviert) vom Mikrofon und
des Audiosignals vom Computer an.
12. IN-Buchse – Mono-
Instrumenteneingang (6,3mm)
zum Anschluss von Instrumenten
wie E-Gitarren, E-Bässen oder
Line-Signalen wie von Keyboards,
Drumcomputern und Mischpulten.
10
11
12
G-Track Pro • Professionelles USB-Mikrofon mit Audioschnittstelle24
Page 25

Kurzanleitung
Führen Sie die Anweisungen dieser einfachen Kurzanleitung aus, um mit einem
typischen Aufbau schnell Aufnahmen zu machen.
Verwendung des G-Track Pro mit einem Computer
1. Positionieren Sie das G-Track Pro mit dem mitgelieferten Mikrofonfuß auf Ihrem
Tisch.
2. Stellen Sie den Schalter des G-Track Pro für die Richtcharakteristik ein. Wenn
Sie eine Einzelperson aufnehmen, stellen Sie den Schalter auf Niere ein und
besprechen Sie die Vorderseite mit dem Samson-Logo. Wenn Sie zwei Personen
aufnehmen, stellen Sie das Mikrofon auf die Achter-Charakteristik ein; wenn Sie
mehrere Personen aufnehmen, verwenden Sie die Kugelcharakteristik.
3. Schließen Sie Kopfhörer an den Kopfhörerausgang auf der Rückseite des Mikrofons an.
4. Verbinden Sie das USB-Kabel mit dem G-Track Pro und stecken Sie das andere Ende in
einen freien USB-Anschluss Ihres Computers.
5. Richten Sie das G-Track Pro als Ein- und Ausgabegerät ein, indem Sie die Schritte im
Abschnitt „Anschluss an einen Computer“ befolgen.
6. Starten Sie Ihre Recording-Software.
7. Stellen Sie den VOLUME-Regler des G-Track Pro auf den linken Anschlag und wählen
Sie das G-Track Pro Als Ein- und Ausgabegerät in der Software aus, sofern nicht bereits
geschehen.
8. Erstellen Sie zwei Mono-Audiospuren. Stellen Sie eine Spur für den linken Eingang des
G-Track Pro als Mikrofoneingang und die andere Spur für den rechten Eingang des G-Track
Pro als Instrumenteneingang ein. Hinweis: Eingangsbezeichnungen können je nach
Software abweichen.
9. Geben Sie die Spuren für die Aufnahme frei.
10. Stellen Sie den Eingangspegel des Mikrofons ein, indem Sie die Schritte im Abschnitt
„Pegel einstellen“ befolgen.
11. Stellen Sie die direkte Monitoring-Funktion ein, indem Sie die Schritte im Abschnitt
„Direktes Monitoring“ befolgen.
12. Während Sie singen/sprechen oder Ihr Instrument über das G-Track Pro einspielen, drehen
Sie den VOLUME-Regler auf, bis der Audioeingang auf eine angenehme Abhörlautstärke
eingestellt ist.
13. Betätigen Sie die Aufnahmeschaltfläche und beginnen Sie die Aufnahme.
ENGLISH
FRANÇAISDEUTSCHEESPAÑOLITALIANO
Bedienungshandbuch 25
Page 26

Anschluss an einen Computer
Verwendung des G-Track Pro mit Windows-Computern
1. Schließen Sie das G-Track Pro mit dem mitgelieferten USB-Kabel an den
Computer an.
2. Öffnen Sie im Startmenü die Systemsteuerung und wählen Sie Sound.
3. Klicken Sie auf die Reiterkarte Aufnahme und wählen Sie das Samson G-Track Pro
als Audio-Eingabegerät aus.
4. Stellen Sie die Ausgabe-Samplerate durch Anklicken der Schaltfläche
Eigenschaften ein und wählen Sie die Reiterkarte Erweitert aus.
5. Stellen Sie das G-Track Pro als Ausgabegerät ein, indem Sie auf die Reiterkarte
Wiedergabe klicken und das Samson G-Track Pro auswählen.
6. Stellen Sie die Eingangs-Samplerate durch Anklicken der Schaltfläche
Eigenschaften ein und wählen Sie die Reiterkarte Erweitert aus. Hinweis: Die
Eingangs- und Ausgabe-Sampleraten müssen gleich eingestellt sein. Stellen
Sie sicher, dass die Sampleraten in Ihrer Software gleich eingestellt sind, um
eventuelle Umwandlungsprobleme der Samplerate zu vermeiden.
Verwendung des G-Track Pro mit Apple OSX
1. Schließen Sie das G-Track Pro mit dem mitgelieferten USB-Kabel an den
Computer an.
2. Öffnen Sie die Systemeinstellungen im Dock oder über das Apple-Hauptmenü.
3. Wählen Sie die das Symbol für Sound-Einstellungen aus, klicken Sie auf die
Reiterkarte Eingang und wählen Sie Samson G-Track Pro.
4. Stellen Sie das G-Track Pro als Ausgabegerät ein, indem Sie auf die Reiterkarte
Ausgang klicken und das Samson G-Track Pro auswählen.
5. Um die Samplerate einzustellen, öffnen Sie im Ordner Anwendungen den Ordner
Dienstprogramme und öffnen Sie Audio MIDI-Einrichtung.
6. Wählen Sie aus dem Fenster-Menü Audiofenster anzeigen.
7. Wählen Sie das Samson G-Track Pro aus.
8. Wählen Sie im Auswahlmenü Format die gewünschte Samplerate und Bittiefe.
G-Track Pro • Professionelles USB-Mikrofon mit Audioschnittstelle26
Page 27

Einpegeln
Sie können den internen analogen Vorverstärker des G-Track Pro mit den INSTRUMENTund MIC-Reglern am G-Track Pro einstellen. Der Zweck der Pegelregler (Gain-Regler)
ist die Optimierung des Nutzsignalpegels bezogen auf den Pegel unerwünschten
Hintergrundrauschens. Der Vorverstärker des G-Track Pro verfügt über eine ClippingAnzeige zur Visualisierung von Übersteuerungen und Verzerrungen am Eingang.
So pegeln Sie das Mikrofon ein:
1. Positionieren Sie das G-Track Pro vor der gewünschten Schallquelle und drehen
Sie langsam den MIC-Lautstärkeregler auf, bis die CLIP-Anzeige rot aufleuchtet.
2. Drehen Sie den MIC-Lautstärkeregler zurück, bis die Anzeige nicht mehr rot
aufleuchtet.
3. Wiederholen Sie dieses Verfahren für das Instrument. Spielen Sie Ihr Instrument
oder Gerät mit Line-Pegel in der erwarteten Lautstärke und drehen Sie den
INSTRUMENT-Lautstärkeregler auf, bis die CLIP-Anzeige rot aufleuchtet.
4. Drehen Sie den INSTRUMENT-Lautstärkeregler dann zurück, bis die CLIP-Anzeige
nicht mehr rot aufleuchtet.
5. Wenn Sie die Eingangspegel für INSTRUMENT und MIC eingestellt haben,
müssen Sie diese während der Aufnahme nicht mehr verändern.
6. Verwenden Sie die Pegelregler in der Computersoftware, um das
Instrumentensignal in die Stereomischung der Software zu integrieren.
ENGLISH
FRANÇAISDEUTSCHEESPAÑOLITALIANO
Bedienungshandbuch 27
Page 28

Über Richtcharakteristika
180
180
180
Eine wichtige Eigenschaft von Mikrofonen ist die Richtwirkung oder Richtcharakteristik.
Das G-Track Pro verfügt über duale 1-Zoll-Kapseln, die eine Auswahl aus drei
individuellen Richtcharakteristika ermöglichen: Kugel (omnidirektional), Niere
(unidirektional) und Acht (bidirektional). Die Richtcharakteristik des Mikrofons kann mit
dem 3-Wege-Schalter links unter dem Korb ausgewählt werden. Jede Charakteristik hat
unterschiedliche Eigenschaften bezüglich der Empfindlichkeit und des Frequenzgangs
bei Schall aus verschiedenen Einfallswinkeln. Im folgenden Abschnitt werden einige
Eigenschaften der einzelnen Charakteristika behandelt, um Ihnen die optimale
Einstellung für Ihre Anwendung zu ermöglichen.
Kugel - Die Kugel-Einstellung nimmt Schall aus allen
Richtungen mit gleicher Intensität (auch achsfern) mit
einem linearen Frequenzgang auf, wodurch sie gegenüber
dem Nahbesprechungseffekt unempfindlich ist. Sie
nimmt mehr Umgebungsgeräusche als die anderen
Einstellungen auf, wodurch auch mehr Raumklang
als bei gerichteten Einstellungen aufgenommen wird.
Die Kugel-Einstellung eignet sich hervorragend für
Ensemble-Aufnahmen mit Sängern, Bläsern, Holzbläsern
und anderen Instrumenten, wenn die Musiker im Kreis
um das Mikrofon herum stehen/sitzen. Zur Auswahl der
Kugelcharakteristik stellen Sie den Auswahlschalter in die
rechte Position.
Niere (unidirektional) - Die Nierencharakteristik ist die bei
Studio- und Liveanwendungen am häufigsten eingesetzte
Richtcharakteristik. Sie nimmt frontal auf das Mikrofon
auftreffenden Schall auf und bedämpft Schall von den
Seiten sowie von hinten, was eine bessere Trennung der
Instrumente im Studio ermöglicht und mehr Direktschall
vom Instrument als Raumklang erfasst. Die Trennung
ermöglicht außerdem mehr Kontrolle und größere
Rückkopplungssicherheit in Live-Situationen. Zur Auswahl
der Nierencharakteristik stellen Sie den Auswahlschalter
in die mittlere Position.
Acht (bidirektional) - Diese Einstellung nimmt Schall von
der Vorder- und Rückseite des Mikrofons gleichermaßen
auf, während sie Schall von links und rechts bedämpft.
Dabei bietet sie einen sehr flachen Frequenzgang
für achsfernen Schall. Sie ist bei diversen StereoMikrofonierungstechniken sehr nützlich. Die AchterRichtcharakteristik kann zur gleichzeitigen Aufnahme von
zwei Instrumenten oder Sängern verwendet werden, wenn
das Mikrofon zwischen ihnen aufgestellt wird, sodass
das Mikrofon durch ein Instrument bzw. einen Sänger
von vorne und vom anderen von hinten besprochen wird.
Zur Auswahl der Achter-Charakteristik stellen Sie den
Auswahlschalter in die linke Position.
135 135
135 135
135 135
0
5
45
45
10
15
20
25
dB
90 90
Kugel
0
5
45
45
10
15
20
25
dB
90 90
Niere
0
5
45
45
10
15
20
25
dB
90 90
Acht
G-Track Pro • Professionelles USB-Mikrofon mit Audioschnittstelle28
Page 29

Direct Monitor
Das G-Track Pro verfügt über ein einfaches aber fortschrittliches direktes
Monitorsystem, das latenzfreies Monitoring ermöglicht.
Was ist Latenz, was ist Latenzfreiheit und warum brauche ich das?
Latenz ist die Verzögerungszeit zwischen Aufnahme und Wiedergabe, die alle
Softwareprodukte bei gleichzeitiger Aufnahme und Wiedergabe haben. Einfach
ausgedrückt, benötigt die Software bei der Aufnahme Zeit, um das Eingangssignal
zu erkennen, Berechnungen durchzuführen und das Signal dann an den Ausgang
anzulegen. Diese Zeit kann je nach Geschwindigkeit Ihres Computers, der Anzahl
aufgenommener Spuren und der Verwendung von in der Software integrierten Effekten
wenige oder mehrere Millisekunden betragen. Eine Verzögerung von mehreren
Millisekunden kann einem Musiker unter Umständen Schwierigkeiten mit dem Timing
bereiten. Um dieses Problem zu lösen, bietet das G-Track Pro eine Möglichkeit, das
interne Mikrofon und die Line-Eingänge direkt mit einem Kopfhörer abzuhören, ohne
dass deren Signale durch den Computer geführt werden. Dadurch hören Sie die
Eingänge latenzfrei ab.
MONITOR Ein/Aus-Schalter
Wenn Sie sich beim Abmischen Ihre Aufnahmen anhören oder die Eingänge des
G-Track Pro nach der Bearbeitung durch Effekte in Ihrer Software hören möchten,
können Sie die Funktion „Direct Monitor“ abschalten. Um die Funktion „Direct
Monitor“ abzuschalten, stellen Sie den Schalter DIRECT MONITOR auf der Rückseite
des G-Track Pro in die OFF-Position. Dann hören Sie nur das Ausgabesignal Ihrer
Software in Stereo ohne Eingangssignal. Um die Funktion „Direct Monitor“ zu
aktivieren, stellen Sie den Schalter DIRECT MONITOR in die ON-Position. Wenn Sie
das direkte Monitoring des G-Track Pro verwenden möchten, deaktivieren Sie die
Ausgabe der zur Aufnahme freigegebenen Spuren durch die Software.
ENGLISH
FRANÇAISDEUTSCHEESPAÑOLITALIANO
Bedienungshandbuch 29
Page 30

Technische Daten
Wandlertyp dualer Back-Elektret-Kondensator
Membrandurchmesser/-dicke 25mm/3Mikrometer
Richtcharakteristik Niere (unidirektional), Acht (bidirektional),
Frequenzgang 50Hz bis 20kHz
Max Empfindlichkeit +6dBFS/PA (alle Richtcharakteristika)
Max. SPL 120dBSPL
Bittiefe/Samplerate 16 oder 24Bit/ bis zu 96kHz
Digitalausgang USB
Kopfhörerausgang/Impedanz 3,5mm (1/8”)/ 16Ω
Leistung Kopfhörerausgang 85mW @ 32Ω
Instrumenteneingang/Impedanz 6,3mm (1/4”)/ 1MΩ
Regler Mute, Mikrofon-/Instrumenten-/
LED 3-farbig Stromversorgung/Clipping/Mute
Konstruktion Körper/Korb Zink-Druckguss / schweres Drahtgitter
Zubehör Integrierter Fuß, USB-Kabel
Produktabmessungen Durchmesser 116x268,5mm
Produktgewicht 1,6kg (3,52lb)
Kugel
Kopfhörerlautstärke, Monitor Ein/Aus,
Mono-/2-Spur-Aufnahmemodi
(4,5” x 10,5”)
G-Track Pro • Professionelles USB-Mikrofon mit Audioschnittstelle30
Page 31

Wichtige Sicherheitshinweise
Hinweis: Das Gerät wurde geprüft und entspricht der Produktklasse B gemäß Teil 15 der
FCC-Bestimmungen für digitale Geräte. Diese Begrenzungen sollen einen angemessenen Schutz gegen Störungen in privat genutzten Wohnungen bieten. Das Gerät erzeugt
und nutzt Hochfrequenzstrahlung und kann solche abstrahlen und kann, wenn es nicht
gemäß den Anweisungen aufgestellt und benutzt wird, den Funkverkehr beeinträchtigen.
Es besteht jedoch keine Garantie, dass bei einer bestimmten Aufstellweise nicht doch
Störungen auftreten. Wenn dieses Gerät beim Radio- oder Fernsehempfang Störungen
verursacht, was Sie feststellen können, indem Sie das Gerät aus- und wieder einschalten, können Sie versuchen, dieses Problem mit einer oder mehrerer der folgenden
Maßnahmen zu beseitigen:
Ausrichtung oder Position der Empfangsantenne verändern.
Abstand zwischen Gerät und Empfänger vergrößern.
Gerät an eine Steckdose anschließen, an deren Stromkreis nicht auch der Empfänger
angeschlossen ist.
Den Händler oder einen erfahrenen Radio-/Fernsehtechniker zurate ziehen.
WARNUNG: Wenn Sie sich über längere Zeiträume hohen Lautstärken aussetzen, kann
dies Ihr Gehör schädigen. Um das Risiko von Gehörschäden zu minimieren, sollte die
Lautstärke auf ein sicheres, angenehmes Niveau eingestellt und die Dauer des Hörens
bei hohen Lautstärken minimiert werden.
Bitte beachten Sie folgenden Richtlinien der Occupational Safety Health Administration
(OSHA) zu den maximalen Zeitspannen bei unterschiedlichen Schalldruckpegeln, nach
denen Hörschäden auftreten:
Entsorgen Sie dieses Gerät nach Ende seiner Nutzungsdauer bitte nicht als
Restmüll. Nutzen Sie bitte die in Ihrer Region bestehenden Entsorgungsmöglichkeiten (Sammelsystem) für Elektronikprodukte. Mit einer fachgerechten
Entsorgung ermöglichen Sie ordnungsgemäße Handhabung, Aufbereitung und
Wiederverwendung gemäß den gesetzlichen Bestimmungen.
Privathaushalte in den 28 Mitgliedsstaaten der EU, in der Schweiz und in Norwegen
können gebrauchte elektronische Geräte kostenlos in den dafür vorgesehenen Sammelstellen oder beim Einzelhändler (bei Kauf eines anderen Neugeräts) abgeben.
In allen anderen als den genannten Ländern wenden Sie sich zwecks ordnungsgemäßer
Entsorgung bitte an die für Ihren Wohnort zuständige Behörde.
So gehen Sie sicher, dass das von Ihnen entsorgte Produkt ordnungsgemäß gehandhabt,
aufgearbeitet oder recycelt wird, und leisten einen wichtigen Beitrag zum Schutz von
Umwelt und Gesundheit.
• 90dBSPL nach 8Stunden
• 95dBSPL nach 4Stunden
• 100dBSPL nach 2Stunden
• 105dBSPL nach 1Stunde
• 110dBSPL nach 1/2Stunde
• 115dBSPL nach 15Minuten
• 120dBSPL - Hörschäden können unmittelbar eintreten
ENGLISH
FRANÇAISDEUTSCHEESPAÑOLITALIANO
Bedienungshandbuch 31
Page 32

Introducción
Felicidades por adquirir el Micrófono USB G-Track Pro de Samson con interfaz
de audio. El G-Track Pro presenta cápsulas ultrafinas dobles de 1” con patrones
polares seleccionables, convertidor de analógico a digital de 96 kHz y 24 bits y
una salida USB. Además, el G-Track Pro incluye una interfaz de audio integrada
con salida para auriculares, que le permite conectar la guitarra eléctrica o
el bajo, los teclados, las cajas de ritmos y cualquier otra fuente de señal.
La mezcladora integrada le permite ajustar señales limpias para grabaciones
ofreciendo controles de nivel de entrada de instrumentos y micrófono. Además,
el G-Track Pro emplea un sistema de supervisión inteligente que le permite
escoger una variedad de opciones de reproducción para auriculares o monitores
con supervisión de latencia cero de las señales de entrada. Sea lo que sea lo que
esté haciendo, grabando su última idea de canción, podcast o streaming de su
canal de juegos, el G-Track Pro es la solución más sencilla y completa para una
grabación de alta calidad en un Mac o PC. ¡Enchúfelo y empiece a crear!
En estas páginas encontrará una descripción detallada de las funciones del
G-Track Pro, así como instrucciones paso a paso para su configuración y uso. Si
su micrófono se adquirió en los Estados Unidos, encontrará también una tarjeta
de registro incluida. No olvide seguir las instrucciones, de modo que pueda recibir
asistencia técnica online y para que en el futuro podamos enviarle información
actualizada acerca de este y de otros productos Samson. Consulte también
nuestro sitio web www.samsontech.com para obtener completa información sobre
toda nuestra línea de productos.
Le recomendamos conservar los siguientes registros como referencia, además de
una copia de su recibo de compra:
Número de serie: _______________________________________________
Fecha de compra: ______________________________________________
Si tiene alguna pregunta o comentario sobre G-Track Pro u otros productos de
Samson, no dude en ponerse en contacto con nosotros en
support@samsontech.com.
Con un cuidado y mantenimiento adecuados, su G-Track Pro funcionará sin problemas
durante muchos años. En el caso de que su G-Track Pro necesitara ser reparado,
deberá obtener un número de autorización de devolución (Return Authorization, RA)
antes de expedir su unidad a Samson. Sin este número, su unidad no será aceptada.
Visite www.samsontech.com/ra para obtener un número RA antes de enviar su unidad.
Conserve los materiales del embalaje original y, si es posible, devuelva la unidad en su
caja de cartón original. Si su G-Track Pro fue comprado fuera de los Estados Unidos,
póngase en contacto con su distribuidor local para obtener los detalles de la garantía y
la información de servicio.
G-Track Pro • Micrófono USB Profesional USB con interfaz de audio32
Page 33

Leyendas de LG-Track Pro
1. Cápsula – Diafragmas dobles de 1
pulgada (25 mm)
2. Interruptor de patrón – Seleccionar
uno de los patrones de captura:
omnidireccional, cardioide,
Figura-8
3. Interruptor de selección de
grabación – El interruptor
deslizante que le permite
seleccionar los diferentes modos
de grabación:
Mono: La entrada del micrófono
y la entrada de instrumentos se
mezclan y envían al ordenador
como una señal mono.
2-Pista: la entrada de micrófono y
entrada de instrumentos se envían
al ordenador en pistas diferentes.
4. Indicador de estado – Las LED de
Power/Clip/Mute (alimentación/
clip/silenciado) de tres colores
se iluminan en rojo para indicar
alimentación, parpadean en
rojo cuando se corta la señal de
entrada y en naranja cuando se
silencia el micrófono.
5. Botón Mute – Silencia la salida del
micrófono al ordenador y la salida
de los auriculares. El indicador
de estado se iluminará en naranja
cuando se silencie el micrófono.
6. MIC – Control para ajustar la
sensibilidad del micrófono interno.
7. INSTRUMENT – Control para ajustar
el nivel de entrada de la entrada
de instrumentos.
8. VOLUME – Control para ajustar el
volumen global de salida de los
auriculares de 1/8".
9. Clavija USB – Conector USB de
tamaño B para realizar la conexión
con su ordenador PC o MAC.
5
7
1
2
3
ENGLISH
4
6
8
FRANÇAISDEUTSCHEESPAÑOLITALIANO
9
Manual del propietario 33
Page 34

Leyendas de G-Track Pro
10. Interruptor DIRECT MONITOR
On/Off (encendido/apagado del
monitor directo) - Este interruptor
enciende o apaga el monitor
directo. Este interruptor no
afecta al audio procedente del
ordenador.
11. Salida de los auriculares - Clavija
estéreo de 3,5 mm para conectar
los auriculares o monitores
de estudio. La salida de los
auriculares ofrece una mezcla de
señal directa (si está activada)
del micrófono y la reproducción
de audio del ordenador.
12. Clavija IN (entrada) - Entrada de
instrumentos mono de 1/4" para
conectar instrumentos como
la guitarra eléctrica y el bajo o
señal de nivel de línea como
aquellas de teclados, cajas de
ritmos y mezcladoras.
10
11
12
G-Track Pro • Micrófono USB Profesional USB con interfaz de audio34
Page 35

Inicio rápido
Sigue los pasos de esta sencilla guía de inicio rápido para llevar a cabo una
configuración típica para empezar a grabar.
Utilización de G-Track Pro con un ordenador
1. Coloque el G-Track Pro es su ordenador de escritorio con ayuda de la base
del micrófono incluida.
2. Defina el interruptor del patrón de G-Track Pro. Si está grabando a una
única persona, ajuste el interruptor en la posición Cardioid y asegúrese de
que mira hacia delante, con el logotipo de Samson. Si va a grabar a dos
personas, ajuste el micrófono en la posición Figure-8 y si graba a varias
personas, ajuste el interruptor en la posición Omni.
3. Conecte los auriculares en la salida de los auriculares situada en la parte trasera del
micrófono.
4. Enchufe el cable USB en el G-Track Pro y el otro extremo del cable en un puerto
USB disponible de su ordenador.
5. Configure el G-Track Pro como el dispositivo de audio de entrada y salida siguiendo
los pasos de la sección "Conexión a un ordenador".
6. Inicie su software de grabación.
7. Baje el control de volumen de salida del G-Track Pro y, si aún no se ha fijado,
seleccione el G-Track Pro como entrada y salida en el software.
8. Cree dos pistas de audio mono. Establezca una pista en la entrada izquierda de
G-Track Pro para la entrada del micrófono y la otra pista en la entrada derecha del
G-Track Pro para la entrada de instrumentos. Nota: los nombres de entrada pueden
variar en función del software.
9. Arme las pistas para proceder a la grabación.
10. Defina los niveles de entrada del micrófono siguiendo los pasos de la sección
"Ajuste de niveles".
11. Defina el ajuste del monitor directo siguiendo los pasos de la sección "Monitor
directo".
12. Mientras cante/hable o toque instrumentos en el G-Track Pro, suba el control de
volumen hasta que la salida de audio se realice a un nivel de escucha cómodo.
13. Pulse el botón de grabación y empiece a crear.
ENGLISH
FRANÇAISDEUTSCHEESPAÑOLITALIANO
Manual del propietario 35
Page 36

Conexión a un ordenador
Utilización de G-Track Pro con ordenadores Windows
1. Conecte el G-Track Pro al ordenador con ayuda del cable USB suministrado.
2. En el menú Inicio, abra el Panel de control y seleccione Sonido.
3. Haga clic en la pestaña Grabación y seleccione el Samson G-Track Pro como
dispositivo de entrada de audio.
4. Ajuste la tasa de muestreo de salida haciendo clic en el botón Propiedades y
seleccionando la pestaña Avanzadas.
5. Configure el G-Track Pro como dispositivo de salida haciendo clic en la
pestaña Reproducción y seleccionando Samson G-Track Pro.
6. Configure la tasa de muestreo de entrada haciendo clic en el botón
Propiedades y seleccionando la pestaña Avanzadas. Nota: las tasas de
muestreo de entrada y salida deben configurarse en el mismo ajuste. Para
evitar cualquier tipo de problema con la conversión de tasas de muestreo,
asegúrese de que la tasa de muestreo de su software está configurada en los
mismos ajustes.
Utilización del G-Track Pro con Apple OSX
1. Conecte el G-Track Pro al ordenador utilizando el cable USB incluido.
2. Abra Preferencias del sistema en el menú principal de Apple.
3. Seleccione el icono de preferencia Sonido y escoja la pestaña Entrada y
seleccione Samson G-Track Pro.
4. Configure el G-Track Pro como dispositivo de salida haciendo clic en la
pestaña Salida Reproducción y seleccionando Samson G-Track Pro.
5. Para ajustar la tasa de muestreo, desde la carpeta Aplicaciones, abra la
carpeta Herramientas y abra Configuración MIDI de Audio.
6. En el menú Ventana, seleccione Mostrar ventana de audio.
7. Seleccione el Samson G-Track Pro
8. En el menú desplegable Formato, seleccione la tasa de muestreo deseada y la
profundidad de bits.
G-Track Pro • Micrófono USB Profesional USB con interfaz de audio36
Page 37

Ajuste de niveles
Puede ajustar la entrada analógica interna del G-Track Pro utilizando los mandos
de control de nivel de MIC e INSTRUMENT de G-Track Pro. La finalidad de los
controles de nivel (o ganancia) es optimizar la cantidad de buena señal relativa
con cualquier ruido asociado. El preamplificador G-Track Pro incluye un indicador
de clipping para mostrar cuándo se sobreexcita la señal de entrada o se satura la
entrada.
Para ajustar un buen nivel en el micrófono:
1. Ajuste el G-Track Pro arriba en frente de la fuente de sonido deseada y eleve
lentamente el control de volumen del MIC hasta que vea iluminarse en color
rojo la luz indicador de CLIP.
2. A continuación, gire el control de volumen del MIC hacia abajo hasta que el
indicador deje de iluminarse en rojo.
3. Repita el mismo proceso para el instrumento. Toque su instrumento o
dispositivo de nivel de línea a un nivel de actuación y suba lentamente
el control de volumen de INSTRUMENT hasta que se encienda la luz
indicadora CLIP de color rojo.
4. A continuación, gire el control de volumen de INSTRUMENT hacia abajo
hasta que el indicador de CLIP deje de iluminarse en rojo.
5. Una vez configurados, el control de nivel de entrada de INSTRUMENT y
MIC no necesitarán cambiarse durante la grabación.
6. Utilice los controles de nivel del software del ordenador para ajustar el
balance entre el micrófono del instrumento y la mezcla estéreo del software.
ENGLISH
FRANÇAISDEUTSCHEESPAÑOLITALIANO
Manual del propietario 37
Page 38

Acerca de los patrones polares
180
180
180
Una característica importante de cualquier micrófono es su direccionalidad o patrón de
polaridad. El G-Track Pro presenta cápsulas dobles de 1”, que permiten escoger entre
tres patrones de polaridad individuales: omnidireccional, unidireccional ("cardioid"
o cardioide) y bidireccional (Figure-8). El patrón del micrófono puede seleccionarse
utilizando el interruptor deslizante de tres posiciones situado debajo del lado izquierdo
de la cabeza. Cada patrón tiene diferentes características de captura del sonido con
respecto a la sensibilidad y la respuesta de frecuencia a los sonidos que llegan de
diferentes direcciones. En la siguiente sección se tratan algunas de las funciones de
cada patrón para ayudarle a escoger el mejor ajuste para su aplicación.
Omnidireccional - El ajuste omnidireccional reproduce
el sonido de todas las direcciones (incluido el eje
desplazado), con una respuesta de frecuencia uniforme,
que lo hace resistente al fenómeno denominado "efecto
de proximidad". Captura una mayor cantidad de sonido
ambiente que otros ajustes y, por lo tanto, incluirá
más sonido ambiente que cuando se utiliza el ajuste
direccional. El ajuste omnidireccional es perfecto para
grabar actuaciones grupales, incluidas voces de un grupo,
instrumentos metálicos, de viento u otros instrumentos
con los artistas mirándose unos a otros en un círculo en
torno al micrófono. Para seleccionar el patrón de captura
omnidireccional, ajuste el interruptor de selección de
patrón en la posición adecuada.
Unidireccional (Cardioide) - El patrón de captura cardioide
es el más utilizado para las aplicaciones en estudio
y registro de instrumentos en vivo. Captura el sonido
de delante del micrófono y rechaza el sonido de los
laterales y de la parte trasera, que permite una mejor
separación de los instrumentos de estudio y captura más
sonido instrumental con relación al sonido ambiente.
La separación también permite un mayor control y
más ganancia antes del feedback de las situaciones de
refuerzo de sonido en vivo. Para seleccionar el patrón de
captura cardioide, ajuste el interruptor de selección de
patrón en la posición central.
Bidireccional (Figure-8) - Este ajuste captura el sonido
directamente de la parte delantera y trasera del
micrófono y rechaza el sonido de los lados izquierdo y
derecho; tiene un deterioro mínimo de la respuesta de
frecuencia de fuera del eje. Es muy útil en una amplia
variedad de técnicas de micrófono estéreo. El patrón
Figure-8 puede utilizarse para capturar simultáneamente
dos instrumentos o vocalistas colocando el micrófono
directamente entre ellos, para que uno mire a la
parte delantera del micrófono y el otro a la trasera.
Para seleccionar el patrón de captura Figure-8, ajuste
el interruptor de selección de patrón en la posición
izquierda.
135 135
135 135
135 135
0
5
45
10
15
20
25
dB
Omnidirectional
0
5
45
10
15
20
25
dB
Cardioid
0
5
45
10
15
20
25
dB
Figure-8
45
45
45
90 90
90 90
90 90
G-Track Pro • Micrófono USB Profesional USB con interfaz de audio38
Page 39

Direct Monitor
El G-Track Pro tiene un sistema de monitor directo, que ofrece una supervisión de
latencia cero.
¿Qué es la latencia y qué es la latencia cero, y por qué la necesito?
La latencia es el tiempo de retardo entre la grabación y la reproducción que todo
software informático tiene cuando se graba y supervisa simultáneamente. En pocas
palabras, cuando se graba, el software necesita reconocer la señal de entrada, luego
desgranar una serie de números y enviar la señal a la salida. Según diversos factores,
como la velocidad de su ordenador, la cantidad de pistas que haya grabado y de si está
utilizando o no los efectos en el software, esto puede llevar entre unas pocas o varias
milésimas de segundo. Un retardo de varias milésimas de segundo puede dificultar a
veces para un músico reproducir cuando toca. Para resolver el problema, el G-Track
Pro le permite supervisar el micrófono interno y las entradas de línea directamente en
los auriculares, sin hacer el camino de ida y vuelta de entrada y salida del ordenador.
Como resultado, se oyen las entradas sin latencia.
Interruptor MONITOR ON/OFF (Encendido/apagado del monitor)
Cuando escuche su grabación durante una sesión de mezclas, o si desea oír solo las
entradas del G-Track Pro después de haberlas sometido a los efectos del software
informático, puede que desee apagar el monitor directo. Para apagar el monitor
directo, mueva el interruptor DIRECT MONITOR de la parte trasera del G-Track Pro a
la posición OFF; oirá solo la reproducción de su software informático en estéreo, sin
señal de entrada. Para activar el monitor directo de nuevo, ajuste el interruptor DIRECT
MONITOR en la posición ON. Si tiene previsto utilizar la supervisión directa en el
G-Track Pro, desactive la supervisión del software para las pistas (de entrada) activadas.
ENGLISH
FRANÇAISDEUTSCHEESPAÑOLITALIANO
Manual del propietario 39
Page 40

Especificaciones
Tipo de elemento Condensador de electreto posterior doble
Grosor/ancho de diafragma 25 mm/3 micras
Patrón polar Cardioide (unidireccional), bidireccional
Respuesta de frecuencia 50 Hz–20 kHz
Sensibilidad máx. +6dB FS/PA (todos los patrones polares)
Máx. SPL 120dB SPL
Profundidad de bits/Tasa de muestreo 16 o 24 bits/ Hasta 96 kHz
Salida digital USB
Salida de auriculares/Impedancia 1/8” (3,5 mm)/ 16Ω
Salida de potencia de auriculares 85 mW a 32Ω
Entrada de instrumentos/Impedancia 1/4”/ 1MΩ
Controles Mute (Silenciado), Mic/Instrument/Headphone
LED Power/Clip/Mute (Alimentación/Clipping/
Cabeza/construcción del cuerpo Malla de calibre alto/cinc fundido
Accessorios Base de escritorio integrada, cable USB
Dimensiones del producto diámetro de 4,5” x 10,5”
Peso del producto 3,52 lb (1,6 kg)
(Figure-8), omnidireccional
Volumes (Volúmenes Mic/Instrumento/
Auriculares), Monitor On/Off (Encendido/
apagado del monitor), Mono/2 Track Recording
Modes (Modos de grabación Mono/2 pistas)
Silenciado) en tres colores
(diámetro de 116 mm x 268,5 mm)
G-Track Pro • Micrófono USB Profesional USB con interfaz de audio40
Page 41

Información importante sobre seguridad
Nota: Este equipo ha sido sometido a pruebas y se ha encontrado que cumple con
los límites para un dispositivo digital de Clase B, de conformidad con el epígrafe
15 de las normas de la FCC. Estos límites están diseñados para proporcionar protección razonable contra interferencias perjudiciales en una instalación residencial. Este equipo genera, usa y puede irradiar energía de radiofrecuencia y, de no
instalarse y ser usado de acuerdo con las instrucciones, podría provocar interferencias perjudiciales a las radiocomunicaciones. No obstante, no se garantiza que
las interferencias no puedan ocurrir en una instalación en particular. Si el equipo
provoca interferencias perjudiciales en la recepción de radio o televisión, lo cual
puede determinarse encendiendo y apagando el equipo, se anima al usuario a que
trate de corregir la interferencia adoptando una o más de las siguientes medidas:
Reoriente o cambie de ubicación la antena receptora.
Aumente la separación entre el equipo y el receptor.
Conecte el equipo a una toma de corriente en un circuito diferente a aquel al que
está conectado el receptor.
Si necesita ayuda, consulte a su vendedor o a un técnico de radio/TV con experiencia.
ADVERTENCIA: escuchar música a volúmenes muy altos y durante mucho tiempo
puede dañar el oído. Para reducir el riesgo de daños en el oído, deberá ajustarse
el volumen a un nivel cómodo y seguro y reducir la cantidad de tiempo de escucha a niveles altos.
Utilice las siguientes guías establecidas por la Administración de Seguridad y
Salud Ocupacional (OSHA) sobre una exposición de tiempo máximo a niveles de
presión de sonido antes de que se produzcan daños en el oído.
• 90 dB SPL durante 8 horas
• 95 dB SPL durante 4 horas
• 100 dB SPL durante 2 horas
• 105 dB SPL durante 1 hora
• 110 dB SPL durante 1/2 hora
• 115 dB SPL durante 15 minutos
• 120 dB SPL - evitar este valor; riesgo de daños en el oído
ENGLISH
FRANÇAISDEUTSCHEESPAÑOLITALIANO
Si desea desechar este producto, no lo mezcle con los residuos domésticos de tipo general. Existe un sistema de recogida por separado para los
productos electrónicos, de conformidad con la legislación que requiere
un tratamiento, recuperación y reciclaje adecuados.
Los domicilios particulares de los 28 estados miembro de la UE, y de
Suiza y Noruega, pueden devolver sus productos electrónicos usados sin cargo
alguno en instalaciones de recogida designadas o a un vendedor (en caso de que
usted comprara uno nuevo similar).
Para los países no mencionados arriba, por favor, póngase en contacto con sus
autoridades locales para informarse sobre un método de eliminación correcto.
Haciéndolo así, tendrá la seguridad de que su producto desechado se somete al
tratamiento, recuperación y reciclaje necesarios y, de esta manera, evitará efectos
potencialmente negativos en el entorno y la salud humana.
Manual del propietario 41
Page 42

Introduzione
Congratulazioni per aver acquistato il microfono USB Samson G-Track Pro con
Interfaccia Audio. G-Track Pro è dotato di due capsule ultra sottili da 1" con diagrammi
polari selezionabili, convertitore da 96 kHz analogico-digitale a 24 bit integrato e
uscita USB. Inoltre, il G-Track Pro è dotato di un'interfaccia audio integrata con uscita
cuffie che consente di collegare la chitarra elettrica o il basso, le tastiere, le batterie
elettroniche e praticamente qualsiasi altra sorgente di segnale. Il mixer integrato
consente di impostare segnali nitidi per la registrazione fornendo controlli di livello
in ingresso Microfonici e Strumentali. Inoltre, il G-Track Pro utilizza un sistema di
monitoraggio ingegnoso che consente di scegliere una varietà di opzioni di riproduzione
per cuffie o monitor con monitoraggio a latenza zero dei segnali di ingresso. Che tu
stia registrando la tua ultima intuizione di canzone, un podcast o sei in streaming
sul tuo canale di gioco, G-Track Pro è la soluzione più semplice e completa per una
registrazione di alta qualità su Mac o PC. Basta collegarlo e iniziare a creare!
In queste pagine, troverete una descrizione dettagliata delle caratteristiche di G-Track
Pro, oltre a istruzioni passo-a-passo per la configurazione e l'utilizzo. Se il microfono è
stato acquistato negli Stati Uniti, troverai allegata anche una scheda di registrazione:
compilala seguendo le istruzioni per ricevere assistenza tecnica online e informazioni
aggiornate su questo e altri prodotti Samson in futuro. Inoltre, è possibile visitare il sito
web www.samsontech.com per informazioni complete sulla nostra linea di prodotti.
Si raccomanda di conservare i seguenti dati come riferimento, oltre a una copia della
ricevuta di acquisto:
Numero di serie: ______________________________________________
Data di acquisto: ______________________________________________
Per qualsiasi domanda o commento riguardante il G-Track Pro o qualsiasi altro prodotto
di Samson, non esitate a contattarci al seguente indirizzo email support@samsontech.com.
Seguendo le istruzioni per la cura e la manutenzione, il tuo G-Track Pro funzionerà
senza problemi per diversi anni. Per eventuali interventi di assistenza sul tuo G-Track
Pro, è necessario ottenere un numero di autorizzazione al reso (RA) prima di inviare il
prodotto a Samson. Senza tale numero il prodotto non sarà preso in carico. Si prega
di visitare il sito www.samsontech.com/ra per ottenere un numero RA prima della
spedizione dell'unità. Conservare i materiali di imballaggio originali e, se possibile,
inviare il prodotto nel suo imballo originale. Se il tuo G-Track Pro è stato acquistato al
di fuori degli Stati Uniti, contattare il proprio distributore locale per i dettagli in merito
alla garanzia e informazioni in materia di assistenza.
G-Track Pro - Microfono USB Professionale con Interfaccia Audio42
Page 43

G-Track Pro Descrizione
1. Capsula - Diaframma Doppio da
1pollice (25 mm).
2. Interruttore di selezione del Diagramma
Polare - Selezionare da uno dei tre
diagrammi polari la direzionalità di
risposta del suono: Omnidirezionale,
Cardioide, Figura-8.
3. Interruttore di Selezione Registrazione-
l'interruttore a scorrimento permette
di selezionare le diverse modalità di
registrazione:
Mono: L'ingresso del microfono e
l'ingresso dello strumento vengono
mixati insieme e inviati al computer
sotto forma di segnale mono.
2-Track (2 Tracce): l'ingresso del
microfono e l'ingresso dello strumento
vengono inviati al computer su tracce
separate.
4. Indicatore di Stato - La spia a LED -
Power/Clip/Mute (Acceso/Clip/Audio
Disattivato) in tre colori, si accende
in verde per indicare l'accensione,
lampeggia in rosso quando il segnale
di ingresso è clippato (in saturazione)
e si accende in arancione quando il
microfono è silenziato.
5. Tasto Mute (Audio Disattivato) -
Disattiva l'uscita del microfono
al computer e l'uscita cuffie.
L'indicatore di stato si accende in
giallo/ambra quando il microfono è
silenziato.
6. MIC - Comando per regolare la
sensibilità del microfono interno.
7. INSTRUMENT (STRUMENTO) - Comando
per regolare il livello di entrata
dell'ingresso dello strumento.
8. VOLUME - Comando per regolare il
volume complessivo dell'uscita cuffie
da 1/8 ".
9. Jack USB - Connettore USB tipo B per
interfacciare il PC o il Mac.
1
2
5
3
4
ENGLISH
6
7
8
FRANÇAISDEUTSCHEESPAÑOLITALIANO
9
Manuale utente 43
Page 44

G-Track Pro Descrizione
10. Interruttore On/Off (Acceso/Spento)
MONITOR DIRECT (MONITORAGGIO
DIRETTO AUDIO) - Questo
interruttore accende e spegne la
funzione di monitoraggio diretto
audio. Questo interruttore non
influisce sull'audio proveniente dal
computer.
11. Uscita Cuffie - Jack stereo da
3,5mm per il collegamento
di cuffie o monitor da studio.
L'uscita cuffie fornisce un mix tra
il segnale diretto (se abilitato) del
microfono e la riproduzione audio
dal computer.
12. INGRESSO Jack - Ingresso mono
da 1/4" per il collegamento di
strumenti come chitarra elettrica
e basso, o segnale di livello linea
come quelli provenienti da tastiere,
batterie elettroniche e mixer.
10
11
12
G-Track Pro - Microfono USB Professionale con Interfaccia Audio44
Page 45

Avvio rapido
Attenersi a questo "avvio rapido semplificato" a una configurazione standard per
cominciare la registrazione.
Utilizzo del G-Track Pro con un computer
1. Posizionare il G-Track Pro sulla scrivania utilizzando la base microfonica in
dotazione.
2. impostare l'interruttore di selezione del diagramma polare del G-Track Pro. Se si
sta registrando una singola persona, impostare l'interruttore in posizione Cardioide
e assicurarsi che la persona si posizioni frontalmente davanti al microfono, fare
riferimento per questo al logo Samson. Se si registrano due persone, impostare
il microfono sulla posizione Figura 8 e se si registrano più soggetti, impostare
l'interruttore sulla posizione Omni.
3. Collegare le cuffie all'uscita Cuffie situata nella parte posteriore del microfono.
4. Collegare il cavo USB nel G-Track Pro e collegare l'altra estremità del cavo a una porta
USB disponibile sul computer.
5. Impostare il G-Track Pro come dispositivo audio di ingresso/uscita seguendo i passaggi
descritti nella sezione "Collegamento a un computer".
6. Avviare il software di registrazione.
7. Disattivare il controllo VOLUME di uscita su G-Track Pro e, se non già impostato,
selezionare G-Track Pro come ingresso/uscita nel software.
8. Creare due tracce audio mono. Impostare una traccia su G-Track Pro "Left Input" (Ingresso
Sinistro) per l'ingresso microfono e l'altra su G-Track Pro "Right Input" (Ingresso Destro) per
l'ingresso strumento. Nota: i nomi degli ingressi possono variare a seconda del software.
9. Fornire le tracce per la registrazione.
10. Impostare i livelli di ingresso del microfono seguendo le istruzioni riportate nella sezione
"Impostazione dei Livelli".
11. Impostare il monitoraggio diretto audio seguendo i passaggi descritti nella sezione
"Monitoraggio Diretto".
12. Durante il canto/la conversazione o la riproduzione dello strumento nel G-Track Pro, alzare
il comando di controllo VOLUME fino a quando l'uscita audio non raggiunge un livello di
ascolto ottimale.
13. Premere il pulsante di registrazione e iniziare a registrare.
ENGLISH
FRANÇAISDEUTSCHEESPAÑOLITALIANO
Manuale utente 45
Page 46

Collegamento a un Computer
Utilizzo del G-Track Pro con un computer a sistema operativo Windows
1. Collegare G-Track Pro al computer utilizzando il cavo USB in dotazione.
2. Dal Menu Start, aprire il Pannello di Controllo e selezionare Audio.
3. Cliccare la scheda di Registrazione e selezionare il Samson G-Track Pro come
dispositivo d'ingresso.
4. Impostare la frequenza di campionamento in uscita cliccando il pulsante Proprietà
e selezionare la scheda Impostazioni Avanzate.
5. Impostare il G-Track Pro come dispositivo di uscita cliccando sulla scheda di
riproduzione e selezionando il G-Track Pro.
6. Impostare la frequenza di campionamento d'ingresso cliccando il pulsante
proprietà e selezionando la scheda impostazioni avanzate. Nota: La
frequenza di campionamento Ingresso/Uscita deve essere riconfigurata sulla
stessa impostazione. Per evitare problemi di conversione della frequenza di
campionamento, assicurarsi che la frequenza di campionamento nel software sia
configurata sulle stesse impostazioni.
Utilizzo di G-Track Pro a sistema operativo Apple OSX
1. Collegare G-Track Pro al computer utilizzando il cavo USB in dotazione.
2. Aprire Preferenze di Sistema dalla barra o dal Menu principale Apple.
3. Selezionare l'icona preferenze Audio, scegliere la scheda Imput (ingresso) e
selezionare Samson G-Track Pro.
4. Impostare il G-Track Pro come dispositivo di uscita cliccando sulla scheda Uscita e
selezionando il G-Track Pro.
5. Per configurare la frequenza di campionamento, dalla cartella Applicazioni, aprire la
cartella Utilità e aprire la configurazione Audio MIDI.
6. Dal menu Window (Finestra), selezionare Mostra Window (Finestra) Audio.
7. Selezionare il Samson G-Track Pro
8. Dal menu a discesa Formattazione, selezionare la frequenza di campionamento
desiderata e la profondità di bit (la risoluzione del campione).
G-Track Pro - Microfono USB Professionale con Interfaccia Audio46
Page 47

Impostazione dei livelli
È possibile regolare lo stadio di guadagno dell'ingresso analogico interno di G-Track Pro
utilizzando le manopole dei comandi di regolazione INSTRUMENT e MIC di G-Track
Pro. Lo scopo dei controlli di livello (o guadagno) è quello di ottimizzare la portata di un
buon livello di segnale rispetto a qualsiasi rumore associato. Il pre-amplificatore G-Track
Pro include un indicatore clip che indica quando il segnale è sovra-pilotato (saturazione)
oppure distorce la forma d'onda d'ingresso.
Per impostare un buon livello di segnale sul mic:
1. Posizionare il G-Track Pro di fronte alla sorgente sonora desiderata e alzare
lentamente il controllo del volume MIC fino a vedere l'indicatore CLIP illuminarsi
di rosso.
2. Quindi, abbassare il comando di regolazione del volume MIC finché l'indicatore
non si illumina più di rosso.
3. Ripetere la stessa procedura per la regolazione degli strumenti. Riprodurre lo
strumento o il dispositivo livello di linea ad un livello prestazionale e aumentare
lentamente il volume del comando di regolazione INSTRUMENT finché
l'indicatore CLIP non si illumina in rosso.
4. Quindi, abbassare il comando di regolazione del volume INSTRUMENT finché
l'indicatore CLIP non si illumina più di rosso.
5. Una volta impostato i comandi di regolazione INSTRUMENT e MIC, non è più
necessario modificarli durante la registrazione.
6. Usare i comandi di regolazione di livello nel software del computer per impostare
il bilanciamento tra il microfono dello strumento e il mix stereo del software.
ENGLISH
FRANÇAISDEUTSCHEESPAÑOLITALIANO
Manuale utente 47
Page 48

Informazioni sui Diagrammi Polari
180
180
180
Una caratteristica importante di qualsiasi microfono è la sua direzionalità o il suo
diagramma polare. G-Track Pro è dotato di due capsule doppie da 1", che consentono
di scegliere tra tre diagrammi polari distinti: omnidirezionale, unidirezionale (cardioide)
e bidirezionale (figura-8). Il diagramma polare del microfono può essere selezionato
utilizzando l'interruttore a scorrimento a tre posizioni sotto il lato sinistro della griglia.
Ogni diagramma ha caratteristiche di risposta distinte per quanto riguarda la sensibilità
e la risposta di frequenza ai suoni provenienti da diverse direzioni. La seguente
sezione illustra alcune delle caratteristiche di ogni diagramma, per aiutarvi a scegliere
l'impostazione migliore per la vostra applicazione.
Omnidirezionale - L'impostazione omnidirezionale
riproduce il suono da tutte le direzioni, (anche fuori asse),
con una risposta in frequenza uniforme, che lo rende
resistente al fenomeno noto come effetto di prossimità.
Cattura una quantità maggiore di suono ambientale
rispetto alle altre impostazioni, e quindi includerà una
quantità maggiore di suoni di sottofondo rispetto a
quando si utilizza un'impostazione direzionale.
L' impostazione omnidirezionale è ottima per la
registrazione di performance d'ensemble che includono
canti a cappella, ottoni, strumenti a fiato e altri strumenti
con gli artisti che si dispongono in cerchio intorno al
microfono. Per selezionare il diagramma di risposta
omnidirezionale, impostare l'interruttore di selezione del
diagramma nella posizione appropriata.
Unidirezionale (Cardioide) - Il diagramma di risposta
cardioide è il più utilizzato per applicazioni in studio e
microfonaggio live. Cattura il suono solo frontalmente
al microfono e rifiuta il suono dai lati e dalla parte
posteriore, il che consente una migliore separazione
degli strumenti in studio, e rimanda maggiormente il
suono dello strumento rispetto al rumore ambientale.
La separazione consente inoltre un maggiore controllo
e maggior guadagno prima di ricevere il feedback del
suono in situazioni di elevate pressioni sonore nelle
performance dal vivo. Per selezionare il il diagramma di
risposta cardioide, impostare l'interruttore di selezione del
diagramma in posizione centrale.
Bidirezionale (Figure-8) - Questa impostazione cattura
il suono direttamente davanti e dietro al microfono
mentre rifiuta il suono sul lato sinistro e destro, presenta
un deterioramento minimo della risposta in frequenza
fuori asse. È molto utile in una molteplicità di tecniche
microfoniche stereo. Il diagramma della figura-8
può essere utilizzato per catturare simultaneamente
due strumenti o cantanti, posizionando il microfono
direttamente tra di loro, in modo che un cantante o uno
strumentista si rivolge alla parte anteriore del microfono e
l'altro alla parte posteriore. Per selezionare il diagramma
di risposta figura 8, impostare l'interruttore di selezione
del diagramma a sinistra.
G-Track Pro - Microfono USB Professionale con Interfaccia Audio48
135 135
135 135
135 135
0
5
45
10
15
20
25
dB
Omnidirezionale
0
5
45
10
15
20
25
dB
Cardioide
0
5
45
10
15
20
25
dB
Figura-8
45
45
45
90 90
90 90
90 90
Page 49

Monitoraggio Diretto
Il G-Track Pro è dotato di un sistema di monitoraggio diretto semplice ma sofisticato,
che consente il monitoraggio a latenza zero.
Che cos'è la latenza, che cos'è è la Latenza Zero e perché è necessaria?
La latenza è il tempo di ritardo tra la registrazione e la riproduzione che tutti i software
del computer hanno durante la registrazione e il monitoraggio simultanei. In poche
parole, durante la registrazione, il software del computer deve riconoscere il segnale
di ingresso, quindi elaborarlo e poi inviare il segnale attraverso l'uscita. A seconda
di diversi fattori come la velocità del computer, la quantità di tracce registrate e se
si utilizzano o meno gli effetti nel software, questo può richiedere da pochi a diversi
millisecondi. Un ritardo di diversi millisecondi può, a volte, rendere difficile per un
musicista suonare a tempo. Per risolvere questo problema, il G-Track Pro consente di
monitorare il microfono interno e gli ingressi di linea direttamente in cuffia senza dover
effettuare il round-trip (il tempo che occorre fra andata e ritorno) dal computer. Di
conseguenza, si possono ascoltare gli ingressi audio senza alcuna latenza.
interruttore MONITOR ON/OFF (interruttore di MONITORAGGIO ACCESO/SPENTO)
Quando si ascolta la registrazione durante una sessione di mixaggio, o se si desidera
ascoltare gli ingressi di G-Track Pro solo dopo che sono passati attraverso gli effetti
software del computer, è possibile disattivare il monitoraggio diretto. Per disattivare
il monitoraggio diretto, spostare l' interruttore DIRECT MONITOR sul retro di G-Track
Pro in posizione OFF, eseguendo questa operazione si sente solo la riproduzione dal
software del computer, in stereo, senza alcun segnale di ingresso. Per abilitare il
Monitoraggio diretto, impostare l'interruttore MONITORAGGIO DIRETTO sulla posizione
ON. Se si prevede di utilizzare il monitoraggio diretto su G-Track Pro, disattivare il
monitoraggio software per le tracce fornite (in ingresso).
ENGLISH
FRANÇAISDEUTSCHEESPAÑOLITALIANO
Manuale utente 49
Page 50

Specifiche tecniche
Tipo Componente Condensatore a elettrete dual back
Larghezza/Spessore del diaframma 25 mm/3 micron
Diagramma Polare Cardioide (unidirezionale), bidirezionale
Risposta di Frequenza 50 Hz-20 kHz
Sensibilità Max +6 dB FS/PA (tutti i diagrammi polari)
Max. SPL 120 dB SPL
Profondità di bit / frequenza di
campionamento 16 oppure 24-bit/ Fino a 96 kHz
Uscita Digitale USB
Impedenza/Uscita cuffie 1/8” (3,5 mm)/ 16 Ω
Uscita Potenza Cuffie 85 mW @ 32Ω
Impedenza/Ingresso Strumenti 1/4”/ 1M Ω
Comandi Audio disattivato, Volumi Mic/Strumenti/
LED 3-colori Alimentazione/Clip/Audio disattivato
Struttura del corpo/Griglia Zinco pressofuso/maglia di spessore elevato
Accessori Base da tavolo integrata, cavo USB
Dimensioni prodotto diametro 4.5” x 10.5”
Peso Prodotto 3.52 lb (1,6 kg)
(Figura-8), omnidirezionale
Cuffie Monitoraggio On/Off, Mono/2 Modalità
di Registrazione Traccia
(diametro 116 mm x 268.5 mm)
G-Track Pro - Microfono USB Professionale con Interfaccia Audio50
Page 51

Informazioni importanti sulla sicurezza
NOTA: questo apparecchio è stato collaudato e ritenuto conforme ai limiti applicati ai dispositivi digitali di Classe B, ai sensi della parte 15 della normativa FCC.
Tali limiti hanno lo scopo di fornire una ragionevole protezione contro interferenze
dannose negli impianti domestici. Questo apparecchio genera, usa e può irradiare
energia in radiofrequenza e, se installato e usato non conformemente alle istruzioni, può provocare interferenze dannose alle comunicazioni radio. Tuttavia, non
si fornisce alcuna garanzia sull'assenza di interferenza in particolari impianti. Se
l'apparecchio causa interferenze dannose alla ricezione radiofonica o televisiva,
verificabili spegnendo e accendendo l'apparecchio, si invita l'utente a tentare di
risolvere il problema ricorrendo a una o più delle seguenti misure:
Riorientare o spostare l'antenna ricevente.
Aumentare la distanza tra l'apparecchiatura e il ricevitore.
Collegare l'apparecchio a una presa collocata su un circuito diverso da quello a
cui è collegato il ricevitore.
Contattare il rivenditore o un tecnico radio/TV per assistenza
AVVERTENZA: Ascoltare musica ad alti livelli di volume e per lunghi periodi può
danneggiare l'udito. Per ridurre il rischio di danni all'udito, è necessario abbassare
il volume ad un livello sicuro e adeguato e ridurre il tempo di ascolto a livelli
sonori elevati.
Si prega di utilizzare le seguenti linee guida stabilite dall'Occupational Safety
Health Administration (OSHA) (Amministrazione della Salute e della Sicurezza sul
Lavoro) in merito all'esposizione massima nel tempo ai livelli di pressione sonora
prima che si verifichi un danno all'udito.
• 90 dB SPL a 8 ore
• 95 dB SPL a 4 ore
• 100 dB SPL a 2 ore
• 105 dB SPL a 1 ora
• 110 dB SPL a 1/2 ora
• 115 dB SPL a 15 minuti
• 120 dB SPL - possono verificarsi danni all'udito
ENGLISH
FRANÇAISDEUTSCHEESPAÑOLITALIANO
Il prodotto non va smaltito con i rifiuti domestici generici. Esiste
un sistema di raccolta separata per gli apparecchi elettronici usati,
conformemente alla legislazione che ne impone il corretto trattamento,
recupero e riciclaggio.
Gli utenti privati dei 28 stati membri dell'UE, Svizzera e Norvegia possono portare
gratuitamente i propri apparecchi elettronici usati presso le apposite strutture di
raccolta o al rivenditore (quando si acquista di un nuovo prodotto simile).
Gli utenti privati dei Paesi non compresi tra quelli summenzionati devono contattare le autorità locali per conoscere la corretta modalità di smaltimento.
In questo modo il prodotto sarà sottoposto al trattamento, recupero e riciclaggio
necessari, prevenendo i potenziali effetti negativi sull'ambiente e la salute umana.
Manuale utente 51
Page 52

Samson Technologies Corp.
Copyright 2017, Samson Technologies Corp. v3
278-B Duffy Ave
Hicksville, New York 11801
Phone: 1-800-3-SAMSON (1-800-372-6766)
Fax: 631-784-2201
www.samsontech.com
 Loading...