

Samson Expedition XP310w Owner's Manual
300-WATT PORTABLE PA SYSTEM
Owner's Manual

Copyright 2019 v2
Samson Technologies Corp.
278-B Duffy Ave
Hicksville, New York 11801
www.samsontech.com
The Bluetooth® word mark and logos are registered trademarks owned by Bluetooth SIG,
Inc. and any use of such marks by Samson Technologies is under license. Other trademarks
and trade names are those of their respective owners.”
Important Safety Information
RISQUE DE CHOC ÉLECTRONIQUE -
AVIS
NE PAS OUVRIR
This lightning flash with arrowhead symbol within an equilateral triangle is
intended to alert the user to the presence of non-insulated “dangerous voltage”
within the product’s enclosure that may be of sufficient magnitude to constitute
a risk of electric shock.
The exclamation point within an equilateral triangle is intended to alert the user
to the presence of important operating and maintenance instructions in the
literature accompanying the appliance.
WARNING: TO REDUCE THE RISK OF ELECTRIC SHOCK, DO NOT REMOVE COVER (OR
BACK) AS THERE ARE NO USER-SERVICEABLE PARTS INSIDE. REFER SERVICING TO
QUALIFIED SERVICE PERSONNEL.
If you want to dispose this product, do not mix it with general household waste.
There is a separate collection system for used electronic products in accordance
with legislation that requires proper treatment, recovery and recycling.
Private household in the 28 member states of the EU, in Switzerland and Norway
may return their used electronic products free of charge to designated collection facilities or
to a retailer (if you purchase a similar new one).
For Countries not mentioned above, please contact your local authorities for a correct
method of disposal.
By doing so you will ensure that your disposed product undergoes the necessary treatment,
recovery and recycling and thus prevent potential negative effects on the environment and
human health.
ENGLISH
FRANÇAISDEUTSCHEESPAÑOLITALIANO
XP310w • Portable PA System 3

Important Safety Information
1. Read these instructions.
2. Keep these instructions.
3. Heed all warnings.
4. Follow all instructions.
5. Do not use this apparatus near water.
6. Clean only with dry cloth.
7. Do not block any ventilation openings. Install in accordance with the manufacturer’s
instructions.
8. Do not install near any heat sources such as radiators, heat registers, stoves, or other
apparatus (including amplifiers) that produce heat.
9. Do not defeat the safety purpose of the polarized or grounding type plug. A polarized
plug has two blades with one wider than the other. A grounding type plug has two
blades and a third grounding prong. The wide blade or the third prong are provided for
your safety. If the provided plug does not fit into your outlet, consult an electrician for
replacement of the obsolete outlet.
10. Protect the power cord from being walked on or pinched particularly at the plugs,
convenience receptacles, and at the point where they exit from the apparatus.
11. Only use attachments/accessories specified by the manufacturer.
12. Use only with the cart, stand, tripod, bracket, or table specified by the
manufacturer, or sold with the apparatus. When a cart is used, use caution
when moving the cart/apparatus combination to avoid injury from tip-over.
13. Unplug the apparatus during lightening storms or when unused for long periods of time.
14. Refer all servicing to qualified personnel. Service is required when the apparatus has
been damaged in any way, such as power supply cord or plug is damaged, liquid has
been spilled or objects have fallen into the apparatus has been exposed to rain or
moisture, does not operate normally, or has been dropped.
15. This appliance shall not be exposed to dripping or splashing water and that no object
filled with liquid such as vases shall be placed on the apparatus.
16. Caution-to prevent electrical shock, match wide blade plug wide slot fully insert.
17. Please keep a good ventilation environment around the entire unit.
18. To prevent injury, this apparatus must be securely attached to the stand in accordance
with the installation instructions.
19. WARNING: The battery (battery or batteries or battery pack) shall not be exposed to
excessive heat such as sunshine, fire or the like.
20. CAUTION: Danger of explosion if battery is incorrectly replaced. Replace only with the
same or equivalent type.
21. WARNING: The mains plug/appliance coupler is used as disconnect device, the
disconnect device shall remain readily operable.
22. Battery disposal should be drawn to environmental aspects and should be according to
local law requirements.
23. No naked flame sources, such as lighted candles, should be placed on the apparatus.
4

Important Safety Information
FCC Notice
1. This device complies with Part 15 of the FCC Rules. Operation is subject to the following
two conditions:
(1) This device may not cause harmful interference.
(2) This device must accept any interference received, including interference that
may cause undesired operation.
2. Changes or modifications not expressly approved by the party responsible for compliance
could void the user’s authority to operate the equipment.
FCC Statement
This equipment has been tested and found to comply with the limits for a Class B digital
device, pursuant to Part 15 of the FCC Rules. These limits are designed to provide
reasonable protection against harmful interference in a residential installation.
This equipment generates uses and can radiate radio frequency energy and, if not
installed and used in accordance with the instructions, may cause harmful interference
to radio communications. However, there is no guarantee that interference will not occur
in a particular installation. If this equipment does cause harmful interference to radio or
television reception, which can be determined by turning the equipment off and on, the user
is encouraged to try to correct the interference by one or more of the following measures:
• Reorient or relocate the receiving antenna.
• Increase the separation between the equipment and receiver.
• Connect the equipment into an outlet on a circuit different from that to which the
receiver is connected.
• Consult the dealer or an experienced radio/TV technician for help.
RF Warning Statement
The device has been evaluated to meet general RF exposure requirement. The device can be
used in portable exposure condition without restriction.
This device complies with RSS-310 of Industry Canada. Operation is subject to the condition
that this device does not cause harmful interference.
Hereby, Samson Technologies Corp., declares that this Expedition XP310w is in compliance
with the essential requirements and other relevant provisions of Directive 2014/53/EU. The
declaration of conformity may be consulted at:
http://www.samsontech.com/site_media/support/manuals/XP310w_DOC.pdf
ENGLISH
FRANÇAISDEUTSCHEESPAÑOLITALIANO
XP310w • Portable PA System 5

Introduction
Thank you for purchasing the XP310w battery-powered portable sound system, featuring
wireless Bluetooth® connectivity. Lightweight and compact, the XP310w features 300
watts of power weighing only 27.5 pounds, making it an excellent complement to any mobile
speaker application. The internal rechargeable battery provides up to 12 hours of continuous
use. The XP310w can also be AC powered (with the included power cord). The locking
telescopic handle and integrated wheels, make the XP310w easy to transport to any outing.
The XP310w is a complete all-in-one solution providing the flexibility of a four-channel
mixer (with inputs for microphones and line level devices), a line output for linking multiple
speakers, and Voiceover priority ducking. For a completely untethered performance, the
XP310w includes a Samson Concert 88a Handheld Wireless system and an additional slot
to add a second Concert 88a system. There is also a USB jack for adding a Samson XPD
Series wireless system. Whether you are looking for a sound system for use outdoors, in the
classroom, for karaoke, for presentations, or performing live music, the XP310w provides
high quality, portable audio in a small self-powered package.
We recommend you keep the following records for reference, as well as a copy of your sales
receipt.
Serial number: ______________________________________________________
Date of purchase: ___________________________________________________
If you have any questions or comments regarding the XP310w Portable PA System or any
other products from Samson, do not hesitate to contact us at support@samsontech.com.
With proper care and maintenance, your XP310w Portable PA System will operate troublefree for many years. Should your XP310w Portable PA System ever require servicing, a
Return Authorization (RA) number must be obtained before shipping your unit to Samson.
Without this number, the unit will not be accepted. Please visit www.samsontech.com/ra for
an RA number prior to shipping your unit. Please retain the original packing materials and,
if possible, return the unit in its original carton. If your XP310w Portable PA System was
purchased outside of the United States, contact your local distributor.
Features
• 300 watt, all-in-one portable PA system that weighs 27.5lb
• 2-way speaker enclosure with 10” woofer and 1” tweeter
• Internal rechargeable lithium ion battery for up to 12 hours of continuous use
• Bluetooth connectivity to connect wireless music sources
• Includes Concert 88a Handheld Frequency-agile UHF Wireless System
• Top-mounted 4-channel mixer with microphone and line level inputs
• Master Bass and Treble EQ
• Variable reverb control for mic/wireless inputs
• Voiceover control with priority ducking
• Line output to daisy-chain multiple systems together
• USB wireless port for use with Samson XPD Series USB Digital Wireless Systems
• Locking telescopic handle and smooth rolling wheels for easy transport
• 1 3/8” speaker stand mount
• Two integrated microphone holders for wireless mic storage
6

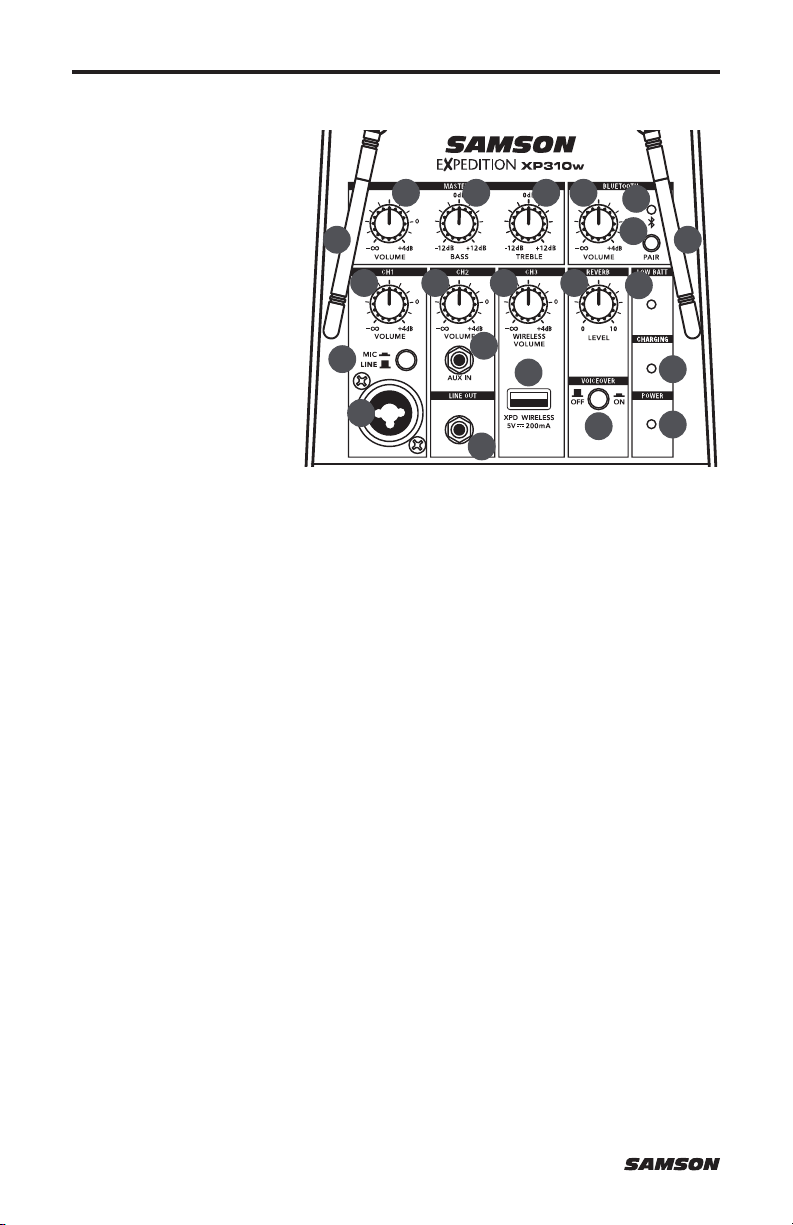
XP310w Mixer Callouts
1. MASTER VOLUME - Used to
control the overall level of
the speaker system.
2. MASTER BASS - Controls
the low-frequency tone of
the entire system.
3. MASTER TREBLE - Controls
the high-frequency tone of
the entire system.
4. CH1 VOLUME - Controls the
level of the Channel 1 Mic/
Line input.
5. LINE / MIC Switch - Adjusts
the gain of the CH1 input
for a microphone or line
level device.
6. CH1 Input - XLR-1⁄4” input for connecting a microphone or a device with a line level
signal.
7. CH2 VOLUME - Controls the level of the Channel 2 Aux input.
8. AUX IN - Connect a line level device using a 1/8” audio cable.
9. CH3 WIRELESS VOLUME - Controls the level of the Concert 88a wireless microphone
receivers as well as the optional XPD USB wireless receiver.
10. XPD WIRELESS Input - Connect a Samson XPD USB digital wireless receiver to this
input. The wireless receiver gets its power from the XP310w, so no additional power
supply is needed.
11. REVERB - This knob is used to adjust the total amount of reverb added to Channel 1
and Channel 3 (wireless) input channels.
12. BLUETOOTH® VOLUME - Controls the level of the Bluetooth input.
13. PAIR Button - Press this button to enable pairing mode in order to connect to a
Bluetooth audio device.
14. Pairing Indicator - Displays the Bluetooth status of the XP310w system.
15. LINE OUT - Line level 1/4” output jack to connect the XP310w to the input of another
XP310w to create an expanded speaker system. The LINE OUT signal is before the
MASTER VOLUME and EQ Controls.
16. VOICEOVER ON/OFF Switch - Turns the VOICEOVER ducking on or off.
17. LOW BATTERY Indicator - This LED lights when the XP310w battery is low. When the
light is on, it is recommended to plug the XP310w into and AC outlet.
18. CHARGING Indicator - When the XP310w is plugged in and the POWER switch is set
to the RECHARGE position, the CHARGING indicator will illuminate RED while it is
charging. Once charging is complete the indicator will turn off.
19. POWER Indicator - Lights green when the power switch is in the ON position.
20. Antennas - The antenna mountings allow full rotation for optimum placement. When
using the Concert 88a wireless system, both antennas should be placed in a vertical
position.
5
1
4 7 9 11
6
2 3 12
8
10
15
16
14
13
17
2020
18
19
ENGLISH
FRANÇAISDEUTSCHEESPAÑOLITALIANO
XP310w • Portable PA System 7
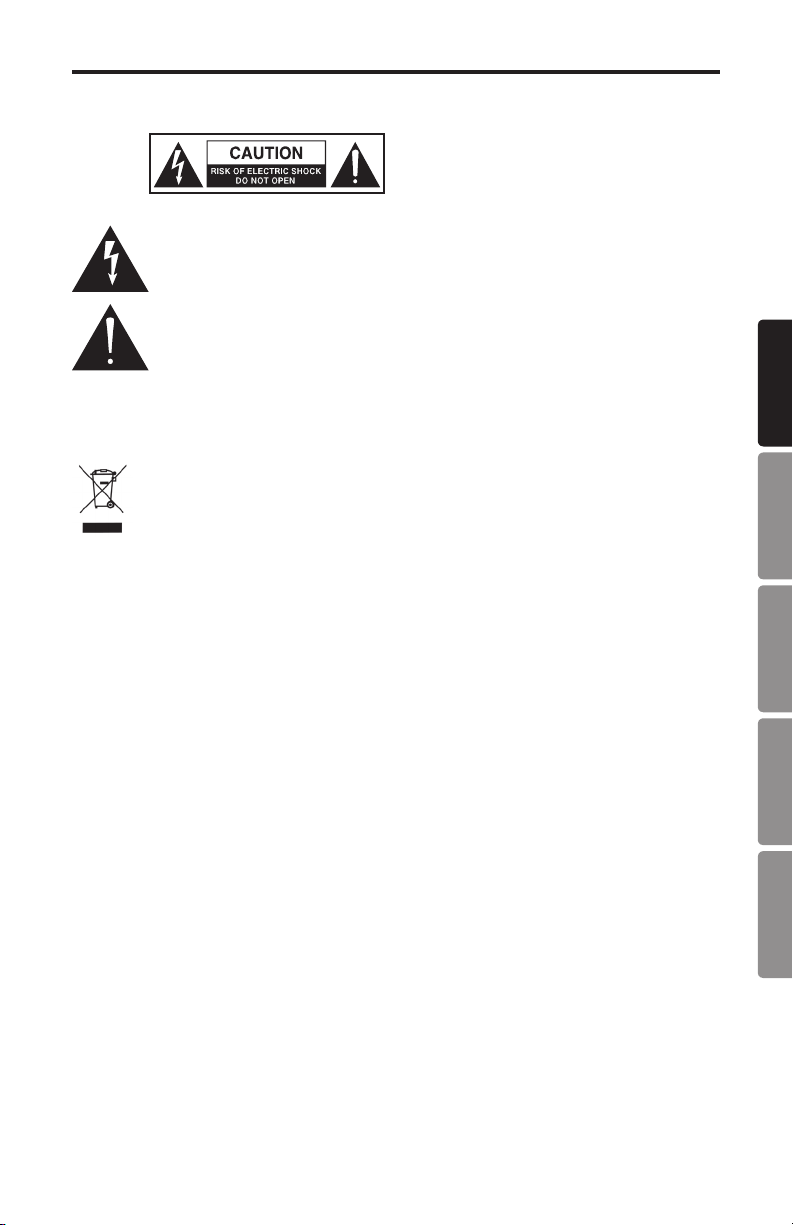
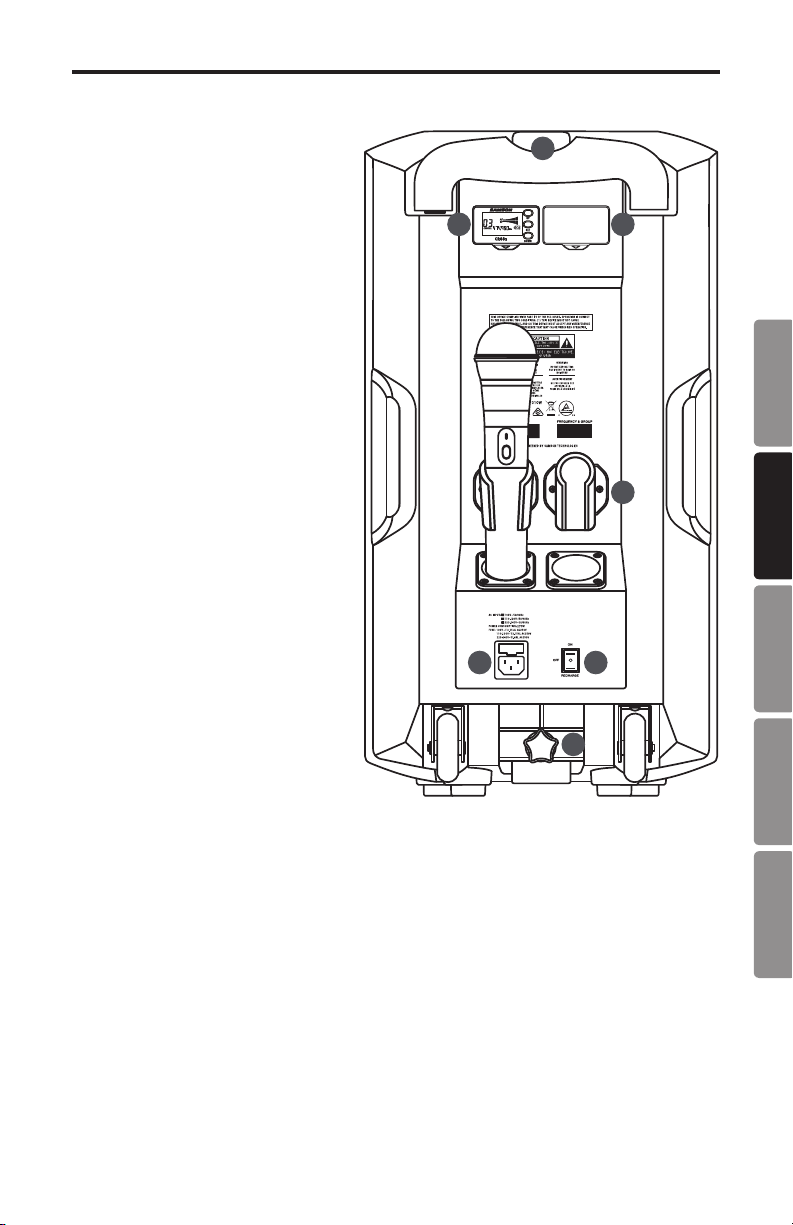
XP310w Rear Panel Callouts
1. Power / Recharge Switch - This
three position switch is used to turn
the XP310w ON, OFF or place the
system into RECHARGE mode to
charge the internal battery.
2. AC INPUT - Connect the supplied
power cord here.
3. CR88a Receiver - Included
frequency agile wireless UHF
receiver.
4. CR88a receiver cover/slot - Extra
slot to add an additional CR88a
wireless receiver.
5. Microphone storage - Two slots
to store wireless handheld
transmitters.
6. Telescopic handle - Press button
and pull up to extend the telescopic
handle.
7. Speaker stand receptacle - 1 3/8”
locking stand mount for placing
the XP310w on a standard speaker
stand.
6
3
4
5
2
1
7
8
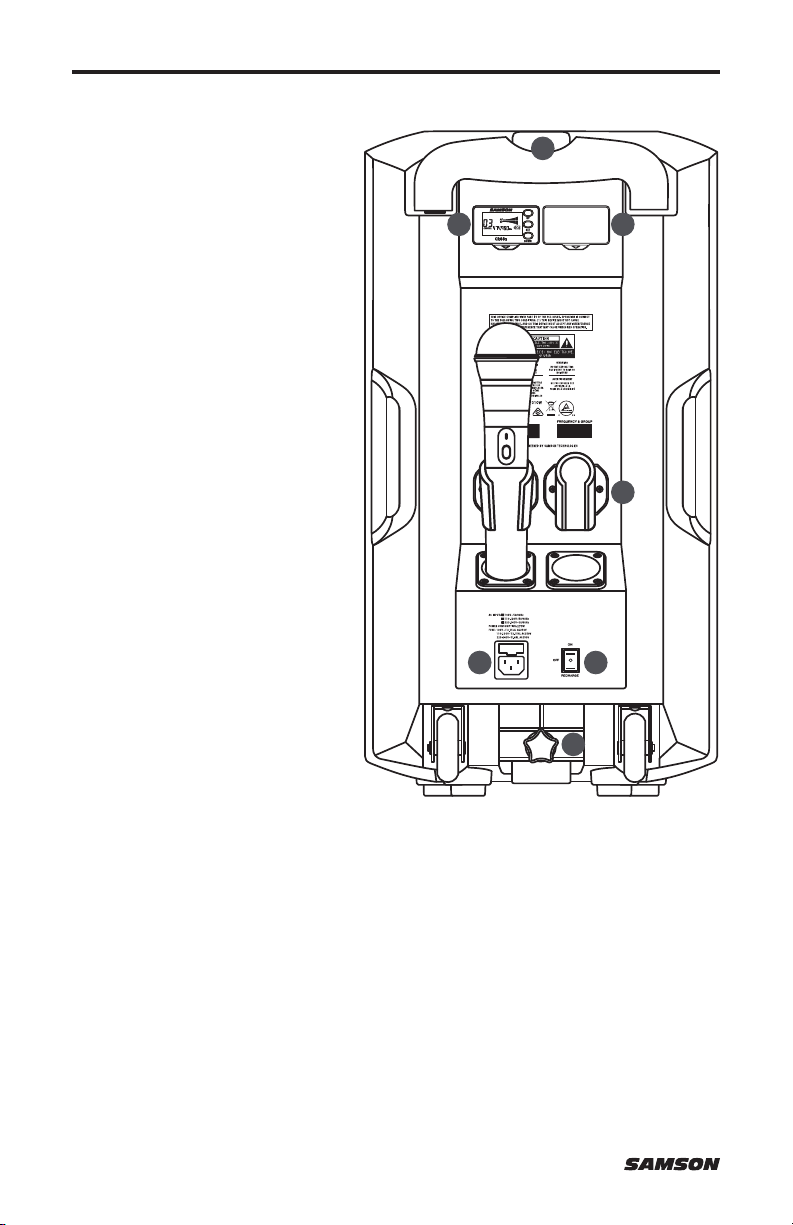
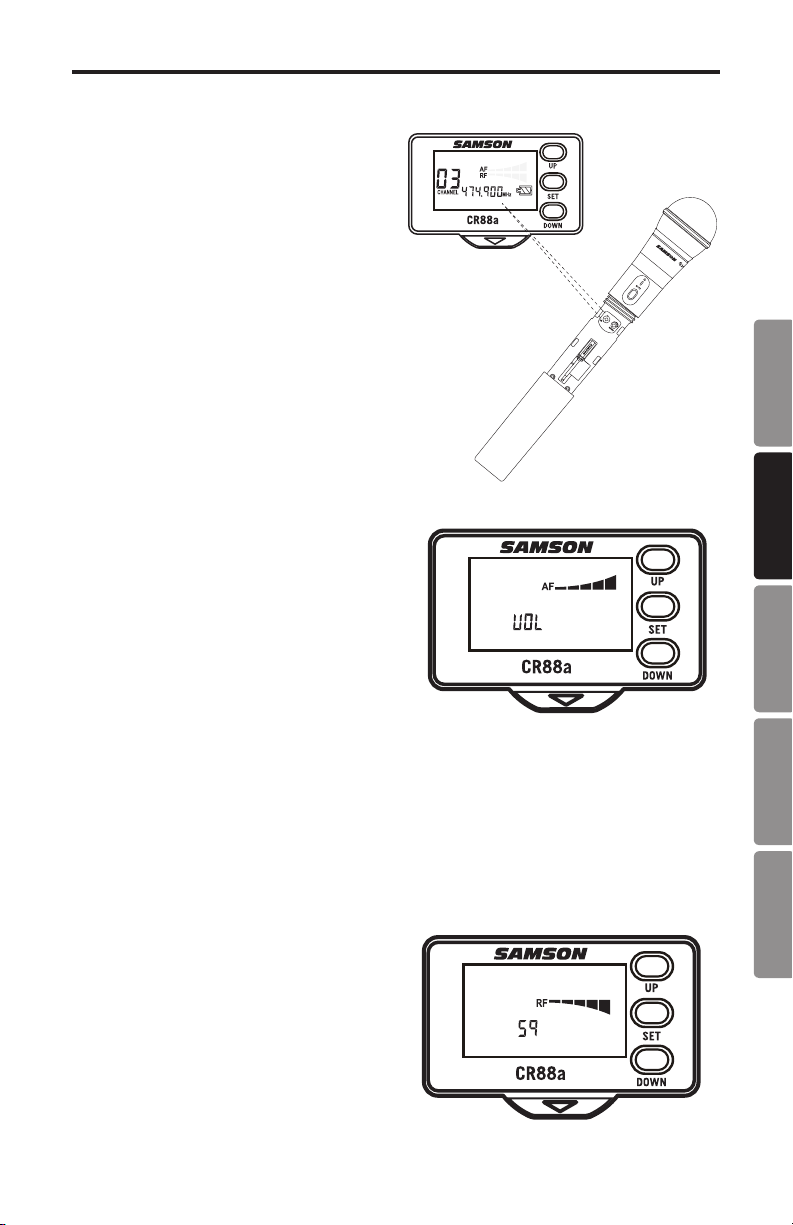
CR88a Receiver Display
1
4
2 5
3
Channel - Displays the selected channel number.
1.
2. Frequency - Indicates the operating frequency of the selected channel.
3. Audio Meter - Displays the strength of the incoming audio signal.
4. RF Signal Meter - Displays the strength of the incoming radio signal.
5. Transmitter Battery Level - Indicates the battery level of the transmitter.
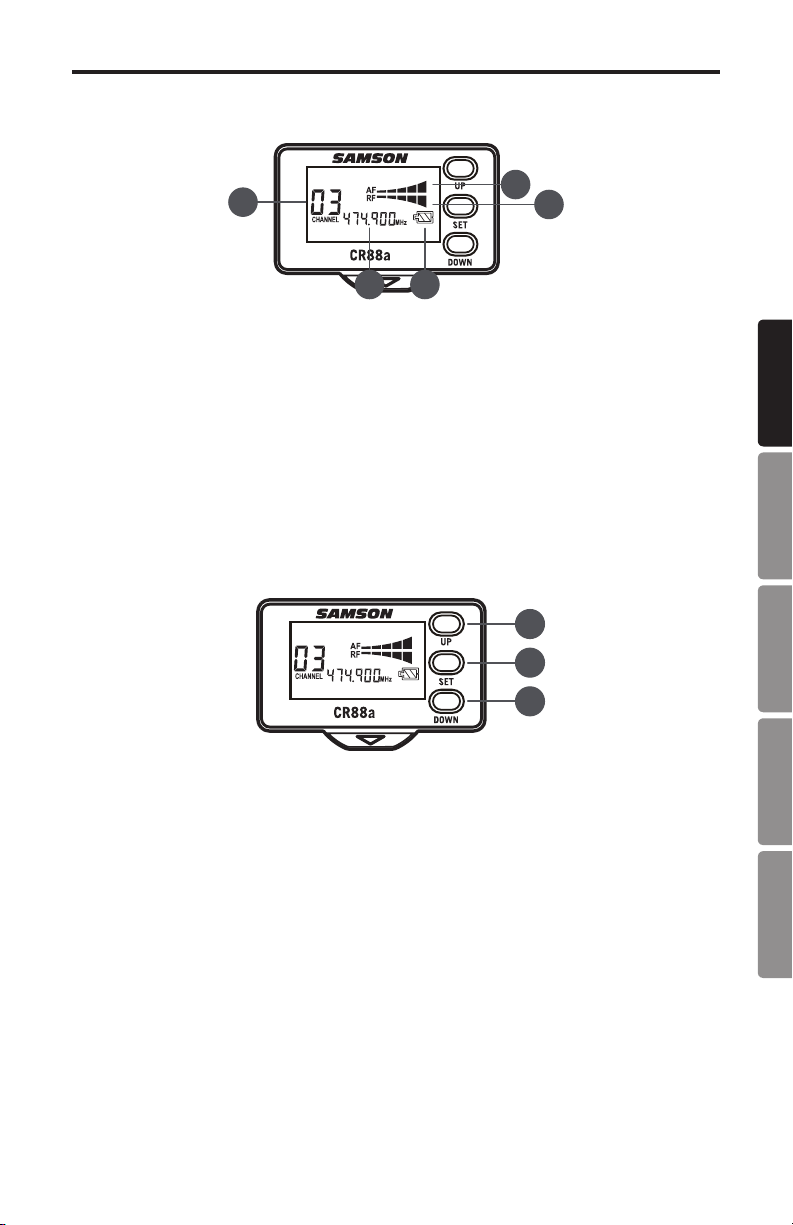
Using the CR88a Receiver
1
3
2
ENGLISH
FRANÇAISDEUTSCHEESPAÑOLITALIANO
Selecting a channel
1. Short press the UP (1) & DOWN (2) buttons to step through the available channels.
2. Press and hold the UP (1) button for 3 seconds to enter IR Set mode to send the
selected channel to the transmitter.
3. Press and hold the UP (1) button for more than 6 seconds to rapidly cycle through the
channels. Once the button is released, the receiver will enter IR Set mode to send the
selected channel to the transmitter.
4. Press and hold the DOWN (2) button for 3 seconds to enter scan mode. The CR88a
will scan through the operating channels and find the optimal channel for performance.
Once the scan is complete, the receiver will enter IR Set mode to send the selected
channel to the transmitter.
XP310w • Portable PA System 9

Using the CR88a Receiver
IR Set
5. Press and hold the UP (1) button for 3
seconds to enter IR Set mode to send the
selected channel to the transmitter.
6. Position the transmitter about 6”–12”
(15–30 cm) from the front of the CR88a
receiver display with the transmitter’s
IR window (located in the battery
compartment facing the receiver.
7. When the transmission of the operating
channel is complete, the CR88a will
receive RF signal and the RF Signal Meter
will light indicating that it is receiving
wireless signal from the transmitter.
Setting the receiver volume
8. Short press the SET (3) button to enter the
receiver volume adjustment mode.
9. Press the UP (1) button to increase the
receiver output level.
10. Press the DOWN (2) button to decrease
the receiver output level.
Adjusting the squelch
Squelch is a function of the receiver that passes audio when the desired radio signal is
above the squelch threshold and mutes audio when the radio signal is below the threshold.
The higher the squelch setting, the stronger the incoming signal will have to be in order for
you to hear it.
To set your squelch level, place the wireless transmitter at the furthest distance you expect
to use it and adjust the squelch level until it mutes the signal. Then adjust the squelch level
back up until the wireless transmitter signal is heard.
The squelch level should be set just above the
background radio signal noise. If the squelch
setting is set too low, you will hear static noise
pass through the receiver when the transmitter
is turned off or out of range.
11. Short press the SET (3) button two times
to enter the squelch adjustment mode.
12. Press the UP (1) button to increase the
squelch threshold level.
13. Press the DOWN (2) button to decrease
the squelch threshold level.
10
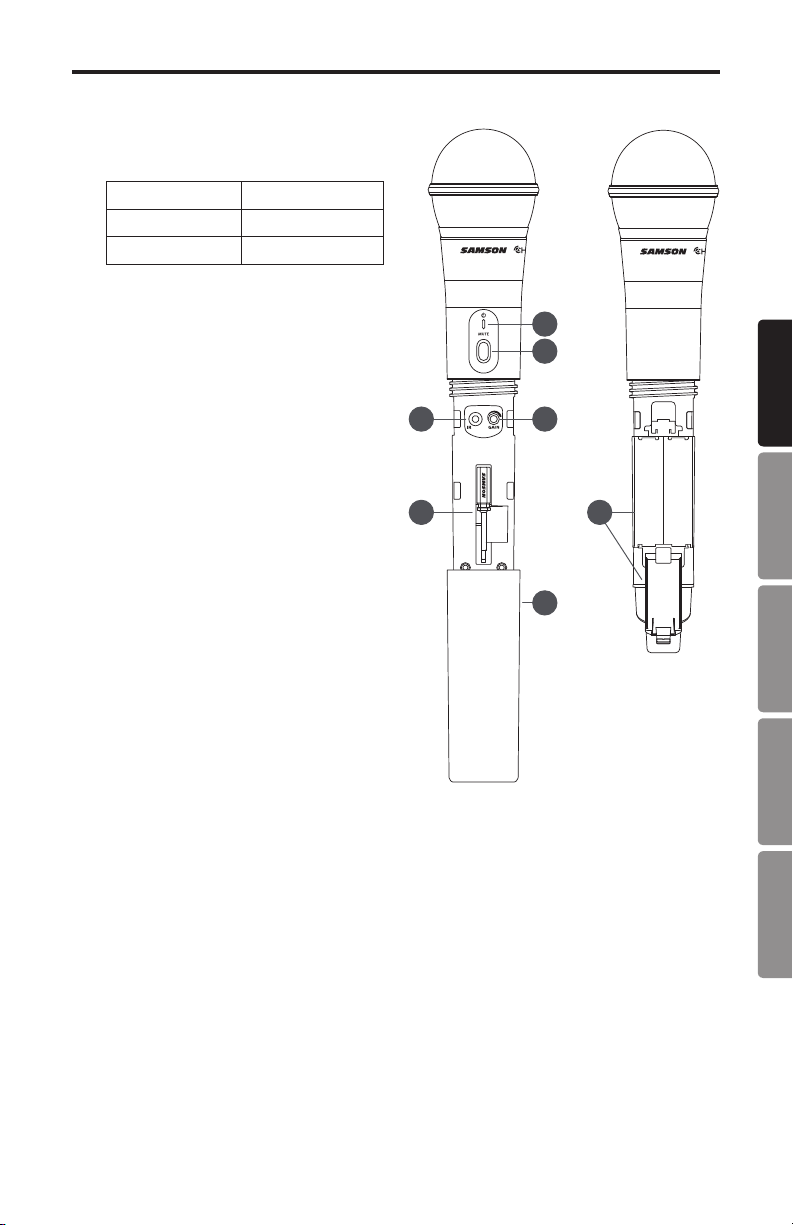
CH88 Handheld Transmitter Callouts
1. Status Indicator - This LED displays the
operation mode:
GREEN Normal Operation
RED Mute
Flashing GREEN Low Battery
2. Power/Mute Switch - Press and hold
to turn the unit on or off. Press
and release to mute or unmute the
transmitte r.
3. Battery Cover - Unscrew the battery
cover and slide down to open the CH88
battery compartment.
4. Battery Holder - Open the battery
holder by pressing the tab and lifting
the cover. Insert two standard AA (LR6)
batteries here, being sure to observe
the plus and minus polarity markings
shown. Although rechargeable Ni-Cad
batteries can be used, they do not
supply adequate current for more than
four hours.
WARNING: Do not insert the batteries
backwards; doing so can cause severe
damage to the CH88 and will void your
warranty.
5. Input GAIN Control - This control adjusts
the transmitter input sensitivity.
For optimal performance, using the
included screwdriver, set the input
GAIN control to where you see the all
of the CR88a AF indicators light under
high levels, then turn down the control
until the last indicator lights only
during audio peaks.
6. IR Lens - This window is used to
capture the infrared signal sent from
the CR88a during the IR SET to
channelize the transmitter. The battery
cover must be open and the IR Lens
facing towards the receiver to load the
selected channel.
7. Screwdriver - Designed for use in
adjusting the CH88 input GAIN control.
7
1
2
56
ENGLISH
4
FRANÇAISDEUTSCHEESPAÑOLITALIANO
3
XP310w • Portable PA System 11
Quick Start
1. Set the XP310w power switch to the
OFF position, and fully turn all of the
LEVEL controls counterclockwise to 0.
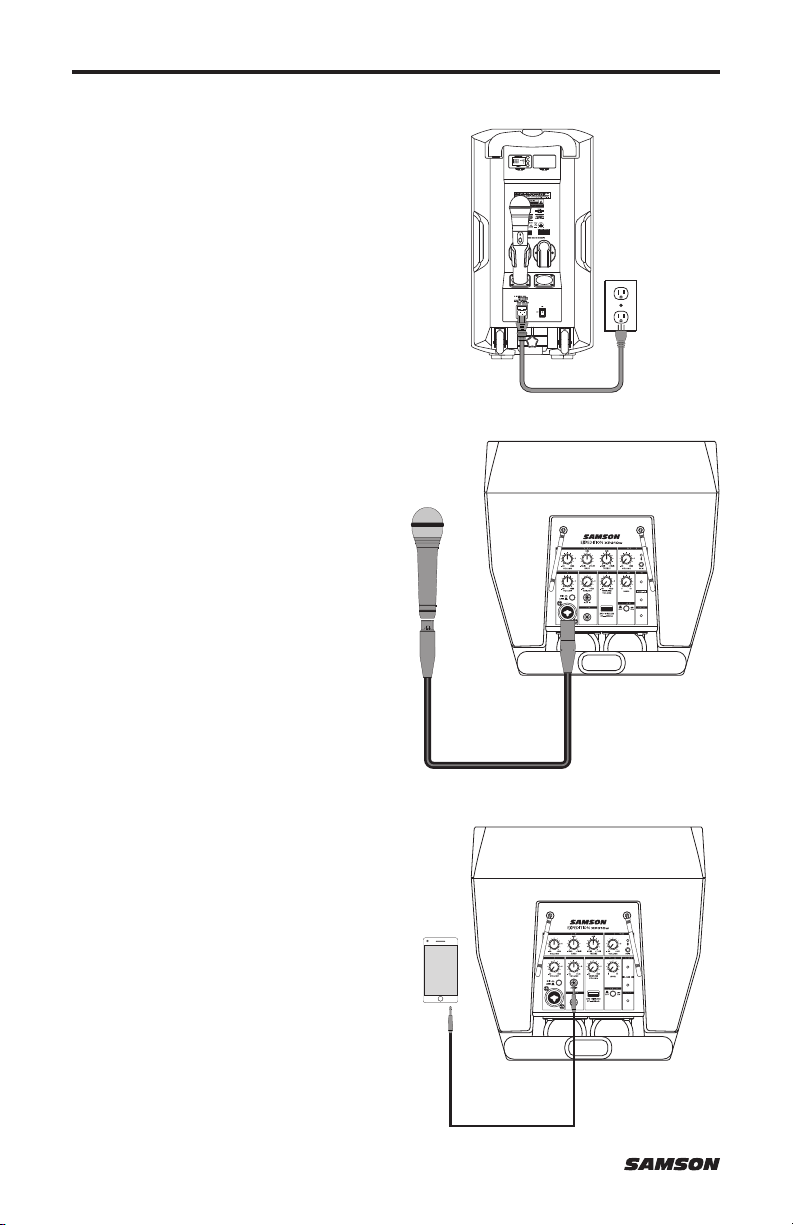
2. If an outlet is available, connect the
included power cord to the AC input
of the speaker, and plug it into an
electrical outlet.
3. Set the XP310w power switch to the
ON position.
4. Connect your audio sources.
5. Turn the MASTER VOLUME control up
and set the input levels, following the
steps below.
Making Connections
Channel 1 (Microphone / Line Input)
1. Connect a microphone using a standard
XLR cable or line level equipment using
a 1⁄4” instrument cable.
2. If connecting a microphone, set the
LINE / MIC switch to the down (MIC)
position. If connecting a line level
device, set the LINE / MIC switch to the
up (LINE) position.
3. While speaking into the microphone or
playing music from a line level audio
source, slowly raise the channel CH1
VOLUME control until you have reached
the desired level.
NOTE: If not using the Channel 1 input,
turn the VOLUME control all the way
down to keep out any unwanted noise.
Channel 2 (Aux Input)
4. Connect a line level device using 1⁄8”
instrument cable.
5. While playing music from a line level
audio source, slowly raise the channel
CH2 VOLUME control until you have
reached the desired level.
12
Quick Start
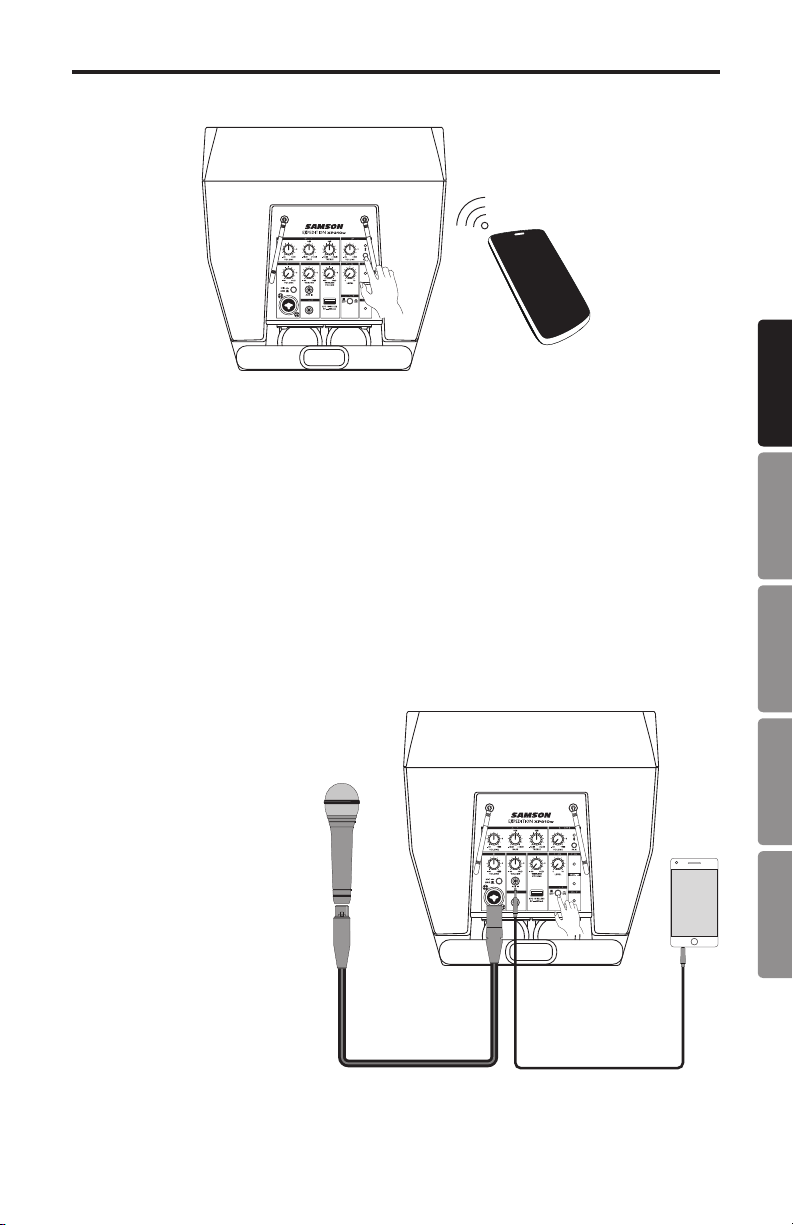
Bluetooth®
1. Turn the BLUETOOTH VOLUME control down counterclockwise to 0.
2. With the XP310w and your Bluetooth device powered on; press the PAIR button on the
rear panel of the XP310w to make the speaker discoverable. The Bluetooth indicator
will slowly flash blue.
3. In the settings of your Bluetooth device, set it to “discover” available devices.
4. From the Bluetooth device list, select the “Samson BLUETOOTH” device.
5. If your device asks for a passkey, enter digits 0000 (four zeros) and press OK. Some
devices may also ask you to accept the connection.
6. The XP310w speaker indicates that pairing is complete when the indicator turns steady
blue. You can now stream audio from your device to the XP310w speakers.
7. With the volume control on your Bluetooth device turned up, play some music, and
slowly raise the XP310w BLUETOOTH VOLUME control until you have reached the
desired level.
Using the Voiceover Switch
The XP310w Voiceover ducker is
a sophisticated music and paging
system where the background
music will automatically lower
when an announcement is made.
The ducker can operate with sound
coming from any of the wired or
wireless microphone inputs.
When the VOICEOVER switch
is pressed in, when ever signal
is present at the Channel 1
microphone input, Concert 88a
wireless inputs or XPD wireless
input, the Channel 2 line level
input and Bluetooth audio will
automatically be lowered.
Once there is no input present
on microphone and wireless
microphone inputs, the line level
input and Bluetooth audio will
return to their normal levels.
ENGLISH
FRANÇAISDEUTSCHEESPAÑOLITALIANO
XP310w • Portable PA System 13
Connecting Samson XPD Wireless
The following steps detail connecting a Samson
XPD2 USB digital wireless system (sold separately)
to your XP310w.
1. Plug the RXD2 USB receiver into one of
the USB jacks on rear panel of the XP310w
directly (figure 1) or using the included USB
extension cable (figure 2).
2. Place a fresh set of AA (LR6) batteries in
the transmitter battery holder, taking care to
observe the polarity markings.
3. Turn the Channel 3 Wireless Volume knob
completely counterclockwise, then turn the
power of the XP310w to the ON position.
4. Turn on the power to the HXD1 handheld or
PXD1 beltpack transmitter by pressing and
holding Power switch; the indicator LED will
light amber.
5. If the transmitter and receiver have not been
previously paired, press and hold the button
on the RXD2 receiver for >5 seconds, until
it begins to flash. Press and continue to hold
the Power button on the transmitter until the
LED indicators on both units light steady,
indicating that the receiver and transmitter are
paired and ready for operation.
6. Speak or sing into the microphone at a normal
performance level and raise the Channel 3
Wireless Volume knob on the XP310w until
the desired level is reached.
7. If you hear distortion turn down the Channel 3
Wireless Volume on the XP310w. If distortion
is still audible, use the supplied screwdriver to
turn the Gain control in the HXD1 transmitter
slowly counterclockwise until the distortion
disappears.
Conversely, if you hear a weak, noisy signal
at the desired volume level and with the
Wireless level control of the XP310w is set
to maximum, use the screwdriver to turn
the Gain control in the HXD1 transmitter
slowly clockwise until the signal reaches an
acceptable level.
Figure 1
Figure 2
14
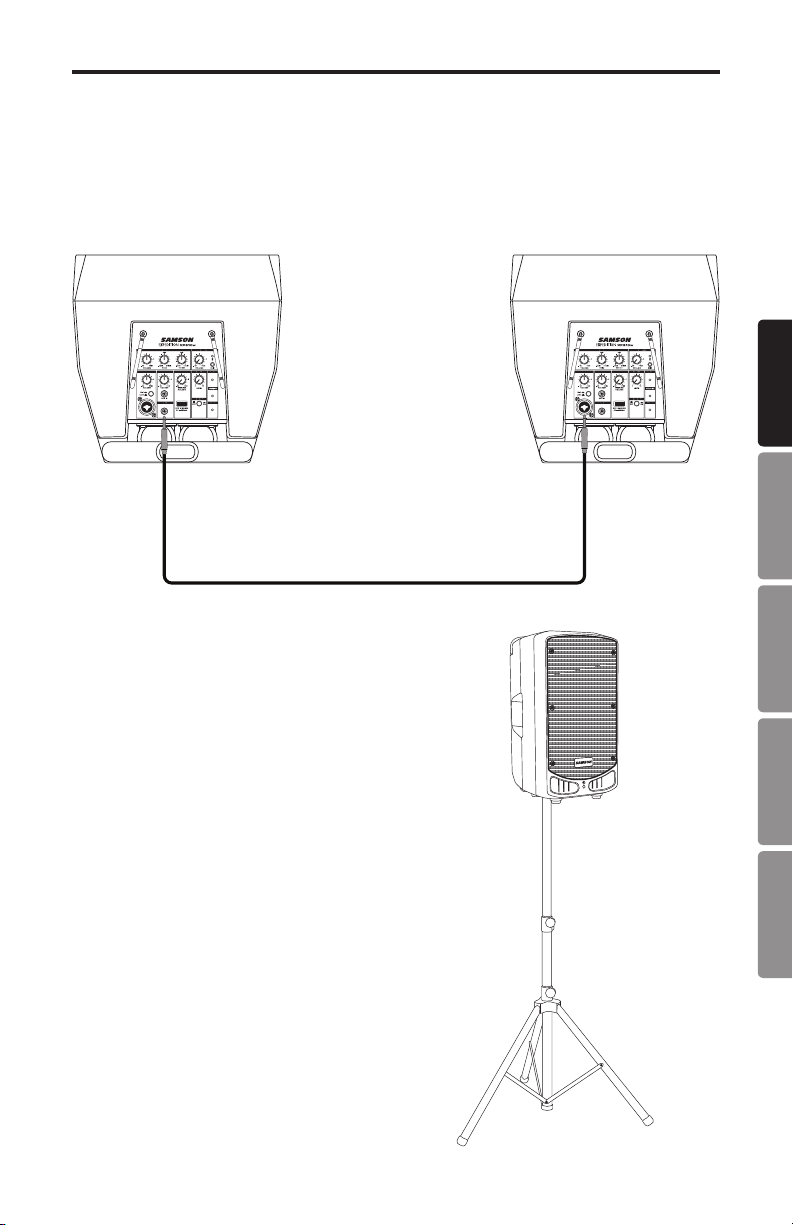
Using the LINE OUT Jack
The XP310w LINE OUT jack allows you to connect the XP310w with any powered speaker to
expand your system or link two XP310w systems together to daisy chain the speakers.
Using a standard shielded 1/4” instrument cable, connect the LINE OUT on the XP310w to
a line level input of a second powered speaker. The XP310w will send a mix of all inputs,
including Bluetooth® audio. Each channel VOLUME will control corresponding output level
to the LINE OUT jack.
ENGLISH
FRANÇAISDEUTSCHEESPAÑOLITALIANO
Using a Speaker Stand
The XP310w includes a 1 3/8” (35mm) pole mount
receptacle on the bottom of the cabinet. This fits
a standard 1-3/8” (35mm) speaker stand. For
maximum coverage when using a speaker stand,
the speaker should be raised above the heads of the
listening audience.
Take care when placing the speaker on a stand,
to ensure that it is on a level, steady surface and
will not tip over. Use a stand designed to support a
speaker with a minimum weight of 30lb.
XP310w • Portable PA System 15
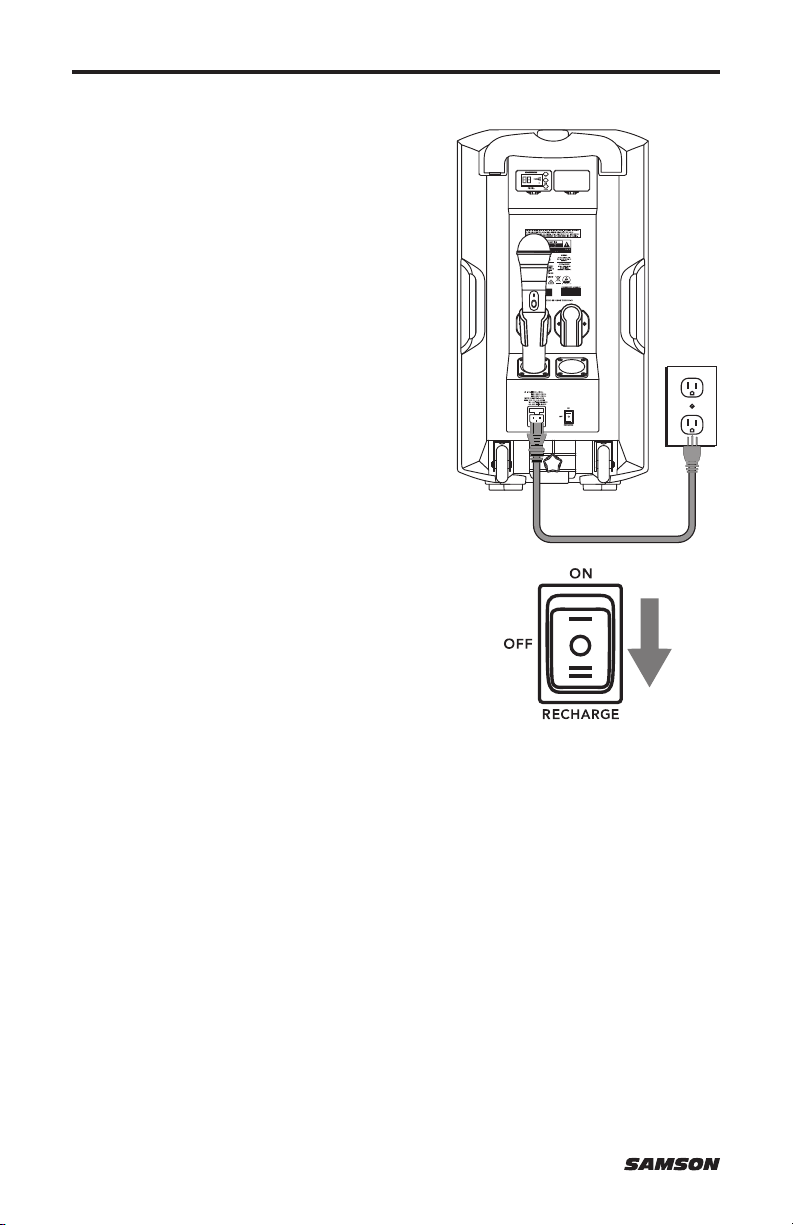
Charging the Battery
The XP310w has an internal, rechargeable
battery capable of up to 12 hours of continuous
audio on a full charge. Even though the system
may have some charge when first taken out of
the box, it is recommended to fully charge your
XP310w before first using the system.
To charge the battery:
1. Connect the XP310w to an AC power outlet
using the included power cable.
2. Set the power switch to the “RECHARGE”
position.
3. While charging the CHARGING indicator
will light red.
4. Keep the system plugged in until the
CHARGING indicator changes to green,
indicating the battery is fully charged.
If you find that the operation time of the
XP310w becomes noticeably decreased, even
after fully charging, the battery should be
replaced. Contact Samson customer service or
your local distributor for a replacement battery.
A warning that batteries (battery pack or batteries installed) shall not be exposed to
excessive heat such as sunshine, fire or the like.
CAUTION: Danger of explosion if battery is incorrectly replaced. Replace only with the
same or equivalent type. Attention should be drawn to the environmental aspects of battery
disposal
16
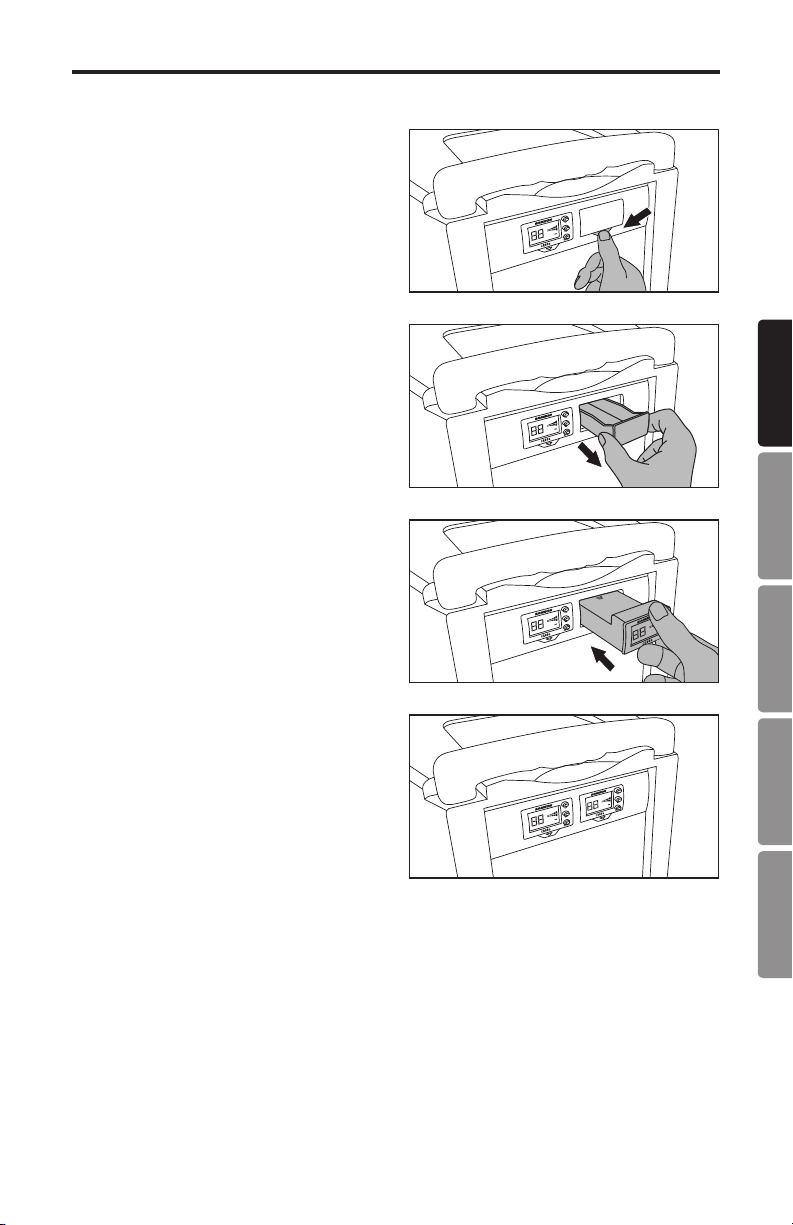
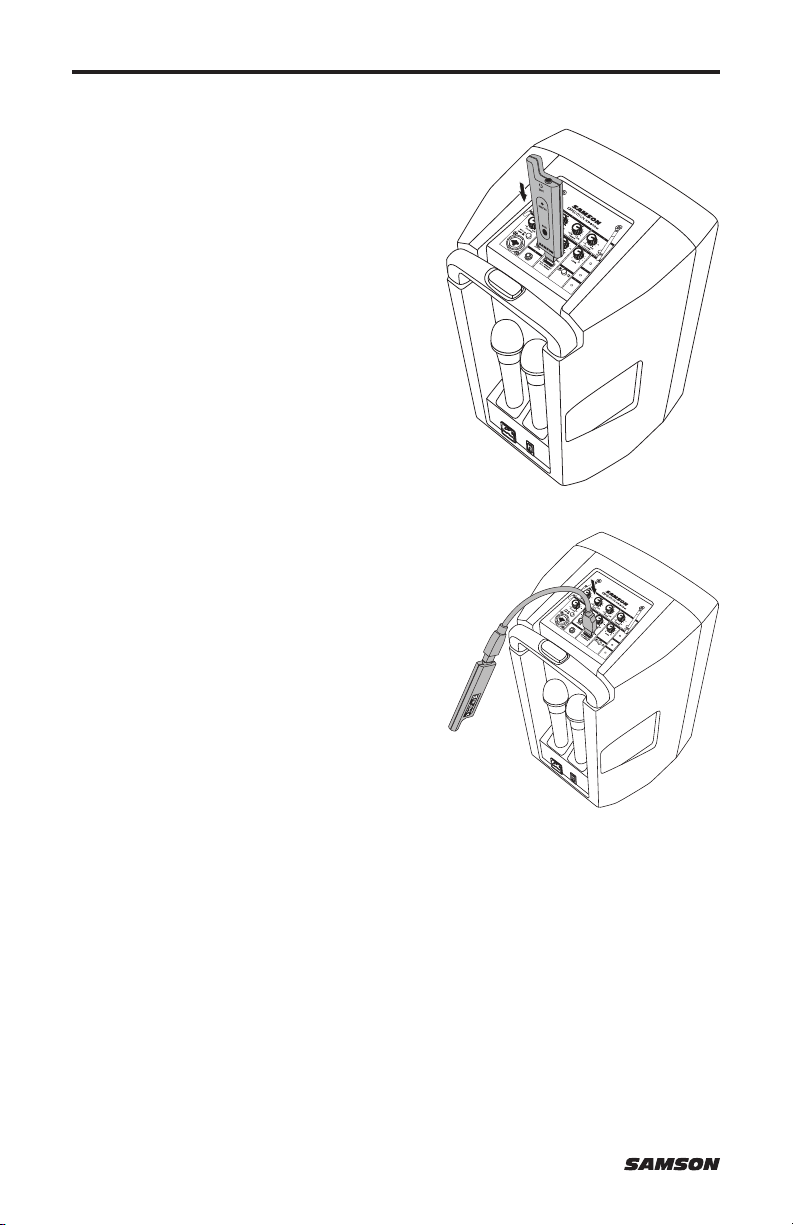
Installing the CR88a Receiver
The XP310w comes with one CR88a
receiver installed. You can add an additional
CR88a receiver to the system. Follow these
steps to install the receiver.
1. Turn the XP310w POWER off and leave
the AC power cable disconnected until
the installation process is completed.
2. Press the button with the arrow under
the blank receiver panel until the panel
pops out (you may need to use a nonmarking tool).
3. Remove the blank panel by sliding it
out of the XP310w.
4. Align the CR88a module with the open
slot and slide the module in until it is
fully seated in the XP310w.
Note: When using multiple systems, each
system must be set to a different operating
channel.
ENGLISH
FRANÇAISDEUTSCHEESPAÑOLITALIANO
XP310w • Portable PA System 17

Specifications
Output Power 300 watts Peak
Speakers 10” woofer + 1” tweeter
Frequency Response 50Hz–18kHz (-3dB)
Mic/Line Input XLR-1⁄4” combo
Aux Input 1/8” Aux
Wireless Input USB wireless
Outputs 1⁄4” Line
Tone Control Master Bass & Treble EQ
Dynamics Control Reverb, Voiceover (ducker)
Bluetooth Bluetooth 4.0, A2DP
Working Frequency 2.402GHz~2.480GHz
RF Power <10mW
Battery Life Up to 12 hours by built-in Li-ion
Battery Charging 4-6 hours
Power Supply AC:100-120V/220-240V, 50~60Hz
Construction Polypropylene
Grille Perforated steel grille, powder coated
Mounting Integral 1 3/8” Pole Mount Receptacle
Wireless Receiver Samson CR88a
Wireless Sensitivity -100 dBm / 30 dB sinad
Wireless Image Rejection >50 dB
Wireless Working Range 100’ (30m) line-of-sight
Operating Temperature -10°C ~ +40°C
Dimensions (LxDxH) 12.25” x 12.25” x 22
Weight 27.5 lb / 12.5 kg
CH88 Handheld Transmitter
Microphone Element Dynamic
Input Gain Range 28 dB
RF Power 10 mW EIRP
Power Requirements Two AA (LR6) alkaline batteries
Battery Life 8 hours
Dimensions (HxØ) 10.23” x 2.1”
Weight 0.48 lb / 218 g
310mm x 310mm x 560mm
260mm x 54mm
18
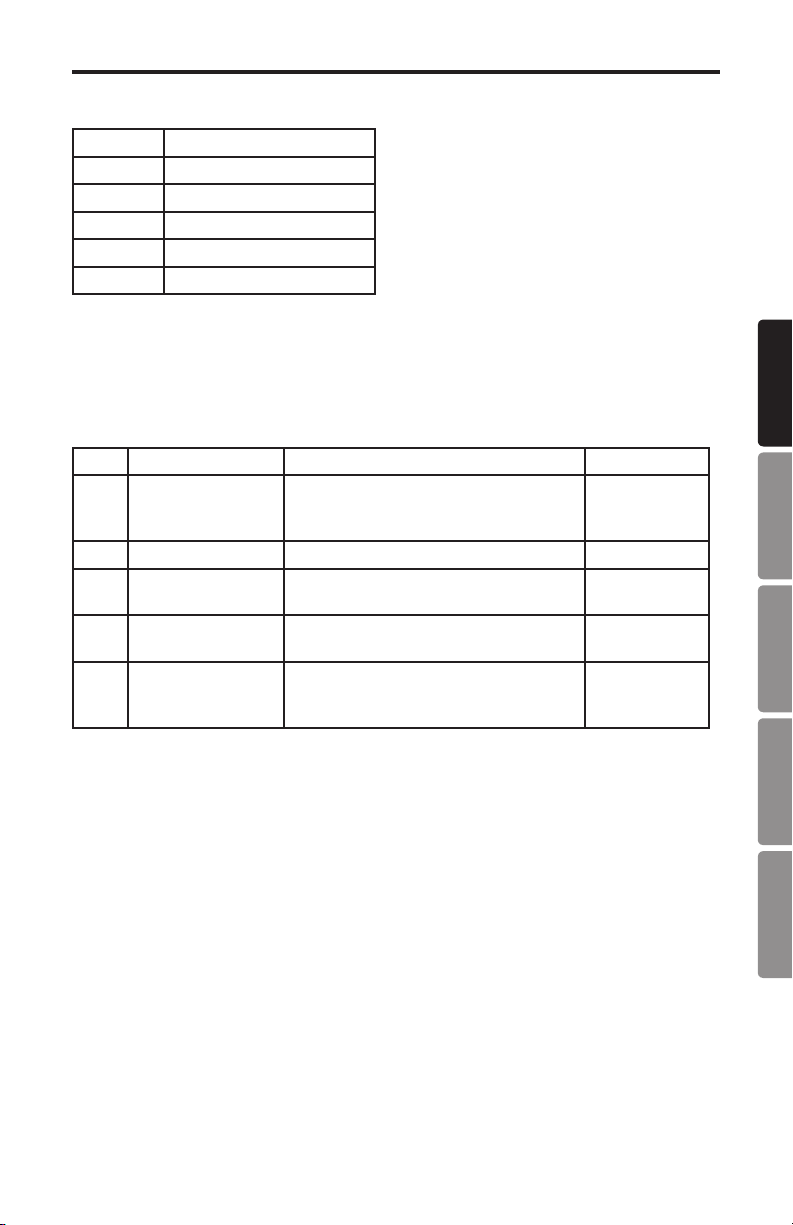
Concert 88a Operating Bands and Frequency Ranges
Band Frequency Range
Kª 470 – 494 MHz
Dª 542–566 MHz
IL* 794–806 MHz
B* 806–810 MHz
G* 863–865 MHz
* Not for use in the USA and Canada.
European Frequency Operation
Note: This equipment is intended for professional musical and similar applications, and
may be capable of operating on some frequencies not authorized in your region. Please
contact your national authority to obtain information on authorized frequencies for wireless
microphone products in your region.
Band Frequency Range EU Country Codes Note
Kª 470 –494 MHz AT, BE, BG, CY, CZ, DK, EE, FI, FR, DE,
D** 542–566 MHz
IL* * 794–806 MHz For use in
B** 806–810 MHz For use in
G 863–865 MHz AT, BE, BG, CY, CZ, DK, EE, FI, FR, DE,
** Not for use in the EU.
ª Licensing: Note that a ministerial license to operate this equipment may be required in
certain areas. Consult your national authority for possible requirements. Licensing of
Samson wireless microphone equipment is the user’s responsibility, and licensability
depends on the user’s classification and application, and on the selected frequency.
GR, HU, IS, IE, IT, LV, LT, LU, MT, NL,
NO, PL, PT, RO, SK, SI, ES, SE, CH, UK
Israel
Japan
License Free
GR, HU, IS, IE, IT, LV, LT, LU, MT, NL,
NO, PL, PT, RO, SK, SI, ES, SE, CH, UK
ENGLISH
FRANÇAISDEUTSCHEESPAÑOLITALIANO
XP310w • Portable PA System 19

Consignes importantes de sécurité
RISQUE DE CHOC ÉLECTRONIQUE -
Le pictogramme avec un éclair dans un triangle équilatéral informe l’utilisateur
de la présence d’une « tension dangereuse » et non isolée dans l’appareil. Cette
tension constitue un risque d’électrocution.
Le pictogramme avec un point d’exclamation dans un triangle informe
l’utilisateur d’instructions importantes relatives à l’utilisation et à la maintenance
de l’appareil.
AVERTISSEMENT : POUR ÉVITER TOUT RISQUE D'ÉLECTROCUTION, NE PAS ÔTER
LE COUVERCLE OU LE DOS DU BOÎTIER, CAR CET APPAREIL NE CONTIENT AUCUNE
PIÈCE REMPLAÇABLE PAR L’UTILISATEUR. CONFIEZ TOUTES LES RÉPARATIONS À UN
MEMBRE DE PERSONNEL QUALIFIÉ.
Si vous souhaitez vous débarrasser de ce produit, ne le jetez pas avec les ordures
ménagères. Il existe un service de collecte spécifique aux produits électroniques
usagés. Ce service est conforme aux dispositions légales sur le traitement, la
récupération et le recyclage.
Les consommateurs des 28 pays membres de l'UE, de la Suisse et de la Norvège peuvent
renvoyer gratuitement leurs produits électroniques usagés dans des points de collecte
désignés ou auprès d’un revendeur (lorsqu’un nouveau produit est acheté).
Pour les autres pays, veuillez contacter votre administration locale pour connaître la
méthode de mise au rebut appropriée.
En procédant ainsi, vous êtes assuré que votre produit sera correctement traité, récupéré et
recyclé afin de prévenir les effets négatifs possibles sur l'environnement et la santé.
AVIS
NE PAS OUVRIR
La marque et les logos Bluetooth® déposées appartenant à Bluetooth SIG, Inc. et toute
utilisation de ces marques par Samson Technologies est s’effectue sous licence. Les autres
marques et noms commerciaux sont ceux de leurs propriétaires respectifs."
20

Consignes importantes de sécurité
1. Lisez ces instructions.
2. Conservez ces instructions.
3. Lisez avec attention tous les avertissements.
4. Suivez toutes les instructions.
5. N'utilisez pas cet appareil près d’une source d'eau.
6. Nettoyez l’appareil uniquement avec un chiffon sec.
7. N'obstruez pas les fentes prévues pour la ventilation. Installez l'appareil selon les
instructions du fabricant.
8. N'installez pas l'appareil à proximité de sources de chaleur telles que radiateurs,
bouches d’air chaud, poêles ou autres appareils (y compris les amplificateurs)
susceptibles de générer de la chaleur.
9. Ne défaites pas le dispositif de sécurité de la fiche polarisée ou de mise à la terre. Une
fiche polarisée possède deux lames dont l'une est plus large que l'autre. Une fiche de
type terre possède deux lames et une troisième broche de mise à la terre. La lame la plus
large ou la troisième broche assure la sécurité de l’utilisateur. Si la fiche fournie ne rentre
pas dans votre prise, consultez un électricien pour remplacer la prise obsolète.
10. Protégez le cordon d'alimentation pour éviter qu'il ne soit piétiné ou pincé, notamment
au niveau des prises, des réceptacles et à la sortie de l'appareil.
11. Utilisez uniquement les accessoires/équipements recommandés par le fabricant.
12. Utilisez uniquement le chariot, le pied, le trépied, le support ou la table
recommandé par le fabricant, ou fourni avec l'appareil. Lors de l’utilisation
d’un chariot, veuillez déplacer l’ensemble chariot/appareil avec précaution
afin d’éviter toute blessure en cas de renversement.
13. Débranchez l'appareil en cas d'orage ou d'inutilisation prolongée.
14. Confiez toute réparation à un membre de personnel qualifié. L’intervention d’un
technicien s’impose dans les cas où le cordon d’alimentation ou la prise secteur sont
endommagés, des corps étrangers se sont introduits dans l’appareil, l’appareil a été
exposé à la pluie ou à l’humidité, l’appareil montre des signes de dysfonctionnement ou
est tombé.
15. Cet appareil ne doit pas être exposé à des éclaboussures ou des gouttes d'eau et aucun
objet rempli de liquide, tel qu'un vase, ne doit être placé sur l'appareil.
16. Attention - afin d’éviter tout risque d'électrocution, n’insérez la lame large que dans la
fente large de la prise.
17. Veillez à maintenir une ventilation adéquate autour de l'appareil.
18. Afin d’éviter tout risque de blessure, cet appareil doit être fermement fixé au support
selon les instructions d'installation.
19. AVERTISSEMENT : Les batteries (les piles ou les bloc-batteries) ne doivent pas être
exposées à une chaleur excessive telle que le soleil, le feu ou autre source de chaleur
similaire.
20. ATTENTION : Un remplacement inadéquat de la batterie risque de provoquer une
explosion. Remplacez les batteries exclusivement par des batteries identiques ou
équivalentes.
21. AVERTISSEMENT : La prise électrique ou le coupleur est utilisé(e) comme dispositif de
débranchementqui doit toujours être en état de marche.
22. L'élimination des batteries doit être conforme aux normes environnementales et aux lois
locales en vigueur.
23. Ne placez aucune source de flamme nue, comme des bougies allumées, sur l'appareil.
ENGLISH
FRANÇAISDEUTSCHEESPAÑOLITALIANO
XP310w - Système de sonorisation portable 21

Consignes importantes de sécurité
Avis de la FCC
1. Cet appareil est conforme à l'alinéa 15 des règlements FCC. Le fonctionnement est
soumis aux deux conditions suivantes :
(1) Cet appareil ne doit pas causer d'interférences nuisibles.
(2) Cet appareil doit accepter toute interférence reçue, y compris celles
2. Tout changement ou modification apporté à l’appareil sans l’approbation des autorités
compétentes peut annuler l’autorisation de l’utiliser.
Déclaration de la FCC
Cet appareil a été testé et déclaré conforme aux limites imposées aux appareils numériques
de classe B, conformément à l’alinéa 15 des règlements FCC. Ces limites sont destinées
à assurer une protection efficace contre les interférences dans un environnement résidentiel.
Cet appareil génère, utilise et peut émettre de l'énergie radiofréquence et, s'il n'est
pas installé et utilisé conformément au manuel d’utilisation, risque de provoquer des
interférences. Cependant, tout risque d’interférence ne peut être totalement exclu. S’ill
constate des interférences lors de la réception d’émissions de radio ou de télévision (il suffit
pour le vérifier d’allumer et d’éteindre successivement l’appareil), l’utilisateur devra prendre
les mesures nécessaires pour les éliminer. À cette fin, il devra :
• Réorienter ou déplacer l'antenne réceptrice.
• Augmenter la distance entre l'appareil et le récepteur.
• Brancher l’appareil sur un autre circuit que celui du récepteur.
• Consulter le revendeur ou un technicien de radio/TV expérimenté.
Déclaration d'avertissement RF
L'appareil est conforme aux normes générales d'exposition aux radiofréquences. L'appareil
peut être utilisé sans aucune restriction dans des conditions d'exposition portable.
Cet appareil est conforme à la norme RSS-310 d'Industrie Canada. Le fonctionnement est
soumis à la condition que cet appareil ne cause pas d'interférences nuisibles.
Par la présente, Samson Technologies Corp. déclare que l’appareil Expedition XP310w est
conforme aux principales exigences et autres clauses pertinentes de la directive 2014/53/
UE. La déclaration de conformité peut être consultée sur le site :
http://www.samsontech.com/site_media/support/manuals/XP310w_DOC.pdf
susceptibles de provoquer son fonctionnement défectueux.
22

Introduction
Merci d'avoir acheté le système de sonorisation portable XP310w alimenté par batterie. Il
est doté d'une connectivité Bluetooth® sans fil. Léger et compact, le XP310w dispose d'une
puissance de 300 watts et ne pèse que 27,5 livres, le rendant un excellent complément à
toute application nécessitant une enceinte portable. La batterie interne rechargeable fournit
jusqu'à 12 heures d'utilisation continue. Le XP310w peut également être alimenté en courant
alternatif (avec le cordon d'alimentation fourni). La poignée télescopique verrouillable et les
roues intégrées facilitent le déplacement du XP310w dans toutes les sorties.
Le XP310w est une solution clé en main offrant la polyvalence d'une console de mixage à
quatre canaux (avec entrées pour les microphones et appareils de niveau ligne), une sortie
directe pour relier plusieurs enceintes et une atténuation voix-off. Pour des performances
tout à fait exceptionnelles, le XP310w comprend un système sans fil portable Samson
Concert 88a et un port supplémentaire pour ajouter un second système Concert 88a. Une
prise USB permet également d’ajouter un système sans fil Samson de la série XPD. Pour
vos besoins de sonorisation à l'extérieur, en classe, au karaoké, en studio ou en concert, le
XP310w offre un son portable de haute qualité dans un petit boîtier autonome.
Nous vous recommandons de conserver les documents suivants à titre de référence, ainsi
qu'une copie de votre reçu de caisse.
Numéro de série : ______________________________________________________
Date d'achat : _________________________________________________________
Si vous avez des questions ou des commentaires concernant le système de sonorisation
portable XP310w ou tout autre produit de Samson, n'hésitez pas à nous contacter à
support@samsontech.com.
Avec un entretien et une maintenance appropriés, votre système de sonorisation portable
XP310w vous donnera satisfaction pendant de nombreuses années. Si votre système de
sonorisation portable XP310w doit être réparé, vous devez obtenir un numéro d'autorisation
de retour (RA) avant d'expédier votre appareil à Samson. Sans ce numéro, l'appareil ne sera
pas accepté. Veuillez consulter le site www.samsontech.com/ra pour obtenir un numéro RA
avant d'expédier votre appareil. Veuillez conserver les matériaux d'emballage d'origine et, si
possible, retourner l'appareil dans son emballage d'origine. Si votre système de sonorisation
portable XP310w a été acheté en dehors des États-Unis, contactez votre distributeur local.
ENGLISH
FRANÇAISDEUTSCHEESPAÑOLITALIANO
Caractéristiques
• Système de sonorisation portatif tout-en-un de 300 wattspesant 27,5 lb.
• Enceinte acoustique à 2 canaux avec woofer de 10" et tweeter de 1".
• Batterie interne au lithium-ion rechargeable pour une utilisation continue pouvant durer
12 heures
• Connectivité Bluetooth pour connecter des sources musicales sans fil
• Comprend le système portable sans fil Concert 88a agile en fréquence UHF
• Console de mixage à 4 canaux avec entrées microphone et niveau ligne au sommet de l'appareil
• Égaliseur Master de graves et d'aigus
• Commande de réverbération variable pour les entrées micro/sans fil
• Commande d’atténuation de voix-off
• Sortie de ligne vers plusieurs systèmes connectés en série.
• Port USB sans fil pour utilisation avec les systèmes numériques sans fil Samson de la
série XPD USB
• L'appareil se transporte aisément grâce à sa poignée télescopique verrouillable et ses
roues à roulement facile.
• Support pour enceinte de 1 3/8 po
• Deux porte-microphones intégrés pour l’entreposage des microphones sans fil
XP310w - Système de sonorisation portable 23
Indications de la console de mixage XP310w
1. MASTER VOLUME - Permet
de contrôler le niveau
global du système
d'enceintes.
2. MASTER BASS - Contrôle la
tonalité basse fréquence du
système complet.
3. MASTER TREBLE - Contrôle
la tonalité haute fréquence
du système complet.
4. CH1 VOLUME - Contrôle le
niveau de l'entrée micro/
ligne du canal 1.
5. Interrupteur LINE / MIC-
Permet de régler la
puissance de l'entrée CH1
pour un microphone ou un
appareil de niveau ligne.
6. Entrée CH1 - Entrée XLR-1/4" pour brancher un microphone ou un appareil avec un
signal de niveau ligne.
7. CH2 VOLUME - Contrôle le niveau de l'entrée auxiliaire du canal 2.
8. AUX IN - Branchez un appareil de niveau ligne à l'aide d'un câble audio de 1/8".
9. CH3 VOLUME SANS FIL - Contrôle le niveau des récepteurs micro sans fil Concert 88a
ainsi que le récepteur sans fil USB XPD en option.
10. Entrée SANS FIL XPD - Branchez un récepteur numérique sans fil USB Samson XPD
à cette entrée. Le récepteur sans fil est alimenté par le XP310w, de sorte qu’aucune
alimentation supplémentaire n'est nécessaire.
11. REVERB - Ce bouton sert à régler la quantité totale de réverbération ajoutée aux canaux
d'entrée des canaux 1 et 3 (sans fil).
12. BLUETOOTH® VOLUME - Contrôle le niveau de l'entrée Bluetooth.
13. Bouton PAIR - Appuyez sur ce bouton pour activer le mode d’appariement afin de vous
connecter à un appareil audio Bluetooth.
14. Témoin d’appariement - Affiche l'état Bluetooth du système XP310w.
15. LINE OUT - Prise de sortie niveau ligne de 1/4" pour connecter le XP310w à l'entrée d'un
autre XP310w afin de créer un système d’enceintes étendu. Le signal LINE OUT se
trouve avant les commandes MASTER VOLUME et EQ.
16. Interrupteur VOICEOVER ON/OFF - Active ou désactive l'atténuation de VOIX-OFF.
17. Témoin de BATTERIE FAIBLE - Ce témoin DEL s'allume lorsque la batterie du XP310w est
faible. Si le témoin s’allume, il est recommandé de brancher le XP310w sur une prise
secteur.
18. Témoin de CHARGE - Lorsque le XP310w est branché et que l'interrupteur POWER est
sur RECHARGE, le témoin CHARGE va s'allumer en rouge pendant la charge. Une fois
la charge terminée, le témoin va s'éteindre.
19. Témoin POWER - S'allume en vert lorsque l'interrupteur d'alimentation est sur ON.
20. Antennes - Les fixations d'antenne assurent une rotation complète pour un
positionnement optimal. Lors de l'utilisation du système sans fil Concert 88a, les deux
antennes doivent être placées en position verticale.
24
5
1
2 3 12
4 7 9 11
8
10
6
15
16
14
13
17
2020
18
19
Indications du panneau arrière pour XP310w
1. Interrupteur d'alimentation / de
recharge - Cet interrupteur a trois
positions sert à allumer, éteindre
ou mettre le XP310w en mode
RECHARGE pour charger la batterie
interne.
2. ENTRÉE CA - Branchez ici le cordon
d'alimentation fourni.
3. Récepteur CR88a - Récepteur UHF
sans fil agile en fréquence inclus.
4. Couvercle du récepteur CR88a /port
- Un port supplémentaire permet
d’ajouter un autre récepteur sans fil
CR88a.
5. Entreposage du microphone - Deux
emplacements pour entreposer les
émetteurs portatifs sans fil.
6. Poignée télescopique - Appuyez sur
le bouton et tirez vers le haut pour
allonger la poignée télescopique.
7. Socle pour pied de l’enceinte - Socle
pour pied verrouillable de 1 3/8"
permettant de placer le XP310w sur
un pied de haut-parleur standard.
6
3
4
ENGLISH
5
FRANÇAISDEUTSCHEESPAÑOLITALIANO
2
1
7
XP310w - Système de sonorisation portable 25

Affichage du récepteur CR88a
1
4
2 5
3
Canal - Affiche le numéro du canal sélectionné.
1.
2. Fréquence - Indique la fréquence de fonctionnement du canal sélectionné.
3. Audiomètre - Affiche l'intensité du signal audio entrant.
4. Compteur de signaux RFRF - Affiche l'intensité du signal radio entrant.
5. Niveau de pile batterie de l'émetteur - Indique le niveau de pile batterie de
l'émetteur.
Utilisation du récepteur CR88a
1
3
2
Sélection d'un canal
1. Appuyez brièvement sur les touches UP (1) et DOWN (2) pour parcourir les canaux
disponibles.
2. Appuyez sur la touche UP (1) et maintenez pendant 3 secondes pour passer en mode
Réglage IR afin d'envoyer le canal sélectionné à l'émetteur.
3. Appuyez sur la touche UP (1) et maintenez pendant plus de 6 secondes pour passer
rapidement d'un canal à l'autre. Une fois la touche relâchée, le récepteur passe en
mode Réglage IR pour envoyer le canal sélectionné à l'émetteur.
4. Appuyez sur la touche DOWN (2) et maintenez pendant 3 secondes pour passer
en mode balayage. Le CR88a va balayer les canaux disponibles et trouver celui qui
convient pour une utilisation optimale. Une fois le balayage terminé, le récepteur passe
en mode Réglage IR pour envoyer le canal sélectionné à l'émetteur.
26
Utilisation du récepteur CR88a
Réglage IR
5. Appuyez sur la touche UP (1) et
maintenez pendant 3 secondes pour
passer en mode Réglage IR afin d'envoyer
le canal sélectionné à l'émetteur.
6. Positionnez l'émetteur à environ 6"-12"
(15-30 cm) de l'avant de l'affichage
du récepteur CR88a en plaçant la
fenêtre IR de l'émetteur (située dans
le compartiment à batteries) face au
récepteur face au récepteur.
7. Lorsque la transmission du canal
utiliséest terminée, le CR88a reçoit le
signal RF et le témoin de signal RF va
s'allumer pour indiquer qu'il reçoit le
signal radio de l'émetteur.
Réglage du volume du récepteur
8. Appuyez brièvement sur la touche SET
(3) pour accéder au mode de réglage du
volume du récepteur.
9. Appuyez sur la touche UP (1) pour
augmenter le niveau de sortie du
récepteur.
10. Appuyez sur la touche DOWN (2) pour
diminuer le niveau de sortie du récepteur.
ENGLISH
FRANÇAISDEUTSCHEESPAÑOLITALIANO
Réglage du silencieux de recherche
Le silencieux de recherche est une fonction du récepteur qui transmet l'audio lorsque le
signal radio désiré est supérieur au seuil du silencieux et coupe le son lorsque le signal radio
est inférieur à ce seuil. Plus le réglage du silencieux de recherche est élevé, plus le signal
d'entrée doit être puissant pour que vous puissiez l'entendre.
Pour régler votre niveau de silencieux de recherche, placez l'émetteur sans fil à la distance
la plus éloignée à laquelle vous pensez l'utiliser et réglez le niveau du silencieux jusqu'à ce
qu'il coupe le signal. Réglez ensuite le niveau du silencieux de recherche jusqu'à ce que le
signal de l'émetteur sans fil retentisse.
Le niveau du silencieux de recherche doit être réglé légèrement au-dessus du bruit de fond
du signal radio. Si le réglage du silencieux de
recherche est trop bas, vous entendrez du bruit
statique à travers le récepteur si l'émetteur est
éteint ou hors de portée.
11. Appuyez brièvement deux fois sur la
touche SET (3) pour accéder au mode de
réglage du silencieux de recherche.
12. Appuyez sur la touche UP (1) pour
augmenter le niveau du seuil du silencieux.
13. Appuyez sur la touche DOWN (2) pour
diminuer le niveau du seuil du silencieux.
XP310w - Système de sonorisation portable 27
 Loading...