

Page 1

STUDIO REFERENCE MONITORS
Two-way Active Studio Reference Monitor
®
Page 2

Safety Instructions/Consignes de sécurité/Sicherheitsvorkehrungen/Instrucciones de seguridad
ACHTUNG: Um die Gefahr eines Brandes oder Stromschlags zu verringern, soll-
ten Sie dieses Gerät weder Regen noch Feuchtigkeit aussetzen.Um die Gefahr
eines Stromschlags zu verringern, sollten Sie weder Deckel noch Rückwand des
Geräts entfernen. Im Innern befinden sich keine Teile, die vom Anwender
gewartet werden können. Überlassen Sie die Wartung qualifiziertem
Fachpersonal.Der Blitz mit Pfeilspitze im gleichseitigen Dreieck soll den Anwender
vor nichtisolierter “gefährlicher Spannung” im Geräteinnern warnen. Diese
Spannung kann so hoch sein, dass die Gefahr eines Stromschlags besteht. Das
Ausrufezeichen im gleichseitigen Dreieck soll den Anwender auf wichtige
Bedienungs- und Wartungsanleitungen aufmerksam machen, die im mitgelieferten
Informationsmaterial näher beschrieben werden.
Wichtige Sicherheitsvorkehrungen
1. Lesen Sie alle Anleitungen, bevor Sie das Gerät in Betrieb nehmen.
2. Bewahren Sie diese Anleitungen für den späteren Gebrauch gut auf.
3. Bitte treffen Sie alle beschriebenen Sicherheitsvorkehrungen.
4. Befolgen Sie die Anleitungen des Herstellers.
5. Benutzen Sie das Gerät nicht in der Nähe von Wasser oder Feuchtigkeit.
6. Verwenden Sie zur Reinigung des Geräts nur ein feuchtes Tuch.
7. Blockieren Sie keine Belüftungsöffnungen. Nehmen Sie den Einbau des
Geräts nur entsprechend den Anweisungen des Herstellers vor.
8. Bauen Sie das Gerät nicht in der Nähe von Wärmequellen wie Heizkörpern,
Wärmeklappen, Öfen oder anderen Geräten (inklusive Verstärkern) ein, die
Hitze erzeugen.
9. Setzen Sie die Sicherheitsfunktion des polarisierten oder geerdeten Steckers
nicht außer Kraft. Ein polarisierter Stecker hat zwei flache, unterschiedlich breite Pole. Ein geerdeter Stecker hat zwei flache Pole und einen dritten
Erdungsstift. Der breitere Pol oder der dritte Stift dient Ihrer Sicherheit. Wenn
der vorhandene Stecker nicht in Ihre Steckdose passt, lassen Sie die veraltete
Steckdose von einem Elektriker ersetzen.
10. Schützen Sie das Netzkabel dahingehend, dass niemand darüber laufen und
es nicht geknickt werden kann. Achten Sie hierbei besonders auf Netzstecker,
Mehrfachsteckdosen und den Kabelanschluss am Gerät.
11. Ziehen Sie den Netzstecker des Geräts bei Gewittern oder längeren
Betriebspausen aus der Steckdose.
12. Überlassen Sie die Wartung qualifiziertem Fachpersonal. Eine Wartung ist
notwendig, wenn das Gerät auf irgendeine Weise, beispielsweise am Kabel
oder Netzstecker beschädigt wurde, oder wenn Flüssigkeiten oder Objekte in
das Gerät gelangt sind, es Regen oder Feuchtigkeit ausgesetzt war, nicht
mehr wie gewohnt betrieben werden kann oder fallen gelassen wurde.
WARNING: To reduce the risk of fire or electric shock, do not expose this unit to
rain or moisture. To reduce the hazard of electrical shock, do not remove cover or
back. No user serviceable parts inside. Please refer all servicing to qualified personnel.The lightning flash with an arrowhead symbol within an equilateral triangle,
is intended to alert the user to the presence of uninsulated "dangerous voltage"
within the products enclosure that may be of sufficient magnitude to constitute a
risk of electric shock to persons. The exclamation point within an equilateral triangle is intended to alert the user to the presence of important operating and maintenance (servicing) instructions in the literature accompanying the product.
Important Safety Instructions
1. Please read all instructions before operating the unit.
2. Keep these instructions for future reference.
3. Please heed all safety warnings.
4. Follow manufacturers instructions.
5. Do not use this unit near water or moisture.
6. Clean only with a damp cloth.
7. Do not block any of the ventilation openings. Install in accordance with the
manufacturers instructions.
8. Do not install near any heat sources such as radiators, heat registers, stoves,
or other apparatus (including amplifiers) that produce heat.
9. Do not defeat the safety purpose of the polarized or grounding-type plug. A
polarized plug has two blades with one wider than the other. A grounding type
plug has two blades and a third grounding prong. The wide blade or third
prong is provided for your safety. When the provided plug does not fit your
outlet, consult an electrician for replacement of the obsolete outlet.
10. Protect the power cord from being walked on and pinched particularly at
plugs, convenience receptacles and at the point at which they exit from the
unit.
11. Unplug this unit during lightning storms or when unused for long periods of
time.
12. Refer all servicing to qualified personnel. Servicing is required when the unit
has been damaged in any way, such as power supply cord or plug damage, or
if liquid has been spilled or objects have fallen into the unit, the unit has been
exposed to rain or moisture, does not operate normally, or has been dropped.
PRECAUCION: Para reducir el riesgo de incendios o descargas, no permita que
este aparato quede expuesto a la lluvia o la humedad. Para reducir el riesgo de
descarga eléctrica, nunca quite la tapa ni el chasis. Dentro del aparato no hay
piezas susceptibles de ser reparadas por el usuario. Dirija cualquier reparación al
servicio técnico oficial. El símbolo del relámpago dentro del triángulo equilátero
pretende advertir al usuario de la presencia de “voltajes peligrosos” no aislados
dentro de la carcasa del producto, que pueden ser de la magnitud suficiente como
para constituir un riesgo de descarga eléctrica a las personas. El símbolo de exclamación dentro del triángulo equilátero quiere advertirle de la existencia de importantes instrucciones de manejo y mantenimiento (reparaciones) en los documentos
que se adjuntan con este aparato.
Instrucciones importantes de seguridad
1. Lea todo este manual de instrucciones antes de comenzar a usar la unidad.
2. Conserve estas instrucciones para cualquier consulta en el futuro.
3. Cumpla con todo lo indicado en las precauciones de seguridad.
4. Observe y siga todas las instrucciones del fabricante.
5. Nunca utilice este aparato cerca del agua o en lugares húmedos.
6. Limpie este aparato solo con un trapo suave y ligeramente humedecido.
7. No bloquee ninguna de las aberturas de ventilación. Instale este aparato de
acuerdo a las instrucciones del fabricante.
8. No instale este aparato cerca de fuentes de calor como radiadores, calentadores, hornos u otros aparatos (incluyendo amplificadores) que produzcan
calor.
9. No anule el sistema de seguridad del enchufe de tipo polarizado o con toma
de tierra. Un enchufe polarizado tiene dos bornes, uno más ancho que el
otro. Uno con toma de tierra tiene dos bornes normales y un tercero para la
conexión a tierra. El borne ancho o el tercero se incluyen como medida de
seguridad. Cuando el enchufe no encaje en su salida de corriente, llame a un
electricista para que le cambie su salida anticuada.
10. Evite que el cable de corriente quede en una posición en la que pueda ser
pisado o aplastado, especialmente en los enchufes, receptáculos y en el
punto en el que salen de la unidad.
11. Desconecte de la corriente este aparato durante las tormentas eléctricas o
cuando no lo vaya a usar durante un periodo de tiempo largo.
12. Dirija cualquier posible reparación solo al servicio técnico oficial. Deberá
hacer que su aparato sea reparado cuando esté dañado de alguna forma,
como si el cable de corriente o el enchufe están dañados, o si se han derramado líquidos o se ha introducido algún objeto dentro de la unidad, si esta ha
quedado expuesta a la lluvia o la humedad, si no funciona normalmente o si
ha caído al suelo.
ATTENTION: Pour éviter tout risque d’électrocution ou d’incendie, ne pas
exposer cet appareil à la pluie ou à l’humidité. Pour éviter tout risque d’électrocution, ne pas ôter le couvercle ou le dos du boîtier. Cet appareil ne contient aucune
pièce remplaçable par l'utilisateur. Confiez toutes les réparations à un personnel qualifié. Le signe avec un éclair dans un triangle prévient l’utilisateur de la
présence d’une tension dangereuse et non isolée dans l’appareil. Cette tension
constitue un risque d’électrocution. Le signe avec un point d’exclamation dans
un triangle prévient l’utilisateur d’instructions importantes relatives à l’utilisation
et à la maintenance du produit.
Consignes de sécurité importantes
1. Veuillez lire toutes les instructions avant d’utiliser l’appareil.
2. Conserver ces instructions pour toute lecture ultérieure.
3. Lisez avec attention toutes les consignes de sécurité.
4. Suivez les instructions du fabricant.
5. Ne pas utiliser cet appareil près d’une source liquide ou dans un lieu
humide.
6. Nettoyez l’appareil uniquement avec un tissu humide.
7. Veillez à ne pas obstruer les fentes prévues pour la ventilation de l’appareil.
Installez l’appareil selon les instructions du fabricant.
8. Ne pas installer près d’une source de chaleur (radiateurs, etc.) ou de tout
équipement susceptible de générer de la chaleur (amplificateurs de puissance par exemple).
9. Ne pas retirer la terre du cordon secteur ou de la prise murale. Les fiches
canadiennes avec polarisation (avec une lame plus large) ne doivent pas
être modifiées. Si votre prise murale ne correspond pas au modèle fourni,
consultez votre électricien.
10. Protégez le cordon secteur contre tous les dommages possibles (pincement, tension, torsion,, etc.). Veillez à ce que le cordon secteur soit libre,
en particulier à sa sortie du boîtier.
11. Déconnectez l’appareil du secteur en présence d’orage ou lors de périodes
d’inutilisation prolongées.
12. Consultez un service de réparation qualifié pour tout dysfonctionnement
(dommage sur le cordon secteur, baisse de performances, exposition à la
pluie, projection liquide dans l’appareil, introduction d’un objet dans le boîtier, etc.).
Page 3

Table of Contents
Copyright 2003, Samson Technologies Corp.
Printed August, 2003
Samson Technologies Corp.
575 Underhill Blvd.
P.O. Box 9031
Syosset, NY 11791-9031
Phone: 1-800-3-SAMSON (1-800-372-6766)
Fax: 516-364-3888
www.samsontech.com
Introduction 2
RESOLV 80a Features 3
RESOLV 80a Layout
Front View Layout 4
Rear Panel Layout 5
Setting Up the RESOLV 80a 6-7
Connecting the RESOLV 80a 8
Operating the RESOLV 80a 9-10
Mono Sub With Active Satellites 11
RESOLV 80a Wiring Guide 12
Specifications 46
Inhalt
Einleitung 24
RESOLV 80a Features 25
RESOLV 80a Layout
Vorderseite 26
Rückseite 27
RESOLV 80a einrichten 28-29
RESOLV 80a anschließen 30
RESOLV 80a bedienen 31 - 32
Mono Sub mit aktiven Satelliten 33
RESOLV 80a Verdrahtung 34
Technische Daten 46
Table des matières
FRANÇAIS
Introduction 13
Caractéristiques des moniteurs RESOLV 80a 14
Présentation des moniteurs RESOLV 80a
Face avant 15
Face arrière 16
Configuration des moniteurs RESOLV 80a 17-18
Connexion des moniteurs RESOLV 80a 19
Utilisation des moniteurs RESOLV 80a 20-21
Subwoofer mono avec satellites actifs 22
Plan de câblage des moniteurs RESOLV 80a 23
Caractéristiques techniques 46
Indice
Introducción 35
Características del RESOLV 80a 36
Vista general del RESOLV 80a
Vista del panel frontal 37
Vista del panel trasero 38
Configuración del RESOLV 80a 39-40
Conexión del RESOLV 80a 41
Manejo del RESOLV 80a 42-43
Sub Mono con satélites activos 44
Cableado del RESOLV 80a 45
Especificaciones técnicas 46
Page 4

2
ENGLISH
Introduction
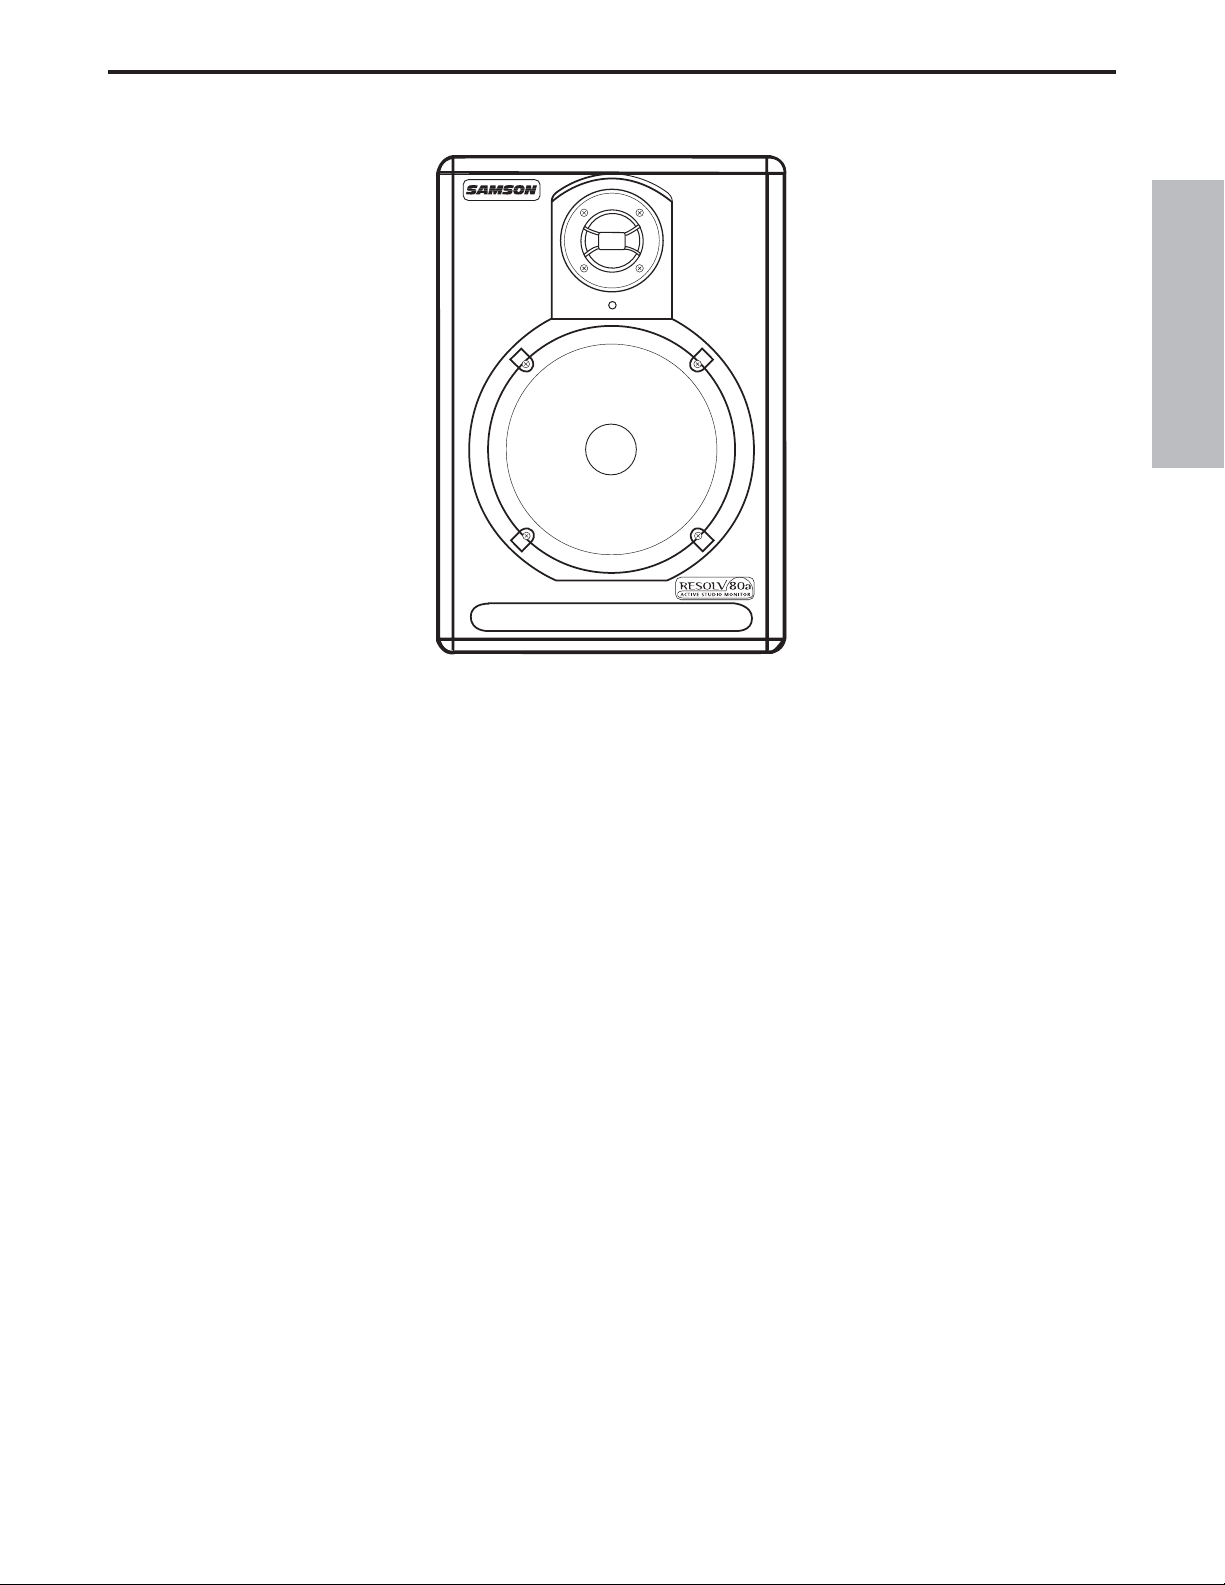
Thank you for purchasing the Samson RESOLV 80a Studio Reference Monitors. The Samson
RESOLV 80a is a self powered 100 Watt monitor featuring an extended range 8-inch (20.3
cm) copolymer woofer and a 1-inch ( 2.5 cm) titanium dome tweeter. The RESOLV 80a is an
ideal near field monitor system for studios, video post production suites, fixed installations or
where great sound is desired.
In these pages, you’ll find a detailed description of the features of the RESOLV 80a subwoofer,
as well as a guided tour through its control panel, step-by-step instructions for its setup and
use, and full specifications. You’ll also find a warranty card enclosed—please don’t forget to fill
it out and mail it in so that you can receive online technical support and so we can send you
updated information about these and other Samson products in the future.
With proper care and adequate air circulation, your RESOLV 80a will operate trouble free for
many years. We recommend you record your serial number in the space provided below for
future reference.
Serial number:
Date of purchase:
Should your unit ever require servicing, a Return Authorization number (RA) must be obtained
before shipping your unit to Samson. Without this number, the unit will not be accepted.
Please call Samson at 1-800-3SAMSON (1-800-372-6766) for a Return Authorization number
prior to shipping your unit. Please retain the original packing materials and if possible, return
the unit in the original carton and packing materials.
Page 5
3
ENGLISH
RESOLV 80a Features
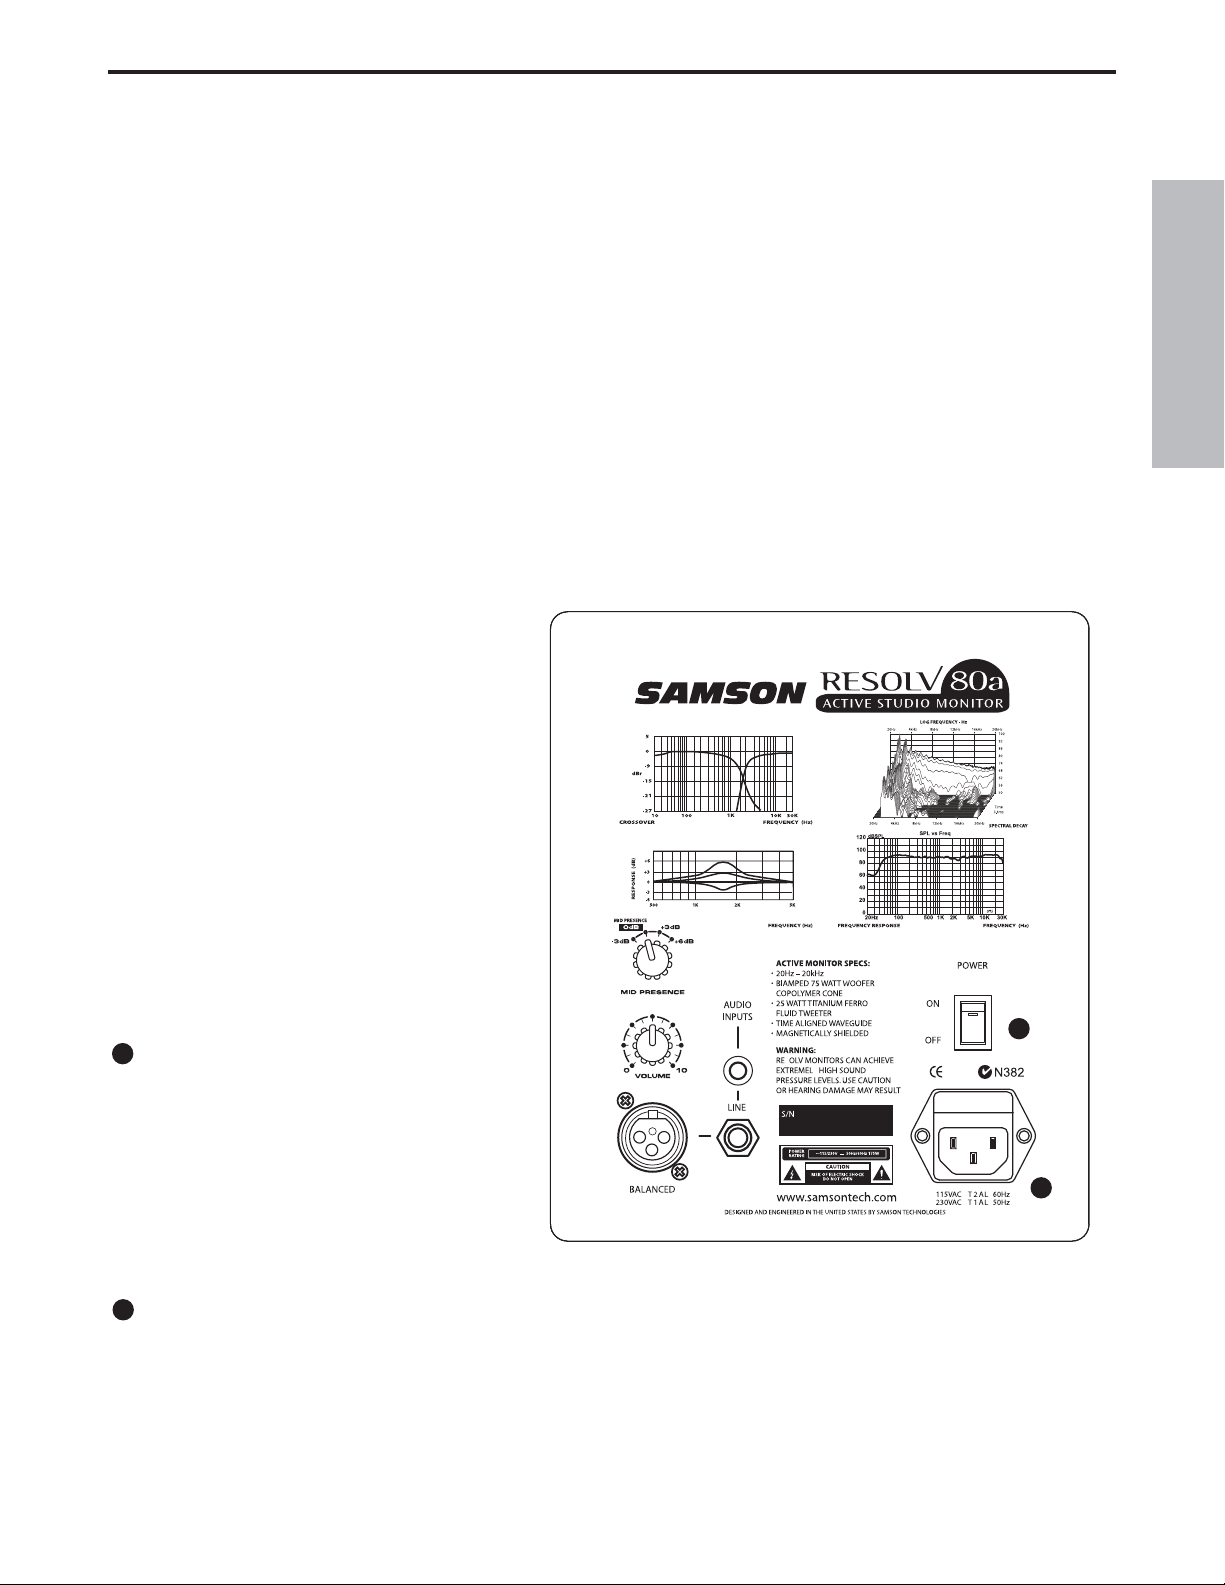
The Samson RESOLV 80a reference monitors provide a smooth response that is accurate, and at the same time
pleasant to listen to. Here are some of its main features:
•Two-way, active studio reference monitor with ported tuned enclosure providing extremely accurate monitoring for recording studio, post-production and multi-media applications.
•Eight inch (20.3 cm) Copolymer Butyl Surround woofer provides tight and controlled low frequency response.
•One inch (2.5 cm) Titanium Dome tweeter with Neodymium magnet, plus Heat-sink and FerroFluid Cooling provides smooth and sweet high frequency response.
•Bi-Amp Power with 75 watts on the LF driver and 25 watts on the HF driver.
• Four-position midrange Presence control allows the user to contour the response curve to emulate monitors from hi-fi, through flat and all the way to aggressive midrange nearfield.
• Active crossover utilizing a multi-pole design for linear response from bottom to top.
• XLR and 1/4-inch balanced inputs, as well as unbalanced RCA inputs make connecting to most
any -10 or + 4db signal source quick and easy.
• A/V shielded for multimedia applications providing clean operation near computer monitors.
• Solid MDF (Medium Density Fiberboard) construction, extremely rigid delivering maximum SPL.
•Black satin finish is attractive and durable thanks to the heavy textured epoxy paint.
• Three-year extended warranty.
®
Page 6
4
ENGLISH
RESOLV 80a Layout
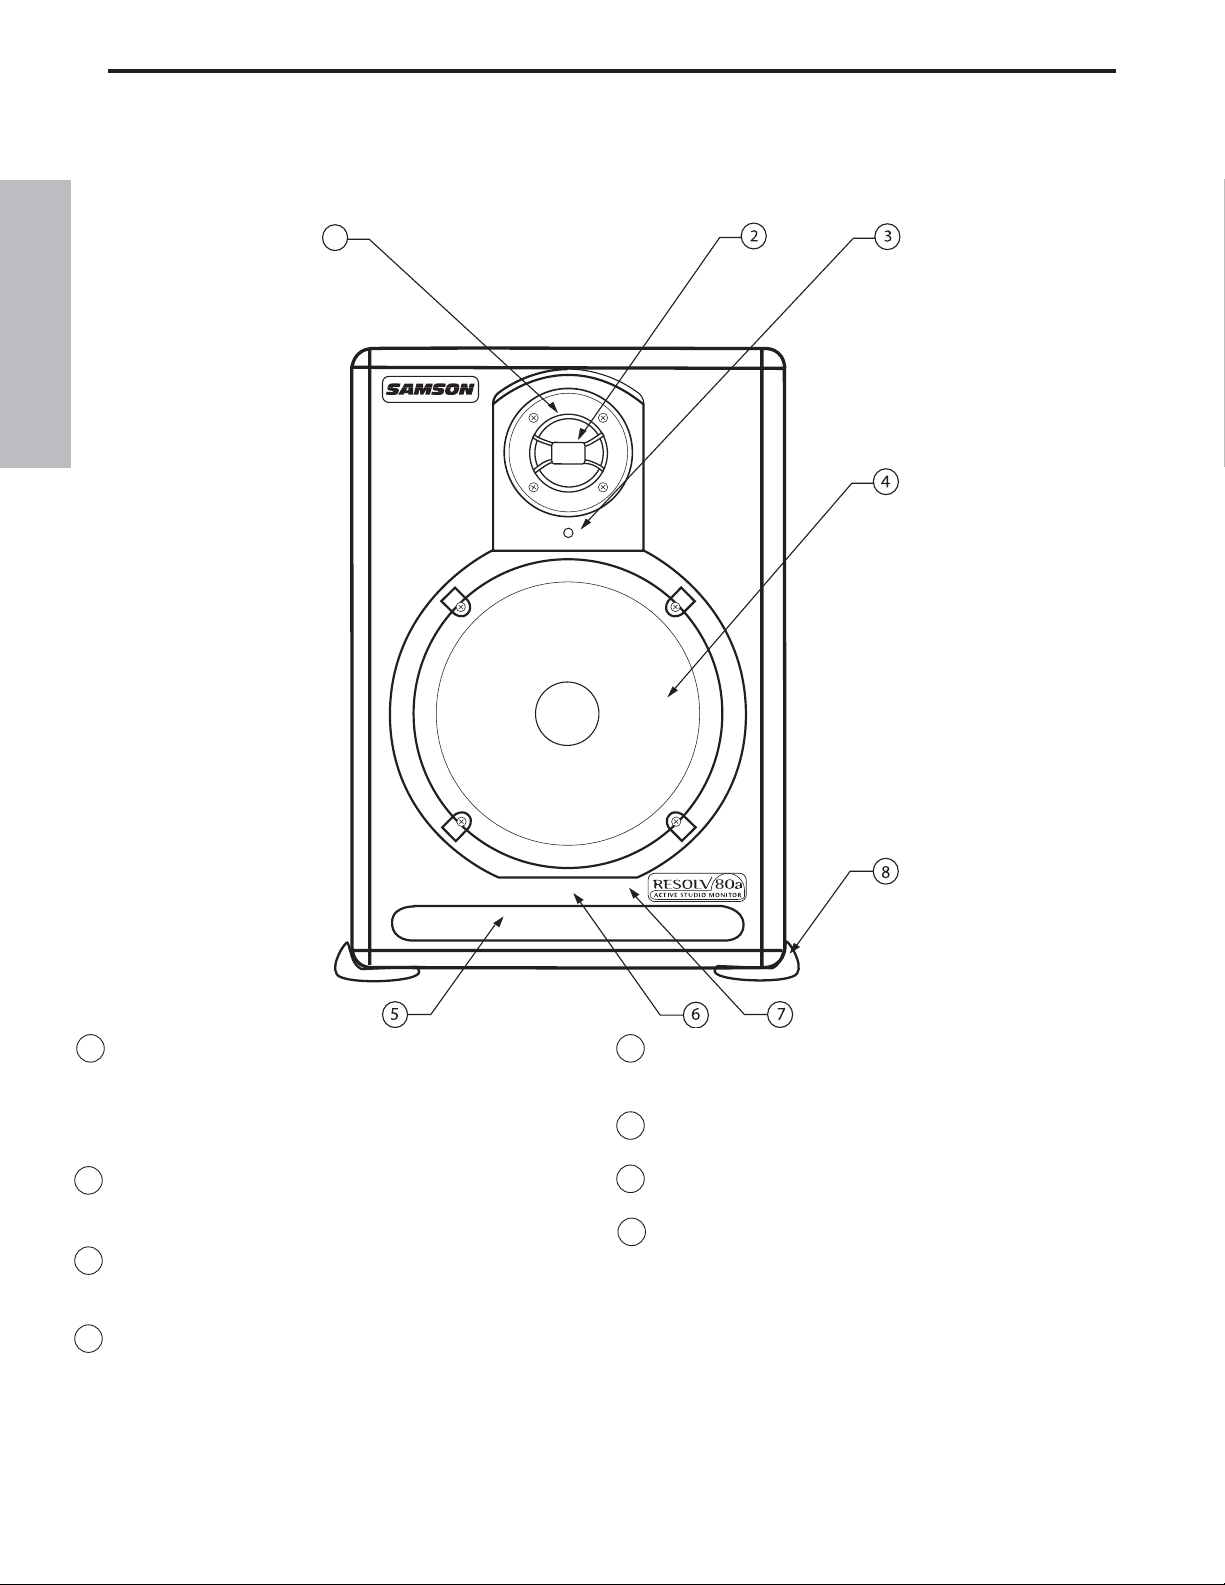
1 ONE-INCH (2.5 CM) TITANIUM DOME TWEETER -
Smooth high frequency response produced from
titanium dome, Neodymium Magnet with Ferrofluid plus Heat-sink cooling for high output.
2 PHASE PLUG- Insures even dispersion of the high
frequencies and improves off axis listening.
3POWER LED - Blue LEDilluminates indicating the
unit is powered on, ready for operation.
4 EIGHT-INCH (20.3 cm) LOW FREQUENCY DRIVER-
Heavy duty 6.5,” extended range low frequency
transducer.
5 TUNED PORT- Quiet port design offering linear
extended low frequency response.
6 ENCLOSURE- Rigid MDF construction.
7 FINISH - Sleek black textured finish.
8 NON-SKID FEET - Large rubber feet keep enclo-
sure in place even at high sound pressure levels.
.
Front View Layout
1
®
Page 7
5
ENGLISH
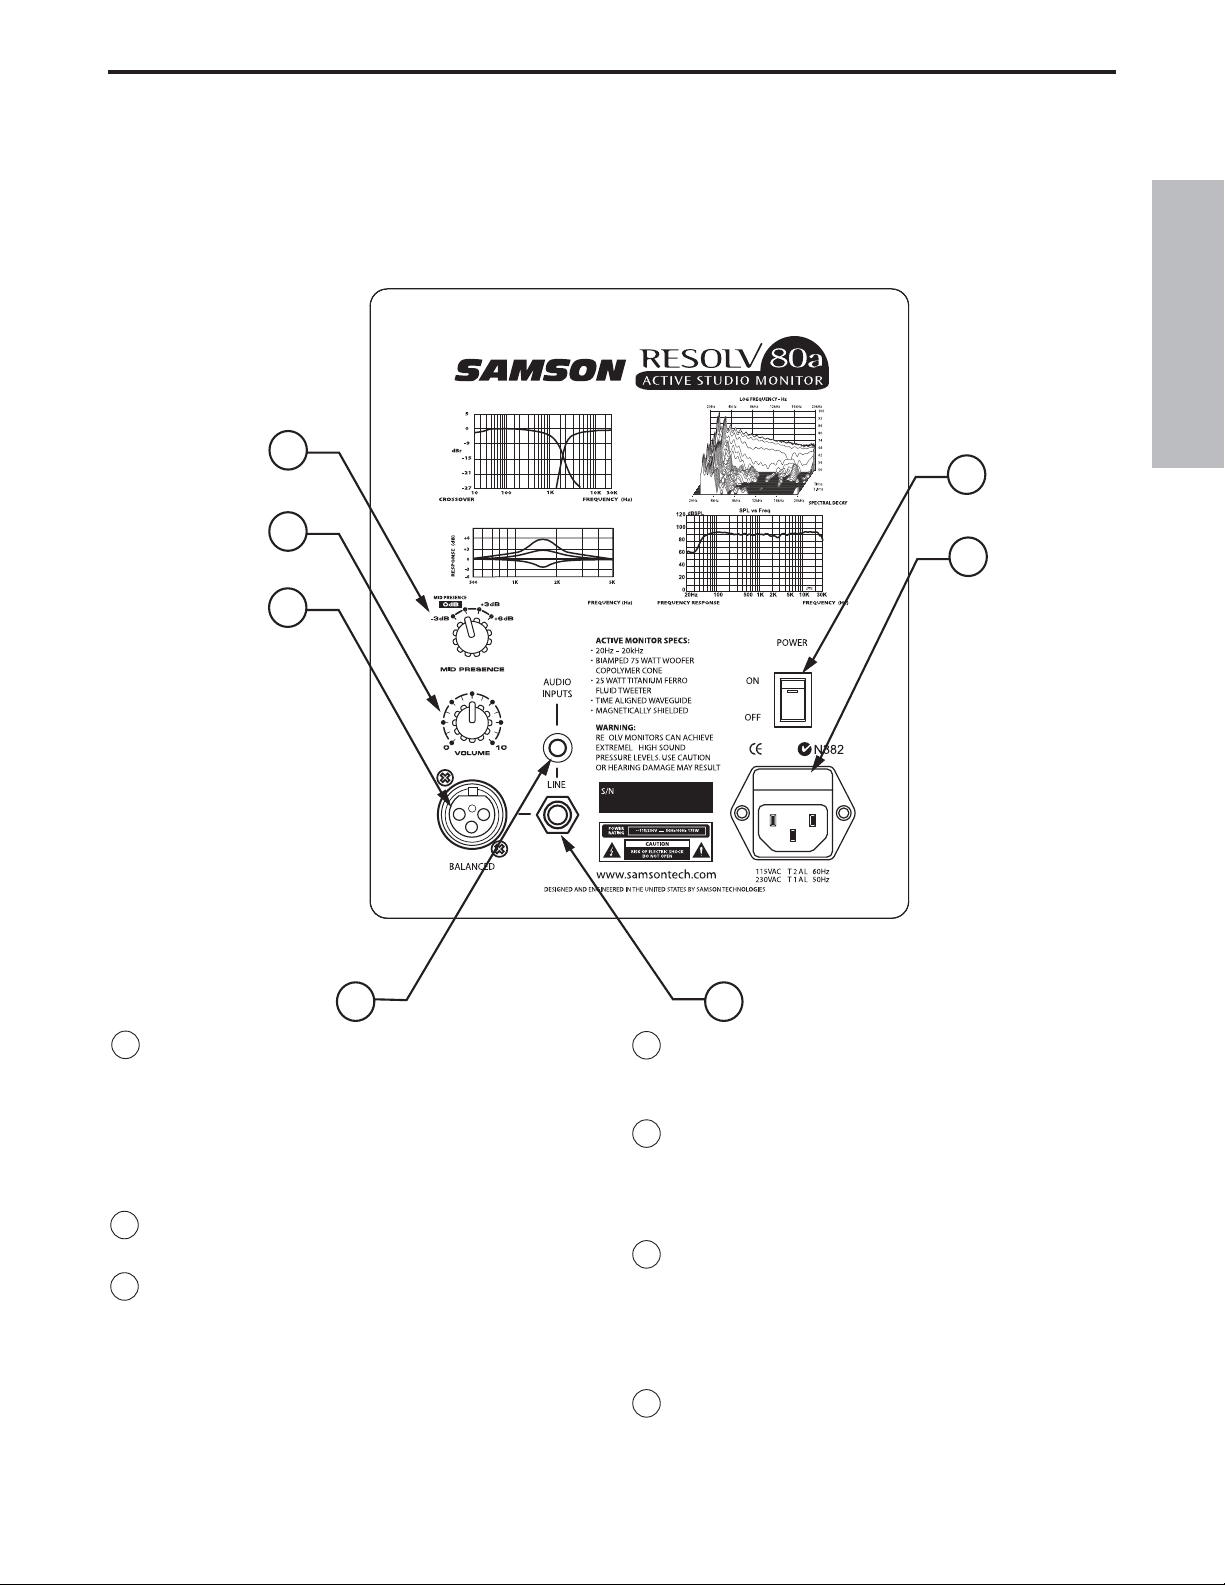
1 MID RANGE CONTOUR CONTROL – Four-posi-
tion switch used to adjust the midrange
response (in 3dB increments) providing customized voicing from hi-fi, to aggressive midrange, near-field monitoring.
2VOLUME- Controls the amount of output level.
3 XLR INPUT - Balanced, line level input is con-
nected here via standard XLR (microphone)
cable.
RESOLV 80a Layout
Rear Panel Layout
7
4RCA– Used to connect signals from unbalanced,
–10dBV devices.
5 1/4-INCH PHONE – Balance TRS (Tip, Ring,
Sleeve) 1/4-inch phone plug used to connect
balanced or unbalanced line level signals.
6POWER SWITCH– Main power switch. When set
to the on position, illuminates green indicating
the Resolv 80a is powered up and ready for
operation.
7AC INLET - Connect the supplied IEC power
cable here.
1
2
3
6
4
5
Page 8
6
ENGLISH
Setting up the RESOLV 80a
Background on the Resolv 80a Studio Reference Monitor
The Resolv 80a is a near field reference monitor featuring a custom designed, 20.3 cm copolymer, low
frequency driver and a 2.5 cm titanium tweeter, employing a Ferro fluid cooled voice coil and neodymium magnet. The monitor’s crossover has been carefully designed with high quality components insuring a linear frequency and phase response. The Resolv 80a enclosure is constructed from MDF
(Medium Density Fiberboard) and is finished in scuff resistant, textured paint. The monitor’s enclosure
also includes a tuned vent port that provides extended low-end response, and with a low turbulence
design, the low frequency driver can move freely with minimal effect on the overall impedance. On the
rear of the enclosure you’ll find Resolv 80a’s control panel, which features a variety of input connections including XLR balanced input, 1/4-inch TRS balance input and RCA unbalanced input. These
inputs are connected to Resolv 80a’s internal bi-amp power module providing 75 watts of power for the
low frequency woofer, an active crossover, and 25 watts of power for the high frequency tweeter. You
will also find the pre-amp controls, including VOLUME knob, used to adjust the overall level of the internal power amplifier, as well as the innovative MID PRESENCE control. This four-position switch allows
the mix engineer to contour the mid-range response of the monitor from a traditional hi-fi sound to flat
and then through two levels of aggressive mid-range response. The Resolv 80a has been designed to
provide flat, accurate monitoring, and at the same time, to provide an adjustable response curve so
that the sound of other popular nearfield monitors can be easily emulated.
Positioning the Resolv 80a
Near field monitoring has become
the choice of many engineers in
large and small studios because it
minimizes the effect of room
acoustics. This is especially important in today’s project studios since
the budget for room acoustics is
often close to nothing. By positioning the reference monitors in the
near field (close to the listeners),
you can greatly reduce the effects
of room acoustics. The most important considerations when evaluating
the effects of room acoustics are
reflective surfaces that are around
the monitoring area. These can
include flat tabletops, glass mirrors
or framed pictures, large open walls
and even the surface of your mixing
console. Mostly all reflecting sound
will eventually reach the listening position, but since it is slightly delayed from the direct source, the
result is random cancellation of some frequencies, or comb filtering. If possible, remove any and all
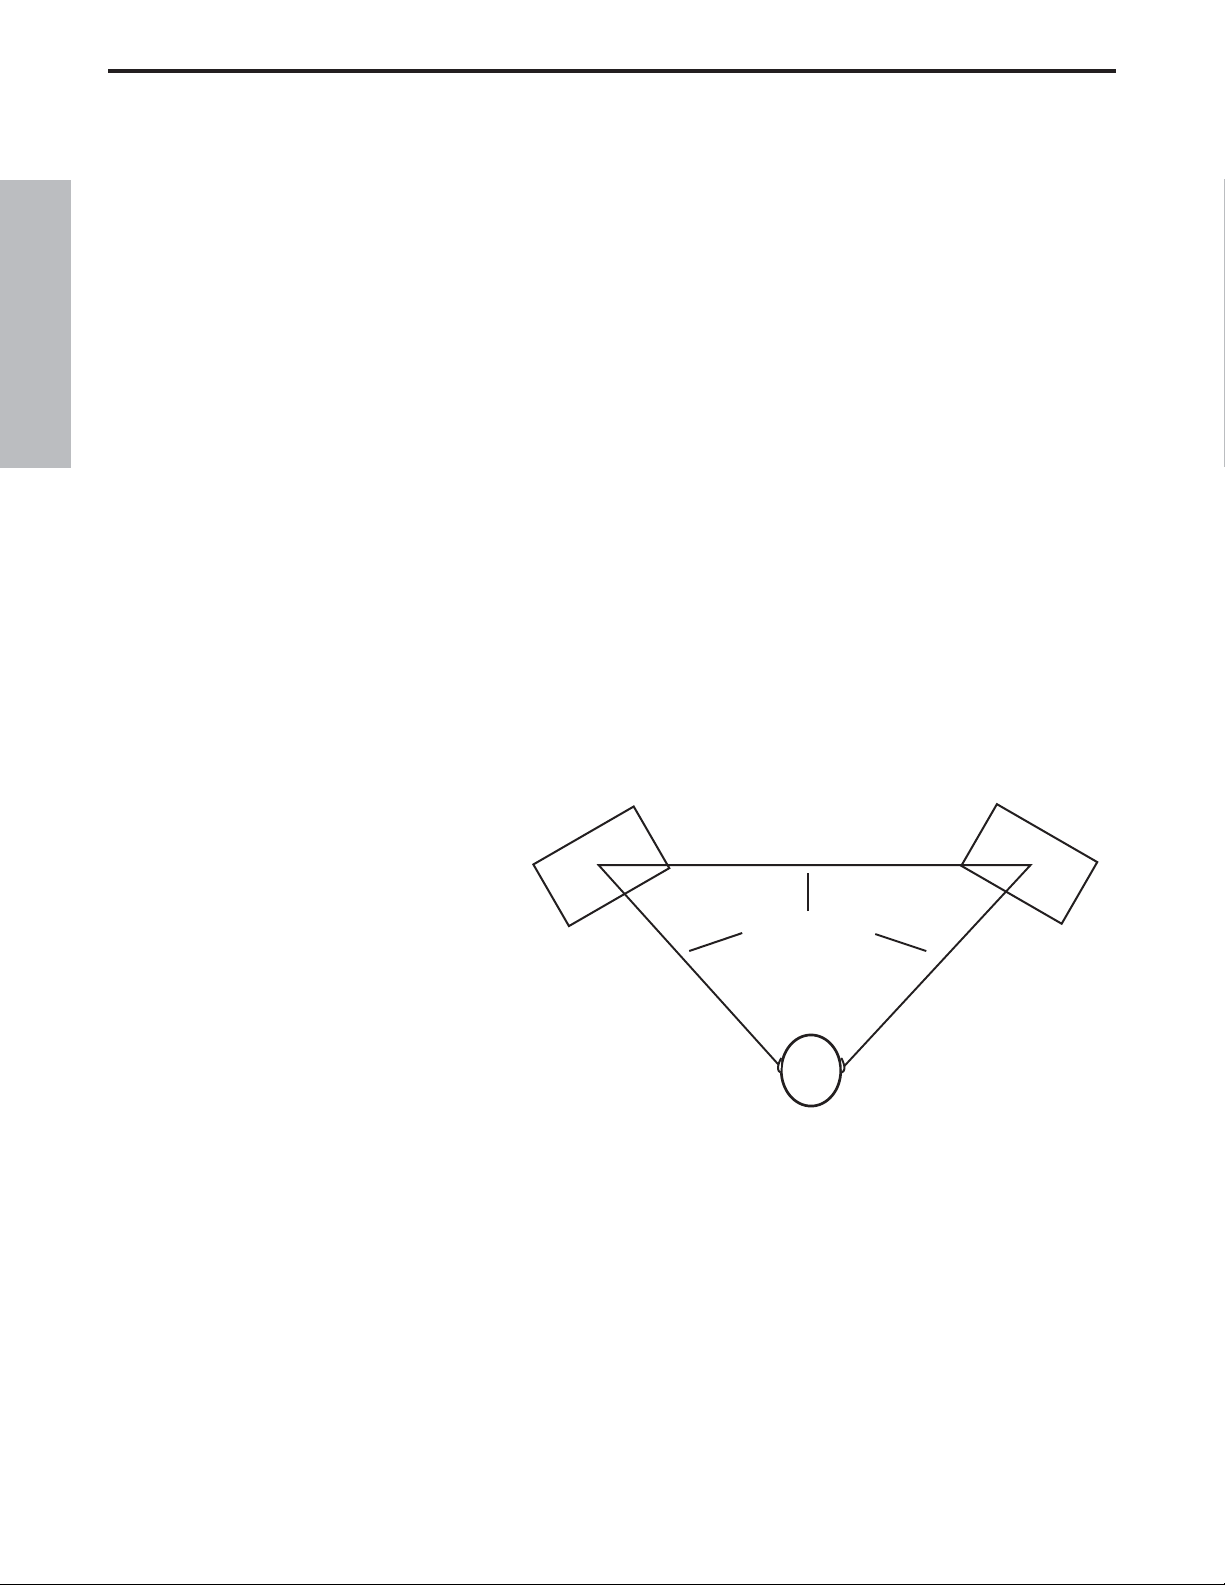
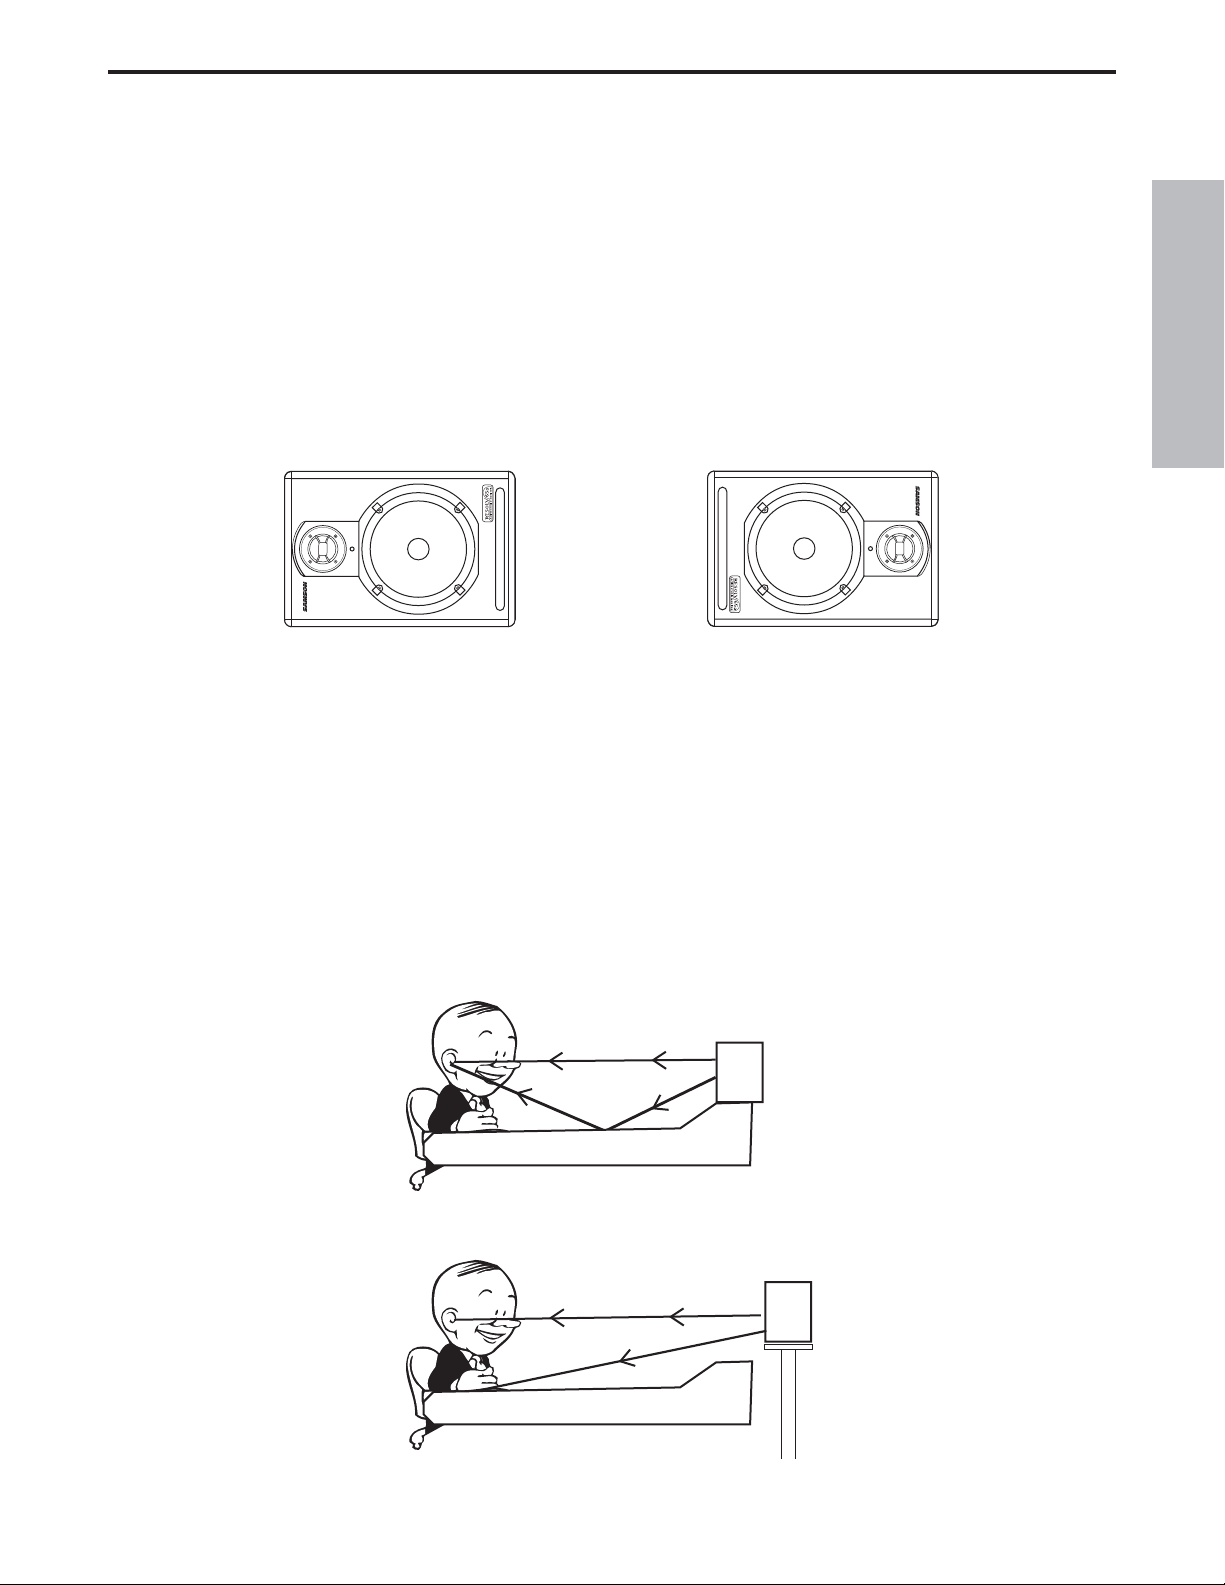
reflective surfaces. You may also want to hang some acoustic foam on walls that are close to the monitors. When positioning the monitors you’ll want to set up what is commonly referred to as the “mix triangle”. In this ideal configuration, the space between the left and right monitor is equal to the distance
from the listener to each monitor, forming an equilateral triangle. (Figure 1.)
Figure 1.
Equal Distance
Prime Listening Spot
Page 9
7
ENGLISH
Setting up the RESOLV 80a
A Moment of Reflection
When choosing the height of your monitor system, be careful to avoid reflections off the surface of the
mixing console. (Figure 3.) These reflections arrive at the listening position slightly delayed from the
original sound resulting in strange cancellations and overall unpredictable response. Visualize straight
lines representing the beams of sound radiating from the monitors and choose a height that reduces
the occurrence of reflections that will end up in the prime listening spot. (Figure 4.) In most cases, the
ideal position is slightly behind and above the mixing console’s meter bridge.
Figure 2.
Speaker Orientation
The Resolv 80a’s can be used in either the vertical or horizontal position. When using the monitors in
the horizontal position, be certain to place the left and right side tweeters on the outer most sides.
(Figure 2) This will improve the stereo imaging and bass response by increasing the coupling of the
low-end drivers.
Positioning the Resolv 65 - continued
Figure 3.
Figure 4.
®
®
Page 10
8
ENGLISH
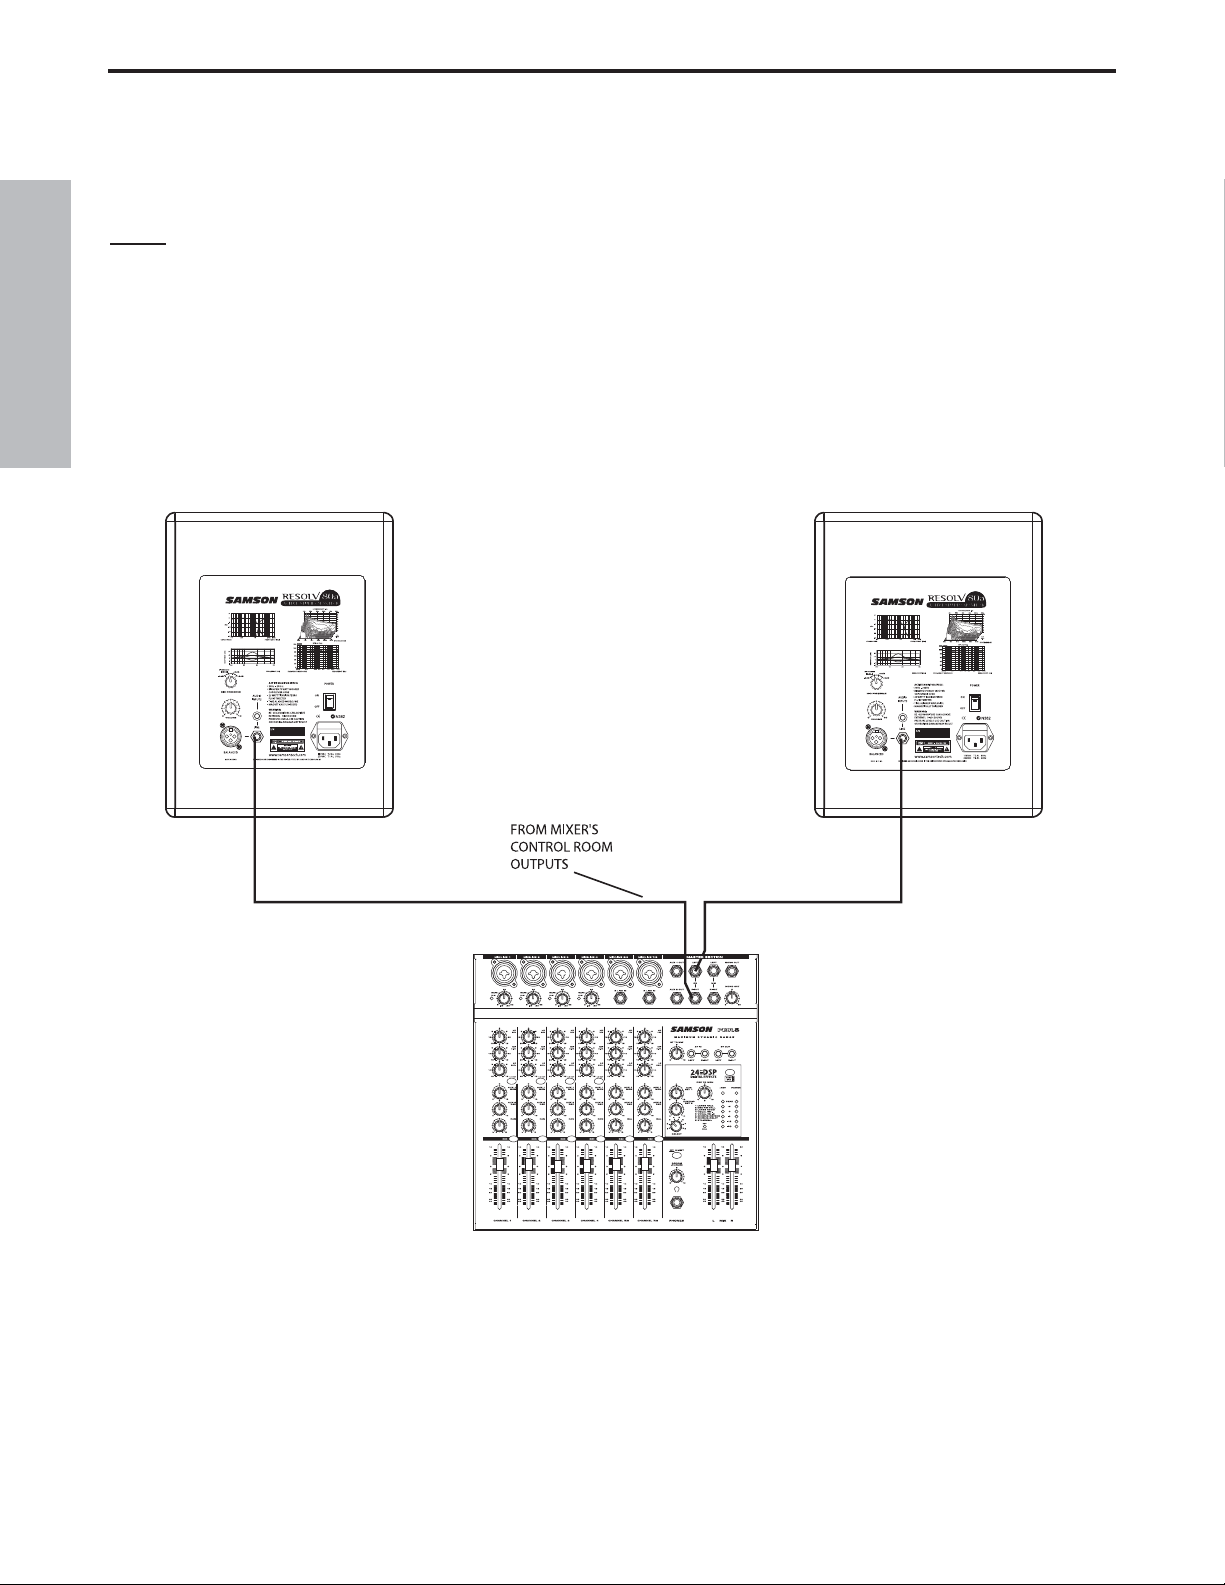
Connecting the RESOLV 80a
• Lower your mixer’s master outputs to all the way off.
• Connect the mixer’s left Control Room output to the left-side RESOLV 80a LINE INPUT and the
mixer’s right Control Room output to the right-side RESOLV 80a LINE INPUT.
• Set the Resolv 80a’s input Volume control to the 2 o’clock position.
• Run an audio signal (like some music from a CD) through your mixer and raise the Control
Room level to a comfortable listening level.
Resolv 80a Quick Connections
Note:
Before plugging in and turning on, remember the “last on first off” rule of power amplifiers (and
powered monitors). When powering up your system, be sure that all the wires are connected, turn your
mixer and any other outboard gear on, and then last turn your RESOLV 80a’s on. When powering
down, turn your RESOLV 80a’s off first and then your mixer and outboard gear.
The Resolv 80a connections can be made via one of the three rear panel Audio Inputs. You can use
RCA inputs for unbalanced -10dBV level signals, or either the 1/4-inch or XLR inputs for balanced
+4dBu level signals. Follow the simple steps and diagram below for a quick connection using a standard recording console’s control room outputs.
Page 11
9
ENGLISH
Operating the RESOLV 80a
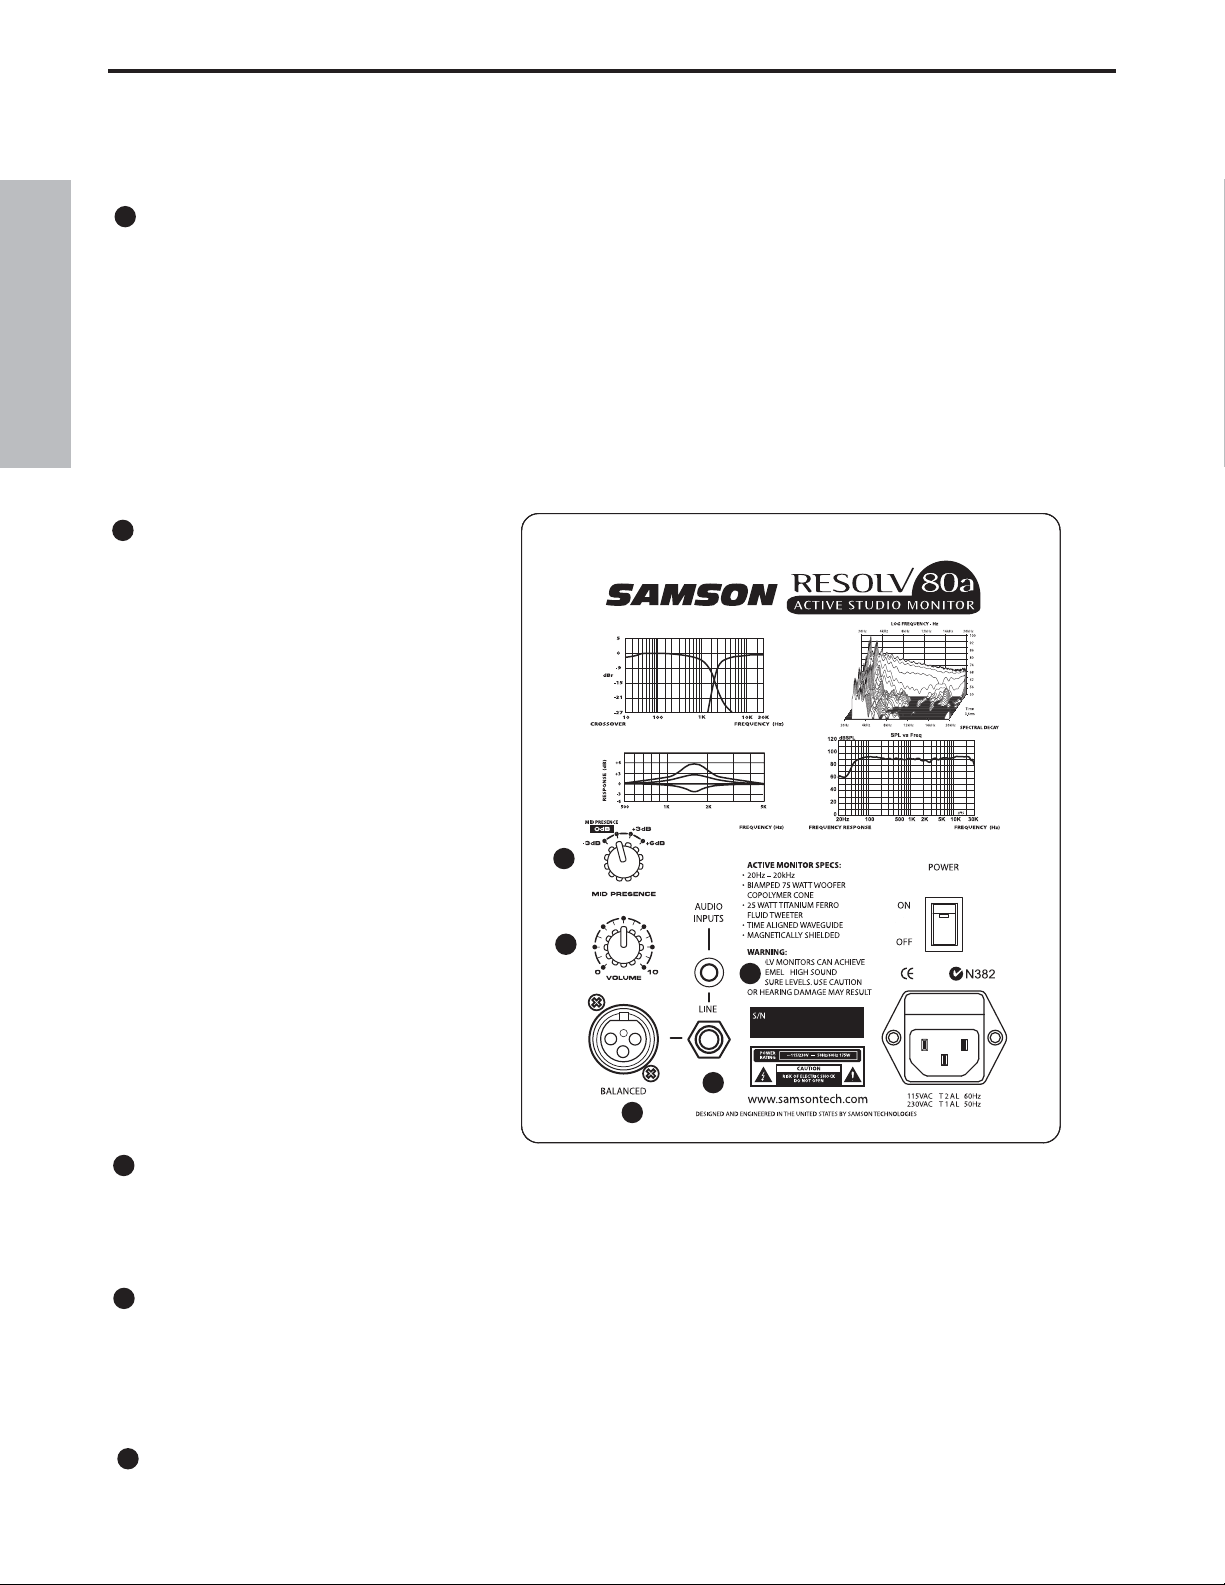
RESOLV 80a Control Panel
The Resolv 80a’s rear control panel is where you will make your connections for both AC power and
audio signals. The rear panel is also contains the controls to make adjustments to the overall volume
and frequency response curve. The following section details the rear panel controls and connections.
Powering the Resolv 80a
Since the Resolv 80a is an active studio monitor with an on-board power amplifier and electronic
crossover, it is necessary to connect the unit to an AC power supply. Make sure that the main Power
switch is set to the off position and connect the supplied IEC power cable into the AC inlet.
The Resolv 80a power amplifier features a Sleep Mode to conserve energy and extend the life of the
unit. The Sleep Mode is a low power, standby mode that will automatically engage when the unit
receives no input signal for 10 minutes. The Blue LED located on the front of the unit will turn off during this mode. The Resolv 80a will instantaneously wake up and achieve full power as soon as a signal is present at any of the inputs.
Things that go Hum!
When running power cables, be careful
not to run the AC power cords or AC
extension cords in parallel to your
input cables. This will help reduce any
AC hum that can be picked up. If your
have to cross an AC line with an audio
line, try to cross them at a 90 degree
angle for the least amount of induced
hum. Using the Resolv 80a’s balanced
input connectors will greatly protect
against the induced hum thanks to the
common mode rejection (the induced
hum is phase canceled) that its balanced input circuit provides.
POWER SWITCH – The POWER
switch is used to turn on the Resolv
80a’s active electronics. When set to
the on position, the internal LED will
illuminate green, indicating the Resolv
80a is powered up and ready for operation. The Resolv 80a also has a blue
LED which illuminates when the unit is
powered up.
AC INLET - Connect the supplied IEC power cable here.
The Resolv 80a’s rear panel provides two important controls for adjusting the overall sound of the
monitor, Mid-Presence and Volume. Eventually, you will adjust these controls to your preferable position and “set it and forget it”. That’s assuming that the monitors remain in the same spot, in the same
studio. If you take your monitors to other studios you may find the controls extremely useful in adjusting the sound for the new room.
1
2
2
1
Page 12
10
ENGLISH
Operating the RESOLV 80a
RESOLV 80a Control Panel - continued
MID PRESENCE CONTROL
The four-position Mid Presence control switch is used to adjust the mid-range response (in 3dB increments), providing customized voicing from hi-fi to aggressive mid-range, near-field monitoring. There
are many mix engineers that prefer the sound of near field monitors that have an aggressive midrange
response. In a typical recording, the mid range is often where many parts of the music compete for the
same frequency range. Having a slight ‘bump” is like having a microscope on the heavy traffic area.
You’ll find that the change is very subtle. The best way to set the controls is what sounds good to you.
Therefore, you should experiment with the various settings to find the combination of the Mid-Presence
and Volume controls you like. To do this play several CD’s of music that you are familiar with.
Remember, if you think you’re getting lost, the Resolv 80a is flat when the Presence control is set to
the “0” position.
VOLUME CONTROL
The volume control is used to adjust
the overall output level of the Resolv
80a. When operating the unit for the
first time, start with the volume control set all the way off. Slowly raise
the Volume control to reach a comfortable listening level.
The Ins and The Outs
The RESOLV 80a features a full complement of input connectors providing
easy installation with a variety of
audio devices like recording consoles, hard disk recorders, CD players and computer sound cards, to
name a few. The following section
details the Resolv 80a’s input connectors. In addition, there is a
detailed cable-wiring diagram on
page 12.
BALANCED XLR AUDIO INPUT -
The Resolv 80a features a female XLR connector that will accept balanced or unbalanced +4dBm line
level signal. If you are using a mixer that has balanced outputs on XLR connectors, you can make the
connections via standard XLR (microphone) cable.
1/4-INCH PHONE AUDIO INPUT – A balanced TRS (Tip, Ring, Sleeve) 1/4-inch phone plug is
used to connect balanced or unbalanced line level signals. The 1/4-inch input is a switching jack, so
when a 1/4-inch connector is inserted into the jack, the RCA and/or XLR inputs are switched off and
the 1/4-inch input is switched on. This provides a convenient patch point for quick insertion of a secondary signal source for testing or expanded operation.
RCA AUDIO INPUT – The RCA input accepts unbalanced signals used to connect signals from
unbalanced –10dBV devices.
5
6
7
5
6
7
4
3
4
3
Page 13
11
ENGLISH
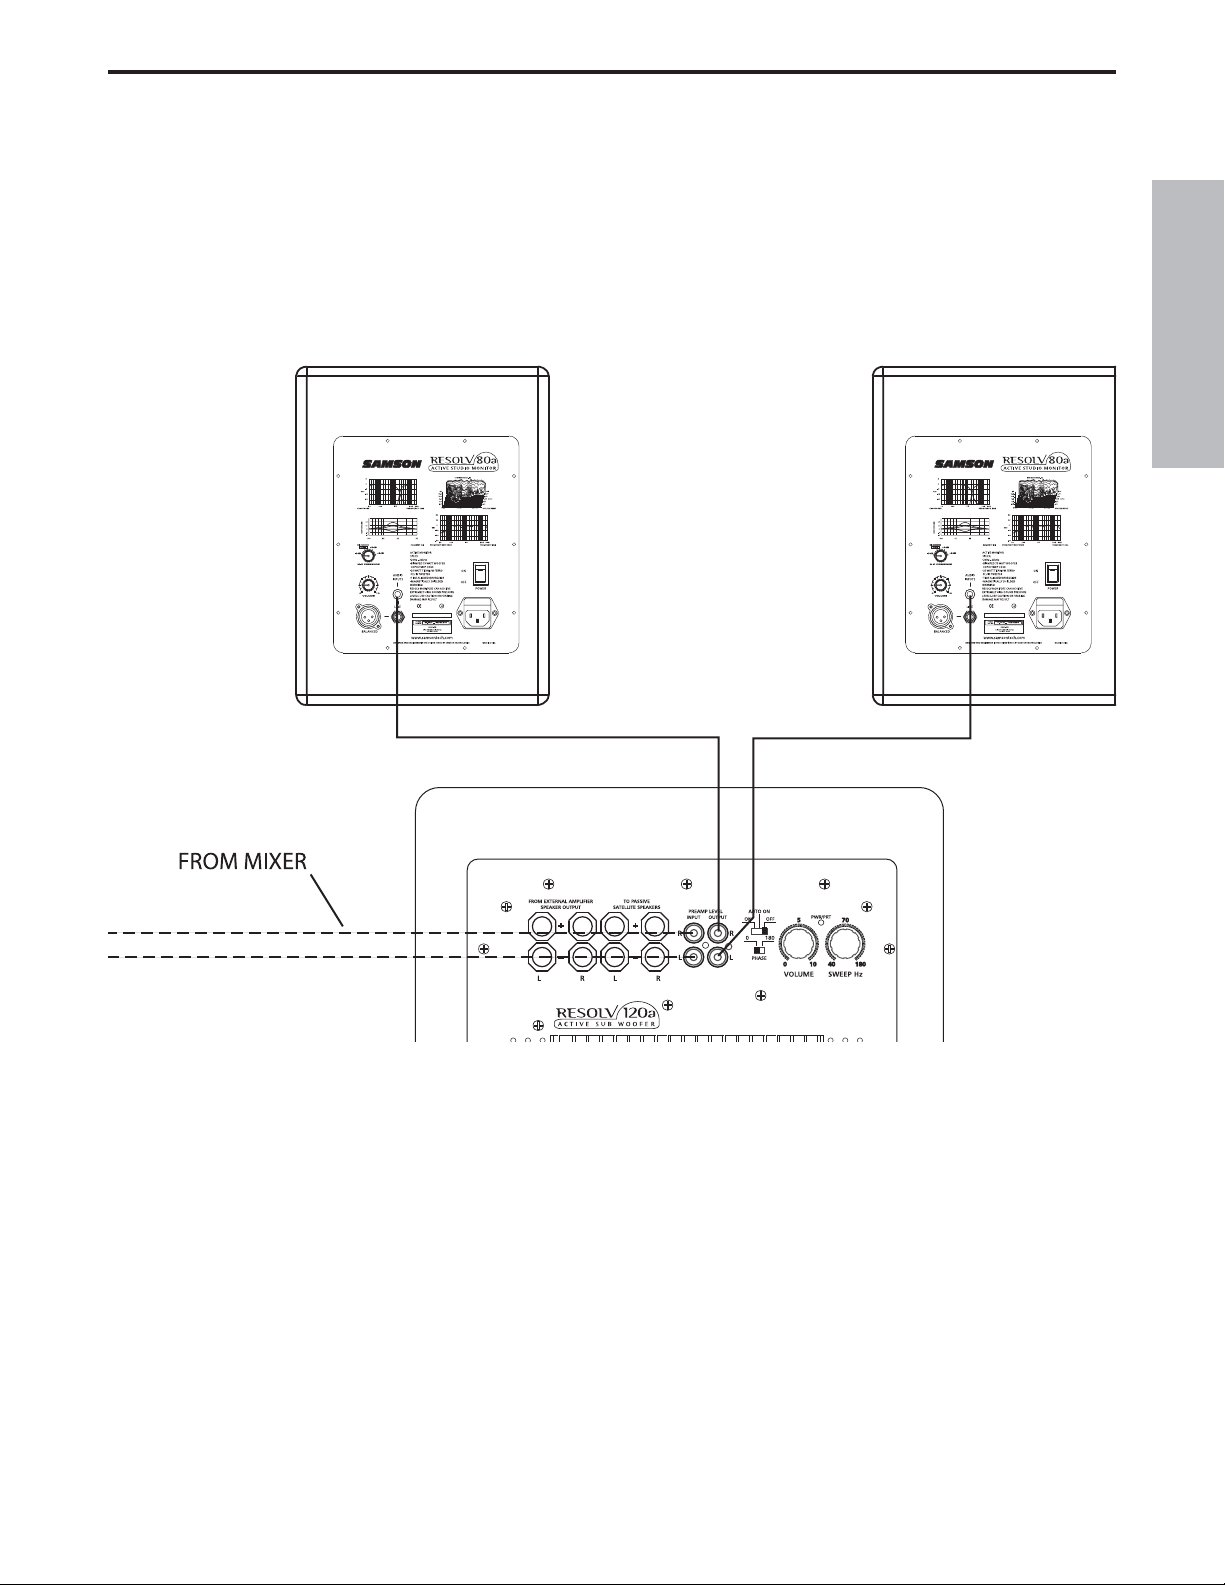
Connecting to the Resolv120a Subwoofer
Resolv 80a with Mono Sub
Adding a subwoofer and extended low frequency response to your Resolv 80a system is easy using
the RESOLV 80a’s LINE LEVEL inputs. Below is a typical system set-up using the RESOLV 120a with
a mixer and a pair of Resolv 80a’s satellite speakers. The RESOLV 80a’s inputs utilize industry standard RCA connectors. For a detailed wiring diagram, see the section “RESOLV 80a Connections” on
page 12. Follow the steps in the diagram below to set up your system.
• Lower your mixer’s master outputs to all the way off.
• Connect the mixer’s left output to the RESOLV 120’s LEFT LINE INPUT and the mixer’s right
output to the RESOLV 120’s RIGHT LINE INPUT. Now connect the RESOLV 120’s LEFT LINE
OUTPUT to the input of the left RESOLV 80a, and the RESOLV 120’s RIGHT LINE OUTPUT to
the input of the right RESOLV 80a.
• Run an audio signal (like some music from a CD) through your mixer and raise the level to a
comfortable listening level.
•Now adjust the SWEEP control to the desired frequency. Consult your studio monitors owner’s
manual for a recommended crossover point. You can also use your ears by adjusting the
SWEEP control to the frequency that sounds good to you. A good place to start is about 70 Hz.
-27
S/N
10 Inch Long Throw Transducer 120 Watt Amplifier
-27
S/N
Page 14
12
ENGLISH
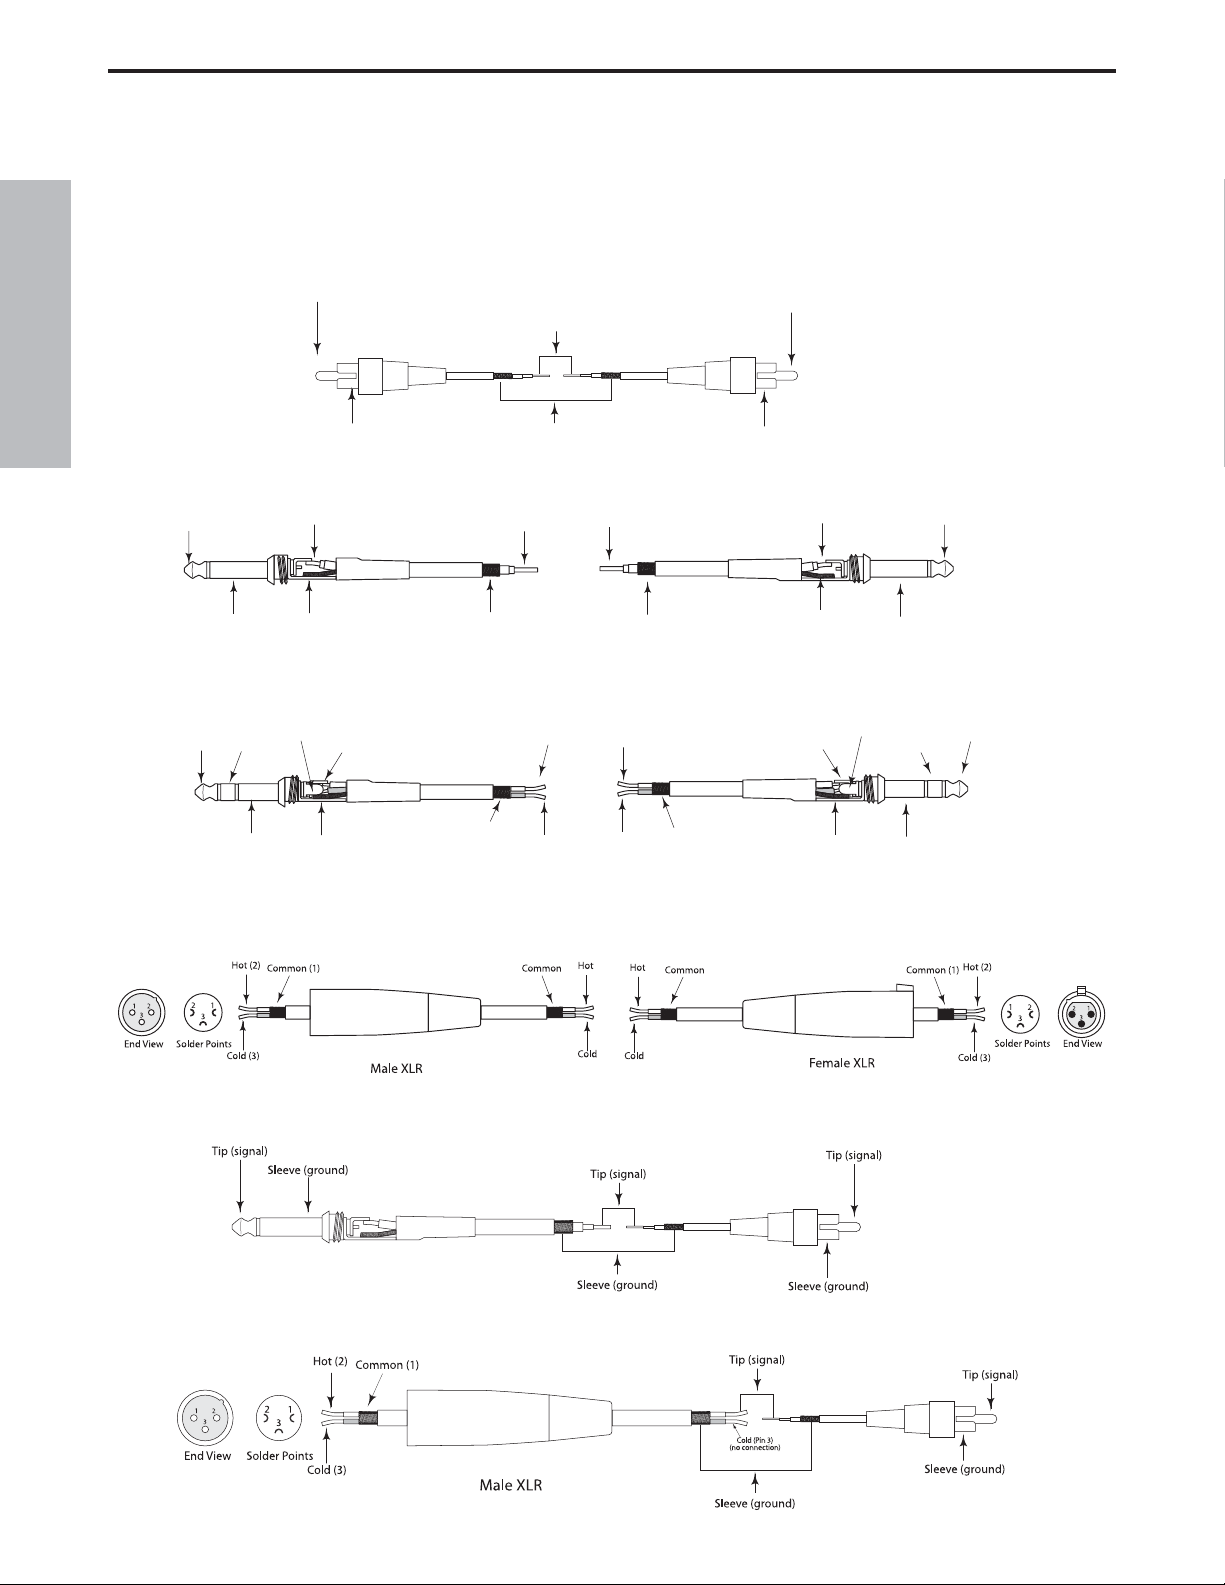
RESOLV 80a Connections
Unbalanced 1/4” to RCA Cable
Un-Balanced XLR to RCA Cable
RESOLV 80a Wiring Guide
There are several ways to interface the RESOLV 80a, depending on your exact monitoring set-up.
Follow the cable diagrams below for connecting your monitor system.
Balanced XLR to XLR Cable
Balanced 1/4” to 1/4” Cable
Un-Balanced 1/4” to 1/4” Cable
RCA to RCA Cable
Tip (signal)
Sleeve (ground)
Tip (signal)
Sleeve (ground)
Tip (signal)
Sleeve (ground)
Tip (signal)
Sleeve (ground)
Signal
Ground
Tip (signal)
Sleeve (ground)
Signal (tip)
Ground
Signal (ring)
Ring (signal)
Ground
Ground
Signal
Signal (ring)
Signal (tip)
Ground
Signal (tip)
Signal (ring)
Ground
Signal
Ground
Signal (tip)
Ground
Sleeve (ground)
Signal (ring)
Sleeve (ground)
Tip (signal)Signal
Ring (signal)
Tip (signal)
Page 15

13
FRANÇAIS
Introduction
Nous tenons à vous remercier d’avoir choisi les moniteurs de studio Samson RESOLV 80a.
Les moniteurs Samson RESOLV 80a sont actifs, bi-amplifiés (75 + 25 Watts), d’un Woofer de
20,3 cm avec membrane en copolymère et d’un Tweeter à dôme au titane de 25 mm. Les
RESOLV 80a sont d’excellents moniteurs de proximité pour les studios, la post-production
vidéo, les installations fixes nécessitant des écoutes d’une qualité parfaite.
Dans ces pages, vous trouverez une description détaillée de toutes les fonctions des moniteurs RESOLV 80a, ainsi qu’une description des réglages, des connexions, de son utilisation
et de ses caractéristiques techniques. Vous trouverez également une carte d’enregistrement
— n’oubliez pas de la remplir et de nous l’envoyer afin de recevoir notre lettre d’information et
de pouvoir accéder à notre service technique.
Installez et utilisez votre RESOLV 80a avec soin et veillez à assurer une ventilation suffisante.
Nous vous recommandons de noter le numéro de série du produit ci-dessous pour toute
référence ultérieure.
Numéro de série :
Date d’achat :
Si vous devez faire réparer l’appareil, vous devez tout d’abord obtenir un numéro de retour
auprès de Samson. Sans ce numéro, l’appareil sera refusé. Contactez Samson aux USA
au : 1-800-3SAMSON (1-800-372-6766) ou contactez votre revendeur. Les conditions de
garantie et de retour varient selon le pays de distribution. Conservez l’emballage d’origine et
utilisez-le pour tout retour en atelier.
Page 16

14
FRANÇAIS
Caractéristiques de moniteurs RESOLV 80a
Les moniteurs Samson RESOLV 80a offrent une réponse linéaire et précise tout en restant très agréables à
l’écoute. Voici les caractéristiques générales :
• Moniteur de studio actif deux voies avec baffle accordé offrant une écoute extrêmement fidèle
pour les studios d’enregistrement, de post-production et les applications multi-media.
•Woofer de 20,3 cm avec suspension en Copolymère Butyle pour une réponse précise et éten-
due dans les basses fréquences.
•Tweeter à dôme au titane de 2,5 cm avec aimant au Néodymium. La structure de refroidisse-
ment et l’assemblage Ferro-Fluid offrent une réponse douce et fidèle dans les aigus.
•Bi-amplification : 75 Watts pour le Woofer et 25 Watts pour le Tweeter.
• Réglage de présence des médiums à quatre positions permettant d’émuler la réponse
d’enceintes hi-fi, plates, ainsi qu’une accentuation sensible des médiums.
•Filtre actif multi-pôle pour une réponse linéaire sur toute l’étendue du spectre sonore.
•Entrées symétriques XLR et Jack 6,35 mm, et entrées asymétriques RCA permettant l’utilisa-
tion de signaux à -10 ou + 4 dB.
• Blindage magnétique pour les applications multimédia (utilisation près d’écrans vidéo).
• Baffle en panneaux de particules MDF, pour une puissance maximale exempte de vibrations.
•Finition noire satinée très robuste avec peinture ultra-résistante à base d’époxy.
• Garantie de 3 ans (variable selon le pays de distribution — consultez votre revendeur).
®
Page 17

15
FRANÇAIS
Présentation des moniteurs RESOLV 80a
1TWEETER À DÔME AU TITANE DE 25 MM -
Réponse douce dans les aigus assuré par le dôme au
titane, l’aimant Ferro-fluide au néodymium et le
radiateur de refroidissement pour une puissance de
sortie accrue.
2AXE DE MISE EN PHASE - Assure une dispersion
homogène des hautes fréquences et améliore
l’écoute hors-axe.
3 LED POWER - La Led bleue indique que le moniteur
est sous tension et prêt à l’utilisation.
4WOOFER DE 20,3 CM - Woofer de 20,3 cm à
réponse étendue dans les basses fréquences.
5 ÉVENT ACCORDÉ - Évent accordé offrant une
réponse linéaire étendue dans les basses
fréquences.
6BAFFLE - Baffle à panneaux de particules MDF.
7 FINITION - Superbe finition noire.
8 PIEDS ANTI-DÉRAPANT - Pieds en caoutchouc
de grande taille assurant l’ancrage parfait du
moniteur en présence de fortes pressions
sonores.
.
Face avant
1
®
Page 18

16
FRANÇAIS
1 RÉGLAGE DE LA RÉPONSE DANS LES
MÉDIUMS – Sélecteur à quatre positions perme-
ttant de modeler la réponse dans les basses
fréquences (par pas de 3 dB) et d’obtenir une
réponse similaire à celle d’enceintes hi-fi, ou
d’accentuer les médiums.
2VOLUME- Détermine le niveau général.
3 ENTRÉE XLR - Entrée XLR symétrique à niveau
ligne. Utilise un câble micro standard.
Présentation des moniteurs RESOLV 80a
Face arrière
7
4RCA– Permet la connexion de signaux
asymétriques à –10 dBV.
5 ENTRÉE JACK 6,35 MM – Jack stéréo 6,35 mm
symétrique (pointe, bague, corps) permettant la
connexion de signaux symétriques ou
asymétriques à niveau ligne.
6 INTERRUPTEUR SECTEUR – Interrupteur
secteur principal. En position ON, il s’allume en
vert, ce qui indique que le moniteur est sous
tension et prêt à l’utilisation.
7 EMBASE SECTEUR - Utilisez cette embase pour
connecter le cordon secteur fourni.
1
6
2
3
4
5
Page 19

17
FRANÇAIS
Configuration des moniteurs RESOLV 80a
Généralités sur les moniteurs de référence Resolv 80a
Les Resolv 80a sont des moniteurs de référence de proximité équipés d’un Woofer de 20,3 mm avec
membrane en Copolymère et d’un Tweeter au titane de 2,5 cm avec bobine Ferro fluide refroidie et
aimant au néodymium. Le filtre actif du moniteur a été conçu avec des composants de très haute qualité pour assurer une réponse en fréquence linéaire tout en minimisant les déphasages dans la zone de
transition. Le baffle du Resolv 80a est construit à base de panneaux de particules de moyenne densité
(MDF) recouverts d’une peinture ultra-résistante. Le baffle du moniteur est équipé d’un évent accordé
offrant une réponse étendue dans les basses fréquences avec une génération minimum de turbulences acoustiques : le Woofer peut se déplacer en toute liberté, avec une incidence minimale sur les
variations d’impédance. En face arrière, vous trouverez les réglages du Resolv 80a, comprenant de
nombreux connecteurs d’entrée, dont une embase XLR symétrique, un Jack stéréo 6,35 mm
symétrique et des entrées RCA asymétriques. Ces entrées sont directement reliées au module interne
bi-amplifié avec filtre actif du moniteur Resolv 80a, délivrant une puissance de 75 Watts pour le
Woofer, et 25 Watts pour le Tweeter. Les réglages du préamplificateur offrent un bouton de VOLUME
(permettant de régler le volume général du moniteur) et un sélecteur MID PRESENCE. Ce sélecteur à
quatre positions permet à l’ingénieur du son de modifier la réponse dans les médiums pour obtenir une
réponse semblable à celle d’enceintes hi-fi ou bien une réponse plate (en passant par deux réglages
de réponse des médiums). Le moniteur Resolv 80a a été conçu pour offrir une réponse plate et une
écoute précise et fidèle du signal. La modification de la réponse vous permet d’émuler facilement certains autres moniteurs du marché.
Positionnement du Resolv 80a
L’écoute de proximité est devenu le
moyen de contrôle privilégié par les
ingénieurs du son dans les studios de
petite ou de grande taille car ce type
d’écoute minimise l’incidence de l’acoustique de la pièce sur l’écoute. Ceci est
particulièrement important dans les studios de maquette d’aujourd’hui où le
budget de traitement acoustique de la
pièce d’écoute et très faible, voire nul.
En plaçant les moniteurs à proximité de
l’auditeur, vous réduisez grandement
l’incidence de l’acoustique de la pièce
sur la sonorité globale. Le problème le
plus important dans l’acoustique de la
pièce vient des surfaces réfléchissantes
autour de la zone d’écoute. Celles-ci
peuvent être constituées de tables, miroirs ou cadres, murs de grandes dimensions, voire même la
surface de votre console de mixage. Les sons réfléchis atteignent l’auditeur d’une façon ou d’une
autre, mais les retards produits par les réflexions génèrent des déphasages sonores, atténuation de
certaines fréquences ou effets de filtres en peigne. Dans la mesure du possible, supprimez toutes les
surfaces réfléchissantes. Il est possible de tendre un tissu acoustique sur les murs près des moniteurs.
Il est important de créer un “triangle” d’écoute”. Grâce à cette configuration idéale, l’auditeur et les
moniteurs forment un triangle équilatéral parfait (Figure 1).
Figure 1.
Égale distance
Point d’écoute
Equal Distance
Prime Listening Spot
Page 20

18
FRANÇAIS
Configuration des moniteurs RESOLV 80a
Quelques réflexions...
Lorsque vous choisissez la hauteur de vos moniteurs, évitez de créer des réflexions sur la surface de
la console (Figure 3). Ces réflexions atteignent la position d’écoute avec un temps de retard qui crée
des annulations de fréquences et une réponse incontrôlables. Représentez-vous des lignes droites
représentant la projection du signal sonore en provenance des moniteurs et sélectionnez une hauteur
permettant de réduire les réflexions atteignant le point d’écoute (Figure 4). Dans la plupart des cas, la
position idéale correspond au point situé au-dessus et en arrière du bandeau de VU-mètres.
Figure 2.
Orientation des enceintes
Les moniteurs Resolv 80a peuvent être utilisés en position verticale ou horizontale. Lorsque vous
utilisez les moniteurs en position horizontale, assurez-vous de placer les Tweeter à l’extérieur des
enceintes (Figure 2). Ceci améliorera la définition stéréo et la réponse dans les basses en améliorant
le couplage des Woofers.
Positionnement des moniteurs Resolv 65 - suite...
Figure 3.
Figure 4.
®
®
Page 21

19
FRANÇAIS
Connexion des moniteurs RESOLV 80a
•Diminuez le niveau de sortie de votre console de mixage au minimum.
• Reliez la sortie Control Room gauche de la console à l’entrée LINE INPUT du moniteur
RESOLV 80a de gauche, et la sortie Control Room droite de la console à l’entrée LINE INPUT
du moniteur RESOLV 80a de droite.
• Réglez le volume des Resolv 80a en position 2 heures.
•
Utilisez le signal d’un CD pour réaliser les essais, augmenter le niveau de la sortie
Control
Room de la table de mixage jusqu’à obtenir un niveau d’écoute confortable.
Connexion rapide des moniteurs Resolv 80a
Remarque
: Avant de réaliser les connexions et de placer les enceintes sous tension, souvenez-vous
de la règle de mise sous/hors tension des équipements. L’appareil placé sous tension en dernier doit
être placé hors tension en premier. Avant la mise sous tension, assurez-vous que tous les câblages
sont corrects. Placez votre console de mixage sous tension ainsi que tous les équipements externes,
puis, en dernier, les moniteurs RESOLV 80a. Lors de la mise hors tension, placez les RESOLV 80a
hors tension en premier, puis la console de mixage et les équipements périphériques.
Les Resolv 80a utilisent trois formes d’entrées : RCA (signaux asymétriques à -10 dBV), ou les entrées
Jack 6,35 mm ou XLR pour les signaux symétriques à +4 dBu.
En provenance des
sorties Control Room
de la console de
mixage
Page 22

20
FRANÇAIS
Utilisation des moniteurs RESOLV 80a
Réglages des RESOLV 80a
La face arrière des Resolv 80a regroupe les connexions audio, l’embase secteur et les réglages de volume et de modification de la courbe de réponse.
Mise sous tension des Resolv 80a
Les Resolv 80a sont des moniteurs actifs avec amplificateurs de puissance et filtres actifs intégrés. Il
est donc nécessaire de les raccorder au secteur pour assurer leur fonctionnement. Assurez-vous que
l’interrupteur secteur de la face arrière est sur OFF avant de connecter le cordon secteur.
Les amplificateurs de puissance des Resolv 80a disposent d’un mode veille permettant d’économiser
l’énergie et d’augmenter la fiabilité des enceintes dans le temps. Le mode de mise en veille est
automatiquement activé en absence de signal pendant 10 minutes. La Led bleue située en façade
s’éteint pendant la veille. Les Resolv 80a sont placées automatiquement sous tension dès qu’un signal
est détecté sur l’une des entrées.
Ronflements
Veillez à toujours séparer les cordons
secteur des câbles audio pour éviter
toute induction de ronflement. Si vous
devez croiser les cordons, veillez à les
croiser avec un angle de 90 degrés.
L’utilisation des entrées symétriques
des Resolv 80a évite l’apparition de
ronflements induits par les câbles (le
déphasage de la ligne symétrique
annule en effet ces ronflements).
INTERRUPTEUR SECTEUR –
L’interrupteur secteur POWER permet
de placer les moniteurs sous/hors tension. Lorsque les enceintes sont sous
tension, la Led de l’interrupteur
s’allume en vert. Les Resolv 80a sont
également équipées d’une Led bleue
située en face avant allumée lors du
fonctionnement.
EMBASE SECTEUR - Utilisez cette
embase pour connecter le cordon
secteur fourni.
La face arrière des Resolv 80a
regroupe deux fonctions importantes permettant de régler le volume et la courbe de réponse des
enceintes. Vous pouvez modifier ces réglages selon votre souhait. Vous n’avez plus à modifier ces
réglages tant que les enceintes restent dans la même position et dans le même studio. Si vous utilisez
vos moniteurs dans un lieu différent, il vous suffit de modifier les réglages en fonction de l’acoustique
de la pièce.
1
2
2
1
Page 23

21
FRANÇAIS
Utilisation des moniteurs RESOLV 80a
Réglages des moniteurs RESOLV 80a - suite...
RÉGLAGE DE PRÉSENCE DES MÉDIUMS
Le sélecteur à quatre positions Mid Presence permet de modifier la réponse dans les médiums de
l’enceinte (par pas de 3 dB), permettant d’obtenir une réponse de type “hi-fi” à une réponse avec des
médiums agressifs pour l’écoute de proximité. De nombreux ingénieurs du son préfèrent des moniteurs
de proximité avec une réponse agressive dans les médiums. Dans un enregistrement typique, les
médiums sont la partie du spectre sonore comprenant la plus grande densité d’informations sonores.
Une légère bosse dans les médiums permet de mettre en évidence la partie du spectre contenant le
plus d’informations. Vous verrez que la variation est très subtile. La meilleure façon de décider quel
réglage vous convient le mieux consiste à utiliser vos oreilles comme juge. Essayez les différents
réglages de médium et de volume pour trouver quelle configuration vous convient le mieux. Utilisez
des CD que vous connaissez bien.
En cas de doute, revenez à la position “0” du réglage de Presence.
VOLUME
Le volume détermine le niveau
sonore de l’enceinte. Lorsque vous
utilisez les moniteurs pour la première fois, placez le volume au minimum et augmentez progressivement.
Entrées et sorties
Les RESOLV 80a disposent de nombreux connecteurs d’entrées et de
sorties pour assurer une installation
simple avec de nombreux
équipements audio (consoles
d’enregistrement, enregistreurs D-tD, lecteurs de CD, cartes sons, etc.).
Les chapitres suivants décrivent avec
précision les connecteurs d’entrée
des Resolv 80a. Consultez également les plans de câblage de la page
12.
ENTRÉE AUDIO XLR SYMÉTRIQUE - Les Resolv 80a sont équipées d’une embase XLR femelle
acceptant des signaux symétriques ou asymétriques à niveau ligne +4 dBu. Si vous utilisez une console de mixage avec des sorties en XLR symétriques, il vous suffit d’utiliser un câble micro standard.
ENTRÉE AUDIO JACK 6,35 mm – L’entrée symétrique en Jack stéréo 6,35 mm (pointe, bague,
corps) vous permet d’utiliser des signaux d’entrée à niveau ligne symétriques ou asymétriques. Le connecteur est de type contacteur, de sorte que lorsque vous utilisez cette entrée, les signaux des entrées
RCA et/ou XLR sont coupés et le signal du Jack devient prioritaire. Ceci est un moyen pratique d’insérer rapidement un signal secondaire, par exemple.
ENTRÉE RCA – L’entrée RCA accepte les signaux asymétriques à niveau grand public (–10 dBV).
5
6
7
5
6
7
4
3
4
3
Page 24

22
FRANÇAIS
Connexion au Subwoofer Resolv120a
Moniteurs Resolv 80a avec Subwoofer mono
L’adjonction d’un Subwoofer permettant d’obtenir une réponse étendue dans le bas du spectre est très
simple : il vous suffit d’ajouter un Sub RESOLV 120a connecté aux entrées à niveau ligne des
Resolv 80a. Voici le plan de câblage type permettant d’utiliser le RESOLV 120a avec une console de
mixage et deux satellites Resolv 80a. Les entrées des RESOLV 80a sont au format RCA. Pour obtenir
un guide détaillé du câblage des entrées, consultez la page 12.
•Diminuez le niveau de sortie de votre console de mixage au minimum.
• Connectez la sortie gauche de la console de mixage à l’entrée LEFT LINE INPUT du
RESOLV 120, et la sortie droite de la console de mixage à l’entrée RIGHT LINE INPUT du
RESOLV 120. Reliez la sortie gauche LEFT LINE OUTPUT du RESOLV 120 à l’entrée du
RESOLV 80a de gauche, et la sortie droite RIGHT LINE OUTPUT du RESOLV 120 à l’entrée
du RESOLV 80a de droite.
•
Utilisez le signal d’un CD pour réaliser les essais, augmenter le niveau de la sortie
Control
Room de la table de mixage jusqu’à obtenir un niveau d’écoute confortable.
• Réglez maintenant la fréquence de coupure du filtre actif du Subwoofer sur 100 Hz (dans le cas
des RESOLV 80a). Si vous utilisez un autre Subwoofer, consultez son mode d’emploi. Vous
pouvez également utiliser le réglage SWEEP pour sélectionner la fréquence qui vous convient
le mieux à l’oreille
.
Depuis la console de mixage
-27
S/N
-27
S/N
Page 25

23
FRANÇAIS
Connexion des entrées des moniteurs RESOLV 80a
Câble asymétrique Jack 6,35 mm à RCA
Câble asymétrique XLR à RCA
Plan de câblages des moniteurs RESOLV 80a
Il y a différentes façons d’utiliser les moniteurs RESOLV 80a selon votre configuration matérielle.
Suivez les plans de câblage suivants correspondant à vos besoins.
Câble XLR/XLR symétrique
Jack 6,35 mm/Jack 6,35 mm symétrique
Jack 6,35 mm/Jack 6,35 mm asymétrique
Câble RCA/RCA
Tip (signal)
Tip (signal)
Tip (signal)
Sleeve (ground)
Sleeve (ground)
Tip (signal)
Sleeve (ground)
Signal
Ground
Signal
Ground
Tip (signal)
Ring (signal)
Sleeve (ground)
Signal (ring)
Signal (tip)
Ground
Ground
Signal (ring)
Signal (tip)
Ground
Signal (tip)
Signal (ring)
Ground
Sleeve (ground)
Signal
Ground
Signal (tip)
Ground
Sleeve (ground)
Signal (ring)
Sleeve (ground)
Tip (signal)Signal
Ring (signal)
Tip (signal)
Page 26

DEUTSCHE
24
Einleitung
Herzlichen Dank für den Kauf des Samson RESOLV 80a Studio Reference Monitors. Der
Samson RESOLV 80a ist ein aktiver 100 Watt Monitor, der sich durch einen 8" (20.3 cm)
Copolymer Woofer mit erweitertem Frequenzbereich und einem 1” (2.5cm) TitankalottenTweeter auszeichnet. Der RESOLV 80a ist das ideale Nahfeld-Monitorsystem für Studios,
Video-Nachbearbeitungen, Festinstallationen und alle Veranstaltungen, die Spitzensounds
erfordern.
Auf diesen Seiten finden Sie eine detaillierte Erläuterung der Funktionen des RESOLV 80a
Subwoofers sowie eine Führung durch das Bedienfeld, schrittweise Anleitungen für die
Einrichtung und Anwendung plus umfassende Spezifikationen. Bitte vergessen Sie nicht, die
beiliegende Garantiekarte ausgefüllt an uns zurück zu senden, damit Sie online technischen
Support erhalten und wir Ihnen zukünftig aktuelle Informationen über dieses und andere
Samson-Produkte zukommen lassen können.
Bei sorsamer Behandlung und angemessener Belüftung wird Ihr RESOLV 80a viele Jahre
störungsfrei arbeiten. Die Seriennummer Ihres Geräts sollten Sie sicherheitshalber in der Zeile
unten eintragen.
Seriennummer:
Kaufdatum:
Sollte Ihr Gerät einmal gewartet werden müssen, besorgen Sie sich vor der Rücksendung an
Samson bitte eine Return Authorization Number (RA) (Rückgabeberechtigungsnummer).
Ohne diese Nummer wird das Gerät nicht angenommen. Bitte rufen Sie Samson unter der
Nummer 1-800-3SAMSON (1-800-372-6766) an, um eine RA-Nummer vor der Rücksendung
zu erhalten. Heben Sie bitte das Original-Verpackungsmaterial auf und schicken Sie das
Gerät, falls möglich, im Originalkarton und mit dem Originalverpackungsmaterial zurück.
Page 27

RESOLV 80a Features
Die Samson RESOLV 80a Referenzmonitore bieten einen ausgewogenen Frequenzgang, der zudem präzise und
wohlklingend ist. Die wichtigsten Vorzüge sind:
• Aktiver 2-Weg Referenz-Studiomonitor mit abgestimmtem Gehäuse, der ein extrem präzises
Monitoring für Aufnahmestudios, Nachbearbeitungen und Multimedia-Anwendungen bietet.
•Eight inch (20.3 cm) Copolymer Butylen Surround Woofer für kompakten, kontrollierten Bass-
Frequenzgang.
• 1" (2.5 cm) Titankalotten-Tweeter mit Neodym-Magnet plus Kühlkörper und Ferroflüssig-
Kühlung für einen ausgewogenen, angenehmen Höhen-Frequenzgang.
•Bi-Amp-Leistung mit 75 Watt für den LF-Treiber und 25 Watt für den HF-Treiber.
• 4-Weg Mitten-Präsenz-Schalter ermöglicht das Anpassen der Frequenzkurve, um verschiedene
Monitore – von HiFi über linear bis hin zu aggressivem Mitten-Nahfeld – zu emulieren.
•Aktives Crossover mit Multipol-Technik für linearen Frequenzgang über das gesamte
Audiospektrum.
• Symmetrische XLR- und 1/4”-Eingänge sowie asymmetrische Cinch-Eingänge erlauben ein
schnelles und einfaches Anschließen fast jeder Signalquelle von -10 dB bis + 4 dB.
• A/V-Abschirmung für Multimedia-Anwendungen ermöglicht den störungsfreien Betrieb in der
Nähe von Computermonitoren.
•Massive, extrem stabile MDF (Faserplatten) Konstruktion für maximalen Schalldruckpegel.
•Attraktive und strapazierfähige schwarze Oberfläche im Satin-Dekor aus stark texturiertem
Epoxid-Lack.
• Erweiterte 3-Jahres-Garantie.
25
DEUTSCHE
®
Page 28

DEUTSCHE
26
RESOLV 80a Layout
1 1" TITANKALOTTEN-TWEETER - Ausgewogener
Höhen-Frequenzgang, erzeugt mittels Titankalotte,
Neodym-Magnet mit Ferro-Flüssigkeit plus Kühlkörper für hohe Ausgangsleistung.
2 PHASEN-AUFSATZ - Sorgt für ausgewogene Höhen-
Streuung und breiteren optimalen Hörbereich.
3POWER LED - Bei leuchtender blauer LEDist das
Gerät eingeschaltet und betriebsbereit.
4 EIGHT INCH (20.3 CM) BASS-TREIBER-
Hochbelastbarer 6,5” Bass-Wandler mit erweitertem
Bereich
5 ABGESTIMMTER PORT - Geräuscharme Port-Kons-
truktion für erweiterten linearen Bass-Frequenzgang.
6 GEHÄUSE - Massive Faserplatten-Konstruktion.
7 FINISH - Eleganter, schwarz texturierter Bezug.
8RUTSCHFESTE FÜSSE- Große Gummifüße sorgen
auch bei hohen Schalldruckpegeln für einen sicheren
Stand des Gehäuses.
Vorderseite
1
®
Page 29

1 MITTENKONTUR-REGLER – 4-Weg-Schalter
zum Einstellen des Mitten-Frequenzgangs (in 3
dB-Schritten) und angepasster Klangverläufe,
von HiFi bis Nahfeld-Monitoring mit aggr essiven
Mitten.
2VOLUME- Steuert den Ausgangspegel.
3 XLR INPUT - Symmetrischer Line-Pegel-
Eingang, Anschluss via standard XLR (Mikrofon)
Kabel.
RESOLV 80a Layout
Rückseite
7
4RCA/CINCH – Zum Anschließen von asym-
metrischen –10 dBV Geräten.
5 1/4-” KLINKEN-BUCHSE – Symmetrische TRS
(Tip, Ring, Sleeve) 1/4” Klinkenbuchse für symmetrische oder asymmetrische Signale.
6POWER-SCHALTER – Haupt-Netzschalter.
Leuchtet in der ON-Stellung grün, um anzuzeigen, dass der Resolv 80a eingeschaltet und
betriebsbereit ist.
7 NETZANSCHLUSS - Zum Anschließen des mit-
gelieferten IEC-Netzkabels.
27
DEUTSCHE
1
6
2
3
4
5
Page 30

DEUTSCHE
28
RESOLV 80a einrichten
Hintergrundinformationen zum Resolv 80a Referenz-Studiomonitor
Der Nahfeld-Referenzmonitor Resolv 80a verfügt über einen speziell entwickelten 6,5” Copolymer
Bass-Treiber und einen 1” Titan-Tweeter, der eine Schwingspule mit Ferro-Flüssigkeitskühlung und
einen Neodym-Magneten verwendet. Das Crossover des Monitors wurde mit hochwertigen Bauteilen
sorgfältig konstruiert und garantiert einen linearen Frequenz- und Phasengang. Das Gehäuse des
Resolv 80a besteht aus einer Faserplatte mittlerer Dichte (MDF) und ist mit einer kratzfesten, texturierten Schutzschicht überzogen. Das Monitorgehäuse besitzt auch einen abgestimmten Belüftungsport,
der einen erweiterten Tiefbass-Frequenzgang liefert, wobei der Basstreiber – dank NiedrigturbulenzTechnik – sich bei minimaler Wirkung auf die Gesamtimpedanz frei bewegen kann. Auf der GehäuseRückseite befindet sich das Bedienfeld des Resolv 80a, das über vielfältige Eingänge, inklusive XLR
symmetrisch, 1/4” TRS symmetrisch und Cinch asymmetrisch, verfügt. Diese Eingänge sind mit dem
internen Bi-Amp Modul des Resolv 80a verbunden, das 75 Watt Leistung für den Bass-Woofer, ein
aktives Crossover und 25 Watt Leistung für den Höhen-Tweeter bereitstellt. Hier finden Sie auch die
Preamp-Regler, inklusive VOLUME-Regler, mit dem Sie den Gesamtpegel der internen Endstufe einstellen können, sowie den innovativen MID PRESENCE-Regler. Mit diesem 4-Weg-Schalter kann der
Tontechniker bei der Mischung den Mitten-Frequenzgang des Monitors an einen herkömmlichen HiFiKlang, einen linearen Klang oder an zwei Varianten aggressiver mittenbetonter Klänge anpassen. Die
Konzeption des Resolv 80a ermöglicht also nicht nur lineares, präzises Monitoring, sondern auch einstellbare Frequenzkurven, mit denen sich die Klänge anderer beliebter Nahfeld-Monitore problemlos
emulieren lassen.
Resolv 80a positionieren
Viele Tontechniker in großen und kleinen Studios
bevorzugen das Nahfeld-Monitoring, da es den
Einfluss der Raumakustik verringert. Dies ist bei
den heutigen Projektstudios besonders wichtig, da
das Budjet für Raumakustik häufig gar nicht
existiert. Indem Sie die Referenz-Monitore im
Nahfeld (dicht am Zuhörer) aufstellen, können Sie
den Einfluss der Raumakustik stark verringern. Die
wichtigsten Erwägungen beim Abschätzen des
Raumakustik-Einflusses betreffen reflektierende
Oberflächen in der Umgebung des Abhörbereichs.
Dazu zählen flache Tischflächen, Glasspiegel oder
gerahmte Bilder, große offene Wände und sogar
die Oberfläche des Mischpults. Fast alle reflektierten Klänge treffen früher oder später an der
Abhörposition ein, aber da die Reflexionen im Bezug zum Direktschall verzögert eintreffen, werden
manche Frequenzen wahllos ausgelöscht – der Kammfilter-Effekt. Falls möglich, sollten Sie alle reflektierenden Oberflächen entfernen. Sie können auch Akustikschaum an Wänden im nahen Umfeld der
Monitore aufhängen. Beim Positionieren der Monitore sollten Sie ein sogenanntes “Mix-Dreieck” aufbauen. In dieser Idealkonfiguration entspricht der Abstand zwischen linkem und rechtem Monitor der
Entfernung vom Zuhörer zu jedem Monitor, woraus sich ein gleichschenkeliges Dreieck ergibt
(Abbildung 1).
Abbildung 1.
Equal Distance
Prime Listening Spot
Page 31

DEUTSCHE
29
RESOLV 80a einrichten
Ein Wort zu Reflexionen
Wenn Sie Ihr Monitorsystem in der Höhe ausrichten, sollten Sie unbedingt Reflexionen durch die Oberfläche des Mischpults vermeiden (Abb. 3). Diese Reflexionen kommen beim Hörer minimal später als
der Originalklang an, was zu seltsamen Auslöschungen und einem insgesamt unvorhersehbaren
Frequenzgang führt. Stellen Sie sich die vom Monitor ausgehenden Schallwellen als gerade Linien vor
und wählen Sie die Monitorhöhe so, dass möglichst wenig Reflexionen an der Haupt-Abhörposition
auftreten (Abb. 4). In den meisten Fällen liegt die ideale Position etwas hinter und über den Pegelanzeigen des Mischers.
Abb. 2.
Lautsprecherausrichtung
Sie können den Resolv 80a entweder in vertikaler oder horizontaler Stellung einsetzen. In der horizontalen Stellung sollten Sie die links- und rechtsseitigen Tweeter am äußeren Rand positionieren (Abb.
2). Dadurch verbessern Sie die Stereo-Abbildung und Bass-Betonung, da die Tiefbass-Treiber in ihrer
Wirkung gekoppelt sind.
Resolv 65 positionieren - Fortsetzung
Abb. 3.
Abb. 4.
®
®
Page 32

DEUTSCHE
30
RESOLV 80a anschließen
•Setzen Sie die Master-Ausgänge Ihres Mischers ganz zurück.
•Verbinden Sie den linken Control Room-Ausgang des Mischers mit dem linken LINE INPUT des
RESOLV 80a und den rechten Control Room-Ausgang mit dem rechten LINE INPUT.
•Stellen Sie den Input Volume-Regler des Resolv 80a auf 2 Uhr ein.
•
Schicken Sie ein Audiosignal
(z. B. eine Musik-CD) durch Ihren Mischer und stellen Sie den
Control Room-Pegel auf eine angenehme Abhörlautstärke ein.
Schnellanschluss des Resolv 80a
Anmerkung: Beim Anschließen und Einschalten sollten Sie die “Zuletzt ein/Zuerst aus” Regel für Endstufen (und Aktivmonitore) beherzigen. Beim Einschalten des Systems stellen Sie zunächst sicher,
dass alle Kabel angeschlossen sind, und schalten dann zuerst Ihren Mischer und alle anderen
Peripheriegeräte und zuletzt den RESOLV 80a ein. Beim Auschalten des Systems beginnen Sie mit
dem RESOLV 80a und fahren mit dem Mischer und den Peripheriegeräten fort.
Sie können den Resolv 80a über einen der drei rückseitigen Audio-Eingänge anschließen. Sie können
die Cinch-Eingänge für asymmetrische -10 dBV Signale bzw. die 1/4”- oder XLR-Eingänge für symmetrische +4 dBu Signale verwenden. Anhand der folgenden einfachen Schritte und des Diagramms
können Sie schnell eine Verbindung zu den Kontrollraum-Ausgängen eines normalen Mischers herstellen.
Page 33

31
RESOLV 80a bedienen
RESOLV 80a Bedienfeld
Auf dem rückseitigen Bedienfeld des Resolv 80a nehmen Sie die Strom- und Audiosignal-Anschlüsse
vor. Dieses Bedienfeld enthält auch die Regler zum Einstellen der Gesamtlautstärke und Frequenzgang-Kurve. Der folgende Abschnitt beschreibt die rückseitigen Regler und Anschlüsse.
Resolv 80a mit Strom versorgen
Da der Resolv 80a ein aktiver Studiomonitor mit integrierter Endstufe und elektronischem Crossover
ist, muss er an eine Netzsteckdose angeschlossen werden. Stellen Sie den Haupt-Power-Schalter auf
Off/Aus und verbinden Sie das mitgelieferte IEC Netzkabel mit dem Netzeingang.
Die Endstufe des Resolv 80a verfügt über einen Sleep-Modus, der Energie spart und die Lebensdauer
des Geräts verlängert. Der Sleep-Modus ist ein leistungsreduzierter Standby-Modus, der automatisch
aktiviert wird, wenn das Gerät 10 Minuten lang kein Signal empfängt. In diesem Modus leuchtet die
vorderseitige blaue LED nicht. Der Resolv 80a wacht sofort wieder zur vollen Leistungsfähigkeit auf,
sobald an einem der Eingänge ein
Signal anliegt.
Brummgeräusche!
Netzkabel oder Verlängerungskabel sollten nie parallel zu EingangssignalKabeln verlegt werden. Dadurch können
Sie Brumm-Einstreuungen durch das
Stromnetz verringern. Wenn sich
Netzkabel und Audiokabel kreuzen
müssen, sollte dies in einem Winkel von
90 Grad geschehen, um das induzierte
Brummen so gering wie möglich zu halten. Die symmetrischen Eingänge bieten
einen guten Schutz gegen induziertes
Brummen, da deren Gleichtaktunterdrückung das induzierte Brummen
durch Phasenumkehr auslöschen.
POWER-SCHALTER – Mit dem
POWER-Schalter schalten Sie die
aktive Elektronik des Resolv 80a ein. In
der ON-Position leuchtet die interne
LED grün – der Resolv 80a ist jetzt
eingeschaltet und betriebsbereit. Der
Resolv 80a besitzt auch eine blaue
LED, die ebenfalls leuchtet, wenn das
Gerät eingeschaltet ist.
AC INLET/NETZEINGANG - Zum Anschließen des mitgelieferten IEC-Netzkabels.
Auf der Rückseite des Resolv 80a befinden sich zwei wichtige Regler zum Einstellen des Gesamt-
klangs des Monitors: Mid-Presence und Volume. Sie werden diese Regler schließlich auf Ihre bevorzugte Position einstellen und dort belassen – vorausgesetzt, die Monitore bleiben an der gleichen
Stelle und im gleichen Studio. Wenn Sie die Monitore in einem anderen Studio aufbauen, werden
Ihnen diese Regler beim Einstellen des Klangs für den neuen Raum sehr gute Dienste leisten.
1
2
2
1
DEUTSCHE
Page 34

DEUTSCHE
32
RESOLV 80a bedienen
RESOLV 80a Bedienfeld - Fortsetzung
MID PRESENCE-REGLER
Mit dem 4-Weg Mid Presence-Schalter können Sie den Mitten-Frequenzgang (in 3 dB-Schritten) einstellen und angepasste Klangverläufe, von HiFi bis zu aggressivem, Mitten-betontem Nahfeld-Monitoring wählen. Viele Tontechniker bevorzugen bei der Mischung den Klang von Nahfeld-Monitoren mit
aggressivem Mitten-Frequenzgang. Bei einer normalen Aufnahme drängen sich viele musikalische
Parts im Mittenbereich. Eine leichte Überbetonung der Mitten wirkt wie eine mikroskopische Vergrößerung des Bereichs mit dem stärksten Frequenzverkehr. Die Änderung ist eigentlich sehr subtil. Stellen
Sie die Regler nach Gehör ein und experimentieren Sie mit den verschiedenen Einstellungen, um die
Kombination von Mid-Presence und Volume zu finden, die Ihnen gefällt. Spielen Sie einfach ein Paar
Musik-CDs ab, die Sie gut kennen. Im Zweifelsfall können Sie den Presence-Regler auf “0” setzen, um
den Resolv 80a wieder linear einzustellen.
VOLUME-REGLER
Mit dem Volume-Regler stellen Sie den
Gesamt-Ausgangspegel des Resolv 80a ein.
Drehen Sie den Volume-Regler vorm ersten
Betreiben des Monitors ganz zurück und
erhöhen Sie dann den Pegel auf eine
angenehme Abhörlautstärke.
Eingänge und Ausgänge
Der RESOLV 80a bietet eine breite Auswahl an
Eingängen, an die sich die verschiedensten
Audiogeräte, wie Aufnahmepulte, Hard DiskRecorder, CD Player und Soundkarten,
anschließen lassen. Die Eingänge werden im
folgenden Abschnitt detailliert beschrieben. Auf
Seite 12 finden Sie zudem ein
Verdrahtungsdiagramm.
SYMMETRISCHER XLR AUDIO-EINGANG
- Die XLR-Buchse des Resolv 80a kann symmetrische oder asymmetrische +4 dBm Line-Pegel-Signale verarbeiten. Bei einem Mischer mit sym-
metrischen XLR-Ausgängen können Sie die Verbindungen über normale XLR (Mikrofon) Kabel herstellen.
1/4” KLINKEN AUDIO-EINGANG – Über die symmetrische TRS 1/4” Klinkenbuchse können Sie
symmetrische oder asymmetrische Line-Pegel-Signale anschließen. Der 1/4” Eingang verfügt über
eine Schaltfunktion, die bei Belegung der Buchse die Cinch- und/oder XLR-Eingänge ausschaltet und
den 1/4” Eingang einschaltet. Dadurch erhalten Sie einen komfortablen Patch-Punkt zum schnellen
Einschleifen einer zweiten Signalquelle für Tests oder Betriebserweiterungen.
CINCH AUDIO-EINGANG – Über den Cinch-Eingang können Sie asymmetrische Signale von
–10 dBV Geräten einspeisen.
5
6
7
5
6
7
4
3
4
3
Page 35

DEUTSCHE
33
Anschluss an den Resolv120a Subwoofer
Resolv 80a mit Mono Sub
Über die LINE LEVEL-Eingänge des RESOLV 80a können Sie Ihrem Resolv 80a System einen
Subwoofer und damit einen erweiterten Tiefbass-Bereich hinzufügen. Es folgt ein typisches SystemSetup, bei dem der RESOLV 120a mit einem Mischer und einem Paar Resolv 80a SatellitenLautsprechern kombiniert ist. Die Ein- und Ausgänge des RESOLV 120a sind mit Cinch-Anschlüssen
gemäß Industriestandard bestückt. Ein detailliertes Verdrahtungsdiagramm finden Sie im Abschnitt
“RESOLV 80a Anschlüsse” auf Seite 12. Gehen Sie zum Einrichten des Systems wie folgt vor.
•Drehen Sie die Master-Ausgänge Ihres Mischers ganz zurück.
•Verbinden Sie den linken Mischerausgang mit dem LEFT LINE INPUT des RESOLV 120a und
den rechten Mischerausgang mit dem RIGHT LINE INPUT des RESOLV 120a. Verbinden Sie
dann den LEFT LINE OUTPUT des RESOLV 120a mit dem Eingang des linken RESOLV 80a
und den RIGHT LINE OUTPUT mit dem Eingang des rechten RESOLV 80a.
• Schicken Sie ein Audiosignal (z. B. eine Musik-CD) durch Ihren Mischer und stellen Sie den
Pegel auf eine angenehme Abhörlautstärke ein.
•Stellen Sie dann den SWEEP-Regler auf die gewünschte Frequenz ein. Schlagen Sie den em-
pfohlenen Crossover-Punkt im Handbuch Ihrer Studiomonitore nach. Sie können den SWEEPRegler auch nach Gehör auf die Frequenz einstellen, die am besten klingt. Ein guter Anfangswert ist 70 Hz.
-27
S/N
-27
S/N
Page 36

DEUTSCHE
34
RESOLV 80a Anschlüsse
Asymmetrisches 1/4”- auf Cinch-Kabel
Asymmetrisches XLR- auf Cinch-Kabel
RESOLV 80a Verdrahtung
Abhängig von Ihrem Monitoring-Setup können Sie den RESOLV 80a auf mehrere Arten ins System
integrieren. Gehen Sie nach den folgenden Verkabelungsdiagrammen vor, um Ihr Monitorsystem
anzuschließen.
Symmetrisches XLR- auf XLR-Kabel
Symmetrisches 1/4”- auf 1/4”-Kabel
Asymmetrisches 1/4”- auf 1/4”-Kabel
Cinch- auf Cinch-Kabel
Tip (signal)
Tip (signal)
Tip (signal)
Sleeve (ground)
Tip (signal)
Sleeve (ground)
Signal
Ground
Tip (signal)
Sleeve (ground)
Signal (tip)
Ground
Signal (ring)
Ring (signal)
Ground
Ground
Sleeve (ground)
Signal
Signal (ring)
Signal (tip)
Ground
Signal (tip)
Signal (ring)
Ground
Sleeve (ground)
Signal
Ground
Signal (tip)
Ground
Sleeve (ground)
Signal (ring)
Sleeve (ground)
Tip (signal)Signal
Ring (signal)
Tip (signal)
Page 37

35
ESPAÑOL
Introducción
Gracias por comprar los nuevos monitores de referencia para estudio Samson RESOLV 80a.
Este Samson RESOLV 80a es un monitor autoamplificado a 100 watios que dispone de un
woofer de 8” fabricado con polímeros y de rango ampliado y un tweeter convexo de 1” hecho
en titanio. El RESOLV 80a es un sistema de monitorización de campo próximo ideal para
estudios de grabación, salas de post-producción, instalaciones fijas o allí donde sea necesario
un buen sonido.
En estas páginas va a encontrar una descripción detallada de las características del monitor
RESOLV 80a, así como un recorrido guiado a través de su panel de control, instrucciones
paso-a-paso para su configuración y manejo y una completa tabla con sus especificaciones
técnicas. También encontrará una tarjeta de garantía—no olvide rellenarla y enviárnosla por
correo para que pueda recibir soporte técnico online y para que le podamos ofrecer información actualizada sobre este y otros productos de Samson en el futuro.
Con unos cuidados mínimos y una circulación de aire adecuada, su RESOLV 80a funcionará
sin ningún problema durante muchos años. Le recomendamos que en las líneas siguientes
anote su número de serie para cualquier consulta en el futuro.
Número de serie:
Fecha de compra:
En el improbable caso de que en algún momento tenga que reparar este aparato, deberá
solicitarnos un número de autorización de devolución (RA) para poder enviar su unidad a
Samson. Sin este número, ninguna unidad es aceptada en fábrica. Póngase en contacto con
Samson en el 1-800-3SAMSON (1-800-372-6766) para que le facilitemos este número de
autorización de devolución antes de enviarnos la unidad. Si es posible guarde el embalaje
original y los materiales de protección para devolvernos la unidad dentro de ellos.
Page 38

36
ESPAÑOL
Características del RESOLV 80a
Los monitores de referencia Samson RESOLV 80a le ofrecen una respuesta suave, precisa y a la vez agradable
al oído. Aquí tiene algunas de sus características principales:
• Un monitor de referencia activo de dos vías para estudios de grabción con un recinto abierto
que le ofrece una monitorización extremadamente precisa para estudios de grabación, salas de
post-producción y entornos multimedia.
•Woofer de 8" (20.3 cm) fabricado en polímero rodeado de butilo que ofrece una respuesta de
frecuencias graves compacta y controlada.
•Tweeter convexo de 1" (2.5 cm) fabricado en titanio con imán de neodimio, con sistema de
refrigeración de disipador de calor y fluido férrico para conseguir una respuesta en agudos
dulce y suave.
•Etapa de potencia bi-amplificada con 75 watios en el cabezal de graves y 25 en el de agudos.
• Control de presencia de rango medio de cuatro posiciones que permite al usuario moldear la
curva de respuesta para emular monitores desde los de tipo hi-fi, pasando por completamente
planos a la agresiva respuesta de rango medio de los de campo cercano.
• Crossover activo con un diseño multipolo para conseguir una respuesta linea de abajo a arriba.
• Entradas balanceadas XLR y de 6,3 mm, así como entradas RCA no balanceadas que per-
miten una fácil y rápida conexión a casi cualquier fuente de señal -10 o + 4 dB.
• Protección A/V para aplicaciones multimedia que permite un funcionamiento sin problemas al
lado de monitores de ordenador.
• Fabricación robusta en MDF (fibra de densidad media), para ofrecer el máximo nivel SPL con
una total rigidez y fiabilidad.
• Acabado en satinado negro de gran atractivo y solidez gracias a la textura de su pintura en
epoxy.
•Tres años de garantía.
®
Page 39

37
ESPAÑOL
Vista general del RESOLV 80a
1TWEETER CONVEXO DE 1" DE TITANIO - Una
respuesta en agudos suave y dulce gracias a su
cúpula de titanio, imén de neodimio con refrigeración de fluido férrido y disipador de calor para
una alta salida.
2TAPON DE FASE - Asegura dispersión equilibra-
da de agudos y mejora la escucha fuera de eje.
3 LED POWER - Un piloto azul que se ilumina para
indicar que la unidad está encendida, lista para
funcionar.
4CABEZAL DE GRAVES DE 8” - Transductor de
graves de 8”, gran resistencia y rango ampliado.
5 ABERTURA DE GRAVES- Un perfecto iseño de
abertura para ofrecer una respuesta en graves lineal y de mayor rango.
6CAJA ACUSTICA - Sólida construcción en MDF.
7ACABADO - Acabado liso de color negro.
8 SOPORTES ANTIDESLIZANTES - Grandes topes
de goma que hacen que el recinto acústico no se
mueva incluso a niveles de presión sonora muy
elevados.
.
Vista del panel frontal
1
®
Page 40

38
ESPAÑOL
1CONTROL CONTORNO RANGO MEDIO – Este
es un interruptor de cuatro posiciones que se
usa para ajustar la respuesta de rango medio (en
incrementos de 3 dB) lo que permite conseguir
un sonido personalizado desde hi-fi a un rango
medio agresivo, de monitorización cercana.
2VOLUME - Controla el nivel de salida.
3 ENTRADA XLR - Aquí puede conectar una
entrada balanceada de nivel de línea por medio
de un cable XLRstandard (micrófono).
Vista general del RESOLV 80a
Vista del panel trasero
7
4RCA– Esta entrada se usa para conectar señales
de unidades a -10 dBV, no balanceadas.
5 PHONE 6.3 MM – Conector TRS (punta, anillo,
lateral) balanceado que se usa para conectar
señales con nivel de línea balanceadas o no balancedas.
6 INTERRUPTOR POWER – Interruptor general de
encendido. Cuando lo coloque en la posición
ON se iluminará en verde para indicar que el
Resolv 80a está encendido y listo para su uso.
7 ENTRADA DE CA - Conecte aquí el cable de ali-
mentación IEC que se incluye.
1
2
3
6
4
5
Page 41

39
ESPAÑOL
Configuración del RESOLV 80a
Diseño e historia del monitor de referencia para estudio Resolv 80a
El Resolv 80a es un monitor de referencia de campo cercano que dispone de un cabezal de graves de 6.5”
fabricado en polímeros, con diseño exclusivo y un tweeter de 1” hecho en titanio, en el que se emplea una
bobina de voz refrigerada por fluido férrido y un imán de neodimio. El divisor o crossover del monitor ha
sido cuidadosamente diseñado con componentes de alta calidad para asegurar una respuesta de fase y
frecuencia lineales. El recinto acústico del Resolv 80a está construido con MDF (fibra de densidad media) y
está acabado con una resistente pintura. La caja del monitor también dispone de una boca o abertura que
ofrece una ampliación en la respuesta de graves, lo que unico a un diseño de baja turbulencia, hace que el
cabezal de graves pueda moverse libremente con un efecto mínimo sobre la impedancia global. En la parte
trasera de la caja encontrará el panel de control del Resolv 80a que dispone de una amplia gama de conexiones de entrada incluyendo una entrada XLR balanceada, una entrada TRS de 6.3 mm balanceada y una
RCA no balanceada. Estas entradas están conectadas al módulo de biamplificador interno del Resolv 80a
que le da 75 watios de potencia para el woofer de graves, un crossover activo, y 25 watios para el tweeter
de agudos. También encontrará los controles del previo, incluyendo un mando VOLUME, que se usa para
ajustar el nivel global de la etapa de potencia interna, así como el innovador control MID PRESENCEl.
Este interruptor de cuatro posiciones permite al técnico de sonido modelar la respuesta de rango medio del
monitor para cubrir una gama desde el tradicional sonido hi-fi, pasando por una respuesta plana hasta dos
niveles de respuesta agresiva de medios. El Resolv 80a ha sido diseñado para dar una señal de monitorización plana y precisa, y a la vez para ofrecer una curva de respuesta ajustable para que pueda emular el
sonido de otros monitores de campo cercano famosos.
Colocación del Resolv 80a
La monitorización de campo cercano se
ha convertido en la elección de muchos
técnicos tanto en estudios grandes como
en pequeños porque minimiza el efecto
de la acústica de la sala. Esto es muy
importante en los estudios de proyectos
de hoy en día dado que el presupuesto
que se suele contar para trabajar en la
acústica de la sala suele ser de cero.
Colocando los monitores de referencia
en el campo cercano (cerca del oyente),
puede reducir en gran medida el efecto
de esta acústica, siendo esto algo a
tener muy en cuenta cuando evaluamos
el efecto de la acústica sobre superficies
reflexivas alrededor de la zona de monitorización. Estas superficies pueden
incluir láminas planas, espejos o
cuadros, grandes paredes planas e incluso la propia superficie de la mesa de
mezclas. Prácticamente cualquier sonido reflejado llegará a la posición de escucha, pero dado que estará
ligeramente retardado con respecto a la fuente directa, el resultado será una cancelación aleatoria de algunas frecuencias, también llamado filtro de peine. Si puede, elimine todas estas superficies reflexivas.
También puede serle de ayuda colocar algún aislamiento acústico en las paredes más cercanas a los monitores. Cuando coloque los monitores le interesará colocarlos de la forma llamada habitualmente “triángulo
de mezcla”. En esta configuración ideal, el espacio entre los dos monitores debe ser igual a la distancia
desde cada uno de ellos al oyente, formando un triángulo equilátero. (Figura 1.)
Figura 1.
Equal Distance
Prime Listening Spot
Page 42

40
Configuración del RESOLV 80a
Un momento de reflexión
Cuando esté escogiendo la altura para su sistema de monitores, tenga cuidado para evitar las reflexiones
de la superficie de su mesa de mezclas (Figura 3). Estas reflexiones llegan a la posición de escucha con un
ligero retardo con respecto al sonido original produciendo unas extrañas cancelaciones y una respuesta
global impredecible. Piense en los rayos de la radiación del sonido como en líneas rectas que salen desde
los monitores y escoja una altura que le permita reducir la aparición de estas reflexiones que terminarán en
el punto de escucha. (Figura 4). En la mayoría de los casos, la posición ideal estará ligeramente por detrás
y encima del panel de medidores de la mesa de mezclas.
Figura 2.
Orientación de los altavoces
Puede usar el Resolv 80a tanto en vertical como en horizontal. Cuando utilice los monitores en la posición
horizontal, asegúrese de colocar los tweeters del lado izquierdo en la parte exterior de cada lado (Figura 2).
Esto mejorará la imagen stereo y la respuesta de graves, aumentando el acoplamiento de los cabezales de
super-graves.
Colocación del Resolv 65 - continuación
Figura 3.
Figura 4.
ESPAÑOL
®
®
Page 43

41
ESPAÑOL
Conexión del RESOLV 80a
• Coloque abajo del todo los controles de salidas master de la mesa de mezclas.
• Conecte la salida izquierda de sala de control de la mesa a la toma LINE INPUT izquierda del
RESOLV 80a y la salida derecha correspondiente de la mesa a la LINE INPUT de la derecha.
•Ajuste el control de volumen de entrada del Resolv 80a a la posición de las 2 en punto.
• Dé paso a una señal audio (música desde un CD, por ejemplo) a través de su mezclador y
suba el nivel de la sala de control hasta un volumen de escucha cómodo.
Conexiones rápidas del Resolv 80a
Nota: Antes de conectar la unidad y encenderla, recuerde la regla “el último en encender, primero en apagar”
de las etapas de potencia (y monitores autoamplificados). Cuando encienda su sistema, asegúrese de que
todos los cables estén conectados, encienda la mesa y el resto de unidades exteriores y al final encienda el
RESOL V 80a. Cuando apague todo, primero apague el RESOLV 80a y después el resto del equipo.
Puede hacer las conexiones del Resolv 80a a través de una de sus entradas audio del panel trasero.
Puede usar las entradas RCA para señales de -10 dBV de nivel, no balanceadas, o las entradas XLR o de
6.3 mm para señales a +4 dBm balanceadas. Siga los sencillos pasos y diagramas siguientes para hacer
una rápida conexión usando las salidas de sala de control de una mesa de mezclas standard.
Page 44

42
ESPAÑOL
Manejo del RESOLV 80a
Panel de control del RESOLV 80a
El panel de control trasero del Resolv 80a es el lugar en el que hará todas las conexiones para señales audio
y corriente. El panel trasero contiene también los controles para realizar ajustes en el volumen global y la
curva de respuesta de frecuencia. La sección siguiente le detalla los controles y conexiones de este panel.
Encendido del Resolv 80a
Dado que el Resolv 80a es un monitor de estudio activo con una etapa de potencia interna y un crossover
electrónico, debe conectar la unidad a una salida de corriente. Asegúrese de que el interruptor Power esté
colocado en la posición off y conecte el cable de alimentación IEC incluido a una salida de alterna.
La etapa de potencia dle Resolv 80a dispone de un modo Sleep para ahorrar energía y alargar la duración
de la unidad. Este modo es un modo standby de baja potencia que se activará automáticamente cuando la
unidad no reciba señal de entrada durante 10 minutos. El piloto azul que está situado en la parte frontal de
la unidad se apagará en este modo. El Resolv 80a se “despertará” instantáneamente y quedará totalmente
operativo tan pronto como haya una señal presente en cualquiera de sus entradas.
¡Elementos que producen zumbidos!
Cuando coloque cable de corriente, tenga
cuidado de no colocarlos estos ni otras
alargaderas en paralelo a sus cables de
entrada. Esto producirá un zumbido de alterna que puede ser captado por la unidad. Si
tiene que cruzar un cable de corriente por
donde pase una línea audio, trate de formar
ángulos de 90º al menos para reducir los
zumbidos. El uso de los conectores de entrada balanceados del Resolv 80a le protegerá
en gran medida de este zumbido inducido
gracias al modo de rechazo común (cancelación de fase del ruido inducido) que
ofrece su circuitería de entrada balanceada.
INTERRUPTOR POWER – Este inter-
ruptor se usa para activar los circuitos del
Resolv 80a. Cuando esté en la posición
ON, el piloto interno se iluminará en verde,
indicando que el Resolv 80a está encendido
y listo para funcionar. El Resolv 80a también dispone de un piloto de color azul que
se ilumina cuando la unidad está encendida.
ENTRADA DE CA -
Conecte aquí el
cable de corriente IEC que se incluye.
En el panel trasero del Resolv 80a encontrará dos controles muy importantes para el ajuste del sonido
global del monitor, Mid-Presence y Volume. Puede ajustar estos controles a la posición que más le gusto y
después “olvidarlos en esa posición”. Esto es así siempre y cuando los monitores vayan a quedar en la
misma posición del mismo estudio. Si se los lleva a otro estudio verá que estos controles le son de gran
utilidad para ajustar de nuevo el sonido de acuerdo a esa nueva sala.
1
2
2
1
Page 45

43
ESPAÑOL
Manejo del RESOLV 80a
Panel de control del RESOLV 80a - continuación
CONTROL MID PRESENCE
El control de cuatro posiciones Mid Presence se usa para ajustar la respuesta de rango medio (en pasos de
3 dB), lo que permite conseguir unos sonidos personalizados desde sonidos hi-fi a monitorización de rango
cercano, con un rango medio agresivo. Hay muchos técnicos de sonido que le gusta este último tipo de
sonido. En una grabación típica, el rango medio es habitualmente el que engloba a más partes de la música dentro de un mismo rango de frecuencia. El tener un ligero ‘realce’ allí es como tener una cámara que
amplíe una zona de tráfico denso. Observará que el cambio es sutil. La mejor forma de ajustar este control
es hacer que el sonido le guste a usted. Así pues, pruebe con los distintos ajustes para localizar la combinación entre los controles de volumen y presencia que quiera. Para conseguir esto, reproduzca varios CD
de música con los que esté familiarizado. Recuerde, si piensa que las cosas no están como quiere, siempre
puede volver a una respuesta plana cuando el control de presencia está en la posición “0”.
CONTROL VOLUME
Este control se utiliza para ajustar el
nivel de salida global del Resolv 80a.
Cuando use esta unidad por primera
vez, comience con el control de volumen abajo del todo. Vaya subiendo el
valor de este control hasta llegar a un
nivel de escucha cómodo.
Las entradas y salidas
El RESOL V 80a dispone de una amplia
gama de conectores de entrada que le
permiten una instalación muy sencilla
con una gran variedad de unidades
audio como mesas de mezclas,
grabadoras de disco duro, reproductores de CD y tarjetas de sonido, por
nombrar solo unos pocos. En la sección
siguiente le detallamos los conectores
de entrada del Resolv 80a. En la página
12 puede ver además un completo diagrama de cableado.
ENTRADA AUDIO XLR BAL-
ANCEADA -
El Resolv 80a dispone de un conector XLR hembra que aceptará una señal con nivel de línea
+4 dBm balanceada o no balanceada. Si está usando una mesa de mezclas que tenga conectores de salida XLR balanceados, puede hacer las conexiones por medio de cables XLR standard (micrófono).
ENTRADA AUDIO PHONE DE 6,3 MM – También tiene una entrada TRS (punta, anillo, lateral) de
6,3 mm que se usa para conectar señales de nivel de línea balanceadas o no balanceadas. Esta entrada
es un conector interruptor, por lo que cuando introduce aquí un conector, las entradas XLR y/o RCA quedan
desactivadas y la entrada de 6,3 mm queda activa. Esto le permite disponer de un punto de distribución de
señal muy útil para una rápida inserción de una segunda fuente de señal para tests o ampliaciones.
ENTRADA AUDIO RCA – La entrada RCA acepta señales no balanceadas y se usa para conectar
señales procedentes de unidades con nivel de –10dBV no balanceadas.
6
7
5
6
7
4
3
4
3
Page 46

44
ESPAÑOL
Conexión al subwoofer Resolv120a
Resolv 80a con Mono Sub
El añadir un subwoofer y ampliar así la respuesta en graves a su sistema Resolv 80a es muy sencillo usando las entradas LINVEL LEVEL del RESOLV 80a. Aquí abajo tiene una configuración típica de sistema en
el que se usa el RESOLV 120a con una mesa de mezclas y un par de altavoces satélites Resolv 80a. Las
entradas del RESOLV 80a utilizan conectores RCA standard. Si quiere ver un diagrama de cableado completo, vea la sección “Conexiones del RESOLV 80a” en la página 12. Siga los pasos indicados en el diagrama siguiente para configurar su sistema.
• Coloque abajo del todo los controles de salidas master de la mesa de mezclasf.
• Conecte la salida izquierda de la mesa a la entrada LINE INPUT izquierda del RESOLV 120 y
la salida derecha de la mesa a la otra entrada. Conecte ahora la salida LINE OUTPUT izquierda del RESOLV 120 a la entrada del RESOLV 80a izquierdo y la salida derecha del RESOLV
120 a la entrada del monitor satélite derecho.
• Haga pasar una señal audio (como la de un CD de música) a través de la mesa y aumente el
nivel hasta llegar a un volumen de escucha que le resulte cómodo.
•Ajuste ahora el control SWEEP a la frecuencia que quiera. Consulte el manual de instruc-
ciones de sus monitores de estudio para ver cual es el punto de separación recomendado.
También puede ajustar este control SWEEP de oído a la frecuencia que mejor le suene. Un
buen punto medio suele ser sobre los 70 Hz.
Page 47

45
ESPAÑOL
Conexiones del RESOLV 80a
Cable de 6,3 mm no balanceado a RCA
Cable XLR no balanceado a RCA
Guía de cableado del RESOLV 80a
Hay varias formas de interconectar el RESOLV 80a, dependiendo de su montaje de monitorización
concreto. Para la conexión de su sistema de monitorización vea los siguientes diagramas de cables.
Cable XLR a XLR balanceado
Cable 6,3 mm balanceado a 6,3 mm
Cable 6,3 mm no balanceado a 6,3 mm
Cable RCA a RCA
Tip (signal)
Sleeve (ground)
Tip (signal)
Sleeve (ground)
Signal
Ground
Signal (ring)
Ring (signal)
Tip (signal)
Sleeve (ground)
Signal (tip)
Ground
Ground
Ground
Tip (signal)
Sleeve (ground)
Signal
Signal (ring)
Signal (tip)
Ground
Signal (tip)
Signal (ring)
Ground
Tip (signal)
Sleeve (ground)
Signal
Ground
Signal (tip)
Ground
Sleeve (ground)
Signal (ring)
Sleeve (ground)
Tip (signal)Signal
Ring (signal)
Tip (signal)
Page 48

Resolv 80a Specifications/Caractéristiques techniques/Technische Daten/Especificaciones técnicas
Specifications
Transducers: 8” (20.3 cm) copolymer woofer with butyl surround,
1-inch titanium , ferro fluid cooled tweeter
Frequency response: 58Hz - 20KHz +/-3 dB
Sensitivity: 97dB SPL @ 1 W/1m
Amplifier:
Power Rating:
Low-frequency - 75 Watts RMS
High-frequency 25 Watts RMS
Frequency response: 30Hz- 300Hz+/-3 dB
Crossover Frequency: 2.3KHz, multi-pole filter
Inputs:
Unbalanced -10dBV Line Level
Connector: RCA
Balanced +4dBu Line Level
Connector: 1/4-inch Phone TRS (Tip Ring Sleeve)
XLR
Enclosure:
Construction: MDF(Medium Density Fiberboard)
Finish: Black Textured Epoxy Paint
Feet: Large Rubber
Dimensions: 11 1/8” (283mm) W x 16” (407mm) H
x 13” (330mm) D
Weight: 25 lbs. 11.4 kg.
Technische Daten
Wandler: 8" (20.3 cm) Copolymer Woofer mit ButylenRahmen,
2.5 cm Titan-Tweeter, Ferro-
Flüssigkeitsgekühlt
Frequenzgang: 58 Hz - 20 kHz, +/-3 dB
Betriebsleistung: 97 dB SPL @ 1 W/1m
Verstärker:
Nennleistung: Bässe - 75 Watt RMS
Höhen - 25 Watt RMS
Frequenzgang: 30 Hz - 300 Hz, +/-3 dB
Crossover- Frequenz: 2,3 kHz, Multipol-Filter
Eingänge:
Asymmetrisch -10 dBV Line-Pegel
Anschluss: Cinch
Symmetrisch +4 dBu Line-Pegel
Anschluss: 1/4” Klinke TRS (Tip Ring Sleeve)
XLR
Gehäuse:
Konstruktion: MDF (Faserplatte mittlerer Dichte)
Überzug: schwarz texturierter Epoxid-Lack
Füße: große Gummifüße
Abmessungen: 283 mm (11 1/8”) B x 407 mm (16”) Hx 330
mm (13”) T
Gewicht: 11.4 kg, 25 lbs.
Caractéristiques techniques
Haut-parleurs : Woofer de 8”(20,3 cm) à membrane
copolymère et suspension butyle ;
Tweeter de 2,5 cm au titane, refroidi par ferro
fluide
Bande passante : 58 Hz - 20 kHz +/-3 dB
Rendement : 7 dB SPL à 1 W/1 m
Amplificateurs
Puissance : Woofer - 75 Watts efficace
Tweeter - 25 Watts efficace
Bande passante : 30 Hz - 30 kHz +/-3 dB
Fréquence de coupure : 2,3 kHz, filtre multi-pôle
Entrées :
Asymétriques : -10 dBV niveau ligne
Connecteurs : RCA
Symétriques : +4 dBu niveau ligne
Connecteurs : Jack stéréo 6,35 mm (pointe, bague, corps)
XLR
Baffle :
Construction : Panneaux de particules de fibre de moyenne
densité MDF
Finition : Peinture époxy noire
Pieds : Caoutchouc de grande dimension
Dimensions : 283 mm (l) x 407 mm (h)
330 mm (p)
Poids : 11.4 kg
Especificaciones técnicas
Transductores: woofer de 8”(20.3 cm) en polímero con
recubrimiento de butilo,
tweeter de 2.5 cm en titanio, refrigerado por
fluido férrico
Respuesta de frecuencia: 58 Hz - 20 KHz +/-3 dB
Sensibilidad: 97dB SPL @ 1 W/1m
Amplificador:
Nivel de potencia: Graves - 75 watios RMS
Agudos - 25 watios RMS
Respuesta de frecuencia: 30 Hz- 300 Hz+/-3 dB
frecuencia de separación o crossover: 2.3 KHz, filtro multi-polo
Entradas:
No balanceada Nivel de línea -10dBV
Conector: RCA
Balanceada Nivel de línea +4dBu
Conector: TRS de 6,3 mm (punta-anillo-lateral)
XLR
Recinto acústico:
Construcción: MDF(fibra de densidad media)
Acabado: Pintura epoxy en negro
Patas: Grandes piezas de goma
Dimensiones: 11 1/8” (283mm) L x 16” (407mm) A x 13”
(330mm) P
Peso: 25 lbs., 11.4 kg.
46
Page 49

Page 50

Samson Technologies Corp.
575 Underhill Blvd.
P.O. Box 9031
Syosset, NY 11791-9031
Phone: 1-800-3-SAMSON (1-800-372-6766)
Fax: 516-364-3888
www.samsontech.com
 Loading...