

Sammic CK-8 Installation Manual

INSTRUCCIONES - USERS MANUAL - GEBRAUCHSANWEISUNG MODE D’EMPLOI - INSTRUZIONI PER L’USO - MANUAL DE INSTRUÇÕES
CUTTER - EMULSIONADOR
CUTTER - EMULSIFYERS
KUTTER - EMULGATOR
CUTTER - ÉMULSIONNEURS
CUTTER - EMULSIONATORE
CUTTER - EMULSIONADORA
CK-5 / CKE-5
CK-8 / CKE-8
Cada máquina lleva las siguientes indicaciones:
- Nombre y dirección del fabricante: SAMMIC S.L
- Basarte 1 Azkoitia. Gipuzkoa (SPAIN)
- El número de serie se indica en la hoja de
garantía y en la declaración de conformidad.
MODELOS
Este manual describe la instalación,
funcionamiento y mantenimiento de la CK-5,
CKE-5, CK-8 y CKE-8. La referencia del modelo
y sus características se indican en la placa de
identificación colocada en la máquina. Este
cutter/emulsionador está diseñado y fabricado de
acuerdo con las siguientes directivas Europeas o
internacionales:
· Directiva de máquinas 2006/42/CE
· Directiva de baja tensión 2006/95/CE
· Directiva de compatibilidad electromagnética
2004/108/CE
· Norma de higiene y materiales alimentarios:
ANSI-NSF 8 y ANSI-NSF 51.
· Norma Procesadores de alimentos y
mezcladoras: UNE-EN 12852
Índice de protección según la norma UNE-EN
60529: Mandos IP-55 y el resto de máquina IP-23
Los modelos de 120V/60Hz/1~ cumplen con las
normas UL-763 y CSA C22.2
OBSERVACIONES IMPORTANTES
- Este aparato no está destinado
para ser usado por personas
(incluido niños) cuyas
capacidades físicas, sensoriales o
mentales estén reducidas, o
carezcan de experiencia o
conocimiento, salvo si han tenido
supervisión o instrucciones
relativas al uso del aparato por
una persona responsable de su
seguridad.
- Esta máquina es de uso vigilado.
No dejar nuca la máquina en
marcha sin que nadie este al
cargo de ella.
- Marcha de 30 minutos con
descansos de 10 minutos.
- Antes de utilizar por primera vez la
máquina, limpiar la zona de
contacto con alimentos con agua
jabonosa (templada), aclarar y
dejarla secar.
- El conjunto cuchillas (T) de la
cutter/emulsionador están
provistos de cuchillas muy
afiladas, por tanto hay que
manipularlas cuidadosamente.
- Antes de cualquier intervención
para la limpieza, revisión o
reparación de la máquina, es
obligatorio desconectar la
máquina de la red
.
INSTALACION
Para obtener las mejores prestaciones y una
buena conservación de la máquina, siga las
instrucciones contenidas en este manual.
EMPLAZAMIENTO
Se recomienda colocar la máquina sobre una
superficie estable (que no actúe como caja de
resonancia). La máquina no está sujeta y es
fácilmente desplazable.
CONEXION ELECTRICA
Comprobar que las características eléctricas de
la máquina coinciden con el de la red.
Modelos CK-5 y CK-8
Se suministran para tensión de 400/50/3N
trifásica o 220/60/3 trifásica. Preparar una toma
de corriente mural, con interruptor general de
seccionamiento, y protección diferencial y
magneto-térmica de 4P de 16A con su clavija
correspondiente. Colocar un interruptor general o
la clavija de forma accesible para la desconexión
de la máquina.
ATENCION: ES OBLIGATORIA LA CONEXION
A TIERRA. PELIGRO DE ELECTROCUCION.
Modelos CKE-5 y CKE-8
Se suministra para tensión de 230V 50-60 Hz
monofásica o 120V 50-60 Hz monofásica.
Preparar una toma de corriente mural, con
interruptor general de seccionamiento, y
protección diferencial y magneto-térmica de 2P
de 20A con su clavija correspondiente. Colocar
un interruptor general o la clavija de forma
accesible para la desconexión de la máquina.
ATENCION: ES OBLIGATORIA LA CONEXION
A TIERRA. PELIGRO DE ELECTROCUCION.
El variador está provisto de un filtro que conduce
las perturbaciones existentes a tierra. Por este
motivo puede ocurrir que el diferencial de la
instalación actúe de forma intempestiva. Se
recomienda utilizar un diferencial propio para la
máquina o uno del tipo "súper inmunizado”.
Además, la máquina está provista de un tornillo
externo para la conexión a un sistema equipotencial
de tierra.
En todos los modelos el motor es trifásico y está
comandado por un variador de frecuencia.
No manipular en ningún caso la configuración del
variador.
Sentido de giro (modelos CK y CKE):
Como el motor es trifásico, puede que el sentido
de giro no sea el correcto. El sentido de giro de la
máquina es el antihorario. Para invertirlo, en los
modelos CK intercambiar dos cables de
alimentación y en los modelos CKE dos cables
del motor a la salida del variador de frecuencia.
Características del cable
Las máquinas se suministran con un cable
eléctrico de 1,5 m de largo, con recubrimiento
termo plástico.
FUNCIONES DEL CONTROL ELECTRONICO
Y SU FUNCIONAMIENTO
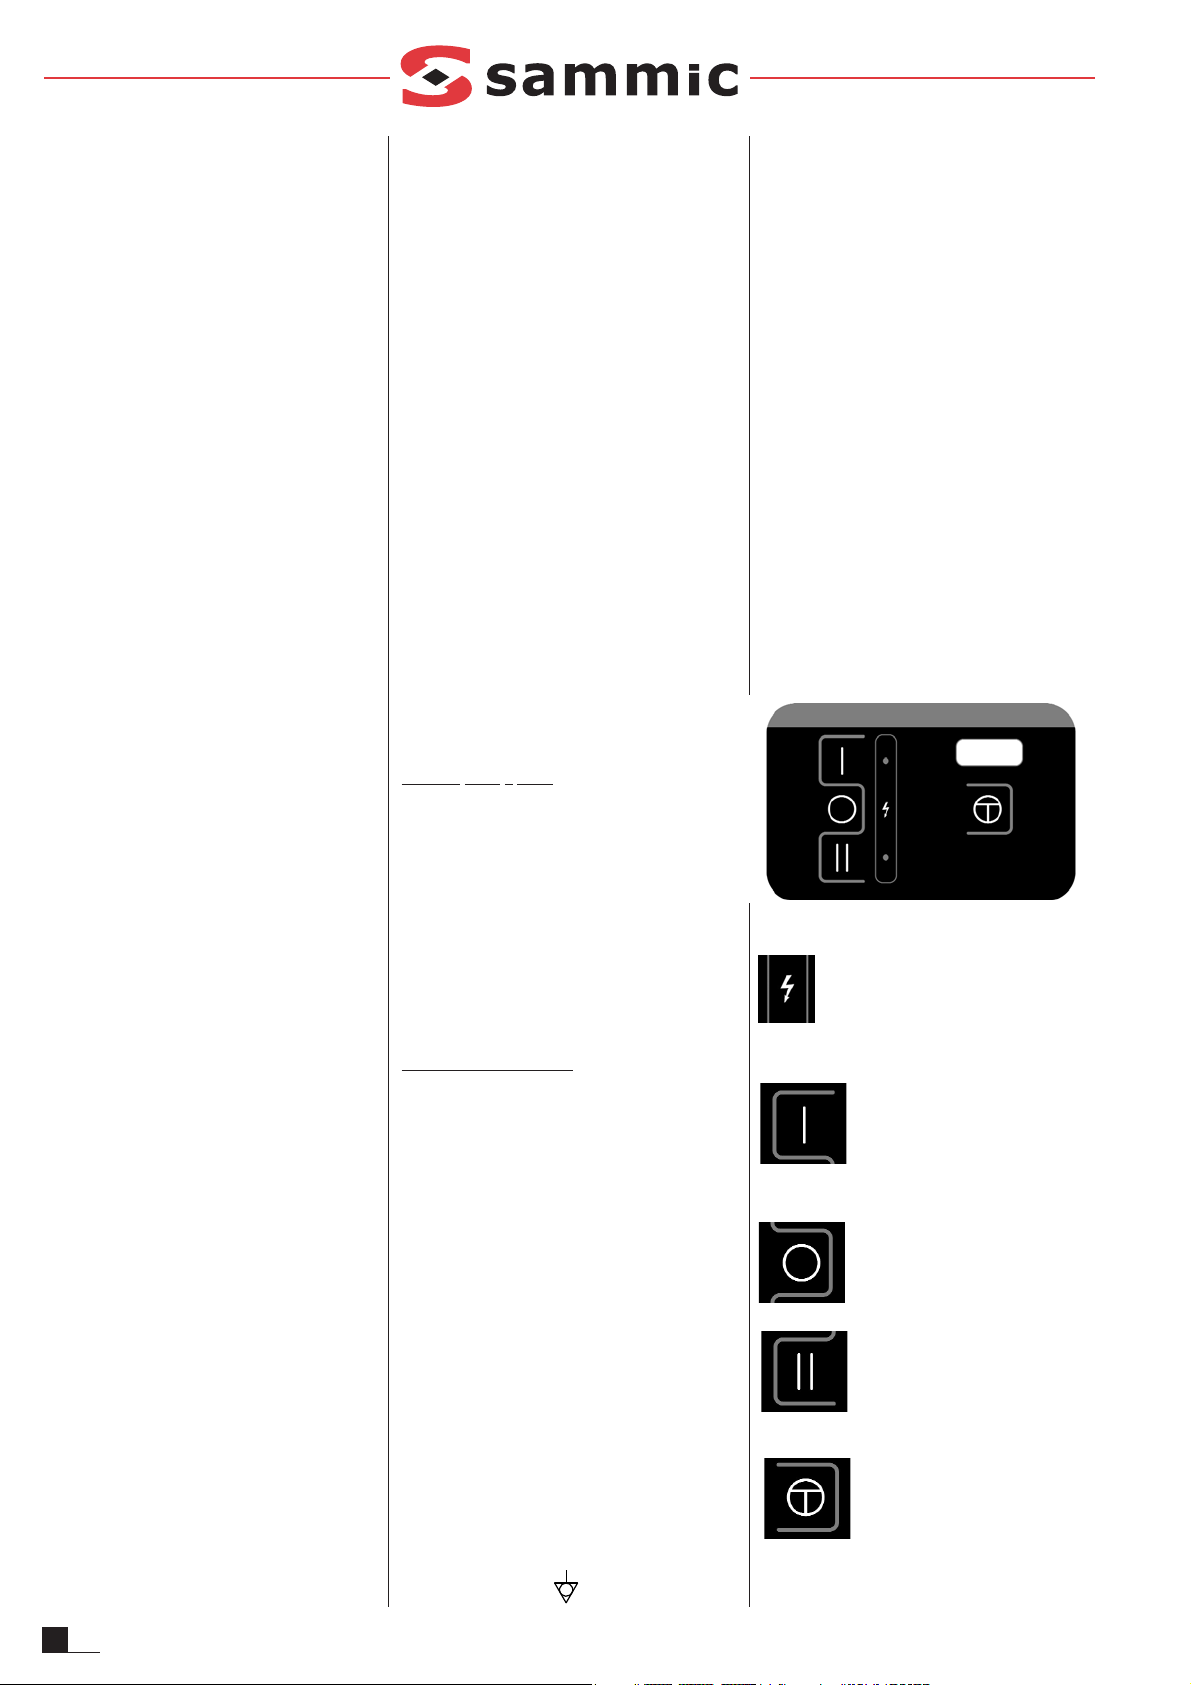
Modelo CK (figura 1)
Piloto máquina en tensión (14)
Al conectar la máquina a la red, este
piloto se enciende indicando que la máquina está
alimentada.
Pulsador de velocidad lenta (7)
Pone en marcha el motor a
velocidad lenta si las seguridades
están activadas.
Parada (8)
La primera pulsación detiene el
motor.
Pulsador de velocidad rápida (11)
Pone en marcha el motor a
velocidad rápida si las
seguridades están activadas.
Ráfagas (9)
Mientras se mantenga pulsado
se pone marcha el motor si las
seguridades están activadas. Si se suelta el
pulsador el motor se para. Las ráfagas se
realizan a velocidad lenta.
2
ES
3
ES
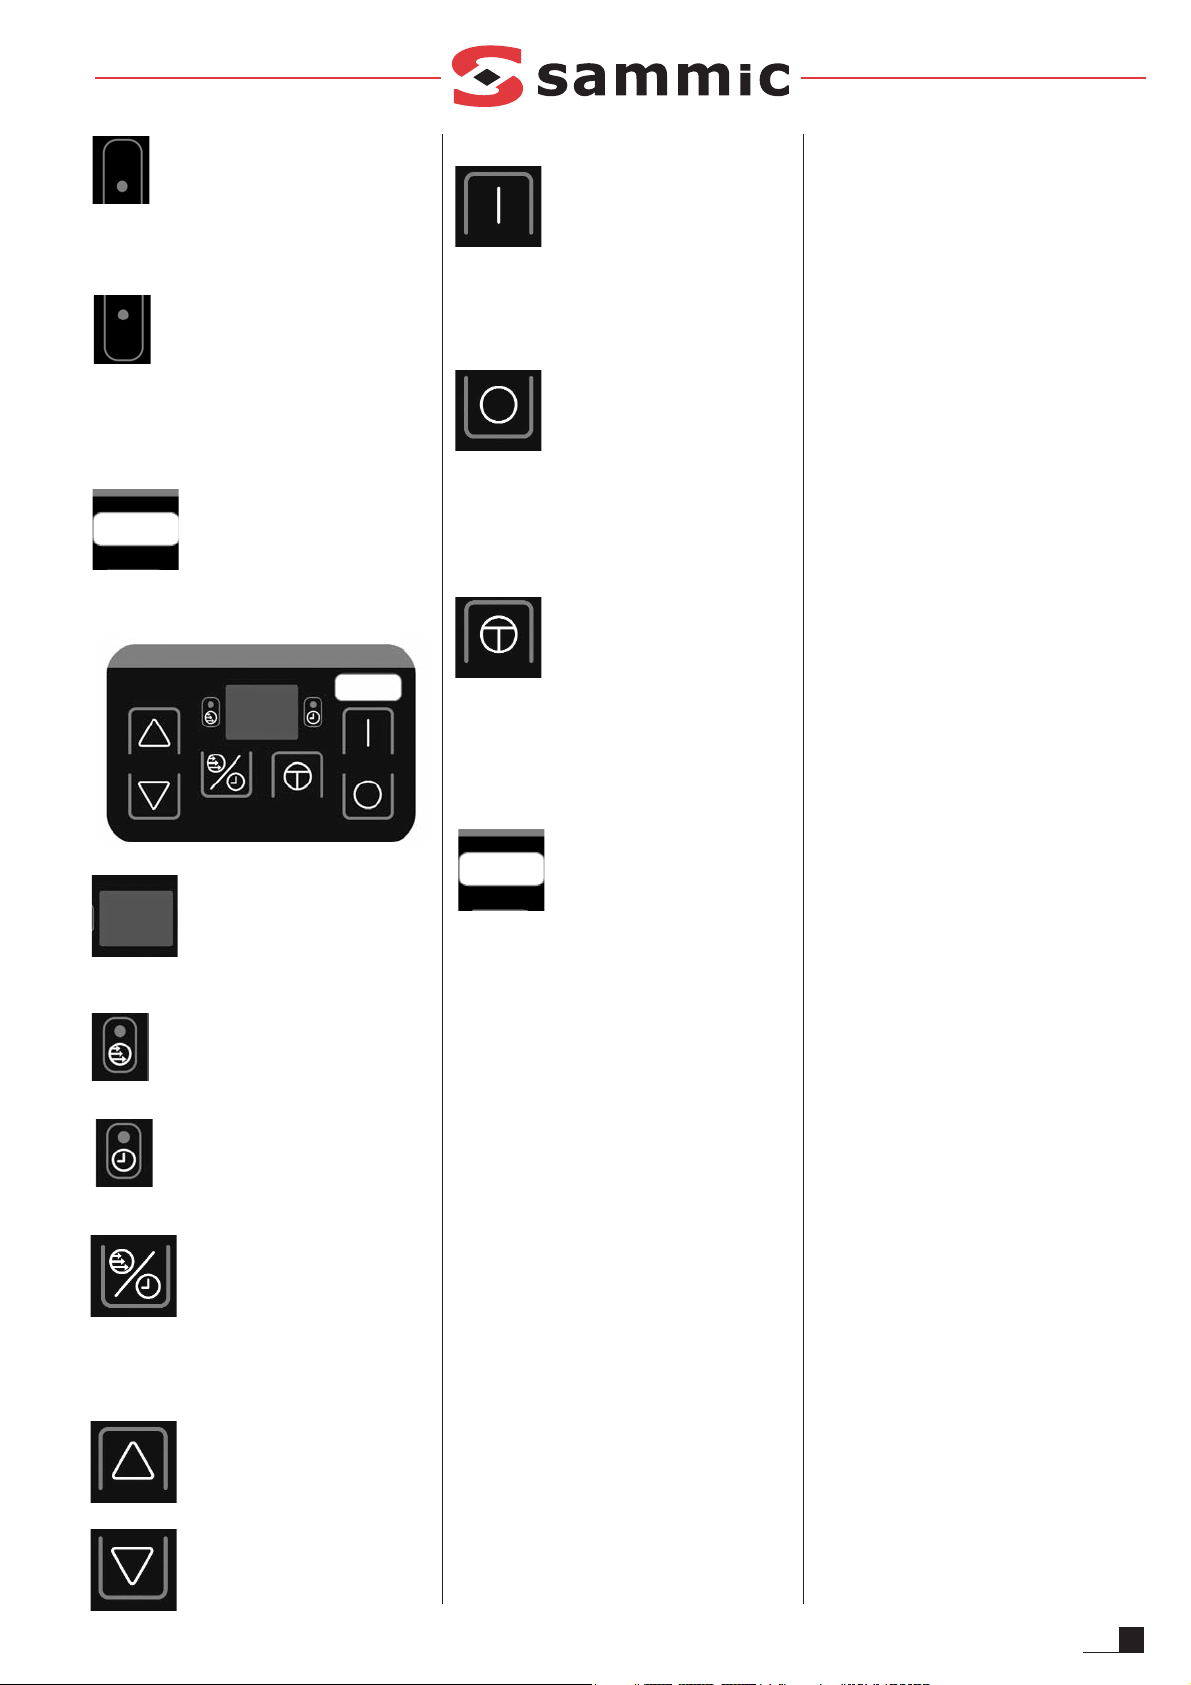
Piloto velocidad lenta (12)
Si este piloto esta encendido, indica
que la máquina está trabajando en
velocidad lenta. Si se pulsa el “Pulsador de
velocidad lenta” (7) y este piloto parpadea, quiere
decir que alguna seguridad no está activada.
Piloto velocidad rápida (13)
Si este piloto esta encendido, indica
que la máquina está trabajando en velocidad
rápida. Si se pulsa el “Pulsador de velocidad
rápida” (11) y este piloto parpadea, quiere decir
que alguna seguridad no está activada.
Modelo (10)
Indica el modelo de máquina.
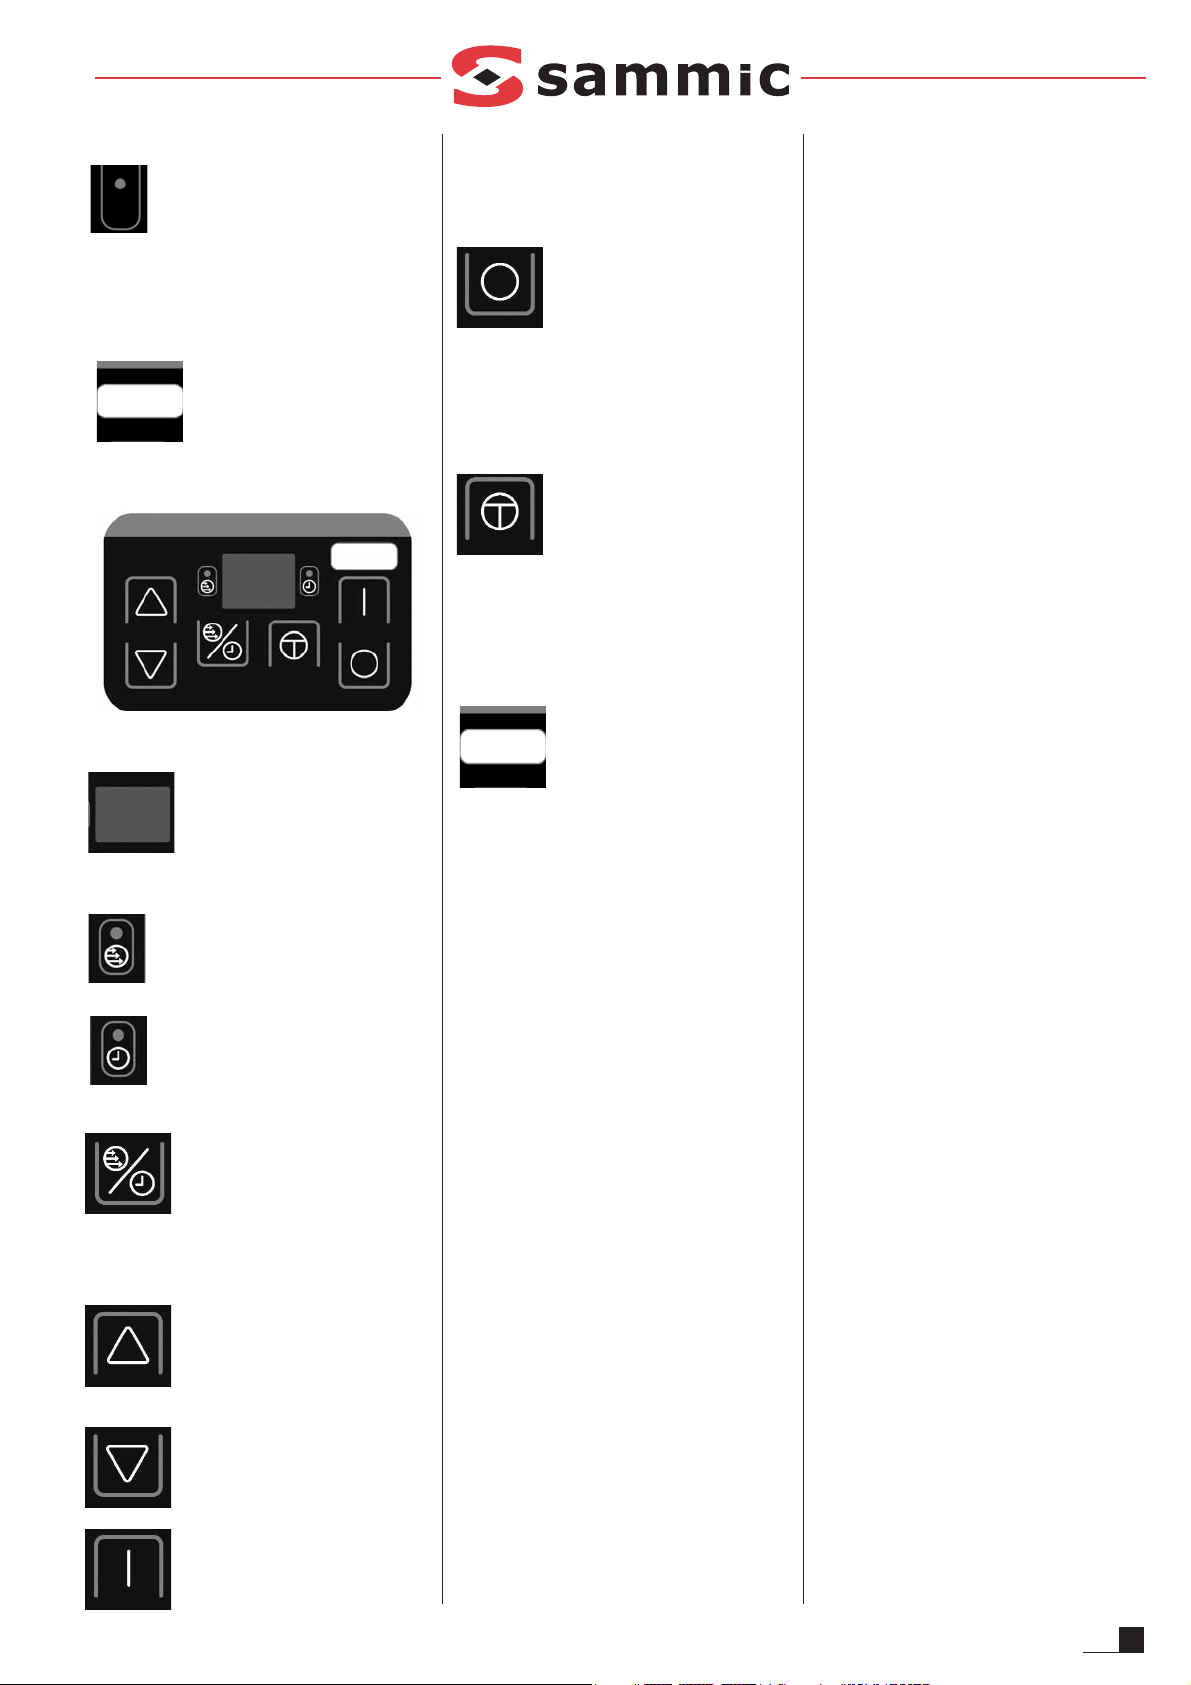
Modelo CKE (figura 2)
Visor (1)
Visualiza la velocidad, el tiempo
de funcionamiento, y los diferentes avisos.
Piloto “velocidad” (2)
Cuando esta encendido en el “visor”
se visualiza la velocidad.
Piloto “tiempo” (3)
Cuando esta encendido en el “visor”
se visualiza el tiempo.
Función (4)
Pulsando este pulsador
cambiamos entre la función de
“velocidad” y “tiempo”. La función elegida parece
en el visor con su piloto correspondiente
encendido.
Subir (5)
Cada pulsación incrementa el
valor seleccionado en el “visor”.
Bajar (6)
Cada pulsación disminuye el valor
seleccionado en el “visor”.
Marcha (7)
Pone en marcha el motor si las
seguridades están activadas. Si
falta alguna de las seguridades y pulsamos
“Marcha” (7), el “visor” (1) visualiza "SE"
(seguridad) indicando que falta alguna seguridad
para el arranque.
Parada (8)
La primera pulsación detiene el
motor, el visor “1” empieza a parpadear indicando
que está en espera. Sigue guardando los valores
de tiempo y velocidad. Una vez transcurridos 3
minutos o volviendo a pulsar "parada" la máquina
pierde esos valores y pasa al estado inicial.
Ráfagas (9)
Mientras se mantenga pulsado se
pone marcha el motor si las
seguridades están activadas. Si se suelta el
pulsador el motor se para. Si falta alguna de las
seguridades y pulsamos “ráfagas” (9), el visor
visualiza "SE" (seguridad) indicando que falta
alguna seguridad para el arranque.
Modelo (10)
Indica el modelo de máquina.
NOTA: Algunos modelos disponen de una
Seta de Emergencia que se debe
desenclavar antes de poner en marcha la
cortadora.
FUNCIONAMIENTO
Solo modelo CK (figura 1 y 3)
Al conectar la CK se activa el “Piloto máquina en
tensión” (14). Si la seguridad bayoneta (Y) está
abierta (posición AA) parpadean los pilotos de
velocidad lenta y rápida (12 y 13). Si la tapa (U)
no está colocada el piloto velocidad lenta (12 o
13) parpadea. Con la bayoneta (Y) cerrada
(posición Z) y la tapa (U) colocada, si pulsamos el
“Pulsador de velocidad lenta” (7), “Pulsador de
velocidad rápida” (11) o “Ráfagas” (9) la máquina
se pondrá en marcha.
La máquina se para automáticamente si en 15
minutos no se actúa sobre algún accionamiento.
Solo modelo CKE (figura 2 y 3)
Al conectar la CKE el “Visor” (1) visualiza dos
rallas centrales (espera). Cuando montemos el
accesorio cutter/emulsionador el “visor” (1)
visualiza “CU” durante 2 sg. Por defecto la
velocidad seleccionada por la máquina es de 5
Control de Velocidad: Se visualiza con el piloto
"Velocidad" (2) encendido y se pueden
seleccionar de 1 a 10 velocidades.
Control de Tiempo: Se visualiza cuando el piloto
"Tiempo" (3) está encendido. Hay dos tipos de
funcionamiento, el funcionamiento continuo y el
temporizado:
Funcionamiento continuo: Una raya girando en el
visor indica que lo tenemos seleccionado. La
máquina se para automáticamente si en 30
minutos no se actúa sobre algún accionamiento.
Funcionamiento temporizado: Es posible
programar una temporización de 0 a 10 minutos.
El tiempo se selecciona de ½ minuto en ½
minuto. El “Visor” (1) visualiza el descuento del
tiempo de la misma forma. El último minuto, se
descuenta en segundos. Cuando el tiempo
programado finaliza, la máquina se detiene y se
oye un pitido.
Ahorro: Estando la máquina parada si en 5
minutos no hacemos nada, el “visor” (1) se apaga
y visualiza solo un punto. Pulsando cualquier
tecla se enciende de nuevo.
PUESTA EN MARCHA
ATENCION:
Antes de utilizar por primera vez la máquina,
limpiar la zona de contacto con alimentos con
agua jabonosa (templada), aclarar y dejarla
secar.
El conjunto cuchillas (T) de la
cutter/emulsionador están provistos de
cuchillas muy afiladas, por tanto hay que
manipularlas cuidadosamente.
Figura 3. Con el mecanismo de bayoneta (Y)
abierto (AA), colocar el accesorio “Cutter” sobre
el bloque motor de forma que los tres tetones del
accesorio se introduzcan dentro de los agujeros
del mecanismo de fijación rápida. Para que la
máquina funcione el asa tiene que colocarse
justo encima del teclado. Cerrar (Z) el
mecanismo de bayoneta (Y) para bloquear el
accesorio sobre el bloque motor.
Colocar el “Conjunto de cuchillas” (T) y cerrar
la tapa (U) girándola en sentido antihorario
hasta que queda encajada y bloqueada. Ya se
puede trabajar con la máquina.
La tapa (U) va provista de un orificio para la
incorporación de producto mientras la máquina
está funcionando.
Además los modelos cutter/emulsionador llevan
incorporado un conjunto rascador que girándolo
revuelve el contenido de la olla (S) para que el
procesado del producto sea más homogéneo.

ACCESORIOS DISPONIBLES PARA LOS
CUTTER/EMULSIONADORES CK Y CKE.
- Rotor de cuchilla lisa.
- Rotor de cuchilla perforada.
- Rotor de cuchilla microdentada.
- Revolvedor.
Consultar el catalogo de Sammic.
LIMPIEZA
ATENCION:
Desconectar la máquina de la red antes de
cualquier manipulación en su interior.
Es necesario desmontar y limpiar la máquina
al término de cada día o cada vez que se
cambie de producto.
Todos los elementos que están en contacto
con los alimentos se deben limpiar
inmediatamente después de su utilización,
con agua caliente y un detergente admitido en
alimentación. Después aclarar con abundante
agua caliente y desinfectar con un paño
suave impregnado en alcohol etílico (90 º). NO
SE DEBEN utilizar detergentes abrasivos
(aguafuerte, lejía concentrada etc…) ni
estropajos o rasquetas que contengan acero
común. Pueden causar la oxidación de la
máquina.
Se aconseja que los elementos desmontables
de la máquina no sean introducidos en un
lavavajillas para su limpieza. Los detergentes
pueden producir deterioro del aspecto
superficial.
- Si la suciedad está seca, adherida al caldero y
a las cuchillas. Poner agua caliente y
detergente en el caldero y hacer funcionar a la
máquina para que los residuos se ablanden.
- Para evitar salpicaduras, una vez procesado el
producto, quitar la tapa (U), colocar la seguridad
bayoneta (Y) en posición abierta (AA) y quitar la
olla (S) con la cuchilla dentro (T).
- Es posible desmontar el revolvedor (V+X) de la
tapa (U). Para ello, manteniendo fija el
revolvedor (X), apretar y girar la manivela
revolvedor (V). Una vez realizada estas
operaciones se puede separar el revolvedor y
la manivela revolvedor. Para montar de nuevo el
revolvedor, introducir de nuevo el revolvedor (X)
en la tapa (U) y la manivela revolvedor (V) en el
revolvedor (X). Empujar el revolvedor (X) y la
manivela revolvedor (V) contra la tapa e girar la
manivela revolvedor (X) hasta llegar al tope.
Una vez realizadas estas acciones separar el
revolvedor (X) y la manivela revolvedor (V).
-Limpieza del bloque motor:
El exterior de la máquina NO SE DEBE limpiar
con un chorro directo de agua. Emplear para su
limpieza un paño húmedo y cualquier
detergente habitual. NO SE DEBEN utilizar
detergentes abrasivos (aguafuerte, lejía
concentrada etc...) ni estropajos o rasquetas
que contengan acero común, pueden causar la
oxidación de la máquina.
MANTENIMIENTO
PRECAUCIONES IMPORTANTES
- Antes de cualquier intervención para la
limpieza, revisión o reparación de la máquina,
es obligatorio desconectar la máquina de la red.
- Verificar periódicamente el funcionamiento de
las seguridades de la máquina. En caso de
detectar alguna anomalía llamar al servicio
técnico reconocido por SAMMIC.
- Verificar periódicamente el estado del reten del
eje de arrastre para preservar la estanqueidad
de esta zona. Cada vez que se suelte el eje de
arrastre para mantenimiento se recomienda
colocar un reten nuevo.
- Limpiar la máquina después de cada uso tal y
como se ha descrito con anterioridad.
- Si el cable de alimentación se deteriora y es
preciso instalar uno nuevo, dicho recambio sólo
podrá ser realizado por un servicio técnico
reconocido por SAMMIC.
- Nivel de ruido de la máquina, en marcha,
colocada a 1,6 m de altura y 1 m de distancia,
inferior a 77 dB(A). Ruido de fondo: 32 dB(A).
AFILADO DE CUCHILLAS
ATENCION: El conjunto cuchillas (T) están
provistos de cuchillas muy afiladas, por tanto
hay que manipularlas cuidadosamente.
Las cuchillas (T) se desmontan fácilmente para
poder afilarse. Para su afilado emplear siempre
piedras blandas conservando el ángulo de corte
de la cuchilla.
INCIDENCIAS DE FUNCIONAMIENTO
Modelo CK
Estando la máquina preparada para su
funcionamiento al pulsar “Marcha” velocidad
lenta o velocidad rápida (pulsadores 7 o 11) la
máquina no arranca:
- Si parpadea el piloto “velocidad” (12 o 13) hay
algún problema con la tapa (U). Comprobar que
la tapa (U) este correctamente colocada, el
sistema de bajada del imán que está en la olla
(S) o en último caso el detector que esta de la
tapa inferior (F).
- Sin caldero si parpadean los pilotos de
velocidad lenta y rápida a la vez (12 y 13)
verificar el sistema de bayoneta (Y) esté
cerrado (Z), el imán asociado a ella o en último
caso el detector que esta de la tapa inferior (F).
- Si parpadean el piloto de velocidad (12 o 13) y
máquina en tensión (14), es que el térmico del
motor ha actuado. Se ha sobrecargado el motor
o la máquina está trabajando en “dos hilos”.
La CK-5 o 8 están programados para que se
paren automáticamente en caso que en 15
minutos no se actúa sobre cualquier dispositivo.
Verificación del teclado: Para ver que el teclado
funciona si mantenemos pulsado cualquier tecla
a los 3 sg el piloto “máquina en tensión” (14) se
tiene que apagar.
Modelo CKE
Estando la máquina preparada para su
funcionamiento al pulsar “Marcha” (7) la máquina
no arranca y en el display aparece SE
(Seguridad):
- Si se mantiene pulsada “Marcha” (7) indica cual
es el sensor que no se ha detectado.
d1: Seguridad Cierre bayoneta.
d2: Detector Cutter. En caso de estar solo el
bloque motor.
- Algunas de las seguridades esta desactivada.
Verificar que todos los componentes están en
posición.
- Tras verificar el punto anterior el error persiste.
Hay algún problema en alguna de las
seguridades. Llamar a un servicio técnico
autorizado por Sammic,S.L.
"E1" en el visor, indica que alguna protección del
variador de frecuencia ha actuado. Para salir de
este estado pulsar desconectar la máquina de la
red y esperar.
No se enciende el “visor” (1): No llega tensión al
visor o la placa electrónica de control esta
estropeada.
Para verificar que el teclado funciona
correctamente con el accesorio
cutter/emulsionador montado pulsar las teclas y
verificar que la placa emite un pitido y el display
reacciona. Si no es así cambiar el teclado.
La CKE-5 o 8 están programados para que se
paren automáticamente en caso que en 30
minutos no se actúa sobre cualquier dispositivo
.
4
ES
APLICACIONES
Recomendaciones de uso.
A la hora de picar se recomienda utilizar el revolvedor e introducir los alimentos previamente cortados en trozos pequeños (3-4 cm) para poder conseguir
un corte más uniforme.
5
ES
Operación
Cantidad
Máxima
CK/CKE-5
Cantidad
Máxima
CK/CKE-8
Velocidad
Tipo de cuchilla optima*
Revolvedor Notas
Carne cruda en general
1.5-2 Kg 2.5-3 Kg
I o 3-6
Lisa
Si
Cuchilla lisa
obligatoria
Carne cocinada o Jamón York
2.5-3 Kg 3.5-4 Kg
I o 3-7
Lisa
Si
Recomendación:
Ráfagas
Patés
1.5-2 Kg 2.5-3 Kg
I o 3-6
Lisa o Microdentada
No
Pescados
2-2.5 Kg 3-3.5 Kg
I,II o 3-7
Lisa
Si
Masas y Pastas
1.5-2 Kg 2-2.5 Kg
I o 3-5
Lisa o Microdentada
No
Pan rayado
1-1.5 Kg 2-2.5 Kg
I, II o 5-10
Microdentada
No
Purés, salsas, sopas
2 litros 3 litros
II o 7-10
Microdentada
Si
Mayonesa
3 litros 4 litros
I-II o 7-10
Lisa, Microdentada,
Perforada
Si
Azucar glass
1-1.5 Kg 1.5-2 Kg
II o 8-10
Microdentada
Si
Picar cebolla, ajo, perejil
1 Kg 1.5 Kg
I-II o 1-4
Lisa o Microdentada
Si
Recomendación:
Ráfagas
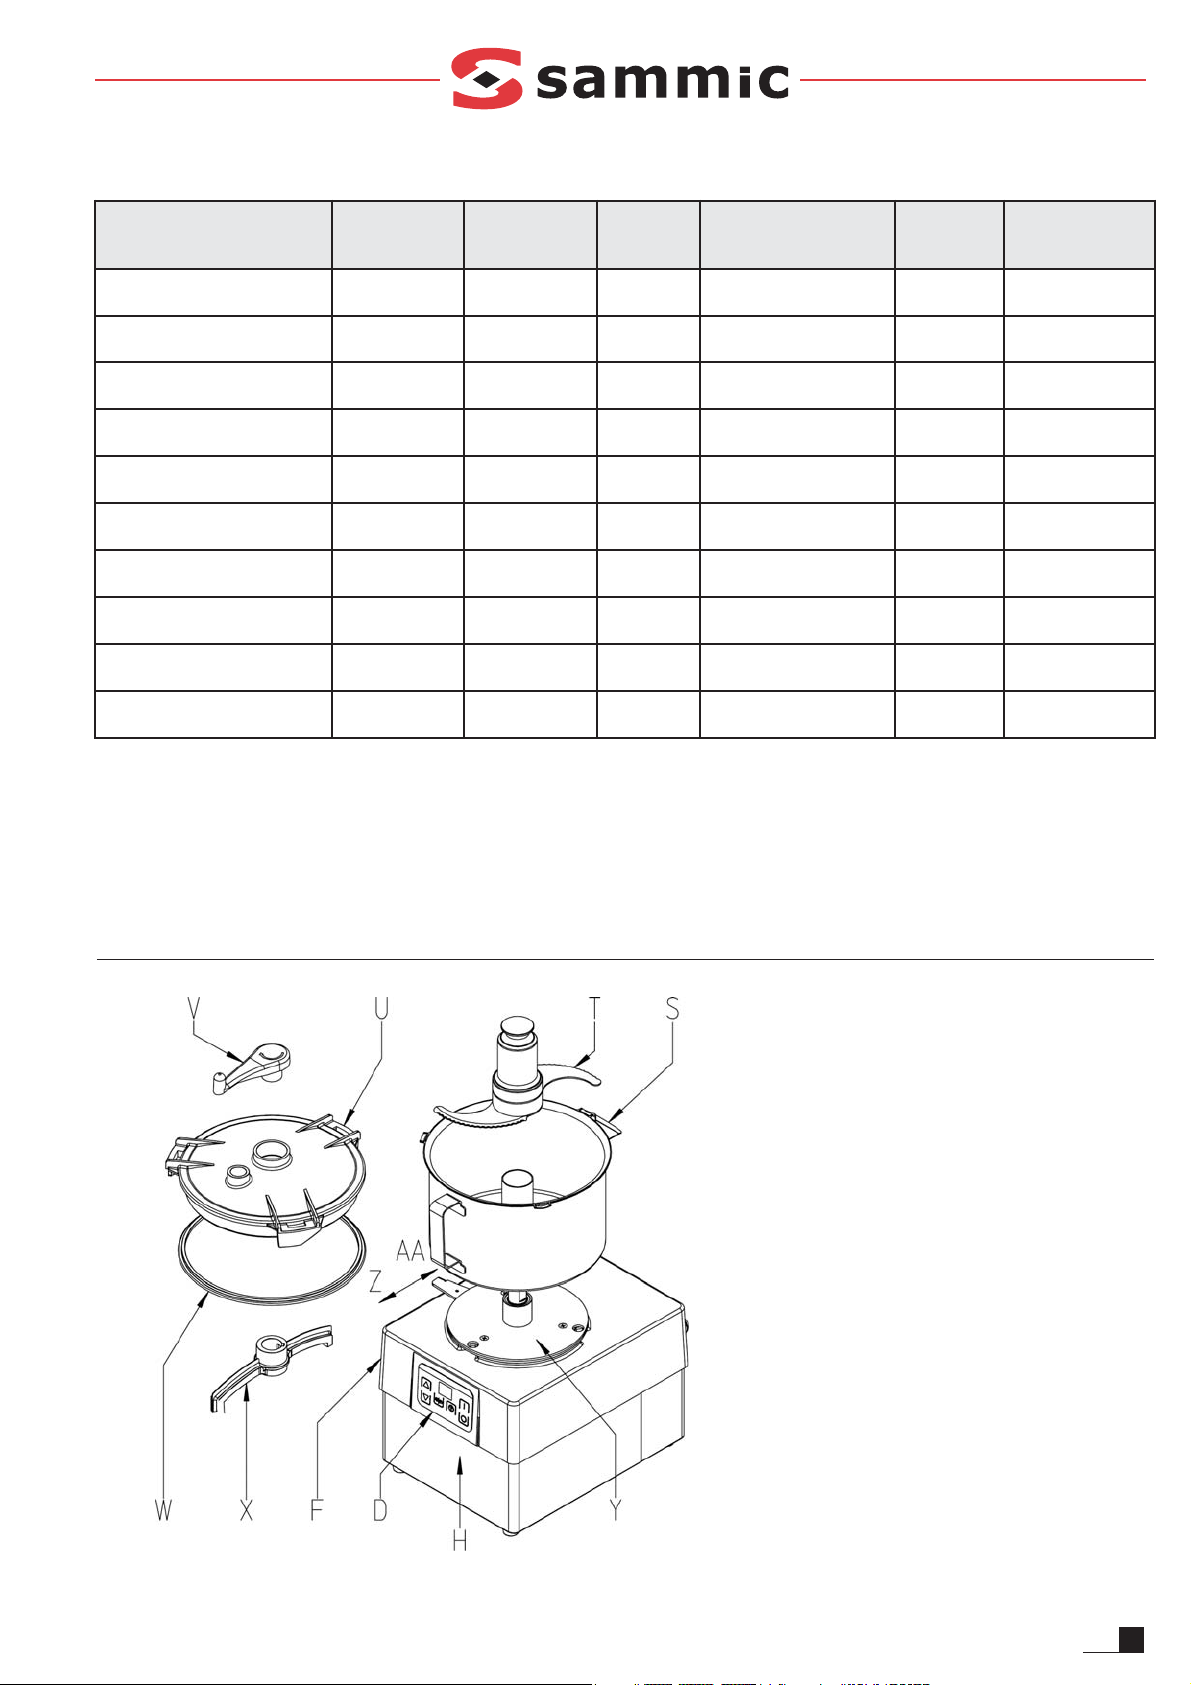
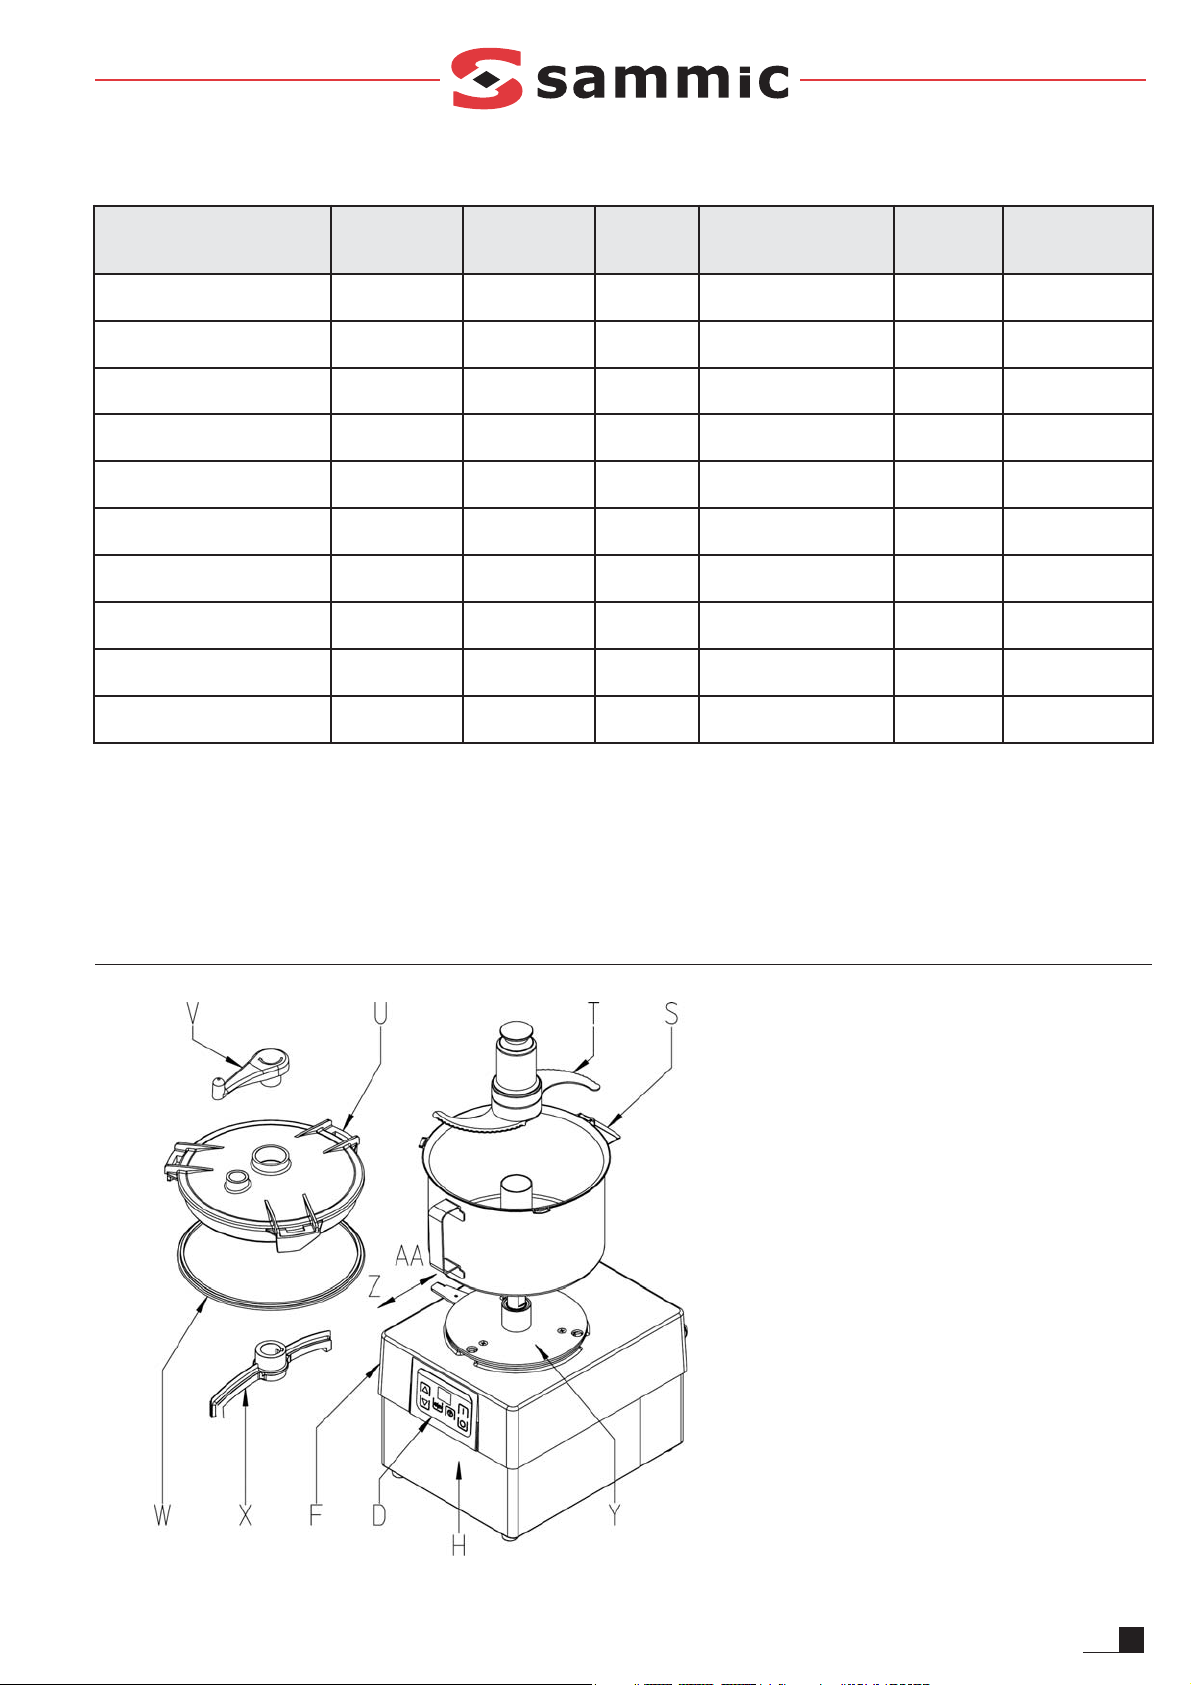
FIGURA 3
DESCRIPCION TECNICA
D - Teclado.
F - Tapa inferior.
H - Base.
S - Olla.
T - Cuchilla.
U - Tapa olla.
V - Manivela revolvedor.
W - Junta tapa olla.
X - Revolvedor.
Y - Bayoneta.
Z - Bayoneta cerrada.
AA - Bayoneta abierta.
6
EN
Each machine is identified as follows:
-Name and address of the manufacturer:
SAMMIC S.L - Basarte 1 Azkoitia. Gipuzkoa
(SPAIN)
-The serial number is printed on the Guarantee
Card and in the Declaration of Conformity.
MODELS
This manual describes the installation, operation
and maintenance of the CK-5, CKE-5, CK-8 and
CKE-8. The model reference and technical data
appear on the name plate attached to the
machine. This cutter/emulsifier is designed and
manufactured according to the following
European and international directives:
· Machinery Directive 2006/42/EC.
· Low Voltage Directive 2006/95/EC.
· Electromagnetic Compatibility Directive
2004/108/EC.
· Hygiene and food contact materials standard:
ANSI-NSF 8 and ANSI-NSF 51.
· Food processors and mixers standard: UNE-EN
12852
Protection level in accordance with UNE-EN
60529: Controls IP-55 and rest of machine IP-23
The 120V/60Hz/1~ models comply with the
regulations UL-763 and CSA C22.2
IMPORTANT INFORMATION
- This machine is not designed for
use by people (including children)
with reduced physical, sensory or
mental capabilities or lacking the
necessary experience or
knowledge, unless they have
received supervision or
instructions from a health and
safety expert.
- This machine is for supervised
use. Never leave the machine
running unsupervised.
- On for 30 minutes with 10-minute
breaks
- Before using the machine for the
first time, clean the area in contact
with food with (lukewarm) soapy
water, rinse and leave to dry.
- The blade set (T) of the
cutter/emulsifier has very sharp
blades, so they must be handled
with care.
- Before undertaking any cleaning,
inspection or repair work on the
machine, the machine must be
unplugged from the mains.
INSTALLATION
For optimum service and maintenance, please
follow these instructions.
INSTALLATION SITE
You should position the machine on a stable
surface (that does not act as a resonator). The
machine is not fixed in place and can be moved
around easily.
ELECTRICAL CONNECTION
Check that the machine's electrical
characteristics match the mains power supply.
Models CK-5 and CK-8
They are supplied for 400/50/3N three phase
power or 220/60/3 three phase power. Prepare a
wall-mounted socket that is always accessible,
with a general cut-out switch, residual current
protection and 4P, 16A circuit breaker, with its
corresponding plug. Fit a general switch or the
plug in an accessible place to disconnect the
machine.
WARNING: THE EARTH CONNECTION IS
OBLIGATORY. DANGER OF
ELECTROCUTION.
Models CKE-5 and CKE-8
They are supplied for 230V 50-60 Hz single
phase power or 120V 50-60 Hz single phase
power.
Prepare a wall-mounted socket that is always
accessible, with a general cut-out switch, residual
current protection and 2P, 20A circuit breaker,
with its corresponding plug. Fit a general switch or
the plug in an accessible place to disconnect the
machine.
WARNING: THE EARTH CONNECTION IS
OBLIGATORY. DANGER OF
ELECTROCUTION. The converter includes a
filter that shunts power disturbances to safety
ground. The residual current device may
therefore cause untimely tripping. You are
advised to use a suitable residual current device
for the machine or a super immunised
RCD.Moreover, the machine includes an external
screw for its connection to a ground equipotential
system.
The motor is three-phase in every model and
controlled by a variable frequency drive.
Do not change the variable frequency drive
settings under any circumstances.
Rotational direction (models CK and CKE):
Because the motor is three-phase, the direction
of rotation may be incorrect. The machine’s motor
rotates anti-clockwise. To invert it, in the CK
models two power supply cables must be
changed and in the CKE models two motor
cables at the frequency converter output.
Power cable characteristics
The machines are supplied with a 1.5 m
thermoplastic-sheathed power cable.
ELECTRONIC CONTROL FUNCTIONS AND
OPERATION
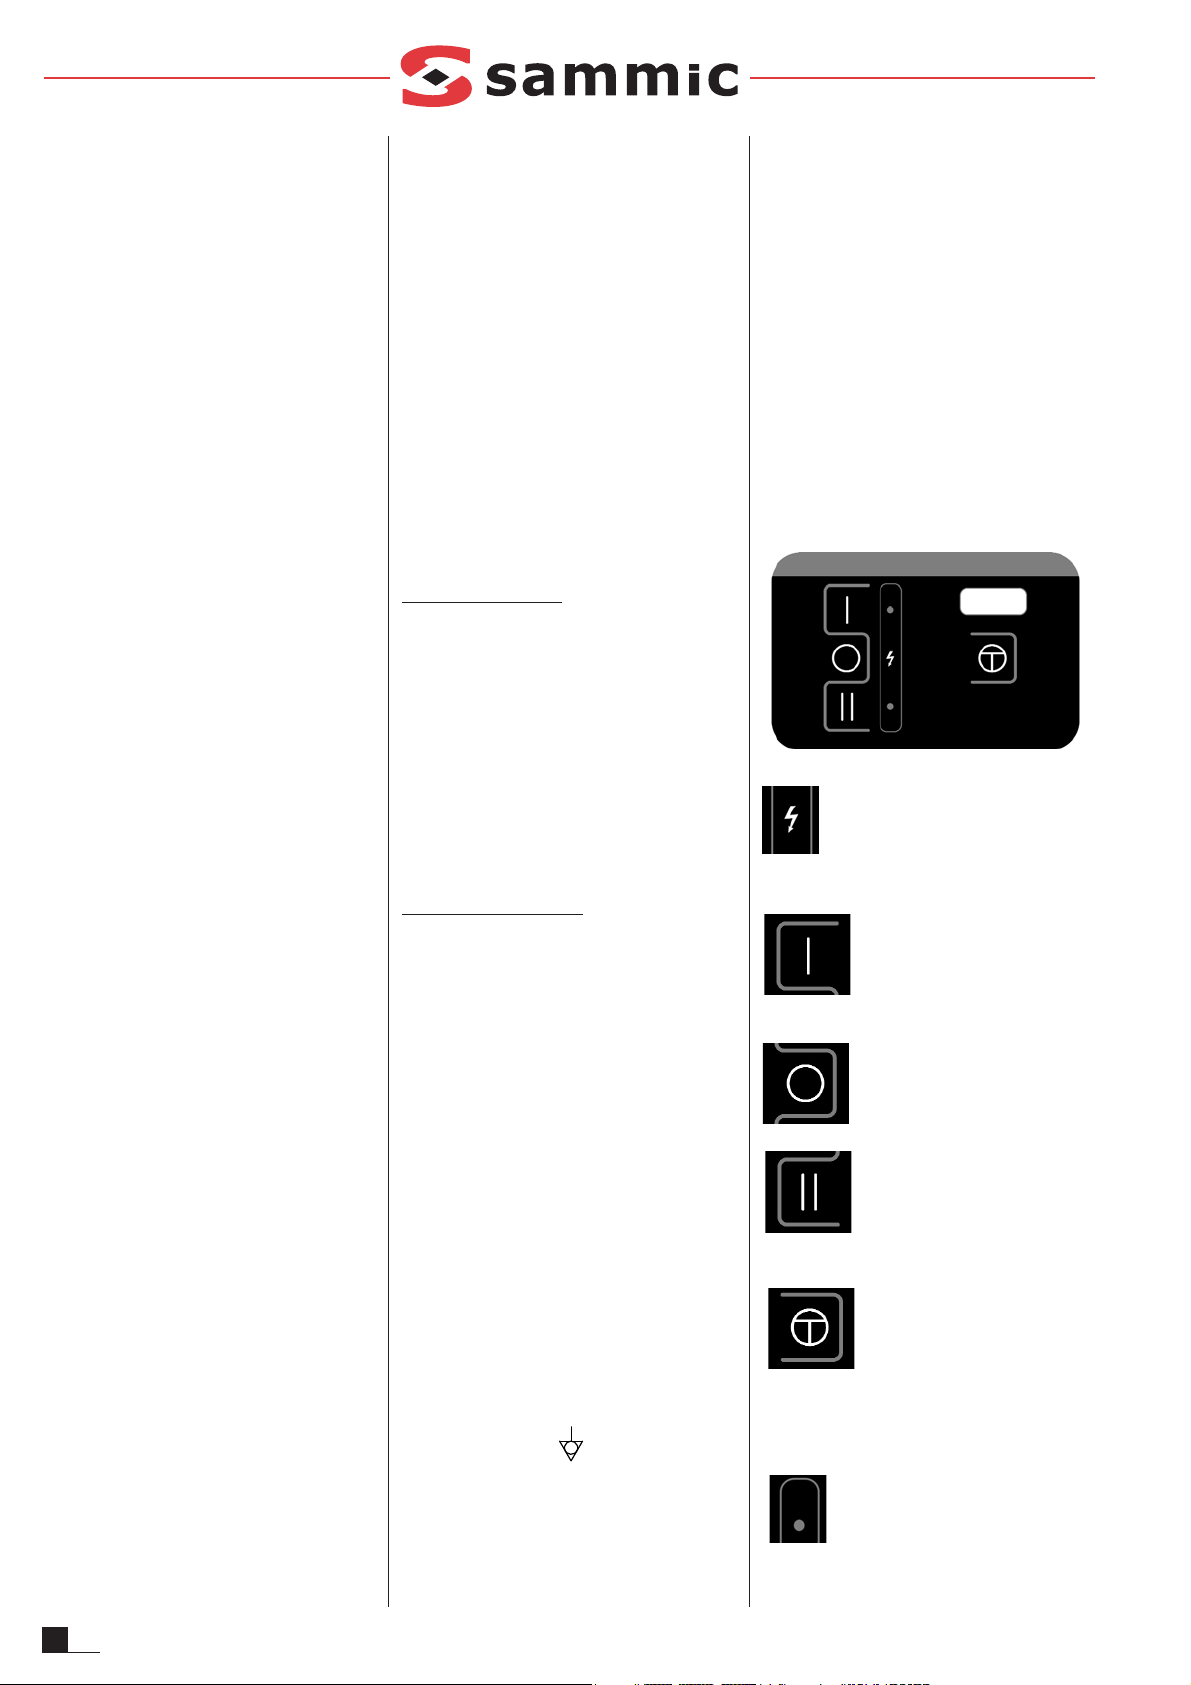
CK model (figure1)
Machine connected to mains light (14)
When the machine is plugged in, this
warning light switches on to show that the
machine is connected to the mains.
Slow button (7)
Starts the motor in slow mode if
the safety devices are activated.
Shutdown (8)
Pressing it once stops the motor.
Fast button (11)
Starts the motor in fast mode if
the safety devices are activated.
Pulse (9)
While it remains pressed down,
the motor switches on if the
safety devices are activated. When released, the
motor stops. The bursts are in slow mode.
Slow speed light (12)
If this is lit, it indicates that the
machine is working in slow mode. If you press the
“Slow button” (7) and this light blinks, it means
7
EN
there is a safety device that is not activated.
Fast speed light (13)
If this is lit, it indicates that the machine is working
in fast mode. If you press the “Fast button” (11)
and this light blinks, it means there is a safety
device that is not activated.
Model (10)
Indicates the model of the
machine.
CKE mode (ffigure ))
Display (1)
Shows speed, operating time and
warnings.
Speed light (2)
When it is on, the display (1) shows the
speed.
Time light (3)
When it is on, the display (1) shows the
time.
Function (4)
This button switches between the
speed (2) and time (3) functions.
The selected function appears on the display and
the pilot light comes on.
Up (5)
Each time the key is pressed the
setting on the display (1) increases.
Down (6)
Each time the key is pressed the
setting on the display (1) decreases.
On (7)
Starts the motor if the safety
devices are activated. If any of the safety devices
is missing and you press “On” (7), the display (1)
shows "SE" (safety) to warn that a safety device
is missing.
Shutdown (8)
Pressed once, the motor stops
and the display (1) starts to flash to show that it is
on standby. The time and speed settings are still
saved. After 3 minutes, or if the "off" button is
pressed again, the machine loses those settings
and is reset.
Pulse (9)
While it remains pressed down, the motor
switches on if the safety devices are activated.
When released, the motor stops. If any of the
safety devices is missing and you press “Pulse”
(9), the display shows "SE" (safety) indicating that
a safety device is missing.
Model (10)
Indicates the model of the machine.
PLS. NOTE: Some vegetable preparation
machines have an emergency stop button.
This must be unlocked before starting the
machine.
OPERATION
CK models only (Figure 1 and 3)
When the CK is connected the “Machine
connected to mains” light is lit (14). If the bayonet
mechanism (Y) is open (position AA) the slow and
fast speed lights blink (12 and 13). If the lid (U) is
not placed the speed light (12 or 13) blinks. With
the bayonet mechanism (Y) closed (position Z)
and the lid (U) in place, if the “Slow button” (7),
“Fast button” (11) or “Pulse” (9) buttons are
pressed, the machine will start.
The machine will stop automatically if no action
has begun within 15 minutes.
CKE models only (Figure 2 and 3)
When the CKE is connected the display (1) has
two lines in the centre (standby). When the
cutter/emulsifier attachment is fitted the display
(1) shows “CU” for 2 seconds. By default the
speed selected by the machine is 5.
Speed Control: This is displayed with the "Speed"
light (2) lit and speeds from 1 to 10 can be
selected.
Time Control: It is displayed when the "Time" pilot
light (3) switches on. There are two functions,
continuous mode and time-out:
Continuous mode: A rotating line on the display
means that this has been selected. The machine
will stop automatically if no action has begun
within 30 minutes. Time-out: A time-out between
0 and 10 minutes can be programmed. The time
is selected in ½ minute intervals. The “Display” (1)
shows the countdown in the same way. The last
minute counts down in seconds. When the
programmed time finishes, the machine stops
and beeps.
Energy saving: If the machine is stopped and no
button is pressed on the display (1) for 5 minutes,
it switches off and only a dot is displayed. Press
any button to switch it on again.
START-UP
WARNING:
Before using the machine for the first time,
clean the area in contact with food with
(lukewarm) soapy water, rinse and leave to
dry.
The blade set (T) of the cutter/emulsifier has
very sharp blades, so they must be handled
with care.
Figure 3. With the bayonet mechanism (Y) open
(AA), fit the “Cutter” attachment on the motor so
that the three attachment lugs are inserted in the
quick-connect mechanism holes. The handle
must be placed just above the keypad for the
machine to operate. Close (Z) the bayonet
mechanism (Y) to lock the attachment on the
motor block.
Fit the blade set (T) and close the lid (U) by
rotating it anti-clockwise until it locks into
place. You can now operate the machine.
The lid (U) has hole to feed the product through
while the machine is functioning.
In addition the cutter/emulsifier models include a
scraper which, when rotated, the stirs the
contents (S) so that they are processed more
evenly.
ATTACHMENTS AVAILABLE FOR THE CK AND
CKE CUTTER/EMULSIFIERS.
- Smooth blade
- Perforated blade
- Finely serrated blade
- Mixer
Consult the Sammic Catalogue.
CLEANING
WARNING:
Disconnect the machine from the mains

8
EN
before handing any internal components.
You must dismantle and clean the machine at
the end of the day or each time you use a
different product.
Any components in contact with the food
must be cleaned immediately after use, using
hot water and a food-safe detergent. Then
rinse with plenty of hot water and disinfect
using an ethyl alcohol-soaked cloth (90 º). DO
NOT use abrasive detergents (nitric acid, neat
bleach, etc.) or stainless steel scourers or
scrubbers. They could cause rusting.
The removable parts of the machine are not
dishwasher safe. Detergents could damage
the surface.
- If the dirt is dry and stuck to the pot and the
blades pour hot water and detergent into the pot
and switch the machine on to soften the residue.
- To avoid splashes, once the product has been
processed, remove the lid (U), place the
bayonet mechanism (Y) in the open position
(AA) and remove the pot (S) with the blade
inside (T).
- You can remove the mixer (V+X) from the lid
(U). To do so, keep the mixer (X) firmly in place,
tighten and turn the mixer handle (V). Once you
have done this you can separate the mixer and
the mixer handle. To reassemble the mixer,
insert the mixer (X) into the lid (U) again and the
mixer handle (V) into the mixer (X). Push the
mixer (X) and the mixer handle (V) against the
lid and turn the mixer handle (X) until it will no
longer turn. Once you have done this, separate
the mixer (X) and the mixer handle (V).
- Cleaning the motor block:
NEVER power clean. Use a damp cloth and
mild detergent for cleaning. DO NOT use
abrasive detergents (nitric acid, neat bleach,
etc.) or stainless steel scourers or scrubbers as
they could cause rusting.
MAINTENANCE
CAUTION
- Before undertaking any cleaning, inspection or
repair work on the machine, the machine must
be unplugged from the mains.
- Regularly check that the machine safety devices
are working. If you detect any anomaly, call the
SAMMIC authorised technical service.
- Regularly inspect the trailing axle seal to ensure
that this area is properly sealed. Every time you
loosen the trailing axle for maintenance you
should fit a new seal.
- Clean the machine after every use, as described
above.
- Only a SAMMIC authorised technical service
can replace the power cable if this is damaged.
- Machine noise level, while running, at a height
of 1.6 m and a distance of 1 m, less than 77
dB(A). Background noise: 32 dB(A).
BLADE SHARPENING
WARNING: The blade set (T) is fitted with very
sharp blades, so they must be handled with
care.
The cutters (T) can be dismantled easily for
sharpening. Always use soft stone to keep the
blade's cutting angle intact.
TROUBLESHOOTING
CK models
When the machine is ready for operation and you
press “On” in slow or fast mode (buttons 7 or 11)
the machine does not start:
- If the “speed” light (12 or 13) blinks there is a
problem with the lid (U). Check the lid (U) is
correctly in place, the system for lowering the
magnet that is in the pot (S) or finally the
detector that is in the lower cover (F).
- Whitout pot if the slow and fast mode lights blink
at the same time (12 and 13) check the bayonet
mechanism (Y) is closed (Z), the magnet
associated with it or finally the detector in the
lower cover (F).
- If the speed (12 or 13) and machine connected
to the mains (14) lights blink, the thermal relay of
the motor has been tripped. The motor is
overloaded or the machine is working in “twowire”.
The CK-5 and 8 are programmed to stop
automatically if no device is operated within 15
minutes.
Verifying the keypad: To see that the keypad
works, hold down any button for 3 seconds and
the “machine connected to the mains” light (14)
should turn off.
CKE models
The machine is ready for use, but when you press
“On” (7) the machine does not start and SE
(Safety) appears on the display:
- If you hold down “On” (7), it indicates which
sensor has not been detected.
d1: Bayonet mechanism
d2: Cutter Detector If there is only the engine
block.
- Some of the safety devices are disabled. Check
that all of the components are in position.
- The error persists after running the above
check. There is a problem with one of the safety
devices. Call a SAMMIC authorised technical
assistance service.
"E1" on the display means that a variable
frequency drive safety device has been activated.
To exit this status, press disconnect the machine
from the mains and wait.
The display (1) does not light up: There is no
power supply to the display or the electronic
control board is broken.
To verify that the keypad works correctly, with the
cutter/emulsifier attachment fitted, press the keys
and verify that the plate beeps and the display
reacts. If it does not, change the keypad.
The CKE-5 and 8 are programmed to stop
automatically if no device is operated within 30
minutes.
OTHER IMPORTANT INFORMATION
This machine is not designed for use by people
(including children) with reduced physical,
sensory or mental capabilities or lacking the
necessary experience or knowledge, unless they
have received supervision or instructions from a
health and safety expert.
This machine is for supervised use. Never leave
the machine running unsupervised.
9
EN
APPLICATIONS
Recommendations for use
When chopping, we recommend you use the mixer and cut the food into small pieces (3-4 cm) before feeding them in, for a more uniform cut.
Operation
Maximum
quantity for
CK/CKE-5
Maximum
quantity for
CK/CKE-8
Speed
Optimum blade type *
Scraper Notes
Raw meats in general
1.5-2 Kg 2.5-3 Kg
I or 3-6
Smooth
Yes
Smooth blade
obligatory
Cooked meats
2.5-3 Kg 3.5-4 Kg
I or 3-7
Smooth
Yes
Recommendation:
Pulse
Pates
1.5-2 Kg 2-3 Kg
I or 3-6
Smooth or Serrated
No
Fish
2-2.5 Kg 3-3.5 Kg
I,II or 3-7
Smooth
Yes
Dough and Pasta
1.5-2 Kg 2-2.5 Kg
I or 3-5
Smooth or Serrated
No
Breadcrumbs
1-1.5 Kg 2-2.5 Kg
I, II or 5-10
Serrated
No
Purees, sauces, soup
2 litres 3 litres
II or 7-10
Serrated
Yes
Mayonnaise
3 litres 4 litres
I-II or 7-10
Smooth, Serrated or
Perforated
Yes
Icing sugar
1-1.5 Kg 1.5-2 Kg
II or 8-10
Smooth
Yes
Chopping: onion, garlic,
parsley
1 Kg 1.5 Kg
I-II or 1-4
Smooth or Serrated
Yes
Recommendation:
Pulse
FIGURE 3
TECHNICAL DESCRIPTION
D - Keyboard.
F - Lower cover.
H - Base.
S - Pot.
T - Blade.
U - Pot cover.
V - Scraper knob.
W - Bowl lid gasket.
X - Scraper.
Y - Bayonet.
Z - Closed bayonet.
AA - Open bayonet.
 Loading...