

Sammic CK-401 Installation Manual
INSTRUCCIONES - USERS MANUAL - GEBRAUCHSANWEISUNG MODE D’EMPLOI - INSTRUZIONI PER L’USO - MANUAL DE INSTRUÇÕES
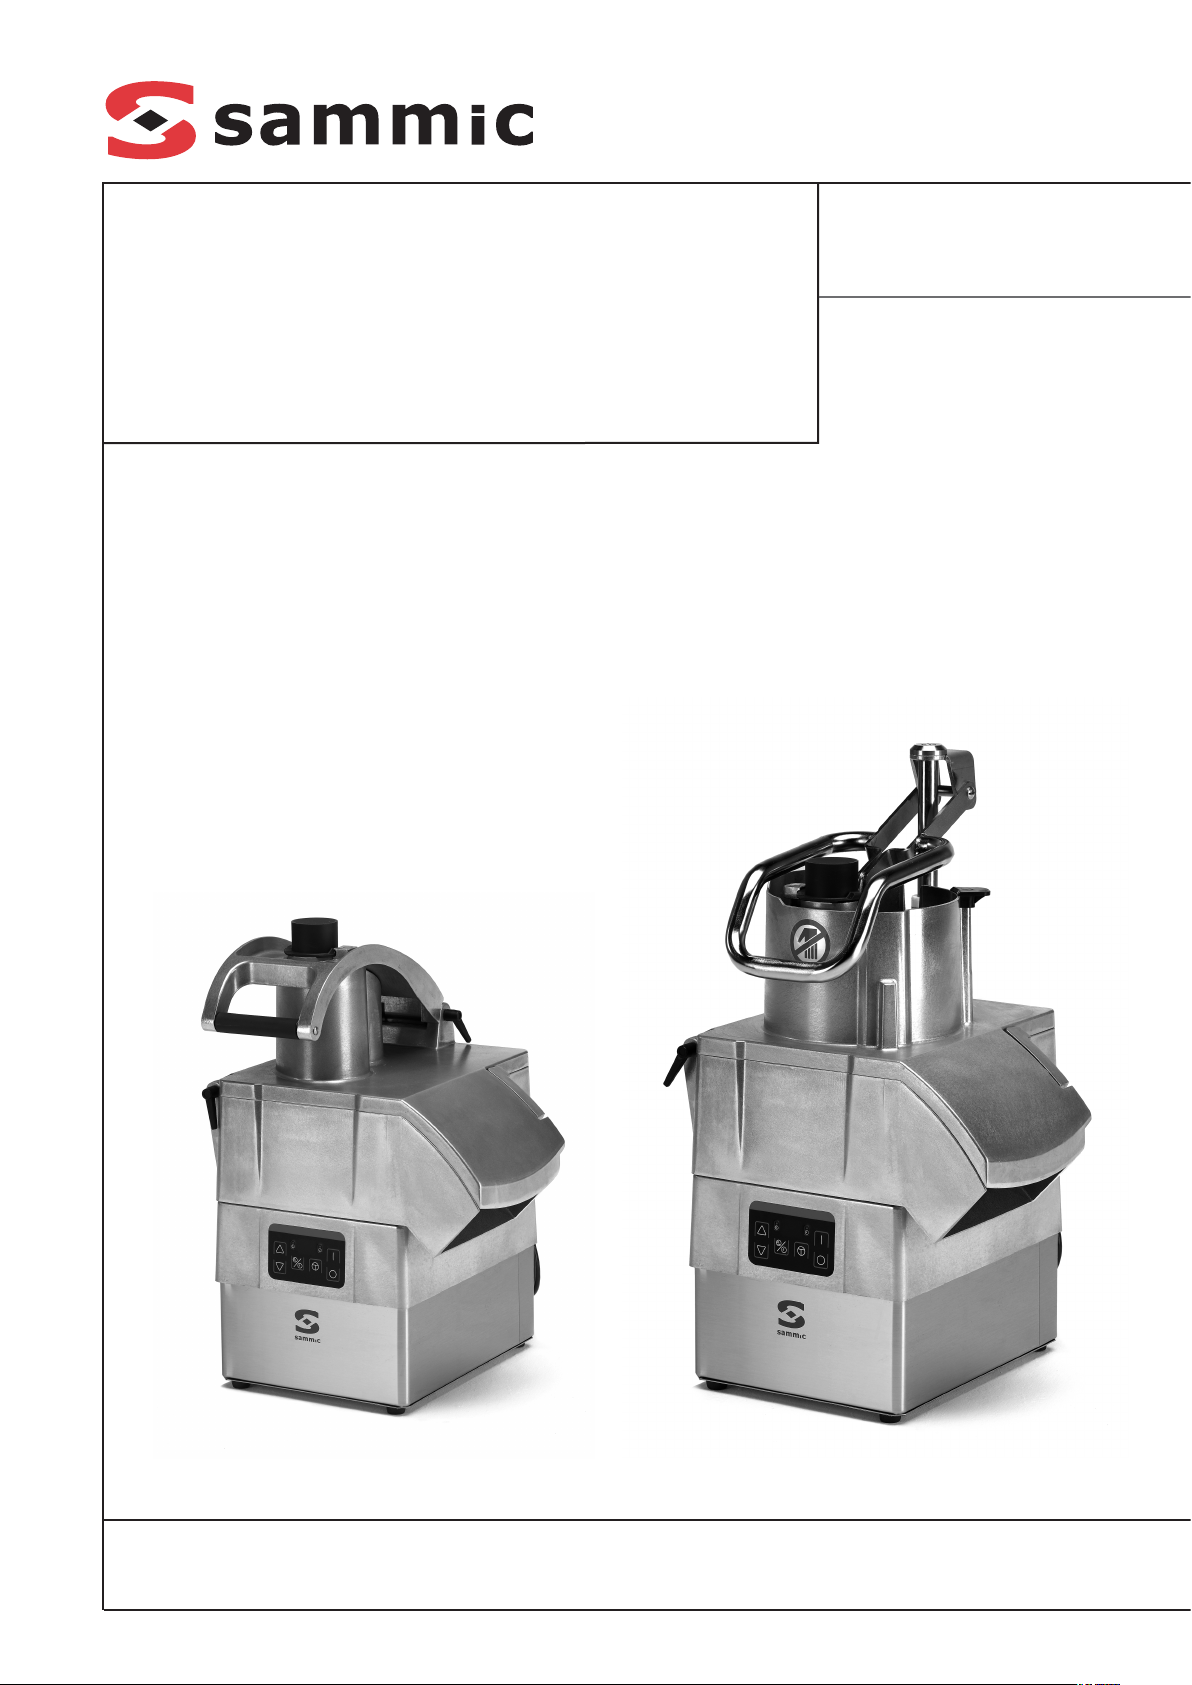
Cortadoras de hortalizas
Vegetable preparation machine
Gemüseschneidemaschine
Coupe-légumes
Tagliatrice di ortaggi
Cortadora de hortaliças
CK-301/302
CK-401/402
Cada máquina lleva las siguientes indicaciones:
- Nombre y dirección del fabricante: SAMMIC
S.L - Basarte 1 Azkoitia. Gipuzkoa (SPAIN)
- El número de serie se indica en la hoja de
garantía y en la declaración de conformidad.
MODELOS
Este manual describe la instalación, funcionamiento y mantenimiento de la CK-301/302 y CK401/402. La referencia del modelo y sus características se indican en la placa de identificación
colocada en la máquina. Esta cortadora está
diseñada y fabricada de acuerdo con las directivas Europeas:
- Directiva de máquinas 2006/42/CE.
- Directiva de baja tensión 2006/95/CE.
- Directiva de compatibilidad electromagnética
2004/108/CE.
- Directivas de materiales de aluminio y plásticos
alimentarios 89/109/CEE y 90/128/CEE.
- Norma de aleaciones de aluminio moldeadas
en contacto con alimentos EN 601-2004.
- Norma de higiene y materiales alimentarios:
ANSI-NSF 8 y ANSI-NSF 51.
- Norma Cortadoras de Hortalizas: UNE-EN
1678.
- Norma Procesadores de alimentos y mezcladoras: UNE-EN 12852.
- Índice de protección según la norma UNE-EN
60529: Mandos IP-55 y el resto de máquina IP-
23.
- Los modelos de 120V/60Hz/1~ cumplen con
las normas UL-763 y CSA C22.2.
OBSERVACIONES IMPORTANTES
- Este aparato no está destinado
para ser usado por personas
(incluido niños) cuyas capacidades físicas, sensoriales o mentales estén reducidas, o carezcan
de experiencia o conocimiento,
salvo si han tenido supervisión o
instrucciones relativas al uso del
aparato por una persona responsable de su seguridad.
- Esta máquina es de uso vigilado.
No dejar nuca la máquina en marcha sin que nadie este al cargo de
ella.
- Antes de utilizar por primera vez la
máquina, limpiar la zona de contacto con alimentos con agua
jabonosa (templada), aclarar y
dejarla secar.
- El conjunto cuchillas (T) de la cut-
ter/emulsionador están provistos
de cuchillas muy afiladas, por
tanto hay que manipularlas cuidadosamente.
- Antes de cualquier intervención
para la limpieza, revisión o reparación de la máquina, es obligatorio
desconectar la máquina de la red
.
INSTALACION
Para obtener las mejores prestaciones y una
buena conservación de la máquina, siga las instrucciones contenidas en este manual.
EMPLAZAMIENTO
Se recomienda colocar la CK-301/302 sobre una
superficie estable -que no actúe como caja de
resonancia- a una altura comprendida entre 700
y 900 mm y entre 600 y 800 mm para la CK401/402. Colocar el recipiente de recuperación
por debajo de la boca de salida de los alimentos.
La máquina no está sujeta y es fácilmente desplazable.
CONEXION ELECTRICA
Comprobar que las características eléctricas de
la CK coinciden con el de la red.
La CK se suministra para tensión de 230V 50-60
Hz monofásica o 120V 50-60 Hz monofásica.
Preparar una toma de corriente mural, con interruptor general de seccionamiento, y protección
diferencial y magneto-térmica de 2P (de 13A a
20A) con su clavija correspondiente. Colocar un
interruptor general o la clavija de forma accesible
para la desconexión de la máquina.
ATENCION: ES OBLIGATORIA LA CONEXION
A TIERRA. PELIGRO DE ELECTROCUCION.
El variador está provisto de un filtro que conduce las perturbaciones existentes a tierra. Por
este motivo puede ocurrir que el diferencial de la
instalación actúe de forma intempestiva. Se
recomienda utilizar un diferencial propio para la
máquina o uno del tipo "súper inmunizado" .
Además, la máquina está provista de un tornillo
externo para la conexión a un sistema equipotencial de tierra.
En todos los modelos el motor es trifásico y está
comandado por un variador de frecuencia.
No manipular en ningún caso la configuración
del variador.
Sentido de giro: Como el motor es trifásico,
puede que el sentido de giro no sea el correcto.
El sentido de giro de la CK es el antihorario. Para
invertirlo, intercambiar dos cables del motor a la
salida del variador de frecuencia.
Características del cable
Las CK se suministran con un cable eléctrico de
1,5 m de largo, con recubrimiento termo plástico.
FUNCIONES DEL CONTROL ELECTRONICO
Y SU FUNCIONAMIENTO
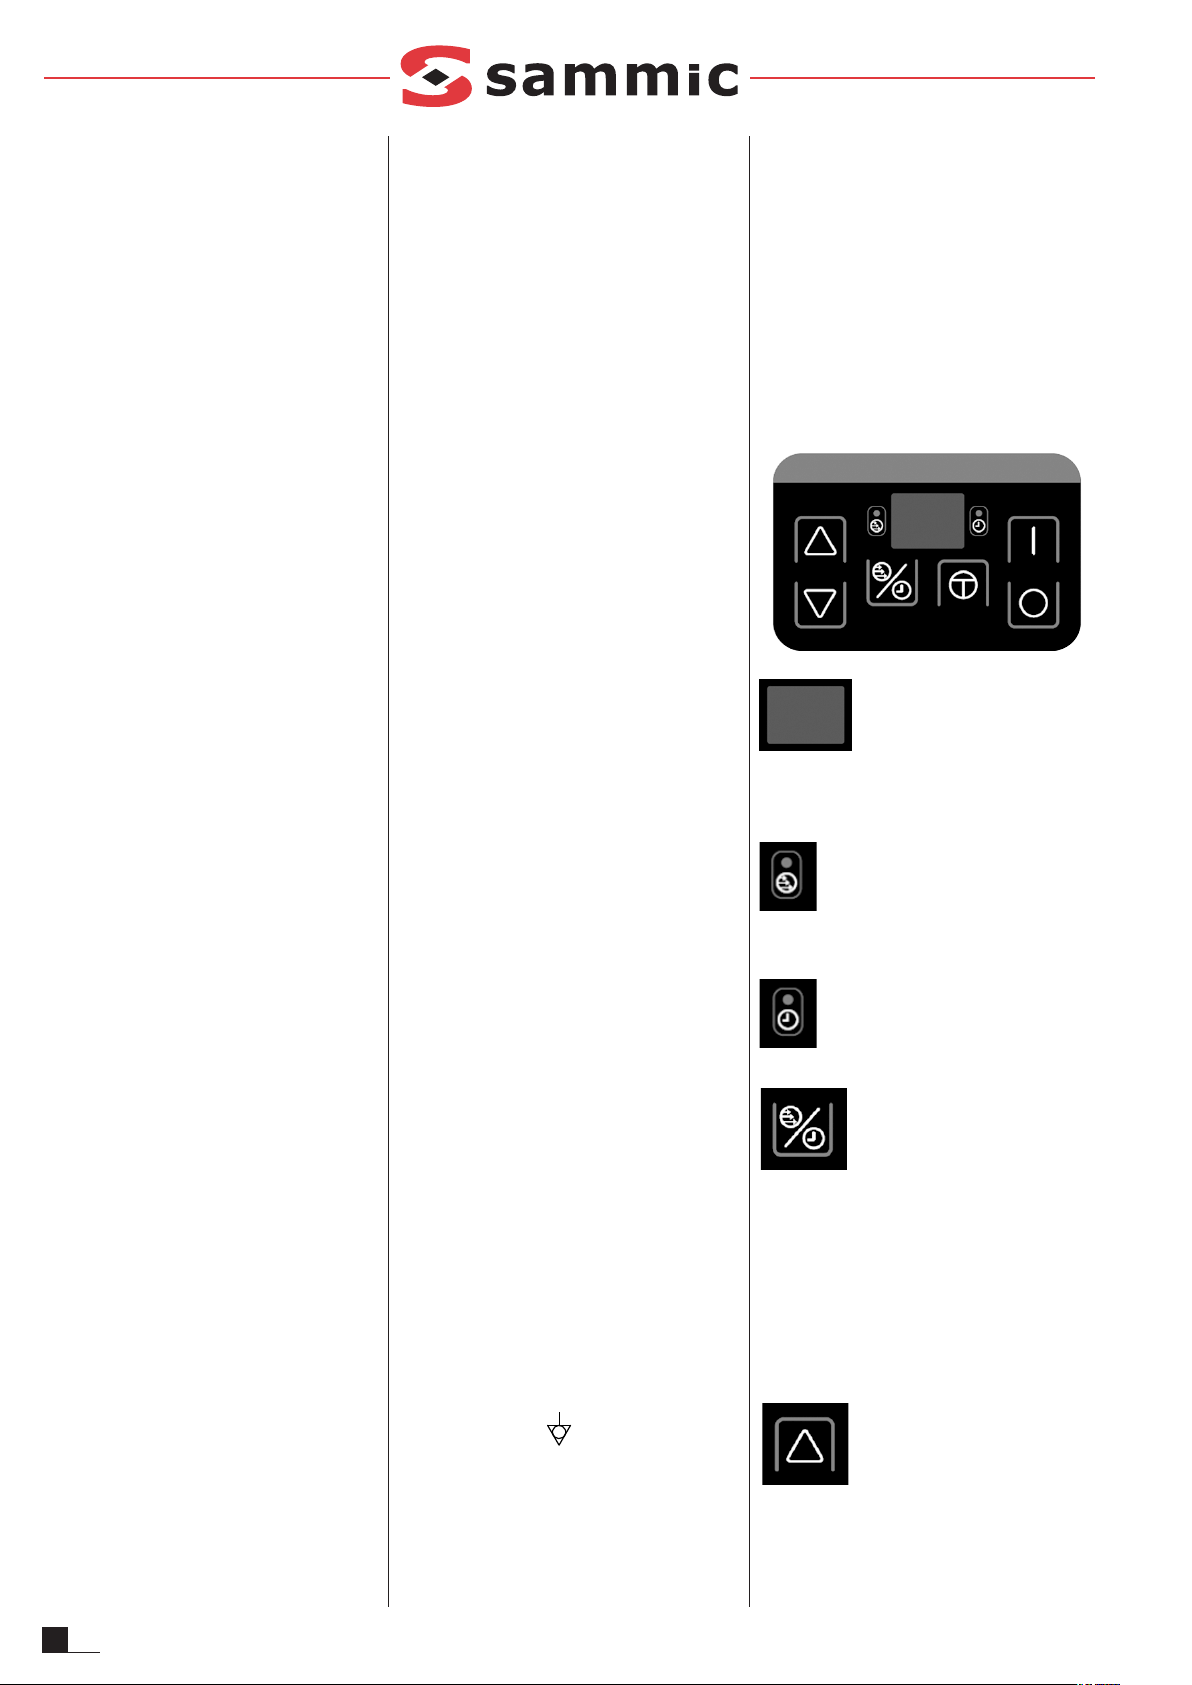
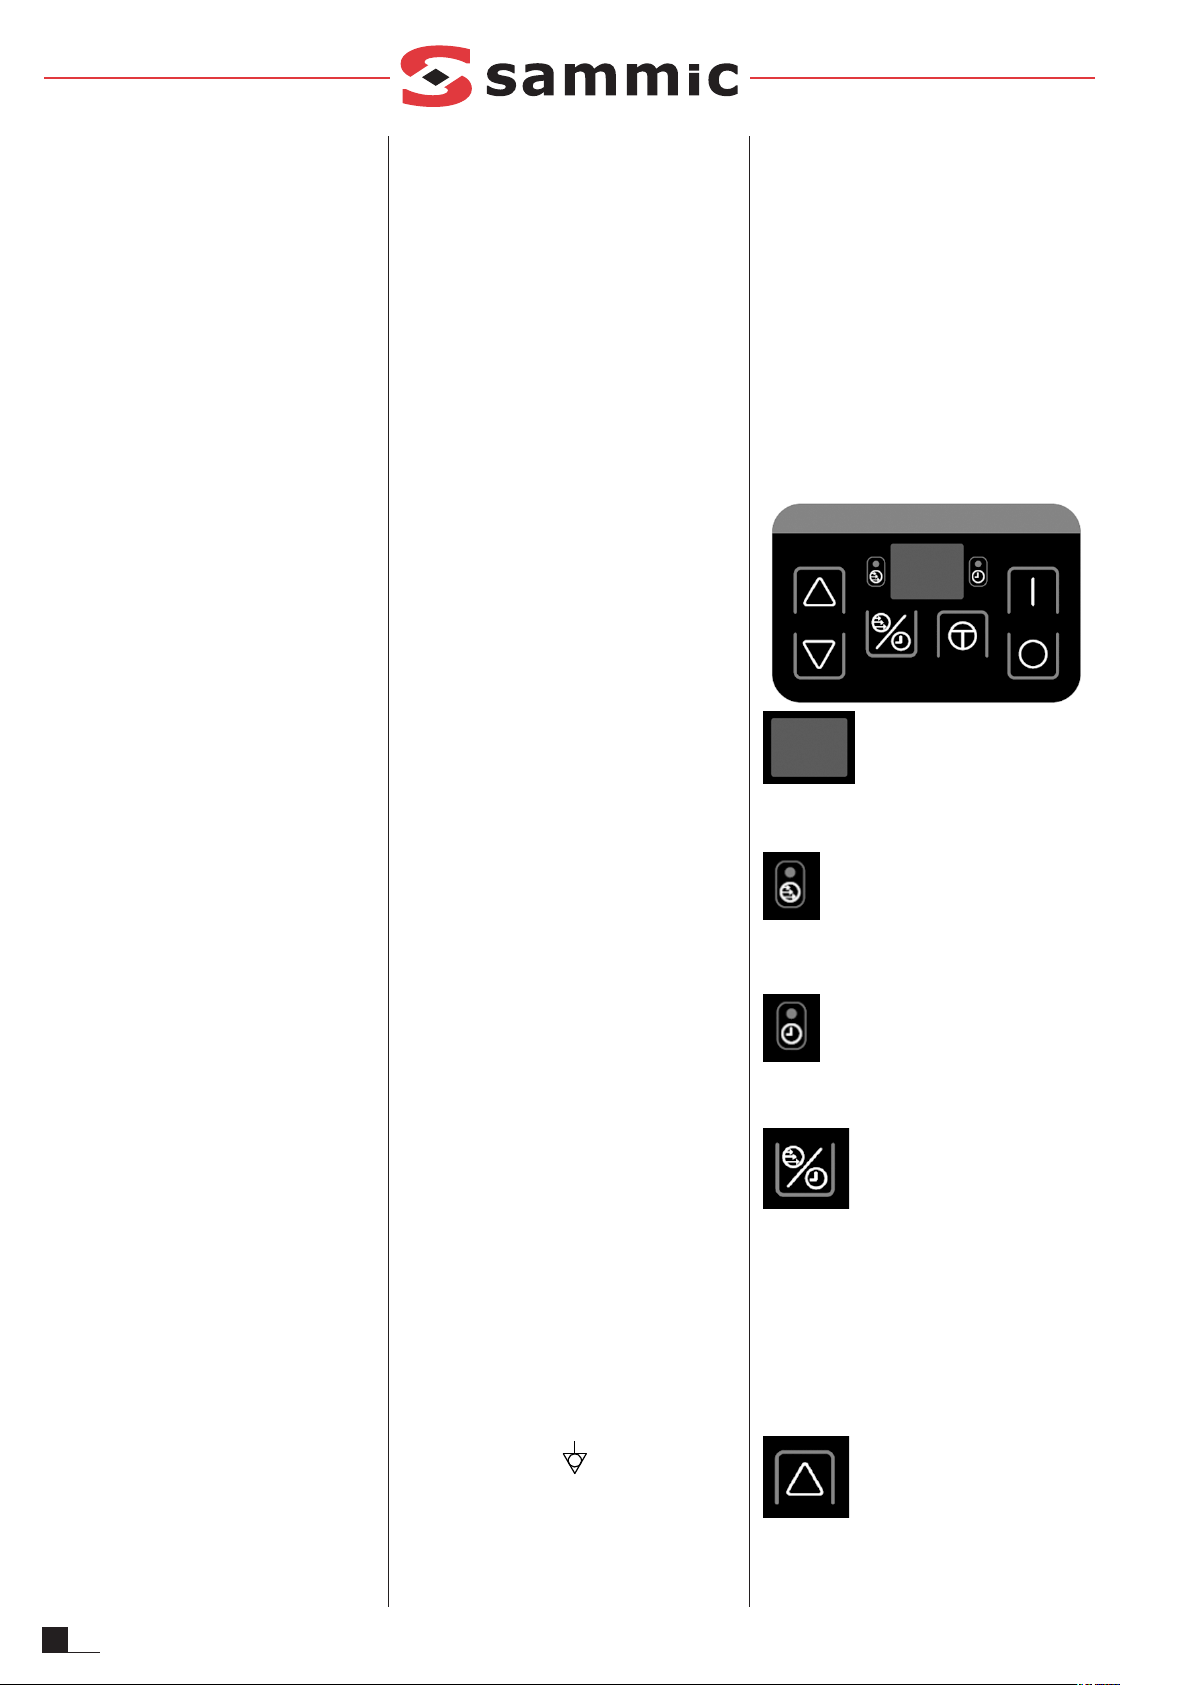
Visor (1)
Visualiza la velocidad, el tiempo de funcionamiento, y los diferentes avisos.
Piloto “velocidad” (2)
Cuando esta encendido en el “visor”
se visualiza la velocidad.
Piloto “tiempo”(3)
Cuando esta encendido en el “visor”
se visualiza el tiempo.
Función (4)
Pulsando este pulsador cambiamos entre la función de “velocidad” y “tiempo”. La función elegida aparece en el visor con su piloto correspondiente encendido.
Este pulsador solo funciona en modo “Cutter”.
En modo “Cortadora de Hortalizas” este pulsador no hace nada debido a que solo se encuentra activada la función “velocidad”.
Subir (5)
Cada pulsación incrementa el valor seleccionado en el visor.
2
ES
3
ES
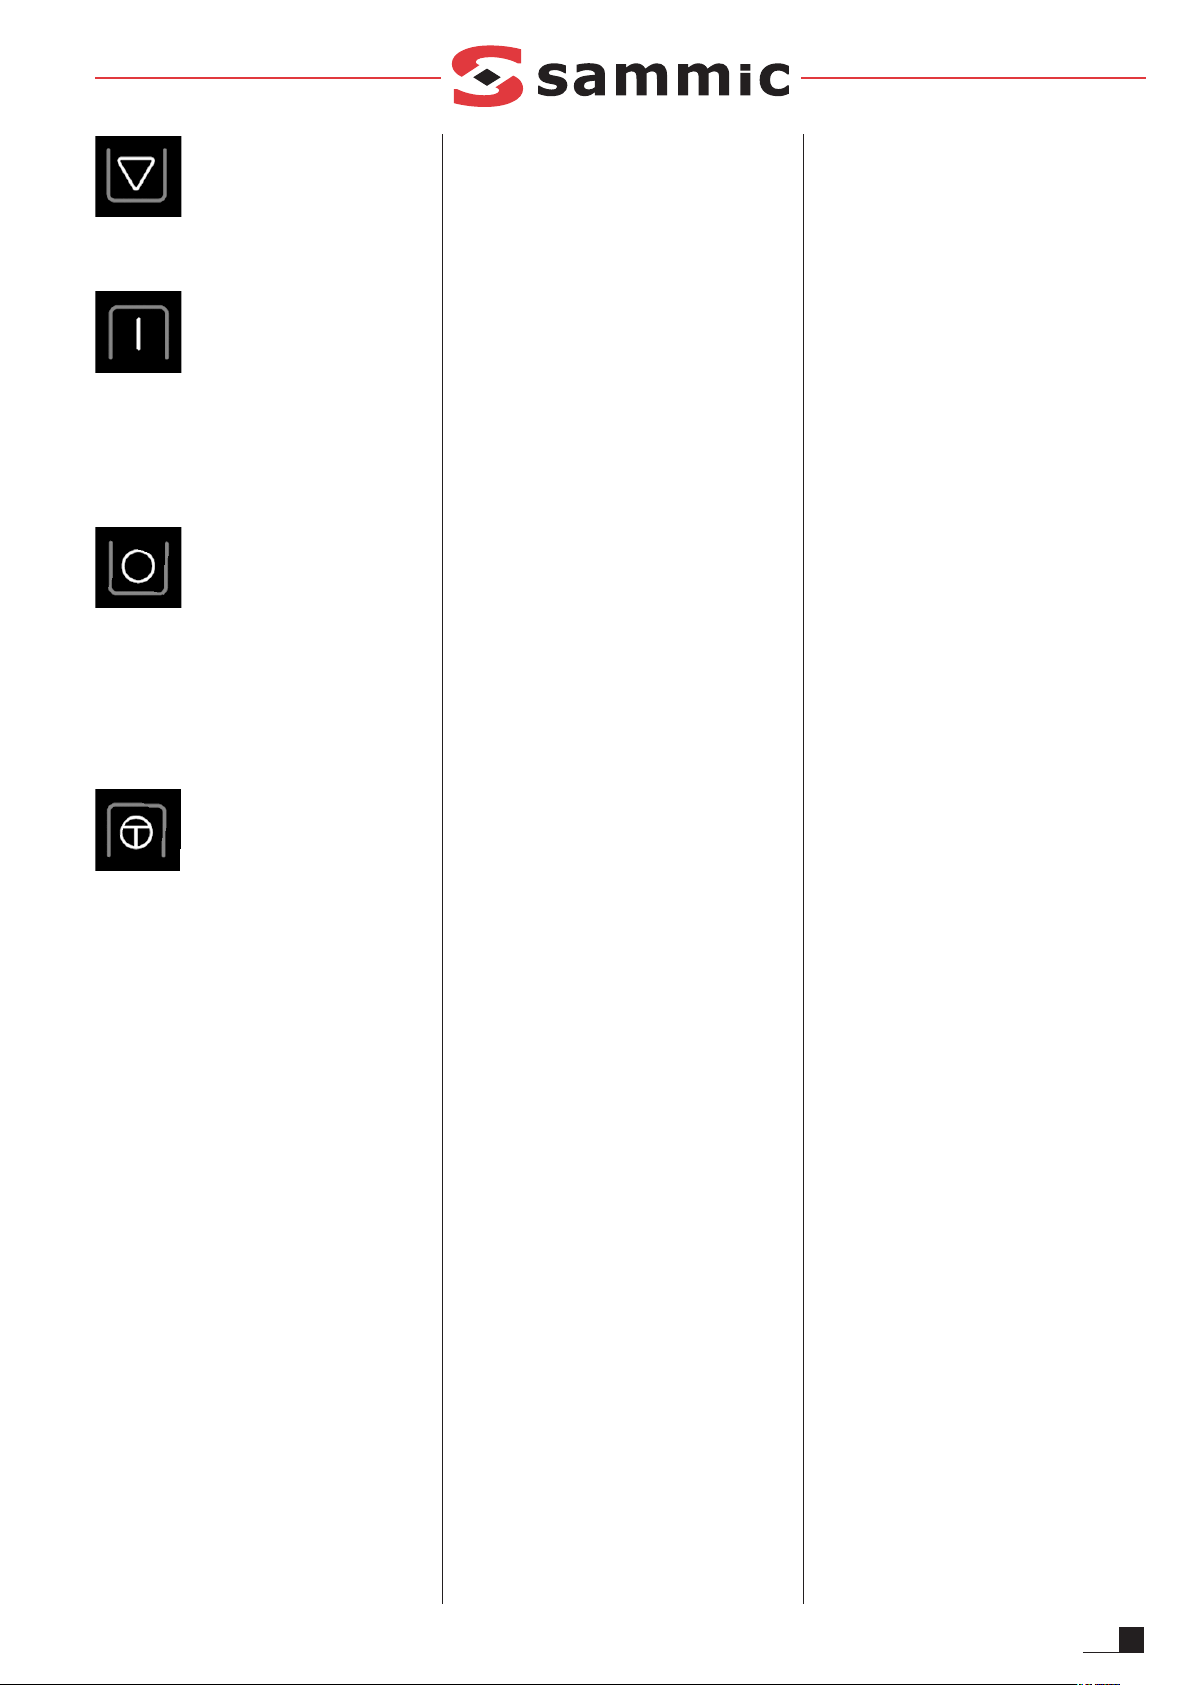
Bajar (6)
Cada pulsación disminuye el valor seleccionado
en el visor.
Marcha (7)
Pone en marcha el motor si las seguridades
están activadas. Si falta alguna de las seguridades y pulsamos “Marcha” (7), el visor visualiza
"SE" (seguridad) indicando que falta alguna
seguridad para el arranque.
Parada (8)
La primera pulsación detiene el motor, el visor
empieza a parpadear indicando que está en
espera. Sigue guardando los valores de tiempo
y velocidad. Una vez transcurridos 3 minutos o
volviendo a pulsar "parada" la máquina pierde
esos valores y pasa al estado inicial.
Ráfagas (9)
Mientras se mantenga pulsado se pone marcha
el motor si las seguridades están activadas. Si
se suelta el pulsador el motor se para. Si falta
alguna de las seguridades y pulsamos “ráfagas”,
el visor visualiza "SE" (seguridad) indicando que
falta alguna seguridad para el arranque.
NOTA: Algunos modelos disponen de una
Seta de Emergencia que se debe desenclavar antes de poner en marcha la cortadora.
Funcionamiento
Al conectar la CK el “Visor” (1) visualiza dos
rayas centrales (espera). Si montamos el accesorio “Cortadora de Hortalizas” el visor visualiza
“CA” y si montamos el accesorio “Cutter” el visor
visualiza “CU” durante 2 sg. Nos indica que la
placa de control ha identificado cada accesorio.
Luego se visualiza la velocidad 1 en caso de
detectar el accesorio CA y velocidad 5 en caso
de detectar accesorio Cutter.
- Control de Velocidad: Se visualiza con el piloto
"Velocidad" (2) encendido y se pueden seleccionar de 1 a 10 velocidades distintas en el
modo de funcionamiento “Cutter” y de 1 a 5
velocidades en el modo de funcionamiento
“Cortadora de Hortalizas”.
- Control de Tiempo: Solo es posible en modo de
funcionamiento “Cutter”. Se visualiza cuando el
piloto "Tiempo" (3) está encendido. Hay dos
tipos de funcionamiento, el funcionamiento
continuo y el temporizado:
- Funcionamiento continuo: Una raya girando en
el visor indica que lo tenemos seleccionado. Si
la CK-301 se deja en marcha sin actuar sobre
ningún accionamiento la máquina se para automáticamente a los 30 min.
- Funcionamiento temporizado: Es posible programar una temporizacion de 0 a 10 minutos.
El tiempo se selecciona de ½ minuto en ½
minuto. El “Visor” (1) visualiza el descuento del
tiempo de la misma forma. El ultimo minuto, se
descuenta en segundos. Cuando el tiempo programado finaliza, la máquina se detiene y se
oye un pitido.
- Ahorro: Estando la máquina parada si en 5
minutos no hacemos nada en el visor se apaga
y visualiza solo un punto. Pulsando cualquier
tecla se enciende de nuevo.
PUESTA EN MARCHA
ATENCION: Antes de utilizar por primera vez
la máquina, limpiar la zona de contacto con
alimentos con agua jabonosa (templada),
aclarar y dejarla secar.
Los discos (A), rejillas (B) de la cortadora de
hortalizas y el conjunto cuchillas (T) de la
cutter están provistos de cuchillas muy afiladas, por tanto hay que manipularlas cuidadosamente.
Para la colocación de los accesorios se tiene
desconectar la CK de red.
Modo de funcionamiento “Cortadora de
Hortalizas”:
· Con el mecanismo de bayoneta (Y) abierto
(AA), colocar el accesorio “Cortadora
Hortalizas” sobre el bloque motor de forma que
los tres tetones del accesorio se introduzcan
dentro de los agujeros del mecanismo de fijación rápida. Cerrar (Z) el mecanismo de bayoneta (Y) para bloquear el accesorio sobre el
bloque motor.
· En la CK-301/302, CK-401/402 es necesario
colocar la tapa articulada (J) según se indica en
los dibujos, fijándolos con el pasador (O).
·En la CK-301/302 es necesario colocar el pisa-
dor (M) según se indica en los dibujos fijándolos
con el pasador (N).
·En la CK-301/302, CK-401/402 si se quiere uti-
lizar el cabezal de tubos es necesario colocarla
según se indica en los dibujos, fijándolos con el
pasador (O).
Colocación de discos (A) y rejillas (B).
- Desbloquear el cierre (I), y abrir la Tapa articulada (J).
- Colocar el expulsor (C) en su alojamiento del
eje de arrastre.
- La rejilla (B) se inserta en la cavidad de la tapa
inferior (D) cuando el proceso lo requiera.
- Colocar un disco (A) en el eje de arrastre. Para
ello introducir el disco (A) en el eje de arrastre
y girarlo en sentido horario hasta que queda
encajado en el eje de arrastre.
- En la CK-401/402 roscar en el eje de arrastre la
broca (Q) o el revolvedor (R) según el producto a cortar.
- Bajar la tapa articulada (J) y bloquear el cierre(I).
Con la tapa articulada (J) cerrada y pisador (M)
abajo, si pulsamos “Marcha” (7) el motor arranca.
Con el motor parado, tapa articulada (J) cerrada
y pisador (M) arriba, si pulsamos “Marcha” (7) el
visor empieza a parpadear indicando que la
máquina esta armada o lista para trabajar. Al
bajar el pisador (M) el motor arranca.
Con el motor en marcha si subimos el pisador
(M) el motor se para. Al bajar el pisador (M) el
motor vuelve a arrancar automáticamente. Si en
30 sg no se ha bajado el pisador (M) es necesario volver a pulsar el pulsador de “Marcha” (7)
para poder arrancar la máquina.
Con el motor en marcha si se abre la tapa articulada (J) el motor se para. Al cerrar la t apa articulada (J) es necesario volver a pulsar el pulsador de “Marcha” (7) para poder arrancar la
máquina.
Si se deja la máquina en marcha con el pisador
(M) abajo a los 30 minutos la máquina se para
automáticamente.
Funcionamiento con la tolva normal (J) y
pisador (M). CK-301/302.
- Es necesario que el mazo (L) este alojado y
bloqueado en su orificio. Esto se hace girándolo en el sentido antihorario.
- Poner en marcha la cortadora.
- Levantar el pisador (M). El motor se para.
- Introducir los productos en la tolva normal (J).
- Al empezar a bajar el pisador (M) el motor
arranca y empieza el proceso de corte.
Empujar el producto bajando suavemente el
pisador (M). Repetir la operación una y otra
vez.
- Pulsar “Parada” (8) al terminar la producción.
ATENCION: Hacer una fuerza de apriete excesiva sobre el pisador (M) puede deteriorar el
producto y forzar el motor en exceso.
Funcionamiento con la tolva normal (K) de
entrada y pisador (M). CK-401/402.
- Es necesario que el mazo (L) este alojado y
bloqueado en su orificio. Esto se hace girándolo en el sentido antihorario.

- Poner en marcha la cortadora.
- Levantar el pisador (M) y girarlo en sentido antihorario para liberar la zona de introducción de
alimentos de la tolva normal (K). El pisador (M)
se puede dejar apoyado sobre el soporte pisador (M). El motor se para.
- Introducir los productos en la tolva normal (K).
- Al girar el pisador (M) en sentido horario el
motor arranca y empieza el proceso de corte.
Empujar el producto bajando suavemente el
pisador (M). Repetir la operación una y otra
vez.
- Pulsar “Parada” (4) al terminar la producción.
ATENCION: Hacer una fuerza de apriete excesiva sobre el pisador (M) puede deteriorar el
producto y forzar el motor en exceso.
Funcionamiento con tolva cilíndrica (L) (CK301/302-CK-401/402).
Esta tolva de Ø55mm se utiliza para el corte de
productos cilíndricos y alargados, como las
zanahorias, endivias, pepinos, etc.
- Poner en marcha la cortadora.
- Desbloquear el mazo (L) girándolo en el sentido horario.
- Introducir los productos por el orifico y empujarlos suavemente con el “Mazo” (L). Repetir la
operación una y otra vez.
- Pulsar “Parada” (8) al terminar la producción.
IMPORTANTE: Cuando no se utiliza la tolva
cilíndrica, dejar el mazo (L) dentro de la tolva.
Funcionamiento de la CK-301/302, CK401/402 con cabezal de tubos.
- Es necesario que el cabezal de tubos este
montado y bloqueado.
- Poner en marcha la cortadora.
- Ir introduciendo los productos por los agujeros
superiores del cabezal de tubos. A los 30 minutos la cortadora automáticamente se para. Si se
quiere seguir trabajando volver a pulsar macha.
- Pulsar “Parada” (4) al terminar la producción.
Modo de funcionamiento “Cutter”:
Con el mecanismo de bayoneta (P) abierto (R),
colocar el accesorio “Cutter” sobre el bloque
motor de forma que los tres tetones del accesorio se introduzcan dentro de los agujeros del
mecanismo de fijación rápida. Para que la
máquina funcione el asa tiene que colocarse
justo encima del teclado. Cerrar (Q) el mecanismo de bayoneta (P) para bloquear el accesorio
sobre el bloque motor.
Colocar el “Conjunto de cuchillas” (T) y
cerrar la tapa (U) girándola en sentido antihorario hasta que queda encajada y bloqueada.
Ya se puede trabajar con la máquina.
La tapa (U) va provista de un orificio para la
incorporación de producto mientras la máquina
está funcionando y de un conjunto rascador que
girándolo revuelve el contenido de la olla (S)
para que el procesado sea más homogéneo.
LIMPIEZA
ATENCION: Desconectar la CK de la red
antes de cualquier manipulación en su interior.
Los discos (A) y rejillas (B) están provistos
de cuchillas muy afiladas, por tanto hay que
manipularlas cuidadosamente.
Es necesario desmontar y limpiar la máquina
al término de cada día o cada vez que se
cambie de producto o de accesorio.
Todos los elementos que están en contacto
con los alimentos se deben limpiar inmediatamente después de su utilización, con agua
caliente y un detergente admitido en alimentación. Después aclarar con abundante agua
caliente y desinfectar con un paño suave
impregnado en alcohol etílico (90 º). NO SE
DEBEN utilizar detergentes abrasivos (aguafuerte, lejía concentrada etc..) ni estropajos o
rasquetas que contengan acero común.
Pueden causar la oxidación de la máquina.
Se aconseja que los elementos desmontables de la CK no sean introducidos en un
lavavajillas para su limpieza. Los detergentes pueden producir deterioro del aspecto
superficial.
Limpieza de accesorio “Cortadora
Hortalizas”:
- Desbloquear el cierre (I), y abrir la tapa articulada (J).
- En la CK-401/402, sujetando el disco (A) con la
mano sin tocar las cuchillas, utilizar la llave (P)
suministrada junto con la máquina para desmontar la broca (Q) o el revolvedor (R), desenroscándolo en sentido antihorario.
- Retirar el disco (A) girándolo en sentido horario
y tirando de el hacia arriba cuidadosamente.
Retirar el la rejilla (B) y el expulsor (C).
- En la CK-301/302 es posible desmontar el pisador (M) y la tapa articulada (J) para facilitar su
limpieza. Para ello desmontar los pasadores (N
y O).
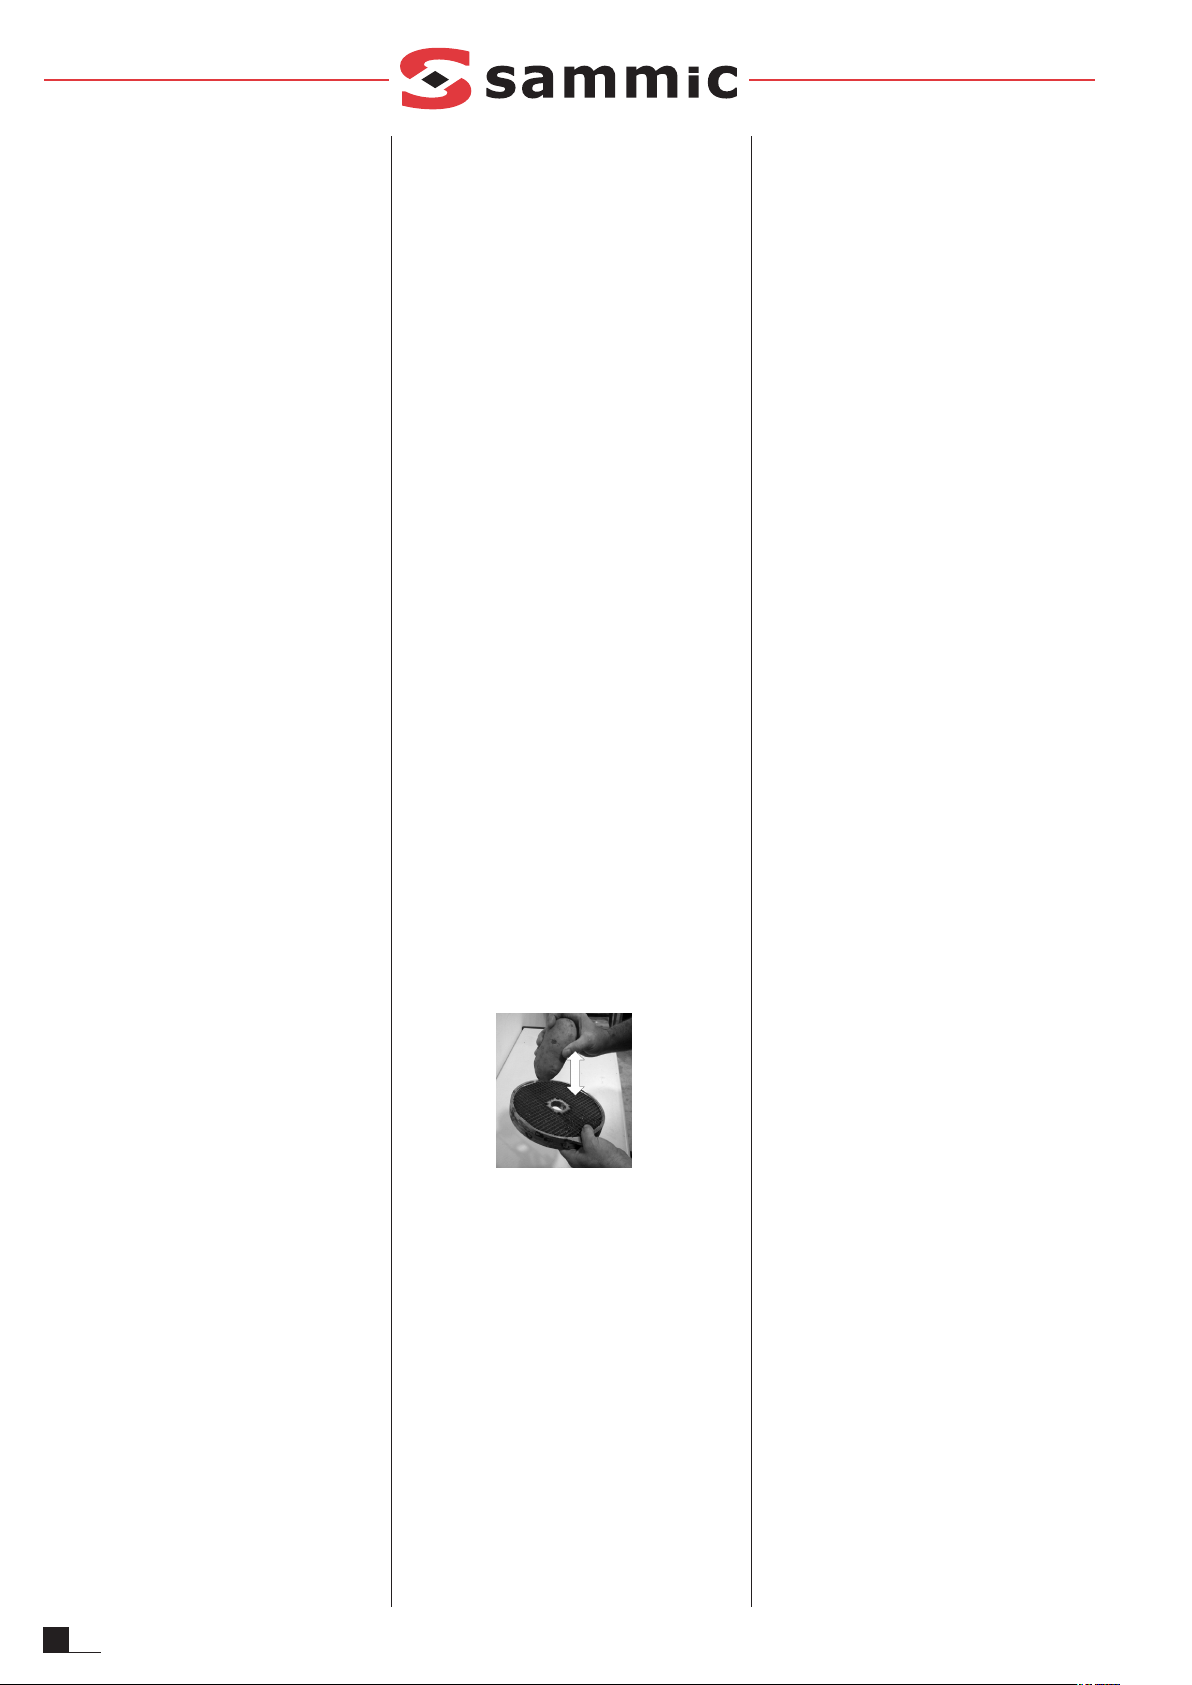
ATENCION: Para poder retirar los productos
encajados en las rejillas (B) basta golpearlas
con una patata alargada o una zanahoria
entera en el sentido de corte. De esta forma
no se daña la rejilla (B). Tener precaución con
el filo de la rejilla (B). Nunca utilizar objetos
duros para golpear la rejilla (B).
Limpieza de accesorio “Cutter”:
- Si la suciedad esta seca, adherida al caldero y
a las cuchillas. Poner agua caliente y detergente en el caldero y hacer funcionar a la
máquina para que los residuos se ablanden.
- Para evitar salpicaduras, una vez procesado el
producto, quitar la tapa (U), colocar la seguridad bayoneta (Y) en posición abierta (AA) y
quitar la olla (S) con la cuchilla dentro (T).
- Es posible desmontar el revolvedor (V+X) de la
tapa (U). Para ello, manteniendo fija el revolvedor (X), apretar y girar la manivela revolvedor
(V). Una vez realizada estas operaciones se
puede separar el revolvedor y la manivela
revolvedor. Para montar de nuevo el revolvedor, introducir de nuevo el revolvedor (X) en la
tapa (U) y la manivela revolvedor (V) en el
revolvedor (X). Empujar el revolvedor (X) y la
manivela revolvedor (V) contra la tapa e girar la
manivela revolvedor (X) hasta llegar al tope.
Una vez realizadas estas acciones separar el
revolvedor (X) y la manivela revolvedor (V).
Limpieza del bloque motor CK:
El exterior de la máquina NO SE DEBE limpiar
con un chorro directo de agua. Emplear para su
limpieza un paño húmedo y cualquier detergente habitual. NO SE DEBEN utilizar detergentes
abrasivos (aguafuerte, lejía concentrada etc..) ni
estropajos o rasquetas que contengan acero
común, pueden causar la oxidación de la máquina.
Accesorio “Cortadora Hortalizas: Funcionamiento de discos (A) y rejillas (B).
· Discos (A):
- Discos (A) FC-1 y FC-2 para cortar patatas
"chips" o rodajas finas de 1 y 2 mm.
- Discos (A) de FC-3 a FC-25 para obtener rodajas de 3 a 25 mm de patatas, zanahorias, remolachas, coles, pepinos, calabacines, cebollas,
rábanos, etc.
- Discos (A) con cuchilla curva, para productos
blandos, FCC-2, FCC-3 y FCC-5 para cortar en
rodajas tomate, naranja, limón, plátano, manzana, etc.
- Discos (A) ralladores tipo FR, desde 2 á 7 mm,
para deshilar verduras y rallar queso, pan, nueces, almendras, etc.
- Para cortar patatas del tipo "paja" y "cerilla",
tiras de zanahorias, apio, remolacha, etc., discos (A) FCE-2 , FCE-4 y FCE-8.
4
ES

- Discos (A) FR-1 y FR-8 para rallar el pan,
queso, chocolate, etc.
· Discos (A) y rejillas (B). Combinaciones
posibles:
- Los discos (A) FC-6, FC-8, FC-10 combinadas
con las rejillas (B), FFC-8 y FFC-10 se obtienen
patatas del tipo "fritas".
- Los discos (A) FC-3, FC-6, FC-8, FC-10 y FC14 combinados con las rejillas (B) FMC-8 ,
FMC-10 y FMC-14, se obtienen dados y/o
cubos de 3 a 14 mm de patatas para tortillas,
de hortalizas y frutas para macedonia, ensalada rusa, etc.
- Los discos (A) FC-20 y FC-25 combinados con
las rejillas (B) FMC-20 y FMC-25 se obtienen
dados y/o cubos de 20x20 y 25x25.
Broca (Q) y Revolvedor (R).
- Broca (Q): Es utilizada exclusivamente para
trabajos en col o similares. Gracias a ella es
posible cortar piezas enteras.
- Eje revolvedor (R): Hay que utilizarlo con todos
los productos menos la col y similares.
Expulsor alto y normal (C).
- Expulsor alto: Para corte de productos voluminosos como la col, la coliflor, el apio y para el
rallado de productos como queso, zanahorias...
- Expulsor normal: Resto de cortes.
Accesorio “Cutter”.
Mediante el accesorio “Cutter” se puede:
PICAR: Perejil, ajo, cebolla, queso, jamón cocido, carne cocinada, etc...
SALSAS: Tomate, mayonesa, tártara, alioli,
verde, gazpacho, etc...
PURES: Legumbres, verduras, compotas, etc...
PASTAS: Gambas, mejillones, ostras, carne,
embutidos, etc...
SOPAS / CREMAS: Marisco, ajo, verduras,
legumbres, carne, etc...
MANTEQUILLAS DE SABORES: Ajo, perejil,
finas hierbas, anchoas, etc...
En repostería:
PICAR: Almendras, avellanas, chocolate, pasas,
frutas para macedonia, etc...
PREPARAR: Azúcar glass, pasta de almendras,
batir nata; crema de chocolate, vainilla, café, fresas y frutas en general, etc...
MANTENIMIENTO
PRECAUCIONES IMPORTANTES
- Antes de cualquier intervención para la limpieza, revisión o reparación de la CK, es obligatorio desconectar la máquina de la red.
- Verificar periódicamente el funcionamiento de
las seguridades de la máquina. En caso de
detectar alguna anomalía llamar al servicio técnico reconocido por SAMMIC.
- Verificar periódicamente el estado del reten del
eje de arrastre para preservar la estanqueidad
de esta zona. Cada vez que se suelte el eje de
arrastre para mantenimiento se recomienda
colocar un reten nuevo.
- No introducir NUNCA la mano ni cualquier
utensilio por las bocas de salida o tolvas (L y
K)de entrada de la cortadora, a fin de evitar
accidentes o el deterioro de las cuchillas.
- Limpiar la máquina después de cada uso tal y
como se ha descrito con anterioridad.
- Si el cable de alimentación se deteriora y es
preciso instalar uno nuevo, dicho recambio sólo
podrá ser realizado por un servicio técnico
reconocido por SAMMIC.
- Nivel de ruido de la máquina, en marcha, colocada a 1,6 m de altura y 1 m de distancia, inferior a 70 dB(A). Ruido de fondo:32 dB(A).
AFILADO DE CUCHILLAS
ATENCION: Los discos (A), rejillas (B) y el
conjunto cuchillas(T) están provistos de
cuchillas muy afiladas, por tanto hay que
manipularlas cuidadosamente.
Las cuchillas de los discos (A) y del Conjunto
Cuchillas (T) se desmontan fácilmente para
poder afilarse. Para su afilado emplear siempre
piedras blandas conservando el ángulo de corte
de la cuchilla.
INCIDENCIAS DE FUNCIONAMIENTO
Estando la máquina preparada para su funcionamiento al pulsar “Marcha” (7) la máquina no
arranca y en el display aparece SE (Seguridad):
- Si se mantiene pulsada “Marcha” (7) indica cual
es el sensor que no se ha detectado.
d1: Seguridad Cierre bayoneta.
d2: Detector Cutter o Cortadora. En caso de
estar solo el bloque motor.
d3: Detector Pisador.
- Algunas de las seguridades esta desactivada.
Verificar que todos los componentes están en
posición.
- Tras verificar el punto anterior el error persiste.
Hay algún problema en alguna de las seguridades. Llamar a un servicio técnico autorizado
por Sammic, S.L.
"E1" en el visor, indica que alguna protección del
variador de frecuencia ha actuado. Para salir de
este estado pulsar desconectar la máquina de la
red y esperar 3 minutos.
“E2” en el visor, indica que la placa ha detectado
una función no lógica. Por ejemplo estando mon-
tado el accesorio “Cutter” detecta una seguridad
de la “cortadora” . Hay algún problema con los
detectores o al colocar uno de los accesorios se
ha acercado un imán a un detector que no era
por descuido. Desconectar la máquina de la red
o pulsar “Parada” (8) para desactivar el error y
probar varias veces. Si el error persiste llamar a
un servicio técnico autorizado.
No se enciende el visor: No llega tensión al visor
o la placa electrónica de control esta estropeada.
Para verificar que el teclado funciona correctamente con algún accesorio montado pulsar las
teclas y verificar que la placa emite un pitido y el
display reacciona. Si no es así cambiar el teclado.
La CK estaba en marcha y se ha parado sin pulsar ninguna tecla. Si estando la máquina en marcha sin actuar sobre ningún dispositivo se para
automáticamente a los 30 minutos.
En modo Cortadora de Hortalizas al bajar el
pisador (M) el motor no arranca:
- Si se deja el pisador (M) abierto mas de 30 Sg
es necesario volver a pulsar “Marcha” (7) para
rearmar la cortadora.
- En la CK-301/302 puede que la tolva esta
demasiado llena y el pisador (M) no actúa sobre
el micro. Vaciar p arte de la tolva he intent arlo de
nuevo.
Si el ruido de la CK es excesivo, el disco (A) o el
Conjunto Cuchillas (C) roza en alguna parte. Es
probable que los rodamientos del eje principal se
hayan deteriorado.
5
ES
6
EN
Each machine is identified as follows:
- Name and address of the manufacturer: SAMMIC
S.L - Basarte 1 Azkoitia. Gipuzkoa (SPAIN).
- The serial number is printed on the Guarantee
Card and in the Declaration of Conformity.
MODELS
This manual describes the installation, operation
and maintenance of the CK-301/302 and CK401/402. The model reference number and its
features are specified on the name plate attached
to the machine. This preparation machine has
been designed and manufactured in accordance
with the following European directives:
- Machinery Directive 2006/42/CE.
- Low Voltage Directive 2006/95/CE.
- Electromagnetic Compatibility Directive 2004/108/CE.
- Directives 89/109/EEC and 90/128/EEC on aluminium and plastic materials and articles in contact with food.
- Aluminium alloys in contact with food standard
EN 601-2004.
- Hygiene and food contact materials standard:
ANSI-NSF 8 and ANSI-NSF 51.
- Vegetable Preparation Machines S tandard: UNEEN 1678.
- Food processors and mixers standard: UNE-EN
12852.
- Protection level in accordance with UNE-EN
60529: Controls IP-55 and rest of machine IP-23.
- The 120V/60Hz/1~ models comply with the UL763 and CSA C22.2 standards.
IMPORTANT INFORMATION
- This machine is not designed for
use by people (including children)
with reduced physical, sensory or
mental capabilities or lacking the
necessary experience or knowledge, unless they have received
supervision or instructions from a
health and safety expert.
- This machine is for supervised
use. Never leave the machine running unsupervised.
- Before using the machine for the
first time, clean the area in contact
with food with (lukewarm) soapy
water, rinse and leave to dry.
- The blade set (T) of the
cutter/emulsifier has very sharp
blades, so they must be handled
with care.
- Before undertaking any cleaning,
inspection or repair work on the
machine, the machine must be
unplugged from the mains.
INSTALLATION
For optimum service and maintenance, please
follow these instructions.
INSTALLATION SITE
You are advised to install the CK-301/302 on a
steady surface -this must not act as a soundboard- elevated at a height of 700-900 mm, and 600800 mm for CK-401/402. Place the collector
underneath the food outlet. The machine is not
fixed in place and can be moved around easily.
ELECTRICAL CONNECTION
Check that the CK electrical characteristics match
the grid power supply.
The CK is supplied for 230V 50-60 Hz single phase
power or 120V 50-60 Hz single phase power.
Prepare a wall-mounted socket, with a general disconnecting switch and with a residual current and
magneto thermal protection of 2P (of 13A to 20A) with
its corresponding socket. Fit a general switch or the
plug in an accessible place to disconnect the machine.
WARNING: THE EARTH CONNECTION IS OBLIGATORY. DANGER OF ELECTROCUTION. The
converter includes a filter that shunts power disturbances to safety ground. The residual
current device may therefore cause untimely
tripping. You are advised to use a suitable residual current device for the machine or a super
immunised RCD.
Moreover, the machine includes an external screw for its connection to a
ground equipotential system.
The motor is three-phase in every model and
controlled by a variable frequency drive.
Do not change the variable frequency drive settings
under any circumstances.
Direction of rotation: Because the motor is threephase, the direction of rotation may be incorrect.
The CK motor rotates anti-clockwise. To reverse
it, switch two motor wires at the variable frequency drive outlet.
Power cable characteristics
The CK is supplied with a 1.5 m thermoplasticsheathed power cable.
ELECTRONIC CONTROL FUNCTIONS AND
OPERATION
Display (1)
Shows speed, operating time and warnings.
“Speed” pilot light (2)
When it is on, the “display” shows the speed.
“Time” pilot light (3)
When it is on, the “display” shows the time.
Function (4)
This button switches between
the “speed” and “time” functions. The selected
function appears on the display and the pilot
light comes on.
This button only works in “Cutter” mode. In
“Vegetable Cutter” mode this button does not
work because only the “speed” function is activated.
Up (5)
Each time the key is pressed the setting on the
display increases.
Down (6)
Each time the key is pressed the setting on the
display decreases.

7
EN
On (7)
Starts the motor if the safety
devices are activated. If any of the safety devices is missing and you press “On” (7), the display shows "SE" (safety) to warn that a safety
device is missing.
Off (8)
Pressed once, the motor stops and the display
starts to flash to show that it is on standby. The
time and speed settings are still saved. After 3
minutes, or if the "off" button is pressed again,
the machine loses those settings and is reset.
Pulse (9)
While it remains pressed down, the motor switches
on if the safety devices are activated. When
released, the motor stops. If any of the safety
devices is missing and you press “Pulse” (9),
the display shows "SE" (safety) indicating that a
safety device is missing.
PLS. NOTE: Some vegetable preparation
machines have an emergency stop button.
This must be unlocked before starting the
machine.
Operation
When the CK-301 is connected the “Display” (1)
has two lines in the centre (standby). If you fit the
“Vegetable Cutter” attachment, “CA” appears on
the display. If you fit the “Cutter” attachment
“CU” appears for 3 seconds. This shows that the
control board has identified each attachment.
After these first seconds if CA attachment is
assembled in the display appear speed 1, and if the
“Cutter” attachment is assembled appear speed 5.
- Speed Control: The "Speed" pilot light (2) switches
on. There are 1 to 10 different speed settings in
“Cutter” mode and 1 to 5 speed settings in
“Vegetable Cutter” mode.
- Time Control: Only available in “Cutter” mode.
It is displayed when the "Time" pilot light (3)
switches on. There are two functions, continuous
mode and time-out:
- Continuous mode: A rotating line on the dis-
play means that this has been selected. If the
CK-301 is left on without any function being
selected, it switches off automatically after 30
minutes.
- Time-out: A time-out between 0 and 10 minu-
tes can be programmed. The time is selected
in ½ minutes. The “Display” (1) shows the
countdown in the same way. The last minute
counts down in seconds. When the programmed
time finishes, the machine stops and beeps.
- Energy saving: If the machine is stopped and
no button is pressed on the display for 5 minutes, it switches off and only a dot is displayed.
Press any button to switch it on again.
START-UP
WARNING: Before using the machine for the
first time, clean the area in contact with food
with (lukewarm) soapy water, rinse and
leave to dry.
Handle the discs (A), vegetable cutter grids
(B) and the blades (T) very carefully because
they have very sharp edges.
To fit the attachments, unplug the CK from
the mains.
“Vegetable Cutter” operating mode:
· With the bayonet mechanism (Y) open (R), fit
the “Vegetable Cutter” attachment on the
motor block so that the three attachment lugs
are inserted in the quick-connect mechanism
holes. Close (Z) the bayonet mechanism (Y)
to lock the attachment on the motor block.
· In the CK-301/302 and CK-401 the hinged lid (J)
must be positioned as indicated in the illustrations, being fixed with the pin (O).
· In the CK-301/302 the pusher plate (M) must
be positioned as indicated in the illustrations,
being fixed with the pin (N).
· In the CK-301/302 and CK-401/402, if the
header is to be used it must be positioned as
indicated in the illustrations, being fixed with
the pin (O).
Fitting discs (A) and grids (B).
- Release the lock (I), and open the hinged lid
(J).
- Fit the ejector (C) in its housing at the trailing
edge.
- The grid (B) is inserted in the top lid (D) pocket
at the right time during the process.
- Fit a disc (A) on the trailing axle. Insert the disc
(A) in the axle and rotate it clockwise until it
slots into place.
- In the case of the CK-401/402, screw the bit
(Q) or mixer (R) into the trailing axle depending
on the product being chopped.
- Lower the hinged lid (J) and apply the lock (I).
With the hinged lid (J) closed and the pusher plate
(M) down, if you press “On” (7) the motor starts.
With the motor stopped, the hinged lid (J) closed
and the pusher plate (M) up, if you press “On” (7)
the display start flashing indicating that the machine
is prepared to start, when the pusher plate is
lowered (M) the motor starts.
With the motor on, if you lift the pusher plate (M)
the motor stops. When you lower the pusher
plate (M), the motor re-starts automatically. If
the pusher plate (M) has not lowered in 30
seconds, the “On” button (7) must be pressed
again to start the machine.
With the motor on, if the hinged lid (J) is opened
the motor stops. When the hinged lid (J) is closed,
the “On” button (7) needs to be pressed again to
start the machine.
If the machine is left running with the pusher
plate (M) down, after 30 minutes the machine
stops automatically.
Operation with standard feed hopper (J) and
pusher plate (M). CK-301/302.
- The mallet (L) must be housed and locked. To
do so, rotate it anti-clockwise.
- Start the vegetable preparation machine.
- Lift the pusher plate (M). The motor stops.
- Add the products to the standard hopper (J).
- When you start to lower the pusher plate (M)
the motor starts and the cutting process
begins. Feed the product while gently lowering
the pusher plate (M). Repeat the process
several times.
- Press “Stop” (8) to finish.
WARNING: Applying too much force on the
pusher plate (M) could damage the product
and strain the motor.
Operation with standard feed hopper (K) and
pusher plate (M) in CK-401/402.
- The mallet (L) must be housed and locked. To
do so, rotate it anti-clockwise.
- Start the vegetable preparation machine.
- Lift the pusher plate (M) and rotate it anti-clockwise to clear the standard hopper (K) feed
chute. The pusher plate (M) can be left resting
on the pusher support (M). The motor stops.
- Add the products to the standard hopper (K).
- When the pusher plate (M) is rotated clockwise
the motor starts and the cutting process begins.
Feed the product while gently lowering the pusher
plate (M). Repeat the process several times.
- Press “Stop” (4) to finish.
ATTENTION: Excessive clamping force on
the lever (M) can damage the product and
force the motor excessively.
8
EN
Operation with cylinder hopper (L) (CK301/302 and CK-401/402).
This Ø55mm hopper is used to cut long, cylindershaped vegetables, such as carrot, chicory,
cucumber, etc.
- Start the vegetable preparation machine.
- Unlock the mallet (L) by rotating it clockwise.
- Feed the vegetables through the hole and
push them gently using the mallet (L). Repeat
the process several times.
- Press “Stop” (8) to finish.
IMPORTANT: When the cylinder hopper is not
in use, leave the mallet (L) inside the hopper.
Operation of the CK-301/302, CK-401/402 with
header.
- The pipe manifold must be mounted and locked.
- Start up the cutting machine.
- Gradually introduce the products via the top
holes in the header. After 30 minutes the cutting
machine stops automatically. If you wish to
continue working press “On” again.
- Press “Off” (4) when finishing production.
“Cutter” operating mode:
With the bayonet mechanism (Y) open (AA), fit
the “Cutter” attachment on the motor so that the
three attachment lugs are inserted in the quickconnect mechanism holes. The handle must be
placed just above the keypad for the machine to
operate. Close (Z) the bayonet mechanism (Y)
to lock the attachment on the motor block.
Fit the “Blade set” (T) and close the lid (U) by
rotating it anti-clockwise until it locks into
place. You can now operate the machine.
The lid (U) has a hole to feed the product through
while the machine is operating and a scraper
which, when rotated, the stirs the contents (S) so
that they are processed more evenly.
CLEANING
WARNING: Disconnect the CK from the mains
before handing any internal components.
Handle the discs (A), grids (B) and blade set
(T) very carefully because they have very
sharp edges.
You must dismantle and clean the machine
at the end of the day or each time you use a
different product or attachment.
Any components in contact with the food
must be cleaned immediately after use,
using hot water and a food-safe detergent.
Then rinse with plenty of hot water and
disinfect using an ethyl alcohol-soaked
cloth (90 º). DO NOT use abrasive detergents
(nitric acid, neat bleach, etc.) or stainless
steel scourers or scrubbers. They could
cause rusting.
The CK dismountable part s are not dishwasher
safe. Detergents could damage the surface.
Cleaning the “Vegetable Cutter” attachment:
- Release the lock (I), and open the hinged lid
(J).
- In the case of the CK-401/402 machine, while
holding the disc without touching the blades,
use the Allen key supplied with the machine to
remove the bit (P) or mixer (R), unscrewing it
anti-clockwise.
- Remove the disc (A) by rotating it clockwise
and pulling it upwards carefully. Remove the
grid (B) and ejector (C).
- In the CK-301/302 the pusher plate (M) and
hinged lid (J) can be dismantled for cleaning.
To do so, remove the pins (N and O).
WARNING:To remove food stuck in the grids
(B) you can knock them through using an
elongated potato or whole carrot in the cutting
direction. This avoids damaging the grid (B).
Take care with the edge of the grid (B). Never
use hard objects to hit the grid (B).
Cleaning the “Cutter” attachment:
- If the dirt is dry and stuck to the pot and the
blades, pour hot water and detergent into the
pot and switch the machine on to soften the
residue.
- To avoid splashes, once the product has been
processed, remove the lid (U), place the bayonet mechanism (Y) in the open position (AA)
and remove the pot (S) with the blade inside
(T).
- You can remove the mixer (V+X) from the lid
(U). To do so, keep the mixer (X) firmly in
place, tighten and turn the mixer handle (V).
Once you have done this you can separate the
mixer and the mixer handle. To reassemble
the mixer, insert the mixer (X) into the lid (U)
again and the mixer handle (V) into the mixer
(X). Push the mixer (X) and the mixer handle
(V) against the lid and turn the mixer handle
(X) until it will no longer turn. Once you have
done this, separate the mixer (X) and the
mixer handle (V).
Cleaning the CK motor block:
NEVER power clean. Use a damp cloth and
mild detergent for cleaning. DO NOT use abrasive
detergents (nitric acid, neat bleach, etc.) or
stainless steel scourers or scrubbers as they
could cause rusting.
“Vegetable Cutter" attachment: Disc (A) and
grid (B) functions.
· Discs (A):
- Discs (A) FC-1 and FC-2 to cut chips or fine
slices measuring 1-2 mm.
- Discs (A) FC-3 to FC-25 to cut 3-25 mm slices
for potatoes, beetroot, cabbage, cucumber,
courgette, onion, radish, etc.
- Discs (A) with curved blade for soft food, FCC2, FCC-3 and FCC-5 to cut slices of tomato,
orange, lemon, banana, apple, etc.
- Grater discs (A) FR, 2-7 mm, to shred vegetables
and grate cheese, bread, nuts, almonds, etc.
- Discs FCE-2, FCE-4 and FCE-8 to cut potato
"matchsticks", carrot, celery, beetroot strip s, etc.
- Discs (A) FR-1 and FR-8 to grate bread, cheese, chocolate, etc.
· Discs (A) and grids (B). Possible combinations:
- Discs (A) FC-6, FC-8, FC-10 combined with
grids (B), FFC-8 and FFC-10, give chip style
potatoes.
- Discs (A) FC-3, FC-6, FC-8, FC-10 and FC-14
combined with grids (B) FMC-8, FMC-10 and
FMC-14 make 3-14 mm cubed potatoes for
omelettes, vegetables and fruit for salads and
Russian salad, etc.
- Discs (A) FC-20 and FC-25 combined with
grids (B) FMC-20 and FMC-25 give 20x20 and
25x25 cubes.
Bit (Q) and Mixer (R).
- Bit (Q): It is only used when working with cabbage
and similar vegetables. Whole pieces can be
cut.
- Mixer (R): It must be used with any food
except cabbage and similar vegetables.
High and normal ejector (C).

9
EN
- High ejector: For cutting large products such
as cabbage, cauliflower, celery and for grating
products such as cheese, carrots...
- Normal ejector: All other cutting.
“Cutter” attachment:
With the “Cutter” attachment you can:
CHOP: Parsley, garlic, cheese, cooked ham,
cooked meat, etc...
SAUCES: Tomato, mayonnaise, tartar, garlic
mayonnaise, green sauce, gazpacho, etc...
PUREES: Pulses, vegetables, spreads, etc...
PASTES; Prawn, mussel, oyster, meat, cold meat,
etc...
SOUPS: Seafood, garlic, vegetables, pulses,
meat, etc...
FLAVOURED BUTTER: Garlic, parsley, herb,
anchovy, etc...
Cakes and desserts:
CHOP: Almonds, hazelnuts, chocolate, raisins,
fruit for fruit salad, etc...
PREPARE: Powdered sugar, almond paste,
whip cream; creamed chocolate, vanilla, coffee,
strawberries and general fruit, etc...
MAINTENANCE
CAUTION
- Before undertaking any cleaning, inspection or
repair work on the CK, the machine must be
unplugged from the mains.
- Regularly check that the machine safety devices are working. If you detect any anomaly,
call the SAMMIC authorised technical service.
- Regularly inspect the trailing axle seal to
ensure that this area is properly sealed. Is
recommendable change the seal if the motor
has been removed.
- NEVER insert your hand or any other utensil
through the outlets or hoppers (L and K) that
feed the machine, to avoid accidents or damages to the blades.
- Clean the machine after every use, as described above.
- Only a SAMMIC authorised technical service
can replace the power cable if this is damaged.
- Machine noise level, while running, at a height
of 1.6 m and a distance of 1 m, less than 70
dB(A). Background noise: 32 dB (A).
BLADE SHARPENING
WARNING: Handle the discs (A), grids (B) and
blade set (T) very carefully because they have
very sharp edges.
The disc blades (A) and blade set (T) can be
removed easily for sharpening. Always use soft
stone to keep the blade's cutting angle intact.
TROUBLESHOOTING
The machine is ready for use, but when you
press “On” (7) the machine does not start and
SE (Safety) appears on the display:
- If the “On” (7) button is maintained pressed the
boards indicated witch sensor is not detected.
d1: Bayonet mechanism (Y) detector.
d2: Cutter or Vegetable Cutter detector.
d3: Vegetable Cutter handle detector.
- Some of the safety devices are disabled. Check
that all of the components are in position.
- The error persists after running the above
check. There is a problem with one of the
safety devices. Call a SAMMIC authorised
technical assistance service.
"E1" on the display means that a variable frequency
drive safety device has been activated. To exit
this status, press disconnect the machine from
the mains and wait 3-5 minutes.
“E2” on the display means that the control board
has detected an illogical function. For example,
while the “Cutter” attachment is fitted it detects a
“cutter” safety device. There is a problem with
the sensors or at the assemble fitting moment
the a incorrect movement has been done so a
illogical situation has happened. Reset “E2” pushing
“stop” button or unplugging the machine and try
again. If the error continues call to a SAMMIC
authorised technical service.
The display does not light up: There is no power
supply to the display or the electronic control
board is broken.
To check that the keypad works properly, when
the keys are pressed the board beeps.
The CK was on and stopped without pressing
any key. If the machine is on, without pressing
any button the machine stops automatically
after 30 minutes.
In Vegetable Cutter mode, when the pusher
plate (M) is pressed the motor does not start:
- If the pusher plate (M) is left open for more
than 30 seconds, press “On” (7) again to
reset the machine.
- With “Vegetable cutter” attachment, the hopper might be too full and the pusher plate (M)
does not activate the microswitch. Empty part
of the hopper and try again.
If the CK makes excessive noise, the disc (A)
or the Blade Set (C) is causing friction with a
part. Its possible that the main shaft bearing is
damaged.
10
DE
Jede Maschine ist mit folgenden Angaben gekennzeichnet:
- Name und Anschrift des Herstellers: SAMMIC
S.L - Basarte 1 Azkoitia. Gipuzkoa (SPANIEN).
- Serien-Nr. auf dem Garantieschein und in der
Konformitätserklärung.
MODELLE
Dieses Handbuch enthält die Beschreibung für das
Aufstellen, den Betrieb und die Wartung der
Modelle CK-301/302 und CK-401/402. Die
Referenznummer des Modells und seine technischen Eigenschaften sind auf dem T ypenschild des
Geräts angegeben. Dieser Gemüseschneider
wurde in Einklang mit folgenden Europäischen
Richtlinien konstruiert und produziert:
- Richtlinie Maschinen: 2006/42/EU.
- Richtlinie Niederspannung: 2006/95/EU.
- Richtlinie Elektromagnetische Verträglichkeit:
2004/108/EU.
- Richtlinien Aluminium und Kunststoffe, die mit
Nahrungsmittel in Berührung kommen
89/109/EU und 90/128/EU.
- Norm für Aluminiumlegierungen, die mit
Nahrungsmitteln in Berührung kommen EN
601-2004.
- Norm für Hygiene- und Materialanforderungen
Nahrungsmittelindustrie ANSI-NSF 8 und ANSINSF 51.
- Norm für Gemüseschneider: UNE-EN 1678.
- Norm für Lebensmittelverarbeitungs- und
Mischgeräte: UNE-EN 12852.
- Schutzklasse gemäß der Norm UNE-EN 60529:
Bedienelemente IP-55, übrige Teile des Geräts
IP-23.
- Die Modelle mit 120V/60Hz/1~ erfüllen die
Normen UL-763 und CSA C22.2.
WICHTIGE HINWEISE
- Dieses Gerät darf weder von
Kindern oder Personen mit körperlicher, sensorischer oder geistiger
Behinderung bedient werden noch
von solchen Personen, die nicht
über die nötige Erfahrung und
Qualifikation verfügen, außer letztere wurden in Bezug auf die
Bedienung der Maschine von der
für ihre Sicherheit verantwortliche
Person überwacht und eingewiesen.
- Diese Maschine darf nur unter
Beobachtung betrieben werden.
Lassen Sie sie niemals in Betrieb,
wenn sie von niemandem bedient
wird.
- Vor der Erstinbetriebnahme der
Maschine den Bereich, der in
Kontakt mit Lebensmitteln kommt,
mit Seifenlauge (lauwarm) reinigen,
abspülen und trocknen lassen.
- Die Messergruppe (T) der
Cutter/Kirnmaschine besitzt sehr
scharfe Klingen, weshalb sie sehr
vorsichtig zu behandeln ist.
- Vor jedem Eingriff zwecks
Reinigung, Überprüfung oder
Reparatur muss die Maschine
unbedingt vom Stromnetz genommen werden.
MONTAGE
Um die bestmögliche Leistung und eine lange
Lebensdauer der Maschine sicherzustellen, befolgen
Sie bitte genau die Hinweise dieser Betriebsanleitung.
AUFSTELLUNG
Es wird empfohlen, das Modell CK-301/302 auf
einer glatten Oberfläche abzustellen – die nicht als
Resonanzkörper wirkt – auf einer Höhe zwischen
700 und 900 mm und zwischen 600 und 800 mm
für das Modell CK-401/402. Der Auffangbehälter
muss unter dem Nahrungsmittelauslass gestellt
werden. Das Gerät wird nicht befestigt und ist
leicht an einen anderen Ort zu bewegen.
ELEKTRISCHER ANSCHLUSS
Vergewissern Sie sich, dass die elektrischen
Anforderungen des Modells CK von den
Eigenschaften des Netzes erfüllt werden.
Das Modell CK ist für eine einphasige Spannung
von 230 V, 50-60 Hz, bzw. von 120 V, 50-60 Hz,
geeignet.
Sehen Sie eine Wandsteckdose mit
Abschnittshauptschalter, Fehlerstromschutz
und thermo-magnetischem Schutzschalter mit
2P (auf 13A bis 20A) sowie den entsprechenden
Stecker vor. Bringen Sie einen Hauptschalter
oder den Stecker so an, dass dieser für das
Abschalten des Geräts zugänglich ist.
ACHTUNG: DER ERDANSCHLUSS IST
PFLICHT. GEFAHR EINES STROMSCHLAGS.
Der Regler ist mit einem Filter ausgestattet, der die
Störungen zur Erdung leitet. Aus diesem Grund
kann es vorkommen, dass der Fehlerstromschutz
der Installation unbeabsichtigt aktiviert wird. Es
wird empfohlen, einen Fehlerstromschutz zu verwenden, der für das Gerät geeignet oder vom Typ
“superimmunisiert ” ist.
Ausserdem kann die
Maschine über eine aussen am Gerät angebrachte Schraube zum Potentialausgleich
benutzt werden.
Alle Modelle verfügen über einen Dreiphasenmotor,
der über einen Frequenzwandler gesteuert wird.
Führen Sie keinesfalls Änderungen an den
Einstellungen des Wandlers durch.
Drehrichtung: Da es sich um einen Dreiphasenmotor
handelt, könnte die Drehrichtung möglicherweise
nicht korrekt sein. Die Drehrichtung des Modells
CK ist gegen den Uhrzeigersinn. Um sie umzudrehen,
müssen die beiden Kabel des Motors am Ausgang
des Frequenzwandlers getauscht werden.
Eigenschaften des Kabels
Die Modelle CK werden mit einem Elektrokabel
mit einer Länge von 1,5 Metern mit thermoplastischer Beschichtung geliefert.
FUNKTIONEN DER ELEKTRONISCHEN UND
BETRIEBSSTÖRUNGEN
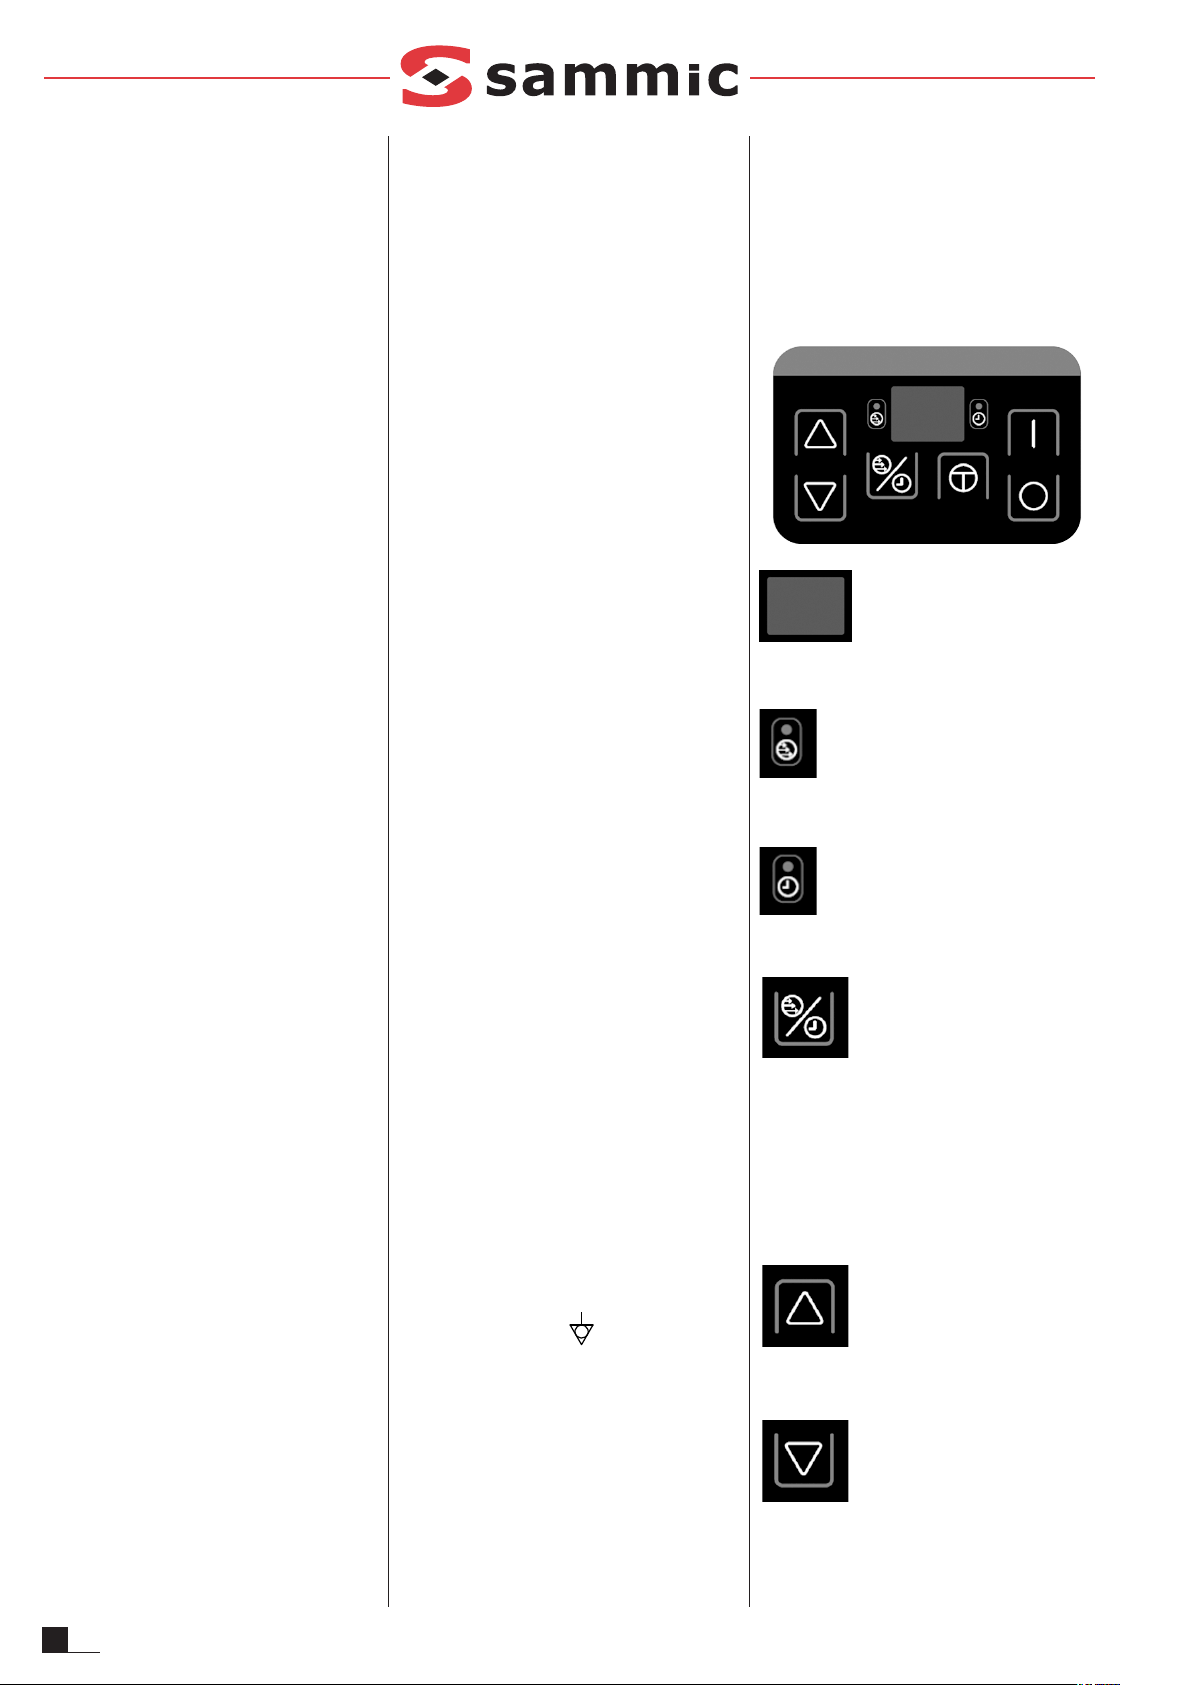
Anzeige (1)
Zeigt die Geschwindigkeit, die
Betriebsdauer und unterschiedliche Hinweise
an.
Kontrolllampe “Geschwin digkeit” (2)
Wenn diese Kontrolllampe leuchtet, zeigt
die Anzeige die Geschwindigkeit an.
Kontrolllampe “Zeit“ (3)
Wenn diese Kontrolllampe leuchtet, zeigt
die Anzeige die Zeit an.
Funktion (4))
Durch das Drücken dieser Taste
kann zwischen den Funktionen
“Geschwindigkeit” und “Zeit” gewechselt werden. Die ausgewählte Funktion erscheint auf
der Anzeige und die entsprechende
Kontrolllampe leuchtet auf.
Diese Taste funktioniert nur im Modus “Cutter”.
Im Modus “Gemüseschneider” hat diese Taste
keine Funktion, da nur die Funktion
“Geschwindigkeit” aktiviert ist.
Oben (5)
Jeder Tastendruck erhöht den ausgewählten
Wert auf der Anzeige.
 Loading...