

Page 1

7
90-D
7
90A
U
ser g
uid
e
Page 2

1
Dear customer,
You have just acquired a new generation Sagemcom telephone. Thank you
for placing your confidence in us.
This device has been manufactured with the utmost care. If you should have
difficulties in operating it, we recommend that you consult this user manual.
This product follows a strategy of continuous development. We reserve the
right to make changes, modifications and improvements without notice to the
products described in this quick start guide.
To operate the device safely and easily, please read carefully the paragraph
“Recommendations and safety instructions”, page 2.
The CE label confirms that the product complies with the 1999/5/EC
regulations of the European Union Parliament regarding wireless
systems and telecommunications.
The declaration of compliance may be looked up on the
www.sagemcom.com website section «Support», or can be obtained
from the following address:
Sagemcom Broadband SAS
250, route de l'Empereur
92848 Rueil-Malmaison Cedex - France
Copyright © Sagemcom Broadband SAS
All rights reserved
Sagemcom is a registered trademark.
Page 3

2
Recommendations and safety instructions
Recommendations and safety
instructions
For safety reasons, never put the handset in the base
station without the battery inserted or without the lid on
the battery compartment as this could cause an electric
shock.
To avoid damaging your handset/base, only use certified
rechargeable batteries NiMH 1.2 V 650 mAh, never use
never use non-rechargeable batteries. Insert the batteries
in the handset/base battery compartment respecting
polarity.
Only use the enclosed Sagemcom power supply unit and
connect it to your plug socket as per the instructions in
this user guide and on the power supply unit's sticker. As
a precaution if there is a risk of danger, the power plug
can be pulled out to disconnect the 230 volt power supply.
Therefore the sockets should be near the device and
easily accessible.
Do not install your DECT telephone in a damp
environment, such as a bathroom, washroom, kitchen etc,
and not within 1.50 metres of a source of water or outside.
This device is designed for use in temperatures of
between 5 °C and 45 °C.
In regions greatly affected by electrical storms we
recommend that you protect your telephone circuit with a
special fixture for excess voltage.
Do not attempt to remove screws or open the appliance. It
does not contain any user-replaceable parts.
Page 4

3
This product is intended to be connected to the public
analogue telephone network of any British and Irish
network operator.
Should you experience any problems, contact your
nearest specialst dealer or the Sagemcom Support Team
on 0845 0900 316.
Your DECT telephone has a range of approx. 50 metres
indoors and up to 300 metres outdoors. The range can be
affected by the proximity of metal objects, such as a
television and electrical devices.
Zones without reception may appear owing to elements in
the building. This can cause brief interruptions in the
conversation, caused by faulty transmission.
Certain medical equipment and highly-sensitive machines
or security systems may be affected by the transmission
power of the telephone. In these cases we recommend
adhering to the safety information.
Your D790-D790A has anti-skid pads that should leave no
traces on your furniture and ensure stability. However,
given the the wide variety of finishes used by furniture
manufacturers, traces may appear on surfaces in contact
with the parts of your D790-D790A. Sagemcom
Broadband SAS decline all responsibility in any such
cases of damage.
The used battery must be disposed of in line with the
recycling regulations in this user manual.
Page 5

4
Overview
Recommendations and safety instructions ............. 2
Discover... ............................................................. 6
The pack.................................................................................... 6
Your phone ................................................................................ 7
Connecting the base .................................................................. 9
Setting up the handset ............................................................. 10
Battery replacement ................................................................ 12
Charging your phone ............................................................... 13
Browsing through the menus ................................................... 13
Making and receiving calls... .................................20
Managing a call........................................................................ 20
Managing several calls ............................................................ 22
Using additional handsets........................................................ 23
Options during a call................................................................ 25
Locating your handset ............................................................. 27
Organizing your contacts......................................28
Using the phonebook ............................................................... 28
Listening and Recording... (model D790A) ...........30
Enabling/disabling the answering machine .............................. 30
Answering machine message .................................................. 31
Messages ................................................................................ 32
Page 6

5
Setting up... ..........................................................35
The phone................................................................................ 35
The handset ............................................................................. 39
The base .................................................................................. 42
The line.................................................................................... 44
Answering machine settings .................................................... 46
Enjoy... .................................................................48
The alarm................................................................................. 48
The Surveillance mode............................................................. 49
Tracing your calls... ..............................................51
Call logs................................................................................... 51
The events log.......................................................................... 52
Troubleshooting ...................................................53
FAQ ......................................................................................... 53
Environment .........................................................54
Guarantee ............................................................55
Page 7

6
Discover...
The pack
Make sure that your pack contains the following items:
In the case of purchasing a pack DUO or TRIO, you will find in addition:
Discover...
1
a D790 or D790A base
according to the model
a handset
an AC power supply
a handset charger
a telephone
connection cord
a quick installation
guide
a handset charger
DUO - or -TRIO
a handset
Page 8

7
Your phone
The base
Caption Description
1 Indicator light
2 Telephone socket
3 Power socket
4
button Paging/Pairing :
• Short press: paging of handsets
• Long press: pairing of handsets
2
3
4
1
Note Indicator light operation:
• Fixed for 10 seconds: base startup.
• Fast flashing: the base is in pairing mode.
• Medium Flashing : searching for handsets paired on the base.
• Slow flashing: ongoing call in progress.
Page 9

8
Discover...
The handset
* Your D790-D790A has an indicator light on
the back of the handset.
14
4
3
13
10
1
2
5
6
8
9
12
7
11
Key Description
1 Speaker
2 Graphic screen
3 Programmable / cancel
shortcut key
4 Browsing through the
menus
5 Hang up key.
Long press: Switch off
handset
6 Alphanumeric keypad
7 # key.
Hold down during a call :
Deactivate / Activate the
microphone
8 Phonebook access key
9 Microphone.
10 Hands-free key
11 Star key :
Long press: keypad lock /
unlock
12 Pick-up key / Hands-free.
Long press: Switch on
handset
13 Programmable/confirm
shortcut key.
14 Indicator light *.
Page 10

9
Indicator light operation:
Connecting the base
Take the base and turn it over.
1 Take the telephone connecting cord, plug the phone into its socket.
2 Connect the other end of the cord to the telephone wall outlet.
3 Take the power adapter. Connect the power adapter cord to the underside
of the base.
4 Connect the power adapter to the wall power socket.
5 Position the base in its final location.
On: When pressing a keypad button.
Flashing: When paging or receiving a call (internal/external)
Slow flashing: A new event occured
Note Check the safety instructions (page 2) before setting up your
phone.
2
1
3
4
Page 11

10
Discover...
Setting up the handset
1 Connect the power adapter of the charger to the mains socket.
2 The batteries are already inserted in the handset. To start using your
handset, simply remove the plastic tab by pulling on it firmly in the
direction of the arrow.
3 The screen will turn on.
4 An information screen presents the current language used.
5 Select the language using or keys. Press OK.
6 An information screen asks you to choose the country where you will use
your telephone.
7 Select the country using or keys. Press OK.
8 Place your handset on its charger and fully charge the batteries for at least
15 hours prior to the initial use.
A beep sounds when you place the handset on the charger.
The battery charging icon moves to inform you that charging is in
progress. The icon will stop moving when the batteries are fully charged.
1
321
15 H
HD
13/12 -1- 14:05
13/12 -1- 14:05
13/12 -1- 14:05
HD
HD
Note By default, the handset is registered on the base.
If your handset is not recognized by the base, launch manual
recognition (refer to the section "Associating a new handset to
D790 base ", page 39).
Page 12
11
The screen
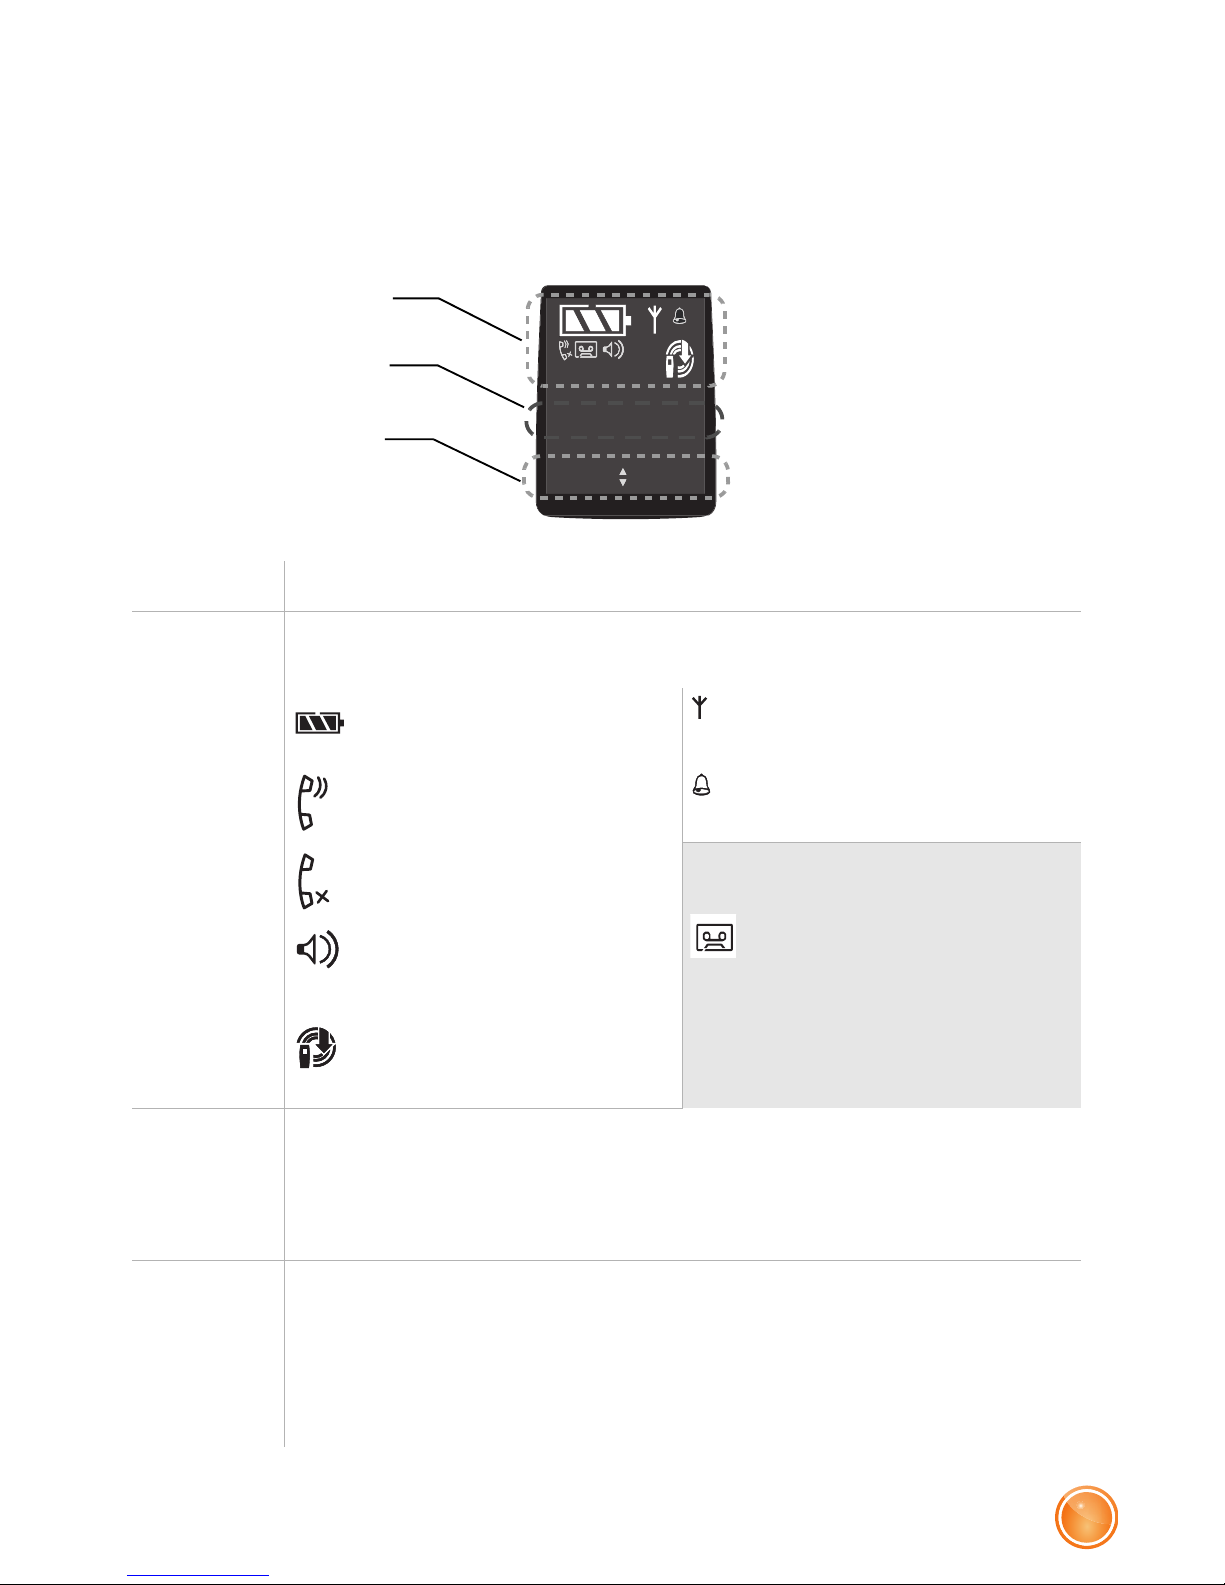
THE ICONS DISPLAYED
In standby mode or during use, your phone screen informs you of your
phone’s current state through icons, and in particular:
Caption Description
1 Status icons
Indicates your phone’s current state.
Battery charge
condition
Signal
Phone in conversation
mode
Alarm on
Secret mode on Only for the D790A model:
Answering machine on.
Flashing : new
message(s) on your
answering machine or
voicemail
Hands-Free on
Low transmission
2 Information field
This section will display:
• Current time (if handset placed in the charger),
• Handset number, date and time (if taken out of the charger).
3 Available keys
This section will display:
• Browser and confirmation keys (if handset placed in the
charger),
• Short-cut keys (of taken out of the charger).
13/12 -1- 14:05
Calls
TAM
2
1
3
Page 13

12
Discover...
LOW TRANSMISSION MODE
Due to its Low Transmission feature your handset will adjust the power
consumption according to the distance to the base station.
Battery replacement
1 Have your credit card or any plastic card ready to remove the battery
compartment.
Slide your card into one of the notches (A) on the sides of the handset.
2 Lift (or push down) the card gently to free the other clips of the battery
compartment.
3 Remove the old batteries.
4 Insert the new batteries as indicated and according to their electrical
polarity.
5 Slide the battery compartment cover from the bottom of the handset
towards the top. It should connect securely.
6 Place your handset on its charger and fully charge the batteries.
A beep sounds when you place the handset on the charger.
1
32
4
5
6
+
+
-
-
-
+
-
15 H
+
+
-
+
-
-
+
-
+
-
A
-
+
-
+
HD
13/12 -1- 14:05
13/12 -1- 14:05
13/12 -1- 14:05
HD
HD
Note Depleted batteries should be disposed of in line with the
recycling instructions on page 54 (“Environment”) .
Page 14

13
Charging your phone
To charge your phone, place the handset in the charger, making sure the
charger is connected to an AC outlet.
During the charging process an animated battery icon progresses from
empty to full. Once it has stopped the batteries are charged.
Browsing through the menus
Browser
This browser allows you to quickly access menus and change
your settings easily. It points in two directions.
When choosing menus, press the top or the bottom of the
browser to access the previous or next menu.
During a call, press the top of the browser to increase the
volume or the bottom to decrease it.
Programmable keys
Your phone has two so-called “programmable” keys allowing you to
associate a shortcut to the menus you use most. This shortcut can then be
accessed from your phone's home screen.
Note To ensure optimum performance, charge the handset in the
charging unit for at least 15 hours prior to its first use. During
the charging process the batteries may get warm; this is
normal behaviour and no reason for concern.
If handset and telephone base fail to connect we recommend
to check all cables as displayed in this User Guide.
WARNING To prevent damage to your handset, only use approved
AAA format NiMH 1.2 V 650 mAh rechargeable type
batteries. Never us non-rechargeable batteries.
Page 15

14
Discover...
These keys are also used to confirm or cancel an action in a menu.
Illustration
To browse through menus, use the browser and the two programmable keys :
Programmable
key...
Use this key from the
home screen to...
Use this key from the
menus to...
Left
Directly access the
associated menu through
the shortcut.
• Confirm the current entry.
• Display additional menu
options available during a
call.
Right
• Cancel the current entry.
Note For further details on programming the left and right
programmable keys, see section “Setting up short-cut keys”,
page 36.
1 Press the top or bottom of the browser key .
The main menu is displayed on the screen.
2 Press the top or bottom of the browser key to scroll through
the menus and access the desired function.
3 Confirm your choice/Enter the displayed menu by pressing the left
programmable key .
4 Cancel your choice/Exit the displayed menu:
- either by pressing the right programmable key ,
- or by pressing the key; the home screen is displayed.
Page 16

15
DETAILED BROWSER EXAMPLE: ADJUST THE DATE AND TIME
To access the date and time setting menu:
1 Press the top or bottom of the browser key .
2 The main menu is displayed on the screen.
3 Scroll through the menus to the SETTINGS menu by pressing the top or
bottom of the browser key .
4 Enter the SETTINGS menu by pressing the left programmable key .
The SETTINGS menu is displayed.
5 Scroll through the menus to the DATE/TIME menu by pressing the top or
bottom of the browser key .
6 Enter the DATE/TIME menu by pressing the left programmable key .
The DATE/TIME menu is displayed.
7 Enter the DATE : using the numeric keypad (day, month and year) in the
form DD/MM/YY.
8 Confirm your entry by pressing the left programmable key .
The home screen displays the message OK.
9 Enter theTIME : using the numeric keypad (hours then minutes).
10 Confirm your entry by pressing the left programmable key .
The home screen displays the message OK.
You have just set your phone’s current date and time.
Refer to section “Menu tree structure”, (page 16) for an overview of your
phone's functions.
Note It is recommended to set the date and time accurately to allow
you to follow the chronological order of your calls and
messages.
Note If you have the Display number option, the date and time will,
depending on your operator, be set automatically when you
receive a call.
Page 17

16
Discover...
Menu tree structure
PHONEBOOK
CALLS
ACCESSORIES
RING TONE
Option
VIEW
EDIT
ADD NUMBER
NEW ENTRY
DELETE
TRANSMIT
INCOMING CALLS
OUTGOING CALLS
EVENTS
ALARM
ROOM. MONITOR
EXTERNAL CALL
INTERNAL CALL
BEEPS
SILENT MODE
"Menu during a call"
HANDSFREE
CALL TRANSFER (**)
SECOND CALL
PHONEBOOK
CALLS
SECRET
RECORD (*)
SIMPLE CALL
(*) Model D790A.
(**) Only if two handsets are registered on the same base.
SWITCH
3-PARTY CONF
HANDSFREE
PHONEBOOK
CALLS
SECRET
RECORD (*)
HANGING UP
SECOND CALL
< New >
Page 18

17
SETTINGS
PROGRAM KEYS
DATE/TIME
CONTRAST
AUTO HANG UP
AUTO PICKUP
VOICE BOX NO
LANGUAGE
KEYPAD LOCK
RESTRICTION
LIGHT EFFECT
ADVANCED SET.
SET HANDSET
REGISTRATION
BASE PRIORITY
RESET HANDSET
PERSON REGISTR
HANDSET NAME
REGISTR.MODE
RESET BASE
DELETE HANDSET.
RENAME BASE
INTRUSION
SET BASE
SET LINE
NETWORK TYPE
DIAL
FLASHING
PABX PREFIX
COUNTRY
CHANGE CODE
Page 19

18
Discover...
MESSAGES
PLAY
DELETE OLD
ANSWERING MODE
OUTGOING MESS.
PLAY
CHANGE
DELETE
SETTINGS
REMOTE CODE
MODE ENREG.
NO OF RINGS
ANS.MACH (*)
(*) Model D790A.
Page 20

19
Procedures in your booklet
This user guide will explain the product features by either:
• displaying the direct shortcut keys
• displaying the path to certain features
EXAMPLE :
or means that you can use one of the
two buttons offered to access the
function.
"Menu during a call" > HANDSFREE means that you access this
function by displaying the menu
and then the HANDSFREE
function.
Page 21

20
Making and receiving calls...
Managing a call
Making and receiving calls...
2
Making a call
METHOD 1
1 Dial your contact’s number.
2 Press the key .
METHOD 2
1 Press the key .
2 Dial the number.
At the end of the call, press the
handset key and replace the handset
on its charger.
1
2
2
1
- OR -
Page 22

21
Receiving a call
1 Press the key to take the call.
2 At the end of the call, press the
handset key and replace the
handset on its charger.
A beep sounds.
1
2
Notes Your handset includes the AUTO PICKUP and
AUTO HANG UP functions.
For further details, refer to the “Picking up and hanging up
calls automatically”, page 36.
Checking your operator voice mail
Follow the instructions issued by your operator’s online answering
machine.
(long press).
Or dial your voice mail number. Press the key.
Notes You must first define the phone number for your operator
voice mail. For further details, refer to the"Changing your
voice mail number ", page 37).
Notes Select the preferred D790A answering machine setting :
• Answering machine activated: the message read/record
function is handled by your D790A answering machine.
• Answering machine deactivated: the message
read/record function is handled by your operator.
Page 23

22
Making and receiving calls...
Managing several calls
Your phone allows you to take and manage several calls when you are
already on the line.
These calls can be managed with the "Menu during a call".
Receiving a second call
During a call, a beep indicates the arrival of a second call.
To take this call, press ACCEPT when the message is displayed on the
screen.
Your first call is put on hold and you can talk with the second caller.
Making a second call
"Menu during a call" > SECOND CALL
Dial your contact’s number and confirm.
The message SECOND CALL is displayed on the screen to indicate that
the second call is in progress.
Switching from one call to the other
"Menu during a call" > SWITCH
The call in progress is then put on hold and you can take back the
previous call.
Ending one of the calls in progress
"Menu during a call" > HANGING UP
The call in progress is interrupted and you take back the previous call.
Page 24

23
Using additional handsets
You can associate additional handsets with your phone. You can then :
• make calls between two handsets,
• transfer calls to another handset,
• transfer your directory files to another handset (refer to the “Transferring
entries from one handset to another”, page 29),
• monitor another room (refer to the “The Surveillance mode”, page 49).
Talking with two contacts at the same time (3-party
conference)
"Menu during a call" > 3-PARTY CONF
You can then talk with your two contacts at the same time.
To end the 3-party conference, press the key .
Notes You first have to pair the handsets with the base.
For further details, refer to the “Associating a new handset to
D790 base”, page 39.
Page 25

24
Making and receiving calls...
Calling another handset (intercom)
1 Enter the handset’s number directly on the keypad (1-6).
2 Press .
The selected handset rings.
3 Take the call from the handset called with the key.
4 End the call by pressing .
3
1
2
Handset calling
Handset called
Transferring a call to another handset
1 Select the handset and confirm.
The handset called rings.
2 Pick up the other handset and then transfer the call by pressing .
"Menu during a call" > CALL TRANSFER
Notes You must have at least two handsets paired on the same
base.
Page 26

25
Options during a call
You can use the following options during a call:
Intrusion
With this function, another handset registered
on the same base can join a call in progress.
1 Press the key of the handset that you
want to include in the conversation (handset
B).
2 Your D790-D790A handset in
communication (handset A) emits 3
consecutive beeps to tell you of the intrusion
of handset B.
Handset B
Handset A
Bip..
Bip..
Bip
1
2
Adjusting the volume
• To increase the volume, press .
• To decrease the volume, press .
Note In handset mode the minimum volume level is 1 and the
maximum volume level is 8.
In handsfree mode the minimum volume level is 1 and the
maximum volume level is 5.
Page 27

26
Making and receiving calls...
Enabling/Disabling the secret mode (during a call)
Or
The secret mode allows you to temporarily mute the line so that you are
not heard by the caller. Once enabled, the SECRET MODE message
flashes on the screen.
To disable the secret mode, Press Exit.
"Menu during a call" > SECRET > Activ.
(long press)
Enable/Disable loudspeaker (handsfree mode)
HANDSET LOUDSPEAKER
(during a call)
Or
"Menu during a call" > HANDSFREE > Activ. or Disable
OR
Page 28

27
Recording a conversation (D790A only)
Confirm the messages on the screen.
Recorded messages are considered as new answering machine
messages and are stored in the menu "ANS.MACH > MESSAGES > PLAY".
"Menu during a call" > RECORD > Begin then End
ATTENTION According to UK legislation it is prohibited to record a
conversation without your conversation partner's
knowledge and consent.
Locating your handset
If you have misplaced your
handset, press the key on your
phone’s base.
The handset will ring.
Page 29

28
Organizing your contacts...
Using the phonebook
You can save up to 100 entries (24 digits and 12 characters) in the
phonebook.
Organizing your contacts...
3
Creating an entry
Specify the required information by confirming at each step:
• NEW NAME? : enter your contact’s name,
• NEW NUMBER? : enter their number,
• HOME, WORK, MOBILE or FAX : select the number type.
• TRNSF.MODE? : Select if you want to transfer this contact to another
handset that has been registred to the D790 base:
- Press Yes to transfer your contact to other handsets registered on the
base (for further details refer to paragraph "Transferring entries from
one handset to another ", on page 29).
- Press No to skip transfer operation and save the entry to the
phonebook.
Menu > PHONEBOOK > < New >
Changing an entry
The telephone proposes to modify :
• The name,
• The number,
• The type of number,
then proposes to transfer the modified entry to another handset registered
on the base :
- Press Yes to transfer your contact.
- Press No to skip transfer operation and save the entry to the
phonebook.
Menu > PHONEBOOK > Option > EDIT
Page 30

29
Deleting an entry
Confirm the deletion of the entry.
Menu > PHONEBOOK > Option > DELETE
Adding another number to an entry
Specify the required information by confirming at each step:
• NEW NUMBER?: enter the number,
• HOME, WORK, MOBILE or FAX: select the number type,
• TRNSF.MODE? : select Yes/No ( refer to paragraph "Transferring entries
from one handset to another ", on page 29).
Menu > PHONEBOOK > Option > ADD NUMBER
Transferring entries from one handset to another
Each handset has its own phonebook.
To transfer one or more entries from a phonebook to another handset:
1 Confirm the message BY INTERCOM.
2 Choose the desired option to transfer:
- ONE ENTRY: the current entry,
- MANY. ENTRIES: the selected entries,
- ALL ENTRIES: all the phonebook entries.
3 Select the handset to which the data is to be transferred.
The receiving handset will ring.
4 Pick up the handset by pressing .
A confirmation message is displayed.
Menu > PHONEBOOK > Option > TRANSMIT
Note You must have at least two handsets paired on the same
base.
Page 31

30
Listening and Recording...
Listening and Recording...
(model D790A)
4
IMPORTANT Your answering machine is able to record individual
messages of up to 2 minutes.
Your answering machine will turn itself off once it has
reached its recording capacity (12 minutes for high
recording quality / 24 minutes for standard recording
quality (For further details, see section “Changing the
recording quality”, on page 46)).
In such case please check and delete your old
messages to free up memory space.
Enabling/disabling the answering
machine
When the answering machine is enabled, the icon is displayed.
Menu > ANS.MACH > ANSWERING MODE > ON or OFF
Note Select the preferred D790A answering machine setting:
• Answering machine activated: the message read/record
function is handled by your D790A answering machine.
• Answering machine deactivated: the message
read/record function is handled by your operator.
Note For further details on the settings of your answering
machine, see section “Answering machine settings”, on
page 46.
Page 32

31
Answering machine message
Note If you have not saved a personal announcement, the answering
machine will automatically use the pre-recorded announcement.
Recording your outgoing message
Confirm the instructions on the screen.
Menu > ANS.MACH > OUTGOING MESS. > CHANGE
Listening to your outgoing message
The currently used announcement is played.
Menu > ANS.MACH > OUTGOING MESS. > PLAY
Erasing your outgoing message
Confirm the instructions on the screen.
Menu > ANS.MACH > OUTGOING MESS. > DELETE
Note If you have erased your personal announcement, the
answering machine will use the pre-recorded
announcement.
Page 33

32
Listening and Recording...
Messages
Listening to your messages
The messages are played in chronological order (from oldest to newest).
At the end of the last message, the answering machine will stop
automatically.
Menu > ANS.MACH > MESSAGES > PLAY
HD
A
B
C
*
=< 0=P #=> 3=X
10:15 08/12 12345
A : date of recording of the
message.
B : time of recording of the
message
C : control keys while reading
messages.
Note Please be aware that your phone line provider needs to
allow CALLER ID for your phone to display caller name and
number. Please contact your phone line provider for further
information.
Page 34

33
Managing your messages
When playing back messages, press the following keys:
TO... FROM THE HANDSET
Go on to the next message
1 press
Return to the start of the message
1 press
Return to the previous message
2 presses
Pause/Resume playback
1 press
Delete the message being played
1 press
Querying your answering machine remotely
This function allows you to check your messages even when you are not
at home.
Your answering machine must be activated.
1 Dial your phone number.
2 While listening to your message press the key and enter your
remote access code.
Page 35

34
Listening and Recording...
When playing back messages, press the following keys:
TO... FROM THE REMOTE
TELEPHONE
Play / Stop message
1 press
5
Disable the answering/recording machine
1 press
9
Go on to the next message
1 press
#
Return to the start of the message
1 press
*
Return to the previous message
2 presses
*
Delete the message being played
1 press
3
Pause/Continue playback
1 press
0
Note By default, the remote access function is deactivated.. To
activate it, you should modify the remote enquiry code (0000
by default).
To modify the remote enquiry code, refer to paragraph
“Changing the remote querying code”, on page 46.
Delete all your messages
Confirm the deletion.
Menu > ANS.MACH > MESSAGES > DELETE OLD
Page 36

35
The phone
Setting up...
5
Change the ring tone
Your D790-D790A has 17 ring tones.
You can change the ring tone of:
• external calls,
• internal "intercom" calls (between handsets).
1 Scroll through the pre-recorded ring tones and confirm.
2 Adjust the ring tone volume (from 1 to 4) and validate.
Menu > RING TONE > EXTERNAL CALL and INTERNAL CALL
Enabling/Disabling audio alerts
The audio alerts apply to:
• BATTERY LOW : low battery,
• KEYTONE : keypad keys pressed,
• CHARGER : placing the handset on the charger.
Follow the instructions on the screen and confirm.
Menu > RING TONE > BEEPS
Enabling/Disabling the silent mode
Follow the instructions on the screen and confirm.
A short-cut key can be set up with this function (refer to paragraph
“Setting up short-cut keys”, page 36).
Menu > RING TONE > SILENT MODE
Page 37

36
Setting up...
Activate / Deactivate the light effect
You can activate or deactivate the indicator light on the back of the
handset.
Follow the instructions on the screen and confirm.
For further details, refer to the section "The handset ", on page 8.
Menu > SETTINGS > LIGHT EFFECT
Setting up short-cut keys
You can define a shortcut for the function(s) you use most.
Select the menu to be displayed as a shortcut for the left , and
right programmable keys, confirming each step.
Menu > SETTINGS > PROGRAM KEYS
Setting the date and the time
1 Enter the DATE : in the format DD/MM/YY.
2 Enter the TIME : starting with the hours and then the minutes.
3 Confirm your entry.
For further details, refer to the section “Detailed browser example: adjust
the date and time”, on page 15.
Menu > SETTINGS > DATE/TIME
Picking up and hanging up calls automatically
This function allows you to take and end a call by simply taking the
handset off its charger or placing it back on its charger.
Follow the instructions on the screen and confirm.
Menu > SETTINGS > AUTO HANG UP or AUTO PICKUP
Page 38

37
Changing the display language
Select the language to be used and confirm.
Menu > SETTINGS > LANGUAGE
Changing your voice mail number
Enter the voice mail number and confirm.
Menu > SETTINGS > VOICE BOX NO
Note If you do not know your voice mail number, request it from
your network provider.
Note For further details on your operator voice mail, refer to
section “Checking your operator voice mail”, on page 21.
Call restriction (Parental Control)
Set up customised call restrictions to barr certain prefixes or international
calls. You can define up to 5 different profiles..
1 Enter the base code and confirm.
2 Select an entry (from 0 to 4) and confirm.
3 Enter the prefix to be inhibited and confirm.
4 Return to the previous menu and confirm the activation of the function.
Menu > SETTINGS > RESTRICTION
Note The default code is 0000.
Page 39

38
Setting up...
Enabling/Disabling keypad locking
This function lets you lock the keypad when you are not calling.
Follow the instructions on the screen and confirm.
Menu > SETTINGS > KEYPAD LOCK
(1 long press)
Note To unlock the keypad keep pressed for a few seconds.
Changing the default code
The base code is required to access certain security functions (banned
calls, reinitialising the base, etc.).
Enter the old and then the new code and confirm.
Menu > SETTINGS > ADVANCED SET. > CHANGE CODE
Allow/Prevent the sharing of a call with another
handset
Follow the instructions on the screen and confirm.
Menu > SETTINGS > ADVANCED SET. > SET BASE > INTRUSION
Note If you disable the intrusion mode, you will not be able to
share a call in progress with another handset (refer to
paragraph “Intrusion”, page 25).
Page 40

39
The handset
Associating a new handset to D790 base
You can associate/register up to 6 GAP compatible handsets with your
base by following below pairing process.
Register an additional D790 handset:
1 Go to
2 The message "Register HS" appears on the screen.
3 Press Yes to put the handset into pairing mode to search for the base.
Register a handset from a different manufacturer:
Put the handset into pairing / registration mode to look for the D790
base unit (please refer to the manual of your handset).
Put the D790 base into pairing mode:
While your handset is in pairing mode keep the paging button (on
the back of your base) pressed for several seconds.
Your base will now search for new handsets.
Your base will automatically exit the pairing mode as soon as the new
handset has been registered.
Menu > SETTINGS > ADVANCED SET. > SET HANDSET >
REGISTRATION
Long press:
> 4 seconds
Page 41

40
Setting up...
Defining the main base for your handset
This function allows you to specify the priority base to be used for making
calls.
Select the base that the handset should use first.
Menu > SETTINGS > ADVANCED SET. > SET HANDSET >
BASE PRIORITY
Note Only if you have paired the same handset on several bases.
Note In automatic mode your handset will automatically select the
most suitable base.
Resetting the handset
When you reset your handset, all the settings are returned to their initial
values (factory settings), except for the phonebook.
Follow the instructions on the screen and confirm.
Menu > SETTINGS > ADVANCED SET. > SET HANDSET >
RESET HANDSET
Renaming the handset
You can assign a meaningful name to your handset if you have several
handsets.
Follow the instructions on the screen and confirm..
Menu > SETTINGS > ADVANCED SET. > SET HANDSET > HANDSET
NAME
Page 42

41
Customizing the handset’s registration
This function allows you to pair your handset with a phone base (if you
have more than one).
FROM THE HANDSET :
1 Select the base number and confirm.
2 Enter the new base name and confirm.
3 Enter the base code.
F
ROM THE BASE:
4 Press the paging button for several seconds .
the light flashes (refer to the section "The base ", on page 7), the base
is in pairing mode.
5 Once the handset is registered, a screen asks you to specify which
position you would attribute to the registred handset. Use keys or
and validate.
The pairing mode is automatically exited.
Menu > SETTINGS > ADVANCED SET. > SET HANDSET >
PERSON REGISTR
Note The default code is 0000.
Adjusting the contrast
Select the appropriate contrast level (LEVEL 1 - LEVEL 5) and confirm.
Menu > SETTINGS > CONTRAST
Page 43

42
Setting up...
The base
Enabling the pairing mode
The pairing mode needs to be enabled to pair an additional handset with
your D790 base.
You can either do this by pressing the button on the back of the base for
more than 4 seconds.
Or
you can use the handset Menu to activate it:
Your base will now remain in pairing mode for approximately a minute.
Please consult page 7 for more information about the base unit.
Menu > SETTINGS > ADVANCED SET. > SET BASE > REGISTR.MODE
Long press:
> 4 seconds
Note Your base will remain in pairing mode for about a minute.
Page 44

43
Resetting the base
When you reset your base, all the settings are returned to their initial
values (factory settings), except for the phonebook.
1 Enter the base code and confirm.
2 Follow the instructions on the screen and confirm.
Menu > SETTINGS > ADVANCED SET. > SET BASE > RESET BASE
Note The default code is 0000.
Removing a handset registered on the base
1 Enter the base code and confirm.
2 Select the handset number and confirm.
Menu > SETTINGS > ADVANCED SET. > SET BASE >
DELETE HANDSET.
Note The default code is 0000.
Renaming the base
You can assign a meaningful name to your base if you have several bases.
Follow the instructions on the screen and confirm.
Menu > SETTINGS > ADVANCED SET. > SET BASE > RENAME BASE
Page 45

44
Setting up...
The line
Important We do not recommend that you change line settings without
first contacting your operator, as this may result in your phone
line being disconnected.
Changing the network type
You can connect your phone to a public or private network.
Follow the instructions on the screen and confirm.
Menu > SETTINGS > ADVANCED SET. > SET LINE > NETWORK TYPE >
PRIVATE or PUBLIC
ATTENTION Per default your network type is set to PUBLIC.
If you connect your base to a Gateway it is necessary
to change the network type to PRIVATE to correctly
assign the name of your contact (If the caller
recognition service is activated on your line).
Changing the dialling type
You can choose between TONE or PULSE dialling..
Follow the instructions on the screen and confirm.
Menu > SETTINGS > ADVANCED SET. > SET LINE > DIAL > TONE or
PULSE
Page 46

45
Changing the flash duration
You can configure the flash duration if you use your phone abroad or on
private PABX network, you may need to modify the flash duration in order
to use your telephone correctly with regard to the following functionalities:
outgoing 2nd call, incoming 2nd call, 3 way calling.
Please contact your service provider to obtain the correct flash duration
and then modify it by doing the following.
Follow the instructions on the screen and confirm.
Menu > SETTINGS > ADVANCED SET. > SET LINE > FLASHING > 80 MS
to 600 MS
Defining the outside call prefix (PABX)
If you use your phone within a private autoamtic branch exchange
network (=PABX) you can assign a prefix to make calls outside that
network.
The following options are available:
• ACTIVATE / DEACTIVATE : to define the prefix status.
• PREFIX : set up a number that will allow you access to the external line.
• EDIT LENGTH : Define a maximum length for numbers within the
private network (from 01 -99). When a longer number is dialled, it will
automatically add the above defined prefix for an external call.
Menu > SETTINGS > ADVANCED SET. > SET LINE > PABX PREFIX >
ACTIVATE / DEACTIVATE or PREFIX or EDIT LENGTH
Page 47

46
Setting up...
Answering machine settings
Modifying the country
Tihs menu allows you to select the country where you are using the
telephone.
Follow the instructions on the screen and confirm.
Menu > SETTINGS > ADVANCED SET. > SET LINE > COUNTRY
Changing the remote querying code
This code allows you and your family remote access to the messages on
your answering machine.
Follow the instructions on the screen to change the code.
Menu > ANS.MACH > SETTINGS > REMOTE CODE > MODIFY CODE?
Note The default code is 0000.
This code must be modified for remote access to be
activated.
Changing the recording quality
Two quality modes are available:
• HIGH for higher quality (12 minutes and 30 seconds of recording),
• STD for standard quality (24 minutes).
Menu > ANS.MACH > SETTINGS > MODE ENREG. > HIGH or STD
Page 48

47
Changing the number of rings
Change the ringing time before your answering machine accepts a call.
You can choose between 2 and 7 rings.
Menu > ANS.MACH > SETTINGS > NO OF RINGS > 2 > 7
Note Please be aware that some telephone lines do not support
this settings.
Page 49

48
Enjoy...
a
The alarm
Enjoy...
6
Note The alarm sounds for 60 seconds through the handset speaker.
To stop the alarm clock, press any key on the handset.
Programming the alarm
To program the alarm :
1 Depending on the alarm status, enable or disable the ALARM function.
2 If necessary, change the ring tone.
3 Select the time at which you want to be woken up.
For further details, refer to the following sections.
Menu > ACCESSORIES > ALARM
Finding out the alarm status
The display indicates the alarm status (ALARM CLOCK OFF or the alarm
time programmed).
Confirm to save the indicated information or display the options by
pressing .
Menu > ACCESSORIES > ALARM
Enabling/Disabling the alarm
Follow the instructions on the screen and confirm.
Once the alarm is enabled, the icon is displayed on the screen.
Menu > ACCESSORIES > ALARM > ACTIVATE or DEACTIVATE
Page 50

49
The Surveillance mode
This function allows you to use your phone like a baby monitor by using one
handset as a transmitter (placed in the room) and another handset as the
receiver.
Changing the ringing tone
Scroll down the list of available ring tones and confirm.
Menu > ACCESSORIES > ALARM > RING TONE
Defining the wake-up time
Follow the instructions on the screen and confirm.
Menu > ACCESSORIES > ALARM > SET TIME
Note You must have at least two handsets registered on the same
base to use this mode.
Enabling the surveillance mode
ON THE RECEIVING HANDSET:
1 Use the browser button to select and call the second handset which
will be used as the transmitter.
Menu > ACCESSORIES > ROOM. MONITOR
HD
Yes
No
Sender
HANDSET: X
Base: Basis X
1
Handset receiver Handset transmitter
HANDSET: X
Base: Basis X
2
3
Yes
No
Sender
HD
Page 51

50
Enjoy...
ON THE TRANSMITTING HANDSET:
2 Accept the call from the other handset by pressing .
3 Confirm activation of surveillance mode.
Note In surveillance mode the transmitting handset will not
receive any exernal calls. You can still make or accept a call
from the receiving handset however.
Disabling the surveillance mode
Press Off on the receiving and transmitting handset to deactivate the
surveillance mode.
Page 52

51
Call logs
Logs are lists of numbers or events received by your phone.
Depending on your operator, call logs contain the following information:
• your contact’s name or number,
• the call time or date.
Tracing your calls...
7
Note Your calls log will display the last 20 incoming and the last 30
outgoing calls.
Accessing the call log
Scroll through the list of stored numbers.
You can use the options described in section “Managing incoming or
outgoing calls”, page 51.
A shortcut is set as default for the key to access the log directly
(please consult section "Setting up short-cut keys ", on page 36).
Menu > CALLS > INCOMING CALLS or OUTGOING CALLS
Managing incoming or outgoing calls
Use the following options from the call list to:
• VIEW : display the information about the selected call,
• CALL : call the displayed number,
• DELETE : delete the stored number,
• STORE NUMBER : save the number in your phonebook,
• DELETE ALL : delete all the numbers in the list.
Menu > CALLS > INCOMING CALLS or OUTGOING CALLS > Option
Page 53

52
Tracing your calls...
The events log
The NEW EVENTS! message informs you that you missed a call or message.
Checking new events
Please use the short-cut key:
Or
Menu > CALLS > EVENTS > VIEW
NEW EVENTS!
Enabling/Disabling event notification
Disable this function to delete the display of the NEW EVENTS! message.
Menu > CALLS > EVENTS > ACTIVATE or DEACTIVATE
Delete the notifications
All notifications are stored in the events log and can be reviewed or
deleted.
Select the event and confirm.
Menu > CALLS > EVENTS > DELETE NOTIF.
Page 54

53
Troubleshooting
FAQ
If you require a further help with your product please do not hesitate to
contact the friendly Sagemcom Support Team:
phone: 0845 0900 316*
email: support.service@sagemcom.com
*3.95 pence per minute from all fixed lines, tariff cost effective from
01/09/2009)
WHAT TO DO IF… CHECK IF...
I can't hear the dial
tone
• the base power cord connected to a working outlet
• the telephone line cord connected to the base unit
and the wall jack
• the handset is out of range of the base
The caller can't hear me• the secret mode is disabled (see section
"Enabling/Disabling the secret mode (during a
call) ", on page 26).
The Handset does
not ring
• silent mode is not set (see section
"Enabling/Disabling the silent mode ", on page 35).
No display on the
screen
• batteries are fully charged.
• batteries are properly installed (see section "Setting
up the handset ", on page 10).
You obtain a "busy"
dial tone for each
dialled number
• make sure no one else is using another handset.
• make sure you are not calling a restricted telephone
number (see section "Call restriction (Parental
Control) ", on page 37).
My answerphone
does not work
• answering phone is ON (see section
"Enabling/disabling the answering machine ", on
page 30).
• your answering machine has not reached its
recording capacity (“Changing the recording
quality”, page 46).
Page 55

54
Environment
Environment
Environmental protection and sustainable development is an important
priority for Sagemcom. Sagemcom has a policy of using environmentallyfriendly systems and makes environmental protection an essential part of the
life-cycle of its products – from manufacturing, to installation, operation and
disposal.
Packaging
The logo (green point) on the packaging means that a fee is paid to
an authorised national organisation to improve packaging recycling
and the recycling infrastructure. Follow the local sorting regulations
for this type of waste product in order to improve recycling.
Batteries
If your product contains batteries, they must be disposed of at the designated
collection points.
The product
The crossed out dustbin displayed on the product signifies that it
belongs to the electrical and electronic equipment group. The
European regulations request you to carry out your own selective
recycling collection at:
•the sales outlet when you buy a similar new device.
•the collection points available in your area (recycling centres,
sorting points, etc).
This means you participate in the recycling and valorisation of used electric
and electronic goods which would otherwise have a negative impact on the
environment and health.
Page 56

55
Guarantee
Terms and Conditions for United Kingdom
& Ireland only
In order to apply the guarantee, or for technical assistance, you should
contact the Sagemcom Helpdesk (0845 0900 316) or the retailer you
purchased your equipment from.
Please make sure that you use your equipment only for the purpose for which
it was designed and under normal usage conditions.
Sagemcom do not accept any liability for the equipment if used outside the
frame of its original designed purpose or any consequence that may arise
from this usage.
Should any malfunction arise, the Sagemcom Helpdesk or your retailer will
advise you how to proceed.
A) General Guarantee conditions
Sagemcom undertakes to remedy by repair or exchange at its own
convenience, free of charge for labour and replacement parts, any defects in
the equipment during the guarantee period of 12 (twelve) months or 3 (three)
months for accessories, from the date of original invoice of the Equipment,
where those defects are a result of faulty workmanship.
Unless the customer has concluded with Sagemcom a maintenance contract
in respect of the equipment which specifically provides for repairs to be
carried out at the customer`s premises, the repairs will not be carried out on
the equipment at the customer premises.
The customer must however return the defective equipment at his/her own
expense, to the address supplied by the Sagemcom Helpdesk or by the
retailer.
In the case that a product needs to be sent in for a repair, it must always be
accompanied by a proof of purchase (which is not altered, written on or in any
way made illegible) showing that the product is still under guarantee. In the
case that no proof of purchase is enclosed, the Sagemcom repair centre will
use the production date as its reference for establishing the guarantee status
of the product.
Apart from all legal obligatory rules, Sagemcom, do not give any Guarantee,
either implicit or explicit which is not set force in the present section, and can
not be held responsible for any direct or indirect, material or immaterial
damage, either in or out of the frame of the present guarantee.
Page 57

56
Guarantee
If any provision of this guarantee shall be held to be in whole or in part invalid
or illegal due to an obligatory rule applicable to consumers pursuant to their
national legislation, such invalidity or illegality shall not impair or affect the
remaining provisions or parts of this guarantee.
This guarantee does not affect the Customer statutory rights
B) General Guarantee conditions
Sagemcom shall have no liability under the guarantee in respect of:
• Damage, defects, breakdown or malfunction due to one or more of the
following:
- Failure to properly follow the installation process and instructions for use
- An external cause to the equipment (including but not limited to:
lightening, fire, shock, vandalism, inappropriate conditions of electrical
network or water damage of any nature)
- Modifications made without the written approval of Sagemcom
- Unsuitable operating conditions, particularly of temperature and
humidity
- Repair or maintenance of the equipment by persons not authorised by
Sagemcom
• Wear and tear from normal daily use of the equipment and its accessories
• Damage due to insufficient or bad packaging of equipment when returned
to Sagemcom
• Usage of new versions of software without the previous approval of
Sagemcom
• Work on any equipment or software modified or added without the prior
written consent of Sagemcom
• Malfunctions not resulting from the Equipment or from software installed in
user workstations for the purpose of use of the equipment.
Communication problems related to an unsuitable environment including:
- Problems related to access and/or connection to the Internet such as
interruptions by access networks or malfunction of the line used by the
subscriber or his correspondent
- Transmission faults (for example poor geographical coverage by radio
and TV transmitters, interference or poor line quality)
- Local network faults (wiring, servers, workstations) or the failure of the
transmission network (such as but not limited to interferences, fault or
poor quality of the network)
- Modification of the parameters of the cellular or broadcast network
carried out after the sale of the Product
Page 58

57
• Normal servicing (as defined in the user guide supplied with the
equipment) as well as malfunctioning due to servicing not being carried
out. Servicing costs are in any event always borne by the customer.
Malfunctions resulting from the usage of products, consumables or
accessories not compatible with the equipment.
C) Out of Guarantee Repairs
In the cases set forth in B) as well as after expiry of the guarantee period, the
customer must ask the Authorised Sagemcom Repair Centre for a cost
estimation prior to work being carried out. In such cases, the repair and
delivery costs will be invoiced to the customer.
The foregoing shall apply unless otherwise agreed in writing with the
customer and only for the United Kingdom and Ireland.
Page 59

253536450A - 07/2013
 Loading...