

Page 1

LCD Television 32”
SAGEM AXIUMTM HD-L32
TM
SAGEM AXIUM
IMPORTANT:
Please read this guide thoroughly before
using your unit.
Veuillez lire attentivement ce manuel
avant d'utiliser votre téléviseur.
Lesen Sie bitte dieses Handbuch
sorgfältig vor der Inbetriebnahme Ihres
Gerätes.
HD-L32 T
Dear SAGEM Customer,
Congratulations and thank you for choosing the SAGEM AXIUMTM High Definition LCD TV.
This product was manufactured with the greatest care and attention and we hope you will enjoy the
spectacular viewing experience for many years. This product is very diverse and we recommend that
you first refer to the Quick Start Guide on page 4.
We recommend you to keep this document in a safe place in order to be able to refer to it afterwards.
This product is European compliant.
If you should incur any potential problem which is not covered in Troubleshooting and Support on
page 70, please contact your retailer or distributor where applicable.
© 2005 SAGEM COMMUNICATION SA. All rights reservedThis document is the property of SAGEM COMMUNICATION SA.
Reproduction without written permission from SAGEM COMMUNICATION SA is strictly forbidden. The information contained in
this document may be changed without prior warning. The brands quoted in this operating manual, SAGEM logo and SAGEM, are
SAGEM COMMUNICATION SA registered trademarks. Virtual Dolby Surround ‘Manufactured under license from Dolby Laboratories.
‘Dolby’, ‘Pro Logic’ and the double-D symbol are trademarks of Dolby Laboratories.’ The ‘HD ready’ Logo is a trademark of
EICTA. Documentation content can be subject to amendment.
ENVIRONMENT
Preservation of the environment as part of a sustainable development logic is an essential concern of SAGEM
SA. The desire of SAGEM SA is to operate systems observing the environment and consequently it has
decided to integrate environmental performances in the life cycle of its products, from manufacturing to
commissioning, use and elimination.
PACKAGING
The presence of the logo (green circle) means that a contribution is paid to an approved
national organization to improve packaging recovery and recycling infrastructures.
To faciliate recycling, respect the sorting rules set up locally for this kind of waste.
ENGLISH
USER GUIDE
THE PRODUCT
The crossed-out waste bin stuck on the product means that the product belongs to the
family of electrical and electronic equipment.
In this respect, the European regulations ask you to dispose of it selectively:
z At sales points in the event of the purchase of similar equipment.
z At the collection points made available to you locally (drop-off center, selective
collection, etc.).
In this way you can participate in the re-use and upgrading of Electrical and Electronic Equipment Waste,
which can have an effect on the environment and human health.
Page 2

SAFETY PRECAUTIONS
High Voltage This LCD TV is a class 1 appliance; it MUST be connected to an electrical wall
socket equipped with an earth.
This LCD TV is designed to function:
z with a 100-240 V, 50-60 Hz, AC (alternating current) network,
z at an ambient temperature between +5 deg C and +35 deg C,
z in areas with humidity less than 85%.
This LCD TV uses high voltages. Never attempt to access the interior of the
device. Only suitably qualified persons are authorised to do this.
Do not open or dismantle this product, as this will expose you to risk of
electrocution.
Damage Never use your TV if it is damaged in any way. Always place your TV on a flat
level surface avoiding anywhere which may be subject to strong vibration.
Weather It is advisable to unplug the aerial during an electrical storm.
Moisture Do not allow your TV to be exposed to rain, moisture, dust. If any liquid is spilt
into your TV it can cause serious damage. If you spill any liquid into your TV
switch it off at the mains immediately. Contact your store.
Interference Do not place your TV on or near appliances which may cause electromagnetic
interference (TV or Hi-Fi speakers). If you do, it may adversely affect the
working of the unit, and cause a distorted picture or sound.
Temperature Avoid extremes of temperature, either hot or cold, place your TV well away
from heat sources such as radiators or gas/electric fires.
Ventilation The TV must be well ventilated. Do not cover your TV or position in a small
confined space. It is recommended that you leave a gap all around your TV.
Batteries Batteries are easily swallowed by young children. Do not allow young children
to play with the remote control unit.
Only use suitable batteries that comply with the maker’s specifications (see 4-2
Inserting Batteries into the Remote Control).
ENGLISH
z The batteries supplied are not rechargeable;
z Pay particular attention to environmental matters;
z Take the defective or used batteries to places provided for this effect in
accordance with current regulations; never throw them in the dustbin.
Covers Do not remove any fixed covers as this may expose dangerous high voltages.
Standby Do not leave your TV in standby for long periods of time e.g. while on holiday.
Screen Burn ATTENTION! Please note that some programmes are broadcast with a logo
that will appear in the corner of your TV screen. Some of these logo’s can be
very bright and may cause damage by permanently marking the logo on the
screen. To prevent this, avoid leaving channels displaying a logo for prolonged
periods of time, particularly when the TV is not being watched.
2
3
Page 3

Quick Start Guide
QUICK START GUIDE
Display Stand Installation
The display stand may not be already assembled when you receive your unit. If it is not, follow the
procedure below to install it to your unit before you continue.
1. Remove the protective cover and hinge cover on the back
of your LCD TV.
Back Protective Cover
2. Remove the hinge cover on the back of your LCD TV.
Hinge Cover
3. Fasten the two (2) M8*100 capscrews with washers to
the bottom of the glass display stand using the provided
hexagon key.
NOTE: The washers are necessary to prevent damage to
the glass when fastening the capscrews.
Back of LCD TV
Back of TV with Protective Cover
and Hinge Cover Removed
4. Attach the display stand to the back of your LCD TV with
two (2) M8*30 capscrews using a hexagon key to tighten
the capscrews.
5. Fasten the hinge cover with the three (3) M8*30 capscrews
that were removed in Step 1 using the provided hexagon
key.
6. Fasten the back protective cover that was removed in
Step 1.
4
Glass Display Stand
LCD TV with Display Stand Attached
Hinge Cover
5
Back Protective Cover
6
ENGLISH
3
4
5
Page 4

Quick Start Guide Quick Start Guide
Connection Diagrams
Basic Connection for Analog TV
Basic Connection for Digital TV
(DTV)* and AV
Getting Started
1. Unpack your LCD TV.
z LCD TV
z Remote control
z Two (2) AA alkaline batteries
z 6-in-1 CF adaptor*
z Power cord
z RF (aerial) lead
z This user’s guide
z Display stand
z Five (5) M8*30 capscrews
z Two (2) M8*100 capscrews
z Two (2) washers for M8*100 capscrews
z Hexagon key
2. Disconnect power to all your existing equipment.
3. Locate unit in preferred position.
4. Connect all equipment as shown in the diagram on the adjacent page.
5. Once all other connections are made, connect power and switch on your unit.
Remote Control Modes
3
4
8 9
ENGLISH
* Available only with SAGEM AXIUM HD-L32 T.
6
RF LOOP
THROUGH
CABLE
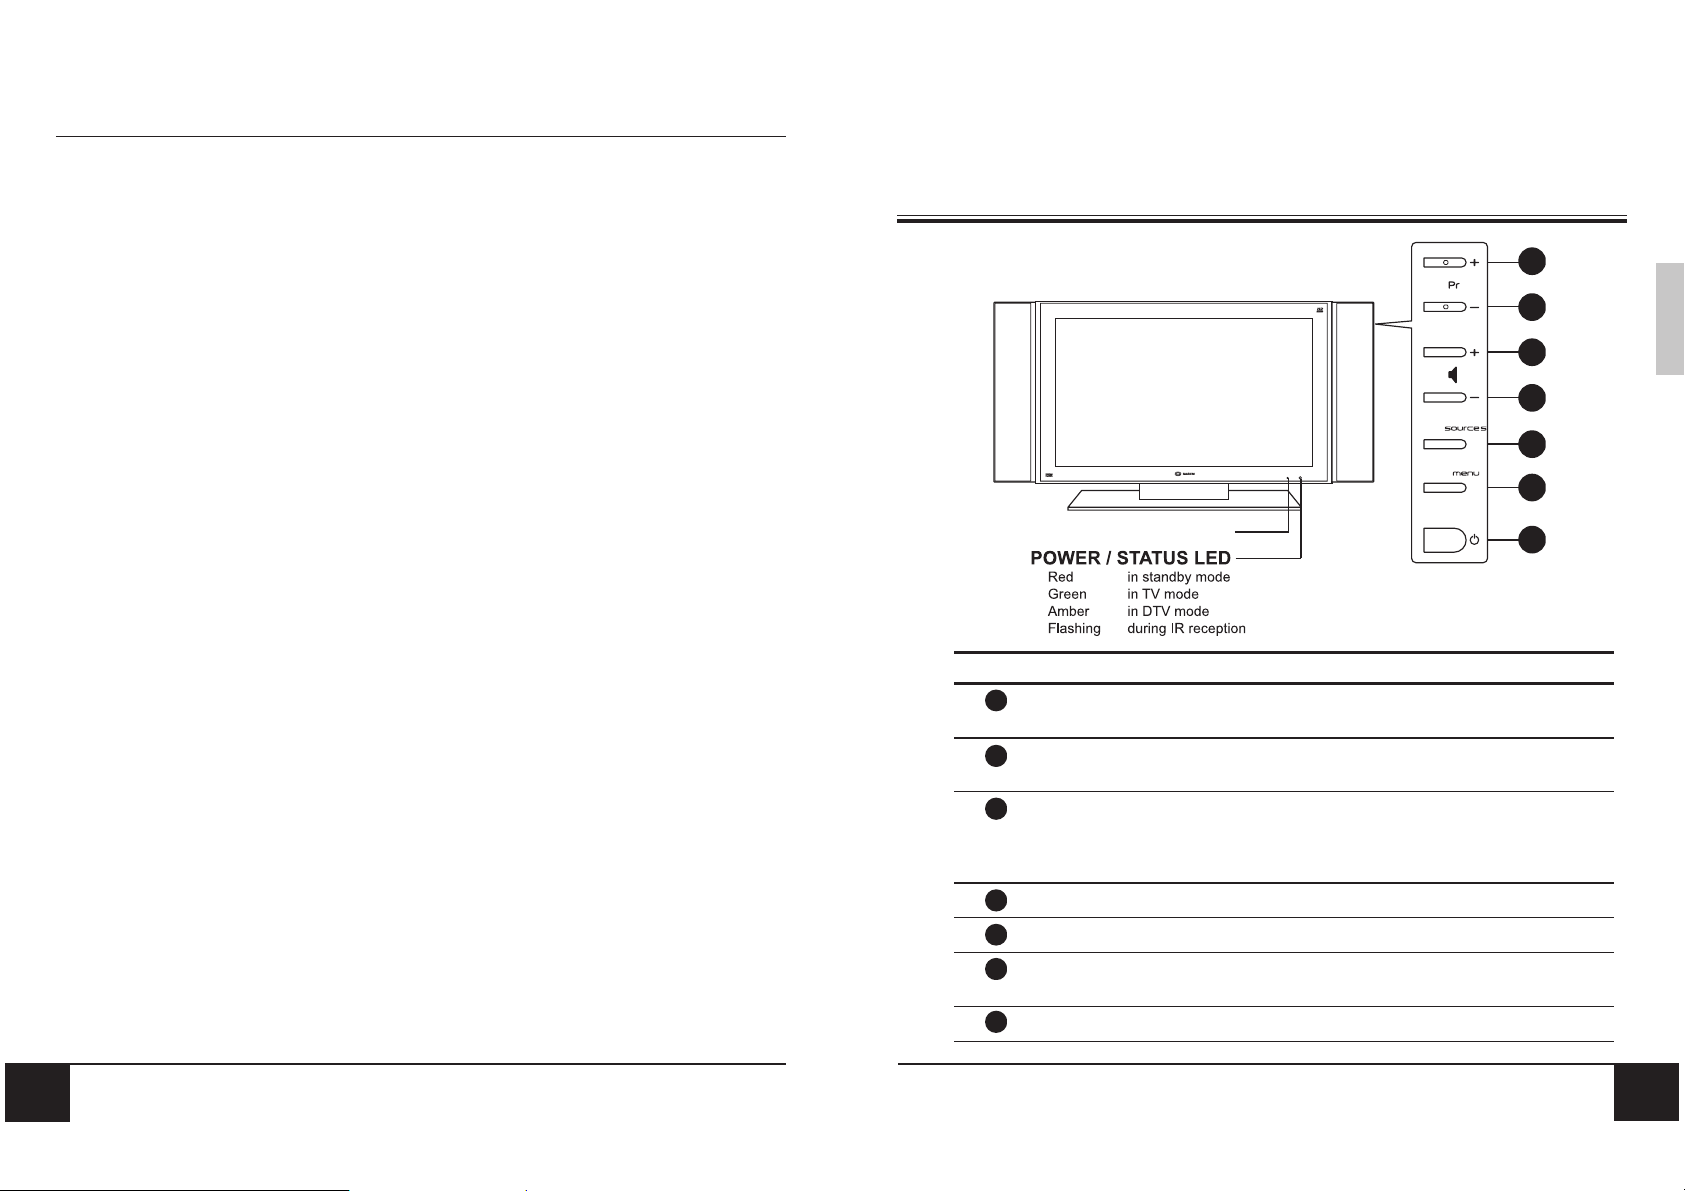
The remote control must be in the same mode (analog or digital*) as the LCD TV in order for it to work
properly. The Power/Status LED at the front of the unit indicates the current mode of your unit (see 2-1
Front Panel Controls for the different modes and the corresponding LED indicator color).
When the remote control is in analog mode, the TV button on your remote control will light up in green
each time a button on the remote control is pressed. When the remote control is in digital mode*, the
DTV button on your remote control will light up in yellow each time a button on the remote control is
pressed.
LCD TV POWER LED REMOTE CONTROL MODE
GREEN GREEN TV BUTTON ANALOG TV
AMBER YELLOW DTV BUTTON DIGITAL TV*
* Available only with SAGEM AXIUM HD-L32 T.
7
Page 5

Quick Start Guide Quick Start Guide
Connecting Your TV
1. Connect an aerial antenna (see Basic Connection diagram on the adjacent
page).
2. Insert batteries into the remote control (see 4-2 Inserting Batteries into the
Remote Control for more details).
3. Connect the power cord to the power cord connector on the back of your
LCD TV (see Basic Connection diagram on the adjacent page).
4. Press the Main Power switch next to the power cord connector on the LCD
TV.
5. Press the POWER button on your remote control.
Setting Up Analog TV
To change the language of the OSD menus
1. Press the TV MENU button on your remote control to access the Main Menu.
2. Use
3. Press OK, and the Options Menu opens.
4. Use
to highlight Options.
to highlight Language.
Switching to Digital TV*
This LCD TV features an integrated digital TV tuner designed to receive digital broadcast.
To switch to digital TV, press the DTV button.
NOTE: When set to digital TV, the DTV button will light up in yellow each time you use your
remote control.
When set to analog TV, the TV button will light up in green each time you use your
remote control.
First Time Use
The first time you use your TV in DTV mode, you will have to perform a “First Installation procedure”.
NOTE: The OK button always confirms a selection within these menus, and pressing it will
take you to the next step in the installation process. However, and this is important,
often more than one value has to be entered in a menu. First, perform all necessary settings on the different lines. Then confirm them all simultaneously by pressing OK.
Use
to move upwards and downwards from one line to another.
Use
control to enter numeric values.
to change settings. You can also use the numerical keys on the remote
ENGLISH
5. Use
6. Press the EXIT button on your remote control to close the OSD.
to select the desired language.
To tune channels automatically
To quickly add all channels that have signals to your channel list, refer to 7-1 Tuning Channels Automatically for detailed instructions.
8
* Available only with SAGEM AXIUM HD-L32 T.
9
Page 6

Quick Start Guide
1. Press the DTV button to switch to digital TV.
2. Press OK on your remote control to continue.
The Menu Language menu opens.
Contents
3. Select the desired language with
OK.
4. Select the desired country with
OK. This will also set the current time.
5. The search procedure begins for digital TV and
radio channels.
NOTE: The search procedure may take a few
minutes, so be patient. Cancel at any time by
pressing EXIT.
When the search procedure has ended, a mes-
sage will indicate how many digital TV and radio
channels have been found.
6. If the channel has found no channel, this screen is
displayed to help you adjust the aerial.
Enter a channel number (refer to http//
www.dtg.org.uk/retailer/tx_details/_tx_index.htm.
For example, Oxford channel numbers are 29,
34, 48, 51, 52, 68. These numbers depend on
broadcasters and are subject to change.) and
move the antenna until the signal and quality bars
are green. When signal and quality are green,
press to launch a new channel search.
and press
and press
SAFETY PRECAUTIONS ..........................................................................................2
QUICK START GUIDE ............................................................................................... 4
Display Stand Installation .......................................................................................4
Connection Diagrams ............................................................................................ 6
Getting Started ......................................................................................................7
Remote Control Modes ..........................................................................................7
Connecting Your TV ............................................................................................... 8
Setting Up Analog TV ............................................................................................ 8
Switching to Digital TV*..........................................................................................9
First Time Use ....................................................................................................... 9
1 BEFORE YOU START ....................................................................................... 13
1-1 What’s in the Box ........................................................................................13
1-2 Optional Accessories...................................................................................14
2 YOUR LCD TV AT A GLANCE ...........................................................................15
2-1 Front Panel Controls .................................................................................... 15
2-2 Back Connectors ......................................................................................... 16
3 YOUR REMOTE CONTROL AT A GLANCE ...................................................... 18
4 BASIC LCD TV SETUP .....................................................................................21
4-1 Connecting an Aerial Antenna ......................................................................21
4-2 Inserting Batteries into the Remote Control .................................................. 22
4-3 Using the Remote Control (Basic Operation) ................................................ 22
4-4 Plugging In Your LCD TV.............................................................................. 23
4-5 Turning ON the Power ..................................................................................24
ENGLISH
10
* Available only with SAGEM AXIUM HD-L32 T.
11
Page 7

5 CONNECTING EXTERNAL DEVICES ..............................................................25
5-1 Connecting an HDMI Device ........................................................................ 26
5-2 Connecting a Component Device ................................................................27
5-3 Connecting a VCR Using Coaxial (RF) ........................................................ 28
5-4 Connecting a SCART Device ....................................................................... 29
5-5 Connecting a Computer (VGA) ....................................................................30
6 ADJUSTING TV SETTINGS ..............................................................................35
6-1 Basic Operations ......................................................................................... 35
6-2 Using the TV On-screen Display (TV OSD) ..................................................37
6-3 OSD Menus and Options .............................................................................38
6-4 Adjusting Picture Settings ............................................................................ 44
7 TUNING YOUR ANALOG TV ............................................................................. 45
7-1 Tuning Channels Automatically (AUTO SEARCH) .........................................45
7-2 Tuning Channels Manually (MANUAL SEARCH) ........................................... 46
7-3 Sorting Channels (PROGRAMME SORT) ................................................... 47
7-4 Removing Unwanted Channels (MANUAL SEARCH) ................................... 48
8 ADVANCED SETTINGS AND FUNCTIONS ......................................................49
8-1 Setting the Sleep Timer ...............................................................................49
8-2 Setting Parental Control ...............................................................................50
8-3 Setting a Password...................................................................................... 51
8-4 Displaying Teletext ....................................................................................... 52
8-5 Dual Picture Modes .....................................................................................53
8-6 Multi-channel View Mode ............................................................................. 56
8-7 Picture Formats ...........................................................................................56
9 DIGITAL TV (DTV)* ............................................................................................57
9-1 Advanced Digital TV Settings .......................................................................57
9-2 Using Digital TV ...........................................................................................62
9-5 Digital TV Software Upgrade .......................................................................69
1 BEFORE YOU START
1-1 What’s in the Box
When you receive your LCD TV, unpack it carefully, and check to make sure you have all the
items below.
REMOTE CONTROL
1
AND TWO AA
BATTERIES
4
DISPLAY STAND
7
TWO WASHERS
USER GUIDE
10
3
4
8 9
POWER CORD
2
FIVE M8*30
5
CAPSCREWS
8
HEXAGON KEY
RF CABLE
3
TWO M8*100
6
CAPSCREWS
9
ENGLISH
TROUBLESHOOTING AND SUPPORT .................................................................70
PRODUCT SPECIFICATIONS ................................................................................ 73
12
* Available only with SAGEM AXIUM HD-L32 T. * Available only with SAGEM AXIUM HD-L32 T.
13
Page 8
Chapter 1 Before You Start
1-2 Optional Accessories
The following are optional accessories you may purchase for your LCD TV:
CABLE KITS
RCA audio cable
SCART lead/cable
S-video video cable
Composite video cable - RCA to RCA
Component (YUV) video cable - 3 RCA to 3 RCA
WALL MOUNT KIT
The SAGEM wall mount kit, which is sold separately, contains all of the required hardware
for mounting your LCD TV on your wall. It is highly recommended that you find a qualified
installer to do this.
VGA video cable
HDMI video cable
2 YOUR LCD TV AT A GLANCE
2-1 Front Panel Controls
REMOTE CONTROL SENSOR
BUTTON VIEWING FUNCTION (OSD OFF) MENU FUNCTION (OSD ON)
1
Displays the next stored channel. Selects the next menu option.
N/A when the video source is set to DTV*.
1
2
3
ENGLISH
4
5
6
7
14
2
3
4
5
6
7
Displays the previous stored channel. Selects the previous menu option.
N/A when the video source is set to DTV*.
Increases the sound level. Displays a submenu with selections for
Lowers the sound level. Reduces a menu option value.
Selects the next input source. Selects the next input source.
Activates the OSD main menu. Returns to the previous menu or exits
Turns the LCD TV ON/OFF. Turns the LCD TV OFF.
* Available only with SAGEM AXIUM HD-L32 T.
the current menu option.
Increases a menu option value.
OSD menus.
15
Page 9

Chapter 2 Your LCD TV At A Glance Chapter 2 Your LCD TV At A Glance
2-2 Back Connectors
1 2 3 4
CONNECTOR DESCRIPTION
1
2
3
4
5
6
7
8
9
10
Main power switch - Turns the main power ON and OFF.
Power cord connector - Connect the power cable to this.
HDMI - Connect a Consumer Electronics device, such as a DVD player or
HDTV STB, to this. NOTE: This connector can also accept DVI signal with a
DVI-to-HDMI adaptor.
VGA - Connects to a computer’s VGA terminal output.
Audio In - Connects to a computer’s audio out jack.
HiFi Out - Connects to your audio amplifier device.
SCART - Connect a decoder, DVD player, or satellite box to this connector
(RGB, S-Video, or Composite).
SCART - Connect a decoder, DVD player, or satellite box to this connector
(RGB, S-Video, or Composite).
TUNER (UHF/VHF-CATV) - Connect to antenna or analog cable service.
YUV - Connect a component (YPbPr) device, such as a DVD player, to these
connectors.
2-3 Right-side Connectors
1
ENGLISH
7 8 95 6
10
11 12
CONNECTOR DESCRIPTION
1
2
3
4
5
6
Memory card reader* - Supports Type I/II CompactFlash cards.For other
compatible cards, please use the 6-in-1 adapter provided.
AV3 (S-Video In) - Connect an S-Video device to this.
AV3 (Composite Video In) - Connect a composite audio/video device, such as
a camcorder or digital camera, to this connector.
Audio In (Left) - Connect the white (L) audio RCA from a composite or S-video
device to this connector.
Audio In (Right) - Connect the red (R) audio RCA from a composite or S-video
device to this connector.
Headphone jack - Connect a headphone to this stereo headphone jack. Using
this jack automatically disables the built-in speakers.
2
3
4
5
6
11
12
* Available only with SAGEM AXIUM HD-L32 T.
16
DTV loop through* - Feeds both analog and digital TV signals to the TV’s
tuner and enables independent recording of both analog and digital channels.
DTV Antenna In* - Connects to digital broadcast.
17
Page 10

Chapter 3 Your Remote Control At A Glance
3 YOUR REMOTE CONTROL AT A GLANCE
1
14
34
3
5
12
16
18
22
24
35
7
8
6
25 26 27 28
36 37 38 39
29 30 31
40 41 42
9
19
20
21
2
4
11
17
32
10
13
15
PR
3
4
8 9
23
33
BUTTON DESCRIPTION (TV MODE)
POWER Turns the power ON/OFF.
1
DTV* Switches to DTV mode (Digital TV).
2
TV Switches to TV mode (Analog TV).
3
AV Changes the input source to AV1, AV2, or AV3.
4
PC Changes the input source to YUV, HDMI, or VGA.
5
FORMAT Selects the picture format (4:3, 14:9, 16:9, Zoom, Panorama) that best
6
VIDEO MODE Sets the video mode. Options are User, Soft, Normal, Strong, and Intense.
7
GUIDE* Displays the channel guide when in DTV mode.
8
BACKLIGHT Adjusts the backlight brightness level.
9
UP Navigates up in the on-screen display (OSD) menus.
10
LEFT Navigates left in the on-screen display (OSD) menus.
11
RIGHT Navigates right in the on-screen display (OSD) menus.
12
DOWN Navigates down in the on-screen display (OSD) menus.
13
OK Works as the ENTER button. Confirms selection. Displays the channel list in
14
BACK Toggles between the last viewed channel and the current channel.
15
EXIT Exits from the on-screen display (OSD).
16
VOL+/VOL- Increases/decreases the volume.
17
PR+/PR- Changes the channel.
18
MUTE Mutes or restores the sound volume.
19
INFO Shows information about the current input source.
20
STILL Freezes the displayed image.
21
NUMBER PAD Selects a channel or enters a number.
22
DTV MENU* Activates the DTV* OSD menu.
23
meets your viewing requirement.
DTV* mode.
ENGLISH
18
* Available only with SAGEM AXIUM HD-L32 T.
19
Page 11

Chapter 3 Your Remote Control At A Glance
BUTTON DESCRIPTION (cont’d)
24
TV MENU Activates the TV OSD menu.
RED Activates Teletext RED functions.
25
GREEN Activates Teletext GREEN functions.
26
YELLOW Activates Teletext YELLOW functions.
27
BLUE Activates Teletext BLUE functions.
28
AUDIO Changes the audio mode.
29
AUDIO ENH Options are STANDARD, SPATIAL, VIRTUAL DOLBY SURROUND, and
30
RADIO* Available in DTV mode only. Switches to Radio mode.
31
FUNCTION P ress to activate functions such as PIP that are marked in blue.
32
TELETEXT Toggles ON/OFF Teletext mode.
33
SUBTITLES* Activates subtitles in DTV mode.
34
LIST* Changes the favorite list when in DTV mode.
35
+
+
+
25
26
27
36
37
38
ENHANCED SPATIAL.
MOSAIC - Activates Multi Channel View mode (only available in Analog Mode).
PIP, PAP, Full Screen - Selects PIP mode.
PIP SEL - Changes sub source (TV/AV1/AV2/AV3) when the main source is
set to YUV, HDMI, or VGA, or vice versa.
4 BASIC LCD TV SETUP
4-1 Connecting an Aerial Antenna
Connect the outdoor aerial (antenna) cable lead-in to the TUNER (UHF/VHF-CATV) jack
on the back of your LCD TV using the supplied RF (coaxial) lead. See 2-2 Back Connectors
for location.
ENGLISH
20
39
40
41
42
+
+
+
+
28
29
30
31
PIP SWAP - Swaps the main and sub pictures.
Teletext Index (only in Teletext mode)
Teletext List (only in Teletext mode)
Teletext Reveal (only in Teletext mode)
* Available only with SAGEM AXIUM HD-L32 T.
21
Page 12

Chapter 4 Basic LCD TV Setup Chapter 4 Basic LCD TV Setup
4-2 Inserting Batteries into the Remote Control
Before using the remote control for the first time, insert two AA batteries (supplied). When the
batteries become depleted and the remote control fails to operate, replace the batteries with
new batteries.
TO INSERT BATTERIES
1. Remove the battery cover on the back of the
remote control.
2. Insert two AA batteries into the remote control.
Make sure that you match the + and -on the
batteries with the + and - symbols inside the
battery compartment.
3. Close the battery cover by aligning it with the
base of the remote control and sliding it back into
place.
NOTE: Always recycle used batteries in accordance with local regulations.
Contact your local recyling center for proper disposal information.
z The batteries supplied are not rechargeable.
z Pay particular attention to environmental matters.
4-4 Plugging In Your LCD TV
1. Connect the power cord to the power cord connector on the back of your LCD TV (see
2-2 Back Connectors).
2. Plug the other end of the power cord into a properly grounded electrical outlet or surge
protector.
ENGLISH
z Take the defective or used batteries to places provided for this effect in
accordance with current regulations; never throw them in the dustbin.
4-3 Using the Remote Control (Basic Operation)
Point the remote control towards the remote control sensor window located on the front of
your LCD TV. Make sure no objects are in the line of aim, otherwise the remote control may
not operate properly.
22
23
Page 13

Chapter 4 Basic LCD TV Setup
4-5 Turning ON the Power
1. Press the Main Power switch next to the power
cord connector on the LCD TV. The Status LED
on the front turns red and your LCD TV is ready
to turn on.
2. Press the POWER button on the right side of
your LCD TV or on your remote control. The
Status LED on the front turns green, and the unit
turns on.
NOTE: When in analog TV mode, the power LED at the front of your unit will
be green.
When in digital TV* mode, the power LED at the front of your unit will
be amber.
5 CONNECTING EXTERNAL DEVICES
Read this section to learn how to connect the following devices:
DVD players
DTV or HDTV set-top boxes
VCRs
Computers
Game players
WARNING! Before connecting any external components, make sure to unplug
your LCD TV and any connecting devices to prevent damage.
ENGLISH
* Available only with SAGEM AXIUM HD-L32 T.
24
25
Page 14

Chapter 5 Connecting External Devices Chapter 5 Connecting External Devices
5-1 Connecting an HDMI Device
1. Connect one end of an HDMI cable (not supplied) to your device and the other to the
HDMI connector on the back of your LCD TV. See 2-2 Back Connectors for location.
2. Turn on your LCD TV (see 4-5 Turning ON the Power), then press the PC button on
your remote control repeatedly to select HDMI.
5-2 Connecting a Component Device
1. Connect the green-colored Y RCA jack on the back of your device to the green-colored
Y RCA jack on the back of your LCD TV.
2. Connect the red-colored Pr RCA jack on the back of your device to the red-colored Pr
RCA jack on the back of your LCD TV.
3. Connect the blue-colored Pb RCA jack on the back of your device to the blue-colored
Pb RCA jack on the back of your LCD TV.
4. Connect the red (R) and white (L) audio RCA jacks on the back of your device to the
YUV R and L audio-in RCA jacks on the back of your LCD TV.
5. Turn on your LCD TV, then press the PC button repeatedly to select YUV.
ENGLISH
26
NOTE: To connect a DVI device, use a DVI-to-HDMI adaptor. You will also
have to connect the audio cable from your DVI device to the PC
Audio In connector.
27
Page 15
Chapter 5 Connecting External Devices Chapter 5 Connecting External Devices
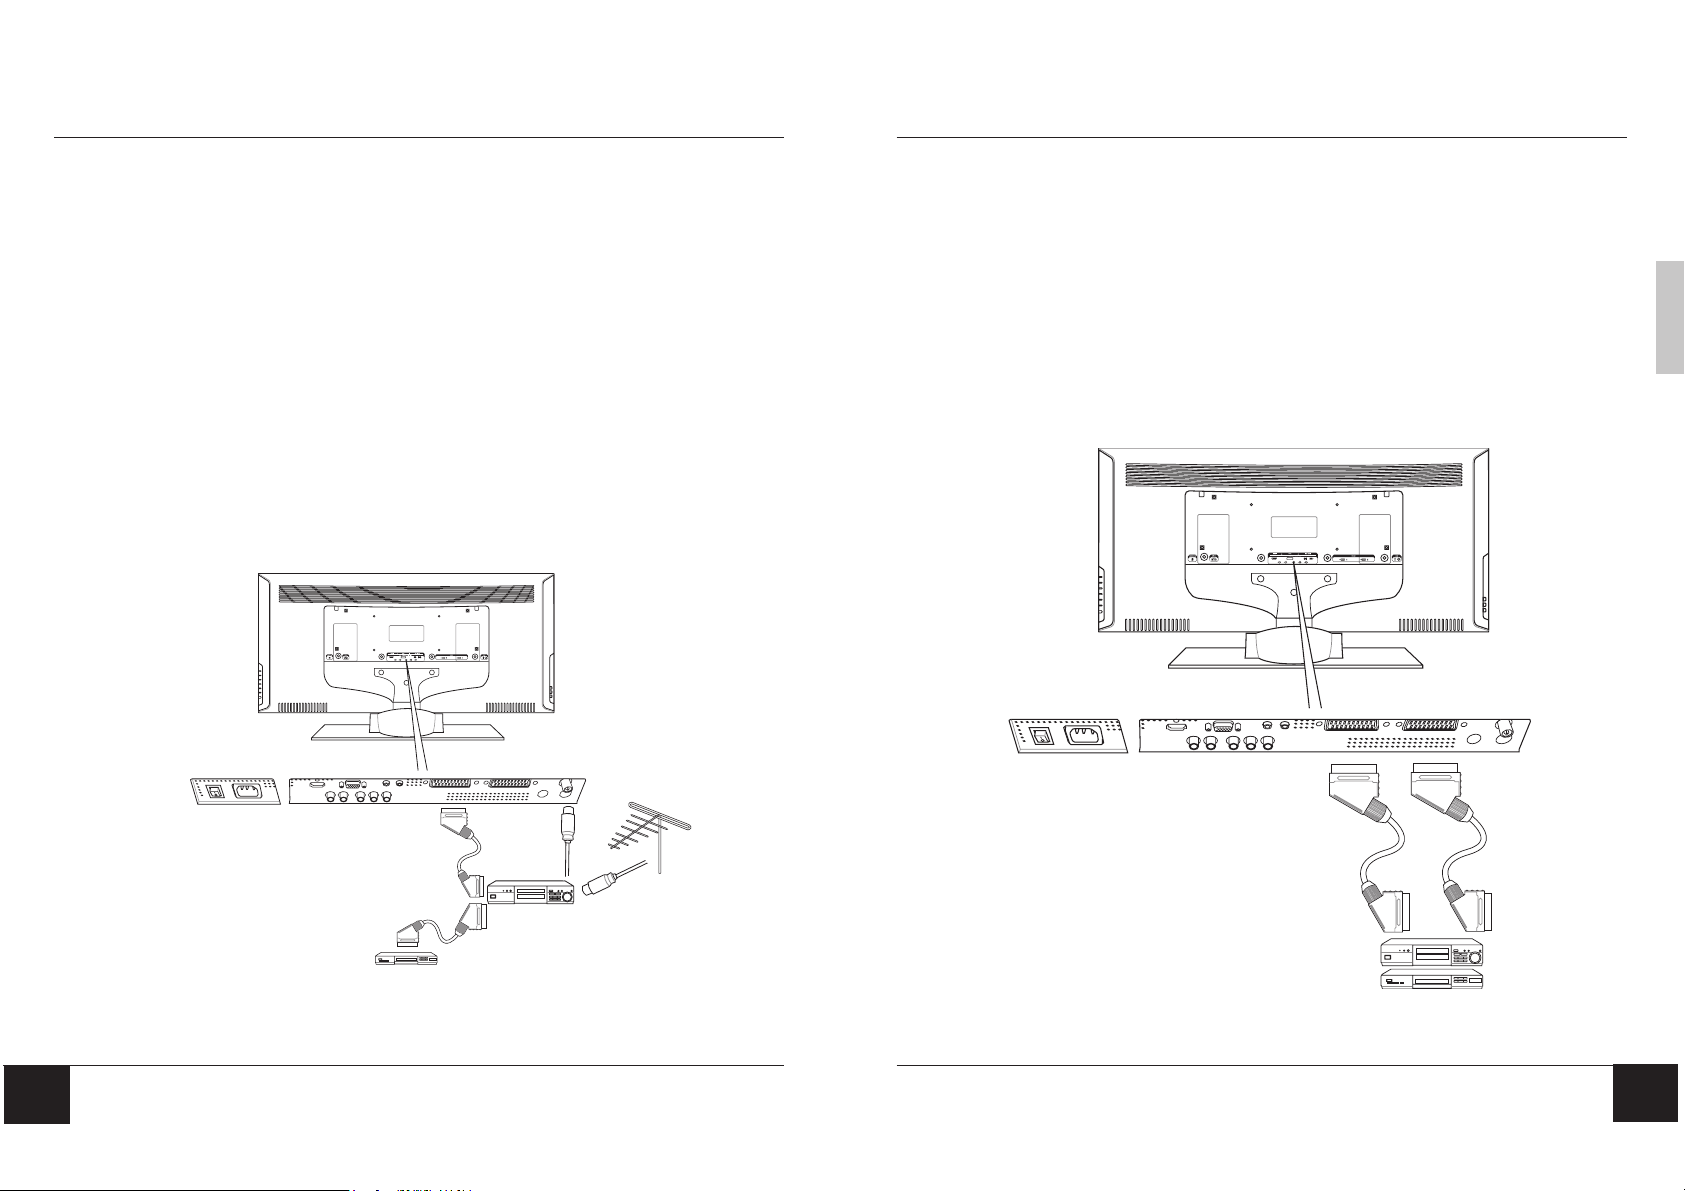
5-3 Connecting a VCR Using Coaxial (RF)
5-3-1 Video Recorder without Decoder
To record digital programmes from your LCD TV, the VCR must be connected to a SCART
connector.
NOTE: If your VCR does not have a SCART connector, the only connection
possible is via the aerial cable. You will therefore need to tune in
your video recorder’s test signal and assign it to a program number.
In this case, it will not be possible to record digital channels.
5-3-2 Video Recorder with Decoder
Connect the decoder to the second SCART connector on your video recorder. You will then
be able to record scrambled transmissions.
WARNING! If an outdoor antenna or cable system is connected to your LCD TV,
make sure that the antenna or cable system is correctly grounded.
5-4 Connecting a SCART Device
1. Connect one end of a 21-pin Euro-SCART lead (not supplied) to your device and the
other to the SCART connector on the back of your LCD TV. See 2-2 Back Connectors
for location.
2. Turn on your LCD TV (see 4-5 Turning ON the Power), then press the AV button
repeatedly to select either AV 1 or AV 2 , depending on to which connector your SCART
device is connected.
NOTES: The picture format (16:9) is automatically detected by your unit.
ENGLISH
28
AV1
SCART lead
(optional accessory)
DECODER
RF lead
(supplied)
VCR
SCART lead
(optional accessory)
ANTENNA
SCART
Devices
29
Page 16

Chapter 5 Connecting External Devices Chapter 5 Connecting External Devices
5-5 Connecting a Computer (VGA)
1. Connect the VGA connector on your computer to the VGA connector on the back of
your LCD TV with a VGA monitor cable.
2. Connect the Audio Out jack on your computer to the Audio In jack on the back of your
LCD TV.
3. Turn on your LCD TV (see 4-5 Turning ON the Power), then press the PC button on
your remote control to select VGA as your input source.
5-6 Connecting an Audio Amplifier Device
Connect an audio amplifier device to the HiFi Out jack on the back of your LCD TV.
ENGLISH
3.5mm
30 31
Page 17

Chapter 5 Connecting External Devices Chapter 5 Connecting External Devices
5-7 Connecting a Composite Device
1. Connect the yellow video RCA from your VCR, camcorder, or digital camera to the
yellow AV3 videoRCA connector on the right-side of your LCD TV with an RCA cable
(not supplied).
2. Connect the red (R) and white (L) audio jacks from your VCR, camcorder, or digital
camera to the appropriately numbered AV3 R and L audio-in jacks on the right-side of
your LCD TV.
3. Turn on your LCD TV (see 4-5 Turning ON the Power), then press the AV button on
your remote control repeatedly to select AV 3.
5-8 Connecting an S-Video Device
1. Connect the S-Video mini-DIN connector on the back of your S-Video device to the SVIDEO connector on the right-side of your LCD TV with the correct optional cable.
2. Connect the red (R) and white (L) audio RCA jacks on the back of your S-Video device
to the R and L audio-in RCA jacks on the right-side of your LCD TV.
3. Turn on your LCD TV (see 4-5 Turning ON the Power), then press the AV button on
your remote control repeatedly to select AV 3.
ENGLISH
32 33
Page 18

Chapter 5 Connecting External Devices
5-9 Connecting a Headphone
Connect a headphone to the Line Out jack on the right-side of your LCD TV.
3.5mm
6 ADJUSTING TV SETTINGS
6-1 Basic Operations
6-1-1 Adjusting the Volume
You can adjust the volume in two ways - from your LCD TV’s right side panel or by using the
remote control.
TO ADJUST VOLUME FROM THE RIGHT SIDE PANEL
Press to increase/decrease the sound level.
ENGLISH
1
2
3
4
34
NOTE: When a headphone is connected, the TV’s internal speakers are turned
OFF.
5
6
7
35
Page 19

Chapter 6 Adjusting Settings Chapter 6 Adjusting Settings
TO ADJUST VOLUME FROM THE REMOTE
Press (see illustration for location) to turn up or turn down the volume.
TO TEMPORARILY TURN OFF VOLUME (MUTE)
Press the MUTE button on the remote control.
TO TURN VOLUME BACK ON
Press the MUTE button again or press .
6-1-2 Selecting Channels
TO SELECT CHANNELS FROM THE LCD TV
6-2 Using the TV On-screen Display (TV OSD)
Your LCD TV features an on-screen display (OSD) that lets you adjust and save contrast, brightness, and other settings. All the function settings are accessible either through the proper control
buttons on the right side of your LCD TV or through the remote control. OSD menus may be
different depending on the current input source.
PR
3
4
8 9
6-2-1 Making Adjustments
You can access the OSD from either the right side of your LCD TV display or from your
remote control.
1. With the power ON, press the TV
button.
2. Press TV MENU to access the Main
Menu. In DTV* mode, press DTV
MENU to set DTV* parameters.
NOTE: When you press the TV MENU
button on your remote control, the remote
control switches automatically to TV
mode.
3. Press
options.
4. Press OK on your remote control to
access the submenu.
to select one of the menu
ENGLISH
1
4
5
6
PR
4
8 9
2
1
3
6
3
2
36
Press to select channels.
TO SELECT CHANNELS FROM THE REMOTE
Press PR (see illustration for location) or use the number pad to input the
channel number..
5. Press
to make adjustments.
6. Press the BACK button to return to the
previous menu option.
PR
3
* Available only with SAGEM AXIUM HD-L32 T.
- OR -
Press the EXIT button to close the OSD.
37
Page 20

Chapter 6 Adjusting Settings Chapter 6 Adjusting Settings
6-3 OSD Menus and Options
You can use these OSD menus and options to adjust various settings for your LCD TV.
6-3-1 With Source Input Set to TV
Main Menu
Picture Menu
To access the Picture Menu, highlight Picture from the Main Menu and press OK.
Picture Menu
Brightness
Contrast
Colour
Sharpness
Image+ No rmal
Colour Temp. Natu ral
30
25
30
30
Contrast - Adjusts the contrast ratio.
Brightness - Adjusts the luminance of the
image.
Colour - Adjusts the color intensity,
making colors more or less intense.
Sharpness - Adjusts the sharpness of the
image.
Sound Menu
To access the Sound Menu, highlight Sound from the Main Menu and press OK.
Sound Menu
Balance
Bass
Trebble
Loudness Normal
Sound Effect Standard
0
0
0
Balance - Adjusts the level of sounds
between the left and right speakers.
Bass - Adjusts the bass value to enhance
the low frequency sounds.
Treble - Adjusts the treble value to
enhance high frequency sounds.
Loudness - Sets the sound intensity.
Sound Effect - Select Standard, Spatial,
SettingMove
Return BACK
Virtual Dolby Surround, or Enhanced
Spatial.
Setup Menu
To access the Setup Menu, highlight Setup from the Main Menu and press OK.
Setup Menu
Auto Search
Manual Search
Programme Sort
Move Return BACK
Enter
Enter
Auto Search - Select this option allows
you to automatically search for all analog
programmes that are available in your
region.
Manual Search - Select this option
allows you to store analog programmes
one at a time.
Programme Sort - Select this option to
rearrange the channel list and remove
channels from the channel list.
ENGLISH
38
Return BACKSettingMove
Image - Adjusts the image clarity. Options
are Normal and Crystal+.
NOTE: See 7 Tuning Your LCD TV for detailed procedures for Auto Search
and Manual Search.
Colour Temp - Adjusts the color
temperature. Options are Natural, Cold,
and Warm.
39
Page 21

Chapter 6 Adjusting Settings Chapter 6 Adjusting Settings
Options Menu
To access the Options Menu, highlight Options from the Main Menu and press OK.
Language English
Parental Control
Slee p Timer Off
Factory Preset Off
SCART Autoswitch On
OSD Typ e 0%
Options Menu
SettingMove
Return BACK
NOTE: See 8 Advanced Settings for detailed procedures for Parental Con-
trol and Sleep Timer.
Language - Changes the language of the
OSD menu.
Parental Control - Activates parental
controls. This option is accessible only
from the remote control.
Sleep Timer - Turns the sleep timer ON/
OFF. Select 15, 30, 45, 60, 90, or 120
minutes.
Factory Preset - Resets user password
to 0000 and deletes the analog channel
list.
SCART Autoswitch - Sets the SCART
autoswitch ON or OFF.
OSD Type - Sets the transparency of the
OSD. Options are 0%, 50%, 100% (OSD
gray background), and 50%, 100% (blue
background).
6-3-2 With Source Input Set to AV1, AV2, AV3, or DTV
NOTE: The Picture, Sound, and Options Menu for these inputs are the same as
those for TV and DTV sources.
Main Menu
Main Menu
Picture
Sound
Sources
Options
Move Return BACK
Sources Menu
To access the Sound Menu, highlight Sound from the Main Menu and press OK.
Input Video NR
AV1 Off
AV2 Off
AV3 Off
DTV Off
SettingMove
Enter
Enter
Soures Menu
Return BACK
Set the Video NR for each input source
from this menu. Turn Video NR ON to
reduce on-screen noise.
Four modes are available:
OFF: not activated
LOW: if original screen noise is low
MIDDLE: if original screen noise is middle
HIGH: if original screen noise is high
ENGLISH
40
41
Page 22

Chapter 6 Adjusting Settings Chapter 6 Adjusting Settings
6-3-3 With Source Input Set to PC VGA, HDMI, or YUV
NOTE: The Sound Menu and Options Menu for this input is the same as the one
for TV.
Main Menu
Main Menu
Picture
Sound
Setup
Options
Move Return BACK
Picture Menu
To access the Picture Menu, highlight Picture from the Main Menu and press OK.
Brightness
Contrast
Colour
Sharpness 50
Colour Temp. Natural
Enter
Enter
Picture Menu
SettingMove
50
35
50
Return BACK
Brightness - Adjusts the luminance of the
image.
Contrast - Adjusts the contrast ratio.
Colour - Adjusts the color saturation,
making colors more or less intense.
Sharpness - Adjusts the sharpness of the
image.
Colour Temp - Adjusts the color
temperature. Options are Natual, Cool,
and Warm.
Setup Menu
To access the Setup Menu, highlight Setup from the Main Menu and press OK.
Setup Menu
Auto Adjust Off
H-P os ition
V-P ositio n
Clock
Phase
R-A djust
G-Adjust
B-A djust
Video N R Off
Return BACKSettingMove
30
25
30
30
25
30
30
Auto Adjust - Automatically adjusts to the
best image position, as well as the best
clock and phase settings.
H-Position - Adjusts the horizontal
position of the image.
V-Position - Adjusts the vertical position
of the image.
Clock - Adjusts your LCD TV to match the
video input source. Used when patterns
appear.
Phase - Adjusts the picture to remove any
noise such as, horizontal distortion, and
clears or sharpens the displayed
characters.
R-Adjust - Adjusts the red color.
G-Adjust - Adjusts the green color.
B-Adjust - Adjusts the blue color.
Video NR - Turns Video NR ON or OFF.
Turn Video NR ON to reduce on-screen
noise. Four modes: OFF/LOW/MIDDLE/
HIGH.
NOTE: Depending on the selected input
source, some options may be disabled
(grayed out).
ENGLISH
42
43
Page 23

Chapter 6 Adjusting Settings
Auto Search Menu
Country UK
Start Search No
Program Found
Frequency
Return BACK
SettingMove
6-4 Adjusting Picture Settings
Follow these steps to adjust your LCD TV image.
1. Press TV MENU to call up the on-screen
display (OSD) main menu.
2. Press
3. Press OK. The Picture Menu opens.
4. Press
5. Press
6. Press
settings.
7. Press EXIT to close the OSD menus.
to highlight Picture.
to select the option you want to adjust.
to adjust the setting.
to select and adjust other picture
7 TUNING YOUR ANALOG TV
3
2
5
PR
3
4
8 9
4
6
7
1
7-1 Tuning Channels Automatically (AUTO SEARCH)
With the input source set to TV, use this option to quickly add all channels that have a signal
to the channel list.
TO TUNE CHANNELS AUTOMATICALLY
1. Press the TV MENU button on the
remote control to open the OSD.
2. Press
to select Setup Menu.
3. Press OK to open the menu.
4. Press
to select AUTO SEARCH.
5. Press OK to open the Auto Search
submenu.
6. Press
to select Start Search.
Auto Search
Manual Search
Programme Sort
Move Return BACK
Setup Menu
Enter
Enter
ENGLISH
Picture Menu
Brightness
Contrast
Colour
Sharpness
Image+ No rmal
Colour Temp. Natu ral
Source Input - TV Source Input - AV
44
Picture Menu
30
25
30
30
Return BACKSettingMove
Brightness
Contrast
Colour
Sharpness 50
Colour Temp. Natural
SettingMove
Return BACK
50
35
50
7. Use
The LCD TV will search for all available
channels. This will take a few minutes.
NOTE: Auto Search replaces your previous
channel list.
to select Ye s to start search.
45
Page 24

Chapter 7 Tuning the Channels Chapter 7 Tuning the Channels
Programme Sort Menu
Sele ct OK
Move
PR Name PR N ame
1 TF1 8 525.25
2 FR2 9 BBC1
3 FR3 10
4 CANAL 11
5 ARDE 12
6 M 6 13
67 ZDF 14
Delete RED
Return BACK
7-2 Tuning Channels Manually (MANUAL SEARCH)
Use this option to add certain channels to the channel list.
TO ADD CHANNELS MANUALLY
1. Press the TV MENU button on the
remote control to open the OSD.
2. Press
3. Press OK to open the menu.
4. Press
SEARCH.
5. Press OK to select. The Manual Search
menu opens.
6. Press
search.
7. Use
selected.
To change the settings for Channel, Name,
or Frequency, press OK and then enter
the numbers and/or characters. Press OK
again when finished.
8. When finished, press EXIT to close the
OSD.
46
to select Setup Menu.
to select MANUAL
to select the method to use for
to select setting for the method
Picture
Sound
Setup
Options
Move Return BACK
Auto Search
Manual Search
Programme Sort
Move Return BACK
Programme 10
Country France
Frequency 61.75MHz
Fine Tune 0
Naming TF 1
Sys tem L
Noise R ed uctor Off
Memorize Off
Main Menu
Enter
Enter
Setup Menu
Enter
Enter
Manual Search/Edit Menu
SettingMove
Return BACK
7-3 Sorting Channels (PROGRAMME SORT)
To sort the channels so that, for example, BBC1 is stored as number “1”, follow the steps
below:
1. Press the TV MENU button on the
remote control to open the OSD.
2. Press
3. Press OK to open the menu.
4. Press
SORT.
5. Press OK to select. The Programme Sort
menus opens.
6. Use
channel e.g. BBC1.
7. Press OK to highlight in red.
8. Press
position e.g. “1”.
9. Press OK, the channel name will change from
red to white.
10. Repeat steps 6-9 for all the channels you want
to watch. When complete, press the EXIT
button to close the OSD menu.
Now you will be able to select programmes using
the number pad or
to select Setup Menu.
to select PROGRAMME
and to find your first chosen
to move the channel to your selected
PR
on your remote control.
Programme Sort Menu
PR Name PR N ame
BBC1
1 8
2 9
3 10
4 11
5 12
6
67
Move
Sele ct OK
PR Name PR N ame
1 8
2 9
3 10
4 11
5 12
6
67
Move
Sele ct OK
TF1
FR
2
FR
3
CANAL
ARDE
13
M6
M6
Programme Sort Menu
BBC1
TF1
FR
FR
CANAL
ARDE
13
M6
M6
14
2
3
14
ENGLISH
ZDF
525.25
Delete RED
Return BACK
ZDF
525.25
Delete RED
Return BACK
47
Page 25

Chapter 7 Tuning the Channels
Enter
Main Menu
Picture
Sound
Options
Setup
Move Return BACK
Enter
Enter
7-4 Removing Unwanted Channels (MANUAL SEARCH)
Main Menu
Enter
Enter
Setup Menu
Enter
Enter
Programme Sort Menu
Delete RED
Return BACK
48
TO REMOVE CHANNELS
1. Press the TV MENU button on the
remote control to open the OSD.
2. Press
to select Setup Menu.
3. Press OK to open the menu.
4. Press
to select PROGRAMME
SORT.
5. Press OK to select. The Programme Sort
menus opens.
6. Use
and to highlight the channel
you want to remove.
7. Press
(red) to remove the highlighted
channel.
Picture
Sound
Setup
Options
Move Return BACK
Auto Search
Manual Search
Programme Sort
Move Return BACK
PR Name PR N ame
1 TF1 8 525.25
2 FR2 9 BBC1
3 FR3 10
4 CANAL 11
5 ARDE 12
6 M 6 13
67 ZDF 14
Move
Sele ct OK
8 ADVANCED SETTINGS AND FUNCTIONS
8-1 Setting the Sleep Timer
The sleep timer allows your LCD TV to automatically turn OFF after a given amount of time.
You can set the sleep timer through the on-screen display (OSD).
TO SET THE SLEEP TIMER
1. Press the TV MENU button on the
remote control to open the OSD.
2. Press
3. Press OK to open the menu.
4. Press
5. Use
minutes) that you want.
6. Press the OK button on the remote
control to confirm. The sleep timer
appears at the top of your screen.
NOTE: To turn off the sleep timer, access
the OSD menu and set SLEEP TIMER to
OFF.
to select Options.
to select Sleep Timer.
to select the time duration (in
Language English
Parental Control
Slee p Timer Off
Factory Preset Off
SCART Autoswitch On
OSD Type 0%
Move Return BACK
Options Menu
Enter
Enter
Enter
ENGLISH
49
Page 26

Chapter8 Advanced Settings and Functions Chapter 8 Advanced Settings and Functions
Change Password Menu
Recon firm N ew Password
? ? ? ?
Enter New Password
X X X X
0~9 De let e BACK Ca nc el E XIT
8-2 Setting Parental Control
The Parental Control feature prevents viewers from turning on the TV without entering a
password.
TO SET PARENTAL CONTROL
1. Press the TV MENU button on the
remote control to open the OSD.
2. Press
3. Press OK to open the menu.
4. Press
submenu.
5. Press OK to open the submenu.
6. Use the number pad to enter your
password if prompted.
If the password is 0000, the system skips
the Input Password screen.
7. Press OK.
to select the Options menu.
to select the Parental Control
Language English
Parental Control
Slee p Timer Off
Factory Preset Off
SCART Autoswitch On
OSD Typ e 0%
Move Return BACK
Options Menu
Enter
Enter
Password Menu
Please Input Password
? ? ? ?
8-3 Setting a Password
You control access to the parental control with a password. The default password is 0000.
You can change the password to any four-digit number.
TO SET OR CHANGE A PASSWORD
1. Press the TV MENU button on the
remote control to open the OSD.
2. Press
3. Press OK to open the menu.
4. Press
5. Press OK to open the submenu.
6. Use the number pad to enter your
password if prompted.
7. Use
submenu.
8. Press OK opens the Password menu.
to select the Options menu.
to select Parental Control.
to select the Change Password
Parental Control Menu
Startup Lock Off
Change Password
Move Return BACK
Change Password Menu
Enter New Password
Recon firm N ew Pass word
Enter
Enter
? ? ? ?
? ? ? ?
ENGLISH
8. Press
9. Press
10. Press EXIT when you are finished
making changes to this option.
50 51
to select Startup Lock.
to select On.
0~9 De let e BACK Ca nc el E XIT
Parental Control Menu
Startup Lock Off
Change Password
SettingMove
Return BACK
9. Use the number pad to enter a new fourdigit password when prompted.
10. Re-enter the new four-digit password.
11. Press EXIT to close the OSD.
0~9 De let e BACK Cancel EXIT
Page 27

Chapter8 Advanced Settings and Functions Chapter 8 Advanced Settings and Functions
8-4 Displaying Teletext
Many television stations provide Teletext, a written information service, in addition to regular
television broadcasting. Information such as television program times, news bulletin, weather
forecast, stock exchange prices, and closed captioning for the deaf, are sent by a TV station to
your LCD TV through special Teletext signals and displayed on screen.
8-4-1 To Turn ON/OFF Teletext Mode
1. Select a TV channel that provides Teletext service.
2. Press the TELETEXT button to activate
Teletext mode.
3. To turn OFF Teletext mode, press the
TELETEXT button twice.
8-4-2 Teletext Buttons
(red) Activates Teletext RED functions.
(green) Activates Teletext GREEN functions.
(yellow) Activates Teletext YELLOW functions.
(blue) Activates Teletext BLUE functions.
8-5 Dual Picture Modes
[ + (green) ] PIP, PAP, Full Screen - Selects PIP mode.
[ + (yellow) ] PIP SEL - Changes sub source (TV/AV1/AV2/AV3) when the main
source is set to YUV, HDMI, or VGA, or vice versa.
[ + (blue)] PIP SWAP - Swaps the main and sub pictures.
3
4
8 9
NOTE: This function is not available if the current source is DTV*.
8-5-1 Picture in Picture (PIP)
The Picture in Picture (PIP) function displays a small image from a secondary source on the
Teletext Mix Mode
screen within the main picture.
ENGLISH
First press - displays Teletext (if available)
Second press - displays Teletext in Mix mode with transparent background
Third press - turns off Teletext.
[ + ] Teletext Index (only in Teletext mode)
[ +
[ +
52 53
] Teletext List (only in Teletext mode)
] Teletext Reveal (only in Teletext mode)
* Available only with SAGEM AXIUM HD-L32 T.
Page 28

Chapter8 Advanced Settings and Functions Chapter 8 Advanced Settings and Functions
To display PIP, on your remote control press and then press (green).
To change the main picture source, press the TV, AV , or PC button on your remote
control.
To change the sub (smaller) picture source, on your remote control press
press
NOTE: If the main source is a video one (TV, AV1, AV2, AV3), the sub
To swap the main and sub picture locations, on your remote control press
press
To change the size of the sub picture, press
To change the position of the sub picture on screen, press
To change the sound source from main to sub source or vice versa, press
PIP or sound source text is still on screen.
(yellow).
source can only display a graphic source (VGA, DVI/HDMI, YUV) and
vice versa.
(blue).
on your remote control.
on your remote control.
and then
and then
while the
8-5-4 Picture and Picture (PAP)
The Picture and Picture (PAP) function displays two equal size split screen images so that you
can watch two programs at a time. The left image displays the main picture while the right
image displays the sub picture.
To display PAP, on your remote control, press and then press (green) twice.
To change the main picture source, press the TV, AV , or PC button on your remote
control.
To change the sub (right side) picture source, on your remote control press
press
To swap the main and sub picture locations, on your remote control press
press
To change the sound source from main to sub source or vice versa, press
or sound source text is still on screen.
(yellow).
(blue).
ENGLISH
and then
and then
while PAP
54 55
Page 29

Chapter8 Advanced Settings and Functions
8-6 Multi-channel View Mode
To activate channel scan, press the MOSAIC button. Press this button again to stop channel
scan and return to the main source.
NOTE: This feature is only available in Analog Mode.
8-7 Picture Formats
Press the FORMAT button repeatedly to move through the different picture format options.
Each time that you press the FORMAT button on your remote control, the display format
information will show at the top-left corner of the display for a few seconds.
4:3
Displays a 4:3 input picture at its standard 4:3 size without any distortion. Black bands will be visible down the left and right sides of the
picture.
14:9
Displays the picture enlarged to 14:9 format with part of the top and
bottom of a 4:3 image cut off. Thin black bands are visible on both the
right and left sides of the picture.
16:9 (full screen)
Displays a true 16:9 picture full screen with no distortion.
Zoom
Enlarges or reduces the original picture without distorting it. Use
to change the zoom factor. Use to move the picture up and down.
Panorama (4:3 stretch)
Displays a 4:3 input picture stretched to full screen. The picture is
progressively stretched from the center third of the screen outward.
9 DIGITAL TV (DTV)*
9-1 Advanced Digital TV Settings
Access the DTV OSD main menu by pressing the DTV MENU button on your remote
control.
NOTE: In general, press OK to confirm selection.
Return to the previous OSD menu by pressing the BACK button.
Exit from the OSD menu by pressing the EXIT button.
9-1-1 Box Settings
CHANNEL TUNING
It is recommended that you perform a channel
search each month to keep your digital TV channels
up-to-date.
TO TUNE CHANNELS
1. From the Box Settings Menu, select CHAN-
NEL TUNING and press OK.
2. An indicator at the bottom of the screen indi-
cates the percentage of the scanned frequency
band. The current frequency found is displayed
in real time.
3. A message at the end of the scanning process
will ask you to save. Press OK.
You can cancel the scanning process at any time
by pressing EXIT.
ENGLISH
56
* Available only with SAGEM AXIUM HD-L32 T.
57
Page 30

Chapter 9 Digital TV (DTV) Chapter 9 Digital TV (DTV)
RESET
Use this option only if you have to start the complete installation procedure all over again. If you
continue from here, all your previous settings,
access code and favourite channels, etc. will be
erased!
If you do not want to perform a reinstallation, you
can leave this menu when the warning is displayed
by pressing the BACK or EXIT button.
9-1-2 Changing User Settings
Press OK for access to various configurations.
LANGUAGE SETTING
1. Press to select LANGUAGE SET-
TING.
2. Press OK to confirm.
3. Press
options and press OK to access the
submenu.
to select one of the language
USER PREFERENCES (APPEARANCE PREFERENCES)
NETWORK MONITORING - Set to NO if you
do not want the decoder to scan automatically
when a new channel is available.
BANNER TIME OUT - Sets the number of
seconds (0 to 5 seconds) that you would like
the information banner to show when you
switch channels. When set to 0, no banner is
displayed.
BANNER TRANSPARENCY - Sets the
transparency aspect of the banner (0% for full
blue, 100% for full transparent).
VOLUME BAR TIME OUT - Sets the number
of seconds (0 to 5 seconds) that you would like
the volume bar to show when you adjust
volume. When set to 0, no volume bar is
displayed.
USER COUNTRY - The time is set from the
GMT time by using
where you live. Press OK to confirm.
to select the country
ENGLISH
4. Press
MENU LANGUAGE - Set the menu display
lanuguage.
MAIN AUDIO / ALTERNATIVE AUDIO - If
there is more than one audio language
transmitted, you may set the main and
alternative languages separately.
MAIN SUBTITLES / ALTERNATIVE
SUBTITLES - If there is more than one subtitle
transmitted, you may set the main and
alternative subtitles separately. Select NONE to
remove either subtitle.
to make adjustments.
58 59
Page 31

Chapter 9 Digital TV (DTV) Chapter 9 Digital TV (DTV)
FAVOURITE LISTS
This function allows you to create FAVOURITE LISTS of TV channels or radio stations
from a reference list ALL CHANNELS (built from provider (transponder) installation or a
scanning).
Two lists are displayed simultaneously. The list on the right side is the reference list (issued
from transponder or scanning installation). The list on the left side is the list under construction.
To Add a Channel
1. Use to select the list that you want
to create or modify.
2. Use
3. Press OK to confirm.
4. Press
5. Press the BLUE button on your remote
6. Repeat steps 3 and 4 until you have all the
7. Press the YELLOW button on your
to select CREATE OR MODIFY.
to highlight the channel you want
to add to your list.
control to copy from the highlighted
channel from the ALL CHANNEL list on
the right side to your FAVOURITE LIST
X on the left side of the OSD.
channels that you frequently use added to
your FAVOURITE LIST.
remote control to save your list(s).
NOTE: To erase a channel, highlight the channel to be erased and press the RED
button on your remote control.
To insert a new channel from main list A (for example if you have forgotten
to put it in position 5).
z Highlight the channel in list A (ALL CHANNELS), select it by pressing
the GREEN button (the highlighted channel moves to the FAVOURITE
LIST).
ENGLISH
z Move the highlighted channel in your favourite list to the channel just
after the number where you want to insert, and press the GREEN
button.
z After modifying your favourite list (B to H), press the YELLOW button
to save the list.
To move a channel from one place to another in a favourite list, delete it
and then insert it from the main list to the place you want.
60 61
Page 32

Chapter 9 Digital TV (DTV) Chapter 9 Digital TV (DTV)
9-2 Using Digital TV
Access the DTV OSD main menu by pressing the DTV MENU button on your remote
control.
9-2-1 Changing Channels
Your DTV function provides several ways to switch channels.
Using PR on the remote control
Switch to the next service up (PR+) or the next service down (PR-) from the current channel.
Type in a single digit (1), which is displayed on the screen banner, e.g.”1—”. If you do not
type in another digit within 2 seconds, the digit is displayed in the first digit position on the
screen banner, the second and the third digits are blanked out and the video and audio playing
process is activated on the new Video service, e.g. “1” . If you type in another digit (2), this is
displayed in the second digit position, e.g. “12-”. If you do not type in another digit within 2
seconds, the two digits are displayed in the first and second digit positions on the screen
banner, the third digit is blanked out and the video and audio playing process is activated on
the new Video service, e.g. “12”. If you type in another digit (3), this last digit is displayed in
the first digit position on the screen banner and the video and audio playing process is activated on the new Video service, e.g. “123”. If the numerical code entered does not correspond to a video service in the list, the unit selects the first lower video service in the list.
9-2-2 Program Information
Every time you change channels, you will receive program information for a few seconds (in
the User Preferences menu (see 9-1-2 Changing User Settings), you can select how long
this information will be shown).
Information may include the following:
A. Channel list
B. Number of audio tracks and subtitles available
C. Channel number and name
D. Name of the current program
E. Current time
F. The start and end time of the current program
G. A bar, indicating the elapsed time of the current program
H. The start and end time of the next program.
Program information will only be available if it is included in the transmission. You can change
directly the transparency of the zapping banner: press INFO for 2 seconds, adjust with
and then press OK to save.
ENGLISH
Previous Channel
The BACK button enables you to toggle between the current channel and the last channel
viewed. This button is especially useful when waiting for a movie to begin.
C
A
B
E
F G H
D
62 63
Page 33

Chapter 9 Digital TV (DTV) Chapter 9 Digital TV (DTV)
9-2-3 Extended Program Information
You can display information about programs currently being broadcasted as well as those that
will be broadcasted next. By pressing INFO while watching TV, you will get the “Program
information” banner.
A. Program information
B. Short summary
C. Next program
D. Information icon
If necessary, use the LIST button on your remote control to continue reading on the next info
page.
B
C
A
9-2-4 TV Channel List
z When viewing TV programs, press OK to display the current channels list.
z Use to select channel and then press OK.
z You can access your favourite list by pressing the LIST button on your remote control.
z You can directly change your favourite list without first displaying the TV list by pressing
the LIST button.
ENGLISH
9-2-5 Audio and Subtitle Language Selection
By pressing the AUDIO or SUBTITLE button, you open a menu that lets you enter temporary settings. Settings made in either one of these options menus are only valid for the pro-
gram you are currently watching. If you leave the program and return to it again, the temporary
settings will be lost.
AUDIO LANGUAGE
When available, you can select among the different languages being broadcast. If a digital audio
stream is available, “ DA “ eg digital audio - will be displayed on the same line than the audio
language tag. This allows you to choose between stereo or home cinema audio tracks.
NOTE: When you select a digital audio, there will be no sound output from the
D
analogue audio connections.
SUBTITLE LANGUAGE
When available, you can select among different subtitle languages.
z Each time you press this button, you change the language.
z A timeout automatically closes this menu.
z The number on the left of each language indicates how many languages are available for
this current channel.
64 65
Page 34

Chapter 9 Digital TV (DTV) Chapter 9 Digital TV (DTV)
9-2-6 Enhanced Program Guide
To display more detailed information about a selected program, press the GUIDE button. To
remove this information, press the EXIT button.
A. Resized video is displayed. This video is the current one before entering the EPG.
B. Channels list of the current list is displayed. Select the chosen channel with
C. Display the name of the favourite list used.
D. By pressing
pressing
E. The following information about the selected program is displayed at the top of the screen:
z The time the program begins and ends
z A bar which fills in as the program progresses
z The name of the program
z Information about the program’s contents (press the INFO button to have extended
content shown by...).
F. Press the RED button to be able to change the date. Then press to change the date (7
days available according to the data sent by the provider).
NOTE: Information about a selected program can be displayed only if available
from the broadcaster.
, the current event is high lighted. You can see all events of the day by
.
A
D
9-2-7 Freeze Video
The current video image can be frozen using the STILL button. Pressing the button again to
bring back the live image.
In order to avoid screen burning, brightness is automatically decreased after a few minutes.
Normal brightness can be recovered by pressing the STILL button again.
.
E
WARNING: Keeping the video frozen at full brightness for a long time may
damage your TV.
ENGLISH
B
C
F
66 67
Page 35

Chapter 9 Digital TV (DTV) Chapter 9 Digital TV (DTV)
9-2-8 Radio Mode
Press the RADIO button on the remote control to
access radio mode. You can move through the list
displayed using
.
9-2-9 Photo Viewer
You can launch PHOTO VIEWER by inserting a memory card and selecting “PHOTO
VIEWER” in the Main Menu. The total number of pictures is read and an album screen
preview is displayed.
You can launch PHOTO VIEWER by selecting PHOTO VIEWER from the Main Menu.
The total number of pictures is read and an album screen preview is displayed.
NOTES: File supported: Jpeg (JFIFF Format).
Cards supported: CF Type I and Type II and with the 6-in-1 adaptor,
SM (Smartmedia), MS (Memory stick), MSPRO (Memory stick Pro),
SD (Secure Digital), MMC (Multimedia card), and XD card.
If the file has no thumbnail or no DCF format
thumbnail, the decoder will show a ?.
Change the selected picture
Go directly to the next page of
thumbnail
OK Display the selected picture
Run directly the slide show beginning
with the selected picture
EXIT Exit from photo Mode to TV Mode.
MENU Show the Photo Menu
9-5 Digital TV Software Upgrade
The Download Process screen appears after startup
when a new version of software is available on the
network.
You can delay the downloading process by pressing
the EXIT button. This process will be displayed
again the next time you switch to digital TV.
ENGLISH
When you press OK, the downloading starts and
the screen becomes black.
During this mode, no action is authorized.
On completion, digital TV switches on automatically.
After startup, an information screen is displayed to
confirm that the download has been completed.
Press OK and enjoy your last viewed program.
NOTE: If the download process was not
correctly performed, the screen
remains black.
When an error occurs, press any button on the
remote to continue. Put the unit in standby mode
and switch it back ON to download again.
If this operation does not succeed, unplug the main
power cord and the antenna cord. Plug them back
in and download again.
Show the Radio Menu
68 69
Page 36

TROUBLESHOOTING AND SUPPORT
Before contacting customer service, use the following information to solve common problems.
No Picture
Make sure that the power cord is properly plugged into a grounded electrical outlet.
Make sure that the main power switch and power button are turned ON.
Make sure that the selected video input source is connected to a working device.
If your LCD TV is connected to your computer in VGA mode, press any key on your
keyboard to wake up your computer.
No Sound
Try pressing the MUTE button.
Make sure that the headphones are not connected.
Check Audio setting under the OSD Audio menu.
Distorted Picture or Unusual Sounds
You may be getting interference from electrical appliances, cars, motorcycles, or fluorescent
lights. Try moving your LCD TV to another location.
Abnormal Colors
Make sure that the input source cable is connected securely and correctly to your LCD
TV.
Use OSD menus to restore the factory default color settings.
Normal Picture, No Sound
Make sure that the volume is not turned down.
Make sure that the sound is not muted.
Make sure that your audio input source cables are connected securely and correctly.
Wrong Image Size
If you are using VGA mode, make sure that the H-Position and V-Position in the OSD is set
correctly.
Screen Noise
When your LCD TV’s digital capabilities exceed a digital broadcast signal, the signal is upconverted (increased) to match your LCD TV’s display capabilities. Up-converting can cause
noise or trash.
Dim Screen
Video display devices experience degradation of brightness over the life of the device. Normal
brightness degradation is not covered by your warranty.
No Photo Displayed*
Make sure that the photo card is inserted in the correct orientation. If the problem still exists,
your card model is not supported by this LCD TV.
Pixel Problems
Your LCD TV is manufactured using an extremely high level of precision technology. However,
sometimes some pixels of your LCD TV may not display correctly. Pixel defects within
industry specifications are inherent to this type of product and do not constitute a defective
product.
ENGLISH
70
* Available only with SAGEM AXIUM HD-L32 T.
71
Page 37

Remote Control Not Working
Make sure that the batteries are inserted correctly.
Make sure the remote control sensor window is not under strong lighting.
Make sure the remote control is in the correct mode :
Yellow remote control LED: Digital TV mode
Green remote control LED: Analog TV mode
Technical Support
If this troubleshooting information does not resolve your problem or if you have other questions relating to your LCD TV, please visit our website www.sagem.com or contact your local
dealer.
PRODUCT SPECIFICATIONS
PICTURE
Technology 16/9 TFT LCD
Screen size : diagonal (cm / inch) 80/31,5
Resolution 1366x768 (WXGA)
Horizontal Viewing Angle 170 °
Vertical Viewing Angle 170 °
Brightness >= 500 Cd/m²
Picture Contrast >= 800:1
TV SYSTEM
frequency range 45,5 - 85,25 MHz ( VHF-UHF-Cable tv)
Reception Norm Pan European (LL’ / BG / I / DKK)
Program number 200
Video standard PAL / SECAM
Added Video standard via video in NTSC 3.58 / 4.43
DTV SYSTEM*
Compliant to DVBT MPEG2 MP@ML
RF input frequency range: UHF 470-862 MHz ; VHF 174-222 MHz
COFDM bandwidth : 7 / 8 MHz ( according to country set up)
COFDM mode : 2k and 8k supported ; Support SFN
SOUND
Loudspeakers built in 10 speakers
Power 2x28 W Music
CONNECTION
TV Antenna Input 1 ( IEC169-2 Female)
DTV Antenna Input* 1 ( IEC169-2 Female)
DTV loopthrough output* 1 ( IEC169-2 Male)
AV1 CVBS / RGB / S-Video (21 pins euro connector)
AV2 CVBS / RGB / S-Video (21 pins euro connector)
AV3 CVBS (1x RCA)
AV3 S S-VIDEO ( 1x minidin)
AV3 Audio input Audio stereo (2xRCA)
YUV input YPbPr progressive and enterlaced ( (3x RCA)
YUV Audio input Audio stereo (2xRCA)
PC input VGA (1xD-sub 15 pin)
HDMI HDMI with HDCP
Audio for VGA/HDMI input Audio stereo (1xJack 3,5mm stereo)
Hifi Output Audio stereo (1xJack 3,5mm stereo)
Headphone output Audio stereo (1xJack 3,5mm stereo)
ENGLISH
72
The manufacturer reserves the right to change specifications.
* Available only with SAGEM AXIUM HD-L32 T.
73
Page 38

PHOTO MEMORY CARD*
Card reader Compact flash I&II reader + external adaptor 6 to 1
External adaptator 6 to 1 (Memory stick, Memory stick Pro, Secure Digital ,
GENERAL DATA
Power supply AC 100-240 V ~ 50-60Hz
Consumption 200W max. ( <3W in stand-by)
Size (W x H x D) in cm 104 x 55,8 x 14,3
Packaging size (WxHxD) in cm 117,5 x 750 x 37,5
Weight : Net / Gross in kg 23.5 / 30 kg
MultiMediaCard , Smart media Card, XD)
74
* Available only with SAGEM AXIUM HD-L32 T.
252111035 ind. A
 Loading...