

Page 1
SAGEM F@st™ 1704
Quick Installation Guide
Page 2
SAGEM F@stTM 1704
Sagem Communications SAS (hereafter referred to as Sagem Communications) thanks you for choosing the
TM
range of SAGEM F@st
TM
SAGEM F@st
1704 products adapt the ADSL function respectively on POTS (ITU G.992.1/3/5 -
1704 routers while hoping that it will provide you with full satisfaction.
Appendix A) and on ISDN (ITU G.992.1/3/5 - Appendix B).
TM
SAGEM F@st
1704 equipment include four ethernet interfaces (LAN1 to LAN4).
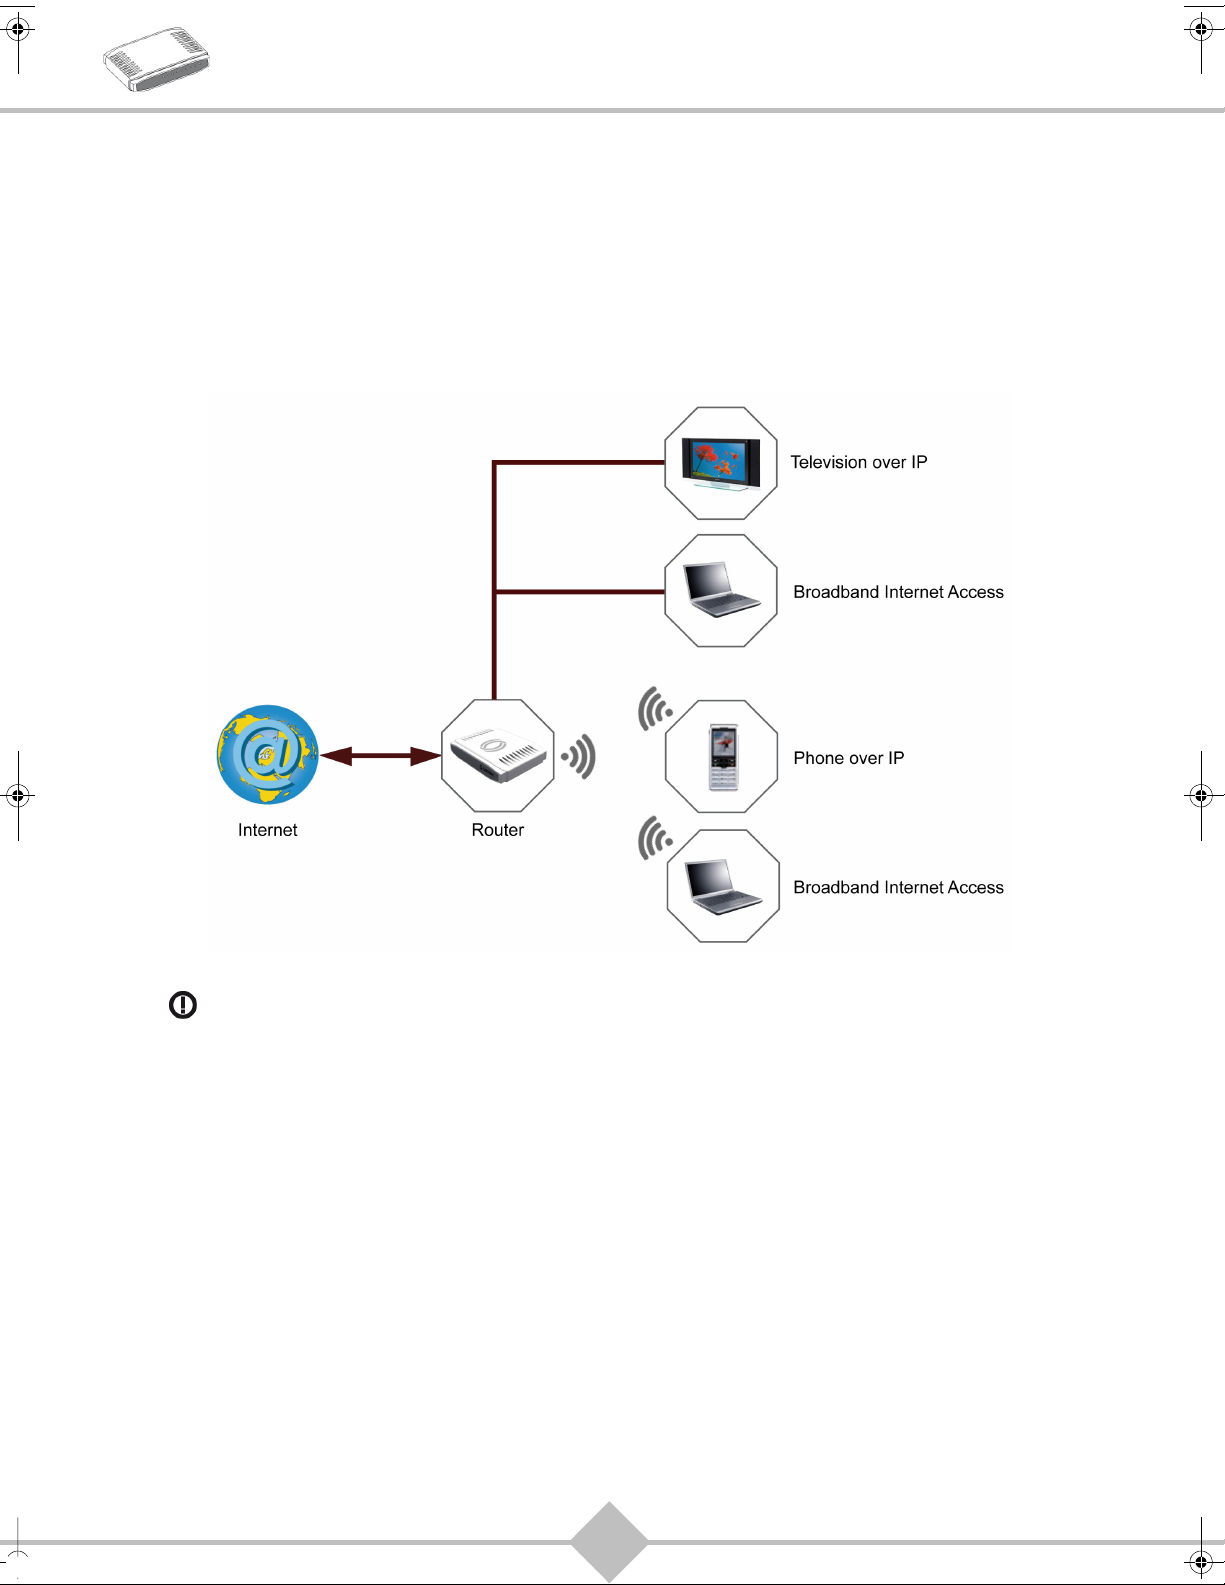
In addition, this router will provide you with access to all the services provided by your Internet Access
Provider, as shown in the diagram below.
CE marking:
The CE marking certifies that the product complies with the essential requirements of the Directive
1999/5/EC concerning radio equipment and telecommunication equipment, and of Directives 2006/95/EC
concerning safety and 2004/108/EC concerning electromagnetic compatibility, defined by the European
Parliament and Council to reduce electromagnetic interferences and protect the health and safety of users.
TM
The product named SAGEM F@st
1704 can be operated in the European Union without restrictions indoor
but cannot be operated in France in the whole of the band until further notice.
The CE declaration of conformity can be viewed in the support section of the Sagem Communications site
www.sagem-communications.com, or it can be obtained from the following address:
Sagem Communications SAS - Customer relations department
250, Route de l'Empereur
92500 RUEIL MALMAISON - FRANCE
Copyright © Sagem Communications SAS
All rights reserved.
TM
SAGEM F@st
®
Mac OS
Windows
is a registered trademark of Apple Computer, Inc.
®
is a registered trademark of Sagem Communications SAS.
is a registered trademark of Microsoft Corporation.
1
Page 3

SAGEM F@stTM 1704
Contents
1. Contents of the pack ...................................................................................... 3
2. Safety instructions ......................................................................................... 4
2.1. Power supply source ............................................................................................................. 4
2.2. Location conditions ................................................................................................................ 4
2.3. Maintenance .......................................................................................................................... 4
2.4. Safety level ............................................................................................................................ 4
3. Connection ..................................................................................................... 5
3.1. Connecting your router .......................................................................................................... 5
3.2. Connecting additional telephones.......................................................................................... 5
4. Installation from the CD-ROM ....................................................................... 6
4.1. Installation by Wi-Fi interface................................................................................................. 6
4.2. Installation of the Ethernet port .............................................................................................. 8
4.3. Installation of an additional computer .................................................................................... 8
5. Router supervision ........................................................................................ 9
5.1. Status of the LEDs on the front panel .................................................................................... 9
5.2. Router supervision............................................................................................................... 10
6. Advanced router configuration ................................................................... 12
7. Troubleshooting ........................................................................................... 13
7.1. Diagnostics tool ................................................................................................................... 13
7.2. Restarting your router .......................................................................................................... 14
7.3. Resetting factory configuration ............................................................................................ 14
2
Page 4
SAGEM F@stTM 1704
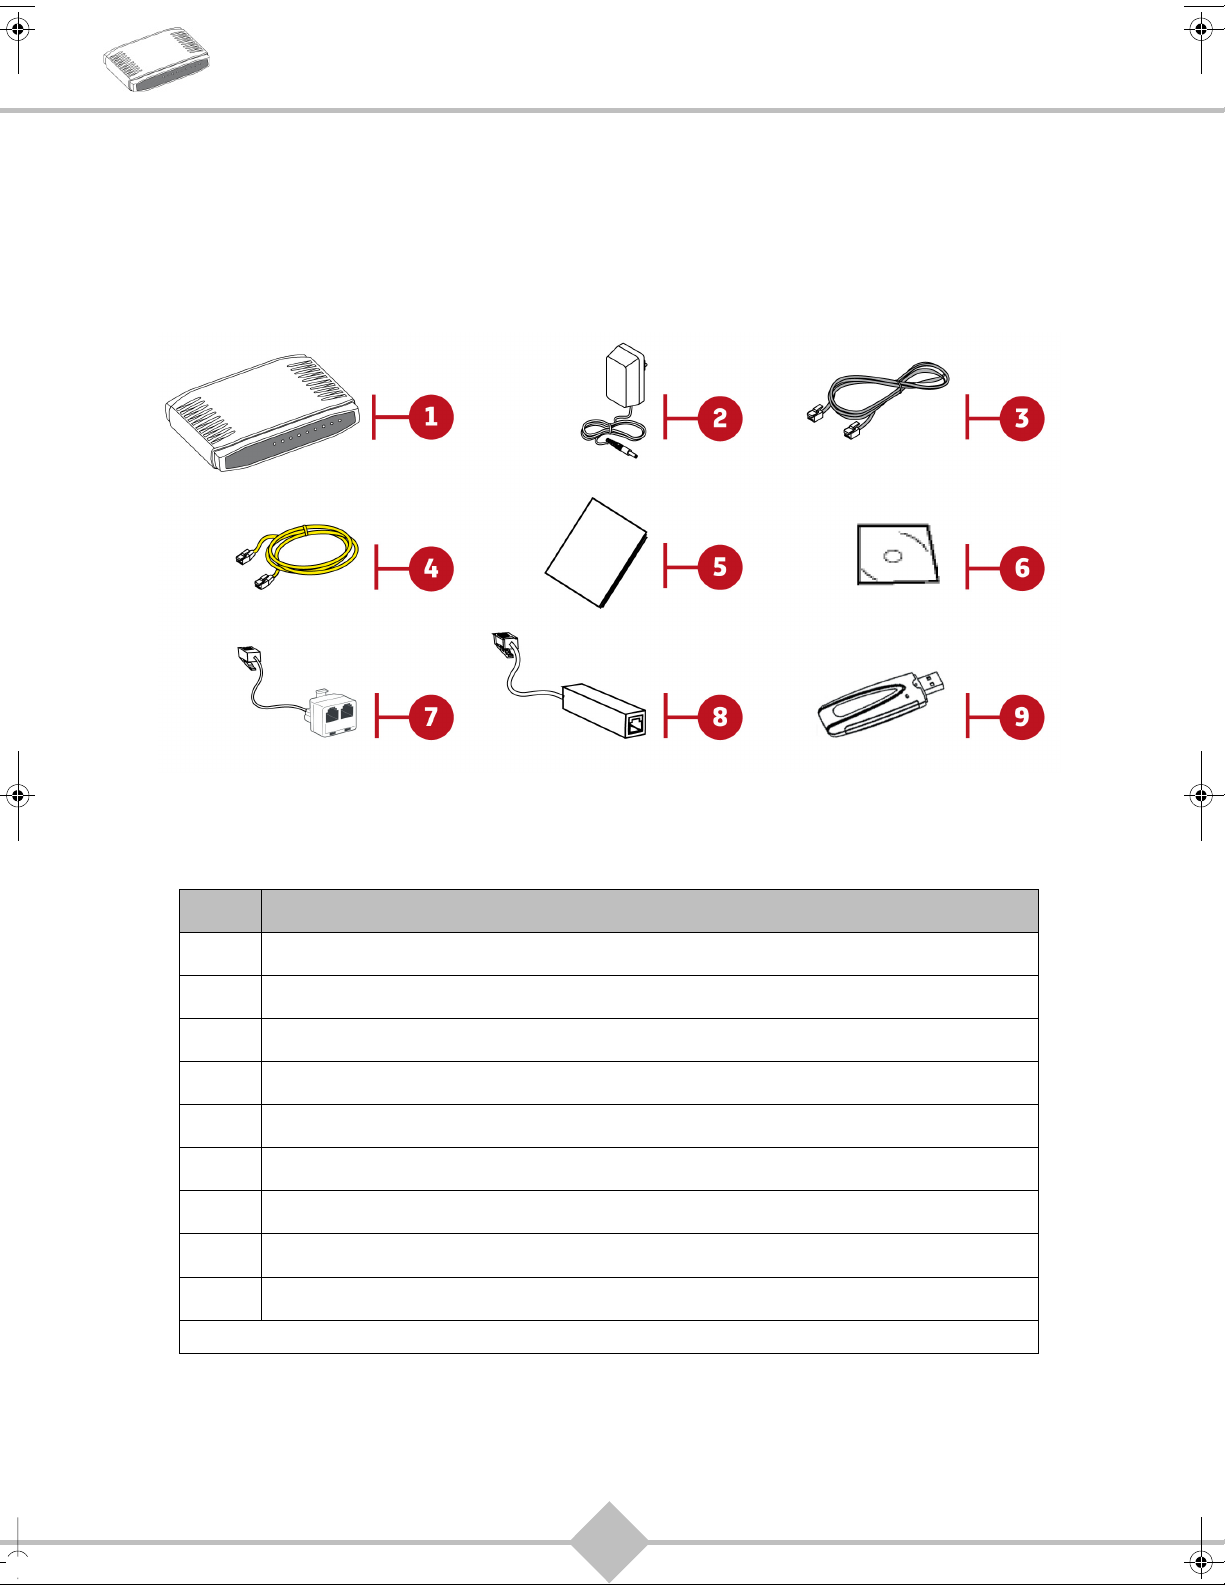
1. Contents of the pack
Before you carry out the installation, make sure that the pack contains the following elements:
Item Description
1
SAGEM F@st
2 Mains adapter
3 ADSL line cable used to connect your router to your telephone line
4 Ethernet cable used to connect your router to the Ethernet port of your computer
5 Quick Installation Guide
6 CD-ROM
7 Filter/Splitter used to connect one phone set and your router to your telephone line*
8 Microfilter used to connect another phone set to your telephone line*
9 802.11g USB Wi-Fi key*
* Option depending on pack content requested
TM
1704 router
3
Page 5
SAGEM F@stTM 1704
2. Safety instructions
Power supply source
• Do not cover the router’s mains adapter.
• The router comes with its own mains adapter. Do not use another adapter.
• This class II adapter does not need to be grounded (earthed). The connection to the electrical network
should comply with the indications given on the label.
• Use a readily accessible mains outlet located near the router. The power supply cord is 2 m long.
• Arrange the power supply cord in such a way as to avoid any accidental power cut to the router.
• The router is designed to be connected to a GG- (ground-to-ground) or GN- (ground-to-neutral) type
power supply network.
• The router is not designed to be connected to an electrical installation with IT type diagram (neutral
connected to earth through an impedance).
• Protection against short-circuits and leaks between the phase, neutral and earth should be provided by
the building’s electrical installation. The power supply circuit for this equipment should be fitted with
16 A overcurrent protection and differential protection.
• Connect the router to the mains via a readily accessible wall socket ensuring the electric cutting.
Location conditions
By choosing an appropriate location, you will preserve the longevity of the device. Ensure that the
selected location has the following characteristics:
• Install and use the router inside a building.
• The room temperature must not exceed 45°C.
• The router can be placed on a desktop or fixed vertically in its wall mounting.
• Do not expose the router to strong sunlight or place it near a substantial source of heat.
• Do not place the router in an environment where it could be subjected to considerable steam
condensation.
• Do not expose the router to splashes of water.
• Do not cover the router’s casing.
• Do not use the router or its peripherals for outdoor transmissions.
Maintenance
• Never open the casing. This must be done only by qualified personnel approved by your supplier.
• Do not use liquid or aerosol cleaning agents.
Safety level
Primary power source access
Bipolar AC mains socket
DC power supply access
Miniature fixed connector (PWR)
RJ45 Ethernet access
(LAN1 to LAN4)
RJ11 line access (LINE) TNV3 (Telecommunication Network Voltage level 3 circuit)
HPV (Hazardous Primary Voltage circuit)
SELV (Safety Extra Low Voltage)
SELV
4
Page 6

SAGEM F@stTM 1704
3. Connection
Connecting your router
Important
Make sure that the router is not connected to your computer
before you start the installation from the CD-ROM.
Make the connections as shown in the diagram below.
e
l
b
a
c
e
n
i
L
Note
A "UK" mains adapter can be provided in option according
to the customer.
Connecting additional telephones
Make the connections as shown in the diagram below.
5
Page 7

SAGEM F@stTM 1704
4. Installation from the
CD-ROM
Important
Make sure that the router is not
connected to your computer before
you start the installation from the CDROM.
Note
The installation procedure described
below was undertaken in Windows
TM
Vista
(98, ME, 2000 and XP) can be slightly
different.
1. Insert the CD-ROM into the relevant drive of your
computer.
2. The welcome screen appears. Click on Next.
3. Read carefully the precautions to be taken
during the installation then click on Next.
4. Select the type of installation you want to
perform then click on Next. For a first-time
installation, select "You want to install your
router modem for the first time".
5. Select the interface you want to use to connect
your router to your computer: Wi-Fi or Ethernet.
. Installation in other Windows®
Installation by Wi-Fi interface
1. You selected the Wireless interface (Wi-Fi), click
on Next.
2. Select the wireless connection mode (Wi-Fi).
The following connection modes are available:
• by installing a Wi-Fi USB adapter (or key) on
your computer,
• or by using your computer’s built-in Wi-Fi.
USB Wi-Fi adapter
1. You selected Wi-Fi USB adapter, click on
Next.
2. Follow the instructions displayed onscreen
by connecting the USB Wi-Fi adapter to your
computer, then configure the Wi-Fi interface.
Depending on the interface you select, refer to
the relevant section to proceed with the
installation:
• Installation by Wi-Fi interface, page 6
• Installation of the Ethernet port, page 8
Important
Whichever mode you select, you must
plug in the router and connect it to the
ADSL line.
The following Wi-Fi parameters must be
entered:
• SSID,
• Security key.
6
Page 8

SAGEM F@stTM 1704
Note
The Wi-Fi security key field only
appears if a Wi-Fi security (WEP 128,
WPA-PSK and WPA2-PSK) is
assigned to your router. The length of
this field depends on the selected
security.
The Wi-Fi information is marked on your
router.
3. Once you have filled in the Wi-Fi parameters,
click on Next.
2. The Internet connection screen appears.
Enter your connection ID and password, then
click on Next.
4. The Internet connection screen appears.
Enter your connection ID and password, then
click on Next.
Note
This information is provided by your
Internet Service Provider (ISP).
5. A summary of the completed installation
steps appear. Click on Finish to end the
installation.
Note
This information is provided by your
Internet Service Provider (ISP).
3. A summary of the completed installation
steps appear. Click on Finish to end the
installation.
You may now use your Internet access.
You may now use your Internet access.
Wi-Fi interface integrated into your
computer
Important
Before you continue installing your
router, you must first configure your
computer’s wireless manager.
1. Once you have configured your computer’s
wireless manager, click on Next.
7
Page 9

SAGEM F@stTM 1704
Installation of the Ethernet
port
1. You selected the Use the Ethernet cable, click
on Next.
2. Follow the instructions displayed on screen by
plugging in the router supply, switching it on and
connecting the ADSL line, then connect your
computer to one of the four Ethernet sockets
(LAN1 to LAN4) of the router by using the
Ethernet cable.
Once you have made the connections, click on
Next.
Installation of an additional
computer
Important
Your router is already connected.
1. Insert the CD-ROM into the relevant drive of your
computer.
2. The welcome screen appears. Click on Next.
3. When asked for the installation type, select "You
want to install an additional computer" then
click on Next.
4. The interface selection screen appears.
Select the interface you want to use to install an
additional computer in the local network (LAN)
then click on Next.
5. Continue the installation as described in the case
of a first-time installation.
Note
Given that the router has already been
installed once, you do not need to plug
it in or connect the ADSL line.
3. The Internet connection screen appears.
Enter your connection ID and password, then
click on Next.
Note
This information is provided by your
Internet Service Provider (ISP).
4. A summary of the completed installation steps
appear. Click on Finish to end the installation.
You may now use your Internet access.
8
Page 10

SAGEM F@stTM 1704
5. Router supervision
You can monitor the router’s activity and status using the following sources:
• status of the LEDs on the front panel of the router
• using the router’s built-in «DSL Router» HTTP controller, available in the HTTP configuration tool
Status of the LEDs on the front panel
LED Status Meaning
Off Power Off
Power
ADSL
Internet
LAN x
(1 to 4)
Green Power On
Red Router in rescue mode
Off ADSL Down
Green steady ADSL Up
Green blinking ADSL Synchronisation in progress
• Power Off
Off
Green steady
Green blinking Tx/Rx traffic
Red Invalid or unauthorised Internet account
Off No link detected on the Ethernet port
Green steady Ethernet port has detected a link with 100 Mbps device
Green blinking Tx/Rx traffic at 100 Mbps
or
• The Internet account must be configured
• The Internet account is configured
or
• Bridge mode
WLAN
Off Wi-Fi deactivated
Green steady WI-Fi activated
Green blinking Wi-Fi Tx/Rx
9
Page 11

SAGEM F@stTM 1704
Router supervision
The HTTP configuration tool lets you configure and monitor the router remotely.
To access the HTTP configuration tool:
1. Open your browser.
2. Enter the router’s IP address or enter the following URL: http://myrouter
3. In the login screen that appears, enter your username and password.
Note
This information is provided by your
Internet Service Provider (ISP).
The welcome page of the HTTP configuration tool appears.
The router’s activity status is always visible at the top right corner.
You can perform the following actions:
• click on Refresh to update the data displayed
• click on Reboot to restart your router
ADSL information
The following table presents the possible states of the ADSL field:
Status Meaning
Green ADSL line synchronised
Yel low ADSL line synchronising
Red ADSL line not connected
The Down field displays the nominal downlink bit rate.
The Up field displays the nominal uplink bit rate.
10
Page 12

SAGEM F@stTM 1704
Internet information
The following table presents the possible states of the Internet field:
Status Message Meaning
Adsl Down ADSL line not connected or not activated
Off
Green Connected The Internet account is configured
Yellow Waiting for ISP ADSL line synchronising
Red Access denied Incorrect Internet account
Not configured The Internet account must be configured
Router rebooting Router is rebooting
11
Page 13

SAGEM F@stTM 1704
6. Advanced router configuration
Use the HTTP configuration tool to access advanced router settings and configure your equipment
according to your needs.
Example of an advanced Wi-Fi configuration:
12
Page 14

SAGEM F@stTM 1704
7. Troubleshooting
Many sources of information are available to help you identify and resolve issues you may experience:
• the LEDs on the front panel of the router (see Status of the LEDs on the front panel, page 9),
• the HTTP configuration tool (see Router supervision, page 10).
For step-by-step and advanced problem-solving procedures, use the Diagnostic tool available in the
HTTP configuration tool.
If none of the above helps you solve the problem, and you are still having trouble connecting to the
Internet, we recommend that you restart your router and eventually reset the factory configuration. You
will then need to re-configure your router as a first-time setup.
Diagnostics tool
To access the Diagnostic tool:
1. Open the configuration tool (see Router supervision, page 10).
2. Select the Diagnostics menu.
3. Click on Test. The Internet connection is tested step-by-step:
• successful tests are marked as a pass.
• unsuccessful tests are marked as a fail.
Note
Status DOWN means that an interface was not detected (LAN or
Wi-Fi).
4. If a test fails, click on the corresponding Help link to access detailed information and problem-solving
procedures.
5. Click on Test to check the problem is solved and resume the connection tests.
13
Page 15

SAGEM F@stTM 1704
Restarting your router
To restart your router, use one of the following methods:
• press the Power button located on the rear panel of the router,
• click on the Reboot action of the HTTP configuration tool (see Router supervision, page 10).
Resetting factory configuration
To reset the default settings and therefore restore the router to its factory configuration, use one of the
following methods:
• press and hold for about 10 seconds the Reset button located on the rear panel of the router,
• in the HTTP configuration tool, select Management > Settings > Restore default.
14
Page 16

Sagem Communications SAS
Broadband & Residential Terminals Business Unit
Headquarters: 250, route de l'Empereur
92500 Rueil-Malmaison - FRANCE
www.sagem-communications.com
253271827A
All rights reserved. The information and specifications included are subject to change without prior notice. Sagem Communications tries to ensure that all information in this document is correct, but does not accept liability for error or omission. Non contractual document.
All trademarks are registered by their respective owners. Simplified joint stock company - Capital 158.291.895 Euro - 440 294 510 RCS Paris - SAGEM is a registered brand from Safran Group.
 Loading...