

Page 1
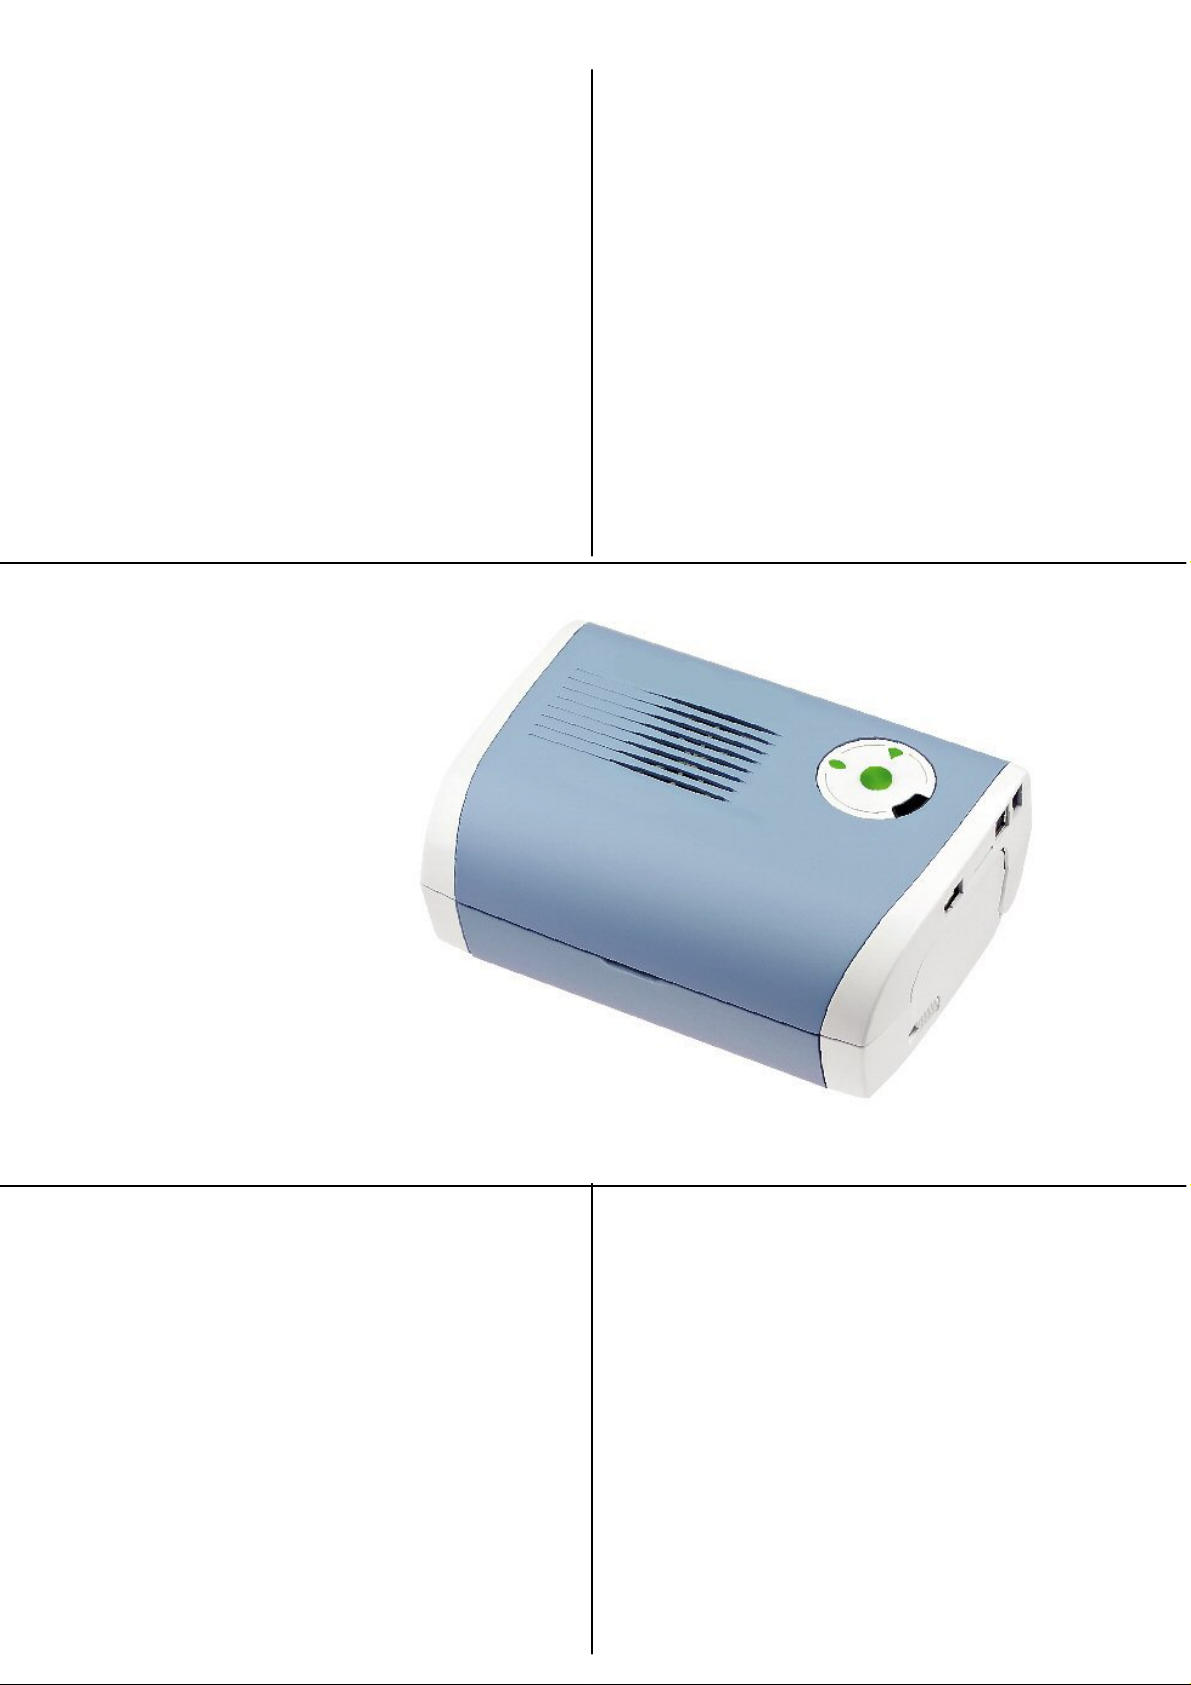
Companion Photo
Software user manual
Page 2

- License agreement for the software -
PLEASE READ THE TERMS AND CONDITIONS OF THIS LICENSE CAREFULLY.
BY PRESSING THE "ACCEPT" BUTTON HEREUNDER,YOU SIGNIFY THAT YOU HAVE READ,
UNDERSTOOD AND ACCEPTED THESE TERMS AND CONDITIONS.
If you do not accept the terms of this license, promptly return the CD-ROM packaging as well as the other parts
of the product. You will be reimbursed the price you paid for the product. No reimbursements will be made for
products whose original CD-ROM packaging or other parts are missing, or when the request for reimbursement
takes place more than ten (10) days after the date of delivery that appears on your invoice.
DEFINITION
The word Software designates all the computer programs and their associated documentation intended for the
operation of the printer.
GRANT OF LICENSE
- This license gives you the right to use the Software on a personal computer connected to a printer. You have
the right to use the Software on one computer only. You cannot loan or cede the right to use the Software to a
third party.
- You are authorised to make one backup copy.
- This license is non-exclusive and non-transferable.
OWNERSHIP
The manufacturer or its suppliers retains ow n ership of the Software. You only have owne rship of the CD-ROM
media of the Software. You may not modify, adapt, decompile, translate, create a derivative product, lease or sell
the Software or the documentation. All rights not explicitly granted are reserved by th e manufacturer or its
suppliers.
TERMINATION
This license shall remain valid until it is terminated. You may terminate the license by destroying the Software
and the documentation along with any copies thereof. This license shall be terminated automatically if you do
not respect the terms of this license agreement. In case of termination, you agree to destroy all the copies of the
Software and the documentation.
WARRANTY
The Software is provided on an "as is" basis, with no explicit nor implied warranties, including but not limited to
implied warranties of merchantability and fitness for a particular purpose. The user shall be liable for all risks
involving the results and performance of the Software. If the Software should prove defective, all the repair and
restoration expenses shall be at the user's expense. The license holder nonetheless has the following warranty:
The CD-ROM on which the Software is recorded will be free of material or manufacturing defects under normal
use and operating conditions for a duration of ninety (90) days from the date of delivery that appears on your
invoice. If a defect on the CD-ROM occurs following an accident or improper use, the CD-ROM will not be
replaced under the terms of this warranty.
LIABILITY
The only responsibility of your dealer and your only recourse is the replacement of any CD-ROMs that do not
meet the terms of the warranty, and which have been returned with a copy of your invoice. Neither the
manufacturer nor any other party involved in the creation, development, sale or delivery of this Software shall be
held liable for any damages whatsoever, be they direct, indirect or immaterial including, but not limited to, the
loss of information, time, operations, revenue, or customers arising out of the use or inability to use this
Software.
EVOLUTION
In our constant efforts to improve the program, the manufacturer reserves the right to modify the characteristics
of the Software without prior notice. If the product evolves, your license does not give you the right to free
upgrades.
JURISDICTION
This Agreement is governed by the laws of France. Any litigation arising from the interpretation or execution of
this license shall be submitted to the Paris Tribunal.
Page 3

- CONTENTS -
- License agreement for the software - ........................................................................2
- CONTENTS -...............................................................................................................1
1 Introduction .............................................................................................................3
1.1 Typographic rules...................................................................................................................3
1.2 Kit components.......................................................................................................................3
1.3 Configuration required ...........................................................................................................3
2 Software pack installation ...................................................................................... 4
2.1 Execution of the installation program ....................................................................................4
2.2 Restarting the computer..........................................................................................................7
2.3 Final installation of the printer ...............................................................................................8
2.3.1 With Windows 98SE operating system......................................................................8
2.3.2 With Windows Millennium operating system..........................................................10
2.3.3 With Windows 2000 operating system.....................................................................10
2.3.4 With Windows XP operating system........................................................................10
3 Wireless network, a few explanations:................................................................13
3.1 What is a wireless network?.................................................................................................13
3.2 WiFi network settings...........................................................................................................14
4 Installation of a "WiFi" wireless connection for your printer .........................15
4.1 Installation in " Infrastructure" mode (Access Point)...........................................................15
4.1.1 Step 1: Starting installation.......................................................................................16
4.1.2 Step 2: WIFI parameters setup..................................................................................17
4.1.3 Step 3: WiFi security setup.......................................................................................18
4.1.4 Step 4: IP setup.........................................................................................................19
4.1.5 Step 5: Printer selection............................................................................................20
4.1.6 Step 6: Ready to go...................................................................................................22
4.1.7 Step 7: Final screen...................................................................................................23
4.2 Installation in "Ad-Hoc" mode (Peer-to-Peer) .....................................................................24
4.2.1 Step 1: Starting installation.......................................................................................24
4.2.2 Step 2: WIFI parameters setup..................................................................................25
4.2.3 Step 3: WiFi security setup.......................................................................................26
4.2.4 Step 4: IP setup.........................................................................................................27
4.2.5 Step 5: Computer configuration................................................................................28
4.2.6 Step 6: Printer selection............................................................................................30
4.2.7 Step 7: Ready to go...................................................................................................32
4.2.8 Step 8: Final screen...................................................................................................33
5 Uninstalling the software pack............................................................................. 34
6 Print formatting..................................................................................................... 35
6.1 Parameter setting window under Windows 98SE and Millennium......................................36
- 1 -
Page 4

6.2 Parameter setting window under Windows 2000 and XP....................................................36
7 Monitoring print jobs and printer status............................................................ 37
7.1 Information bar icon.............................................................................................................37
7.2 "Printer status" window........................................................................................................39
7.3 Monitoring print jobs............................................................................................................40
7.4 Printer properties window ....................................................................................................41
8 Incident management............................................................................................44
9 Checking printer data under Windows 2000 and XP........................................ 45
10 File read / write operations on the memory card ............................................... 45
10.1 Firmware Update..................................................................................................................45
11 FAQ......................................................................................................................... 47
11.1 Issue #1.................................................................................................................................47
11.2 Issue #2.................................................................................................................................47
11.3 Issue #3.................................................................................................................................48
11.4 Issue #4.................................................................................................................................48
- 2 -
Page 5
1 Introduction
The "Companion Suite Photo" software pack contains the items necessary to connect your printer
to your PC and to print your photographs.
1.1 Typographic rules
This manual uses conventions designed to help you identify the information provided.
These conventions are listed in the following table:
Symbol Definition
When you see the word "Important", you must strictly comply with the content
Important
of the text opposite. If you fail to comply with the text, you may encounter
problems where the software does not operate correctly.
Text opposite the word "Info!" provides you with additional information about
the topic being discussed.
When you see texts starting with the symbol , perform the action described
in order to move on the next action.
Numbered lists introduce a list of points in strict order (e.g. the steps in a
procedure).
Info!
1.
1.2 Kit components
A CD-ROM containing the installation and configuration software pack for the Companion Photo
and this software user manual.
1.3 Configuration required
The minimum configuration of your PC is as follows:
o Windows 98SE / Millennium / 2000 service pack 3 / XP,
o 64 MB or more for Windows 98SE / Millennium, at least 256 MB for Windows 2000
service pack 3 / XP
o A free USB port,
o To use the print in WiFi mode, a WiFi network installed and a WiFi dongle,
o 150 MB free disk space for the complete installation,
o CD-ROM drive,
o USB cable (not supplied).
- 3 -
Page 6
2 Software pack installation
This software pack contains the files for USB installation and WiFi
installation.
- To do a USB installation, execute only the procedure chapter 3.1.
- To do a WiFi installation, execute procedures of the chapters 3.1. and 4.
Info!
The Companion Photo software is installed in three steps:
1. Execution of the installation program,
2. Restarting the computer,
3. Final installation of the printer.
Once installed on your personnel computer Easy PE110 photo printer will be
called "A6 Photo Printer" in the Windows printer window.
On certain models of the A6 Photo Printer peripherals , Companion Photo
enables you to read and save files directly via your PC onto memory cards that
can be inserted in to the unit.
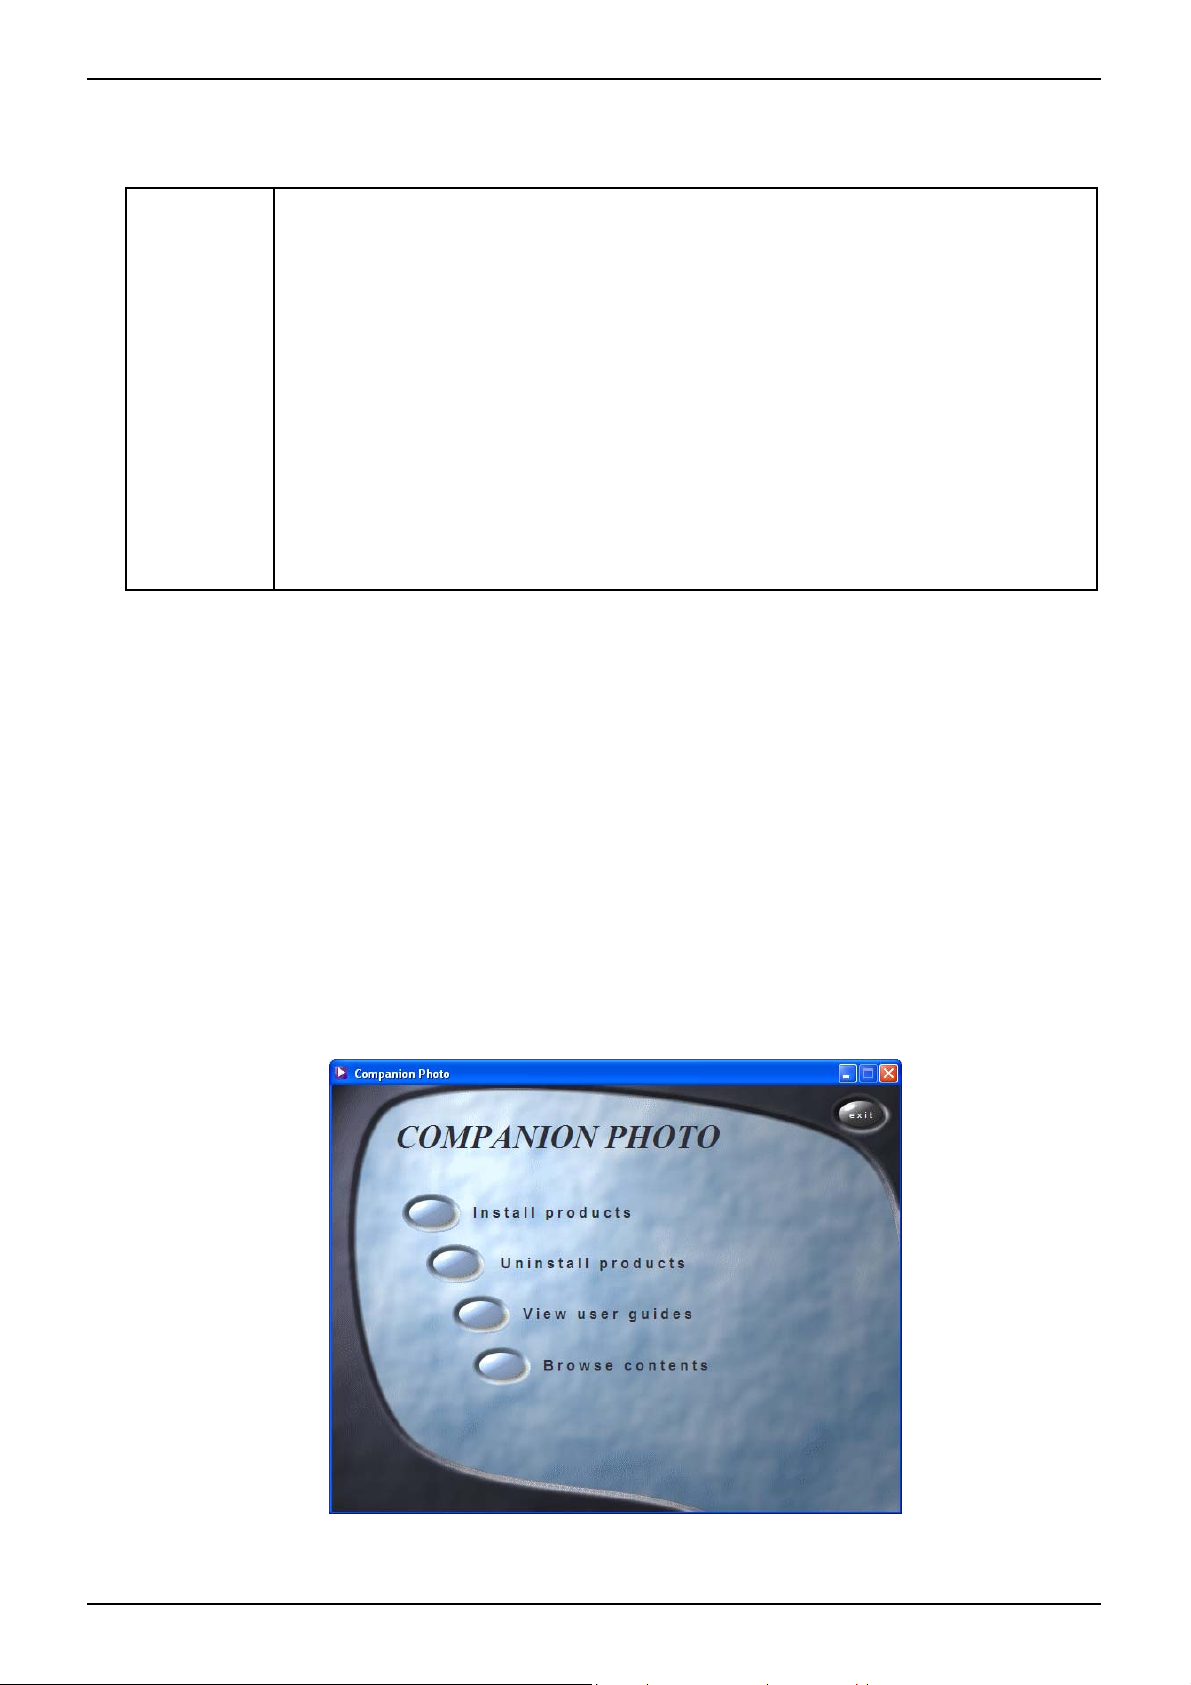
2.1 Execution of the installation program
Insert the CD-ROM in the drive to start the installation.
If it fails to start, double click on the "setup.exe" file located at the root of the CD-ROM to
launch the installation program.
The following screen is displayed:
The Companion Photo software consists of printer drivers for the A6 Photo printer.
- 4 -
Page 7
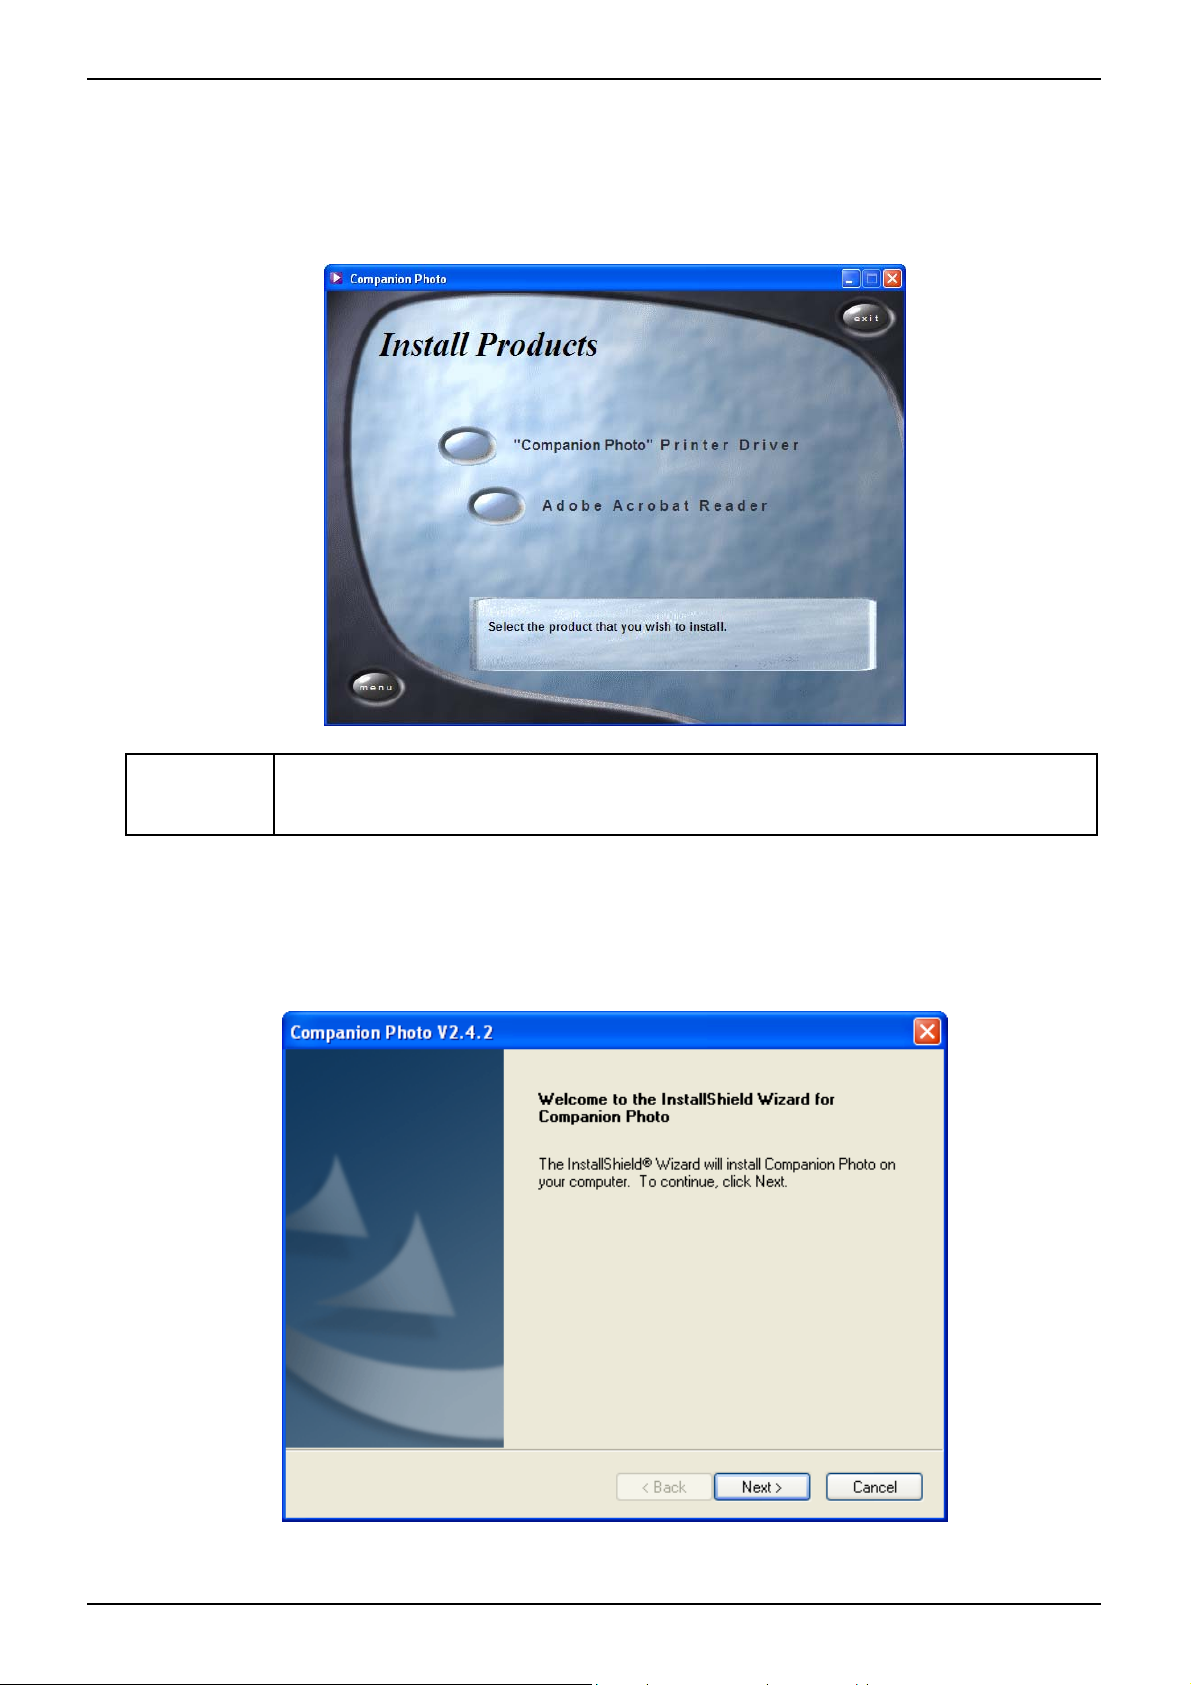
Select "Install products".
The "Install products" screen is displayed.
Info!
Double click on the "Companion Photo" printer driver button,
The installation of the printer driver starts.
The installation program also enables you to install Acrobat Reader (not
compulsory, but allows you to read the help files).
- 5 -
Page 8
Click on "Next",
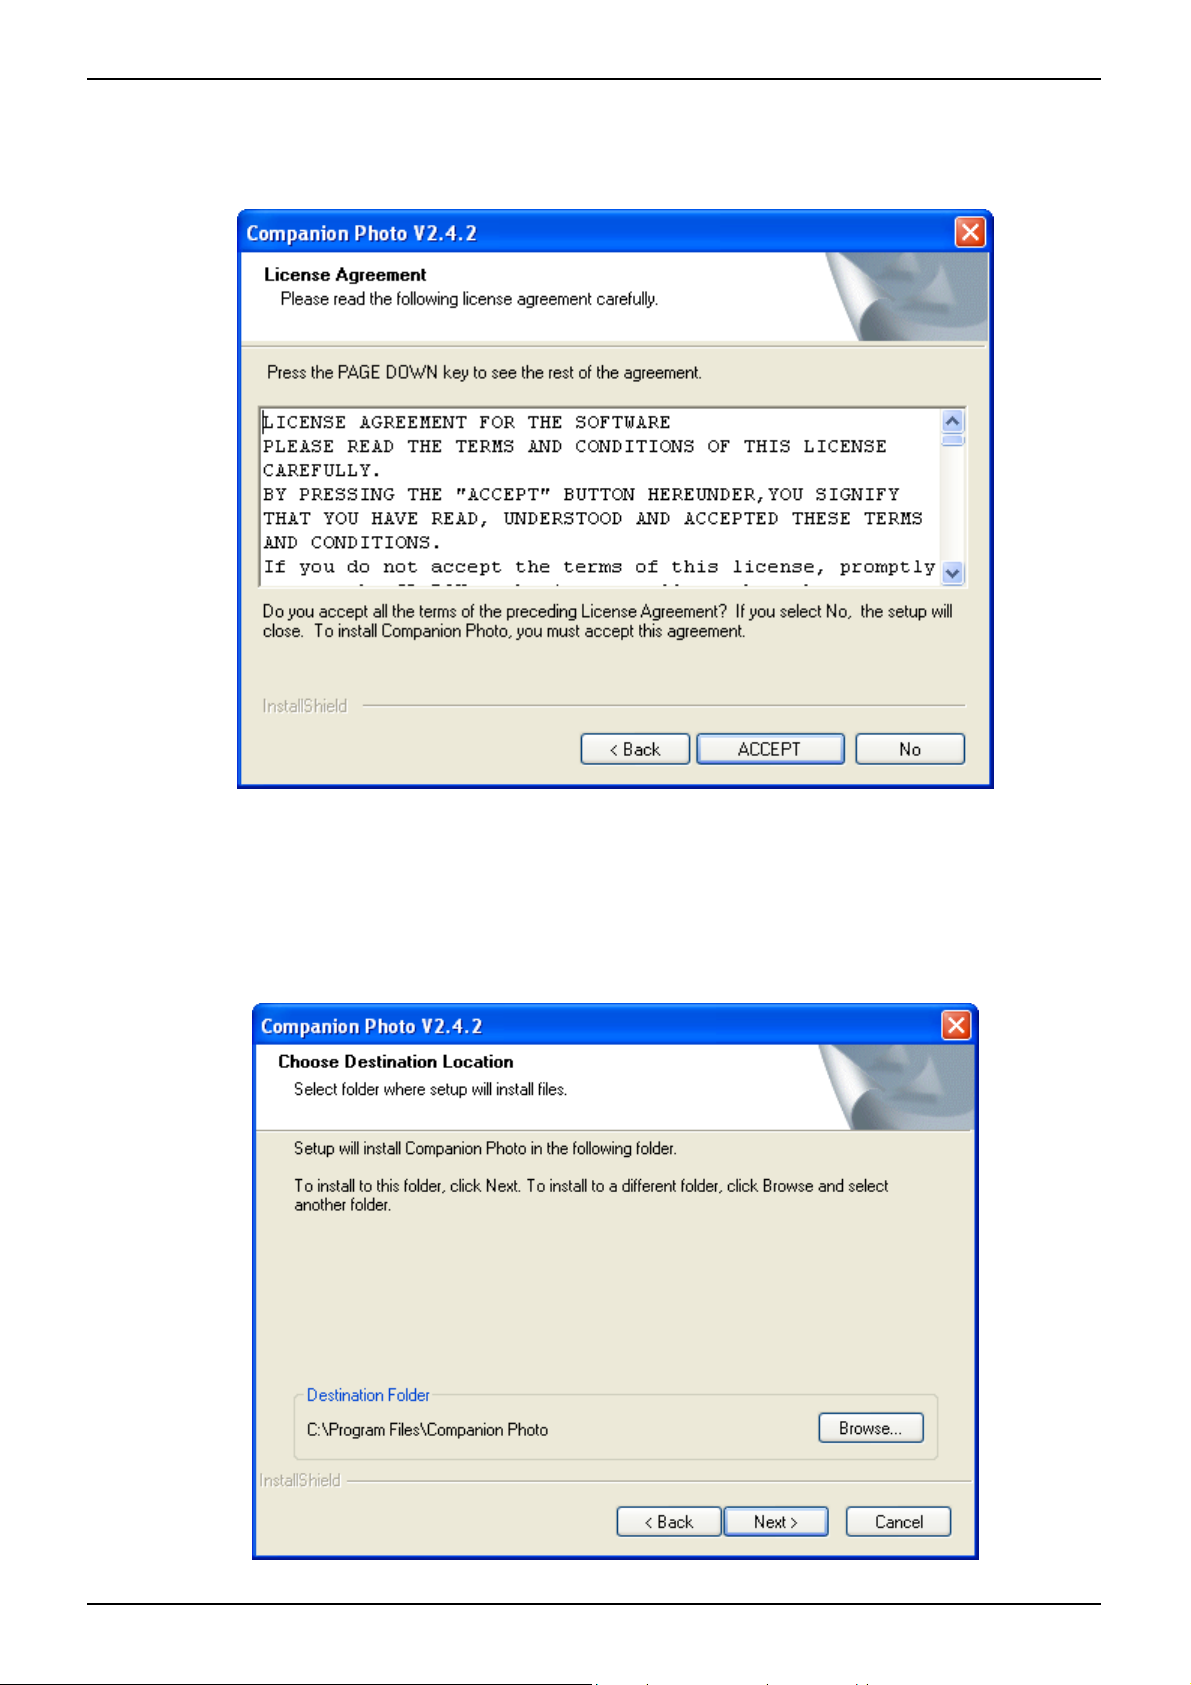
The license agreement is displayed. Read this carefully:
To continue the installation, you must accept the terms of the license agreement.
Click on "Accept".
The Companion Photo files will be copied onto your hard disk, you can select the destination.
- 6 -
Page 9

Use the "Browse" button to select a location different from that indicated in the window.
Otherwise validate this step by clicking the "Next" button.
The installation termination screen is displayed.
Click on "Install", the Companion Photo files will be copied onto your hard disk.
2.2 Restarting the computer
When the installation of the printer driver is finished, an option to restart the computer is displayed,
to complete the operation.
• Click on "Finish".
- 7 -
Page 10
2.3 Final installation of the printer
After restarting, connect your printer to the computer with a USB cable (not
Important
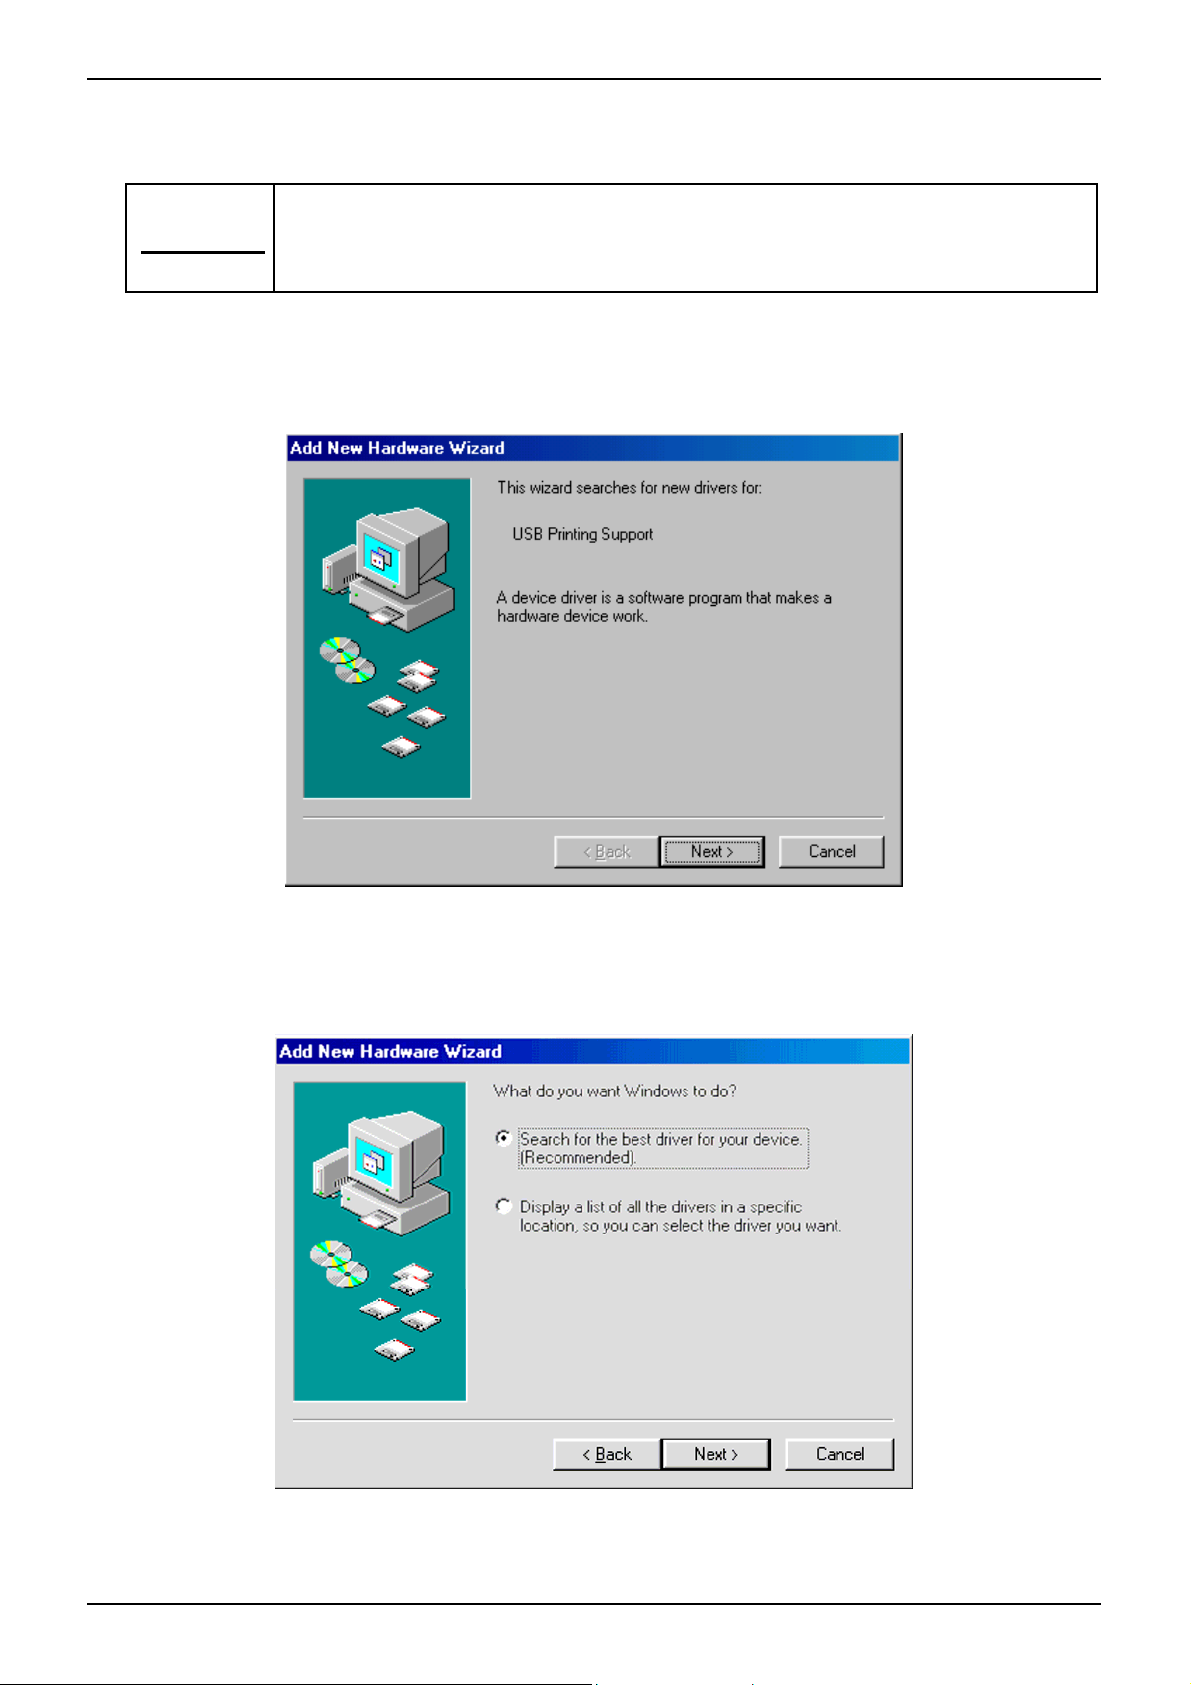
2.3.1 With Windows 98SE operating system
The following screen is displayed:
supplied). Your printer will then be detected by the operating system as a new
USB peripheral printer.
Click on "Next".
A new screen is displayed:
Select the "Search for the best driver for your printer (Recommended)" option.
Click on "Next".
- 8 -
Page 11
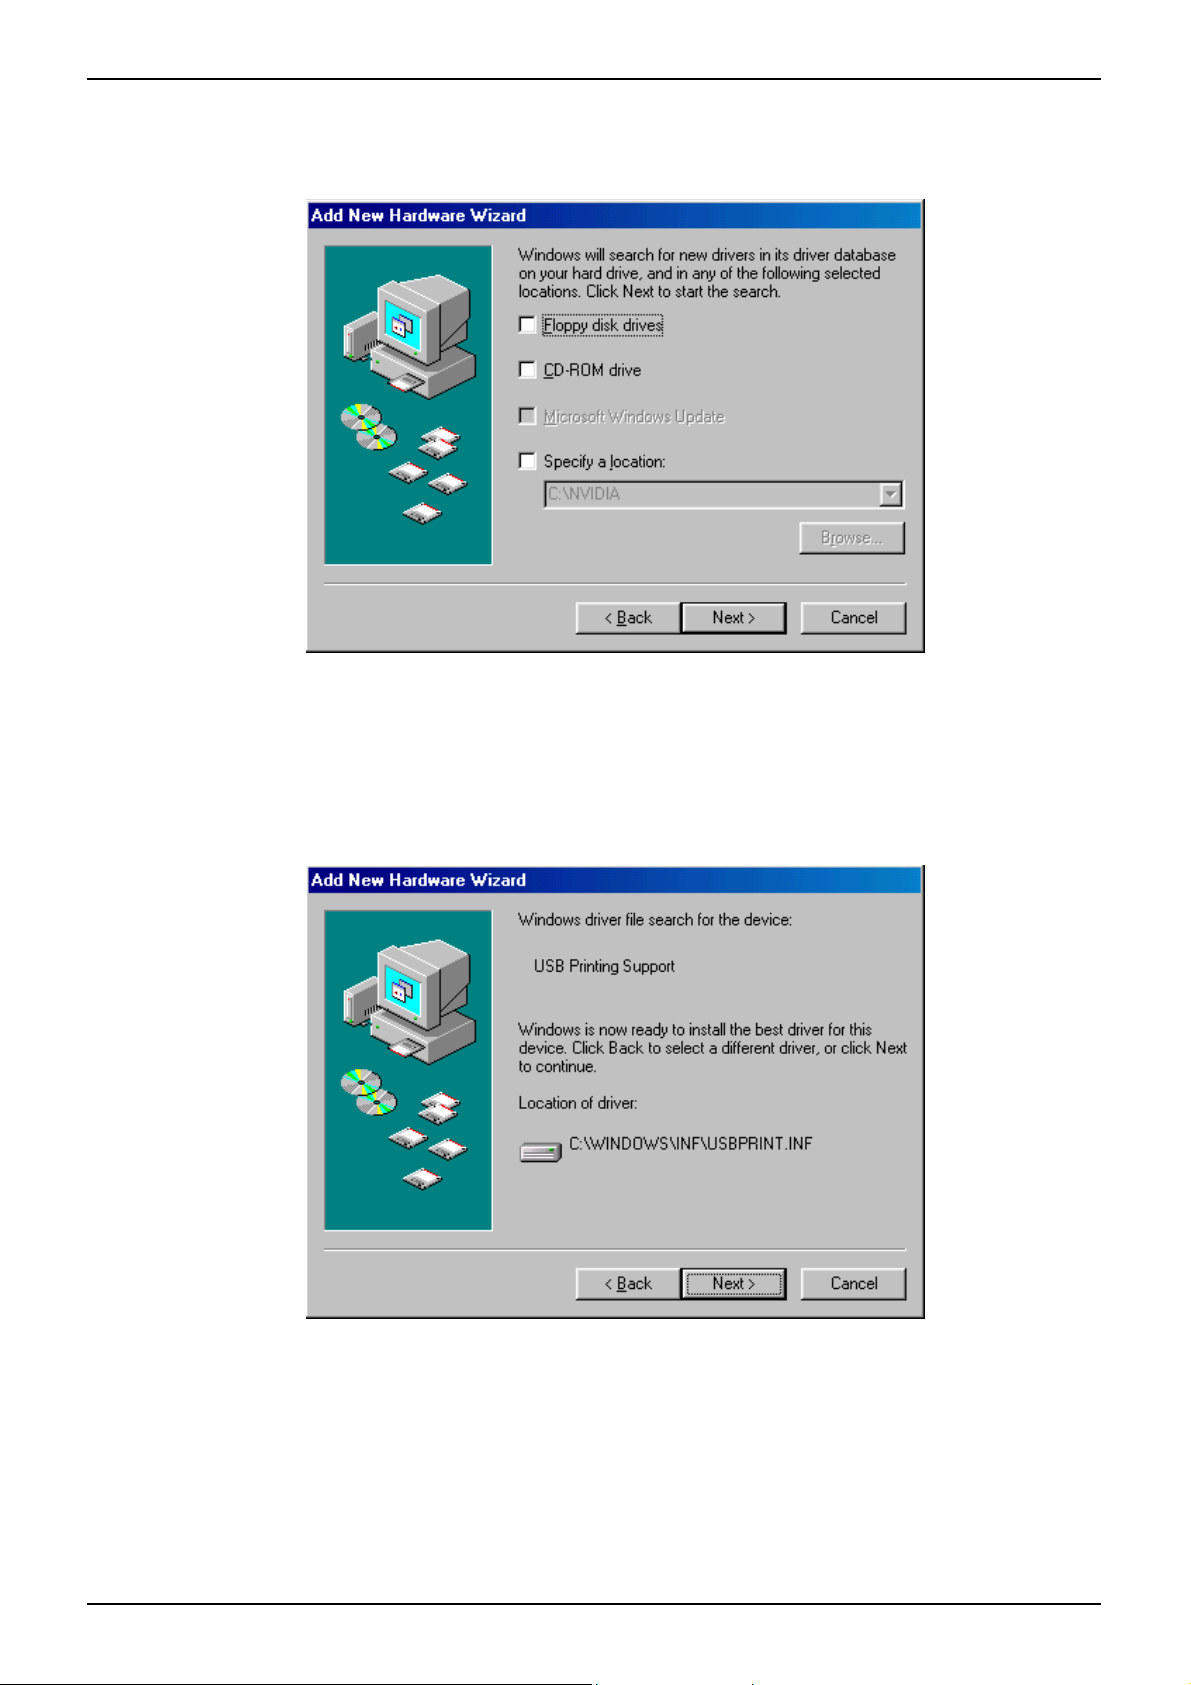
A new screen is displayed:
Deselect all the options (the printer driver components have been pre-installed by the
Companion Photo software.
Click on "Next".
A new screen is displayed:
Windows 98SE has found the pre-installed printer driver components.
Click on "Next".
- 9 -
Page 12
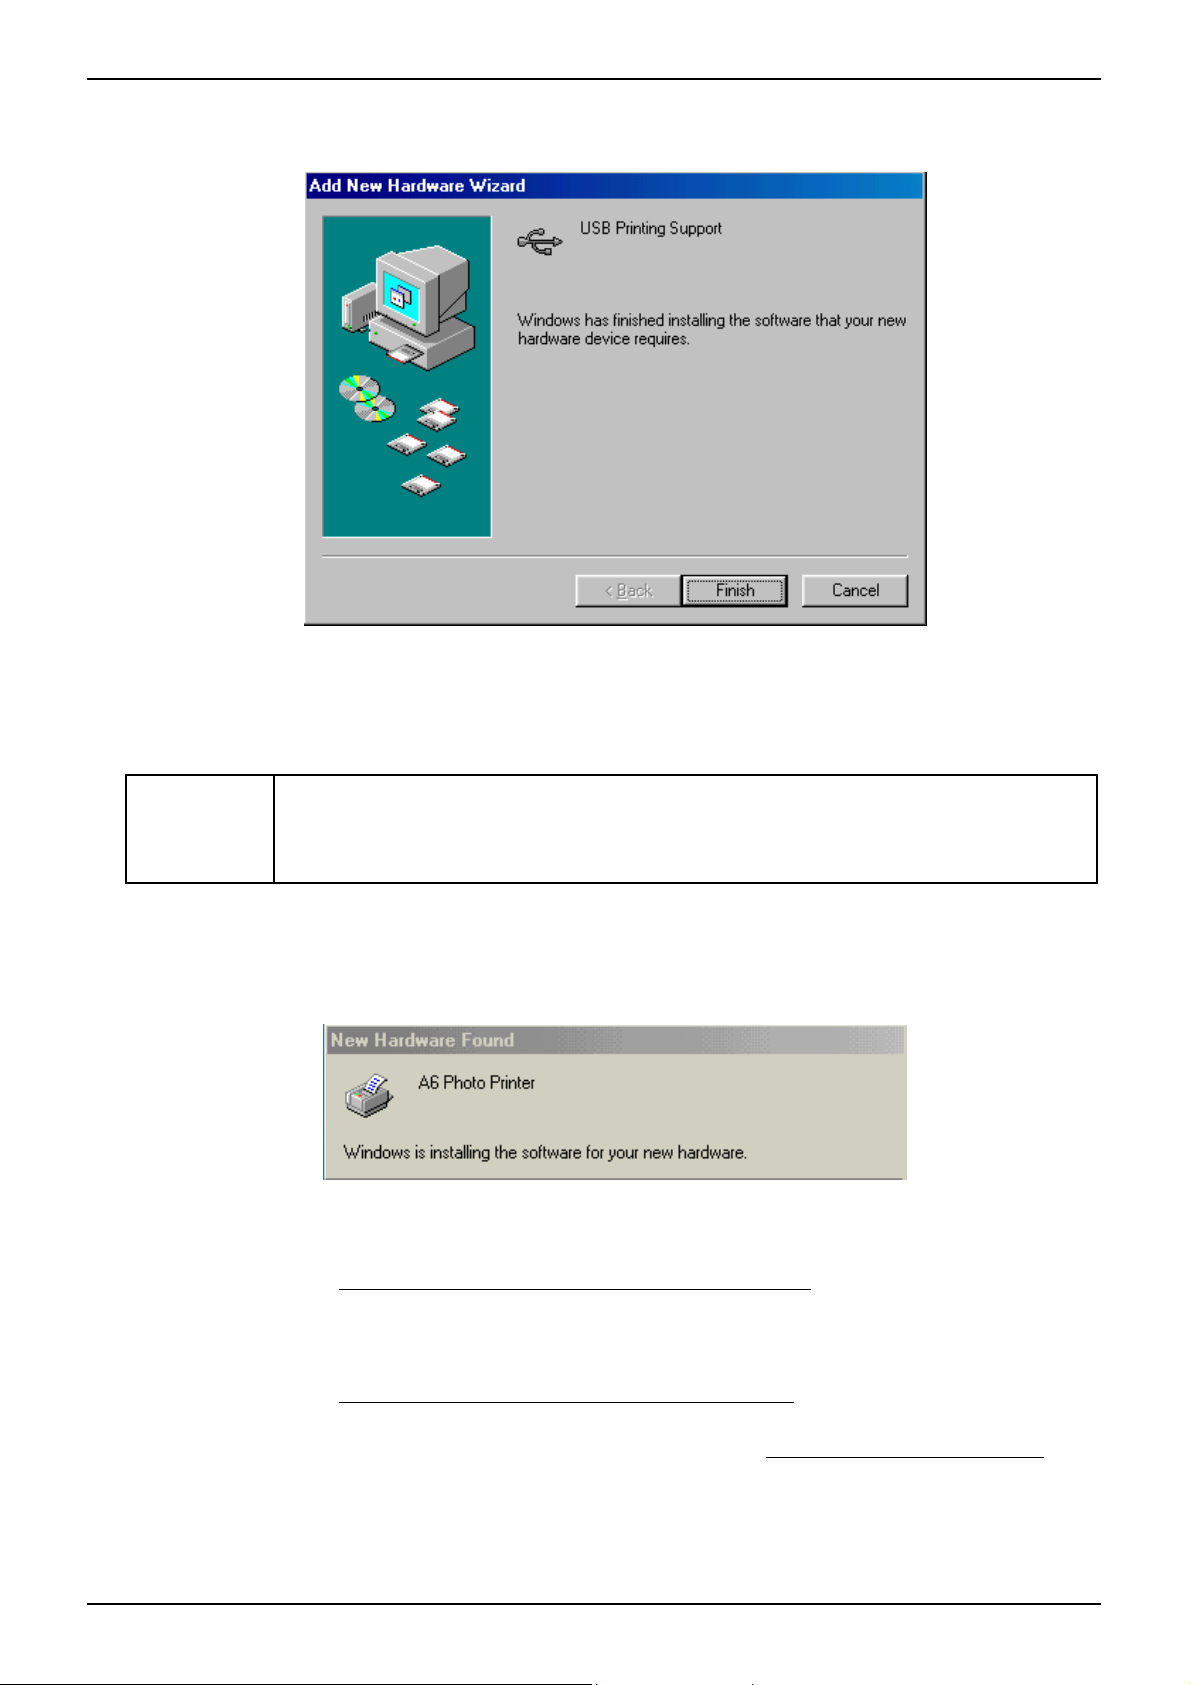
A new screen is displayed:
Installation of your printer under Windows 98SE is finished.
Click on "Finish".
Depending on the model of your printer, new systems or equipment may be
Info!
2.3.2 With Windows Millennium operating system
Final installation of the printer is automatic. The following message will be displayed several times:
2.3.3 With Windows 2000 operating system
The printer driver components have been pre-installed by the Companion Photo software
installation program. Windows 2000 will locate them automatically.
detected when you have finished the above install operation. If so, repeat the
procedure just described.
2.3.4 With Windows XP operating system
The printer driver components have been pre-installed by the Companion Photo software
installation program. Windows XP will locate them automatically.
The information in the screenshot below will be displayed only if Windows XP Service Pack 2
installed:
- 10 -
is
Page 13
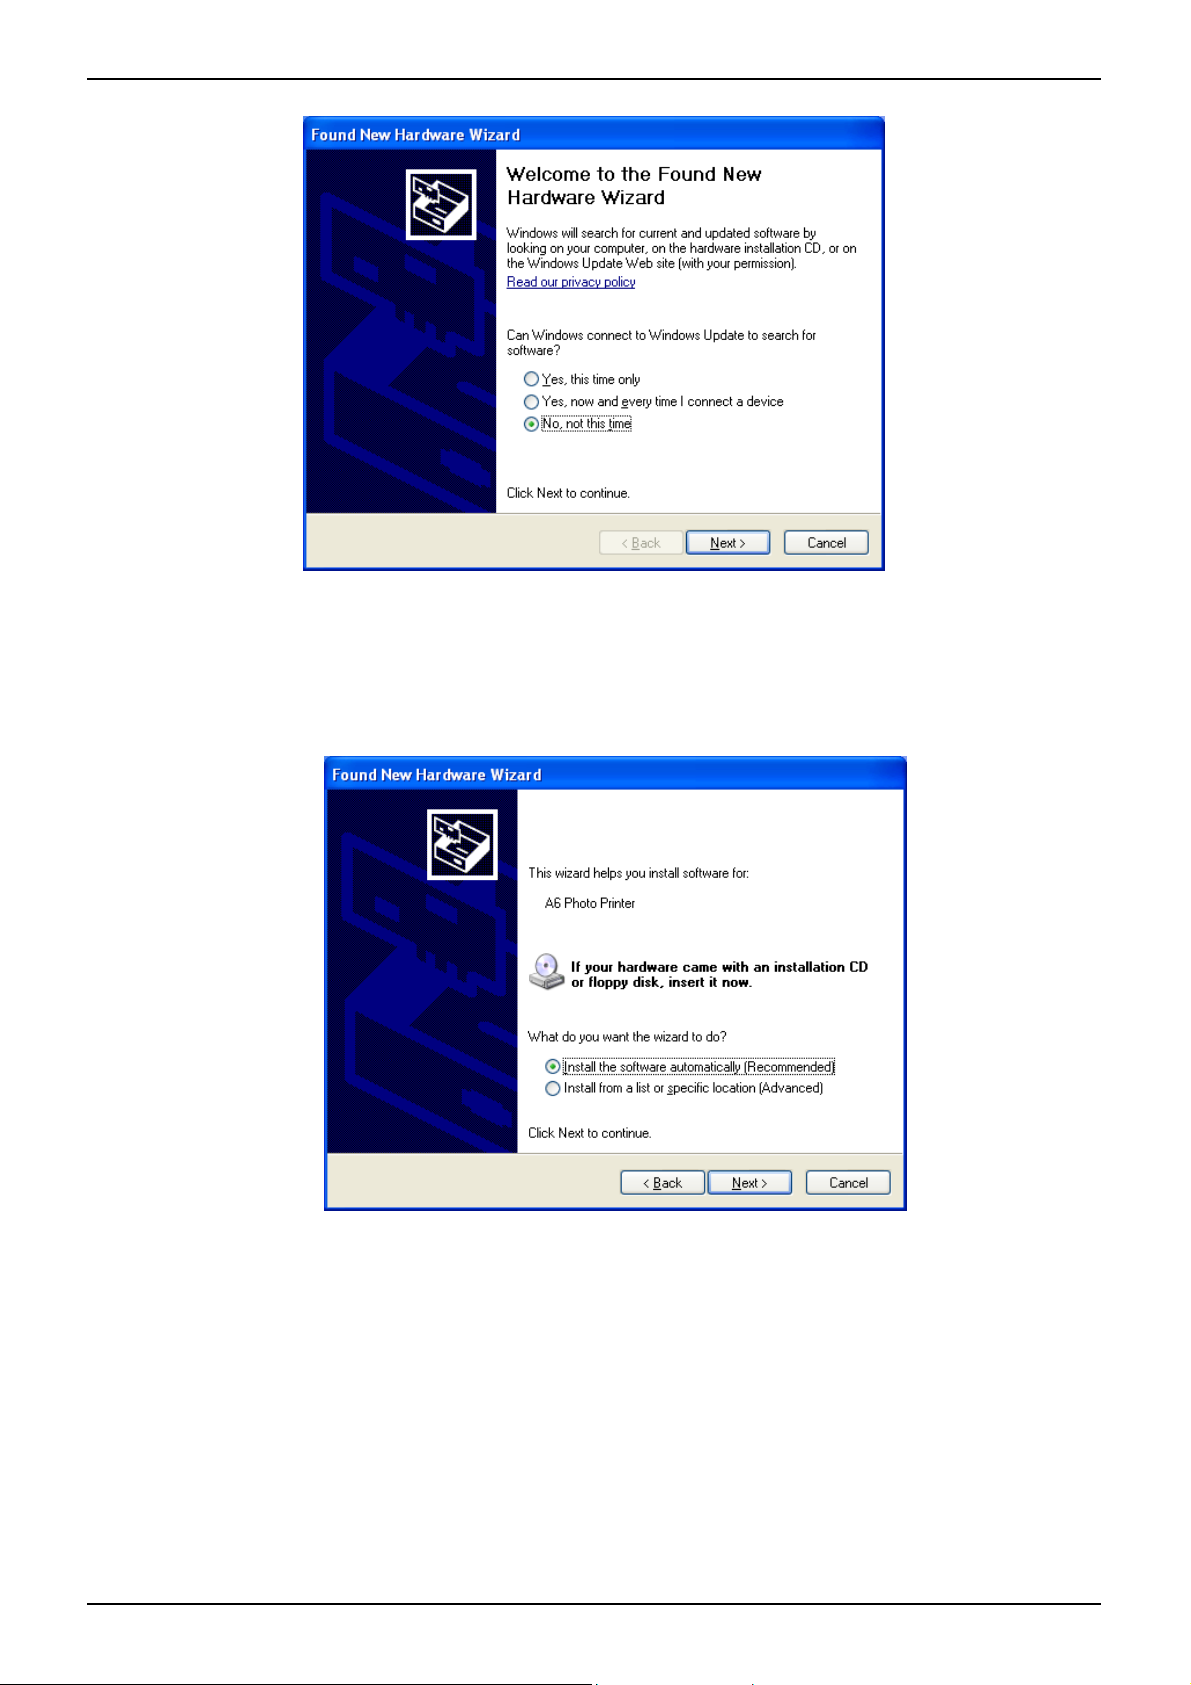
Select "No, not this time",
Click on "Next",
A new screen is displayed:
Select "Install software automatically (recommended)".
Click on "Next".
- 11 -
Page 14

A new screen is displayed:
Final installation of your printer is finished.
Click on "Finish".
- 12 -
Page 15
3 Wireless network, a few explanations:
3.1 What is a wireless network?
A wireless local area network (WLAN), more usually called a WiFi network, is a collection of
two or more computer, printers and other peripherals connected by radio waves (high frequency
electromagnetic waves). The waves transmit information from one point to another.
To connect to a wireless network, a computer or a peripheral requires a WiFi wireless network card.
Your photo printer uses an external WiFi dongle (wireless radio network card). No cabling is
necessary between networked devices to print, but a USB connection is temporarily required for
installation and configuration.
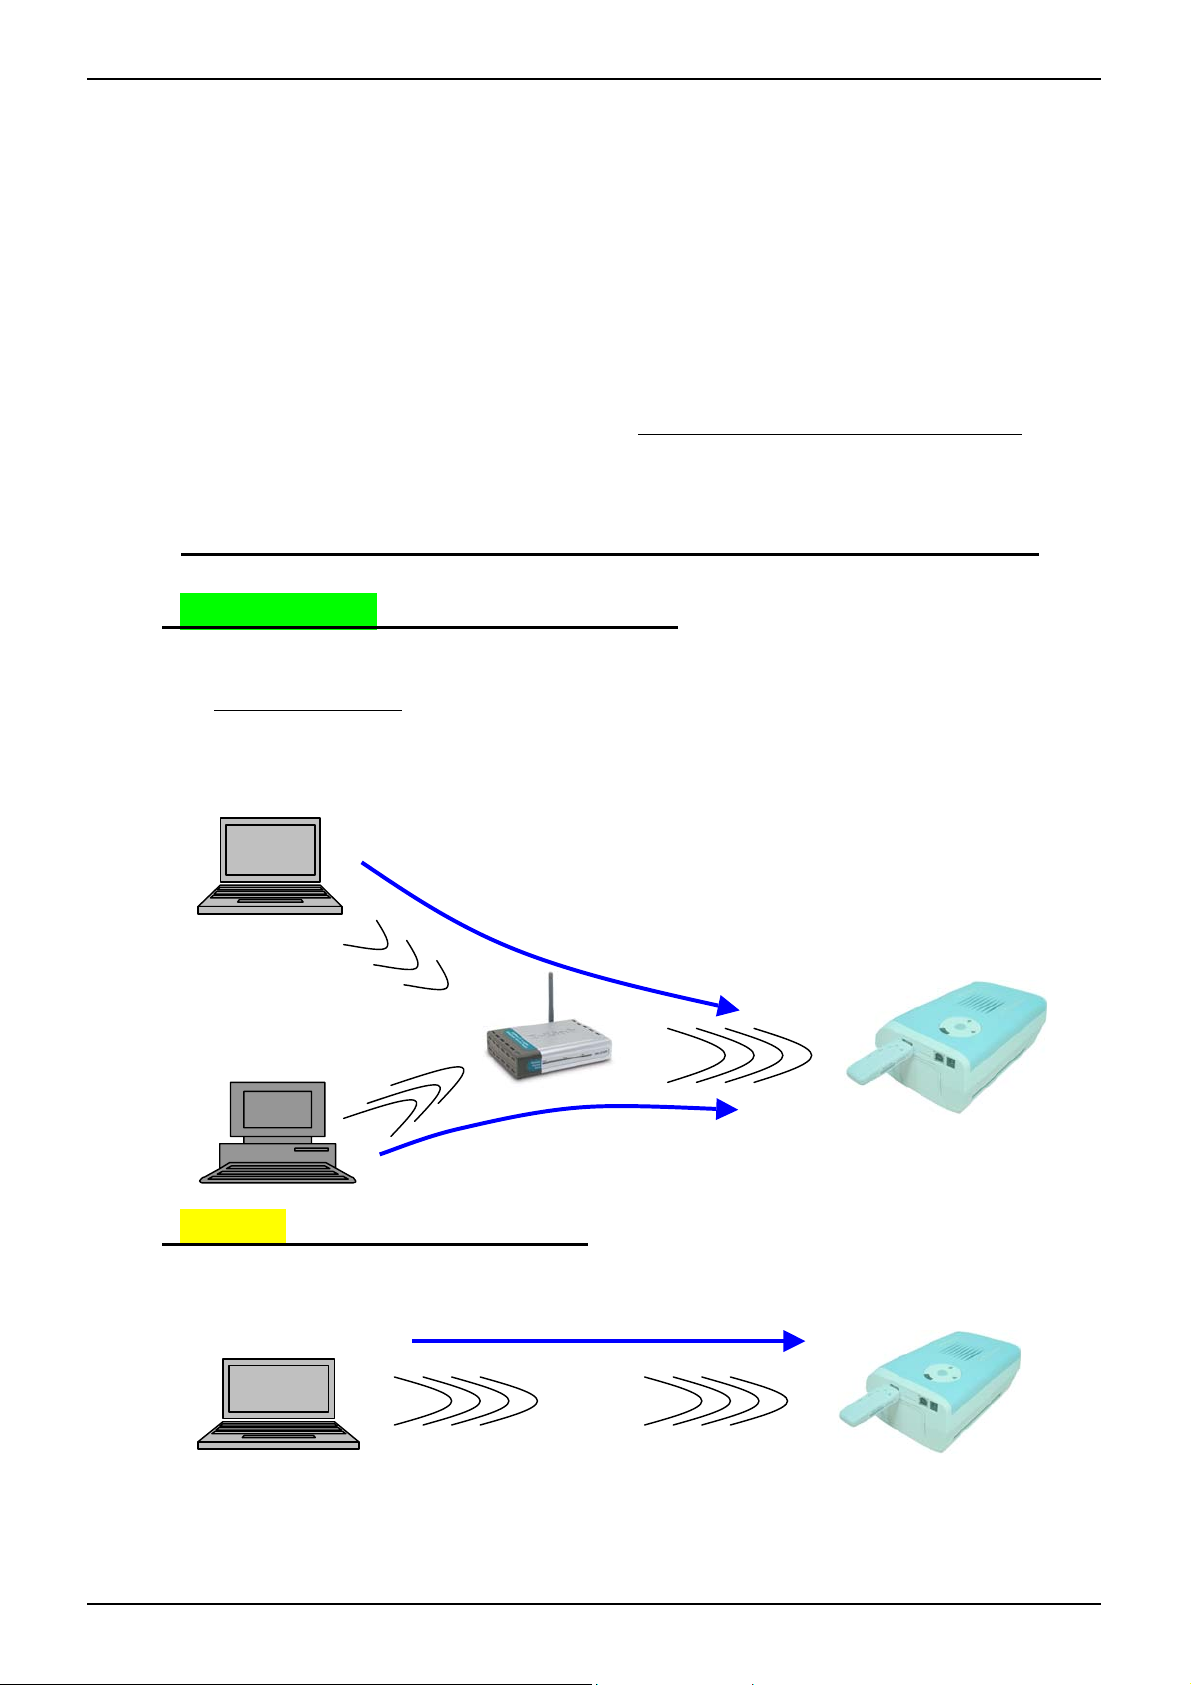
There are two primary types of wireless communication modes:
o "Infrastructure" mode (Access Point)
In an "Infrastructure" network, multiple devices (for example your photo printer) communicate
via a central access point. This access point acts as a central hub (or gateway) connecting
wireless (or wired) devices. An access point is usually an ADSL modem that has WiFi
capabilities or it can be a device (router) connected to the ADSL modem allowing several
computers to share the internet access.
Access point
Photo printer
o "Ad-Hoc" mode (Peer-to- P eer)
In an "Ad-Hoc" network, your photo printer communicates directly with your computer. This
mode is usually limited to simple, small wireless networks.
- 13 -
Page 16

Your photo printer supports "Infrastructure" and "Ad-Hoc" wireless
communication modes.
Info!
If you have an access point, it is recommended to install in "Infrastructure"
mode rather than "Ad-Hoc" mode.
"Ad-Hoc" communication is only possible if your PC is running Windows
2000 or XP.
3.2 WiFi network settings
All of the devices on a wireless network must have the same settings to
operate correctly.
When you add your photo printer to your wireless network, it must be
configured with:
Important
- the same network name (SSID),
- the same wireless channel,
- the same wireless WEP secure encryption key (if used), like the rest of
the devices on your network.
- 14 -
Page 17

4 Installation of a "W iFi" wireless connection for your printer
Prior to installation:
1. Before installing your WiFi printer, you must install the Companion Photo software package
according to the procedure described in paragraph 3.
2. Make sure:
• Your printer is switched on,
• That the WiFi dongle is plugged in to the printer. The two LEDs (near the printer dongle),
flash while the WiFi parameters are being configured.
4.1 Installation in " Infrastructure" mode (Access Point)
Check that your PC is configured for a WiFi connection (is your PC is connected to your access
point via a WiFi network?):
If a WiFi connection is already configured on your PC:
Find the configuration parameters of your WiFi network (using the WiFi configuration
software installed on your computer)
Read and write down:
- the value in the SSID field (network name):
- the value of the encryption key (if it is configured):
- the WEP encryption type: 64 bits or 128 bits (WPA is not supported by the printer).
Keep these values since you will need them later when configuring the
printer.
Important
Ensure that the network you want to use is selected and the network type
is correctly selected ("Infrastructure" mode). Refer to the user guide of
your PC or the user guide of the WiFi adaptor for more information on
how to get these values.
- 15 -
Page 18

If the WiFi connection is not already configured on your PC:
If your access point is configured, refer to the access point user guide to configure its SSID
(network name) and if necessary its encryption values.
Then copy these values into the WiFi utility of your PC.
Important
4.1.1 Step 1: Starting installation
Select in "Start>Programs>Companion Photo" the item "Install a WIFI printer".
The application starts and displays the following wizard:
Keep these values since you will need them later when configuring the
printer.
Connect your printer to your PC with a USB cable (not supplied) and wait until Windows has
detected it.
Click on "Next" to move on to step 2.
If you have already installed the printer in WiFi mode on one PC and you want
Important
to install the same WiFi printer on another PC then leave the parameters in
Steps 2 through 4 unchanged.
- 16 -
Page 19

4.1.2 Step 2: WIFI parameters setup
The following screen is displayed (the information in the windows is given as an example):
You must choose the following parameters:
SSID:
Read the SSID of your access point (refer to the user guide of your access point
to find out how to obtain this information).
Info!
Network type
Channel:
If no SSID is configured in the access point, choose one, e.g.
"WIFIDOMICILE", and configure it in the access point.
Enter these values in the screen.
:
"Infrastructure" if you use an "access point".
Read the channel number of your access point (refer to the user guide of your
access point to find out how to obtain this information).
Enter these values in the screen.
When your changes are finished, click "Next".
- 17 -
Page 20

4.1.3 Step 3: WiFi security setup
The following screen is displayed (the information in the windows is given as an example):
The wizard displays the WiFi security settings entered,
If you decide to leave these parameters unchanged, click "Next".
Otherwise, select in the various fields:
Encryption type: "WEP"
WEP type: "64 bits" or "128 bits"
Encryption key:
Format of the encryption keys:
Value 1 of the encryption key: write the encryption key number that meets the
"1" as on the screen
"ASCII" or "Hexadecimal"
requirements of your wireless network.
These values must be the same as those of your access point.
Check that security settings correspond to your wireless network configuration.
If you do not know how to set the security parameters, set the "Encryption
type" setting to "None"( security will be disabled).
Important
When your changes are finished, click "Next".
If your security settings are not correct, you may be unable to use your photo
printer.
Please note that WPA encryption capabilities are not supported by your
photo printer. If they are activated in your wireless network, you must inhibit
WPA encryption in order to use your photo printer.
- 18 -
Page 21

4.1.4 Step 4: IP setup
The wizard displays the IP settings entered in your printer:
It is recommended to start with automatic IP setup mode (depending on the
Info!
4.1.4.1 "Automatic" IP setup mode
Select in the various windows:
4.1.4.2 "Manual" IP setup (Advanced Users)
o IP setup mode: "Auto IP"
o NETBIOS name 1:
"MyPhotoPrinter".
•
Go to Step 5 to continue.
Enter the IP values, select in the various fields:
o IP setup mode: "Manual"
o In the Windows task bar click "Start > Run" and type "CMD"
• A black Windows screen is displayed,
• Enter "IPCONFIG" and press "Return" on the keyboard.
• Text is displayed:
configuration of your network, automatic configuration may or may not be
possible).
choose the name that you want to give to the printer, for example:
Connection-specific DNS Suffix.:
IP Address . . . . . . . . . . .: 10.204.131.238
Subnet Mask . . . . . .: 255.255.255.0
Default Gateway . . . . . .: 10.204.131.1
- 19 -
Page 22

Note that the values above (10.204.131.238, 255.255.255.0 and 10.204.131.1)
are provided as an example. Those displayed on your PC will be different.
Info!
Return to the "Add a wireless printer" window and enter the following values:
o IP Address: Choose an IP address that is similar to but different from the PC
o Subnet mask:
o Default gateway: In this field enter the exact value displayed in the black
o NETBIOS name 1:
Go to Step 5 to continue.
If the message "Network card disconnected" is displayed in this window: then
you must first check that the WiFi parameters of your PC match the WiFi
parameters of your access point.
address. In our example, the IP address is 10.204.131.238. We allocate address
10.204.131.239
screen. In our example, we enter the value 255.255.255.0.
Windows screen. In our example, we enter the value 10.204.131.1.
"MyPhotoPrinter".
The "NETBIOS Name 2" setting is the default auto-configured printer name
which identifies your printer on your wireless network.
to our printer and copy this value into the "IP Address" field.
In this field enter the exact value displayed in the black Windows
Choose the name that you want to give to the printer, for example:
Info!
This setting is used by your computer for your photo printer configuration
(refer to following chapter: Printer selection).
4.1.5 Step 5: Printer selection
At this step, your printer might make some mechanical movements to reinitialise.
The wizard automatically tries to find the WiFi printers present on the wireless network, then
displays the NetBIOS name and IP address of the WiFi printers it has detected.
Select the printer you want to install, then click on "Next".
- 20 -
Page 23

If a firewall is present on your network, it could prevent correct printer
detection: in this case adjust your network settings to leave TCP port No.
1001 accessible during the setup. If you do not know how to adjust these
Important
If the printer you wish to install is not present in the list, you can select it manually by
clicking the "Not in the list…" button.
The following dialogue box is displayed:
parameters, you can disable the firewall during the setup.
During normal use of the printer TCP port No. 9100 must be accessible, so
make sure that your firewall settings allow this requirement.
To indicate which printer to connect to, enter the NetBIOS name or the IP address of the
printer in the edit box.
Dynamic IP allocation: Depending on your network configuration, the IP
address of the network element (PC, WiFi printer, etc.) could change each
time you start your computer and you will have to re-configure your printer
each time.
Info!
To prevent this issue, use the NetBIOS name rather than the IP address. The
NetBIOS name of your printer should appear in the bottom of the box of the
"Step 4: IP Setup", in the edit box "NetBIOS name 1" or "NetBIOS name 2".
You can then click on the "Test" button to find out whether the printer can be
accessed correctly.
- 21 -
Page 24

When finished, click "OK" and the new printer will appear in the printer list:
You can now select your printer and click "Next".
Important
4.1.6 Step 6: Ready to go
A dialog box is displayed summarising the installation parameters:
If Step 5 fails, click "back", return to the "IP Setup" screen and "Manual" IP
setup mode.
You can now click "Next" to carry out the final installation,
- 22 -
Page 25

4.1.7 Step 7: Final screen
The installation is finished, this last screen indicates whether the installation was successful:
Click on "Finish".
Info!
To allow this WiFi printer to be recognised and used by other computers,
repeat this installation procedure on each additional computer.
If you are installing in Manual IP mode for the printer, make sure that the PCs
do not have the same IP address (example: if the first computer has IP address
192.168.0.2, then you can use IP address 192.168.0.3 for another computer).
- 23 -
Page 26

4.2 Installation in "Ad-Hoc" mode (Peer-to-Peer)
4.2.1 Step 1: Starting installation
Select in "Start>Programs>Companion Photo" the item "Install a WiFi printer".
The application starts and displays the following wizard:
Connect your printer to your PC with a USB cable and wait until Windows has detected it.
Click on "Next" to move on to step 2.
If you have already installed the printer in WiFi mode on one PC and you want
Info!
to install the WiFi printer on another PC then leave the parameters in Step 2
through 4 unchanged.
- 24 -
Page 27

4.2.2 Step 2: WIFI parameters setup
The following screen is displayed (the information in the windows is given as an example):
You must choose the following parameters:
o SSID:
Choose an SSID (e.g. WIFIDOMICILE)
Enter these values in the screen.
o Network type:
Choose "Ad-Hoc", "Peer to Peer" configuration.
o Channel:
Choose a channel number (e.g. channel 7)
Enter these values in the screen.
Info!
When your changes are finished, click "Next",
Write down these values, you will need them later when configuring the
computer.
- 25 -
Page 28

4.2.3 Step 3: WiFi security setup
The following screen is displayed (the information in the windows is given as an example):
The wizard displays the current WiFi Security settings, if you decide to leave these parameters
unchanged, click "Next".
Otherwise, select in the various fields:
o Encryption type: "WEP"
o WEP type: "64 bits" or "128 bits"
o Encryption key: "1" as on the screen
o Format of the encryption keys: "ASCII" or "Hexadecimal"
o Value 1 of the encryption key: write the encryption key number that meets the
requirements of your wireless network.
• Now choose whether you want to encrypt the link with the computer. If yes,
select:
o Encryption type:
o WEP type:
o Format of the encryption keys: "ASCII" or "Hexadecimal"
o Value 1 of the encryption key:
64 bits encryption: if you select hexadecimal format, you must create an
encryption code by entering 10 of the characters 0, 1, 3 ….,9, a, b, c, d, e, f.
128 bits encryption: if you select hexadecimal format, you must create an
encryption code by entering 26 of the characters 0, 1, 3 ….,9, a, b, c, d, e, f.
WEP,
64 bits or 128 bits
• Example: 0f2b45a789
• Example: 12b45a7890123456789d123f56
- 26 -
Page 29

Check that security settings correspond to your wireless network
configuration. If you do not know how to set the security parameters, set the
"Encryption type" setting to "None"( security will be disabled).
Important
If your security settings are not correct, you may be unable to use your photo
printer.
Please note that WPA encryption capabilities are not supported by your
photo printer. If they are activated in your wireless network, you must inhibit
WPA encryption in order to use your photo printer.
When your changes are finished, click "Next".
4.2.4 Step 4: IP setup
The wizard displays the IP settings entered in your printer:
Info!
It is recommended to start with automatic IP setup mode (depending on the
configuration of your network, automatic configuration may or may not be
possible).
- 27 -
Page 30

4.2.4.1 "Automatic" IP setup mode
Select in the various windows:
o IP setup mode: "Auto IP"
o NETBIOS name 1: choose the name that you want to give to the printer, for example:
"MyPhotoPrinter".
Go to Step 5 to continue.
Info!
4.2.4.2 "Manual" IP setup (Advanced Users)
You will need to enter IP values. One method to allocate the IP values is shown below:
Proceed as follows:
o IP setup mode: "Manual"
o IP Address: Enter 192.168.0.1,
o Subnet mask: Enter 255.255.255.0,
o Click "Next" once (the printer makes some mechanical movements to reinitialise),
Go to Step 5 to continue.
If Step 5 fails, click "back", return to the "IP Setup" screen and "Manual" IP
setup mode.
The "NETBIOS Name 2" setting is the default auto-configured printer name
which identifies your printer on your wireless network.
Info!
This setting is used by your computer for your photo printer configuration
(refer to following chapter: Printer selection).
4.2.5 Step 5: Computer configuration
At this step, your printer might make some mechanical movements to reinitialise.
In "Ad-Hoc" mode you need to configure the WiFi function on your computer.
Refer to the following screen prompting you to configure the computer:
- 28 -
Page 31

To configure the WiFi function on your computer:
o For instructions on how to configure the function, refer to the user guide of the
computer or the user guide of the WiFi card installed on your computer,
o Run the WiFi configuration utility,
o Select the scan function to scan for the WiFi networks. After a few seconds this utility
will display the SSID of the printer selected in Step 2,
o When the printer SSID is displayed, select this network and set up a connection with it.
o If in step 3 you decided to use encryption, you must indicate in the utility the
encryption type (64 bits or 128 bits) and the WEP key you selected. WPA is not
supported by the printer.
Only if "IP setup mode" was selected in Manual mode at Step 4:
o On the computer, now check that the WiFi function is correctly configured in the WiFi
utility by checking the radio signal.
o On the WiFi network card, carefully copy the IP parameters of the computer.
o Display the TCP/IP properties of the WiFi network connection on your PC,
o Proceed as follows:
IP setup mode: "Manual"
IP Address: Enter 192.168.0.2,
Subnet Mask: Enter 255.255.255.0,
Gateway: Enter 192.168.0.128
Close the two network windows by clicking on OK
- 29 -
Page 32

Under Windows 2000: to access the TCP/IP properties, click the Start button
Parameters Network Connections Double-click on the WiFi network
card Properties Select TCP/IP Properties
Important
When the computer is configured, return to the "Add WiFi printer wizard".
Click on "Next".
4.2.6 Step 6: Printer selection
The wizard automatically tries to find the WIFI printers present on the wireless network, then
displays the NetBIOS name and IP address of the WIFI printers it has detected.
Select the printer you want to install,
Click on "Next",
Important
Under Windows XP: to access the TCP/IP properties, click the Start button
Networks Double-click on the WiFi network card Properties
Select TCP/IP Properties
If you are installing in "Ad-Hoc" mode, it might need a considerable time
(even up to 10 minutes) to detect all the devices. Wait until the device has
been detected. If the printer is not detected, click on the Back button and
check the WiFi parameter on your PC.
A new screen is displayed:
- 30 -
Page 33

If a firewall is present on your network, it could prevent correct printer
detection: in this case adjust your network settings to leave TCP port No.
1001 accessible during the setup. If you do not know how to adjust these
Important
If the printer you wish to install is not present in the list, you can select it manually by
clicking the "Not in the list…" button.
The following dialogue box is displayed:
parameters, you can disable the firewall during the setup.
During normal use of the printer TCP port No. 9100 must be accessible, so
make sure that your firewall settings allow this requirement.
To indicate which printer to connect to, enter the NetBIOS name or the IP address of the
printer in the edit box.
Dynamic IP allocation: Depending on your network configuration, the IP
address of the network element (PC, WiFi printer, etc.) could change each
time you start your computer and you will have to re-configure your printer
each time.
Info!
When finished, click "OK" and the new printer will appear in the printer list:
To prevent this issue, use the NetBIOS name rather than the IP address. The
NetBIOS name of your printer should appear in the bottom of the box of the
"Step 4: IP Setup", in the edit box "NetBIOS name 1" or "NetBIOS name 2".
You can then click on the "Test" button to find out whether the printer can be
accessed correctly.
- 31 -
Page 34

You can now select your printer and click "Next",
Important
4.2.7 Step 7: Ready to go
A dialog box is displayed summarising the installation parameters:
If Step 6 fails, click "Back", return to the "IP Setup" screen and "Manual" IP
setup mode.
You can now click "Next" to carry out the final installation,
- 32 -
Page 35

4.2.8 Step 8: Final screen
The installation is finished, this last screen indicates whether the installation was successful:
Click on "Finish".
Info!
To allow this WiFi printer to be recognised and used by other computers,
repeat this installation procedure on each additional computer.
If you are installing in Manual IP mode for the printer, make sure that the PCs
do not have the same IP address (example: if the first computer has IP address
192.168.0.2, then you can use IP address 192.168.0.3 for another computer).
- 33 -
Page 36

5 Uninstalling the software pack
To run the Uninstall program, double-click on the "setup.exe" file located in the CD-ROM root
directory.
The following screen is displayed:
Select "Uninstall products".
A window will appear and offer you to uninstall either the Companion Photo or Acrobat Reader or
both.
- 34 -
Page 37

6 Print formatting
The Companion Photo printer driver lets you print your photographs with the most suitable format
and layout selected from the available formatting options:
Format Portrait Landscape
15 x 10 cm, without border
15 x 10 cm, white border
15 x 10 cm, 2 images
15 x 10 cm, 4 images
15 x 10 cm, 6 images
15 x 10 cm, 20 images
- 35 -
Page 38

6.1 Parameter setting window under Windows 98SE and Millennium
This window can be accessed from most applications. It allows you to set the print parameters for
the current document: format, page orientation and number of copies.
6.2 Parameter setting window under Windows 2000 and XP
This window can be accessed from most applications. It allows you to set the print parameters for
the current document: format, page orientation and number of copies. A thumbnail image shows the
result corresponding to the current parameter settings. If the format allows, the space between two
images printed on the same page can also be adjusted.
- 36 -
Page 39

7 Monitoring print jobs and printer status
7.1 Information bar icon
Located by default in the lower right-hand corner of the screen:
This program, referred to as the Companion Photo Assistant, is automatically started each time a
Windows session is opened.
The Companion Photo Assistant can also be started from the "Start" menu:
Select "Start" > "Programs" > "Companion Photo" > "Assistant".
The icon shows the printer status:
Printer ready to receive a print command
Printing
Printer error
Move the mouse cursor onto the icon to display a small help window with more detailed printer
status information.
Click on the right mouse button to display the Companion Photo Assistant menu.
• "About…
" Displays the "About…" dialogue box for the Companion Photo Assistant. This window
displays various items of information about the A6 Photo printers installed, such as the port
name or serial number. These parameters are detailed in the "Printer properties window"
section.
• "A6 Photo Printer 2006", "A6 Photo Printer 2006 WiFi"…
This box also lists the A6 Photo Printer installed, these printers can be USB printers (in this
case the printer has to be connected by a USC cable) or a WiFi printer.
- 37 -
Page 40

• "Open on error"
If this option is ticked, a dialogue box is automatically displayed each time an incident
occurs. It shows the type of error and allows the user to respond (by cancelling the print job,
for example). Refer to the next chapter for more information concerning the "Printer status"
window.
• "Open when printing"
If this option is ticked, a dialogue box is automatically displayed while the printer executes a
print job. It shows the progression of the print job throughout the process. Refer to the next
chapter for more information concerning the "Printer status" window.
• "Open" (selected by default)
Displays the dialog box showing the printer status. Refer to the next chapter for more
information concerning the "Printer status" window.
• "Exit"
Exits the Companion Photo Assistant and removes the icon from the information bar. Run
the Companion again from "Start", "Programs", "Companion Photo", "Assistant"
The Companion Photo Assistant need not be active for printing. It displays the
progress of the print job and facilitates management of incidents. You can
Info!
print even after closing the assistant. In this case, printing is monitored by the
Windows print manager.
Double-clicking on the icon has the same effect as the "Open" command.
- 38 -
Page 41

7.2 "Printer status" window
Double-click on the icon in the information bar or use the "Open" menu item in the Companion
Photo Assistant menu to display the "Printer status" window.
This window provides information on the current status of the printer. Some examples and their
explanations:
The printer is in initialisation phase.
Wait until it switches to ready status
before starting a print job.
The printer is printing in autonomous
mode (print job directly started from
the printer's control panel). Printing
from the PC is therefore momentarily
unavailable.
Please wait until the autonomous mode
print job is finished before restarting
the PC print job.
- 39 -
Page 42

7.3 Monitoring print jobs
During print jobs, the "Printer status" shows the progression of the print job step by step. A progress
bar shows the percentage completed of the current step, while the "Total" progress bar shows the
status of the entire process.
Step 1:
Loading paper
Step 2:
Printing yellow
Step 3:
Printing magenta
Step 4:
Printing cyan
Step 5:
Applying protective
coating
- 40 -
Page 43

Step 6:
Ejecting paper
The "Close" button closes the window: it has no effect on the printing.
The "Cancel" button cancels the print job.
Important
If the "Open during printing" option has been selected in the menu of the
information bar icon, the "Printer status" window is automatically displayed
when printing begins. It automatically disappears upon completion of the print
job.
7.4 Printer properties window
In order to open the printer properties window, you have first to open the Printer Status window,
and click on the small hammer located on the top right of the window:
Then the Printer Properties window appears:
This window gives some information on the technical parameters of the printer:
- 41 -
Page 44

1. Its vendor and product ID,
2. its model name,
3. its serial number,
4. its firmware version (with the corresponding CheckSum),
5. its bootloader version (with the corresponding CheckSum),
6. Two photo counters
7. Lastly, an internal counter for maintenance purposes.
The window shows the status of the WiFi connection plus some details about the driver:
The window gives:
o The driver name,
o The product name,
o The product version.
This window also allows you to:
- 42 -
Page 45

o Export: This feature allows you to save the displayed data in a text file (with the .info
extension).
o Logs: This feature, used for maintenance purposes only, allows you to read some internal
printer logs, to obtain information in the event of malfunction.
- 43 -
Page 46

8 Incident management
Should an incident occur during the print job, the "Printer status" window allows action to be taken
in response. Some examples of incidents and explanations follow:
The print job cannot start because
there is no paper in the paper tray.
Insert one or more sheets and press
the "Print" button on the printer to
restart printing or press the
"Cancel" button to cancel.
The print job was interrupted
because of a paper jam. Pull out
the sheet from the printer and
press the "Print" button to restart
printing.
Important
The print job was interrupted
because of a problem with the
transfer film cartridge. Check the
condition of the cartridge.
This should be replaced if the end
of the film has been reached.
Printing was interrupted because
the tape has run out. To change the
tape, refer to the printer manual
The "Close" button closes the window: it has no effect on the printing.
The "Cancel" button cancels the print job.
Depending on the model of your printer, an additional "Resume" button may
also appear in order to continue printing after the incident has been resolved.
If the "Display errors" option has been selected in the menu of the information
bar icon, the "Printer status" window is automatically displayed whenever an
incident occurs. It automatically disappears upon resolution of the error, or
after one minute has elapsed.
- 44 -
Page 47

9 Checking printer data under Windows 2000 and XP
The A6 Photo Printer tab is displayed in the printer properties window if running under Windows
2000 and XP. It allows you to check the serial number and embedded software version of your
printer.
10 File read / write operations on the memory card
On certain models, a removable disk appears in the workstation when the peripheral is connected.
This drive provides direct access to the contents of a memory card or USB key when these are
connected to the peripheral.
This utility lets you open, copy, modify or delete the files present on the memory card or USB key
by using your PC and the peripheral card drive.
10.1 Firmware Update
The firmware defines the basic functions and capabilities of your multifunction machine. We
constantly strive to implement improvements and innovations. With Companion Photo you can
perform a firmware update.
- 45 -
Page 48

Check our internet homepage for information on the current firmware version available for
your Photo printer.
The firmware version running in your machine can be checked by clicking Start > Programs >
Companion Photo > Companion Photo – Update Printer. The MFUpdatePrinter window
appears:
Click on "Versions information" to see the current firmware version of the machine.
Download the firmware file from our homepage and save it on your PC.
In the Device Update window under Firmware file to load select the saved firmware file.
Then click on "Start upload" to transfer the current firmware file to the multifunction machine.
Important
Wait until the firmware update is completed before performing more
operations on your printer.
- 46 -
Page 49

11 F AQ
11.1 Issue #1
If you encounter the following error message during installation:
[
RunDLL
Error loading C:\program~1\File~1\instal~1\profes~1RunTime\09\00\intel32\Ctor.dll
The specified module could not be found.
]
Please follow the following sequence to fix the issue:
Close all open programs.
Rename "C:\Program Files\Common Files\InstallShield\Professional" directory to "C:\Program
Files\Common Files\InstallShield\Professional.old".
Run the "setup.exe" file that is located on the "Companion Photo" directory of the Companion
Photo CD-ROM.
Be careful to run the "setup.exe" of the "Companion Photo" directory of
Important
the CD-ROM and NOT the "setup.exe" file located on the root of the CDROM.
11.2 Issue #2
If you encounter the following InstallShield error message at the beginning of the Companion Photo
setup process:
[
An error (-????: 0x??) has occurred while running the setup.
Please make sure you have finished any previous setup and closes other applications.
If the error still occurs, please contact your vendor: ???
]
Please follow the following sequence to fix the issue:
Reboot PC.
Log in with administrator privileges.
Delete all files and subdirectories in <Windir>\Temp directory.
Delete all files and subdirectories in C:\Documents and Settings\<User>\Local Settings\Temp
directory.
Reboot the PC,
Log in with administrator privileges.
Retry Companion Suite setup.
where:
• <Windir> is the windows directory name (C:\WINNT or C:\WINDOWS for example).
• <User> is the current user (Administrator for example)
- 47 -
Page 50

11.3 Issue #3
The automatic removal of the old version may have no effect. After reboot, the setup still continues
to detect the old version.
Cause:
• The automatic removal process uses files that were copied on hard disk during the
installation of the version to remove.
• For example, if Companion Photo 1.04 is present while trying to install Companion Photo
2.00, Companion Photo 2.00 setup launches Companion Photo 1.04 setup in removal mode
using files that were copied in the hard disk during Companion Photo 1.04 setup.
This issue may occur if, for any reasons, these files are missing or corrupted.
Resolution:
Solution 1:
• From the "Add/Remove Programs" utility from the "Control Panel" select "Companion
Photo" in the programs list and click "Remove",
• Follow the removal process,
• After reboot, relaunch the new setup.
Solution 2:
• Remove the old version from your hard disk using the original CD-ROM of the old version.
• Follow the removal process.
• After reboot, relaunch the new setup.
11.4 Issue #4
Remove a previous version of Companion Photo or Photo Easy is impossible from the "Uninstall"
item of the Start menu or from the Add/Remove programs of the Control Panel.
Description:
• The uninstall program displays a message box indicating that a previous version is already
installed and that this version must be uninstalled before installing the new one.
Resolution:
• Insert the original CD-ROM of the previous version and launch the "setup.exe" program that
is located in the "Companion" directory at the root of the Companion Photo CD-ROM or in
the "Photo Easy" directory at the root of the Photo Easy CD-ROM.
• Then, select "Remove".
- 48 -
 Loading...