


the Smart Scoop
™
BCI600
EN
QUICK GUIDE
DE
KURZANLEITUNG

2
CONTENTS
2 Important Safeguards
5 Features of your new appliance
6 Components
8 Operation
10 Care & Cleaning
11 Troubleshooting
SAGE®
RECOMMENDS
SAFETY FIRST
At Sage® we are very safety
conscious. We design and
manufacture consumer
products with the safety of
you, our valued customer,
foremost in mind. In addition
we ask that you exercise a
degree of care when using
any electrical appliance
and adhere to the following
precautions.
WARNING
To prevent damage to
the compressor and
to ensure maximum
performance, place unit
in the up right position for
12 hours after transit.
NOTE
Always store the ice cream
machine upright and level on its
supporting feet. This will ensure
reliable compressor performance.
IMPORTANT
SAFEGUARDS
WHEN USING ELECTRICAL
APPLIANCES, BASIC SAFETY
PRECAUTIONS SHOULD
ALWAYS BE FOLLOWED,
INCLUDING THE FOLLOWING:
• The full information
book is available at
sageappliances.com
• Before using the rst time
ensure your electricity
supply is the same as
shown on the label on the
underside of the appliance.
• Remove and safely discard
any packaging materials
before rst use.
• To eliminate a choking hazard
for young children, safely
discard the protective cover
tted to the power plug.
• This appliance is for household
use only. Do not use the
appliance for anything other
than its intended use. Do not
use in moving vehicles or boats.

3
EN
WE RECOMMEND SAFETY FIRST
Do not use outdoors.
Misuse may cause injury.
• Fully unwind the power cord
before operating.
• Position the appliance on
a stable, heat resistant, level,
dry surface away from the edge
and do not operate on or near
a heat source such as a hot
plate, oven or gas hob.
• Vibration during operation may
cause the appliance to move.
• Do not let the power cord
hang over the edge of a bench
or table, touch hot surfaces
or become knotted.
• Always ensure the appliance
is turned OFF, unplugged at
the power outlet and has been
allowed to cool before cleaning,
attempting to move or storing.
• Always turn the appliance to
the o position, switch o at the
power outlet and unplug at the
power outlet when the appliance
is not in use.
• Do not use the appliance if the
power cord, plug, or appliance
becomes damaged in any way.
If damaged or maintenance other
than cleaning is required, please
contact Sage Customer Service
or go to sageappliances.com
• Any maintenance other
than cleaning should be
performed by an authorised
Sage service centre.
• Children should not play with
the appliance.
• Cleaning of the appliance
should not be carried out by
children unless they are
8 year or older and supervised.
• The appliance and its
cord should be kept out
of reach of children aged
8 years and younger.
• The installation of a residual
current safety switch is
recommended to provide
additional safety when using
all electrical appliances.
Safety switches with a rated
operating current not more
than 30mA are recommended.
Consult an electrician for
professional advice.
• Always ensure the appliance is
properly assembled before use.
The appliance will not operate
unless properly assembled.
• Do not use the appliance on
a sink drain board.
• Keep hands, ngers, hair,
clothing as well as spatulas
and other utensils away
from moving or rotating
parts during operation.
• Do not use the appliance for
anything other than food and/or
beverage preparation.
4
WE RECOMMEND SAFETY FIRST
• In order to avoid the possible
hazard of the appliance starting
by itself due to inadvertent
resetting of the overload
protection, do not attach an
external switching device (such
as a timer) or connect the
appliance to a circuit that can
regularly switch the appliance
on and o.
• Carefully read all instructions
before operation and save for
future reference.
• The appliance can be used by
persons with reduced physical
or mental capabilities or a lack
of experience and knowledge,
only if they have been given
supervision or instruction
concerning use of the appliance
in a safe way and understand
the hazards involved.
• The appliance can be used by
children aged 8 or older.
• Position the appliance at a
minimum distance of 15cm
away from walls to ensure
proper ventilation.
• Do not cover the air vents when
the ice cream machine is in use.
• Do not place any ingredients
directly into the ice cream
chamber. Place ingredients into
the ice cream bowl only.
• Do not store explosive
substances such as aerosol
cans with a ammable
propellant in this appliance.
• Do not leave the lid o the ice
cream machine for extended
periods of time.
The symbol shown
indicates that this appliance
should not be disposed of
in normal household waste.
It should be taken to a local
authority waste collection centre
designated for this purpose or to
a dealer providing this service.
For more information, please
contact your local council oce.
To protect against electric
shock, do not immerse the
power plug, cord or appliance
in water or any liquid.
SAVE THESE INSTRUCTIONS

5
EN
FEATURES OF YOUR NEW APPLIANCE
Automatic Mode
Automatic mode churns and freezes the
ingredients to the selected/desired consistency.
Select one of the four pre-set functions: Sorbet,
frozen yogurt, gelato or ice cream. Smart Scoop
will beep when ready.
Manual Mode
The time to make ice cream can be manually set
for pre-timed recipes.
Preset Functions
The Sage
®
Smart Scoop™ has four pre-set
functions to pick from. Select one of the following
settings; sorbet, frozen yogurt, gelato, or ice cream.
Pre-Cool
It’s good practice to pre-cool the machine when
preparing your dessert base. This optional function
will cool the machine to approximately -10 to -30°C
and usually take about 5–10 minutes.
Keep Cool
Once the consistency of the dessert has been
achieved, Keep Cool will prevent the mixture from
melting for up to 3 hours. When the machine is in
this mode, note that the compressor will operate
intermittently to ensure consistency of the dessert.
Child Lock
The Sage
®
Smart Scoop™ features a child lock.
Press and hold HOLD for 2 seconds to set the
child lock mode. To exit this mode press and hold
for 2 seconds again.
Add Mix-Ins
Mix-ins such as chocolate chips, fresh fruit and
avours can all be added easily through the ip
back lid. The ice cream machine will beep and
ADD MIX-INS will ash to let you know that it is
time to add your favourite condiments!
Sound
The ice cream machine features an alert beeper
when your ice cream is ready. This alert can be
set between: loud, soft or mute.
6
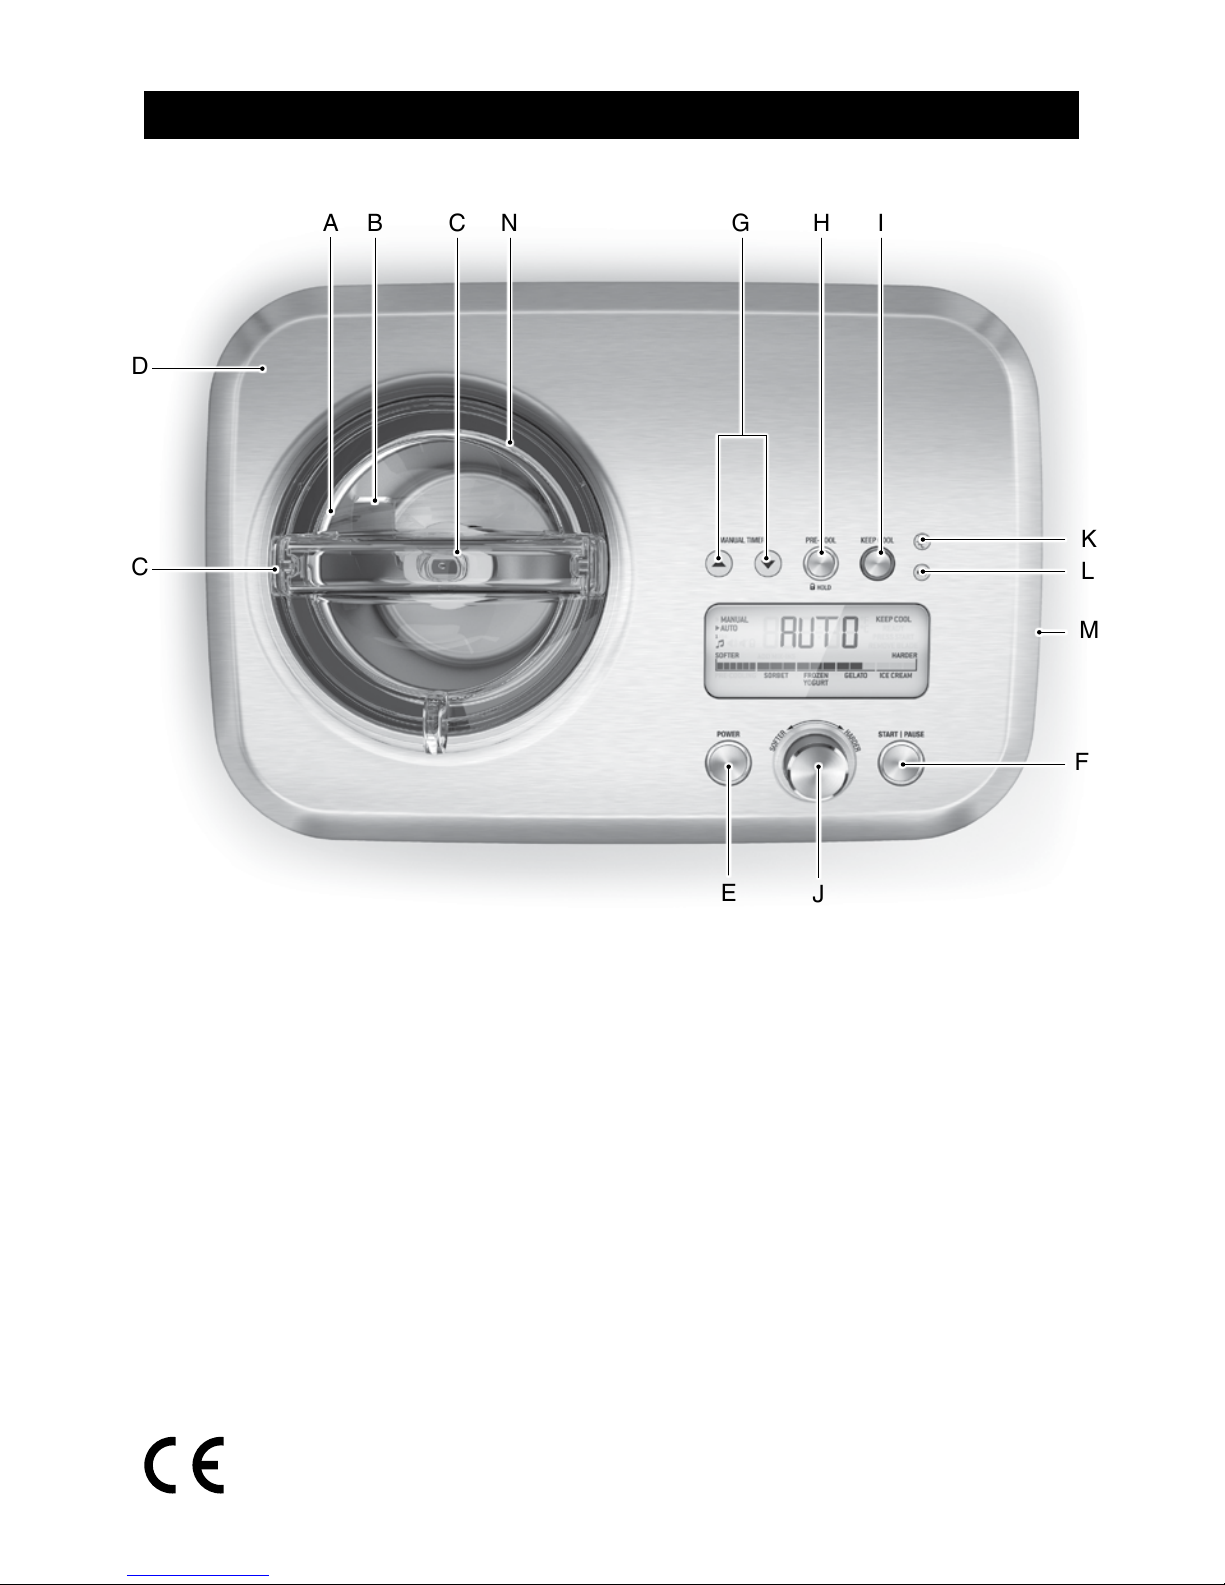
COMPONENTS
A B C G H I
E
J
F
K
L
D
C
N
M
A. Anodised ice cream bowl
Not dishwasher safe and should not be stored
in the freezer.
B. Paddle
C. Lid
D. Stainless steel housing
E. POWER
F. START / PAUSE
G. Manual timer
H. PRE-COOL function
I. Keep cool
J. Auto timer/Hardness selection dial
Will scroll between the following settings:
sorbet, frozen yogurt, gelato, or ice cream.
Rotate the dial left for softer textured desserts
or right for harder textured desserts.
K. TEMP / UNITS button
Allows you to toggle between Celsius and
Fahrenheit.
L. Sound
Select between loud, soft or mute.
M. Handles
N. Bowl chamber
Rating Information
220–240V~ 50Hz 170–200W

7
EN
COMPONENTS
W
Y
X
Z
T
PQ
R
U
V
S O
SMART SCOOP DISPLAY
O. LCD Control Display
P. Hardness selection bar
Q. Progress indicator bar
R. Keep Cool will keep the frozen dessert chilled
and churned for up to 3 hours.
S. Add mix-ins will ash to let you know when
it is time to add your favourite mix-ins.
T. Pre-Cooling
Pre-cool works by reducing the temperature
of the cooling chamber to its optimal operating
temperature before the base mix is introduced.
As the appliance is already cold it will take
less time to freeze. This reduces the churning
required to achieve the dense & creamy
consistency of a great gelato.
U. Press Start ashes when in the PRE-COOL
mode to advise that the machine is chilled
and ready to start churning.
V. Remove blade indicates that the dessert is
nished and the blade can be removed from
the bowl.
ACCESSORIES
W. Anodised ice cream bowl
X. Spatula use to scrape the bowl
Y. Paddle
Z. Bottle brush for easy cleaning of the paddle
and bowl
8
OPERATION
BEFORE FIRST USE
Machine preparation
Remove and discard all labelling and packaging
materials attached to your ice cream machine.
Ensure you have removed all parts and
accessories before discarding the packaging.
Remove the lid, ice cream bowl and paddle from
the machine. Clean these parts and accessories
using warm soapy water and rinse thoroughly.
Ensure all parts are completely dry.
FIRST USE
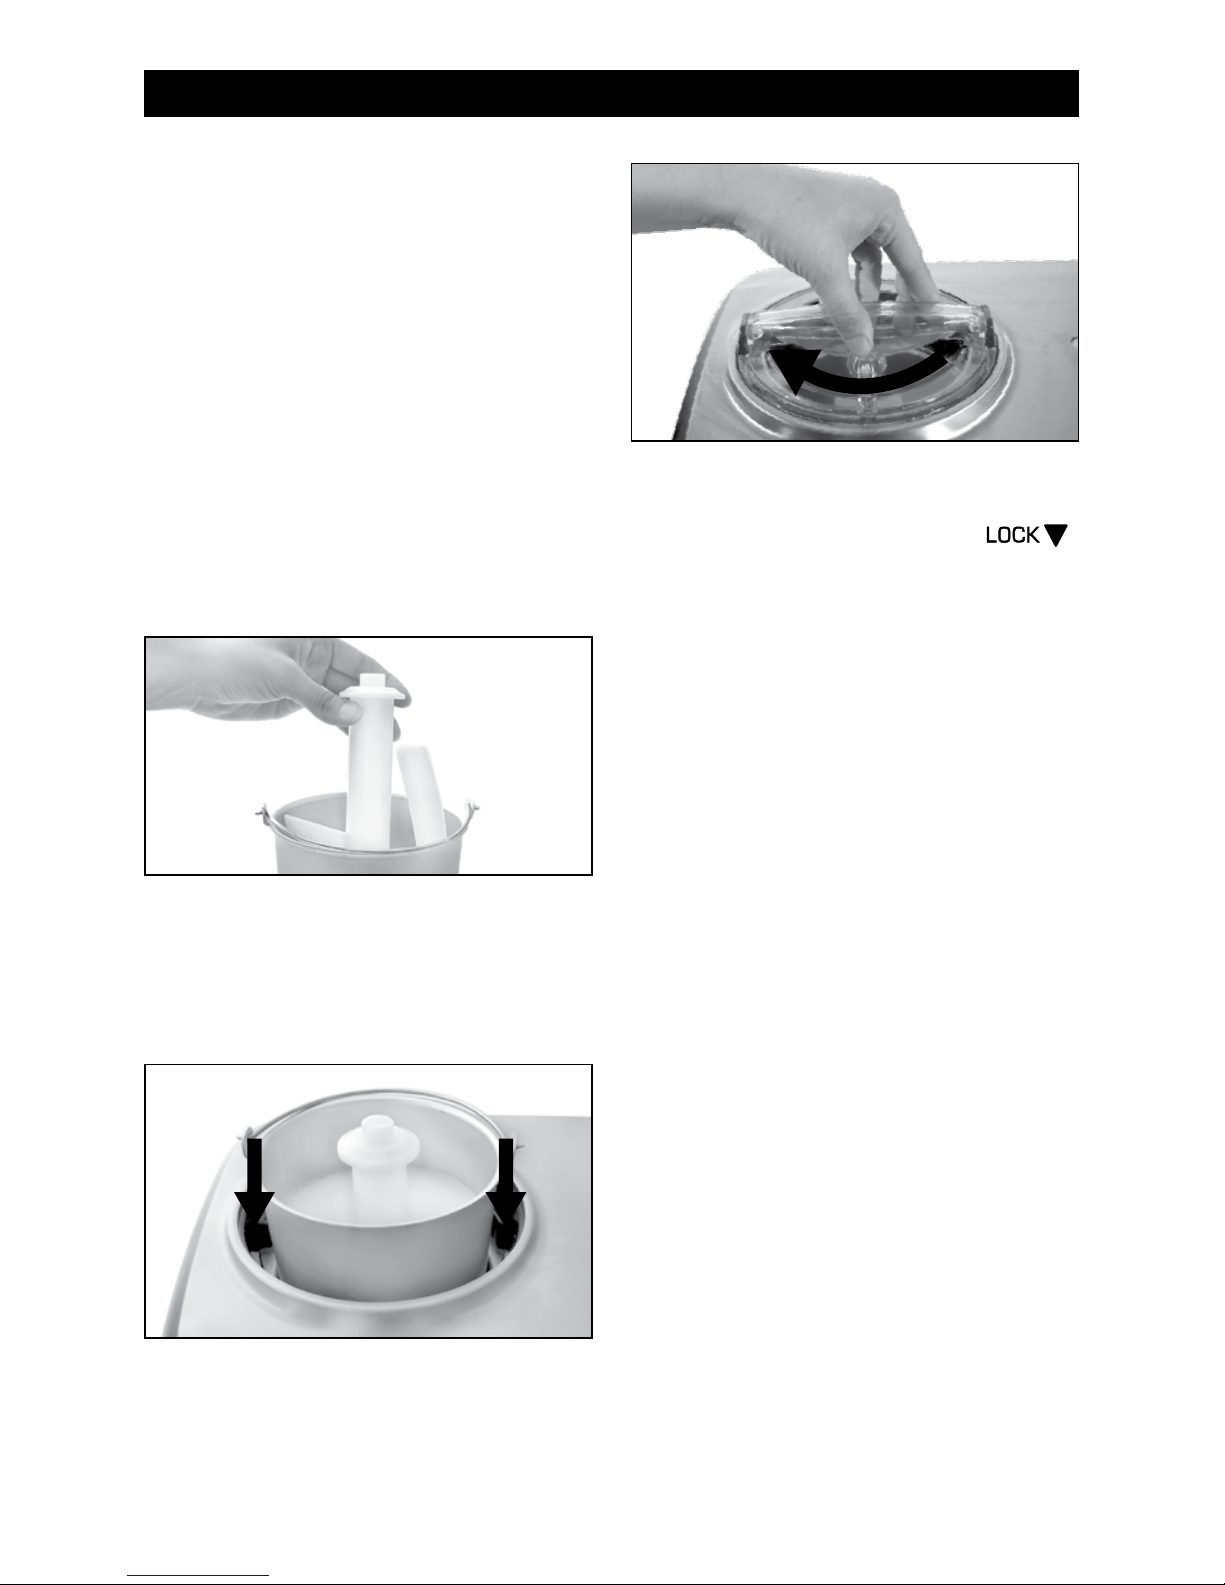
Initial start up
• Place paddle inside the bowl.
• Place ingredients inside the bowl in order
of the recipe.
• Place ice cream bowl into the ice
cream chamber.
• There are 2 grooves in the bowl chamber.
When positioning the bowl, align so that the
bowl handle hinge is positioned within these
grooves.
• Make sure the BOWL CHAMBER and the
exterior of the ice cream bowl is completely
dry before inserting.
1. To lock the lid into position, align the lid
handle to the alignment graphic, rotating
clockwise into the LOCK position.
2. Press the POWER button to turn the
machine on.
3. Rotate the hardness selection dial to your
chosen dessert.
Press the START / PAUSE button to begin
the churning process. The elapsed time will
be displayed on the LCD.
4. The smart scoop will beep when your
dessert has reached its desired consistency.

9
EN
OPERATION
PRE-COOL
NOTE
PRE-COOL can only be operated in the
stand by mode, before pressing start
cancel button.
a) PRE-COOL lowers the temperature of the
ice cream machine to reduce the time it
takes to prepare your dessert. It is optional
and is ideal to use while you are preparing
your ice cream base before churning.
b) To select PRE-COOL function, press the
PRE-COOL button. The light surrounding
the button will turn from white to red to
indicate that the machine is in
PRE-COOL mode.
This mode will ‘PRE-COOL’ the machine to
approximately -10°C to -30°C, taking about
5-10 minutes. READY will illuminate and
PRESS START will ash on the LCD screen
when the ice cream maker has reached
optimal temperature.
The paddle will start turning after 15
minutes has passed, but will not start
making the frozen dessert unless the
START / PAUSE button is pressed.
In this function, the LCD screen will display
the temperature, PRE-COOLING will
illuminate and the progress indicator will
scroll, to let you know that you are in
this mode.
c) PRE-COOL will return to standby after
20 minutes or alternatively can be switched
o either by pressing
PRE-COOL button again or pressing the
START / PAUSE button which will override
the pre-cooling mode.
NOTE
START / PAUSE button will have to be
pressed to start the churning process after
pre-cooling.

10
CARE & CLEANING
Ensure that the ice cream machine is turned o
by pressing the POWER button. The ice cream
machine is o when the START / PAUSE button’s
LED light is no longer illuminating red. Remove
the power plug from the power outlet. Allow the ice
cream machine compressor to cool completely
before disassembling and cleaning.
CLEANING THE STAINLESS
STEEL HOUSING
1. Wipe the exterior of the stainless steel
housing and the LCD screen with a soft
damp cloth. Do not use a dry paper towel
or cloth to clean the LCD screen, or use an
abrasive cleanser or metal scouring pad to
clean any part of the ice cream machine as
these will scratch the surface.
NOTE
Never immerse the stainless steel housing
in water or place in the dishwasher. Take
care not to allow water or cleaning uids to
seep under the buttons or LCD screen on
the control panel.
NOTE
To clean the ice cream chamber ensure that
the unit is at room temperature. Wipe out
with soapy water and a soft damp cloth.
2. If over-spill of cream, milk, chocolate etc.
occurs in the interior chamber, carefully
remove using a soft, damp cloth.
3. Let all surfaces dry thoroughly prior to
inserting the power plug into a power outlet.
CLEANING THE LID
The lid can be cleaned in warm soapy water, using
a soft sponge. Do not use an abrasive cleanser
or metal scouring pad as these will scratch the
surface. Let all surfaces dry thoroughly prior to
placing into the ice cream machine.
CLEANING THE ICE CREAM BOWL
Fill the ice cream bowl up halfway with warm
soapy water. A non-abrasive liquid cleanser or
mild spray solution may be used. Allow to stand
for 10-20 minutes.
NOTE
Ice Cream Bowl is NOT dishwasher safe.
CLEANING THE PADDLE
1. Wash the paddle with warm soapy water.
Using the bottle brush supplied insert this in
the central part of the paddle to clean all the
ice cream out.
2. Let all surfaces dry thoroughly before
reassembling the ice cream machine.
NOTE
Paddle and lid are dishwasher safe on the
top rack ONLY.
STORAGE
Store the appliance in an upright position and level
on it support legs. Do not store anything on top
of the ice cream machine.

11
EN
TROUBLESHOOTING
PROBLEM EASY SOLUTION
Ice cream won’t
freeze
• START / PAUSE button needs to be pressed.
• Alcohol in ice cream? Added too much or too soon.
• Ensure that there is adequate ventilation around the ice
cream maker. We recommend leaving at least 15cm
between the ice cream machine and adjacent hard
surfaces.
Paddle won’t
move
• Paddle won’t move if the pre-cool function is selected for
the rst 5 minutes.
• Check to see if centre spindle is inserted correctly into plastic
paddle; if the centre spindle is not moving then there maybe
an issue with the machine – Call Sage
®
customer service.
Lid will not lock
into position
• Paddle and bowl are not positioned properly – make sure
the handle of the bowl sits within the grooves and paddle
is inserted properly.
Frozen dessert
not frozen in
allocated time
• Dessert mixture was too warm when placed in the ice
cream bowl for time allocated in manual setting.
• Dierent ingredients and quantities will eect freezing time.
Allow for more time if using ingredients like eggs/alcohol.
Can’t remove
bowl insert after
churning
• Ingredients may have spilt over the side of the bowl and into
the chamber. Turn the machine o and let stand for 10–20
minutes to defrost the ice cream. Then remove bowl and
wipe the interior chamber of the ice cream machine.
How do I make
soft serve ice
cream?
• The frozen desserts on the hardness indicator bar are only there
as a guide. Try making your soft serve on the sorbet setting.
You can turn the hardness back up if the ice cream is not hard
enough.
I want my ice
cream even
harder!
• Remove ice cream from ice cream bowl, place in another
air-tight container and place in freezer for a further
1–2 hours or until desired hardness is achieved.
Can I put my
mix-ins into the
custard base?
• Put your mix-ins at the end when prompted.
Note: Often ingredients such as fruits may disintegrate
during the churning process if added to early.

12
TROUBLESHOOTING
PROBLEM EASY SOLUTION
My ice cream
maker seems
to be vibrating
briey?
• The internal compressor is mounted on special rubber
mounts to reduce the noise and vibration during operation.
When cooling is not required the compressor will
automatically turn o and a small amount of vibration for
1–2 seconds is normal.
The controls don’t
work?
• The child lock may be on. Press and hold the
HOLD
button for 2 seconds to disengage
the locking.
The ice cream
maker does not
remember my last
setting?
• The internal computer will only remember the settings once
START / PAUSE has been activated.
The temperature
is reading in
Fahrenheit
• Press
button to change temperature units.
Ice Cream not
churning but the
compressor is on
• The PRE-COOL is activated.
• To preserve the life if the compressor there is a self timer
on the compressor. Please allow for up to 3 minutes for the
compressor to activate.
My ice cream
is icy? Why?
• Some desserts have a higher water content in them which
will make the mixture more icy.
I pulled the ice
cream out of the
freezer and it is
very hard. Why?
• Home made ice cream will always be harder than store
bought ice cream as it contains less air. We suggest
removing the ice cream for about 5–10 minutes before
serving.
Can I place the
ice cream bowl
into the freezer?
• We do not suggest placing the ice cream bowl the freezer
as the ice cream will freeze solid and be very dicult to
scoop out. Do not use any sharp or metal utensils to scoop
the ice cream from the bowl as it may scratch the coating.

13
EN

14
INHALT
HINWEIS
Eismaschine immer auf einer
ebenen Fläche aufrecht auf
den Füßchen stehend lagern,
um zuverlässige Leistung des
Kompressors zu gewährleisten.
WICHTIGE
SICHERHEITS-
HINWEISE
BITTE ALLE ANWEISUNGEN
VOR DEM GEBRAUCH
LESEN UND ZUR
SPÄTEREN BEZUGNAHME
AUFBEWAHREN.
• Die komplette
Informationsbroschüre ist unter
sageappliances.com verfügbar.
• Vor dem ersten Gebrauch
prüfen, dass Ihre Netzspannung
mit der auf dem Etikett
an der Unterseite des
Geräts übereinstimmt.
• Vor dem ersten Gebrauch
alle Verpackungsmaterialien
abnehmen und sicher
entsorgen.
• Schutzhülle am Netzstecker
sicher entsorgen, da
sie für Kleinkinder eine
Erstickungsgefahr
darstellen könnte.
14 Wichtige Sicherheitshinweise
17 Funktionen Ihres neuen Geräts
18 Komponenten
20 Betrieb
22 Reinigung und Pege
23 Problembeseitigung
SAGE® EMPFIEHLT:
SICHERHEIT
GEHT VOR
Wir bei Sage® sind sehr
sicherheitsbewusst.
Beim Design und bei der
Herstellung unserer Geräte
denken wir zu allererst
an Ihre Sicherheit. Darüber
hinaus bitten wir Sie, bei
der Verwendung jedes
Elektrogeräts angemessene
Sorgfalt anzuwenden und
sich an die folgenden
Vorsichtsmaßnahmen
zu halten.
WARNUNG
Für maximale Leistung und
zur Vermeidung von Schäden
am Kompressor Gerät nach
einem Transport 12 Stunden
lang aufrecht stehen lassen.

15
DE
WIR EMPFEHLEN: SICHERHEIT GEHT VOR
• Dieses Gerät ist nur für den
Haushaltsgebrauch bestimmt.
Gerät nur bestimmungsgemäß
verwenden. Nicht in fahrenden
Fahrzeugen oder Booten
verwenden. Nicht im Freien
verwenden. Missbrauch kann
Verletzungen nach sich ziehen.
• Netzkabel vor dem Gebrauch
vollständig entrollen.
• Gerät in sicherem Abstand
von Kanten auf eine stabile,
hitzebeständige, ebene und
trockene Fläche stellen.
Nicht auf oder neben einer
Wärmequelle wie einem Gasoder Elektroherd oder einem
heißen Ofen betreiben.
• Das Gerät kann während
des Betriebs aufgrund von
Vibrationen verrutschen.
• Netzkabel nicht über
Arbeitsplatten oder Tischkanten
hängen lassen, von heißen
Oberächen fern halten,
Kabelgewirr vermeiden.
• Gerät immer AUSschalten,
Netzstecker ziehen und
abkühlen lassen, ehe Sie es
bewegen, reinigen oder lagern.
• Gerät immer ausschalten,
sofern möglich auch
an der Steckdose, und
Netzstecker ziehen, wenn
es nicht in Gebrauch ist.
• Gerät nicht verwenden,
wenn das Netzkabel, der
Netzstecker oder das Gerät
selbst in irgendeiner Weise
beschädigt ist. Wenden
Sie sich bei Schäden
oder zur Wartung (außer
Reinigung) bitte an den SageKundendienst oder besuchen
Sie sageappliances.com
• Alle Wartungsarbeiten außer
Reinigung nur von autorisierten
Sage-Kundendienststellen
vornehmen lassen.
• Kinder nicht mit dem
Gerät spielen lassen.
• Reinigung des Geräts nicht
von Kindern unter 8 Jahren
und nur unter Aufsicht
vornehmen lassen.
• Gerät und Netzkabel für
Kinder bis zu 8 Jahren
unzugänglich aufbewahren.
• Die Installation eines Schutzoder Sicherheitsschalters
wird bei der Verwendung
von Elektrogeräten als
zusätzliche Schutzmaßnahme
empfohlen. Es wird ein
Sicherheitsschalter mit maximal
30 mA Nennleistung empfohlen.
Fachgerechte Beratung erhalten
Sie von Ihrem Elektriker.

16
WIR EMPFEHLEN: SICHERHEIT GEHT VOR
• Gerät nur nutzen, wenn es
richtig zusammengesetzt ist.
Das Gerät funktioniert nur, wenn
es richtig zusammengesetzt ist.
• Gerät nicht auf der Abtropäche
Ihrer Spüle verwenden.
• Hände, Finger, Haare und
Bekleidung, Schaber und
andere Utensilien während des
Betriebs von beweglichen oder
rotierenden Teilen fern halten.
• Gerät nur bestimmungsgemäß
zur Zubereitung von Speisen
und/oder Getränken verwenden.
• Zur Vermeidung des
Risikos, dass sich das
Gerät aufgrund einer
unbeabsichtigt zurückgesetzten
Überlastsicherung selbst
in Betrieb setzt, keine
externen Schalter (z. B. eine
Zeituhr) anschließen und
das Gerät nicht an einen
Stromkreis anschließen,
der das Gerät regelmäßig
aus- und einschalten kann.
• Alle Anweisungen vor
dem Gebrauch sorgfältig
lesen und zur späteren
Bezugnahme aufbewahren.
• Dieses Gerät kann von
Personen mit eingeschränkten
körperlichen, sensorischen
oder geistigen Fähigkeiten
oder mit mangelnder Erfahrung
und fehlenden Kenntnissen
genutzt werden, sofern sie
beaufsichtigt werden oder in
den sicheren Gebrauch des
Geräts eingewiesen wurden
und sich der entsprechenden
Risiken bewusst sind.
• Dieses Gerät kann von
Kindern im Alter ab 8 Jahren
genutzt werden.
• Zwischen dem Gerät und
Wänden mindestens
15cm Abstand halten, um
ausreichende Luftzirkulation
zu gewährleisten.
• Belüftungsschlitze nicht
abdecken, wenn die
Eismaschine in Gebrauch ist.
• Keine Zutaten direkt in die
Gefrierkammer geben. Zutaten
nur in den Eisbehälter geben.
• In diesem Gerät keine
explosiven Stoe wie
Spraydosen mit entammbarem
Treibmittel aufbewahren.
• Deckel der Eismaschine
nicht über längere Zeiträume
hinweg abgenommen lassen.
ANWEISUNGEN BITTE AUFBEWAHREN

17
DE
FUNKTIONEN IHRES NEUEN GERÄTS
Automatik-Modus
Im Automatik-Modus werden die Zutaten
bis zur gewählten/gewünschten Konsistenz
gerührt und gefroren. Wählen Sie eine der vier
voreingestellten Funktionen: Sorbet, Joghurteis,
Gelato oder Eiscreme. Die Smart Scoop piepst,
sobald das Produkt fertig ist.
Manueller Modus
Hier wird die Zubereitungszeit für Eisprodukte
manuell für bestimmte Rezepte eingestellt.
Voreingestellte Funktionen
Die Sage
®
Smart Scoop™ bietet vier
voreingestellte Funktionen zur Auswahl: Wählen
Sie eine der vier voreingestellten Funktionen:
Sorbet, Joghurteis, Gelato oder Eiscreme.
Pre-Cool (Vorkühlung)
Eine Vorkühlung des Geräts, während Sie die
Grundzutaten vorbereiten, ist hilfreich. Diese
optionale Funktion kühlt das Gerät in ungefähr
5–10 Minuten auf etwa -10 bis 30 °C herunter.
Kühlhaltefunktion
Sobald das Produkt die richtige Konsistenz
erreicht hat, verhindert die Kühlhaltefunktion
bis zu 3 Stunden lang ein Schmelzen.
Bitte beachten, dass in diesem Modus der
Kompressor gelegentlich aktiviert wird, um die
richtige Konsistenz des Produkts zu bewahren.
Kindersicherung
Die Sage
®
Smart Scoop™ verfügt über
eine Kindersicherung. Zur Aktivierung der
Kindersicherung HOLD-Taste 2 Sekunden
lang gedrückt halten. Zur Deaktivierung der
Kindersicherung HOLD-Taste wieder
2 Sekunden lang gedrückt halten.
Add Mix-Ins (Sonderzutaten hinzufügen)
Sonderzutaten wie Schokoladensplitter,
frisches Obst und Geschmackszutaten lassen
sich einfach durch den hochklappbaren
Deckel hinzufügen. Die Eismaschine
piepst und die Anzeige „ADD MIX-INS“
(Sonderzutaten hinzufügen) blinkt um
Sie darauf hinzuweisen, wenn es Zeit ist,
Ihre Lieblingszutaten hinzuzufügen.
Akustikmeldung
Die Eismaschine gibt durch eine
Akustikmeldung an, wenn Ihr Eis fertig ist. Diese
Akustikmeldung kann auf laut, leise oder stumm
geschaltet werden.
Dieses Symbol zeigt,
dass das Gerät nicht im
normalen Hausmüll
entsorgt werden sollte.
Es sollte stattdessen bei einem
entsprechenden kommunalen
Wertstohof oder Fachhändler
zur Entsorgung abgegeben
werden. Weitere Einzelheiten
erfahren Sie von Ihrer
Kommunalbehörde.
Zum Schutz gegen
Stromschlag Netzstecker,
Netzkabel oder Gerät nicht
in Wasser oder sonstige
Flüssigkeiten tauchen.

18
KOMPONENTEN
A B C G H I
E
J
F
K
L
D
C
N
M
A. Eloxierter Eisbehälter
Nicht spülmaschinenfest. Nicht im
Gefrierfach aufbewahren.
B. Paddel
C. Deckel
D. Edelstahlgehäuse
E. POWER-Taste
F. START / PAUSE-Taste
G. Manueller Timer
H. Funktion PRE-COOL (Vorkühlung)
I. Kühlhaltefunktion
J. Automatik-Timer / Drehwähler für Konsistenz
Auswahl aus einer der folgenden Einstellungen:
Sorbet, Joghurteis, Gelato oder Eiscreme.
Drehwähler für weichere Konsistenz nach links,
für festere Konsistenz nach rechts drehen.
K. Taste TEMP / UNITS
(Temperatur / Maßeinheiten)
Umschaltung zwischen Celsius und Fahrenheit.
L. Akustikmeldung
Umschaltung zwischen laut, leise oder stumm.
M. Grie
N. Gefrierkammer
Leistungsangaben
220–240V~ 50Hz 170–200W

19
DE
KOMPONENTEN
W
Y
X
Z
T
PQ
R
U
V
S O
SMART SCOOP-DISPLAY
O. LCD-Anzeige
P. Balken für Konsistenzanzeige
Q. Balken für Fortschrittsanzeige
R. Kühlhaltefunktion – kühlt und rührt das
zubereitete Produkt bis zu 3 Stunden lang.
S. Anzeige „ADD MIX-INS“ (Sonderzutaten
hinzufügen) blinkt, wenn es Zeit ist, Ihre
Lieblingszutaten hinzuzufügen.
T. Pre-Cooling (Vorkühlung)
Die Vorkühlung senkt die Temperatur
in der Gefrierkammer auf die optimale
Betriebstemperatur ab, ehe die Grundzutaten
eingefüllt werden. Da das Gerät dann
bereits kalt ist, gefrieren die Zutaten
schneller. Dies verringert die für die cremige,
dichte Konsistenz eines hervorragenden
Gelato benötigte Rührdauer.
U. Die Anzeige „Press Start“ (Start drücken) blinkt
im Modus PRE-COOL (Vorkühlung), wenn die
Eismaschine gekühlt und bereit ist, mit dem
Rühren zu beginnen.
V. Die Anzeige „Remove Blade“ (Messer
abnehmen) bedeutet, dass die Zubereitung
fertig ist und das Messer aus dem Behälter
entnommen werden kann.
ZUBEHÖR
W. Eloxierter Eisbehälter
X. Spatel zum Ausschaben des Behälters
Y. Paddel
Z. Flaschenbürste zur einfachen Reinigung von
Paddel und Behälter

20
BETRIEB
VOR DEM ERSTEN GEBRAUCH
Vorbereitung der Maschine
Alle Verpackungsmaterialien und Etiketten
von Ihrer Eismaschine abnehmen. Vor dem
Entsorgen der Verpackung prüfen, dass alle
Teile und Zubehörteile entnommen sind. Deckel,
Eisbehälter und Paddel aus der Maschine
nehmen. Diese Teile und Zubehörteile mit
warmem Spülwasser waschen und gründlich
spülen. Prüfen, dass alle Teile komplett
trocken sind.
ERSTE VERWENDUNG
Erster Start
• Paddel in den Behälter einsetzen.
• Zutaten in der im Rezept angegebenen
Reihenfolge in den Behälter geben.
• Eisbehälter in die Gefrierkammer einsetzen.
• Die Gefrierkammer hat 2 Rillen. Eisbehälter
so einsetzen, dass das Scharnier des
Henkels in diese Rillen passt.
• Vor dem Einsetzen prüfen, dass die
GEFRIERKAMMER und die Außenseite
des Eisbehälters komplett trocken sind.
1. Zum Einrasten des Deckels den Deckelgri
an den Markierungen ausrichten und
im Uhrzeigersinn in die Position LOCK
(Verriegeln) drehen.
2. Maschine durch Betätigung der POWERTaste einschalten.
3. Drehwähler für Konsistenz auf die
gewünschte Einstellung drehen. Taste
START / PAUSE drücken, um den
Rührvorgang zu starten. Die abgelaufene
Zeit wird auf der LCD-Anzeige angezeigt.
4. Die Smart Scoop piepst, sobald die
Zubereitung die gewünschte Konsistenz
erreicht hat.

21
DE
BETRIEB
PRE-COOL (VORKÜHLUNG)
HINWEIS
Die Funktion PRE-COOL (Vorkühlung)
kann nur im Standby-Modus aktiviert
werden, ehe die Taste START / CANCEL
(Start / Abbruch) betätigt wurde.
A. PRE-COOL senkt die Temperatur
der Eismaschine ab, um die
Zubereitungszeit zu verkürzen.
Diese optionale Funktion ideal,
während Sie Ihre Grundzutaten
vor dem Rühren vorbereiten.
B. Zur Auswahl der Funktion PRE-COOL
die Taste PRE-COOL (Vorkühlung)
drücken. Die Hinterleuchtung der
Taste wechselt von weiß auf rot um
anzuzeigen, dass die Maschine jetzt
im Modus PRE-COOL ist. In diesem
Modus wird die Maschine in ungefähr
5–10 Minuten auf etwa -10 °C bis -30°C
vorgekühlt. Auf der LCD-Anzeige
leuchten READY (Fertig) und PRESS
START (Start drücken) auf, sobald die
Eismaschine die optimale Temperatur
erreicht hat. Das Paddel beginnt
sich nach 15 Minuten zu drehen,
aber die Maschine beginnt erst mit
der Eiszubereitung, wenn die Taste
START / PAUSE gedrückt wird. In
dieser Funktion zeigt die LCD-Anzeige
die Temperatur. PRE-COOLING
(Vorkühlung) leuchtet auf und die
Fortschrittsanzeige läuft durch, um
diesen Modus anzuzeigen.
C. PRE-COOL (Vorkühlung) wird nach
20 Minuten automatisch in den
Standby-Modus umgeschaltet. Die
Funktion kann alternativ durch erneute
Betätigung der Taste PRE-COOL
deaktiviert werden; Betätigung der
Taste START / PAUSE löst die Funktion
Vorkühlung ab.
HINWEIS
START / PAUSE muss gedrückt werden,
um nach der Vorkühlung den Rührvorgang
zu starten.

22
REINIGUNG UND PFLEGE
Eismaschine durch Betätigung der POWER-Taste
ausschalten. Das Gerät ist ausgeschaltet, wenn
die LED-Leuchte der START / PAUSE-Taste nicht
mehr rot leuchtet. Netzstecker aus der Steckdose
ziehen. Kompressor der Eismaschine vor dem
Auseinandernehmen und der Reinigung völlig
abkühlen lassen.
REINIGUNG DES
EDELSTAHLGEHÄUSES
1. Außenseite des Edelstahlgehäuses und
LCD-Anzeige mit einem weichen, feuchten
Tuch abwischen. Zur Reinigung der LCDAnzeige keine trockenen Papiertücher
oder Tücher, zur Reinigung der gesamten
Eismaschine keine scheuernden Mittel oder
Metall-Scheuerschwämme verwenden,
da diese Oberächen verkratzen.
HINWEIS
Edelstahlgehäuse nie in Wasser eintauchen
oder in der Spülmaschine waschen. Kein
Wasser oder üssige Reinigungsmittel unter
die Tasten oder LCD-Anzeige im Bedienfeld
geraten lassen.
HINWEIS
Eismaschine nur reinigen, wenn das Gerät
Zimmertemperatur hat. Mit Spülwasser und
einem weichen, feuchten Tuch abwischen.
2. In die Gefrierkammer ausgelaufene Sahne,
Milch, Schokolade usw. sorgfältig mit einem
weichen, feuchten Tuch entfernen.
3. 3. Alle Oberächen gründlich trocknen
lassen; Netzstecker erst dann wieder
an eine Steckdose anschließen.
REINIGUNG DES DECKELS
Der Deckel kann in warmem Spülwasser mit
einem weichen Schwamm gereinigt werden.
Keine scheuernden Mittel oder MetallScheuerschwämme verwenden, da diese
Oberächen verkratzen. Alle Oberächen vor
dem Wiedereinsetzen in das Gerät gründlich
trocknen lassen.
REINIGUNG DES EISBEHÄLTERS
Eisbehälter zur Hälfte mit warmem Spülwasser
füllen. Ein nicht scheuernder Flüssigreiniger oder
ein mildes Reinigungsspray können verwendet
werden. 10–20 Minuten lang stehen lassen.
HINWEIS
Der Eisbehälter ist NICHT
spülmaschinenfest.
REINIGUNG DES PADDELS
1. Paddel mit warmem Spülwasser
waschen. Beiliegende Flaschenbürste
in die Mitte des Paddels einschieben,
um alle Eisreste zu entfernen.
2. Alle Oberächen vor dem Zusammensetzen
des Geräts gründlich trocknen lassen.
HINWEIS
Das Paddel und der Deckel sind NUR in
der oberen Schublade spülmaschinenfest.
LAGERUNG
Gerät aufrecht und eben auf seinen Füßchen
stehend lagern. Nichts obenauf legen.

23
DE
PROBLEMBESEITIGUNG
PROBLEM EINFACHE LÖSUNG
Eis gefriert nicht
• Taste START / PAUSE muss gedrückt werden.
• Alkohol in der Zubereitung? Zu viel oder zu früh hinzugefügt.
• Ausreichende Luftzufuhr um die Eismaschine sicherstellen. Es wird
empfohlen, zwischen der Eismaschine und harten Oberächen um
das Gerät herum mindestens 15cm Abstand zu lassen.
Paddel bewegt
sich nicht
• Das Paddel bewegt sich in den ersten 5 Minuten nach der
Aktivierung der Vorkühlung nicht.
• Prüfen, ob die Spindel in der Mitte korrekt in das Kunststopaddel
eingesetzt ist; bewegt sich diese Spindel nicht, kann ein Fehler am
Gerät vorliegen. Wenden Sie sich an den Sage
®
-Kundendienst.
Deckel rastet
nicht ein
• Paddel und Behälter sind nicht korrekt eingesetzt. Prüfen, dass der
Henkel des Behälters in den Rillen sitzt und das Paddel korrekt
eingesetzt ist.
Produkt gefriert
nicht in der
vorgesehenen Zeit
• Zutaten waren beim Hinzufügen zum Behälter für die manuell
eingestellte Dauer zu warm.
• Verschiedene Zutaten und Mengen wirken sich auf die
Gefrierdauer aus. Bei Verwendung von Zutaten wie Eiern oder
Alkohol längere Gefrierdauer vorsehen.
Behälter lässt sich
nach dem Rühren
nicht entnehmen
• Zutaten sind eventuell über den Behälter in die Gefrierkammer
ausgelaufen. Maschine ausschalten und zum Abtauen
10–20 Minuten stehen lassen; Behälter dann abnehmen
und Gefrierkammer der Eismaschine innen auswischen.
Wie mache ich
Softeis?
• Die auf der Balkenanzeige für die Konsistenz angegebenen
Eiszubereitungen dienen nur als Orientierung. Versuchen Sie,
Softeis mit der Einstellung Sorbet herzustellen. Ist das Eis nicht
hart genug, Konsistenz härter einstellen.
Ich möchte noch
härteres Eis!
• Eis aus dem Eisbehälter entnehmen, in einen anderen luftdichten
Behälter umfüllen und für weitere 1–2 Stunden oder bis zur
gewünschten Konsistenz ins Gefrierfach legen.
Kann ich meine
Sonderzutaten
direkt in die
Grundzutaten
mischen?
• Sonderzutaten gegen Ende zugeben, wenn Sie dazu aufgefordert
werden. Hinweis: Zutaten wie Obst lösen sich während des
Rührvorgangs oft auf, wenn sie zu früh zugegeben werden.

24
PROBLEMBESEITIGUNG
PROBLEM EINFACHE LÖSUNG
Meine Eismaschine
vibriert kurzzeitig
• Der eingebaute Kompressor ist speziell gummigelagert,
um Geräusche und Vibrationen während des Betriebs möglichst
gering zu halten. Wenn keine Kühlung erforderlich ist, schaltet sich
der Kompressor automatisch aus. Eine kurzzeitige Vibration von
1–2 Sekunden ist in diesem Fall normal.
Die Steuerelemente
funktionieren nicht
• Eventuell ist die Kindersicherung aktiviert. HOLD-
Taste 2
Sekunden lang gedrückt halten, um die Sicherung zu deaktivieren.
Die Eismaschine
hat meine letzte
Einstellung nicht
gespeichert
• Der interne Speicher merkt sich nur die Einstellungen, die nach
Betätigung der Taste START / PAUSE vorgenommen wurden.
Die
Temperaturanzeige
zeigt Fahrenheit
• Taste
TEMP / UNITS drücken, um die Temperatureinheit
zu ändern.
Eis wird nicht
gerührt, aber der
Kompressor ist ein
• Funktion PRE-COOL (Vorkühlung) ist aktiviert.
• Der Kompressor verfügt für eine möglichst lange Lebensdauer über
eine Zeituhr. Seine Aktivierung kann bis zu 3 Minuten dauern.
Mein Eis hat
Kristalle. Warum?
• Manche Zubereitungen haben einen höheren Wasseranteil,
der zur Kristallbildung führen kann.
Mein Eis ist sehr
hart, wenn ich es
aus dem Gefrierfach
nehme. Warum?
• Selbstgemachtes Eis ist immer fester als gekauftes Eis, weil es
weniger Luft enthält. Wir empfehlen, die Zubereitung etwa 5–10
Minuten vor dem Servieren aus dem Gefrierfach zu nehmen.
Kann ich den
Eisbehälter ins
Gefrierfach legen?
• Wir empfehlen nicht, den Eisbehälter ins Gefrierfach zu legen,
da das Eis dann hart gefriert und schwierig zu entnehmen ist.
Zubereitung nicht mit scharfen oder Metallutensilien aus dem
Behälter entnehmen, da dies die Beschichtung verkratzen kann.

25
DE
NOTES / NOTIZEN

NOTES / NOTIZEN
26

NOTES / NOTIZEN
27

www.sageappliances.com
UK IE
BRG Appliances Limited
Unit 3.2, Power Road Studios, 114 Power Road, London, W4 5PY
Freephone (UK Landline): 0808 178 1650
Mobile Calls (National Rate): 0333 0142 970
DE AT
Sage Appliances GmbH
Johannstraße 37, 40476 Düsseldorf, Deutschland
Für den Kundendienst besuchen
Sie bitte www.sageappliances.com
Registered in Germany No. HRB 81309 (AG Düsseldorf).
Registered in England & Wales No. 8223512.
Aufgrund kontinuierlicher Produktverbesserungen kann das auf dieser Verpackung dargestellte Produkt leicht vom tatsächlichen Produkt abweichen.
Due to continued product improvement, the products illustrated or photographed in this document may vary slightly from the actual product.
Copyright BRG Appliances 2017.
BCI600 A17
 Loading...