

Sage Smart Grinder Pro BCG820 Quick Manual
the Smart Grinder
™
Pro
BCG820
EN
QUICK GUIDE
DE
KURZANLEITUNG
FR
GUIDE RAPIDE
IT
GUIDA RAPIDA
NL
SNELSTARTGIDS

2
CONTENTS
SAGE®
RECOMMENDS
SAFETY FIRST
At Sage® we are very safety
conscious. We design and
manufacture appliances with
your safety foremost in mind.
In addition, we ask that you
exercise a degree of care
when using any electrical
appliance and adhere to the
following precautions.
IMPORTANT
SAFEGUARDS
READ ALL INSTRUCTIONS
BEFORE USE AND SAVE
FOR FUTURE REFERENCE
• A downloadable version of this
document is also available at
sageappliances.com
• Before using the rst time
ensure your electricity supply
is the same as shown on
the label on the underside of
the appliance.
• Remove and safely discard
any packaging materials
before rst use.
• To eliminate a choking hazard
for young children, safely
discard the protective cover
tted to the power plug.
• This appliance is for household
use only. Do not use the
appliance for anything other
than its intended use. Do not
use in moving vehicles or boats.
Do not use outdoors. Misuse
may cause injury.
• Fully unwind the power cord
before operating.
• Position the appliance on a
stable, heat resistant, level, dry
surface away from the edge and
do not operate on or near a heat
source such as a hot plate, oven
or gas hob.
• Do not let the power cord hang
over the edge of a bench or
table, touch hot surfaces or
become knotted.
• Do not leave the appliance
unattended when in use.
• Always ensure the appliance
is turned OFF, unplugged at
the power outlet and has been
2 Sage® Recommend Safety First
5 Getting To Know Your New Appliance
6 Operating Your New Appliance
11 Care, Cleaning & Storage
12 Troubleshooting

3
EN
allowed to cool before cleaning,
attempting to move or storing.
• Always turn the appliance to
the OFF position, switch o at
the power outlet and unplug
at the power outlet when the
appliance is not in use.
• Do not use the appliance if the
power cord, plug, or appliance
becomes damaged in any way.
If damaged and maintenance
other than cleaning is
required please contact Sage
Customer Service or go to
sageappliances.com
• Any maintenance other than
cleaning should be performed
by an authorised Sage®
service centre.
• Children should not play with
the appliance.
• Cleaning of the appliance
should not be carried out by
children unless they are 8 years
or older and supervised.
• The appliance and its cord
should be kept out of reach
of children aged 8 years
and younger.
• The installation of a residual
current safety switch is
recommended to provide
additional safety when using
all electrical appliances.
Safety switches with a rated
operating current not more
than 30mA are recommended.
Consult an electrician for
professional advice.
• Do not use attachments
other than those provided
with the appliances.
• Do not attempt to operate
the appliance by any method
other than those described
in this booklet.
• Do not move the appliance
whilst in operation.
• Do not touch hot surfaces.
Allow the appliance to cool
down before moving or
cleaning any parts.
• This appliance shall not be
used by children. Keep the
appliance and its cord out
of reach of children.
• This appliance can be used by
persons with reduced physical,
sensory or mental capabilities
or a lack of experience and
knowledge, only if they have
been given supervision or
instruction concerning use
of the appliance in a safe
way and understand the
hazards involved.
• Do not operate the grinder
without the hopper lid in
position. Keep ngers,
hands, hair, clothing and
utensils away from the
hopper during operation.
WE RECOMMEND SAFETY FIRST
4
WE RECOMMEND SAFETY FIRST
The symbol shown
indicates that this appliance
should not be disposed of
in normal household waste.
It should be taken to a local
authority waste collection centre
designated for this purpose or to
a dealer providing this service.
For more information, please
contact your local council oce.
To protect against electric
shock, do not immerse the
power plug, cord or appliance in
water or any liquid.
FOR HOUSEHOLD USE ONLY
SAVE THESE INSTRUCTIONS

5
EN
C
B
D
E
F
G
H
M
L
O
N
A
K
J
I
Oi
Oii
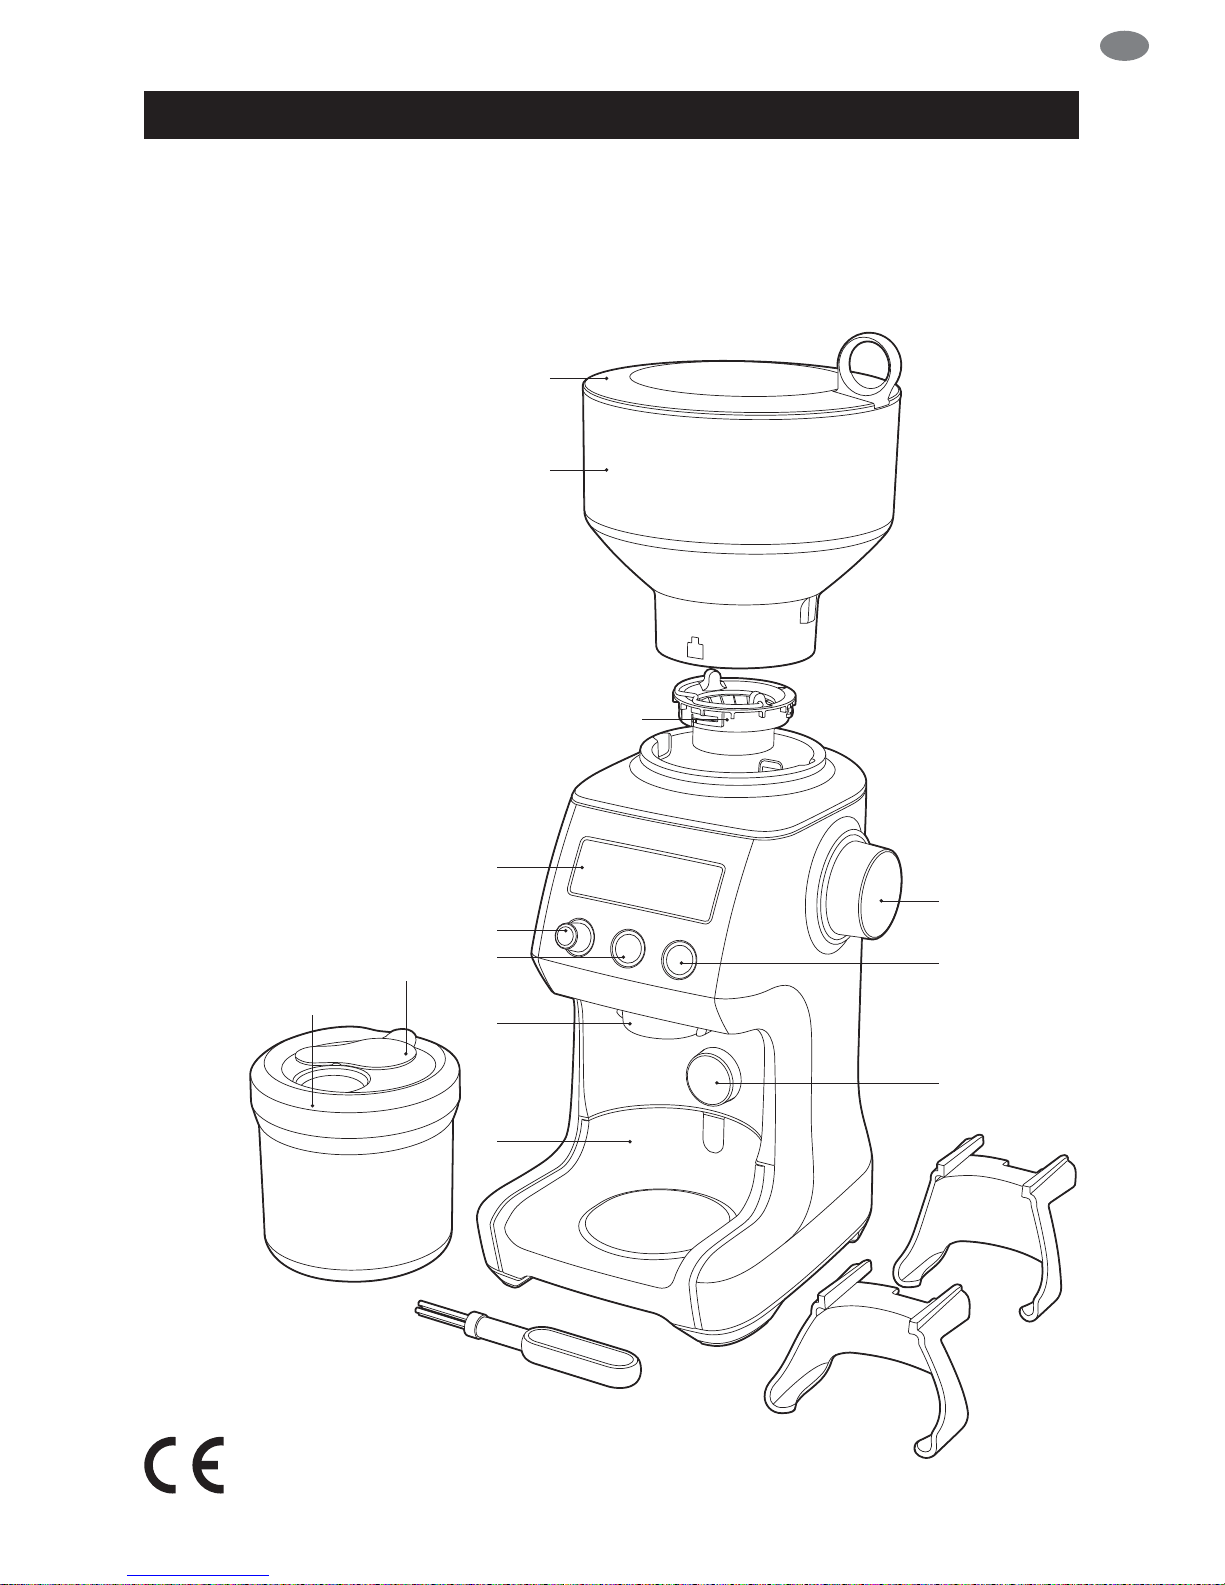
GETTING TO KNOW YOUR NEW APPLIANCE
A. Bean Hopper Lid
B. Bean Hopper
C. Hardened Stainless Steel Conical Burrs
D. Backlit LCD Screen
E. GRIND AMOUNT / PROGRAM Dial
F. SHOTS / CUPS Button
G. Grind Outlet
H. Grind Tray
I. Grind Size Dial
J. START / PAUSE / CANCEL Button
K. Portalter Activation Switch
ACCESSORIES
L. Portalter Cradle 50–54mm
M. Portalter Cradle 58mm
N. Conical Burr Cleaning Brush
O. Grinds Container
Oi - Container Cap
Oii - Container Lid
Rating Information
220–240V ~ 50-60Hz 165W

6
BEFORE FIRST USE
Remove and safely discard all promotional
labels and packing materials attached to
your Sage® product.
Wash hopper, cradles, grind container, container
lid and cleaning brush in warm soapy water and
dry thoroughly. Wipe exterior of grinder with a
soft damp cloth and dry thoroughly. Place grinder
on at level surface and plug power cord into
220–240V outlet and switch Power ‘ON’.
ENERGY SAVING FEATURE
The grinder will automatically switch o if not
used after 5 minutes.
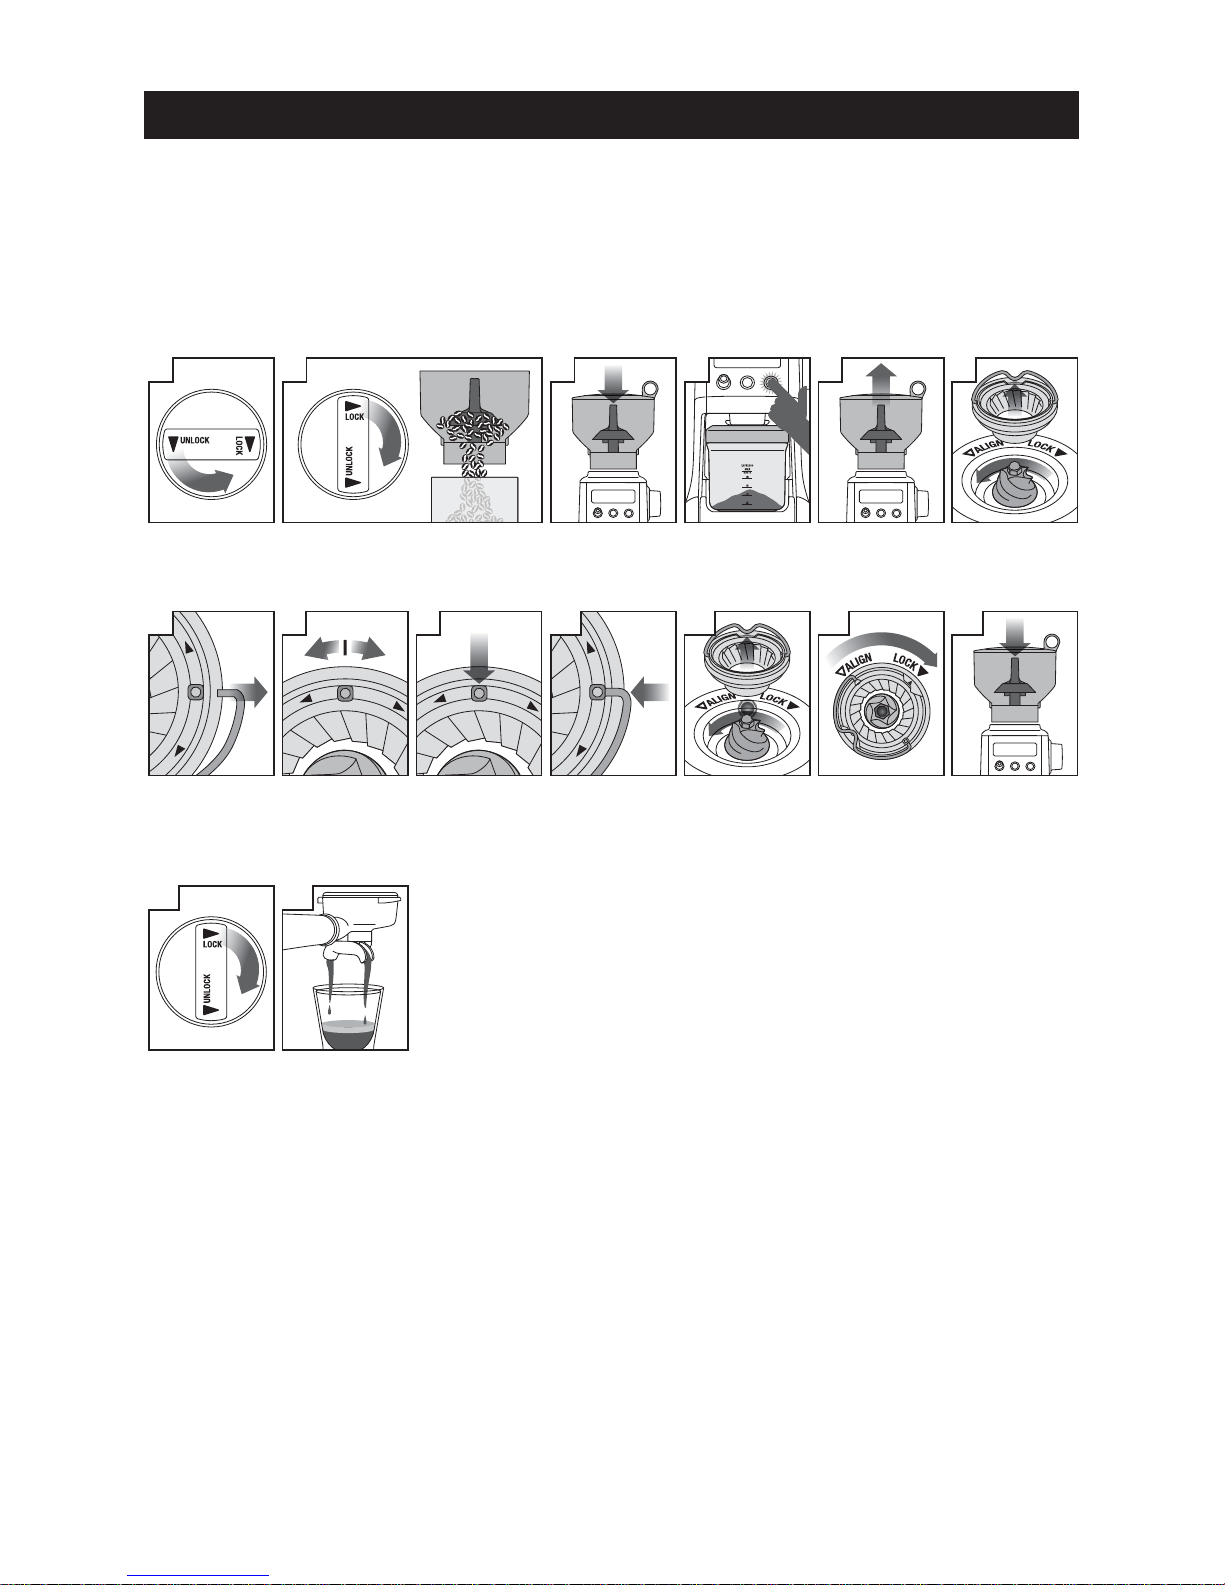
ASSEMBLING YOUR SAGE SMART
GRINDER™ PRO
Bean Hopper
Align tabs on the base of the bean hopper
and insert hopper into position. Turn the
bean hopper dial 90° to lock into position.
Fill with fresh coee beans and secure lid
on top of bean hopper.
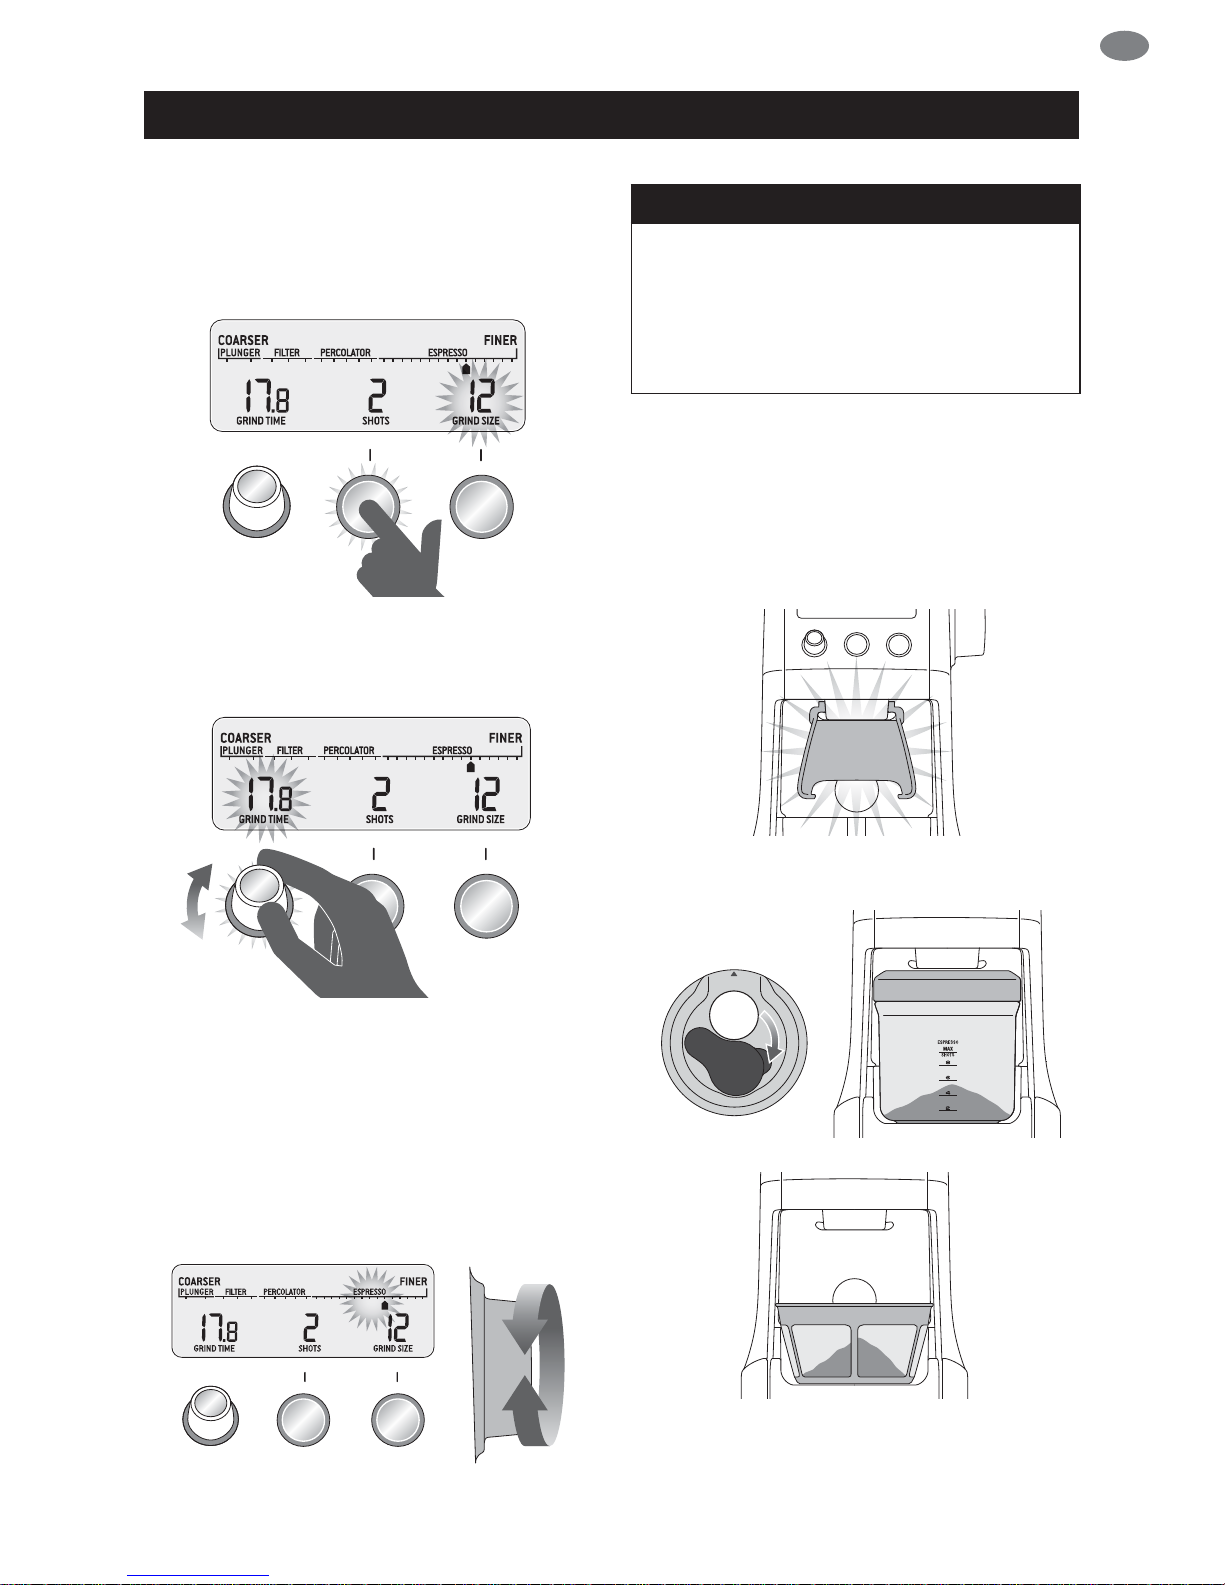
GRINDING FOR ESPRESSO
COFFEE
Use single wall lter baskets when grinding fresh
coee beans. Use the ner 1–30 settings in the
ESPRESSO range.
STEP 1:
Insert the appropriate portalter cradle size. Insert
your portalter into the cradle.
PUSH
50-54mm
58mm
CRADLES
NOTE
Maximum number of shots with the cradle
inserted is 2.
PLUNGER
1 UP TO 12 CUPS
BREW METHOD
GRIND SETTING
GRIND SIZE
AMOUNT
FINE
1-30
1 UP TO 8 SHOTS
ESPRESSO DRIP FILTER
MEDIUM COARSE
46-54
COARSE
55-60
1 UP TO 12 CUPS
PERCOLATOR
31-45
1 UP TO 12 CUPS
MEDIUM
COFFEE CHART
OPERATING YOUR NEW APPLIANCE
7
EN
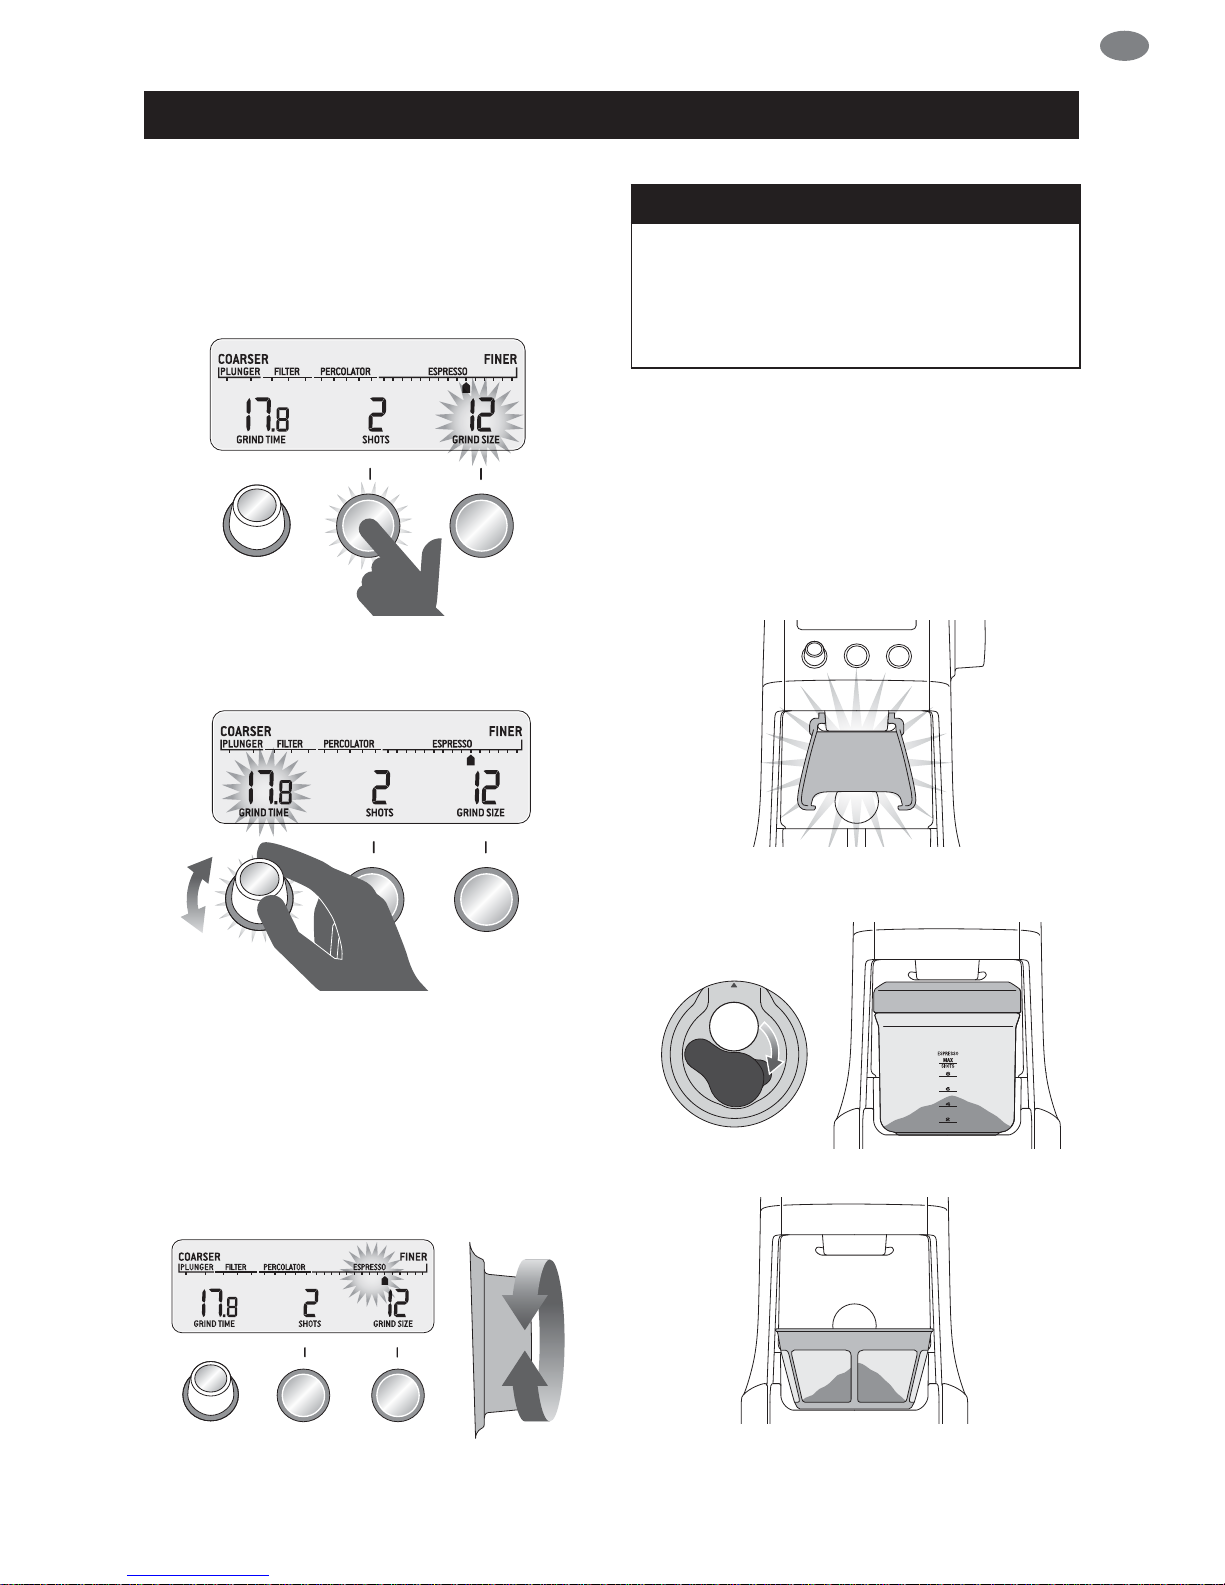
STEP 2:
Selecting your SHOTS / CUPS
Select the desired amount of ground coee
required by pressing the SHOTS / CUPS button.
START PAUSE
GRIND AMOUNT SHOTS CUPS
CANCELPROGRAM
Rotate the Grind Amount Dial to adjust the grinding
time to achieve the correct amount of coee.
START PAUSE
GRIND AMOUNT SHOTS CUPS
CANCELPROGRAM
STEP 3:
Select your grind size
For espresso, we recommend selecting Grind Size
setting 12 as a starting point and moving the Grind
Size dial Coarser or Finer to adjust the ow of
espresso as required.
START PAUSE
GRIND AMOUNT SHOTS CUPS
CANCELPROGRAM
NOTE
If the Grind Size Dial is tight, run the grinder
by pressing the START / PAUSE / CANCEL
button while turning the Grind Size Dial. This
will release coee grounds caught between
the burrs.
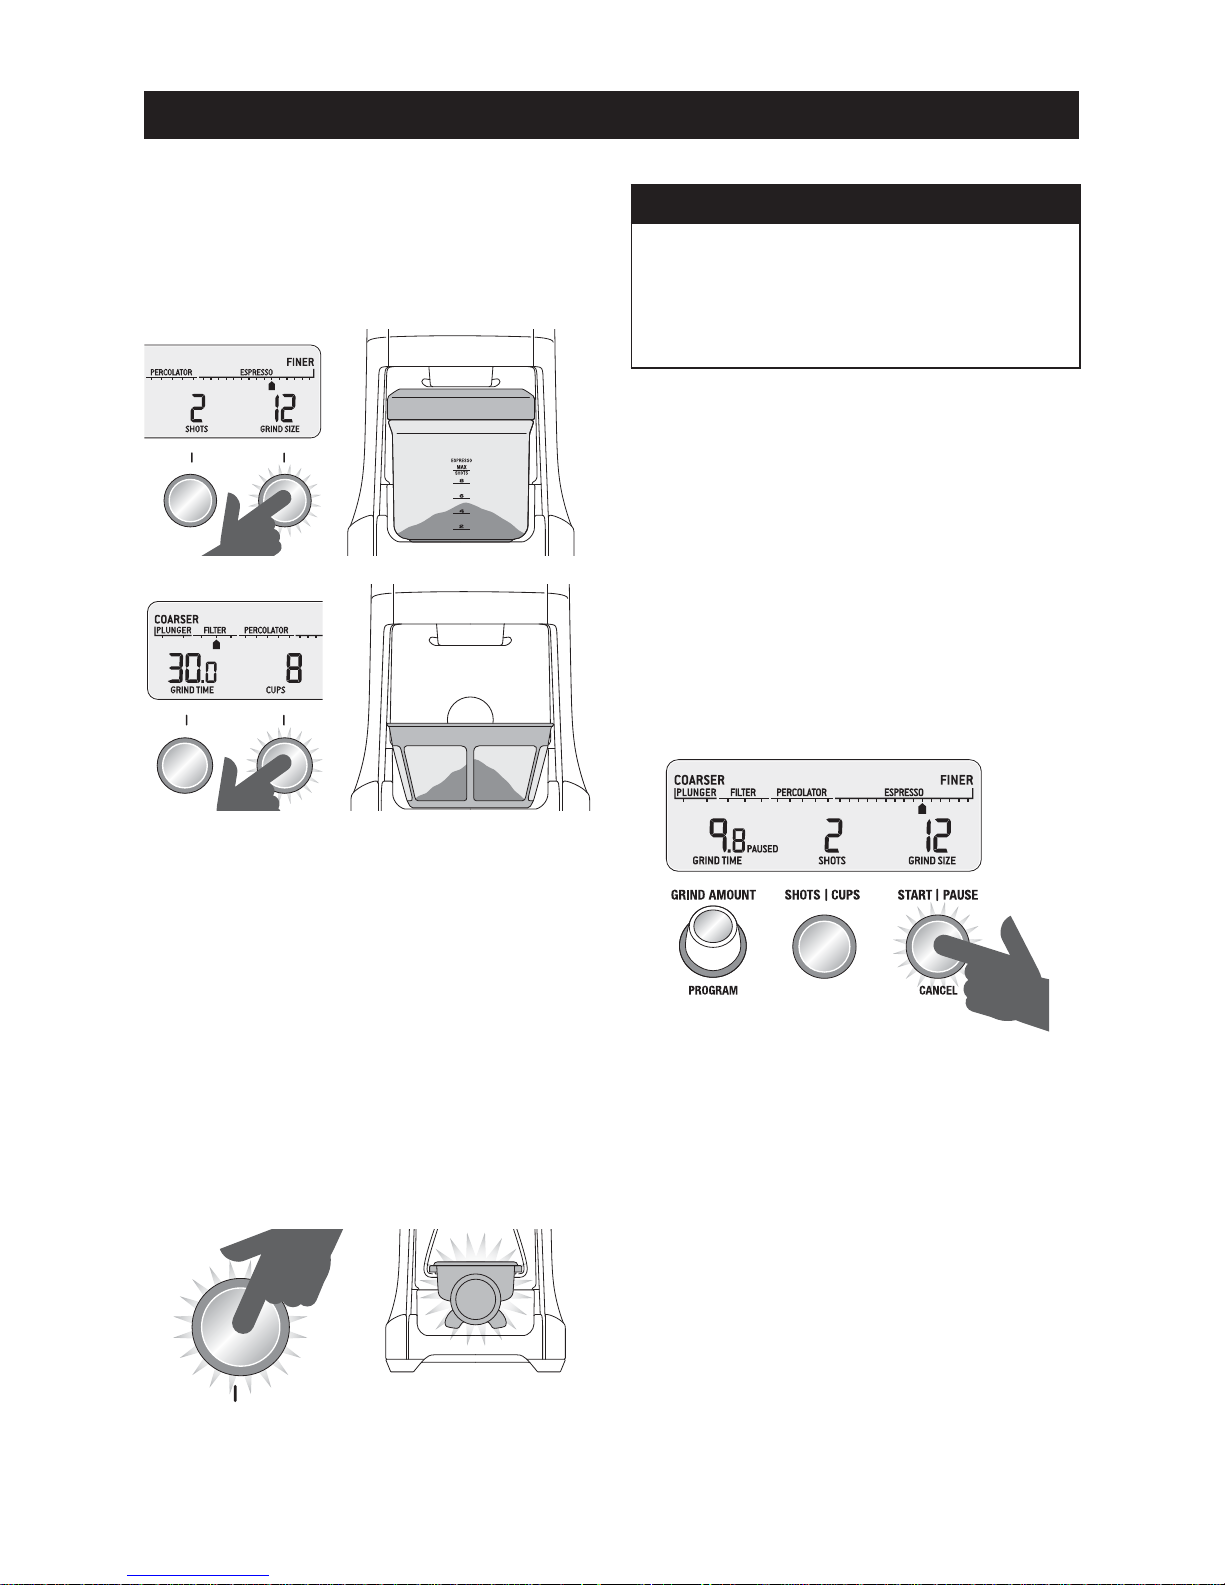
GRINDING INTO GRINDS
CONTAINER OR COFFEE FILTER
STEP 1:
Remove cradle by sliding out from under the
grind outlet.
PULL
Slide in grinds container with cap open or coee
lter directly under grind outlet.
INSERT UNDER
GRIND OUTLET
OPEN CONTAINER
CAP
OPERATING YOUR NEW APPLIANCE

8
NOTE
Programming a custom grind amount/time
only sets it for that particular brew method.
This will not change the other Shots or
Cups settings.
Pause Function
You can pause the grinder during operation
allowing you to collapse or settle the coee
in the portalter.
• Press and release the
START / PAUSE / CANCEL button to start the
grinding operation.
• During grinding, press the
START / PAUSE / CANCEL button again
to pause the operation for 10 seconds.
• Press again within this time to resume grinding
the remaining dose.
START PAUSE
GRIND AMOUNT SHOTS CUPS
CANCELPROGRAM
PRESS & RELEASE
OPERATING YOUR NEW APPLIANCE
• Select the required amount of ground coee
by pressing the SHOTS / CUPS button.
• Press the START / PAUSE / CANCEL button
to start grinding operation.
START PAUSE
SHOTS CUPS
CANCEL
START PAUSE
SHOTS CUPS
CANCEL
FEATURES OF YOUR SAGE
SMART GRINDER™ PRO
Automatic Grinding
Grinding automatically allows you to grind
hands-free.
• Press and release either the
START / PAUSE / CANCEL button or push
the handle of your portalter once. This will
activate the PORTAFILTER SWITCH.
• Grinding will automatically stop when the
preset amount is dispensed.
START PAUSE PORTAFILTER SWITCH
PRESS & RELEASE
OR
PUSH
9
EN
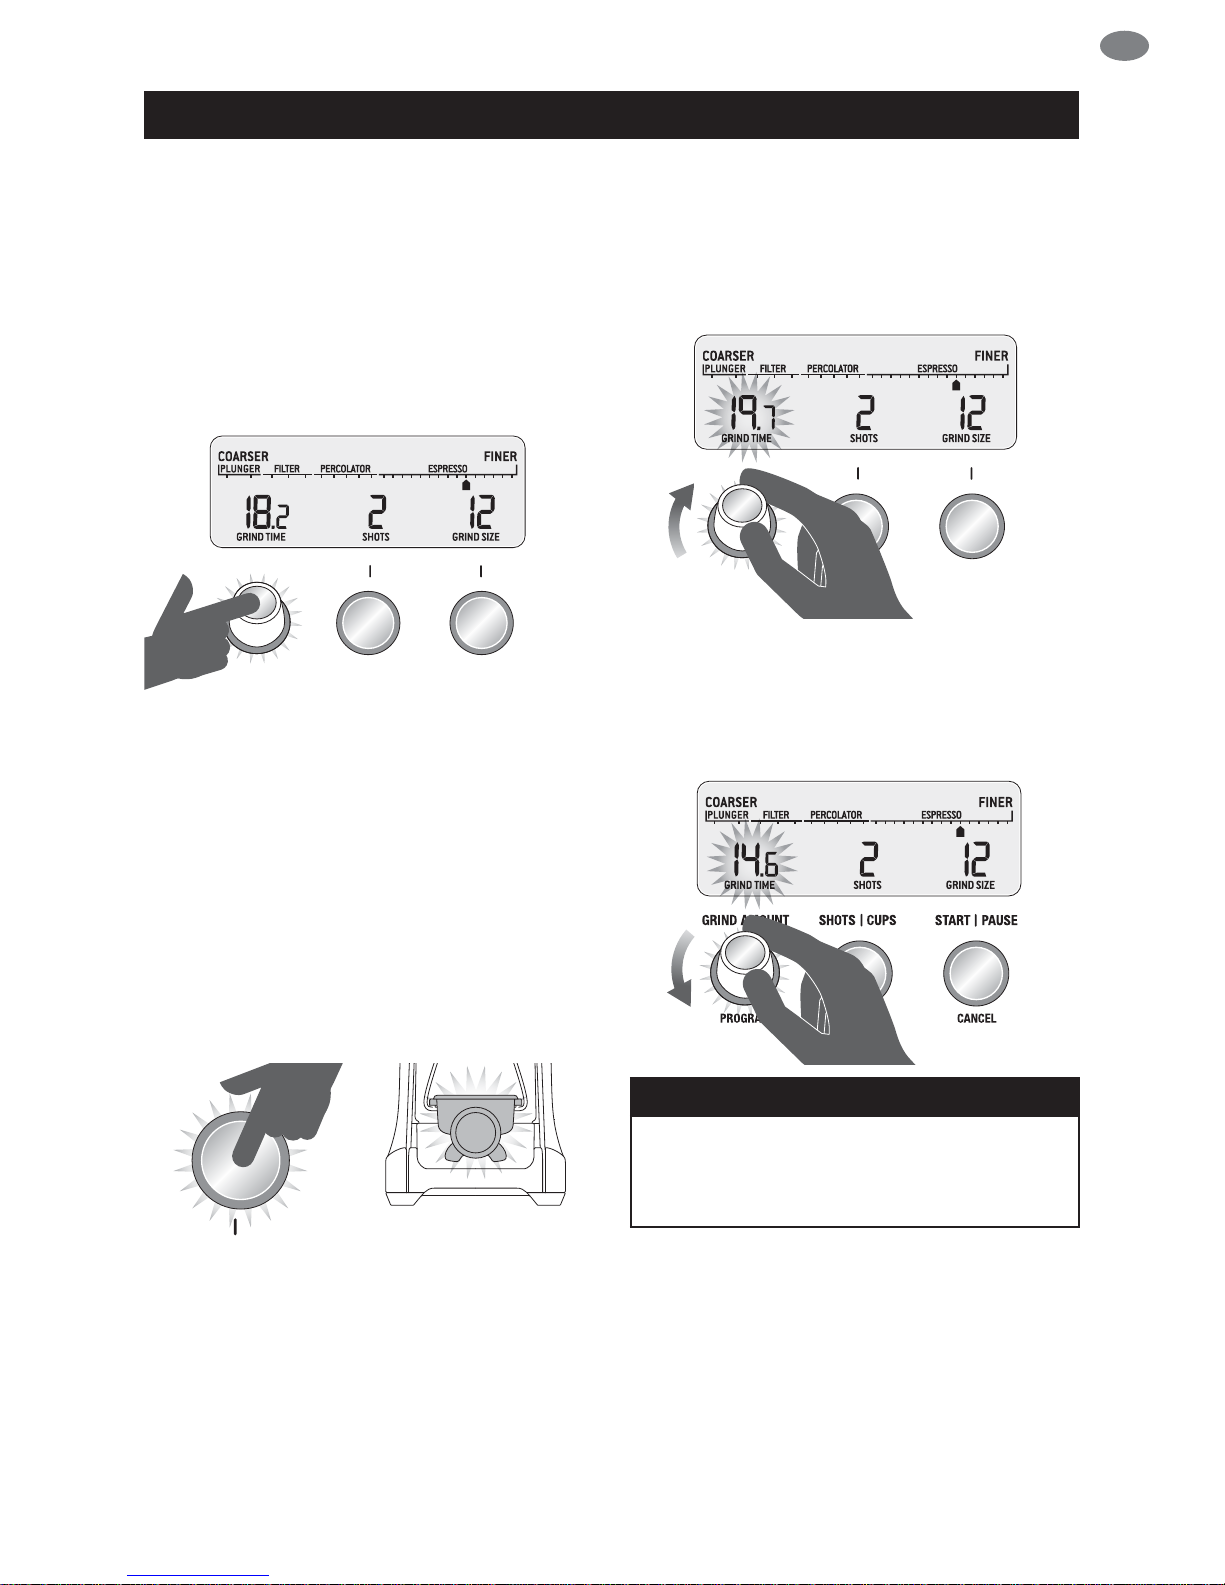
ADJUSTING YOUR GRIND AMOUNT
Increasing the Grind Amount
To increase the grind amount selected, turn the
GRIND AMOUNT dial to the right.
START PAUSE
GRIND AMOUNT SHOTS CUPS
CANCELPROGRAM
Decreasing the Grind Amount
To decrease grind amount selected, turn the
Grind Amount Dial to the left.
NOTE
To RESET the grind amount/time to the default
settings, press and hold the SHOTS / CUPS
button until a long beep sounds.
Program Function
Once you have set your required dose,
you can program this time into the number
of shot(s) currently displayed on the LCD.
Press and hold the PROGRAM button,
grinder will beep twice to conrm. Only
the shot displayed will be programmed,
all other shots will remain unchanged.
START PAUSE
GRIND AMOUNT SHOTS CUPS
CANCELPROGRAM
PRESS & HOLD
Manual Grinding
Grinding manually allows you to have complete
control over how much coee is dispensed.
• Press and hold either the START / PAUSE /
CANCEL button or push the handle of your
portalter to activate the PORTAFILTER
SWITCH for as long as you require.
• Release START / PAUSE / CANCEL button or
PORTAFILTER SWITCH and grinding will stop.
START PAUSE PORTAFILTER SWITCH
PRESS, HOLD & RELEASE
OR
PUSH
OPERATING YOUR NEW APPLIANCE
10
OPERATING YOUR NEW APPLIANCE
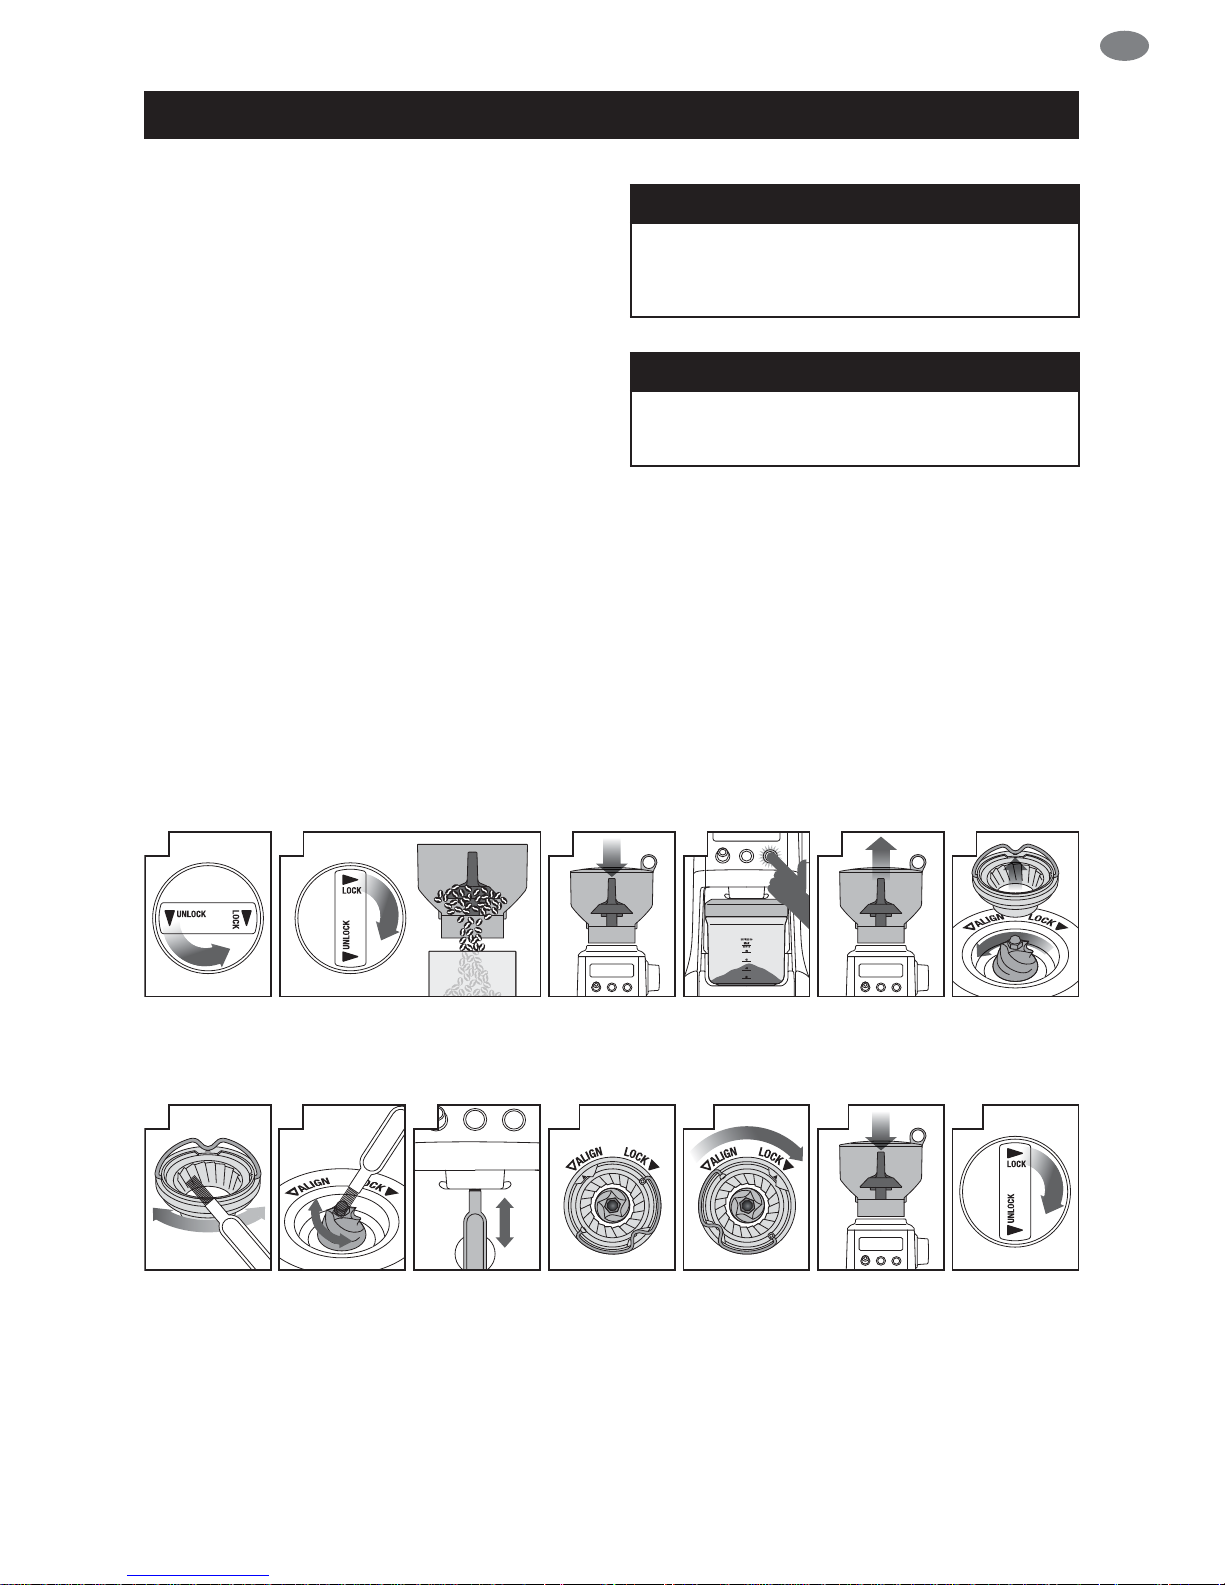
ADJUSTING CONICAL BURRS
Some types of coee may require a wider grind range to achieve an ideal extraction or brew.
A feature of your Smart Grinder™ Pro is the ability to extend this range with an adjustable upper burr.
We recommend making only one adjustment at a time.
13
Hold hopper over container & turn
dial to release beans into container
Align hopper
into position
Run grinder
until empty
Remove hopperUnlock hopper
1 2 3 4 5
Move adjustable
top burr, 1 number,
coarser or finer
Remove wire
handle from both
sides of the burr
Align the number
with the handle
opening
Remove upper
burr
6
8877 9
Insert wire
handle from both
sides of the burr
10
Push upper burr
firmly into
position
11
Lock upper burr
12
Align hopper
into position
AIR TIGHT
CONTAINER
14
Lock hopper
15
Check your
extraction
F
I
N
E
C
O
A
R
S
E
F
I
N
E
C
O
A
R
S
E
4
5
6
7
8
F
I
N
E
C
O
A
R
S
E
F
I
N
E
C
O
A
R
S
E
11
EN
CARE, CLEANING & STORAGE
CARE, CLEANING & STORAGE
1. Empty beans from the hopper
and grind out any excess beans
(see below).
2. Unplug power cord from power outlet
before cleaning.
3. Wash the grind container and lid,
bean hopper and lid in warm soapy
water, rinse and dry thoroughly.
4. Wipe and polish exterior of appliance
with a soft damp cloth.
CLEANING CONICAL BURRS
Regular cleaning helps the burrs achieve consistent grinding results which is especially important when
grinding for espresso coee.
13
Hold hopper over container & turn
dial to release beans into container
Align hopper
into position
Run grinder
until empty
Remove hopper
Unlock hopper
1 2 3 4 5
Clean lower
burr with
cleaning brush
Clean upper
burr with
cleaning brush
Clean grind
outlet with
brush
Remove upper
burr
6
8877 9
Push upper
burr firmly into
position
10
Lock upper burr11Align hopper
into position
12
Lock hopper
AIR TIGHT
CONTAINER
NOTE
Do not use alkaline or abrasive cleaning
agents, steel wool or scouring pads, as
these can damage the surface.
NOTE
Please do not clean any grinder parts or
accessories in the dishwasher.
12
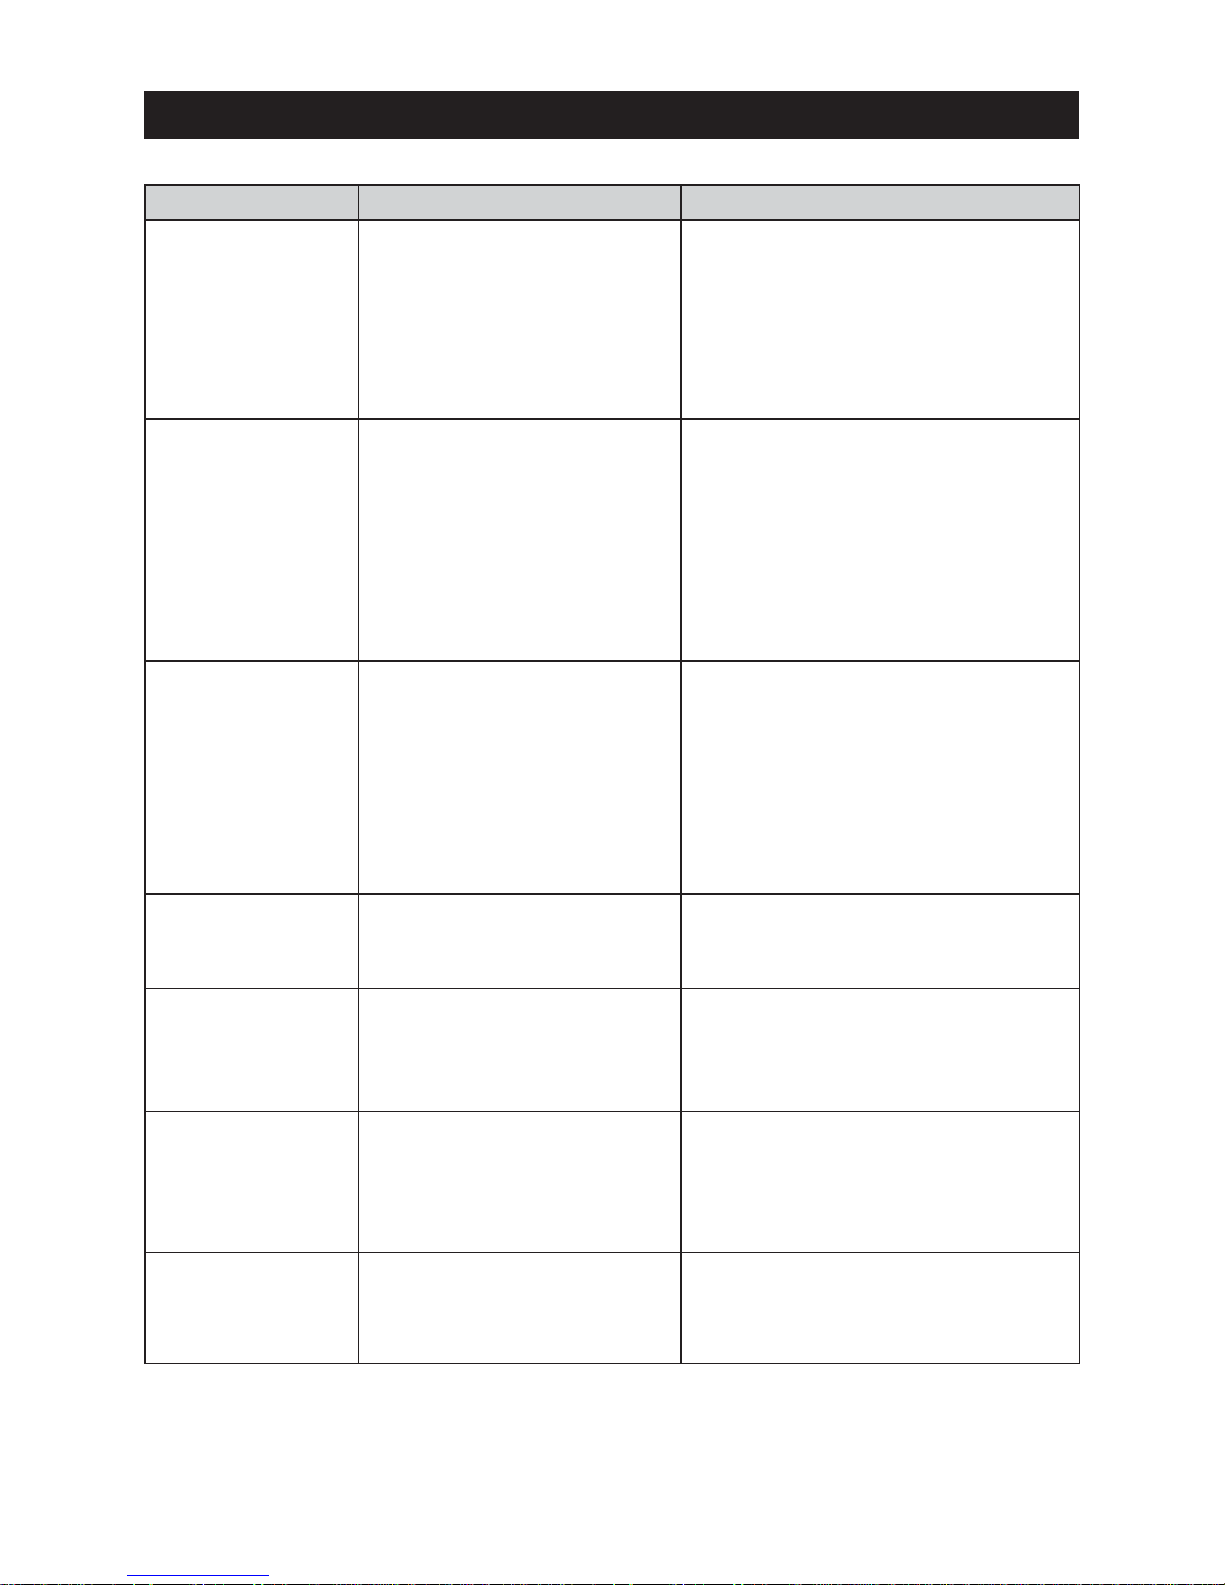
TROUBLESHOOTING
PROBLEM POSSIBLE CAUSE WHAT TO DO
Grinder does
not start after
pressing START /
PAUSE / CANCEL
button
• Grinder not plugged in.
• Grinder has overheated.
• Bean hopper not attached
correctly. ‘PLEASE LOCK
HOPPER’ will be displayed
on LCD screen.
• Plug power cord into power outlet.
• Remove power plug from power outlet.
Leave for 20 minutes to cool down
before using again.
• Lock bean hopper into position.
Motor starts but
coming from
grind outlet
• Incorrect button pressed.
• No coee beans in bean
hopper.
• Grinder/bean hopper
is blocked.
• Press START / PAUSE / CANCEL
or PORTAFILTER SWITCH
to activate.
• Fill bean hopper with fresh
coee beans.
• Remove bean hopper. Inspect bean
hopper and burrs for blockage.
Replace parts and try again.
Motor starts but
operates with a
loud ‘racket’ noise
• Grinder is blocked with
foreign item or chute
is blocked.
• Moisture clogging grinder.
• Remove bean hopper, inspect burrs
and remove any foreign body.
• Clean burrs and chute (refer to Care
& Cleaning on page 11).
• Leave burrs to dry thoroughly before
re-assembling. You can use a hair dryer
to blow air into grinder inlet (lower burr)
to dry.
Unable to lock
bean hopper into
position
• Coee beans obstructing bean
hopper locking device.
• Remove bean hopper. Clear coee
beans from top of burrs. Re-lock hopper
into position & try again.
Not enough/
too much
• Grind amount requires
adjustment.
• Press SHOTS / CUPS button to change
grind amount.
• Use Grind Amount Dial to ne tune
the amount ‘more’ or ‘less’.
• It is normal for the correct amount
of coee to appear overlled in
your portalter. Untamped coee
has approximately three times
the volume of tamped coee.
Emergency stop?
• Press START / PAUSE / CANCEL
button to stop operation.
• Unplug power cord from power outlet.

13
EN
NOTES

14
INHALTE
• Dieses Informationsbuch
steht zum Download unter
www.sageappliances.com zur
Verfügung.
• Vor dem ersten Gebrauch
prüfen, dass Ihre Netzspannung
mit der auf dem Etikett an
der Unterseite des Geräts
übereinstimmt.
• Vor dem ersten Gebrauch
alle Verpackungsmaterialien
abnehmen und sicher
entsorgen.
• Schutzhülle am Netzstecker
sicher entsorgen, da
sie für Kleinkinder eine
Erstickungsgefahr
darstellen könnte.
• Dieses Gerät ist nur für den
Haushaltsgebrauch bestimmt.
Gerät nur bestimmungsgemäß
verwenden. Nicht in fahrenden
Fahrzeugen oder Booten
verwenden. Nicht im Freien
verwenden. Missbrauch kann
Verletzungen nach sich ziehen.
• Netzkabel vor dem Gebrauch
vollständig entrollen.
• Gerät in sicherem Abstand
von Kanten auf eine stabile,
hitzebeständige, ebene und
trockene Fläche stellen.
WICHTIGE
VORSICHTSMASS
NAHMEN
BITTE ALLE ANWEISUNGEN
VOR DEM GEBRAUCH
LESEN UND ZUR
SPÄTEREN BEZUGNAHME
AUFBEWAHREN.
14 Wir empfehlen: Sicherheit geht vor
17 Lernen Sie Ihr neues Gerät kennen
18 Bedienung Ihres Neuen Geräts
23 Reinigung und Pege
24 Problembeseitigung
SAGE® EMPFIEHLT:
SICHERHEIT
GEHT VOR
Wir bei Sage® sind sehr
sicherheitsbewusst.
Beim Design und bei der
Herstellung unserer Geräte
denken wir zu allererst
an Ihre Sicherheit. Darüber
hinaus bitten wir Sie, bei
der Verwendung jedes
Elektrogeräts angemessene
Sorgfalt anzuwenden und
sich an die folgenden
Vorsichtsmaßnahmen
zu halten.

15
DE
WIR EMPFEHLEN: SICHERHEIT GEHT VOR
Nicht auf oder neben einer
Wärmequelle wie einem
Gas- oder Elektroherd oder
einem heißen Ofen betreiben.
• Netzkabel nicht über
Arbeitsplatten oder Tischkanten
hängen lassen, von heißen
Oberächen fern halten,
Kabelgewirr vermeiden.
• Gerät während des Betriebs
nicht unbeaufsichtigt lassen.
• Gerät immer ausschalten,
Netzstecker ziehen und
abkühlen lassen, ehe Sie es
bewegen, reinigen oder lagern.
• Gerät immer ausschalten,
sofern möglich auch an der
Steckdose, und Netzstecker
ziehen, wenn es nicht in
Gebrauch ist.
• Gerät nicht verwenden,
wenn das Netzkabel,
der Netzstecker oder das
Gerät selbst in irgendeiner
Weise beschädigt ist. Wenden
Sie sich bei Schäden und zur
Wartung (außer Reinigung) bitte
an den Sage-Kundendienst
oder besuchen Sie
sageappliances.com
• Alle Wartungsarbeiten außer
Reinigung nur von autorisierten
Sage®-Kundendienststellen
vornehmen lassen.
• Kinder nicht mit dem Gerät
spielen lassen.
• Reinigung des Geräts nicht
von Kindern unter 8 Jahren
und nur unter Aufsicht
vornehmen lassen.
• Gerät und Netzkabel für
Kinder bis zu 8 Jahren
unzugänglich aufbewahren.
• Die Installation eines Schutzoder Sicherheitsschalters
wird bei der Verwendung
von Elektrogeräten als
zusätzliche Schutzmaßnahme
empfohlen. Es wird ein
Sicherheitsschalter mit maximal
30 mA Nennleistung empfohlen.
Fachgerechte Beratung erhalten
Sie von Ihrem Elektriker.
• Nur die mit Ihrem Gerät
mitgelieferten Einsätze
verwenden.
• Ihr Gerät nicht anders betreiben
als in dieser Broschüre
beschrieben.
• Gerät während des Betriebs
immer an Ort und Stelle lassen.
• Keine heißen Oberächen
berühren. Gerät vor dem
16
NUR FÜR DEN HAUSHALTSGEBRAUCH
DIESE ANLEITUNG AUFBEWAHREN
WIR EMPFEHLEN: SICHERHEIT GEHT VOR
Transport oder der Reinigung
abkühlen lassen.
• Gerät nicht von Kindern
bedienen lassen. Gerät und
Kabel für Kinder unzugänglich
aufbewahren.
• Dieses Gerät kann von
Personen mit eingeschränkten
körperlichen, sensorischen
oder geistigen Fähigkeiten oder
mit mangelnder Erfahrung und
fehlenden Kenntnissen genutzt
werden, sofern sie beaufsichtigt
werden oder in den sicheren
Gebrauch des Geräts
eingewiesen wurden und sich
der entsprechenden Risiken
bewusst sind.
• Mahlwerk nur mit auf den
Bohnenbehälter aufgesetztem
Deckel verwenden. Finger,
Hände, Haare, Bekleidung
und Utensilien während der
Verwendung des Mahlwerks
vom Bohnenbehälter fernhalten.
Dieses Symbol zeigt,
dass das Gerät nicht im
normalen Hausmüll
entsorgt werden sollte.
Es sollte stattdessen bei einem
entsprechenden kommunalen
Wertstohof oder Fachhändler
zur Entsorgung abgegeben
werden. Weitere Einzelheiten
erfahren Sie von Ihrer
Kommunalbehörde.
Zum Schutz gegen
Stromschlag Netzstecker,
Netzkabel oder Gerät nicht
in Wasser oder sonstige
Flüssigkeiten tauchen.
17
DE
C
B
D
E
F
G
H
M
L
O
N
A
K
J
I
Oi
Oii
LERNEN SIE IHR NEUES GERÄT KENNEN
A. Bohnenbehälter-Deckel
B. Bohnenbehälter
C. Kegelmahlwerk aus gehärtetem Edelstahl
D. Hintergrundbeleuchtetes LCD-Display
E. Drehwähler MAHLMENGE / PROGRAMM
F. Taste SHOTS / TASSEN
G. Mahlwerkausgabe
H. Auangschale
I. Drehwähler Mahlgrad
J. Taste START / PAUSE / ABBRUCH
K. Schalter zur Siebträger-Aktivierung
ZUBEHÖR
L. Siebträger-Halter 50–54 mm
M. Siebträger-Halter 58 mm
N. Reinigungsbürste für Kegelmahlwerk
O. Mahlbehälter
Oi – Mahlbehälter-Kappe
Oii – Mahlbehälter-Deckel
Leistungsangaben
220–240 V ~50 Hz 165W

18
VOR DEM ERSTEN GEBRAUCH
Alle Werbeaufkleber und Verpackungsmaterialien
an Ihrem Sage®-Produkt entfernen und sicher
entsorgen.
Bohnenbehälter, Halter, Mahlbehälter,
Behälterdeckel und Reinigungsbürste in warmem
Spülwasser waschen und sorgfältig trocknen.
Mühle außen mit einem weichen, feuchten Tuch
abwischen und sorgfältig trocknen. Mühle auf
eine ebene Fläche stellen, Netzkabel in eine
230–240-V-Steckdose einstecken und Gerät
EINschalten.
ENERGIESPARFUNKTION
Die Mühle schaltet sich bei Nichtgebrauch
nach 5 Minuten automatisch aus.
ZUSAMMENSETZEN IHRER SAGE
SMART GRINDER™ PRO
Bohnenbehälter
Markierungen am Fuß des Bohnenbehälters
ausrichten und Behälter einsetzen. Drehscheibe
am Bohnenbehälter zum Einrasten um 90 ° drehen.
Mit frischen Kaeebohnen füllen und Deckel auf
den Bohnenbehälter aufsetzen.
Zum Mahlen frischer Kaeebohnen einwandige
Filtersiebe verwenden. Für ESPRESSO die
feineren Einstellungen von 1–30 verwenden.
SCHRITT 1:
Siebträger-Halter der richtigen Größe einsetzen.
Siebträger in den Halter einsetzen.
DRÜCKEN
HALTER
HINWEIS
Mit eingesetztem Halter können maximal 2
Espresso-Shots gemahlen werden.
FRENCH PRESS
1 BIS 12 TASSEN
BRÜHMETHODE
MAHLEINSTELLUNG
MAHLGRAD
MENGE
FEIN
1-30
1 BIS 8 ESPRESSO
-SHOTS
ESPRESSO FILTERKAFFEE
MITTELGROB
46-54
GROB
55-60
1 BIS 12 TASSEN
KAFFEEMASCHINE
31-45
1 BIS 12 TASSEN
MITTEL
BEDIENUNG IHRES NEUEN GERÄTS
19
DE
SCHRITT 2:
Auswahl Ihrer SHOTS / TASSEN
Gewünschte Mahlmenge durch Betätigung der
Taste SHOTS / TASSEN einstellen.
START PAUSE
GRIND AMOUNT SHOTS CUPS
CANCELPROGRAM
Drehwähler MAHLMENGE drehen, um die
Mahldauer für die gewünschte Menge an
Kaeemehl einzustellen.
START PAUSE
GRIND AMOUNT SHOTS CUPS
CANCELPROGRAM
SCHRITT 3:
Einstellung des Mahlgrads
Für Espresso empfehlen wir, mit der Einstellung
12 zu beginnen und den Drehwähler für die
Mahlgradeinstellung dann gröber oder feiner
zu stellen, um die Espressoausgabe nach
Wunsch anzupassen.
START PAUSE
GRIND AMOUNT SHOTS CUPS
CANCELPROGRAM
BEDIENUNG IHRES NEUEN GERÄTS
HINWEIS
Bei schwer drehbarer Mahlgradeinstellung
die Taste START / PAUSE / ABBRUCH
drücken, um die Mühle zu starten, und
dann den Drehwähler Mahlgrad drehen.
Dies entfernt etwaige Bohnenrückstände
zwischen den Kegeln.
MAHLEN IN EINEN
SCHRITT 1:
Halter von der Unterseite der Mahlwerkausgabe
herausziehen.
ZIEHEN
Oenen Kaeebehälter oder Kaeelter direkt unter
die Mahlwerkausgabe stellen.
INSERT UNDER
GRIND OUTLET
BEHÄLTERDECKEL
ÖFFNEN
20
HINWEIS
Die Programmierung einer personalisierten
Mahlmenge/Mahldauer stellt sie nur für die
jeweilige Brühmethode ein. Sie hat keine
Auswirkung auf andere Einstellungen für
Espresso-Shots oder Tassen.
Pause-Funktion
Sie können den Betrieb der Kaeemühle
unterbrechen, z. B. um Kaee im Siebträger
geradezustreichen.
• Taste START / PAUSE / ABBRUCH kurz drücken,
um das Mahlwerk zu starten.
• Während des Mahlvorgangs Taste START /
PAUSE / ABBRUCH erneut drücken, um den
Mahlvorgang 10 Sekunden lang zu pausieren.
• Taste während dieser Zeit erneut drücken,
um die restliche Menge zu mahlen.
KURZ DRÜCKEN
BEDIENUNG IHRES NEUEN GERÄTS
• Gewünschte Mahlmenge durch Betätigung
der Taste SHOTS / TASSEN einstellen.
• Taste START / PAUSE / ABBRUCH drücken,
um das Mahlwerk zu starten.
START PAUSE
SHOTS CUPS
CANCEL
START PAUSE
SHOTS CUPS
CANCEL
FUNKTIONEN IHRER SAGE SMART
GRINDER™ PRO
Automatisches Mahlen
Automatisches Mahlen lässt Sie die Mühle
freihändig bedienen.
• Taste START / PAUSE / ABBRUCH kurz
drücken oder den Gri Ihres Siebträgers
ein Mal andrücken. Dies aktiviert den
SIEBTRÄGER-SCHALTER.
• Der Mahlvorgang endet automatisch,
wenn die voreingestellte Menge Kaee
ausgegeben wurde.
START PAUSE SIEBTRÄGER-SCHALTER
KURZ DRÜCKEN
ODER
DRÜCKEN
 Loading...