

Page 1

Powerful accounting software for growing businesses
Line50 v11 User Guide
Page 2

Copyright
This document and software described in it are copyrighted with all rights
reserved. Under copyright laws, neither the documentation nor the software may
be copied, photocopied, reproduced, translated, or reduced to any electronic
medium or machine readable form, in whole or in part, without prior written
consent of Sage (UK) Limited (‘Sage’). Failure to comply with this condition may
result in prosecution.
This computer program is the property of Sage. The program is protected under
copyright law and is licensed for use only by a user who has returned the
completed registration card included with the computer program and further is
licensed strictly in accordance with the conditions specified in the Software
Licence. Sale, lease, hire rental or reassignment to, or by, a third party without the
prior and written permission of Sage is expressly prohibited.
Sage does not warrant that the software package will function properly in every
hardware/software environment. For example, the software may not work in
combination with modified versions of the operating system, with certain
print-spooling or file facility programs, or with certain printers supplied by
independent manufacturers.
Although Sage has tested the software and reviewed the documentation, Sage
makes no warranty, representation or condition, either express or implied,
statutory or otherwise, with respect to this software or documentation, their
performance, satisfactory quality, or fitness for a particular purpose. This
software and documentation are licensed ‘as is’, and you, the licensee, by
making use thereof, are assuming the entire risk as to their quality and
performance.
In no event will Sage be liable for direct, indirect, special, incidental, or
consequential damages (including but not limited to economic loss, such as
loss of profits, loss of use of profits, loss of business or business
interruption, loss of revenue, loss of goodwill or loss of anticipated savings)
arising out of the use or inability to use the software or documentation, even
if advised of the possibility of such damages. In particular, and without prejudice
to the generality of the foregoing, Sage has no liability for any programs or data
stored or used with Sage software, including the costs of recovering such
programs or data.
Nothing in this notice shall exclude or limit Sage’s liability for fraud, death or
personal injury arising out of Sage’s wilful default or negligence.
Sage’s policy is one of constant development and improvement. We reserve the
right to alter, modify, correct and upgrade our software programs and publications
Copyright: © 1999 - 2004 Sage (UK) Limited
North Park
Newcastle upon Tyne NE13 9AA
All Worldwide Rights Reserved
Issue date: 02/08/2004
Pbn No: 12701
Page 3

Read This...
Your Sage Line 50 User Guide is made up of two parts.
The first part deals with setting up your accounting system (if you are a new user) and also the
maintenance of your accounts (for established users, i.e. who are upgrading).
In the first part, Setting Up and Maintenance, we deal with:
Installing Sage Line 50 onto your computer and using it for the first time (for new users).
How to use Line 50.
Setting up your company details (defaults).
Setting up your nominal structure.
Setting up your customer and supplier records.
Entering your product or service details.
Entering your opening balances.
Setting up your regular monthly payments.
Setting up prices and discounts for your products or services.
Working with fixed assets.
Setting up an e-banking system.
As a new user, you will have to work through this first part to set up your accounting system. All
of the sections may not apply to your business, so you will have to see which ones do apply to
you and work through the relevant sections.
As an established user who is upgrading, your system will already have your opening balances
on, as well as most of your company details. So, you can use this part of the manual to make
changes to your company details and defaults.
The second part is concerned with Daily Activities and Processing and we deal with:
Completing everyday tasks, such as looking after your data, using the search, making
journal entries, and so on.
Recording invoices and credit notes.
Sales and purchase order processing.
Recording payments and receipts.
How to carry out credit control activities, such as chasing unpaid bills and writing off bad
debts.
Reconciling your bank accounts on your computer with your real bank accounts.
Using advanced stock features, such as working with bills of materials.
Working with Projects.
Producing your VAT Return.
Page 4

Running a range of financial reports, including your profit and loss and balance sheet
report.
Running your month and year end routines.
Working with Sage MIS, which is a management information system.
All the tasks contained in the second part are mostly concerned with processing, i.e. working
with your finances as part of your day to day accounting activities. Sometimes you may have to
consult the first part of the chapter, for example, if you want to learn how to reconcile your
e-banking transactions. In these instances, the User Guide will clearly direct you to where you
need to go.
Page 5

Contents
Chapter 1: Getting Started ................................................................... 1
Transferring Accounting Systems .....................................................................2
Installation........................................................................................................3
The ActiveSetup Wizard...................................................................................4
Registering Sage Line 50 ...............................................................................13
Getting Started ..............................................................................................13
About SageCover ..........................................................................................14
SageCover Online Support ............................................................................14
sage.co.uk & sage.ie......................................................................................15
Sage Training .................................................................................................15
Chapter 2: How to Use Sage Line 50 ................................................ 17
Instructions in This Guide ...............................................................................19
The Sage Line 50 Options .............................................................................20
The Sage Line 50 Window.............................................................................21
Using Windows..............................................................................................24
Menu Commands ..........................................................................................25
Getting Help ..................................................................................................41
Wizards .........................................................................................................41
Debits and Credits .........................................................................................42
Chapter 3: Setting Up Your Company Details .................................. 43
The Configuration Editor ................................................................................44
Entering Your Company Preferences..............................................................68
Entering Your Company Defaults....................................................................77
Setting the Financial Year ...............................................................................77
Entering Your Bank Defaults...........................................................................78
The Euro and Other Currencies......................................................................80
The Countries Table .......................................................................................82
Passwords and Access Rights.......................................................................83
Changing Your Password...............................................................................84
Working With Internet Resources...................................................................84
The Foreign Trader
(Financial Controller only) ...............................................................................85
To Set Up the Foreign Trader .........................................................................86
Opening Balances .........................................................................................91
Page 6

Sage Line 50 User Guide
Chapter 4: Setting Up Your Nominal Structure ................................. 93
Nominal Ledger Accounts Explained..............................................................94
The Nominal Account Structure .....................................................................99
Control Accounts.........................................................................................100
The Nominal Ledger Window.......................................................................102
Entering, Editing and Deleting Nominal Records ..........................................108
Entering Bank Account Records ..................................................................113
The Chart of Accounts .................................................................................116
Checking Your Chart of Accounts ................................................................120
Chapter 5: Entering Customer and Supplier Records .................... 123
Planning Your Customer and Supplier Codes...............................................124
Entering Customer Defaults .........................................................................125
Setting an Account Status ...........................................................................128
Entering Customer Records.........................................................................129
Opening Balances for Customers ................................................................133
Entering Supplier Defaults ............................................................................137
Entering Supplier Records ...........................................................................138
Opening Balances for Suppliers ...................................................................141
Checking and Clearing Your Customers’ and Suppliers’ Opening Balances .145
Chapter 6: Entering Product Details and
Planning a Stock System ................................................................. 151
Product Valuation.........................................................................................152
Setting Up Your Product List........................................................................152
Creating Product Categories........................................................................153
Entering Product Defaults ............................................................................154
Entering Product Records............................................................................157
Entering Your Product Opening Balances.....................................................161
Chapter 7: Entering Opening Balances for Nominal
and Bank Accounts .......................................................................... 163
The Opening Balance Sequence Consists of: ..............................................164
Entering the Opening Balances for Your
Nominal Ledger Accounts............................................................................165
Entering the Opening Balances for Your Bank Accounts ..............................167
Uncleared Items in Your Bank Opening Balance...........................................168
Checking Your Nominal and Bank Opening Balances ..................................169
Completing the Opening Balances Procedure..............................................170
Page 7

Contents
Chapter 8: Setting Up Recurring Entries,
Prepayments and Accruals .............................................................. 173
Explaining Recurring Entries.........................................................................174
Prepayments
(Accountant Plus and Financial Controller Only)............................................186
Accruals
(Accountant Plus and Financial Controller Only)............................................189
Chapter 9: Pricing and Discounts .................................................... 193
Using Customer Price Lists
(Accountant Plus and Financial Controller Only)............................................195
Importing Product Prices onto a Customer Price List
(Accountant Plus and Financial Controller only) ............................................201
Setting Special Customer Prices
(Accountant Plus and Financial Controller Only)............................................205
Supplier Price Lists
(Financial Controller users only) ....................................................................210
Importing Supplier Price Lists
(Financial Controller users only) ....................................................................212
'Good Customer' Discount ..........................................................................214
Early Settlement Discount ............................................................................216
Discounting by Quantity of Product Sold
(Accountant Plus and Financial Controller Only)............................................219
Discounting by Invoice Value
(Accountant Plus and Financial Controller Only)............................................222
Checking Discount Amounts & Editing the Total Discount ............................224
Other Discount Options ...............................................................................226
The Invoice and Order Defaults Options List.................................................228
Discounting by Unit Price
(Accountant Plus and Financial Controller Only)............................................230
Chapter 10: Working With Fixed Assets
(Accountant Plus and Financial Controller Only) ............................ 233
Fixed Assets ................................................................................................234
Depreciation ................................................................................................235
Depreciation Methods in Line 50..................................................................235
Writing Off Fixed Assets ...............................................................................237
Selling Fixed Assets .....................................................................................237
Creating Fixed Asset Categories ..................................................................237
Entering Your Fixed Asset Records ..............................................................238
Page 8

Sage Line 50 User Guide
Chapter 11: E-Business ................................................................... 243
Contacting Sage ..........................................................................................244
e-Banking ....................................................................................................245
Configuring Your e-Banking Option..............................................................246
Using the e-Payments Option ......................................................................248
Entering Supplier Bank Details .....................................................................248
Using the e-Reconcile Option ......................................................................250
Importing e-Banking Transactions................................................................250
Reconciling Your Bank Account ...................................................................251
Transaction e-Mail........................................................................................255
Setting Up Transaction e-Mail ......................................................................256
Configuring Transaction e-Mail.....................................................................257
Processing Incoming Orders and Invoices in
Transaction e-Mail........................................................................................265
Matching in Transaction e-Mail.....................................................................267
Help with Transaction e-Mail ........................................................................274
Sage WebTrader Professional ......................................................................274
Chapter 12: Everyday Tasks ............................................................ 275
Changing the Program Date ........................................................................276
Checking Your Data .....................................................................................277
Backing Up Your Data..................................................................................279
Restoring Your Data.....................................................................................281
Event Logging..............................................................................................282
Using the Search to Find Records................................................................286
Building Your Search....................................................................................289
Finding Transactions ....................................................................................291
Using ActiveSearch......................................................................................293
Using the Spelling Checker ..........................................................................294
Printing What’s On Your Screen ...................................................................295
Working with Attachments using Document Manager ..................................298
Using The Task Manager..............................................................................304
Exporting to Microsoft Word, Excel and Outlook ..........................................305
Journal Entries .............................................................................................307
Reversing Nominal Journals
(Accountant Plus and Financial Controller Only)............................................310
Paying Wages Using Journal Entries ............................................................312
Setting Up a Petty Cash Account.................................................................317
Page 9

Contents
Chapter 13: Entering Invoices and Credit Notes ............................ 319
Special Product Codes ................................................................................320
Invoices and Credit Notes ............................................................................321
Batch Invoices and Credit Notes..................................................................322
Creating Invoices and Credit Notes From the Invoicing option......................324
Memorising and Recalling Batch Invoices and Credit Notes
(Accountant Plus and Financial Controller Only)............................................349
Creating Recurring Transactions ..................................................................350
Entering Invoice and Order Defaults .............................................................355
Updating the Ledgers ..................................................................................361
Invoice Profit Check
(Accountant Plus and Financial Controller Only)............................................362
Creating Mix and Match Invoices and Orders
(Financial Controller Only) .............................................................................364
Invoicing From Telephone Calls
(Financial Controller Only) .............................................................................372
Quotations and Proformas
(Accountant Plus and Financial Controller Only)............................................374
Chapter 14: Order Processing
(Financial Controller Only) ................................................................ 377
Sales Orders................................................................................................378
The Sales Order Cycle .................................................................................378
Creating a Sales Order.................................................................................379
Creating Recurring Orders ...........................................................................398
Completing Your Sales Order if it has Already Been Despatched..................400
Saving Your Sales Order ..............................................................................400
Printing Your Sales Orders ...........................................................................400
Allocating Stock to Sales Orders ..................................................................401
Order Shortfalls............................................................................................403
Despatching Sales Orders ...........................................................................406
Recording Delivery of Goods using Goods Despatched Notes.....................407
Recording Sales Order Despatches .............................................................411
Manually Recording Sales Order Despatches...............................................411
Printing an Invoice Created From the Sales Order ........................................412
Updating the Ledgers ..................................................................................412
Deleting a Sales Order .................................................................................413
Converting Quotes and Proformas to Sales Orders......................................414
Intrastat Reporting .......................................................................................417
Page 10

Sage Line 50 User Guide
Confirming your Intrastat Dispatches............................................................419
Working With Purchase Orders ....................................................................424
Creating Purchase Orders............................................................................425
Completing Your Purchase Order if it has Already Been Delivered ................440
Saving Your Purchase Orders ......................................................................440
Printing Your Purchase Orders .....................................................................440
Putting Purchase Orders 'On Order' ............................................................441
Recording Delivery of Goods........................................................................442
Recording Delivery of Goods Using Goods Received Notes.........................443
Recording Purchase Order Deliveries ...........................................................447
Manually Recording Purchase Order Deliveries ............................................447
Creating Purchase Invoices From Your Purchase Orders..............................448
Deleting a Purchase Order ...........................................................................448
Confirming your Intrastat Arrivals..................................................................448
Chapter 15: Project Costing
(Accountant Plus and Financial Controller Only) ............................ 453
Introduction to Project Costing.....................................................................454
Who Can Use Project Costing?....................................................................454
The Life Cycle of a Project ...........................................................................454
The Project Life Cycle in Line 50 ..................................................................455
Setting Up Project Costing...........................................................................457
Project Statuses ..........................................................................................458
Cost Codes .................................................................................................459
Resources ...................................................................................................463
Working with Projects ..................................................................................465
Project Records...........................................................................................465
Project Only Costs .......................................................................................472
Stock Postings ............................................................................................474
Cost Postings ..............................................................................................475
Billing Your Customer for a Project...............................................................477
Project Enquiries, Analysis and Reporting ....................................................481
Completing Your Project ..............................................................................483
Chapter 16: Recording Payments and Receipts ............................. 485
Customer Receipts ......................................................................................486
Bank Receipts .............................................................................................488
Memorising and Recalling Bank Receipts
(Accountant Plus and Financial Controller Only)............................................492
Supplier Payments.......................................................................................494
Page 11

Contents
Recording Bank, Cash and Credit Card Payments .......................................498
Memorising and Recalling Bank Payments
(Accountant Plus and Financial Controller Only)............................................501
Batch Supplier Payments
(Financial Controller Only) .............................................................................503
Producing Cheques
(Accountant Plus and Financial Controller Only)............................................505
Recording Expenses....................................................................................512
Bank Transfers.............................................................................................514
Chapter 17: Credit Control ............................................................... 525
The Cash Flow Option .................................................................................526
Manual Entries in a Cash Flow .....................................................................530
Credit Control ..............................................................................................531
Ageing Transactions in Line 50.....................................................................531
Producing a Retrospective Aged Balance Report .........................................535
Checking Aged Balances .............................................................................535
Credit Control for Each Customer ................................................................538
The Credit Control Window ..........................................................................541
Recording Contact Details ...........................................................................543
Viewing Transaction History and Aged Balances ..........................................547
Handling Disputed Transactions
(Accountant Plus and Financial Controller Only)............................................550
Charging Your Customers for Late Payments...............................................551
Writing Off Bad Debts ..................................................................................552
Writing Off Bad Debt Transactions Using the Wizard ....................................553
Writing Off Bad Debts Manually....................................................................555
Days Sales Analysis .....................................................................................560
Suggested Payments...................................................................................566
Credit Control Reporting ..............................................................................569
Other Customer Reports..............................................................................571
Supplier Reports ..........................................................................................572
Chapter 18: Reconciling Your Bank Accounts ................................ 573
Bank Reconciliation .....................................................................................574
Preparing to Reconcile.................................................................................574
Reconciling Your Bank Account ...................................................................574
Posting Bank Adjustments...........................................................................577
Printing a Bank Statement Report ................................................................578
Page 12

Sage Line 50 User Guide
Chapter 19: Using the Advanced Stock Features
(Accountant Plus and Financial Controller Only) ............................ 579
Bill of Materials.............................................................................................580
Checking Component Availability .................................................................583
Making Stock Transfers................................................................................584
Using the Stock Shortfall Option ..................................................................586
Running a Stock Take..................................................................................590
Recording Stock Returns .............................................................................592
Adjusting Stock Levels.................................................................................594
Chapter 20: Running Your VAT Return ............................................ 595
The VAT Return Checklist.............................................................................596
Producing the VAT Return............................................................................597
Checking Your VAT Return...........................................................................599
Saving your VAT Return ...............................................................................601
Handling Late Transactions..........................................................................603
Handling Future Transactions .......................................................................603
Reconciling Your VAT Return........................................................................604
Clearing Your VAT Control Accounts ............................................................605
Submitting the VAT Return to the Tax Authorities .........................................606
VAT Audit Reports........................................................................................607
Entering Scale Charges
(Accountant Plus and Financial Controller Only)............................................607
Chapter 21: Running Financial Reports .......................................... 609
Reports........................................................................................................610
Running the Audit Trail Report......................................................................611
Running the Trial Balance Report .................................................................612
Running the Profit and Loss Report .............................................................613
Running the Balance Sheet Report ..............................................................614
Running the Quick Ratio Report
(Accountant Plus and Financial Controller Only)............................................615
Running the Budget Report .........................................................................617
Running the Prior Year Report......................................................................618
Running the Transactional-Based Management Reports
(Accountant Plus and Financial Controller Only)............................................619
Running the Audit Assistant .........................................................................622
The Sage Management Information System (MIS)........................................634
Page 13

Contents
Chapter 22: Running Your Month End ............................................ 635
The Month End ............................................................................................636
Month End Checklist....................................................................................637
Changing Your Program Date ......................................................................639
Running the Month End ...............................................................................640
Posting Opening and Closing Stock.............................................................642
Posting Monthly Accruals
(Accountant Plus and Financial Controller Only)............................................648
Clearing Your Stock Transactions.................................................................651
Printing Your Product Reports
(Accountant Plus and Financial Controller) ...................................................652
Clearing the Audit Trail .................................................................................653
Handling Late Entries ...................................................................................653
Posting Late Entries .....................................................................................653
Chapter 23: Running Your Year End ............................................... 657
The Year End ...............................................................................................658
Year End Checklist.......................................................................................659
Backing Up Your Data..................................................................................660
Running the Accounts Year End...................................................................662
Historical Data Analysis ................................................................................664
Checking the Financial Year Start Date Setting.............................................667
Clearing the Audit Trail .................................................................................667
Deleting Records .........................................................................................672
Compressing Your Data ...............................................................................675
Chapter 24: Accountant Link ........................................................... 677
What Is Accountant Link? ............................................................................678
Using Accountant Link with Line 50 Accountant, Accountant Plus or Financial
Controller.....................................................................................................680
Exporting Your Accounts Data to File to Send to Your Accountant ...............683
Recording Material Changes To Your Data ...................................................686
Importing and Applying Your Accountant's Adjustments ..............................688
Using Accountant Link with Line 50 Client Manager.....................................693
Importing Your Client's Accounts Data From a File.......................................696
Recording Adjustments................................................................................698
Exporting Your Adjustments and Narratives to File .......................................700
Page 14

Sage Line 50 User Guide
Appendix: Installing and Upgrading to Line 50 Version 11 ............ 703
System Requirements..................................................................................704
The Readme File..........................................................................................705
Information for Users in the Republic of Ireland ............................................705
Installing Sage Line 50 Version 11 for the First Time
(Single User Version) ....................................................................................706
Installing Sage Line 50 Version 11 for the First Time
(Multi User Version) ......................................................................................709
Upgrading from Earlier Versions ...................................................................715
Preparing to Upgrade from Version 4 or Version 5........................................718
Preparing to Upgrade from Version 6, Version 7 or Version 8 .......................720
Preparing to Upgrade from Version 9 or Version 10......................................722
Upgrading to Sage Line 50 Version 11
(Single User Version) ....................................................................................723
Upgrading to Sage Line 50 Version 11
(Multi-User Version)......................................................................................724
After Upgrading: Converting Line 50 Version 5 Layouts................................725
Registering Your Program ............................................................................727
Page 15

Chapter 1
Getting Started
Welcome to Sage Line 50.
Sage Line 50 lets you record, control and
examine your finances quickly in a
traditional way, through a state-of-the-art
computer program.
Sage Line 50 is a totally integrated
system, which means that when you
record a financial transaction into one
ledger, all the other related ledgers are
immediately updated with that
information. Sage Line 50 does your
double-entry bookkeeping for you.
Read this chapter to find out how to get
started with Sage Line 50, including
installation and using your program for the
first time.
This User Guide covers Sage Line 50
Accountant, Sage Line 50 Accountant
Plus, Sage Line 50 Financial Controller
and Sage Line 50 Network Versions.
In this chapter:
Transferring Accounting Systems.........2
Installation ...........................................3
The ActiveSetup Wizard.......................4
Registering Sage Line 50 ...................13
Getting Started ..................................13
About SageCover ..............................14
SageCover Online Support ................14
sage.co.uk & sage.ie .........................15
Sage Training.....................................15
Page 16

Transferring Accounting Systems
To help you achieve a smooth transition from your current accounting system to your new
Sage Line 50 program, you should decide on which features and functionality you will use,
and when. For example, if you run a shop, you will not enter each customer transaction
(so you will have no customer records), but you will need to use cash book functionality
to enter the day’s takings. (For details about how to do this, see Bank Receipts on page
488.) Sage Line 50 lets you choose the accounting functions suitable to your business.
As a result of your business needs, you may need to do some, or all, of the following:
Enter your company details.
Set up and check your nominal account structure (this includes setting up bank
accounts in Sage Line 50). For an explanation of the nominal account structure, see
Nominal Ledger Accounts Explained on page 94.
Enter your customer records and their opening balances.
Enter your supplier records and their opening balances.
Enter your product details and their opening balances.
Enter the opening balances for your nominal ledger.
Enter the opening balances for your bank accounts.
For many people, moving from one system of accounting to another is a staged process.
It doesn’t happen overnight. Because of the nature of bookkeeping, where invoices may
not be paid on time and bank statements do not arrive until the end of the month, you
may have to make the transfer to your new system gradually.
Also, many people prefer to gain confidence in a new system by choosing to set up one
ledger at a time, for example, first the sales ledger, then the purchase ledger (Customers
and Suppliers in Sage Line 50), then the nominal ledger. However, other people choose
to transfer their accounts in one go, and do so successfully.
Whatever the implementation strategy you choose, we recommend that, until you
become familiar with Sage Line 50, you continue using your existing system for a short
time. In this way you can check that you are getting the right figures from Sage Line 50,
and you can also see the benefits of the new system, as many of your entries are
automatically done for you. You should also use the Demonstration Data supplied with
your Sage Line 50 program to experiment with all of the different areas of the program.
Page 17

Getting Started
Installation
This section guides you through installing a single user version of Sage Line 50 for the first time.
If you are installing a network version, or are upgrading from a previous version of Sage Line 50,
refer to the Appendix at the back of this guide. New users of Sage Line 50 (single user) should
follow these instructions:
Note: You must ensure that you are logged onto your computer as 'Administrator', or as a user
with administrative access rights, before attempting to install Sage Line 50. The installation
process cannot proceed if you do not have sufficient access rights.
1. Shut down any other programs you are running.
2. Put the Sage Line 50 CD into your CD-ROM drive.
If the Sage menu does not appear automatically after a few moments, open the Start menu
from the Windows menu bar, choose Run and then type d:\start in the Open text box.
Note: If your drive letters are different to those shown above, replace them with the
appropriate letter.
The Installation main menu appears.
3. Before you begin to install Sage Line 50, select ‘Readme’. This contains any additional or
late-breaking information about your Sage product.
Note: Sage Line 50 version 11 requires Microsoft Internet Explorer version 6 to run. If you
do not have Internet Explorer version 6 on your computer, a warning message appears
advising you that you must install it before you continue with the Line 50 installation. Install
Internet Explorer from the Line 50 CD, then start the Line 50 version 11 installation again.
4. Click Install and follow the on-screen instructions.
5. When the installation is complete, click Finish.
You can now close the installation menu.
A Sage Accounts short-cut is created on your desktop, so that you can double-click on
this icon to start the program.
If prompted, restart your PC.
You are now ready to run your Sage Line 50 program for the first time.
3
Page 18

Sage Line 50 User Guide
The ActiveSetup Wizard
Once you have installed Sage Line 50 you are ready to use it for the first time. To activate Sage
Line 50, double-click the Sage icon on your desktop or open the Start menu from the Windows
menu bar, choose Programs, then select Sage and finally select Sage Accounts.
Important Note: If you are using a multi-user version of Sage Line 50, the Logon window
appears every time that you start the program. When you first use Sage Line 50 program the
default logon name is MANAGER, with no password. Once you have completed the
ActiveSetup Wizard, you can then set up your access rights and passwords. For more
information, read Passwords and Access Rights on page 83.
When you start the program, the ActiveSetup Wizard appears. Use this to enter all of your
company information.
Click Next to progress onto the next step or click Back to return to the previous step to re-enter
or edit any information.
There are nine screens in the ActiveSetup Wizard when you are using Sage Line 50 for the first
time:
Welcome
My Company
My Details
My Financial Year
My VAT Details
My Currency
Program Activation
Program Registration
Next Steps
After the first Welcome screen, you should enter your company information into the relevant
boxes on-screen. Information about each of these screens can be seen in the following pages.
If you need additional help on any of the screens in the ActiveSetup Wizard, press F1 or select
the Help button for more information.
4
Page 19
Getting Started
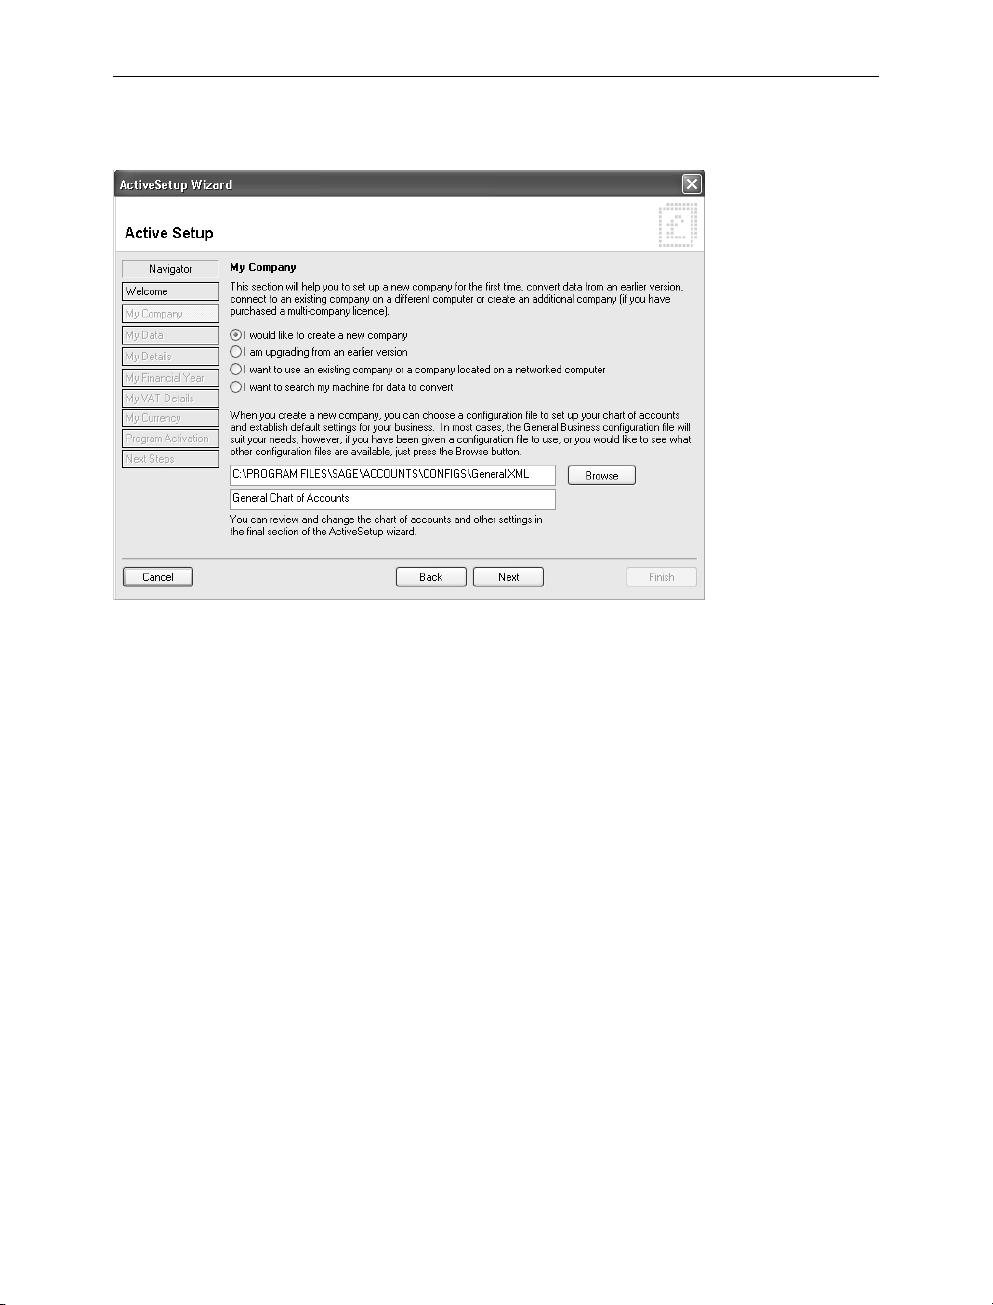
Step 2: My Company
If you are a new user you must select the first option ‘I would like to create a new company’. If
you are upgrading from an earlier version, or if you have Sage Line 50 and want to set up a
network version, refer to Appendix, Installing and Upgrading to Line 50 Version 11 on page 703.
You must also decide what type of chart of accounts your company needs. Sage Line 50 has
a number of charts to suit different business types. For example, you can choose from
construction, charities, medical, farming, garage and transport.
Note: There are more chart of accounts to choose from. To see details of the different chart of
accounts, press F1, enter the words Chart of Accounts in the Index tab and then select
‘standard’.
From the list, choose the chart of accounts most suited to your needs. If you are in doubt, select
the 'General Business - Standard Accounts' layout. This provides you with a basic chart of
accounts layout that is suitable for most businesses. To select a chart of accounts, click Browse
to access the Company Configurations window. Choose the chart you require and click Open.
For more information, see To use an existing configuration file on page 6.
Alternatively, you may have been given a Sage Line 50 configuration file by your accountant, or
someone in your company, to use. The configuration file holds all of your basic Sage Line 50
setup information, such as the nominal ledger details and the default settings for your company.
For more information about the details held in the configuration file, see the section The
Configuration Editor on page 44.
Important Note: You must select the configuration file before you exit the ActiveSetup Wizard.
You cannot change the configuration file once you have completed the ActiveSetup Wizard.
5
Page 20
Sage Line 50 User Guide
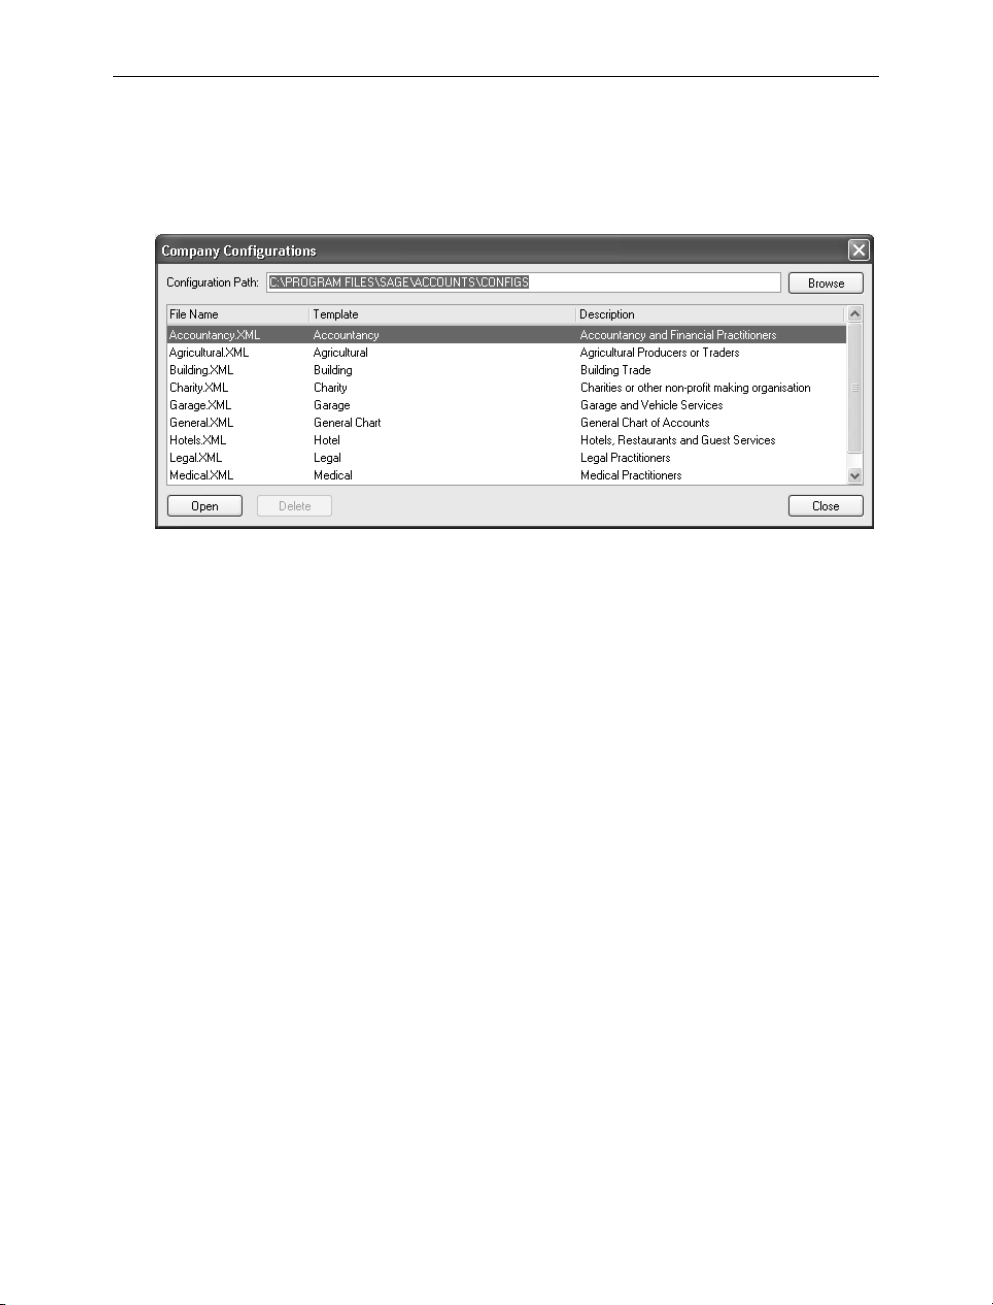
To use an existing configuration file
1. From the ActiveSetup Wizard’s ‘My Company’ window, click Browse.
The Company Configurations window appears.
If your configuration file has been saved into the default file location, the file will appear in
the list. The default file location is C:\Program Files\Sage\Accounts\Configs.
2. Select the appropriate file from the scrolling list. If the configuration file is not in the list, click
Browse to find the file.
3. Once you have selected the configuration file, click Open.
Line 50 returns you to the ActiveSetup Wizard and displays the file you selected.
4. Click Next to continue through the ActiveSetup Wizard.
6
Page 21
Getting Started
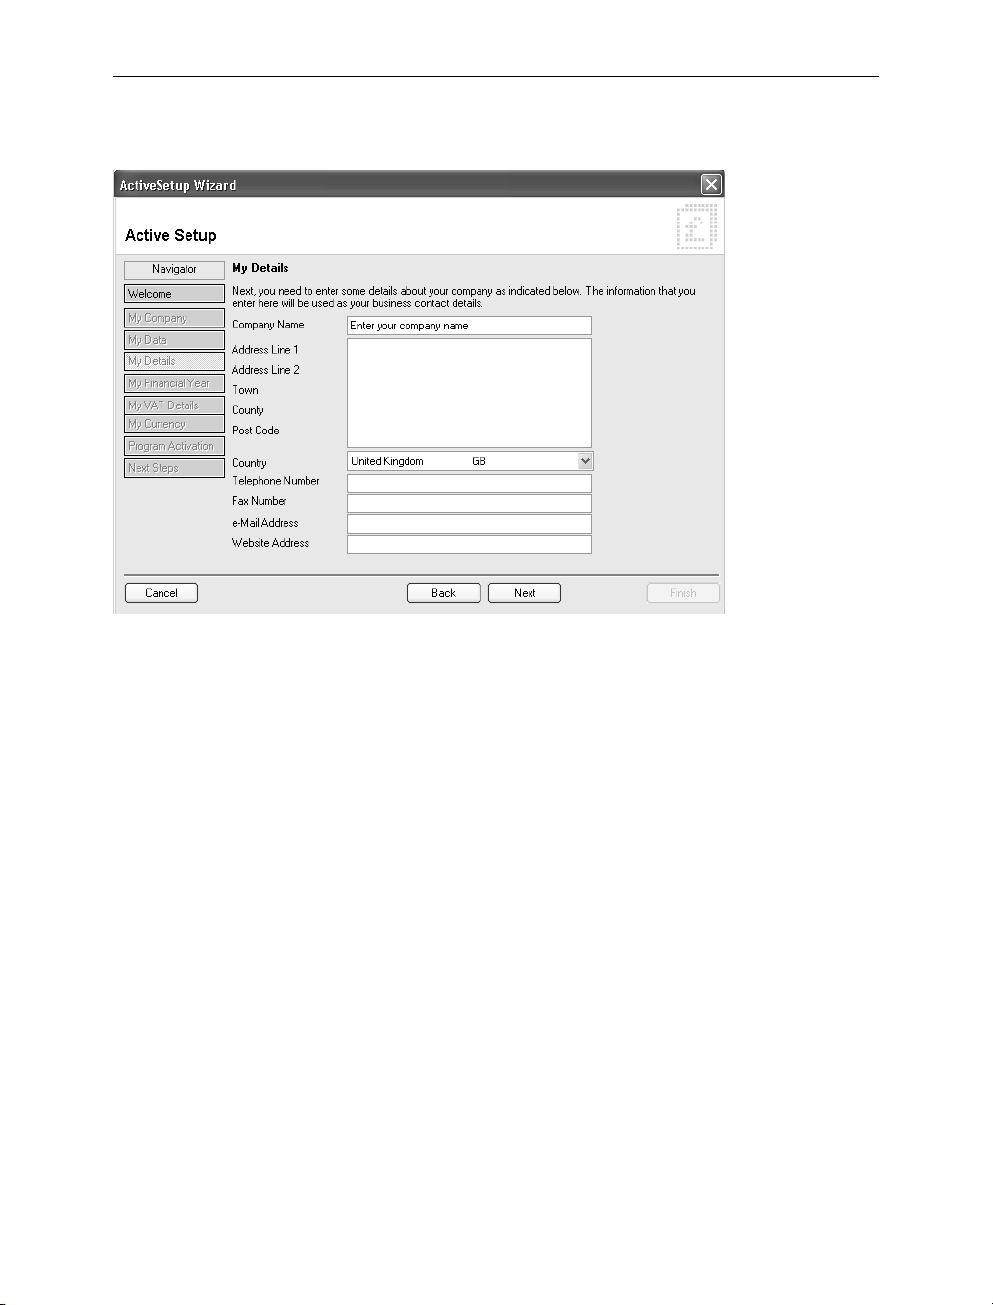
Step 3: My Details
Use this step to enter your company name and contact details. When you have completed the
wizard, these details will be copied to your Sage Line 50 program. If your company details
change, or if you make a mistake, you can change these details within your Sage Line 50
program.
7
Page 22

Sage Line 50 User Guide
Step 4: My Financial Year
Use this step to enter your Financial Year start date.
Note: It is important that you enter the correct Financial Year start date as it is difficult to change
this date once you have started to enter transactions. If you are in any doubt as to your Financial
Year start date you should contact your accountant or your company’s accounts department
before proceeding.
8
Page 23
Getting Started
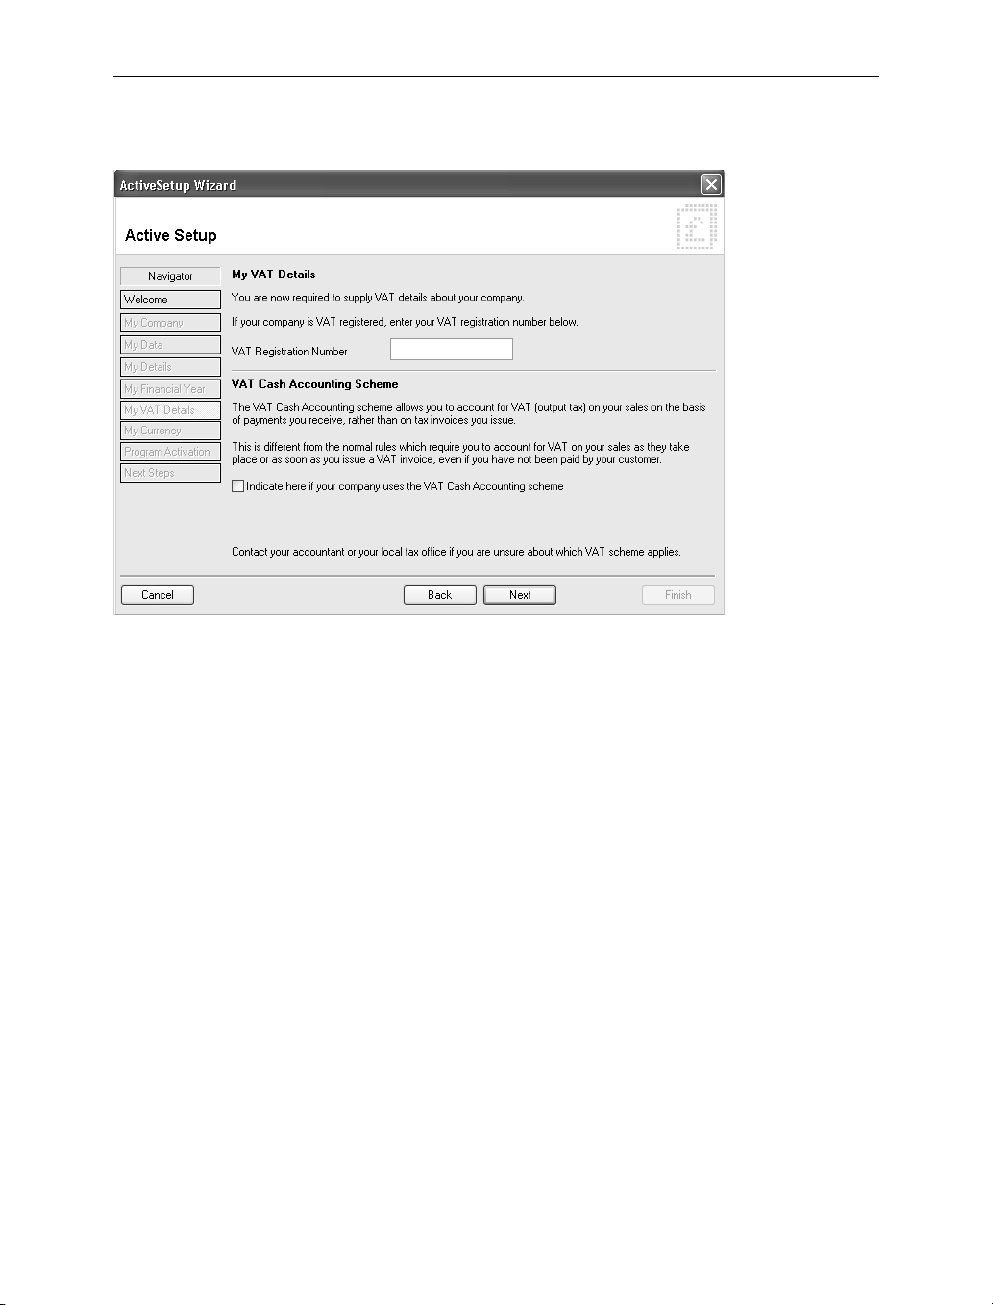
Step 5: My VAT Details
If your company is VAT registered, enter the VAT registration number in the relevant box. You
must also specify if your company uses the VAT Cash Accounting scheme. By default, Sage
Line 50 calculates tax liability using the Standard VAT scheme.
If you are in any doubt as to the VAT scheme that you are using, you should contact your
accountant or your company’s accounts department.
9
Page 24
Sage Line 50 User Guide
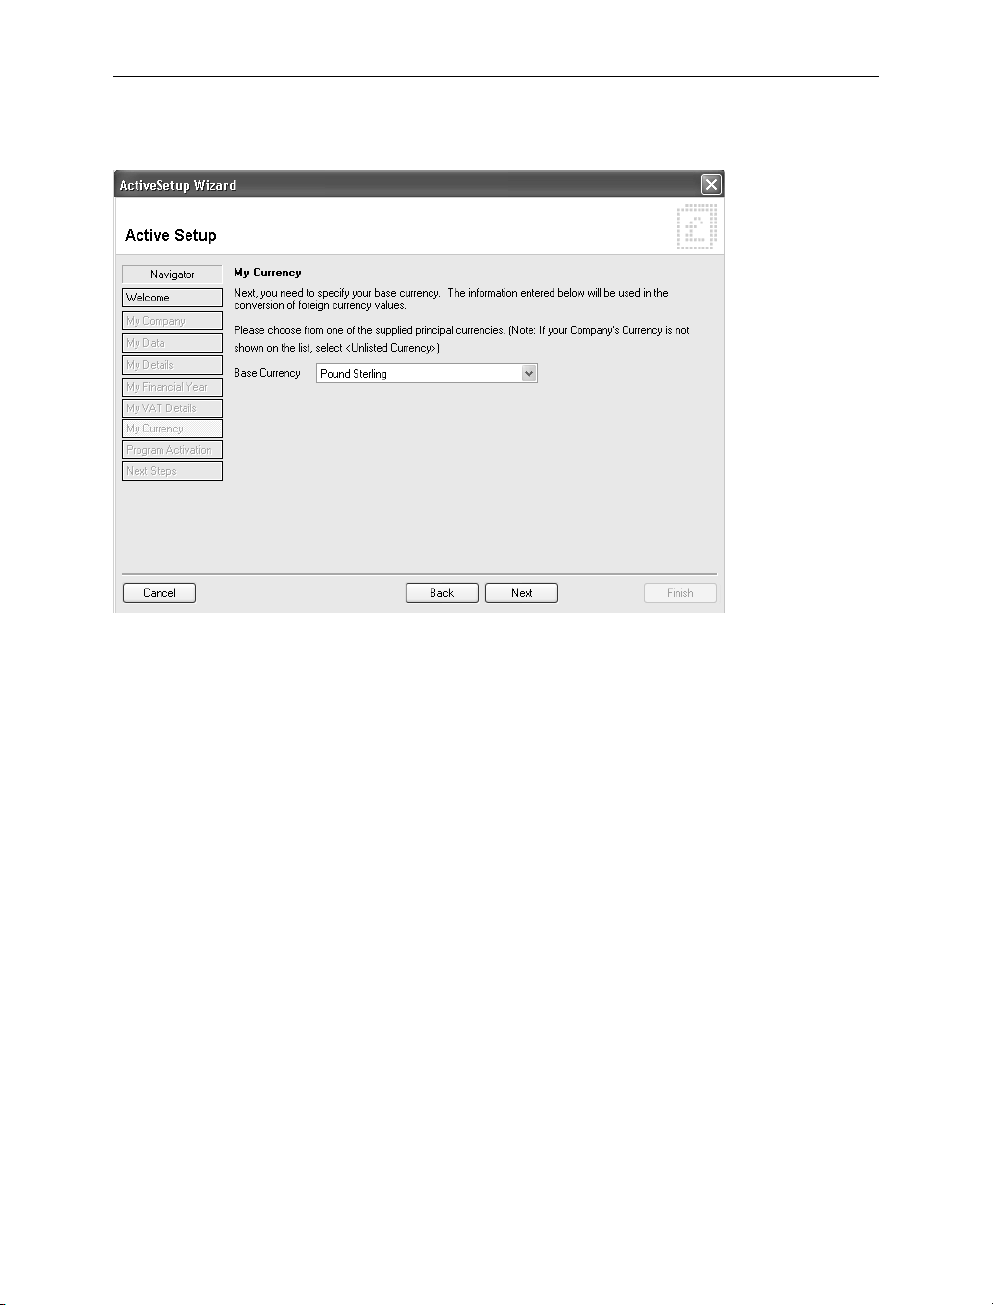
Step 6: My Currency
You now need to choose your base currency. This is the currency you will use most often to
record your transactions.
Note: It is very important that you choose your base currency correctly, as you cannot change
it once it has been selected.
10
Page 25
Getting Started
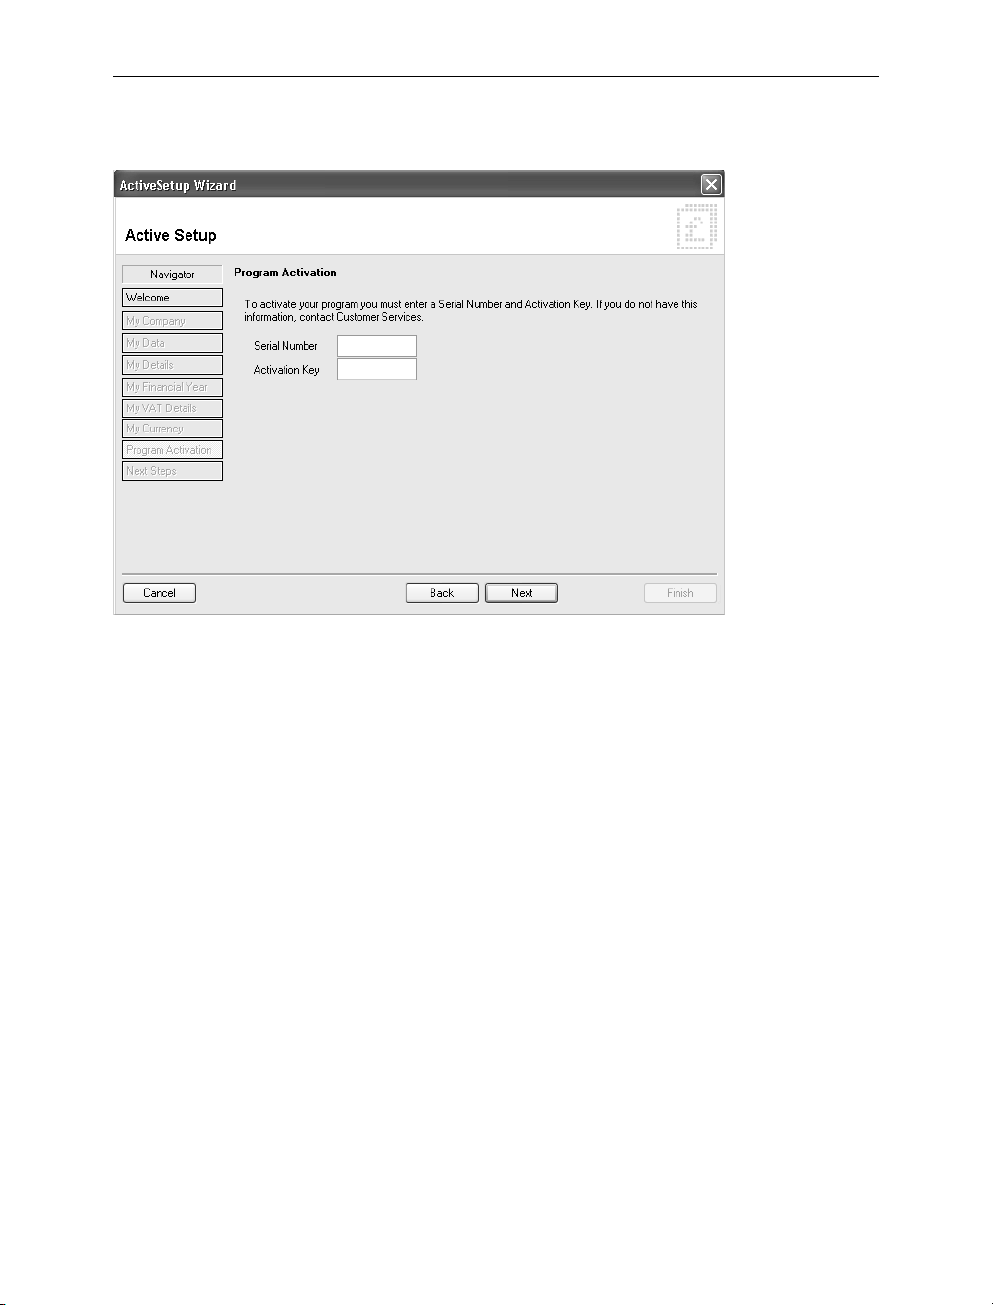
Step 7: Program Activation
You must now enter your Serial Number and Activation Key in the relevant boxes. You can find
these on the sticker sheet entitled 'Important Information', which comes within your program
box.
If you cannot find your Serial Number and Activation Key, please contact our Customer Care
department.
11
Page 26
Sage Line 50 User Guide
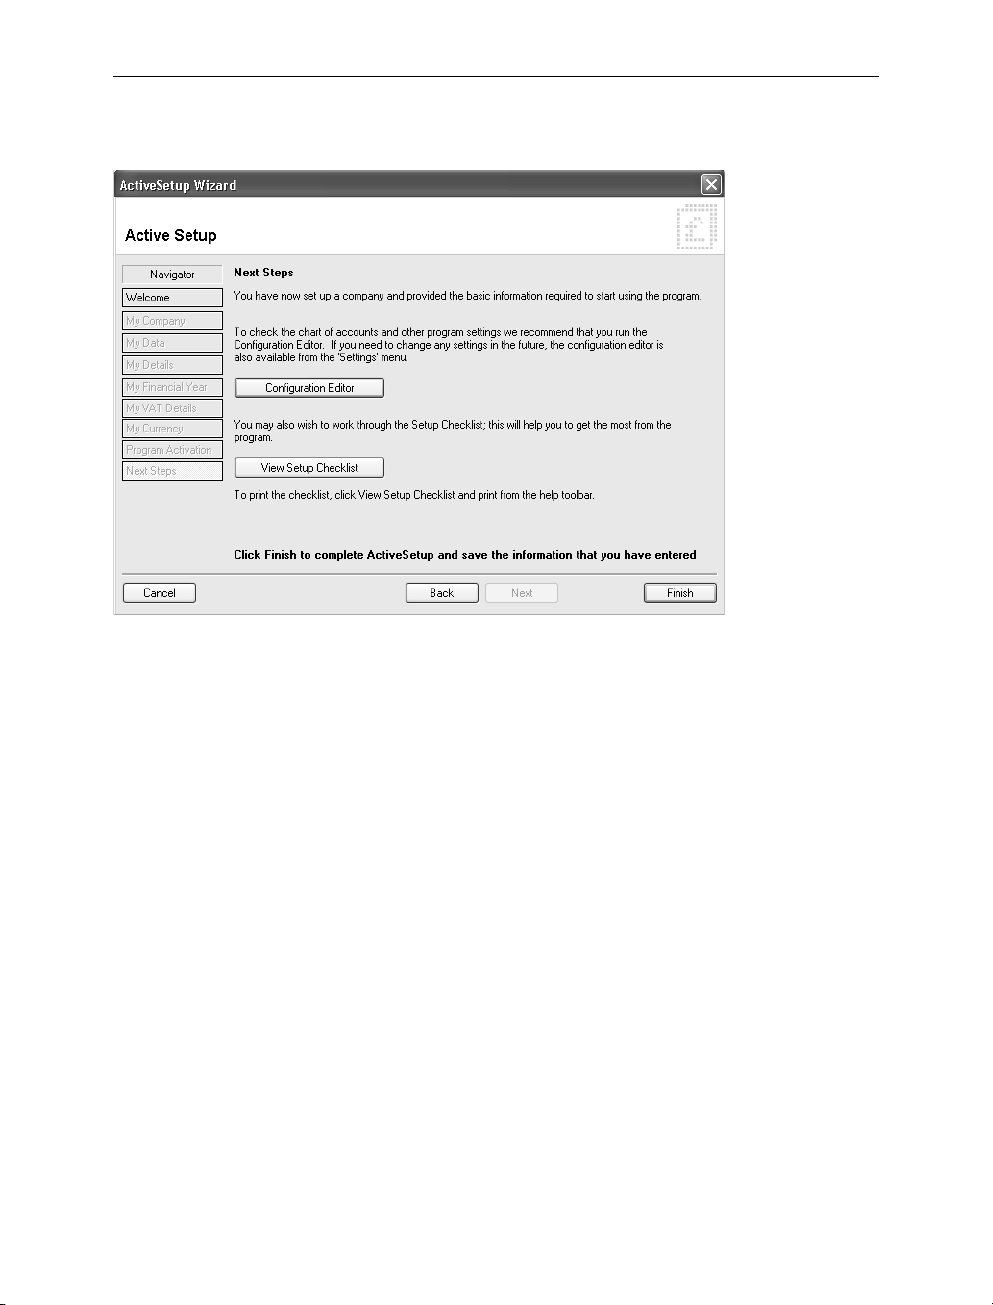
Step 8: Next Steps
This is the final screen of the ActiveSetup Wizard.
From this window you can access the Configuration Editor. You can use the Configuration
Editor to set up the basic information about your company. For more information, see The
Configuration Editor on page 44.
From here you can also open the help system to see the Setup Checklist. To do this, click View
Setup Checklist.
Click Finish to close the ActiveSetup Wizard.
12
Page 27

Getting Started
Registering Sage Line 50
Unless you register your Sage Line 50 program, you can only use your new Sage Line 50 for a
maximum of 60 days. At the end of the unregistered period you will be unable to use the
program (however, all of the information you entered during this period will be unaffected).
To register your Sage Line 50 program, call one of the following telephone numbers.
UK residents (mainland), 0845 111 66 66
Northern Ireland, 0845 245 0280
Republic of Ireland, 01 642 0800
If you have Internet access, you can register your program online. From the Tools menu, choose
Activation and select Upgrade Program, then click Web Register from the Product Registration
window. Follow the instructions on-screen to register your program.
Getting Started
You are now ready to begin entering information into your new Sage Line 50 program. Sage
recommends that you follow the structure of Part One of this User Guide in order to lay the
foundations of your new accounting system.
This chapter of the User's Guide introduces you to the new Sage Line 50 and shows you how
to install the program and where to get help. Chapter two explains how to use Sage Line 50
and shows you some useful hints and tips. Chapter three starts with the first major task which
you must complete and continues through to Chapter seven which is the last of the tasks which
you should perform in sequence. Chapters eight to eleven explain other key setup tasks. In
summary, the tasks you are advised to perform in sequence are:
Set your company defaults. Check that you have entered your company details correctly,
including your financial year start date and your VAT scheme. For more information, see
Setting Up Your Company Details on page 43.
Check your nominal account structure (this includes setting up bank accounts in Sage Line
50). Sage Line 50 has already created a nominal account structure for you, but you should
check that the structure is right for your company. At this stage you can rename your
nominal accounts to suit your business, add additional accounts and delete others that
you do not need. For more information, see chapter 4, Setting Up Your Nominal Structure.
Enter your customer and supplier information. If you need to keep details of your
customers and suppliers, the next stage is to enter their records and their opening
balances. A customer or supplier record is like a card in a card index box. Each record
holds information about a specific customer or supplier, such as an address, telephone
number, contact name, credit details and so on. Depending on your business you may
need to complete both supplier and customer records or you may need only the supplier
option. For more information, see chapter 5, Entering Customer and Supplier Records.
13
Page 28

Sage Line 50 User Guide
Enter your product information. If your business has stock, you should now enter your
product details, including their opening balances. For more information, see chapter 6,
Entering Product Details and Planning a Stock System.
Enter the opening balances for your nominal ledger and bank accounts (in that order). Any
figure listed on your opening trial balance should be entered as an opening balance against
the relevant nominal account. You should enter the opening balance for your bank account
after you have entered the balances of all your other nominal ledger accounts. This is the
last task which you should complete in order. For more information, see Entering Opening
Balances for Nominal and Bank Accounts on page 163.
The remaining chapters of Part One contain instructions on how to set up monthly payments,
discounts for customers, your fixed asset details and e-Banking.
About SageCover
If you are new to Sage Line 50, you are entitled to receive free SageCover for a 60-day period.
Your cover begins when you register your Sage product. This entitles you to unlimited
assistance in registering, installing and starting to use your new software. During this period you
can contact us by calling 0845 111 5555, e-mailing your query to support@sage.com or by
visiting www.sage.co.uk. There is no limit to the amount of times you can use the SageCover
service in this period.
Note: The free period of SageCover applies only to new users of Sage Line 50. If you are
upgrading from an earlier version of Line 50, you should use your existing SageCover support
contract if you have any queries. If you do not have an existing SageCover agreement, you can
subscribe to SageCover as detailed below.
If you want to subscribe to a full annual SageCover period, which gives you additional benefits
such as discounted program upgrades, call 0800 33 66 33 if you are resident in the UK
(mainland), 0800 1690315 for residents of Northern Ireland, or 1800 255300 for residents of the
Republic of Ireland. Alternatively, complete the order forms that are sent to you following
registration of your Sage Line 50 program.
SageCover Online Support
If you have SageCover and access to e-mail, you can send online queries to SageCover
support. To do this, from Sage Line 50's menu bar, open the Help menu, choose Email Support
and follow the on-screen instructions.
On www.sage.co.uk you'll find a wealth of business advice as well as tips on how to get the
maximum benefit from your new software. Business advice includes over 100 expertly written
articles on topics ranging from "How to write a marketing plan" to "How to write a contract of
employment".
14
Page 29

Getting Started
sage.co.uk & sage.ie
The Sage UK website, www.sage.co.uk (or www.sage.ie for users in the Republic of Ireland), is
a valuable resource available to you 24 hours a day, seven days a week. You can find
information on our products and services, print your latest invoice from us or sign up for a free
newsletter. It's a convenient place to buy Sage products, find out how to get help and advice
locally from a Sage business partner and much more. We are constantly adding new features
to the website, so visit regularly to take advantage of our online services.
To access the website, click the sage.com option from your Line 50 toolbar and choose Sage
Home Page.
Sage Training
Sage offers a portfolio of classroom training courses for all of our users, designed to enable
them to make the most of their Sage software packages. Every Sage training course is written
and presented by staff who know and understand Sage software. There are training centres in
Birmingham, Bristol, Croydon, Glasgow, Manchester, Newcastle upon Tyne, North London,
Reading, Swansea and Leeds, all offering a range of training courses every month.
For customers who prefer to study in their own time, Sage has also developed a range of self
study products, including on-line training courses, interactive CD-ROMs and workbooks with
practice data.
For further details about our Training products and course availability, please contact one of our
sales advisors on 0800 33 66 33.
15
Page 30

Sage Line 50 User Guide
16
Page 31

Chapter 2
How to Use Sage Line 50
Now you have installed Sage Line 50 and
run the ActiveSetup Wizard, you are ready
for a quick tour.
Sage Line 50 is compatible with most
Windows products. This means that it has
its own main window, which you can
maximise, minimise and resize, and keep
open while you work on other Windows
compatible applications.
This chapter will help you become familiar
with Sage Line 50. You will find out what
Sage Line 50 can do and you will learn
about the demonstration data.
This chapter also describes the different
ways that you can enter and manipulate
your data in the program.
Finally, this chapter provides an
explanation of debits and credits, and how
they work in an accounting system.
In this chapter:
Instructions in This Guide...................19
The Sage Line 50 Options .................20
The Sage Line 50 Window .................21
Using Windows..................................24
Menu Commands..............................25
Getting Help ......................................41
Wizards .............................................41
Debits and Credits .............................42
Page 32

The best way to become familiar with Sage Line 50 is to practise!
Sage Line 50 includes a demonstration data set for a fictitious company called Stationery
& Computer Mart UK. To access the demonstration data, go to File on the Sage Line 50
menu bar, then choose Open and select Open Demo Data. If Line 50 prompts you to
login, enter the default user name MANAGER, leave the password box empty, and click
OK.
Start using Sage Line 50 by experimenting with this demo data. Try moving around the
windows and familiarise yourself with list boxes, option buttons, check boxes and the
other elements of the program. Use the Search, Clear and Swap buttons on the Nominal
Ledger window to see how they work and then select some records from the Nominal list.
These are all activities you will use throughout Sage Line 50 and learning them now will
be a real help later on.
As you are working through this guide, you can swap between your own company
information and the demo data to practise any functions that you are unsure of. The demo
data is fully interactive and you can enter information into the data set to try out the
functions and work within the system. Whilst you are in the demo data set, you can do
nothing that will influence your real accounts. So don’t worry and try things out.
Remember, you are not on your own. This chapter explains how to use Sage Line 50 on
your computer, the rest of this guide explains procedures and processes with
step-by-step instructions. You also have the Sage Line 50 Help system at your disposal,
which you can search at any time if you are stuck, or press F1 if you are stuck on a
particular screen.
Note: All details in the demonstration data are fictitious. Any similarities in the
demonstration data with real names, addresses or other company details, past or
present, is coincidental.
Page 33

How to Use Sage Line 50
Instructions in This Guide
Sage Line 50 is a fully Windows compatible product which means that all the usual windows
elements are used. This User Guide also uses the same terminology and instruction
conventions that are used in your Windows User Guide, so, if you are familiar with Windows,
you will already know how to navigate around your Sage Line 50 program. If you are not, the
basic elements of Windows are described in this chapter.
This guide takes you through many different procedures, step-by-step, such as recording a
payment or running a report. To make it easy for you to follow, these instructions are written
using the following conventions. For example, a step by step procedure always starts in the
same format and continues as a series of numbered steps, as shown below.
Example
1. Select a record you want to delete from the Records list.
2. Click Delete.
Note: If during a procedure you are asked to type specific text into a box, this text is
always shown in boldface, as shown in step 3 below.
3. In the Command Line text box type d:\setup.exe and then press ENTER.
If you are required to press a specific key on the keyboard, this key is shown in CAPITAL
LETTERS. You will notice that the key you needed to press in step 3 above, the ENTER key,
is written in capital letters.
Italic text is used to refer you to other sections of the guide, for example:
4. To print your VAT Return, click Print. For more information, see Chapter 20, Running
Your VAT Return.
There is also consistent use of command words within the procedures, such as:
Open a menu from the menu bar.
Choose from a drop-down menu.
Select an option button, check box or an item from a list.
Click a command button or an option from a toolbar.
You decide whether to use the keyboard or the mouse to open, choose or select items.
Instructions on how to do this and how to use other elements of Sage Line 50 are contained in
this chapter. The next page explains what the main buttons of Sage Line 50 are used for.
19
Page 34

Sage Line 50 User Guide
The Sage Line 50 Options
Enter your customers’ details and keep track of your sales. Post any invoices or credit notes you raise and
instantly see when payments are due and overdue.
The Suppliers button lets you enter details of each of your suppliers, including invoices and credit notes and
contains all of their transaction details.
All your transactions are posted to the nominal accounts. Looking at these accounts lets you see the exact
state of your finances.
Record your bank and cash payments, receipts, transfers and adjustments. Pay your supplier invoices and log
customer receipts against invoices sent.
Use the Products option to record all of the items and services that you sell. The details can then be transferred
onto the sales invoices you create.
Invoicing lets you generate and print invoices and then updates your ledgers automatically. You can invoice for
items of stock you sell, or for the services your business provides.
Sales Order Processing is only available to users of Financial Controller. It lets you easily complete your sales
orders and automatically updates your ledgers.
Purchase Order Processing is only available to users of Financial Controller. It makes recording your purchase
orders quick and straightforward.
Look at details of your income and expenditure, assets and liabilities, compare your finances against last year’s
figures, and calculate your VAT Return.
Accountant Plus and Financial Controller users can use the Projects option to create and manage projects
and their associated costs, bill customers for work carried out and analyse cost information.
Use Credit Control to keep track of your money and find out how to set payment deadlines for your customers,
how to charge your customers for late payment of bills and how to write off bad debts.
The e-Mail option lets you electronically send and receive invoices and orders. Sage Line 50 then automatically
updates your records with their details.
Use the Period End options to carry out your routine functions at your month and year ends, such as clearing
transactions from the audit trail.
This option lists all of the financial reports that are available. From here you can print off your Balance Sheet,
Profit and Loss and many other reports.
Sage MIS uses your accounting data to give you a snapshot of your finances, sales performance, customers,
products and suppliers, in graphs and tables.
Sage.com is a great resource for your company. Find information on products and services, print your latest
invoice from us or sign up for free newsletters.
Sage Line 50’s Help system has over 1000 pages of support and instructions. If you cannot find what you want
in this User Guide, it will be in the Help system.
20
Page 35

How to Use Sage Line 50
The Sage Line 50 Window
When you double-click on the Sage Line 50 program icon, the Sage Line 50 window appears.
You can choose different views for your window. The first option shows a taskbar with the
toolbar visible. You can get this view by selecting View on the menu bar and putting a tick next
to Taskbar and Status Bar, if you want these to show.
Option 1: The Taskbar and Toolbar View
This is the Sage Line 50 Taskbar.
Open an option by putting the arrow
over the word and clicking the
mouse. When you first open Sage
Line 50, the Shortcuts and Recent
Reports areas will be empty.
This is the Sage Line 50 Menu
Bar. Open a menu by putting the
arrow over the word and clicking
the mouse or Alt + underlined
key.
This is the Sage Line 50 Toolbar.
Open an option by pointing the
cursor to the icon you want and
clicking the mouse.
Click to
minimise,
shrink or
close.
This is the Suppliers window, which appears
when you click Suppliers from the Toolbar. You
can open as many windows as you want, or
close them as you finish with them by using the
X in the top right hand corner. Or, you can
minimise them to use them later.
This is the Status Bar. This figure tells you how
many transactions you have entered onto
your system, the program date and the
financial year start date. You can choose to
show or hide this.
21
Page 36

Sage Line 50 User Guide
Option 2: The Taskbar View
This is the Taskbar. Open an option by
putting the arrow over the word and
clicking the mouse. When you first
open Sage Line 50, the Shortcuts and
Recent Reports areas will be empty.
This is the Sage Line 50 Menu
Bar. Open an option by pointing
the cursor on the option you
want and clicking the mouse.
Click here to
minimise, shrink
or close.
22
This is the Status Bar. This figure tells you how
many transactions you have entered onto your
system, the program date and the financial year
start date. You can choose to show or hide this.
Page 37

How to Use Sage Line 50
T
Option 3: The Toolbar View
The third option is to display the Toolbar only (if you are upgrading, this is the view the Sage Line
50 window defaults to). You can get this view by selecting View on the menu bar and putting a
tick next to Toolbar and Status Bar, if you want it showing (see bottom right of screen shot).
his is the Sage Line 50
Menu Bar. Open a menu by
putting the arrow over the
word and clicking the mouse
or Alt + underlined key.
This is the Sage Line 50
Toolbar. Open an option by
pointing the cursor to the icon
you want and clicking the
mouse.
Click on the minimise button to
display Sage Line 50 as a small icon
at the bottom of the screen, or use
the middle button to shrink the Sage
Line 50 window.
The X button closes the program.
This is the Status Bar. This figure tells you how
many transactions you have entered onto
your system, the program date and the
financial year start date. You can choose to
show or hide this.
23
Page 38

Sage Line 50 User Guide
Using Windows
When you select an option from the Sage Line 50 toolbar, a window appears in which you can
enter or view information. You can open several options at once, so you can move between one
function and another without having to close each one in turn. However, only one window can
be active at any one time. When you open a new screen, a new tab appears in the bottom left
area of the window. Click on these tabs to move between any of the screens.
24
Click on a tab to view any screen that you have opened.
Page 39

How to Use Sage Line 50
Data Entry Windows
In Sage Line 50, your data is entered onto window ‘forms’. Each form is divided into small boxes
into which data can be typed using the keyboard or selected from a list of choices.
Each single piece of information you enter on a screen is called a field. For example, a
customer’s name is a field; so is a price. Fields that accept both letters and numbers, plus a few
symbols such as hyphens or brackets, are called alphanumeric fields. Those that accept only
numbers are called numeric fields and those that accept and display a date are called date
fields.
The width of a field’s box usually denotes the limit of the number of characters it will accept. This
is known as the field length. However, Sage Line 50 will make sure that you only enter the right
type and amount of data in each field. So, for example, you will not be permitted to enter text
in a numeric field. You will also be prevented from entering a date which is not a calendar date.
Other types of field validation ensure that, as far as possible, the right kind of information is
entered into the appropriate field. Any deviation from the expected data may result in the input
being rejected or ignored, or in the screen displaying an error message.
Menu Commands
Each option on the menu bar provides access to a drop-down menu. If you use other software
on your PC, you will probably be familiar with drop-down menus. You can open menus and
choose options using the keyboard or mouse, as described below.
Selecting Menus With a Mouse
Click on the left mouse button when the pointer is on the menu option name, to display the pull
down menu. To select an option, click on the left mouse button again when the mouse pointer
is pointing to the option on the menu that you want.
Selecting Menus With the Keyboard
All menu and option names have one underlined character. You can select a menu by pressing
the ALT key simultaneously with the key corresponding to the underlined character. For
example, to select the Edit menu, you would type ALT and E (ALT+E) at the same time. When
the menu appears, you can select one of the options on the menu by pressing just the character
underlined. For example, having opened the Edit menu, you could select the Delete Row option
by pressing the D key.
25
Page 40

Sage Line 50 User Guide
The Toolbar
The main Sage Line 50 options are on a toolbar, which displays beneath the main menu bar. To
run any of these options, click on the appropriate option with the left mouse button.
When you run one of these options, a separate window will appear with its own toolbar options.
You can however run these options without a mouse by pressing the ALT key and the underlined
character shown on the option, at the same time.
Command Buttons
Command buttons appear in most of the Sage Line 50 option windows. Use these to take
action once you have entered some data or selected a record to work with. Command buttons
appear on virtually every window and include one or more of the following commands:
.
Save Choose the Save button to accept the data you have entered and process the
information, e.g. make the changes in the record. Any data entry boxes on the
screen will be cleared for you to enter details for another record. Save does not
take you out of the option.
Close Close is the button to choose when you want to exit from an option. Close does
not save any data you have entered so make sure you do this first, if
appropriate.
Discard If you choose the Discard button, any data you have just entered in the data
entry boxes will clear from the screen for you to start again.
Note: Discard does not undo any entries you have already saved.
OK The OK button is sometimes shown instead of the Save button. The difference is
that OK will not only save and process your data but will also exit the option.
Cancel The Cancel button is sometimes shown instead of the Discard button. The
difference is that Cancel not only Discards your data entry (or process) but it also
exits the option.
When there are too many buttons to display on the visible window, for example if you are using
a low display resolution, a double-arrow symbol appears to the right-hand side of the command
button bar. Click the arrow symbol to access the remaining available buttons:
26
Page 41

How to Use Sage Line 50
Entering and Editing Data
To type data into a form, you can move the arrow-shaped pointer (the cursor) to the field area
where you want to enter data, at which stage the pointer changes to a vertical bar called the
insertion pointer.
Move the cursor to the part of the field where you want to begin typing and click the left hand
mouse button. If the field is blank, an insertion pointer appears at the far left of the box. If there
is data already in the field, the insertion pointer appears at the same place as the cursor was
positioned when you clicked the mouse button.
The figure below shows a typical data-entry screen.
Find records with this button.
When you click Save, a blank screen appears, ready for another record. If you want to recall
your last record, click on the drop-down list button (represented by a down-ward pointing arrow)
and this will give you a list, in alphanumeric order, of all the records that have been entered. Find
the record reference that you want and select it with your mouse.
Moving Around Fields and Forms
After you have entered data within a field, you can use any of the following keys, found on your
keyboard, to locate the cursor elsewhere within the field or the form:
:
TAB Move to the next field.
SHIFT+TAB Move back to the previous field.
27
Page 42

Sage Line 50 User Guide
ESC Exit the form. If any data has been entered, you will be asked to
save the details.
END Move the cursor to the last character of the last word in the field.
HOME Moves the cursor to the start of the field.
CTRL+RIGHT ARROW Moves the cursor to the first character of the next word in the
field.
CTRL+LEFT ARROW Moves the cursor to the first character of the previous word in the
field.
Alternatively, you can use the mouse to place the cursor wherever you want and click the left
mouse button to accept the location.
Editing Field Contents
To add characters within a field, simply place the cursor at the point you want to start typing
and click the left mouse button. When you type, characters are inserted from the cursor
position, displacing existing characters to the right of the cursor.
To delete all or part of a field’s contents, use one of the following methods:
To delete individual characters to the left of the cursor, use the BACKSPACE key.
To delete several characters at once, you can highlight the text using the mouse.
Alternatively, you can press and keep the SHIFT button depressed while you use the right
or left arrow key to select the characters you want to remove, and then press DELETE.
To delete a complete word, either highlight the word by placing the cursor over it and
double-clicking the left-hand mouse button, or use CTRL+SHIFT and the right or left arrow
key, to highlight the whole word and then press DELETE.
To delete a whole line on transaction entry screens, place the cursor in any field and press
F8.
To delete the entire contents of the field, use the mouse to highlight all of the field’s contents
and press DELETE.
28
Page 43

How to Use Sage Line 50
Using Drop-Down List Boxes and Scroll Bars
You can enter some field entries by selecting from a drop-down list box. Such fields are
indicated by a down-pointing arrow in a small box at the right-hand end of the field.
Click on this arrow for the drop-down box
to appear.
Use these arrows to scroll up and down the list
box to select the appropriate records.
When you click on a drop-down arrow in a list box, the program opens a list of the first few
choices. To make a selection, click on the option you want, and it appears in the field box. If
necessary, use the scroll bar to move down the full list.
Scroll Bars
Windows and drop-down lists will not always be able to display all of the records or fields that
can be selected. Where a window has more to display than can be shown at one time, a scroll
bar appears at the right-hand side of the window, like the one shown on the drop-down list box
above.
To use the scroll bar, click on the up or down arrows, holding the mouse button down, to scroll
the list up or down respectively. Alternatively, drag the empty box in the scroll bar up or down
using the mouse.
Option Buttons
Option buttons that appear in Sage Line 50 let you select one action, from two or more possible
actions.
You can only select one option button. In this
example, the Top Left option is selected.
You select an option button by clicking on the required option with the left mouse button (a dot
appears in the selected option), or use the TAB key to move the cursor to the option button
area, then select the button with the arrow keys.
29
Page 44

Sage Line 50 User Guide
When
k this butt
Click this button to display a mini calculat
Click this button to go to view the
Check Boxes
Check boxes let you select one or more of the actions you require from a range of actions. For
example, in the Graph windows, you can show different types of transactions.
You can select one, two or three of
these check boxes at once.
Select a check box by clicking with the left mouse button on the required box (a tick appears).
Alternatively, use the TAB key to move the cursor to the check box area and select on or off
using the SPACE BAR. To clear a check box, repeat the procedure so that the tick does not
appear in the box.
Using the Calendar Button
All those fields which require you to enter a date have a Calendar button attached. When you
click this button a calendar appears from which you can select the date you need using your
mouse.
you clic
which you can select the required date.
on, a calendar appears from
Using the Calculator Button
To help you perform your calculations, a Calculator button is attached to many numeric
data-entry boxes. When you click this button a mini calculator is displayed, which you can use
like an everyday calculator with clicks of your mouse. The results seen on the on-screen
calculator appear in the numeric data entry box.
or.
‘Smart Link’ Buttons
There are often times as you use Sage Line 50, where you require additional information about
an account or transaction. At the click of a button, the 'Smart Link' feature allows you to move
from the screen you are working in to another window containing related data. Your account
information becomes more accessible as you work.
For example, when you enter an invoice, you may want to check the customer's details. Click
on the arrow button alongside the account code field to go to the customer's record details.
account details.
30
Page 45

How to Use Sage Line 50
The 'Drill-Down' Facility
You can click on a transaction listed on a customer, supplier, bank or nominal activity window
to drill down into the associated order, invoice or credit note details.
The following example shows the same transaction listed on the Bank Activity window.
Click this icon to see the details that
make up the transaction.
Function Keys
Sage Line 50 uses function keys in several areas to access a number of important features,
including the calculator and the Help features. Several of these keys are context sensitive,
meaning that they will only perform their function when you have selected an appropriate box.
For example, if you are in Customer Records and your cursor is in the A/C box, pressing F4 will
open the customer record list. However, if your cursor, in the same screen, is in the Name box,
nothing would happen if you pressed F4.
31
Page 46

Sage Line 50 User Guide
The various functions associated with the function keys are:
:
F1 Press this key to bring up Help that relates to the particular window you are using.
For example, if you are in the Customers window and press F1, the Help system will
display assistance on the Customers function.
F2 This key brings up the calculator which you can use with the mouse, in the same way
you would use a normal calculator.
F3 This key brings up the Edit Item Line window when you are entering an invoice using
the Invoicing option. Financial Controller users can also use the F3 key in the SOP
and POP modules.
F4 This button is a shortcut to the calendar, calculator or record list, if the selected text
box that you are using has any of these functions attached. Also if you select a
drop-down list box, you can press F4 to display this list.
F5 If you press this key it brings up the Currency Calculator when the focus is in a
numeric box. It will display the Spell Checker if the cursor is in a text box.
F6 Press this button in the appropriate screen to copy data from the box immediately
preceding it. For example, when entering invoice data in the Customers window,
press F6 to copy the data from the box immediately above it. This speeds up the
process of entering the same data.
F7 Using F7 inserts a blank row in a list. For example, if you need to insert a blank row
for another customer invoice in the Customer Invoice window, place your cursor on
an existing row, press F7 and a new blank row appears immediately above the list
where your cursor rests.
F8 Press F8 to delete a row, for example, in the Customers Invoice window.
F9 Use this key in a relevant field to calculate the Net amount from any Gross tax values.
For example, in the Batch Supplier Invoices window, you can enter the gross figure in
the Net column and press F9, which splits the amount into a Net and VAT amount.
F11 This button launches the Windows control panel, so, for example, you could access
your Internet options without having to minimise or close down your Sage Line 50
program.
F12 By default, the F12 key launches the Report Designer. Alternatively, you can configure
this button to launch another program on your PC, or minimise your Sage Line 50
program.
32
Page 47

How to Use Sage Line 50
Select
You
t this list in
Selecting Records to Work With
When you first run many of the Sage Line 50 options, the active window shows you the record
or records you can work with. In some options, you must first create these records; in others,
you are given a standard set of records to work with straight away. As you create each new
record, it is added to the list in code or reference order, so that you can always find the record
you want quickly.
The following figure shows an example of the Supplier Ledger window:
.
one or more records by
clicking on the lines you require.
can sor
the header range, for example Balance or Contact.
any column-type order by clicking on
New records appear on the
list automatically.
Click on these arrows to scroll up and down
the Supplier Ledger list.
A scroll bar appears when there are more records to be viewed than can be displayed in the list
box at any one time.
33
Page 48

Sage Line 50 User Guide
Selecting One Record for Processing
Each ledger window displays a list of records you have added to your ledger.
When you want to work with a single record, for example if you want to make a transfer from a
bank account, you can select the record from the list before you click the appropriate button
from the toolbar. This saves you from selecting the record once the process window, for
example the Bank Transfer window, is open.
To select a record from a ledger window, move the mouse pointer to the record in the list and
left click. The selected record is highlighted in the list.
If the ‘Enable Smart Totals’ option is switched on in Company Preferences, the information ‘1
of xx items selected’ displays at the bottom of the list, where ‘xx’ is the number of records
currently displayed in the ledger. In addition, when you select a record that has a balance
associated with it, for example in the Customers or Bank window, the balance amount shows
in the ‘Total Amount’ box at the bottom of the record list. For more information about setting up
your Company Preferences, see Entering Your Company Preferences on page 68.
Selecting More Than One Record
There may be times when you want to process several records in succession, or print a report
based on a particular selection of records. Using the same method as when selecting one
record, you can click on as many records in the list as you want. As you do so, each one is
highlighted and becomes part of the selected set of records for processing.
Tip: You can also select the records you want by using your cursor arrows on your keyboard to
scroll down or up, and pressing the SPACEBAR to select the record or records you want.
If you select several records and then click Record, for example if you want to make
amendments to several records in succession, the first record highlighted in the list appears on
the record window ready for processing. When you finish processing that record, you can view
the next one in the selection by clicking the Next button. To go back to a previous record from
the ones you have chosen, click the Previous button.
You will find it useful to be able to select several records when using the report options. You can
highlight all the records you want to include in the report before choosing the report you want
to print.
If the ‘Activate Smart Totals’ option is switched on in Company Preferences, as you select your
records Line 50 shows how many records you have highlighted at the bottom of the list. In
addition, Line 50 adds together the balance on each record and displays the total balance in
the ‘Total Amount’ box at the bottom of the list. The balance may show as one total amount,
for example on the Invoicing window, or it may display as total debit and credit amounts, such
as in the Nominal Ledger.
Note: The total debit or total credit only display on the Nominal Ledger when it is set to use the
List layout.
34
Page 49

How to Use Sage Line 50
Deselecting Records
Having highlighted a record you may want to deselect it, either because you have finished
processing it or perhaps because you selected the wrong one. If you click on the selected
record (or use the SPACEBAR), the highlight disappears. As you deselect records, Line 50
subtracts their balance from the ‘Total Amount’ box at the bottom of the list.
Using the Swap and Clear Button
If you have highlighted records that you no longer want selected, click the Clear button. Any
records that were highlighted are deselected, and no records are left highlighted.
When you want to select numerous records, it may be quicker to select those records you don’t
want, rather than what you do want. By using the Swap button, you can change the selection
to those that are not highlighted.
Click on the records you don’t want selected so they are highlighted and then click on the Swap
button. Everything that isn’t highlighted is immediately selected, and the records you clicked on
are deselected. You can swap back again using the same button. Try it out and you’ll soon be
familiar with the process.
Sorting the List
You can sort the records in most Sage Line 50 windows by ascending, descending or
alphabetical order, depending on the information in the list. Click with the mouse button on the
column name to sort the records. When you close and restart Sage Line 50, any sorts that you
apply are remembered.
Showing More Data Columns in the Windows
Many of the windows can show more columns of data if you maximise the window. Try it and
see. If you still can’t see all of the columns a scroll bar appears, enabling you to see the
additional columns by moving the window to the left.
35
Page 50

Sage Line 50 User Guide
Resizing and Hiding Data Columns
As you become more familiar with the ledgers and windows in Line 50, you may find that you
use some data columns more than others. For example, in the Customers window, you might
use the 'A/C' and 'Name' columns frequently for looking up a particular account, but perhaps
use the 'Contact' column less often.
Using the Configurable Columns feature, you can hide certain data columns that you do not use
very frequently, allowing more room on-screen for those columns that you use more often. You
can also resize the columns on-screen to make the best use of the space available, according
to your needs. So, in Customers, you could hide the 'Contact' column and then make the 'A/
C' and 'Name' columns wider.
Note: You cannot hide "essential" columns such as the Account Reference.
Line 50 stores the settings you select against your user name, so you can personalise your
program view without affecting other users. When you next log into the program, Line 50
remembers your settings and displays each window as you configured it.
Note: You can customise the program's columns for all users at once, so that every user sees
the same data column configuration regardless of their user name. To do this, log in using the
'Manager' user name, choose Tools then Options from the menu bar, and select the 'Use
Manager account settings for column display' check box. You can then set up the columns in
each option of Line 50 as you want them to appear for all users.
To resize a data column
1. From the appropriate Line 50 window, hover your mouse pointer over the label in the
heading of the column you want to resize.
2. Move the mouse pointer so that it appears between the column heading labels:
When it is positioned correctly between the column headings, your mouse pointer appears
as a cross with a double-headed arrow pointing to the left and right.
3. To increase the column width, left-click the mouse and hold the button down. With the left
mouse button held down, drag the mouse pointer towards the right until the column is at
the width you require. Release the left mouse button.
4. To reduce the column width, left-click the mouse and hold the button down. With the left
mouse button held down, drag the mouse pointer towards the left until the column is at
the width you require. Release the left mouse button.
5. To reset all of the columns in the current window to their default width, right-click on any
column heading and select 'Use Defaults' from the drop-down menu.
36
Page 51

How to Use Sage Line 50
The window displays all the columns at their default width.
Note: When you select 'Use Defaults', any columns you have previously hidden reappear
on the current window. To return to your customised view, right-click on any column
heading and click 'Use Defaults'. Your customised view reappears.
To hide or restore a data column
1. From the appropriate Line 50 window, right-click the heading of the column you want to
hide.
For example, if you want to hide the 'Contact' column in the Customers window, open
Customers from the Line 50 toolbar, and right-click the 'Contact' label at the top of the
column.
A drop-down menu appears, displaying all the column headings that relate to the current
window. The column headings that currently display in the window show a tick alongside
them on the menu.
2. To hide a column from the current window, left-click the column heading on the drop-down
menu.
The column disappears from the window, and the item no longer shows a tick against it on
the drop-down menu.
Note: You cannot hide all of the columns on any window. To prevent this happening, Line
50 does not allow you to hide the first column on the window. For example, in Customers,
you cannot hide the 'A/C' column.
3. To restore a column to the current window, right-click a column heading that is currently
displayed. The column headings menu appears. Left-click on the column heading you
want to display.
The column reappears on the window, and the item shows a tick against it on the
drop-down menu.
4. To restore the default column settings for the window and display all the available columns,
select 'Use Defaults' from the drop-down menu.
The window displays all the available columns at their default width.
37
Page 52

Sage Line 50 User Guide
Right-Click
You can use the right button on your mouse in many areas of Sage Line 50. This is known as
‘right-click’. You can use the right-click as a quick way of copying and pasting (and deleting).
You can also right-click in many areas to access common commands that relate to the line that
you click on; for example, you can right-click on a product item in a Product Invoice to access
the Edit Item Line window. To learn more about invoicing, see Chapter 13, Entering Invoices and
Credit Notes.
You can also use right-click to add a shortcut to your Taskbar. Point to the icon of the option
or function you want to create a shortcut for, then right-click. The drop-down text 'Add To
Shortcuts' appears - left-click the text to add that function to your shortcuts menu. For more
information about the Taskbar, see The Sage Line 50 Window on page 21.
Duplicating Records
To save you time when you are creating new records, Sage Line 50 provides the facility to
duplicate the details of an existing record. This is particularly useful if you need to create several
customers or suppliers, for example, that use many of the same account details. You can
duplicate a customer, supplier, nominal, bank, product or fixed asset record.
Note: You cannot use the Duplicate facility to create control or bank accounts in the Nominal
Ledger. When you duplicate an existing nominal record, Line 50 automatically sets the record
type to Nominal.
You can duplicate invoices, for example, if you want to create a number of invoices for the same
products or services. Financial Controller users can use the Duplicate feature to make copies of
existing sales orders and purchase orders.
To duplicate a record’s details
1. From the appropriate ledger window, select the record whose details you want to
duplicate.
2. Click Duplicate.
The Record window appears, showing the details copied from the original record. For
more details about what information Line 50 copies for each record type, please refer to
the Help system that accompanies Sage Line 50.
3. Enter an Account Reference, Nominal Code, Product Code or Fixed Asset Reference for
the new record.
Note: You must enter a new, unique Account Reference, Nominal Code, Product Code or
Fixed Asset Reference. If you enter one that already exists, Line 50 displays a warning
message. Click OK to return to the record window and enter a new reference.
When duplicating a nominal record, if you enter a nominal code that falls outside the range
of your current chart of accounts, Line 50 displays the message ‘This nominal code is
outside the range of the chart of accounts, therefore its balance will not be reflected in your
38
Page 53

How to Use Sage Line 50
P&L and Balance Sheet reports. Either choose a different nominal code or ensure that you
update the chart of accounts layout.’ Click OK to return to the Nominal Record window.
You can choose a different nominal code that falls within the current chart of accounts, or
alternatively you must remember to amend your chart of accounts layout to include the
new nominal code. For details about editing your chart of accounts, see To edit your chart
of accounts on page 119.
4. Add or amend the details you require in each of the record’s tabs.
5. To save the new record, click Save. To exit without saving your changes, click Discard.
6. To close the record window, click Close.
The main ledger window appears.
You have successfully duplicated the record.
Making Changes to Records in a Batch
If you want to make identical changes to a number of records in a ledger, Line 50 lets you make
the changes once and then apply them to all the records you require. For example, if you want
to set the 'Terms Agreed' flag on all of your customer records, you can select all of the relevant
records simultaneously and make the change only once. Because you do not need to open and
amend every record individually, this feature saves you valuable time and effort.
You can make batch record changes in Customers, Suppliers and Products. Financial
Controller users can also record changes in Fixed Assets.
To make changes to a batch of records
1. From the Customers, Suppliers, Products or Fixed Assets window, select the records you
want to make changes to.
2. Click Batch Changes.
The Batch Changes window appears.
Note: You can only enter information into the boxes that are suitable for batch changes.
Boxes and buttons that appear 'greyed out' are unavailable. For a list of what you can
change for each type of record, please refer to Line 50's Help system.
3. Make the changes you require.
4. Choose one of the following options:
39
Page 54

Sage Line 50 User Guide
Save Click Save to apply your changes to all the records you
selected. A confirmation message appears: 'You have chosen
to make changes to multiple records. Do you want to save
changes?'
To confirm that you want to apply your changes, click Yes. If
you do not want to apply your changes, click No to return to
the main ledger window. Alternatively, to cancel and return to
the Batch Changes window, click Close.
Close To cancel your changes without applying them to the records
you selected, click Close. A confirmation message appears:
'Do you want to save changes?'
To save the changes to all the records you selected, click Yes.
If you do not want to apply your changes, click No to return to
the main ledger window. Alternatively, to cancel and return to
the Batch Changes window, click Close.
Discard To clear the information you enter into the Batch Changes
window and start again, click Discard. The data clears from
the window, ready for you to re-enter your changes.
5. To return to the main ledger window, click Close.
Help
For details about what you can change in a batch of records, type 'Batch Changes' in the Help
system’s Index tab.
40
Page 55

How to Use Sage Line 50
Getting Help
The Sage Line 50 Help system provides you with all of the information you need to get the most
out of your Sage Line 50 program. To access the Help you can:
Press F1.
Press the F1 key at any point in Sage Line 50. The Help topic that appears, directly relates
to the actual window that is displayed on-screen. For example, click Customers and then
click Record. Pressing F1 at this point displays the Help information relating to the
Customer Record.
Click the Help option on the main Sage Line 50 toolbar and then choose Contents and
Index.
Use the Contents tab on the left side of the Help system to search for a Help topic. The
Contents is laid out module-by-module, in the same way as they appear in your Sage Line
50 program.
Open the Help menu and choose Contents and Index.
If you cannot find the topic you are looking for in the Contents structure, or you do not
know where the topic is, select the Index tab and click on the word that most closely
relates to the topic that you require.
Wizards
The wizards in Sage Line 50 are specifically designed to help you complete routine or
complicated procedures. A wizard takes you through the procedure you want to carry out in a
logical, step-by-step process. All you have to do is follow the on-screen instructions. You will
find wizards in various places in Sage Line 50, such as on the Modules menu from Line 50’s
main menu bar and on the various ledger windows throughout the program.
41
Page 56

Sage Line 50 User Guide
Debits and Credits
Sage Line 50 does the majority of your double-entry bookkeeping for you. It automatically
enters the debits (Dr) and credits (Cr) when you enter a transaction.
In double-entry bookkeeping every transaction has a debit and a credit. These debits and
credits are represented in the nominal ledger accounts, which are made up of two sides; debits
on the left and credits on the right.
Also, in the accounts, assets appear on the left; therefore to increase an asset you have to
create a debit. Liabilities and capital appear on the right, so to increase them you have to create
a credit.
For example, a bank loan to a business of £5000 is an increase in the bank balance and an
increase in a liability, so we would debit and credit as follows:
DR Bank CR Loan
£5000 Dr = £5000 Cr
Dr = Cr
The only other time that you have come across debit and credit amounts is probably on your
bank statement. You must remember that your bank statement shows your account from the
perspective of the bank’s own Balance Sheet, therefore when you put money into the bank, you
are actually lending them money. As they owe you this money back, from their point of view,
you become the banks creditor, hence the credit (Cr) balance. If you are overdrawn, the bank
sees you as a debtor who owes them money, thus the debit (Dr) label.
A debit will show in your Sage Line 50 accounts as one of the following:
An increase in the value of an asset.
A decrease in the value of a liability.
An item of expenditure.
A credit will show in your Sage Line 50 accounts as one of the following:
A decrease in the value of an asset.
An increase in the value of an liability.
An item of income.
The ledger used to record the double-entry is known as the Nominal Ledger. This is divided up
into individual nominal account records. Some accounts may have debit balances and some
may have credit balances, but when you run your Trial Balance report (a summary of all your
nominal accounts), the total value of all debits must equal the total value of all credits.
42
Page 57

Chapter 3
Setting Up Your Company Details
You need to work through this chapter to
set up your company details and defaults.
These defaults are the settings that Sage
Line 50 will use in the absence of any other
instruction from you. Using defaults will
save you time, as you won’t have to retype
the same information onto invoices or
customer and supplier records.
First you should enter your company’s
address(es) and decide how you want
Sage Line 50 to display information, such
as information on your customers,
suppliers and products. Then you need to
enter information like your financial year,
your tax code rates and passwords.
Also in this chapter, there are details about
how to work with foreign currencies,
including the euro.
Finally, this chapter introduces a vital part
of your accounting activities; your opening
balances.
In this chapter:
The Configuration Editor ....................44
Entering Your Company Preferences..68
Entering Your Company Defaults .......77
Setting the Financial Year...................77
Entering Your Bank Defaults...............78
The Euro and Other Currencies..........80
The Countries Table ...........................82
Passwords and Access Rights...........83
Changing Your Password...................84
Working With Internet Resources.......84
The Foreign Trader (Financial Controller
only)...................................................85
To Set Up the Foreign Trader .............86
Opening Balances .............................91
Page 58

The Configuration Editor
The Configuration Editor allows you to set up the basic information that your company
needs to get you started with your Sage Line 50 program.
The information that you enter here can be saved and used in future installations of Sage
Line 50. Accountants can set up this basic information for their clients so that defaults
such as the nominal ledger are ready to use.
The Configuration Editor consists of the following areas:
General
Chart of Accounts
Te rm s
Tax Codes
Account Status
Products
Departments
Fixed Assets (Accountant Plus and Financial Controller versions only)
Custom Fields
Dispute Reasons
Credit Control
Project Costing (Accountant Plus and Financial Controller versions only)
Page 59

Setting Up Your Company Details
The General Tab
When you use the Configuration Editor to set up your company defaults, you can save your
settings to a template. You can then use this template to set up a new company ready to work
with, or edit the template at a later date.
Use the General tab of the Configuration Editor to give your template a name, and specify where
you want to store the template. You can also select the General tab to locate and open an
existing template for editing.
Note: You cannot load and use a new template once you have completed and exited from the
ActiveSetup Wizard.
To set up your general configuration settings
1. From the Settings menu, choose Configuration.
The Configuration Editor window appears, showing the General tab.
2. Enter the following settings in the relevant boxes:
Template Name Type a name for the configuration file. You should enter a
name that allows you to identify the file.
We recommend that you use a name that relates to your
company or to your business type or industry sector. You can
enter up to 30 characters.
Description Enter a description for the configuration file. You can enter up
to 252 characters to describe the template that you are
creating. For example, 'Configuration for Garage, revised by
Smith and Sons'.
Filename If you have an existing template that has already been set up,
you can choose the Browse button to find the file.
Sage has created a set of templates with information for
specific industry types. When you click Browse, a list of these
existing template files appears.
3. To continue entering your configuration settings, see The Chart of Accounts Tab on page
46.
To save the changes to your template file, click Save, or to exit without saving, click Close.
45
Page 60

Sage Line 50 User Guide
The Chart of Accounts Tab
The Configuration Editor enables you to set up and amend your Chart of Accounts to suit your
business. You can add or modify ranges of nominal accounts to preset categories and you can
set up or change individual nominal accounts. You can also specify whether an account is a
standard nominal code, a control account, or a bank account.
Note: You cannot change default bank accounts from the Configuration Editor. To edit your
default bank accounts, access the Control Accounts option from the Settings menu.
Before you edit your Chart of Accounts, we recommend that you read the next chapter. See
Setting Up Your Nominal Structure on page 93.
The Chart of Accounts list box uses the following colour coding to differentiate between the
types of nominal account:
Green Floating range
A floating range is one that could be an asset or a liability depending on the
balance of the nominal accounts included in it, and so appears in both the current
assets and current liabilities categories of the Chart of Accounts.
Blue Control account
Control accounts are used by Sage Line 50 to make double-entry postings, and
include your Debtors and Creditors Control Accounts, Default Bank Accounts and
VAT Control Accounts.
46
Page 61

Setting Up Your Company Details
Red Bank account
A bank account is a nominal code that you create in the Bank module.
Pink Bank and Control account
If a bank account also appears in your list of control accounts, for example your
default bank account, the Chart of Accounts list box displays it in pink.
Note: The Configuration Editor only allows you to create one Chart of Accounts for each
configuration file. To set up another Chart of Accounts, you will need to create a separate
configuration file.
You can set up your chart of accounts in the Configuration Editor or in the Nominal option.
For instructions about adding and editing your existing chart of accounts, see Chapter 4,
Setting Up Your Nominal Structure, or press F1 on the Chart of Accounts tab and read the
information that appears in the help system.
47
Page 62

Sage Line 50 User Guide
The Terms Tab
Each time you create a new customer or supplier record, you can enter details such as the credit
limit, trading terms and discount available for that account.
If you give most of your customers similar terms and conditions, or receive similar terms from
many of your suppliers, you can use the Configuration Editor to set up defaults. This saves you
time as you will not need to enter the same information each time you create a new record.
In addition, if your company applies credit charges to customers who do not pay on time, you
can set up your finance rates here.
To set up your terms
1. From the Configuration Editor window, click the Terms tab.
The Terms information appears.
2. Enter your Customer Trading Terms and Supplier Trading Terms in the relevant boxes:
Credit Limit Enter the standard credit limit that you give your customers,
or that your suppliers give you.
Sett. Discount If you want to offer early settlement discount, or if your
suppliers offer you this facility, enter the default percentage in
this box.
48
Page 63

Setting Up Your Company Details
Payment Due Days Enter your usual credit terms, i.e. the number of days that you
usually give your customers to pay, or that your suppliers give
you.
Sett. Due Days You can give your customers a discount for early payment, or
your suppliers may offer you this discount. If payment is
received within the days you enter here, you or your customer
can qualify for a discount.
Terms Type in up to 30 characters of text, such as '30 Days'. You
can print this on your invoices or statements if required.
3. To add a Customer Finance Rate, click Add in the Customer Finance Rates section.
You can enter the following finance rate information:
Date applying from Enter the date you want the new interest rate to apply from.
Base Rate % Enter the current base rate here.
Additional % If you want to charge interest above the current base rate,
enter the additional percentage here.
4. To amend an existing finance rate, click Edit in the Customer Finance Rate section.
5. To delete a finance rate, click Delete.
To save your changes to your template file, click Save, or to exit without saving, click Close.
To continue entering your configuration settings, see Tax Codes on page 50.
49
Page 64

Sage Line 50 User Guide
Tax Codes
Sage Line 50 sets the standard UK and EC VAT Rates automatically for you, so you don’t
normally need to adjust anything. However, we recommend you read this section to familiarise
yourself with the codes that are used and what they represent.
Upon installation, Sage Line 50 sets the code T1 - standard rate (currently at 17.5%) as the
default tax code.
Note for Irish users upgrading from an existing Sage program: When you set your Regional
Settings to English (Ireland), Sage Line 50 sets the standard default tax codes T1 to 21% and
T3, which is used for reduced rate transactions, to 13.5%. The remaining tax codes remain as
detailed in the bulleted list later in this section.
Note for new Irish users installing Sage Line 50 for the first time: When you install with your
Regional Settings set to English (Ireland), Sage Line 50 version 11 creates the following
standard default tax codes: T0, 0% (zero rated sales and goods for resale); T1, 21% (standard
rate sales and goods for resale); T2, 0% (exempt transactions for sales and goods for resale);
T3, 13.5% (reduced rate sales and goods for resale); T4, 0% (sales to VAT registered customers
in the EC); T7, 0% (zero rated purchases from suppliers in the EC); T8, 0% (standard rated
purchases from suppliers in EC); T9, 0% (transactions not involving VAT); T10, 0% (zero rated
goods for non-resale); T11, 21% (standard rate goods for non-resale) and T12, 22% (reduced
rate goods for non-resale).
If you need to add or change VAT Codes, use the Tax Codes tab from the Configuration Editor.
Tax codes are used to identify the rate of VAT to be applied to a given transaction. You can
specify up to 100 VAT rates, each one identified by a code from T0 to T99. You can then select
the rates that are to be included in the VAT Return calculations and which relate to EC
transactions.
When you install your program, Sage Line 50 automatically sets up the following VAT Rates for
you:
T0 zero rated transactions
T1 standard rate
T2 exempt transactions
T4 sales to VAT registered customers in the EC*
T7 zero-rated purchases from suppliers in the EC**
T8 standard rated purchases from suppliers in the EC**
T9 transactions not involving VAT***
* This tax code can be used for VAT registered customers outside of the UK, but within the EC.
You must have the customer’s VAT registration number entered on the customer record if you
want to use the T4 tax code. If your customer is not VAT registered, you should use one of the
standard UK VAT rates.
50
Page 65

Setting Up Your Company Details
** These tax codes can be used for suppliers outside of the UK but within the EC. In accordance
with VAT regulations, EC VAT rate codes used for purchases are given a 'notional' rate that is
linked to a UK VAT Rate. For example, the T8 tax rate for standard-rated purchases from
suppliers in the EC is linked to T1, which is the standard rate of VAT in the UK.
*** These transactions are not included on the VAT Return. Sage Line 50 also uses T9 as the
default tax code for all the routines that are non-vatable, e.g. journal entries and error
corrections. If you want to change the function of T9, you will need to set up another tax code
that is non-vatable, for Sage Line 50 to use for these routines
You can add or edit tax codes. To add or edit a tax code, open the Settings menu and choose
Tax Codes. Select the code you require and then click Edit.
Note: The tax codes are set up by default, but it is your responsibility to ensure that these tax
codes are used correctly.
For more information about tax codes, you should check the following HMCE publication
notices:
Notice 700 - The VAT Guide. This is the main VAT reference guide.
Notice 725 - The single market. This notice explains the way that VAT is charged and accounted
for on the movement of goods within the EC single market.
For more tax information and copies of Notice 700 and Notice 725, you should refer to the
HMCE Web site. You can access this Web site from your Sage accounts program, by clicking
on the Sage.com icon on the main Sage desktop and then selecting Customs and Excise from
the pop-up list.
51
Page 66

Sage Line 50 User Guide
To edit a VAT rate
1. From the Configuration Editor window, click the Tax Codes tab.
The Tax Codes information appears, listing all the VAT rates currently available for you. The
list also shows whether each rate is 'In Use' (i.e. included on your Sage Line 50 VAT
Return), and if the rate refers to transactions with EC countries.
2. To edit an existing VAT Rate, select a tax code and click Edit.
The Edit Tax Code window appears. This window shows any basic information about the
tax code that you have selected, such as the code, rate and description.
52
Page 67

Setting Up Your Company Details
3. Enter or edit the following information:
Enter or edit the rate to be applied (as a percentage) in the Rate text box provided.
You should not change this rate if it is an EC Code, as this rate does not apply.
If you want to include this tax code in your Sage Line 50 VAT Return, select the
'Include in VAT Return' check box. Clear the check box if you do not want to include
transactions with this tax code in your VAT Return calculations.
If the rate relates to transactions with EC countries, enter the EC details in the boxes
provided.
If you want to change the tax code description, type the text you require into the
Description box.
4. To save the details of this tax code, click OK. To exit without saving, click Cancel.
5. To apply the changes to the company that is currently open in Line 50, click Apply.
6. To save the changes to your template file, click Save, or to exit without saving, click Close.
To continue entering your configuration settings, see The Account Status Tab on page 54.
53
Page 68

Sage Line 50 User Guide
The Account Status Tab
Sage Line 50 helps you to manage your customer accounts by allowing you to set up a range
of status settings for these accounts. You may want to set several different types of account
status to signal whether your customers are good or priority customers. You may also want to
assign statuses for bad customers, or specify that a particular status on an account places that
customer 'On Hold'.
A number of account statuses are already set up for you to use, but you can edit or add to these
if you require.
To edit an account status
1. From the Configuration Editor, click the Account Status tab.
The Account Status information appears, listing all the account statuses currently available
to you. The list shows a 'Y' if a status places an account 'On Hold'.
2. Highlight the account status you want to amend and click Edit.
Note: If you try to edit the Open account status, a message appears advising you that you
cannot change the 'On Hold' status.
The Edit Account Status window appears.
3. If you want to edit the name of the account status, type the new name into the Description
box.
4. If you want to change the on hold status, select or clear the Marks Account As 'On Hold'
check box as required.
54
Page 69

Setting Up Your Company Details
5. To save your changes, click OK. Alternatively, to exit without saving, click Cancel.
6. To apply the changes to the company that is currently open in Line 50, click Apply.
7. To save the changes to your template file, click Save, or to exit without saving, click Close.
To continue entering your configuration settings, refer to the section The Products Tab on
page 56.
55
Page 70

Sage Line 50 User Guide
The Products Tab
The Products tab of the Configuration Editor allows you to manage your Product Categories.
The categories you set up will be available as a drop-down list on Sage Line 50's Product
Record window.
Sage Line 50 lets you divide your products into 999 different categories for analysis and
reporting purposes.
To report on products that belong to different categories, use the Search button on the Products
window to enter the category number as a selection criterion before you run the relevant report.
You can also change the category label to a term more relevant to your business, and set up
custom additional information labels to appear on all your product records.
To edit a product category
1. From the Configuration Editor window, click the Products tab.
The Products information appears.
2. Select the category you want to amend and click Edit.
The Edit Product Category window appears.
3. In the text box provided, enter the name for your product category.
4. To save your entry click OK, or to abandon your entry click Cancel.
5. To apply the changes to the company that is currently open in Line 50, click Apply.
56
Page 71

Setting Up Your Company Details
6. To save the changes to your template file, click Save, or to exit without saving your details,
click Close.
To set up your product category label fields
1. From the Configuration Editor window, click the Products tab.
The Products information appears.
2. If you want to set up an alternative label for the Product Category box on your product
records, type the name you require in the Label box.
3. To apply the changes to the company that is currently open in Line 50, click Apply.
4. To save the changes to your template file, click Save, or to exit without saving, click Close.
To set up your product record custom fields
1. From the Configuration Editor window, click the Products tab.
The Products information appears.
2. Enter your custom field labels in the Product Custom Fields section. You can enter up to
three custom field labels. The labels you enter appear on the Web tab of each of your
product records.
3. To apply the changes to the company that is currently open in Line 50, click Apply.
4. To save the changes to your template file, click Save, or to exit without saving, click Close.
To continue entering your configuration settings, see The Departments Tab on page 58.
57
Page 72

Sage Line 50 User Guide
The Departments Tab
You can use up to 999 departments to analyse transactions. For example, you may want to
analyse sales by area. To do this, you must set up departments to represent each of your sales
areas. Each time you post an invoice, you can analyse the sales to the corresponding area. You
can then run your company reports, per department, to see how each department in your
company is performing.
Tip: To allow for expansion of your business, we recommend that you leave gaps so you
can set up new departments. For example, your sales areas may originally be:
Scotland
North
Midlands
Wales
London
South
As your business expands, you could break down your departments to:
Glasgow
Edinburgh
Aberdeen
Manchester
Newcastle
Leeds
To edit a department
1. From the Configuration Editor window, click the Departments tab.
The Departments information appears, listing all the departments currently available to you.
2. Select the department you want to amend and click Edit. To add a new department, select
the next available department in the list and click Edit.
The Edit Department window appears.
3. In the text box provided, type a new name for your department.
4. To save your entry click OK, or to abandon your entry click Cancel.
5. To apply the changes to the company that is currently open in Line 50, click Apply.
6. To save the changes to your template file, click Save, or to exit without saving, click Close.
To continue entering your configuration settings, see The Fixed Assets Tab (Accountant
Plus and Financial Controller only) on page 60.
58
Page 73

Setting Up Your Company Details
To edit the department label
Your company may not use departments. It is possible to change this label so that you can enter
your own analysis information on your accounts records. Follow the following procedure to
change the Department boxes throughout your Sage Line 50 program.
1. From the Configuration Editor window, click the Departments tab.
2. Enter your new text label in the Label box.
3. To apply the changes to the company that is currently open in Line 50, click Apply.
4. To save the changes to your template file, click Save, or to exit without saving, click Close.
To continue entering your configuration settings, see The Fixed Assets Tab (Accountant
Plus and Financial Controller only) on page 60.
59
Page 74

Sage Line 50 User Guide
The Fixed Assets Tab
(Accountant Plus and Financial Controller only)
Sage Line 50 lets you divide your fixed assets into 99 different categories for analysis and
reporting purposes. For example, you may want to set up separate categories for equipment,
furniture and vehicles, which you can use on each fixed asset record you create.
Note: You can change the name of the 'Fixed Asset Category' label wherever it appears in Sage
Line 50 by typing a new name in the 'Label' box on the Fixed Assets tab of the Configuration
Editor.
For more information, see Chapter 10, Working With Fixed Assets (Accountant Plus and
Financial Controller Only).
To edit your fixed asset categories
1. From the Configuration Editor window, click the Fixed Assets tab.
The Fixed Assets information appears, listing all of the fixed asset categories currently
available to you.
2. Click Edit (or double-click on the category that you want to add or change).
The Edit Fixed Asset Category window appears.
3. In the text box provided, type a name for your fixed asset category.
4. To save your entry click OK, or to abandon your entry click Cancel.
5. To apply the changes to the company that is currently open in Line 50, click Apply.
60
Page 75

Setting Up Your Company Details
6. To save the changes, click Save, or to exit without saving, click Close.
To continue entering your configuration settings, see The Custom Fields Tab on page 62.
To edit the fixed asset category label
Your company may not use fixed asset categories. It is possible to change this label so that you
can enter your own analysis information on your fixed asset records. The following procedure
explains how to change the label on 'Fixed Asset' boxes wherever they appear throughout your
Sage Line 50 program.
1. From the Configuration Editor window, click the Fixed Assets tab.
2. Enter your new text label in the Label box.
3. To apply the changes to the company that is currently open in Line 50, click Apply.
4. To save the changes, click Save, or to exit without saving, click Close.
To continue entering your configuration settings, see The Custom Fields Tab on page 62.
61
Page 76

Sage Line 50 User Guide
The Custom Fields Tab
When you record information about a customer or supplier in Sage Line 50, you can enter up
to three additional pieces of detail for that account. For example, you might want to show the
customer type, sales representative and sales region on a Customer Record, or you may need
to categorise your supplies by region and account manager.
The Custom Fields tab allows you to set up labels that determine how Sage Line 50 displays
information on your customer and supplier records. You can use this extra data for analysis and
reporting purposes.
To set up your custom fields
1. From the Configuration Editor window, click the Custom Fields tab.
The Custom Fields information appears.
2. Enter up to three custom field labels in the Customer Record Custom Fields and Supplier
Record Custom Fields sections.
3. To apply the changes to the company that is currently open in Line 50, click Apply.
4. To save the changes to your template file, click Save, or to exit without saving, click Close.
To continue entering your configuration settings, see The Dispute Reasons Tab on page
63.
62
Page 77

Setting Up Your Company Details
The Dispute Reasons Tab
When you mark a customer or supplier invoice as being in dispute, Line 50 requires you to enter
a reason code that explains why the transaction is disputed.
The Dispute Reasons tab allows you to create up to 999 different dispute reason codes so that
you can specify why an invoice is being disputed.
To set up your dispute reasons
1. From the Configuration Editor window, click the Dispute Reasons tab.
The Dispute Reasons information appears, listing all of the dispute reasons currently
available.
Note: By default, only one dispute reason is available. This is '1 - No Reason'.
2. Select the dispute reason that you want to add or change and click Edit.
The Edit Dispute window appears.
3. In the text box provided, type a description for your dispute reason.
Note: You cannot edit dispute reason '1 - No Reason' and leave the description blank. If
no other reason codes exist, Line 50 uses this as the default entry when you dispute an
item and it is important that there is always one reason code entry available for you to use.
4. To save your entry click OK, or to abandon click Cancel.
5. To apply the changes to the company that is currently open in Line 50, click Apply.
6. To save the changes, click Save, or to exit without saving click Close.
To continue entering your configuration settings, see The Credit Control Tab on page 64.
63
Page 78

Sage Line 50 User Guide
The Credit Control Tab
If your customers do not pay after you have sent them their statement, you can use Line 50’s
Payment Reminder letters. You can choose from 3 different types of letter: a simple reminder,
the more forceful warning, or the threat of legal action.
Using Line 50’s Credit Control features, you can choose to automatically generate letters to
send to your customers, reminding them of any outstanding invoices. The Credit Control tab of
the Configuration Editor allows you to select which of your standard or customised reports you
would like to use for each type of letter.
To set up your credit control letter details
1. From the Configuration Editor window, click the Credit Control tab.
The Credit Control Standard Letters information appears.
2. In the 'Reminder Letter:' box, enter the path to the Line 50 report you want to use for a
simple reminder letter. If you do not know the exact path to the letter you want to use, click
Browse to locate the file.
3. From the 'Set status to' drop-down list alongside the Reminder letter path, select the
status code you want Line 50 to set the customer’s record to after you send them a
Reminder letter.
4. Repeat the procedure to enter a path and status code for the Warning and Legal Threat
letters.
5. To apply the changes to the company that is currently open in Line 50, click Apply.
6. To save your entries, click Save, or to exit without saving, click Close.
64
Page 79

Setting Up Your Company Details
The Project Costing Tab
(Accountant Plus and Financial Controller Only)
If you use Sage Line 50’s Project Costing option to record and track your company’s projects,
use this tab of the Configuration Editor to set up your project statuses, cost codes and custom
analysis fields.
Sage Line 50 helps you to track the progress of your projects using a set of statuses that you
can define to suit your business. For each status, you can enter a short code and description,
and specify whether the status allows you to make cost postings to the project and whether
you can delete the project record.
Cost codes are a means of identifying the various types of costs that a project incurs, such as
the materials that make up a product or the labour element of a job. When you enter a cost for
a project, you can associate a code with each cost. This helps you to analyse the costs for your
projects at a later date.
To set up or amend project statuses, cost codes and custom fields
1. From the Configuration Editor window, click the Project Costing tab.
The Project Costing information appears.
65
Page 80

Sage Line 50 User Guide
2. In the three sections of the window, enter the following project settings:
'Project Status' Use this section of the window to add, edit or delete project
statuses. You can add to Line 50's original five statuses,
creating up to 99 statuses.To add a new status, click Add.
Set up each status with a unique short code and a
description. You can then use the Allow Postings and Allow
Deletion check boxes to specify whether the status allows you
to make cost postings to the project, or whether you can
delete the project. You cannot set up a status with both of
these check boxes selected.
To edit a status, select the status in the list and click Edit.
To delete a status, select the status in the list and click Delete.
You can only delete a status if no project records currently use
it.
Note: You cannot delete the default status. In addition, you
must always retain at least one status, which will be set as the
default if it is the only one remaining. You cannot delete all
statuses.
If you want to change the default status, select the status you
require and click Set as Default.
66
'Cost Codes' Use the 'Cost Codes' section of the window to define your
project cost codes. You can add to Line 50's original four cost
codes, creating up to 99 codes.
To add a new cost code, click Add. Enter a unique short code
and a description for the cost code and click OK.
To amend a cost code, select the code in the list and click
Edit.
To delete a cost code, select the code in the list and click
Delete. You can only delete a cost code if no transactions
exist that use the code.
'Project Custom Fields' The Project Record contains three analysis fields that you can
use to categorise projects for reporting and analysis
purposes. For example, you could categorise projects by
project manager, project type and geographical area.
Use the Field 1, Field 2 and Field 3 boxes in the 'Project
Custom Fields' area to set up the labels for the record's
analysis fields.
Page 81

Setting Up Your Company Details
3. To apply the changes to the company that is currently open in Line 50, click Apply.
4. To save your entries, click Save, or to exit without saving, click Close.
67
Page 82

Sage Line 50 User Guide
Entering Your Company Preferences
The Company Preferences option is a very important area of the program as it affects the way
your program displays information. We recommend that you read this section and enter your
company preferences before you use any of the other Sage Line 50 features.
Some areas of the Company Preferences option will already contain information, taken from the
information that you entered on the ActiveSetup Wizard. We recommend that you check this
information and enter the remaining company preferences now.
Use the Accountant tab to enter your accountant's name and address details. Line 50 uses this
information when you use Accountant Link to exchange data with your accountant. For
information about entering your accountant's details and using Accountant Link, see Chapter
24, Accountant Link.
To enter your address preferences
Use this area of the program to fill in your company address.
1. Open the Settings menu and choose Company Preferences.
The Company Preferences information appears.
68
Page 83

Setting Up Your Company Details
2. If necessary, edit your company name and address. You can also add your company’s
telephone and fax numbers, e-mail and website address.
3. Financial Controller users: If you want to use Line 50 to produce Intrastat Supplementary
Declarations information and you do not have a default company Delivery Address set up,
you must set the Country to GB (or IE for users in the Republic of Ireland). Select GB or IE
from the drop-down list in the Country box.
4. Enter your company’s VAT registration number in the box provided.
5. If you have an Accountant Plus or Financial Controller version of Sage Line 50, you can
have multiple delivery addresses. For example, if your business has several offices, you can
enter a delivery address for each office.
Help
Type 'Delivery Address' in the Help system’s index to find out how.
6. To save any changes and exit, click OK, or to exit without saving, click Cancel.
To enter your label preferences
Setting your label preferences determines how your Sage Line 50 program displays information.
This includes how you want to display addresses and additional information on your customer,
supplier and product records.
1. Open the Settings menu and choose Company Preferences.
2. Choose the Labels tab.
The Labels information appears.
69
Page 84

Sage Line 50 User Guide
3. To ensure that you always enter address information consistently, you can amend the
labels that appear on all address data entry screens. For example, you can change the
labels to Street 1, Street 2, Town, County and Postcode. This ensures that the county will
always be entered on the fourth line. Therefore if you want to search for all customers in a
specific county, you can search on Address Line 4. For more information about searches,
see Using the Search to Find Records on page 286.
4. To save any changes and exit, click OK, or to exit without saving, click Cancel.
To enter your company parameters
By setting your company parameters, you can choose from a range of options which affect how
your Sage Line 50 program works. These options are explained in the following instructions.
1. Open the Settings menu and choose Company Preferences.
2. Click the Parameters tab.
The Parameters information appears.
70
Page 85

Setting Up Your Company Details
3. Enter the following information in the relevant section of the window:
:'
'Item VAT Amendable' Select this check box if you want to be able to change the VAT
Amount figure (which is automatically calculated by Sage Line
50 when you create invoices or credit notes from within the
Invoicing option). If you have Financial Controller, you can also
change VAT amounts when creating sales and purchase
orders.
'VAT Cash
Accounting'
Select this check box if you are using the VAT Cash Accounting
scheme. The VAT Cash Accounting scheme allows you to pay
and reclaim VAT on receipts and payments (instead of invoices
raised). It is available to companies with turnovers below a
certain threshold. For further information about VAT Cash
Accounting, contact your local Tax Office.
'Non-Vatable Tax
Code'
When you install Sage Line 50, T9 is set as the default tax code
for transactions which do not include VAT.
71
Page 86

Sage Line 50 User Guide
T9 transactions are not included on the VAT Return. T9 is used
for all the routines within Sage Line 50 which are non-vatable,
for example journal entries. You can change this code, if
required, to a code of your own choice by selecting one of the
codes from the drop-down box. However, it is recommended
that you keep the existing T9 code.
'Default Call Charge
Rate'
(Financial Controller
only)
'Display Account
Status'
'Exclude Deleted
Transactions'
You can charge people for the amount of time you talk to them
on the telephone. The hourly rate that you enter here is used as
the default rate that can be assigned to service invoices
generated from within customer records contacts tab. To read
about how to charge people for telephone calls, see Invoicing
From Telephone Calls (Financial Controller Only) on page 372.
Select this check box if you want Line 50 to display the status
of your customer and supplier.
If you select this check box, two option buttons become
available.
If you want Line 50 to display the account status when you use
the account, but allow you to continue, select 'Show a warning
on each change'. When you create or amend an invoice, credit
note or order for the account, Line 50 displays a warning
message informing you that the account is on hold. You can still
create or amend the invoice, credit note or order.
If you want Line 50 to prevent postings to accounts that are on
hold, select the 'Stop the account' option. When you try to
create or amend an invoice, credit note or order for an account
that is marked as on hold, Line 50 displays a warning message
advising that the account is on hold, and that you must take the
account off hold before you can create or modify the
transaction.
Select this check box to exclude any transactions from your
transaction activity list boxes which have been deleted using
the Error Corrections option. If you do not select this check
box, deleted transactions appear in red on the activity
windows. You cannot exclude them from the Financials
window.
72
'Display ActiveSearch
popup'
Select this check box to enable the ActiveSearch option. The
ActiveSearch option speeds up data entry by trying to match
what you are typing to records stored within Sage Line 50 or
items that you have previously typed. For more information, see
Using ActiveSearch on page 293.
Page 87

Setting Up Your Company Details
'Access Rights' Sage Line 50’s Access Rights option lets you set individual
passwords for each person who has access to Sage Line 50.
You can also restrict the options a user has access to,
increasing the security of your company data. Select this check
box if you want to set up access rights. For more information,
see Passwords and Access Rights on page 83.
'Allow Negative Stock' If you want Sage Line 50 to allow negative stock levels, select
this check box. For example, a negative stock value may occur
if you have not recorded recent deliveries of stock to your
warehouse but have still been recording the sales to your
customers.
Note: If your stock value does fall to a negative value, the cost
price is calculated as an average one, so there could be an
increased profit on the stock valuation report.
'Copy skeleton journal
values'
(Accountant Plus
and Financial
Controller only)
'Timeslips Link'
(only relevant to
owners of the Sage
Timeslips product)
'Validate VAT
Numbers'
If you want to be able to save the values of your skeleton
Nominal Ledger Journal Entries which you make regularly,
select this check box. For example, you can save your salary
journal values so that you do not have to enter all the values
each time you post your salary journal.
If you want to import your accounting journals from your
Timeslips program to your Sage Line 50 program, select this
check box. When you have selected this check box an
additional option appears on the File Import menu enabling you
to import your accounting journals from Timeslips.
If you want Line 50 to check the VAT numbers you enter into
your records to see if they in the correct format, select this
check box.
73
Page 88

Sage Line 50 User Guide
'Login Check'
(Network versions
only)
'No Recurring entries
at startup'
If you try to logon to Sage Line 50 using a logon name that is
already in use on another computer on the network, Line 50
prevents the logon. You cannot logon to a company using the
same logon name from more than one computer at a time.
If you want to be able to remove the logon name from the user
list at the point of logging in to Line 50, select this check box. If
you try to logon using the same logon name more than once,
Line 50 displays the message "This username is already in use.
Do you want to remove this user from the request list and logon
again?". You can remove the user by clicking Yes, and logon to
Line 50 as normal.
If you do not select this check box, Line 50 displays the
message "Username is in use - the program cannot connect
you at this time." You cannot logon using this logon name until
the user is logs out on the other computer.
Note: If you use this option, you must ensure that this check
box is cleared on every other computer that is running Sage
Line 50 across the network.
Clear this check box if you do not want to be reminded of
outstanding recurring entries when you start your Sage Line 50
program.
If this check box is not selected, a message appears when you
start your Sage Line 50 program if it detects any recurring
entries that are due to be posted. Accepting the pop-up
message opens the Recurring Entries window.
74
'Enable Project
Costing'
Select this check box if you want to use Line 50's Project
Costing option.
'Enable Smart Totals' Select this check box if you want Line 50 to display a total
balance for all records selected within a ledger window, such as
Customers, Nominal or Invoicing. The window also displays
how many records you have selected out of the total number
available, for information purposes.
Note: The number of records selected and their total balance
only displays on the Nominal Ledger if it is set to use the List
layout. If the Nominal Ledger is using the Analyser or Graph
layout, the totals do not display.
Page 89

Setting Up Your Company Details
'Log Events' Select this check box if you want Line 50 to keep a record of
important changes and processes in your data, such as when a
user runs the year end process. For more details, Event
Logging on page 282.
4. To save any changes and exit, click OK, or to exit without saving, click Cancel.
To enter your reporting preferences
1. Open the Settings menu and choose Company Preferences.
2. From the Company Preferences window, click the Reporting tab.
The Reporting information appears.
3. Enter the following information in the relevant section of the window:
'Print End of Report
Banner'
Select this to print an 'End of Report' message at the end of all
reports to indicate that the report is complete.
75
Page 90

Sage Line 50 User Guide
'Cheque lines per
page'
(Financial Controller
and Accountant Plus
only)
'Print Address on
Stationery'
'Use Data Path for
Reports'
(Network users only)
'EMail Generation
Mode'
Enter the number of lines that appear on your cheque layout
here. The program uses this value to generate the correct
cheque number when your remittance note runs over more
than one page.
Note: If you have 12" cheque layouts, set this to 15 cheque
lines per page. If you are using A4 cheque layouts, set this to
11 cheque lines per page. When you are printing your cheques,
you may have to continue making adjustments to the number
of cheque lines per page until your cheque layout is printed
correctly.
Select this check box to print your name and address on all of
your invoices, orders, statements and letters.
If you want your client machines to use the reports stored on
the server, select this check box. This means that all client
computers are using the same set of reports.
Use this drop-down list to select the default file format to use
when you generate any Line 50 report to E-mail. You can
®
choose from Plain Text, HTML or PDF (Adobe
Portable
Document Format).
When you generate a report and select the 'E-mail' output
option, Line 50 attaches the report to an e-mail message in the
file format you specify here, ready to send to your chosen
recipient.
Alternatively, if you generate a report and select the 'Preview'
output option, you can e-mail the report by clicking the E-mail
button within the Preview window. Again, Line 50 uses the
default file format you specify here for the report attachment.
4. To save any changes and exit, click OK, or to exit without saving, click Cancel.
Note: For details about entering your Accountant Link preferences, see Chapter 24, Accountant
Link.
76
Page 91

Setting Up Your Company Details
Entering Your Company Defaults
You should enter and check the following company defaults now.
Financial Year
Bank Defaults
Currencies
Passwords and Access Rights
Internet Resources
These options are all accessed from the Settings menu. The Settings menu also provides
several other options, such as Customer Defaults, to make using Sage Line 50 easier. These
are covered in detail by other chapters in this guide.
Help
For more information about tax codes, type 'Tax Codes' into the help system’s index.
Setting the Financial Year
When you first used your program, you entered the financial year start date in the ActiveSetup
wizard. We recommend that you check that you have entered the correct date now as you
cannot easily change the financial year start date after you have started entering transactions.
To check your Financial Year Start Date open the Settings menu and choose Financial Year.
Your Financial Year start date appears. If you need to change the date, you should do so
now.
If the date is greyed out, you have already started to enter transactions. For further
information about changing your financial year start date after you have started entering
transactions, type financial year into the index of the Help system, then double-click on
'changing'. It is essential that you read all the information about changing your financial
year start date before attempting to change the start date.
Note: If you change your Financial Year start date, all of your prior year columns (on nominal
records) will be cleared.
77
Page 92

Sage Line 50 User Guide
Entering Your Bank Defaults
Use the Bank Defaults option to set up how you want to use your banking options. For example,
you can choose how you want transactions to be grouped.
To enter your bank defaults
1. From the Settings menu, choose Bank Defaults.
The Bank Defaults window appears.
2. Select the bank defaults you want to use.
'Enable E-Banking' Select this check box to enable the e-Banking option in the
Bank module. When this check box is selected, the next time
you enter the Bank option, a registration window appears.
Enter your e-Banking registration details (which appear on the
'Important Information' sticker sheet included in your Line 50
box) to use the features for a trial period of 30 days.
When the 30-day trial period is over, you must enter a new
Activation Key in order to continue using e-Banking. If you have
valid SageCover for your Line 50 program, you can obtain this
activation key free of charge from Sage’s Customer Care
department. If you do not have valid SageCover for Line 50,
you can continue to use e-Banking for a charge of £99 + VAT
per annum. For Customer Care’s contact details, see
Contacting Sage on page 244.
For more information about e-Banking, see Chapter 11,
E-Business.
78
Page 93

Setting Up Your Company Details
'Group Items in Bank
Reconciliation'
'List Payment/Receipt
by split'
'No Warning on Visa
Receipts'
'Group Bank
Transactions'
If you select this check box, consecutive transactions of the
same type are combined as one item when shown in the Bank
Reconciliation window if the reference code and date are the
same. A 'Y' also appears in the 'Grouped?' column of the
Bank Reconciliation window if the transactions have been
grouped.
Select this check box to display every individual transaction
when viewing invoices in the Supplier payments and customer
receipts screens. If this check box is not selected, the
individual transactions are grouped and only one line appears
per invoice.
When entering a receipt on a Credit Card Account, Line 50
warns you that you have selected a credit card account. To
turn off this warning, select this check box.
If this check box is selected, bank transactions (bank
payments and bank receipts) with the same reference and
transaction date that are saved on the same batch entry
window are grouped together on the bank activity under one
header line. To see the individual transactions that make up the
header, you must use the drill-down facility. If you do not want
your bank transactions to be grouped together in this way,
clear this check box. When you clear the check box, each
bank transaction appears on a separate line of the Bank
Activity window.
Note: This option does not work retrospectively. If you change
the setting of this check box, it will only effect the transactions
that you post after the setting has been changed.
'Always Create
Remittance'
Select this check box if you want to create a remittance advice
note each time you save a supplier payment. This is useful
when you need to record details of exactly what you are paying
for. If you do not want to create a remittance advice note for
every supplier payment, clear this check box. You will still be
able to request a remittance advice note from the supplier
payment screen.
3. To save your bank defaults, click OK. To exit without saving your bank defaults, click
Cancel.
79
Page 94

Sage Line 50 User Guide
The Euro and Other Currencies
Sage Line 50 makes it easy for your business to record payments and receipts in other
currencies, including the euro. To do this you must first set up the exchange rates for the foreign
currencies that you trade in. After you have done this, you can enter the foreign currency
amounts. For example, while entering a supplier invoice, press F5 when you are entering the
net amount (or click on the calculator button in the net column) and click CC. This will bring up
the currency calculator, which will convert your foreign currency values into your base currency.
Note: Your base currency is fixed as a result of your choice in the ActiveSetup Wizard (or if you
upgraded, your new Sage Line 50 detected your original base currency from your records).
Help
If you accept payment in more than one currency, you have to set up your defaults to handle
the conversions. The three examples below set out common scenarios.
Note: Because the exchange rate fluctuates, you will have to agree a rate or set a time (e.g.
open or close of the day’s trading) with your customers to enter an up-to-date exchange rate.
For up-to-date exchange rates, we recommend looking in the Business and Trade section of
www.hmce.gov.uk.
A UK business accepting payments in Pound Sterling and in euro
For more information about working with foreign currencies, type 'Currencies' in the Help system
index.
1. Open the Settings menu and choose Currencies.
The Currencies window appears.
2. Select euro and enter the exchange rate for euro into Pound Sterling in the 'Exchange rate'
box.
80
Page 95

Setting Up Your Company Details
3. To save and close, click Close.
You have now fixed the exchange rate between euro and Pound Sterling.
An Irish business accepting payment in euro and Pound Sterling
If you are an Irish business, working in euros, you should have chosen euro in the ActiveSetup
Wizard as your base currency. If you also accept payment in Pound Sterling (or any other
currency), follow these instructions.
1. Open the Settings menu and choose Currencies.
The Currencies window appears.
2. Select Pound Sterling (number 1 on the list) and enter the exchange rate for euro into
Pound Sterling.
You have now fixed the exchange rate between euro and Pound Sterling.
A UK business accepting payment in South African Rand and US Dollars
1. Open the Settings menu and choose Currencies.
The Currencies window appears (as previous).
2. Choose US Dollar from the list and enter the exchange rate for US Dollars into Pound
Sterling.
3. Repeat step 2 for the South African Rand.
You have now fixed the exchange rate for South African Rand and US Dollars.
Once you have set up your currency defaults, you can calculate your base currency value
from the foreign currency by using the currency calculator. To do this press F5, whenever
you are in any field which requires a currency value (e.g. 'net', 'price' or 'gross' field boxes).
81
Page 96

Sage Line 50 User Guide
The Countries Table
The Countries table lists all countries, together with country codes, that are currently members
of the European Union (EU). Line 50 uses this information for Intrastat reporting purposes.
If a country joins or leaves the EU, the Countries table allows you to amend the current EU
Members list so that you can keep your country list up to date.
Note for users upgrading from Line 50 version 9 or version 10: Line 50’s online Help
contains important information about the Countries table. To see this information, type
'Countries' in the Help Index tab and select 'Countries: Information for Users Upgrading from
Line 50 v9 and v10’.
To set up your Countries information
1. From the Settings menu, choose Countries.
The Countries table appears.
The table shows three columns, containing the country name, country code and a check
box which indicates whether or not the country is an EU member.
2. To set up a country as an EU member, for example if a new country joins the EU and needs
to be taken into account for Intrastat reporting, select the check box in the EU Member
column alongside the country you require.
3. To remove a country from the list of EU members, for example if a country leaves the EU
and should no longer be taken into account for Intrastat reporting, clear the check box in
the EU Member column alongside the country you require.
4. To save your changes and return to the Sage Line 50 desktop, click OK. Alternatively, to
close the Countries table without saving your changes, click Cancel.
The Line 50 desktop reappears. You have now set up your Countries information.
82
Page 97

Setting Up Your Company Details
Passwords and Access Rights
The Access Rights feature lets you set individual passwords for each person who uses Sage
Line 50. You can even restrict which ledgers, menus and windows each user can access. For
example, you can hide nominal and bank balances from certain users.
To be able to set up your access rights, you must log in as Manager.
Note: The Access Rights option is only available if you select the 'Access Rights' check box on
the Parameters tab of Company Preferences.
To create a new user
1. Open the Settings menu and choose Access Rights.
2. Click New.
The Create New User window appears.
3. Enter a logon name and a password for your new user in the boxes provided.
4. Set the access you are giving the new user from the options provided.
Full Access Select this option to give the user unlimited access to all parts
of Sage Line 50. You can modify these options later if you
want. For further information about how to do this, refer to the
following section, To assign access rights to options.
No Access Select this option to give the user no access to any part of
Sage Line 50.
5. To save the new user’s details, click Save. To clear the details without saving, click Discard.
6. To exit the Create New User window, click Close.
To assign access rights to options
1. From the User’s list on the User Access Rights window, select the user whose access
rights you want to assign.
2. Click Details.
The Access Details list appears showing all of the options and menus in Sage Line 50 that
can have access rights attached. The user’s current access status for each option is also
shown as full, partial or none.
3. To change the access status of any of the options, click Modules.
The Option List window appears.
83
Page 98

Sage Line 50 User Guide
4. Select each option you want to change from the list, then select whether the user is to be
given full access or no access to the option. Click OK.
5. If you want to give partial access to modules within Sage Line 50, select the module you
require and click Dialogs.
6. Select each window you want to change from the list, then select whether the user is to
be given full access or no access to the window. Click OK.
7. To return to the User Access Rights window, click Close.
Changing Your Password
You can use the Change Password option to:
Enter your company password.
Change your company password.
Change your user passwords if you are using access rights.
Help
Type 'Password' in the help system’s index to find out how to set up and apply passwords.
Working With Internet Resources
If your business regularly uses couriers to deliver goods or if you use credit checking bureaus
to assess customer credit risks and you are connected to the Internet, you can enter their web
site details using the Internet Resources option from the Settings menu. Once you have entered
their details, you can link to the courier or credit bureau web sites directly from Sage Line 50.
For more information on this, go to Settings, choose Internet Resources and press F1.
You have now completed entering your company defaults.
84
Page 99

Setting Up Your Company Details
The Foreign Trader
(Financial Controller only)
Note: You cannot use this option if you are using VAT Cash Accounting.
The Foreign Trader option within Sage Line 50 lets you:
Keep a record of foreign currency bank accounts.
Keep customer and supplier records in a foreign currency.
Record invoices, credit notes, orders, proformas and quotes in a foreign currency.
Record customer receipts and supplier payments in different currencies.
The section on the next page explains the steps you have to take to set up your Foreign Trader
option.
Help
A Note About Invoicing, Sales Orders and Purchase Orders
Foreign Trader lets you enter invoices, sales orders and purchase orders in the currency that is
associated with a particular customer or supplier. For example, you could enter an invoice in
Yen using an account code (A/C) for a customer record that is set up to handle Yen.
When you put the account code in the invoice or order, Sage Line 50 will automatically pick up
the customer or supplier’s currency. For example, if you want to place a purchase order with a
supplier in Holland, click on POP on the main toolbar, then New/Edit, and when you put the
supplier’s account code in the A/C box on the order screen, Sage Line 50 will detect your
supplier’s currency from the supplier’s record and all the values will then be shown in euro.
For further instructions on entering invoices and orders, see Chapter 13, Entering Invoices and
Credit Notes and Chapter 14, Order Processing (Financial Controller Only).
Select 'Foreign Trade' from the 'Accounting and Bookkeeping' area of the help system to find out
more.
85
Page 100

Sage Line 50 User Guide
To Set Up the Foreign Trader
Go through these steps in order to set up Sage Line 50 to work with foreign currencies:
Run the Foreign Trader Setup Wizard.
Enter your foreign exchange rates for all currencies that you deal with on the Currencies
window.
Set up any new bank accounts that will accept payments in a foreign currency.
Note: If you use your high street bank to make payments in Pound Sterling, euro and US
dollars, you must set up three separate bank accounts in your Sage Line 50 program to
accept each currency.
Set up any new customer accounts.
Note: As with the bank accounts in the previous step, if you deal with a customer who pays
in a number of different currencies, you must set up a separate customer account for each
currency that the customer deals in.
Set up any new supplier accounts.
Note: As with the bank accounts in the previous step, if you deal with a supplier who pays
in a number of different currencies, you must set up a separate supplier account for each
currency that this supplier deals in.
To activate Foreign Trader
Caution: You cannot turn off Foreign Trader once you have set it up using the Foreign Trader
Setup Wizard.
1. From the Modules menu, choose Wizards, then choose Foreign Trader Setup Wizard.
Note: If you have already run the Foreign Trader Setup Wizard for the current company or
if you are on the VAT Cash Accounting scheme, this menu option will not be shown. (If you
have a multi-company licence you can run this Wizard with each new company you set up.)
2. Click Next on the Welcome screen.
The Currency Revaluation information appears.
86
 Loading...