

Sage Kitchen Wizz Pro BFP800 Quick Manual
the K itchen Wizz Pro
BFP800
™
EN
QUICK GUIDE
FR
GUIDE RAPIDE
NL
SNELSTARTGIDS
DE
KURZANLEITUNG
IT
GUIDA RAPIDA

EN
CONTENTS
2 Sage® Recommends Safety First
6 Components
8 Assembly
10 Food Processing Guide
14 Care, Cleaning & Storage
15 Troubleshooting
SAGE® RECOMMENDS SAFETY FIRST
At Sage® we are very safety
conscious. We design and
manufacture consumer
products with the safety
of you, our valued customer,
foremost in mind. In
addition, we ask that you
exercise a degree of care
when using any electrical
appliance and adhere to
the following precautions.
IMPORTANT
SAFEGUARDS
READ ALL INSTRUCTIONS
BEFORE USE AND SAVE
FOR FUTURE REFERENCE
• A downloadable version of
this document is also available
at sageappliances.com
• Before using for the rst time
ensure your electricity supply
is the same as shown on
the label on the underside
of the appliance.
• Remove and safely discard
any packaging materials
before rst use.
• To eliminate a choking hazard
for young children, safely
discard the protective cover
tted to the power plug.
• This appliance is for household
use only. Do not use the appliance
for anything other than its intended
use. Do not use in moving vehicles
or boats. Do not use outdoors.
Misuse may cause injury.
• Fully unwind the power cord
before operating.
• Position the appliance on a
stable, heat resistant, level,
dry surface away from the
edge and do not operate on
or near a heat source such as
a hot plate, oven or gas hob.
• Vibration during operation may
cause the appliance to move.
• Do not let the power cord hang
over the edge of a bench or
table, touch hot surfaces or
become knotted.
• This appliance shall not be
used by children.
• Always disconnect the appliance
from the supply if it is left
unattended and before assembling,
disassembling or cleaning.
• Children should not play with
the appliance.
• Cleaning of the appliance and user
maintenance should not be carried
out by children unless they are
8 years or older and supervised.
SAGE® RECOMMENDS SAFETY FIRST
• Keep the appliance and its
cord out of reach of children.
• The appliance can be used by
persons with reduced physical
or mental capabilities or a lack
of experience and knowledge,
only if they have been given
supervision or instruction
concerning use of the appliance
in a safe way and understand
the hazards involved.
• Do not use the appliance
if the power cord, plug, or
appliance becomes damaged
in any way. If damaged and
maintenance other than
cleaning is required, please
contact Sage Customer Service
or go to sageappliances.com
• Any maintenance other
than cleaning should be
performed by an authorised
®
Sage
• The installation of a residual
current safety switch is
recommended to provide
additional safety when using
all electrical appliances. Safety
switches with a rated operating
current not more than 30mA
are recommended. Consult an
electrician for professional advice.
• Always ensure the appliance
is properly assembled as per
instructed before use. Use the
appliance without properly
assembled may cause product
malfunction, product damage
or pose safety risk including
personal injury.
service centre.
• Do not use the food processor
on slippery, unstable or
uneven surfaces such as
a sink drain board.
• Keep hands, ngers, hair,
clothing as well as spatulas and
other utensils away from moving
or rotating parts during operation.
• Do not use the appliance
for anything other than food
and/or beverage preparation.
• In order to avoid the possible
hazard of the appliance
starting by itself due to
inadvertent resetting of the
overload protection, do not
attach an external switching
device (such as a timer) or
connect the appliance to a
circuit that can regularly switch
the appliance on and o.
• Keep the appliance clean.
Follow the cleaning instructions
provided in this book.
• This appliance is for household
use only. Do not use this
appliance for anything other
than its intended use.
Do not use in moving vehicles
or boats. Do not use outdoors.
Misuse may cause injury.
• Never use attachments or
accessories that are not supplied
with this product or authorised
by Sage
product. Failing to follow this
instruction may cause product
malfunction, product damage
or even pose safety risk.
®
to be used on this
2 3

EN
SAGE® RECOMMENDS SAFETY FIRST
• For optional accessories
®
authorised by Sage
to be used
on this product, please read all
instructions supplied with the
accessory in conjunction with
the instructions contained in
this booklet
• Care should be taken when
removing the food from the
processing bowl by ensuring
™
the motor, Quad
blade,
dough blade or disc, have
completely stopped before
disassembling. Ensure the
OFF button has been pressed
to switch the motor o; the
appliance is switched o at the
power outlet and unplugged,
before removing the lid from
the bowl. The processing
bowl should then be unlocked
from the motor body and the
™
Quad
blade, dough blade or
discs carefully removed before
attempting to remove the
processed food.
• Do not process hot or boiling
liquids - allow liquids to
cool before placing into the
processing bowl. Hot liquid
can be ejected to cause injury
due to sudden steaming.
• Ensure the OFF button has
been pressed, and the food
processor is switched o at the
power outlet and unplugged
™
before attaching the Quad
blade, dough blade, disc or
processing lid.
• To avoid possible malfunction
of the processing bowl’s
auto switch, do not place the
processing lid in the locked
position when the appliance
is not in use
• Do not place hands or ngers in
the bowl of the food processor
unless the motor, Quad
™
blade,
dough blade or discs have
come to a complete stop.
• The processing blades and
discs are extremely sharp,
handle with care at all times.
Avoid contact with moving
parts during operation. Keep
hands, hair, clothing, spatulas
and other utensils out of food
processor feed chute to prevent
personal injury or damage to
the mixer. Always use the food
pusher to push the food down
the feed chute.
• Handle the food processor
and attachments with care –
remember the blades and discs
are razor-sharp and should be
kept out of reach of children.
• Care should be taken when
handling the sharp cutting
blades, emptying the bowl
and during cleaning.
• Do not ll bowl above marked
liquid levels or 15 cups dry
level (shredding). Always add
drier or thicker ingredients to
the processing bowl prior to
adding uids.
SAGE® RECOMMENDS SAFETY FIRST
• Never remove the lid while the
processor is operating. Always
use the POWER/OFF button
to stop the machine before
removing the lid.
• Do not place the food processor
near the edge of a bench or
table during operation. Ensure
the surface is level, clean and
free of water, our, etc.
• Do not place any part of
the food processor in the
microwave oven.
• Do not leave the food processor
unattended when in use.
• Do not move the food processor
whilst in operation.
• Do not use attachments other
• Please do not crush ice in the
large or small processing bowls.
This will cause damage to the
blades (Quad
™
We recommend that you use
a blender for ice crushing.
• When mixing yeast dough,
the operating time of the food
processor should not longer
than 30 seconds. Allow the
appliance to cool down
before next use.
• Some sti mixtures, such
as dough, may cause the
processing blade to rotate
more slowly than normal.
If this happens, do not process
for longer than 30 seconds.
than those provided with the
food processor.
• Do not attempt to operate the
food processor by any method
other than those described in
this booklet.
• Do not push food into the feed
chute with your ngers or other
utensils. Always use the food
pusher provided.
• Always operate the food
processor with the processing
lid securely in position.
• Always secure the processing
bowl onto the motor base
before attaching the Quad
™
It should be taken to a local
authority waste collection centre
designated for this purpose or to
a dealer providing this service.
For more information, please
contact your local council oce.
appliance in water or any liquid.
The symbol shown
indicates that this appliance
should not be disposed of
in normal household waste.
To protect against electric
shock, do not immerse the
power plug, cord or
blade, dough blade or discs.
SAVE THESE INSTRUCTIONS
or mini blade).
4 5
EN
COMPONENTS
A
B
C
D
E
F
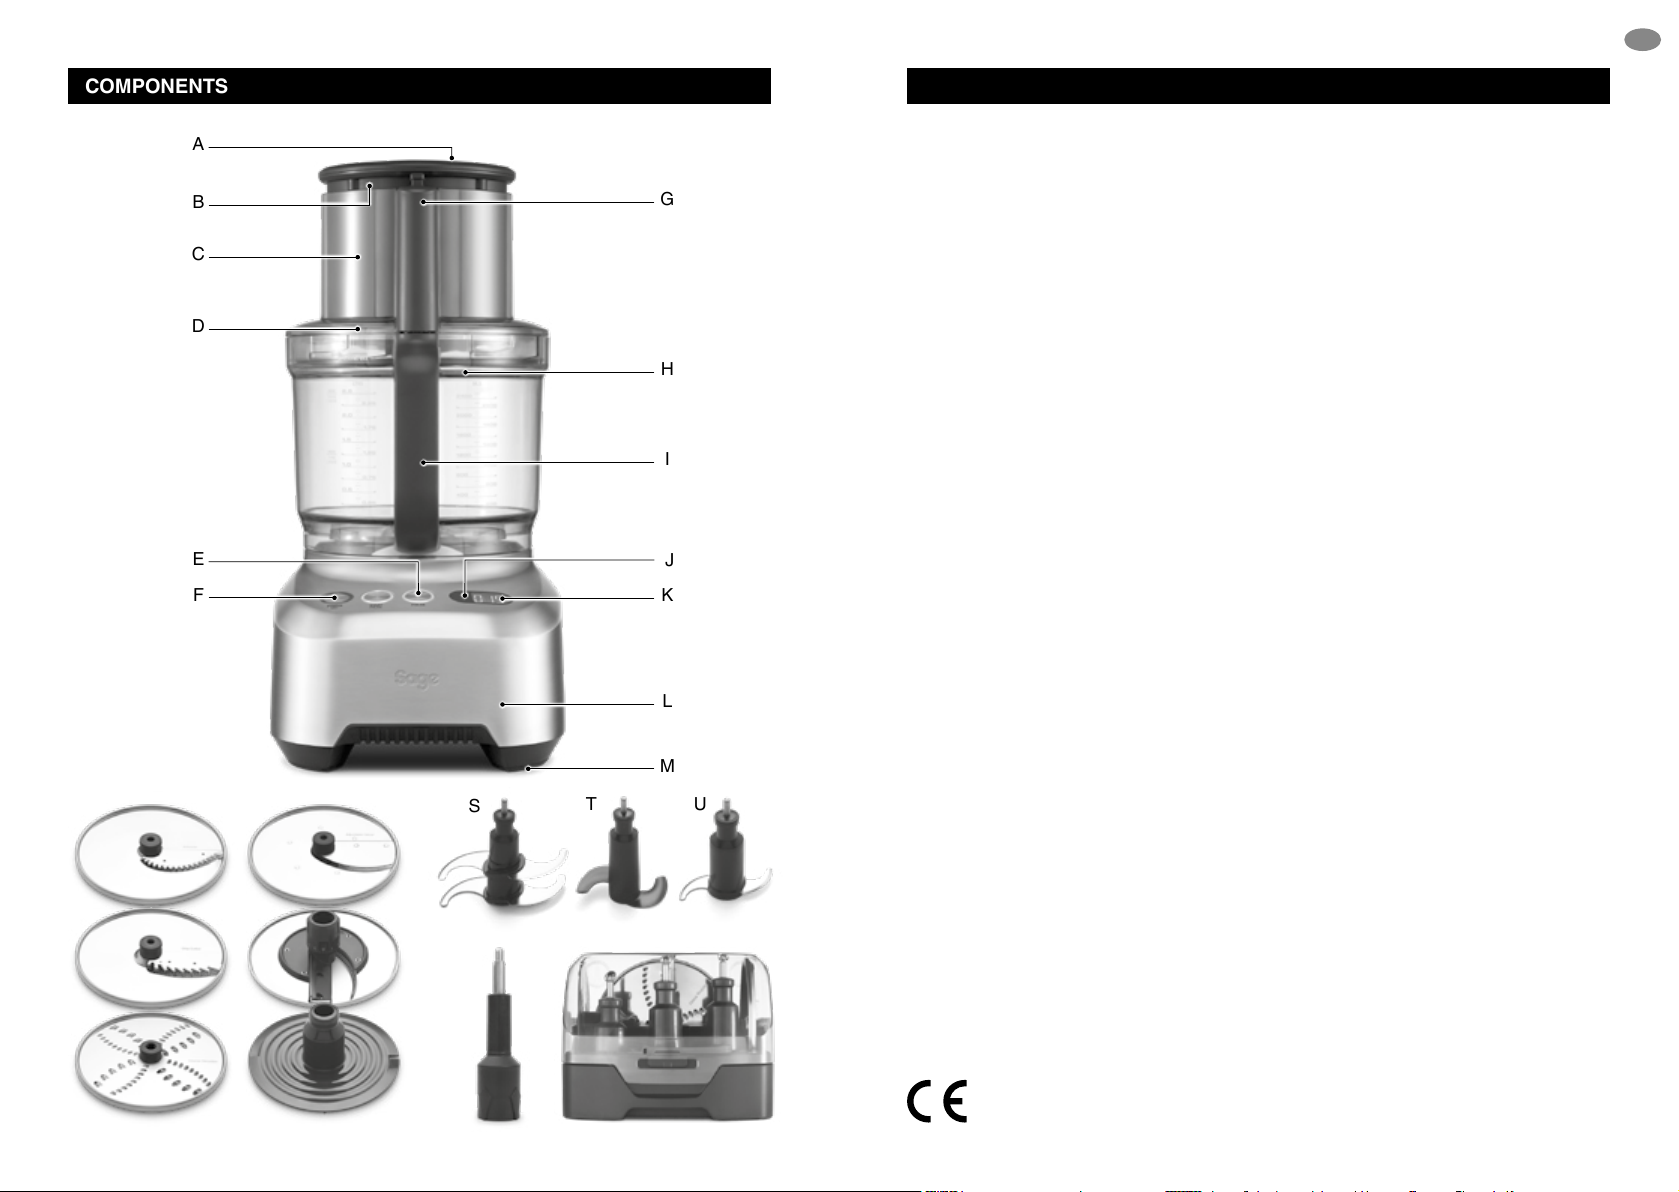
COMPONENTS
A. Small Food Pusher
B. Large Food Pusher
G
H
I
J
K
C. Extra Wide Feed Chute
D. Processing Lid
E. PULSE Button
F. POWER / OFF Button
G. Feed Chute Safety System
H. Silicone Seal
I. Processing Bowl With Handle
J. Count Up & Count Down Timer
K. LCD Display
L. Direct Drive Motor Base
M. Non-skid Rubber Feet
N. Julienne Disc
O. Chip Cutter
P. Reversible Shredder
Q. Adjustable Slicer
R. Whisk / Emulsifying Disc
S. 4 Blade Processor
T. Dough Blade
U. Mini Processing Blade
V. Disc Spindle
W. Storage Container with Lid
NOT SHOWN
Cleaning Brush
Plastic Spatula
Mini Processing bowl
Cord Storage
®
Sage
Assist Plug
L
M
N
O
Q
Q
S
T U
WV
P
R
Rating Information
220–240V~ 50Hz 2000W
6 7
EN
ASSEMBLY
BEFORE FIRST USE
Before using your Sage® food processor,
become familiar with all the parts. Remove all
packaging materials and promotional labels,
being careful when handling the processing
blades and discs as they are very sharp. Wash
the processing bowl, processing lid and other
attachments in warm, soapy water. Rinse and
dry thoroughly. (Refer to cleaning, care and
storage section).
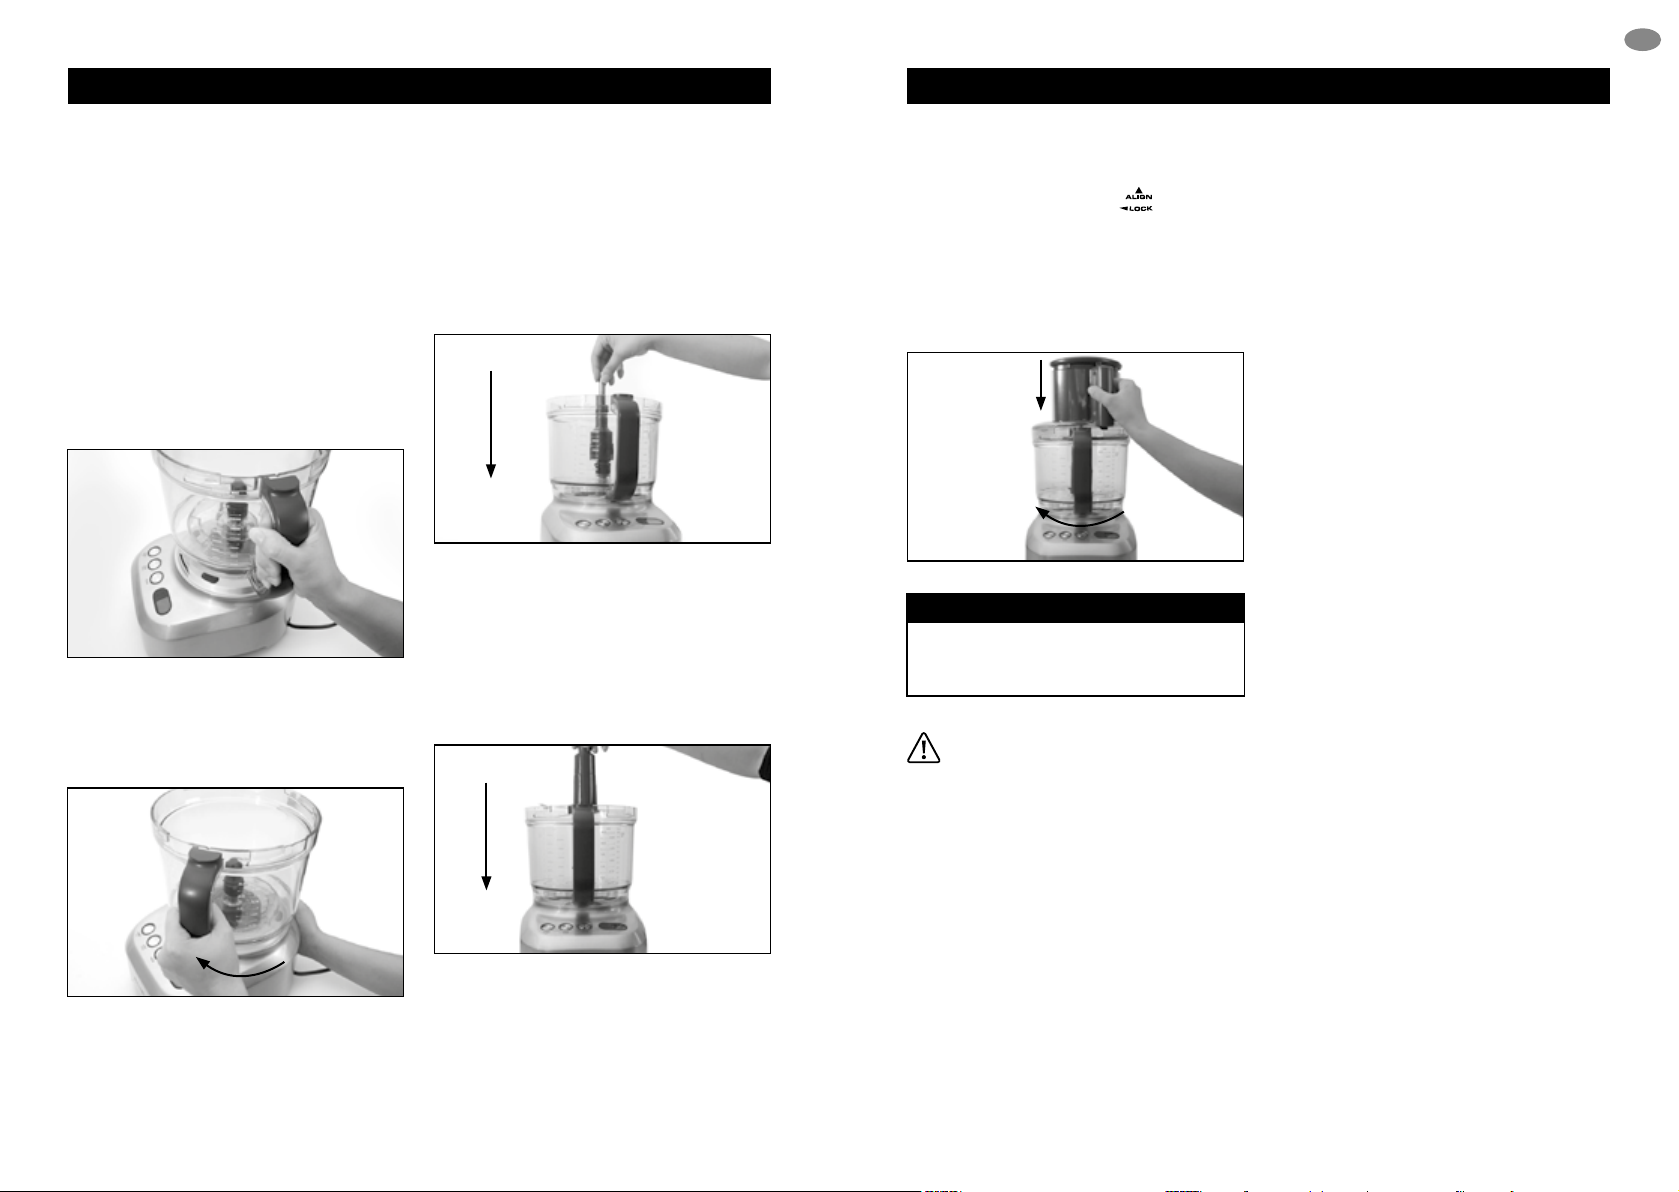
1. Place the motor base on a dry, level work
surface. Place the processing bowl on
to the motor base with the handle in line
with the ALIGN HANDLE graphic on
the motor base.
2. Turn the processing bowl clockwise
until the handle aligns with the
TURN TO LOCK graphic.
The processing bowl should
be securely locked into position.
3. If using a disc, rst assemble the disc
spindle onto the bowl drive coupling.
Orientate the disc so that the side you
wish to use is facing upwards. Hold
the disc by the centre plastic moulding
and position the central hole above the
attachment spindle. Push down rmly
until tted correctly.
(Please note that these discs only t the
larger processing bowl).
4. For using the processing blades, carefully
grasp either the 4 blade processor, dough
blade or mini processing blade using
the central plastic support and position
it over the bowl drive coupling and push
down until inserted correctly. If using the
mini processing blade, ensure the mini
processing bowl is assembled into the
main bowl rst.
ASSEMBLY
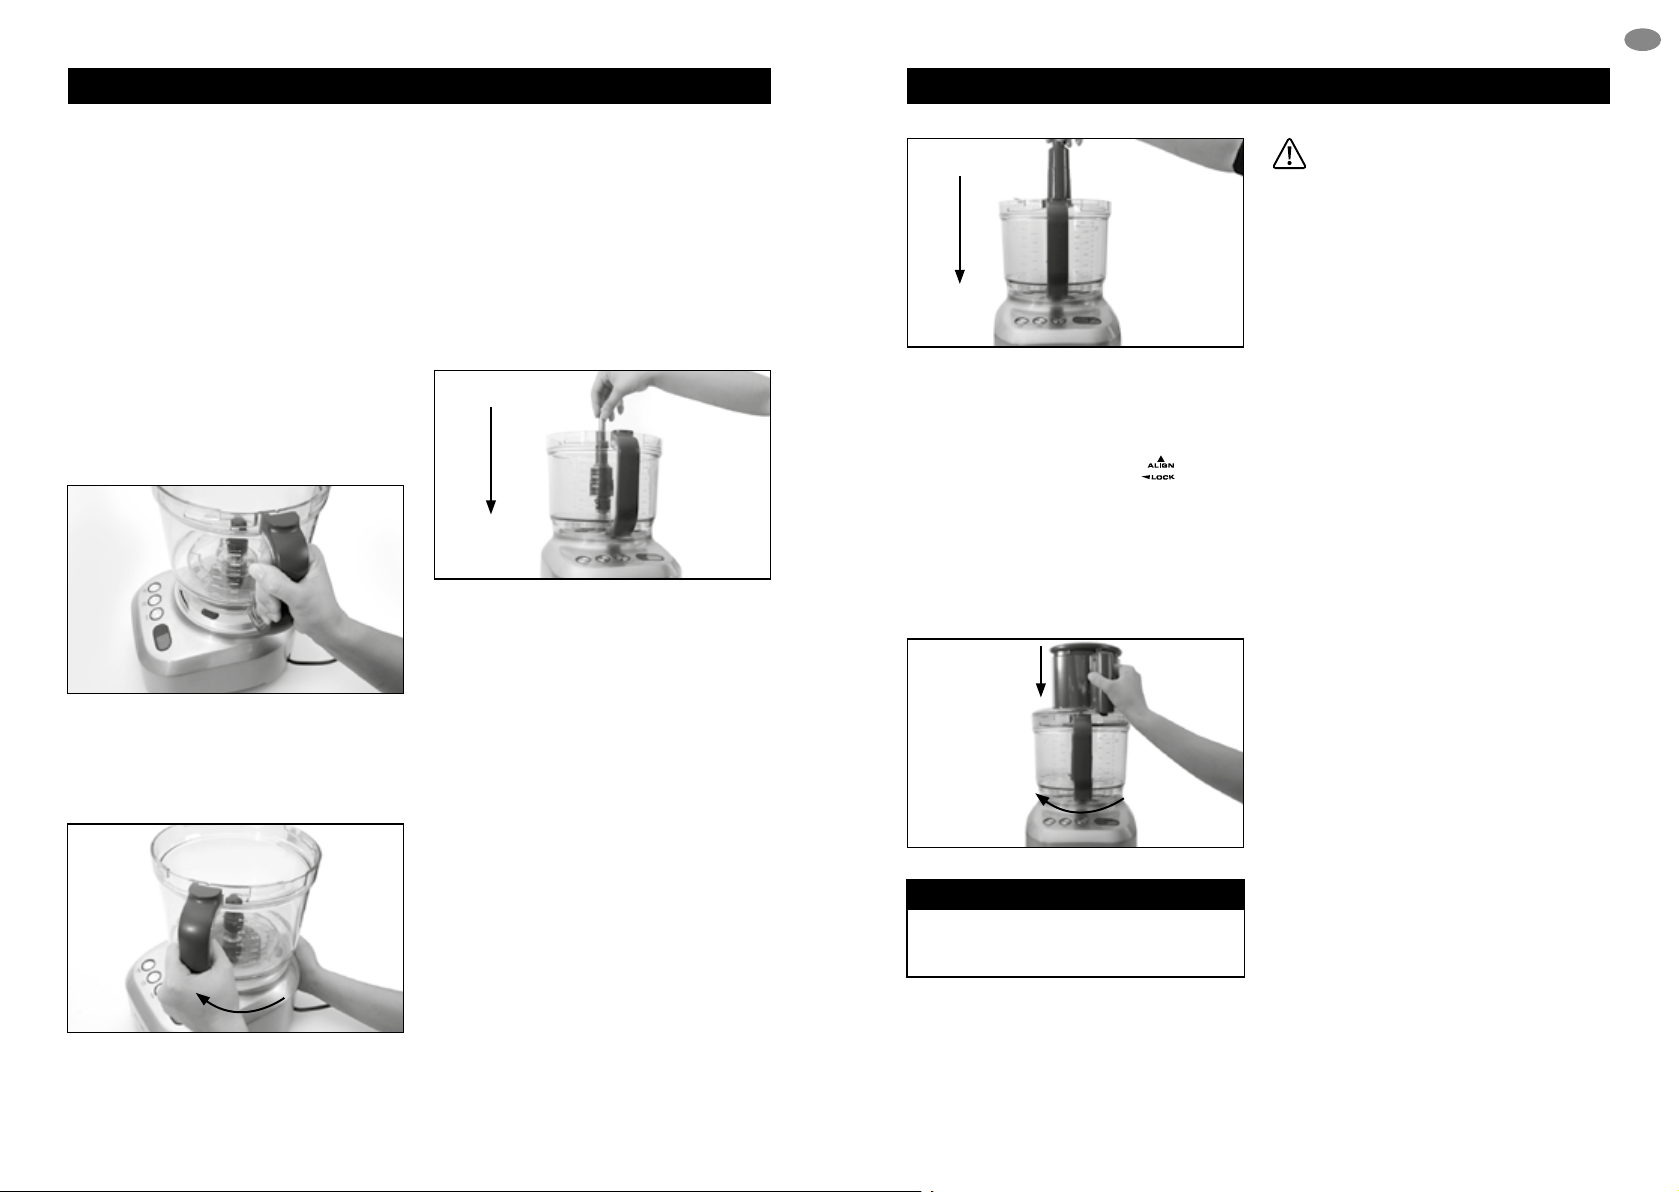
5. Place the processing lid onto the
processing bowl so the feed chute is
slightly right of the bowl handle and the
arrow graphics are aligned .
Holding the feed chute and pressing
down rmly at the same time, turn the lid
clockwise (as indicated by the graphic)
so the ‘Locking Tab’ on the lid slots into
the ‘Interlocking Safety Catch’ on the
handle. The lid should be securely locked
into position.
NOTE
The food processor will not operate
unless both the processing bowl and
lid are correctly locked into position.
CAUTION
The processing blade (including
the mini bowl blade) and discs are
extremely sharp, handle with care
at all times.
6. Insert the power plug into a 220–240 volt
power outlet and switch the power
outlet on.
7. At the end of processing, always wait until
the blades or discs have stopped spinning
before unlocking and removing the lid.
To remove the processing lid, ensure the
POWER / OFF button has been pressed,
the power is switched o at the power
outlet and the cord is unplugged from the
power outlet. Holding the feed chute and
pressing down rmly at the same time,
turn the lid anti-clockwise so that the
arrow graphics are no longer aligned.
8. Remove the processing bowl (before
removing blade or discs) by turning it
anti-clockwise until the handle is in line
with the ALIGN HANDLE. Lift the bowl
o the motor shaft. When removing the
discs – carefully remove by gripping the
plastic hub on the centre of the disc and
lifting the disc up and away from the pin
on the spindle.
OVERLOAD PROTECTION SYSTEM
If the motor overloads, the food processor will go
to STANDBY mode and OVERLOAD icon in the
LCD starts to ash. The food processor can still
be switched o by pressing the POWER / OFF
button. To operate the food processor again,
allow the machine to cool for approx 30 minutes.
Some sti mixtures, such as dough, may cause
the dough blade to rotate more slowly than
normal. If this happens, do not process for
longer than 1 minute.
8 9

EN
FOOD PROCESSING GUIDE
NOTE
The food processor is very powerful and recommended using PULSE function
where possible as to avoid over chopping or whipping.
FOOD BLADE TYPE (DOUGH/
Avocado 4 blade processor or mini
Asparagus
(cooked)
Beetroot 2–5 Shredding Use:
Broccoli
(cooked)
Cabbage Thin 1–2 and med 2–3
Carrot 4 blade processor or mini
Cauliower
(cooked)
Celery 4 blade processor or mini
Chilli 4 blade processor or mini
Aubergine 4 blade processor or mini
Garlic 4 blade processor or mini
Ginger 4 blade processor or mini
Herbs 4 blade processor or mini
Leeks 4 blade processor or mini
Lettuce 2–4
4 BLADE PROCESSOR/
MINI)
Use: Guacamole
4 blade processor or mini
Use: Asparagus Dip
4 blade processor
Use: Broccoli Soup
Use: Vegetable Soup
4 blade processor or mini
Use: Cauliower Soup
Use: Vegetable Soup
Use: Seasoning
Use: Accompaniment,
soups
Use: Seasoning
Use: Seasoning
Use: Seasoning pesto
Use: Cooked for soups
ADJUSTABLE SLICING
BLADE THICKNESS
2–5
Use: Accompaniment
0–5 Shredding Use:
Thin 1–2 med 2–3
Use: Salad
2–5
Use: Grilled aubergine
2–5
Use: Vegetable Soup
Use: Salad
RECOMMENDED
DISC TYPE
(CHIP/SHRED/
JULIENNE/
WHISK)
Salad
Shredding Use:
Salad
Salad
Shred or Julienne
Use:
Accompaniment
to dishes
FOOD PROCESSING GUIDE
FOOD BLADE TYPE (DOUGH/
Mushrooms
(raw)
Mushrooms
(cooked)
Onion 4 blade processor or mini
Parsnip 4 blade processor or mini
Parsnip (cooked) 4 blade processor
Peas (cooked) 4 blade processor or mini
Potatoes 0.5–6
Potatoes
(cooked)
Spinach 4 blade processor or mini
Spinach
(cooked)
Swede 4 blade processor or mini
Tomatoes 4 blade processor or mini
Courgette 3–6
Apple 4 blade processor or mini
Apple (cooked) 4 blade processor or mini
Banana 4 blade processor or mini
4 BLADE PROCESSOR/
MINI)
4 blade processor or mini
Use: Vegetable Soup
4 blade processor
Use: Mushroom Soup
Use: Soups, Sauces
Use: Vegetable soup
Use: Accompaniment
Use: Accompaniment,
baby food
4 blade processor or mini
Use: Mash potato,
Skordallia
Use: Accompaniment
4 blade processor or mini
Use: Creamed spinach
Use: Vegetable Soup,
creamed swede
Use: Salsa
Use: Apple sauce
Use: Baby food
Use: Dessert sauces
ADJUSTABLE SLICING
BLADE THICKNESS
4–6 Use: Salad, vegetable
soup, mushroom sauce,
mushroom soup"
4–6 Use: Salad, vegetable
soup, mushroom sauce,
mushroom soup
0–5
Use: Salad
2–5
Use: Vegetable lasagna
Use: Potato bake
2–5
Use: sandwich lling,
Tomato Bocconcini Salad,
tomato relish
Use: Accompaniment,
courgette slice, gratin
2–5
Use: Apple galette
4–6
Use: Fruit Salad
RECOMMENDED
DISC TYPE
(CHIP/SHRED/
JULIENNE/
WHISK)
Chip / Julienne /
Shredder
Use: Chips
Shredder – Coarse
or ne Use: Salad,
Frittata
10 11

EN
FOOD PROCESSING GUIDE
FOOD BLADE TYPE (DOUGH/
Berries 4 blade processor or mini
Citrus Fruit 4 blade processor or mini
Citrus Peel 4 blade processor or mini
Dried Fruit 4 blade processor or mini
Kiwi fruit 4 blade processor or mini
Mango 4 blade processor or mini
Melon
(Honeydew /
rockmelon)
Pear 4 blade processor or mini
Pear (cooked) 4 blade processor or mini
Pineapple 4 blade processor or mini
Stone Fruit
(Apricot,
nectarine,
peach, plum)
Strawberries 4 blade processor or mini
Batters Dough
Breadcrumbs 4 blade processor or mini
Cheese Shredder - Coarse
4 BLADE PROCESSOR/
MINI)
Use: Fruit salad
Use: Fruit mince
Use: Fruit mince
Use: Fruit salad, dessert
sauce
Use: Fruit salad, dessert
sauce
Use: Fruit salad, dessert
sauce
4 blade processor or mini
Use: Fruit salad
Use: Fruit salad
Use: Baby food
Use: Fruit salad
4 blade processor or mini
Use: Fruit salad, dessert
sauce
Use: Fruit salad, dessert
sauce
Use: Cakes, crepes
Use: Coatings, breadcrumb
stung
ADJUSTABLE SLICING
BLADE THICKNESS
4–6
Use: Dessert decoration
4–6
Use: Pear pie
RECOMMENDED
DISC TYPE
(CHIP/SHRED/
JULIENNE/
WHISK)
Whisk
Use: cakes,
muns, crepes
or Fine
Use: Grated
Cheese
FOOD PROCESSING GUIDE
FOOD BLADE TYPE (DOUGH/
Chocolate 4 blade processor or mini
Cream Cheese 4 blade processor or mini
Doughs Dough
Egg Whites
use PULSE
function
Eggs (hard
boiled)
Eggs (whole
or yolks) use
PULSE function
Cream
use PULSE
function
Milkshakes and
smoothies
Meat (raw)
use PULSE
function
Meat (cooked)
use PULSE
function
Meat (deli) 1–6
4 BLADE PROCESSOR/
MINI)
Use: Chocolate Ganache
Use: Dips, cheese cake
Use: Pastry, scones, bread
4 blade processor or mini
Use: Sandwich lling
4 blade processor
Use: recommend using
PULSE function
4 blade processor
Use: Mince meatloaf,
burgers
4 blade processor
Use: Sandwich llings,
pate, baby food
ADJUSTABLE SLICING
BLADE THICKNESS
2–5
Use: sandwich lling
Use: Sandwiches,
antipasto, pizza toppings
RECOMMENDED
DISC TYPE
(CHIP/SHRED/
JULIENNE/
WHISK)
Shredder –
Coarse or Fine
Use: Dessert
decoration
Whisk
Use: Egg
foams (not
recommended
for meringue,
pavlova)
Whisk
Use: Mayonnaise
Whisk
Use:
recommended
PULSE function
to avoid over
whipping
12 13

EN
CARE, CLEANING & STORAGE
CARE AND CLEANING
When nished processing, switch the food
processor o at the power outlet and unplug
the power cord.
Motor base
Wipe the motor base with a clean, damp
cloth after each use. Dry thoroughly with
a soft, clean cloth.
Processing bowl, lid and food pusher
Hand wash in hot, soapy water using a mild
detergent. Do not use a scourer or abrasive
cleaners as they will scratch the plastic surface.
The plastic parts may occasionally be washed
in the dishwasher (top shelf only). It is not
recommended on a regular basis, as prolonged
exposure to hot water temperatures and harsh
detergents will damage and shorten the life of
the plastic.
NOTE
Do not place food pusher in the
dishwasher as the heat may deform it.
Processing 4 blade processor,
dough blade and discs
Hand wash the bowl and lid. Use the cleaning
brush accessory to scrub stubborn foods o the
blades and discs. The handle end of the brush
is designed for scraping.
To avoid accidental cuts, do not leave 4 blade
processor or discs to soak in sudsy water. The
4 blade processor, dough blade, discs and
spindle can also be washed in the dishwasher
(top shelf only).
NOTE
The 4 blade processor cover can
be assembled onto the 4 blade
processor while it is placed in the
dishwasher for added safety.
WARNING
The 4 blade processor, mini and
adjustable processing blades and
discs are extremely sharp, handle
with care at all times.
Never immerse the motor base,
power cord or power plug in water
or any other liquid.
Never store your food processor
with the bowl xed and lid locked
into position. Doing so will cause
unnecessary strain on the auto
operating switch on the handle
of the processing bowl and the
automatic safety switch on the
motor base.
Do not put any part of the food
processor in the microwave oven.
TROUBLESHOOTING
PROBLEM EASY SOLUTION
Food is unevenly
processed
Slices are slanted
or uneven
Food falls over
in the feed chute
Chipper disk
Some food remains
on the disc after
processing
Motor slows down
when mixing dough
Motor slow to start
with the 4 blade
processor
The motor does
not start
• Ingredients should be cut evenly into 2.5cm pieces
before processing.
• Ingredients should be processed in batches to
avoid overloading.
• Load food in feed chute. Place pusher onto food and apply
pressure. Then press start.
• The large feed chute must be packed full for best results.
If processing smaller quantities, use the small feed chute.
• Always clear any blocked potato from the chipper disc before
processing more potatoes.
• It is normal for small pieces to remain after processing.
• Amount of dough may exceed maximum capacity.
Remove half and process in two batches.
• Dough may be too wet (see next page). If motor speeds up,
continue processing. If not, add more our, 1 tablespoon
at a time until the motor speeds up. Process until dough
cleans the side of the processing bowl.
• The amount of meat may have exceed the maximum capacity.
Refer to the Instruction Booklet for maximum quantities.
Remove the meat and process in two batches.
• Note that for best results trim the meat of fat
before processing.
• There is a safety interlock switch to prevent the motor from
starting if it is not properly assembled. Make sure the processing
bowl, lid and the pusher are securely locked into position.
• If you are slicing or shredding and the above solution does not
work, make sure that the food contents in the feed chute are cut
below the maximum ll line so that the activation rod can engage
the motor.
• If the motor still will not start, check the power cord and
power outlet.
14 15

EN
TROUBLESHOOTING
PROBLEM EASY SOLUTION
The food processor
shuts o during
operation
The motor
slowed down
during operation
The food processor
vibrates/moves
during processing
Dough doesn’t
fully incorporate
ingredients
• The lid may have become unlocked, check to make sure
it is securely in position.
• If the motor overloads, the ‘OVERLOAD’ icon in the LCD will
start to ash. Switch o by pressing the POWER / OFF button
and unplug the power cord. Allow the food processor to cool
for 20–30 minutes before resuming.
• This is normal as some heavier loads may require the motor
to work harder. Reposition the food in the feed chute
and continue processing.
• The maximum load capacity may have been exceeded.
Refer to the Instruction Booklet for maximum quantities.
Remove some of the ingredients and continue processing.
• Make sure the rubber feet at the bottom of the unit are clean
and dry. Also make sure that the maximum load capacity
is not being exceeded.
• When kneading dough, always start the food processor before
adding liquid. Add liquid in a slow, steady stream, allowing the
dry ingredients to absorb it. If too much liquid is added, wait
until ingredients in the processing bowl have mixed, then add
remaining liquid slowly (do not turn o the machine). Pour liquid
onto the dough as it passes under the feed chute opening,
do not pour liquid directly onto the bottom of the processing bowl.
NOTES
Dough feels tough
after kneading
Dough is too dry
Dough is too wet
• Divide dough into 2 or 3 pieces and redistribute evenly
in processing bowl. Process 10 seconds or until uniformly
soft and pliable.
• While machine is running, add water through the small feed
chute, 1 tablespoon at a time until dough cleans the inside
of the processing bowl.
• While machine is running, add our through the small feed
chute, 1 tablespoon at a time until dough cleans the inside
of the processing bowl.
16 17

DE
INHALTE
18 Sage® empehlt: sicherheit geht vor
22 Komponenten
24 Montage
26 Leitfaden für lebensmittelverarbeitung
30 Reinigung, pege und aufbewahrung
31 Fehlerbehebung
SAGE®
EMPFIEHLT:
SICHERHEIT
GEHT VOR
Wir bei Sage® sind sehr
sicherheitsbewusst.
Beim Design und bei der
Herstellung unserer Geräte
denken wir zu allererst an
Ihre Sicherheit. Darüber
hinaus bitten wir Sie, bei
der Verwendung jedes
Elektrogeräts angemessene
Sorgfalt anzuwenden und
sich an die folgenden
Vorsichtsmaßnahmen
zu halten.
WICHTIGE
VORSICHTSMASSNAHMEN
BITTE ALLE ANWEISUNGEN
VOR DEM GEBRAUCH
LESEN UND ZUR
SPÄTEREN BEZUGNAHME
AUFBEWAHREN.
• Dieses Informationsbuch
steht zum Download unter
www.sageappliances.com zur
Verfügung.
• Vor dem ersten Gebrauch prüfen,
dass Ihre Netzspannung mit der
auf dem Etikett an der Unterseite
des Geräts übereinstimmt.
• Vor dem ersten Gebrauch
alle Verpackungsmaterialien
abnehmen und sicher entsorgen.
• Schutzhülle am Netzstecker
sicher entsorgen, da sie für
Kleinkinder eine Erstickungsgefahr
darstellen könnte.
• Dieses Gerät ist nur für den
Haushaltsgebrauch bestimmt.
Gerät nur bestimmungsgemäß
verwenden. Nicht in fahrenden
Fahrzeugen oder Booten
verwenden. Nicht im Freien
verwenden. Missbrauch kann
Verletzungen nach sich ziehen.
• Netzkabel vor dem Gebrauch
vollständig entrollen.
• Gerät in sicherem Abstand
von Kanten auf eine stabile,
hitzebeständige, ebene und
trockene Fläche stellen.
Nicht auf oder neben einer
Wärmequelle wie einem Gasoder Elektroherd oder einem
heißen Ofen betreiben.
SAGE® EMPFIEHLT: SICHERHEIT GEHT VOR
• Das Gerät kann während
des Betriebs aufgrund von
Vibrationen verrutschen.
• Netzkabel nicht über
Arbeitsplatten oder Tischkanten
hängen lassen, von heißen
Oberächen fern halten,
Kabelgewirr vermeiden.
• Gerät immer AUSschalten,
Netzstecker ziehen und
abkühlen lassen, ehe Sie es
bewegen, reinigen oder lagern.
• Gerät immer ausschalten,
sofern möglich auch an der
Steckdose, und Netzstecker
ziehen, wenn es nicht in
Gebrauch ist.
• Gerät nicht verwenden,
wenn das Netzkabel, der
Netzstecker oder das Gerät
selbst in irgendeiner Weise
beschädigt ist. Wenden Sie
sich bei Schäden und zur
Wartung (außer Reinigung) bitte
an den Sage-Kundendienst
oder besuchen Sie
sageappliances.com
• Alle Wartungsarbeiten außer
Reinigung nur von autorisierten
Sage-Kundendienststellen
vornehmen lassen.
• Kinder nicht mit dem Gerät
spielen lassen.
• Reinigung des Geräts nicht
von Kindern unter 8 Jahren
und nur unter Aufsicht
vornehmen lassen.
• Gerät und Netzkabel für Kinder
bis zu 8 Jahren unzugänglich
aufbewahren.
• Die Installation eines Schutzoder Sicherheitsschalters
wird bei der Verwendung von
Elektrogeräten als zusätzliche
Schutzmaßnahme empfohlen.
Es wird ein Sicherheitsschalter
mit maximal 30 mA
Nennleistung empfohlen.
Fachgerechte Beratung erhalten
Sie von Ihrem Elektriker.
• Gerät nur nutzen, wenn es
richtig zusammengesetzt ist.
Das Gerät funktioniert nur, wenn
es richtig zusammengesetzt ist.
• Gerät nicht auf der
Abtropäche Ihrer Spüle
verwenden.
• Hände, Finger, Haare und
Bekleidung, Schaber und
andere Utensilien während des
Betriebs von beweglichen oder
rotierenden Teilen fern halten.
• Gerät nur bestimmungsgemäß
zur Zubereitung von
Speisen und/oder
Getränken verwenden.
18 19

DE
SAGE® EMPFIEHLT: SICHERHEIT GEHT VOR
• Zur Vermeidung des Risikos,
dass sich das Gerät aufgrund
einer unbeabsichtigt
zurückgesetzten
Überlastsicherung selbst in
Betrieb setzt, keine externen
Schalter (z. B. eine Zeituhr)
anschließen und das Gerät
nicht an einen Stromkreis
anschließen, der das
Gerät regelmäßig aus- und
• Zutaten nie mit den Fingern
oder anderen Utensilien als
dem mitgelieferten Stopfer in
den Einfüllschacht pressen.
Hand oder Finger nie in den
Einfüllschacht stecken, wenn
dieser am Gerät angebracht ist.
• Keinen Teil des Geräts in einen
Mikrowellenherd legen.
• Gerät während des Betriebs
immer an Ort und Stelle lassen.
einschalten kann.
• Küchenmaschine und Zubehör
• Alle Anweisungen vor dem
Gebrauch sorgfältig lesen und
zur späteren Bezugnahme
aufbewahren.
• Dieses Gerät kann von
Personen mit eingeschränkten
körperlichen, sensorischen
oder geistigen Fähigkeiten
oder mit mangelnder Erfahrung
und fehlenden Kenntnissen
genutzt werden, sofern sie
beaufsichtigt werden oder in
stets vorsichtig handhaben.
Stets daran denken, dass
die Messer und Scheiben
rasiermesserscharf sind und
von Kindern ferngehalten
werden sollten.
• Arbeitsbehälter vor dem
Anbringen von Einsätzen
(Einsatz mit vier Messern,
Knet- oder Scheibeneinsätze)
stets korrekt in den
Motorfuß einsetzen.
den sicheren Gebrauch des
Geräts eingewiesen wurden
und sich der entsprechenden
Risiken bewusst sind.
• Gerät nicht von Kindern
bedienen lassen.
• Küchenmaschine nur
mit sicher angebrachtem
Deckel betreiben.
• Stets prüfen, dass der Motor
anhand der AUS-Taste
(OFF) ausgeschaltet und
• Gerät während des Betriebs
nicht unbeaufsichtigt lassen.
das Gerät am Netzschalter
ausgeschaltet und ausgesteckt
ist, ehe Sie den Deckel vom
SAGE® EMPFIEHLT: SICHERHEIT GEHT VOR
Arbeitsbehälter abnehmen.
Der Arbeitsbehälter sollte
anschließend vom Motorfuß
entriegelt und etwaige Einsätze
(vier Messer, Knet-oder
Scheibeneinsätze) vorsichtig
abgenommen werden, ehe Sie
versuchen, verarbeitete Zutaten
zu entnehmen.
• In den großen oder kleinen
Arbeitsbehältern bitte kein
EIS zerkleinern, da dies die
Messer beschädigt. Zum
eine mögliche Fehlfunktion
des Automatikschalters am
Arbeitsbehälter zu vermeiden.
• Küchenmaschine nicht
anders betreiben als in dieser
Broschüre beschrieben.
• Manche feste Mischungen
wie bestimmte Teige können
dazu führen, dass sich die
Einsätze langsamer als üblich
drehen. Wenn dies geschieht,
Gerät nicht länger als
1 Minute betreiben.
Zerkleinern von Eis empfehlen
wir einen Mixer.
• Keine heißen oder kochenden
Flüssigkeiten verarbeiten.
Flüssigkeiten abkühlen lassen,
ehe sie in den Arbeitsbehälter
gegossen werden.
Es sollte stattdessen bei einem
entsprechenden kommunalen
Dieses Symbol zeigt,
dass das Gerät nicht im
normalen Hausmüll
entsorgt werden sollte.
Wertstohof oder Fachhändler
• Behälter nicht über die
Markierungen für Flüssigkeiten
oder zum Zerkleinern hinaus
füllen. Trockenere und dickere
zur Entsorgung abgegeben
werden. Weitere Einzelheiten
erfahren Sie von Ihrer
Kommunalbehörde.
Zutaten stets zuerst und
Flüssigkeiten danach in den
Arbeitsbehälter geben.
• Arbeitsbehälter nicht einrasten
lassen, wenn das Gerät
nicht in Gebrauch ist, um
Zum Schutz gegen
Stromschlag Netzstecker,
Netzkabel oder Gerät nicht
in Wasser oder sonstige
Flüssigkeiten tauchen.
DIESE ANLEITUNG AUFBEWAHREN
20 21

DE
KOMPONENTEN
A
B
C
D
E
F
KOMPONENTEN
A. Kleiner Lebensmittelstopfer
B. Großer Lebensmittelstopfer
G
H
I
J
K
C. Extraweiter Einfüllstutzen
D. Deckel für Arbeitsbehälter
E. PULSE-Schalter
F. POWER / OFF-Schalter
G. Einfüllstutzen-Sicherheitssystem
H. Silicondichtung
I. Arbeitsschüssel mit Gri
J. Aufwärtszähler und Abwärtszähler
K. LCD-Anzeige
L. Direktantriebsmotor
M. Antirutschgummifüße
N. Julienne-Scheibe
O. Pommes-frites-Schneider
P. Wendbarer Schredder
Q. Verstellbare Schneidescheibe
R. Quirl-Emulgier-Scheibe
S. Vierklingeneinsatz
T. Teigklinge
U. Mini-Arbeitsklinge
V. Antriebsschaft
W. Aufbewahrungsbehälter mit Deckel
NICHT ABGEBILDET
Reinigungsbürste
Plastikspachtel
Mini-Arbeitsschüssel
Kabelaufbewahrung
®
Sage
-Assist-Plug-Stecker
L
M
N
O
Q
Q
S
T U
WV
P
R
Leistungsangaben
220–240V~ 50Hz 2000W
22 23
DE
MONTAGE
VOR DER INBETRIEBNAHME
Vor der Inbetriebnahme Ihrer Sage®
Küchenmaschine machen Sie sich bitte
mit allen Teilen vertraut. Entfernen Sie das
gesamte Verpackungsmaterial und alle
Werbeetiketten; seien Sie vorsichtig, wenn Sie
die Schneideklingen und Scheiben berühren,
sie sind sehr scharf. Die Arbeitsschüssel,
den Deckel und weiteres Zubehör in warmem
Seifenwasser waschen. Gründlich abspülen
und trocknen. (Siehe Absatz zur Reinigung,
Pege und Aufbewahrung).
1. Den Motorfuß auf eine trockene, ebene
Arbeitsäche stellen. Die Arbeitsschüssel
auf den Motorfuß stellen, dabei richten
Sie sich nach der ALIGN-HANDLEAbbildung auf dem Motorfuß.
2. Die Arbeitsschüssel im Uhrzeigersinn
drehen, bis der Gri mit der Abbildung
TURN TO LOCK übereinstimmt. Die
Arbeitsschüssel sollte sich nun fest
eingerastet in Position benden.
3. Wenn sie eine Scheibe benutzen, dann
setzen Sie zuerst den Antriebsschaft
auf die Antriebskupplung der Schüssel.
Richten Sie die Scheibe so aus, dass
die gewünschte Seite nach oben zeigt.
Halten Sie die Scheibe in der Mitte am
Kunststogristück und positionieren
Sie die Mitte des Lochs über den
Zubehörschaft. Fest runterdrücken,
bis sie richtig sitzt. (Anmerkung:
Diese Scheiben passen nur zur
größeren Arbeitsschüssel).
4. Um die Arbeitsklingen zu benutzen,
greifen Sie den Vierklingeneinsatz,
die Teigklinge oder die
Miniverarbeitungsklinge vorsichtig
an dem Kunststogristück in der
Mitte; die jeweilige Klinge über den
Antriebsschaft der Schüssel positionieren
und runterdrücken, bis sie korrekt
sitzt. Wenn Sie die Miniarbeitsklinge
benutzen, dann vergewissern Sie sich
erst, dass die Miniarbeitsschüssel in der
Hauptschüssel zusammengesetzt ist.
MONTAGE
5. Den Deckel auf die Arbeitsschüssel
setzen, dabei sollte die Schüssel so
aufgesetzt sein, dass der Einfüllstutzen
sich leicht rechts vom Schüsselgri
bendet und die Pfeilabbildungen
aufeinander ausgerichtet sind .
Halten Sie den Einfüllstutzen und drücken
Sie ihn gleichzeitig fest nach unten, den
Deckel im Uhrzeigersinn drehen (wie
in der Abbildung gezeigt), sodass die
Verrieglungslasche auf dem Deckel in die
Sicherheitsverrieglungsvorrichtung auf
dem Gri einrastet. Der Deckel muss fest
in Position eingerastet sein.
HINWEIS
Die Küchenmaschine wird nicht in Betrieb
gehen, bis die Arbeitsschüssel und der Deckel
korrekt in ihrer Position eingerastet sind.
VORSICHT
Die Arbeitsklingen (einschließlich
Minischüsselklinge) und Scheiben
sind extrem scharf; immer mit
äußerster Vorsicht handhaben.
6. Den Netzstecker in eine Steckdose
mit 220–240 Volt stecken und ggf. die
Steckdose anschalten.
7. Am Ende der Verarbeitung immer warten,
bis die Klingen oder Scheiben aufgehört
haben sich zu drehen, bevor Sie entriegeln
und den Deckel entfernen. Vor dem
Deckelentfernen sicherstellen, dass der
POWER / OFF-Schalter gedrückt, der
Strom ggf. an der Steckdose abgeschaltet
und das Netzkabel aus der Steckdose
gezogen ist. Den Einfüllstutzen halten
und gleichzeitig fest runterdrücken, den
Deckel gegen den Uhrzeigersinn drehen,
sodass die Pfeilabbildungen nicht länger
aufeinander ausgerichtet sind.
8. Die Arbeitsschüssel (vor dem Entfernen
der Klingen oder Scheiben) entfernen,
indem sie gegen den Uhrzeigersinn
gedreht wird bis der Gri auf ALIGN
HANDLE ausgerichtet ist. Die Schüssel
vom Motorschaft heben. Zum Entfernen
der Scheibe diese vorsichtig an dem
Gristück aus Kunststo in der Mitte der
Scheibe halten und die Scheibe hoch und
weg vom Antriebsstift heben.
ÜBERLASTUNGSSCHUTZSYSTEM
Bei einer Überbelastung des Motors, stellt sich
die Maschine auf den STANDBY-Modus und
das OVERLOAD-Symbol auf der LCD-Anzeige
beginnt aufzuleuchten. De Küchenmaschine
kann immer noch durch Drücken mit dem
POWER / OFF-Schalter ausgestellt werden.
Vor erneuter Betriebsaufnahme ca. 30 Minuten
warten, bis die Küchenmaschine abgekühlt ist.
Bei manchen zähen Mischungen wie z. B. Teig,
kann es vorkommen, dass die Klingen sich
langsamer drehen, als normal.
Ist dies der Fall, dann den Inhalt nicht länger
als 1 Minute verarbeiten.
24 25

DE
LEITFADEN FÜR LEBENSMITTELVERARBEITUNG
HINWEISE
Die Küchenmaschine ist sehr leistungsstark; wir empfehlen so weit möglich den
Einsatz der PULSE-Funktion anstatt Zerkleinern oder Quirlen.
LEBENSMITTEL KLINGENTYP (TEIG/
Avocado Vierklingeneinsatz oder Mini
Spargel (gekocht) Vierklingeneinsatz oder Mini
Rote Beete 2–5 Schreddern
Brokkoli (gekocht) Vierklingeneinsatz
Kohl Dünn 1–2 und Mittel 2–3
Karotte Vierklingeneinsatz oder Mini
Blumenkohl
(gekocht)
Sellerie Vierklingeneinsatz oder Mini
Chili Vierklingeneinsatz oder Mini
Aubergine Vierklingeneinsatz oder Mini
Knoblauch Vierklingeneinsatz oder Mini
Ingwer Vierklingeneinsatz oder Mini
Kräuter Vierklingeneinsatz oder Mini
Lauch Vierklingeneinsatz oder Mini
Salatkopf 2–4
VIERKLINGENEINSATZ/
MINI)
Verwendung: Guacamole
Verwendung: Spargeldip
Verwendung: Brokkolisuppe
Verwendung: Gemüsesuppe
Vierklingeneinsatz oder Mini Verwendung:
Verwendung: Gemüsesuppe
Verwendung: Gewürz
Verwendung: Beilage, Suppen
Verwendung: Gewürz
Verwendung: Gewürz
Verwendung: Pesto-Würzmittel
Verwendung: gekocht für
Suppen
VERSTELLBARES
SCHNEIDEBLATT FÜR
UNTERSCHIEDLICHE DICKE
2–5
Verwendung: Beilage
0–5 Schreddern
Dünn 1–2 Mittel 2–3
Verwendung: Salat
2–5
Verwendung: gegrillte
Aubergine
2–5
Verwendung: Gemüsesuppe
Verwendung: Salat
EMPFOHLENER
SCHEIBENTYP
(POMMES FRITES/
SCHREDDERN/
JULIENNE/QUIRL)
Verwendung: Salat
Schreddern
Verwendung: Salat
Verwendung: Salat
Blumenkohlsuppe
Schreddern oder
Julienne
Verwendung: Beilage
für Gerichte
LEITFADEN FÜR LEBENSMITTELVERARBEITUNG
LEBENSMITTEL KLINGENTYP (TEIG/
Pilze (roh) Vierklingeneinsatz oder Mini
Pilze (gekocht) Vierklingeneinsatz
Zwiebel Vierklingeneinsatz oder Mini
Sellerieknolle und
Pastinake
Pastinake
(gekocht)
Erbsen (gekocht) Vierklingeneinsatz oder Mini
Kartoeln 0.5–6
Kartoeln
(gekocht)
Spinat Vierklingeneinsatz oder Mini
Spint (gekocht) Vierklingeneinsatz oder Mini
Kohlrübe Vierklingeneinsatz oder Mini
Tomaten Vierklingeneinsatz oder Mini
Zuccini 3–6
Apfel Vierklingeneinsatz oder Mini
Apple (gekocht) Vierklingeneinsatz oder Mini
VIERKLINGENEINSATZ/
MINI)
Verwendung: Gemüsesuppe
Verwendung: Pilzsuppe
Verwendung: Suppen, Soßen
Vierklingeneinsatz oder Mini
Verwendung: Gemüsesuppe
Vierklingeneinsatz
Verwendung: Beilage
Verwendung: Beilage,
Babynahrung
Vierklingeneinsatz oder Mini
Verwendung: Kartoelbrei,
Skordalia
Verwendung: Beilage
Verwendung: Spinatcreme
Verwendung: Gemüsesuppe,
Steckrübencreme
Verwendung: Salsa
Verwendung: Apfelmus
Verwendung: Babynahrung
VERSTELLBARES
SCHNEIDEBLATT FÜR
UNTERSCHIEDLICHE DICKE
4–6
Verwendung: Salat,
Gemüsesuppe, Pilzsoße,
Pilzsuppe
4–6 Verwendung: Salat,
Gemüsesuppe, Pilzsoße,
Pilzsuppe
0–5
Verwendung: Salat
2–5
Verwendung: Gemüselasagne
Verwendung: Kartoelauauf
2–5
Verwendung: gefüllte Brote,
Tomaten-Bocconcini-Salat,
Tomatenwürzsoße
Verwendung: Beilage,
Zuccinischnitten, Gratin
2–5
Verwendung: Apfel-Galette
4–6
Verwendung: Obstsalat
EMPFOHLENER
SCHEIBENTYP
(POMMES FRITES/
SCHREDDERN/
JULIENNE/QUIRL)
Pommes frites /
Julienne / Schredder
Verwendung:
Pommes frites
Schredder –
grob oder fein
Verwendung:
Salat,Frittata
26 27

DE
LEITFADEN FÜR LEBENSMITTELVERARBEITUNG
LEBENSMITTEL KLINGENTYP (TEIG/
Bananen Vierklingeneinsatz oder Mini
Beeren Vierklingeneinsatz oder Mini
Zitrusfrüchte Vierklingeneinsatz oder Mini
Zitronenschale Vierklingeneinsatz oder Mini
Trockenfrüchte Vierklingeneinsatz oder Mini
Kiwi Vierklingeneinsatz oder Mini
Mango Vierklingeneinsatz oder Mini
Melone
(Cantaloupe- und
Galia-Melone)
Birne Vierklingeneinsatz oder Mini
Birne (gekocht) Vierklingeneinsatz oder Mini
Ananas Vierklingeneinsatz oder Mini
Steinfrüchte
(Aprikose,
Nektarine, Prsich,
Paume)
Erdbeeren Vierklingeneinsatz oder Mini
Teigsorten Teig
Brotkrümel Vierklingeneinsatz oder Mini
VIERKLINGENEINSATZ/
MINI)
Verwendung: Dessertsoßen
Verwendung: Obstsalat
Verwendung: Fruchtmischung
Verwendung: Fruchtmischung
Verwendung: Obstsalat,
Dessertsoßen
Verwendung: Obstsalat,
Dessertsoße
Verwendung: Obstsalat,
Dessertsoßen
Vierklingeneinsatz oder Mini
Verwendung: Obstsalat
Verwendung: Obstsalat
Verwendung: Babynahrung
Verwendung: Obstsalat
Vierklingeneinsatz oder Mini
Verwendung: Obstsalat,
Dessertsoßen
Verwendung: Obstsalat,
Dessertsoßen
Verwendung: Kuchen, Crêpes
Verwendung: Panieren,
Brotfüllungen
VERSTELLBARES
SCHNEIDEBLATT FÜR
UNTERSCHIEDLICHE DICKE
4–6
Verwendung:
Nachtischdekoration
4–6
Verwendung: Birnenkuchen
EMPFOHLENER
SCHEIBENTYP
(POMMES FRITES/
SCHREDDERN/
JULIENNE/QUIRL)
Quirl
Verwendung:
Kuchen, Muns,
Crêpes
LEITFADEN FÜR LEBENSMITTELVERARBEITUNG
LEBENSMITTEL KLINGENTYP (TEIG/
Käse Schredder – grob
Schokolade Vierklingeneinsatz oder Mini
Doppelrahmfrischkäse
Teigsorten Teig
Eiweiß
Verwendung:
PULSE-Funktion
Eier (hart gekocht) Vierklingeneinsatz oder Mini
Eier (ganz oder
Eigelb)
Verwendung:
PULSE-Funktion
Sahne
Verwendung:
PULSE-Funktion
Milkshakes und
Smoothies
Fleisch (roh)
Verwendung:
PULSE-Funktion
Fleisch (gekocht)
Verwendung:
PULSE-Funktion
Wurstaufschnitt 1–6
VIERKLINGENEINSATZ/
MINI)
Verwendung: SchokoladenGanache
Vierklingeneinsatz oder Mini
Verwendung: Dips,
Käsekuchen
Verwendung: Gebäck,
Scones, Brot
Verwendung: Brotfüllung
Vierklingeneinsatz
Verwendung: PULSE-Funktion
wird empfohlen.
Vierklingeneinsatz
Verwendung: Fleischauauf,
Burger
Vierklingeneinsatz
Verwendung: Brotfüllung, Pate,
Babynahrung
VERSTELLBARES
SCHNEIDEBLATT FÜR
UNTERSCHIEDLICHE DICKE
2–5
Verwendung: Brotfüllung
Verwendung: belegte Brote,
Antipasto, Pizzabelag
EMPFOHLENER
SCHEIBENTYP
(POMMES FRITES/
SCHREDDERN/
JULIENNE/QUIRL)
oder fein
Verwendung:
geriebener Käse
Schredder – grob
oder fein
Verwendung:
Nachtischdekoration
Quirl
Verwendung:
Eierschaum (nicht
empfohlen für
Meringue, Pavlova)
Quirl
Verwendung:
Mayonnaise
Quirl
Verwendung:
Wir empfehlen die
PULSE-Funktion,
um ein übermäßiges
Schlagen zu
vermeiden.
28 29
 Loading...