

Sage Kitchen Wizz Pro, BFP800UK Instruction Book

the Kitchen Wizz Pro
™
BFP800UK
Instruction Book / Betjeningsvejledning / Instruksjonsbok
Ohjekirja / Instruktionsbok
EN User manual
DK Brugermanual
NO Bruksanvisning
FI Käyttöopas
SE Bruksanvisning
2
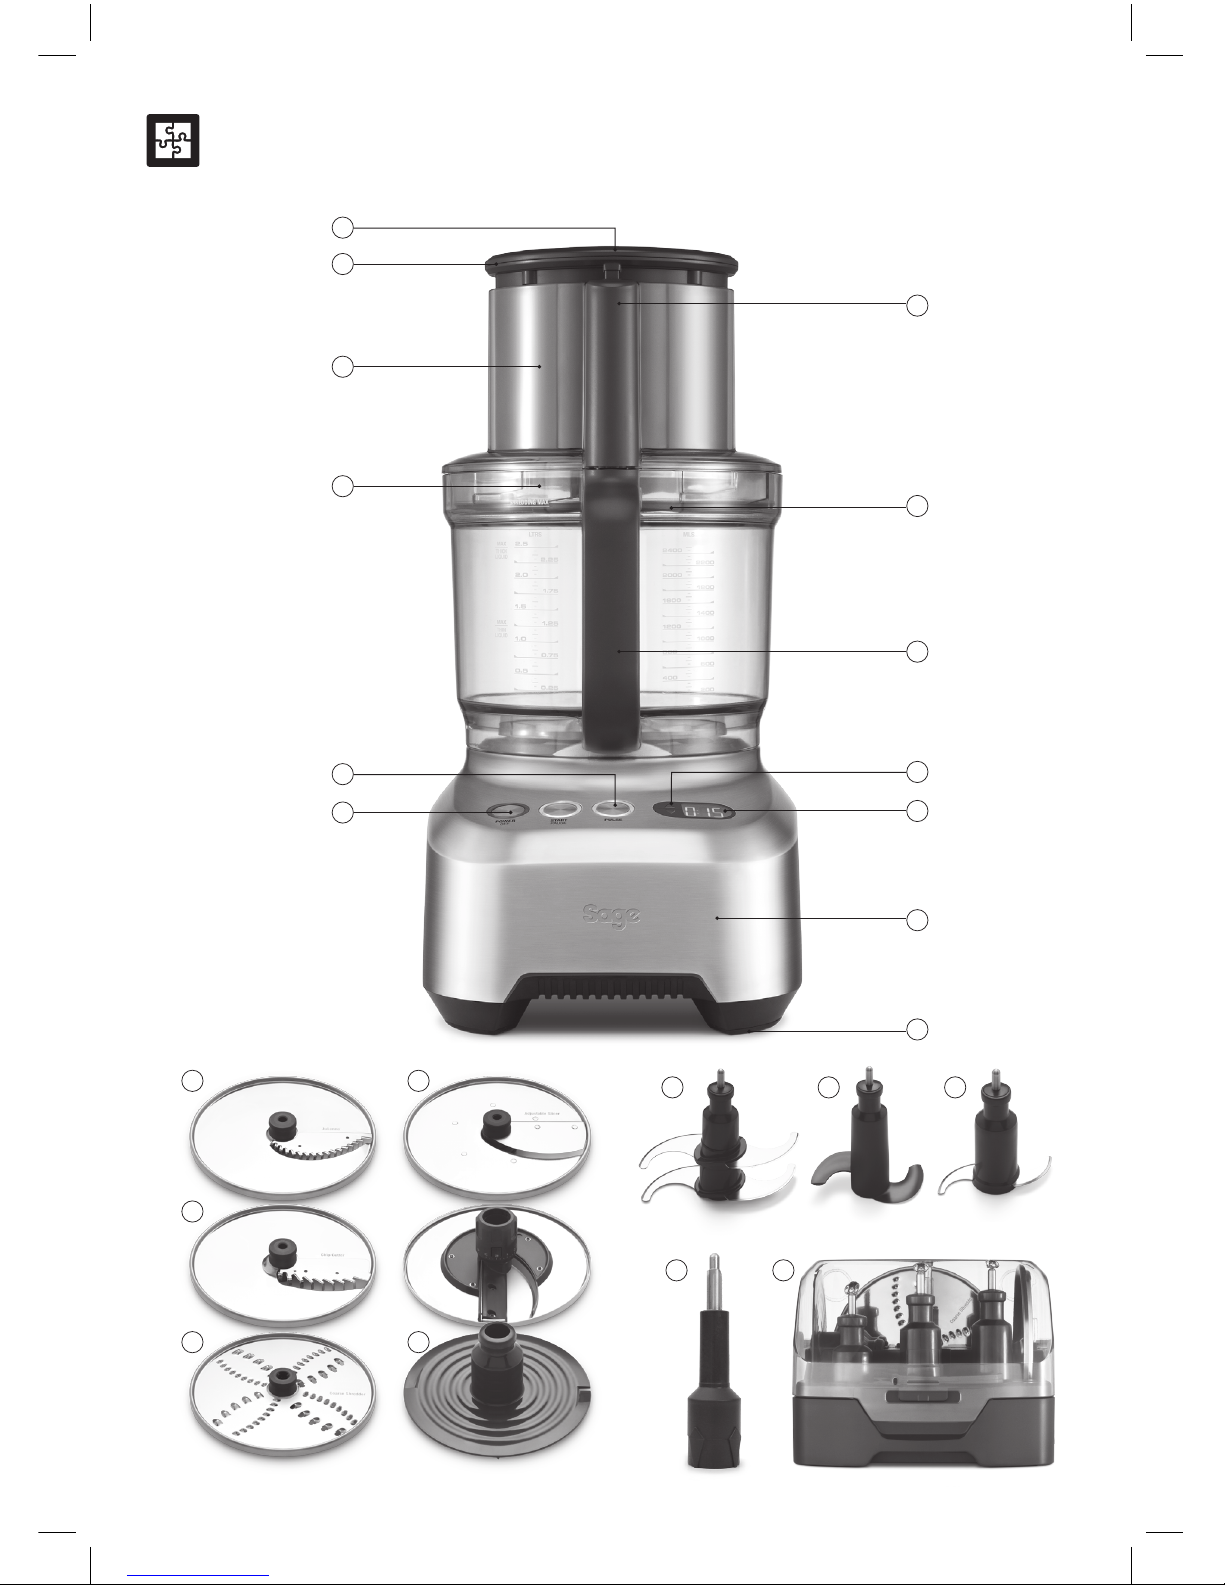
COMPONENTS / KOMPONENTER / DELER / RAKENNEOSAT / DELAR
2
3
4
5
1
6
7
8
9
10
11
12
13
14 17
18
19 20 21
22 23
15
16

3
1
Small food pusher / Lille skubber / Stapperedskap til små ingredienser / Pieni painin / Liten påmatare
2
Large food pusher / Stor skubber / Stapperedskap til store ingredienser / Suuri painin / Stor påmatare
3
Extra wide feed chute / Ekstrabredt påfyldningsrør / Ekstra vid munning / Ekstraleveä syöttösuppilo / Extra stort påfyllningsrör
4
Processing Lid / Låg til foodprocessor / Lokk / Kulhon kansi / Beredningslock
5
PULSE button / PULS-knap / PULS-knapp / SYKÄYS-painike / PULS-knapp
6
POWER/OFF button / TÆND/SLUK-knap / PÅ/AV-knapp / Virtapainike / Strömbrytare
7
Feed Chute Safety System / Sikkerhedssystem til påfyldningsrør / Sikkerhetsmekanisme / Syöttösuppilon turvajärjestelmä / Säkerhetssystem för
påfyllningsröret
8
Silicone Seal / Silikonetætning / Silikonpakning / Silikonitiiviste / Silikontätning
9
Processing Bowl with Handle / Røreskål med håndtag / Bolle med håndtak / Kahvallinen kulho / Beredningsskål med handtag
10
Count Up & Count Down Timer Used / Timer til optælling og nedtælling af tid / Klokke og tidsmåler / Käytössä ylös- ja alaslaskeva ajastin /
Upp- och nedräknande tidur
11
LCD Display / LCD-Display / LCD-skjerm / LCD-näyttö / LCD-display
12
Direct Drive Motor Base / Direkte styret motorbase / Motor og fundament / Suoravetomoottori / Direktdriven motor
13
Non-skid Rubber Feet / Skridsikre gummifødder / Anti-skli gummiføtter / Luistamattomat kumijalat / Halkfria gummifötter
14
Julienne Disc / Julienne-skive / Skjæreskive til strimler / Ohut suikalointiterä / Julienneskiva
15
French Fries Disc / Pommes Frites-skive / Skjæreskive til pommes fritt / Ranskanperunaterä / Pommes fritesskiva
16
Reversible Shredder / Vendbart rivejern / Dobbeltsidig rivjern / Käännettävä raastinterä / Vändbar rivskiva
17
Adjustable Slicer / Justerbar skæreskive / Justerbar skjæreskive / Säädettävä viipalointiterä / Justerbar skärskiva
18
Whisk/Emulsifying Disc / Piskeris/piskeskive / Vispeskive / Vatkain/emulgointilevy / Visp- och emulgeringsskiva
19
Quad® Blade Processor / Quad®-kniv / Quad®-kniv / Quad® -neliteräleikkuri / Quad® beredningskniv
20
Dough Blade / Dejkniv / Deig-kniv / Taikinavatkain / Degkniv
21
Mini Processing Blade / Minikniv / Mini-kniv / Minileikkuri / Liten beredningskniv
22
Disc Spindle / Aksel til skiver / Plugg til skjæreskiver / Varsi levyille ja terille / Drivaxel för skivorna
23
Storage Container with Lid / Opbevaringsboks med låg / Oppbevaringsboks med lokk / Kannellinen säilytyskotelo / Förvaringsbehållare med lock
NOT SHOWN / IKKE VIST / IKKE AVBILDET / EI KUVASSA / EJ PÅ BILD
Cleaning Brush / Rengøringsbørste / Rengjøringsbørste / Puhdistusharja / Rengöringsborste
Plastic Spatula / Plastikspartel / Slikkepott i plast / Muovinen kaavin / Plastspatel
Mini Processor Bowl / Mini-røreskål / Mini-bolle / Minikulho / Liten beredningsskål
Cord Storage / Opbevaring til ledning / Lagring av ledning / Johdon säilytys / Sladdförvaring
4
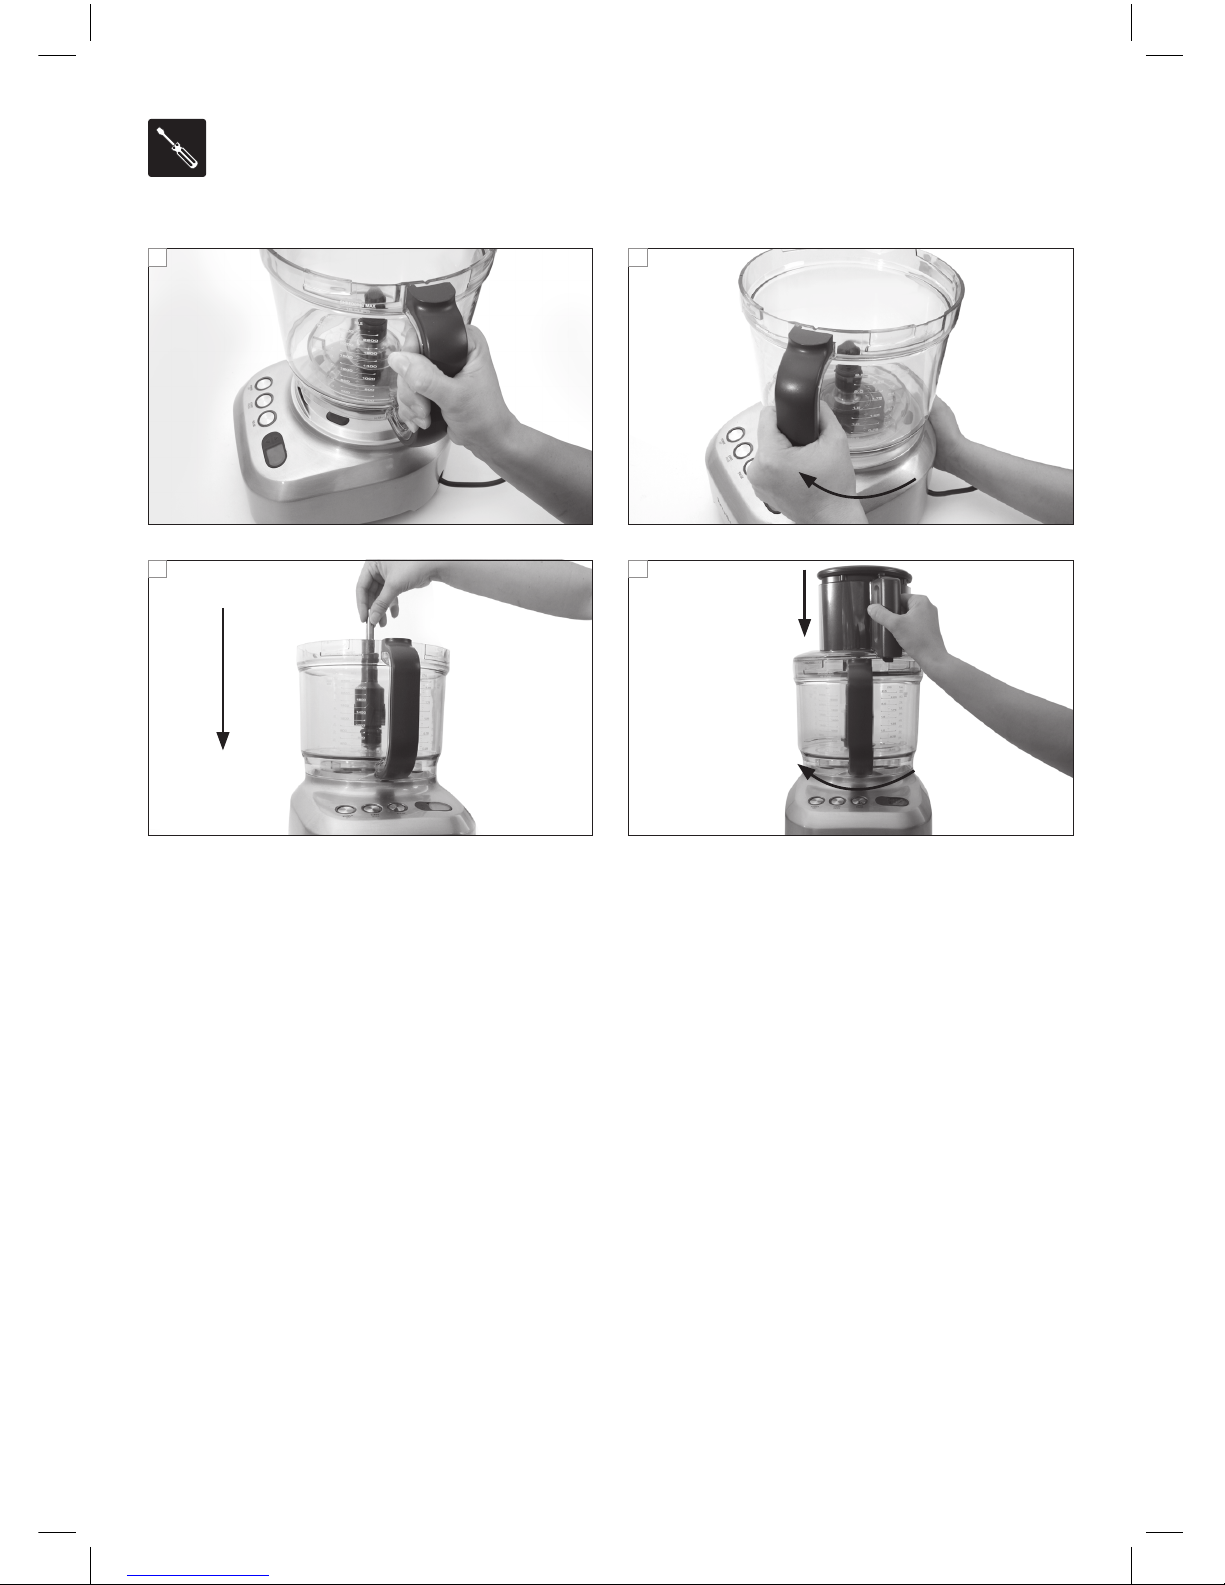
ASSEMBLY / MONTERING / MONTERING / LAITTEEN KOKOAMINEN /
MONTERING
1
3
2
4

5
ENGLISH
At Sage™ by Heston Blumenthal® we are very safety conscious. We design
and manufacture consumer products with the safety of you, our valued
customer, foremost in mind. In addition we ask that you exercise a degree
of care when using any electrical appliance and adhere to the following
precautions.
IMPORTANT SAFEGUARDS
READ ALL INSTRUCTIONS BEFORE USE AND SAVE FOR FUTURE
REFERENCE
• Remove any packaging material and promotional labels before using the
food processor for the rst time.
• Do not attempt to operate the food processor by any method other than
that it is intended and described in this booklet.
• Before using for the rst time please ensure that your electricity supply is
the same as shown on the rating label on the underside of the appliance.
If you have any concerns please contact your local electricity company.
• Do not place the food processor near the edge of a bench or table during
operation. Ensure the surface is level, clean and free of water, our, etc.
Vibration during operation may cause the appliance to move.
• Do not place this appliance on or near a hot gas or electric burner,
or where it could touch a heated oven.
• Always make sure the food processor is completely assembled before
operating. The appliance will not operate unless properly assembled.
Always operate the food processor with the processing lid securely
in position.
• Ensure the motor, blades or discs have completely stopped before
disassembling. Ensure the OFF button has been pressed and the
appliance is switched off at the power outlet and unplugged when not
in use, if left unattended and before assembling and disassembling,
cleaning or storing.
• Always secure the processing bowl onto the motor base before attaching
the blade processor, dough blade or discs.
• Please do not crush ICE in the large or small processing bowls. This will
cause damage to the blades
• Do not process hot or boiling liquids - allow liquids to cool before placing
into the processing bowl.
• Do not move the food processor whilst in operation.
• Do not place any part of the food processor in the microwave oven.
CAUTION
• To avoid possible malfunction of the processing bowl’s auto switch,
do not place the processing lid in the locked position when the appliance
is not in use.
• The processing blades and discs are extremely sharp, handle with care
at all times. Do not place hands, knives or other utensils into the feed
chute. Always use the food pusher to push the food down the feed chute.
IMPORTANT SAFEGUARDS FOR ALL ELECTRICAL APPLIANCES
• Unwind power cord fully before use.
• Do not let the power cord hang over the edge of a table, counter,
touch hot surfaces or become knotted.
• To protect against electric shock do not immerse the power cord,
power plug or appliance in water or any other liquid.
• This appliance is for household use only. Do not use this appliance for
anything other than its intended use. Misuse may cause injury.
• In order to avoid a hazard due to inadvertent resetting of the thermal cut
out this appliance must not be supplied through an external switching
device such as a timer or connected to a circuit that it regularly switched
on and off by the utility.
• Children shall not play with the appliance.
• This appliance is not intended for use by persons with reduced physical,
sensory or mental capabilities, lack of experience and knowledge,
or children unless they have been given supervision or instruction
concerning use of the appliance by a person responsible for their safety.
Keep the appliance and its cord out of the reach of children.
• Do not use the appliance if power cord, power plug or appliance
becomes damaged in any way. If damaged or maintenance other than
cleaning is required, please contact Sage™ by Heston Blumenthal
®
Customer Service.
The symbol shown indicates that this appliance should not
be disposed of in normal household waste. It should be taken
to a local authority waste collection centre designated for
this purpose or to a dealer providing this service. For more
information, please contact your local council ofce.

6
ASSEMBLY
BEFORE FIRST USE
Before using your food processor, become familiar with all the parts.
Wash the processing bowl, processing lid and other attachments in warm,
soapy water. Rinse and dry thoroughly. (Refer to Care & Cleaning).
1. Place the processing bowl handle in line with the ALIGN HANDLE
graphic on the motor base (see g.
1
).
2. Turn the handle clockwise until aligns with the TURN TO LOCK
graphic (see g.
2
).
3. The spindle is required when using all discs. Position the spindle over
the coupling in the centre of the processing bowl. Then position your
chosen cutting attachment over it. Push down rmly until tted correctly
(Please note that these discs only t the larger processing bowl)
(see g.
3
).
4. Place lid onto the processing bowl so that the ALIGN/LOCK graphics
on the lid and handle align (see g.
4
). To LOCK the lid, hold the
chute and turn clockwise so that the handle parts align. Locking the lid
correctly will engage the interlocking safety catch on the handle,
and allow the motor to run.
NOTE
• If using the mini processing blade, ensure the mini processing bowl is
assembled into the main bowl rst.
• Some stiff mixtures, such as dough may cause the processing blade to
rotate more slowly than normal. If this happens, do not process for longer
than 1 minute.
• Do not ll bowl above marked liquid levels (shredding). Always add drier
or thicker ingredients to the processing bowl prior to adding uids.
OVER LOAD PROTECTION SYSTEM
• If the motor overloads, the food processor will go to STANDBY mode and
OVERLOAD icon in the LCD starts to ash. The food processor can still
be switched off by pressing the POWER/OFF button. To operate the food
processor again, allow the machine to cool for approx. 30 minutes.
• If the blades or discs should jam while processing, ensure the
POWER/OFF button is pressed to switch the motor off. Switch off the
power outlet. Remove the processing lid and adjust any food wedged
between the blade and the bowl or in the disc. Replace the lid and
proceed as normal. If this occurs again, the processing bowl may be
overloaded, so remove some of the food and process in smaller batches.
NOTE
The food processor is designed so the motor will not operate without
the processing bowl and lid correctly locked into position and the pusher
inserted into the feed chute. In the event that the food processor starts
without the lid correctly locked into position, immediately disconnect
at the power outlet and contact Sage™ by Heston Blumenthal
®
Customer Service.
OPERATION
CHOPPING WITH THE QUAD® BLADE
• The micro-serrated Quad® blade chops raw and cooked food to the
consistency required, from coarsely chopped to minced.
• Avoid over-processing by checking the consistency frequently. For many
tasks, we recommend using the PULSE button, as it may only take a few
seconds to fully process food to your desired consistency.
• If necessary, turn the POWER off and use a spatula to scrape down the
sides of the bowl to encourage even processing.
RAW VEGETABLES, FRUIT AND COOKED MEATS
Trim and cut food into 2.5cm cubes. Process no more than 4 cups at a time
using the PULSE button at 1–2 second intervals until chopped to desired
size or consistency.
RAW MEAT, CHICKEN AND FISH
• Trim excess fat and cut food into 2.5cm cubes. Ensure all bones are
removed. Chill well in freezer until rm as this will help to cut through the
food more readily.
• Process no more than 600g of raw meat at a time. At this capacity the
motor should run for no more than 30 seconds at a time.
• Use a combination of the START | PAUSE and the PULSE button until
chopped or minced to the desired consistency.
GARLIC, CHILLI AND GINGER
• Peel garlic cloves and process them whole. Leave chillies whole,
or remove seeds for milder chilli. Peel and cut ginger into 2.5cm cubes.
• For other solid herbs like lemongrass or galangal, peel and cut into cubes
or pieces between 1 and 2cm in size.
• Size should be made smaller for harder or more dense herbs.
• Process using the PULSE button at 1–2 second intervals until chopped
to the desired consistency.
• If adding garlic, chilli or ginger to other ingredients, drop whole pieces
down the small feed chute while the motor is running.
LEAFY HERBS
Wash and dry herbs thoroughly. Remove any coarse stems.
Process no more than 2 bunches of herbs (approx. 4 cups) at a time using
the PULSE button at 1–2 second intervals until chopped to the desired
consistency.
NUTS
Process no more than 4 cups of shelled nuts at a time using the PULSE
button at 1–2 second intervals until chopped to the desired consistency.
NUT BUTTERS
• Process no more than 4 cups of shelled roasted nuts at a time using the
START | PAUSE button until chopped to the desired consistency.
• The volume of nuts reduces after processing, for example 2 cups of nuts
will make around 1 cup of nut butter.
• Natural nut butter (without using stabilisers) will separate on standing,
and needs to be stirred before use.
• For smoother nut butter, add a little vegetable oil. This can improve the
texture of nuts with lower oil content, like roasted almonds.
DRIED FRUIT
• Dried fruit can be sticky, and may stick to the blades during processing.
We recommend putting dried fruit in the freezer for about 10 minutes
before processing. Process no more than 2 cups at a time using the
PULSE button at 1–2 second intervals until chopped to the desired
consistency.

7
• If chopping fruit to add to cake mixture, process the fruit before making
the cake mix. Add a little our (from the quantity of our in the recipe) to
prevent fruit from sticking to the Quad
®
blade.
• For dates, removes pits and cut into quarters before processing.
Process no more than 1 cup at a time.
SOFT BREADCRUMBS
Break stale bread into chunks (fresh bread will stick to blades).
Process no more than 6–8 slices at a time using the PULSE button at
1–2 second intervals until crumbed to desired consistency. For best results
when making bread crumbs, add one slice at a time.
DRIED BREADCRUMBS
Tear bread into chunks and toast in oven until golden and crisp. Do not over
brown. Process no more than 6–8 slices at a time using the PULSE button
at 1–2 second intervals.
BISCUIT CRUMBS
• Break biscuits into quarters, and weigh a maximum of 250g.
• Process using the PULSE button at 1–2 second intervals until chopped to
the desired consistency. Sweet or savoury biscuit crumbs can be used as
an alternative to pastry for sweet or savoury pies.
• Do not process very hard biscuits as this may damage the blades.
PURÉEING WITH THE QUAD® BLADE
• The micro-serrated Quad® blade purees raw and cooked food to the
consistency required, including baby food.
• Carefully remove the Quad
®
blade after pureeing food and use a spatula
to scrape food adhering to the blade and bowl.
BABY FOOD
Trim and cut vegetables and meat into 2.5cm cubes. Cook vegetables and
meat before processing. Process no more than 7½ cups at a time using the
START | PAUSE button in intervals until the food is pureed to a smooth and
even consistency. Stock, milk or gravy can be added through the small feed
chute if the mixture becomes too thick.
MIXING WITH THE QUAD® BLADE
• The Quad® blade mixes ingredients for cakes, batters, and cookie
doughs.
• The Quad
®
blade can also emulsify egg-based sauces such as
mayonnaise.
BUTTER CAKE AND BISCUIT DOUGH
• Place softened, chopped butter and sugar into the processing bowl.
Process using the START | PAUSE button until the mixture is lightly
creamed. With the motor running, add eggs one at a time through the
small feed chute, mixing well after each egg is added. Take lid off and
add liquid and dry ingredients to the mixture. Process using the PULSE
button until folded evenly. Scrape down sides of bowl as needed. Do not
over-process.
• Add choc chips, nuts, dried fruit, etc after the main mixture is done.
Use the PULSE button in very short bursts until the additions are
combined. Do not over-process, as these larger ingredients will break
down quickly.
QUICK-MIX CAKES AND BATTERS
• Place all ingredients in the bowl, starting with liquids, and being careful
not to exceed the MAX LIQUID level. Process using the PULSE button
until folded evenly. Scrape down sides of bowl as needed. Do not
over-process.
• This method can also be used for melt ’n’ mix cakes, packet cake mixes
and crepe batters.
PASTRY DOUGH
• Place our and chilled, cubed butter into the processing bowl.
• Do not process more than 3 cups (450g) of our using the
START | PAUSE button in intervals until the butter is absorbed into
the our.
• Steadily add liquid through the small feed chute with the motor still
running. Process until the mixture forms a ball.
KNEADING WITH THE DOUGH BLADE
The edges of the plastic dough blade create a softer action for combining
dough ingredients.
BREAD OR PIZZA DOUGH
• Place our and dry ingredients into the processing bowl, including instant
active dry yeast.
• Do not process more than 3 cups (450g) of our or using the
START | PAUSE button in intervals.
• Steadily add liquid (including oil, if applicable) through the small feed
chute with the motor still running. Process until the mixture it forms a soft,
elastic dough ball.
• Transfer dough ball to a lightly oured surface and knead for a further
5 minutes if necessary until soft and pliable.
• If processing more than two recipes of dough ingredients (700g our),
allow the motor base to cool for an extended period before subsequent
kneading to prevent the motor from overloading.
SLICING, GRATING AND SHREDDING
Important: The spindle must be used with both the adjustable slicer and the
reversible shredder/grater.
ADJUSTABLE SLICER
• The adjustable slicer will slice food to an even and consistent thickness.
It can be adjusted to 24 settings, from very ne (0.3mm) to thick (8.0mm).
• To adjust the slicing thickness, hold the adjustable slicing disc by the
outer edge with one hand, and turn the adjustment dial on the underside
with the other hand.
REVERSIBLE GRATER AND SHREDDER
This disc has an array of small blades on both sides of the disc. Align the
disc so larger holes face up for coarser results, or with the smaller holes
facing up for ner results. The discs are labelled showing which side faces
up.
CONTROLLING THE INGREDIENTS
It is important to position the food in the chute to gain maximum control and
best results.
SMALLER INGREDIENTS
For long thin foods such as carrots, cucumbers, zucchini, etc., use the small
feed chute. This will avoid the ingredients from tipping over during slicing.
LARGER INGREDIENTS
The wide feed chute is 14cm wide, and can t ingredients up to this size.
The chute can be packed to ll the width of the chute. The food should t
snugly so it is supported in an upright position in the chute, but not so tight
that it could prevent the food from moving down the chute.

8
PRESSURE
• When processing, never force the food down the chute as this can
damage the discs.
• Apply light, even pressure for soft foods such as tomatoes and bananas.
• Apply medium, even pressure for rmer foods such as potatoes
and apples.
• Apply rm, even pressure for hard foods such as parmesan cheese and
deli meats such as salami.
ROUND FRUIT AND VEGETABLES
• Small fruit and vegetables should be trimmed on one end so the food sits
at inside the feed chute.
• Large fruit and vegetables may need to be cut in half to t in the chute.
LONG FRUIT AND VEGETABLES
• Ingredients can be cut cross-sectionally to create circular results.
Use the small and medium feed chute, or pack ingredients vertically in
the large feed chute.
• Ingredients can be cut lengthwise to create ribbons. Use the large
feed chute, and trim ingredients if necessary to encourage them to sit
at in the feed chute when the disc starts. Pack the large feed chute
horizontally.
LEAFY VEGETABLES
Cut cabbage into wedges to t the feed chute. For lettuce, separate leaves,
then roll up and pack vertically in the feed chute.
CHEESE
• Caution should be taken when processing cheese in a food processor.
For soft cheese such as mozzarella, partially freeze it until rm. This will
help prevent jamming the disc.
• Round cheeses such as mozzarella should be trimmed at one end to
encourage them to sit at in the feed chute when the disc starts.
• Hard cheeses such as parmesan must be checked rst to ensure they
are not too hard (to avoid damaging blade edges). The cheese should
slice easily with a sharp knife and remove the rind before processing.
• Wedged shaped cheeses such as parmesan can be packed side by side
to form a rectangular shape in the chute.
DELI MEATS
• Cut in lengths to t the height of the feed chute. The length must not
be higher than MAX CHUTE FILL graphic. Pack with the cut side
facing down.
• For hard cured sausages like salami and pepperoni trim on one end and
process one sausage at a time through the small or medium feed chute,
depending on size.
CHOCOLATE
Break a block of chocolate into small pieces, and chill until rm. Pack into
the small feed chute, and then shred.
MINI BOWL AND BLADE
• The mini processing bowl is used inside the main processing bowl.
It is for better control when processing small quantities of food, or herb/
spice mixes. It can be used for chopping, mixing and blending a variety
of ingredients.
• The mini blade cannot be used inside the main processing bowl.
• The main processing attachments will not t inside the mini bowl.
CARE & CLEANING
When nished processing, switch the food processor off at the power outlet
and unplug the power cord.
MOTOR BASE
• Wipe the motor base with a clean, damp cloth after each use.
• Dry thoroughly with a soft, clean cloth.
PROCESSING BOWL, LID AND FOOD PUSHER
Hand wash in hot, soapy water using a mild detergent. Do not use a
scourer or abrasive cleaners as they will scratch the plastic surface.
The plastic parts may occasionally be washed in the dishwasher (top shelf
only). It is not recommended on a regular basis. Do not place food pusher
in the dishwasher as the heat may deform it.
2 BLADE PROCESSOR, DOUGH BLADE AND DISCS
• Hand wash the bowl and lid. Use the cleaning brush accessory to scrub
stubborn foods off the blades and discs. The handle end of the brush is
designed for scraping.
• To avoid accidental cuts, do not leave dual blade processor or discs to
soak in sudsy water. The Quad
®
blade processor, dough blade, discs and
spindle can also be washed in the dishwasher (top shelf only).
FOOD STAINS AND ODOURS
Foods such as carrot may leave a stain on plastic parts whilst other foods
such as garlic may leave a strong odour. To remove either, soak the parts
for 5 minutes in 2 Litres of water with ½ cup lemon juice added. Rinse and
wash as normal.
STORAGE
• Place the large food pusher (with medium and small pushers inserted)
into the feed chute for storage.
• Store your food processor upright, with the bowl and lid resting in
position, but not locked. Locking the bowl and lid can put unnecessary
strain on the safety interlock.
• All accessories should be kept in the storage container and out of the
reach of children to avoid accidental cuts. It is not recommended to store
the discs in a drawer with other utensils.
• Do not place anything else on top of your food processor.

9
TROUBLESHOOTING
Food is unevenly processed • Ingredients should be cut evenly into 2.5cm pieces before processing.
• Ingredients should be processed in batches to avoid overloading.
Slices are slanted or uneven. • Load food in feed chute. Place pusher onto food and apply pressure. Then press start.
Food falls over in the feed chute • The large feed chute must be packed full for best results. If processing smaller quantities, use the small
feed chute.
Chipper disk • Always clear any blocked potato from the chipper disc before processing more potatoes.
Some food remains on the disc
after processing
• It is normal for small pieces to remain after processing.
Motor slows down when mixing
dough
• Amount of dough may exceed maximum capacity. Remove half and process in two batches.
• Dough may be too wet (see next page). If motor speeds up, continue processing. If not, add more our,
1 tablespoon at a time until the motor speeds up. Process until dough cleans the side of the processing bowl.
Motor slow to start with the
Quad
®
blade processor
• The amount of meat may have exceed the maximum capacity. Remove the meat and process in two batches.
• Note that for best results trim the meat of fat before processing.
The motor does not start • There is a safety interlock switch to prevent the motor from starting if it is not properly assembled. Make sure the
processing bowl, lid and the pusher are securely locked into position.
• If you are slicing or shredding and the above solution does not work, make sure that the food contents in the feed
chute are cut below the maximum ll line so that the activation rod can engage the motor.
• If the motor still will not start, check the power cord and power outlet.
The food processor motor shuts
off during operation
• The lid may have become unlocked; check to make sure it is securely in position.
• If the motor overloads, the ‘OVERLOAD’ icon in the LCD will start to ash. Switch off by pressing the
POWER/OFF button and unplug the power cord. Allow the food processor to cool for 20–30 minutes
before resuming.
The motor slowed down during
operation.
• This is normal as some heavier loads may require the motor to work harder. Reposition the food in the feed
chute and continue processing.
• The maximum load capacity may have been exceeded.
• Remove some of the ingredients and continue processing.
Dough doesn’t fully incorporate
ingredients
• Make sure the rubber feet at the bottom of the unit are clean and dry. Also make sure that the maximum load
capacity is not being exceeded.
Dough feels tough after
kneading
• When kneading dough, always start the food processor before adding liquid. Add liquid in a slow, steady stream,
allowing the dry ingredients to absorb it. If too much liquid is added, wait until ingredients in the processing bowl
have mixed, then add remaining liquid slowly (do not turn off the machine). Pour liquid onto the dough as it
passes under the feed chute opening; do not pour liquid directly onto the bottom of the processing bowl.
Dough is too dry • While machine is running, add water through the small feed chute, 1 tablespoon at a time until dough cleans the
inside of the processing bowl.
Dough is too wet • While machine is running, add our through the small feed chute, 1 tablespoon at a time until dough cleans the
inside of the processing bowl.

10
DANSK
Hos Sage™ by Heston Blumenthal® er vi meget sikkerhedsbevidste.
Først og fremmest designer og fremstiller vi produkter med vores kunders
sikkerhed i tankerne. Derudover beder vi om, at du udviser varsomhed,
når du bruger et elektrisk apparat og overholder de følgende forholdsregler.
VIGTIGE SIKKERHEDSFORANSTALTNINGER
LÆS HELE BRUGSANVISNINGEN FØR APPARATET TAGES I BRUG
FØRSTE GANG OG GEM DEN TIL SENERE BRUG
• Fjern emballage og mærkater før Sage Oracle bruges for første gang.
• Betjen ikke foodprocessoren på anden måde end den tilsigtede og
beskrevne i denne folder.
• Før apparatet bruges første gang, skal du sikre, at din elforsyning er
den samme som vist i bunden af apparatet. Hvis du har spørgsmål i den
forbindelse, skal du kontakte dit lokale elselskab.
• Placer ikke foodprocessoren nær kanten af en bordplade. Sørg for, at
overaden er jævn, ren og fri for vand, mel osv. Rystelser under brug kan
få apparatet til at bevæge sig.
• Placer ikke apparatet på eller i nærheden af et varmt gasblus,
en kogeplade eller med kontakt til en varm ovn.
• Sørg altid for, at foodprocessoren er korrekt samlet før brug. Apparatet
virker ikke, hvis ikke det er korrekt samlet. Brug kun foodprocessoren,
mens låget sidder på plads.
• Sørg altid for, at motor, knive og skiver er stoppet helt, før du adskiller
foodprocessoren. Tjek, at du har trykket på OFF-knappen og at apparatet
er slukket ved stikkontakten og ledningen taget ud, når apparatet ikke er
i brug eller hvis det er uden opsyn – og før samling, adskillelse, rengøring
og opbevaring.
• Sørg for, at røreskålen er fastgjort til motorbasen, før du monterer knive,
skiver eller dejskniv.
• Du må ikke knuse IS i de store eller små skåle, da det vil beskadige
knivene.
• Du må ikke bruge varmt vand eller kogende væsker – lad dem i stedet
køle af, før de anbringes i røreskålen.
• Flyt ikke på foodprocessoren, mens den er i drift.
• Placer ikke nogen af foodprocessorens dele i mikrobølgeovnen.
VÆR OPMÆRKSOM PÅ
• For at undgå eventuelle fejl med røreskålens autoknap, må låget ikke stå
i den låste position, hvis apparatet ikke er i brug.
• Knive og skiver er meget skarpe, så vær altid opmærksom på dette.
Læg ikke hænder, knive eller redskaber i påfyldningsrøret. Brug altid
skubberen til at skubbe ingredienser gennem påfyldningsrøret.
VIGTIGE SIKKERHEDSFORANSTALTNINGER FOR ALLE
ELEKTRISKE APPARATER
• Ledningen skal vikles helt ud før brug.
• Sørg for, at ledningen ikke hænger ud over bordkanten, berører varme
overader eller vikles sammen.
• For at undgå elektrisk stød må hverken ledning, stik eller apparatet
sænkes i vand eller anden væske.
• Apparatet er kun til husholdningsbrug. Brug det ikke til andet end det
tiltænkte formål. Forkert brug kan medføre skader.
• For at undgå fare på grund af utilsigtede nulstillinger må apparatet ikke
tilsluttes en ekstern skifteenhed - såsom en timer eller en fjernbetjening
eller forbindes til en enhed, der jævnligt tændes og slukkes.
• Børn må ikke lege med apparatet.
• Apparatet er ikke beregnet til brug af personer med nedsatte fysiske,
sensoriske eller mentale evner, manglende erfaring og viden eller af børn
- medmindre de er blevet vejledt og instrueret i brugen af apparatet af
en person med ansvar for deres sikkerhed. Apparatet og ledningen skal
opbevares et sted, der er utilgængeligt for børn.
• Brug ikke apparatet hvis ledningen, stikket eller apparatet er beskadiget
på nogen måde. Hvis dette er tilfældet, og det ikke kan løses med en
rengøring, kontakt da Sage™ by Heston Blumenthal
®
Kundeservice.
Symbolet betyder, at produktet ikke skal smides ud sammen
med almindeligt husholdningsaffald, men i stedet aeveres
på en autoriseret affaldsplads, der er beregnet til formålet,
eller til en forhandler med en sådan service. Kontakt din egen
kommune, hvis du har brug for mere information.
 Loading...