

Page 1

the Adjusta Grill
BGR200
™
EN
QUICK GUIDE
FR
GUIDE RAPIDE
NL
SNELSTARTGIDS
DE
KURZANLEITUNG
IT
GUIDA RAPIDA
Page 2

CONTENTS
2 Sage® Recommend Safety First
4 Getting To Know Your New Appliance
5 Operating Your New Appliance
7 Care & Cleaning
SAGE®
RECOMMENDS
SAFETY FIRST
At Sage® we are very safety
conscious. We design and
manufacture appliances
with your safety foremost
in mind. In addition, we ask
that you exercise a degree
of care when using any
electrical appliance and
adhere to the following
precautions.
IMPORTANT
SAFEGUARDS
READ ALL INSTRUCTIONS
BEFORE USE AND SAVE
FOR FUTURE REFERENCE
• A downloadable version of this
document is also available at
sageappliances.com
• Before using the rst time
ensure your electricity supply
is the same as shown on
the label on the underside
of the appliance.
• Remove and safely discard
any packaging materials
before rst use.
• The appliance is for household
use only. Do not use the
appliance for anything other
than its intended use. Do not
use in moving vehicles or
boats. Do not use outdoors.
Misuse may cause injury.
• Fully unwind the power cord
before operating.
• Position the appliance on a
stable, heat resistant, level,
dry surface away from the
edge and do not operate on
or near a heat source such as
a hot plate, oven or gas hob.
• Do not let the power cord hang
over the edge of a bench or
table, touch hot surfaces or
become knotted.
• Position the appliance at least
20cm from walls or heat/steam
sensitive materials and provide
adequate space above and on
all sides for air circulation.
• Ensure the power cord
does not become trapped
between the upper and lower
hot plates of the appliance
during use or storage.
• Do not leave the appliance
unattended when in use.
• The appliance is not intended
to be operated by the means
of an external timer or separate
remote control system
• Do not place anything on top
of the grill when lid is closed,
when in use and when stored.
2
Page 3

SAGE® RECOMMENDS SAFETY FIRST
EN
The appliance is marked
with a HOT surface
symbol. The lid and
other surfaces will be
hot when the appliance is
operating and for some time
after use. To prevent burns
always use insulated oven
mitts or use handles or
knobs where appropriate.
• Always ensure the appliance
is turned OFF, unplugged at
the power outlet and has been
allowed to cool before cleaning,
moving or storing.
• Do not use the appliance if
the power cord, plug, or
appliance becomes damaged
in any way. If damaged or
maintenance other than
cleaning is required, please
contact Sage Customer Service
or go to sageappliances.com
• Any maintenance other
than cleaning should be
performed by an authorised
Sage® service centre.
• Children shall not play with
the appliance.
• The appliance can be used by
children aged 8 or older and
persons with reduced physical,
sensory or mental capabilities
or a lack of experience and
knowledge, only if they have
been given supervision or
instruction concerning use
of the appliance in a safe
way and understand the
hazards involved.
• Cleaning of the appliance
should not be carried out by
children unless they are 8 years
or older and supervised.
• The appliance and its cord
should be kept out of reach
of children aged 8 years
and younger.
• The installation of a residual
current safety switch is
recommended to provide
additional safety when using
all electrical appliances.
Safety switches with a rated
operating current not more
than 30mA are recommended.
Consult an electrician for
professional advice.
The symbol shown
indicates that this appliance
should not be disposed of
in normal household waste.
It should be taken to a local
authority waste collection centre
designated for this purpose or to
a dealer providing this service.
For more information, please
contact your local council oce.
To protect against electric
shock, do not immerse
the power plug, cord or
appliance in water or any liquid.
SAVE THESE INSTRUCTIONS
3
Page 4

GETTING TO KNOW YOUR NEW APPLIANCE
B
C
GA H
I
J
K
D F
A. 2200 watt element
B. Floating hinged top plate
C. Durable non-stick cooking plates
D. Angle adjust non-slip feet
E. Convenient cord storage in base
F. Variable temperature control dial
Rating Information
220–240V~ 50–60Hz 1850–2200W
4
E
G. POWER and READY lights
H. Adjustable grilling height control clip
with 7 settings
I. Locking storage clip
J. Heavy duty die cast arms
K. Removable drip tray
Page 5

OPERATING YOUR NEW APPLIANCE
EN
BEFORE FIRST USE
Remove and safely discard any packaging
material or promotional labels before using your
grill for the rst time. Check that the cooking
plates are clean and free of dust. If necessary,
wipe over with a soft damp cloth. Dry thoroughly.
NOTE
When using the grill for the rst time you
may notice a ne smoke haze. This is
caused by the heating of some of the
components. There is no need for concern.
The grill can be used as a grill for searing meats
and vegetables or as a sandwich press for
toasting breads and focaccias. It also features
an adjustable height control feature which
allows you to x the top plate to a range of
positions above the bottom plate.
TO USE AS A GRILL
1. Insert the power plug into a 220-240V
power outlet and turn the power ON.
The red POWER light will illuminate.
2. Turn the variable temperature control
to SEAR for fast heat up. Allow the
grill to pre-heat with the top cooking
plate in the closed position until the
green READY light illuminates.
3. When the grill has preheated, place
the foods to be cooked onto the bottom
cooking plate. Always place foods towards
the rear of the bottom cooking plate.
NOTE
The grill can be used to cook foods in the
open or closed position.
4. Close the top cooking plate. The top
cooking plate has a oating hinge that
is designed to evenly press down on food.
The top plate must be fully lowered to
achieve grill marks on the selected foods.
5. Grilling times will depend on the food
being cooked.
6. Once food is cooked, use the handle
to open the grill and raise the top cooking
plate. Remove food with the help of a plastic
or wooden spatula. Never use metal tongs
or a knife as these can cause damage
to the non-stick coating.
TO USE AS A SANDWICH PRESS
1. Insert the power plug into a 220-240V
power outlet and turn the power ON.
The red POWER light will illuminate.
2. Turn the variable temperature control
to SANDWICH setting. Allow the grill to
preheat with the top cooking plate in the
closed position until the green READY
light illuminates.
3. When the sandwich press has pre-heated,
place the sandwich onto the bottom cooking
plate. Always place sandwiches towards
the rear of the bottom cooking plate.
4. Close the top cooking plate. The top plate
must be fully lowered to cook sandwiches.
5. Once the sandwich is cooked, use the
handle to open the grill and raise the
top cooking plate. Remove sandwich with
the help of a plastic or wooden spatula.
Never use metal tongs or a knife as these
can cause damage to the non-stick coating.
5
Page 6

OPERATING YOUR NEW APPLIANCE
USING THE ADJUSTABLE
GRILLING HEIGHT CONTROL
FEATURE
Adjustable height control feature allows you
to x the top plate to a range of positions above
the bottom plate. This allows your grill to be
used to grill delicate ingredients such as sh
and hamburger buns without squashing. It can
also be used for toasting open sandwich melts
and snacks where you don’t need to apply the
height of the top plate.
1. Turn the variable temperature control
to SEAR or SANDWICH setting and
allow the grill to pre-heat until the
green READY light illuminates.
2. Place food to be grilled or your sandwich
to be melted on the bottom plate.
3. Move the adjustable height control clip
on the right hand side of the grill to the
desired height.
4. Slowly lower the top plate until it rests on
the adjustable height control clip.
5. The top plate will radiate the desired heat
to lightly grill foods or melt ingredients such
as cheese. Grilling and toasting times will
be a matter of taste. It will depend on the
height of the top plate.
USING THE ANGLE ADJUST
NON-SLIP FEET
Your grill features unique extendable feet which
are designed to level the bottom plate when
cooking foods such as sausages. This ensures
the sausages do not roll o the hotplate but still
drain the maximum amount of fat while cooking.
VARIABLE TEMPERATURE
CONTROL DIAL
The grill features a variable temperature
control dial which allows a variety of foods
to be cooked. With the dial set on SEAR the
temperature is correctly suited to grill meats
or other foods.
With the dial set on SANDWICH the
temperature is correctly suited to toasting
sandwiches. The variable temperature control
dial allows you to select a setting suited to the
foods which are being cooked.
6
Page 7

CARE & CLEANING
EN
Before cleaning, switch the power o at the
power outlet and then remove the power plug.
Allow your grill to cool before cleaning. The grill
is easier to clean when slightly warm.
Always clean your grill after each use to prevent
a build up of baked-on foods.
Wipe cooking plates with a soft cloth to remove
food residue. For baked on food residue
squeeze some warm water mixed with detergent
over the food residue then clean with a non
abrasive plastic scouring pad.
CLEANING THE DRIP TRAY
Remove and empty the drip tray after each use
and wash the tray in warm, soapy water. Avoid
the use of scouring pads or harsh detergents
as they may damage the surface. Rinse and dry
thoroughly with a clean, soft cloth and replace.
Alternatively the drip tray can be cleaned
in the dishwasher.
DURABLE NON-STICK COATING
Cooking on a non-stick surface minimises the
need for oil, food does not stick and cleaning
is easier. When cleaning the non-stick coating,
do not use metal (or other abrasive) scourers.
Wash with warm soapy water. Remove stubborn
residue with a non abrasive plastic scouring pad
or nylon washing brush.
STORAGE
To store your grill:
1. Switch o the grill and unplug power cord
from the power outlet.
2. Allow the grill to fully cool.
3. Slide the height control clip towards the
front handle to the LOCK position so that
the top and bottom cooking plates are
locked together.
4. Click the removable drip tray into place.
5. Wrap the power cord in the cord storage
area below the grill.
6. Store on a at, dry level surface.
NOTE
The storage clip should not be used to clamp
down the top plate when food is in the grill.
NOTE
Do not use spray-on non-stick coatings
as this will aect the performance of the
non-stick surface on the cooking plates.
7
Page 8

INHALTE
9 Wir empfehlen: Sicherheit geht vor
11 Machen Sie sich mit Ihrem neuen
Gerät vertraut
12 Anwendung Ihres neuen Geräts
14 Pege & Reinigung
SAGE® EMPFIEHLT:
SICHERHEIT
GEHT VOR
Wir bei Sage® sind sehr
sicherheitsbewusst.
Beim Design und bei der
Herstellung unserer Geräte
denken wir zu allererst an
Ihre Sicherheit. Darüber
hinaus bitten wir Sie, bei
der Verwendung jedes
Elektrogeräts angemessene
Sorgfalt anzuwenden und
sich an die folgenden
Vorsichtsmaßnahmen
zu halten.
WICHTIGE
VORSICHTSMASSNAHMEN
BITTE ALLE ANWEISUNGEN
VOR DEM GEBRAUCH
LESEN UND ZUR SPÄTEREN
BEZUGNAHME AUFBEWAHREN.
• Dieses Informationsbuch
steht zum Download unter
www.sageappliances.com zur
Verfügung.
• Vor dem ersten Gebrauch
prüfen, dass Ihre Netzspannung
mit der auf dem Etikett an
der Unterseite des Geräts
übereinstimmt.
• Vor dem ersten Gebrauch
alle Verpackungsmaterialien
abnehmen und sicher entsorgen.
• Dieses Gerät ist nur für den
Haushaltsgebrauch bestimmt.
Gerät nur bestimmungsgemäß
verwenden. Nicht in fahrenden
Fahrzeugen oder Booten
verwenden. Nicht im Freien
verwenden. Missbrauch kann
Verletzungen nach sich ziehen.
• Netzkabel vor dem Gebrauch
vollständig entrollen.
• Gerät in sicherem Abstand
von Kanten auf eine stabile,
hitzebeständige, ebene und
trockene Fläche stellen.
Nicht auf oder neben einer
Wärmequelle wie einem Gasoder Elektroherd oder einem
heißen Ofen betreiben.
• Netzkabel nicht über
Arbeitsplatten oder Tischkanten
hängen lassen, von heißen
Oberächen fern halten,
Kabelgewirr vermeiden.
8
Page 9

WIR EMPFEHLEN: SICHERHEIT GEHT VOR
DE
• Zwischen dem Gerät und
Wänden oder hitze- bzw.
dampfempndlichen Materialien
mindestens 20 cm Abstand
halten und nach allen Seiten
und oberhalb des Geräts
stets ausreichend Platz zur
Luftzirkulation lassen.
• Sicherstellen, dass das
Netzkabel beim Gebrauch
oder während der Lagerung
des Geräts nicht zwischen der
oberen und unteren Heizplatte
eingeklemmt werden kann.
• Gerät während des Betriebs
nicht unbeaufsichtigt lassen.
Das Gerät trägt das
Symbol für HEIßE
Oberächen. Der Deckel
und andere Oberächen
werden beim Betrieb des Geräts
heiß und bleiben dies für einige
Zeit nach dem Gebrauch. Zur
Vermeidung von Verbrennungen
immer Ofenhandschuhe
verwenden und gegebenenfalls
Grie und Knöpfe nutzen.
• Gerät immer ausschalten,
Netzstecker ziehen und
abkühlen lassen, ehe Sie es
bewegen, reinigen oder lagern.
• Gerät nicht verwenden, wenn
das Netzkabel, der Netzstecker
oder das Gerät selbst in irgendeiner Weise beschädigt ist.
Wenden Sie sich bei Schäden
oder zur Wartung (außer Reinigung) bitte an den Sage-Kundendienst oder besuchen Sie
sageappliances.com
• Alle Wartungsarbeiten
außer der Reinigung nur
von autorisierten Sage®Kundendienststellen
vornehmen lassen.
• Kinder nicht mit dem Gerät
spielen lassen.
• Dieses Gerät kann von Kindern
im Alter ab 8 Jahren und von
Personen mit eingeschränkten
körperlichen, sensorischen
oder geistigen Fähigkeiten oder
mit mangelnder Erfahrung und
fehlenden Kenntnissen genutzt
werden, sofern sie beaufsichtigt
werden oder in den sicheren
Gebrauch des Geräts
eingewiesen wurden und sich
der entsprechenden Risiken
bewusst sind. Reinigung des
Geräts nicht von Kindern unter
8 Jahren und nur unter Aufsicht
vornehmen lassen.
9
Page 10

WIR EMPFEHLEN: SICHERHEIT GEHT VOR
• Gerät und Netzkabel für Kinder
bis zu 8 Jahren unzugänglich
aufbewahren.
• Die Installation eines Schutzoder Sicherheitsschalters
wird bei der Verwendung von
Elektrogeräten als zusätzliche
Schutzmaßnahme empfohlen.
Es wird ein Sicherheitsschalter
mit maximal 30 mA
Nennleistung empfohlen.
Fachgerechte Beratung erhalten
Sie von Ihrem Elektriker.
Dieses Symbol zeigt, dass
das Gerät nicht im
normalen Hausmüll
entsorgt werden sollte. Es sollte
stattdessen bei einem
entsprechenden kommunalen
Wertstohof oder Fachhändler
zur Entsorgung abgegeben
werden. Weitere Einzelheiten
erfahren Sie von Ihrer
Kommunalbehörde.
Netzstecker, Netzkabel
oder Gerät nicht in
Wasser oder sonstige
Flüssigkeiten tauchen.
DIESE ANLEITUNG AUFBEWAHREN
10
Page 11
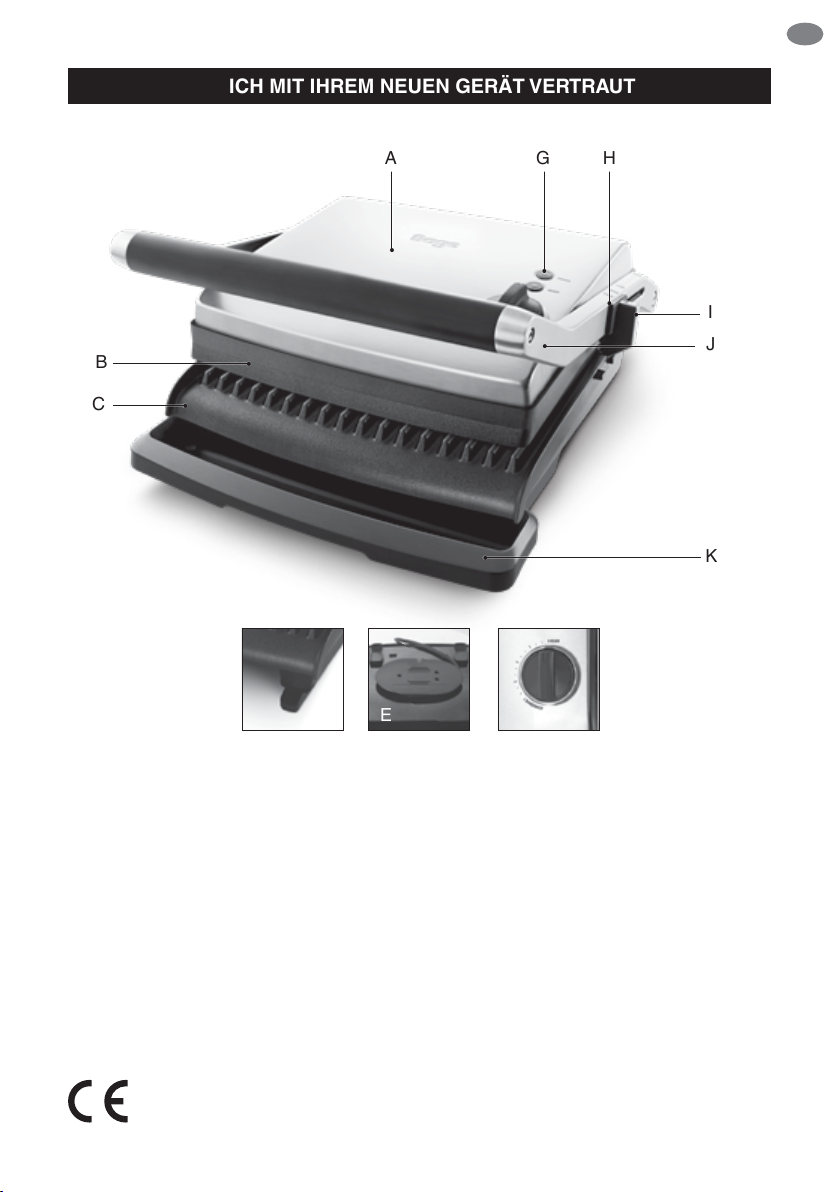
MACHEN SIE SICH MIT IHREM NEUEN GERÄT VERTRAUT
GA H
B
C
DE
I
J
K
D F
A. 2200 Watt Element
B. Beweglich befestigtes Deckelelement
C. Langlebige, antihaftbeschichtete
Grillplatten
D. Neigungsausgleichende, rutschfeste
Standfüße
E. Bequeme Kabelaufbewahrung im
Basiselement
F. Variabler Temperaturregler
Leistungsangaben
220–240V~ 50–60Hz 1850–2200W
E
G. POWER (AN) und READY (BEREIT)
Anzeigen
H. Einstellbarer Grill-
Höhenverstellungsschieber mit 7
Einstellungen
I. Verschlussklammer zum Verstauen
J. Massive Gusseisen-Bügel
K. Abnehmbare Abtropfschale
11
Page 12

ANWENDUNG IHRES NEUEN GERÄTS
VOR DER ERSTEN
INBETRIEBNAHME
Entfernen und entsorgen Sie das gesamte
Verpackungsmaterial und alle Werbeaufkleber,
bevor Sie Ihren Grill zum ersten Mal benutzen.
Stellen Sie sicher, dass die Grillächen sauber
und frei von Staub sind. Wenn nötig, benutzen
Sie ein weiches, feuchtes Reinigungstuch zum
Abwischen. Gründlich trocknen lassen.
HINWEIS
Wenn Sie den Grill zum ersten Mal
benutzen, ist es möglich, dass Sie ein
wenig feinen Rauch aufsteigen sehen.
Dies wird durch das Erhitzen einiger
Elemente verursacht. Es gibt jedoch
keinen Grund zur Besorgnis.
Der Grill kann als Grill zum Anbraten von
Fleisch und Gemüse benutzt werden oder
als Sandwichpresse, um Brot und Focaccias
zu toasten. Er hat auch eine Vorrichtung
zur variabel einstellbaren Höhenkontrolle,
die es Ihnen erlaubt, die obere Platte in
einer Reihe unterschiedlicher Höhen über
der unteren Platte zu positionieren.
ANWENDUNG ALS GRILL
1. Schließen Sie den Netzstecker an eine
220-240V Steckdose an. Die rote POWER
(STROM AN) Anzeige wird sofort aueuchten.
2. Drehen Sie den variablen Temperaturregler
auf SEAR (ANBRATEN) für schnelles
Erhitzen. Lassen Sie den Grill bei
geschlossenem Deckelelement
vorwärmen, bis die grüne READY
(BEREIT) Anzeige aueuchtet.
3. Wenn der Grill vorgewärmt ist, legen Sie die
zu grillenden Lebensmittel auf die untere
Kochäche. Legen Sie die Lebensmittel
immer näher an den hinteren Rand der
unteren Kochäche.
HINWEIS
Der Grill kann sowohl oen als auch in
geschlossener Position zur Zubereitung
Ihrer Speisen benutzt werden.
4. Schließen Sie die obere Kochplatte. Die
obere Kochplatte hat ein bewegliches
Scharnier, das so gebaut ist, dass auf der
gesamten Fläche gleichmäßiger Druck auf
die Lebensmittel ausgeübt wird. Die obere
Kochplatte muss ganz heruntergedrückt
sein, um Grillstreifen auf den ausgewählten
Lebensmitteln zu erhalten.
5. Die Grilldauer hängt von den zu kochenden
Lebensmitteln ab.
6. Wenn die Lebensmittel gekocht sind,
benutzen Sie den Bügel um den Grill
zu önen und die obere Grillplatte
anzuheben. Nehmen Sie Ihr Grillgut mit
Hilfe eines Bratenhebers aus Holz oder
Kunststo heraus. Sie sollten niemals
metallische Greifzangen oder ein Messer
dazu verwenden, weil Sie dadurch die
Antihaftbeschichtung beschädigen könnten.
ANWENDUNG ALS
SANDWICHPRESSE
1. Schließen Sie den Netzstecker an eine 220-
240V Steckdose und schalten Sie den Strom
an. Die rote POWER (STROM AN) Anzeige
wird sofort aueuchten.
2. Drehen Sie den variablen Temperaturregler
auf die SANDWICH Einstellung. Lassen
Sie den Grill bei geschlossenen Platten
vorwärmen, bis die grüne READY (BEREIT)
Anzeige aueuchtet.
3. Wenn die Sandwichpresse vorgewärmt
ist, legen Sie das Sandwich auf die untere
Kochäche. Legen Sie die Sandwiches immer
näher an den hinteren Rand der unteren
Kochäche.
4. Schließen Sie die obere Kochplatte. Diese
muss ganz heruntergedrückt sein, um
Sandwiches zu toasten.
12
Page 13

ANWENDUNG IHRES NEUEN GERÄTS
DE
5. Wenn das Sandwich getoastet ist, benutzen
Sie den Bügel, um die obere Grillplatte
anzuheben und den Grill zu önen. Nehmen
Sie das Sandwich mit Hilfe eines Bratenhebers
aus Holz oder Kunststo heraus. Sie sollten
niemals metallische Greifzangen oder ein
Messer dazu verwenden, weil Sie dadurch die
Antihaftbeschichtung beschädigen könnten.
ANWENDUNG DER
EINSTELLBAREN
HÖHENVERSTELLUNG
ZUM GRILLEN
Die Vorrichtung zur einstellbaren Höhenverstellung erlaubt es Ihnen, die obere Platte in
untersjchiedlichen Abständen zur unteren Platte
einzustellen. Damit können Sie auch delikate Zutaten wie Fisch oder Hamburgerbrötchen grillen,
ohne sie zu zerdrücken. Der Grill kann auch dazu
benutzt werden, oene Sandwiches oder Snacks
zu schmelzen, wofür Sie die obere Platte nicht
herunterzudrücken brauchen.
1. Drehen Sie den variablen Temperaturregler
auf die SEAR (ANBRATEN) oder SANDWICH
Einstellung und lassen Sie den Grill
vorwärmen, bis die grüne READY (BEREIT)
Anzeige aueuchtet.
2. Legen Sie das Grillgut oder das
Sandwich, das Sie schmelzen wollen,
auf die untere Kochplatte.
3. Bringen Sie den Schieber für die einstellbare
Höhenverstellung auf der rechten Seite des
Grills auf die gewünschte Höhe.
ANWENDUNG DER NEIGUNGS
- AUSGELEICHENDEN,
RUTSCHFESTEN STANDFÜSSE
Ihr Grill ist mit einzigartigen, aufklappbaren
Standfüßen ausgestattet, die konzipiert wurden,
um die untere Platte waagrecht zu stellen,
wenn Sie zum Beispiel Würste braten. Dies
stellt sicher, dass die Würste nicht von der
heißen Platte rollen, während trotzdem die
größtmögliche Menge an Fett während des
Kochens abgeleitet wird.
VARIABLER TEMPERATURREGLER
Der Grill hat einen Drehschalter für variable
Temperatureinstellung, die es Ihnen erlaubt,
eine Anzahl verschiedener Gerichte
zuzubereiten. Wenn der Schalter auf SEAR
(ANBRATEN) eingestellt ist, ist die Temperatur
genau richtig zum Grillen von Fleisch und
anderen Lebensmitteln.
Wenn der Schalter auf SANDWICH eingestellt
ist, haben Sie die richtige Temperatur um
Sandwiches zu toasten. Der Drehschalter für
variable Temperatureinstellung erlaubt es Ihnen,
die Einstellung auszuwählen, die genau richtig
ist für die Speisen, die Sie zubereiten wollen.
4. Drücken Sie die obere Kochäche
langsam nach unten, bis sie auf der
Höhenverstellungsvorrichtung auiegt.
5. Die obere Platte strahlt die gewünschte
Hitze ab, um Speisen leicht anzubraten
oder Zutaten wie Käse zu schmelzen.
Grill- und Toastzeiten hängen von Ihren
persönlichen Vorlieben ab, sowie von der
Höheneinstellung der oberen Platte.
13
Page 14

PFLEGE & REINIGUNG
Vor dem Reinigen Netzstecker ziehen.. Lassen
Sie den Grill abkühlen, bevor Sie ihn reinigen.
Der Grill ist einfacher zu reinigen, wenn er noch
ein wenig warm ist.
Reinigen Sie den Grill immer nach jedem
Gebrauch, um zu verhindern, dass sich
angebackene Speisereste ansammeln.
Wischen Sie Speisereste mit einem weichen
Reinigungstuch von den Kochplatten. Um
angebackene Speisereste zu entfernen,
spritzen Sie ein wenig Wasser mit Spülmittel
auf die Speisereste und reinigen Sie die
Platte mit einem nicht kratzenden Kunststo-
Scheuerschwamm.
REINIGUNG DER
ABTROPFSCHALE
Nehmen Sie die Abtropfschale nach jedem
Gebrauch heraus, entleeren Sie die Schale
und waschen Sie sie in warmem, seigem
Wasser. Vermeiden Sie es, dazu Topfreiniger
oder scharfe Reinigungsmittel zu benutzen,
da die Oberäche beschädigt werden könnte.
Verwenden Sie ein sauberes, weiches
Geschirrtuch zum Abspülen und Trocknen.
Alternativ können Sie die Abtropfschale auch im
Geschirrspüler waschen.
LANGLEBIGE
ANTIHAFTBESCHICHTUNG
Das Kochen auf einer nicht haftenden
Oberäche reduziert den Bedarf an Speiseöl
auf ein Minimum, Speisen haften nicht an
und die Reinigung des Geräts ist einfacher.
Benutzen Sie keine metallischen (oder andere,
scheuernde) Spülschwämme zur Reinigung
der Antihaftbeschichtung. Reinigen Sie mit
warmem, seigem Wasser. Hartnäckige
Speisereste können mit einem nicht
scheuernden Kunststo-Scheuerschwamm
oder einer Nylon-Abwaschbürste
entfernt werden.
AUFBEWAHRUNG
Um Ihren Grill zu verstauen:
1. Schalten Sie den Grill aus und ziehen Sie den
Netzstecker von der Steckdose ab.
2. Lassen Sie den Grill vollständig abkühlen.
3. Schieben Sie die Klammer an der
Höheverstellung nach vorne in Richtung
Bügel in die LOCK (SPERRE) Position, so
dass die obere und die untere Kochplatte
zusammen verriegelt sind.
4. Lassen Sie die Abtropfschale einrasten.
5. Wickeln Sie das Netzkabel in die
Kabelaufbewahrung unter dem Grill.
6. Verstauen Sie den Grill auf einer achen,
trockenen, ebenen Fläche.
HINWEIS
Die Aufbewahrungsklammer sollte nicht
dazu benutzt werden, die obere Grillplatte
nach unten einzuklemmen, wenn sich
Essen im Grill bendet.
HINWEIS
Verwenden Sie keine Antihaft-Sprays, da
sich dies auf die Leistung der Antihaft-
Oberäche der Kochplatten auswirkt.
14
Page 15

the Adjusta Grill
BGR200
FR
™
FR
GUIDE RAPIDE
Page 16

TABLE DES MATIÈRES
2 Nous recommandons la sécurité
avant tout
5 Découverte de votre nouvel appareil
6 Fonctionnement de votre nouvel appareil
8 Entretien et nettoyage
SAGE®
RECOMMANDE LA
SÉCURITÉ AVANT
TOUT
Chez Sage®, la sécurité
est une priorité. Nous
concevons et fabriquons
des appareils en mettant
votre sécurité au premier
plan. Nous vous demandons
également de faire attention
lorsque vous utilisez un
appareil électrique et de
respecter les consignes
suivantes.
CONSIGNES
DE SÉCURITÉ
IMPORTANTES
LISEZ TOUTES LES
INSTRUCTIONS AVANT
UTILISATION ET CONSERVEZ-
LES POUR RÉFÉRENCE
ULTÉRIEURE
• Une version téléchargeable
de ce document est
également disponible sur
sageappliances.com.
• Avant une première utilisation,
assurez-vous que l’alimentation
électrique est identique à
celle illustrée sur l’étiquette
sous l’appareil.
• Retirez tout emballage avant la
première utilisation et éliminezle de façon sûre.
• L’appareil est réservé à un
usage domestique. N’utilisez
pas l’appareil pour toute autre
n que son utilisation prévue.
Ne l’utilisez pas sur un bateau
ou dans des véhicules en
mouvement. Ne l’utilisez pas en
plein air. Une mauvaise utilisation
peut engendrer des blessures.
• Déroulez entièrement le cordon
d’alimentation avant utilisation.
• Placez l’appareil sur une
surface stable, résistante à la
chaleur, plane et sèche, loin
du bord. Ne l’utilisez pas sur
ou à proximité d’une source
de chaleur (plaque chauante,
four ou cuisinière au gaz).
• Ne laissez pas le cordon
d’alimentation suspendu
au bord d’un plan de travail
ou d’une table, toucher des
surfaces chaudes ou se nouer.
• Placez l’appareil au moins
à 20 cm des murs ou des
matériaux sensibles à la
chaleur/vapeur et prévoyez un
espace susant au-dessus
et sur tous les côtés pour la
circulation d’air.
2
Page 17

SAGE® RECOMMANDE LA SÉCURITÉ AVANT TOUT
FR
• Assurez-vous que le cordon
d’alimentation ne reste pas
coincé entre les plaques
chauantes supérieure et
inférieure de l’appareil pendant
l’utilisation ou lorsqu’il est rangé.
• Ne laissez pas l’appareil
sans surveillance lorsqu’il
est en marche.
• L’appareil ne doit pas être utilisé
avec une minuterie externe ou
un système de commande à
distance séparé.
• Ne placez rien au-dessus du
gril lorsque le couvercle est
fermé, ni lorsque l’appareil est
utilisé ou rangé.
L’appareil est marqué
avec un symbole surface
CHAUDE. Le couvercle
et les autres surfaces
deviennent chauds
lorsque l’appareil est en marche
et pendant quelque temps après
son utilisation. An d’éviter les
brûlures, utilisez toujours des
gants isolants, les poignées
ou les boutons au besoin.
• Assurez-vous toujours que
l’appareil est hors tension,
débranché de la prise électrique
et refroidi avant de le nettoyer,
de le déplacer ou de le ranger.
• N’utilisez pas l’appareil si le
cordon d’alimentation, la prise
ou l’appareil est endommagé
de quelque manière que ce soit.
En cas de dommages ou si un
entretien autre que le nettoyage
est nécessaire, contactez le
service client Sage ou consultez
le site sageappliances.com
• Tout entretien autre que le
nettoyage doit être réalisé
par un centre de services
Sage® agréé.
• Les enfants ne doivent pas
jouer avec l’appareil.
• Cet appareil peut être
utilisé par des enfants âgés
de 8 ans ou plus et des
personnes aux capacités
mentales, sensorielles ou
physiques réduites, ou ayant
peu d’expérience et de
connaissances, uniquement
sous supervision ou s’ils ont
reçu des instructions sur
l’utilisation sécuritaire de
l’appareil et qu’ils comprennent
les risques impliqués.
• Le nettoyage de l’appareil ne
doit pas être eectué par des
enfants à moins qu’ils aient
8 ans ou plus, et ce, sous la
surveillance d’un adulte.
• L’appareil et son cordon doivent
être conservés hors de la portée
des enfants de 8 ans et moins.
• L’installation d’un interrupteur
diérentiel à courant résiduel
est recommandée pour fournir
une sécurité supplémentaire
lors de l’utilisation de tous
les appareils électriques.
3
Page 18

SAGE® RECOMMANDE LA SÉCURITÉ AVANT TOUT
Les interrupteurs diérentiels
avec un courant de
fonctionnement nominal
maximal de 30 mA sont
recommandés. Consultez un
électricien pour obtenir des
conseils professionnels.
Le symbole illustré indique
que cet appareil ne doit
pas être jeté aux ordures
ménagères. Il doit être
amené dans un centre de collecte
de déchets local agréé désigné
à cette n ou à un revendeur
proposant ce service. Pour en
savoir plus, veuillez contacter
votre municipalité.
Pour éviter tout risque
de décharge électrique,
n’immergez pas la prise
électrique, le cordon ou l’appareil
dans de l’eau ou tout autre
liquide.
CONSERVEZ CES INSTRUCTIONS
4
Page 19

DÉCOUVERTE DE VOTRE NOUVEL APPAREIL
B
C
FR
GA H
I
J
K
D F
A. Élément chauant de 2 200 W
B. Plaque supérieure articulée
C. Plaques de cuisson antiadhésives
durables
D. Pieds anti-dérapants réglables
E. Rangement pratique pour cordon sous
le socle
F. Bouton de réglage de la température
E
Informations sur la tension nominale
220 à 240 V ~50 à 60 Hz 1 850 à 2 200 W
G. Voyants POWER (MARCHE/ARRÊT)
et READY (PRÊT)
H. Clip d’ajustement de la hauteur de
grillage avec 7 réglages
I. Clip de verrouillage pour rangement
J. Bras robustes en métal moulé
K. Bac d’égouttement amovible
5
Page 20

FONCTIONNEMENT DE VOTRE NOUVEL APPAREIL
AVANT LA PREMIÈRE UTILISATION
Retirez et jetez en lieu sûr les emballages et les
étiquettes promotionnelles avant d’utiliser le gril
pour la première fois. Vériez que les plaques de
cuisson sont propres et exemptes de poussières.
Essuyez-les avec un chion doux et humide si
nécessaire. Séchez-les soigneusement.
REMARQUE
Lorsque vous utilisez le gril pour la première
fois, une légère émanation de fumée peut
se dégager de l’appareil. Ce phénomène
est causé par le chauage de certains
composants. Il n’y a pas à s’inquiéter.
Le gril peut être utilisé pour saisir des viandes
et des légumes ou comme presse-sandwich
pour griller le pain ou les focaccias. Il comprend
également une fonction de contrôle de la
hauteur qui vous permet d’ajuster la plaque
supérieure à la position souhaitée au-dessus de
la plaque inférieure.
UTILISATION COMME GRIL
1. Branchez le cordon d’alimentation
à une prise de courant de 220 à
240 V et allumez l’appareil. Le voyant
d’alimentation POWER devient rouge.
2. Tournez le sélecteur de température
sur SEAR (Saisir) pour un chauage
rapide. Laissez le gril préchauer en
mettant la plaque de cuisson supérieure
en position fermée jusqu’à ce que le
voyant READY (Prêt) devienne vert.
3. Lorsque le gril est préchaué, placez les
aliments à griller sur la plaque de cuisson
inférieure. Placez toujours les aliments à
l’arrière de la plaque de cuisson inférieure.
REMARQUE
Le gril peut être utilisé en position ouverte
ou fermée pour cuire les aliments.
4. Fermez la plaque de cuisson supérieure.
La plaque de cuisson supérieure est
équipée d’une articulation mobile conçue
pour se refermer de façon uniforme sur les
aliments. Abaissez entièrement la plaque
supérieure pour laisser des marques de
grillage sur les aliments choisis.
5. La durée du grillage dépend des aliments
à griller.
6. À la n du grillage de la nourriture, utilisez
la poignée pour ouvrir le gril et soulever la
plaque de cuisson supérieure. Retirez la
nourriture avec une spatule en plastique
ou en bois. N’utilisez jamais de pinces en
métal ou un couteau, car ils risqueraient
d’endommager le revêtement anti-adhésif.
UTILISATION COMME PRESSE-
SANDWICH
1. Branchez le cordon d’alimentation à une
prise de courant de 220 à 240 V et allumez
l’appareil. Le voyant d’alimentation POWER
devient rouge.
2. Tournez le sélecteur de température sur
la position SANDWICH. Laissez le gril
préchauer en mettant la plaque de cuisson
supérieure en position fermée jusqu’à ce
que le voyant READY (Prêt) devienne vert.
3. Lorsque le presse-sandwich est préchaué,
placez le sandwich sur la plaque de cuisson
inférieure. Placez toujours les sandwichs à
l’arrière de la plaque de cuisson inférieure.
4. Fermez la plaque de cuisson supérieure.
Abaissez entièrement la plaque supérieure
pour faire chauer les sandwichs.
5. À la n de la cuisson du sandwich, utilisez
la poignée pour ouvrir le gril et soulever la
plaque de cuisson supérieure. Retirez le
sandwich avec une spatule en plastique
ou en bois. N’utilisez jamais de pinces en
métal ou un couteau, car ils risqueraient
d’endommager le revêtement anti-adhésif.
6
Page 21

FONCTIONNEMENT DE VOTRE NOUVEL APPAREIL
FR
UTILISATION DE LA FONCTION DE
RÉGLAGE DE LA HAUTEUR
La fonction de réglage de la hauteur vous
permet d’ajuster la position de la plaque
supérieure au-dessus de la plaque inférieure.
Vous pouvez ainsi griller des aliments plus
délicats comme du poisson ou des pains à
hamburger sans les écraser. Cette fonction
permet également de griller et faire fondre
des sandwichs ouverts et d’autres aliments
sans avoir à appliquer le poids de la plaque
supérieure.
1. Tournez le sélecteur de température
sur SEAR (Saisir) ou SANDWICH et
laissez le gril préchauer jusqu’à ce que
le voyant READY (Prêt) devienne vert.
2. Placez l’aliment à griller ou le sandwich à
faire fondre sur la plaque inférieure.
3. Ajustez le clip de réglage de la hauteur situé
sur le côté droit du gril pour sélectionner la
hauteur souhaitée.
4. Abaissez doucement la plaque supérieure
jusqu’à ce qu’elle repose sur le clip de
réglage de la hauteur.
5. La plaque supérieure diusera la chaleur
souhaitée pour griller légèrement les
aliments ou faire fondre les ingrédients
comme le fromage. Le temps de grillage est
une question de goût. et dépend également
de la hauteur de la plaque supérieure.
UTILISATION DES PIEDS
ANTIDÉRAPANTS INCLINABLES
Votre gril est équipé de pieds extensibles
uniques conçus pour aplanir la plaque inférieure
lorsque vous faites cuire des aliments tels
que des saucisses. Cela permet d’éviter que
les saucisses ne glissent hors de la plaque
chauante, tout en évacuant une quantité
maximale de graisse pendant la cuisson.
BOUTON DE RÉGLAGE DE LA
TEMPÉRATURE
Le gril est équipé d’un bouton de réglage
de la température qui vous permet de cuire
diérents types d’aliments. Lorsque le bouton
est réglé sur SEAR (Saisir), la température est
parfaitement adaptée pour griller des viandes
ou d’autres aliments.
Lorsque le bouton est réglé sur SANDWICH,
la température est parfaitement adaptée pour
griller des sandwichs. Le bouton de réglage de
la température vous permet de sélectionner le
réglage le mieux adapté aux aliments à griller.
7
Page 22

ENTRETIEN ET NETTOYAGE
Avant le nettoyage, éteignez l’appareil et
débranchez la prise de courant. Laissez le gril
refroidir avant de le nettoyer. Le gril est plus
facile à nettoyer lorsqu’il est légèrement chaud.
Veillez à toujours nettoyer le gril après chaque
utilisation pour éviter l’accumulation de résidus
d’aliments cuits.
Essuyez les plaques de cuisson avec un chion
doux pour enlever les résidus d’aliments. Pour
les résidus tenaces, mouillez-les avec un peu
d’eau tiède savonneuse et nettoyez les plaques
avec une éponge à récurer non abrasive.
NETTOYAGE DU BAC
D’ÉGOUTTEMENT
Retirez et videz le bac d’égouttement après
chaque utilisation et lavez-le avec de l’eau
tiède savonneuse. Évitez d’utiliser des éponges
abrasives ou des détergents puissants, car ils
risqueraient d’endommager la surface. Rincez
et séchez soigneusement avec un chion doux
et propre, puis remettez le bac en place.
Vous pouvez également le mettre au lave-
vaisselle.
REVÊTEMENT ANTIADHÉSIF
DURABLE
La cuisson sur des plaques antiadhésives
nécessite un minimum d’huile, empêche les
aliments de coller et facilite le nettoyage.
N’utilisez pas d’éponges à récurer métalliques
(ou tout autre produit abrasif) pour nettoyer le
revêtement antiadhésif. Lavez-le avec de l’eau
tiède savonneuse. Enlevez les résidus tenaces
avec une éponge à récurer non abrasive ou
avec une brosse de nettoyage en nylon.
RANGEMENT
Pour ranger votre gril :
1. Éteignez-le et débranchez le cordon
d’alimentation de la prise de courant.
2. Laissez le gril refroidir complètement.
3. Assurez-vous que les plaques sont
verrouillées ensemble en faisant glisser le
clip de réglage de la hauteur vers la poignée
avant, en position LOCK (Verrouillé).
4. Mettez le bac d’égouttement amovible en
place.
5. Enroulez le cordon d’alimentation dans
l’espace de rangement situé sous le gril.
6. Rangez l’appareil sur une surface plane et
sèche.
REMARQUE
Le clip de verrouillage ne doit pas être
utilisé pour bloquer la plaque supérieure
lorsque des aliments sont en cours de
cuisson dans le gril.
REMARQUE
N’utilisez pas d’enduits antiadhésifs
pulvérisables, car ils risqueraient d’aecter
les performances des plaques de cuisson
antiadhésives.
8
Page 23

the Adjusta Grill
BGR200
IT
™
IT
GUIDA RAPIDA
1
Page 24

SOMMARIO
2 Il nostro consiglio: la sicurezza prima di tutto
5 Componenti del nuovo apparecchio
6 Utilizzo del nuovo apparecchio
8 Manutenzione e pulizia
SAGE® CONSIGLIA:
LA SICUREZZA
PRIMA DI TUTTO
In Sage® abbiamo molto
a cuore la sicurezza.
In fase di progettazione
e realizzazione dei nostri
apparecchi diamo assoluta
priorità alla sicurezza dei
clienti. Inoltre, invitiamo
i clienti a prestare molta
attenzione durante
l'utilizzo degli apparecchi
elettrici e a osservare le
seguenti precauzioni.
NORME DI
SICUREZZA
IMPORTANTI
LEGGERE TUTTE LE
ISTRUZIONI PRIMA DELL'USO
E CONSERVARLE PER
CONSULTARLE IN FUTURO
• Una versione scaricabile
di questo documento è
disponibile anche nel sito
Web sageappliances.com
• Prima di usare l'apparecchio
per la prima volta, verica che la
tensione della rete corrisponda
a quella indicata sull'etichetta
posta sotto il dispositivo.
• Rimuovere e smaltire in
sicurezza tutti i materiali di
imballaggio prima di utilizzare
l'apparecchio per la prima volta.
• Questo apparecchio è destinato
esclusivamente all'uso
domestico. Non utilizzare per usi
diversi da quello previsto. Non
utilizzare su veicoli in movimento
o barche. Non utilizzare
all'aperto. L'uso non corretto
potrebbe provocare lesioni.
• Svolgere completamente
il cavo prima dell'uso.
• Posizionare l'elettrodomestico
su una supercie stabile,
resistente al calore, piana e
asciutta, lontano dal bordo.
Utilizzare l'apparecchio lontano
da fonti di calore come piastre
elettriche, fornelli a gas o forni.
• Evitare che il cavo di
alimentazione rimanga sospeso
oltre il bordo di un tavolo o un
banco, tocchi superci calde
o formi nodi.
• Posizionare l'apparecchio
ad almeno 20 cm da pareti o
materiali sensibili al calore e al
vapore e lasciare uno spazio
adeguato sopra e su tutti i lati
per la circolazione dell'aria.
2
Page 25

SAGE® CONSIGLIA: LA SICUREZZA PRIMA DI TUTTO
IT
• Assicurarsi che il cavo di
alimentazione non rimanga
intrappolato tra le piastre
calde superiore e inferiore
dell'apparecchio durante l'uso
o la conservazione.
• Non lasciare l'elettrodomestico
incustodito mentre sta
funzionando.
• L'apparecchio non deve essere
utilizzato per mezzo di un timer
esterno o di un sistema di
controllo remoto separato
• Non posizionare nulla sopra
la griglia elettrica quando è
montata, in uso e a riposo.
L'elettrodomestico
è contrassegnato con un
simbolo che rappresenta
superci calde. Quando
l'elettrodomestico è in funzione
e per qualche tempo dopo l'uso
il coperchio e le altre superci
saranno calde. Per evitare
ustioni, utilizzare sempre
guanti da forno isolati,
oppure utilizzare maniglie
o manopole ove disponibili.
• Prima di pulire, spostare
o riporre l'elettrodomestico,
assicurarsi sempre che sia
spento e scollegato dalla presa
di alimentazione e che si sia
rareddato a sucienza.
• Non utilizzare l'elettrodomestico
se il cavo di alimentazione,
la presa o l'elettrodomestico
stesso subiscono qualsiasi
tipo di danneggiamento.
Se l'elettrodomestico è
danneggiato o richiede un
intervento di manutenzione
diverso dalla pulizia, contattare
il Servizio clienti Sage o visitare
il sito Web sageappliances.com
• Qualsiasi operazione di
manutenzione diversa dalla
pulizia deve essere eseguita
da un centro assistenza
Sage® autorizzato.
• Non lasciare che i bambini
giochino con l'elettrodomestico.
• L'elettrodomestico può essere
utilizzato da bambini di età
superiore a 8 anni e da persone
con ridotte capacità motorie,
sensoriali o mentali o prive
di esperienza o conoscenza
dell'elettrodomestico stesso,
a condizione che lo utilizzino
sotto la supervisione
di qualcuno o secondo
speciche istruzioni ricevute
in merito all'uso in sicurezza
dell'elettrodomestico e che
comprendano i rischi associati.
• La pulizia dell'elettrodomestico
può essere eettuata da bambini
di età non inferiore a 8 anni e
con la supervisione di un adulto.
• Tenere l'elettrodomestico e
il cavo fuori dalla portata dei
bambini di età pari o inferiore
agli 8 anni.
3
Page 26

SAGE® CONSIGLIA: LA SICUREZZA PRIMA DI TUTTO
• Si consiglia l'installazione di un
interruttore salvavita per una
maggiore sicurezza durante
l'utilizzo di tutti i dispositivi
elettrici. Si consiglia l'uso di un
salvavita con corrente operativa
nominale non superiore a
30 mA. Rivolgersi a un elettricista
per un parere professionale.
Questo simbolo indica
che l'apparecchio non
può essere smaltito con
i rifiuti domestici comuni.
Deve essere conferito presso
un centro di smaltimento locale
specializzato o presso un
rivenditore che fornisce questo
servizio. Per ulteriori informazioni,
contattare l'ufficio comunale
locale.
Per proteggersi dalle
scariche elettriche, non
immergere la spina, il cavo di
alimentazione o l'elettrodomestico
in acqua o in qualsiasi altro liquido.
CONSERVARE QUESTE ISTRUZIONI
4
Page 27

COMPONENTI DEL NUOVO APPARECCHIO
B
C
IT
GA H
I
J
K
D F
A. Elemento da 2200 watt
B. Piastra superiore incernierata amovibile
C. Piastre di cottura antiaderenti e resistenti
D. Piedini regolabili antiscivolo
E. Pratico avvolgicavo di alimentazione
nella base
F. Manopola di controllo della
temperatura regolabile
E
Informazioni sui valori nominali
220–240 V ~50–60 Hz 1850–2200 W
G. Spie luminose POWER e READY
H. Leva di controllo dell'altezza di cottura
regolabile con 7 impostazioni
I. Fermaglio di chiusura per la
conservazione
J. Bracci pressofusi ad alta resistenza
K. Vassoio raccogligocce rimovibile
5
Page 28

UTILIZZO DEL NUOVO APPARECCHIO
PREPARAZIONE AL PRIMO
UTILIZZO
Rimuovere e smaltire in sicurezza tutti i materiali
di imballaggio o le etichette promozionali prima
di utilizzare la griglia elettrica per la prima volta.
Controllare che le piastre di cottura siano pulite
e prive di polvere. Se necessario, pulire con un
panno morbido umido. Asciugare a fondo.
NOTA
Quando si utilizza la griglia elettrica per
la prima volta si potrebbe notare una
leggera nube di fumo. Ciò è causato dal
riscaldamento di alcuni componenti e non
deve destare preoccupazione.
La griglia elettrica può essere utilizzata per la
cottura di carni e verdure o per tostare pane
e focacce. Comprende inoltre una funzione di
controllo dell'altezza regolabile, che consente di
ssare la piastra superiore in diverse posizioni
sopra la piastra inferiore.
UTILIZZO COME GRIGLIA
1. Inserire la spina di alimentazione in
una presa di corrente da 220–240 V
e accendere l'alimentazione. La spia rossa
POWER (alimentazione) si illumina.
2. Ruotare il controllo della temperatura
variabile su SEAR (arrostire) per riscaldare
rapidamente. Lasciare che la griglia
si preriscaldi con la piastra di cottura
superiore in posizione chiusa nché la
spia verde READY (pronto) non si illumina.
3. Quando la griglia si è preriscaldata,
posizionare gli alimenti da cuocere sulla
piastra di cottura inferiore. Posizionare
sempre gli alimenti verso la parte posteriore
della piastra di cottura inferiore.
NOTA
La griglia elettrica può essere utilizzata per
cucinare cibi in posizione aperta o chiusa.
4. Chiudere la piastra di cottura superiore.
La piastra di cottura superiore ha una
cerniera mobile progettata per pressare
uniformemente il cibo. La piastra superiore
deve essere abbassata completamente per
ottenere i segni della griglia sugli alimenti.
5. I tempi di cottura variano in base agli alimenti.
6. Una volta che il cibo è cotto, utilizzare
la maniglia per aprire la griglia e sollevare
la piastra di cottura superiore. Rimuovere
il cibo con l'aiuto di una spatola di plastica
o di legno. Non utilizzare mai pinze
metalliche o un coltello, poiché potrebbero
danneggiare il rivestimento antiaderente.
UTILIZZO COME PRESSA
PER SANDWICH
1. Inserire la spina di alimentazione in una
presa di corrente da 220–240 V e accendere
l'alimentazione. La spia rossa POWER
(alimentazione) si illumina.
2. Ruotare il controllo della temperatura variabile
su SANDWICH. Lasciare che la griglia si
preriscaldi con la piastra di cottura superiore
in posizione chiusa nché la spia verde
READY (pronto) non si illumina.
3. Quando la pressa per sandwich si
è preriscaldata, posizionare gli alimenti da
cuocere sulla piastra di cottura inferiore.
Posizionare sempre i sandwich verso la
parte posteriore della piastra di cottura
inferiore.
4. Chiudere la piastra di cottura superiore.
Per la cottura dei sandwich la piastra
superiore deve essere abbassata
completamente.
5. Una volta che il sandwich è cotto, utilizzare
la maniglia per aprire la griglia e sollevare
la piastra di cottura superiore. Rimuovere
il sandwich con l'aiuto di una spatola di
plastica o di legno. Non utilizzare mai pinze
metalliche o un coltello, poiché potrebbero
danneggiare il rivestimento antiaderente.
6
Page 29

UTILIZZO DEL NUOVO APPARECCHIO
IT
UTILIZZO DELLA FUNZIONE
DI CONTROLLO DELL'ALTEZZA
DELLA GRIGLIA REGOLABILE
La funzione di controllo dell'altezza regolabile
consente di ssare la piastra superiore in
diverse posizioni sopra la piastra inferiore.
Ciò consente di utilizzare la griglia elettrica
per grigliare ingredienti delicati come pesce
e hamburger senza schiacciarli. Può anche
essere usata per tostare sandwich e spuntini
aperti dove non è necessario applicare l'altezza
della piastra superiore.
1. Ruotare il controllo della temperatura
variabile su SEAR (arrostire)
o SANDWICH e consentire alla griglia
di preriscaldarsi no all'accensione
della spia verde READY (pronto).
2. Posizionare gli alimenti da grigliare
o il sandwich sulla piastra inferiore.
3. Spostare la leva di controllo dell'altezza
regolabile sul lato destro della griglia
all'altezza desiderata.
4. Abbassare lentamente la piastra superiore
nché non si appoggia sulla leva di controllo
dell'altezza regolabile.
5. La piastra superiore irradierà il calore
desiderato per grigliare leggermente i cibi
o fondere ingredienti come il formaggio.
I tempi di grigliatura e tostatura saranno una
questione di gusto personale. Ciò dipenderà
dall'altezza della piastra superiore.
UTILIZZO DEI PIEDINI REGOLABILI
ANTISCIVOLO
La griglia elettrica dispone di piedini estensibili
progettati per livellare la piastra inferiore durante
la cottura di cibi come le salsicce. Questo
garantisce che le salsicce non si stacchino dalla
piastra riscaldante, espellendo comunque la
massima quantità di grasso durante la cottura.
MANOPOLA DI CONTROLLO
DELLA TEMPERATURA
REGOLABILE
La griglia elettrica è dotata di una manopola
di controllo della temperatura variabile che
consente di cuocere diversi alimenti. Con la
manopola impostata su SEAR (arrostire),
la temperatura è adatta per grigliare carni
o altri cibi.
Con la manopola impostata su SANDWICH,
la temperatura è adatta per tostare sandwich.
La manopola di controllo della temperatura
variabile consente di selezionare l'impostazione
adatta agli alimenti in cottura.
7
Page 30

MANUTENZIONE E PULIZIA
Prima di procedere alla pulizia, spegnere
l'interruttore di alimentazione e scollegare
il cavo dalla presa. Lasciare rareddare la griglia
prima di pulirla. La griglia è più facile da pulire
quando è leggermente calda.
Pulire sempre la griglia dopo ogni utilizzo
per evitare l'accumulo di residui di cibo
bruciacchiati.
Pulire le piastre di cottura con un panno
morbido per rimuovere i residui di cibo.
Per i residui di cibo bruciacchiati, passare un
po' di acqua calda mescolata con detergente
sui residui di cibo, quindi pulire con una
spugnetta di plastica non abrasiva.
PULIZIA DEL VASSOIO
RACCOGLIGOCCE
Rimuovere e svuotare il vassoio raccogligocce
dopo ogni uso e lavarlo con acqua calda
e sapone. Evitare l'uso di pastiglie o detergenti
abrasivi, perché potrebbero danneggiare la
supercie. Sciacquare e asciugare a fondo
il vassoio con un panno morbido, quindi pulito
e rimontarlo.
In alternativa, il vassoio raccogligocce può
essere lavato in lavastoviglie.
RIVESTIMENTO ANTIADERENTE
RESISTENTE
La cottura su una supercie antiaderente
riduce al minimo la necessità di olio; inoltre,
il cibo non si attacca e la pulizia è più facile.
Durante la pulizia del rivestimento antiaderente,
non utilizzare pagliette metalliche (o di altro
tipo abrasivo). Lavare con acqua calda
e sapone. Rimuovere i residui più tenaci con
una spugnetta di plastica non abrasiva o una
spazzola lavapiatti in nylon.
CONSERVAZIONE
Per conservare la griglia elettrica:
1. Spegnere e scollegare l'apparecchio dalla
presa di corrente.
2. Lasciare che la griglia si rareddi
completamente.
3. Far scorrere la leva di controllo dell'altezza
verso la maniglia anteriore no alla
posizione LOCK (blocco) in modo che le
piastre di cottura superiore e inferiore siano
bloccate insieme.
4. Far scattare il vassoio raccogligocce
rimovibile in posizione.
5. Avvolgere il cavo di alimentazione
nell'alloggiamento sotto il grill.
6. Conservare su una supercie piana
e asciutta.
NOTA
La leva di conservazione non deve essere
utilizzata per bloccare la piastra superiore
quando il cibo è nella griglia.
NOTA
Non applicare vernici antiaderenti spray
in quanto ciò potrebbe compromettere le
prestazioni della supercie antiaderente
delle piastre di cottura.
8
Page 31

the Adjusta Grill
BGR200
NL
™
NL
SNELSTARTGIDS
Page 32

INHOUD
2 We stellen veiligheid voorop
5 Uw nieuwe apparaat leren kennen
6 Uw nieuwe apparaat gebruiken
8 Onderhoud en reiniging
SAGE® STELT
VEILIGHEID
VOOROP
Bij Sage® gaan we
veiligheidsbewust te
werk. Bij het ontwerpen
en produceren van onze
apparaten staat uw
veiligheid voorop. Daarnaast
vragen wij u voorzichtig
om te gaan met elektrische
apparaten en de volgende
voorzorgsmaatregelen in
acht te nemen.
BELANGRIJKE
VEILIGHEIDS-
MAATREGELEN
LEES ALLE INSTRUCTIES
VÓÓR GEBRUIK EN
BEWAAR DEZE VOOR
TOEKOMSTIGE NASLAG
• Een downloadbare
versie van dit document
is ook beschikbaar op
sageappliances.com
• Controleer vóór het
eerste gebruik of uw
elektriciteitsvoorziening dezelfde
is als die op het label aan de
onderkant van het apparaat.
• Verwijder voor het
eerste gebruik het
verpakkingsmateriaal en gooi
het op een veilige manier weg.
• Het apparaat is alleen voor
huishoudelijk gebruik. Gebruik
het apparaat alleen voor het
beoogde gebruik. Gebruik het
niet in bewegende voertuigen
of boten. Gebruik het niet
buitenshuis. Verkeerd gebruik
kan tot letsel leiden.
• Wikkel het netsnoer volledig af
voordat u het apparaat gebruikt.
• Plaats het apparaat op een
stabiele, hittebestendige,
vlakke, droge ondergrond,
weg van de rand, en gebruik
het niet op of in de buurt van
een warmtebron zoals een
kookplaat, oven of gasfornuis.
• Zorg dat het netsnoer niet over
de rand van een aanrecht of
tafel hangt, in aanraking komt
met hete oppervlakken of in
de knoop raakt.
• Plaats het apparaat op minstens
20 cm van muren of hitte-/
stoomgevoelige materialen en
zorg voor voldoende ruimte
boven en aan weerskanten
voor luchtcirculatie.
2
Page 33

SAGE® STELT VEILIGHEID VOOROP
NL
• Zorg ervoor dat het netsnoer
niet vast komt te zitten tussen
de boven- en onderplaat van
het apparaat wanneer de grill
in gebruik of opgeborgen is.
• Laat het apparaat tijdens
gebruik niet onbeheerd achter.
• Dit apparaat is niet ontworpen
om te worden bediend met
behulp van een externe
timer of een afzonderlijk
afstandsbedieningssysteem.
• Plaats niets op de grill wanneer
deze in de gesloten stand,
in gebruik of opgeborgen is.
Het apparaat is
gemarkeerd met
symbool om te
waarschuwen voor een
HEET oppervlak. Het deksel
en andere oppervlakken zijn
gedurende en enige tijd na
gebruik heet. Gebruik altijd
beschermende ovenwanten
of gebruik de handgrepen of
knoppen wanneer beschikbaar
om brandwonden te voorkomen.
• Zorg er altijd voor dat het
apparaat UIT staat, de stekker
uit het stopcontact is gehaald
en het apparaat is afgekoeld
voordat u het reinigt, verplaatst
of opbergt.
• Gebruik het apparaat niet als
het netsnoer, de stekker of het
apparaat op enigerlei wijze
beschadigd is. Neem contact op
met de klantenservice van Sage
of ga naar sageappliances.com
als er sprake is van schade of er
ander onderhoud dan reiniging
is vereist.
• Alle onderhoud anders dan
reiniging moet worden uitgevoerd
door een geautoriseerd
Sage®-servicecentrum.
• Kinderen mogen niet met het
apparaat spelen.
• Dit apparaat kan worden
gebruikt door kinderen van
8 jaar en ouder en personen
met beperkte fysieke, zintuiglijke
of mentale capaciteiten of een
gebrek aan ervaring en kennis,
mits zij worden begeleid of
instructies hebben gekregen
over het veilige gebruik van
het apparaat en de gevaren
ervan begrijpen.
• Reiniging van het apparaat
mag niet door kinderen
worden uitgevoerd, tenzij ze
ten minste 8 jaar oud zijn en
onder toezicht staan.
• Het apparaat en het snoer
moeten buiten het bereik van
kinderen jonger dan 8 jaar
worden gehouden.
3
Page 34

SAGE® STELT VEILIGHEID VOOROP
• Het wordt aanbevolen
een aardlekschakelaar
te installeren voor extra
veiligheid bij het gebruik van
alle elektrische apparaten.
Veiligheidsschakelaars met
een nominale bedrijfsstroom
van niet meer dan 30
mA worden aanbevolen.
Raadpleeg een elektricien
voor professioneel advies.
Het weergegeven symbool
geeft aan dat dit apparaat
niet met het normale
huishoudelijk afval mag
worden weggegooid. Het moet
naar een geschikt plaatselijk
afvalverwerkingscentrum worden
gebracht of naar een provider die
deze service biedt. Neem voor
meer informatie contact op met
uw gemeente.
Dompel de stekker, het
snoer of het apparaat niet
onder in water of een
andere vloeistof om elektrische
schokken te voorkomen.
BEWAAR DEZE INSTRUCTIES
4
Page 35

UW NIEUWE APPARAAT LEREN KENNEN
B
C
NL
GA H
I
J
K
D F
A. Element van 2200 watt
B. Bovenplaat met zwevend scharnier
C. Duurzame platen met antiaanbaklaag
D. Antislipvoetjes met verstelbare hoek
E. Handige kabelopbergruimte onder de grill
F. Verstelbare temperatuurknop
E
Classicatiegegevens
220–240 V ~50–60 Hz 1850-2200 W
G. Indicatielampjes POWER en READY
H. Verstelbare klem voor grillhoogte met
7 standen
I. Vergrendelingsklem voor opbergen
J. Robuuste armen van gegoten metaal
K. Verwijderbare opvangbak
5
Page 36

UW NIEUWE APPARAAT GEBRUIKEN
VOOR HET EERSTE GEBRUIK
Verwijder het verpakkingsmateriaal of de
promotielabels en gooi ze op een veilige manier
weg voordat u uw grill voor het eerst gebruikt.
Controleer of de platen schoon en stofvrij zijn.
Veeg ze indien nodig schoon met een zachte,
vochtige doek. Droog ze grondig af.
OPMERKING
Wanneer u de grill voor het eerst gebruikt,
kan er lichte rookontwikkeling optreden.
Dit wordt veroorzaakt door de verwarming
van bepaalde onderdelen. Maakt u zich
hierover geen zorgen.
Het apparaat kan worden gebruikt als grill
voor het aanbraden van vlees en groenten
of als tosti-ijzer voor boterhammen en ander
brood. Het beschikt ook over een verstelbare
hoogteklem waarmee u de bovenplaat op
verschillende standen boven de onderplaat
kunt vastzetten.
GEBRUIKEN ALS GRILL
1. Steek de stekker in een
220–240 V-stopcontact en zet het apparaat
AAN. Het rode POWER-lampje licht op.
2. Zet de verstelbare temperatuurknop in
de stand SEAR om de grill snel op te
warmen. Laat de grill voorverwarmen met
de bovenplaat in de gesloten stand totdat
het groene lampje (READY) gaat branden.
3. Wanneer de grill is voorverwarmd,
plaatst u het te bereiden eten op de
onderplaat. Plaats eten niet te ver
naar voren op de onderplaat.
OPMERKING
De grill kan worden gebruikt om eten in de
open of gesloten stand te bereiden.
4. Sluit de bovenplaat. De bovenplaat
heeft een zwevend scharnier dat is
ontworpen om eten gelijkmatig in te
drukken. De bovenplaat moet volledig
worden neergelaten om grillstrepen op
de etenswaren te maken.
5. De grilltijden zijn afhankelijk van het eten
dat wordt bereid.
6. Zodra het eten gaar is, gebruikt u het
handvat om de grill te openen en de
bovenplaat omhoog te duwen. Verwijder
het eten van de grill met behulp van een
plastic of houten spatel. Gebruik nooit
een metalen tang of mes: deze kunnen
de antiaanbaklaag beschadigen.
GEBRUIKEN ALS TOSTI-IJZER
1. Steek de stekker in een
220–240 V-stopcontact en zet het apparaat
AAN. Het rode POWER-lampje licht op.
2. Zet de verstelbare temperatuurknop
in de stand SANDWICH. Laat de grill
voorverwarmen met de bovenplaat in de
gesloten stand totdat het groene lampje
(READY) gaat branden.
3. Wanneer het tosti-ijzer is voorverwarmd,
plaatst u de boterham op de onderplaat.
Plaats boterhammen niet te ver naar voren
op de onderplaat.
4. Sluit de bovenplaat. De bovenplaat moet
volledig worden neergelaten om tosti's
te maken.
5. Zodra de boterham gaar is, gebruikt
u het handvat om de grill te openen en de
bovenplaat omhoog te duwen. Verwijder
de boterham van de grill met behulp van
een plastic of houten spatel. Gebruik nooit
een metalen tang of mes: deze kunnen de
antiaanbaklaag beschadigen.
6
Page 37

UW NIEUWE APPARAAT GEBRUIKEN
NL
DE VERSTELBARE KLEM VOOR
GRILLHOOGTE GEBRUIKEN
Met de verstelbare hoogteregeling kunt u de
bovenplaat op verschillende standen boven
de onderplaat vastzetten. Zo kunt u delicate
ingrediënten zoals vis en hamburgerbroodjes
grillen zonder ze te pletten. Het kan ook worden
gebruikt voor het roosteren van open tosti's
of andere snacks waarbij u de druk van de
bovenplaat niet nodig heeft.
1. Zet de verstelbare temperatuurknop in
de stand SEAR of SANDWICH en laat
de grill voorverwarmen tot het groene
lampje (READY) gaat branden.
2. Plaats de gewenste etenswaren op
de bodemplaat.
3. Zet de verstelbare hoogteklem aan
de rechterkant van de grill op de
gewenste hoogte.
4. Laat de bovenplaat langzaam zakken
totdat deze op de hoogteklem rust.
5. De bovenplaat straalt de gewenste
warmte uit om etenswaren licht te grillen
of ingrediënten zoals kaas te smelten.
De tijden voor grillen en roosteren zijn een
kwestie van smaak. Dit is afhankelijk van
de hoogte van de bovenplaat.
DE HOEK VAN DE
ANTISLIPVOETJES VERSTELLEN
Uw grill heeft unieke uitschuifbare voetjes die
zijn ontworpen om de bodemplaat recht te
zetten bij het bereiden van etenswaren zoals
worstjes. Zo kunnen de worstjes niet van de
plaat afrollen, terwijl er toch zo veel mogelijk
vet wordt afgevoerd.
VERSTELBARE
TEMPERATUURKNOP
De grill heeft een verstelbare temperatuurknop
waarmee verschillende soorten eten kunnen
worden bereid. Met de instelling SEAR is de
temperatuur geschikt voor het grillen van vlees
of andere etenswaren.
Met de instelling SANDWICH is de temperatuur
geschikt voor het maken van tosti's.
Met de temperatuurknop kunt u een instelling
selecteren die geschikt is voor het eten dat
wordt bereid.
7
Page 38

ONDERHOUD EN REINIGING
Trek vóór reiniging de stekker uit het
stopcontact. Laat uw grill afkoelen voordat
u begint met reinigen. De grill is gemakkelijker
te reinigen als deze nog een beetje warm is.
Reinig uw grill na elk gebruik om ophoping van
vastgekoekte etensresten te voorkomen.
Veeg de platen af met een zachte doek om
etensresten te verwijderen. Als etensresten zijn
vastgekoekt, knijpt u wat warm water vermengd
met reinigingsmiddel over de resten en reinigt
u ze vervolgens met een krasvrij synthetisch
schuursponsje.
DE OPVANGBAK REINIGEN
De opvangbak na elk gebruik verwijderen,
legen en in warm zeepsop afwassen.
Vermijd schuursponsjes of agressieve
reinigingsmiddelen, omdat deze het oppervlak
kunnen beschadigen. Spoel en droog goed
af met een schone, zachte doek en plaats
de opvangbak terug.
De opvangbak kan ook in de vaatwasser
worden gereinigd.
DUURZAME ANTIAANBAKLAAG
Door op een antiaanbaklaag te grillen, heeft
u minder olie nodig, blijven etenswaren niet
vastplakken en zijn de platen gemakkelijker
te reinigen. Gebruik bij het reinigen van de
antiaanbaklaag geen schuursponsjes van
metaal of ander schurend materiaal. Wassen
in warm zeepsop. Verwijder hardnekkige
resten met een krasvrij synthetisch
schuursponsje of nylon afwasborstel.
OPBERGEN
De grill opbergen:
1. Schakel de grill uit en haal de stekker
uit het stopcontact.
2. Laat de grill volledig afkoelen.
3. Schuif de hoogteklem richting het handvat
vooraan in de stand LOCK, zodat de
boven- en onderplaten vast blijven zitten.
4. Klik de verwijderbare opvangbak op
zijn plaats.
5. Wikkel het netsnoer op in de
snoeropbergruimte onder de grill.
6. Opbergen op een vlak, droog oppervlak.
OPMERKING
De opbergklem mag niet worden gebruikt
om de bovenplaat vast te zetten als de grill
in gebruik is.
OPMERKING
Gebruik geen antiaanbaksprays, omdat
deze de prestaties van de antiaanbaklaag
op de platen aantasten.
8
Page 39

OPMERKINGEN
NL
9
Page 40

DEU AUT
Sage Appliances GmbH
Campus Fichtenhain 48, 47807 Krefeld, Deutschland
Deutschland: +49 (0)8005053104
Österreich: +43 (0)800 80 2551
GBR IRE
BRG Appliances Limited
Unit 3.2, Power Road Studios, 114 Power Road, London, W4 5PY
Freephone (UK Landline): +44 (0)808 178 1650
Mobile Calls (National Rate): 0333 0142 970
BEL
Belgium
+32 (0)800 54 155
LUX
Luxembourg
+352 (0)800 880 72
CHE
Switzerland
+41 (0)800 009 933
www.sageappliances.com
Registered in Germany No. HRB 81309 (AG Düsseldorf).
• Aufgrund kontinuierlicher Produktverbesserungen kann das auf dieser Verpackung dargestellte Produkt leicht vom tatsächlichen Produkt abweichen.
• Due to continued product improvement, the products illustrated or photographed in this document may vary slightly from the actual product.
• En raison de son amélioration continue, le produit représenté sur cet emballage peut di érer légèrement du produit réel.
• A causa del continuo miglioramento dei prodotti, il prodotto illustrato su questa confezione può variare leggermente rispetto al prodotto reale.
• Vanwege voortdurende productverbetering kunnen de producten die in dit document worden geïllustreerd of gefotografeerd enigszins afwijken
Registered in England & Wales No. 8223512.
van het daadwerkelijke product.
Copyright BRG Appliances 2018.
BGR200 C18
 Loading...