

Page 1

the BBQ Grill
800GR
™
EN QUICK GUIDE DE KURZANLEITUNG
FR GUIDE RAPIDE
ES GUÍA RÁPIDA
NL SNELSTARTGIDS
Page 2

CONTENTS
2 Sage® Recommends Safety First
4 Getting To Know Your New Appliance
5 Operating Your New Appliance
8 Care & Cleaning
9 Guarantee
SAGE®
RECOMMENDS
SAFETY FIRST
At Sage® we are very safety
conscious. We design and
manufacture appliances
with your safety foremost
in mind. In addition, we ask
that you exercise a degree
of care when using any
electrical appliance and
adhere to the following
precautions.
IMPORTANT
SAFEGUARDS
READ ALL INSTRUCTIONS
BEFORE USE AND SAVE
FOR FUTURE REFERENCE
• A downloadable version of this
document is also available at
sageappliances.com
• Before using the rst time
ensure your electricity supply
is the same as shown on
the label on the underside
of the appliance.
• Remove and safely discard
any packaging materials
before rst use.
• The appliance is for household
use only. Do not use the
appliance for anything other
than its intended use. Do not
use in moving vehicles or
boats. Do not use outdoors.
Misuse may cause injury.
• Fully unwind the power cord
before operating.
• Position the appliance on a
stable, heat resistant, level,
dry surface away from the
edge and do not operate on
or near a heat source such as
a hot plate, oven or gas hob.
• Do not let the power cord hang
over the edge of a bench or
table, touch hot surfaces or
become knotted.
• Position the appliance at least
20cm from walls or heat/steam
sensitive materials and provide
adequate space above and on
all sides for air circulation.
• Ensure the power cord
does not become trapped
between the upper and lower
hot plates of the appliance
during use or storage.
• Do not leave the appliance
unattended when in use.
• The appliance is not intended
to be operated by the means
of an external timer or separate
remote control system
• Do not place anything on top
of the grill when lid is closed,
when in use and when stored.
2
Page 3

SAGE® RECOMMENDS SAFETY FIRST
EN
The appliance is marked
with a HOT surface
symbol. The lid and
other surfaces will be
hot when the appliance is
operating and for some time
after use. To prevent burns
always use insulated oven
mitts or use handles or
knobs where appropriate.
• Always ensure the appliance
is turned OFF, unplugged at
the power outlet and has been
allowed to cool before cleaning,
moving or storing.
• Do not use the appliance if
the power cord, plug, or
appliance becomes damaged
in any way. If damaged or
maintenance other than
cleaning is required, please
contact Sage Customer Service
or go to sageappliances.com
• Any maintenance other
than cleaning should be
performed by an authorised
®
Sage
service centre.
• Children shall not play with
the appliance.
• The appliance can be used by
children aged 8 or older and
persons with reduced physical,
sensory or mental capabilities
or a lack of experience and
knowledge, only if they have
been given supervision or
instruction concerning use
of the appliance in a safe
way and understand the
hazards involved.
• Cleaning of the appliance
should not be carried out by
children unless they are 8 years
or older and supervised.
• The appliance and its cord
should be kept out of reach
of children aged 8 years
and younger.
• The installation of a residual
current safety switch is
recommended to provide
additional safety when using
all electrical appliances.
Safety switches with a rated
operating current not more
than 30mA are recommended.
Consult an electrician for
professional advice.
The symbol shown
indicates that this appliance
should not be disposed of
in normal household waste.
It should be taken to a local
authority waste collection centre
designated for this purpose or to
a dealer providing this service.
For more information, please
contact your local council oce.
To protect against electric
shock, do not immerse
the power plug, cord or
appliance in water or any liquid.
SAVE THESE INSTRUCTIONS
3
Page 4
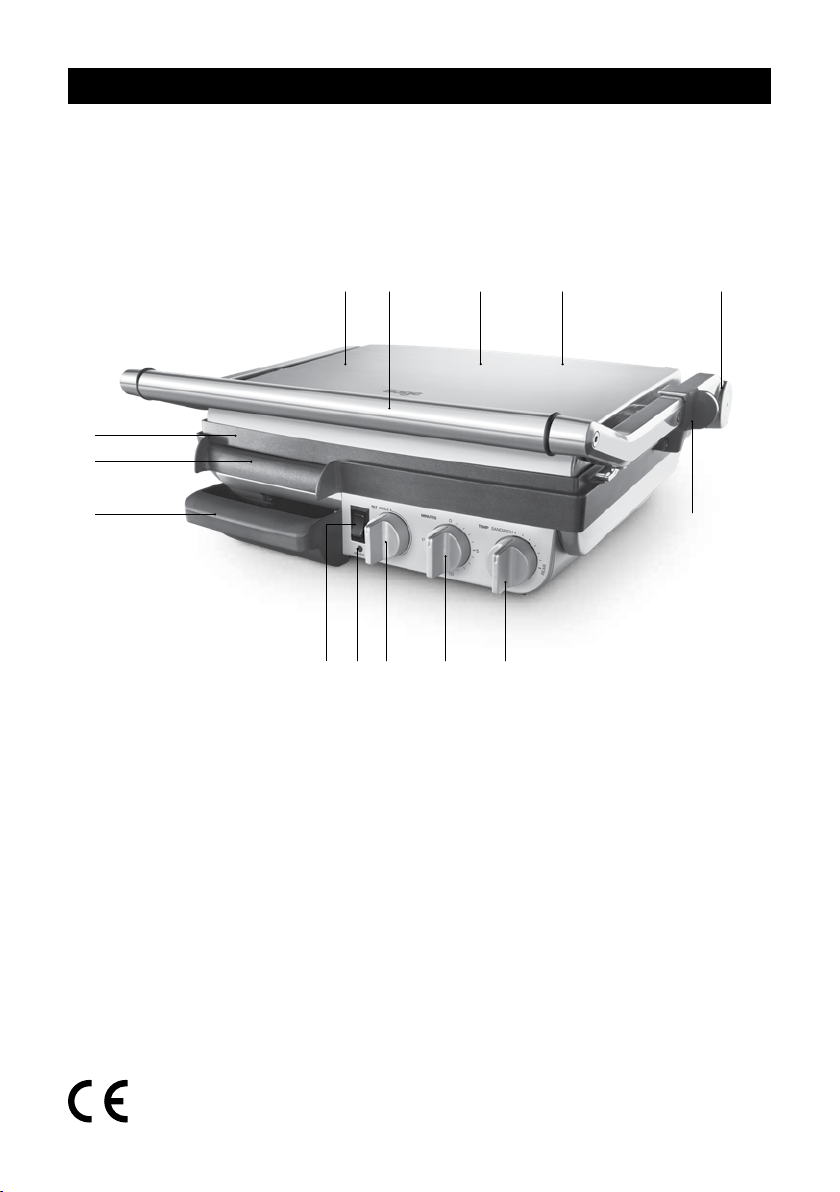
GETTING TO KNOW YOUR NEW APPLIANCE
F
G
H
J
I K L M
A. Grill lock dial
B. Stainless steel body
C. 2400 watts of power
D. Levelling handle
E.
F. Quantanium™ non-stick ribbed top plate
G.
D
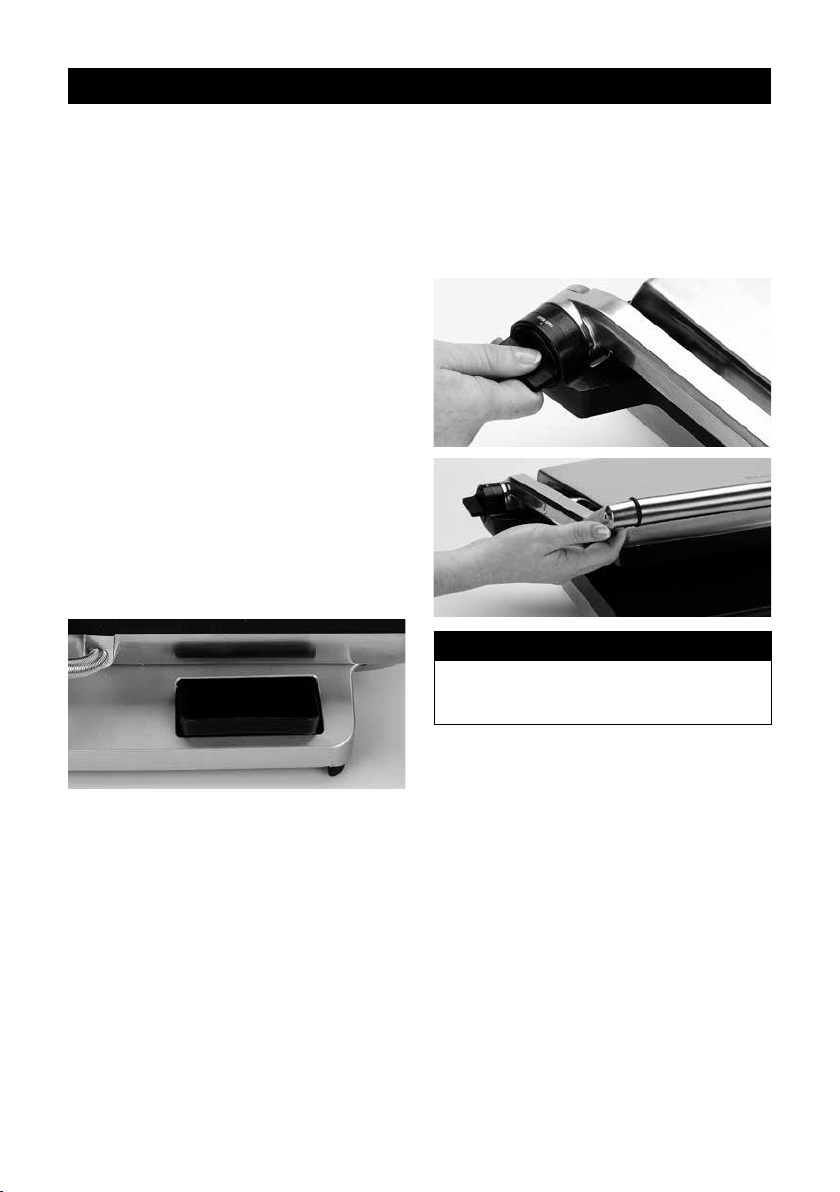
H. Removable drip tray
I. ON/OFF switch
J. Red heating light
K. Bottom plate tilt dial
L. 15 minute timer dial
M. Variable temperature control dial
N. Adjustable grilling height
BCE A
N
Rating Information
220–240V ~ 50–60Hz 2000–2400W
4
Page 5

OPERATING YOUR NEW APPLIANCE
BEFORE FIRST USE
Remove and safely discard any promotional
materials and packaging materials before use.
Check that the cooking plates are clean and free
of dust. If necessary, wipe over with a damp cloth.
When using the grill for the rst time you may
notice a ne smoke haze This is caused by
the rst heating of some of the components.
There is no need for concern.
TO USE AS AN OPEN GRILL
1. Insert the plug into a 220–240V power
outlet and switch the power ON Switch
the ON/OFF button to ON. The red
heating light will illuminate.
2. Ensure the removable drip tray is
correctly inserted and positioned
back into the appliance.
3. Ensure the top plate is in the closed position
for more ecient preheating.
4. Turn the base plate tilt dial to the FLAT
position.
5. Turn the variable temperature control dial
to SEAR for fast preheating.
6. Allow the grill to preheat until the red heating
light goes out.
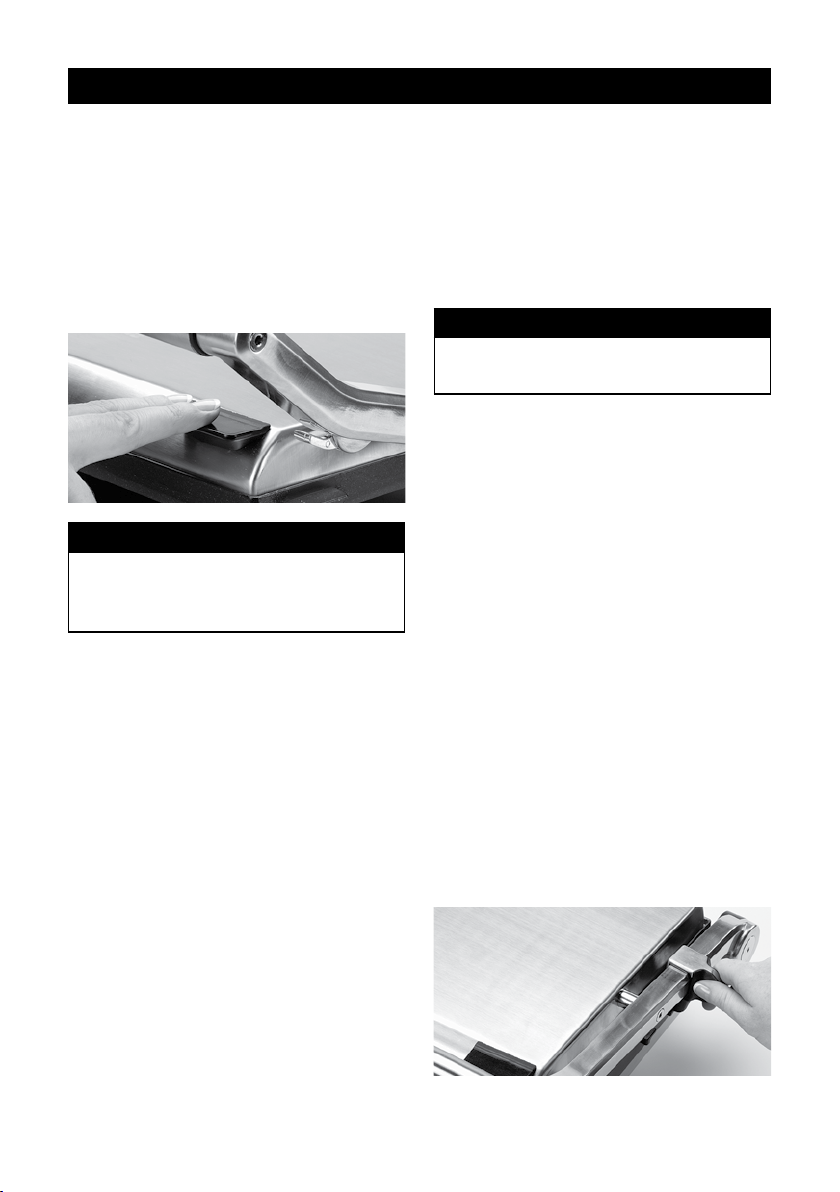
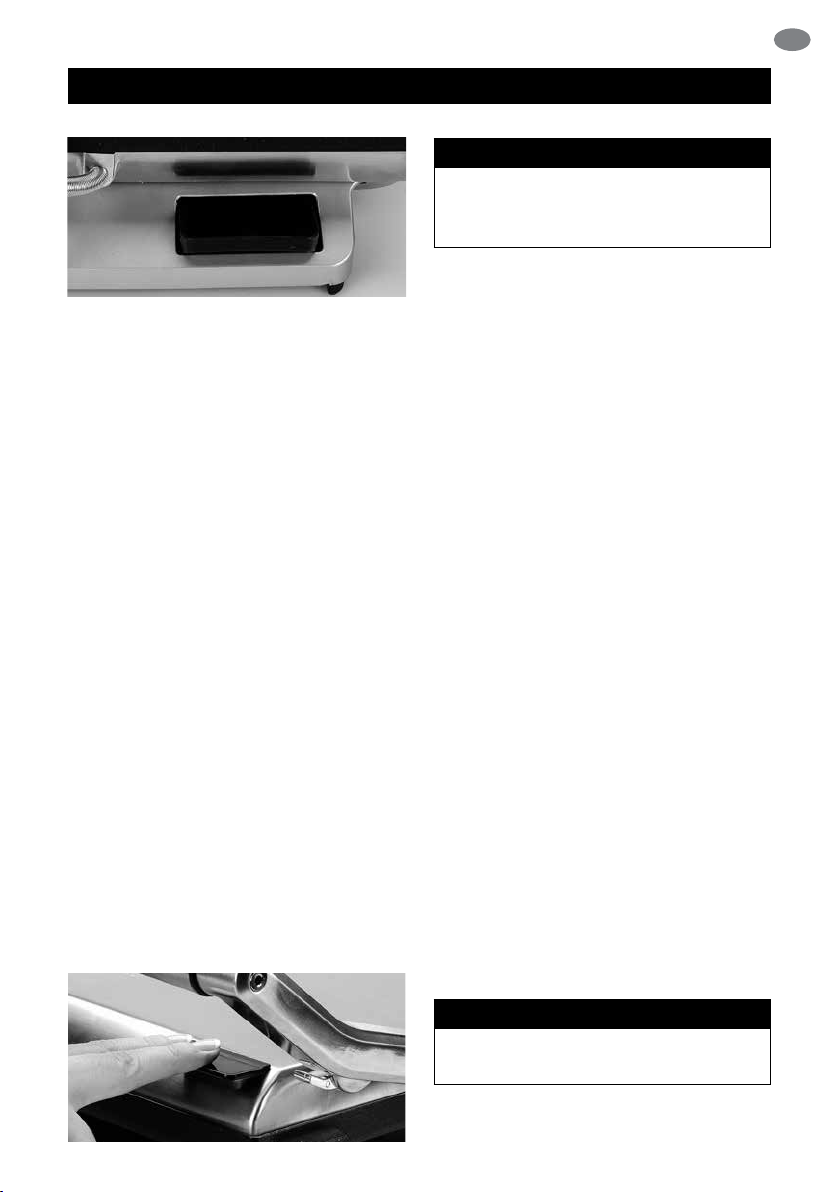
7. The grill must be closed to release the lock.
Turn the grill lock dial on the side of the grill
to horizontal position and use the handle
to pull the top plate into the open position.
EN
NOTE
Grill lock will automatically reset when
returned to the CLOSED position.
8. Place meat or foods to be cooked on either
or both of the cooking plates.
9. When the food is cooked, remove using
a plastic spatula.
TO USE AS A CLOSED GRILL
1. Insert the plug into a 220–240V power
outlet and switch the power ON. Switch the
ON/OFF button to ON. The red heating light
will illuminate.
2. Ensure the removable drip tray is
correctly inserted and positioned back
into the appliance.
3. Ensure the top plate is in the closed position
for more ecient preheating.
4. Turn the base plate tilt dial to the ANGLE
or FLAT position.
5. Turn the variable temperature control dial
to SEAR for fast preheating.
6. Allow the grill to preheat until the red
heating light goes out.
7. Use the handle to pull the top plate into
the 90° position.
8. Place meat or foods to be cooked on the
base cooking plate.
5
Page 6
OPERATING YOUR NEW APPLIANCE
Use the handle to close the top plate. The
9.
top plate has a oating hinge system that is
designed to press down evenly on the food.
The grilling height control on the right hand
side of the top plate is used to adjust for the
thickness of the food. The levelling handle
on the right hand side of the top of the grill
may be used to even out the top plate. The
top plate must be fully lowered to achieve
grill marks onto the food.
NOTE
The red heating light will cycle on and o
during the cooking process indicating that
the correct temperature is being maintained.
TO USE AS A SANDWICH PRESS
1. Insert the plug into a 220–240V power
outlet and switch the power on. Switch the
ON/OFF button to ON. The red heating light
will illuminate.
2. Ensure the removable drip tray is
correctly inserted and positioned back
into the appliance.
3. Ensure the top plate is in the closed position
for more ecient preheating.
4. Turn the base plate tilt dial to the
FLAT position.
5. Turn the variable temperature dial to the
SANDWICH position.
6. Allow the grill to preheat until the red
heating light goes out.
7. During this time, prepare the sandwich
and place it onto the base plate. Always place
sandwiches towards the rear of the base plate.
8. Use the handle to close the top plate.
The top plate has a oating hinge system
that is designed to press down evenly on
the sandwich. The grilling height control on
the right hand side of the top plate is used
to adjust for the thickness of the sandwich.
The levelling handle on the right hand side
of the top of the grill may be used to even
out the top plate.
NOTE
Always allow the grill to preheat until the
red heating light goes out.
9. Toasting should take approximately 5–8
minutes. Exact toasting time will be a matter
of preference. It will also depend on the
type of bread and lling used.
10. When the sandwich is cooked, use the
handle to open the top plate. Remove the
sandwich using a plastic spatula. Never use
metal tongs or a knife as these can cause
damage to the non-stick coating of the
cooking plates.
USING THE ADJUSTABLE
GRILLING HEIGHT
CONTROL FEATURE
This allows your grill to be used for toasting open
sandwich style ‘melts.’ It can also be used to grill
delicate ingredients such as sh and hamburger
buns without squashing.
1. Allow the grill to preheat until the red heating
light goes out.
2. Place the food to be grilled on the base plate.
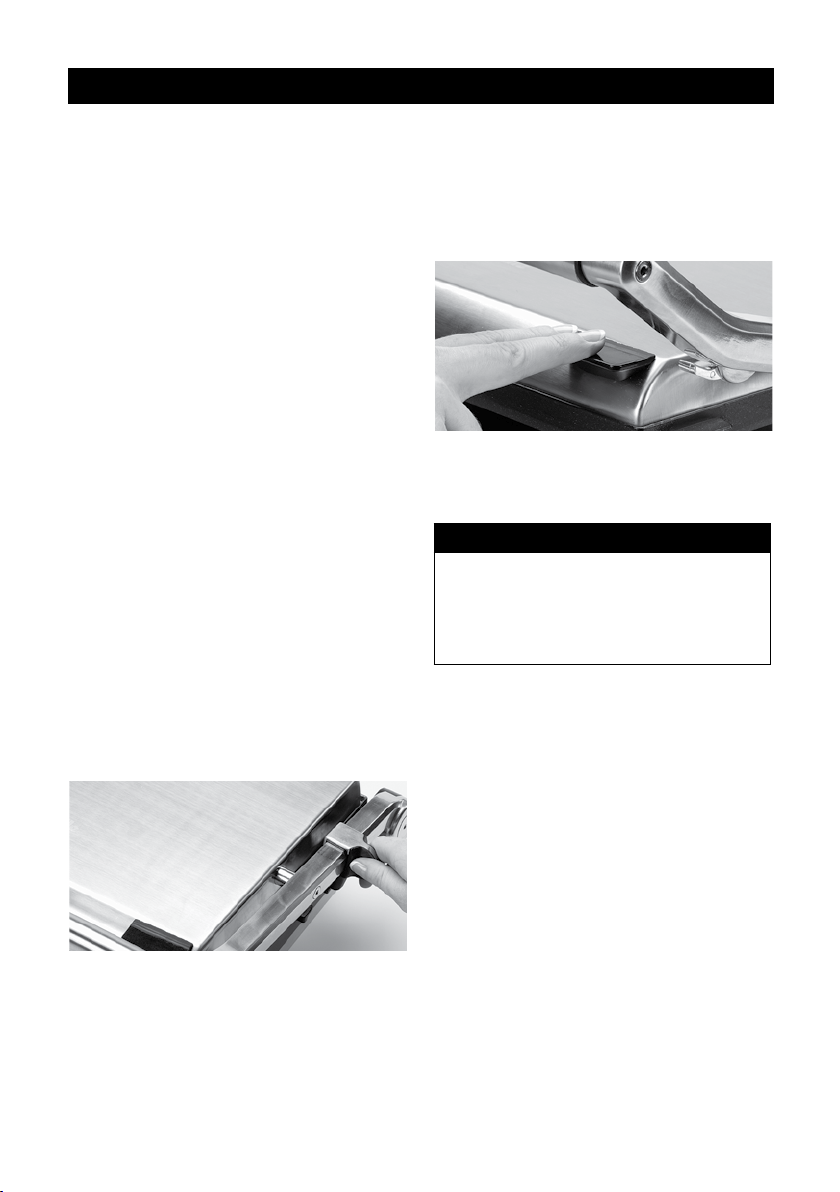
3. Move the adjustable grill control clip on the
right hand side of the grill to the desired height.
6
Page 7

OPERATING YOUR NEW APPLIANCE
EN
4. Slowly lower the top plate, using the levelling
handle on the top right-hand side of the plate,
until it rests in the appropriate position above
the food.
5. The top plate will radiate the desired
heat to melt ingredients such as
cheese or lightly grill foods.
NOTE
The adjustable grill height control can be
moved to accommodate thick or thin foods
by sliding the clip forwards or backwards
along the arm.
BASE PLATE TILT DIAL
1. To place the base plate into the sloped
position, simply turn the base plate tilt dial
anti-clockwise until the dial reaches the
ANGLE position. This position is suitable
for achieving the maximum fat drainage
when using the grill as a closed grill.
2. To place the base plate into the at position,
turn the base plate tilt dial clockwise until
the dial reaches the FLAT position.
15 MINUTE TIMER DIAL
The Sage® grill features a 15 minute timer which
allows you to monitor the time elapsed during
preheating or cooking. To set the timer, simply turn
the dial clockwise completely to the 15 position
and then anti-clockwise to select the desired
minutes. The timer will ring once when the
desired time has elapsed. The grill will not turn o,
it will remain heating.
VARIABLE TEMPERATURE
CONTROL DIAL
The grill features a variable temperature control
dial. Just select a temperature suited to the
foods which are being cooked.
With the dial set on SEAR the temperature
is correctly suited to grill meats or other foods.
With the dial set on SANDWICH the temperature
is correctly suited to toasting sandwiches.
7
Page 8

CARE & CLEANING
Before cleaning, switch the grill o at the
ON/OFF button, switch o at the power outlet and
unplug. Allow your grill to cool before cleaning. The
appliance is easier to clean when slightly warm.
Always clean your grill after each use to prevent
a build up of baked-on foods.
Wipe cooking plates with a soft cloth to remove
food residue. For baked on food residue squeeze
some warm water mixed with detergent over the
food residue then clean with a non abrasive
plastic scouring pad.
CLEANING THE DRIP TRAY
Remove and empty the drip tray after each use
and wash the tray in warm, soapy water. Avoid
the use of scouring pads or harsh detergents
as they may damage the surface. Rinse and dry
thoroughly with a clean, soft cloth and replace.
QUANTANIUM SCRATCH
RESISTANT COATING
Your grill features a special scratch resistant
non-stick coating that makes it safe to use metal
utensils when cooking.
Regardless of this fact, Sage
that care is taken with the non-stick coating
particularly when using metal utensils.
Do not use sharp objects or cut food inside the
grill. Sage
non-stick coating where metal utensils have
been misused.
Cooking on a non-stick surface minimises the
need for oil, food does not stick and cleaning
is easier.
Any discolouration that may occur will only detract
from the appearance of grill and will not aect the
cooking performance.
When cleaning the non-stick coating, do not use
metal (or other abrasive) scourers. Wash in hot
soapy water. Remove stubborn residue with
a non abrasive plastic scouring pad or nylon
washing brush.
®
will not be liable for damage to the
®
recommends
STORAGE
To store your grill:
1. Switch o the appliance at the ON/OFF
button, switch o at the power outlet
and unplug.
2. Allow the grill to fully cool.
3. Slide the storage clip towards the front
handle to the LOCK position so that
the top and bottom cooking plates are
locked together.
4. Slide the removable drip tray into place.
5. Wrap the cord in the cord storage area
below the appliance.
6. Store on a at, dry, level surface.
NOTE
For added convenience the grill may be
stored standing up in a vertical position.
WARNING
Do not immerse any part
of the grill in water or any
other liquid.
8
Page 9

GUARANTEE
2 YEAR LIMITED GUARANTEE
Sage Appliances guarantees this product for
domestic use in specied territories for 2 years
from the date of purchase against defects caused
by faulty workmanship and materials. During this
guarantee period Sage Appliances will repair,
replace, or refund any defective product (at the
sole discretion of Sage Appliances).
All legal warranty rights under applicable
national legislation will be respected and will
not be impaired by our guarantee. For full terms
and conditions on the guarantee, as well as
instructions on how to make a claim, please visit
www.sageappliances.com.
EN
9
Page 10

INHALTE
10 Sage® empehlt: Sicherheit
geht vor
®
13 Was sie über Ihr Sage
wissen sollten
14 Anwendung Ihres Neuen
18 Pege & Reinigung
20 Garantie
Sage
®
Geräts
Gerät
SAGE® EMPFIEHLT:
SICHERHEIT
GEHT VOR
Wir bei Sage® sind sehr
Sicherheitsbewusst.
Beim Design und bei der
Herstellung unserer Geräte
denken wir zu allererst an
Ihre Sicherheit. Darüber
hinaus bitten wir Sie, bei
der Verwendung jedes
Elektrogeräts angemessene
Sorgfalt anzuwenden und
sich an die folgenden
Vorsichtsmaßnahmen
zu halten.
WICHTIGE
VORSICHTSMASS
NAHMEN
BITTE ALLE ANWEISUNGEN
VOR DEM ERSTEN
GEBRAUCH LESEN UND ZUR
SPÄTEREN BEZUGNAHME
AUFBEWAHREN.
• Dieses Informationsbuch
steht zum Download unter
www.sageappliances.com zur
Verfügung.
• Vor dem ersten Gebrauch
prüfen, dass Ihre
Netzspannung mit der auf dem
Etikett an der Unterseite des
Geräts übereinstimmt.
• Vor dem ersten Gebrauch
alle Verpackungsmaterialien
abnehmen und sicher
entsorgen.
• Dieses Gerät ist nur für den
Haushaltsgebrauch bestimmt.
Gerät nur bestimmungsgemäß
verwenden. Nicht in fahrenden
Fahrzeugen oder Booten
verwenden. Nicht im Freien
verwenden. Missbrauch kann
Verletzungen nach sich ziehen.
• Netzkabel vor dem Gebrauch
vollständig entrollen.
• Gerät in sicherem Abstand
von Kanten auf eine stabile,
hitzebeständige, ebene und
trockene Fläche stellen.
Nicht auf oder neben einer
Wärmequelle wie einem Gasoder Elektroherd oder einem
heißen Ofen betreiben.
• Netzkabel nicht über
Arbeitsplatten oder
Tischkanten hängen lassen,
von heißen Oberächen fern
halten, Kabelgewirr vermeiden.
10
Page 11
WIR EMPFEHLEN: SICHERHEIT GEHT VOR
DE
• Zwischen dem Gerät und
Wänden oder hitze- bzw.
dampfempndlichen
Materialien mindestens
20 cm Abstand halten und
nach allen Seiten und oberhalb
des Geräts stets ausreichend
Platz zur Luftzirkulation lassen.
• Sicherstellen, dass das
Netzkabel beim Gebrauch
oder während der Lagerung
des Geräts nicht zwischen der
oberen und unteren Heizplatte
eingeklemmt werden kann.
• Gerät während des Betriebs
nicht unbeaufsichtigt lassen.
Das Gerät trägt das
Symbol für HEIßE
Oberächen. Der Deckel
und andere Oberächen
werden beim Betrieb des Geräts
heiß und bleiben dies für einige
Zeit nach dem Gebrauch. Zur
Vermeidung von Verbrennungen
immer Ofenhandschuhe
verwenden und gegebenenfalls
Grie und Knöpfe nutzen.
• Vergewissern Sie sich immer,
dass das Gerät ausgeschaltet
ist, dass das Gerät aus der
Steckdose gezogen wurde
und dass es vor der Reinigung,
dem Transport oder der
Lagerung abkühlen kann.
• Gerät nicht verwenden,
wenn das Netzkabel, der
Netzstecker oder das Gerät
selbst in irgendeiner Weise
beschädigt ist. Wenden
Sie sich bei Schäden
oder zur Wartung (außer
Reinigung) bitte an den SageKundendienst oder besuchen
Sie sageappliances.com
• Alle Wartungsarbeiten außer
Reinigung nur von autorisierten
®
Sage
-Kundendienststellen
vornehmen lassen.
• Kinder nicht mit dem Gerät
spielen lassen.
• Dieses Gerät kann von
Kindern im Alter ab 8 Jahren
und von Personen mit
eingeschränkten körperlichen,
sensorischen oder geistigen
Fähigkeiten oder mit
mangelnder Erfahrung und
fehlenden Kenntnissen
genutzt werden, sofern sie
beaufsichtigt werden oder in
den sicheren Gebrauch des
Geräts eingewiesen wurden
und sich der entsprechenden
Risiken bewusst sind.
• Reinigung des Geräts nicht
von Kindern unter 8 Jahren
und nur unter Aufsicht
vornehmen lassen.
NUR FÜR DEN HAUSHALTSGEBRAUCH
ANWEISUNGEN BITTE AUFBEWAHREN
11
Page 12
WIR EMPFEHLEN: SICHERHEIT GEHT VOR
• Gerät und Netzkabel für Kinder
bis zu 8 Jahren unzugänglich
aufbewahren.
• Die Installation eines Schutzoder Sicherheitsschalters
wird bei der Verwendung
von Elektrogeräten als
zusätzliche Schutzmaßnahme
empfohlen. Es wird ein
Sicherheitsschalter mit
maximal 30 mA Nennleistung
empfohlen. Fachgerechte
Beratung erhalten Sie
von Ihrem Elektriker.
Dieses Symbol zeigt,
dass das Gerät nicht im
normalen Hausmüll
entsorgt werden sollte.
Es sollte stattdessen bei einem
entsprechenden kommunalen
Wertstohof oder Fachhändler
zur Entsorgung abgegeben
werden. Weitere Einzelheiten
erfahren Sie von Ihrer
Kommunalbehörde.
Netzstecker, Netzkabel
oder Gerät nicht in Wasser
oder sonstige Flüssigkeiten
tauchen.
12
Page 13

WAS SIE ÜBER IHR SAGE® GERÄT WISSEN SOLLTEN
DE
F
G
H
I K L M
A. Drehknopf für den Grillverschluss
B. Edelstahlkörper
C. 2400 Watt Leistung
D. Ausgleichender Haltebügel
E. Einzigartiges, schwebend befestigtes
Deckelelement
F. Quantanium™ nicht haftende gerillte
obere Platte
G. Quantanium™ nicht haftende ebene
untere Platte
D
BCE A
N
J
H. Herausnehmbare Tropftasse
I. EIN/AUS SCHALTER
J. Rote Heizanzeigeleuchte
K. Drehregler für die Neigung der
unteren Platte
L. 15 Minuten Timer
M. Drehregler für variable
Temperatureinstellungen
N. Einstellbare Höhe beim Grillen
Leistungsangaben
220–240V ~ 50–60Hz 2000–2400W
13
Page 14
ANWENDUNG IHRES NEUEN SAGE® GERÄTS
VOR DER ERSTEN
INBETRIEBNAHME
Entfernen Sie und entsorgen Sie das gesamte
Verpackungsmaterial oder Werbeaufkleber
mit Bedacht, bevor Sie Ihren Grill zum ersten
Mal benutzen. Stellen Sie sicher, dass die
Grillächen sauber und frei von Staub sind.
Wenn nötig, benutzen Sie ein weiches, feuchtes
Reinigungstuch zum Abwischen. Wenn Sie den
Grill zum ersten Mal benutzen, ist es möglich,
dass Sie ein wenig feinen Rauch aufsteigen
sehen. Dies wird durch das Erhitzen einiger
Elemente verursacht. Es gibt jedoch keinen
Grund zur Besorgnis.
ANWENDUNG ALS OFFENER
GRILL
1. Schließen Sie den Netzstecker an eine
220-240V Steckdose und schalten
Sie den Strom an. Schalten Sie den
EIN/AUS Schalter auf EIN. Die rote
Heizanzeigeleuchte wird sofort aueuchten.
2. Vergewissern Sie sich, dass die
herausnehmbare Tropftasse richtig eingefügt
und in das Gerät zurückgeschoben ist.
7. Der Grill muss geschlossen sein, um den
Sperrmechanismus önen zu können.
Drehen Sie den Drehknopf für den
Grillverschluss an der Seite des Grills in
eine waagrechte Stellung und benutzen Sie
den Bügel, um die obere Platte in die oene
Position zu klappen.
HINWEIS
Der Grillverschluss stellt sich automatisch
zurück, wenn Sie zu einer geschlossenen
Position zurückkehren.
3. Stellen Sie sicher, dass die obere Platte
geschlossen ist. Dies ermöglicht ein
ezienteres Vorheizen.
4. Drehen Sie den Drehregler für die Neigung
der unteren Platte auf FLAT (EBEN).
5. Stellen Sie den Drehregler für variable
Temperatureinstellungen auf SEAR
(ANBRATEN) für schnelles Vorheizen.
6. Lassen Sie den Grill vorheizen, bis die rote
Heizanzeigeleuchte erlischt.
14
8. Legen Sie Ihr Grillgut auf eine oder beide
Grillplatten.
9. Benutzen Sie eine Kunststo-Spachtel,
um die fertig gegrillten Speisen vom Grill
zu nehmen.
ANWENDUNG ALS
GESCHLOSSENER GRILL
1. Schließen Sie den Netzstecker an eine
220-240V Steckdose und schalten
Sie den Strom an. Schalten Sie den
EIN/AUS Schalter auf EIN. Die rote
Heizanzeigeleuchte wird sofort aueuchten.
2. Vergewissern Sie sich, dass
die herausnehmbare Tropftasse
richtig eingefügt und in das Gerät
zurückgeschoben ist.
Page 15
ANWENDUNG IHRES NEUEN SAGE® GERÄTS
HINWEIS
Die rote Heizanzeigeleuchte wird sich
während des Kochvorgangs ein- und
ausschalten und damit anzeigen, dass die
richtige Temperatur beibehalten wird.
ANWENDUNG ALS
SANDWICHPRESSE
3. Stellen Sie sicher, dass die obere
Platte geschlossen ist. Dies erlaubt
ezienteres Vorheizen.
4. Drehen Sie den Regler für die Neigung
der unteren Platte auf ANGLE
(ANGEWINKELT) oder auf FLAT (EBEN).
5. Stellen Sie den Regler für variable
Temperatureinstellungen auf SEAR
(ANBRATEN) für schnelles Vorheizen.
6. Lassen Sie den Grill vorheizen, bis die rote
Heizanzeigeleuchte erlischt.
7. Benutzen Sie den Bügel, um die obere
Platte in eine 90° Stellung zu bringen.
8. Legen Sie das Fleisch oder die
zu grillenden Lebensmittel auf die
untere Platte.
9. Benutzen Sie den Bügel, um die obere
Platte zu schließen. Die obere Kochplatte
hat ein sogenanntes schwebendes
Scharniersystem, das so beschaen ist,
dass überall gleichmäßiger Druck auf die
Lebensmittel ausgeübt wird. Die Grill-
Höheneinstellung auf der rechten Seite
der oberen Platte wird dazu benutzt, den
Höhenabstand auf die Dicke des Grillguts
auszurichten. Der Gri zum Flachstellen
auf der rechten Seite der oberen Grillplatte
kann dazu benutzt werden, die obere
Grilläche waagrecht zu stellen. Die obere
Grilläche muss ganz nach unten gebracht
sein, um Grillstreifen auf den Speisen
zu erzielen.
1. Schließen Sie den Netzstecker an eine
220-240V Steckdose und schalten Sie den
Strom an. Die rote POWER (STROM AN)
Anzeige wird sofort aueuchten.
2. Vergewissern Sie sich, dass die
herausnehmbare Tropftasse richtig eingefügt
und in das Gerät zurückgeschoben ist.
3. Stellen Sie sicher, dass die obere
Platte geschlossen ist. Dies erlaubt
ezienteres Vorheizen.
4. Drehen Sie den Drehregler für die Neigung
der unteren Platte auf FLAT (EBEN).
5. Stellen Sie den Drehregler für variable
Temperatureinstellungen auf SANDWICH ein.
6. Lassen Sie den Grill vorheizen, bis die rote
Heizanzeigeleuchte erlischt.
7. Währenddessen bereiten Sie das Sandwich
vor und legen Sie es auf die untere Platte.
Legen Sie die Sandwiches immer näher an
den hinteren Rand der unteren Kochäche.
8. Benutzen Sie den Bügel um die obere
Platte zu schließen. Die obere Platte ist
an einem schwebenden Scharniersystem
montiert, das so gebaut ist, dass
überall gleichmäßiger Druck auf das
Sandwich ausgeübt wird. Die einstellbare
Höhenverstellung beim Grillen an der
rechten Seite der oberen Platte dient dazu,
die Höhe auf die Dicke des Sandwiches
einzustellen. Der Gri zum Flachstellen
auf der rechten Seite der oberen Grillplatte
kann dazu benutzt werden, die obere Platte
waagrecht zu stellen.
DE
HINWEIS
Lassen Sie den Grill immer vorheizen,
bis die rote Heizanzeigeleuchte erlischt.
15
Page 16
ANWENDUNG IHRES NEUEN SAGE® GERÄTS
Das Toasten sollte ungefähr 5 – 8 Minuten
9.
dauern. Die genaue Toastzeit hängt von
Ihren persönlichen Vorlieben ab und
von der Sorte Brot und der Füllung, die
Sie verwenden.
10. Wenn das Sandwich getoastet ist, benutzen
Sie den Bügel, um die obere Platte
anzuheben. Nehmen Sie das Sandwich mit
Hilfe einer Kunststospachtel heraus. Sie
sollten niemals metallische Greifzangen
oder ein Messer dazu verwenden, weil
Sie dadurch die Antihaftbeschichtung
beschädigen könnten.
ANWENDUNG DER
EINSTELLBAREN
HÖHENVERSTELLUNG
ZUM GRILLEN
Die Vorrichtung zur einstellbaren
Höhenverstellung erlaubt es Ihnen, den Grill
auch als Toaster zu verwenden und oene
Sandwiches anzuschmelzen. Sie können
damit auch delikate Zutaten wie Fisch
oder Hamburgerbrötchen grillen, ohne sie
zu zerdrücken.
1. Lassen Sie den Grill vorheizen, bis die rote
Heizanzeigeleuchte erlischt.
2. Legen Sie das Grillgut auf die untere Platte.
3. Bringen Sie den Schieber für die einstellbare
Höhe beim Grillen auf der rechten Seite des
Grills auf die gewünschte Höhe.
4. Senken Sie die obere Kochäche
langsam nach unten, indem Sie dazu
den ausgleichenden Haltebügel auf der
rechten oberen Seite der Platte benutzen,
bis die entsprechende Stellung der Platte
über den Lebensmitteln erreicht ist.
5. Die obere Platte strahlt die gewünschte Hitze
ab, um Zutaten wie Käse zu schmelzen
oder Speisen leicht anzugrillen.
HINWEIS
Der Schieber für die einstellbare Höhe
beim Grillen kann auf unterschiedlich
dickes oder dünnes Grillgut ausgerichtet
werden, indem Sie den Schieber entlang
dem Bügel nach vorne oder nach
hinten schieben.
DREHREGLER FÜR DIE NEIGUNG
DER UNTEREN PLATTE
1. Um die untere Platte in eine schräge
Stellung zu bringen, drehen Sie den
Drehregler für die Neigung der unteren
Platte einfach gegen den Uhrzeigersinn
bis der Drehregler auf ANGLE
(ANGEWINKELT) steht. Diese Position
ist ideal, um die größtmögliche Menge
Fett abzuleiten, wenn Sie den Grill in der
geschlossenen Position benutzen.
2. Um die untere Platte in eine ebene Stellung
zu bringen, drehen den Drehregler für die
Neigung der unteren Platte einfach im
Uhrzeigersinn bis der Schalter auf FLAT
(EBEN) steht.
16
Page 17

ANWENDUNG IHRES NEUEN SAGE® GERÄTS
DREHREGLER FÜR VARIABLE
TEMPERATUREINSTELLUNGENL
Der Grill weist einen Drehregler für variable
Temperatureinstellungen auf. Wählen Sie damit
einfach jene Temperatur, die für die Zubereitung
Ihrer Speisen am besten geeignet ist.
Wenn der Drehregler auf SEAR (ANBRATEN)
eingestellt ist, ist die Temperatur genau
richtig zum Grillen von Fleisch und anderen
Lebensmitteln.
Wenn der Drehregler auf SANDWICH
eingestellt ist, haben Sie die richtige Temperatur
um Sandwiches zu toasten.
15 MINUTEN TIMER
Der Sage® Grill hat einen 15 Minuten Timer,
mit dem Sie überwachen können, wieviel Zeit
beim Aufwärmen oder beim Kochen bereits
abgelaufen ist. Um den Timer einzustellen,
drehen Sie den Drehregler im Uhrzeigersinn voll
auf die 15 Minuten-Einstellung und dann gegen
den Uhrzeigersinn, bis er auf die gewünschten
Minuten eingestellt ist. Der Timer klingelt einmal,
wenn die gewünschte Zeit abgelaufen ist. Der
Grill schaltet sich dabei nicht aus, sondern wird
weiterhin erhitzen.
DE
17
Page 18

PFLEGE & REINIGUNG IHRES SAGE® GERÄTS
Vor dem Reinigen schalten Sie das Gerät an
dem EIN/AUS Schalter aus, schalten Sie die
Steckdose aus und ziehen Sie das Netzstecker
ab. Lassen Sie den Grill abkühlen, bevor Sie ihn
reinigen. Der Grill ist einfacher zu reinigen, wenn
er noch ein wenig warm ist.
Reinigen Sie den Grill immer nach jedem
Gebrauch, um zu verhindern, dass sich
angebackene Speiserückstände ansammeln.
Wischen Sie Speiserückstände mit einem
weichen Reinigungstuch von den Kochplatten.
Um angebackene Speiserückstände zu
entfernen, spritzen Sie ein wenig Wasser
mit Spülmittel auf die Speiserückstände
und reinigen Sie die Platte mit einem nicht
kratzenden Kunststo-Scheuerlappen.
REINIGUNG DER ABTROPFTASSE
Nehmen Sie die Abtropftasse nach jedem
Gebrauch heraus, entleeren Sie die Tasse und
waschen Sie sie in warmem, seigem Wasser.
Vermeiden Sie es, dazu Topfscheuerlappen
oder scharfe Reinigungsmittel zu benutzen,
da die Oberäche beschädigt werden könnte.
Verwenden Sie ein sauberes, weiches
Geschirrtuch zum Abspülen und Trocknen.
QUANTANIUM KRATZFESTE
BESCHICHTUNG
YIhr Grill hat eine ganz besondere, kratzfeste
Antihaftbeschichtung, die es erlaubt, auch
Küchenutensilien aus Metall beim Kochen
zu benutzen.
Dessen ungeachtet empehlt Sage
Sie sorgsam mit der Antihaftbeschichtung
umgehen, besonders, wenn Sie metallische
Utensilien verwenden. Sage® kann nicht
für Schäden an der Antihaftbeschichtung
haftbar gemacht werden, wenn metallische
Gegenstände falsch verwendet wurden.
Das Kochen auf einer nicht haftenden
Oberäche reduziert die Notwendigkeit für
Speiseöl auf ein Minimum, Speisen haften nicht
an und die Reinigung des Geräts ist einfacher.
®
, dass
Mögliche Verfärbungen, die auftreten können,
können höchstens vom Aussehen des Grills
ablenken, beeinussen jedoch nicht die
Kochleistung.
Benutzen Sie keine metallischen (oder andere,
scheuernde) Scheuerlappen zur Reinigung
der Antihaftbeschichtung. Reinigen Sie mit
warmem, seigem Wasser. Hartnäckige
Speiserückstände können mit einem nicht
scheuernden Kunststo-Scheuerlappen oder
einer Nylon-Abwaschbürste entfernt werden.
WARNUNG
Tauchen Sie keinen Teil des
Grill in Wasser oder andere
Flüssigkeiten.
AUFBEWAHRUNG
Um Ihren Grill zu verstauen:
1. Schalten Sie den Grill aus und ziehen Sie
den Netzstecker von der Steckdose ab.
2. Lassen Sie den Grill vollständig abkühlen.
3. Schieben Sie die Klammer an der
Höhenverstellung nach vorne in Richtung
Bügel in die LOCK (SPERRE) Stellung,
so dass die obere und die untere Kochplatte
zusammen verriegelt sind.
4. Schieben Sie die herausnehmbare
Tropftasse in die richtige Position.
5. Wickeln Sie das Netzkabel in die
Kabelaufbewahrung unter dem Gerät.
6. Verstauen Sie den Grill auf einer achen,
trockenen, ebenen Fläche.
18
Page 19

PFLEGE & REINIGUNG IHRES SAGE® GERÄTS
HINWEIS
Der Bequemlichkeit halber können Sie den
Grill zum Verstauen senkrecht aufstellen.
DE
19
Page 20

GARANTIE
2 JAHRE BESCHRÄNKTE
GARANTIE
Sage Appliances gibt auf dieses Produkt für den
häuslichen Gebrauch in bestimmten Gebieten
eine Garantie über 2 Jahre ab Kaufdatum für
Mängel, die durch fehlerhafte Verarbeitung
und Materialien verursacht wurden. Während
dieser Garantiezeit wird Sage Appliances
jedes fehlerhafte Produkt reparieren, ersetzen
oder das Geld zurückerstatten (nach eigenem
Ermessen von Sage Appliances).
Alle gesetzlichen Gewährleistungsrechte nach
geltendem nationalem Recht werden beachtet
und durch unsere Garantie nicht beeinträchtigt.
Die vollständigen Garantiebestimmungen
und -bedingungen sowie Hinweise zur
Geltendmachung von Ansprüchen nden Sie
unter www.sageappliances.com.
20
Page 21

the BBQ Grill
800GR
FR
™
FR
GUIDE RAPIDE
Page 22

TABLE DES MATIÈRES
2 Sage® recommande la sécurité en
premier
5 Découverte de votre nouvel appareil
6 Fonctionnement de votre nouvel appareil
9 Entretien et nettoyage
10 Garantie
SAGE®
RECOMMANDE
LA SÉCURITÉ EN
PREMIER
Chez Sage®, la sécurité
est une priorité. Nous
concevons et fabriquons
des appareils en mettant
votre sécurité au
premier plan. Nous vous
demandons également
de faire attention lorsque
vous utilisez un appareil
électrique et de respecter
les consignes suivantes.
CONSIGNES
DE SÉCURITÉ
IMPORTANTES
LISEZ TOUTES LES
INSTRUCTIONS AVANT
LES POUR RÉFÉRENCE
ULTÉRIEURE
• Une version téléchargeable
de ce document est
également disponible sur
sageappliances.com.
• Avant une première utilisation,
assurez-vous que l’alimentation
électrique est identique à
celle illustrée sur l’étiquette
sous l’appareil.
• Retirez tout emballage avant
la première utilisation et
éliminez-le de façon sûre.
• L’appareil est réservé à un
usage domestique. N’utilisez
pas l’appareil pour toute autre
n que son utilisation prévue.
Ne l’utilisez pas sur un bateau
ou dans des véhicules en
mouvement. Ne l’utilisez pas en
plein air. Une mauvaise utilisation
peut engendrer des blessures.
• Déroulez entièrement le cordon
d’alimentation avant utilisation.
• Placez l’appareil sur une
surface stable, résistante à la
chaleur, plane et sèche, loin
du bord. Ne l’utilisez pas sur
ou à proximité d’une source
de chaleur (plaque chauante,
four ou cuisinière au gaz).
• Ne laissez pas le cordon
d’alimentation pendre au bord
d’un plan de travail ou d’une
table, entrer en contact avec des
surfaces chaudes ou se nouer.
• Placez l’appareil à au moins
20 cm des murs ou des
matériaux sensibles à la
chaleur/vapeur et prévoyez un
espace susant au-dessus
et sur tous les côtés pour la
circulation d’air.
2
Page 23

SAGE® RECOMMANDE LA SÉCURITÉ EN PREMIER
FR
• Assurez-vous que le cordon
d’alimentation ne reste pas
coincé entre les plaques
chauantes supérieure et
inférieure de l’appareil pendant
l’utilisation ou lorsqu’il est rangé.
• Ne laissez pas l’appareil
sans surveillance lorsqu’il
est en marche.
• L’appareil ne doit pas être
utilisé avec une minuterie
externe ou un système de
commande à distance séparé.
• Ne placez rien au-dessus du
gril lorsque le couvercle est
fermé, ni lorsque l’appareil est
utilisé ou rangé.
L’appareil est marqué
avec un symbole surface
CHAUDE. Le couvercle
et les autres surfaces
deviennent chauds lorsque
l’appareil est en marche et
pendant quelques temps après
son utilisation. An d’éviter les
brûlures, utilisez toujours des
gants isolants, les poignées ou
les boutons au besoin.
• Assurez-vous toujours que
l’appareil est hors tension,
débranché de la prise électrique
et refroidi avant de le nettoyer,
de le déplacer ou de le ranger.
• N’utilisez pas l’appareil si le
cordon d’alimentation, la prise
ou l’appareil est endommagé
de quelque manière que ce soit.
En cas de dommages ou si un
entretien autre que le nettoyage
est nécessaire, contactez le
service client Sage ou consultez
le site sageappliances.com
• Tout entretien autre que le
nettoyage doit être réalisé
par un centre de services
®
Sage
agréé.
• Les enfants ne doivent
pas jouer avec l’appareil.
• Cet appareil peut être
utilisé par des enfants âgés
de 8 ans ou plus et des
personnes aux capacités
mentales, sensorielles ou
physiques réduites, ou ayant
peu d’expérience et de
connaissances, uniquement
sous supervision ou s’ils ont
reçu des instructions sur
l’utilisation sécuritaire de
l’appareil et qu’ils comprennent
les risques impliqués.
• Le nettoyage de l’appareil ne
doit pas être eectué par des
enfants à moins qu’ils aient
8 ans ou plus, et ce, sous la
surveillance d’un adulte.
• L’appareil et son cordon doivent
être conservés hors de la portée
des enfants de 8 ans et moins.
• L’installation d’un commutateur
de sécurité de courant résiduel
est recommandée pour fournir
une sécurité supplémentaire
lors de l’utilisation de tous
les appareils électriques.
3
Page 24

SAGE® RECOMMANDE LA SÉCURITÉ EN PREMIER
Les commutateurs de
sécurité avec un courant
de fonctionnement nominal
maximal de 30 mA sont
recommandés. Consultez un
électricien pour obtenir des
conseils professionnels.
Le symbole illustré indique
que cet appareil ne doit pas
être jeté aux ordures
ménagères. Il doit être
amené dans un centre de collecte
de déchets local agréé désigné à
cette n ou à un revendeur
proposant ce service. Pour en
savoir plus, veuillez contacter le
bureau de votre municipalité.
An d’éviter tout risque de
décharge électrique, ne
plongez pas la prise
électrique, le cordon ou l’appareil
dans de l’eau ou dans un autre
liquide.
CONSERVEZ CES INSTRUCTIONS
4
Page 25

DÉCOUVERTE DE VOTRE NOUVEL APPAREIL
FR
F
G
H
J
I K L M
A. Bouton de verrouillage du gril
B. Corps en acier inoxydable
C. Puissance 2 400 watts
D. Poignée de réglage
E. Plaque supérieure mobile articulée unique
F. Plaque supérieure à nervures non
adhésive Quantanium™
G. Plaque inférieure plate non adhésive
Quantanium™
D
H. Bac d’égouttement amovible
I. Interrupteur marche/arrêt
J.
K. Bouton de commande d’inclinaison
de la plaque inférieure
L. Minuteur 15 minutes
M. Bouton de réglage de la température
N. Hauteur de grillage réglable
BCE A
N
Informations sur la tension nominale
220–240 V ~50–60 Hz 2 000–2 400 W
5
Page 26

FONCTIONNEMENT DE VOTRE NOUVEL APPAREIL
AVANT LA PREMIÈRE UTILISATION
Retirez tous les emballages et toutes les
étiquettes promotionnelles avant la première
utilisation et éliminez-les de façon sûre. Vériez
que les plaques de cuisson sont propres et
exemptes de poussières. Essuyez-les avec un
chion humide s’il le faut.
Lorsque vous utilisez le gril pour la première
fois, une petite fumée peut sortir de l’appareil.
Cela est causé par le chauage de certains
composants. Il n’y a pas à s’inquiéter.
POUR UTILISER LE GRIL OUVERT
1. Branchez le cordon d’alimentation à une prise
de courant de 220 à 240 V et mettez l’appareil
sous tension avec le bouton de marche/arrêt.
Le voyant rouge de chauage s’allume.
2. Assurez-vous de remettre le bac
d’égouttement amovible dans l’appareil
et de l’insérer correctement.
REMARQUE
Le verrou du gril est automatiquement
réinitialisé lorsqu’il est remis en position
fermée.
8. Placez la viande ou les aliments à griller sur
l’une ou sur les deux plaques de cuisson.
9. Une fois l’aliment grillé, retirez-le avec une
spatule en plastique.
POUR UTILISER LE GRIL FERMÉ
1. Branchez le cordon d’alimentation à une
prise de courant de 220 à 240 V et mettez
l’appareil sous tension. Placez le bouton de
marche/arrêt sur ON (Marche). Le voyant
rouge de chauage s’allume.
2. Assurez-vous de remettre le bac
d’égouttement amovible dans l’appareil et
de l’insérer correctement.
3. Assurez-vous que la plaque supérieure est en
position fermée pour un meilleur préchauage.
4. Tournez le bouton d’inclinaison de la plaque
de base en position FLAT (HORIZONTALE).
5. Tournez le réglage variable de la
température sur SEAR (GRILLER) pour un
préchauage rapide.
6. Laissez le gril se préchauer jusqu’à ce que
le voyant rouge de chauage s’éteigne.
7. Vous devez fermer le gril pour ouvrir le
verrou. Tournez le bouton de verrouillage du
gril sur le côté du gril en position horizontale,
et avec la poignée, ramenez la plaque
supérieure en position ouverte.
6
3. Assurez-vous que la plaque supérieure
est en position fermée pour un meilleur
préchauage.
4. Tournez le bouton d’inclinaison de la plaque
de base en position ANGLE (ANGULAIRE)
ou FLAT (HORIZONTALE).
5. Tournez le réglage variable de la
température sur SEAR (GRILLER) pour un
préchauage rapide.
6. Laissez le gril se préchauer jusqu’à ce que
le voyant rouge de chauage s’éteigne.
Page 27

FONCTIONNEMENT DE VOTRE NOUVEL APPAREIL
FR
7. Utilisez la poignée pour ramener la plaque
supérieure à 90°.
8. Placez la viande ou les aliments à griller sur
la plaque de cuisson de base.
9. Utilisez la poignée pour fermer la plaque
supérieure. La plaque supérieure est équipée
d’un système d’articulation mobile conçu
pour se refermer de façon uniforme sur
les aliments. Le contrôle de la hauteur du
grillage à droite de la plaque supérieure sert
à régler le gril en fonction de l’épaisseur de
l’aliment. La poignée de réglage à droite de
la plaque supérieure peut servir à mettre la
plaque supérieure au bon niveau. Abaissez
entièrement la plaque supérieure pour laisser
les marques de grillage sur les aliments.
REMARQUE
Le témoin rouge de chauage s’allume et
s’éteint pendant le processus de grillage
indiquant que la bonne température est
maintenue.
UTILISATION COMME PRESSESANDWICH
1. Branchez le cordon d’alimentation à une
prise de courant de 220 à 240 V et mettez
l’appareil sous tension. Placez le bouton de
marche/arrêt sur ON (Marche). Le voyant
rouge de chauage s’allume.
2. Assurez-vous de remettre le bac
d’égouttement amovible dans l’appareil et
de l’insérer correctement.
3. Assurez-vous que la plaque supérieure
est en position fermée pour un meilleur
préchauage.
4. Tournez le bouton d’inclinaison de la plaque
de base en position FLAT (HORIZONTALE).
5. Placez le bouton de réglage variable de la
température sur SANDWICH.
6. Laissez le gril se préchauer jusqu’à ce que
le voyant rouge de chauage s’éteigne.
7. Pendant ce temps, préparez le sandwich
et mettez-le sur la plaque de base. Placez
toujours les sandwichs à l’arrière de la
plaque de base.
8. Utilisez la poignée pour fermer la plaque
supérieure. La plaque supérieure est
équipée d’un système d’articulation mobile
conçu pour se refermer de façon uniforme
sur le sandwich. Le contrôle de la hauteur
du grillage, à droite de la plaque supérieure,
sert à régler le gril en fonction de l’épaisseur
du sandwich. La poignée de réglage à droite
de la plaque supérieure peut servir à mettre
la plaque supérieure au bon niveau.
REMARQUE
Laissez toujours le gril se préchauer
jusqu’à ce que le voyant rouge de
chauage s’éteigne.
9. Environ 5 à 8 minutes sont nécessaires pour
le grillage. La durée exacte du grillage est
une question de préférence. Elle dépendra
par ailleurs du type de pain et du type
d’ingrédients utilisés.
10. Lorsque le sandwich est grillé, utilisez la
poignée pour ouvrir la plaque supérieure.
Retirez le sandwich avec une spatule en
plastique. N’utilisez jamais des pinces
de service en métal ou un couteau, car
ils peuvent endommager le revêtement
anti-adhésif des plaques de cuisson.
UTILISATION DE LA FONCTION DE
RÉGLAGE DE LA HAUTEUR
Elle permet de griller des tartines fondantes
avec le gril. Elle permet d’utiliser le gril des
ingrédients délicats comme le poisson et les
pains à hamburger sans les écraser.
1. Laissez le gril se préchauer jusqu’à ce que
le voyant rouge de chauage s’éteigne.
2. Mettez les aliments à griller sur la plaque
de base.
7
Page 28

FONCTIONNEMENT DE VOTRE NOUVEL APPAREIL
3. Déplacez le bouton de contrôle de la
hauteur à droite du gril à la hauteur
souhaitée.
4. Abaissez doucement la plaque supérieure
avec la poignée de réglage dans le coin
supérieur droit de la plaque jusqu’à ce
qu’elle atteigne la bonne position au-dessus
de la nourriture.
5. La plaque supérieure diusera la
chaleur souhaitée pour faire fondre
les ingrédients comme le fromage
ou griller doucement les aliments.
2. Pour mettre la plaque de base en position
horizontale, tournez le bouton d’inclinaison
de la plaque de base dans le sens des
aiguilles d’une montre jusqu’à la position
horizontale souhaitée.
BOUTON DE RÉGLAGE DE LA
TEMPÉRATURE
Le gril est équipé d’un bouton de réglage
variable de la température. Sélectionnez
simplement la température adaptée aux
aliments que vous grillez.
Lorsque le bouton est réglé sur SEAR (Saisir),
la température est parfaitement adaptée pour
griller des viandes ou d’autres aliments.
Lorsque le bouton est réglé sur SANDWICH,
la température est parfaitement adaptée pour
griller les sandwichs.
MINUTEUR 15 MINUTES
Le gril Sage® est équipé d’un minuteur
15 minutes qui permet de surveiller le temps
écoulé pendant le préchauage ou la cuisson.
Pour régler le minuteur, tournez à fond le bouton
dans le sens des aiguilles d’une montre jusqu’à
15, puis dans le sens contraire des aiguilles
d’une montre pour sélectionner les minutes
souhaitées. Le minuteur sonne une fois lorsque
le temps désiré est écoulé. Le gril ne s’éteindra
pas, il continuera de chauer.
REMARQUE
Vous pouvez ajuster la hauteur de grillage
en fonction de la taille des aliments en
faisant coulisser le bouton de réglage de
la hauteur vers l’avant ou vers l’arrière le
long du bras.
BOUTON D’INCLINAISON DE LA
PLAQUE DE BASE
1. Pour mettre la plaque de base en position
inclinée, tournez simplement le bouton
d’inclinaison de la plaque de base dans le
sens contraire des aiguilles d’une montre
jusqu’à la position d’angle souhaitée. Cette
position est parfaitement adaptée pour faire
évacuer le maximum de graisse lorsque
vous utilisez l’appareil comme gril fermé.
8
Page 29

ENTRETIEN ET NETTOYAGE
FR
Avant le nettoyage, éteignez le gril avec le bouton
de marche/arrêt et débranchez-le. Laissez le gril
refroidir avant de le nettoyer. L’appareil est plus
facile à nettoyer lorsqu’il est légèrement chaud.
Veillez à toujours nettoyer le gril après chaque
utilisation pour éviter l’accumulation de résidus
d’aliments cuits.
Essuyez les plaques de cuisson avec un chion
doux pour enlever les résidus d’aliments. Pour
les résidus tenaces, mouillez-les avec un peu
d’eau tiède savonneuse et nettoyez les plaques
avec une éponge à récurer non abrasive.
NETTOYAGE DU BAC
D’ÉGOUTTEMENT
Retirez et videz le bac d’égouttement après
chaque utilisation et lavez-le avec de l’eau
tiède savonneuse. Évitez d’utiliser des éponges
abrasives ou des détergents puissants, car ils
risqueraient d’endommager la surface. Rincez
et séchez soigneusement avec un chion doux
propre et remettez-le en place.
REVÊTEMENT RÉSISTANT AUX
RAYURES QUANTANIUM
Votre gril est équipé d’un revêtement spécial
anti-adhésif résistant aux rayures, ce qui vous
permet d’utiliser en toute sécurité des ustensiles
en métal pendant la cuisson.
Malgré cela, Sage
attention au revêtement non adhésif, surtout
lorsque vous utilisez des ustensiles en métal.
N’utilisez pas des objets tranchants et ne
coupez pas les aliments dans le gril. Sage
n’est pas responsable des dommages causés
au revêtement anti-adhésif dus à une mauvaise
utilisation des ustensiles en métal.
Griller des aliments sur une surface non adhésive
permet d’utiliser moins d’huile, empêche les
aliments de coller et facilite le nettoyage.
La survenue d’une décoloration modie
uniquement l’apparence de l’appareil, mais
n’aecte pas les performances de cuisson.
N’utilisez pas d’éponges à récurer
métalliques (ou tout autre produit abrasif)
pour nettoyer le revêtement antiadhésif.
Lavez-le dans de l’eau chaude savonneuse.
Enlevez les résidus tenaces avec une
éponge à récurer non abrasive ou avec
une brosse de nettoyage en nylon.
®
recommande de faire
®
RANGEMENT
Pour ranger votre gril :
1. Éteignez le gril avec le bouton de marche/
arrêt et débranchez-le.
2. Laissez le gril refroidir complètement.
3. Glissez le bouton de rangement vers
la poignée avant en position LOCK
(VERROUILLÉE) pour verrouiller ensemble les
plaques de cuisson supérieure et inférieure.
4. Faites glisser le bac d’égouttement
amovible pour le mettre en place.
5. Enroulez le cordon d’alimentation dans
l’espace de rangement situé sous l’appareil.
6. Rangez l’appareil sur une surface plane et
sèche.
REMARQUE
Pour plus de commodité, vous pouvez
ranger le gril en position verticale.
AVERTISSEMENT
Ne plongez aucune pièce du gril
dans de l’eau ou tout autre liquide.
9
Page 30

GARANTIE
GARANTIE LIMITÉE 2 ANS
Sage Appliances garantit ce produit pour
un usage domestique sur les territoires
spéciés pendant 2 ans à compter de la date
d’achat, contre les défauts de fabrication
et de matériaux. Au cours de cette période
de garantie, Sage Appliances s’engage à
réparer, remplacer ou rembourser tout produit
défectueux (à sa seule discrétion).
Tous les droits de garantie légaux en vertu de la
législation nationale applicable seront respectés
et ne seront pas compromis par notre garantie.
Pour connaître les conditions générales
complètes relatives à la garantie ou pour obtenir
des instructions sur la manière de déposer une
réclamation, rendez-vous sur
www.sageappliances.com.
10
Page 31

the BBQ Grill
800GR
NL
™
NL
SNELSTARTGIDS
Page 32

INHOUD
2 Sage® stelt veiligheid voorop
5 Uw nieuwe apparaat leren kennen
6 Uw nieuwe apparaat gebruiken
9 Onderhoud en reiniging
10 Garantie
SAGE® STELT
VEILIGHEID
VOOROP
Bij Sage® gaan we zeer
veiligheidsbewust te
werk. Bij het ontwerpen
en produceren van onze
apparaten staat uw veiligheid
voorop. Daarnaast vragen
wij u voorzichtig om te
gaan met elektrische
apparaten en de volgende
voorzorgsmaatregelen in
acht te nemen.
BELANGRIJKE
MAATREGELEN
LEES ALLE INSTRUCTIES
VÓÓR GEBRUIK EN
BEWAAR DEZE VOOR
TOEKOMSTIGE NASLAG
• Een downloadbare
versie van dit document
is ook beschikbaar op
sageappliances.com
• Controleer vóór het
eerste gebruik of uw
elektriciteitsvoorziening dezelfde
is als die op het label aan de
onderkant van het apparaat.
• Verwijder voor het
eerste gebruik het
verpakkingsmateriaal en gooi
het op een veilige manier weg.
• Het apparaat is alleen voor
huishoudelijk gebruik. Gebruik
het apparaat alleen voor het
beoogde gebruik. Gebruik het
niet in bewegende voertuigen
of boten. Gebruik het niet
buitenshuis. Verkeerd gebruik
kan tot letsel leiden.
• Wikkel het netsnoer volledig af
voordat u het apparaat gebruikt.
• Plaats het apparaat op een
stabiele, hittebestendige,
vlakke, droge ondergrond,
weg van de rand, en gebruik
het niet op of in de buurt van
een warmtebron zoals een
kookplaat, oven of gasfornuis.
• Zorg dat het netsnoer niet over
de rand van een aanrecht of
tafel hangt, in aanraking komt
met hete oppervlakken of in
de knoop raakt.
• Plaats het apparaat op minstens
20 cm van muren of hitte-/
stoomgevoelige materialen en
zorg voor voldoende ruimte
boven en aan weerskanten
voor luchtcirculatie.
2
Page 33

SAGE® STELT VEILIGHEID VOOROP
NL
• Zorg ervoor dat het netsnoer
niet vast komt te zitten tussen
de boven- en onderplaat van
het apparaat wanneer de grill in
gebruik of opgeborgen is.
• Laat het apparaat tijdens
gebruik niet onbeheerd achter.
• Dit apparaat is niet ontworpen
om te worden bediend met
behulp van een externe
timer of een afzonderlijk
afstandsbedieningssysteem.
• Plaats niets op de grill wanneer
deze in de gesloten stand,
in gebruik of opgeborgen is.
Het apparaat is
gemarkeerd met
een symbool om te
waarschuwen voor een
HEET oppervlak. Het deksel
en andere oppervlakken zijn
gedurende en enige tijd na
gebruik heet. Gebruik altijd
beschermende ovenwanten
of gebruik de handgrepen of
knoppen wanneer beschikbaar
om brandwonden te voorkomen.
• Zorg er altijd voor dat het
apparaat UIT staat, de stekker
uit het stopcontact is gehaald
en het apparaat is afgekoeld
voordat u het reinigt, verplaatst
of opbergt.
• Gebruik het apparaat niet als
het netsnoer, de stekker of het
apparaat op enigerlei wijze
beschadigd is. Neem contact op
met de klantenservice van Sage
of ga naar sageappliances.com
als er sprake is van schade of er
ander onderhoud dan reiniging
is vereist.
• Onderhoud anders dan reiniging
moet worden uitgevoerd
door een geautoriseerd
®
Sage
-servicecentrum.
• Laat kinderen niet met het
apparaat spelen.
• Dit apparaat kan worden
gebruikt door kinderen van
8 jaar en ouder en personen
met beperkte fysieke, zintuiglijke
of mentale capaciteiten of een
gebrek aan ervaring en kennis,
mits zij worden begeleid of
instructies hebben gekregen
over het veilige gebruik van
het apparaat en de gevaren
ervan begrijpen.
• Reiniging van het apparaat
mag niet door kinderen
worden uitgevoerd, tenzij
ze ten minste 8 jaar oud zijn
en onder toezicht staan.
• Het apparaat en het snoer
moeten buiten het bereik van
kinderen jonger dan 8 jaar
worden gehouden.
3
Page 34

SAGE® STELT VEILIGHEID VOOROP
• Het wordt aanbevolen
een aardlekschakelaar
te installeren voor extra
veiligheid bij het gebruik van
alle elektrische apparaten.
Veiligheidsschakelaars met een
nominale bedrijfsstroom van
niet meer dan 30 mA worden
aanbevolen. Raadpleeg een
elektricien voor professioneel
advies.
Het weergegeven symbool
geeft aan dat dit apparaat
niet met het normale
huishoudelijke afval mag
worden weggegooid. Het moet
naar een geschikt plaatselijk
afvalverwerkingscentrum worden
gebracht of naar een provider die
deze service biedt. Neem voor
meer informatie contact op met
uw gemeente.
Dompel de stekker,
het snoer of het apparaat
niet onder in water of een
andere vloeistof om elektrische
schokken te voorkomen.
BEWAAR DEZE INSTRUCTIES
4
Page 35

UW NIEUWE APPARAAT LEREN KENNEN
NL
F
G
H
J
I K L M
A. Grillvergrendelingsknop
B. Roestvrijstalen behuizing
C. Vermogen van 2400 watt
D. Handgreep
E. Bovenplaat met uniek zwevend scharnier
F. Quantanium™ geribbelde bovenplaat met
antiaanbaklaag
G. Quantanium™ egale onderplaat met
antiaanbaklaag
D
H. Verwijderbare opvangbak
I. AAN/UIT-schakelaar
J. Rood voorverwarmlampje
K. Draaiknop voor kantelen van onderplaat
L. 15-minutentimer
M. Verstelbare temperatuurknop
N. Verstelbare klem voor grillhoogte
BCE A
N
220–240 V ~50–60 Hz 2000–2400 W
5
Page 36

UW NIEUWE APPARAAT GEBRUIKEN
VOOR HET EERSTE GEBRUIK
Verwijder voor het eerste gebruik het reclameen verpakkingsmateriaal en gooi het op een
veilige manier weg. Controleer of de platen
schoon en stofvrij zijn. Veeg ze indien nodig
schoon met een vochtige doek.
Wanneer u de grill voor het eerst gebruikt, kan
er lichte rookontwikkeling optreden. Dit wordt
veroorzaakt door de verwarming van bepaalde
onderdelen. Maakt u zich hierover geen zorgen.
GEBRUIKEN ALS OPEN GRILL
1. Sluit het netsnoer aan op een stopcontact
van 220–240 V en zet de AAN/UITschakelaar op het apparaat aan. Het rode
voorverwarmlampje gaat branden.
2. Zorg ervoor dat de verwijderbare opvangbak
correct terug in het apparaat is geplaatst.
3. Zorg ervoor dat de bovenplaat zich in de
gesloten stand bevindt voor eciënter
voorverwarmen.
4. Zet de knop voor het kantelen van de
onderplaat in de stand FLAT.
5. Zet de verstelbare temperatuurknop in de
stand SEAR (aanbraden) om de grill snel
op te warmen.
6. Laat de grill voorverwarmen tot het rode
voorverwarmlampje uitgaat.
7. De grill moet worden gesloten om
het slot te ontgrendelen. Draai de
grillvergrendelingsknop aan de zijkant van
de grill in de horizontale stand en gebruik
de handgreep om de bovenplaat in de open
stand te zetten.
OPMERKING
De grill wordt automatisch vergrendeld
wanneer deze weer in de gesloten stand
wordt gezet.
8. Leg vlees of etenswaren op een of beide
platen.
9. Wanneer het eten gaar is, verwijdert u het
met een plastic spatel.
GEBRUIKEN ALS GESLOTEN GRILL
1. Sluit het netsnoer aan op een stopcontact
van 220–240 V. Zet de AAN/UITschakelaar op het apparaat aan. Het rode
voorverwarmlampje gaat branden.
2. Zorg ervoor dat de verwijderbare
opvangbak correct terug in het apparaat
is geplaatst.
3. Zorg ervoor dat de bovenplaat zich in de
gesloten stand bevindt voor eciënter
voorverwarmen.
4. Zet de knop voor het kantelen van de
onderplaat in de stand ANGLE (hoek)
of FLAT (plat).
5. Zet de verstelbare temperatuurknop in de
stand SEAR (aanbraden) om de grill snel
op te warmen.
6. Laat de grill voorverwarmen tot het rode
voorverwarmlampje uitgaat.
6
Page 37

UW NIEUWE APPARAAT GEBRUIKEN
NL
7. Gebruik de handgreep om de bovenplaat in
een hoek van 90° te zetten.
8. Leg vlees of etenswaren op de onderplaat.
9. Gebruik de handgreep om de bovenplaat te
sluiten. De bovenplaat heeft een zwevend
scharnier dat is ontworpen om eten
gelijkmatig in te drukken. De grillhoogteknop
aan de rechterkant van de bovenplaat kan
worden afgesteld op basis van de dikte van
de etenswaren. De stelknop rechtsbovenop
kan worden gebruikt om de bovenplaat
waterpas te zetten. De bovenplaat moet
volledig worden neergelaten om grillstrepen
op de etenswaren te maken.
OPMERKING
Het rode voorverwarmlampje gaat tijdens
het bereidingsproces afwisselend aan
en uit om aan te geven dat de juiste
temperatuur wordt gehandhaafd.
1. Sluit het netsnoer aan op een stopcontact van
220–240 V. Zet de AAN/UIT-schakelaar op het
apparaat aan. Het rode voorverwarmlampje
gaat branden.
2. Zorg ervoor dat de verwijderbare
opvangbak correct terug in het apparaat is
geplaatst.
3. Zorg ervoor dat de bovenplaat zich in de
gesloten stand bevindt voor eciënter
voorverwarmen.
4. Zet de knop voor het kantelen van de
onderplaat in de stand FLAT.
5. Zet de verstelbare temperatuurknop in de
stand SANDWICH.
6. Laat de grill voorverwarmen tot het rode
voorverwarmlampje uitgaat.
7. Bereid ondertussen de boterham en plaats
deze op de onderplaat. Plaats boterhammen
niet te ver naar voren op de onderplaat.
8. Gebruik de handgreep om de bovenplaat te
sluiten. De bovenplaat heeft een zwevend
scharnier dat is ontworpen om de boterham
gelijkmatig in te drukken. De grillhoogteknop
aan de rechterkant van de bovenplaat kan
worden afgesteld op basis van de dikte van
de boterham. De stelknop rechtsbovenop
kan worden gebruikt om de bovenplaat
waterpas te zetten.
OPMERKING
Laat de grill altijd voorverwarmen tot het
rode voorverwarmlampje uitgaat.
9. Het roosteren moet zo'n 5–8 minuten duren.
De exacte roostertijd is een kwestie van
smaak. Het hangt ook af van het soort brood
en het gekozen beleg.
10. Zodra de boterham gaar is, gebruikt
u het handvat om de bovenplaat omhoog
te duwen. Verwijder de boterham met
een plastic spatel. Gebruik nooit een
metalen tang of mes: deze kunnen de
antiaanbaklaag van de platen beschadigen.
DE VERSTELBARE KLEM VOOR
GRILLHOOGTE GEBRUIKEN
Hiermee kunt u de grill gebruiken voor open tosti's.
Daarnaast kunt u delicate ingrediënten zoals vis en
hamburgerbroodjes grillen zonder ze te pletten.
1. Laat de grill voorverwarmen tot het rode
voorverwarmlampje uitgaat.
2. Plaats de etenswaren die u wilt grillen op de
onderplaat.
3. Zet de verstelbare grillklem aan de rechterkant
van de grill op de gewenste hoogte.
7
Page 38

UW NIEUWE APPARAAT GEBRUIKEN
4. Laat de bovenplaat langzaam zakken met
behulp van de stelknop rechtsbovenop
totdat de bovenplaat op de juiste hoogte
boven het eten staat.
5. De bovenplaat straalt de gewenste
warmte uit om ingrediënten zoals kaas te
smelten of etenswaren licht te grillen.
OPMERKING
De hoogteknop kan worden versteld
om ruimte te bieden aan dikke of dunne
etenswaren door de klem langs de arm
naar voren of achteren te schuiven.
KNOP VOOR HET KANTELEN VAN
DE ONDERPLAAT
1. Om de onderplaat schuin te zetten,
draait u de knop voor het kantelen van de
onderplaat linksom tot deze in de stand
ANGLE staat. Deze stand is optimaal
voor vetafvoer wanneer het apparaat
als gesloten grill wordt gebruikt.
2. Om de onderplaat vlak neer te zetten,
draait u de knop voor het kantelen van de
onderplaat rechtsom tot deze in de stand
FLAT staat.
De Sage®-grill beschikt over een
15-minutentimer waarmee u de verstreken tijd
kunt controleren tijdens het voorverwarmen
of grillen. Om de timer in te stellen, draait u
de knop eenvoudig helemaal rechtsom naar
15 en vervolgens terug tot het gewenste aantal
minuten. De timer gaat één keer af als de
gewenste tijd is verstreken. De grill gaat door
met verwarmen en wordt niet uitgeschakeld.
VERSTELBARE
TEMPERATUURKNOP
De grill heeft een verstelbare temperatuurknop.
Selecteer gewoon een temperatuur die geschikt
is voor het eten dat wordt bereid.
Met de instelling SEAR is de temperatuur
geschikt voor het grillen van vlees of andere
etenswaren.
Met de instelling SANDWICH is de temperatuur
geschikt voor het maken van tosti's.
8
Page 39

ONDERHOUD EN REINIGING
Zet de grill vóór reiniging uit met de AAN/UITknop en trek de stekker uit het stopcontact. Laat
uw grill afkoelen voordat u begint met reinigen.
Het apparaat is gemakkelijker te reinigen als het
nog een beetje warm is.
Reinig uw grill na elk gebruik om ophoping van
vastgekoekte etensresten te voorkomen.
Veeg de platen af met een zachte doek om
etensresten te verwijderen. Als etensresten zijn
vastgekoekt, knijpt u wat warm water vermengd
met reinigingsmiddel over de resten en reinigt
u ze vervolgens met een krasvrij synthetisch
schuursponsje.
DE OPVANGBAK REINIGEN
De opvangbak moet na elk gebruik worden
verwijderd, geleegd en in warm zeepsop
afgewassen. Vermijd schuursponsjes of
agressieve reinigingsmiddelen, omdat deze het
oppervlak kunnen beschadigen. Spoel en droog
goed af met een schone, zachte doek en plaats
de opvangbak terug.
QUANTANIUM KRASBESTENDIGE
ANTIAANBAKLAAG
Uw grill is voorzien van een speciale
krasbestendige antiaanbaklaag zodat u veilig
metalen keukengerei kunt gebruiken tijdens grillen.
Desondanks raadt Sage
te zijn met de antiaanbaklaag, vooral bij het
gebruik van metalen keukengerei.
Gebruik geen scherpe voorwerpen en snijd
etenswaren niet rechtstreeks op de grill.
®
Sage
is niet aansprakelijk voor schade aan
de antiaanbaklaag bij verkeerd gebruik van
metalen keukengerei.
Door op een antiaanbaklaag te grillen, heeft
u minder olie nodig, blijven etenswaren niet
vastplakken en zijn de platen gemakkelijker te
reinigen.
Eventuele verkleuring zal uitsluitend afbreuk
doen aan het uiterlijk van de grill en is niet van
invloed op de grillprestaties.
Gebruik bij het reinigen van de
antiaanbaklaag geen schuursponsjes van
metaal of ander schurend materiaal. Was
af in warm zeepsop. Verwijder hardnekkige
resten met een krasvrij synthetisch
schuursponsje of nylon afwasborstel.
®
aan om voorzichtig
NL
WAARSCHUWING
Dompel geen enkel deel van
de grill onder in water of een
andere vloeistof.
OPBERGEN
De grill opbergen:
1. Zet het apparaat uit met de AAN/UIT-knop
en trek de stekker uit het stopcontact.
2. Laat de grill volledig afkoelen.
3. Schuif de opbergklem richting het handvat
vooraan in de stand LOCK (vergrendeld),
zodat de boven- en onderplaten vast blijven
zitten.
4. Schuif de verwijderbare opvangbak op zijn
plaats.
5. Wikkel het snoer op in de
snoeropbergruimte onder het apparaat.
6. Opbergen op een vlak, droog oppervlak.
OPMERKING
Voor extra gemak kan de grill rechtop
worden opgeborgen.
9
Page 40

GARANTIE
BEPERKTE GARANTIE VAN 2 JAAR
Sage Appliances biedt een garantie op dit
product voor huishoudelijk gebruik in genoemde
gebieden gedurende 2 jaar vanaf de datum
van aankoop tegen defecten veroorzaakt
door gebrekkige afwerking en materialen.
Gedurende deze garantieperiode zal Sage
Appliances defecte producten repareren,
vervangen of terugbetalen (naar eigen
goeddunken van Sage Appliances).
Alle wettelijke garantierechten onder de
toepasselijke nationale wetgeving worden
gerespecteerd en onze garantie doet geen
afbreuk aan deze rechten. Voor de algemene
voorwaarden van de garantie, evenals
instructies over hoe u aanspraak maakt op de
garantie, gaat u naar
www.sageappliances.com.
10
Page 41

ES
the BBQ Grill
800GR
™
ES
GUÍA RÁPIDA
Page 42

ÍNDICE
2 Sage® recomienda seguridad ante todo
4 Conoce tu nuevo electrodoméstico
5 Manejo de tu nuevo electrodoméstico
8 Cuidado y limpieza
9 Garantía
SAGE®
RECOMIENDA
SEGURIDAD
ANTE TODO
En Sage® nos preocupa
mucho la seguridad.
Diseñamos y fabricamos
electrodomésticos teniendo
en cuenta tu seguridad.
También te rogamos que
actúes cuidadosamente
al usar cualquier electrodoméstico y que tomes las
precauciones siguientes.
MEDIDAS
DE SEGURIDAD
IMPORTANTES
LEE TODAS LAS INSTRUC
CIONES ANTES DEL USO
Y GUÁRDALAS
• Hay una versión de este documento disponible para descargar en sageappliances.com
• Antes de usar el producto por
primera vez, asegúrate de que
la tensión eléctrica de la toma
de corriente coincida con la que
gura en la etiqueta en la base
del electrodoméstico.
• Retira y desecha de forma
apropiada los materiales de
embalaje antes del primer uso.
• Este aparato es solo para uso
doméstico. No se debe utilizar
para nes distintos de su uso
previsto. No se debe utilizar en
vehículos o embarcaciones en
movimiento. No se debe utilizar
al aire libre. El uso inapropiado
podría causar lesiones.
• Desenrolla completamente
el cable de alimentación antes
de usar el aparato.
• Coloca el aparato sobre una
supercie estable, resistente
al calor, nivelada y seca. No lo
pongas muy cerca del borde
ni cerca de una fuente de calor
(por ejemplo, una placa de
cocina eléctrica, un quemador
de gas o un horno).
• Evita que el cable de alimentación sobresalga del borde de
una encimera o una mesa, entre
en contacto con supercies
calientes o se enrede.
• Coloca el aparato a una
distancia mínima de 20 cm
de las paredes o de materiales
sensibles al calor/vapor y deja
un espacio adecuado por
encima y por todos los lados
para que circule el aire.
• Comprueba que el cable
de alimentación no quede
atrapado ente las placas
del aparato durante el uso
o almacenamiento.
• Supervisa el aparato en todo
momento mientras esté en
funcionamiento.
• Este aparato no está diseñado
para utilizarse mediante un temporizador externo o un sistema
de control remoto independiente.
2
Page 43

SAGE® RECOMIENDA SEGURIDAD ANTE TODO
ES
• No coloques nada sobre el
aparato cuando esté cerrado,
ya sea durante el uso o almacenamiento.
Este símbolo indica que
la supercie está caliente.
La tapa y las demás
supercies estarán
calientes mientras el
aparato esté en funcionamiento
y durante un tiempo después
del uso. Para evitar quemaduras, utiliza manoplas aislantes o
usa las asas y diales según sea
apropiado.
• Antes de limpiar, mover
o guardar el electrodoméstico,
asegúrate siempre de que esté
apagado (OFF) y desenchufado
de la toma de corriente, y de
que se haya enfriado tras el uso.
• No lo utilices si el cable de
alimentación, el enchufe
o el aparato propiamente dicho
están dañados. Si existe algún
daño o se requiere algún tipo
de mantenimiento (que no sea
la limpieza), ponte en contacto
con el servicio de atención
al cliente de Sage o visita
sageappliances.com
• Cualquier tarea de mantenimiento que no sea de limpieza
debe realizarla un Centro de
servicio autorizado de Sage
®
• No permitas que los niños
jueguen con el aparato.
• El aparato puede ser utilizado
por niños mayores de 8 años
y personas con discapacidades físicas o mentales, o sin
experiencia ni conocimientos de
uso, siempre y cuando reciban
supervisión o instrucciones
para el uso seguro del dispositivo y comprendan los riesgos
implicados.
• La limpieza del aparato no debe
ser realizada por niños a menos
que sean mayores de 8 años
y estén supervisados por un
adulto.
• El aparato y el cable deben
mantenerse fuera del alcance
de los niños menores de 8 años.
• Se recomienda la instalación
de un interruptor diferencial
para ofrecer seguridad adicional al usar todos los aparatos
eléctricos. Se recomienda usar
interruptores de seguridad con
una corriente de funcionamiento
nominal de no más de 30 mA.
Solicita asesoramiento profesional a un electricista.
El símbolo mostrado aquí
indica que este aparato no
debe desecharse con la
basura doméstica normal.
Debe llevarse a un centro de
recogida de residuos designado
por las autoridades locales para
ese n, o a una empresa que
preste ese servicio. Para obtener
más información, ponte en
contacto con los servicios
.
municipales.
Para evitar descargas
eléctricas, no sumerjas el
enchufe, el cable de alimentación ni el electrodoméstico en
agua u otros líquidos.
GUARDA ESTAS INSTRUCCIONES
3
Page 44

CONOCE TU NUEVO ELECTRODOMÉSTICO
F
G
H
J
I K L M
A. Dial de bloqueo de la parrilla
B. Cuerpo de acero inoxidable
C. 2400 vatios de potencia
D. Asa de nivelación
E. Placa superior con exclusiva bisagra
F. Placa superior acanalada antiadherente
Quantanium™
G. Placa de fondo plano antiadherente
de Quantanium™
D
H. Bandeja de goteo extraíble
I. Interruptor de encendido/apagado
J. Luz roja de calentamiento
K. Disco de inclinación de la placa inferior
L. Reloj temporizador de 15 minutos
M. Dial de control de temperatura variable
N. Altura de grill ajustable
BCE A
N
Datos técnicos
220-240 V ~ 50–60 Hz 2000–2400 W
4
Page 45
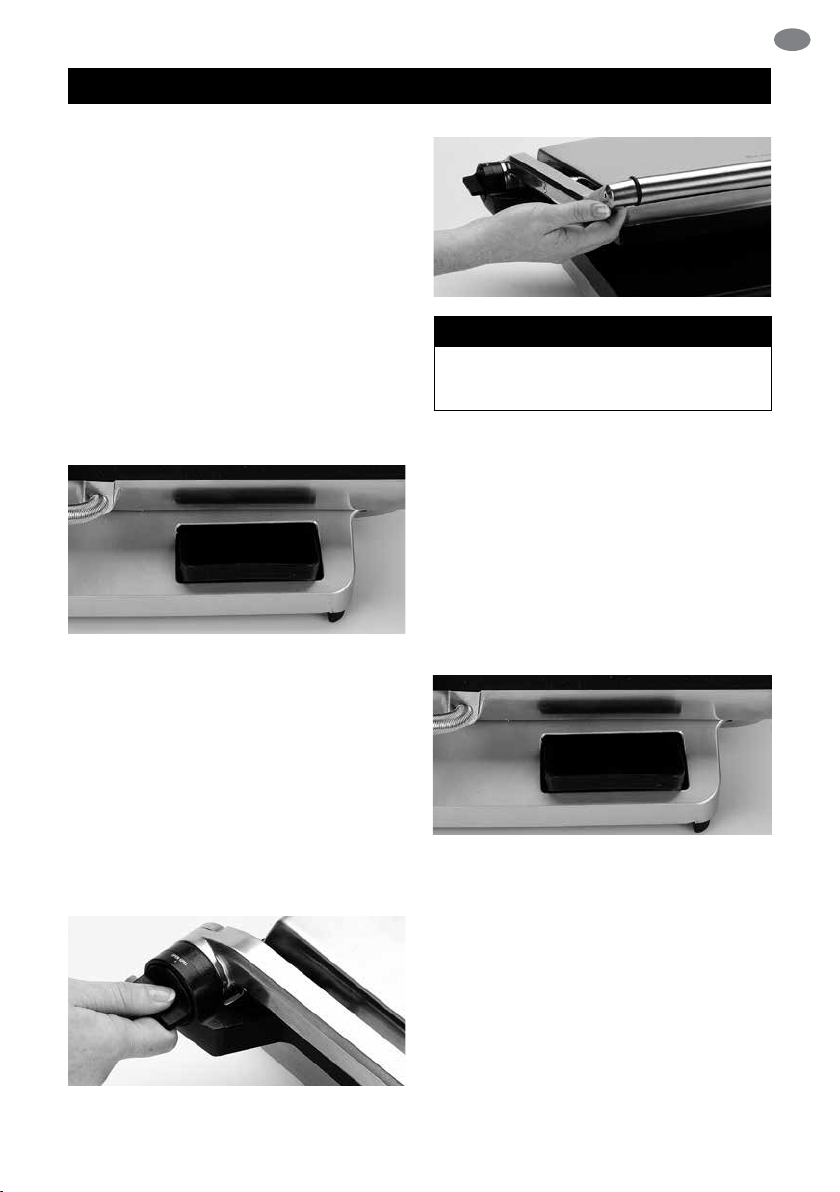
MANEJO DE TU NUEVO ELECTRODOMÉSTICO
ANTES DEL PRIMER USO
Retira y desecha de forma segura cualquier
material promocional y material de embalaje antes
de usar. Comprueba que las placas de cocción
estén limpias y libres de polvo. Si es necesario,
limpia con un paño húmedo.
Cuando uses la parrilla por primera vez, puedes
notar una neblina de humo na. Esto se debe al
primer calentamiento de algunos de los componentes. No hay que preocuparse.
USO COMO PARRILLA ABIERTA
1. Conecta el enchufe en una toma de corriente
de 220–240 V y enciende el aparato (ON).
Se encenderá la luz roja de calentamiento.
2. Asegúrate de que la bandeja de goteo
extraíble esté correctamente insertada
y colocada de nuevo en el aparato.
NOTA
El bloqueo de la parrilla se restablecerá
automáticamente cuando vuelve a la
posición cerrada (CLOSED).
8. Coloca la carne o los alimentos para cocinar
en cualquiera de los platos de cocción o en
ambos.
9. Cuando la comida esté cocida, retírala con
una espátula de plástico.
PARA USAR COMO UNA PARRILLA
CERRADA
1. Conecta el enchufe en una toma de corriente
de 220–240 V. Pon el botón ON/OFF en ON.
Se encenderá la luz roja de calentamiento.
2. Asegúrate de que la bandeja de goteo
3. Asegúrate de que la placa superior esté en
la posición cerrada para un precalentamiento
más eciente.
4. Gira el disco de inclinación de la placa base
a la posición plana (FLAT).
5. Gira el dial de control de temperatura variable
a SEAR para precalentar rápidamente.
6. Deja que la parrilla se precaliente hasta que
se apague la luz roja de calentamiento.
7. La parrilla debe estar cerrada para liberar el
bloqueo. Gira el dial de bloqueo en el costado
de la parrilla a la posición horizontal y usa el
asa para tirar de la placa superior a la posición
abierta.
extraíble esté correctamente insertada
y colocada de nuevo en el aparato.
3. Asegúrate de que la placa superior esté en
la posición cerrada para un precalentamiento
más eciente.
4. Gira el disco de inclinación de la placa base
a la posición en ángulo (ANGLE) o plana
(FLAT).
5. Gira el dial de control de temperatura variable
a SEAR para precalentar rápidamente.
6. Deja que la parrilla se precaliente hasta que
se apague la luz roja de calentamiento.
7. Utiliza el asa para tirar de la placa superior
a la posición de 90 °.
8. Coloca la carne o los alimentos que se van
a cocinar en la base de cocción.
ES
5
Page 46

MANEJO DE TU NUEVO ELECTRODOMÉSTICO
Usa el asa para cerrar la placa superior.
9.
La placa superior tiene un sistema de bisagra
otante que está diseñado para presionar
uniformemente la comida. El control de altura
de la parrilla en el lado derecho de la placa
superior se usa para ajustarse según el grosor
de los alimentos. El asa de nivelación en el
lado derecho de la parte superior de la parrilla
se puede usar para nivelar la placa superior.
La placa superior debe estar completamente
bajada para lograr las “marcas de parrilla”
en los alimentos.
NOTA
La luz roja de calentamiento se encenderá
y apagará durante el proceso de cocción,
lo que indica que se está manteniendo
la temperatura correcta.
USO COMO PRENSA
DE SÁNDWICHES
1. Conecta el enchufe en una toma de corriente
de 220–240 V. Pon el botón ON/OFF en ON.
Se encenderá la luz roja de calentamiento.
2. Asegúrate de que la bandeja de goteo
extraíble esté correctamente insertada
y colocada de nuevo en el aparato.
3. Asegúrate de que la placa superior esté
en la posición cerrada para un precalenta-
miento más eciente.
4. Gira el disco de inclinación de la placa base
a la posición plana (FLAT).
5. Gira el selector de temperatura variable
a la posición SANDWICH.
6. Deja que la parrilla se precaliente hasta que
se apague la luz roja de calentamiento.
7. Durante este tiempo, prepara el sándwich
y colócalo en la placa base. Coloca siempre
los sándwiches hacia la parte posterior de
la placa base.
8. Usa el asa para cerrar la placa superior.
La placa superior tiene un sistema de
bisagra otante que está diseñado para
presionar uniformemente la comida.
El control de altura de la parrilla en el lado
derecho de la placa superior se usa para
ajustarse según el grosor de los alimentos.
El asa de nivelación en el lado derecho de
la parte superior de la parrilla se puede usar
para nivelar la placa superior.
NOTA
Siempre deja que la parrilla se precaliente
hasta que se apaga la luz roja de calentamiento.
9. El tostado debe durar aproximadamente
5-8 minutos. El tiempo exacto de tostado
será una cuestión de preferencia. También
dependerá del tipo de pan y relleno usado.
10. Cuando el sándwich esté cocido, usa el asa
para abrir la placa superior. Retira el sándwich
con una espátula de plástico. Nunca utilices
pinzas metálicas o cuchillos ya que podrían
dañar la supercie antiadherente de las
placas de cocción.
USO DE LA FUNCIÓN DE CONTROL
DE ALTURA DE PARRILLA
AJUSTABLE
Esto permite que tu parrilla se use para tostar
emparedados abiertos. También se puede
usar para asar ingredientes delicados como
el pescado y los bollos de hamburguesa sin
aplastarlos.
1. Deja que la parrilla se precaliente hasta que
se apague la luz roja de calentamiento.
2. Coloca los alimentos a asar en el plato base.
3. Mueve el clip de control ajustable en el lado
derecho de la parrilla a la altura deseada.
6
Page 47

MANEJO DE TU NUEVO ELECTRODOMÉSTICO
ES
4. Baja lentamente la placa superior, usando
el asa de nivelación en el lado superior
derecho de la placa, hasta que descanse
en la posición adecuada sobre la comida.
5. La placa superior irradiará el calor
deseado para derretir ingredientes como
el queso o los alimentos a la parrilla.
NOTA
El control de altura de la parrilla ajustable
se puede mover para acomodar alimentos
gruesos o nos deslizando el clip hacia
adelante o hacia atrás a lo largo del brazo.
DIAL DE INCLINACIÓN
DE LA PLACA BASE
1. Para colocar la placa base en una posición
inclinada, simplemente gira el disco de
inclinación de la placa base en sentido
antihorario hasta que el disco alcance la
posición ANGLE. Esta posición es adecuada
para lograr el máximo drenaje de grasa
cuando se usa el grill como parrilla cerrada.
2. Para colocar la placa base en la posición
plana, gira el disco de inclinación de la
placa base en sentido horario hasta que
el disco alcance la posición FLAT.
RELOJ TEMPORIZADOR
DE 15 MINUTOS
La parrilla Sage® cuenta con un temporizador
de 15 minutos que te permite controlar el tiempo
transcurrido durante el precalentamiento
o la cocción. Para congurar el temporizador,
simplemente gira el dial hacia la derecha
completamente a la posición 15 y luego a la
izquierda para seleccionar los minutos deseados.
El temporizador sonará una vez cuando hayas
transcurrido el tiempo deseado. La parrilla no se
apagará, seguirá calentando.
DIAL DE CONTROL DE
TEMPERATURA VARIABLE
La parrilla cuenta con un dial de control de
temperatura variable. Simplemente selecciona
una temperatura adecuada para la cocción
de los alimentos.
Con el dial ajustado en SEAR, la temperatura
es adecuada para asar carnes u otros
alimentos.
Con el dial en SANDWICH, la temperatura
es adecuada para tostar sándwiches.
7
Page 48

CUIDADO Y LIMPIEZA
Antes de limpiar, apaga la parrilla con el botón
ON/OFF y desenchúfala. Deja que la parrilla se
enfríe antes de limpiarla. El aparato es más fácil
de limpiar cuando está tibio.
Siempre limpia la parrilla después de cada uso
para evitar la acumulación de restos de alimentos.
Limpia las placas de cocción con un paño suave
para quitar residuos de comida. Para los restos
de alimentos, echa un poco de agua tibia con
detergente sobre los residuos y limpia con una
esponja de plástico no abrasiva.
LIMPIEZA DE LA BANDEJA
DE GOTEO
Retira y vacía la bandeja de goteo después
de cada uso y lávala con agua tibia y jabón.
Evita el uso de estropajos abrasivos o detergen-
tes fuertes, ya que pueden dañar la supercie.
Enjuaga y seca bien con un paño limpio y suave
y vuelve a colocarla.
RECUBRIMIENTO DE QUANTANIUM
RESISTENTE A LOS RASGUÑOS
Tu parrilla cuenta con un revestimiento antiadherente especial resistente a los rasguños que
hace seguro usar utensilios de metal al asar.
Independientemente de este hecho, Sage
recomienda que se tenga cuidado con el recubrimiento antiadherente, especialmente cuando
se utilizan utensilios metálicos.
No uses objetos alados ni cortes alimentos
dentro de la parrilla. Sage
por daños en el revestimiento antiadherente en
el caso de que los utensilios de metal hayan
sido mal utilizados.
Cocinar sobre una supercie antiadherente
minimiza la necesidad de aceite, los alimentos
no se pegan y la limpieza es más fácil.
Cualquier decoloración que pueda ocurrir solo
afectará negativamente a la apariencia de la
parrilla y no afectará el rendimiento de la cocción.
Al limpiar el revestimiento antiadherente,
no uses estropajos metálicos (o esponjas
abrasivas). Lava con agua jabonosa caliente.
Elimina los residuos más difíciles de limpiar
con un estropajo plástico o un cepillo
de nailon para lavar platos no abrasivo.
®
no será responsable
®
ALMACENAMIENTO
Para guardar la parrilla:
1. Apaga el electrodoméstico con el botón
ON/OFF y desenchúfalo.
2. Deja que la parrilla se enfríe completamente.
3. Desliza el clip de almacenamiento hacia
el asa frontal hasta la posición LOCK para
que las placas de cocción superior e inferior
se bloqueen entre sí.
4. Desliza la bandeja de goteo extraíble
en su lugar.
5. Envuelve el cable en el área de almacena-
miento del cable debajo del aparato.
6. Guarda el aparato en un lugar plano,
seco y nivelado.
NOTA
Para mayor comodidad, la parrilla se puede
almacenar en posición vertical.
ADVERTENCIA
No sumerjas ninguna parte
de la parrilla en agua ni en
ningún otro líquido.
8
Page 49

GARANTÍA
GARANTÍA LIMITADA DE 2 AÑOS
La garantía de Sage Appliances cubre este
producto para uso doméstico en territorios
especícos durante 2 años a partir de la fecha
de compra contra fallos causados por mano
de obra y materiales defectuosos. Durante el
plazo de la garantía, Sage Appliances reparará
o sustituirá productos defectuosos (a criterio de
Sage Appliances).
Todos los derechos de garantía en virtud
de la legislación nacional vigente serán
respetados y no se verán afectados por
nuestra garantía. Para consultar los términos
y condiciones completos de la garantía, así
como instrucciones sobre cómo hacer una
reclamación, visite www.sageappliances.com
ES
9
Page 50

NOTAS
10
Page 51

NOTAS
ES
11
Page 52

CHE
Switzerland
+41 (0)800 009 933
DEU AUT
Sage Appliances GmbH
Campus Fichtenhain 48, 47807 Krefeld, Deutschland
Deutschland: +49 (0)8005053104
Österreich: +43 (0)800 80 2551
BEL
Belgium
+32 (0)800 54 155
LUX
Luxembourg
+352 (0)800 880 72
ESP
Spain
+34 (0)900 838 534
www.sageappliances.com
Registered in Germany No. HRB 81309 (AG Düsseldorf).
• Aufgrund kontinuierlicher Produktverbesserungen kann das auf dieser Verpackung dargestellte Produkt leicht vom tatsächlichen Produkt abweichen.
• Due to continued product improvement, the products illustrated or photographed in this document may vary slightly from the actual product.
• En raison de son amélioration continue, le produit représenté sur cet emballage peut di érer légèrement du produit réel.
• A causa del continuo miglioramento dei prodotti, il prodotto illustrato su questa confezione può variare leggermente rispetto al prodotto reale.
• Perfeccionamos nuestros productos continuamente, por lo que el artículo podría diferir ligeramente de la ilustración o imagen en este documento.
Registered in England & Wales No. 8223512.
Copyright BRG Appliances 2019.
SGR800 UG3 A19
 Loading...