

Saeco Xelsis SM7686, Xelsis SM7684, Xelsis SM7685, Xelsis SM7680, Xelsis SM7683 User Manual
Page 1
CS UŽIVATELSKÁ PŘÍRUČKA
ET KASUTUSJUHEND
HR KORISNIČKI PRIRUČNIK
LV LIETOT JA ROKASGR MATA
LT NAUDOTOJO VADOVAS
HU FELHASZNÁLÓI KÉZIKÖNYV
PL INSTRUKCJA OBSŁUGI
RO MANUAL DE UTILIZARE
SL UPORABNIŠKI PRIROČNIK
SK NÁVOD NA POUŽITIE
SR УПУТСТВО ЗА КОРИШЋЕЊЕ
BG РЪКОВОДСТВО ЗА ПОТРЕБИТЕЛЯ
RU РУКОВОДСТВО ПОЛЬЗОВАТЕЛЯ
UK ПОСІБНИК КОРИСТУВАЧА
KK ПАЙДАЛАНУШЫ НҰСҚ АУЛЫҒЫ
WWW.SAECO.COM/CARE
SM7686, SM7685, SM7684
SM7683, SM7680
SM7686, SM7685, SM7684
SM7683, SM7680
EN USER MANUAL
한국어 사용 설명서
WWW.SAECO.COM/CARE
4219.460.4726.1 XELSIS BETTER EN-KO_FRONTCOVER_A5_FC.indd 1 29-08-18 14:04
Page 2
Page 3
12
1
1
10
9
8
7
6
5
4
3
2
1
21 3 4
12
10
11
7
15
13
14
29
28
30
31
16
19
22
26 2724 2523
18
17
6
9 8
20
5
21
7
1
Page 4

5 sec.
2
30 sec.
3
4
AquaClean
Stand-by
time
Water
hardness
5
1.4oz
Very
Strong
Strength
ESPRESSO
6
1.4oz
Strength
ESPRESSO
Very
Strong
7
1.4oz
Strength
ESPRESSO
Very
Strong
8
2
1
91011
12
1.4oz
Strength
ESPRESSO
Very
Strong
13
ESPRESSO MACCHIATO
Milk
Strength
1.4oz 0.4oz
Very
strong
14
15
NEW PROFILE
16
MARJOLEIN
Add drink
Espresso
MAR
17
1
2
1
2
11
10
9
8
7
6
5
4
3
2
1
18
192021
222324
25
Page 5
26272829303132333435363738
39
press to start
15 min
DESCALING
40
Page 6

Page 7

English 6
한국어
26
Page 8

English
Contents
Important safety information ________________________________________________________________________ 6
Introduction __________________________________________________________________________________________ 8
Machine overview (Fig. 1)_____________________________________________________________________________ 9
First installation_______________________________________________________________________________________ 9
Using the control panel and touchscreen ___________________________________________________________ 10
AquaClean filter ______________________________________________________________________________________ 10
Measuring water hardness ___________________________________________________________________________ 11
Brewing drinks ________________________________________________________________________________________ 11
Personalizing drinks and creating profiles___________________________________________________________ 12
Adjusting machine settings __________________________________________________________________________ 13
Handling the brew group_____________________________________________________________________________ 14
Cleaning and maintenance __________________________________________________________________________ 14
Descaling procedure _________________________________________________________________________________ 17
Warning icons and error codes ______________________________________________________________________ 18
Ordering accessories _________________________________________________________________________________ 19
Troubleshooting ______________________________________________________________________________________ 19
Beverage types and lengths _________________________________________________________________________ 23
Technical specifications ______________________________________________________________________________ 24
Recycling______________________________________________________________________________________________ 25
Warranty and support ________________________________________________________________________________ 25
Important safety information
This machine is equipped with safety features. Nevertheless, read and follow the safety instructions
carefully and only use the machine as described in these instructions, to avoid accidental injury or
damage due to improper use of the machine. Keep this user manual for future reference.
Warning
General
-
Check if the voltage indicated on the machine corresponds to the local mains voltage before you
connect the appliance.
-
Connect the machine to an earthed wall socket.
-
Do not let the power cord hang over the edge of a table or worktop and do not let it touch hot
surfaces.
-
To avoid the danger of electric shock, never immerse the machine, mains plug or power cord in
water or any other liquid.
-
Do not pour liquids on the power cord connector.
-
To avoid the danger of burns, keep body parts away from hot water jets produced by the machine.
-
Do not touch hot surfaces. Use handles and knobs.
-
Switch off the machine with the main switch located on the back (if present) and remove the mains
plug from the wall socket:
-
if a malfunction occurs.
-
if you are not going to use the appliance for a long time.
-
before you clean the machine.
6
English
Page 9

-
Pull at the plug, not at the power cord.
-
Do not touch the mains plug with wet hands.
-
Do not use the machine if the mains plug, the power cord or the machine itself is damaged
-
Do not make any modifications to the machine or its power cord.
-
Only have repairs carried out by a service center authorized by Philips to avoid ahazard
-
The machine should not be used by children.
-
This machine is not intended for use by persons (including children) with reduced physical, sensory
or mental capabilities, or lack of experience and knowledge, unless they have been given
supervision or instruction concerning use of the machine by a person responsible for their safety.
-
Cleaning and user maintenance shall not be made by children.
-
Keep the machine and its cord out of the reach of children.
-
Children should be supervised to ensure that they do not play with the machine.
-
Never insert fingers or other objects into the coffee grinder.
-
Be carefull when you dispense hot water. Dispensing may be preceded by small jets of hot water.
Wait until the end of the dispensing cycle before you remove the hot water dispensing spout.
Caution
General
-
This machine is intended for normal household use only. It is not intended for use in environments
such as staff kitchens of shops, offices, farms or other work environments.
-
Always put the machine on a flat and stable surface. Keep it in upright position, also during
transport
-
Do not place the machine on a hotplate or directly next to a hot oven, heater or similar source of
heat.
-
Only put roasted coffee beans in the bean hopper. Putting ground coffee, instant coffee, raw
coffee beans or any other substance in the coffee bean hopper may cause damage to the
machine.
-
Let the machine cool down before you insert or remove any parts. The heating surfaces may retain
residual heat after use.
-
Never fill the water tank with warm, hot or sparkling water, as this may cause damage to the water
tank and the machine.
-
Never use scouring pads, abrasive cleaning agents or aggressive liquids such as petrol or acetone
to clean the machine. Simply use a soft cloth dampened with water.
-
Descale your machine regularly. The machine indicates when descaling is needed. Not doing this
will make your machine stop working properly. In this case, repair is not covered by your warranty.
-
Do not keep the machine at temperatures below 0°C/32°F. Water left in the heating system may
freeze and cause damage.
-
Do not leave water in the water tank when you are not going to use the machine for a long period
of time. The water can become contaminated. Use fresh water every time you use the machine.
-
Never use any accessories or parts from other manufacturers or that Philips does not specifically
recommend. If you use such accessories or parts, your guarantee becomes invalid.
-
Regular cleaning and maintenance prolongs the lifetime of your machine and ensures optimum
quality and taste of your coffee.
-
The machine is exposed continuously to moisture, coffee and scale. Therefore it is very important
to regularly clean and maintain the machine as described in the user manual and shown on the
website. If you do not perform these cleaning and maintenance procedures, your machine
eventually may stop working. In this case repair is not covered by warranty.
7
English
Page 10

-
Do not clean the brew group in the dishwasher and do not use washing-up liquid or a cleaning
agent to clean it. This may cause the brew group to malfunction and may have a negative effect on
the coffee taste.
-
Do not dry the brew group with a cloth to prevent fibers from collecting inside the brew group.
-
Never drink the solution dispensed during the descaling process.
-
Only put preground coffee into the preground coffee compartment. Other substances and objects
may cause severe damage to the machine. In this case, repair is not covered by your warranty.
-
The machine shall not be placed in a cabinet when in use.
Cappuccinatore and milk container
Warning
-
To avoid the danger of burns, be aware that dispensing steam or hot water may be preceded and
followed by small jets of hot water or steam.
-
Never touch or open the door of the internal cappuccinatore while dispensing drinks, as it may
become very hot.
-
Never touch the metal part of the milk tube during and right after performing one of the cleaning
programs for the internal cappuccinatore, as it may become very hot. Let it cool down first.
-
Never drink the solution dispensed during the monthly cleaning procedure of the adjustable coffee
and milk dispensing spout.
Caution
-
For hygienic reasons, make sure that the outer surface of the adjustable coffee and milk dispensing
spout is clean.
-
Make sure that the milk tube tube is connected to the cappuccinatore before you select a milkbased drink.
-
Do not put any other liquids in the milk container than water (for cleaning) or milk.
-
After brewing milk-based drinks, the adjustable coffee and milk dispensing spout automatically
dispenses a small amount of steam to clean the internal cappuccinatore and the metal part of the
milk spout.
-
Be careful, the adjustable coffee and milk dispensing spout and the metal part of the milk spout
may be hot if the machine has been used recently.
-
Be careful when you open the internal cappuccinatore door, the adjustable coffee and milk
dispensing spout may dispense a small amount of steam to clean the internal cappuccinatore.
-
If the internal cappuccinatore door is difficult to close, check if the internal cappuccinatore is
inserted correctly. Follow the instructions in the user manual. Do not push the internal
cappuccinatore too far on the coffee/milk dispensing spout when you insert it. In this case, the
internal cappuccinatore would not work correctly as it would not be able to suck up milk.
-
The metal part of the milk spout may become hot. To avoid the danger of burns, always put the
milk spout in the milk spout holder before you start the cleaning program for the internal
cappuccinatore.
-
Do not clean the internal cappuccinatore in the dishwasher.
Electromagnetic fields (EMF)
This machine complies with all applicable standards and regulations regarding exposure to
electromagnetic fields.
Introduction
Congratulations on your purchase of a Saeco full-automatic coffee machine! To fully benefit from the
support that Saeco offers, please register your product at www.saeco.com/care.
8
English
Page 11
Read this user manual carefully before you use the machine for the first time and save it for future
reference.
To help you get the best out of your coffee machine, Saeco offers full support in 3 different ways:
1 The separate quick start guide for first installation and first use.
2 This user manual for more detailed information.
3 Online support and movies: scan the QR code on the front page or visit www.saeco.com/care
Note: This machine has been tested with coffee. Although it has been carefully cleaned, there may be
some coffee residues and/or water left. We guarantee, however, that the machine is absolutely new.
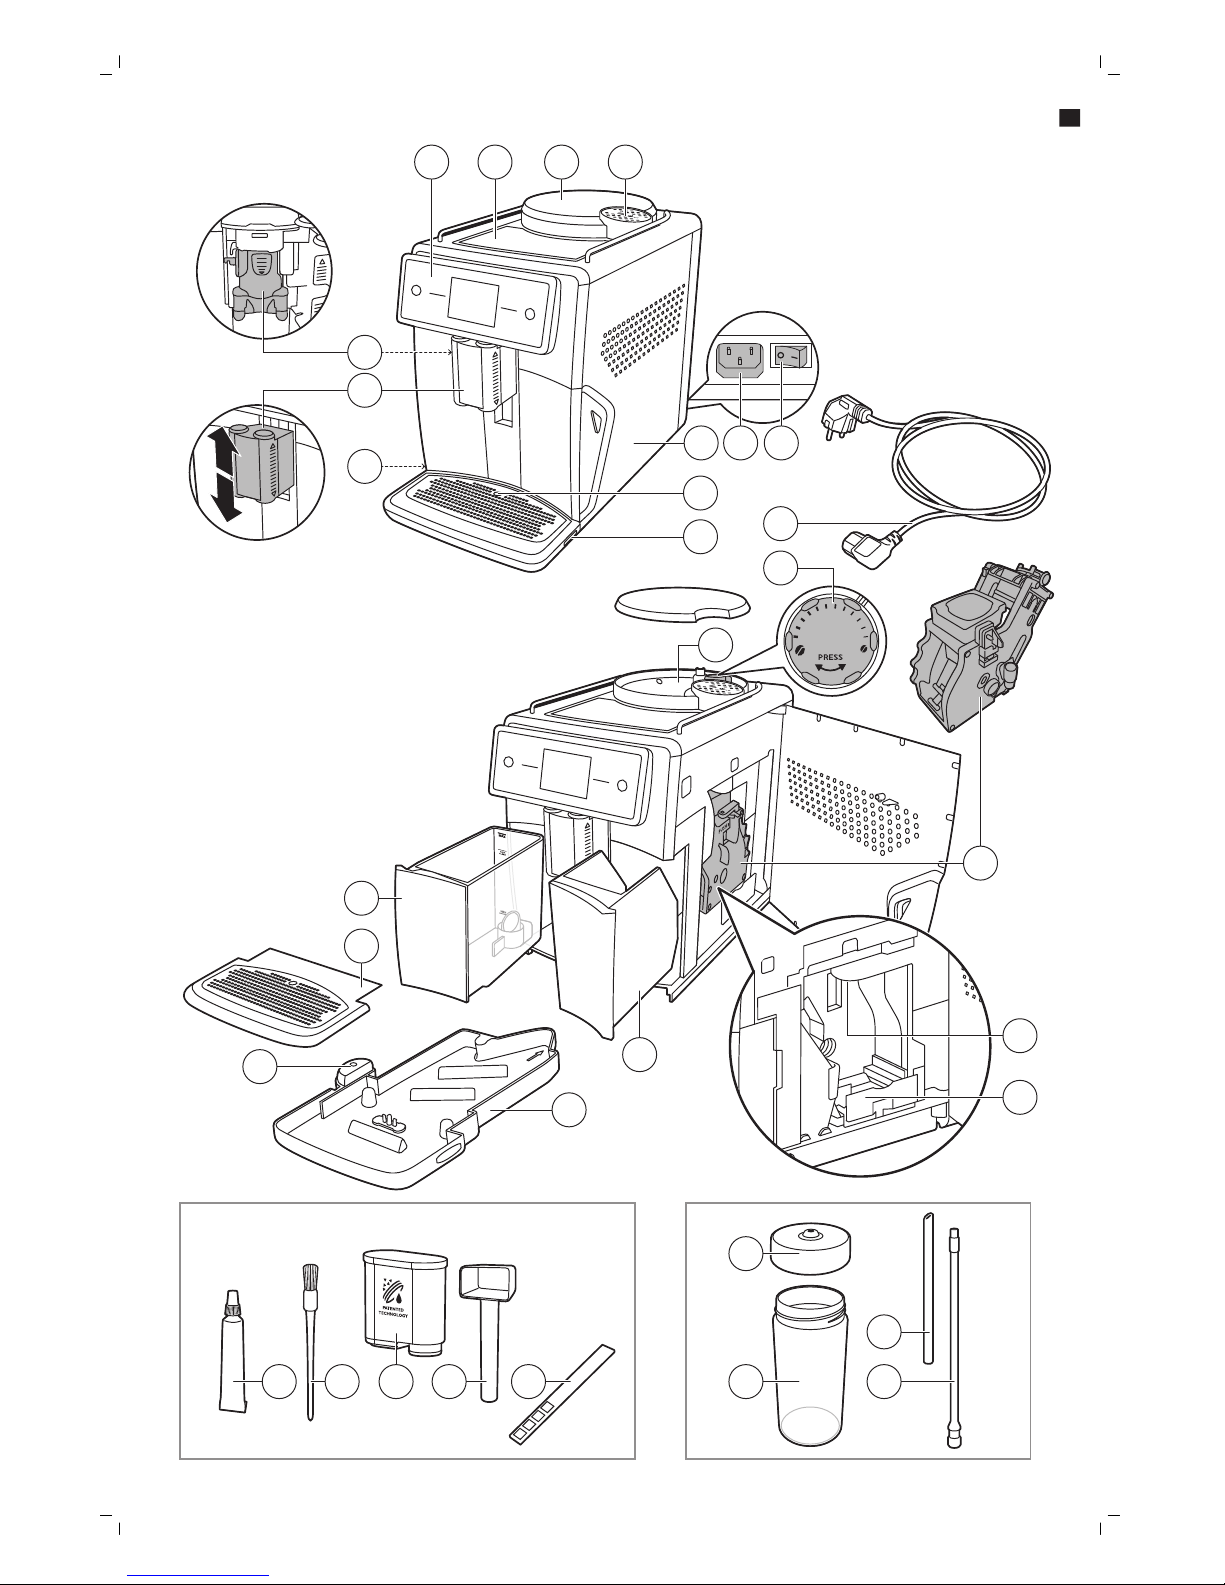
Machine overview (Fig. 1)
1
Control panel and touchscreen 12 Drip tray release grip
2 Cup holder 13 Mains cord with plug
3 Lid of bean hopper 14 Grind setting knob
4 Lid of pre-ground coffee compartment 15 Bean hopper
5 Internal cappuccinatore 16 Brew group
6 Adjustable coffee and milk dispensing
spout
17 Coffee funnel
7 Milk tube holder 18 Coffee residues drawer
8 Main switch 19 Coffee grounds container
9 Socket for cord 20 Drip tray
10 Service door 21 Drip tray cover
11 'Drip tray full' indicator 22 Water tank
Accessories
23
Grease tube 26 Measuring scoop
24 Cleaning brush 27 Water hardness test strip
25 AquaClean filter
Milk frothing parts
28
Lid of milk container 30 Metal milk tube
29 Milk container 31 Flexible milk tube
First installation
To prepare your coffee machine for use, you need to perform a few simple steps such as filling the
water circuit and activating the AquaClean filter. These steps are shown in the separate quick start
guide.
For the best-tasting coffee, you need to brew 5 coffees initially to allow the machine to complete its
self-adjustment.
9
English
Page 12
The machine has been set up to get the best taste out of your coffee beans. Therefore we advise you
not to adjust the grinder settings until you have brewed 100-150 cups (approx. 1 month of usage).
Thoroughly clean the milk container, the milk tubes and the cappuccinatore before first use. We
advise you not to clean the cappuccinatore in the dishwasher, to prevent food particles or detergent
residues from clogging it.
Using the control panel and touchscreen
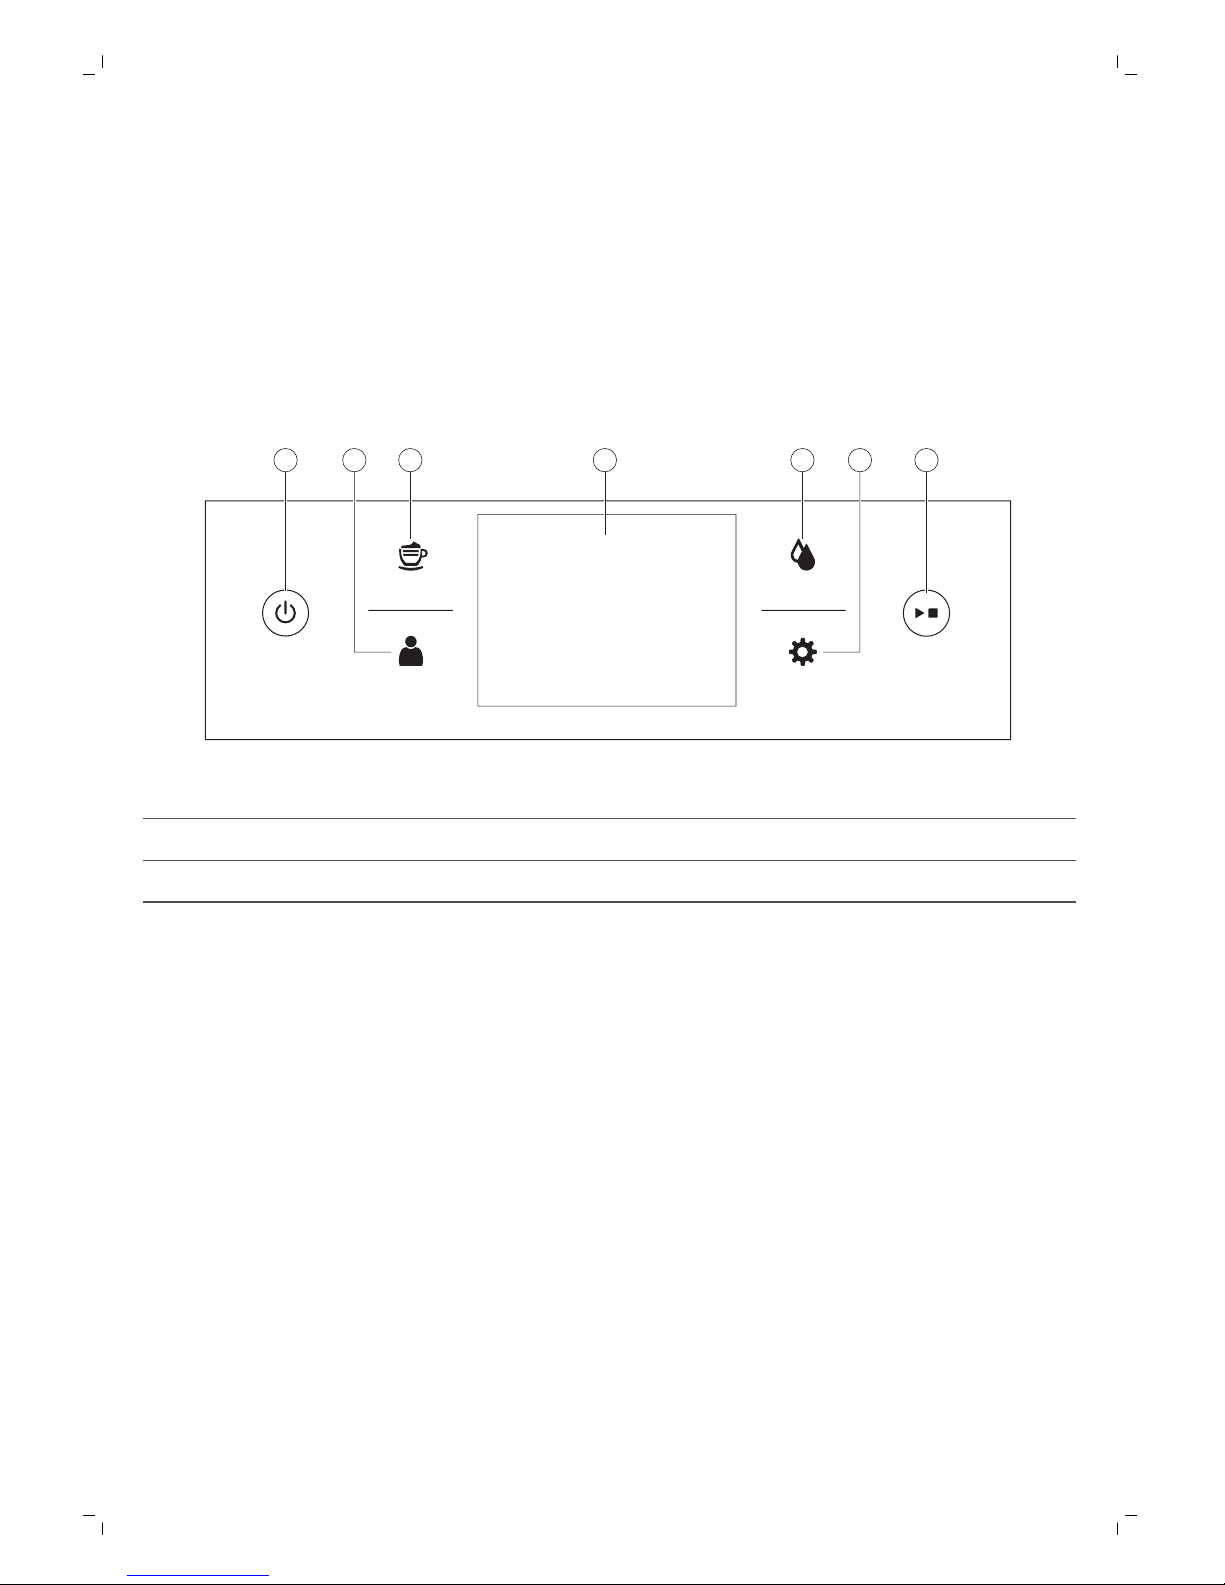
Below you find an overview and description of the control panel and touchscreen of the machine. You
can swipe the touchscreen and tap to select or confirm your choices.
Drink s
Proles
Clean
Setti ngs
43 51 72 6
1. On/off button 4. Touchscreen 7. Start/stop button
2. Personal profiles 5. Cleaning menu
3. Drinks menu 6. Machine settings
AquaClean filter
The AquaClean filter is designed to reduce limescale deposits in your coffee machine and provide
filtered water to preserve the aroma and flavor of each cup of coffee. If you use a series of 8
AquaClean filters as indicated by the machine and in this user manual, you don't have to descale your
machine for up to 5000 cups. With each filter you can enjoy up to 625 cups, depending on the
selected coffee varieties and the rinsing and cleaning frequencies.
Preparing the AquaClean filter for activation
Before you place the AquaClean filter in the water tank, you need to prepare it for use:
1 Shake the filter for about 5 seconds (Fig. 2).
2 Fully immerse the filter upside down in a jug with cold water for at least 30 seconds. Wait until no
more air bubbles come out (Fig. 3).
3 Push the filter onto the filter connection to the lowest possible point. (Fig. 4)
Activating the AquaClean filter
You need to activate every new AquaClean filter that you use. By activating the AquaClean filter, the
machine monitors the capacity of the AquaClean filter and the number of filters used. There are 3
ways to activate the AquaClean filter.
10
English
Page 13
1. Activating the AquaClean filter during first installation
After switching on for the first time, the machine guides you through the first installation steps such as
filling the water tank, filling the water circuit and activating the AquaClean filter. Simply follow the
instructions on the screen.
2. Activating the AquaClean filter when prompted
Replace the AquaClean filter when the screen shows the message 'Replace AquaClean filter?'. Then
follow the instructions on the screen to activate the filter properly.
Replace the AquaClean filter at least every 3 months, even if the machine has not yet indicated that
replacement is required.
3. Activating the AquaClean filter at any other time
You can start using the AquaClean filter at any time by following the instructions below.
1 Tap the Settings
icon and then select 'AquaClean' (Fig. 5).
2 Select 'new' and when the activation screen appears, press the start/stop button.
3 Follow the instructions on the screen.
Note: In some situations the machine will tell you that you need to descale the machine before you
can install and activate a new AquaClean filter. This is because your machine has to be completely
limescale-free before you start to use the AquaClean filter. Follow the instructions on the screen.
Measuring water hardness
During first installation, you have to set the water hardness. Follow the steps on the screen and use
the water hardness test strip supplied. To set the water hardness later, tap the Settings icon and
select 'water hardness'.
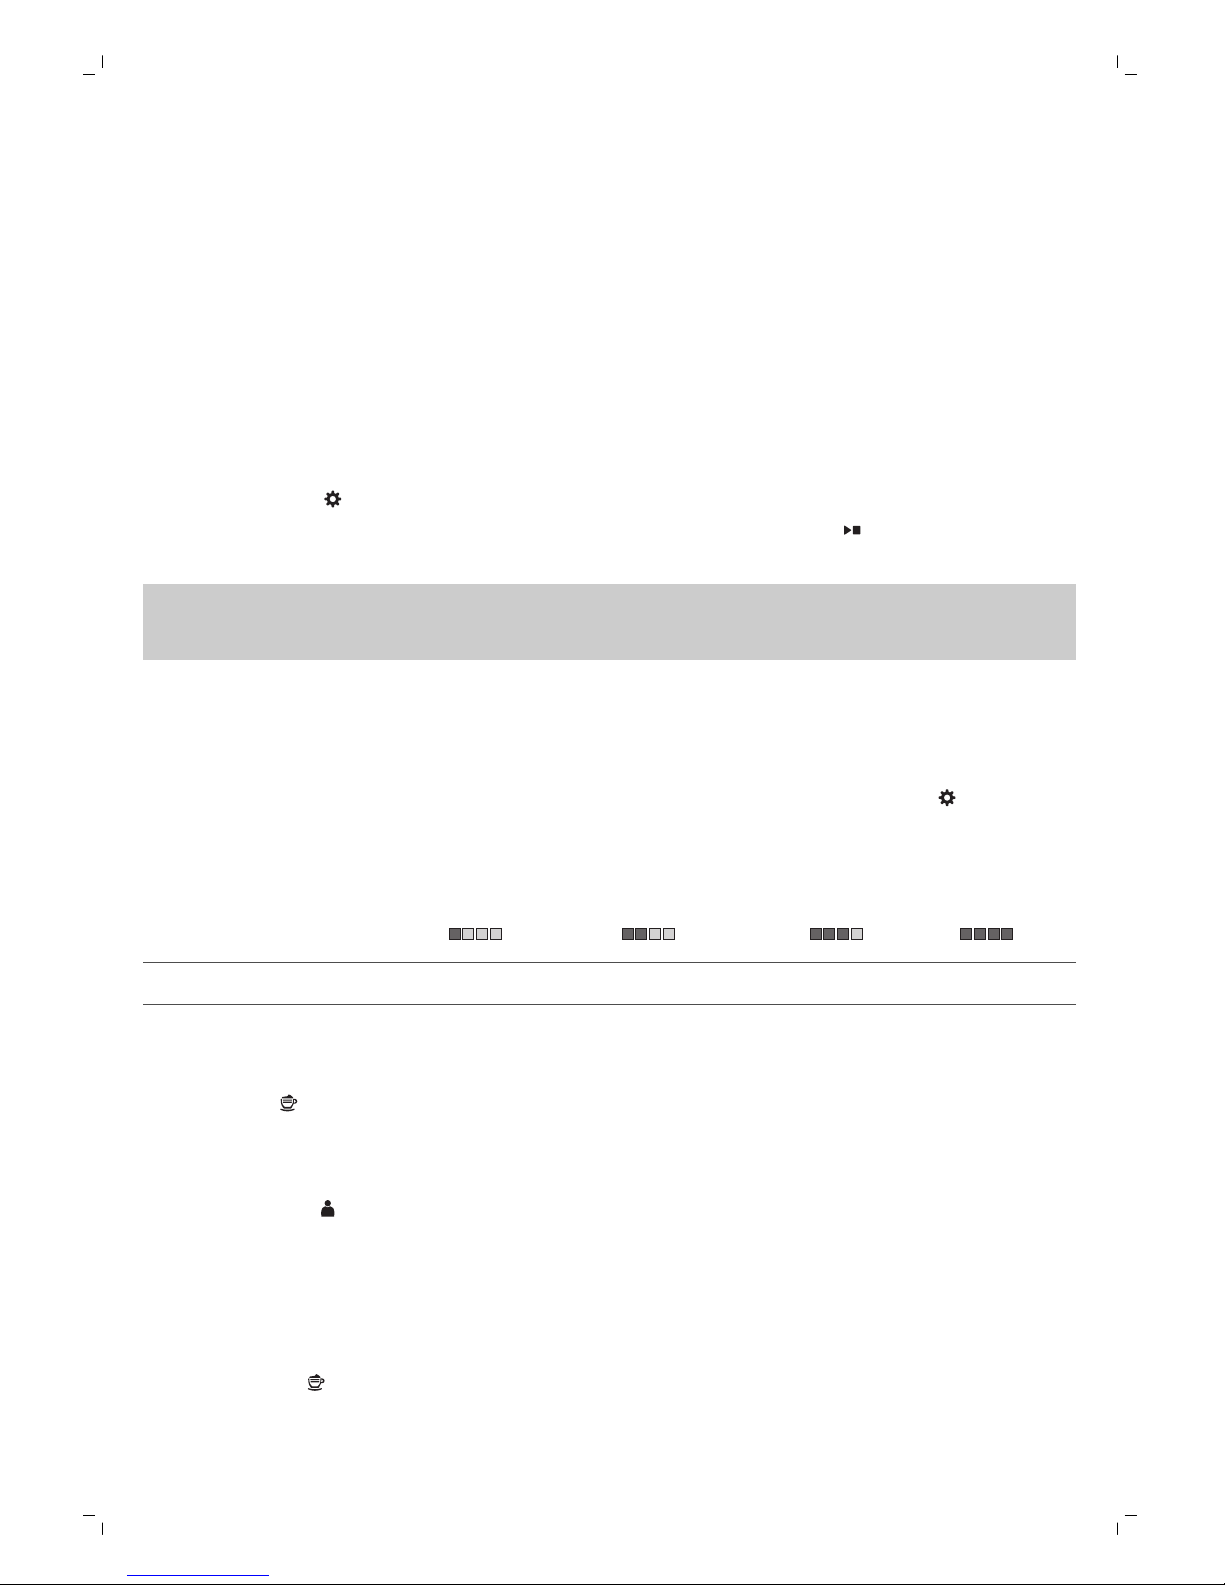
1 Immerse the water hardness test strip in tap water for 1 second. Then wait for 1 minute.
2 Check how many squares have turned red.
3 Select the appropriate water hardness setting and tap the OK icon to confirm.
Number of red squares:
Value to be set 1 2 3 4
Brewing drinks
Tap the Drinks icon to enter the 'Drinks' menu. Scroll through the different pages to find your drink.
After selecting a drink you can personalize it by adjusting the settings (see 'Personalizing your drinks').
-
Tap the '2x' icon if you want to brew two cups (Fig. 6). The machine automatically carries out two
grinding cycles in sequence of the selected drinks.
-
Tap the Profiles icon to brew one of your saved drinks.
-
Slide the dispensing spout up or down to adjust the height to the size of the cup or glass you are
using.
Brewing coffee drinks
1 Fill the water tank with tap water and fill the bean hopper with beans.
2 Tap the Drinks
icon and select your coffee.
11
English
Page 14
3 You can personalize coffee strength and volume in the first screen, by swiping the adjustable bars
up and down (Fig. 7). If you click on the arrow on the right (Fig. 8), the second screen appears with
more settings to adjust.
4 Press the start/stop
button to start brewing the selected drink.
Brewing milk-based drinks
1 Fill the water tank with tap water and fill the bean hopper with beans.
Tip: Slide the dispensing spout to the uppermost position for easy access to the water tank.
2 Unscrew the lid of the milk container and fill the milk container with milk (Fig. 9).
We advise you to use milk coming directly from the fridge for optimal results.
3 Place the metal milk tube in the container. Open the door of the internal cappuccinatore (Fig. 10)
and connect the flexible milk tube to the cappuccinatore (Fig. 11). Then close the door of the
internal cappuccinatore again.
4 Tap the Drinks
icon and select your milk-based drink.
5 You can personalize coffee strength, coffee and milk volume in the first screen, by swiping the
adjustable bars up and down (Fig. 7). If you click on the arrow on the right (Fig. 8), the second
screen appears with more settings to adjust.
6 You can adjust the settings to your preference by swiping the adjustable bars up and down.
7 Press the start/stop button to start brewing the selected drink.
8 Directly after dispensing the milk, the 'Auto Steam Shoot' is performed. The machine forces steam
through the internal milk system to rinse it quickly.
Tip: You can also use a regular milk carton to brew your milk-based drinks. Place the metal milk tube
directly into the milk carton.
Brewing coffee with pre-ground coffee
1 Open the lid of the pre-ground coffee compartment and pour one measuring scoop of pre-ground
coffee into it (Fig. 12). Then close the lid.
2 After selecting a drink, tap the pre-ground coffee icon (Fig. 13) and then press the start/stop
button.
Note: If you select pre-ground coffee, you cannot adjust the coffee strength and brew more than one
drink at the same time.
Dispensing hot water
1 Tap the Drinks icon and then select 'Hot water'.
2 Press the start/stop button to start dispensing hot water.
Personalizing drinks and creating profiles
This machine allows you to adjust the settings of a drink to your own preference and to save the
adjusted drink in a personal profile. There are two ways to create a profile:
1 In the 'Drinks' menu: Select and adjust a drink and then tap the 'save' icon.
2 In the 'Profiles' menu: Create a profile by tapping the 'add profile' icon. Select the newly created
profile, select a drink, adjust it to your preference and then tap the 'save'
icon.
12
English
Page 15
Personalizing your drinks
You can adjust the drink settings to your own preference:
1 Tap the Drinks icon.
2 Select your preferred drink.
3 The screen shows the settings you can adjust to your preference. Tap on the arrow on the right (Fig.
8) to go to the next screen for more settings to adjust. Depending on the type of drink, you can
adjust the settings. For coffee drinks you can adjust volume, strength, taste and temperature. For
milk-based drinks you can adjust the milk volume, foam level and the order of brewing coffee and
milk. For hot water you can adjust the volume.
4 Swipe the bars you want to adjust up or down to your preferred level (Fig. 7).
5 You can save these settings to a profile by tapping the 'save' icon (Fig. 14) and selecting an
existing profile or adding a new one (Fig. 15).
Creating a profile
1 Tap the Profiles icon.
2 Select 'Add profile' (Fig. 15).
3 Enter a name for the new profile and confirm (Fig. 16).
4 Select the newly created profile.
5 Add drinks to the profile by selecting 'Add drink' (Fig. 17).
Removing a profile
1 Tap the Profiles icon.
2 Press and hold the icon you want to delete.
3 Select 'Delete' and confirm.
Adjusting machine settings
You can adjust the grinder settings by using the grind setting knob inside the bean container. There
are 12 different grind settings you can choose from. The lower the setting, the stronger the coffee.
Note: You need to brew 2 to 3 drinks before you can taste the full difference.
Note: You can only adjust the grinder settings when the machine is grinding coffee beans.
Caution: Do not turn the grind setting knob more than one notch at a time to prevent damage to the
grinder.
1 Place a cup under the coffee dispensing spout.
2 Open the lid of the bean hopper.
3 Tap the Drinks icon and select Espresso. Then press the start/stop button.
4 When the grinder starts grinding, press down the grind setting knob and turn it to the left or right
(Fig. 18). Turn the grind setting knob one notch at at time. Each time you have turned the grind
setting one notch, brew a coffee drink to prevent damage to the grinder.
5 Close the lid of the bean hopper.
Adjusting default settings
Use the SETTINGS icon to change the following settings:
-
AquaClean: To check the status of AquaClean and install a new one.
13
English
Page 16

-
Water hardness: to be able to adjust the machine settings to the water in your region, please
measure the water hardness.
-
Stand-by time: this is the time after which the machine goes into stand-by mode.
-
Brightness: to adjust the display contrast
-
Water tank light: to adjust the light in the water tank
-
Coffee spout light: to adjust the light illuminating the cup tray.
-
Language: to select a different language
-
Measurement unit: to select millilitres or US fluid ounces
-
Sound feedback: to activate/deactivate the sound feedback of the display,
Handling the brew group
Go to www.saeco.com/care for detailed video instructions on how to remove, insert and clean the
brew group.
Removing the brew group from the machine
1 Switch off the machine by pressing the main switch on the back of the machine.
2 Open the service door (Fig. 19).
3 Remove the coffee residues drawer (Fig. 20).
4 Press the PUSH button (Fig. 21) and pull at the grip of the brew group to remove it from the
machine (Fig. 22).
Reinserting the brew group
Before you slide the brew group back into the machine, make sure it is in the correct position.
1 Check if the arrow on the yellow cylinder on the side of the brew group is aligned with the black
arrow and N (Fig. 23).
-
If they are not aligned, push down the lever until it is in contact with the base of the brew group
(Fig. 24).
2 Make sure that the yellow locking hook on the other side of the brew group is in the correct
position.
-
To position the hook correctly, push it upwards until it is in uppermost position (Fig. 25).
3 Slide the brew group back into the machine along the guiding rails on the sides (Fig. 26) until it
locks into position with a click (Fig. 27). Do not press the PUSH button.
4 Place back the coffee residues drawer and close the service door.
Cleaning and maintenance
Regular cleaning and maintenance keeps your machine in top condition and ensures good-tasting
coffee for a long time, a steady coffee flow and a perfect milk froth.
Consult the table on when and how to clean all detachable parts of the machine. You can find more
detailed information and video instructions on www.saeco.com/care.
Cleaning table
Part description
When to clean How to clean
Brew group Weekly Remove the brew group and rinse it under the
tap and let it air-dry.
14
English
Page 17

Part description When to clean How to clean
Monthly Perform the 'Brew group clean' procedure with
the Philips coffee oil remover tablet. Select 'Brew
group clean' in the cleaning menu and follow the
instructions on the screen. Go to
www.saeco.com/care for detailed video
instructions.
Lubrication of the
brew group
Depending on the type of
usage. Consult the
lubrication table (see
'Lubricating the brew group').
Lubricate the brew group with the Philips grease.
Go to www.saeco.com/care for detailed video
instructions.
Milk
system/internal
cappuccinatore
After every day of use Perform the HYGIESTEAM program in the
cleaning menu. Select HYGIESTEAM in the
cleaning menu and follow the instructions on the
screen. Wipe the outside of the metal milk tube
with a damp cloth before placing it into the milk
tube holder.
Weekly Remove and disassemble the internal
cappuccinatore (see 'Cleaning the internal
cappuccinatore under the tap'). Rinse all parts
under the tap with some washing-up liquid.
Monthly Perform the 'DEEP MILK CLEAN' procedure with
the Philips milk circuit cleaner. Select 'DEEP MILK
CLEAN' in the cleaning menu and follow the
instructions on the screen. Go to
www.saeco.com/care for detailed video
instructions.
Milk container Weekly Disassemble the milk container (Fig. 28) and push
the ball out with the measuring scoop (Fig. 29).
Rinse all parts under the tap or in the dishwasher
Drip tray Empty the drip tray every
day or as soon as the red
'drip tray full' indicator pops
up through the drip tray (Fig.
30).
Remove the drip tray and rinse it under the tap
with some washing-up liquid.
Coffee grounds
container
Empty the coffee grounds
container when prompted by
the machine. Clean it weekly.
Remove the coffee grounds container while the
machine is switched on and rinse it under the tap
with some washing-up liquid.
Water tank Weekly Rinse the water tank under the tap
Coffee funnel Check the coffee funnel
weekly to see if it is clogged.
Unplug the machine and remove the brew group.
Open the lid of the pre-ground coffee
compartment and insert the spoon handle into
the coffee funnel. Move the handle up and down
until the clogged ground coffee falls down (Fig.
31). Go to www.saeco.com.care for detailed video
instructions.
15
English
Page 18

Tip: There is a cleaning calender on the last page of this user manual. Write down the dates on which
you have performed a cleaning action.
Cleaning the brew group
Regular cleaning of the brew group prevents coffee residues from clogging up the internal circuits.
Visit www.saeco.com/care for support videos on how to remove, insert and clean the brew group.
Cleaning the brew group under the tap
1 Open the service door and remove the brew group (see 'Removing the brew group from the
machine').
2 Rinse the brew group thoroughly with water. Carefully clean the upper filter (Fig. 32).
3 Let the brew group air-dry before you place it back. Do not dry the brew group with a cloth to
prevent fibers from collecting inside the brew group.
Cleaning the brew group with the coffee oil remover tablets
Only use Philips coffee oil remover tablets. Tap the Clean
icon and select 'Brew group clean'. Then
follow the instructions on the screen. Visit www.saeco.com/care for detailed video instructions.
Lubricating the brew group
Lubricate the brew group regularly to ensure that the moving parts continue to move smoothly.
1 Apply a thin layer of grease around the shaft in the bottom of the brew group (Fig. 33).
2 Apply a thin layer of grease to the rails on both sides (Fig. 34).
See the table below for the lubrication frequency. Visit www.saeco.com/care for detailed video
instructions.
Usage frequency
Nr of drinks brewed daily Lubrication frequency
Low 1-5 Every 4 months
Normal 6-10 Every 2 months
Heavy >10 Every month
Cleaning programs for the internal cappuccinatore
The machines has three programs to clean the internal cappuccinatore. The Auto Steam Shoot
cleaning program is automatically performed by the machine after brewing a milk-based drink. You
can select the HYGIESTEAM or DEEP MILK CLEAN program by tapping the Clean icon and scrolling
through the cleaning menu. Then follow the instructions on the screen.
-
Auto Steam Shoot: the machine shoots steam through the internal cappuccinatore to quickly rinse
it.
-
HYGIESTEAM: the machine thoroughly cleans the internal milk system with steam. Place the milk
tube in the milk tube holder (Fig. 35) and follow the instructions on the screen.
-
DEEP MILK CLEAN: Perform the 'DEEP MILK CLEAN' procedure with the Philips milk circuit cleaner
for a thorough cleaning of the internal milk system.
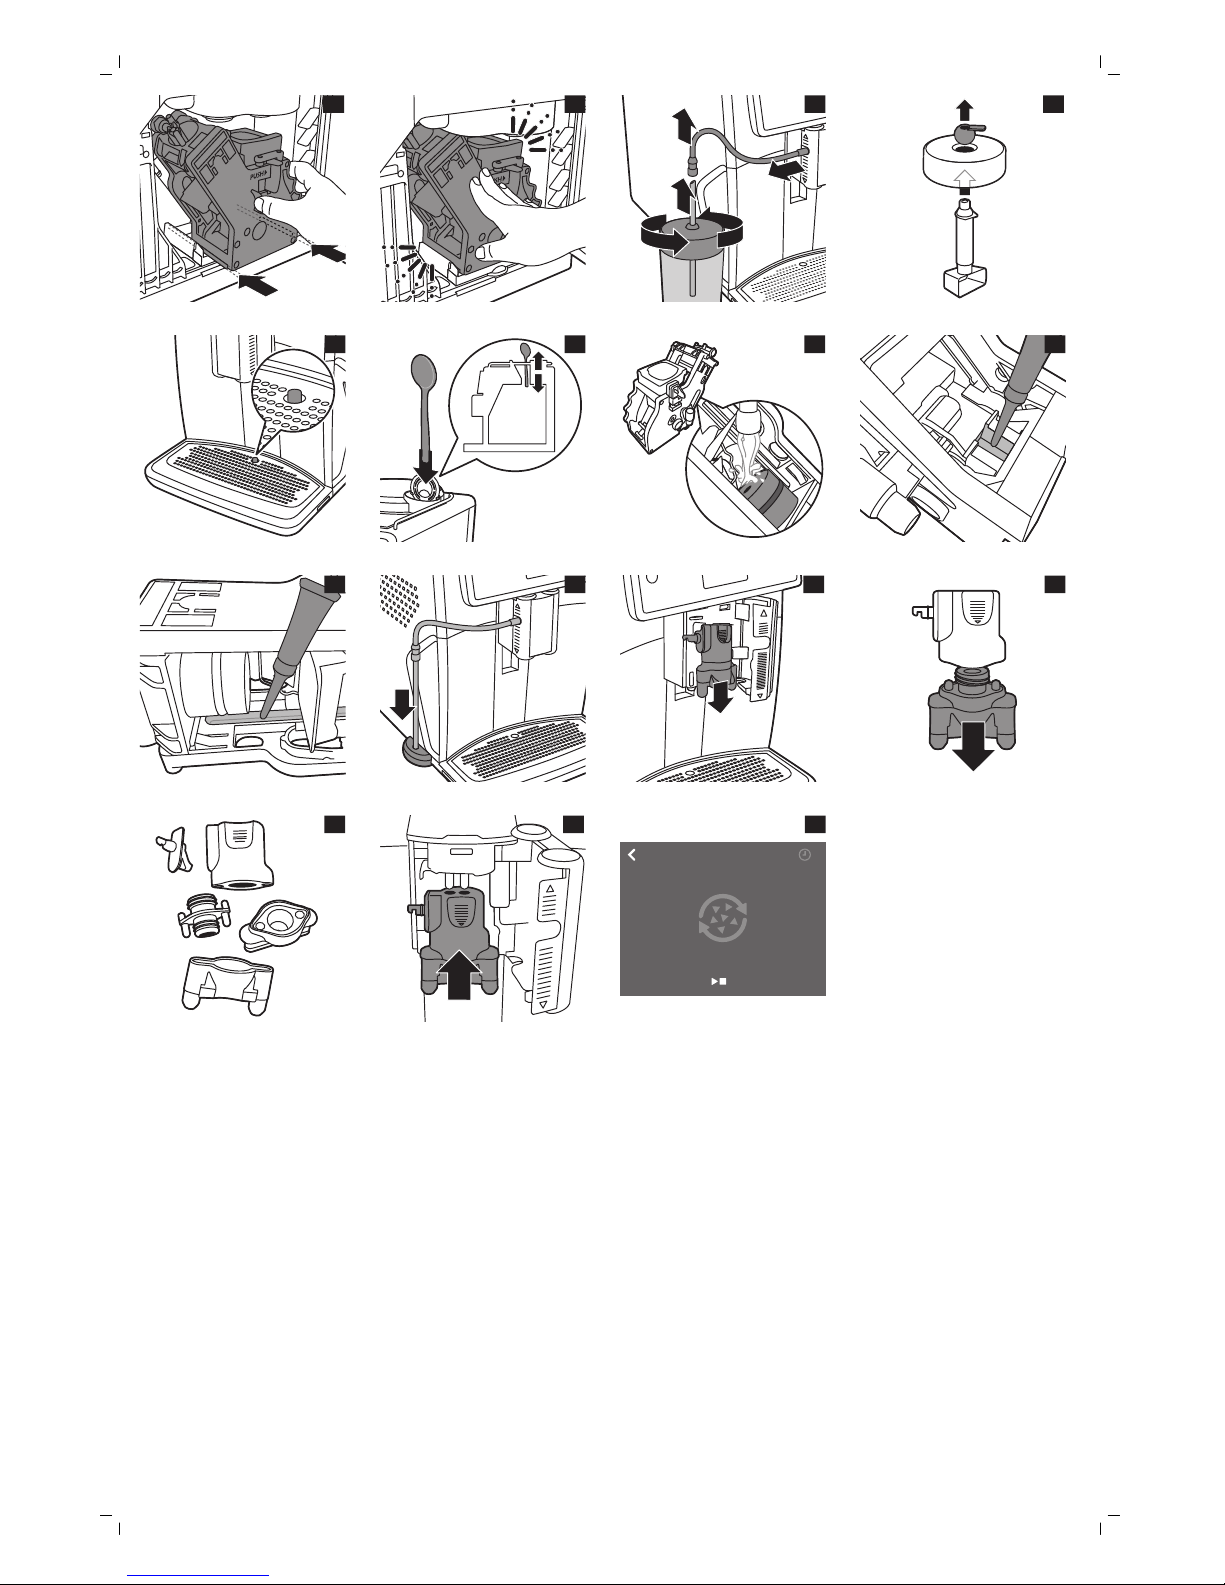
Cleaning the internal cappuccinatore under the tap
1 Open the door of the internal cappuccinatore (Fig. 10).
2 Remove the internal cappuccinatore by pulling it down (Fig. 36).
3 Disassemble the internal cappuccinatore by pulling the bottom part off the top part (Fig. 37).
16
English
Page 19

4 Disassemble all parts (Fig. 38) and clean them under the tap.
5 Reassemble the internal cappuccinatore.
6 To place back the internal cappuccinatore, put it in upright position and make sure the holes are
aligned with the two tubes on the machine. Then move the internal cappuccinatore upwards until it
locks into place (Fig. 39).
7 Close the door.
Visit www.saeco.com/care for detailed video instructions.
Descaling procedure
Please use Philips descaler only. Under no circumstances should you use a descaler based on sulfuric
acid, hydrochloric acid, sulfamic or acetic acid (vinegar) as this may damage the water circuit in your
machine and not dissolve the limescale properly. Not using the Philips descaler will void your
warranty. Failure to descale the appliance will also void your warranty. You can buy Philips descaling
solution in the online shop at www.saeco.com/care.
1 When the machine asks you to descale it, press the start/stop
button to start. To start descaling
without being prompted by the machine, tap the Clean icon and select 'Descale' (Fig. 40).
2 Remove the drip tray and the coffee grounds container, empty them and put them back into place.
3 Remove the water tank and empty it. Then remove the AquaClean filter.
4 Pour the whole bottle of Philips descaler in the water tank and then fill it with water up to the CALC
CLEAN level. Then place it back into the machine.
5 Place a large container (1.5 l) under the coffee dispensing spout.
6 Follow the instructions on the screen to start the descaling procedure. The descaling procedure
lasts approx. 15 minutes and consists of a descaling cycle and a rinsing cycle.
7 Once the descaling cycle is finished, you need to rinse the water tank and water circuit. Follow the
instructions on the screen.
8 Place a new AquaClean filter in the water tank and reactivate the AquaClean filter in the menu.
Tip: Using the AquaClean filter reduces the need for descaling!
What to do if the descaling procedure is interrupted
You can exit the descaling procedure by pressing the on/off button on the control panel. If the
descaling procedure is interrupted before it is completely finished, do the following:
1 Empty and rinse the water tank thoroughly.
2 Fill the water tank with fresh water up to the CALC CLEAN level indication and switch the machine
back on. The machine will heat up and perform an automatic rinsing cycle.
3 Before brewing any drinks, perform a manual rinsing cycle. To perform a manual rinsing cycle, first
dispense half a water tank of hot water and then brew 2 cups of pre-ground coffee without adding
ground coffee.
Note: If the descaling procedure was not completed, the machine will require another descaling
procedure as soon as possible.
17
English
Page 20

Warning icons and error codes
Meaning of the warning icons
Fill the water tank with fresh water
to the MAX level indication.
Close the service door.
The bean hopper is empty. Put new
coffee beans in the bean hopper.
Close the lid of the bean hopper.
The brew group is not inserted or is
not inserted correctly. Insert the
brew group and make sure that it
locks into place.
The internal cappuccinatore is not
inserted or is not inserted correctly
and/or the spout door is open. Make
sure that the holes in the
cappuccinatore are aligned with the
tubes in the machine before you
push the internal cappuccinatore
upwards into place. Then close the
spout door.
The coffee grounds container is full.
Make sure that the machine is
switched on. Then remove and
empty the coffee ground container.
The coffee grounds container is not
in place. Place back the coffee
grounds container.
The machine needs to fill the water
circuit with water. Make sure there
is water in the water tank and press
the start/stop button to start.
Meaning of error codes
Below you find a list of the error codes showing problems that you can solve yourself. Video
instructions are available on www.saeco.com/care. If another error code appears, please contact the
Philips Consumer Care Center in your country. For contact details, see the warranty leaflet.
Error
code
Problem Possible solution
01 The coffee funnel is
clogged.
Switch off the machine and unplug it. Remove the brew group.
Then open the lid of the pre-ground coffee compartment and
insert the spoon handle. Move the handle up and down until
the clogged ground coffee falls down (Fig. 31). Visit
www.saeco.com/care for detailed video instructions.
03 The brew group is dirty
or not well-greased.
Switch off the machine with the main switch. Rinse the brew
group with fresh water, let it air-dry and then lubricate it.
Consult chapter 'Cleaning the brew group' or visit
www.saeco.com/care for detailed video instructions. Then
switch the machine on again.
18
English
Page 21

Error
code
Problem Possible solution
04 The brew group is not
positioned correctly.
Switch off the machine with the main switch. Remove the brew
group and reinsert it. Make sure that the brew group is in the
correct position before you insert it. Consult chapter 'Handling
the brew group or visit www.saeco.com/care for detailed
video instructions. Then switch the machine on again.
05 There is air in the water
circuit.
Restart the machine by switching it off and on again with the
main switch. If this works, dispense 2-3 cups of hot water.
Descale the machine if you have not done so for a longer
period of time.
The AquaClean filter
was not prepared
properly before
installation or it is
clogged.
Remove the AquaClean filter and try again to brew a coffee. If
this works, make sure that the AquaClean filter is prepared
properly before you place it back (see 'Preparing the
AquaClean filter for activation'). Put the AquaClean filter back
into the water tank. If this still does not work, the filter might be
clogged and needs to be replaced.
14 The machine is
overheated.
Switch the machine off and switch it back on again after 30
minutes.
Ordering accessories
To clean and descale the machine, only use the Philips maintenance products. These products can be
purchased from your local retailer, from the authorized service centers or online at
www.saeco.com/care. To find a full list of spare parts online, enter the model number of your
machine. You can find the model number on the inside of the service door.
Maintenance products and type numbers:
-
Descaling solution CA6700
-
AquaClean filter CA6903
-
Brew group grease HD5061
-
Coffee oil remover tablets CA6704
-
Milk circuit cleaner CA6705
-
Maintenance kit CA6707
Troubleshooting
This chapter summarizes the most common problems you could encounter with the machine. Support
videos and a complete list of frequently asked questions are available on www.saeco.com/care. If you
are unable to solve the problem, contact the Consumer Care Center in your country. For contact
details, see the warranty leaflet.
Problem
Cause Solution
The drip tray fills up
quickly.
This is normal. The machine
uses water to rinse the internal
circuit and brew group. Some
water flows through the internal
system directly into the drip
tray.
Empty the drip tray every day or as
soon as the red 'drip tray full' indicator
pops up through the drip tray (Fig. 30).
Place a cup under the dispensing spout
to collect rinsing water.
19
English
Page 22

Problem Cause Solution
The machine is in DEMO
mode.
You pressed the standby
button for more than 8
seconds.
Switch the machine off and then on
again with the main switch on the back
of the machine.
The 'coffee grounds
container full' icon
remains displayed.
You emptied the coffee
grounds container while the
machine was switched off.
Always empty the coffee grounds
container while the machine is switched
on. If you empty the coffee grounds
container when the machine is switched
off, the coffee cycle counter is not reset.
You placed back the coffee
grounds container too fast.
Do not place back the coffee grounds
container until the screen prompts you
to put it back.
The 'coffee grounds
container full' icon is
displayed even though
the container is not full.
The machine did not reset the
counter the last time you
emptied the coffee grounds
container.
Always wait approx. 5 seconds when
you place back the coffee grounds
container.In this way the coffee
grounds counter will be reset to zero.
Always empty the coffee grounds
container while the machine is switched
on. If you empty the coffee grounds
container when the machine is switched
off, the coffee grounds counter will not
be reset.
I cannot remove the
brew group.
The brew group is not in the
correct position.
Reset the machine in the following way:
place back the drip tray and the coffee
grounds container. Then close the
service door and switch the machine off
and back on again. Try again to remove
the brew group.
You have not removed the
coffee grounds container.
Remove the coffee grounds container
before you remove the brew group.
I cannot insert the brew
group.
The brew group is not in the
correct position.
Reset the machine in the following way:
place back the drip tray and the coffee
grounds container. Leave the brew
group out. Close the service door and
switch the machine on and off. Then put
the brew group in the correct position
and reinsert it into in the machine (see
'Reinserting the brew group').
The coffee is watery. The brew group is dirty or
needs to be lubricated.
Clean and lubricate the brew group.
The grinder is set to a too
coarse setting.
Set the grinder to a finer (lower) setting.
The coffee settings have been
adjusted.
Select your coffee drink and adjust the
settings to a stronger coffee.
20
English
Page 23

Problem Cause Solution
The machine is performing its
self-adjustment procedure
after a change in grinder
settings or bean types.
Brew a few cups of coffee.
The coffee is not hot
enough.
The cups you use are cold. Preheat the cups by rinsing them with
hot water.
The temperature is set too low.
Check the menu settings.
Set the temperature to 'high' in the
menu.
You added milk. Whether the milk you add is warm or
cold, it always decreases the
temperature of the coffee to some
extent.
Coffee does not come
out or coffee comes out
slowly.
The AquaClean filter was not
prepared properly for
installation or it is clogged.
Remove the AquaClean filter and try to
brew a coffee again. If this works, make
sure the AquaClean filter is prepared
properly before you place it back. Place
back the prepared filter. If this still does
not work, the filter might be clogged
and needs to be replaced.
The grinder is set to a too fine
setting.
Set the grinder to a coarser (higher)
setting.
The brew group is dirty. Clean the brew group.
The coffee dispensing spout is
dirty.
Clean the coffee dispensing spout and
its holes with a needle.
The machine circuit is blocked
by limescale.
Descale the machine.
The milk does not froth. The internal cappuccinatore is
dirty or not inserted correctly.
Clean the internal cappuccinatore and
make sure that you position and insert it
correctly (see 'Cleaning the internal
cappuccinatore under the tap').
The type of milk used is not
suitable for frothing.
Different types of milk result in different
amounts of froth and different froth
qualities. We have tested the following
milk types which proved to deliver a
good milk froth result: semi-skimmed or
full-fat cow's milk, soy milk and lactosefree milk.
The milk is splashing. The milk you use is not cold
enough.
Make sure you use cold milk coming
directly from the fridge.
21
English
Page 24

Problem Cause Solution
The flexible milk tube is not
connected properly.
Open the door of the coffee dispensing
spout (Fig. 10) and check if the flexible
milk tube is fully connected to the
cappuccinatore (Fig. 11). Note that the
cappuccinatore and milk tubes may be
hot. Let the cappuccinatore and the
tubes cool down before you touch
them.
The cappuccinatore and milk
tubes are not clean.
Remove and disassemble the internal
cappuccinatore (see 'Cleaning the
internal cappuccinatore under the tap').
Rinse all parts under the tap. For a
thorough cleaning, use the Philips milk
circuit cleaner and perform the DEEP
MILK CLEAN procedure via the cleaning
( ) menu. Note that if the parts have
been cleaned in the dishwasher, they
may have become clogged by food
particles or detergent residues. A visual
check that they are not obstructed is
also recommended.
We advise you to perform the
HygieSteam program every day: 1) Press
'Clean' on the control panel. 2) Select
'HygieSteam'. 3) Press the start button
to start the process, then confirm all
steps on the display.
The milk tubes are clogged. Always store the milk container without
the milk tubes in the refrigerator.
Leftover milk could accumulate within
the milk tubes and block the flow of
milk going through the tubes. Rinse the
milk tubes before storage.
The machine seems to
be leaking.
The machine uses water to
rinse the internal circuit and
brew group. Some water flows
through the internal system
directly into the drip tray.
Empty the drip tray every day or as
soon as the 'drip tray full' indicator pops
up through the drip tray cover (Fig. 30).
Place a cup under the dispensing spout
to collect rinsing water.
The drip tray is too full and has
overflowed which makes it look
like the machine is leaking.
Empty the drip tray every day or as
soon as the 'drip tray full' indicator pops
up through the drip tray cover (Fig. 30).
Place a cup under the dispensing spout
to collect rinsing water.
The machine is not placed on a
horizontal surface.
Place the machine on a horizontal
surface so that the 'drip tray full'
indicator works properly.
22
English
Page 25

Problem Cause Solution
I cannot activate the
AquaClean filter and the
machine asks for
descaling.
The filter has not been replaced
in time after the AquaClean
filter icon flashed and the
capacity dropped to 0%.
Descale your machine first and then
install the AquaClean filter.
You did not install the
AquaClean filter during first
installation, but after having
brewed approx. 25 coffees
(based on 100ml/3oz cups). The
machine has to be completely
limescale-free before you
install the AquaClean filter.
First descale the machine and then
install a new AquaClean filter. After
descaling, the filter counter is reset to
0/8. Always confirm filter activation in
the machine menu. Also do this after
filter replacement.
The new water filter does
not fit.
You are trying to install another
filter than the AquaClean filter.
Only the AquaClean filter fits into the
machine.
The machine is making a
noise.
It is normal that your machine
makes noise during use.
If the machine starts to make a different
kind of noise, clean the brew group and
lubricate it (see 'Lubricating the brew
group').
The AquaClean filter was not
prepared properly and air is
now drawn into the machine.
Remove the AquaClean filter from the
water tank. Shake the filter for about 5
seconds. Immerse the filter upside
down in a jug with cold water for at
least 30 seconds. Wait until no more air
bubbles come out. Place the prepared
AquaClean filter back into the water
tank. Then dispense 2-3 cups of hot
water.
Beverage types and lengths
Beverage types
Beverage name
Description
Espresso Coffee with thick crema served in a small cup
Coffee Coffee served in a larger cup or in a mug
Americano Espresso coffee diluted with hot water in a larger cup
Cappuccino 1/3 espresso, 1/3 hot milk and 1/3 milk foam served in a large cup
Latte macchiato Long shot of hot milk with foam and a shot of espresso served in a tall glass
Cafè latte Espresso with a long shot of milk and a small amount of milk foam on top of it,
served in a large glass
Espresso macchiato Espresso with a small amount of milk foam on top of it, served in a small cup
Cafè au lait Coffee mixed with the same amount of hot milk, served in a large glass
23
English
Page 26

Espresso lungo A longer espresso with thick crema served in a medium-sized cup
Ristretto A short shot of espresso coffee served in a small cup
Froth milk Hot milk with foam
Beverage lengths
Beverage
Default length / Adjustable length range (min-max)
Coffee Milk Water
Espresso 40ml / 30-70ml - -
Coffee 120ml / 100-220ml - -
Americano 40ml / 20-80ml - 110ml / 60-160ml
Cappuccino 40ml / 20-80ml 120ml / 100-340ml -
Latte macchiato 40ml / 20-50ml 200ml / 120-340ml -
Cafè latte 60ml / 20-80ml 140ml / 120-340ml -
Hot water - - 150
Espresso macchiato 40ml /20-70ml 20ml / 10-40ml -
Cafè au lait 90ml / 50-150ml 90ml / 50-150ml -
Espresso lungo 80ml / 60-110ml - -
Ristretto 30ml / 20-40ml - -
Froth milk - 180ml / 40-280ml -
Warm milk - 180ml / 40-280ml -
Technical specifications
The manufacturer reserves the right to improve the technical specifications of the product. All the
preset quantities are approximate.
Description
Value
Size (w x h x d) 283 x 393 x 489 mm
Weight 10.8 - 12.2 kg
Power cord length 1200 mm
Water tank 1.7 litres, removable
Coffee bean hopper capacity 450 g
Coffee grounds container capacity 14 pucks
Milk container capacity 600 ml
Adjustable spout height 75-148 mm
24
English
Page 27

Nominal voltage - Power rating Power supply
See data plate on inside of service door
Recycling
-
Do not throw away the product with the normal household waste at the end of its life, but hand it
in at an official collection point for recycling. By doing this, you help to preserve the environment.
-
Follow your country's rules for the separate collection of electrical and electronic products. Correct
disposal helps prevent negative consequences for the environment and human health.
Warranty and support
If you need information or support, please visit www.saeco.com/care or read the separate warranty
leaflet.
25
English
Page 28

한국어
목차
중요 안전 정보 ___________________________________________________________________________ 26
소개 ____________________________________________________________________________________ 28
커피 머신 개요(그림 1) ____________________________________________________________________ 29
최초 설치 ________________________________________________________________________________ 29
제어판 및 터치스크린 사용 _________________________________________________________________ 29
AquaClean 필터 __________________________________________________________________________ 30
물 경도 측정 _____________________________________________________________________________ 31
음료 추출 ________________________________________________________________________________ 31
음료 설정 및 프로필 생성 __________________________________________________________________ 32
머신 설정 조절 ___________________________________________________________________________ 33
추출기 취급 ______________________________________________________________________________ 33
청소 및 유지관리 _________________________________________________________________________ 34
석회질 제거 과정 _________________________________________________________________________ 36
경고 아이콘 및 오류 코드 __________________________________________________________________ 37
액세서리 주문 ____________________________________________________________________________ 38
문제 해결 ________________________________________________________________________________ 38
음료 종류 및 양 ___________________________________________________________________________ 42
기술 사양 ________________________________________________________________________________ 43
재활용 ___________________________________________________________________________________ 43
품질 보증 및 지원 _________________________________________________________________________ 43
중요 안전 정보
이 커피 머신에는 안전 기능이 장착되어 있습니다. 그럼에도 부적절한 커피 머신 사용으로 인해 부상 또는
손상을 입지 않도록 안전 지침을 주의 깊게 읽고 준수하며 이 지침에 설명된 대로 커피 머신을 사용하시기
바랍니다. 이 설명서는 나중에 참조할 수 있도록 잘 보관하십시오.
경고
일반
-
전원을 연결하시기 전에 커피 머신의 어댑터에 표시된 전압과 해당 지역의 전압이 일치하는지
확인하십시오.
-
커피 머신을 접지된 벽면 콘센트에 연결하십시오.
-
전원 코드가 식탁이나 조리대의 가장자리로 흘러내리지 않으며 뜨거운 표면에 닿지 않도록 하십시오.
-
감전 사고의 위험을 방지하려면 커피 머신, 전원 플러그, 전원 코드를 물이나 다른 어떤 액체에도 담그지
마십시오.
-
전원 코드 커넥터에 액체를 붓지 마십시오.
-
화상 위험을 방지하려면 커피 머신에서 분사되는 뜨거운 물 근처에 신체 부위를 두지 마십시오.
-
뜨거운 표면에 손을 대지 마십시오. 손잡이와 조절기를 사용하십시오.
-
다음과 같은 경우 뒷면(있는 경우)에 있는 전원 스위치를 끈 다음 벽면 콘센트에서 전원 플러그를
뽑으십시오.
-
오작동이 발생할 경우
-
제품을 오랫동안 사용하지 않을 경우
-
커피 머신을 청소하기 전
26
한국어
Page 29

-
전원 코드를 잡지 말고 플러그를 잡고 당기십시오.
-
젖은 손으로 전원 플러그를 만지지 마십시오.
-
만약 전원 플러그나 전원 코드 또는 본체가 손상되었을 때는 머신을 사용하지 마십시오.
-
커피 머신이나 전원 코드를 개조하지 마십시오.
-
수리가 필요할 경우 안전을 위해 필립스 지정 서비스 센터만 이용하십시오.
-
이 커피 머신은 어린이가 사용해서는 안 됩니다.
-
어린이를 비롯하여 신체적인 능력, 감각 또는 정신적인 능력이 떨어지는 사람이나 경험과 지식이
풍부하지 않은 사람이 혼자서 이 커피 머신을 함부로 조작하면 사고가 발생할 수 있습니다. 안전에
책임을 지는 보호자가 사용 방법을 지도하거나 곁에서 지켜보십시오.
-
어린이가 제품 청소 및 관리를 하도록 두어서는 안 됩니다.
-
커피 머신과 전원 코드는 어린이의 손이 닿지 않는 곳에 보관하십시오.
-
어린이가 커피 머신을 가지고 놀지 못하도록 지도하십시오.
-
손가락이나 다른 이물질을 커피 분쇄기에 넣지 마십시오.
-
뜨거운 물을 배출할 때 조심하십시오. 배출 과정에서 소량의 뜨거운 물이 분사될 수 있습니다. 배출
과정이 끝날 때까지 기다린 후 뜨거운 물 배출구를 빼내십시오.
주의
일반
-
이 커피 머신은 가정용입니다. 본 제품은 매장의 직원 휴게실, 사무실, 농장 또는 기타 작업 환경 등에서
사용하기 위한 것이 아닙니다.
-
커피 머신을 평평하고 안정적인 곳에 두십시오. 이동 시에도 항상 똑바로 세워 옮기십시오.
-
커피 머신을 열판 위, 뜨거운 오븐 바로 옆, 히터 또는 화기 근처에 놓지 마십시오.
-
원두 투입구에는 볶은 커피 원두만 넣으십시오. 커피 원두 투입구에 분쇄 커피, 인스턴트 커피, 커피 생두
또는 다른 물질을 넣으면 커피 머신이 손상될 수 있습니다.
-
부품을 끼우거나 빼낼 때는 커피 머신이 충분히 식은 후에 하십시오. 사용 후 가열 표면에 잔열이 남아
있을 수 있습니다.
-
물탱크에 따뜻하거나 뜨거운 물 또는 탄산수를 채우지 마십시오. 물탱크와 커피 머신이 손상될 수
있습니다.
-
커피 머신을 세척할 때 수세미, 연마성 세제나 휘발유, 아세톤과 같은 강력 세제를 사용하지 마십시오.
물에 적신 부드러운 천을 사용하여 닦으십시오.
-
커피 머신의 석회질을 정기적으로 제거하십시오. 석회질 제거가 필요한 경우 커피 머신에 메시지가
표시됩니다. 석회질을 제거하지 않으면 커피 머신이 제대로 작동하지 않습니다. 이러한 경우의 수리는
보증되지 않습니다.
-
0°C/32°F 이하의 온도에서 커피 머신을 보관하지 마십시오. 가열 시스템에 남아 있는 물이 얼어
손상될 수 있습니다.
-
커피 머신을 장기간 사용하지 않을 경우 물탱크에 물을 남아 있지 않도록 하십시오. 물이 오염될 수
있습니다. 커피 머신을 사용할 때는 항상 깨끗한 물을 사용하십시오.
-
다른 제조업체에서 만들었거나 필립스에서 권장하지 않는 제품 액세서리 또는 부품은 절대 사용하지
마십시오. 이러한 액세서리나 부품을 사용했을 경우에는 품질 보증이 무효화됩니다.
-
정기적인 세척과 유지관리를 통해 커피 머신의 수명이 연장되고 최적의 커피 맛과 품질이 보장됩니다.
-
이 커피 머신은 습기, 커피 및 석회질에 계속 노출됩니다. 따라서 사용 설명서와 웹 사이트에 설명된 대로
커피 머신을 정기적으로 세척하고 유지관리하는 것이 중요합니다. 이러한 세척 및 유지관리 절차를
수행하지 않으면 결국 커피 머신이 작동되지 않을 수 있습니다. 이러한 경우의 수리는 보증되지
않습니다.
-
추출기를 식기세척기로 세척하지 마시고 세척 시 주방용 액체 세제나 세정제를 사용하지 마십시오.
이렇게 할 경우 추출기가 고장 날 수 있으며 커피의 향과 맛을 떨어뜨릴 수 있습니다.
-
추출기 내부를 천으로 닦으면 보풀이 묻을 수 있으므로 천으로 닦지 마십시오.
-
석회질 제거 과정에서 배출된 용액은 절대 마시지 마십시오.
27
한국어
Page 30

-
분쇄 커피함에는 분쇄 커피만 넣어 주십시오. 다른 물질이나 물건을 넣으면 커피 머신에 심각한 손상을
초래할 수 있습니다. 이러한 경우의 수리는 보증되지 않습니다.
-
커피 머신을 사용할 때에는 캐비닛에 두지 마십시오.
음료 추출 노즐 및 우유통
경고
-
화상 위험을 방지하려면 스팀이나 뜨거운 물을 배출하기 전후에 뜨거운 물이나 스팀이 소량 분사될 수
있음을 유의하십시오.
-
매우 뜨거워질 수 있으므로 음료를 배출하는 동안 음료 추출 노즐 도어를 만지거나 열지 마십시오.
-
매우 뜨거워질 수 있으므로 음료 추출 노즐 세척 프로그램 도중과 직후에 우유 튜브의 금속 부분을
만지지 마십시오. 먼저 식혀 주십시오.
-
조절이 가능한 커피 및 우유 배출구를 월 1회 세척하는 과정에서 배출된 용액을 절대로 마시지 마십시오.
주의
-
위생을 위해 조절 가능한 커피 및 우유 배출구의 외부 표면을 깨끗하게 유지하십시오.
-
우유 함유 음료를 선택하기 전에 우유 튜브가 음료 추출 노즐에 연결되어 있어야 합니다.
-
우유통에는 물(세척용) 또는 우유 외에 다른 액체를 넣지 마십시오.
-
우유 함유 음료를 추출한 후에는 조절 가능한 커피 및 우유 배출구에서 자동으로 소량의 스팀을 배출하여
음료 추출 노즐과 우유 배출구의 금속 부분을 세척합니다.
-
최근에 커피 머신을 사용한 경우 조절 가능한 커피 및 우유 배출구와 우유 배출구의 금속 부분이 뜨거울
수 있으니 주의해야 합니다.
-
음료 추출 노즐을 세척하기 위해 소량의 스팀이 조절 가능한 커피 및 우유 배출구에서 분사될 수
있으므로 음료 추출 노즐 도어를 열 때 주의하십시오.
-
음료 추출 노즐 도어가 잘 닫히지 않으면 음료 추출 노즐이 제대로 끼워졌는지 확인하십시오. 사용
설명서의 지침을 준수하십시오. 음료 추출 노즐을 끼울 때 커피/우유 배출구에 너무 세게 밀어 넣지
마십시오. 그러면 음료 추출 노즐이 우유를 흡입할 수 없게 되어 올바르게 작동하지 않습니다.
-
우유 배출구의 금속 부분이 뜨거워질 수 있습니다. 화상의 위험을 피하려면 항상 음료 추출 노즐 세척
프로그램을 시작하기 전에 우유 배출구 홀더에 우유 배출구를 놓으십시오.
-
음료 추출 노즐을 식기세척기로 세척하지 마십시오.
EMF(전자기장)
이 커피 머신은 EMF(전자기장) 노출과 관련된 모든 기준 및 규정을 준수합니다.
소개
Saeco 전자동 커피 머신을 구입해 주셔서 감사합니다! Saeco가 드리는 지원 혜택을 받으실 수 있도록
www.saeco.com/care 에서 제품을 등록해 주십시오.
커피 머신을 처음 사용하기 전에 이 사용 설명서를 주의 깊게 읽고 나중에 참조할 수 있도록 잘
보관하십시오.
커피 머신을 최대한 활용할 수 있도록 Saeco는 다음 세 가지 방법으로 모든 지원을 제공합니다.
1 별도로 제공되는 최초 설치 및 최초 사용에 대한 요약 설명서
2 이 사용자 설명서에 더 자세한 정보가 나와 있습니다.
3 온라인 지원 및 동영상: 앞 페이지에서 QR 코드를 스캔하거나 www.saeco.com/care 를 방문하십시오.
참고: 이 커피 머신은 커피를 사용하여 테스트를 거쳤습니다. 꼼꼼히 세척하였으나 일부 커피 찌꺼기나 물이
남아 있을 수 있습니다. 그러나 이 커피 머신은 완벽한 새 제품임을 보장합니다.
28
한국어
Page 31

커피 머신 개요(그림 1)
1
제어판 및 터치스크린 12 물받이 열림 손잡이
2 컵 홀더 13 플러그 전원 코드
3 원두 투입구 뚜껑 14 분쇄 설정 조절기
4 분쇄 커피함 뚜껑 15 원두 투입구
5 음료 추출 노즐 16 추출기
6 조절이 가능한 커피 및 우유 배출구 17 커피 주입구
7 우유 튜브 홀더 18 커피 찌꺼기 통
8 전원 스위치 19 커피 가루 용기
9 코드 소켓 20 물받이
10 서비스 도어 21 물받이 덮개
11 '물받이 가득 참' 표시등 22 물탱크
액세서리
23 윤활유 튜브 26 계량 스푼
24 세척용 브러시 27 물 경도 검사지
25 AquaClean 필터
우유 거품 내기 부품
28 우유통 뚜껑 30 금속 우유 튜브
29 우유통 31 유연한 우유 튜브
최초 설치
커피 머신 사용을 준비하기 위해 물 배출구 채우기 및 AquaClean 필터 활성화와 같은 몇 가지 간단한
단계를 수행해야 합니다. 이 단계는 별도로 제공되는 요약 설명서에 나와 있습니다.
처음에 5번 정도 커피를 추출해 커피 머신에서 자율 조절 기능을 완료하게 하면 가장 맛있는 커피를 만들 수
있습니다.
커피 머신은 분쇄 커피를 가장 맛있게 추출하도록 설정되어 있습니다. 그러므로 커피를 100-150잔 정도
추출할 때까지(약 1개월 사용) 분쇄기 설정을 조정하지 않는 것이 좋습니다.
처음 사용하기 전에 우유통, 우유 튜브, 음료 추출 노즐을 깨끗이 씻으십시오. 음식 찌꺼기나 세제 잔여물이
끼지 않도록 음료 추출 노즐을 식기세척기에서 씻지 않는 것이 좋습니다.
제어판 및 터치스크린 사용
커피 머신 제어판과 터치스크린의 개요와 설명은 다음과 같습니다. 터치스크린을 살짝 밀고 눌러 항목을
선택하거나 선택을 확인할 수 있습니다.
29
한국어
Page 32

Drink s
Proles
Clean
Setti ngs
43 51 72 6
1. 전원 버튼 4. 터치스크린 7. 시작/중지 버튼
2. 개인 프로필 5. 세척 메뉴
3. 음료 메뉴 6. 머신 설정
AquaClean 필터
AquaClean 필터는 커피 머신에 물때가 끼는 것을 줄이고 커피의 향과 풍미를 항상 유지하기 위해 여과된
물을 공급하도록 고안된 것입니다. 머신 및 사용 설명서에 표시된 바와 같이 AquaClean 필터를 사용할 경우
선택한 커피 종류와 헹굼 및 세척 빈도에 따라 각 필터에서 최대 625잔을 만들 수 있습니다. 선택한 커피
종류와 헹굼 및 세척 빈도에 따라 각 필터에서 최대 625잔을 만들 수 있습니다.
활성화를 위한 AquaClean 필터 준비
물탱크에 AquaClean 필터를 장착하기 전에 다음과 같이 사용 준비를 해야 합니다.
1 필터를 약 5초 (그림 2) 동안 흔들어 줍니다.
2 찬물이 들어 있는 용기에 30초 이상 완전히 잠기도록 필터를 거꾸로 담급니다. 거품이 더 이상 나오지
(그림 3) 않을 때까지 기다립니다.
3 필터를 필터 연결부에서 최대한 아래까지 (그림 4) 밀어 넣습니다.
AquaClean 필터 활성화
사용할 때마다 새 AquaClean 필터를 활성화해야 합니다. AquaClean 필터를 활성화하면 커피 머신이
AquaClean 필터 용량과 사용된 필터 수를 모니터링합니다. AquaClean 필터를 활성화하는 세 가지 방법이
있습니다.
1. 최초 설치 시 AquaClean 필터 활성화
처음 전원을 켜면 커피 머신이 물탱크 채우기, 물 배출구 채우기 및 AquaClean 필터 활성화와 같은 최초
설치 단계를 안내합니다. 화면의 지침을 잘 따르기만 하면 됩니다.
2. 메시지가 표시될 때 AquaClean 필터 활성화
화면에 'AquaClean 필터 교체?' 메시지가 나타나면 AquaClean 필터를 교체하고 화면의 지침에 따라
필터를 제대로 활성화하십시오.
교체가 필요하다는 메시지가 나타나지 않더라도 적어도 3개월에 한 번은 AquaClean 필터를 교체하십시오.
3. 다른 시간에 AquaClean 필터 활성화
아래 지침을 따라 언제든 AquaClean 필터 사용을 시작할 수 있습니다.
30
한국어
Page 33

1 설정 아이콘을 누르고 'AquaClean' (그림 5)을 선택합니다.
2 '새 필터'를 선택하고 활성화 화면이 나타나면 시작/중지 버튼을 누릅니다.
3 화면의 지침을 잘 따르십시오.
참고: 커피 머신에 새 AquaClean 필터를 설치하고 활성화하기 전에 커피 머신의 석회질을 제거해야 한다는
메시지가 표시되는 경우가 있습니다. AquaClean 필터를 사용하려면 커피 머신에 석회질이 전혀 없어야
하기 때문에 표시되는 메시지입니다. 화면의 지침을 잘 따르십시오.
물 경도 측정
처음 설치할 때 물 경도를 설정해야 합니다. 화면의 단계에 따라 제공된 물 경도 검사지를 사용합니다. 물
경도를 나중에 설정하려면 설정 아이콘을 누르고 '물 경도'를 선택합니다.
1 물 경도 검사지를 사용할 물에 1초 동안 담급니다. 그런 다음 1분 동안 기다립니다.
2 빨간색으로 변한 사각형 수를 확인합니다.
3 알맞은 물 경도 설정을 선택하고 확인 아이콘을 눌러 적용합니다.
빨간 사각형 수:
설정할 값 1 2 3 4
음료 추출
음료
아이콘을 눌러 '음료' 메뉴를 시작합니다. 페이지를 스크롤하여 원하는 음료를 찾습니다. 음료를
선택한 후 설정 (보기 '음료 설정')을 조절하여 원하는 맛으로 설정합니다.
-
두 잔 (그림 6)을 추출하려면 '2x' 아이콘을 누릅니다. 선택한 음료에 맞는 분쇄 과정이 자동으로 연속 두
번 진행됩니다.
-
저장한 음료 중 하나를 추출하려면 프로필 아이콘을 누릅니다.
-
커피 배출구 높이를 사용하는 컵이나 유리잔 크기에 맞추려면 배출구를 위나 아래로 밀어 조절합니다.
커피 음료 추출
1 물탱크에 사용할 물을 채우고 커피 원두 투입구에 원두를 채웁니다.
2 음료 아이콘을 누르고 커피를 선택합니다.
3 조절 가능한 막대를 위 아래 (그림 7)로 살짝 밀어 첫 번째 화면에서 커피 농도와 양을 원하는 대로 맞출
수 있습니다. 오른쪽 (그림 8)의 화살표를 클릭하면 조절할 수 있는 여러 가지 설정이 두 번째 화면에
나타납니다.
4 시작/중지 버튼을 눌러 선택한 음료를 추출합니다.
우유 함유 음료 추출
1 물탱크에 사용할 물을 채우고 커피 원두 투입구에 원두를 채웁니다.
도움말: 배출구를 맨 위로 밀면 물 탱크를 쉽게 이용할 수 있습니다.
2 우유통 뚜껑을 열고 우유 (그림 9)를 우유통에 채웁니다.
항상 냉장고에서 바로 꺼낸 우유를 사용하는 것이 가장 좋습니다.
3 금속 우유 튜브를 통에 넣습니다. 음료 추출 노즐 (그림 10) 도어를 열고 유연한 우유 튜브를 음료 추출
노즐 (그림 11)에 연결합니다. 음료 추출 노즐 도어를 다시 닫습니다.
4 음료
아이콘을 누르고 우유 함유 음료를 선택합니다.
31
한국어
Page 34

5 조절 가능한 막대를 위 아래 (그림 7)로 살짝 밀어 첫 번째 화면에서 커피 농도, 커피와 우유의 양을
원하는 대로 맞출 수 있습니다. 오른쪽 (그림 8)의 화살표를 클릭하면 조절할 수 있는 여러 가지 설정이
두 번째 화면에 나타납니다.
6 조절 가능한 막대를 위 아래로 살짝 밀어 기호에 맞게 설정을 조절할 수 있습니다.
7 시작/중지 버튼을 눌러 선택한 음료 추출을 시작합니다.
8 우유 배출 직후에 '자동 스팀'이 진행됩니다. 내부 우유 시스템에서 스팀이 분사되어 신속하게
헹궈집니다.
도움말: 시판되는 우유 팩을 사용하여 우유 함유 음료를 추출할 수도 있습니다. 금속 우유 튜브를 우유 팩에
직접 넣으십시오.
분쇄 커피로 커피 추출
1 분쇄 커피함 (그림 12) 뚜껑을 열고 분쇄 커피를 한 스푼 붓습니다. 그런 다음 뚜껑을 닫습니다.
2 음료를 선택한 후 분쇄 커피 아이콘 (그림 13) 을 누른 후 시작/중지 버튼을 누릅니다.
참고: 분쇄 커피를 선택하면 커피 농도를 조절할 수 없으며 음료를 한 번에 하나만 추출할 수 있습니다.
온수 배출
1 음료 아이콘을 누른 후 '온수'를 선택합니다.
2 시작/중지 버튼을 눌러 뜨거운 물 배출을 시작합니다.
음료 설정 및 프로필 생성
이 커피 머신에서는 취향에 맞게 음료 설정을 조절하고 조절한 음료를 개인 프로필에 저장할 수 있습니다.
다음 두 가지 방법으로 프로필을 만들 수 있습니다.
1 '음료' 메뉴에서 음료를 선택하고 조절한 후 '저장' 아이콘을 누릅니다.
2 '프로필' 메뉴에서 '프로필 추가' 아이콘을 눌러 프로필을 만듭니다. 새로 만든 프로필을 선택하고 음료를
고른 후 기호에 맞게 조절하고 '저장' 아이콘을 누릅니다.
음료 설정
기호에 맞게 음료 설정을 조절할 수 있습니다.
1 음료 아이콘을 누릅니다.
2 원하는 음료를 선택합니다.
3 기호에 맞게 조절할 수 있는 설정이 화면에 표시됩니다. 오른쪽 (그림 8)의 화살표를 눌러 여러 가지
설정을 조절할 수 있는 다음 화면으로 이동합니다. 음료 유형에 따라 설정을 조절할 수 있습니다. 커피
음료는 양, 농도, 맛, 온도를 조절할 수 있고 우유 함유 음료는 우유의 양, 거품 수준, 커피와 우유 추출
순서를 조절할 수 있습니다. 온수의 경우 양을 조절할 수 있습니다.
4 막대를 살짝 밀어 원하는 수준 (그림 7)까지 위나 아래로 조절합니다.
5 '저장' 아이콘 (그림 14)을 누르고 기존 프로필을 선택하거나 새 프로필 (그림 15)을 추가해 이 설정을
프로필에 저장할 수 있습니다.
프로필 생성
1 프로필 아이콘을 누릅니다.
2 '프로필 추가' (그림 15)를 선택합니다.
3 새 프로필 이름을 입력하고 확인 (그림 16)합니다.
4 새로 만든 프로필을 선택합니다.
5 '음료 추가' (그림 17)를 선택하여 프로필에 음료를 추가합니다.
32
한국어
Page 35

프로필 삭제
1 프로필 아이콘을 누릅니다.
2 삭제하려는 아이콘을 잠시 누릅니다.
3 '삭제'를 선택하고 확인합니다.
머신 설정 조절
원두 용기 안에 있는 분쇄 설정 노브를 사용하여 분쇄 설정을 조절할 수 있습니다. 12가지 분쇄 설정 중에서
선택할 수 있습니다. 설정이 높을 수록 커피가 진해집니다.
참고: 2~3번 정도 음료를 추출해야 전체적인 차이를 맛볼 수 있습니다.
참고: 분쇄기 설정은 커피 원두가 분쇄되는 동안에만 조절할 수 있습니다.
분쇄 설정 조절기를 한 번에 한 단계씩 돌립니다. 그라인더가 손상되지 않도록 분쇄 설정을 한 단계씩
돌린 후 커피 음료를 추출하십시오.
5 원두 투입구의 뚜껑을 닫습니다.
기본 설정 조절
설정 아이콘을 사용하여 다음 설정을 변경합니다.
-
AquaClean: AquaClean 상태를 확인하고 새 필터를 설치합니다.
-
물 경도: 해당 지역의 수질에 맞게 커피 머신 설정을 조절하려면 물 경도를 측정하십시오.
-
대기 시간: 커피 머신이 대기 모드가 된 후 경과 시간입니다.
-
밝기: 디스플레이 대비를 조절합니다.
-
물 탱크 표시: 물 탱크 표시등을 조절합니다.
-
커피 배출구 표시: 컵 받침대에 비추는 표시등을 조절합니다.
-
언어: 다른 언어를 선택합니다.
-
측정 단위: 밀리리터 또는 미국 액량 온스를 선택합니다.
-
버튼음: 디스플레이 버튼음을 활성화/비활성화합니다.
추출기 취급
추출기를 분리, 삽입, 세척하는 방법을 보여주는 자세한 동영상 지침은 www.saeco.com/care 를
참조하십시오.
커피 머신에서 추출기 꺼내기
1 커피 머신 뒷면의 전원 스위치를 눌러 전원을 끕니다.
2 서비스 도어 (그림 19)를 엽니다.
3 커피 찌꺼기 통 (그림 20)을 빼냅니다.
4 PUSH(누름) 버튼 (그림 21)을 누르고 추출기의 손잡이를 잡아당겨 커피 머신 (그림 22)에서 빼냅니다.
33
한국어
주의: 그라인더 손상을 방지하려면 분쇄 설정 노브를 한 번에 한 단계 이상 돌리지 마십시오.
1 커피 배출구 아래에 잔을 놓습니다.
2 원두 투입구의 뚜껑을 엽니다.
3 음료 아이콘을 누르고 에스프레소를 선택합니다. 시작/중지 버튼을 누릅니다.
4 분쇄기가 분쇄를 시작하면, 분쇄 설정 노브를 돌려 왼쪽이나 오른쪽(그림18) (그림 18)으로 돌립니다.
Page 36

추출기 다시 끼우기
추출기를 커피 머신에 다시 끼우기 전 위치가 올바른지 확인합니다.
1 추출기 측면에 있는 노란색 실린더의 화살표가 검은색 화살표 및 N (그림 23)과 나란히 정렬되었는지
확인합니다.
-
정렬되지 않았으면 추출기 (그림 24) 바닥에 닿을 때까지 레버를 아래로 누릅니다.
2 추출기의 다른 쪽 노란색 잠금 훅이 올바른 위치에 있는지 확인합니다.
-
훅을 올바르게 배치하려면 맨 위쪽 (그림 25)까지 밀어 올리십시오.
3 딸깍 (그림 27) 소리가 날 때까지 측면 (그림 26)의 가이딩 레일을 따라 추출기를 커피 머신에 다시 끼워
넣습니다.PUSH(누름) 버튼을 누르지 마십시오.
4 커피 찌꺼기 통을 다시 끼우고 서비스 도어를 닫습니다.
청소 및 유지관리
주기적으로 세척하고 유지 보수를 수행하면 커피 머신의 상태가 최상으로 유지되어 오랫동안 맛있는 커피를
추출하고 커피 흐름이 안정적으로 유지되며 우유 거품을 완벽하게 제조할 수 있습니다.
커피 머신의 모든 분리형 부품을 청소하는 시기와 방법에 대한 내용은 표를 참조하십시오. 자세한 정보와
동영상 지침은 www.saeco.com/care 에서 확인할 수 있습니다.
청소 표
부품 설명
세척 시기 세척 방법
추출기 매주 추출기를 분리하여 흐르는 사용할 물에 헹구고 자연
건조합니다.
매월 Philips 커피 기름때 제거용 세정제로 '추출기 세척'
과정을 진행합니다. 세척 메뉴에서 '추출기 세척'을
선택하고 화면의 지침에 따릅니다. 자세한 동영상
지침은 www.saeco.com/care 에서 에서 자세한
동영상 지침을 참조하십시오.
추출기에 윤활유
도포
사용 종류에 따라 다릅니다.
윤활 표 (보기 '추출기 윤활')를
참조하십시오.
추출기에 Philips 윤활유를 도포합니다. 자세한
동영상 지침은 www.saeco.com/care 에서 에서
자세한 동영상 지침을 참조하십시오.
밀크 시스템/음료
추출 노즐
매일 사용 후 세척 메뉴의 HYGIESTEAM 프로그램을 진행합니다.
세척 메뉴에서 HYGIESTEAM을 선택하고 화면의
지침에 따릅니다. 금속 우유 튜브를 우유 튜브
홀더에 끼우기 전에 젖은 천으로 그 외부를
닦습니다.
매주 내부 음료 추출 노즐 (보기 '사용할 물에 음료 추출
노즐 세척')를 빼내 분리합니다. 세제를 이용해 모든
부품을 사용할 물에 헹굽니다.
매월 Philips 우유 배출구 세척제로 '우유 집중 세척'
과정을 진행합니다. 세척 메뉴에서 '우유 집중
세척'을 선택하고 화면의 지침에 따릅니다. 자세한
동영상 지침은 www.saeco.com/care 에서 에서
자세한 동영상 지침을 참조하십시오.
우유통 매주 우유통 (그림 28)을 분리하고 계량 스푼 (그림
29)으로 볼을 꺼냅니다. 사용할 물이나
식기세척기에 모든 부품을 헹굽니다.
34
한국어
Page 37

부품 설명 세척 시기 세척 방법
물받이 물받이 (그림 30)에서 빨간색
'물받이 가득 참' 표시등이
켜지는 즉시 또는 매일
물받이를 비웁니다.
물받이를 분리해 소량의 세제와 함께 사용할 물로
헹굽니다.
커피 찌꺼기 용기 커피 머신에서 메시지가
표시되면 커피 찌꺼기 용기를
비우십시오. 매주 세척합니다.
커피 머신이 켜져 있는 상태에서 커피 찌꺼기 용기를
분리하고 소량의 세제로 사용할 물에 헹굽니다.
물탱크 매주 사용할 물로 물탱크를 헹굽니다.
커피 주입구 일주일에 한 번 정도 커피
주입구가 막혔는지
확인합니다.
커피 머신 플러그를 뽑고 추출기를 꺼냅니다. 분쇄
커피함의 뚜껑을 열고 커피 주입구에 스푼 손잡이를
삽입합니다. 막힌 분쇄 커피가 떨어질 때까지 (그림
31) 손잡이를 위아래로 움직입니다. 자세한 동영상
지침은 www.saeco.com.care 에서 자세한 동영상
지침을 참조하십시오.
도움말: 이 사용 설명서 마지막 페이지에 세척 달력이 있습니다. 세척한 날에 날짜를 적어 두십시오.
추출기 세척
추출기를 정기적으로 청소하면 커피 찌꺼기로 인해 내부 추출관이 막히는 것을 방지할 수 있습니다.
추출기를 분해, 삽입, 세척하는 방법을 보여주는 지원 동영상은 www.saeco.com/care 를 참조하십시오.
수돗물로 추출기 세척
1 서비스 도어를 열고 추출기 (보기 '커피 머신에서 추출기 꺼내기')를 분리합니다.
2 미지근한 물로 추출기를 깨끗이 헹굽니다. 상단 필터 (그림 32)를 조심스럽게 청소합니다.
3 추출기를 다시 넣기 전에 상온에서 완전히 말립니다. 추출기 내부를 천으로 닦으면 보풀이 묻을 수
있으므로 천으로 닦지 마십시오.
커피 기름때 제거용 세정제로 추출기 세척
Philips 커피 기름때 제거용 세정제만 사용하십시오. 세척 아이콘을 누르고 '추출기 세척'을 선택합니다.
그런 다음 화면의 지침을 따릅니다. 자세한 동영상 지침은 www.saeco.com/care 를 참조하십시오.
추출기 윤활
추출기에 주기적으로 윤활유를 도포하여 움직이는 부품이 계속 부드럽게 움직이도록 하십시오.
1 추출기 (그림 33) 바닥의 축 주변에 윤활유를 얇게 바릅니다.
2 양쪽 (그림 34) 레일에 윤활유를 얇게 바릅니다.
윤활 주기는 아래 표를 참조하십시오. 자세한 동영상 지침은 www.saeco.com/care 를 참조하십시오.
사용 빈도
매일 추출하는 음료 수 윤활 주기
낮음 1-5 4개월마다
보통 6-10 2개월마다
높음 >10 매월
35
한국어
Page 38

음료 추출 노즐 세척 프로그램
커피 머신에 음료 추출 노즐 세척을 위한 세 가지 프로그램이 있습니다. 자동 스팀 세척 프로그램은 우유
함유 음료 추출 후 자동으로 진행됩니다. 세척
아이콘을 누르고 세척 메뉴를 스크롤하여 HYGIESTEAM
또는 우유 집중 세척 프로그램을 선택할 수 있습니다. 그런 다음 화면의 지침을 따릅니다.
-
자동 스팀: 음료 추출 노즐에 스팀이 분사되어 신속하게 헹궈집니다.
-
HYGIESTEAM: 내부 우유 시스템이 스팀으로 깨끗이 세척됩니다. 우유 튜브 홀더 (그림 35)에 우유
튜브를 끼우고 화면의 지침에 따릅니다.
-
우유 집중 세척: Philips 우유 배출구 세척제를 이용해 '우유 집중 세척' 과정을 진행하면 내부 우유
시스템이 깨끗이 청소됩니다.
사용할 물에 음료 추출 노즐 세척
1 내부 음료 추출 노즐 (그림 10) 도어를 엽니다.
2 음료 추출 노즐을 아래로 (그림 36) 당겨 분리합니다.
3 윗 부분 (그림 37)에서 아랫 부분을 빼내 음료 추출 노즐을 분리합니다.
4 모든 부품 (그림 38)을 분리하고 사용할 물에 세척합니다.
5 음료 추출 노즐을 다시 조립합니다.
6 음료 추출 노즐을 다시 끼우려면 제자리에 똑바로 놓고 커피 머신에 있는 튜브 2개에 구멍이 맞춰지도록
합니다. 제자리 (그림 39)에 고정될 때까지 음료 추출 노즐을 위로 올립니다.
7 도어를 닫습니다.
자세한 동영상 지침은 www.saeco.com/care 를 참조하십시오.
석회질 제거 과정
필립스 석회질 제거제만 사용하십시오. 황산, 염산, 술팜산 또는 아세트산(식초) 기반의 석회질 제거제는
절대 사용하지 마십시오. 커피 머신의 물 배출구가 손상되고 석회질이 적절하게 녹지 않을 수 있습니다.
필립스 석회질 제거제를 사용하지 않으면 보증이 무효화됩니다. 제품의 석회질을 제거하지 않아도 보증이
무효화됩니다. 필립스 석회질 제거 용액은 온라인 매장 http://pok.co.kr/ 에서 구입할 수 있습니다.
1 석회질을 제거할지 묻는 메시지가 나타나면 시작/중지 버튼을 눌러 시작합니다. 커피 머신의 메시지가
나타나지 않아도 석회질 제거를 시작하려면 세척 아이콘을 누르고 '석회질 제거' (그림 40)를
선택합니다.
2 물받이와 커피 가루 용기를 빼내고 비운 다음 제자리에 넣습니다.
3 물탱크를 빼내 비웁니다. 그런 다음 AquaClean 필터를 제거합니다.
4 물탱크에 필립스 석회질 제거제 한 병을 모두 붓고 CALC CLEAN 표시선까지 물을 채웁니다. 그런 다음
커피 머신에 다시 끼웁니다.
5 커피 배출구 아래에 큰 용기(1.5l)를 놓습니다.
6 화면의 지침에 따라 석회질 제거 과정을 시작합니다. 석회질 제거 절차에는 약 15분이 소요되며 석회질
제거 과정과 헹굼 과정으로 이루어져 있습니다.
7 석회질 제거 과정이 끝나면 물 탱크와 물 배출구를 헹굽니다. 화면의 지침을 잘 따르십시오.
8 새 AquaClean 필터를 물 탱크에 끼우고 메뉴에서 AquaClean 필터를 다시 활성화합니다.
도움말: AquaClean 필터를 사용하면 석회질을 자주 제거할 필요가 없습니다!
석회질 제거 절차가 도중에 중단된 경우의 대처 방법
제어판에서 전원 버튼을 눌러 석회질 제거 절차를 종료할 수 있습니다. 완료되기 전에 석회질 제거 절차가
중단된 경우 다음을 수행합니다.
1 물탱크를 비우고 깨끗이 헹굽니다.
2 물탱크에 CALC CLEAN 표시선까지 깨끗한 물을 채운 후 커피 머신을 다시 켭니다. 커피 머신이
가열되고 자동 헹굼 단계가 수행됩니다.
36
한국어
Page 39

3 음료를 추출하기 전에 수동 헹굼 과정을 수행합니다. 수동 헹굼 과정을 수행하려면 먼저 물탱크에서
온수를 반 정도 배출하고 분쇄 커피를 넣지 않고 미리 분쇄한 커피를 2컵 만듭니다.
참고: 석회질 제거 과정이 완료되지 않은 경우 가능한 한 빨리 석회질 제거 과정을 다시 수행해야 합니다.
경고 아이콘 및 오류 코드
경고 아이콘의 의미
물탱크의 MAX 표시선까지 깨끗한
물을 채우십시오.
서비스 도어를 닫습니다.
원두 투입구가 비었습니다. 원두
투입구에 새 커피 원두를 넣으십시오.
원두 투입구의 뚜껑을 닫습니다.
추출기가 없거나 제대로 끼워져 있지
않습니다. 추출기를 끼우고 제자리에
고정되었는지 확인합니다.
음료 추출 노즐에 없거나 제대로
끼워져 있지 않거나 배출구 도어가
열려 있습니다. 음료 추출 노즐을
제자리로 밀어 올리기 전에 음료 추출
노즐 구멍이 커피 머신의 튜브에
맞춰져야 합니다. 그런 다음 배출구
도어를 닫습니다.
커피 찌꺼기 용기가 가득 찬
것입니다. 커피 머신이 켜져 있는지
확인합니다. 그런 다음 커피 찌꺼기
용기를 빼내서 비웁니다.
커피 찌꺼기 용기가 제자리에 있지
않습니다. 커피 찌꺼기 용기를 다시
끼웁니다.
커피 머신에서 물 배출구에 물을
채워야 합니다. 물 탱크에 물이
있는지 확인하고 시작/중지 버튼을
눌러 시작합니다.
오류 코드의 의미
직접 해결할 수 있는 문제를 표시하는 오류 코드 목록은 다음과 같습니다. www.saeco.com/care 에서
동영상 지침을 확인할 수 있습니다. 다른 오류 코드가 나타나면 해당 국가의 필립스 서비스 센터에
문의하십시오. 연락처 정보는 보증서를 참조하십시오.
오류 코드
문제점 가능한 해결책
01 커피 주입구가
막혔습니다.
커피 머신 전원을 끄고 전원 코드를 뽑습니다. 추출기를
분리합니다. 그런 다음 분쇄 커피함 뚜껑을 열고 스푼 손잡이를
삽입합니다. 막힌 분쇄 커피가 떨어질 때까지 (그림 31) 손잡이를
위아래로 움직입니다. 자세한 동영상 지침은
www.saeco.com/care 를 에서 자세한 동영상 지침을
참조하십시오.
03 추출기가 더럽거나
윤활유가 제대로
도포되지 않았습니다.
전원 스위치를 사용하여 커피 머신을 끕니다. 추출기를 깨끗한
물로 헹구고 자연 건조 후 윤활유를 도포합니다. '추출기 세척'
장을 확인하거나 www.saeco.com/care 를 에서 자세한 동영상
지침을 참조하십시오. 그런 다음 커피 머신을 다시 켭니다.
37
한국어
Page 40

오류 코드 문제점 가능한 해결책
04 추출기 위치가 올바르지
않습니다.
전원 스위치를 사용하여 커피 머신을 끕니다. 추출기를 분리했다
다시 삽입합니다. 삽입하기 전에 추출기가 올바른 위치에 있는지
확인합니다. '추출기 취급' 장을 확인하거나
www.saeco.com/care 에서 에서 자세한 동영상 지침을
참조하십시오. 그런 다음 커피 머신을 다시 켭니다.
05 물 배출구에 공기가 들어
있습니다.
전원 스위치로 전원을 껐다가 다시 켜 커피 머신을 재시작합니다.
이런 방식으로 작동하면 뜨거운 물을 2~3잔 배출합니다. 오랫동안
커피 머신의 석회질을 제거하지 않았으면 제거하십시오.
설치 전 AquaClean
필터가 제대로 준비되지
않았거나 막혀 있습니다.
AquaClean 필터를 빼내고 다시 시도한 후 커피를 추출합니다.
이런 방식으로 작동하면 다시 (보기 '활성화를 위한 AquaClean
필터 준비') 장착하기 전에 AquaClean 필터가 제대로
준비되었는지 확인합니다. AquaClean 필터를 물탱크에 다시
끼웁니다. 그래도 작동하지 않으면 필터가 막혔거나 필터를 다시
끼워야 합니다.
14 머신이 과열됩니다. 커피 머신을 끈 다음 30분 후에 다시 켭니다.
액세서리 주문
커피 머신을 청소하거나 석회질을 제거할 때는 반드시 필립스 Philips 관리 제품을 사용하십시오. 이러한
제품은 현지 대리점, 지정 서비스 센터 또는 www.saeco.com/care 에서 온라인으로 구입할 수 있습니다.
전체 예비 부품 목록을 온라인에서 확인하려면 커피 머신의 모델 번호를 입력하십시오. 모델 번호는 서비스
도어 뒷면에 있습니다.
관리 제품 및 유형 번호:
-
석회질 제거 용액 CA6700
-
AquaClean 필터 CA6903
-
추출기 윤활유 HD5061
-
커피 기름때 제거용 세정제 CA6704
-
우유 배출구 세척제 CA6705
-
유지 관리 키트 CA6707
문제 해결
이 장에서는 커피 머신을 사용하면서 접할 수 있는 가장 일반적인 문제를 다룹니다. www.saeco.com/care
에서 지원 동영상 및 FAQ 전체 목록을 확인할 수 있습니다. 문제를 해결할 수 없으면 해당 국가의 고객
상담실로 문의하십시오. 연락처 정보는 보증서를 참조하십시오.
문제점
원인 해결책
물받이가 금방 찹니다. 이는 일반적인 현상입니다. 커피
머신의 내부 추출관 및 추출기가
물로 헹궈집니다. 이때 약간의
물이 내부 시스템을 통해
물받이로 직접 떨어집니다.
물받이 (그림 30)에서 빨간색 '물받이 가득
참' 표시등이 켜지는 즉시 또는 매일
물받이를 비웁니다. 헹굼 물을 받을 수
있도록 우유 거품 배출구 아래에 잔을
놓습니다.
커피 머신이 DEMO(데모)
모드입니다.
대기 버튼을 8초 이상
눌렀습니다.
커피 머신 뒷면의 전원 스위치로 전원을
껐다가 다시 켜십시오.
38
한국어
Page 41

문제점 원인 해결책
'커피 찌꺼기 용기가 가득
참' 아이콘이 계속
표시됩니다.
커피 머신의 전원을 끈 상태로
커피 찌꺼기 용기를 비웠습니다.
커피 찌꺼기 용기는 항상 커피 머신의
전원을 켠 상태에서 비웁니다. 커피 머신의
전원을 끈 상태에서 커피 찌꺼기 용기를
비우면 커피 사이클 카운터가 리셋되지
않습니다.
커피 찌꺼기 용기를 너무 빨리
끼웠습니다.
커피 찌꺼기 용기를 다시 끼우라는
메시지가 화면에 표시된 후에 끼웁니다.
통이 가득 차지 않아도
'커피 찌꺼기 용기가 가득
참' 아이콘이 표시됩니다.
커피 찌꺼기 용기를 마지막으로
비운 후 카운터가 리셋되지
않았습니다.
커피 찌꺼기 용기를 다시 끼운 후 항상 5초
가량 기다리십시오. 그러면 커피 찌꺼기
용기 카운터가 0으로 리셋됩니다.
커피 찌꺼기 용기는 항상 커피 머신의
전원을 켠 상태에서 비웁니다. 커피 머신의
전원을 끈 상태에서 커피 찌꺼기 용기를
비우면 커피 가루 카운터가 리셋되지
않습니다.
추출기를 빼낼 수
없습니다.
추출기 위치가 올바르지
않습니다.
다음 방법으로 머신을 리셋합니다. 물받이
및 커피 찌꺼기 용기를 다시 넣습니다.
그런 다음 서비스 도어를 닫고 커피 머신
전원을 껐다가 다시 켜십시오. 다시 시도해
추출기를 분리합니다.
커피 찌꺼기 용기를 빼내지
않았습니다.
추출기를 빼내기 전에 커피 찌꺼기 용기를
먼저 빼냅니다.
추출기를 끼울 수
없습니다.
추출기 위치가 올바르지
않습니다.
다음 방법으로 머신을 리셋합니다. 물받이
및 커피 찌꺼기 용기를 다시 넣습니다.
추출기는 끼우지 말고 둡니다. 서비스
도어를 닫고 커피 머신 전원을 켰다가 다시
끄십시오. 그런 다음 추출기를 제자리에
놓고 커피 머신 (보기 '추출기 다시
끼우기')에 다시 끼웁니다.
커피가 너무 묽습니다. 추출기가 더럽거나 윤활유를
도포해야 합니다.
추출기를 세척하고 윤활유를 도포합니다.
분쇄기가 너무 굵게 설정되어
있습니다.
분쇄기를 미세(낮음) 설정으로 맞춥니다.
커피 설정이 조절되었습니다. 커피 음료를 선택하고 더 진한 커피로
설정을 조절합니다.
그라인더 설정이나 원두 유형을
변경한 후에 자율 조절 과정이
진행됩니다.
커피 몇 잔을 추출합니다.
커피가 충분히 뜨겁지
않습니다.
사용한 잔이 차갑습니다. 뜨거운 물로 헹궈 잔을 예열합니다.
설정 온도가 너무 낮습니다. 메뉴
설정을 확인합니다.
메뉴에서 온도를 '높음'으로 맞춥니다.
39
한국어
Page 42

문제점 원인 해결책
나중에 우유를 넣었습니다. 따뜻한 우유든 찬 우유든, 우유를 추가하게
되면 언제나 어느 정도는 커피 온도가
내려갑니다.
커피가 나오지 않거나
느리게 나옵니다.
설치 시 AquaClean 필터가
제대로 준비되지 않았거나 막혀
있습니다.
AquaClean 필터를 빼내고 다시 시도한 후
커피를 추출합니다. 이런 방식으로
작동하면 다시 장착하기 전에 AquaClean
필터가 제대로 준비되었는지 확인합니다.
준비된 필터를 다시 배치합니다. 그래도
작동하지 않으면 필터가 막혔거나 필터를
다시 끼워야 합니다.
분쇄기가 너무 곱게 설정되어
있습니다.
분쇄기를 좀더 굵은(높음) 설정으로
맞춥니다.
추출기가 더럽습니다. 추출기를 세척합니다.
커피 배출구가 더럽습니다. 커피 배출구와 구멍을 바늘로 청소합니다.
커피 머신 추출관이 석회질로
막혔습니다.
커피 머신의 석회질을 제거합니다.
우유에 거품이 생기지
않습니다.
음료 추출 노즐이 더럽거나 잘못
끼워졌습니다.
음료 추출 노즐을 세척하고 올바르게
(보기 '사용할 물에 음료 추출 노즐 세척')
제자리에 끼웁니다.
사용한 우유가 거품을 내기에
적합하지 않습니다.
우유 종류에 따라 거품의 양과 질이
달라집니다. 테스트 결과 양질의 우유
거품을 내는 것으로 입증된 우유는 저지방
우유 또는 전유, 두유, 무유당 우유입니다.
우유가 잔 밖으로 튑니다. 사용하는 우유가 충분히 차갑지
않습니다.
냉장고에서 바로 꺼낸 찬 우유를
사용하십시오.
유연한 우유 튜브가 제대로
연결되지 않았습니다.
커피 배출구 (그림 10) 도어를 열고 유연한
우유 튜브가 음료 추출 노즐 (그림 11)에
완전히 연결되었는지 확인합니다. 음료
추출 노즐과 우유 튜브는 뜨거워질 수
있으므로 만지기 전에 식히십시오.
음료 추출 노즐과 우유 튜브가
깨끗하지 않습니다.
내부 음료 추출 노즐 (보기 '사용할 물에
음료 추출 노즐 세척')를 빼내 분리합니다.
사용할 물로 모든 부품을 헹구십시오.
깨끗이 씻기 위해 Philips 우유 배출구
세척제를 이용해 세척 메뉴의 우유 집중
세척 과정을 진행합니다. 부품을
식기세척기에 청소한 경우 음식 찌꺼기나
세제 잔여물이 낄 수 있습니다. 막힌
부분이 없는지 잘 살펴보십시오.
매일 HygieSteam 프로그램을 진행하는
것이 좋습니다. 1) 제어판에서 '세척'을
누릅니다. 2) 'HygieSteam'을 선택합니다.
3) 시작 버튼을 눌러 과정을 시작하고
디스플레이의 모든 단계를 확인합니다.
40
한국어
Page 43

문제점 원인 해결책
우유 튜브가 막혔습니다. 항상 우유 튜브를 빼고 우유통을 냉장고에
보관하십시오. 남은 우유가 우유 튜브에
쌓이면 우유가 튜브를 통과하는 데 방해가
됩니다. 보관하기 전에 우유 튜브를 헹궈
주십시오.
머신에서 물이 샙니다. 커피 머신의 내부 추출관 및
추출기가 물로 헹궈집니다. 이때
약간의 물이 내부 시스템을 통해
물받이로 직접 떨어집니다.
물받이 커버 (그림 30)에서 '물받이 가득
참' 표시등이 켜지는 즉시 또는 매일
물받이를 비웁니다. 헹굼 물을 받을 수
있도록 우유 거품 배출구 아래에 잔을
놓습니다.
물받이가 가득 차 커피 머신이
새는 것처럼 흘러 넘칩니다.
물받이 커버 (그림 30)에서 '물받이 가득
참' 표시등이 켜지는 즉시 또는 매일
물받이를 비웁니다. 헹굼 물을 받을 수
있도록 우유 거품 배출구 아래에 잔을
놓습니다.
커피 머신을 평평한 곳에 놓지
않았습니다.
'물받이 가득 참' 표시등이 제대로
작동하도록 커피 머신을 평평한 곳에
놓습니다.
AquaClea 필터를
활성화할 수 없고 커피
머신에 석회질 제거가
필요하다는 메시지가
나타납니다.
AquaClean 필터 아이콘이
깜박이고 용량이 0%로 떨어진 후
상당 기간 필터를 교체하지
않았습니다.
먼저 커피 머신의 석회질을 제거한 다음
AquaClean 필터를 끼웁니다.
최초 설치 시가 아니라 약
25잔(100ml/3oz 잔 기준)을
추출한 후에 AquaClean 필터를
끼웠습니다. AquaClean 필터를
끼우려면 커피 머신에 석회질이
전혀 없어야 합니다.
먼저 커피 머신의 석회질을 제거한 다음 새
AquaClean 필터를 끼웁니다. 석회질을
제거하면 필터 카운터가 0/8로
리셋됩니다. 항상 커피 머신 메뉴에서 필터
활성화를 확인합니다. 필터를 교체한
후에도 동일하게 합니다.
새 물 필터가 잘 들어맞지
않습니다.
AquaClean 필터가 아닌 다른
필터를 끼우려고 합니다.
커피 머신에 꼭 맞는 필터는 AquaClean
필터뿐입니다.
커피 머신에서 소리가
납니다.
사용 중 커피 머신에서 소리가
나는 것은 자연스런 현상입니다.
커피 머신이 평소와 다른 소리를 내며
작동하는 경우 추출기를 세척하고
윤활유를 도포 (보기 '추출기
윤활')합니다.
AquaClean 필터가 제대로
준비되지 않았고 지금은 커피
머신에 공기가 유입됩니다.
물 탱크에서 AquaClean 필터를
분리하십시오. 필터를 약 5초 동안 흔들어
줍니다. 찬물이 들어 있는 용기에 30초
이상 필터를 거꾸로 담급니다. 거품이 더
이상 나오지 않을 때까지 기다립니다.
준비된 AquaClean 필터를 물 탱크에 다시
끼웁니다. 그런 다음 뜨거운 물 2 ~ 3잔을
배출합니다.
41
한국어
Page 44

음료 종류 및 양
음료 유형
음료 이름
설명
에스프레소 크레마가 진한 커피, 작은 잔
커피 큰 잔이나 머그에 담아 내는 커피
아메리카노 큰 잔에 뜨거운 물로 희석한 에스프레소 커피
카푸치노 1/3 에스프레소, 1/3 뜨거운 우유, 1/3 우유 거품, 큰 잔
라테 마키아토 거품을 낸 뜨거운 우유 롱 샷과 에스프레소 샷을 더한 커피, 높은 유리잔
카페 라떼 우유 롱 샷과 위쪽에 소량의 거품을 추가하여 큰 유리잔에 담아 내는 에스프레소
에스프레소 마키아토 샷과 위쪽에 소량의 거품을 추가하여 작은 잔에 담아 내는 에스프레소
카페 오레 같은 양의 뜨거운 우유를 섞어 큰 유리잔에 담아 내는 커피
에스프레소 룽고 크레마가 진한 중간 양의 에스프레소, 중간 잔
리스트레토 작은 잔에 담아 내는 쇼트 샷 에스프레소 커피
우유 거품 거품을 낸 뜨거운 우유
음료 양
음료 기본 길이/조절 가능한 길이 범위(최소 ~ 최대)
커피 우유 물
에스프레소 40ml/30 ~ 70ml - -
커피 120ml/100 ~ 220ml - -
아메리카노 40ml/20 ~ 80ml - 110ml/60 ~ 160ml
카푸치노 40ml/20 ~ 80ml 120ml/100 ~ 340ml -
라테 마키아토 40ml/20 ~ 50ml 200ml/120 ~ 340ml -
카페 라떼 60ml/20 ~ 80ml 140ml/120 ~ 340ml -
온수 - - 150
에스프레소 마키아토 40ml/20 ~ 70ml 20ml/10 ~ 40ml -
카페 오레 90ml/50 ~ 150ml 90ml/50 ~ 150ml -
에스프레소 룽고 80ml/60 ~ 110ml - -
리스트레토 30ml/20 ~ 40ml - -
우유 거품 - 180ml/40 ~ 280ml -
따뜻한 우유 - 180ml/40 ~ 280ml -
42
한국어
Page 45

기술 사양
제조업체는 제품의 기술 사양을 개선할 권한이 있습니다. 사전 설정된 모든 수량은 대략적인 수치입니다.
설명
값
크기(W x H x D) 283 x 393 x 489mm
중량 10.8 ~ 12.2kg
전원 코드 길이 1200 mm
물탱크 1.7리터, 분리형
커피 원두 투입구 용량 450g
커피 가루 용기 용량 14개
우유통 용량 600 ml
조절 가능한 배출구 높이 75 ~ 148mm
공칭 전압 - 전력 등급 - 전원 공급
장치
서비스 도어 안쪽에 있는 데이터 참조
재활용
-
수명이 다 된 제품은 일반 가정용 쓰레기와 함께 버리지 말고 지정된 재활용품 수거 장소에 버리십시오.
이를 준수함으로써 환경 보호에 동참할 수 있습니다.
-
전기 및 전자 제품의 분리 수거에 대한 해당 국가의 규정을 준수하십시오. 제품을 올바르게 폐기하면
환경과 인체 건강에 미치는 부정적인 영향을 예방할 수 있습니다.
품질 보증 및 지원
보다 자세한 정보나 지원이 필요한 경우에는 웹사이트(www.saeco.com/care) 를 방문하거나 별도의 제품
보증서를 참조하십시오.
43
한국어
Page 46

fillpage std
Page 47

inside back page
Page 48

fillpage Saeco
Page 49

fillpage Saeco
Page 50

Page appears only if there are more than 24 figures
Page 51

Milk
circuit
cleaner
press to start
15 min
DESCALING
Page 52

www.saeco.com/care
>75% recycled paper
>75% papier recyclé
4219.460.4726.1 (8/2018) rev.00
4219.460.4726.1 XELSIS BETTER EN-KO_BACKCOVER_A5_FC.indd 1 29-08-18 14:02
 Loading...