

Push gently on the edge of the water tank door to release
the hand grip. Remove the tank by pulling the hand grip. To
use without water filter, rinse tank with water. Fill with fresh
water up to MA X mark. Place water tank into machine. To
install water filter see user manual.
NOTE: Only use cool fresh water, any other liquid may cause
damage.
Remove coffee bean hopper lid. Slowly pour beans into
hopper. Replace lid.
NOTE: Only use coffee beans. Ground, instant and flavored
coffees may damage the machine.
QUICK START GUIDE
MOLTIO FOCUS
HD8767/47
PLEASE NOTE: OUR MACHIN ES ARE TE STED WITH
COFFE E AT THE FACTORY TO ENSUR E HIGH
QUALITY STANDARDS . WHILE M ACHINES ARE
CLEAN ED THOR OUGHLY AFTE R TESTIN G, IN
SOME CA SES, C OFFEE GROUNDS MAY REMAI N IN
THE MACHINE.
FOR FULL I NSTRU CTIONS , PLEAS E REFE R TO THE
USER MANUAL
1
BEFORE FIRST USE
2
Switch power button on back of machine to the “I” or ON position.
Turn machine on by pressing “
” button on control panel.
2
1
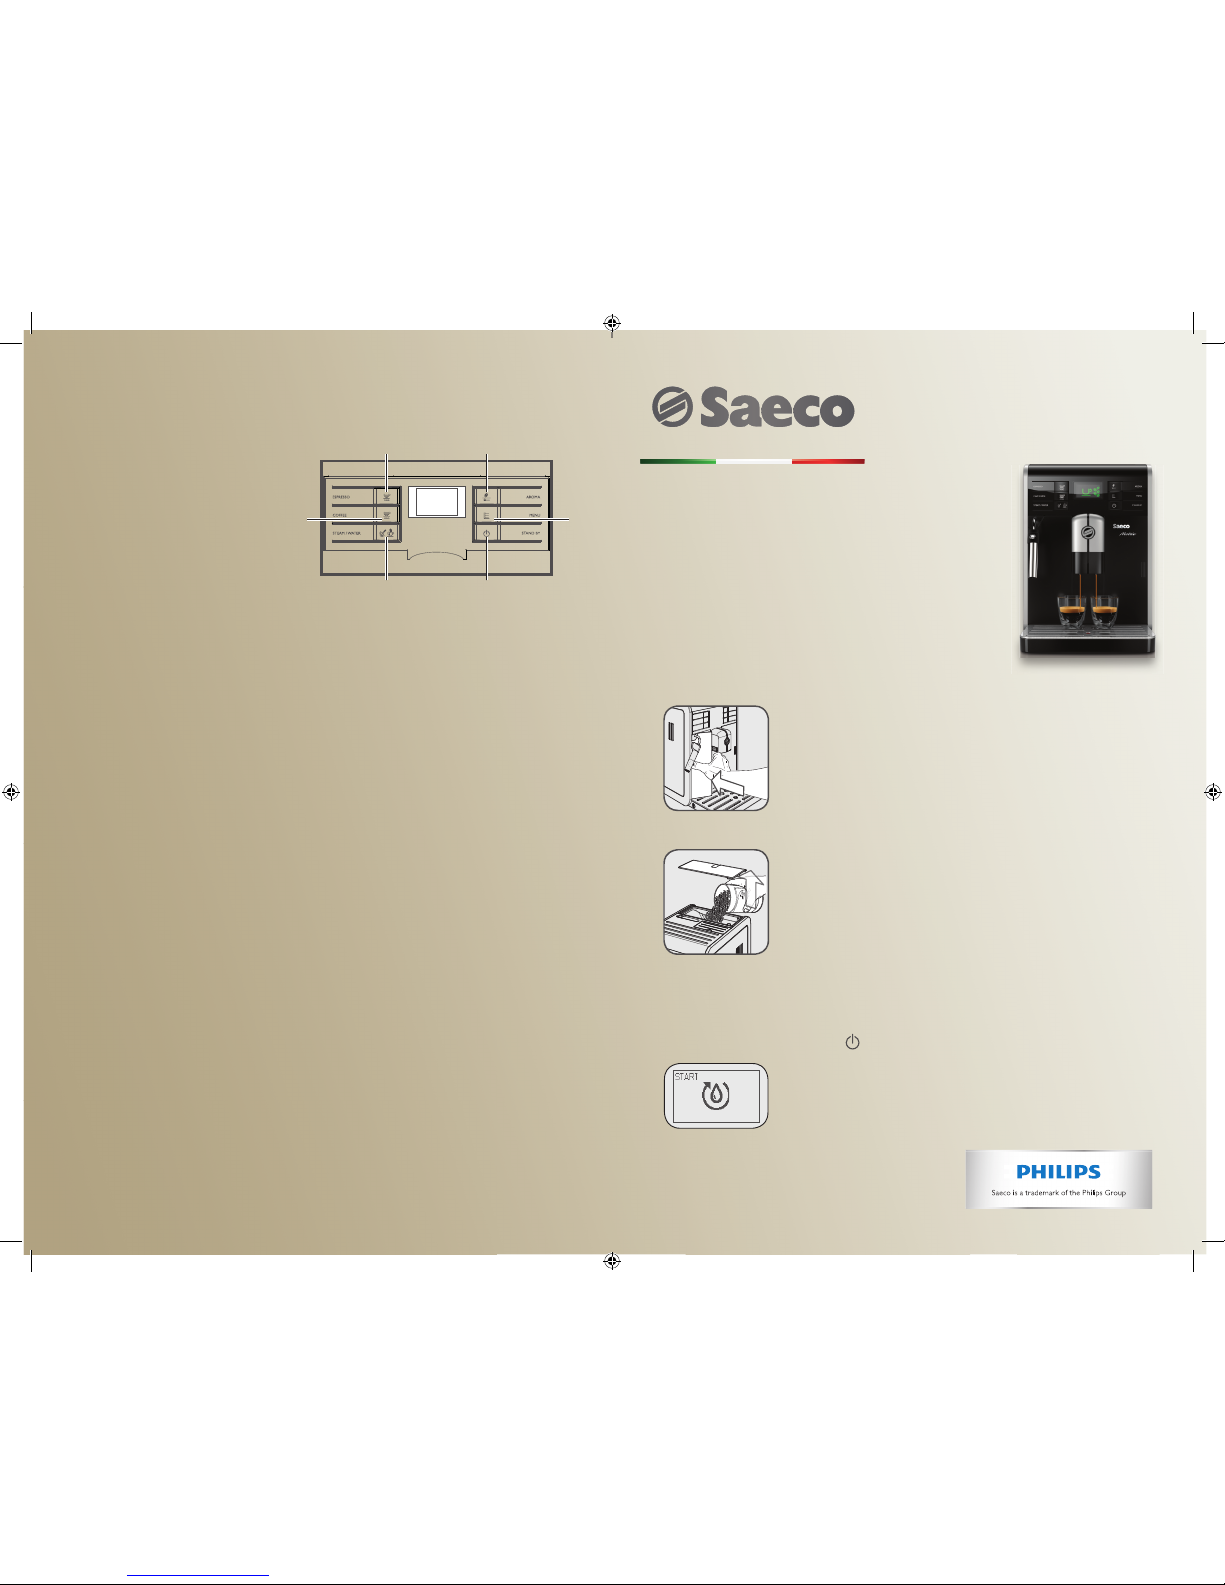
SET UP
CONTROL PANEL QUICK REFERENCE
For a full understanding of functions, see the user manual.
24. Espresso brew button
25. Coffee brew button
26. Steam / hot water button
27. "Aroma" - Pre-ground coffee button
28. "MEN U" but ton
29. ON/OFF button
TROUBLE SHOOTING
Q: Why isn’t my coffee coming out hot enough?
A: Cups may be cold. Preheat cups with hot water prior to dispensing coffee.
Q: Why is my coffee coming out so weak?
A: The machine automatically adjusts itself after brewing a few cups of coffee to
optimize the extraction of the coffee to the compactness of the ground coffee.
We recommend brewing 3-5 espressos before drinking to allow for this
adjustment process. Refer to the "Saeco Adapting System" in the user manual
for more information.
A: The coffee may be too coarse. Change the coffee blend or adjust the grind.
Finer coffee grounds result in stronger tasting coffee. Refer to the “Adjusting
the ceramic coffee grinder” in the user manual for more information.
Q: Why is my machine leaking water/coffee?
A: Sometimes water is drained automatically by the machine into the drip
tray to manage the rinsing of the circuits and ensure optimum machine
performance.
A: The dispensing spout may be clogged. Clean the holes in the dispensing spout.
Q: Why isn’t the machine filling up my cup?
A: The machine’s coffee lengths can be programmed. Enter the beverage
programming menu and adjust the coffee length setting to your liking for
every beverage. See "Adjusting the coffee length" section in the user manual.
For more troubleshooting please refer to the User Manual.
NEED ASSISTANCE:
If you have any questions or concerns, we are always available to
assist you.
Please call us direct at 1- 800 -933-7876 or visit us at
www.philips.com/saeco
6.1.2015
421946031661
26 29
24 27
25
28
3
Once machine turns on, it will indicate a priming cycle
must be started. Place a container under the steam wand.
421946031661_MoltioFocus_HD8767_47_.indd 1 9/10/15 3:52 PM

Turn the selector to the “ ” position.
Caution:
It may happen that the selector can not be switched as it is
blocked by coffee beans. In this case gently move the selector
back and forth until the beans are released.
Lift the sides of the coffee bean hopper with both hands. Fill the hopper with
whole beans.
Press the ”
” button to start the cycle. The machine will
start the automatic priming by dispensing some water through
the steam wand. When the machine stops dispensing, a warm
up cycle will begin automatically.
Once heated, a 1-minute rinse/self-cleaning cycle with fresh water will begin
automatically. Place a container under dispensing spout to catch water.
Before using the machine for the first time a manual rinse cycle must be initialized.
Place container under dispensing spout. Select the pre-ground coffee brewing
function by pressing the “
” button. Press the “ ” button. Wait for dispensing to
stop. When it has stopped, repeat this operation 2 more times.
NOTE: Do not add pre ground coffee into the machine during this process.
Place a container under the steam wand and press the “
” button.
Press the “ ” button to start dispensing hot water through the steam wand
Do this until the "no water" icon appears in display.
Remove any beans from the coffee bean hopper
compartment, then insert the hopper into the
compartment.
Slide the selector switch to the “ ” position.
Fill the water tank again up to the MAX level indicator.
Place a cup under dispensing spout and press the
“ ” button to grind and
dispense espresso.
Repeat Step 2 three-five times.
Your machine is now ready to brew coffee!
4
5
6
1
2
4
3
OPTIMIZE YOUR COFFEE
To optimize coffee extraction to compactness of the ground coffee, brew 3-5 cups of
espresso and discard BEFORE drinking.
1
2
3
5
7
1
COFFEE BEAN SELECTION
CHANGING COFFEE BEANS
1
USING THE STEAM WAND TO FROTH MILK
2
Fill a frothing pitcher 1/3 of the way with cold milk.
Immerse the steam wand into the milk. Press
“
”
button then press the
“ ”
button to start dispensing
steam. Steam will continue to dispense for 3 minutes
or until you press the
“ ”
button to stop dispensing.
After each use, clean steam wand as described in the user manual.
3
Yel l o w
Press the “
” MENU button and scroll the pages by
pressing the “ ” MENU button until the following icon
is displayed.
Press the “
” button or the “ ” button to select the type of coffee beans in
the coffee bean hopper. Press the “ ” MENU button to confirm the setting.
To exit, press the “
” button. The machine is now programmed to optimize
the grinding of your coffee beans.
4
2
1
This function allows you to optimize the grinding for selected types of coffee beans.
BREWING ESPRESSO AND COFFEE
USING WHOLE BEANS
To brew an espresso or a coffee, press the “ ” button to select the desired
aroma. Press the “ ” button for an espresso or “ ” button for a coffee.
To brew 1 cup of espresso or coffee, press the desired button once. To brew
2 cups of espresso or coffee, press the desired button twice consecutively.
After the pre-brewing cycle, coffee begins to pour out of the dispensing spout.
Coffee brewing automatically stops when the pre-programmed level is reached;
press the “
” button to stop it earlier.
2
3
421946031661_MoltioFocus_HD8767_47_.indd 2 9/10/15 3:52 PM
 Loading...