

Saeco Estrosa HD8525/09 User Manual
Register your product and get support at
www.philips.com/welcome
Type HD 8525 / HD8527
EnglishPolski
Русский
MagyarČeštinaSlovensky
OPERATING INSTRUCTIONS
INSTRUKCJA OBSŁUGI
ИНСТРУКЦИЯ ПО ЭКСПЛУАТАЦИИ
HASZNÁLATI UTASÍTÁS
NÁVOD NA POUŽÍVÁNÍ
NÁVOD NA POUŽITIE
PRZECZYTAĆ UWAŻNIE NINIEJSZĄ INSTRUKCJĘ OBSŁUGI PRZED ROZPOCZĘCIEM UŻYTKOWANIA URZĄDZENIA.
ПЕРЕД ИСПОЛЬЗОВАНИЕМ МАШИНЫ, ВНИМАТЕЛЬНО ПРОЧИТАЙТЕ ЭТУ ИНСТРУКЦИЮ ПО ЭКСПЛУАТАЦИИ.
SKÔR, NEŽ ZAČNETE PRÍSTROJ POUŽÍVAŤ, SI POZORNE PREČÍTAJTE TENTO NÁVOD NA POUŽITIE.
READ THESE INSTRUCTIONS CAREFULLY BEFORE USING THE MACHINE.
A GÉP HASZNÁLATA ELŐTT ALAPOSAN OLVASSA EL EZT A HASZNÁLATI UTASÍTÁST.
TYTO POKYNY SI PEČLIVĚ PROČTĚTE, NEŽ ZAČNETE KÁVOVAR POUŽÍVAT.
2 3
1
4
5
6
7
8
9
10 12
11 13
14 15 16 17 18
22
20
23
19
21
16 in
40 cm
20 cm
8 in
20 cm
8 in
20 cm
8 in
Fig.-R ys.-O br.-Мал.-Sl ika-Sl.- Фиг. (A) Fig.-R ys.-O br.-Мал.-Sl ika-Sl.- Фиг. (B)
20 cm
8 in
25
24
• 2 •

Fig.-R ys.-O br.-Мал.-Sl ika-Sl.- Фиг. (1)
Fig.-R ys.-O br.-Мал.-Sl ika-Sl.- Фиг. (2)
Fig.-R ys.-O br.-Мал.-Sl ika-Sl.- Фиг. (3)
Fig.-R ys.-O br.-Мал.-Sl ika-Sl.- Фиг. (4)
Fig.-R ys.-O br.-Мал.-Sl ika-Sl.- Фиг. (7)
Fig.-R ys.-O br.-Мал.-Sl ika-Sl.- Фиг. (10)
Fig.-R ys.-O br.-Мал.-Sl ika-Sl.- Фиг. (5)
Fig.-R ys.-O br.-Мал.-Sl ika-Sl.- Фиг. (8)
Fig.-R ys.-O br.-Мал.-Sl ika-Sl.- Фиг. (11)
Fig.-R ys.-O br.-Мал.-Sl ika-Sl.- Фиг. (6)
Fig.-R ys.-O br.-Мал.-Sl ika-Sl.- Фиг. (9)
Fig.-R ys.-O br.-Мал.-Sl ika-Sl.- Фиг. (12)
• 3 •
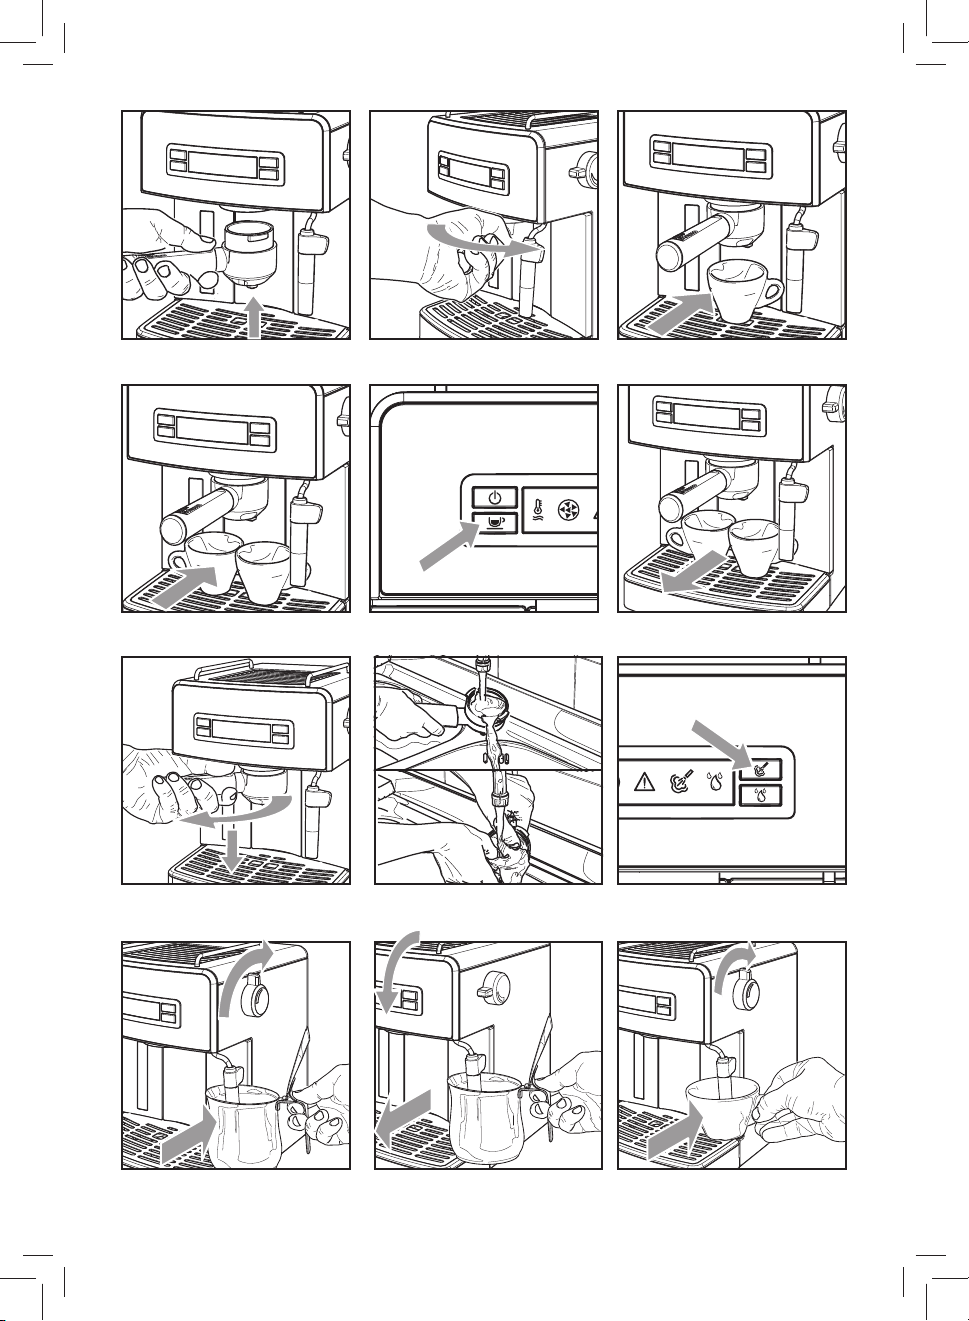
Fig.-R ys.-O br.-Мал.-Sl ika-Sl.- Фиг. (13)
Fig.-R ys.-O br.-Мал.-Sl ika-Sl.- Фиг. (14)
Fig.-R ys.-O br.-Мал.-Sl ika-Sl.- Фиг. (15)
Fig.-R ys.-O br.-Мал.-Sl ika-Sl.- Фиг. (16)
Fig.-R ys.-O br.-Мал.-Sl ika-Sl.- Фиг. (19)
Fig.-R ys.-O br.-Мал.-Sl ika-Sl.- Фиг. (22)
Fig.-R ys.-O br.-Мал.-Sl ika-Sl.- Фиг. (17)
Fig.-R ys.-O br.-Мал.-Sl ika-Sl.- Фиг. (20)
Fig.-R ys.-O br.-Мал.-Sl ika-Sl.- Фиг. (23)
Fig.-R ys.-O br.-Мал.-Sl ika-Sl.- Фиг. (18)
Fig.-R ys.-O br.-Мал.-Sl ika-Sl.- Фиг. (21)
Fig.-R ys.-O br.-Мал.-Sl ika-Sl.- Фиг. (24)
• 4 •
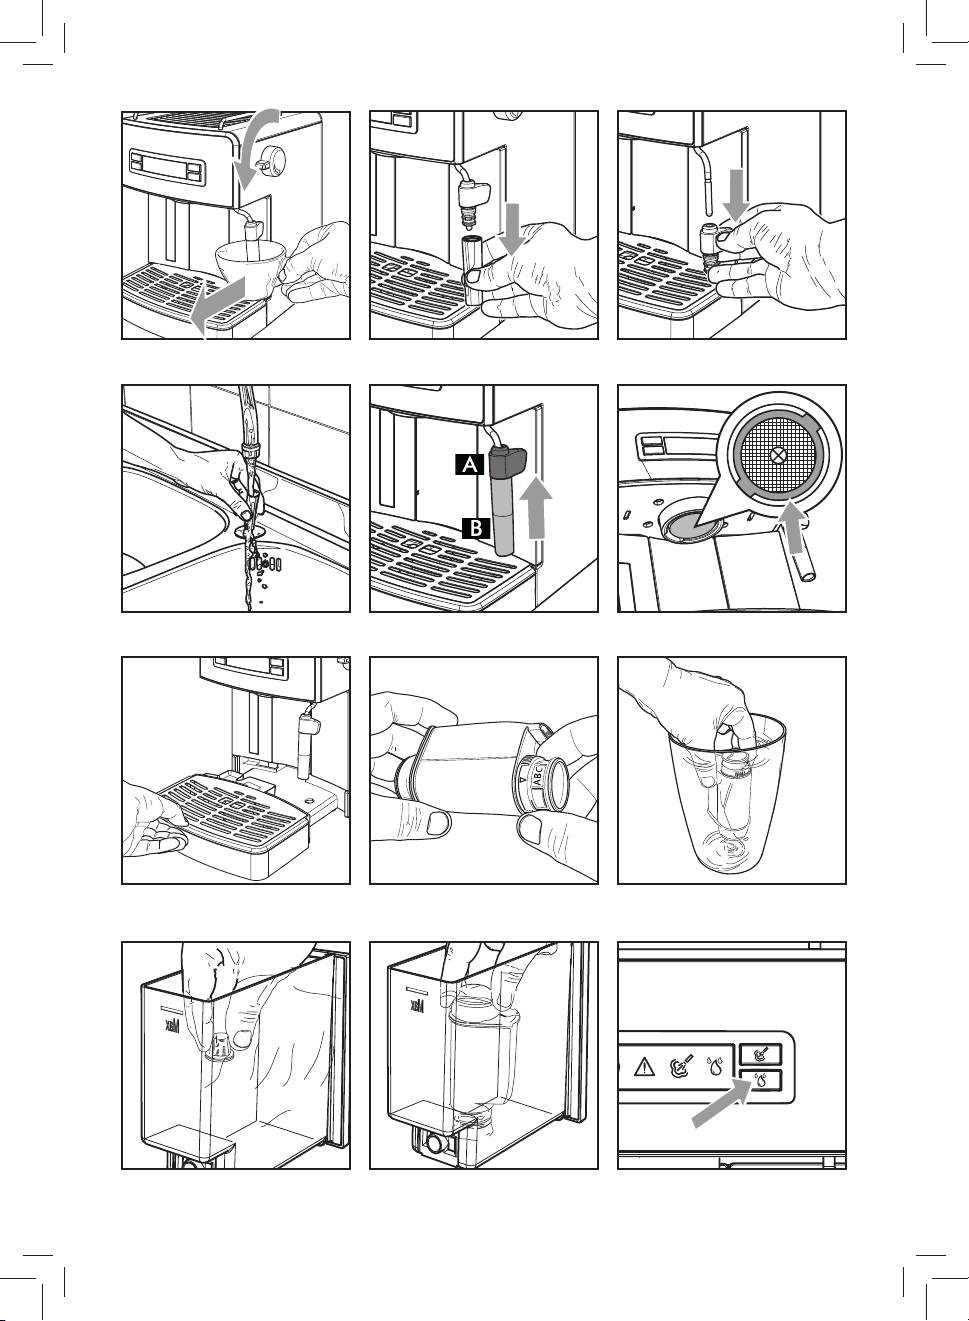
Fig.-R ys.-O br.-Мал.-Sl ika-Sl.- Фиг. (25)
Fig.-R ys.-O br.-Мал.-Sl ika-Sl.- Фиг. (26)
Fig.-R ys.-O br.-Мал.-Sl ika-Sl.- Фиг. (27)
Fig.-R ys.-O br.-Мал.-Sl ika-Sl.- Фиг. (28)
Fig.-R ys.-O br.-Мал.-Sl ika-Sl.- Фиг. (31)
Fig.-R ys.-O br.-Мал.-Sl ika-Sl.- Фиг. (34)
Fig.-R ys.-O br.-Мал.-Sl ika-Sl.- Фиг. (29)
Fig.-R ys.-O br.-Мал.-Sl ika-Sl.- Фиг. (32)
Fig.-R ys.-O br.-Мал.-Sl ika-Sl.- Фиг. (35)
Fig.-R ys.-O br.-Мал.-Sl ika-Sl.- Фиг. (30)
Fig.-R ys.-O br.-Мал.-Sl ika-Sl.- Фиг. (33)
Fig.-R ys.-O br.-Мал.-Sl ika-Sl.- Фиг. (36)
• 5 •
1 General Information
The co ee machine is suitable for preparing 1 or 2 cups of
espresso co ee and is provided with a swivel steam and hot
water wand. The controls on the front side of the machine are
labelled with eas y-to-read symbols.
The machine has been designed for domestic use and is not
suitable for professional, continuous use.
Warning. No liability is held for damage caused
by:
• Incorrect use not in accordance with the intended
purposes;
• Repairs not carried out in authorised service centres;
• Tampering with the power cord;
• Tampering with any part of the machine;
• Use of non-o riginal spare par ts and accessories;
• Failure to descale the machine and storage at temperatures below 0°C.
In these cases, the warranty is void.
1.1 To Simplify Manual Reading
The warning triangle indicates
all important instructions for the
user’s safety. Carefully follow these
instructions to avoid serious injury!
References to illustrations, parts of the appliance or controls,
etc. are indicated by numbers or letters. Whenever possible,
refer to the illus tration.
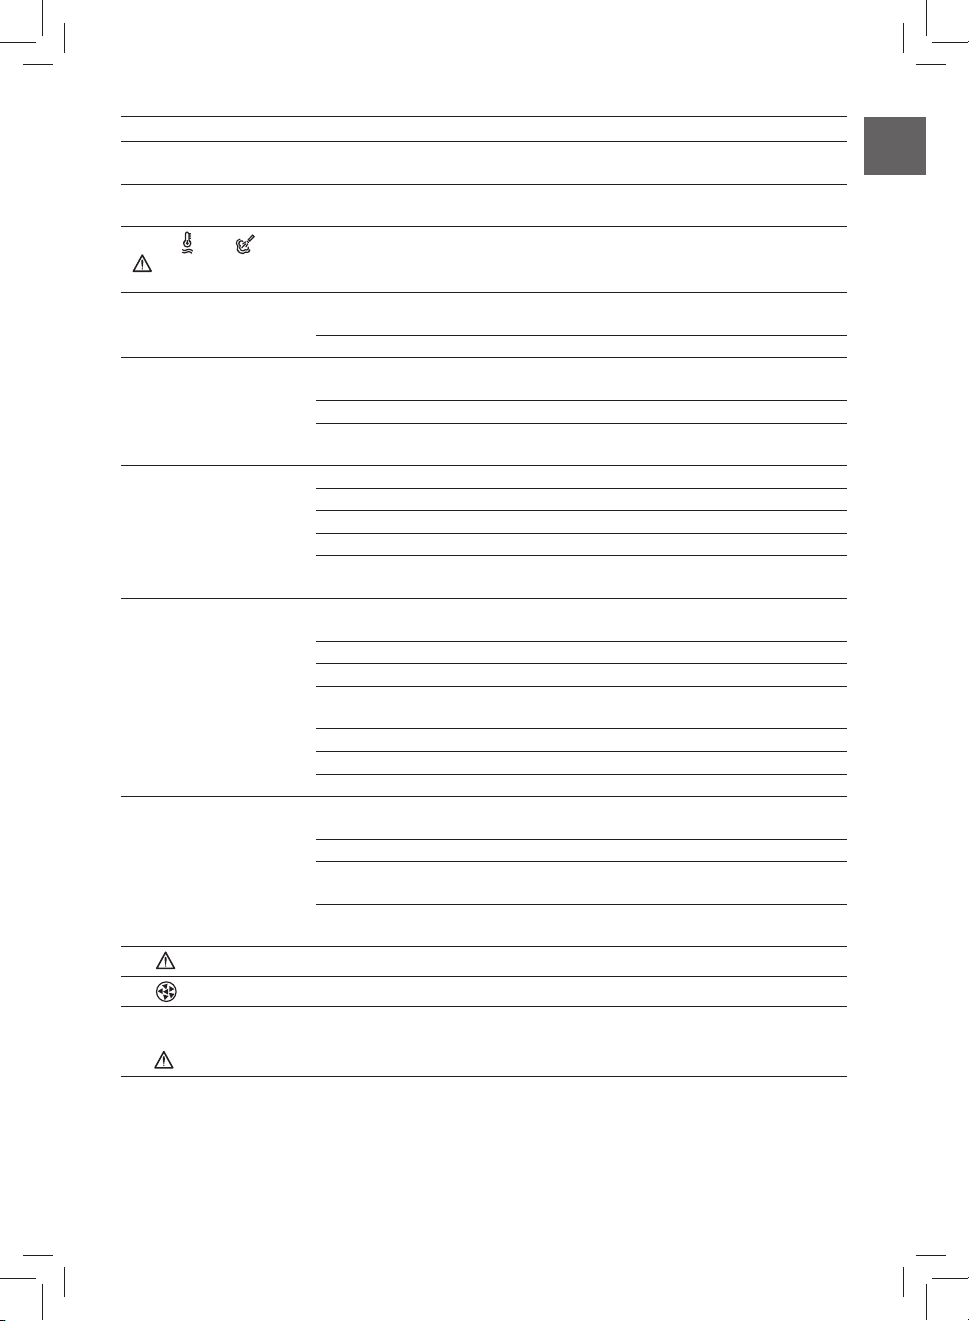
2 Technical Specifications
The manufacturer reserves the right to make changes to the
technical speci c ations of the product.
Nominal Voltage - Power Rating - Power Supply
See label on the appliance
Housing Material
Plastic model HD8525
Metal model HD8527
Size (w x h x d) (mm)
210 x 300 x 280
Weight (kg)
HD 8525 = 3.9
HD 8527 = 5.4
Power Cord Length
1.3 m
Control Panel
Front side
Filter Holder
Pressurized type
Pannarello
Special for cappuccinos
Water Tank
1.25 litres - Removable type
Pump Pressure
15 ba r
Boiler
Stainless steel
Safety Devices
Thermal fuse
This symbol is used to highlight information
that is particularly important to ensure opti-
mal use of the machine.
The illustrations corresponding to the text can be
found on the rst pages of the manual. Please refer to
these pages while re ading the operating instructions.
1.2 How to Use these Operating Instructions
Keep these operating instructions in a safe place and make
them available to anyone who may use the co ee machine.
For further information or in case of problems, please refer to
an authorised service centre.
• 6 •
3 Safety Regulations
Never allow water to come into contact with any of the
electrical parts of the machine: danger of short circuit!
Overheated steam and hot water may cause burning!
Never direct the steam or hot water jet towards body
parts. Handle the steam/hot water spout with care:
danger of scalding!
Intended Use
This co ee machine is intended for domestic use only. The use
by children older than 8 years and by persons with reduced
physical, mental or sensory abilities or with lack of experience
and skills is allowed, provided that they are supervised or instructed on how to use the appliance correctly and that they
understand the hazards involved. Children must not play with
the appliance. Children must not carry out any cleaning and

maintenance operations without being monitored.
Power Supply
Connect the co ee machine only to a suitable socket. The voltage must correspond to that indic ated on the appliance label.
Power Cord
Never use the co ee machine if the power cord is defective or
damaged. If the power cord is damaged, it must be replaced
by the manufac turer or by its author ised service centre. Do not
pass the power cord around corners, over sharp edges or over
hot objec ts and keep it away from oil.
Do not use the power cord to carry or pull the co ee machine.
Do not pull out the plug by the power cor d or touch it with wet
hands. Do not let the power cord hang freely from tables or
shelves.
For the Safety of Others
Prevent children from playing with the machine. Children are
not aware of the risks related to electrical household appliances. Do not leave the machine packaging materials within
the reach of children.
Danger of burns
Never direct jets of overheated steam and/or hot water towards yourself or others. Do not touch the steam wand with
bare hands. Always us e the handles or knobs provided.
Do not disconnect (remove) the pressurized lter holder while
co ee is brewed.
Hot water drips may spill out of the brew unit during the
warm-up phase.
Do not touch the brew unit when the machine is on or before
it cools down.
Location
Place the co ee machine in a safe place, whe re there will be no
danger of overt urning or injury. Hot water or overhe ated steam
may spill out of the machine: danger of scalding!
Do not keep the machine at a temperature below 0°C. Frost
may damage it.
Do not use the co ee machine outdoors.
In order to prevent its housing from melting or being damaged, do not place the machine on very hot surfaces and close
to open ames.
Cleaning
Bef ore c leani ng th e mach ine, t urn i t o by pre ssin g the O N/OFF
button, th en remove the plug from th e socket. Wait also for the
machine to cool down.
Never immerse the machine in water!
It is strictly forbidden to tamper with the internal parts of the
machine. Water left in the tank for several days should not be
consumed. Wash the tank and ll it with fresh drinking water.
Suitable Location for Operation and Maintenance
In order to ensure correct and e cient performance of the coffee machine, we reco mmend following the instr uctions below:
• Choose a level surf ace.
• Choose a location that is su ciently well-lit, clean and
near an easily reachable socket.
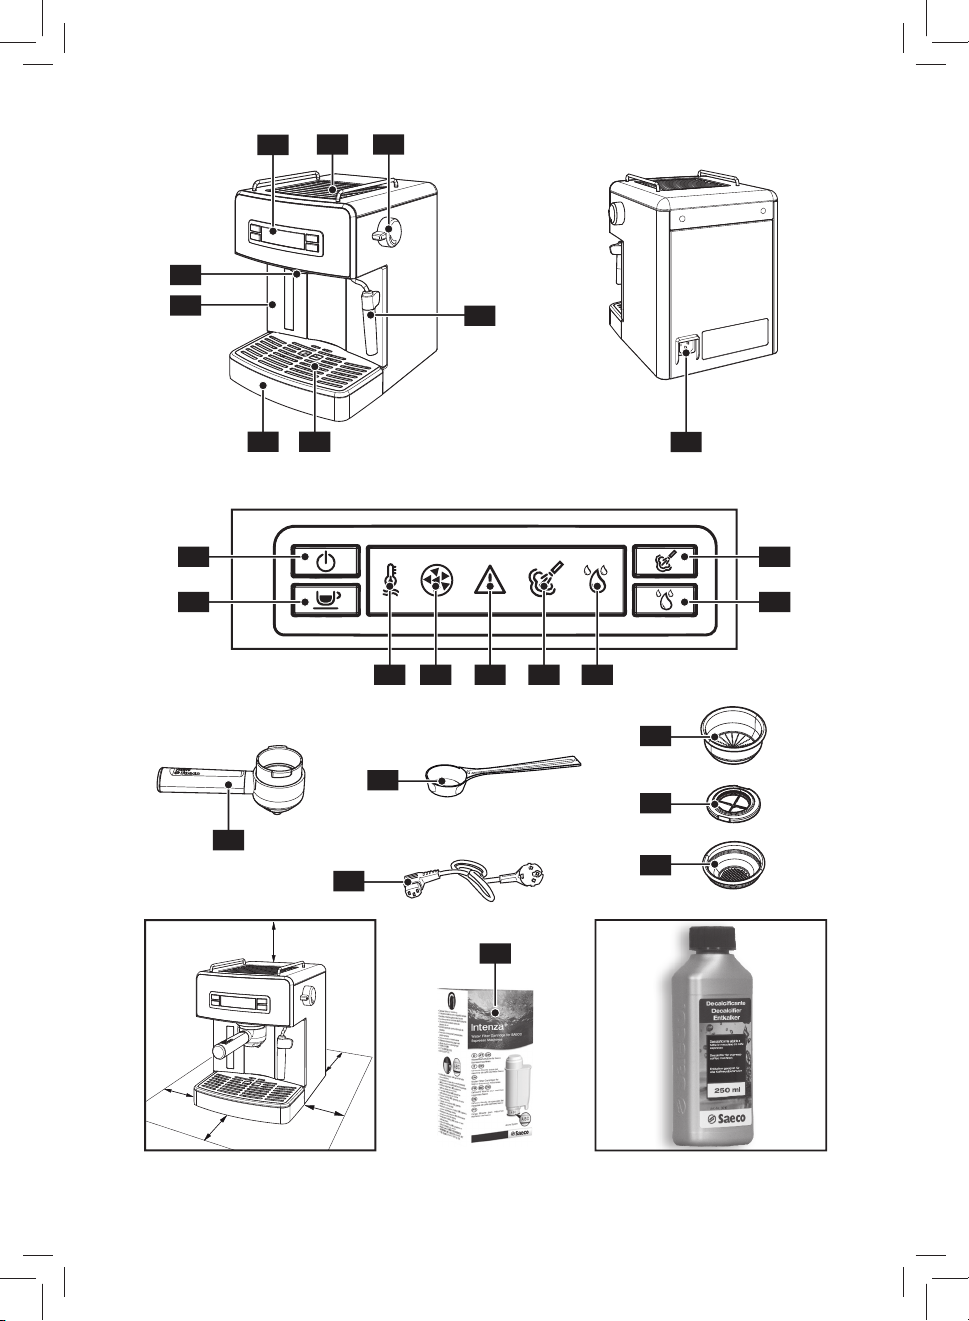
• Allow for a minimum distance from the sides of the machine as shown in Fig. A.
Storing the Machine
If the machine is to remain inactive for a long time, turn it o
and unplug it. Stor e the machine in a dry pla ce, out of the reach
of children. Keep it protec ted from dust and dir t.
Do not keep the machine at a temperature below 0°C. Frost
may damage it.
Repairs / Maintenance
In case of failure, problems or a suspected fault resulting from
the falling of the machine, immediately remove the plug from
the socket. Never attempt to operate a faulty machine. Servicing and repairs may only be carried out by Authorised Service
Centres. All liability for damages resulting from work not carried out by prof essionals is declined.
Fire Safety Precautions
In case of re, use carbon dioxide (CO2) extinguishers. Do not
use water or dry powder extinguishers.
Key to Machine Parts (Page 2)
1 Control panel
2 Cup holder rest
3 Hot water/steam knob
4 Co ee brew unit
5 Water tank
6 Water recover y tray
7 Cup holder grill
8 Steam wand (Pannarello)
9 Power cord socket
10 ON/OFF button
11 "Co ee brew" button
12 "Steam" button
13 "Rinsing" button
14 "Temperature" light
15 "Descaling" light
16 "Alarm" light
17 "Steam" light
18 "Rinsing" light
19 Pressurized lter holder
20 Ground co ee measuring scoop
21 Power cord
English
• 7 •
22 Ground co ee lter
(single piece for 1 or 2 co ee(s))
23 Co ee pod lter adapter
24 Co ee pod lter
25 "Intenza+" water lter (sold separately)
4 Installation
For your own and other people safety, carefully follow
the "Safety Regulations" indicated in chapter 3.
4.1 Packaging
The original packaging has been designed and manufactured
to protect the machine during transport. We recommend
keeping the pac kaging material for possible future tr ansport.
4.2 Installation Precautions
Do not move the machine by grabbing the cup
protection grilles.
Before installing the machine, read the following safety precautions carefully:
• Place the machine in a safe p lace.
• Make sure children cannot play with the machine.
• Do not place the machine on hot surfaces or near open
a m e s .
The co ee machine is now ready to be co nnected to the elec tric
network.
Note: we recommend washing the components
before using them for the rst time and/or af-
ter they have not be en used for a cert ain period of tim e.
4.3 Water tank
• 1 Remove the water tank (5).
•
Rinse it and ll it with fresh drinking water, making
2
sure that the (MAX) level indicated in the tank is not exceeded.
Fill the tank only with fresh, non-sparkling,
drinking water. Hot water or any other liquid
may damage the tank. Do not operate the machine
when the water level in the tank is below the MIN
threshold. Make sure there is enough water in the water tank.
• Insert the water tank into its seat in the co ee machine
and make sure that it locks into place - its pro le should
adhere to that of the co ee machine.
Note: the water level can be checked looking
through the window on the front side of the
tank.
4.4 Machine Connection
Electric power may be very dangerous! It is
therefore necessary to strictly follow the safet y
regulat ions. Do not use fau lty power cords . Faulty cords
and plugs m ust be replaced im mediately by Author ised
Service Centres.
The voltage of the appliance has been pre-set by the manufacturer. Check that the voltage matches the indication on the
data plate at the bottom of the appliance.
•
Insert the plug into the socket on the back of the ma-
3A
chine.
•
Insert the o ther end of the plug into a wall socke t with
3B
suitable power voltage.
4.5 First Use
At rst start-up, the co e e machine circuit must be pr imed.
Press the ON/OFF button (10); when the (14) " ", (16)
4
"
" and (17) lights " " start blinking, the circuit must
be primed.
Place a container under the steam wand (Pannarello).
5
Open the "hot water/steam" knob (3) by turning it clock-
wise. The pump is activated automatically. Wait until
a steady jet of water ows out of the steam wand (Pannarello).
Close the "hot water/steam" knob (3) by turning it coun-
6
ter-clockwise. Remove the container.
The machine begins the warm-up phase only after the water
circuit has been correctly primed.
Note: if the knob is left open, the pump is automatically disengaged after a few seconds and
the "
" light (16) starts blinking.
• 8 •

4.6 Circuit Priming
When the water tank is empty, the machine circuit must be
primed again.
Note: if the machine has been operating with-
out water for a l ot of time and the "
(16) and "
"Troubleshooting" table.
•
• Open the "hot water/steam" knob (3) by turning it clock-
• Wait until a steady jet of water ows out of the steam
•
starts blinking. Close the knob and wait until the machine is ready.
" (17) lights are blink ing, please re fer to the
Place a container under the steam wand (Pannarello).
5
wise. The pump is ac tivated automatically.
wand (Pannarello).
Close the "hot water/steam" knob (3) by turning it
6
counter-clock wise. Remove the container.
Note: if the steam knob is opened by mistake
during the warm-up phase, the "
" (14), " "
" light (16)
4.7 Using the Machine for the First Time or
After a Period of Inactivity
This simple operation ensures an optimum brewing and must
be performed:
- at rst star t-up;
- when the machine remains inactive for a long time (more
than 2 weeks).
Dispensed water must be emptied into an ad-
equate drai n. This water is not suita ble for food
use. If the container lls up during the cycle, stop dispensing water and empty the container before resuming the operation.
A
Rinse the water tank and re ll it with fresh drinking
2
water. Insert the water tank back into its seat in the co ee
machine and make sure that it locks into place - its pro le
should adhere to that of the co ee machine.
B Turn on the machin e by pressing the (10) button. Wait until
the "
" light (14) turns on steady.
C
Place a container under the steam wand (Pannarello).
5
Open the knob (3) by turning it clockwise. The pump is ac-
tivated automatically.
D Dispense the whole water tank content from the steam/
hot water wand (Pannarello); to stop the dispensing pro-
cess, close the knob (3) by turning it counter-clockwise.
During this operation the pump is automati-
cally disengaged and the "
blinking: this is a normal behaviour of the machine.
Close the k nob. Wait until the "
before opening the knob again.
E
Fill the water tank with fresh drinking water. Insert
2
the water tank back into its seat in the co ee machine and
make sure that it lock s into place - its pro le should adhere
to that of the co ee machine.
F
G
H 17 Press the " " button and dispense a cup of hot wa-
At the end of the process, stop the operation by pressing
I Repeat the operations described in step (H) until the wa-
L
M
Now the machine is rea dy. Please see related chapters for o perating details on how to brew co ee and dispense steam.
Insert the lter holder into the brew unit (4) from
13 14
the bottom and turn it from left to right until it locks into
place.
Place a suitable container under the lter holder.
15
ter.
the "
" button.
ter tank is completely empty.
Re ll the water tank with fresh drinking water.
2
Remove the lter holder from the unit by turning it
19
from right to left and rinse it with f resh drinking water.
" light (16) is
" light (14) is steady on
5 Rinsing
Note: make sure the lter holder is inserted to
ensure a proper warm-up of the machine.
The machine is set s o as to automatically rinse the co ee circuit
with fresh water every time it is turned on. This is concei ved to
ensure the correct machine warm-up and an optimum co ee
aroma.
Place a container under the dispensing spout.
On newly purchased machines this function is active (the "
" light (18) is on) and is performed at the end of the warm-up
phase, when the "
Note: should no water pour from the lter
holder, perform a manual rinse as described in
sect. 7.1.
" light (14) is steady on.
English
• 9 •

The rinsing procedure may:
A be stopped by pressing the "
B be deactivated by pressing the " " button while the " "
light (14) is bli nking or stea dy-on. In thi s case the "
(18) turns o .
Note: if the rinsing procedure is deactivated,
it can be reactivated only by pressing the "
button.
" or " " button;
" light
6 Energy Saving
The machine is designed for energy saving.
After 9 minutes of inactivity, the machine turns o in order to
save energy and respect nature.
Press the ON/OFF "
" button (10) to operate the mac hine.
7.1 Filter Holder Warm-Up
If the "rinse" func tion is not activa ted and/or the lter holder is
to be warmed-up manually, do as follows:
•
Insert the pressurized lter holder into the brew unit
13
(4) from the bottom.
Turn th e press urized lter hol der fro m left to right un-
•
14
til it locks into place. Release the pressurized lter holder
"
grip. The handle will turn slightly to the left. This movement guarantees optimum lter holder perf ormance.
•
Preheat the pressurized lter holder by pressing the
17
"
" button; some water will ow out of the pressurized
lter holder (this operation is necessary only for the rst
co ee).
• After 50cc of water have been dispensed, press the "
button again to stop the dispensing procedure.
•
Remove the pressu rized lter holder by tur ning it from
19
right to lef t and then drain the remaining water.
Place a container under the dispensing spout.
"
7 Coffee Brewing
Warning! During the co ee brewing it is forbidden to remove the pressurized lter holder by
manually turning it clock wise. Danger of bur ns!
• During this operation, the "
to be considered as a standard and not a faulty operating
mode.
• Before using the machine, make sure that there is enough
water in the machine tank.
Note: if the steam knob is opened by mistake
during the warm-up phase, the "
starts blinking. Close the knob and wait until the machine is ready.
If co ee is NOT brewed after pressing the brew
button "
(11) again and check the "Troubleshooting" table before removing the lter holder.
Ensure the machine is ready before brewing co ee. The machine is ready when the "
" (11), press the " " brew button
" light (14) is blinking; this is
" light (16)
" light (14) is steady on.
Now you can go on with the co ee brewing procedures described in the following sections.
7.2 Using Ground Co ee
• 7 Insert the lter (22) in the pressurized lter holder
(19); the lter is already inserted when using the machine
for the rst time. As the machine is tted with the special
lter (22), there is no need to change the lter to prepare
either one or two co ees.
•
Add 1-1.5 measuring scoop(s) for a single co ee and 2
8
measuring scoops for a double co ee. Remove any co ee
residues from the rim of the pressurized lter holder.
Note: do not press the co ee, since the lter
holder is provided with an optimized system
for original espresso brewing.
•
Insert the lter holder (19) into the brew unit (4) from
13
the bottom.
•
Turn the lter holder from left to right until it locks
14
into place.
•
Take 1 or 2 preheated cups and place them un-
16
der the pressurized lter holder. Make sure that they are
placed correc tly under the co ee brewing nozzles.
•
Press the " " button.
17
•
When the desired qu antity of co ee has been brewed,
18
press the "
dure. Wait for a few seconds after brewing, then remove
the cups of co ee.
" button again to stop the brewing proce-
• 10 •
• 19 After brewing, wait until the
ing, then remove the pressurized lter holder by turning it
from right to le ft and empty the r emaining co ee ground s.
Note: a small quantity of water remains in the
pressurized lter holder. This has to be considere d as a bsol utel y norm al an d is du e to th e lt er hol der
characteristics.
Important note: the lter (22) should be kept
clean to guarantee perfect results. Clean daily
after use.
" " light (14)
stops blink-
7.3 Using Co ee Pods
• 9 Remo ve the gr ound co ee lter (2 2) from t he pres sur-
ized lter holder (19).
•
Insert the pod adapter (23) into the pressurized lter
10
holder (19) ensuring that its convex par t faces down.
•
Then insert the pod lter (24) into the pressurized l-
11
ter holder (19).
•
Insert the p od into the lter holder; ma ke sure that the
12
paper of the po d does not stick out of the lter holder.
•
Insert the pressurized lter holder into the brew unit
13
(4) from the bottom.
•
Turn the lter holder from left to right until it locks
14
into place.
•
Take 1 preheated cup and place it under the lter
15
holder. Check that it is placed correctly under the co ee
brewing noz zles.
•
Press the " " button.
17
•
When the desired qu antity of co ee has been brewed,
18
press the "
dure. Wait for a few seconds after brewing, then remove
the cup of co ee.
•
After brewing, wait until the (14) co ee light stops
19
blinking, then r emove the pressurized lter holder by tur ning it from right to left and dispose of the us ed pod.
results. Clean daily after use.
" button again to stop the brewing proce-
Important note: the lter (24) and the adapter
(23) should be kept clean to guarantee perfect
8 Tips for Choosing Coffee
As a general rule, any type of co ee available on the market
can be used. However, co ee is a natural product and its avour changes according to its origin and blend; therefore, it is
advisable to t ry di erent typ es of co ee in order to nd out the
blend that best suits your personal tastes. For optimal results,
we recommend using espresso machine blends. As a rule, coffee should always come out of the pressurized lter holder,
without dripping. The co ee brewing speed can be modi ed
by slightly changing the amount of co ee in the lter and/or
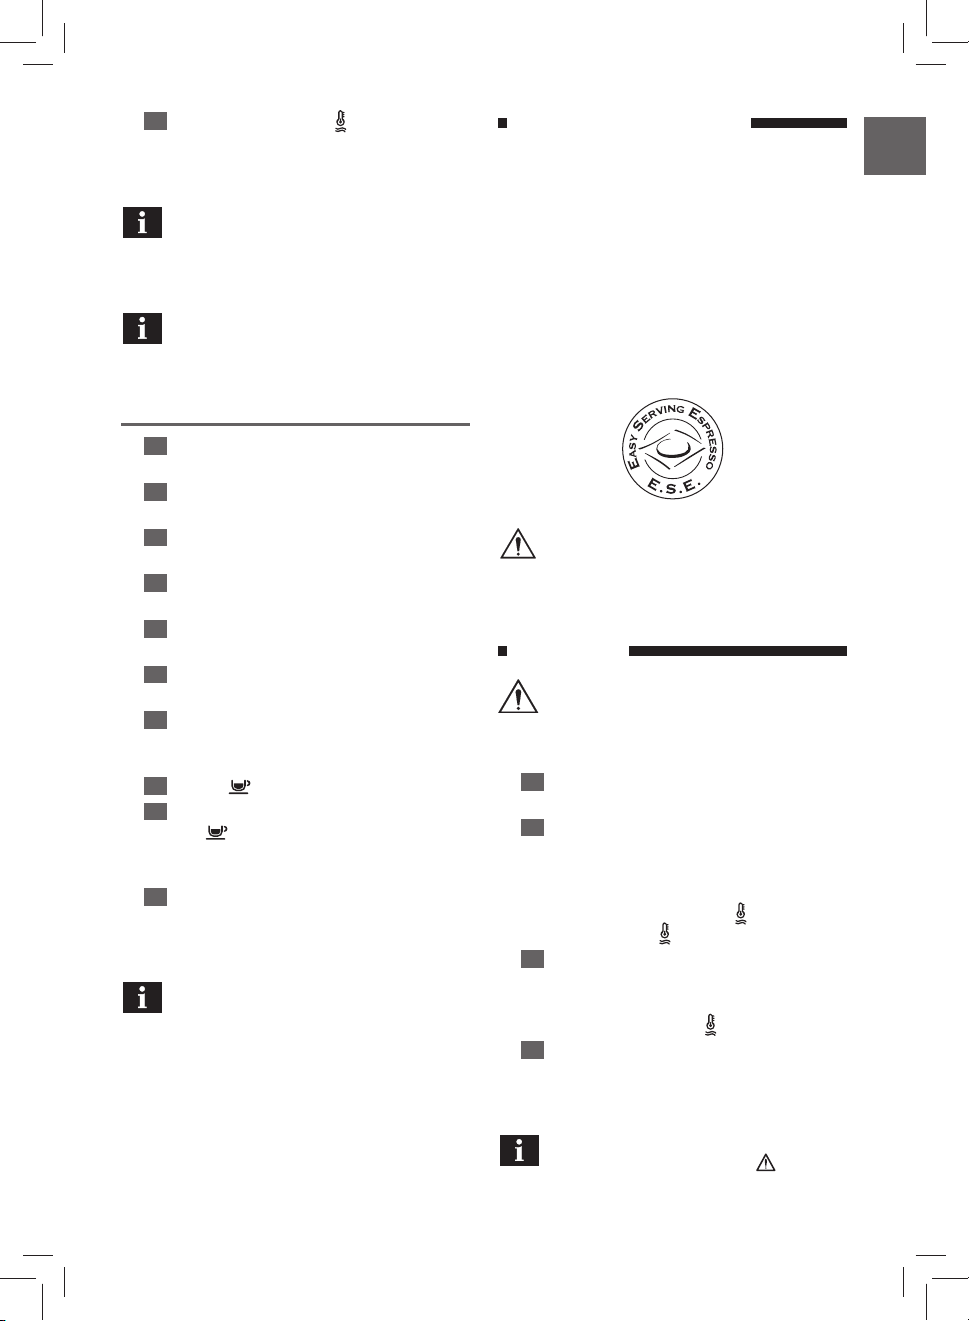
using a di erent co ee grind. Saeco recommends using ESE
single-dose co ee pods for a tasty co ee and easier cleaning
and preparation.
BEFORE PERFORMING ANY OPERATIONS RELATED
TO HOT WATER/STEAM DISPENSING, MAKE SURE
THAT THE STEAM WAND (PANNARELLO) IS DIRECTED OVER
THE WATER RECOVERY TRAY.
9 Hot Water
Danger of scalding! Dispensing may be preced-
ed by small jets of hot water. The steam wand
may reach high temperatures: never touch it with bare
hands.
•
Insert the pressurized lter holder into the brew unit
13
(4) from the bottom.
•
Turn th e press urized lter hol der fro m left to right un-
14
til it locks into place. Release the pressurized lter holder
grip. The handle will turn slightly to the left. This movement guarantees optimum lter holder perf ormance.
• Press the ON/OFF button (10). The "
blinking. Wait until the "
•
Place a container or a tea glass under the steam wand
5
(Pannarello).
• Open the knob (3) by turning it clockwise. The pump is au-
tomatically disengaged and the "
• 6 When the desired amount of hot water has been dis-
pensed, clo se the knob (3) by turning it counter-cloc kwise.
• Remove the hot water container.
" light (14) turns on steady.
" light (14) starts
" light (14) turns o .
English
Note: during this operation the pump is automatically disengaged and the "
is blinking: this is a normal behaviour of the machine.
" light (16)
• 11 •
Close the k nob. Wait until the " " lig ht (14) is steady on
before opening the knob again.
10 Steam / Cappuccino
Danger of scalding! Dispensing may be preceded
by small jets of hot water. The steam wand may
reach high temperatures: never touch it with bare
hands.
•
Insert the pressurized lter holder into the brew unit
13
(4) from the bottom.
•
Turn th e press urized lter hol der fro m left to right un-
14
til it locks into place. Release the pressurized lter holder
grip. The handle will turn slightly to the left. This movement guarantees optimum lter holder perf ormance.
• Press the ON/OFF button (10). The "
blinking. Wait until the "
•
Press the " " button (12). The " " light (14) turns o
21
and the "
" light (17) starts blinking.
" light (14) turns on steady.
" light (14) starts
• To stop the steam dispensing procedure, press the " "
(12) or "
(16) lights blink fast at the same time. This is to indicate
that the machine temperature is too high to brew co ee.
" button (11). The " " (14), " " (17) and " "
10.1 Machine Cooling
Proceed as follows to lower the temperature:
•
Place a container or a tea glass under the steam wand
5
(Pannarello).
• Open the knob (3) by turning it clockwise.
• When the machine reaches the proper temperature, the
pump is automatically disengaged and the "
is blinking.
Close the kno b (3) by turning it cou nter-cl ockwise and
6
remove the container.
• Ensure the machine is ready before brewing co ee. The
machine is ready when the "
" light (14) is steady on.
" light (16)
Note: if the stea m knob (3) is opened by mistake
during the warm-up phase, the "
starts blinking. Close the knob and wait until the machine is ready.
• Wait until the "
chine is ready for dispensing steam.
•
Place a container under the steam wand.
22
• Open the knob (3) for a few seconds so that the remaining
water can ow out of the steam wand (Pannare llo). Within
a short time only steam will come out.
•
Close the knob (3) and remove the container.
23
• Fi ll 1/3 of the co ntainer - the one you wish to use to pre pare
the cappuccino - with cold milk.
Use cold milk to get a better result.
•
Immerse the steam wand in the milk and open the
24
knob (3) by turning it clockwise; the pump is automatically engaged. Rot ate the milk container with slow upward
movements to obt ain uniform warmth.
• Once nished, close the knob (3) by turning it counter-
clockwise and remove the c up with frothed milk.
• After this operation, clean the steam wand with a wet
cloth.
The same procedure can be used to heat other
beverages.
" light (17) is steady on. Now the ma-
" light (16)
11 Cleaning
Maintenance and cleaning can only be carried out when the
machine is cold and disconnec ted from the electric network.
• Do not immerse the machine in water or place any of its
parts in a dishwasher.
• Do not use spirit, solvents and/or aggressive chemical
agents.
• We recommend cleaning the water tank and re lling it
with fresh water every day.
•
Every week, clean the boiler ring with a wet cloth
30
when the machine is o , cold and disconnected from the
mains.
•
•
Every day, after heating milk, remove the exter-
26 27
nal part of the Pannarello and wash it with fresh drinking
water.
26 27 28
this, perform the following operations:
- Remove the external part of the Pannarello (for standard
cleaning);
- Remove the upper part of the Pannarello from the steam
wand;
- Wash the upper par t of the Pannarello with f resh drinking
water;
- Wash the steam wand with a wet cloth and remove any
milk residue;
- Re t the upper part in the steam wand (make sure it is
completely inserted);
Clean the steam wand weekly. In order to do
• 12 •
After cleaning, reassemble the external part of the
29
Pannarello and make sure it reaches its limit stop. Make
also sure that the plas tic part is correc tly t into the metal
part.
•
Empty and wash the drip tray daily.
31
• Use a sof t, dampened cloth to clean the appliance.
Clean the pressurized lter holder as follows:
•
20
Remove the lter and wash it thoroughly with hot
-
9
water.
- Remove the adapter (if tted), and wash it thoroughly
with hot water.
- Wash the internal part of the pressurized lter holder.
• Do not dr y the machine and/or its par ts using a microwave
and/or standard oven.
Note: do not wash the pressurized lter holder
in the dishwasher.
12 Descaling
Limescale is a natural part of the water used for machine operation. It needs to be removed regularly as it may clog the
water and co ee circuit of your appliance.
This is an easy procedure with your Philips-Saeco machine.
When the "
When the "
" light (15) turns on, descaling i s recommended.
" light (15) turns on, descaling is needed.
fresh drinking water up to the MAX level. Insert the water
tank back into it s seat in the co ee machine and make sur e
that it locks into place - its pro le should adhere to that of
the co ee machine.
Turn on the machine by pr essing the ON/OFF " " but-
4
4
ton (10).
Following the instructions provided in chapter 9 of
5
this manual, dispense 2 cups of water (about 150ml each)
from the steam wand (Pannarello) and turn the machine
o by pressing the ON/OFF "
5 Let the descaling solution take e ect for approx. 15-20
minutes with the machine turned o .
6 Turn on the machine
(10).
Following the instructions provided in chapter 9 of
5
this manual, dispense 2 cups of water (about 150ml each)
from the
steam wand (Pannarello).
pressing the ON/OFF "
minutes.
7 Repeat the operations described in step 6 until the water
tank is completely empty.
During this operation the pump is automati-
cally disengaged and the "
blinking: this is a normal behaviour of the machine.
Close the k nob. Wait until the "
before opening the knob again.
" button (10).
by pressing the ON/OFF " " button
Turn o the machine
"
button (10) and leave it o for 3
" light (16) is
" light (14) is steady on
by
English
This operation needs to be carried out before
the appliance stops working properl y, as in this
case rep air is not covered by warranty.
Use the Saeco descaling product (Fig. B). Its
formula has been designed to ensure better
machine performance and operation for its whole operating life. If correctly used, it also avoids alterations
in the brewed product. Before starting a descaling cycle make sur e that: THE WATER FILTER (if used) HA S BEEN
REMOVED.
Never drink the descaling solution or any prod-
ucts dispensed until the cycle has been carried
out to the end. Never use vinegar as a descaling solution.
1
2
3
Insert the pressurized lter holder into the brew
13 14
unit (4) from the bot tom and turn it from lef t to right until
it locks into place.
Remove and empty the water tank.
1
Pour HALF the content of the S aeco concentrated des-
2
caling solution into the water tank, then ll the tank with
8
Rinse the water t ank with fresh drinkin g water and ll
2
it up.
9 Place a cont ainer under the lter holder.
10 Turn on the machine by pressing the ON/OFF " " button
(10); press the "
of the tank by mean s of the lter holder. Press the "
ton again to stop the dispensing process.
11
2
Re ll the tank with fresh water. Insert the water tank
back into its seat in the co ee machine and make sure that it
locks into pla ce - its pro le should adher e to that of the co ee
machine.
Place a large container (about 1l capacity) under the
5
steam wand (Pannarello).
Open the water dispensing knob (3) by turning it clock-
wise and dispense the whole content of the water tank by
means of the steam wand (Pannarello).
12
After the water dispensing process is complete, close
6
the water dispensing knob (3) by turning it counter-clockwise.
13 Repeat the operati ons once again from step (8), for a total
" button and di spense the whole content
" but-
• 13 •

of 4 tanks.
14
19
Rem ove t he lt er ho lde r fr om th e uni t by t urn ing i t fr om
right to lef t and rinse it with fresh dr inking water.
The descaling cycle is now complete.
During this operation the pump is automati-
cally disengaged and the "
blinking: this is a normal behaviour of the machine.
Close the k nob. Wait until the "
before opening the knob again.
" light (16) is
" light (14) is steady on
Re ll the tank with fresh water. If necessary, prime the
2
circuit as describe d in section 4.5.
At the end, press an d hold the "
for 3 seconds; the "
The descaling solution is to be disposed of according to the manufacturer’s instructions
and/or the regulations in force in the country of use.
" light (15) turns o .
" (11) and " " (12) buttons
13 "Intenza+" Filter (Optional)
The "INTENZA+" water lter can improve the quality of water. Using the "Intenza+" lter will prevent limescale from
building up and will ensure a much more intense aroma to
your espresso co ee. We therefore recommend you install
the "Intenza+" water lter, which can be purchased from your
local dealer or on-line at the Philips on-line store http://shop.
philips.com or at author ized service centres.
•
Remove the small white lter from the tank and store
34
it in a dry place sheltered from dust.
•
Remove the "INTENZ A+" water l ter from its package.
32
Set the lter according to the water hardness.
•
Immerse the "INT ENZA+" water l ter vertically in cold
33
water (with the opening positioned upwards) and gently
press its sides to let the air bubbles out.
•
Put the lter into the empty ta nk. Press it until its limi t
35
stop.
• Fill th e water tank with fresh dr inking water and reinser t it
into the machine.
Now the lter is active and the machine is ready for use.
14 Disposal
- The packing mater ials can be recycled.
- Appliance: unplug the appliance and cut the p ower cord.
- Deliver the appliance and power cord to a service center or
public waste disposal facilit y.
This produc t complies with EU directive 2002/96/EC.
The symbol
cates that this p roduct may not be treated as h ousehold waste.
Instead it shall be handed over to the applicable collection
point for the recycling of electrical and electronic equipment.
By ensuring this product is disposed of correctly, you will help
prevent potential negative consequences for the environment
and human health, which could otherwise be caused by inappropriate waste handling of this product. For more detailed information about recycling of this produc t, please contact your
local city o ce, your household waste disposal service or the
shop where you purchased the product.
on the product or on its packaging indi-
Carry out the following steps to activate the "Intenza+" lter:
•
Press the ON/O FF button (10). The " " ligh t (14) starts
4
blinking. Wait until the "
• 5 Place a container or a tea glass under the steam wand
(Pannarello).
• Open the knob (3) by turning it clockwise.
•
When about 1 litre of hot water has been dispensed,
6
close the knob (3) by turning it counter-clockwis e.
• Empty the hot water container.
" light (14) turns on steady.
• 14 •
Problem Possible Causes Solution
The machine does not switch on.
The pump is very noisy. No water in the tank .
The (14) " ", (17) " " and (16)
" lights blink simultane-
"
ously.
Co ee is too cold.
The milk does not f roth.
It is not possible to prepare a
cappuccino.
Co ee is brewed too fast, crema
does not for m.
Co ee doe s not come out or drips
only.
Co ee ows out of the edges.
The "
" light (16) is on.
The " " light (15) is on.
The pump turns o during water
or steam dispensing and
the "
" light (16) turns on.
The machine is not connected to the electric network.
This is the rst start-up or the machine is
overheated.
The lter holder is not inserted for preheating (chapter 7).
The cups are cold. Preheat the cups with hot water.
The milk is not suitable: powdered milk,
low-fat milk.
Dirty Pannarello. Clean the Pannarello as described in chapter 11.
No water in the tank.
There is too litt le co ee in the lter holder. Add co ee (chapter 7).
The grind is too coarse. Use a di erent blend (chapter 8).
Co ee is old or not suitable. Use a di erent blend (chapter 8).
The pod is old or not suitable. Change the pod.
Missing component in the lter holder.
No water.
The grind is too ne. Use a di erent blend (chapter 8).
Co ee tamped in the lter holder. Shake the ground co ee.
There is too much co ee in the lter
holder.
The machine has limescale build- up. Descale the machine (chapter 12).
The lter in the lter holder is clogged. Clean the lter (chapter 11).
Not suitable pod. Change type of pod.
The lter holder is not correctly inserted
in the brew unit.
The upper rim of the lter holder is dir ty. Clean the rim of the lter holder.
Pod inserted incorrectly.
There is too much co ee in the lter
holder.
The water knob (3) is open. Close the knob (3).
Descale the machine. Please refer to chapter 12.
Safety time-out. Close the water knob.
Connect the machine to the electric network.
Fill the tank up with water and prime the circuit
(sec tion 4.6).
Make sure the tank is full and fully inserted and
lower the temperature as described in section
10.1.
Preheat the lter holder.
Use whole milk.
Fill the tank up with water and prime the circuit
(sec tion 4.6).
Make sure that all the components are present
and properly installed.
Fill the tank up with water and prime the circuit
(sec tion 4.6).
Reduce the quantity of co ee in the lter holder.
Insert the lter holder correctly (chapter 7).
Insert the pod correctly. Make sure it does not
come out of the lter holder.
Reduce the quantity of co ee using the measuring scoop.
English
Please cont act an authoris ed service cent re for any problems n ot covered in the above tab le or when the sugges ted
solutions do not sol ve the problem. Refer to the ww w.Philips.com/Support website.
• 15 •
1 Uwagi ogólne
Ekspres do kaw y jest przeznaczony do prz ygotowywania 1 lub
2 liżanek kawy espresso i jest on wyposażony w nastawną
rurkę do wy twarzania par y i nalewania gorącej wody. Przyc iski
umieszczone na przedniej części urządzenia są oznaczone łatwymi do zrozumienia symbolami.
Urządzenie zo stało zaprojek towane do użytku dom owego i nie
nadaje się do intensywnego wykorzystywania profesjonalnego.
Uwaga. Producent nie ponosi odpowiedzialności za ewentualne szkody spowodowane przez:
• Użytkowanie błędne i niezgodne z przewidzianym
celem;
• Naprawy niewykonane w autoryzowanych centrach obsługi k lienta;
• Przerobienie kabla zasilającego;
• Przerobienie jakiejkolwiek części urządzenia;
• Stosowanie nieoryginalnych części zamiennych
i akcesoriów;
• Brak odwapniania i przechowywanie urządzenia
w pomieszc zeniach o temperatur ze poniżej 0°C.
W każdym powyżs zym wypadku g warancja wygas a.
1.1 Ułatwienie zrozumienia instrukcji
Trójkąt ostrzegawczy sygnalizuje
wszystkie ważne instrukcje doty-
Należy ich ściśle pr zestrzegać, aby zapobiec kalectwu!
Odniesienia do ilustracji, części urządzenia lub elementów
sterowania itd. są oznaczone numerami lub literami. W tym
przyp adku użytkownik jest odsyłany do ilustracji.
Ten symbol sygnalizuje ważne informacje,
które pozwalają na jak najlepsze stosowanie
urządzenia.
Ilustracje do tekstu znajdują się na pierwszych stronach instrukcji. Pozostawić tą stronę otwartą podczas
zapoznawania się z instrukcją obsługi.
1.2 Zastosowanie niniejszej instrukcji podczas użytku
Zachować niniejszą instrukcję obsługi w bezpiecznym miejscu
i dołączyć ją każdorazowo do ekspresu do kawy, gdy będzie go
używa ła inna osoba.
W przypadku potrzeby dodatkowych informacji lub w przypadku pojawienia się problemów należy zwrócić się do autoryzowanych centrów obsługi klienta.
czące bezpieczeństwa użytkownika.
2 Dane techniczne
Producent zastrzega sobie prawo do zmian właściwości technicznych produktu.
Napięcie nominalne - Moc nominalna - Zasilanie
Patrz tablic zka umieszczona na urz ądzeniu
Materiał obudowy
Tworzywo sz tuczne w modelu HD8525
Metal w modelu HD8527
Wymiary (dł. x w ys. x gł.) (mm)
210 x 300 x 280
Waga (kg)
HD 8525 = 3,9
HD 8527 = 5,4
Długość kabla
1,3 m
Panel sterując y
Z przodu
Uchwyt ltra
Pod ciśnieniem
Przystawka Pannarello
Specjalna do cappuccino
Pojemnik na wodę
1,25 litra - Wyjmowany
Ciśnienie pompy
15 ba rów
Bojler
Nierdzewny
Urządzenia zabezpieczające
Bezpiec znik termiczny
3 Normy bezpieczeństwa
Elementy pod napięciem nie mogą stykać się z wodą
ze względu na niebezpieczeństwo zwarcia! Rozgrzana
para i gorąca woda mogą spowodować oparzenia! Nie
wolno kierować strumienia pary lub gorącej wody w
kierunku części ciała, ostrożnie dotykać dzióbka wylotu pary / gorącej wody: niebezpieczeństwo opar zenia!
Przeznaczenie użytkowe
Ek sp res do k aw y j est pr ze zna cz ony wy łą cz nie do u ży tk u do mo wego. Urządzenie może być użytkowane przez dzieci w wieku
powyżej 8 lat or az przez osoby o ogranic zonych możliwościach
zycznych, umysłowych oraz o ograniczonych zdolnościach
zmysłowych, lub w przypadku niewystarczającego doświadczenia i odpowiedniego przygotowania tylko i wyłącznie pod
opieką osoby odpowiedzialnej za ich bezpieczeństwo oraz po
• 16 •

uprzednim ich pouczeniu co do sposobu użytkowania urządzenia i związanych z nich zagrożeniach. Dzieci nie powinny
bawić się urządzeniem. Czynności związane z czyszczeniem i
konserwacją urządzenia przez użytkownika nie mogą być wykonywane pr zez dzieci pozostawione bez opiek i.
Zasilanie elektryczne
Podłączyć urządzenie tylko do odpowiedniego gniazdka elektrycznego. Napięcie musi odpowiadać napięciu podanemu na
tabliczce umieszczonej na urządzeniu.
Kabel zasilający
Nie wolno używać ekspresu do kawy, jeżeli kabel zasilający
jest uszkodzony. Jeżeli kabel zasilający jest uszkodzony, musi
być wymieniony przez producenta lub przez serwis obsługi
klientów. Nie przeciągać kabla zasilającego pr zez narożniki lub
ostre krawędzie albo nad gorącymi przedmiotami i chronić go
od oleju.
Nie przesuwać i nie ciągnąć ekspresu do kawy, trzymając go
za kabel. Nie wyciągać wtyczki z gniazdka, ciągnąc za kabel, i
nie dotykać jej mokrymi rękami. Kabel zasilający nie powinien
swobodnie z wisać ze stołów lub półek.
Ochrona osób
Nie pozostawiać dzieci bez opieki, aby uniknąć, by bawiły się
urządzeniem. D zieci nie zdają sobie sprawy z zagr ożeń związanych ze sprzętem domowego użytku. Nie zostawiać materiałów użytych do opakowania urządzenia w zasięgu dzie ci.
Niebezpieczeństwo poparzeń
Nie wolno kierować strumienia rozgrzanej pary i/lub gorącej
wody w kierunku własnym i/lub w kierunku innych osób. Nie
wolno dotykać rurki wylotu pary rękami. Zawsze należy używać odpowiednich uchwy tów lub pokręteł.
Nie wolno wyjmować uchwytu ltra pod ciśnieniem podczas
parzenia kaw y.
Podczas fazy rozgrzewania bloku zaparzającego kawę mogą
wypł ynąć krople gorącej wody.
Nie wolno dotykać bloku zaparzającego, jeżeli urządzenie jest
włączone lub jeżeli jeszc ze nie ostygło.
Usytuowanie
Umieścić ekspres do kawy w bezpiecznym miejscu, w którym
nikt nie będzie mógł go przewrócić lub zostać zraniony. Możliwość wydostania się gorącej wody lub pary: niebezpieczeń-
stwo poparzeń!
Nie trzy mać urządzenia w temperatur ze niższej niż 0°C. Istnieje niebezpieczeństwo uszkodzenia ur ządzenia przez lód.
Nie używać ekspresu do kawy na świeżym powietrzu.
Nie umieszczać urządzenia w pobliżu bardzo rozgrzanych powierzchni lub otwartego ognia. Obudowa mogłaby się stopić
lub zostać uszkodzona.
Czyszczenie
Prz ed czy szcze niem ur ządzen ia nale ży je w yłącz yć prz y pomo -
cy prz ycisku ON/OFF i następnie wyc iągnąć wtyczkę z gniazdk a
elektr ycznego. Poczekać, a ż urządzenie się ochłodzi.
Nie wolno zanurzać urządzenia w wodzie!
Surowo zabrania się przeprowadzania interwencji wewnątrz
urządzenia. Nie używać do celów spożywczych wody, która
stała w pojemniku przez kilka dni. Umyć pojemnik i napełnić
go świeżą pitną wodą.
Miejsce przeznaczone do użytku i konserwacji
W celu zapewnienia poprawnego funkcjonowania ekspresu do
kawy zalec amy przestrzeganie następujących warunków:
• Wybrać dobrze wypoziomowaną powierzchnię;
• Wybrać pomieszczenie wystarczająco oświetlone, higieniczne, z łat wo dostępnym gniazdem elek trycznym;
• Umieścić urządzenie w odpowiedniej odległości od ścian
zgodnie ze wskazówkami na rysunku - Rys.A.
Ochrona urządzenia
Jeżeli urządzenie nie jest używane przez dłuższy okres czasu,
należy je wy łączyć i wyjąć wtyczkę z gniazdka. Przechowywać
urządzenie w suc hym i niedostępnym dla dzieci miejs cu. Chronić urządzenie przed kurzem i brudem.
Nie trzy mać urządzenia w temperatur ze niższej niż 0°C, ponieważ lód mógłby je uszkodzić.
Naprawy / Konserwacja
W przypadku awarii, usterek lub podejrzenia o usterkach powstałych w wyniku upadku należy natychmiast wyjąć wtyczkę z gniazdka. Nie wolno włączać uszkodzonego urządzenia.
Tylko autoryzowane centra obsługi klienta mogą dokonywać
interwencji i napraw. Producent nie ponosi odpowiedzialności
za ewentualne szkody spowodowane przez interwencje niewykonane według powyższych zaleceń.
Postępowanie w przypadku pożaru
W przypadku pożaru należy używać do gaszenia gaśnicy z
dwutlenkiem węgla (CO
kowych.
). Nie używać wody ani gaśnic prosz-
2
Objaśnienie elementów urządzenia (str.2)
1 Panel sterujący
2 Taca do odstawiania liż anek
3 Pokrętło gorącej wody / p ary
4 Blok zap arzający kawę
5 Pojemnik na wodę
6 Zbiornik ściekowy wody
7 Kratka do odstawiania liżanek
8 Rurka w ylotu pary (Pannarello)
9 Gniazdo kabla zasilającego
10 Przycisk ON/OFF
11 Przycisk „Parzenie kawy”
12 Przycisk „Para”
13 Przycisk „Płukanie”
• 17 •
Polski
14 Kontrolka „Temperatura”
15 Kontrolka „Odwapnianie”
16 Kontrolka „Alarm”
17 Kontrolka „Para”
18 Kontrolka „Płukanie”
19 Uchw yt ltra pod ciśnieniem
20 Miarka do kawy mielonej
21 Kabel zasilający
22 Filtr do kawy mielonej
(jeden do parzenia 1 lub 2 kaw)
23 Adapter do ltra do kawy w saszetkach
24 Filtr do kawy w saszetkach
25 Filtr wody „Intenza+” (sprzedawany oddzielnie)
4 Instalacja
Dla własnego bezpieczeństwa oraz bezpieczeństwa
innych osób należy uważnie przestrzegać „norm bezpieczeństwa” opisanych w rozdziale 3.
4.3 Pojemnik na wodę
• 1 Wyjąć pojemnik na wodę (5).
Opłuka ć go i napełnić świeżą pi tną wodą. Nie przekra-
•
2
czać poziomu (MAX) oznaczonego na pojemniku.
Wlewać do pojemnika tylko i wyłącznie świeżą
pitną wodę niegazowaną. Gorąca woda lub inne
płyny mogą uszkodzić pojemnik. Nie wolno włączać
urządzenia, jeżeli poziom wody nie przekracza oznaczenia MIN. Sprawdzić, czy w pojemniku na wodę jest
dostatec zna ilość wody.
• Włożyć pojemnik na wodę w odpowiednie miejsce w eks-
presie do kawy i sprawdzić, czy jest włożony do samego
końca. Pro l powinien przylegać do pro lu ek spresu.
Uwaga: poziom wody można sp rawdzić poprzez
okno umieszczone z przodu pojemnika.
4.1 Opakowanie
Oryginalne opakowanie zost ało zaprojektowane i w yprodukowane w celu ochrony ur ządzenia podczas transportu.
Zaleca się jego zachowanie do ewentualnej potrzeby transportu w przys złości.
4.2 Informacje dotyczące instalacji
Nie chwytać urządzenia za barierki ochronne na
l i ż a n k i .
Przed rozpoczęciem instalacji urządzenia należy uwzględnić
następujące zalecenia dotyczące bezpiec zeństwa:
• umieścić urządzenie w bezpie cznym miejscu;
• upewnić się, czy dzieci nie mają możliwości bawienia się
urządzeniem;
• ni e umieszc zać urząd zenia na bard zo gorący ch powierz chniach lub w pobliżu p łomieni ognia.
Ekspres do kawy jest gotowy do podłączenia do sieci elektryc znej.
Uwaga: zalecamy umycie elementów urządzenia przed ich pierwszym użyciem i/lub po okre-
sie, w któr ym nie były używane.
4.4 Podłączenie urządzenia
Prąd elektryczny może być niebezpieczny!
Z tego powodu należy zawsze uważnie przestrzegać norm bezpieczeństwa. Nie wolno używać
uszkodzonych kabli! Uszkodzone kable i wt yczki muszą
być bezzwłocznie wymienione w autoryzowanych centrach obsługi klienta.
Napięcie urządzenia zostało ustawione fabryc znie. Sprawdzić,
czy napięcie sieci jest zgodne z napięciem umieszczonym na
tabliczce identy kacyjnej znajdującej się w dolnej części urządzenia.
•
Włożyć wtyczkę do gniazdka elektrycznego znajdują-
3A
cego się z tyłu ekspresu do kawy.
•
Włożyć drugą końcówkę wtyczki do ściennego
3B
gniazdka elektrycznego o odpowie dnim napięciu.
4.5 Pierwsze uruchomienie
Przy pierwszym uruchomieniu ekspresu do kawy należy napełnić obwód.
Nacisnąć przycisk ON/OFF (10). Migają kontrolki (14) „ ”,
4
(16) „
” i (17)„ ”, sygnalizując, że należy napełnić ob-
wód.
Ustawić pojemnik pod rurką wylotu pary (Pannarello).
5
Otworzyć pokrętło (3) „gorąca woda/para”, obracając je w
kierunku zgodnym z ruchem wskazówek zegara. Pompa
zostanie automatycznie uruchomiona. Poczekać, a ż z rurki
wylotu pary (Pannarello) wypłynie regularny strumień
wody.
• 18 •
Zamknąć pokrętło (3) „gorąca woda/para”, obracając je w
6
kierunku przeciwnym do kierunku ruchu wskazówek zegara. Wyjąć pojemnik .
Dopiero po poprawnym wy konaniu napełniania obwodu ur ządzenie rozpoczyna fazę rozgrzewania.
Uwaga: jeżeli pokrętło pozostanie otwarte, po
upływie kilku sekund pompa zostanie automa-
tycznie wyłączona i zacznie migać kontrolka (16) „
”.
4.6 Napełnianie obwodu
Gdy skończy się woda w pojemniku, obwód urządzenia musi
być napełniony.
Uwaga: jeżeli urządzenie pracowało przez długi
czas bez wody, wówczas migają kontrolki (14)
„
”, (16) „ ” i (17) „ ”. Należy zapoznać się z tabelą
„Rozwiązywanie problemów”.
•
Ustawić pojem nik pod rurką wylot u pary (Pannarello).
5
• Otworzyć pokrętło (3) „gorąca woda/para”, obracając je w
kierunku zgodnym z ruchem wskazówek zegara. Pompa
zostanie automatycznie uruchomiona.
• Poczekać, aż z rurki wylotu pary (Pannarello) wypłynie
regularny strumień wody.
•
Zamknąć pokrętło (3) „gorąca woda/para”, obracając
6
je w kierunku przeciwnym do kierunku ruchu wskazówek
zegara. Wyjąć pojemnik.
Uwaga: jeżeli w fazie rozgrzewania omyłkowo
zostanie otwarte pokrętło pary, kontrolka (16)
„
” zacznie migać. Zakręcić pokrętło i poczekać, aż
urządzenie będzie gotowe do pracy.
4.7 Pierwsze użycie lub użycie po okresie
nieużywania
Ta prosta czynność zagwarantuje optymalne par zenie. Powinna być wykonana:
- przy pierwszym uruchomieniu;
- jeżeli ur ządzenie nie było uży wane przez długi ok res czasu
(dłużej niż 2 tygo dnie).
A
Wypłukać pojemnik na wodę i napełnić go świeżą
2
pitną wodą. Włożyć z p owrotem pojemnik na wodę do odpowiedniego m iejsca w ekspresie do kawy i sp rawdzić, czy
jest włożony do samego końca. Pro l powinien przylegać
do pro lu ekspresu.
B Włączyć urządzenie, naciskając przycisk (10). Poczekać, aż
kontrolka (14) „
C
Ustawić pojem nik pod rurką wylot u pary (Pannarello).
5
Otworzyć pokrętło (3), przekręcając je w kierunku zgod-
nym z ruchem wskazówek zegara. Pompa zostanie automatycznie uruchomiona.
D Nalać całą zawartość pojemnika na wodę przez rurkę
wylotu pary/gorącej wody (Pannarello). Aby zakończyć
nalewanie, należy zamknąć pokrętło (3), obracając je w
kierunku pr zeciwnym do ruchu wskazówek zegara.
Podczas tej operacji całkowicie normalnym
zjawiskiem jest automatyczne wyłączenie się
pompy, wówczas miga kontrolka (16) „
krętło. Przed odkręceniem pokrętła należy poczekać,
aż kontrolka (14) „
E
Napełnić pojemnik świeżą pitną wodą. Włożyć z po-
2
wrotem pojemnik na wodę do odpowiedniego miejsca w
ekspresie do k awy i sprawdzić, czy je st włożony do samego
końca. Pro l powinien przylegać do pro lu ek spresu.
F
13 14
jącego (4) i przekręcić go od lewej do prawej strony, aż do
momentu zablokowania.
G
Ustawić odpowiedni pojemnik pod uchw ytem ltra.
15
H
Nacisnąć przycisk „ ” i nalać liżankę gorącej wody.
17
Po zakończeniu zatrzymać nalewanie, naciskając przycisk
„
”.
I Powtórzyć operacje opisane w punkcie (H) aż do wyczer-
pania wody w pojemniku na wodę.
L
Napełnić pojemnik na wodę świeżą pitną wodą.
2
M
Wyj ąć uc hwy t lt ra z bl oku, prze kręc ając go od prawe j
19
do lewej strony, i opł ukać go świeżą pitną wodą.
Urządzenia jest teraz gotowe. Szczegóły dotyczące parzenia
kawy i wy twarzania pary są opisane w odpowiednich rozdziałach.
” zaświeci się ś wiatłem ciągłym.
”. Z ak rę ci ć po -
” zaświec i się światłem ciągł ym.
Od dołu włożyć uchwyt ltra do bloku zaparza-
Polski
Nalaną wodę należy wylać do zlewu i nie wol-
no stosować jej do celów spożywczych. Jeżeli
pojemnik napełni się podczas cyklu, należy zatrzymać
nalewanie i opróżnić go przed kontynuowaniem czynności.
• 19 •

5 Płukanie
Uwaga: sprawdzić, czy uchwyt ltra jest włożo-
ny, aby zapewnić optymalne rozgrzanie całego
urządzenia.
Ekspres do kawy jest przystosowany do wykonywania automatycznego płukania obwodu kawy świeżą wodą po każdym
włączeniu. Takie rozwiązanie zapewnia poprawne ogrzanie
całego ur ządzenia oraz lepszy aromat kawy.
Zalecamy ustawienie pojemnika pod dozowni-
kiem.
Ta funkcja jest aktywowana w momencie zakupu urządzenia
(świeci się kontrolka (18) „
kończeniu fazy rozgrzewania, gdy kontrolka (14) „
świecić się światłem ciągł ym.
Uwaga: jeżeli z uchwytu ltra nie wypływa
woda, należ y wykonać ręcz ne płukanie zgod nie
z opisem zawart ym w punkcie 7.1.
”) i jest wykonywana po za-
” zacznie
7 Parzenie kawy
Uwaga! Podczas parzenia kawy nie wolno wyj-
mować uchw ytu ltra pod c iśnieniem, obra cając
go ręcznie w kierunku zgodnym z ruchem wskazówek
zegara. Niebezpieczeństwo poparzeń.
• Podczas tej operacji miga kontrolka (14) „
malne zjawisko i nie należy go uważać za usterkę.
• Przed użyciem należy upewnić się, czy pojemnik na wodę
zawiera wystarczającą ilość wod y.
Uwaga: jeżeli w fazie rozgrzewania omyłkowo
zostanie otwarte pokrętło pary, kontrolka (16)
„
” zacznie migać. Zakręcić pokrętło i poczekać, aż
urządzenie będzie gotowe do pracy.
Jeżeli po naciśnięciu przycisku 11 „ ” nie wy-
pły wa kawa, należy ponownie nac isnąć przycisk
11 „
” i zapoznać się z tabelą „Rozwiązywanie pro-
blemów” przed wyjęciem uchwytu ltra.
”. Jest to nor-
Płukanie można:
A przerwać poprzez naciśnięcie prz ycisku „
„
”;
B wyłączyć poprzez naciśnięcie przycisku „ ”, gdy kontrolka
(14) „
” miga lub świeci się światłem ciągłym. Wówczas
kontrolka (18) „
Uwaga: jeżeli płukanie zostanie wyłączone,
można je ponownie włąc zyć tylko poprzez naci-
śnięcie przycisku „
” gaśnie.
”.
” lub przycisku
6 Oszczędność energii
Urządzenie jest przy stosowane do oszczędzania energii.
Po upływie 9 minut bezczynności urządzenie wyłącza się, aby
oszczędzać energię. Takie rozwiązanie zapewnia poszanowanie środowiska.
Aby korzystać z urządzenia, należy nacisnąć przycisk ON/OFF
(10) „
”.
Przed zapar zeniem kawy należy sprawdz ić, czy urządzeni e jest
gotowe do użycia. Urządzenie jest gotowe do pracy, gdy kontrolka (14) „
” zacznie świecić się światłem ciągł ym.
7.1 Ogrzewanie uchwytu ltra
Jeżeli funkcja „płukanie” jest nieaktywna i/lub użytkownik
zamierza ręcznie ogrzać uchwyt ltra, należy wykonać następujące czynności:
•
Włożyć od spodu uchwy t ltr a pod ciśnieniem do blo-
13
ku zaparzającego (4).
•
Obracać uchwyt ltra pod ciśnieniem od lewej do
14
prawej strony, aż do momentu zablokowania. Wypuścić
rączkę uchwytu ltra pod ciśnieniem, rączka obraca się
lekko w lewą st ronę. Ten ruch g warantuje poprawne funkcjonowanie uchw ytu ltra.
•
Ogrzać uchwyt ltra pod ciśnieniem, naciskając przy-
17
cisk „
”. Woda zacznie wypływać z uchwytu ltra pod
ciśnieniem (czynność ta jest niezbędna jedynie do zaparzenia pierwszej kawy).
• Po wypłynięciu 50 ml wody nacisnąć ponownie przycisk
„
”, aby zatrzymać nalewanie.
•
Wyjąć uchwyt ltra pod ciśnieniem z urządzenia,
19
obracając go od prawej do lewej strony, i wylać pozostałą
wodę.
Zalecamy ustawienie pojemnika pod dozownikiem.
• 20 •
Następnie należy wykonać czynności opisane w kolejnych
punktach w celu zaparzenia kawy.
7.2 Kawa mielona
• 7 Włożyć ltr (22) do uchwytu ltra pod ciśnien iem (19).
Przy pierwszym użyciu ltr jest już włożony. Przy użyciu
specjalnego ltra (22), w który jest wyposażone urządzenie, nie trzeba zmieniać ltra, by zaparzyć jedną lub dwie
kawy.
•
Wsypać 1-1,5 miarki, aby zaparzyć pojedynczą kawę,
8
lub 2 płaski e miarki, aby zaparzyć pod wójną kawę. Wyczyścić brzeg uchwytu ltra z resztek kawy.
Uwaga: nie ściskać kawy, ponieważ uchwyt ltra posiada system dostosowany do zaparzania
prawdziwej kawy espresso.
•
Włożyć od spodu uchwyt ltra (19) do bloku zaparza-
13
jącego (4).
•
Obracać uchwyt ltra od lewej do prawej strony, aż do
14
momentu zablokowania.
•
Wziąć 1 lub 2 rozgrzane liżanki i ustawić je pod
16
uchwytem ltra pod ciśnieniem. Sprawdzić, czy są poprawnie umieszczone pod otworami wylotu kawy.
•
Nacisnąć przycisk „ ”.
17
•
Po nal aniu odp owiedni ej ilośc i kawy na leży po nownie
18
nacisnąć przycisk „
zakończeniu parzenia poczekać kilka sekund. Wziąć liżanki z kawą.
•
Po zakończeniu zaparzania kawy należy poczekać,
19
aż
kontrolka (14) „ ”
uchwyt ltra pod ciśnieniem, obracając go od prawej s trony do lewej, i opróżnić z pozostał ych fusów.
Uwaga: w uchwycie ltra pod ciśnieniem pozostanie niewielka ilość wody. Jest to normalne
zjawisko związane z w łaściwościami uchwytu ltra.
Ważna info rmacja: Filtr (22) należy ut rzymywać
w czystości, aby zapewnić doskonały rezultat.
Myć codziennie po zakończeniu używania.
”, aby zatrzymać parzenie kawy. Po
przestanie migać, następnie wyjąć
7.3 Kawa w saszetkach
• 9 Wyjąć z uchwytu ltra pod ciśnieniem (19) ltr do
kawy mielonej (22).
Włożyć do uchwytu ltra pod ciśnieniem (19) adapter
•
10
do saszetek (23) z częścią wypukłą skierowaną w dół.
Następnie włożyć ltr do saszetek (24) do uchwytu
•
11
ltra pod ciśnieniem (19).
•
Włożyć saszetkę do uchw ytu ltra. Sprawdzić, cz y pa-
12
pier saszet ki nie wystaje z uchwytu ltra.
•
Włożyć od spodu uchwy t ltr a pod ciśnieniem do blo-
13
ku zaparzającego (4).
•
Obracać uchwyt ltra od lewej do prawej strony, aż do
14
momentu zablokowania.
•
Wziąć 1 liżankę wstępnie ogrzaną i ustawić ją pod
15
uchwytem ltra. Sprawdzić, czy jest poprawnie umieszczona pod ot worami wylotu kawy.
•
Nacisnąć przycisk „ ”.
17
•
Po nal aniu odp owiedni ej ilośc i kawy na leży po nownie
18
nacisnąć przycisk „
zakończeniu parzenia poczekać kilka sekund. Wziąć liżankę z kawą.
•
Po zakończeniu zaparzania kawy należy poczekać, aż
19
kontrolka 14 przestanie migać, następnie wyjąć uchwyt
ltra pod ciśnieniem, obracając go od prawej strony do
lewej, i wyrzucić zużytą saszetkę.
Ważna informacja: Filtr (24) i adapter (23) na-
leży utrzymywać w czystości, aby zapewnić
doskonały rezultat. Myć codziennie po zakończeniu
używania.
”, aby zatrzymać parzenie kawy. Po
8 Wybór typu kawy - porady
W zasadzie możliwe jest stosowanie każdego typu kawy dostępnej w sprzedaż y. Kawa jest jednak produktem naturalnym
i może zmieniać smak w zależności od pochodzenia i rodzaju
mieszanki. Z tego powodu zaleca się spróbowanie różnych
jej typów, aby odkryć gatunek, który najbardziej odpowiada
indywidualnym upodobaniom. W celu otrzymania jak najlepszych rezultatów w każdym przypadku zalecamy stosowanie
mieszanek przygotowanych wyłącznie dla ekspresów do
kawy espresso. Kawa powinna zawsze wypływać regularnie z
uchwytu ltra pod ciśnieniem, nie ściekając kroplami. Można
zmienić sz ybkość wypł ywania kawy poprze z niewielką zmianę
dawki kawy w ltrze i/lub poprzez zastosowanie kawy o innym stopniu mielenia. W celu zapewnienia lepszego smaku
kawy i ułatwienia czynności czyszczenia i przygotowywania
Polski
• 21 •

Saeco zaleca stosować kawę w saszetkach ze znakiem ESE na
opakowaniu.
PRZED WYKONANIEM JAKIEJKOLWIEK CZYNNOŚCI
ZWIĄZANEJ Z WYTWARZANIEM PARY LUB NALEWANIEM GORĄCEJ WODY NALEŻ Y SPRAWDZIĆ, CZY RURKA
WYLOTU PARY (PANNARELLO) JEST ZWRÓCONA W KIERUNKU ZBIORNIKA ŚCIEKOWEGO WODY.
9 Gorąca woda
Niebezpieczeństwo poparzeń! Na początku pa-
rzenia gorąca woda może przez chwilę pryskać.
Rurka wylotu może być bardzo rozgrzana: nie wolno
dotykać jej bezpośrednio rękami.
•
Włożyć od spodu uchwy t ltr a pod ciśnieniem do blo-
13
ku zaparzającego (4).
•
Obracać uchwyt ltra pod ciśnieniem od lewej do
14
prawej strony, aż do momentu zablokowania. Wypuścić
rączkę uchwytu ltra pod ciśnieniem, rączka obraca się
lekko w lewą st ronę. Ten ruch g warantuje poprawne funkcjonowanie uchw ytu ltra.
• Nacisnąć wyłącznik ON/OFF (10), a kontrolka (14) „
cznie migać. Poczekać, aż kontrolka (14) „
światłem ciągłym.
•
Ustawić pojemnik lub szklankę pod rurką wylotu pary
5
(Pannarello).
• Ot wor zyć p okrę tło (3), prze krę cając je w k ieru nku zg odny m
z ruchem wskazówek zegara. Pompa jest uruchamiana automatycznie, a kontrolka (14) „
• 6 Po nalaniu odpowiedniej ilości gorącej wody należy
zamknąć pokrętło (3), przekręcając je w lewo.
• Zabrać pojemnik z gorącą wodą.
Uwaga: Podczas tej operacji całkowicie nor-
malnym zjawiskiem jest automatyczne wyłączenie się pompy, wówczas miga kontrolka (16) „
Zakręcić pokrętło. Przed odkręceniem pokrętła należy
poczekać, aż kontrolka (14) „
ciągłym.
” gaśnie.
” zaświeci się światłem
” za-
” zaświeci się
10 Para / Cappuccino
Niebezpieczeństwo poparzeń! Na początku pa-
rzenia gorąca woda może przez chwilę pryskać.
Rurka wylotu może być bardzo rozgrzana: nie wolno
dotykać jej bezpośrednio rękami.
•
Włożyć od spodu uchwy t ltr a pod ciśnieniem do blo-
13
ku zaparzającego (4).
Obracać uchwyt ltra pod ciśnieniem od lewej do
•
14
prawej strony, aż do momentu zablokowania. Wypuścić
rączkę uchwytu ltra pod ciśnieniem, rączka obraca się
lekko w lewą st ronę. Ten ruch g warantuje poprawne funkcjonowanie uchw ytu ltra.
• Nacisnąć wyłącznik ON/OFF (10), a kontrolka (14) „
cznie migać. Poczekać, aż kontrolka (14) „
światłem ciągłym.
•
Nacisnąć przycisk (12) „ ”. Zgaśnie kontrolka (14)
21
„
” i zacznie migać kontrolka (17) „ ”.
Uwaga: jeżeli w fazie rozgrzewania omyłkowo
zostanie odkręcone pokrętło pary 3, kontrolka
(16) „
” zacznie migać. Zakręcić pokrętło i poczekać,
aż urządzenie będzie gotowe do pracy.
• Poczekać, aż kontrolka (17) „
ciągłym. Wówczas urządzenie jest gotowe do wytwarzania pary.
•
Ustawić pojemnik pod rurką wylotu pary.
22
• O tworzyć pokrę tło (3) na chwilę ta k, aby umożliwić wypł y-
nięcie pozostałej wody z rurki wylotu pary (Pannarello).
Wkrótce zac znie wydobywać się tylko para.
•
Zakręcić pokrętło (3) i zabrać pojemnik.
23
• Napełnić zimnym mlekiem 1/3 pojemnika, który zostanie
użyt y do przygotowania cappuccino.
Stosować zimne mleko, by zapewnić jak najle-
-psze rezultaty.
•
Zanurzyć rurkę wylotu pary w mleku i otworzyć po-
24
krętło (3), obracając je w kierunku zgodnym z ruchem
wskazówek zegara. Pompa zostanie automatycznie uru-
”.
chomiona. Obrócić powoli pojemnik zawierający mleko, od
dołu do góry, by zapewnić równomierne ogrzanie.
• Po zakończeniu zakręcić pokrętło (3), obracając je w kie-
runku przeciwnym do ruchu wskazówek zegara. Zabrać
liżankę ze spienionym mlekiem.
• Po tej operacji należy wyczyścić rurkę wylotu pary wilgot-
ną ściereczką.
” zaświeci się światłem
” za-
” zaświeci się
• 22 •
 Loading...