

Page 1
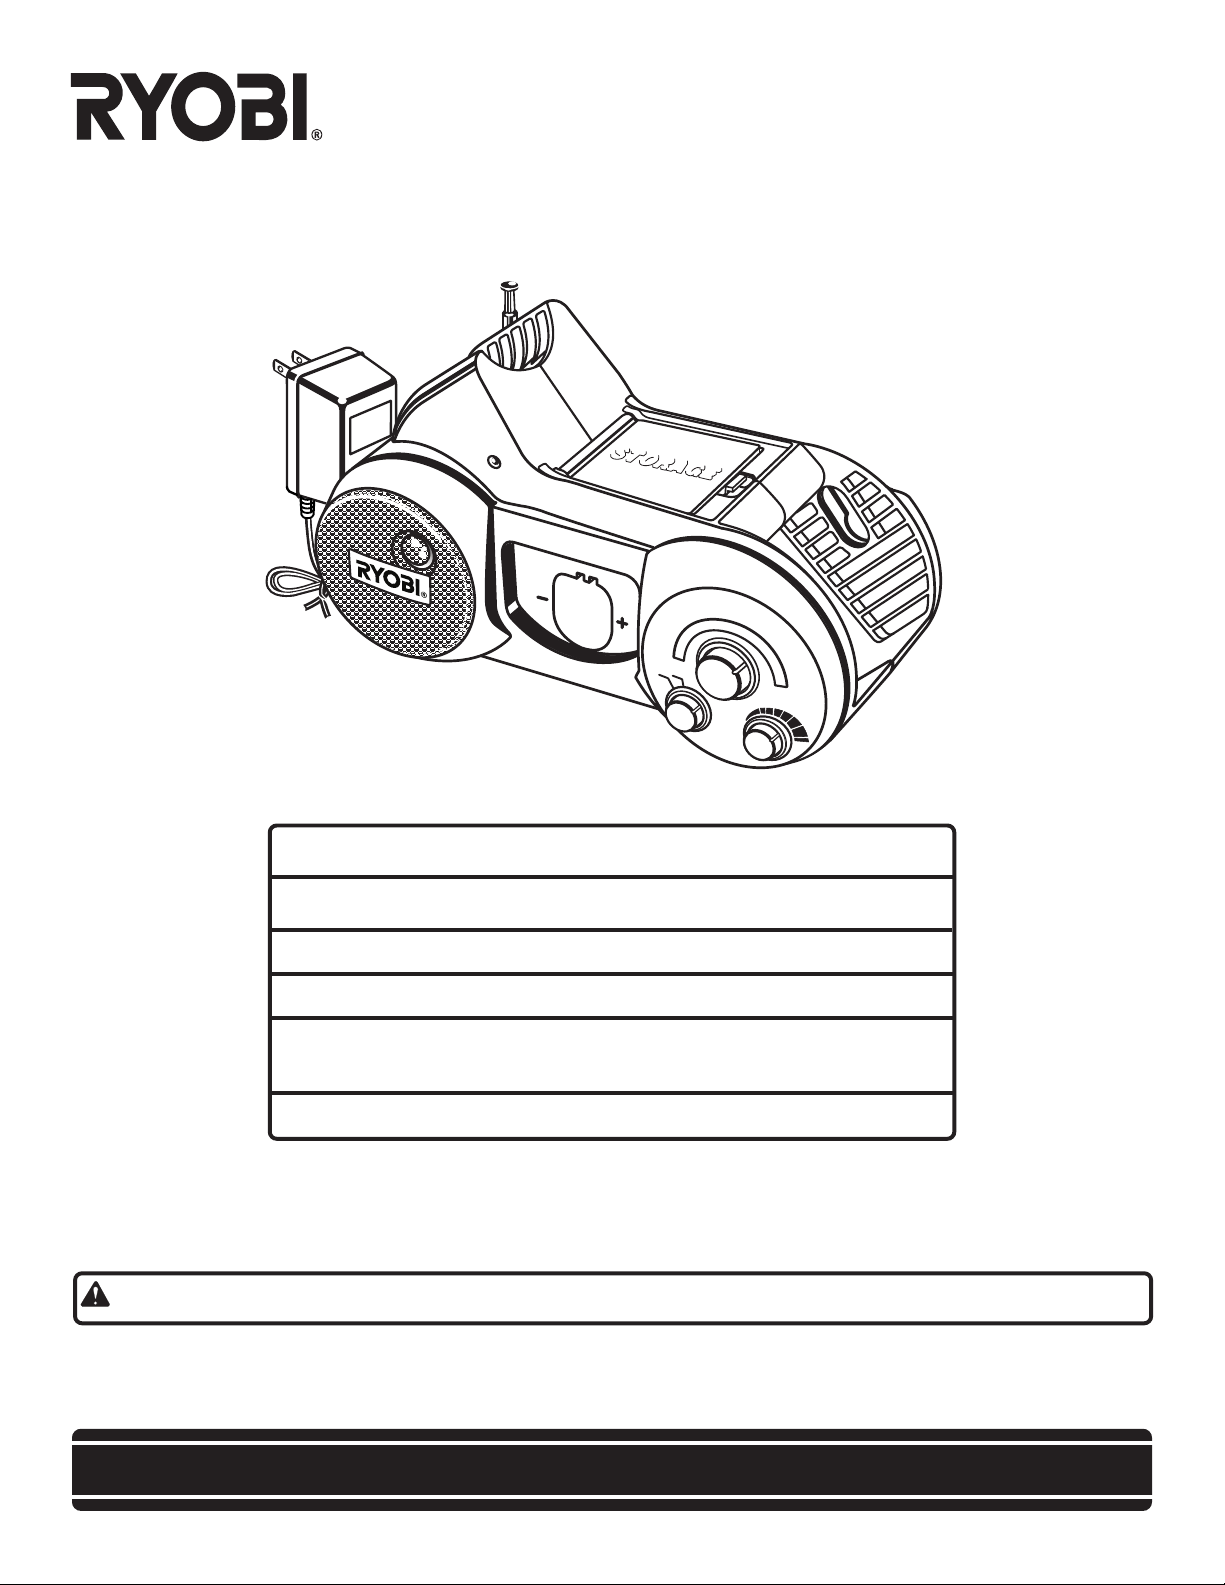
OPERATOR'S MANUAL
9.6 VOLT AM/FM RADIO CHARGER
Model No. RC960
charging
STORAGE
800
700
100
98
600
92
0
A
M
8
53
8
F
M
A
F
M
M
A
M
/F
M
TUNING
1000
104
1200
106
14
00
1
0
8
1
MHz
7
0
k
H
z
0
ME
SPECIFICATIONS:
AM/FM Radio Charger Model No. RC960
Input 120 Volts, 60 Hz, AC Only
Charging Voltage 9.6 Volt
AM/FM Tuner AM: 520-1710 KHz
FM: 87.9-107.9 MHz
Net Weight 2.2 Lbs. (1 kg.)
THANK YOU FOR BUYING A RYOBI RADIO CHARGER.
Your new radio charger has been engineered and manufactured to Ryobi’s high standard for dependability, ease of operation,
and operator safety. Properly cared for, it will give you years of rugged, trouble-free performance.
CAUTION: Carefully read through this entire operator’s manual before using your new radio charger.
Pay close attention to the Rules for Safe Operation, Warnings, and Cautions. If you use your radio charger properly and only
for what it is intended, you will enjoy years of safe, reliable service.
Thank you again for buying Ryobi products.
SAVE THIS MANUAL FOR FUTURE REFERENCE
Page 2
CAUTION:
RISK OF ELECTRIC SHOCK
DO NOT OPEN
WARNING:
To reduce the risk of electric shock, do not remove cover
(or back). No user-serviceable parts inside. Refer servicing
to qualified service personnel.
IMPORTANT SAFETY INSTRUCTIONS FOR RADIO
CHARGER AND SPECIFIC SAFETY RULES
WARNING:
To reduce the risk of fire or electric shock, do not expose
this product to rain or moisture.
WARNING:
To prevent electric shock, match wide blade of plug to
wide slot, fully insert.
■ Save these instructions. This manual contains important safety and operating instructions for charger.
Following this rule will reduce the risk of electric shock,
fire, or serious personal injury.
■ Before using charger, read all instructions and cautionary markings in this manual, on battery charger,
and product using battery charger. Following this rule
will reduce the risk of electric shock, fire, or serious
personal injury.
■ To reduce risk of injury, charge only nickel-cadmium
rechargeable batteries. Other types of batteries may
burst causing personal injury and damage. Following
this rule will reduce the risk of electric shock, fire, or
serious personal injury.
■ Do not expose charger to wet or damp conditions.
Following this rule will reduce the risk of electric shock,
fire, or serious personal injury.
■ Use of an attachment not recommended or sold by
the battery charger manufacturer may result in a risk
of fire, electric shock, or injury to persons. Following
this rule will reduce the risk of electric shock, fire, or
serious personal injury.
■ To reduce risk of damage to charger body and cord,
pull by charger plug rather than cord when disconnecting charger. Following this rule will reduce the risk
of electric shock, fire, or serious personal injury.
■ Make sure cord is located so that it will not be
stepped on, tripped over, or otherwise subjected to
damage or stress. Following this rule will reduce the risk
of serious personal injury.
■ An extension cord should not be used unless absolutely necessary. Use of improper extension cord could
result in a risk of fire and electric shock. If extension cord
must be used, make sure:
a. That pins on plug of extension cord are the
same number, size and shape as those of
plug on charger.
b. That extension cord is properly wired and in
good electrical condition; and
c. That wire size is large enough for AC ampere
rating of charger as specified below:
Cord Length (Feet) 25' 50' 100'
Cord Size (AWG) 16 16 16
Note: AWG = American Wire Gage
■ Do not operate charger with a damaged cord or plug.
If damaged, have replaced immediately by a qualified
serviceman. Following this rule will reduce the risk of
electric shock, fire, or serious personal injury.
■ Do not operate charger if it has received a sharp
blow, been dropped, or otherwise damaged in any
way; take it to a qualified serviceman. Following this
rule will reduce the risk of electric shock, fire, or serious
personal injury.
■ Do not disassemble charger; take it to a qualified
serviceman when service or repair is required. Incorrect reassembly may result in a risk of electric shock
or fire. Following this rule will reduce the risk of electric
shock, fire, or serious personal injury.
■ To reduce the risk of electric shock, unplug charger
from outlet before attempting any maintenance or
cleaning. Turning off controls will not reduce this
risk. Following this rule will reduce the risk of electric
shock, fire, or serious personal injury.
■ Disconnect charger from power supply when not in
use. Following this rule will reduce the risk of electric
shock, fire, or serious personal injury.
■ Risk of electric shock. Do not touch uninsulated
portion of output connector or uninsulated battery
terminal.
■ Do not place battery tools or their batteries near fire
or heat. This will reduce the risk of explosion and
possible injury.
■ For best results, your battery tool should be charged
in a location where the temperature is more than 50°F
(10°C) but less than 100°F (38°C). Do not store outside
or in vehicles.
■ Never attempt to connect two chargers together.
Page 2
Page 3

IMPORTANT SAFETY INSTRUCTIONS FOR RADIO
CHARGER AND SPECIFIC SAFETY RULES
■ The charger is designed to operate on standard
household voltage. Do not attempt to use it on any other
voltage.
■ Do not insert foreign matter into the battery port.
■ Do not charge by means of an engine generator or DC
power source.
■ Do not disassemble the battery.
■ Do not charge or store the tool and battery in loca-
tions where the temperature may reach or exceed
°F (38°C), such as outside sheds or metal build-
100
ings.
■ Do not incinerate the battery, even if it is severely
damaged or completely worn out. The battery may
explode in fire.
■ Under extreme usage or temperature conditions,
battery leakage may occur. If liquid comes in contact
with your skin, wash immediately with soap and water,
then neutralize with lemon juice or vinegar. If liquid gets
in your eyes, flush them with clean water for at least 10
minutes, then seek immediate medical attention.
■ Do not short-circuit the battery.
■ A damaged battery is subject to explosion. To avoid
serious personal injury, properly dispose of a damaged
battery.
■ Do not discharge battery beyond normal use limits.
Further discharging (such as by placing a rubber band on
the trigger switch) can cause a deep discharge which
may result in polarity reversal of a cell, rendering the
battery useless.
■ Grounding or Polarization – This product may be
equipped with a polarized alternating-current line plug
(a plug having one blade wider than the other). This
plug will fit into the power outlet only one way. This is
a safety feature. If you are unable to insert the plug
fully into the outlet, try reversing the plug. If the plug
should still fail to fit, contact your electrician to replace
your obsolete outlet. Do not defeat the safety purpose
of the polarized plug.
■ Object and Liquid Entry – Never push objects of any
kind into this product through openings as they may
touch dangerous voltage points or short-out parts that
could result in a fire or electric shock. Never spill liquid of
any kind on the product.
■ Damage Requiring Service – Unplug this product from
the wall outlet and refer servicing to qualified service
personnel under the following conditions:
A) When the power-supply cord or plug is damaged,
B) If liquid has been spilled, or objects have fallen into
the product,
C) If the product has been exposed to rain or water,
D) If the product does not operate normally by following
the operating instructions. Adjust only those controls
that are covered by the operating instructions as an
improper adjustment of other controls may result in
damage and will often require extensive work by a
qualified technician to restore the product to its normal
operation,
E) If the product has been dropped or damaged in any
way, and
■ Batteries vent hydrogen gas and can explode in the
presence of a source of ignition, such as a pilot light.
To reduce the risk of serious personal injury, never use
any cordless product in the presence of open flame. An
exploded battery can propel debris and chemicals. If
exposed, flush with water immediately.
■ Ventilation – Slots and openings in the cabinet are
provided for ventilation and to ensure reliable operation
of the product and to protect it from overheating. These
openings must not be blocked or covered. The openings
should never be blocked by placing the product on a bed,
sofa, rug, or other similar surface. This product should
not be placed in a built-in installation such as a bookcase
or rack unless proper ventilation is provided or the
manufacturer's instructions have been adhered to.
F) When the product exhibits a distinct change in performance – this indicates a need for service.
■ Safety Check – Upon completion of any service or
repairs to this product, ask the service technician to
perform safety checks to determine that the product is in
proper operating condition.
■ Wall or Ceiling Mounting – This product should be
mounted to a wall or ceiling only as recommended by the
Manufacturer.
■ Heat – The product should be situated away from heat
sources such as radiators, heat registers, stoves, or
other products (including amplifiers) that produce heat.
■ Save these instructions. Refer to them frequently
and use them to instruct others who may use this
tool. If you loan someone this tool, loan them these
instructions also. Following this rule will reduce the risk
of electric shock, fire, or serious personal injury.
Page 3
Page 4

IMPORTANT SAFETY INSTRUCTIONS
■ Heed Warnings – All warnings on the product and in the
operating instructions should be adhered to.
■ Follow Instructions – All operating and use instructions
should be followed.
■ Cleaning – Unplug this product from the wall outlet before
cleaning. Do not use liquid cleaners or aerosol cleaners.
Use a damp cloth for cleaning.
■ Attachments – Do not use attachments not recommended
by the product manufacturer as they may cause hazards.
■ Accessories – Do not place this product on an unstable
cart, stand, tripod, bracket, or table. This product may fall,
causing serious injury to a child or adult, and serious
damage to the product. Use only with a cart, stand, tripod,
bracket, or table recommended by the manufacturer, or
sold with the product. Any mounting of the product should
follow the manufacturer's instructions, and should use a
mounting accessory recommended by the manufacturer.
■ Power Sources – This product should be operated only
from the type of power source indicated on the marking
label. If you are not sure of the type of power supply to
your home, consult your product dealer or local power
company. For products intended to operate from battery
power, or other sources, refer to the operating instructions.
■ Power-Cord Protection – Power-supply cords should be
routed so that they are not likely to be walked on or
pinched by items placed upon or against them, paying
particular attention to cords at plugs, convenience receptacles, and the point where they exit from the product.
■ Lightning – For added protection for this product during a
lightning storm, or when it is left unattended and unused
for long periods of time, unplug it from the wall outlet and
disconnect the antenna or cable system. This will prevent
damage to the product due to lightning and power-line
surges.
■ Overloading – Do not overload wall outlets, extension
cords, or integral convenience receptacles as this can
result in a risk of fire or electric shock.
■ Replacement Parts – When replacements parts are required, be sure the service technician has used replacement parts specified by the manufacturer or have the
same characteristics as the original part. Unauthorized
substitutions may result in fire, electric shock, or other
hazards.
SYMBOLS
SAFETY AND INTERNATIONAL SYMBOLS
This operator's manual describes safety and international symbols and pictographs that may appear on this product.
Read the operator's manual for complete safety, assembly, operating and maintenance, and repair information.
MEANING
Do not expose to rain or use in damp locations.
Page 4
Page 5

SYMBOLS
Important: Some of the following symbols may be used on your tool. Please study them and learn their meaning. Proper
interpretation of these symbols will allow you to operate the tool better and safer.
SYMBOL NAME DESIGNATION/EXPLANATION
V Volts Voltage
A Amperes Current
Hz Hertz Frequency (cycles per second)
min Minutes Time
Alternating Current Type or a characteristic of current
--- Direct Current Type or a characteristic of current
n
0
.../min Revolutions or Reciprocation Per Minute Revolutions, strokes,
The purpose of safety symbols is to attract your attention to possible dangers. The safety symbols, and
the explanations with them, deserve your careful attention and understanding. The safety warnings do
not by themselves eliminate any danger. The instructions or warnings they give are not substitutes for
proper accident prevention measures.
No Load Speed Rotational speed, at no load
surface speed, orbits etc. per minute
Safety Alert Symbol Indicates danger, warning or caution.
It means attention!!! Your safety is
involved.
Lightning Alert Symbol The lightning flash with arrow head within
a triangle is intended to tell the user that
parts inside the product are a risk of
electric shock to persons.
SYMBOL MEANING
SAFETY ALERT SYMBOL:
Indicates danger, warning, or caution. May be used in conjunction with other symbols or pictographs.
DANGER: Failure to obey a safety warning will result in serious injury to yourself or to others.
Always follow the safety precautions to reduce the risk of fire, electric shock and personal injury.
WARNING: Failure to obey a safety warning can result in serious injury to yourself or to others.
Always follow the safety precautions to reduce the risk of fire, electric shock and personal injury.
CAUTION: Failure to obey a safety warning may result in property damage or personal injury to
yourself or to others. Always follow the safety precautions to reduce the risk of fire, electric shock
and personal injury.
NOTE: Advises you of information or instructions vital to the operation or maintenance of the equipment.
SAVE THESE INSTRUCTIONS
Page 5
Page 6

RULES FOR SAFE OPERATION
READ ALL INSTRUCTIONS
■ READ THESE INSTRUCTIONS AND THE INSTRUCTIONS FOR YOUR HP962 DRILL-DRIVER THOROUGHLY before using this radio charger.
■ DO NOT CONNECT YOUR RADIO CHARGER TO
POWER SUPPLY UNTIL YOU HAVE READ AND
UNDERSTOOD ALL PRECAUTIONS AND OPERATING
INSTRUCTIONS IN THIS MANUAL AND PRINTED ON
RADIO CHARGER.
■ KNOW YOUR RADIO CHARGER. Read operator's
manual carefully. Learn its applications and limitations as
well as the specific potential hazards related to this radio
charger.
■ CHARGE ONLY THE RECOMMENDED BATTERY
PACK. Any attempt to use another battery pack will
cause damage to your radio charger and could possibly
explode, cause a fire, or personal injury.
■ DO NOT DISASSEMBLE YOUR RADIO CHARGER.
■ DO NOT PERMIT CHILDREN TO USE RADIO
CHARGER. It is not a toy.
■ KEEP WORK AREA CLEAN. Cluttered areas and
benches invite accidents.
■ AVOID DANGEROUS ENVIRONMENT. DO NOT use
radio charger in a damp or wet environment or near a sink,
tub, pool, or the like.
■ KEEP DRY, CLEAN, AND FREE FROM OIL AND
GREASE. Always use a clean cloth when cleaning. Never
use brake fluids, gasoline, petroleum-based products or
any strong solvent to clean your radio charger.
■ STAY ALERT. Watch what you are doing and use com-
mon sense. Do not rush.
■ CHECK DAMAGED PARTS. Before further use of this
radio charger, a part that is damaged should be carefully
checked to determine that it will operate properly and
perform its intended function. Do not use radio charger if
it does not function properly.
■ ALWAYS DISCONNECT RADIO CHARGER FROM
POWER SUPPLY WHEN NOT IN USE.
■ SAVE THESE INSTRUCTIONS. Refer to them frequently
and use to instruct other users. If you loan someone this
tool, loan them these instructions also.
IMPORTANT INFORMATION
Avoid mounting or storing your radio charger
in these areas:
■ Areas exposed to direct sunlight or near appliances that
generate heat.
■ Areas not well ventilated or dusty.
■ Areas subject to constant vibration.
■ Humid or moist areas.
■ High traffic areas.
■ Areas that children can reach.
Look for this symbol to point out important safety precautions. It means attention!!!
Your safety is involved.
WARNING:
The operation of any power tool can result in foreign objects being thrown into your eyes,
which can result in severe eye damage. Before beginning power tool operation, always
wear safety goggles or safety glasses with side shields and a full face shield when
needed. We recommend Wide Vision Safety Mask for use over eyeglasses or standard
safety glasses with side shields. Always wear eye protection which is marked to comply
with ANSI Z87.1.
Page 6
Page 7

FEATURES
KNOW YOUR RADIO CHARGER
See Figure 1.
Before attempting to use this product, familiarize yourself
with all operating features and safety requirements.
Features include easily operated am/fm radio; built-in
charger; tool rest for your drill-driver and bit storage compartment.
LOCATION OF FEATURES AND CONTROLS
See Figure 1.
FM ANTENNA
CHARGE
INDICATOR
LIGHT (LED)
ADAPTER
POWER CORD
SPEAKER
BATTERY PORT
charging
UNPACKING
Your radio charger has been shipped completely assembled.
Inspect it carefully to make sure no breakage or damage has
occurred during shipping. If any parts are damaged or
missing, contact your nearest Ryobi Authorized Service
Center to obtain replacement parts before attempting to
operate radio charger.
WARNING:
If any parts are missing, do not operate this tool until the
missing parts are replaced. Failure to do so could result
in possible serious personal injury.
STORAGE
COMPARTMENT
TOOL REST
STORAGE
AM/FM
DIAL
800
0
1000
70
100
104
1
98
600
0
AM
53
88
A
F
M
M
2
2
9
FM
AM/FM
0
106
0
14
0
0
108
17
M
Hz
00
kHz
T
U
N
IN
G
M
E
AM/FM
RADIO CHARGER
AM/FM
BAND KNOB
RADIO CHARGER AND HP962 DRILL-DRIVER
See Figure 2.
Figure 2 is a view of your radio charger with the HP962
Drill-Driver on the tool rest with one battery pack in charger
and the other battery pack installed in drill-driver.
0
2
charging
BATTERY PACK
9.6v
5
1
Page 7
TUNING KNOB
STORAGE
0
8
0
0
7
1
0
0
0
8
9
6
92
0
A
M
53
88
FM
A
F
M
M
A
M
/
F
M
ON / OFF AND
VOLUME CONTROL KNOB
0
1000
0
104
1200
1
0
6
1
4
6v
0
0
1
08
1
MHz
7
0
kH
z
0
T
U
N
IN
G
M
E
Fig. 1
Fig. 2
Page 8

OPERATION
ELECTRICAL CONNECTION
Your radio charger must be connected to a power supply
that is 120 volts, 60 Hz, AC only (normal household
current). Do not operate this radio charger on direct current
(DC). A substantial voltage drop will cause a loss of power. If
the radio charger does not operate when plugged into an
outlet, check the radio charger, and then double check the
power supply.
TO OPERATE RADIO
See Figure 3.
■ Connect adapter to power supply. Note: Radio does not
operate on power from your drill's battery pack.
■ Set the AM/FM Band Knob to AM or FM position.
■ Turn radio ON by turning the ON/OFF Knob in a clockwise
direction. Note: You will hear a soft click when radio
comes ON.
■ Extend the antenna if radio is selected to listen to FM. If
reception is poor, fully extend antenna and rotate in all
directions until reception improves.
■ Adjust the volume up and down by turning the Volume
Control Knob.
■ Set radio to the desired station by turning the Tuning Knob.
■ Turn radio OFF by turning the ON/OFF Knob in a
counterclockwise direction. Note: You will hear a soft click
when radio turns OFF.
ADAPTER
c
h
a
r
g
i
n
g
FM ANTENNA
AM/FM
DIAL
STORAGE
CHARGING BATTERY PACK
See Figure 4.
The battery pack for your drill-driver has been shipped in a
low charge condition to prevent possible problems. Therefore, you should charge it overnight prior to use.
Note: Batteries will not reach full charge the first time they
are charged. Allow several cycles (drilling followed by recharging batteries) for them to fully charge.
TO CHARGE BATTERY PACK
■ Charge the battery pack for your drill-driver only with
the radio charger provided.
■ Make sure power supply is normal household voltage, 120 volts, 60 Hz, AC only.
■ Connect adapter to power supply.
■ Place battery pack in charger.
raised rib on battery pack with groove in charger.
■ Push in on battery pack to be sure contacts on battery
pack engage properly with contacts in charger. When
properly connected, red light on charger will turn on and
remain on until disconnected from power supply.
■ After normal usage, 3 hours or less of charging time is
required to fully recharge battery pack. Note: If battery
pack is completely discharged, 6 hours or longer of
charging time is required to fully recharge battery pack.
■ The battery pack will become slightly warm to the touch
while charging. This is normal and does not indicate a
problem.
■ DO NOT place radio charger in an area of extreme
heat or cold. It will work best at normal room temperature.
■ When battery pack has been charged, disconnect
adapter from power supply and remove the battery
pack. This practice will increase battery life.
See Figure 4
. Align
800
0
0
1000
7
100
0
0
104
1200
98
6
1
92
POWER CORD
0
AM
53
AM
FM
0
6
1
88
FM
AM/FM
4
0
0
108
1700
M
H
z
kHz
T
U
N
IN
G
M
E
SPEAKER
AM/FM
BAND KNOB
ON/OFF AND VOLUME
TUNING KNOB
CONTROL KNOB
Fig. 3
Your radio charger is a AM/FM Radio with a built in charger
for charging the battery pack supplied with your HP962 DrillDriver. Use this charger to charge only battery pack No.
1311146.
Page 8
ADAPTER
c
h
a
rg
in
g
BATTERY PORT
BATTERY PACK
CHARGE
INDICATOR
LIGHT (LED)
STORAGE
0
0
8
0
0
7
1
0
0
0
0
98
6
92
0
AM
53
88
FM
A
F
M
M
T
U
A
M
/
F
M
1
0
0
0
104
1200
1
0
6
14
00
108
1700
M
H
z
k
H
z
N
IN
G
M
E
Fig. 4
Page 9

OPERATION
LED FUNCTION OF CHARGER
■ LED on indicates battery pack is in charging mode.
■ LED does not come on indicates the following:
a. No battery pack in the charger.
b. Battery pack was not inserted into charger
properly. Remove battery pack then reinsert.
c. Battery pack is deeply discharged. Battery pack
should remain in charger 5 to 30 minutes. The
LED will come on automatically and start charging
the battery pack; or
d. Defective Battery Pack.
WARNING:
To reduce risk of injury, charge only the recommended
nickel-cadmium type rechargeable batteries. Other types
of batteries may burst causing personal injury and damage.
IMPORTANT INFORMATION FOR RECHARGING
HOT BATTERIES
When using your drill-driver continuously, the batteries in
your battery pack become hot. You should let a hot battery
pack cool down for approximately 30 minutes before
attempting to recharge.
Note: This situation occurs when continuous use of your
drill-driver causes the batteries to become hot. It does not
occur under normal circumstances. Refer to "Charging
Battery Pack" for normal recharging of batteries. If the
charger does not charge your battery pack under normal
circumstances, return both the battery pack and radio charger
to your nearest Ryobi Authorized Service Center for elec-
trical check.
MOUNTING RADIO CHARGER
See Figure 5.
Your radio charger has a "key hole" hanging feature for
convenient, space saving storage. Screws should be
installed so that center distances are 6 in. (152.4 mm)
apart.
CAUTION:
Mount radio charger to a surface that will accommodate
the weight of the radio charger, drill, and both batteries.
WARNING:
Do not allow screws or other metal pieces to touch
battery contacts or fall in battery port. Failure to do so can
result in fire, explosion, or personal injury.
STO
R
STO
R
6.00”
152.4 mm
TO
CLOSE
STORAGE
AM
A
M
R
E
P
P
U
E
D
I
S
Fig. 5
DOOR
TO
OPEN
800
1000
700
100
104
8
1
9
600
92
0
53
88
FM
F
M
A
M
2
0
1
0
0
6
14
0
0
1
0
8
1
M
7
H
z
00
k
H
TU
N
IN
/F
M
z
G
M
E
Fig. 6
R
E
P
P
U
E
D
I
S
BACK SIDE OF RADIO CHARGER
STORAGE
COMPARTMENT
c
h
a
rg
TAB
in
g
AG
E
A
G
E
STORAGE COMPARTMENT
See Figure 6.
A storage compartment is located on the top portion of your
radio charger. This storage compartment is convenient for
storing small items such as bits, screws, washers, etc. The
door to the compartment opens and closes in the direction of
the arrows as shown in Figure 6. Pull back on tab and lift up
on door to open. When closing door, make sure tab snaps into
place so items will not fall out.
Page 9
Page 10

MAINTENANCE
WARNING:
When servicing, use only identical replacement parts.
Use of any other part may create a hazard or cause
product damage.
WARNING:
Do not at any time let brake fluids, gasoline, petroleumbased products, penetrating oils, etc. come in contact with
plastic parts. They contain chemicals that can damage,
weaken or destroy plastic.
NOTES
DO NOT abuse power tools. Abusive practices can damage
tool as well as workpiece.
WARNING:
Do not attempt to modify this product or create accessories
not recommended for use with this product. Any such
alteration or modification is misuse and could result in a
hazardous condition leading to possible serious personal
injury.
Page 10
Page 11

NOTES
Page 11
Page 12

OPERATOR'S MANUAL
9.6 VOLT AM/FM RADIO CHARGER
Model No. RC960
• SERVICE
Now that you have purchased your Radio Charger, should a need ever exist for repair parts
or service, simply contact your nearest Ryobi Authorized Service Center. Be sure to provide
all pertinent facts when you call or visit. Please call 1-800-525-2579 for your nearest Ryobi
Authorized Service Center. You can also check our web site at www.ryobitools.com for a
complete list of Authorized Service Centers.
• MODEL NO. AND SERIAL NO.
The model number and serial number of this radio charger will be found on a plate attached
to the back of the unit. Please record the serial number in the space provided below.
• NAME OF ITEM
• MODEL NUMBER
• SERIAL NUMBER
Radio Charger
RC960
983000-009
4-02
Ryobi Technologies Inc.
1428 Pearman Dairy Road Anderson, SC 29622
Post Office Box 1207 Anderson, SC 29622-1207
Phone 1-800-525-2579
www.ryobitools.com
 Loading...