

Page 1
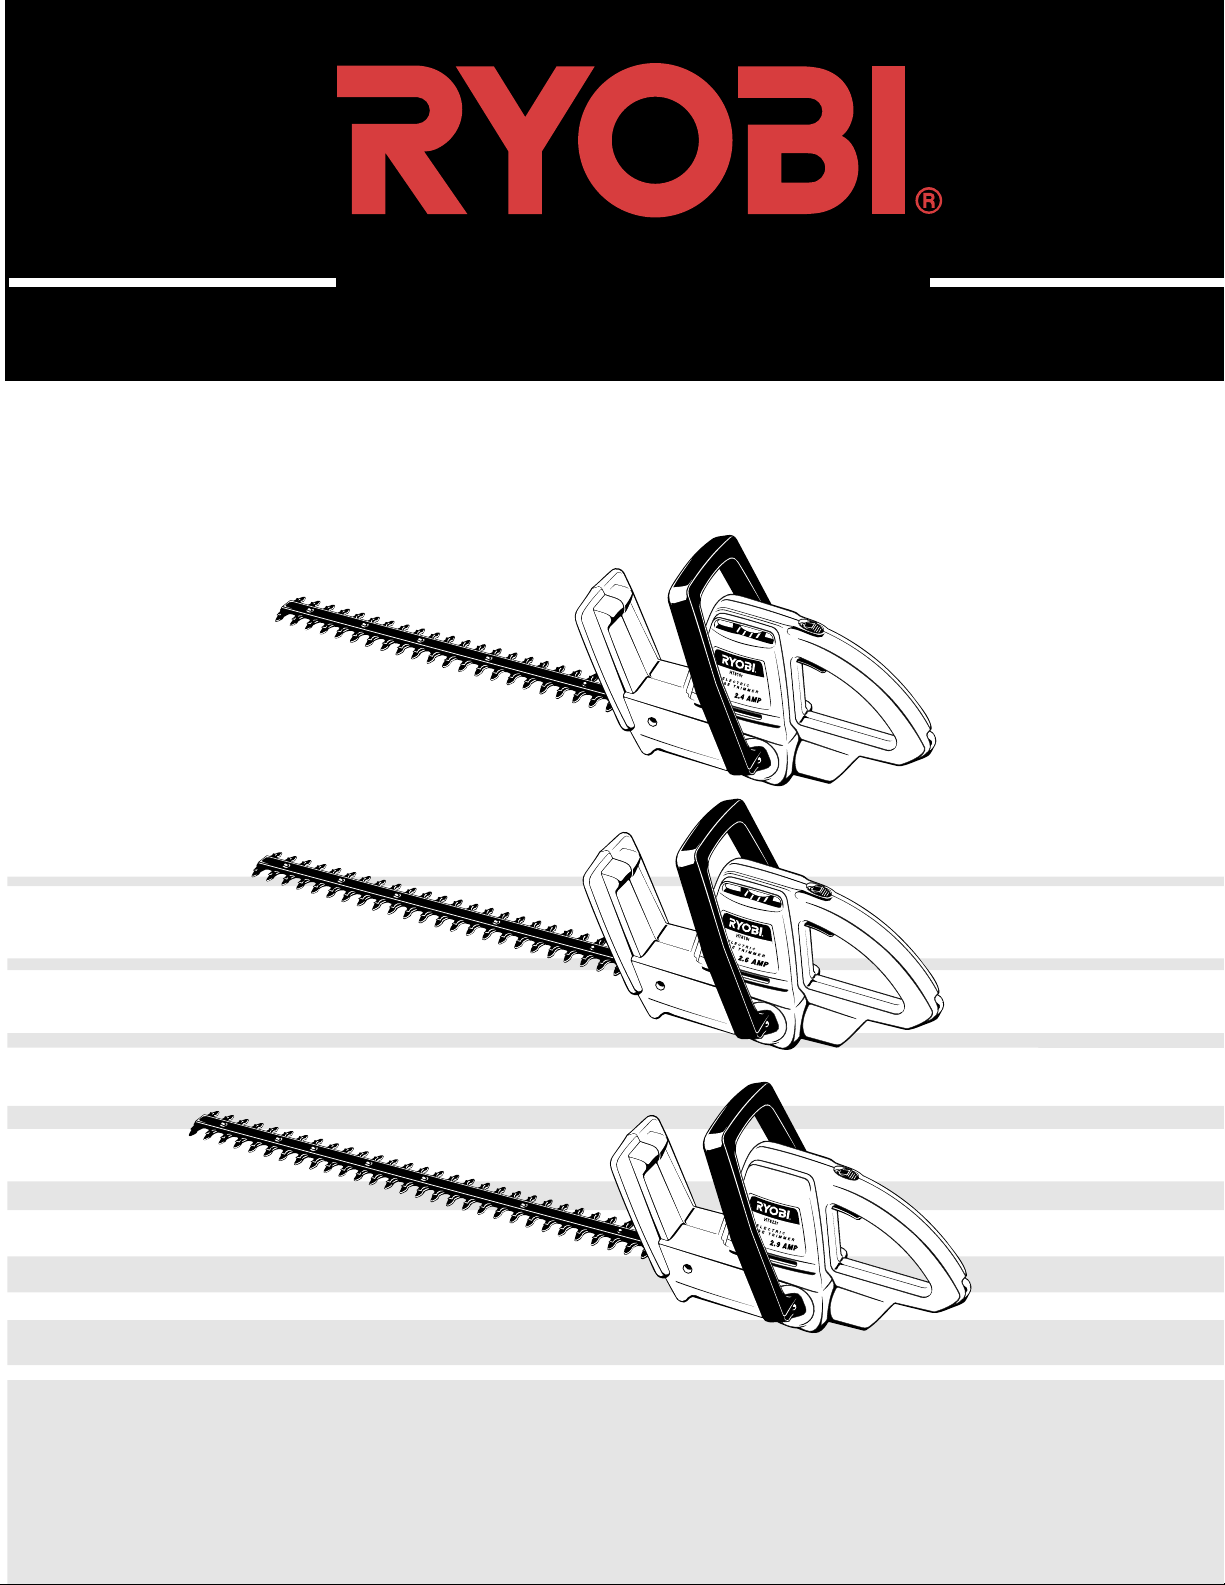
HT816r / HT818r / HT822r
Electric Hedge Trimmer
OPERATOR’S MANUAL
FOR QUESTIONS, CALL 1-800-345-8746 in U.S. or
1-800-265-6778 in CANADA
www.ryobi.com
IMPORTANT MANUAL DO NOT THROW AWAY
Page 2

INTRODUCTION
2
TABLE OF CONTENTS
I. Rules for Safe Operation . . . . . . . . . . . . . . . . . . . . . 3-6
A. Important Safety Information . . . . . . . . . . . . . . . 3-4
B. Safety and International Symbols . . . . . . . . . . . . . 5
C. Know Your Unit . . . . . . . . . . . . . . . . . . . . . . . . . . . 6
II. Assembly Instructions . . . . . . . . . . . . . . . . . . . . . . . . 6
A. Installing Front Handle . . . . . . . . . . . . . . . . . . . . . . . . . 6
III. Operating Instructions . . . . . . . . . . . . . . . . . . . . . . 7-8
A. To Turn Your Hedge Trimmer On . . . . . . . . . . . . . 7
B. Extension Cord Retainer . . . . . . . . . . . . . . . . . . . . 7
C. Using the Hedge Trimmer . . . . . . . . . . . . . . . . . . . 8
D. To Trim a Hedge . . . . . . . . . . . . . . . . . . . . . . . . . . 8
IV. Maintenance and Repair Instructions . . . . . . . . . . 9-12
A. General Recommendations . . . . . . . . . . . . . . . . . . 9
B. Before Each Use Check for
Damaged/Worn Parts . . . . . . . . . . . . . . . . . . . . . . 9
C. After Each Use Clean Unit and Labels . . . . . . . . . 9
D. Sharpening the Cutting Blade . . . . . . . . . . . . . . . . 9
E. Blade Lubrication . . . . . . . . . . . . . . . . . . . . . . . . . . 9
F. Blade Replacement . . . . . . . . . . . . . . . . . . . . . . 10
G. Servicing Double Insulated Units . . . . . . . . . . . . . 12
H. Cleaning the Unit . . . . . . . . . . . . . . . . . . . . . . . . 12
I. Inspect Extension Cords . . . . . . . . . . . . . . . . . . . 12
J. Storage . . . . . . . . . . . . . . . . . . . . . . . . . . . . . . . . 12
V. Specifications . . . . . . . . . . . . . . . . . . . . . . . . . . . . . . 12
VI. Replacement Parts . . . . . . . . . . . . . . . . . . . . . . . . . . 13
VII. Warranty . . . . . . . . . . . . . . . . . . . . . . . . . . . . . . . . . . 14
CONTENTS OF CARTON
• Hedge Trimmer, Either Model HT816r,
HT818r or HT822r
• Front Handle with Hardware
• Operator’s Manual
• Owner’s Registration Card
Examine all parts to make certain that nothing is missing
and no breakage has occurred during shipping.
Damaged or missing parts must be replaced before
using this unit.
THANK YOU
Thank you for buying this quality product. This modern
outdoor power tool will provide many hours of useful
service. You will find it to be a great labor-saving device.
This operator’s manual provides you with easy-tounderstand operating instructions. Read the whole
manual and follow all the instructions to keep your new
outdoor power tool in top operating condition.
PRODUCT REFERENCES, ILLUSTRATIONS AND
SPECIFICATIONS
All information, illustrations and specifications in this
manual are based on the latest product information
available at the time of printing. We reserve the right to
make changes at any time without notice.
Copyright©1999 Ryobi Outdoor Products, Inc.
All Rights Reserved.
SERVICE INFORMATION
Service on this unit both within and after the warranty
period should be performed only by an authorized and
approved service dealer.
Dial:
•
1-800-345-8746 or www.ryobi.com on the world wide
web for authorized service dealers in the United States
Or
• 1-800-265-6778 in Canada to obtain the listing of the
authorized service dealer nearest you.
to obtain the listing of the authorized service dealer
nearest you.
DO NOT RETURN THE UNIT TO THE RETAILER.
NOTE: PROOF OF PURCHASE WILL BE REQUIRED
FOR WARRANTY SERVICE.
Make sure this manual is carefully read and understood
before starting or operating this equipment.
THIS PRODUCT IS COVERED BY ONE OR MORE
US PATENTS, OTHER PATENTS PENDING.
WARNING: The operation of any hedge trimmer can result in foreign objects being thrown
in the eyes. This can lead to severe eye damage. Before commencing power tool operation, always
wear safety glasses or goggles that are marked as meeting ANSI Z87.1 standards, and a full face
shield when needed.
Page 3
The purpose of safety symbols is to attract your
attention to possible dangers. The safety symbols,
and their explanations, deserve your careful attention
and understanding. The safety warnings do not by
themselves eliminate any danger. The instructions or
warnings they give are not substitutes for proper
accident prevention measures.
SYMBOL MEANING
SAFETY ALERT SYMBOL:
Indicates danger, warning, or caution.
Attention is required in order to avoid serious
personal injury. May be used in conjunction
with other symbols or pictographs.
NOTE: Advises you of information or instructions vital to
the operation or maintenance of the equipment.
DANGER:
Failure to obey a safety warning will result in
serious injury to yourself or to others. Always
follow the safety precautions to reduce the
risk of fire, electric shock, and personal injury.
WARNING:
Failure to obey a safety warning can result in
injury to yourself and others. Always follow
the safety precautions to reduce the risk of
fire, electric shock, and personal injury.
CAUTION:
Failure to obey a safety warning may result
in property damage or personal injury to
yourself or to others. Always follow the
safety precautions to reduce the risk of fire,
electric shock, and personal injury.
RULES FOR SAFE OPERATION
3
• IMPORTANT SAFETY INSTRUCTIONS •
WARNING:
When using this electric Hedge Trimmer,
basic safety precautions should always be
followed to reduce the risk of fire, electric
shock, and personal injury. Carefully read
and understand the entire Operator's
Manual before using your Hedge Trimmer.
Pay close attention to the Operating
Instructions and Safety Warnings.
READ ALL INSTRUCTIONS
WARNING:
To reduce the risk of fire, electric shock, or injury:
• Do not leave the Hedge Trimmer plugged in. Unplug
from outlet when not in use, changing attachments,
blades, or before servicing.
• Avoid dangerous environments. Never operate your
unit in damp or wet conditions. Moisture is a shock
hazard.
• Do not use the unit in the rain.
• Do not handle the unit with wet hands.
• Use the right tool. Use this unit only as described in
this manual. Do not use for any job except that for
which it is intended. Use only the manufacturer’s
recommended attachments.
•
Clear the area to be cut before each use. Remove
all objects such as cords, lights, wire, or string
which can become entangled in the cutting blade.
• Do not abuse the power cord. Do not pull or carry the
unit by the cord, use cord as a handle, close a door on
cord, or pull the cord around sharp edges or corners.
Keep the cord away from heated surfaces, oil and
sharp edges.
• Turn off all controls before unplugging.
• Do not unplug by pulling on the cord. To unplug, grasp
the plug, not the cord.
• Keep hair, loose clothing, fingers, and all parts of body
away from openings and moving parts.
• Do not allow to be used as a toy. Close attention is
necessary when used by or near children.
• Inspect all extension cords and the unit power
connection periodically. Look closely for deterioration,
cuts or cracks in the insulation. Also inspect the
connections for damage. Replace the cords if any
defects or damage appear.
• Risk of cut. Keep hands away from blades. Keep both
hands on handles when power is on.
• Do not attempt to remove cut material or hold material
to be cut when blades are moving. Make sure unit is
unplugged and the switch is off when clearing jammed
material from blades. Do not grasp the exposed
cutting blades or cutting edges when picking up or
holding the unit. CAUTION - blades coast after unit is
turned off.
• To reduce the risk of electrical shock, use only with
an extension cord intended for outdoor use, such as
SW-A, SOW-A, STW-A, STOW-A, SJW-A, SJOW-A,
SJTW-A or SJTOW-A.
Page 4

RULES FOR SAFE OPERATION
4
BEFORE OPERATING
• Read the instructions carefully. Be familiar with the
controls and proper use of the unit.
• Children and teens under the age of 15 must not use
the unit, except for teens guided by an adult.
• Before each use, thoroughly inspect your unit for
loose or damaged parts. Do not use until adjustments
or repairs are made.
• All guards and safety attachments must be installed
properly before operating the unit.
• Use the unit only in daylight or good artificial light.
• Keep all bystanders, especially children and pets, at
least 50 feet (15 m) away from the unit while operating.
• To reduce the risk of electrical shock, this unit has a
polarized plug (one blade is wider than the other) and
will require the use of a polarized extension cord. This
unit plug will fit into a polarized extension cord only
one way. If the plug does not fit fully into the extension
cord, reverse the plug. If the plug still does not fit,
obtain a correct polarized extension cord. A polarized
extension cord will require the use of a polarized wall
outlet. This plug will fit into a polarized wall outlet only
one way. If the plug does not fit fully into the wall
outlet, reverse the plug. If the plug still does not fit,
contact a qualified electrician to install the proper wall
outlet. Do not change the unit plug, extension cord
receptacle, or extension cord plug in any way.
• Ground Fault Circuit Interrupter (GFCI) protection
should be provided on the circuit(s) or outlet(s) to be
used for this unit. Receptacles are available having
built-in GFCI protection and may be used for this
measure of safety.
• EXTENSION CORDS: Make sure your extension cord
is in good condition. When using an extension cord,
be sure to use a cord that is heavy enough to carry the
current that your unit will draw. An undersized
extension cord will cause a drop in line voltage
resulting in loss of power and overheating. The table
shows the correct size to use depending on the cord
length and nameplate amperage rating. If in doubt, use
the next heavier size line gauge. The smaller the gauge
number, the heavier the cord. To reduce the possibility
of disconnection of the unit from the extension cord
during operation, see Fig. 5, page 7.
• A nameplate on your unit indicates what voltage it
uses. Never connect the unit to an AC voltage that
differs from this voltage.
FOR SAFE OPERATION
• Avoid unintentional starting. Do not carry plugged-in
unit with your finger on the switch. Be sure switch is
off when plugging in.
• Always remain alert. Use common sense. To prevent
injury to yourself and others, do not operate this unit if
you are fatigued.
• Do not operate the unit while under the influence of
drugs, alcohol or medication.
• Wear safety glasses or goggles that are marked as
meeting ANSI Z87.1 standards, and ear/hearing
protection when operating this unit. Wear a face or
dust mask if the operation is dusty.
• Do not overreach or use the unit from unstable
surfaces such as ladders, trees, steep slopes,
rooftops, etc. Keep proper footing and balance at all
times.
• Wear heavy, long pants, boots, gloves and a long
sleeve shirt. Do not wear loose clothing, jewelry, short
pants, sandals or go barefoot. Secure hair above
shoulder level.
• Always stop the motor when cutting is delayed or
when walking from one cutting location to another.
• Keep unit clean of vegetation and other materials.
They may become lodged in the cutting blades.
• When operating the hedge trimmer, always hold the
unit with both hands. Keep a firm grip on both the
housing grip and front handle. Never grip the unit by
the guard or use the guard as a handle.
• Do not force unit. It will do the job better and with less
likelihood of injury at a rate for which it was designed.
• Use only genuine Ryobi replacement parts and
accessories for this unit. These are available from
your authorized service dealer. Use of any non Ryobi
parts or accessories could lead to serious injury to the
user, or damage to the unit, and void your warranty.
• This unit is provided with double-insulation. Use only
identical replacement parts. See instructions for
Servicing of Double-Insulated Units.
• If you strike or become entangled with a foreign
object, stop the unit immediately and check for
damage. Do not operate before repairing damage. Do
not operate the unit with loose or damaged parts.
• Maintain the unit with care. Keep cutting edge sharp
and clean for best performance and to reduce the risk
of injury. Follow instructions for lubricating and
changing accessories. Keep handles dry, clean and
free from oil and grease. Always use a clean cloth
when cleaning. Never use brake fluid, gasoline,
petroleum-based products, or any strong solvents to
clean your tool.
MINIMUM WIRE SIZE FOR EXTENSION CORDS
FOR 120 VOLT APPLIANCES
Cord length (ft) 25 50 100 150
Amperage Rating Wire size (AWG)
1 to 10 amps 18 16 14 12
10 to 12 amps 16 16 14 12
12 to 16 amps 14 12
NOT
RECOMMENDED
Page 5

SAFETY AND INTERNATIONAL SYMBOLS
This operator's manual describes safety and international symbols and pictographs that may appear on this product.
Read the operator's manual for complete safety, assembly, operating and maintenance and repair information.
SYMBOL MEANING
• SAFETY ALERT SYMBOL
Indicates danger, warning, or caution. May be used in conjunction with other
symbols or pictographs.
• WARNING - READ OPERATOR'S MANUAL
Read the operator's manual before starting or operating this unit. Failure to follow operating
instructions and safety precautions in the operator's manual can result in serious injury to the
operator and/or bystanders.
• FOR SERVICE INFORMATION, CALL:
USA: 1-800-345-8746
CANADA: 1-800-265-6778
• WEAR EYE AND HEARING PROTECTION
WARNING: Wear safety glasses or goggles that are marked as meeting ANSI Z87.1
standards, and ear/hearing protection when operating this unit.
• DO NOT USE IN THE RAIN
WARNING: Avoid dangerous environments. Never operate your unit in the rain, or in
damp or wet conditions. Moisture is a shock hazard.
• KEEP BYSTANDERS AWAY
WARNING: Keep all bystanders, especially children and pets, at least 50 feet (15 m) from
the operating area.
• KEEP HANDS AWAY FROM BLADES
WARNING: Moving blades can cause severe injury. Do not touch the blades when
starting or while operating the unit.
RULES FOR SAFE OPERATION
5
• Check for damaged parts. Before further use of the
unit, a guard or other part that is damaged should be
carefully checked to determine that it will operate
properly and perform its intended function. Check for
alignment of moving parts, binding of moving parts,
breakage of parts, mounting, and any other condition
that may effect the units operation. A guard or other
part that is damaged should be properly repaired or
replaced by an authorized service dealer unless
indicated elsewhere in this manual.
OTHER SAFETY WARNINGS
• Store the unit inside in a dry place, either locked up or
up high to prevent unauthorized use or damage.
Keep out of the reach of children.
• Never douse or squirt the unit with water or any other
liquid. Keep handles dry, clean and free from debris.
Clean after each use, see Cleaning and Storage
instructions.
• Be sure to secure the unit while transporting.
• Keep these instructions. Refer to them often and use
them to instruct other users. If you loan someone this
unit, also loan them these instructions.
SAVE THESE INSTRUCTIONS
Page 6

ASSEMBLY INSTRUCTIONS
RULES FOR SAFE OPERATION
6
INSTALLING FRONT HANDLE
After removing your hedge trimmer from its carton,
remove the front handle, screw, and lock nut from the
plastic bag. Using a flat blade screwdriver, which is the
only tool needed for assembly, install as follows:
WARNING: To prevent serious personal
injury, the handle must be installed when
operating this unit.
1. Turn the front handle so that the flat surface faces
the blade guard of your trimmer.
Fig. 1
APPLICATION
This unit is intended for household purpose only.
Use the Hedge Trimmer for;
• Trimming and the forming of hedges, shrubs, and
bushes with a branch diameter of up to 3/8 inch.
Fig. 2
KNOW YOUR UNIT
Screw
Screw
Lock Nut
Handle Slot
Blade Guard
Front Handle
Rear Handle
Ears
Rear Handle
Lock Nut
Front Handle
Blade Guard
Cutting Blade
NOTE: The hollow side of the front handle faces the
rear handle when installed properly.
2. Spread the ears of the front handle and fit into the
handle slots on the motor housing (Fig. 1).
NOTE: For your convenience and ease of assembly one
of the ears on the front handle has been keyed.
3. Place your trimmer on a workbench and place lock
nut into molded slot on right side of the front handle.
4. Insert screw from left to right through the front
handle and motor housing (Fig. 2).
5. Tighten screw and lock nut securely with a flat blade
screwdriver.
Extension Cord
Retainer
Switch Trigger
Lock-On Tab
Lock-Off Button
Page 7

TO TURN YOUR HEDGE TRIMMER ON
WARNING:
Before connecting your hedge
trimmer to power supply source, always
check to be sure it is not in lock-on position
(depress and release the switch trigger).
Failure to do so could result in accidental
starting of your trimmer resulting in possible
serious injury. Also, do not lock the trigger on
jobs where your trimmer may need to be
stopped suddenly.
Your hedge trimmer is equipped with a lock-off button,
that reduces the possibility of accidental starting.
1. Slide the lock-off button forward (Fig. 3).
2. Depress and hold the switch trigger.
3. Release the lock-off button.
NOTE: The lock-off button is located on top of the
handle. The lock resets each time the switch
trigger is released.
LOCK-ON FEATURE
Your hedge trimmer is also equipped with a lock-on
feature, which is convenient when continuous trimming
for extended periods of time is required.
To Lock-On
1. Slide the lock-off button forward (Fig. 4).
2. Depress and hold the switch trigger.
3. Release the lock-off button.
4. Pull lock-on tab back with your thumb and hold.
5. Release switch trigger, then release lock-on tab.
To Release the Lock-On
1. Depress the switch trigger and release it.
If you have the lock-on feature engaged during use and
your hedge trimmer becomes disconnected from power
supply, disengage the lock-on feature immediately.
EXTENSION CORD RETAINER
An extension cord retainer has been provided to prevent
extension cord from becoming disconnected from your
trimmer during use. It is molded into the switch handle of
your hedge trimmer. Plug extension cord into plug
recess below switch handle, then snugly fit cord into
retainer as shown in Figure 5.
Extension cord retainer works best with 16 A.W.G.
extension cords. When using 14 A.W.G. extension
cords the cord may be tight in extension cord retainer.
We suggest an alternate method as shown in figure 5 for
securing tight extension cords.
OPERATING INSTRUCTIONS
7
Fig. 3
Fig. 4
Fig. 5
Alternate Method
of Securing
Extension Cord
Extension Cord
Retainer
Lock-Off Button
Switch Trigger
Switch Trigger
Lock-Off Button
Lock-On Tab
Page 8

OPERATING INSTRUCTIONS
8
USING THE HEDGE TRIMMER
WARNING:
If any parts are missing, damaged,
or broken do not operate your trimmer until they
have been replaced. Failure to do so could result
in possible serious personal injury.
WARNING: To prevent serious personal
injury, always use both the front handle and
rear handle to hold the hedge trimmer during
operation.
Use the hedge trimmer for trimming and the forming of
hedges, shrubs, and bushes with a branch diameter of
up to 3/8 inch.
WARNING: To prevent serious personal
injury, keep hands away from blades. Do not
attempt to remove cut material or hold material
to be cut when blades are moving. Make sure
unit is unplugged and the switch is off when
clearing jammed material from blades.
Do not grasp the exposed cutting blades or
cutting edges when picking up or holding
the unit.
WARNING: Never use guard as a handle.
Never grasp the unit by the guard. Failure to
heed this warning can result in serious
personal injury.
For your protection there is a blade guard between the
front handle and the blade.
1. Cord secured to unit and plugged in.
2. With the blade directed away, hold the unit by the
front and rear handle (Fig. 6).
3. Start the unit with the blades away from the hedge to
be trimmed.
General Tips:
• Keep from trimming too much at one time. This can
cause the blades to bind and slow, reducing the
cutting efficiency.
• Do not force the unit through dense growth. If the
blades slow down, reduce your pace.
TO TRIM A HEDGE
WARNING: Clear the area to be cut before
each use. Remove all objects such as cords,
lights, wire, or string which can become
entangled in the cutting blade.
1. Use hedge trimmer properly. Before starting hedge
trimmer, hold the unit with both hands and face the
cutting blade away from you (Fig. 6).
2. Always keep the cord behind the hedge trimmer
when in use. Do not place it over the hedge where it
may be cut by the blade.
DANGER: If blade jams on any electrical
cord or line, DO NOT TOUCH THE BLADE!
IT CAN BECOME ELECTRICALLY LIVE AND
VERY DANGEROUS. Continue to hold your
trimmer by the insulated handles and
immediately disconnect the damaged
electrical cord or line from the power source.
Failure to heed this Danger will result in
serious personal injury and possibly death.
2. If desired, you can use a string to help cut your
hedge level. Decide how high you want the hedge.
Then, stretch a piece of string along the hedge at
this height. Trim the hedge just above this guide line
of string. Trim the side of a hedge so that it will be
slightly narrower at the top (Fig. 7). More of the
hedge will be exposed when shaped this way, and it
will be more uniform.
3. Wear gloves when trimming thorny or prickly growth.
When trimming new growth, use a wide sweeping
action, so that the stems are fed directly into the
cutting blade. Older growth will have thicker stems
and will be trimmed easiest by using a sawing
movement.
Do not try to cut stems that are larger than 3/8 inch
thick, or those obviously too large to feed into the
cutting blade. Use a non-powered hand saw or pruning
saw to trim large stems.
Fig. 7
Fig. 6
Page 9

WARNING: When servicing, use only
identical Ryobi replacement parts. Use of
any other parts may create a hazard or cause
product damage.
WARNING: To avoid serious personal
injury, be sure the unit is off and unplugged
before cleaning or performing any
maintenance on it.
GENERAL RECOMMENDATIONS
The warranty on this unit does not cover items that have
been subjected to operator abuse or negligence. To
receive full value from the warranty, the operator must
maintain the unit as instructed in this operator’s manual.
BEFORE EACH USE CHECK FOR
DAMAGED/WORN PARTS
• Check for damaged parts. Before further use of the
unit, a guard or other part that is damaged should be
carefully checked to determine that it will operate
properly and perform its intended function. Check for
alignment of moving parts, binding of moving parts,
breakage of parts, mounting, and any other condition
that may effect the units operation. A guard or other
part that is damaged should be properly repaired or
replaced by an authorized service dealer unless
indicated elsewhere in this manual.
AFTER EACH USE CLEAN UNIT
AND LABELS
• Clean the unit using a damp cloth with a mild
detergent.
NOTE: Do not use any strong detergents on the plastic
housing or the handle. They can be damaged by
certain household cleaners that contain aromatic
oils such as pine and lemon, and by solvents
such as kerosene.
WARNING: Do not at any time let brake
fluids, gasoline, petroleum-based products,
penetrating oils, etc. come in contact with
plastic parts. They contain chemicals that
can damage, weaken, or destroy plastic.
• Wipe off the unit with a clean, dry, soft cloth.
• Keep handles dry, clean and free from oil and grease
at all times.
SHARPENING THE CUTTER BLADE
WARNING: During these procedures, you will
need to connect the unit to power. To avoid
serious personal injury, be sure to disconnect
the power when stated.
1. Allow your hedge trimmer to come to a stop with the
cutter blade and guard positioned as shown in
Figure 8. This will allow clearance for the file
between cutter teeth and guard teeth.
2. Disconnect Hedge Trimmer from power supply.
MAINTENANCE AND REPAIR INSTRUCTIONS
9
Fig. 9
Fig. 8
BLADE LUBRICATION
Disconnect hedge trimmer from power supply.
For easier operation and longer blade life, lubricate the
hedge trimmer blade before and after each use. Before
lubricating, be sure the switch is in the off position and
the tool is disconnected from the power supply. Apply
light machine oil along the edge of the top strap as
shown in figure 9.
CAUTION: Some spray-on lubricants contain
solvents and will cause some types of grease
to break-down. To prevent damage to the
unit, only use a quality machine oil.
Your trimmer should be stopped, disconnected, and
oiled occasionally during use.
3. Clamp the blade assembly in a vise and file the
exposed cutting surface of each blade tooth with an
8 inch fine round file, 1/4 in. or 7/32 in. diameter. Be
sure to retain the original angle of tooth when filing.
4. Remove the hedge trimmer from the vise, restart it,
and stop it so that the unsharpened edges of the
blade teeth are exposed.
5. Disconnect the tool and repeat the sharpening
procedure as described above.
Page 10

MAINTENANCE AND REPAIR INSTRUCTIONS
10
BLADE REPLACEMENT
WARNING: To avoid serious personal
injury, be sure the unit is off and unplugged
before cleaning or performing any
maintenance on it.
WARNING: When servicing, use only
identical Ryobi replacement parts. Use of
any other parts may create a hazard or cause
product damage.
WARNING: To prevent serious personal
injury, wear gloves when handling, removing
or installing the cutting blades. When
handling blade assembly, do not place your
hand or fingers between blades or in any
position where they could get pinched or cut.
Disconnect hedge trimmer from power supply.
1. Remove blade cover screw (Fig. 10).
2. Remove blade cover: To remove, push blade cover
forward and lift from hedge trimmer.
3. Remove blade screws (Fig. 11).
NOTE: A flat blade or # T20 Torx bit screwdriver. is
required to remove blade screws.
4. Remove grease cover and blade assembly.
5. Make sure drive washer remains installed on drive
pin (Fig. 11).
6. Align slot in new blade assembly and grease cover
with drive washer on gear assembly (Fig. 12).
7. After aligning, continue to hold blade assembly in
place, then manually slide blade assembly back and
forth until screw holes in grease cover align with
screw holes in gear housing (Fig. 13).
WARNING: Blades are sharp. When
manually sliding blade assembly, do not
place your hand or fingers between blades
or in any position where they could get
pinched or cut.
Fig. 10
Fig. 11
Drive Washer
Blade Screws
Page 11

MAINTENANCE AND REPAIR INSTRUCTIONS
11
8. Replace blade screws. Tighten screws securely.
9. Replace blade cover screw (Fig. 14).
NOTE: Do not tighten blade cover screw until blade
cover has been replaced.
10. Replace blade cover. Place rear tab inside housing,
align front tabs with slots in housing, then slide blade
cover back into its correct position (Fig. 15).
11. Tighten blade cover screw securely.
WARNING: Make sure blade cover is
replaced before connecting your hedge
trimmer to power supply. Failure to do so will
expose internal parts which could cause an
accident or electrical shock resulting in
serious injury.
NOTE: If binding occurs after replacing blade assembly,
repeat the steps above for reassembly.
Fig. 12
Fig. 13
Fig. 14
Fig. 15
Blade Cover
Screw
Page 12

MAINTENANCE AND REPAIR INSTRUCTIONS
12
Motor Rating . . . . . . . . . . . . . . . . . . . . . . . . . . . . . . . . . . . . . . . . . . . . . . . . . . . . . . . . . . . . . . . . . 120 Volts AC, 60 Hz
Motor Amperage
Model HT816r . . . . . . . . . . . . . . . . . . . . . . . . . . . . . . . . . . . . . . . . . . . . . . . . . . . . . . . . . . . . . . . . . . 2.4 Amps
Model HT818r . . . . . . . . . . . . . . . . . . . . . . . . . . . . . . . . . . . . . . . . . . . . . . . . . . . . . . . . . . . . . . . . . . 2.6 Amps
Model HT822r . . . . . . . . . . . . . . . . . . . . . . . . . . . . . . . . . . . . . . . . . . . . . . . . . . . . . . . . . . . . . . . . . . 2.9 Amps
Blade Length
Model HT816r . . . . . . . . . . . . . . . . . . . . . . . . . . . . . . . . . . . . . . . . . . . . . . . . . . . . . . . . . . 16 inches (40.6 cm)
Model HT818r . . . . . . . . . . . . . . . . . . . . . . . . . . . . . . . . . . . . . . . . . . . . . . . . . . . . . . . . . . 18 inches (46.0 cm)
Model HT822r . . . . . . . . . . . . . . . . . . . . . . . . . . . . . . . . . . . . . . . . . . . . . . . . . . . . . . . . . . 22 inches (56.0 cm)
Cutting Action . . . . . . . . . . . . . . . . . . . . . . . . . . . . . . . . . . . . . . . . . . . . . . . . . . . . . . . . . . . . . . . . . . . . . Single Action
Cutting Speed (no load) . . . . . . . . . . . . . . . . . . . . . . . . . . . . . . . . . . . . . . . . . . . . . . . . . . . . . . . . . . . up to 3400 SPM
Operating Weight
Model HT816r . . . . . . . . . . . . . . . . . . . . . . . . . . . . . . . . . . . . . . . . . . . . . . . . . . . . . . . . . . . . 5.42 lbs(2.46 kg)
Model HT818r . . . . . . . . . . . . . . . . . . . . . . . . . . . . . . . . . . . . . . . . . . . . . . . . . . . . . . . . . . . . 5.56 lbs(2.52 kg)
Model HT822r . . . . . . . . . . . . . . . . . . . . . . . . . . . . . . . . . . . . . . . . . . . . . . . . . . . . . . . . . . . . 5.96 lbs(2.70 kg)
SPECIFICATIONS
WARNING: To avoid serious
personal injury, be sure the unit is off and
unplugged before cleaning or performing
any maintenance on it.
SERVICING OF DOUBLE INSULATED UNITS
This unit is double-insulated. In a double-insulated unit,
two systems of insulation are provided instead of
grounding. No means of grounding are provided on a
double-insulated unit, nor should a means for grounding
be added to this unit.
Servicing a double-insulated unit requires extreme care
and knowledge of the system, and should be done only
by qualified service personnel. Replacement parts for a
double-insulated unit must be identical to the parts they
replace. Refer any repair to an authorized service dealer.
A double-insulated unit is marked with the words
“DOUBLE INSULATION” or “DOUBLE INSULATED.”
CLEANING THE UNIT
1. With the switch in the OFF position, disconnect the
Hedge Trimmer from the power source.
2. Use a small brush or the air discharge of a vacuum
cleaner brush to keep the air vents free of
obstructions.
3. Do not use strong detergents on the plastic housing
or components. These can be damaged by certain
household cleaners that contain aromatic oils such
as pine and lemon, and by solvents such as
kerosene or acetone. Moisture can also cause a
shock hazard. Wipe off any moisture with a soft dry
cloth.
INSPECT EXTENSION CORDS
Inspect all extension cords periodically. Look closely for
deterioration, cuts or cracks in the insulation. Inspect the
connectors for damage. Replace cords if defective or
damaged.
STORAGE
• Store the unit indoors, away from moisture and
harmful substances such as fertilizers and solvents.
• Store the unit in a dry, well ventilated area.
• Store the unit inside in a dry place, either locked up
or up high to prevent unauthorized use or damage.
Keep out of the reach of children.
Page 13

13
REPLACEMENT PARTS
Item Part No. Description
1 180182 REPLACEMENT BLADE - Model HT816r
1 180183 REPLACEMENT BLADE - Model HT818r
1 180184 REPLACEMENT BLADE - Model HT822r
2 180185 BLADE PLATE
3 180398 BLADE SCREW
4 180049 FRONT (WRAP-AROUND) HANDLE
5 180048 FRONT HANDLE SCREW
6 180050 LOCK NUT
7 181424 BLADE COVER SCREW
8 181422 BLADE COVER
4
7
8
5
1
2
6
3
Page 14

ALL IMPLIED WARRANTIES ARE LIMITED IN
DURATION TO THE TWO (2) YEAR WARRANTY
PERIOD OR NINETY (90) DAYS FOR PRODUCTS
USED FOR ANY COMMERCIAL PURPOSE.
ACCORDINGLY, ANY SUCH IMPLIED WARRANTIES
INCLUDING MERCHANTABILITY, FITNESS FOR A
PARTICULAR PURPOSE, OR OTHERWISE, ARE
DISCLAIMED IN THEIR ENTIRETY AFTER THE
EXPIRATION OF THE APPROPRIATE TWO-YEAR
OR NINETY DAY WARRANTY PERIOD. RYOBI’S
OBLIGATION UNDER THIS WARRANTY, IS STRICTLY
AND EXCLUSIVELY LIMITED TO THE REPAIR OR
REPLACEMENT OF DEFECTIVE PARTS, AND ROP
DOES NOT ASSUME OR AUTHORIZE ANYONE TO
ASSUME FOR THEM ANY OTHER OBLIGATION.
SOME STATES DO NOT ALLOW LIMITATIONS ON
HOW LONG AN IMPLIED WARRANTY LASTS, SO
THE ABOVE LIMITATION MAY NOT APPLY TO YOU.
RYOBI ASSUMES NO RESPONSIBILITY FOR
INCIDENTAL, CONSEQUENTIAL OR OTHER
DAMAGES INCLUDING, BUT NOT LIMITED TO
EXPENSE OF RETURNING THE RYOBI PRODUCT
TO AN AUTHORIZED SERVICE DEALER AND
EXPENSE OF DELIVERING IT BACK TO THE
OWNER, MECHANIC’S TRAVEL TIME, TELEPHONE
OR TELEGRAM CHARGES, RENTAL OF A LIKE
PRODUCT DURING THE TIME WARRANTY SERVICE
IS BEING PERFORMED, TRAVEL, LOSS OR DAMAGE
TO PERSONAL PROPERTY, LOSS OF REVENUE,
LOSS OF USE OF THE PRODUCT, LOSS OF TIME,
OR INCONVENIENCE. SOME STATES DO NOT
ALLOW THE EXCLUSION OR LIMITATION OF
INCIDENTAL OR CONSEQUENTIAL DAMAGES, SO
THE ABOVE LIMITATION OR EXCLUSION MAY NOT
APPLY TO YOU.
This warranty gives you specific legal rights, and you
may also have other rights which vary from state to
state.
This warranty applies to all RYOBI Products
manufactured by RYOBI and sold in the United States
and Canada.
To locate your nearest service dealer dial
1-800-345-8746 in the United States or
1-800-265-6778 in Canada.
RYOBI OUTDOOR PRODUCTS
550 N. 54th Street
Chandler, AZ 85226 U.S.A.
RYOBI CANADA INC.
275 Industrial Rd
Cambridge, Ontario N1R 6K2 CANADA
RYOBI OUTDOOR PRODUCTS warrants each new
RYOBI Product for two (2) years according to the
following terms.
This warranty extends to the original retail purchaser
only and commences on the date of original retail
purchase.
Any part of the RYOBI Product manufactured or
supplied by RYOBI and found in the reasonable
judgement of RYOBI to be defective in material or
workmanship will be repaired or replaced by an
authorized RYOBI service dealer without charge for
parts and labor.
The RYOBI Product including any defective part must
be returned to an authorized service dealer within the
warranty period. The expense of delivering the RYOBI
Product to the dealer for warranty work and the
expense of returning it back to the owner after repair
or replacement will be paid for by the owner. RYOBI’s
responsibility in respect to claims is limited to making
the required repairs or replacements and no claim of
breach of warranty shall be cause for cancellation or
rescission of the contract of sale of any RYOBI
Product. Proof of purchase will be required by the
dealer to substantiate any warranty claim. All warranty
work must be performed by an authorized RYOBI
service dealer.
This warranty is limited to ninety (90) days from the
date of original retail purchase for any RYOBI Product
that is used for rental or commercial purposes, or any
other income-producing purpose.
This warranty does not cover any RYOBI Product that
has been subject to misuse, neglect, negligence, or
accident, or that has been operated in any way
contrary to the operating instructions as specified in
the RYOBI Operator’s Manual. This warranty does not
apply to any damage to the RYOBI Product that is the
result of improper maintenance or to any RYOBI
Product that has been altered or modified so as to
adversely affect the product's operation, performance
or durability or that has been altered or modified so as
to change its intended use. The warranty does not
extend to repairs made necessary by normal wear or
by the use of parts or accessories which are either
incompatible with the RYOBI Product or adversely
affect its operation, performance or durability.
In addition, this warranty does not cover:
A. Wear items - Blades.
RYOBI reserves the right to change or improve the
design of any RYOBI Product without assuming
any obligation to modify any product previously
manufactured.
SAVE THESE INSTRUCTIONS FOR FUTURE REFERENCE.
FOR QUESTIONS CALL 1-800-345-8746 IN U.S.
OR 1-800-265-6778 IN CANADA
OPERATOR’S MANUAL PART NO. 182556 REV. A (51650)
PRINTED IN U.S.A. 12/99
LIMITED TWO-YEAR WARRANTY
 Loading...