

Page 1
INSTRUCTIONS AND WARRANTY
MODEL NO.
18589SA/ 18260SA/ 18513SA / 18259SA
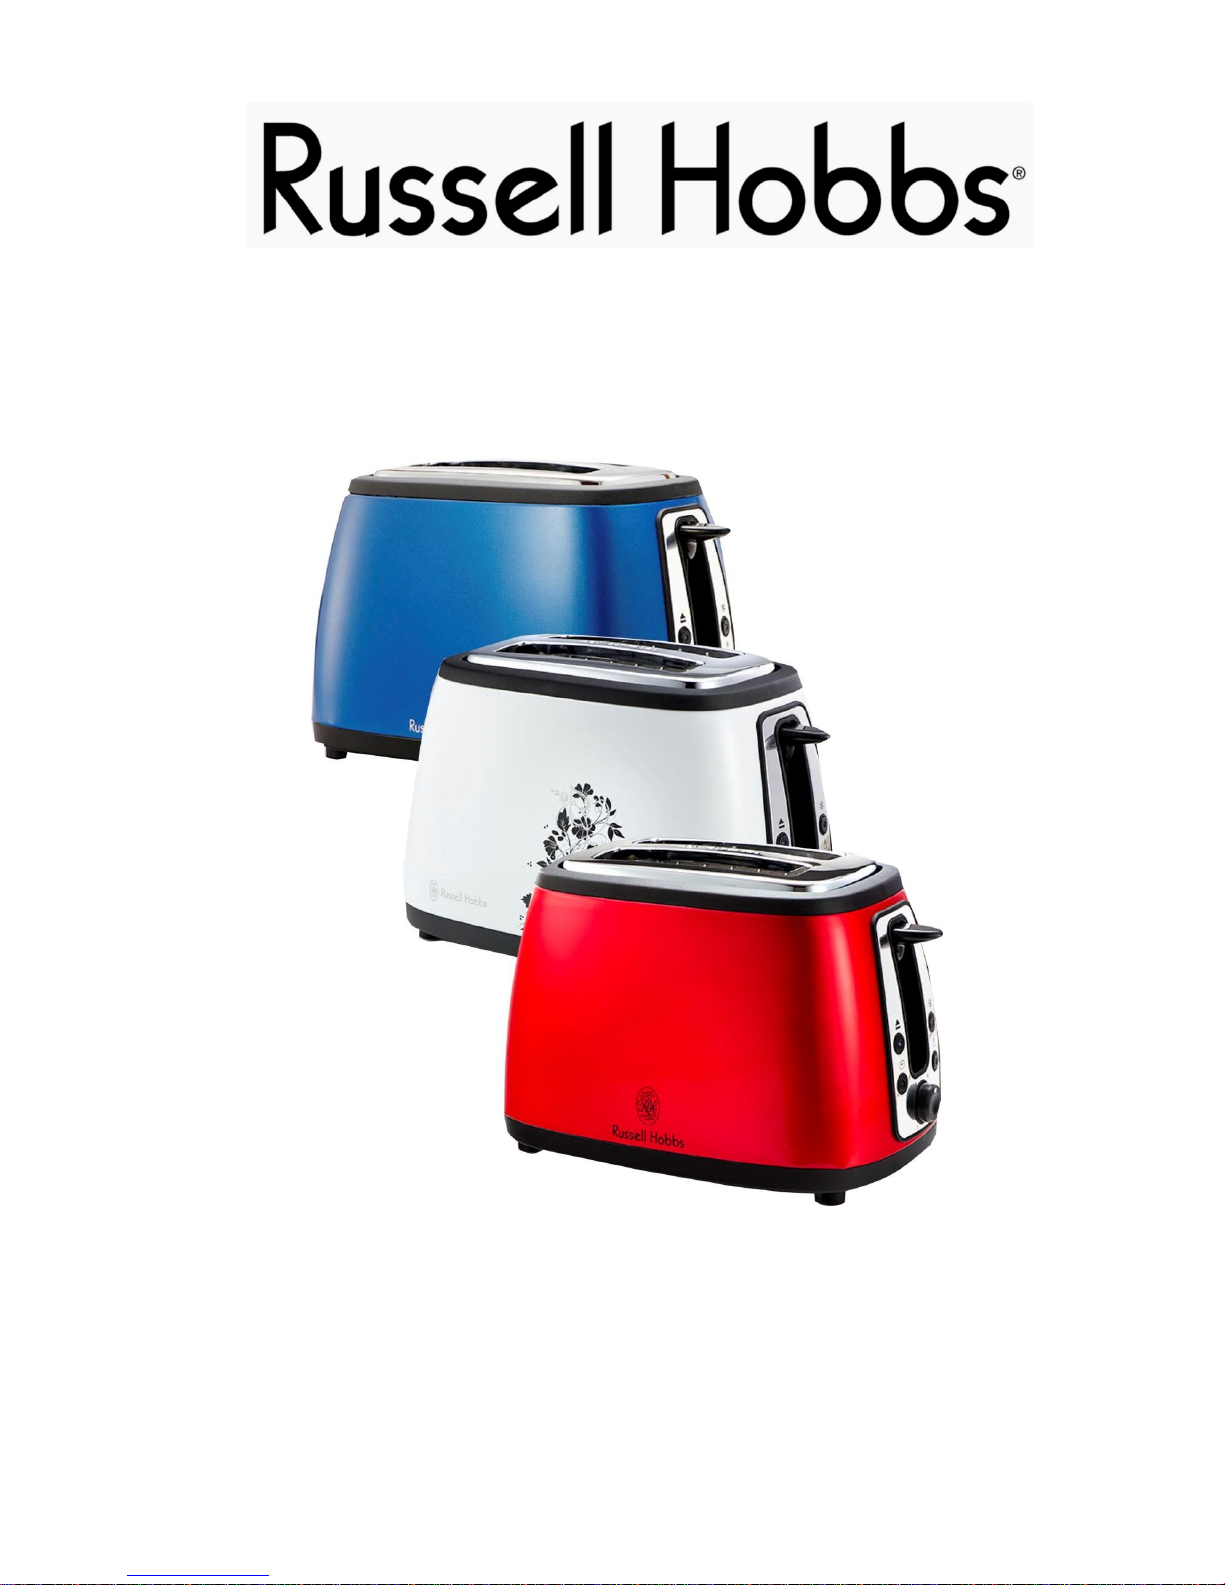
RUSSELL HOBBS BLUE/ RED/ FLORAL/ CREAM
HERITAGE 2-SLICE TOASTER
Page 2

Congratulations on purchasing our Russell Hobbs Blue/Red/Floral/Cream Heritage 2-Slice
Toaster. Each unit is manufactured to ensure safety and reliability. Before using this
appliance for the first time, please read the instruction manual carefully and keep it for
future reference.
FEATURES OF THE RUSSELL HOBBS BLUE/RED/FLORAL/ CREAM
HERITAGE 2-SLICE TOASTER
• Mid cycle cancel
• Reheat, defrost and bagel function
• Variable browning control
• Removable crumb tray
• Matching kettle available – sold separately
• For domestic use only
IMPORTANT SAFEGUARDS
When using any electrical appliance, basic safety precautions should always be followed
including the following:
1. Please read the instructions carefully before using any appliance.
2. Always ensure that the voltage on the rating label corresponds to the mains voltage
in your home.
3. Incorrect operation and improper use can damage the appliance and cause injury
to the user.
4. The appliance is intended for household use only. Commercial use invalids the
warranty and the supplier cannot be held responsible for injury or damage caused
when using the appliance for any other purpose than that intended.
5. Avoid any contact with moving parts.
6. Close supervision is required when any appliance is used near or by children or
invalids.
7. This appliance is not intended for use by persons (including children) with reduced
physical, sensory or mental capabilities, or lack of experience and knowledge,
unless they have been given supervision or instruction con cerning use of the
appliance by a person responsible for their safety
8. Check the power cord and plug regularly for any damage. If the cord or the plug is
damaged, it must be replaced by the manufacturer or a qualified person in order to
avoid an electrical hazard.
9. Do not use the appliance if it has been dropped or damaged in any way. In case of
damage, take the unit in for examination and/or repair by an authorised service
agent.
10. To reduce the risk of electric shock, do not immerse or expose the appliance, plug
or the power cord to water or any other liquid.
11. Never immerse the appliance in water or any other liquid for cleaning purposes.
Page 3

12. If liquid should accidentally enter the switch mechanism or spill into the body,
unplug the power cord immediately. Important: Prior to reconnecting to the
power supply, the product should be inspected by a qualified technician.
13. Remove the plug from the socket by gripping the plug. Do not pull on the cord to
disconnect the appliance from the mains. Always unplug the unit when not in
use, before cleaning or when adding or removing parts.
14. The use of accessory attachments that are not recommended or supplied by the
manufacturer may result in injuries, fire or electric shock.
15. A short cord is provided to reduce the hazards resulting from becoming
entangled in or tripping over a longer cord.
16. Do not let the cord hang over the edge of a table or counter. Ensure that the cord
is not in a position where it can be pulled on inadvertently.
17. Do not allow the cord to touch hot surfaces and do not place on or near a hot gas
or electric burner or in a heated oven.
18. Do not use the appliance on a gas or electric cooking top or over or near an open
flame.
19. Use of an extension cord with this appliance is not recommended. However, if it is
necessary to use an extension lead, ensure that the lead is suited to the power
consumption of the appliance to avoid overheating of the extension cord, appliance
or plug point. Do not place the extension cord in a position where it can be pulled
on by children or animals or tripped over.
20. This appliance is not suitable for outdoor use. Do not use this appliance for
anything other than its intended use.
21. DO NOT carry the appliance by the power cord.
22. Always exercise caution when using this appliance as it generates heat. Take the
proper precautions to prevent the risk of burns, fires or other injury to persons or
damage to property.
23. Always unplug this unit when not in use or before moving or cleaning. Let it cool
fully before cleaning or storing.
24. Never use this appliance below curtains or other combustible materials.
25. Never touch hot surfaces, this may result in injury, always use the handles.
26. Never clean with metal scouring pads. Pieces can break off the pad and
potentially short electrical parts; this may cause an electric shock.
27. Never place anything other than food in the appliance while it is operating or
while it is hot.
28. Always operate the appliance on a smooth, even, stable surface. Do not place
the unit on a hot surface.
29. Ensure that the switch is in the “Off” position after each use.
30. Don’t put it on or near anything that could be damaged even by moderate heat.
31. Bread may burn. Don’t use the toaster near or below curtains or other
combustible materials, and watch it while it’s hot.
32. The area round the toasting slots gets very hot – don’t touch!
33. If you’re only using one slot, don’t let anything get into the empty slot, as both
slots will be “live” when the lever is lowered.
34. Don’t cover the toaster, or put anything on top of it – you’ll cause a fire hazard.
35. If bread gets jammed, unplug the toaster, let it cool, then carefully remove the
bread. Don’t use anything sharp, you’ll damage the elements.
36. Don’t toast sandwiches or buttered items, the filling or spread may burn.
37. Don’t use torn, curled up, oversized, or misshapen slices of bread, as these may
jam the toaster.
Page 4

38. Clean the crumbs out of your toaster frequently, to avoid a build-up of crumbs.
This is unhygienic, and could cause a fire hazard.
39. Don’t use the toaster unless the crumb tray is fitted and closed.
40. Don’t connect the toaster to an external timer or remote control system.
41. The manufacturer does not accept responsibility for any damage or injury caused
by improper or incorrect use, or for repairs carried out by unauthorized personnel.
42. In case of technical problems, switch off the machine and do not attempt to repair
it yourself. Return the appliance to an authorised service facility for examination,
adjustment or repair. Always insist on the use of original spare parts. Failure to
comply with the above mentioned pre-cautions and instructions, could affect the
safe operation of this machine.
43. This product should be used for FOOD PREPARATION ONLY.
household use only
Page 5
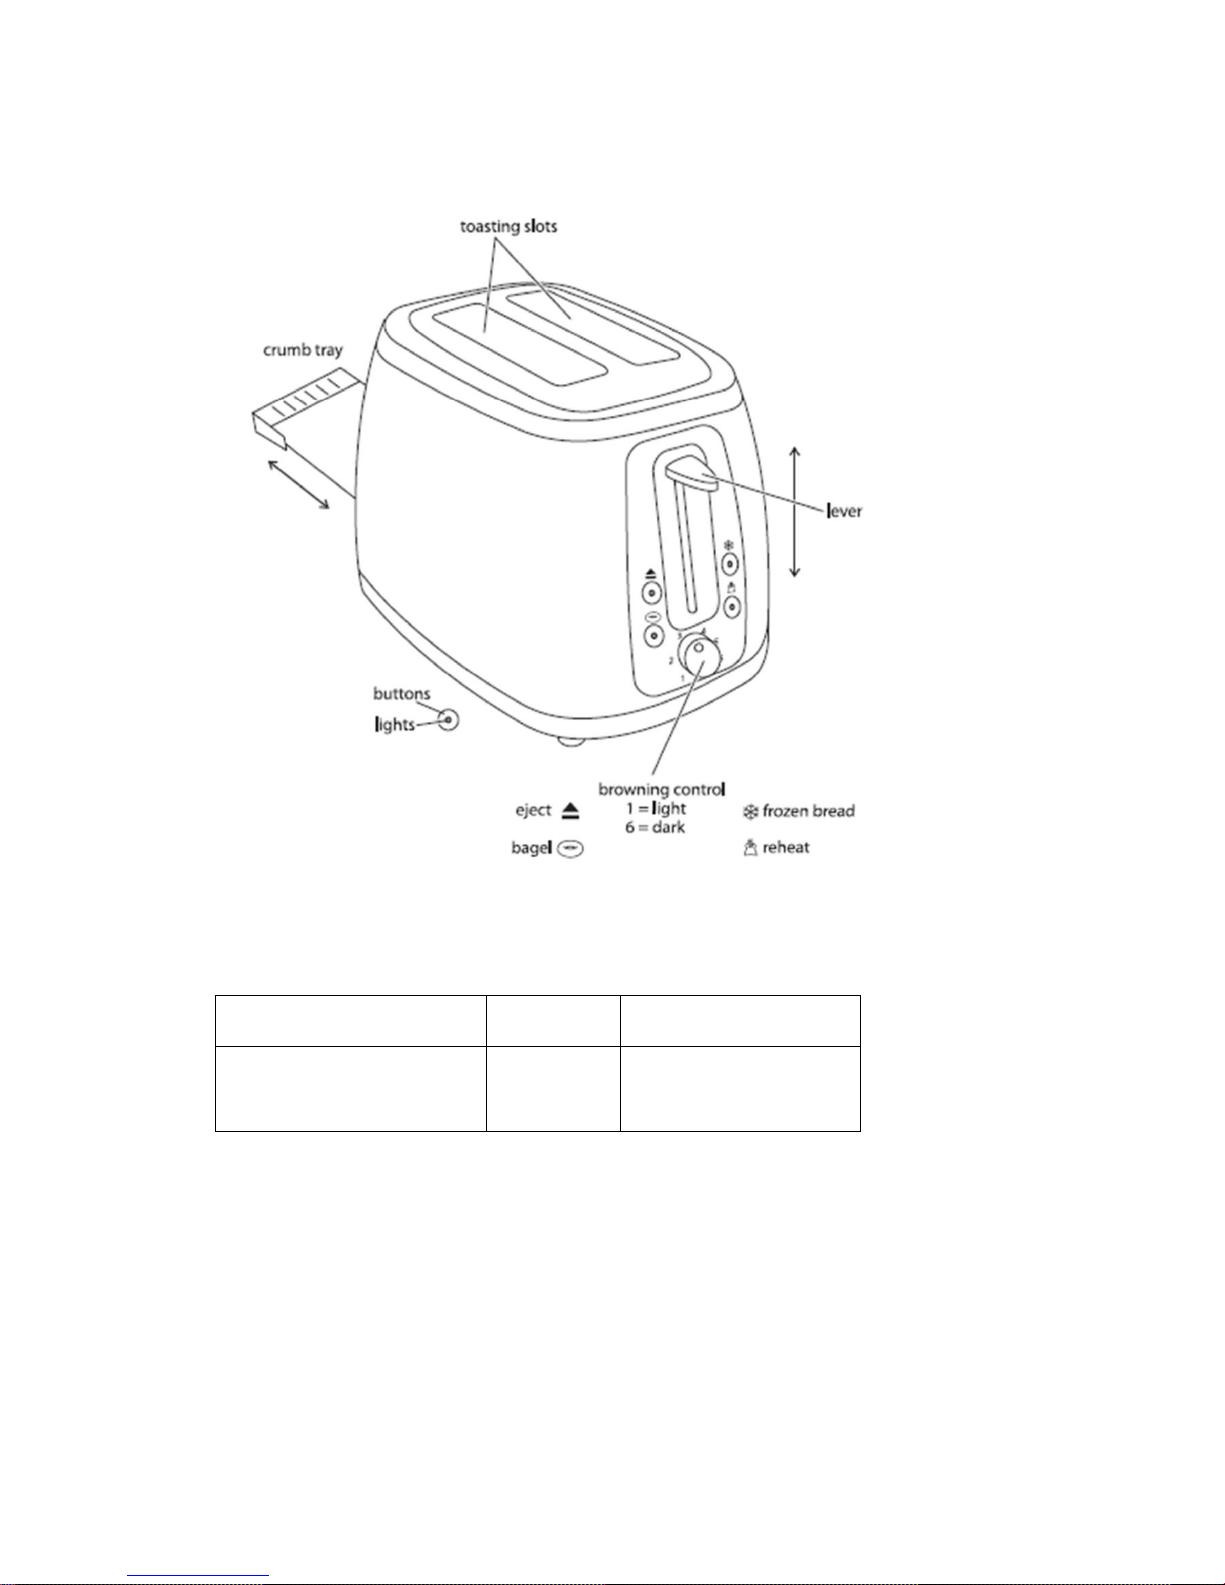
PARTS DIAGRAM
SPECIFICATIONS
Model
Voltage Power
18589SA /18260SA/18513SA/
18259SA
230-240V
50/60Hz
900-980W
Page 6

BEFORE FIRST USE
Carefully unpack the product making sure you keep all the packing material until all
the parts of the product have been found and the product has been used. We
recommend keeping all the packing material in a safe place in case at any time you
wish to re-pack the product for shipping purposes.
Place the appliance on a level and stable work surface.
Check the slots are empty.
Set the browning control to the highest setting (6).
Operate the toaster without bread, to cure the new elements.
They may smoke a bit, but it’s nothing to worry about – ensure the room is well
ventilated.
OPERATING INSTRUCTIONS
Toasting Bread
1. Sit the toaster upright on a stable, level, heat-resistant surface.
2. Don’t put it on or near anything that could be damaged even by moderate heat.
3. Route the cable so it doesn’t overhang and can’t be tripped over or caught.
4. Bread may burn. Don’t use the toaster near or below curtains or other
combustible materials, and watch it while it’s hot.
5. Put the plug into the power socket (switch the socket on, if it’s switchable).
6. Turn the browning control to the required setting (1 = light, 6 = dark).
7. Put bread into the toasting slots (maximum thickness 25mm (1in)).
8. Press the lever down fully – it won’t lock down unless the toaster is connected to the
electricity supply.
9. The light will glow and the elements will heat up
10. When it’s done, the toast will pop up, the light and the elements will go off.
Eject
11. To stop the toaster before it’s finished, press the button.
12. The toast will pop up, the light and the elements will go off.
Frozen Bread
13. This takes the guesswork out of toasting frozen bread.
14. Leave the browning control at your favoured setting, insert the frozen bread, lower the
lever, then press the button.
Page 7

15. The light will glow, and the toasting time will be altered automatically to
give the same degree of browning you get with unfrozen bread.
Reheating Toast
16. Leave the browning control at your favoured setting, insert the bread, lower the
lever, then press the button.
17. The light will glow, the toast will be given a short burst of heat, then it’ll pop
up, and the light will go out.
18. You must only reheat plain, “unbuttered” toast.
Bagel
19. Conventionally, only the brown crusty surfaces of bagels are toasted; the soft
inner surfaces are just warmed, not browned.
20. Split your bagel, and put the two halves into the slots with the
brown crusts facing the outside elements.
21. Leave the browning control at your favoured setting, press the
lever fully down, then press the button.
22. The light will glow, the brown outsides of the bagel will
be toasted, and the cut sides will be warmed.
23. If you’re not conventional, and prefer your bagels toasted on the cut side, feel free
to put them into the slots the other way round – we won’t tell anyone!
Page 8

Hints and Tips
24. When toasting more than one slice, use slices of similar size, thickness and
freshness.
25. Old (yesterday’s) bread contains less moisture, so makes crisper toast.
26. Old or thin bread cooks faster than fresh or thick bread – use a lighter setting.
27. Sweet bread products (tea cakes, fruit loaf, etc.) brown much more quickly than
ordinary bread, so should be toasted on a lighter setting.
Crumbs
28. Clean the crumbs out of your toaster frequently, to avoid a build-up of crumbs. This is
unhygienic, and it could cause a fire hazard.
29. Unplug the toaster and let it cool down.
30. Slide the crumb tray out from underneath the toaster.
31. Empty it, wipe it with a damp cloth, dry it, then replace it in the toaster.
32. Don’t use the toaster unless the crumb tray is fitted and closed.
CLEANING AND MAINTENANCE
•
This appliance is for household use only and is not user-serviceable.
•
Do not open or change any parts by yourself. Please refer to a qualified electrical
service department or return to the supplier if servicing is necessary.
•
Before cleaning, unplug the appliance from the wall outlet and allow to cool
completely.
•
Do not immerse the appliance in water or any other liquid, or hold it under a tap to
clean.
•
Wipe outer surfaces with a damp cloth. If necessary, use a little washing-up liquid.
•
Don’t let anything enter the slots, you might damage the elements.
•
Don’t use harsh or abrasive cleaning agents or solvents.
STORING THE APPLIANCE
•
Unplug the unit from the wall outlet and clean all the parts as instructed above.
Ensure that all parts are dry before storing.
•
Store the appliance in its box or in a clean, cool, dry place.
•
Never store the appliance while it is still wet or dirty.
•
Lightly coil the power cord – never wrap the power cord tightly around the
product. Never wrap the power cord around the appliance.
Page 9
SERVICING THE APPLIANCE
There are no user serviceable parts in this appliance. If the unit is not operating
correctly, please check the following:
•
You have followed the instructions correctly
•
That the unit has been wired correctly and that the wall socket is switched on.
•
That the mains power supply is ON.
•
That the plug is firmly in the mains socket.
If the appliance still does not work after checking the above:
- Consult the retailer for possible repair or replacement. If the retailer fails to resolve
the problem and you need to return the appliance, make sure that:
•
The unit is packed carefully back into its original packaging.
•
Proof of purchase is attached.
•
A reason is provided for why it is being returned.
If the supply cord is damaged, it must be replaced by the manufacturer or an
authorised service agent, in order to avoid any hazard. If service becomes necessary
within the warranty period, the appliance should be returned to an approved Home of
Living Brands (Pty) Ltd service centre. Servicing outside the warranty period is still
available, but will, however, be chargeable.
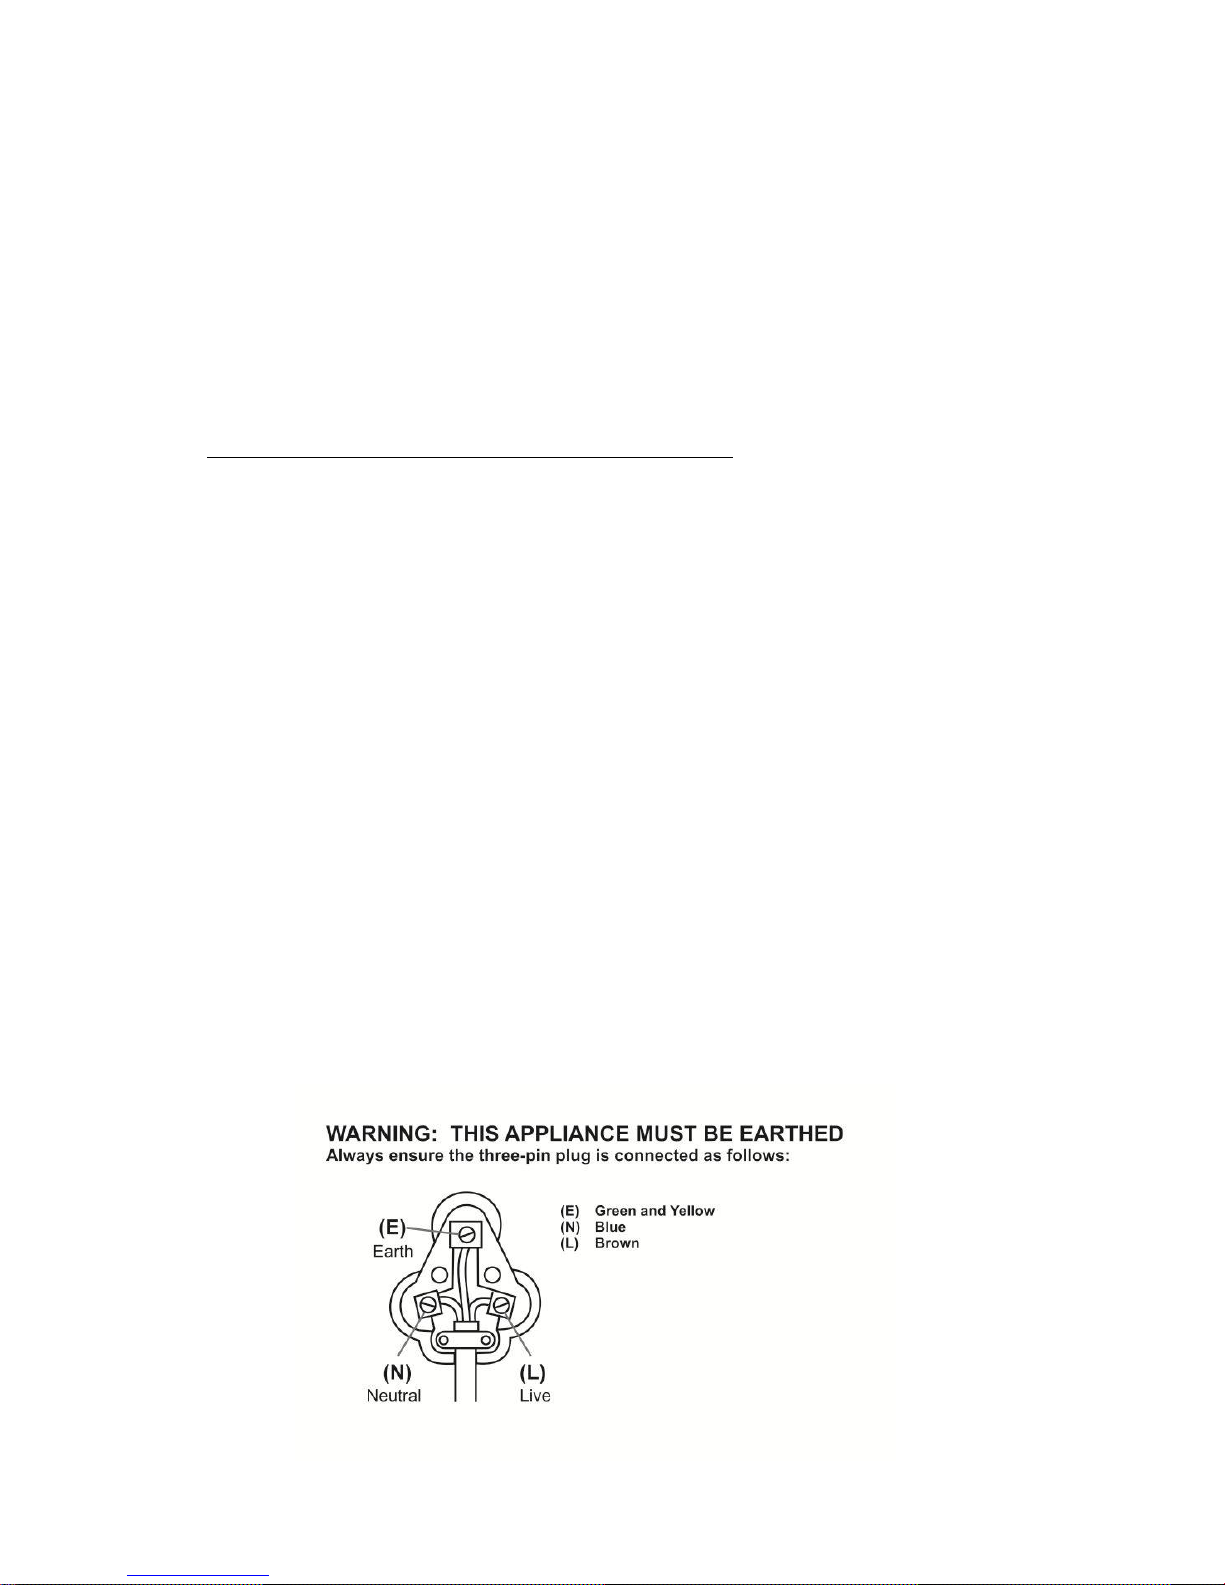
CHANGING THE PLUG
Should the need arise to change the fitted plug, follow the instructions below.
This unit is designed to operate on 230V-240V current only. Connecting to
other power sources may damage the appliance.
Page 10

W A R R A N T Y
1. Home of Living Brands
(Pty) Limited (“Home of Living Brands ”) warrants to the
original purchaser of this product (“the customer”) that this product will be free of
defects in quality and workmanship which under normal personal, family or household use
and purpose may manifest within a period of 1 (one) year from the date of purchase
(“warranty period”).
2.
Where the customer has purchased a product and it breaks, is defective or does not work
properly for the intended purpose, the customer must notify the supplier from whom the
customer bought the product (“the supplier”) thereof within the warranty period. Any
claim in terms of this warranty must be supported by a proof of purchase. If proof of purchase
is not available, then repair, and/or service charges may be payable by the customer to the
supplier.
3.
The faulty product must be taken to the supplier's service centre to exercise the
warranty.
4.
The supplier will refund, repair or exchange the product in terms of this warranty subject to
legislative requirements. This warranty shall be valid only where the customer has not
broken the product himself, or used the product for something that it is not supposed
to be used for. The warranty does not include and will not be construed to cover products
damaged as a result of disaster, misuse, tamper, abuse or any unauthorised modification or
repair of the product.
5.
This warranty will extend only to the product provided at the date of the purchase and not
to any expendables attached or installed by the customer.
6.
If the customer requests that the supplier repairs the product and the product breaks or fails
to work properly within 3 (three) months of the repair and not as a result of misuse, tampering
or modification by or on behalf of the customer, then the supplier may replace the
product or pay a refund to the customer.
7.
The customer may be responsible for certain costs where products returned are not in the
original packaging, or if the packaging is damaged. This will be deducted from any refund
paid to the customer.
HOME OF LIVING BRANDS (PTY) LTD
JOHANNESBURG TEL NO. (011) 490-9600
CAPE TOWN TEL NO. (021) 552-5161
DURBAN TEL NO. (031) 792-6000
www.homeoflivingbrandsco.za
PLEASE AFFIX YOUR PROOF OF PURCHASE/RECEIPT HERE
IN THE EVENT OF A CLAIM UNDER WARRANTY THIS RECEIPT MUST BE PRODUCED.
Page 11

Parabéns por ter comprado a nossa Torradeira para duas fatias Heritage Azul/ Vermelha/
Floral/Creme da Russel Hobbs. Cada unidade é fabricada de forma a garantir segurança e
fiabilidade. Antes de utilizar este aparelho pela primeira vez, leia o manual de instruções
atentamente e guarde-o para futura referência.
CARACTERÍSTICAS DA TORRADEIRA PARA DUAS FATIAS HERITAGE
AZUL/ VERMELHA/CREME FLORAL DA RUSSELL HOBBS
Cancelamento a meio do ciclo
Função de reaquecimento, descongelação e bagel
Controlo de torragem variável
Tabuleiro de migalhas amovível
Chaleira semelhante disponível – vendida em separado
Apenas para utilização doméstica
SALVAGUARDAS IMPORTANTES:
Quando utilizar qualquer aparelho elétrico, deve seguir sempre as precauções de segurança
básicas, incluindo o seguinte:
1. Leia atentamente as instruções antes de utilizar qualquer aparelho.
2. Certifique-se sempre de que a tensão na etiqueta de classificação corresponde à
tensão da corrente elétrica na sua residência.
3. A operação incorreta e utilização imprópria podem danificar o aparelho e causar lesões
no utilizador.
4. O aparelho destina-se apenas a utilização doméstica. A utilização comercial invalida a
garantia e o fornecedor não pode ser responsabilizado por lesões ou danos causados
quando o aparelho for utilizado para qualquer outra finalidade diferente da prevista.
5. Evite qualquer contacto com as peças em movimento.
6. É necessária uma supervisão de perto quando qualquer aparelho for utilizado perto ou
por crianças ou pessoas com incapacidades.
7. Este aparelho não se destina a ser utilizado por pessoas (incluindo crianças) com
capacidades físicas, sensoriais ou mentais reduzidas, ou com falta de experiência e
conhecimentos, a não ser que tenham sido supervisionados ou ensinados a utilizar o
aparelho por uma pessoa responsável pela sua segurança.
8. Verifique o cabo de alimentação e a ficha regularmente para verificar a existência de
quaisquer danos. Se o cabo ou a ficha estiverem danificados, devem ser substituídos
pelo fabricante ou por uma pessoa qualificada de forma a evitar um perigo elétrico.
9. Não utilize o aparelho se este tiver sido deixado cair ou estiver danificado de qualquer
forma. Em caso de danos, devolva a unidade para verificação e/ou reparação por parte
de um agente de assistência autorizado.
10. Para reduzir o risco de choque elétrico, não mergulhe ou exponha o aparelho, ficha ou
cabo de alimentação em água ou em qualquer outro líquido.
11. Nunca coloque o aparelho dentro de água ou qualquer outro líquido para fins de
limpeza.
12. Caso entre líquido acidentalmente para o mecanismo de troca ou se derrame no corpo,
desligue imediatamente o cabo de alimentação. Importante: Antes de voltar a ligar à
fonte de alimentação, o produto deve ser inspeccionado por um técnico qualificado.
Page 12

13. Remova a ficha da tomada ao agarrar na ficha. Não puxe pelo cabo para desligar o
aparelho da corrente elétrica. Desligue sempre a unidade quando esta não estiver a ser
utilizada, antes de limpar ou quando adicionar ou remover peças.
14. A utilização de acessórios não recomendados ou fornecidos pelo fabricante pode
resultar em lesões, incêndios ou choque elétrico.
15. É fornecido um cabo pequeno para reduzir os riscos resultantes de ficar preso ou de
tropeçar num cabo maior.
16. Não deixe o cabo suspenso pela extremidade de uma mesa ou balcão. Certifique-se de
que o cabo não se encontra numa posição em que possa ser puxado inadvertidamente.
17. Não permita que o cabo toque em superfícies quentes e não o coloque sobre ou perto
de uma caldeira elétrica ou a gás quente ou num forno aquecido.
18. Não utilize o aparelho sobre uma superfície de cozimento a gás ou elétrica ou sobre ou
perto de uma chama.
19. A utilização de uma extensão com este aparelho não é recomendada. No entanto, caso
seja necessário utilizar uma ficha de extensão, certifique-se de que a ficha é adequada
para o consumo de energia do aparelho para evitar o sobreaquecimento do cabo da
extensão, aparelho ou tomada. Não coloque o cabo da extensão numa posição em que
possa ser puxada por crianças ou animais ou que possibilite o tropeçamento.
20. Este aparelho não é adequado para ser utilizado no exterior. Não utilize este aparelho
para outra finalidade diferente da prevista.
21. NÃO transporte o aparelho pelo cabo de alimentação.
22. Tenha sempre cuidado quando utilizar este aparelho, uma vez que gera calor. Tome as
devidas precauções para evitar o risco de queimaduras, incêndios ou outras lesões em
pessoas ou danos na propriedade.
23. Desligue sempre a unidade quando não estiver a ser utilizada, antes de a deslocar ou
antes de limpar. Deixe-a arrefecer completamente antes de limpar ou guardar.
24. Não utilize o aparelho debaixo de cortinas ou outros materiais combustíveis.
25. Nunca toque nas superfícies quentes, pois podem provocar lesões e utilize sempre as
pegas.
26. Nunca limpe com esfregões de palha-de-aço. As peças podem quebrar os esfregões e
potencialmente provocar curto-circuitos; isto pode provocar um choque eléctrico.
27. Nunca coloque nada para além de alimentos sobre o aparelho durante o seu
funcionamento ou enquanto estiver quente.
28. Utilize sempre o aparelho numa superfície suave, uniforme e estável. Não coloque a
unidade numa superfície quente.
29. Certifique-se de que o interruptor está na posição "Off" (desligado) após cada
utilização.
30. Não coloque o aparelho dentro ou próximo de qualquer tipo de objecto que possa ser
danificado até mesmo por calor moderado.
31. O pão pode queimar. Não utilize a torradeira próxima ou debaixo de cortinas ou outros
materiais combustíveis e supervisione-a enquanto estiver quente.
32. A área em redor das ranhuras de torragem ficam muito quentes - não toque!
33. Se estiver a utilizar apenas uma ranhura, não deixe que nada entre para a ranhura
vazia, uma vez que ambas as ranhuras estarão a funcionar quando a alavanca é
baixada.
34. Não cubra a torradeira nem coloque nada sobre a mesma – provocará um perigo de
incêndio.
35. Se o pão ficar preso, desligue a torradeira, deixe arrefecer e depois remova
cuidadosamente o pão. Não utilize nada pontiagudo, pois irá danificar os elementos.
Page 13

36. Não torre sandes ou alimentos com manteiga, pois o recheio ou cobertura poderão
queimar.
37. Não utilize fatias de pão dobradas, curvadas, com um tamanho excessivamente grande
ou de forma irregular, uma vez que podem obstruir a torradeira.
38. Retire as migalhas da torradeira com frequência, para evitar a acumulação de migalhas.
Isto não é higiénico e poderia provocar um perigo de incêndio.
39. Não utilize a torradeira a não ser que o tabuleiro de migalhas esteja devidamente
colocado e fechado.
40. Não ligue a torradeira a um temporizador externo ou sistema de controlo remoto.
41. O fabricante não aceita responsabilidade por qualquer dano ou lesão causados devido
a uma utilização imprópria ou incorreta ou a reparações realizadas por pessoal não
autorizado.
42. Em caso de problemas técnicos, desligue a máquina e não tente repará-la você próprio.
Devolva o aparelho a um agente de assistência autorizado para verificação, ajuste ou
reparação. Insista sempre em utilizar peças sobresselentes originais. O não
cumprimento das precauções e instruções acima poderá afetar o funcionamento seguro
desta máquina.
43. Este produto deve ser utilizado APENAS PARA A PREPARAÇÃO DE ALIMENTOS.
apenas para utilização doméstica
No final da vida útil do aparelho, não deve ser eliminado com
os resíduos domésticos gerais.
Verifique junto da sua Autoridade Local ou revendedor para
obter conselhos sobre a reciclagem na sua região local.
Page 14

DIAGRAMA DE PEÇAS
ESPECIFICAÇÕES
Modelo
Tensão
Potência
18589SA /18260SA / 18513SA /
18259SA
230 - 240 V
50/60 Hz
900 - 980 W
Page 15

ANTES DA PRIMEIRA UTILIZAÇÃO
Retire cuidadosamente o produto da embalagem, certificando-se de que guarda todo
o material da embalagem até que todas as peças do produto sejam encontradas e
que o produto seja utilizado. É recomendável guardar todo o material da embalagem
num local seguro, caso pretenda voltar a embalar o produto a qualquer altura para
fins de expedição.
Coloque o aparelho numa superfície de trabalho nivelada e estável.
Verifique se as ranhuras estão vazias.
Defina o controlo de torragem para a definição mais elevada (6).
Opere a torradeira sem pão, para curar os novos elementos.
Poderá sair um pouco de fumo, mas não necessita de se preocupar - certifique-se
de que o compartimento está bem ventilado.
INSTRUÇÕES DE FUNCIONAMENTO
Torrar pão
1. Coloque a torradeira na vertical numa superfície estável, nivelada e resistente ao
calor.
2. Não coloque o aparelho dentro ou próximo de qualquer tipo de objecto que possa
ser danificado até mesmo por calor moderado.
3. Encaminhe o cabo de forma a não ficar suspenso e a não ficar numa posição onde
alguém possa tropeçar ou ficar preso.
4. O pão pode queimar. Não utilize a torradeira próxima ou debaixo de cortinas ou
outros materiais combustíveis e supervisione-a enquanto estiver quente.
5. Coloque a ficha na tomada eléctrica (ligue a tomada, caso seja desse tipo).
6. Defina o controlo de torragem para a definição desejada (1 = ligeira, 6 = escura).
7. Coloque o pão nas ranhuras de torragem (espessura máxima de 25 mm [1
polegada]).
8. Pressione a alavanca totalmente para baixo – não fica fixa a não ser que a torradeira
esteja ligada à fonte de alimentação.
9. A luz brilha e os elementos aquecem.
10. Quando estiver concluído, a torrada salta, a luz e os alimentos desligam-se.
Page 16

Ejectar
11. Para desligar a torradeira antes da conclusão, pressione o botão .
12. A torrada salta, a luz e os alimentos desligam-se.
Pão congelado
13. Isto elimina as dúvidas no que diz respeito a torrar pão congelado.
14. Coloque o controlo de torragem na sua definição preferida, insira o pão congelado,
baixe a alavanca e depois pressione o botão .
15. A luz brilha e o tempo de torragem será alterado automaticamente para dar o
mesmo nível de torragem que obtém com pão descongelado.
Reaquecer a torrada
16. Coloque o controlo de torragem na sua definição preferida, insira o pão, baixe a
alavanca e depois pressione o botão .
17. A luz brilha, a torrada recebe um estímulo de calor curto, depois salta e a luz
desliga-se.
18. Deve reaquecer apenas as torradas sem manteiga.
Bagel
19. Normalmente, só se torram as superfícies crocantes castanhas dos bagels; as
superfícies macias internas só são aquecidas e não torradas.
20. Divida o seu bagel e coloque as suas metades nas ranhuras com as
crostas castanhas viradas para os elementos externos.
21. Coloque o controlo de torragem na sua definição preferida, baixe a
alavanca e depois pressione o botão .
22. A luz brilha, a parte castanha fora do bagel será torrada e os lados
inferiores serão aquecidos.
23. Se não é uma pessoa convencional e prefere os seus bagels torrados
no lado inferior, pode coloca-los nas ranhuras do outro lado – não dizemos a
ninguém!
Page 17

Dicas e sugestões
24. Quando torrar mais de uma fatia, utilize fatias de tamanho, espessura e frescura
semelhantes.
25. O pão antigo (do dia anterior) contém menos humidade, por isso cria uma torrada
mais estaladiça.
26. O pão antigo ou fino torra mais rápido que o pão fresco ou espesso – utilize uma
definição mais suave.
27. Os produtos de pão doce (bolos de chá, bolos de frutas, etc.) torra muito mais
rapidamente que o pão normal, por isso devem ser torrados numa definição mais
ligeira.
Migalhas
28. Retire as migalhas da torradeira com frequência, para evitar a acumulação de
migalhas. Isto não é higiénico e poderia provocar um perigo de incêndio.
29. Desligue a torradeira e deixe-a arrefecer.
30. Faça deslizar o tabuleiro de migalhas para fora da parte inferior da torradeira.
31. Esvazie-o, limpe-o com um pano humedecido, seque-o e depois volto a coloca-lo na
torradeira.
32. Não utilize a torradeira a não ser que o tabuleiro de migalhas esteja devidamente
colocado e fechado.
LIMPEZA E MANUTENÇÃO
Este aparelho destina-se apenas a utilização doméstica e não é reparável pelo
utilizador.
Não abra nem substitua quaisquer peças. Consulte um departamento de apoio
elétrico qualificado ou devolva o aparelho ao fornecedor, caso seja necessário
repará-lo.
Antes de limpar, retire a ficha do aparelho da tomada de parece e deixe arrefecer
completamente.
Nunca mergulhe o aparelho em água ou em qualquer outro líquido nem o coloque
debaixo de água a correr para o limpar.
Limpe as superfícies externas com um pano humedecido. Se necessário, utilize um
pouco de líquido de lavagem.
Não deixe nada entrar nas ranhuras, pois poderá danificar os elementos.
Não utilize agentes de limpeza agressivos ou abrasivos ou solventes.
GUARDAR O APARELHO
Desligue a unidade da tomada e limpe todas as peças conforme instruído acima.
Certifique-se de que todas as peças estão secas antes de guardar.
Guarde o aparelho na sua embalagem ou num local limpo, fresco e seco.
Nunca guarde o aparelho enquanto estiver molhado ou sujo.
Enrole ligeiramente o cabo de alimentação – nunca enrole o cabo de alimentação
muito apertado em redor do produto. Nunca enrole o cabo de alimentação à volta do
aparelho.
Page 18

REPARAÇÃO DO APARELHO
O aparelho não contém componentes que possam ser reparados pelo utilizador. Se a
unidade não estiver a funcionar corretamente, verifique o seguinte:
Se seguiu as instruções corretamente.
Se a unidade foi devidamente ligada e se a tomada de parede está ligada.
Se a fonte de alimentação elétrica está ligada.
Se a ficha está firmemente encaixada na tomada elétrica.
Se o aparelho continuar sem funcionar depois de verificar os itens acima:
- Consulte o revendedor para uma possível reparação ou substituição. Se o
revendedor não for capaz de resolver o problema e necessitar de devolver o
aparelho, certifique-se de que:
A unidade está devidamente embalada na sua embalagem original.
Apresenta uma prova de compra.
É fornecida uma razão para a devolução.
Se o cabo de alimentação estiver danificado, deve ser substituído pelo fabricante ou por um
agente de assistência autorizado de forma a evitar qualquer perigo. Caso seja necessário
reparar o aparelho dentro do período de garantia, o aparelho deve ser devolvido a um centro
de assistência da Home of Living Brands (Pty) Ltd aprovado. A reparação fora do período
de garantia continua a ser possível, mas, contudo, será cobrada.
SUBSTITUIÇÃO DA FICHA
Cumpra com as instruções seguintes caso seja necessário substituir a ficha.
Esta unidade foi concebida para funcionar apenas com a corrente de 230V-240V. A
ligação a outras fontes de alimentação poderá danificar o aparelho. Ligue uma ficha
de três pinos da seguinte maneira:
Page 19

ANEXE A SUA PROVA DE COMPRA/RECIBO AQUI
EM CASO DE RECLAMAÇÃO AO ABRIGO DE GARANTIA, É NECESSÁRIO PRODUZIR
ESTE RECIBO.
GARANTIA
1. A Home of Living Brands (Pty) Limited (“Home of Living Brands ”) garante ao
comprador original deste produto (“o cliente") que este produto não apresenta defeitos
de material e fabrico que se manifestam na utilização normal pessoal, familiar ou
doméstica num período de 1 (um) ano desde a data de compra (“período de garantia”).
2. No caso de um cliente comprar um produto e este se quebrar, apresentar defeitos ou
não funcionar corretamente para a finalidade prevista, o cliente tem de notificar o
fornecedor ao qual comprou o produto ("o fornecedor") desse fato dentro do período de
garantia. Qualquer reclamação nos termos da garantia deve ser acompanhada por uma
prova de compra. Caso não esteja disponível uma prova de compra, então as despesas
da reparação e/ou manutenção poderão ter de ser pagas pelo cliente ao fornecedor.
3. O produto avariado tem de ser devolvido ao centro de assistência do fornecedor para
aplicar a garantia.
4. O fornecedor irá reembolsar, reparar ou trocar o produto nos termos desta garantia,
sujeito aos requisites legislativos. Esta garantia será válida apenas quando o cliente não
tiver quebrado ele próprio o produto ou utilizado o produto para outro fim que não o
previsto. A garantia não inclui e não será interpretada como abrangendo produtos
danificados como resultado de um desastre, utilização imprópria, manipulação, abuso ou
qualquer modificação não autorizada ou reparação do produto.
5. Esta garantia aplicar-se-á apenas ao produto fornecido na data de compra e não a
quaisquer acessórios incluídos ou instalados pelo cliente.
6. Se o cliente solicitar que o fornecedor repare o produto e o produto se quebrar ou não
funcionar corretamente nos 3 (três) meses após a reparação, considerando que não seja
resultado de utilização imprópria, manipulação ou modificação por ou em nome do
cliente, então o fornecedor poderá substituir o produto ou pagar um reembolso ao
cliente.
7. O cliente poderá ser responsável por certos custos quando os produtos devolvidos não
estiverem na embalagem original, ou caso a embalagem esteja danificada. Este custo
será deduzido de qualquer reembolso pago ao cliente.
HOME OF LIVING BRANDS (PTY) LTD
JOANESBURGO N.º TEL. (011) 490-9600
CIDADE DO CABO N.º TEL. (021) 552-5161
DURBAN N.º TEL. (031) 792-6000
Page 20

Nous vous félicitons pour l'achat de votre Grille-pain 2 tranches Heritage Bleu / Rouge/
Floral/Crème Russell Hobbs. Chaque unité est fabriquée afin de d’assurer la sécurité et la
fiabilité. Avant d’utiliser cet appareil pour la première fois, merci de lire le manuel avec soin
et de le garder à titre de référence.
CARACTÉRISTIQUES DU GRILLE-PAIN 2 TRANCHES HERITAGE BLEU/ ROUGE/
FLORAL/CRÈME RUSSELL HOBBS
Annulation en cours de cycle
Fonction réchauffer, décongeler et bagel
Contrôle variable de la puissance
Plateau récupérateur de miettes amovible
Bouilloire assortie disponible - vendue séparément
Réservé uniquement à un usage domestique
GARANTIES IMPORTANTES
Lors de l’utilisation de n’importe quel appareil électrique, des précautions de sécurité
élémentaires devraient toujours être suivies, ainsi que les points suivants :
1. Merci de lire les instructions avec attention avant d’utiliser tout appareil quel qu’il soit.
2. Toujours vous assurer que le voltage indiqué sur la plaque signalétique correspond
aux voltages principaux dans votre maison.
3. Une opération incorrecte et une utilisation inappropriée peuvent endommager
l’appareil et entraîner des blessures pour l’utilisateur.
4. L’appareil est destiné à uniquement à un usage domestique. Une utilisation
commerciale annule la garantie et le fournisseur ne peut pas être tenu pour
responsable des blessures ou des dommages causent lors de l’utilisation de
l’appareil pour tout autre usage que celui auquel il est destiné.
5. Eviter tout contact avec les parties mobiles.
6. Une surveillance étroite est requise lorsque tout appareil est utilisé près d’enfants ou
de personnes invalides.
7. Cet appareil n’est pas destiné aux personnes (y compris les enfants) dont les
capacités physiques, sensorielles et intellectuelles sont limitées, ou qui ont un
manque d’expérience et de connaissances à moins qu’elles n’aient été supervisées
ou qu’elles aient reçu des instructions sur l’utilisation de l'appareil par une
responsable de leur sécurité.
8. Vérifier le cordon d’alimentation et brancher régulièrement pour éviter que le cordon
ne soit endommagé. Si le cordon ou la prise sont endommagés, ils doivent être
remplacés par le fabricant ou par une personne qualifiée afin d’éviter un danger
électrique.
9. Ne pas utiliser l’appareil s’il est tombé ou s’il a été endommagé de quelque manière
que ce soit. En cas de dommage, rapporter l’unité pour un examen et / ou une
réparation par un agent de maintenance agréé.
10. Pour éviter le risqué de choc électrique, ne pas immerger ou exposer l’appareil, la
prise, ou le cordon d’alimentation dans l’eau ou bien dans tout autre liquide.
11. Ne jamais immerger l’appareil dans l’eau ou dans tout autre liquide pour le nettoyer.
Page 21

12. Si du liquide venait à pénétrer accidentellement dans l’interrupteur ou se répandre
dans le boitier, débranchez immédiatement le cordon d'alimentation. Important :
avant de rebrancher l'appareil, il faudrait le faire inspecter par un technicien qualifié.
13. Retirer la fiche de la prise en tenant la fiche. Ne pas tirer sur le cordon pour
déconnecter l’appareil du secteur. Toujours débrancher l’unité lorsqu’elle n’est pas
utilisée, avant le nettoyage ou lors de l’ajout ou du retrait de parties.
14. L’utilisation d’accessoires se fixant à l’unité qui ne sont ni recommandés ou fournis
par le fabricant pourrait entraîner des blessures, un incendie ou un choc électrique.
15. Un cordon court est fourni pour réduire les risques résultant d’un entremêlement, ou
de trébuchement sur ce dernier.
16. Ne pas laisser le cordon dépasser du bord de la table ou du comptoir. S’assurer que
le cordon n’est pas dans une position ou il peut être tire par inadvertance.
17. Ne pas laisser le cordon de toucher des surfaces chaudes et ne pas le placer sur ou
près d’un réchaud à gaz ou électrique ou d’un four chaud.
18. Ne pas utiliser l’appareil sur une plaque à gaz ou électrique ou au-dessus d’une
flamme.
19. L’utilisation d’un cordon d’extension avec cet appareil n’est pas recommandée.
Cependant, s’il s’avère nécessaire d’utiliser une rallonge électrique qui est adaptée à
la consommation d’énergie de l’appareil, afin d’éviter le surchauffement du cordon
d’extension, de l’appareil ou de la prise de courant. Ne pas mettre la rallonge dans
une position où elle peut être tirée par des enfants, ou des animaux, ou bien où ils
risquent de trébucher dessus.
20. Cet appareil n’est pas recommandé pour un usage extérieur. Ne pas utiliser cet
appareil pour quoique ce soit d’autre que l’utilisation à laquelle il est destiné.
21. NE PAS porter l’appareil en le prenant par le cordon d’alimentation.
22. Soyez toujours prudent en utilisant l'appareil car il produit de la chaleur. Prenez les
précautions nécessaires pour éviter les brûlures, les feux, les dommages matériels
ou de blesser des personnes.
23. Débrancher toujours l’unité lorsqu’elle n’est pas utilisée, ou avant de la nettoyer.
Laissez-le refroidir avant de le nettoyer et de le ranger.
24. N’utilisez jamais l’appareil en dessous de rideaux ou d’autres matériaux
inflammables.
25. Ne touchez jamais les surfaces chaudes, vous pourriez vous blesser, utilisez
toujours les poignées.
26. Ne nettoyez jamais l’appareil avec une éponge à récurer métallique. Des pièces
pourraient se casser et occasionnellement des parties électriques pourraient
manquer ; cela pourrait entrainer des court-circuits.
27. Ne placez rien d'autre que de la nourriture dans l'appareil lorsqu'il est en
fonctionnement ou lorsqu'il est chaud.
28. Faire toujours fonctionner l’appareil sur une surface régulière et stable. Ne pas
placer l’unité sur une surface chaude.
29. S’assurer que l’interrupteur est en position « ARRET » après chaque utilisation.
30. Ne le placez pas sur ou près de quoi que ce soit susceptible d’être endommagé,
même par une chaleur modérée.
31. Le pain peut brûler. N’utilisez pas le grille-pain près de rideaux ou autres matières
combustibles ou sous de tels matériaux, et gardez l’œil dessus pendant qu’il est
chaud.
32. La zone située autour des encoches du grille-pain devient très chaude - ne la
touchez pas !
Page 22

33. Si vous n'utilisez qu'une seule encoche du grille-pain, assurez-vous que rien ne
pénètre dans l’encoche vide, chacune des encoches étant « sous tension » une fois
le levier abaissé.
34. Ne couvrez pas le grille-pain, ni ne placez quoi que ce soit dessus - ceci pourrait
provoquer un risque d'incendie.
35. Si le pain reste coincé, débranchez le grille-pain, laissez-le refroidir, puis retirez-en
soigneusement le pain. N'utilisez aucun objet pointu au risque d'endommager les
résistances.
36. Ne faites pas griller de sandwiches ou de produits beurrés, la garniture ou le beurre
pouvant brûler.
37. L'utilisez pas de tranches de pain déchirées, racornies, de trop grande dimension ou
de forme irrégulière, ceci pouvant bloquer le grille-pain.
38. Nettoyez fréquemment les miettes présentes dans votre grille-pain afin d'éviter que
celles-ci ne s'accumulent. Ceci est non-hygiénique et pourrait provoquer un incendie.
39. N'utilisez pas le grille-pain à moins que le plateau récupérateur de miettes ne soit en
place et fermé.
40. Ne branchez pas le grille-pain à une minuterie externe ou à un système de contrôle à
distance.
41. Le fabricant n’accepte de prendre aucune responsabilité pour tout dommage ou
blessure que ce soit, qui seraient dues à une utilisation incorrecte ou inappropriée,
ou celle de réparations exécutées par un personnel non-agréé.
42. En cas de problèmes techniques, éteindre la machine et ne pas essayer de la
réparer vous-même. Renvoyer l’appareil à un service de maintenance habileté pour
un examen, un ajustement ou pour une réparation. Insister toujours pour que les
pièces détachées d’origines soient utilisées. Le non-respect avec les précautions et
les instructions mentionnées ci-dessus pourrait empêcher le bon fonctionnement de
cette machine.
43. Ce produit ne doit être utilisé que pour la PREPARATION DE NOURRITURE.
utilisation domestique uniquement
A la fin de la durée de fonctionnement de l’appareil, il ne devra pas être
jeté avec les déchets ménagers.
Vérifiez auprès des autorités locales ou du détaillant les conseils en
matière de recyclage dans votre commune.
Page 23

SCHEMA DES PIECES
SPECIFICATIONS
Modèle
Voltage
Puissance
18589SA /18260SA /18513SA/
18259SA
230 - 240 V
50/60 Hz
900 - 980 W
Page 24

AVANT LA PREMIÈRE UTILISATION
Déballer soigneusement le produit et assurez-vous que vous gardez tout le matériel
d'emballage, jusqu’à ce que vous ayez trouvé toutes les pièces du produit et qu’il ait
été utilisé. Il est recommandé de garder le matériel d’emballage dans un endroit sûr,
au cas où vous souhaitiez remballer le produit pour l'expédier.
Placez l’appareil sur une surface de travail plane et stable.
Assurez-vous que les encoches sont vides.
Réglez le contrôle de la puissance sur le niveau le plus fort (6).
Faites fonctionner le grille-pain à vide, afin de nettoyer les résistances neuves.
Celles-ci pourraient légèrement fumer, mais ne vous inquiétez pas - assurez-vous
que la pièce est bien aérée.
INSTRUCTIONS D’UTILISATION
Faire griller du pain
1. Positionnez le grille-pain en position droite sur une surface stable, plate et résistante
à la chaleur.
2. Ne le placez pas sur ou près de quoi que ce soit susceptible d’être endommagé,
même par une chaleur modérée.
3. Amenez le câble afin qu’il ne dépasse pas et que l’on ne puisse pas trébucher
dessus ou qu’il ne s’emmêle pas.
4. Le pain peut brûler. N’utilisez pas le grille-pain près de rideaux ou autres matières
combustibles ou sous de tels matériaux, et gardez l’œil dessus pendant qu’il est
chaud.
5. Branchez la prise (actionnez la prise murale si celle-ci doit l'être).
6. Réglez la commande de puissance sur le réglage désiré (1 = léger, 6 = fort).
7. Placez le pain dans les encoches (épaisseur maximum 25 mm (1 pouce)).
8. Appuyez à fond sur le levier - il ne s'enclenchera pas si le grille-pain n'est pas
branché.
9. Le voyant s'allumera, et les résistances chaufferont. Une fois le pain grillé, le
grille-pain remontera et le voyant et les résistances s'éteindront.
Ejecter
10. Pour arrêter le grille-pain avant qu'il n'ait fini, appuyez sur le bouton .
11. Le pain remontera, le voyant et les résistances s'éteindront.
Pain surgelé
12. Cette fonction vous évitera de chercher comment griller du pain surgelé.
13. Laissez le contrôle de puissance sur le réglage désiré, insérez le pain surgelé,
abaissez le levier et appuyez sur le bouton .
14. Le voyant s'allumera et le temps de chauffe sera automatiquement modifié afin
de vous garantir un pain aussi grillé que si vous utilisiez du pain non surgelé.
Page 25

Réchauffer une tartine
15. Laissez la commande de puissance sur le réglage désiré, insérez le pain, abaissez
le levier et appuyez sur le bouton .
16. Le voyant s'allumera, la tartine sera rapidement réchauffée puis ressortira, et le
voyant s'éteindra.
17. Il n'est pas possible de réchauffer autre chose que du pain nature, « non beurré ».
Bagel
18. Traditionnellement, seules les surfaces brunes et croustillantes des bagels sont
grillées ; les surfaces internes sont simplement réchauffées mais ne
sont pas grillées.
19. Coupez votre bagel en deux, et placez les deux moitiés dans les
encoches, les parties brunes face aux résistances externes.
20. Laissez la commande de puissance sur le réglage désiré, abaissez le
levier et appuyez sur le bouton .
21. Le voyant s'allumera, les côtés bruns du bagel seront grillées, et les
côtés tranchés seront réchauffés.
22. Si vous n'êtes pas traditionnel et préférez vos bagels grillés sur le côté tranché,
n'hésitez pas à les tourner dans l'autre sens dans les encoches - nous ne le
répéterons pas !
Trucs et astuces
23. Si vous grillez plus d'une tranche de pain, utilisez des tranches d'une même
dimension, d'une même épaisseur et d'une même fraîcheur.
24. Le vieux pain (de la veille) contient une moindre proportion d'humidité, celui-ci sera
donc plus croustillant.
25. Le vieux pain ou le pain finement tranché grille plus rapidement que le pain frais ou
épais - réduisez la puissance.
26. Les pains sucrés (cakes, pains aux fruits, etc.) grillent beaucoup plus rapidement
que le pain ordinaire, et devraient donc être grillés à une puissance moins élevée.
Miettes
27. Nettoyez fréquemment les miettes présentes dans votre grille-pain afin d'éviter que
celles-ci ne s'accumulent. Ceci est non-hygiénique et pourrait provoquer un incendie.
28. Débranchez le grille-pain et laissez-le refroidir.
29. Retirez le plateau récupérateur de miettes qui se trouve sous le grille-pain.
30. Videz-le et essuyez-le avec un linge humide, séchez-le et repositionnez-le dans le
grille-pain.
31. N'utilisez pas le grille-pain à moins que le plateau récupérateur de miettes ne soit en
place et fermé.
Page 26

NETTOYAGE ET MAINTENANCE
Cet appareil est destiné uniquement à un à usage domestique et il ne peut pas être
réparé par l’utilisateur.
Ne pas ouvrir ou changer aucune des parties vous-même. Veuillez-vous référer
auprès d’un service électrique qualifié ou renvoyer le batteur manuel au fournisseur
si cela s’avère nécessaire pour son entretien.
Avant de nettoyer l’appareil, débranchez la prise et laissez-le refroidir complètement.
Ne pas immerger l'appareil dans de l’eau ou dans tout autre liquide, et le maintenir
sous un robinet pour le nettoyer.
Essuyez les surfaces externes avec un chiffon humide. Si besoin est, utilisez un peu
de liquide vaisselle.
Ne laissez rien pénétrer dans les encoches, ceci pourrait en endommager les
résistances.
N’utilisez pas de produits de nettoyage agressifs ou abrasifs, ainsi que des solvants.
RANGEMENT DE L'APPAREIL
Débrancher l’unité de l’alimentation électrique et nettoyer les pièces comme il l’a été
recommandé ci-dessus. S’assurer que toutes les pièces sont sèches avant de les
ranger.
Ranger l'appareil dans sa boîte ou bien dans un endroit propre, frais et sec.
Ne jamais ranger l'appareil s’il est encore humide ou sale.
Enroulez doucement le cordon d’alimentation ; n’entourez jamais le produit avec le
cordon d’alimentation serré. Ne jamais enrouler le cordon d’alimentation autour du
appareil.
Page 27

MAINTENANCE DE L’APPAREIL
Il n’existe pas de pièces dans cet appareil, dont la maintenance puisse être faite par
l’utilisateur. Si l’unité ne fonctionne pas correctement, veuillez vérifier les points
suivants :
Vous avez correctement suivi les instructions.
Que l’unité a été correctement connectée et que toutes les prises murales sont
allumées.
Que l’alimentation secteur est sur MARCHE.
Que la fiche est solidement ancrée dans la prise de courant.
Si cet appareil ne fonctionne toujours pas après avoir vérifié les points énoncés ci-
dessus :
Consulter un détaillant pour la possibilité d’une réparation ou bien d’un replacement. Si
le détaillant ne réussit pas à résoudre le problème et que vous devez renvoyer
l’appareil, assurez-vous que :
L’unité est emballée avec soin dans son emballage d’origine.
La preuve d’achat est jointe.
La raison pour laquelle l’appareil est renvoyé.
Si le cordon d’alimentation est endommagé, il doit être remplacé par le fabriquant ou par un
agent de maintenance agréé, afin d’éviter tout danger. Si la maintenance devient nécessaire
pendant la durée de la garantie, l’appareil devrait être renvoyé à un centre de maintenance
agréé par Home of Living Brands (Pty) Ltd. La maintenance au-delà de la garantie est
toutefois possible, mais elle sera cependant facturée.
Page 28

LE CHANGEMENT DE LA PRISE
Si la prise intégrée devait être change, suivez les instructions ci-dessous.
Cette unité est conçue pour fonctionner uniquement sur un courant continu de 230V-
240V. La connexion à d’autres sources d’alimentation pourrait endommager l’appareil.
Page 29

VEUILLEZ APPOSER VOTRE PREUVE D’ACHAT / RECU ICI
EN CAS DE RECLAMATION PENDANT LA PERIODE DE GARANTIE CE RECUS DOIT
ETRE PRESENTE.
GARANTIE
1. Home of Living Brands (Pty) Limited garantie à l’acheteur d’origine de ce produit (« le
client »), que ce dernier ne présentera pas de défauts de qualité, ni de fabrication qui
dans le cadre d’une utilisation normale, familiale ou domestique pourrait apparaître en
l’espace d’1 (d’une) année suivant la date d’achat (« période de garantie »).
2. Lorsque le client a acheté un produit qui se casse, présente des défauts ou qui ne
fonctionne pas correctement pour l’utilisation pour laquelle il était destiné, le client doit
signaler cela au fournisseur auprès duquel il a acheté le produit (« le fournisseur »)
durant la période de garantie. Toute réclamation selon les conditions de la garantie doit
être accompagnée d’une preuve d’achat. Si la preuve d’achat, n’est pas disponible, à ce
moment-là, les frais de réparation et / ou d’entretien peuvent être à la charge du client
vis-à-vis du fournisseur.
3. Un produit défectueux doit être rapporté au centre d’entretien du fournisseur pour faire
jouer la garantie.
4. Le fournisseur remboursera, réparera ou échangera le produit selon les termes de cette
garantie qui est assujettie aux exigences légales. Cette garantie devrait être valable
uniquement quand le client n’a pas cassé lui-même l’appareil, ou utilisé ce dernier pour
faire quelque chose pour lequel il n’était pas destiné. La garantie ne comprend pas et ne
peut pas être saurait être considérée comme couvrant les dommages affectant l’appareil,
qui seraient le résultat d’un accident, d’une mauvaise utilisation, d’une modification, d’un
abus ou de toute modification ou réparation non-autorisée de l’appareil.
5. La garantie couvrira uniquement le produit fournit à la date d’achat et elle ne s’appliquera
pas à toute pièces ajoutée ou installée par le client.
6. Si le client demande au fournisseur de réparer le produit et si le produit casse ou ne
fonctionne pas correctement dans les 3 (trois) mois de la réparation, et si ceci n’est pas
le résultat d’une mauvaise utilisation, à ce moment-là le fournisseur pourrait remplacer le
produit ou rembourser le client.
7. Le client pourrait être tenu pour responsable de certains frais lorsque les produits ne sont
pas renvoyés dans leur emballage d’origine, ou si l’emballage est endommagé. Ceci sera
déduit de tout remboursement fait au client.
HOME OF LIVING BRANDS (PTY) LTD
JOHANNESBOURG TEL NO. (011) 490-9600
CAPE TOWN TEL NO. (021) 552-5161
DURBAN TEL NO. (031) 792-6000
 Loading...