

Page 1
INSTRUCTIONS AND WARRANTY
MODEL NO. 14845
RUSSELL HOBBS STEAM, SURGE AND SPRAY IRON
Page 2

2
Congratulations on purchasing our RUSSELL HOBBS Steam, Surge and Spray Iron.
Each unit is manufactured to ensure safety and reliability. Before using this appliance for
the first time, please read the instruction manual carefully and keep it for future
reference.
IMPORTANT SAFEGUARDS
When using any electrical appliance, basic safety precautions should always be followed
including the following:
1. Please read the instructions carefully before using any appliance.
2. Always ensure that the voltage on the rating label corresponds to the mains
voltage in your home.
3. Incorrect operation and improper use can damage the appliance and cause injury
to the user.
4. The appliance is intended for household use only. Commercial use invalids the
warranty and the supplier can not be held responsible for injury or damage
caused when using the appliance for any other purpose than that intended.
5. Avoid any contact with moving parts.
6. This appliance is not intended for use by persons (including children) with
reduced physical, sensory or mental capabilities, or lack of experience and
knowledge, unless they have been given supervision or instruction concerning
use of the appliance by a person responsible for their safety.
7. Children should be supervised to ensure that they do not play with the appliance.
8. Check the power cord and plug regularly for any damage. If the cord or the plug
is damaged, it must be replaced by the manufacturer or a qualified person in
order to avoid an electrical hazard.
9. Do not use the appliance if it has been dropped or damaged in any way. In case
of damage, take the unit in for examination and/or repair by an authorised service
agent
10. To reduce the risk of electric shock, do not immerse or expose the motor
assembly, plug or the power cord to water or any other liquid.
11. Never immerse the unit in water or any other liquid for cleaning purposes.
Page 3

3
12. Remove the plug from the socket by gripping the plug. Do not pull on the cord to
disconnect the appliance from the mains. Always unplug the unit when not in
use, before cleaning or when adding or removing parts.
13. The use of accessory attachments that are not recommended or supplied by the
manufacturer may result in injuries, fire or electric shock.
14. A short cord is provided to reduce the hazards resulting from becoming
entangled in or tripping over a longer cord.
15. Do not let the cord hang over the edge of a table or counter. Ensure that the cord
is not in a position where it can be pulled on inadvertently.
16. Do not allow the cord to touch hot surfaces and do not place on or near a hot gas
or electric burner or in a heated oven.
17. Do not use the appliance on a gas or electric cooking top or over or near an open
flame.
18. Use of an extension cord with this appliance is not recommended. However, if it
is necessary to use an extension lead, ensure that the lead is suited to the power
consumption of the appliance to avoid overheating of the extension cord,
appliance or plug point. Do not place the extension cord in a position where it can
be pulled on by children or animals or tripped over.
19. This appliance is not suitable for outdoor use. Do not use this appliance for
anything other than its intended use.
20. DO NOT carry the appliance by the power cord.
21. Do not leave this appliance unattended during use. Always unplug the unit when
not in use or before cleaning.
22. Always operate the appliance on a smooth, even, stable surface. Do not place
the unit on a hot surface.
23. Ensure that the switch is in the “Off” position after each use.
24. The manufacturer does not accept responsibility for any damage or injury caused
by improper or incorrect use, or for repairs carried out by unauthorised
personnel.
25. In case of technical problems, switch off the machine and do not attempt to repair
it yourself. Return the appliance to an authorised service facility for examination,
adjustment or repair. Always insist on the use of original spare parts. Failure to
comply with the above mentioned pre-cautions and instructions, could affect the
safe operation of this machine.
Page 4
4
ADDITIONAL SAFEGUARDS
• Take care not to scratch the soleplate – avoid buttons, zips, etc.
• The iron has a protective thermal fuse, which will blow if it overheats. If this
happens, the iron will stop working, and must be returned for repair.
• Don’t use the iron if it’s dropped or damaged, or if it malfunctions or leaks.
• If the cable is damaged, return the iron, to avoid hazard.
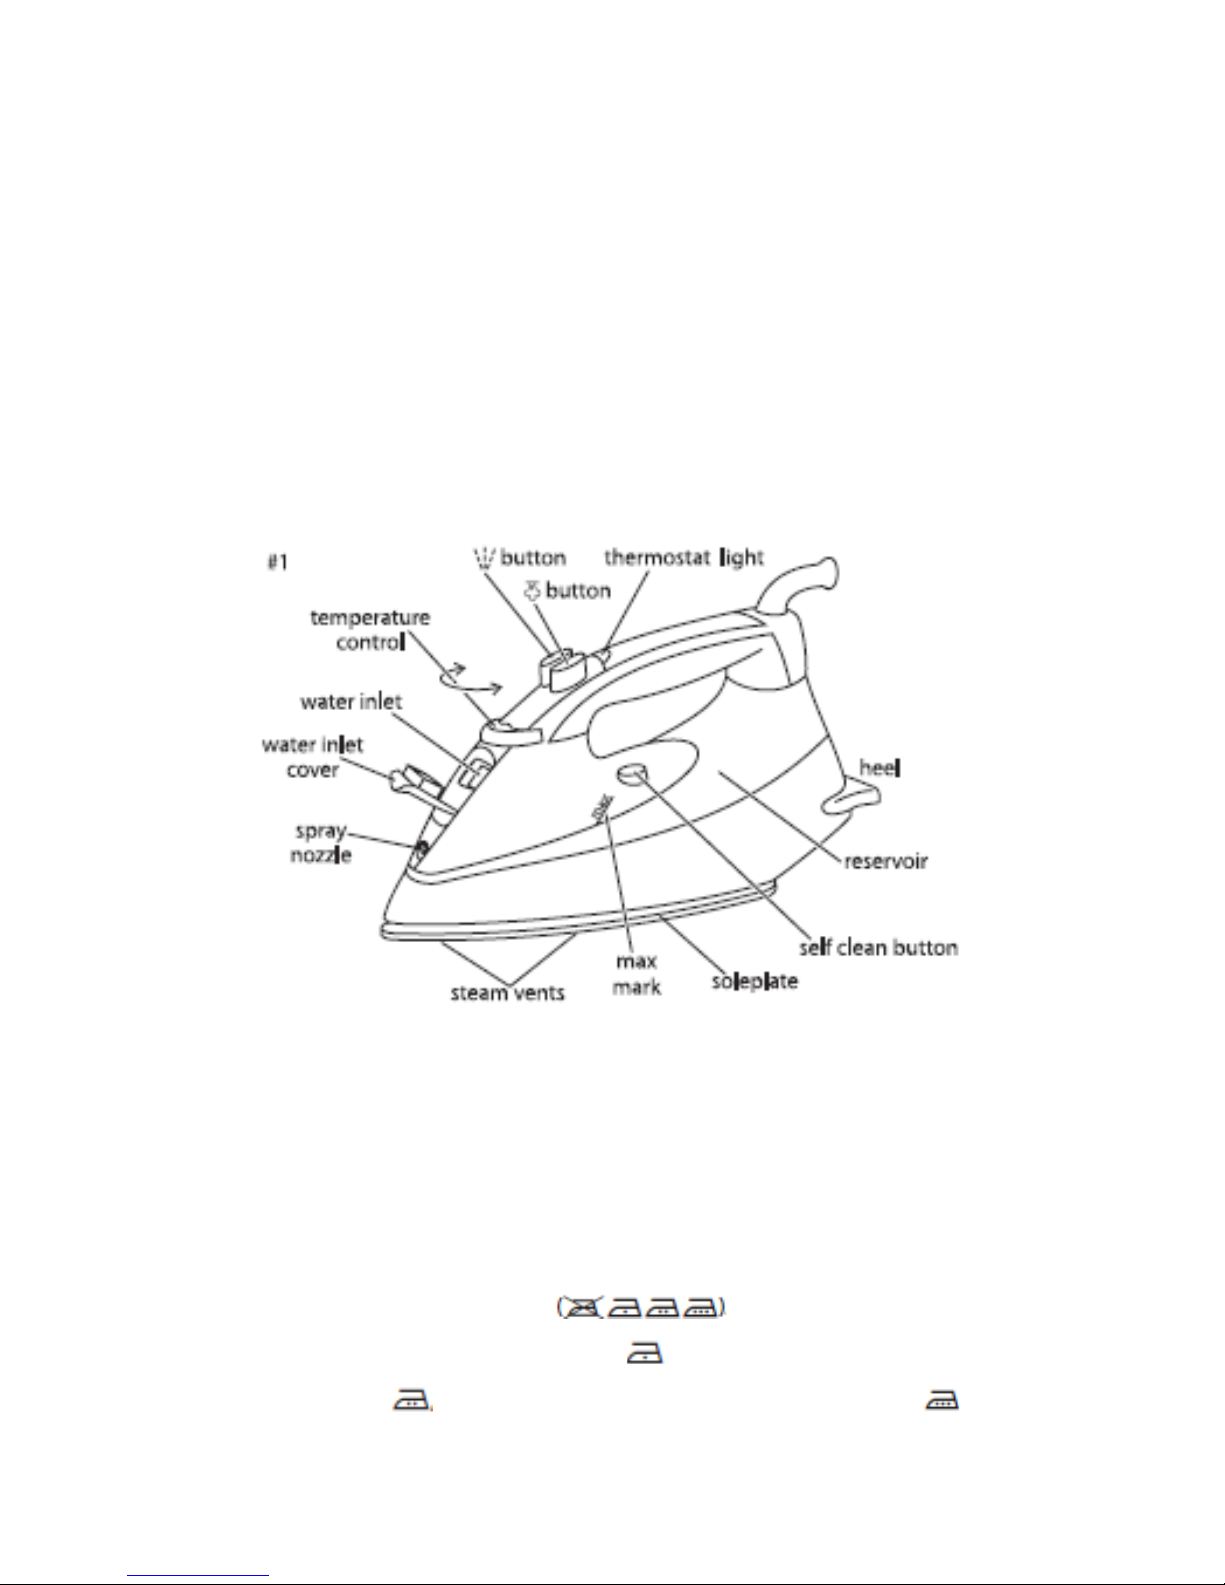
PARTS DIAGRAM
OPERATING INSTRUCTIONS
BEFORE USING FOR THE FIRST TIME:
• Don’t worry if the iron smokes a bit at first, it’ll stop as the element cures.
• Iron an old piece of cotton fabric, to clean the soleplate.
PREPARATION:
• Check for textile care symbols .
• Iron fabrics needing low temperatures first, then those that need medium
temperatures , and finish with those needing high temperatures .
Page 5

5
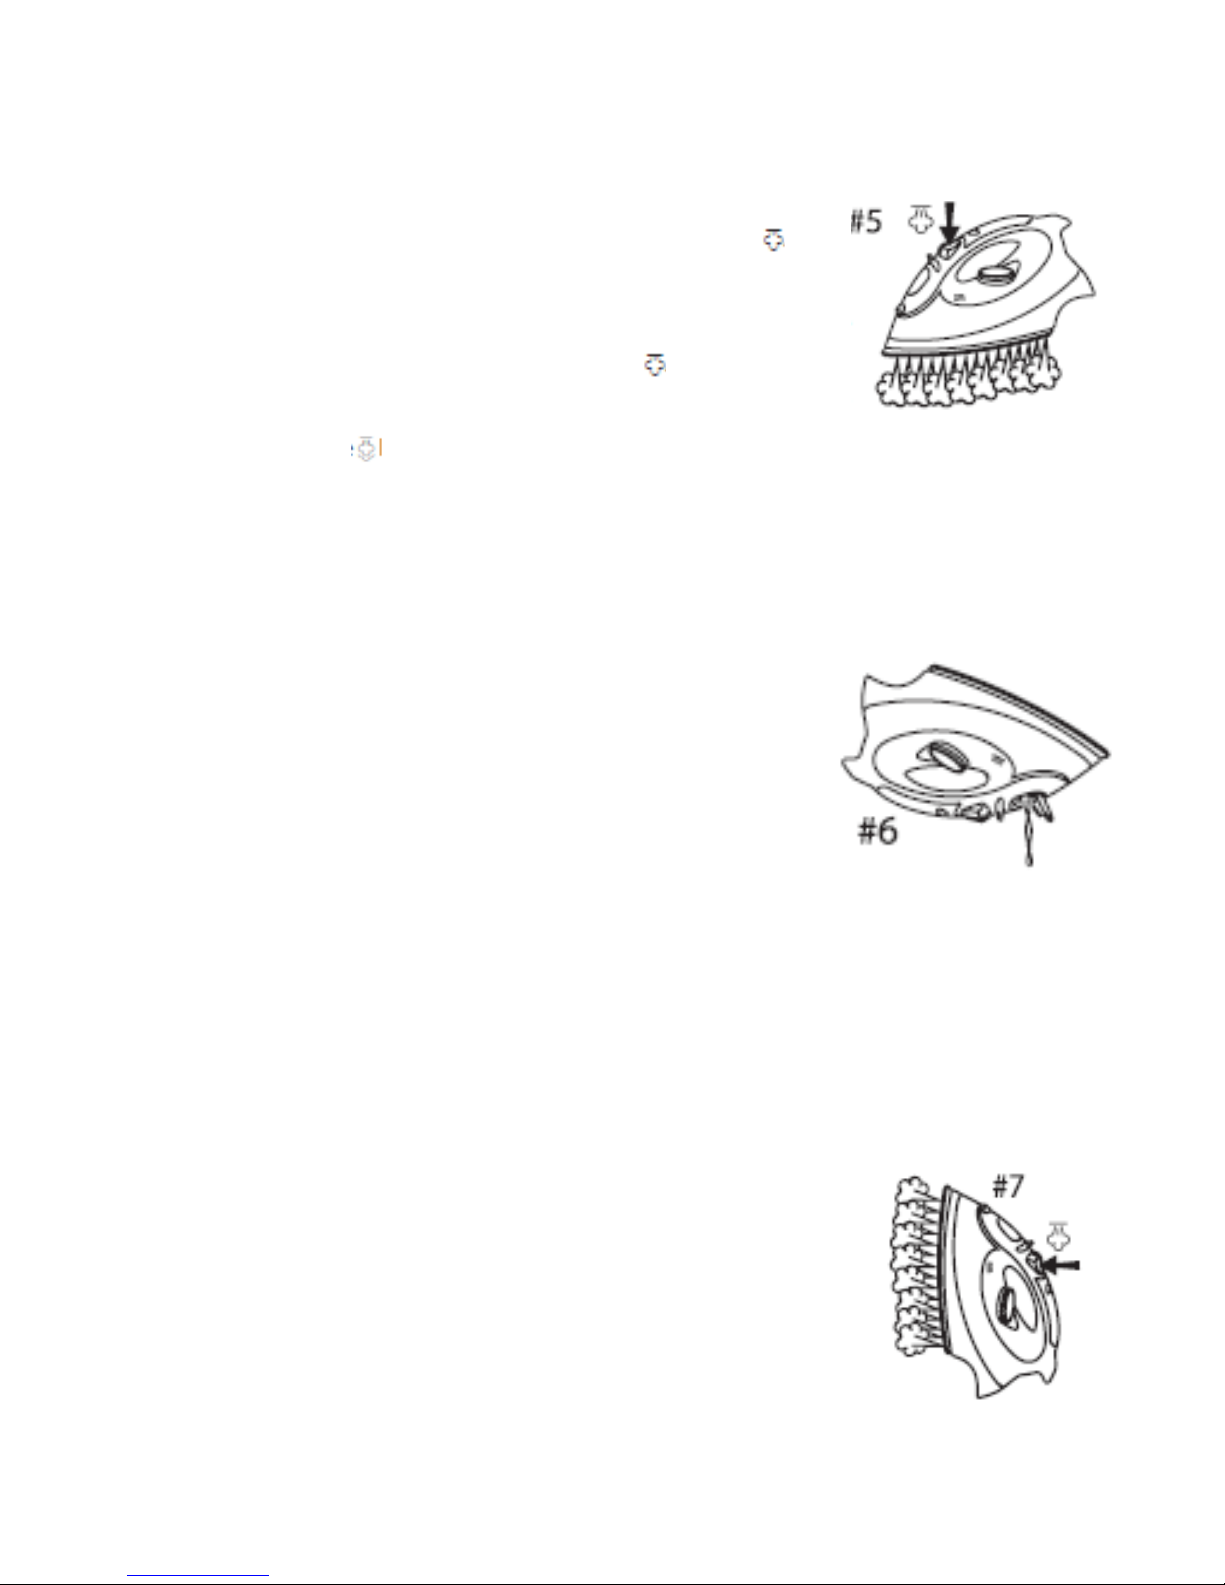
FILING (#2):
• You may use the iron with tap-water, but if you live in a hard water area, you
should use distilled water (not chemically descaled or softened water).
• If you buy distilled water, check that it’s marketed as suitable for use in irons.
• Unplug the iron.
• Turn the temperature control to ●, slide the steam control to (#3).
• Hold the iron with the soleplate down (#2).
• Lift the bottom of the water inlet cover to open it.
• Pour slowly, to let the air in the reservoir escape,
otherwise you will cause an air lock and the water
will overflow.
• Don’t fill past max, or water will escape in use.
• Wipe up any spillage.
SWITCH ON:
• Place the iron on its heel.
• Put the plug into the power socket (switch the socket on, if it’s switchable).
• The thermostat light will come on.
SET THE TEMPERATURE:
• Turn the temperature control to bring the setting you
want opposite to the notch (#3).
• When the iron reaches the temperature you set, the
thermostat light will go off. It’ll then cycle on and off
as the thermostat operates to maintain the
temperature.
TEMPERATURE SETTING GUIDE:
Page 6

6
Please Note: If the instructions on the fabric label differ from this guide, follow the
instructions on the label.
REDUCIING TEMPERATURE:
• Reducing the temperature takes a bit longer, as the element has to lose the heat
it has built up, so be patient. It’s best to organise your ironing so that you don’t
need to reduce the temperature.
STEAM IRONING:
• When steam ironing, you must set the temperature control at or higher. (#3)
• If you don’t, you’ll get water on your clothes, not steam.
• Check that there is water in the reservoir.
• The iron will adjust the amount of steam automatically.
• Wait until the thermostat light goes out then start ironing.
SPRAY:
Water spotting affects some fabrics. Test this out on a
hidden part of the fabric.
• This works with dry or steam ironing, as long as
there’s water in the reservoir.
• Check that there’s water in the reservoir.
• Lift the iron off the fabric.
• Aim the spray nozzle at the fabric.
• Press the button.
• You may have to press it 2 or 3 times to pump water through the system.
Page 7
7
SHOT OF STEAM:
• This works with dry or steam ironing, as long as there’s
water in the reservoir, and the temperature is above . At
lower temperatures you will only get water spotting.
• Check that there’s water in the reservoir.
• Check that the temperature control is at or higher.
• Lift the iron off the fabric.
• Press the button.
• You may have to press it 2 or 3 times to pump water through the system.
• Leave 4 seconds between shots, to let the temperature build up.
DRY IRONING:
• If you’re going to be dry ironing for 20 minutes or more,
empty the reservoir first, to avoid spontaneous bursts of
steam.
• Unplug the iron.
• Hold it over a sink or basin.
• Flip the water inlet cover open.
Caution: The water may be hot.
• Carefully turn the iron upside down and empty the water into the sink or basin.
• Wipe any spillage off the iron before use.
• Set the temperature.
• Wait till the thermostat light goes out, then start ironing
VERTICAL STEAMING:
• Remove wrinkles from hanging clothes, hanging curtains, and
furnishing fabrics.
• Check that there’s adequate ventilation behind the fabric,
otherwise moisture may build up, causing mildew.
• Check that there’s nothing behind the fabric that may be
damaged by the steam.
• Check that pockets, turn-ups, and cuffs are empty.
• Check that there’s water in the reservoir.
Page 8
8
• Turn the temperature control to max opposite the notch.
• Wait until the thermostat light goes out.
• Hold the iron close to (but not touching) the fabric.
• Press the button (you’re using the “shot of steam” function vertically).
• You may have to press it 2 or 3 times to pump water through the system.
• Leave 4 seconds between shots, to let the temperature build up.
AFTER USE:
• Unplug the iron.
• Lift the bottom of the water inlet cover to open it.
• Hold the iron over a sink, turn it upside down, and drain
the water from the reservoir.
Caution: The water may be hot
• Place the iron on its heel.
• Leave it to cool down completely.
• When it’s cold, wipe off any moisture, and close the water inlet cover.
• Store the iron on its heel, to avoid corrosion and damage to the soleplate.
SELF CLEAN:
• To prevent scale building up, use the self clean function regularly, at least
monthly in normal water areas, more often in hard water areas.
• You’ll need a basin or a large bowl to catch the water
coming out of the soleplate.
• Fill the reservoir to the max mark.
• Turn the temperature control to max, move the steam
control to .
• Place the iron on its heel.
• Put the plug into the power socket, and wait till the
thermostat light goes out.
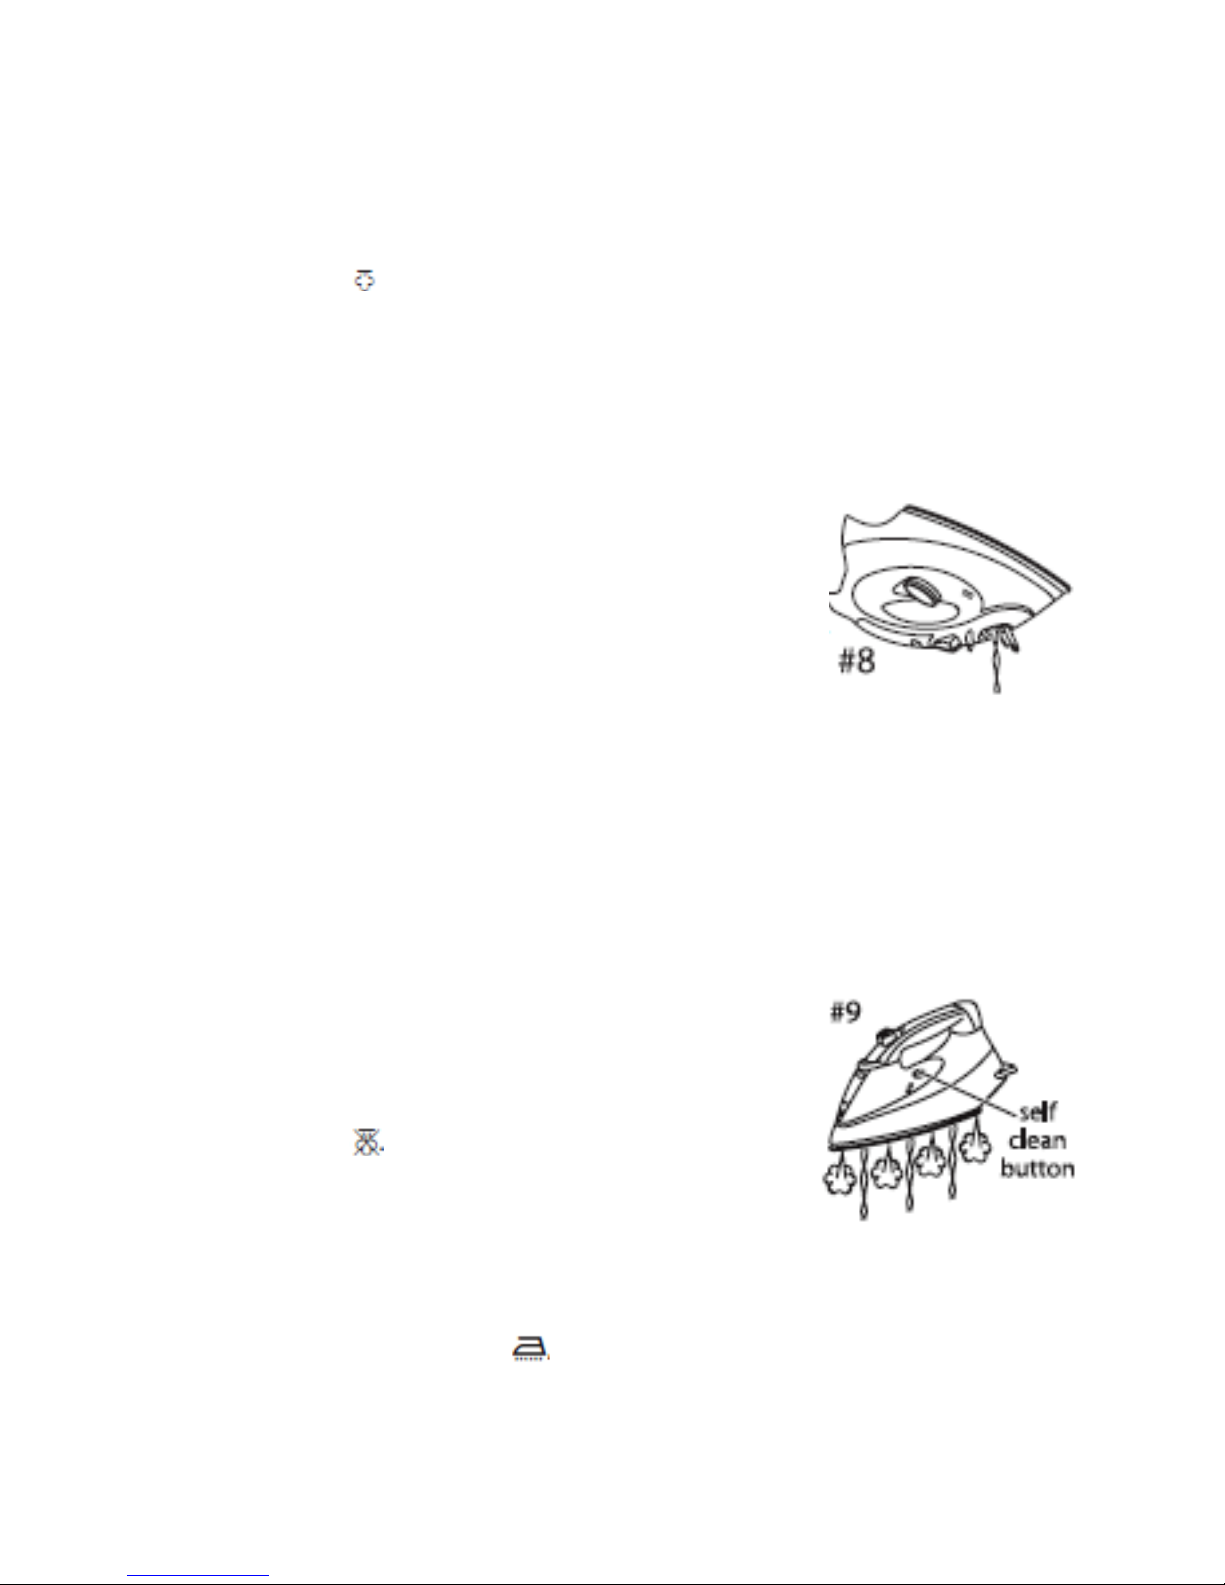
• Now hold the iron over the basin or bowl, with the soleplate down (#9).
• Move the steam control to , hold it there, and gently move the iron to and fro,
over the basin or bowl.
Page 9

9
Caution keep clear of the escaping water and steam
• Water and steam will wash scale and dust through the soleplate, and into the
sink.
• When the reservoir is empty, release the self clean button.
• Unplug the iron, and place it on its heel to cool.
• When it’s cold, wipe off any moisture.
• Store the iron on its heel, to avoid corrosion and damage to the soleplate.
ANTI-SCALE:
• The anti-scale agent incorporated in the iron helps prevent the build-up of scale.
• Don’t use a descaling solution, or you’ll destroy the anti-scale agent.
CLEANING AND MAINTENANCE
• Unplug the iron when not in use, before moving and before cleaning. Let it cool
down fully before cleaning and storing away.
• Remove spots from the soleplate with a little vinegar.
• This appliance is for household use only and is not user-serviceable.
• Do not open or change any parts by yourself. Please refer to a qualified electrical
service department or return to the supplier if servicing is necessary.
• Always remember to unplug the unit from the electrical outlet when not in use
and before cleaning. Ensure that the speed control is set to “0”.
• It is much easier to clean the accessories directly after they have been used.
Wash them in warm, soapy water, rinse and dry well.
• The body of the appliance and the stand should be cleaned with a damp cloth.
Do not let water enter the appliance or the stand.
• Do not use bleach or other abrasive substance or solvents to clean your
appliance as it can be damaging to the finish.
• Do not immerse the appliance in water or any other liquid, or hold it under a
running tap to clean.
STORING THE APPLIANCE
• Unplug the unit from the wall outlet and clean all the parts as instructed above.
Ensure that all parts are dry before storing.
Page 10

10
• Store the appliance in its box or in a clean, dry place.
• Never store the appliance while it is still wet or dirty.
• Never wrap the power cord around the appliance.
SERVICING THE APPLIANCE
There are no user serviceable parts in this appliance. If the unit is not operating
correctly, please check the following:
• You have followed the instructions correctly
• That the unit has been wired correctly and that the wall socket is switched on.
• That the mains power supply is ON.
• That the plug is firmly in the mains socket.
If the appliance still does not work after checking the above:
- Consult the retailer for possible repair or replacement. If the retailer fails to resolve the
problem and you need to return the appliance, make sure that:
• The unit is packed carefully back into its original packaging.
• Proof of purchase is attached.
• A reason is provided for why it is being returned.
If the supply cord is damaged, it must be replaced by the manufacturer or an authorised
service agent, in order to avoid any hazard. If service becomes necessary within the
warranty period, the appliance should be returned to an approved Tedelex Trading (Pty)
Limited service centre. Servicing outside the warranty period is still available, but will,
however, be chargeable.
Page 11
11
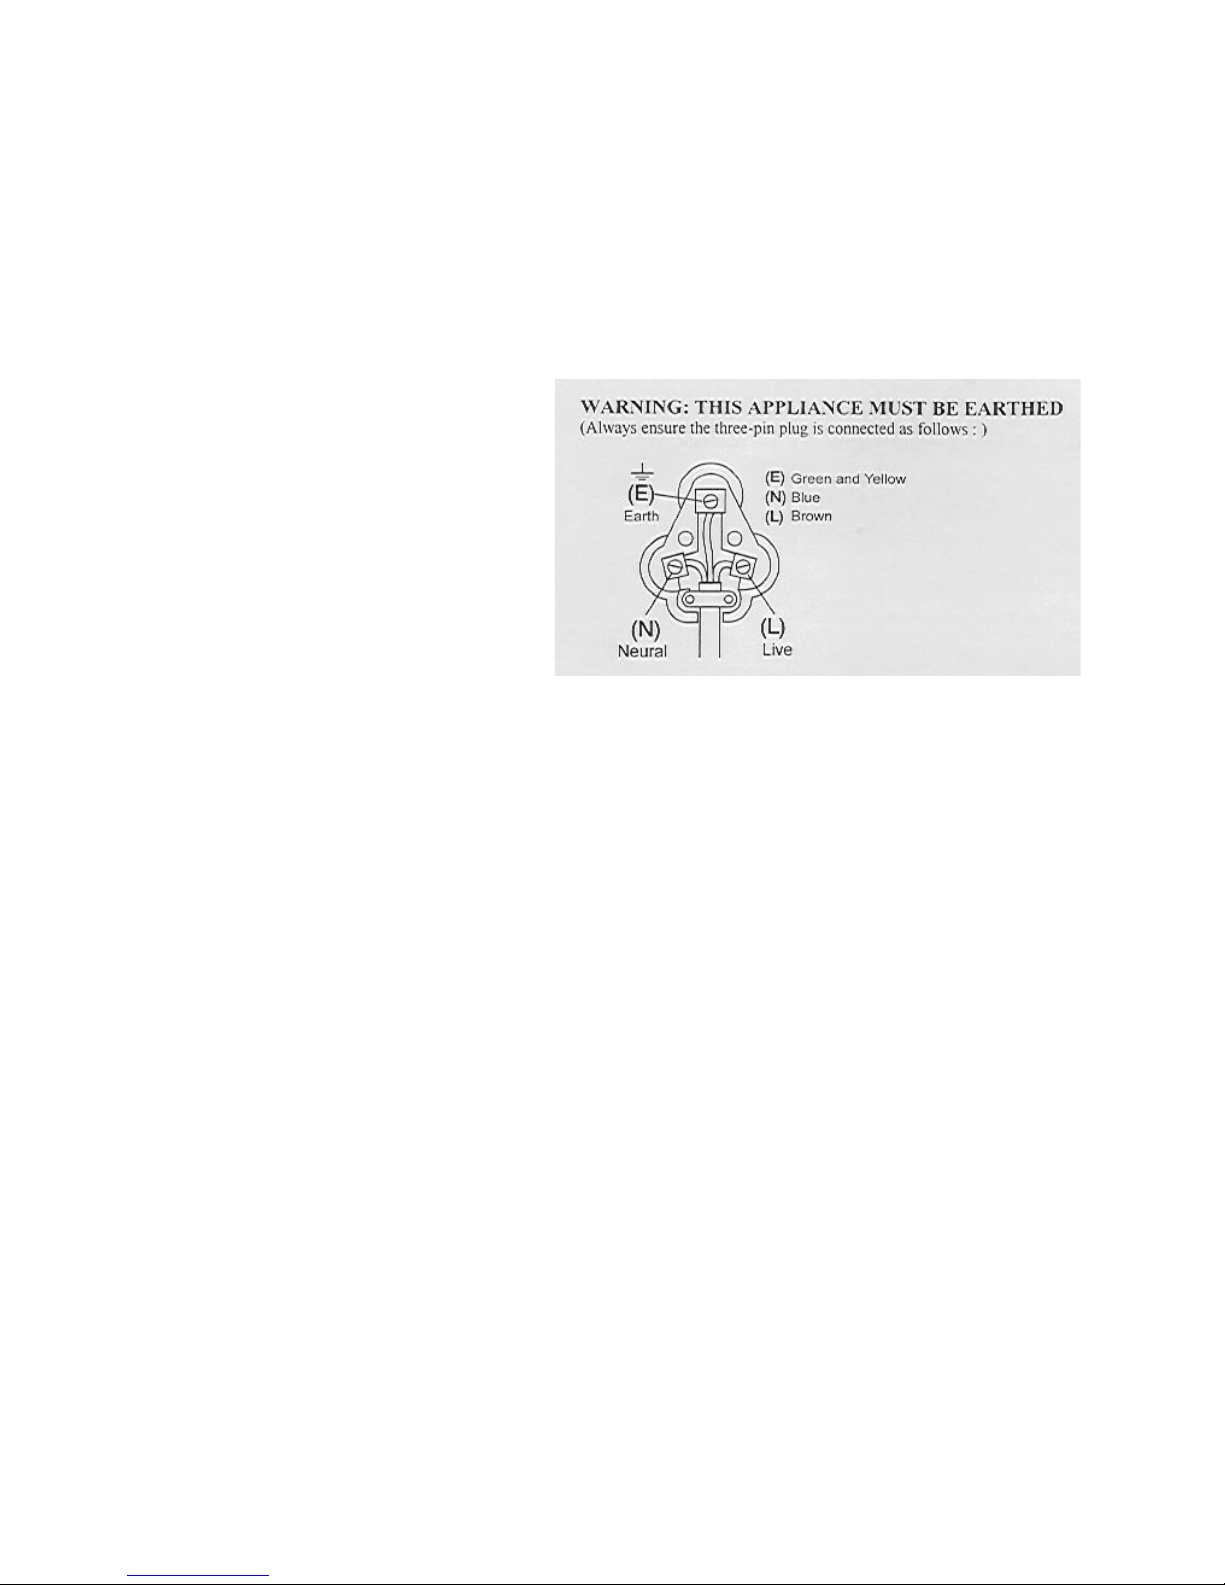
CHANGING THE PLUG
Should the need arise to change the fitted plug, follow the instructions below.
This unit is designed to operate on the stated current only. Connecting to other
power sources may damage the appliance. Connect a three-pin plug as follows:
The wires in this mains lead are coloured in accordance with the following code:
Green/Yellow = Earth
Blue = Neutral
Brown = Live
Page 12

12
PLEASE AFFIX YOUR PROOF OF PURCHASE/RECEIPT HERE
IN THE EVENT OF A CLAIM UNDER WARRANTY THIS RECEIPT MUST BE PRODUCED.
W A R R A N T Y
1. Tedelex Trading (Pty) Limited (“Tedelex”) warrants to the original purchaser of this product (“the
customer”) that this product will be free of defects in quality and workmanship which under normal
personal, family or household use and purpose may manifest within a period of 1 (one) year from
the date of purchase (“warranty period”).
2. Where the customer has purchased a product and it breaks, is defective or does not work
properly for the intended purpose, the customer must notify the supplier from whom the customer
bought the product (“the supplier”) thereof within the warranty period. Any claim in terms of this
warranty must be supported by a proof of purchase. If proof of purchase is not available, then
repair, and/or service charges may be payable by the customer to the supplier.
3. The faulty product must be taken to the supplier's service centre to exercise the warranty.
4. The supplier will refund, repair or exchange the product in terms of this warranty subject to
legislative requirements. This warranty shall be valid only where the customer has not broken the
product himself, or used the product for something that it is not supposed to be used for. The
warranty does not include and will not be construed to cover products damaged as a result of
disaster, misuse, tamper, abuse or any unauthorised modification or repair of the product.
5. This warranty will extend only to the product provided at the date of the purchase and not to any
expendables attached or installed by the customer.
6. If the customer requests that the supplier repairs the product and the product breaks or fails to
work properly within 3 (three) months of the repair and not as a result of misuse, tampering or
modification by or on behalf of the customer, then the supplier may replace the product or pay a
refund to the customer.
7. The customer may be responsible for certain costs where products returned are not in the original
packaging, or if the packaging is damaged. This will be deducted from any refund paid to the
customer.
TEDELEX TRADING (PTY) LTD (JOHANNESBURG)
JOHANNESBURG TEL NO. (011) 490-9600
CAPE TOWN TEL NO. (021) 535-0600
DURBAN TEL NO. (031) 792-6000
www.amap.co.za
Page 13

13
Félicitations pour l’achat de notre fer à repasser à vapeur, à jet de vapeur et à
pulvérisation RUSSELL HOBBS. Chaque unité est fabriquée avec un souci de sécurité
et de fiabilité. Avant d’utiliser cet appareil pour la première fois, merci de lire le manuel
d’instructions et de le conserver afin de pouvoir vous y reporter à l’avenir.
CARACTERISTIQUE DU FER A REPASSER A VAPEUR, A JET DE
VAPEUR ET A PULVERISATION RUSSELL HOBBS
MESURES DE SECURITE IMPORTANTES
Lorsque vous utilisez n’importe quel appareil électrique, les précautions de sécurité de
base devraient toujours être suivies, y compris les points suivants :
1. Merci de lire les instructions avec attention avant d’utiliser un appareil quel qu’il
soit.
2. Toujours vous assurer que le voltage inscrit sur l’étiquette de classification
correspond aux voltages principaux de votre habitation.
3. Un mauvais fonctionnement et une utilisation inappropriée peuvent
endommager l’appareil et peuvent entraîner des blessures pour l’utilisateur.
4. L’appareil est uniquement destiné à un usage domestique. Une utilisation
commerciale annule la garantie et le fournisseur ne peut pas être tenu pour
responsable en cas de blessures ou de dommages causés lors d’une utilisation
différente de celle pour laquelle cet appareil est destiné.
5. Eviter tout contact avec les parties articulées.
6. Cet appareil n’est pas conçu pour être utilisé par des personnes (y compris les
enfants) dont les capacités physiques, sensorielles ou mentales sont déficientes,
ou bien, ne possédant pas assez d’expérience ou de connaissance, à moins
qu’elles n’aient été supervisées ou qu’elles aient reçu des instructions relatives à
l’utilisation de l’appareil, par une personne responsable de leur sécurité.
7. Les enfants devraient être supervisés afin de s’assurer qu’ils ne jouent pas avec
l’appareil.
Page 14

14
8. Vérifier le cordon d’alimentation et le brancher régulièrement afin d’éviter tout
endommagement. Si le cordon ou la prise sont endommagés, ils doivent être
remplacés par le fabricant ou par une personne qualifiée, afin d’éviter un risque
électrique.
9. Ne pas utiliser l’appareil dans le cas où il serait tombé ou s’il a été endommagé
de quelque manière que ce soit. En cas de dommage, vous devez apporter
l’unité à un agent d’entretien autorisé.
10. Afin de réduire le risque d’électrocution, ne pas immerger ou exposer le groupe
moteur, la prise ou le cordon d’alimentation dans et à l’eau ou dans tout autre
liquide.
11. Ne jamais immerger l’unité dans l’eau ou dans tout autre liquide pour le nettoyer.
12. Retirer la prise en l’empoignant. Ne pas tirer sur le cordon pour débrancher
l’appareil du réseau électrique. Toujours rebrancher l’unité lorsqu’elle n’est pas
utilisée, avant de la nettoyer ou lorsque vous ajoutez ou enlevez des pièces de
l’appareil.
13. L’utilisation d’attachements accessoires qui ne sont ni recommandés, ni fournis
par le fournisseur peut entraîner des blessures, des incendies ou bien encore
des électrocutions.
14. Un cordon court est fournit afin d’éviter les risques d’enchevêtrement ou bien de
trébuchement avec un cordon plus long.
15. Ne pas laisser le cordon suspendu sur le bord d’une table ou d’un comptoir.
S’assurer qu’on ne peut pas tirer dessus par inadvertance
16. Eviter que le cordon ne touche pas des surfaces chaudes et qu’il se trouve pas
sur ou à proximité d’un brûleur à gaz chaud ou d’un brûleur électrique, ou
encore d’un four chauffé.
17. Ne pas utiliser l’appareil sur une cuisinière à gaz ou électrique ou bien au-dessus
ou près d’une flamme.
18. L’utilisation d’un cordon prolongateur n’est pas recommandée avec cet appareil.
Cependant, dans le cas où il s’avérerait nécessaire d’utiliser un fil de
prolongation, s’assurer que ce dernier convient à la consommation électrique de
l’appareil, afin d’éviter de surchauffer le cordon prolongateur, l’appareil ou bien
les électrodes. Ne pas placer le cordon prolongateur de façon à ce que les
enfants ou les animaux puissent le tirer ou encore trébucher dessus.
Page 15

15
19. Cet appareil ne convient pas à un usage à l’extérieur. Ne pas utiliser cet appareil
pour un usage autre que celui pour lequel il est destiné.
20. NE PAS porter l’appareil en le prenant par le cordon d’alimentation.
21. Ne pas laisser cet appareil dans surveillance pendant son utilisation. Toujours
débrancher l’unité lorsqu’elle n’est pas utilisée ou avant de la nettoyer.
22. Faire toujours fonctionner l’appareil sur une surface lisse, égale et stable. Ne pas
placer l’unité sur une surface chaude.
23. S’assurer que l’interrupteur est en position « éteint » après chaque utilisation.
24. Le fabriquant n’accepte pas de porter la responsabilité de tout dommage ou
blessure qui serait cause par une utilisation inappropriée ou incorrecte, ou pour
des réparations qui n’auraient pas été faites par un personnel autorisé.
25. En cas de problèmes techniques, éteindre la machine et n’essayez pas de la
réparer vous-même. Rapportez l’appareil à un service d’entretien autorisé afin
qu’il soit examiné, ajusté ou bien réparé. Toujours insister pour que les pièces
détachées d’origine soient utilisées. Le manquement à suivre les précautions et
les instructions mentionnées ci-dessus, pourrait affecter le fonctionnement en
toute sécurité de cette machine.
MESURES DE SECURITE SUPPLEMENTAIRES
• Faire attention à ne pas griffer la semelle - éviter les boutons, les fermetures
éclairs, etc.
• Le fer à repasser possède un fusible thermique qui explosera en cas de
surchauffe. Si cela arrive, le fer à repasser s’arrêtera de fonctionner et il doit être
renvoyé pour être réparé.
• Ne pas utiliser le fer à repasser s’il est tombé, ou endommagé, ou s’il présente
des défaillances ou des fuites.
• Si le cordon est endommagé, renvoyer le fer à repasser, pour éviter tout risque.
Page 16

16
SCHEMA DES PIECES
INSTRUCTIONS DE FONCTIONNEMENT
AVANT DE L’UTILISER POUR LA PREMIERE FOIS :
• Ne vous inquiétez pas si le fer à repasser fume un peu au début, cela s’arrêtera
lorsque l’appareil sèchera.
• Repassez un vieux morceau de tissu en coton, pour nettoyer la semelle.
PREPARATION :
• Vérifiez les symboles d’entretien correspondant aux textiles. ).
• Repassez en premier les tissus ayant besoin de températures basses , puis
ceux nécessitant des températures moyennes , et terminez avec ceux ayant
besoin de températures élevées .
REMPLISSAGE (#2) :
• Le fer peut être utilisé avec de l’eau du robinet, mais si vous vivez dans une zone
où l’eau est dure, vous devriez utiliser de l’eau distillée (pas de l’eau détartrée
chimiquement).
Page 17

17
• Si vous achetez de l’eau distillée, vérifiez qu’elle est indiquée comme convenant
pour l’utilisation dans les fers à repasser.
• Débranchez le fer à repasser.
• Tournez le contrôle de la température sur ●, glissez le contrôle de la vapeur sur
(#3).
• Maintenez le fer à repasser avec sa semelle vers
le bas (#2).
• Soulevez la base du couvercle de l’orifice du
réservoir d’eau pour l’ouvrir.
• Versez lentement pour permettre à l’air de
s’échapper du réservoir, sinon vous causerez un
sas et l’eau débordera.
• Ne pas remplir au-delà de max, sinon l’eau s’écoulera pendant l’utilisation.
• Essuyez toutes éclaboussures.
ALLUMAGE :
• Posez le fer sur son talon.
• Branchez la prise sur l’alimentation électrique (allumez la prise si elle dispose
d’un interrupteur).
• Le témoin lumineux du thermostat s’allumera.
RÉGLEZ LA TEMPÉRATURE :
• Tournez le contrôle de la température sur le réglage
que vous souhaitez près de la marque (#3).
• Lorsque le fer à repasser atteint la température que
vous souhaitez, le témoin lumineux s’éteindra. Il
s’allumera puis s’éteindra en alternance, lorsque le
thermostat fonctionnera pour maintenir la
température.
Page 18

18
GUIDE DE RÉGLAGE DE LA TEMPERATURE :
Veuillez noter : si les instructions sur l’étiquette du tissu sont différentes de celles du
guide, suivre les instructions de l’étiquette.
DIMINUTION DE LA TEMPERATURE :
• Diminuez La température prend un peu plus de temps, car l’appareil doit refroidir,
donc soyez patient. Il vaut mieux organiser votre repassage, afin que vous ne
soyez pas obligé de réduire la température.
REPASSAGE A VAPEUR :
• Lors du repassage à vapeur, vous devez régler le contrôle de la température à
ou plus élevé. (#3)
• Si vous ne le faites pas, vous aurez de l’eau sur vos vêtements et non de la
vapeur.
• Vérifiez qu’il y a de l’eau dans le réservoir.
• Le fer à repasser ajustera automatiquement le volume de vapeur.
• Attendez jusqu’à ce que le témoin lumineux du thermostat s’éteigne, puis
commencez à repasser.
PULVERISER :
Des tâches d’eau peuvent affecter certains tissus.
Essayez cela sur une partie non visible du tissu.
• Ceci fonctionne avec le repassage à sec et à
vapeur, tant qu’il y a de l’eau dans le réservoir.
• Vérifiez qu’il y a de l’eau dans le réservoir.
• Enlevez le fer à repasser du tissu.
Page 19

19
• Dirigez le bec de pulvérisation vers le tissu.
• Appuyez sur le bouton .
• Vous devrez peut être appuyer 2 ou 3 fois pour pomper l’eau à travers le
système.
JET DE VAPEUR :
• Ceci fonctionne avec le repassage à sec et à vapeur, tant
qu’il y a de l’eau dans le réservoir et que la température est
supérieure à . A des températures basses, vous n’aurez
que des tâches d’eau.
• Vérifiez qu’il y a de l’eau dans le réservoir.
• Vérifiez que le contrôle de la température est à ou plus
élevé.
• Enlevez le fer à repasser du tissu.
• Appuyez sur le bouton .
• Vous devrez peut être appuyer 2 ou 3 fois pour pomper l’eau à travers le
système.
• Laissez passer 4 secondes entre les jets, afin de laisser la température monter.
REPASSAGE A SEC :
• Si vous allez repasser à sec pendant 20 minutes ou plus,
videz d’abord le réservoir d’eau, afin d’éviter des jets de
vapeur.
• Débranchez le fer à repasser.
• Maintenez-le au-dessus d’un évier ou d’une cuvette.
• Ouvrez le couvercle de l’orifice du réservoir d’eau.
Avertissement : l’eau peut être chaude.
• Tournez avec précautions le fer à repasser à l’envers et vider l’eau dans l’évier
ou dans la cuvette.
• Essuyez toutes éclaboussures du fer à repasser avant de l’utiliser.
• Réglez la température.
• Attendez jusqu’à ce que le témoin lumineux du thermostat s’éteigne, puis
commencez à repasser.
Page 20

20
VAPEUR VERTICALE :
• Enlève les plis des vêtements suspendus, des rideaux et des
tissus d’ameublement.
• Vérifiez qu’il y ait une bonne aération derrière le tissu, sinon
l’humidité peut rester et entraîner des moisissures.
• Vérifiez qu’il n’y ait rien derrière le tissu qui puisse être
endommagé par la vapeur.
• Vérifiez que les poches, les revers de manches et les
manchettes sont vides.
• Vérifiez qu’il y a de l’eau dans le réservoir.
• Tournez le contrôle de la température sur le maximum opposé au bouton.
• Attendre que le témoin lumineux du thermostat s’éteigne.
• Maintenez le fer à repasser près (mais sans le toucher) du tissu.
• Appuyez sur le bouton (vous utilisez la fonction de jet de vapeur
verticalement).
• Vous devrez peut être appuyer 2 ou 3 fois pour pomper l’eau à travers le
système.
• Laissez passer 4 secondes entre les jets, afin de laisser la température monter.
APRES L’UTILISATION :
• Débranchez le fer à repasser.
• Soulevez la base du couvercle de l’orifice du réservoir
d’eau pour l’ouvrir.
• Maintenir le fer à repasser au-dessus d’un évier, le
tourner de haut en bas et vider l’eau du réservoir.
Avertissement : l’eau peut être chaude.
• Reposez le fer à repasser sur son talon.
• Le laisser refroidir complètement.
• Lorsqu’il est froid, essuyez toute humidité et fermez le couvercle de l’orifice du
réservoir d’eau.
• Rangez le fer à repasser en le posant sur son talon, afin d’éviter que la semelle
ne rouille ou qu’elle ne s’endommage.
Page 21

21
AUTO-NETTOYAGE :
• Pour éviter le dépôt du calcaire, utilisez la fonction d’auto-nettoyage au moins
une fois par mois dans les zones où l’eau n’est pas calcaire et plus souvent
dans celles où c’est le cas.
• Vous aurez besoin d’une cuvette ou bien d’un grand
bol, pour récupérer l’eau s’écoulant du réservoir d’eau.
• Remplissez le réservoir d’eau au maximum.
• Tournez le contrôle de la température au maximum,
déplacer le contrôle de la vapeur sur .
• Reposez le fer à repasser sur son talon.
• Branchez la prise sur l’alimentation électrique et
attendez jusqu’à ce que le témoin lumineux du thermostat s’éteigne.
• Maintenant, maintenez le fer à repasser au-dessus de la cuvette ou du bol, avec
la semelle vers le bas (#9).
• Déplacez le contrôle de la vapeur sur , maintenez-le sur cette position et
déplacez doucement le fer à repasser de droite à gauche au-dessus de l’évier
ou de la cuvette.
Avertissement : tenez-vous à distance de l’eau et de la vapeur qui se dégagent du fer
à repasser.
• L’eau et la vapeur nettoieront le calcaire et la poussière à travers la semelle et
dans l’évier.
• Lorsque le réservoir est vide, relâchez le bouton d’auto-nettoyage.
• Débranchez le fer à repasser et le mettre sur son talon pour qu’il refroidisse.
• Lorsqu’il est froid, essuyez toute humidité restante.
• Rangez le fer à repasser en le posant sur son talon, afin d’éviter que la semelle
ne rouille ou qu’elle ne s’endommage.
ANTITARTRE :
• L'agent détartrant incorporé dans le fer à repasser prévient les dépôts calcaires.
• Ne pas utiliser une solution détartrante, sinon vous détruirez l’agent détartrant.
Page 22

22
NETTOYAGE ET MAINTENANCE
• Débranchez le fer à repasser lorsqu’il n’est pas utilisé, avant de le déplacer et
avant de le nettoyer. Laissez-le refroidir complètement avant de le ranger.
• Enlevez les tâches se trouvant sur la semelle en utilisant un peu de vinaigre.
• Cet appareil est uniquement destiné à un usage domestique et il ne peut pas
être réparé par l’utilisateur.
• Ne pas ouvrir ou changer vous-même toute pièce que ce soit. Merci de vous
adresser au département de maintenance électrique compétent ou bien de
renvoyer l’appareil au fournisseur si une révision est nécessaire.
• Rappelez-vous de toujours débrancher l’unité de la prise électrique lorsqu’elle
n’est pas utilisée ou bien avant de la nettoyer. S’assurer que la commande de
vitesse est réglée sur « 0 ».
• Il est beaucoup plus facile de nettoyer les accessoires directement après leur
utilisation. Nettoyez-les dans une eau chaude et savonneuse, les rincer et bien
les sécher.
• Le corps de l’appareil et son support devraient être nettoyés à l’aide d’un chiffon
humide. Ne pas laisser l’eau entrer dans l’appareil ou dans le support.
• Ne pas utiliser d’eau de javel ou toute autre substance abrasive ou solvants pour
nettoyer votre appareil, car cela pourrait endommager le revêtement.
• Ne pas plonger l’appareil dans l’eau ou dans tout autre liquide, ou bien ne pas le
maintenir sous un robinet ouvert pour le nettoyer.
• Afin d’enlever les tâches ou les marques récalcitrantes, essuyer les surfaces
avec un chiffon légèrement humidifié dans une eau chaude et savonneuse, ou
bien avec un nettoyant doux non-abrasive. Le rincer et le sécher avec un chiffon
doux.
LE RANGEMENT DE L’APPAREIL
• Débrancher l’unité de la prise et nettoyer toutes les pièces en suivant les
instructions ci-dessus. S’assurer que toutes les pièces sont sèches, avant de les
ranger.
• Ranger l’appareil dans sa boite ou bien dans un lieu propre et sec.
Page 23

23
• Ne jamais ranger l’appareil dans s’il est encore humide ou sale.
• Ne jamais enrouler le cordon d’alimentation autour de l’appareil.
ENTRETIEN DE L’APPAREIL
Il n’existe pas dans cet appareil de pièces qui soient réparables par l’utilisateur. Si
l’unité ne fonctionne pas correctement, merci de bien vouloir vérifier les points suivants :
• Vous avez suivit correctement les instructions.
• Que l’unité est correctement câblée et que la prise est allumée.
• Que le réseau d’alimentation électrique est allumé.
• Que la prise est fermement branchée dans la prise du réseau.
Si l’appareil ne fonctionne toujours pas après avoir vérifié les points ci-dessus :
- Consulter le distributeur pour une réparation ou bien pour un remplacement possibles.
Dans le cas où le revendeur ne résoudrait pas le problème et que vous devez renvoyer
l’appareil, assurez-vous que :
• L’unité est remballée avec soin dans son emballage d’origine.
• La preuve d’achat est jointe.
• La raison de son renvoi est fournie.
Si le cordon d’alimentation est endommagé, il doit être remplacé par un fabricant ou par
un agent d’entretien autorisé, afin d’éviter risqué. Si une révision s’avère nécessaire
Durant la période de garantie, l’appareil devrait être renvoyé à un centre d’entretien
approuvé par Tedelex Trading (Pty) Limited. Une révision en dehors de la période de
garantie est toujours possible, mais sera toutefois facturée.
Page 24

24
LE CHANGEMENT DE LA PRISE
Si la prise intégrée devait être change, suivez les instructions ci-dessous.
Cette unité est conçue pour fonctionner uniquement sur courant continu.
La connexion à d’autres sources d’alimentation pourrait endommager
l’appareil. Connecter la prise à trois chiffes de la manière suivante :
Les fils de ce réseau sont colorés selon le code suivant :
Page 25

25
MERCI D’ATTACHER VOTRE PREUVE D’ACHAT ICI
EN CAS DE RECLAMATION SOUS GARANTIE CE RECU DOIT ETRE PRESENTE.
GARANTIE
1. Tedelex Trading (Pty) Limited (« Tedelex ») garantie à l’acheteur d’origine de ce produit (« le
client ») que produit ne sera pas défectueux que ce soit en ce qui concerne sa qualité ou sa
fabrication, ce dernier dans le cas d’une utilisation personnelle normale, familiale ou domestique,
pourra se manifester à ce propos dans une période d’une (1) année à partir de la date de l’achat
(« période de garantie »).
2. Si le client a acheté un produit et qu’il se casse, qu’il est défectueux ou qu’il ne fonctionne pas
correctement, le client doit notifier cela au fournisseur auprès duquel il a acheté le produit (« le
fournisseur ») dans la période de garantie. Toute réclamation dans le cadre de cette garantie doit
être accompagnée d’une preuve d’achat. Si la preuve d’achat n’est pas disponible, les frais de la
réparation, et / ou de la révision peuvent être réglés par le client au fournisseur.
3. Le produit défectueux doit être rapporté au centre d’entretien du fournisseur afin d’activer la
garantie.
4. Le fournisseur remboursera, réparera ou échangera le produit, selon les termes de cette garantie,
qui est soumise à des conditions juridiques. Cette garantie devrait être valide, uniquement dans le
cas où le client n’aurait pas cassé lui-même le produit, ou qu’il ne l’a pas utilisé pour un usage
autre que celui pour lequel il était destine. La garantie ne comprend pas et ne sera pas interprétée
de manière à couvrir les produits endommagés à la suite d’un désastre, d’une mauvaise utilisation,
d’un traficage, d’un abus ou de toute modification ou d’une réparation non-autorisée du produit.
5. Cette garantie s’étendra uniquement au produit fournit à la date de l’achat et non à toute pièce
supplémentaire attachée ou installée par le client.
6. Si le client requiert que le fournisseur répare le produit et que le produit se casse, ou bien qu’il ne
fonctionne pas dans les 3 (trois) mois suivant la réparation, et que cela n’est pas le résultat d’une
mauvaise utilisation, d’une falsification ou d’une modification par ou bien au nom du client, à ce
moment là, le fournisseur devra remplacer le produit ou rembourser le client.
7. Le client peut être tenu responsable de certains frais, lorsque les produits renvoyés ne sont pas
dans leur emballage d’origine, ou bien si l’emballage est endommagé. Ceci sera déduit de tout
remboursement réglé au client.
TEDELEX TRADING (PTY) LTD (JOHANNESBURG)
JOHANNESBURG NO TEL. (011) 490-9600
CAPE TOWN NO TEL. (021) 535-0600
DURBAN NO TEL. (031) 792-6000
www.amap.co.za
Page 26

26
Parabéns pela aquisição do nosso Ferro de Engomar a Vapor RUSSELL HOBBS. Cada
aparelho é fabricado com vista a assegurar a segurança e a fiabilidade. Leia o
manual de instruções cuidadosamente e guarde-o para consulta futura antes de
utilizar este aparelho pela primeira vez.
CARACTERÍSTICAS DO FERRO DE ENGOMAR A VAPOR RUSSELL
HOBBS
MEDIDAS DE SEGURANÇA IMPORTANTES
Ao utilizar qualquer aparelho eléctrico, cumpra sempre com as precauções
básicas de segurança, incluindo o seguinte:
1. Leia as instruções cuidadosamente antes de utilizar qualquer aparelho.
2. Certifique-se sempre de que a voltagem indicada na etiqueta de
classificação corresponde à voltagem da corrente na sua residência.
3. O funcionamento incorrecto e a utilização indevida do aparelho podem-no
danificar e provocar lesões no utilizador.
4. O aparelho destina-se apenas para uso doméstico. O uso comercial do
aparelho invalida os termos da sua garantia e o fornecedor não poderá
ser responsabilizado por quaisquer lesões ou danos que tenham ocorrido
na sequência do uso do aparelho para qualquer outro fim que não o
indicado.
5. Evite qualquer contacto com peças móveis.
6. Este aparelho não se destina a ser utilizado por pessoas (incluindo
crianças) com capacidades físicas, sensoriais ou mentais reduzidas ou
falta de experiência e conhecimento, excepto caso tenham supervisão ou
recebido instruções acerca do seu uso por uma pessoa responsável pela
sua segurança.
7. As crianças devem ser supervisionadas para assegurar que não brincam
com o aparelho.
8. Inspeccione o fio e a tomada regularmente para detectar quaisquer sinais
de danos. Se o fio ou a tomada estiverem danificados, devem ser
Page 27

27
substituídos pelo fabricante ou um técnico devidamente qualificado para
evitar um risco eléctrico.
9. Não use o aparelho caso tenha caído ao chão ou sido danificado de
qualquer maneira. Caso ocorram quaisquer danos, o aparelho deve ser
inspeccionado e/ou reparado por um centro de assistência devidamente
autorizado.
10. Para reduzir o risco de choque eléctrico, não submirja ou exponha o
motor, ficha ou fio a água ou qualquer outro líquido.
11. Nunca submirja o aparelho em água ou qualquer outro líquido para fins de
limpeza.
12. Segure a ficha firmemente para a retirar da tomada. Nunca puxe o fio
para retirar a ficha da tomada e desligar o aparelho da corrente. Retire
sempre a ficha da tomada quando o aparelho não estiver em uso, antes
de a limpar ou ao adicionar ou remover peças.
13. O uso de acessórios que não sejam recomendados ou fornecidos pelo
fabricante pode originar lesões, incêndios ou choques eléctricos.
14. É fornecido um fio curto para reduzir os perigos resultantes de ficar
emaranhado ou tropeçar num fio mais comprido.
15. Não deixe o fio pendurado na extremidade de uma mesa ou balcão.
Certifique-se de que o fio não está numa posição onde possa ser puxado
inadvertidamente.
16. Não deixe o fio entrar em contacto com superfícies quentes e não o
coloque sobre ou perto de um fogão a gás ou eléctrico ou forno quente.
17. Não use o aparelho sobre um fogão a gás ou eléctrico ou sobre ou perto
de chamas vivas.
18. Não recomendamos o uso de uma extensão com este aparelho. Porém,
se for necessário usar uma extensão, certifique-se de que o terminal é
adequado para o consumo de electricidade do aparelho para evitar o
sobreaquecimento da extensão, aparelho ou tomada. Não coloque a
extensão numa posição onde possa ser puxada por crianças ou animais
ou onde possa tropeçar nela.
Page 28

28
19. Este aparelho não é adequado para uso no exterior. Não use este
aparelho para qualquer outro fim que não o previsto.
20. NÃO transporte o aparelho através do fio.
21. Não deixe este aparelho sem vigilância durante o seu uso. Retire sempre
a ficha da tomada quando o aparelho não estiver em uso ou ao limpar.
22. Utilize o aparelho sempre sobre uma superfície suave, uniforme e estável.
Não o coloque sobre uma superfície quente.
23. Após cada utilização, certifique-se de que o interruptor se encontra na
posição “Off” (Desligado).
24. O fabricante não aceita qualquer responsabilidade por quaisquer danos
ou lesões resultantes de um uso indevido ou incorrecto ou devido a
reparações efectuadas por pessoal não autorizado.
25. Na eventualidade de quaisquer problemas técnicos, desligue o aparelho e
não o tente reparar sozinho. Devolva o aparelho a um centro de
assistência autorizado para fins de inspecção, ajuste ou reparação.
Insista sempre na utilização de peças sobresselentes originais. O não
cumprimento das precauções e instruções acima indicada poderá
comprometer o funcionamento seguro deste aparelho.
MEDIDAS DE SEGURANÇA ADICIONAIS
• Tenha cuidado para não riscar a base, evite botões, fechos, etc.
• O ferro tem um fusível térmico protector que irá rebentar se sobreaquecer. Se
isto acontecer, o ferro irá parar de trabalhar e deverá ser reparado.
• Não utilize o ferro se este tiver caído ou estiver danificado, ou ainda se funcionar
mal ou tiver fugas.
• Se o cabo eléctrico estiver danificado, devolva o ferro para evitar qualquer perigo
Page 29

29
DIAGRAMA DAS PEÇAS
INSTRUÇÕES OPERACIONAIS
ANTES DA PRIMEIRA UTILIZAÇÃO:
• Não se assuste se o ferro deitar fumo no início, irá parar quando se ambientar.
• Passe a ferro uma peça de algodão para limpar a base do ferro.
PREPARAÇÃO:
• Verifique os símbolos de cuidado com tecidos ( ).
• Primeiro passar a ferro tecidos que necessitem de baixas temperaturas ,
depois os que necessitam de temperaturas médias e termine com aqueles
que necessitam de altas temperaturas .
ENCHIMENTO (#2):
• O ferro poderá ser utilizado com água da torneira mas se viver numa área com
água mineralizada deverá utilizar água destilada (e não água quimicamente
desincrustante).
• Se adquirir água destilada, verifique se está identificada como adequada para
utilizar em ferros de engomar.
• Desligue o ferro.
Page 30

30
• Rode o controlo de temperatura para ●, rode o controlo de vapor para (#3).
• Segure no ferro com a base para baixo (#2).
• Levante a parte de baixo da tampa de entrada de
água para a abrir.
• Coloque devagar para permitir que o ar no
reservatório saia, caso contrário, irá fazer com
que o ar fique retido e causará sobrefluxo.
• Não encha além do limite máximo ou pode haver
uma fuga de água quando o ferro estiver a ser utilizado.
• Limpe o derrame.
LIGUE O FERRO:
• Coloque o ferro na base.
• Ligue a ficha eléctrica à tomada (ligue a tomada se for o caso).
• A luz do termóstato ligar-se-á.
CONFIGURE A TEMPERATURA:
• Rode o controlo de temperatura escolhendo a
configuração que deseja ao lado da marca (#3).
• Quando o ferro atingir a temperatura escolhida, a luz
do termóstato desligar-se-á. Irá alternar entre ligado
e desligado enquanto o termóstato funciona para
manter a temperatura.
GUIA DE CONFIGURAÇÃO DE TEMPERATURA:
Por favor, não esqueça: Se as instruções na etiqueta do tecido diferirem das deste
guia, siga as instruções da etiqueta.
Page 31

31
REDUÇÃO DE TEMPERATURA:
• Reduzir a temperatura demorará um pouco mais uma vez que o elemento terá
de soltar o calor que acumulou, portanto seja paciente. É melhor organizar a sua
tarefa de passar a ferro para que não tenha de reduzir a temperatura.
PASSAR A VAPOR:
• Quando passar a vapor, deverá configurar o controlo de temperatura para ou
superior. (#3)
• Se não o fizer, irá derramar água nas suas roupas e não vapor.
• Verifique se existe água no reservatório.
• O ferro irá ajustar a quantidade de vapor automaticamente.
• Aguarde até que a luz do termóstato desapareça e depois comece a passar a
ferro.
BORRIFAR:
As manchas de água afectam alguns tecidos. Teste
numa parte escondida do tecido.
• Isto funciona com passar a vapor ou sem vapor
desde que haja água no reservatório.
• Verifique se existe água no reservatório.
• Levante o ferro do tecido.
• Aponte o bocal de borrifo para o tecido.
• Prima o botão .
• Poderá ter de premir o botão 2 ou 3 vezes para bombear a água através do
sistema.
DISPARO DE VAPOR:
• Isto funciona com passar a vapor ou sem vapor desde que
haja água no reservatório e desde que a temperatura
esteja acima de . A temperaturas baixas irá apenas ter
pingos de água.
Page 32

32
• Verifique se existe água no reservatório.
• Verifique se o controlo de temperatura está em ou superior.
• Levante o ferro do tecido.
• Prima o botão .
• Poderá ter de premir o botão 2 ou 3 vezes para bombear a água através do
sistema.
• Aguarde 4 segundos entre disparo para deixar a temperatura aumentar.
ENGOMAR A SECO:
• Se vai engomar a seco durante 20 minutos ou mais,
esvazie primeiro o reservatório para evitar borrifos de
vapor espontâneos.
• Desligue o ferro.
• Segure-o sobre um lavatório ou pia.
• Abra a tampa de entrada de água.
Cuidado: A água poderá estar quente.
• Com cuidado, vire o ferro ao contrário e esvazie a água para o lavatório ou pia.
• Limpe qualquer derrame no ferro antes da utilização.
• Configure a temperatura.
• Aguarde até que a luz do termóstato desapareça e depois comece a passar a
ferro.
ENGOMAR VERTICAL:
• Remova vincos de roupa pendurada, cortinados pendurados e tecidos de
estofos.
• Verifique se existe uma ventilação adequada atrás do tecido, caso contrário a
humidade pode aumentar, criando mofo.
• Verifique se não existe nada atrás do tecido que possa ser danificado pelo
vapor.
• Verifique se bolsos, bainhas e punhos estão vazios.
• Verifique se existe água no reservatório.
• Rode o controlo de temperatura para o máximo.
• Espere até que a luz do termóstato se desligue.
Page 33

33
• Segure no ferro perto (mas não a tocar) no tecido.
• Prima o botão (está a utilizar a função "disparo de vapor" verticalmente).
• Poderá ter de premir o botão 2 ou 3 vezes para bombear a água através do
sistema.
• Aguarde 4 segundos entre disparo para deixar a temperatura aumentar.
APÓS A UTILIZAÇÃO:
• Desligue o ferro.
• Levante a parte de baixo da tampa de entrada de água
para a abrir.
• Segure no ferro sobre um lavatório, vire-o ao contrário e
drene a água do reservatório.
Cuidado: A água poderá estar quente.
• Coloque o ferro na base.
• Deixe-o arrefecer por completo.
• Quando estiver frio, retire qualquer humidade e feche a tampa de entrada de
água.
• Guarde o ferro na sua base para evitar a corrosão e os danos na base.
AUTO-LIMPEZA:
• Para evitar a acumulação de calcário utilize a função de auto-limpeza
regularmente, pelo menos uma vez por mês em áreas de água norma, e com
mais frequências em áreas de água mineralizada.
• Irá necessitar de um lavatório ou de um recipiente
para colocar a água advinda da base.
• Encha o reservatório até ao nível máximo.
• Rode o controlo de temperatura para o máximo, rode
o controlo de vapor para .
• Coloque o ferro na base.
• Ligue o ferro à ficha eléctrica e aguarde até que a luz
do termóstato se desligue.
• Agora segure no ferro sobre o lavatório ou recipiente com a base para baixo
(#9).
Page 34

34
• Rode o controlo de vapor para , mantenha-o aí e movimento, com cuidado,
para a frente e para trás sobre o lavatório.
Cuidado: Mantenha-se afastado/a na água e do vapor
• A água e o vapor irão lavar o calcário e o pó através da base para o lavatório.
• Quando o reservatório estiver vazio, solte o botão de auto-limpeza.
• Desligue o ferro e coloque-o na sua base para arrefecer.
• Quando estiver frio, limpe qualquer humidade.
• Guarde o ferro na sua base para evitar a corrosão e os danos na base.
ANTI-CALCÁRIO:
• O agente anti-calcário incorporado no ferro ajuda a evitar a acumulação de
calcário.
• Não utilize uma solução para retirar calcário ou irá destruir o agente anti-
calcário.
LIMPEZA E FUNCIONAMENTO
• Desligue o ferro quando não estiver a ser utilizado, antes de o arrumar ou antes
de o limpar. Deixe-o arrefecer por completo antes de o limpar e arrumar.
• Remova as manchas da base com um pouco de vinagre.
• Este aparelho destina-se apenas para uso doméstico e não pode ser alvo
de assistência por parte do utilizador.
• Não abra o aparelho ou substitua quaisquer peças sozinho. Consulte um
departamento de assistência eléctrica devidamente qualificado ou devolva
o aparelho ao fornecedor caso seja necessário qualquer tipo de
assistência.
• Não se esqueça de retirar a ficha da tomada quando o aparelho não
estiver em uso e antes de o limpar. Certifique-se de que o controlo da
velocidade está definido para "0".
• É mais fácil limpar os acessórios directamente depois de terem sido
utilizados. Lave-os com água quente e sabão e enxagúe-os bem e deixeos secar devidamente.
Page 35

35
• O corpo do aparelho e o suporte deve ser limpo com um pano húmido.
Não permita a entrada de água no aparelho ou suporte.
• Não use lixívia ou qualquer outra substância abrasiva ou solventes para
limpar o aparelho visto que podem danificar o seu acabamento exterior.
• Não submirja o aparelho em água ou qualquer outro líquido, ou
mantenha-o debaixo de água corrente para limpar.
• Para remover quaisquer manchas/marcas resistentes, limpe as
superfícies do aparelho com um pano ligeiramente humedecido com água
e detergente ou utilize um agente de limpeza suave e não abrasivo.
Enxagúe e seque o aparelho com um pano macio, limpo e seco.
ARMAZENAMENTO DO APARELHO
• Desligue a ficha da tomada e limpe todas as peças do aparelho conforme
indicado acima. Certifique-se de que todas as peças estão secas antes de
as armazenar.
• Armazene o aparelho na sua embalagem original ou num local limpo e
seco.
• Nunca armazene o aparelho enquanto ele se encontra húmido ou sujo.
• Nunca enrole o fio à volta do aparelho.
ASSISTÊNCIA DO APARELHO
Este aparelho não tem quaisquer peças que possam ser alvo de assistência por
parte do utilizador. Se o aparelho não estiver a funcionar correctamente,
verifique o seguinte:
• Cumpriu com as instruções correctamente.
• O aparelho foi devidamente ligado à corrente e a tomada tem corrente.
• A alimentação está ligada.
• A ficha está devidamente introduzida na tomada.
Se após a primeira inspecção, o aparelho continuar a não funcionar:
Page 36

36
Consulte o revendedor com vista a uma possível reparação ou substituição. Se o
revendedor não resolver o problema e tiver de devolver o aparelho, certifique-se
do seguinte:
• O aparelho é cuidadosamente colocado na sua embalagem original.
• O recibo da compra é anexado.
• É fornecido um motivo para a devolução do aparelho.
Se o fio estiver danificado, deverá ser substituído pelo fabricante ou um centro
de assistência devidamente autorizado, com vista a evitar quaisquer situações
de risco. Se o aparelho necessitar por algum motivo de assistência durante o
período da garantia, deve ser devolvido a um centro de assistência devidamente
aprovado pela Tedelex Trading (Pty) Limited. O aparelho poderá igualmente ser
alvo de assistência fora do período da garantia, porém, nesse caso tais tarefas
serão cobradas.
SUBSTITUIÇÃO DA FICHA
Cumpra com as instruções seguintes caso seja necessário substituir a ficha.
Este aparelho foi concebido para funcionar apenas com a corrente
indicada. A ligação a outros fontes de alimentação poderá danificá-lo.
Ligue uma ficha de três pinos da seguinte maneira:
Os fios neste terminal de alimentação estão coloridos de acordo com o seguinte
código:
Page 37

37
FIXE O RECIBO DA COMPRA AQUI
O RECIBO TEM DE SER FORNECIDO NA EVENTUALIDADE DE UMA RECLAMAÇÃO AO ABRIGO
DOS TERMOS DA GARANTIA
G A R A N T I A
1. A Tedelex Trading (Pty) Limited (“Tedelex”) garante ao comprador original deste produto (“o
cliente”) que este produto estará livre de defeitos de qualidade e mão-de-obra, os quais sob uso
pessoal, familiar ou doméstico normal se possam manifestar dentro de um período de 1 (um) ano a
partir da data de compra (“período de garantia”).
2. Quando o cliente compra um produto e ele se avaria, possui defeitos ou não funciona devidamente
para o fim previsto, deverá notificar o fornecedor a quem comprou o produto (“o fornecedor”) da
situação dentro do período de garantia. Qualquer reclamação no âmbito dos termos desta garantia
deve ser suportada por uma prova de compra. Na ausência de uma prova de compra, então os
serviços de reparação e/ou assistência poderão ser pagáveis pelo cliente ao fornecedor.
3. O produto defeituoso deverá ser devolvido ao centro de assistência do fornecedor com vista a
exercer os termos da garantia.
4. O fornecedor irá reembolsar, reparar ou trocar o produto no âmbito dos termos desta garantia,
sujeito aos requisitos legislativos. Esta garantia só é válida quando o cliente não avariou o produto
ele próprio ou o utilizou para qualquer outro fim que não o previsto. A garantia não inclui e não
será considerada como abrangendo outros produtos danificados devido a uma situação de
desastre, utilização indevida, manipulação, abuso ou qualquer outra modificação ou reparação não
autorizada do produto.
5. Esta garantia só se estende ao produto fornecido na data da compra e não a quaisquer outras
peças anexadas ou instaladas pelo cliente.
6. Se o cliente solicitar ao fornecedor a reparação do produto e este se avariar ou não funcionar
devidamente dentro de 3 (três) meses da reparação e não devido a uma situação de utilização
indevida, manipulação ou modificação efectuada por ou sob pedido do cliente, então o fornecedor
poderá substituir o produto ou reembolsar o cliente.
7. O cliente poderá ser responsável por determinados custos quando os produtos devolvidos não se
encontram na sua embalagem original ou esta se encontra danificada. Tais custos serão
deduzidos de qualquer reembolso pago ao cliente.
TEDELEX TRADING (PTY) LTD (JOANESBURGO)
JOANESBURGO TEL. (011) 490-9600
CIDADE DO CABO TEL. (021) 535-0600
DURBAN TEL. (031) 792-6000
www.amap.co.za
 Loading...