


User guide |
|
EN |
|
Brugervejledning |
DA |
Bedienungsanleitung |
DE |
Manual de instrucciones |
ES |
Guide de l’utilisateur |
FR |
Manuale utente |
IT |
Gebruikershandleiding |
NL |
Brukerveiledning |
NO |
R7 HIGH FIDELITY
RADIOGRAM
Thank you for choosing our R7 high fidelity radiogram.
Inspired by 60s design, R7 is an iconic creation of which we are exceedingly proud. With its stunning looks and amazing audio quality, we guarantee that you’ll be rediscovering the joy of music and radio, all over again.
Please take the time to read this user guide as although I’m sure you’ll want to start using your R7 straight away, this guide will help you to understand its great features and get the most listening pleasure from it.
With due care, we’re confident your R7 will give you many years of listening pleasure but, should you need help or advice, please do not hesitate to contact us. As a British, family-run company, we pride ourselves on our customer service and will always do our utmost to help.
Once again, thank you for choosing Ruark Audio.
Alan O’Rourke
Founder and Managing Director
2
Table of contents
What’s in the box |
4 |
Remote control |
5 |
Parts and controls overview |
6 |
Using your R7 on spindle legs |
8 |
Using your R7 on puck feet |
9 |
Getting started |
10 |
Commonly used functions |
13 |
Switch power on or off |
13 |
Switch on or standby |
13 |
Adjust volume |
13 |
Pause track or mute radio |
13 |
Play next/previous track |
13 |
Change FM or DAB radio station |
13 |
Selecting audio source |
13 |
Navigating menu screens |
14 |
Now playing screens |
14 |
Changing now playing information |
14 |
Save radio preset |
14 |
Recall radio preset |
14 |
Front panel controls |
15 |
System settings |
16 |
Bass and treble |
16 |
3D sound |
16 |
Subwoofer level |
16 |
Input levels |
16 |
Brightness |
16 |
Antenna |
17 |
CD player |
18 |
EN |
|
|
|||
FM radio |
19 |
DA |
|
DAB radio |
20 |
DE |
|
DAB & FM aerials |
21 |
||
|
|||
Internet radio |
22 |
FR |
|
Bluetooth |
24 |
IT |
|
Network player |
26 |
||
|
|||
Digital Media Renderer mode |
28 |
ES |
|
Auxiliary inputs |
28 |
NL |
|
Specifications |
29 |
||
General care |
30 |
NO |
|
Cautions |
30 |
||
|
|||
Guarantee information |
31 |
|
|
Copyright and trademarks |
31 |
|
|
|
|
|
3

What’s in the box
Ensure that all parts listed below are in the box. If any part is missing, do not use the R7 and contact us directly if purchased in the UK, or your Ruark Audio dealer if purchased outside the UK.
1.R7
2.Four spindle legs
3.Four feet & fixing screws
4.Remote control
5.Remote battery (CR2032)
6. Wire antenna |
2 |
|
7.Mains power cord
8.User guide & other documents
If possible, please retain carton and all packing materials.
|
|
3 |
|
|
6 |
|
5 |
8 |
|
|
|
4 |
|
7 |
|
|
4

Remote control
|
15 |
16 |
14 |
17 |
13 |
12 |
11 |
18 |
10 |
9
Functions
Fitting the battery
Gently pull off the magnetic steel base. With the remote face down, slide the
battery (5) into the slot, ensuring the flat side marked with + faces up. Replace the steel base.
NOTE: you must pair the remote with your R7 before using it for the first time, see page 10.
9. |
– STANDBY |
|
|
10. |
CONTROL KNOB – rotate to adjust volume from |
14. |
SOURCE – select audio source |
|
a now playing screen, rotate to choose options in |
15. |
– PLAY/PAUSE track or mute radio |
|
menus and press to SELECT |
16. |
MENU – enter options menu |
11. |
– press to skip to NEXT track/station, press and |
17. |
BACK – go back to previous menu or list |
|
hold to fast-forward |
18. |
INDICATOR |
12. |
– press to skip to PREVIOUS track/station, press |
|
Green – normal |
|
and hold to rewind |
|
Red – low battery |
13. |
PRESET – press to recall or long press to save station |
|
|
EN
DA
DE
FR
IT
ES
NL
NO
5

Parts and controls overview
|
|
19 |
20 |
24 |
25 |
23 |
|
|
|
18 |
|
|
|
|
|
18 |
|
|
30 |
|
|
22 |
|
21 |
|
|
Front |
|
|
|
|
|
|
|
|
18. |
Dual concentric stereo drivers |
26. |
– PLAY/PAUSE track or mute radio |
|
|
|||
19. |
Headphone out (3.5 mm jack) |
27. |
MENU/SOURCE |
|
|
|
|
|
20. |
CD loading slot |
|
– Press to enter options MENU or go BACK |
|
|
|||
21. |
CD eject button |
|
to previous menu item |
26 27 |
28 |
29 |
||
22. |
STANDBY |
|
– Long press for SOURCE |
|
|
|||
23. |
Standby light |
28. |
Adjust volume or choose options in menus |
|
|
|||
24. |
Remote control dock |
29. |
SELECT |
|
|
|
|
|
25. |
Display |
30. |
Subwoofer |
|
|
|
|
|
6
31 |
|
|
|
34 |
35 |
36 |
ON |
|
|
|
|
|
|
|
|
|
|
Charge port |
|
|
OFF |
|
|
|
5VDC 2.1A |
|
|
|
|
DAB / FM |
FM |
|
|
|
33 |
32 |
39 |
38 |
37 |
|
|
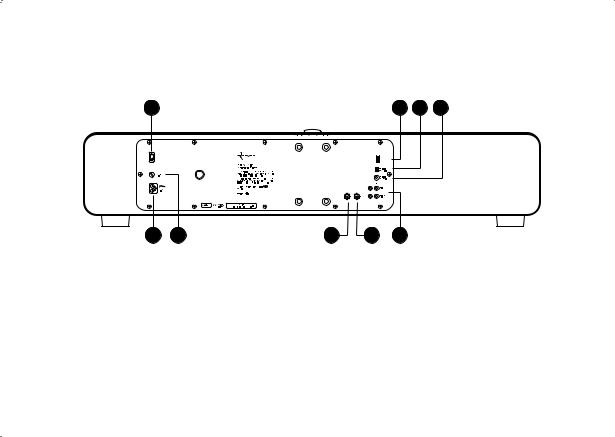
Back |
35. |
Digital optical line-in (TOSLINK) |
|
31. |
Mains power switch |
36. |
Digital coaxial line-in (S/PDIF) |
32. |
Mains power fuse |
37. |
Line-in (1 & 2) |
33. |
Mains power cord inlet |
38. |
FM-only antenna |
34. |
USB charge port (5 VDC 2.1 A) |
39. |
Combined DAB-FM antenna |
EN
DA
DE
FR
IT
ES
NL
NO
7
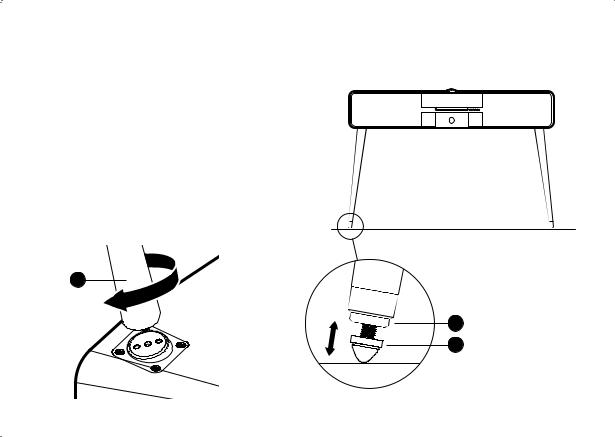
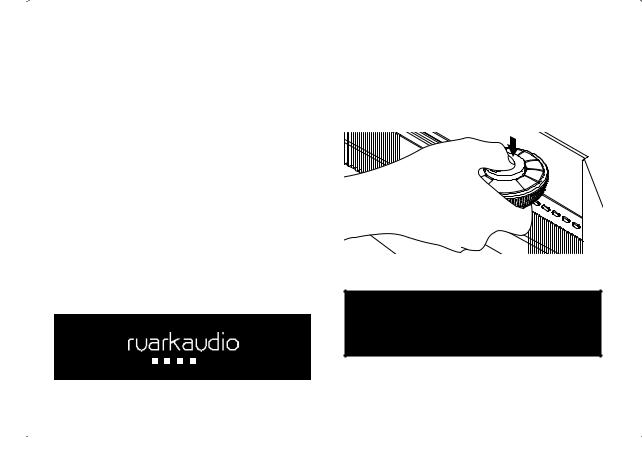
Using your R7 on spindle legs
To mount your R7 on the spindle legs:
1.Carefully place your R7 upside down on a soft and protective surface like a rug or the R7 bag. We recommend
you get help with moving your R7 as it is heavy!
2. Screw the four legs into the mounting plates on the underside of the cabinet. Carefully hand-tighten each leg so that it is secure but take care not to overtighten.
3.Turn your R7 over and let it rest on the legs gently.
4.Carefully move your R7 into its final position and adjust the leg tips (41) to ensure it is completely stable. The locknuts (40) on the leg tips should also be tightened.
4x
2
40
41
8
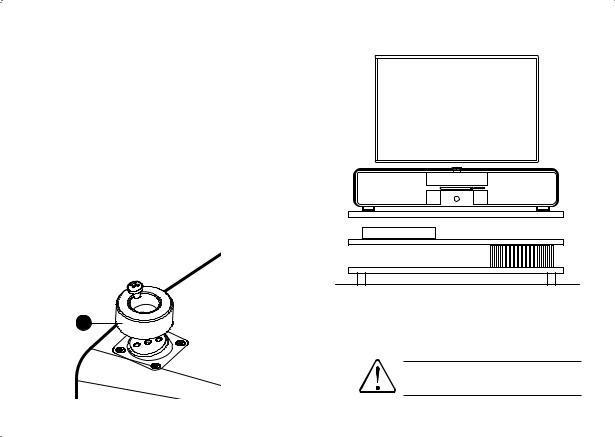
Using your R7 on puck feet
To mount your R7 on the puck feet:
1.Carefully place your R7 upside down on a soft and protective surface like a rug or the R7 bag. We recommend you get help with moving your R7 as it is heavy!
2.Place a foot onto each of the four mounting plates on the underside of the cabinet, ensuring each is correctly
aligned. Use a suitable cross-headed screwdriver to secure them with the screws provided.
3.Turn your R7 over and let it rest on the feet gently.
4.Place on a suitably strong and secure surface.
4x
3
EN
DA
DE
FR
IT
ES
NL
NO
The R7 is heavy and improper handling can result in damage or personal injury.
9
Getting started
1 Connect the aerial
The supplied aerial is a temporary wire aerial for initial use and is designed to work with both DAB and FM signals. Connect it to the combined DAB-FM antenna socket (39).
For best reception we highly recommend having an external professionally installed combined aerial or separate FM and DAB aerials. See page 21.
2 Connect to mains power
Plug the mains power cord (7) into the mains power socket (33) on the back of your R7 and then plug it into a mains outlet.
4 Switch on
Switch the mains power switch (31) on the back of your R7 to the ON position. Your R7 is now in standby.
To turn your R7 on, press STANDBY (22). The Ruark Audio logo will then appear on the screen.
5 Pair your remote
When you are prompted to pair your remote control, hold it very close to the display, just above the front panel controls, and press SELECT (10).
When your remote pairs you will see a confirmation screen and your remote is now ready to use.
Remote paired
You won’t normally need to pair it again but if you if do, simply repeat the steps above. Please note that each remote can only be paired to one music system at a time.
10
 Loading...