


Userer guideguide |
ENEN |
Brugervejledning |
DA |
Bedienungsanleitung |
DE |
Guía del usuario |
ES |
Guide de l’utilisateur |
FR |
Manuale dell’utente |
IT |
Gebruikershandleiding |
NL |
Brukerveiledning |
NO |
|
KR |
Tabletop Stereo
R2 mk3

Thank you for choosing our R2 Tabletop Radio.
Please take the time to read this user guide as it will help you get the best from your radio.
With due care, we’re confident your R2 will give you many years of listening pleasure but, should you need help or advice, please do not hesitate to contact us. As a British, family-run company, we pride ourselves on our customer service and will always do our utmost to help.
Once again, thank you for choosing Ruark Audio.
Alan O’Rourke
Founder and managing director
EN-2

Contents
Specifications |
3 |
What’s in the box |
4 |
Overview |
5 |
Controls |
6 |
Remote control |
7 |
Getting started |
8 |
Common functions |
12 |
System settings |
15 |
Alarms, snooze and sleep |
17 |
FM radio |
18 |
DAB radio* |
19 |
Internet radio |
21 |
Bluetooth |
23 |
Music player (network & USB) |
25 |
DLNA media streaming |
27 |
Spotify Connect |
28 |
Line in audio inputs |
29 |
Troubleshooting |
29 |
Safety and regulatory information |
30 |
Guarantee information |
32 |
General care |
32 |
Specifications
• |
2 x 3.5” custom high fidelity drivers |
EN |
|
• |
Tuned bass reflex cabinet |
||
• |
18w nominal power output |
DA |
|
• |
Enhanced 3D sound processing |
||
|
|||
• |
DAB*, DAB+* and FM tuner with RDS |
DE |
|
• |
Internet radio |
||
|
|||
• |
Spotify Connect |
FR |
|
• |
Removable DAB/FM aerial with F-Type connector |
|
|
• |
Security slot |
IT |
|
• 128 x 64 OLED display |
ES |
||
• |
Full function remote control |
||
• |
Wi-Fi 802.11a/b/g/n compliant |
NL |
|
• |
Wi-Fi Protected Setup (WPS2) |
||
|
|||
• |
Compatible with UPnP™ DLNA media servers |
NO |
|
|
|
||
•MP3, WMA, AAC, FLAC, WAV up to 96kHz/24-bit
•A2DP, aptX Bluetooth
Inputs and outputs
•Line in audio input 1 - 3.5mm stereo jack
•Line in audio input 2 - stereo RCA/phono
•3.5mm headphone output
•USB 2.0 playback, 5.0V 1.0A (5W) output
Power supply
• Input power 100V to 240VAC, 50-60Hz 1.0A max
Physical
•Dimensions: 360x115x199mm (14.2x4.5x7.8ins)
•Weight: 3.4kg (7.5 lbs)
* excludes R2 mk3/US version
EN-3

What’s in the box
Ensure that all the parts listed |
1 |
below are in the box. |
If any part is missing, do not use the R2. If purchased in the UK, contact us directly. If purchased outside the UK, please contact your Ruark Audio dealer.
1. R2 stereo
2. 100-240V to 14V power supply
3. Mains plug adapter(s)*
4. Remote control
5. Telescopic aerial
6. Aerial spanner
7. User guide
If possible, please retain carton and |
|
|
|
all packing materials. |
3 |
4 |
|
2 |
|||
|
|
5
* the number and type of plug adapters |
|
|
supplied will vary according to region. |
7 |
6 |
EN-4

Overview |
13 |
8 |
9 |
13 |
|
|
|
|
8. Controls
9. Display
10. (STANDBY) – press to power on or off the radio.
11.Audio input (3.5mm jack)
12. Headphone (3.5mm jack)
13. Full range 3.5” speaker
14. Audio input (stereo RCA/phono)
15.Aerial connector
16.Security slot
17. |
DC power socket (14V 2.0A) |
12 |
11 |
10 |
|
18. |
USB (5W output) |
||||
|
|
|
|||
|
|
14 |
|
15 |
EN
DA
DE
FR
IT
ES
NL
NO
16 |
17 |
18 |
EN-5
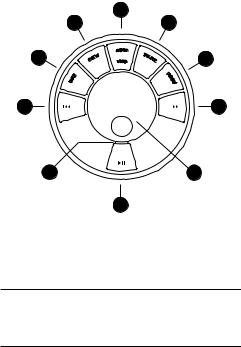
Controls
19.
 – press to play/pause a track or mute radio
20.CONTROL KNOB / SELECT
Rotate to adjust volume from a Now-playing screen Rotate to browse browse menus, tracks or station lists* Press to select
21.
 – press to skip to next station or track
22.
 – press to skip to previous station or track
23.PRESET – press to recall a saved station or press and hold for two seconds to save a radio station
24.SOURCE – press to change audio source
25.ALARM/SLEEP – press once to set alarm 1, press twice to set alarm 2 or press and hold for two seconds to set sleep timer
26.MENU – press to view the menu
27.BACK – press to return to the previous menu or list screen
28.Indicator light – indicates your R2 is on and flashes when Bluetooth is ready to pair or when pressing a key on the remote.
|
25 |
26 |
24 |
27 |
23 |
22 |
21 |
28 |
20 |
19
* You can also press
 or
or
 to browse menus, tracks or station lists
How long you press a key is important
Press = tap or press and immediately release
Press and hold = press and release after two seconds
EN-6
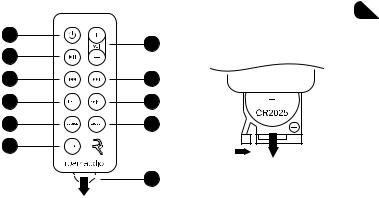
Remote control
29. (STANDBY) – press to power on or off the radio
30.
 – Press to play/pause a track or mute radio
31.
 – press to skip to previous station/track/menu option
32.
 – press to skip to next station/track/menu option
33.BACK – press to return to the previous menu or list screen
34.SOURCE – press to change audio source
35.MENU – press to view the menu
36.VOL – press + or - to change the volume
37.SELECT – press to select (same as pressing the control knob)
38.PRESET – press to recall a saved station or press and hold for two seconds to save a radio station.
29 |
36 |
|
|
30 |
|
31 |
32 |
33 |
37 |
34 |
38 |
35 |
|
|
39 |
NOTE: before using your remote for the first time you must remove the orange plastic tab (39) to activate the battery.
EN
DA
DE
FR
IT
ES
NL
NO
Changing battery
1.Hold the lock to the side with your finger and slide the battery compartment out.
2.With the remote face down, replace the battery with a new CR2025, ensuring the flat side marked with + faces up.
3.Push the battery compartment back into place.
EN-7

Getting started


 5 1
5 1 


2
3 |
4 |
EN-8

1. Fit aerial
Connect the aerial to the socket on the back of your R2 and tighten the nut with the spanner. If you do not tighten the nut, the aerial may come lose when moving the aerial.
Place your R2 on a suitable shelf or table and fully extend the aerial to ensure you get the best possible radio reception.
2. Fit the plug to the AC power adapter
Fit the correct plug for your region to the mains power supply. When you fit the plug adapter, it will “click” into place.
3. Connect the DC cable
Connect the DC cable from the power supply to the DC power socket (14V 2.0A) on the back of your R2.
4. Connect to AC mains
Plug the AC power adapter into a mains power socket.
5. Turn on
Press  to turn the radio on.
6. Setup wizard
When you turn on your R2 for the first time, setup wizard starts automatically. Follow the on-screen guide to configure the clock and connect to your Wi-Fi network. EN
To configure a setting, rotate the CONTROL KNOB |
DA |
|||
until your preferred choice is highlighted, then press the |
||||
|
||||
knob to select it. |
DE |
|||
|
|
|
FR |
|
|
|
|
||
|
|
|
IT |
|
|
|
|
ES |
|
|
|
|
NL |
|
|
|
|
||
To start the setup wizard, rotate the CONTROL KNOB
to highlight YES and then press the knob to select. If NO you choose NO, you can then choose to run the wizard
next time your R2 is turned on, and then it starts without configuring time/date and network settings.
7. Time format
Choose 12 or 24 hour clock display.
EN-9

8. Automatic clock update
Choose whether the clock updates automatically from DAB, FM or Network, or is set manually. If you select to update it automatically, the time and date will update every time you use that source, so it’s best to select a source you use regularly.
If you select No update, the date and time are displayed as dd-mm-yyyy and hh:mm AM/PM with the day flashing. Rotate the CONTROL KNOB to change the day then press the knob to save it. Now the month will flash, set that and then continue until you’ve set the time and date.
9. Time zone
Choose the time zone for your region.
10. Daylight savings
Choose whether the time is automatically updated for summer/winter time.
11. Keep network connected
Choose whether your R2 always remains connected to your Wi-Fi, even in standby. We recommend you set it to keep connected as it will ensure your R2 is always accessible using Spotify or DLNA music streaming, even when in standby. We also recommend this if you have set your clock to update from Network.
12. Select Wi-Fi region
Select the appropriate region for your location.
13. Select Wi-Fi network
Select a network from the list of available wireless networks.
Connecting to an open (unsecured) network
If the network is open, your R2 will connect automatically.
Connecting to a standard encrypted network
If your network is a standard encrypted (secure) network, you will need to enter the password.
Rotate the CONTROL KNOB to highlight a character,
EN-10
then press the knob to enter it. When you have entered the complete password highlight OK and press the knob. Selecting BKSP deletes the last character and CANCEL returns to the previous menu.
Connecting to an encrypted WPS network
If your network has WPS (Wi-Fi Protected Setup), it will be identified by [WPS] before the network name. You can connect using a password or by either pressing the WPS button on your router, or entering the WPS PIN. For more information, please refer to your router’s user guide.
If your R2 fails to connect to the network, it will return to the previous screen so you can enter the security settings again. For more instructions on how to connect to your network, see your router’s instructions.
14. Complete setup wizard
When your setup is complete, press the CONTROL KNOB to save the settings and exit the wizard.
|
EN |
|
|
DA |
|
|
DE |
|
|
FR |
|
15. Select a source |
IT |
|
|
||
At the end of the initial setup, your R2 will display |
ES |
|
|
||
a menu with a list of the available sources. Use the |
NL |
|
CONTROL KNOB to choose a source and press |
||
|
||
SELECT. |
NO |
|
|
Currently saved settings are marked with an asterisk ( )
EN-11
Common functions
Switch on and to standby
Press STANDBY to turn your radio on. Press again to switch to standby.
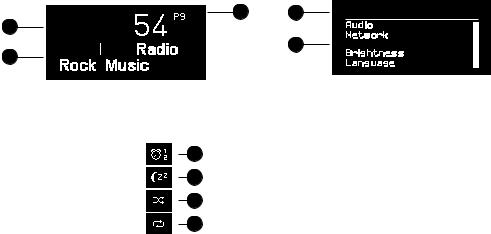
Now-playing screens
Unless you’re adjusting a setting, the screen will look similar to the example below.
40

41


40.Clock
41.Station/track info
42.Preset number
On-screen icons:
43.Alarm 1 & 2
44.Sleep timer
45.Shuffle
46.Repeat
42
43
44
45
46
Menu screens
The menus enable you to set the various options such as adjusting the bass and treble. To change a setting, press MENU to display the list of available options, rotate the CONTROL KNOB to highlight the one you wish to change, then press the knob to confirm your selection.
47


48


47.Menu title
48.Menu options
Browsing menus, track and station lists
To change settings – press MENU
To scroll through options – rotate CONTROL KNOB To select option – press CONTROL KNOB
To exit menu – press MENU or wait for a few seconds To return to the previous menu/list – press BACK
EN-12
Adjust volume
Rotate the CONTROL KNOB from any Now-playing screen.
Speaker volume and headphone volume are adjusted separately, so when headphones are plugged in the volume is shown as Volume (HP).
NOTE: rotating the CONTROL KNOB when a menu or track/station list is displayed will scroll through the menu or list and not change the volume.
Change audio source
Press SOURCE to view the current source, rotate the CONTROL KNOB to cycle through the list of sources, then press the knob to select one currently displayed. (You can also press SOURCE repeatedly to cycle through the list of sources instead of rotating the knob.)
Pause track or mute radio
Press 
 and then press again to resume listening.
Play next/previous track
Press |
to skip to the next track in the folder or album, |
|
||
press |
to skip to the start of the current track, press |
EN |
||
again to skip to the previous track. |
||||
Fast forward or rewind track |
DA |
|||
|
||||
Press and hold |
or (not available with Bluetooth). |
DE |
||
Change FM radio station |
FR |
|||
Press |
or |
to seek the next or previous station. See |
IT |
|
FM section for more details. |
|
|||
Change DAB radio station |
ES |
|||
NL |
||||
Press |
or |
to tune to the next or previous station. |
||
|
||||
You can also view the multiline station list by selecting |
NO |
|||
MENU > Station list. |
|
|||
See DAB section for more details.
How long you press a key is important Press = tap or press and immediately release
Press and hold = press and release after two seconds
EN-13

Save radio station preset
Press and hold PRESET for two seconds, rotate the CONTROL KNOB to choose the preset number, then press the knob to save the current station. Presets are either marked with the station name, frequency or as ‘[Not set]’.
If you save a station over an existing preset, the new station will replace it.
Recall radio station preset
Press PRESET, rotate the CONTROL KNOB to scroll through the preset station list, then press the knob to select a station.
Change station or track information
Change the station/track information displayed by selecting one of the options from MENU > Info.
Connect a Bluetooth device
Your R2 will attempt to automatically connect to the last connected device. If you have not yet paired your device or the previous device is not available, your R2 will enter into pairing mode. See Bluetooth section for more details.
Headphones
Connect your headphones to the 3.5mm stereo jack socket ( ) on the front of your R2.
Headphone volume is adjusted independently from speaker volume, so when headphones are plugged in the volume is shown as Volume (HP).
Please note that: MENU > System settings > Audio means press MENU, select System settings and finally select Audio
EN-14

System settings
Bass and treble
MENU > System > Audio
Adjust the bass and treble levels using the CONTROL KNOB then press it to save the setting.
Loudness
Loudness automatically boosts the treble and bass frequencies at lower volumes.
MENU > System > Audio
Highlight Loudness and press the CONTROL KNOB to toggle on and off.
3D sound
3D widens the stereo sound stage and creates a more immersive and involving sound.
MENU > System > Audio
Highlight 3D and press the CONTROL KNOB to toggle on and off.
Date and time
MENU > System > Date and time
The time and date are automatically synchronised with national time signals broadcast over DAB, network and FM (when available).
You can also set the time manually by turning auto update off and change the time and date format.
Display brightness
MENU > System > Brightness
You can independently adjust the brightness of the display when the radio is on On level and in standby Standby level. When your R2 is in standby and the standby brightness is set to OFF, pressing any key on the dial or remote will briefly illuminate the display.
Language
MENU > System > Language
Change the menu language.
Software update
MENU > System > Software update
Your R2 is set to automatically check for software updates. If one is available, you will be asked whether you want to download and install it.
CAUTION: Disconnecting the power during a software update could permanently damage your R2.
EN
DA
DE
FR
IT
ES
NL
NO
EN-15
Factory reset
MENU > System > Factory reset
Resets all settings and clears presets.
Setup wizard
MENU > System > Setup wizard
Runs the setup wizard to guide you through setting up the clock and network.
Inactive standby
Your R2 is set to automatically switch itself to standby if there is no audio for more than 2 hours. To change this select MENU > System > Inactive standby.
Network wizard
For a guided process to help you connect to a Wi-Fi network, select MENU > System > Network > Network wizard.
Network profiles
Your R2 will automatically attempt to connect to any network it has previously connected to.
To see the list of saved networks, select Menu > System > Network > Network profile. To delete an unwanted network, highlight it, press the CONTROL KNOB and select YES.
Keep network connected
MENU > System > Network > Keep connected
Change whether your R2 remains permanently connected to the network (recommended) or not.
System information
Shows details of your R2 including the software version, unique radio ID code and friendly name.
Advanced network settings
There are other advanced network settings for experienced users for manual configuration or diagnosing and fixing network problems.
Friendly name
The friendly name is how your R2 shows up on networks, Spotify and Bluetooth. You can change this to something more descriptive like “Archie’s R2” or “Living room R2”.
You can view your R2’s status and change its friendly name by viewing its web page in a browser. In Windows, your R2 will typically show up as a Media Device, double clicking on the icon will open the configuration page in your browser.
To find out more, visit www.ruarkaudio.com/support
EN-16
Alarms, snooze and sleep
Setting an alarm
An active alarm is indicated by the alarm icon (41) and when it sounds, the icon flashes.
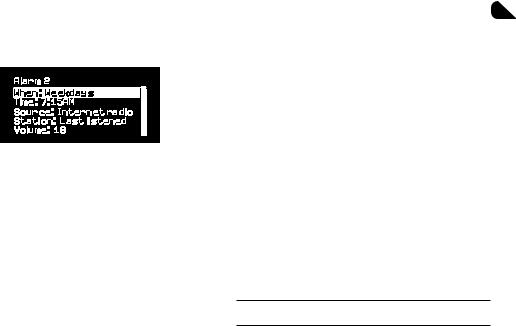
Press ALARM and select alarm 1 or alarm 2 using the
CONTROL KNOB.
Using the CONTROL KNOB highlight the option you wish to change and press the knob.
Choose when the alarm will sound (off, daily, once, weekends or weekdays), set the time and then choose to have the alarm play a radio station or sound a tone and finally choose the volume. Finally, select save to save the alarm and exit the set up menu.
NOTE: it is not possible to use a Bluetooth source, USB or network music server for the alarm.
Snooze
Press the CONTROL KNOB to temporarily silence a sounding alarm, press it again to increase the snooze period (5, 10, 15 or 30 minutes).
To cancel an alarm that is sounding or in snooze mode, press and hold the CONTROL KNOB for two seconds or press ALARM.
Sleep timer
To set the time after which your R2 will automatically switch to standby, press SLEEP for two seconds.
Press the CONTROL KNOB, then rotate it to choose the delay in minutes (Off, 15, 30, 45, 60, 90) and finally press the knob to confirm your selection. The display then dims to standby brightness, returns to the Now-playing screen and displays the sleep icon (42).
Alarms can also be set in standby
EN
DA
DE
FR
IT
ES
NL
NO
EN-17

FM radio
Your R2 radio receives analogue radio from the FM band and when available, displays the station name and radio text using RDS/RBDS information (Radio Data System/ Radio Broadcast Data System).
Press SOURCE and rotate the CONTROL KNOB or repeatedly press SOURCE until FM radio is displayed, then press the knob to select it.
Change station
Press 
 or
or 
 to automatically tune to the next available FM station. If RDS/RBDS is unavailable the frequency is displayed instead.
You can change the scan setting to only stop at stations with a strong signal by selecting Menu > Scan setting > Strong stations only.
FM radio text (RDS/RBDS)
RDS is information broadcast by some FM stations. Choose from radio text, programme type, frequency, signal strength and date by selecting MENU > Info.
Manual tune
Select MENU > Manual tune then either rotate the CONTROL KNOB or press 
 or
or 
 to change the frequency.
Save preset
You can store 10 FM stations in your preset list. The station name will be stored only when RDS/RBDS is available. See ‘Common functions’ section.
Recall preset
‘See Common functions’ section.
For optimal reception, fully extend the aerial and adjust its position
EN-18
DAB radio*
Your R2 radio receives DAB/DAB+ digital radio and displays information about the station and programme being broadcast.
Press SOURCE and rotate the CONTROL KNOB or repeatedly press SOURCE until DAB radio is displayed, then press the knob to select it.
The first time you use your R2, or if the station list is empty, it will automatically perform a full scan to identify available stations.
Change station
Press
 or
or
 to tune to the next/previous station.
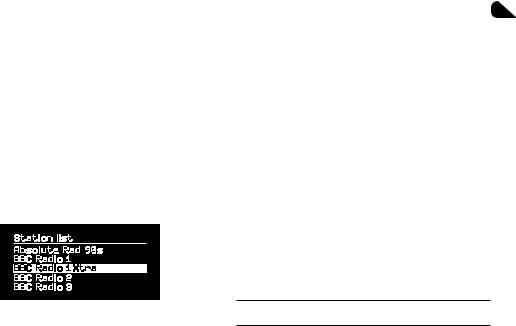
Station list
To view a list of available DAB stations select MENU > Station list. To tune to a new station, scroll through the list by rotating the CONTROL KNOB and select a station by pressing the knob.
* excludes R2 mk3/US version
DAB radio text (DLS)
DLS (Dynamic Label Segment) is information |
EN |
|
|
broadcast by DAB stations. Choose from radio text, |
DA |
programme type, signal strength, signal format and date |
DE |
by selecting MENU > Info. |
Save preset |
FR |
|
You can store 10 DAB stations in your preset list. See |
IT |
|
‘Common functions’ section. |
ES |
|
Recall preset |
||
NL |
||
See ‘Common functions’ section. |
||
|
||
Secondary services |
NO |
|
|
||
Some DAB radio stations have one or more secondary |
|
|
stations associated with them. If a secondary station is |
|
|
available ‘>>’ is shown after the current station name in |
|
|
the station list. |
|
|
Secondary stations are indicated with ‘<<’ before the |
|
|
station name. |
|
Invalid stations have ‘?’ in front of the station name
EN-19
Station order
The DAB station list can be ordered by Alphanumeric,
Ensemble or Valid. Alphanumeric puts the stations in alphabetical order, Ensemble groups stations from the same broadcaster together, Valid shows available stations first and places invalid stations (marked with ‘?’) last.
To change station order, select Menu > Station order and select Alphanumeric (default), Ensemble or Valid.
Station scan
If the station list is empty the radio will automatically perform a full scan as soon as you switch to DAB.
In any case, we recommend you do a full scan from time to time to update the station list because:
●New stations sometimes become available
●Stations close or may no longer be received
●Reception was poor during the original scan (for example the aerial wasn’t extended)
●You move the radio to a different region
To do a full scan, select MENU > Scan.
Remove weak or invalid stations
Weak (burbling) or invalid stations have ‘?’ in front of the station name. They can all be removed by selecting
MENU > Prune.
EN-20
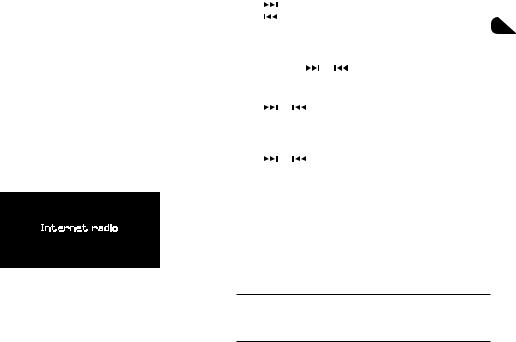
Internet radio
Your R2 radio can play thousands of internet radio stations and podcasts from all over the world (connection to Wi-Fi network with internet access required).
Press SOURCE and rotate the CONTROL KNOB or repeatedly press SOURCE until Internet radio is displayed, then press the knob to select it.
Main menu
The first time you listen to internet radio you will see the main menu for this mode.
If you have listened to internet radio stations on your R2 before, it will automatically play the last listened station.
Last listened
To access a list of recently listened to stations select
MENU > Last listened.
When you use your R2 for the first time, the list will be empty.
Station list
You can browse or search the extensive list of stations |
EN |
|
|
by selecting MENU > Station list and selecting from |
DA |
the various options, including genre, location and |
DE |
popularity. |
Now playing information |
FR |
|
The station name is shown along with additional |
IT |
|
information like artist and track name. To change what |
ES |
|
is displayed select MENU > Info and choose from radio |
||
text, genre, signal quality, track name, location, and |
NL |
|
date. |
||
|
||
Search for a station |
NO |
|
|
||
Search for a station by selecting MENU > Station list > |
|
|
Stations > Search stations and then entering the name |
|
|
of the station you’re looking for. |
|
To return to the previous menu level or station list, press BACK
EN-21
Podcasts
Many stations will have associated podcasts which you can browse and search for just like internet radio stations.
Mute
Press 
 to mute and press again to resume listening.
Save a preset
You can store 10 Internet radio stations in your preset list. See ‘Common functions’ section.
Recall a preset
See ‘Common functions’ section.
Ruark radio portal
In addition to presets, Internet radio has two further ways of storing and organising your favourite radio stations using the online Ruark radio portal.
For more information, visit
www.ruarkaudio.com/radioportal
You will need the your radio’s unique portal access code so make a note of it by selecting Menu > Station list > Help > Get access code.
My favourites
This is similar to storing presets, except that the stations are stored online, on the Ruark radio portal. This means that your saved favourite stations are accessible from any Ruark internet radio product registered on the same account.
To store a station as a favourite, press and hold the CONTROL KNOB until Favourite added is displayed. This is only available if you have registered your R2 on the radio portal.
My added stations
You can manually add stations that are not already listed by visiting the online Ruark radio portal. Stations added this way are accessible by selecting MENU > Station list > My added stations.
EN-22

Bluetooth
Your R2 radio is Bluetooth enabled and can receive music streamed from Bluetooth devices such as a smartphone.
Press SOURCE and rotate the CONTROL KNOB or repeatedly press SOURCE until Bluetooth is displayed, then press the knob to select it.
To connect your device you must first establish a secure connection to your R2, a process called pairing.
Pairing your Bluetooth device
When you have changed the source to Bluetooth, wait until Awaiting connection... is shown and the indicator light (28) on top flashes.
Use the Bluetooth setup on your smart device to pair and connect it to your R2. It will appear in the list of paired devices as Ruark R2*. When connected, BT Connected + your device name (eg Archie’s phone) is displayed.
It may take a few seconds for your R2 to appear in the list on your device, and in some cases you may need to input “0000” as the pairing password.
If you do not connect within a few minutes, your R2 will stop attempting to connect and show No connection.
To connect, select MENU > Connect device.
Connecting your Bluetooth device
EN
As soon as you switch to Bluetooth, your R2 will
display Connecting as it attempts to connect to the last DA device it was paired with.
DE
If that device isn’t available, it displays Awaiting connection... To connect to your R2, ensure the FR Bluetooth function on your device is on and select
Ruark R2* from the paired devices list on your Bluetooth IT device.
ES
*Friendly name
NL
Your R2 will shown up as Ruark R2 on Bluetooth
devices, however, you can change this to something NO more descriptive like “Archie’s R2” or “Living room R2”.
See System settings.
Play audio
Once connected, audio from your Bluetooth device will play through your R2. For more information on playing audio from your Bluetooth device, refer to your device’s documentation.
NOTE: you may need to select your Ruark R2 or Bluetooth as your audio output on your device.
EN-23
Pause track
Press 
 and then press again to play.
Play next/previous track
Press 
 to skip to the next track in the folder or album, press
 to skip to the start of the current track, press again to skip to the previous track.
Adjust volume
We recommend that you set the volume on your Bluetooth device to maximum and then use the volume control on your R2 to adjust playback volume. If the volume on your Bluetooth device is not set to maximum, the playback volume from Bluetooth will be lower than other sources.
Now-playing information
Artist, album and track name will show if your Bluetooth device and app support Bluetooth metadata. You can also show the name of the connected device. Select what is shown from MENU > Info.
Operating range
This is typically up to 10 metres (30 feet) from your R2, although obstructions such as walls may reduce this.
Disconnect current device
To disconnect the current device and connect a new one, select MENU > Connect device.
Pairing additional devices
You can pair up to 7 devices, although you will only be able to play audio from one device at a time.
Clearing the paired devices list
If you are having trouble connecting your Bluetooth device, we recommend you clear all pairing information. To do this, select MENU > Forget devices.
You will also need to delete Ruark R2 from the paired devices list on your Bluetooth device before pairing it to your R2 again.
For help with using Bluetooth, please visit
www.ruarkaudio.com/support.
You cannot use the Bluetooth function on your R2 to connect to Bluetooth headphones
Your R2 includes aptX coding technology so if your smart device is also aptX enabled, you will benefit from CD-quality streaming.
EN-24
Music player (network & USB)
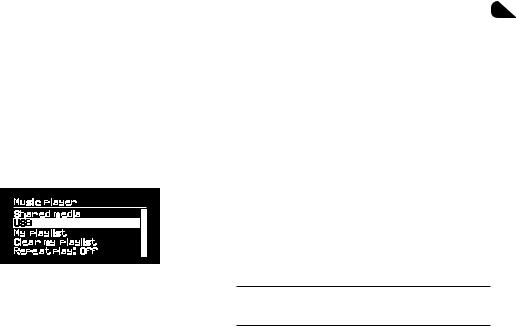
Music player enables you to play audio files stored on a computer on your Wi-Fi network, or from a USB memory stick or portable hard drive (must be FAT32 format).
Press SOURCE and rotate the CONTROL KNOB or repeatedly press SOURCE until Music player is displayed, then press the knob to select it.
USB music player
To play audio from a USB mass-storage device such as a USB Flash stick or USB hard drive, connect it to the USB socket on the back of your R2.
When you first connect a USB mass-storage device, your R2 will automatically ask if you want to view the track list. Otherwise, to view the track list select Menu > USB.
will also charge most smartphones including iPhones and most Android and Windows phones.
NOTE: the USB will not charge an Apple iPad or any other device that requires more than 5W.
Network music player
Your R2 is fully DLNA compatible and will play music stored in shared media libraries on other devices on your network. A shared library might be on a laptop, smartphone or tablet, but it could also be on a dedicated music server such as a NAS drive (Network Attached Storage).
Most computers running Windows are already configured as media servers as are most NAS drives and some routers will also work as media servers. There are many apps available for Mac, iOS, Linux, Android, Windows phone, Blackberry, Symbian, etc. that will turn your MP3 player, smartphone or tablet into a music server.
EN
DA
DE
FR
IT
ES
NL
NO
USB charging
The USB socket on your R2 is rated at 5W (1.0A) and will power most USB powered external hard drives. It
Rights-protected WMA and AAC tracks cannot be played on your R2.
EN-25
To play music shared by devices on your network select Menu > Shared media. After your R2 has scanned your network for shared media you will see a list of music servers consisting of the computer name and shared media name, for example <Ruark-Laptop: Archie Music>.
The menus after this are generated by the media server, although in most cases you will find options to browse by genre, folder, artist, album etc.
If your R2 is not connected to a network it will now attempt to connect.
If it cannot connect automatically, the network wizard will start to help you through the process.
Browse and play music
Rotate the CONTROL KNOB to scroll though the track lists, then press the knob to open the highlighted folder/ album or play the track.
To go back to the previous screen press BACK.
Pause track
Press 
 and then press again to play.
Skip track
Press 
 to skip to the next track in the folder or album, press
 to skip to the start of the current track, press again to skip to the previous track.
Fast-forward or rewind
Press and hold 
 or
or 
 to fast-forward or rewind.
Shuffle play
To play tracks in random order, select MENU > Shuffle play and press the CONTROL KNOB to toggle shuffle play on and off.
NOTE: It may not be possible to use this function if the folder contains a large number of tracks.
Repeat play
To repeat a single track or all the tracks in the current folder, select MENU > Repeat play and press the CONTROL KNOB to toggle repeat play on and off.
My playlist
You can create your own playlist and queue of up to 500 tracks. These can be a mixture of tracks from any available media servers and an attached USB device. To manage your playlist, select Menu > My playlist.
To add a track or folder to your playlist, highlight it then press and hold the CONTROL KNOB for two seconds.
To remove a track from your playlist, highlight the track in My playlist and then press and hold the CONTROL KNOB for two seconds.
EN-26

Now playing information
Typically, the track name is shown with additional information below. To change what is displayed select MENU > Info and choose from album and artist information, show the progress bar or signal format.
Prune servers
Your R2 will automatically store the name of media servers it has connected to and that are not currently available are shown with a question mark before their name eg ‘?Home-Laptop’. You can remove them from the list by selecting MENU > Prune servers > YES.
DLNA media streaming
You can also stream audio to your R2 from a Digital Living Network Alliance (DLNA) compatible media server. This is where you browse for music on the server itself and play it through your R2. There are many apps available for Mac, iOS, Linux, Android, Windows phone, etc that will turn your smartphone, tablet or laptop into a DLNA media server. Windows Media Player even has a ‘Play to’ function built in that allows you to stream music stored on your computer directly to your R2.
With DLNA media streaming, your R2 functions as a |
|
|
Digital Media Renderer (DMR) so you browse for music |
|
|
on your smartphone or laptop and then stream it to your |
|
|
R2 over your network. |
EN |
|
|
||
Your R2 will automatically change to DMR mode when |
DA |
|
you select your R2* as your chosen player – DMR is not |
||
a mode that can be selected using the SOURCE key. |
DE |
|
Similarly, all the Now playing information will be |
||
|
||
controlled by the server so there are no settings you can |
FR |
|
change. |
IT |
|
For more details refer to the documentation for your |
||
|
||
device or app or visit www.ruarkaudio.com/support. |
ES |
|
|
||
|
NL |
|
|
NO |
DLNA media streaming requires that your R2 is connected to your Wi-Fi network so we recommend that you set it to keep network connected. See system settings section.
EN-27

Spotify Connect
Spotify is one of the world’s leading digital music services that gives you instant access to over 20 million songs. With Spotify Connect you can stream your favourite music from the Spotify app on a smartphone or tablet directly to your R2.
Spotify Premium subscription required, for more details and a free 30-day trial, visit www.spotify.com/freetrial/
Link Spotify to your R2
When you use Spotify Connect for the first time your R2 must be on the same Wi-Fi network as your smart device.
Launch the Spotify app on your smartphone or tablet, tap on the Now Playing bar and tap on the speaker icon  . Choose Ruark Audio R2* from the list of available devices and your Spotify audio will automatically
start playing on the R2. This will also link your Spotify account to your R2.
* If you have changed the friendly name of your R2 it will show up as this new name rather than Ruark Audio R2. See System settings section.
EN-28
Once you have linked your Spotify account to your R2 can listen to your Spotify playlists directly, without using your smart device.
Press SOURCE and rotate the CONTROL KNOB or repeatedly press SOURCE until Spotify is displayed, then press the knob to select it. Press 
 to start playing from your current Spotify playlist.
If Waiting for Users is displayed you need to link your Spotify account to your R2 again.
For more information visit www.spotify.com/connect/
Pause track
Press 
 and then press again to play.
Skip track
Press 
 or
or 
 to skip to the next or previous track in the playlist.
Your R2 must be connected to the internet in order to use Spotify Connect. Please ensure the option ‘keep network connected’ is set to On. See system settings section.

Now playing information
To change what track information is displayed select MENU > Info and choose from artist, album, format, date or progress bar.
CAUTION: When you stream music to your R2 from Spotify on your mobile device, your R2 will
automatically switch source and play the audio. This will also work if you are away from home, depending on volume level, the output may be loud, so be sure to check the audio output selection carefully before starting audio streaming.
Line in audio inputs
You can listen to audio from an external audio device by connecting it to the audio input 1 (  ) on the front using a 3.5mm stereo jack cable or to the audio input 2 (

 ) on the back using a stereo RCA/phono cable.
Press SOURCE and rotate the CONTROL KNOB or repeatedly press SOURCE until Line in 1 or Line in 2 is displayed, then press the knob to select it.
If your external audio source has a volume control you may need to adjust it for best performance. If it’s too high the sound may distort; if it’s too low the playback volume may be too low.
Troubleshooting
For help with your product, please refer to the FAQ (Frequently Asked Questions) page in the support area of our website.
www.ruarkaudio.com/support
EN
DA
DE
FR
IT
ES
NL
NO
EN-29
Safety and regulatory information
●Read this user guide and follow all instructions, it will help you set up and operate your product properly.
●Heed all warnings and keep this user guide for future reference.
●Do not attempt to use a damaged device as this could result in a dangerous electric shock.
●Do not open the unit or remove any panels to expose the electronics. No user serviceable parts inside.
●Refer all servicing to qualified service personnel. Servicing is required when the device has been damaged in any way, such as power-supply cord or plug is damaged, liquid has been spilled or objects have fallen into the device, the device has been exposed to rain or moisture, does not operate normally, or has been dropped.
●This device is intended to be operated ONLY from the AC Voltages listed on the back panel or included power supply. Operation from other voltages other than those indicated may cause irreversible damage to the device and void the product warranty.
●Use only the power supply provided with the device or an approved alternative.
●Ensure that the power adapter, mains plug or mains connector into the unit is readily accessible in case disconnection from the mains is required.
●The mains adapter, mains plug or mains connector must be removed from the socket to completely disconnect the system from mains power.
●Liquids can cause a failure and/or a fire hazard. Do not expose this device to dripping or splashing, and do not place objects filled with liquids, such as vases, on or near the device.
●Do not place any naked flame sources, such as lighted candles, on or near the device. Do not install near any heat sources such as radiators, stoves, or other devices (including amplifiers) that produce heat.
●Avoid exposure to extreme heat or cold.
●Only use attachments/accessories specified for this device. Make no modifications to the system or accessories. Unauthorised alterations may compromise safety, regulatory compliance, and system performance.
●Only use the supplied aerial or an approved replacement.
●To reduce the risk of fire or electrical shock, do not expose the device to rain or moisture. Do not expose this device to dripping or splashing, and do not place objects filled with liquids, such as vases, on or near the device. As with any electronic products, use care not to spill liquids into any part of the system. Liquids can cause a failure and/or a fire hazard.
●Unplug this device during lightning storms or when unused for long periods of time to prevent damage to this device.
●To prevent risk of fire or electric shock, avoid overloading wall outlets, extension cords, or integral convenience receptacles.
●Long-term exposure to loud music may cause hearing damage. It is best to avoid extreme volume when using headphones, especially for extended periods.
●The remote control supplied with this product contains a Lithium coin cell battery. Do not swallow. Keep new and used batteries away from children. Do not handle leaking or damaged batteries.
●Do not install this device in a confined space. Always leave a space of at least 10cm around the device for ventilation and ensure that curtains or other objects never cover ventilation openings on the device.
EN-30
 Loading...