

Page 1
Cronus
Digital Intercom Matrix
F . 01U.118.890
Rev. 23
June/2013
Page 2
ii Cronus
PROPRIETARY NOTICE
The product information and design disclosed herein were originated by and are the property of Bosch Security Systems, Inc.
Bosch reserves all patent, proprietary design, manufacturing, reproduction, use and sales rights thereto, and to any article disclosed
therein, except to the extent rights are expressly granted to others.
COPYRIGHT NOTICE
Copyright 2012 by Bosch Security Systems, Inc. All rights
reserved. Reproduction, in whole or in part, without prior written
permission from Bosch is prohibited.
*All other trademarks are property of their respective owners.
WARRANTY AND SERVICE INFORMATION
For warranty and service information, refer to the appropriate web
site below:
RTS Intercoms.............................. www.rtsintercoms.com/warranty
RTS Digital
RTSTW
AudioCom
RadioCom..................................www.telexradiocom.com/warranty
Headsets................................ www.intercomheadsets.com/warranty
CUSTOMER SUPPORT
Te chnical questions should be directed to:
Customer Service Department
Bosch Security Systems, Inc.
12000 Portland Avenue South
Burnsville, MN 55337 USA
Telephone: 877-863-4169
Fax: 800-323-0498
Info@rtsintercoms.com
THE LIGHTNING
FLASH AND
ARROWHEAD
WITHIN THE
TRIANGLE IS A
WARNING SIGN
ALERTING YOU OF
“DANGEROUS
VOLTAGE” INSIDE
THE PRODUCT.
SEE MARKING ON BOTTOM/BACK OF PRODUCT.
WARNING: APPARATUS SHALL NOT BE EXPOSED TO DRIPPING OR
SPLASHING AND NO OBJECTS FILLED WITH LIQUIDS, SUCH AS VASES,
SHALL BE PLACED ON THE APPARATUS.
WARNING: THE MAIN POWER PLUG MUST REMAIN READILY OPERABLE.
CAUTION: TO REDUCE THE RISK OF ELECTRIC SHOCK, GROUNDING OF
THE CENTER PIN OF THIS PLUG MUST BE MAINTAINED.
WARNING: TO REDUCE THE RISK OF FIRE OR ELECTRIC SHOCK, DO NOT
EXPOSE THIS APPRATUS TO RAIN OR MOISTURE.
WARNING: TO PREVENT INJURY, THIS APPARATUS MUST BE SECURELY
ATTACHED TO THE FLOOR/WALL/RACK IN ACCORDANCE WITH THE
INSTALLATION INSTRUCTIONS.
CAUTION: TO REDUCE
THE RISK OF ELECTRIC
SHOCK, DO NOT REMOVE
COVER. NO USERSERVICABLE PARTS
INSIDE. REFER
SERVICING TO
QUALIFIED SERVICE
PERSONNEL.
This product is AC only.
THE EXCLAMATION
POINT WITHIN THE
TRIANGLE IS A
WARNING SIGN
ALERTING YOU OF
IMPORTANT
INSTRUCTIONS
ACCOMPANYING
THE PRODUCT.
TECHNICAL QUESTIONS EMEA
Bosch Security Systems Technical Support EMEA
http://www.rtsintercoms.com/contact_main.php
DISCLAIMER
The manufacturer of the equipment described herein makes
no expressed or implied warranty with respect to anything
contained in this manual and shall not be held liable for any
implied warranties of fitness for a particular application or
for any indirect, special, or consequential damages. The
information contained herein is subject to change without
prior notice and shall not be construed as an expressed or
implied commitment on the part of the manufacturer.
Bosch Security Systems, Inc.
Technical Manual
F.01U.118.890
Rev. 23
Page 3

Cronus iii
Important Safety Instructions
1. Read these instructions.
2. Keep these instructions.
3. Heed all warnings.
4. Follow all instructions.
5. Do not use this apparatus near water.
6. Clean only with dry cloth.
7. Do not block any ventilation openings. Install in accordance with the
manufacturer’s instructions.
8. Do not install near any heat sources such as radiators, heat registers, stoves,
or other apparatus (including amplifiers) that produce heat.
9. Do not defeat the safety purpose of the polarized or grounding-type plug. A
polarized plug has two blades with one wider than the other. A grounding
type plug has two blades and a third grounding prong. The wide blade or the
third prong are provided for your safety. If the provided plug does not fit
into your outlet, consult an electrician for replacement of the obsolete outlet.
10. Protect the power cord from being walked on or pinched particularly at
plugs, convenience receptacles, and the point where they exit from the
apparatus.
11. Only use attachments/accessories specified by the manufacturer.
12. Use only with the cart, stand, tripod, bracket, or table specified by the
manufacturer, or sold with the apparatus. When a cart is used, use caution
when moving the cart/apparatus combination to avoid injury from tip-over.
13. Unplug this apparatus during lightning storms or when unused for long
periods of time.
14. Refer all servicing to qualified service personnel. Servicing is required
when the apparatus has been damaged in any way, such as power-supply
cord or plug is damaged, liquid has been spilled or objects have fallen into
the apparatus, the apparatus has been exposed to rain or moisture, does not
operate normally, or has been dropped.
Bosch Security Systems, Inc.
Te chnical Manual
F . 01U.118.890
Rev. 23
Page 4

iv Cronus
Bosch Security Systems, Inc.
Technical Manual
F.01U.118.890
Rev. 23
Page 5

Table
of
Contents
INTRODUCTION .........................................................................................................................3
General Description .................................................................................................................................3
Features ....................................................................................................................................................3
Differences between Cronus and ADAM ................................................................................................4
Front and Rear Panel Controls and Connections .....................................................................................4
Cronus Gain Structure ..............................................................................................................................6
Specifications ...........................................................................................................................................7
Connections ..............................................................................................................................................7
GPIO-16 ...................................................................................................................................................8
Determining the Master System From the Slave Systems .....................................................................10
DIP Switch Settings ...............................................................................................................................10
Cronus System Diagram and Frame Cabling .........................................................................................11
Default Jumper Settings for the Master Controller Board .....................................................................12
Default Jumper Settings for the Cronus AIO Board ..............................................................................13
CRONUS MENU STRUCTURE ................................................................................................15
Configure Menu .....................................................................................................................................15
Set Frame ID ......................................................................................................................................................................15
IFB Program INs ...............................................................................................................................................................16
I/O Gains .............................................................................................................................................................................16
Vox Thresholds .......................................................................................................... ..........................................................16
Status Menu .........................................................................................................................................................................17
Status, AZedit ......................................................................................................................................................................17
Status, Crosspoints ..............................................................................................................................................................18
Status, Frames ......................................................................................................................................................................18
Status, GPI Input .................................................................................................................................................................19
Status, GPI Output ...............................................................................................................................................................19
Status, Keypanels ................................................................................................................................................................20
Status, Links ........................................................................................................................................................................20
Version, Intercom ................................................................................................................................................................20
Cronus Menu System Quick Reference .................................................................................................21
CRONUS AND AZEDIT ............................................................................................................23
Vox Settings in AZedit ..........................................................................................................................23
Accessing Vox ............................ .........................................................................................................................................24
Download Cronus License File ..............................................................................................................28
Bosch Security Systems, Inc.
Technical Manual
F.01U.118.890
Rev. 23
Page 6

2 Cronus
ETHERNET SETUP FOR CRONUS ........................................................................................29
Default IP Addresses .............................................................................................................................29
Connecting Cronus to the PC and the Network .....................................................................................30
Download Firmware for Cronus ..........................................................................................................................................31
Finding the MAC Address for Cronus ................................................................................................................................33
Final Assembly Drawing .......................................................................................................................35
RVON-C RTS VOICE OVER NETWORK FOR CRONUS .....................................................41
Description of the RVON-C Voice Over Network Card .......................................................................41
Features ..................................................................................................................................................41
Specifications .........................................................................................................................................42
DIGITAL .............................................................................................................................................................................42
CONNECTIONS - PINOUTS .............................................................................................................................................42
RVON-C JUMPERS and CONNECTIONS .......................................................................................................................42
Installation of the RVON-C Card into the Cronus System ....................................................................45
Addresses and the RVON-C Card ................................................................................................ . ......................................45
Software Requirements ..........................................................................................................................45
Switches and Connections .....................................................................................................................46
Configuring the RVON-C Card with AZedit ........................................................................................47
RVON-C Connection Status Window ...................................................................................................49
View RVON-C Status from Cronus Front Panel ...................................................................................56
Download RVON-C Firmware through AZedit ....................................................................................58
BASIC NETWORK CONFIGURATION ..................................................................................61
Basic Network Configuration ................................................................................................................61
LAN (Local Area Network) vs. WAN (Wide Area Network) ..............................................................61
Local Area Network ............................................................................................................................................................61
Wide Area Network .............................................................................................................................................................62
ACCESSING THE WIDE AREA NETWORK (WAN) .....................................................................................................63
NETWORK ADDRESS TRANSLATION (NAT) ..............................................................................................................63
PORTS .................................................................................................................................................................................63
IP Addresses ..........................................................................................................................................65
Ping a Computer ..................................................................................................................................................................66
POSSIBLE PITFALL WITH ROUTERS, GATEWAYS, AND SWITCHES ....................................................................67
RVON Configuration .............................................................................................................................68
Network Terminology ............................................................................................................................69
RVON Serial and Telnet Commands .....................................................................................................71
Setup ....................................................................................................................................................................................71
RVON-C Boot Download ......................................................................................................................72
Access Serial Command Mode ..............................................................................................................74
Serial Command Table ..........................................................................................................................75
Codec Specifications ..............................................................................................................................77
RVON-C Default Setup .........................................................................................................................78
Install Front and Back Cards in Cronus .................................................................................................79
Connect Ethernet ....................................................................................................................................79
Launch AZedit and Connect to the Cronus Frame ................................................................................80
Configure the RVON-C Card ................................................................................................................81
Configure the Devices Connected to the RVON-C Card ......................................................................83
Setting up a Serial Pass-Through Connection or Serial Connection .....................................................83
XCP-32-DB9 Breakout Panel ................................................................................................................86
Bosch Security Systems, Inc.
Technical Manual
F.01U.118.890
Rev. 23
Page 7

Cronus 3
XCP-48-RJ45 Breakout Panel ...............................................................................................................88
XCP-48-Telco Breakout Panel ..............................................................................................................90
Telco Backcard
Telco Connector J1, J4 ........................................................................................................................................................91
CRONUS MASTER CONTROLLER CARD ............................................................................93
Legacy Master Controller Card Jumper Settings ...................................................................................93
ADDITIONAL INFORMATION ...............................................................................................95
RVON TRUNKING CONNECTIONS .......................................................................................97
Notes ....................................................................................................................................................105
Bosch Security Systems, Inc.
Tech nical Manual
F.01U.118.890
Rev. 23
Page 8

4 Cronus
Bosch Security Systems, Inc.
Technical Manual
F.01U.118.890
Rev. 23
Page 9

List
of
Figures
FIGURE 1. Controls, Connections, and Cronus backcard. .................................................................... 4
FIGURE 2. Cronus Gain Structure. ........................................................................................................ 6
FIGURE 3. RJ-12 backcard (CRONUS CX-LINKKIT) ........................................................................ 6
FIGURE 4. MDR backcard (CRONUS MDR) ...................................................................................... 6
FIGURE 5. System Diagram and Frame Cabling ................................................................................ 11
FIGURE 6. Cronus from the inside. ..................................................................................................... 11
FIGURE 7. Cronus Master Controller board (9030-7785-001) ........................................................... 12
FIGURE 8. Cronus AIO Board 9030-7784-000 .................................................................................. 13
FIGURE 9. Menu List - Tree Diagram ................................................................................................ 21
FIGURE 10. Cronus Final Assembly ..................................................................................................... 35
FIGURE 11. Wiring Diagram for Cronus .............................................................................................. 38
FIGURE 12. Wiring Diagram ................................................................................................................ 39
FIGURE 13. Front card - RVON-C 9030-7835-000 .............................................................................. 43
FIGURE 14. RVON-C Backcard ........................................................................................................... 44
FIGURE 15. RVON-C Backplate .......................................................................................................... 44
FIGURE 16. RVON-C DIP Switch panel ..............................................................................................46
FIGURE 17. RVON Connection Status – Card/Channel page .............................................................. 50
FIGURE 18. RVON Connection Status – Connection page .................................................................. 51
FIGURE 19. RVON Connection Status – VOIP page ........................................................................... 52
FIGURE 20. RVON Connection Status – Network page ...................................................................... 53
FIGURE 21. RVON Connection Status – Errors page .......................................................................... 54
FIGURE 22. RVON Connection Status – Pass-Through page .............................................................. 55
FIGURE 23. RVON-C System Diagram ............................................................................................... 60
FIGURE 24. Local Area Network Diagram ...........................................................................................62
FIGURE 25. Wide Area Network Diagram ........................................................................................... 62
FIGURE 26. Network Address Translation ........................................................................................... 63
FIGURE 27. XCP-32-DB9 Breakout Panel (XCP-32DB-DB9-BP) ...................................................... 86
FIGURE 28. XCP-48-RJ45 Breakout Panel (XCP-48-RJ45) ................................................................ 88
FIGURE 29. XCP-48-Telco Breakout Panel (XCP-48-TELCO) .......................................................... 90
FIGURE 30. Legacy Master Controller Card ........................................................................................93
FIGURE 31. Cable drawings for PAP-32, AZedit, Trunking and UIO-256/GPIO-16/LCP-102 .......... 95
FIGURE 32. AZedit Via RVON-8 RS-232 Mode ................................................................................. 99
FIGURE 33. CS9500 Trunking Via RVON-I/O To RVON-8 ............................................................. 100
FIGURE 34. ADAM Trunking Via RVON-8 ...................................................................................... 101
FIGURE 35. Zeus II Trunking Via RVON-I/O to RVON-C ............................................................... 102
FIGURE 36. Cronus Trunking Via RVON-I/O To RVON-8 .............................................................. 103
FIGURE 37. RVON-16 Trunking ........................................................................................................ 104
Bosch Security Systems, Inc.
Te chnical Manual
F .01U.118.890
Rev. 23
Page 10

2 Cronus
Bosch Security Systems, Inc.
Technical Manual
F.01U.118.890
Rev. 23
Page 11

CHAPTER 1
Intr oduction
General Description
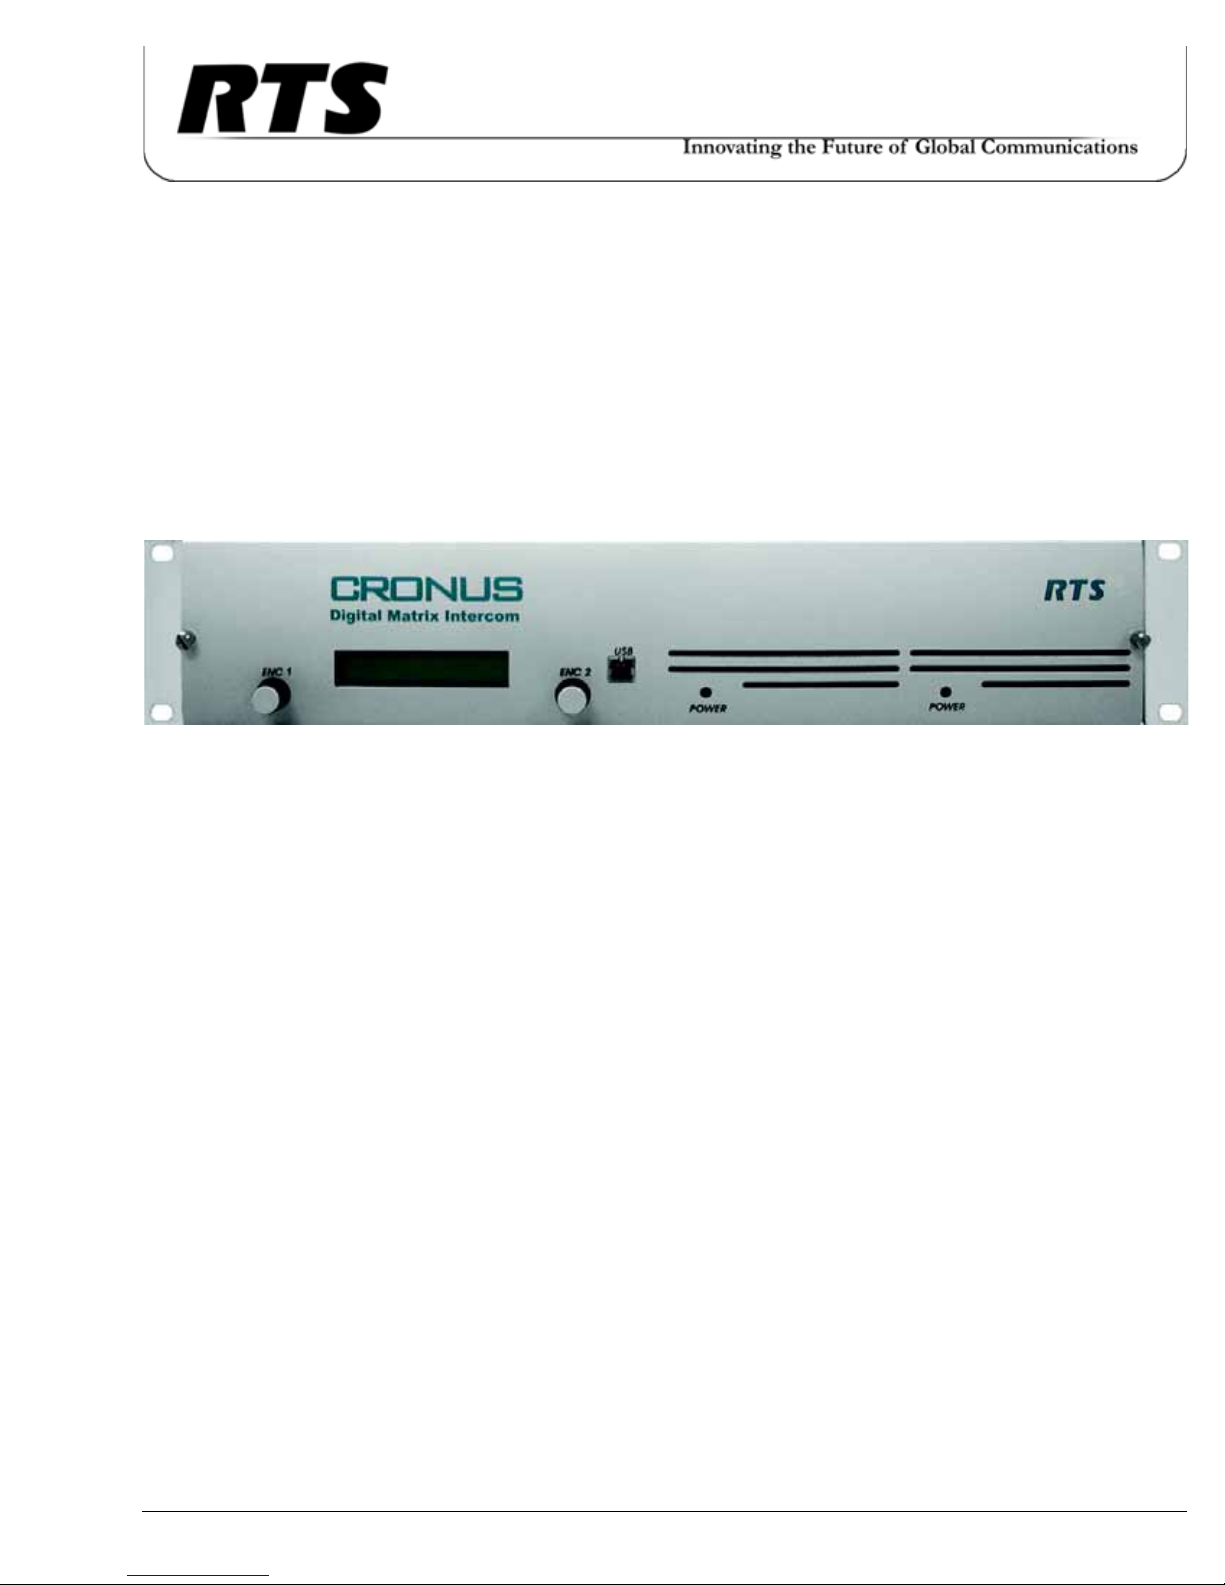
RTS Cronus is a 32-port digital matrix intercom in 2 RU (rack units). Based upon an advanced DSP (Digital Signal Processor)
architecture, Cronus has the ability to link up to four (4) units into a single 128 port matrix. Through the use of standard video
coaxial cable, the maximum distance between the first and last Cronus system can be up to 300ft., and still appear as a single
matrix. However, when using the Fiber Option card, the distance is increased up to 15 kilometers nominally. When connected
as a single matrix, the individual Cronus control remains autonomous and independent at each matrix for the hi ghest
reliability.
Features
USB Connectivity
Advanced DSP
Modular Architecture
Redundant Power Supply
Convenient front panel access, as well as traditional rear access for system
programming. Note, you may use either the front panel access or the rear panel access,
but not both at the same time.
NOTE: The USB drivers for Cronus are installed with the AZedit software. You
can find the folder at C:\Telex\AZedit\V20606. The drivers are bundled in
version 2.06.06 or later.
Digital signal processing designed to support audio signal processing on all 32 ports
(inputs).
The modular architecture allows for port expansion from 8 to 32 ports giving each
user expandable systems in the field.
Each chassis is powered by two power supplies, either of which can sufficiently power
all the equipment ALONE. This provides constant power and disaster recovery even
with the failure of one power supply.
Bosch Security Systems, Inc.
Te chnical Manual
F . 01U.118.890
Rev. 23
Page 12

4 Introduction Cronus
Differences between Cronus and ADAM
Cronus ADAM
Most practical for small to medium systems.
In small to medium-sized broadcast company, Cronus would
be used like an ADAM.
Cronus is scalable - can add up to four systems maximum to
the original configuration.
Most practical for more complex systems because the
number of users is much higher.
Uses ASIC technology
ADAM has both a redundant power supply and a redundant
Master Controller card.
Cronus has a redundant power supply.
Has one (1) USB port with front and rear access.
Has capability for an Ethernet connection
Cronus has individual data drivers, meaning the address
does not need to be set at the keypanel.
Front and Rear Panel Controls and Connections
There are two Cronus backcards, an MDR backcard and an RJ-12 backcard. You can have up to four backcards installed on
Cronus. You can have any combination of backcards on the Cronus, too (for example, you can have two RJ-12 backcards and
two MDR backcards
FIGURE 1. Controls, Connections, and Cronus backcard.
NOTE: For more information on a VOIP option card (RVON-C) for the Cronus, See “RVON-C RTS Voice Over
Network for Cronus” on page 41.
Bosch Security Systems, Inc.
Technical Manual
F . 01U.118.890
Rev. 23
Page 13

Cronus Introduction 5
1. ENC1 – This knob allows you to select a menu item, scroll through menus or exit the display menu.
2. ENC2 – This knob allows you to select a menu item, scroll through menus or exit the display menu.
NOTE: Only when you are in the Crosspoint Status menu do the left and right knob perform separate functions. The
right knob adjusts the output port, while the left knob adjusts the import port.
3. Display Panel – LCD display showing menu options.
4. USB Connection – There are two (2) USB connections on the Cronus: one on the front panel and one on the rear
panel (J7). The Cronus system can use the USB port to connect with a PC. This allows for the most flexibility when
planning where to use the system. In a rack unit, where the back is inaccessible, or on a desktop where the back is
accessible.
NOTE: Only one USB connector can be used at a time.
5. Power 1& Power 2 – The power source indicator is a green LED light displaying the power is on. The Cronus has a
redundant power source. This means there are two (2) power su pp lies, so it power supply 1 fails, power supply 2
takes over powering the system.
6. Keypanel Ports (backcard) – One Cronus frame can have 32 ports through the use of either an RJ-12 backcard or an
MDR backcard. In all, the Cronus system supports a maximum of 128 ports available for keypanels. You can also mix
and match the backcards (for example, you can have 2 MDR backcards with 2 RJ-12 backcards on the same frame).
The MDR backcard is primarily used to connect the three compatible breakout panels. XCP-32-DB9, XCP-48-RJ45
and the XCP-48-Telco (See “Breakout Panels” on page 85).
NOTE: Using an MDR backcard (CRONUS MDR), you can utilize a DB-9 breakout panel. (XCP-32-DB9 BP).
Once DB-9 breakout panel can support all four (4) AIO cards within the Cronus.
7. LINE 1 – Cronus has two (2) power sources; a primary source (LINE 1) and a redundant power source (LINE 2).
Both power sources are running at the same time, so that if the primary source fails, the redundant source is able to
power the Cronus.
8. Fans – There are two (2) fans to cool the power supplies.
9. LINE 2 – Cronus has two (2) power sources; a primary source (LINE 1) and a redundant power source (LINE 2).
Both power sources are running at the same time, so that if the primary source fails, the redundant source is able to
power the Cronus.
10. DB-9 Serial Connection – DB-9 serial connection to the PC from Cronus.There are six (6) DB-9 serial ports, however
only five (5) are used (J1, J2[reserved], J3, J4, and J5) and one is undefined.
11. USB Connection – USB connection to the PC from Cronus.
12. RJ-45 Connection – RJ-45 connection to the PC from the Cronus.
13. DB-25 Connection – General Input Output connection.
NOTE: The pin out of this connection is not the same as Zeus, ADAM or ADAM CS.
14. Coaxial and Fiber Connection – There are four (4) coaxial or two (2) fiber connections used to connect the frames
together, see Figure 5 for the configuration illustration. Requires optional licensing firmware. Contact Bosch Security
Systems, Inc customer service for more information. When contacting customer service, be sure to have the MAC
Address for each unit. For information on how to obtain the MAC Address, see “Finding the MAC Address for
Cronus” on page 33.
Bosch Security Systems, Inc.
Technical Manual
F.01U.118.890
Rev. 23
Page 14

6 Introduction Cronus
Cronus Gain Structure
FIGURE 2. Cronus Gain Structure.
The table below shows the gain level adjustments for Cronus, ADAM and Zeus.
Cronus
V0.2.x
MAX Audio
Input Level
Input Gain
Control Range
via AZedit
+10dBu -20dB to +20dB 20dB to 12dB Nominal +10dB -6dB to +6dB +21dBu
Output Gain
Control Range
via AZedit
Max Input Gain
Cross Point
Gain
V1.0.0 +20dB -20dB to +20dB -20dB to +20dB Nominal +20dB -6dB to +6dB +24dBu
ADAM +20dB -20dB to +20dB -20 to 20dB Nominal +20dB -6dB to +6dB +28dBu
Zeus +20dB -20dB to +20dB -20 to 13dB Nominal +20dB -6dB to +6dB +22dBu
FIGURE 3. RJ-12 backcard (CRONUS CX-LINKKIT)
Max Audio
Output
Level
FIGURE 4. MDR backcard (CRONUS MDR)
Bosch Security Systems, Inc.
Technical Manual
F . 01U.118.890
Rev. 23
Page 15

Cronus Introduction 7
Specifications
J2: RS-232 (Debug)
Analog Inputs and Out puts
Signal Type .............................................. ..............balanced
Nominal Level................................. ........................... 8dBu
Maximum Level........................................................ 20dBu
Input Impedance ...................................................22k Ohm
Output Impedance........................600 Ohm SNR at 20dBu:
Power Requirements ..................90-240V, 50/60Hz, 70W
Pin 1..................................... .................................Not Used
Pin 2............................................................................GND
Pin 3........................................ .......................Input RS-232
Pin 4..................................... .................................Not Used
Pin 5..................................... .................................Not Used
Pin 6..................................... .................................Not Used
Pin 7............................................................................GND
Pin 8........................................ .................... Output RS-232
Pin 9..................................... .................................Not Used
A/D and D/A
Sampling Rate........................................................... 48kHz
Resolution...................................................... ........... 24 bits
Performance
SNR at 20 dBu: (A-weighted) ..................................>90dB
THD+N at 20dBu, 1 kHz (unweighted) ............... <0.007%
Frequency Response at 20 dBu...within ±1dB from 50Hz 20kHz
Crosstalk at 20dBu.................................................<-60dBu
CMRR.......................................................................>70dB
NOTE: All measurements performed using an Audio
Precision System 1 Dual Domain System at
f=1kHz and Level = 20dBu. Measurement
bandwidth = 20Hz to 20kHz.
Connections
Intercom Channels (1-32)
Connector Type: 6-pin RJ-12
Pin 1...................................................................... Control -
Pin 2.................................................................Audio Out +
Pin 3................................................................... Audio In +
Pin 4.................................................................... Audio In -
Pin 5...................................................................Audio Out-
Pin 6..................................................................... Control +
Serial Interface Port (J1 - J6)
Connector Type: 9-pin female D-sub
J1: RS-232 (AZedit)
Pin 1......................................................................Not Used
Pin 2............................................................... Input RS-232
Pin 3.............................................................Output RS-232
Pin 4......................................................................Not Used
Pin 5............................................................................GND
Pin 6............................................................................GND
Pin 7......................................................................Not Used
Pin 8......................................................................Not Used
Pin 9......................................................................Not Used
J3: RS-232/RS-485 (J3 is trunking)
Pin 1........................................................RS-422-/RS-485-
Pin 2........................................................................... GND
Pin 3..................................... ................................Not Used
Pin 4..................................... ................................Not Used
Pin 5........................................ ..................Output RS-422+
Pin 6..................................... ................RS-422+/ RS-485+
Pin 7........................................................................... GND
Pin 8..................................... ................................Not Used
Pin 9.......................................................... Output RS-422-
J4: RS-232/RS-485 (J4 is for peripheral devices, such as
UIO-256,GPIO-16, and PAP-32)
Pin 1...............................................Input RS-422-/RS-485-
Pin 2............................................................................GND
Pin 3..................................... .................................Not Used
Pin 4..................................... .................................Not Used
Pin 5........................................ ..................Output RS-422+
Pin 6.............................................Input RS-422+/RS-485+
Pin 7............................................................................GND
Pin 8..................................... .................................Not Used
Pin 9........................................ ...................Output RS-422-
J5: RS-485 (J5 is PAP-32)
Pin 1......................................................................RS-485 -
Pin 2..................................... .......................................GND
Pin 3.....................................................................Not Used
Pin 4.....................................................................Not Used
Pin 5.....................................................................Not Used
Pin 6.....................................................................RS-485 +
Pin 7..................................... .......................................GND
Pin 8.....................................................................Not Used
Pin 9.....................................................................Not Used
J6: RS-232 (J6 is undefined)
Pin 1......................................................................RS-485 -
Pin 2............................................................................GND
Pin 3..................................................................... Not Used
Pin 4..................................................................... Not Used
Pin 5..................................................................... Not Used
Pin 6.....................................................................RS-485 +
Pin 7............................................................................GND
Pin 8..................................................................... Not Used
Pin 9..................................................................... Not Used
Bosch Security Systems, Inc.
Technical Manual
F . 01U.118.890
Rev. 23
Page 16

8 Introduction Cronus
USB Connectors (front end and back end J7)
Connector Type............................................Standard USB
Ethernet Interface Port (J8)
Connector Type...........................................RJ-45 standard
10 Base-T (Cat 3) /
100 Base Tx (Cat5)
GPIO Interface Port (J9)
Connector Type: 25-pin Female D-sub
Pin 1......................................................................... Input 1
Pin 2......................................................................Common
Pin 3......................................................................... Input 2
Pin 4......................................................................Common
Pin 5......................................................................... Input 3
Pin 6......................................................................Common
Pin 7......................................................................... Input 4
Pin 8......................................................................Common
Pin 9............................................................................GND
Pin 10..........................................................................GND
Pin 11..........................................................................GND
Pin 12.......................................................................... +5 V
Pin 13.......................................................................... +5 V
Pin 14................................................................Relay 1 NC
Pin 15................................................................Relay 1 NO
Pin 16....................................................................Common
Pin 17................................................................Relay 2 NC
Pin 18................................................................Relay 2 NO
Pin 19....................................................................Common
Pin 20................................................................Relay 3 NC
Pin 21................................................................Relay 3 NO
Pin 22....................................................................Common
Pin 23................................................................Relay 4 NC
Pin 24................................................................Relay 4 NO
Pin 25....................................................................Common
The fiber cable recommended for Cronus Single mode SM
SC-SC Duplex type. Two SC-SC simplex pair will work, but
you will have to verify which end to connect to each other.
Physical
Dimensions........................................19w x 3.5h x 14 deep
(482.6mm x 88.9mm x 355.6mm)
Weight ........................................14.15lbs (6.41 kilograms)
Environment
Operating...............................0°C to 50°C (32°F to 122°F)
Storage . ..............................-20°C to 75°C (-4°F to 167°F)
GPIO-16
The maximum number of devices that can be connected
when using a GPIO-16 are as follows:
Zeus, Zeus II, and ADAM CS = Four (4) devices (64 relays)
ADAM and Cronus = 16 devices (256 relays)
For more information on the GPIO-16, see the GPIO User
Manual (F.01U.193.288).
NOTE: The pin out of this connect does not confirm to
the standard pin out of Zeus, Zeus II, ADAM
CS, or ADAM and cannot be connected
directly to the GPI connector of the RVON I/O.
It requires a custom cable assembly.
Hotlink Connectors
Coax Type (J10 - J11.................................RG6 BNC Female
..........................................................75 Ohm coax connector
Fiber Optic Type..............................................HFCT-5208M
(single mode transceiver)
- 1300 nm laser based
transceiver in standard 1 x 9
mezzanine package for links
of 15km nominal with single
mode fiber cables.
Bosch Security Systems, Inc.
Technical Manual
F.01U.118.890
Rev. 23
Page 17

Cronus Introduction 9
MDR Connector
MDR Connector
PIN
NO.
PORT FUNCTION
81 Data +
33 1 Data -
PIN
NO.
PORT FUNCTION
39 6 Audio To Matrix 15 6 Audio From Matrix +
40 6 Audio From Matrix 24 1 Audio To Matrix +
49 1 Audio To Matrix 25 1 Audio From Matrix +
50 1 Audio From Matrix -
27 Data +
27 7 Data -
12 7 Audio To Matrix +
37 7 Audio To Matrix 72 Data +
32 2 Data -
13 7 Audio From Matrix +
38 7 Audio From Matrix 22 2 Audio To Matrix +
47 2 Audio To Matrix 23 2 Audio From Matrix +
48 2 Audio From Matrix -
18 Data +
26 8 Data -
10 8 Audio To Matrix +
35 8 Audio To Matrix 63 Data +
31 3 Data -
11 8 Audio From Matrix +
36 8 Audio From Matrix 20 3 Audio To Matrix +
45 3 Audio To Matrix 21 3 Audio From Matrix +
46 3 Audio From Matrix -
54 Data +
30 4 Data 18 4 Audio To Matrix +
43 4 Audio To Matrix 19 4 Audio From Matrix +
44 4 Audio From Matrix 45 Data +
29 5 Data 16 5 Audio To Matrix +
41 5 Audio To Matrix 17 5 Audio From Matrix +
42 5 Audio From Matrix -
36 Data +
28 6 Data 14 6 Audio To Matrix +
Bosch Security Systems, Inc.
Technical Manual
F . 01U.118.890
Rev. 23
Page 18

10 Introduction Cronus
Determining the Master System From the Slave Systems
By default, Cronus is set to operate in standalone mode. Y ou will need a license file to link Cronus frames together. In order to
link two (2) or more Cronus systems together, each must have the optional linking firmware installed. To purchase the
firmware, contact RTS sales.
Setting the master frame is done through the display panel m e nu as well as cabling the frames together.
To configure the master frame, do the following:
1. From the display panel of the frame you want to configure, tap the ENC1 knob.
SET FRAME ID appears.
2. Tap the ENC1 knob once.
SLAVE appears.
3. Tap ENC1.
AUTO CONFIG appears.
4. Turn the ENC1 knob to select Auto Config, Frame ID 2, Frame ID 3, or Frame ID 4.
NOTE: Once you have set the Master frame you can set the rest of the frames by using autoconfig.
T o cable Cronus, use the coaxial connectors located on the back panel (see Figure 2 on page 6). On the first frame connect the
two (2) outside coax ports to the two (2) inside coax ports on frame 2. For more information, see Figure 5 on page 11. This
determines the master frame and the first slave. Repeat this procedure with the two (2) remaining frames.
DIP Switch Settings
Switch 1 AZedit Baud Rate
Baud rate is a measure of the communications speed for a serial port. Baud is
measured in bits per second or bps. By default, AZedit is set for COM1 and 38.4K.
NOTE: The baud rate set with Switch 1 must match the baud rate set in AZedit.
To see what the baud setting is in AZedit, do the following:
Description:
Settings
Switches 2-7 Not Available
Switch 8 Reserved. Must be kept in OPEN position.
1. Open AZedit.
The Keypanels/Ports window appears.
2. From the Options menu, select Communications.
The Communications window appears showing the AZedit session
connection configurations.
OPEN: 9600 baud
CLOSED: 38.4K baud (default)
Bosch Security Systems, Inc.
Technical Manual
F . 01U.118.890
Rev. 23
Page 19
Cronus Introduction 11
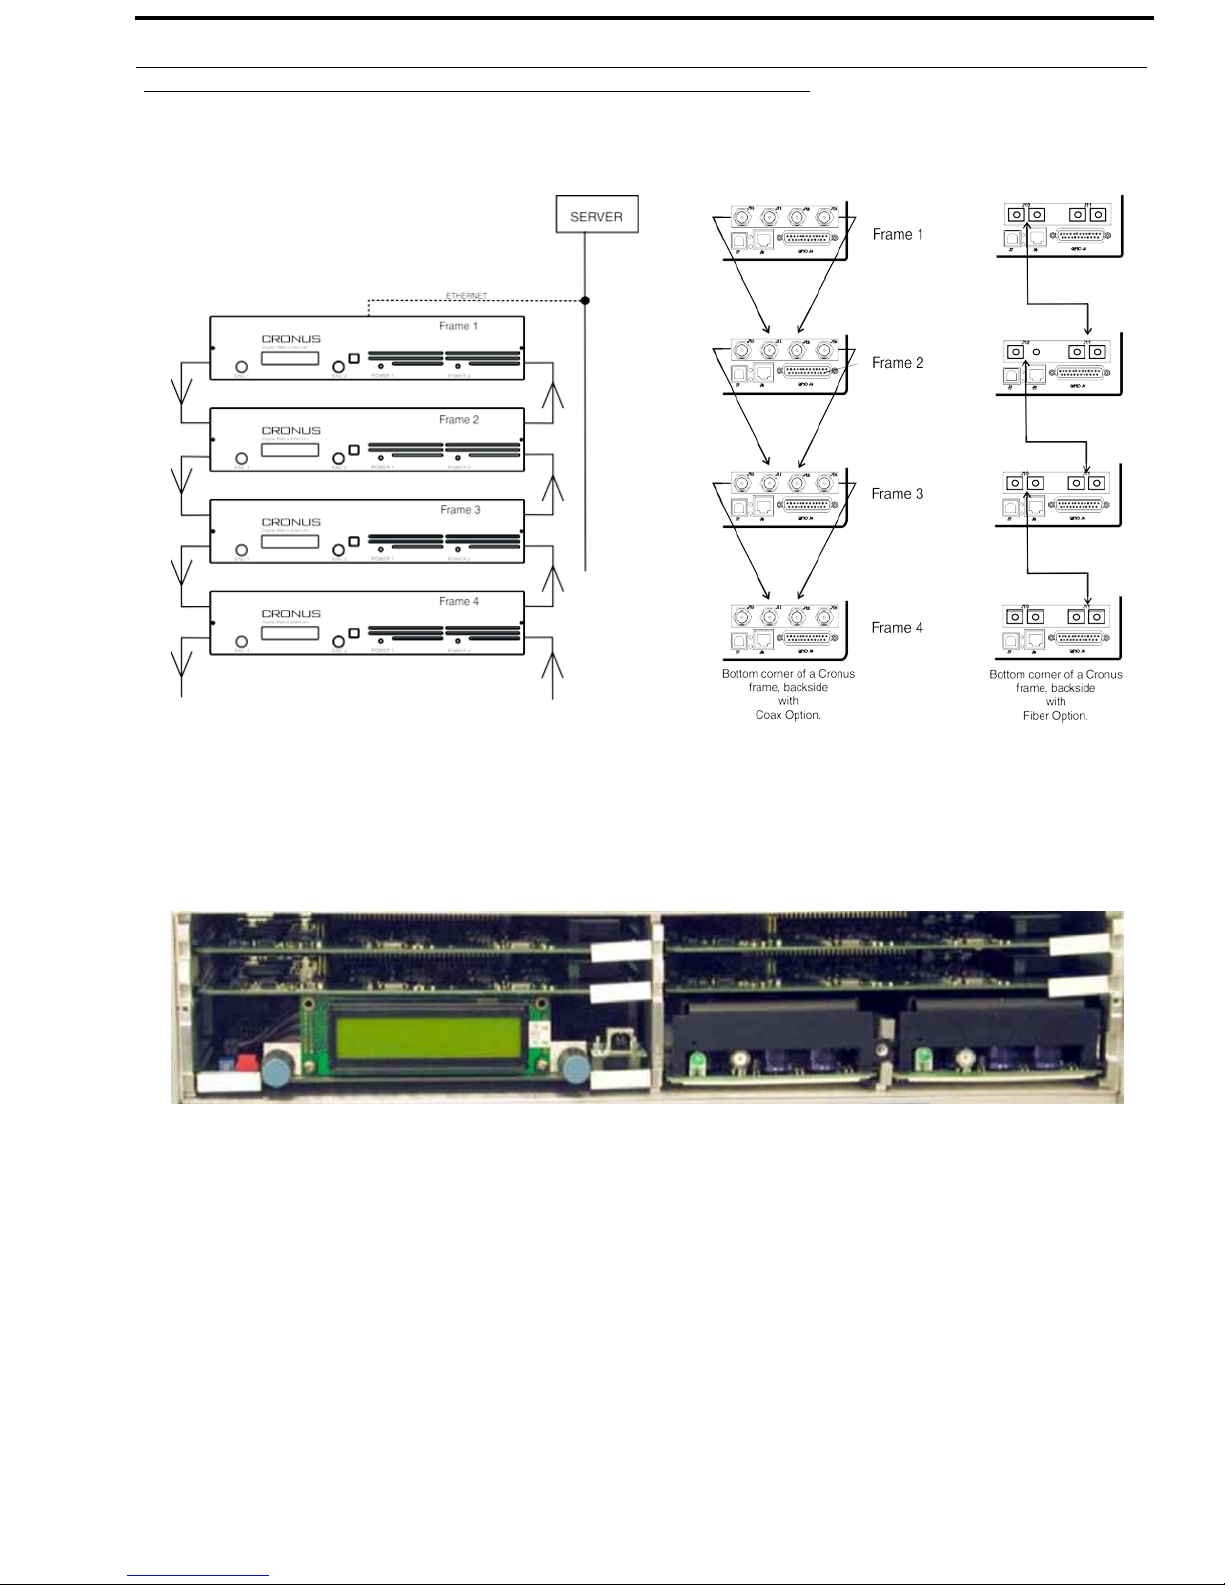
Cronus System Diagram and Frame Cabling
FIGURE 5. System Diagram and Frame Cabling
The Cronus intercom system has four (4) frames, one (1) Master and three (3) Slave stations (see system diagram on left)
connected via coaxial cables (see cabling diagram at right). Each frame can support up to 32 ports, and each system can have a
maximum of 128 ports (all four frames available).
FIGURE 6. Cronus from the inside.
Bosch Security Systems, Inc.
Technical Manual
F.01U.118.890
Rev. 23
Page 20
12 Introduction Cronus
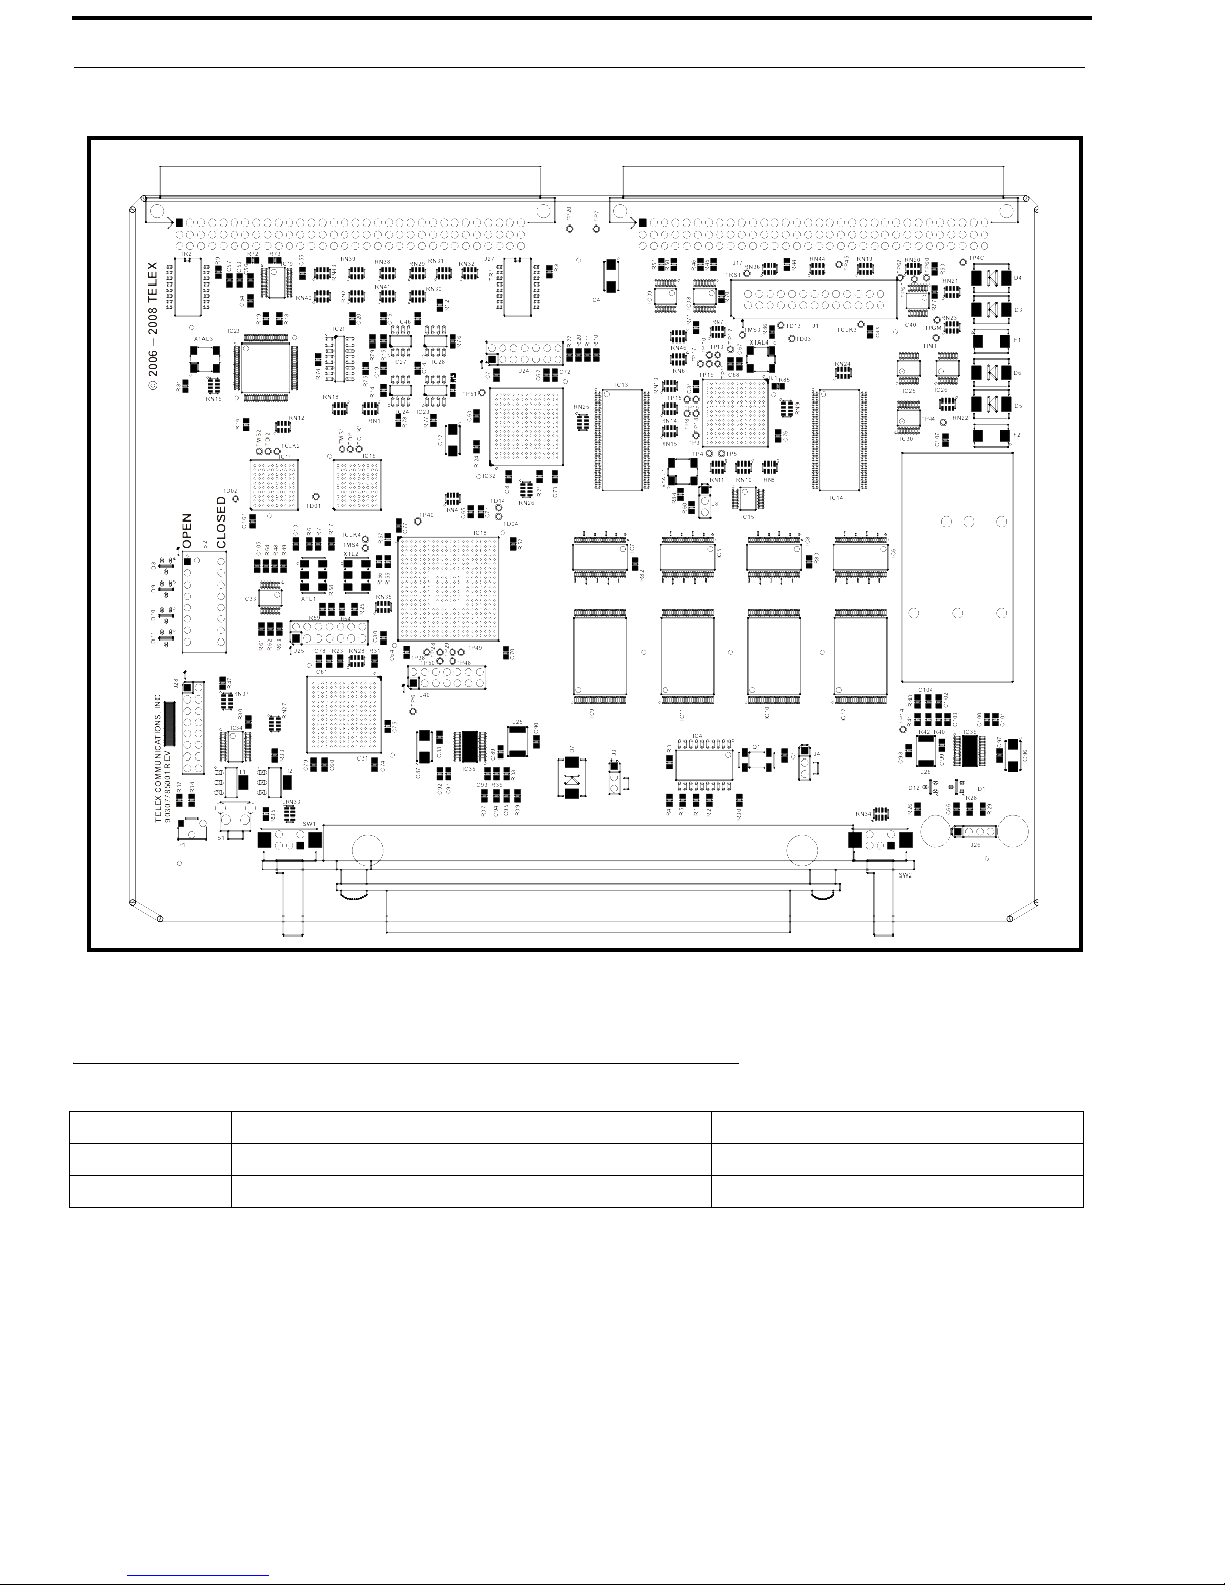
FIGURE 7. Cronus Master Controller board (9030-7785-001)
Default Jumper Settings for the Master Controller Board
Connection Description Default Setting
J3 Write Protect Flash Chips IC9 and IC10 (Code Flash) Populate jumper across pins 2 and 3.
J4 Write Protect Flash Chips IC11 and IC12 (Config Flash) Populate jumper across pins 2 and 3.
NOTE: If you have board 9030-7785-000, see “Cronus Master Controller Card 9030-7785-000” on page 93 for the
Default Jumper settings.
Bosch Security Systems, Inc.
Technical Manual
F . 01U.118.890
Rev. 23
Page 21
Cronus Introduction 13
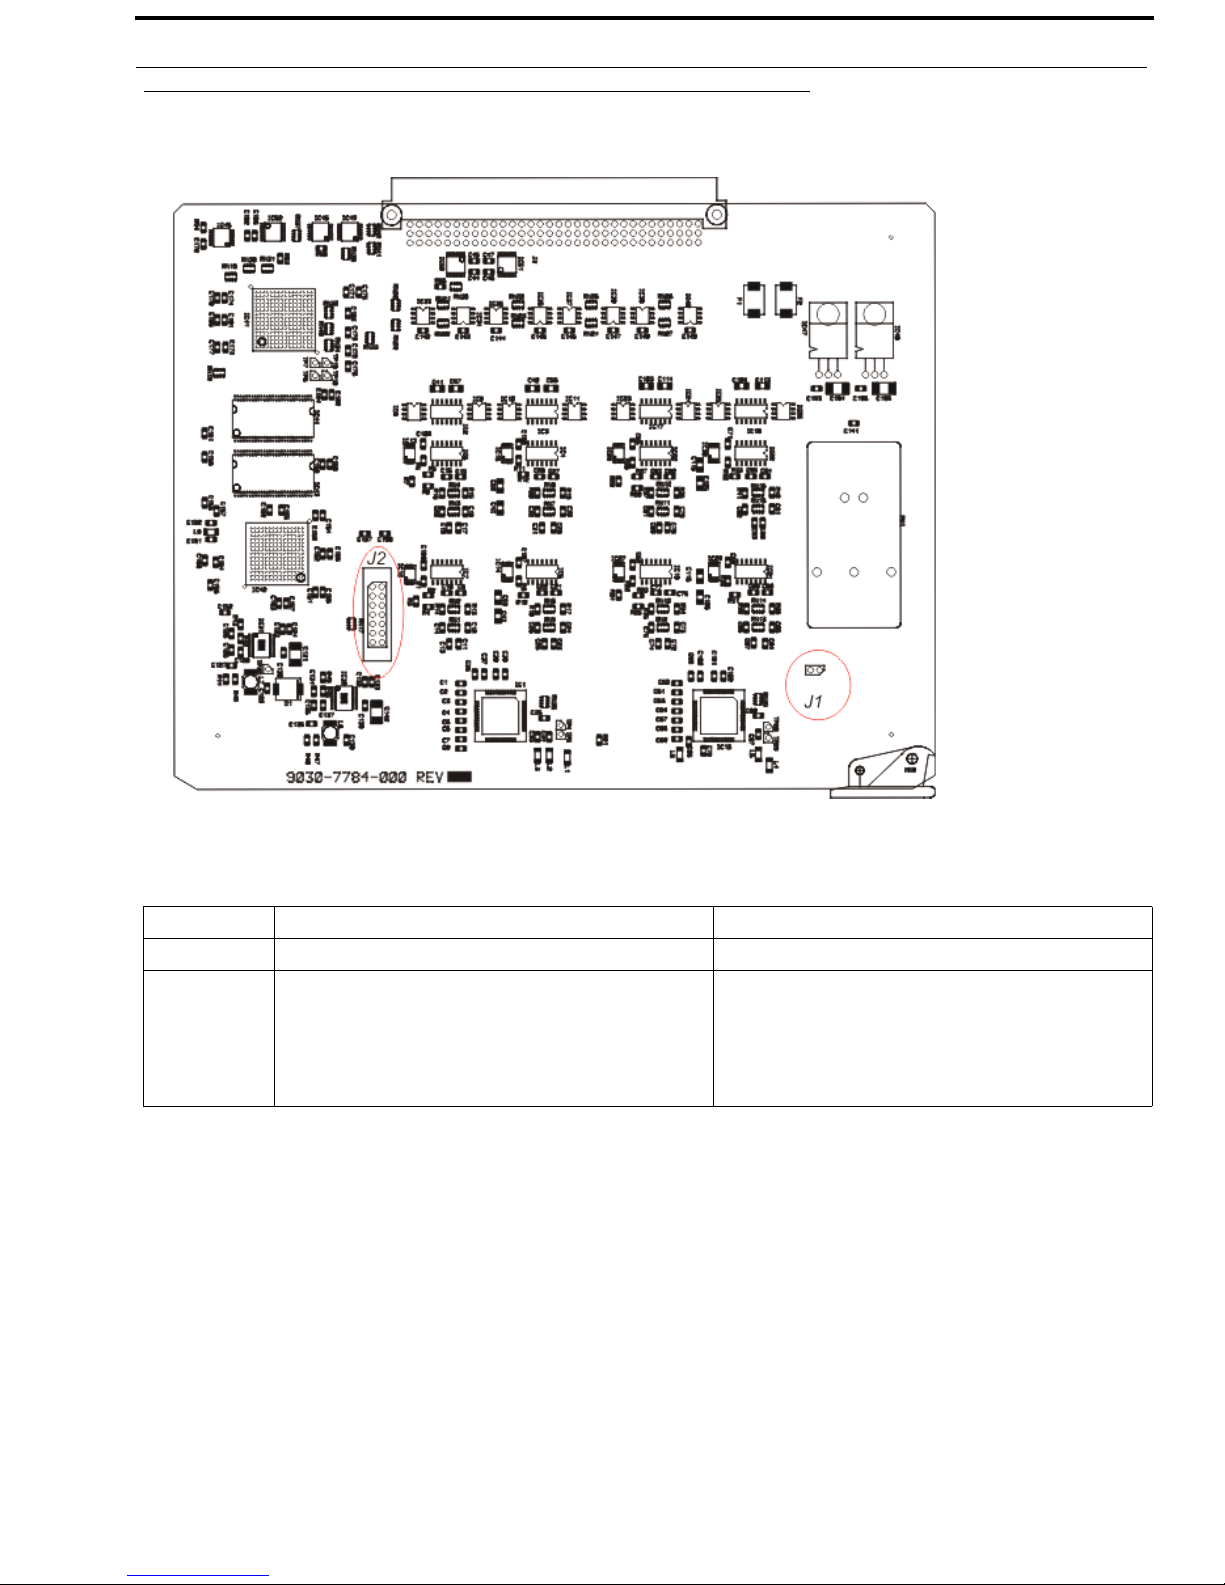
Default Jumper Settings for the Cronus AIO Board
FIGURE 8. Cronus AIO Board 9030-7784-000
Jumper Description Default Setting
J1 5 volt Power Isolation Populate Jumper across J1
Populate Jumpers across J2:
Pins 5-6
J2 DSP Debug Port
Pins 7-8
Pins 9-10
Pins 11-12
Bosch Security Systems, Inc.
Technical Manual
F.01U.118.890
Rev. 23
Page 22

14 Introduction Cronus
Bosch Security Systems, Inc.
Technical Manual
F . 01U.118.890
Rev. 23
Page 23

CHAPTER 2
Cr onus Menu S tructur e
To open the Cronus menu structure, do the following:
1. On the front panel of the Cronus system, tap the ENC1 encoder knob.
SET FRAME ID appears.
2. Turn the ENC1 encoder knob clockwise to scroll forward or counter-clockwise to scroll backwards through the list of
menus.
By scrolling, you see Status or Version.
3. Tap the ENC1 encoder knob to enter a menu.
Within a menu:
To scroll within a menu, do the following:
1. Turn the ENC1 encoder knob clockwise to scroll forward, and counter-clockwise to scroll backward through a list of
menus.
2. Tap the ENC1 encoder knob to enter a menu.
or
Tap the ENC1 encoder knob twice to exit a menu or press the encoder knob for 3 - 5 seconds to exit the menu system.
Configure Menu
Set Frame ID
In a single frame Cronus system, the frame is always Stand Alone (or the Master frame). In a multi-frame system, the first time
Cronus is powered on, each frame shows as Frame 1 and will need to be configured, either manually or by auto-config, to
designate which frame it is.
To set the FRAME ID, do the following:
1. Tap the ENC1 knob.
Configure appears.
2. Tap the ENC1 knob.
Frame ID appears.
3. Tap the ENC1 knob.
Set Frame ID displays.
4. Tap the ENC1 knob.
SLAVE Frame Set Slave ID displays.
Bosch Security Systems, Inc.
Te chnical Manual
F . 01U.118.890
Rev. 23
Page 24

16 Cronus Menu Structure Cronus
5. Tap the ENC1 knob.
Auto Config displays. You can either have auto config set the frame or you can manually set the frame ID by turning
the ENC1 knob to scroll through the Frame ID options.
6. Turn the ENC1 knob to scroll through the choices (Auto Config, Frame ID 2, Frame ID 3, or Frame ID 4).
7. Tap the ENC1 knob to make your selection.
IFB Program INs
I/O Gains
I/O Gain is the level of audio at which you hear and are heard. There may be occasions where you need to adjust the gain for
some specific intercom port. For example, a belt pack operator may want to monitor a party line, but at a lower level than the
normal intercom volume. Or, a belt pack operator may want to listen to the background music coming from some intercom
input port, but at a reduced level.
To set Gain from the front panel of Cronus, do the following:
1. Tap the ENC1 knob.
Configure appears.
2. Tap the ENC1 knob.
Frame ID appears.
3. Turn the ENC1 knob to I/O Gains.
4. Tap the ENC1 knob.
Select Port appears. There are 32 ports from which to select.
5. Turn the ENC1 knob to the port you want.
6. Tap the ENC1.
IN Gain and OUT Gain appears.
7. Use the ENC1 knob to adjust the IN Gain.
OR
Use the ENC2 knob to adjust the OUT Gain.
NOTE: You can change the gain levels in AZedit and see the results on Cronus almost immediately. For more
information on gain levels, see Figure 2 on page 6.
Vox Thresholds
Vox Threshold is the level of audio at which a channel becomes active. When the threshold is set, the microphone does not
turn on until the set audio level hits the set threshold. In a high activity area, this prevents a channel from staying active when
no one is around.
To set and enable Vox Thresholds from the front panel of Cronus, do the following:
1. Tap the ENC1 knob.
Configure appears.
2. Tap the ENC1 knob.
Frame ID appears.
3. Turn the ENC1 knob to Vox Thresholds
Threshold appears.
4. Tap the ENC1 knob.
Select Port appears.
5. Turn the ENC1 knob to the port to be set.
You can set the thresholds on all 32 ports on the Cronus.
6. Tap the ENC1 knob to select the port.
Bosch Security Systems, Inc.
Technical Manual
F . 01U.118.890
Rev. 23
Page 25

Cronus Cronus Menu Structure 17
7. Tur n the ENC1 knob to set the threshold level (-127dB to 0.0dB)
8. Double-tap the ENC1 knob to exit the threshold set menu item.
Port displays.
9. Tur n the ENC1 knob to Hold Time.
10. Tap the ENC1 knob.
Hold Time appears.
11. Tur n the ENC1 knob to set the hold time (up to 12.5 seconds).
NOTE: Hold time is the amount of time the VOX will stay active on a port before closing the port.
12. Double-tap the ENC1 knob to exit the Hold Time menu item.
Port displays
13. Tur n the ENC1 knob to Enable.
14. Tap the ENC1 knob.
Enable appears. You can Enable or Disable from this point.
15. Double-tap the ENC1 knob to exit the Enable menu item.
NOTE: You can also set the VOX within AZedit. For more information about setting VOX in AZedit see “Vox
Settings in AZedit” on page23.
Status Menu
The Status Menu displays settings for the following:
AZedit
Crosspoints
Frames
GPI Input
GPI Output
Keypanels
Links
NOTE: This chapter covers the menu display for the Master frame (Frame 1). On slave frames, the only display you see
under Status menu is Links.
Status, AZedit
AZedit displays if there is an active connection.
NOTE: This only shows the status of the primary serial cable.
To show the status, do the following:
1. Tur n the ENC1 knob to scroll to Status.
2. When Status is displayed, tap the ENC1 knob.
AZedit displays.
3. Tap the ENC1 knob
The status of AZedit appears.
OK = there is a connection to AZedit.
-- = there is no connection to AZedit.
Bosch Security Systems, Inc.
Technical Manual
F.01U.118.890
Rev. 23
Page 26
18 Cronus Menu Structure Cronus
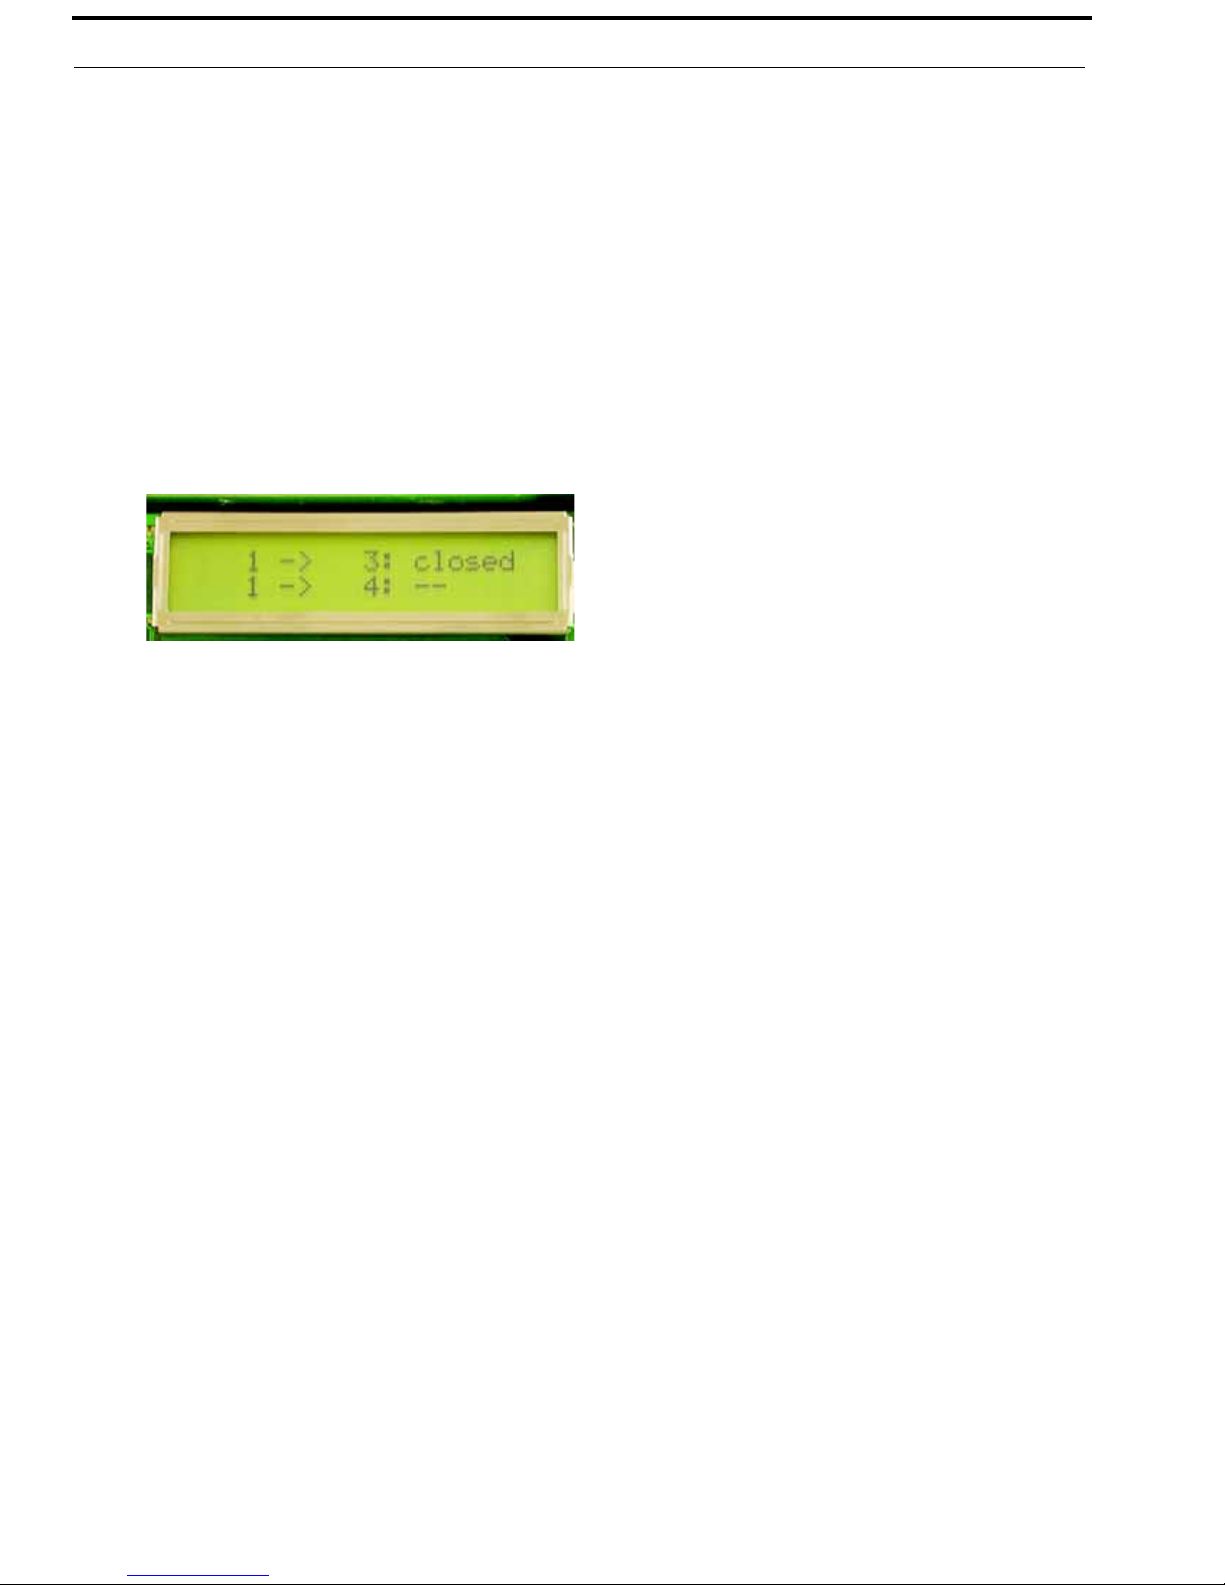
Status, Crosspoints
The Crosspoints Status displays the status of each crosspoint closure. You can also view Crosspoint Status in AZedit.
To show the crosspoint status, do the following:
1. Turn the ENC1 knob to scroll to Status.
2. Tap the ENC1 knob.
AZedit displays.
3. Turn the ENC1 knob to scroll to Crosspoints.
4. Tap the ENC1 knob.
The status of the crosspoints for input 1 and outputs 1 and 2 is shown.
5. Turn the encoders to change which crosspoints are displayed.
ENC1 adjusts the input port. ENC2 adjusts the output port.
6. Once the status you want to display appears, tap the ENC2 knob.
The Crosspoint status appears.
Status, Frames
Frames displays the status of each of the Cronus frames. It tells if the frame is still active or if it has been deactivated.
To display the frame status, do the following:
1. Turn the ENC1 knob to scroll to Status.
2. When Status is displayed, tap the ENC1 knob.
AZedit displays.
3. Turn the ENC1 knob to scroll to Frames.
4. Tap the ENC1 knob.
The status is shown for frames 1 & 2.
5. Turn the encoders to display the status of the other frames.
Bosch Security Systems, Inc.
Technical Manual
F . 01U.118.890
Rev. 23
Page 27

Cronus Cronus Menu Structure 19
Status, GPI Input
GPI Input displays the status of each GPI (General Purpose Input) assigned in the system. The GPI Input allows an external
piece of equipment to trigger the intercom. For example, using an on-air tally to dim or mute specific outputs. GPI Inputs are
created within AZedit.
NOTE: The maximum number of devices that can be connected when using a GPIO-16 are as follows:
• Zeus, Zeus II, and ADAM CS = 4 devices (64 relays)
• ADAM and Cronus = 16 devices (256 relays)
For more information on the GPIO-16, see the GPIO User Manual (F .01U.193.288).
To display the GPI Input status, do the following:
1. Tur n the ENC1 knob to scroll to Status.
2. When Status is displayed, tap the ENC1 knob.
AZedit displays.
3. Tur n the ENC1 knob to scroll to GPI Input.
4. Tap the ENC1 knob.
1-64 displays.
5. Tur n the ENC1 knob to scroll through the GPI Input assignments.
Status, GPI Output
GPI Output displays the status of each GPI Output assigned in the system. GPI output is similar to the GPI Input, except
instead of triggering an action on the intercom, the intercom is programmed to perform a function as a result of an action on
the intercom. For example, when a port is connected to a 2-way radio, the radio is normally in receive mode. Use a GPI Output
to trigger the transmitter whenever anyone talks to the port.
NOTE: The maximum number of devices that can be connected when using a GPIO-16 are as follows:
• Zeus, Zeus II, and ADAM CS = 4 devices (64 relays)
• ADAM and Cronus = 16 devices (256 relays)
For more information on the GPIO-16, see the GPIO User Manual (F .01U.193.288).
To display the GPI Output status, do the following:
1. Tur n the ENC1 knob to scroll to Status.
2. When Status is displayed, tap the ENC1 knob.
AZedit displays.
3. Tur n the ENC1 knob to scroll to GPI Output.
4. Tap the ENC1 knob.
1-64 displays.
5. Tur n the ENC1 knob to scroll through the GPI Output assignm ent s.
Bosch Security Systems, Inc.
Technical Manual
F.01U.118.890
Rev. 23
Page 28

20 Cronus Menu Structure Cronus
Status, Keypanels
The Keypanel menu displays the status of each of the keypanels in the Cronus system.
To display the keypanel status, do the following:
1. Turn the ENC1 knob to scroll to Status.
2. When Status is displayed, tap the ENC1 knob.
AZedit displays.
3. Turn the ENC1 knob to scroll to Keypanels.
4. Tap the ENC1 knob.
The status is shown for keypanels 1 & 2.
5. Turn the encoders to display the status of the other keypanels (up to 32 keypanels per frame).
The status displays as OK or blank.
Status, Links
The Links menu displays the status of the links (connections) between frames, see “Cronus System Diagram and Frame
Cabling” on page 11. Each frame in the system has two (2) links, Link A and Link B. Link A on each frame connects to the
preceding frame (connecting to Link B).
To display the links status, do the following:
1. Turn the ENC1 knob to scroll to Status.
2. When Status is displayed, tap the ENC1 knob.
AZedit displays.
3. Turn the ENC1 knob and scroll to Links.
4. Tap the ENC1 knob.
5. Turn the ENC1 knob to scroll through the Links.
You should check the status of the Frame Clock and the Link to each frame. This is good for diagnostic troubleshooting.
NOTE: Frame 1 (Master) shows only the Frame 2 status because it connects only to one other Cronus frame.
Version, Intercom
The Version, Intercom menu, displays the firmware version that is current on the intercom.
NOTE: For Firmware upgrades, contact Telex Customer Service. The Cronus Firmware can be upgraded through
AZedit. See “Download Firmware for Cronus” on page 31, for more information.
Bosch Security Systems, Inc.
Technical Manual
F . 01U.118.890
Rev. 23
Page 29
Cronus Cronus Menu Structure 21
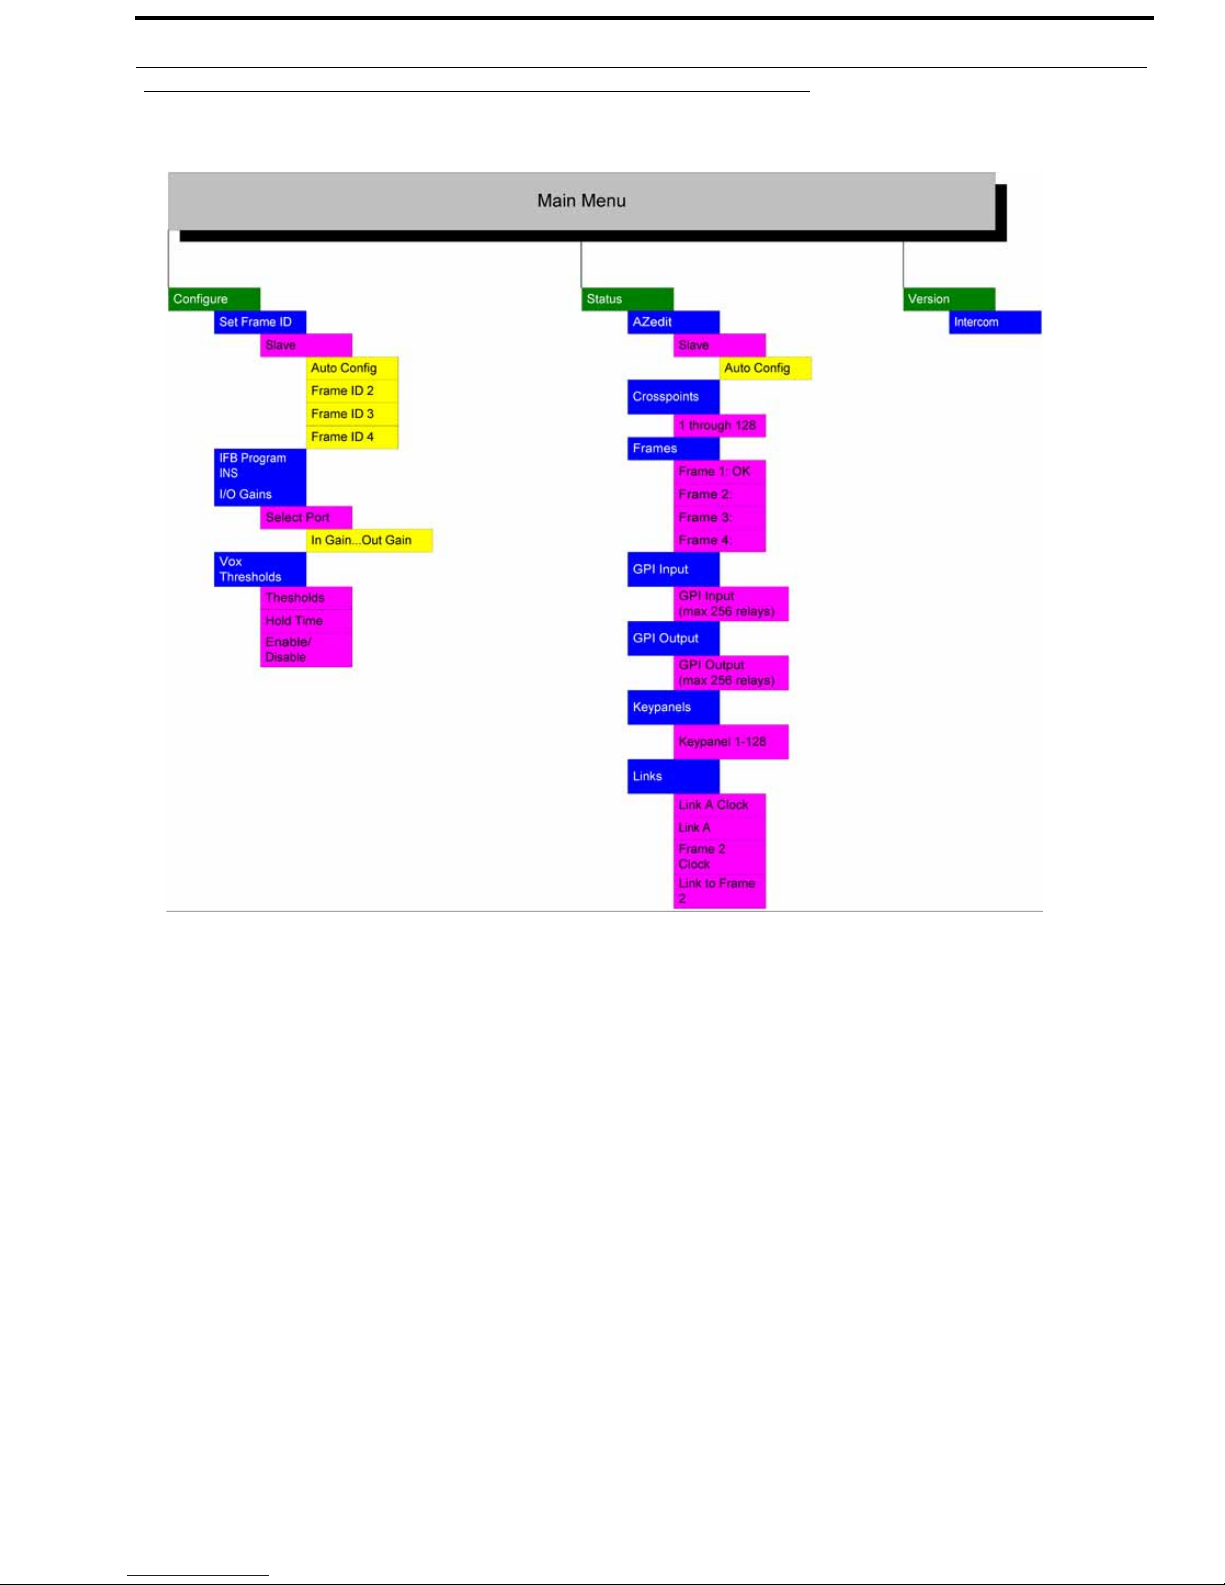
Cronus Menu System Quick Reference
FIGURE 9. Menu List - Tree Diagram
To open the Cronus menu system, do the following:
1. On the front panel of the Cronus system, tap the ENC1 encoder knob.
The word Status appears.
2. Turn the ENC2 encoder knob clockwise to scroll forward or counter-clockwise to scroll backwards through the list of
menus.
3. Tap the ENC1 encoder knob to enter a menu.
To scroll within a menu, do the following:
1. Turn the ENC1 encoder knob clockwise to scroll forward, and counter-clockwise to scroll backward through a list of
menus.
2. Tap the ENC1 encoder knob to enter a menu.
or
Tap the ENC1 encoder knob twice to exit a menu or press the encoder knob for 3–5 seconds to exit the menu system.
NOTE: In Slave mode, the Status Menu only shows Links Status.
Bosch Security Systems, Inc.
Technical Manual
F.01U.118.890
Rev. 23
Page 30

22 Cronus Menu Structure Cronus
Bosch Security Systems, Inc.
Technical Manual
F . 01U.118.890
Rev. 23
Page 31

CHAPTER 3
Cr onus and AZedit
Vox Settings in AZedit
Cronus and the AIO-16 card are the only devices that presently support Vox. Vox refers to voice activation. This means once
audio is passed through Cronus or AIO-16 at a preset threshold level, the audio lines are open for conversation between ports.
With Cronus, you can set the Vox threshold from the front panel or you can set it through AZedit. In AZedit there are two(2)
ways to access the Vox Settings window.
NOTE: AZedit must be at version 2.09.0 or later.
• An icon on a customized tool bar.
• From the System menu.
Bosch Security Systems, Inc.
Te chnical Manual
F . 01U.118.890
Rev. 23
Page 32

24 Cronus and AZedit Cronus
Accessing Vox
To access the Vox Settings window from the System menu, do the following:
1. From the System menu in AZedit, select Vox.
The Vox Settings window appears.
NOTE: You can change the threshold levels and hold times of more than one port at a time by pressing the CTRL
key and clicking the ports you want to change.
Bosch Security Systems, Inc.
Technical Manual
F . 01U.118.890
Rev. 23
Page 33

Cronus Cronus and AZedit 25
Figure 1. Vox Settings window
Window Item Field Type Description
Threshold
Adjust arrow keys Use the UP or DOWN arrow keys to increase or decrease the vox threshold
by.5 dB (-127dB to 0.0dB). You can see the level adjustments in the
parameter display window (to th e ri ght).
NOTE: You can select multiple ports to change at the same time.
However, when you increase or decrease the threshold of
multiple ports the levels change from each port’s starting dB
level. For example, Port 002 is set to -82.5dB and Port 010 is
set to -30.0dB. If both are selected and the vox threshold is
increased by clicking the up arrow twice the ending threshold
for each port would be as follows:
Port 002 = -81.5dB
Port 010 = -29.0dB
Bosch Security Systems, Inc.
Technical Manual
F.01U.118.890
Rev. 23
Page 34

26 Cronus and AZedit Cronus
Window Item Field Type Description
Threshold Level display box The Threshold Level display box displays the threshold level selected by
the slider bar below.
Threshold adjust slider The Threshold Adjust slider allows you to set the vox threshold by moving
the slider right (increase) or left (decrease).
NOTE: This sets the threshold to the level you set by the slider bar. It
does not increase or decrease the threshold from the individual
port starting dB.
> Slide the threshold slider bar to the level you want to set the port (s)
selected.
Set To button The
Set T o button activates the Threshold Level slider selection. The Set To
button must be clicked to accept the threshold level.
> Once the threshold slider is at the desired threshold level, click Set
To.
Hold Time
Adjust arrow keys Use the UP or Down arrow keys to increase or decrease the time the port is
active from meeting the threshold level set above. Once a port meets or
exceeds its threshold level, the hold time determines how long that port will
stay active before closing (up to 12.5 seconds). Y ou can see the adjustments
in the parameter display window (to the right)
You can select multiple ports to change at the same time. However, when
you increase or decrease the hold time of multiple ports the time changes
from each port’s starting point. For example, Port 002 has a hold time of 0.7
seconds and Port 010 has a hold time of 1.0. If both are selected and the
hold time is increased by clicking the up arrow twice the ending threshold
for each port would be as follows:
Port 002 = 1.7 seconds
Port 010 = 2.0 seconds
Hold Time display box The
Hold Time display box displays the hold time level selected by the
slider bar below.
Hold Time Adjust slider The Hold Time Adjust slider allows you to set the time by moving the
slider right (increase) or left (decrease).
NOTE: This sets the threshold to the level you set by the slider bar. It
does not increase or decrease the threshold from the individual
port starting dB.
> Slide the hold time slider bar to the level you want to set the
selected ports.
Set To button The
Set To button activates the Hold Time slider selection. The Set To
button must be clicked to accept the hold time.
> Once the hold time slider is at the desired level, click Set To.
Options
Show Enabled
Only
check box The Show Enabled Only check box, when selected displays only the Vox
enabled
ports in the display list to the right. When the check box is cleared,
all ports are displayed.
Bosch Security Systems, Inc.
Technical Manual
F . 01U.118.890
Rev. 23
Page 35

Cronus Cronus and AZedit 27
Window Item Field Type Description
Real-Time
Changes
check box The Real-Time Changes check box allows you to see the adjustments to the
Vox and hold time dynam icall y on the connected device (Cronus or AIO-
16).
NOTE: When making adjustments from the front panel of the Cronus
take into consideration that AZedit has a five (5) second
display refresh rate which causes a delay in the application’s
display.
Parameter Display Window
Port display The Port column displays the port identification number for the intercom
port. This identification number cannot be changed
Alpha display The Alpha column displays the label given to the port (input/output) of the
matrix. Alphas are the names that appear in the alphanumeric displays on
keypanels when keys are assigned to talk to destinations in the intercom
system. Alpha names for intercom ports are assigned using Port Alphas
setup. Alpha names for everything else are assigned using Other Alphas
setup.
Supported? display The
Supported? column displays whether the port is attached to a device
that supports Vox (either a Cronus or AIO-16 card).
NOTE: Cronus and AIO-16 are the only devices, presently, that
support Vox.
When a green
Yes is displayed, the device supports Vox. When a red No is
displayed, the device does not support Vox.
Enabled? display The
Enabled? column displays whether Vox is enabled on the specific port.
When a green
Yes is displayed, Vox is enabled. When a red No is displayed
it is not active.
Threshold display The
Hold Time display The
Threshold column displays the threshold level for the specific port.
Hold Time column displays the amount of time a port will stay active
once the Vox threshold level has been met or exceeded.
Audio? display The
Audio? column displays whether audio is being detected on the port.
When a green
Yes is displayed, audio is detected. When a red No is
displayed, no audio is detected.
Enable Vox button The
Enable Vox button enables Vox on the selected port (s).
1. Select a port or multiple ports.
2. Click Enable V ox.
Vox is enabled on the selected port (s).
Disable Vox button The Disable Vox buttons disables Vox on the selected port (s).
1. Select a port or multiple ports where Vo x is enabled.
2. Click Disable V ox.
Vox is disabled on the selected port (s).
Reset Threshold butt on The
Reset Threshold button resets the threshold level of the selected port (s)
to default (-30dB).
1. Select a port or multiple ports you want to reset to the default
threshold level.
2. Click Reset Threshold.
The Threshold is reset to the default value.
Bosch Security Systems, Inc.
Technical Manual
F.01U.118.890
Rev. 23
Page 36

28 Cronus and AZedit Cronus
Window Item Field Type Description
Reset Hold Time button The
Reset Hold Time button resets the hold time of the selected port (s) to
default (.5 seconds).
1. Select a port or multiple ports you want to reset to the default hold
time.
2. Click Reset Hold Time.
The Threshold is reset to the default value.
Select All button Select All selects all the list items in the current view.
> Click Select All to select all the items in the current view.
De-select All button De-select All de-selects all the list items in the current view that are
selected.
> Click De-select All to de-select all ports in the current window
view.
Invert Selection button The Invert Selection button reverses the order in which the list is currently
displayed.
> Click Invert Selection to reverse the list of ports from the current
view.
Download Cronus License File
To link more than one Cronus system together, you must have linking software installed on the system (normally, this is
loaded at time of purchase). If you are adding a Cronus Intercom System to an existing Cronus matrix, you may need to load a
license file on your existing system.
Each license file is uniquely stamped with the MAC address of the master controller running in the intercom system.
NOTE: The Cronus system must be in Stand Alone state shown on the front panel display. Once the License file is
loaded, the Download License option in the Options menu disappears.
To download the Cronus license file, do the following:
1. Open AZedit.
2. From the Options menu, select Download License , and then Select a license file to download.
The Download License submenu appears.
3. Select the license file to download or use Browse to navigate to the file.
4. Click Open.
The License file begins to download. Once the file is downloaded, the message “AZedit download successful! The
license file X:\XXX.lic was downloaded and accepted by the intercom.
5. Click OK.
On the Cronus front panel, you should see Frame 1 appear after the download completes.
Bosch Security Systems, Inc.
Technical Manual
F . 01U.118.890
Rev. 23
Page 37

Ethernet Setup for Cr onus
Default IP Addresses
Product Default IP Address Default Subnet
RVON-I/O 192.168.0.1 255.255.0.0
RVON-8 192.168.0.2 255.255.0.0
RVON-1 192.168.0.3 255.255.0.0
RVON-2 192.168.0.3 255.255.0.0
RVON-C 192.168.0.4 255.255.0.0
RVON-16 192.168.0.5 255.255.0.0
GPIO-16 192.168.0.6 255.255.0.0
MCII-e 192.168.0.7 255.255.0.0
Cronus 192.168.0.8 255.255.0.0
Zeus III 192.168.0.9 255.255.0.0
CHAPTER 4
Bosch Security Systems, Inc.
Te chnical Manual
F . 01U.118.890
Rev. 23
Page 38

30 Ethernet Setup for Cronus Cronus
Connecting Cronus to the PC and the Network
IMPORTANT: The PC must be running version 2.06.07 or later of AZedit and have an Ethernet card installed.
Verify Cronus is connected to the PC using either a USB (universal) or RS-232 (ADAM standard) cable. The USB drivers can
be found in the AZedit software directory (C:\Telex\AZedit|V20701|USB). You m ay only use one USB connection (front
panel or back panel) at a time.
NOTE: Cronus can support up to 32 multiple sessions of AZedit on Ethernet.
To connect Cronus to the PC with a serial cable, do the following:
NOTE: For more information on Network Basics, “Basic Network Configuration” on page 61.
1. Open AZedit.
The Keypanels/Ports window appears.
2. From the Options menu, select Ethernet Setup.
The Ethernet Setup Window appears.
3. In the IP Address field, enter the IP Address for the Cronus system.
4. In the Network Mask field, enter the Network Mask number for the Cronus System.
5. Where appropriate, in the Default Gateway field, enter the gateway number for Cronus.
NOTE: If you do not know these numbers, your system administrator can give you th e IP Address and Netm ask to
use.
6. Click Apply.
7. Click Close.
The Ethernet Setup window is closed.
8. Connect the Cronus to your network with an Ethernet cable.
9. Connect the PC to you network with an Ethernet cable.
Bosch Security Systems, Inc.
Technical Manual
F . 01U.118.890
Rev. 23
Page 39

Cronus Ethernet Setup for Cronus 31
Once you have entered the IP Address and Network Mask, do the following:
1. From the Options menu, select Communications.
The Communications window appears.
2. In the Connection area, select the Network radio button.
3. In the IP Address field, enter either the Cronus IP Address you wish to connect with, or click the Search button.
The search button scans the network for any Cronus devices. If multiple units are on the network, each will appear in
the list. Select the Cronus you wish to work with.
4. Click OK.
The Communications window closes.
Download Firmware for Cronus
When firmware is downloaded to Cronus, all the code is put on the Master Controller card. This includes code for the AIO
cards. Therefore, because the Master Controller downloads the firmware for the system and the code for the AIO cards, the
download time is extended while the Master Controller pushes the AIO code out to the appropriate cards.
NOTE: Cronus must have AZedit version 2.06.07 or later.
Also, every time the system is reset or rebooted, the Master Controller card reloads each of the AIO cards with the most
current version of code it is housing.
To download firmware to the Master Controller, do the following:
1. Open AZedit.
The Keypanels/Ports window appears.
Bosch Security Systems, Inc.
Technical Manual
F.01U.118.890
Rev. 23
Page 40

32 Ethernet Setup for Cronus Cronus
2. From the Status menu, select Software Versions, then Master Controllers.
The Master Controller Version Information window appears.
3. Highlight the Cronus version to be updated.
You may select more than one version at a time by holding the CTRL key down while you select.
4. Right-click the highlighted selections and then select Download Firmware.
The Firmware Download window appears.
5. Using the browse feature, browse to the file to be downloaded.
6. Click Open.
The Download Device Firmware window appears.
Bosch Security Systems, Inc.
Technical Manual
F . 01U.118.890
Rev. 23
Page 41

Cronus Ethernet Setup for Cronus 33
7. Click Begin Download.
The download begins.
8. Once the Download is finished, click OK.
The Cronus firmware download is complete. This takes a minute or two depending upo n the type of connection you
use (network or serial).
9. Verify the version upgrade in the Master Controller Version Information window.
Finding the MAC Address for Cronus
To retrieve the MAC Address, do the following:
1. Open AZedit.
The Keypanels/Ports window appears.
2. From the Options menu, select Communications.
The Communications window appears.
3. Verify that USB is selected.
4. Click OK.
The Communications window closes.
5. From the Options menu, select Ethernet Setup.
The Ethernet Setup window appears. The MAC Address aappears at the bottom of the window.
NOTE: If you have multiple Cronus systems linked together, you need to individually connect them to the PC to see
the MAC address. You cannot look at multiple Cronus MAC Addresses at the same time.
Bosch Security Systems, Inc.
Technical Manual
F.01U.118.890
Rev. 23
Page 42

34 Ethernet Setup for Cronus Cronus
Bosch Security Systems, Inc.
Technical Manual
F . 01U.118.890
Rev. 23
Page 43

35
Final Assembly Drawing
FIGURE 10. Cronus Final Assembly - see Table 2, “Final Assembly,” on page37 for descriptions to the corresponding numbers.
Page 44

36
Page 45

37 Cronus
TABLE 2. Final Assembly
Item
No.
1 Front panel, Cronus 9070-7770-000
2 Lens 9150-7770-000
3 Master Controller Assembly 9020-7770-000
4 Screw, FH, 6-32 x 3/8” LG. 51847-022
5 AI/O PC Board Assembly 9030-7784-000
6 Card Guide 6” LG 591601-001
7 Left Wall, Cronus 9110-7770-000
8 Back Plane PC Board Assembly 9110-7786-000
9 Screw, PH, 4-40 x 1/4” LG. 51845-038
10 Card Guide, 5” LG 591601-000
11
12
13 Screw, FH, 4-40 x 3/8” LG. 51847-012
14 Top Cover, Cronus 9100-7770-000
15 Bulkhead Jack, BNC, Feedthru 539074-000
16 Screwlock, 4-40 58421-000
17 Screw, PH, 4-40 x 1.0” LG 500125
18
19 Rear Panel, Cronus 9080-7770-004
20
21 Fans w/ Cable Assembly 2502-7770-004
22 Coax Cable Assembly 2502-7770-000
23 Right Wall, Cronus 9111-7770-000
24 Chassis, Cronus 9090-7770-000
25 Rack Ear, Cronus 9114-7770-000
26 Keps Nut, #4 51745-000
27 Power Supply, Switching 532073-000
28 Power Supply Wa ll, Cronus 9112-7770-000
29 Middle Wall, Cronus 9113-7770-000
30 Captive Panel Screw 58095-000
31 Screw, PH, 4-40 x 3/8” LG 51845-039
32 Nut, Special 4-40, Small, #4 50033-022
33 Screw, PH, 6-32 x 1/4” LG 51845-074
34
35 Retaining Ring, External 50016-001
36 Rear Card Plate 9110-7784-003
37 Connector Key 539207-001
Master Controller Rear PC
Board Assembly
AI/O Rear PC Board Assembly
(RJ-12)
Line 1 Power Entry Cable
Assembly
Line 2 Power Entry Cable
Assembly
Spacer,.25 O.D. x.14 I.D.,
Stainless Steel
Description Part No.
9030-7788-000
9020-7787-000
2502-7770-002
2502-7770-003
701840-000
TABLE 2. Final Assembly
Item
No.
38
39
40 Coax Link Module Card Plate 9110-7784-008
41 Cronus Fiber Link Module PCB 9030-7827-000
42 Fiber Link Module Card Plate 9110-7784-011
43 Fiber Link Module Cable Assy 2502-7770-005
Foam Tape, Double Sided, 1”
Wide
AI/o Rear PC Board Assembly,
MDR SCSI
Description Part No.
840051
9030-7800-000
Bosch Security Systems, Inc.
Technical Manual
F.01U.118.890
Rev. 23
Page 46

Cronus 38
FIGURE 11. Wiring Diagram for Cronus
Bosch Security Systems, Inc.
Technical Manual
F.01U.118.890
Rev. 23
Page 47

Cronus 39
Bosch Security Systems, Inc.
Technical Manual
F.01U.118.890
Rev. 23
FIGURE 12. Wiring Diagram
Page 48

Bosch Security Systems, Inc.
Technical Manual
F.01U.118.890
Rev. 23
40 Cronus
Page 49

CHAPTER 8
RVON-C
RTS Voice Over Network for Cr onus
Description of the RVON-C Voice Over Network Card
Installed directly into the Cronus Intercom frame, the RVON-C provides voice over IP (Internet Protocol) communications for
the RTS Cronus intercom system. In general, voice over IP means sending voice information in digital form using discrete
packets rather than the traditional telephone network. The RVON-C delivers an integrated solution for connecting custom
keypanels to the Intercom Matrix over standard IP networks by supporting eight (8) channels (ports) of audio in and out.
The RVON-C card supports all standard, hot-swappable and configurable features through Bosch’s AZedit configuration
software as well as support for remote keypanels and virtual keypanels via VO IP (Voice Over IP).
RVON-C supports Bosch Intelligent Trunking over IP. Trunking is a method of using a relatively few audio paths for a large
number of potential users. Because it is flexible, a trunked system can expand along with your business, to accommodate a
growing number of users. Bosch’s Intelligent Trunking is proven technology, which provides the same capabilities and ease of
use for seamless routing and path finding of communications between facilities regardless of distance — as does the long
distance telephone system for phone calls.
RVON-C is fully compatible with internationally recognized standards and supports the following protocols: G.711, G.729A,
and G.723 (2 speeds).
Features
Installation The RVON-C card is hot-swappable and installs in any available slot in a Cronus Intercom System. It
provides a single RJ-45 Ethernet connection for use with a 10 BASE-T or 100 BASE-TX network. It also
has a DB-9 connection for an RS-232 or RS-485 pass-thru port.
8 Channels of
Audio in and out
Ethernet
Compatible
AZedit
Configurations
Trunk Capable The RVON-C card supports ancillary data control for use with Bosch Intelligent Trunking.
Addressing Eig ht (8) individually addressable audio channels. The RVON-C card can feed simultaneously VOIP
Pass-Through
Serial Port
Expands the connectivity of the Cronus intercom by supporting eight (8) channels (ports) in and out. Each
channel has configurable network and bandwidth parameters that can be tailored to individual network
functions as well as ancillary data for keypanels and trunking control.
Fully Ethernet capable. The RVON-C card uses standard Ethernet protocols and is compatible with 10
BASE-T or 100 BASE-TX Ethernet compliant devices and networks.
Users have the ability to adjust the audio parameters of each RVON-C channel to optimize the available
bandwidth on the network.
capable keypanels as well as various other matrix intercom systems.
Provides a virtual serial connection via an IP connection, that if used while trunking, may eliminate the
need for multiple IP resources.
Bosch Security Systems, Inc.
Te chnical Manual
F . 01U.118.890
Rev. 23
Page 50

42 RVON-C RTS Voice Over Network for Cronus Cronus
Specifications
DIGITAL
TABLE 3. Digital Specifications
COMPRESSION BIT RATE CODING DELAY PLAYOU T DELAY BANDWIDTH
G.711 64K 125μs 20-60 ms 160-224 kbp s
G.728AB 8 K 10 ms 20-120 ms 32-112 kbps
G.723 5.3K / 6.3 K 30 ms 60-120 ms 29-45 kbps
*Data Rate depends on Codec selection
NOTE: The Playout Delay and Bandwidth depend on
the configured amount of audio per packet.
CONNECTIONS - PINOUTS
RJ-45 Ethernet via backcard
RJ-45 Function
1Ethernet TPO+
2Ethernet TPO3Ethernet TPI+
4TPO+
5TPO6Ethernet TPI7TPI+
8TPI-
DB-9 Serial Port via backcard
DB-9 Pin Function
1N/A
2 RXD, RVON-C Received
Data
3 TXD, RVON-C Received
Data
4N/A
5GND
6N/A
7N/A
8N/A
9N/A
Power ...................................................................5W Typical
Physical.......................................................8.25”W x 6.25”L
RVON-C JUMPERS and CONNECTIONS
A selectable RS-232/485 serial port is at connector J1 Serial
on the back card, see Figure 14 on page 44. Jumper
connections on J10, J11, and J12 select the signal mode on
J1, on the front card, see Figure 13 on page 43.
• When J10, J11, and J12 are jumped from pins 1 to 2 - J1.
The RVON-C is configured for RS485.
• When J10, J11, and J12 are jumped from pins 2 to 3 - J1.
The RVON-C is configured for RS232.
Bosch Security Systems, Inc.
Technical Manual
F . 01U.118.890
Rev. 23
Page 51

J10, J11,
and J12
Pin 1
Cronus RVON-C RTS Voice Over Network for Cronus 43
FIGURE 13. Front card - RVON-C 9030-7835-000
Bosch Security Systems, Inc.
Technical Manual
F.01U.118.890
Rev. 23
Page 52

44 RVON-C RTS Voice Over Network for Cronus Cronus
J1 Serial J2 Serial
FIGURE 14. RVON-C Backcard
FIGURE 15. RVON-C Backplate
Bosch Security Systems, Inc.
Technical Manual
F . 01U.118.890
Rev. 23
Page 53

Cronus RVON-C RTS Voice Over Network for Cronus 45
Installation of the RVON-C Card into the Cronus System
CAUTION: When inserting the RVON-C card into the Cronus system, the following considerations must be made:
• Gently insert the R VON-C card into the correct slot. If the card is forced or twisted while inserting, a pin
on the backplane could short or break causing the card to become inoperable.
• When inserting the RVON-C card into the Cronus system, make sure to insert it into a compatible
backcard. If the card is inserted into a incompatible backcard, undesirable results can occur.
Addresses and the RVON-C Card
Because the RVON-C has an Ethernet interface, it is required to have a MAC (Media Access Control) address. This is a low
level address that contains 48 bits. Do not confuse this address with an IP (Internet Protocol) Address. In order to be IP
compliant, all cards must have a unique MAC ID when shipped from the manufacturer. Typically, the MAC ID of a piece of
hardware, such as the RVON -C card, has a fixed or static address. Whereas, the RVON-C card’s IP Address can change over
time.
The MAC Address uniquely identifies each node of a network and interfaces directly with the network media. The RVON-C
card has a small 8-pin serial device on the board so that the processor can read the unique MAC Address. For more
information on MAC IDs, contact technical support.
Software Requirements
AZedit .......................................................version 3.1 or higher
RVON-I/O..............................................version 1.1.0 or higher
RVON-1 .......................................... .......version 1.2.0 or higher
RVON-8 .......................................... .......version 1.2.2 or higher
VKP........................................................version 1.1.0 or higher
Master Controller...................................version 1.3.0 or higher
NOTE: For improved performance, we recommend using a router switch that supports High Priority Packets. For more
information on High Priority Packet Router Switch es, consult your System Administrator.
Bosch Security Systems, Inc.
Technical Manual
F.01U.118.890
Rev. 23
Page 54

46 RVON-C RTS Voice Over Network for Cronus Cronus
Switches and Connections
IMPORTANT: You must remove the card from the frame in order to change any DIP switch settings on the front card,
see Figure 16 on page 46.
DIP Switch 1 Closed: Configuration via AZedit is disabled.
Open: (Default) Configuration via AZedit is enabled
Description: Disables the configuration changes via AZedit. AZedit is still able to view the card
configuration and connection status. The configuration can still be changed via the serial and
Telnet connections.
DIP Switches 2-4 Unused - Keep in Open Position
DIP Switch 5 Closed: Reset the Telnet user and passwords to their default value
User: telex
Password: password
Open: (Default) Uses the current user name and password to their default values.
Description: Enables the user to reset the telnet user name and Password
DIP Switch 6 Closed: Enables a serial monitor on the backcard DB9 (J2).
Open: (Default) Enables pass-through serial port via the backcard DB9 (J2)
Description: Selects DB9 (J2) serial configuration.
DIP Switch 7 Closed: Runs the boot download.
Open: (Default) Runs the native flash program.
Description: Switch to the boot download flash program. This program is sent with the RVON-C card in
case the native flash program becomes corrupt.
DIP Switch 8 DEBUG ONLY!
WARNING: DIP Switch 8 should always be left in the off position. It is reserved for
FIGURE 16. RVON-C DIP Switch panel
debugging and can have intended consequences.
Bosch Security Systems, Inc.
Technical Manual
F . 01U.118.890
Rev. 23
Page 55

Cronus RVON-C RTS Voice Over Network for Cronus 47
Configuring the RVON-C Card with AZedit
Once the RVON-C card is inserted into the Intercom, AZedit automatically recognizes the card.
NOTE: Requires intercom firmware and AZedit software that support RVON cards.
To configure the RVON-C card, do the following:
1. From the Status menu, select I/O cards.
The I/O Card Status window appears showing the types of installed cards.
2. Right-click on an RVON-C card, and select RVON-C Configuration.
The RVON-C Configuration window appears.
Bosch Security Systems, Inc.
Technical Manual
F.01U.118.890
Rev. 23
Page 56

48 RVON-C RTS Voice Over Network for Cronus Cronus
3. From the RVON-C drop down list, select the slot in which the RVON-C card resides, if it is not already selected.
4. In the IP Address field, enter the IP Address you have assigned to the RVON-C card.
5. In the Network Mask field, enter the Network Mask to which the RVON-C card is connected.
6. In the Default Gateway field, enter the Default Gateway Address (if applicable) of the network to which the
RVON-C card is connected.
A Default Gateway is only required if the RVON-C connections are between LANs.
Under Settings for Pass-Through Serial via Ethernet
7. In the Target IP Address field, enter the target IP Address of the device you want to connect to over Ethernet.
8. From the Serial Baud Rate drop down list, select the baud rate at which the data is transmitted.
Under Settings for Connected Devices
NOTE: You must configure the channel settings on each end of a connection and ensure the same codec and packet
size are selected at each end. Remember, the RVON-C card has different channels that can be configured.
9. In the R VON-C Channel drop down list, select the channel you want to use to communicate to another device across
the network.
10. In the Device IP Address field, enter the IP Address of the device you want to connect to.
11. From the Device Type drop down list, select the type of device the RVON-C card is connecting to.
12. From the Device Channel drop down list, select the channel on the device the RVON-C card communicates to.
13. From the CODEC Type drop down list, select the CODEC type you want to use for this channel.
14. From the Packet Size drop down list, select the size of each audio packet.
NOTE: A CODEC is an algorithm used to compress audio. There are five (5) Codices support by Bosch: G.711μs
law, G.711A law, G.729A, G.723 (5.3k) and G.723 (6.3k). The type of CODEC dictates the quality of audio
you hear and the network ba ndwidth us ed. The packet size determines how much audio data is carried across
the network in each transmitted packet. The CODEC type and pack size chosen require different amounts of
bandwidth from the network (See “Specifications” on page 42.). As with CODEC type, the packet size you
choose for the audio transfer affects the audio you hear and the bandwidth you use over the network. The
larger the audio packet you choose to use, the lower the bandwidth used. However, the larger packet size can
result in a higher delay and longer gaps if the packet is lost. On the other hand, the smaller packet sizes result
in larger bandwidth use, but lower delays and smaller gaps if the packet is lost. The Intercom System
Engineer and the Network Administrator may want to work together in choosing the CODEC type and
packet size suitable for the size of the network, so degradation of network resources does not happen.
15. Select Enable VAD, if you want to conserve bandwidth when the audio level is below a given threshold.
NOTE: VAD (Voice Activity Detection) saves network bandwidth by stopping the flow of audio packets when
silence is detected. VAD is similar to VOX.
At this point you may choose another channel to configure or choose another card to configure.
16. Once you are completely finished, click Apply.
Apply sends all of the changes to all the cards in the intercom, or click Cancel to discard all changes you made.
Bosch Security Systems, Inc.
Technical Manual
F . 01U.118.890
Rev. 23
Page 57

Cronus RVON-C RTS Voice Over Network for Cronus 49
RVON-C Connection Status Window
The RVON-C Connection Status windows display information pertaining to RVON-C channel connections. You can show
statistics for only one channel on a card at a time.
NOTE: T o view the RVON-C Connection Status windows make sure both AZedit and the RVON-C card are on the same
Ethernet network. The reason this is important is because the statistics are updated once per second. At this rate
of dynamic update, a serial port could not pass this much data effectively.
To get to the RVON Connection Status window, do the fo llowing:
1. From the Status menu, select I/O Cards.
The I/O Card Status window appears showing the types of installed cards.
2. Right-click the card you want to work with.
A context menu appears.
3. Select RVON Connection Status.
The RVON Connection Status window appears.
Bosch Security Systems, Inc.
Technical Manual
F.01U.118.890
Rev. 23
Page 58

50 RVON-C RTS Voice Over Network for Cronus Cronus
The Connection Status window contains six pages of information about the selected channel and are described in detail on the
following pages.
FIGURE 17. RVON Connection Status – Card/Channel page
Window Item Description
Select Local Card and Channel
RVON Card The card for which you want to view the status.
> From the RVON drop down list, select the card you want to view.
IP Address Displays the IP Address of the card you select
Local Channel One of eight (8) audio channels supported by the RVON-C card.
> From the Channel drop down list, select the channel for which you want to view the
status.
Remote Connection Information
Device Type Displays the type of device the RVON-C card is connected at the other end of the channel.
IP Address Displays the IP Address of the device connected at the other end of the channel.
Remote Channel Displays the channel at the other end of the connection that the device is using.
Bosch Security Systems, Inc.
Technical Manual
F . 01U.118.890
Rev. 23
Page 59

Cronus RVON-C RTS Voice Over Network for Cronus 51
FIGURE 18. RVON Connection Status – Connection page
Window Item Description
Attempts / Drops The number of tim es a call att e mpt has been made and dropped.
NOTE: The number of attempts should always be one (1) greater than the
number of drops.
Current Call State Displays the state of connection. There are two (2) connection states: Connected or
Idle.
Origination / Termination Displays which end of the connection originated or terminated the call.
Local: RVON-C Card
Remote: Device at the other end of the connection
Release Reason Displays why the connection was terminated, for example congestion, network error,
local release, or remote release.
Connection Duration Displays the duration of the connection. This is shown in hh /mm /ss.
Compression Algorithm
Audio Packet Size
Voice Activity Detect (VAD)
Displays what type of configuration the connection is using. This can be different than
the original configuration if both ends of the channel are not configured the same. If
the configuration is different, these fields will be in red.
Bosch Security Systems, Inc.
Technical Manual
F.01U.118.890
Rev. 23
Page 60

52 RVON-C RTS Voice Over Network for Cronus Cronus
FIGURE 19. RVON Connection Status – VOIP page
Window Item Description
VoIP Playout Statistics
Playout Buffer Size Displays how much audio can be received from the network before packets are lost. This is four
(4) times bigger than configured packet size. This is a static system setting.
Nominal Playout
Delay
Average Playout
Delay
Voice Playout Buffer
Underrun
Displays how much audio is collected before playout begins. Playout begins at half the Playout
Buffer size, which is two (2) times the configured packet size. This is a static system setting.
Displays the actual average audio collected before packets are played out. This is measured over
the length of the connection.
Displays the number of packet times that packets were not played because the Playout Buffer was
empty.
NOTE: If VAD is enabled, there are playout buffer runs because there are no packets being
received during silence.
Voice Playout Buffer
Displays the number of packets that were discarded because the Playout Buffer was full.
Overrun
Missing Sequence
Displays how many audio packets were missed in the sequence.
Packet
Replayed Packets Displays how many audio packets were replayed.
Average Frame Jitter Displays the measure of consistency of packet arrival times. Lower jitter is better.
Bosch Security Systems, Inc.
Technical Manual
F . 01U.118.890
Rev. 23
Page 61

Cronus RVON-C RTS Voice Over Network for Cronus 53
FIGURE 20. RVON Connection Status – Network page
Window Item Description
Network Statistics
Voice Playout Packets
(Tx/Rx)
DTMF Relay Packets
(Tx/Rx)
Displays the number of voice packets transmitted and received from the other side of the
connection.
Displays the number of DTMF (Dual Tone Multiple Frequency) relay packets transmitted and
received. DTMF relay packets are a bandwidth and quality saving feature within the RVON-C
card.
Silence Detection
Packets (Tx/Rx)
Silence Suppressed
Displays the number of times a silence detection packet has been sent or received. VAD (V oice
Activity Detection) must be enabled.
Displays the number of packets never sent because the packets contained silence.
Packets (Tx)
Packet Interval Time
Displays the minimum and maximum time elapsed between packets being sent.
(min/max)
Recent Bandwidth Use
(Tx/Rx)
Average Bandwidth
Use (Tx/Rx)
Displays the amount of bandwidth used in Kbytes/sec over the length of the call. This is
calculated by the number of voice packets transmitted and received over the last 10 calls.
Displays the amount of bandwidth used in Kbytes/sec over the length of the call. This is
calculated by the number of voice packets transmitted and received and the length of the
connection.
Bosch Security Systems, Inc.
Technical Manual
F.01U.118.890
Rev. 23
Page 62

54 RVON-C RTS Voice Over Network for Cronus Cronus
FIGURE 21. RVON Connection Status – Errors page
Window Item Description
Error Counts
Invalid Headers Displays how many IP packets could not be parsed.
Invalid MAC Address Displays how many invalid MAC addresses tried to connect.
Invalid SSRC Displays the number of packets with an invalid SSRC.
Invalid Payload Displays how many incorrectly formatted packets were received.
DSP to Micro Overrun Displays the number of packets that were lost because the micro was too busy to
receive.
Invalid Destination Displays how many invalid destinations were received.
Lost Packets Displays how many packets were lost.
Bosch Security Systems, Inc.
Technical Manual
F . 01U.118.890
Rev. 23
Page 63

Cronus RVON-C RTS Voice Over Network for Cronus 55
FIGURE 22. RVON Connection Status – Pass-Through page
Window Items Description
SERIAL TO
ETHERNET
The Serial to Ethernet information shows the serial data that is received on the serial connection
and transferred to the Ethernet address of the card the serial data is sent to.
Bytes Transferred Displays the number of bytes transferred from the serial connection to Ethernet.
Bytes Lost Displays the number of bytes that could not be transferred.
Errors Displays the number of errors that occurred during transfer.
Tx IP Address Displays the IP address of the card the serial data is sent.
Baud Rate Displays the baud rate of the serial connection.
ETHERNET TO
SERIAL
The Ethernet to Serial information shows the serial data that is received on the Ethernet
connection and transferred to the serial connection.
Bytes Transferred Displays the number of bytes that have been transferred to the serial port.
Bytes Lost Displays the number of bytes that could not be transferred.
Errors Displays the number of errors that occurred during transfer.
Rx IP Address Displays the IP Address from which data was last received via Ethernet.
NOTE:This address should match the Tx IP Address.
Unexpected Bytes Displays the number of unexpected bytes of data.
Unexpected bytes is data that has come from any IP address that is not the Tx IP Address. The
bytes of data are considered unexpected bytes and are not transmitted.
Bosch Security Systems, Inc.
Technical Manual
F.01U.118.890
Rev. 23
Page 64

56 RVON-C RTS Voice Over Network for Cronus Cronus
View RVON-C Status from Cronus Front Panel
Not only are you able to view the status of the RVON-C from AZedit, but now you can also view the status of your card from
the front panel display on the Cronus system.
To access RVON-C status from the Cronus front panel, do the following:
1. On the front of the Cronus, tap either of the selector knobs.
The top-level menu appears.
2. Turn either selector knob to display Status.
3. Tap the selector knob.
The Status sub-menu appears.
4. Turn either selector knob to display RVON-C.
5. Tap the selector knob.
Slots Available appears.
NOTE: There are four (4) slots maximum in each Cronus for RVON-C cards. Each RVON-C card has eight (8)
channels of audio IN and OUT. Slots connected to an RVON-C card have an arrow in the front panel display,
otherwise a dot appears next to the slot.
If you have more than one Cronus linked together, the slots will continue numbering slot 5, slot 6, and so on.
6. Turn the selector knob to select the desired slot.
7. Tap the selector knob.
Ethernet Status, Serial Status, and VoIP Channel Status appears. See “RVON-C Status Descriptions” on page 57. for
description of each status.
8. Turn the selector knob to the desired status.
9. Tap the selector knob.
Bosch Security Systems, Inc.
Technical Manual
F . 01U.118.890
Rev. 23
Page 65

Cronus RVON-C RTS Voice Over Network for Cronus 57
TABLE 4. RVON-C Status Descriptions
ACTION DISPLAY
When Ethernet is selected:
Link Up - Displays whether the Ethernet link is active or inactive.
Link Up - Active, Link Down – Inactive
Speed - Displays the connection speed in mbps. Can be either 10mbps or 100mbps.
Mode - Displays whether the connection is Half Duplex (data that moves in one
direction) or Full Duplex (data that moves in both directions).
Auto-Negotiate - Automatically determines the Ethernet speed and mode, and then
adjusts the settings accordingly.
When Serial is selected:
IP - Displays the IP Address of where the transfer is being sent.
Baud - Displays the connection speed of the RVON-C.
To Net - Displays the number of bytes that have been transferred from the serial port.
To Ser - Displays the number of bytes that have been transferred to the serial port.
When VoIP Channel is selected:
VoIP........ Displays the channel connection status to other RVON devices. The
channel connection shows connections to RVON-8, RVON-I/O,
RVON-1, RVON-C, and VKP.
Each dot or check mark represents a channel connection. There are
eight (8) channel connections for each RVON-C card.
If a dot (•) is seen in the display, this means that the channel is not
connected to a RVON device.
If a check mark () is seen in the display , this means that the channel
is connected to an RVON device.
Panels......... Displays whether or not there is a keypanel connected at the other end
of the channel connections.
Each dot or check mark represents a channel connection. There are
eight (8) channel connections for each RVON-C card.
If a dot (•) is seen in the display, this means that the channel is not
connected to a keypanel.
If a check mark () is seen in the display , this means that the channel
is connected to a keypanel.
NOTE: Channels are ordered from left to right.
Bosch Security Systems, Inc.
Technical Manual
F.01U.118.890
Rev. 23
Page 66

58 RVON-C RTS Voice Over Network for Cronus Cronus
Download RVON-C Firmware through AZedit
NOTE: AZedit sends the program di rectly to the R VON-C card over Ethernet. This is different from other I/O cards that
receive the firmware from the Master Controller. For this reason, verify the PC running AZedit is on the same
network as the RVON-C card. If it is not, AZedit is not able to find the RVON-C card.
To test the connection, ping the RVON-C card from a command line. For more information on testing for a
connection, see See “Basic Network Configuration” on page 61.
To download the RVON-C firmware through AZedit, do the following:
1. Open AZedit.
2. From the Status menu, select Software Versions, and then I/O Cards.
The I/O Card Version Information window appears showing the occupied slots in the system.
3. Highlight the Version to be updated.
You may select more than one (1) version at a time by holding the CTRL key down while you select.
4. Right-click the highlighted selections and select Download Firmware.
The Firmware Download window appears.
5. Using the browse feature, browse to the file to be downloaded.
Bosch Security Systems, Inc.
Technical Manual
F . 01U.118.890
Rev. 23
Page 67

Cronus RVON-C RTS Voice Over Network for Cronus 59
6. Click Open.
The Download Device Firmware window appears.
7. Click Begin Download.
The download begins.
8. Click OK.
The RVON-C firmware download is complete. This may take a minute or two to occur.
9. Verify the version upgrade in the I/O Card Version Information Window is correct.
IMPORTANT: Do not reset the Master Controller. Do not power down the frame or pull the RVON-C card(s) from the
frame until you have verified the new version information from AZedit. If the card loses power while
reprogramming the on-board flash memory, the card may need to be returned to the Lincoln service
department.
Bosch Security Systems, Inc.
Technical Manual
F.01U.118.890
Rev. 23
Page 68

60 RVON-C RTS Voice Over Network for Cronus Cronus
FIGURE 23. RVON-C System Diagram
Bosch Security Systems, Inc.
Technical Manual
F . 01U.118.890
Rev. 23
Page 69

APPENDIX A
Basic Network Configuration
Basic Network Configuration
This section covers basic network configuration setup and testing. Basic concepts and operations, including the difference
between LAN and WAN networks and how IP Addressing is used is covered.
Typically, there are many computers connected together using a router or a switch in a networked environment, such as a
company . In larger companies, there may be several different routers distributed in buildings and plant locations. A router
allows any LAN-side computer to communicate with other computers and devices outside the LAN (Local Area Network).
Routers send data packets from one place to another place on a network. routers use network addresses to route packets to the
correct destination. For example, in a TCP/IP network, the IP (Internet Protocol) Address of the network interface is used to
direct router destinations.
Because routers help computers inside the LAN “talk” with computers outside of the LAN, the security of a company’s LAN
may be compromised by gaps of open ports in the router. Security measures may have been instituted to compensate for these
vulnerabilities. Consult you network administrator to learn about the security measures taken to protect your network. VPN
(Virtual Private Network) is one such security measure to protect the intelligence of the LAN. A computer outside the LAN
must have an address or key known by the VPN to allow access to the LAN. Many companies use a VPN to connect two (2)
different LANs, thus allowing the transfer of data between two networks.
LAN (Local Area Network) vs. WAN (Wide Area Network)
Local Area Network
Simply put, a LAN is a computer network that connects a relatively small area (a single building or group of buildings). Most
LANs connect workstations and computers to each other. Each computer, also known as a node, has its own processing unit
and executes its own programs; however, it can also access data and devices anywhere on the LAN. This means many users
can access and share the same information and devices. A good example of a LAN device is a network printer. Most
companies cannot afford the budgetary or hardware expense of providing printers for each of its users; therefore, one printer
(or device) is placed on the LAN where every user can access the same printer.
The LAN uses IP Addresses to route data to different destinations on the network. An IP Address is a 32-bit numeric address
consisting of four (4) numbers separated by periods (for example, 1.160.10.240).
NOTE: For more information on IP Addresses, see you local network administrator.
Bosch Security Systems, Inc.
Te chnical Manual
F . 01U.118.890
Rev. 23
Page 70

62 Cronus
FIGURE 24. Local Area Network Diagram
Wide Area Network
A WAN (Wide Area Network) connects two (2) or more LANs and can span a relatively lar ge geographical area. For example,
Telex Headquarters in Burnsville, MN is connected to several branch offices in Nebraska and Arkansas over a WAN. The
WAN in existence is the Internet.
FIGURE 25. Wide Area Network Diagram
Bosch Security Systems, Inc.
Technical Manual
F . 01U.118.890
Rev. 23
Page 71

Cronus 63
ACCESSING THE WIDE AREA NETWORK (WAN)
As shown in Figure 26, the LAN IP Address, 10.2.100.X (192.168.X.X is another common address), as seen in . Most devices
are shipped with these addresses as the default. It is recommended to use these addresses for LANs.
FIGURE 26. Network Address Translation
NETWORK ADDRESS TRANSLATION (NAT)
The network address translation works using the initial IP Address, then converting it to a valid WAN IP Address. Once the IP
address is changed, it is up to the network interface device (such as a router, gateway, switch, etc.) to keep track of which
computers are talking on which ports. For ex ample, if two local devices (PC1 and PC2 in Figure 3) both wanted to talk via port
1031, then the network interface device would have to change one of the port requests to the next available port, 1032.
PORTS
In general, a network port is an endpoint to a logical connection. The port number identifies what type of port it is. For
example, port 80 is used for HTTP traffic. When you type an address into the address bar of a web browser, your computer
locates an IP Address for the url you are requesting (http://www.telex.com). To obtain this address, the computer contacts a
DNS (Domain Name Server) server. Once the IP Address is found, it tries to connect to the http port of the network device
(port 80). See Table 1 for a list of the more well-known port numbers.
Each network device can be set up to respond or not respond to the various ports. The function of responding or hosting a
service is called serving.
TABLE 5. Packet Translation
Packet before Translation Packet after Translation
Source Destination Source Destination
To
Internet
From
Internet
IP Address
Port
Number
10.2.100.2 1031
192.156.136.
22
80 99.5.1.30 1031
IP Address
192.156.136.
22
Port
Number
IP Address
Port
Number
80 99.5.1.30 1031
192.156.136.
22
80 10.2.100.2 1031
IP Address
192.156.136.
22
Port
Number
80
If a second workstation on the LAN wants to communicate to the same server, and happens to use the same source port
number, then the LAN Modem translates the source port number as well as the source IP address. In Table, 2, a second LAN
computer wants to access a web page. The NAT device now uses port 1032 for this connection where it used port 1031, see
Figure 5.
Bosch Security Systems, Inc.
Technical Manual
F.01U.118.890
Rev. 23
Page 72

64 Cronus
TABLE 6. Packet Translation
Packet before Translation Packet After Translation
Source Destination Source Destination
To
Internet
From
Internet
IP Address
10.2.100.1 1031 192.156.136.22 80 99.5.1.30 1032
192.156.136.22 80 99.5.1.30 1032 192.156.136.22 80 10.2.100.1 1031
Port
Number
IP Address
Port
Number
IP Address
Port
Number
IP Address
192.156.136.2
2
Port
Number
80
All the address translation that occurs takes place
automatically in order to make web browsing and other
functions easier. This is also a way for large web hosting
services to speed up the network, by having different devices
perform different functions.
Port
Number
Description
137 NetBIOS Name Service
139 NetBIOS Datagram Service
143 Interim Mail Access Protocol (IMAP)
Port
Number
1
TCP Port Service Multiplexer
(TCPMUX)
Description
5 Remote Job Entry (RJE)
7ECHO
18 Message Send Protocol (MSP)
20 FTP-Data
21 FTP- Control
23 Telnet
25 Simple Mail Transfer Protocol (SMTP)
29 MSG ICP
37 Time
42 Host Name Server (Nameserv)
43 Whols
49 Login Host Protocol (Login)
53 Domain Name Server (DNS)
69 Trivial File Transfer Protocol (TFTP)
70 Gopher Service
79 Finger
150 NetBIOS Session Service
156 SQL Server
161 SNMP
179 B order Gateway Protocol (BGP)
190
Gateway Access Control Protocol
(GACP)
194 Internet Relay Chat (IRC)
197 Directory Location Services (DLS)
389
Lightweight Directory Access Protocol
(LDAP)
396 Novell Netware over IP
443 HTTPS
444 Simple Network Paging Protocol (SNPP)
445 Microsoft-DS
458 Apple Quick Time
546 DHCP Client
547 DHCP Server
563 SNEWS
569 MSN
1080 Socks
80 HTTP
103 X.400 Standard
108 SNA Gateway Access Server
109 POP2
110 POP3
115 Simple File Transfer Protocol
118 S QL Services
119 Newsgroup (NNTP)
Bosch Security Systems, Inc.
Technical Manual
F . 01U.118.890
Rev. 23
Page 73

Cronus 65
IP Addresses
If you do not know your IP Address, you can open a DOS window in a Windows-based environment and bring up the ipconfig
window.
To find your IP Address using ipconfig, do the following:
1. From the Start Menu, open a Command Prompt window.
2. At the prompt, type ipconfig, then press Enter.
The IP configurations appear for your machine, such as the DNS suffix, IP Address, Subnet Mask, and Default
Gateway.
3. At the prompt, type Exit to close the window.
NOTE: If you want more detailed parameters for your machine, type ipconfig/All. This window shows the
computers network configuration settings.
Bosch Security Systems, Inc.
Technical Manual
F.01U.118.890
Rev. 23
Page 74

66 Cronus
Ping a Computer
Pinging a computer on the network makes sure it is able to send and receive messages on the network.
NOTE: You can also ping your RVON-8 card to verify that it is responding over the network by putting the cards IP
Address in place of the computer’s IP Address.
To ping a computer on the network, do the following:
1. From the Start Menu, open a Command Prompt window.
2. At the prompt, type the IP Address of the computer you wish to ping (for example, 10.2.100.130).
3. Press Enter.
NOTE: If the computer you are pinging is not responding to the ping, you receive a time-out message in the command
prompt window.
Bosch Security Systems, Inc.
Technical Manual
F . 01U.118.890
Rev. 23
Page 75

Cronus 67
POSSIBLE PITFALL WITH ROUTERS, GATEWAYS, AND SWITCHES
Anytime computers communicate through routers, gateways, and switches, they must gain pe rm ission to the connection.
Network interface devices can be configured to block specific outgoing requests, as well as incoming requests, based on the IP
Address and/or port. This is one of the security mechanisms of a router. This also happens when broadcast messages are sent
and received.
To view the path an IP Address takes to retrieve information, you can execute a tracert from the Command Prompt Window.
To run a tracert, do the following:
1. From the Start Menu, open a Command Prompt window.
2. At the prompt, type tracert and type the url or IP Address you want to trace.
3. Press Enter.
The details of the tracer route are displayed.
NOTE: The message Request Timed Out appears if the IP Address/port in or out is denied to the incoming or
outgoing message.
4. When you are finished, type exit to close the Command Prompt window.
Bosch Security Systems, Inc.
Technical Manual
F.01U.118.890
Rev. 23
Page 76

68 Cronus
RVON Configuration
RVON cards use ports for communication of audio and control packets. Because routers can be configured to block certain
incoming and outgoing requests, you will need to open the following ports in your network to allow WAN connections to and
from a Network Interface Device. See the table below for the ports that need to be opened for the RVON cards to operate
properly.
TABLE 7. Ports necessary for RVON card functionality.
Port Port Description
2076 UDP Call Control Signalling
2077 UDP Audio Packets
2079
2080 TCP Telex Keypanel Protocol
2081 UDP Pass Thro ugh Serial
2082 TCP Firmware Download
2100 Remote Ad ministration
2102 Authen ticati on Server
UDP Telex Proprietary
Signalling
Below is an example of a router configuration window. Not all routers are configured the same way and may not look exactly
like the example.
Figure 8. Example of a router configuration window.
NOTE: Linksys supports up to 253 nodes on a router. This is why it is called a Router/Switch because there are WAN
functions like a router as well as having a 4-port LAN switch. It also does not support simultaneous forward and
DHCP.
Bosch Security Systems, Inc.
Technical Manual
F . 01U.118.890
Rev. 23
Page 77

Cronus 69
Network Terminology
Bridges A bridge is a device that connects two LANs, or two segments of the same LAN that use the
same protocol. Sometimes called “transparent bridges, they work at the OSI model Layer 2.
Simply put, they are not concerned with protocols. Their main job is to pass data to a destination
address that is predetermined in the data packet.
With a bridge, all of your computers are on the same network subnet (see Subnet). This means
your computers can communicate with each other and have their own Internet connection. If
you assign your own IP Addresses be sure to use the same first 3 “octets” of the IP Address (for
example, 192.168.0.X).
Domain Name Server
(DNS)
A DNS Server is an Internet service that translates domain names (for example, in the URL
http://www.telex.com, the domain name is the telex.com) into IP Addresses. The Internet is
based on IP Addresses which are numeric and since domain names are alphabetic, they are
easier to remember. Every time a domain name is used it must go through th e DNS server to be
translated into an IP Address.
Gateway A gateway is a node on a network that serves as an entrance to another network. The gateway
routes traffic from a computer to an outside network that is serving the web pages. For example,
the gateway for a home computer is the ISP provider that connects the user to the Internet.In a
corporate environment, the gateway often acts as a proxy server and a firewall. Gateways are
similar to routers and switches in that they forward da ta to the desti nati on and provide the path
for which the data will travel to the destination.
Hub A hub is a common connection point for devices in a network. A hub has multiple ports. When
a data packet arrives at a hub, it is copied and distributed to all of its ports so that all nodes on
the LAN can see the packets
There are three types of hubs:
passive hub - this hub serves as a conduit for the data, enabling it to go from one device
to another.
intelligent hub (also known as manageable hubs) - this hub includes addition features
that enable administrators to monitor traffic through the hub.
switching hub - this hub reads the destination address of each packet and then forwards
the data pack to the appropriate port.
Bosch Security Systems, Inc.
Technical Manual
F.01U.118.890
Rev. 23
Page 78

70 Cronus
IP Address (Internet
Protocol Address)
An IP Address is an identifier or numerical name for a computer or device on a network. Data
between computers are routed over the network using these addresses to identify the computer
the message is being sent to and the computer the message is being sent from.The format of an
IP Address is a 32-bit numeric address written as four numbers separated by periods. For
example, an IP Address looks like 10.100.1.1.
IMPORTANT: When working within an isolated network (meaning there is no Internet
access), IP Addresses can be assigned at random just as long as they are
unique to each computer and device. When the isolated network is
connected to the Internet, registered Internet Addresses must be obtained.
This is to prevent duplication of addresses.
The four numbers in and IP Address are used in different was to identify a particular network
and host on that network. There are three classes of Internet Addresses.
CLASS A - supports 16 million hosts on each of 127 networks.
CLASS B - supports 65,000 hosts on each of 16,000 networks.
CLASS C - supports 254 hosts on each of 2 million networks.
LAN A LAN is a computer network that connects a relatively small area (a single building or group
of buildings). Most LANs connect work stations and computers to each other. Each computer
(also known as a “node”), has its own processing unit and executes its own processing unit and
executes its own programs; however it can also access data and devices anywhere on the LAN.
This means that many users can access and share the same information and devices. A good
example of a LAN device is a network printer. Most companies cannot afford the budgetary or
hardware expense of providing printers for each of its users; therefore, one printer (i.e., device)
is placed on the LAN where every user can access the same printer.
The LAN uses IP Addresses to route data to different destinations on the network. An IP
Address is a 32-bit numeric address written as four numbers separated by periods (for example
1.160.10.240).
Port A port, when referring to TCP and UDP networks, is an endpoint in a logical connection. The
port number identifies the type of port it is. For example, port 80 is used for HTTP traffic.
Routers A router is a device that forwards data packets over networks. Most commonly, a router is
connected to at least two networks (normally LANs or W ANs). Routers are located at gateways,
the place where two networks are connected. Routers do little data filtering, they mainly deliver
the data.
Subnet A subnet is a portion of a network that shares a common address component. On a TCP/IP
network, a subnet is described as all computers or devices whose IP Address have the same
prefix.
Subnetting a network is useful because it provides security for the network as well as increases
performance of the network. IP networks are divided using subnet masks
Switches A switch is a device that filters and forwards data packets between networks. Switches operate
at the data layer, and sometimes at the network layer.
WAN A wide area network connects two or more LANs and can span a relatively large geographical
area. For example, Telex Headquarters in Burnsville, MN is connected to several of its branch
offices in Nebraska and Arkansas over the wide area network. The largest WAN is the Internet.
Bosch Security Systems, Inc.
Technical Manual
F . 01U.118.890
Rev. 23
Page 79

APPENDIX B
RVON-C Card
Serial Port Pr ogramming
RVON Serial and Telnet Commands
RVON-C card programming can be done via direct serial or telnet connection. There are several physical connections to an
RVON-C card.
• Direct serial through custom debug cable (J7 6-pin bottom front).
The customer debug cable always functions as the general purpose debug tool.
• Backcard DB-9 J1
The backcard DB-9 (must be disabled/enabled via a DIP Switch because it can also be used for serial
port
pass-through.
The backcard DB-9 can be used for debug terminal when DIP Switch 6 is switched to the Closed
position.
• Backcard RJ-45 J2 (Telnet Only)
Setup
Serial Port 38,400 baud, no flow control
Telnet IP Address, port 23
Bosch Security Systems, Inc.
Te chnical Manual
F . 01U.118.890
Rev. 23
Page 80

72 Cronus
RVON-C Boot Download
*****************************
RVON-C Revision 1.00.02
(C) Copyright 2003 Telex Inc. All Rights Reserved.
Flash File System initialized.
DIP Switch settings:....XXXX
Configuration via AZedit disabled (via DIP Switch 1 on)
Back card UA RT enabled for pass-through serial (via DIP Switch 6 off)
Boot downloader disabled (via DIP Switch 7 off)
Autoload enabled (via DIP Switch 8 off)
Monitor Revision 1.00.02
Monitor Compilation time Oct 18 2005, 14:33:52
Processor ID / Revision 0x80 (4Kc) / 0x05
Avalanche Device Type Avalanche-I, Revision 1.3
Memory Controller Revision 1.204
Endianness Big
External Memory rate Full
CPU Frequ 8 MBytes
RAM size 64 MBytes
First free RAM address 0x9401f1a8
PLL Mode Operating 2.50X
Press any key to abort OS load, or wait 1 seconds for OS to boot...
** Defragmenting File System and Environment flash area(s) **
Reading flash file system... No deleted flash file entries found.
Reading environment flash space... Complete.
FlashEraseBlock(b07f8000);
..
Copying environment to flash... Complete.
Loading file /bin/telex1 from FFS
PC: 94020000
FTP done!, PC: 94020000
Target Name: vxTarget
Attached TCP/IP interface to emac unit 0
Attaching network interface lo0... done.
0x97e796f0 (tNetTask): Link is down on EMAC A.
NFS client support not included.
Bosch Security Systems, Inc.
Technical Manual
F . 01U.118.890
Rev. 23
Page 81

Cronus 73
Adding 5160 symbols for standalone.
appCreate: autoBootLevel=2
MXP environment is created.
Creating RVON application...
-> Bringing DSP subsystem out of reset...
DSP Daughtercard type is set to NONE - No DSP Daughtercard Found
0000004883 - ROOT: FPGA Version = ff00
0000004890 - ROOT: Channel 2 Remote IP Address is unconfigured
0000004892 - ROOT: Channel 3 Remote IP Address is unconfigured
0000004894 - ROOT: Channel 4 Remote IP Address is unconfigured
0000004895 - ROOT: Channel 5 Remote IP Address is unconfigured
0000004897 - ROOT: Channel 6 Remote IP Address is unconfigured
0000004898 - ROOT: Channel 7 Remote IP Address is unconfigured
About to create Idle Task
About to create Measurement Task
Idle Measurement Tasks created
0000004931 - SMGR: tcid 0, expecting remote device connection
0000004931 - SMGR: tcid 0, added to new socket for device 0
0000004931 - SERV: in0000005049 - DSPA: DSP 0,Image 0:Download done!
0000005055 - DSPA: DSP 1,Image 0:Download done!
0000005155 - NMM: ATPM Update Database Granted
0000005255 - NMM: ATPM Configured for R VON operation
0000005255 - NMM: ATPM Update database done
0000005258 - NMM: 0, states: oper=NORMAL, admin=NORMAL, call=IDLE
0000005259 - NMM: 1, states: oper=NORMAL, admin=NORMAL, call=IDLE
0000005260x97e796f0 (tNetTask): Link is up on EMAC A: 100 MBps and FULL duplex.
0000005763 - RVON: port 0, requesting call permission
0000005763 - UDPT: error - CALL_REQUEST: don't send to an R VON-1 or RVON-IO till
ports known
0000005813 - RVON: port 1, requesting call permission
0000005813 - RVON: port 1, call permission granted, initiate call
0000005814 - RVON: p: CBRX_RVON_ALPHAS
0000005832 - FNRX: CBRX_ANALOG_TRIM
0000005832 - FNRX: CBRX_POLL_DELAYS, ignored
0000005833 - NMM: 1, states: oper=NORMAL, admin=NORMAL, call=SEIZED
0000005833 - NMM: 1, states: oper=NORMAL, admin=NORMAL, call=SETUP
0000005834 - FNRX: CBRX_VOX_PARAMS
Bosch Security Systems, Inc.
Technical Manual
F.01U.118.890
Rev. 23
Page 82

74 Cronus
Access Serial Command Mode
There are many different serial port commands supported from here, but it is NOT recommended that any be used except:
dbgcmd
> At a DOS prompt, type dbgcmd, and then press Return.
This places the serial port into the MXP> (MXP command mode). The MXP Command Mode is the only mode used.
The table below is a list of commands supported from the MXP Shell Prompt.
Bosch Security Systems, Inc.
Technical Manual
F . 01U.118.890
Rev. 23
Page 83

Cronus 75
Serial Command Table
TABLE 9. Serial Command Table
Command Variable 1 Variable 2 Description
set rvon Help window which lists all set rvon commands.
set rvon ip_addr X.X.X.X Set the IP Address for the RVON Card.
set rvon netmask X.X.X.X Set network mask for the RVON Card.
set rvon gateway X.X.X.X Set the gateway IP Address for the R VON-8 card.
set rvon user abcdefg
set rvon password abcdefg
set rvon vad_threshold [adaptive #]
Set the RVON user name for telnet access.
Default is telex
Set the RVON password for telnet access (8–40
characters).
Default is password
Set the VAD threshold (silence detection) Adaptive refers
to auto-select. The # can be
-20 to +10dBm.
set channel [chan]
set channel [chan] dest_ip X.X.X.X
set channel [chan] dest_type X
set channel [chan] chan_codec X
Help window which lists all set tcid commands (TCID 0-
7).
Set the destination IP Address for this particular
RVON_Channel (same as tcid).
dest_type X = 0 (rvon-8 or rvon-C), 1 (rvon-1), 2 (rvon-I/
O).
Set the profile, which includes the compression codec see
below (0-27).
set channel [chan] onhook Force the channel to disconnect the port.
set channel [chan] offhook Force the channel to connect the port.
set emac auto*
set emac 10 half
Enables auto-negotiation of the Ethernet interface
configuration.
Configures the Ethernet interface for 10Mbps half-
duplex.
set emac 10 full Configures the Ethernet interface for 10Mbps full-duplex.
set emac 100 half
set emac 100 full
Configures the Ethernet interface for 100 Mbps half-
duplex.
Configures the Ethernet interface for 100 Mbps full-
duplex.
set serial ip_addr X.X.X.X
set serial baud X Set the baud rate to use: 50 through 115000.
activate
Bosch Security Systems, Inc.
Set the destination IP Address for this serial pass-through
port.
Must do an activate command to cause changes to take
effect.
Technical Manual
F.01U.118.890
Rev. 23
Page 84

76 Cronus
TABLE 9. Serial Command Table
Command Variable 1 Variable 2 Description
show rvon Display current settings
show serial Display current settings
show channel [chan] Display current settings
show emac Display current settings
Bosch Security Systems, Inc.
Technical Manual
F . 01U.118.890
Rev. 23
Page 85

Cronus 77
Codec Specifications
TABLE 10. Codec Specifications
Codec
Coding Profile
0,3,6,9 G.711 64k 10 100.00 80 60 140 14000 112 224
1,4,7,10 G.711 64k 20 50.00 160 60 220 11000 88 176
2,5,8,11 G.711 64k 30 33.33 240 60 300 10000 80 160
12,16 G.729 8k 10 100.00 10 60 70 7000 56 112
13,17 G.729 8k 20 50.00 20 60 80 4000 32 64
14,18 G.729 8k 40 25.00 40 60 100 2500 20 40
15,19 G.729 8k 60 16.67 60 60 120 2000 16 32
Codec Rate
Packets/Second
Audio (ms) / Packet
Encoded Audio (bytes)
IP Overhead (bytes)
Total Packet Size (bytes)
Bandwidth (Bytes/sec)
Bandwidth (kbps/side)
Bandwidth (kbps/channel)
20,22 G.723 5.3k 30 33.33 24 60 84 2800 22.4 44.8
24,26 G.723 6.3k 30 33.33 24 60 84 2800 22.4 44.8
21,23 G.723 5.3k 60 16.67 48 60 108 1800 14.4 28.8
25,27 G.723 6.3k 60 16.67 48 60 108 1800 14.4 28.8
NOTE: A channel consists of a transmitting and a receiving side, so the bandwidth is double for a bi-directional
audio stream.
NOTE: Bandwidth values are approximate maximums, actual bandwidth could be considerably lowe r wit h VAD
enabled.
Codec Determines how the audio is compressed/decompressed and the name given to the defined
algorithm
Coded Rate Actual bits per second of the audio in compressed form. This is sent over the network through
various data packets. Network efficiency can be calculated with an IP header for each packet of
X ms of audio.
Size Amount of audio in each IP Packet, milliseconds (ms).
VAD Voice Activity Detection, when enabled and only when audio is above a certain threshold, sends
packets. Otherwise, a silence packet is sent once, and not again until audio is above the threshold.
Enabling this results in a more efficient network.
Bosch Security Systems, Inc.
Technical Manual
F.01U.118.890
Rev. 23
Page 86

78 Cronus
RVON-C Default Setup
The board is shipped from the factory containing the following:
All are set rvon commands
Variable Environment Name Default Value Description
ip_addr EMACA_IPADDR x.x.x.x IP Address for the RVON-C Card
netmask EMACA_NETMASK 255.255.255.0 Network Mask for the RVONC card
gateway EMACA_GW none Gateway IP Address for the RVON-C Card
serial_ip RVON_SERIAL_IP none Pass-thru serial port IP Address for the RVON-C Card
serial_baud RVON_SERIAL_ Baud 9600 Set the pass-thru serial port baud rate for the RVON-C
Card
user RVON_USER telex RVON-C user name for telnet acce ss
password RVON_PASSWORD password RVON-C password for telnet access (8-40 characters)
vad_threshold RVON_THRESHOLD_VAD 10 VAD Threshold
There are more parameters that the software will auto-configure if they have not been previously setup. The user can also set
these parameters, in which case the software would not modify but take them as they are.
All are set chan # commands because they are for each audio channel.
Variable Environment Name Default Value Description
dest_ip RVON_DEST_IP_# X.X.X.X Destination IP Address for this particular RVON_CH
dest_type RVON_DEST_TYPE_3 X Destination Type Y= 0 (R VON-C), 1 (rvon-1), 2 (rvon-I/
O)
dest_chan RVON_DEST_CHAN_# X Destination Channel - what port of far end (0-7)
chan_codec RVON_CHAN_CODEC_# X Profile to use (previous coding table)
T yping printenv, then pressing Return from an RVON-C boot code or sys-printenv from the MXP Debug System Prompt may
show these commands. The Environment name is listed because this is the label used by the software.
IMPORTANT: If the user is attempting to do a setenv to change a parameter from the RVON-C boot code, the
Environment Name must be used and not the set rvon variable name.
Bosch Security Systems, Inc.
Technical Manual
F . 01U.118.890
Rev. 23
Page 87

APPENDIX C
RV ON-C Quick S tart
This guide explains briefly how to install and configure an RVON-C card in a Cronus system. It contains the following
sections
Step 1 Install the front card and the back card into Cronus. See“Install Front and Back Cards in Cronus” on
page 79.
Step 2 Connect Ethernet. See “Connect Ethernet” on page 79
Step 3 Connect to Cronus frame in AZedit. See “Launch AZedit and Connect to the Cronus Frame” on page 80
Step 4 Configure the RVON-C card. See “Configure the RVON-C Card” on page 81.
Step 5 Configure the devices the card will connect with. See “Configure the Devices Connected to the RVON-C
Card” on page 83.
Step 6 Begin Operation.
NOTE: If you are connecting using Serial Pass-Through Port, See “RVON-C Card Serial Port Programming” on page 71.
Install Front and Back Cards in Cronus
When inserting the RVON-C card into Cronus, the following consideration s need to be made:
• Gently insert the RVON-C card into the correct slot. If the card is forced or twisted while inserting, a pin
on the backplane could short or break causing the card to become inoperable.
• When inserting the RVON-C card into Cronus, be sure to insert it into a compatible back card. If the
card is inserted into an incompatible back card, undesirable results can occur.
Connect Ethernet
Verify there is an Ethernet connection from the RVON-C card (J2 Ethernet on the back of the Cronus) to the network.
Bosch Security Systems, Inc.
Te chnical Manual
F . 01U.118.890
Rev. 23
Page 88

80 Cronus
Launch AZedit and Connect to the Cronus Frame
NOTE: You can connect to Cronus using Serial, USB, or Network Connections. The following instructions show how to
connect to a network. For more information on configuring the network connection for the Cronus, see page 29.
To connect to the Cronus system from AZedit, do the following:
1. From the Options menu, select Communications.
The Communications window appears.
2. Verify that Network is selected.
3. Press the browse button next to the Main IP Address field.
The Available Intercoms window appears.
4. Highlight Cronus in the Intercoms window and click OK.
Bosch Security Systems, Inc.
Technical Manual
F . 01U.118.890
Rev. 23
Page 89

Cronus 81
5. Click OK when the Configuration Change message appears.
CRONUS appears in the lower, right corner of the AZedit application.
Configure the RVON-C Card
Once you have a connection to Cronus, you are ready to configure the RVON-C card within the Cronus system.
To configure the RVON-C card, do the following:
1. From the Navigation bar at the bottom of the AZedit application, click the RVON button.
The RVON Configuration window appears.
2. From the RVON Card drop down list, select the slot in which the RVON-C card resides, if it is not already selected.
3. In the IP Address field, enter the IP Address you have assigned to the RVON-C card.
Bosch Security Systems, Inc.
Technical Manual
F.01U.118.890
Rev. 23
Page 90

82 Cronus
4. In the Network Mask field, enter the Network Mask of the network the RVON-C card is connected to.
5. In the Default Gateway field, enter the Default Gateway Address (if applicable) of the network the R VON-C card is
connected.
A Default Gateway is only required if the RVON-C connections are between LANs or WANs.
Under Settings for Pass-Through Serial via Ethernet
6. Enter the Target IP Address of the device you want to connect to over the Ethernet.
7. From the Serial Baud Rate drop down list, select the baud rate at which the data is transmitted.
Under Settings for Connected Devices
NOTE: You MUST configure the channel settings on each end of a connection and ensure the same codec and
packet size are select at each end. Remember, the RVON-C card has different channels that can be
configured.
8. In the R VON-C Channel drop down list, select the channel you want to use to communicate to another device across
the network.
9. In the Device IP Address field, enter the IP Address of the device you want to connect to.
10. From the Device Type drop down list, select the type of device the RVON-C card is connecting to.
11. From the Device Channel drop down list, select the channel on the device the RVON-C card communicates with.
12. From the CODEC Type drop down list, select the CODEC type you want to use for this channel.
13. From the Packet Size drop down list, select the size of each audio packet.
NOTE: A CODEC is an algorithm used to compress audio. There are 5 Codices supported by Telex: G.711μs law,
G.711A law, G.729AB, G.723 (5.3k), G.723 (6.3k). The type of CODEC dictates the quality of audio you
hear and the network bandwidth used. The packet size determines how much audio data is carried across the
network in each transmitted packet. The CODEC type and packet size chosen require different amounts of
bandwidth from the network (See “Codec Specifications” on page 77). As with the CODEC type, the packet
size you choose for the audio transfer affects the audio you hear and the bandwidth you use over the
network. The larger the audio packet you choose to use, the lower the bandwidth used. However, the larger
packet size can result in a higher delay and longer gaps if the packet is lost. On the other had, smaller packet
sizes result in larger bandwidth use, but lower delays and smaller gaps if the packet is lost. The Intercom
System Engineer and the Network Administrator may want to work together in choosing the CODEC type
and packet size suitable for the size of the network, so degradation of network resources does not happen.
14. Select Enable VAD (Voice Activity Detection), if you want to conserve bandwidth when the audio level is below a
given threshold.
NOTE: Voice Activity Detection saves network bandwidth by stopping the flow of audio packets when silence is
detected. VAD is similar to VOX.
15. At this point you may choose another channel to configure or choose another card to configure.
16. Once you are completely finished, click Apply.
Apply sends all of the changes to all the cards in the intercom, or click Cancel to discard all changes you make.
Bosch Security Systems, Inc.
Technical Manual
F . 01U.118.890
Rev. 23
Page 91

Cronus 83
Configure the Devices Connected to the RVON-C Card
See the device user manual for specific configuration instructions.
Setting up a Serial Pass-Through Connection or Serial Connection
If you plan to pass data using either a Serial Pass-Through or Serial Connection you need to set the DIP switches and jumpers
to reflect which connection you want to use.
NOTE: When making adjustments to the DIP switches and jumpers, you msut take the front card out of the Cronus.
To use the Serial Pass-Through, do the following:
1. Set DIP Switch 6 to the OPEN position.
2. Set the serial protocol, either RS232 or RS485:
• For RS232, jumper pins 2 & 3 of J10, J11, and J12
• For RS485, jumper pins 1 & 2 of J10, J11, and J12
3. Once you have set the correct configurations, place the RVON-C into Cronus and hook the DB-9 connector to the
RVON-C backcard.
To use the Serial connection, do the following:
1. Set DIP Switch 6 to the CLOSED position.
2. Set the serial protocol, either RS232 or RS485:
• For RS232, jumper pins 2 & 3 of J10, J11, and J12
• For RS485, jumper pins 1 & 2 of J10, J11, and J12
3. Once you have set the correct configuration, replace the RVON-C into Cronus and hook the DB-9 connector to the
RVON-C backcard.
4. Use Table 9, “Serial Command Table,” on page 75, to configure you RVON-C card.
Bosch Security Systems, Inc.
Technical Manual
F.01U.118.890
Rev. 23
Page 92

84 Cronus
Bosch Security Systems, Inc.
Technical Manual
F . 01U.118.890
Rev. 23
Page 93

APPENDIX D
Br eakout Panels
Breakout Panels provide a convenient way of expanding the
port capacity of a Cronus Intercom System. Currently, there
are three breakout panels for use with the Cronus MDR
backcard: XCP-32-DB9, XCP-48-RJ45, and XCP-48-Telco.
On the Cronus you can have up to four MDR backcards
mounted on the chassis to give you that many more keypanel
ports.
Pin Number Port Function
81Data +
33 1 Data 24 1 Audio to Matrix +
49 1 Audio to Matrix 25 1 Audio from Matrix +
50 1 Audio from Matrix -
72Data +
32 2 Data 22 2 Audio to Matrix +
47 2 Audio to Matrix 23 2 Audio from Matrix +
48 2 Audio from Matrix -
63Data +
31 3 Data 20 3 Audio to Matrix +
45 3 Audio to Matrix 21 3 Audio from Matrix +
46 3 Audio from Matrix -
Pin Number Port Function
54Data +
30 4 Data 18 4 Audio to Matrix +
43 4 Audio to Matrix 19 4 Audio from Matrix +
44 4 Audio from Matrix -
45Data +
29 5 Data 16 5 Audio to Matrix +
41 5 Audio to Matrix 17 5 Audio from Matrix +
42 5 Audio from Matrix -
36Data +
28 6 Data 14 6 Audio to Matrix +
39 6 Audio to Matrix 15 6 Audio from Matrix +
40 6 Audio from Matrix -
27Data +
27 7 Data 12 7 Audio to Matrix +
37 7 Audio to Matrix 13 7 Audio from Matrix +
38 7 Audio from Matrix -
Bosch Security Systems, Inc.
Te chnical Manual
F . 01U.118.890
Rev. 23
Page 94

86 Cronus
Pin Number Port Function
18Data +
26 8 Data 10 8 Audio to Matrix +
35 8 Audio to Matrix 11 8 Audio from Matrix +
36 8 Audio from Matrix -
XCP-32-DB9 Breakout Panel
FIGURE 27. XCP-32-DB9 Breakout Panel (XCP-32DB-DB9-BP)
The XCP-48-DB9 breakout panel is the newly created
32-port DB9 breakout panel with MDR connecotr for the
AIO-16. It allows you to expand the number of DB-9 serial
ports on the Cronus.
NOTE: When using the 32-port DB-9 breakout panel,
you must use the MDR backcard
Pin Number Port Function
81Data +
33 1 Data 24 1 Audio to Matrix +
49 1 Audio to Matrix 25 1 Audio from Matrix +
50 1 Audio from Matrix -
72Data +
32 2 Data 22 2 Audio to Matrix +
Pin Number Port Function
47 2 Audio to Matrix 23 2 Audio from Matrix +
48 2 Audio from Matrix -
63Data +
31 3 Data 20 3 Audio to Matrix +
45 3 Audio to Matrix 21 3 Audio from Matrix +
46 3 Audio from Matrix -
54Data +
30 4 Data 18 4 Audio to Matrix +
43 4 Audio to Matrix -
Bosch Security Systems, Inc.
Technical Manual
F.01U.118.890
Rev. 23
Page 95

Cronus 87
Pin Number Port Function Pin Description
19 4 Audio from Matrix +
44 4 Audio from Matrix 45Data +
29 5 Data 16 5 Audio to Matrix +
41 5 Audio to Matrix 17 5 Audio from Matrix +
42 5 Audio from Matrix -
Pin 1 Keypanel Data +
Pin 2 Keypanel Data Pin 3 GND
Pin 4 Audio to Matrix +
Pin 5 Audio to Matrix Pin 6 GND
Pin 7 Audio from Matrix Pin 8 Audio from Matrix +
Pin 9 GND
36Data +
28 6 Data 14 6 Audio to Matrix +
39 6 Audio to Matrix 15 6 Audio from Matrix +
40 6 Audio from Matrix -
27Data +
27 7 Data 12 7 Audio to Matrix +
37 7 Audio to Matrix 13 7 Audio from Matrix +
38 7 Audio from Matrix -
18Data +
26 8 Data 10 8 Audio to Matrix +
35 8 Audio to Matrix 11 8 Audio from Matrix +
36 8 Audio from Matrix -
NOTE: There are 4 MDR connectors on the XCP-32-
DB9 Breakout Panel.
MDR Connector Port
J1 1-8
J2 9-16
J3 17-24
J4 25-32
Bosch Security Systems, Inc.
Technical Manual
F . 01U.118.890
Rev. 23
Page 96

88 Cronus
XCP-48-RJ45 Breakout Panel
FIGURE 28. XCP-48-RJ45 Breakout Panel (XCP-48-RJ45)
The XCP-48-RJ45 is the newly created 48-port RJ45
breakout panel with MDR connector for the Cronus. It
allows you to expand the number of RJ-45 ports on the
ADAM system, up to 48 ports.
NOTE: When using the 48-port RJ-45 breakout panel,
you must use the MDR backcard with the
Cronus.
Pin Number Port Function
81Data +
33 1 Data 24 1 Audio to Matrix +
49 1 Audio to Matrix 25 1 Audio from Matrix +
50 1 Audio from Matrix -
72Data +
32 2 Data 22 2 Audio to Matrix +
47 2 Audio to Matrix 23 2 Audio from Matrix +
48 2 Audio from Matrix -
63Data +
31 3 Data 20 3 Audio to Matrix +
Pin Number Port Function
45 3 Audio to Matrix 21 3 Audio from Matrix +
46 3 Audio from Matrix -
54Data +
30 4 Data 18 4 Audio to Matrix +
43 4 Audio to Matrix 19 4 Audio from Matrix +
44 4 Audio from Matrix -
45Data +
29 5 Data 16 5 Audio to Matrix +
41 5 Audio to Matrix 17 5 Audio from Matrix +
42 5 Audio from Matrix -
36Data +
28 6 Data 14 6 Audio to Matrix +
39 6 Audio to Matrix 15 6 Audio from Matrix +
40 6 Audio from Matrix -
Bosch Security Systems, Inc.
Technical Manual
F.01U.118.890
Rev. 23
Page 97

Cronus 89
Pin Number Port Function
27Data +
27 7 Data 12 7 Audio to Matrix +
37 7 Audio to Matrix 13 7 Audio from Matrix +
38 7 Audio from Matrix -
18Data +
26 8 Data 10 8 Audio to Matrix +
35 8 Audio to Matrix 11 8 Audio from Matrix +
36 8 Audio from Matrix -
NOTE: There are six (6) MDR Connector on the
XCP-48 Telco Breakout
MDR Connector Port
J1 41-48
J2 33-40
J3 25-32
J4 17-24
J5 9-16
J6 1-8
Pin Description
Pin 1 N/A
Pin 2 Keypanel Data Pin 3 Audio Out +
Pin 4 Audio In +
Pin 5 Audio In Pin 6 Audio Out Pin 7 Keypanel Data +
Pin 78 N/A
Bosch Security Systems, Inc.
Technical Manual
F . 01U.118.890
Rev. 23
Page 98

90 Cronus
XCP-48-Telco Breakout Panel
FIGURE 29. XCP-48-Telco Breakout Panel (XCP-48-TELCO)
The XCP-48-Telco is the newly created breakout panel with
MDR connector for the Cronus. It combines audio to matrix,
audio from matrix, and data pairs. It then routes them on
individual Telco connectors.
NOTE: When using the XCP-48-Telco breakout panel,
you must use the MDR backcard with the
Cronus.
Pin Number Port Function
81Data +
33 1 Data 24 1 Audio to Matrix +
49 1 Audio to Matrix 25 1 Audio from Matrix +
50 1 Audio from Matrix -
72Data +
32 2 Data 22 2 Audio to Matrix +
47 2 Audio to Matrix 23 2 Audio from Matrix +
48 2 Audio from Matrix -
63Data +
31 3 Data 20 3 Audio to Matrix +
45 3 Audio to Matrix 21 3 Audio from Matrix +
46 3 Audio from Matrix -
Pin Number Port Function
54Data +
30 4 Data 18 4 Audio to Matrix +
43 4 Audio to Matrix 19 4 Audio from Matrix +
44 4 Audio from Matrix -
45Data +
29 5 Data 16 5 Audio to Matrix +
41 5 Audio to Matrix 17 5 Audio from Matrix +
42 5 Audio from Matrix -
36Data +
28 6 Data 14 6 Audio to Matrix +
39 6 Audio to Matrix 15 6 Audio from Matrix +
40 6 Audio from Matrix -
Bosch Security Systems, Inc.
Technical Manual
F.01U.118.890
Rev. 23
Page 99

Cronus 91
Table 11. Telco Backcard Connector (J1, J4)
Pin Number Port Function
27Data +
27 7 Data 12 7 Audio to Matrix +
Pin Number Port Function
5 5 Audio to Matrix +
30 5 Audio to Matrix 37 7 Audio to Matrix -
13 7 Audio from Matrix +
38 7 Audio from Matrix -
6 6 Audio to Matrix +
31 6 Audio to Matrix -
18Data +
26 8 Data 10 8 Audio to Matrix +
35 8 Audio to Matrix 11 8 Audio from Matrix +
36 8 Audio from Matrix -
NOTE: There are six (6) MDR Connectors on the
XCP-48-Telco Breakout Panel.
MDR Connector Port
J1 1-8
J2 9-16
J3 17-24
J4 25-32
J5 33-40
J6 41-48
Telco Backcard
Telco Connector J1, J4
Table 11. Telco Backcard Connector (J1, J4)
7 7 Audio to Matrix +
32 7 Audio to Matrix -
8 8 Audio to Matrix +
33 8 Audio to Matrix -
9 9 Audio to Matrix +
34 9 Audio to Matrix -
10 10 Audio to Matrix +
35 10 Audio to Matrix -
11 11 Audio to Matrix +
36 11 Audio to Matrix -
12 12 Audio to Matrix +
37 12 Audio to Matrix -
13 13 Audio to Matrix +
38 13 Audio to Matrix -
Pin Number Port Function
1 1 Audio to Matrix +
26 1 Audio to Matrix -
2 2 Audio to Matrix +
27 2 Audio to Matrix -
3 3 Audio to Matrix +
28 3 Audio to Matrix -
4 4 Audio to Matrix +
29 4 Audio to Matrix -
Bosch Security Systems, Inc.
14 14 Audio to Matrix +
39 14 Audio to Matrix -
15 15 Audio to Matrix +
40 15 Audio to Matrix -
16 16 Audio to Matrix +
41 16 Audio to Matrix -
17 17 Audio to Matrix +
42 17 Audio to Matrix -
18 18 Audio to Matrix +
Technical Manual
F . 01U.118.890
Rev. 23
Page 100

92 Cronus
Table 11. Telco Backcard Connector (J1, J4)
Pin Number Port Function
43 18 Audio to Matrix -
19 19 Audio to Matrix +
44 19 Audio to Matrix -
20 20 Audio to Matrix +
45 20 Audio to Matrix -
21 21 Audio to Matrix +
46 21 Audio to Matrix -
22 22 Audio to Matrix +
47 22 Audio to Matrix -
23 23 Audio to Matrix +
48 23 Audio to Matrix -
24 24 Audio to Matrix +
49 24 Audio to Matrix -
Bosch Security Systems, Inc.
Technical Manual
F . 01U.118.890
Rev. 23
 Loading...