


User Instructions
DKP-8, DKP-12, AND KP-12 KEYPANELS PUSH-BUTTON AND LEVER KEY VERSIONS
up to and including firmware version 1.05.15
DKP-8
KP-12
Short
 HDST
HDST
SPKR
PRGM
MCP
DYN |
HDST |
|
DKP-12 |
KP-12 |
|
9350-7497-001 Rev H |
April 2007 |
PROPRIETARY NOTICE
The product information and design disclosed herein were originated by and are the property of Telex Communications, Inc. Telex reserves all patent, proprietary design, manufacturing, reproduction, use and sales rights thereto, and to any article dislcosed therein, except to the extent rights are expressly granted to others.
COPYRIGHT NOTICE
Copyright 2007 by Telex Communications, Inc. All rights reserved. Reproduction, in whole or in part, without prior written permission from Telex is prohibited.
WARRANTY NOTICE
See the enclosed warranty card for further details.
CUSTOMER SUPPORT
Technical questions should be directed to:
Customer Service Department
RTS/Telex Communications, Inc.
12000 Portland Avenue South
Burnsville, MN 55337 USA
Telephone: 800-392-3497
Fax: 800-323-0498
Factory Service: 800-553-5992
RETURN SHIPPING INSTRUCTIONS
Customer Service Department
Telex Communications, Inc (Lincoln, NE) Telephone: 402-467-5321
Fax: 402-467-3279
Factory Service: 800-553-5992
Please include a note in the box which supplies the company name, address, phone number, a person to contact regarding the repair, the type and quantity of equipment, a description of the problem and the serial number(s).
SHIPPING TO THE MANUFACTURER
All shipments of product should be made via UPS Ground, prepaid (you may request from Factory Service a different shipment method). Any shipment upgrades will be paid by the customer. The equipment should be shipped in the original packing carton. If the original carton is not available, use any suitable container that is rigid and of adequate size. If a substitute container is used, the queipment should be wrapped in paper and surrounded with at least four (4) inches of excelsior or similar shock-absorbing material. All shipments must be sent to the following address and must include the Proof of Purchase for warranty repair. Upon completion of any repair the equipment will be returned via United Parcel Service or specified shipper, collect.
Factory Service Department
Telex Communications, Inc.
8601 Cornhusker Hwy.
Lincoln, NE 68507 U.S.A.
Attn: Service
This package should include the following:
Table |
|
of |
|
Contents |
|
READ ME FIRST ....................................................................................................................................... |
1 |
Menu List for DKP-8, DKP-12, and KP-12 Keypanels ............................................................................. |
3 |
Power-Up and Initial Settings ................................................................................................................... |
9 |
Applying Power ................................................................................................................................... |
9 |
“MD1”, “Key Type” and “Set Addr” Messages ................................................................................ |
9 |
Determining the Address, CS9XXX Intercoms .................................................................................... |
9 |
Determining the Address, ADAM and ADAM CS Intercoms .............................................................. |
9 |
Determining the Address, Zeus Intercom Systems ............................................................................... |
9 |
Setting the Address ............................................................................................................................ |
10 |
Power-Up Indications ........................................................................................................................ |
10 |
Keypanel with Alphanumeric Displays .............................................................................................. |
10 |
Keypanel without Alphanumeric Displays ......................................................................................... |
10 |
CALL / MENU Indicators .................................................................................................................. |
10 |
HDST/SPKR/PGM volume indicator ................................................................................................. |
10 |
Specifications ........................................................................................................................................... |
11 |
Basic Intercom Operation ........................................................................................................................ |
13 |
Keys and Displays .............................................................................................................................. |
13 |
Talk and Listen Indicators ................................................................................................................. |
13 |
Headset/Speaker/PRGM Selection and Volume Adjustment ............................................................. |
14 |
Flashing Call Indicator ..................................................................................................................... |
14 |
Copy Call Waiting ............................................................................................................................. |
14 |
Telephone Operation ............................................................................................................................... |
15 |
All-Purpose Phone Key Operation .................................................................................................... |
15 |
Manual Dialing with an All-Purpose Phone Key .............................................................................. |
15 |
Hanging Up ....................................................................................................................................... |
16 |
Receiving a Phone Call ..................................................................................................................... |
16 |
Talk Mute During a Phone Conversation .......................................................................................... |
16 |
Last Number Redial with an All-Purpose Phone Key ....................................................................... |
16 |
Dialing an Autodial Number Using an All-Purpose Phone Key ....................................................... |
16 |
Dialing a Number Using a Redial or Autodial Key ........................................................................... |
16 |
Using the Top-Level Menu ....................................................................................................................... |
17 |
General Description .......................................................................................................................... |
17 |
Top Level Menu, - - - - (Clear call waiting) ...................................................................................... |
17 |
Top Menu Level, Call List Names ...................................................................................................... |
18 |
Top Level Menu, Display ................................................................................................................... |
18 |
General Description .......................................................................................................................... |
18 |
Table |
|
of |
|
Contents |
|
Top Level Menu, Display, CHANS ON .............................................................................................. |
18 |
Top Level Menu, Display, Exclusive .................................................................................................. |
18 |
Top Level Menu, Display, Group (1-4) ............................................................................................. |
18 |
Top Level Menu, Display, KEY ICOM .............................................................................................. |
19 |
Top Level Menu, Display, KEY TYPE ............................................................................................... |
19 |
Top Level Menu, Display, Level 2 ..................................................................................................... |
19 |
Top Level Menu, Display, Listen ....................................................................................................... |
20 |
Top Level Menu, Display, Page Use ................................................................................................. |
20 |
Top Level Menu, Display, Port Num ................................................................................................. |
20 |
Top Level Menu, Display, SOLO ....................................................................................................... |
20 |
Top Level Menu, Display, Version .................................................................................................... |
20 |
Top Level Menu, Key List .................................................................................................................. |
21 |
Top Level Menu, Level ....................................................................................................................... |
21 |
Top Level Menu, Lists ........................................................................................................................ |
21 |
Top Level Menu, Lists, ICOM ............................................................................................................ |
21 |
Top Level Menu, Lists, PL (party lines) ............................................................................................ |
21 |
Top Level Menu, Lists, P-P (Point-to-Point) ..................................................................................... |
22 |
Top Level Menu, Lists, IFB ................................................................................................................ |
22 |
Top Level Menu, Lists, IFSL .............................................................................................................. |
22 |
Top Level Menu, Lists, ISO ................................................................................................................ |
23 |
Top Level Menu, Lists, RLY (Relays) ................................................................................................. |
23 |
Top Level Menu, Lists, SPCL (Special Lists) .................................................................................... |
23 |
Top Level Menu, Lists, UPL .............................................................................................................. |
24 |
Top Level Menu, Menus ..................................................................................................................... |
24 |
Top Level Menu, Page (1-4) .............................................................................................................. |
24 |
Top Level Menu, TGL LISN (Toggle Listen ON/OFF) ...................................................................... |
25 |
Menu Mode .............................................................................................................................................. |
27 |
Select Control Operation in Menu Mode .......................................................................................... |
27 |
Menus, Autodial (for KP-12/DKP-12 Only) ...................................................................................... |
28 |
Menus, KEY ASGN ............................................................................................................................ |
29 |
Menus, KEY ASGN, General Description ......................................................................................... |
29 |
Menus, KEY ASGN, AUTODIAL (For KP-12, DKP-12 Only) .......................................................... |
29 |
Menus, KEY ASGN, AUTOFUNC ..................................................................................................... |
29 |
Menus, KEY ASGN, CLEAR .............................................................................................................. |
30 |
Menus, KEY ASGN, COPY ................................................................................................................ |
30 |
Menus, KEY ASGN, LISTS ................................................................................................................ |
31 |
General Description .......................................................................................................................... |
31 |
Menus, KEY ASGN, LISTS ................................................................................................................ |
32 |
General Description .......................................................................................................................... |
32 |
Menus, KEY ASGN, LISTS, ICOM .................................................................................................... |
32 |
Table |
|
of |
|
Contents |
|
Menus, KEY ASGN, LISTS, PL (Party Line) ..................................................................................... |
32 |
Menus, KEY ASGN, LISTS, IFB ........................................................................................................ |
32 |
Menus, KEY ASGN, LISTS, IFSL ...................................................................................................... |
33 |
Menus, KEY ASGN, LISTS, ISO ........................................................................................................ |
33 |
Menus, KEY ASGN, LISTS, P-P (Point-to-Point) ............................................................................. |
33 |
Menus, KEY ASGN, LISTS, RLY (Relays) ......................................................................................... |
34 |
Menus, KEY ASGN, LISTS, SPCL (Special Lists) ............................................................................. |
34 |
Menus, KEY ASGN, LISTS, UPL ....................................................................................................... |
35 |
Menus, KEY ASGN, LOCAL I/O (For KP-12 Only) .......................................................................... |
35 |
Menus, KEY ASGN, PHONE (For KP-12, DKP-12 Only) ................................................................ |
35 |
Menus, KEY ASGN, REDIAL (For KP-12, DKP-12 Only) ............................................................... |
36 |
Menus, KEY ASGN, UPL ................................................................................................................... |
36 |
Menus, Key Opt Menu ....................................................................................................................... |
37 |
General Description .......................................................................................................................... |
37 |
Menus, KEY OPT, BTN LOCK (Button Lock) ................................................................................... |
37 |
Menus, KEY OPT, CHIME ................................................................................................................ |
37 |
Menus, KEY OPT, CLR OPT ............................................................................................................. |
38 |
Menus, KEY OPT, COPY .................................................................................................................. |
38 |
Menus, KEY OPT, EXCLUSIVE ........................................................................................................ |
38 |
Menus, KEY OPT, GROUP (1-4) ...................................................................................................... |
38 |
Menus, KEY OPT, LATCHING ......................................................................................................... |
39 |
Menus, KEY OPT, SOLO ................................................................................................................... |
39 |
Menus, SERVICE MENU .................................................................................................................. |
40 |
General Description .......................................................................................................................... |
40 |
Menus, SERVICE, DIMMER ............................................................................................................. |
40 |
Menus, SERVICE, FOOT SW (with GPI module ONLY) .................................................................. |
40 |
Menus, SERVICE, KEY TYPE ........................................................................................................... |
40 |
Menus, SERVICE, LOCK/UNLOCK ................................................................................................. |
40 |
Menus, SERVICE, MIC CTRL ........................................................................................................... |
41 |
Menus, SERVICE, MIC COMP ......................................................................................................... |
41 |
Menus, SERVICE, MIC GAIN ........................................................................................................... |
42 |
Menus, SERVICE, MOD ASGN ......................................................................................................... |
42 |
How MODS Work .............................................................................................................................. |
42 |
Procedure to Assign MODS .............................................................................................................. |
43 |
Using Multiple Expansion Panels (KP-12 Only) .............................................................................. |
44 |
Menus, SERVICE, MUTE LVL .......................................................................................................... |
44 |
Menus, SERVICE, OPTO-ISO (KP-12 with GPI Module Only) ....................................................... |
45 |
Menus, SERVICE, OUT CTRL .......................................................................................................... |
46 |
Menus, SERVICE, RESET ................................................................................................................. |
46 |
Menus, SERVICE, SAVE CFG .......................................................................................................... |
46 |
Menus, SERVICE, SET ADDR .......................................................................................................... |
46 |
Table |
|
of |
|
Contents |
|
Determining the Keypanel Address, CS9XXX Intercoms .................................................................. |
46 |
Determining the Keypanel Address, ADAM and ADAM CS Intercoms ............................................ |
46 |
Determining the Keypanel Address, Zeus Intercom Systems ............................................................ |
46 |
Menus, SERVICE, SIDETONE .......................................................................................................... |
47 |
Menus, SERVICE, TALLY ................................................................................................................. |
47 |
Menus, SERVICE, TEST PNL ............................................................................................................ |
47 |
Menus, SERVICE, TONE ................................................................................................................... |
48 |
Menus, SERVICE, USM (Unswitched Microphone, for |
|
KP-12 with Rear Connector Module Only) ....................................................................................... |
48 |
Appendix A |
|
KP-12 Audio Transmit Board Connections ............................................................................................. |
51 |
Appendix B |
|
Replacing the KP-12 Power Supply ......................................................................................................... |
53 |

READ ME FIRST
READ ME FIRST
This manual is designed for two basic types of users: 1) those who are not involved in the setup or maintenance of the keypanel, but simply want to use it to communicate; and 2) those who will use the advanced features to modify the keypanel’s operation and key assignments. The second type of user may also be the maintenance person and/or system administrator for the intercom system.
The first type of user should skip to “Basic Intercom Operation” on page 13. If you will also be using the optional telephone interface (with KP-12 only) refer to the information in “Telephone Operation” on page 15. Additionally, a few of the items in “Using the Top-Level Menu” on page 17 may be of interest.
The second type of user should become familiar with “Power-Up and Initial Settings” on page 9, as well as the basic operation. The advanced features are arranged in a system of menus accessible using the control labeled “SELECT” on the front panel. The entire menu structure is summarized in Table 1 on page 28, with references to the page numbers where you can find detailed information. Use this list as your starting point to become familiar with the advanced features. Be sure to also read any general information supplied at the start of each menu section. At first, the menu system might seem complicated, but navigation through it is actually quite basic, and experience has shown that users catch onto it fairly quick. From any given level, just turn the SELECT control to find the item that you want, then quickly press and release (tap) the control to select that item. For many items, brief instructions are given as you navigate. From any level in the menus, you can double-tap the SELECT control to exit to the next higher level.
1

2

CHAPTER 1
Menu List for DKP-8, DKP-12, and KP-12 Keypanels
TOP LEVEL MENU. With the MENU indicator OFF, turn the SELECT control to view the following items in the call waiting window.
MENU ITEM |
DESCRIPTION |
--- See “Top Level Menu, - - - - (Clear call |
Clear call waiting. Default condition of call waiting window. |
waiting)” on page 17. |
|
Call List See “Top Menu Level, Call List |
Up to 4 names that are not assigned to keys are saved for quick talk using SELECT control. |
Names” on page 18. |
|
DISPLAY Menu See “Top Level Menu, Display” on page 18. |
|
CHANS ON |
Displays a list of destinations that are currently communicating with the keypanel. |
EXCLUSIVE |
Displays keys assigned Exclusive rights. |
GROUP 1-4 |
Displays keys assigned to groups using GROUP feature on KEY OPT menu. |
KEY ICOM |
Displays intercom system to which each talk key is assigned. |
KEY TYPE |
Displays type of key assignment for all assigned talk keys (P-P, PL, IFB, etc.) |
LEVEL 2 |
Displays any level 2 talk key assignments. |
LISTEN |
Displays all listen key assignments |
PAGE USE |
Displays which setup pages are currently being used and where. |
PORT NUM |
Displays the intercom port number that the keypanel is connected to. |
SOLO |
Displays any keys that have the SOLO option assigned from the KEY OPT menu. |
VERSION |
Displays the firmware version for the keypanel. |
KEY LIST See “Top Level Menu, Level” on |
Gets a list of all keys that are assigned on any of the 4 setup pages for quick talk using the SELECT |
page 21. |
control. Only keys that are assigned will be displayed. |
LEVEL See “Top Level Menu, Level” on |
Lets you adjust the listen level for any key assigned to an intercom port or party line. |
page 21. |
|
LISTS See “Top Level Menu, Lists” on page 21. |
|
ICOM |
Appears only in trunked intercoms. Lets you log onto another intercom system. |
PL |
Accesses the party line list to talk using SELECT control when desired party line is not assigned |
|
to a key. |
IFB |
Accesses the IFB list for quick talk using SELECT control when desired IFB is not assigned to a |
|
key. |
IFSL |
Accesses the IFSL list to talk using SELECT control when desired IFSL is not assigned to a key. |
ISO |
Accesses the ISO list for quick talk using SELECT control when desired ISO is not assigned to a |
|
key. |
P-P |
Accesses the point-to-point list to talk using SELECT control when desired destination is not |
|
assigned to a key. |
RLY |
Accesses the intercom system’s list of relays to talk using SELECT control when desired relay is |
|
not assigned to a key. |
SPCL |
Accesses the special lists to talk using SELECT control when desired special list is not assigned |
|
to a key. |
UPL |
Access the intercom system’s list of UPL resources. |
MENUS See “Top Level Menu, Menus” on |
Accesses less often used features. (See,“MENU MODE See “Menu Mode” on page 27.” on page 4.) |
page 24. |
|
|
|
3

Menu List for DKP-8, DKP-12, and KP-12 Keypanels
PAGE 1-4 See “Top Level Menu, Page (1-4)” on page 24.
Changes setup pages on the keypanel or any connected expansion panels.
TGL LISN See “Top Level Menu, TGL LISN (Toggle Listen ON/OFF)” on page 25.
Lets you activate/deactivate a key’s listen assignment independently of talk. Only available on push button keypanels.
MENU MODE In the top level menu, tap See “Menu Mode” menus. Tap the SELECT on page 27.
SELECT on MENUS to turn on the MENU indicator. Then, turn SELECT to view the following control to select a menu to view items in that menu.
AUTODIAL Menu |
Stores autodial numbers for use by a phone or autodial key. |
KEY ASGN Menu |
|
AUTODIAL |
Assigns a key to dial a specific autodial number that was entered using the AUTODIAL menu, |
|
above. |
AUTOFUNC |
Assigns any of the available auto functions (also called special functions) to a key. |
CLEAR |
Clears talk/listen assignments. (Does not clear key options, see “CLR OPT” in KEY OPT menu. |
COPY |
Copies one key’s assignment to another key |
LISTS |
|
ICOM |
Accesses another intercom system for key assignment (trunked intercoms only). |
PL |
Accesses party line list for key assignment |
GRP |
Accesses group list for key assignment |
IFB |
Accesses IFB list for key assignment. |
ISO |
Accesses ISO list for key assignment. |
P-P |
Accesses point-to-point list for key assignment. |
RLY |
Accesses the intercom system’s list of relays for key assignment. |
SPCL |
Accesses special lists for key assignment. |
UPL |
Accesses UPL resources for key assignment. |
LOCAL I/O |
Assigns relays or open collector outputs to keys. (Appears only on KP-12 with GPI module |
|
options.) |
PHONE |
Assigns an all-purpose phone key for use with TIF Telephone Interface. |
REDIAL |
Assigns a redial key for use with a TIF Telephone Interface. |
KEY OPT Menu |
|
BTN LOCK |
Locks intercom keys in the ON or OFF position, or unlocks them. |
CHIME |
Adds a chime tone to an intercom key for incoming call announcement. |
CLR OPT |
Clears all options from a key. |
COPY |
Copies one key’s options to another key. |
EXCLUSIVE |
Assigns keys for use with the exclusive key option. |
GROUP 1-4 |
Assigns several keys for simultaneous activation when a group master key is activated. |
LATCHING |
Turns the latching feature ON or OFF for selected keys. |
SOLO |
Assigns a key that, while activated, will temporarily turn OFF all other active keys. |
SERVICE Menu |
|
DIMMER |
Adjusts brightness of displays. |
FOOT SW |
Enables or Disables the use of the foot switch. (Only available if the GPI board is installed) |
KEY TYPE |
Select push-button or lever style keys, whichever the keypanel has. |
LOCK |
Locks out access to all SERVICE menu items, and locks HDST / SPKR / PRGM selection. |
MIC CNTL |
Selects microphone input from either a headset, panel mic or from the EXT MIC IN connector. |
MIC COMP |
Adjusts the MIC compression of the audio source. |
MIC GAIN |
Adjusts the mic gain. |
MOD ASGN |
Defines which keys occupy which positions on the keypanel and expansion panels. |
MUTE LVL |
Adjusts the amount of listen muting when talk keys are activated. |
OPTO-ISO |
Assign opto-isolator inputs to actuate keys, pages, etc. (KP-12 with GPI module only.) See |
|
“Menus, SERVICE, OPTO-ISO (KP-12 with GPI Module Only)” on page 45. |
OUT CTRL |
Assigns whether you listen to audio through either HEADSET or SPEAKER |
RESET |
Clears all settings that are saved locally at the keypanel. |
SAVE CFG |
Saves all local settings. |
4
SET ADDR |
|
|
|
|
|
|
Sets the logical keypanel number, or keypanel address. |
||||||||||||||||||||||||||||
SIDETONE |
|
|
|
|
|
|
Adjusts the level of your own voice in headphones when talking. Also adjusts chime tone level. |
||||||||||||||||||||||||||||
TALLY |
|
|
|
|
|
|
Provides adjustable flashing indication for any destination that is communicating with the |
||||||||||||||||||||||||||||
|
|
|
|
|
|
|
|
|
|
|
keypanel. |
||||||||||||||||||||||||
TEST PNL |
|
|
|
|
|
|
Tests keys, controls and displays. |
||||||||||||||||||||||||||||
TONE |
|
|
|
|
|
|
Activates an internal tone generator. Used to test the talk and listen paths. |
||||||||||||||||||||||||||||
USM |
|
|
|
|
|
|
Activates hot mic to matrix and/or MIC PRE OUT connector of option Rear Connector Module. |
||||||||||||||||||||||||||||
|
|
|
|
|
|
|
|
|
|
|
|
|
|
|
|
|
|
|
|
|
|
|
|
|
|
|
|
|
|
|
|
|
|
|
|
|
|
|
|
|
|
|
|
|
|
|
|
|
|
|
|
|
|
|
|
|
|
|
|
|
|
|
|
|
|
|
|
|
|
|
|
|
|
|
|
|
|
|
|
|
|
|
|
|
|
|
|
|
|
|
|
|
|
|
|
|
|
|
|
|
|
|
|
|
|
|
|
|
|
|
|
|
|
|
|
|
|
|
|
|
|
|
|
|
|
|
|
|
|
|
|
|
|
|
|
|
|
|
|
|
|
|
|
|
|
|
|
|
|
|
|
|
|
|
|
|
|
|
|
|
|
|
|
|
|
|
|
|
|
|
|
|
|
|
|
|
|
|
|
|
|
|
|
|
|
|
|
|
|
|
|
|
|
|
|
|
|
|
|
|
|
|
|
|
|
|
|
|
|
|
|
|
|
|
|
|
|
|
|
|
|
|
|
|
|
|
|
|
|
|
|
|
|
|
|
|
|
|
|
|
|
|
|
|
|
|
|
|
|
|
|
|
|
|
|
|
|
|
|
|
|
|
|
|
|
|
|
|
|
|
|
|
|
|
|
|
|
|
|
|
|
|
|
|
|
|
|
|
|
|
|
|
|
|
|
|
|
|
|
|
|
|
|
|
|
|
|
|
|
|
|
|
|
|
|
|
|
|
|
|
|
|
|
|
|
|
|
|
|
|
|
|
|
|
|
|
|
|
|
|
|
|
|
|
|
|
|
|
|
|
|
|
|
|
|
|
|
|
|
|
|
|
|
|
|
|
|
|
|
|
|
|
|
|
|
|
|
|
|
|
|
|
|
|
|
|
|
|
|
|
|
|
|
|
|
|
|
|
|
|
|
|
|
|
|
|
|
|
|
|
|
|
|
|
|
|
|
|
|
|
|
|
|
|
|
|
|
|
|
|
|
|
|
|
|
|
|
|
|
|
|
|
|
|
|
|
|
|
|
|
|
|
|
|
|
|
|
|
|
|
|
|
|
|
|
|
|
|
|
|
|
|
|
|
|
|
|
|
|
|
|
|
|
|
|
|
|
|
|
|
|
|
|
|
|
|
|
|
|
|
|
|
|
|
|
|
|
|
|
|
|
|
|
|
|
|
|
|
|
|
|
|
|
|
|
|
|
|
|
|
|
|
|
|
|
|
|
|
|
|
|
|
|
|
|
|
|
|
|
|
|
|
|
|
|
|
|
|
|
|
|
|
|
|
|
|
|
|
|
|
|
|
|
|
|
|
|
|
|
|
|
|
|
|
|
|
|
|
|
|
|
|
|
|
|
|
|
|
|
|
|
|
|
|
|
|
|
|
|
|
|
|
|
|
|
|
|
|
|
|
|
|
|
|
|
|
|
|
|
|
|
|
|
|
|
|
|
|
|
|
|
|
|
|
|
|
|
|
|
|
|
|
|
|
|
|
|
|
|
|
|
|
|
|
|
|
|
|
|
|
|
|
|
|
|
|
|
|
|
|
|
|
|
|
|
|
|
|
|
|
|
|
|
|
|
|
|
|
|
|
|
|
|
|
|
|
|
|
|
|
|
|
|
|
|
|
|
|
|
|
|
|
|
|
|
|
|
|
|
|
|
|
|
|
|
|
|
|
|
|
|
|
|
|
|
|
|
|
|
|
|
|
|
|
|
|
|
|
|
|
|
|
|
|
|
|
|
|
|
|
|
|
|
|
|
|
|
|
|
|
|
|
|
|
|
|
|
|
|
|
|
|
|
|
|
|
|
|
|
|
|
|
|
|
|
|
|
|
|
|
|
|
|
|
|
|
|
|
|
|
|
|
|
|
|
|
|
|
|
|
|
|
|
|
|
|
|
|
|
|
|
|
|
|
|
|
|
|
|
|
|
|
|
|
|
|
|
|
|
|
|
|
|
|
|
|
|
|
|
|
|
|
|
|
|
|
|
|
|
|
|
|
|
|
|
|
|
|
|
|
|
|
|
|
|
|
|
|
|
|
|
|
|
|
|
|
|
|
|
|
|
|
|
|
|
|
|
|
|
|
|
|
|
|
|
|
|
|
|
|
|
|
|
|
|
|
|
|
|
|
|
|
|
|
|
|
|
|
|
|
|
|
|
|
|
|
|
|
|
|
|
|
|
|
|
|
|
|
|
|
|
|
|
|
|
|
|
|
|
|
|
|
|
|
|
|
|
|
|
|
|
|
|
|
|
|
|
|
|
|
|
|
|
|
|
|
|
|
|
|
|
|
|
|
|
|
|
|
|
|
|
|
|
|
|
|
|
|
|
|
|
|
|
|
|
|
|
|
|
|
|
|
|
|
|
|
|
|
|
|
|
|
|
|
|
|
|
|
|
|
|
|
|
|
|
|
|
|
|
|
|
|
|
|
|
|
|
|
|
|
|
|
|
|
|
|
|
|
|
|
|
|
|
|
|
|
|
|
|
|
|
|
|
|
|
|
|
|
|
|
|
|
|
|
|
|
|
|
|
|
|
|
|
|
|
|
|
|
|
|
|
|
|
|
|
|
|
|
|
|
|
|
|
|
|
|
|
|
|
|
|
|
|
|
|
|
|
|
|
|
|
|
|
|
|
|
|
|
|
|
|
|
|
|
|
|
|
|
|
|
|
|
|
|
|
|
|
|
|
|
|
|
|
|
|
|
|
|
|
|
|
|
|
|
|
|
|
|
|
|
|
|
|
|
|
|
|
|
|
|
|
|
|
|
|
|
|
|
|
|
|
|
|
|
|
|
|
|
|
|
|
|
|
|
|
|
|
|
|
|
|
|
|
|
|
|
|
|
|
|
|
|
|
|
|
|
|
|
|
|
|
|
|
|
|
|
|
|
|
|
|
|
|
|
|
|
|
|
|
|
|
|
|
|
|
|
|
|
|
|
|
|
|
|
|
|
|
|
|
|
|
|
|
|
|
|
|
|
|
|
|
|
|
|
|
|
|
|
|
|
|
|
|
|
|
|
|
|
|
|
|
|
|
|
|
|
|
|
|
|
|
|
|
|
|
|
|
|
|
|
|
|
|
|
|
|
|
|
|
|
|
|
|
|
|
|
|
|
|
|
|
|
|
|
|
|
|
|
|
|
|
|
|
|
|
|
|
|
|
|
|
|
|
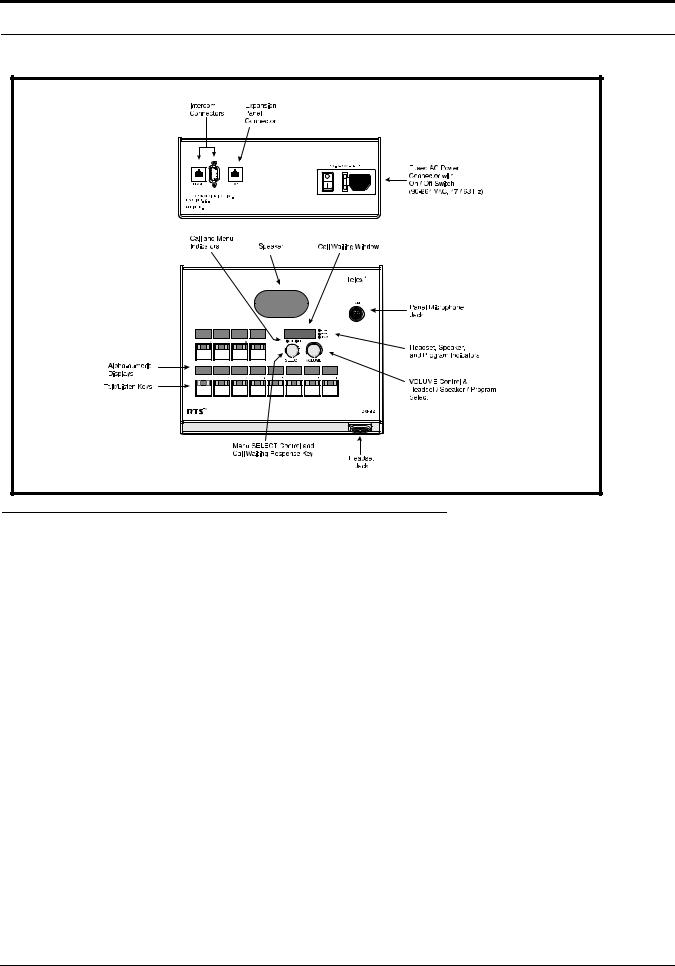
FIGURE 1. DKP-8 Keypanel Reference View (Push-button version shown)
•Although the DKP-8 has an expansion connector for connection of expansion panels and level control panels, this feature is generally not used, since the DKP-8 is a desktop unit, while expansion panels and level control panels are designed for rack mounting.
5
Menu List for DKP-8, DKP-12, and KP-12 Keypanels
FIGURE 2. DKP-12 Keypanel Reference View (Push-button version shown).
•Although the DKP-12 has an expansion connector for connection of expansion panel and level control panels, this feature is generally not used, since the DKP-12 is a desktop unit, while expansion panels and level control panels are designed for rack mounting.
6

FIGURE 3. KP-12 Keypanel Reference View (Push-button version shown).
7

Menu List for DKP-8, DKP-12, and KP-12 Keypanels
8

CHAPTER 2
Power-Up and Initial Settings
Applying Power
Versions with an AC power connector have a power switch on the back panel. Versions with an external power supply and DC power jack do not have a power switch: plug in the power supply to apply power.
“MD1”, “Key Type” and “Set Addr” Messages
•If the keypanel displays MD or KEY TYPE in the call waiting window at power-up, this indicates that service adjustments must be made before using the keypanel. To correct the MD1 service message, see “Menus, SERVICE, MOD ASGN” on page 42. To correct the KEY TYPE service message, see “Menus, SERVICE, KEY TYPE” on page 40.
Normally, when the keypanel is powered-up for the first time, the call waiting window will display SET ADDR. This means that you must set the address prior to first use of the keypanel. The address is based on the intercom port number to which the keypanel is connected as follows:
Determining the Address, CS9XXX Intercoms
For intercom port numbers ending in 1 through 9, the keypanel address is the last digit of the port number. If the last digit of the port number is 0, us 10 as the address.
Determining the Address, ADAM and ADAM CS Intercoms
Determine the keypanel’s address using Table 7 on page 49.
Determining the Address, Zeus Intercom Systems
The address is the number (1-8) printed next to the connector on the back panel of the Zeus Frame. (This number repeats for each group of 8 connectors. The intercom system is able to distinguish between two keypanels set to the same address by the group where each one is connected.)
NOTE: Cronus system and the AIO-16 card do not require you to set the address because they automatically set the address when installed into the system.
9

Power-Up and Initial Settings
Setting the Address
1.While SET ADDR is displayed, tap the SELECT control.
ADDR 1 will display in the call waiting window.
2.Turn the SELECT control to display the address (ADDR 1 through ADDR 10) that you determined above.
3.Tap the SELECT control.
While the address is being stored, the alphanumeric displays and the call waiting window will show asterisks (****). Then, the normal power-up indications will occur as described below. If you move the keypanel to a new port and need to change the address at a later time, see “Menus, SERVICE, SET ADDR” on page 46.
Power-Up Indications
After the correct keypanel address has been set, SET ADDR will no longer display at power-up. Instead, the following indications will be given:
Keypanel with Alphanumeric Displays
Alphanumeric Displays:
During a normal power-up, the alphanumeric displays will first show asterisks (****). After a few moments, the intercom key assignments will display. If the keypanel cannot establish communications with the intercom system, all alphanumeric displays will continue to show asterisks. Check the cable connection.
Unassigned Keys:
For each unassigned key, the display will show dashes (- - - -).
Keypanel without Alphanumeric Displays
The call waiting window will first display asterisks (****) then dashes (- - - -). If the keypanel cannot establish communications with the intercom system, the call waiting window will continue to show asterisks. Check the cable connection.
CALL / MENU Indicators
At power-up, the CALL and MENU indicators should be OFF.
HDST/SPKR/PGM volume indicator
At power-up, the selected Volume indicator is red, while the rest of them are green.
10

Specifications
Specifications
MICROPHONE PREAMPLIFIER
Audio Input Level (at 1kΩ)
Electret Mic: -42dBu, 5kΩ
Dynamic Mic: 50dBu, 150Ω
Output Level (to matrix): +8dBu, ±0.2dBu
Max Voltage Gain, Mic to Line: 70dB, ±0.2dB
Frequency Response: 100Hz to 8000 Hz, ±3dB
TEST OSCILLATOR
Output Level (to matrix): +8dBu, ±2dBu
Output Frequency: 400Hz
HEADPHONE AMPLIFIER
Maximum Voltage Gain: 30dB
Frequency Response: 100Hz to 8000Hz, ±3dB
Headphone Impedance: 50 to 600Ω
Output Power: 150mW into 50Ω
Output Voltage Level: 8 volts peak-to-peak (max.)
Mute:
Full: 70dB min.
Partial: 0 to 30dB
Sidetone Range: 30dB
SPEAKER AMPLIFIER AND SPEAKER
Frequency Response: 100Hz to 8000Hz, ±3dB
Output Power (per amplifier): 5 watts into 4Ω
Output Voltage Level: 16 volts peak-to-peak (max.)
Volume Control Range: 70dB
Mute:
Full: 70dB min
Partial: 6dB. 0 to 30 dB adjustable
Speaker: 2 watts continuous, 4 watts peak
INTERCOM LINE INPUT/OUTPUT
Main Output: Nominal +8dBu, ±0.2dBu
Main Input: Nominal +8dBu, Peak: ±20dBu max.
External Line Input: Nominal +8dBu
GENERAL
Input Power Requirements:
AC Supply: 90-230 VAC ±10%, 50/60Hz
Environmental
Storage: -40°C to +60°C (-40°F - 140°F)
Operating: -10°C to +41°C (14°F - 105.8°F)
Dimensions:
8.156” W x 4.94” H x 9” D (207.16 mm x 125.48mm x 228.6mm)
Weight:
3.84 lbs. (1.74 kg)
11

Power-Up and Initial Settings
12
CHAPTER 3
Basic Intercom Operation
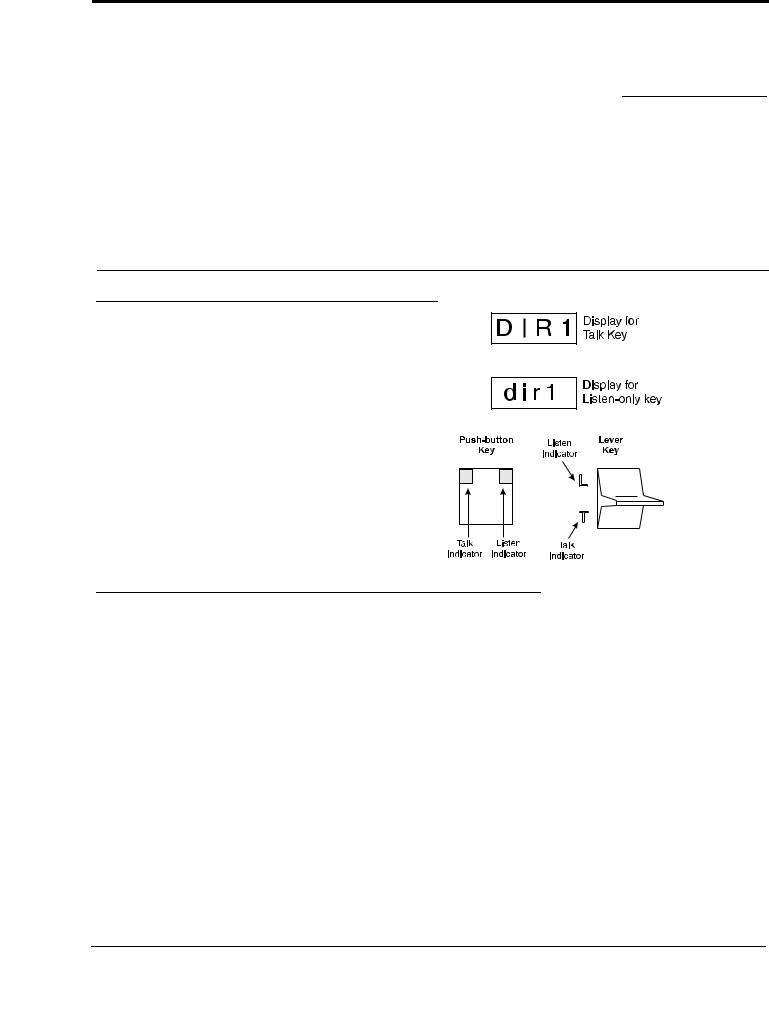
Keys and Displays
• Keys that are assigned for talk or talk+listen are indicated using UPPER CASE letters in the alphanumeric displays above the keys.
• Keys that are assigned for listen-only are indicated using lower case letters.
• For momentary activation of a key press and hold the key. Then, release it when finished.
• For latching operation, tap the key; it will turn ON and remain ON. Tap the key again to turn it OFF when finished.
NOTE: For lever keys only: You can independently activate talk and listen by tapping up or down.
Talk and Listen Indicators
The talk and/or listen indicators turn green when a key is activated, depending on the key’s assignment. For example, if the key is assigned for talk, but not for listen, only the talk indicator will turn green when the key is pressed; if the key is assigned for talk + auto-listen, both indicators will turn green when the key is activated. If there is no key assignment, they will not activate.
The talk indicator also provides some other indications, as follows:
Continuous red “in use” indication: an “in-use” indication is provided for IFB and ISO keys. An “in-use” indication is also provided for keys that are assigned to destinations in remote intercom systems (when your intercom system is equipped with optional trunking). If another keypanel is currently talking to any of these destinations, and you have a key assigned to the same destination, the talk indicator in that key will light red to indicate “in-use”. If you activate the key and it turns continuous green, this indicated that you and the other keypanel operator are both talking to the destination. If the indicator flashes green when a key is activated for an IFB or a remote destination, this indicates that the other keypanel has a higher priority and you cannot talk to that destination at the current time.
Red flashing “incoming call” indication: If the talk indicator in a key starts to flash red, this indicates that the destination assigned to that key is calling you. Activate the key as described above to talk back.
13
 Loading...