

Page 1

1
INTRODUCTION
Congratulations on the purchase of your new Royal CS300 Time Management System. The CS300 is a
full-featured, electronic clock that includes everything needed to efficiently keep track of the times of all of
your employees. We recommend that you read this manual carefully to become familiar with the operation
of the product. The manual explains, in simple steps, how to program, operate, and maintain your new
Time Clock. Please retain this guide for further reference.
If you have questions regarding the CS300 set-up or operation, please call the Royal Customer Service
Department, toll-free, at 1-800-272-6229 (or call +1-732-563-9944). In Canada please call 1-888-266-
9380.
FEATURES
REUSABLE EMPLOYEE BADGE/CARDS
BUILT-IN 80 COLUMN INTERNAL THERMAL PRINTER
AUTOMATICALLY TOTALS EMPLOYEE WORK HOURS (INCLUDING OVERTIME)
AUTOMATIC MEAL DEDUCTION OPTION
INTERNAL CALENDAR AUTOMATICALLY ADJUSTS FOR NUMBER OF DAYS IN THE MONTH
AND LEAP YEAR, INCLUDING DAYLIGHT SAVINGS TIME
WEEKLY, BI-WEEKLY, BI-MONTHLY, AND MONTHLY PAY PERIODS
STAND ALONE UNIT (NO PC REQUIRED)
INTERNAL BATTERY BACK-UP PROTECTION SAVES PROGRAM SETTINGS AND EMPLOYEE
DATA DURING POWER FAILURE
WALL OR TABLE TOP INSTALLATION
FOR BUSINESSES WITH UP TO 100 EMPLOYEES
RS232 INTERFACE ALLOWS DATA TO BE EXPORTED TO A PC.
Y 2 K COMPLIANT
Page 2

2
PARTS LIST
Remember to save your sales receipt in case you need warranty service, and make sure your CS300
includes the items listed below:
CS300 Time Clock
Two Keys
50 reusable Royal magnetically encoded employee badges
1 Roll of 80mm thermal paper
Wall-Mounting Screws and Mounting Bracket
Instruction Manual
Table Top Stand
RS232 Cable
Quick Start Training CD ROM
Tools Required:
Standard Philips head Screw Driver
UNPACKING AND SETUP
Before plugging the CS300 into the electrical outlet remove all packing materials and
tape and especially the printer packing guard from the printer.
BATTERY BACK-UP
The CS300 is equipped with a battery back-up system that protects time, date, employee data and
program settings during a power outage. The time clock must be plugged in for a minimum of 30 minutes
before programming to charge the back-up battery. The battery should be fully charged after being
plugged in for 24 hours. In the event of a power failure the data in the CS300 will be retained and
employees will still be able to swipe their cards normally for a maximum of 2 days. This back-up battery
will retain the memory of the employees’ data for 2 to 3 weeks. To conserve battery power during a power
outage reports will not be printable due to the amount of power required to print. After power has been
restored full usage of the CS300 will again be available. If there is an extended power outage the clock
may not register the correct time and may require resetting since battery power will be used primarily to
conserve the employee data. The battery back-up is rechargeable, with an expected life of a maximum of
5 years. The back-up battery is not user replaceable and must be done by an authorized service
technician.
Make sure you have an appropriate AC power source near the place you’ve chosen to install the CS300.
Royal offers a complete line of accessories for your clock – including replacement thermal paper and
replacement magnetic badges – to make replacement of parts quick, safe, and inexpensive. To reorder
supplies call the Royal Supply Center toll-free at 1-888-261-4555.
Page 3

3
SPECIFICATIONS AND SAFETY INSTRUCTIONS
Always follow basic safety precautions when using this product to reduce risk of injury, fire, or electric
shock.
1. Read and understand all instructions in the owner’s manual.
2. Do not install the CS300 in places subject to high humidity and excessive dust, in areas exposed to
direct sunlight or in places subject to temperatures below 32°F (0°C) or above 104°F (40°C) and
allow for good ventilation. Do not block the fan ventilation exhaust.
3. Unplug this product from wall outlets before cleaning.
4. Do not use this product near water or when you are wet. If the product comes in contact with any
liquids, unplug the line cord immediately. Do not plug the product back in until it has been dried
thoroughly.
5. Install the product securely on a stable, level surface.
6. If wall mounting the time clock, locate on a straight wall and please follow the mounting instructions to
install securely.
7. Install this product in a protected location where no one can step on or trip over the cord. Do not
place objects on the cord that may cause damage or abrasion.
8. If this product does not operate normally, see the Maintenance & Troubleshooting section of this
publication. If you cannot resolve the problem, or if the product is damaged, refer to the Warranty
section of this publication.
NOTE: Since the cards are magnetically encoded, do not locate them or the clock near a strong magnetic
field or any source of electro-magnetic energy.
SAVE THESE INSTRUCTIONS
SPECIFICATIONS
MODEL: CS300
TYPE: ELECTRONIC TIME CLOCK
DISPLAY: BACKLIT LCD. 3 LINES
PRINTER: 80-COLUMN THERMAL, PANASONIC MODEL EPT2144S3HP
MEMORY BATTERY: UP TO 21 DAYS AFTER POWER INTERRUPTION
TOTAL RAM: 1 MB
POWER CONSUMPTION: STANDBY – 1.5-2W .06A, OPERATING - 9W .07A
OPERATING TEMPERATURE: 0-40 DEGREES CENTIGRADE – 32-104
DEGREES FAHRENHEIT
DIMENSIONS: 12” x 3 ¾” x 6 ¾”
WEIGHT: 7 LBS.
Page 4
4
IMPORTANT: DO NOT PLUG THE CS300 INTO AN ELECTRICAL
OPENING THE COVER
OUTLET UNTIL THE PRINTER PACKING MATERIAL IS REMOVED.
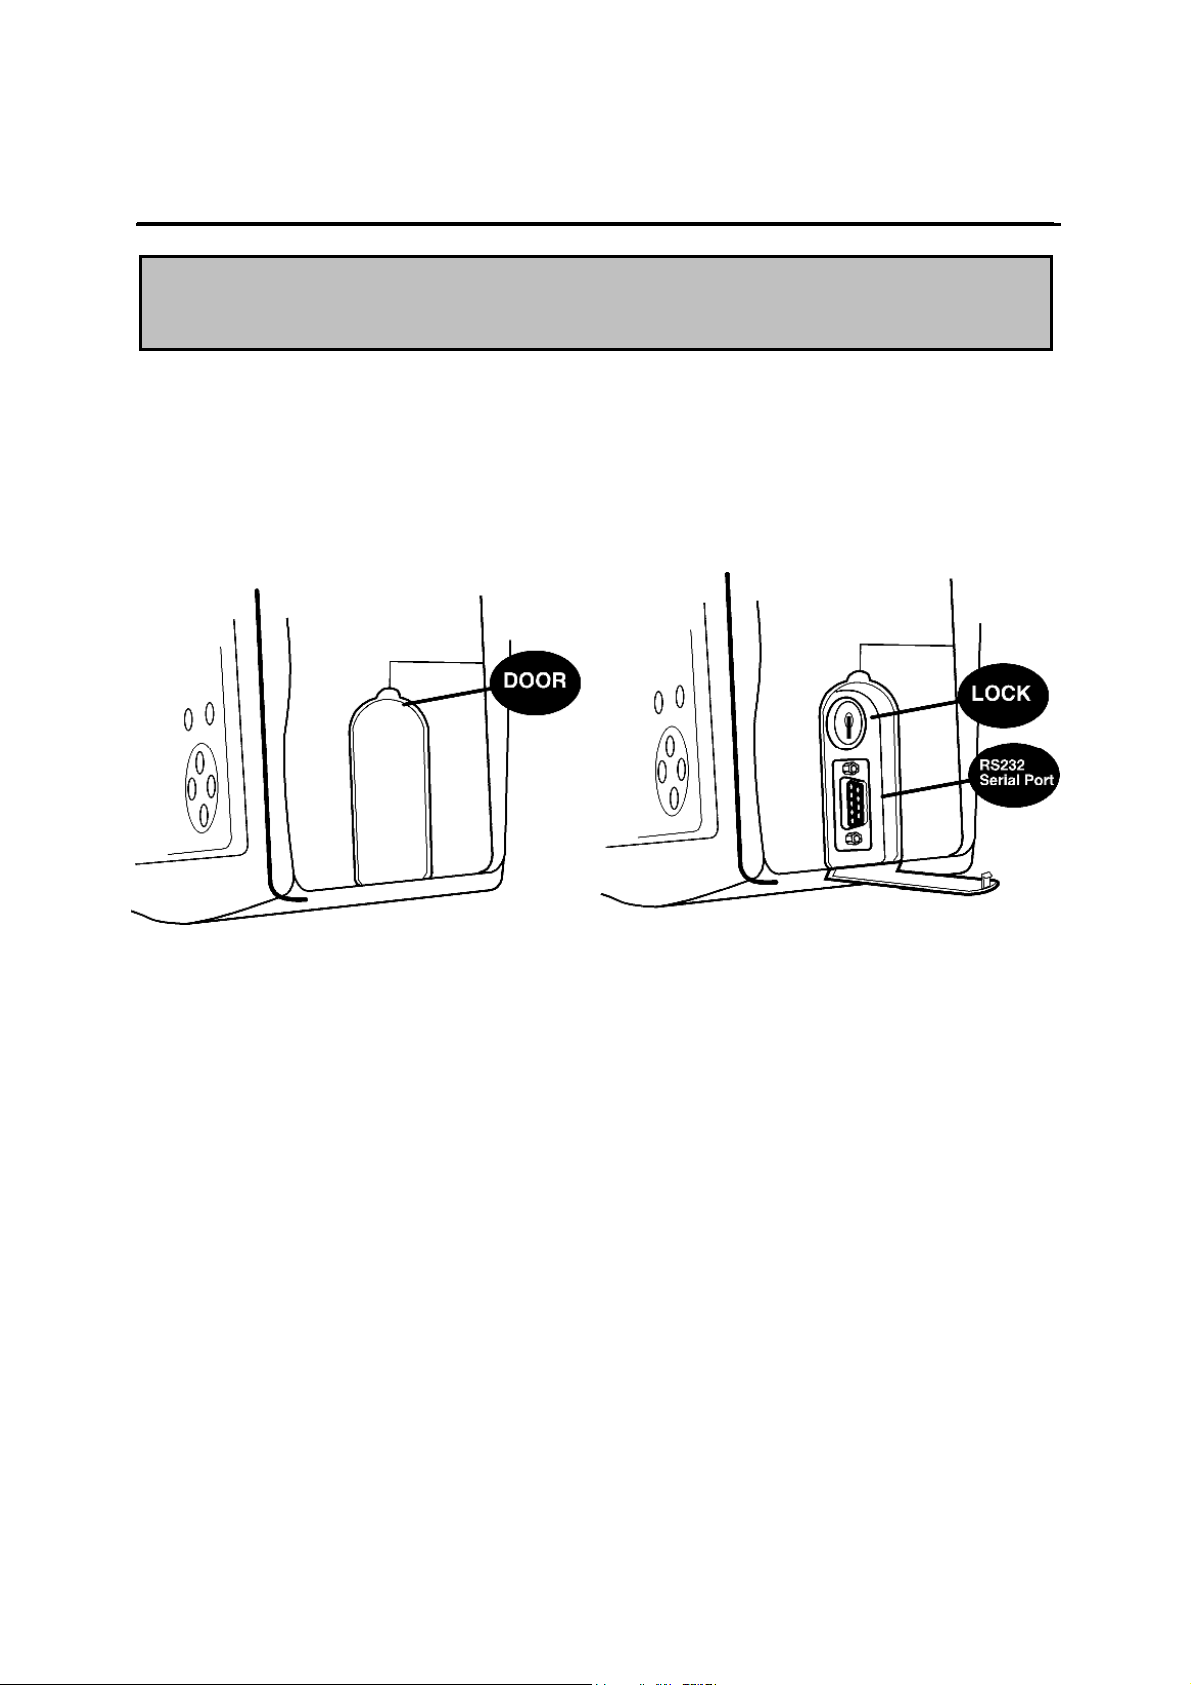
To release the front cover open the lock cover located on the right side of the CS300 behind the badge
reader. Insert the key into the lock and turn the key to the right. The front cover will release. To re-lock the
cover press the cover closed and turn the key to the locked position.
Page 5
5
Note: Use
only
thermal paper in your clock. Use of plain bond paper will not produce
LOADING THE PAPER
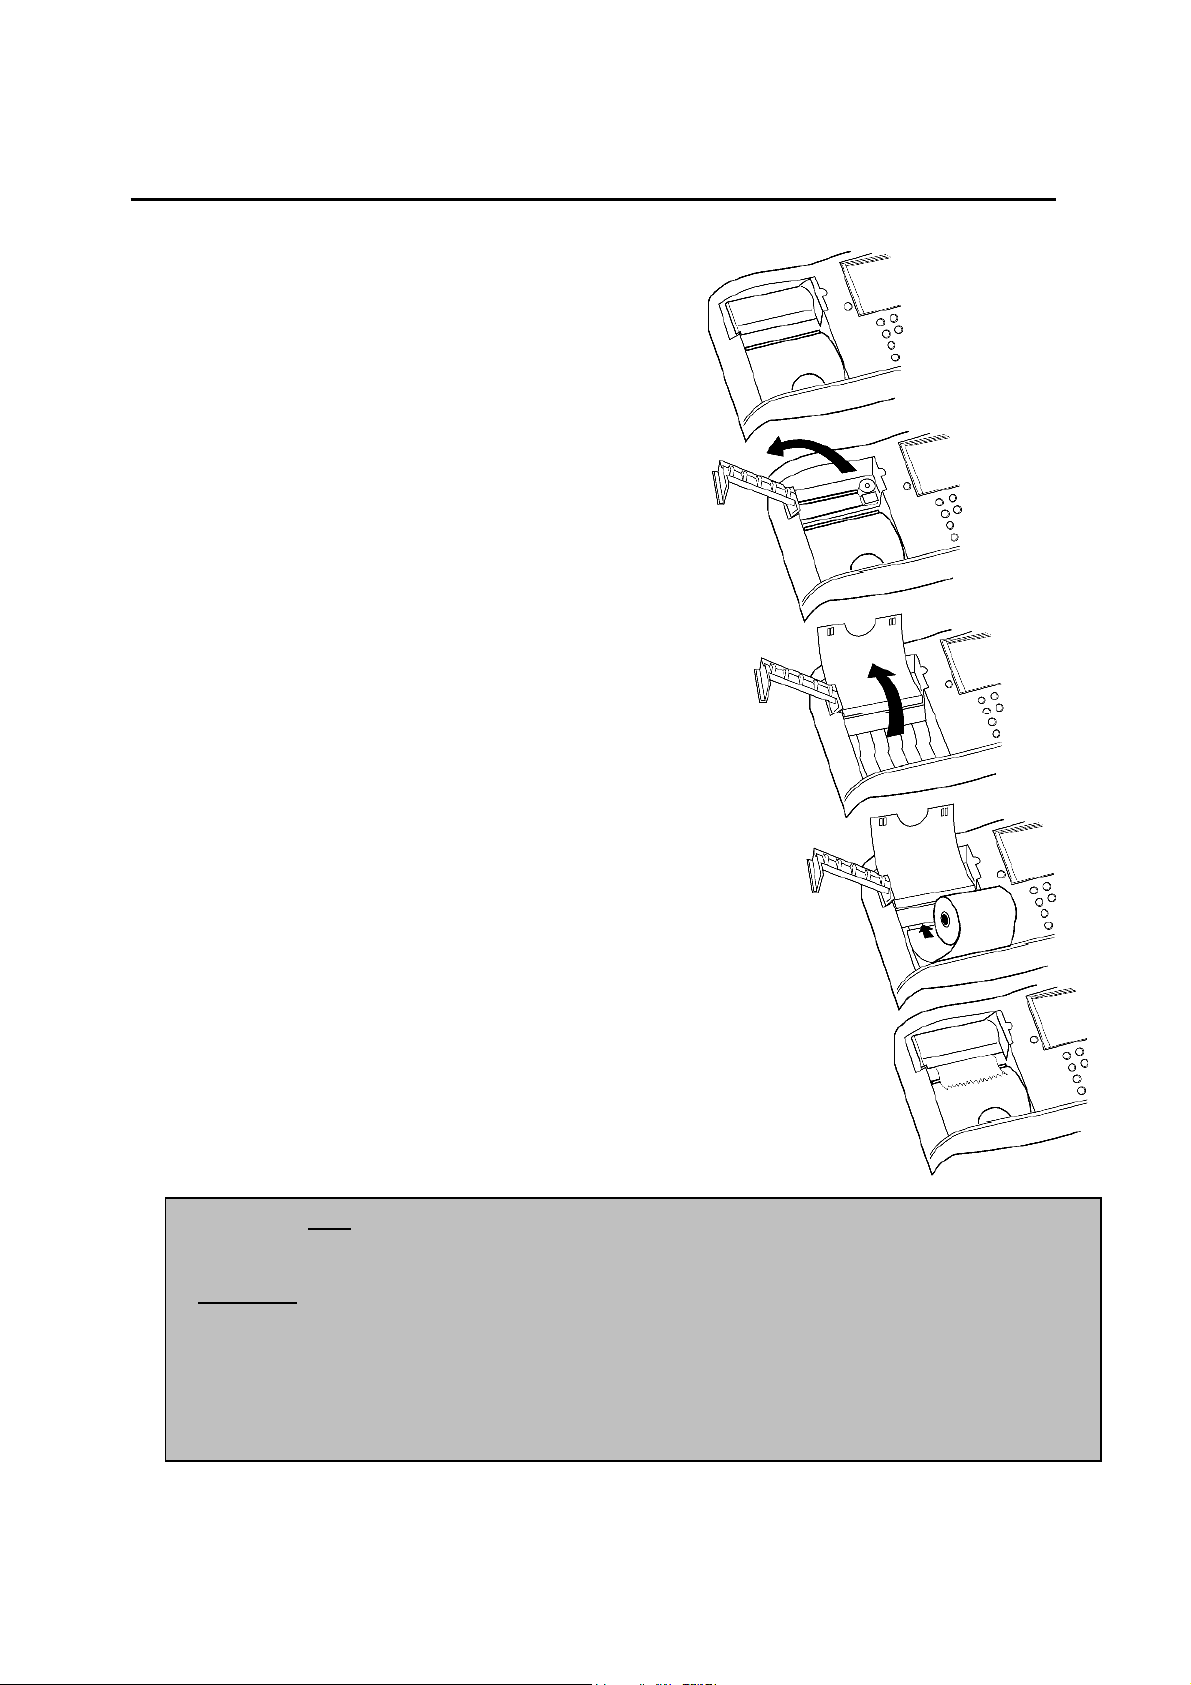
HOW TO LOAD THE PAPER
1. Unlock and open the front cover of the time clock.
(See page 4)
2. Grasp the tab on the printer cover and gently pull
it open in the direction of the arrow.
3. Remove the protective retaining tab from the
printer and discard. This is to prevent any
damage to the printer during shipment.
4. Cut the end of the paper roll evenly for a straight
edge to permit proper feeding through the print
head.
5. Lift the paper guard and place the paper roll in
the paper nest so that the paper will feed out
from the bottom of the roll and towards the rear of
the clock.
6. Gently push the paper upward into the paper slot
and press the paper feed key [FEED] until the
paper catches and advances from the print head.
Release the paper guard. Feed about two inches
of paper and then close the printer cover.
7. When the paper is near the end of the roll a
colored stripe will appear on the edge of the roll
to warn that you are near the end of the paper
and when the paper is out a sensor will stop the
printer but not disable the CS300.
any print and will damage the print head and void your warranty.
Important:
Due to the inherent qualities of thermal paper there may be a tendency of the
print to lighten over time due to temperature, humidity, light, etc. The amount of
time for this to occur will be determined by the environment of the storage area.
If the reports are intended to be kept as employment records over an extended
period of time a photocopy of the printed reports is recommended.
Page 6
6
[ FEED ]
-
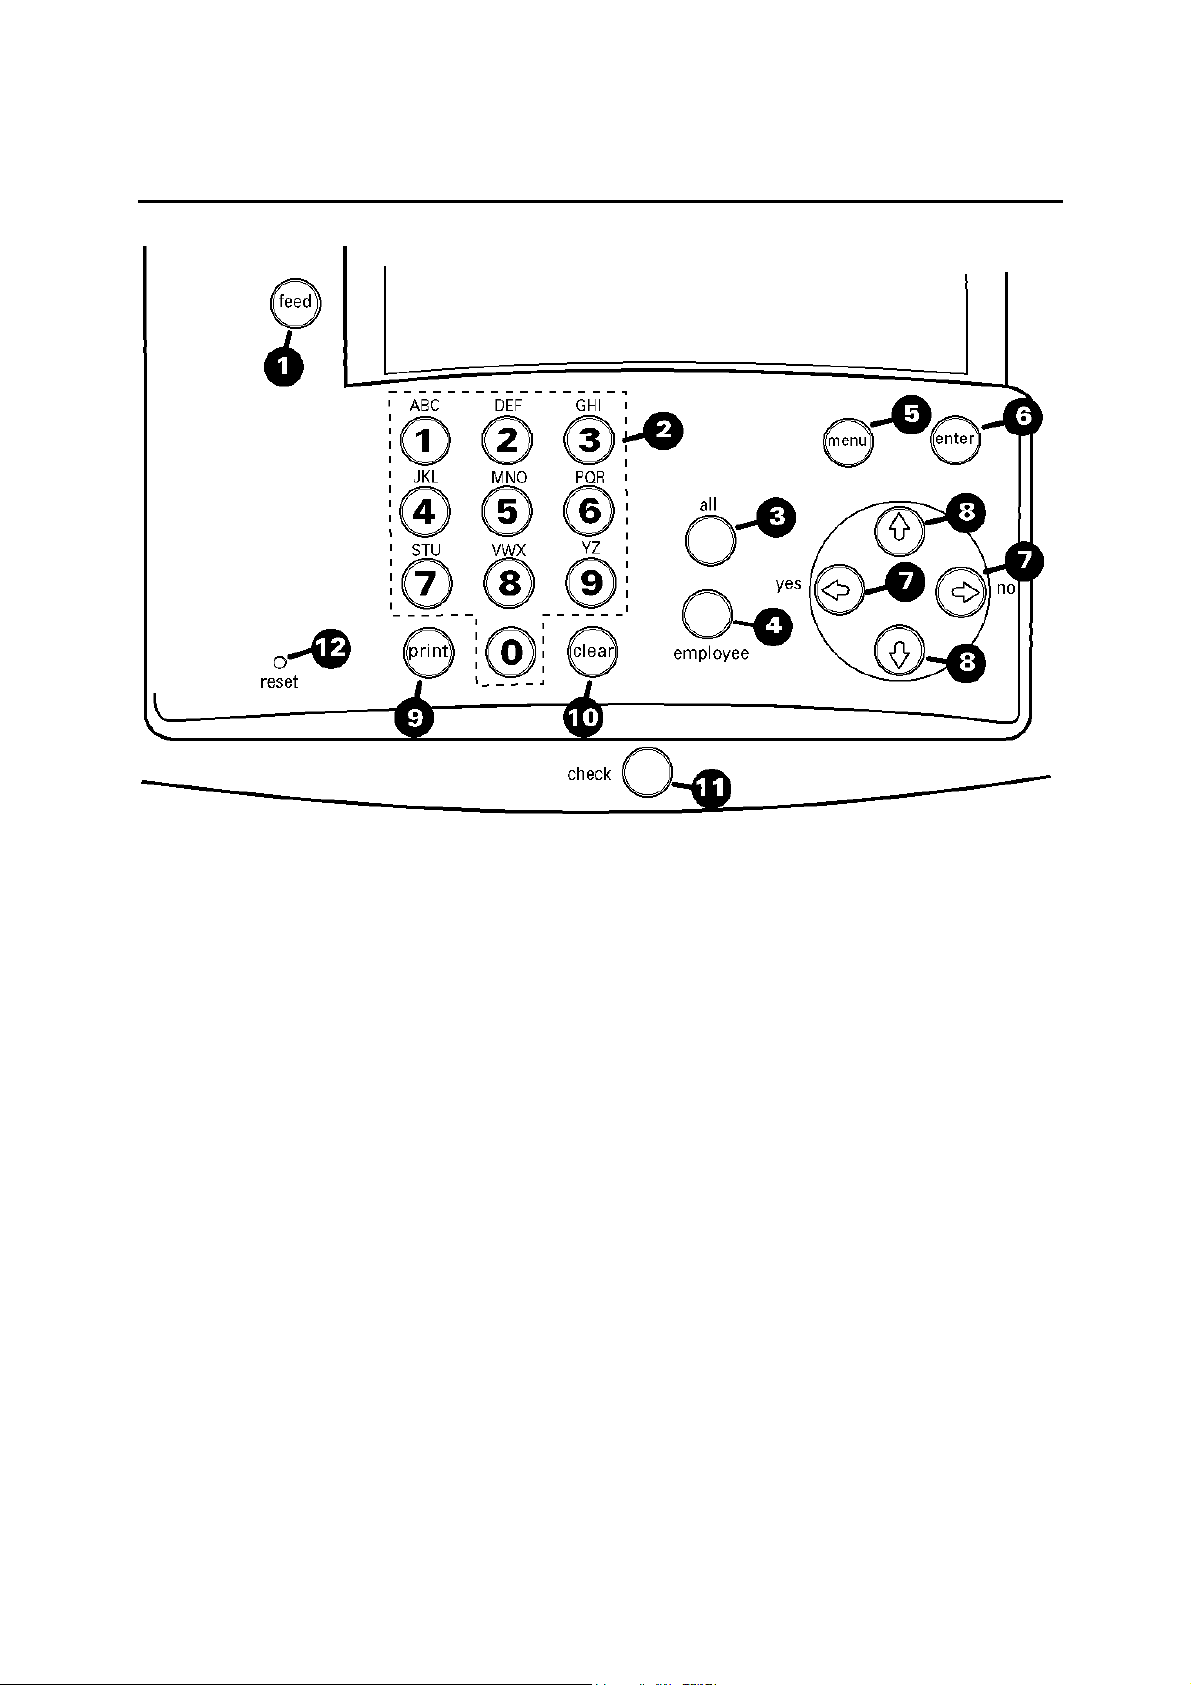
KEYPAD CONTROLS
1.
2. [ KEYPAD (1-0) ] – The key pad is used to enter alpha or numeric data into the CS300, such as
Names, Dates, Hours, etc.
3. [ ALL ] – This key is used to select all employees during setup or when selecting a report.
4. [ EMPLOYEE ] – This key is used to select an individual employee during setup or when selecting a
report.
5. [ MENU ] – This key is used to select any of the functions of the CS300.
6. [ ENTER ] – This key is used to confirm selections made in the MENU.
7. [ YES () LEFT or NO () RIGHT ] – These keys are used to select a yes or no answer or to move
the cursor to another position during data entry.
8. [ UP () or DOWN () ] – These keys are used to make selections during data entry.
9. [ PRINT ] – This key is used to temporarily override the serial port if the internal printer is desired.
10. [ CLEAR ] – This key is used to clear errors. It can also be used to stop the CS300 during printing or
transmitting to a PC.
11. [ CHECK ] – This key is used by an employee to check the total number of hours worked during the
current pay period. This key can also be used to step backwards within a menu.
12. [ RESET ] – Reset button to reset clock data.
This key is used to manually feed paper through the printer.
Page 7
7
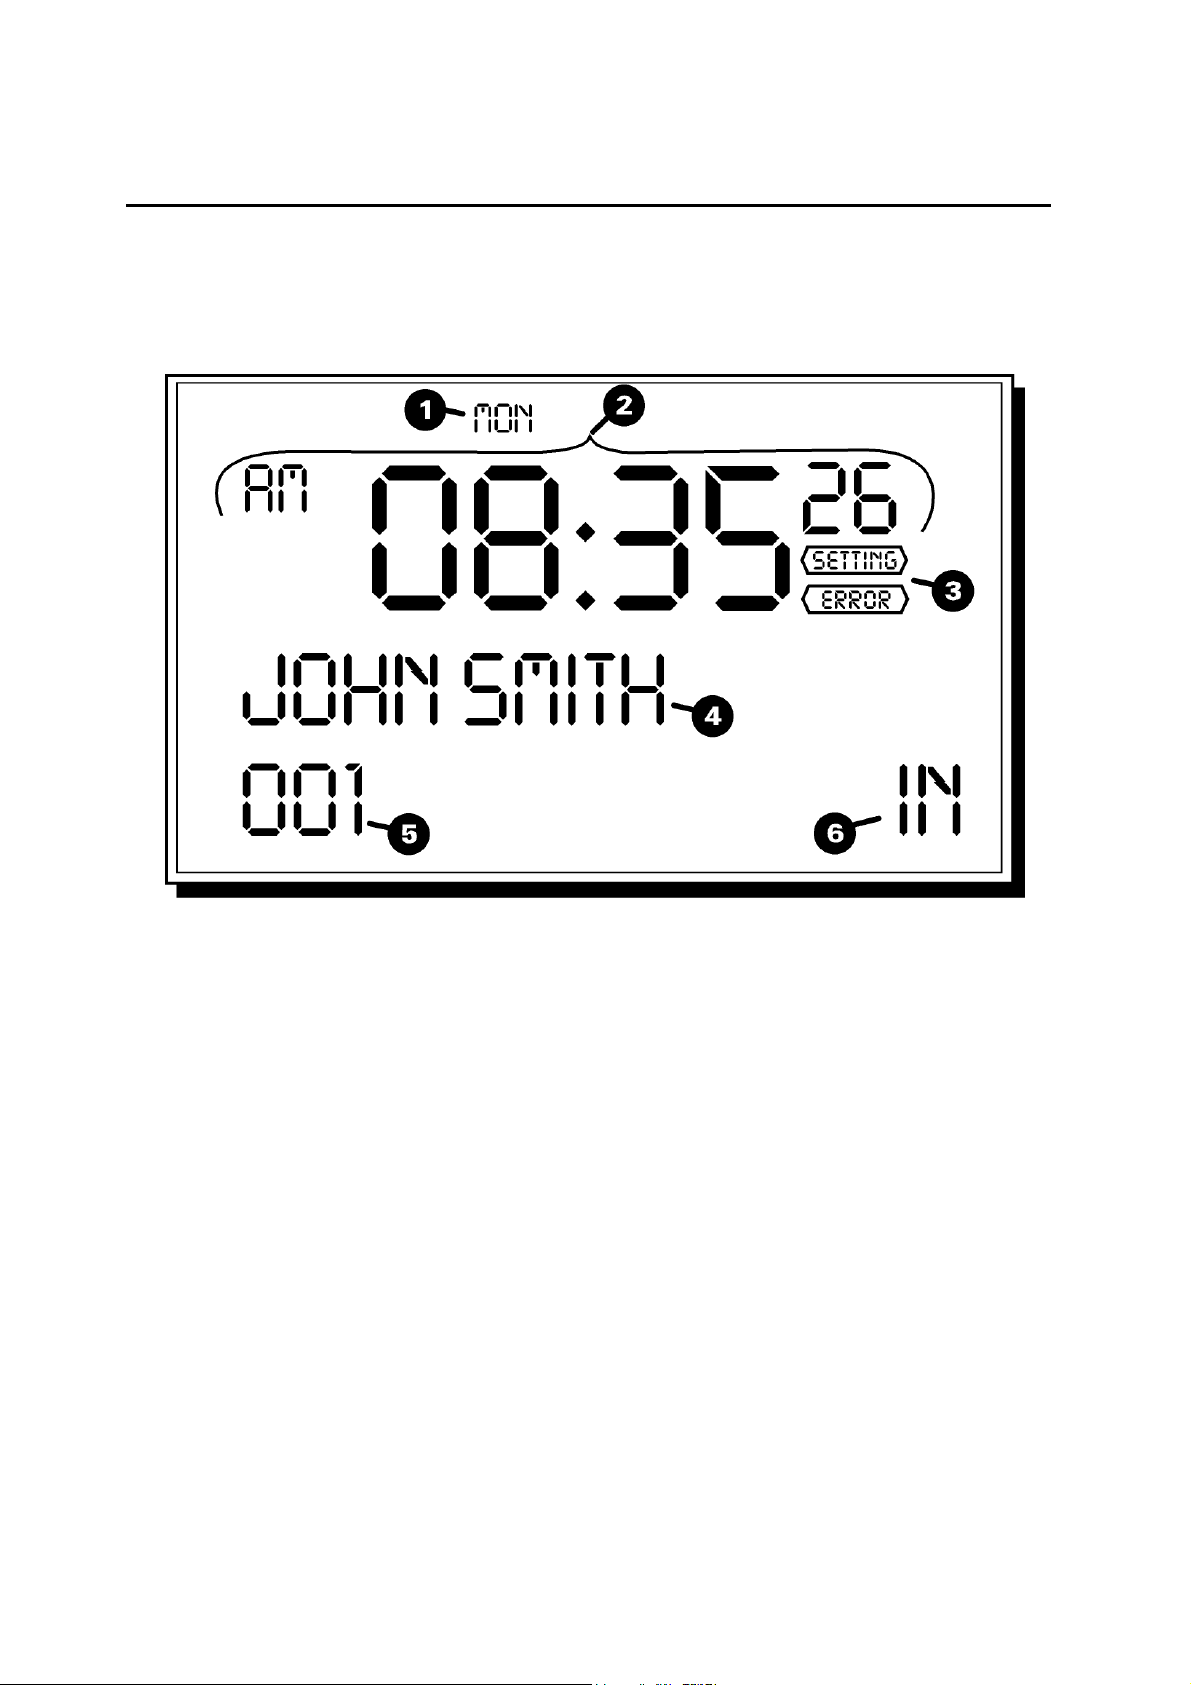
DISPLAY
Your time clock has a three line LCD display for easy viewing. The current day and time (hour, minute,
second) are displayed when the time clock is not in use. When an employee swipes a card the display will
show the employee’s name and badge number as well as the clock in and out time.
1. CURRENT DAY OF THE WEEK
2. CURRENT TIME (12 OR 24 HOUR MODES)
3. ERROR INDICATOR
4. EMPLOYEE NAME
5. EMPLOYEE BADGE NUMBER
6. EMPLOYEE PUNCH STATUS
Page 8
8
HOW TO USE THE CS300
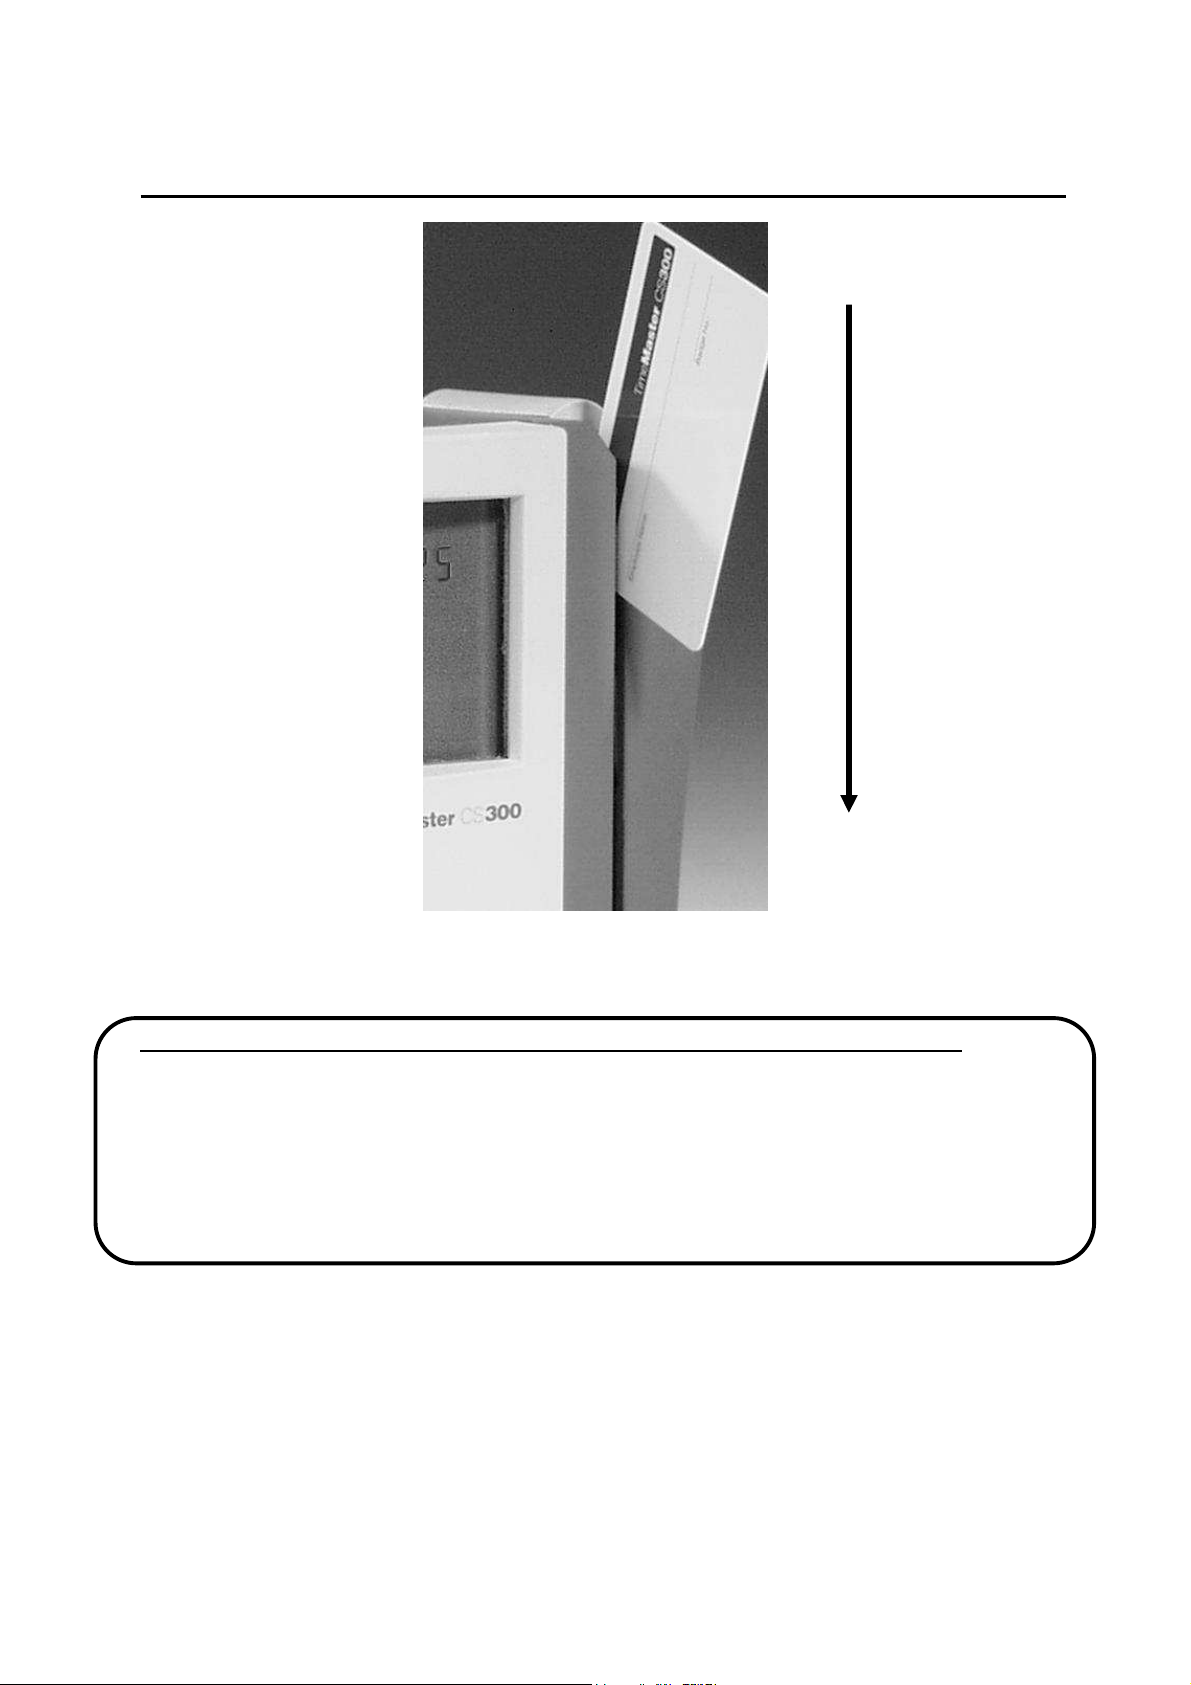
With the black, magnetic stripe on the back of the employee badge card facing towards the clock and to
the right (the magnetic stripe should be on the side of the badge card facing AWAY from the time clock
display) smoothly slide the card through the entire length of the slot from top to bottom.
IMPORTANT NOTE
The badge card must be swiped through the slot in the time clock completely flat, with the magnetic stripe
facing the right direction. The card must be swiped at a slow, steady, and consistent pace. The card
should start at the edge of the slot at the very top of the time clock, as pictured above, and be swiped or
slid down the entire length of the slot in the time clock, to the bottom of the time clock. Do NOT flick the
card through the slot.
The time clock will not read the swipe of the badge card if it is swiped through the time clock too slow, too
fast, at an angle, only partially swiped through the reader mechanism, or flicked through the slot and not
slid through flat.
If the pass is successful the name and badge number of the employee and the current clock in or out time
will be displayed. If there is an error or the clock cannot recognize the badge an error will appear
instructing the user to retry the swipe.
If you are unsure if the swipe was successful do not swipe again. Press the [CHECK] button and then
swipe the card. The display will show the date and time of the last swipe. This will prevent clocking in and
out at the same time.
- HOW TO CORRECTLY SWIPE THE BADGE CARD:
Page 9

9
Items
that are of particular interest or that may affect the operation of the clock are highlighted
If an employee fails to punch out at the end of the shift the CS300 will display “ERROR” at the next punch
to alert the supervisor that a manual punch must be inserted in the employee’s punch data for that pay
period.
USING THIS MANUAL
The procedure to enter data for each menu item is as follows:
EXAMPLE 1: To enter a name or number press the alphanumeric key labeled with the character you
want. Each time you press the key, the next character labeled on the key appears in the display. When
the character you want appears, press the RIGHT arrow () key to the next position to the right. Select
the next character you want in the same manner. If a mistake is made press the LEFT () or RIGHT ()
arrow key to the error and select the correct entry. When you are finished with each menu item press
[ENTER] to confirm.
EXAMPLE 1: (DATA ENTRY)
LAST NAME: SMIT_
Example 2: If the menu item is multiple selection press the required LEFT () or RIGHT () or [UP] ()
or [DOWN] () arrow until the desired option is blinking and then press the [ENTER] key.
EXAMPLE 2: (MULTIPLE CHOICE)
PAY PERIOD LENGTH: W—BW—BM--M
EXAMPLE 3: If the menu item requires a Yes or No selection press the [YES] or [NO] key or press the
LEFT () or RIGHT () arrow until the desired option is blinking and then press [ENTER].
EXAMPLE 3: (YES or NO)
AUTO DEDUCT LUNCH: Y/N
• If the menu item is optional or does not apply you may press the
[ENTER]
key to the next menu item.
• Settings that are entry points are in BOLD and UNDERLINED
• For example: LAST NAME ____________
• Keys that are used for data entry or are used to move through the menu are BOLDED and in
brackets. For example: Press [MENU]
NOTE: Depending on the choices made during setup not all of the prompts listed
will appear. Settings that do not apply to the particular choice selected will be
skipped and/or replaced by other choices. The menus shown in this manual will
include all of the prompts for each menu described.
in a shaded box.
Page 10

10
PRINT:
Y/N
SET UP INSTRUCTIONS
SETUP
DATE: _________________________
DATE FORMAT: MM/DD/YY-DD/MM/YY
TIME: _________________________
TIME FORMAT: 12/24 HR
DST SELECTION: ON/OFF
DST START DATE: _________________________
DST END DATE: _________________________
SHIFT GRACE: 5-6-10-15
ROUNDING: 5-6-10-15
PASSWORD USAGE: DISABLE/ENABLE
EMPLOYEE CHECK: ENABLE/DISABLE
OUTPUT DEVICE: PRINTER/SERIAL PORT
REVIEW: Y/N
If you wish to experiment with the settings of the CS300 to familiarize yourself
with its capabilities, it is strongly recommended that afterward you reset all
settings to their defaults as described on page 28 before putting into use. After
the reset, begin to program with the current date and time as well as the other
items listed below.
These are the general settings that will normally apply to all employees.
1. Press the [ MENU ] key. If a password has been programmed enter the password and press
[ENTER]. If no password has been programmed go to step 2.
2. Press the [UP] () or [DOWN] () arrow to SETUP and press [ENTER].
3. DATE - Using the LEFT () or RIGHT () arrows and the numeric keys enter the current date and
press [ENTER].
4. DATE FORMAT – Using the LEFT () or RIGHT () arrows select the format you wish to use and
press [ENTER]. The choices are MONTH/DAY/YEAR or DAY/MONTH/YEAR.
5. TIME – Using the LEFT () or RIGHT () arrows and the numeric keys enter the current time and
press [ENTER].
6. TIME FORMAT - Using the LEFT () or RIGHT () arrows select the time format desired and press
[ENTER]. The choices are 12 or 24 Hours.
7. DST SELECTION – Using the LEFT () or RIGHT () arrow keys select whether or not you wish to
have Daylight Savings Time enabled or disabled and press [ENTER]. Enabled means that the CS300
will automatically adjust the time at the beginning and end of daylight savings time.
8. DST START DATE – Enter the starting date of daylight savings time and press [ENTER]. Currently
under US law it is the first Sunday in April at 2:00 AM. This date must be reset each year.
9. DST END DATE - Enter the ending date of daylight savings time and press [ENTER]. Currently under
US law it is the last Sunday in October at 2:00AM. This date must be reset each year.
Page 11

11
Page 12

12
NOTE
: Once the Date and Time are set it is important not to change these items.
SET UP INSTRUCTIONS (continued)
10. SHIFT GRACE – This is the number of minutes after the shift starting time or before the shift ending
time that an employee may punch in late or out early and the punches will be treated as if they had
punched at the correct time. The choices are 5-6-10-15 minutes. Using the LEFT () or RIGHT ()
arrows select the number of minutes desired and press [ENTER].
11. ROUNDING – This is the number of minutes before the shift start time or after the shift ending time
during which the employee punches will be treated as though they had occurred exactly on the start
and stop times. Using the LEFT () or RIGHT () arrows select the number of minutes desired and
press [ENTER].
12. PASSWORD USAGE – This is an optional setting. If you wish to activate the password feature you
must enter the password every time you wish to access the menu. You may enter up to six (6) digits
for a password, and then press [ENTER]. You will then be asked to reenter the password to verify the
correct entry.
IMPORTANT: The password will be displayed in the form of asterisks (*)
during the entry. It will NOT be printed on any of the reports. The setup
report will only indicate that the password feature is enabled. If you
forget the password the CS300 will not allow you to enter the menu.
The ONLY way to disable the password in this situation is to reset the
password portion of the clock or the Setup portion. The Setup
information will have to be reentered as it was originally entered and
may affect the employee totals since the time in the clock will be reset
13. EMPLOYEE CHECK - The CS300 has an external button located at the lower front of the time clock
just below the white front cover. This button is the “[CHECK]” button that allows an employee to
check the number of hours he has worked during the current pay period. The employee presses the
[CHECK] button and then swipes his card as he would to clock in or out and the display will show the
employee name and the total number of hours worked, both regular and overtime hours, during the
current pay period. About 5 seconds after the key has been pressed the display will return to the
normal swipe mode. If you wish to make this feature available press the [YES] () key or [NO] ()
key to enable or disable this setting and then press [ENTER]. Swiping the card during the [CHECK]
function will not add to or affect the employee’s times that are currently recorded in the clock.
A more detailed explanation of the CHECK function is shown on page 17.
14. OUTPUT DEVICE: Using the LEFT () or RIGHT () arrows select PRINTER if you wish to use
the internal printer to print your reports or select SERIAL PORT if you wish to send the data to a PC.
If SERIAL PORT is selected the [print] button can be used to temporarily override the serial port.
15. REVIEW – If you wish to review your settings press the [YES] () key, or the [NO] () key if you do
not wish to review your settings. If you choose YES the display will return to the first entry. Press the
[UP] () and [DOWN] () arrow keys to scroll through the settings.
16. PRINT - If you wish to have a print out of your settings press the yes key. If the OUTPUT DEVICE is
set for SERIAL PORT this setting will change to PC RX. At this point you can transmit your settings to
a PC for storing your setup or to print from your PC printer. (See page 22 for the procedure.) If you
wish to temporarily use the internal printer of the CS300 press the [print] button.
17. Press the [ MENU ] key to exit out of the SETUP section and return to the normal operating mode.
Changing the time and date after the clock has been running may affect the employee
punches that are resident in the memory of the clock and produce erroneous totals. If
it is necessary to change the data reset the SETUP portion (page 27) and set the data.
It will not be necessary to reprogram the employee data or the stored punches.
Page 13

13
ADD/EDIT EMPLOYEE
IMPORT
ANT: When adding an employee it is necessary to step through
all of the items in the
menu
and press the [ENTER] key to confirm the entry.
ADD/EDIT EMPLOYEE
LAST NAME: ___________________
FIRST NAME: ___________________
EMPLOYEE NO: ___________________
SWIPE CARD:
START DATE: ___________________
DEPT NUMBER: ___________________
PAY PERIOD START: ___________________
MAX TIME ON CLOCK: ___________________
PERIOD LENGTH: W-B-BM-M
PAYMENT DATE: ___________________
WORK TYPE: STD-FLEX HRS
DAILY OVERTIME AFTER: _______HRS_____MIN
WEEKLY OVERTIME AFTER: _______HRS_____MIN
SHIFT START: ___________________
SHIFT STOP: ___________________
AUTO DEDUCT LUNCH: Y/N
LUNCH START: ___________________
LUNCH STOP: ___________________
LUNCH DURATION: ___________________
DEDUCT AFTER ___________________
REVIEW: Y/N
To ADD an employee:
1. Press the [ MENU ] key. If a password has been programmed enter the password and press
[ENTER]. If no password has been programmed go to step 2.
2. Press the [UP] or [DOWN] arrow until EMPLOYEE appears in the display then press [ENTER].
3. LAST NAME will be displayed and a flashing cursor will indicate the position of the first letter of
the last name. Enter the last name using the procedure described on page 9 by pressing the
correct keys for the desired letters to be displayed, and the arrow keys to position the letters. You
may use up to 15 characters for the name. When the last name is finished press the [ENTER]
key to confirm the entry.
4. FIRST NAME will be displayed. Continue the same procedure to enter the first name using the
letter and arrow keys until the first name is completed and press [ENTER] to confirm the entry.
You may use up to 15 characters for the name.
5. EMPLOYEE NUMBER will be displayed. This is an optional entry. If you do not wish to enter a
number press the [ENTER] key. You may enter up to 10 digits using the same procedure and
keys as before, and then press the [ENTER] key to confirm. This number will appear on the
individual employee and daily attendance reports.
6. SWIPE CARD will be displayed. Swipe the card you wish to assign to the employee. NOTE: If a
card is swiped that is already in use an error will be displayed and it will be necessary to
assign another, unused card. If you wish to assign a previously used card to another
Page 14

14
employee you must first delete the previous employee. Deleting an employee will erase all
time records for that employee that may still be resident in the time clock’s memory.
Page 15

15
ADD/EDIT EMPLOYEE (continued)
7. START DATE will be displayed. Enter the date the employee was hired using the alphanumeric
and arrow keys. When finished press [ENTER] to confirm.
8. DEPT NUMBER will be displayed. Enter a number between 0 and 4 to designate the department
for the employee. If no department number is desired you may enter 0 for none. The number
entered will not affect the employee totals. This setting is only for your reference.
9. PAY PERIOD START will be displayed. Enter the date of the employee’s starting pay period and
then press the [ENTER] key to confirm.
10. MAX TIME ON CLOCK will be displayed. This is the number of hours to elapse if the employee
misses punching out before the clock will signal an error the next time the employee’s badge is
swiped. The maximum amount of time available is 23 hours and 59 minutes. When this occurs it
will be necessary to manually adjust the hours using the PUNCH setting. When finished press
[ENTER] to confirm.
11. PERIOD LENGTH will be displayed. Using the LEFT () or RIGHT () arrows select the pay
period: weekly, biweekly (every two weeks), bimonthly (normally from the 1st to the 15th and from
the 16th to the last day of the month), or monthly and then press the [ENTER] key to confirm.
12. PAYMENT DATE:
13. WORK TYPE will be displayed. Using the [UP] () and [DOWN] () arrows select the type of
hours the employee will be working. STANDARD is the normal setting for employees who work a
standard set of hours and days. These employees would normally be subject to regular starting
and stopping hours each day. FLEXIBLE would be selected for those employees who do not
work any regular hours, such as occasional part time workers who only work a few hours per day
and do not take lunch. The FLEXIBLE setting will only total up the amount of hours and minutes
from the time the employee punches in and out. The employee will not be able to punch out and
in for lunch. If FLEXIBLE is selected the menu will skip to Step 22. When finished press [ENTER]
to confirm.
14. DAILY OT AFTER will be displayed. Enter the number of hours and minutes the employee must
work before qualifying for daily overtime pay. The maximum amount of time available is 23 hours
and 59 minutes. When finished press [ENTER] to confirm.
15. WEEKLY OT AFTER will be displayed. Enter the number of hours and minutes the employee
must work during the week before qualifying for overtime pay. The maximum amount of time
available is 99 hours and 59 minutes. When finished press [ENTER] to confirm.
16. SHIFT START will be displayed. Enter the starting time of the employee’s shift. When finished
press [ENTER] to confirm.
17. SHIFT STOP will be displayed. Enter the ending time for the employee’s shift. When finished
press [ENTER] to confirm.
18. AUTO DEDUCT LUNCH will be displayed. If it is not desired to have the employee punch out
and in for the lunch period you may set this option to automatically deduct the length of the lunch
period set in step 20. If NO is selected the menu will next display step 18. If YES is selected the
menu will next display step 20. When finished press [ENTER] to confirm.
19. LUNCH START will be displayed. Enter the time the employee will punch out for lunch. When
finished press [ENTER] to confirm.
20. LUNCH STOP will be displayed. Enter the time the employee will punch in after lunch. When
finished press [ENTER] to confirm.
Page 16

16
NOTE: When entering a new employee it is necessary to answer ALL items in the menu. When
NOTE
ADD/EDIT EMPLOYEE (continued)
21. LUNCH DURATION will be displayed. Enter the length of the lunch period. When finished press
[ENTER] to confirm.
22. DEDUCT AFTER will be displayed. If Auto Deduct Lunch is selected enter the number of hours
the employee is required to work before the lunch period is automatically deducted. When
finished press [ENTER] to confirm.
23. REVIEW will be displayed. If you wish to review your settings press the [YES] () key or press
the [NO] () key if you do not wish to review your settings and then press [ENTER]. If you
choose [YES] the display will return to the first entry. Press the [UP] () and [DOWN] () arrow
keys to scroll through the settings. When finished press [ENTER] to confirm.
24. PRINT will be displayed. If you wish to retain a record of the employee settings you may print the
settings at this time.
25. Press the [ MENU ] key to exit out of the EMPLOYEES section and return to the operating mode.
To EDIT an employee:
1. Press the [ MENU ] key. If a password has been programmed enter the password and press
[ENTER]. If no password has been programmed go to step 2.
2. Press the [UP] or [DOWN] arrow until EMPLOYEE appears in the display then press [ENTER].
3. Press the LEFT () or RIGHT () arrow keys to the EDIT position (Blinking) and then press
[ENTER]. The prompt to SWIPE CARD will appear. Swipe the card of the employee to be edited and
press [ENTER]. If the card is not available you may press the LEFT () or RIGHT () arrow keys to
choose by BADGE # or by NAME and press [ENTER]. When the correct name or number appears
press [ENTER]. Or you may scroll through the list using the [UP] () and [DOWN] () arrow keys.
When the desired employee is displayed press the [ENTER] key.
4. PUNCH Y/N will appear next. If you wish to adjust the employee’s punch times press Y or press N if
this is not the change you are making. For a more detailed explanation see PUNCH on page 16.
5. Press the [UP] () and [DOWN] () arrow keys to scroll through the settings until you display the
setting you wish to change. Press the [ENTER] key one time and change the information required.
When completed press the [ENTER] key to confirm the change. Any changes made will not
take effect until the [ENTER] key is pressed.
6. If you wish to assign a different badge/card to an employee due to loss or if the card becomes
damaged or unreadable, at the prompt SWIPE CARD press [ENTER] one time and then swipe the
new card. Press [ENTER] to confirm. It will not be necessary to reenter the employee data.
7. You may continue to scroll through the settings if other changes are needed or press the [MENU] key
to exit from the EDIT mode.
: If a badge/card becomes unreadable it cannot be reprogrammed. If you wish to purchase
replacement cards please see the Accessories order form in the back of this manual for the number of
the badge set you wish to order.
editing an existing employee it is not necessary to step through all menu items.
Page 17

17
DELETE
WARNING: Deleting an employee will erase ALL records of the employee
from the memory. If you wish to have a record of the employee’s times, exit
from this setting first and print the employee’s report before proceeding.
1. Press the [ MENU ] key. If a password has been programmed enter the password and press
[ENTER]. If no password has been programmed go to step 2.
2. Press the [UP] () and [DOWN] () arrow to EMPLOYEE and press [ENTER].
3. Press the LEFT () or RIGHT () arrow until DELETE blinks in the display and then press [ENTER].
4. The prompt to SWIPE CARD will appear. Swipe the card of the employee to be deleted. If the card is
not available you may press the LEFT () or RIGHT () arrow keys to choose by BADGE # or by
NAME and press [ENTER]. You may scroll through the list using the [UP] () and [DOWN] ()
arrow keys. When the desired employee is displayed press the [ENTER] key.
5. Press the LEFT () or RIGHT () arrow to select Yes or No. If you press “YES” you will be asked
to confirm deleting this employee. Press the Yes key if correct and press the [ENTER] key to confirm.
6. Press the [ MENU ] key to exit out of the EMPLOYEE section and return to the operating mode.
Page 18

18
PUNCH
If one or more existing employees require an adjustment of their time(s) the PUNCH
selection can be used as follows:
PUNCH
1. Press the [ MENU ] key. If a password has been programmed enter the password and press
[ENTER]. If no password has been programmed go to step 2.
2. Press the [UP] () or [DOWN] () arrow to EMPLOYEE and press [ENTER].
3. Press the LEFT () or RIGHT () arrow to select EDIT and press [ENTER].
4. You will be prompted to SWIPE CARD. If the correct employee is displayed select Yes and press
[ENTER].
5. At the prompt PUNCH Y/N press Y.
6. The current date is displayed and will be flashing. If the current date is to be modified simply
press [ENTER], or if you wish to change to another date use the [UP] () or [DOWN] () arrows
to select the desired date in the current pay period and press [ENTER], The current pay period is
the only period during which the punches may be modified. Use the [UP] () or [DOWN] ()
arrows to select the date to be modified.
7. The SHIFT IN will be displayed. If you wish to change the shift start time press [ENTER] and use
the [UP] () or [DOWN] () arrows and the LEFT () or RIGHT () arrows to change the time
or directly key in the number to change, and then press [ENTER]. If the employee does not
punch out and in for lunch or is set as FLEXIBLE steps 8 and 9 will not be displayed and
you may proceed to step 10.
8. If the employee punches out and in for lunch, LUNCH IN will be displayed. If you wish to change
the lunch in time press [ENTER] and use the [UP] () or [DOWN] () arrows and the LEFT ()
or RIGHT () arrows to change the time or directly key in the number, and then press [ENTER].
9. If the employee punches out and in for lunch, LUNCH OUT will be displayed. If you wish to
change the lunch out time press [ENTER] and use the [UP] () or [DOWN] () arrows and the
LEFT () or RIGHT () arrows to change the time or directly key in the number, and then press
[ENTER].
10. The SHIFT OUT will be displayed. If you wish to change the shift end time press [ENTER] and
use the [UP] () or [DOWN] () arrows and the LEFT () or RIGHT () arrows to change the
time or directly key in the number, and then press [ENTER].
11. The change(s) you have made will be recorded automatically. If you wish to retain a record of the
change(s) you have made, print the employee(s) report.
12. Press the [ MENU ] key to exit out of the PUNCH section and return to the operating mode.
NOTE: Whenever any time changes are made please note if the new time you have set is AM
or PM as required.
Page 19

19
CHECK
[CHECK]
[CHECK]
CHECK FUNCTION
To use the
to swipe his card. The display will register the date and time of the last swipe and if it was in or out.
Pressing the
worked during the current pay period.
function the employee first presses the
button a second time will display the total number of regular and overtime hours
button and then will be prompted
Pressing the button a third time will display the amount of time the employee was late or left early during
the current pay period.
After the button has been pressed the display will return to the normal swipe mode after approximately
five seconds.
If the message NO PUNCH is displayed the employee has not yet punched in during the current pay
period.
Page 20

20
EMPLOYEE REPORT
REPORTS
1. Press the [ MENU ] key. If a password has been programmed enter the password and press
[ENTER]. If no password has been programmed go to step 2.
2. Press the [UP] () or [DOWN] () arrow to REPORTS and press [ENTER].
3. Press the [UP] () or [DOWN] () arrow to EMPLOYEE and press [ENTER].
4. Press the LEFT () or RIGHT () arrow to select ALL (for a total report for all employees) or
EMPLOYEE (to select a report on any employee) and press [ENTER]. Or you may press the ALL or
EMPLOYEE key to make your selection. If ALL is selected you will be prompted for the starting
employee number of the reports you wish. Scroll through the numbers until you reach the staring
number desired. If EMPLOYEE is selected you will be prompted to SWIPE CARD. If the correct
name appears select YES to confirm the choice and at PRINT select Yes or press the PRINT key to
print the report. To select another employee repeat the steps 2 through 4.
5. When finished press the [ MENU ] key to exit out of the REPORTS section and return to the
operating mode.
If you wish to stop the printing at any time press and hold the [CLEAR] key. If the printer runs out of
paper before the report is finished, reload more paper and begin printing again by following the above
procedure and start at the desired employee number.
EMPLOYEE LAST NAME: ________________
EMPLOYEE FIRST NAME: ________________
EMPLOYEE # ________________
BADGE # ________________
DEPARTMENT # ________________
START DATE: ________________
PAY PERIOD START: ________________
PAYMENT DATE: ________________
PAY PERIOD LENGTH: W-B-BM-M
WORK TYPE: ________________
MAX TIME ON CLOCK: ________________
DAILY OT AFTER: _____HRS____MIN
WEEKLY OT AFTER: _____HRS____MIN
SHIFT START TIME: ________________
SHIFT STOP TIME: ________________
AUTO DEDUCT LUNCH: Y/N
LUNCH START TIME: ________________
LUNCH STOP TIME: ________________
LUNCH DURATION: ________________
AUTO DEDUCT LUNCH AFTER: _____HRS____MIN
Page 21

21
REPORTS (continued)
PAY PERIOD
1. Press the [ MENU ] key. If a password has been programmed enter the password and press
[ENTER]. If no password has been programmed go to step 2.
2. Press the [UP] () or [DOWN] () arrow to REPORTS and press [ENTER].
3. Press the [UP] () or [DOWN] () arrow to PAY PERIOD and press [ENTER].
4. Press the [UP] () or [DOWN] () arrow to select either the CURRENT or the PREVIOUS pay
period and then press [ENTER]. NOTE: If the employees are on a monthly pay period only the
current pay period will be available.
5. Select ALL or EMPLOYEE and press [ENTER]. If ALL is selected you will be prompted for the
starting number of the employees you wish. Scroll through the numbers until you reach the staring
number desired. If EMPLOYEE is selected you will be prompted to SWIPE CARD. If the correct
name appears select YES to confirm the choice and then press [PRINT].
6. At PRINT select Yes or No and press [ENTER] to print the report.
7. When finished press the [ MENU ] key to exit out of the REPORTS section and return to the
operating mode.
(SEE NEXT PAGE FOR EXAMPLES OF THE REPORT)
Page 22

22
CURRENT
PAY PERIOD
REPORTS (continued)
PREVIOUS
DAILY ATTENDANCE
LAST NAME: SMITH
FIRST NAME: JOHN
EMPLOYEE #: 123456789
BADGE # 001 DATE: 02-18-2000
PAYMENT PERIOD: FROM 02-14-2000
TO 02-18-2000
DATE IN OUT IN OUT
02-14 8:28 12:00 1:00 5:00
02-15 8:30 12:00 1:00 5:01
02-16 8:29 12:01 1:00 5:00
02-17 8:30 12:00 1:00 7:02
02-18 8:30 12:00 1:00 5:01
TOTAL
REGULAR TIME: 37:30
OVERTIME: 1:30
LATE: 0:00
TOTAL PAYMENT:____________________________
SIGNATURE:_________________________________
DATE:_______________________________________
REPORT PRINTED ON INTERNAL PRINTER
REPORT SENT TO PC:
DAILY ATTENDANCE
LAST NAME: JONES
FIRST NAME: MARY
EMPLOYEE #: 987456321
BADGE # 002 DATE: 02-18-2000
PAYMENT PERIOD: FROM 02-14-2000
TO 02-18-2000
DATE IN OUT IN OUT REG OT LATE
02-14 8:28 12:00 1:00 5:00 7:30 0:00 0:00
02-15 8:30 12:00 1:00 5:01 7:30 0:00 0:00
02-16 8:29 12:01 1:00 5:00 7:30 0:00 0:00
02-17 8:30 12:00 1:00 5:02 7:30 0:00 0:00
02-18 8:30 12:00 1:00 5:01 7:30 0:00 0:00
TOTAL
REGULAR TIME: 37:30
OVERTIME: 0:00
LATE: 0:00
TOTAL PAYMENT:_________________________________________________________________________
SIGNATURE:______________________________________________________________________________
DATE:____________________________________________________________________________________
Page 23

23
EMPLOYEE REPORT
BY EMPLOYEE
01-04-2000
SMITH
ALL EMPLOYEE REPORT
SAMPLE REPORTS
REPORTS (continued)
LAST NAME:
FIRST NAME: JOHN
EMPLOYEE #: 123456789
BADGE # 001
DEPARTMENT # 1
START DATE: 01-03-00
PAY PERIOD START: 01-03-00
PAYMENT DATE: _______
PAY PERIOD LENGTH: W-B-BM-M
WORK TYPE: STD/FLEX
MAX TIME ON CLOCK: 12 HR__0_MINS
DAILY OT AFTER: 08 HRS__0 MINS
WEEKLY OT AFTER: 40_HRS__0MINS
SHIFT START TIME: 8:30 A
SHIFT STOP TIME: 5:00 P
AUTO DEDUCT LUNCH: Y/N
LUNCH START TIME: 12:00________
LUNCH STOP TIME: 1:00________
LUNCH DURATION: 01 HR 00 MIN
DATE: 02-28-2000 TIME: 6:09PM
BADGE# LAST & FIRST PRESENT
001 SMITH JOHN NO
002 JONES MARY NO
003 WOLF TOM IN
SETUP REPORT
To print a Setup report press the [MENU] key then press the [UP] () or [DOWN] () arrow to select
REPORT and press [ENTER]. Print Y/N is displayed. Press Yes to print the report. To exit from the
SETUP mode press the [MENU] key.
DATE:
DATE FORMAT: M/D/Y-D/M/Y
TIME: 8:00 A
TIME FORMAT: 12/24 HR
DAYLIGHT SAVING TIME: YES/NO
DAYLIGHT SAVING START: 04-02-2000
DAYLIGHT SAVING STOP: 10-29-2000
SHIFT GRACE: 5 –6-10-15
ROUNDING: 5-6-10-15
PASSWORD: ENABLE/DISABLE
Page 24

24
TRANSFERRING DATA TO A PC
If you are running Windows 95, 98, Me and already have HyperTerminal installed on your system, which
should have been a standard application provided with your Windows application, you may transfer the
data in the CS300 to a PC.
System Requirements:
- Windows 95, 98, Me or
- Windows HyperTerminal is installed on your system (HyperTerminal should have been provided with
and loaded as part of the Windows operating system installed on your PC. Windows HyperTerminal is not
a program or software that is supplied by Royal.)
- An available serial port
- Female to Female serial cable (included in the box with the time clock)
If you do not have HyperTerminal installed on your PC you can install it in the Add/Remove programs
section in Control Panel. If you are unsure of how to install this part of the Windows program consult your
Windows manual or the Windows Help file or contact your computer support personnel.
Page 25

25
NOTE: Before turning on the PC make sure t
hat the serial cable (9 pin female to female) is
File
Open
connected to either COM1 or COM2.
CONFIGURING THE CONNECTION
Click on “Start”, “Accessories”, “Communications”, “HyperTerminal”. If you have HyperTerminal
installed in a different folder go to that folder and select “HyperTerminal”. When you open the
HyperTerminal program a window will appear labeled “Connection Description”. In the space under “Enter
a name and choose an icon for the connection:” enter the name you will use for your connection to the
CS300, and choose an icon from the selections shown, and then click on OK. If you have already set up
your connection, click on the cancel button.
TRANSFERRING DATA TO A PC (continued)
To open an existing connection click on “
bar, and select the connection you have named for your data transfer. Click on “File”, and then
“Properties”. In the “Properties” window click on the “Connect To” tab. Next to “Connect using:”
select the “Direct to Com(?)” port number you will be using to connect to the CS300. Be sure to
select a Com port that is not already in use by another device such as a serial mouse, modem, PDA
docking cradle, scanner or other device on your system.
”, “
”, or click on the open folder icon on the tool
Next, click on the “Configure” button to set your port settings. Change the settings to read:
Page 26

26
Bits per second: 2400
Data Bits: 8
Parity: None
Stop Bits: 1
Flow Control: Xon/Xoff
Then click the OK button.
TRANSFERRING DATA TO A PC (continued)
In the Properties window click on the “Settings” tab. The emulation should be set to “Auto Detect” and
Telnet Terminal set to “ANSI”. Click on the button marked “ASCII SETUP”. Under “ASCII Receiving”
select the top box marked “Append line feeds to incoming line ends”. Click on OK to confirm the ASCII
settings and again on OK to confirm the Properties settings.
When you are ready to receive the data from the CS300 click on “Transfer”, and then “Receive File”. In
the “Receive File” window specify the drive and folder on your computer where you wish to store the data
being sent. Under “Use Receiving Protocol” select “Ymodem” and then click the “Receive” button.
Page 27

27
On the CS300 select SETUP from the menu. Press the [ENTER] key to OUTPUT FORMAT. Press the
LEFT () or RIGHT () arrow to select SERIAL PORT and then press [ENTER].
Page 28

28
TRANSFERRING DATA TO A PC (continued)
When you wish to transfer data to the PC select “Yes” at the prompt “PC RX Y/N”, and the data will be
transmitted.
IMPORTANT: The connection and transfer procedure must be set in the order listed above for proper
connection and transfer of data.
If you wish to print the transmitted data directly from HyperTerminal to your PC printer select the Print
function from the File menu of HyperTerminal. Since the data is sent in standard text format the file(s) can
be opened in any word processing or spreadsheet program.
If you wish to output data directly to the built-in printer in the CS300 you must return to SETUP
and change the OUTPUT FORMAT to PRINTER. Or you may use the [print] button to temporarily
override the SERIAL PORT setting.
NOTE:
As the data is sent to the PC, the files will automatically renumber if there are files in the same folder with
matching names. For instance, existing file setup.txt will become setup0.txt. The next time the file is sent
setup.txt will become setup1.txt, etc. The file without a number will be the latest file. This can be verified
by noting the date and time that Windows assigns as the file is recorded. The files can then be used as
reference if needed. Over a period of time, depending on how many times the data is sent to the PC, a
large number of files will accumulate and it may be necessary to manually delete some of these files from
time to time. If you are unsure how to delete files within a folder consult the help setting in W indows
Explorer or contact your computer support personnel for assistance.
Page 29

29
WALL MOUNT INSTALLATION
NOTE: Do not mount the CS300 directly to plasterboard, paneling, brick or
concrete block. Rather, using appropriate fasteners, secure a sturdy wood board
to the wall and then mount the CS300 to the wood board.
1. At a height convenient for all members of the work force and within 5 ft. of a power outlet, use the
mounting bracket (enclosed) to mark the points where the mounting screws for the CS300 are to be
installed.
2. Attach the mounting bracket to the wall with the release tab facing down using the enclosed mounting
screws.
3. Remove the table top support bracket from the rear of the CS300. At the base of the power cord
guide channel there is a removable tab. With a pair of pliers remove this tab and ensure there are no
rough edges that may cut through the insulation of the cord. Insert the cord into the channel.
4. Attach the CS300 to the mounting bracket by aligning the tabs on the bracket to the corresponding
slots on the rear of the CS300. If it becomes necessary to remove the CS300 from the mounting
bracket press on the tab at the bottom of the bracket and lift the clock off of the bracket.
Page 30

30
MAINTENANCE
MAINTENANCE
Although your CS300 is designed to be maintenance-free, it contains sensitive electronic parts. Treat it with
care to ensure best performance.
AVOID ROUGH TREATMENT
Avoid dropping the unit. Only gentle pressure is needed to swipe the card in the card reader. Retain the
original packaging so you can reuse it if you must ship the CS300.
CLEANING
The hard plastic casing of your clock has a durable finish that should retain its original luster for many years.
Clean exposed parts with a soft, slightly damp cloth. To remove stains, use a mild soap. Never use
detergents, excess water, treated cloths, harsh cleaning agents, or sprays.
Page 31

31
CAUTION:
Resetting the setup portion of the clock will require the setup information to be
NOTE:
THIS RESET DELETES
ALL EMPLOYEE PUNCHES. YOU MAY WISH TO PRINT A
TROUBLESHOOTING
ERROR SIGNALS
ERROR – If an employee fails to punch out at the end of the shift an error will flash on the display when the
next swipe is made. The CS300 will not show any punch out time on the pay period report and the supervisor
can adjust the report through the PUNCH editing setting in EDIT EMPLOYEE.
NOTE: The first time the clock is used the error signal will flash each time an employee punches in
for the first time since there is no data in the memory of the clock.
CARD NOT USED – The card swiped has not been assigned to any of the employees entered into the clock.
DAILY PUNCH FULL – The maximum daily number of swipes allowed is exceeded.
Please Note: The maximum number of swipes for STANDARD is four, if an employee manually punches out
and in for lunch. The number is two if the Auto Lunch Deduction option is set: which would be the punch-in
for the start-of-day or shift and one punch-out at the end of the work-day / shift. The maximum number of
punches for FLEXIBLE time is two, punch-in time and punch-out time.
WRONG CARD – The card being used is not a CS300 card or the card may be damaged.
RESET
The CS300 can be reset by inserting a thin object such as a paper clip into the small hole marked “RESET”.
There are up to four resets available to reset particular functions, depending on your needs.
1.) If a Password has been set during the setup portion the first message will be “RESET PASSWORD Y/N”.
If you wish to delete the password press Y.
2.) Pressing the RESET again will display “RESET SETUP Y/N” – if yes is selected only the settings made
under SETUP will be reset to the factory default.
reentered as it was originally and may affect the employee totals since the time in the clock
will be reset to the defaults.
3.) Pressing the RESET again will display “RESET PUNCH REC Y/N” – if yes is selected only the punch
records of the employees will be erased.
RECORD OF THE PAY PERIOD FOR YOUR RECORDS IF YOU HAVE NOT ALREADY DONE SO.
4.) Pressing the RESET again will display “RESET EMPLOYEE Y/N” – if yes is selected, all of the employee
information will be erased. If only one employee is to be deleted select the DELETE setting under
EMPLOYEE from the main menu.
If the clock becomes inoperable due to misoperation or outside influences, hold the RESET depressed for a
minimum of seven seconds and release. If the machine is not damaged it may return to normal operating
mode without any loss of data.
Page 32

32
ROYAL ELECTRONIC TIME CLOCK LIMITED WARRANTY
Royal Consumer Information Products, Inc. (Royal) at 379 Campus Drive, 2nd Floor, in Somerset, NJ 08875
USA warrants that your NEW Royal Time Clock is free of defects of workmanship and materials. If there is a
defect or malfunction of this time clock, Royal will repair the time clock free of charge as follows:
PARTS: New or comparable rebuilt parts in exchange for defective parts for ONE YEAR from the date of
purchase.
LABOR: All labor charges incurred from a Royal Authorized Service Center or the Royal Corporate Service
Center are covered for 90 DAYS from the date of purchase. After 90 days there will be a labor charge for repair
of the unit and/or assemblies such as the keyboard, display, logic board, power supply and printer at the Royal
Corporate Service Center’s or the Royal Authorized Service Center’s then prevailing rates. The time clock must
be brought to a Royal Authorized Service Center nearest to your location; or the time clock must be shipped
postage prepaid, insured and via a traceable shipping method to a Royal Authorized Service Center or to the
Royal Corporate Service Center. Royal will pay return postage from the Royal Corporate Service Center during
the labor warranty period only.
This warranty does not apply to persons who purchased this product second hand or used.
This warranty does not include the replacement of ink rolls, ribbons, time cards, paper rolls or any other
consumables or supplies used in the time clock and consumed through the normal use of the time clock.
This warranty does not include cleaning, adjustments, parts, or repairs required by circumstances beyond the
control of Royal, including, but not limited to, fire or other casualty, accident, neglect, abuse, abnormal use,
misuse or battery leakage damages. THERE ARE NO OTHER EXPRESSED WARRANTIES EXCEPT AS
STATED HEREIN. AFTER THE PERIOD OF EXPRESSED WARRANTY SET FORTH HEREIN, THERE
ARE NO EXPRESSED OR IMPLIED WARRANTIES AND THOSE EXCLUDED INCLUDE THOSE OF
MERCHANTABILITY AND FITNESS FOR A PARTICULAR PURPOSE. Royal shall NOT be liable for
CONSEQUENTIAL DAMAGES resulting from any failure, defect, or malfunction of this time clock. Some states
do not allow limitations on how long an implied warranty lasts and some states do not allow the exclusion or
limitation of incidental or consequential damages, so the above limitations or exclusions may not apply to you.
TO OBTAIN SERVICE UNDER THE TERMS OF THIS WARRANTY:
• Pack your time clock in the original carton or equivalent.
• Enclose a copy of the bill of sale or other documentation showing original purchase date.
• Enclose a card or note describing the difficulty you have had with the time clock.
• Be sure to include your complete name, address and day-time telephone number.
• Bring or ship, prepaid and insured, via a traceable shipping method the above product to the nearest Royal
Authorized Service Center location or to the Royal Corporate Service Center. The Service Center cannot
be held responsible for any loss or damage in transit.
For Authorized Service Centers within your local area, please call 1-888-261-3888 or +1-732-563-9944. In
Canada call 1-888-266-9380. Or you may call the Royal Corporate Service Center directly at 1-708-6158124 for repair rates and shipping instructions.
Please retain the original proof of purchase for your records to establish date of original purchase. Your
warranty starts with the date of original purchase. This warranty gives you specific legal rights, and you may
also have other rights which vary from State to State.
• This warranty is valid only on time clocks purchased, delivered and used in the United States and/or
Canada.
Page 33

33
ROYAL CS300 Electronic Time Clock
ACCESSORIES
1. Replacement Key Set (2 keys) 47300511
2. Replacement set of Badge Cards (Cards Numbered #1 to #50 cards) 013707
3. Additional set of Badge Cards (Cards Numbered #51 to #100 cards) 013708
4. Set of Magnetic Badge Cards (Cards Numbered #1 to #25) 013703
5. Set of Magnetic Badge Cards (Cards Numbered #26 to #50) 013704
6. Set of Magnetic Badge Cards (Cards Numbered #51 to #75) 013705
7. Set of Magnetic Badge Cards (Cards Numbered #76 to #100) 013706
8. Owners Manual CS300TCIM0301A
9. Wall Mounting Bracket 204-13000002-200
10. Table Top Stand 401-30000010-001
11. Thermal Paper - 80mm (3.125”) Wide X 95ft. Long (3-rolls/package) 013135
12. RS232 Serial Cable 019850
For Prices, Availability and Ordering
CALL 1-888-261-4555
or visit our web site at
www.royalsupplies.com
Prices and Availability Subject to Change Without Notice
 Loading...