

Page 1
OWNER'S MANUAL
Operating and Servicing Instructions
CAN VAC"
PLEASE READ THESE INSTRUCTIONS CAREFULLY
BEFORE USING YOUR CAN VAC.
1-200397-001
Rev.
1/93
Page 2
CONSUMER INFORMATION
This information has been compiled by the Vacuum Cleaner Manufacturer's Association working with government and private sources, concerned with product safety.
These basic guidelines are for your protection and convenience.
THIS CLEANER IS INTENDED FOR HOUSEHOLD USE ONLY.
IMPORTANT SAFETY INSTRUCTIONS
SAVE THESE INSTRUCTIONS
When you use an appliance, basic precautions should always be followed, including
the following:
READ ALL INSTRUCTIONS BEFORE YOU USE THE APPLIANCE.
ALWAYS FOLLOW THESE SAFETY INSTRUCTIONS.
WARNING:
TO REDUCE THE RISK OF FIRE,
ELECTRIC SHOCK OR INJURY:
Look on your vacuum cleaner and follow all
label and marking instructions.
Electric shock could occur if used outdoors or
on wet surfaces.
Do not let children play with the vacuum
cleaner. Watch closely when the vacuum cleaner is used by or near children.
Do not use the vacuum cleaner to pick up
flammable or combustible liquids or fumes,
such as gasoline, or use in areas where they
may be present.
Keep the vacuum cleaner on the floor. Only
the hand-held vacuum cleaners may be set on
furniture.
Do not use the vacuum cleaner without dust-
bag or filters in place.
Do not use the power cord to pull or carry the
vacuum cleaner. Do not use the power cord as a
handle. Do not shut any door on the cord or pull
the cord around sharp edges or corners. Keep
the cord away from heated surfaces. Do not run
the vacuum cleaner over the cord.
Do not use vacuum cleaner with a damaged
cord or plug. Do not use vacuum cleaner if
working improperly, dropped, damaged, left
outdoors or dropped in water. First, send to
service center for check and repair.
Store the vacuum cleaner indoors. Put the
vacuum cleaner away after use to prevent tripping accidents.
Do not pull on the cord to unplug the vacuum
cleaner. Grasp the plug instead.
Be most careful when vacuum cleaning on
stairs.
Approved by the Vacuum Cleaners Manufacturers Association Executive Committee, April
Only use attachments and hoses recommended by the manufacturer. Use the vacuum
cleaner only as stated in this manual.
Turn all controls to "OFF" before unplugging
the vacuum cleaner.
Do not use an extension cord with this
cleaner.
Do not touch the plug or the vacuum cleaner
with wet hands.
Do not put any object into the vacuum cleaner
vent or other openings. Do not turn the vacuum
cleaner on if something is blocking an opening.
Keep vents free of things that slow air flow, such
as dust, lint and hair.
Do not pick up anything that is hot, smoking
or burning. Do not pick up cigarettes, hot ashes
or matches.
Unplug the vacuum cleaner if you leave the
room. Unplug it when it is not in use and before
you service it.
Always turn off the vacuum cleaner before
connecting or removing either the hose or the
motorized nozzle.
Do not use hose if it is damaged, cut or punctured. Do not pick up sharp objects with the
vacuum nozzle or hose. The hose contains electrical wires.
Keep end of hose, wands and other openings
away from your face and body. Keep your
hands, feet, hair and clothing away from moving
parts.
2
29,
1987.
Page 3
SAVE THESE INSTRUCTIONS
This cleaner contains a thermal protector which will automatically shut off
the current flow at abnormally high motor temperatures. If the thermal protector is
-
activated
and secondary filter for any blockage.
Once the motor cools the current's flow will be reactivated.
unplug the cleaner and inspect the exhaust, inlet, hose, paper bag
/
WAR
I
outdoors or on wet surface.
N
I
NG
:
Electrical shock could occur if used
I
I
TABLE
Features
Paper Bag Removal and lnstallation
Hose lnstallation and Removal
Attachment lnstallation and Removal
Cord Wrap and Quick Release
Mount Tool Caddy
Remove Tool Caddy
Shoulder Strap lnstallation and Removal
Using as a Blower
Using with a Power Nozzle
Customer Service
. . .
. . .
. .
. . .
.
. . . . . . . .
. .
OF
. . . .
. . . .
. . . . . . . . .
. . . . .
. . . .
. . .
.
.
. . . .
. . . . .
CONTENTS
. . . . .
. .
. . .
. . .
. . . . . . . . .
. . . .
. . .
. . . . .
. . .
.
. . . . . . . . .
. . . . .
.
. . . .
.
. . . . . . . . . . . .
.
. . . . .
. .
.
. . . . . . . . . . . . . . .
. . . .
. . . . . . . . . . . .
. .
. .
.
. . . .
. . . . . . .
.
. . . . . . . . .
. . . .
.
.
. . . . .
. . . . . . .
.
. . . . .
. .
. .
. .
. .
. . . .
.
.
. . .
. . . . .
. . . .
.
. .
. . .
. . . . .
. .
. .
.
. . . . . . . . .
. . . . . . . .
. .
. . .
. .
. .
. .
. .
. .
.
. . .
. . . . .
. . . . .
.
. . . .
. . . . .
. . . . . .
. .
. . . . .
.
. . .
. .
.
4
.
5
.
7
.
8
.
9
10
10
.
11
13
14
.
14
Page 4
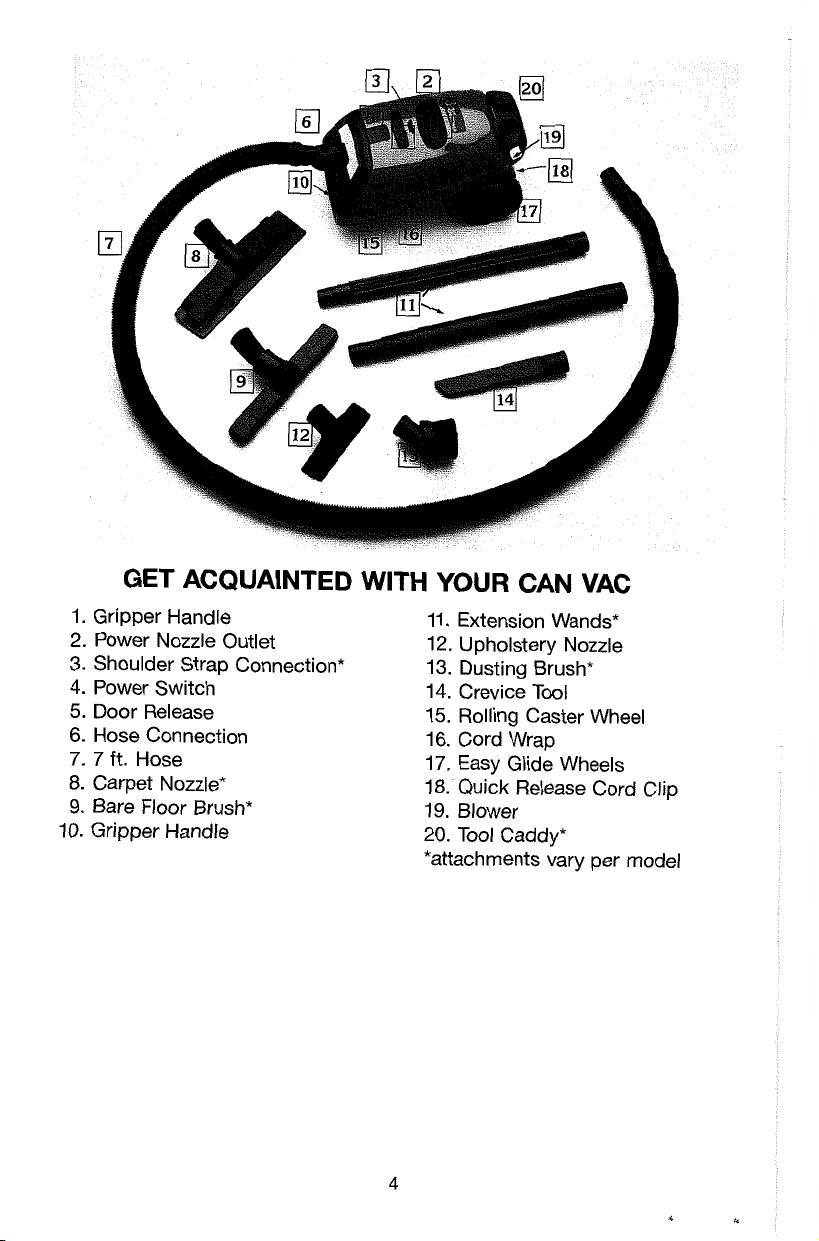
GET ACQUAINTED WITH YOUR CAN VAC
1.
Gripper Handle
2. Power Nozzle Outlet
3. Shoulder Strap Connection*
4.
Power Switch
5. Door Release
6. Hose Connection
7
ft. Hose
7.
8.
Carpet Nozzle*
9. Bare Floor Brush*
10. Gripper Handle
11.
Extension Wands*
12. Upholstery Nozzle
13. Dusting Brush*
14. Crevice Tool
15. Rolling Caster Wheel
16. Cord Wrap
17. Easy Glide Wheels
18. Quick Release Cord Clip
19. Blower
20.
Tool Caddy*
*attachments vary per model
Page 5
OPERATING INSTRUCTIONS
NOTE:
UNPLUG CLEANER BEFORE
CHANGING PAPER BAG.
CLEANER MUST HAVE PAPER
BAG IN PLACE AT ALL TIMES.
A. PAPER BAG REMOVAL AND INSTALLATION
Check to be sure your CAN VAC has
one paper bag in place before you
begin vacuuming.
1.
Remove hose if it is in place
from the face of the cleaner.
(SEE SECTION
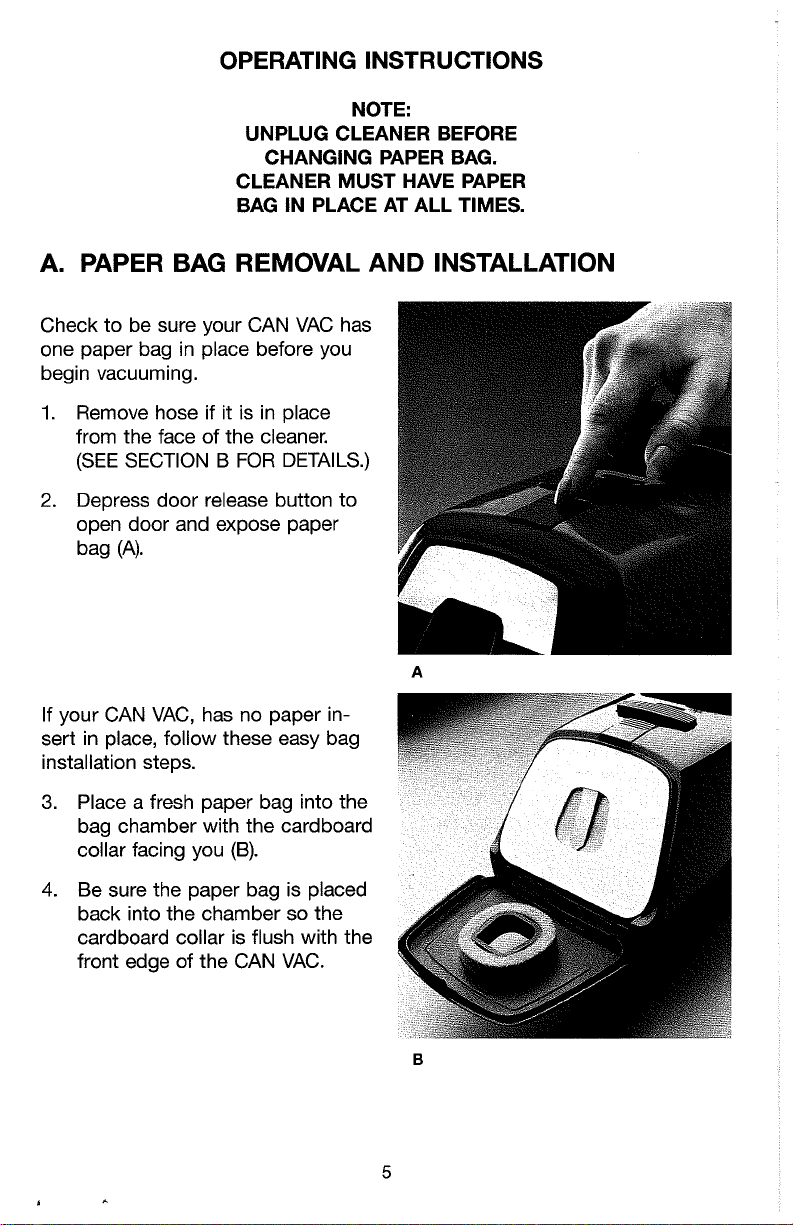
2.
Depress door release button to
open door and expose paper
bag (A).
B
FOR DETAILS.)
If your CAN VAC, has no paper insert in place, follow these easy bag
installation steps.
3.
Place a fresh paper bag into the
bag chamber with the cardboard
collar facing you
4.
Be sure the paper bag is placed
back into the chamber so the
cardboard collar is flush with the
front edge of the CAN VAC.
(B).
Page 6
5.
Snap the bottom two corners of
the cardboard collar behind the
two clips along the bottom edge
of the chamber. Your new bag is
now secure.
6. Close the door and be sure it
snaps shut tightly.
If your paper bag is full and you'd
like to replace it with a fresh bag,
follow instructions
tion A and then begin at
#I
and
#2
#7.
in sec-
(You
can tell your bag needs replaced
when you experience low performance with the CAN VAC.)
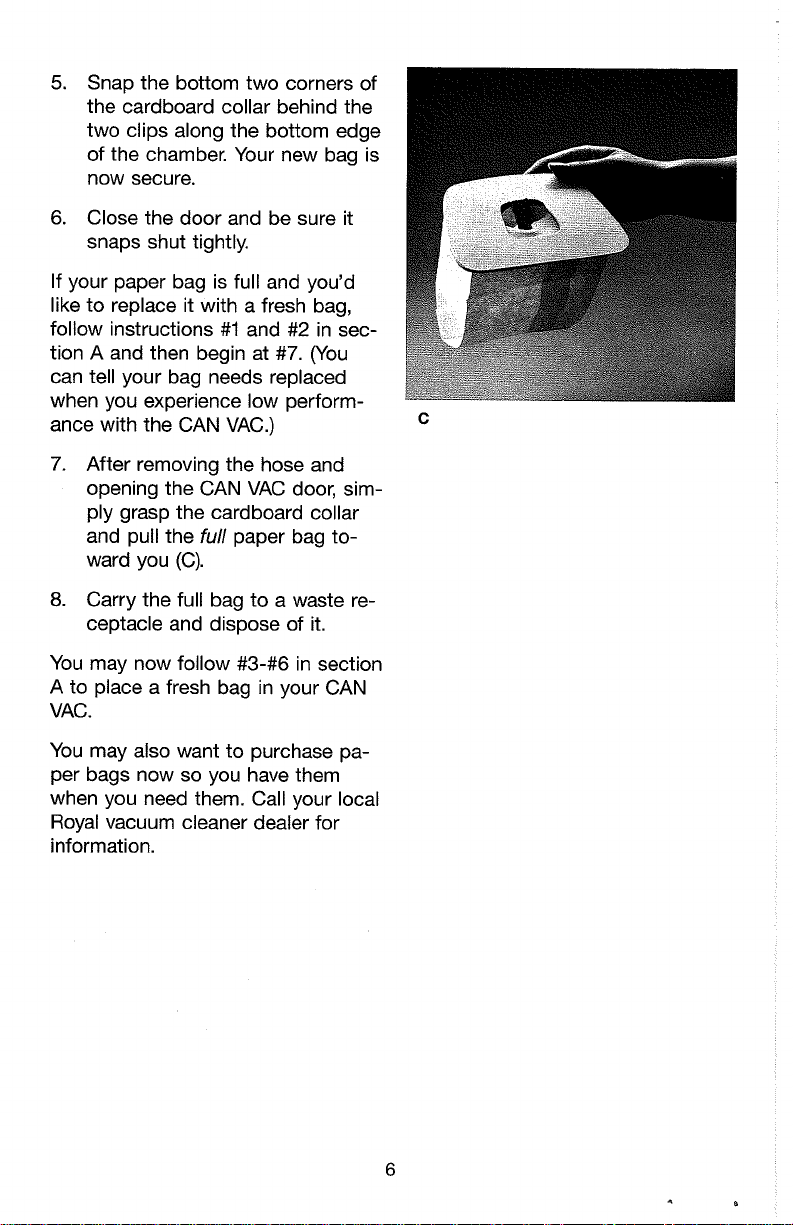
7.
After removing the hose and
.
opening the CAN VAC door, simply grasp the cardboard collar
and pull the
full
paper bag to-
ward you (C).
8.
Carry the full bag to a waste receptacle and dispose of it.
You may now follow #3-#6 in section
A
to place a fresh bag in your CAN
VAC.
c
You may also want to purchase paper bags now so you have them
when you need them. Call your local
Royal vacuum cleaner dealer for
information.
Page 7

B.
HOSE INSTALLATION AND REMOVAL
NOTE:
UNPLUG CLEANER BEFORE
REMOVING OR INSTALLING HOSE
1.
Hold hose adapter end so that
button is at the top
2.
Line up adapter with intake hole
on face of cleaner.
3.
Depress button on hose adapter
and slide adapter into intake
(B).
hole
4.
Release button. Give hose a
slight tug to be sure it is in
place securely.
With a paper bag and the hose
in place, you are ready to begin
vacuuming.
(A).
A
Page 8
C. ATTACHMENT INSTALLATION AND REMOVAL
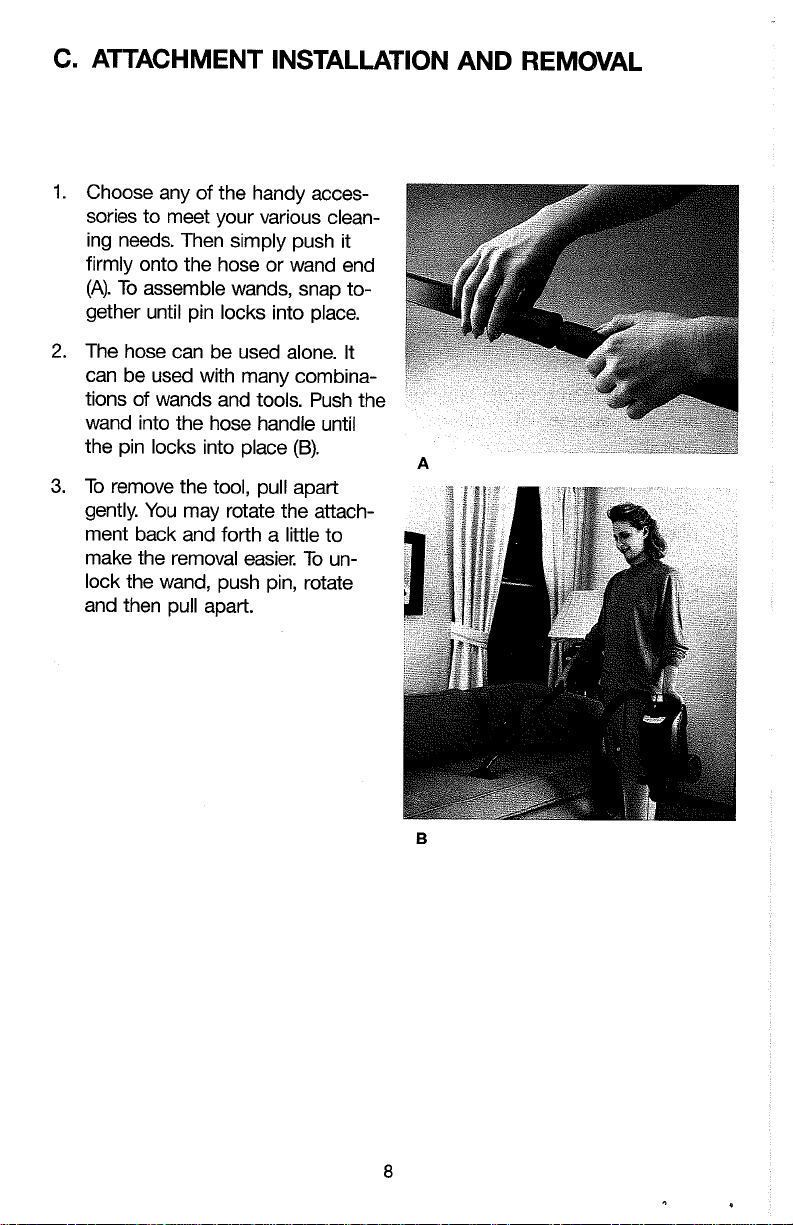
Choose any of the handy accessories to meet your various cleaning needs. Then simply push it
firmly onto the hose or wand end
(A).
To assemble wands, snap to-
gether until pin locks into place.
The hose can be used alone. It
can be used with many combinations of wands and tools. Push the
wand into the hose handle until
the pin locks into place
To remove the tool, pull apart
gently. You may rotate the attachment back and forth a little to
make the removal easier. To unlock the wand, push pin, rotate
and then pull apart.
(B).
Page 9
D. CORD WRAP AND QUICK RELEASE
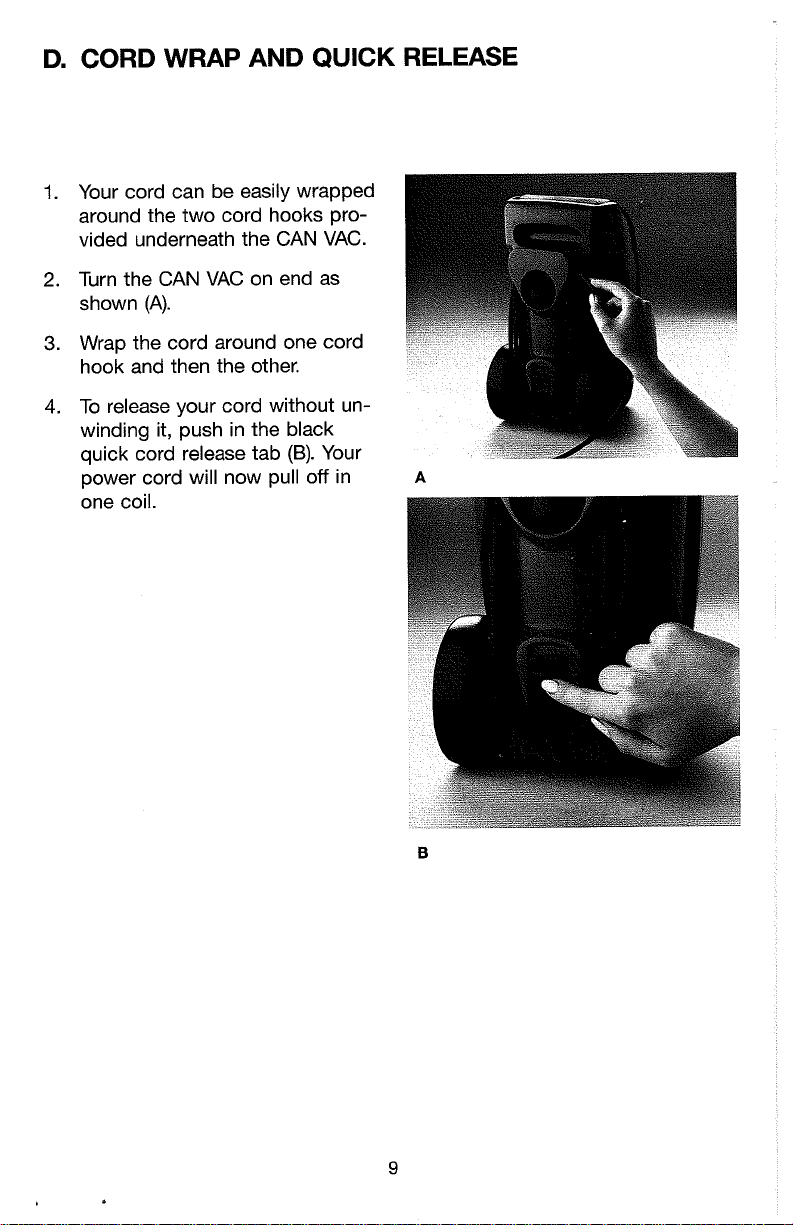
Your cord can be easily wrapped
around the two cord hooks provided underneath the CAN VAC.
Turn the CAN VAC on end as
shown (A).
Wrap the cord around one cord
hook and then the other.
To release your cord without un-
winding it, push in the black
(B).
quick cord release tab
power cord will now pull off in
one coil.
Your
A
Page 10
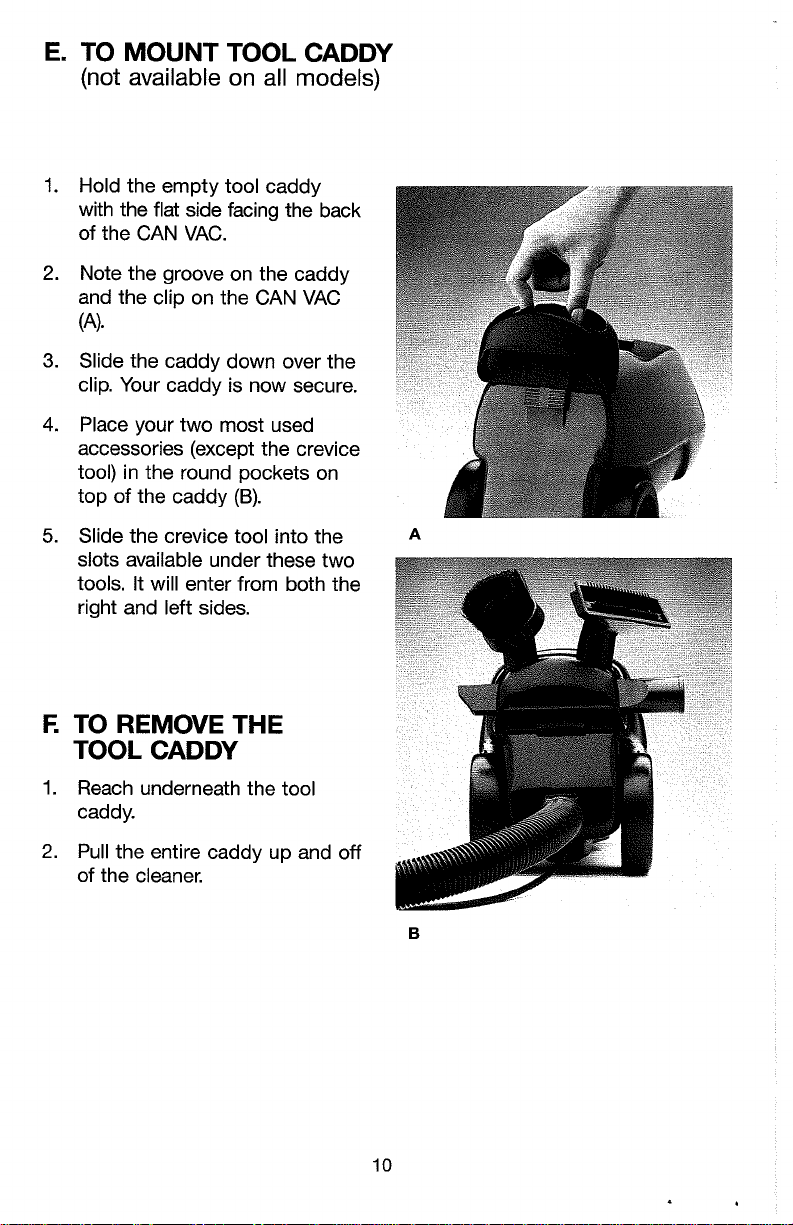
TO MOUNT TOOL
CADDY
(not available on all models)
Hold the empty tool caddy
with the flat side facing the back
of the CAN VAC.
Note the groove on the caddy
and the clip on the CAN VAC
(4.
Slide the caddy down over the
clip. Your caddy is now secure.
Place your two most used
accessories (except the crevice
tool) in the round pockets on
top of the caddy
Slide the crevice tool into the
slots available under these two
tools. It will enter from both the
right and left sides.
(B).
TO REMOVE THE
TOOL
Reach underneath the tool
caddy.
Pull the entire caddy up and off
of the cleaner.
CADDY
Page 11

G.
SHOULDER STRAP INSTALLATION
AND REMOVAL
1.
Squeeze together the clip on one
end of the strap.
2.
Insert the clip into one of the
grooves (one front, one back) on
CAN VAC (A).
(optional)
NOTE:
properly.
3.
Clip may break if not installed
Do the same steps for the
remaining clip and groove. Your
CAN VAC can now be carried on
your shoulder while you clean
above the floor
(B).
Page 12

H.
TO MOUNT WALL BRACKET
(optional)
Choose a convenient location
such as a broom closet in which
to store your CAN VAC.
Using the screws provided,
mount the bracket as shown
against a wall (a).
Hang the attachments on the
(B).
bracket as shown
store the wands and remaining
tool on the hose end while hang-
ing. If your closet does not allow
for this, simply stand the remaining accessories in a corner.
You can
A
Page 13

I.
TO
USE AS A
BLOWER
NOTE:
UNPLUG CLEANER BEFORE
REMOVING OR INSTALLING HOSE.
Page 14

J.
TO USE POWER NOZZLE
Convert your Can Vac into a dual motor system with an OPTIONAL Power
Nozzle Kit. With its separate motor and revolving brush, the Power Nozzle
actually lifts your carpet. The revolving brush gently sweeps the carpet
clean of dust and dirt particles buried deep in the carpeting.
POWER NOZZLE GRID
CAN VAC MODEL
02003, 02003WC
03004
-
0301 3
*To order, refer to the enclosed quick parts mailer or call 1-800-321-1134 for
an Authorized Royal Dealer near you.
K.
CUSTOMER SERVICE
In the event that further assistance is required, see your Yellow Pages for
an authorized Royal Dealer. Costs of any transportation to and from any
place of repair are to be paid by the owner.
(optional)
*REQUIRED POWER
NOZZLE KIT
Model 213
Model 314
Model 313
The service parts used in this unit are easily replaced and readily available
from an authorized Royal Dealer or retailer.
Always identify your cleaner by the model and serial number when request-
ing information or ordering replacement parts. (The model number appears
on the bottom of the cleaner.)
If further assistance is needed, contact Royal Appliance
Cleveland, Ohio 1-800-321 -11 34.
. .
Mfg. Co.,
-
Page 15

Now
that
you
have a
CAN VAC,
meet the rest
We know you're going to be impressed with the way your new
CAN VAC performs. Why not get the same high quality with other
Royal and Dirt Devil vacuums?
Check your yellow pages for an authorized Royal dealer or see
your favorite retailer.
of
the
family.
Page 16

FOR SERVICE:
Check
YELLOW
the
PAGES
to locate the dealer nearest
Or
01991
all
rights reserved
call toll-free
Royal
Appliance
Mfg.
Co.
1 (800) 321 -1134
ROYAL APPLIANCE
650
Alpha Drive
Cleveland, Ohio
1-800-321 -1 134
you.
MFG.
44143-2172
CO.
Page 17

Page 18

T
INFORMACION
Las siguientes recornendaciones han sido reunidas por la Asociacion de Fabricantes de
Aspiradoras en colaboracion con fuentes gubernarnentales y privadas interesadas en la
seguridad de 10s productos. Estas recornendaciones sirven para ayudarle y protegerlea usted.
Esta aspiradora esta disehada solo para el uso domestico.
PARA
EL
CONSUMIDOR
IMPORTANTES INSTRUCCIONES DE
SEGURIDAD GUARDE ESTAS
INSTRUCCIONES EN UN LUGAR SEGURO
Al utilizar cualquier electrodornestico, hay que seguir unas precauciones basicas, incluidas
las siguientes:
LEA TODAS LAS INSTRUCCIONES ANTES DE UTlLlZAR EL ELECTRODOMESTICO.
SlGA SIEMPRE LAS INSTRUCCIONES DE SEGURIDAD.
AVISO:
PARA MlNlMlZAR EL
ELECTROCHOQUE,
Examine su aspiradora y siga todas las instrucciones que aparezcan en las etiquetas o
en la propia aspiradora.
El utilizar la aspiradora sobre las superficies
rnojadas puede causar un electrochoque.
No perrnita que 10s nifios jueguen con la
aspiradora. Vigile bien cuando la aspiradorase
utiliza cerca de
rnisrnos la utilizan.
No utilice la aspiradora para recoger
liquidos ni hurnos inflarnables o combustibles,
tales corno la gasolina. Evite utilizarla en
lugares donde esten presentes dichos
elernentos.
Mantenga la aspiradora en el suelo. Solo las
aspiradoras de rnano pueden colocarse sobre
10s rnuebles.
No utilice la aspiradora sin que el saco recoge-
polvos
y
respectivos sitios.
No utilice el cable para tirar o llevar la aspira-
dora. No utilice el cable corno mango. Evite
pillar el cable al cerrar las puertas, ni perrnita
que el cable pase por esquinas ni bordes
afilados. Mantenga el cable apartado de las
superficies calentadas. No pase la aspiradora
por encirna del cable.
No utilice la aspiradora con el cable o el en-
chufe daiiado o desgastado. No utilice la aspira-
dora si funciona rnal, ni si ha caido, si esta
datiado, si se ha dejado fuera, ni si ha caido al
agua. Llevela prirnero
para que la revisen
Guarde la aspiradora dentro de la casa. Guar-
dela en su sitio despues de utilizarla para evitar
accidentes
10s nifios, o cuando ellos
10s filtros esten colocados en sus
a
un centro de servicio
y
reparen.
y
traspies.
RIESGO DE INCENDIO
0
DANO
No tire del cable para desenchufar la aspira-
dora; tire del enchufe.
Tenga rnucho cuidado al utilizar la aspiradora
en las escaleras.
Utilice solo 10s accesorios y las rnangas recornendados por el fabricante. Utilice la aspiradora solo segun se describe en est manual.
Ponga todos 10s controles en la posicion de
"apagado" antes de desenchufar la aspiradora.
No utilice esta aspiradora con un cable
alargador.
No toque el enchufe ni la aspiradora con las
rnanos rnojadas.
No introduzca ningun objeto en la abertura
de la aspiradora, ni en otras aberturas. No encienda la aspiradora si alguna de las aberturas
esta bloqueada. Mantenga las aberturas libres
de objetos que irnpidan el flujo del aire, tales
corno el polvo, la pelusa,
No utilice la aspiradora para recoger objetos
calientes, hurneantes ni ardientes. No recoja
cigarrillos, cenizas ni cerillas calientes.
Desenchufe la aspiradora si usted sale de la
habitacion. Desenchufela cuando no se esta
utilizando
Siernpre apague la aspiradora antes de
conectar o desconectar la rnanga.
Mantenga apartados de la cara y del cuerpo
la boca de la rnanga, 10s accesorios
aberturas. Mantenga las rnanos, 10s pies, el pelo
y
la ropa apartados de las partes rnoviles, sobre
todo del cepillo giratorio.
PERSONAL:
y
el pelo.
y
antes de revisarla.
y
dernas
Aprobado por el Comite Ejecutivo de la Asociacion de Fabricantes de Aspiradoras el
2
29
de abril de
1987,
Page 19

GUARDE ESTA INSTRUCCIONES
Esta aspiradora contiene
alcanzarse una temperatura de motor anormalmente alta
desenchufe la aspiradora
La corriente volvera a activarse una vez que se enfrie el motor
AVISO:
1
su~erficies rnoiadas puede causar un electrochoque
un
protector termico
y
examine 10s agujeros de
El
utilizar la aspiradora sobre las
que corta automaticamente la corriente al
.
ventilation,
Si se activa el protector termico.
que pueden estar bloqueados
.
CONTENIDO
Caractreisticas 4
Quitar
lnstalar y Quitar la Manga
Sujetar y Soltar el Cable
Colocar el Portaaccesorios
Quitar el Portaaccesorios
Servicio a1 Consurnidor 14
y
Colocar el Saco de Papel
lnstalar y Quitar 10s Accesorios
lnstalar y Quitar la Correa de Hombro
Utilizar corno Unidad Sopladora
Utilizar con Power Nozzle 14
..........................................
........................ 5
...............................
...........................
.................................
..............................
...............................
....................
.........................
...............................
.................................
.
.
1
7
8
9
10
10
11
13
Page 20

CONOZCA
SU
CAN VAC
1. Mango
2.
Salida de Cabeza de Potencia
(Power Nozzle)
3.
Conexion de correa*
4. Interruptor
5. Pestillo de la puerta
6.
Conexion de manga
7.
Manga de 2 metros
8. Accesorio para alfombras*
9. Cepillo de suelo*
10. Mango
*Los accesorios varian segun el modelo
11. Tubos alargadores*
12. Accesorio para tapices
13. Cepillo quitapolvos*
14. Accesorio para espacios pequefios
15. Ruedecilla
16. Recogedor de cable
17. Ruedas silenciosas
18. Suelta rapida del cable
19. Soplador
20.
Portaaccesorios*
Page 21

INSTRUCCIONES
DESENCHUFE LA ASPIRADORA ANTES
DE CAMBIAR EL SACO DE PAPEL.
LA ASPIRADORA DEBE TENER SIEMPRE
EL SACO DE PAPEL COLOCADO.
DE
NOTA:
OPERACION
A. QUITAR Y COLOCAR EL SACO
Asegurese de que su CAN VAC
tenga un sac0 de papel colocado
antes de utilizarla.
Si esta instalada, quite la manga
1.
de la cara de la aspiradora. (Vea
la
seccion
2.
Presione sobre el pestillo de la
puerta para abrir esta
el sac0 de papel (A).
Si su CAN VAC no tiene ningun sac0
de papel colocado, siga estas
sencillas instrucciones de instalacion.
Coloque un nuevo sac0 de papel
3.
en la camara, con el cuello de
carton orientado hacia usted
B).
y
exponer
(B).
DE
PAPEL
4.
Asegurese de que el sac0 este
colocado de manera que el
cuello de carton este a nivel con
el borde de la CAN VAC.
Page 22

Presione sobre las esquinas in-
5.
feriores del cuello de carton para
que encajen detras de 10s
prendedores que se encuentran
en el borde inferior de la camara.
El sac0 de papel ya esta colocado.
6.
Cierre la puerta, asegurandose
de que este bien cerrada.
Si el sac0 de papel esta lleno y
quiere sustituirlo por uno nuevo, siga
las instrucciones
A, pasando a continuacion a la instruccion
debe reemplazarse al notarse un
rendimiento inferior de la CAN VAC.)
7.
8.
7.
Despues de quitar la manga y
abrir la puerta de la CAN VAC,
coja el cuello de carton y tire el
sac0 hacia usted (C).
Tire el sac0 lleno a la basura.
1
y 2 de la seccion
(Se sabe que el sac0
..
Ahora, siga las instrucciones
colocar un nuevo sac0 de papel en
la CAN VAC.
Es posible que quiera usted comprar
10s sacos de papel ahora para
tenerlos a mano cuando 10s necesite.
Pida
informacion a su vendedor
habitual de productos Royal.
3-6
para
Page 23

6.
INSTALAR Y QUITAR LA MANGA
NOTA:
DESENCHUFE LA ASPlRADORA ANTES
0
DE
INSTALAR
4.
Suelte el boton. Tire de la manga
para asegurarse de que este
colocada seguramente.
papel
y
Con el saco de
colocados, esta todo listo para
empezar a pasar la aspiradora.
la manga
QUITAR LA MANGA.
A
Page 24

C. INSTALAR Y QUITAR LOS ACCESORIOS
Elija cualquiera de 10s accesorios
1.
que cu bren todas sus necesidades de limpieza. Coloquelo en
el extremo de la manga o de uno
de 10s tubos alargadores
La manga puede utilizarse sola, o
2.
puede utilizarse con varias combinaciones de tubos
(B).
Para quitar un accesorio o un
3.
tubo, tire suavemente. Puede
girarlo para quitarlo
mente.
(A).
y
accesorios
mas facil-
I
Page 25

D.
SUJETAR EL CABLE, Y LA SUELTA
1.
El cable puede sujetarse con
facilidad utilizando 10s dos prendedores que se encuentran
debajo de la CAN VAC.
RAPIDA
DEL MlSMO
Ponga la CAN VAC de pie, tal
2.
como se ve en la foto (A).
Pase el cable por un prendedor
3.
luego el otro.
Para soltar el cable sin desen-
4.
volverlo, empuje el sueltacables
(B).
negro
un rollo.
El cable se suelta en
y
y
Page 26

COLOCAR EL PORTAACCESORIOS
(no disponible con todos 10s modelos)
Coja el portaaccesorios vacio
con el lado plano orientado hacia
la parte trasera de la CAN VAC.
Alinee la ranura del portaaccesorios con el prendedor de la
CAN VAC (A).
Coloque el portaaccesorios,
pasandolo por encima del prendedor. El portaaccesorios ya esta
instalado.
Coloque
usted utiliza con mas frecuencia
(pero no el accesorio para espacios pequefios) en
redondos en la parte superior del
portaaccesorios
lntroduzca el accesorio de espacios pequefios en las ranuras
que se encuentran debajo de
otros dos accesorios. Puede
introducirse desde cualquier lado.
10s dos accesorios que
10s huecos
(B)
.
10s
QUITAR EL
PORTAACCESORIOS
Coja el portaaccesorios por
debajo.
Tire hacia arriba, quitando el
portaaccesorios de la aspiradora.
B
Page 27

G.
INSTALAR Y QUITAR
DE HOMBRO
1.
Presione sobre el prendedor de
un extremo de la correa.
lntroduzca el prendedor en una
2.
de las ranuras que se encuentran
en la CAN VAC, una delante,
otra detras (A).
(opcional)
LA
CORREA
NOTA:
rompersae si no esta bien instalado.
3.
4.
El prendedor puede
Suelte el prendedor.
Repita el procedimiento con el
y
otro prendedor
La CAN VAC puede llevarse
ahora del hombro mientras se
limpia por encima del nivel del
suelo
(B).
la otra ranura.
Page 28

H.
MONTAR EL SOPORTE DE PARED
(opcional)
1.
Elija un lugar conveniente, como
un armario, donde guardar su
CAN VAC.
2.
Utilizando 10s tornillos provistos,
instale el soporte en la pared, tal
y
como se ve en la foto (A).
3.
Cuelgue 10s accesorios en el
soporte segun la foto
guardarse 10s tubos alargadores
y
el accesorio restante en el ex-
tremo de la manga. Si su armario
lo impide, guarde
en un rincon.
(B).
Pueden
10s accesorios
Page 29

I.
UTlLlZAR COMO UNIDAD SOPLADORA
NOTA:
DESENCHUFE LA ASPIRADORA ANTES
0
DE
QUITAR
INSTALAR LA MANGA.
luaares de dificil acceso.
A
Page 30

J.
UTlLlZAR
LA
POWER NOZZLE (CABEZA DE POTENCIA)
(opcional)
Convierta su Can Vac en un sistema de motor doble con un juego OPCIONAL
de cabeza de potencia. Con su propio motor y su cepillo giratorio, la Power
Nozzle levanta su alfombra. El cepillo giratorio lirnpia suavemente, eliminando
la suciedad y el polvo de la parte mas profunda de la alfombra.
DE
LA
COMPATlBlLlDAD
CAN
MODEL0
*Para pedir, utilice la hoja de pedido adjunta, o llame al 1-800-321-1 134 para
informacion sobre distribuidores autorizados de Royal proximos a usted.
Si necesita ayuda adicional, busque en las paginas arnarillas un distribuidor
autorizado de Royal. El coste de transporte hasta y desde cualquier lugar de
reparacion sera a cargo del consumidor.
VAC
POWER
*JUEGO
NOZZLE
POWER
NECESARIO
NOZZLE
Los componentes de esta unidad se reemplazan con facilidad, y son
disponibles en todas las tiendas autorizadas de Royal.
Siernpre identifique su aspiradora utilizando 10s nurneros de modelo
la hora de pedir inforrnacion, o al pedir piezas de repuesto. (El numero de
rnodelo se encuentra en la parte inferior de la aspiradora.)
En
caso de necesitar ayuda adicional, pongase en contact0 con la Royal
Applicance Mfg. Co., Cleveland, Ohio, 1-800-321-1134.
y
serie a
Page 31

Ahora que tiene usted una CAN VAC,
le presentamos
10s
demas miembros
de la familia.
Sabemos que le va a impresionar el rendimiento de su
nueva
las demas aspiradoras Royal y Dirt Devil?
Busque un distribuidor autorizado de productos Royal en
las paginas amarillas, o visite su tienda habitual.
CAN
VAC.
6P0r que no recibir la misma calidad con
Page 32

 Loading...