

Page 1

Royal AmeriGo and its suppliers specifically disclaim any
warranties, either express or implied, for their products’ fitness for
use in any high-risk activities.
Page
i
Page 2
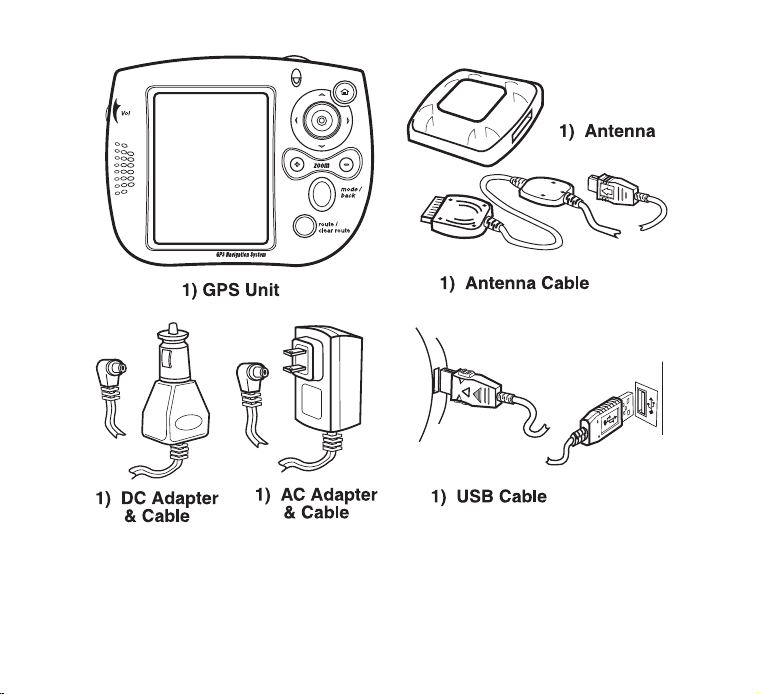
Figure 1
Page
ii
Page 3
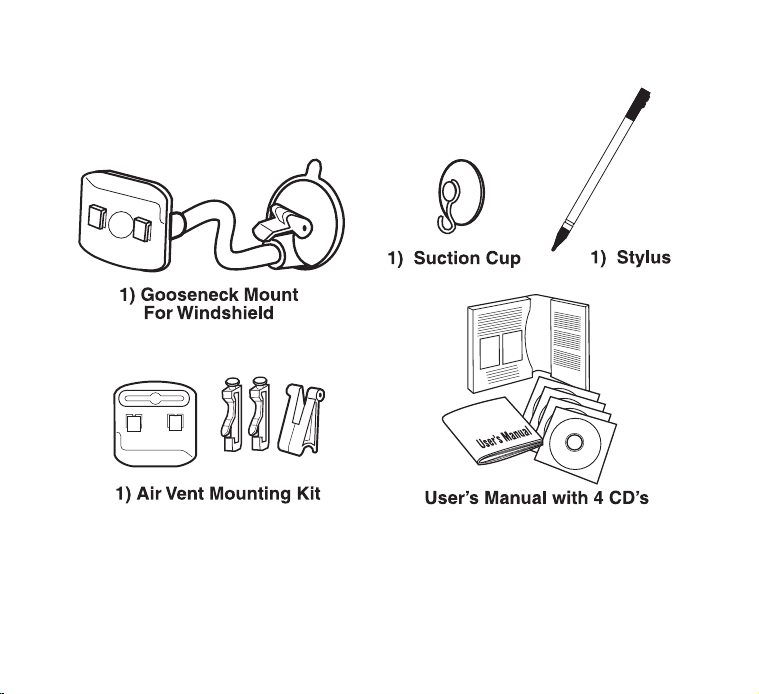
Figure 2
Page
iii
Page 4

1
IMPORTANT SAFETY INSTRUCTIONS ..................... 1
TABLE OF CONTENTS
1.1 CARE OF YOUR SYSTEM ................................................. 4
2 SUMMARY OF FEATURES............................................ 5
3 CHARGING THE GPS SYSTEM .................................... 9
4 CALIBRATING THE GPS SYSTEM............................ 10
5 INSTALLING THE PC SOFTWARE ........................... 11
5.1 SYSTEM REQUIREMENTS ............................................... 11
5.2 INSTALLING MAPFINDER SOFTWARE .......................... 12
5.3 CONNECTING YOUR GPS SYSTEM TO YOUR PC .......... 13
Page
iv
Page 5

6 INSTALLING MAPS....................................................... 14
6.1 SELECTING MAPS........................................................... 14
6.2 COPYING & TRANSFERRING MAPS............................... 18
6.3 ADDITIONAL MAPFINDER FUNCTIONS ......................... 21
7 DELETING MAPS........................................................... 23
7.1 DELETING MAPS FROM THE GPS INTERNAL
MEMORY......................................................................... 23
7.2 DELETING MAPS FROM THE GPS EXTERNAL
MEMORY CARD .............................................................. 24
8 GETTING STARTED WITH YOUR GPS SYSTEM .. 26
8.1 OPENING & VIEWING A MAP ........................................ 26
8.2 FINDING A DESTINATION OR ENDING POINT ............... 27
8.3 FINDING AN ORIGIN OR STARTING POINT.................... 32
8.4 CREATING A ROUTE....................................................... 32
8.5 MULTIPLE STOPS ON A ROUTE ..................................... 33
Page
v
Page 6

9 GPS MENU INDEX ......................................................... 36
9.1 FILE................................................................................. 36
9.2 FIND ................................................................................ 38
9.3 VIEW ............................................................................... 41
9.4 TOOLS ............................................................................. 44
9.4.1 OPTIONS (SUBCATEGORY OF TOOLS) ........................... 46
10 GPS SYSTEM TOOLBAR FUNCTIONS ................... 49
10.1 GPS STATUS INDICATOR/ ENABLING THE GPS
RECEIVER ..................................................................... 49
10.2 SELECTING A PRE STORED FAVORITE AS
DESTINATION................................................................ 50
10.3 SWITCHING THE MAP ORIENTATION ON YOUR GPS
SYSTEM
......................................................................... 50
Page
vi
Page 7

11 GPS SYSTEM CONTROLS ......................................... 51
11.1 HOME BUTTON ............................................................. 51
11.2 MAP SCROLLING JOYSTICK ........................................ 52
11.3 ZOOM IN / ZOOM OUT BUTTON .................................. 52
11.4 NAVIGATION SCREEN .................................................. 53
11.5 ROUTE / CLEAR ROUTE ............................................... 57
12 SETTING UP THE GPS DATE AND TIME .............. 58
13 GPS SYSTEM SETUP................................................... 59
13.1 INSTALLING YOUR MOUNTING ................................... 59
13.1.1 USING THE AIR VENT MOUNT.................................... 59
13.1.2 USING THE GOOSENECK MOUNT................................ 61
13.2 INSTALLING YOUR GPS SYSTEM................................. 62
Page
vii
Page 8

14 TROUBLESHOOTING................................................. 64
14.1 TECHNICAL SUPPORT .................................................. 64
15 WARRANTY, REGISTRATION & TECHNICAL
SUPPORT ....................................................................... 65
16 SOFTWARE LICENSE AGREEMENT ..................... 68
Page
viii
Page 9

1 Important Safety Instructions
For the safety of yourself and others, please observe the following
safety requirements:
Do not attempt to setup or program the GPS navigation and routing
system in a vehicle while the vehicle is in motion, or in any way that
interferes with safe driving. Keep your eyes on the road and
hands on the wheel at all times.
Secure your GPS receiver and unit to the vehicle in such a way as
to not endanger the driver or passengers during driving or
operation.
Do not use the GPS unit in any area (country, state, city, etc.) that
prohibits the use of electronic displays in motor vehicles.
Navigation maps may contain errors and omissions or may be out-
of-date with recent road changes or road conditions. Please be
attentive to roadway signage, all posted roadway information, and
the condition of the roads you are traveling.
Routes generated are only recommendations and are for personal
and non-commercial use.
The software and the GPS receiver may not be used for any
purpose in which failure of the products could lead to personal
injury, physical, or environmental damage.
Page
1
Page 10

FEDERAL COMMUNICATIONS COMMISSION (FCC) RADIO
FREQUENCY INTERFERENCE STATEMENT INFORMATION
TO THE USER:
This device complies with Part 15 of the FCC Rules. Operation is
subject to the following two conditions: (1) This device may not cause
harmful interference, and (2) This device must accept any interference
received, including interference that may cause undesired operation.
Warning: Changes or modifications to this unit not expressly approved
by the party responsible for compliance could void the user’s authority
to operate the equipment.
NOTE: This equipment has been tested and found to comply with the
limits for a Class B digital device, pursuant to Part 15 of the FCC Rules.
These limits are designed to provide reasonable protection against
harmful interference in a residential installation. This equipment
generates, uses and can radiate radio frequency energy and, if not
installed and used in accordance with the instructions, may cause
harmful interference to radio communications.
However, there is no guarantee that interference will not occur in a
particular installation. If this equipment does cause harmful interference
to radio or television reception, which can be determined by turning the
equipment off and on, the user is encouraged to try to correct the
interference by one or more of the following measures:
Page
2
Page 11

• Reorient or relocate the receiving antenna.
• Increase the separation between the equipment and receiver.
• Connect the equipment into an outlet on a circuit different from that
to which the receiver is needed.
• Consult the dealer or an experienced radio/TV technician for help.
Notes: Shielded cables must be used with this unit to ensure
compliance with the Class B FCC limits.
The Responsible party information:
Royal Consumer Information Products, Inc. – 379 Campus Drive, 2nd
Floor, Somerset, NJ 08875, USA
TEL: 732-627-9977
IN CANADA:
This digital apparatus does not exceed the Class B limits for radio noise
emissions from digital apparatus as set forth in the radio interference
regulations of the Canadian Department of Communications.
AU CANADA:
Cet appareil digital respecte les normes de la Classe B pour les
émissions de fréquences radio telles qu´indiquées dans la loi sur les
interférences radio et mises en application par le département canadien
des communications.
Page
3
Page 12

1.1 Care of Your System
• Be careful not to scratch the touch screen. Use only the supplied
stylus or other plastic-tipped pens designed for a touch-sensitive
screen. Never use an actual pen or pencil, fingernails or other
sharp objects on the surface of the touch screen.
• The GPS system should be protected from rain and moisture. Treat
the GPS system as you would treat other electronic devices.
• Do not drop your GPS system or subject it to strong impacts.
• The touch screen can be cleaned with a soft cloth lightly moistened
with a window cleaning solution. Commercial cleaners are sold
separately.
• You can use screen protectors to prolong the life of the touch
screen.
Page
4
Page 13

2 Summary of Features
Detailed street level mapping data.
Mapping features include: location by address, intersection,
location of area points of interest, longitude/latitude.
Calculates route from one location to another, or selection of a
street location on the map.
A one-touch HOME button, gives you directions from your
actual location.
Multiple stop route calculation.
Up to 10 maps can be opened at one time.
Provides driving directions and route guidance.
Tapping the street on the map will show the street name.
Zoom in and zoom out with stylus or board buttons.
Users can save favorite or frequent locations.
GPS status indicators.
Vehicle navigation simulations.
When navigating with the GPS receiver:
o Options to choose from one of three routing methods:
Fastest, Shortest, No Highways.
o Displays the street name of the next turn at the bottom
of screen.
o Shows the distance and direction of the next turn.
o Shows the distance to your final destination.
o Voice directions for reliable route guidance.
Page
5
Page 14

o Auto zoom-in before the turn or highway entrance/exit
and zoom-out after.
o Ability to navigate in compass mode.
o Can use the GPS receiver position (current location) as
the point of origin.
o A one-touch Route/Clear Route button.
o Navigation data such as speed, longitude, latitude,
local time and direction of travel.
o Automatic re-route option.
o Moving maps displayed while navigating with the GPS
receiver.
o A one-touch selectable “North Up” or “Heading Up” for
map display.
o Selectable “on” or “off” for voice prompts.
Page
6
Page 15
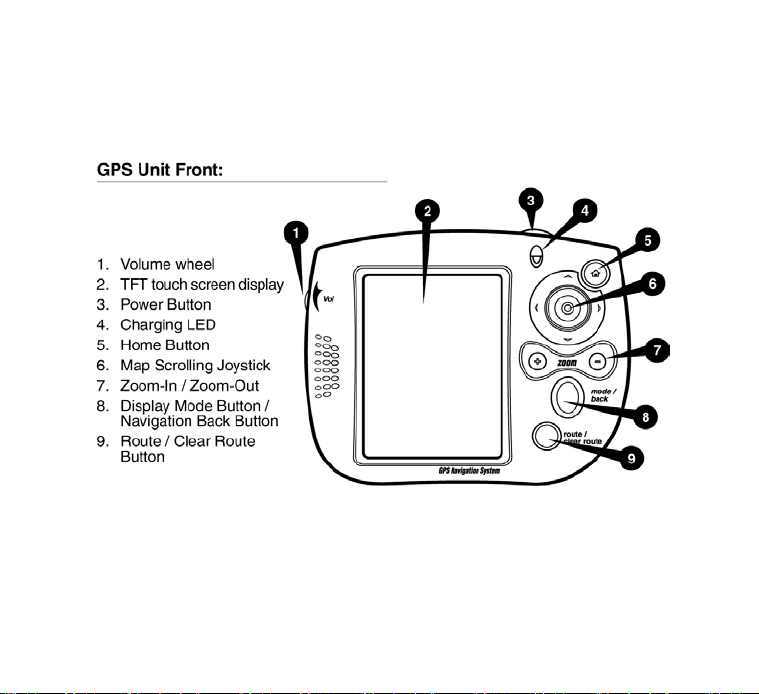
Figure 3
Page
7
Page 16
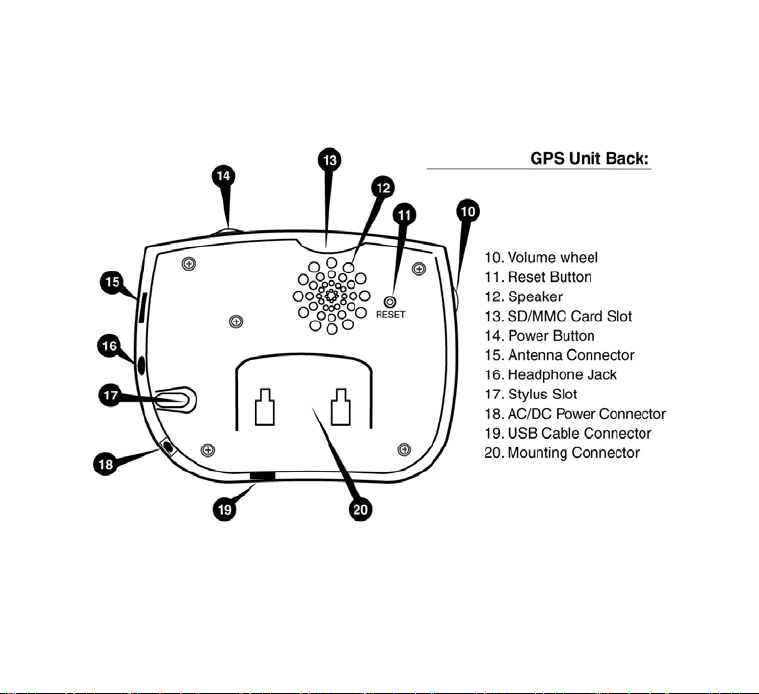
Figure 4
Page
8
Page 17

3 Charging the GPS System
Before using the GPS system for the first time you will need to fully
charge the lithium-ion battery that is built into your GPS system.
Connect the AC adapter to the GPS system where indicated in Figure 1.
Plug in the AC adapter and charge the GPS system for 12 hours. After
the first minute of charging the system will turn itself on. DO NOT
ATTEMPT TO OPERATE THE SYSTEM WHILE IT IS BEING
CHARGED FOR THE FIRST TIME!
Use only the AC adapter supplied with your system!
Failure to use the supplied adapter may cause major damage to
your GPS system.
Page
9
Page 18
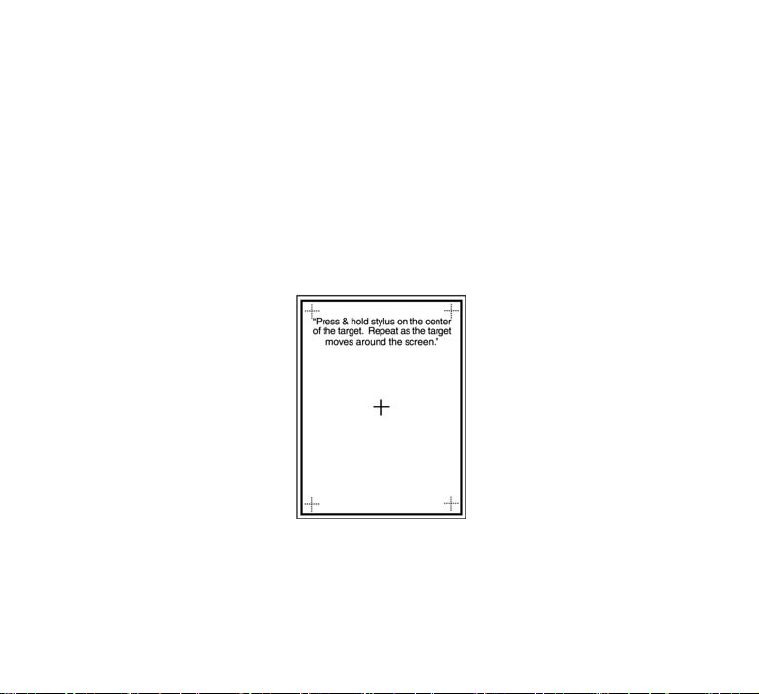
4 Calibrating the GPS System
To insure smooth operation it is necessary to calibrate the touch screen
on the GPS system. Turn on the GPS system. Using the stylus
provided, tap the center of the cross that appears on the middle of the
screen, as shown in figure 2. Tap the center of each cross that appears.
Your system is now calibrated and ready for use. Tap anywhere on the
screen to start the GPS software. You will now see a safety warning
screen. Read the safety warning and tap OK to indicate your
understanding and acceptance.
Figure 5
Page
10
Page 19

5 Installing the PC Software
5.1 System Requirements
Desktop/Laptop Requirements
CPU: Pentium or Pentium compatible
Operating System: Windows 98/ME / XP
Available hard drive space: 24 MB minimum for map installation.
Maps vary in size up to 22 MB for USA maps / 31 MB for Canada
maps. The GPS maps are made up of 260 maps segments for
USA, separated into geographical and municipality boundary
divided sections. Canadian versions of the GPS system consist of
15 maps segments.
Page
11
Page 20

5.2 Installing MapFinder Software
Overview – MapFinder is the PC software that contains all of the
detailed street-level maps for the United States. Simply select the
map or group of maps you wish to download, and download the
selected maps to your unit, or any storage media attached in either
device.
1) Insert the Installation CD into your CD-ROM Drive.
2) The installation screen will be automatically displayed. Click on
the Install button and follow the on-screen instructions.
3) When this process is finished, it will take you back to the
installation screen. Click exit.
If the Installation screen does not appear:
Click the [Start] button ► [My Computer]. (In other versions of
Windows, double-click [My Computer] on the desktop) Then
right-click the CD-ROM drive containing the CD, select [Open]
from the menu that appears and double-click the [SETUP] icon.
Page
12
Page 21
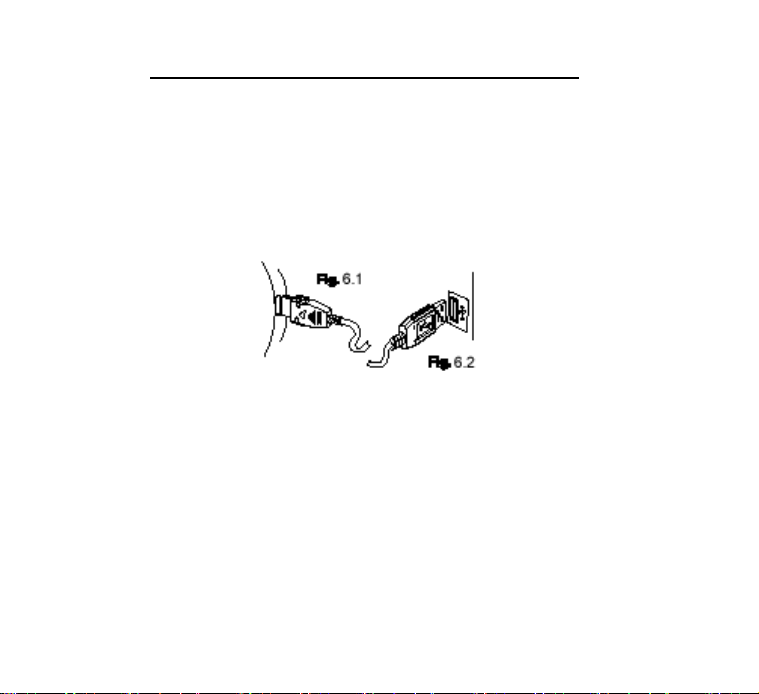
5.3 Connecting your GPS System to your PC
Be sure your GPS system is turned off and connected to the AC adapter
which was supplied with your system. Connect the USB cable supplied
with your GPS system to the connector opening located on the bottom
of your GPS system as shown in Figure 6.1. Connect the other end of
the USB cable to an available USB port on your computer as shown in
Figure 6.2. Turn on the GPS system by pressing the ON/OFF Button.
After turning on your GPS system, the FIND NEW HARDWARE wizard
will be displayed on your screen. Select the option that says
AUTOMATICALLY INSTALL DRIVERS and follow the on-screen
instructions. After completing those instructions, a SET UP
PARTNERSHIP window will be displayed. As a default, YES will be
selected. Click on Next and follow the on-screen instructions.
Page
13
Page 22

6 Installing Maps
Your GPS unit can store up to 100MB of maps in its internal
memory and can also store maps on removable external (MMC or
SD) memory cards. The storage location you select will depend on
your individual needs. For most users, the GPS internal 100MB
memory will hold the maps you will need. If you expect to travel
extensively, for flexibility we recommend you store the maps you
will need on external memory cards.
You may download maps directly to an external memory card or for
convenience, you may order pre-loaded memory cards containing
the maps you require by calling 1-800-261-4555.
6.1 Selecting Maps
To start the map selection process click on the MapFinder Icon on
your PC desktop. The following screen will be displayed:
Page
14
Page 23
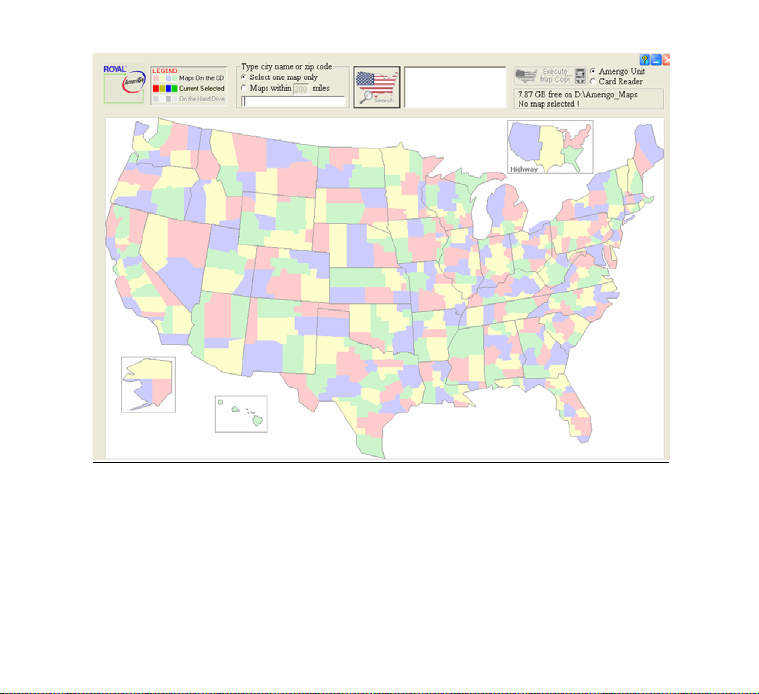
Figure 7
There are two methods that can be used to select a map(s) you
want to use.
Page
15
Page 24
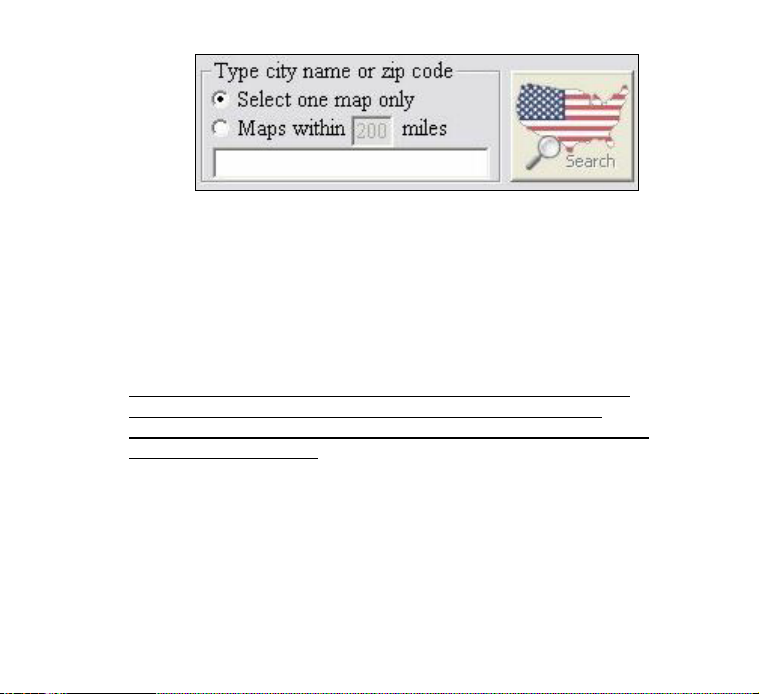
Figure 8
1. Direct Search by City Name or Zip Code
-A city name or zip code can be entered in the search field. Select
one map only, or chose to select Maps within a specified radius.
The factory specified radius is 100 miles. You may modify this to
suit your requirements. Click on the Search button to start your
search.
If an error message appears while searching by zip code, try to
search again using a city name or by entering the first three
numbers of your zip code and scrolling through the suggested zip
codes in the result field.
-After a search is done, a list of maps will appear in the results field,
double-clicking any of these names will cause that map section to
be highlighted on the map.
Page
16
Page 25

2. Select a Map by clicking directly on the map
-By placing the mouse cursor directly on top of a small map on the
screen, the information for that map will be displayed.
Figure 9
-Double-clicking an area on the U.S. map will cause that area to be
selected and remain highlighted.
The number of maps selected will appear to the right of your search
window, along with the total amount of memory required to store
them in your GPS system as shown in figure 10.
Figure 10
Page
17
Page 26

6.2 Copying & Transferring Maps
After the map(s) have been selected, they will need to be
transferred from the appropriate CD(s) to the GPS unit or external
memory card. You may use an SD or MMC memory card.
To load maps on an SD memory card, you will need to remove the
security lock.
A Remove the SD memory card from the GPS system
SD/MMC card slot.
B Unlock the card security lock as shown on figure 11
Figure 11
C Insert the SD memory card onto the GPS system SD/MMC
card slot.
Page
18
Page 27

1. Once all the maps are highlighted and selected, there are two
choices at the top right corner of the MapFinder screen:
- MS ActiveSync – this will transfer maps directly to the GPS unit
or memory card in the GPS unit via ActiveSync.
- Card Reader – if a memory card reader is present MapFinder
can send map files directly to a memory card.
2. Choose the location to store the maps and then click the
“Execute Map Copy” button.
3. This will bring up prompt screens asking which storage location
on the device you want to put the maps:
- On the GPS unit: either Main Memory or External Memory
Card.
- On a Card Reader: if there are multiple card slots on the reader,
it will ask which letter drive to use.
Select the appropriate location and click OK to continue.
Page
19
Page 28

4. A series of screens will follow confirming your requested map
transfer. Keep clicking OK to continue. The final screen will be a
screen displaying the progress of the map transfer process. Once
it is finished, MapFinder will return to the map screen and the maps
on the GPS unit or memory card will be ready to use.
If you don’t have enough memory, you will receive an error
message. You can then deselect maps until the memory space
required matches the amount of available memory on your GPS
system or external memory card. You can also delete maps stored
in your GPS system or external memory card. Refer to section 7 for
details.
After you finish copying maps to an SD memory card, lock the
security lock to protect the maps from any damage. For that, follow
these steps.
A Remove the SD memory card from the GPS system SD/MMC
Card Slot.
B Lock the card security lock.
C Insert the SD memory card onto the GPS system SD/MMC
Card Slot.
Page
20
Page 29

6.3 Additional MapFinder Functions
By right clicking anywhere on the MapFinder screen, the following
menu will appear:
Page
21
Page 30

MapFinder Menu Functions
View Current Map – This will open a map on the PC to be viewed.
Un-Select ALL Maps
– This will cause any maps currently selected
to be un-selected.
Copy Current Map to GPS unit –This option will allow the map(s)
that have been selected to be downloaded to the GPS unit.
Copy Selected Map to GPS unit – This will copy any maps currently
highlighted to the GPS unit.
Extracting Maps to the Hard Drive– Any of these functions will copy
maps directly to the hard drive but not the GPS unit for future
transfers to the GPS unit.
Deleting Maps
– These functions will delete maps from the hard
drive.
MapFinder Help – This will open the help file for MapFinder.
About MapFinder
– This gives the version information about
MapFinder.
Minimize – Minimizes MapFinder.
Exit
– Exits the MapFinder program.
Page
22
Page 31

7 Deleting Maps
You can delete maps from the GPS system internal memory or external
memory card by connecting your GPS system to your PC.
7.1 Deleting Maps From the GPS Internal Memory
1. Connect the GPS System to your computer as described on
section 5.3
2. On your PC, click the [Start] button ► [My Computer]. (In
other versions of Windows, double-click [My Computer] on the
desktop). Then right-click Mobile Device, select [Open].
3. Right-click the My Maps folder, select [Open].
4. Select the maps you want to delete. Each map consists of two
files. In order to completely remove the desired map, you will need
to delete both files. Both files will have the same name, but
different extensions. For example, to delete the map of New York
you will need to delete the following two files;
NY_NEW_YORK_CITY.INX and NY_NEW_YORK_CITY.RMF.
5. Right-click over the selected maps, select [Delete] or press
the Delete Key from your keyboard.
Page
23
Page 32

Your desire maps have been removed form the GPS unit, you can
load more maps by following the steps described on section 6.
7.2 Deleting Maps From the GPS External Memory
Card
1. If you are using an SD memory card:
A Remove the external memory card from the GPS system
SD/MMC card slot.
B Unlock the card security lock as shown on figure
C Insert the external card onto the GPS system SD/MMC
card slot.
2. Connect the GPS System to your PC as described on section
5.3.
3. On your PC, click the [Start] button ► [My Computer]. (In
other versions of Windows, double-click [My Computer] on the
desktop). Then right-click Mobile Device, select [Open].
4. Right-click the Card folder, select [Open].
Page
24
Page 33

5. Select the maps you want to delete. Each map consists of two
files. In order to completely remove the desired map; you will need
to delete both files. Both files will have the same name, but
different extensions. For example, to delete the map of New York
you will need to delete the following two files;
NY_NEW_YORK_CITY.INX and NY_NEW_YORK_CITY.RMF.
6. Right-click over the selected maps, select [Delete] or press
the Delete Key from your keyboard.
7. If you are using an SD memory card.
A. Remove the external memory card from the GPS system
SD/MMC Card Slot.
B. Lock the card security lock.
C. Insert the external card onto the GPS system SD/MMC
Card Slot.
Your desired maps have been removed form the GPS unit. You
can load more maps by following the steps described on section 6.
Page
25
Page 34

8 Getting Started with Your GPS System
Please note
enabled before navigation can begin. (See section 10.1)
8.1 Opening & Viewing a Map
1) Tap File Æ Open
2) A list of all available maps in the GPS system memory will be
listed. To list the maps stored on your memory Card double tap on
the folder that says “Card”.
3) Double tap on the desired map.
Note:
Under normal driving situations you may need to open several
maps. The default setting is 5 maps. You can however, open up to
10 maps for longer trips. To give your GPS unit the ability to open
up to 10 maps, go to the Tools menu on the GPS unit and select
Options. (See section 9.4.1)
: After a route is created, the GPS receiver needs to be
Steps 1 through 3 can be repeated to open multiple maps.
Page
26
Page 35

8.2 Finding a Destination or Ending Point
The methods used to find an Origin (route starting point) or
Destination (route ending point) are the same. The Origin will be
displayed in Green and the Destination in Red.
In the Find menu there are several methods to find a location:
(figure 12)
- Recent Destination
- The user defined Favorites database
- Searching for an address
- Searching for an intersection
- Searching the built-in Points of Interest Database
You also can define the origin or the destination by double taping
the desired street on the map.
Page
27
Page 36

Figure 12
Page
28
Page 37

Recent Destination - This will bring up a list of up to 11 recent
destinations.
Favorites
– This will search a database of locations that have been
previously named and stored by the user.
1. Tap Find Æ Origin or Destination Æ Favorites.
2. Enter the name of the favorite you want to find in the small entry
field. A list of favorites most closely matching the one you entered
will appear in the window below the entry field.
3. Tap on a favorite to highlight it and tap OK.
You can also set up your favorite destination by tapping on the star
icon located on the bottom right corner of your screen, then follow
steps 2 and 3.
Address
– This will allow a specific address to be located on the
map(s) that are currently open.
1. Tap Find Æ Origin or Destination Æ Address.
2. Enter the address number and street name in the appropriate
fields. The window below the address fields will show street names
most closely matching the one that was entered. Tap on a street to
Page
29
Page 38

highlight it and tap Next.
3. The next screen will ask you to select the appropriate city for the
address. You can also tap the Zip Code box at the bottom of the
screen to display zip codes. Tap on a city to highlight it and tap
Next.
4. The final screen will give you the option to save the location as a
Favorite. It also gives you the option to set up as your home
location for one touch routing.
Intersection
– This will allow for an intersection of two streets to be
located on the map(s) that are currently open.
1. Tap Find Æ Origin or Destination Æ Intersection.
2. Enter the name of one of the streets. The window below the
entry field will display a list of streets most closely matching the one
you entered. Tap on a street name to highlight it and tap Next.
3. The next screen will ask you to select the appropriate city for the
intersection. You can also tap the Zip Code box at the bottom of
the screen to display zip codes on the screen. Tap on a city to
highlight it and tap Next.
4. Enter the name of the second street of the intersection. The
Page
30
Page 39

window below the entry field will display a list of streets most
closely matching the one you entered. Tap on a street name to
highlight it and tap Finish.
5. The final screen will ask if you want to save this address as a
Favorite to be used in the future.
Points of Interest – This will search the database of points of
interest that are built into the map(s) in use with the GPS
Navigation software.
1. Tap Find Æ Origin or Destination Æ Point of Interest.
2. In the first screen you will be shown a list of categories that
represent the different points of interest available in the map you
are using. Tap on a category to highlight it and tap Next.
3. On the next screen a list of locations for that category will
appear. Tap on the location to highlight it and tap Finish.
4. The final screen will ask you if you want to save this address as
a Favorite to be used in the future.
Page
31
Page 40

8.3 Finding an Origin or Starting Point
Finding an origin or starting point for your route is easy and
automatic. The GPS system is programmed to use your current
location at the time you set your route as your origin or starting
point. Should you desire a different starting point follow section 8.2.
8.4 Creating a Route
Once an Origin and Destination have been selected, a turn-by-turn
route can be calculated.
IMPORTANT: In order for the software to give voice directions
and on-screen directions, a route MUST be created before
traveling.
To calculate the route, tap Find Æ New Route -OR- touch the
Route button on the GPS unit.
*Note: If the GPS is enabled and locked-on to your position, the
software will treat your current GPS position as the origin of a route
as long as the GPS indicator is on a street. (To enable the GPS,
see section 10.1).
Page
32
Page 41

8.5 Multiple Stops on a Route
This function will allow a route to have several intermediate stops
before reaching a final destination. Multiple Stops will be displayed
in purple on the map.
1. Click Find Æ Multi-stop.
2. This menu will allow you to find stops using the same methods as
stated in the previous section: Favorites, Address, Intersection and
Point of Interest.
3. Steps 1 and 2 can be repeated to add up to 10 stops in a route.
4. Select your final destination by taping Find Æ Destination.
5. Once all stops have been entered, a route can be calculated. Tap
Find Æ New Route -OR- touch the Route button on the GPS
system.
6. When New Route is selected, and there are multiple stops
entered, a screen similar to figure 13 will appear:
Page
33
Page 42

Figure 13
Page
34
Page 43

7. Multi-Stop Route Screen:
- On this screen, the stops can be arranged in any particular
order for a route.
- Selecting Multi-Stop Route will include any stops on the list in
your route.
- Optimize will create the most direct route through all of the
stops.
- “Route to Final Destination” will create a route from Origin to
Destination with all the stops in between.
- “Route Stop by Stop” will create a route starting with the Origin
to the first stop, then from the first stop to the second, from the
second to the third, and so on.
Page
35
Page 44

9 GPS Menu Index
9.1 File
The items below are shown in Figure 14.
File Menu Items Description
Open
Listing of up to 3
maps used
previously
List Active Map(s)
Close Map(s)
About
Exit
Page
Select this item to open a map file. (See section
8.1)
List the last 3 maps that were used.
Give a list of all the maps currently open and in
use.
Close opened map(s), clearing screen and
settings.
Displays a window showing the current version
of the GPS software and/or maps installed on
your GPS system.
Quit Ostia software.
36
Page 45

Figure 14
Page
37
Page 46

9.2 Find
The items below are shown in Figure 15
Find Menu Items Description
Destination/
Origin
Multi-stop
Page
These items allow for the lookup of the
following for use as an Origin or Destination
of a route:
Favorites
Address
Intersections
Points of Interest
(See section 8.2)
Allows up to 10 stops to be added to a route
between the Origin & Destination. (See
section 8.5)
38
Page 47

New Route
Select this menu item to calculate & display
a new route.
1. The Origin is shown as a green line.
2. The Destination is shown as a red line.
3. The Route is shown as a blue path
between origin and destination.
Reverse Route
Select this menu item to switch the Origin
and Destination of a calculated route.
Note: The reverse route may be different
than the original route because of divided
roads and one-way streets.
Page
39
Page 48

Figure 15
Page
40
Page 49

9.3 View
The items below are shown in Figure 16
Text Directions
GPS Info.
Show
Clear
Page
Select this menu item to display turn-by-turn
driving directions in text format. The text
directions can be scrolled through using the
direction pad of the GPS system.
Select this menu item to display the current
direction, speed, longitude, latitude, local time
and “vision” (line of sight) distance to the
destination according to the received GPS
data.
Select this menu item to display any of the
following information currently being used:
- A Trip Trace
- A Favorite
Select this menu item to clear items off of the
map screen.
41
Page 50

Destination
Select this menu item to display the currently
defined destination. Selecting this function
may change the map scale.
Origin
Select this menu item to display the currently
defined origin. Selecting this function may
change the map scale.
Multi-stop
Select this menu item to display Multi-stop
locations that have been already entered into
the system.
Full Route
Select this menu item to display the currently
defined full route. Selecting this function may
change the map scale.
Page
42
Page 51

Figure 16
Page
43
Page 52

9.4 Tools
Simulation
Record Trip
Trace
Store Favorites
Options
Page
Select this menu item after a route has been
calculated to have the software run a simulation
of the route with on-screen text and graphic
prompts as well as voice prompts.
*Function will not work while GPS is enabled.
Select this menu item to have the software
leave markers at given intervals to record and
save the route that you are currently traveling
on. The interval at which the software will leave
markers can be selected here as well.
This function will allow a specific latitude and
longitude point on the map or the current GPS
position to be stored as a Favorite.
This menu item will allow for customization of
the software. See section 9.4.1
44
Page 53

Figure 17
Page
45
Page 54

9.4.1 Options (subcategory of Tools)
Auto Re-route
Enabling this option will have the software
automatically calculate a new route if you stray from
the calculated route for whatever reason.
Heading Up
Voice Options
Page
Enabling this option will set the display to always
show the GPS indicator pointing towards the top of
the screen with a compass in the lower right corner
of the screen. Disabling this option will orient the
screen so that North is always at the top of the
screen.
This option will allow for the voice prompts of the
software to be changed. New voice prompts may
be available at www.royal.com/gps.
46
Page 55

Route Options
This option sets the method of how the software will
calculate a route:
- Fastest – This will calculate the fastest route based
on posted speed limits.
- Shortest – This will calculate the most direct route.
- No Highway – This will calculate a route avoiding
highways completely. This cannot be used when
actually on a highway.
Units
This option allows the distance to be displayed in
either miles or kilometers.
Display Color
This option allows for a choice of optimal color
schemes for either day or night use.
Maximum
Maps
The maximum amount of maps that can be opened
at once is set with this option, maximum amount
being 10 maps. (Default is 5 maps)
Restore
Default
This option will restore all options to the default
settings.
Page
47
Page 56

Figure 18
Page
48
Page 57

10 GPS System Toolbar Functions
10.1 GPS Status Indicator/ Enabling the GPS Receiver
Red Green Yellow
The Happy Face on the menu bar indicates the current status of the
GPS receiver.
TAPPING THE GPS STATUS INDICATOR WILL ENABLE OR
DISABLE THE GPS ANTENNA.
Red Face = The GPS unit is not receiving data from the GPS
antenna. All connections should be checked, including your power
source.
Yellow Face = The GPS antenna is currently acquiring signals from
the satellites for a signal lock.
Green Face
system is ready for navigation. A red arrow should appear on the
map, signifying your current position.
= A GPS signal lock has been established and the
Page
49
Page 58

10.2 Selecting a Pre Stored Favorite as Destination
1. Tap the star icon on the menu bar.
2. Enter the name of the favorite you want to find in the small
entry field. A list of favorites most closely matching the one
you entered will appear in the window below the entry field.
3. Tap on the desired favorite to highlight it and tap OK.
10.3 Switching the map orientation on your GPS
system
Tapping the compass indicator will allow you to toggle your
display setting between Heading Up (always showing the GPS
indicator pointing towards the top of the screen with the
compass in the lower right corner of the screen) or Heading
North (the map on the screen always has North at the top).
Page
50
Page 59

11 GPS System Controls
11.1 Home Button
The home button guides you home quickly & easily. If you are, lost,
confused, or just tired and want to go home, press the home button
and the GPS system will calculate a route from your actual position
and will guide you home.
To Set Up Your HOME Button:
1.Tap FIND and then DESTINATION. A menu will be
displayed.
2. Tap ADDRESS. Type in your home street address in the
appropriate boxes and tap NEXT.
3. Select your city from the list. You can also tap on zip codes
to help you identify the correct city. Tap NEXT.
4. You will now be asked if you want to store this address as a
Favorite location. Select SAVE AS FAVORITE. Type in HOME
and then tap in the SAVE AS HOME box. Tap OK.
Page
51
Page 60

11.2 Map Scrolling Joystick
The Joystick allows you to browse through the opened maps on
your GPS system.
If you use the joystick while you are in a simulation mode, or your
GPS indicator is positioned on the screen, a black icon box will be
displayed on the screen. When you finish browsing your map, you
can tap that icon, and the unit will return you to your actual position
with your GPS indicator in the middle of the screen again. You can
also use the Mode/Back button to return to your actual position.
11.3 Zoom In / Zoom Out Button
You can use the Zoom buttons to increase or decrease the map
scale displayed on your GPS unit in order to be able to see a
specific point on the map or a general view of the trip.
Zooming in and out can also be achieved by:
Figure 19
Page
Zoom In
Zoom Out
52
Page 61

Dragging the stylus on the screen in a motion from the upper left
corner towards the bottom right corner creates a box on the screen.
The software will attempt to do a best-fit zoom to the area within the
box.
Zooming out is the opposite direction; bottom left to upper right.
11.4 Navigation Screen
Tapping on the Mode/back button will cycle through the six (6)
navigation screens that can be viewed as shown in figures 20 – 22
as follows:
Page
53
Page 62

Map View
Figure 20
Page
54
Page 63

A
Note: Tapping anywhere in the text prompt portion of the screen will
manually sound the voice prompt for the current set of directions.
Page
rrow/Text View Split Arrow & Map View
Figure 21
55
Page 64

Text Directions view Compass View
Satellite Info
View
Figure 22
Page
56
Page 65

11.5 Route / Clear Route
Make sure your antenna is connected and you have a GPS
signal. To verify, look for the status indicator (green signal
face) at the bottom of the display of the GPS system.
Once you have set up your DESTINATION, you can press the
ROUTE/CLEAR ROUTE button on the GPS system. Your
route will be computed, displayed and voice prompts will guide
you automatically to your destination.
If you make an incorrect turn, or decide to take a different
route, the GPS system will announce that “YOU ARE OFF
ROUTE” two times. As you continue along that route, the GPS
system will automatically route you to your destination starting
from your actual location.
To manually compute a different route based on traffic or other
factors, first clear the current route by pressing the
ROUTE/CLEAR ROUTE button once. Press the
ROUTE/CLEAR ROUTE button a second time to compute a
new route starting from your current location.
A routing option screen will be displayed. This will allow you to
select a different routing method to get to your final destination.
Page
57
Page 66

The method you select at that point will be stored as your
default setting for future routes.
If you have set up driving directions to a certain destination,
and half way there you decide to go to a different destination
first from which you don’t need driving directions, press the
ROUTE/CLEAR ROUTE button once to stop the system from
giving you directions. The destination is kept so when you
decide to return to your original destination, you can press the
ROUTE/CLEAR ROUTE and the system will route you from
your actual location to your original destination.
12 Setting up the GPS Date and Time
To set up the date and time on the GPS unit, just tap on the Windows
icon on the bottom of the screen then ►Settings ► Control Panel.
Double tap over Date/Time option. The Date/Time Properties screen
will be displayed.
Select today’s date on the calendar displayed. To move along the
months, tap over the arrows that are on each side of the month.
To adjust the hour, just tap over the number that needs adjustment and
increase it or decrease it by tapping the up or down arrow located
Page
58
Page 67

beside the hour. To change the AM or PM indicator, tap over it and
toggle between them by tapping the up or down arrow.
Select your time zone from the list provided by taping over the arrow
located beside the input box.
Tap over the option Automatically adjust clock for daylight saving if
you want your system to adjust the time for daylight savings
automatically twice a year.
Tap Apply to save your settings and then the OK icon on the top right of
your screen.
Tap the cross on the top right of your screen to close the Control Panel
and return to the GPS Navigation Screen.
13 GPS System Setup
13.1 Installing Your Mounting
You can mount your GPS system by using the air vent mount or the
gooseneck mount provided.
13.1.1 Using the Air Vent Mount
1. Review the part list shown in Figure 2.
2. Insert clip # 1, (the longer clip) into the center hole on the backside of
the vent mount and move the clip to position (A) on the left as shown in
figure 23.
Page
59
Page 68

3. Insert clip # 2 (the shorter clip) into the center hole on the backside of
the vent mount and move the clip to position (B) on the right as shown
in figure 23.
4. Insert the positioning arm in the lower holes (C) on the back side of
the vent mount as shown in figure 23. Be sure the longer end of the
positioning arm is positioned towards the bottom of the mount as shown
in figure 23.
Note: An extra #2 short clip has been included to provide
additional mounting options.
5. Attach the vent mount to the air vent by sliding clips #1 and #2 in
between slots on the center air vent as shown in figure 24.
6. Adjust the angle of the positioning arm to insure the best possible
view of the screen.
Figure 23 Figure 24
Page
60
Page 69

13.1.2 Using the Gooseneck Mount
1. Select a spot where the gooseneck mount will not obstruct your
vision.
2. Clean the surface where you plan to install your gooseneck with a
clean towel or cloth.
3. For best results, moisten the surface of the suction cup.
4. Place the gooseneck suction cup end over the desired surface with
the tab facing up.
5. Push the lever down as shown in figure 25 to force out extra air and
improve suction.
6. Adjust the gooseneck to place the GPS system in a comfortable
position for viewing.
Figure 25
Caution: Some state laws prohibit the use of instruments on the
windshield. In cold weather situations, we suggest that you
preheat the windshield and gooseneck with your air vent system
before attaching it.
Page
61
Page 70

13.2 Installing your GPS System
GPS System
1. Place your GPS system
on its vent or gooseneck
mount by inserting the
hooks on the face of the
mount into the holes on
the back of your system,
then push the system
down till it is securely
locked in place.
2. Place the GPS antenna
on the dashboard of the
vehicle close to the
windshield. Use the mini
suction cup to secure the
antenna in place if
necessary.
3. Plug the DC lighter
adaptor into the lighter
socket of your vehicle.
Figure 26
Page
62
Page 71

4. Insert the small end of your DC/adapter power cable into the
bottom right side of your GPS system as shown in call out 18 of
figure 4 (page 8).
5. Connect the small end of your antenna cable to the top right side of
your GPS system as shown in call out 15 of figure 4. A blue light
will be visible on the antenna.
Page
63
Page 72

14 Troubleshooting
See the Royal AmeriGo website (http://www.royal.com) for FAQ’s, tips,
troubleshooting and latest updates.
14.1 Technical Support
Royal Consumer Information Products, Inc.
http://www.Royal.com/amerigo
379 Campus Drive, Somerset, NJ, 08875, USA
Phone: 800-272-6229
Fax: 630-315-2503
Email: support@Royal.com
Telephone technical support is available Monday through Friday
between the hours of 9:00 AM to 5:00 PM Pacific Standard Time.
Page
64
Page 73

15 WARRANTY, REGISTRATION & TECHNICAL
SUPPORT
PLEASE FILL OUT AND RETURN THE PRODUCT
REGISTRATION CARD INCLUDED WITH YOUR NEW ROYAL
PRODUCT OR FILL OUT THE PRODUCT REGISTRATION
FORM ON THE ROYAL WEB PAGE AT
BE SURE TO KEEP A COPY OF YOUR SALES
RECEIPT!
STANDARD WARRANTY
ROYAL CONSUMER INFORMATION PRODUCTS, INC. ("Royal"), at
379 Campus Drive, 2nd Floor, Somerset, NJ 08875 USA WARRANTS
that your NEW Royal GPS System is free of defects of workmanship
and materials. If there is a defect or malfunction of this product, Royal
will repair it free of charge as follows:
PARTS: New or comparable rebuilt parts in exchange for defective
parts for ONE (1) YEAR from date of customer purchase.
Page
www.royal.com .
65
Page 74

LABOR: Royal provides labor warranty for NINETY (90) DAYS from
date of end-user purchase. At completion of the exchange or repair, the
consumer will be responsible for any parts or services no longer
covered under warranty.
This warranty does not apply to persons who purchased this product
second-hand or used.
This warranty does not include adjustments, parts and/or repairs
required by circumstances beyond the control of Royal, including but not
limited to fire or other casualty, accident, neglect, abuse, misuse,
abnormal use or battery leakage damages.
THERE ARE NO OTHER EXPRESSED WARRANTIES EXCEPT AS
STATED HEREIN. AFTER THE PERIOD OF EXPRESSED
WARRANTY SET FORTH HEREIN, THERE ARE NO EXPRESSED OR
IMPLIED WARRANTIES AND THOSE EXCLUDED INCLUDE THOSE
OF MERCHANTABILITY AND FITNESS FOR PARTICULAR
PURPOSE. Royal shall NOT be held liable for CONSEQUENTIAL
DAMAGES resulting from any failure, defect or malfunction of this
product. Some States do not allow limitations on how long an implied
warranty lasts and some States do not allow the exclusion or limitation
of incidental or consequential damages, so the above limitations may
not apply to you.
Page
66
Page 75

WARRANTY PROCEDURES
TO OBTAIN SERVICE UNDER THE TERMS OF
THIS WARRANTY:
Royal is confident you will enjoy years of trouble-free service from your
new GPS system. Should you feel your GPS system is not functioning
properly please do not return the system to your place of purchase.
Please call Royal directly for warranty replacement or repair at the
following number:
800-255-7998, Extension 5584
The Royal Customer Support Representative will advise you of the
product replacement procedures. You should also call this number for
out-of-warranty service and/or repairs.
PRODUCT SUPPORT HOTLINE:
For questions on use of this product or this warranty call +1-
7998 Extension 5584 (in Canada call 1-888-266-9380 or in Mexico
call +(52-55)-53-33-1333), Monday through Friday during normal
business hours. You can also e-mail Royal at hotline@royal.com.
Page
800-255-
67
Page 76

16 Software License Agreement
This is a legal agreement ("this Agreement") between you ("Licensee"),
Royal Consumer Information Products, Inc. (“Royal”) and Pharos
Science & Application, Inc. (“Pharos”). By opening the Royal Amerigo
MapFinder PC Software, (“Software Package”) and by using the Royal
Ostia Software (“Software”), which is resident in the Royal Amerigo
GPS Navigation System, you agree to be bound by the terms of the
Agreement. If you do not agree to the terms of this Agreement, promptly
return the Royal Amerigo GPS Navigation System, Royal Amerigo
MapFinder PC Software, Software Package, and all included accessory
items to the retailer.
1. Grant of License: This Software License Agreement ("License")
permits Licensee to use one (1) copy of the Software and Software
Package enclosed with the License. The Software and Software
Package includes documentation. This non-exclusive License, without
the right to sublicense, rent or lease, is to install and use the Software
and Software Package on a single personal computer or other device.
2. Software Transfer: Licensee may permanently transfer the License
and all rights there under to a third party by written notification to Royal
and Pharos where the recipient agrees to the terms of the License.
When Licensee delivers the entire Software or Software Package to a
third party, Licensee must also destroy any and all remaining copies of
Page
68
Page 77

the Software or Software Package whether installed on a personal
computer or other device. Such a transfer terminates Licensee's rights
to upgrade the Software, Software Package or map information.
3. Royal and Pharos' Rights: Licensee acknowledges that the
Software and Software Package consists of proprietary, unpublished
products of Royal and Pharos, protected under U.S. copyright law and
trade secret laws of general applicability. Licensee further
acknowledges and agrees that all right, title, and interest in and to the
Software are and shall remain with Royal and Pharos. This Agreement
does not convey to licensee an interest in or to the Software or the
Software Package, but only a limited right of use, revocable in
accordance with the terms of this Agreement.
4. Limitation of Liability: IN NO EVENT WILL ROYAL, PHAROS OR
ITS SUPPLIERS BE LIABLE FOR ANY INDIRECT, SPECIAL
INCIDENTAL, ECONOMIC OR CONSEQUENTIAL DAMAGES
ARISING OUT OF THE USE OF OR INABLITY TO USE THE ROYAL
AMERIGO GPS NAVIGATION SYSTEM, ROYAL/PHAROS OSTIA
SOFTWARE OR ROYAL AMERIGO MAPFINDER PC SOFTWARE,
INCLUDING DOCUMENTATION EVEN IF ADVISED OF THE
POSSIBILITY OF SUCH DAMAGES. IN NO CASE SHALL ROYAL,
PHAROS OR ITS SUPPLIERS' LIABILITY EXCEED THE AMOUNT
PAID BY LICENSEE FOR THE SYSTEM. Some states do not allow the
exclusion or limitation of liability for incidental or consequential
Page
69
Page 78

damages, so in those states, the above limitation or exclusion may not
apply to you.
5. Disclaimer of Warranty: THE ROYAL AMERIGO GPS
NAVIGATION SYSTEM, ROYAL OSTIA SOFTWARE, ROYAL
AMERIGO MAPFINDER PC SOFTWARE AND THE ACCOMPANYING
FILES ARE SOLD "AS IS". ROYAL, PHAROS AND ITS SUPPLIERS
DISCLAIM ANY WARRANTIES AS TO PERFORMANCE OR
MERCHANDISE OR ANY OTHER WARRANTIES WHETHER
EXPRESSED OR IMPLIED. In particular, there is no warranty for highrisk activities. NO WARRANTY OF FITNESS FOR A PARTICULAR
PURPOSE IS OFFERED. The user must assume risk of using the
program.
6. Limitations on Reverse Engineering, Decompilation, and
Disassembly: Licensee may not reverse engineer, decompile, or
disassemble the Software or Software Package except, and only to the
extent, that such activity is expressly permitted by applicable law
notwithstanding this limitation.
7. Separation of Components: The Royal Amerigo GPS Navigation
System, Royal/Pharos Ostia Software, Royal Amerigo MapFinder
Software and included accessories are licensed as a single product. Its
component parts may not be separated for use on more than one
hardware device or one computer.
Page
70
Page 79

8. Termination: Without prejudice to any other rights, Royal and/or
Pharos may terminate this License if Licensee fails to comply with the
terms and conditions of this license. In such event, Licensee must
destroy all copies of the Software, the Software Package and all its
component parts.
9. Copyright: All title and copyrights in and to the Software and
Software Package (including, but not limited to, any images,
photographs, animations, video, audio, music, and or text incorporated
into the Software and Software Package), the accompanying printed
materials, and any copies of the Software and Software Package are
owned by Royal, Pharos or its suppliers. The Software and Software
Package is protected by copyright laws and international treaty
provisions. You may not copy the printed materials accompanying the
Software and Software Package.
10. Governing Law: The agreement shall be governed by the laws of
the State of New Jersey.
11. Export Laws and Regulations: Licensee agrees to comply fully
with all relevant export laws and regulations, therefore, is not exported,
directly or indirectly in violation of United States laws.
12. Proprietary Products: For purpose of any public disclosure
provision under any federal, state or local law, it is agreed that the
Page
71
Page 80

Products are a trade secret and a proprietary commercial product and
not subject to disclosure.
13. Restricted Rights: End User hereby represents and warrants that
the Products shall be protected for public disclosure and considered
exempt from any statute, law, regulation, or code, including any
Sunshine Act, Public Records Act, Freedom of Information Act, or
equivalent, which permits access and/or reproduction or use of the
Products. In the event of breach of any part of this paragraph by such
disclosure, this Agreement shall be considered breached and any and
all right to retain any copies or use of the Products shall be terminated
and considered immediately null and void. Any copies of the Licensed
Software and Software Package held by End User shall immediately be
destroyed. If any court of competent jurisdiction considers this clause
void and unenforceable in whole or in part for any reason, this
Agreement shall be considered terminated and null and void, in its
entirety, and any and all its copies of the products shall immediately be
destroyed.
14. Portions of this product, Copyright © 1996-2003 Telcontar.
Page
72
 Loading...