

Page 1

Contents
1 Welcome
Before Starting..................................................................................................................................................... 1
What is in the Box? ............................................................................................................................................. 2
Important Phone Numbers .............................................................................................................................2
2 Getting Started
Plugging in and Putting in the Batteries .................................................................................................... 3
Installing the Paper Roll....................................................................................................................................5
Installing the Barcode Reader ..................................................................................................................... 6
PC-Based Software .............................................................................................................................................7
Setting the Language........................................................................................................................................8
Setting the Date And Time.............................................................................................................................. 9
Programming the Sales Tax ..........................................................................................................................10
Programming Department Keys .................................................................................................................10
3 Getting To Know the Cash Register
About the Displays ...........................................................................................................................................12
Opening and Closing the Customer Display........................................................................................12
About the Numeric Display........................................................................................................................14
Using the Mode Key Area ..............................................................................................................................14
Using the Keyboard .........................................................................................................................................16
Using the Cash Drawer ...................................................................................................................................17
Page 2

Contents
Using the Accessory Drawer ........................................................................................................................ 18
Using the Counterfeit Detector Feature .................................................................................................. 18
About Paper Money ..................................................................................................................................... 19
Detecting Suspicious Money .................................................................................................................... 19
Programming the UV Light........................................................................................................................ 21
4 Setting Up Your Cash Register - the Basics
Using the Displays ........................................................................................................................................... 22
The Clerk Display........................................................................................................................................... 23
Setting Alphanumeric Descriptions .......................................................................................................... 23
Alphanumeric Code Chart ......................................................................................................................... 24
Using Single Width Characters................................................................................................................. 26
Programming Blank Lines or Restoring Factory Default Messages ............................................ 26
About Programming Numbers in Header Messages ....................................................................... 27
Using Double Wide Characters ................................................................................................................ 27
Programming a Header Message............................................................................................................ 28
Setting the Footer Message ...................................................................................................................... 30
Setting Clerk Numbers and Names ........................................................................................................... 32
Using the Clerk System ............................................................................................................................... 34
Setting the Machine Number ...................................................................................................................... 34
Setting X and Manager Passwords ............................................................................................................ 35
Printing the Quick Start Program Confirmation Report..................................................................... 36
Before Going to Register Mode................................................................................................................... 37
Error Codes ......................................................................................................................................................... 38
Clearing an Error............................................................................................................................................ 38
5 Setting Up Your Cash Register - Advanced
Programming Department Keys................................................................................................................. 41
Setting Standard and Gallonage Mode................................................................................................. 43
Programming Multiple and Single Items ............................................................................................. 43
Programming High Digit Lock-out (HDLO)..........................................................................................44
Programming Tax Status............................................................................................................................ 44
Programming Department Preset Price ............................................................................................... 45
Assigning Department Number Keys .................................................................................................... 46
Programming Department Names......................................................................................................... 46
ii Alpha 600/601 User’s Guide
Page 3

Contents
Scrolling Messages...........................................................................................................................................50
Types of Scrolling Messages ......................................................................................................................50
Scrolling Message Length...........................................................................................................................50
Default Scrolling Messages ........................................................................................................................51
Programming Scrolling Messages ...........................................................................................................51
Sample Scrolling Messages........................................................................................................................51
Programming Scrolling Message Display Times ...................................................................................52
Setting the Off Message Start Time.........................................................................................................52
Setting the Mode Message Start Time ...................................................................................................52
Setting the Sales Message Start and Stop Times................................................................................53
Setting the Idle Messages Start Time .....................................................................................................53
Setting the Amount of Time Message Letters Appear in the Display.........................................54
Programming the Credit Keys......................................................................................................................55
Programming PLU Descriptions..................................................................................................................56
Programming PLUs without a Barcode Reader ..................................................................................57
Programming PLUs with the Barcode Reader.....................................................................................58
Setting the Decimal Points............................................................................................................................59
Setting the Rounding Rates ..........................................................................................................................60
Programming Discounts ................................................................................................................................60
Programming Minus Percentage Discounts........................................................................................60
Programming Coupon Discounts............................................................................................................61
Programming Plus Percentage Add-ons...............................................................................................64
Programming Flag Options...........................................................................................................................65
6 Ringing up Sales and Using Training Mode
Ringing up Sales................................................................................................................................................71
Ringing up Sales with the Barcode Reader...........................................................................................73
Printing Receipts...............................................................................................................................................73
Using Training Mode .......................................................................................................................................75
7 Programming Complex Tax Rates
Setting the Tax Rates.......................................................................................................................................77
8 Running Reports
Running the Program Confirmation Report ...........................................................................................80
Running the Department Confirmation Report ....................................................................................82
Alpha 600/601 User’s Guide iii
Page 4

Contents
Running the PLU Confirmation Report .................................................................................................... 82
Running the Department Sales Report.................................................................................................... 83
Running Management Reports................................................................................................................... 83
About X Readings.......................................................................................................................................... 84
About Z Readings.......................................................................................................................................... 84
About Management Reports .................................................................................................................... 85
Running a Cash-In-Drawer Report .......................................................................................................... 85
Running a Clerk Report ............................................................................................................................... 86
Running a Financial Report ....................................................................................................................... 86
Financial Report Example........................................................................................................................... 87
Running an Hourly Report ......................................................................................................................... 89
Running PLU Reports................................................................................................................................... 90
Running an Electronic Journal Reports................................................................................................. 91
9 Maintenance and Options
Installing a New Paper Roll ........................................................................................................................... 94
Using the Battery System.............................................................................................................................. 95
About the Serial Port....................................................................................................................................... 97
10 Troubleshooting
Error Codes ......................................................................................................................................................... 98
I Hear an Error Beep...................................................................................................................................... 98
Sec code error appears in PRG, X OR Z modes ................................................................................... 99
If Clerk E12 Displays In REG 1 or REG 2 Modes.................................................................................... 99
PE Printer Error or Paper End ....................................................................................................................... 99
EJ -FULL Error...................................................................................................................................................100
The Register Does Not Work at All...........................................................................................................101
Opening the Drawer When There is no Power....................................................................................101
Half System Clear ...........................................................................................................................................102
Partial Reset......................................................................................................................................................102
Full System Clear ............................................................................................................................................103
If Nothing Helps..............................................................................................................................................103
11 Examples
Sample Receipt ............................................................................................................................................106
Transaction Codes .........................................................................................................................................106
iv Alpha 600/601 User’s Guide
Page 5

Contents
Adding Tax to a Non-Taxable Department ..........................................................................................108
Cash Sale With Tendering Change .......................................................................................................... 108
Cash Sale Without Tendering Change ...................................................................................................108
Charge Sale ...................................................................................................................................................... 109
Charge Return................................................................................................................................................. 109
Coupon Discount Sale..................................................................................................................................109
Credit Return ................................................................................................................................................... 110
Credit Sale......................................................................................................................................................... 110
Dept Shift Key..................................................................................................................................................111
Exempting Tax On An Item ........................................................................................................................ 111
Exempting Tax on the Entire Sale............................................................................................................ 112
Gallonage Sales Transaction...................................................................................................................... 112
Minus Percentage Discount Sale.............................................................................................................. 112
Multiplication of a Department Unit Price............................................................................................ 113
Multiplication Sale......................................................................................................................................... 113
Multiplying By A Fraction............................................................................................................................114
No-Sale Function............................................................................................................................................ 114
Overriding a PLU Sale................................................................................................................................... 114
Paid-Out Sale................................................................................................................................................... 115
PLU Sale............................................................................................................................................................. 115
PLU Sale With PLU Description ................................................................................................................. 115
Plus Percentage Sale.....................................................................................................................................115
Received-On-Account Sale.........................................................................................................................116
Registering A Department Unit Price ..................................................................................................... 116
Registering A Reference Number ............................................................................................................ 117
Return Sale ....................................................................................................................................................... 117
Split Tendering Sale...................................................................................................................................... 118
Temporarily Overriding a PLU Price........................................................................................................ 118
Use the Error-Correct /Void Key................................................................................................................ 118
Voiding A Coupon Sale................................................................................................................................ 119
Voiding a Department Preset Price......................................................................................................... 119
Voiding a Department Preset with a Coupon Discount ..................................................................119
Voiding a Department Preset with a Minus Percentage Discount ..............................................120
Voiding A Minus Percentage Discount Sale......................................................................................... 120
Alpha 600/601 User’s Guide v
Page 6

Contents
Voiding a Multiplication of a Department Preset Price....................................................................121
Voiding A Multiplication Sale ....................................................................................................................121
Voiding a PLU Multiplication Sale............................................................................................................122
Voiding a PLU Sale......................................................................................................................................... 122
Voiding a PLU Sale with a Coupon Discount .......................................................................................122
Voiding a Plu Sale with a Minus Percentage Discount .....................................................................123
Voiding a PLU Sale with a Plus Percentage Rate.................................................................................123
Voiding a Plus Percentage Sale.................................................................................................................124
Voiding A Sale .................................................................................................................................................124
A Calculating State Tax Table Codes ...............................................................125
Calculating Your Tax .....................................................................................................................................125
Example Tax Chart ......................................................................................................................................129
The Worksheet .............................................................................................................................................130
Programming the State Tax .......................................................................................................................131
B Programming Tax in Canada ........................................................................132
Setting Flag Options .....................................................................................................................................132
Setting Tax Percentage Rates .................................................................................................................... 133
Linking Tax Rate(s) To Each Department...............................................................................................134
C Product Information ......................................................................................135
Specifications and Safety ............................................................................................................................135
Safety and Legal Notices .............................................................................................................................136
Limited Warranty............................................................................................................................................137
Software Licensing Agreement................................................................................................................. 138
D Settings Tables ..............................................................................................139
Alphanumeric Code Chart ..........................................................................................................................139
Flags....................................................................................................................................................................141
Language Table ..............................................................................................................................................146
Transaction Codes .........................................................................................................................................151
US Tax Status Numbers................................................................................................................................152
Ordering Supplies and Accessories...................................................................153
Index....................................................................................................................155
vi Alpha 600/601 User’s Guide
Page 7

CHAPTER 1
Welcome
Congratulations on purchasing your new Royal cash register! This register
is designed to be easy to use, helping you to focus on running your
business.
Before Starting
Before you start using this manual to set up and customize your cash
register, you should know the following.
When you need to press a key, you see a picture of the key you need to
press and the name of the key is in another font. For example:
1 If you are prompted for a Manager Password, type the password number
If you need to type something in the round Number keys area, what you
need to type is shown in a special font. For example:
2 Using the round Number keys, press 444444 and then press the
and then press the Check key. If you did not program a Manager
Password, go to the next step.
Amount Tend Total key.
Alpha 600/601 User’s Guide
Page 8

Chapter 1: Welcome
What is in the Box?
Look for and unwrap the following:
• Cash Register
• 1 starter roll of standard thermal paper, Royal Reorder Number 013127
(57.5mm).
• Journal Spindle, installed in the printer compartment
• Barcode reader located in a small box
•RegisterLinkTM software
• 1 set of keys, consisting of:
• 2 Cash Drawer keys (515).
• 2 PRG Program keys (427-023).
• 2 REG Register keys (427-024).
• 2 Z keys (427-012).
Important Phone Numbers
If you need help or want to order additional supplies, use the following
contact information.
Customer Service: 1-800-272-6229 (USA)
Ordering Supplies: 1-888-261-4555
Website: www.royal.com
To order items, see Ordering Supplies and Accessories on page 153.
1-888-266-9380 (Canada)
2 Alpha 600/601 User’s Guide
Page 9

CHAPTER 2
Getting Started
Setting up your cash register consists of the following steps:
• Plugging in and Putting in the Batteries
• Installing the Paper Roll
• Setting the Language
• Setting the Date And Time
• Programming the Sales Tax
• Setting at least 2 Department Keys
Do all the steps to make sure you have your cash register set up correctly.
When you are done with this chapter, see the chapter called Getting To
Know the Cash Register, starting on page 12 and the chapter called
Setting Up Your Cash Register - the Basics, starting on page 22 for more
information about your cash register.
Plugging in and Putting in the Batteries
Your cash register needs 3 AA 1.5 volt batteries for the memory backup
system. These batteries did not come with your cash register and you must
purchase them additionally. You should purchase these batteries before
you start this section or as soon as possible after setting up the cash
register.
Alpha 600/601 User’s Guide
Page 10

Chapter 2: Getting Started
Make sure that you plug the cash register into the electrical outlet before
you put in the batteries.
Caution
If you put the batteries in first, they can damage the cash register.
Do not use this cash register outdoors in the rain or near any source of
liquid.
To get the cash register ready to use
1 Remove the cash register and the parts from the box. Store the box and
packing material in a safe, dry place. If you need to move the register in
the future, you can put it back in the box.
2 Remove the tape holding the parts of the cash register in place. For
example, there may be tape on the Journal Compartment Cover. Make
sure you remove the tape on the black Journal Tape spindle inside the
printer compartment of the cash register.
3 Put the register on a hard, level surface, away from rain and spilled
drinks. A hard level surface makes it easier for the cash drawer to go in
and out smoothly.
Do not put the register on a porous surface. Depending on the surface or
any cleaning solution used on the surface, the rubber feet may leave
marks on the surface. Do not place the register on any valuable surface,
such as antique or fine wood tables, desks, and so on.
4 Plug the cash register into a standard three-hole electrical wall outlet.
(115-120 volt, 60 hertz). Make sure the electrical cord is not going to get
tripped over or accidentally pulled from the electrical outlet.
Put the cash register on an electrical circuit with no other electrical
device or appliance. Other appliances can overload the circuit or cause
electrical interference with the cash register. It is best that you use a
circuit without other appliances already on it.
5 Install the memory backup batteries.
• Open the Journal Compartment cover. Remove
the cover and put it aside.
• Move the paper roller bar up and out of the way.
Grab the small handle on the right of the print
roller bar. Push the little handle towards the
back of the cash register and raise the paper
roller bar up. You see a slope down to the paper
compartment. The battery cover is located under the print roller bar,
on the slope.
• Remove the battery cover. Press the edge at the top of the cover and
push to the back. The cover pops off.
4 Alpha 600/601 User’s Guide
Page 11
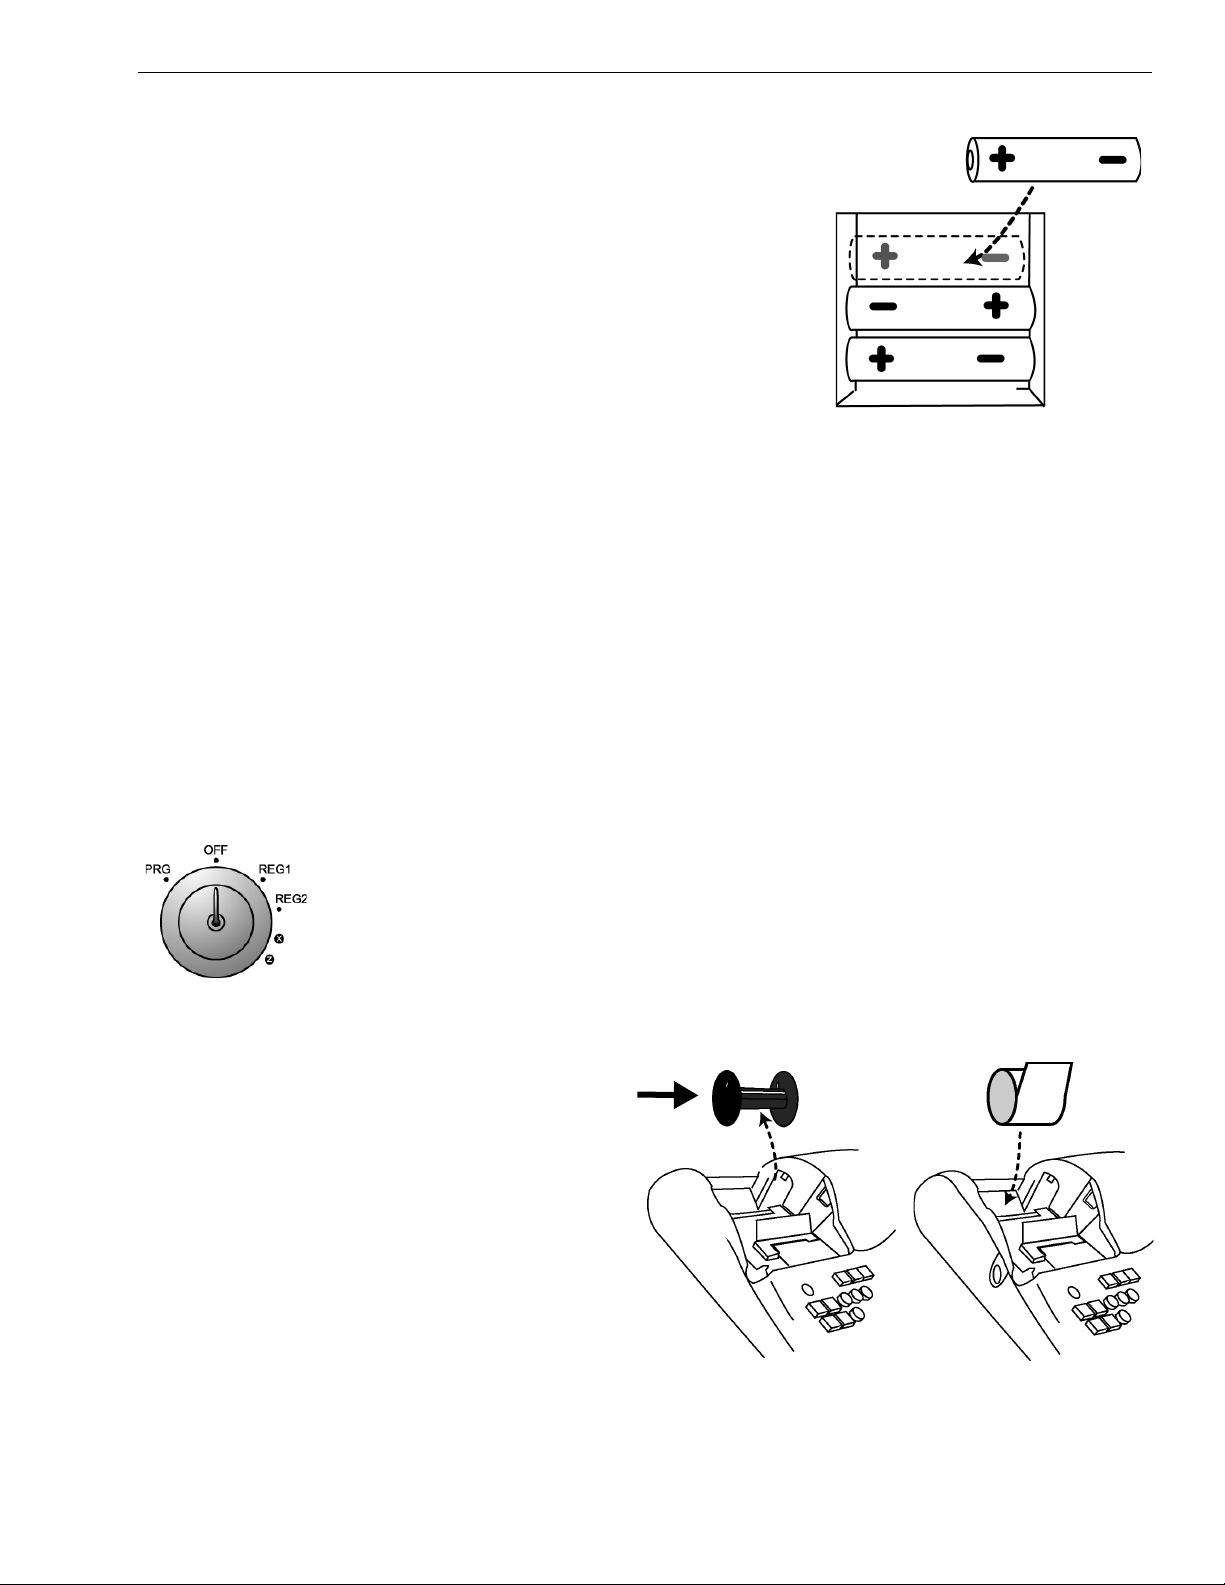
• Put the batteries in the slots. Make
sure that the positive and negative
ends are in the right place. The
batteries have a little plus (positive)
and minus (negative) sign on each end
to help you.
• Replace the battery cover. Slide the
bottom tabs into the long slit in the
bottom position and it snap the cover
into place. Do not put the tabs in the 2
holes in the bottom of the
compartment. The cover will not close and you will break the tabs.
6 Now you are ready to put the paper in the cash register and set the time
and the date. See the next section for more information.
Installing the Paper Roll
Your cash register has a thermal printer that prints receipts for the
customer or a journal tape. Use 2¼ inch (57.5 mm) wide standard thermal
register paper.
Installing the Paper Roll
To install the paper roll
1 Insert the PRG key and turn it to either REG1 or REG2.
• If you need a customer receipt, turn the Mode key to the REG1
position.
• If you do not need a customer receipt, turn the mode key to the REG2
position.
2 Unlock and open the Journal Compartment Cover. Grip the left side of
the cover and gently pull upward. Remove the Journal Compartment
Cover and set aside.
3 Remove the Journal
Takeup spindle. Place
the paper roll in the
little round area at the
bottom of the
compartment. Make
sure the paper feeds
out from the bottom
of the roll, towards
the front of the cash
register.
Alpha 600/601 User’s Guide 5
Page 12
Chapter 2: Getting Started
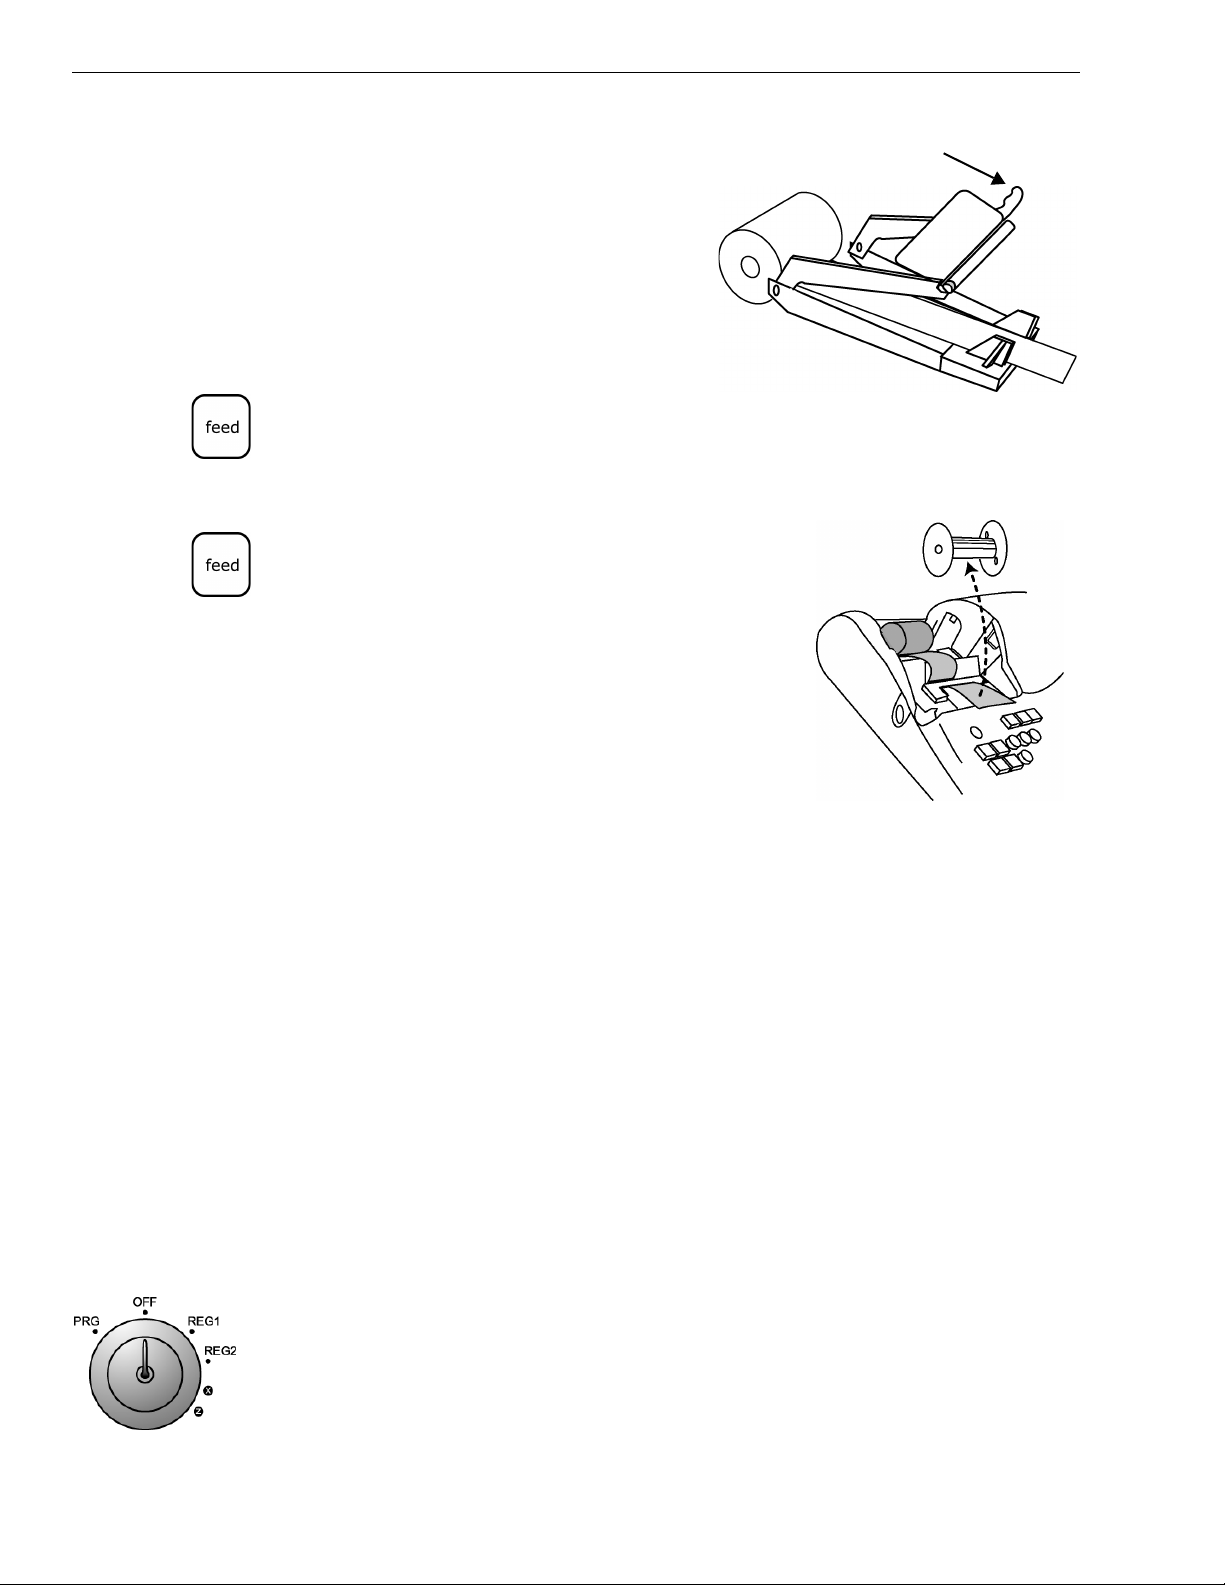
4 Grab the small handle on the right
of the print roller. Push the little
handle towards the back of the cash
register and raise the roller bar up.
5 Lay the end of the paper across the
printer as shown. Move the print
roller down onto the paper and
snap into place. Make sure both
sides are snapped down.
• Press the Feed key until the paper
catches and moves through the printer.
6 Do one of the following:
• If you do not need to print receipts:
Place the black plastic Journal Takeup
spindle on its grooves above the Battery
compartment. The spindle sits above the
paper roll. Press the Feed key to move
the paper through the printer about
10-12 inches. Push the paper through
one of the narrow openings in the center
of the Journal Takeup spindle. Press the
Feed key until the paper catches and
begins to wind securely around the
Journal Takeup spindle. Replace the Journal Compartment Cover.
Handle
• If you want to print receipts:
Lay the customer receipt paper over the receipt slot and close the
Journal Compartment Cover.
Installing the Barcode Reader
Your cash register comes with a barcode reader. It allows you to scan
items with a UPC symbols, instead of using the keyboard to type the PLU
number.
The barcode reader plugs into the port on the lower right side of the cash
register. You don’t need to do anything special to make it work after you
plug it into the cash register. Use the directions below to install it.
To install and program the barcode reader
1 Unpack the reader from the box.
2 Turn the Mode key to OFF.
6 Alpha 600/601 User’s Guide
Page 13

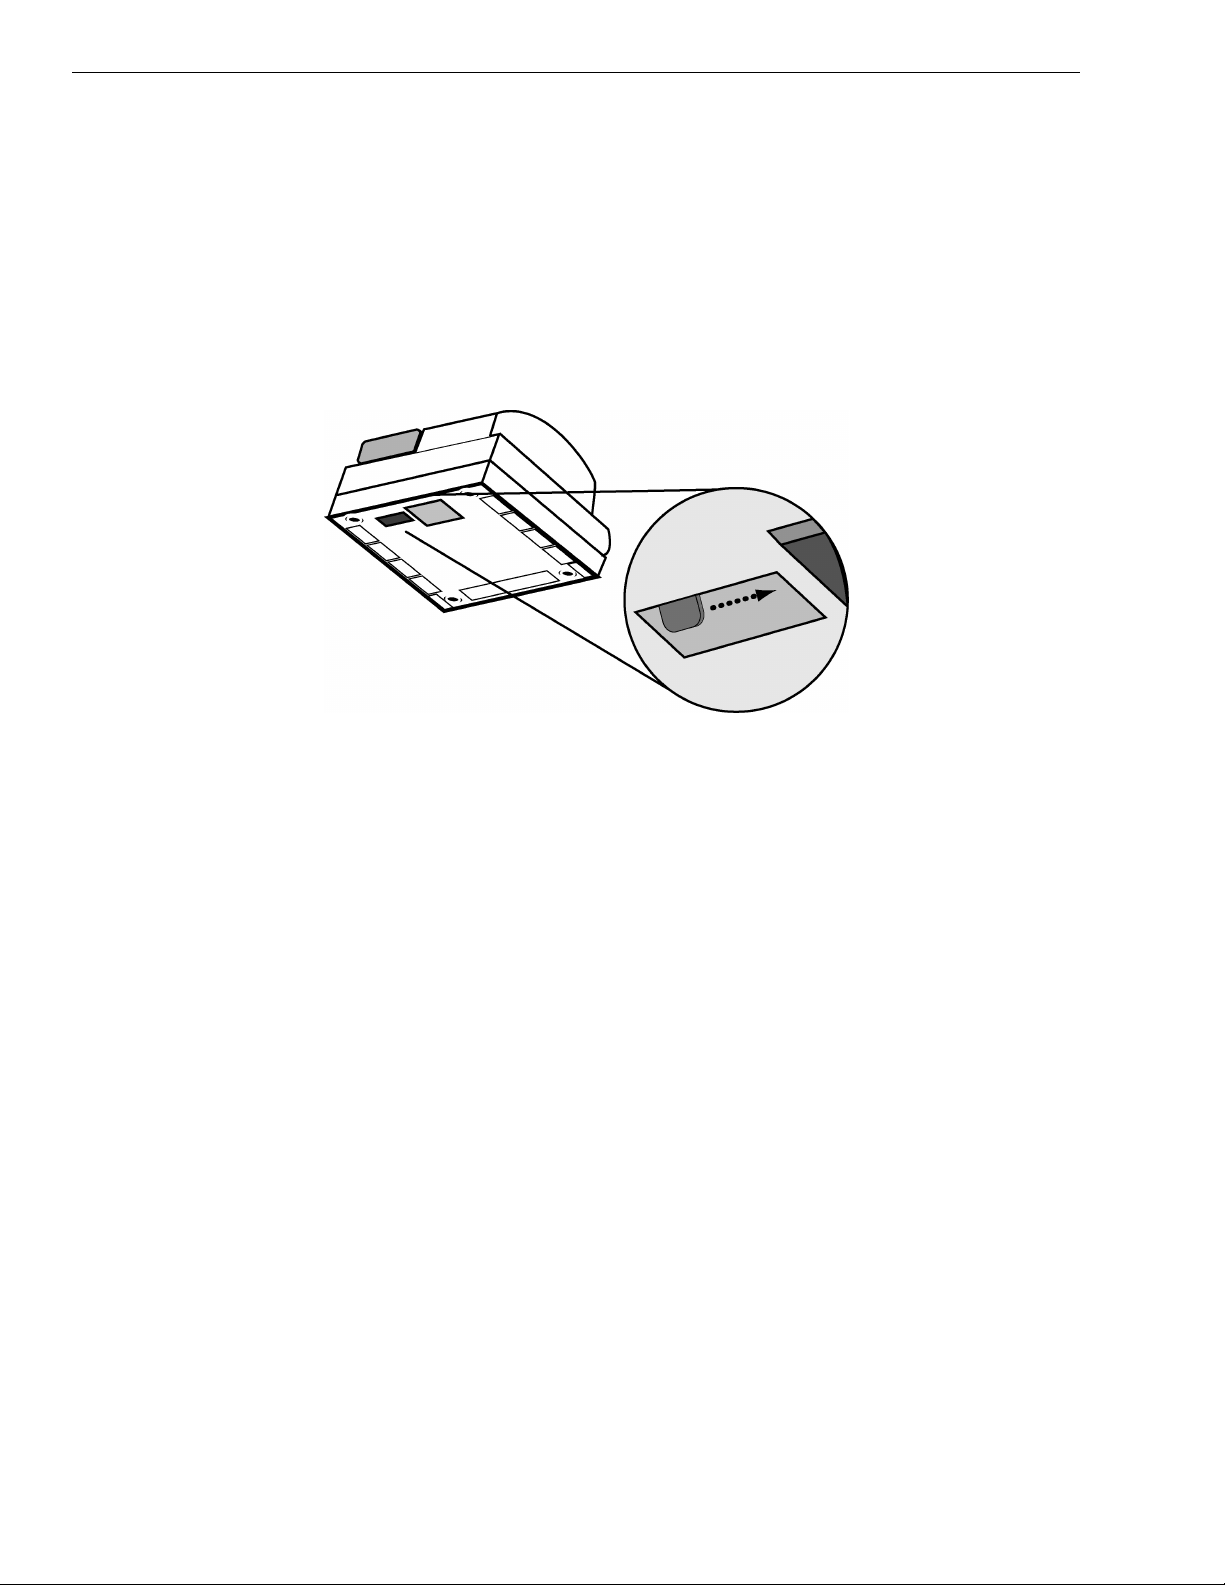
3 Locate the port for the scanner on the lower
right side of the cash register. Plug the reader
into the port.
4 Now you can program the cash register so
that you can scan UPC symbols to ring up
items. For specifics, see Programming PLUs with the Barcode Reader on
page 58.
PC-Based Software
Your cash register includes:
• RegisterLink PC-based software.
• This software allows you to connect the cash register to your PC to
download your sales information and transfer it to QuickBooks® Pro
2002 or later or Peachtree® 7.0 or later accounting software. For
instructions about using the software, see the RegisterLink manual.
PC-Based Software
• Back-Up and Restore - Whether you programmed your cash register
data on the cash register or on your PC, you can back-up that
programming and store the data on your PC. Should you lose the
memory in your cash register, you can simply restore the data from
your PC back to the cash register without having to reprogram all the
PLU's, Departments and other data.
• Additional Registers - When you buy additional cash registers, you can
use the back-up-and-restore feature with multiple registers of the same
model number. Just program one register, back-up the data to your PC,
and then restore or download the data from your PC to the other
registers, as long as they are all the same model number. This saves you
the time of having to program each register individually.
Check the Royal web site for any new features and upgrades to
RegisterLink.
Using the RegisterLink software requires connecting your computer to the
cash register using the serial port. To connect your computer to the serial
port, you need a null-modem serial cable that may or may not be included.
If necessary, you can purchase this cable directly from Royal or at any
computer supply store. For technical details about the serial connection,
see About the Serial Port on page 97.
The RegisterLink software is on a CD. Please install the software from this
CD. Then check for updates on the Royal web site (www.royal.com). If a
later version of the RegisterLink software is available on the web site,
download it from the web site and install it on your PC. It is important that
Alpha 600/601 User’s Guide 7
Page 14

Chapter 2: Getting Started
the CD version of the software is already installed on your PC before you
download and install any upgrades.
RegisterLink software instructions are separate from this manual. The
RegisterLink instruction manual is on the CD that contains the software.
An updated and revised version of the instruction manual accompanies
any newer version of the software that is downloaded from our web site.
Please refer to the RegisterLink instruction manual for all software related
operational instructions and assistance.
Setting the Language
Before you program the cash register, you need to specify a language if
you do not want to use English. You can select English, Spanish, French,
or German.
Changing the language changes the words you and the customer see on
the display. For more information about the prompts that appear, see
Language Table on page 146.
Note
If you start programming the cash register and then set the language, you
will lose all your programming changes.
To set the language
1 Put the PRG key in the Mode key slot and turn it to the PRG position.
2 Using the round Number keys, press 19. Press the round Number key to
select the language you want. The options are:
English 0
Spanish 1
French 2
German 3
3 Press the Void key. The language your cash register shows on the display
is set.
4 If you want to the cash register to show a language other than English,
see Programming Flag Options on page 65 to specify the language you
want. If you set the language after you program more options, all the
custom programing you add is erased.
You are ready to start programming the cash register.
Note
Before you continue, see page 65 for other settings you may want to use.
8 Alpha 600/601 User’s Guide
Page 15

Setting the Date And Time
The date changes every day and prints in the month-day-year format. You
can prevent the date from printing on the transaction receipts. The date
format can also be changed to print day-month-year. For more
information, see Programming Flag Options on page 65.
You can set the cash register so that it does not print the time on receipts.
For more information, see Programming Flag Options on page 65.
The time can print in either the 12 or 24 hour (military time) format. The
default setting is to print in the 12 hour format, which is normally used. To
change to the 24 hour format, see Programming Flag Options on page 65.
Reminder
When you set the time, you need to type the time in a 24 hour format. To
convert the current time to a 24 hour format, add the number 12 to every
hour after 12 noon. For example: 1:15 P.M. programs as 1315. 8:20 A.M.
programs as 0820.
Setting the Date And Time
To set the date
Example 1: To program June 30, 2004
1 Put the PRG key in the Mode key slot and turn it to the PRG position.
2 In the round Number keys area, press 063002 and then press the
#/ST/NS key.
To set the time
Example 2: To program 9:45 P.M.
1 Put the PRG key in the Mode key slot and turn it to the PRG position.
2 In the round Number keys area, press 2145 and then press the Qty/Date
key.
Alpha 600/601 User’s Guide 9
Page 16
Chapter 2: Getting Started
Programming the Sales Tax
Now you need to program the sales tax for your area. If you do not know
your sales tax rate, contact your local government office.
Tip
You must press at least 4 digits in step 4.
Note
If you make a mistake or you hear an error beep, press Clear and start over
with Step 3.
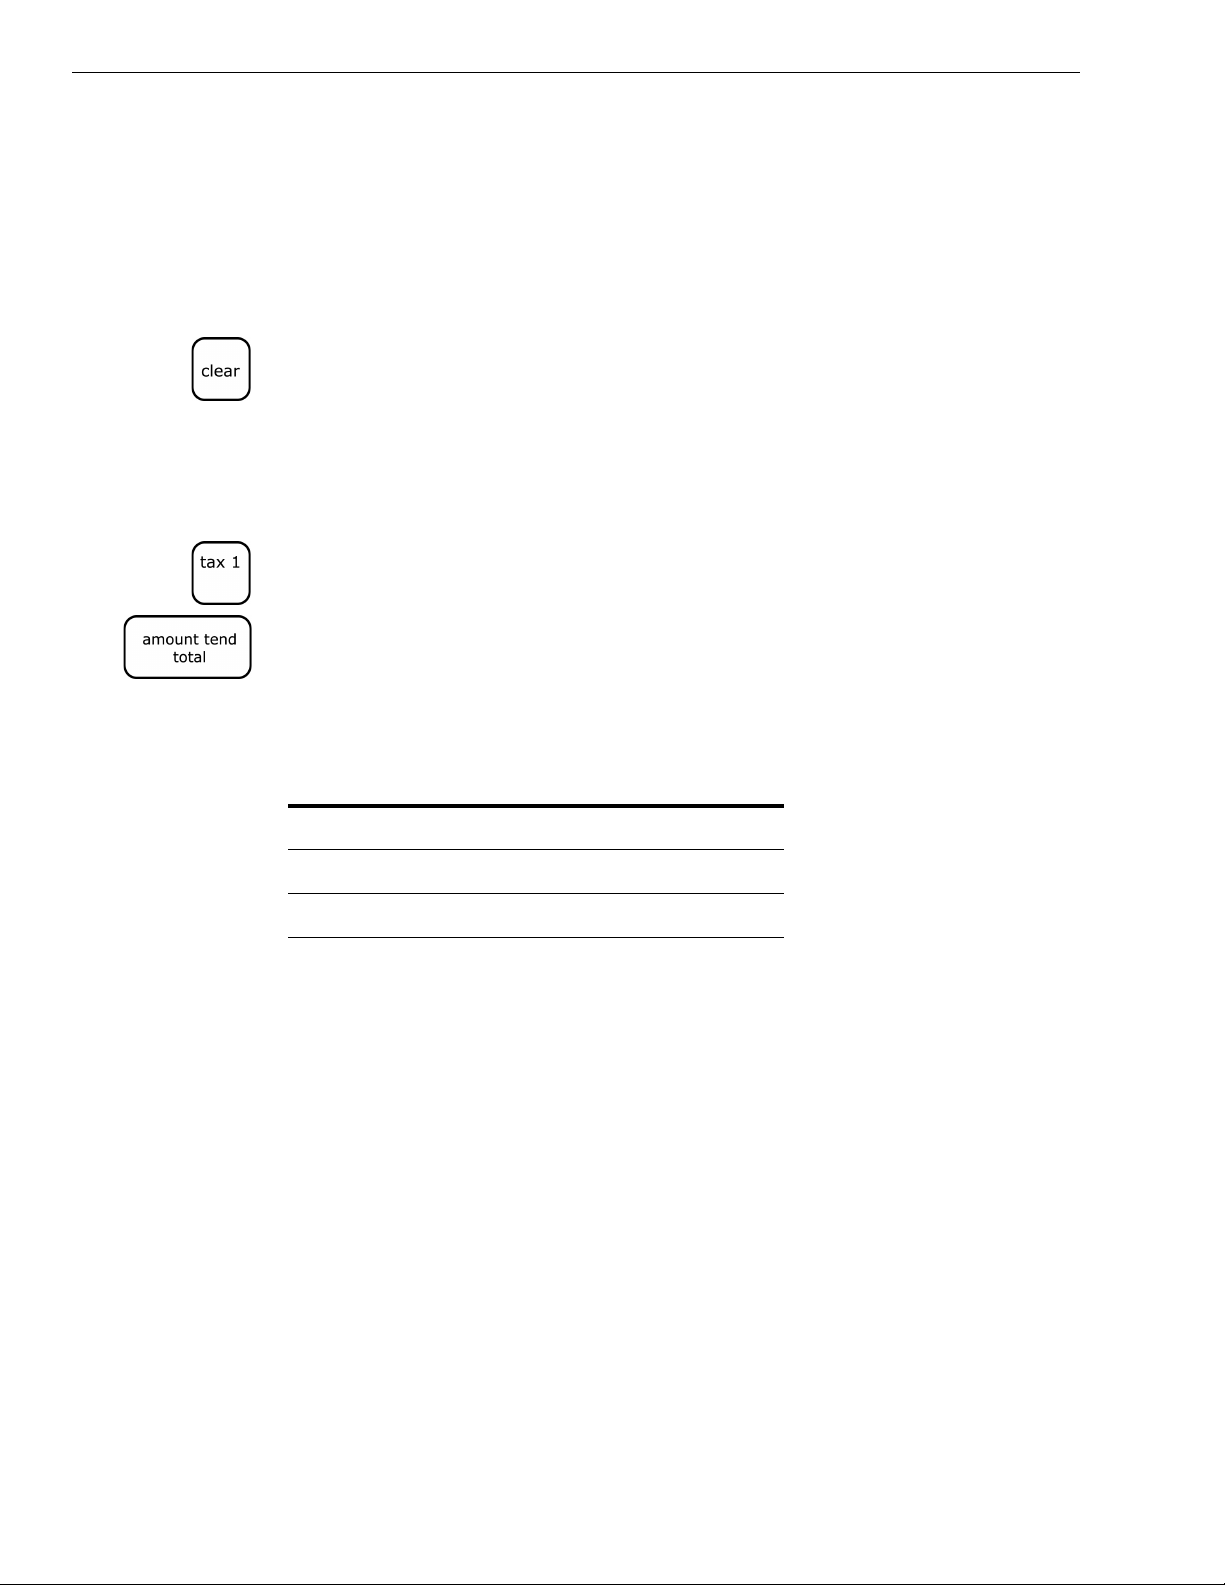
Example 3: To program a sales tax rate of 6%
1 Find your sales tax rate. You may need to contact your local government
office.
2 Put the PRG key in the Mode key slot and turn it to the PRG position.
3 In the round Number keys area, press 1 and then press the Tax 1 key.
4 Press 6000 and press the Amount Tend Total key. Your sales tax is
programmed.
To program other tax rates, in Step 4, press the following:
Table 1 Additional tax rate programming
For this tax rate... Press these keys...
7.75% 7750
5.5% 5500
10.5% 10500
For more advanced tax rate programming, see Programming Complex
Tax Rates on page 76.
Programming Department Keys
You are done with the basic programming of your cash register. After you
program at least 2 department keys, you are ready to use the cash register,
if you do not want to use any of the other features.
For more information about the other features of your cash register, see
Setting Up Your Cash Register - the Basics on page 22 and Setting Up
Your Cash Register - Advanced on page 40.
10 Alpha 600/601 User’s Guide
Page 17
Programming Department Keys
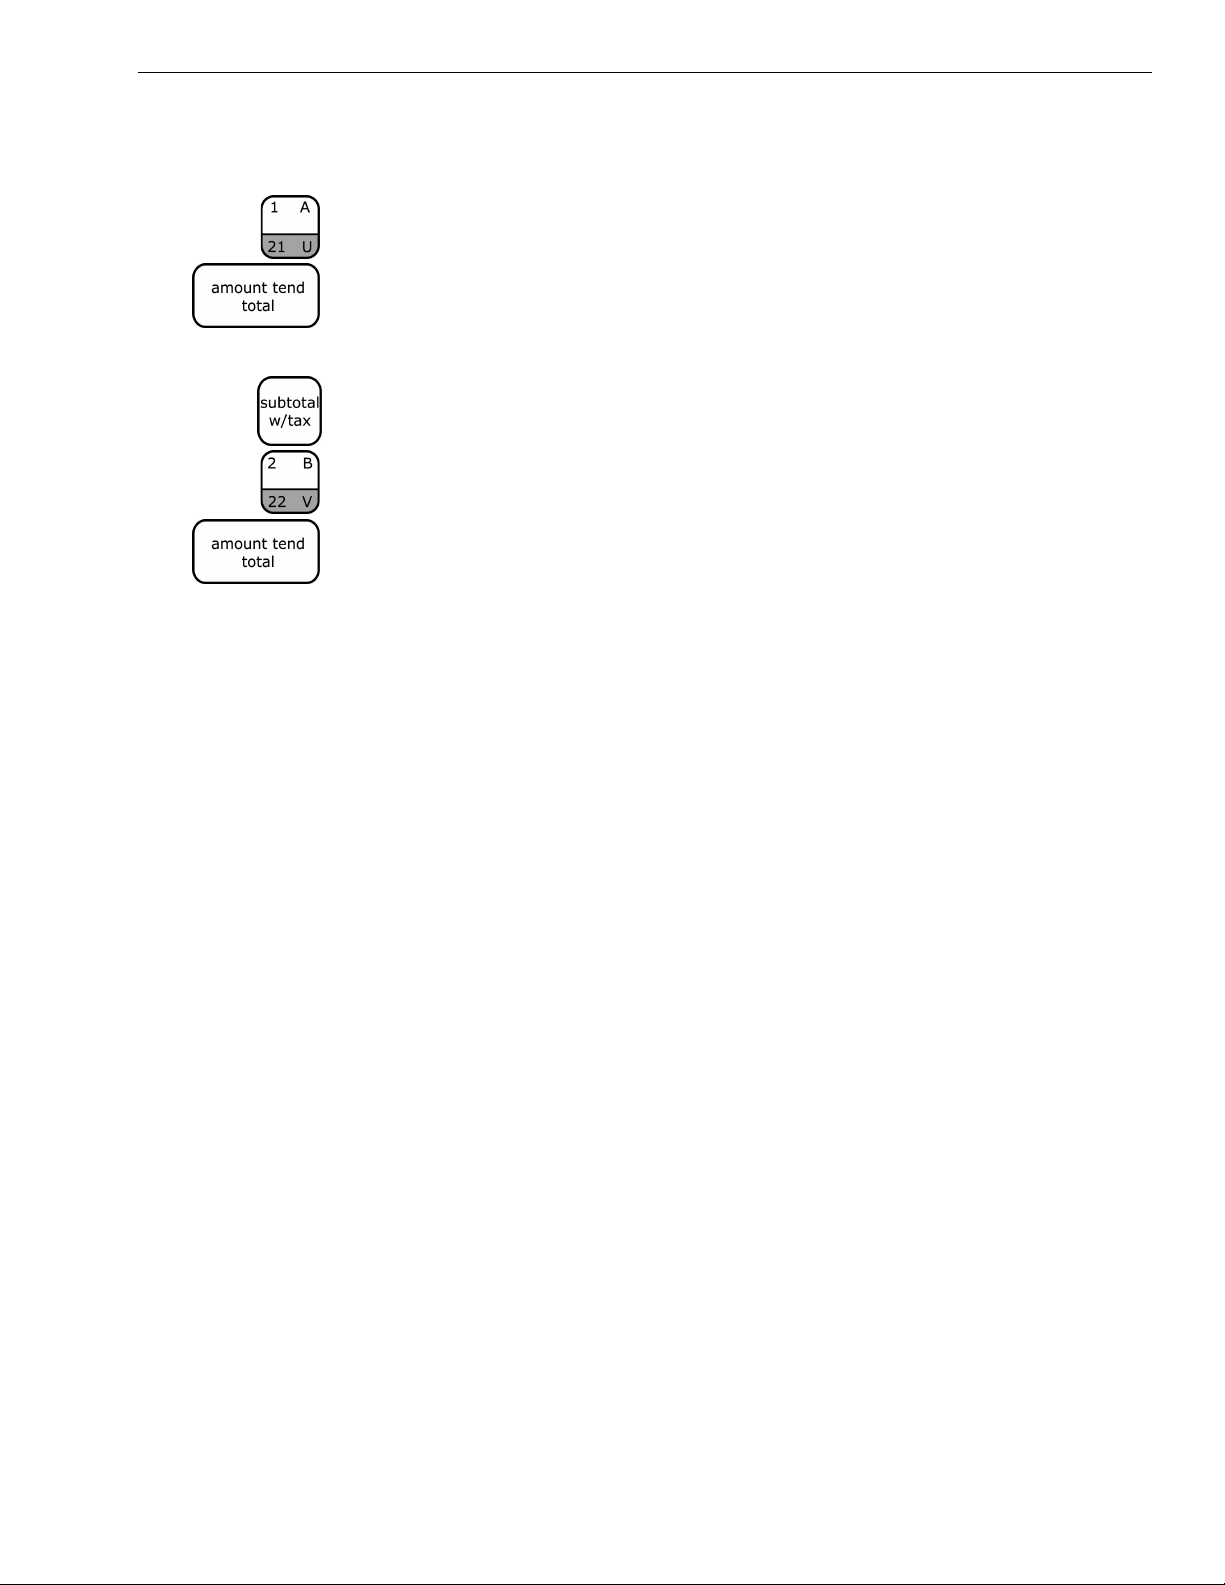
To program Department 1 as taxable with no preset price and no description
1 Using the round Number keys, press 00001 and press the
Subtotal/w/Tax key.
2 Using the round Number keys, press 0 and press the Dept 1 key.
3 Press the Amount Tend/Total key. The department information is saved
in the cash register.
To program Department 2 as non-taxable with no preset price and no
description
1 Using the round Number keys, press 00000 and press the
Subtotal/w/Tax key.
2 Using the round Number keys, press 0 and press the Dept 2 key.
3 Press the Amount Tend/Total key. The department information is saved
in the cash register.
For more information about programming department keys, see
Programming Department Keys on page 41.
Alpha 600/601 User’s Guide 11
Page 18

CHAPTER 3
Getting To Know the Cash Register
This chapter shows you the basics of using your cash register after you set
it up. If you have not yet set up your cash register, see the Quick Start
sheet that came in the box with your cash register or Getting Started on
page 3.
About the Displays
Your cash register has 2 displays.
Customer Display
You can lift, tilt, and rotate customer display so customers can see what is
happening. When you move the register or store it, close the display so it
doesn’t get damaged.
Your cash register has a 1 line customer display
• 1 line that shows letters and numbers (alphanumeric)
The alphanumeric display shows 10 digits for descriptions, scrolling text
messages, and sales dollar amounts.
Opening and Closing the Customer Display
You can open and close the customer display so that customers can easily
see what is happening.
To open and close the customer display
1 To open the rear customer display, pull up, tilt, and rotate to view from
any direction.
2 To close, turn the display to face the rear of the machine and press down.
Alpha 600/601 User’s Guide
Page 19

About the Displays
Operator Display
Your cash register also has a 2 line display for the operator. Both lines
shows letters and numbers (alphanumeric). The following codes can
appear in the display:
Table 2 Codes and words that can appear in the display
This code... Appears when...
: the -%/RA key registers a percent discount amount. Also appears
in the Customer Display.
= the Charge, Check, Amount Tend Total keys are pressed. Also
appears in the Customer Display.
ADD ON the +%/PO key registers a plus percentage amount. *
CASH the Amount Tend Total key finalizes a cash sale. *
CHANGE or C change is due. *
CHARGE the Charge key finalizes a sale. *
CHECK the Check key finalizes a sale. *
CLERK ERR or
CLERK E12
COUPON the -/CPN key is pressed. *
DISCOUNT the -%/RA key registers a percent discount amount. *
E.J FULL the Electronic Journal memory is full. Run the electronic journal
ERROR an incorrect key is pressed. Press the Clear key to clear.
NO SALE the #/ST/NS key is pressed. *
NON TAX the Non Tax key is pressed.
P you are in the middle of a programming step. Also appears in the
PE if an error is detected in the printer.
PAPER END there may be a printer error.
P-O the +%/PO key is used for a paid out function. *
R-A the -%/RA key is used for a received on account function. *
REFUND the Return key is pressed. *
SEC CODE a manager password is programmed. When this appears, you
clerk numbers have been programmed and the clerk system is
active. When this appears, the clerk number must be entered.
report to clear the memory. See EJ -FULL Error on page 100.
Customer Display.
must enter the password.
SUBTTL the Subtotal w/Tax or #ST/NS key is pressed. *
TAX 1/TAX 2 the TAX 1 or TAX 2 key is pressed.
VOID/CORR the Void key is operated. *
* also prints on the receipt or journal tape.
Alpha 600/601 User’s Guide 13
Page 20
Chapter 3: Getting To Know the Cash Register
When ringing up sales, the department number or PLU number can also
appear. If a description or name has been programmed, this description
also appears.
About the Numeric Display
The following codes can appear in the Numeric Display:
Table 3 Codes that can appear in the Numeric Display
This code... Appears when...
PE an error is detected in the printer.
P you are in the middle of a programming step. Also
appears in the Customer Display.
Cr the Charge key is pressed. Also appears in the
Customer Display.
CH the Check key is pressed. Also appears in the Customer
Display.
CA the Amt Tend/Total key is pressed. Also appears in the
Customer Display.
C change is due. Also appears in the Customer Display.
Using the Mode Key Area
The Mode key area allows you to do the following.
Table 4 Mode key settings
This setting... Does this...
• PRG Programs the cash register and sets the cash register to
Training mode. Use the key marked PRG.
• OFF Turns the cash register off. It also electronically locks
the cash drawer. All keys do this.
• REG1 Turns the cash register ON for all normal sales
transactions. All features of the cash register are
activated as programmed. A customer receipt is printed
for every transaction.
14 Alpha 600/601 User’s Guide
Page 21

Using the Mode Key Area
Table 4 Mode key settings
This setting... Does this...
• REG2 Turns ON the cash register and allows all normal sales
transactions just like REG1 mode. However, the built-in
printer is turned-off so that customer receipts are not
automatically printed. This option allows you to control
the amount of receipt paper used by not printing a
receipt for every transaction and only printing a receipt
for those transactions where one is required.
• X Lets you read all transaction totals without clearing any
totals. This is useful for mid day reports. Use the key
marked Z.
• Z Lets you read all transaction totals and clears all
transaction totals to zero, except the end of day, or close
of day, totals. Use the key marked Z.
If you need to keep the register plugged in when you are not using it, turn
the Mode key to the OFF position. The keyboard will not work and the
cash drawer is electronically locked. A small amount of power maintains
the program and transaction data totals.
• For more information about programming the cash register, see Setting
Up Your Cash Register - the Basics on page 22 and Setting Up Your
Cash Register - Advanced on page 40.
• For more information about using the cash register to ring up sales, see
Ringing up Sales and Using Training Mode on page 71.
• For more information about running reports, see Running Reports on
page 80.
Alpha 600/601 User’s Guide 15
Page 22
Chapter 3: Getting To Know the Cash Register
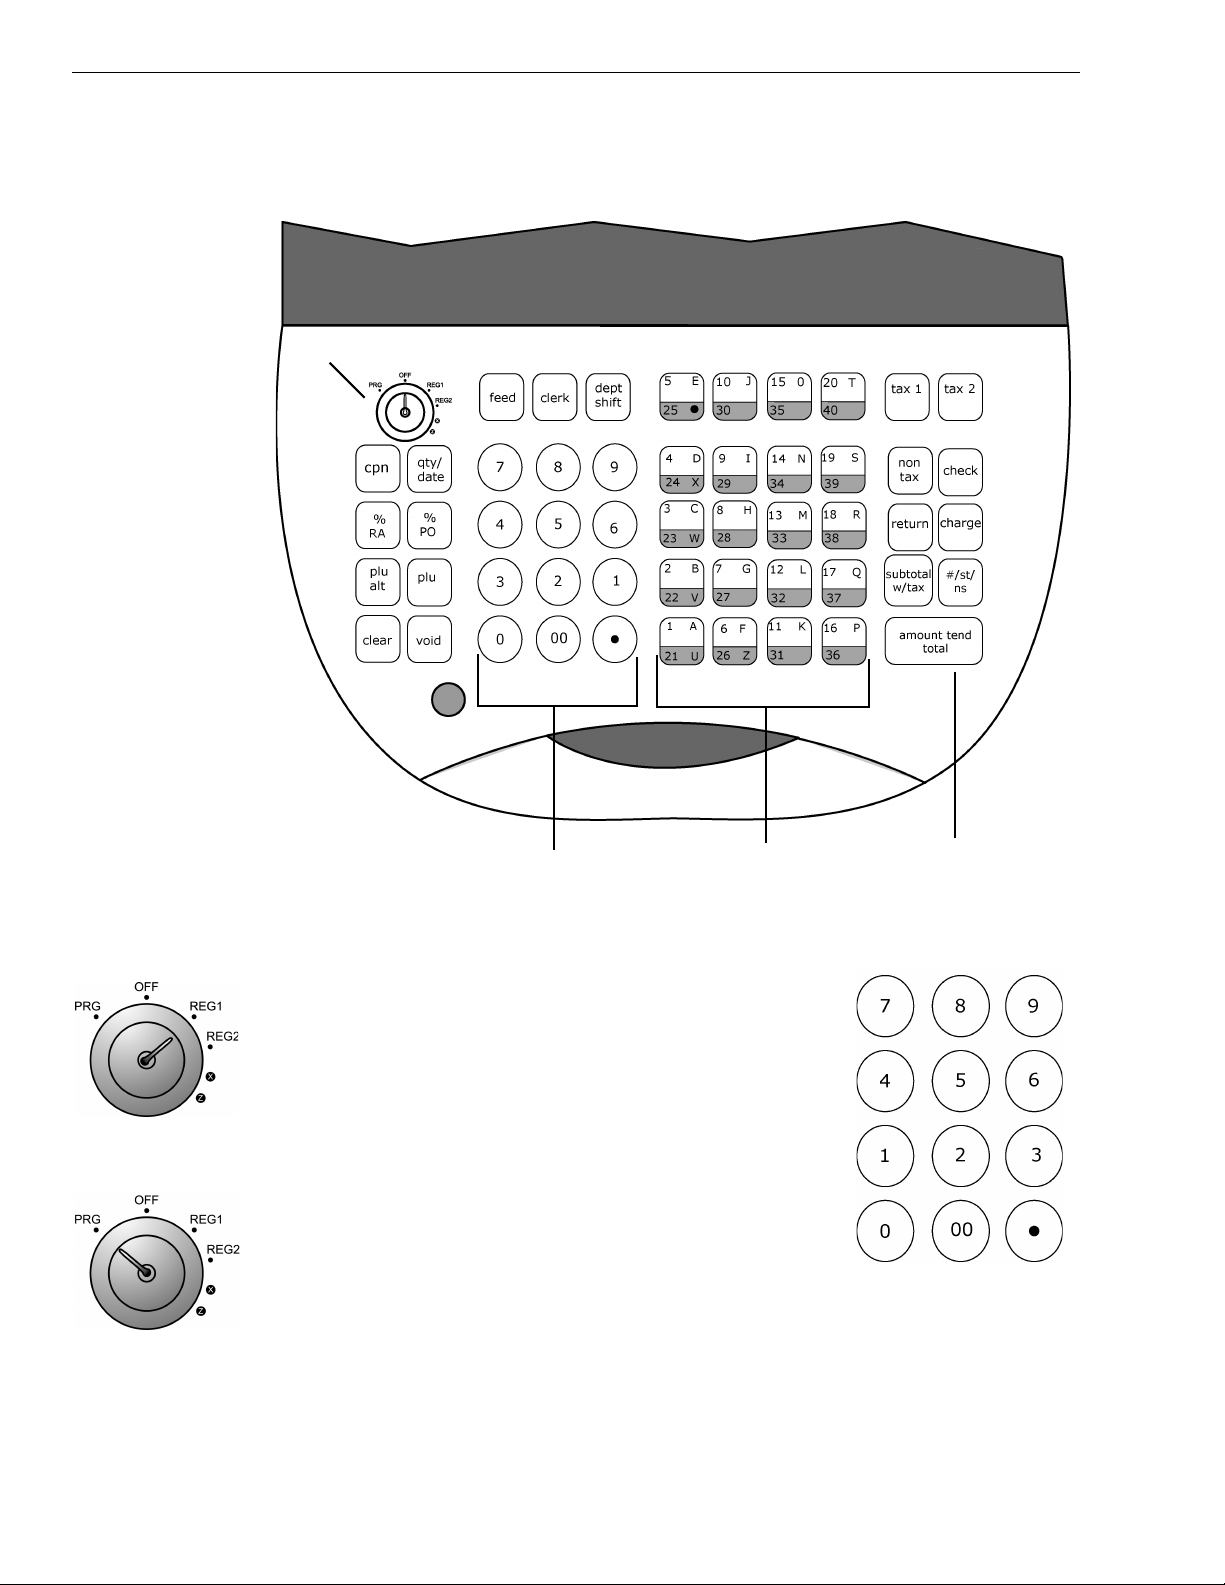
Using the Keyboard
The keyboard on your cash register looks like the following:
Mode key area
Round number keys
Department keys and
letters for programming
Total key
opens cash drawer
To use the keyboard, do the following:
• To use the cash register, put the key marked
REG in the Mode key hole and turn to Reg1 or
Reg 2. Now you can press the round Number
keys and Department keys to ring up a sale. For
more information about ringing up sales, see
Ringing up Sales and Using Training Mode on
page 71.
• To program the cash register, put the key
marked PRG in the Mode key slot and turn to
PRG. For more information about programming
the cash register, see Setting Up Your Cash
Register - the Basics on page 22 and Setting Up Your Cash Register Advanced on page 40.
16 Alpha 600/601 User’s Guide
Page 23
Using the Cash Drawer
The cash drawer is where you put the money after you ring up a sale. The
cash drawer has slots for putting paper bills and a tray for coins. You can
store paper items such as checks and charge slips under the removable
coin tray.
When you ring up a sale, the cash drawer automatically opens so you can
make change and put money away. You can also open the cash drawer
without making a sale. This is handy if you need to make change for
someone or forgot to put something away.
The cash drawer locks in 2 different ways. Locking the cash drawer is a
good idea if you need to leave the cash register.
• The cash drawer automatically locks electronically when you move the
register key to the Off position. Remember to take the register key out if
you are leaving the register. The emergency open lever will still open the
cash drawer when it is electronically locked.
Using the Cash Drawer
• You can also use the 515 key to mechanically lock the cash drawer. If
you lock the cash drawer this way, you must have the key to open it
again. Even the emergency open lever will not open the cash drawer.
when it is locked with the key.
Important
If the cash drawer will not open, see if the lock on the cash drawer is turned
to the right. If it is, the drawer is locked with the 515 key. You need the key to
unlock the cash drawer. If the key is lost or locked in the cash drawer,
contact Royal.
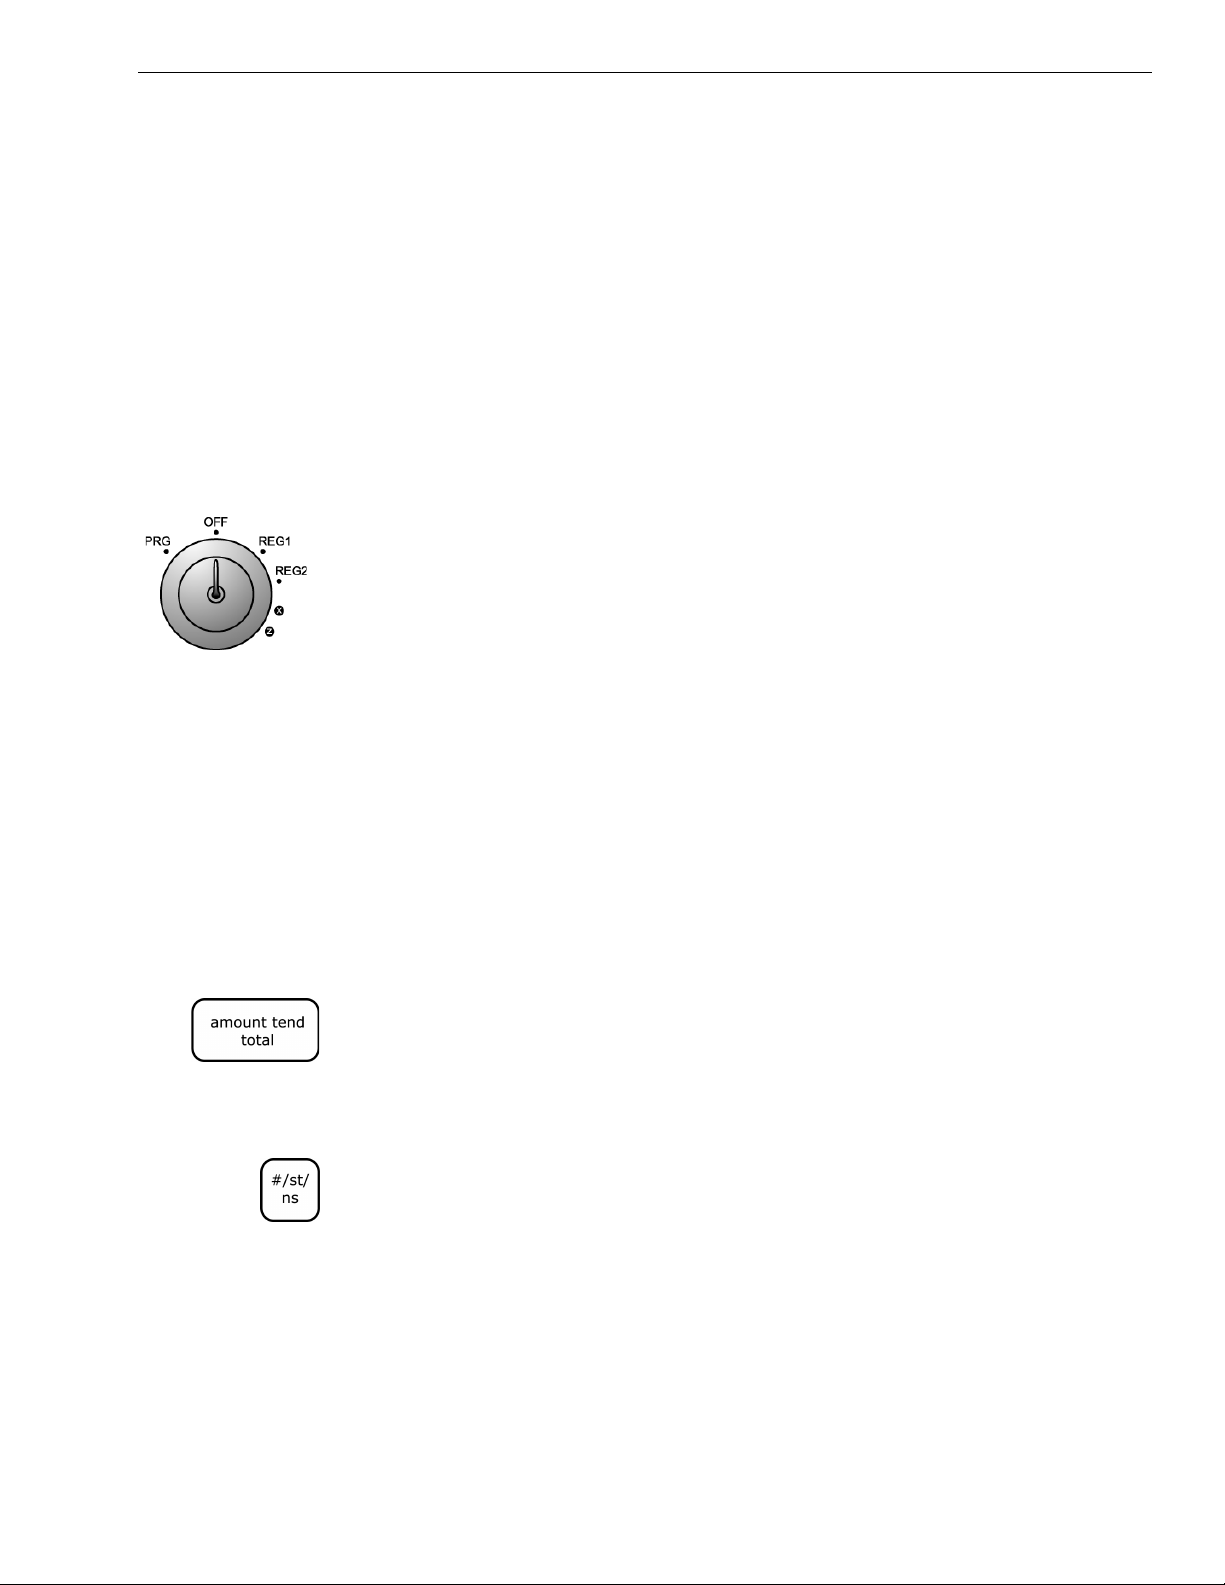
To open the cash drawer after a sale
1 When you are done ringing up a sale, press the Amount Tend Total key
at the bottom right of the keyboard. The cash drawer opens. You can
make change and put the money in the drawer.
2 When you are done, push the cash drawer closed.
To open the cash drawer without making a sale
1 Press the #/ST/NS key at the bottom right of the keyboard. The cash
drawer opens and a No Sale receipt prints.
2 When you are done, push the cash drawer closed.
To lock and unlock the cash drawer using the key
1 Using the small key labeled 515, put the key in the lock in the front of
the cash drawer.
Alpha 600/601 User’s Guide 17
Page 24
Chapter 3: Getting To Know the Cash Register
2 To lock the cash drawer, turn the key to the right and remove the key
from the lock.
3 To unlock the cash drawer, turn the key to the left and remove the key
from the lock.
To open the cash drawer using the emergency lever
1 With your hands on the cash drawer, carefully tip the front of the
register up. Underneath the cash register, toward the back of the register,
you see a small lever.
2 Push the lever in the only direction it will move. The cash drawer opens.
If the cash drawer will not open, make sure it is not locked with the 515
Drawer key.
Using the Accessory Drawer
Your cash register has a small drawer above the cash drawer. The
Accessory drawer can be opened at any time by anyone. It is a good place
to put things like pens, pencils, and note pads.
Because anyone can open the drawer, it is not a good idea to put checks or
charge slips in it. You should put those in the cash drawer, under the coin
drawer.
Make sure that you never put anything valuable in the Accessory drawer.
Using the Counterfeit Detector Feature
Protected by U.S.
Patent D477,836.
Other U.S. and
Foreign Patents
Pending.
Your cash register comes with a handy Counterfeit detector feature that
helps you decide if the money is possibly counterfeit or fraudulent.
All new style American paper money, except for the $1 bill, have a strip
that glows under ultra-violet (UV) light. The Counterfeit detector feature
lets you see that strip before you accept the paper money.
18 Alpha 600/601 User’s Guide
Page 25

About Paper Money
Just because the Counterfeit detector feature shows a glowing strip does
not always mean the paper money is real. A clever forger may include this
strip in a fake bill. Always use multiple methods to decide if you want to
accept a bill as valid.
Each bill amount has a strip that glows a different color. The location of
the UV markings in US and Canadian currency is shown below:
Table 5 US paper currency UV mark locations
US $ bill... Has this color... Located here...
$ 5 Blue Left edge of bill
$ 10 Orange Right of Hamilton's head
$ 20 Green Left edge of bill
$ 50 Yellow Right of Grant's head
Using the Counterfeit Detector Feature
$100 Red Left of Franklin's head
Canadian Paper Currency: UV sensitive dots are placed in a random
pattern throughout the bill. These dots glow blue. Newer Canadian bills
may have different UV-sensitive markings. See your bank or local
government office for help on what UV-sensitive markings to look for in a
genuine bill.
Detecting Suspicious Money
Always use multiple counterfeit detection methods to guard against
fraudulent paper currency. Some of the more common methods for
detecting valid US currency are:
• Look for blue and red threads in the fabric.
• Hold the bill up to a light source and check for the watermark - which
should be the face of the same President pictured on the front of that
denomination bill.
• Hold the bill up to a normal light source (not a UV light) and look for the
UV sensitive strip, the characters USA and the numeric denomination of
the bill (either in numeric form or spelled out).
• Mark the bill using a Universal Counterfeit Detector Pen, which uses
special ink that reacts to counterfeit paper currency.
For other currency, such as Canadian money, see your bank or local
government office for help.
Alpha 600/601 User’s Guide 19
Page 26

Chapter 3: Getting To Know the Cash Register
To use the counterfeit detector feature
1 Put the paper money in the slot in the front of the cash register.
2 UV light button
3 Look in window
1 Insert paper bill
2 Press the UV light button. The UV light turns on.
3 Look thru the small window on the front of the cash register. If the bill
has the strip, you see a strip that glows as a color. See the table above for
the correct color. If the bill is Canadian, you see blue dots.
4 When you are done, remove the bill from the slot. Press the UV button
again. The UV light turns off.
Things to Remember
The counterfeit detector feature in the cash register uses ultra-violet light
(UV light) technology and only works on new style US paper currency.
This currency has the large portrait of a US president, off-center on the
front of the bill. Old style U.S. bills, printed before 1996 and all $1 bills do
not have any fluorescent markings. These bills do not react to UV light and
the counterfeit detector in cash register does not show any fluorescent
markings on these bills, even though they may be valid US bills and not
counterfeit.
Keep in mind that any one method of counterfeit detection, including the
UV light mechanism built-in to the cash register, is not fool-proof and only
suggests suspicious paper currency.
Using this counterfeit detection feature is open to user interpretation of the
reading of the currency under the UV-light. If no fluorescent markings are
seen on a US bill, then consider the bill suspicious. This may not mean that
the bill is definitely counterfeit. Use other counterfeit detection methods to
further examine the suspicious bill. If the US dollar bill fails multiple
counterfeit detection methods, then the bill may be counterfeit and you
must decide whether to accept the bill or not. You should also contact local
law enforcement authorities regarding suspicious or counterfeit bills.
The opposite may also apply, when a US dollar bill may show fluorescent
markings under UV-light, but there is still a slight chance that the bill is a
very sophisticated counterfeit bill. There are no absolute guarantees to the
20 Alpha 600/601 User’s Guide
Page 27

authenticity of a US dollar bill without the use of very high-end,
sophisticated testing methods and devices.
Programming the UV Light
You can program the UV light to stay on for a certain number of seconds
while you view the currency.
You can use the default which is pre-programed to “00” seconds and
works according to the previous instructions.
You can also program a number from “01” to “99” that represents the
number of seconds the light stays “on” after you press the UV light button.
Then the light automatically turns itself off after the programmed amount
of time.
To program the UV light
1 Put the key marked PRG in the Mode key slot and turn to PRG. For
more information about programming the cash register, see Setting Up
Your Cash Register - the Basics on page 22 and Setting Up Your Cash
Register - Advanced on page 40.
Using the Counterfeit Detector Feature
2 Using the round number keys, enter the number of seconds (from 01 to
99) you would like the light to stay on.
3 To save your setting, press the #ST/NS key.
The button now only works to turn the light on. It does not work to turn
the light off.
If the button is pressed when the light is off, then the light turns-on for the
number of seconds that you have set. If the button is pressed again while
the light is on, the light timer resets, and the light stays on for the full
number of programmed seconds.
Alpha 600/601 User’s Guide 21
Page 28

CHAPTER 4
Setting Up Your Cash Register - the
Basics
This chapter includes explanations for setting:
• Messages on the display and on receipts
• Setting clerk numbers
• Setting machine numbers
• Setting clerk and manager passwords
• Clearing error codes
Using the Displays
Your cash register includes two displays: 1 for the clerk and 1 for the
customer. The displays feature large, easy to read fluorescent digits for
easy viewing.
Alpha 600/601 User’s Guide
Page 29
The Clerk Display
When ringing up sales, you see the department number or PLU number
on the clerk display. If a description or name is programmed, this
description appears.
For information about all the messages that can appear on the display and
how to open and close the display, see Opening and Closing the Customer
Display on page 12.
Setting Alphanumeric Descriptions
You can program custom header and footer messages, clerk names,
departments, and item descriptions. These text messages and descriptions
appear on the receipt and on the display.
When you are programming the alpha
descriptions for Departments, PLUs, Clerks,
the Header and Footer messages, use the
Alpha Keyboard.
Setting Alphanumeric Descriptions
Note
Only capital letters of the alphabet are on the
Alpha Keyboard. You can use lower case
letters. See Alphanumeric Code Chart on
page 24.
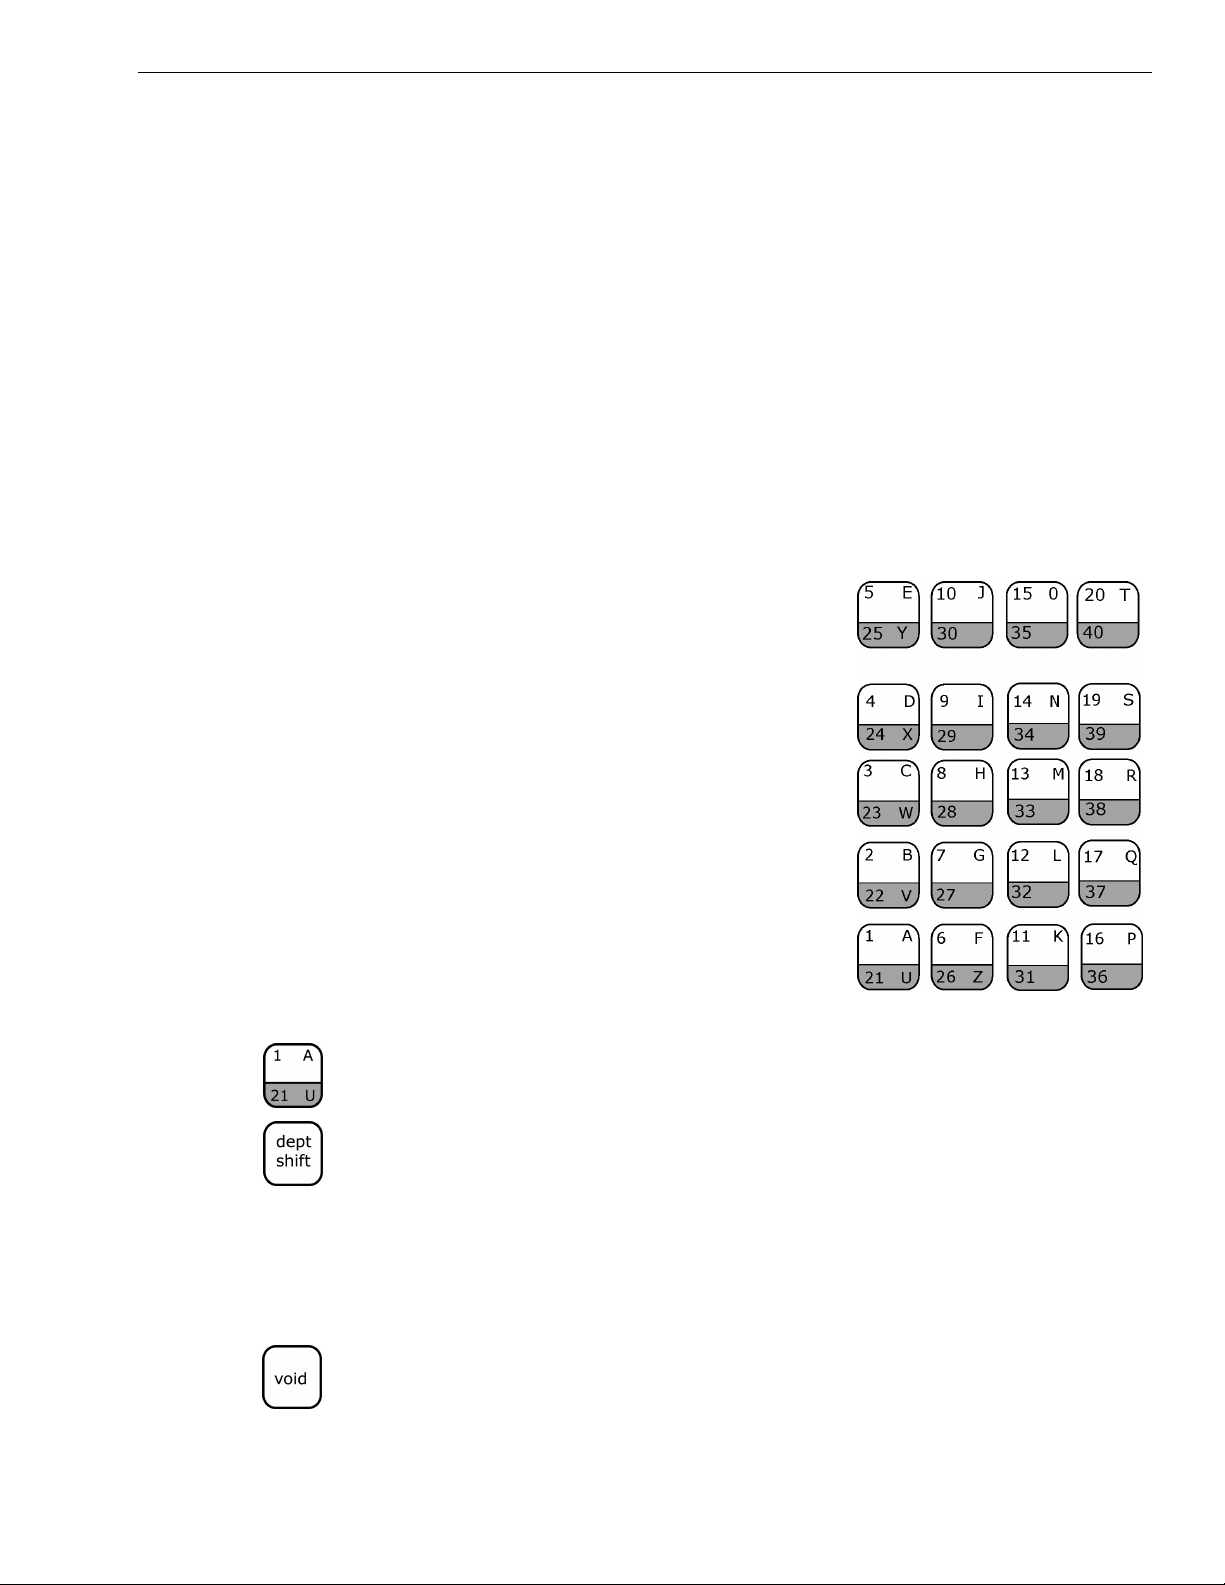
The department keys are clearly labeled
with all the letters needed to program these
descriptions. When you are programming
alpha descriptions, use the department keys
to spell out the words you want.
To use the letters in the white part of the Department keys, simply press
the Department key.
To use the letters in the lower green area of the keys, press the Dept Shift
key and then press the key with the letter you want.
You might need certain symbols or lower case characters that are not
found on the Alpha Keyboard. For example, if you require a space
between words, or if you need the / symbol, or the - symbol, see the
Alphanumeric Code Chart shown in the next section.
Important
If you enter the wrong character, press the Void key to backspace and delete
that character. Now you can continue.
Alpha 600/601 User’s Guide 23
Page 30

Chapter 4: Setting Up Your Cash Register - the Basics
Alphanumeric Code Chart
Other characters are also available. Use the tables in this section to help
you find the ones you need.
Use this table for lower case letters and numbers.
Table 6 Letters and numbers
Code
Character
Space 00 s 20
Wide Character 01 t 21
a 02 u 22
b 03 v 23
c 04 w 24
d 05 x 25
e 06 y 26
f 07 z 27
g 08
h 09 Numbers
i 10 0 30
j 11 1 31
k 12 2 32
Number Character
Code
Number
l 13 3 33
m 14 4 34
n 15 5 35
o 16 6 36
p 17 7 37
q 18 8 38
r 19 9 39
24 Alpha 600/601 User’s Guide
Page 31

Setting Alphanumeric Descriptions
Use this table for punctuation and foreign characters.
Table 7 Special Characters and Punctuation
Code
Character
Number Character
¡ 80 ? 28
¿ 81 ! 29
á 82 @ 40
é 83 / 67
í 84 : 68
ó 85 # 69
ú 86 & 70
Ä 93 % 71
Ü 94 $ 72
Ö 95 ,
(comma)
Ï 96 ( 74
Code
Number
73
ü 97 ) 75
Ñ 98 * 76
ñ 99 + 77
- 78
.
79
(period)
;
87
(semi colon)
> 88
‘
89
(apostrophe)
“ 90
< 91
= 92
Alpha 600/601 User’s Guide 25
Page 32

Chapter 4: Setting Up Your Cash Register - the Basics
Using Single Width Characters
The following describes the maximum number of characters that can be
programmed for each item description in single width.
• Department 12 Characters
• PLU 12 Characters
• Clerk Name 24 Characters
• Header and Footer message 5 Lines (24 characters each)
To make a space to separate words, press the round Number 0 key twice or
press the round Number 00 key one time.
• For double wide characters, see Using Double Wide Characters.
• For programming department keys, see Programming Department Keys
on page 41.
• For programming PLUs, see Programming PLU Descriptions on
page 56.
• For programming Clerk names and numbers, see Setting Clerk Numbers
and Names on page 32.
Programming Blank Lines or Restoring Factory Default Messages
You can customize the header and footer message based on Flag settings
for flag numbers: 33, 37, 38, and 39.
• Flag # 33 and 37: You can now individually select whether to turn on
and print or turn off and skip the header or the footer messages entirely.
This can save paper when you are printing. Or you can leave the factory
default phrases and settings.
• Flag # 38: You can print a blank line or to just skip a blank line. For
example, you can program 3 of the five footer lines as blank lines and
then select not to print the blank lines to save paper. This prints only the
2 programmed lines for your footer message. Or you can select to leave
the blank lines in for spacing so in the final result is 2 lines of print and 3
blank lines with no print, but all 5 lines print and are accounted for.
• Flag #39: You can program a blank line or program the factory default
line by entering a 0 (zero) when you are programming an individual
header or footer message line.
For more details about using flag settings, see Programming Flag Options
on page 65.
For example, for a blank line to print for the 1st line of the header
message:
26 Alpha 600/601 User’s Guide
Page 33

Setting Alphanumeric Descriptions
1 Put the PRG key in the Mode key slot and turn it to the PRG position.
2 If you are prompted for a Manager Password, type the password number
and then press the Check key. If you did not program a Manager
Password, go to the next step.
3 To set Flag #39 to 0, enter 390 and press the Void key.
4 For the first line of the header message, press 31.
5 Press Return.
6 Press 0.
7 Press the Check key.
About Programming Numbers in Header Messages
If you need to print numbers, you must enter the numbers using the
Alphanumeric Code Chart. For example, for the telephone number
999-555-1212, the number 9 is programmed using the character code
39, the number 5 is programmed using the code 35, and so on.
Using Double Wide Characters
For extra emphasis, you can program double wide characters for a specific
character or a line of characters.
Normal Size Double Wide
If you use double wide characters, the maximum number of characters
you can use is cut in half.
• Department 6 characters
• PLU 6 characters
• Clerk Name 12 characters
• Header Message 5 lines, 12 characters each
• Footer Message 5 lines, 12 characters each
Alpha 600/601 User’s Guide 27
Page 34

Chapter 4: Setting Up Your Cash Register - the Basics
To make a character print extra wide, you must use the double width code
01 before each character as you type in the description.
Programming a Header Message
You can specify a header message to print on customer receipts. The
header message can be a maximum of 5 lines. Each line can have 24
characters in single width or 12 characters in double width.
YOUR RECEIPT
THANK YOU
is the default printout for the header message.
You can set Flag #33 to print the Header message or skip the Header
message completely (none of the 5-lines print).
Make a copy of the blank Worksheet below for future changes or
revisions to your header message.
Line 1
Line 2
Line 3
Line 4
Line 5
Header Message Worksheet
Use this worksheet to make your header message. Make a copy of the
blank worksheet before you start, in case you make a mistake or change
your mind.
Note
If you enter the wrong character, press the Void key to backspace and
delete that character and then continue.
Before programming your header message
1 Write out your store name and the header message you want to
program.
2 After writing out your message, count the number of characters on each
line. The following example shows a message and the letter count,
including spaces.
INTERNATIONAL COFFEES 21
999-555-1212 12
28 Alpha 600/601 User’s Guide
Page 35

Setting Alphanumeric Descriptions
INTERNATIONAL COFFEES 21
222 EAST MAIN STREET 20
OPEN 7AM TO 6PM 15
COFFEES OF THE WORLD 20
3 Complete the chart, filling in extra unused characters with blank spaces.
Line 1
Line 2
Line 3
Line 4
Line 5
INTERNATIONAL COFFEE
999-555-1212
222 EAST MAIN STREET
OPEN 7AM TO 6PM
COFFEES OF THE WORLD
In the example, blank spaces are added at the beginning and end of each
line so the message is centered.
Remember, you can make the characters double width but you can only
use half the total number of characters if you do this. For example, if you
want Coffee to be double wide, you need 12 spaces. For more
information about double wide characters, see Using Double Wide
Characters on page 27.
You can also use characters other than those on the Department keys,
such as numbers, punctuation, and international letters. See the
Alphanumeric Code Chart on page 24.
This is an example of a programmed header message:
INTERNATIONAL COFFEES
999-555-1212
222 EAST MAIN STREET
OPEN 7AM TO 6PM
COFFEES OF THE WORLD
To make a space to separate words, press the 0 key twice or press the 00
key one time.
Note
If you enter the wrong character, press the Void key to backspace and delete
that character and then continue.
To program your header message
1 Put the PRG key in the Mode key slot and turn it to the PRG position.
Alpha 600/601 User’s Guide 29
Page 36

Chapter 4: Setting Up Your Cash Register - the Basics
2 If you are prompted for a Manager Password, type the password number
and then press the Check key. If you did not program a Manager
Password, go to the next step.
3 For the 1st line, do the following:
• Using the round Number keys area, press 31.
• Press the Return key. The header line 1 appears on the display.
• Enter the 1st line of the header, up to 24 characters and then press the
Check key.
4 If you want a 2nd line, do the following:
• Using the round Number keys area, press 32.
• Press the Return key. Header line 2 appears on the display.
• Enter the 2nd line of the header, up to 24 characters and then press the
Check key.
5 If you want a 3rd line, do the following:
• Using the round Number keys area, press 33.
• Press the Return key. Header line 3 appears on the display.
• Enter the 3rd line of the header, up to 24 characters and then press the
Check key.
6 If you want a 4th line, do the following:
• Using the round Number keys area, press 34.
• Press the Return key. Header line 4 appears on the display.
• Enter the 4th line of the header, up to 24 characters and then press the
Check key.
7 If you want a 5th line, do the following:
• Using the round Number keys area, press 35.
• Press the Return key. Header line 5 appears on the display.
• Enter the 5th line of the header, up to 24 characters and then press the
Check key.
8 When you are done, turn the Mode key to Off.
Setting the Footer Message
You can also program a message that automatically prints at the bottom of
the receipt. For example, you can list your hours of operation, return
policy, or a special promotion at the bottom of every receipt. You can set
Flag #37 to print the Footer message or skip the Footer message
completely (none of the 5-lines print)
30 Alpha 600/601 User’s Guide
Page 37

Setting Alphanumeric Descriptions
The Footer message can have up to 5 lines. Each line can have 24
characters in single width or 12 characters in double width. For more
information about double-width messages, see Using Double Wide
Characters on page 27.
For example, the message at the bottom of the receipt can say:
TUESDAY IS 10% OFF DAY!
STOCK UP AND SAVE
Use the worksheet on page 28 to plan your message before you start.
Note
If you enter the wrong character, press the Void key to backspace and delete
that character and then continue.
To program your footer message
1 Put the PRG key in the Mode key slot and turn it to the PRG position.
2 If you are prompted for a Manager Password, type the password number
and then press the Check key. If you did not program a Manager
Password, go to the next step.
3 For the 1st line, do the following:
• Using the round Number keys area, press 71.
• Press the Return key. The Footer line 1 appears on the display.
• Enter the 1st line of the footer, up to 24 characters and then press the
Check key.
4 If you want a 2nd line, do the following:
• Using the round Number keys area, press 72.
• Press the Return key. Footer line 2 appears on the display.
• Enter the 2nd line of the footer, up to 24 characters and then press the
Check key.
5 If you want a 3rd line, do the following:
• Using the round Number keys area, press 73.
• Press the Return key. Footer line 3 appears on the display.
• Enter the 3rd line of the footer, up to 24 characters and then press the
Check key.
6 If you want a 4th line, do the following:
• Using the round Number keys area, press 74.
• Press the Return key. Footer line 4 appears on the display.
• Enter the 4th line of the footer, up to 24 characters and then press the
Check key.
7 If you want a 5th line, do the following:
• Using the round Number keys area, press 75.
Alpha 600/601 User’s Guide 31
Page 38

Chapter 4: Setting Up Your Cash Register - the Basics
• Press the Return key. Footer line 5 appears on the display.
• Enter the 5th line of the footer, up to 24 characters and then press the
Check key.
8 When you are done, turn the Mode key to Off.
Setting Clerk Numbers and Names
You can program and assign up to 26 Clerk Numbers so you can monitor
sales by individual employees. Each clerk number can also be assigned a
24 character name.
The Clerk Numbers are used in the register modes REG1 and REG2 only.
To see the sales totals for each clerk, a Clerk Report is available in both
the X and Z modes.
You can spell names by using department keys. For more information, see
Setting Alphanumeric Descriptions on page 23.
Note
When entering the clerk passwords, they appear as asterisks **** on the
displays for extra security.
After you specify Clerk Number and Names, you must set a flag option so
that clerks must enter their clerk number before every transaction. For
more information, see Programming Flag Options on page 65. If you do
not set the flag option to turn on Clerk Numbers, all transactions listed on
reports and receipts will appear under Clerk 1.
After you are done programming clerk numbers, you can check your
results. See Printing the Quick Start Program Confirmation Report on
page 36.
Note
If you make a mistake while you are programming the Clerk Numbers, press
the Clear key and begin again with Step 3.
To set clerk numbers
Example 4: For Clerk #1, Security number is 234
1 Put the PRG key in the Mode key slot and turn it to the PRG position.
2 If you are prompted for a Manager Password, type the password number
and then press the Check key. If you did not program a Manager
Password, go to the next step.
3 Using the round Number keys, press 444444 and then press the
Amount Tend Total key. The letter C appears in the Customer Display
and Clerk Pass appears in the clerk display until Step 6 is complete.
32 Alpha 600/601 User’s Guide
Page 39

Setting Clerk Numbers and Names
4 Using the round Number keys, press 1 for Clerk #1 and then press 234
for the Security number and press the Clerk key.
5 Repeat Step 4 for adding Clerks 2 through 26.
6 When you are done programming Clerk Numbers, press the Clear key.
7 Before you can use Clerk Numbers, you must activate the Clerk System
by selecting Option #1 on Flag 12. Do the following:
Press 121 and then press the Void key.
To program a clerk name
Example 5: For Clerk #1, program name as Sally Smith
1 Put the PRG key in the Mode key slot and turn it to the PRG position.
2 If you are prompted for a Manager Password, type the password number
and then press the Check key. If you did not program a Manager
Password, go to the next step.
3 Using the round Number keys, press 1 for Clerk #1 and then press the
Return key.
4 To program a name, press the Department keys or the Alphanumeric
Code Chart, as needed. For an explanation of how to use the
Department keys to spell words, see Setting Alphanumeric Descriptions
on page 23. Remember, the Department Shift key lets you use the letters
in the lower green section on the Department keys. To make a space to
separate words, press the 0 key twice or press the 00 key one time.
5 Press the Check key when you are done.
To use clerk numbers
Example 6: Clerk #1 has a passcode of 234
1 Put the PRG key in the Mode key slot and turn it to either the REG1 or
REG2 position.
2 Using the round Number keys, press 1, then press the Clerk key. Press
234 and then press the Check key.
3 The first 2 digits of the display show the Clerk Number when entered
and the display shows the Clerk Name. The cash register is now ready
for operation.
Alpha 600/601 User’s Guide 33
Page 40

Chapter 4: Setting Up Your Cash Register - the Basics
Using the Clerk System
If you see the message CLERK E12, RE-CLERK#, or CLERK ERR in the
display and you hear the error beep, clerk numbers are programmed and
the clerk system is active.
To use the Clerk System
1 Press the Clear key to clear the error condition and then enter a clerk
number and press Clerk.
2 If you programmed a clerk security code, enter the clerk number and
then press the Clerk key. Using the round Number keys, press the three
digit security code and then press the Check key.
Setting the Machine Number
You can assign your cash register its own number. This is useful if you
have several cash registers and want to track which one creates which
receipts and transactions.
The machine number prints on all receipts/journal records, and
management reports. The machine number can be up to 4 digits long.
After you are done programming the machine number, you can check
your results. See Printing the Quick Start Program Confirmation Report
on page 36.
To set the machine number
Example 7: Program the cash register number to 1234
1 Put the PRG key in the Mode key slot and turn it to the PRG position.
2 If you are prompted for a Manager Password, type the password number
and then press the Check key. If you did not program a Manager
Password, go to the next step.
3 Using the round Number keys, press 1234 and then press the +%/PO
key.
34 Alpha 600/601 User’s Guide
Page 41

Setting X and Manager Passwords
Two Manager Passwords are available for added security:
• one password to go to the PRG and Z modes
• one password to go to the X mode.
Important
The Manager Password cannot be 0000 (zeros). The cash register will not
accept this password.
Caution
Write your passwords down in a safe place. If you forget the passwords,
you must do a Full System Clear procedure. A Full System Clear erases all
transaction information and programming. For details on the Full System
Clear, see Full System Clear on page 103.
After you program a password, you must use it every time you go to the
program mode or before every X or Z readings, depending on which you
set the password for.
Setting X and Manager Passwords
When you enter a password, it appears as asterisks **** on the displays for
extra security.
To set manager passwords
Example 8: To set the X password as 1212
1 Put the PRG key in the Mode key slot and turn it to the PRG position.
2 Using the round Number keys, press 222222, and then press the
Amount Tend Total key. The X PASS prompt and the letter P appears
until you complete step 3.
3 Using the round Number keys, press 1212 and then press the Non Tax
key.
Example 9: If the PRG/Z password is 1313
1 Put the PRG key in the Mode key slot and turn it to the PRG position.
2 Using the round Number keys, press 111111 and press the Amount
Tend Total key. The PASS prompt and the letter P appears until you
complete step 3.
3 Using the round Number keys, press 1313 and press the Non Tax key.
To use manager passwords
Example 10: Go to the X mode, using the Manager Password 1212
1 Put the PRG key in the Mode key slot and turn it to the X position.
Alpha 600/601 User’s Guide 35
Page 42

Chapter 4: Setting Up Your Cash Register - the Basics
2 Using the round Number keys, press 1212 and then press the Check
key.
3 You are now ready to run an X Report.
Example 11: Go to the PRG or Z modes, using the Manager Password 1313
1 Put the PRG key in the Mode key slot and turn it to the PRG or Z
position.
2 Using the round Number keys, press 1313 and then press the Check
key.
3 You are now ready to program or take any reports based on your
selection in the first step.
Printing the Quick Start Program Confirmation Report
Now that basic programming is complete, check your results with a Quick
Start Program Confirmation Report.
If you made a mistake during programming, repeat only the step you
made the mistake in. For example, if only the tax rate is incorrect, just
re-program the tax—you do not need to re-set the time, date, and so on.
To print the Quick Start Program Confirmation Report
1 Put the PRG key in the Mode key slot and turn it to the PRG position.
2 Using the round Number keys, press 999999 and then press the
Amount Tend Total key.
3 After the Program Confirmation Report prints, press the Feed key to
advance the complete report out of the cash register.
See the next page for an example of this report.
36 Alpha 600/601 User’s Guide
Page 43

Before Going to Register Mode
Your tape looks similar to the example Program Confirmation Report
shown below.
The Date, Time, Tax Rate and Department Status shows the information
based upon your input.
For more details of the symbols printed in the Program Confirmation
Report, see Running Reports on page 80.
Before Going to Register Mode
Your cash register offers many other features not covered in this chapter.
Other options are covered in the chapter called Setting Up Your Cash
Register - Advanced, starting on page 40.
We also provide examples to help you learn how to use your cash register.
For information about the examples, see Examples on page 104.
Alpha 600/601 User’s Guide 37
Page 44

Chapter 4: Setting Up Your Cash Register - the Basics
Error Codes
Your cash register makes beeps as well as shows you messages in the
display. Some beeps and messages let you know everything is working
and others let you know you need to do something.
Table 8 Common errors
This error... Means this...
Register Beep The cash register makes a short beep each
time a key is pressed. This is normal and not a
cause for concern.
Entry Error Beep When using your cash register, you must
perform all operations in the correct order. If
you press the wrong key at the wrong time, an
alarm beep sounds and you see a message on
the display. The keyboard also locks. Press the
Clear key to continue.
Clearing an Error
When a transaction is started in the REG1 or
REG2 position, you must complete the sale
before moving the Mode key to another
position. When an operation is started but not
finished in the REG1 or REG2 positions,
turning the Mode key to another position
makes an alarm beep and you see an error
message on the display. Press the Clear key to
continue.
Printer Error or Paper
End
The Clear key stops an alarm beep that happened because a key was
pressed that was not correct for that operation.
The Clear key does not erase a transaction that was registered by an
operating key and printed on the register tape.
If a PE appears in the display, check if you are
out of paper. Check for a paper jam. For more
information about other solutions, see PE
Printer Error or Paper End on page 99.
To erase an entry after you press a key that printed the entry on the tape,
use the Void key to correct the error.
If the cash register makes a loud error beep, press the Clear key to stop it.
38 Alpha 600/601 User’s Guide
Page 45

Error Codes
If your cash register will not stop making a beeping sound after you press
the Clear key, you can do three more things.
Half System Clear
If you pressed the Clear key and the error beep does not stop, you can do
a Half System Clear. For more information about a Half System Clear, see
Half System Clear on page 102.
Partial Reset
A Partial Reset can help if the Half System clear did not help. For more
information, see Partial Reset on page 102.
Full System Clear
If you did a Half System Clear and a Partial Clear and the error beep still
does not stop, as a last resort, you can do a Full System Clear. For more
information about the Full System Clear, see Full System Clear on
page 103.
Alpha 600/601 User’s Guide 39
Page 46

CHAPTER 5
Setting Up Your Cash Register -
Advanced
This chapter shows you more advanced programming for your cash
register. This chapter covers:
• Programming Department Keys
• Programming PLU Descriptions
• Setting the Decimal Points
• Setting the Rounding Rates
• Programming Discounts
• Programming Flag Options
When you are done programming your cash register, you can run the
Programming Report to see your results. See Running the Program
Confirmation Report on page 80.
Note
While you are programming, the letter P often appears in the display.
Alpha 600/601 User’s Guide
Page 47

Programming Department Keys
Departments are a category of merchandise. For example, Department 1
can be Housewares, Department 2 can be Food, Department 3 can be
Womens Clothing, and so on. This helps you track what you are selling.
Each department can be programmed as taxable or non-taxable, so that if
an item needs to be taxed, it is added automatically when you ring up an
item in a taxable department.
You can have as many as 99 departments on your cash register. If you
have many departments, you may want to make a list so other people who
use the cash register can properly use the department keys.
Programming departments includes up to 6 steps. Not all steps listed
below may apply to your specific needs, but you must specify a value for
each, even if you do not plan to use that feature.
1 Setting Standard and Gallonage Mode
Programming Department Keys
2 Programming Multiple and Single Items
3 Programming High Digit Lock-out (HDLO)
4 Programming Tax Status - If you are using the cash register in Canada,
refer to Programming Tax in Canada on page 132 during this step.
5 Programming Department Preset Price
6 Programming Department Names
For specific information about each of the items above, see the next
sections.
After you are done, you can check your results. See Running the
Department Sales Report on page 83.
To program department keys
1 Put the PRG key in the Mode key slot and turn it to the PRG position.
2 If you are prompted for a Manager Password, type the password number
and then press the Check key. If you did not program a Manager
Password, go to the next step.
3 Press the following, in this order:
Press this... To specify this... See this page...
0 or 1 Standard or gallonage 43
0 or 1 Multiple or single items 43
0 to 6 HDLO 44
Alpha 600/601 User’s Guide 41
Page 48

Chapter 5: Setting Up Your Cash Register - Advanced
Press this... To specify this... See this page...
00 to 15
and then
0 or up to a 7 digit
price
A department key The department key for
Note
If you do not want to program a department name, press
the Amount Tend/Total key.
Skip the next steps. You are done with this department.
The alphanumeric
keys to spell the
department name.
The information is saved in the cash register
4 To add another department, do step 3 again.
Tax status 44
Department preset value 45
this department
The department name 46
To program Department 1 as taxable with no preset price and no
description
1 Put the PRG key in the Mode key slot and turn it to the PRG position.
2 If you are prompted for a Manager Password, type the password number
and then press the Check key. If you did not program a Manager
Password, go to the next step.
3 Using the round Number keys, press 00001 and then press the
Subtotal/w/Tax key.
4 Using the round Number keys, press 0 and then press the Dept 1 key.
5 Press the Amount Tend/Total key. Skip this step if you are going to enter
a description. The department information is saved in the cash register.
To program Department 2 as non-taxable with no preset price and no
description
1 Put the PRG key in the Mode key slot and turn it to the PRG position.
2 If you are prompted for a Manager Password, type the password number
and then press the Check key. If you did not program a Manager
Password, go to the next step.
42 Alpha 600/601 User’s Guide
Page 49

3 Using the round Number keys, press 00000 and then press the
Subtotal/w/Tax key.
4 Using the round Number keys, press 0 and then press the Dept 2 key.
5 Press the Amount Tend/Total key. Skip this step if you are going to enter
a description. The department information is saved in the cash register.
Setting Standard and Gallonage Mode
A department can be set for either Standard Mode or Gallonage Mode.
Gallonage Mode allows entering a price with 3 decimal places,
representing the cost per gallon, pound, kilogram, yard, meter, or other
unit of measurement. For example, $1.499 per gallon.
Standard Mode enters the price using the normal 2 decimal place setting.
Table 9 Standard/Gallonage Mode
Programming Department Keys
This number... Means this...
0 Standard Mode
1 Gallonage Mode
Programming Multiple and Single Items
Multiple Item Entry allows you to ring up two or more items into a
department. For example, if you want to ring up 5 of the same items, you
can tell the cash register to multiply the one price by the number of items.
Single Item Entry allows you to ring up only one item in a department.
For example, if you want to ring up 5 of the same items, you must ring
each one up individually.
Table 10 Multiple / single item
This number... Means this...
0 Multiple Item Sale
1 Single Item Sale
Alpha 600/601 User’s Guide 43
Page 50

Chapter 5: Setting Up Your Cash Register - Advanced
Programming High Digit Lock-out (HDLO)
You can specify the most number of digits that can be rung up in an entry.
This feature helps to prevent against large over-rings. If too many digits
are entered, the error beep sounds and the keypad locks up. For example,
to limit ring ups of more than $99.99, set the HDLO to 4.
Table 11 High digit lock out (HDLO) values
This number... From this... to this...
0 $ .01 $ 99,999.99 (Standard setting)
1.01.09
2.01.99
3 .01 9.99
4 .01 99.99
5 .01 999.99
6 .01 9,999.99
Programming Tax Status
Some items must have tax collected by law. You can program your cash
register to automatically assign the right amount of tax, based on the
department the item is assigned to.
Note
If you are using the cash register in Canada, your instructions are in
Programming Tax in Canada on page 132.
You can link no tax, a single tax rate (Tax 1), or multiple tax rates (Tax 2,
3 or 4) to a department key.
44 Alpha 600/601 User’s Guide
Page 51

Programming Department Keys
Table 12 Tax status settings
This tax status
number... Means this...
00 Non-Taxable (use this if you do not want to charge tax)
01 Taxable by TAX 1 Rate
02 Taxable by TAX 2 Rate
03 Taxable by TAX 3 Rate
04 Taxable by TAX 4 Rate
05 Taxable by TAX 1 and TAX 2 Rates
06 Taxable by TAX 1 and TAX 3 Rates
07 Taxable by TAX 1 and TAX 4 Rates
08 Taxable by TAX 2 and TAX 3 Rates
09 Taxable by TAX 2 and TAX 4 Rates
10 Taxable by TAX 3 and TAX 4 Rates
11 Taxable by TAX 1, TAX 2 and TAX 3 Rates
12 Taxable by TAX 1, TAX 2 and TAX 4 Rates
13 Taxable by TAX 1, TAX 3 and TAX 4 Rates
14 Taxable by TAX 2, TAX 3 and TAX 4 Rates
15 Taxable by TAX 1, TAX 2, TAX 3 and TAX 4 Rates
Programming Department Preset Price
If you do not want to preset a price, a price of 0 must be assigned to that
department key. Department Preset Price programs a price in a
department to save time when ringing up an entry. Even if a price has
been pre-programmed, you can override the price at the time of sale.
The price automatically rings up each time the department key is pressed.
Important
If you do not need a preset price, enter 0 as the price.
If you are using the cash register in Canada, refer to Programming Tax in
Canada on page 132 during this step.
Alpha 600/601 User’s Guide 45
Page 52

Chapter 5: Setting Up Your Cash Register - Advanced
Assigning Department Number Keys
You must assign a department number. After you assign a department
number, you can press the Amount Tend/Total key to finish programming
if you do not want a department description.
The Department number keys from 1 to 20 are easy to use: You just press
the Department number key you want. For example, to use Dept 2, press
the Dept 2 key.
The Department keys from 21 to 40 are also easy to use. Just press the
Dept Shift key and then press the Department number key you want. For
example, to use Dept 23, press the Dept 23 key.
To use the Department keys from 41 to 99, do the following:
• Press the Dept Shift key.
• Using the round Number keys, type the Department number from 41 to
99 that you want to use. For example, for Department 63, press the 6
key and then press the 3 key.
• Press the Dept Shift key again.
Programming Department Names
A name or description can be assigned to each department key. This
name appears on the clerk display and prints when ringing up sales.
For example, Clothing can print on the receipt in place of Dept 1,
Shoes can print on the receipt in place of Dept 2, Sportswear can
print on the receipt in place of Department 3, and so on.
When you are programming the descriptions for Departments, use the
Alphanumeric Keyboard.
When you are done programming the department description, press the
Check key to save your programming. The information is saved in the cash
register and you can program the next item.
46 Alpha 600/601 User’s Guide
Page 53

Programming Department Keys
Note
Only capital letters of the alphabet are on the
Alphanumeric Keyboard. You can also use lower
case letters and numbers, certain symbols, and
international characters. See Alphanumeric Code
Chart on page 47.
The department keys are clearly labeled with all
the letters you need to program these
descriptions. When you are programming
alphanumeric descriptions, use the department
keys to spell out the words you want.
You can use the letters in the lower green area
of the keys by pressing the Dept Shift key and
then pressing the key with the letter you want.
You might need certain symbols, numbers, international characters or
lower case characters that are not found on the Alphanumeric Keyboard.
For example, if you require a space between words, or if you need the /
symbol, or -, you use the round Number keys to type the correct
alphanumeric code. See the Alphanumeric Code Chart shown in the next
section.
Important
If you enter the wrong character, press the Void key to backspace and delete
that character. Now you can continue.
Alphanumeric Code Chart
Many characters are also available. Use the tables in this section to help
you find the ones you need.
Use the following table for lower case letters and numbers. If you want to
use double width characters, press 01 before each character.
For example, to program Y E S, type 01 Department Shift key Y
01 E 01 S. For more information, see Using Double Wide Characters
on page 27.
Table 13 Letters and numbers
Code
Character
Space 00 s 20
Wide Character 01 t 21
Number Character
Code
Number
a 02 u 22
Alpha 600/601 User’s Guide 47
Page 54

Chapter 5: Setting Up Your Cash Register - Advanced
Table 13 Letters and numbers
Character
Code
Number Character
Code
Number
b 03 v 23
c 04 w 24
d 05 x 25
e 06 y 26
f 07 z 27
g 08
h 09 Numbers
i 10 0 30
j 11 1 31
k 12 2 32
l 13 3 33
m 14 4 34
n 15 5 35
o 16 6 36
p 17 7 37
q 18 8 38
r 19 9 39
48 Alpha 600/601 User’s Guide
Page 55

Programming Department Keys
Use this table for punctuation and foreign characters.
Table 14 Special Characters and Punctuation
Character
Code
Number Character
Code
Number
¡ 80 ? 28
¿ 81 ! 29
á 82 @ 40
é 83 / 67
í 84 : 68
ó 85 # 69
ú 86 & 70
Ä 93 % 71
Ü 94 $ 72
Ö 95 ,
73
(comma)
Ï 96 ( 74
ü 97 ) 75
Ñ 98 * 76
ñ 99 + 77
- 78
.
79
(period)
;
87
(semi colon)
> 88
‘
89
(apostrophe)
" 90
< 91
= 92
Alpha 600/601 User’s Guide 49
Page 56

Chapter 5: Setting Up Your Cash Register - Advanced
Scrolling Messages
Your cash register shows messages that move across the display when the
register is not in use. You can use the pre-programmed default messages
or you can program your own. You can change one or more messages at
any time. For example, if you have a new promotion, you can change the
Idle 1 message to say something about the promotion. You can also
control the speed at which the scrolling messages display.
Types of Scrolling Messages
You can program the following types of scrolling messages
Table 15 Scrolling messages
Message
Number Message Type This message shows:.
1 OFF message When the register is in the OFF
position
2 MODE message During the idle state when the register
3 SALES message After the sales transaction
4 IDLE message 1 When the register is in the idle state
5 IDLE message 2 When the register is in the idle state
Scrolling Message Length
You can program up to 42 characters in each scrolling message. Messages
4 and 5 (IDLE messages) can be combined to make a message with a
maximum of 84 characters long.
is in PRG, X, or Z modes
while in REG modes during the
morning hours *
while in REG modes during the
afternoon hours *
* IDLE messages 1 and 2 can be combined for 1 longer message
that runs all day.
50 Alpha 600/601 User’s Guide
Page 57

Default Scrolling Messages
The following messages display automatically.
Off Message CLOSED, NEXT REGISTER PLEASE
Mode Message PLEASE WAIT
Sales Message PLEASE TAKE YOUR RECEIPT
Idle Message 1 GOOD MORNING
Idle Message 2 GOOD AFTERNOON
You can change these default messages, using the following
instructions.
Programming Scrolling Messages
Use the steps below to program your scrolling message.
To program a scrolling message
1 Put the PRG key in the Mode key slot and turn it to the PRG position.
Scrolling Messages
2 If you are prompted for a Manager Password, type the password number
and then press the Check key. If you did not program a Manager
Password, go to the next step.
3 Using the round Number keys, press 6, press the number of the message
you want to change, and press the Return key.
For example, to change the message that displays when you move the
Mode key to the Off position, press number 6, 1, and Return.
4 Type your message, using either the Alphanumeric keys or the special
codes. For more information about using the Alphanumeric keys to type
letters, see Setting Alphanumeric Descriptions on page 23.
Important
If you enter the wrong character, press the Void key to backspace and delete
that character and then continue typing.
5 When you are done, press the Check key. You can program another
message by starting with step 3.
Sample Scrolling Messages
Here are some samples of messages that you can program:
ASK ABOUT OUR DAILY SPECIALS
WE DELIVER
10% DISCOUNT ON THURSDAYS
FREE SODA WITH ANY SANDWICH ORDER
STORE HOURS 9AM TO 10 PM
Alpha 600/601 User’s Guide 51
Page 58

Chapter 5: Setting Up Your Cash Register - Advanced
Programming Scrolling Message Display Times
After you have programed your scrolling message, you can set the length
of time you want the message to run.
After you are done, you can check your results. See Running the Program
Confirmation Report on page 80.
Setting the Off Message Start Time
OFF message Number of seconds after the register is
turned off before the message starts.
To stop the message after it starts,
press the Feed key.
To program the Off message time setting
1 Put the PRG key in the Mode key slot and turn it to the PRG position.
2 If you are prompted for a Manager Password, type the password number
and then press the Check key. If you did not program a Manager
Password, go to the next step.
3 Using the round Number keys, press 1, press the number of seconds you
want to delay as 2 digits, and press the Charge key.
Setting the Mode Message Start Time
MODE message Number of seconds before the
register turns into idle mode in
PRG, X, Z modes and the
message starts.
Settings in
seconds: 00–99
Default=05
Settings in
seconds: 00–99
Default=05
This message does not display in
REG modes.
To program the Mode message time setting
1 Put the PRG key in the Mode key slot and turn it to the PRG position.
2 If you are prompted for a Manager Password, type the password number
and then press the Check key. If you did not program a Manager
Password, go to the next step.
3 Using the round Number keys, press 2, press the number of seconds you
want to delay as 2 digits, and press the Charge key.
52 Alpha 600/601 User’s Guide
Page 59

Programming Scrolling Message Display Times
Setting the Sales Message Start and Stop Times
SALES message
start
To program the Sales message start time setting
1 Put the PRG key in the Mode key slot and turn it to the PRG position.
2 If you are prompted for a Manager Password, type the password number
and then press the Check key. If you did not program a Manager
Password, go to the next step.
3 Using the round Number keys, press 3, press the number of seconds you
want to delay as 2 digits, and press the Charge key.
SALES message
stop
Number of seconds after a sale is
complete before the message
starts.
The register must be set in REG
mode.
Number of seconds the Sales
message runs before the Idle
message starts.
The register must be set in REG
mode.
Settings in
seconds: 00 – 99
Default=10
Settings in
seconds: 00 – 99
Default=20
00 = No Sales
message appears
To program the Sales message stop time setting
1 Put the PRG key in the Mode key slot and turn it to the PRG position.
2 If you are prompted for a Manager Password, type the password number
and then press the Check key. If you did not program a Manager
Password, go to the next step.
3 Using the round Number keys, press 4, press the number of seconds
you want to delay as 2 digits, and press the Charge key.
Setting the Idle Messages Start Time
Idle message
display after the
time appears
Number of seconds for the Time
to appear before the Idle
message appears again.
When the Time changes while an
Idle message is running, the time
appears for a few seconds. After
the specified time, the Idle
message appears again.
Settings in
seconds: 0 – 9
0 does not show
the time at all.
Default=5
Alpha 600/601 User’s Guide 53
Page 60

Chapter 5: Setting Up Your Cash Register - Advanced
To program the Idle message display after the time appears
1 Put the PRG key in the Mode key slot and turn it to the PRG position.
2 If you are prompted for a Manager Password, type the password number
and then press the Check key. If you did not program a Manager
Password, go to the next step.
3 Using the round Number keys, press 50, press the number of seconds
you want to delay as 1 digit, and press the Charge key.
Idle message
pattern
To program the Idle message display pattern
1 Put the PRG key in the Mode key slot and turn it to the PRG position.
2 If you are prompted for a Manager Password, type the password number
and then press the Check key. If you did not program a Manager
Password, go to the next step.
3 Using the round Number keys, press 60, press 0 or 1 for your message
display choice, and press the Charge key.
Setting the Idle message to 0
runs Idle message 1 in the AM
and Idle message 2 in the PM.
Setting the Idle message to 1
combines both Idle messages
and runs them all day.
Settings: 0 – 1
Default=0
Setting the Amount of Time Message Letters Appear in the Display
You can set the amount of time letters appear in the display. The shorter
amount of time, the faster the message scrolls across the display.
To program the amount of time letters appears
1 Put the PRG key in the Mode key slot and turn it to the PRG position.
2 If you are prompted for a Manager Password, type the password number
and then press the Check key. If you did not program a Manager
Password, go to the next step.
54 Alpha 600/601 User’s Guide
Page 61

Programming the Credit Keys
3 Using the round Number keys, press 70. Press one digit number from
the chart below, representing the number of seconds you want to delay,
and press the Charge key.
Press this number... To specify...
0 0.2 seconds Fast
1 0.3
2 0.4 -
3 0.5
4 0.6
5 0.7
6 0.8
7 0.9
8 1.0 Slow
Programming the Credit Keys
You can use 2 department keys as credit card-only keys. You can use one
or both keys if you want. For example, you can set Department 19 to be a
Visa® card and Department 20 to be a MasterCard®. You can also
program the cash register to print the name of the credit card on the
receipt or journal tape.
When you ring up a sale, you can use Department 19 or Department 20 to
finalize the credit card sale, open the cash drawer, and print the receipt or
journal tape.
Default
You must set Flag 16 Option Number 1, 2, or 3 to use this feature. For
more information about setting Flags, see Programming Flag Options on
page 65.
Note
If you want to use Departments 19 and 20 as credit card keys, they no longer
work as department keys until you set Flag 16 back to 0.
To program a credit key
1 Put the PRG key in the Mode key slot and turn it to the PRG position.
2 If you are prompted for a Manager Password, type the password number
and then press the Check key. If you did not program a Manager
Password, go to the next step.
Alpha 600/601 User’s Guide 55
Page 62

Chapter 5: Setting Up Your Cash Register - Advanced
3 To program a card name that prints on the receipt or journal tape, press
51 for Department key 20 or press 52 for Department key 19 and then
press the Return key. If you do not program a card name, it prints as
CREDIT 1 or CREDIT 2.
4 Type the name of the credit card just as you did when you programmed
Department names. You can type up to 12 characters and spaces.
For example, to type VISA, press the following keys:
Press this key... To get this letter...
V
I
S
• For more information about using the Department keys to type letters,
see Programming Department Keys on page 41.
Important
If you enter the wrong character, press the Void key to backspace and
delete that character. Now you can continue.
5 When you are done, press the Check key.
Programming PLU Descriptions
The Price-Look Up system allows for fast, accurate entry of an item and
automatically records the number of items sold. If you want to use the
barcode reader, you can scan UPC codes to ring up items.
Each PLU must be programmed with up to a 12 character description that
appears on the display and prints on the tape.
Programming PLUs consists of the following:
A
1 Assign a PLU number (from 1 to a maximum of 12 digits long) to each
sales item or scan the UPC barcode.
2 Assign a price.
56 Alpha 600/601 User’s Guide
Page 63

3 Link the PLU to a department key with the appropriate Tax Status for
that PLU.
4 Enter a description for the PLU. You must enter a description, even if it
is as simple as PLU4.
For example, if PLU #1 is a taxable item, you can link it to a Department
key which is set up for tax. If PLU #2 is not a taxable item, you can link it
to a Department key which is programmed for no tax.
Important
You do not need to press the decimal point key when entering a price.
After you are done, you can check your results. See Running the PLU
Confirmation Report on page 82.
Programming PLUs without a Barcode Reader
You can program PLUS without using a barcode reader. Use the following
instructions.
Programming PLU Descriptions
To program PLUs without a barcode reader
Example 12: Set PLU #1 with a $2.99 price, linked to Department 1, description
of APPLE
1 Put the PRG key in the Mode key slot and turn it to the PRG position.
2 If you are prompted for a Manager Password, type the password number
and then press the Check key. If you did not program a Manager
Password, go to the next step.
3 Press the Qty/Date key to begin programming the PLUs. The PLU
prompt appears on the display.
4 Using the round Number keys, press 1 and press the PLU key.
5 Using the round Number keys, press 299 and then press the
Department 1 key. For more information about using the department
keys, see Assigning Department Number Keys on page 46.
6 Press the keys to spell APPLE, using the Alphanumeric keys or the
Alphanumeric Code Chart, if needed. For an explanation of how to use
the Department keys to spell words, see Setting Alphanumeric
Descriptions on page 23. The Department Shift key lets you use the
letters in the lower green area on the Department keys.
To make a space to separate words, press the round Number 0 key twice
or press the round Number 00 key one time.
You must enter a description, even if it is as simple as PLU4.
Alpha 600/601 User’s Guide 57
Page 64

Chapter 5: Setting Up Your Cash Register - Advanced
Important
If you enter the wrong character, press the Void key to backspace and
delete that character and then continue.
7 Press the Check key. The PLU information is saved in the cash register.
If you want to program more PLUs, repeat steps 4 through 7.
8 When you are done programming PLUs, press the Qty/Date key.
Programming PLUs with the Barcode Reader
You can use the barcode reader to scan items and automatically ring them
up. Using the barcode reader reduces errors caused by people ringing up
items incorrectly. The barcode reader must be held about ½ inch or closer
above the UPC symbol on the product to read the UPC symbol properly.
To program PLUs using the barcode reader
Example 13: Set a UPC symbol to a $2.99 price, linked to Department 1,
description of BOOK
1 Put the PRG key in the Mode key slot and turn it to the PRG position.
2 If you are prompted for a Manager Password, type the password number
and then press the Check key. If you did not program a Manager
Password, go to the next step.
3 Press the Qty/Date key to begin programming the PLUs.
4 Using the barcode reader, scan the UPC you want for this PLU. Hold
the barcode reader less than ½ inch from the UPC you want to scan.
Press the button on the bottom of the reader to read the UPC. The
barcode reader beeps.
5 Using the round Number keys, press 299 and then press the
Department 1 key. The PLU name appears on the display. For more
information about using the department keys, see Assigning Department
Number Keys on page 46.
6 Press the keys to spell BOOK, using the Department keys or the
Alphanumeric Code Chart, if needed. For an explanation of how to use
the Department keys to spell words, see Setting Alphanumeric
Descriptions on page 23. The Department Shift key lets you use the
letters in the lower green area on the Department keys.
To make a space to separate words, press the 0 key twice or press the 00
key one time.
You must enter a description, even if it is as simple as PLU4.
58 Alpha 600/601 User’s Guide
Page 65

Important
If you enter the wrong character, press the Void key to backspace and delete
that character and then continue.
7 Press the Check key. The PLU information is saved in the cash register.
8 Repeat steps 4 through 7 to program more PLUs.
9 When you are done programming PLUs, press the Qty/Date key.
Setting the Decimal Points
The decimal point is set by selecting from the following 4 options:
This decimal point... Looks like...
zero decimal point 0 = $ X
one decimal point 1 = $ X.X
two decimal point 2 = $ X.XX (U.S. Standard)
Setting the Decimal Points
three decimal point 3 = $ X.XXX
After you program the decimal point, you do not need to specify a decimal
when you ring up sales. If you try to use a decimal point, you hear an error
beep.
After you are done, you can check your results. See Running the Program
Confirmation Report on page 80.
To program the decimal points
Example 14: Program the Decimal Point For Option $X.XX, 2 decimal places,
normally used in the United States
1 Put the PRG key in the Mode key slot and turn it to the PRG position.
2 If you are prompted for a Manager Password, type the password number
and then press the Check key. If you did not program a Manager
Password, go to the next step.
3 Using the round Number keys, press 2 and then press the -%/RA key.
Alpha 600/601 User’s Guide 59
Page 66

Chapter 5: Setting Up Your Cash Register - Advanced
Setting the Rounding Rates
You may want to sell 2 items for an odd number price. If someone wants
to purchase that item, they cannot pay you a half cent, so you need the
cash register to round the half cent to the next nearest penny.
You can select from the following options to set the rounding.
Table 16 Rounding
This number... Rounds to this...
00 Numbers from .1 - .9 to 0
50 Numbers from .5 - .9 to 1 (U.S. Standard)
99 Numbers from .1 - .9 to 1
After you are done, you can check your results. See Running the Program
Confirmation Report on page 80.
To set the rounding
Example 15: Program rounding to 50, normally used in the United States
1 Put the PRG key in the Mode key slot and turn it to the PRG position.
2 If you are prompted for a Manager Password, type the password number
and then press the Check key. If you did not program a Manager
Password, go to the next step.
3 Using the round Number keys, press 50 and then press the Charge key.
Programming Discounts
Sometimes you want to have discounts assigned automatically. For
example, when you have a sale, you may want to be able to apply a 10%
discount to certain items.
Programming Minus Percentage Discounts
You may want to deduct a percentage rate from the usual rate of an item,
such as an employee discount. The Minus Percentage Discount [-%/RA]
subtracts a percentage rate from an individual item. You can program the
rate or you can enter it by hand each time. Regardless of how you specify
a discount, the discount you enter must always be 4 digits. For example,
you enter a 25% discount as 2500.
You can also set it so that the Minus Percentage Discount amount is not
subtracted from the department totals on the Management Reports. For
more information, see Flag 23 on page 68.
60 Alpha 600/601 User’s Guide
Page 67

Programming Discounts
After you are done, you can check your results. See Running the Program
Confirmation Report on page 80.
To program a Minus Percentage Discount [-%/ra]
Example 16: Program the Percentage Discount rate of 10%
1 Put the PRG key in the Mode key slot and turn it to the PRG position.
2 If you are prompted for a Manager Password, type the password number
and then press the Check key. If you did not program a Manager
Password, go to the next step.
3 Using the round Number keys, press 1000 0 and then press the -%/RA
key.
You must always enter the percentage rate as a 4-digit number without
the decimal point, representing 00.00 through 99.99.
Note
See Minus Percentage Discount Sale on page 112 to ring up a Minus
Percentage Discount sale.
Programming Coupon Discounts
You can use the Coupon Discount (CPN) key to subtract a specific amount
from an individual item. You can enter a coupon in the middle of a
transaction or by itself in a transaction.
After you are done, you can check your results. See Running the Program
Confirmation Report on page 80.
Programming the Coupon Discount key includes 2 steps:
1 Setting a High Digit Lock Out (HDLO) number
The High Digit Lock Out (HDLO) number limits the number of digits
that can be rung up in a coupon discount. This prevents you from
accidentally subtracting a large amount.
If large number of digits is entered, you hear an error beep and the
keypad locks up. For example: To make sure no one can ring up more
than $99.99 on the Coupon Discount key, set the HDLO to 4.
Table 17 High digit lockout number (HDLO)
This number... From this... to this...
0 $ .01 $ 99,999.99 (Standard setting)
1.01 .09
2.01 .99
Alpha 600/601 User’s Guide 61
Page 68

Chapter 5: Setting Up Your Cash Register - Advanced
Table 17 High digit lockout number (HDLO) (Continued)
This number... From this... to this...
3 .01 9.99
4 .01 99.99
5 .01 999.99
6 .01 9,999.99
2 Setting the Tax Status.
The tax status determines how you want the tax rate to be charged when
using the Coupon Discount key. Contact your local tax authorities to learn
your local tax requirements.
The options are:
• To charge tax on the original amount of an item (the amount before
the coupon is deducted).
• To charge tax on the discounted amount of an item (the amount after
the coupon discount is deducted).
Note
If you have no tax rate programmed in the cash register, use 00 from the Tax
Status Numbers table.
The following Tax Status numbers are used to link the Tax Status to the
Coupon Discount key.
Table 18 Tax Status Numbers
Number Taxable by... To charge the...
00 Non-Taxable
01
02
TAX 1 TAX 1 rate on the discounted amount of an
TAX 2 TAX 2 rate on the discounted amount of an
• If no tax is programmed in the cash register, or
• If you want to charge tax on the original
amount of an item (the amount before the
coupon is deducted).
item. *
item. *
03
04
05
TAX 3 TAX 3 rate on the discounted amount of an
item. *
TAX 4 TAX 4 rate on the discounted amount of an
item. *
TAX 1 and
TAX 2
TAX 1 and TAX 2 rates on the discounted
amount of an item. *
62 Alpha 600/601 User’s Guide
Page 69

Table 18 Tax Status Numbers (Continued)
Number Taxable by... To charge the...
Programming Discounts
06
07
08
09
10
11
12
13
14
15
TAX 1 and
TAX 3
TAX 1 and
TAX 4
TAX 2 and
TAX 3
TAX 2 and
TAX 4
TAX 3 and
TAX 4
TAX 1, TAX 2
and TAX 3
TAX 1, TAX 2
and TAX 4
TAX 1, TAX 3
and TAX 4
TAX 2, TAX 3
and TAX 4
TAX 1, TAX
2, TAX 3,
TAX 4
TAX 1 and TAX 3 rates on the discounted
amount of an item. *
TAX 1 and TAX 4 rates on the discounted
amount of an item. *
TAX 2 and TAX 3 rates on the discounted
amount of an item. *
TAX 2 and TAX 4 rates on the discounted
amount of an item. *
TAX 3 and TAX 4 rates on the discounted
amount of an item. *
TAX 1, TAX 2 and TAX 3 rates on the
discounted amount of an item. *
TAX 1, TAX 2 and TAX 4 rates on the
discounted amount of an item. *
TAX 1, TAX 3 and TAX 4 rates on the
discounted amount of an item. *
TAX 2, TAX 3 and TAX 4 rates on the
discounted amount of an item. *
TAX 1, TAX 2, TAX 3 and TAX 4 rates on the
discounted amount of an item. *
* the amount after the coupon is deducted
To program the Coupon key
The following examples show the most commonly used options in
programming the Coupon Discount key.
Method 1
You can select if no tax is programmed in the cash register or if you want
to charge the tax rate on the original amount of an item (the amount
before the coupon is deducted).
Example 17: If HDLO is set to 0, and the Tax Status Number is set to 0
(non-taxable)
1 Put the PRG key in the Mode key slot and turn it to the PRG position.
2 If you are prompted for a Manager Password, type the password number
and then press the Check key. If you did not program a Manager
Password, go to the next step.
3 Using the round Number keys, press 000 and then press the Cpn key.
Alpha 600/601 User’s Guide 63
Page 70

Chapter 5: Setting Up Your Cash Register - Advanced
Note
See page 109 to ring up a coupon sale programmed with Method 1.
Method 2
You can select if you want the tax rate to be charged on the discounted
amount of an item (the amount after the coupon is deducted).
Example 18: If HDLO is selected for 0, and the Tax Status is selected for 1
(taxable by TAX 1):
1 Put the PRG key in the Mode key slot and turn it to the PRG position.
2 If you are prompted for a Manager Password, type the password number
and then press the Check key. If you did not program a Manager
Password, go to the next step.
3 Using the round Number keys, press 001 and then press the Cpn key.
Note
See page 109 to ring up a coupon sale programmed with Method 2.
Programming Plus Percentage Add-ons
You may want to add an automatic amount to the total, such as a fixed tip
or other service charge. Plus Percentage adds a fixed rate additional
charge to an individual item. You can program the rate or you can enter it
by hand each time. Regardless of how you specify the Plus Percentage,
the amount you enter must always be 4 digits. For example, you enter a
25% Plus Percentage as 2500.
When you use the Plus Percentage/Add-On key, the words Add-on
appear on the display and print on the receipt.
You can also set the cash register so that the Plus Percentage amount is
not added to the department totals on the Management Reports. For more
information, see Flag 23 on page 68.
After you are done, you can check your results. See Running the Program
Confirmation Report on page 80.
To program the Plus Percentage [+%/PO] key
Example 19: Program a 10% add-on
1 Put the PRG key in the Mode key slot and turn it to the PRG position.
2 If you are prompted for a Manager Password, type the password number
and then press the Check key. If you did not program a Manager
Password, go to the next step.
64 Alpha 600/601 User’s Guide
Page 71

3 Using the round Number keys, press 1000 0 and then press the +%/PO
key.
You must always enter the percentage rate as a 4-digit number without
the decimal point, representing 00.00 through 99.99.
Note
See Plus Percentage Sale on page 115 to ring up a Plus Percentage sale.
Programming Flag Options
Flag options are actions you can set for the cash register. These actions
include how the date appears, if the tax rate prints on receipts, if clerk
numbers are used, and so on.
34 Flags are available on your cash register. The Flags are preset by the
factory to meet the most commonly used actions. Each Flag setting can be
changed or updated at any time, if needed.
Programming Flag Options
Note
All Flag action are factory preset at 0, except for Flags 15, 18, 21, 27, 28, 30,
32, 33, 34, 37, and 39 which have a default setting of 1. Flag actions only
need to be changed if you want to change any action from the default
setting.
If you change the language after programming is complete, descriptions
like logo, department and PLU names revert to their default descriptions
and you must reprogram them. The numeric amounts that you
programmed do not change.
Note
If you program custom messages or department descriptions, changing
languages does not translate those messages. Instead, they are deleted and
reset to the factory default for the message or description. Before you
program your messages, select the language you want the cash register to
be in.
After a Full System Clear, all settings go back to the default settings.
To program flag options
Example 20: Select 1 for Flag 3 (Tendering of change is required)
1 Put the PRG key in the Mode key slot and turn it to the PRG position.
2 If you are prompted for a Manager Password, type the password number
and then press the Check key. If you did not program a Manager
Password, go to the next step.
Alpha 600/601 User’s Guide 65
Page 72

Chapter 5: Setting Up Your Cash Register - Advanced
3 Using the round Number keys, press 31 and then press the Void key.
Flag #3 is now set with Action 1.
The following table shows all Flags and the actions. Bold numbers are the
default.
Table 19 Flag options
This Flag
number... Sets these actions...
1 The Grand Total does not reset after a Z reading. 0
The Grand Total resets after a Z reading. 1
2 Subtotal prints on sales receipts when #/ST/NS key
is pressed.
Subtotal does not print on sales receipts when
#/ST/NS key is pressed.
3 Tendering of change is not required. 0
Tendering of change is required. 1
4 The Date prints as Month-Day-Year. 0
The Date prints as Day-Month-Year. 1
5 Z1 and Z2 Counter Numbers do not reset after a
Z1 or Z2 report.
Z1 and Z2 Counter Numbers reset after a Z1 or Z2
report.
Set
to...
0
1
0
1
6 Tax Rate Amount prints on sales receipts. 0
Tax Rate Amount does not print on sales receipts. 1
7 Skips amounts equaling zero on financial reports. 0
Does not skip amounts equaling zero on financial
1
reports.
8 The Date prints on sales receipts and management
0
reports.
The Date does not print on sales receipts and
1
management reports.
9 The Time prints on sales receipts and management
0
reports.
The Time does not print on sales receipts and
1
management reports.
66 Alpha 600/601 User’s Guide
Page 73

Table 19 Flag options (Continued)
Programming Flag Options
This Flag
number... Sets these actions...
10 The Consecutive Number prints on the receipt. 0
The Consecutive Number does not print on the
receipt.
11 The Clerk Name prints on sales receipts. 0
The Clerk Name does not print on sales receipts. 1
12 Clerk System inactive. 0
Clerk System active. 1
13 USA Tax System. 0
Canadian Tax System. 1
VAT Tax System. 2
14 Z1/Z2 Counter prints. 0
Z1/Z2 Counter does not print. 1
15 Tax amount prints after the sales total on the sales
receipt.
Set
to...
1
0
Tax amount prints before the total amount on the
sales receipt.
16 Standard Department Keyboard layout. 0
Department 20 is Credit 1. 1
Department 19 is Credit 2. 2
Department 20 is Credit 1 and Department 19 is
Credit 2.
17 Sets the non-Taxable Limit without GST tax for
Canadian tax mode.
Sets the non-Taxable Limit with GST tax for
Canadian tax mode.
18 Time appears on the display and prints in 24 hour
mode.
Time appears on the display and prints in 12 hour
(am/pm) mode.
1
3
0
1
0
1
Alpha 600/601 User’s Guide 67
Page 74

Chapter 5: Setting Up Your Cash Register - Advanced
Table 19 Flag options (Continued)
This Flag
number... Sets these actions...
19 Sets the language for the cash register. The options
are:
English 0
Spanish 1
French 2
German 3
20 A Clerk Number is not required before each
transaction.
A Clerk Number is required before each
transaction.
Note
Flag # 12 must be set to 1 so the clerk system is active before
any setting for Flag # 20 can take effect.
21 Receipt printer is turned ON in Reg2 mode. 0
Set
to...
0
1
Receipt printer is turned OFF in Reg2 mode. 1
22 Do not select Canadian tax system of Tax on Tax 0
Select Canadian Tax on Tax system. 1
Select Canadian Tax on Tax on Tax system. 2
Note
Flag # 13 must be set to 1 before setting this flag.
23 -% is subtracted and +% is added to department
totals on X/Z readings.
-% is not subtracted and +% is not added to
department totals on X/Z readings.
24 TAX amounts print separately on sales receipts. 0
TAX amounts print as one figure on sales receipts.
The letters “TX” print next to the total of tax.
25 Duplicate Z report can be printed. 0
Duplicate Z report cannot be printed. 1
26 Consecutive receipt number resets after Z1 Report. 0
0
1
1
Consecutive receipt number does not reset after Z1
1
Report.
68 Alpha 600/601 User’s Guide
Page 75

Table 19 Flag options (Continued)
Programming Flag Options
This Flag
number... Sets these actions...
27 0 price registration is allowed. 0
0 price registration is not allowed. 1
28
(Europe
Euro convert function is allowed. 0
Euro convert function is not allowed. 1
Only)
29 Tax rate does not print on financial report in VAT
mode.
Tax rate prints on financial report in VAT mode. 1
30
(Europe
Print converted total at convert tender. 0
Print converted total always tender. 1
Only)
31
(Europe
Local base currency. 0
Euro base currency. 1
Only)
32 Allow Clerk numbers without security code. 0
Set
to...
0
Clerk must also enter the 3 digit security code. 1
33 The Header message does not print. 0
The Header message prints. 1
34 Second receipt cannot be issued. Receipt reprint
option disabled.
Second receipt can be issued. Receipt reprint
option enabled.
35 Only transaction totals for each receipt are stored
in the Electronic Journal.
Line-by-line transaction details for each receipt are
stored in the Electronic Journal.
Note
Flag # 36 must be set to 0 (active) before any setting for
Flag # 35 can take effect.
36 Activate Electronic Journal. 0
De-activate Electronic Journal. 1
0
1
0
1
Alpha 600/601 User’s Guide 69
Page 76

Chapter 5: Setting Up Your Cash Register - Advanced
Table 19 Flag options (Continued)
This Flag
number... Sets these actions...
37 Do not print Footer message at the bottom of the
receipt.
Print Footer message at the bottom of the receipt. 1
38 Print blank lines in the Header and Footer. 0
Do not print blank lines in the Header and Footer. 1
39 Prints a blank line for that specific line of the
Header message or Footer message.
Prints the factory default text for that one specific
line of the Header message or Footer message.
Note
Flags 28, 30 and 31 do not apply to the U.S. market.
Set
to...
0
0
1
70 Alpha 600/601 User’s Guide
Page 77

CHAPTER 6
Ringing up Sales and Using
Training Mode
After you set up your cash register, ringing up sales is easy. For
information about ringing up complicated sales, see Examples on
page 104.
If you want to learn about using the cash register without affecting the
daily total, you can use the Training mode. You or someone else can learn
how to use the cash register without creating real sales that show up on
reports. For example, you can train a new person about using the
department keys and completing sales.
Training mode lets someone use the cash register without actually
recording the sales in the sales history. When you stop Training mode, the
training sales information is deleted.
Ringing up Sales
After you have the basics programmed in your cash register, you are ready
to ring up sales. For more information about setting up the basics on your
cash register, see Setting Up Your Cash Register - the Basics on page 22.
Reminder
Do not press the Decimal Point key when ringing up a price.
Alpha 600/601 User’s Guide
Page 78

Chapter 6: Ringing up Sales and Using Training Mode
To ring up straight sales without a PLU number
1 Put the REG key in the Mode key slot and turn it to the REG1 or REG2
position. You are ready to ring up a sale.
2 Using the round Number keys area, type the price of the first item.
3 Press the Department key for that item.
To use the Department keys above 40, do the following:
• Press the Dept Shift key.
• Using the round Number keys, type the Department number from 41
to 99 that you want to use. For example, for Department 63, press the
6 key and then press the 3 key.
• Press the Dept Shift key again.
4 Repeat for the rest of the items.
5 When you are done ringing up items, press the Amount Tend Total key.
The cash drawer opens and the receipt or journal prints.
6 Make any change needed and place the money you are given in the cash
drawer.
7 Close the cash drawer.
8 Give the customer the receipt, if the cash register is set to print receipts.
You are ready to ring up another sale.
To ring up straight sales with a PLU number and not using the barcode
reader
1 Put the REG key in the Mode key slot and turn it to the REG1 or REG2
position. You are ready to ring up a sale.
2 Using the round Number keys area, type the PLU number of the first
item.
3 Press the PLU key.
4 Repeat for the rest of the items.
5 When you are done ringing up items, press the Amount Tend Total key.
The cash drawer opens and the receipt or journal prints.
6 Make any change needed and place the money you are given in the cash
drawer.
7 Close the cash drawer.
8 Give the customer the receipt, if the cash register is set to print receipts.
You are ready to ring up another sale.
72 Alpha 600/601 User’s Guide
Page 79

Ringing up Sales with the Barcode Reader
You can also ring up sales using the barcode reader. Before you can ring
up sales with the barcode reader, the UPC symbol must be programmed
into the cash register with the barcode reader. For more information, see
Programming PLUs with the Barcode Reader on page 58.
To ring up sales with the barcode reader
1 Put the REG key in the Mode key slot and turn it to the REG1 or REG2
position. You are ready to ring up a sale.
2 Put the barcode reader light over the UPC symbol, about ½ inch or
closer above the UPC symbol on the product to read the UPC symbol
properly.
3 Press the button under the scanner. The barcode scanner makes a beep
sound and the item appears on the display.
4 Continue using the barcode scanner to scan UPC symbols until you are
done.
Printing Receipts
5 When you are done, press the Amount Tend Total key. The cash drawer
opens and the receipt or journal prints.
6 Make any change needed and place the money you are given in the cash
drawer.
7 Close the cash drawer.
8 Give the customer the receipt, if you set the cash register to print
receipts. You are ready to ring up another sale.
Printing Receipts
REG1 turns the cash register on for all normal sales transactions. All
features of the cash register are activated as programmed. A customer
receipt is printed for every transaction.
REG2 also turns on the cash register and allows all normal sales
transactions just like REG1 mode. However, the built-in printer is
turned-off so that customer receipts are not automatically printed. If you
are a smaller merchant or business, you may not need to print or issue
customer receipts. This controls the amount of receipt paper you use. In
this case, you do not print a receipt for every transaction and only print a
receipt for those transactions where one is required. You must have paper
installed in the cash register even if you are using REG2 mode and are not
printing receipts.
Depending on how the cash register is programmed, you can print receipts
2 ways:
Alpha 600/601 User’s Guide 73
Page 80

Chapter 6: Ringing up Sales and Using Training Mode
• Automatic Receipt Print - Using REG1 mode, the sales receipt will print
automatically for every transaction. You can print a duplicate copy of
the previously printed customer receipt if one is necessary.
Put the REG key in the Mode key slot, turn it to the REG1 position, and
complete the sales transaction. Before you start the next transaction or
any other function, press the Amount Tend Total key for a duplicate
copy of the customer receipt.
• Receipt on Demand - Using REG2 mode, a customer receipt is not
printed automatically, but can be printed by manually requesting one.
When REG2 mode is used with the printer turned off, this allows you to
conserve receipt paper when the customer receipts are not required for
every transaction.
Put the REG key in the Mode key slot, turn it to the REG2 position, and
complete the sales transaction. Before you start the next transaction or
any other function, press the Amount Tend Total key for a print-out of
the customer receipt.
To use the Receipt on Demand feature, make sure the Flag options for
Flag #21 and 34 are both set to the factory default setting of 1.
Flag #21 0 = REG2 mode set to Print mode.
1* = REG2 mode set to Non-print mode. Customer receipts
are not printed automatically during a sales transaction.
Flag #34 0 = Disable printing of duplicate receipts
1* = Allow printing of a duplicate receipt for previous
transaction
74 Alpha 600/601 User’s Guide
Page 81

Using Training Mode
We provide examples to help learn how to use this cash register. For
information about the examples, see Examples on page 104. Using the
examples can help you learn to use the cash register and the available
features.
You can start Training mode at any time because it does not record
activity in the machine totals.
When you are using the cash register in Training mode, you cannot use
any of the operations in the PRG, X, or Z modes. The transaction numbers
and amounts do not count in the Register mode until you stop Training
mode.
When the cash register is in Training mode, asterisks **** print instead of
transaction numbers. When you stop Training mode, the transaction
numbers continue from the last number printed before you entered
Training mode.
Using Training Mode
When the cash register is in Training mode, a small light appears in the
left digit of the Clerk display. Some transactions may also print DEMO on
the receipt.
To start Training mode
1 Put the PRG key in the Mode key slot and turn it to the PRG position.
2 If you are prompted for a Manager Password, type the password number
and then press the Check key. If you did not program a Manager
Password, go to the next step.
3 Using the round Number keys, press 666666 and then press the
Amount Tend Total key.
4 Now you can move the Mode key to the REG1 or REG2 position so
training can start.
To stop Training mode
1 Put the PRG key in the Mode key slot and turn it to the PRG position.
2 If you are prompted for a Manager Password, type the password number
and then press the Check key. If you did not program a Manager
Password, go to the next step.
3 Using the round Number keys, press 555555 and then press the
Amount Tend Total key.
4 Now you can move the Mode key to the REG1 or REG2 position and
use the cash register.
Alpha 600/601 User’s Guide 75
Page 82

CHAPTER 7
Programming Complex Tax Rates
Your cash register can manage complex tax rates and assignments. This
chapter explains how to do this.
Many people do not need the information in this chapter. If this
information does not relate to your business needs, you can skip it. If some
information is related to your specific needs, then skip any sections which
you do not need to set up your cash register.
If you do not know your sales tax rate and base amount, contact your local
government office and ask for your local tax chart. The base tax amount is
the maximum point where no tax is charged. Your cash registers defaults
to a base tax amount of 10 cents. If your base tax amount is other than 10
cents, see Calculating State Tax Table Codes on page 125.
When you set up your cash register, you programmed the cash register to
use a simple sales tax, appropriate for your area. Chapter 2 explains how
to program a simple sales tax. Chapter 5 explains how to set up sales tax
related to departments or PLUs.
Note
If you hear an error tone while you are programming, press the Clear key
and continue by repeating the step.
You do not need to reprogram all options if you want to update or change
one thing. Save this manual in a safe place so you have it for future
programming. After you are done programming, you can print
Confirmation Reports to check your results. For more information, see
Running Reports on page 80.
Alpha 600/601 User’s Guide
Page 83

Setting the Tax Rates
You can program 4 different tax rates on your cash register. Each tax rate
can be linked directly to a department key (see Programming Tax Status
on page 44), or by pressing the Tax 1 or Tax 2 keys before ringing up an
entry.
You can set the cash register to not print the tax rate on receipts. For more
information, see Programming Flag Options on page 65.
You can program each Tax Rate as follows:
• As an ADD-ON RATE (used in the USA) - means the tax amount is
added onto the price of the item sold. Add-on Tax is most common in
the United States. Add-on Tax can be programmed as either a fixed-rate
which charges tax based on a percentage, or using the tax table codes,
which is a calculation based on an approved tax chart issued by your
local or state government.
• Canadian Tax System - allows you to program the Goods and Services
tax (GST) and Provincial Sales Tax (PST) tax system required in Canada.
Setting the Tax Rates
• VAT (Value Added Tax) - means that the tax amount is included in the
price of the item.
After you have the tax table codes for your state, see Calculating State Tax
Table Codes on page 125 for help or contact your local state government
office for the current tax rates.
To program a basic tax rate, see Programming the Sales Tax on page 10.
To program a second fixed tax rate
Example 21: To set Tax 2 for 7%
1 Put the PRG key in the Mode key slot and turn it to the PRG position.
2 If you are prompted for a Manager Password, type the password number
and then press the Check key. If you did not program a Manager
Password, go to the next step.
3 Using the round Number keys area, press 2, then press the Tax 1 key.
4 Using the round Number keys area, press 7000, then press the Amount
Tend Total key.
To program add-on tax table rate
Example 22: The tax code for Arizona's tax rate of 4% is:
121-240096-13-19-23-27-27-1029-25-25-25-1025
1 Put the PRG key in the Mode key slot and turn it to the PRG position.
Alpha 600/601 User’s Guide 77
Page 84

Chapter 7: Programming Complex Tax Rates
2 If you are prompted for a Manager Password, type the password number
and then press the Check key. If you did not program a Manager
Password, go to the next step.
3 Using the round Number keys area, press 1 and press the Tax 1 key.
4 Using the round Number keys area, press 121 and press the Tax 2 key.
5 Using the round Number keys area, press 240096 and press the Tax 2
key.
6 Continue typing any State Tax Table Codes you need. Press the Tax 2
key after each code until you are done.
Note
If you make a mistake during programming the State Tax Table Codes, press
the Clear key and begin again with Step 3.
To program a second add-on tax rate
Example 23: Tax code for Arizona's tax rate of 5% is:
101-190095-11-17-20-21-1021-20-20-20-20-1020
1 Put the PRG key in the Mode key slot and turn it to the PRG position.
2 If you are prompted for a Manager Password, type the password number
and then press the Check key. If you did not program a Manager
Password, go to the next step.
3 Using the round Number keys area, press 2 and press the Tax 1 key.
4 Using the round Number keys area, press 101 and press the Tax 2 key.
5 Using the round Number keys area, press 190095 and press the Tax 2
key.
6 Continue typing any State Tax Table Codes mentioned and press the
Tax 2 key after each code until finished.
Confirmation Report
To check your results, see Running the Program Confirmation Report on
page 80.
To program a VAT tax rate (commonly used in Europe)
You must program Flag 13, as follows:
1 Put the PRG key in the Mode key slot and turn it to the PRG position.
2 If you are prompted for a Manager Password, type the password number
and then press the Check key. If you did not program a Manager
Password, go to the next step.
3 Using the round Number keys area, press 132 and press the Void
key.
78 Alpha 600/601 User’s Guide
Page 85

Setting the Tax Rates
To program a First VAT tax rate
Example 24: 10% Tax Programming
1 Put the PRG key in the Mode key slot and turn it to the PRG position.
2 If you are prompted for a Manager Password, type the password number
and then press the Check key. If you did not program a Manager
Password, go to the next step.
3 Using the round Number keys area, press 1, press the Tax 1 key, press
10000, then press the Tax 2 key.
To program a Second VAT tax rate
Example 25: 5%
1 Put the PRG key in the Mode key slot and turn it to the PRG position.
2 If you are prompted for a Manager Password, type the password number
and then press the Check key. If you did not program a Manager
Password, go to the next step.
3 Using the round Number keys area, press 2, press the Tax 1 key, press
5000, and then press the Tax 2 key.
Alpha 600/601 User’s Guide 79
Page 86

CHAPTER 8
Running Reports
Your cash register includes many reports. In this chapter, we explain:
• Programming confirmation
• The assigned Department keys
• The assigned PLUs
• The tax status of departments and PLUs
• Management reports, such as sales totals
Running the Program Confirmation Report
The Program Confirmation Report allows you to check your
programming results. For more information about programming the cash
register, see Chapter 5 Setting Up Your Cash Register - Advanced on
page 40.
To run a program confirmation report
1 Put the PRG key in the Mode key slot and turn it to the PRG position.
2 If you are prompted for a Manager Password, type the password number
and then press the Check key. If you did not program a Manager
Password, go to the next step.
3 Using the round Number keys, press 999999 and then press the
Amount Tend Total key.
Alpha 600/601 User’s Guide
Page 87

Running the Program Confirmation Report
An example Program Confirmation Report is show below. The figures
shown in this example are randomly selected. Your report shows you the
specific information about the programming for your cash register.
Note
Flags 28, 30 and 31 do not apply to the U.S. market.
Table 20
This code... Means this...
T1 Taxable status programmed with a single tax rate.
T2 Taxable status programmed with a second tax rate.
T3 Taxable status programmed with Tax 3 rate.
T4 Taxable status programmed with Tax 4 rate.
TX Taxable status programmed with more than 1 tax rate.
Alpha 600/601 User’s Guide 81
Page 88

Chapter 8: Running Reports
Running the Department Confirmation Report
You can print a report that shows the programmed information for a
range of departments. This is helpful if you want to see the programmed
names of some of the departments, but do not need to see all other
programming information.
You can also print a report that shows department information and sales.
For more information, see Running the Department Sales Report on
page 83.
To run a department confirmation report
1 Put the PRG key in the Mode key slot and turn it to the PRG position.
2 If you are prompted for a Manager Password, type the password number
and then press the Check key. If you did not program a Manager
Password, go to the next step.
3 Using the round Number keys, press 88.
4 Using the round Number keys, press the number of the first department
you want to see. For example, 01.
5 Using the round Number keys, press the number of the last department
you want to see. For example, 15.
6 Press the Amount Tend Total key.
Running the PLU Confirmation Report
The PLU Confirmation Report allows you to check all PLUs
programmed. For more information about programming PLUs, see
Programming PLU Descriptions on page 56.
To run the PLU confirmation report
1 Put the PRG key in the Mode key slot and turn it to the PRG position.
2 If you are prompted for a Manager Password, type the password number
and then press the Check key. If you did not program a Manager
Password, go to the next step.
3 Press the PLU key.
82 Alpha 600/601 User’s Guide
Page 89

An example PLU Confirmation Report is show below. Your report
shows you the specific information about your programming.
Running the Department Sales Report
The Department Sales Report allows you to check the current sales
information for specified departments.
To run a Department sales report
1 Put the Z key in the Mode key slot and turn it to the X position.
Running the Department Sales Report
2 If you are prompted for a Manager Password, type the password number
and then press the Check key. If you did not program a Manager
Password, go to the next step.
3 Using the round Number keys, press the number of the first department
you want to see. For example, 01.
4 Using the round Number keys, press the number of the last department
you want to see. For example, 15.
5 Press the Amount Tend Total key. The Department Sales report prints.
Running Management Reports
The cash register maintains totals of all transaction information. This
information is saved in the memory of the cash register as long as the
register is plugged in to an electrical outlet or, if the cash register is
unplugged, the batteries are charged.
Management reports show you information about how sales are
progressing. You can run most reports with the Mode key in either the X
position or the Z position. See Running a Financial Report on page 86 for
instructions to run X and Z reports.
• X reports are run during the day to check transactions. These reports do
not clear the transaction memory in the cash register. You can run all
reports in the X position.
• Z reports are run at end of day, end of the week, or end of the month.
These reports do clear the transaction memory in the cash register.
Alpha 600/601 User’s Guide 83
Page 90

Chapter 8: Running Reports
When you are done printing these reports, the information only exists
on the cash register tape. You can run almost all reports in the Z
position.
To prevent someone from accidently printing these reports, a manager
password can be set. After the password is set, these reports do not print
until the password is entered. For information about setting manager
passwords, see Setting X and Manager Passwords on page 35.
Besides passwords, the keys that came with your cash register are also a
form of security. We recommend giving clerks the REG keys and giving
managers the Z and PRG keys.
For additional security, only the Z and PRG keys can run Z reports. The
REG key cannot run Z reports. This means that people with REG keys
cannot run or clear the transaction history.
About X Readings
There are two kinds of readings that can be taken in the X position: an X1
reading and an X2 reading.
• X1 Reading - Commonly known as a mid-day reading. Use this position
• X2 Reading - Commonly known as a mid-week or mid-month reading.
About Z Readings
There are two types of readings that can be taken in the Z position: a Z1
reading and a Z2 reading.
• Z1 reading — Commonly known as a end-of-day/daily-closeout reading.
to print periodic readings of transaction totals during the course of the
day. This reading position does not reset to zero.
Use this position to print periodic readings of transaction totals during
the course of several days. This reading position does not reset to zero.
This reading prints all transaction data and sets all totals to zero, except
the Running Grand Total.
You can also print a duplicate Z1 Report. This is useful if the register
runs out of paper or if there is a power outage while the Z1 Report is
printing. This feature can also be turned off by Flag setting 25. For more
information about Flags, see Programming Flag Options on page 65.
• Z2 reading — Commonly known as a weekly or monthly reading. This
reading prints transaction totals either on a weekly or monthly basis (not
both) and resets all transaction totals to zero except the Running Grand
Total.
84 Alpha 600/601 User’s Guide
Page 91

About Management Reports
The following management reports are available:
• Cash-in-Drawer Report - Only available in the X position. Tells you how
much cash is in the drawer at the time of the report.
• Clerk Report - Prints total sales amounts of each Clerk Number.
• Financial Report - Includes totals of departments, tax, net sales, voids,
returns, coupons, refunds, minus percentage, plus percentage,
receipts-on-account, paid out, cash, check, charge. The running grand
total appears only on Z Reports.
• Hourly Report - Provides total sales amounts rung up each hour.
• All PLU Report - Lists quantity and cost of each PLU number rung up.
• Department Range Report - Shows the sales information for the specified
departments.
• Electronic Journal Report - Prints the information in the Electronic
Journal. Can be run in the X or Z modes.
Running Management Reports
The different management reports available in the X and Z positions:
Prints this
This key
position...
X X1 Financial, PLU,
X X2 Financial Mid-Week or
Z Z1 Financial, PLU, Clerk,
Z Z2 Financial Weekly or
report
symbol... This report is available...
Running a Cash-In-Drawer Report
Department Range, Clerk,
Hourly, Cash-In-Drawer,
Electronic Journal
Hourly, Electronic
Journal
This report is
also known as...
Mid-Day
Mid-Month
End-Of-Day or
Daily-Close-out
Monthly
This report shows how much cash is in the cash drawer.
To run a Cash-In-Drawer report
1 Put the Z key or the PRG key in the Mode key slot and turn it to the X
position.
Alpha 600/601 User’s Guide 85
Page 92

Chapter 8: Running Reports
2 If you are prompted for a Manager Password, type the password number
and then press the Check key. If you did not program a Manager
Password, go to the next step.
3 Press the Qty/Date key. The Cash in Drawer report prints.
Running a Clerk Report
The Clerk report shows sales by clerk number. For more information
about setting clerk numbers, see Setting Clerk Numbers and Names on
page 32.
• A Clerk report in the X position shows sales up to the current hour.
• A Clerk report in the Z position shows sales for the entire day. A Clerk
report must be closed out in the Z position.
Note
If you are not using clerk numbers, then you cannot run a Clerk report. You
hear an error beep when you press the Clerk key.
To run a Clerk report
1 Put the Z key or the PRG key in the Mode key slot and turn it to the X
or Z position.
2 If you are prompted for a Manager Password, type the password number
and then press the Check key. If you did not program a Manager
Password, go to the next step.
3 Press the Clerk key. The Clerk report prints.
Running a Financial Report
The Financial report shows totals of departments, tax, net sales, voids,
returns, coupons, refunds, minus percentage, plus percentage,
receipts-on-account, paid out, cash, check, and charge. The running grand
total appears only on Z reports.
You can run a copy of the Financial report in the Z position. If other keys
are pressed after the first Z reading, the duplicate Z Report will not print.
To turn off the duplicate Z Report printing feature, you must change Flag
25. For more information about Flags, see Programming Flag Options on
page 65.
Important
A Financial Reading must be closed out in the Z position.
For an example Financial report, see Financial Report Example on
page 87.
86 Alpha 600/601 User’s Guide
Page 93

Running Management Reports
To print a Financial report
1 Put the Z key or the PRG key in the Mode key slot and turn it to the X or
Z position.
Note
If you use the Z position, the history is reset in the cash register after the
report is printed.
2 If you are prompted for a Manager Password, type the password number
and then press the Check key. If you did not program a Manager
Password, go to the next step.
3 Press the Amount Tend Total key.
To run a duplicate Z report
Note
Flag # 25 must be set to the factory default setting of “0” for this feature to
work.
You can only print one additional copy of the Z report after printing the
original.
1 Put the Z key or the PRG key in the Mode key slot and turn it to the Z
position.
2 If you are prompted for a Manager Password, type the password number
and then press the Check key. If you did not program a Manager
Password, go to the next step.
3 Press the #/ST/NS key and the Amount Tend Total key. The duplicate Z
report prints.
To take a weekly or monthly financial report (Z2 or X2)
1 Put the Z key or the PRG key in the Mode key slot and turn it to the X or
Z position.
2 If you are prompted for a Manager Password, type the password number
and then press the Check key. If you did not program a Manager
Password, go to the next step.
3 In the round Number keys area, press 99 and the Amount Tend Total
key. The report prints.
Financial Report Example
Totals are calculated for the Management Reports in the following way.
• NET SALES TOTAL (NET) - Shows the true sales for the day. The Net
sales total includes department total (DEPTTL), tax total (T1, T2, T3,
T4), and less the coupon discount (COUPON) and less the percentage
discount.
Alpha 600/601 User’s Guide 87
Page 94

Chapter 8: Running Reports
Note
Minus percentage discount (DISCOUNT), voids (VOID/CORR) and
returns/refunds (REFUND) are all deducted from the department totals and
the plus percentage (ADD ON) is added to the department totals. If you do
not want the percentage discount and plus percentage reflected in the
department totals, see Flag 23 on page 68.
• GROSS SALES TOTAL (GROSS) - Shows the total of all sales
registered. The Gross Sales Total includes net sales total (NET), coupon
discount (COUPON), minus percentage discount (DISCOUNT),
return/refund (REFUND), and void (VOID/CORR).
Note
The Percentage Discount [-%] must be done after each item, not on the
subtotal amount, for the formula given above to balance as shown.
The Financial report looks like the following. Your specific report looks
different, because of your unique cash register activity.
88 Alpha 600/601 User’s Guide
Page 95

Running Management Reports
To reset the Z1 counter
1 Put the PRG key in the Mode key slot and turn it to the PRG position.
2 If you are prompted for a Manager Password, type the password number
and then press the Check key. If you did not program a Manager
Password, go to the next step.
3 In the round Number keys area, press 1 and then press the Z1 Counter
starting number as 4 digits (for example 0001) and then press the Return
key.
To reset the Z2 counter
1 Put the PRG key in the Mode key slot and turn it to the PRG position.
2 If you are prompted for a Manager Password, type the password number
and then press the Check key. If you did not program a Manager
Password, go to the next step.
3 In the round Number keys area, press 2, then press the Z2 Counter
starting number as 4 digits (for example 0001) and press the Return key.
To reset the grand total
1 Put the PRG key in the Mode key slot and turn it to the PRG position.
2 If you are prompted for a Manager Password, type the password number
and then press the Check key. If you did not program a Manager
Password, go to the next step.
3 In the round Number keys area, press 777777 and press the Amount
Tend Total key. Enter the new amount (up to 12 digits) and press the
Non Tax key.
To print a Department Range report
1 Put the PRG key in the Mode key slot and turn it to the X position.
2 If you are prompted for a Manager Password, type the password number
and then press the Check key. If you did not program a Manager
Password, go to the next step.
3 In the round Number keys area, press the Starting Department
number as 2 digits (for example 01). Press the Ending Department
number as 2 digits and then press the Amount Tend Total key.
Running an Hourly Report
The report shows the number of sales and the total sales amount for each
hour. All hours print, even if no sales were made in an hour. Times print
using a 24 hour format.
Alpha 600/601 User’s Guide 89
Page 96

Chapter 8: Running Reports
Important
An hourly reading must be closed out in the Z position.
To take an hourly report
1 Put the Z key or the PRG key in the Mode key slot and turn it to the X
or Z position.
2 If you are prompted for a Manager Password, type the password number
and then press the Check key. If you did not program a Manager
Password, go to the next step.
3 In the round Number keys area, press 11 and the Amount Tend Total
key. The Hourly report prints.
Running PLU Reports
The PLU report shows the quantity and cost of each PLU Number rung up.
Only PLUs that had sales will print.
Important
A PLU Reading must be closed out in the Z position.
To print a PLU report
1 Put the Z or PRG key in the Mode key slot and turn it to the X or Z
position.
2 If you are prompted for a Manager Password, type the password number
and then press the Check key. If you did not program a Manager
Password, go to the next step.
3 Press the PLU key.
To print a PLU sales report, according to an assigned Department number
range
1 Put the Z key or the PRG key in the Mode key slot and turn it to the X
position.
2 If you are prompted for a Manager Password, type the password number
and then press the Check key. If you did not program a Manager
Password, go to the next step.
3 In the round Number keys area, specify the Starting Dept Number. It
must be 2 digits; for example 01.
4 Enter the Ending Dept Number as 2 digits.
5 Press the PLU key. The sales history for the PLUs assigned to the
departments in the specified range prints.
90 Alpha 600/601 User’s Guide
Page 97

Running an Electronic Journal Reports
The Electronic Journal can hold 5,460-lines of transactions in memory.
When the cash register memory is full, no more transactions or
information can be stored in memory. Transactions already in memory
are kept in memory until the Electronic Journal record is printed in
Z-mode or the memory is manually reset.
The Electronic Journal records in the internal memory the line-by-line
details of all the transactions and items completed on the cash register and
printed on the built-in printer. This includes all sales transactions, any
reports run during the day and even using the #/ST/NS key for no-sale
rings to open the cash drawer.
The cash register warns you when the Electronic Journal memory is nearly
full to let you finish the current transaction. Then you can print the
Electronic Journal record to prevent any loss of information. When the
memory is completely full, the cash register warns you and no additional
transaction information can be saved.
Running Management Reports
You can print the entire Electronic Journal record on the printer in the
cash register in either the X Mode or the Z Mode.
• X-Mode: You can print the Electronic Journal record anytime during the
day. This prints what is currently in the Electronic Journal memory and
does not reset the memory.
• Z-Mode: You can print the entire Electronic Journal record and reset the
journal memory so everything in memory is erased after printing. Only
run this report at the end of the day, after running the standard Z Report
for the end-of-the-day sales totals.
Make sure there is a lot of paper on the receipt paper roll so the Electronic
Journal reports can print completely.
You cannot download the Electronic Journal record to the PC using the
serial connection.
Print a Mid-Day Electronic Journal Report
You can print the Electronic Journal record at anytime during the day
without resetting the memory.
To print in the X Mode
1 Turn the Mode key to the X position.
2 Using the round Number keys area, press 96.
3 Press the Amount Tend Total key.
The Electronic Journal record prints and the Electronic Journal memory
is not reset.
Alpha 600/601 User’s Guide 91
Page 98

Chapter 8: Running Reports
Print an End-of-Day Electronic Journal Report
You can print the Electronic Journal Z report at the end of the day. This
report prints all transactions and clears the memory.
To print in the Z Mode
1 Turn the Mode key to the Z position.
2 Run the normal end-of-day reports, including a standard Z Report by
pressing the Amount Tend Total key while in Z Mode.
3 Using the round Number keys area, press 96 to print the Electronic
Journal record.
4 Press the Amount Tend Total key.
The Electronic Journal record prints and the Electronic Journal memory
is cleared.
Note
If you see a EJ - FULL ERROR message on the cash register, go to EJ
-FULL Error on page 100 for help on what to do.
Check the Electronic Journal Memory
To check the current status of the Electronic Journal memory for the
number of lines used in memory and how many lines remain free:
1 Put the PRG key in the Mode key slot and turn it to either the REG1 or
REG2 position.
2 Press the QTY/DATE key twice. The first press displays the date only.
3 The memory status with the number of lines that the memory can still
accept appear on the operator display.
92 Alpha 600/601 User’s Guide
Page 99

CHAPTER 9
Maintenance and Options
Follow these steps to make sure your cash register works well.
• Your register must remain uncovered when turned on. This allows the
electronic components to properly cool.
• Use a dust cover when the register is not in operation and the control
lock key is turned to the OFF position to protect mechanical components
from dust.
• Keep beverages and other liquids away from the machine to avoid spills
which can damage electronic components. Use the optional protective
keytop cover to prevent damage to the cash register.
• Keep the cash register away from dust, dampness, or extreme hot or cold
temperatures.
• To clean your cash register, use a soft dry cloth. Do not use harsh
solutions containing alcohol or ammonia.
• After storing your cash register in extreme temperatures (below 32
degrees Fahrenheit or above 104 degrees Fahrenheit), allow the
temperature inside the machine enough time to reach room temperature
before turning it on.
• If you need electronic service, take the cash register to a Royal
authorized service center. For more information, see Limited Warranty
on page 137.
Alpha 600/601 User’s Guide
Page 100

Chapter 9: Maintenance and Options
Installing a New Paper Roll
As you use the cash register, you will need to replace the paper roll.Your
cash register has a thermal printer that prints receipts for the customer or
a journal tape. Use 2¼ inch (57.5 mm) wide standard thermal register
paper.
To install the paper roll
1 Insert the PRG key and turn it to either REG1 or REG2.
• If you need a customer receipt, turn the Mode key to the REG1
position.
• If you do not need a customer receipt, turn the mode key to the REG2
position.
2 Unlock and open the Journal Compartment Cover. Grip the left side of
the cover and gently pull upward. Remove the Journal Compartment
Cover and set aside.
3 Remove the Journal
Takeup spindle.
Place the paper roll
in the little round
area at the bottom of
the compartment.
Make sure the paper
feeds out from the
bottom of the roll,
towards the front of
the cash register.
4 Grab the small
handle on the right of the print
roller. Push the little handle
towards the back of the cash
register and raise the roller bar up.
5 Lay the end of the paper across the
printer as shown. Move the print
roller down onto the paper and
snap into place. Make sure both
sides are snapped down.
• Press the Feed key until the paper catches and moves through the
printer.
6 Do one of the following:
94 Alpha 600/601 User’s Guide
Handle
 Loading...