

Page 1
User Guide
Page 2

Page 3

Contents
Getting Started 1
i
1
2
Introduction . . . . . . . . . . . . . . . . . . . . . . . . . .2
Installing The Software. . . . . . . . . . . . . . . . . .3
The Toast Main Window. . . . . . . . . . . . . . . . .4
Using the Media Browser. . . . . . . . . . . . . . . .6
Saving and Opening Toast Projects. . . . . . .8
Erasing Discs . . . . . . . . . . . . . . . . . . . . . . . . . .9
Ejecting a Disc . . . . . . . . . . . . . . . . . . . . . . . .9
Technical Support Options . . . . . . . . . . . . .10
Making Video Discs 11
What is a Video Disc? . . . . . . . . . . . . . . . . .12
Types of Video Discs . . . . . . . . . . . . . . . . . .12
Overview of Making a Video Disc . . . . . . .12
Making a DVD . . . . . . . . . . . . . . . . . . . . . . .14
Making a DVD From VIDEO_TS Folders . . .25
Page 4

Toast DVD
ii
www.roxio.com
Using Other Toast Features 27
3
Viewing Information about a Disc. . . . . . . 28
Saving Disc Images. . . . . . . . . . . . . . . . . . . 28
Comparing Files or Folders. . . . . . . . . . . . . 29
Page 5

Getting Started
In this chapter
Introduction 2
Installing The Software 3
The Toast Main Window 4
Using the Media Browser 6
Saving and Opening Toast Projects 8
1
Erasing Discs 9
Ejecting a Disc 9
Technical Support Options 10
Page 6

Toast DVD
2
www.roxio.com
Introduction
Toast brings you award winning disc burning and a whole lot more. This
guide provides the information you need to start burning your video file
projects with Toast DVD. Your version may not have all the features and
capabilities described. The software includes appropriate messages if you
have the limited version.
To register your software, choose Help > Product Registration.
For additional information, choose Help > Product Support.
Page 7

Getting Started
Installing The Software
Installing The Software
To use Toast you will need the following hardware and software:
Mac® computer with an Intel® processor and 1GB of RAM
Mac OS® X 10.7 or later
Approximately 1GB free disk space to install all components, 10 GB
free space is recommended for the burning process
DVD drive
Internet connection required for video tutorials, product updates,
and other functionality
To install the software:
1 Double-click on the downloaded .DMG file or insert the installation
DVD into your drive.
The Roxio Toast window appears on your desktop.
2 Double-click the Toast installer.
3 Follow the instructions on screen to complete the installation.
4 In the applications folder on your hard disk, browse to the Toast
folder. You will see an icon for Toast along with other optional
components you've installed.
5 Double-click the Toast icon and follow the on-screen instructions to
set up Toast for the first time.
3
Page 8
Toast DVD
25
34
1
4
www.roxio.com
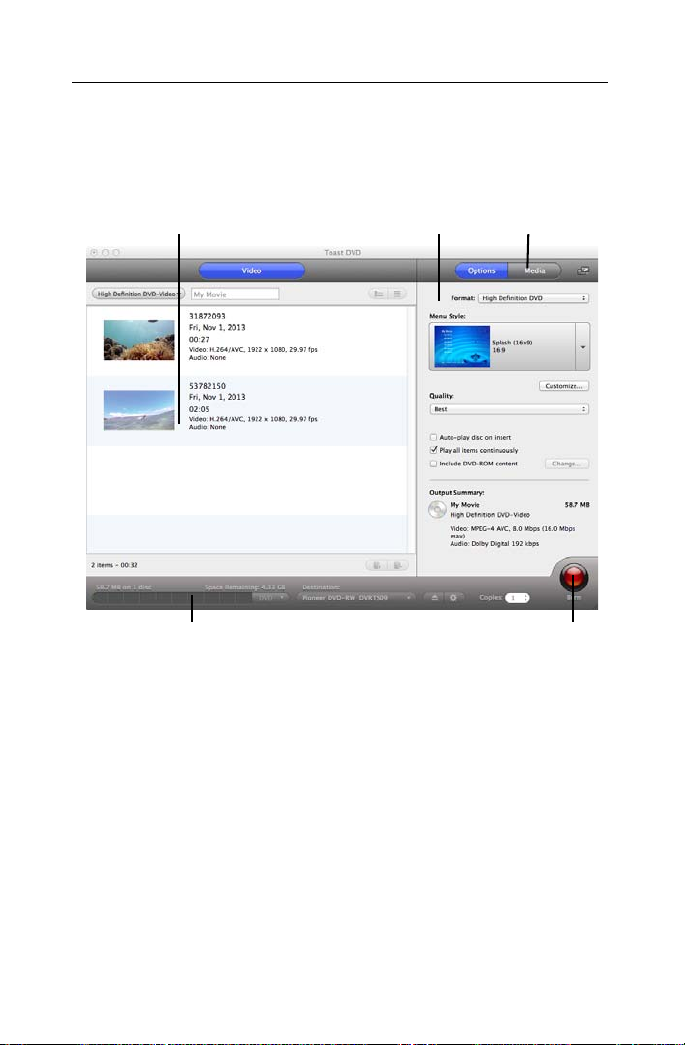
The Toast Main Window
The Toast main window contains the following components:
Content Area (1)
This is the main area at the left side of the window. For most project types,
this is where you drag your files to add them to a project.
Options Area (2)
Located at the right side of the screen, the options area allows you to
select options for the current project. This area may be hidden if the Media
Browser is being shown. To reveal the options area, simply click on the
Options button at the top right of the window.
Space Indicator (3)
Located across the bottom of the Toast window, the space indicator
displays exactly how much content you've added to the current project.
Page 9

Getting Started
Media Type
Buttons
Add Button
Filter or
Search Box
Thumbnail size
controls
The Toast Main Window
You can choose CD, DVD media types to have the indicator calibrated for
your target disc.
Record Button (4)
Located at the bottom right of the Toast window, the red record button
will begin recording your disc.
Media Browser (5)
The Media Browser allows you to easily browse or find files, and preview or
add them to a Toast project. On first launch this window will be hidden. To
bring up the Media Browser, click the Media button at the top of the
Options area. This will hide the options and reveal the Media Browser.
The Media Browser can also be separated from the Toast main window by
clicking the icon to the right of the Media button. This allows you to use
the Media Browser while the Options area is visible. The features and
options available vary depending on your version of the software.
5
Page 10

Toast DVD
6
www.roxio.com
Using the Media Browser
The Toast Media Browser provides quick access to files stored on your
computer. You can easily drag-and-drop content from the Media Browser
into the Content Area. The features and options available vary depending
on your version of the software.
To use the Media Browser:
1 Show the Media Browser window by clicking the Media button or
pressing Ctrl+S.
2 Search for files or folders by entering a search term in the text field at
the bottom of the Media Browser window, or choose the type of
media you want to browse:
Data: Browse files and folders on your local hard disk, external
discs, or connected network volumes.
Video: Browse videos and iMovie projects in your Movies folder.
You can also browse:
3 To search for files or folders enter a search term in the text field at the
bottom of the Media Browser window.
4 When browsing, you can filter the media list by choosing a title or
chapter from the Media Browser browse menu.
Note: You can expand the browse menu into a window by
dragging down the small dot immediately below the menu.
5 Select any item in the file list and drag it to the Content Area to add it
to a disc project or click the Add button at the bottom of the Media
Browser.
You can select multiple items by holding down the Command (Apple)
key while clicking, and then drag the entire selection to the Content
Area.
You can select groups of items by clicking on the first item in the
group and then holding down the Shift key while clicking on the last
item in the group, and then dragging the entire selection to the
Content Area.
Page 11

Getting Started
Using the Media Browser
Toast will display progress information while the items are being added. If
the content is being added from a disc (such as from a set-top DVD
recorder) this may take several minutes, as it is imported from the disc
onto your hard disk.
Imported items from a disc are temporarily stored in the Roxio Converted
Items folder in your Documents folder. These temporary items can be very
large and are automatically deleted when you quit Toast. The original
source content is not deleted from your disc.
7
Page 12

Toast DVD
8
www.roxio.com
Saving and Opening Toast Projects
You can save a Toast project and open it at a later time for recording to
disc.
To save the current project:
1 Choose File > Save.
2 Type a file name and select a location to save to.
3 Click Save. Saved Toast disc projects end in “.disc".
To open a saved project:
1 Choose File > Open.
2 Select the Toast project file you want to open.
3 Click Open.
Tip: You can browse to and quickly open the most recently
used projects by choosing File > Open Recent, and clicking on a
project. You can also double-click a Toast project to open it.
Note: Toast saves pointers for the files and folders in the
content area. If you move or delete any of the original items from
your hard disk, Toast may not be able to find them when you
open the project. To save a single file containing all source files,
you should save as a disc image. See Saving Disc Images on
page 28.
Page 13

Getting Started
Erasing Discs
Erasing Discs
If you are using rewritable CD-RW, DVD-RW, DVD+RW, DVD-RAM media,
you can erase the entire contents of a disc and re-record to it.
Warning: Erasing a disc cannot be undone.
To erase a rewritable disc:
Insert the disc into the recorder.
1 Choose Recorder > Erase.
2 Choose the way you want to erase the disc:
Quick Erase: This erases the disc faster than the standard
erase option, but the disc can only be re-recorded with Toast.
Erase: This erases the disc so it can be re-recorded using any
burning software.
Tip: When burning some projects to rewritable media, you will be
prompted to erase the disc before beginning your project. The entire
contents of the disc will be erased and will not be recoverable.
9
Ejecting a Disc
You can eject a disc from a recorder in any of these ways:
Choose Recorder > Eject.
Click the Eject button to the right of the recorder name.
In the Recorder Settings dialog, click Eject.
Drag the disc icon from the Desktop to the Trash in the Dock.
Page 14

Toast DVD
10
www.roxio.com
Technical Support Options
Unlimited Self-Help Options
Roxio provides a variety of self help tools, including a searchable
knowledge base of support articles with troubleshooting tips, and
discussion groups where other users can help you get the most out of your
Roxio products.
You'll find answers to most of your questions at http://support.roxio.com,
or you can choose Help > Product Support from within Toast.
Telephone and E-mail Support Options
Telephone and E-mail support may be available on a limited or paid basis
for your Roxio product. Registration of your product is required. To learn
what options are available, go to http://support.roxio.com, choose your
product, and click the Contact Support link.
Contacting Roxio
Log in to our Customer Web portal to submit a request for assistance or to
find support contact information for your location. You can find the
customer Web portal at http://selfserve.roxio.com.
Page 15

7 Making Video Discs
In this chapter
What is a Video Disc? 12
Types of Video Discs 12
Overview of Making a Video Disc 12
Making a DVD 14
Making a DVD From VIDEO_TS Folders 25
11
Page 16

Toast DVD
12
www.roxio.com
What is a Video Disc?
A video disc is a CD, DVD disc that contains video files. Video discs are
meant to be played in a set-top player, and can also be used in a Macintosh
or Windows computer with a DVD player and appropriate software.
Types of Video Discs
Toast can create many kinds of video discs.
DVD-Video: This DVD can be played in a set-top DVD player or in a
Macintosh or a Windows computer with a DVD player. A DVD can
hold between 2 and 5 hours of video or slideshows and offers the
best quality and full navigation menus. This is the best choice for
playback in a DVD player. See Making a DVD on page 14.
High Definition DVD: This is a unique type of D VD which allows you
to author HD video to DVD, for playback in true high definition. See
Making a High Definition DVD on page 16.
VIDEO_TS Folders: Use this project to create one or more DVD-
Video discs, each from a separate Video-TS folder. See Making a DVD
From VIDEO_TS Folders on page 25.
Overview of Making a Video Disc
This section describes the basic process of making any video disc with
To as t.
1 Chose the disc format. For example, choose DVD-Video.
2 Choose any optional settings.
3 Add files to the disc by dragging and dropping them into the Content
Area from your hard disk or the Media Browser, or by clicking the Add
button at the bottom of the Media Browser window. (See Using the
Media Browser on page 6.)
You can add any QuickTime-supported video files, such as DV, AVI,
MOV, H.264, HDV (1080i/720p), and MPEG-4.
To add an iMovie project, first save your project in iMovie. Next, select
Share > Media Browser and ensure that the Large size is selected.
After clicking Publish, your project will be available under Movies in
the Media Browser.
Page 17

Making Video Discs
Overview of Making a Video Disc
Each video you add into the Content Area will have a button in the
disc menu that you can choose to play the video. You can duplicate,
rearrange, or remove video. See Working With Videos on page 17 for
more information.
4 Insert a blank, recordable disc.
5 Optional: Change the destination recorder and number of copies at
the bottom of the screen.
6 Click the red Burn button at the bottom right of the Toast window.
Toast displays a progress bar and status information as it records your disc.
13
Page 18

Toast DVD
14
www.roxio.com
Making a DVD
DVDs produce high quality video discs with full menu navigation and
Dolby Digital sound.
A standard DVD-Video can hold approximately 2.5 hours of video or
slideshows. Dual-layer DVD-Video discs can hold approximately 5 hours at
an average quality level.
To make your video disc:
7 From the main Toast window, choose DVD-Video from the format
selection menu.
8 Click the Options button, if necessary, to reveal these optional disc
settings:
Menu Style: Choose a style for the menu background image,
text, and buttons.
Quality: Toast must compress video to fit onto the disc. Choose
the quality you want to have for the compressed video. Better
quality takes longer to process:
Good: Suitable for simple video, such as people talking—
fastest processing time.
Better: Suitable for most video—average processing time.
Best: Suitable for complex video, such as fast motion—
slowest processing time.
Custom: To create a custom quality level, click Customize
and choose the Custom option from the Encoding tab.
Auto-play disc on insert: Select this option to automatically
play the first video, slideshow, or playlist when this disc is
inserted into a player. The main menu is not displayed, but you
can access it by pressing the MENU button on the player’s
remote control.
Play all items continuously: Select this option to
automatically play each video or slideshow on the disc without
first returning to the main menu.
Include DVD-ROM content: Select this option to include
additional data in the ROM portion of the disc. This data will be
Page 19

Making Video Discs
Making a DVD
accessible when the disc is used on a Macintosh or Windows
computer. For more information, see Adding ROM data to a DVD-
Video Disc on page 20.
9 Click Customize for additional disc settings. See Video Disc Settings on
page 17.
10 Add video files to the disc by dragging and dropping them into the
Content Area from your hard disk or the Media Browser.
11 Insert a blank, recordable DVD.
12 Optional: Change the destination recorder and number of copies at
the bottom of the screen.
13 Click the red Burn button at the bottom right of the Toast window.
Toast displays a progress bar and status information as it records your disc.
Previewing a DVD-Video
You can preview a DVD-Video disc prior to burning an actual disc by
saving it as a disc image file.
To preview the DVD:
1 Instead of recording, select File > Save As Disc Image.
2 Give the disc a name, if you are prompted to do so.
3 Select a name and destination for the disc image file.
4 Click Save.
The disc image file is created.
5 Select the file, Control-click, and choose Services > Mount It.
6 Use the DVD Player software included with Mac OS X to preview the
DVD.
15
Note: For more information, see Saving Disc Images on
page 28
Page 20

Toast DVD
16
www.roxio.com
Making a High Definition DVD
High Definition DVD is a unique type of video disc which allows you to
author HD video to DVD, for playback in true high definition. This gives you
the ability to create HD video discs without owning a Blu-ray Disc recorder.
Although you are recording to standard DVD discs with this project, you
can only view the finished project on a Blu-ray Disc player such as the
PlayStation 3.
A standard, single-layer DVD can hold approximately 30 minutes of HD
video and a dual-layer DVD can hold approximately one hour of HD video.
While Toast will allow you to add more than these lengths of video, adding
additional video requires that video be compressed further and results in a
lower quality video.
To make a High Definition DVD:
7 Choose DVD-Video from the format selection menu.
8 Click the Options button, if necessary, and select High Definition DVD
as the format. The other disc settings and options available are
identical to those available when creating a DVD. For more
information on these options and settings, see Making a DVD on
page 14.
9 Add your HD video files to the disc by dragging and dropping them
into the Content Area from your hard disk or the Media Browser.
10 On the disc gauge at the bottom of the window, select DVD or DVD
DL as your target media type.
11 Insert a blank, recordable DVD.
12 Optional: Change the destination recorder and number of copies at
the bottom of the screen.
13 Click the red Burn button at the bottom right of the Toast window.
Toast displays a progress bar and status information as it records your disc.
Page 21

Making Video Discs
Making a DVD
Working With Videos
When you play your completed video disc, you see a menu containing a
button for each video that was added to the Content Area. You can
rearrange, duplicate, and remove videos. This does not affect the original
video file on your hard disk.
To rearrange videos:
1 Select the video you want to rearrange.
2 Drag the video to a new position in the Content Area.
A black bar indicates where the video will be placed.
To duplicate a video:
Select a video and choose Edit > Duplicate.
To remove a video:
1 Select the video you want to remove.
2 Remove the selected video in any of these ways:
Click the Remove files button.
Press Delete.
Choose Edit > Clear.
The video is removed from the Content Area, but the original is not
deleted from your hard disk or your Movies folder.
17
Video Disc Settings
When creating a DVD-Video disc, you can choose various options for the
disc content and menus. Some of the more common settings are available
on the Options panel. The full set can be accessed by clicking the
Customize button on the Options panel and clicking either the Disc or
Menus tab.
Settings available on the Disc tab include:
Disc Name: Type a name for the disc. This name is visible when
you insert the disc into a Macintosh or Windows computer.
Auto-play disc on insert: Select this option to automatically
play the first video, slideshow, or playlist when this disc is
Page 22

Toast DVD
18
www.roxio.com
inserted into a player. The main menu is not displayed, but you
can access it by pressing the MENU button on the player’s
remote control.
Play all items continuously: Select this option to
automatically play each video, slideshow or playlist on the disc
in sequence, without returning to the main menu in between.
Include DVD-ROM content: Select this option to include
additional data in the ROM portion of the disc. This data will be
accessible when the disc is used on a Macintosh or Windows
computer. For more information, see Adding ROM data to a DVD-
Video Disc on page 20.
Settings available on the Menus tab include:
Menu Title: Type a title for the main menu.
Menu Style: Choose the style for the menu background image,
text, and buttons.
DVDs made with Toast will have menus that contain buttons
similar to the menus and buttons in a commercially-produced
DVD.
To create a disc with no menu, choose “No Menu” as the style.
Aspect Ratio: This setting should match the aspect ratio of the
source video. In most cases, Toast is able to detect the aspect
ratio of the source video and the Automatic setting should work
fine.
Number of Buttons: Choose the number of buttons to appear
on each menu.
Note: Different menu styles have different options available for
the number of buttons available on a single menu screen.
Toast adds a button to your menu for each video you add to the
disc. Each time you fill a menu with the maximum number of
buttons, as specified here, Toast automatically creates a new
menu.
Page 23

Making Video Discs
Making a DVD
Button Highlight Color: Choose the highlight color that will
be visible when a button is selected on your DVD.
Background Color: Choose a color that will be used as your
menu background color. This will replace the background in any
selected menu style.
Text Color: Choose a color that will be used for any text
displayed on the disc menus.
Custom Menu Background: To add a custom menu
background image, drag-and-drop an image from the Media
Browser onto the existing menu thumbnail image.
To remove a custom menu background, select the thumbnail
image and press Delete.
Include scene menus for video: Select this option to
include a scene menu in the menu for all videos on your disc.
You will be able to play the video from various points using this
menu.
19
Page 24

Toast DVD
20
www.roxio.com
Adding ROM data to a DVD-Video Disc
When creating a DVD-Video disc, you can choose to add additional data
files to the disc that will only be accessible when you're viewing the
contents of your finished disc on a Mac or PC. When playing back your
DVD on a set-top player, these additional files will be ignored by the DVD
player.
To add ROM data to a DVD-Video disc:
1 Prepare a DVD-Video project, adding the desired video files to the
Content Area.
2 Click the Options button, if necessary, to reveal the Options panel.
3 Click the Include DVD-ROM content check box, if it is not already
selected. This activates the Change button.
4 Click the Change button.
5 Add files and folders to the ROM portion of the disc as instructed
onscreen.
6 Click OK.
7 Insert a blank, recordable DVD.
8 Select additional options, if desired, directly on the Options panel or
by clicking Customize.
9 Optional: Change the destination recorder and number of copies at
the bottom of the screen.
10 Click the red Burn button at the bottom right of the Toast window.
11 Click Record to continue.
Page 25

Making Video Discs
Making a DVD
Disc Encoding Settings
When creating a DVD-Video, you can choose various options for the video
and audio encoding. Some of the more common settings are available on
the Options panel.
To change the Encoding Settings:
1 Start a new Video Disc project:
See Making a DVD on page 14.
2 On the Options panel, click Customize, and choose the Encoding tab.
3 Choose either Automatic or Custom:
Automatic: Choose this option to use video and audio
encoding settings that maximize quality and fit the most
content on the disc. Variable bit rate encoding is used for video,
Dolby Digital 192 kHz is used for audio, and aspect ratio is
determined automatically from the source videos.
Custom: Choose this option to manually set video and audio
encoding options. This option is recommended only for people
who have an understanding of video and audio encoding
terminology.
4 If you selected Automatic, choose the Video Quality:
Good: Suitable for simple video, such as people talking—
fastest processing time.
Better: Suitable for most video—average processing time.
Best: Suitable for complex video, such as fast motion—slowest
processing time.
21
Page 26

Toast DVD
22
www.roxio.com
5 If you selected Custom, choose the video encoding options:
Average Bit Rate: Sets the desired average target bit rate for
the video encoder.
Maximum Bit Rate: Sets the maximum bit rate for the video
encoder.
The minimum bit rate is derived from the above two values
using the following formula: Minimum = (2 x Average) –
Maximum.
Motion Estimation: Choose the method used to search for
pixel movement in the video stream. This setting has a large
impact on the final quality, and on the processing time as well.
Better motion estimation takes longer to process.
Half-PEL: Choose whether the motion estimation operation
also looks for pixels that move only one half of a pixel from one
frame to the next. This setting should usually be enabled and
should only be disabled if speed is desired over quality.
Re-encoding: Choose Always to re-encode all source video.
Choose Never to not re-encode any source video. Choose
Automatic to only re-encode non-standard source video.
Field Dominance: This setting should match the field order of
the source video. DV is generally bottom field first, but other
types of video may be different. In most cases, Toast is able to
detect the field order of the source video and the Automatic
setting should work fine.
Aspect Ratio: This setting should match the aspect ratio of the
source video. In most cases, Toast is able to detect the aspect
ratio of the source video and the Automatic setting should work
fine.
Page 27

Making Video Discs
Making a DVD
6 If you selected Custom, choose the audio encoding options:
Audio Format: Choose Dolby Digital or uncompressed PCM. In
almost all cases, Dolby Digital is the best choice. It uses less disc
space, so you can fit more video on the DVD, and the sound
quality is almost the same as PCM.
Data Rate: Choose the bit rate to encode the Dolby Digital
audio. Higher bit rates can produce slightly better sounding
audio, but use more disc space. Toast uses 192 kbps by default.
Dynamic Range Compression: Enabling dynamic range
compression reduces the range between loud and soft sounds
in order to make dialogue more audible, especially when
listening at low volume levels.
7 Click OK.
Note: You can also click Reset Defaults if you want to reset the
encoding to the default settings when Toast was first installed.
The Toast Preferences contains options for setting the appropriate TV
standard for your video discs.
To change TV standard preferences:
1 Choose Toast > Preferences.
2 Click the Video tab.
3 Choose the TV standard:
NTSC: Create discs compatible with televisions in North
America, Japan, and parts of South America and Asia.
PAL: Create discs compatible with televisions in much of Europe
and Asia, and parts of South America.
4 Close the preferences.
Encoded items are temporarily stored in the Roxio Converted Items folder
in your Documents folder. These items are available for additional disc
projects and will not need to be re-encoded. Temporary files can be very
large and are automatically deleted when you quit Toast.
23
Page 28

Toast DVD
24
www.roxio.com
Note: The original source content is not deleted from your
hard disk.
Page 29

Making Video Discs
Making a DVD From VIDEO_TS Folders
Making a DVD From VIDEO_TS Folders
You can create a DVD from DVD-Video VIDEO_TS folders for playback on a
set-top DVD player or in a Macintosh or Windows computer with a DVD
drive and DVD playback software.
Some VIDEO_TS folders may be too large to fit on a standard recordable
4.7 GB DVD. Toast can compress this video to fit on a standard DVD, or if
your recorder supports dual-layer recordable DVDs, you can create a duallayer DVD-Video from this folder.
To make a DVD from a VIDEO_TS Folder:
5 From the main Toast window, choose VIDEO_TS Folders from the
format selection menu.
6 Click the Options button, if necessary, to reveal these optional disc
settings:
Use Fit-to-DVD™ video compression: Fit-to-DVD
automatically compresses the video to fit on a standard 4.7 GB
recordable DVD. Compressing may result in a slight reduction in
video quality, but will leave the audio quality unchanged.
Note: If you are recording to a dual-layer DVD, no compression
will occur.
25
7 Drag-and-drop VIDEO_TS folders into the Content Area from your
hard disk.
A summary of the information that will be copied appears in the
content area.
8 Click Options to choose optional Fit-to-DVD settings.
9 Insert a blank, recordable DVD.
10 Optional: Change the destination recorder and number of copies at
the bottom of the screen.
11 Click the red Burn button at the bottom right of the Toast window.
Toast automatically adds an empty AUDIO_TS folder to the disc at
burn time for improved compatibility with set-top DVD players.
Page 30

Toast DVD
26
www.roxio.com
Toast displays a progress bar and status information as it records your disc.
If you are burning multiple VIDEO_TS folders, you will be prompted to
insert a blank, recordable DVD for each one.
You can preview a DVD prior to burning an actual disc by saving it as a disc
image. See Previewing a DVD-Video on page 15 for more information.
Page 31

Using Other Toast
Features
In this chapter
Viewing Information about a Disc 28
Saving Disc Images 28
Comparing Files or Folders 29
27
Page 32

Toast DVD
28
www.roxio.com
Viewing Information about a Disc
You can view detailed information about a blank or recorded disc in your
recorder. This feature works only with CD, DVD recorders.
Note: Make sure that the disc is compatible with your recorder.
For example, you cannot use a DVD recorder to view disc
information for a Blu-ray Disc.
To view disc information:
1 Insert a blank or used disc into the recorder.
2 Choose Recorder > Disc Info.
The Disc Information dialog appears. The Medium section contains
information about the disc itself (such as space available, supported
write speeds, and manufacturer ID) and the Content and Details
sections contain information about the contents of the disc (such as
individual tracks or sessions, CD-TEXT, and ISRC codes).
Saving Disc Images
Instead of recording a project to disc, you can save it as a disc image file. A
disc image file is a single file, saved on your hard disk, which contains all
the data and formatting information needed to create a CD, DVD. Image
files contain all source data (as opposed to saved Toast projects which
contain only references to the data).
You may also want to save a disc image file to avoid having to use a blank
disc. Mounted image files appear and behave like an actual disc in your
computer. For example, you can create a disc image for a DVD-Video
project and preview the output using the DVD player in your Mac without
having to burn it to disc. If you are satisfied with the results, you can then
burn a disc. If not, you can simply delete the file and start again, and you
have avoided wasting a disc.
Disc image files have an added benefit of being faster to access than a disc
in your drive and may offer longer battery life for notebook users.
You can create disc images from any Toast disc type.
Page 33

Using Other Toast Features
Comparing Files or Folders
To save a project as an image file:
1 Set up your disc project as you normally would.
2 Choose File > Save As Disc Image
3 Type a file name and select a location to save to.
By default, Toast creates Mac disc image files, which are compatible with
the Disc Utility program included in Mac OS X. You can also use Toast to
create cross-platform (Mac & PC) disc image files.
Comparing Files or Folders
You can compare the contents of files or folders to see if they match. You
might do this to double-check that the original files are identical to a copy
you made of them.
Compare differs from the verification that Toast performs after recording a
disc. Verification only compares source data to a recorded disc, while
Compare can compare any two data sets, such as two files, folders, or hard
disks. Compare checks each individual file when comparing the data,
while verification compares only blocks of data. Both are accurate, but
Compare is more precise and can usually tell you exactly which file is
missing or damaged.
To compare folders or files:
1 Choose Utilities > Compare.
2 Choose whether you want to compare folders or files from the pop-
up:
Compare Folders: Compares any two folders, hard disks, or
discs.
Compare Files: Compares any two files.
3 Click Original.
4 Select the original data you want to compare and click Open.
5 Click Copy.
6 Select the copied data you want to compare and click Open.
7 Click Start.
29
Page 34

Toast DVD
30
www.roxio.com
You will see a progress bar that tracks the comparison. Any data that is in
the original but missing from the copy will appear in the list.
Page 35

Legal Information
Copyright © 201 4 Corel Corporation. All rig hts reserved. Use of this product is subject to your
agreement to all of the terms of each of the license agreements included in this package. This
product may be protected by one or more US and/or foreign patents, including certain patents.
Trademarks
Roxio, Toast, the toaster with discs icon, DivX, DivX Plus, the DivX Plus logo, and Sonic Solutions are
trademarks or registered trademarks owned by Corel Corporation and or its subsidiaries. All other
product names and any registered and unregistered trademarks mentioned are used for
identification purposes only and remain the exclusive property of their respective owners.
Patents: www.corel.com/patent
Product specifications, pricing, packaging, technical support and information (“specifications”)
refer to the retail English version only. The specifications for all other versions (including other
language versions) may vary.
INFORMATION PROVIDED HEREIN BY COREL IS PROVIDED “AS IS” BASIS, WITHOUT WARRANTIES
OR CONDITIONS, EXPRESS OR IMPL IED, INCLUDING, BUT NOT LIMITED TO, WARRANTIES OF
MERCHANTABLE, FITNESS FOR A PAR TICULAR PURPOSE, TITLE AND NON-INFRINGEMENT, OR
THOSE ARISING BY LAW, STATUTE, USAGE OF TRADE, COURSE OF DEALING OR OTHERWISE. THE
ENTIRE RISK AS TO THE RESULTS OF THE INFORMATION PROVIDED OR ITS USE IS ASSUMED BY
YOU. COREL SHALL HAVE NO LIABILITY TO YOU OR ANY OTHER PERSON OR ENTITY FOR ANY
INDIRECT, INCIDENTAL, SPECIAL, OR CONSEQUENTIAL DAMAGES WHATSOEVER, INCLUDING, BUT
NOT LIMITED TO, LOSS OF REVENUE OR PROFIT, LOST OR DAMAGED DATA OR OTHER
COMMERCIAL OR ECONOMIC LOSS, EVEN IF COREL HAS BEEN ADVISED OF THE POSSIBILITY OF
SUCH DAMAGES OR THEY ARE FORESEEABLE. COREL IS ALSO NOT LIABLE FOR ANY CLAIMS MADE
BY ANY THIRD PARTY. COREL'S MAXIMUM AGGREGATE LIABILITY TO YOU SHALL NOT EXCEED THE
COSTS PAID BY YOU TO PURCHASE THE MATERIALS. SOME STATES/COUNTRIES DO NOT ALLOW
EXCLUSIONS OR LIMITATIONS OF LIABILITY FOR CONSEQUENTIAL OR INCIDENTAL DAMAGES, SO
THE ABOVE LIMITATIONS MAY NOT APPLY TO YOU.
This manual may not, in whole or part, be copied, photocopied, reproduced, translated, or
reduced to any electronic medium or machine readable form without the prior agreement and
written permission of Corel Corporation.
Third-Party Trademarks and Technologies
Mac, the Mac logo, QuickTime, Aperture, iLife, iDVD, iPhoto, iMovie, iTunes, DVD Studio Pro, Final
Cut, iPod, iPhone, iPad and Apple TV are trademarks of Apple, Inc. in the U.S. and other countries.
PowerPC is a registered trademark of International Business Machines Corporation.
Intel is a registered trademark of Intel Corporation in the U.S. and/or other countries.
Adobe, Flash and Lightroom are either trademarks or registered trademarks of Adobe Systems
Incorporated in the United States and/or other countries.
Turbo.264, Turbo.264 HD are registered trademarks of Elgato Systems.
Page 36

AVCHD and the AVCHD logo and AVCHD Lite are trademarks of Panasonic Corporation and Sony
Corporation and are used under license.
YouTube and the YouTube logo are trademarks of Google, Inc.
Vimeo and the Vimeo logo are trademarks of Vimeo, LLC.
Facebook is a registered trademark of Facebook, Inc.
NVIDIA, CUDA, and the CUDA logo are trademarks or registered trademarks of NVIDIA
Corporation.
The RIM and BlackBerry families of related marks, images, and symbols are the exclusive properties
of and trademarks of Research in Motion Limited – used by permission.
Palm and Treo are among the trademarks or registered trademarks owned by or licensed to Palm,
Inc.
CD and music-related data from Gracenote, Inc., copyright © 2000 to present Gracenote.
Gracenote Software, copyright © 2000 to present Gracenote. One or more patents owned by
Gracenote apply to this product and service. See the Gracenote website for a non-exhaustive list of
applicable Gracenote patents. Gracenote, CDDB, MusicID, the Gracenote logo and logotype, and
the “Powered by Gracenote” logo are either registered trademarks or trademarks of Gracenote in
the United States and/or other countries.
Music recognition technology and related data are provided by Gracenote®. Gracenote is the
industry standard in music recognition technology and related content delivery. For more
information, please visit www.gracenote.com.
Page 37

“Dolby” and the double-D symbol are trademarks of Dolby laboratories.
This product contains one or more programs protected under international and U.S. copyright
laws as unpublished works. They are confidential and proprietary to Dolby Laboratories. Their
reproduction or disclosure, in whole or in part, or the production of derivative works therefrom
without the express permission of Dolby Laboratories is prohibited. Copyright 1992-1997 by
Dolby Laboratories, Inc. All rights reserved.
Manufactured under license from Dolby Laboratories.
Ogg Vorbis audio compression technology provided cour tesy of the Xiph.Org Foundation.
XiphQT - Copyright © 2005, 2006, 2007 Arek Korbik
This product uses Xiph QuickTime Components under the GNU Lesser General Public License v2.1.
A copy of this license a nd source code can be found inside the applic ation bundle. More
information is available at http://www.xiph.org/quicktime.
FFmpeg is a trademark of Fabrice Bellard, originator of the FFMPEG project.
This product uses libavcodec, part of FFmpeg, under the GNU Lesser General Public License v2.1. A
copy of the license and source code can be found inside the application bundle. More inform ation
is available at http://ffmpeg.org.
libvorbis and libogg
Copyright (c) 1994-2004 Xiph.org Foundation
THIS SOFTWARE IS PROVIDED BY THE COPYRIGHT HOLDERS AND CONTRIBUTORS ``AS IS'' AND
ANY EXPRESS OR IMPLIED WARRANTIES, INCLUDING, BUT NOT LIMITED TO, THE IMPLIED
WARRANTIES OF MERCHANTABILITY AND FITNESS FOR A PARTICULAR PURPOSE ARE
DISCLAIMED. IN NO EVENT SHALL THE REGENTS OR CONTRIBUTORS BE LIABLE FOR ANY DIRECT,
INDIRECT, INCIDENTAL, SPECIAL, EXEMPLARY, OR CONSEQUENTIAL DAMAGES (INCLUDING, BUT
NOT LIMITED TO, PROCUREMENT OF SUBSTITUTE GOODS OR SERVICES; LOSS OF USE, DATA, OR
PROFITS; OR BUSINESS INTERRUPTION) HOWEVER CAUSED AND ON ANY THEORY OF LIABILITY,
WHETHER IN CONTRACT, STRICT LIABILITY, OR TORT (INCLUDING NEGLIGENCE OR OTHERWISE)
ARISING IN ANY WAY OUT OF THE USE OF THIS SOFTWARE, EVEN IF ADVISED OF THE POSSIBILITY
OF SUCH DAMAGE.
Page 38

libflac and libflac++
Copyright (C) 2000, 2001, 2002, 200 3, 2004 Josh Coalson
THIS SOFTWARE IS PROVIDED BY THE COPYRIGHT HOLDERS AND CONTRIBUTORS ``AS IS'' AND
ANY EXPRESS OR IMPLIED WARRANTIES, INCLUDING, BUT NOT LIMITED TO, THE IMPLIED
WARRANTIES OF MERCHANTABILITY AND FITNESS FOR A PARTICULAR PURPOSE ARE
DISCLAIMED. IN NO EVENT SHALL THE FOUNDATION OR CONTRIBUTORS BE LIABLE FOR ANY
DIRECT, INDIRECT, INCIDENTAL, SPECIAL, EXEMPLARY, OR CONSEQUENTIAL DAMAGES
(INCLUDING, BUT NOT LIMITED TO, PROCUREMENT OF SUBSTITUTE GOODS OR SERVICES; LOSS OF
USE, DATA, OR PROFITS; OR BUSINESS INTERRUPTION) HOWEVER CAUSED AND ON ANY THEORY
OF LIABILITY, WHETHER IN CONTRACT, STRICT LIABILITY, OR TORT (INCLUDING NEGLIGENCE OR
OTHERWISE) ARISING IN ANY WAY OUT OF THE USE OF THIS SOFTWARE, EVEN IF ADVISED OF THE
POSSIBILITY OF SUCH DAMAGE.
Audio effect engine licensed by Algorithmix, www.algorithmix.com.
VST is a trademark of Steinberg Media Technologies GmbH.
CD and music-related data from Gracenote, Inc., copyright © 2000-2008 Gracenote. Gracenote
Software, copyright © 2000-2008 Gracenote. One o r more patents owned by Gracenote apply to
this product and service. See the Gracenote website for a non-exhaustive list of applicable
Gracenote patents. Gracenote, CDDB, MusicID, the Gracenote logo and logotype, and the
“Powered by Gracenote” logo are either registered trademarks or trademarks of Gracenote in the
United States and/or other countries.
Music recognition technology and related data are provided by Gracenote®. Gracenote is the
industry standard in music recognition technology and related content delivery. For more
information, please visit www.gracenote.com.
Disclaimer
THIS PRODUCT DOES NOT BYPASS OR CIRCUMVENT COPY PROTECTION. THIS PRODUCT DOES
NOT ENABLE YOU TO COPY DVDS CONTAINING CSS-ENCRYPTION OR OTHER COPY-PROTECTED
CONTENT. IF THIS PR ODUCT ALLOWS YOU TO COPY A NY CONTENT, YOU MAY DO SO ONLY IF YOU
OWN THE COPYRIGHT, YOU HAVE OBTAINED PERMISSION TO COPY FROM THE COPYRIGHT
OWNER, OR YOU HAVE THE LEGAL RIGHT TO MAKE SUCH A COPY. IF YOU ARE NOT THE
COPYRIGHT OWNER OR YOU HAVE NOT OBTAINED PERMISSION TO COPY FROM THE COPYRIGHT
OWNER, YOU MAY BE VIOLATING COPYRIGHT AND OTHER LAWS LAW AND YOU MAY BE SUBJECT
TO CLAIMS FOR DAMAGES AND/OR CRIMINAL PENALTIES. ANY ILLEGAL USE OF THIS PROD UCT IS
STRICTLY PROHIBITED. IF YOU ARE UNCERTAIN ABOUT YOUR RIGHTS, YOU SHOULD CONTACT
YOUR LEGAL ADVISOR. YOU ASSUME FULL RESPONSIBILITY FOR THE LEGAL AND RESPONSIBLE
USE OF THIS PRODUCT.
 Loading...