

Page 1

Roxio Creator Enterprise 10 Deployment Guide
Welcome to the System Administrator's Deployment Guide
Installation
System requirements
Changes
Installing a multiple-user license
Installing Roxio Creator from the command prompt
To install Roxio Burn using the command prompt (Windows 7, Windows 8, Windows 8.1 and Windows 10)
Command line syntax
Using command line parameters
Required parameters
Install options
Optional parameters
Use these command lines to uninstall the suite:
Feature Registry Switch
Data gathering
Compatibility information
SMS and SCCM
Active Directory Group Policy
Altiris
Method 1: Script File Deploy
Method 2: Zap Installer Deploy
Page 2

Welcome to the System Administrator’s Deployment Guide
This guide is designed to help system administrators deploy Roxio Creator in their enterprise.
This guide is intended only for the deployment of Roxio Creator Silver 10, Roxio Creator Palladium 10, Roxio Creator Gold 10 and
Roxio Creator Platinum NXT5 and does not apply to other versions of Roxio Creator.
These instructions are designed for information technology professionals who may need to use advanced techniques to deploy Creator, or to
the product to fit their organization’s needs.Individuals can simply install Creator by running the setup.exe installer program included on their
installation disc, or in the installation files. Setup.exe is an installer designed with a graphical user interface, and it provides all of the instructions
necessary for normal installation.
To learn how to use Creator, please open the application, click on the Help menu, and select from one of the available options
Installation
Installing a multiple-user license
The default installation locations for Creator are:
C:\Program Files\Roxio Creator Silver 10.
C:\Program Files\Roxio Creator Palladium 10.
C:\Program Files\Roxio Creator Gold 10.
C:\Program Files\Roxio Creator Platinum NXT 5.
See for space requirements.
System requirements
Prior to installing Creator, please ensure that all other applications are closed.
tailor
This version of Roxio Creator does not coexist with previous versions. If another version of Creator or a product in the Creator family is installed, it
will be uninstalled before installing this version.
Installing Roxio Creator from the command prompt
Creator can be installed by calling the setup.exe application. One or more parameters can be added to customize the installation. You can also
include instructions that generate a log file in case you should run into a problem that requires assistance from Roxio’s Global Customer Care
team.
The following instructions explain how to install Roxio Creator on a client PC. The command line syntax can be used with network management
tools to perform a network-based deployment.
You must have system Administrator privileges to install Roxio Creator from the command prompt.
To install Roxio Burn using the command prompt (Windows 7, Windows 8, Windows 8.1 and Windows
10)
1.
Open the Windows Start menu and select
2.
Right-click , and select from the shortcut menu.
The Command Prompt window opens. If a User Account Control prompt appears, click to continue installation.
Command Prompt Run as administrator
All Programs > Accessories.
Yes
3.
Call setup.exe and include the desired command line parameters. (For more information, see
Command line syntax
below.)
Page 3
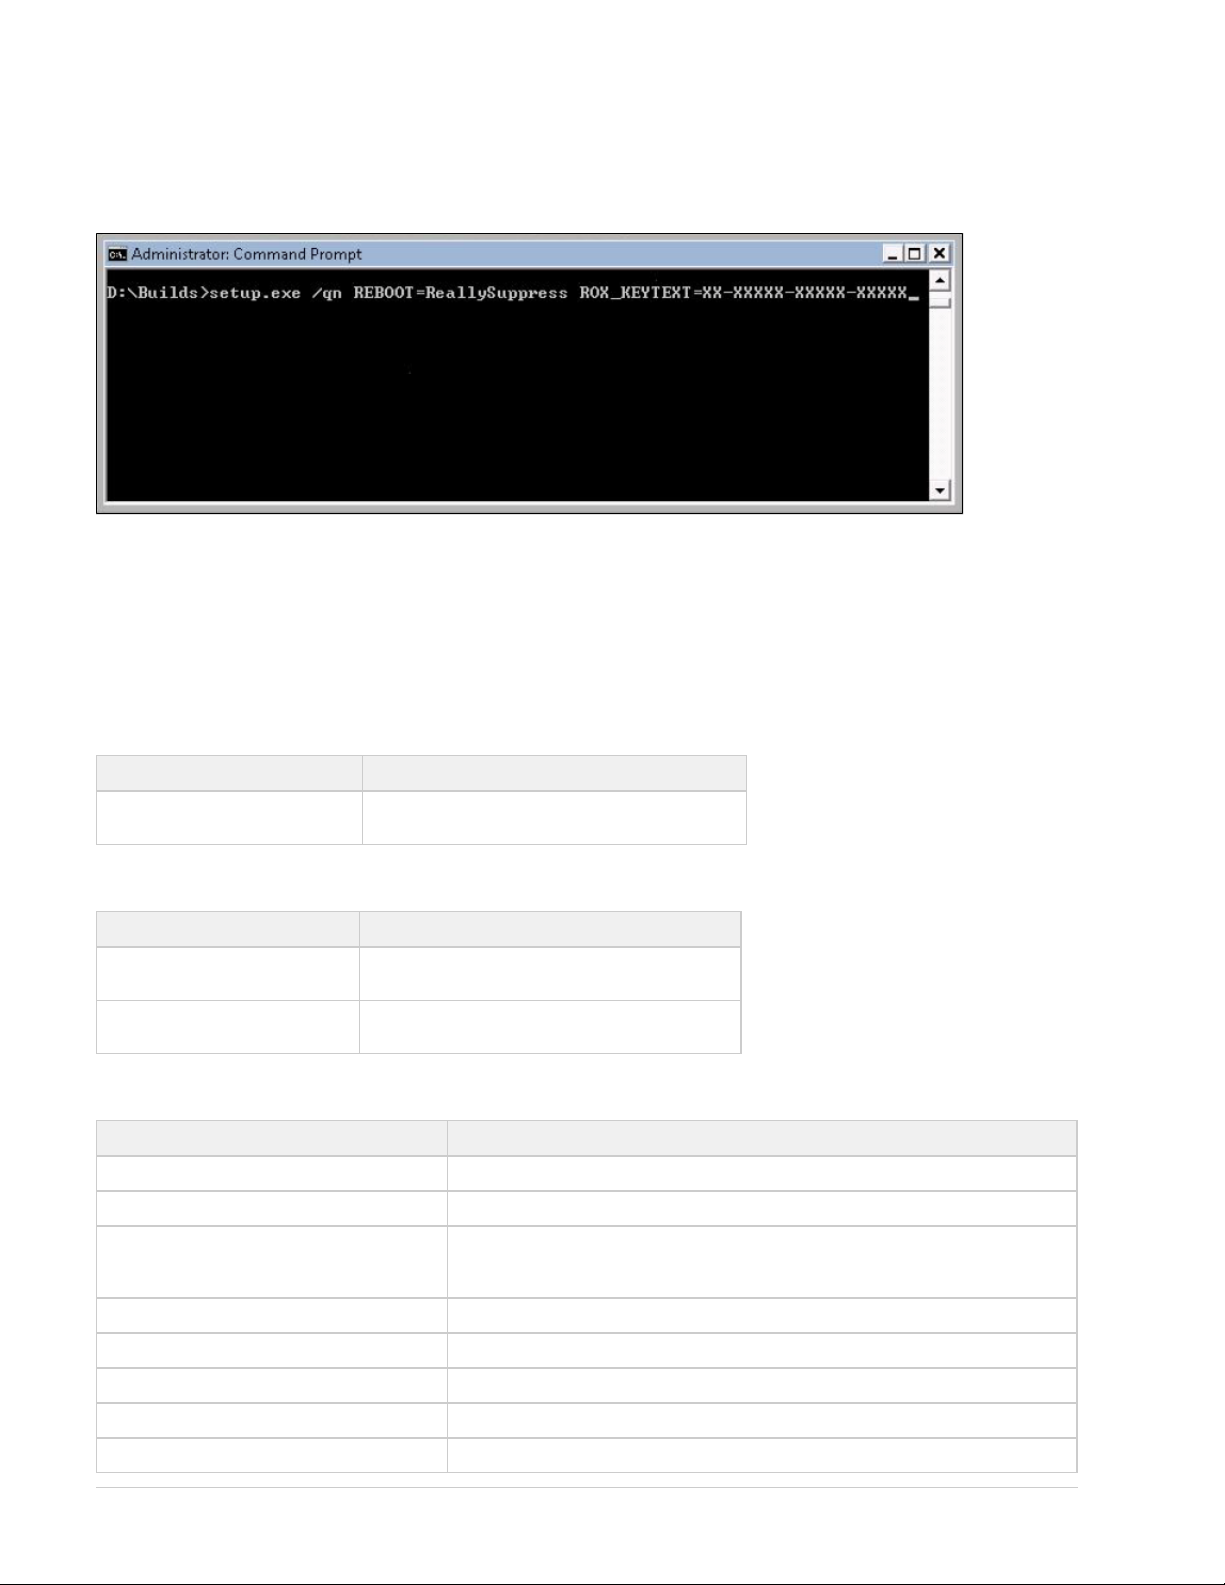
Command line syntax
Setup.exe is the installer application, designed to provide a graphical user interface for the typical end-user installation. This application can also
run silently, without the graphical user interface.
Here’s an example of the syntax used to perform a silent install from the setup.exe file:
The location of the setup.exe file will depend on where on the system the Creator install files are located.
Using command line parameters
Add parameters to your install instructions to control the installation experience and the amount of interaction required from your users.
The following tables list the available parameters:
Required parameters
Parameter Description
Add CD Key ROX_KEYTEXT=XX-XXXXX- XXXXX-XXXXX
Install options
Parameter Description
/qn Silent install (no dialogs).
/qn Reboot=ReallySuppress Suppress reboot, to be used with silent installation.
Optional parameters
Parameter Description
{lang}=XXX XXX is a three-letter language code (ENU, FRA, ITA, ESN, JPN, DEU, etc.).
MPI_EULA_ACCEPTED=1 Switch to automatically accept the End-User License Agreement.
MANDATORY=0 This command is mandatory when using the DISABLE_APP command. It disables the
mandatory flag in the installer’s configuration file.
DisableProducts=CPDECODERPACK_XXX Excludes the CinePlayerDecoder Pack.
DisableProducts=BOTPRODUCT_4X Excludes BackOnTrack on 32- bit based Windows systems.
DisableProducts=BOTPRODUCT_ A64_4X Excludes BackOnTrack on 64- bit based Windows systems.
DisableProducts=WINDVD Excludes WinDVD.
DisableProducts=BOTPRODUCT_4X,WINDVD Excludes BackOnTrack and WinDVD.
Page 4

DISABLE_APP=Video Excludes video applications such as VideoWave.
When installing the software or when rebooting your system at the end of an installation, you must be logged into the system
with Administrator privileges.
To install from a shared network location:
DISABLE_APP=Audio Excludes audio applications such as Sound Editor.
DISABLE_APP=Photo Excludes most photos applications.
DISABLE_APP=Video,Audio Excludes Video and Audio.
CleanupSourceFiles=1 Clean the installer after installation.
Use these command lines to uninstall the suite:
Operating
System
Windows 7 “C: \ProgramData\Uninstall \{FA62A522-D698-46DB-B592-4B409A93F63E}\setup.exe” /X
Windows 8 “C: \ProgramData\Uninstall \ {FA62A522-D698-46DB-B592-4B409A93F63E}\setup.exe” /X
Windows 8.1 “C: \ProgramData\Uninstall \ {FA62A522-D698-46DB-B592-4B409A93F63E}\setup.exe” /X
Windows 10 “C: \ProgramData\Uninstall \ {FA62A522-D698-46DB-B592-4B409A93F63E}\setup.exe” /X
Command line
{FA62A522-D698-46DB-B592-4B409A93F63E} /qn REBOOT=ReallySuppress
{FA62A522-D698-46DB-B592-4B409A93F63E} /qn REBOOT=ReallySuppress
{FA62A522-D698-46DB-B592-4B409A93F63E} /qn REBOOT=ReallySuppress
{FA62A522-D698-46DB-B592-4B409A93F63E} /qn REBOOT=ReallySuppress
Feature Registry Switch
Force Close Write-Once disc.
Key
Path HKEY_LOCAL_MACHINE\SOFTWARE\Roxio\RoxioCentral75\Preference for 32-bit Operating System
Type String
Value
Description
ForceDiscClose
HKEY_LOCAL_MACHINE\SOFTWARE\Wow6432Node\Roxio\RoxioCentral75\Preference for 64-bit Operating
System.
1
Write-Once CD/BD/DVD Record Type in Options will be default set to "Disc at Once (DAO), Closed". The optional
button will be hidden.
Value
Description
0
Write-Once CD/BD/DVD Record Type in Options Can be selected by User.
Data gathering
Data gathering tools are available to assist Roxio developers in understanding the nature of any installation issues.
By default ROXIO_SETUP.log and all msi installation log files are placed on the user’s system here: {PROGRAMDATA_FOLDER}\Roxio Log
Files\ {Product Name}\ {DATE_TIME}\, where PROGRAMDATA_FOLDER is the same as the % % environment variable. ProgramData
add the L*V parameter and a new path to redirect the log files to a different location as shown in this example:
/qn REBOOT=ReallySuppress /L*V C:\logs\ROX_ {ProductID}.txt
C:\enu\setup.exe ROX_KEYTEXT=XX-XXXXX-XXXXX-XXXXX
Installing from a network
You can install Creator from a shared network location.
You can
Page 5

1.
2.
3.
Copy the contents of the Creator installation disc to a network location.
From remote computers, go to the menu ( on Windows 7, Windows 8, Windows 8.1 and Windows 10).Start > Run Start Search box
Browse to the shared copy of the disc and enter the setup.exe command with the desired switches. For a list of switches that can be
added to the command line, see .Using command line parameters
Compatibility information
SMS and SCCM
Roxio Creator is compatible with Microsoft’s Desktop Deployment tools, including SMS and System Center Configuration Manager
Active Directory Group Policy
Creator is compatible with Group Policy deployment and can be installed using the script file.
There are two methods to deploy via Group Policy:
Method 1: Script File Deploy
Method 2: Zap Installer Deploy
When deploying through Group Policy, use the Group Policy options (Computer Configuration > Administrative
Templates > System > Scripts) to set the Maximum wait time for Group Policy scripts to 0.
Method 1: Script File Deploy
1.
Create a shared path to the installer folder on the server.
2.
Create a script file with the following command line parameter: \\server\shared folder\setup.exe ROX_KEYTEXT=XX-XXXXXXXXXX-XXXXX /qn REBOOT=ReallySuppress
To create Group Policy for Deploy:
1.
Launch Group Policy Object Editor.
2.
Under , select , then double-click .Computer Configuration Windows Settings > Scripts Startup
3.
Click .Add
4.
Browse for your script file.
5.
Click OK
6.
Restart the client machine and verify installation during login.
To uninstall by editing the script file on Windows7, Windows 8, Windows 8.1 and Windows 10, use the following
command:
{FA62A522-D698-46DB-B592-4B409A93F63E} /qn REBOOT=ReallySuppress
“C: \ProgramData\Uninstall \ {FA62A522-D698-46DB-B592-4B409A93F63E}\setup.exe” /X
Method 2: Zap Installer Deploy
Create a Zap file based on the following example:
[Application]
; Only FriendlyName and SetupCommand are required,
; everything else is optional.
; FriendlyName is the name of the program that will appear in the software installation snap-in and the Add/Remove Programs tool.
REQUIRED
FriendlyName = "Roxio Creator"
; SetupCommand is the command line used to run the program's Setup. With Windows Server 2003 and later you must specify the fully
qualified path containing the setup program.
; Long file name paths need to be quoted. For example:
; SetupCommand = "\\server\share\long_folder\setup.exe" /unattend
; REQUIRED
;
Page 6

1.
2.
3.
4.
5.
6.
7.
8.
SetupCommand = "\\server\share\setup.exe /ROX_KEYTEXT-XX- XXXXX-XXXXX-XXXXX /qn REBOOT=ReallySuppress"
; Version of the program that will appear in the software installation snap-in and the Add/Remove Programs tool.
; OPTIONAL
DisplayVersion = 17.0
; Version of the program that will appear in the software installation snap-in and the Add/Remove Programs tool.
; OPTIONAL
Publisher = Roxio
Publishing the Program
Roxio Creator cannot be uninstalled with a Zap file. Please see the script file for uninstall procedures, or remove the program
via the Control Panel.
In User Configuration, right-click Software Installation, and then click .New
Click .Package
Type the path to the folder containing the .zap file.
Click .Open
In the Files of Type box, click (*.zap).ZAW Down-level applications package
Click the .zap file, and then click .Open
Click , and then click .Publish OK
Client will now be available to add program through the Control Panel.
Altiris
Creator is compatible with Altiris software deployment tools.
Page 7

System requirements
Roxio Creator has the following minimum system requirements:
Microsoft® Windows® 7 Ultimate, Professional, or Enterprise; 32-bit or 64-bit with latest service pack. (Client operating systems must be
able to be added to a network domain.)
For data burning and copy, audio capture and editing: Intel® 1.6GHz Pentium 4 processor or AMD equivalent, 1GB RAM for Windows 7,
Windows 8, Windows 8.1 and Windows 10. For video editing and conversion and DVD playback Intel Pentium 4 2GHz processor or AMD
equivalent and 1GB RAM. Multicore processor with at least 2GB RAM recommended.
1024x768 DirectX 9.0c compatible graphics card with at least 16-bit color setting, sound card, DVD-ROM drive
ATI Stream® and CUDA™ acceleration only available with AMD ATI Stream and NVIDIA CUDA enabled graphics cards
Hard drive with at least 3GB free space for the installation process.DVD and BD copy, video editing and authoring may require large
amount of free disk space, up to 10’s of GB
Windows Media Player version 10, 11 or 12
Internet Explorer 7, 8, or 9
QuickTime® player version 7 required for some functionality
iTunes® version 8 or newer for some functionality
For video capture: OHCI compliant IEEE 1394 FireWire card for use with DV camera or Roxio Video Capture USB for analog sources.
.NET Framework 4.5 installed for MyDVD.
Changes
The material in this document is for information purposes only and is subject to change without notice. While reasonable efforts have been made
in the preparation of this document to assure its accuracy, Roxio assumes no liability resulting from errors or omissions in this document, nor from
the use of the information contained herein.
Roxio reserves the right to make changes in the product design without reservation and without notification to its users.
 Loading...