

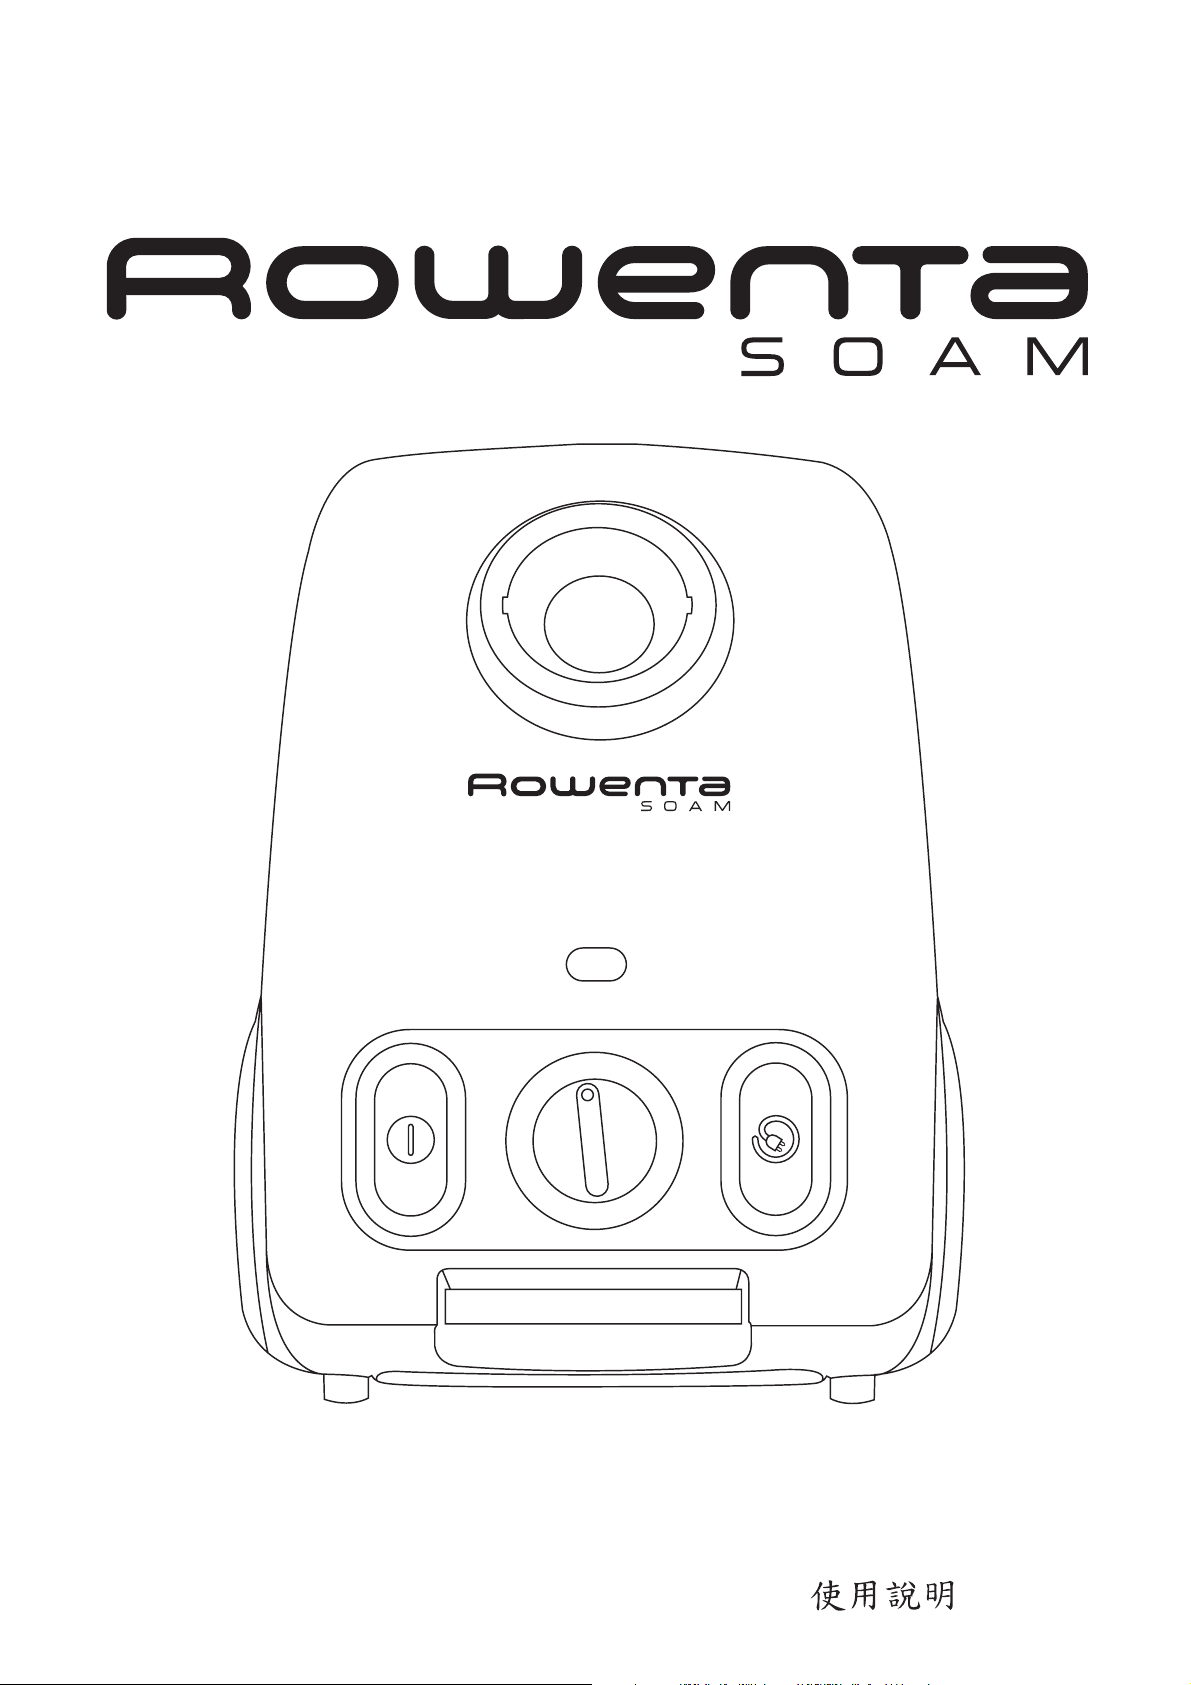
Page 1

Réf. 901204 • Rowenta France Siret 301859 880 000 33 • Sous réserve de modifications • Conception & réalisation : JPM interactive (03 80 56 28 11)
Page 2
mode d’emploi • instructions for use • Gebrauchsanweisung
gebruiksaanwijzing • istruzioni per l’uso • modo de empleo
instruções de utilização • O‰ËÁ›Â˜ ¯Ú‹Û˘ • Kullanıma kılavuzu
• Руководство по эксплуатации • Instrukcja obs∏ugi
Návod k obsluze • Návod na obsluhu • Használati utasítás
Instrucţiuni de folosire • Naãin uporabe •
≈¸®Uœ«‹ «ùß∑FLU‰
Page 3

I. «∞Lu«ÅHU‹
. . . . . . . . . . . . . . . . . . . . . . . . . . . . . . . . . . . . . . . . . .
II. ≤BUz` Ë¢∫c¥d«‹
. . . . . . . . . . . . . . . . . . . . . . . . . . . . . . . . . . . . .
III. Æ∂q «ùß∑FLU‰
. . . . . . . . . . . . . . . . . . . . . . . . . . . . . . . . . . . . . . . .
VI. ©d¥IW «ùß∑FLU‰
. . . . . . . . . . . . . . . . . . . . . . . . . . . . . . . . . . . . . .
V. «∞BOU≤W Ë«∞∑MEOn
. . . . . . . . . . . . . . . . . . . . . . . . . . . . . . . . . . . .
IV. ±s √§q ßö±∑p
. . . . . . . . . . . . . . . . . . . . . . . . . . . . . . . . . . . . . . .
IIV. ±U–« ¢HFq ≈–«
. . . . . . . . . . . . . . . . . . . . . . . . . . . . . . . . . . . . . . . .
français
I. DESCRIPTION. . . . . . . . . . . . . . . . . . . . . . . . . . . . . . . . . . . . . . . . 2
II. CONSEILS ET PRECAUTIONS. . . . . . . . . . . . . . . . . . . . . . . . . . . 2
III. AVANT UTILISATION . . . . . . . . . . . . . . . . . . . . . . . . . . . . . . . . 2-3
IV. UTILISATION. . . . . . . . . . . . . . . . . . . . . . . . . . . . . . . . . . . . . . . . . 3
V. ENTRETIEN ET NETTOYAGE . . . . . . . . . . . . . . . . . . . . . . . . . . 3-4
VI. POUR VOTRE SÉCURITÉ. . . . . . . . . . . . . . . . . . . . . . . . . . . . . . . 5
VII. QUE FAIRE SI… . . . . . . . . . . . . . . . . . . . . . . . . . . . . . . . . . . . . . . 5
english
I. DESCRIPTION . . . . . . . . . . . . . . . . . . . . . . . . . . . . . . . . . . . . . . . . 6
II. HINTS AND PRECAUTIONS. . . . . . . . . . . . . . . . . . . . . . . . . . . . . 6
III. BEFORE USE . . . . . . . . . . . . . . . . . . . . . . . . . . . . . . . . . . . . . . . 6-7
IV. VACUUMING. . . . . . . . . . . . . . . . . . . . . . . . . . . . . . . . . . . . . . . . . 7
V. MAINTENANCE AND CLEANING . . . . . . . . . . . . . . . . . . . . . . 7-8
VI. FOR YOUR SAFETY . . . . . . . . . . . . . . . . . . . . . . . . . . . . . . . . . . . 9
VII. WHAT TO DO IF…. . . . . . . . . . . . . . . . . . . . . . . . . . . . . . . . . . . . . 9
deutsch
I. GERÄTEBESCHREIBUNG. . . . . . . . . . . . . . . . . . . . . . . . . . . . . . 10
II. HINWEISE . . . . . . . . . . . . . . . . . . . . . . . . . . . . . . . . . . . . . . . . . . 10
III. VOR DER BENUTZUNG. . . . . . . . . . . . . . . . . . . . . . . . . . . . . 10-11
IV. ZUM SAUGEN. . . . . . . . . . . . . . . . . . . . . . . . . . . . . . . . . . . . . . . 11
V. REINIGUNG UND PFLEGE . . . . . . . . . . . . . . . . . . . . . . . . . . 11-12
VI. ZU IHRER SICHERHEIT . . . . . . . . . . . . . . . . . . . . . . . . . . . . . . . . 13
VII. WAS MACHEN, WENN…. . . . . . . . . . . . . . . . . . . . . . . . . . . . . . 13
nederlands
I. BESCHRIJVING . . . . . . . . . . . . . . . . . . . . . . . . . . . . . . . . . . . . . 14
II. RAADGEVINGEN EN VOORZORGSMAATREGELEN . . . . . . . 14
III. VÓÓR HET EERSTE GEBRUIK . . . . . . . . . . . . . . . . . . . . . . . 14-15
IV. OM TE ZUIGEN . . . . . . . . . . . . . . . . . . . . . . . . . . . . . . . . . . . . . . 15
V. REINIGEN EN ONDERHOUDEN . . . . . . . . . . . . . . . . . . . . . . 15-16
VI. VOOR UW VEILIGHEID. . . . . . . . . . . . . . . . . . . . . . . . . . . . . . . . 17
VII. WAT TE DOEN ALS… . . . . . . . . . . . . . . . . . . . . . . . . . . . . . . . . . 17
italiano
I. DESCRIZIONE . . . . . . . . . . . . . . . . . . . . . . . . . . . . . . . . . . . . . . . 18
II. CONSIGLI E PRECAUZIONI . . . . . . . . . . . . . . . . . . . . . . . . . . . . 18
III. PRIMA DELL’USO. . . . . . . . . . . . . . . . . . . . . . . . . . . . . . . . . . 18-19
IV. ASPIRARE . . . . . . . . . . . . . . . . . . . . . . . . . . . . . . . . . . . . . . . . . . 19
V. PULIZIA E MANUTENZIONE . . . . . . . . . . . . . . . . . . . . . . . . 19-20
VI. PER LA VOSTRA SICUREZZA . . . . . . . . . . . . . . . . . . . . . . . . . . 21
VII. COSA FARE SE… . . . . . . . . . . . . . . . . . . . . . . . . . . . . . . . . . . . . 21
español
I. DESCRIPCIÓN . . . . . . . . . . . . . . . . . . . . . . . . . . . . . . . . . . . . . . . 22
II. CONSEJOS Y PRECAUCIONES . . . . . . . . . . . . . . . . . . . . . . . . . 22
III. ANTES DE UTILIZAR . . . . . . . . . . . . . . . . . . . . . . . . . . . . . . . 22-23
IV. ASPIRAR . . . . . . . . . . . . . . . . . . . . . . . . . . . . . . . . . . . . . . . . . . . 23
V. MANTENIMIENTO Y LIMPIEZA . . . . . . . . . . . . . . . . . . . . . . 23-24
VI. PARA SU SEGURIDAD . . . . . . . . . . . . . . . . . . . . . . . . . . . . . . . . 25
VII. QUÉ HACER SI … . . . . . . . . . . . . . . . . . . . . . . . . . . . . . . . . . . . . 25
português
I. DESCRIÇÃO. . . . . . . . . . . . . . . . . . . . . . . . . . . . . . . . . . . . . . . . . 26
II. CONSELHOS E PRECAUÇÕES. . . . . . . . . . . . . . . . . . . . . . . . . . 26
III. ANTES DA PRIMEIRA UTILIZAÇÃO . . . . . . . . . . . . . . . . . . . 26-27
IV. UTILIZAÇÃO. . . . . . . . . . . . . . . . . . . . . . . . . . . . . . . . . . . . . . . . . 27
V. MANUTENÇÃO E LIMPEZA . . . . . . . . . . . . . . . . . . . . . . . . 27-28
VI. PARA A SUA SEGURANÇA . . . . . . . . . . . . . . . . . . . . . . . . . . . . 29
VII. O QUE FAZER SE…. . . . . . . . . . . . . . . . . . . . . . . . . . . . . . . . . . . 29
ВППЛУИО¿
I. ¶∂ƒπ°ƒ∞º∏ ∆∏™ ™À™∫∂À∏™
. . . . . . . . . . . . . . . . . . . . . . .
30
II. ™Àªµ√À§∂™ ∫∞𠶃√ºÀ§∞•∂π™
. . . . . . . . . . . . . . . . . . .
30
III. ¶ƒπ¡ ∞¶√ ∆∏¡ ¶ƒø∆∏ Ã∏™∏
. . . . . . . . . . . . . . . . . .
30-31
IV. ™∫√À¶π™MA
. . . . . . . . . . . . . . . . . . . . . . . . . . . . . . . . . . . . . . .
31
V. ™À¡∆∏ƒ∏™∏ ∫∞π ∫∞£∞ƒπ™ªA
. . . . . . . . . . . . . . . . .
31-32
VI. °π∞ ∆∏ ¢π∫∏ ™∞™ ∞™º∞§∂π∞
. . . . . . . . . . . . . . . . . . . . . . .
33
VII. ∆π ¡∞ ∫∞¡∂∆∂ ∂∞¡…
. . . . . . . . . . . . . . . . . . . . . . . . . . . . . .
33
türkçe
I. TANIMLAMA. . . . . . . . . . . . . . . . . . . . . . . . . . . . . . . . . . . . . . . . 34
II. ‹PUÇLARI VE ÖNLEMLER . . . . . . . . . . . . . . . . . . . . . . . . . . . . . . 34
III. KULLANMADAN ÖNCE. . . . . . . . . . . . . . . . . . . . . . . . . . . . . 34-35
IV. SÜPÜRME . . . . . . . . . . . . . . . . . . . . . . . . . . . . . . . . . . . . . . . . . . 35
V. TEMIZLIK VE BAKIM . . . . . . . . . . . . . . . . . . . . . . . . . . . . . . . 35-36
VI. EMN‹YET KURALLARI . . . . . . . . . . . . . . . . . . . . . . . . . . . . . . . . . 37
VII. NE YAPMALIYIZ E⁄ER... . . . . . . . . . . . . . . . . . . . . . . . . . . . . . . 37
38
38
38-39
39
39-40
41
41
рyccкий
I. ОПИСАНИЕ. . . . . . . . . . . . . . . . . . . . . . . . . . . . . . . . . . . . . . . . . 42
II.
ПРАВИЛА ИСПОЛЬЗОВАНИЯ И МЕРЫ ПРЕДОСТОРОЖНОСТИ
. 42
III. ПЕРЕД ИСПОЛЬЗОВАНИЕМ . . . . . . . . . . . . . . . . . . . . . . . 42-43
IV. ИСПОЛЬЗОВАНИЕ . . . . . . . . . . . . . . . . . . . . . . . . . . . . . . . . . . 43
V. УХОД И ОЧИСТКА . . . . . . . . . . . . . . . . . . . . . . . . . . . . . . . . 43-44
VI. СOBETЫ ПО TЕXНИКЕ БEЗOПACHOCTИ. . . . . . . . . . . . . . . 45
VII. ЧТО ДЕЛАТЬ, ЕСЛИ… . . . . . . . . . . . . . . . . . . . . . . . . . . . . . . 45
polski
I. OPIS . . . . . . . . . . . . . . . . . . . . . . . . . . . . . . . . . . . . . . . . . . . . . . . 46
II. WSKAZÓWKI I ÂRODKI OSTRO˚NOÂCI . . . . . . . . . . . . . . . . . 46
III. PRZED PRZYSTÑPIENIEM DO PRACY . . . . . . . . . . . . . . . . 46-47
IV. ODKURZANIE . . . . . . . . . . . . . . . . . . . . . . . . . . . . . . . . . . . . . . . 47
V. OBS¸UGA TECHNICZNA I CZYSZCZENIE . . . . . . . . . . . . . 47-48
VI. DLA BEZPIECZE¡STWA U˚YTKOWNIKA . . . . . . . . . . . . . . . . 49
VII. USTERKI I ICH USUWANIE… . . . . . . . . . . . . . . . . . . . . . . . . . . 49
ãesky
I. POPIS . . . . . . . . . . . . . . . . . . . . . . . . . . . . . . . . . . . . . . . . . . . . . . 50
II. RADY A UPOZOMùNÍ . . . . . . . . . . . . . . . . . . . . . . . . . . . . . . . . 50
III. P¤ED POUÎITÍM . . . . . . . . . . . . . . . . . . . . . . . . . . . . . . . . . . 50-51
IV. VYSÁVÁNÍ . . . . . . . . . . . . . . . . . . . . . . . . . . . . . . . . . . . . . . . . . . 51
V. ÚDRÎBA A âI·TùNÍ . . . . . . . . . . . . . . . . . . . . . . . . . . . . . . . 51-52
VI. BEZPEâNOSTNÍ UPOZOMùNÍ . . . . . . . . . . . . . . . . . . . . . . . . . . 53
VII. CO DùLAT KDYÎ… . . . . . . . . . . . . . . . . . . . . . . . . . . . . . . . . . . 53
slovensky
I. POPIS . . . . . . . . . . . . . . . . . . . . . . . . . . . . . . . . . . . . . . . . . . . . . . 54
II. POKYNY A DOPORUâENIA . . . . . . . . . . . . . . . . . . . . . . . . . . . . 54
III. PRED POUÎITÍM . . . . . . . . . . . . . . . . . . . . . . . . . . . . . . . . . . 54-55
IV. VYSÁVANIE. . . . . . . . . . . . . . . . . . . . . . . . . . . . . . . . . . . . . . . . . 55
V. ÚDRÎBA A âISTENIE. . . . . . . . . . . . . . . . . . . . . . . . . . . . . . . 55-56
VI. BEZPEâNOSTNÉ UPOZORNENIA . . . . . . . . . . . . . . . . . . . . . . . 57
VII. âO ROBIT AK… . . . . . . . . . . . . . . . . . . . . . . . . . . . . . . . . . . . . . 57
magyar
I. LEÍRÁS . . . . . . . . . . . . . . . . . . . . . . . . . . . . . . . . . . . . . . . . . . . . . 58
II. TIPPEK ÉS ÓVINTÉZKEDÉSEK . . . . . . . . . . . . . . . . . . . . . . . . . . 58
III. HASZNÁLAT ELÃTT . . . . . . . . . . . . . . . . . . . . . . . . . . . . . . . 58-59
IV. PORSZÍVÓZÁS. . . . . . . . . . . . . . . . . . . . . . . . . . . . . . . . . . . . . . . 59
V. KARBANTARTÁS ÉS TISZTÍTÁS. . . . . . . . . . . . . . . . . . . . . . 59-60
VI. BIZTOSÁGI ELÃÍRÁSOK. . . . . . . . . . . . . . . . . . . . . . . . . . . . . . . 61
VII. HIBAELHÁRÍTÁS… . . . . . . . . . . . . . . . . . . . . . . . . . . . . . . . . . . . 61
română
I. DESCRIEREA APARATULUI . . . . . . . . . . . . . . . . . . . . . . . . . . . . . . 62
II. INSTRUCŢIUNI DE SECURITATE . . . . . . . . . . . . . . . . . . . . . . . . . . 62
III. ÎNAINTE DE UTILIZARE . . . . . . . . . . . . . . . . . . . . . . . . . . . . . . 62-63
IV. ASPIRAREA . . . . . . . . . . . . . . . . . . . . . . . . . . . . . . . . . . . . . . . . . . 63
V. CURĂŢARE ŞI ÎNTREŢINERE . . . . . . . . . . . . . . . . . . . . . . . . . . 63-64
VI. PENTRU SECURITATEA DUMNEAVOASTRĂ . . . . . . . . . . . . . . . . . 65
VII. CE ESTE DE FĂCUT DACĂ… . . . . . . . . . . . . . . . . . . . . . . . . . . . . 65
hrvatski
I. OPIS . . . . . . . . . . . . . . . . . . . . . . . . . . . . . . . . . . . . . . . . . . . . . . . 66
II. UPUTE I SIGURNOSNI NAPUTCI . . . . . . . . . . . . . . . . . . . . . . . . 66
III. PRIJE UPORABEPORABA . . . . . . . . . . . . . . . . . . . . . . . . . . . . . . 67
V. ODRÎAVANJE I âI·åENJE . . . . . . . . . . . . . . . . . . . . . . . . . . . 67-68
VI. RADI SVOJE SIGURNOSTI. . . . . . . . . . . . . . . . . . . . . . . . . . . . . . 69
VII. ·TO UâINITI UKOLIKO… . . . . . . . . . . . . . . . . . . . . . . . . . . . . . 69
´‡‡‡‡‡d°w
Page 4
18
19
30-31
1
4
5
2
3
6
8
7
11
11a
11b
11c
12
9
10
15
14
17
16
11d
13
20 21 22 23
27
24
25
26
28
29
Page 5
II • CONSEILS ET PRECAUTIONS
Avant chaque utilisation, le cordon doit être déroulé complètement. Ne le coincez pas et ne le passez pas sur des arêtes tranchantes.
Ne déplacez pas l’aspirateur en tirant sur le cordon, l’appareil doit être déplacé par sa poignée de transport. N’utilisez pas le cordon
pour soulever l’appareil. Si vous utilisez une rallonge, assurez-vous qu’elle est en parfait état et de section adaptée à la puissance de
votre aspirateur. Ne débranchez jamais l’appareil en tirant sur le cordon.
N’utilisez que des accessoires, sacs et filtres d’origine Rowenta. Vérifiez que tous les filtres sont bien en place. Ne le faites jamais
fonctionner sans sac et sans filtre.
En cas de difficultés pour obtenir sacs et filtres pour cet aspirateur, contactez le Service Consommateurs Rowenta :
ou consommateurs@rowenta.fr
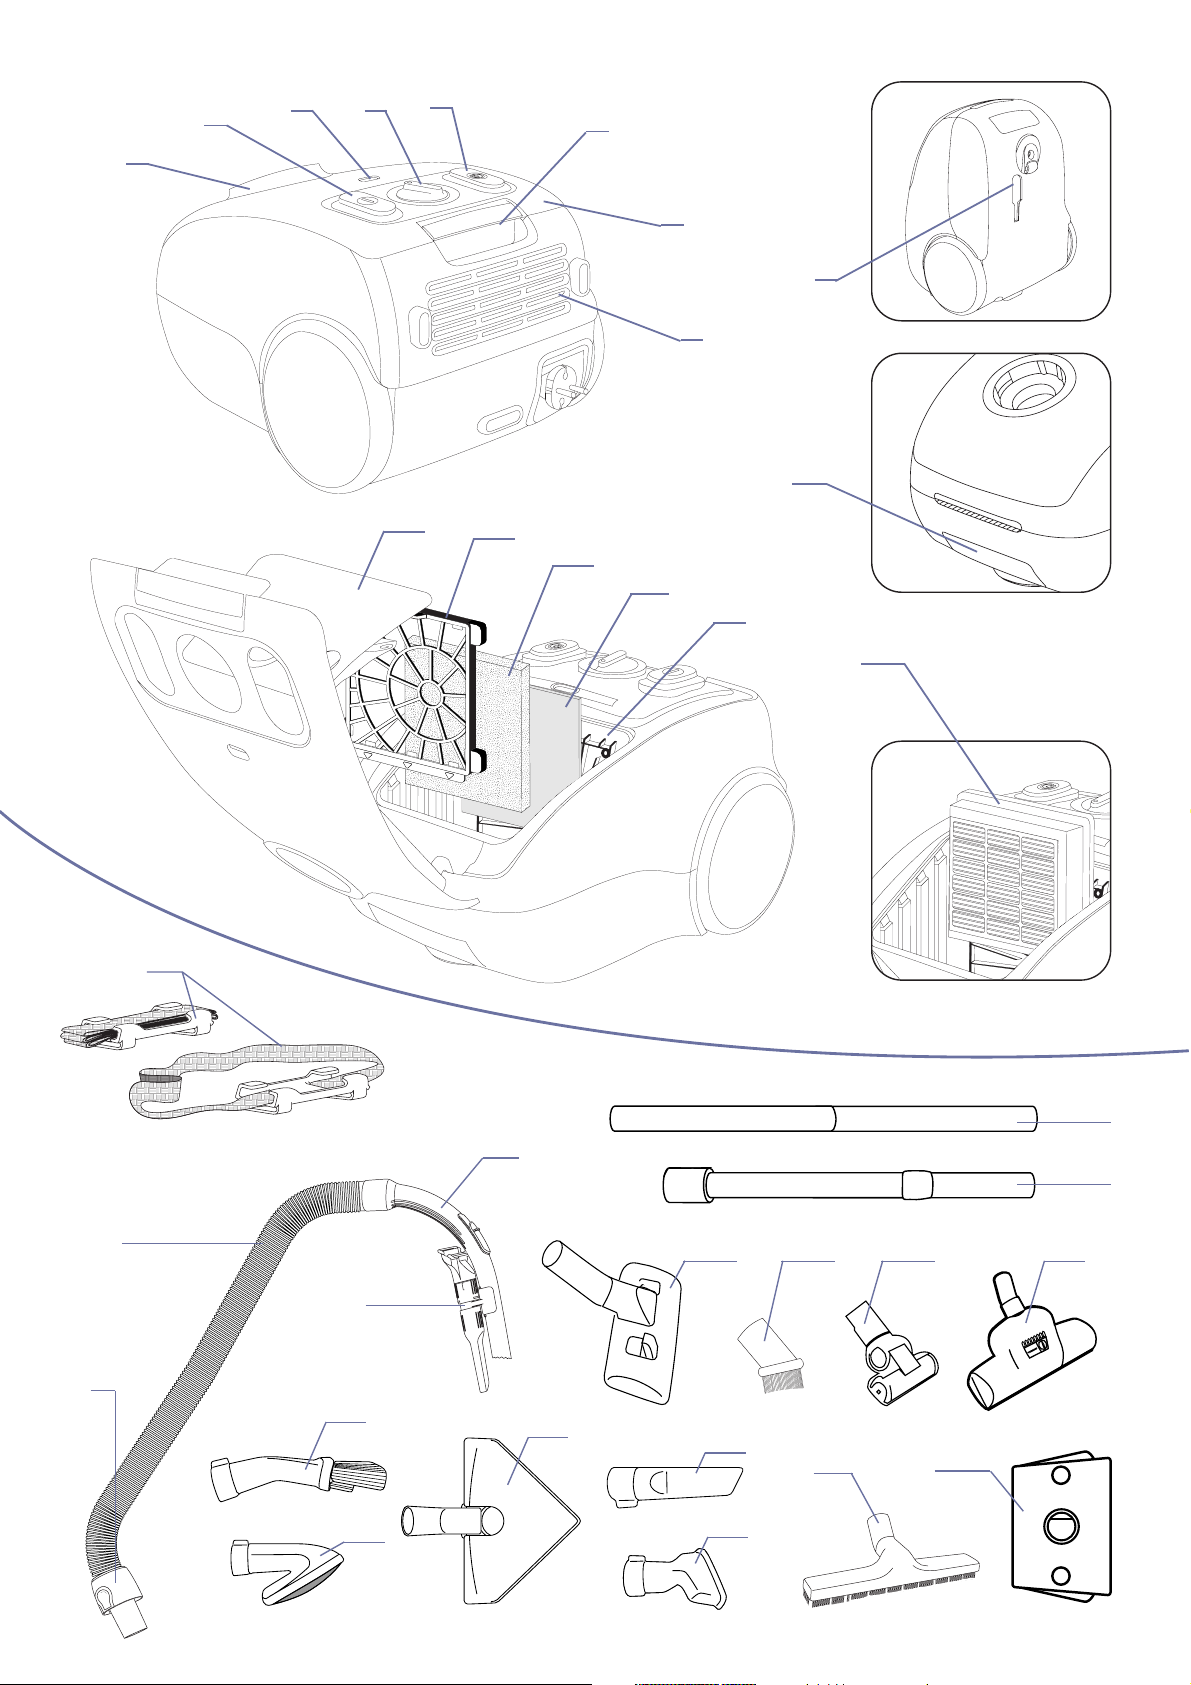
I • DESCRIPTION
1. Ouverture d’aspiration
2. Commande Marche/Arrêt
3. Témoin de remplissage du sac
4. Variateur électronique de la puissance*
5. Commande enrouleur de cordon
6. Ouverture du couvercle
7. Couvercle du compartiment sac
8. Grille de sortie d’air
9. Système Parking
10. Poignée de transport
11. Compartiment sac
a. Filtre micro-actif antibactérien* ZR 480
b. Filtre mousse*
c. Support-filtres*
d. Cassette-filtre HEPA* ZR 0016
(High Efficiency Particulate Air)
Votre aspirateur est équipé soit d'un filtre micro-actif antibactérien*, d'un filtre
mousse* et d'un support-filtres* (a+b+c), soit d'une cassette-filtre HEPA* (d).
12. Sac*
Accessoires :
13. Bandoulière*
14. Raccord flexible
15. Flexible avec crosse
16. Variateur mécanique de puissance
17. Support accessoires*
18. Tubes de rallonge*
19. Tube télescopique métal*
20. Suceur combiné 2 positions*
21. Brosse*
22. Turbo Brosse ameublement* TB 155
23. Turbo Brosse sols* ZR 980
24. Plumeau aspirant Swip*
25. Mousse aspirante Wip*
26. Suceur Delta*
27. Suceur plat*
28. Suceur ameublement*
29. Suceur parquet*
30. Sac papier double paroi antibactérien* ZR 480
31. Sac textile permanent* RS-RT 1420
français
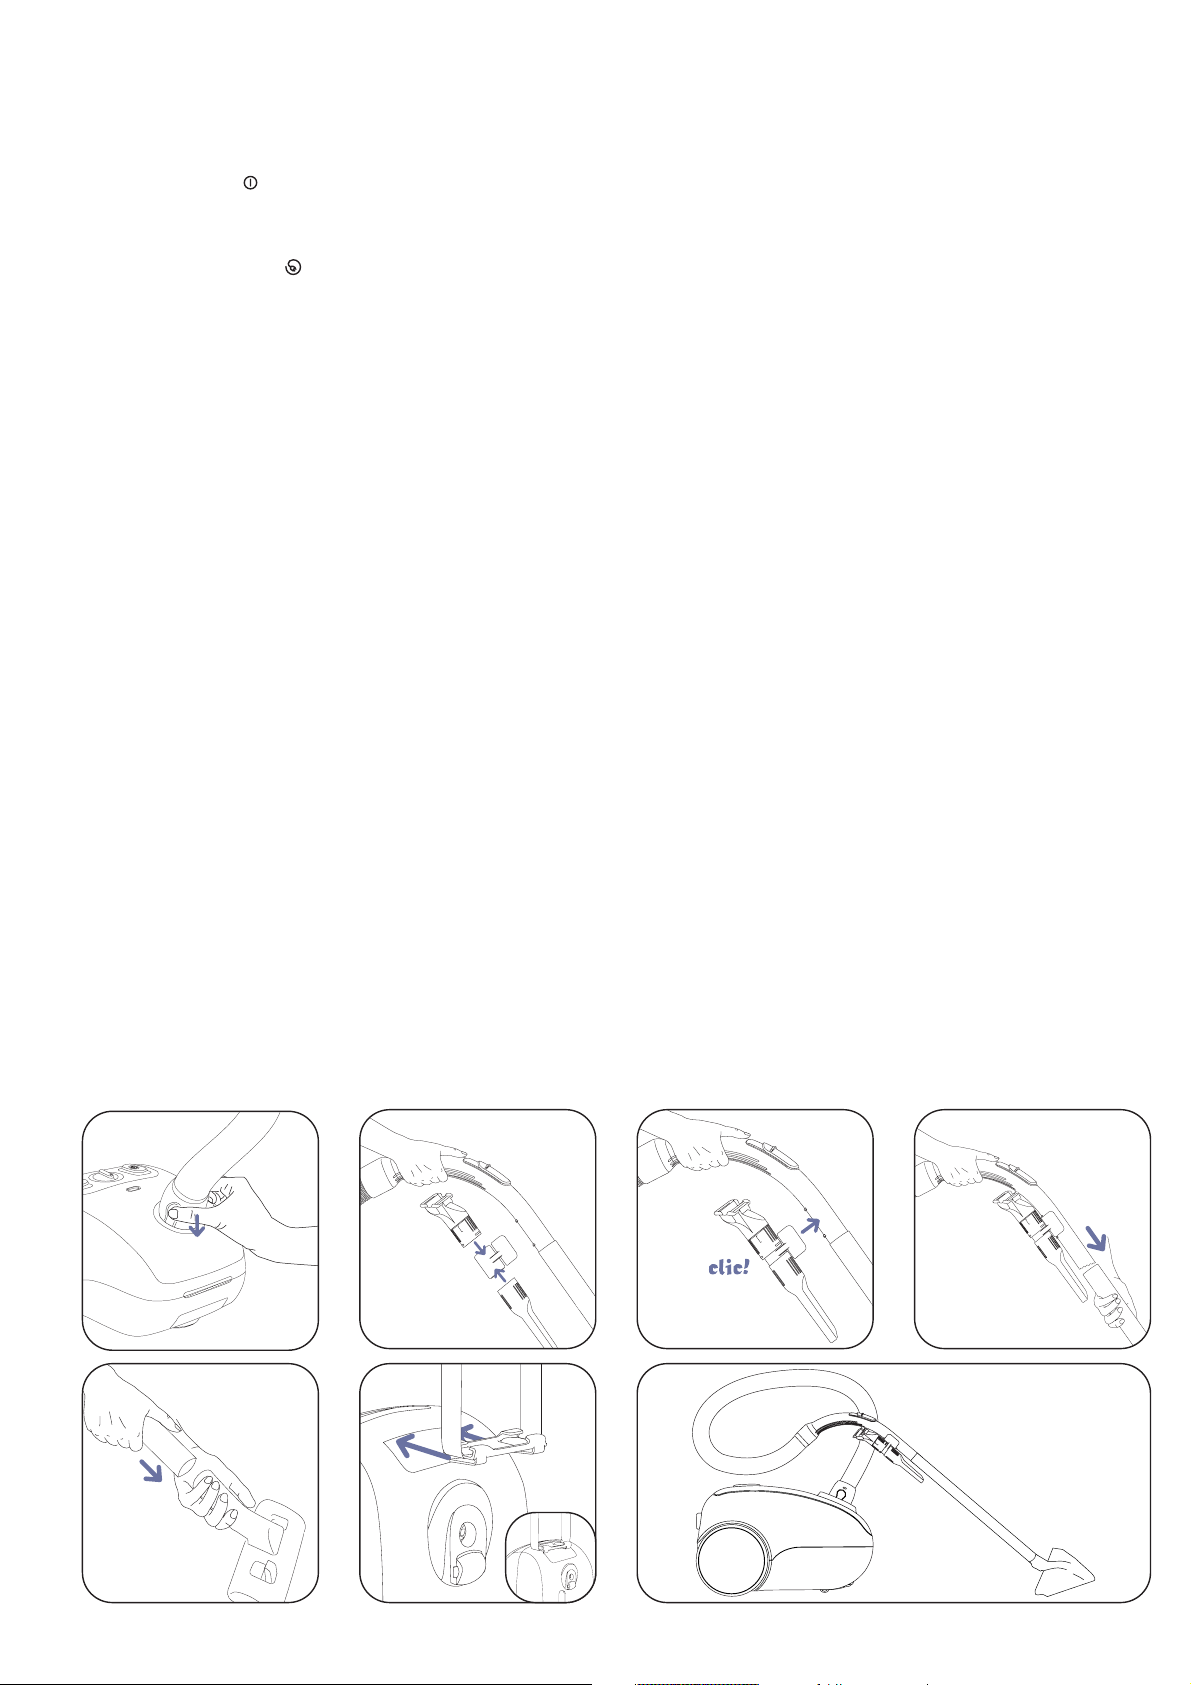
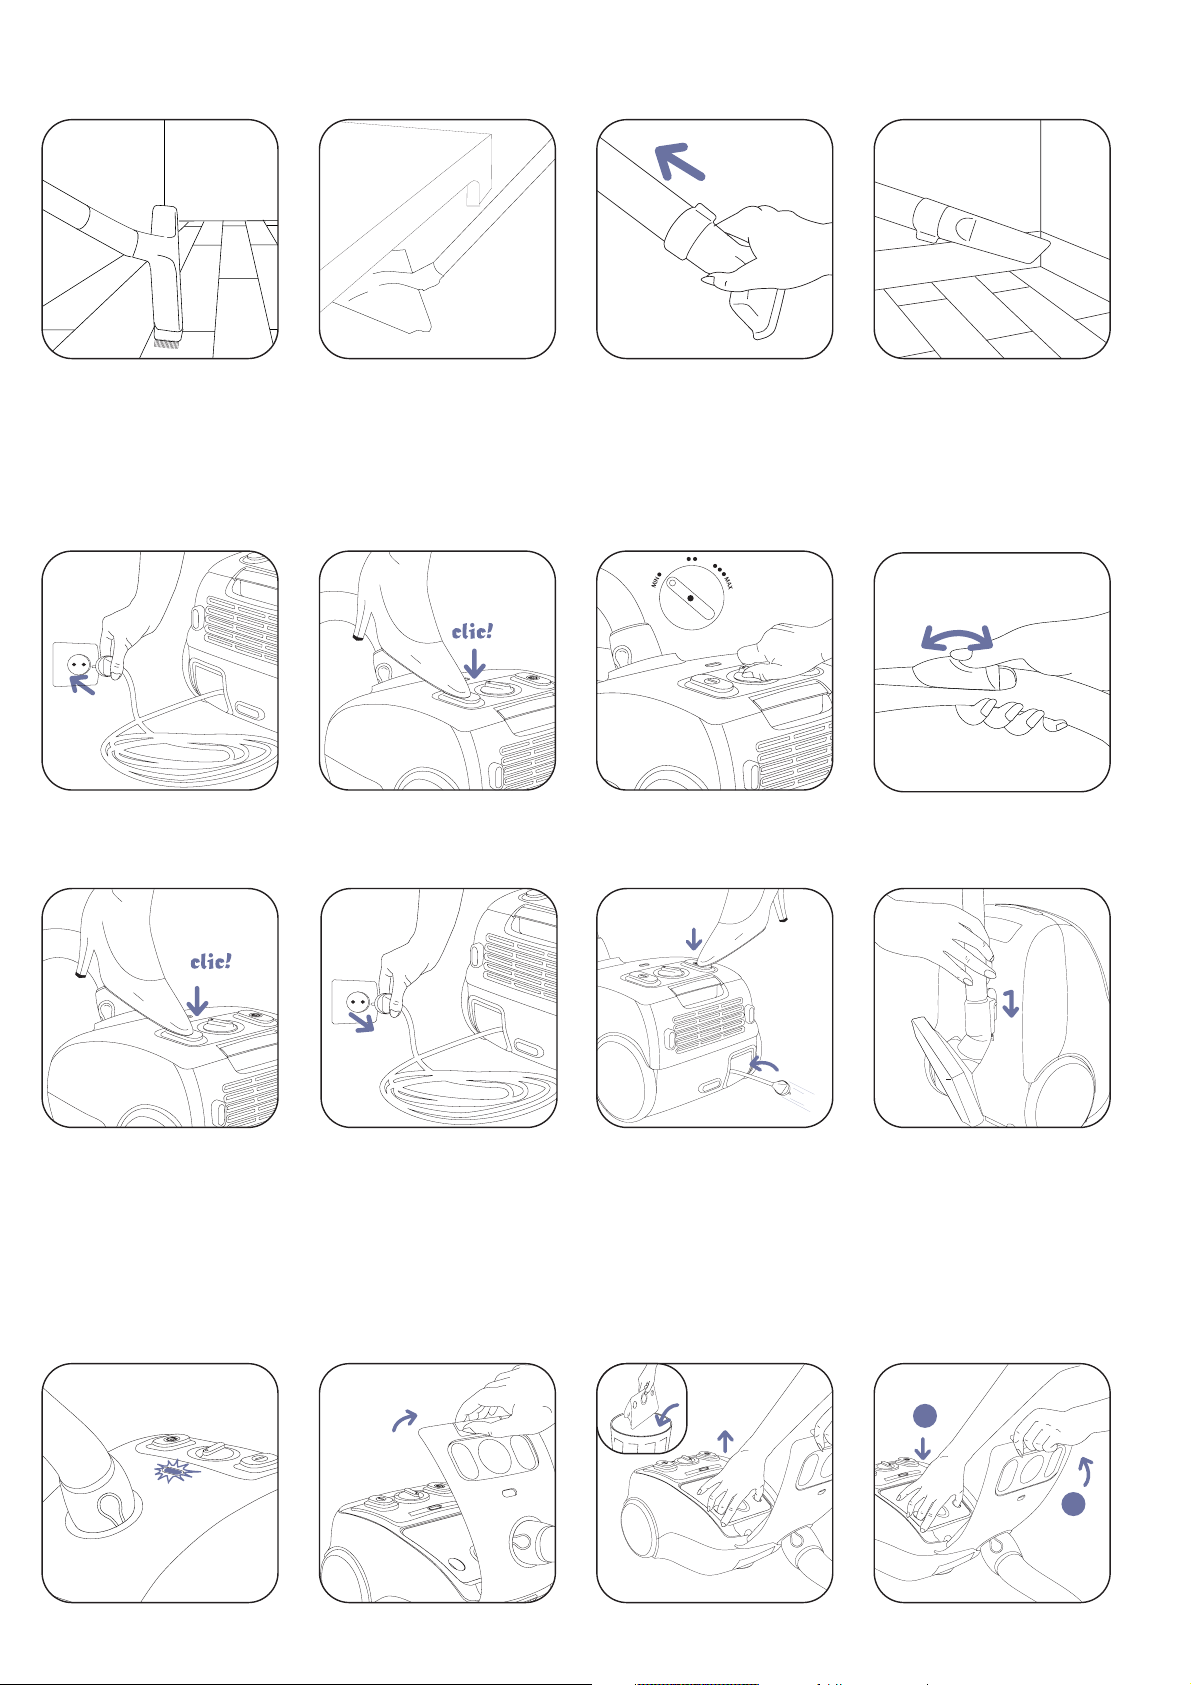
2
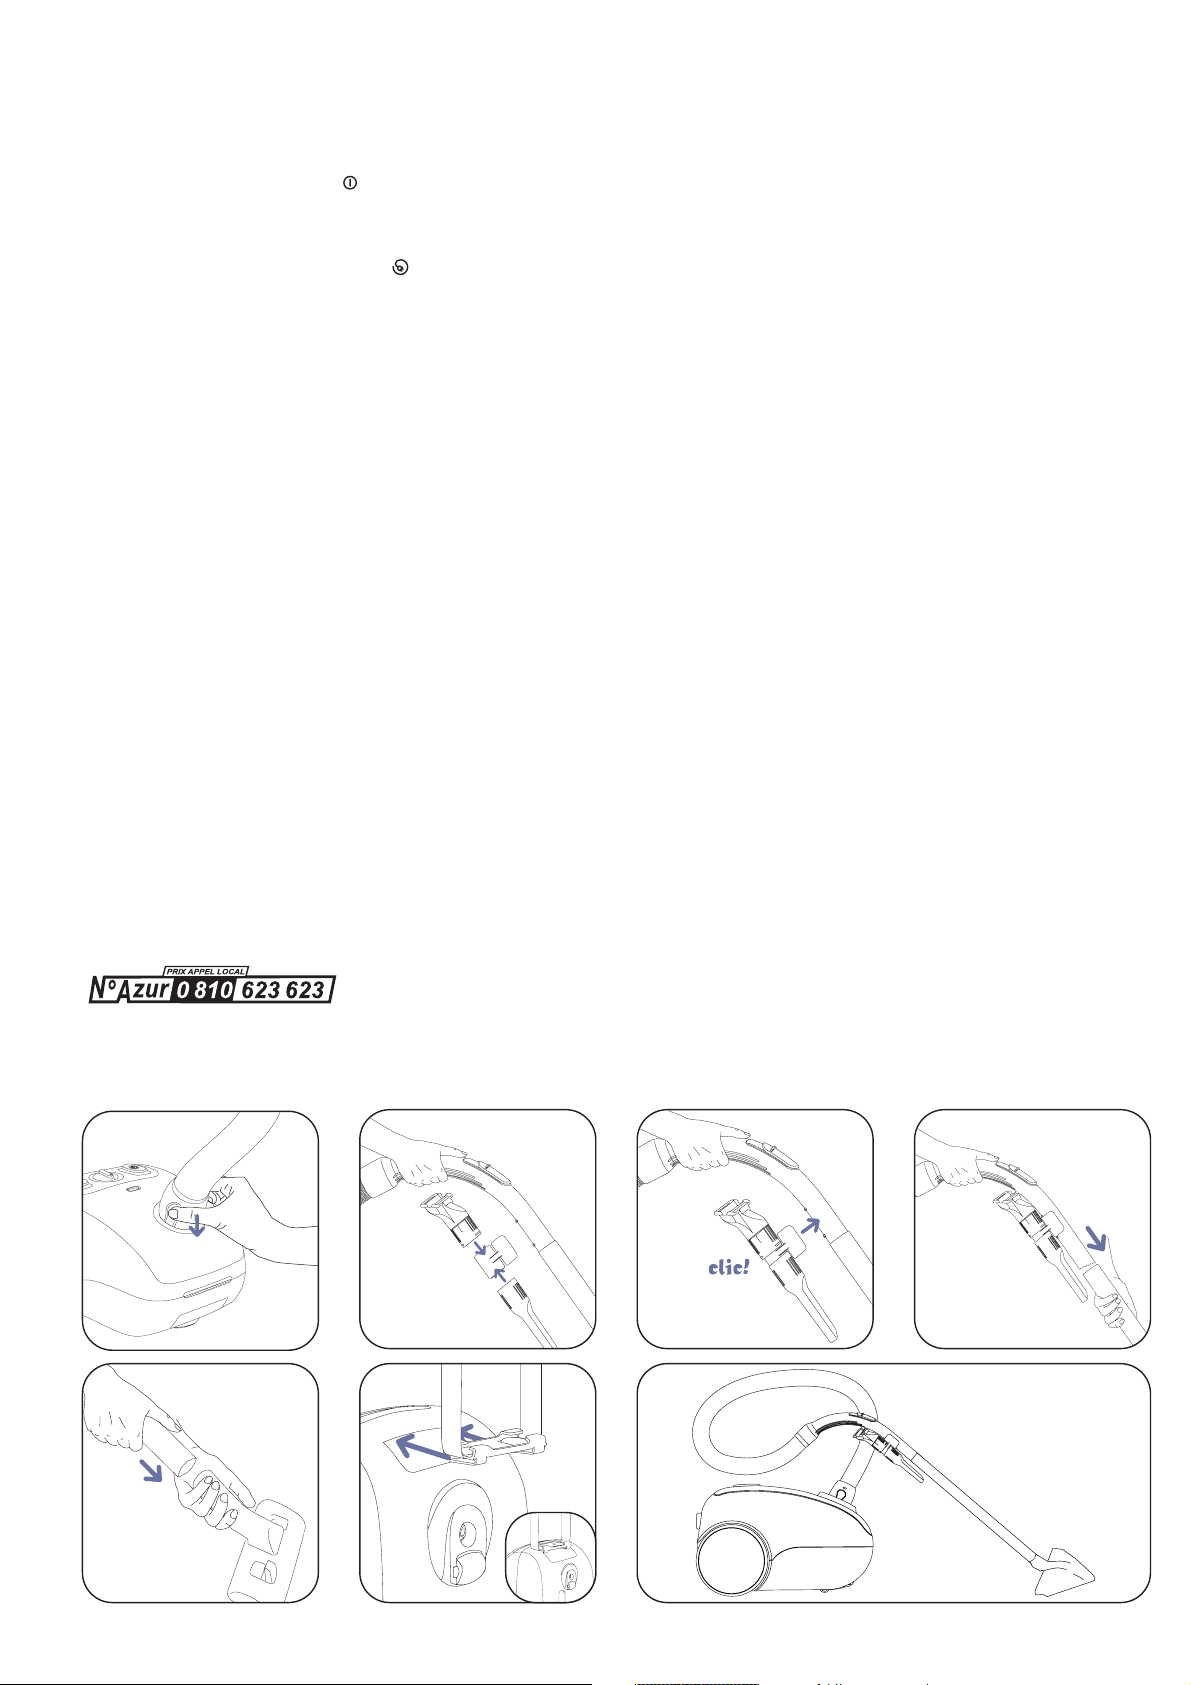
III • AVANT UTILISATION
Assemblez votre aspirateur
* Selon modèle : il s’agit d’équipements spécifiques à certains modèles ou d’accessoires disponibles en option.
Page 6
3
français
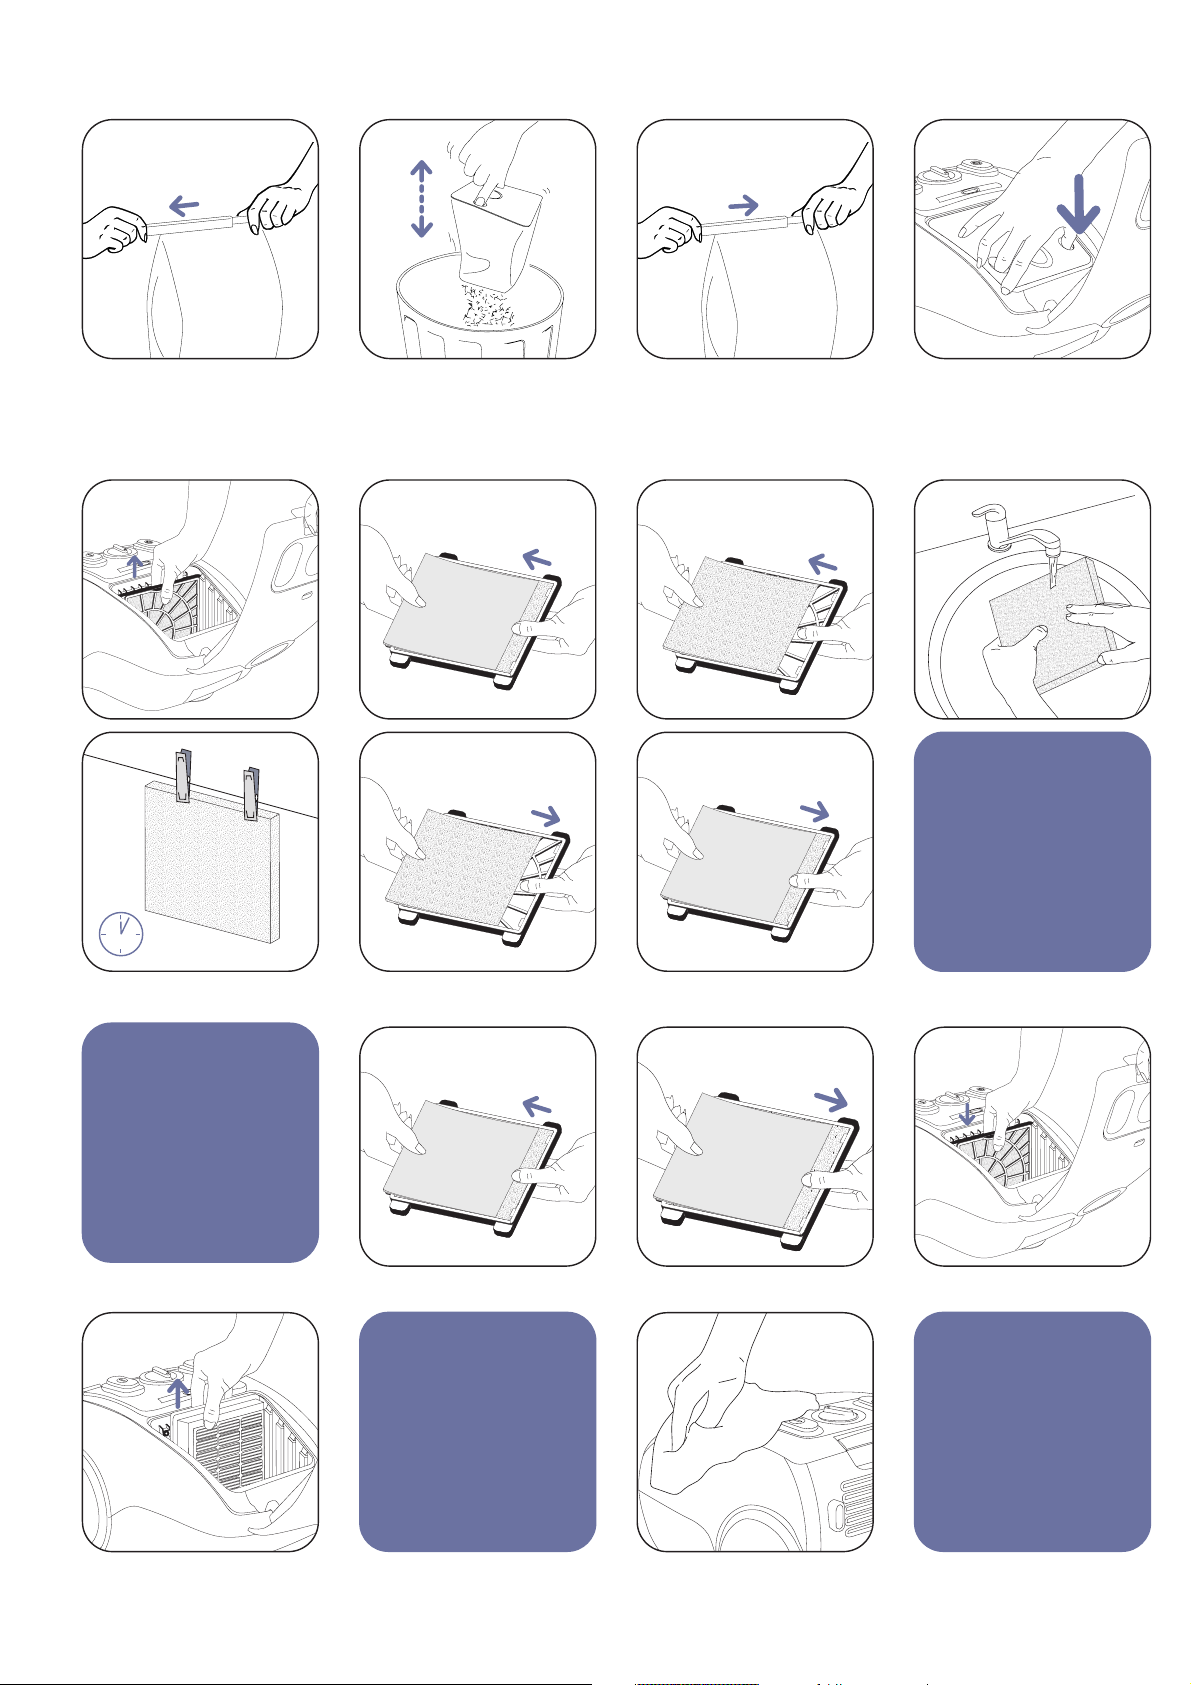
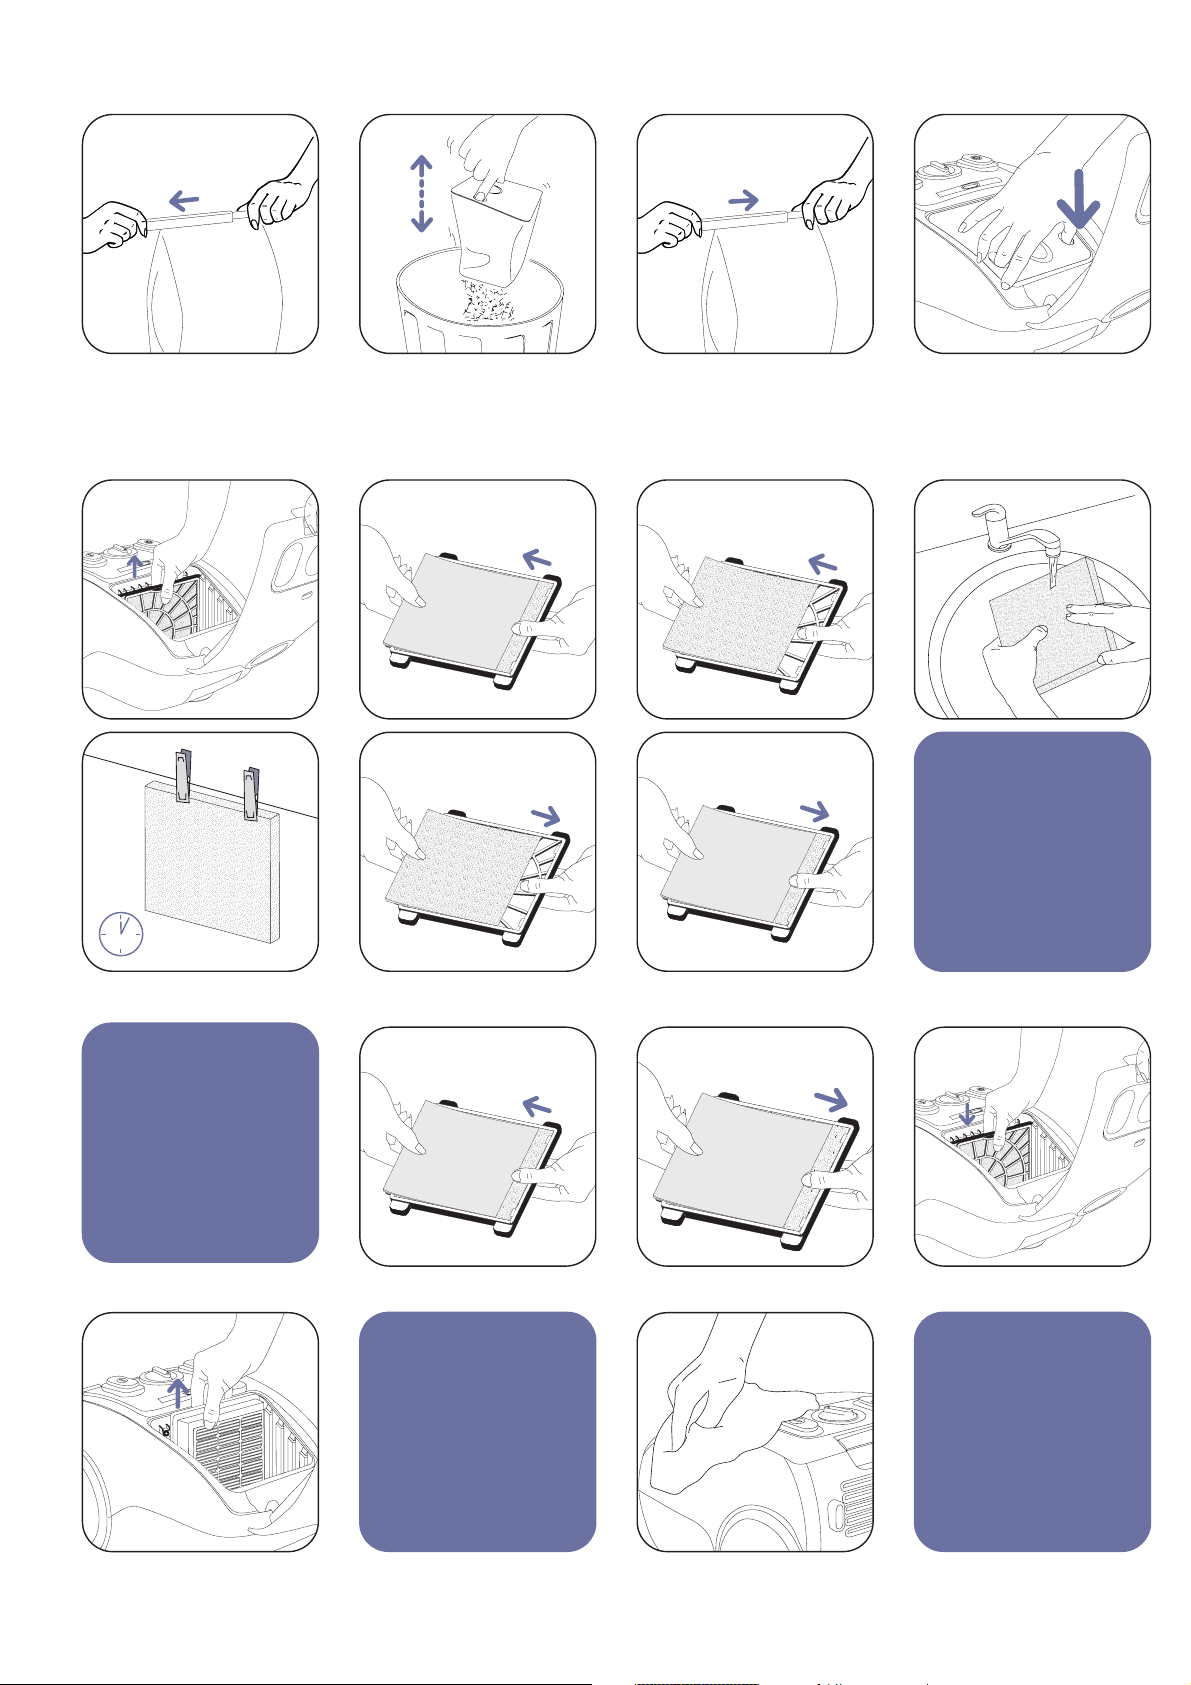
Changez le sac*
Le témoin de remplissage du sac* vous indique que le sac est plein ou saturé par des poussières fines.
Si l’indicateur reste rouge, l’embout soulevé du sol et la puissance d’aspiration réglée au maximum,
remplacez le sac* ou videz le sac textile.*
V • ENTRETIEN ET NETTOYAGE
IMPORTANT !
Arrêtez et débranchez toujours votre aspirateur avant l'entretien ou le nettoyage.
2
1
IV • UTILISATION
Mettez en marche votre aspirateur et réglez la puissance d’aspiration*
Arrêtez et rangez votre aspirateur
ATTENTION !
Ne faites jamais fonctionner votre aspirateur sans sac* et sans filtre.*
Max : sols
Min : mobilier,
tissus fragiles…
Fermé : sols
Ouvert : mobilier,
tissus fragiles…
Sélectionnez le bon accessoire
Pour les recoins et
endroits difficiles d'accès*
Pour les parquets* Pour le mobilier ou les
surfaces fragiles*
Pour les recoins*
Page 7
4
français
IMPORTANT !
Lorsque vous utilisez la
cassette-filtre HEPA*,
n'oubliez pas d'enlever
le filtre mousse* et le
filtre micro-actif.* Ne
l'utilisez pas avec un
sac textile* !
Videz le sac textile*
Nettoyez le filtre mousse*
IMPORTANT !
Tous les 5 changements de sacs : - nettoyez le filtre mousse* avec de l’eau claire. Laissez sécher avant de le remettre en place.
- remplacez le filtre micro-actif.*
Remplacez-la tous les 9 à 12 mois
(selon la fréquence d'utilisation)
Remplacez le filtre micro-actif* (ref. ZR 480)
Remplacez la cassette-filtre HEPA* (ref. ZR 0016)
IMPORTANT !
N'utilisez pas de
produits agressifs
ou abrasifs
Nettoyez votre aspirateur
IMPORTANT !
Le filtre micro-actif*
se trouve sur le filtre
mousse*
ATTENTION !
Le filtre mousse*
doit toujours
rester en place
lors de l'utilisation
Page 8

5
VI • POUR VOTRE SECURITE
Lisez attentivement votre mode d’emploi et conservez-le soigneusement.
• Votre aspirateur est un appareil électrique : il doit être utilisé dans des conditions normales d’utilisation.
Utilisez et rangez l’appareil hors de portée des enfants. Ne laissez jamais l’appareil fonctionner sans surveillance.
Ne tenez pas le suceur ou l’extrémité du tube à portée des yeux et des oreilles.
• Vérifiez que la tension d’utilisation (voltage) de votre aspirateur corresponde bien à celle de votre installation.
• Débranchez l’appareil en retirant la prise de courant, sans tirer le cordon : immédiatement après utilisation, avant chaque
changement d’accessoires, avant chaque nettoyage, entretien ou changement de filtre.
• N’aspirez pas de surfaces mouillées, de liquides quelle que soit leur nature, de substances chaudes, de
substances ultrafines (plâtre, ciment, cendres…), de gros débris tranchants (verre), de produits nocifs (solvants,
décapants...), agressifs (acides, nettoyants ...), inflammables et explosifs (à base d’essence ou d’alcool).
• Ne plongez jamais l’appareil dans l’eau, ne projetez pas d’eau sur l’appareil et ne l’entreposez pas à l’extérieur.
• N’utilisez pas l’appareil :
- s’il est tombé et présente des détériorations visibles ou des anomalies de fonctionnement.
- si le cordon est défectueux.
Dans ce cas, n’ouvrez pas l’appareil mais envoyez-le au Centre Service Agréé le plus proche (voir ci-joint la liste des adresses).
• Les réparations ne doivent être effectuées que par des spécialistes avec des pièces détachées d’origine.
Réparer un appareil soi-même peut constituer un danger pour l’utilisateur.
• L'ensemble enrouleur et cordon des aspirateurs doit être remplacé impérativement par un Centre Service Agréé car des outils
spéciaux sont nécessaires pour effectuer toute réparation afin d’éviter un danger.
• Conformément à la réglementation en vigueur, tout appareil hors d’usage doit être rendu définitivement inutilisable : débrancher
et couper le cordon avant de jeter l’appareil.
• Cet appareil est uniquement réservé à un usage ménager et domestique, en cas d’utilisation non appropriée ou non
conforme au mode d’emploi, aucune responsabilité ne peut engager la marque.
Votre appareil est conforme aux directives 73/23 CEE et 89/336 CEE.
français
VII • QUE FAIRE SI…
IMPORTANT !
Dès que votre aspirateur fonctionne moins bien et avant toute vérification :
• Arrêtez-le en appuyant sur la commande Marche/Arrêt.
• Débranchez-le.
Votre aspirateur ne démarre pas ou n'aspire pas.
• L’appareil n’est pas alimenté :
vérifiez que l’appareil est correctement branché.
• Un accessoire* ou le flexible est bouché : débouchez l’accessoire* ou le flexible.
Votre aspirateur aspire moins bien, fait du bruit, siffle.
• Un accessoire* ou le flexible est partiellement bouché :
débouchez l’accessoire* ou le flexible.
• Le sac* est plein ou saturé par des poussières fines : remplacez le sac* ou videz le sac textile*.
• Le filtre mousse* et/ou le filtre micro-actif* sont saturés : nettoyez le filtre mousse*
et remplacez le filtre micro-actif.*
• Le variateur mécanique de puissance est ouvert : fermez le variateur mécanique de puissance.
• Le variateur électronique de puissance* est en position min. : augmentez la puissance à l'aide du variateur
électronique de puissance* (sauf si vous aspirez des tissus fragiles).
• Le suceur est difficile à déplacer : ouvrez le variateur mécanique de puissance de la crosse
ou diminuez la puissance.
Le témoin de remplissage du sac reste rouge.
• Le sac* est saturé :
remplacez le sac* ou videz le sac textile.*
• La cassette-filtre HEPA* est saturée : changez la cassette-filtre HEPA.*
Le cordon ne rentre pas totalement.
• Le cordon est ralenti lors de sa rentrée :
ressortez le cordon et appuyez sur la commande.
Si un problème persiste, confiez votre aspirateur au Centre Service Agréé Rowenta le plus proche.
Voir la liste des Centres Service Agréé Rowenta
ou contacter le Service Consommateur Rowenta .
Page 9
II • HINTS AND PRECAUTIONS
Before each use the supply cord should be completely unwound. Do not allow it to become trapped or be pulled over sharp edges.
Do not move the vacuum cleaner by pulling its cord, the appliance must be moved by its carrying handle. Never lift the appliance by its
cord. If you use an extension cord, make sure that it is in perfect condition and appropriate to the power rating of your appliance.
Never unplug the appliance by pulling on the cord.
Only use original Rowenta accessories. Check that all the filters are properly in place. Never turn the appliance on without a dustbag
and filters.
If you encounter any difficulties in obtaining dustbags and filters for this appliance, please contact Rowenta Helpline:
0845 602 1454 - UK (01) 4751947 - IRELAND
or visit our web site : www.rowenta.uk.co
I • DESCRIPTION
1. Suction opening
2. On/Off pedal
3. Dustbag full indicator
4. Electronic power control*
5. Cord rewind pedal
6. Lid release handle
7. Dustbag compatment lid
8. Air outlet grill
9. Park system (for tool)
10. Handle
11. Dustbag compartment
a. Antibacterial micro-active filter* ZR 480
b. Foam filter*
c. Filters support*
d. HEPA filter cartridge* ZR 0016
(High Efficiency Particulate Air)
Your vacuum clamer is equipped either with an antibacterial micro-active filter*, a
foam filter* and a filters support* (a+b+c), or with a HEPA filter cartridge* (d).
12. Bag*
Accessories:
13. Shoulder strap*
14. Hose connector
15. Suction hose with handle
16. Mechanical power control
17. Accessories support*
18. Extention tubes*
19. Telescopic tube*
20. Dual purpose floor noozle
21. Brush*
22. TB 155 turbo-brush for furniture*
23. ZR 980 turbo-brush for floors*
24. Swip suction duster tool*
25. Wip suction foam tool*
26. Delta noozle*
27. Crevice tool*
28. Upholstery nozzle*
29. Floor nozzle*
30. ZR 480 double-walled antibacteria paper bags*
31. RS-RT 1420 reusable cloth dustbag*
english
6
III • BEFORE USE
Assemble your vacuum cleaner
* According to model, it refers to equipment specific to certain models or accessories available as options.
Page 10
7
english
Change the dustbag*
The dustbag full indicator* informs you that the bag* is full or blocked with dust particles.
If the indicator is red, replace the bag* or empty the textile filter* (with the nozzle lifted off the ground and the
power set at its max level).
V • MAINTENANCE AND CLEANING
CAUTION!
Always turn off and unplug your appliance before maintenance or cleaning.
2
1
IV • VACUUMING
Turn on your appliance and adjust the suction power*
Turn off and store your vacuum cleaner
CAUTION!
Never turn the appliance on without a dustbag* and filters*.
Max : floors
Min. : furniture, delicate
fabrics…
Closed : floors
Open : furniture, delicate
fabrics…
Select the right accessory
For crevices and out of
reach places*
For wooden flooring* For furniture or for fragile
surfaces*
For crevices*
Page 11
8
english
IMPORTANT !
When using the HEPA
filter cartridge, do not
forget to remove the
micro-active filter and
the foam filter*. Never
use it with a permanent
textile dustbag*
Empty the textile bag*
Clean the foam filter*
IMPORTANT !
Every 5 changes of the dustbag : - clean the foam filter* with clean water. Leave to dry before putting back into place.
- replace the micro-active filter*
Change it every 9 to 12 months
(depending on the frequency of use).
Replace the micro-active filter* (ref. ZR 480)
Change the HEPA filter cartridge* (ref. ZR 0016)
IMPORTANT !
Do not use strong or
abrasive cleaning
products
Clean your vacuum cleaner
IMPORTANT !
The micro-active
filter* is over the
foam filter*
CAUTION !
The foam filter*
should always be in
place during use
Page 12

9
VI • FOR YOUR SAFETY
Read the instructions for use carefully and keep them in a safe place.
• Your vacuum cleaner is an electrical appliance: it must only be used under normal operating conditions.
The appliance should be used and stored out of the reach of children. Never leave the appliance unattended when it is
switched on. Always keep nozzles and tube ends well away from eyes and ears.
• Make sure that the operating voltage of your vacuum cleaner is the same as your supply voltage - 230-240v.
• Unplug the appliance by removing the plug from the power outlet: immediately after use, before changing accessories,
before maintenance, cleaning or changing the dustbag.
• Do not vacuum wet surfaces, any kinds of liquids, hot substances, ultra-fine substances (plaster, cement, ash, etc.)
large sharp debris (glass), dangerous products (solvents, stripping compounds, etc.), chemical products (acids,
cleaners, etc.), inflammable or explosive products (petrol- or alcohol-based).
• Do not immerse the appliance in water, do not project water on the appliance or store it outdoors.
• Do not use the appliance:
- if it has been dropped and shows signs of damage or functions abnormally.
- if the supply cord is defective.
In this case do not open the appliance and call our helpline (overleaf).
• Repairs should only be carried out by specialists using original replacement parts.
It is dangerous to try to repair an appliance by yourself.
• Vacuum cleaner supply cords and winding systems must, in all cases, be replaced by our approved Service Centre as special
tools are needed to avoid accidents during repairs.
• In accordance with current regulations, before disposing of an appliance no longer needed, the appliance should be made nonoperational (by unplugging it and cutting off the electricity supply cord).
• This product has been designed for domestic use only, any professional use, innapropriate use or failure to comply with
the instructions, the manufacturer accepts no responsibillity and the guarantee will not apply.
Your appliance conforms to the 73/23 EEC and 89/336 EEC directives.
english
VII • WHAT TO DO IF…
Important!
As soon as your vacuum cleaner starts to malfunction, and before performing any checks:
• Stop the appliance by pressing the Start/Stop switch.
• Unplug the appliance.
Your vacuum cleaner will not start or will not suck.
• The product is not connected to the mains:
check that the product is correctly plugged in.
• Either a tool* or the hose is blocked: unblock the tool* or the hose.
Your vacuum cleaner suction power is ineffective, makes more noise than usual, and whistles.
• A tool* or the hose is partially blocked:
unblock the tool* or the hose.
• The bag* is full or blocked by fine dust: replace the bag* or empty the cloth bag.*
• The foam filter* and the micro-active filter *are saturated: clean the foam filter* and replace the micro-active filter.*
• The mechanical power control is open: close the mechanical power control.
• The electronic power control* is in the min. position: increase power using the electronic power control* (except
when vacuuming delicate fabrics).
• The nozzle is difficult to remove: open the mecanical power control or reduce its power.
The dust bag full indicator is red.
• The bag* is full:
replace the bag* or empty the cloth bag*.
• The HEPA filter cartridge* is full: change the HEPA filter cartridge*.
The power cord does not fully retract.
•
The cord slows down as it is retracted: pull out the cord until completely extended and press on the retraction button.
If a problem persists, take the appliance to the nearest Rowenta Authorised Service Centre.
See the list of Rowenta Authorised Service Centres
Or contact the Rowenta Consumer Service :
0845 602 1454 - UK
(01) 4751947 - Ireland
www.rowenta.co.uk
Page 13

II • HINWEISE
Vor jedem Gebrauch, Zuleitung vollständig abrollen. Zuleitung nicht einklemmen und nicht über heiße Flächen und scharfe Kanten ziehen.
Das Gerät nicht am Kabel ziehen. Immer am Tragegriff bewegen.
Ziehen sie nicht am Stromkabel, um den Staubsaugerhochzuheben. Verlängerungskabel nur dann verwenden, wenn Sie sich vorher von
deren einwandfreiem Zustand überzeugt haben und diese der Leistung des Gerätes entsprechen. Den Stecker nie an der Zuleitung aus der
Steckdose ziehen.
Benutzen Sie nur Original-Zubehör von Rowenta. Überprüfen Sie die richtige Positionierung aller Filter. Niemals ohne Staubbeutel und
Filter saugen.
Wenn Sie Probleme haben Staubbeutel oder Ersatzfilter zu erhalten wenden Sie sich bitte an die ROWENTA Kundendienst Hotline
0180 – 5002263
I • GERÄTEBESCHREIBUNG
1. Ansaugöffnung
2. Ein-/Ausschalter
3. Staubbeutelfüllanzeige
4. Elektronische Saugkraft-Regulierung*
5. Kabelautomatik
6. Deckel Eröffnung
7. Deckel Staubbeutelfach
8. Abluftgitter
9. PARK-System
10. Transportgriff
11. Staubbeutelfach
a. Mikroaktiv-Filter antibakteriell* ZR 480
b. Schaumstoffilter*
c. Filterstütze
d. HEPA-Filter Kassette* ZR 0016
(High Efficiency Particulate Air Filter)
Ihr Staubsauger ist mit einem Mikroaktiv-Filter antibakteriell*, einem
Schaumstoffilter* und eine Filterstütze (a+b+c), oder mit einem HEPA-Filter
Kassette* (c) ausgestattet.
12. Staubbeutelfach*
Zubehöre :
13. Tragegurt*
14. Saugschlauchverriegelung
15. Saugschlauch mit Handgriff
16. Fehlluftregulator
17. Zubehöreträger*
18. Saugrohre*
19. Teleskoprohr*
20. Reinigungkopf mit 2 positionen*
21. Bürste*
22. Turbobürste Möbel* TB 155
23. Turbobürste für Böden* ZR 980
24. Saugpinsel Swip *
25. Saugschaum Wip*
26. Delta Düse*
27. Fugendüse*
28. Polsterdüse*
29. Parkettdüse*
30.
Doppelwandige Papierbeutel mit Hygieneverschluss ZR 480*
31. Permanenter Textilbeutel RS-RT 1420 *
deutsch
10
III • VOR DER BENUTZUNG
Setzen Sie das Gerät zusammen
*Je nach Modell : Es handelt sich um Sonderausstattungen für bestimmte Modelle oder um Sonderzubehör.
Page 14

11
deutsch
So wechseln Sie den Staubbeutel*
Wenn die Anzeige auf rot steht, wechseln Sie den Staubbeutel *oder leeren Sie den Textilfilter* (Öffnen Sie die
Klappe der Staubkammer).
V • REINIGUNG UND PFLEGE
WICHTIG !
Schalten Sie vor der Reinigung und Pflege Ihren Staubsauger ab, und ziehen Sie den Netzstecker.
2
1
IV • ZUM SAUGEN
So bedienen Sie Ihren Staubsauger und regeln Sie die Saugleistung*
So schalten Sie Ihren Staubsauger ab und bewahren Sie es ab
ACHTUNG !
Niemals ohne Staubbeutel* oder Filter* saugen.
Max: Böden
Min: Polstermöbel,
empfindliche Flächen…
Geschlossen: Böden
Geöffnet: Polstermöbel,
empfindliche Flächen…
Wählen Sie das richtige Zubehör
Für Ecken und Ritzen*
Für Parkett* Für Möbel, Polstermöbel,
empfindliche Flächen*
Für Ecken*
Page 15

12
deutsch
WICHTIG
Vor der Benutzung des
HEPA Filter Kassette*,
entfernen Sie immer
den Schaumstofffilter*
und den MicroAktivfilter* oder den
Textilbeutel*.
Leeren Sie den Textilbeutel*
Reinigen Sie den Schaumstofffilter*
WICHTIG !
Bei jedem 5. Staubbeutelwechsel : - reinigen Sie den Schaumstofffilter* am klaren Wasser. Gut ausspülen und vor dem
Wiedereinsetzen gut trocknen lassen.
- wechseln Sie den Mikroaktiv-Filter*
Wechselintervall ca. alle 9 – 12 Monate
(je nach Anwendungshäufigkeit).
Wechseln Sie das Mikroaktiv-Filter* (ref. ZR 480)
Wechseln Sie der Hepa Filter Kassette* (ref. ZR 0016)
WICHTIG !
Verwenden Sie
niemals aggressive
oder scheuernde
Reinigungsmittel.
Reinigen Sie Ihren Staubsauger.
WICHTIG !
Der MikroaktivFilter* ist auf dem
Schaumstoffilter*.
ACHTUNG !
Nie ohne
Schaumstoffilter*
saugen !
Page 16

13
VI • ZU IHRER SICHERHEIT
Gebrauchsanweisung aufmerksam durchlesen und sorgfältig aufbewahren.
• Ihr Staubsauger ist ein Elektrogerät: er muß unter Beachtung der üblichen Nutzungsbedingungen verwendet werden.
Das Gerät von Kindern fernhalten und nie ohne Aufsicht betreiben.
Saugdüsen und das Ende des Saugrohres nie in die Nähe von Augen und Ohren bringen.
• Das Gerät nur an Wechselstrom mit Spannung (Volt) gemäß dem Typenschild anschließen.
• Den Netzstecker ziehen: unmittelbar nach dem Benutzen, vor jedem Zubehör- und Filterwechsel, vor jeder Reinigung und Pflege.
• Saugen Sie niemals feuchte oder nasse Flächen, weder jegliche Flüssigkeiten, heisse Substanzen, extrem feine
Staubpartikel (Gips, Zement, Asche…), grosse, spitze oder schneidende Gegenstände (Glas), schädliche Stoffe
(Lösungs- oder Beizmittel…), aggressive Stoffe (Säure, Reinigunsmittel…), entflammbare oder explosive Stoffe
(benzin-oder alkoholhaltig).
• Das Gerät nicht in Wasser tauchen oder darin betreiben. Nicht im Freien aufbewahren.
• Das Gerät nicht in Betrieb nehmen, wenn:
- nach einem Sturz, Verdacht auf einen Defekt oder auf Funktionsstörungen besteht.
- die Zuleitung sichtbare Schäden aufweist.
Auf keinen Fall das Gerät öffnen, sondern an eine Rowenta Service-Stelle schicken (siehe beiliegenden Service-Spiegel).
• Reparaturen dürfen nur von Fachkräften unter Verwendung von Original-Ersatzteilen des Herstellers durchgeführt werden.
Selbst ausgeführte Reparaturen sind eine Gefahrenquelle für den Benutzer.
• Die komplette Kabelautomatik mit Zuleitung darf nur in einer Rowenta Service-Stelle ausgetauscht werden.
• Entsprechend den geltenden Vorschriften, ist das ausgediente Gerät sofort unbrauchbar zu machen: Netzstecker ziehen,
Zuleitung abschneiden und einer ordnungsgemäßen Entsorgung zuzuführen.
• Dieses Gerät ist ausschließlich für Verwendung im Haushalt bestimmt. Wird das Gerät zweckentfremdet, falsch bedient
oder nicht fachgerecht repariert, kann keine Haftung für eventuelle Schäden übernommen werden.
Ihr Rowenta-Gerät entspricht den Richtlinien 73/23 EWG und 89/336 EWG.
deutsch
VII • WAS MACHEN, WENN…
WICHTIG !
Sobald der Staubsauger nicht vorschriftsmässig funktioniert oder einer Überprüfung unterzogen werden muß :
• Ist der Staubsauger auszuschalten.
• Und der Netzstecker zu ziehen.
Ihr Staubsauger schaltet sich nicht ein oder saugt nicht.
• Das Gerät ist nicht an das Stromnetz angeschlossen:
prüfen Sie, ob das Gerät korrekt angeschlossen ist.
• Ein Zubehörteil* oder der Saugschlauch sind verstopft: entfernen Sie die Verstopfung.
Ihr Staubsauger saugt weniger und macht ein aussergewöhnlich pfeifendes Geräusch.
• Ein Zubehörteil* oder der Saugschlauch sind teilweise verstopft: entfernen Sie die Verstopfung.
• Der Staubbeutel* ist voll oder durch sehr feinen Staub gesättigt: setzen Sie einen neuen Staubbeutel ein oder
leeren Sie den Textilbeutel.
• Der Schaumstoffilter* und/oder der Mikro-Aktivfilter* sind gesättigt: reinigen Sie die Schaumstoffilter* und erneuern
Sie den Mikro-Aktivfilter*
• Die mechanische Saugkraftregulierung ist geöffnet: schliessen Sie die mechanische Saugkraftregulierung.
• Die elektronische Saugkraftregulierung* ist auf minimaler Position: erhöhen Sie die Saugkraft anhand der
elektronischen Regulierung* (ausser beim Saugen von sehr empfindlichen Stoffen oder Flächen).
• Die Düse gleitet schlecht: öffnen Sie die mechanische Saugkraftregulierung am Handgriff des Saugschlauchs oder
reduzieren Sie die Saugleistung.
Die Staubfüllanzeige bleibt rot.
• Der Staubbeutel* ist vol:
setzen Sie einen neuen Staubbeutel* ein oder leeren Sie den Textilbeutel.*
• Die HEPA Filter Kassette* ist gesättigt: wechseln Sie die HEPA Filter Kassette*.
Das Kabel läßt sich nicht vollständig aufwickeln.
• Das Kabel wird beim Einziehen gebremst: ziehen Sie das Kabel erneut vollständig heraus und betätigen Sie dann
den Druckknopf
Falls ein Problem weiterhin besteht, reichen Sie das Gerät an eine Rowenta Service Stelle weiter.
Sehen im Rowenta-Service-Spiegel nach oder kontaktieren Sie unser Rowenta Kundendienst 069 / 8504 - 606
Page 17

II • RAADGEVINGEN EN VOORZORGSMAATREGELEN
Vóór gebruik moet het snoer altijd helemaal worden afgewikkeld. Zorg ervoor dat het snoer niet klem komt te zitten en voer hem niet
over scherpe randen. Verplaats de stofzuiger niet door aan het snoer te trekken, het apparaat dient verplaatst te worden met behulp
van de handgreep. Het apparaat niet bij het snoer optillen. Maakt u gebruik van een verlengsnoer, controleer dan of deze in perfecte
staat verkeert en of de draaddoorsnede (mm2) geschikt is voor het vermogen van uw stofzuiger. Trek nooit aan het snoer om de stekker
uit het stopcontact te halen. Gebruik alleen originele accessoires, filters en stofzakken van Rowenta. Controleer of het filter goed
geplaatst is. Gebruik het apparaat nooit zonder filters en stofzak. Neem contact op met de consumentenservice van Rowenta indien
het moeilijk is stofzakken of filters voor uw stofzuiger te bemachtigen. Zie hiervoor de bijgevoegde servicelijst.
Zie hiervoor de
bijgevoegde Rowenta servicelijst of neem rechtstreeks contact op met de consumentenservice van Rowenta.
Voor Nederland: Groupe SEB Nederland BV, tel. 0318 - 58 24 24.
Voor België: Groupe SEB Belgium SA, tel. 71.82.52.11.
I • BESCHRIJVING
1. Zuigopening
2. Aan/uit-schakelaar
3. Stofzak-vol-indicator
4. Elektronische zuigkrachtregeling*
5. Pedaal van snoeroprol-unit
6. Opening van het deksel
7. Deksel stofzakruimte
8. Luchtuitlaatrooster
9. Parkeersysteem
10. Handvat van vervoer
11. Stofzakruimte
a. Micro-actief anti-bacteriële* ZR 480
b. Schuimfilter*
c. Steun-filter*
d. HEPA Filtercassette ZR 0016*
Uw stofzuiger is uitgerust met een schuimfilter* een micro-actief
anti- bacterieel filter* en een steun-filter* (a+b+c) of een HEPA
filtercassette* (d).
12. Zak*
Toebehoren:
13. Draagband*
14. Slangaansluiting
15. Slang met greep
16. Luchtregelaar
17. Steun van de toebehoren*
18. Verlengbuis*
19. Uitschuifbuis*
20. Zuigmond met 2 standen*
21. Borstel*
22. Turboborstel voor meubels* TB 155
23. Turboborstel voor vloeren* ZR 980
24. SWIP-zuigstoffer*
25. WIP-schuimrubber zuigkussen*
26. Delta zuigmond*
27. Spleetzuigmond*
28. Meubelzuigmond*
29. Vloermondstuk*
30. Dubbelwandige anti-bacteriële papieren stofzakken ZR 480*
31. Permanente textiel stofzak RS-RT 1420*
nederlands
14
III • VÓÓR HET EERSTE GEBRUIK
De stofzuiger in elkaar zetten
*Afhankelijk van het model: wil zeggen dat het om bepaalde, modelspecifieke onderdelen gaat of om accessoires die naar keuze extra kunnen worden aangeschaft.
Page 18

15
nederlands
Vervangen van de stofzak*
De stofzak*-vol-indicator geeft aan dat de stofzak* vol is of verzadigd met fijn stof.
Wanneer de indicator rood blijft als de zuigmond niet op de grond rust en de zuigkracht op maximum staat, dient de
stofzak* vervangen te worden.
V • REINIGEN EN ONDERHOUDEN
LET OP!
Voor de onderhouds- of reinigingsbeurt altijd eerst de stofzuiger uitschakelen en de stekker uit het stopcontact trekken.
2
1
IV • OM TE ZUIGEN
Schakel de stofzuiger in en regel de zuigkracht*
De stofzuiger uitschakelen en opbergen
BELANGRIJK!
Gebruik het apparaat nooit zonder filter* en stofzak*.
Max : vloeren
Min : meubels en
kwetsbare oppervlakken…
Dicht : vloeren
Open : meubels en
kwetsbare oppervlakken…
Kies het juiste accessoire
Voor moeilijik toegankelijke
hoekjes en pleten*
Voor houten vloeren* Voor meubels of tere
oppervlakken*
Voor de uithoeken*
Page 19

16
nederlands
LET OP!
Wanneer u het filter van het
HEPA Filtercassette*
gebruikt, moet u niet
vergeten de schuimfilters*
en het micro-actieve filter
uit* het apparaat te halen.,
en nooit met een
permanente textiel stofzak*.
Leegmaken van de textiel stofzak*
Maak het schuimrubber filter*
LET OP!
Bij elke vijfde stofzak :
- maak het schuimrubber filter* met eigen water schoon. Laat drogen alvorens in plaats te overhandigen.
- vervang het micro-actief filter.*
Vervang het ongeveer 9 tot 12 maanden
(afhankelijk van het gebruik).
Vervang het micro-actief filter* (ref. ZR 480)
Vervang het HEPA Filtercassette* (ref. ZR 0016)
LET OP!
Nooit afbijt- of
schuurmiddelen
gebruiken.
Reinigen van de stofzuiger
LET OP!
Het micro-actief
filter* bevindt zich op
de schuimfilter*.
BELANGRIJK!
Het beschermende
schuimfilter*moet
tijdens gebruik altijd
op zijn plaats blijven.
Page 20

17
VI • VOOR UW VEILIGHEID
Deze gebruiksaanwijzing goed lezen en zorgvuldig bewaren.
• Uw stofzuiger is een elektrisch apparaat: hij mag dus alleen onder normale gebruiksomstandigheden worden gebruikt.
Gebruik en berg het apparaat op buiten bereik van kinderen. Laat hem nooit zonder toezicht aan staan. Houd de zuigmond of het
uiteinde van de zuigbuis nooit in de buurt van ogen of oren.
• Controleer of de gebruiksspanning (voltage) aangegeven op de stofzuiger overeenkomt met die van uw lichtnet.
• Haal de stekker uit het stopcontact door aan de stekker te trekken: direct na gebruik, vóór het verwisselen van accessoires,
vóór elke schoonmaak- of onderhoudsbeurt en het schoonmaken van het filter.
• Geen vochtige of natte oppervlakken zuigen. Verder niet opzuigen: vloeistoffen van welke aard dan ook, warme
stoffen/substanties, bijzonder fijne substanties (bv. gips, kalk, cement, as e.d.), grove, scherpe scherven (bv. glas
of glas-splinters), schadelijke stoffen (bv. oplos- of afbijtmiddelen), agressieve producten (bv. zuren,
schoonmaakproducten e.d.) en ontvlambare of explosieve producten (op basis van benzine of alcohol).
• Het apparaat nooit in water dompelen en niet buiten laten staan.
• Dit apparaat niet meer gebruiken als:
- het is gevallen en zichtbare beschadigingen of werkingsstoornissen vertoont.
- het snoer beschadigd is.
In deze gevallen het apparaat niet zelf openen, maar het terugsturen of brengen naar de dichtstbijzijnde servicedienst van
Rowenta (zie garantiebewijs voor adressen).
• Reparaties mogen uitsluitend uitgevoerd worden door vakmensen en met gebruik van originele onderdelen.
Het zelf repareren van een apparaat kan gevaar voor de gebruiker inhouden.
• Overeenkomstig de van kracht zijnde voorschriften moet dit apparaat aan het einde van zijn levensduur definitief onbruikbaar
gemaakt worden.
• Overeenkomstig de wetgeving in uw land, dient een apparaat dat niet meer gebruikt wordt niet-operationeel te worden
gemaakt door de stekker uit het stopcontact te halen en het snoer door te knippen.
• Dit apparaat is uitsluitend bedoeld voor normaal huishoudelijk gebruik. In geval van onjuist gebruik of gebruik niet
overeenkomstig de gebruiksaanwijzing accepteert de fabrikant geen verantwoordelijkheid voor eventuele schade of reparatie.
Dit apparaat is uitgevoerd overeenkomstig de Europese richtlijnen 73/23 en 89/336.CEE.
nederlands
VII • WAT TE DOEN ALS…
LET OP!
Zodra u merkt dat uw stofzuiger minder goed begint te werken en voordat u hem op voorgaande punten nakijkt:
• Zet hem uit door de aan/uit-knop in te drukken.
• Trek de stekker uit het stopcontact.
Uw stofzuiger slaat niet aan of zuigt niet.
• Het apparaat is niet op het stroomnet aangesloten:
controleer of de stekker zich goed in het stopcontact bevindt.
• Een accessoire* of de zuigslang is verstopt: ontstop het accessoire* of de zuigslang.
Uw stofzuiger zuigt minder goed, maakt lawaai, fluit.
• Een accessoire* of de zuigslang is gedeeltelijk verstopt:
ontstop het accessoire* of de zuigslang.
• De stofzak* zit vol of is verzadigd door fijn stof: de zak* vervangen of de textielstofzak* legen.
•
Het schuimfilter* en het micro-actief filter zijn verzadigd: reinig de schuimfilters* en vervang het micro-actieve filter*.
• Het schuifje op de handgreep staat open: sluit het schuifje op de handgreep.
• De elektronische zuigkrachtregeling* staat op de minimum stand: stel de zuigkracht hoger in met behulp van de
elektronische regelaar* (behalve bij het zuigen van tere weefsels).
• De zuigmond schuift moeilijk: open de regelschuif op de buis of zet de zuigkracht in een lagere stand.
De stofzak-vol-indicator blijft rood.
• De stofzak* is vol:
vervang de stofzak* of leeg de textielstofzak*.
• Het HEPA filtercassette* is verzadigd: vervang het HEPA filtercassette*.
Het snoer wordt niet helemaal opgerold.
• Tijdens het oprollen wordt het snoer ergens afgeremd:
trek het snoer weer helemaal uit en druk op de
snoeropwikkelingsknop.
Indien het probleem zich blijft voordoen, stuur uw stofzuiger op of breng hem naar de dichtstbijzijnde servicedienst
van Rowenta. Zie hiervoor de bijgevoegde Rowenta servicelijst of neem rechtstreeks contact op met de
consumentenservice van Rowenta. Voor Nederland: Groupe SEB Nederland BV, tel. 0318 - 58 24 24.
Voor België: Groupe SEB Belgium SA, tel. 71.82.52.11.
Page 21

II • CONSIGLI E PRECAUZIONI
Prima di ogni utilizzo, il cavo va srotolato completamente. Non bloccatelo e non fatelo passare su profili taglienti.
Non spostate l’aspirapolvere tirandolo per il cavo, l’apparecchio deve essere spostato impugnando l’apposita maniglia di trasporto.
Non utilizzate il cavo per sollevare l’apparecchio. Se utilizzate una prolunga, verificate che sia in perfette condizioni e che abbia una
sezione adatta alla potenza del vostro aspirapolvere. Non esercitate trazioni sul cavo per staccarlo dalla presa di corrente.
Utilizzate soltanto accessori e filtri originali Rowenta. Verificate il corretto posizionamento di tutti i filtri. L’apparecchio non deve mai
funzionare senza sacco e senza filtri.
Nel caso vi fosse difficile reperire sacchi carta o filtri per questo apparecchio, contattate il Servizio Consumatori Rowenta :
Tel 02457751
I • DESCRIZIONE
1. Apertura d’aspirazione
2. Comando Acceso/Spento
3. Indicatore sacco pieno
4. Variazione elettronica della potenza*
5. Pedale avvolgicavo
6. Appertura del coperchio
7. Coperchio dello scomparto sacco
8. Griglia d’uscita aria
9. Parking system
10. Maniglia di trasporto
11. Scomparto sacco
a. Filtro microattivo antibatterico* ZR 480
b. Filtro di gommapiuma*
c. Appoggio di filtri*
d. Cassetta filtro HEPA* ZR 0016
Il vostro aspirapolvere è dotato di un filtro microattivo*, un filtro di
gommapiuma* et di un appogio di filtri (a+b+c), o di una casseta
filtro HEPA (d) .
12. Sacco*
Accessori:
13. Tracolla*
14. Raccordo del tubo flessibile
15. Tubo flessibile con impugnatura
16. Variazione meccanica della potenza
17. Appogio di accessori*
18. Tubi di prolunga*
19. Tubo telescopico*
20. Bocchetta combinata 2 posizioni*
21. Spazzola*
22. Turbospazzola per mobili* TB 155
23. Turbospazzola pavimento* ZR 980
24. Piumino aspirante Swip*
25. Cuscinetto aspirante Wip*
26. Spazzola Delta*
27. Bocchetta piatta*
28. Bocchetta per imbottiti*
29. Spazzola parquet*
30. Sacco di carta a doppio strato* ZR 480
31. Filtro permanente di tessuto* RS-RT 1420
italiano
18
III • PRIMA DELL’USO
Assemblate il vostro aspirapolvere
* Secondo il modello: si tratta di elementi specifici a certi modelli oppure di accessori disponibili in opzione.
Page 22

19
italiano
Cambiate il sacco*
L’indicatore di sacco pieno* vi indica che il sacco* è pieno saturo di polvere.
Si l’indicatore rimane acceso, sostituite il sacco o rimuovete il filtro di tessuto
(senza il tubo e con la potenza sul livello max).
V • PULIZIA E MANUTENZIONE
IMPORTANTE !
L’apparecchio va sempre spento e staccato dalla corrente prima della pulizia o della manutenzione.
2
1
IV • ASPIRARE
Mettete in funzione il vostro aspirapolvere, regolate la potenza d’aspirazione*
Spegnete i riporre il vostro aspirapolvere
ATTENZIONE !
L’apparecchio non deve mai funzionare senza sacco* e senza filtri.*
Max : pavimenti
Min : mobili,
superfici fragili…
Chiuso : pavimenti
Aperto : mobili,
superfici fragili…
Scegliete l’accessorio giusto
Per gli angoli e i punti
d’accesso più difficili*
Per parquet* Per mobili o superfici
fragili*
Per gli angoli*
Page 23

20
italiano
IMPORTANTE !
Quando utilizzate la
cassetta-filtro HEPA*,
non dimenticate di
togliere i filtri di
gommapiuma* e il filtro
microattivo*. Non la
utilizzate con un sacco
in tessuto*.
Svuotate il filtro di tessuto*
Pulite il filtro di gommapiuma*
Importante! Ogni cinque sacchi sostituiti:
- pulite il filtro di gommapiuma* con l'acqua chiara. Lasciate asciugare prima di rimettere a posto.
- sostituite il filtro microattivo*
Sostituitelo ogni 9-12 mesi
(secondo la frequenza d'utilizzo).
Sostituite il filtro microattivo* (ref. ZR 480)
Cambiate la cassetta-filtro HEPA* (ref. ZR 0016)
IMPORTANTE !
Non utilizzate
prodotti aggressivi o
abrasivi.
Pulite il vostro aspirapolvere
IMPORTANTE !
Il filtro microattivo*
è sul il filtro di
gommapiuma*
dell’aria in uscita.
ATTENZIONE !
Il filtro di
gommapiuma* deve
sempre rimanere
nella sua sede
durante l’utilizzo
Page 24

21
VI • PER LA VOSTRA SICUREZZA
Leggete attentamente il presente manuale d’uso/manutenzione e conservatelo con cura.
• Il vostro aspirapolvere va utilizzato nelle condizioni normalmente previste per gli apparecchi elettrici.
Pertanto utilizzatelo e riponetelo lontano dalla portata dei bambini. Non lasciate mai funzionare l’apparecchio senza sorveglianza.
Non tenete mai le bocchette o l’estremità del tubo vicino agli occhi o alle orecchie.
• Verificate che la tensione d’utilizzo (voltaggio) dell’apparecchio corrisponda bene a quella del vostro impianto.
• L’apparecchio va staccato dalla corrente (staccarlo dalla presa) : subito dopo l’utilizzo, prima di ogni sostituzione di accessori,
prima di ogni operazione di pulizia, manutenzione o sostituzione di filtro
• Non aspirare su superfici bagnate, liquidi di qualsiasi natura, sostanze calde, sostanze ultrafini (gesso, cemento,
cenere, ecc.) grossi detriti affilati (vetro), prodotti nocivi (solventi, sverniciatori, ecc.), aggressivi (acidi, detersivi,
ecc.), infiammabili ed esplosivi (a base di benzina o alcol).
• Non immergete mai l’apparecchio nell’acqua e non lasciatelo all’aperto.
• Non utilizzate l’apparecchio se:
- è caduto e presenta danni visibili o anomalie di funzionamento.
- il cavo è difettoso.
In questo caso non aprite l’apparecchio ma inviatelo al più vicino Centro Assistenza Tecnica Autorizzato (vedasi l’allegata lista
degli indirizzi).
• Le riparazioni vanno effettuate esclusivamente da specialisti e con ricambi originali.
Riparare da soli un apparecchio puo’ costituire un pericolo per l’utente.
• Pertanto l’insieme avvolgicavo/cavo degli apparecchi va tassativamente sostituito da un Centro di Assistenza Tecnica
Autorizzato.
• Conformemente alla regolamentazione in vigore, ogni apparecchio fuori uso va reso definitivamente inutilizzabile: staccare e
tagliare il filo prima di gettare l’apparecchio.
• Il Vostro apparecchio è stato ideato per il solo uso domestico, all’interno della casa. La responsabilità del Marchio non
sarà coinvolta in caso d’utilizzo improprio o non conforme alle istruzioni fornite.
Il vostro apparecchio è conforme alle Direttive 73/23 CEE e 89/336 CEE.
italiano
VII • COSA FARE SE …
IMPORTANTE!
Se l’aspirapolvere non funziona bene e prima di ogni verifica :
• Spegnerlo premendo sul comando Acceso/Spento.
• Scollegarlo.
Il vostro aspirapolvere non si accende o non aspira.
• L’apparecchio non è alimentato :
verificate che l’apparecchio sia collegato correttamente.
• Un accessorio* o il flessibile è intasato : disintasate l’accessorio* o il flessibile.
Il vostro aspirapolvere aspira meno, fa rumore, emette fischi.
• Un accessorio* o il flessibile sono parzialmente intasati :
sturate l’accessorio* o il flessibile.
• Il sacco* è pieno o saturo di polveri fini : sostituite il sacco* o svuotate il sacco in tessuto*.
•
I filtri di gommapiuma* e il filtro micro-attivo* sono saturi : pulite i filtri di gommapiuma*e cambiate il filtro micro-attivo*.
• Il regolatore meccanico di potenza è aperto : chiudete il regolatore meccanico di potenza.
• Il regolatore elettronico di potenza* è in posizione min. : aumentate la potenza tramite il regolatore elettronico di
potenza* (salvo che stiate aspirando su tessuti delicati).
• La spazzola e` difficile da spostare : aprite il regolatore meccanico di potenza o diminuite la potenza.
La spia di riempimento del sacco rimane rossa.
• Il sacco* è saturo :
sostituite il sacco* o svuotate il sacco in tessuto*.
• La casseta filtro HEPA* è saturo : cambiate la cassetta filtro HEPA*.
Il cavo non rientra completamente.
• Il cavo rallenta nel riavvolgimento :
estraete completamente il cavo e premete sul comando.
Se il problema persiste, portate il vostro aspirapolvere presso un Centro Assistenza Tecnica Autorizzato Rowenta
più vicino.
Consultare l'elenco dei centri assistenza autorizzati o contattare il Servizio Consumatori Tel. 024528181.
Page 25

II • CONSEJOS Y PRECAUCIONES
Antes de cada uso del aparato, el cable debe ser desenrollado completamente. No lo deje atascado en ninguna parte ni lo pase por
encima de aristas cortantes.
No mueva el aparato estirando del cable, utilice el asa de transporte.
Si utiliza un alargador, compruebe que esté en perfecto estado y de sección que se adapte a la potencia de su aspirador.
No tire nunca del cable para desenchufar el aparato.
Utilice únicamente accesorios, bolsas y filtros Rowenta. Compruebe que todos los filtros estén bien colocados.
No utilice el aspirador sin el filtro.
Si tiene algún problema para encontrar las bolsas o filtros para este aspirador, puede contactar con Rowenta a través de nuestro
teléfono de Atención al Consumidor : 902 10 14 76
I • DESCRIPCIÓN
1. Boca de aspiración
2. Interruptor ON/OFF
3. Indicador de bolsa llena
4. Selector electrónico de potencia*
5. Interruptor recogecable automático
6. Apertura de la tapa
7. Tapa del compartimento de la bolsa
8. Rejilla de salida de aire
9. PARK system
10. Asa de transporte
11. Compartimento de la bolsa
a. Filtro micro-activo antibacterias* ZR 480
b. Filtro-espuma*
c. Porta-filtro*
d. Cartucho filtro HEPA*
(Filtro de partículas de aire de alta eficacia) ZR 0016
Su aspirador está equipado* con un filtro de espuma*, un filtro microactivo* y
un porta-filtro* (a+b+c) o un filtro HEPA* (d)
12. Bolsa*
Accesorios:
13. Bandolera*
14. Conector de la manguera
15. Manguera flexible con mango
16. Regulador manuel de potencia de aspiraciòn
17. Porta-accessorios*
18. Tubos de extensión*
19. Tubo telescópico*
20. Boquilla universal*
21. Cepillo*
22. Turbocepillo para tapicería* TB 155
23. Turbocepillo para suelos* ZR 980
24. Boquilla cepillo Swip*
25. Boquilla espuma Wip*
26. Boquilla Delta*
27. Boquilla para ranuras*
28. Boquilla tapicería*
29. Boquilla parquet*
30. Bolsas de papel de doble capa anti-bacterias ZR 480*
31. Bolsa textil reutilizable* RS-RT 1420
español
22
III • ANTES DE UTILIZAR
Monte su aspirador
*Según modelo: consiste en equipos específicos de ciertos modelos o accesorios disponibles opcionalmente.
Page 26

23
español
Cambie la bolsa.*
El indicador de la bolsa* le indicará que la bolsa* está llena o saturada de partículas de polvo.
Si permanece de color rojo, cambie la bolsa* o vacíe la bolsa textil* (con la boquilla levantada del suelo y la
potencia al máximo).
V • MANTENIMIENTO Y LIMPIEZA
¡IMPORTANTE!
Pare y desenchufe siempre su aspirador antes del mantenimiento o la limpieza.
2
1
IV • ASPIRAR
Ponga su aspirador en marcha y ajuste la potencia de aspiración*
Pare y almacenamiente su aspirador
¡CUIDADO!
No utilice el aspirador sin la bolsa* y los filtros*.
Máx : suelos
Mín : muebles,
superficies delicadas…
Cerrado : suelos
Abierto : muebles,
superficies delicadas…
Seleccione el accesorio correcto
Para los rincones
y lugares de difícil acceso*
Para suelos de parquet* Para el mobiliario o las
superficies frágiles*
Para los rincones*
Page 27

24
español
¡IMPORTANTE!
Cuando utilice el
cartucho filtro HEPA*, no
olvide extraer el filtro de
es puma* y el filtro
microactivo*. ¡Nunca lo
utilice con una bolsa
textil permanente* !
Vacíe la bolsa textil*
Limpie el filtro de espuma*
¡IMPORTANTE!
Cada vez que haya cambiado en cinco ocasiones la bolsa:
- Limpie el filtro de espuma* al agua clara. Aclare, seque y vuelva a colocarlo.
- Cambie el filtro microactivo*.
Cámbielo cada 9 o 12 meses
(según la frecuencia de utilización).
Cambie el filtro microactivo* (ref. ZR 480)
Cambie el cartucho filtro HEPA* (ref. ZR 0016)
¡IMPORTANTE!
No utilice productos
agresivos o abrasivos
Limpie su aspirador
¡IMPORTANTE!
El filtro microactivo*
está debajo del filtro
de es puma*
¡CUIDADO!
El filtro de espuma*
deberá estar siempre
colocado durante la
utilización
Page 28

25
VI • PARA SU SEGURIDAD
Lea atentamente el modo de empleo y guarde bien las instrucciones.
• Su aspirador es un aparato eléctrico: se ha de utilizar en condiciones normales de uso.
Utilice y guarde el aparato fuera del alcance de los niños. Nunca deje su aparato en marcha sin vigilancia.
No acerque nunca la boquilla o la extremidad del tubo a los ojos o las orejas.
• Compruebe que la tensión del aparato utilizada (voltaje) corresponde a la de su instalación eléctrica.
• Desenchufe el aparato : justo después de su utilización, antes de cada cambio de accesorios, antes de cada limpieza,
mantenimiento o cambio de filtro.
• No aspire superficies mojadas, líquidos de cualquier tipo, substancias calientes, materias ultrafinas (yeso,
cemento, cenizas…), desechos voluminosos cortantes (vidrio), productos nocivos (disolventes,...), tóxicos (ácidos,
limpiadores ...), inflamables ni explosivos (a base de gasolina o de alcohol).
• No sumerja nunca el aparato en agua y no lo deje en el exterior.
• No utilice el aparato si :
- se ha caído o presenta averías visibles o anomalías de funcionamiento.
- el cable está defectuoso.
En este caso, no abra el aparato y envíelo al Servicio Técnico más cercano autorizado por la marca (ver lista adjunta de direcciones).
• Las reparaciones sólo deberán ser realizadas por especialistas, con piezas de recambio originales.
Reparar un aparato por su cuenta puede representar un peligro para el usuario.
• Deberá dirigirse exclusivamente a un Servicio Técnico autorizado por el fabricante para reemplazar los conjuntos de
recogecable y cable.
• De acuerdo con la reglamentación vigente, todo aparato que esté fuera de servicio debe quedar inutilizado definitivamente.
Por ello, se ruega desenchufar y cortar el cable antes de tirar el aparato.
• Este aparato se reserva solamente a un uso doméstico. En caso de uso inadecuado o inconforme con el modo de empleo,
la marca declina toda responsabilidad.
Su aparato ha sido fabricado de acuerdo con las directivas 73/23 CEE y 89/336 CEE.
español
VII • QUÉ HACER SI…
¡IMPORTANTE!
Cuando su aspirador no funcione bien y antes de cualquier verificación:
• Apáguelo pulsando el interruptor encendido/apagado.
• Desconéctelo.
Su aspirador no se pone en marcha y no aspira.
• El aparato no tiene corriente :
verifique que el aparato esté correctamente conectado.
• El accesorio* o la manguera está obstruido : destape el accesorio* o la manguera.
Su aspirador no aspira bien, hace ruido, silba.
• El accesorio* o la manguera está obstruido :
destape el accesorio* o la manguera.
• La bolsa* está llena o saturada con polvo fino : cambie la bolsa* o vacíe la bolsa textil.*
• El filtro de espuma* y el filtro microactivo* están llenos : limpie el filtro de es puma* y cambie el filtro microactivo.*
• El regulador mecánico de potencia del mango está abierto : cierre el regulador mecánico de potencia.
• El regulador electrónico de potencia* está en posición mima : aumente la potencia por medio del regulador
electrónico de potencia* (excepto si aspira tejidos frágiles).
• La boquilla es difícil de extraer : abra el control de succión y reduzca su potencia.
El indicador de bolsa llena permanece de color rojo.
• La bolsa* está saturada :
cambie la bolsa* o vacíe la bolsa textil.*
• El cartucho filtro HEPA* está saturado : cambie el cartucho filtro HEPA.*
El cable no entra totalmente.
• No todo el cable se enrolla :
sáquelo por completo y pulse el botón.
Si el problema persiste, lleve su aspirador al Centro de Servicio Autorizado más cercano.
Consulte la lista de Servicios Técnicos o contactan el servicio consumidores.
Page 29

II • CONSELHOS E PRECAUÇÕES
O cabo deve ser desenrolado completamente antes de qualquer utilização. Não o bloqueie e não o passe sobre bordas afiadas.
Nunca puxe pelo cabo para deslocar o aspirador, deve transportá-lo com a ajuda da pega de transporte de aspirador.
Não puxe pelo cabo para levantar o aparelho. Se utilizar uma extensão, certifique-se de que ela se encontra em perfeito estado e
dispõe de uma secção adequada à potência do seu aspirador.
Nunca desligue o aparelho puxando o cabo. Utilize apenas acessórios, sacos e filtros de origem Rowenta.
Verifique se todos os filtros estão bem colocados. Nunca colocar em funcionamento o aspirador sem saco ou filtros.
Se tiver alguma dificuldade em encontrar sacos ou filtros para o seu aspirador, contacte o Serviço de Apoio a Clientes Rowenta,
Linha Clube Consumidor : 808 284 735
I • DESCRIÇÃO
1. Abertura de aspiração
2. Comando Ligar/Desligar
3. Indicador de saco cheio
4. Variação electrónica de potência*
5. Botão para enrolar o cabo
6. Abertura da tampa
7. Tampa do compartimento do saco
8. Grelha de saída de ar
9. Sistema Parking
10. Pega de transporte
11. Compartimento do saco
a. Filtro microactivo anti-bacteriano* ZR 480
b. Filtro de espuma*
c. Suporte dos filtros*
d. Filtro HEPA* ZR 0016 (High Efficiency Particulate Air)
O seu aspirador encontra-se equipado com um filtro de espuma*, um filtro
microactivo e um suporte dos filtros* (a+b+c) ou um filtro HEPA* (d)
12. Saco*
Acessórios:
13. Alça*
14. Conector do tubo flexível
15. Tubo flexível de aspiração com pega
16. Regulador mecânico de potência
17. Supporte dos acessórios*
18. Tubos de extensão*
19. Tubo telescópico*
20. Escova com 2 posições*
21. Escova pequena*
22. Escova turbo para tapetes* TB 155
23. Escova turbo para soalhos* ZR 980
24. Espanador “Swip”*
25. Escova de espuma “Wip”*
26. Escova Delta*
27. Escova para aspirar soalho*
28. Escova para móveis*
29. Escova para parquet*
30. Sacos de papel dupla folha antibacteriano* ZR 480
31. Saco têxtil permanente* RS-RT 1420
português
26
III • ANTES DA PRIMEIRA UTILIZAÇÃO
Prepare o seu aspirador
* Consoante os modelos: trata-se de equipamentos específicos para certos modelos ou de acessórios disponíveis em opção.
Page 30

27
português
Substituição do saco*
O indicador de saco* cheio indica que o saco* está cheio ou saturado por poeiras finas.
Se o indicador permanecer aceso, mude o saco* ou esvazie o saco têxtil permanente*
(com a escova levantada do solo e a potência ao máximo).
V • MANUTENÇÃO E LIMPEZA
IMPORTANTE!
Pare e desligue sempre o seu aspirador antes da manutenção ou limpeza.
2
1
IV • UTILIZAÇÃO
Ligue o seu aspirador e regule a potência de aspiração*
Desligue e arrume o seu aspirador
ATENÇÃO!
Nunca utilize o aspirador sem saco* ou filtro*.
Max:chão
Min: móveis,
superfícies delicadas…
Fechado: chão
Aberto: móveis,
superfícies delicadas…
Seleccione o acessório adequado
Para cantos e zonas de
difìcil acesso*
Para parquet* Para móveis ou
superfícies delicadas*
Para frestas e rodapés*
Page 31

28
português
IMPORTANTE!
Quando utilizar o filtro
HEPA*, não se esqueça
de retirar o filtro de
espuma* e o filtro
microactivo*. Não o
utilize com um saco
têxtil permanente*.
Esvazie o saco têxtil*
Limpe o filtro de espuma*
IMPORTANTE!
Após cinco mudanças de saco : - limpe o filtro de espuma* com água. Seque e volte a colocá-la no seu lugar.
- substitua o filtro microactivo*.
Substitua-o a cada 9/12 meses
(consoante a frequência de utilização).
Substitua o filtro microactivo* (ref. ZR 480)
Mude o filtro HEPA* (ref. ZR 0016)
IMPORTANTE!
Não utilize produtos
agressivos ou
abrasivos.
Limpe o seu aspirador
IMPORTANTE!
O filtro microactivo*
está sobre o filtro de
espuma*.
IMPORTANTE!
O filtro de espuma*
deve manter-se no
seu lugar durante a
utilização.
Page 32

29
VI • PARA A SUA SEGURANÇA
Leia atentamente o manual de instruções e guarde-o para futuras utilizações.
• O seu aspirador é um aparelho eléctrico: deve ser usado nas suas condições normais de utilização.
Utilize e arrume o aparelho fora do alcance das crianças. Nunca deixe o aparelho funcionar sem vigilância.
Nunca ponha os olhos ou as orelhas ao alcance da escova ou do tubo.
• Verifique se a voltagem de utilização do seu aspirador corresponde à da sua instalação eléctrica.
• Desligar o aparelho retirando a ficha da tomada: imediatamente após cada utilização, antes de cada mudança de acessórios,
antes de cada limpeza, manutenção ou mudança de filtro.
• Não aspire superfícies molhadas, líquidos, seja qual for a sua natureza, substâncias quentes, substâncias ultra
finas (gesso, cimento, cinzas,…) cacos cortantes (vidros), produtos nocivos (dissolventes, decapantes,…),
agressivos (ácidos, detergentes,…), inflamáveis e explosivos (a base de gasolina ou de álcool).
• Nunca mergulhe o aparelho em água nem o guarde no exterior.
• Nunca utilize o aparelho:
- se caiu e apresenta danos visíveis ou anomalias de funcionamento.
- se o cabo de alimentação estiver defeituoso.
Neste caso, não abra o aparelho, envie-o ao Serviço de Assistência Técnica Rowenta autorizado pela marca mais próximo
(ver a lista de moradas incluída).
• As reparações apenas devem ser efectuadas por especialistas com peças sobresselentes de origem.
Reparar por si próprio um aparelho pode constituir um perigo para o usuário.
• O conjunto formado pelo enrolador e cabo de alimentação dos aspiradores deve ser forçosamente substituído por um Serviço
de Assistência Técnica Rowenta autorizado.
• Em conformidade com a regulamentação em vigor, qualquer aparelho fora de utilização deve ser tornado definitivamente
inutilizável: desligar e cortar o cabo de alimentação antes de deitar o aparelho fora.
• O ceu aparelho destina-se exlusivamente a uma utilização doméstica e no interior de casa.
Uma utilização não
apropriada ou não conforme as instruções de utilização liberta o fabricante de qualquer responsabilidade e anula a garantia.
O seu aparelho está em Conformidade com as directivas 73/23 CEE e 89/336 CEE.
português
VII • O QUE FAZER SE…
IMPORTANTE!
Assim que o seu aspirador apresentar um problema de funcionamento e antes de proceder a qualquer verificação:
• Páre-o carregando no botão.
• Retire a ficha da tomada.
O seu aspirador não funciona ou não aspira.
• O aparelho não está ligado :
verifique se o aparelho está correctamente ligado.
• Um acessório* ou o tubo flexível está entupido : desentupa o acessório* ou o tubo flexível.
O seu aspirador não aspira bem, faz barulho, assobia.
• Um acessório* ou o tubo flexível está entupido : desentupa o acessório* ou o tubo flexível.
• O saco está cheio ou saturado de poeiras finas : substitua o saco* ou esvazie o saco têxtil*.
• O filtro de espuma* e o filtro microactivo* estão saturados : limpe os filtros de espuma* e substitua o filtro
microactivo*.
• O regulador do tubo está aberto : feche o regulador mecânico de potência do tubo.
• O regulador electrónico de potência* está em posição mínima : aumente a potência por meio do regulador
electrónico de potência* (excepto quando aspirar tecidos delicados).
• A escova é difícil de deslocar : abra o regulador mecânico de potência ou diminua a potência.
O indicador de saco cheio fica de cor laranja.
• O saco* está saturado :
substitua o saco* e esvazie o saco têxtil.*
• O filtro HEPA* está saturado : substitua o filtro HEPA.*
O cabo não entra completamente.
• A entrada do cabo é retardada : tire o cabo completamente para fora e carregue no comando.
Se o problema persistir, leve o seu aparelho ao Serviço de Assistência Técnica Rowenta mais próximo do seu domícilio.
Veja o capítulo de Serviços de Assistência Técnica Rowenta.
Page 33

II • ™Àªµ√À§∂™ ∫∞𠶃√ºÀ§∞•∂π™
¶ЪИУ ·fi О¿ıВ ¯Ъ‹ЫЛ ЩФ О·ПТ‰ИФ Ъ¤ВИ У· НВЩ˘П›БВЩ·И ВУЩВПТ˜ О·И У· МЛУ И¤˙ВЩ·И ·fi ·И¯МЛЪ¿
·УЩИОВ›МВУ·. ªЛУ ¯ЪЛЫИМФФИВ›ЩВ ЩФ О·ПТ‰ИФ БИ· У· ·У·ЫЛОТЫВЩВ ЩЛУ Ы˘ЫОВ˘‹.
∂¿У ¯ЪЛЫИМФФИВ›ЩВ М·П·УЩ¤˙·, ‚В‚·ИˆıВ›ЩВ fiЩИ В›У·И ЫВ ¿ЪИЫЩЛ О·Щ¿ЫЩ·ЫЛ О·И fiЩИ Л ИЫ¯‡˜ ЩЛ˜ ·УЩИЫЩФИ¯В›
ЫЩЛУ ИЫ¯‡ Ф˘ ·У·БЪ¿КВЩ·И ЫЩЛУ ЫОФ‡· Ы·˜.
¶ФЩ¤ МЛУ ·ФЫ˘У‰¤ВЩВ ЩЛУ Ы˘ЫОВ˘‹ ЩЪ·‚ТУЩ·˜ ЩЛУ ·fi ЩФ О·ПТ‰ИФ. ™˘УИЫЩФ‡МВ У· ¯ЪЛЫИМФФИВ›ЩВ
·ФОПВИЫЩИО¿ ·УЩ·ПП·ОЩИО¿ ВН·ЪЩ‹М·Щ·, Ы·ОФ‡ПВ˜, К›ПЩЪ· О·И ·ЪТМ·Щ· ЩЛ˜ Rowenta.
µВ‚·ИˆıВ›ЩВ fiЩИ fiП· Щ· К›ПЩЪ· ‚Ъ›ЫОФУЩ·И ЫЩЛУ ЫˆЫЩ‹ ı¤ЫЛ. ªЛУ ı¤ЩВЩВ ФЩ¤ ЩЛУ ЫОФ‡· ЫВ ПВИЩФ˘ЪБ›·
¯ˆЪ›˜ Ы·ОФ‡П· ‹ ¯ˆЪ›˜ К›ПЩЪФ.
I • ¶∂ƒπ°ƒ∞º∏ ∆∏™ ™À™∫∂À∏™
1. O‹ ·ÔÚÚfiÊËÛ˘
2. ¢И·ОfiЩЛ˜ ¤У·ЪНЛ˜/‰И·ОФ‹˜ ПВИЩФ˘ЪБ›·˜
√N/OFF
3. ŒÓ‰ÂÈÍË ·ÏÏ·Á‹˜ Û·ÎԇϷ˜
4. ∏ПВОЩЪФУИО‹ Ъ‡ıМИЫЛ ЩЛ˜ ИЫ¯‡Ф˜*
5. ¶Ï‹ÎÙÚÔ ÂÚÈÙ‡ÏÈ͢ ηψ‰›Ô˘
6. §·‚‹ ·ÓÔ›ÁÌ·ÙÔ˜ ÙÔ˘ ηχÌÌ·ÙÔ˜
7. ∫¿Ï˘ÌÌ· ÙÔ˘ ¯ÒÚÔ˘ ÙÔÔı¤ÙËÛ˘ Û·ÎԇϷ˜
8. º›ÏÙÚ· ÂÍ·ÁˆÁ‹˜ ÙÔ˘ ·¤Ú·
9. £¤ЫЛ ·ЪОИУБО
10. ГВИЪФП·‚‹ МВЩ·КФЪ¿˜
11. £¿Ï·ÌÔ˜ Û·ÎԇϷ˜
·. ªИОЪФВУВЪБfi К›ПЩЪФ МВ ·УЩИ‚·ОЩЛЪИ·О‹ ‰Ъ¿ЫЛ*
ZR 480
‚. º›ÏÙÚÔ ·fi ·ÊÚ҉˜ ˘ÏÈÎfi*
Á. £‹ÎË Ê›ÏÙÚÔ˘*
‰. ∫·Û¤Ù· Ê›ÏÙÚÔ˘ HEPA* ZR 0016
∏ ЫОФ‡· Ы·˜ В›У·И ВНФПИЫМ¤УЛ В›ЩВ МВ ¤У· МИОЪФВУВЪБfi К›ПЩЪФ МВ
·УЩИ‚·ОЩЛЪИ·О‹ ‰Ъ¿ЫЛ*, ¤У· К›ПЩЪФ ·fi ·КЪТ‰В˜ ˘ПИОfi*, О·И ЩЛУ ı‹ОЛ
К›ПЩЪФ˘ (·+‚+Б), ‹ К›ПЩЪФ ∏∂ƒ∞* (‰)
12. ™·ÎԇϷ*
∂Í·ÚÙ‹Ì·Ù·:
13. πÌ¿ÓÙ·˜ ÌÂÙ·ÊÔÚ¿˜*
14. ∂‡Î·ÌÙÔ˜ ۈϋӷ˜
15. ™ˆÏ‹Ó·˜ ·ÔÚÚfiÊËÛ˘ Ì ̷ÎÚÈ¿ Ï·‚‹
16. ªË¯·ÓÈ΋ Ú‡ıÌÈÛË ·ÔÚÚfiÊËÛ˘
17. £‹ÎË ÛÙ‹ÚÈ͢ ÂÍ·ÚÙËÌ¿ÙˆÓ*
18. ™ˆÏ‹Ó˜ ÚÔ¤ÎÙ·Û˘*
19. ∆ЛПВЫОФИОФ› ЫˆП‹УВ˜*
20. ∞ÎÚÔʇÛÈÔ Û˘Ó‰˘·ÛÌÔ‡ 2 ı¤ÛˆÓ*
21. µÔ‡ÚÙÛ·*
22. µÔ‡ÚÙÛ· Ù‡Ô˘* TB 155 ÁÈ· ÂÈÊ¿ÓÂȘ
23. µÔ‡ÚÙÛ· Ù‡Ô˘* ZR 980 ÁÈ· ÈÊ¿ÓȘ
24. º›ÏÙÚÔ ·ÔÚÚfiÊËÛ˘ ÛÎfiÓ˘ Swip*
25. ∞ÊÚÔÏ¤Í ·ÔÚÚfiÊËÛ˘ ÛÎfiÓ˘ Wip*
26. ¶¤ÏÌ· Ù‡Ô˘ Delta*
27. ∂Í¿ÚÙËÌ· ÁÈ· ÁˆÓ›Â˜*
28. ∂ȉÈÎfi ÂÍ¿ÚÙËÌ· ÁÈ· ¤ÈÏ·*
29. ∂ȉÈÎfi ¤ÏÌ· ÁÈ· ÙÔ ¿ÙˆÌ·*
30.
Г¿ЪЩИУВ˜ Ы·ОФ‡ПВ˜ МВ ‰ИП¿ ЩФИ¯ТМ·Щ· О·И
·УЩИ‚·ОЩЛЪИ·О‹ ‰Ъ¿ЫЛ*
ZR 480
31. ªfiÓÈÌË ˘Ê·ÛÌ¿ÙÈÓË Û·ÎԇϷ Ù‡Ô˘* RS-RT 1420
ВППЛУИО¿
30
III • ¶ƒπ¡ ∞¶√ ∆∏¡ ¶ƒø∆∏ Ã∏™∏
™˘У·ЪМФПФБВ›ЫЩВ ЩЛ ЫОФ‡· Ы·˜
* ∞У¿ПФБ· МВ ЩФ МФУЩ¤ПФ, ЪfiОВИЩ·И БИ· ВНФПИЫМФ‡˜ Ф˘ В›У·И ВИ‰ИОФ› ЫВ ФЪИЫМ¤У· МФУЩ¤П· ‹ БИ· ВН·ЪЩ‹М·Щ·
Ф˘ В›У·И ‰И·ı¤ЫИМ· ЪФ·ИЪВЩИО¿.
Page 34

31
ВППЛУИО¿
∞ÏÏ¿ÍÙ ÙË Û·ÎԇϷ*
∏ ¤У‰ВИНЛ ·ПП·Б‹˜ Ы·ОФ‡П·˜ Ы·˜ ВУЛМВЪТУВИ fiЩИ Л Ы·ОФ‡П· В›У·И БВМ¿ЩЛ ‹ ¤¯ВИ КЪ¿НВИ ·fi ПВЩ‹
ЫОfiУЛ. ∂¿У Л ¤У‰ВИНЛ В›У·И ОfiООИУЛ, ·УЩИО·Щ·ЫЩ‹ЫЩВ ЩЛУ Ы·ОФ‡П· ‹ О·ı·Ъ›ЫЩВ ЩФ ˘К·ЫМ¿ЩИУФ К›ПЩЪФ
(МВ ЩФ ¤ПМ· У· МЛУ ·ОФ˘М¿ВИ ЫЩФ ¿ЩˆМ· О·И ЩЛУ ИЫ¯‡ Ъ˘ıМИЫМ¤УЛ ЫЩЛУ М¤БИЫЩЛ ИЫ¯‡).
V • ™À¡∆∏ƒ∏™∏ ∫∞π ∫∞£∞ƒπ™ªA
™∏ª∞¡∆π∫√!
¶¿УЩФЩВ У· ЫЩ·М·Щ¿ЩВ ЩЛУ ПВИЩФ˘ЪБ›· О·И У· ·ФЫ˘У‰¤ВЩВ ЩЛУ Ы˘ЫОВ˘‹ ЪИУ ЩЛУ Ы˘УЩ‹ЪЛЫЛ ‹ ЩФУ О·ı·ЪИЫМfi.
2
1
IV • ™∫√À¶π™MA
µ¿ПЩВ ЩЛУ Ы˘ЫОВ˘‹ ЫВ ПВИЩФ˘ЪБ›· О·И Ъ˘ıМ›ЫЩВ ЩЛУ ·ФЪЪФКЛЩИО‹ ИЫ¯‡*
∫Ï›ÛÙÂ Î·È ·ÔıË·ÛÙ ÙËÓ ÛÎÔ‡· Û·˜
¶ÚÔÛÔ¯‹!
ªЛУ ı¤ЩВЩВ ФЩ¤ ЩЛУ Ы˘ЫОВ˘‹ ЫВ ПВИЩФ˘ЪБ›· ¯ˆЪ›˜ Ы·ОФ‡П· О·И ¯ˆЪ›˜ К›ПЩЪФ*.
Max: ‰¿Â‰·
Min : ¤ÈÏ· ηÈ,
¢·›ÛıËÙ˜ ÂÈÊ¿ÓÂȘ…
ОПВИЫЩfi : ‰¿В‰·
·УФИОЩfi : ¤ИП· О·И,
В˘·›ЫıЛЩВ˜ ВИК¿УВИВ˜…
∂ÈϤÍÙ ÙÔ ÛˆÛÙfi ·ÍÂÛÔ˘¿Ú
°И· БˆУ›В˜ О·И ‰‡ЫОФП·
ЪФЫВББ›ЫИМ· ЫЛМВ›·*
°È· ÙÔ ·ÚΤ* °È· ¤ÈÏ· ‹ ÁÈ·
‡ıÚ·˘ÛÙ˜ ÂÈÊ¿ÓÂȘ*
°È· ÁˆÓ›Â˜*
Page 35

32
ВППЛУИО¿
™∏ª∞¡∆π∫√!
ŸЩ·У ¯ЪЛЫИМФФИВ›ЩВ ЩФ
К›ПЩЪФ ∏∂ƒ∞*, МЛУ НВ¯¿ЫВЩВ
У· ‚Б¿ПВЩВ ЩФ МИОЪФ-ВУВЪБfi
К›ПЩЪФ О·И ЩФ К›ПЩЪФ ·fi
·КЪТ‰В˜ ˘ПИОfi*. ¶ФЩ¤ МЛУ ЩФ
¯ЪЛЫИМФФИВ›ЩВ М·˙› МВ
МfiУИМЛ ˘К·ЫМ¿ЩИУЛ Ы·ОФ‡П·*
∞‰ÂÈ¿ÛÙ ÙËÓ ˘Ê·ÛÌ¿ÙÈÓË Û·ÎԇϷ*
∫·ı·Ú›ÛÙ ÙÔ Ê›ÏÙÚÔ ·fi ·ÊÚ҉˜ ˘ÏÈÎfi*
™∏ª∞¡∆π∫√ ! ªÂÙ¿ ·fi οı 5 ·ÏÏ·Á¤˜ Ù˘ Û·ÎԇϷ˜ :
- ∫·ı·Ъ›ЫЩВ ЩФ К›ПЩЪФ* ·fi ·КЪТ‰В˜ ˘ПИОfi МВ О·ı·Ъfi УВЪfi. ∞К‹ЫЩВ ЩФ У· ЫЩВБУТЫВИ ЪИУ ЩФ ‚¿ПВЩВ ЫЩЛУ ı¤ЫЛ ЩФ˘.
- ∞УЩИО·Щ·ЫЩ‹ЫЩВ ЩФ МИОЪФ-ВУВЪБfi К›ПЩЪФ*.
∞ÏÏ¿˙ÂÙ ÙËÓ Û·ÎԇϷ οı 9-12 Ì‹Ó˜ (·Ó¿ÏÔÁ·
Ì ÙË Û˘¯ÓfiÙËÙ· ¯Ú‹Û˘ Ù˘ ÛÎÔ‡·˜ Û·˜).
∞УЩИО·Щ·ЫЩ‹ЫЩВ ЩФ МИОЪФ-ВУВЪБfi К›ПЩЪФ* (ref. ZR 480)
∞ÓÙÈηٷÛÙ‹ÛÙ ÙÔ Ê›ÏÙÚÔ ∏∂ƒ∞* (ref. ZR 0016)
™∏ª∞¡∆π∫√ !
ªЛУ
¯ЪЛЫИМФФИВ›ЩВ
ИЫ¯˘Ъ¿ ‹
ПВИ·УЩИО¿
ЪФ˚fiУЩ·
О·ı·ЪИЫМФ‡
∫·ı·Ъ›ЫЩВ ВНˆЩВЪИО¿ ЩЛУ Ы˘ЫОВ˘‹ Ы·˜
™∏ª∞¡∆π∫√!
∆Ф МИОЪФ-ВУВЪБfi
К›ПЩЪФ* ‚Ъ›ЫОВЩ·И
¿Уˆ ·fi ЩФ
·ÊÚ҉˜ ˘ÏÈÎfi*
¶ÚÔÛÔ¯‹!
∆Ô Ê›ÏÙÚÔ ·fi
·ÊÚ҉˜ ˘ÏÈÎfi*
Ú¤ÂÈ ¿ÓÙ· Ó·
Â›Ó·È ÛÙËÓ ı¤ÛË
ÙÔ˘ ηٿ ÙËÓ
¯Ú‹ÛË Ù˘
ÛÎÔ‡·˜ Û·˜
Page 36

33
VI • °π∞ ∆∏ ¢π∫∏ ™∞™ ∞™º∞§∂π∞
¢И·‚¿ЫЩВ О·И К˘П¿НЩВ ЪФЫВОЩИО¿ ЩИ˜ Ф‰ЛБ›В˜ ¯Ъ‹ЫЛ˜ ЩЛ˜ ЫОФ‡·˜ Ы·˜.
• ∏ ЫОФ‡· Ы·˜ В›У·И МИ· ЛПВОЩЪИО‹ Ы˘ЫОВ˘‹ О·И БИ· ЩФУ ПfiБФ ·˘Щfi Ъ¤ВИ У· ЩЛЪВ›ЩВ ЩИ˜ Ф‰ЛБ›В˜ ¯Ъ‹ЫЛ˜. ¡·
¯ЪЛЫИМФФИВ›ЩВ О·И У· ·ФıЛОВ‡ВЩВ ЩЛУ Ы˘ЫОВ˘‹ М·ОЪИ¿ ·fi Щ· ·И‰И¿. ªЛУ ЩЛУ ·К‹УВЩВ ФЩ¤ У· ПВИЩФ˘ЪБВ›
¯ˆЪ›˜ ВИЩ‹ЪЛЫЛ. ªЛУ ОЪ·Щ¿ЩВ ЩФ ¤ПМ· ‹ ЩЛУ ¿ОЪЛ ЩФ˘ ЫˆП‹У· ОФУЩ¿ ЫЩ· М¿ЩИ· О·И Щ· ·˘ЩИ¿.
•∂П¤БНЩВ fiЩИ Л Щ¿ЫЛ ПВИЩФ˘ЪБ›·˜ Ф˘ ·У·БЪ¿КВЩ·И ЫЩЛУ ЫОФ‡· Ы·˜ ·УЩИЫЩФИ¯В› МВ ВОВ›УЛ ЩЛ˜ ЛПВОЩЪИО‹˜ Ы·˜
ÂÁηٿÛÙ·Û˘.
• ∞ÔÛ˘Ó‰¤ÛÙ ÙËÓ Û˘Û΢‹ ‚Á¿˙ÔÓÙ¿˜ ÙËÓ ·fi ÙËÓ Ú›˙· : ·Ì¤Ûˆ˜ ÌÂÙ¿ ÙËÓ ¯Ú‹ÛË, ÚÈÓ ·fi οı ·ÏÏ·Á‹
ÂÍ·ÚÙËÌ¿ÙˆÓ, ÚÈÓ ·fi οı ηı·ÚÈÛÌfi, Û˘ÓÙ‹ÚËÛË ‹ ·ÏÏ·Á‹ Ê›ÏÙÚÔ˘.
• ªЛУ ¯ЪЛЫИМФФИВ›ЩВ ЩЛУ ЫОФ‡· БИ· ·ФЪЪfiКЛЫЛ ¿Уˆ ЫВ ‚ЪВБМ¤УВ˜ ВИК¿УВИВ˜, БИ· ˘БЪ¿
ФФИ·Ы‰‹ФЩВ МФЪК‹˜, ˙ВЫЩ¤˜ Ф˘Ы›В˜, Ф˘Ы›В˜ ˘ВЪ‚ФПИО¿ ПВЩfiОФООВ˜ (Б‡„Ф, ЩЫИМ¤УЩФ, ЫЩ¿¯ЩВ˜...),
МВБ¿П· ·И¯МЛЪ¿ ıЪ·‡ЫМ·Щ· (Б˘·П›), ЪФ˚fiУЩ· ‚П·‚ВЪ¿ (‰И·П˘ЩИО¿, ‰И·‚ЪˆЩИО¿...), В‡КПВОЩ· О·И
ВОЪЛОЩИО¿ (МВ ‚¿ЫЛ ЩЛУ ‚ВУ˙›УЛ ‹ ЩФ ФИУfiУВ˘М·).
• ªЛУ ‚˘ı›˙ВЩВ ФЩ¤ ЩЛУ Ы˘ЫОВ˘‹ ЫЩФ УВЪfi О·И МЛУ ЩЛУ ЩФФıВЩВ›ЩВ ЫВ ВНˆЩВЪИОfi ¯ТЪФ.
• ªЛУ ¯ЪЛЫИМФФИВ›ЩВ ЩЛУ Ы˘ЫОВ˘‹ :
- В¿У ¤¯ВИ ¤ЫВИ О·И ·ЪФ˘ЫИ¿˙ВИ КıФЪ¤˜ ‹ ЪФ‚П‹М·Щ· ЫЩЛУ ПВИЩФ˘ЪБ›·;
- В¿У ЩФ О·ПТ‰ИФ В›У·И ВП·ЩЩˆМ·ЩИОfi.
™В ·˘Щ‹У ЩЛУ ВЪ›ЩˆЫЛ Ы˘УИЫЩФ‡МВ У· МЛУ ВИ¯ВИЪ‹ЫВЩВ У· ВИЫОВ˘¿ЫВЩВ МfiУФИ Ы·˜ ЩЛУ ЫОФ‡· ·ПП¿ У·
ЩЛУ ·Ъ·‰ТЫВЩВ ЫВ О¿ФИФ ВИ‰ИОfi ЩВ¯УИОfi, ЫЩФ ПЛЫИ¤ЫЩВЪФ ВНФ˘ЫИФ‰ФЩЛМ¤УФ О¤УЩЪФ Ы¤Ъ‚И˜ ЩЛ˜ Rowenta.
• √È ÂÈÛ΢¤˜ Ú¤ÂÈ Ó· Á›ÓÔÓÙ·È ÌfiÓÔ ·fi ÂȉÈÎÔ‡˜ Ì ηÈÓÔ‡ÚÈ· ·ÓÙ·ÏÏ·ÎÙÈο. ∏ ÂÈÛ΢‹ ·fi ÙÔÓ ¯Ú‹ÛË
ÌÔÚ› Ó· ·Ô‚› ÂÈΛӉ˘ÓË ÁÈ· ÙÔÓ ›‰ÈÔ.
• √ПfiОПЛЪФ˜ Ф МЛ¯·УИЫМfi˜ ВЪИЩ‡ПИНЛ˜ О·И ЩФ О·ПТ‰ИФ ЩЛ˜ ЫОФ‡·˜ Ъ¤ВИ ФˆЫ‰‹ФЩВ У· ·УЩИО·ı›ЫЩ·УЩ·И
·fi ¤Ó· ÂÍÔ˘ÛÈÔ‰ÔÙË̤ÓÔ Î·Ù¿ÛÙËÌ· ۤڂȘ.
• ™‡МКˆУ· МВ ЩФ˘˜ ИЫ¯‡ФУЩВ˜ О·УФУИЫМФ‡˜, О¿ıВ Ы˘ЫОВ˘‹ Ф˘ ‰ВУ ¯ЪЛЫИМФФИВ›Щ·И П¤ФУ, Ъ¤ВИ У· Щ›ıВЩ·И
ФЪИЫЩИО¿ ЫВ ·¯ЪЛЫЩ›· : БИ· ЩФУ ПfiБФ ·˘Щfi ·ФЫ˘У‰¤ЫЩВ ЩЛУ О·И Оfi„ЩВ ЩФ О·ПТ‰ИФ ЪИУ ЩЛУ ВЩ¿НВЩВ.
• ∏ Rowenta ‰ÂÓ Ê¤ÚÂÈ Î·Ì›· ¢ı‡ÓË ÁÈ· Ù˘¯fiÓ ‚Ï¿‚˜ Ù˘ Û˘Û΢‹˜ ÔÈ Ôԛ˜ ÚÔÎÏ‹ıËÎ·Ó ÏfiÁˆ η΋˜
‹ Ï·Óı·Ṳ̂Ó˘ ¯Ú‹Û˘ Ô˘ ‰ÂÓ ˘Ô‰ÂÈÎÓ‡ÂÙ·È ·fi ÙȘ Ô‰ËÁ›Â˜ Ù˘ ηٷÛ΢¿ÛÙÚÈ·˜ ÂÙ·ÈÚ›·˜.
∏ Û˘Û΢‹ Û·˜ ÙËÚ› ÙȘ Ô‰ËÁ›Â˜ 73/23 Î·È 89/336 EOK.
ВППЛУИО¿
VII • ∆π ¡∞ ∫∞¡∂∆∂ ∂∞¡ …
™∏ª∞¡∆π∫√!
ªfiПИ˜ Л ЫОФ‡· ·Ъ¯›ЫВИ У· ‰˘ЫПВИЩФ˘ЪБВ› О·И ЪИУ ЩЛУ ¯ЪЛЫИМФФИ‹ЫВЩВ:
• ™Щ·М·Щ‹ЫЩВ ЩЛУ ПВИЩФ˘ЪБ›· ЩЛ˜ Ы˘ЫОВ˘‹˜ ·ЩТУЩ·˜ ЩФ ОФ˘М› Start/Stop
• µÁ¿ÏÙ ÙËÓ Û˘Û΢‹
∏ ЫОФ‡· Ы·˜ ‰ВУ ПВИЩФ˘ЪБВ›, ∏ ·ФЪЪФКЛЩИО‹ ИЫ¯‡ ЩЛ˜ ЫОФ‡·˜ ‰ВУ ПВИЩФ˘ЪБВ›.
• ∏ Ы˘ЫОВ˘‹ ‰ВУ ЩЪФКФ‰ФЩВ›Щ·И ЫˆЫЩ¿ ·fi ЩЛУ ·ЪФ¯‹ ЩФ˘ ЛПВОЩЪИОФ‡ ЪВ‡М·ЩФ˜ :
ÂϤÁÍÙ ·Ó Ë Û˘Û΢‹ ›ӷÈ
ÛˆÛÙ¿ Û˘Ó‰Â‰Â̤ÓË Ì ÙËÓ Ú›˙·.
• ŒÓ· ÂÍ¿ÚÙËÌ· ‹ Ô Â‡Î·ÌÔ˜ ۈϋӷ˜ Â›Ó·È ‚Ô˘ÏˆÌ¤Ó· : НВ‚Ф˘ПТЫЩВ ЩФ ВН¿ЪЩЛМ· ‹ ЩФУ В‡О·МЩФ ЫˆП‹У·.
∏ ·ФЪЪФКЛЩИО‹ ИЫ¯‡ ·ФЪЪФК¿ ПИБfiЩВЪФ О·П¿, О¿УВИ ıfiЪ˘‚Ф, ЫК˘Ъ›˙ВИ.
• ŒУ· ВН¿ЪЩЛМ· ‹ Ф В‡О·МЩФ˜ ЫˆП‹У·˜ В›У·И МВЪИОТ˜ ‚Ф˘ПˆМ¤У· :
НВ‚Ф˘ПТЫЩВ ЩФ ВН¿ЪЩЛМ· ‹ ЩФУ В‡О·МЩФ
ۈϋӷ.
• ∏ Ы·ОФ‡П· В›У·И БВМ¿ЩЛ ·fi ПВЩfiОФООЛ ЫОfiУЛ : ∞ÓÙÈηٷÛÙ‹ÛÙ ÙËÓ Û·ÎԇϷ ‹ ·‰ÂÈ¿ÛÙ ÙËÓ ˘Ê·ÛÌ¿ÙÈÓË
Û·ÎԇϷ.
• ∆Ф К›ПЩЪФ ·КЪТ‰Ф˘˜ ˘ПИОФ‡ О·И ЩФ МИОЪФВУВЪБfi К›ПЩЪФ В›У·И ОФЪВЫМ¤У· : ηı·Ú›ÛÙ ÙÔ Ê›ÏÙÚÔ ·fi ·ÊÚ҉˜
˘ПИОfi О·И ·УЩИО·Щ·ЫЩ‹ЫЩВ ЩФ МИОЪФВУВЪБfi К›ПЩЪФ.
• √ ‰ÚÔ̤·˜ Ú‡ıÌÈÛ˘ ÙÔ˘ ۈϋӷ ·ÔÚÚfiÊËÛ˘ Â›Ó·È ·ÓÔȯÙfi˜ : ÎÏ›ÛÙ ÙÔ ‰ÚÔ̤· Ú‡ıÌÈÛ˘ ÙÔ˘ ۈϋӷ
·ÔÚÚfiÊËÛ˘.
• √ ЛПВОЩЪФУИОfi˜ Ъ˘ıМИЫЩ‹˜ ИЫ¯‡Ф˜* В›У·И ЫЩЛ ı¤ЫЛ min: ·˘Н‹ЫЩВ ЩЛУ ИЫ¯‡ МВ ЩЛУ ‚Ф‹ıВИ· ЩФ˘ ЛПВОЩЪФУИОФ‡
Ъ˘ıМИЫЩ‹ ИЫ¯‡Ф˜ * (ВОЩfi˜ О·И ·У ·ФЪЪФК¿ЩВ ¿Уˆ ЫВ В˘·›ЫıЛЩ· ˘К¿ЫМ·Щ·).
• √ ۈϋӷ˜ ·ÔÚÚfiÊËÛ˘ ÌÂÙ·ÎÈÓÂ›Ù·È Ì ‰˘ÛÎÔÏ›· : Б˘Ъ›ЫЩВ ЩФУ ‰ЪФМ¤· Ъ‡ıМИЫЛ˜ ЩФ˘ ЫˆП‹У· ‹ МВИТЫЩВ ЩЛУ ИЫ¯‡.
∏ ¤Ó‰ÂÈÍË ·ÏÏ·Á‹˜ Û·ÎԇϷ˜ ·Ú·Ì¤ÓÂÈ ·Ó·Ì̤ÓË.
• ∏ Û·ÎԇϷ* Â›Ó·È ‚Ô˘ÏˆÌ¤ÓË :
·ÓÙÈηٷÛÙ‹ÛÙ ÙË Û·ÎԇϷ* ‹ ·‰ÂÈ¿ÛÙ ÙËÓ ˘Ê·ÛÌ¿ÙÈÓË Û·ÎԇϷ.
• ∆Ф К›ПЩЪФ HEPA* В›У·И ОФЪВЫМ¤УФ : ·ÓÙÈηٷÛÙ‹ÛÙ ÙÔ Ê›ÏÙÚÔ ∏∂ƒ∞.*
∞УЩИО·Щ·ЫЩ‹ЫЩВ ЩЛУ ¯¿ЪЩИУЛ Ы·ОФ‡П· ‹ ·‰ВИ¿ЫЩВ ЩЛУ ˘К·ЫМ¿ЩИУЛ Ы·ОФ‡П·.
• ∏ О›УЛЫЛ ЩФ˘ ЛПВОЩЪИОФ‡ О·Пˆ‰›Ф˘ ВИ‚Ъ·‰‡УВЩ·И О·Щ¿ ЩЛУ В›ЫФ‰Ф :
Л О›УЛЫЛ ЩФ˘ ЛПВОЩЪИОФ‡ О·Пˆ‰›Ф˘
ÂÈ‚Ú·‰‡ÓÂÙ·È Î·Ù¿ ÙËÓ Â›ÛÔ‰fi ÙÔ˘ ÛÙËÓ ÛÎÔ‡·.
™В ВЪ›ЩˆЫЛ Ф˘ ЩФ Ъfi‚ПЛМ· ‰ВУ П˘ıВ› МВ ЩЛУ Ы˘У‰ЪФМ‹ ЩˆУ ·Ъ·¿Уˆ Ф‰ЛБИТУ, Ы·˜ Ы˘М‚Ф˘ПВ‡Ф˘МВ У·
·В˘ı˘УıВ›ЩВ ЫЩФ ПЛЫИ¤ЫЩВЪФ ВНФ˘ЫИФ‰ФЩЛМ¤УФ О¤УЩЪФ Ы¤Ъ‚И˜ ЩЛ˜ Rowenta.
Page 37

II • ‹PUÇLARI VE ÖNLEMLER
Her kullanımdan önce güç kablosunun sa¤lam oldu¤undan emin olun. Sıkıflmasına veya keskin köflelere
takılmasına engel olun. Süpürgeyi kablosundan çekerek de¤il, taflıma sapından tutarak taflıyın. Süpürgeyi
kesinlikle kablosundan tutarak kaldırmayın. Uzatma kablosu kullanıyorsanız, bu kablonun iyi durumda ve
cihazınızın güç de¤erlerine uygun oldu¤undan emin olun. Cihazı asla kablosundan çekerek prizden
çıkarmayın. Yalnızca orijinal Rowenta aksesuarları kullanın.
Tüm filtrelerin do¤ru takıldı¤ından emin olun.
Süpürgeyi, torbası ve filtreleri olmadan kesinlikle çalıfltırmayın.
Bu süpürge için torba ve filtre bulamazsanız, 0-216-578-65-00/0-800-211-08-61 numaralı telefondan ya da
www.tefal.com.tr adresinden Rowenta Helpline ile ba¤lantı kurun.
I • TANIMLAMA
1. Emme a¤z›
2. ON/OFF pedal›
3. Toz torbas› dolu göstergesi
4. Elektronik güç kontrolü*
5. Kordon sarma pedal›
6. Kapak a¤z›
7. Toz torbas› bölmesi açma kapa¤›
8. Hava ç›k›fl ›zgaras›
9. PARK sistemi
10. Tafl›ma kolu
11. Toz torbas› bölmesi
a. Antibakteriyel mikro-aktif filtre* ZR 480
b. Köpük filtresi*
c. Destek filtresi*
d. Filtre muhafazas› HEPA* ZR 0016
Elektrik süpürgeniz, hem köpük filtresi* hem mikro-aktif filtre*
ve hem destek filtresi (a+b+c) hemde HEPA filtre (d) ile
donat›lm›flt›r.
12. Torbas›*
Aksesuarlar:
13. Tafl›ma kay›fl›*
14. Hortum ba¤lant› parças›
15. Emme hortumu
16. Mekanik güç kontrolü
17. Destek aksesuarlar*
18. Uzatma borusu*
19. Teleskopik boru*
20. 2 konumlu zemin ucu*
21. F›rças›*
22. Turbo koltuk F›rças›* TB 155
23. Turbo yer F›rças›* ZR 980
24. Swip-F›rça uç*
25. Wip emici köpük*
26. Delta uç*
27. Ay›rma dü¤mesi*
28. Döfleme borusu*
29. Zemin a¤›zl›¤›*
30. ZR 480 ka¤›t torbas›*
31. RS-RT 1420 geri dönüflümlü toz torbas›*
türkçe
34
III • KULLANMADAN ÖNCE
Süpürgeyi birlefltirin
* Modele göre: belirli modeller ile kullanılan donanım ya da seçenek olarak sunulan aksesuarlar için kullanılır.
Page 38

35
türkçe
Toz torbas›n›n* de¤ifltirilmesi
Toz torbas› dolum göstergesi* size torban›n dolu olup olmad›¤›n› gösterir.
E¤er gösterge de k›rm›z› ›fl›k yan›p sönüyor ise toz torbas›n›* de¤ifltirin.
V • TEMIZLIK VE BAKIM
ÖNEML‹!
Cihaz›n›z›n temizlik ve bak›m›n› yaparken kapal› ve fiflinin çekili olup olmad›¤›n› kontrol edin
2
1
IV • SÜPÜRME
Cihazı çalıfltırın ve emifl gücünü ayarlayın*
Cihaz›n›z› kapat›n ve saklam›n
Max : zemin
Eco : mobilya, hassas
kumafllar…
Kapal› : zemin için
Aç›k : mobilyalar, hassas
yüzeyler…
Do¤ru aksesuarı seçin
Süpürgelik veya ulafl›lmas›
zor köfleleri temizlemek için*
Ahflap döfleme için* Mobilya ve hassas yüzeyler
için*
Süpürgelik*
D‹KKAT!
Süpürgeyi, torbası* ve filtreleri* olmadan kesinlikle çalıfltırmayın.
Page 39

36
türkçe
Toz torbas› k›l›f›n›n* de¤ifltirilmesi
ÖNEML‹!
Sert ve afl›nd›r›c›
tmizlik maddeleri
kullanmay›n›z.
ÖNEML‹!
HEPA Filtre*
kulland›¤›n›z zaman
köpük filtreyi* ve mikro
aktif filtreyi* temizlemeyi
unutmay›n. HEPA filtre
asla sabit kumafl toz
torbas› ile kullanmay›n.
Köpük filtrenin* temizleyin
ÖNEML‹!
Toz torbas›n›n her befl kez de¤ifliminde : - Köpük filtresini* ›l›k sabunlu su kem›z. Kurutup yerine yerlefltirin.
- Mikro-aktif filtreyi* tak›n.
Kullan›m s›kl›¤›na göre 9-12 ay aras› de¤ifltirin
Remplacez le filtre micro-actif* (ref. ZR 480)
HEPA filtrenin* tak›lmas› (ref. ZR 0016) Süpürgenizin temizlenmesi
ÖNEML‹!
Mikro aktif filtre*
hava ç›k›fll› köpük
filtrenin* alt›nda
olmal›d›r
D‹KKAT!
Köpük filtre*
daima yerinde
tak›l› olmal›d›r
Page 40

37
VI • EMN‹YET KURALLARI
Güvenli¤iniz için kullanma k›lavuzunu dikkatli bir flekilde okuyunuz ve muhafaza ediniz.
• Elektrik süpürgeniz elektrikli bir cihazdır: Yalnızca normal çalıfltırma koflullarında kullanılmalıdır.
Aygıt çocukların ulaflamayaca¤ı yerlerde kullanılmalı ve saklanmalıdır. Cihazı çalıflır durumda bırakmayın.
Uçları ve boruları daima göz ve kulaklardan uzak tutun.
• Elektrik süpürgenizin voltajının flebeke voltajı ile aynı oldu¤undan emin olun.
• Afla¤›daki durumlarda cihaz›n›z› prizden çekiniz: her kullan›m›n sonunda, her aksesuar de¤ifliminden
önce, her temizleme, bak›m ve filtre de¤ifliminden önce.
• Islak yüzeyleri, ne türden olursa olsun s›v›lar›, s›cak maddeleri, çok ince maddeleri (alç›, çimento,
kül…), kesici büyük parçalar› (cam), zararl› (solvent, boya ç›kar›c›), afl›nd›r›c› (asitler,
temizleyiciler…), yan›c› ve patlay›c› (benzin veya alkol esasl›) maddeleri emdirmeyiniz.
• Cihazı suya sokmayın, suyla temas ettirmeyin veya dıflarıda bırakmayın.
• fiu durumlarda cihazı kullanmayın:
- cihaz düflürüldüyse ve düflmeye ba¤lı olarak hasar belirtileri görülüyor ya da cihaz her zamankinden
farklı çalıflıyorsa.
- elektrik kablosu arızalıysa.
Bu durumda cihaz› açmay›n›z ve en yak›n Rowenta Yetkili Servisi’ne götürünüz (ekteki adres listesine bak.).
• Cihaz›n›zda yaln›zca orijinal Rowenta aksesuarlar› kullan›n›z. Cihaz›n›z orijinal yedek parçalar ile uzman
Rowenta teknisyenleri taraf›ndan tamir edilmelidir.
Asla kendiniz tamir etmeye çal›flmay›n, tehlikeli olabilir.
• Elektrikli süpürgenizin kordon ve sar›c› ünitesi mutlaka Rowenta Yetkili servisi taraf›ndan de¤ifltirilmelidir.
•
Yürürlükteki yasalar uyarınca, kullanılmayan cihazlar, atılmadan önce çalıflmaz duruma getirilmelidir
(prizden çektikten sonra elektrik kablosunu keserek). Bu cihaz yalnızca evde kullanılmak üzere tasarlanmıfltır.
• Profesyonel ve hatalı kullanımdan ya da talimatlara uygun kullanılmamasından kaynaklanacak
sorunlarda, üretici sorumluluk kabul etmez ve cihaz garanti kapsamı dıflında kalır.
Cihazınız 73/23 EEC ve 89/336 EEC talimatlarına uygundur.
türkçe
VII • NE YAPMALIYIZ E⁄ER...
ÖNEML‹!
Süpürgeniz iyi çalıflmamaya bafllarsa, önce flunları yapın:
• açma/kapama dü.mesine basarak.
• cihazı kapatın ve prizden çekin.
Süpürgeniz çal›flmaz ise, emmiyorsa.
• Cihaz çal›flm›yorsa :
cihaz›n fifle tak›l› olup olmad›¤›n› kontrol edin.
• Hortum* yada cihaz t›kanm›fl olabilir : hortum* yada cihaz›n t›kan›kl›¤›n› giderin.
Süpürgenizin temizlerken ç›kard›¤› ses normalden çok gürültülü ve ›sl›k çal›yor.
• Cihaz yada hortum* k›smen t›kanm›fl :
cihaz yada hortumdaki* t›kan›kl›¤› giderin.
• Toz torbas›* dolu yada ince torba dolu : torbay› boflalt›n yada de¤ifltirin.
• Köpük fiiltre* yada mikro aktif filtre*dolu : köpük filtreyi* temizleyin ve mikro aktif filtreyi* de¤ifltirin.
• Mekanik güç kontrolü aç›k : mekanik güç kontrolü kapat›n.
• Elektronik güç kontrol* minimum pozisyonda : gücü artt›rrmak için elektronik güç kontrolünü* kullan›nd
(hassas ve narin dokumalarda ayr›).
• Süpürürken zorlan›yorsan›z : mekanik güç kontrol aç›n veya gücü düflürün.
Toz torbas› dolu göstergesi k›rm›z› ise.
• Toz torbas›* doludur :
torbay›* de¤ifltirin yada kumafl torbay› boflalt›n*.
• HEPA filtre* dolu : HEPA filtre* yi de¤ifltirin.
Kordon iyi sar›lm›yorsa.
• Kordonu yavaflça geri çekin : kordonu tamam› ile sonuna kadar çekin ve sarma dü¤mesine bas›n.
E¤er problem devam ediyorsa, Lütfen en yak›n Rowenta yetkili servisine baflvurun .
 Loading...