

Page 1
GARMENT STEAMER GS6030
Instruction for use
Instructivo de operación
Groupe SEB USA
2121 Eden Road
Millville, NJ 08332
USA - Tel: 1-800-769-3682
Groupe.S.E.B. México, S.A. DE C.V.
Goldsmith 38 Desp. 401,
Col. Polanco
Delegación Miguel Hildalgo
11 560 México D.F.
RFC GSM8211123P5
EN
ES
www.rowenta.com
Page 2
2
1
9*
10*
11*
12*
13*
16*
3
8
7
4
5
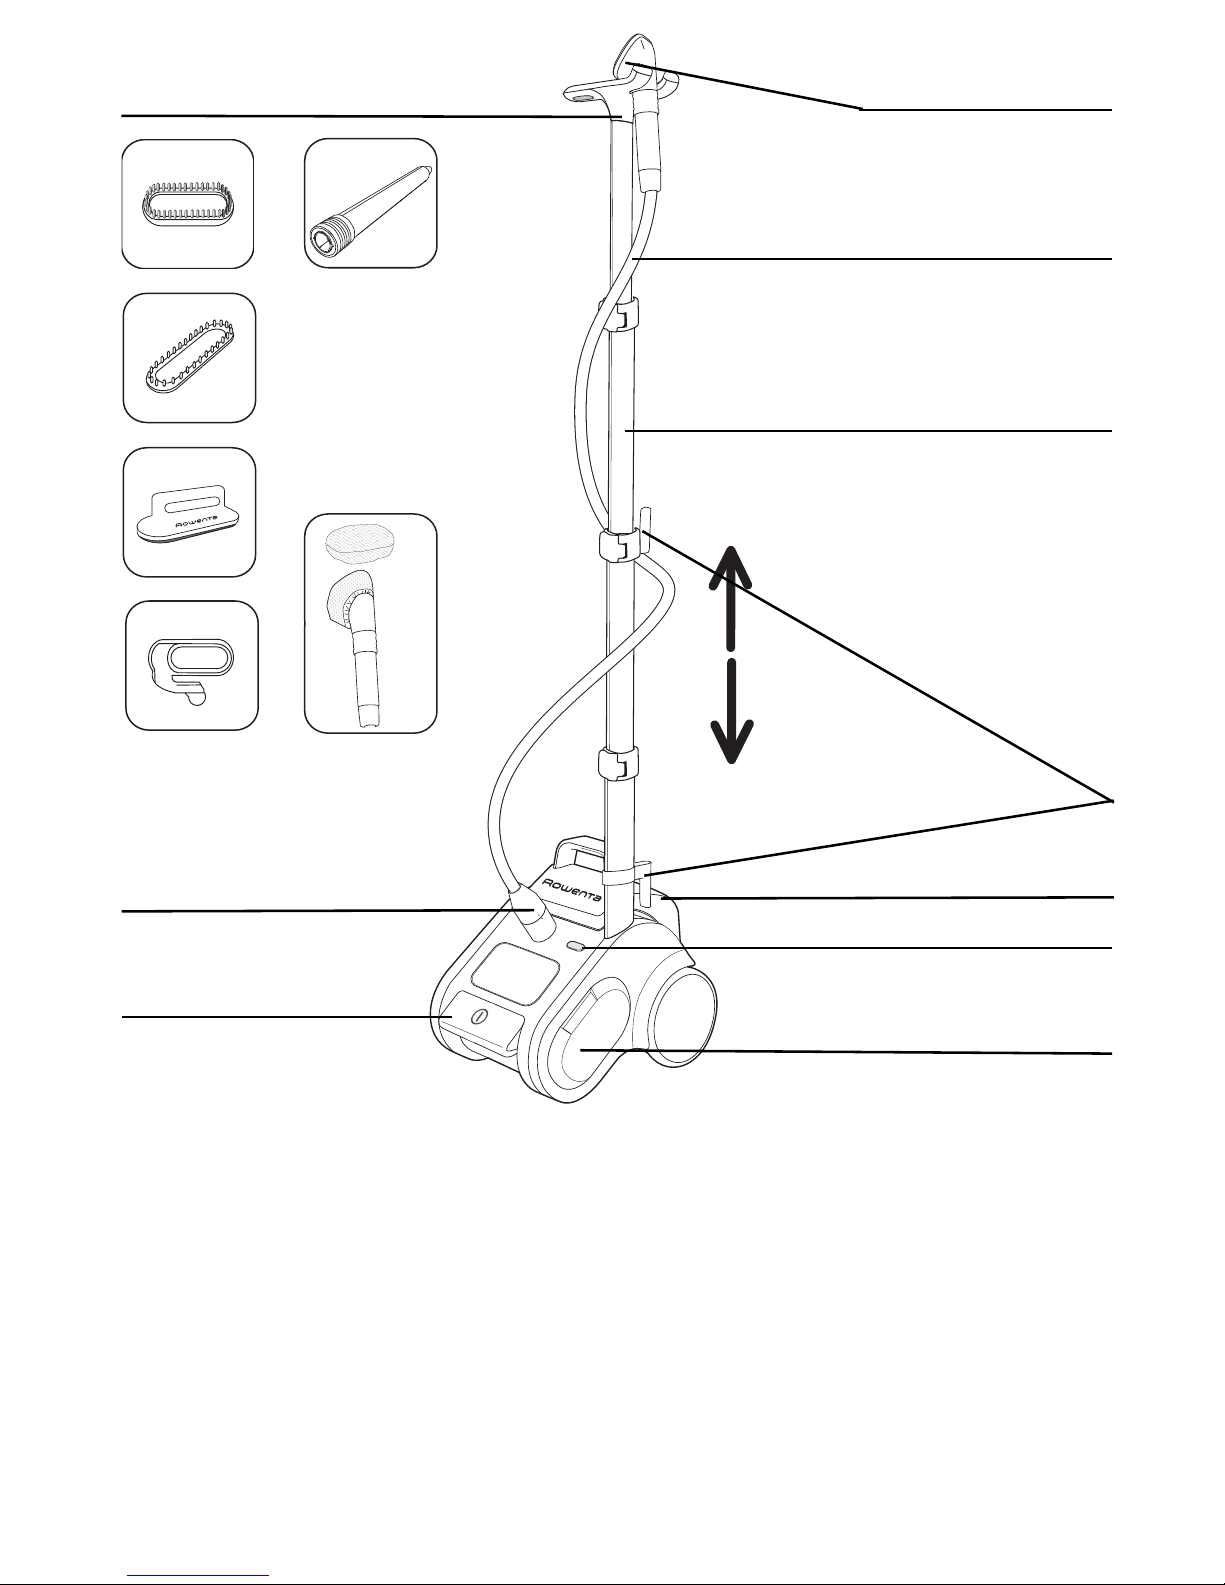
DESCRIPTION
1. Handle
2. Steam head hanger
3. Flexible fabric hose
4. Hose connector
5. Foot operated On/Off switch
6. Removable water tank
7. Power cord clip
8. Telescopic pole
9. Fabric brush *
6
15
14
10. Upholstery brush*
11. Lint pad*
12. Crease attachment*
13. Curtain rod extension*
14. On board accessories
storage
15. Power indicator light
16. Steam bonnet*
*Depending on the model: these accessories are specific to certain models or available as an option.
2
Page 3

IMPORTANT SAFETY
INSTRUCTIONS
When using your appliance, basic precautions should always be
followed, including the following:
READ ALL INSTRUCTIONS
BEFORE USING
-To reduce the risk of contact with hot water emitting from steam vents,
check appliance before each use by holding it away from body and operating steam button.
- Use appliance for its intended use only.
- To reduce the risk of electric shock, do not immerse the appliance in
water or other liquids.
- Appliance should always be turned “OFF” before plugging or unplugging from outlet. Never yank the cord to disconnect from the outlet, instead grasp plug and pull to disconnect.
- Do not allow cord to touch hot surfaces. Let appliance cool completely
before storing away. Loop cord loosely around appliance when storing.
- Do not direct steam at people or animals, or use steamer on garments
while they are being worn.
- Always disconnect appliance from electrical outlet when filling with
water, emptying or when not in use.
- Do not operate appliance with a damaged cord or if the appliance has
been dropped or damaged. To avoid the risk of electrical shock, do not
disassemble or attempt to repair the appliance. Ship it to the nearest
authorized Rowenta approved service center for examination and repair.
Incorrect reassembly can cause risk of fire, injury and electrical shock to
persons when the appliance is in use.
- This appliance is not intended for use by or near children and other persons whose physical, sensory or mental capabilities or lack of experience
and knowledge prevents them from using the appliance safely without
supervision or instruction by a responsible person to ensure that they
can use the appliance safely.
- Children should be supervised by the responsible person to ensure that
they do not play with the appliance.
- Burns could occur from touching hot metal parts, hot water or steam.
3
Page 4

Use care when you empty a steam appliance, there may be hot water in
the tank.
- Pour water in water tank only.
- Never drop or insert any object into any opening or hose.
- Always keep the hose and nozzle elevated above the water tank.
- Steam only in an up and down vertical motion. Never use steamer in a
horizontal position or tilt into a backward position, this may result in hot
water discharge.
- Do not place the steam nozzle directly on any surface or the appliance
power cord while it is hot or plugged in. Use the stand provided.
- When changing attachments, please be sure the unit is off and no
steam is being released to avoid contact with hot water.
- Use caution when changing attachments, as they may contain hot
water from condensation. Ensure the attachments are cooled off to
avoid contact with hot water.
- The use of accessory attachments other than those provided by
Rowenta is not recommended and may result in fire, electric shock or
personal injury.
- This unit is for indoor use only.
SPECIAL INSTRUCTIONS
- To avoid a circuit overload, do not operate another high wattage
appliance on the same circuit.
If an extension cord is absolutely necessary, a 15-amp rated cord
should be used. Cords rated for less amperage may overheat. Care
should be taken to arrange the cord so that it cannot be pulled or
tripped over.
SAVE THESE INSTRUCTIONS
ENVIRONMENTAL PROTECTION FIRST!
Your appliance contains valuable materials which can be recovered
or recycled.
‹ When disposing of it, take it to a collection point or an
approved service center.
4
Page 5

Assembly :
Preparation:
• Place the base on the floor and
remove the water tank.
Install pole in main unit:
• Insert the pole according to the diagram
to the right, ensuring the marks on the
unit and the pole line up.
• Press pole firmly into place.
Locking the pole :
• Lay the base on its side with the
inserted pole.
•Turn the lockbar located on the bottom
of the base 90° to secure the pole.
Use a coin or similar object to turn the
lockbar.
•After the pole is locked, pick up the
unit and return to its use position
Installing Integrated Hanger :
•Position the hanger with the brush
hooks facing to the outer side
•Check for correct orientation with the
index marks matching
•Insert the end of the hanger into the
pole connection and press it into the
pole until the hanger properly
engages.
•If it is required to dismantle the pole
from the main unit, tilt the appliance
and unlock the pole first
•Then place the appliance back into it’s
upright position and pull out the pole
•Dismantling of the hanger from the
pole by the customer is not foreseen.
Attaching Steam hose to main unit :
1) Insert hose plug into hose connector
on main unit.
2) Secure hose connector by pulling
clamping ring upwards.
1
2
5
Page 6

Filling the water tank
• The steamer is designed to be used
with TAP WATER . If the water in your
area is hard, Rowenta recommends
that you mix half tap water and half
distilled water, which reduces the
hardness or just use inexpensive
bottled spring water.
IMPORTANT
Never use water that contains
additives (starch, perfume, aromatic
substances, softener, etc) in the
steamer. Additives such as these can
affect the properties of the steam and
lead to the formation of deposits.
• Ensure that the steamer is
unplugged. Remove the water tank
from the base of the appliance by
pulling it upwards. Unscrew the lid
and fill the tank. The tank holds 128
ounces.
• After closing the lid, place the water
tank on the base of the appliance.
Tips
• We recommend checking the garment care label for manufacturer
recommendations. We also recommend testing the garment on an
unobtrusive area such as an inner seam.
• Read the recommendations for the maintenance of the fabrics on the
labels of the clothing to be steamed.
• Test the strength of the colour of the fabric on an area of the garment that
is not visible (inside of a hem).
• Avoid contact between the steam head and silk or velvet.
• Certain garments are smoothed more easily on the reverse side.
• If you are using your steamer in a position close to the ground, raise the
hose frequently in order to avoid the formation of condensation. You may
hear a gurgling noise if the hose is obstructed in any way.
• Heavy fabrics may need to be steamed longer.
• Be careful at all times.
6
Page 7
Use
Warning: Never steam a garment while
it is being worn.
The hose and steam head may become
hot during use. This is perfectly normal.
Be careful and avoid any prolonged
contact.
• Only operate the steamer on the floor
clear of any materials which may
obstruct the base of the steamer (flat
and horizontal surface). Do not obstruct
the openings on the lower part of the
appliance.
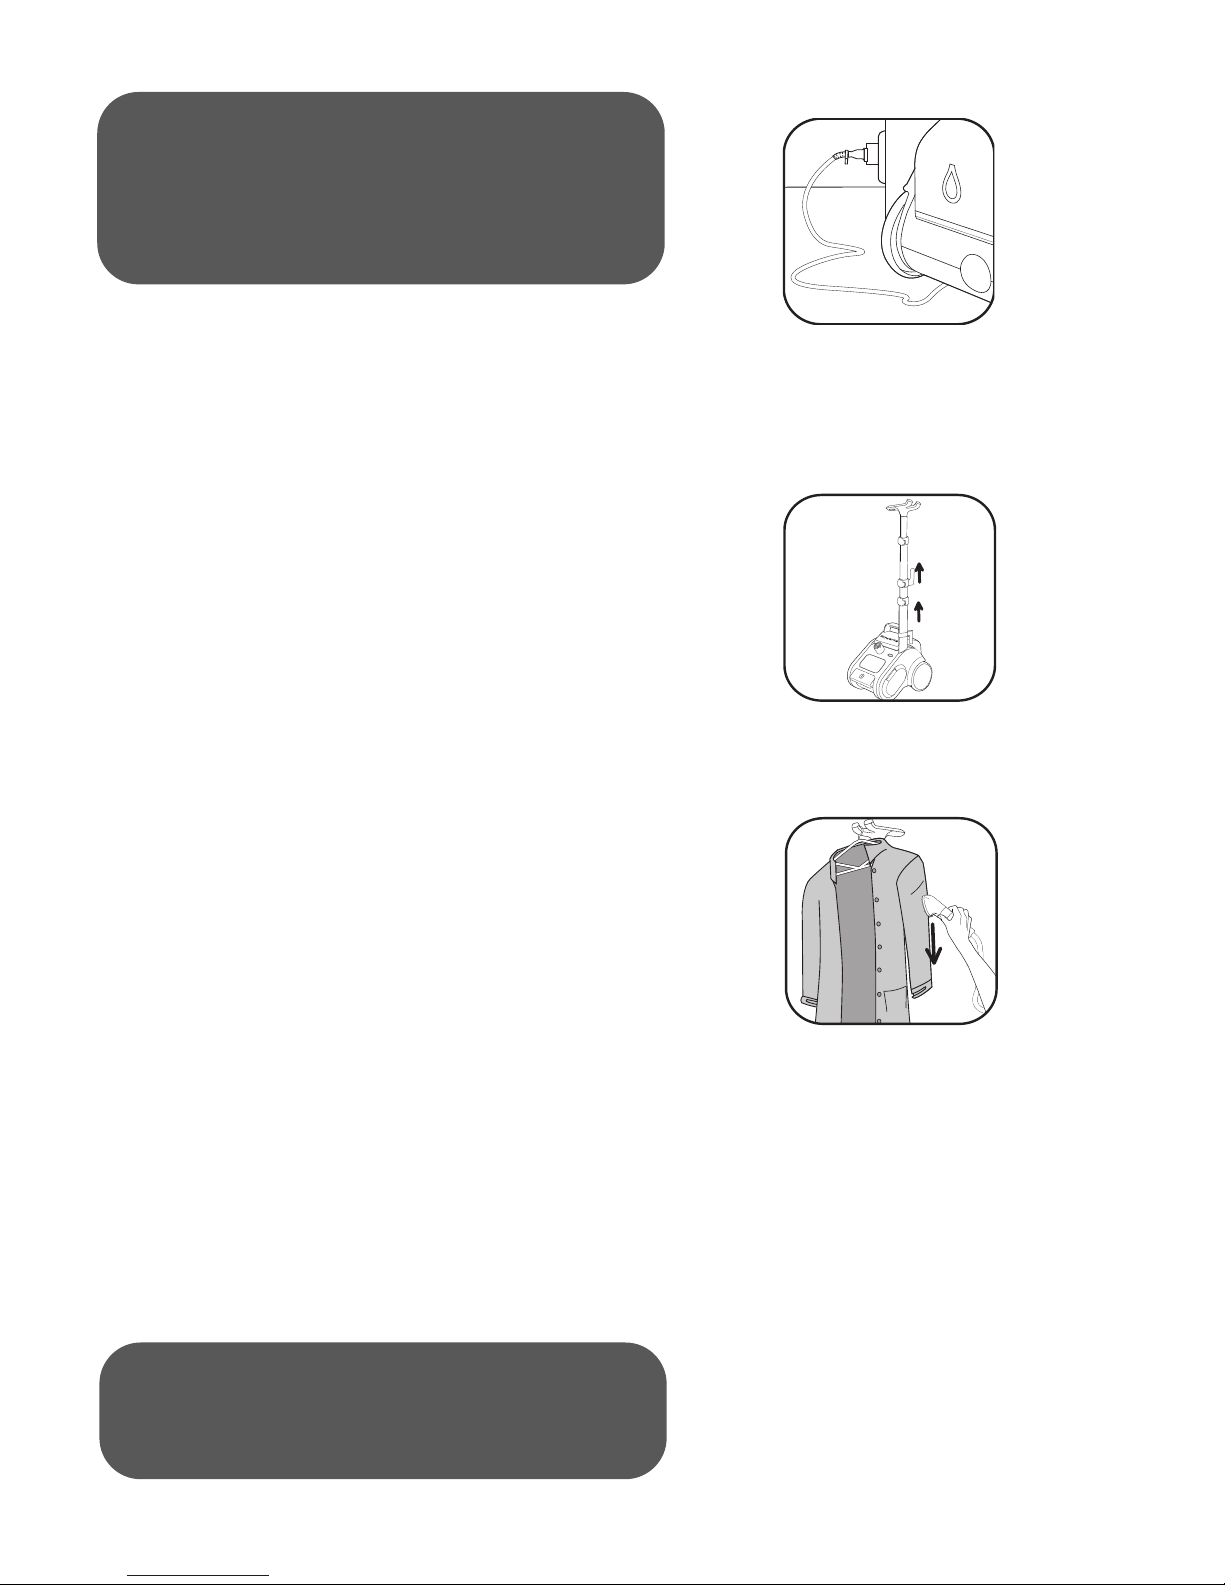
• If necessary, expand the poles to the
desired height by unlocking them,
pulling them gently and locking them
again. Unlock the three clips while
keeping integrated hanger in your
hand.
• Plug in the power cord and turn on the
power using the foot operated pedal.
The power light will illuminate. The
steamer is operating.
• The unit will produce steam in 60
seconds.
• Hang garment onto the hanger head.
Grasp the steam head with the steam
vents pointing away from you. Start
steaming by touching material lightly
with steaming head and moving in an
up/down vertical motion. Beginning at
the top of the garment move in a
downward direction. Always steam in a
vertical position.
• During use, the hose sometimes makes
a gurgling noise. This is a normal
occurrence due to condensation. If you
hear the gurgling noise, hold the hose
up to direct the condensation back into
the appliance.
Warning: Do not allow the steamer to
run dry.
Warning: Never use the steamer more
than 3 hours.
7
Page 8

Accessories (depending on model)
Before using an accessory, check the manufacturer recommendations.
It is also recommend that you carry out a test on part of
the fabric which cannot be seen.
Crease attachment*
• Gently push the crease attachment into place on the
steam head.
• Push on the handle to open the crease attachment.
• Place the garment between the crease attachment and
steam head.
• Release the handle.
• Starting at the top of the garment, move the crease
attachment in a downwards motion.
• Once unit is unplugged and completely cooled down,
remove the crease attachment by sliding it off of the
steam head.
Fabric brush*
The fabric brush opens the weave of the fabrics for better
steam penetration.
Be sure unit is unplugged and completely cool before attaching accesories.
• Attach the fabric brush to the steam head by lining up the bot-
tom of the brush with the bottom of the steam head. Gently
push the top of the brush onto the steam head until it clicks
into place.
• Gently brush the area to be steamed with the grain or nap
of the fabric.
• Remove the fabric brush once unit is unplugged and com-
pletely cool. Remove it by pressing on the release tab on
top of brush while pulling it forward.
Lint pad*
The lint pad is a separate accessory and cannot be attached
to the steam head.You can use the lint pad independently from
the steamer.
The lint pad removes hair, lint and animal fur for a professional
finish.
• To use the lint pad, slowly brush the clothing with the grain or
nap of the fabric.
• The pad can be cleaned by brushing it in the opposite direction.
*Depending on the model: these accessories are specific to certain models or available as an option.
8
Page 9

We recommend cleaning the pad on an old cloth that can be discarded.
• We recommend to use the lint pad before steaming your clothes for perfect results.
Delicates steam cap*
The steam cap cannot be used together with the fabric brush on the steam head.
Be sure unit is unplugged and completely cool before attaching accesories.
The steam cap provides even distribution of
steam, filters impurities from the water and
protects fabrics from water dripping.
• Attach the steam cap to the steam head.
The steam head should be totally covered.
• Gently press the steam head with cap on the
area to be steamed.
• Remove the steam cap once unit is unplugged
and completely cool.
After us
er us
t
Af
•
er
pow
go out
e
f
he s
pow
(
ng t
i
of
and unpl
)
t
er
ug t
eamer,
at
c
ndi
i
he appl
s
or
i
w
i
l
anc
i
h t
c
t
ght
e.
he
l
l
i
w
• Hang steam head in an upright
ot in
n
n
e
•
s
po
se
u
Wra
lips
c
ition
.
th
p
torag
s
on han
rd a
o
c
e
.
e
er head
g
roun
d th
wh
p
e
ower c
ord
• Empty water tank before storage.
• Do not carry the steamer by the water tank handle.
The unit includes luggage style wheels for added
convenience when transporting.
Warning: Never touch the steam head until it has
cooled down completely.
*Depending on the model: these accessories are specific to certain models or available as an option.
9
Page 10

Cleaning
Clean the main unit with a damp cloth. To maintain
maximum performance, your steamer must be descaled
occasionally. The time between descaling operations
depends on the quality of the water and the frequency
with which you use the appliance. The appliance must
be descaled at least once a year or after 50 hours of use.
To carry out a descaling operation, follow the following
steps:
1. Ensure that the appliance has cooled down
completely. Unplug the unit and remove the steam hose
from main unit. Collapse the telescopic pole.
2. Fill the water tank with fresh water and attach it to the
main unit again , allowing water to fill the boiler.
3. Remove the tank from main unit and empty the water
from the boiler through the open hose connector into a
sink. Scale and other residues will be rinsed out.
4. Repeat Step 2 and 3 several times until the scale has
been removed.
TIP: For more effective descaling, after every 50 hours of use, use descalers available at your store recommanded for garment steamers or electric kettles. To avoid
irritant vapors, use products based on citric acid only.
Follow the products instruction for use with garment steamers or electric kettles.
10
Page 11

Troubleshooting
PROBLEMS Possible causes Solutions
There is no steam. The appliance has not
been turned on.
The hose has been
obstructed.
There is no water left. Turn off the appliance and refill the
The steam flow
is low.
Water runs
through the holes
of the steambrush.
The steamer
takes a long time
to heat.
Your steamer has a build-up
of scale because it has not
been rinsed out regularly.
There is no water left. Turn the appliance off and refill it.
There is condensation in
the hose.
Your steamer has a build-up
of scale because it has not
been descaled regularly.
Check that your appliance is properly
plugged in and press the On / Off
button (on the front of the appliance).
The power light should turn on.
Check that the hose is not bent or twisted.
water tank.
Descale the steamer at least once a
year or every 50 hours of use. If your
water is hard, increase the frequency.
Never use steamer in a horizontal
position. Hold the hose vertically
outstretched and wait for water to
flow back into the steamer.
Rinse out the steamer at least once
a year or every 50 hours of use. If your
water is hard, increase the frequency.
If it is not possible to establish the cause of the problem, seek the assistance of an
Approved ROWENTA Service Center www.rowentausa.com
11
Page 12

ÊUÊ,"7 /Ê /, /" Ê/Ê1, /
: www.rowenta.com
/
ÃÊ«À`ÕVÌÊÃÊÀi«>À>LiÊLÞÊ,"7 /]Ê`ÕÀ}Ê>`Ê>vÌiÀÊÌiÊ}Õ>À>ÌiiÊ«iÀ`°
VViÃÃÀiÃ]ÊVÃÕ>LiÃÊ>`Êi`ÕÃiÀÊÀi«>Vi>LiÊ«>ÀÌÃÊV>ÊLiÊ«ÕÀV>Ãi`]ÊvÊV>ÞÊ>Û>>Li]Ê>ÃÊ
`iÃVÀLi`ÊÊÌiÊ,"7 /ÊÌiÀiÌÊÃÌiÊÜÜÜ°ÀÜiÌ>°V
The Guarantee
R
OWENTA guarantees this product against any manufacturing defect in materials or workmanship
during the guarantee period within those countries*** as stated in the country list on the last page of
the user manual, starting from the initial date of purchase.
The international manufacturer’s guarantee covers all costs related to restoring the proven defective
product so that it conforms to its original specifications, through the repair or replacement of any defective part and the necessary labor. At ROWENTA’s choice, a replacement product may be provided
instead of repairing a defective product. ROWENTA’s sole obligation and your exclusive resolution
under this guarantee are limited to such repair or replacement.
Conditions & Exclusions
ROWENTA shall not be obliged to repair or replace any product which is not accompanied by a valid
proof of purchase. The product can be taken directly in person or must be adequately packaged and
returned, by recorded delivery (or equivalent method of postage), to a ROWENTA authorized service
centre. Full address details for each country’s authorized service centers are listed on ROWENTA
website (www.rowenta.com) or by calling the appropriate consumer Service centre set out in the
attached Country List.
This guarantee applies only for products purchased and used for domestic purposes and will not
cover any damage which could occur as a result of misuse, negligence, failure to follow ROWENTA
instructions, or a modification or unauthorized repair of the product, faulty packaging by the owner or
mishandling by any carrier. It also does not cover normal wear and tear, maintenance or replacement
of consumable parts, or the following:
- using the wrong type of water or consumable
- damages or bad results specifically due to wrong voltage or frequency as stamped on the
product ID or specification
- scaling (any de-scaling must be carried out according to the instructions for use)
- accidents including fire, flood, thunderbolt etc
- mechanical damages, overloading
- ingress of water, dust or insects into the product
- damage to any glass or porcelain ware in the product
- professional or commercial use
Consumer Statutory Rights
This international ROWENTA guarantee does not affect the Statutory Rights a consumer may have or
those rights that cannot be excluded or limited, nor rights against the retailer from which the consumer purchased the product. This guarantee gives a consumer specific legal rights, and the consumer
may also have other legal rights which vary from State to State or Country to Country. The consumer
may assert any such rights at his sole discretion.
*** Where a product purchased in one listed country and then used in another listed country, the international
ROWENTA guarantee duration is the one in the country of usage, even if the product was purchased in a listed country
with different guarantee duration. The repair process may require a longer time if the product is not locally sold by
ROWENTA. If the product is not repairable in the new country, the international ROWENTA guarantee is limited to a
replacement by a similar or alternative product at similar cost, where possible.
12
Page 13

2
1
9*
10*
11*
12*
3
16*
8
13*
7
4
5
DESCRIPCIÓN
1. Cabezal de vapor
2. Colgador del cabezal
3. Tubo flexible
4. Conector del tubo
5. Interruptor accionado por el pie
6. Depósito de agua desmontable
7. Abrazadera del cable
8. Brazo telescópico
6
15
14
9. Cepillo para tejido y tela*
10. Cepillo para tapicerías*
11. Recogedor de pelusa*
12. Accesorio para arrugas*
13. Suplemento para cortinas*
14. Compartimento para accesorios*
15. Piloto indicador de encendido
16. Capucha para tejidos delicados*
*Según el modelo: Estos accesorios son específicos de determinados modelos, o se pueden adquirir de modo opcional.
13
Page 14

INSTRUCCIONES
MPORTANTES DE SEGURIDAD
Durante el uso de este electrodoméstico, deberán seguirse siempre
unas precauciones básicas, entre ellas las que se indican a continuación :
LEA TODAS LAS INSTRUCCIONES
ANTES DE UTILIZAR
ESTE APARATO
- Para reducir el riesgo de contacto con el agua caliente expulsada
por los orificios del vapor, compruebe el aparato antes de cada uso
sujetándolo apartado del cuerpo y presionando el botón del vapor.
- Utilice este aparato únicamente para el uso al que está destinado.
- Para reducir el riesgo de sufrir una descarga eléctrica, no sumerja
el aparato en agua ni ningún otro líquido.
- El aparato deberá estar siempre apagado (“OFF”) antes de enchufarlo o desenchufarlo en/de la toma de corriente. No tire nunca del
cable para desconectarlo de la toma de corriente, en vez de ello
sujételo por el enchufe y tire de este para desenchufarlo.
- No permita que el cable haga contacto con superficies calientes.
Deje que el aparato se enfríe completamente antes de guardarlo.
Enrolle el cable sin apretar alrededor del aparato para guardarlo o
recójalo en su interior mediante el mecanismo de recogida del
cable.
- No dirija el chorro de vapor hacia personas ni animales, ni utilice
la plancha de vapor sobre la ropa que lleva puesta.
- Desconecte siempre el aparato de la toma de corriente cuando lo
esté llenando de agua, vaciándolo o cuando no lo esté utilizando.
- No utilice el aparato con el cable dañado o si el aparato se le cayó
o está dañado. Para evitar el riesgo de sufrir una descarga eléctrica,
no desmonte ni intente reparar el aparato. Envíelo al Servicio
Técnico Autorizado Rowenta más cercano para su examen y reparación. Un montaje incorrecto podría provocar riesgo de incendio,
lesiones y/o una descarga eléctrica a la persona que lo está utilizando.
- Este aparato no está previsto para ser utilizado por o cerca de
niños u otras personas cuyas capacidades físicas, sensoriales o
14
Page 15

mentales o su falta de experiencia y conocimientos puedan impedir el uso del aparato con seguridad sin la vigilancia o las instrucciones de una persona responsable que garantice que pueden utilizar el aparato con seguridad.
- Los niños deberán ser vigilados por la persona responsable para
asegurarse de que no jueguen con el aparato.
- Podrían producirse quemaduras al tocar partes metálicas
calientes, agua caliente o vapor. Extreme las precauciones cuando
vacíe un aparato de vapor, el depósito podría contener agua
caliente.
- No eche nunca agua directamente en el depósito del aparato.
Eche el agua sólo en el depósito de agua.
- No introduzca ni deje caer nunca ningún objeto en ningún orificio
ni en el tubo del aparato.
- Mantenga siempre el tubo flexible y la boquilla elevados por
encima del depósito de agua.
- Aplique el vapor con movimientos verticales hacia arriba y hacia
abajo solamente. No utilice nunca esta plancha de vapor en posición horizontal ni la incline hacia atrás, podría provocar la descarga
de agua caliente.
- No coloque el cabezal de vapor directamente sobre ninguna
superficie ni sobre el cable de corriente del aparato mientras esté
caliente o el aparato enchufado. Utilice la base suministrada para
este fin.
- Cuando vaya a cambiar de accesorios, asegúrese de que el aparato está apagado y de que no se libera vapor para evitar el
contacto con agua caliente.
- Extreme las precauciones al cambiar de accesorios, ya que estos
pueden contener agua caliente producto de la condensación.
Asegúrese de que los accesorios están fríos para evitar el contacto
con agua caliente.
- No se recomienda el uso de otros accesorios que no sean los
suministrados por Rowenta, ello podría ser causa de incendio, descarga eléctrica o lesiones.
- Este aparato es para uso en interiores solamente.
INSTRUCCIONES ESPECIALES
- Para evitar una sobrecarga del circuito, no conecte ningún otro
aparato de alta potencia al mismo circuito.
- En el caso de que el uso de un cable de prolongación sea
15
Page 16

absolutamente necesario, deberá utilizarse un cable con una
intensidad nominal de 15 A. Cables con una intensidad nominal
inferior podrían sobrecalentarse. Se adoptarán las debidas
precauciones para extender el cable de modo que nadie pueda
darle un tirón o tropezar con él y caerse.
GUARDE ESTAS
INSTRUCCIONES
¡LA PROTECCIÓN DEL MEDIO AMBIENTE ES LO PRIMERO!
Su aparato contiene materiales valorizables o reciclables.
‹
Para deshacerse de él, llévelo a un punto de recogida o
a un servicio técnico autorizado.
Montaje :
Preparación:
• Coloque la base sobre el suelo y
retire el depósito de agua.
Colocación del brazo en la
unidad principal:
• Introduzca el brazo según el dibujo
de la derecha, asegurándose de que
las marcas en el brazo y en el
aparato queden alineadas.
• Presione firmemente el brazo en su
lugar.
Bloqueo del brazo :
•Tienda la base sobre un lado con el
brazo insertado de modo que
permanezca estable.
•Gire la barra de bloqueo situada en el
fondo de la base 90º para sujetar el
brazo.
•Para girar la barra de bloqueo, utilice
una moneda o un objeto similar.
•Una vez bloqueado el brazo, vuelva a
colocar el aparato en su posición de
uso.
16
Page 17

Colocación de la percha
integrada:
•Coja la percha con los ganchos para
sujetar el cepillo mirando hacia fuera
•Para orientarla correctamente, haga
coincidir las marcas de alineación.
•Introduzca el extremo de la percha en la
conexión del brazo y presiónelo contra
el brazo hasta que la percha quede
correctamente encajada.
•Si fuese necesario desmontar el brazo
de la unidad principal, primero incline
el aparato y desbloquee el brazo.
•Luego vuelva a colocar el aparato en su
posición vertical y tire hacia fuera del
brazo.
•El desmontaje de la percha del brazo del
aparato por el cliente no está previsto.
1
Sujeción del tubo de vapor a la
unidad principal:
1) Inserte el conector del tubo flexible en
el conector correspondiente previsto en
la unidad principal.
2) Sujete el conector del tubo tirando
hacia arriba del aro de sujeción.
Llenado del depósito de
agua
• La plancha vertical a vapor está diseñada
para ser utilizada con AGUA CORRIENTE.
Si el agua de su zona es dura, Rowenta
recomienda mezclar un 50% de agua
corriente con un 50% de agua destilada,
para reducir su dureza; también se puede
utilizar agua de manantial embotellada o
solamente agua destilada.
2
17
Page 18

IMPORTANTE
No utilice nunca agua que contenga aditivos
(almidón, perfume, sustancias aromáticas,
suavizantes, etc.) para la plancha vertical a
vapor. Aditivos como los mencionados
pueden afectar a las propiedades del vapor y
provocar la formación de depósitos sólidos.
• Asegúrese de que el aparato está
desenchufado. Saque el depósito de agua de
la base del aparato tirando de él hacia arriba.
Desatornille la tapa y llene el depósito.
El depósito tiene una capacidad de 3,8 litros.
• Tras cerrar la tapa, coloque el depósito de
agua en su lugar en la base del aparato.
CONSEJOS:
• Le aconsejamos comprobar las recomendaciones del fabricante en la
etiqueta de la prenda que va a planchar. También es aconsejable probar
la prenda en un lugar discreto, por ejemplo en una costura interior.
• Lea en las etiquetas de las prendas que va a planchar las
recomendaciones para la conservación de los tejidos.
• Pruebe la resistencia del color del tejido en una zona de la prenda que
no quede a la vista (en el interior de un dobladillo).
• Evite el contacto del cabezal de vapor con seda o terciopelo.
• Algunas prendas son más fáciles de planchar por el revés.
• Si está utilizando la plancha vertical a vapor en una posición cerca del
suelo, alce el tubo flexible con frecuencia con el fin de evitar la
formación de condensación. Si, en cualquier caso, se obstruyera el tubo,
podría oír un ruido como de gorgoteo.
• Los tejidos fuertes pueden necesitar más tiempo de planchado.
• Extreme las precauciones en todo momento.
*Según el modelo: Estos accesorios son específicos de determinados modelos, o se pueden
adquirir de modo opcional.
18
Page 19

Uso
Advertencia: No planche nunca una prenda llevándola
puesta. El tubo flexible y el cabezal de vapor pueden
calentarse durante el planchado.
Esto es totalmente normal. Extreme las precauciones y
evite un contacto prolongado.
• Utilice la plancha vertical a vapor solamente sobre un
suelo (plano y horizontal) despejado de cualquier
objeto que pueda obstruir la base del aparato. No
obstruya los orificios de la parte inferior del aparato.
• Si es necesario, extienda el brazo del aparato a la altura
deseada desbloqueándolo, tirando de él suavemente y
bloqueándolo de nuevo.
• Enchufe el cable y encienda el aparato accionando con
el pie el interruptor de la base. El piloto indicador se
encenderá. Ahora la plancha vertical a vapor está lista
para usar.
• El aparato producirá vapor en 60 segundos.
• Cuelgue la prenda en la percha. Sujete el cabezal de
vapor con los orificios de vapor mirando en dirección
opuesta a Ud..... Empiece a planchar tocando la prenda
ligeramente con el cabezal mientras lo desplaza con
movimientos verticales arriba / abajo. Empiece por la
parte de arriba de la prenda avanzando en sentido
descendente. Planche siempre en posición vertical.
• Durante el uso, el tubo flexible podría hacer un ruido de
gorgoteo. Esto es una consecuencia normal de la
Advertencia: No deje funcionar la plancha vertical a
vapor en seco.
Advertencia: No utilice nunca la plancha vertical a
vapor durante más de 3 horas seguidas.Advertencia:
No doble la manguera durante su uso o almacenaje.
condensación. Si oye este ruido, sujete el tubo en
vertical para hacer que el condensado vuelva al
aparato.
*Según el modelo: Estos accesorios son específicos de determinados modelos, o se pueden
adquirir de modo opcional.
19
Page 20

Accesorios (según el modelo)
Antes de utilizar un accesorio, compruebe las
instrucciones del fabricante.
También es aconsejable realizar una prueba sobre una
parte del tejido que no esté a la vista.
Accesorio para arrugas*
• Colóquelo con suavidad en posición.
• Presione la empuñadura para abrir el accesorio para
arrugas.
• Sitúe la prenda entre el accesorio para arrugas y el
cabezal de vapor.
• Suelte la empuñadura.
• Empiece por la parte de arriba de la prenda,
desplazando el accesorio para arrugas en sentido
descendente.
• Una vez desenchufado y totalmente frío el aparato,
retire el accesorio para arrugas deslizándolo para
separarlo del cabezal de vapor.
Cepillo para tejidos *
Asegúrese de que el aparato está desenchufado y completamente frío antes de colocar los accesorios.
El cepillo para tejidos abre los tejidos para facilitar la
penetración del vapor.
• Sujete el cepillo para tejidos al cabezal de vapor
alineando la base del cepillo con la base del cabezal.
Empuje suavemente la parte superior del cepillo
encajándolo en su lugar en el cabezal hasta escuchar
un clic.
• Cepille con suavidad aplicando vapor a la fibra o la
lanilla del tejido.
• Retire el cepillo para tejidos con el aparato
desenchufado y completamente frío. Para
desprenderlo del cabezal, presione la orejeta de la
parte superior del cepillo al mismo tiempo que tira
hacia delante.
*Según el modelo: Estos accesorios son específicos de determinados modelos, o se pueden
adquirir de modo opcional.
20
Page 21

Recogedor de pelusa*
El recogedor de pelusa es un accesorio aparte y no se puede sujetar al
cabezal de vapor. El recogedor de pelusa se puede usar independientemente de la central vertical a vapor.
El recogedor de pelusa recoge pelos, hilachas y pelaje
de animales, permitiendo obtener un acabado
profesional.
• Para utilizar el recogedor de pelusa, cepille lentamente
la prenda por la fibra o la lanilla del tejido.
• El recogedor se puede limpiar cepillando con él en
sentido opuesto. Aconsejamos limpiar el recogedor
sobre una prenda vieja que luego se pueda tirar.
• Le recomendamos que, para obtener un mejor
resultado, utilice el cepillo antipelusa antes de
planchar sus prendas.
Capucha para tejidos delicados*
El accesorio para tejidos delicados no puede ser usado al mismo tiempo
que el cepillo para tejidos sobre el cabezal. Asegúrese de que el aparato
está desenchufado y completamente frío antes de colocar los accesorios.
La capucha para tejidos delicados
garantiza una distribución uniforme
del vapor, filtra las impurezas del
agua y protege la ropa de las gotas
de agua
• Coloque la capucha sobre el cabezal
de vapor de modo que este quede
totalmente cubierto.
• Presione suavemente el cabezal de
vapor con la capucha contra la
superficie que desee planchar.
• Retire la capucha cuando el aparato
esté desconectado y se haya enfriado
por completo
*Según el modelo: Estos accesorios son específicos de determinados modelos, o se pueden
adquirir de modo opcional.
21
Page 22

Después del uso
• Después de utilizar la plancha vertical a vapor,
apague el interruptor (el piloto indicador se
apagará) y desenchufe el aparato.
• Cuelgue el cabezal de vapor en posición
vertical en los ganchos de la percha cuando no
lo esté utilizando.
• Enrollar el cable alrededor de los guardacables.
• Vacíe el depósito de agua .
• No transporte la central vertical a vapor
tomándola por el asa del depósito de agua. Esta
unidad está diseñada para transportarse con la
conveniencia de un equipaje, facilitando el
almacenamiento.
Advertencia: No toque nunca el cabezal de
vapor hasta que se haya enfriado
completamente.
Limpieza
Limpie la unidad principal con un paño húmedo.
Para obtener el máximo rendimiento, es
necesario desincrustar la plancha vertical a
vapor de vez en cuando. El período entre dos
operaciones de desincrustación dependerá de
la calidad del agua y de la frecuencia con que
se utilice el aparato.
*Según el modelo: Estos accesorios son específicos de determinados modelos, o se pueden
adquirir de modo opcional.
22
Page 23

El aparato se debe desincrustar al menos una vez al
año o después de 50 horas de uso.
Para llevar a cabo la desincrustación de la plancha,
siga los pasos que se indican a continuación:
1. Asegúrese de que el aparato esté totalmente frío.
Desenchufe el aparato y desconecte el tubo de
vapor de la unidad principal. Pliegue el brazo
telescópico.
2. Llene el depósito de agua dulce y vuelva a
colocarlo en la unidad principal. De este modo la
caldera interior se llena de agua también.
3. Retire el depósito de agua de la unidad principal
y vacíe en el fregadero el agua de la caldera a
través del conector abierto del tubo flexible. Las
incrustaciones y otros residuos se desprenderán.
4.Repita los pasos 2 y 3 varias veces hasta que
todas las incrustaciones se hayan desprendido
Para una más efectiva descalcificación, usar, después de cada 50 horas de
uso, descalcificadores para centrales de vapor o teteras eléctricas disponibles en los centros de servicio autorizados.
Para evitar vapores irritantes, use sólo productos a base de ácido cítrico.
Siga las instrucciones de uso del producto.
23
Page 24

ÊÊÊÊÊККККККККККККККККККККККККККККККККÊÊ
ÊÊÊÊÊÊÊÊÊÊÊÊÊÊÊ
Ê
ÊÊÊÊÊÊÊÊÊÊÊÊ
ÊÊÊÊÊÊÊÊÊÊÊÊÊÊ
l
-
daños o mal funcionamiento debidos específicamente a un voltaje o frecuencia distintos de los
q
Localización de averías
PROBLEMAS Causas posibles Soluciones
No hay vapor. El aparato no está
encendido.
El flujo de vapor
es bajo
Sale agua por los
orificios del cepillo
de vapor.
La plancha tarda
bastante en calentar.
Si no fuese posible establecer la causa del problema, solicite la asistencia de un
Servicio Técnico autorizado de Rowenta www.rowenta.com.mx.
El tubo flexible está obstruido.
No queda agua. Apague el aparato y rellene el depó-
La plancha vertical a vapor
tiene depósitos de
incrustaciones porque no ha
sido lavada con regularidad.
No queda agua. Apague el aparato y rellene el depósito
Hay condensación en el
tubo flexible.
La plancha vertical a vapor
tiene depósitos de
incrustaciones porque no ha
sido desincrustada con
regularidad.
Compruebe que el aparato está
correctamente enchufado y encienda el
interruptor ON/OFF (en la parte frontal
del aparato). El piloto indicador deberá
encenderse.
Compruebe que el tubo flexible no está
doblado ni retorcido.
sito de agua
Realice la desincrustación de la plancha al
menos una vez al año o cada 50 horas de
uso. Si el agua que utiliza es dura,
aumente la frecuencia de esta limpieza.
de agua.
No utilice nunca la plancha vertical a
vapor en posición horizontal. Mantenga
el tubo flexible extendido verticalmente
y espere a que el agua vuelva al interior
de la plancha.
Realice el lavado interior de la plancha al
menos una vez al año o cada 50 horas de
uso. Si el agua que utiliza es dura,
aumente la frecuencia de esta limpieza.
127 V~ 50-60 Hz - 1550 W
24
Page 25

-КUК,"7 /К, /К/К /, " КККККККККККККККККККККККККККККККККК
: www.rowenta.com
КГМiК«А`ХVМКiГКГХГVi«МLiК`iКАi«>А>VК«АК,"7 /К`ХА>МiКЮК`iГ«ХjГК`iК«iА`К`iК}>А>М>°
ÃÊ>VViÃÀÃ]ÊVÃÕLiÃÊÞÊV«iÌiÃÊÀii«>â>LiÃÊ«ÀÊiÊÕÃÕ>ÀÊw>]ÊV>ÃÊ`iÊiÃÌ>ÀÊ`ë
LiÃÊV>iÌi]Ê«Õi`iÊÃiÀÊ>`µÕÀ`ÃÊÌ>ÊÞÊVÊÃiÊ`iÃVÀLiÊiÊiÊÃÌÊÜiLÊÜÜÜ°ÀÜiÌ>°V
La garantía
E
ste es un producto garantizado por ROWENTA contra defectos de fabricación o en los materiales
durante el periodo de garantía en aquellos países *** que figuran en la lista de países incluida en la
última página del manual de usuario, a partir de la fecha de compra.
La garantía internacional del fabricante cubre todos los costes de restitución del producto defectuoso, de forma que se ajuste a sus especificaciones originales, ya sea mediante su reparación o la
sustitución de los componentes defectuosos y la mano de obra necesaria. A criterio de ROWENTA,
se podrá sustituir el producto defectuoso, en lugar de repararlo. La reparación o sustitución del
producto es la única obligación de ROWENTA y la única y exclusiva solución facilitada al cliente en
virtud de la presente garantía.
Condiciones y exclusiones
ROWENTA no estará obligada a reparar o sustituir productos que no vayan acompañados de una
prueba de compra válida. Se puede llevar el producto en persona directamente a un centro de servicios autorizado, o embalarlo adecuadamente y enviarlo, por correo certificado (o envío postal equivalente), a un centro de servicios autorizado de ROWENTA. La dirección completa de los centros de
servicio autorizados en cada país puede obtenerse en el sitio web de ROWENTA (www.rowenta.com)
o llamando al número de teléfono de Atención al Consumidor del país en cuestión indicado en la
Lista de Países.
La garantía internacional ROWENTA se aplica únicamente a productos adquiridos en uno de los
países relacionados, y destinados exclusivamente a uso doméstico en uno de los países indicados
en la Lista de Países. Esta garantía no cubrirá los daños que puedan producirse como resultado de
usos incorrectos, negligencia, inobservancia de las instrucciones de ROWENTA, o una modificación
o reparación no autorizada del producto, un embalaje inadecuado por parte del consumidor o por
una manipulación incorrecta del transportista. Tampoco cubre el uso y desgaste habitual, el mantenimiento o sustitución de consumibles, ni lo siguiente:
- la utilización de un tipo de agua o consumible incorrecto
- la calcificación (las descalcificaciones deberán realizarse con arreglo a las instrucciones de
uso)
- daños mecánicos, sobrecarga
- la entrada de agua, polvo o insectos dentro del producto
- uso profesional o comercial
- accidentes, incluidos incendios, inundaciones, rayos, etc.
- daños en los materiales de vidrio o porcelana del producto
- daños o mal funcionamiento debidos específicamente a un voltaje o frecuencia distintos de los
que aparecen impresos en la etiqueta del producto u otras especificaciones locales.
Derechos legales de los consumidores
La garantía internacional ROWENTA no afecta a los derechos legales
de los consumidores ni a derechos que no puedan ser excluidos o restringidos, ni a los derechos que el consumidor tenga frente al comerciante minorista que le vendió el producto. Esta garantía proporciona
al consumidor derechos legales específicos, y el consumidor también
podrá tener otros derechos legales que variarán de una región a otra o
de un país a otro. El consumidor ejercerá esos derechos a su criterio.
***Cuando un producto sea adquirido en un país incluido en la Lista de Países y posteriormente se utilice en otro país
incluido en la Lista, la duración de la garantía internacional ROWENTA será la vigente en el país de utilización del
producto, incluso aunque el producto haya sido adquirido en otro país incluido en la Lista con una duración distinta
de garantía. El proceso de reparación para productos adquiridos fuera del país de uso puede precisar de un plazo
mayor si ROWENTA no comercializa localmente el producto. En los casos en los que el producto no sea susceptible de
reparación en el país de uso, la garantía internacional ROWENTA se limitará a la sustitución por un producto similar o
un producto alternativo de precio similar, siempre que sea posible.
FECHA DE COMPRA
25
Page 26

1103907383/02 - 48/14 - GS6030
 Loading...