

Page 1
CP11 - BAUREIHE
KU RZ E BE DI EN UN GS AN LE IT UN G
Wir gratulieren Ihn en zu m Kauf des neuen tragbaren Luftffeu chtigkeit-, Temperaturund CO2- Messgeräte s. Bi tte lesen Sie diese kurze Anleitung sorgfältig du rch , bevor
Sie das Gerät in Betrie b neh men.
Al lgemein e Be schreib un g
Das CP11 is t ein p räzises, tragbares Messgerät, das die rel ati ve Luftfeuchtigkeit,
Temperatur und den CO2- Geh alt a nzeigen und speichern kann und andere
Parameter, wie den Taupunkt oder die Feuchttemperatur ber ech nen k ann. Die
detaillierte Bedi enu ngs anleitung finden Sie auf www.rotronic-hu mid ity.com.
Pr og ramm ie ru ng
Die meisten Einstel lun gen , wie das Löschen des Speichers, der CO2-Alar m, di e
Einheiten (C / F), die Abt ast frequenz, die Echtzeituhr können durch Be nut zun g der
Funktionstasten g eän der t werden.
integriert e Messson de
eingebaute r
CO2 -Sensor
mit Kalibrie rkappe
Sta tivgewi nde
Batteriefa ch
En er gi eve rs or gu ng
Das CP11 is t bat teriebetrieben und benötigt 4
AA Alkalibatterien od er ei nen 5 VDC Adapter
(optinales Zubehö r). U m die B atterien
einzulegen (oder zu w ech sel n), benutzen Sie
den beiliegenden Sc hra ube nzieher. Lösen Sie
die zwei Schrauben un d leg en Si e die Batterien
entsprechend der Po lar itä t ein. Gewährleisten
Sie den Kontakt zu den Ba tte riepolen.
Ver bi ndung mit P C od er Laptop
Verbinden Sie das CP11 per Mini-USB-Kabel mit
einem PC oder Laptop. D ie ge spe icherten Daten
können nun leicht mit d er be ili egenden Software
heruntergeladen w erd en.
ON/ OFF/SET UP
Fu nktions ta sten
STAR T/ESC
-Startet den a utomati sche n
Pro tokollm odus
-Beendet Ein stellun gen/Speiche r/
Pro tokoll
MEM/DOWN
-Halten Sie di ese Tast e gedrück t, um die
Mes sungen ma nuell auf zuzeichnen
-Wä hlt die Ein heit aus od er senkt den
eingestell ten We rt
Di splay
CO2
HOLD
MAX
TEMP
MIN
DP
AVG
AM
PM
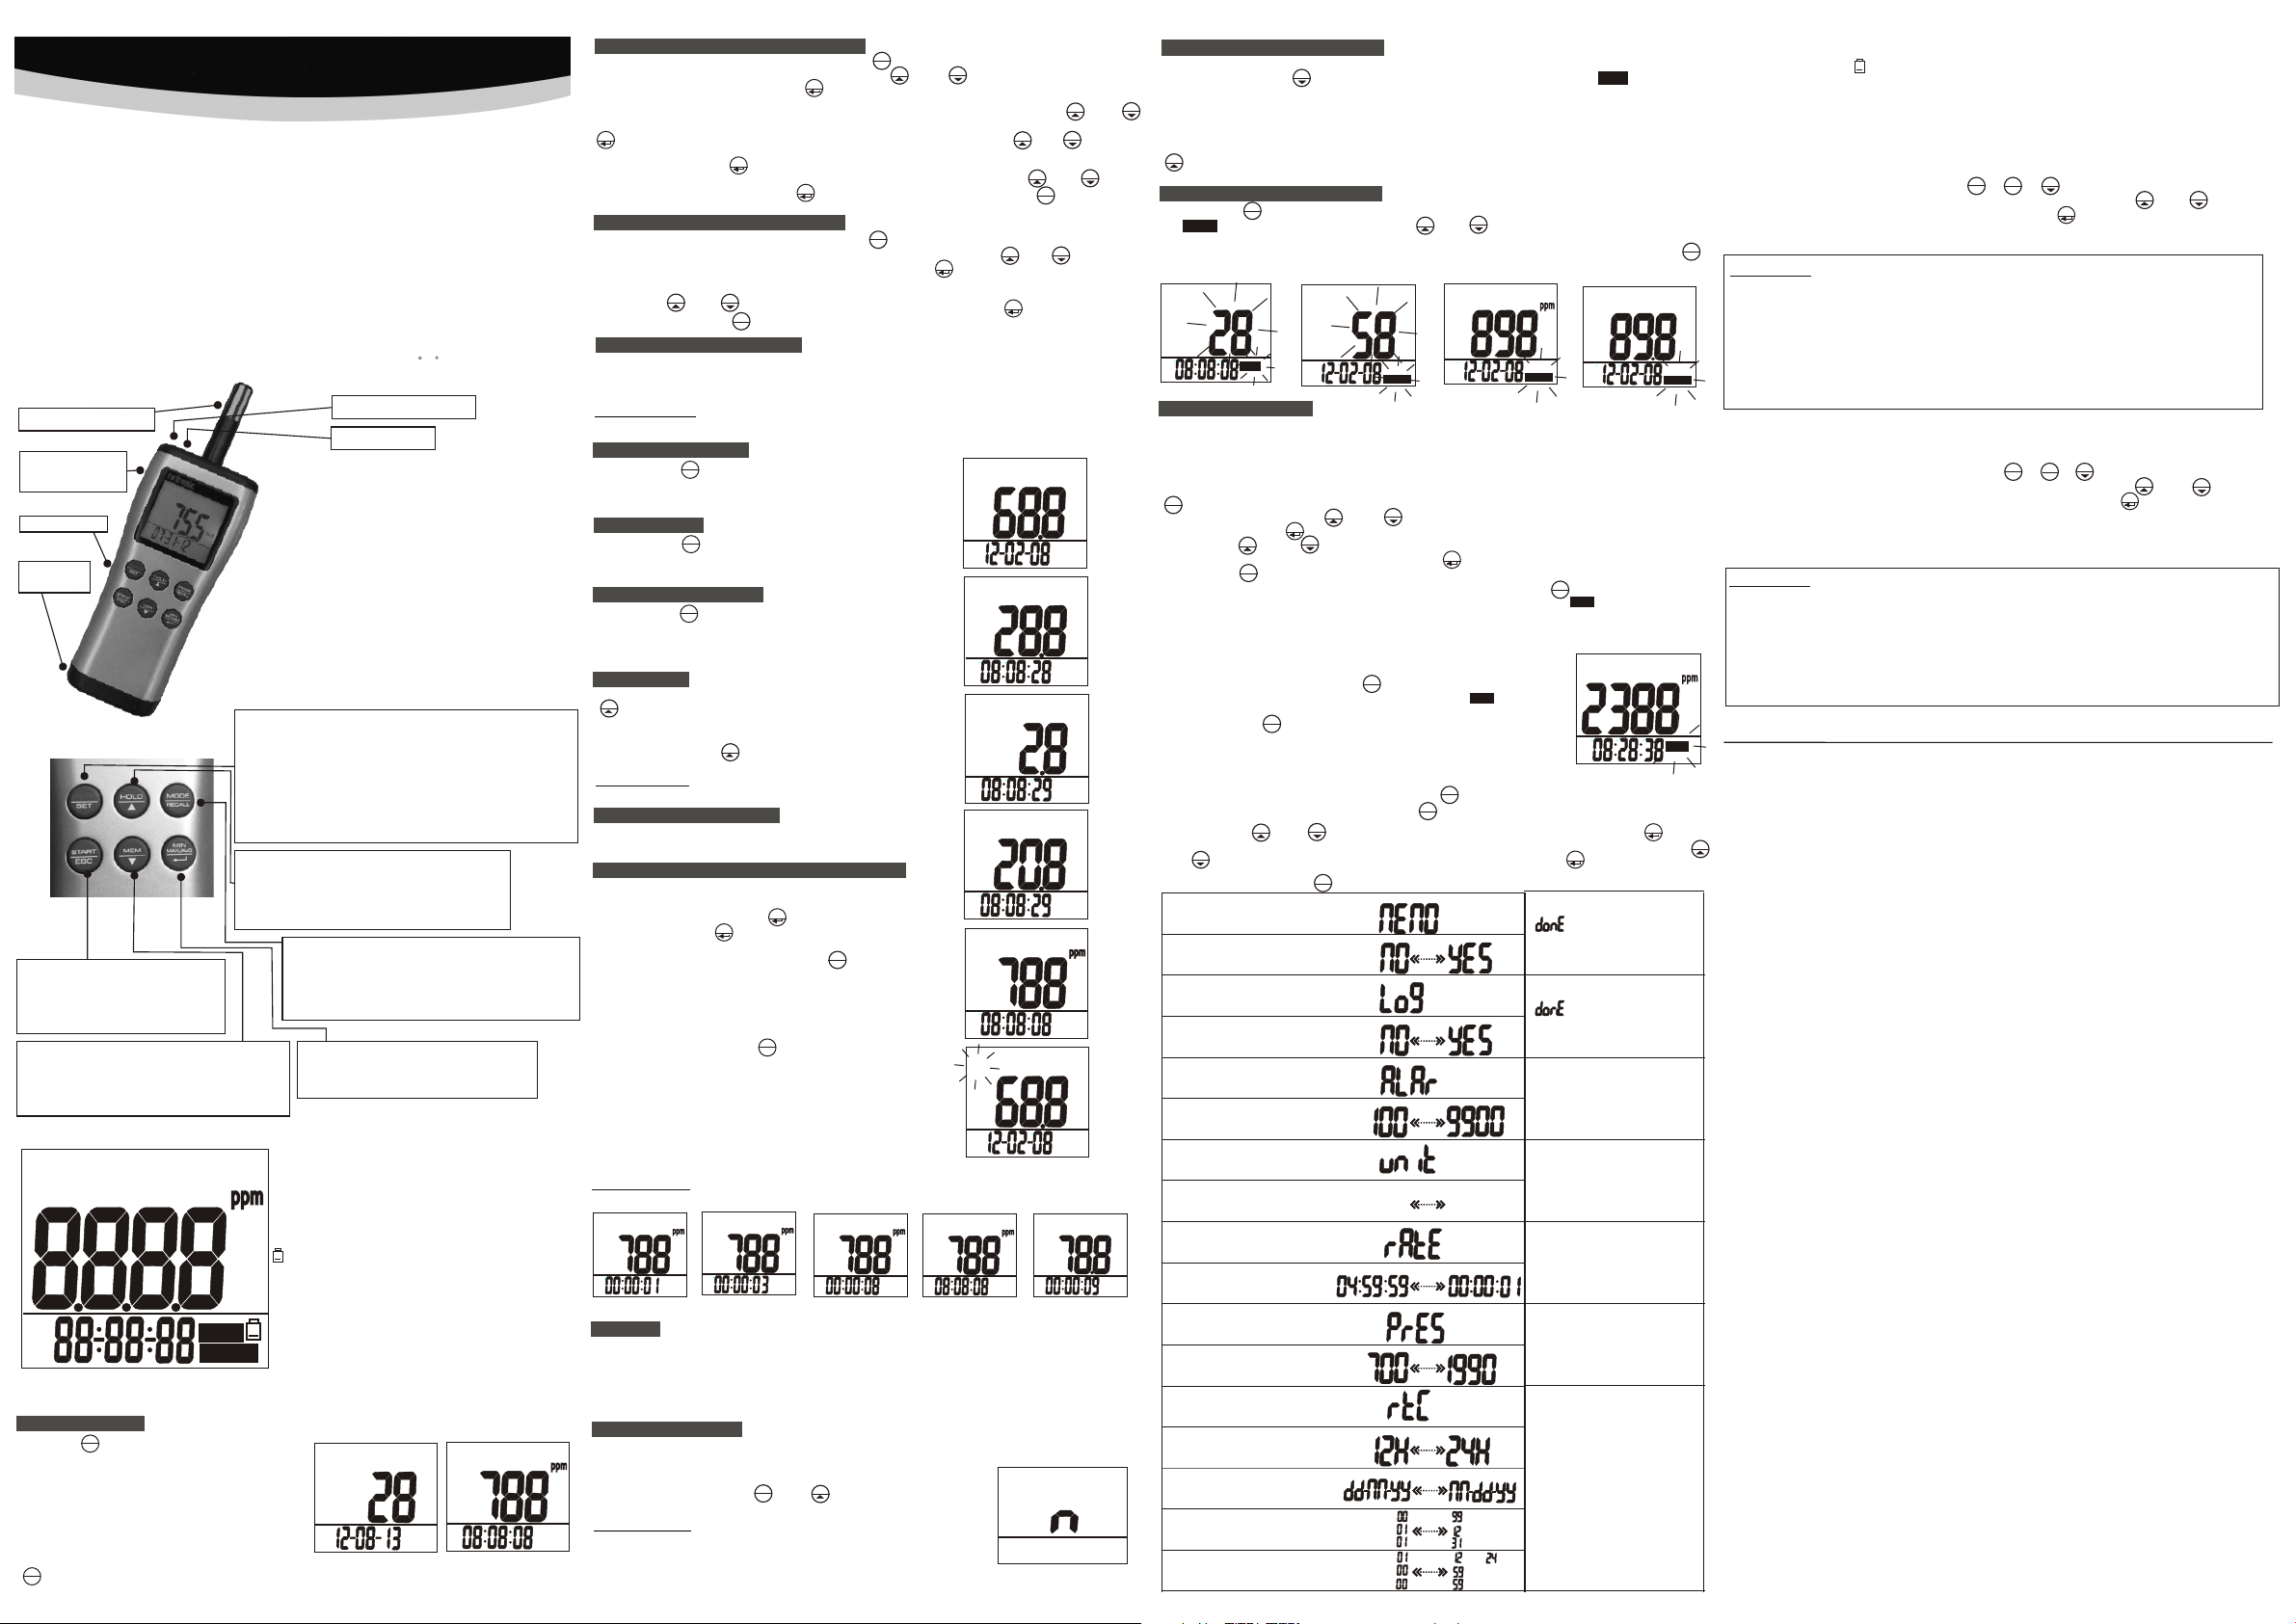
Be dienung
POWER ON/OFF
Halten Sie 2 Sek unden lan g gedrückt, um da s
Messgerät ei nzuscha lten. Beim Eins chalten p iepst
das Gerät kurz . Das Hochf ahre n dauert 28
Sekunden. Di e Zeit wird a ls Countdown an gezeigt
(Abb. 1). Anschl ießend be finden Sie sich i m
Normalmodu s. Die Echt zeituhr wird an gezeigt
(Abb. 2). Das Da tum und die U hrzeit werden
abwechseln d angezei gt.
Um das Gerät aus zuschal ten, halten Sie d ie Taste
ON/OFF
2 Sek unden lan g gedrück t und lassen Sie di e Taste dan n wieder lo s.
ON/OFF
SET
SET
-Halten Sie di e Taste 2 Sek unden lan g gedrück t, um da s
Ger ät einzus chalten
-Halten Sie di e Taste 2 Sek unden lan g drückt und lass en
Sie d ann die Taste wiede r los, um das G erät auszusch alten
-Halten Sie di e Taste im No rmalmod us länger g edrü ckt,
um zu m Einstel lungsmo dus zu gelangen
-Drücken Sie d ie HOLD Taste, um den R uhemodus zu
bee nden
HOL D/UP
-St oppt die ak tuelle Me ssung
-Löscht die Da ta Hold Fun ktion
-Wä hlt die Ein heit aus od er erhöht die Werte der
Ein stellun gen
Obe re LCD-An zeige
WBT
CAL
REC
Recall
Untere LCD-A nzeige
CO2
HOL D
OO
MIN /MAX
CC
OO
AVG
FF
DP
%rh%rh
TEM P
WBT
%rh
°C/ °F
CAL
REC
RECALL
5VDC Adapterans chluss
PC-Anschlu ss
MOD E/RECAL L
-Halten Sie di e Taste ged rückt, um d ie angezeigte n
Par ameter zu w echseln
-Halten Sie di e Taste län ger gedrü ckt, um in den
Spe ichermo dus zu gela ngen
MIN /MAX/AVG/ENT ER
-Ak tiviert d ie MIN, MAX , AVG Funkt ion
-Sp eichert u nd beende t die Einstellu ngen
Luftfeucht igkeit/ Tem pera tur/
CO2-Messun g
Ech tzeituh ranzeig e
Kohlenstoffdio xidmess ung
Die Messunge n werden
unveränder t angehal ten
Minimum- und
Maxiummess ungen
Durchschni ttliche M essungen
Batteriest and niedr ig
Taupunkttemp eratur
Temperatur
Feu chttemp eratur
Einheit der re lativen
Luftfeucht igkeit
Celsius/Fa hrenhei t der
Temperatur
im Kalibrier status
im manuellen /automa tischen
Loggingsta tus
Recall-Mod us in manue llen
Aufzeichnu ngen
CO2
AM
Fig.1
Fig.2
DATU MS- /UHRZEITEINSTELLUNGEN
Wen n das Messgerät e ingesch altet ist, halt en Sie läng er als 2 Sekunden l ang gedrü ckt, bis Sie
in den Einstel lungsmo dus gelangen. D rücken Si e die oder Taste, um das Prog ramm P70
(rtc) anzuwä hlen und dr ücken Sie die Taste um das Pr ogramm zu s tarten.
Wählen Sie als e rstes das F ormat aus, wie di e Zeit ange zeigt werden so ll, indem S ie oder
drücken. Sie k önnen ent weder den 12h ode r 24h Modus w ählen und diese n durch Drü cken der Taste
MIN
MAX/AVG
bes tätigen . Als nächst es wäh len Sie das D atumsfo rmat i ndem Sie di e oder Tast e
drücken. Sie k önnen das D atum entweder a ls Monat- Tag-Jahr oder Tag-M onat -Jahr anz eigen
lassen. Drüc ken Sie die Taste, um I hre Wahl zu be stätige n. Ste llen Sie nu n das Jahr, de n
Monat, den Tag, die Stun den, die Mi nuten und die Sek unden ein . Drücken S ie ode r um die
Wer te einzustell en und drüc ken Sie , um diese zu b estätig en. Drücken Sie u m in den
Normalmodu s zurückz ukehren.
MAX/AVG
MIN
MAX/AVG
MIN
MAX/AVG
MIN
EINSTELLUNGEN DER E INH EITEN
Wen n das Messgerät i n Betrieb i st, halten Sie di e Tas te län ger als 2 Sek unden ged rück t, um
den Einstell ungsmod us des Messgerä tes auszu wählen. Drück en Sie die od er Taste , um
das Program P4 0 (Einhei t) auszuwähle n und drück en Sie die Taste, um da s Prog ramm zu
sta rten.
Drücken Sie od er , um °C oder ° F ausz uwählen u nd drücke n Sie um I hre Auswah l zu
bestätigen . Drücken S ie , um in d en Normal modus zur ückz ukehren .
MEM
HOLD
START
ESC
ON/OFF
SET
HOLD
ON/OFF
SET
MAX/AVG
MEM
HOLD
MEM
HOLD
HOLD
START
ESC
MEM
MIN
HOLD
MIN
MAX/AVG
MEM
MEM
MESSUNGEN VORNEHM EN
Das Messgerät begin nt di e Mes sungen, wenn es eingeschaltet ist und aktua lis iert
die Messungen sekün dli ch. Wenn die Umgebung veränder t wir d, da uert es 30
Sekunden bis der CO2- Sen sor r eagiert.
ANMERKUNG: Halten S ie da s Messgerät von Gesichtern fern, da Ausatmen
den CO2-Wert verändern kann.
LUFTFEUCHTIGKEI T
Drücken Sie , um die Luftfeuchtig kei t anzeigen zu
lassen. (Abb. 3). Das u nte re Display zeigt die
Echtzeituhr an.
TEMP,DP,WBT
Drücken Sie , um die Tempe rat ur anzeigen zu
lassen (Abb. 4, 5, 6). Da s unt ere Display zeigt die
Echtzeituhr an.
CO2 (Kohlenstoffdioxid)
Drücken Sie , um den CO2-Gehalt anz eig en zu
lassen. Nutzer sehe n die C O2- Messung in ppm auf
dem Hauptdisplay. (Abb. 7). Das untere Display zeigt
die Echtzeituhr an.
DATA HOLD
Wen n Sie sich im norm alen Display b efinden, drü cken Sie
HOLD
, um die Mes sungen anzuh alten. Das „HO LD“ Zeichen
blinkt a uf der oberen li nken Seite des L CD-Bildsch irms auf
(Abb. 8) . Alle bisherig en Messungen b leiben unver änd ert.
Drücke n Sie wieder , um di e „HOLD“ Funkt ion
aufzuh eben.
ANMERK UNG: Die Hold Fu nktion ist im Mi n/Max/AVG
Modus ni cht verfügba r.ode.
DISPLAYBELEUCHTUNG
Die Displaybeleuc htu ng wi rd durch Drücken einer
beliebigen Taste für 10 Sekunden aktiviert.
MIN, MAX. AVG, AKTUELLE ÜBERPRÜFUNG
Diese Messg erät ermöglicht es Ihnen di e minimalen,
maximalen , durchschnittlichen un d aktuellen Werte z u
überprüfe n, sobald Sie die Taste d rücken. Durch
Drücken der Taste im Normalmodus w erden die MIN,
MAX, AVG und die aktuellen Werte der Reihe nach
angezeigt . (Abb. 9 11). Drücken S ie , um in den
Normalmod us zurückzukehren. (Abb . 12)In diesem Modus
werden die en tsprechenden Messunge n und die Zeit, die
dieser Modu s aktiviert ist, angezeig t. Dieser Modus kann
bis zu 18 Stund en aktiviert sein.
Durch Drück en der Taste können Sie di e ang ezeigten
Parameter w echseln. (Abb. 13)
Sie können da s normale Display von der Aktu ellen
Überprüfu ngsanzeige unterschei den, indem Sie das
angezeigt e Zeitformat überprüfen . Auf dem normalen
Display wer den das Datum und die Zeit abwe chselnd
angezeigt . In der Aktuellen Überprüfu ngsanzeige, zeigt
das untere Di splay die Zeit an, die der max/ min/avg Modus aktivi ert i st.
ANMERKUNG : Die „HOLD“ Funktion, d ie „M ANUELLE MESSUNG“ und d ie „
RECALL“ Fun ktion sind im Min/Max/ Avg Modus n icht verfügbar.
CO2
MAX
Fig.9
MODE
RECAL L
MODE
RECAL L
MODE
RECAL L
CO2
MAX/AVG
MIN
HOLD
AVG
Fig.10
RECAL L
Fig.3
%rh%rh
TEMP
OO
CC
Fig.4
AM
DP
OO
CC
Fig.5
AM
WBT
OO
CC
Fig.6
MAX/AVG
MIN
AM
CO2
START
ESC
Fig.7
AM
MODE
HOL D
Fig.8
%rh%rh
CO2
Fig.11
CO2
AM
Fig.12
MAX
%rh% rh
Fig.13
ALARM
Das Messgerät hat ein en hö rba ren Alarm, um Sie zu warnen, wenn die CO2-Grenze
überschritten wir d. (I n den Einstellung des Messgerätes können Sie die j ewe iligen
Grenzwerte einste lle n.) Es piepst (ca. 80dB), wenn der CO2-Gehalt den ei nge stellten
Grenzwert übersch rei tet und hört erst dann auf, wenn die Messungen unter d em
eingestellten Wert liegen. Es piepst erneut, wenn der Wert die Grenze übersteigt.
AUTO POW ER OFF
Das Messger ät schaltet sich automati sch aus, wenn es 20
Minuten lan g nicht benutzt wurde. Um die se Funktion zu
übergehen , schalten Sie das Messgerä t zunächst aus.
Anschließ end halten Sie und für 2 Sek und en gedrückt
und schalte n das Messgerät ein bis ein „n“ e rscheint. (Abb. 14)
ANMERKUNG : Die automatische Ruhefu nktion ist während
des Kalibri erungs- und des automa tis chen
Aufzeichn ungsmodus nicht verf ügb ar. Der automatische
Ruhemodus i st während der Benutzu ng de s Adap ter s
NICHT autom atisch ausgeschalt et.
ON/OFF
HOLD
SET
Fig.14
MANUELLE AUFZEICHN UNG EN
Das Mess gerät beinha ltet einen 99 Pu nktspeiche r. Drücken Sie im N orm almodus oder i m
Holdmo dus die Taste , u m mit den Aufzeic hnungen zu beg innen. Das Zei chen und
das Haup tdisplay leu chten dreima l auf. Die Numme r der Speicherrei henfolge wer den auf
dem Haup tdisplay mit b is zu 99 Punkten a ngezeigt. Di e Speicherda ten e nthalten all e
Inform ationen zu den P arametern, n icht nur dienj enigen, welc he ge rade angezei gt werden.
Wen n der 99 Punktsp eicher voll is t, erscheint d ie Nachricht „ FUL L“ auf dem Bilds chirm.
Wen n Sie das Gefühl h aben, dass die Au fzeichnung en zu schnell we chs eln, können Si e die
HOLD
Taste d rücken, um die a ktuellen Aufz eichnungen z u stoppen und di e Dat en dann
manuel l aufzeichne n. Die Funktio n ist im Min/Max M odus nicht ver füg bar.
99 PUNKTE SPEICHERM ODU S
Halten Sie die Taste im No rmalmod us oder im Holdmo dus länge r als 2 Sekun den ge drückt, b is
Rec all
das -Zeichen a ufleuch tet. D rücken Si e oder um die g espe icherte n Inhalte
durchzublä ttern. Zu nächst wird die N ummer der S peicherreih enfolge a uf dem Haupt-LC D-Displ ay
angezeigt, d anach wer den die Aufzeich nungen an gezeigt. (Abb . 16 und 17). D rücken Sie die
Taste um den angez eigten Pa rameter zu ände rn. (Abb. 1 8). Die Zeit die im S peicher modus zeigt an,
wie lange aufg ezeichn et wurde.
AM
Fig.15
DATE NPR OTOKOLL
Das Mess gerät kann die L uftfeuchti gkeit, die Temperatur und d en CO 2-Gehalt aut omatisch
aufzei chnen und die Um gebung langf ristig überw ach en. Die Speich erkapazitä t beträgt 6000
Punkte f ür jeden Param eter. Nutzer kö nnen die Abtast frequenz von 1 S eku nde bis zu 4
Stunde n 59 Minuten und 5 9 Sekunden ein stellen. Die Werksein ste llungen betr agen 30
Sekund en.
Um die Abta stfrequenz e inzustelle n, während das M essgerät ein ges chaltet ist, h alten Sie
ON/OFF
länger a ls 2 Sekunden ge drückt, bis Si e in den Einstel lungsmodus des Me ssgerätes
SET
gelang en. Drücken Si e die oder Tast e, um das Progra mm P50 (rAtE) au szuwählen
und drüc ken Sie die Tast e, um das Progra mm zu starten.
Drücke n Sie oder , um die St unden-, Minu ten- und Sekun denanzahl de r
Abtast frequenz aus zuwählen und d rücken Sie , um Ih re Auswahl zu bes tätigen.
Drücke n Sie , um wieder in d en Normalmod us zurückzuk ehren.
Nachde m Sie eine Abtast frequenz aus gewählt habe n, ha lten Sie 2 Se kun den lang im
Normal modus gedrüc kt, um das Proto kollprogra mm zu starten. D as -Zeichen le uch tet
auf, um de n Protokolls tatus anzuze igen. Das Haup t-LCD-Disp lay
zeigt de n Echtzeitwe rt an. Das unter e Display zeig t die Echtzeit uhr
an. (Abb . 19)
Wieder holen Sie das ob en genannte, u m ein weiteres P rotokoll zu
erstel len. Wenn d er Protokoll speicher vol l ist, wird das Ze ich en
„FULL“ a ngezeigt. Ha lten Sie die Taste 2 Sekunden l ang
gedrüc kt, um das Daten protokoll zu s chließen. Da s -Zeichen
leucht et nicht mehr au f.
Drücke n Sie die Taste , um in den Modus Ih rer Wa hl zu gelangen .
Mit Ausnah me der Modusau swahlfunkt ion , sind auto powe r off, min/
max, man uelle Aufzeic hnungen, die H old- und Speic her funktion
währen d des Protokol lierens nich t verfügbar.
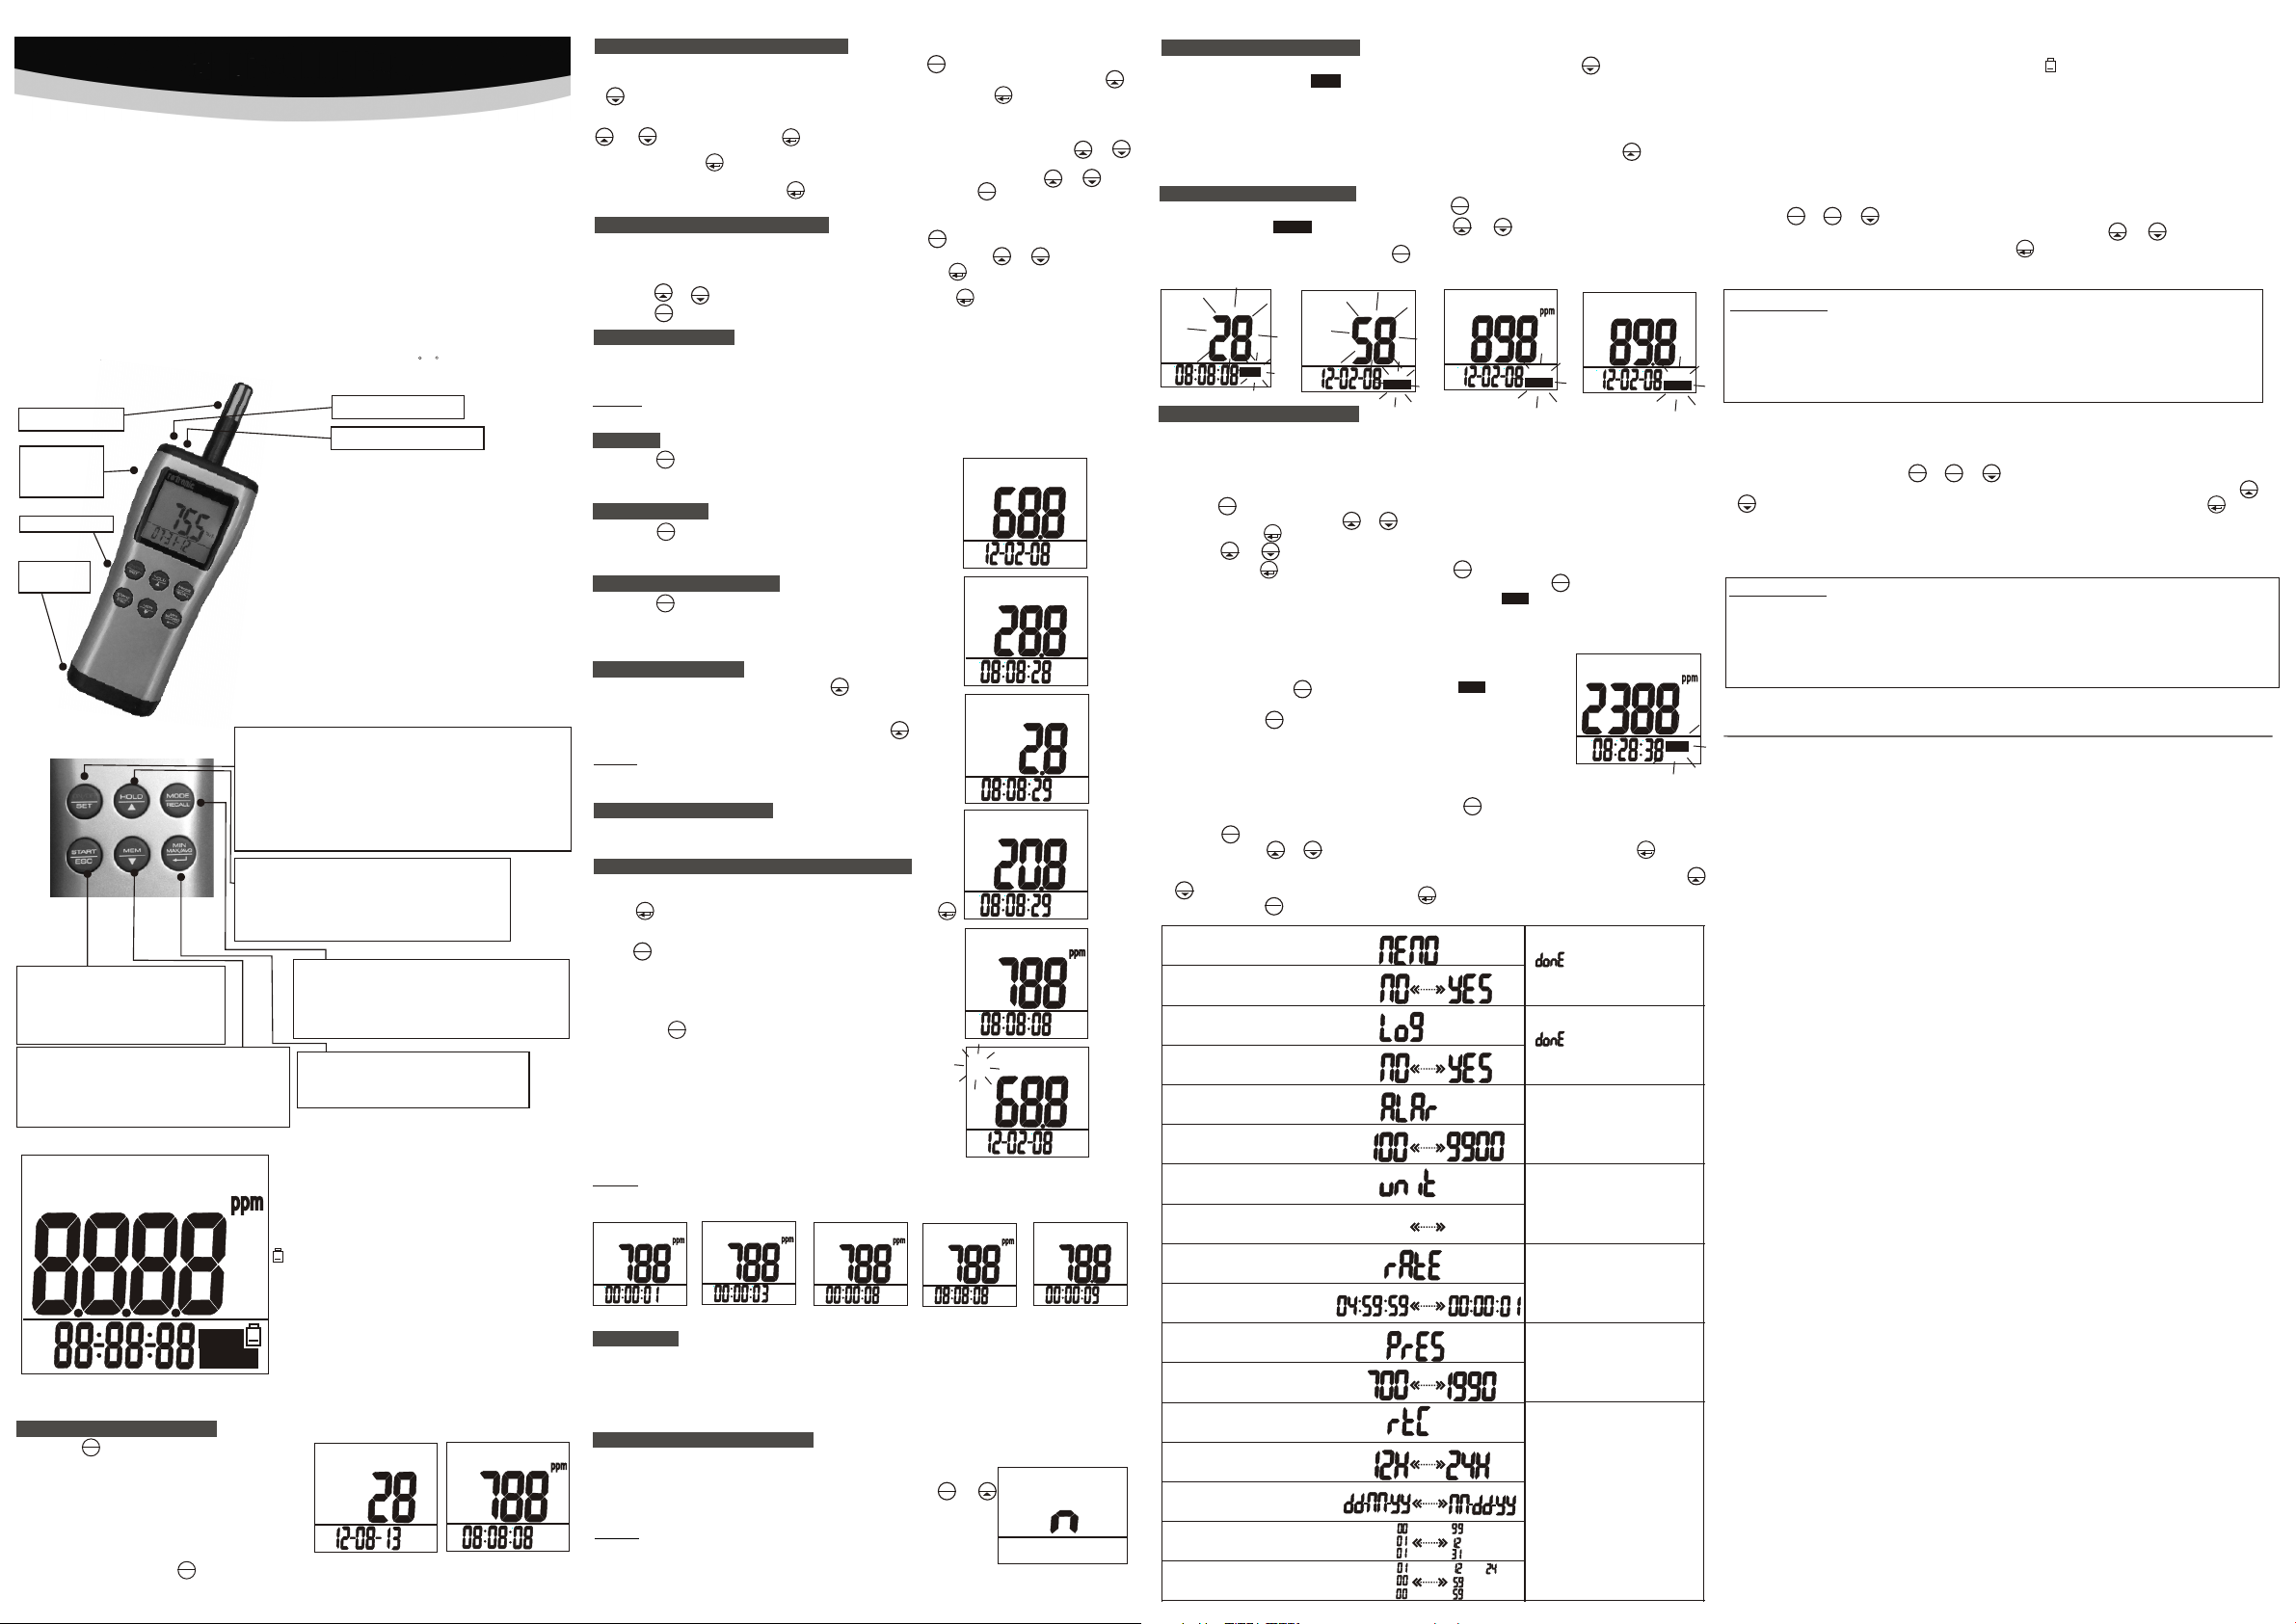
Me ssgerätei ns tellung en
Wen n das Messgerät e ingesch altet ist, halt en Sie läng er als 2 Sekunden g edrückt , um in den
Einstellun gsmodus z u gelangen. Drü cken Sie , um w ieder in den Norm almodus z urückzukehr en.
Drücken Sie di e oder Tast e, um das Pro gramm auszuwä hlen und dr ücken Sie um es
zu st arten. Di e program mierbaren Ein stellun gen leuchten au f dem Displ ay auf. Drücken S ie die
MEM
oder Taste, um die Einst ellunge n auszuwählen u nd drücke n Sie die Taste, um Ihr e
Auswahl zu bes tätigen . Wenn S ie in das Hau ptme nü zurück kehren wo llen , ohne Ihre Au swahl zu
speichern, d rücken Si e die Tast e.
P 10, 9 9 Pun ktespeicher
löschen
P 11, wä hle n Sie ja oder
nein (yes oder no)
P20, auto Protokoll dat en
löschen
P21, wählen Sie ja oder
nein (yes oder no)
P30, CO2-Alarm Eins tel lungen
P31, wählen Sie
zwischen 1000 und 990 0
P40,
Temp eratureinh eiteinstel lungen
P41, wählen
Sie °C oder °F
P50, Abtastfrequenz
des Protokolls
P51, wählen Sie von
04:59:59 bis
00:00:01
P60, Druckausglei ch
P61, wählen Sie zwisc hen
700 und 1990hpa
P70, Echtzeituhre ins tellungen
P71, wählen Sie das
Format: 12h oder 24h
Wählen Sie das
Datumsformat aus
Geben Sie Jahr/
Monat/Tag ein
Geben Sie Stunde /
Minute/Sekun de ei n
REC
HOLD
START
ESC
RECAL L
MEM
MODE
MEM
HOLD
REC
MODE
RECAL L
CO2
%rh%rh
Fig.17
Rec all
START
Rec all
Fig.18
ESC
REC
MAX/AVG
Rec all
Fig.16
HOLD
MIN
MEM
MEM
MIN
MAX/AVG
CO2
START
ESC
MODE
RECAL L
MEM
HOLD
START
ESC
o
C
Jahr
Monat
Tag
Stu nde
Minute
Sekunde
START
REC
AM
REC
Fig.19
ON/OFF
SET
ESC
MIN
MAX/AVG
Anmerkung:
„ “ wird angezeigt,
während der Speiche r
gelöscht wird.
Anmerkung:
„ “ wird angezeigt,
während der Speiche r
gelöscht wird.
Anmerkung:
- Die Werk sei nstellungen
betragen 1000ppm.
- Die Skala kann immer um
100ppm verstellt we rde n.
Anmerkung:
- Wer kse ins tellungen °C
o
F
Anmerkung:
- Die Werk sei nstellungen
betragen 30 Sekunde n
- Das Format ist Stunde :
Minute:Sekunden
Anmerkung:
- Die Werk sei nstellungen
betragen 1013hpa
- Die Skala kann immer um
1hpa verstellt werd en
Anmerkung:
- Die Werk sei nstellungen
betragen 12h und das
Format Tag-Mon at- Jahr
MAX/AVG
MIN
HOLD
or
Batteri ea nzeige
Die Batterianzeig e leu cht et auf, wenn der Batteriestand zu niedrig ist . Bit te
wechseln Sie die Batt eri en, u m eine genaue Messung zu gewährleisten. Für
Langzeitmessung en un d Dat enprotokolle wird die Nutzung eines Adapte rs
empfohlen (option ale s Zub ehör: AC1214)
Lu ftfeu chtigkeitska li brierung
Das Mess gerät kann ent weder mittel s einer 35 % oder 80 % S alzlösung od er ei nem
Feucht egenerator k alibriert we rden. Es wird em pfohlen, das s die U mgebungsbe dingungen
bei 25°C l iegen. Legen S ie die Messson de in eine 35%iS alz lösung, währ end das
Messge rät ausgesch altet ist.Ha lten Sie , , 3 Sekun den lang gleic hze itig
gedrüc kt, um in den Kali brierungsm odus zu gelang en. Drücken Si e ode r , um die
die 35. 0% Kalibrier ung auszuwäh len und drücke n Sie , um ihn zu stop pen.“CAL“ un d
der Kali brierungsw ert leuchten a uf dem LCD Bilds chirm auf. Das d eta ilierte
Kalibr ierungsver fahren könne n Sie im Interne t auf www.rotro nic -humidity.com nachle sen.
WARNUNG:
Kalibrieren Sie die F euc htigkeit nicht ohne das Standardkalibri eru ngssalz,
ansonsten können sc hwe re Schäden die Folge sein. Für das
Kalibrierungssa lz od er andere Dienstleistungen, kontaktie ren S ie Ihren
Händler.
Die Einpunktkalib rie rung kann den Fehlercode E11 oder eine unge nau e
Messung verursach en. F ühren Sie immer die Zweipunktkalibrieru ng du rch,
um das Verfahren zu been den . Kalibrieren Sie zunächst eine geringe
Luftfeuchtigkei t.
ON/OFF
SET
START
MEM
ESC
MIN
MAX/AVG
MEM
HOLD
CO 2-Kalib ri er un g
Die Werkseinste llungen des Me ssgerätes si nd standardm äßi g auf 400ppm CO2 -Gehalt
kalibr iert. Es wird em pfohlen, reg elmäßig eine m anuelle Kalibri erung durchz uführen, um
die Gena uigkeit zu gew ährleisten . Halten Sie , , 3 Sek unden lang gleich zeitig
gedrüc kt, um in den Kali brierungsm odus zu gelang en. Drücken Si e ode r , um die
0ppm ode r 400ppm CO2 Kal ibrierung au szuwählen. D rüc ken Sie , um in den Mo dus zu
gelang en. „CAL“ und de r CO2 Wert le uchten auf dem L CD Bildschir m auf . Wenn Sie di e
0ppm CO2 K alibrierun g gewählt habe n, entfernen S ie den Deckel an der Rü ckseite des
Messge rätes und folg en Sie den Anweis ungen des Kali bri erungsgerä ts.Das detai lierte
Kalibr ierungsver fahren könne n Sie im Interne t auf www.rotro nic -humidity.com nachle sen
WARNUNG:
Kalibrieren Sie das M ess gerät nicht in einer Umgebung mit unbekannt em
CO2-Gehalt, anson ste n wird es standardmäßig auf 0 oder 400ppm kalib rie rt,
was zu ungenauen Mess ung en führen kann.
Stellen Sie sicher, da ss di e Batterien während der Kalibrierung gela den s ind,
um eine Unterbrechu ng od er eine fehlerhafte Kalibrierung vorzub eug en. Wenn
die Genauigkeit des M ess geräts nach langer Benutzung nicht mehr
gewährleistet wer den k ann, wenden Sie sich an den Händler, um eine
Standardkalibri eru ng vorzunehmen.
ON/OFF
SET
START
MEM
ESC
MAX/AVG
HOLD
MIN
MEM
Pr ob lembeha nd lung
Fehler Nachricht Lösung
E01
Der CO2-Sensor ist ni cht
funktionsfähig
E33
Der CO2-Sensor ist ni cht
funktionsfähig
E02
Der Messwert ist zu
niedrig
E03
Der Messwert ist zu hoc h
E04
Der originale Daten feh ler
hat diesen Fehler zur F olg e
(DP, WB)
RH Kalibrierungsf ehl er
E11
Temperatursensor od er
E31
AD beschädigt
Speicher IC beschäd igt
E32
RH-Sensor oder Scha ltu ng
E33
Beschädigt
Schalten Sie das Mess ger ät
aus und wieder ein
Wiederholen Sie die
CO2-Kalibrierun g
Platzieren Sie das Me ssg erä t in
einer normalen Umge bun g
Platzieren Sie das Me ssg erä t in
einer normalen Umge bun g
Beheben Sie den origi nal en
Datenfehler
Wiederholen Sie die
Luftfeuchtigkei tsk aibrierung
Bringen Sie das Gerät z ur
Reparatur
Bringen Sie das Gerät z ur
Reparatur
Bringen Sie das Gerät z ur
Reparatur
Tec hnische D aten
Luftfe uchtigkeit / G enauigkeit :
Temperat ur / Genauigke it:
CO2-Ge nauigkeit
Speich erung und Über tragung:
Betrie bslimit der El ektronik:
Speich er:
Größe, m m:
Gewich t:
Batter ie:
Gleich stromtyp:
PC-Verb indung:
0. 1% bis 99. 9%/ +- 3. 0%( 10 ~95% @25°C) , +-5 % (andere)
-20... 60°C/+-0,3 °C@5~40°C
0...99 99ppm/+-(3 0ppm+5% der
Messun gen)@0~500 0ppm
-20... 60°C/10... 90%rh, nicht
konden sierend
0...50 °C für CO2, -20. ..60°C für
die übri gen Paramete r/ nicht
konden sierend
99 manue lle Aufzeichn ungen,
60 Speic herungen bei Au toprotokol l
234 (L)x 77(B)x42(H )
200g
4 AA Alkalibat terien
1 5VDC, 25 0mA, optiona l erhältlich
Mini-U SB-Anschlu ss
Op tionale s Zu behör
Artikelnummer
5VCD Universalada pte r: Ac1214
CO2-Kalibrator: C O2 CA LIBRATOR
ROTRONIC AG, CH-8303 Bassersdorf
Tel. +41 44 838 11 44, w ww.rotronic.com
ROTRONIC Messgerä te Gm bH, D-76275 Ettlingen
Tel.+49 7243 383 250, www. rot ron ic.de
ROTRONIC SARL, 56, F- 771 83 Croissy Beaubourg
Tél. +33 1 60 95 07 10, www.ro tro nic .fr
ROTRONIC Italia srl , I-2 0157 Milano
Tel. +39 2 39 00 71 90, www.rotr oni c.i t
ROTRONIC Instrume nts ( UK) Ltd. West Sussex RH10 9EE
Phone +44 1293 571000 , www. rot ronic.co.uk
ROTRONIC Instrume nt Co rp. NY 11788, USA
Phone +1 631 427-3898 , www. rot ronic-usa.com
ROTRONIC South East Asia Pte Ltd., Si nga por e 339156
Phone +65 6294 6065, ww w.ro tro nic.com.sg
ROTRONIC Shanghai R ep Of fice, Shanghai 200233, China
Phone +86 40 08162018 , www. rot ronic.cn
Page 2
SERIE DI CP11
MA NUA LE D I ISTRU ZI ONI BREVE
Congratulazioni p er l' acq uisto del nuovo strumento portatile per la mi sur a di umidità,
temperatura e CO2. Si p reg a di leggere queste brevi istruzioni con attenzi one p rima
di installare il disp osi tiv o.
De scrizio ne g enerale
Il CP11 è un da tal ogger accurato portatile che visualizza e r egi stra umidità relativa,
temperatura, CO2 e ca lco la i parametri come il punto di rugiada e bulbo umido.
Queste brevi istruz ion i sono limitate a una descrizione delle principa li fu nzi oni e
l'installazione d el di spo sitivo. Il dettagliato manuale di istruzi oni p uò es sere trovato
sul sito internet www. ret ron ic-humidity.com
Pr og ramm az ione
La maggior parte dell e imp ost azioni, ad esempio eliminazione di memori a, al lar me
CO2, unità (°C/°F), c omp ensazione di pressione e orologio in tempo reale p oss ono
essere modificati u til izz ando i tasti funzione.
sonda integr ata
Sensore
integrato co n
tap po di
calibrazio ne
Buco treppie de
Vano
batteria
Al imentaz io ne Elettr ic a
Il CP11 uti liz za 4 batterie alcaline AA o adattatore
5VDC (accessorio op zio nal e). Per inserire
(sostituire) le bat ter ie. Per inserire (sostituire) le
batterie, si prega di u til izzare il cacciavite in
dotazione a liberar e 2 vit i e met tere le batterie in
polarità corretta c on un b uon c ontatto.
Co lleg amento al P C o La ptop
Collegare il CP11 tramite cavo mini USB ad un PC
o Laptop. I dati regist rat i possono essere
facilmente scaric ati c on il software allegato.
Tas ti d elle Funz io ni
STAR T/ESC
- Avvi are la modalit à di
regist razione auto matica
- si esce da lla configur azione /
richia mo / registraz ione
MEM/DO WN
- Premer e per registra re manualmen te la
lettur a
- Selezi ona l'unità o di minuisce il va lore
nella co nfigurazio ne
Scherm o
CO2
HOLD
MAX
TEMP
MIN
DP
AVG
AM
PM
Far funzi on ar e
ACCENDERE / SPEGNER E
Premere per 2 seco ndi per accendere il
misuratore.All' acc ensione, emette un breve
segnale acustico ed e seg ue 28 secondi del
conto alla rovesc ia ( Fig.1) per il misuratore
per riscaldarsi, poi entra in modalità
normale con un oro log io v isualizzato in
tempo reale (Fig. 2). Data e ora vengono
visualizzati a tu rno .
Per spegnere, preme re pe r 2 secondi e
poi rilasciare il tas to pe r spe gnere il misuratore.
ON/OFF
SET
ON/OFF
ON/OFF /SETUP
- Premer e per 2 secondi pe r accendere lo s trumento
- Premer e per 2 secondi, p oi rilasciar e il tasto per
spegne re
- In modal ità normale, p remere più a lun go per
entrar e nella modali tà di configur azione
- Premer e il tasto di CONS ERVAR E (HOLD) per
disatt ivare la modal ità di sonno.
HOLD/U P
- Si blocc a le letture cor renti
- Annulla l a funzione di co nservare i dat i
- Selezi ona l'unità o au menta il valor e
nella co nfigurazio ne
LCD supe riore
OO
CC
OO
FF
%rh%rh
LCD infe riore
Co2
CONSERVARE
MIN/MA X
AVG
DP
TEMP
WBT
%rh
°C/°F
CAL
REC
WBT
CAL
REC
Recall
RICHIA M
SET
Porta adatta tore 5Vdc
Porta di colle gamento P C
MODE/R ECALL
- Premer e per passare al p arametro
visual izzato
- Premer e a lungo per entr are nel richia mo
memori a
MIN/MA X/AVG/EN TER
- Attiva le f unzioni di MIN , MAX, AVG
- Salva e fi niture le conf igurazioni
Umidit à/TEMP/CO2 …….lettura
Vis ualizzazio ne dell'orol ogio di
tempo re ale
Lettur a di biossido di c arbonio
Le lettu re sono tenuta e i nvariati
Lettur e di massimo / min ime
Lettur a media
Indica tore di batter ia scarica
Temperat ura di punto di ru giada
Temperat ura
Temperat ura di bulbo umi do
Unità di u midità relat iva
Temperat ura in gradi Cel sius /
Fahrei nheit
In stato d i calibrazio ne
In stato d i registrazi one
manual e o automatica
OModali tà di richiamo d i
regist razioni manu ali
CO2
AM
Fig.1
Fig.2
CONFIGURAZIONE DI D ATA E ORA
Quando lo str umento è acceso, conserva re premuto per più di 2 seco ndi f ino a
quando entr are nella modalità di confi gurazione del misurator e. Premere il tasto
MEM
o per selezio nare il programma P70 (rtc) e p remere il tasto per entr are .
In primo luog o, scegliere il formato di te mpo come il sistema di 12 or e o 24 o pr emendo
MEM
HOLD
o e quindi prem ere per confermare. In s eco ndo luogo, scegliere i l
formato del la data come mese-giorno- anno o giorno-mese-a nno p remendo o
e quindi prem ere per confermare. Or a, in iziare a inserire il tem po re ale del valore
dell'orol ogi o di anno, mese, giorno, o ra, minuto alla second a. Pr emere o per
seleziona re e qu indi premere per confe rmare. Premere per tor nar e allo stato
normale.
CONFIGURAZIONE DE LL' UNITÀ
Quando il mis uratore è acceso, conserv are premuto per più di 2 sec ond i fino a
quando la mod ali tà di configurazione d el misuratore. Preme re o pe r
seleziona re il p rogramma P40 (unità) e p remere il tasto per entr are .
Premere o per s elezionare °C o °F, poi prem ere p er confermare.
Premere per t ornare allo stato norm ale .
HOLD
START
MIN
MAX/AVG
MEM
ESC
MAX/AVG
MIN
MAX/AVG
MIN
ON/OFF
SET
MIN
MAX/AVG
START
ESC
ON/OFF
SET
MIN
MAX/AVG
MIN
MAX/AVG
HOLD
MEM
HOLD
HOLD
MEM
HOLD
MEM
PRESA DI MISURA
Il misuratore inizi a la mi sur azione quando è acceso e aggiorna le letture og ni
secondo. Nel caso in cu i se ca mbi a la condizione dell'ambiente operativo , ci
vogliono 30 secondi p er ri spo ndere per sensore di CO2.
NOTA: Non c onservare il misuratore vicino alle facce n el ca so in cui se
l'espirazione inf lui sce sulla Co2
Umidità
Premere per p assare alla visualizzaz ione
dell'umid ità. (Fig. 3). La visualizz azione inferiore mos tra
l'orologi o in tempo reale.
TEMP, DP, WBT
Premere per p assare alla visualizzaz ione delle
temperatu re (Fig. 4, 5, 6). La visual izz azione inferiore
mostra l'or ologio in tempo reale.
CO2 (Biossido di carb oni o)
Premere per c ambiare la modalità a CO2. L' utente
può otconse rvare la lettura di CO2 in unit à ppm sulla
visualizz azione principale. (Fig . 7). La visualizzazio ne
inferiore m ostra l'orologio in tempo r eale.
CONSERVARE I DATI
In visualiz zazione normale, premer e per bloccare le
letture. L' icona di “CONSERVARE” lampeggia in al to a
sinistra de llo schermo LCD (Fig. 8). Tutt e le letture
correnti ve ngono mantenuti invaria ti. Premere
nuovament e per annullare la funzione d i conservare.
NOTA:
La funzione d i conservare è disabil ita ta in modalità di
Min / Max / Avg.
RETROILLUMINAZI ONE
La retroilluminaz ion e si at tiva premendo un tasto
qualsiasi per 10 seco ndi .
REVISIONE IN CORSO DE GLI M IN, MAX, AVG
Questo m isuratore co nsente di cont rollare il val ore minimo,
massim o, medio e attua le dal momento i n cui si preme il
tasto . In m odalità norm ale, ogni volt a che si preme ,
visual izza MIN, MAX, AVG e il valore co rrente in sequ enza.
(Fig. 9- 11). Per tor nare alla moda lità normale , premere il
tasto pe r sfuggire (Fi g. 12).
Nelle mo dalità massi ma/minima/ media/corr ente, mostra l e
lettur e corrispond enti sulla vis ualizzazio ne principale e il
tempo ac cumulato di qu anto tempo ci si t rova in questa
modali tà. L'interv allo di tempo ma ssimo per ques ta funzione
è di 18 ore.
Premen do è possibile p assare i param etri visuali zzati.
(Fig. 13 )
È possib ile distingu ere la visuali zzazione nor mal e e
revisi one corrente s elezionand o il formato di
visual izzazione de l tempo. In visu alizzazion e normale, la
data e l'o ra vengono vis ualizzate a tu rno. In curren t review,
the lowe r visualizat ion is the accum ulated time of h ow long
you are in t he maximum, mi nimum, avera ge mode.
Nel ries ame in corso, la v isualizzaz ione inferio re è il tempo
accumu lato di quanto t empo si è in modal ità massima/
minima /media.
NOTA:
Le funzioni di “CO NSE RVARE”, “REGI STR ARE M ANUALMENTE” e
“RICHIAMARE” sono d isa ttivate in modalità minima/massima/ med ia.
CO2
MAX
MIN
MAX/AVG
START
ESC
Fig.9
RECAL L
RECAL L
MODE
RECAL L
MODE
Fig.3
MODE
%rh%rh
TEMP
OO
CC
Fig.4
HOLD
AM
DP
HOLD
OO
CC
Fig.5
AM
WBT
OO
CC
Fig.6
AM
MIN
MAX/AVG
CO2
Fig.7
CO2
AM
AM
HOL D
Fig.12
MAX
Fig.13
%rh%rh
Fig.8
%rh% rh
RECAL L
MODE
CO2
AVG
Fig.10
CO2
Fig.11
ALLARME
Il misurato re dispone di allarme acust ico per dare avvertime nti q uando la concentrazi one
di CO2 supera i l limite. (Vedere la “config urazione del misurat ore ” per configurare la
soglia di all arme). Emette segnali acu stici (80dB) quando il l ive llo di CO2 supera il valor e
impostato e s i arresta solo quando le lett ure scendono di sotto de l val ore impostato. Si
emette un seg nale acustico di nuovo quan do il valore supera il limite .
SPEGNIMENTO AUTOMATI CO
Il misurato re si spegne automaticame nte dopo 20 minuti di
inattivit à. Per disabilitare la funz ione, in primo luogo, il
misurator e è in stato di spegnimento. Tenere premuto e
per 2 secondi p er accendere il misurator e finché "n" appare.
(Fig. 14)
NOTA:
La funzione d i spegnimento automa tic o viene disabilitata
durante la mo dalità di calibrazio ne e re gistrazione
automatic a. La funzione di spegni men to automatico NON
sarà disabi litata automaticam ent e quando si utilizza l'a dattatore.
ON/OFF
HOLD
SET
Fig.14
REGISTRAZIONE MAN UAL E
Il misurato re dispone di una memoria di pu nto 99. Premere il tasto p er av viare la
registraz ione, l'icona di e il display p rincipale lampegge rà 3 vo lte. Il numero di
memoria seq uenziale verrà visualiz zato sul display princ ipa le con 99 punti al massimo .
I dati nella me moria contiene le informa zioni di tutti i paramet ri e no n solo il parametro
visualizz ato. Quando tutti i 99 punti de lla memoria sono occup ati , un messaggio che
indica "PIE NO" viene visualizzato su llo schermo. Se pensat e che l a lettura sta
cambiando t roppo velocemente, è poss ibile innanzitutto p rem ere il tasto per
bloccare la l ettura corrente, quindi m anualmente registr are i d ati. Questa funzione d i
registraz ione sarà disabilitata ne l modo minimo / massimo.
RICHIAMO DI 99 MEMORI E
In modalità n ormale o attesa, Premere il t asto per più di 2 secondi fi no a qu ando
lampeggia l 'ic ona (Richiamo). Prem ere o per scorrere i ricor di. Il numero
della memor ia sequenziale mostra in pr imo luogo sul LCD principal e e la lettura viene
dopo. (Fig. 1 6 e 17). Premere il tasto pe r cam biare il parametro di vi sua lizzazione.
(Fig. 18). Il t empo dimostrato in mod o di ri chiamo della memoria è i l tem po di
registraz ione di questa memoria.
Recall
REC
MODE
RECAL L
CO2
RECAL L
MODE
MEM
HOLD
AM
Fig.15
REC
Fig.16
Rec all
Fig.17
Rec all
MEM
HOLD
%rh%rh
Rec all
Fig.18
REGISTRAZION E DEI D ATI
Il misurato re può registrare automat icamente l'umidità /TE MP/CO2 per il monitora ggi o
ambiental e a lungo termine. La capacit à di memoria è di 6000 punti p er og ni parametro.
Gli utenti po ssono configurare il tass o di campionamento da 1 se con do a 4 ore 59 minuti
e 59 secondi. I l tasso preregolato di fabb rica è di 30 secondi.
Per configu rare il tasso di campioname nto quando il misurato re è ac ceso, tenere
premuto per p iù di 2 secondi fino a quando ent ra la modalità di config ura zione del
misurator e. Premere il tasto o per se lez ionare il programma P5 0 (rA tE) e
premere il ta sto per entrare.
Premere o per s elezionare il tasso di c amp ionamento da ora, minu to se condo e
quindi prem ere per confermare. Pr eme re per tornare alla norm ali tà.
Dopo il tasso d i campionamento è stato sel ezionato, premere pe r 2 sec ondi in
modalità no rmale per avviare la regist razione. L'icona lam peg gia per indicare lo
stato di regi strazione e la visualizza zione principale del L CD mo stra il valore di tempo
reale. La vis ualizzazione inferior e mostra l'orologio in t emp o reale.
Ripetere il p rocesso precedente per in iziare un'altra esec uzi one
della regis trazione. Quando lo spazi o di registrazione è pie no,
esso mostra “ FULL” (PIENO). Per ter min are la registrazione d ei
dati, preme re il tasto per 2 secondi, l 'ic ona smette di l
ampeggiar e.
Premere il ta sto per passare alla mod ali tà che si desidera
vedere. Ecc etto la funzione di commuta zione della modalità , le
funzioni di s pegnimento automatico , minimo / massimo,
registraz ione manuale, conservar e e richiamo sono tutti
disabilit ati durante la registrazi one.
Co nfigurazi on e del Misur at or e
Quando il mis uratore è acceso, tenere pr emuto per più di 2 secondi f ino a q uando
si accede all a modalità di configurazi one del misuratore. Pe r usc ire dalla configuraz ion e,
premere per t ornare alla modalità norm ale.
Premere il ta sto o per selezionare il p rog ramma e premere il tasto p er
seleziona re.
La configur azione programmabile la mpeggia sulla visualizz azione, premere il tas to
o per selezio nare e premere il tasto pe r con fermare. Per uscire se nza s alvare,
premere il ta sto per tornare.
ON/OFF
SET
MIN
MAX/AVG
MEM
HOLD
MIN
MAX/AVG
MODE
RECAL L
START
ESC
HOLD
MEM
P10, elimin are la memoria
di 99 punti
START
ESC
START
ESC
HOLD
MEM
P11, sceglie re Sì o No
P20, elimin are la registrazione
automatic a dei dati
P21, scegli ere Sì o No
P30, config urazione
dell'alla rme CO2
P31, scegli ere da 100
a 9900
P40, config urazione di
temperatu ra e unità
P41, scegli ere °C o °F
P50, TASSO di campionament o
di registra zione
P51 sceglie re da
04:59:59 a 00 :00:01
P60, compen sazione della
PRESSIONE
P61, scegli ere da
700 a 1990hpa
P70, Config urazione
dell'orol ogio in tempo reale
P71, Scegli ere il
formato di 12 o 2 4 ore
Scegliere i l
formato del la data
Inserire l' anno /
mese / giorno
Inserire l' ora
Minuto / Seco ndo
Ann o
Mes e
Gio rno
Ora
Min uto
Sec ondo
MEM
START
ESC
REC
START
ESC
CO2
REC
AM
ON/OFF
SET
MIN
MAX/AVG
Nota:
“ ” viene mostr ato
quando la mem oria viene
eliminata
Nota:
“ ” viene mostr ato
quando la mem oria viene
eliminata
Nota:
- Preregola to per fabbrica
1000 ppm.
- Scala regol abile è ogni
100ppm
Nota:
- Preregola to per
o
C
o
F
fabbrica °C
Nota:
- Preregola to per fabbrica
a 30 sec.
- Il formato è
ore: minuti : secondi
Nota:
- Preregola to per fabbrica
a 1013hpa
- Scala regol abile è ogni
1hpa
Nota:
Preregola to per fabbrica
a 12H et al forma to
gg-mm-ann o
Fig.19
MIN
MAX/AVG
REC
HOLD
or
In dicat or e di b asso live llo della b atteria
Un'icona che indica i l liv ell o basso della batteria viene visualizzata q uan do
l'alimentazione è t rop po ba sso per mantenere un funzionamento normal e. Si p reg a
di sostituire con bat ter ie nuove per la misurazione accurata. Si consigl ia di u tilizzare
un adattatore (part e opz ion ale: AC1214) per la registrazione dei dati e mis ura zio ne
a lungo termine.
Ca librazione di U midità
Questo misuratore p uò es sere calibrato sia via una bottiglia di sale al 35% e 80 % o
il generatore di umid ità . La co ndizione ambientale si raccomanda di esse re st abi le
a 25°C. Mentre il misur ato re è spento, inserire la sonda sensore nel 35% sale.
Premere , e contempor ane ame nte per 3 secondi per accendere il
misuratore ed entra re in m oda lità di calibrazione. Premere o per
selezionare la tara tur a del 3 5.0% e premere per iniziare. "CAL" e il valore di
taratura lampeggi ano s ul di splay LCD. La procedura dettagliata di cali bra zio ne è
disponibile su inte rne t: ww w.rotronic-humidity.c om.
ATTE NZI ONE:
Non calibrare l'umi dit à senza il sale di calibrazione predefinita . In ca so
contrario, potreb be ca usare danni permanenti. Contattare il riv end itore per
le sale di calibrazio ne o se rvizi.
Calibrazione a punt o sin golo causerà il codice di errore E11 o lettura non
accurata. Fare semp re la c alibrazione a doppio punto per completare u n
processo. Si consig lia d i calibrare in primo luogo la bassa umidit à.
ON/OFF
SET
START
MEM
ESC
MIN
MAX/AVG
MEM
HOLD
Ca librazion e di C O2
Il misuratore è tarat o ad un a concentrazione standard di 400 ppm CO2 in fabbri ca.
Si consiglia di esegu ire l a cal ibrazione manuale regolarmente per mant ene re un a
buona precisione. P rem ere , e c ontemporaneamente per 3 secondi per
accendere il misura tor e ed en trare in modalità di calibrazione. Premer e il ta sto
MEM
o per selezionare la ca lib raz ione di CO2 a 0 ppm o 400 ppm. Premere per
iniziare e vedere "CA L" e il v alo re di CO2 lampeggiano sul display LCD. Mentre l a
scelta della calibr azi one C O2 di 0 ppm, rimuovere il tappo dal lato posterio re de l
misuratore e seguir e le is tru zioni dello strumento di calibrazione. La p roc edu ra
dettagliata di cali bra zio ne è disponibile su internet: www.rotronic -hu mid ity.com.
ATTE NZI ONE:
Non calibrare il misu rat ore in aria con concentrazione di CO2 sconosc iut a. In
caso contrario, ess o sar à calibrato come 0 o 400 ppm per impostazione
predefinita e condu ce a mi surazioni imprecise. Assicurarsi che le batterie
sono con piena ten sio ne du rante la calibrazione per impedire l'i nte rru zione o
fallito di calib raz ion e. Quando la precisione diventa un probl ema d opo un
lungo periodo di u til izzo, tornare a al rivenditore per la calibra zio ne standard.
ON/OFF
SET
START
MEM
ESC
MAX/AVG
HOLD
MIN
Ri soluzio ne d ei Problemi
Errore Messaggi Soluzione
E01
Sensore di CO2 è fuori us o
E33
Sensore di CO2 è fuori us o
E02
Il valore misurato è so tto l a
gamma
E03
Il valore misurato è so pra l a
gamma
Risultati di errore d ei da ti
E04
originali in questo e rro re
(DP, WB)
Errore di calibrazi one d i
E11
umidità relativa (R H)
Sensore di temperat ura o AD
E31
danneggiati
IC di Memoria dannegg iat o
E32
Sensore di umidità re lat iva
E33
(RH) o circuito danne ggi ato
Spegnere il misurat ore e r iav viare di nuovo
Ripetere la calibra zio ne di C O2
Mettere il misurato re in c ondizioni normali
Mettere il misurato re in c ondizioni normali
Risolvere l'error e dei d ati o riginali
Ritentare la calibr azi one d ell'umidità
Ritorno per la ripara zio ne
Ritorno per la ripara zio ne
Ritorno per la ripara zio ne
Dati Tecnici
Umidità / precision e:
Temperatura / precisi one :
CO2 / precisione:
Stoccaggio e traspo rto :
Limite di funzionam ent o
in elettronica:
Memoria:
Dimensione, mm:
Peso:
Tipo di batteria:
Tipo di alimentazione di
corrente continua ( DC) :
Collegamento al PC:
0.1% a 99.9%/±3.0%( 10~ 95% @25°C), ±5%(altro)
-20...60°C/±0.3 °C@ 5-40°C
0...9999ppm/±(3 0pp m±5% della lettura)
@0-5000ppm
-20... 60°C/10... 90r h, senza condensa
0...50°C per CO2, -20 ... 6 0°C
per il resto / senza cond ens a
99 secondi manualme nte , 600 0 secondi
registrazione aut oma tica
234 (L) x 77 (W) x 42 (H)
200 gr.
4 pezzi AA alcaline
1 pezzo 5VDC, 250mA,
opzionale disponi bil e
mini porta USB
Ac cessori o Op zionale
Numero di Parte
Adattatore univer sal e Ac1214
Calibratore di CO2 CA LIB RATORE CO2
ROTRONIC AG, CH-8303 Bassersdorf
Tel. +41 44 838 11 44, w ww.rotronic.com
ROTRONIC Messgerä te Gm bH, D-76275 Ettlingen
Tel.+49 7243 383 250, www. rot ron ic.de
ROTRONIC SARL, 56, F- 771 83 Croissy Beaubourg
Tél. +33 1 60 95 07 10, www.ro tro nic .fr
ROTRONIC Italia srl , I-2 0157 Milano
Tel. +39 2 39 00 71 90, www.rotr oni c.i t
ROTRONIC Instrume nts ( UK) Ltd. West Sussex RH10 9EE
Phone +44 1293 571000 , www. rot ronic.co.uk
ROTRONIC Instrume nt Co rp. NY 11788, USA
Phone +1 631 427-3898 , www. rot ronic-usa.com
ROTRONIC South East Asia Pte Ltd., Si nga por e 339156
Phone +65 6294 6065, ww w.ro tro nic.com.sg
ROTRONIC Shanghai R ep Of fice, Shanghai 200233, China
Phone +86 40 08162018 , www. rot ronic.cn
Page 3

SERIES CP-11
MA NU EL S IM PL IF IE
Félicitations pou r vot re achat du nouveau enregistreur portable pour h umi dité,
température et CO2. Ve uil lez l ire attentivement ce manuel simplifié ava nt de
commencer son insta lla tio n.
De scripti on g énérale
Le CP11 est u n app areil portatif qui affich e et en reg istre les données relatives sur
humidité, tempéra tur e, CO2, ainsi que les paramètres calculés comme le p oin t de
rosée et du bulbe humid e.
Ces instructions so nt de s descriptions simples sur les fonctions princ ipa les et
l'installation de c et ap par eil. Le manuel détaillé peut être trouvé sur le s ite i nternet
www.rotronic-hum idi ty.com
Pr og ramm ation
La plupart des paramè tre s, tels que effacement de mémoir e, al arme de CO2, unités
(C / F), fréquence d'éc han tillonnage, compensation de la pression et hor log e en temps
réel, sont suscepti ble s d'être modifié en utilisant les touches de fonct ion .
Capteur inté gré
Sonde de CO2
w intégrée /
bouchon de
calibrage
Trou pour
tré pied
Com parti ment
pou r batte rie
Al imentat ion
Le CP11 uti lis e 4 piles alcalines AA ou 5VDC
adaptateur (acces soi re en o ption). Pour insérer
(remplacer) les bat ter ies, utiliser le tournevis
joint pour dévisser l es 2 vi s et mettre les piles
en respectant la pola rit é ave c le bon contact.
Co nnexi on à P C ou PC port able
Brancher le CP11 via un câble mini USB à un PC
ou un portable. Le télé cha rge ment de
données enregistr ées p eut ê tre facile avec le
logiciel ci-joint .
Tou ches de Foncti on
STAR T/ESC
-Démar rer le mode
d'enre gistrement a utomatique
-Quitt er configura tion/ rappel /
enregi strement
MEM/DO WN
-Apppu yer pour enreg istrement ma nuel
de lectu re
-Séléc tionner unit é ou diminuer la v aleur
de confi guration
Af fi chage
CO2
HOLD
MAX
TEMP
MIN
DP
AVG
AM
PM
Op ér ation
POWER ON/OFF
Appuye r pendant 2 seco ndes pour allu mer
l'appa reil.Il va éme ttre un bip émit e t effectu e
28 sec. co mpte à rebours ( Fig.1) pour ré chauffe r
le compt eur, puis entre r en mode normal a vec
l'horl oge en temps rée l affiché e (Fig.2). Dat e et
heure affichent à t our de rôle.
Pour éte indre l'appa reil, appuye r pendant 2
second es et relâcher.
ON/OFF
SET
ON/OFF/SE TUP
-Appuyer sur 2 s econdes pour allumer l'ap pareil
-Appuyer sur 2 s econdes puis relâcher pou r éteindre
-En mode norma l, appuyer plus de temps pour e ntrer
dans la confi guration
-Appuyer sur H OLD pour désactiver le mode v eille
HOLD/UP
-Figer la lec tutre actuelles
-Annuler la fo nction de fige-data
-Séléctio nner unité ou augmenter la va leur
de configur ation
Upper LCD
OO
CC
OO
FF
%rh%rh
Lower LCD
Co2
HOLD
MIN/MAX
AVG
DP
TEMP
WBT
CAL
WBT
%rh
REC
Recall
o o
CAL
REC
RECALL
ON/OFF
SET
Port d'adapta teur 5VDC
Connexion PC P ort
MODE/RECA LL
-Appuyer po ur changer paramètre affiché
-Appuyer plu s longtemps pour rappel de
mémoire
MIN/MAX/AVG/ENTER
-Activer le s fonctions MIN,MAX, AVG
-Enregist rer et finir les réglages
Lecture d'Humidit é/T EMP/CO2
Horloge en temps réel
Lecture de Carbon dio xid e
Lectures sont figée s inc hangées
Lectures Minimal/ Max imun
Lecture moyenne
Indicateur de batte rie f aible
Température de point de r osé e
Température
Température de bulbe hu mid e
Unité d'Humidité re lat ive
C/ F
Température Celsius / Fah renheit
dans Etat d'étalonn age
en mode d'enregistr eme nt
manuel/automati que
en mode de rappel
d'enregistremen t man ue
CO2
AM
Fig.1
Fig.2
DATE /TI ME SETUP
Lorsque l'a ppa reil est allumé, maint enir pendant plus de 2 sec ond es jusqu'à entrer
en mode de conf iguration. Appuyer sur ou pou r sél éctionner le program me P7 0
(rtc) et appu yer pour y entrer.
Commencer d 'abord par choisir le forma t d'heure de 12 heures ou 24 h eur es en
appuyant su r ou puis pour confirmer. Deux ièmement, choisir le f orm at de
jour, comme mo is-jour-année ou jour-m ois-année en appuyant sur o u puis
MIN
MAX/AVG
sur pour conf irmer. Maintenant, entre r le temps réel de l'année , moi s, jour, heure,
minute, sec onde. Appuyer ou pour sélect ionner, puis appuyer su r pou r
confirmer. Ap puyer sur pour revenir en mod e normale.
HOLD
MAX/AVG
MIN
MEM
START
ESC
MAX/AVG
HOLD
REGLAGE DE L'UNITE
Lorsque l'apparei l est a llu mé, maintenir pendant plus de 2 secondes jusq u'à
entrer en mode de confi gur ati on. Appuyer sur ou pour séléctionner le
programme P40 (unit é) et a ppu yer pour entrer.
Appuyer ou pour sélec tio nne r F ou C, pu is ap puy er sur pour confirmer.
Appuyer sur pour reto urn er en m ode normale.
HOLD
START
MEM
ESC
ON/OFF
SET
MEM
HOLD
MIN
MEM
ON/OFF
SET
HOLD
MIN
MAX/AVG
o o
MEM
MAX/AVG
MEM
HOLD
MIN
MAX/AVG
MIN
PRENDRE MESURE
L'appareil commen ce à me sur er dès qu'il est allumé. La lecture est mise à jour
chaque seconde. Au cas o ù l'e nvi ronnement d'exploitation change, il fau t 30
secondes pour que la so nde C O2 ré pond.
Note : Ne pas tenir l'app are il proche de visage. L'expiration de CO2 pour ra
affecter le résulta t.
Humidité
Appuyer sur pour chan ger l 'affichage de l'humidité.
(Fig. 3). L'affichage en bas montre l'horloge en temps
réel.
TEMP. DP. WBT
Appuyer sur pour chan ger l 'affichage de
température.(Fi g. 4, 5 ,6).
L'affi cha ge en bas montre l'horloge en temps réel.
CO2 (Dioxyde de Carbo ne)
Appuyez sur pour chan ger l e mod e de CO2. Vous
pouvez obtenir la lec tur e de CO 2 en unité ppm sur
l'écran principal . (Fi g.7 ). L'écran inférieur affi che
l'horloge en temps ré el.
DATA HOLD
En affic hag e normal, appuyer sur pour figer les
lectures,"HOLD" i côn e clignote en haut à gauche de
l'écran LCD (Fig.8) . Toutes lectures actuelles sont
maintenues inchan gée s. App uyer sur de nouveau
pour annuler la fonct ion d e mai ntenir.
NOTE : La fonction d e ver rou illage est désactivée
en mode de Min / Max / Moy.
BACKLIGHT
Le rétro-éclairag e est a ctivé pendant 10 secondes par
appuyer sur n'impor te qu ell e touche.
MODE
RECA LL
RECA LL
RECA LL
Fig.3
MODE
%rh%rh
TEMP
MODE
OO
CC
Fig.4
AM
HOLD
HOLD
DP
OO
CC
Fig.5
AM
WBT
OO
CC
Fig.6
REVISION MIN, MAX, AVG, ACTUELLE
Cet appareil vous per met d e vér ifier la révision minimal ;
maximun, moyenne, a ctu ell e du moment où vous
appuyer sur la touche E n mod e nor mal, à chaque
appuie de il affichera la révision minimale ; maximun,
moyenne, actuelle d ans l 'or dre. (Fig. 9-11). Pour reven ir
au mode normal, appuy er su r pou r quitter (Fig. 12).
En mode de max/min/av g/c urrent, il montre les valeurs
correspondantes s ur l' écr an principal et le temps cumulé
où vous êtes en ce mode.
L'intervalle de tem ps ma xim al de cette fonction est 18
heures.
Appuyer sur peut chan ger l es pa ramètres affichés.
(Fig. 13).
Différ enc ier l'affichage normal et l a rév isi on actuelle en
vérifiant le format d 'affichage de l'heure. En affichage
normal, la date et l'he ure s 'affiche à tour de rôle. Lors de
révision en cours, l' écr an en b as est le temps cumulé de
la durée que vous êtes en m ode d e max /min/avg.
NOTE :
Les fonctions de “HOL D” & “M ANUALLY RECORD” & “RECALL” ne sont pas
activées dans les mod es de M in/Max/Avg .
CO2
MAX
Fig.9
MAX/AVG
MIN
MODE
RECA LL
CO2
MIN
MAX/AVG
AVG
Fig.10
START
ESC
CO2
Fig.11
CO2
AM
AM
CO2
AM
HOL D
Fig.12
MAX
Fig.13
%rh%rh
Fig.7
Fig.8
%rh% rh
ALARME
Cet appareil dispos e l'a lar me d'avertissement sonore pour avertir la c onc entration
CO2 qui dépasse la limi te. ( Voir ¡ °Meter Setup¡± section pour réglage du seui l
d'alarme). Il émet de s bip s (env. 80dB) lorsque le niveau de CO 2 dép asse la valeur
de consigne et ne s'arr ête q ue lo rsque le chiffre descend au d ess ous d e la valeur
réglée. Il émet un bip à no uve au lo rsque la valeur dépasse la limite.
AUTO POW ER OFF
L'appareil s'étei nt au tom atiquement après 20 minutes
d'inactivité.
Pour annuler cette fo nct ion, il faut tout d'abord que l'appareil
soit en état éteint. Ma int enir et pendant 2 secondes
pour allumer l'appa rei l jus qu'à ce que "N" apparaît. (Fig.14)
NOTE : Fonction de m ise e n vei lle sera désactivée
pendant l'étalonn age e t l'enregistrement.
Automatiquement . La fo nction de mise en veille NE SERA
PAS dé act ivée par utilisation d'un adaptateur auto mat ique.
ON/OFF
HOLD
SET
Fig.14
ENREGISTREMENT MANUEL
L'appa reil dispose d 'une mémoire d e 99 points. Dan s le mo de normal ou att ente, appuye r
sur la tou che pour comme ncer l'enreg istrement. L 'icône et l'éc ran principa l ser ont
flashé s 3 fois. La numér o séquentiel à l a mémoire s'affiche sur l 'éc ran principa l avec 99
points e n maximum. Les d onnées conte nues dans la mém oire contien nen t toutes les
inform ations des par amètrages affichées o u non affic hée s. Lorsque tou te la mémoire de
99 point s sont occupés , un "FULL" mess age sera affiché sur l'éc ran . Si vous pensez q ue
la lectu re change trop v ite, vous pouv ez appuyer sur t ouche pour fig er la l ecture en
cours, p uis enregist rer manuelle ment les donné es. La fonctio n d'e nregistrem ent sera
désact ivée dans le mod e Min / Max.
99 RAPPELS MEMOIRES
En mode no rmal ou d'atte nte, appuyer s ur la touche pen dant plus de 2 sec ond es jusqu'à
ce que l'i cône clignot e. Appuyez sur ou p our faire défi ler l es mémoires. L e
numéro d e mémoire séqu entielle affichage su r l'écran prin cip ale LCD poing et l a lecture qui
vient ap rès. (Fig16 et 1 7). Appuyez sur l a touche pour ch anger le param ètr e d'affic hage.
(Fig.1 8). L'heure affichée da ns le mode rappe l mémoire est le t emp s d'enregist rement de
cette mé moire.
AM
DATA LOGGING
L'appa reil peut enre gistrer auto matiquemen t Humidité / TEM P./CO2 pour su rveiller
l'envi ronnement à lo ng terme. La cap acité de mémoi re est de 6000 poi nts p our chaque
paramè tre. Les utili sateurs peuv ent configur er la fréquenc e d'é chantillon nage de 1
second e à 4 heures 59 minu tes et 59 second es. Le taux de déf aut est de 30 seco nde s.
Pour con figurer la fré quence d'éch antillonna ge, lorsque l' app areil est allu mé, mainteni r la
touche p endant plus de 2 s econdes jusq u'à entrer dan s le mode de confi gur ation de
l'appa reil. Appuyer s ur ou pour sélec tionner le pro gra mme P50 (Rate) e t appuyez
sur la tou che pour entre r.
Appuye z sur ou pour séle ctionner la fr équence d'éc han tillonnage d e l'heure, la
minute e t la seconde, pu is appuyez sur p our confirme r. Appuyez sur pour rev enir au
mode nor mal.
Une fois q ue la fréquenc e d'échantil lonnage est sé lectionnée, app uyer pendant 2
second es sous le mode no rmal pour comm encer l'enre gistrement . L'i cône clignot e pour
indiqu er l'état de l'e nregisreme nt et l'écran pr incipal d'af fichage indi que la valeur du t emps
réel. L' écran en bas affiche l'ho rloge en temps r éel. (Fig.19 )
Répéte r comme décrit c i-dessus pou r commencer un n ouvel
enregi strement . Alor s que l'espace d 'enregsitr ement est plei n, il
indiqu era "FULL". Po ur mettre fin à l' enregistre ment de donnée s,
appuye z pendant 2 seco ndes, l'icôn e cesse de clign oter.
Appuye z sur la touche po ur passer au mod e souhaité. Sa uf le
mode de co mmutation, l es fonctions d 'auto power off, min / max,
enregi strement man uel, fige et rap pel sont désac tivées penda nt
l'enre gistrement .
Me ter Setup
Lorsqu e l'appariel e st allumé, mai ntenir la touc he pendant plus de 2 se condes jusqu 'à
entrer d ans le mode de con figuration . Pour quitter l a configurat ion , appuyez sur po ur
reveni r au mode normal .
Appuye r sur ou pour séle ctionner le pr ogramme et app uyer sur pour sélec tionner.
Le param ètre program mable cligno te sur l'écran , appuyer sur la t ouc he ou pour
sélect ionner et appu yer sur la touch e pour confirm er. Pour quitte r san s sauvegarde r,
appuye r sur la touche po ur revenir.
P10, 99 points MEMOIR E
nettoyée
Fig.15
ON/OFF
SET
START
ESC
MEM
Recall
REC
MIN
MAX/AVG
HOLD
HOLD
REC
HOLD
MODE
RECA LL
MEM
HOLD
MODE
RECAL L
CO2
%rh%rh
Rec all
Fig.16
MEM
HOLD
MEM
MAX/AVG
MIN
Fig.17
Rec all
START
ESC
START
Rec all
Fig.18
ESC
REC
CO2
MAX/AVG
REC
AM
ON/OFF
SET
MIN
MAX/AVG
MIN
HOLD
Fig.19
START
MEM
REC
ESC
MODE
RECAL L
MEM
START
ESC
Note:
“ “affic he lorsque la
mémoire est effacée.
P11, choisir oui ou non
P20 ; donnée ENREGIST REE
effacée
Note:
“ “affic he lorsque la
mémoire est effacée.
P21, choisir oui ou non
P30 ; configurer Alarme Co2
P31, choisir entre 10 0
et 9900
P40, configurer UNI TE de
Temp éra ture
P41, Choisir C or F
P50, taux d'échanti llo nnage
enregistrement
P51, cho isir entre
04:59: 59 to
00:00: 01
P60, compensation d e
PRESSION
P61, choisir entre
700 et 1990hpa
P70, HORLOGE EN TEMPS
REEL
P71, choisir entre 12
ou 24 forme d'heure
Choisir DATE
format
Entrer Année/
Mois/ Jour
Entrer Heure/
Minute/Secon de
o o
Année
Mois
Jour
Heure
Minute
Seconde
o
C
o
F
or
Note:
- 1000ppm par défaut.
- Échelle réglable es t
chaque 100ppm
Note:
-C par défaut
Note:
-30 secondes par défa ut
-Le format est heure :
minute : seconde
Note:
-1013 hpa par défaut
- Échelle réglable es t
chaque 1hpa.
Note:
-12H & jour-mois-an née
par défaut.
In dicat eu r de batt er ie faible
Une icône de ba tterie faible " " s'affiche lorsque la puis san ce fournie est trop faib le
pour mainte nir l'opération normale . Veuillez remplacer par des p iles neuves pour une
mesure préc ise. Nous suggérons d'uti liser l'adaptateur ( piè ce en option: AC1214) pou r
le long terme d e mesure et d'enregistrem ent des données.
Et alonnage d' hu midité
Cet apparei l peut être étalonné, soit pa r 35% et 80% de bouteille de s el ou g énérateur
dl'humidi té. La condition ambiante 2 5 °C est recommandée com me st ables. Lorsque
l'apparei l est hors tension, branche r la sonde de capteur de sel à 3 5%. Ap puyer sur ;
MEM
START
, en même temps p endant 3 secondes pour allu mer l'appareil et pass er en m ode
ESC
d'étalonn age. Appuyer ou pour sélecti onner l'étalonnage 35.0 % et appuyez sur
MIN
MAX/AVG
pour démarr er. «CAL» et la valeur d'étalo nnage clignotent sur l 'éc ran LCD. La
procédure d 'étalonnage de détails pe uvent être trouvée sur l 'In ternet à
www.rotron ic-humidity.co m
ATTE NTION:
Ne pas cal ibrer l'humi dité sans le sel d e calibrage pa r défaut. Dans l e cas contrair e,
cela cau sera des domma ges permanen ts. Contacte r le revendeur p our le sel
d'étal onnage ou de ser vices.
Étalon nage à point uni que provoque ra le code d'err eur E11 ou une lect ure pas
correc te Toujour s faire étalon nage à deux poin ts pour complé ter un process us. Il
est sugg érer à calibre r l'humidité b as en premier.
HOLD
MEM
ON/OFF
SET
Ca llbrati on C O2
L'apparei l est calibré à 400 ppm de CO2, nor me de concentration da ns l' usine. Il est
suggéré de fa ire étalonnage manuel rég ulièrement pour mainten ir une bonne précision .
Appuyer sur , e n même temps pendant 3 sec ond es pour allumer l'appa rei l et
entrez en mod e d'étalonnage. Appuyer sur o u pou r sélectionner 0ppm ou
400ppm de d'é talonnage CO2. Appuyer sur s tart et voir "CAL" clign ote r et la
valeur de CO2 s ur l'écran LCD. Lorsque vou s choisissez 0ppm CO2 ca lib rage, retirez le
couvercle d u côté arrière de l'apparei l et suivez l'instruct ion d 'outil pour l'étalon nag e.
La procédur e détailée peut être trouvé s ur l'Internet à www.rot ron ic-humidity.co m
ATTE NTI ON :
Ne pas étalonner l'ap par eil dans l'air sans connaître la concentrat ion d e CO2.
Dans le cas contraire , il se ra calibré à 0 ou 400 ppm par défaut et conduit à des
mesures inexactes .
Vérifier que les batt eri es sont à pleine tension pendant l'étalonna ge po ur éviter
de l'interruption o u de l' étalonnage échoué. Lorsque la précis ion d evi ent une
préoccupation apr ès l' usage de longue période, revenir aux conces sio nnaires
pour l'étalonnage s tan dard.
ON/OFF
SET
MEM
START
ESC
HOLD
MEM
MIN
MAX/AVG
Dé pannage
Messages d' err eur S olution
E01
Capteu r de CO2 est en pann e
E33
Capteu r de CO2 est en pann e
E02
valeur m esurée est sou s étendue
E03
valeur m esurée dépas sée étendue
E04
erreur r ésulté de l'er reur de donnée s
origni ales (DP, BM)
E11
Erreur d 'étalonnag e HR
E31
Sonde te mpérature ou AD e ndommagé
E32
CI mémoi re endommagé
E33
capteu r d'humidité o u circuit endo mmagé
Éteind re l'apparei l et redémarre r
Réessa yer calibrag e CO2
Mettre l 'appareil da ns condition n ormale.
Mettre l 'appareil da ns condition n ormale.
Résoud re l'erreur d' origine de don nées
Réessa yer étalonna ge de l'humidi té.
Retour ner-le pourr éparation
Retour ner-le pour ré paration
Retour ner-le pour ré paration
Do nnées tec hniques
Humidité / précisio n: 0, 1% à 99,9% / ± 3,0% (10 ~ 95% à 25 °C), ± 5% (autre)
Température / précisi on: - 20 ... 60 ° C / 0,3 ° C @ 40 °C 5 ~
CO2 / précision: 0 ... 99 99p pm / + (30 ppm +5% de la lecture)
@ 0 ~ 5000ppm
Stockage et transpo rt: - 20...60oC/10...90% HR, sans condensat ion .
Limite de 0 ... 50 °C po ur le C O2, -20 ... 60 °C
fonctionnement à po ur le r este / sans condensation.
l'électronique:
Mémoire: 99 enre gis tre ments manuellement,
6000 enregistr eme nt automatique.
Dimension en mm: 234 (L ) x77 ( W) x42 (H)
Poids: 200gr.
Type de batterie: 4 AA alcaline
DC Typ e: 1p c 5VDC, 250mA. Disponible en option.
Connexion PC: po rt mi ni US B
Ac cessoir e en o pt ion
Référence
5VDC adaptateur uni ver sel : AC1214
CO2 calibrateur: ETALONNAGE CO2
ROTRONIC AG, CH-8303 Bassersdorf
Tél. +41 44 838 11 44, www.rotronic.com
ROTRONIC Messgerä te Gm bH, D-76275 Ettlingen
Tél. +49 7243 383 250, ww w.ro tro nic.de
ROTRONIC SARL, 56, F - 77 183 C roissy Beaubourg
Tél. +33 1 60 95 07 10, www.ro tro nic .fr
ROTRONIC Italia srl , I- 20 157 Milano
Tél. +39 2 39 00 71 90, www.ro tro nic .it
ROTRONIC Instrume nts ( UK) Ltd, West Sussex RH10 9EE
Phone +44 1293 571000 , www. rot ronic.co.uk
ROTRONIC Instrume nt Co rp, NY 11788, USA
Phone +1 631 427-3898 , www. rot ronic-usa.com
ROTRONIC South East Asia Pte Ltd, Sin gap ore 3 39156
Phone +65 6294 6065, ww w.ro tro nic.com.sg
ROTRONIC Shanghai R ep. O ffi ce, Shanghai 200233, China
Phone +86 40 08162018 , www. rot ronic.cn
Page 4

SH OR T IN ST RUCTION MANUA L
Congratulations o n you r pur chase of the new portable humidity, temperature and CO2
instrument. Pleas e rea d these short instruction carefully befor e ins tal ling the device.
Ge neral descr ip tion
The CP11 is a n acc urate hand-held datalogger that display s & rec ords relative humidity, temp erature, CO2 and calculated parameters such as d ew po int and wet bulb.
These short instruc tio ns are limited to a description of the main funct ion s and i nstallation of the device. The detailed instruction manual can be f oun d on the internet at
www.rotronic-hum idi ty.com
Pr og ramm in g
Most of the settings, s uch a s memory clear, CO2 alarm, units( C/ F), samplin g rat e,
pressure compensa tio n and r eal time clock can be changed using the functio n key s.
Integrated p robe
Built-in Co2
sensor w/
calibratio n cap
Tripod ho le
Battery
com partm ent
Power S upply
The CP11 us es 4p cs AA alkaline batteries or
5VDC adaptor (optio nal a cce ssory). To insert
(replace)the batt eri es, use the screw driver
enclosed to loose 2 scr ews a nd pu t the batteries
in correct polarity w ith g ood contact.
Co nnectio n to P C or Laptop
Connect the CP11 via mini USB cable to a PC or
Laptop. Recorded da ta do wnl oad can be easily
download with the sof twa re en closed.
Fu nctions Key
ON/OFF/SETUP
-Press 2 seconds to tur n on th e instrument
-Press 2 seconds then r ele ase key to power off
-In normal mode, pres s lon ger to enter setup mode.
-Press with HOLD key to d isa ble sleep mode
HOLD/UP
-Freezes the curren t rea dings
-Cancels data hold fu nct ion
-Selects unit or incr eas es value in setup
STAR T/E SC
-Start automatic lo ggi ng mode
-Exits setup/reca ll/ logging
MEM/DOWN
-Press to manually re cor d the r eading
-Selects unit or decr eas es va lue in setup
Di splay
CO2
HOLD
AM
PM
MAX
TEMP
AVG
MIN
DP
CAL
REC
Recall
WBT
Upper LCD Humidity/TEMP/CO2....reading
Lower LCD Real time clock display
CO2 Carbon dioxide re adi ng
HOLD Readings are hol d unc han ged
OO
MIN/MAX Minimum/M axi mun readings
CC
OO
AVG Average reading
FF
Low battery indi cat or
%rh%rh
DP De w poi nt temperature
TEMP Temperature
WBT Wet bulb temperature
%rh Unit of relati ve hu mid ity
o o
CAL In calibration status
REC In manual/autom ati c logging status
RECALL In manual records recall mode
Op er ation
POWER ON/OFF
ON/OFF
Press for 2 seconds to tu rn th e meter on.
SET
At power up, it emits a sho rt be ep and performs 28 sec. countdo wn (F ig.1) for meter
warm up, then enters no rma l mode with real
time clock displaye d (Fi g.2). Date and time
displayed in turns.
To power off , pre ss for 2 seconds and
then release key to tur n off the meter.
ON/OFF
SET
5VDC adaptor por t
PC co nnect por t
MODE/RECALL
-Press to switch disp lay ed parameter
-Press longer to ente r mem ory recall
MIN/MAX/AVG/ENTER
-Activates MIN,MA X,AVG function
-Saves and finishes s ett ings
C/ F Celsius/Fahrenh eit o f temperature
CO2
AM
Fig.1
Fig.2
DATE /TI ME SETUP
When meter is powered o n , hol d dow n for more than 2 second until entering
meter setup mode. Pre ss or k ey to select the program P70 (rtc) and press
MIN
MAX/AVG
key to enter.
First, choose the tim e for mat as 12hour or 24hour by pressing or and then
MIN
MAX/AVG
press to confirm. Sec ond , choose the date format as Month-Day-Year or DayMonth-Year by pressing or and then, pr ess k ey to c onfirm. Now, start to
input the real time clo ck va lue from year, month, day, hour, minu te to s econd. Press
HOLD
MEM
or to select and the n pre ss to c onfirm. Press to return to normal.
UNIT SET UP
When meter is powered o n , hol d dow n for more than 2 second until entering
meter setup mode. Pre ss or k ey to select the program P40 (unit) and press
MIN
MAX/AVG
key to enter.
MEM
HOLD
Press or to select o r and t hen p ress to confirm. Press to return
to normal.
TAKI NG ME ASUREMENT
The meter starts meas ure ment when power on and update readings every secon d. In
the condition of oper ati ng en vironment change, it takes 30 seconds to resp ond f or
CO sensor.
2
NOTE: Do not hold th e met er cl ose to faces in case exhalation affects CO2
HOLD
HOLD
HOLD
o
C
ON/OFF
SET
MEM
MEM
HOLD
MAX/AVG
MIN
MAX/AVG
START
ESC
MIN
START
ESC
MEM
MIN
MAX/AVG
ON/OFF
SET
MEM
o
F
Humidity
MODE
RECA LL
Press to switch to h umi dit y display.(Fig.3).The
lower display shows t he re al ti me clock.
TEMP,DP,WBT
MODE
Press to switch to t emp era tures display(Fig.4,5,6).
RECA LL
The lower display sho ws th e rea l time clock.
CO2 (Carbon Dioxide )
MODE
Press to switch th e mod e to CO 2.User can get the
RECA LL
CO2 reading in ppm unit o n mai n dis play.(Fig.7). The
lower display shows t he re al ti me clock.
DATA HOLD
In normal display, press to freeze the readings,
"HOLD” icon is flashed o n the l eft top of LCD(Fig.8). All
current readings ar e kep t unchanged. Press again
to cancel the hold func tio n.
NOTE:
The hold functio n is di sab le in Min/Max/Avg mode.
HOLD
HOLD
TEMP
AM
AM
BACKLIGHT
The backlight will be a cti vated for 10 seconds by
pressing any key.
MIN,MAX,AVG,CURRENT REVIEW
This meter allows you t o che ck the minimun, maximun,
average, current va lue f rom the moment you press the
MIN
MAX/AVG
key. Unde r normal mode, each press of ,it
displays MIN, MAX, AVG and current value in sequence.
(Fig.9~11) . To return to normal mode, press to
escape(Fig.12)
In this max/min/avg /cu rrent modes, it shows the
corresponding rea din gs on m ain display and the
accumulated time of h ow lo ng you are in this mode.
The maximum time inte rva l for this function is 18 hours.
MODE
Press can switch the di spl ayed parameters. (Fig.13)
RECA LL
Distinguishing th e nor mal d isplay and current review
by checking the time di spl ay format. In normal display,
the date & time display ed in t urn s. In current review, the
lower display is the ac cum ulated time of how long you
are in max/min/avg mo de.
NOTE:
“HOLD” & “MANUALLY RECO RD” & “ RECALL” function are disable in Min/
Max/Avg mode.
CO2
MAX
Fig.9
CO2
AVG
Fig.10
CO2
Fig.11
START
ESC
MAX/AVG
MIN
AM
CO2
AM
HOL D
CO2
AM
Fig.12
DP
WBT
MAX
%rh%rh
OO
CC
OO
CC
OO
CC
%rh%rh
Fig.13
Fig.3
Fig.4
Fig.5
Fig.6
Fig.7
Fig.8
%rh% rh
ALARM
The meter features au dib le al arm to give warnings when CO2 concentration e xce eds
the limit. (See “Mete r Set up” section for setting alarm threshold). I t emi ts be eps (Abt.
80dB) when CO2 level go es ov er th e set value and stops only when the readings
fall below the set valu e. It b eeps again when value goes over the limit.
AUTO POW ER OFF
The meter turns off automatically after 20 minutes of inac tiv ity.
To override the functio n, fi rst, the meter is in power off st atu s.
Hold down and for 2 se con ds to t urn on the meter until
“n” appears.(Fig. 14)
NOTE:
Auto sleep function w ill b e disabled during calibration &
auto recording mode . Auto sleep fun cti on WILL NOT be
disabled automati cal ly via using adaptor.
ON/OFF
SET
HOLD
Fig.14
MANUALLY RECORDING
The meter features a 99 p oin t memory. In the normal or hold mo de, p res s key
to start recording, t he ic on and the main display will be flashed 3 times. The
memory sequential n umb er wi ll show on the main display with 99 points in maxim um.
The data in the memory co nta ins all parameters information and not only the di spl ayed parameter. When al l 99 po int s memory are occupied, a “FULL” message will be
displayed on the scre en. I f you think the reading is changing too fast, you can pr ess
HOLD
key to freeze curr ent r ead ing fist then manually record the data. This recording
function will be disa ble d in th e Min/Max mode.
99 MEMORIES RECALL
In normal or hold mode, p res s key for more than 2 seconds until the icon
flashes. Press or to sc rol l the memories. The memory se que nti al number
displays on main LCD fi st an d rea ding comes after. (Fig16&17). Press key t o
switch the display pa ram ete r.(Fig.18).The time displayed in memory re cal l mode is
the recording time of t his m emory.
REC
MODE
MEM
HOLD
RECA LL
Recall
MODE
RECAL L
MEM
CO2
AM
Fig.15
REC
Fig.16
Rec all
Fig.17
Rec all
Fig.18
%rh%rh
Rec all
DATA LOGGING
The meter can automat ica lly record Humidity/TEMP./CO 2 for l ong term environment
monitor. The m emory capacity is 6000 points for each parame ter. U sers can set up
sampling rate from 1 se con d to 4hours 59 minutes and 59 seconds. Th e factory
preset rate is 30 secon d.
To setup the sampling rat e, wh en me ter is powered on , hold down for more than
2 second until enteri ng me ter s etup mode. Press or key to select the progra m
P50 (rAtE) and press ke y to en ter.
MEM
HOLD
Press or to select t he sa mpl e rate from hour, minute to second and then press
MIN
MAX/AVG
to confirm. Pres s to re tur n to normal.
After sampling rate i s sel ected, press for 2 seconds under normal mode to s tar t
logging. Th e icon flashes to indicate the logging status a nd LC D main display
shows the real time val ue. L owe r displays are real time clock.(Fig.19)
Repeat above to start a not her run of logging. While the logging
space is full, it show “F ULL ”. To terminate data logging, pres s
START
for 2 seconds, ico n sto ps fl ashing.
ESC
Press key to switc h to th e mod e you want to see. Except the
mode switching func tio n, auto power off, min/max, manu al
record, hold and reca ll fu nct ions are all disabled during logging.
MODE
RECAL L
REC
Me ter Setup
When meter is powered o n , hol d dow n for more than 2 second until entering
meter setup mode. To exit setup, press to returns to normal m ode .
MEM
HOLD
Press or key to sele ct th e pro gram and press key to select.
The programmable se tti ng flashes on display, press or key t o sel ect and
MIN
MAX/AVG
press key to confi rm. To leave without saving, press key to r etu rn.
P10, 99 points MEMORY cl ear
MAX/AVG
REC
MIN
START
ESC
START
ESC
ON/OFF
START
ESC
SET
MEM
HOLD
MIN
MAX/AVG
HOLD
Note:
“ “displayed while
memory is cleared.
START
ESC
ON/OFF
SET
CO2
AM
MEM
REC
Fig.19
P11, choose yes or no
P20, auto LOG data c lea r
Note:
“ “displayed while
memory is cleared.
P21, choose yes or no
P30, CO2 ALARM setup
P31, choose from 100
to 9900
P40, Temp . UNIT setup
P41, choose C or F
o o
P50, logging sampli ng RATE
P51, choose from
04: 59:59 to
00: 00:01
P60, PRESSURE compe nsa tion
P61, choose from
700 to 1990hpa
P70, REAL TIME CLOCK setup
P71, choose 12 or 24
hour format
choose DATE
format
Input Yea r/
Month/ Day
Input Hour/
Min./Sec.
year
month
date
Hour
Minute
Second
o
C
o
F
or
Note:
-Factory preset 100 0pp m.
-Adjustable scale i s eve ry
100ppm
Note:
-Factory preset C
o
Note:
-Factory preset at 30 s ec.
-The format is
hour:minute:sec ond
Note:
-Factory preset at 10 13h pa
-The adjustable sca le is
every 1hpa.
Note:
-Factory preset at 12 H &
dd-mm-year format .
Batter y lo w indicat or
A battery low ic on “ “ appears when the supplie d power is too low to mainta in a
normal oper ation. Please replace wit h new batteries for accu rat e measuring. Suggest
to use adapto r (optional part: AC1214) for l ong t erm measuring & datalo ggi ng.
Hu midity Ca li br ation
This meter can be calib rat ed either via 35% & 80% salt bottle or humidity genera tor.
The ambient conditi on is r eco mmended as stable 25oC. While the meter is powe red
off , plu g the s ensor probe into 35% salt. Press , , simulta neo usl y for 3
seconds to turn on the me ter a nd enter calibration mode. Press or to select
35.0% calibration a nd pr ess to start. “CAL” and calibrating value are b lin kin g on
the LCD. The de tail calibration procedure can be found on th e int ern et at
www.rotronic-hum idi ty.com
CAUTION:
Do not calibrate the hu mid ity without the default calibration sa lt. O the rwise,
it will cause permane nt da mage. Contact the dealer for calibration sa lt or
services.
Single point cal ibr ati on will cause error code E11 or non accurate readi ng.
Always do dual point ca lib ration to complete a process. Suggest to cali bra te
low humidity fir st.
MAX/AVG
MIN
ON/OFF
SET
START
ESC
MEM
HOLD
MEM
CO 2 Calibrati on
The meter is calibrat ed at s tandard 400ppm CO2 concentration in factory. It's suggested to do manual calib rat ion r egularly to maintain good accuracy. Press ,
MEM
simultaneously fo r 3 sec onds to turn on the meter and enter calibration m ode .
HOLD
Press or key to sele ct 0p pm or 4 00ppm CO2 calibration. Press to start
and see “CAL” and CO2 val ue bl ink o n LCD. While choose 0ppm CO2 calibration,
remove the cap from met er re ar side and follow up the instruction of calibrati on to ol.
The detail procedur e can b e fou nd on the internet at www.rotronic-humidit y.com
CAUTION:
Do not calibrate the me ter i n the air with unknown CO concentration.
Otherwise, it will be c ali brated as 0 or 400ppm by default and leads to
inaccurate measur eme nts.
Ensure the batterie s are w ith full voltage during the calibration to pr eve nt from
interruption or fai led c alibration. When the accuracy becomes a con cer n after
a long time usage, retu rn to d ealers for standard calibration.
MEM
2
MAX/AVG
ON/OFF
START
ESC
SET
MIN
Trouble S ho oting
Error Messages Solution
E01 CO sensor is out of order Turn off meter and re-start again
E33 CO2 sensor is out of order Retry CO2 calibration
2
E02 measured value is under range Put meter in normal condition
E03 measured value is over range Put meter in normal condition
E04 Original data error results in
this error (DP, WB)
Solve the original data error
E11 RH calibration error Retry humidity calibration
E31 Temp. sensor or AD damaged Return for repair
E32 Memory IC damaged Return for repair
E33 RH sensor or circuit damaged Return for repair
Tec hnical Da ta
Humidity/accura cy: 0 .1% to 99.9%/ ±3.0%(10~95%@25 °C), ±5% (oth er)
Temperature/accur acy : -20...60 C/+0.3 C@5~40 C
CO2 /accuracy: 0... 9999ppm/+(30ppm+5% of reading)@0~5000p pm
Storage and transit : -20 ...60 C/10...90%rh, non cond ens ing .
Operating limit at el ect ronics:0...50 C fo r CO2 , -20...60 C for rest/ non condens ing .
o o o
o
o o
Memory: 99 recor ds ma nually, 6000 records auto lo ggi ng.
Dimension,mm: 234 (L) x77(W)x42(H)
Wei ght : 200gr.
Battery type: 4p cs AA alk aline
DC power type: 1pc 5 VDC , 250 mA. Optional available.
PC connection: mini U SB po rt
Op tional Ac ce ssor y
Part Number
5VDC universal adap tor : AC1214
CO2 calibrator: CO2 C ALIBRATOR
ROTRONIC AG, CH-8303 Bassersdorf
Tel. +41 44 838 11 44, w ww.rotronic.com
ROTRONIC Messgerä te Gm bH, D-76275 Ettlingen
Tel. +49 7243 383 250, www.r otr oni c.de
ROTRONIC SARL, 56, F - 77 183 C roissy Beaubourg
Tél. +33 1 60 95 07 10, www.ro tro nic .fr
ROTRONIC Italia srl , I- 20 157 Milano
Tel. +39 2 39 00 71 90, www.rotr oni c.i t
ROTRONIC Instrume nts ( UK) Ltd, West Sussex RH10 9EE
Phone +44 1293 571000 , www. rot ronic.co.uk
ROTRONIC Instrume nt Co rp, NY 11788, USA
Phone +1 631 427-3898 , www. rot ronic-usa.com
ROTRONIC South East Asia Pte Ltd, Sin gap ore 3 39156
Phone +65 6294 6065, ww w.ro tro nic.com.sg
ROTRONIC Shanghai R ep. O ffi ce, Shanghai 200233, China
Phone +86 40 08162018 , www. rot ronic.cn
 Loading...