

Page 1
Owner’s Manual
Manuel d’utilisation
Bedienungsanleitung
Manuale di Istruzioni
Manual de Instrucciones
Gebruiksaanwijzing
Instruktionsbok
!"#$%&'(!) *+,-.+/0$1,)
RB-06
Stereo Power Amplifi er
Amplifi cateur De Puissance Stéréo
Stereo-Endstufe
Amplifi catore di Potenza
Etapa de Potencia Estereofónica
Stereo Eindversterker
Stereoslutsteg
!"#$#% &'()("#)* +%,-%'"(
Page 2
RB-06 Stereo Power Amplifi er
Important Safety Instructions
WARNING: There are no user serviceable parts inside.
Refer all servicing to qualifi ed service personnel.
WARNING: To reduce the risk of fi re or electric shock, be
sure that the apparatus shall not be exposed to dripping
or splashing and that no objects fi lled with liquids, such
as vases, shall be placed on the apparatus.
Do not allow foreign objects to get into the enclosure. If
the unit is exposed to moisture, or a foreign object gets
into the enclosure, immediately disconnect the power
cord from the wall. Take the unit to a qualifi ed service
person for inspection and necessary repairs.
Read all the instructions before connecting or operating the component.
Keep this manual so you can refer to these safety instructions.
Heed all warnings and safety information in these instructions and
on the product itself. Follow all operating instructions.
Clean the enclosure only with a dry cloth or a vacuum cleaner.
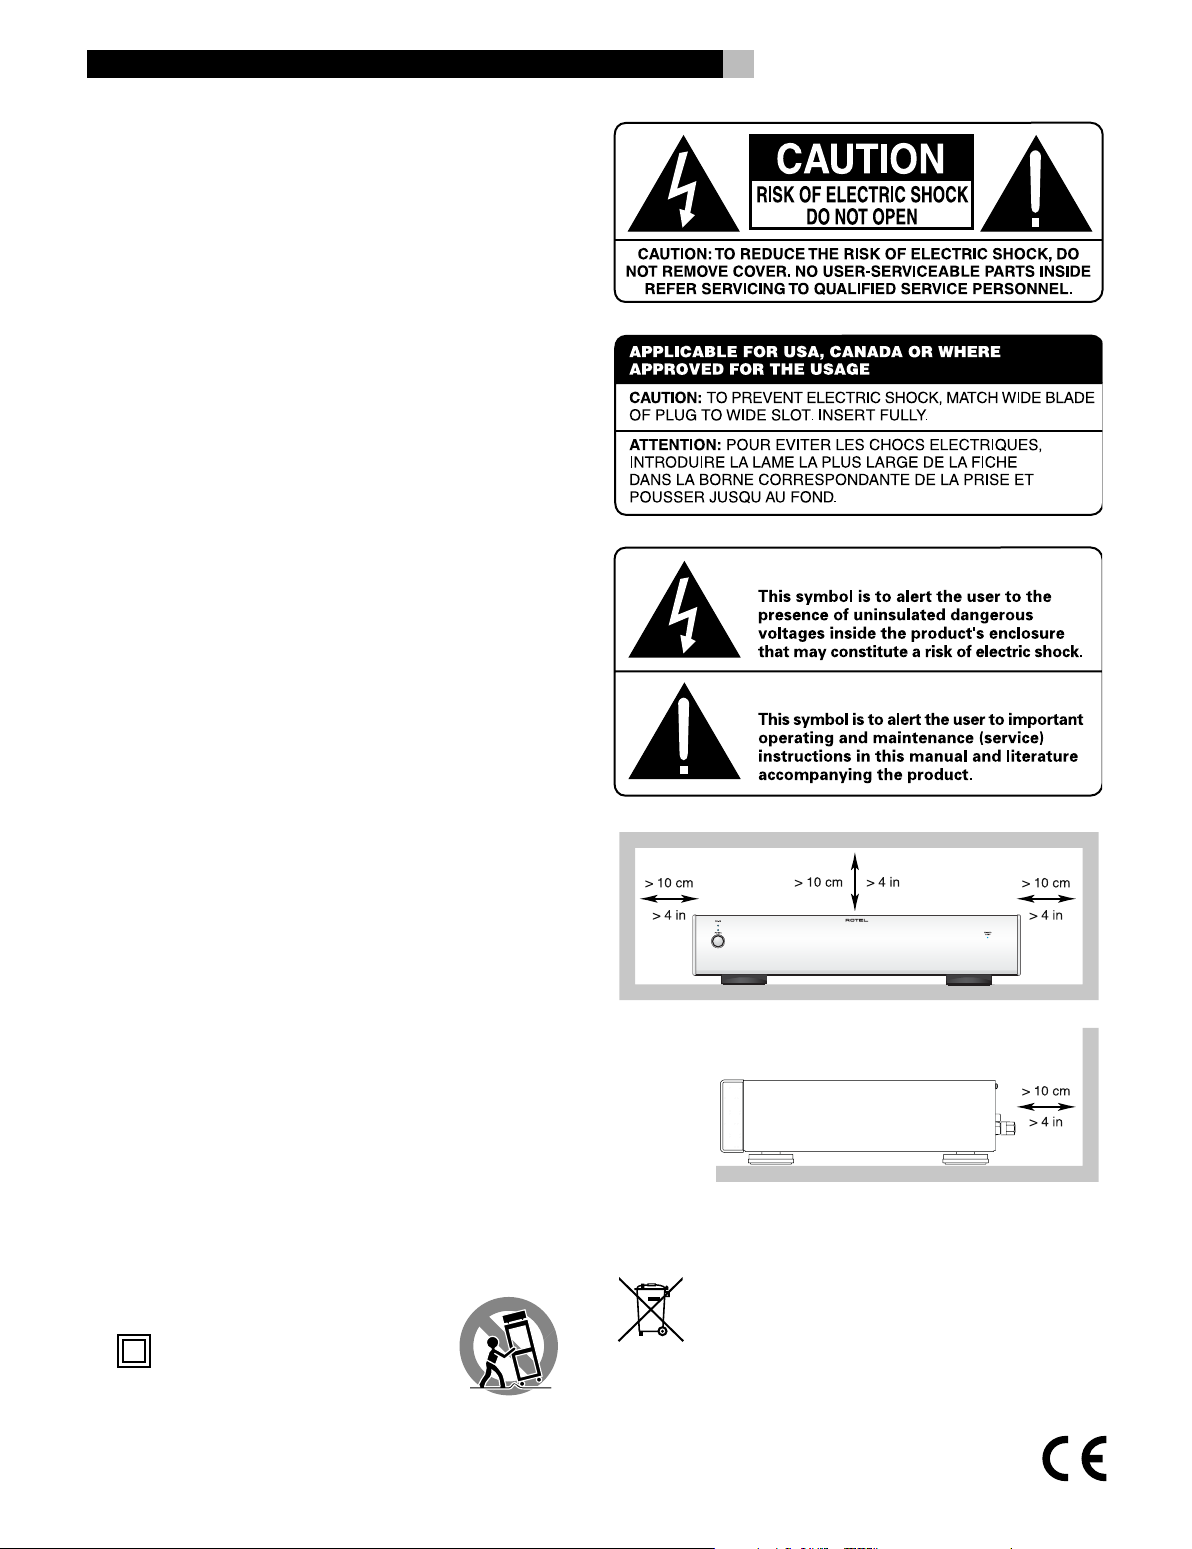
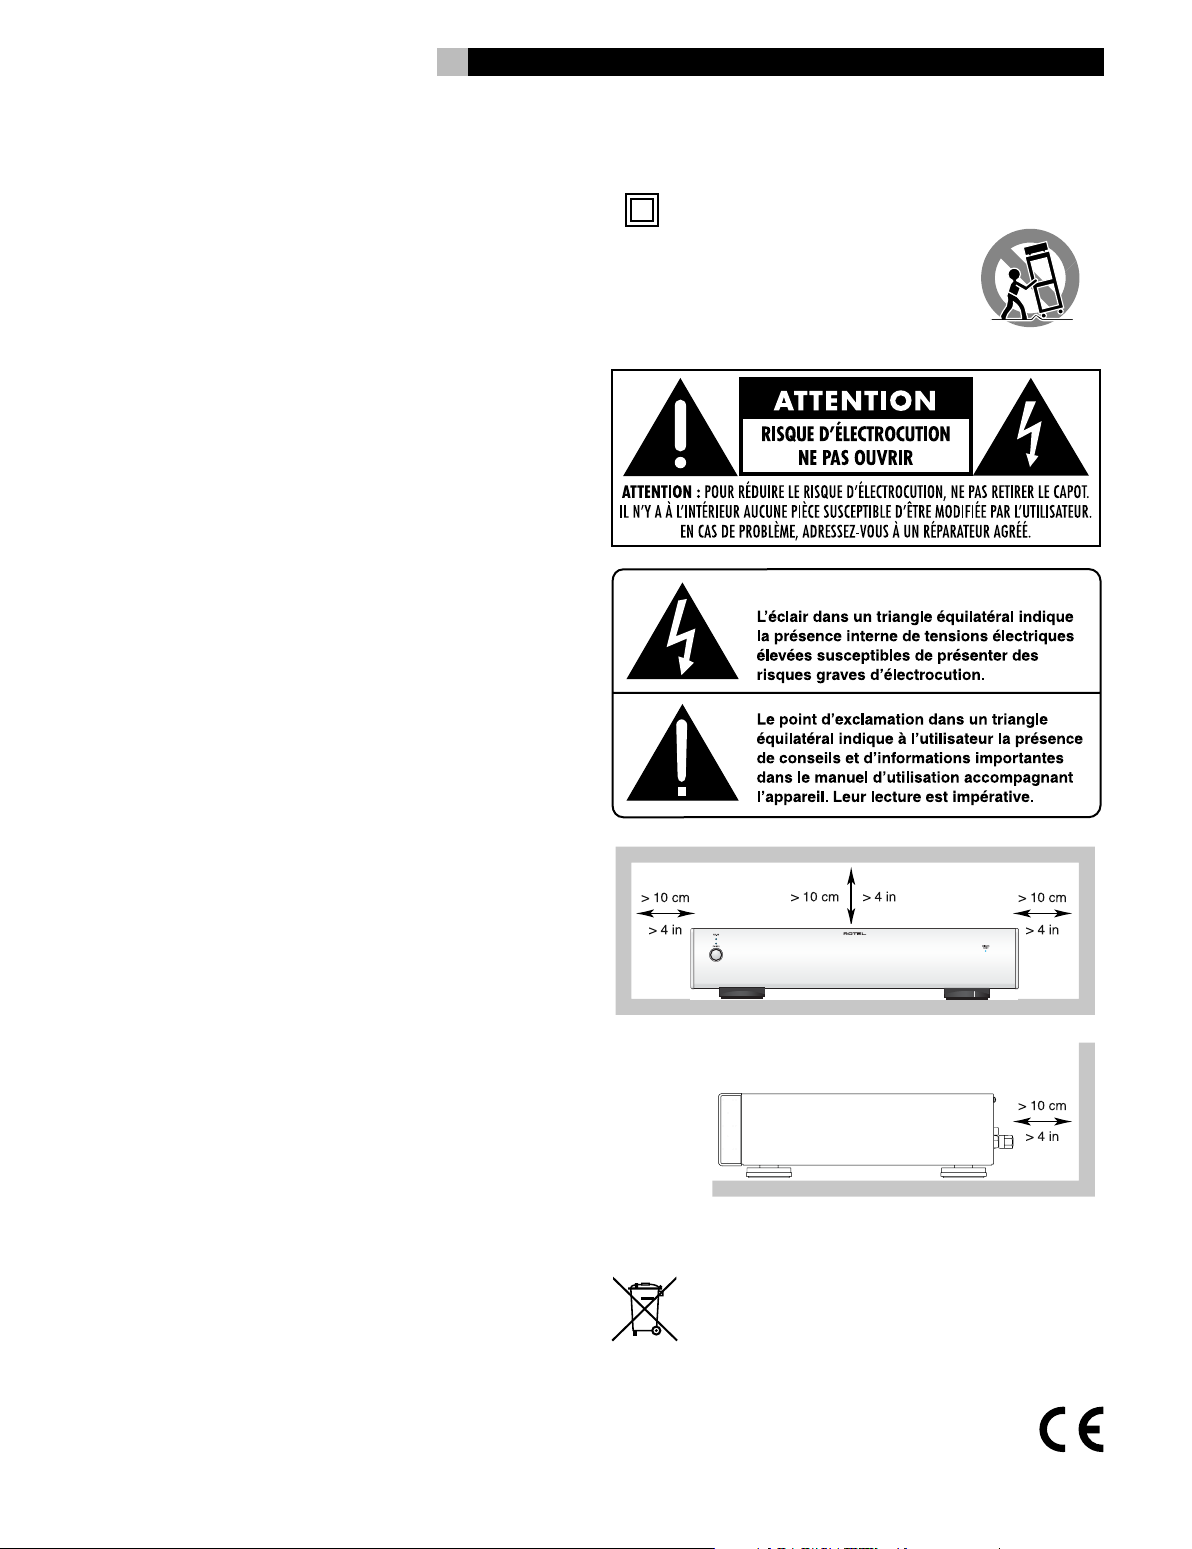
You must allow 10 cm or 4 inches of unobstructed clearance around the unit. Do not place the unit on a bed, sofa, rug, or
similar surface that could block the ventilation slots. If the component
is placed in a bookcase or cabinet, there must be ventilation of the
cabinet to allow proper cooling.
Keep the component away from radiators, heat registers, stoves, or
any other appliance that produces heat.
The unit must be connected to a power supply only of the type and
voltage specifi ed on the rear panel of the unit.
Connect the component to the power outlet only with the supplied
power supply cable or an exact equivalent. Do not modify the
supplied cable in any way. Do not attempt to defeat grounding and/or
polarization provisions. Do not use extension cords.
Do not route the power cord where it will be crushed, pinched, bent
at severe angles, exposed to heat, or damaged in any way. Pay
particular attention to the power cord at the plug and where it exits
the back of the unit.
The power cord should be unplugged from the wall outlet if the unit
is to be left unused for a long period of time.
Immediately stop using the component and have it inspected and/or
serviced by a qualifi ed service agency if:
• The power supply cord or plug has been damaged.
• Objects have fallen or liquid has been spilled into the unit.
• The unit has been exposed to rain.
• The unit shows signs of improper operation
• The unit has been dropped or damaged in any way
Please use Class 2 Wiring when connecting the speaker terminals
of the unit to ensure proper insulation and minimize the risk of
electrical shock.
Place the unit on a fi xed, level surface strong enough to support its
weight. Do not place it on a moveable cart that could tip over.
This symbol means that this unit is
double insulated. An earth connection
is not required.
2
Rotel products are designed to comply with international
directives on the Restriction of Hazardous Substances
(RoHS) in electrical and electronic equipment and the
disposal of Waste Electrical and Electronic Equipment
(WEEE). The crossed wheelie bin symbol indicates compliance and that the products must be appropriately recycled
or processed in accordance with these directives.
Page 3
3
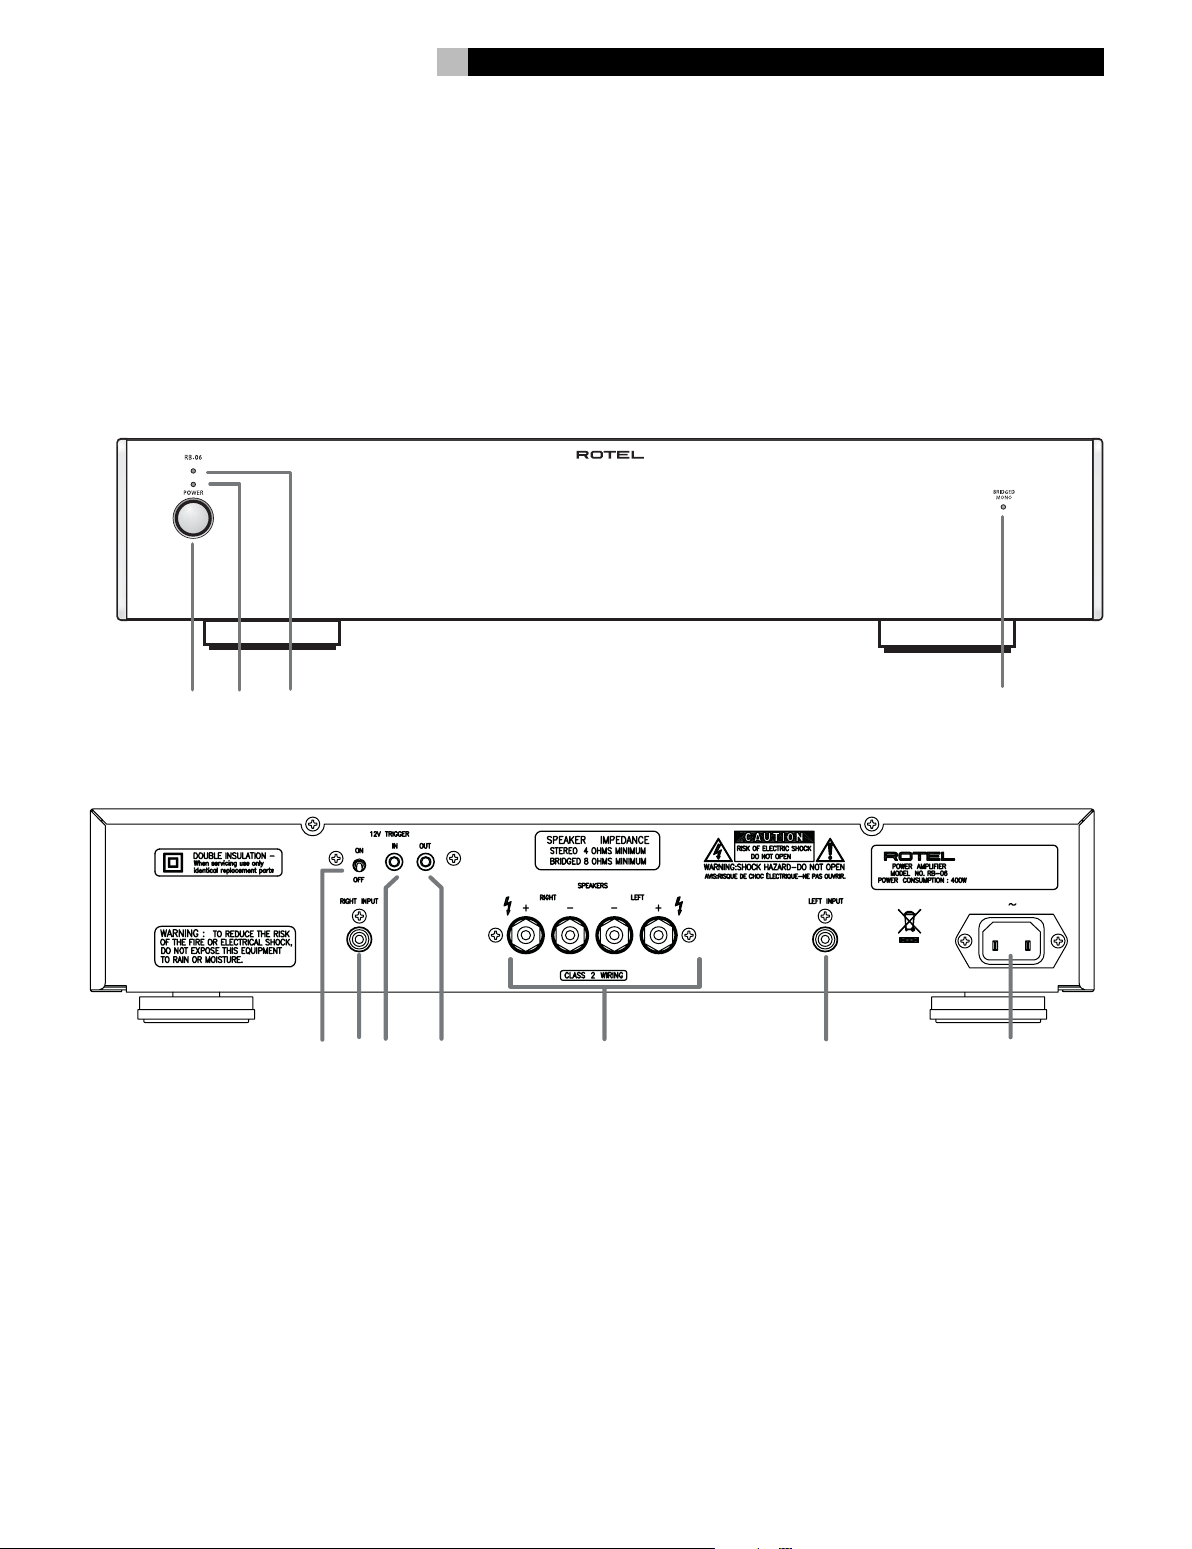
Figure 1: Controls and Connections
Commandes et branchements
Bedienelemente und Anschlüsse
Pannello frontale e posteriore
Controles y Conexiones
De bedieningsorganen en de aansluitingen
Funktioner och anslutningar
.$/0-1 &2$03)#-(4 ( $056#+1
English
1
2
3
6 7 8
5
9
6
4
0
Page 4
RB-06 Stereo Power Amplifi er
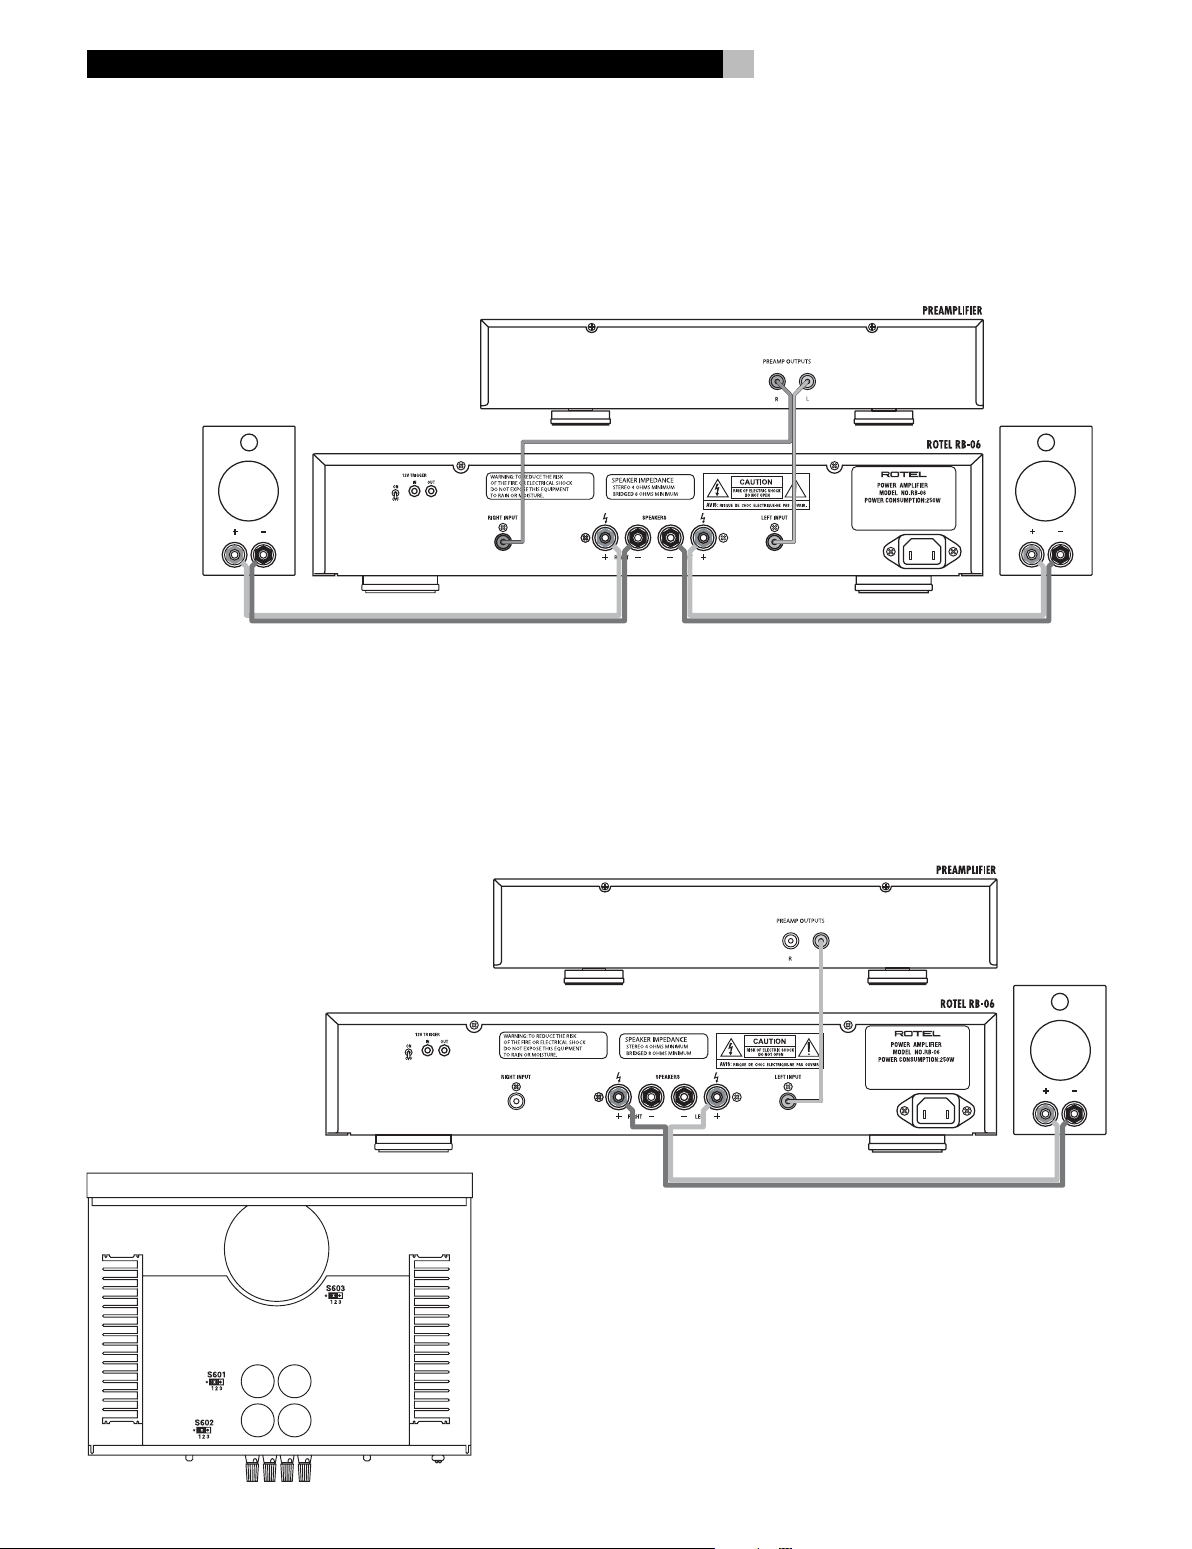
Figure 2: Stereo Connections
Branchements stéréo
Anschlussdiagramm bei Stereobetrieb
Schema dei collegamenti stereo
Conexiones de Entrada y de Salida para Funcionamiento en Modo Estereofónico
De cinch- en luidsprekerverbindingen
Stereoanslutningar
7%8'%#8(-#-(# ('"%9-(:%3 '(/-0)0 ( 0:&'"(9#':(; '('"#+
4
Figure 3: Bridged Mono Connections – Inputs and Speakers
Branchements en monophonie – Entrée et enceinte Position des cavaliers
Anschlussdiagramm bei Brückenschaltung – Eingänge und Lautsprecher
Schema dei collegamenti mono a ponte – Ingressi e diffusori
Conexiones de Entrada y de Salida para Funcionamiento en
Modo Monofónico Puenteado
Gebrugde mono aansluitingen/voorversterker/plaats van de doorverbindingen/
Anslutningar – bryggkopplat läge
<%'"%3%# 3:)=9#-(# 3 $#>(+# +%-% – 2%8:)=9#-(# 3;%8-%/% '(/-0)0 ( :%)%-%:
Jumper Locations
Emplacement des Cavaliers
Jumper-Positionen
Posizione dei Jumper
Ubicacion de los Puentes
Locatie van de doorverbindingen
Omkopplarnas placering
?0'2%)%>#-(# 2#$#+19#:
Page 5

5
English
Contents
Important Safety Instructions ...............................2
Figure 1: Controls and Connections 3
Figure 2: Stereo Connections 4
Figure 3: Bridged Mono Connections
– Inputs and Speakers 4
About Rotel ............................................ 5
Getting Started ....................................... 5
A Few Precautions 5
Placement 6
Cables 6
AC Power and Control ............................. 6
AC Power Input
Power Switch and
Indicator
12
Trigger ON/OFF Mode Selector 5 6
12V Trigger Input
Input Signal Connection 6 ..................... 6
Speaker Connection ................................. 7
Speaker Selection 7
Speaker Wire Selection 7
Polarity and Phasing 7
Stereo Speaker Connection 9 7
Bridged Mono Operation 4 ................... 7
Resetting Jumpers 7
Input Connection 7
Bridged Speaker Connection 7
Protection Indicator 3 .......................... 8
Troubleshooting 8
Front Panel Power Indicator Is Not Lit 8
Fuse Replacement 8
No Sound 8
Specifi cations ......................................... 8
6
0
6
and Output 8 6
7
About Rotel
A family whose passionate interest in music led
them to manufacture high fi delity components
of uncompromising quality founded Rotel
over 40 years ago. Through the years that
passion has remained undiminished and the
family goal of providing exceptional value
for audiophiles and music lovers regardless of their budget, is shared by all Rotel
employees.
The engineers work as a close team, listening
to, and fi ne tuning each new product until it
reaches their exacting musical standards. They
are free to choose components from around
the world in order to make that product the
best they can. You are likely to fi nd capacitors from the United Kingdom and Germany,
semiconductors from Japan or the United
States, while toroidal power transformers are
manufactured in Rotel’s own factory.
Rotel’s reputation for excellence has been
earned through hundreds of good reviews
and awards from the most respected reviewers in the industry, who listen to music every
day. Their comments keep the company true
to its goal - the pursuit of equipment that is
musical, reliable and affordable.
All of us at Rotel, thank you for buying this
product and hope it will bring you many
hours of enjoyment.
Getting Started
Thank you for purchasing the Rotel RB-06
Stereo Power Amplifi er. When used in a
high-quality music audio system, it will provide
years of musical enjoyment.
The RB-06 is a full featured, high performance
component. All aspects of the design have
been optimized to retain the full dynamic
range and subtle nuances of your music. The
RB-06 has a highly regulated power supply
incorporating a Rotel custom-designed toroidal power transformer. This low impedance
power supply has ample power reserves,
which enables the RB-06 to easily reproduce
the most demanding audio signals. This type
of design is more expensive to manufacture,
but it is better for the music.
The prin t ed circui t boar d s (PCB) ar e
designed with Symmetrical Circuit Traces. This
insures that the precise timing of the music
is maintained and faithfully recreated. The
RB-06 circuitry uses metal fi lm resistors and
polystyrene or polypropylene capacitors in
important signal paths. All aspects of this
design have been examined to ensure the
most faithful music reproduction.
The main functions of the RB-06 are easy
to install and use. If you have experience
with other stereo systems, you shouldn’t
fi nd anything perplexing. Simply plug in the
associated components and enjoy.
A Few Precautions
WARNING:
to your system, turn off ALL the components
in the system when connecting or disconnecting the loudspeakers or any associated
components. Do not turn the system components back on until you are sure all the
connections are correct and secure. Pay
particular attention to the speaker wires.
There must be no loose strands that could
contact the other speaker wires, or the
chassis of the amplifi er.
Please read this manual carefully. It provides
information on how to incorporate the RB-06
into your system as well as information that
will help you get optimum sound performance.
Please contact your authorized Rotel dealer
for answers to any questions you might have.
In addition, all of us at Rotel welcome your
questions and comments.
Save the RB-06 shipping carton and all
enclosed packing material for future use.
Shipping or moving the RB-06 in anything
other than the original packing material may
result in severe damage to your amplifi er.
Fill out and send in the owner’s registration
card packed with the RB-06. Also be sure
to keep the original sales receipt. It is your
best record of the date of purchase, which
you will need in the event warranty service
is ever required.
To avoid potential damage
Page 6

RB-06 Stereo Power Amplifi er
6
Placement
Like all audio components that handle lowlevel signals, the RB-06 can be affected by
its environment. Avoid placing the RB-06 on
top of other components. Also avoid routing
audio signal cables near power cords. This
will minimize the chance it will pick up hum
or interference.
The RB-06 generates heat as part of its normal
operation. The heat sinks and ventilation
openings in the amplifi er are designed to
dissipate this heat. The ventilation slots in
the top cover must be open. There should
be 10 cm (4 inches) of clearance around the
chassis, and reasonable airfl ow through the
installation location, to prevent the amplifi er
from overheating.
Remember the weight of the amplifi er when
you select an installation location. Make sure
that the shelf or cabinet can support it. We
recommend installing the RB-06 in furniture
designed to house audio components. Such
furniture is designed to reduce or suppress
vibration which can adversely affect sound
quality. Ask your authorized Rotel dealer for
advice about component furniture and proper
installation of audio components.
Cables
Be sure to keep the power cords, digital signal
cables and regular audio signal cables in
your installation away from each other. This
will minimize the chance of the regular audio
signal cables picking up noise or interference
from the power cords or digital cables. Using
only high quality, shielded cables will also
help to prevent noise or interference from
degrading the sound quality of your system.
If you have any questions see your authorized
Rotel dealer for advice about the best cable
to use with your system.
AC Power and Control
AC Power Input 0
The RB-06 is supplied with the proper AC
power cord. Use only this cord or an exact
equivalent. Do not use an extension cord. A
heavy duty multi-tap power outlet strip may
be used, but only if it is rated to handle the
current demand of the RB-06.
Be sure the Power Switch on the front panel
of the RB-06 is turned off. Then, plug one end
of the cord into the AC power connector
on the back panel of the amplifi er. Plug the
other end into an appropriate AC outlet.
Your RB-06 is confi gured at the factory for
the proper AC line voltage in the country
where you purchased it (USA: 115 volts/60
Hz , Europe: 120 volts/60 Hz). The AC
line confi guration is noted on a label on the
back panel.
NOTE: Should you move your RB-06 to another country, it is possible to confi gure your
amplifi er for use on a different line voltage.
Do not attempt to perform this conversion
yourself. Opening the enclosure of the RB06 exposes you to dangerous voltages.
Consult a qualifi ed technician or the Rotel
factory service department for information.
If you are going to be away from home for
an extended period of time, it is a sensible
precaution to unplug your amplifi er.
Power Switch and
Indicator
The Power Switch is located on the front
panel. To turn the amplifi er on (or to activate
either of the optional automatic power-on
modes), push the switch in. The LED indicator
above the switch will light, indicating that the
amplifi er is turned on. To turn the amplifi er
off, push the button again and return it to
the out position.
12
0
Trigger ON/OFF
Mode Selector
The amplifi er provides the option for manual
or automatic power on/off operation. These
modes are selectable using a toggle switch
on the back panel.
With the switch in the 12V TRIGGER ON
position, the amplifi er is turned on automatically when a 12V trigger signal is present
at the 3.5 mm Jack of TRIGGER IN on the
rear panel. The amplifi er will go into standby
mode if the 12V signal is not present. The
front panel POWER SWITCH overrides this
function. It must be ON for the 12V trigger
to work. Turning the switch OFF cuts power
to the amplifi er, regardless of whether or not
a trigger signal is present.
5
12V Trigger Input 7
and Output 8
The jack labeled IN is for connecting the
3.5mm Plug/Cable carrying a 12V trigger
signal to turn the amplifi er on and off. To
use this feature the toggle switch must be
set to the ON position. This input accepts
any control signal (AC or DC) ranging from
3 volts to 30 volts.
The jack labeled OUT is for connecting another 3.5mm plug/cable to provide a 12V
trigger signal to other components. The 12V
output signal is available whenever a 12V
trigger signal is applied to the IN connector.
Input Signal Connection 6
[See Figure 2 for normal stereo wiring
illustration.]
The RB-06 has conventional RCA type input
connectors, the type found on nearly all
audio equipment.
To prevent loud noises that neither
Note:
you nor your speakers will appreciate,
make sure the amplifi er is turned off when
you make any signal connections.
Select a high quality pair of audio interconnect cables. Connect the left channel output of
your preamp to the left channel input on the
RB-06. Connect the right channel output of
your preamp to the right channel input.
Page 7

7
English
Speaker Connection
Speaker Selection
We recommend using loudspeakers with
a nominal impedance of 4 ohms or higher
with the RB-06. You should exercise some
caution in driving multiple pairs of speakers
in parallel confi guration, because the effective impedance the amplifi er sees is cut in
half. For example, when driving two pair
of 8 ohm speakers, the amplifi er sees a 4
ohm load. When driving multiple speakers
in parallel, it is recommended that you select
speakers with a nominal impedance of 8
ohms or higher. Speaker impedance ratings
are less than precise. In practice, very few
loudspeakers will present any problems for
the RB-06. See your authorized Rotel dealer
if you have any questions.
Speaker Wire Selection
Use insulated two-conductor stranded wire
to connect the RB-06 to the speakers. The
size and quality of the wire can have an
audible effect on the performance of the
system. Standard speaker wire will work,
but can result in lower output or diminished
bass response, particularly over longer
distances. In general, heavier wire will improve the sound. For best performance, you
may want to consider special high-quality
speaker cables. Your authorized Rotel dealer
can help in the selection of appropriate cables
for your system.
Polarity and Phasing
The polarity — the positive/negative orientation of the connections — for every speaker
and amplifi er connection must be consistent
so all the speakers will be in phase. If the
polarity of one connection is mistakenly reversed, bass output will be very weak and
stereo imaging degraded. All wire is marked
so you can identify the two conductors. There
may be ribs or a stripe on the insulation of
one conductor. The wire may have clear
insulation with different color conductors
(copper and silver). There may be polarity
indications printed on the insulation. Identify
the positive and negative conductors and be
consistent with every speaker and amplifi er
connection.
Stereo Speaker Connection 9
The RB-06 has two pairs of color coded
binding posts on the back panel. These connectors accept bare wire, connector lugs, or
dual banana type connectors (except in the
European Community countries where their
use is not permitted).
Route the wire from the RB-06 to the speakers.
Give yourself enough slack so you can move
the components enough to allow access to
the speaker connectors.
If you are using dual banana plugs, connect
them to the wires and then plug into the
backs of the binding posts. The hexagonal
thumbscrews of the binding posts should be
screwed in all the way (clockwise).
If you are using terminal lugs, connect them
to the wires. If you are attaching bare wires
directly to the binding posts, separate the
wire conductors and strip back the insulation
from the end of each conductor. Be careful
not to cut into the wire strands. Unscrew (turn
counterclockwise) the binding post hexagonal
thumbscrews. Place the connector lug or wire
around the binding post shaft. Turn the hexagonal thumbscrews clockwise to clamp the
connector lug or wire fi rmly in place.
Note: Be sure there are no loose wire
strands that could touch adjacent wires or
connectors.
Bridged Mono Operation 4
[ See Fig u re 3 fo r br i dg e d o p e ra tion ju m per sett i n g an d co n n ect i o n
illustration.]
The two channels of the RB-06 can be
“bridged”. In this confi guration the single
channel produces a massive 180 watts! This
feature allows you to increase the overall
power output of your system by bridging
the RB-06 and adding a second bridged
RB-06. Or the RB-06 is bridged to drive a
monophonic subwoofer. Note however that
when the RB-06 is bridged the speaker connected to it must have an impedance of 8
ohms or more.
In order to use the RB-06 in bridged mode, three
“jumper” connectors inside the amplifi er must
be moved from one set of pins to another.
This task should be done by a qualified
technician. See your authorized Rotel dealer.
In addition the RB-06 is connected to the
other components in a different way. When
the RB-06 is setup for bridged operation the
Bridged Mono indicator light
panel will light.
on the front
4
Resetting Jumpers
Before opening the RB-06 cabinet to reset the
jumpers, the power cord must be unplugged
from the wall. DO NOT OPEN THE CABINET
OF THE RB-06 BEFORE THE POWER CORD
HAS BEEN UNPLUGGED FROM THE WALL.
FAILURE TO DO SO WILL EXPOSE YOU TO
HAZARDOUS VOLTAGES.
After the power cord has been unplugged,
remove the screws that hold the cabinet
cover in place and slide the cover off the
amplifi er. Locate the three jumper pin blocks
labeled S 601, S 602 and S 603. The factory
standard (stereo) position of the jumpers is
on pins 1 and 2 of each block. There is a *
mark on the circuit board next to this position. To convert the RB-06 to bridged mono
move all three jumpers so they are on pins
2 and 3 of each jumper pin block. Replace
the cover of the cabinet. Do not plug the
RB-06 power cord back into the wall
outlet until the cabinet cover has been
replaced.
Input Connection
When using the RB-06 in bridged mono
mode, connect the cable from the preamplifi er output to the left input. No connection is
made to the right input.
Bridged Speaker Connection
When using the RB-06 in bridged mono
mode, the wire to the speakers is connected
to the positive terminals of the left and right
channels. Connect the wire that goes to the
positive terminal of the speaker to the positive terminal of the left channel of the RB-06.
Connect the wire that goes to the negative
terminal of the speaker to the positive terminal
of the right channel of the RB-06. No connections are made to the negative terminals
of the RB-06.
Page 8

RB-06 Stereo Power Amplifi er
8
Protection Indicator
The RB-06 has both thermal and over-current
protection circuitry that protects the amplifi er
against damage in the event of extreme or
faulty operating conditions. The protection
circuits are independent of the audio signal
and have no impact on sonic performance.
Instead, the protection circuits monitor the
temperature of the output devices and shut
down the amplifi er if temperatures exceed
safe limits.
Most likely, you will never see this protection
circuitry in action. However, should a faulty
condition arise, the amplifi er will stop playing and the LED indicator on the front panel
will light up.
If this happens, turn the amplifi er off. Let it
cool down for several minutes, and attempt
to identify and correct the problem that
caused the protection circuitry to engage.
When you turn the amplifi er back on, the
protection circuit will automatically reset and
the indicator LED should go out.
3
Troubleshooting
Most diffi culties in audio systems are the result
of poor or wrong connections, or improper
control settings. If you encounter problems,
isolate the area of the diffi culty, check the
control settings, determine the cause of the
fault and make the necessary changes. If
you are unable to get sound from the RB-06,
refer to the suggestions for the following
conditions:
Front Panel Power Indicator Is
Not Lit
No main power to the RB-06. Check the front
panel power switch. Make sure that it is set to
the on position. Check AC power connections
at the amplifi er and the AC outlet.
Fuse Replacement
If everything checks out correctly and you still
cannot get the amplifi er to turn on, the internal
power fuse may have blown. If you believe
this has happened, contact your authorized
Rotel dealer for information on where to take
your amplifi er to get the fuse replaced.
No Sound
If the amp is getti ng AC powe r, but
is producing no sound, check all of your
connections and control settings on associated
components.
In most cases, the protection circuitry activates
because of a fault condition such as shorted
speaker wires, or inadequate ventilation
leading to an overheating condition. In very
rare cases, highly reactive or extremely low
impedance speaker loads could cause the
protection circuit to engage.
If the protection circuitry triggers repeatedly
and you are unable to isolate and correct the
faulty condition, contact your authorized Rotel
dealer for assistance in troubleshooting.
Specifi cations
Continuous Power Output 70 watts/ch
(20-20 kHz, < 0.03%, 8 ohms)
Bridged Mono Power Output 180 watts
(20-20 kHz, < 0.1%, 4 ohms) (200 watts at 1kHz)
Total Harmonic Distortion (20Hz-20kHz, 8 ohms) < 0.03%
Intermodulation Distortion (60 Hz : 7 kHz, 4:1) < 0.03%
Frequency Response ( ±1dB) 10Hz-100kHz
Damping Factor (20-20,000 Hz, 8 ohms) 500
Speaker Impedance (Normal mode) 4 ohms minimum
Signal to Noise Ratio (IHF A network) 116 dB
Input Impedance/Sensitivity 33 k Ohms/1.0 volt
Power Requirements
USA Version 120 Volts, 60 Hz
European Version 230 Volts, 50 Hz
Power Consumption 250 Watts
Dimensions (W x H x D) 437 x 72 x 342 mm
5
Panel Height 80 mm / 2
Weight (net) 7.5 kg, 16.54 lb.
All specifi cations are accurate at the time of printing.
Rotel reserves the right to make improvements without notice.
/32”
Page 9
9
Français
Instructions importantes concernant
la sécurité
ATTENTION : Il n’y a à l’intérieur aucune pièce susceptible d’être
modifi ée par l’utilisateur. Adressez-vous impérativement à une personne qualifi ée.
ATTENTION : Pour réduire tout risque d’électrisation ou d’incendie,
ne pas exposer l’appareil à une source humide, ou à tout type de
risque d’éclaboussure ou de renversement de liquide. Ne pas poser
dessus d’objet contenant un liquide, comme un verre, un vase, etc.
Prenez garde à ce qu’aucun objet ou liquide ne tombe à
l’intérieur de l’appareil par ses orifi ces de ventilation. Si
l’appareil est exposé à l’humidité ou si un objet tombe
à l’intérieur, débranchez-le immédiatement de son alimentation secteur, et adressez-vous immédiatement et
uniquement à une personne qualifi ée et agréée.
Tous les conseils de sécurité et d’installation doivent être lus avant de
faire fonctionner l’appareil. Conservez soigneusement ce livret pour
le consulter à nouveau pour de futures références.
Tous les conseils de sécurité doivent être soigneusement respectés.
Suivez les instructions. Respectez les procédures d’installation et de
fonctionnement indiquées dans ce manuel.
L’appareil doit être nettoyé uniquement avec un chiffon sec ou un
aspirateur.
L’appareil doit être placé de telle manière que sa propreventilation puisse fonctionner, c’est-à-dire avec un
espacelibre d’une dizaine de centimètres minimum autour de lui. Il ne doit pas être posé sur un fauteuil, un canapé, une
couverture ou toute autre surface susceptible de boucher ses ouïes
d’aération ; ou placé dans un meuble empêchant la bonne circulation
d’air autour des orifi ces d’aération.
Cet appareil doit être branché sur une prise d’alimentation secteur,
d’une tension et d’un type conformes à ceux qui sont indiqués sur la
face arrière de l’appareil.
Brancher l’appareil uniquement grâce au cordon secteur fourni, ou à
un modèle équivalent. Ne pas tenter de modifi er ou changer la prise.
Notamment, ne pas tenter de supprimer la prise de terre (troisième
broche de la prise) si celle-ci est présente. Si la prise n’est pas conforme à celles utilisées dans votre installation électrique, consultez
un électricien agréé. Ne pas utiliser de cordon rallonge.
Prendre garde à ce que ce cordon d’alimentation ne soit pas pincé,
écrasé ou détérioré sur tout son trajet, à ce qu’il ne soit pas mis
en contact avec une source de chaleur. Vérifi ez soigneusement la
bonne qualité des contacts, à l’arrière de l’appareil comme dans la
prise murale.
La prise d’alimentation secteur constitue le moyen radical de déconnexion de l’appareil. Elle doit donc rester en permanence accessible.
L’appareil doit être immédiatement éteint, débranché puis retourné
au service après-vente agréé dans les cas suivants :
• Le câble d’alimentation secteur ou sa prise est endommagé..
• Un objet est tombé, ou du liquide a coulé à l’intérieur de
l’appareil.
• L’appareil a été exposé à la pluie.
• L’appareil ne fonctionne manifestement pas normalement.
• L’appareil est tombé, ou le coffret est endommagé.
Utilisez un câble de type Classe 2 pour la liaison avec les enceintes
acoustiques, afi n de garantir une installation correcte et de minimiser
les risques d’électrocution.
Utilisez uniquement un support, meuble, rack, étagère suffi samment
solide pour supporter le poids de l’appareil. N’utilisez pas de meuble
mobile ou risquant de se renverser.
Ce symbole signifi e que cet appareil bénéfi cie d’une double
isolation électrique. Sa prise d’alimentation n’a pas besoin
d’être reliée à la terre ou à une masse
particulière..
Tous les appareils Rotel sont conçus en totale conformité
avec les directives internationales concernant les restrictions d’utilisation de substances dangereuses (RoHS)
pour l’environnement, dans les équipements électriques
et électroniques, ainsi que pour le recyclage des matériaux utilisés (WEEE, pour Waste Electrical and Electronic
Equipment). Le symbole du conteneur à ordures barré par
une croix indique la compatibilité avec ces directives, et le
fait que les appareils peuvent être correctement recyclés
ou traités dans le respect total de ces normes.
.
Page 10

RB-06 Amplifi cateur De Puissance Stéréo
10
Sommaire
Figure 1: Commandes et branchements 3
Figure 2: Branchement des entrées
et des enceintes en stéréo 4
Figure 3: Branchements des entrées et des
enceintes en ponté mode mono 4
Au sujet de Rotel .................................. 10
Pour démarrer ...................................... 10
Quelques précautions 10
Disposition 11
Câbles 11
Alimentation secteur et mise
sous tension ......................................... 11
Prise d’alimentation secteur
Interrupteur de mise sous tension et
indicateur
11
12
Activation/désactivation du système
automatique de commutation (trigger) 5 11
Entrée et sortie gâchette 12 V
(trigger input/output)
Prises d’entrée 6 ............................... 12
Raccordement des enceintes ................... 12
Choix des enceintes 11
Choix des câbles d’enceintes 12
Polarité et mise en phase 12
Raccordement des enceintes en
mode stéréo 9 12
Utilisation de l’appareil en
mode ponté 4 ..................................... 12
Remise en place des cavaliers 13
Raccordement des câbles d’entrée 13
Raccordement des enceintes en mode ponté 13
Indicateurs de protection 3 13
Dépannage ........................................... 13
Le témoin d’alimentation sur le devant de l’appareil
ne s’allume pas 13
Remplacement du fusible 13
Absence de son 13
Spécifi cations ........................................ 13
0
11
7 8
11
Au sujet de Rotel
C’est une famille de passionnés de musique
qui a fondé Rotel, il y a maintenant plus
de 40 ans. Pendant toutes ces années, leur
passion ne s’est jamais émoussée et tous les
membres de la famille se sont toujours battus
pour fabriquer des appareils présentant un
exceptionnel rapport musicalité-prix, suivis
en cela par tous les employés.
Les ingénieurs travaillent toujours en équipe
réduite, écoutant et peaufi nant soigneusement
chaque appareil pour qu’il corresponde parfaitement à leurs standards musicaux. Ils sont
libres de choisir n’importe quels composants
dans le monde entier, uniquement en fonction
de leur qualité. C’est ainsi que vous trouvez
dans les appareils Rotel des condensateurs
britanniques ou allemands, des transistors
japonais ou américains, tandis que tous les
transformateurs toriques sont directement
fabriqués dans une usine Rotel.
L’excellente réputation musicale des appareils
Rotel a été saluée par la plupart des magazines spécialisés ; ils ont reçu d’innombrables
récompenses, et sont choisis par de nombreux
journalistes critiques du monde entier, parmi
les plus célèbres, ceux qui écoutent de la
musique
quotidiennement. Leurs commentaires restent
immuables : Rotel propose toujours des
maillons à la fois musicaux, fi ables et abordables.
Mais plus que tout, Rotel vous remercie pour
l’achat de cet appareil, et souhaite qu’il vous
apporte de nombreuses heures de plaisir
musical.
Mais plus que tout, Rotel vous remercie pour
l’achat de cet appareil, et souhaite qu’il vous
apporte de nombreuses heures de plaisir
musical.
Pour démarrer
Merci d’avoir acheté cet amplifi cateur de
puissance stéréo Rotel RB-06. Il a été spécialement conçu pour vous fournir des heures et
des heures de plaisir musical au cœur d’une
chaîne haute-fi délité de très haute qualité.
Le RB-06 est un amplifi cateur très complet,
de très hautes performances. Les différents
aspects de sa conception ont été réalisés de
manière à reproduire toute la dynamique
comme les plus subtiles nuances de la musique. Le RB-06 est entre autres équipé d’une
alimentation entièrement régulée, utilisant un
transformateur torique spécialement fabriqué
pour Rotel et des condensateurs « slit-foil »
également uniques en leur genre. La faible
impédance de cette alimentation assure une
énorme réserve de puissance, capable de
faire face aux exigences les plus élevées.
Cette conception est évidemment plus coûteuse, mais elle est essentielle pour le respect
de la musique.
Les circuits imprimés possèdent des pistes
parfaitement symétriques. Elles préservent
ainsi parfaitement l’intégrité « temporelle »
de la musique. Les composants utilisés sont
par exemple des résistances à fi lm métallique et des condensateurs au polystyrène
ou polypropylène sur tous les points critiques
du trajet du signal. Les plus infi mes détails
ont été analysés avec soin, afi n que rien ne
vienne détruire l’exceptionnelle musicalité de
cet amplifi cateur.
Les principales fonctions du RB-06 sont faciles
à comprendre et à utiliser. Elles ne diffèrent
en rien de celles d’une chaîne haute-fi délité traditionnelle. Branchez simplement les
sources et écoutez!
Quelques précautions
ATTENTION : afi n d’éviter tout dommage
à l’appareil, éteignez TOUS les maillons
du système avant de procéder au moindre
branchement d’un câble. Ne remettez
pas les appareils sous tension sans avoir
vérifi é que tous les branchements ont été
correctement effectués. Vérifi ez notamment
les câbles des enceintes acoustiques : il
ne doit pas y avoir de brins susceptibles
de créer des courts-circuits d’une prise à
l’autre, ou sur le boîtier de l’amplifi cateur.
Page 11

11
Français
Veuillez lire ce manuel d’utilisation très soigneusement. Il vous donne toutes les informations
nécessaires aux branchements et fonctionnement
du RB-06. Si vous vous posez encore des questions, n’hésitez pas à contacter immédiatement
votre revendeur agréé Rotel.
Conservez soigneusement l’emballage du
RB-06. Il constitue le meilleur et le plus sûr
moyen pour le transport futur de votre nouvel
appareil, afi n d’éviter tout dommage sérieux
à celui-ci.
Re m pl is se z et env oy e z l e co upo n
d’enregistrement fourni dans l’emballage
du RB-06. Conservez la facture de votre
appareil : c’est la meilleure preuve de votre
propriété et de la date réelle d’achat. Elle
sera nécessaire pour mettre éventuellement
en jeu la garantie.
Disposition
Comme tous les appareils traitant des signaux
relativement faibles, le RB -06 est sensible à son
environnement immédiat. Évitez de le placer
sur d’autres maillons. Éloignez les câbles de
modulation sonore des câbles d’alimentation
secteur. Vous éviterez ainsi l’apparition éventuelle de ronfl ements parasites.
Le RB-06 dégage de la chaleur pendant son
fonctionnement, ce qui est normal. Les radiateurs
et les ouvertures pratiquées dans son capot sont
conçus pour dissiper cette chaleur. Ne posez
donc pas d’autres maillons (ou objets) sur lui.
Ne bloquez pas ses ouïes supérieures de refroidissement. Il doit y avoir environ 10 cm de
dégagement au-dessus de lui pour permettre le
bon fonctionnement de sa ventilation.
N’oubliez pas non plus, lors de son installation, qu’il s’agit d’un appareil relativement
lourd. L’étagère ou le support utilisés doivent
être suffi samment robustes et rigides : dans ce
domaine, le sens commun s’applique. Nous
vous recommandons d’ailleurs, à ce sujet,
d’acquérir un de ces meubles spécialement
conçus pour les chaînes haute-fi délité. Votre
revendeur vous donnera toutes les informations nécessaires à ce sujet.
Câbles
Vérifi ez que les câbles d’alimentation secteur
d’une part, les câbles de modulation analogique
d’autre part, et enfi n les câbles transportant un
signal numérique soient bien éloignés les uns
des autres. Cela pour éviter toute interférence
susceptible de générer des bruits parasites.
N’utiliser que des câbles de très bonne qualité,
soigneusement blindés. Votre revendeur agréé
Rotel est en mesure de vous donner tous les
conseils nécessaires quant au choix de câbles
de bonne qualité.
Alimentation secteur et
mise sous tension
Prise d’alimentation secteur
Le RB-06 est livré avec son propre cordon
d’alimentation. N’utilisez que celui-ci, ou un
modèle exactement semblable. N’utilisez pas
de câble rallonge. Une prise multiple pourra
éventuellement être utilisée, mais seulement
si elle possède la capacité en courant (ampères) demandée par le RB-06 et les autres
appareils branchés dessus.
Assurez-vous que l’interrupteur en face avant
du RB-06 est bien dans la position éteint.
Puis branchez une des extrémités du câble
secteur dans la prise de la face arrière
et l’autre dans une prise d’alimentation
murale adaptée.
Votre RB-06 a été confi guré en usine pour la
tension d’alimentation secteur du pays pour
lequel il est prévu (USA : 115 volts/60 Hz,
Europe : 230 volts/50 Hz). Cette valeur est
indiquée sur une étiquette, en face arrière.
NOTE : si vous devez déménager dans
un autre pays, il est possible de modifi er
l’alimentation du RB-06. Ne tentez pas
d’effectuer cette transformation vous-même.
Elle nécessite une intervention interne
présentant des risques d’électrocution si
certaines précautions ne sont pas respectées.
Consultez directement un revendeur agréé
Rotel pour connaître la procédure à suivre.
Si vous vous absentez pendant une longue
période (un mois ou plus), nous vous conseillons de débrancher la prise murale
d’alimentation.
0
0
Interrupteur de mise sous
tension et indicateur
Pressez la touche en face avant pour mettre
le RB-06 en service. La diode corresponde
s’allume simultanément. Une seconde pression
(position relâchée) sur cette même touche
éteint le RB-06.
12
Sélecteur de mode de
commutation Trigger
ON/OFF 5
Le RB-06 vous propose sa mise sous tension
automatique en utilisant le système de commutation par présence de tension continue 12
volts dit « 12 V Trigger ». Le sélecteur en face
arrière repéré « Turn On/Off Mode Selector
» permet de choisir la méthode d’allumage
de l’amplifi cateur.
Lorsque le sélecteur est placé sur la position
repérée « 12V TRIGGER ON », l’amplifi cateur
s’allume automatiquement lorsqu’une tension
de 12 volts est envoyée sur sa prise jack 3,5
mm située sur sa face arrière. Il se remet en
mode de veille Standby dès que cette tension
disparaît sur la prise. L’interrupteur POWER
SWITCH en face avant est placé avant ce
sélecteur : il doit être pressé (ON) pour que
la commutation TRIGGER 12 V soit effective
et effi cace. Couper l’alimentation avec cet
interrupteur (OFF) éteint l’amplifi cateur, qu’il
,
y ait ou non une tension de 12 volts sur la
prise Trigger IN.
Entrée 7 et sortie 8
commutation Trigger 12 V
La prise jack 3,5 mm repérée IN est prévue
pour transporter la tension de 12 volts nécessaire au fonctionnement de la commutation
TRIGGER que nous venons de décrire, la
tension étant envoyée par un processeur
Surround ou préamplifi cateur Rotel. Pour être
effi cace, le sélecteur contigu doit être sur sa
position repérée « ON » (voir le paragraphe
précédent). Cette entrée accepte en fait une
tension continue ou alternative, d’une valeur
comprise entre 3 et 30 volts.
La prise jack 3,5 mm repérée OUT permet de
brancher une autre prise jack 3,5 mm pour
renvoyer la tension de commutation 12 volts
vers un autre appareil. La tension 12 volts
n’est toutefois présente que si la prise IN est
réellement alimentée par une telle tension.
\
Page 12

RB-06 Amplifi cateur De Puissance Stéréo
12
Branchement des signaux
en entrée
[Voir Figure 2 pour les branchements classiques, en utilisation stéréophonique]
Le RB-06 est équipé de prises conventionnelles
de type RCA, celles utilisées sur la majorité
des maillons audio complémentaires.
Note: pour éviter tout bruit parasite
susceptible d’endommager les enceintes acoustiques, assurez-vous
que tout le système est éteint avant
d’effectuer le moindre branchement.
N’utilisez que des câbles d’excellente qualité
pour relier les sources au RB-06. Branchez la
sortie du canal gauche de votre préamplifi cateur sur l’entrée du canal gauche du RB-06.
Procédez de même pour le canal droit.
6
Branchement des
enceintes acoustiques
Choix des enceintes
Nous vous recommandons d’utiliser des
enceintes acoustiques d’une impédance
nominale de 4 ohms ou plus. Si deux paires
sont branchées en parallèle, l’impédance
résultante est divisée par deux. Par exemple,
si vous branchez deux paires d’enceintes
d’impédance nominale 8 ohms, l’amplifi cateur
voit une impédance de charge de seulement
4 ohms. Dans ce cas, les enceintes utilisées
doivent donc avoir une impédance de 8
ohms ou plus. L’impédance des enceintes est
souvent indiquée de manière relativement peu
précise. En pratique, seules quelques rares
modèles d’enceintes risquent de présenter
des problèmes pour le RB-06. Consultez votre
revendeur agréé Rotel pour de plus amples
informations à ce sujet.
Ch o ix de la se c t i on du câ b le
d’enceintes
Utilisez du câble deux conducteurs isolé pour
relier le RB-06 aux enceintes. La taille et la
qualité du câble peuvent avoir de l’infl uence
sur les performances musicales. Un câble
standard fonctionnera, mais il peut présenter
des limitations quant à la dynamique réellement reproduite ou à la qualité du grave,
surtout sur de grandes longueurs. En général,
un câble de plus fort diamètre entraîne une
amélioration du son. Pour des performances
optimales, penchez-vous sur l’offre en terme de
câbles de très haute qualité. Votre revendeur
agréé Rotel est en mesure de vous renseigner
effi cacement à ce sujet.
Polarité et mise en phase
La polarité – autrement dit l’orientation
correcte du « + » et du « - » pour chaque
branchement entre le RB-06 et les enceintes
acoustiques doit être respectée pour toutes
les enceintes, afi n que celles-ci soient toutes
en phase. Si la phase d’une seule enceinte
est inversée, il en résultera un manque de
grave sensible et une dégradation importante
de l’image stéréophonique. Tous les câbles
sont repérés afi n que vous puissiez identifi er
clairement leurs deux conducteurs. Soit les
câbles sont différents (un cuivré, un argenté),
soit la gaine est de couleur différente (fi let
de couleur), soit elle est gravée. Assurez-vous
que vous repérez bien le conducteur repéré
pour toutes les liaisons, et que vous respectez
parfaitement la phase sur toutes les enceintes
acoustiques, par rapport à l’entrée.
Branchement des enceintes en
stéréo 9
Le RB-06 possède des prises rouges et noires
repérées qui acceptent indifféremment du
câble nu, des cosses ou fourches spéciales,
ou encore des fi ches banane (sauf en Europe,
où les nouvelles normes CE l’interdisent).
Tirez le câble depuis le RB-06 vers les enceintes acoustiques. Prévoyez suffi samment
de longueur pour qu’il ne subisse aucune
contrainte sur toute sa longueur et que vous
puissiez déplacer les éléments sans qu’il soit
tendu (accès aux prises de l’amplifi cateur).
Si vous utilisez des fi ches banane, branchezles d’abord sur les câbles, puis insérez-les
à l’arrière des bornes de branchement de
l’amplifi cateur. Le corps hexagonal de cha-
cune des prises doit alors être vissé à fond
(dans le sens des aiguilles d’une montre).
Si vous utilisez des fourches, insérez-les à fond
dans le logement offert par les prises et serrez
fermement. Si vous utilisez du fi l nu, dénudez
tous les câbles sur une longueur suffi sante, et
torsadez les brins de chaque conducteur de
telle manière qu’aucun brin ne puisse venir en
contact avec un autre d’un autre conducteur
(court-circuit). Suivant la taille des torsades,
insérez-les dans les trous centraux des prises
ou entourez-le autour des axes de celles-ci
(sens des aiguilles d’une montre). Dans tous
les cas, serrez fermement à la main les bornes
vissantes hexagonales.
Note: Vérifi ez bien qu’il n’y ait aucun
brin qui vienne en contact avec des brins
ou la prise adjacente.
Fonctionnement en mode
mono (mise en pont)
[Voir la Figure 3 pour l’illustration de la position des cavaliers à modifi er, et le branchement correspondant]
Les deux canaux du RB-06 peuvent être «
mis en pont » (mode bridgé, en anglais).
Dans cette confi guration, on obtient un seul
canal, mais dont la puissance atteint 180
watts ! Cette caractéristique permet donc
d’augmenter la puissance disponible de votre
installation, à condition d’utiliser un second
amplificateur utilisé dans le même mode
monophonique pour la seconde enceinte. Un
RB-06 mis en pont peut également alimenter
un unique caisson de grave. Notez que dans
ce mode de fonctionnement monophonique,
l’unique enceinte branchée doit impérativement présenter une impédance minimum
de 8 ohms.
Afi n d’utiliser le RB-06 en mode monophonique, trois « cavaliers » situés à l’intérieur
de l’amplifi cateur doivent être déplacés d’un
jeu de broches à un autre. Cette modifi cation
ne doit être effectuée que par un technicien
qualifi é agréé. Consultez impérativement votre
revendeur agréé Rotel. De plus, les branchements par rapport aux autres maillons sont
alors différents par rapport au fonctionnement
stéréophonique normal. Lorsque le RB-06
est confi guré en mode monophonique, la
diode « Bridged Mono »
la façade.
4
4
s’allume sur
Page 13
13
RB-06 Stereo-Endstufe
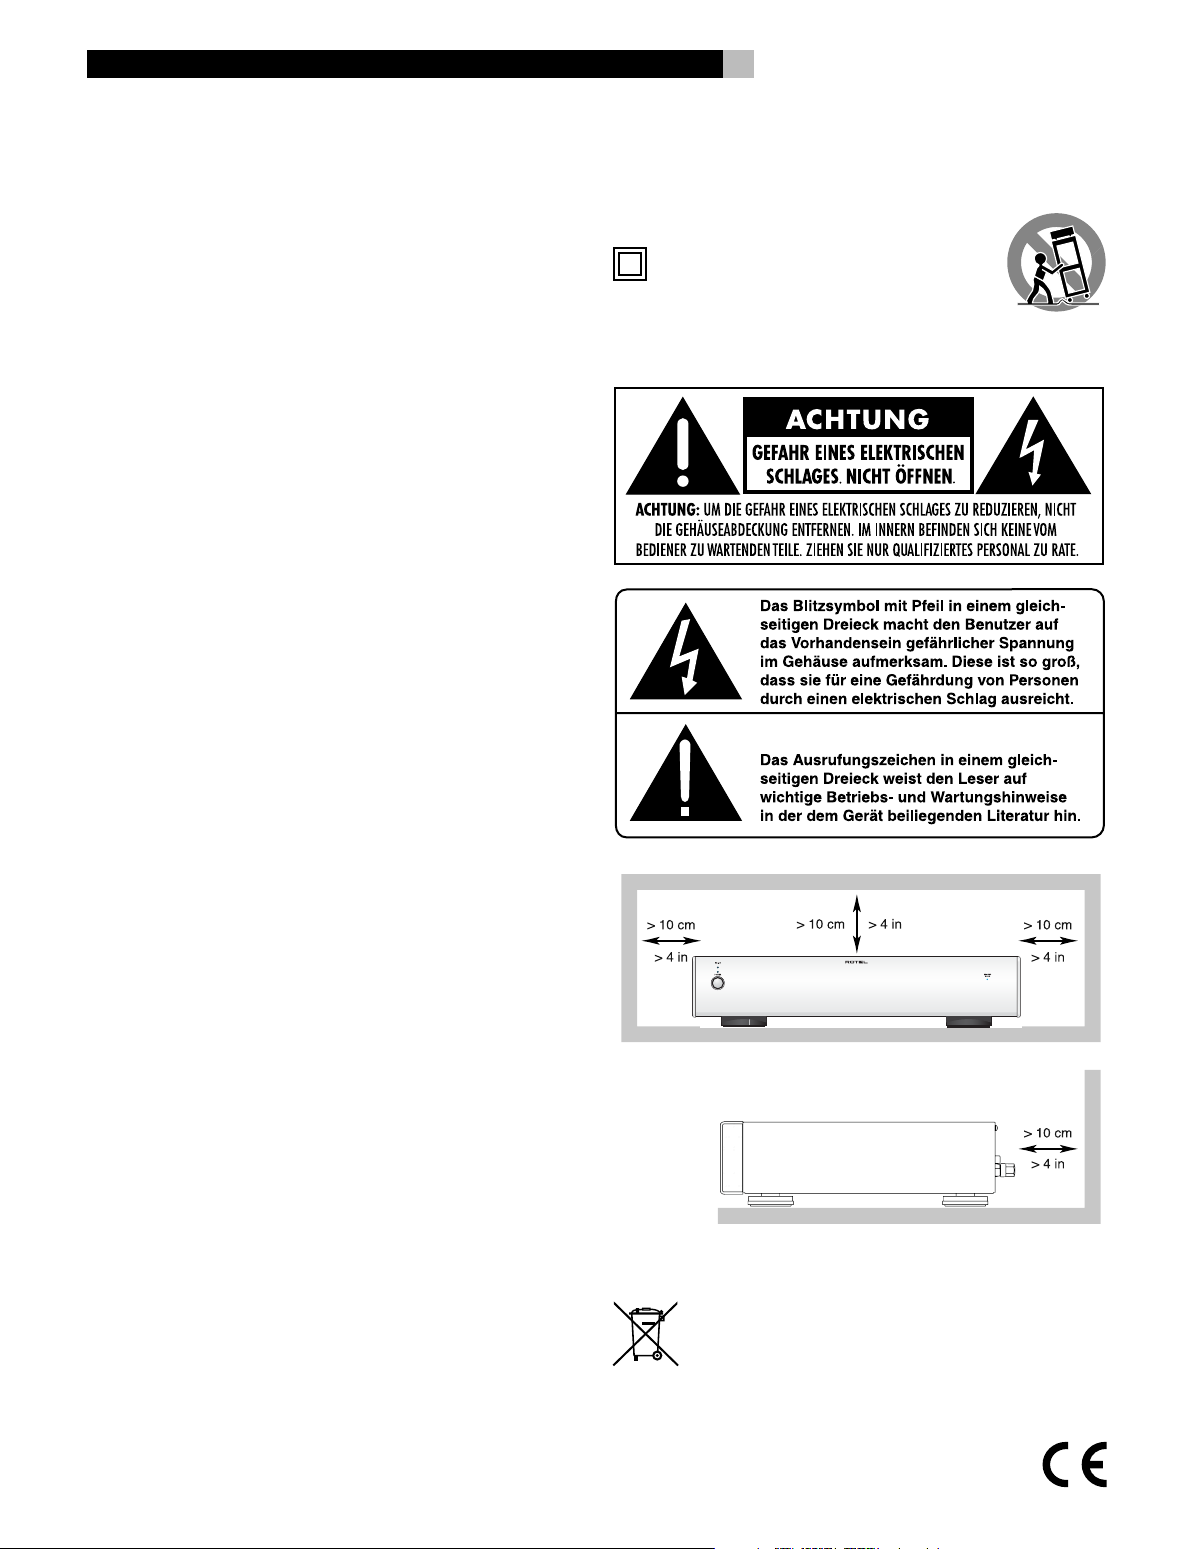
Rotel-Produkte entsprechen den internationalen Richtlinien
über die Beschränkung der Verwendung bestimmter gefährlicher Stoffe in Elektro- und Elektronikgeräten (Restriction of Hazardous Substances (kurz RoHS genannt)) und
über Elektro- und Elektronik-Altgeräte (Waste Electrical
and Electronic Equipment (WEEE)). Die durchgestrichene
Mülltonne steht für deren Einhaltung und besagt, dass die
Produkte ordnungsgemäß recycelt oder diesen Richtlinien
entsprechend entsorgt werden müssen.
Wichtige Sicherheitshinweise
Vorsicht: Im Innern des Gerätes befi nden sich keine vom Bediener
zu wartenden Teile. Alle Service- und Wartungsarbeiten müssen von
qualifi ziertem Fachpersonal durchgeführt werden.
Vorsicht: Dieses Gerät darf nur in trockenen Räumen betrieben
werden. Zum Schutz vor Feuer oder einem elektrischen Schlag dürfen keine Flüssigkeiten in das Gerät gelangen. Stellen Sie keine mit
Flüssigkeit gefüllten Vasen auf das Gerät..
Das Eindringen von Gegenständen in das Gehäuse ist zu
vermeiden. Sollte dieser Fall trotzdem einmal eintreten,
trennen Sie das Gerät sofort vom Netz. Lassen Sie es von
einem Fachmann prüfen und die notwendigen Reparaturarbeiten durchführen.
Bitte lesen Sie sich die Bedienungsanleitung vor Gebrauch des
Gerätes genau durch. Sie enthält wichtige Sicherheitsvorschriften, die
unbedingt zu beachten sind! Bewahren Sie die Bedienungsanleitung
so auf, dass sie jederzeit zugänglich ist.
Alle Warnhinweise in dieser Bedienungsanleitung und auf dem Gerät
müssen genau beachtet werden. Dadurch können Personen- und Sachschäden vermieden werden. Außer den in der Bedienungsanleitung
beschriebenen Handgriffen sind vom Bediener keine Arbeiten am
Gerät vorzunehmen.
Reinigen Sie das Gehäuse nur mit einem weichen, trockenen Tuch
oder einem Staubsauger.
Bitte stellen Sie sicher, dass um das Gerät ein Freiraum
von 10 cm gewährleistet ist Stellen Sie das Gerät weder auf
ein Bett, Sofa, Teppich oder ähnliche Oberfl ächen, um die Ventilationsöffnungen nicht zu verdecken. Das Gerät sollte nur dann in
einem Regal oder in einem Schrank untergebracht werden, wenn
eine ausreichende Luftzirkulation gewährleistet ist.
Stellen Sie das Gerät nicht in die Nähe von Wärmequellen (Heizkörper,
Wärmespeicher, Öfen oder sonstige wärmeerzeugende Geräte).
Bevor Sie das Gerät in Betrieb nehmen, prüfen Sie, ob die Betriebsspannung mit der örtlichen Netzspannung übereinstimmt. Die
Betriebsspannung ist an der Rückseite des Gerätes angegeben.
Schließen Sie das Gerät nur mit dem dazugehörigen zweipoligen
Netzkabel an die Wandsteckdose an. Modifi zieren Sie das Netzkabel auf keinen Fall. Versuchen Sie nicht, die Erdungs- und/oder
Polarisationsvorschriften zu umgehen. Das Netzkabel sollte an eine
zweipolige Wandsteckdose angeschlossen werden. Verwenden Sie
keine Verlängerungskabel.
Netzkabel sind so zu verlegen, dass sie nicht beschädigt werden
können (z.B. durch Trittbelastung, Möbelstücke oder Erwärmung).
Besondere Vorsicht ist dabei an den Steckern, Verteilern und den
Anschlussstellen des Gerätes geboten.
Sollten Sie das Gerät für eine längere Zeit nicht in Betrieb nehmen,
ziehen Sie den Netzstecker aus der Steckdose.
Dieses Gerät sollte, wie andere Elektrogeräte auch, nicht unbeaufsichtigt betrieben werden.
Ist das Gerät z.B. während des Transportes über längere Zeit Kälte
ausgesetzt worden, so warten Sie mit der Inbetriebnahme, bis es
sich auf Raumtemperatur erwärmt hat und das Kondenswasser
verdunstet ist.
Schalten Sie das Gerät sofort aus und ziehen Sie geschultes Fachpersonal zu Rate, wenn:
• das Netzkabel oder der Stecker beschädigt sind,
• Gegenstände bzw. Flüssigkeit in das Gerät gelangt sind,
• das Gerät Regen ausgesetzt war,
• das Gerät nicht ordnungsgemäß funktioniert bzw. eine deutliche
Leistungsminderung aufweist,
• das Gerät hingefallen ist bzw. beschädigt wurde.
Verwenden Sie gemäß Class 2 isolierte Lautsprecherkabel, um eine
ordnungsgemäße Installation zu gewährleisten und die Gefahr eines
elektrischen Schlages zu minimieren.
Stellen Sie das Gerät waagerecht auf eine feste, ebene Unterlage. Es
sollte weder auf beweglichen Unterlagen noch Wagen oder fahrbaren
Untergestellen transportiert werden
Dieses Symbol bedeutet, dass das Gerät doppelt isoliert ist. Es muss daher nicht geerdet
werden.
Page 14

14
Deutsch
Die Firma Rotel
Die Firma Rotel wurde vor mehr als 40 Jahren
von einer Familie gegründet, deren Interesse
an Musik so groß war, dass sie beschloss,
hochwertigste HiFi-Produkte herzustellen und
Musikliebhabern ungeachtet ihres Geldbeutels
einen außergewöhnlichen Wert zukommen
zu lassen. Ein Ziel, das von allen Rotel-Angestellten verfolgt wird.
Die Ingenieure arbeiten als Team eng zusammen. Sie hören sich jedes neue Produkt
an und stimmen es klanglich ab, bis es den
gewünschten Musikstandards entspricht. Die
eingesetzten Bauteile stammen aus verschiedenen Ländern und wurden ausgewählt,
um das jeweilige Produkt zu optimieren. So
fi nden Sie in Rotel-Geräten Kondensatoren aus
Großbritannien und Deutschland, Halbleiter
aus Japan oder den USA und direkt bei Rotel
gefertigte Ringkerntransformatoren.
Rotels guter Ruf wird durch hunderte von
Testerfolgen von den angesehensten Testern
der Branche, die jeden Tag Musik hören,
untermauert. Die Ergebnisse beweisen,
dass das Unternehmen sein Ziel konsequent
verfolgt hat, mit Equipment hoher Musikalität
und Zuverlässigkeit bei gleichzeitig günstigen
Preisen.
Wir danken Ihnen für Ihr Vertrauen in die
Marke Rotel und wünschen Ihnen viel Hörvergnügen.
Zu dieser Anleitung
Vielen Dank, dass Sie sich für die RotelStereo-Endstufe RB-06 entschieden haben.
Dieses einzigartige Gerät kann optimal in
jedem hochwertigen Audiosystem eingesetzt
werden.
Die RB-06 überzeugt durch höchste Wiedergabequalität und ist mit einer Vielzahl von
Ausstattungsmerkmalen ausgestattet. Bei ihrer
Entwicklung wurde besonderer Wert darauf
gelegt, den kompletten Dynamikbereich und
feinste Nuancen der Musik wiederzugeben.
Die RB-06 überzeugt mit einem großzügig
dimensionierten Netzteil mit Ringkerntransformator. Dieses niederohmige Netzteil
hat extreme Leistungsreserven, die es der
Endstufe ermöglichen, die anspruchsvollsten
Musiksignale zu verarbeiten. Zwar ist diese
Konstruktion teurer in der Herstellung, die
Musikwiedergabe jedoch profi tiert davon
deutlich.
Die Signalwege sind streng symmetrisch
gehalten, um Laufzeitunterschiede in den
Kanälen zu verhindern. Auf der Platine werden
Metallfi lmwiderstände und Polystyrol- bzw.
Polypropylenkondensatoren eingesetzt, die
die Signale klanggetreu übertragen. Alle
Aspekte dieser Konstruktion dienen nur dem
Ziel der möglichst originalgetreuen Wiedergabe von Musik.
Die RB-06 ist einfach zu installieren und zu
bedienen. Sollten Sie bereits Erfahrung mit
der Installation anderer Stereosysteme haben,
dürften keinerlei Probleme auftreten. Schließen
Sie einfach die gewünschten Geräte an und
genießen Sie die Musik
Einige Vorsichtsmaßnahmen
WARNUNG: Um eine Beschädigung des
Systems zu vermeiden, sollten Sie ALLE
Geräte des Systems abschalten, bevor Sie
die Lautsprecher oder sonstige Komponenten anschließen bzw. trennen. Schalten
Sie die Geräte erst wieder ein, wenn alle
Anschlüsse ordnungsgemäß hergestellt worden sind. Achten Sie dabei besonders auf
die Lautsprecherkabel oder das Gehäuse
des Verstärkers.
Lesen Sie sich die Bedienungsanleitung bitte
vor der Inbetriebnahme genau durch. Neben
grundsätzlichen Installations- und Bedienungshinweisen (bitte beachten Sie auch die Sicherheitshinweise am Anfang der Bedienungsanleitung)
enthält sie allgemeine Informationen, die Ihnen
helfen werden, Ihr System mit seiner maximalen
Leistungsfähigkeit zu betreiben. Bitte setzen Sie
sich bei etwaigen Fragen mit Ihrem autorisierten
Rotel-Fachhändler in Verbindung.
Bewahren Sie den Versandkarton und das
übrige Verpackungsmaterial der RB-06 für einen
eventuellen späteren Einsatz auf. Der Versand
oder Transport der Endstufe in einer anderen als
der Originalverpackung kann zu erheblichen
Beschädigungen des Gerätes führen.
Schicken Sie die Ihrer Endstufe beiliegende
Garantieanforderungskarte ausgefüllt an den
Rotel-Distributor in Ihrem Land. Bewahren Sie
bitte die Original-Kaufquittung auf. Sie belegt
am besten das Kaufdatum, das für Sie wichtig wird, sobald Sie eine Garantieleistung in
Anspruch nehmen.
Inhaltsverzeichnis
Abb. 1: Bedienelemente und Anschlüsse 3
Abb. 2: Anschlussdiagramm bei Stereobetrieb 4
Abb. 3: Anschlussdiagramm bei Brückenschaltung
- Eingang und Lautsprecher 4
Die Firma Rotel ..................................... 15
Zu dieser Anleitung ............................... 15
Einige Vorsichtsmaßnahmen 15
Aufstellung des Gerätes 16
Kabel 16
Netzspannung und Bedienung ................. 16
Netzeingang
0
16
POWER-Schalter und POWER-LED 1 2 16
12V TRIGGER ON/OFF-Schalter
5
16
12V TRIGGER-Ein 7 und -Ausgang 8 16
Eingangssignalanschlüsse 6 ................ 16
Anschluss der Lautsprecher .................... 17
Auswahl der Lautsprecher 17
Auswahl der Lautsprecherkabel 17
Polarität und Phasenabgleich 17
Anschluss der Lautsprecher bei
Stereobetrieb 9 17
Brückenschaltung 4 ............................ 17
Umstecken der Jumper 17
Anschluss eines Vorverstärkers bei
Brückenschaltung 18
Anschluss eines Lautsprechers bei
Brückenschaltung 18
Schutzschaltung 3 .............................. 18
Bei Störungen ....................................... 18
Die POWER-LED leuchtet nicht 18
Austauschen der Sicherung 18
Kein Ton 18
Technische Daten ................................... 18
Page 15

15
RB-06 Stereo-Endstufe
Netzspannung und
Bedienung
Netzeingang
0
Die RB-06 wird mit dem passenden Netzkabel geliefert. Verwenden Sie nur dieses
oder ein vergleichbares Kabel. Nutzen Sie
kein Verlängerungskabel. Eine hochbelastbare Mehrfachsteckdose kann eingesetzt
werden, wenn sie (und die Wandsteckdose)
ausreichende Strommengen für die RB-06
liefern können.
Stellen Sie sicher, dass die RB-06 vor dem
Anschließen an das Netz abgeschaltet ist,
sich der Netzschalter also in der AUS-Position
befi ndet. Verbinden Sie nun das Netzkabel
mit dem Netzeingang ? an der Geräterückseite. Stecken Sie das andere Ende in eine
Wandsteckdose.
Die RB-06 wird von Rotel so eingestellt, dass
sie der in Ihrem Land üblichen Wechselspannung von 230 Volt entspricht. Die Einstellung
ist an der Geräterückseite angegeben.
HINWEIS: Sollten Sie mit Ihrer RB-06
in ein anderes Land umziehen, kann die
Einstellung geändert werden, so dass das
Gerät mit einer anderen Netzspannung
betrieben werden kann. Versuchen Sie
auf keinen Fall, diese Änderung selber
vorzunehmen. Durch Öffnen des Gehäuses
setzen Sie sich gefährlichen Spannungen
aus. Ziehen Sie hierzu stets qualifi ziertes
Servicepersonal zu Rate.
Sind Sie, wie z.B. bei einer mehrwöchigen
Urlaubsreise, für längere Zeit nicht zu Hause,
sollten Sie Ihre Endstufe (ebenso wie alle anderen Audio- und Videokomponenten) während
Ihrer Abwesenheit vom Netz trennen.
POWER-Schalter und POWERLED 1 2
Der POWER-Schalter befi ndet sich an der
Gerätefront der RB-06. Drücken Sie ihn zum
Einschalten des Gerätes. Die LED über dem
POWER-Schalter beginnt zu leuchten und
zeigt an, dass die Endstufe eingeschaltet ist.
Durch erneutes Drücken des POWER-Schalters
wird die Endstufe ausgeschaltet.
12V TRIGGER ON/OFFSchalter
5
Über diesen Kippschalter können Sie wählen,
ob die Endstufe manuell oder automatisch
über ein 12-V-Trigger-Signal ein- bzw. ausgeschaltet werden soll.
Befi ndet sich der Schalter in der 12V TRIGGER ON-Position, schaltet sich die Endstufe
automatisch ein, wenn an der 3,5-mm-TRIGGER IN-Buchse an der Geräterückseite ein
12-V-Trigger-Signal anliegt. Liegt kein Signal
an, schaltet die Endstufe in den StandbyModus. Damit die Endstufe auf ein 12-V-Trigger-Signal reagieren kann, muss das Gerät
zunächst über den POWER-Schalter an der
Gerätefront eingeschaltet werden.
12V TRIGGER-Ein 7 und
-Ausgang
8
An die 3,5-mm-12 V TRIGGER IN-Buchse kann
zur Übertragung eines 12-V-Trigger-Signals
ein Kabel mit 3,5-mm-Klinkensteckern angeschlossen werden, um die Endstufe ein- bzw.
abzuschalten. Um dieses Feature nutzen zu
können, muss der Kippschalter in die ONPosition gesetzt werden. Dieser Eingang
reagiert auf Gleich- oder Wechselspannungssignale von 3 bis 30 Volt.
Die mit 12V TRIGGER OUT gekennzeichnete Buchse bietet die Möglichkeit, über
ein Kabel mit 3,5-mm-Klinkensteckern ein
12-V-Trigger-Signal an andere Komponenten
weiterzuleiten. Das Ausgangssignal steht
immer dann zur Verfügung, wenn an der
mit IN gekennzeichneten Buchse ein 12-VTrigger-Signal anliegt.
Eingänge
6
(siehe Anschlussdiagramm bei Stereobetrieb
in Figure (Abb.) 2)
Die RB-06 verfügt über Cinch-Anschlüsse,
wie sie an jedem hochwertigen Audiogerät
zu fi nden sind.
HINWEIS: Beim Verkabeln und Anschließen sollten die Geräte generell
abgeschaltet sein.
Aufstellung des Gerätes
Wie bei vielen anderen Audiokomponenten
auch, kann die Signalqualität der RB-06 durch
die Umgebung beeinträchtigt werden. Stellen
Sie den RB-06 daher nicht auf andere Geräte.
Auch sollten die Audiosignalkabel nicht neben
den Netzkabeln verlaufen, um Rauschen oder
Interferenzen zu vermeiden.
Die RB-06 erwärmt sich während des Betriebes. Die entstehende Wärme kann unter
normalen Bedingungen über die Kühlrippen
und Ventilationsöffnungen abgeführt werden.
Die Ventilationsöffnungen an der Oberseite
dürfen nicht verdeckt werden. Um das Gerät
muss ein Freiraum von 10 cm und am Aufstellungsort eine ausreichende Luftzirkulation
gewährleistet sein, um einer Überhitzung der
Endstufe vorzubeugen.
Berücksichtigen Sie beim Aufstellen das
Gewicht der Endstufe. Wir empfehlen, sie in
entsprechendem HiFi-Mobiliar unterzubringen.
HiFi-Mobiliar ist so ausgelegt, dass klangbeeinträchtigende Erschütterungen gedämpft
bzw. unterdrückt werden. Lassen Sie sich von
Ihrem autorisierten Rotel-Fachhändler in Bezug
auf HiFi-Mobiliar und die optimale Aufstellung
von Audiokomponenten beraten.
Kabel
Achten Sie bitte darauf, dass Netz-, Digitalund die normalen Audiosignalkabel separat
verlaufen. Dies minimiert die Wahrscheinlichkeit, dass Netz- bzw. Digitalkabel die Signale
der Analogkabel stören. Wir empfehlen,
hochwertige abgeschirmte Kabel zu verwenden. Wenden Sie sich bei etwaigen Fragen
zu den optimalen Kabeln für Ihr System an
Ihren autorisierten Rotel-Fachhändler.
Page 16

16
Deutsch
Verwenden Sie hochwertige Audioverbindungskabel. Verbinden Sie den linken Ausgangskanal
Ihres Vorverstärkers mit dem linken Eingangskanal an der RB-06. Schließen Sie den rechten
Ausgangskanal Ihres Vorverstärkers an den
rechten Eingangskanal der RB-06 an.
Anschluss der
Lautsprecher
Auswahl der Lautsprecher
Wir empfehlen, an die RB-06 Lautsprecher mit
einer nominalen Impedanz von mindestens
4 Ohm anzuschließen. Beim Betrieb mehrerer
parallel geschalteter Lautsprecherpaare sollten
Sie einige Vorsicht walten lassen, da sich die
effektive, vom Verstärker wahrgenommene
Impedanz verringert. Beim Betrieb von zwei
Paar 8-Ohm-Lautsprechern beträgt die Last
für den Verstärker 4 Ohm. Werden mehrere
parallel geschaltete Lautsprecher angeschlossen, empfehlen wir, Lautsprecher mit einer
nominalen Impedanz von 8 Ohm einzusetzen.
Die Angaben bezüglich der Impedanz von
Lautsprechern sind oft ungenau. In der Praxis
gibt es nur bei sehr wenigen Lautsprechern
Probleme beim Betrieb mit der RB-06. Wenden
Sie sich bei Fragen bitte an Ihren autorisierten
Rotel-Fachhändler.
Auswahl der
Lautsprecherkabel
Verbinden Sie die RB-06 und die Lautsprecher
über ein isoliertes, zweiadriges Lautsprecherkabel. Aufbau und Qualität des Kabels
können hörbare Effekte auf die Musikwiedergabe haben. Standard-„Klingeldraht“ wird
funktionieren, jedoch können vor allem bei
größeren Kabellängen Leistungsverluste und
eine ungleichmäßige Wiedergabe des Frequenzspektrums das Ergebnis sein. Allgemein
gilt, dass Kabel mit größerem Querschnitt
eine verbesserte Wiedergabequalität gewährleisten. Für höchste Wiedergabequalität
sollten Sie die Benutzung von speziellen,
hochwertigen Lautsprecherkabeln erwägen.
Ihr autorisierter Rotel-Fachhändler wird Ihnen
bei der Auswahl dieser Lautsprecherkabel
gerne weiterhelfen.
Polarität und Phasenabgleich
Die Polarität – die positive/negative Ausrichtung der Anschlüsse – muss für jede Lautsprecher-/Verstärkerverbindung phasengleich
sein. Wird die Polarität einer Verbindung
irrtümlicherweise umgekehrt, führt dies
zu einem unausgewogenen Klangbild mit
schwachen Bässen.
Die Kabel sind zur Identifi zierung gekennzeichnet. So kann die Isolationsschicht eines
Leiters gerippt oder ein Leiter mit einem Streifen markiert sein. Das Kabel kann verschiedenfarbige Leiter (Kupfer und Silber) besitzen
und von einer transparenten Isolationsschicht
umgeben sein. Bei anderen Kabeln wird die
Polaritätsangabe auf die Isolationsschicht gedruckt. Unterscheiden Sie zwischen positiven
und negativen Leitern und achten Sie bei jeder
Lautsprecher- und Verstärkerverbindung auf
die gleiche Polung.
Anschluss der Lautsprecher
bei Stereobetrieb
9
Die RB-06 besitzt an der Rückseite zwei Paar
farbig gekennzeichnete Anschlussklemmen.
An diese Anschlussklemmen können blanke
Drähte oder Kabelschuhe angeschlossen
werden.
Führen Sie das Kabel von der RB-06 zu den
Lautsprechern. Lassen Sie sich genügend
Raum, damit Sie die Komponenten bewegen
können und so einen freien Zugang zu den
Lautsprechern sicherstellen.
Bei der Verwendung von Kabelschuhen
verbinden Sie diese mit den Kabeln, stecken
die Kabelschuhe hinten unter die Anschlussklemmen und drehen die Klemmen im
Uhrzeigersinn fest.
Sollten die Lautsprecherkabel direkt (ohne
Kabelschuhe) an die Lautsprecherklemmen
angeschlossen werden, so entfernen Sie an
den Kabelenden ca. 15 mm der Isolation.
Lösen Sie die Schraubklemmen durch Drehen
gegen den Uhrzeigersinn. Verdrillen Sie die
blanken Kabelenden, um ein Zerfasern zu
vermeiden, und stecken Sie das verdrillte Kabel hinter die Schraubklemmen. Anschließend
drehen Sie diese im Uhrzeigersinn fest.
HINWEIS: Achten Sie bitte darauf, dass
die blanken Kabelenden vollständig an
den Schraubklemmen untergebracht sind
und somit das Berühren benachbarter
Drähte oder Anschlüsse ausgeschlossen ist.
Brückenschaltung
4
(siehe Anschlussdiagramm und JumperPositionen bei Brückenschaltung in Figure
(Abb.) 3)
Die beiden Kanäle der RB-06 können zu einem
Kanal „gebrückt“ werden. In Brückenschaltung liefert die RB-06 eine Ausgangsleistung
von beeindruckenden 180 Watt. Hierdurch
und durch das Anschließen einer zweiten
„gebrückten“ RB-06 ist eine Optimierung des
Gesamtsystems möglich. Oder die RB-06 wird
für den Anschluss eines Subwoofers in Brückenschaltung betrieben. Beachten Sie, dass
die Mindestimpedanz der Lautsprecher bei
Brückenschaltung 8 Ohm betragen muss.
Um die RB-06 in Brückenschaltung betreiben
zu können, müssen im Gehäuse drei Jumper
umgesteckt werden. Diese Aufgabe ist von
einem qualifi zierten Fachmann durchzuführen.
Fragen Sie Ihren autorisierten Rotel-Fachhändler. Darüber hinaus sind die anderen Geräte
anders anzuschließen. Wird die Endstufe
in Brückenschaltung betrieben, leuchtet die
BRIDGED MONO-LED.
4
an der Geräte-
front.
Umstecken der Jumper
Bevor Sie das Gehäuse zum Umsetzen der
Jumper öffnen, ziehen Sie zunächst den
Netzstecker aus der Steckdose. VORHER
DARF DER GEHÄUSEDECKEL AUF GAR
KEINEN FALL ABGENOMMEN WERDEN,
DA SIE SICH SONST GEFÄHRLICHEN
SPANNUNGEN AUSSETZEN.
Page 17

17
Italiano
I prodotti Rotel sono realizzati in conformità con le
normative internazionali: Restriction of Hazardous
Substances (RoHS) per apparecchi elettronici ed
elettrici, ed alle norme Waste Electrical and Electronic
Equipment (WEEE). Il simbolo del cestino con le ruote
e la croce sopra, indica la compatibilità con queste
norme, e che il prodotto deve essere riciclato o smaltito
in ottemperanza a queste direttive.
Questo simbolo indica che questo prodotto
è doppiamente isolato. Non è necessario il
collegamento della messa a terra.
Importanti instruzioni di Sicurezza
ATTENZIONE: Non vi sono all’interno parti riparabili dall’utente.
Per l’assistenza fate riferimento a personale qualifi cato.
ATTENZIONE: Per ridurre il rischio di incendio e di scossa elettrica
non esponete l’apparecchio all’umidità o all’acqua. Non posizionate
contenitori d’acqua , ad es. vasi, sull’unità.
Evitare che cadano oggetti all’interno del cabinet. Se
l’apparecchio è stato esposto all’umidità o un oggetto è
caduto all’interno del cabinet, staccate il cavo di alimentazione
dalla presa. Portare l’apparecchio ad un centro di assistenza
qualifi cato per i necessari controlli e riparazioni.
Leggere attentamente tutte le istruzioni prima di collegare l’apparecchio
alla rete di alimentazione ed utilizzarlo. Conservate questo manuale
per ogni riferimento futuro alle istruzioni di sicurezza.
Seguire attentamente tutte le avvertenze e le informazioni sulla sicurezza contenute in queste istruzioni e sul prodotto stesso. Seguire
tutte le istruzioni d’uso.
Pulire il cabinet solo con un panno asciutto o con un piccolo
aspirapolvere.
Mantenere 10 cm circa di spazio libero da tutti i lati del
prodotto. Non posizionate l’apparecchiatura su un letto, divano,
tappeto, o superfi ci che possano bloccare le aperture di ventilazione.
Se l’apparecchio è posizionato in una libreria o in mobile apposito,
fate in modo che ci sia abbastanza spazio attorno all’unità per
consentire un’adeguata ventilazione e raffreddamento.
L’unità dovrebbe essere posta lontano da fonti di calore come caloriferi,
termoconvettori, stufe, o altri apparecchi che producono calore.
L’apparecchiatura deve essere collegata esclusivamente ad una
sorgente di alimentazione elettrica del tipo indicato sul pannello
posteriore dell’unità.
Collegate l’unità alla presa di alimentazione solo con il cavo che
viene fornito o con uno equivalente. Non modifi cate il cavo in dotazione in alcun modo. Non cercate di eliminare la messa a terra o
la polarizzazione. Non utilizzate prolunghe.
Non fate passare il cavo di alimentazione dove potrebbe essere
schiacciato, pizzicato, piegato ad angoli acuti, esposto al calore
o danneggiato. Fate particolare attenzione al posizionamento del
cavo di alimentazione all’altezza della presa e nel punto in cui esce
dalla parte posteriore dell’apparecchio.
Il cavo di alimentazione dovrebbe essere scollegato dalla presa quando
l’apparecchiatura rimane inutilizzata per un periodo piuttosto lungo.
L’apparecchiatura non deve più essere utilizzata, deve essere disattivata immediatamente e fatta ispezionare da personale qualifi cato
quando::
• Il cavo di alimentazione o la spina sono stati danneggiati.
• Sono caduti oggetti, o del liquido è stato versato
nell’apparecchio.
• L'apparecchiatura è stata esposta alla pioggia.
• L'apparecchiatura non sembra funzionare in modo normale.
• L'apparecchiatura è caduta, o è stata danneggiata in qualche
modo.
Utilizzate cavi per i diffusori isolati in Classe 2 per limitare eventuali
rischi di shock elettrico.
Posizionate l’unità su una superfi cie piana abbastanza robusta da
sopportarne il peso. Non posizionate l’unità su un mobile con ruote
poiché potrebbe cadere.
Page 18

18le di Potenza Stereo
Alcune parole sulla Rotel
Una famiglia, la cui passione per la musica
ha spinto a realizzare componenti hi-fi di
elevata qualità, fondò la Rotel più di 40
anni fa. Attraverso gli anni la passione è
rimasta intatta e l’obbiettivo di offrire prodotti
eccezionali agli audiofili e amanti della
musica ad un costo non elevato è condiviso
da tutti alla Rotel.
Una famiglia, la cui passione per la musica
ha spinto a realizzare componenti hi-fi di
elevata qualità, fondò la Rotel più di 40 anni
fa. Attraverso gli anni la passione è rimasta
intatta e l’obbiettivo di offrire prodotti eccezionali, indipendentemente dal loro costo, agli
audiofi li ed amanti della musica è condiviso
da tutti alla Rotel.
Gli ingegneri lavorano come una squadra
affi atata, ascoltando e mettendo a punto ogni
nuovo prodotto fi nché non raggiunge perfettamente i loro standard musicali. Sono liberi
di scegliere i componenti in qualsiasi parte
del mondo al fi ne di realizzare il prodotto nel
miglior modo possibile. Così potrete trovare
condensatori provenienti dall’Inghilterra e
dalla Germania, semiconduttori dal Giappone o dagli Stati Uniti, mentre i trasformatori
toroidali sono prodotti dalla Rotel stessa.
La fama di Rotel è stata costruita grazie a
centinaia di ottime recensioni e riconoscimenti
conferiti dai più autorevoli esperti del settore, che ascoltano la musica ogni giorno. I
loro commenti confermano l’obiettivo della
società - La ricerca di un apparecchio che sia
musicale, affi dabile e conveniente.
Noi tutti della Rotel vi ringraziamo per aver
scelto questo prodotto augurandovi molte ore
di piacevole intrattenimento musicale.
Per Cominciare
Grazie per aver acquistato l’amplifi catore di
potenza stereo Rotel RB-06. Se utilizzato in un
sistema home theater o stereo di alta qualità,
il vostro amplifi catore Rotel vi permetterà di
godere di molti anni di buona musica .
L’RB-06 è un componente versatile di elevate
prestazioni. Tutti gli aspetti del design sono
stati ottimizzati per conservare la piena
gamma dinamica e per riprodurre anche le
più delicate sfumature musicali. L’RB-06 ha
uno stadio di alimentazione stabile e potente
che comprende un trasformatore toroidale
specifi camente progettato dalla Rotel.
Questa alimentazione a bassa impedenza
ha ampie riserve di potenza che consentono
all’RB-06 di riprodurre i segnali audio più
impegnativi.
Questo tipo di design è più costoso da
produrre, ma è migliore per la riproduzione
musicale.
Abbiamo progettato le schede dei circuiti
stampati (PCB) secondo la teoria Symmetrical Circuit Traces. Ciò garantisce una più
fedele riproduzione della musica ed un
mantenimento più preciso del tempo. Nelle
sezioni più critiche del percorso del segnale
vengono utilizzate resistenze a fi lm metallico
e condensatori in polistirene o polipropilene.
Tutti gli aspetti di questo progetto sono stati
studiati con lo scopo fi nale di ottenere la più
fedele riproduzione sonora.
Le principali funzioni dell’RB-06 sono semplici da impostare ed utilizzare. Se avete
già esperienza con altri sistemi stereo,
non dovreste incontrare alcuna diffi coltà.
Collegate semplicemente i componenti da
abbinare ed ascoltate la musica.
Alcune precauzioni
AVVERTENZA : Per evitare potenziali
danni al vostro sistema, spegnete TUTTI i
componenti quando collegate o scollegate i
diffusori o qualsiasi componente connesso.
Non riaccendete l’impianto fi no a quando
non siete sicuri che tutti i componenti siano
collegati correttamente. Ponete particolare
attenzione ai cavi dei diffusori. Non devono
esserci refoli di fi lo liberi che potrebbero fare
contatto con l’altro cavo del diffusore o con
lo chassis dell’amplifi catore.
Vi preghiamo di leggere con attenzione
questo manuale. Insieme alle istruzioni d’uso
e di installazione di base, fornisce una valida
informazione sulle varie confi gurazioni del
RB-06 ed altre informazioni generali che
vi aiuteranno a sfruttare al meglio il vostro
sistema. Siete pregati di mettervi in contatto
con il vostro rivenditore autorizzato Rotel
per eventuali domande o dubbi. Inoltre, tutti
noi della Rotel saremo lieti di rispondere a
qualsiasi vostra domanda e commento.
Indice
Figure 1: Pannello frontale e posteriore 3
Figure 2: Schema dei collegamenti stereo 4
Figure 3: Schema dei collegamenti mono a ponte
– Ingressi e diffusori
Posizione dei Jumper 4
Alcune parole sulla Rotel ....................... 20
Per cominciare ...................................... 20
Alcune precauzioni 20
Posizionamento 21
Cavi 21
Alimentazione AC e comandi .................. 21
Ingresso In Corrente
Alternata
0
21
Interruttore 1 di Accensione ed
Indicatore di Accensione 2 21
Selettore Trigger ON/OFF 5 21
Ingresso ed Uscita Trigger 12V
78
21
Collegamenti di Segnale in Ingresso 6 .. 22
Collegamento diffusori .......................... 22
Scelta dei Diffusori 22
Scelta dei Cavi dei Diffusori 22
Polarita’ e Fase 22
Collegamento Dei Diffusori Stereo 9 22
Confi gurazione Mono “a Ponte” 4 ...... 22
Impostazione dei jumper 22
Collegamento dell’Ingresso 23
Collegamento Dei Diffusori In
Confi gurazione Mono “a Ponte” ............ 23
Indicatori di Protezione
3
................... 23
Risoluzione dei problemi ........................ 23
Il LED Indicatore Power del
Pannello Frontale non si Accende 23
Sostituzione del Fusibile 23
Nessun Suono 23
Caratteristiche Tecniche.......................... 23
Page 19

19 Italiano
Conservate la scatola di imballo ed il materiale di protezione accluso del RB-06 per
eventuali necessità future. La spedizione o
lo spostamento del RB-06 in qualsiasi altro
contenitore che non sia l’imballo originale
potrebbe causare seri danni al prodotto.
Compilate e spedite il tagliando di garanzia
accluso con l’RB-06. Conservate la ricevuta
d’acquisto originale. E’ la prova di acquisto del
prodotto contenente la data di acquisto, che vi
servirà nell’eventualità di dovere ricorrere ad
interventi di riparazione in garanzia.
Posizionamento
Come tutti i componenti audio che gestiscono segnali a basso livello, anche l’RB-06
può essere condizionato da agenti esterni
nell’ambiente in cui viene utilizzato. Evitate
di appoggiare l’RB-06 sopra ad altri componenti o di fare passare i cavi di segnale
audio vicino ai cavi dell’alimentazione.
Questo ridurrà al minimo il verifi carsi di
interferenze o disturbi.
L’RB-06 genera calore durante il normale
funzionamento. I dissipatori di calore e le
aperture di ventilazione sono stati realizzati
per dissipare il calore. Non ostruite le aperture di ventilazione sul pannello superiore.
Lasciate almeno 10cm di spazio libero
attorno all’unità ed assicuratevi che ci sia
una adeguata ventilazione, per prevenire il
surriscaldamento dell’amplifi catore.
Quando scegliete una collocazione tenete in
considerazione il peso dell’unità. Assicuratevi
che lo scaffale su cui poggia o il mobile su cui
viene inserito possano sostenerne il peso. Vi
raccomandiamo di installare l’RB-06 in mobili
progettati per accogliere componenti audio.
Questi mobili sono progettati per ridurre od
eliminare le vibrazioni che possono infl uire
negativamente sulla qualità sonora. Chiedete
consiglio al vostro rivenditore autorizzato Rotel
sui complementi d’arredo dedicati agli apparecchi audio e su come effettuare una corretta
installazione dei componenti audio.
Cavi
Assicuratevi sempre di mantenere separati i cavi
di alimentazione dai cavi di segnale digitali e
quelli di segnale audio standard nel cablaggio
del vostro sistema. Questo ridurrà la possibilità
di un’interferenza e disturbo fra i cavi di alimentazione o i cavi digitali. L’utilizzo di cavi
schermati di alta qualità, contribuirà anche ad
evitare disturbi od interferenze che potrebbero
infl uire sulla qualità sonora del vostro sistema.
Per maggiori dettagli in merito contattate il vostro
rivenditore autorizzato Rotel, che saprà consigliarvi i migliori cavo per il vostro sistema.
Alimentazione AC e
comandi
Alimentazione in corrente
alternata
0
Con l’RB-06 viene fornito in dotazione un cavo
di alimentazione AC; utilizzate questo cavo
o un cavo equivalente. Non usate prolunghe.
Potete eventualmente utilizzare una ciabatta
a prese multiple che sia (così come la presa
a cui verrà collegata) in grado di gestire
la corrente richiesta dall’RB-06 e dagli altri
componenti collegati ad essa.
Assicuratevi che l’interruttore principale Power
sul pannello frontale del RB-06 sia disattivato.
Quindi, inserite un capo del cavo nel connettore di alimentazione AC sul pannello
posteriore dell’amplifi catore; inserite l’altro
capo del cavo in una presa di rete AC.
Il vostro RB-06 è confi gurato dalla fabbrica
per funzionare alla tensione di alimentazione
appropriata del paese in cui l’avete acquistato
(USA:115V/60Hz, Europa:230V/50Hz).
La tensione di alimentazione AC impostata
è indicata su un adesivo posto sul retro del
vostro apparecchio.
NOTA: Nel caso in cui dobbiate spostare
il vostro RB-06 in un altro paese, è possibile
confi gurarlo per l’utilizzo con una tensione
differente. Non tentate di effettuare questa
operazione da soli, l’apertura del cabinet del
RB-06 potrebbe esporvi a tensioni pericolose.
Consultate un tecnico autorizzato o il servizio
assistenza Rotel per maggiori informazioni.
Il cavo di alimentazione dovrebbe essere
scollegato dalla presa se l’apparecchiatura
rimane inutilizzata per un periodo piuttosto
lungo (consigliabile per tutti i vostri componenti audio e video).
Interruttore 1 di Accensione
ed Indicatore di Accensione 2
L’interruttore di accensione Power è posizionato
sul pannello frontale. Per attivare l’amplifi catore (o
per attivare anche la modalità automatica di accensione), premetelo. L’indicatore di accensione
sul tasto si illumina, indicando che l’amplifi catore
è attivo. Per spegnere l’amplifi catore, premete
nuovamente il tasto in modo da riportarlo nella
sua posizione esterna.
Selettore Trigger ON/OFF 5
L’amplifi catore permette di scegliere se effettuare l’accensione/spegnimento manuale o
automatica. Queste modalità sono selezionabili utilizzando un selettore posto sul pannello
posteriore.
Con il selettore in posizione 12V TRIGGER ON,
l’amplifi catore viene attivato automaticamente
quando è presente un segnale trigger da 12V
sul connettore da 3.5 mm TRIGGER IN sul
pannello posteriore. L’amplifi catore si porrà in
modalità di standby se non è presente il segnale
da 12V. L’interruttore di alimentazione sul pannello anteriore bypassa questa funzione. Deve
essere su ON perché il sistema Trigger +12V
possa funzionare. Mettendo l’interruttore su
OFF si toglie l’alimentazione all’amplifi catore,
indipendentemente dal fatto che un segnale
trigger sia presente o no.
Ingresso ed
Uscita Trigger 12V
78
Il connettore contrassegnato IN serve per
collegare un cavo con connettore da 3.5 mm
che trasporta il segnale trigger da 12V al
fi ne di attivare e disattivare l’amplifi catore.
Per utilizzare questa funzione il commutatore
deve essere posto in posizione ON. Questo
ingresso accetta un qualsiasi segnale di
controllo (AC o DC) da 3 a 30V
Il connettore contrassegnato OUT serve per
inviare, tramite un cavo con connettore da
3.5 mm, il segnale trigger da 12V ad altri
componenti. Il segnale di uscita 12V è disponibile ogni qualvolta è presente un segnale
trigger 12V all’ingresso IN.
Page 20

20
RB-06 Finale di Potenza Stereo
Polarita’ e Fase
La polarità, o orientamento positivo/negativo, dei
collegamenti di ogni diffusore ed amplifi catore
deve sempre essere rispettata, in modo che tutti
i diffusori siano in fase. Se la polarità di una
connessione viene erroneamente invertita, la
riproduzione delle basse frequenze sarà molto
debole e l’immagine stereo risulterà degradata.
Tutti i cavi per diffusori sono contrassegnati in
modo da poterli identifi care facilmente: solitamente su uno dei due cavi è presente una striscia
colorata o un altro segno di riconoscimento simile;
oppure, se l’isolante dei cavi è trasparente, i
conduttore sono di colori diversi (uno di colore
rame ed uno argento); oppure potrebbe essere
indicata la polarità direttamente sull’isolante.
Identifi cate i conduttori positivi e negativi e
prestate attenzione ad ogni collegamento che
effettuate sull’amplifi catore e sui diffusori.
Collegamento Di
Diffusori Stereo 9
L’RB-06 è dotato di due coppie di terminali per
diffusori identifi cati con un codice a colori. I
connettori accettano: cavi spellati, terminali ad
anello aperto e terminali di tipo “dual banana”
(esclusi i paesi della Comunità Europea dove il
loro uso non è permesso).
Stendete il cavo dal RB-06 ai diffusori. Lasciate i
cavi un po’ più lunghi del necessario per darvi la
possibilità di spostare i componenti ed accedere
ai connettori dei diffusori.
Se utilizzate connettori dual banana, collegateli
ai cavi e quindi inseriteli nei connettori sul pannello posteriore. Se utilizzate questi connettori il
collare a vite esagonale dei terminali deve essere
avvitato completamente (in senso orario).
Se state usando terminali ad anello aperto,
collegateli ai cavi. Se collegate direttamente i
cavi spellati ai terminali dei diffusori, separate
i cavi, e quindi spellate i terminali dei cavi.
Fate attenzione a non tagliare anche il cavo
interno quando lo spellate. Svitate (in senso
antiorario) i collari a vite esagonali. Posizionate i terminali ad anello aperto attorno al
corpo del connettore. Avvitate il collare
esagonale in senso orario per bloccare il
connettore ad anello aperto o il cavo.
NOTA: Assicuratevi che non vi siano fi li che
fuoriescono dalla parte spellata del cavo,
che potrebbero andare a toccare il cavo o
il connettore adiacente.
Confi gurazione Mono
“a Ponte”
4
(vedere la fi gura 3 per il posizionamento dei jumpers per il funzionamento “a
ponte” e per i collegamenti)
I due canali dell’RB-06 possono essere collegati “a ponte”. In questa confi gurazione
il canale singolo eroga l’enorme potenza di
180 watt! Questa caratteristica vi consente
di aumentare la potenza dell’intero sistema
collegando a ponte il vostro RB-06 e aggiungendo un secondo RB-06 in confi gurazione
“a ponte”. Oppure l’RB-06 viene confi gurato
“a ponte” per pilotare un Subwoofer monofonico. Notate tuttavia che quando l’RB-06
è confi gurato “a ponte” il diffusore collegato
ad esso deve avere un’impedenza pari o
superiore ad 8 ohm.
Al fi ne di utilizzare l’RB-06 in confi gurazione
a ponte, è necessario spostare tre jumpers
all’interno dell’amplifi catore posizionandoli
da una serie di connettori ad un’altra. Questa
operazione dovrebbe essere effettuata da
personale qualifi cato. Chiedete informazioni
a riguardo al vostro rivenditore Rotel. Inoltre
l’RB-06 deve essere collegato agli altri componenti in modo diverso. Quando l’RB-06
è confi gurato “a ponte”, la spia luminosa
contrassegnata
BRIDGED MONO
4
sul pan-
nello frontale si illuminerà.
Impostazione dei jumper
Scollegate il cavo di alimentazione
prima di aprire il cabinet del RB-06
per impostare i jumper. NON APRITE
IL CABINET DEL RB-06 PRIMA DI
AVERE SCOLLEGATO IL CAVO DI
ALIMNETAZIONE DALLA PRESA. LA
NON OSSERVANZA DI QUESTA
AVVERTENZA POTREBBE ESPORVI A
TENSIONI PERICOLOSE.
Dopo avere scollegato il cavo di alimentazione, rimuovete le viti del coperchio del
cabinet, e toglietelo sfi landolo dalla sua sede.
Individuate i tre jumper contrassegnati con
S 601, S 602 ed S 603. L’impostazione di
fabbrica (stereo) dei jumper è sui pin 1 e 2
di ogni blocco; la loro posizione sulla scheda
circuitale è indicata con un asterisco *.
Collegamenti di Segnale
In Ingresso 6
[Vedi fi gura 2 per normali collegamenti stereo.]
L’RB-06 dispone di normali connettori di ingresso RCA, del tipo che si trovano su quasi
tutti gli apparecchio audio.
NOTA: Per prevenire scariche nei diffusori che potrebbero danneggiarli,
assicuratevi che il sistema sia spento
quando effettuate qualsiasi collegamento di segnale.
Utilizzate cavi di connessione alta qualità.
Collegate l’uscita del canale sinistro del vostro
preamplifi catore all’ingresso del canale sinistro del RB-06. Collegate l’uscita del canale
destro del vostro preamplifi catore all’ingresso
del canale destro del RB-06.
Collegamento Diffusori
Selezione Dei Diffusori
Raccomandiamo l’utilizzo di diffusori con
impedenza nominale di 4ohm o superiore.
Fate attenzione se desiderate pilotare più
diffusori in parallelo, poiché l’impedenza
effettiva che l’amplifi catore rileva è sempre
la metà. Per esempio, quando pilotate due
coppie di diffusori da 8ohm, l’amplifi catore
rileva un carico di 4 ohm.
Quando pilotate più coppie di diffusori in parallelo, vi raccomandiamo di scegliere diffusori
con impedenza di 8ohm o superiore. Poiché
i dati sull’impedenza dei diffusori non sono
molto precisi, In pratica, pochissimi diffusori
presenteranno un problema per l’RB-06. Fate
riferimento al vostro rivenditore autorizzato
Rotel se avete eventuali dubbi in merito.
Scelta Dei Cavi Dei Diffusori
Per collegare l’RB-06 ai diffusori utilizzate cavi isolati
bipolari. La sezione e la qualità del cavo possono
avere effetti udibili sulla qualità della riproduzione
del sistema: potete utilizzare dei cavi standard per
diffusori, ma potrebbero dare luogo ad una uscita di
basso livello o ad una risposta alle basse frequenze
inadeguata, in particolar modo con cavi molto lunghi.
In generale, dei cavi di buona qualità miglioreranno
il suono. Se volete ottenere le migliori prestazioni,
dovreste considerare l’acquisto di cavi per diffusori
di alta qualità; il vostro rivenditore Rotel potrà aiutarvi
nella scelta dei cavi adatti al vostro sistema.
Page 21

21 Italiano
Per convertire la normale operatività in confi gurazione “a ponte”, impostate tutti e tre i
jumper sui pin 2 e 3 di ogni blocco. Rimontate
il coperchio del cabinet. Non ricollegate il
cavo di alimentazione del RB-06 alla
presa fi nchè non avete rimontato il
coperchio sul cabinet
Collegamento dell’Ingresso
Quando utilizzate l’RB-06 in confi gurazione
mono “a ponte”, collegate il cavo proveniente
dall’uscita del preamplifi catore all’ingresso
del canale sinistro. Nessun collegamento
deve essere fatto sul canale destro.
Collegamento Dei Diffusori In
Confi gurazione mono
“a Ponte”
Quando utilizzate l’RB-06 in confi gurazione
mono “a ponte”, il cavo diretto ai diffusori
è collegato ai terminali positivi dei canali
destro e sinistro. Collegate il cavo che va al
terminale positivo del diffusore al terminale
positivo del canale sinistro dell’RB-06. Collegate il cavo che va al terminale negativo
del diffusore al terminale positivo del canale
destro dell’RB-06.
Nessuna connessione deve essere effettuata
ai terminali negativi dell’RB-06.
Indicatori di Protezione
3
L’amplifi catore è dotato di una protezione termica
che lo protegge da danni conseguenti a condizioni di funzionamento estreme o inadeguate.
Il circuito di protezione del RB-06 è indipendente
dal segnale audio e non ha nessuna infl uenza
sulle prestazioni soniche: il circuito di protezione
tiene sotto controllo la temperatura degli stadi
fi nali, e disattiva l’amplifi catore se la temperatura
si alza oltre i limiti di sicurezza.
Solitamente questo circuito non entrerà mai in
funzione, comunque, nel caso si verifi chi una
condizione di guasto, l’amplifi catore interrompe
la riproduzione ed il LED indicatore sul pannello
frontale si illumina.
Se questo accade, spegnete l’amplifi catore,
lasciatelo raffreddare alcuni minuti, e provate
ad individuare e risolvere il problema che ha
causato l’intervento del circuito di protezione.
Quando riaccendete l’amplifi catore, il circuito
di protezione si ripristinerà automaticamente ed
il LED si spegnerà.
Nella maggior parte dei casi, il circuito di protezione si attiva in seguito ad una condizione
di guasto dovuta ad un corto circuito dei cavi
dei diffusori, o a causa di una ventilazione
inadeguata che porta ad un surriscaldamento
dell’amplifi catore. In casi molto rari, può essere
causato da una impedenza molto bassa o molto
reattiva dei diffusori.
Se il circuito di protezione interviene continuamente e non siete in grado di individuare e
correggere il guasto, contattate il vostro riven-
ditore Rotel per assistenza.
Risoluzione Dei Problemi
La maggior parte dei problemi nei sistemi
audio è dovuta a collegamenti non effettuati a
dovere o sbagliati, o impostazioni di controllo
errate. Se riscontrate problemi, isolate l’area
interessata, verifi cate le impostazioni degli
apparecchi, determinate la causa del problema ed apportate le necessarie correzioni.
Se non siete in grado di fare funzionare il
RB-06, prendete spunto dalle indicazioni
sotto riportate:
Caratteristiche Tecniche
Potenza di uscita continua 70W/ch
(20-20kHz, < 0.03%, 8)
Potenza di uscita in confi g. mono “a ponte” 180W
(20-20 KHz, <0.1%, 4ohm) (200W a 1KHz)
Distorsione armonica totale (20-20kHz, 8ohm) < 0.03%
Distorsione d’intermodulazione < 0.03%
(60 Hz, 7kHz, 4:1)
Risposta in frequenza (±1 dB) 10Hz-100kHz
Fattore di smorzamento 500
(20 - 20,000Hz, 8 ohm)
Impedenza dei diffusori (modalità normale) 4 ohm minimo
Rapporto S/N (Pesato “A”IHF) 116 dB
Impedenza/sensibilità d’ingresso 33 KOhm/1.0 Volt
Alimentazione
versione USA 120 Volt, 60 Hz
versione Europea 230 Volt, 50 Hz
Assorbimento 250 W
Dimensioni (LxAxP) 437 x 72 x 342 mm
Altezza panello frontale 80mm / 2 5/32”
Peso (netto) 7.5 Kg, 16.54 lbs
Tutte le caratteristiche sono esatte al momento della stampa. Rotel si riserva il diritto di apportare miglioramenti senza alcun preavviso..
Il LED Indicatore Power del
Pannello Frontale Non Si
Accende
L‘RB-06 non è alimentato. Verificate che
l’interruttore principale sul pannello frontale
sia stato premuto. Controllate che il cavo di
alimentazione AC sia collegato alla presa
di rete ed all’amplifi catore.
Sostituzione del Fusibile
Se t u t t o sem b r a a posto ed ancor a
l’amplifi catore non si accende, potrebbe essersi bruciato il fusibile di protezione interno.
Se ritenete che ciò possa essere successo,
contattate il vostro rivenditore Rotel per indicazioni sulla sostituzione del fusibile.
Nessun Suono
Se l’amplifi catore è alimentato, ma non emette
nessun suono dai diffusori, controllate tutte le
connessioni e le impostazioni dei componenti
abbinati nel sistema ..
Page 22

22
RB-06 Etapa de Potencia Estereofónica
Este símbolo signifi ca que el aparato está doblemente
aislado, por lo que no requiere ninguna conexión a tierra.
Los productos Rotel han sido diseñados para satisfacer la
normativa internacional relativa a la Restricción del Uso
de Sustancias Peligrosas (RoHS) en equipos eléctricos y
electrónicos y la eliminación de Desperdicios Referentes
a Equipos Eléctricos y Electrónicos (WEEE). El símbolo
con el cubo de la basura indica el pleno cumplimiento
de estas directrices y que los productos correspondientes
deben ser reciclados o procesados adecuadamente en
concordancia con las mismas.
Cuando conecte los terminales de conexión a cajas del aparato, le
rogamos que utilice cableado de Clase 2 para garantizar el correcto
aislamiento del mismo y minimizar el riesgo de que se produzca
una descarga eléctrica.
Coloque el aparato sobre una superficie fija y
equilibrada que sea sufi cientemente resistente para
soportar su peso. No coloque nunca el aparato en
una carretilla móvil de la que pueda volcar.
Instrucciones Importante Relacionada
con la Seguridad
ADVERTENCIA: No hay componentes manipulables por el usuario
en el interior del aparato. Cualquier operación de mantenimiento debe
ser llevada a cabo por personal cualifi cado.
ADVERTENCIA: Para reducir el riesgo de que se produzca un
incendio o una descarga eléctrica, asegúrese de que el aparato no
esté expuesto a goteos ni salpicaduras y que no se coloquen objetos
que contengan líquidos –copas, vasos- encima suyo.
No permita que ningún objeto extraño penetre en el interior del
aparato. Si el aparato está expuesto a la humedad o algún objeto
extraño penetra en su interior, desconecte inmediatamente el cable
de alimentación de la red eléctrica. En caso de que fuera necesario,
envíe el aparato a un especialista cualifi cado para su inspección y
posterior reparación.
Lea todas las instrucciones del presente manual antes de conectar
o hacer funcionar el aparato. Conserve este manual cerca de usted
para el caso de que necesite revisar las instrucciones de seguridad
que se indican a continuación.
Tenga siempre en mente las advertencias y la información relativa a
seguridad que fi guran tanto en estas instrucciones como en el propio
aparato. Siga al pie de la letra todas las instrucciones relacionadas
con el funcionamiento del mismo.
Limpie el exterior del aparato únicamente con una gamuza seca o
un aspirador.
Debe dejar un mínimo de 10 centímetros de espacio libre
alrededor del aparato. No coloque nunca la RB-06 en una
cama, un sofá, una alfombra o una superfi cie similar susceptible
de bloquear las ranuras de ventilación. Si el aparato está ubicado
en la estantería de una librería o un mueble, debe haber sufi ciente
espacio a su alrededor y ventilación en el mueble para permitir una
refrigeración adecuada.
Mantenga al aparato alejado de radiadores, estufas, cocinas o de
cualquier otra instalación que produzca calor.
El aparato debe ser conectado únicamente a una fuente de alimentación del tipo y la tensión especifi cados en su panel posterior.
Conecte el aparato a una toma de corriente eléctrica únicamente a
través del cable de alimentación de dos clavijas polarizado suministrado de serie o un equivalente exacto del mismo. No modifi que
de ningún modo dicho cable. No intente desactivar los terminales
destinados a la conexión a tierra o polarización. No utilice ningún
tipo de cable de extensión.
No coloque el cable de alimentación en lugares en que pueda ser
aplastado, pinchado, doblado en ángulos críticos, expuesto al calor
o dañado de algún modo. Preste particular atención al punto de
unión entre el cable y la toma de corriente y también a la ubicación
de esta última en el panel posterior del aparato.
El cable de alimentación debería desconectarse de la red eléctrica
cuando el aparato no vaya a ser utilizado durante un largo período
de tiempo (por ejemplo las vacaciones de verano).
Desconecte inmediatamente el aparato y envíelo a un servicio técnico
cualifi cado para su inspección/reparación si:
• El cable de alimentación o alguna clavija del mismo ha sido
dañado.
• Han caído objetos o se ha derramado líquido en el interior del
aparato.
• El aparato ha sido expuesto a la lluvia.
• El aparato muestra signos de funcionamiento inadecuado.
• El aparato ha sido golpeado o dañado de algún modo.
Page 23

23
Español
Acerca de Rotel
Rotel fue fundada hace más 40 años por una
familia cuyo entusiasta interés por la música le
condujo a diseñar y construir componentes de
Alta Fidelidad sin ningún tipo de compromiso.
Esta pasión ha permanecido inalterada durante
todo este tiempo, hasta el punto de que el
objetivo de los fundadores de la compañía
-proporcionar productos de la máxima calidad
a melómanos y audiófi los independientemente
de cuales sean sus posibilidades económicas- es
compartido por todos sus empleados.
Los ingenieros de Rotel trabajan como un equipo
compacto, escuchando y llevando a cabo el
ajuste fi no de cada nuevo producto hasta que
satisface de manera exacta los estándares de
calidad musical para los que fue diseñado. Para
lograrlo, disponen de la máxima libertad para
escoger los mejores componentes allí donde se
encuentren. Le sorprenderá agradablemente encontrar exquisitos condensadores procedentes
del Reino Unido y Alemania o semiconductores
de Japón o Estados Unidos, mientras que los
transformadores toroidales de potencia son
construidos en la propia factoría de Rotel.
Rotel se ha ganado a pulso, a través de a
cientos de artículos, bancos de pruebas y
galardones fi rmados por los críticos especializados más respetados del mundo, una sólida
reputación por la excelencia de sus productos.
Los comentarios de estos profesionales que
escuchan música cada día hacen posible que
la compañía se reafi rme en la validez de sus
objetivos: la puesta a punto de componentes y
equipos musicales, fi ables y asequibles.
Le agradecemos que haya adquirido este
producto y esperamos que le permita disfrutar
de sus grabaciones audiovisuales predilectas
durante largos años.
Para Empezar
Gracias por haber adquirido la Etapa de Potencia Estereofónica Rotel RB-06. Utilizada en un
sistema de reproducción musical o audiovisual
de alta calidad, le permitirá disfrutar durante
muchos años de sus composiciones musicales
y películas favoritas.
La RB-06 es una etapa de potencia particularmente sofi sticada. Todos los aspectos de
su diseño han sido optimizados con el fi n de
preservar toda la gama dinámica y todas
las sutilezas contenidas en sus grabaciones
favoritas. La RB-06 está equipada con una
fuente de alimentación altamente regulada que
incluye un transformador toroidal diseñado a
medida y fabricado por Rotel. Esta fuente de
alimentación de baja impedancia tiene una
considerable reserva de potencia que permite
a la RB-06 reproducir con facilidad las más
exigentes señales de audio. Este tipo de diseño
resulta más costoso de poner a punto pero es
mejor para la música.
Las placas de circuito impreso (PCB) incluyen
Pistas Circuitales Simétricas que aseguran la
perfecta preservación de las relaciones temporales de la música y una fi el reproducción de
esta última. La circuitería de la RB-06 incluye resistencias de película metálica y condensadores
de poliestireno o polipropileno en los trayectos
de señal más importantes. Todos los aspectos
de este diseño han sido cuidadosamente
examinados para asegurar una reproducción
de la música lo más fi el posible.
Algunas Precauciones
ADVERTENCIA:
Para evitar que se produzcan potenciales daños en su equipo,
desactive TODOS los componentes del
mismo cuando conecte o desconecte tanto
las cajas acústicas como cualquier otro
elemento. No vuelva a poner en marcha
los componentes del equipo hasta que esté
completamente seguro de que las conexiones realizadas sean correctas y seguras.
Preste particular atención a los cables de
conexión a cajas. No debe haber conductores sueltos susceptibles de tocar los otros
cables de conexión de conexión a cajas ni
el chasis del amplifi cador.
Le rogamos que lea cuidadosamente el presente
manual de instrucciones. Además de las instrucciones básicas de instalación y puesta a punto
de la RB-06, incluye información de gran valor
sobre las diferentes confi guraciones que permite
el aparato, así como información general que
le ayudará a optimizar las prestaciones de su
sistema. Le rogamos asimismo que contacte con
su distribuidor Rotel autorizado para cualquier
duda o consulta. No le quepa la menor duda
de que todos sus comentarios y observaciones
serán bien recibidos.
Guarde el embalaje de la RB-06 y todo el
material en él contenido para un posible uso
futuro del mismo. El embalaje o transporte de la
RB-06 en condiciones diferentes de las originales
puede dañar seriamente el aparato.
Rellene y envíe la tarjeta de garantía que
acompaña a la RB-06. Asimismo, asegúrese
de conservar en su poder la factura de compra original puesto que la misma constituye
el mejor recordatorio de la fecha de compra
del aparato, un dato esencial en caso de que
necesitara asistencia técnica durante el período
de garantía.
Contenido
Figure 1: Controles y Conexiones 3
Figura 2: Conexiones de Entrada y de Salida para
Funcionamiento en Modo Estereofónico 4
Figura 3: Conexiones de Entrada y de Salida
para Funcionamiento en
Modo Monofónico Puenteado 4
Acerca de Rotel ..................................... 25
Para Empezar.........................................25
Algunas Precauciones 25
Colocación 26
Cables 26
Alimentación y Control............................26
Toma de Corriente Eléctrica
0
26
Conmutador e Indicador 1 Luminoso de
Puesta en Marcha 2 26
Selector del Modo de Disparo para
Conexión/Desconexión 5 26
Entrada 7y Salida8 para Señal de
Disparo de +12 V 26
Conexión de la Señal
de Entrada
6
26
Conexión de las
Cajas Acústicas.......................................27
Selección de las Cajas Acústicas 27
Selección del Cable de Conexión a las
Cajas Acústicas 27
Polaridad y Puesta en Fase 27
Conexiones para Modo Estereofónico 9 27
Funcionamiento en
Modo Monofónico Puenteado 4............27
Reubicación de los Puentes 27
Conexión de Entrada 28
Conexión de la Caja Acústica 28
Indicador Luminoso de Protección
3
28
Problemas y Posibles Soluciones ............ 28
El Indicador Luminoso del
Panel Frontal No Se Activa 28
Sustitución del Fusible 28
Ausencia de Sonido 28
Características Técnicas ..........................28
Page 24

24
RB-06 Etapa de Potencia Estereofónica
de alimentación adecuado. Utilice únicamente dicho cable o un equivalente exacto
del mismo. No utilice ningún tipo de cable
de extensión. Puede utilizarse una base de
enchufes de alta calidad, aunque sólo si la
misma (y, por supuesto, la toma de corriente
ubicada en la pared de su casa) está preparada para manejar la cantidad de corriente
exigida por la RB-06. Asegúrese de que el
Conmutador de Puesta en Marcha del panel
frontal de la RB-06 esté desconectado y a
continuación conecte uno de los extremos
del cable de alimentación suministrado de
serie al receptáculo correspondiente del panel
posterior del aparato (10). Conecte el otro
extremo a una toma de corriente eléctrica
alterna adecuada.
Su RB-06 ha sido confi gurada en fábrica
para que funcione con la tensión eléctrica
alterna correcta que corresponda al país en
que ha sido comprada (120 voltios/60 Hz
en Estados Unidos o 230 voltios/50 Hz en
Europa). Dicha confi guración está indicada
en una etiqueta que fi gura en un lugar visible
del panel posterior del aparato.
NOTA: En caso de que tuviese que trasladar su RB-06 a otro país, es posible reconfi gurarla para que pueda trabajar con una
tensión de red diferente de la establecida
en fábrica. No intente llevar a cabo esta
conversión por su cuenta. El acceso al
interior de la RB-06 le expone a tensiones
peligrosas. Para cualquier información al
respecto, le rogamos que contacte con personal cualifi cado o llame al departamento
de asistencia técnica postventa de Rotel.
Si va a estar fuera de su casa durante un
largo período de tiempo -por ejemplo las
vacaciones de verano-, le recomendamos,
como precaución básica, que desconecte
su amplifi cador (así como el resto de componentes de audio y vídeo de su equipo) de
la red eléctrica.
Conmutador e Indicador
1
Luminoso de Puesta en
Marcha
2
El Conmutador de Puesta en Marcha está
ubicado en el panel frontal de su amplifi cador.
Púlselo para poner en marcha la RB-06 (o
para activar uno cualquiera de los modos
de arranque automático opcionales). El indicador luminoso situado encima del mismo
se activará, indicando que el amplifi cador
está plenamente operativo. Para desactivar
el aparato, basta con que pulse de nuevo el
mencionado botón a fi n de que éste regrese
a su posición inicial (hacia fuera).
Selector del Modo de Disparo
para Conexión/Desconexión
5
El amplificador incorpora la opción de
puesta en marcha/desconexión manual o
automática. Estos modos pueden seleccionarse con ayuda de un pequeño interruptor
situado en el panel posterior.
Con el conmutador situado en la posición
+12V TRIGGER ON, el amplificador se
pondrá en marcha automáticamente cuando
detecte una señal de disparo de 12 voltios en
la toma de 3’5 mm TRIGGER IN situada en su
panel posterior. En caso de que dicha señal
no esté presente, el amplifi cador se situará
en la posición de espera. El CONMUTADOR
POWER del panel frontal permite ignorar
esta función. Debe estar situado en ON
para que el circuito de disparo con señal de
12 voltios actúe. Situando el interruptor en
la posición OFF se suprime la alimentación
del amplifi cador independientemente de que
haya o no una señal de disparo. .
Entrada 7y Salida 8 para
Señal de Disparo de +12V
La toma designada por IN sirve para conectar
el cable/clavija de 3’5 mm que transporta
una señal de disparo de +12 voltios capaz
de poner en marcha o desactivar el amplifi cador. Para utilizar esta función, el conmutador adyacente debe situarse en la posición
ON. Esta entrada acepta cualquier señal de
control (tanto alterna como continua) de valor
comprendido entre 3 y 30 voltios.
La toma designada por OUT sirve para conectar
otro cable/clavija de 3’5 mm para suministrar
una señal de disparo de 12 voltios a otros componentes. La señal de salida de 12 voltios estará
disponible siempre que se aplique una señal de
disparo de +12 voltios al conector IN.
Conexión de la Señal
de Entrada
6
[Vea la Figura 2 para proceder al cableado en
modo estereofónico normal]
La RB-06 incorpora conexiones de entrada
estándar no balanceadas con terminales
RCA, que son los habituales en la inmensa
mayoría de componentes de audio.
NOTA: Para evitar la presencia de ruidos susceptibles de ser apreciados tanto
por usted como por sus cajas acústicas,
asegúrese de que el sistema esté desconectado cuando usted esté realizando
cualquier tipo de conexión de señal.
Colocación
Al igual que todos los componentes de audio
que manejan señales de bajo nivel, la RB-06
puede verse afectado por su entorno. Evite
colocar otros componentes encima de la RB06 ya que ello impedirá a este último disipar
el calor que genera. Asimismo, evite situar los
cables que transporten señales de audio cerca
de los de alimentación ya que de este modo
se minimizará la posibilidad de que se capten
zumbidos o interferencias.
La RB-06 genera calor durante su funcionamiento
normal. Tanto los disipadores térmicos como las
ranuras de ventilación han sido diseñados para
evacuar este calor. Las ranuras de ventilación
de la cubierta superior deben permanecer
siempre despejadas. Debería haber unos 10
centímetros de espacio libre alrededor del
chasis y una razonable corriente de aire a lo
largo del lugar en que haya sido instalado el
aparato con el fi n de evitar el sobrecalentamiento
de este último.
Tenga igualmente en cuenta el peso de la RB-06
cuando seleccione una ubicación determinada
para su instalación. Asegúrese por tanto de
que la estantería o mueble elegido pueda
soportarlo. Le recomendamos que instale la
RC-06 en muebles diseñados específi camente
para albergar componentes de audio. Dichos
muebles están concebidos para reducir o suprimir
vibraciones que pueden afectar negativamente
a la calidad del sonido. Consulte a su distribuidor Rotel autorizado para que le aconseje
acerca de los muebles para componentes de
audio más adecuados para su equipo y sobre
la adecuada instalación en los mismos de los
elementos de su equipo.
Cables
Asegúrese de que los cables de alimentación,
digitales y de modulación de su equipo estén
alejados entre sí ya que de este modo se minimizarán las posibilidades de que la señal de
audio se vea afectada por ruido o interferencias
procedentes de los cables digitales o de alimentación. El uso sistemático de cables apantallados
de alta calidad también contribuirá a prevenir
la entrada de ruido o interferencias susceptibles
de degradar la calidad sonora de su equipo. Si
tiene alguna pregunta que realizar al respecto, le
recomendamos que visite a su distribuidor Rotel
autorizado para que le dé consejo sobre los
cables más adecuados para su sistema.
Alimentación y Control
Toma de Corriente Eléctrica
0
La RB-06 es suministrada de serie con un La
RB-06 se suministra de serie con un cable
Page 25

25
Español
Seleccione un par de cables de interconexión
de audio para alta calidad. Conecte la salida
correspondiente al canal izquierdo de su
preamplifi cador a la entrada pertinente de
la RB-06. Proceda exactamente del mismo
modo con el canal derecho.
Conexión de las
Cajas Acústicas
Selección de las Cajas Acústicas
La impedancia nominal de cada una de las
cajas acústicas conectadas a la RB-06 debería
ser de al menos 4 ohmios. Debería tener en
cuenta ciertas precauciones a la hora de atacar
varias parejas de cajas acústicas conectadas en
paralelo ya que la impedancia efectiva que ve
el amplifi cador se divide entre dos. Por ejemplo,
cuando se atacan dos parejas de cajas acústicas
con una impedancia de 8 ohmios por caja, el
amplifi cador ve una carga de 4 ohmios. Por
lo tanto, cuando ataque varias cajas acústicas
conectadas en paralelo le recomendamos que
seleccione diseños cuya impedancia nominal
sea de 8 o más ohmios. Tenga en cuenta que
la impedancia de las cajas acústicas no tiene
un comportamiento particularmente preciso
aunque, en la práctica, muy pocas de ellas
podrán presentar problemas a la RB-06. Consulte
con un distribuidor Rotel autorizado en caso de
que tenga cualquier duda al respecto.
Selección del Cable de
Conexión a las Cajas Acústicas
Utilice un cable de dos conductores perfectamente aislados para conectar la RB-06 a las
cajas acústicas. El tamaño y la calidad de
dicho cable pueden tener un efecto audible
sobre las prestaciones de la totalidad de su
equipo. Un cable de conexión de calidad
estándar funcionará pero es posible que
provoque una disminución de la potencia
de salida o una atenuación de la respuesta
en graves, en particular si la longitud del
mismo es elevada. En general, un cable más
consistente (léase más grande y pesado)
mejorará el sonido. Para conseguir unas
prestaciones óptimas, debería considerar
la compra de cables de alta calidad especialmente diseñados para aplicaciones de
audio. Su distribuidor Rotel autorizado puede
ayudarle en la selección de los cables que
vaya a utilizar en su sistema.
Polaridad y Puesta en Fase
La polaridad, es decir la orientación positiva/
negativa de las conexiones correspondientes
a cada caja acústica y a la unión con el
amplifi cador, debe ser coherente, de modo
que todas las cajas acústicas del sistema estén
en fase. Si la polaridad de una conexión es
invertida por error, se producirá una fuerte
caída de la respuesta en graves, así como
una degradación perceptible de la imagen
estereofónica global. Todos los cables están
marcados de manera que usted pueda
identifi car fácilmente los dos conductores.
Puede haber marcas o líneas impresas en
el revestimiento aislante de un conductor.
El cable también puede presentar un claro
aislamiento al incorporar conductores de
distintos colores (cobre y plata). También
puede haber indicaciones de polaridad impresas en el revestimiento aislante. Identifi que
los conductores positivos y negativos y sea
coherente con cada una de las conexiones
del amplifi cador y las cajas acústicas.
Conexiones para Modo
Estereofónico 9
La RB-06 incluye dos pares de terminales de
conexión debidamente codifi cados (en color)
para cada canal de amplifi cación, dotación
que hace posible la conexión de cajas acústicas
en bicableado. Estos terminales de conexión
aceptan cable pelado, clavijas estándar o
incluso conectores de tipo banana (excepto en
los países de la Comunidad Europea, donde
su empleo no está permitido).
Lleve los cables desde la RB-06 hasta las cajas
acústicas. Procure que los mismos tengan la
longitud sufi ciente para que pueda accederse
sin ninguna restricción a los terminales de
conexión de aquéllas.
Si usted está utilizando conectores de tipo
banana, únalos primero a los cables y a
continuación insértelos en la zona posterior de
los terminales de conexión. En cualquier caso,
las tuercas de fi jación hexagonales de los
terminales de conexión deberían bloquearse
girándolas en sentido horario.
Si está utilizando terminales de tipo clavija
(por ejemplo cuchillas planas o “spades”),
conéctelos en primer lugar a los cables. Si
está colocando directamente cable pelado a
los terminales de conexión, separe los cables
correspondientes a cada conductor y quite
la parte superior del revestimiento aislante.
Asegúrese asimismo de no cortar ninguno
de los conductores propiamente dichos.
Libere (girándolas en sentido contrario de
las agujas del reloj) las tuercas de fi jación
hexagonales y a continuación coloque las
clavijas alrededor de los terminales de
conexión o el cable pelado en el orifi cio
transversal que hay en los mismos. Gire en
sentido horario las tuercas de fi jación para
sujetar fi rmemente en su lugar la clavija o
el cable de conexión
NOTA: Asegúrese de que no haya restos
de cable susceptibles de tocar los cables o
conductores adyacentes.
Funcionamiento en Modo
Monofónico Puenteado
4
[Vea la Figura 3 para proceder al ajuste de
los puentes que permiten confi gurar al aparato
en modo monofónico puenteado]
Los dos canales de la RB-06 pueden “puentearse”. En esta confi guración, el canal único
resultante suministra un total de 180 vatios continuos. Esta posibilidad le permitirá incrementar
la potencia de salida global de su equipo al
posibilitar la adición de una segunda RB-06
puenteada y atacar así una caja acústica
con cada etapa. También puede utilizar una
RB-06 puenteada para atacar un subwoofer.
No obstante, observe que cuando la RB-06
es puenteada la caja acústica conectada a la
misma deberá tener una impedancia igual o
superior a 8 ohmios.
Para poder utilizar la RB-06 en modo puenteado se dispone de tres “puentes” en su interior
que deberán pasar de un grupo de conectores
a otros. Esta tarea debería ser realizada por
un técnico cualifi cado. Consulte al respecto
con su distribuidor Rotel autorizado. Cuando
la RB-06 esté conectada para funcionar en
modo monofónico puenteado, el indicador
luminoso Bridged Mono
4
del panel frontal
se activará para confi rmarlo.
Reubicación de los Puentes
NOTA: Antes de abrir el recinto de la
RB-06 para reubicar los puentes debería
desconectarse el cable de alimentación de
la toma de corriente eléctrica. NO ABRA
EL RECINTO DE LA RB-06 HASTA QUE EL
CABLE DE ALIMENTACIÓN HAYA SIDO
DESCONECTADO DE LA TOMA DE CORRIENTE ELÉCTRICA. EN CASO DE QUE
NO PROCEDA DE ESTE MODO SE VERÁ
EXPUESTO A TENSIONES ELÉCTRICAS
PELIGROSAS.
Page 26

26
RB-06 Etapa de Potencia Estereofónica
Por lo general, usted no debería ver nunca
esta circuitería en acción. Sin embargo, en el
caso de que se detectara un funcionamiento
defectuoso de su RB-06, el aparato dejaría de
funcionar y se activaría el indicador luminoso
de su panel frontal.
Si esto sucede, desconecte completamente el
amplifi cador, déjelo enfriar unos minutos e
intente identifi car y corregir el problema que
ha provocado la activación de la circuitería
de protección. Cuando vuelva a poner de
nuevo en marcha el aparato, la citada circuitería se reinicializará automáticamente y
el indicador luminoso de protección debería
desactivarse.
Si la circuitería de protección se dispara
repetidamente y usted es incapaz de
aislar y corregir la condición de fallo que
provoca tal situación, contacte con su
distribuidor Rotel autorizado para que le
proporcione la asistencia adecuada.
Problemas y Posibles
Soluciones
La mayoría de difi cultades que suelen producirse
en los sistemas de audio son el resultado de
conexiones realizadas incorrectamente o ajustes
inapropiados. En caso de que se encuentre con
algún problema, aísle en primer lugar el área
afectada, compruebe los ajustes de control
realizados, determine la causa del fallo y
Características Técnicas
Potencia Continua de Salida 70 vatios/canal sobre 8 ohmios
(20-20.000 Hz, THD < 0’03%, 8 ohmios)
Potencia Continua de Salida en Modo Monofónico Puenteado 180 vatios sobre 8 ohmios
(20-20.000 Hz, THD < 0’03%, 8 ohmios) (200 vatios a 1 kHz)
Distorsión Armónica Total (20-20.000 Hz, 8 ohmios) < 0’03%
Distorsión por Intermodulación (60 Hz:7 kHz, 4:1) < 0’03%
Respuesta en Frecuencia (+/-1 dB) 10-100.000 Hz
Factor de Amortiguamiento (20-20.000 Hz, 8 ohmios) 500
Impedancia de las Caja Acústicas (modo Normal) mínima de 4 ohmios
Relación Señal/Ruido (norma IHF/ ponderación A) 116 dB
Sensibilidad/Impedancia de Entrada 1 V/33 kohmios
Alimentación
Versión para EE.UU.: 120 voltios/60 Hz
Versión para Europa: 230 voltios/50 Hz
Consumo 250 vatios
Dimensiones (An x Al x P) 437x72x342 mm
Peso Neto 7’5 kg
Todas estas especifi caciones son correctas en el momento de la impresión del presente manual de instrucciones.
Rotel se reserva el derecho a realizar modifi caciones en las mismas sin aviso previo.
haga los cambios necesarios. Si se ve incapaz de hacer funcionar de nuevo la RB-06,
considere las sugerencias que le damos para
las siguientes condiciones:
El Indicador Luminoso del
Panel Frontal No Se Activa
No entra corriente eléctrica en la RB-06.
Compruebe el conmutador de puesta en
marcha del panel frontal. Asegúrese de que
esté situado en la posición ON. Compruebe
las conexiones relativas al suministro de señal
eléctrica tanto del amplifi cador como de su
propia casa (red eléctrica).
Sustitución del Fusible
Si todo parece funcionar correctamente pero
usted sigue sin poder poner en marcha su
amplifi cador, es posible que el fusible de
protección interno se haya fundido. Si cree
que esto es lo que ha sucedido, contacte con
su distribuidor Rotel autorizado para que le
proporcione información sobre dónde conseguir un fusible de repuesto adecuado.
Ausencia de Sonido
Si el amplificador recibe señal eléctrica
pero no produce sonido, compruebe todas
las conexiones de su equipo y los ajustes
correspondientes a cada uno de los componentes del mismo.
Una vez desenchufado el cable de alimentación, quite los tornillos que mantienen en
su lugar la cubierta del recinto y deslice esta
última hasta separarla del amplifi cador. A
continuación localice los tres bloques de
patillas para la conexión de los puentes
designadas por S 601, S 602 y S 603. La
posición estándar (estéreo) de dichos puentes
es en las patillas 1 y 2 de cada bloque. Hay
una marca * en la placa de circuito impreso
situada cerca de dicha posición. Para convertir la RB-06 en monofónica, desplace los
tres puentes de manera tal que se sitúen
sobre las patillas 2 y 3 de cada bloque de
puentes. Vuelva a colocar la cubierta sobre
el recinto. No conecte de nuevo el cable
de alimentación de la RB-06 a la toma
de corriente eléctrica hasta que la
citada cubierta haya sido colocada
de nuevo en su lugar.
Conexión de Entrada
Cuando utilice la RB-06 en modo monofónico
puenteado, coloque el cable de conexión
entre la salida del preamplicador a la entrada correspondiente al canal izquierdo de
la etapa de potencia. No se debe realizar
ninguna conexión a la entrada correspondiente al canal derecho.
Conexión de la Caja Acústica
Cuando se utilice la RB-06 en modo monofónico
puenteado, el cable de conexión a la caja
acústica se conecta a los terminales positivos
de los canales izquierdo y derecho de la etapa
de potencia. En consecuencia, conecte el cable
asignado al terminal positivo de la caja acústica
al terminal positivo correspondiente al canal
izquierdo de la RB-06 y el cable asignado al
terminal negativo de la caja acústica al terminal
positivo correspondiente al canal derecho de la
RB-06. No se debe realizar ninguna conexión
a los terminales negativos de la RB-06.
Indicador Luminoso de
Protección 3
La RB-06 incorpora circuitos de protección
frente a excesos de corriente y de temperatura que la protegen frente a cualquier daño
potencial que pudiera producirse en caso de
funcionamiento en condiciones extremas o de
que hubiese fallos en la misma. Al contrario
de lo que sucede en muchos diseños de su
clase, los circuitos de protección de la RB-06
es completamente independiente de la señal
de audio y por tanto no tiene el más mínimo
impacto en las prestaciones sonoras. De este
modo, los circuitos de protección monitorizan
la temperatura de los dispositivos de salida y
desconectan el amplifi cador si la temperatura
de funcionamiento excede los límites de seguridad prefi jados.
Page 27

27
Nederlands
Rotel Producten worden zo ontworpen dat zij voldoen
aan de internationale regels betreffende de beperking
van milieuonvriendelijke grondstoffen die gebruikt kunnen
worden in elektrische en elektronische apparatuur. Het
symbool met de vuilcontainer met het kruis erdoor betekent
voor u dat u, wanneer u dit apparaat wilt afvoeren, dit
moet doen volgens de regels die daarvoor hier gelden.
Waarschuwing
Laat u alstublieft het apparaat gesloten, er bevinden
zich binnenin geen door u te bedienen of te herstellen
onderdelen. Iedere reparatie dient door een gekwalifi ceerde technicus verricht te worden.
Om het risico op elektrische schokken of brand te vermijden, moet u zorgen dat het apparaat niet nat wordt.
Zet dus geen objecten gevuld met water, b.v. een vaas
met bloemen, op het apparaat.
Zorg er ook voor dat er geen voorwerpen in de behuizing terecht kunnen komen. Mocht het apparaat toch
nat zijn geworden of voorwerpen in de behuizing terecht
zijn gekomen, ontkoppel dan meteen het toestel van het
lichtnet en breng het naar een erkende audiotechnicus
ter controle en/of eventuele reparatie.
Lees de gehele gebruiksaanwijzing. Voordat u met het apparaat gaat
werken is het van groot belang dat u weet hoe u ermee om moet gaan
en dat zo veilig mogelijk. Bewaar deze gebruiksaanwijzing op een
plek, die u zich na verloop van tijd nog weet te herinneren.
De waarschuwingen op het apparaat en in de gebruiksaanwijzing
zijn belangrijk, sla ze niet in de wind.
Als het apparaat vuil wordt, stof het dan af met een zachte droge
doek, of maak gebruik van een stofzuiger. Gebruik nooit een oplosmiddel van welke soort dan ook.
Het apparaat moet dusdanig gebruikt worden, dat een behoorlijke
koeling niet in het gedrang komt. Laat om het apparaat minstens
een ruimte van 10cm. vrij. Gebruik het apparaat dus niet op:
een bed, een sofa, een plaid of andere onregelmatige oppervlakken
waardoor de ventilatiegaten geblokkeerd zouden kunnen worden.
Ook het inbouwen in een te kleine ruimte kan een voldoende koeling
in de weg staan.
Het apparaat moet verre gehouden worden van warmtebronnen zoals:
radiatoren en kachels, maar ook van andere versterkers.
Het apparaat mag alleen aangesloten worden op het voltage zoals
aangegeven op de achterkant, in dit geval 230 Volts 50 Hz.
Het apparaat dient alleen aangesloten te worden middels de bijgeleverde netkabel of een soortgelijk. Doe in ieder geval nooit iets met
het netsnoer. Doe ook geen pogingen om de aarding of polariteit van
het apparaat te wijzigen en gebruik geen verlengkabels.
De lichtnetkabel dient zo neergelegd te worden, dat er niet op
getrapt kan worden of dat hij geklemd kan worden tussen scherpe
voorwerpen. Vooral de aansluitpunten zijn belangrijk: de aansluiting
op de wandcontactdoos en daar waar de kabel op het apparaat
wordt aangesloten.
De lichtnetsteker is het belangrijkste contactpunt van het apparaat
het moet te allen tijde binnen bereik zijn.
Wanneer het apparaat voor langere tijd niet in gebruik is, dient de
lichtnetkabel uit het lichtnet verwijderd te zijn.
Het apparaat zal in service gegeven moeten worden wanneer één
van de volgende situaties zich voordoet:
• Wanneer het netsnoer en/of steker beschadigd zijn.
• Wanneer er toch voorwerpen/vloeistof in het apparaat terecht
zijn gekomen.
• Als het apparaat in de regen heeft gestaan.
• Als het apparaat niet normaal functioneert of een duidelijk afwijkend
gedrag vertoont.
• Wanneer het apparaat gevallen is en/of de kast beschadigd is.
Plaats de versterker op een vaste, vlakke en stevige
ondergrond. Plaats hem niet op een verrijdbare
wagen die gemakkelijk om kan vallen.
Dit symbool wil zeggen dat het betreffende
apparaat dubbel geaard is. Een separate
aarding is dus overbodig.
Page 28

28RB-06 Stereo Eindversterker
Wij van Rotel
Het is alweer meer dan 40 jaar geleden
dat een familie met een gepassioneerde
betrokkenheid bij muziek besloot om zelf
geluidsapparatuur van onberispelijke kwaliteit
te gaan vervaardigen onder de naam Rotel.
In de loop der jaren is die passie gebleven
en het familiedoel om audiofi elen en muziekliefhebbers voor aantrekkelijke prijzen
topkwaliteit te bieden wordt nog steeds door
iedere Rotel-employé gesteund.
De technici werken als een hecht team al
tweakend en luisterend totdat ieder nieuw
product dat muzikale niveau heeft bereikt
dat hun bij de aanvang voor ogen stond. Zij
worden volkomen vrijgelaten in de keuze van
componenten, waar vandaan ze ook uit de
wereld moeten komen. In Rotel apparatuur
kunt u condensatoren vinden uit Duitsland
en Engeland of half geleiders uit Amerika en
Japan, terwijl de ringkerntransformatoren in
eigen huis worden vervaardigd.
Onze goede reputatie werd gevestigd door
honderden waarderende testrapporten en
vele onderscheidingen die wij hebben mogen ontvangen van mensen die uit professie
dag in dag uit naar muziek luisteren. Hun
kritiek houdt ons bij de les: het vervaardigen
van muzikale, betrouwbare en betaalbare
apparatuur.
Door de aanschaf van dit product danken wij u
voor het vertrouwen in ons gesteld en wensen
wij u er veel en langdurig plezier mee.
Aan de slag met de RB-06
Wij danken u voor de aankoop van onze
RB-06 tweekanalen eindversterker. Wij zijn
ervan overtuigd, dat de muziek d.m.v. deze
RB-06 ten gehore gebracht, voor u een jarenlange bron van plezier zal zijn.
De RB-06 is een topkwaliteit eindversterker
met vele mogelijkheden. Alle aspecten van
het ontwerp staan op een zeer hoog niveau
om de volledige dynamiek en alle subtiele
nuances van muziek te kunnen reproduceren.
We hebben de RB-06 uitgerust met een sterk
geregelde voeding voorzien van een door
ons zelf ontworpen ringkerntransformator.
Deze laagohmige voeding heeft ook een zeer
ruime vermogensreserve, die hem instaat stelt
om de meest complexe muzieksignalen met
het grootste gemak te kunnen weergeven.
Het is een kostbare manier van versterkers
maken, maar het is dan ook voor een goede
zaak: muziek.
De beide circuits op de printboards zijn
volkomen symmetrisch opgebouwd. Deze
symmetrie zorgt ervoor dat de integriteit van
het signaal gewaarborgd blijft. Bij ongelijke
signaalwegen krijgt u n.l. een licht tijdsverschil tussen het linker en rechter kanaal, met
alle vervelende gevolgen van dien. In de
signaalweg op de PCB’s gebruiken wij uitsluitend metaalfi lmweerstanden en polystyreen
of polipropyleen condensatoren, want alle
aspecten van dit ontwerp zijn maar met één
doel voor ogen gemaakt: de natuurgetrouwe
reproductie van muziek.
In zowel bediening als installatie is de RB06 een recht toe recht aan ontwerp. Heeft
u ervaring met andere apparatuur dan
zult u dat spoedig ontdekken. De plugjes
aansluiten, de steker in het stopcontact en
genieten maar.
Een paar
voorzorgsmaatregelen
Toch wel belangrijk: Om onnodige
schade aan uw installatie te voorkomen
raden wij u aan om tijdens het aansluiten
de apparatuur nog NIET aan te sluiten op
het lichtnet. Controleer ook eerst voordat u
de apparatuur aanzet of alles wel correct
is aangesloten. Geef daarbij met name
aandacht aan de luidsprekerverbindingen.
Vooral verloren draadjes tussen de zwarte
en rode klemschroef kunnen desastreus
uitwerken op het functioneren van uw versterker.
Leest u vooral goed de gebruiksaanwijzing.
Er staat behalve over het installeren en de
bediening, belangrijke informatie in over de
wijze waarop u de RB-06 in uw installatie
moet inpassen alsmede algemene richtlijnen
om het maximale uit uw audio-installatie te
halen. Mocht u, ondanks onze pogingen om
het u zo duidelijk mogelijk te maken, toch
nog vragen hebben aarzel dan niet om met
uw Rotel-dealer contact op te nemen: hij heeft
vast en zeker de antwoorden.
Bewaar als het even kan de verpakking. Altijd
handig bij een eventuele verhuizing of wanneer
het apparaat opgestuurd moet worden voor
reparatie, want er is geen betere bescherming
tijdens transport dan zijn eigen doos.
Inhoud
Figure 1: De bedieningsorganen en aansluitingen 3
Figure 2: De in- en uitgangsaansluitingen 4
Figure 3: De versterker mono schakelen – ingan-
gen en uitgangen/De plek van de doorverbindingsstukjes binnenin de versterker 4
Waarschuwing ...................................... 29
Wij van Rotel........................................ 30
Aan de slag met de RB-06 ..................... 30
Een paar voorzorgsmaatregelen 30
Een plek voor de RB-06 31
De bekabeling 31
Het aansluiten op het lichtnet
en de bediening ..................................... 31
De lichtnetaansluiting 0 31
De aan/uitschakelaar 1 met
bijbehorende indicator 2 31
De triggerfunctieschakelaar 5 31
De “12V Trigger” in-
6
en uitgang-7 31
Het aansluiten van de ingangen 8 ....... 32
Luidsprekers ......................................... 32
De luidsprekerkabelkeuze 32
Alles in fase 31
Het aansluiten van luidsprekers in
een stereo-opstelling 9 32
Het aansluiten van de luidspreker in een
mono-opstelling 4 ............................. 32
Het verplaatsen van de doorverbindingsstukjes 32
De verbinding met de voorversterker bij
mono gebruik 32
De verbinding met de luidspreker bij
mono gebruik 33
De beveiligingsindicator
3
................. 33
Wat te doen bij problemen ..................... 33
De lichtnetindicator werkt niet 33
De zekering vervangen 33
Geen geluid 33
Technische gegevens .............................. 33
Page 29

29 Nederlands
Dit zijn Rotel’s algemene garantievoorwaarden: 5 jaar op de elektronische onderdelen, 2 jaar op de mechanische onderdelen
en 1 jaar op een laserunit. Voor het claimen
van garantie moet u wel in het bezit zijn van
de originele aankoopfactuur. De garantie is
niet overdraagbaar.
Een plek voor de RB-06
Zoals bij alle audiocomponenten, die te
maken hebben met lage signaalniveaus,
kan ook de RB-06 beïnvloed worden
door zijn omgeving. Vermijd dan ook dat
signaalkabels langs lichtnetkabels lopen. Een
dergelijk handelen verkleint de kans dat het
signaal brom oppikt en vervuild wordt door
lichtnetinvloeden.
De RB-06 produceert ook onder standaard
omstandigheden nogal wat warmte. De koelribben en de ventilatieopeningen zijn echter onder
normale condities ruim voldoende om deze
warmte adequaat te kunnen afvoeren. Zorg dat
de RB-06 de ruimte heeft (± 10cm. rondom). De
ventilatieopeningen aan de bovenkant moeten
vrij zijn en de lucht moet onbelemmerd langs
de versterker kunnen stromen.
Houd, bij het zoeken naar een plek voor de
RB-06 ook het gewicht van de versterker in de
gaten. Overtuig uzelf dat de plank waarop,
of het meubel waarin u hem wilt plaatsen het
gewicht kan torsen. Wij raden u aan de RB06 te gebruiken in een speciaal audiomeubel.
Daarin kan hij op zijn eigen plank staan. Zet
hem nooit op andere apparatuur. Zodoende
voorkomt u oververhitting, brom en interactie met
die andere componenten. Goede audiomeubels zijn stevig gemaakt en onderdrukken en
verminderen valse resonanties, aartsvijand
nummer 1 in de audio. U zou het niet zeggen maar een meubel kan dus uw installatie
danig beïnvloeden. Vraag uw ROTEL-dealer
om advies, hij weet er alles van!!
De bekabeling
Houd de lichtnet, digitale en analoge signaalkabels uit elkaar. Dat vermindert de kans
dat het lichtnet of de digitale informatie invloed kan uitoefenen op het analoge signaal.
Ook het gebruik van verbindingskabels van
hoge kwaliteit voorkomt signaalvervuiling
van buitenaf. Als het goed is weet uw Rotelleverancier ook hier alles van.
Het aansluiten op het
lichtnet en de bediening
De lichtnetaansluiting
0
Wij hebben het correcte netsnoer bij de
RB-06 gedaan. Gebruik alleen dit snoer of
een perfect equivalent. Gebruik NOOIT een
verlengsnoer. U kunt een z.g. spanningsblok
gebruiken, echter alleen als deze geschikt is
om de hoeveelheid stroom te leveren, die de
RB-06 plus de andere apparatuur die u erop
aansluit, uit het lichtnet trekken.
Zorg dat de versterker uitgeschakeld staat
wanneer u het bijgeleverde netsnoer op de
versterker (10) en op het lichtnet aansluit.
Uw RB-06 is ingesteld op het lichtnetvoltage van
het land waarin hij gekocht is. In uw geval dus
230 volts. U kunt het ingestelde voltage controleren op de achterkant van het apparaat.
Extra informatie: Mocht u ooit moeten
verhuizen naar een land met een ander
voltage, dan is de versterker op dat andere voltage in te stellen. Doe deze operatie
NIET zelf, maar laat hem verrichten door
uw Rotel-leverancier. Deze handelingen
zijn voor een niet ingewijde niet geheel
van gevaar ontbloot.
Als u van plan bent om langdurig van huis
te zijn, adviseren wij u uw gehele beeld en
geluidsinstallatie (dus ook de RB-06) van het
lichtnet te ontkoppelen.
De aan/uitschakelaar 1 met
bijbehorende indicator
2
De aan/uitschakelaar vindt u op de voorkant van de versterker onder de aanduiding
“POWER”. Wanneer u de RB-06 aan wilt
zetten (of om één van de automatische aan/uit
functies te activeren) drukt u deze schakelaar
in. Het lampje boven deze schakelaar gaat
nu aan ten teken dat de versterker aanstaat.
Nogmaals deze schakelaar gebruiken zet het
apparaat weer uit.
De triggerfunctieschakelaar
5
De versterker kan natuurlijk handmatig
aan/uitgezet worden, maar dat kan ook
eventueel op afstand. U kunt kiezen tussen
beide mogelijkheden d.m.v. een schakelaar
op de achterkant.
Met de schakelaar “12V TRIGGER” in de
“ON” (aan) positie, kan de RB-06 automatisch aangezet worden zodra er een 12V
signaal op de 3.5mm mini-jackplug ingang
“TRIGGER IN” (ook op de achterkant) komt
te staan. Wordt dit 12V signaal onderbroken
dan gaat de versterker uit (standby). Om
van deze functie gebruik te maken moet
de aan/uitschakelaar “POWER”
1
op de
voorkant wel geactiveerd zijn. Is de versterker
met deze schakelaar uitgezet dan werkt de
triggerfunctie niet.
De “12V Trigger” in- 6
en uitgang -
7
Op de 3.5mm plugaansluiting gemerkt “IN”
moet u een schakelsignaal van 12V zetten
om de versterker op afstand aan en uit te
kunnen schakelen. Om deze functie te kunnen
gebruiken moet de betreffende schakelaar (5)
in de “ON” positie gezet worden. Deze functie
werkt op zowel gelijk- als wisselspanning en
mag variëren tussen 3 en 30 volts.
De 3.5mm aansluiting gemerkt “OUT” is om
dit schakelsignaal door te kunnen sturen naar
een ander component dat op dezelfde wijze
aan/uitgeschakeld moet worden. Op deze
aansluiting staat alleen een 12-voltssignaal
als ook op de aansluiting “IN” een 12voltssignaal staat.
Het aansluiten van de
ingangen
8
[Zie fi guur 2 voor standaard stereobedrading]
Zoals alle huiskamercomponenten sluit u de
RB-06 aan middels kabels met de bekende
cinchpluggen.
Extra informatie: Het is zeer verstandig
voor uw gehoor en de luidsprekers dat, wanneer u signaalverbindingen maakt van welke
aard dan ook, uw apparatuur UIT staat.
Gebruik voor de verbindingen naar uw
voorversterker eerste klas audiokabels. Let u
er goed op dat u links (LEFT) op links aansluit
en rechts (RIGHT) op rechts. Het kabelplugje
van rechts is rood gekleurd en van links is
wit of zwart.
Page 30

30
RB-06 Stereo Eindversterker
Het aansluiten van
luidsprekers in een stereoopstelling
9
De RB-06 heeft twee stel luidsprekeruitgangen,
één stel voor elke eindtrap. Deze uitgangen
kunnen aangesloten worden met kaal gestripte
kabel, middels de bekende kabelvorkjes
en met banaanpluggen, hoewel de laatste
binnen de Europese gemeenschap (offi cieel)
niet mogen.
Gebruik genoeg kabel om eventueel bij
calamiteiten de luidsprekers of de versterker
te kunnen verschuiven.
Als u tegen alle community-regels in toch
banaanpluggen wilt gebruiken, moet u de
klemschroeven van de RB-06 wel eerst helemaal aandraaien.
Het beste is om verbindingsvorkjes voor de
luidsprekeraansluitingen te gebruiken. Wilt
u echter de kabels direct aan de luidsprekeruitgangen monteren strip dan de juiste
hoeveelheid isolatie van de kabel zonder
het draad zelf af te snijden en draai deze
(of plaats de verbindingsvorkjes) dan om de
verbindingsas nadat u eerst de klemschroeven
heeft losgedraaid. Draai deze dan vervolgens
weer goed vast.
Extra informatie: Let er vooral goed op
dat er geen verdwaalde draadjes van de
ene luidsprekeruitgang de andere uitgang
kunnen raken!
Het aansluiten van de
luidspreker in
een mono-opstelling 4
[Zie fi guur 3 voor het verplaatsen van de
doorverbindingsstukjes]
De twee kanalen van de RB-06 kunnen mono
geschakeld worden, het z.g. “bridgen”.
In deze confi guratie levert de RB-06 een
indrukwekkende 180 watts! Door de RB06 te bridgen en met toevoeging van een
tweede (ook monogeschakelde) RB-06 kunt
u het totale beschikbare vermogen voor uw
geluidssysteem aanzienlijk verhogen. Ook
kunt u natuurlijk een monogeschakelde RB06 gebruiken voor het aansturen van een
passieve subwoofer. Het bridgen stelt aan u
één voorwaarde, de minimum impedantie
van de aan te sluiten luidspreker(combinatie)
moet 8
! zijn.
Om de RB-06 mono te schakelen, moeten
er drie doorverbindingsstukjes binnenin de
versterker verplaatst worden. Het is verstandig
deze handeling te laten verrichten door een
echte technicus: uw Rotel-dealer bij voorbeeld.
Daarbij wordt de RB-06 anders op uw apparatuur en luidsprekers aangesloten. Wanneer
de RB-06 in monoschakeling gebruikt wordt,
licht de “BRIDGED MONO” indicator op het
frontpaneel op.
Het verplaatsen van de
doorverbindingsstukjes
Extra informatie: Voordat de RB-06
geopend wordt moet de voorversterker
eerst van het lichtnet gehaald worden.
OPEN DUS NOOIT DE BEHUIZING VAN
DE RB-06 VOORDAT DE NETSTEKER UIT
HET STOPCONTACT IS VERWIJDERD. DE
AANWEZIGE HOGE VOLTAGES ZIJN ZEER
RISKANT VOOR UW GEZONDHEID.
Nadat het apparaat van het lichtnet is gehaald, moeten de schroeven die de afdekkap op zijn plaats houden verwijderd zijn,
voordat deze eraf geschoven kan worden.
Lokaliseer de drie doorverbindingsblokjes
(zie fi guur 3): S 601, S 602, en S 603.
De fabrieksinstelling is de stereoverbinding
op pinnen 1 en 2 op beide blokjes. Deze
positie is gemerkt met een sterretje (*). Om
de versterker mono te schakelen verplaatst
u de doorverbindingsstukjes naar pinnen 2
en 3 op beide blokjes. De afdekkap moet
nu teruggezet worden. Doe de netsteker niet
eerder in het stopcontact voordat de afdekkap
is teruggeplaatst.
De verbinding met de
voorversterker bij
mono gebruik
Wanneer u de RB-06 mono gebruikt dan
moet de verbinding met de bron op de linker
ingang (LEFT INPUT) aangesloten worden. De
rechter ingang blijft ongebruikt.
Luidsprekers
Zie fi guur 2
Wij raden u aan om op deze versterker
luidsprekers te gebruiken met een nominale
impedantie van tenminste 4
!. U moet op-
passen met het aansluiten van meerdere
luidsprekers in parallelschakeling, want de
vervangingsweerstand van parallelgeschakelde luidsprekers is altijd lager dan die van
de luidspreker met de laagste weerstand.
Voorbeeld, de vervangingsimpedantie van
twee parallelgeschakelde 8Ä luidsprekers
is 4Ä. Wilt u dus twee luidsprekers parallel
schakelen, dan mag, gezien u niet onder de
4Ä mag komen, de impedantie per luidspreker
niet lager dan 8Ä zijn. Luidsprekerimpedanties
moet u wat ruim nemen, in de praktijk zullen
er echter weinig luidsprekers zijn waar u
problemen mee zou kunnen hebben met het
aansluiten op de RB-06. Mocht u twijfelen,
raadpleeg dan uw Rotel-leverancier.
De luidsprekerkabelkeuze
Om de volledige potentie van deze geweldenaar te kunnen ondergaan adviseren wij u
hoge kwaliteit luidsprekerkabel te gebruiken.
Standaard tweeaderig draad werkt wel, maar
en u kunt dat geloven of niet, de kwaliteit
van de kabel is echt van grote invloed op de
totale prestaties van uw installatie, vooral bij
grotere lengtes. Informeer eens bij uw Rotelleverancier over de diverse mogelijkheden
voor uw systeem.
Alles in fase
Het is niet alleen belangrijk dat u de luidsprekers met de juiste kanalen verbindt, (hiermee
bedoelen wij links aan links en rechts aan
rechts), maar ook dat u ze correct aansluit t.o.v.
het signaal. Kortom, wat moet u doen?
Zorg ervoor dat de + (rood) van de speaker
aan de + van de versterker is aangesloten en
dus de – (zwart) van de speaker aan de – van
de versterker. Goede luidsprekerkabel, zoals
in het vorige onderwerp besproken, is, om het
u gemakkelijk te maken, meestal gemerkt middels een tekst, die op één van de twee aders
is afgedrukt of één van de twee geleiders is
gemerkt met een kleur. Als u die tekst of kleur
op alle kanalen als plus aanhoudt dan weet u
dat u het goed gedaan heeft. Verdere controle
is dan ook niet meer noodzakelijk.
Page 31

31
Nederlands
De verbinding met de
luidspreker bij mono gebruik
Wanneer u de RB-06 mono gebruikt dan
wordt de luidspreker aangesloten op de
beide plusaansluitingen (rood) van links en
rechts. Verbind de plus (rood) van de luidsprekeringang op de plus (rood) van de linker
luidsprekeruitgang van de RB-06. Verbind de
min (zwart) van de luidsprekeringang op de
plus (rood) van de rechter luidsprekeruitgang
van de RB-06. De beide minaansluitingen
(zwart) van de RB-06 worden niet gebruikt.
De beveiligingsindicator 3
De RB-06 is zowel uitgerust met een thermische
als een stroom beveiliging, die de versterker
behoeden voor schade veroorzaakt door
foutief of extreem gebruik. Deze beveiligingscircuits werken niet, zoals bij vele andere
versterkers, afhankelijk van het signaal, dus
hebben ze geen invloed op de geluidsweergave. De beveiligingen houden continu de
temperatuur in de gaten en schakelen de
versterker uit wanneer deze te heet wordt.
Waarschijnlijk zult u deze beveiligingsactie
nooit meemaken. Mocht deze alarmsituatie
zich toch voordoen, dan stopt de versterker
met het produceren van geluid en de beveiligingsindicator (3) gaat branden.
Gebeurt dit, schakel de versterker dan uit,
laat hem gedurende enkele minuten afkoelen
en probeer er ondertussen achter te komen
wat de oorzaak van het probleem zou kunnen zijn en herstel de fout. Wanneer u nu
de versterker weer aanzet, zal het beveiligingscircuit zichzelf herstellen en gaat de
indicator weer uit.
In de meeste gevallen wordt het beveiligingscircuit geactiveerd door een foutieve aansluiting b.v. sluiting in de luidsprekerbedrading of
slechte ventilatie bij een oververhitte situatie.
Slechts in uitzonderlijke gevallen zal de impedantie (extreem laag) of de inductie (zeer
hoog) van een luidspreker de oorzaak zijn van
het ingrijpen van het beveiligingscircuit.
Gebeurt het echter regelmatig dat de beveiligingscircuits worden aangesproken en
u bent niet instaat de oorzaak te traceren
en dus de foutconditie te corrigeren, neem
dan contact op met uw Rotel-adviseur voor
assistentie bij dit probleem.
Technische gegevens
Continue uitgangsvermogen per kanaal 70 Watts, per kanaaln.
(20-20.000 Hz. < 0,03% THD aan 8!)
Geschakeld als mono-versterker 180 W.
(20 – 20 kHz., <0.1 THD aan 4!) 200 Watts bij 1 kHz.
Totale harmonische vervorming < 0,03%
(20-20.000 Hz. 8!)
Intermodulatie vervorming < 0,03%
(60 Hz : 7 kHz., 4 : 1)
Frequentiebereik (±1 dB) 10-100.000 kHz
Dempingsfactor (20 – 20 kHz bij 8!) 500
Luidsprekerimpedantie bij stereogebruik minimaal 4!
Signaal/ruisverhouding (IHF, A netwerk) 116 dB
Impedantie/ Ingangsgevoeligheid 33 k!/1 Volt
Lichtnetspanning:
USA: 120 V. 60 Hz
EU: 230 V. 50 Hz
Vermogensopname: 250 Watts
Afmetingen: 437x72x342 mm. (bxhxd)
Hoogte van het frontpaneel: 80 mm
Netto gewicht 7,5 kg
Gegevens en ontwerp zijn voorbehouden.
Rotel houdt zich het recht voorbehouden om zonder mededeling vooraf verbeteringen aan te brengen.
De lichtnetindicator werkt niet
Het is duidelijk: uw RB-06 ziet het lichtnet
niet. Controleer of de aan/uitschakelaar
“POWER” (1) wel ingedrukt is en controleer
tevens of de lichtnetkabel wel goed en
stevig is aangesloten. Check ook even of er
wel een 12 volts signaal staat op de “12V.
TRIGGER IN” plug, wanneer u deze wijze
van aan/uitschakelen gebruikt.
De zekering vervangen
Als alles na controle er goed uitziet en de
versterker vertikt het nog steeds, dan kan
de interne zekering opgeblazen zijn. Als u
meent dat dat het geval is, ga dan met de
RB-06 naar uw Rotel-leverancier, hij kan u
vast uit de brand helpen.
Geen geluid
De lichtnetindicator brandt wel, maar jammer
genoeg weinig welluidende klanken. Controleer dan alle verbindingen en instellingen,
ook die van de andere componenten.
Wat te doen bij
problemen?
De meeste problemen in geluidsinstallaties
ontstaan door slechte aansluitingen of het
verkeerd gebruik van de knoppen en toetsen.
Als u problemen tegenkomt probeer ze dan
te lokaliseren: check eerst de bedieningsorganen en maak eventueel de juiste correcties.
Komt u er dan nog niet uit, probeer dan de
onderstaande suggesties:
Page 32

32
RB-06 Stereo-slutsteg
Rotels produkter är utformade för att följa de internationella
direktiven RoHS (Restriction of Hazardeous Substances)
och WEEE (Waste Electrical and Electronic Equipment)
som behandlar hur uttjänta elektriska och elektroniska
produkter tas om hand. Symbolen med den överkorsade
soptunnan innebär att produkterna måste återvinnas eller
tas om hand enligt dessa direktiv.
Viktig säkerhetsinstruktion
VARNING! Försök aldrig att själv utföra service på apparaten. Anlita
alltid en behörig servicetekniker för all service.
VARNING! För att undvika risk för elektriska stötar och brand, utsätt inte
apparaten för vatten eller fukt. Ställ aldrig föremål som kan läcka eller
droppa vatten, till exempel blomkrukor, i närheten av apparaten. .
Se till att inga föremål kommer in i apparaten. Om apparaten
utsätts för fukt, väta eller om främmande föremål kommer in i den, dra omedelbart ut nätkabeln ur vägguttaget.
Lämna sedan apparaten till en behörig servicetekniker för
översyn och eventuell reparation.
Läs alla instruktioner innan du ansluter eller använder apparaten.
Behåll denna bruksanvisning så att du kan studera dessa säkerhetsföreskrifter.
Följ alla varningar och säkerhetsföreskrifter i bruksanvisningen och på
själva apparaten. Följ alltid alla användarinstruktioner.
Använd bara en torr trasa eller dammsugaren när du rengör apparaten.
Se till att det alltid fi nns 10 cm fritt utrymme runt apparaten. Ställ inte apparaten på en säng, soffa, matta eller någon
liknande yta som kan blockera ventilationshålen. Om apparaten
placeras i en bokhylla eller i ett skåp måste det fi nnas utrymme för
god ventilation..
Placera inte apparaten nära element eller andra apparater som
utvecklar värme.
Apparaten måste vara ansluten till ett vägguttag enligt markeringen
på apparatens baksida. Anslut endast apparaten till vägguttaget med
den medföljande strömkabeln eller en exakt motsvarighet. Modifi era
inte den medföljande strömkabeln på något sätt. Ändra inte jord eller
polaritet. Använd inte någon förlängningskabel.
Placera inte strömkabeln så att den kan bli utsatt för åverkan, extrem
värme eller skadas på annat sätt. Var särskilt noga med att inte skada
kabelns ändar.
Strömkabeln används som huvudströmbrytare och måste finnas
åtkomlig.
Strömkabeln ska kopplas ur vägguttaget vid åskväder eller om apparaten inte ska användas under en längre tid..
Sluta omedelbart använda apparaten och låt behörig servicetekniker
kontrollera den om:
• Strömkabeln eller kontakten har skadats
• Främmande föremål eller vätska har kommit in i apparaten
• Apparaten har utsatts för regn
• Apparaten visar tecken på felaktig funktion
• Apparaten har tappats eller skadats på annat sätt
Använd klass 2-kablar till högtalaranslutningen för att minimera risken för
elektriska stötar och se till att installationen blir säker.
Placera apparaten på en fast, plan yta som
klarar dess vikt. Var försiktig när apparaten
ska fl yttas så att den inte välter.
Page 33

33
Svenska
Om Rotel
Rotel grundades för över 40 år sedan av
en familj med ett passionerat intresse för
musik. Detta ledde till en egen tillverkning
av hifi-produkter med en kompromisslös
kvalitet. Genom alla år har denna passion
för musik, som delas av hela Rotels personal,
varit oförändrad och målet har alltid varit
att tillverka prisvärda produkter för både
audiofi ler och musikälskare.
Rotels ingenjörer arbetar i team och har
ett nära samarbete. Tillsammans lyssnar de
på och fi nslipar varje ny produkt tills den
når upp till Rotels höga krav på musikalisk
kvalitet. De får välja komponenter från hela
världen för att göra produkterna så bra
som möjligt. I apparaterna hittar du ofta allt
från brittiska och tyska kondensatorer till
japanska och amerikanska halvledare och
toroidaltransformatorer som tillverkas i Rotels
egna fabriker.
Rotel har förtjänat sitt goda rykte genom
hundratals goda tester och utmärkelser från
hifi -branschens mest respekterade recensenter,
som lyssnar på musik varje dag. Deras
erkännanden bidrar till att Rotel fortsätter
att tillverka produkter som är musikaliska,
pålitliga och prisvärda.
Alla vi på Rotel är glada för att du köpt denna
produkt och hoppas att den kommer att ge
dig många års njutning och glädje.
Introduktion
Tack för att du har köpt stereoslutsteget Rotel
RB-06. I en musikanläggning av hög kvalitet
kommer det att ge dig många års musikalisk
njutning.
RB-06 är en effektförstärkare med många funktioner och höga prestanda. Den har utformats
och optimerats för att kunna återge musikens
hela dynamiska omfång och alla små nyanser.
RB-06 har en kraftfull strömförsörjning med
en ringkärnetransformator som utvecklats av
Rotel. Denna strömförsörjning har låg impedans och stora kraftresurser, vilket innebär att
RB-06 kan återge även krävande ljudsignaler
med lätthet. Att utforma en förstärkare med en
sådan konstruktion är kostsamt, men innebär
att musiken låter bättre.
Kretskorten är försedda med SCT-teknik
(Symmetrical Circuit Traces) som garanterar
att musikens timing bibehålls och återskapas
på ett korrekt sätt. Alla viktiga signalvägar
i RB-06 har kretsar som använder metallfi lmsresistorer och polystyren- eller polypropylen-kondensatorer. Hela konstruktionen är
noggrant utformad för att återge musiken på
ett så naturtroget sätt som möjligt.
Förstärkarens viktigaste funktioner är enkla
och lättbegripliga. Om du är van vid stereoanläggningar så bör du inte ha några problem
med att börja använda RB-06. Koppla bara
in resten av anläggningen, så kan du börja
njuta av musiken..
Att tänka på
VARNING! För att undvika skador på din
anläggning, stäng av ALLA komponenter i
anläggningen innan du kopplar in eller tar
bort högtalare eller andra komponenter.
Slå inte på anläggningen förrän du är
säker på att alla anslutningar är gjorda på
rätt sätt. Var särskilt noga med högtalarkablarna. Det får inte fi nnas några lösa ledare som kan komma i kontakt med andra
kablar eller förstärkarens chassi.
Läs denna bruksanvisning noggrant. Den
ger dig grundläggande instruktioner om
hur du installerar och använder RB-06 i din
anläggning, samt information om hur du får
ett så bra ljud som möjligt. Om du har några
frågor är du alltid välkommen att kontakta
din Rotel-återförsäljare. Alla vi på Rotel uppskattar dina frågor och synpunkter.
Spara kartongen och allt packmaterial till
RB-06 så att du kan använda detta vid
ett senare tillfälle. Att skicka eller flytta
förstärkaren i en annan förpackning kan
skada den allvarligt.
Fyll i och skicka in registreringsbeviset som
följer med RB-06. Spara också ditt originalkvitto från köptillfället. Det är det bästa
beviset för när du köpt apparaten, vilket kan
vara viktigt om du behöver lämna in den för
garantiservice. .
Innehåll
Figur 1: Funktioner och anslutningar 3
Figure 2:
Stereoanslutningar 4
Figure 3:Anslutningar – bryggkopplat läge 4
Omkopplarnas placering 4
Viktig säkerhetsinformation................... 34
Om Rotel .............................................. 35
Introduktion.......................................... 35
Att tänka på 35
Placering 36
Kablar 36
Ström och strömfunktioner .................... 36
Strömingång 0 36
Strömbrytare och Strömindikator
12
36
Omkopplare för styrsignaler 5 36
Ingång 7 och utgång
8
för styrsignaler 36
Anslutningar för insignaler
6 0
....... 36
Anslutning av högtalare ........................ 37
Val av högtalare 37
Val av högtalarkabel 37
Polaritet och fas 37
Anslutning av stereohögtalare
9
37
Bryggkopplat läge 4 .......................... 37
Ändra omkopplarna 37
Insignaler 37
Högtalaranslutning 37
Säkringskrets 3 ................................ 37
Felsökning ............................................ 38
Strömindikatorn (POWER) lyser inte 38
Säkring 38
Inget ljud hörs 38
Specifi kationer ...................................... 38
Page 34

34
RB-06 Stereo-slutsteg
Ström och
strömfunktioner
Strömingång
0
Till RB-06 ingår det en korrekt strömkabel.
Använd denna eller en exakt motsvarighet
Använd inte någon förlängningskabel. Du
kan använda en kraftig grendosa, men bara
under förutsättning att den klarar att lämna
den ström som förstärkaren behöver.
Försäkra dig om att strömbrytaren på fronten
är avslagen. Anslut sedan strömkabeln till
strömingången
0
på förstärkarens baksida.
Anslut sedan kabelns andra ände till ett passande vägguttag.
Din RB-06 är fabriksinställd på rätt volttal för
vad som gäller i det land där du köpte den
(Europa 230 V/50 Hz och USA 115 V/60
Hz). Fabriksinställningen fi nns utmärkt med
en dekal på apparatens baksida. .
Din RB-06 är fabriksinställd på rätt volttal för
vad som gäller på den marknad som den
är inköpt på (USA 115V/60Hz och Europa
230V/50Hz). Det finns en dekal på apparatens baksida som informerar om detta.
OBS! Om du fl yttar din RB-06 till ett annat
land går det att konfi gurera om den så att
den passar för ett annat elnät. Försök inte
göra detta själv. Om du öppnar RB-06 så
riskerar du att få kraftiga stötar. Kontakta
en behörig servicetekniker eller din Rotelåterförsäljare för mer information.
Om du kommer att vara bortrest en längre tid
är det en lämplig försiktighetsåtgärd att dra
ut strömkabeln till förstärkaren (och övriga
stereokomponenter) ur vägguttaget..
Strömbrytare och
Strömindikator
12
Strömbrytaren sitter på förstärkarens front.
Tryck på strömbrytaren för att sätta på
förstärkaren (eller för att aktivera något
av de två automatiska lägena). Lysdioden
ovanför brytaren börjar då lysa, vilket talar
om att förstärkaren är påslagen. Tryck på
strömbrytaren en gång till för att stänga av
förstärkaren.
Omkopplare för
styrsignaler 5
Förstärkaren kan antingen styras manuellt
eller slås på och stängas av automatiskt.
Dessa olika lägen bestäms med hjälp av en
omkopplare på baksidan
När omkopplaren står i läge 12V TRIGGER
ON slås förstärkaren på automatiskt av en
12-volts styrsignal i TRIGGER IN-ingången på
baksidan. Förstärkaren återgår till viloläge om
den inte får någon styrsignal. Strömbrytaren
på fronten fungerar fortfarande och måste
vara i läge ON för att signalavkänningen
ska fungera. Om strömbrytaren står i läge
OFF är förstärkaren avslagen, oavsett om
den får någon styrsignal eller inte.
Ingång [7] och utgång [8] för
styrsignaler
Ingången märkt 12V TRIG IN används för att
ansluta en 12-volts styrsignal från en Rotelförförstärkare eller surroundprocessor, som
sedan styr om förstärkaren ska slås på eller
av. För att använda denna funktion måste
omkopplaren till vänster stå i läge ON. Denna
ingång tar emot konstrollsignaler på mellan 3
och 30 volt (likström eller växelström).
Anslutningar för
insignaler
60
[Se fi gur 2 för beskrivning av normal stereoanslutning.]
RB-06 har anslutningar för vanliga, obalanserade RCA-kontakter. Det är en typ av kontakter
som används i nästan all audioutrustning.
OBS! För att undvika kraftiga ljud som
varken du eller dina högtalare kommer att
uppskatta bör du se till att anläggningen är
avstängd när du gör alla anslutningar.
Använd signalkablar av hög kvalitet. Anslut
signalen från vänster kanal på förförstärkaren
till LEFT-ingången [10] på RB-06, och signalen
från höger kanal till RIGHT-ingången
6
.
Placering
Liksom andra ljudkomponenter som hanterar
Precis som alla elektriska komponenter som
hanterar lågnivåsignaler påverkas RB-06 av
sin omgivning. Undvik att ställa förstärkaren
ovanpå andra komponenter. Dra inte heller
signalkablar i närheten av nätkablar, eftersom sådana kan påverka ljudsignalen och
orsaka störningar.
RB-06 alstrar värme vid normal användning. Kylfl änsarna och ventilationshålen är
utformade för att leda bort värme. Täck inte
över ventilationshålen. Se till att det fi nns
10 cm fritt utrymme runt om förstärkaren
och att det fi nns god ventilation, så att den
inte överhettas.
Tänk på förstärkarens vikt när du väljer
placering. Se till att apparatens vikt kan
bäras av hyllan eller bänken den ställs på.
Vi rekommenderar att du placerar RB-06 i en
möbel som är utformad för stereokomponenter.
Sådana möbler är byggda för att minimera
eller eliminera vibrationer som kan påverka
ljudkvaliteten. Kontakta din Rotel-återförsäljare
om du vill ha hjälp med installationen och
med att välja hifi -möbel. .
Kablar
Se till att nätkablar, högtalarkablar, digitalkablar och vanliga signalkablar inte ligger i
närheten av varandra. Det minimerar risken
för att signalkablarna påverkas av störningar
eller förvrängningar från andra kablar. Om du
använder avskärmade kablar av hög kvalitet
så förhindrar du också att ljudkvaliteten störs
från andra kablar. Om du har några frågor om
vilka kablar du bör använda är du välkommen
att kontakta din Rotel-återförsäljare.
Page 35

35
Svenska
Anslutning av högtalare
Val av högtalare
Vi rekommenderar att du använder högtalare
som har en nominell impedans på minst 4
ohm. Du bör vara försiktig med att driva fl era
par högtalare samtidigt, eftersom impedansen
då sjunker. Om du till exempel driver två par
högtalare med 8 ohms impedans vardera, så
motsvarar det en sammanlagd impedans på
hälften så mycket, alltså 4 ohm. Om två par
används samtidigt så bör de ha en impedans
på 8 ohm eller högre. Högtalarimpedanser
är inte så exakta, och i praktiken klarar RB06 de fl esta högtalare. Om du har några
frågor är du välkommen att kontakta din
Rotel-återförsäljare.
Val av högtalarkabel
Använd en skärmad, tvåledad högtalarkabel för att ansluta dina högtalare till RB-06.
Högtalarkabelns storlek och kvalitet påverkar
anläggningens ljudkvalitet. En standardkabel
kan fungera, men kan också minska utsignalens styrka och dämpa basåtergivningen,
särskilt i anläggningar med långa kablar.
Rent allmänt fungerar grövre kablar bäst.
För bästa resultat bör du överväga att skaffa
högtalarkablar av hög kvalitet. Din Rotelåterförsäljare kan hjälpa dig att välja rätt
kablar till din anläggning.
Polaritet och fas
När du ansluter högtalarkablarna måste du
se till att polariteten blir rätt. Plus- och minusledarna måste sitta på rätt ställe på förstärkaren
och på högtalarna. Om polariteten i någon
anslutning av misstag blir omvänd, minskas
basåtergivningen och stereoperspektivet
försämras. Alla kablar är märkta så att du
kan se vilken ledare som är vilken – det kan
till exempel fi nnas en färgmarkering eller
en fasad kant på den ena ledaren, eller så
kan kabeln vara genomskinlig och ha olika
färger på själva ledarna (koppar och silver).
Var konsekvent när du ansluter kablarna och
använd alltid samma markering för polaritet
på högtalarna och på förstärkaren.
Anslutning av
stereohögtalare
9
RB-06 har ett par färgkodade anslutningar
[9] för varje kanal. Högtalarterminalerna
tar emot avskalad kabel samt banan- eller
spadkontakter (utom i EU, där banankontakter
inte är tillåtna).
Dra kablarna från förstärkaren till högtalarna.
Se till att kabeln är tillräckligt lång för att du
ska kunna fl ytta komponenterna och komma
åt anslutningarna på baksidan.
Om du använder banankontakter fäster du
dem på kablarna och trycker sedan in dem i
terminalskruvarna, som ska vara inskruvade
helt och hållet (medsols).
Om du använder spadkontakter fäster du dem
på ledarna. Om du använder avskalad kabel
direkt i högtalarterminalerna så separerar
du ledarna och skalar av isoleringen. Var
noga med att du inte skalar av själva koppartrådarna. Skruva sedan upp terminalhylsan
(motsols) och anslut spadkontakten runt terminalen eller trä den avskalade kabeln genom
terminalen. Skruva sedan fast terminalhylsan
ordentligt (medsols).
OBS! Se till att det inte fi nns några lösa
kabeltrådar som kan komma i kontakt med
intilliggande kablar.
Bryggkopplat läge
4
[Se fi gur 3 för beskrivning av anslutningar
och omkopplare för bryggkoppling.]
Förstärkarens båda stereokanaler kan ”bryggkopplas”. Då arbetar RB-06 som ett monoslutsteg och lämnar hela 180 watt! Den här
funktionen innebär att du kan få en högre
effekt i din anläggning genom att använda
två bryggkopplade RB-06. Du kan också
använda ett RB-06 för att driva en passiv
subbas. Observera att högtalaren som drivs
måste ha en impedans på minst 8 ohm när
RB-06 används i bryggkopplat läge.
För att bryggkoppla RB-06 måste tre omkopplare inuti förstärkaren fl yttas. Detta bör
bara utföras av en utbildad servicetekniker.
Kontakta din auktoriserade Rotel-återförsäljare för mer information. I bryggkopplat
läge ansluts RB-06 dessutom på ett annat
sätt i anläggningen. När RB-06 är inställd i
bryggkopplat läge lyser BRIDGED MONOlysdioden [4] på fronten..
Ändra omkopplarna
OBS! Innan RB-06 öppnas måste strömkabeln kopplas ur vägguttaget. ÖPPNA
INTE RB-06 OM INTE STRÖMKABELN ÄR
URKOPPLAD FRÅN VÄGGUTTAGET. DU
RISKERAR ATT FÅ LIVSFARLIGA STÖTAR.
position. För att växla RB-06 till bryggkopplat
läge ska dessa omkopplare fl yttas så att de är
i läge 2 och 3. Skruva sedan tillbaka chassiet
på plats. Sätt inte i RB-06:s strömkabel
i vägguttaget förrän locket sitter på
plats igen.
Insignaler
När RB-06 används i bryggkopplat läge ska
signalkabeln från förförstärkaren anslutas
till LEFT-ingången. Ingen anslutning görs till
RIGHT-ingången.
Högtalaranslutning
När RB-06 används i bryggkopplat läge
ska högtalarkabeln anslutas till höger och
vänster kanals positiva terminaler. Anslut
kabeln från högtalarens positiva terminal till
förstärkarens vänstra positiva kanal (LEFT +)
och kabeln från högtalarens negativa kanal
till förstärkarens högra positiva kanal (RIGHT
+). Inga anslutningar görs till de negativa
terminalerna (LEFT – eller RIGHT –).
Page 36

36
RB-06 Stereo-slutsteg
Säkringskrets
3
RB-06 skyddas av säkrings- och värmekretsar
mot extrem eller felaktig användning. Säkringskretsarna arbetar oberoende av ljudsignalen
och påverkar därför inte ljudkvaliteten. Skyddskretsarna känner i stället av temperaturen på
utgångsenheterna och stänger av förstärkaren
om den blir för hög.
Det är mycket troligt att du aldrig kommer
att behöva uppleva att säkringarna löser
ut. Skulle mot förmodan något fel uppstå,
slutar förstärkaren spela och lysdioden på
frontpanelen tänds.
Om detta händer stänger du av förstärkaren
och låter den kylas av i ett par minuter.
Försök lokalisera problemet som orsakade
att säkringen löste ut och rätta sedan till det.
När du sedan sätter på förstärkaren igen
nollställs säkringskretsarna och lysdioden
på frontpanelen bör slockna.
I de fl esta fall aktiveras säkringskretsarna om
något fel har uppstått. Detta kan till exempel
vara en kortsluten högtalarkabel eller otillräcklig ventilation som orsakar överhettning.
I mycket sällsynta fall kan säkringskretsarna
även aktiveras av högtalare med extremt
låg impedans.
Om säkringskretsarna löser ut ofta och du
inte lyckas lokalisera varför detta händer,
kontaktar du din auktoriserade Rotel-återförsäljare, så hjälper de dig.
Specifi kationer
Kontinuerlig uteffekt 70 watt per kanal
(20 Hz-20 kHz, <0,03%, 8 ohm)
Bryggkopplad effekt) 180 watt
(20–20 000 Hz, 0,1 %, 4 ohm) (200 watt vid 1kHz)
Total harmonisk förvrängning (THD) <0,03%
(20–20 000 Hz, 8 ohm)
Intermodulationsförvrängning <0,03%
(60 Hz :7 kHz, 4:1)
Frekvensomfång (± 1dB) 10 Hz-100 kHz
Dämpfaktor (20 Hz-20 kHz, 8 ohm) 500
Högtalar impedans (normalläge) 4 ohm minimum
Signal/brus-förhållande (IHF A) 116 dB
Ingångskänslighet/-impedans 33 kohm/1,0 volt
Strömförsörjning
Europa 230 volt, 50 Hz
USA 120 volt, 60 Hz
Strömförbrukning 250 watt
Mått (B x H x D) 437 x 72 x 342 mm
Fronthöjd 80 mm
Vikt (netto) 7,5 kg
Alla specifi kationer är korrekta vid tryckningen.
Rotel reserverar sig rätten att göra förbättringar utan föregående meddelanden.
Felsökning
De fl esta problem som uppstår i en anläggning beror på felaktiga anslutningar eller
inställningar. Om du stöter på problem
försöker du lokalisera felet och kontrollerar
dina inställningar. Försök hitta orsaken till felet
och gör sedan de ändringar som behövs. Om
du inte får något ljud ur RB-06 så kommer här
ett par förslag på vad du kan göra:
Strömindikatorn (POWER)
lyser intej
RB-06 får inte någon ström. Kontrollera
strömbrytaren på fronten. Försäkra dig om att
den står i läge ON. Kontrollera strömkabeln
och att vägguttaget fungerar.
Säkring
Om strömanslutningen fungerar och du ändå
inte kan slå på förstärkaren, kan det bero på
att dess inre säkring har löst ut. Om du misstänker att detta kan vara felet så kontaktar
du din auktoriserade Rotel-återförsäljare och
ber dem hjälpa dig att byta ut den.
Inget ljud hörs
Om förstärkaren får ström men du inte hör
något ljud, kontrollerar du alla anslutningar
och inställningar på övriga komponenter i
anläggningen.
Page 37

/"!20"!1
.7@!A.!BC! 7.?@DEAFG!HIEJB?FKE! J F <!B.J.<AE!
.BJ?LM@BC#
MAF<@AFE$!!"#!$%&'()&'*#!+,-.'+./*!,+0-1&'*#!2"&3/0*4&.3*%!
/+3+%"! '&! .'*%-5/&! 6&07'88!*! 9-:'88 ! ,-'&"(#! ;' $/0*! '&/! 4-./&5 "!
:+./$,'<7!:"#!+=."$1*6-'*#!,+"(9+6-/&"8$! !+6&0(/&!+=."$1*6-'*&!
36-"*>*?*0+6-''+%$!%-./&0$$
@9 +=0-1 &'*&! %+"'** ! 6! 0-6' +./+0 +''&% ! /0&$A +"('* 3&!
,0&:$,0&1:-&/!,+"(9+6-/&"#!+!'-"*4**!6'$/0*!3+0,$.-!*9:&"*#!
'&*9+"*0+6-''+A+!'-,0#1&'*#"!6&"*4*'-!3+/+0+A+!%+1&/!.+9:-6-/(!
+,-.'+./(!,+0-1&'*#!4&"+6&3-!
2"&3/0*4&.3*%!/+3+%$
@9+=0-1&'*&!6+.3"*?-/ &"('+A+! 9'-3-! 6!0-6'+./+0+''& %!
/0&$A +"('*3& ! ,0& :$,0&1:-&/! ,+"(9+6 -/&"#! + ! '-"*4**! 6!
.+,0+6+1:-8B&5! -,,- 0-/!:+3$%&'/-?**!6-1'<7!*'./0$3?*5!
,+!23.,"$-/-?**!*!/&7'*4&.3+%$!+=."$1*6-'*8$$
M0>-1#!(-'"$&:N((!2%!O#5%20'-%'"(
7? EP.!BE?EDEAFE$!M-&"$(!-#"! 90'"#Q%! 8%'"&2-1;!8)4!
%O')&>(30-(4! 2%)*5%30"#)=#! P%3#$*"#!%O')&>(30-(#!
:30)(R(N($%30--%+&!+0'"#$&#
7?EP.! BE?EDEAFE$!P)4! '-(>#-(4 ! %20'-%'"(!3%5/%$0-(4!
()(!2%$0>#-(4!S)#:"$(9#':(+!"%:%+!-#!2%83#$/0Q"#!80--1Q!
0220$0"!3%58#Q'"3(=! 8%>84!()(! 3)0/(#!A#!8%2&':0Q" #!
2%2080-(4!2%'"%$%-- (;!2$#8+#"%3!3-&"$*!:%$2&'0#!!E')(!
3-&"$*! :%$2&'0!2%20)0! 3)0/0! ()(!2%'"%$%--(Q!2$#8+#"%!
-#+#8)#--%!31-*"#!3():&!T-&$0!2("0-(4!(5!$%5#":(
#!!P%'"03*"#!
0220$0"!:!:30)(R(N($%30--%+&!'2#N(0)('"&!8)4!%'+%"$0!(!
3%5+%>-%/%!$#+%-"0#
C0&1:&! 4&%! ,+:.+&:*'#/(!-,,-0-/! *!$,0-6"#/(! *%"! ,0+4/*/&! 6.&!
*'./0$3?**$!D+70-'*/&!0$3+6+:./6+!,+!23.,"$-/-?**!:"#!:-"('&5)&A+!
*.,+"(9+6-'*#$
E=0-B-5/&! 6'*%-'*&! '-!,0&:+./&0&1&'*#"!$3-9-''<&! '-!3+0,$.&!
-,,-0-/-!*!6!:-''+%!0$3+6+:./6&$!F,0-6"#5/&!-,,-0-/+%!6!.++/6&/./6**!
.!*'./0$3?*#%*$
C0+*96+:*/&!+4*./3$!3+0,$.-!/+"(3+!.$7+5!
/3-'(8!*"*!,<"&.+.+%$
E./-6(/&!'&!%&'&&!%&!.%!.6+=+:'+A+!,0+./0-'./6-!6+30$A!-,,-0-/-!:"#!
+=&.,&4&'*#!?*03$"#?**!6+9:$7-$!G&!./-6(/&!-,,-0-/!'-!30+6-/("!:*6-'"!3+6&0!
*"*!,+:+='$8!%#A3$8!,+6&07'+./("!3+/+0-#!%+1&/!9-A+0+:*/(!6&'/*"#?*+''<&!
+/6&0./*#$!H."*!-,,-0-/!6./0-*6-&/.#!6!)3->!*"*!:0$A+5!3+0,$."!2/+/!3+0,$.!
:+"1&'!6&'/*"*0+6-/(.#!:"#!+=&.,&4&'*#!+7"-1:&'*#!-,,-0-/-$
!&01*/&!-,,-0-/!,+:-"()&!+/
!0-:*-/+0+6!+/+,"&'*#"!+=+A0&6-/&"&5"!
,&4&5!*!"8=<7!:0$A*7!$./0+5./6"!6<:&"#8B*7!/&,"+$
D&/&6+&!'-,0#1&'*&"!3!3+/+0+%$!,+:.+&:*'#&/.#!-,,-0-/"!:+"1'+!.++/6&/./6+6-/(!
/0&=+6-'*#%"!$3-9-''<%!'-!9-:'&5!,-'&"*!-,,-0-/-$!G&!,&0&:&"<6-5/&!
67+:#B*5!6!3+%,"&3/!)'$0!,*/-'*#$!G&!,+"(9$5/&.(!$:"*'*/&"#%*$
G&!,0+3"-:<6-5/&!)'$0!,*/-'*#!6!%&./-7"!A:&!+'!%+1&/!=</(!,+60&1:&'!
*"*!,&0&A0&/$!E=0-B-5/&!+.+=+&!6'*%-'*&!
'-!.&/&6$8!6*"3$!*!%&./+!
6<7+:-!)'$0-!*9!-,,-0-/-$
H."*!,0&:,+"-A-&/.#!:+./-/+4'+!:+"A+!'&!*.,+"(9+6-/(!-,,-0-/"!6<'(/&!
6*"3$!)'$0-!,*/-'*#!*9!0+9&/3*$
G&%&:"&''+!,0&30-/*/&!,+"(9+6-/(.#! - ,,-0-/+%! *!+=0-/*/&.(! 3!
36-"*>*?*0+6-''+%$!%-./&0$"!&."*'
(! )C+60&1:&'<!)'$0!,*/-'*#!*"*!6*"3-$
(! );'$/0(!-,,-0-/-!,+,-"*!,+./+0+''*&!,0&:%&/<!*"*!1*:3+./($$
(! )I,,-0-/!,+,-"!,+:!:+1:($
(! )I,,-0-/
!'&!>$'3?*+'*0$&/!:+"1'<%!+=0-9+%$
()!I,,-0-/!$0+'*"*!*"*!+'!,+60&1:&'!:0$A*%!.,+.+=+%$
@.,+"(9$5/&!3-=&"*!.!9-B*/+5!*+,--!.!,0*!,+:.+&:*/
'&'**!3+"+'+3!3!3"&%%-%!$.*"*/&"#!:"#!+=&.,&4&'*#!
'-:&1'+5!*9+"#?**! *!%*'*%*9-?**!0*.3-! $:-0-!
2"&3/0*4&./6+%$
J/+/!.*%6+"!+9'-4-&/"!4/+!$./0+5./6+!*%&&/!:6+5'$8!*9+"#?*8$!
K-9&%"&'*&!'&!/0&=$&/.#$
L-9%&B-5/&!-,,-0-/!'-!$./+54*6+5"!,"+.3+5!,+6&07'+./*"!:+/
./-/+4'+!,0+4'+5"!4/+=<!6<:&01-/(!&A+!6&.$!G&!./-6(/&!-,,-0-/!
'-!/&"&13$"!3+/+0-#!%+1&/!+,0+3*'$/(.#$
C0+:$3/<! 0123+!.,0+&3/*0+6-'<! /-3"!4/+=<!.++/6&/./6+6-/(!
/0&=+6-'*#%!!%&1:$'-0+:'<7!:*0&3/*6!,+!+A0-'*4&'*8!,0*/
%&'&'*#!60&:'<7!6&B&./6!6!2"&3/0+/&7'*4&.3+%!*!2"&3/0+''+%!
+=+0$:+6-'**
!403-25672618!19!:,;,5<1=-!>=?-2,873-!/!01:>@"!/-31&!
,+!+=0-B&'*8!.!+/."$1*6)*%!.6+5!.0+3!2"&3/0+/&7'*4&.3*%!
*!2"&3/0+''<%!+=+0$:+6-'*&%!4A,-23!B+372567,+!,8<!B+37251867!
BC=6DE382!/!ABBB@$@9+=0-1&'*&! ,&0&4&03'$/+A+!%$. +0'+A+!
=-43-!'-!3+"&.-7!+9'-4-&/!/-31&!/+"!4/+!2/*!,0+:$3/<!:+"1'<!
=</(!6/+0*4'+!*.,+"(9+6-'<!40&?*3"*0+6-'<@!*"*!1&!+=0-=+/-'<!
6!.++/6&/./6**!.!$,+%#'$/<%*!6<)&!:*0&3/*6-%*$
&'(()*+
37
&'(()*+
Page 38

#3456789:5
%:;. 1: +6<89= >?68@A59:B : 68CD5E= ........ 3
%:;. 2: *34;354:959:5 :;F3G9:H3@ ;:<98A8 :
8H>;F:G5;H:I ;:;F5E ................................ 4
%:;. 3: 23;F3@35 @HAJG59:5 @ 657:E5 E393
– ?34HAJG59:5 @I3493<3 ;:<98A8 : H3A393H 4
%8;?3A3759:5 ?565E=G5H
/879=5 :9;F6>HK:: ?3 L5C3?8;93;F: ....39
+ H3E?89:: Rotel 40
*56@=5 M8<: 40
"5H3F36=5 ?6543;F363793;F: 40
L-9%&B&'*&! 41
M-=&"* 41
*:F89:5 >;:A:F5AB ...........................41
L-9N&%!:"#!.&/&6+A+!)'$0-
0
41
;<3"84-/&"(!,*/-'*#!
1
*!
*':*3-/+0!,*/-'*#!!
2
41
D&"&3/+0!0&1*%+6!%./;!/0*AA&0'<7!
6<7+:+6!
5
41
;7+:!:"#!%.!;!/0*AA&0'+A+!.*A'-"-!
7
*!6<7+:!
8
41
C+:.+&:*'&'*&!67+:'<7!.*A'-"+6!
6
41
*34;354:959:5 0# 42
;<=+0!ID 42
;<=+0!3+"+'+4'+A+!3-=&"# 42
C+"#0'+./(!*!>-9- 42
*34;354:959:5 ;F5653
H3E?A5HF8 0#
9 ..............................42
%8L3F8 @ E3;F3@3E 657:E5
5
........42
C&0&$./-'+63-!,&0&%<4&3 42
C+:.+&:*'&'*&!*./+4'*3+6!3+!67+:-% 42
*34;354:959:5 0# @ E3;F3@3E
657:E5
4
.......................................42
#I5E= C8N:F=!
3
43
!*-A'+./*3-!*!$./0-'&'*&!'&,+"-:+3 43
G&!.6&/*/.#!*':*3-/+0!,*/-'*# 43
K-%&'-!,0&:+70-'*/&"# 43
G&/!96$3- 43
$5I9:G5;H:5 I868HF56:;F:H: ............43
+ H3E?89:: ROTEL
M+%,-'*#! 0FGBH! +.'+6-'-! =+"&&! I&! "&/!
'-9-:! .&%(&5"! 3+/+0-#! *9/9-! ./0-./'+5!
"8=6*!3!%$9<3&!9-'#"-.(!,0+*96+:./6+%!J6/96!
3+%,+'&'/+6$!D!A+:-%*!2/-!./0-./(!'&!$/*7"-"!
*!.&A+:'#!./0&%"&'*&!.&%(*!3!+=&.,&4&'*8!
-$:*+>*"+6!*! %&"+%-'+6"!'&9-6*.*%+! +/!
*7! >*'-'.+6+A+! ,+"+1&'*#"! -,,-0-/$0+5!
6<.+4-5)&A+! 3-4&./6-"! 0-9:&"#8/! 6.&!
.+/0$:'*3*!0123+$
!0$1'-#!3+%-':-!*'1&'&0+6!,0+."$)*6-&/!
*! '-./0-*6-&/! 3-1:+&! '+6+&! *9:&"*&
"!
,+3-!+'+!'&! =$:&/! .++/6&/./6+6-/(!.-%<%!
6<.+3*%! ./-':-0/-%$! @%! ,0&:+./-6"&'-!
.6+=+:-! 6<=+0-! 3+%,"&3/$8B*7! ,+!
6.&%$! %*0$"! 4/+=<! .:&"-/(! -,,-0-/! 3-3!
%+1'+!"$4)&$!;&0+#/'+"!6<!.%+1&/&!'-5/*!
+/=+0'<&!3+':&'.-/+0<!*9!;&"*3+=0*/-'**!
*! O&0%-'**"! ,+"$,0+6+:'*3*! *9! P,+'**!
*! DQI"! -! /-31&! /+0+*:-"('<&! .*"+6<&!
/0-'.>+0%-/+0<"! *9A+/+6"&''<&! '-!
.+=./6&''+%!9-6+:&!0FGBH$
L&,$/-?*#!3+%,-'**!0FGBH!3-3!,0+*96+:*/&"#!
,0&6+.7+:'+5! /&7'*3*! ,+:/6&01:&'-!
.+/'#%*!,+"+1*/&"('<7!+/9<6+6!*!'-A0-:!+/!
'-*=+"&&! $6-1-&%<7! 23.,&0/+6"! 3+/+0<&!
."$)-8/!%$9<3$!&1&:'&6'+$!@7!3+%%&'/-0**!
,+%+A-8/!3+%,-'**!/+4'+!,0*:&01*6-/(.#!
&&! 3$0.-! '-! ,0+*96+:./6+! 3-4&./6&''+A+"!
'-:&1'+A+!*!:+./$,'+A+!+=+0$:+6-'*#$
R<"! .+/0$:'*3*! 3+%,-'**! 0FGBH"!
="-A+:-0*%!;-.!9-!,+3$,3$!2/+A+!*9:&"*#"!*!
'-:&&%.#"!4/+!+'+!:+./-6*/!6-%!%'+A+!4-.+6!
$:+6+"(./6*#$
*56@=5 M8<:
S"-A+:-0*%!;-.!9-!,+3$,3$!0123+!0K/&L$!;!
.+./-6&!6<.+3+3-4&./6&''+5!-$:*+.*./&%<!
+'! =$:&/! :+./-6"#/(! ;-%! $:+6+"(./6*&!
%'+A*&!A+:<$!0K/&L!M!,+"'+>$'3?*+'-"('<5!
3+%,+'&'/! .! +/"*4'<%*! 0-=+4*%*!
7-0-3/&0*./*3-%*$! ;.&! -.,&3/<! &A+!
3+'./0$3?**!+,/*%*9*0+6-'<!:"#!,+"$4&'*#!
,+"'+A+! :*'-%*4&.3+A+! :*-,-9+'-! *!
,&0&:-4*! /+'4-5)*7! '8-'.+6! %$9<3*$!
;<.+3+./-=*"('<5!*./+4'*3!,*/-'*#!0K/&L!
63"84-&/!6!.&=#!>*0%&''<5!/+0+*:-"('<5!
/0-'.>+0%-/+0! 0123+"! +="-:-&/! '*93*%!
6<7+:'<%! .+,0+/*6"&'*&%! *! =+"()*%!
9-,-.+%! ,+! %+B'+./*"! ,+96+"#8B*%!
0K/&L! 6+.,0+*96+:*/(! .-%<&! ."+1'<&!
-$:*+.*A'-"<$! D/+*%+./(! *9A+/+6"&'*#!
:-''+5!3+'./0$3?**!6<)&"! '+! +'-!*%&&/!
,0&*%$B&./6-!.!/+43*!90&'*#!%$9<3*$
!+0+13*! ,&4-/'<7! ,"-/! $.*"*/&"#!
0-.,+"+1&'<! .*%%&/0*4'+$! J/+!
+=&.,&4*6-&/! /+4'+&! .+="8:&'*&!
60&%&''<7! ,-0-%&/0+6! %$9<3-"('+A+!
.*A'-"-$! ;! .*A'-"('+%! /0-3/&!,0*%&'&'<!
%&/-""+,"&'+4'<&! 0&9*./+0<! *!
,+"*./*0+"+6<&! *"*! ,+"*,0+,*"&'+6<&!
3+':&'.-/+0<$! M-1:<5! 2"&%&'/! .7&%<!
,+:6&0A-".#! /B-/&"('+%$! 0-..%+/0&'*8"!
4/+=<!:+=*/(.#!%-3.*%-"('+!:+./+6&0'+A+!
6+.,0+*96&:&'*#! %$9<3*
$! 0K/&L! ,0+./! 6!
'-./0+53&! *! 23.,"$-/-?**$! H."*! ;<! $1&!
*%&"*!:&"+!.+!./&0&+.*./&%-%*"!$!;-.!'&!
6+9'*3'&/! 6+,0+.+6$! C0+./+! ,+:3"84*/&!
+./-"('<&!3+%,+'&'/<!*!'-."-1:-5/&.($
"5H3F36= 5 ?6543;F36 3793;F:
*%!21O0"!1:
;+!*9=&1-'*&!
,+60&1:&'*#!3+%,+'&'/+6!.*./&%<"!
6.&!,+:.+&:*'&'*#!*!+/.+&:*'&'*#!
,0+*96+:*/&!,0*!6<3"84&''+%!
,*/-'**$!C0&1:&!4&%!63"84-/(!
,*/-'*&"!$=&:*/&.("!4/+!.+&:*'&'*#!
6<,+"'&'<!,0-6*"('+!*!'-:&1'+$!
E.+=+&!6'*%-'*&!$:&"*/&!
3+"+'+4'<%!,0+6+:-%$!G&!:+"1'+!
+./-6-/(.#!N0-9"+7%-4&''<7O!1*""!
3+/+0<&!%+A$/!9-%3'$/(.#!%&1:$!.+=+5!
*"*!'-!3+0,$.$
C+1-"$5./-"!6'*%-/&"('+!,0+4/*/&!:-''+&!
0$3+6+:./6+$!H."* ! 6+9'*3'$/!6+,0+.<"!
+=0-/*/&.(!3!-6/+0*9+6-''+%$!:*"&0$!
0123+$!M0+%&!/+A+"!6.&!%<"!.+/0$:'*3*!0123+"!
A+/+6<!+/6&/*/(!'-!;-)*!6+,0+.<!*!,0*'#/(!
;-)*!9-%&4-'*#$
D+70-'*/&!3+0+=3$ ! *! 6.&! +./-"('<&!
$,-3+6+4'<&!%-/&0*-"<"!4/+=<!6!:-"('&5)&%!
*%&/(!6+9%+1'+./(!6+.,+"(9+6-/(.#!*%*$!
T0-'.,+0/*0+63-!0K/&L!6'&!9-6+ :.3+ 5!
$,-3+63*! %+1&/! 6<96-/(! .&0(&9'<&!
,+60&1:&'*#!$.*"*/&"#$
E=#9-/&"('+!
.+70-'*/&!4&3!*!A-0-'/*5'<5!
/-" +' $! J/+ ! A " -6 '< &! : +3 $% & '/ <"!
$:+./+6&0#8B*&! :-/$! ,+3$,3*"! 6!
."$4-&! +=0-B&'*#! 9-! A-0-'/*5'<%!
+=."$1*6-'*&%$
RA-04 !"#$#%!(-"#/$($%30--1Q!&'()("#)*38
Page 39

41
&'(()*+
&'(()*+
%8CE5N59:5
M-3!*!6.&!3+%,+'&'/<"!+=0-=-/<6-8B*&!
."-=<&! 2"&3/0*4&.3*&!.*A'-"<"!0K/&L!
,+:6&01&'!6"*#'*8!+30$1-8B&5!.0&:<!
*!:0$A+A+!+=+0$:+6-'*#$!D/-0-5/&.(!'&!
./-6*/(!0K/&L!'-!:0$A*&!3+%,+'&'/<!*!'&!
,0+3"-:<6-/(!.*A'-"('<&!3-=&"*!0#:+%!.+!
)'$0-%*!,*/-'*#$!J/+!.'*9*/!6&0+#/'+./( !
,+%&7$
;!,0+?&..&!'+ 0 % - " ( '+5!0-=+/ <!0K/&L!
6<:&"#&/!/&,"+$!L-:*-/+0<!*!6&'/*"#?*+''<&!
+/6&0./*#!,0&:'-9'-4&'<!:"#!0-..&*6-'*#!
2/+A+!*9"*)'&A+!/&,"-$!G&
6&'/*"#?*+''<&!+/6&0./*#$!E./-6(/&!'&!
%&'&&!%&!.%!.6+=+:'+A+!,0+./0-'./6-!
6+30$A!3+0,$.-!*!+=&.,&4(/&!:+./-/+4'<5!
6+9:$7++=%&'$
F=&:*/&.( "! 4/+!,+"3-! *"*! ,+:./-63-!
:+./-/+4'+!,0+4'-"!4/+=<!6<:&01-/(!6&.!
-,,-0-/-$!L&3+%&':$&%! *.,+"(9+6-/(!
.,&?*-"*9*0+6-''$8!%&=&"(!:"#!-$:*+!
3+%,+'&'/+6$!T-3-#!%&=&"(!0-..4*/-'-!
'-!,+:-6"&'*&!6*=0-?**"!+/0*?-/&"('+!
6"*#8B&5!'-!3-4&./6+!96$3+6+.,0+*96&:&'*#$!
E=0-/*/&.(!3!6-)&%$!-6/+0*9+6-''+%$!
:*"&0$!0123+!9-!.+6&/-%*!,+!6<=+0$!
,+:7+:#B&5!-$:*+!%&=&"*!*!$./-'+63*!
3+%,+'&'/+6!'-!'&&
!9-A+0-1*6-5/&!
'8L5A:
Q'$0<!,*/-'*#"!?*>0+6<&!*!-'-"+A+6<&!
-$:*+!3-=&"*!:+"1'<!'-7+:*/(.#!3-3!
%+1'+!:-"()&!:0$A!+/!:0$A-$!;!2/+%!."$4-&!
%&'()&!)-'.+6"!4/+!-'-"+A+6<5!.*A'-"!=$:&/!
9-A0#9'&'!)$%+%!*!,+%&7-%*!+/!.*"+6<7!
*!?*>0+6<7!3-=& "&5$!D!/+5!1&!?&"(8!
*.,+"(9$5/&!/+"(3+!6<.+3+3-4&./6&''<&!
230-'*0+6-''<&!3-=&"*$!E=0-/*/&.(!3!
6-)&%$!-6/+0*9+6-''+%$!:*"&0$!0123+!9-!
.+6&/-%*!,+!6<=+0$
:"#!*.,+"(9+6-'*#!6!6-)&5!-$:*+!.*./&%&$
!.-%<7!"$4)*7!3-=&"&5!
*:F89:5 >;:A:F5AB
%8CD5E 4AB ;5F5@3<3 M9>6 8
0 K / & L ! , + . / - 6 " # & / . # ! 6 % & . / & ! .!
.++/6&/./6$8B*%!.&/&6<%!3-=&"&%$!
@.,+"(9$5/&! /+"(3+! &A+! *"*!./0+A+!
236*6-"&'/'<5! 3-=&"($!G&!,+"(9$5/&.(!
$:"*'*/&"#%*$! R+1'+! *.,+"(9+6-/(!
0-96&/6*/&"(!,*/-'*#!6<.+3+5!%+B'+./*"!
&."*!+'!4*!./&''-#!0+9&/3-@!.,+.+='<!
0
6<:&01-/(!/+3!,+/0&="&'*#! $.*"*/&"#!
0K/&L$!C+."&!2/+A+!6./-6(/&!:0$A+5!3+'&?!
.&/&6+A+!3-=&"#!.!6*"3+5!6!0+9&/3$$!
F=&:*/&.("!4/+!6<3"84-/&"(!,*/-'*#!'-!
,&0&:'&5! ,-'&"*!0K/&L! '-7+:*/.#! 6!
,+"+1&'**!P+/3"84&'+Q$!K-/&%!6+/3'*/&!
+:*'!3+'&?!.&/&6+A+! )'$0-!6! 0 -9N&%!
'-!9-:'&5!,-'&"*!$.*"*/&"#$!
0
0K/&L!'-./0+&'!'-!9-6+:&!6!.++/6&/./6**!.+!
./-':-0/-%*!2"&3/0*4&.3+5!.&/*!6!;-)&5!
./0-'&! 4%.&!*"* ! .R&! ;!,&0&%&''+A+!
/+3-!*! L&!*"*!S&!O?@$!M+'>*A$0-?*#!
2"&3/0+,*/-'*#!+=+9'-4&'-!'-!9-:'&5!
,-'&"*!-,,-0-/-$
*%!21O0"!1:
:0$A$8!./0-'$"!%+1'+!,0*.,+.+=*/(!
$.*"*/&"(!3!:0$A+%$!.&/&6+%$!
'-,0#1&'*8$!E:'-3+ "!'&!,</-5/&.(!
.:&"-/(!2/+!.-%*$!E=0-/*/&.(!3!
36-"*>*?*0+6-''+%$!%-./&0$!*" *!6!
.&06*.'$8!."$1=$!0123+$
H."*!;<!'-:+"A+!$&91-&/ &!*9!:+%-"!
'- , 0 * %& 0 " ! ' - ! % & . # ? " ! 0 -9 $ % ' +!
=$:&/!6<'$/(!6*"3*!)'$0+6!,*/-'*#!
$.*"* / &"#! *! :0$A* 7! 3+%, + '&'/+ 6!
.*./&%<!*9!0+9&/+3$
H."*!;< !,&0&&:&/&!6!
/=HAJG8F5AP ?:F89:B 1 :
:94:H8F36 ?:F89:B
U/+=<!63"84*/(!$.*"*/&"("!'-1%*/&!3'+,3$!
6<3"84-/&"#!,*/-'*#!T.U!'-!,&0&:'&5!
,-'&"*$!K-A+0*/.#!*':*3-/+0!,*/-'*#!T%U$!
U/+=<!6<3"84*/(!$.*"*/&"("!.'+6-!'-1%*/&!
2/$!3'+,3$$
2
#5A5HF36 657:E3@ 12-/ F6:<<569=I
@=I343@
F!0K/&L!*%&&/.#!6+9%+1'+./(!0$4'+A+!*"*!
-6/+%-/*4&.3+A+!63"84&'*#!*!6<3"84&'*#$!!"#!
*7!6<=+0-!'-!9-:'&5!,-'&"*!,0&:$.%+/0&'!
.&"&3/+0!M!,&0&3*:'+5!,&0&3"84-/&"($!
H."*!+'!'-7+:*/.#!6!,+"+1&'**!P%./V!G0WXXB0!
FYQ"!$.*"*/&"(!63"84-&/.#!-6/+%-/*4&.3*!
,0*!,+:-4&!'-!&A+!R"S!%%!0-9N&%!G0WXXB0!
WY!'-!9-:'&5!,-'&"*!.++/6&/./6$8B&A+!
.*A'-"-$!C0*! +/.$/./6**!%./;+"(/+6+A+!
N/0*AA&0'+A+O!.*A'-"-!$.*"*/&"(!,&0&7+:*/!
6!0&1*%!+1*:-'*#!>2,8<?Z$!;<3"84-/&"(!
,*/-'*#!'-!,&0&:'&5!,-'&"*!*%&&/!,0*+0*/&/!
'-:!2/+5!>$'3?*&5$!!"#!/+A+"!4/+=<!>$'3?*#!
:*./-'?*+''+A+!63"84&'*#!%+A"-!0-=+/-/("!
5
+'!:+"1&'!'-7+:*/(.#!6!,+"+1&'**!FY$!H."*!
1&!6<3"84-/&"(!,*/-'*#!'-!,&0&:'&5!,-'&"*!
'-7+:*/.#!6!,+"+1&'**!F[["!!/+!,*/-'*&!'-!
$.*"*/&"(!'&!,+:-&/.#!6'&!9-6*.*%+./*!+/!
'-"*4*#!%.!;!'-,0#1&'*#$!!
/I34 4AB 12 / F6:<<5693<3 ;:<98A8
: @=I34
7
L-9N&%!.!'-:,*.(8!WY!,0&:'-9'-4&'!:"#!
,+:.+&:*'&'*#!3-=&"#!.+!)/&3&0+%!R"S!%%"!
,+:-8B*%!.*A'-"-!%.!;!'-!$.*"*/&"($!
!"#!/+A+"!4/+=<!!>$'3?*#!:*./-'?*+''+A+!
63"84&'*#! %+A"-! 0-=+/-/("! .&/&6+5!
6<3"84-/&"(!:+"1&'!'-7+:*/(.#!6!,+"+1&'**!
FY$!;!,+"+1&'**!63"84&'*#!*!6<3"84&'*#!
:0$A*7! 3+%,+'&'/+6! 4.%$!0-9:&"!N%./;!
/0*AA&0'<5!6<7+:O@$!J/+/!67+:!,0*'*%-&/!
"8=+5!$,0-6"#8B*5!.*A'-"!4,+./+#''+A+!
*"*!,&0&%&''+A+!
:+!R&!;$!
L-9N&%!.!'-:,*.(8!F\G!,0&:'-9'-4&'!:"# !
,+:.+&:*'&'*#!:0$A+A+!3-=&"#!.+!)/&3&0+%!
R"S!%%"!4/+=<!,+:-/(!.*A'-"!%.!;!'-!:0$A*&!
3+%,+'&'/<$!M-3!/+"(3+!'-!67+:&!WY!,+#6"#&/.#!
.*A'-"!%.!;"!+'!/$/!1&!,+./$,-&/!*!'-!6<7+:'+5!
0-9N&%$!
8
/+3-@!6!:*-,-9+'&!+/!R!
*34;354:959:5 @I349=I ;:<98A3@ 6
4.%! L*.$! ." ! A: &! ,0*6& : &'-! .7&%-!
,+:.+&:*'&'*#!./&0&+!*./+4'*3-@
0K/&L!*%&&/!+=<4'<&!67+:'<&!0-9N&%<!
0*]"!3+/+0<&!%+1'+!6./0&/*/(!,0-3/*4&.3*!
6+!6.&5!-$:*+!-,,-0-/$0&$!
*%!21O0"!1:
A0+%3*7!96$3+6"!3+/+0<&!'&!,+'0-6#/.#!
'*!6-%"!'*!6-)*%!3+"+'3-%"!
6<3"84*/&!$.*"*/&"("!,0&1:&!4&%!
:&"-/(!3-3*&//+!,+:.+&:*'&'*#$
;<=&0*/&!,-0$!%&1="+4'<7!3-=&"&5!
6<.+3+A+!3-4&./6-!*!.+&:*'*/&!"&6<5!*!
,0-6<5!3-'-"<!6-)&A+!,0&:$.*"*/&"#!.!
.++/6&/./6$8B*%*!67+:-%*!$.*"*/&"#!
%+B'+./*!0K/&L$!
!"#!/+A+"!4/+=<!*9=&1-/(!
Page 40

RA-04 !"#$#%!(-"#/$($%30--1Q!&'()("#)*
RA-05 !"#$ %&'(!) *+,-.+/0$1,)
42
*34;354:959:5 0#
/=L36 0#
R<!0&3+%&':$&%!*.,+"(9+6-/(!.!0K/&L!
3+%,"&3/!ID!.!*%,&:-'.+%!I!E%-!*"*!6<)&$!
;<!:+"1'<!=</(!+./+0+1'<"!,+:3"84-#!
:6&!,-0<!3+"+'+3!!,-0-""&"('+"!/$3$!:"#!
$.*"*/&"#!*7!*%,&:-'.!$%&'()-&/.#!6:6+&$!
G-,0*%&0"! &."*!=$:$/!+:'+60&%&''+!
0-=+/-/(!:6-!3+%,"&3/-!ID!.!*%,&:-'.+%!^!
E%"!'-A0$93-!:"#!$.*"*/&"#!+3-1&/.#!0-6'+5!
I!E%$!C-.,+0/'<&!9'-4&'*#!*%,&:-'.-!
ID"!3-3!,0-6*"+"!+4&'(!,0*="*9*/&"('<$!
T&%! '&! %&'&&"! '-! ,0-3/*3&! /+"(3+!
+4&'(!'&%'+A*&!ID!%+A$/!, 0 &:./-6"#/(!
,0+="&%$!:"#!0K/&L$!C0+3+'.$"(/*0$5/&.(!
.! 6-)*%! -6/+0*9+6-''<%! :*"&0+%!
0123+"! &."*! $! 6-.! 6+9'*3"*! 6+,0+.<$
/=L36 H3A393G93<3
!"#!,+:.+&:*'&'*#!ID!3!0K/&L!*.,+"(9$5/&!
*9+"*0+6-''<5!%'+A+1*"('<5!3-=&"(!.!
:6$%#!,0+6+:'*3-%*$!L-9%&0!*!3-4&./6+!
3-=&"#!%+A$/!9-%&/'+!6"*#/(!'-!96$4-'*&!
.*./&%<$! D/-':-0/'<5! 3+"+'+4'<5!
3-=&"(!,+:+5:&/"!'+!&A+!6"*#'*&!%+1&/!
6<0-9*/(.#!6!.'*1&'**!96$3+6+A+!6<7+:-!
*"*!$7$:)&'**!=-.+6+5!7-0-3/&0*./*3*"!
+.+=&''+! ,0*!=+"()+5!:"* '&!3-=&"#$!
E=<4'+!4&%!/+"B&!,0+6+:"!/&%!"$4)&!96$3$!
!"#
!'-*"$4)&A+!0&9$"(/-/-!*.,+"(9$5/&!
.,&?*-"('<&! 6<.+3+3-4&./6&''<&!
3+"+'+4'<&! 3-=&"*$ ! E=0-/*/&.(! 3!
6-)&%$!-6/+0*9+6-''+%$!:*"&0$!0123+!
9-!.+6&/-%*! ,+! 6<=+0$!.-%<7!"$4)*7!
3-=&"&5!:"#! *.,+"(9+6-'*#! 6!6-)&5!
-$:*+!.*./&%&$
*3AB693;FP : Q8C8
C+"#0'+./(!M!,+:3"84&'*&!,0+6+:'*3-!
3!,+"+1*/&"('+5!*"*!+/0*?-/&"('+5!
3"&%%&!M!'-!6.&7!ID!*!$.*"*/&"&!:+"1'-!
=</(!+:*'-3+6-$! T+A:-!.*A'- "!'-!6.&7!
ID! =$:&/! *%&/(! +:*'-3+6$8! >-9$$!
H."*!,+"#0'+./(!+:'+A+!*9!.+&:*'&'*5!
,&0&,$/-'-"!/+!.$B&./6&''+!.'*1-&/.#!
6<7+:!=-.-!*!,+0/*/.#!./&0&+!+=0-9$!U/+=<!
%+1'+!=<"+!+/"*4*/(!+:*'!,0+6+:'*3!+/!
:0$A+A+"!6.&!3+"+'+4'<&!3-=&"*!*%&8/!
%-03*0+63$'!*9+"#?*#!+:'+A+!,0+6+:'*3-!
%+1&/!=</(!0&=0*./+5"!,+"+.-/+5!*!/$,$!
T-31&!=<6-8/! 3-=&"*! .!,0+90-4'+5!
*9+"#?*&5!*!,0+6+:'*3-%*!0-9'+A+!?6&/-!
4%&:'<5!*!,+.&0&=0&''<5@$!@'+A:-!'-!
*9+"#?*8!'-'+.*/.#! 9'-3!,+"#0'+./*$!
F./-'+6*/&"!3 -3+5!,0+6+:'*3! =$:&/!
,+"+1*/&"('<%"!-!3-3+5!M!+/0*?-/&"('<%"!
*!,0*:&01*6-5/&.(!2/+A+!,0-6*"-!,0*!
,+:.+&:*'&'**!6.&7!ID$!!
*34;354:959:5 ;F5653 H3E?A5HF8
0#
9
M"&%%<! '-! 9-:'&5! ,-'&"*! 0K/&L!
*%&8/!?6&/'$8!3+:*0+63$!*!:+,$.3-8/!
,+:.+&:*'&'*&! 9-4*B&''<7! 3+'?+6!
3-=& "#"! '-3+'&4'*3+6! N"+,-/3-O! *!
N:6+5'+5!=-'-'O!430+%&!./0-'!HD"!A:&!
*7!*.,+"(9+6-'*&!9-,0&B&'+@$!
C0+"+1*/&! ,0+6+:-! +/!0K/&L!3! ID$!
E./-6(/&!'&3+/+0<5!9-,-.!:"*'<"!4/+=<!
%+1'+!=<"+!,+6&0'$/(!3+%,+'&'/<!:"#!
+=&.,&4&'*#!:+./$,-!3!3"&%%-%$! H."*!
*.,+"(9$8/.#!'-3+'&4'*3*!N:6+5'+5!
=-'-'O " ! 9-30&,*/& !
,0+6+:'*3+6!*!6./-6(/&!6!+/6&0./*#!3"&%%$!
O+"+63*!3"&%%!:+"1'<!=</(!9-30$4&'<!:+!
$,+0-!4,+!4-.+6+5!./0&"3&@$
H."*!*.,+"(9$8/.#!'-3+'&4'*3*!N"+,-/3-O"!
9-30&,*/ &!*7!'-!3+'?-7!,0+6+:'*3+6$!
H."*!*.,+"(9$8/.#!9-4*B&''< &!3+'?<!
3-=&"#"!0-9:&"*/&!,0+6+:'*3*!*!.30$/*/&!
1*"<$!D/-0-5/&.(!'&! ,&0&0&9-/(!1*"<!
,0+6+:'*3+6$!E/6&0'*/&!A+"+63*!3"&%%!
4,0+/*6! 4-.+6+5!./0&"3*@$! G-:&'(/&!
N"+,-/3*O!'-!)/<0*!3"&%%!*"*!+=&0'*/&!
3+'?<!,0+6+:-!6+30$A!)/<0&5$!C"+/'+!
9-30$/*/&!A+"+63*!3"&%%"!4/+=<!+=&.,&4*/(!
,0+4'+&!.+&:*'&'*&$
*%!21O0"!1:
F=&:*/&.("!4/+!'&!
+./-"+.(!N0-9"+7%-4&''<7O!1*""!
3+/+0<&!%+A$/!9-%3 '$/(.#!%&1:$ !
.+=+5"!'-!.+.&:'88 !3"&%%$!*"*!'-!
3+0,$.$
%8L3F8 @ E3;F3@3E 657:E5
4D%$!L*.$!R"!A:&!$3-9-'+!0-.,+"+1&'*&!
,&0&%<4&3!:"#!%+./+6+A+!0&1*%-!*!.7&%-!
.+&:*'&'*5@$
!6-!3-'-"-!0K/&L!%+1'+!.+&:*'*/(!P%+./+%Q"!
*!/+A:-!6<7+:'- #!%+B '+./(!:+./*A-&/!
+)&"+%*/&"('<7!%^&!;/#!J/+!,+96+"#&/!
6-%!,+6<.*/(!+/:-4$!./&0&+.*./&%<"!:+=-6*6!
6/+0+5!$.*"*/&"(!0K/&L!*!63"84*6!&A+!
/+1&!P%+./+%Q$!!M0+%&!/+A+"!6<!%+1&/&!
*.,+"(9+6-/(!%+./+6+&!63"84&'*&!0K/&L!:"#!
0-=+/<!.!,-..*6'<%!.-=6$>&0+%$!D"&:$&/!
/+"(3+!*%&/(!6!6*:$"! 4/+! :"#!%+./+6+A+!
63"84&'*#!0K/&L!*%,&:-'.!3+"+'+3!:+"1&'!
=</(!'&!%&'&&!^!E%$!
!"#!,&0&6+:-!0K/&L!6!%+./+6+5!0&1*%!
'&+=7+:*%+!,&0&./-6*/(!/0*!,&0&%<43*!
6'$/0*!$.*"*/& "#$!J/$! 0-=+/$! . "&:$&/!
,+0$4*/(!36-"*>*?*0+6-''+%$!.,&?*-"*./$$!
E=0-/*/&.(!3!-6/+0*9+6-''+%$!:*"&0$!0123+$!
M0+%&!/+A+"!0K/&L!,0*!0-=+/&!6!%+./+6+%!
0&1*%&!,+/:0$A+%$!.+&:*'#&/.#!.!+./-"('<%*!
3+%,+'&'/-%*"!-!'-!&A+!,&0&:'&5!,-'&"*!
9-A+0-&/.#!*':*3-/+0!
!
*7! '-! 3+'?-7!
4
$
4
*565>;F893@H8 ?565E=G5H
C&0&:!/&%"!3-3!+/30</(! 3+0,$.!0K/&L!
:"#!,&0&$./-'+63*!,&0&%<4&3"!.&/&6+5!
)'$0!'&+=7+:*%+!6<'$/(!*9!0+9&/3*$!GH!
ETMLV;IWTH! FD@X@THXY! !E! THZ!
CEL"!CEMI!DHTH;EW!QGFL!GH!;VGFT!
@K! LEKHTM@$! @G IUH! ;V! RE[HTH!
CEXFU@TY!ECIDGVW!!XP
43
&'(()*+
&'(()*+
#I5E= C8N:F=
0K/&L!+.'-B&'!.7&%-%*!9-B*/<!+/!,&0&A0&6-!
*!,&0&A0$93*"!3+/+0<&!,0&:+70-'#8/!$.*"*/&"(!
+/!,+60&1:&'*#! 6!."$4-&! 23./0&%-"('+5!*"*!
'&,0-6*"('+5!23.,"$-/-?**$! D7&%<! 9-B*/<!
'&9-6*.*%<!+/!.*A'-"('+A+!/0-3/-!*!'&!6"*#8/!'-!
3-4&./6+!96$4-'*#$!E'*!."&:#/!9-!/&%,&0-/$0+5!
6<7+:'<7!/0-'9*./+0+6!*!+/3"84-8/!$.*"*/&"("!
&."*!+'-!6<7+:*/!9-!=&9+,-.'<&!,0&:&"<$!
D3+0&&!6.&A+"!6-%!'*3+A:-!'&!
3-3!2/*!.7&%<!.0-=+/-8/$!E:'-3+"!3-3!/+"(3+!
6+9'*3'&/! -6-0*5'-#!.*/$-?*#"! $.*"*/&"(!
,&0&./-'&/!0-=+/-/(!*!'-!&A+!,&0&:'&5!,-'&"*!
9-A+0*/.#!.6&/+:*+:'<5!*':*3-/+0$!
H."*!2/+!,0+*9+)"+"!6<3"84*/&!$.*"*/&"($!
!-5/&!&%$!+./</(!6!/&4&'*&!'&.3+"(3*7!%*'$/!
*!,+,0+=$5/&!$./0-'*/(!,0*4*'$!.0-=-/<6-'*#!
9-B*/<$!!M+A:-!6<!6'+6(!63"84*/&!$.*"*/&"("!
.7&%-!9-B*/<!6&0'&/.#!6!*.7+:'+&
.6&/+:*+:!,+A-.'&/$!
;!=+"()*'./6&!."$4-&6!9-B*/-!.0-=-/<6-&/!
*9/9-!3+0+/3*7! 9 -%<3-'*5!6! ,0+6+:-7!*"*!
'&:+./-/+4'+5! 6&'/*"#?**"! ,0*6+:#B&5! 3!
,&0&A0&6$$!!+6+"('+!0&:3+!.0-=-/<6-'*&!
%+1&/!,0+*9+5/*! *9/9-!30-5'&! 0&-3/*6'+A+!
7-0-3/&0-!'-A0$93*!*"*!23./0&%-"('+!'*93+A+!
*%,&:-'.-!3+"+'+3$!
3
,0*:&/.#!$6*:&/("!
!.+./+#'*&!*!
R:8<93;F:H8 : >;F68959:5
95?3A843H
S+"()*'./6+!'&,+"-:+3!6!-$:*+.*./&%-7!
,0+ *.7 +:* /! *9 /9- ! '&,0 -6* "(' <7!
.+&:*'&'*5!*"*!'&,0-6*"('<7!$./-'+6+3!
+0A-'+6!$,0-6"&'*#$!H."*"!'&.%+/0#!'-!
/B-/&"('$8! ,0+6&03$!.+&:*'&'*5! *!
$./-'+6+3"!;<!'&!%+1&/&!:+=*/(.#!96$3-!
+/!0K/&L"!,0+.%+/0*/&!,0&:./-6"&''<5!
'*1&!.,*.+3$
"5 ;@5F:F;B :94:H8F36 ?:F89:B
M+A:-!3' +,3-!,*/-'*# ! 0K/&L! '-1-/-"!*!6*"3-!
&A+!)'$0-!,*/-'*#!6./-6"&'-!6!.&/&6$8!0+9&/3$"!
:+"1&'!.6&/*/(.#!*':*3-/+0!,*/-'*#$!H."*!+'!'&!
.6&/*/.#"!,0+6&0(/&!'-"*4*&!'-,0#1&'*#!6!.&/&6+5!
0+9&/3&!:0$A*%! 2"&3/0+,0*=+0+%"!'-,0*%&0"!
"-%,+5$!F=&:*/&.("!4/+!0+9&/3-!'&!3+'/0+"*0$&/.#!
3-3*%/"*=+!6<3"84-/&"&%"!3+/+0<5!6! :-''<5!
%+%&'/!6<3"84&'$
.8E598 ?6543I689:F5AB
H."*!:0$A+5!2"&3/0+,0*=+0"!,+:3"84&''<5!3!/+5!
1&!0+9&/3&"!0-=+/-&/"!-!0K/&L!M!'&/"!6+9%+1'+"!
,&0&A+0&"!6'$/0&''*5!,"-63*5!,0&:+70-'*/&"($!
;!2/+%!."$4-&!+=0-/*/&.( ! 6! -6/+0*9+6-''$8!
.&06*.'$8!."$1=$!0123+!:"#!&A+!9-%&'<$
"5F C@>H8
H."*!'-!0K/&L!,*/-'*&!,+:-'+"!'+!96$3-!'&/"!
,0+6&0(/&! *./+4'*3!.*A'-"-!*!$=&:*/&.("!4/+!
+'!0-= +/-&/!'+0%-"('+$! C0+6&0 (/&! 3-=&"*"!
,+:.+&:*'#8B*&!67+:!0K/&L!3!,0&:$.*"*/&"8"!
-!/-31&!6<7+:!3!3+"+'3-%$
H."*!.7&%-!9-B*/<!.0-=-/<6-&/!,+6/+0'+"!*!6<!
'&!%+1&/&!6<#6*/(!*!$./0-'*/(!'&*.,0-6'+./("!
+= 0 -B- 5 /& . (! 9 - ! , + %+ B (8 ! 3 ! 6 - )& % $!
-6/+0*9+6-''+%$!:*"&0$!0123+$
$5I9:G5;H:5 I868HF56:;F:H:
A%+(-0)*-04!31;%8-04!+%,-%'"*
23/!UN!"!3/!:UN%!4/%/56%!-0!7!.+8! ! ! ! `&!;/a3-'-"
M1;%8-04!+%,-%'"*!3!+%'"%3%+!$#>(+#! ! ! %^&!;/!4.&&!;/!'-!%!3O?@
23/!UN!"!3/!:UN%!4!/%96%!-0!:!.+8
.O,(#!/0$+%-(9#':(#!(':0>#-(4!23/!UN!"!3/!:UN%!7!.+8! b&"&Rc!!
F-"#$+%8&)4N(%--1#!(':0>#-(4!20/!UN!$!;!:UN%!:$98!! b&"&Rc!
P(0205%-!90'"%"!2<!9!8V8!! ! ! ! ! %&!O?!M!%&&!3O?
P#+2(-/.R0:"%$!23/!UN!"!3/!:UN%!7!.+8! ! ! S&&
F+2#80-'!@!!23!-%$+0)*-%+!$#>(+#! ! ! I!E%
."-%T#-(#!'(/-0)=T&+!2353#T#--%#!2%!:$(3%Q!>@?8! %%L!:;
K&3'"3("#)*-%'"*='%2$%"(3)#-(#!3;%8%3!! ! ! %!;a!RR!3E%
B$#O%30-(4!:!S)#:"$%2("0-(=! ! ! ! .R&!;"!S&!O?
7%"$#O)4#+04!+%,-%'"*! ! ! ! ! .S&!;/!
U0O0$("1!2W;M;U8! ! ! ! ! IR`!7!`.!7!RI.!%%
M1'%"0!20-#)(! ! ! ! ! ! ^&!%%
!!
<0''0!-#""%! ! ! ! ! ! `"S!3A
!4%*'*%$%@
;.&!/&7'*4&.3*&!7-0-3/&0*./*3*!.++/6&/./6$8/!:&5./6*/&"('+./*!'-!:-/$!*9:-'*#$
M+%,-'*#!0123+!+./-6"#&/!9-!.+=+5!,0-6+!%+:&0'*9*0+6-/(!*9:&"*#!=&9!,0&:6-0*/&"('+A+!$6&:+%"&'*#$
Page 42

44
The Rotel Co. Ltd.
10-10 Shinsen-Cho
Shibuya-Ku
Tokyo 150-0045
Japan
Phone: +81 3-5458-5325
Fax: +81 3-5458-5310
Rotel of America
54 Concord Street
North Reading, MA 01864-2699
USA
Phone: +1 978-664-3820
Fax: +1 978-664-4109
Rotel Europe
Dale Road
Worthing, West Sussex BN11 2BH
England
Phone: +44 (0)1903 221 761
Fax: +44 (0)1903 221 525
Rotel Deutschland
Kleine Heide 12
D-33790 Halle/Westf.
Germany
Phone: +49 05201-87170
Fax: +49 05201-73370
www.rotel.com
082 OM
English • Français • Deutsch • Italiano • Español • Nederlands • Svenska • Русский
RB-06 041506
 Loading...